HOLIDAY DONATION DRIVE - SUPPORT MSW - DO YOUR PART TO KEEP THIS GREAT FORUM GOING! (Only 20 donations so far - C'mon guys!)
×


RdK
-
Posts
120 -
Joined
-
Last visited
Content Type
Profiles
Forums
Gallery
Events
Everything posted by RdK
-
Hi Tony sorry for not posting in a while. Yes I have a little break as life is catching up. I have to finish my PhD study this year and you can imagine things always get a bit stressed in the end. The Mayflower is almost finished and as soon as I have a bit time spare I will continue the story here. But don’t worry, my Mayflower should be ready for her 400 year voyage anniversary! -Radek
-
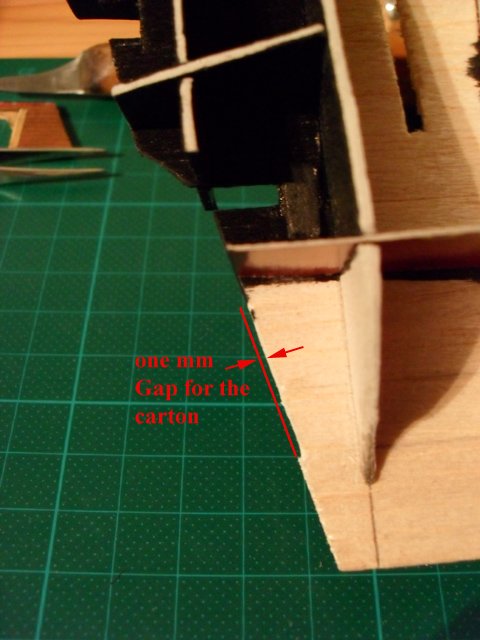
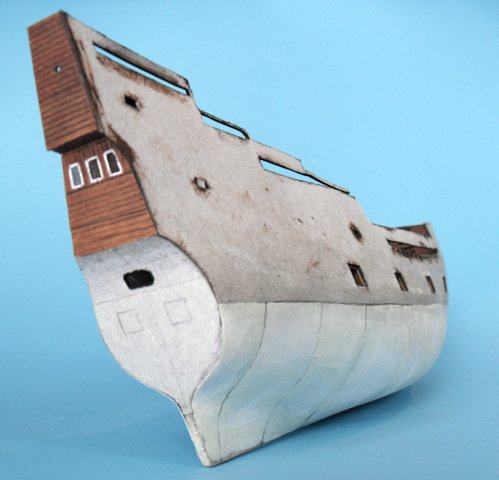
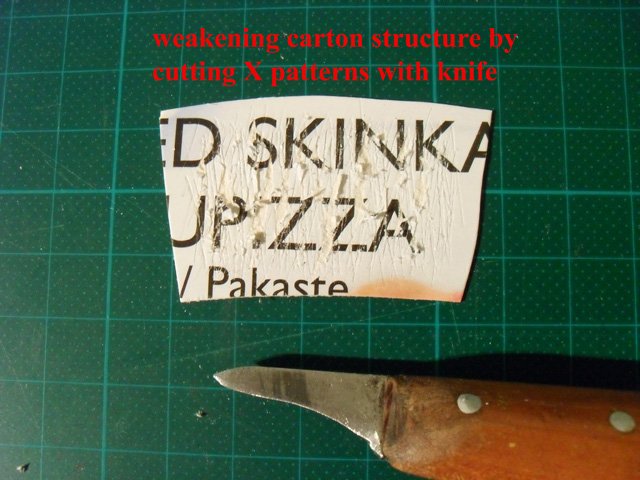
Hi, Regarding the transom: Here are some pictures how I built the stern in my Mayflower, which is of course different than your ship, because it is a galeon. Nevertheless, some of my techniques how to tackle this problem in paper/card modeling. And here’s a link to how Shipyard models are dealing with the problem, as demonstrated by DORIS and her HMS VICTORY: http://www.papirove-modely.cz/velkynahled/52372 Here’s still a link to a great paper modeler community: http://www.papermodelers.com/ Grüssle ausm Allgäu! Radek


- 355 replies
-
- 6
-

-
- prince de neufchatel
- schooner
- (and 3 more)
-
Hi, I would say it depends on the transom itself. In my Mayflower I used the transom piece itself and attached/glued it to the main frame like the other frames. It was hold in place with the horizontal frame parts and the hull sides itself. If the part is small like in your model, maybe you can scratch build some additional frame parts in the back, similar to the shipyard paper models? I will post some pictures tomorrow. Your approach regarding the bulwarks sounds quite right to me. Paper and card are always so much softer than wood and plastic, but your model comes along nicely! Looking forward to seeing more! Rgds, Radek
- 355 replies
-
- 3
-
-
- prince de neufchatel
- schooner
- (and 3 more)
-
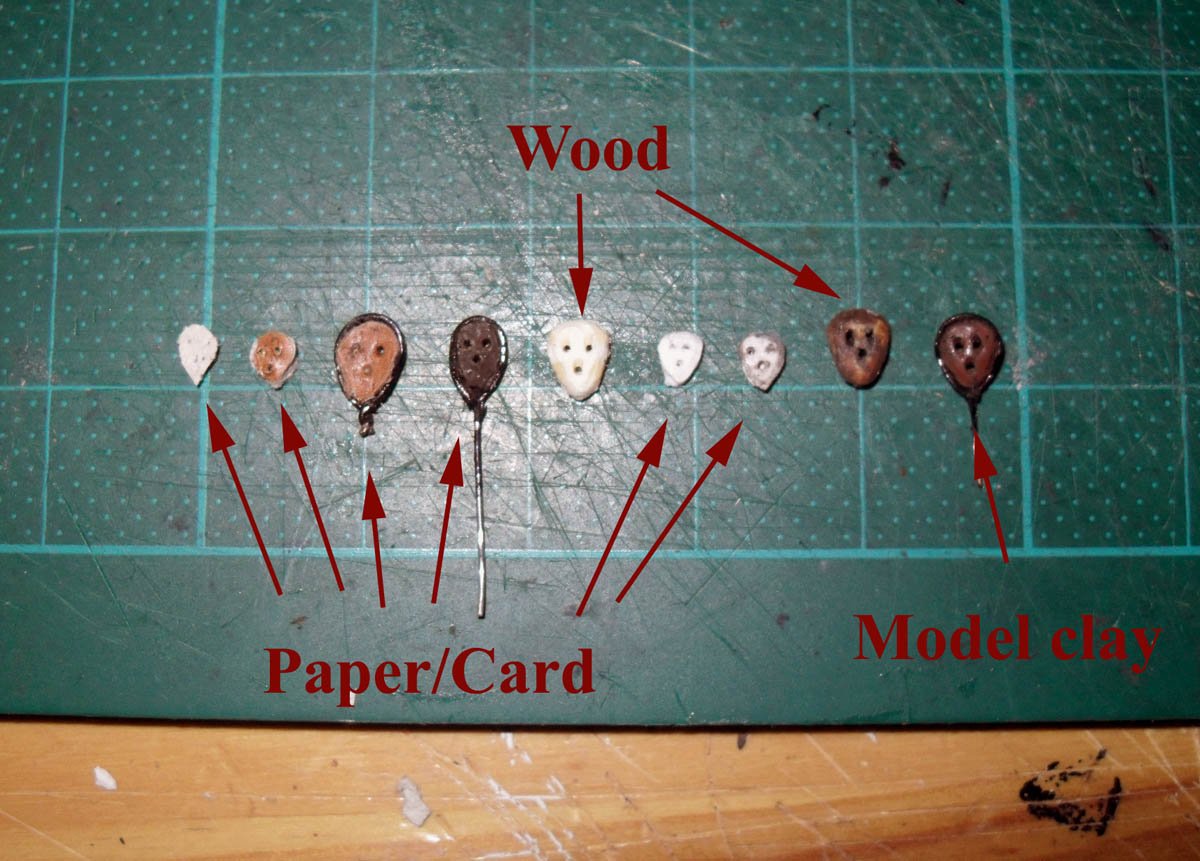
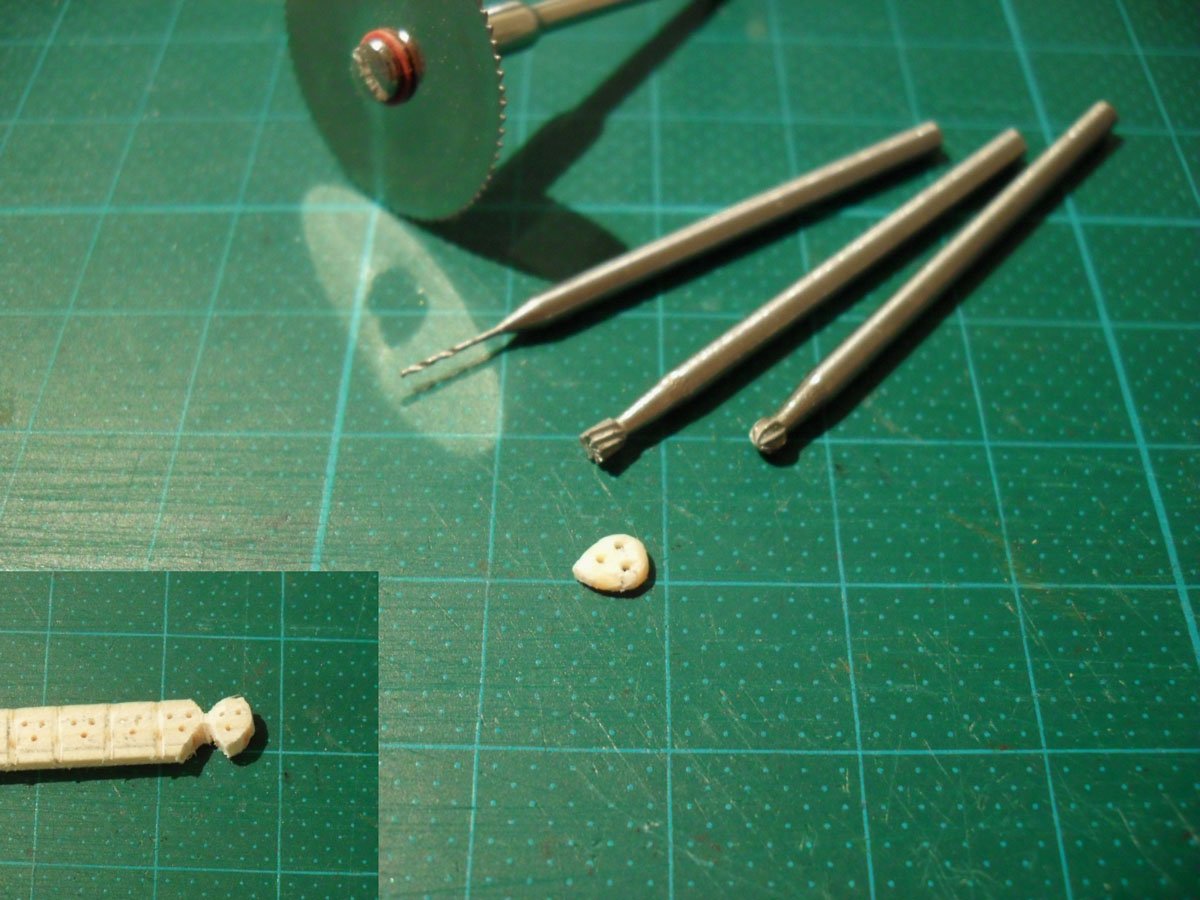
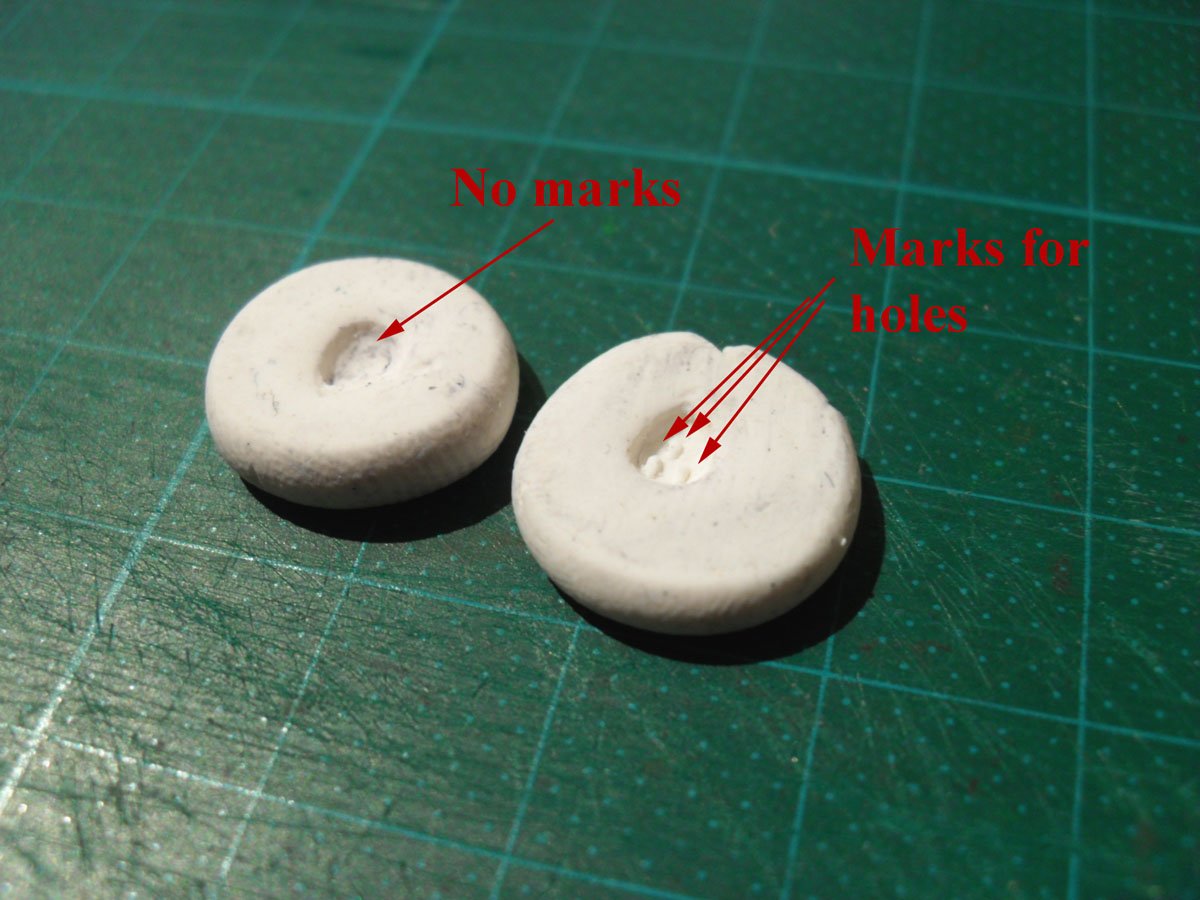
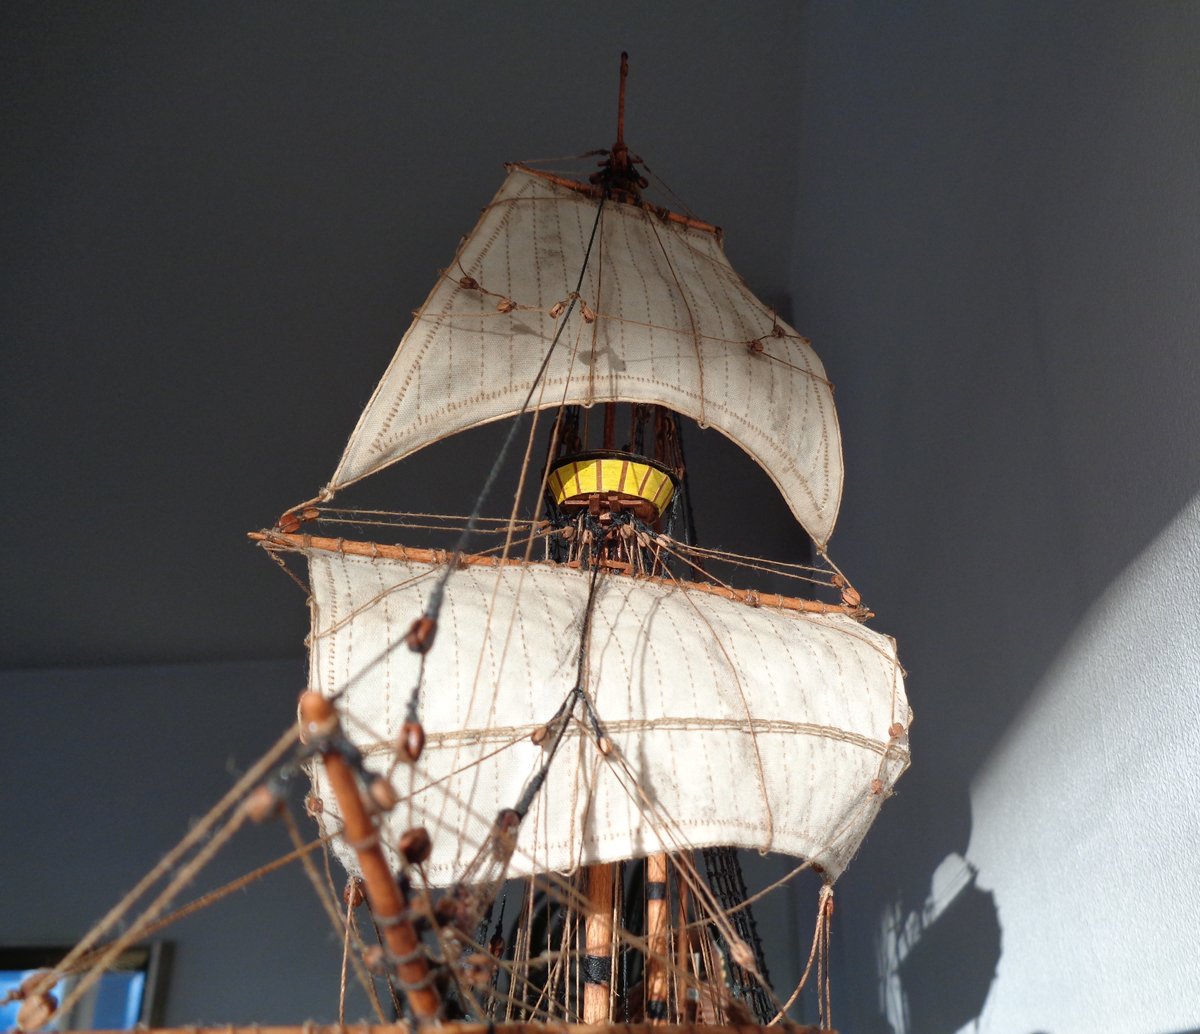
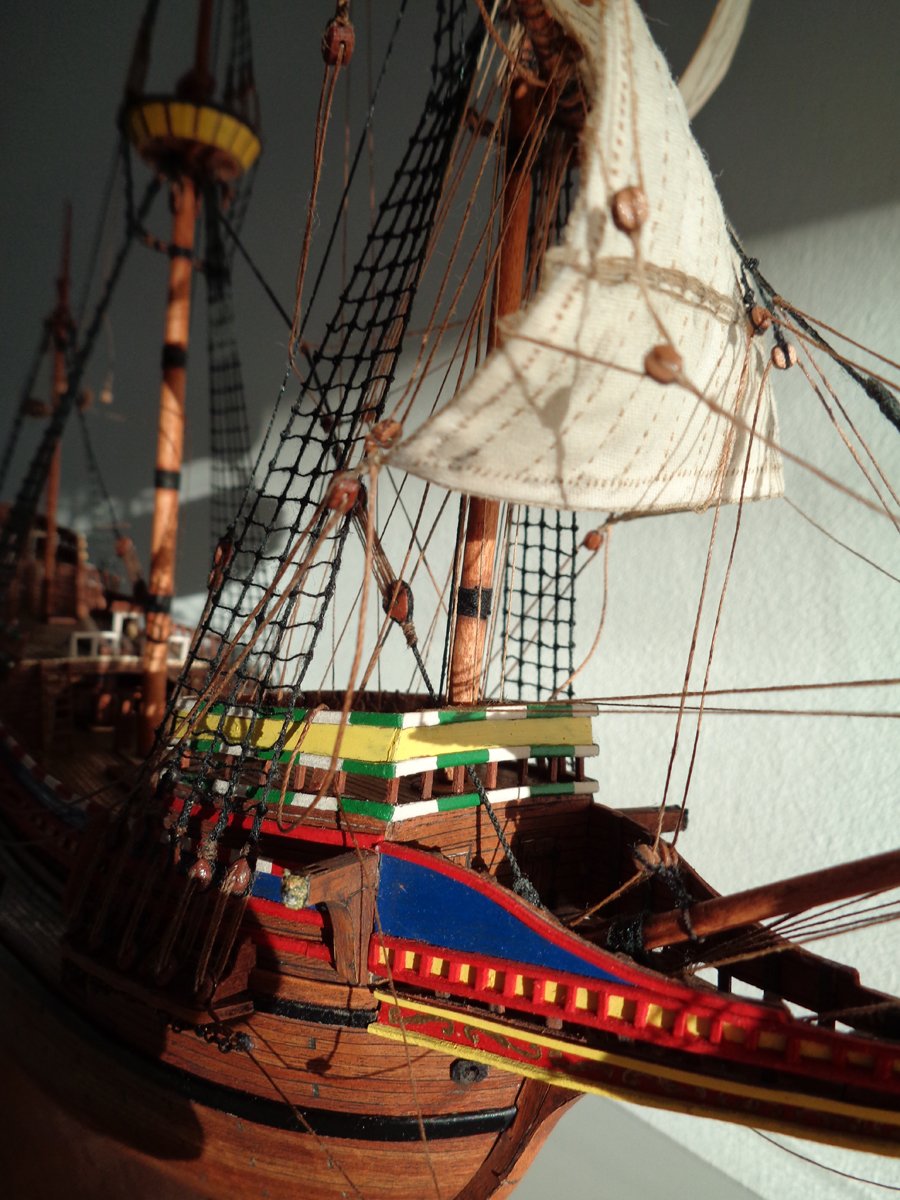
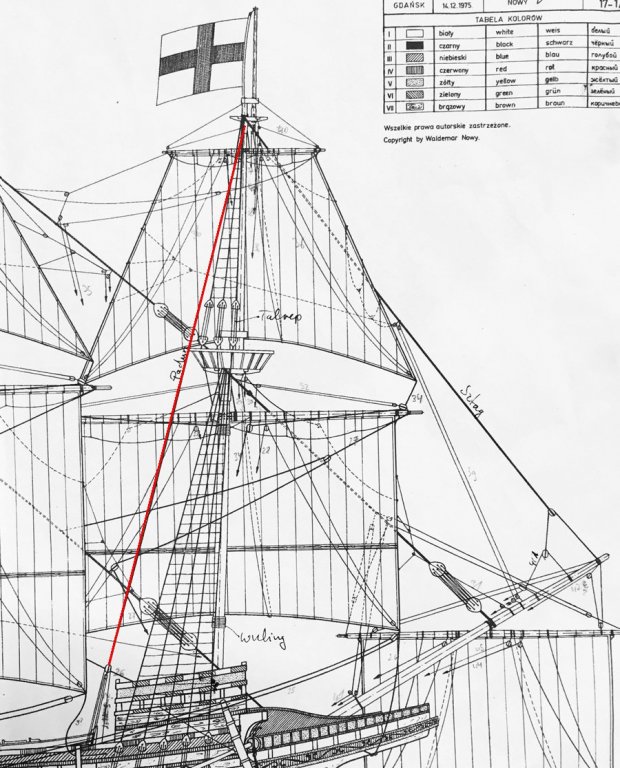
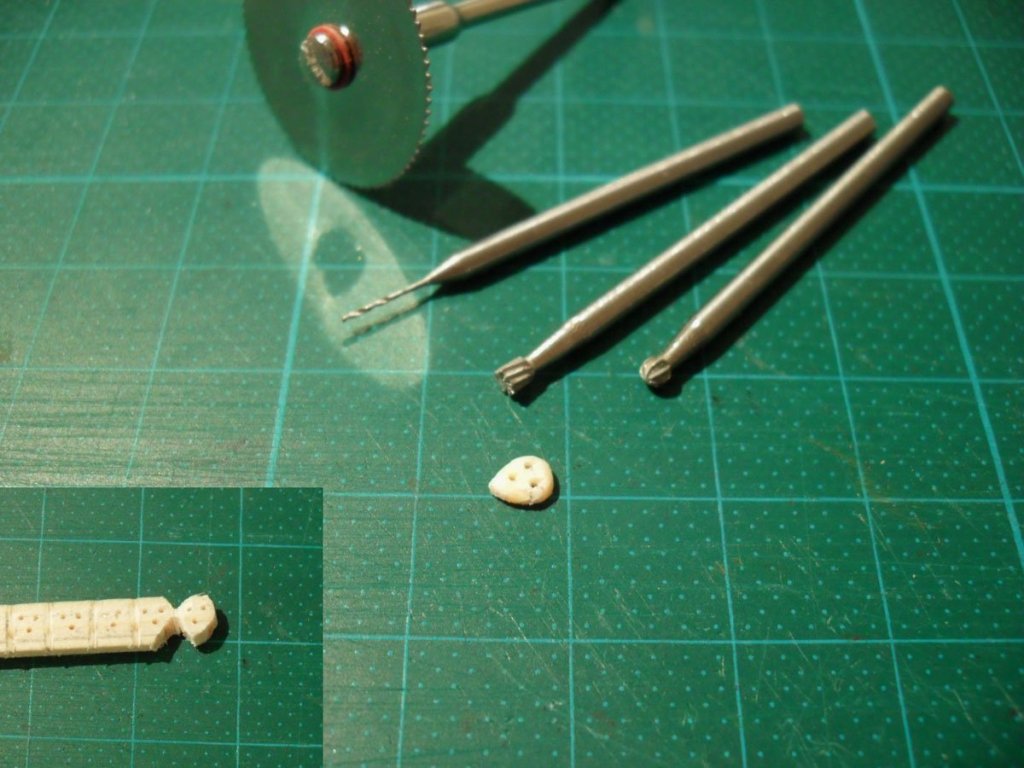
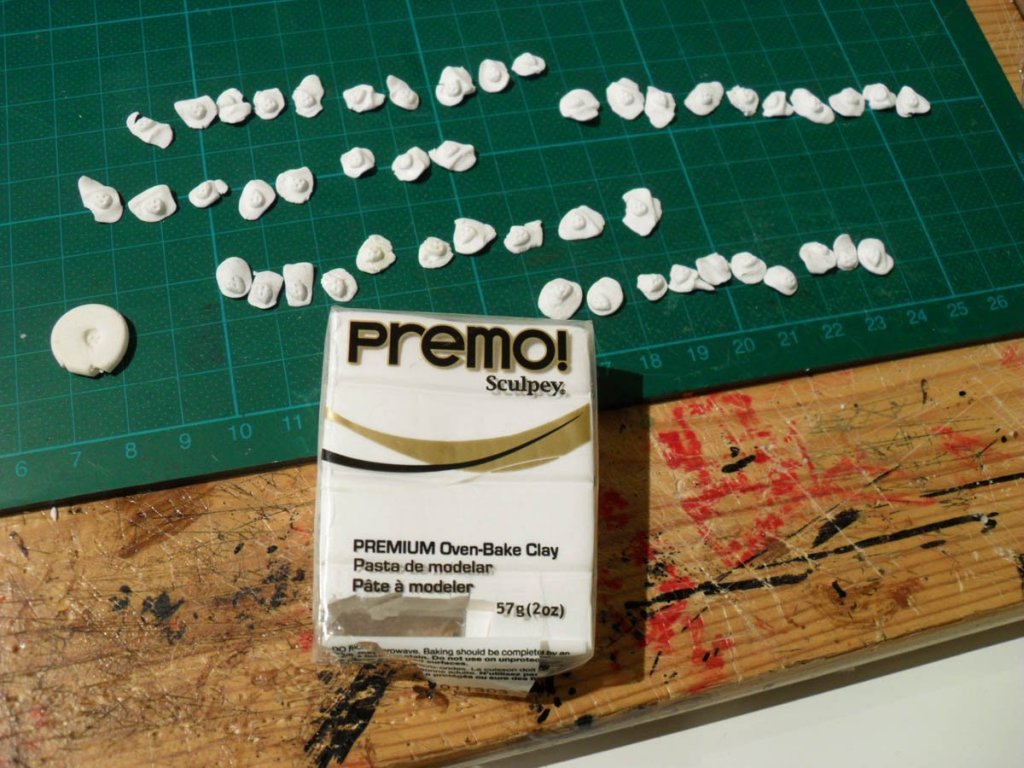
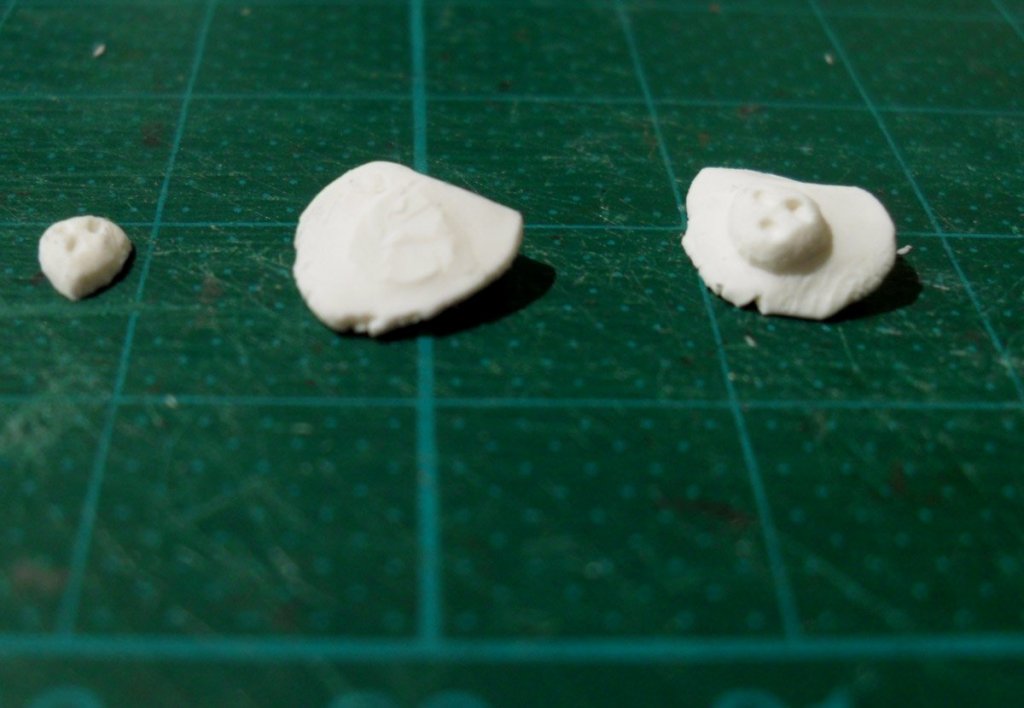
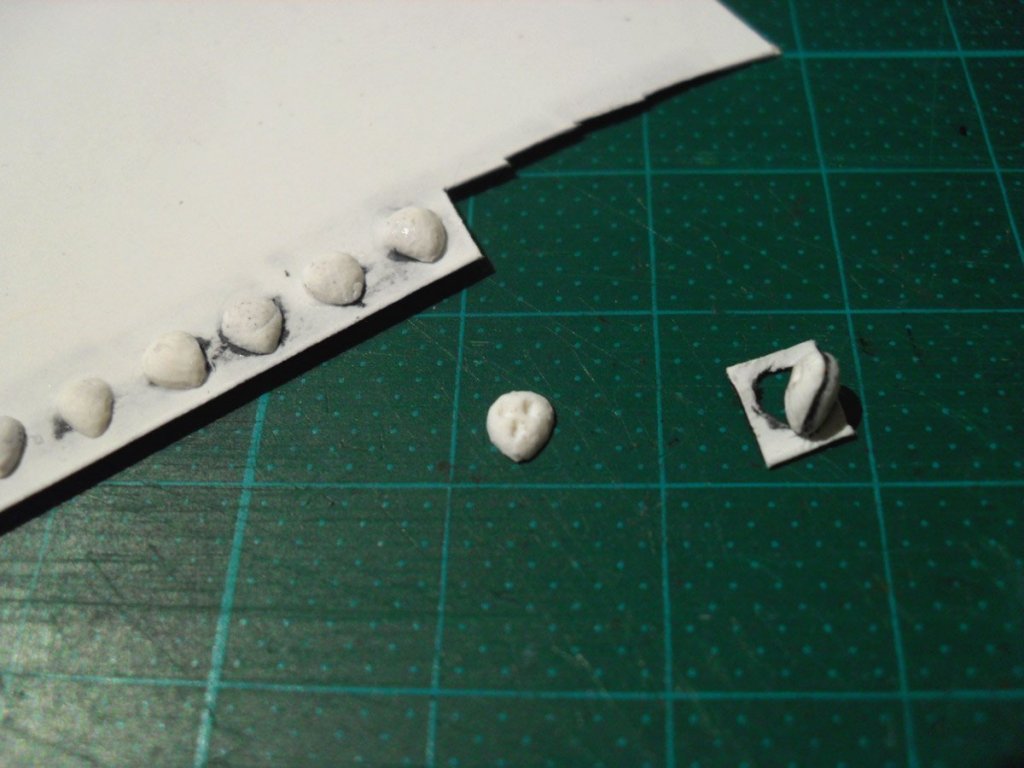
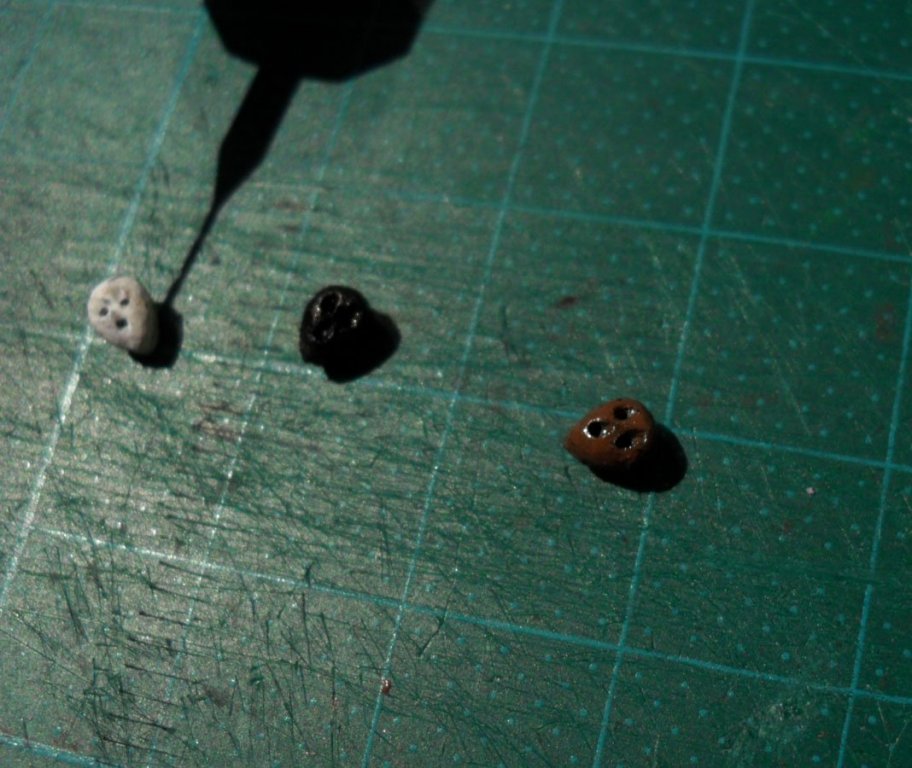
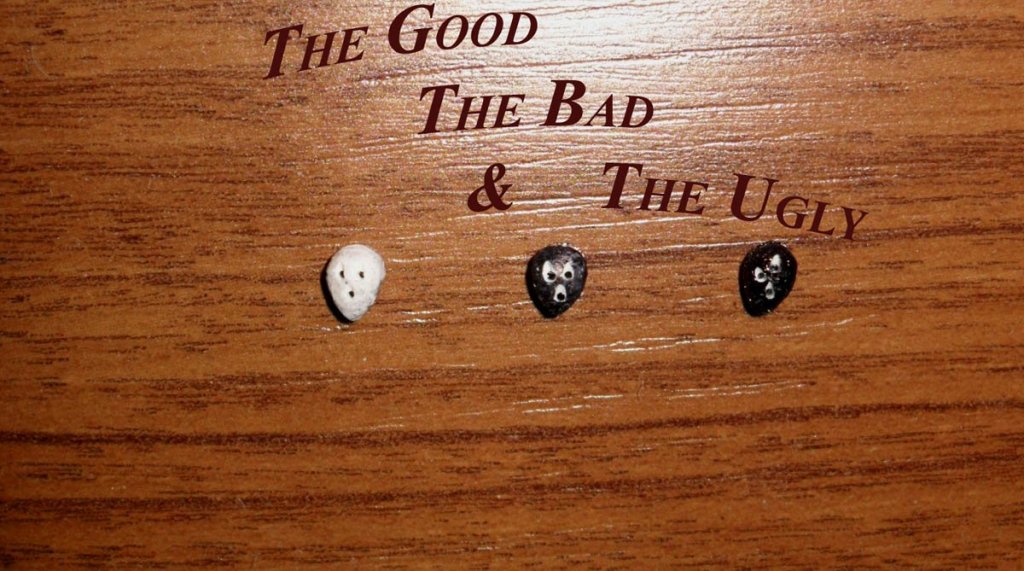
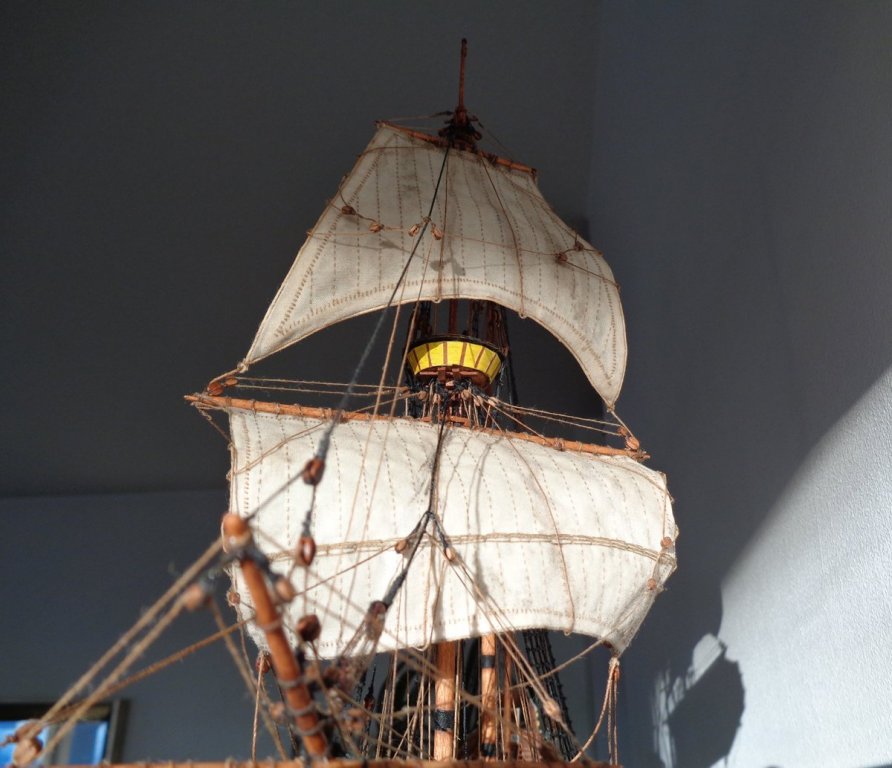
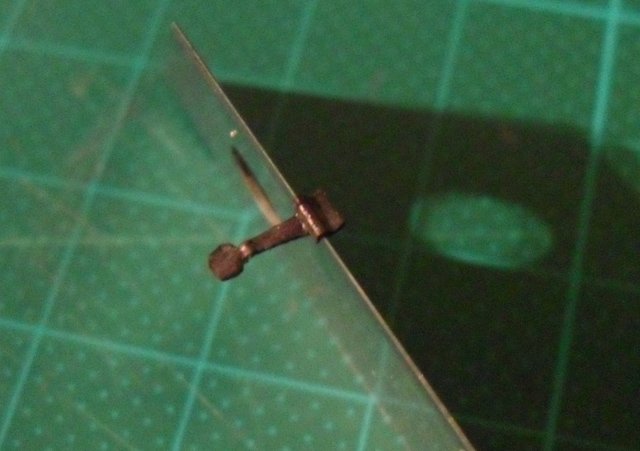
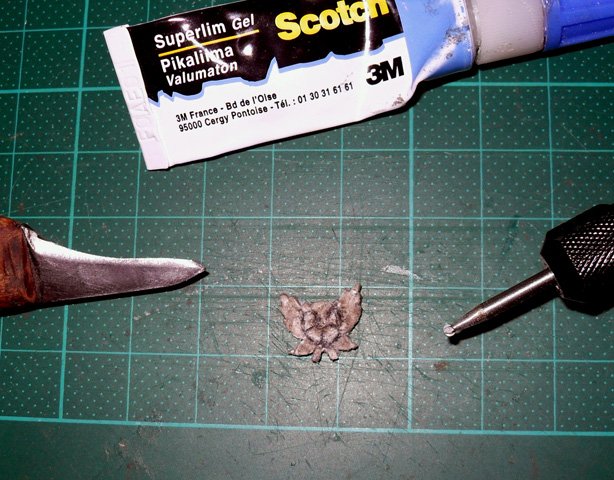
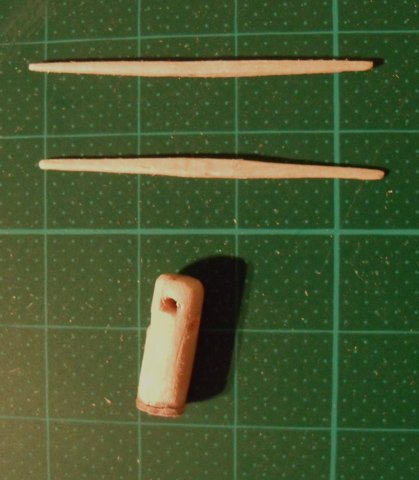
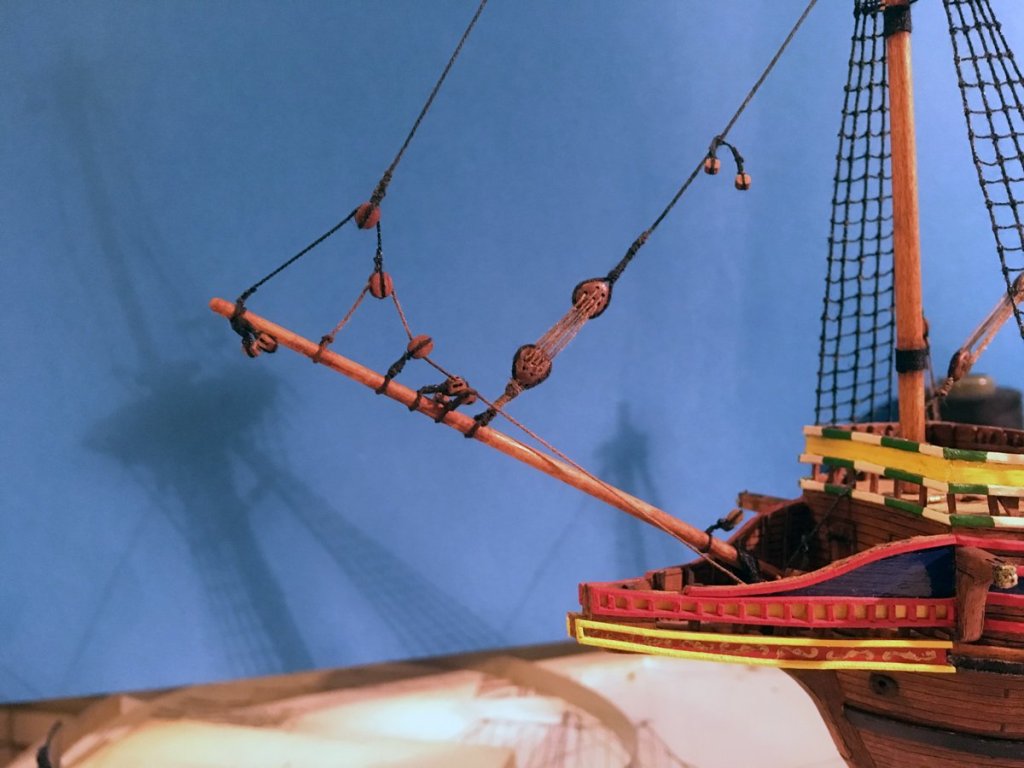
Hi there! Thanks Steven. I am glad you enjoy the build. Backstays or Halliard? ....and the tricky deadeyes While rigging the ship this year I've noticed that the plans either lack the fore top yard halliard or the backstays. If I read the plan correctly, the red line in the next picture is identified as a "padun" or "pardun" (polish), which comes from the Dutch word "pardoen" and translate into english as the backstay. So when mounting the fore top yard, I've noticed that the halliard is missing in the plans. Either or... However, Anderson's book about rigging in the 17th century helps me to sort out the problem. More on this when I have done the top sail halliard. Back when the ship did not have masts yet, I tried to figure out, how to make deadeyes that look realistic (enough). I was not very satisfied with the result from paper/card. They were constantly too soft and too flat and broke apart between my clumsy fingers. I lack the tools to make them from wood, or it would have taken me forever to carve each and everyone by hand. So I decided to make them from the model clay (the one DORIS is using for sculpturing). First I made one template from wood. Then used the clay to form a negative casting mold... ...for both sides of the deadeye. One side had no marks for the holes so they would not misalign while glueing the two parts together. After baking for 30-40 minutes at 130 degree centigrade I cut the excess material off and glued them on a tiny card sheet. After cutting them out, the other half was glued, then I drilled the holes, painted black and a second layer with brown. And here's the result from drilling as seen on the other half that had no holes: So much for now. More on the masts next time. Rgds, Radek


-
HMS ROYAL KATHERINE 1664 by Doris - 1/55 - CARD
RdK replied to DORIS's topic in - Build logs for subjects built 1501 - 1750
Hi there! It is almost unbelievable that your Sovereign is in a scale 1:96! The details on her are just stunning! 👏👏👏 As regards the wiring for the light in your Katherine: Who is making your schematics? Are you doing it yourself or do you have some help? For my scratch build of "Neptune" from Roman Polanski's movie Pirates I plan to implement light as well. But all my components, i.e. resistors, potentiometers, capacitors, will be outside the ship, so in the ship itself there will be only the diodes in a parallel circuit connection. This will save a lot of space. A student at my workplace was friendly enough to help me with the schematics. I hope to post my progress soon on papermodelers "Spanish Galleon Neptune" 😊 and at some point I will start a progress report on her here, too. Kind regards, Radek- 1,035 replies
-
- 6
-
-
- royal katherine
- ship of the line
- (and 1 more)
-
HMS ROYAL KATHERINE 1664 by Doris - 1/55 - CARD
RdK replied to DORIS's topic in - Build logs for subjects built 1501 - 1750
Hi! I think you made one half then the other, Doris, isn’t it so? ButI am also interested in the same questions regarding re-baking the clay. Dziękuje Dziadeczku! -Radek- 1,035 replies
-
- 7
-
-
- royal katherine
- ship of the line
- (and 1 more)
-
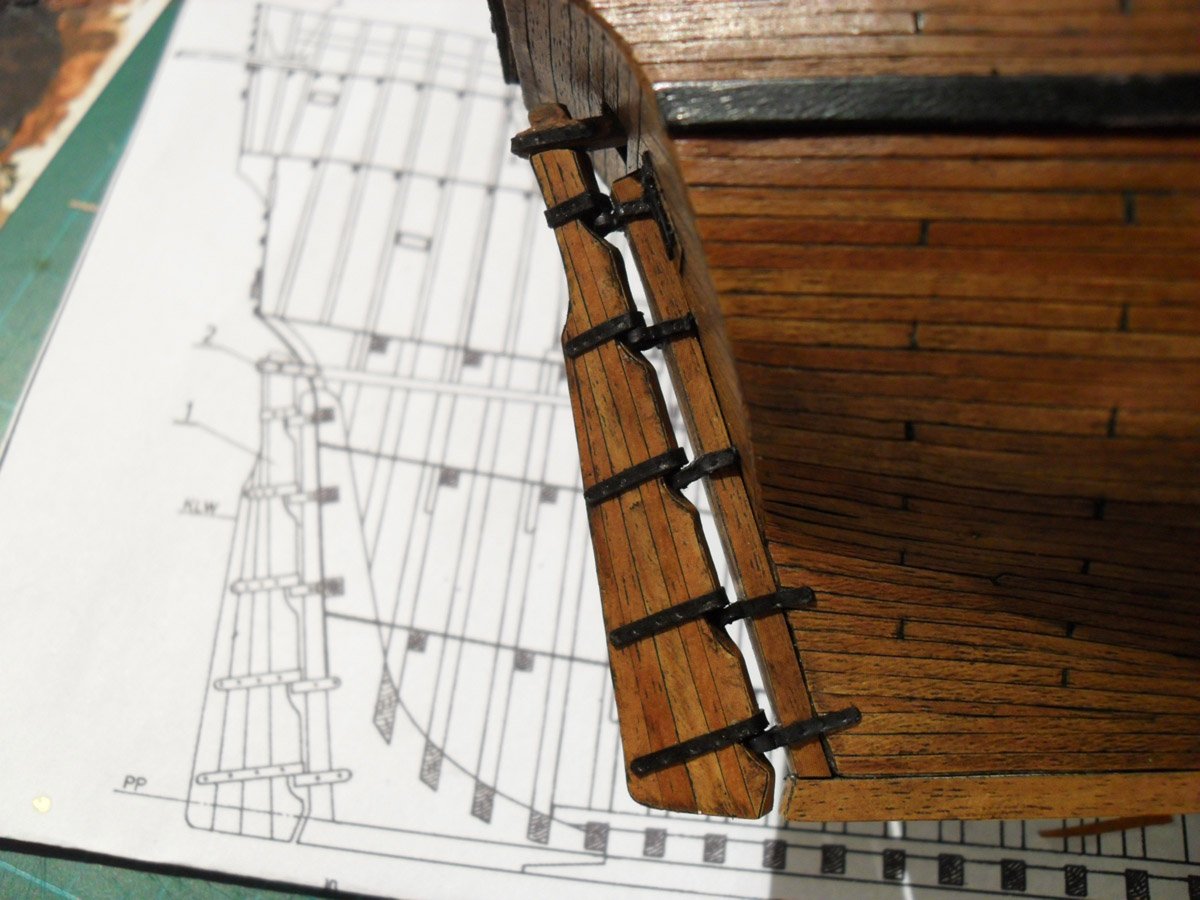
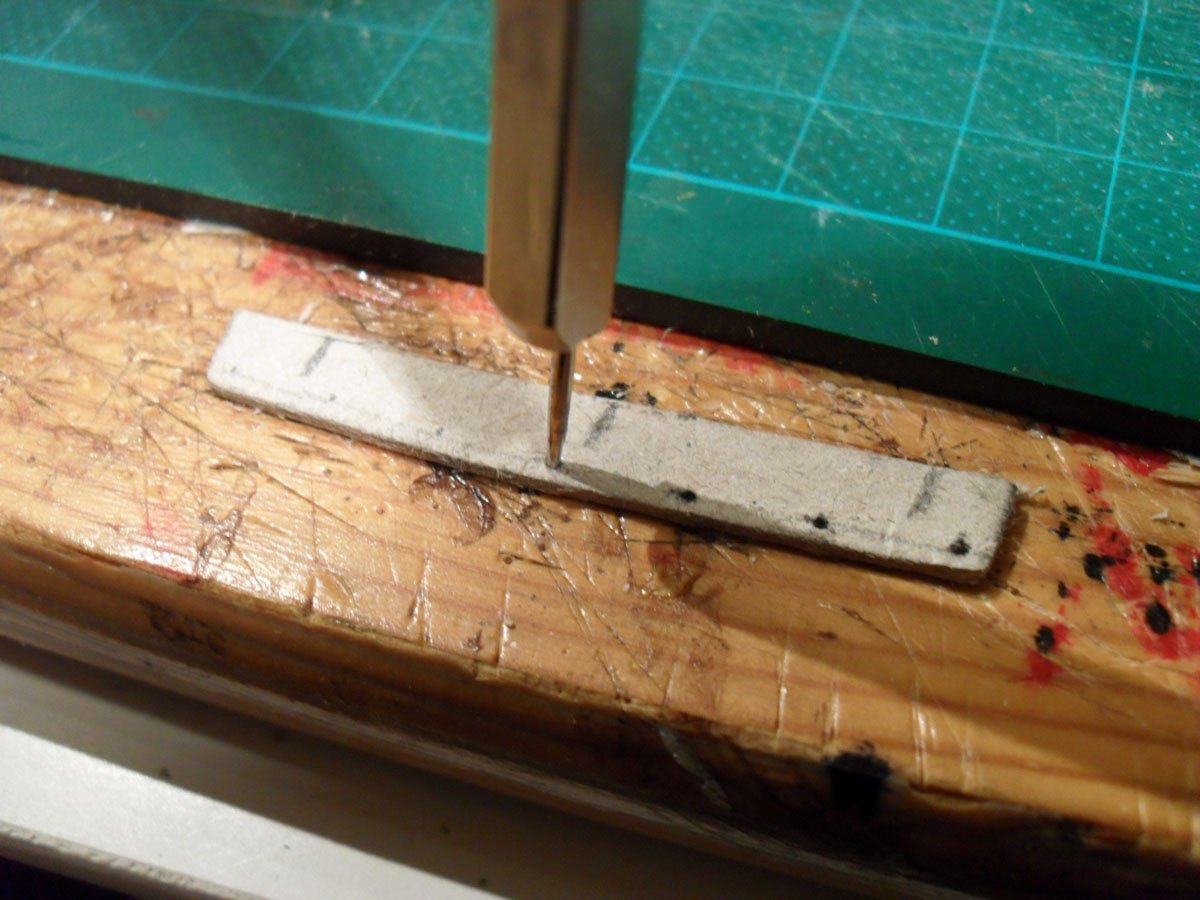
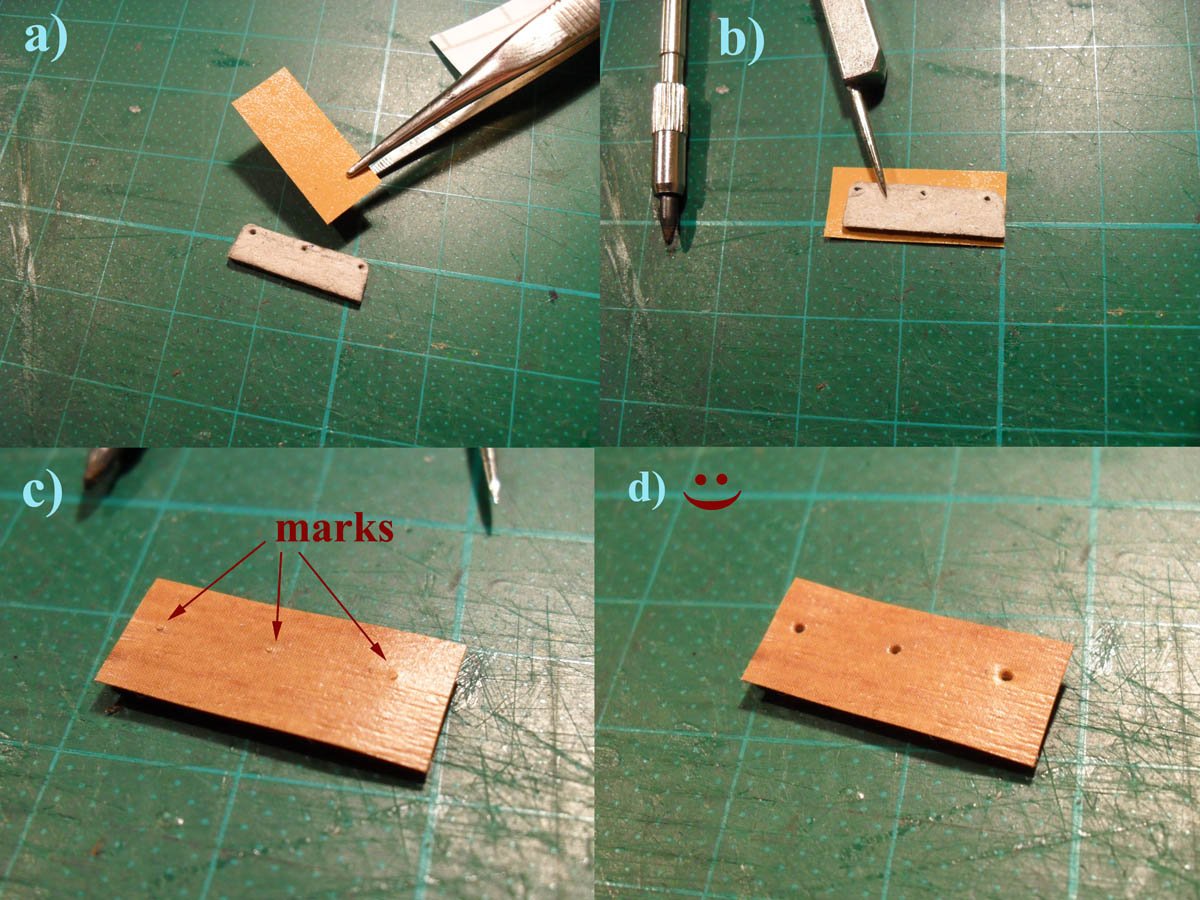
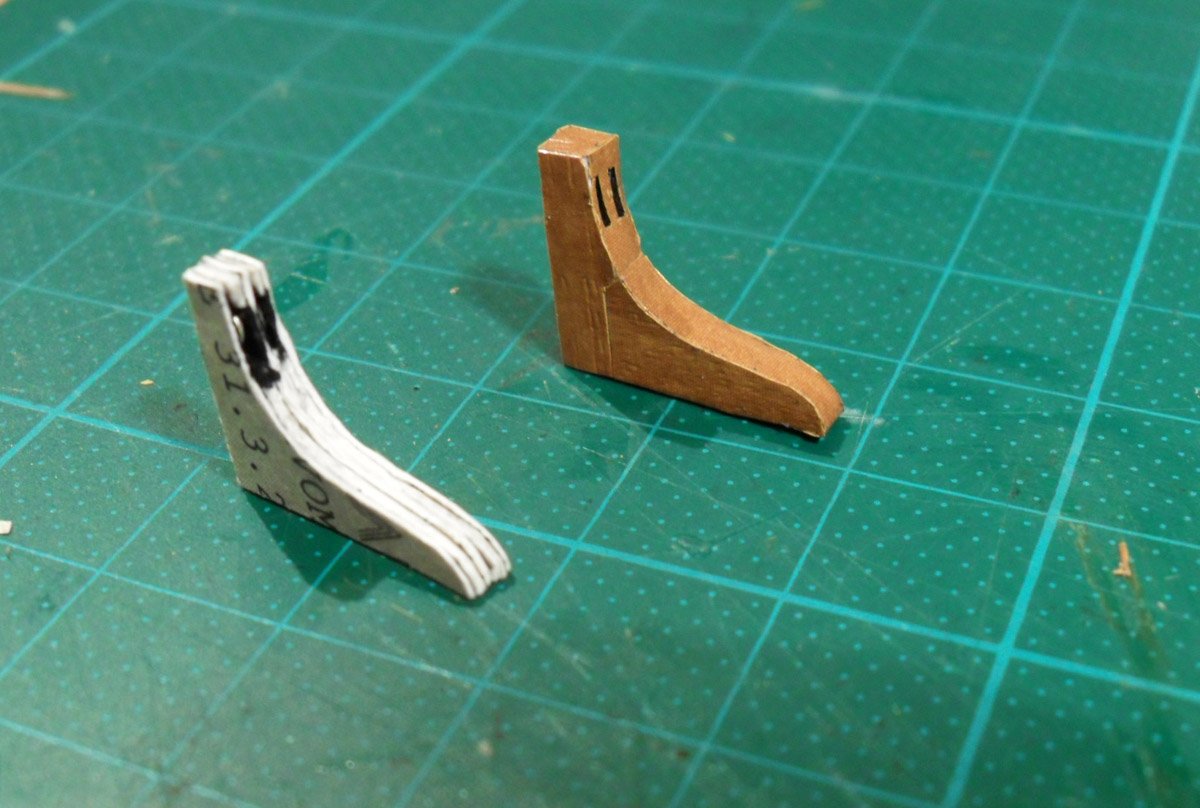
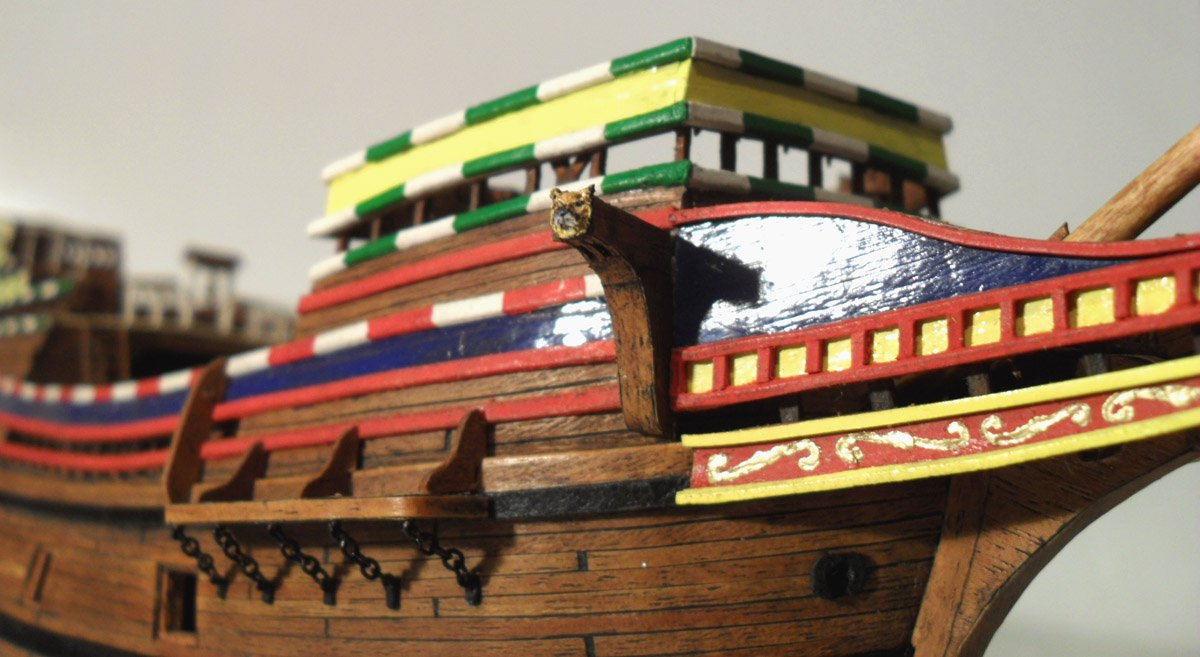
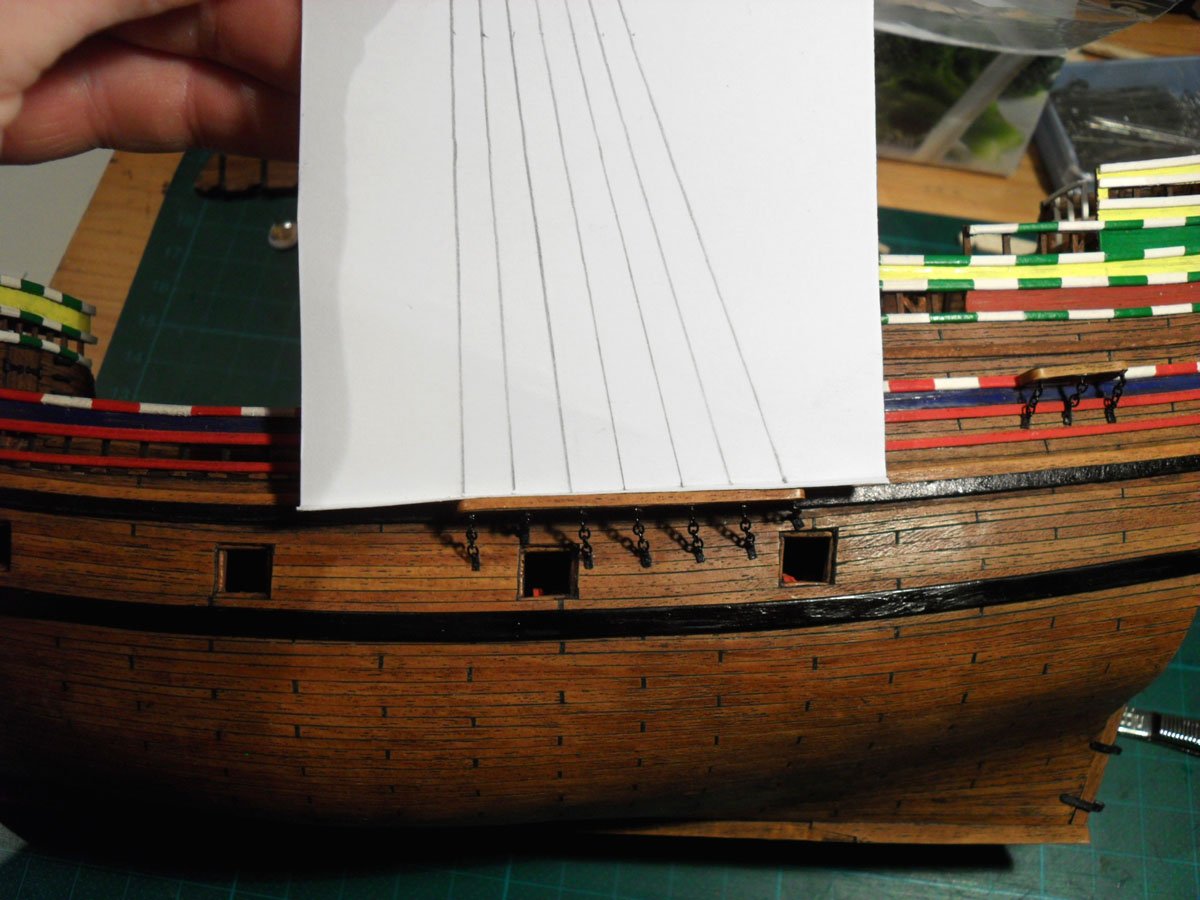
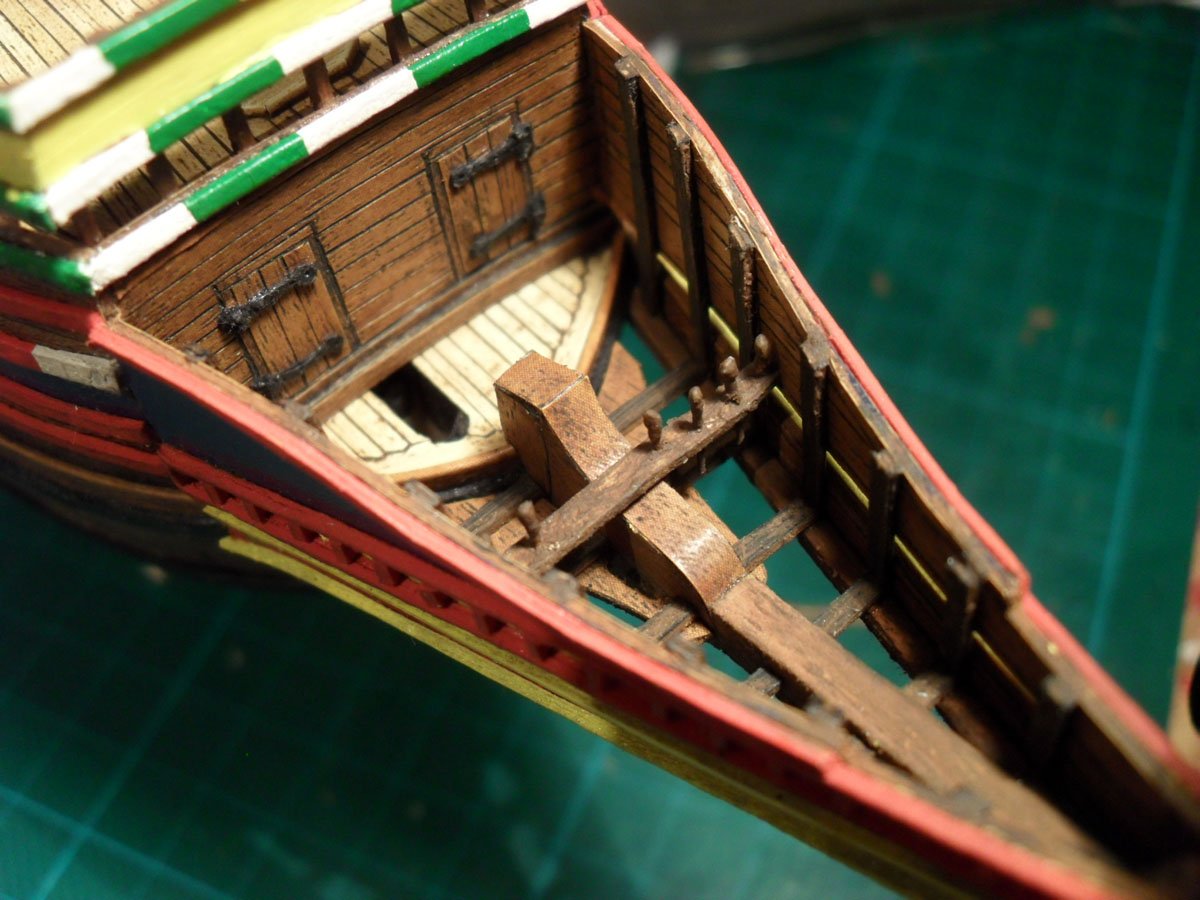
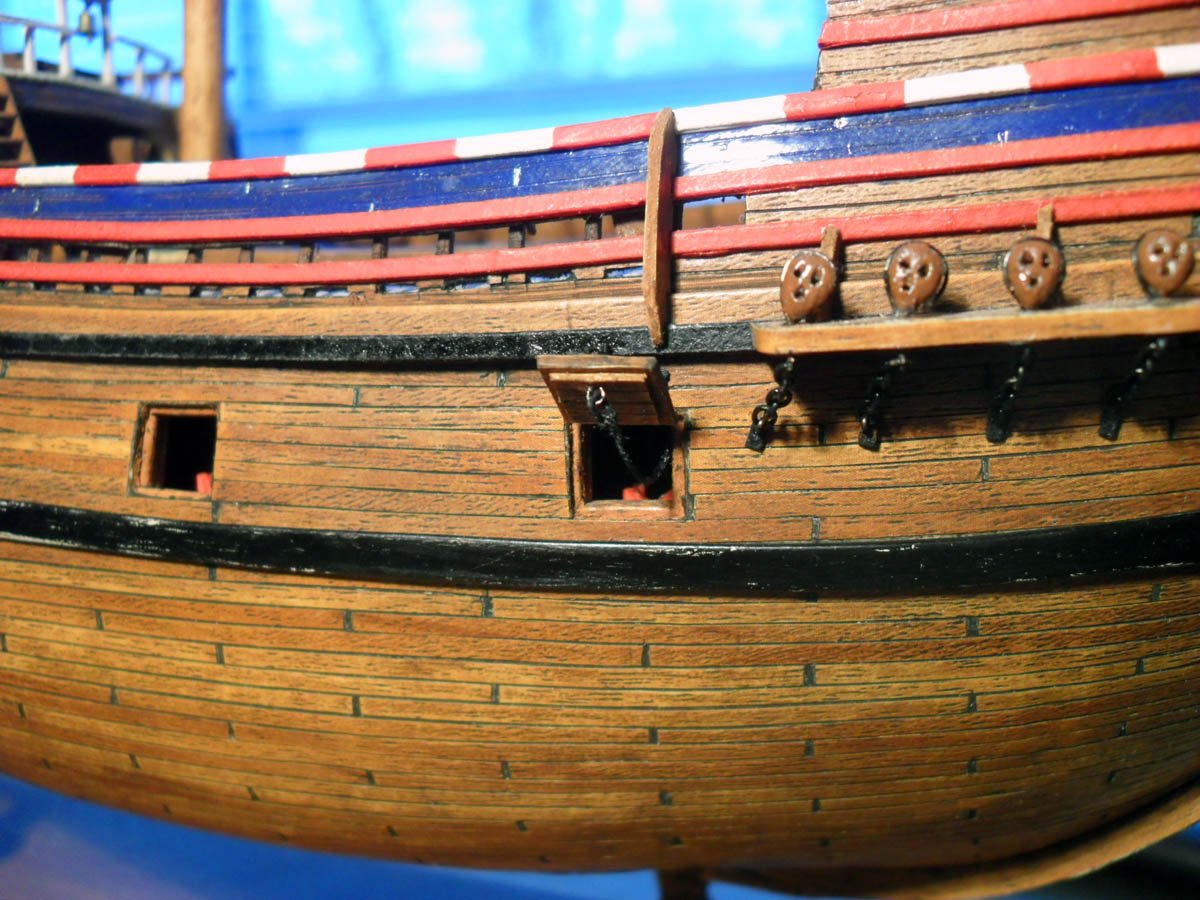
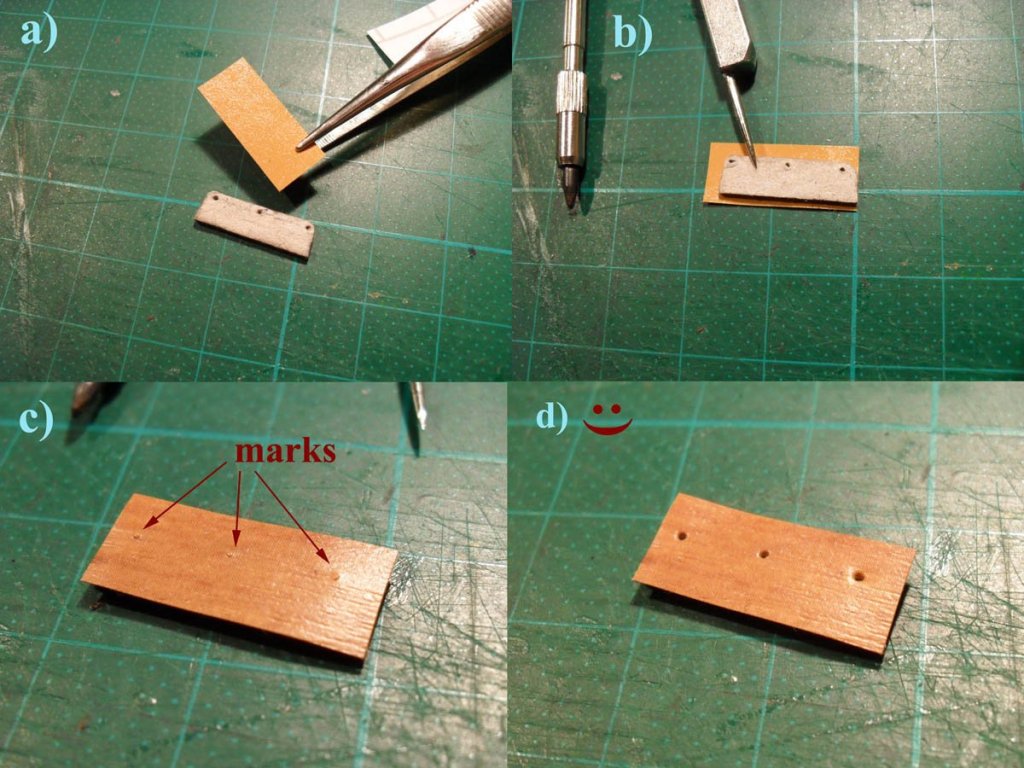
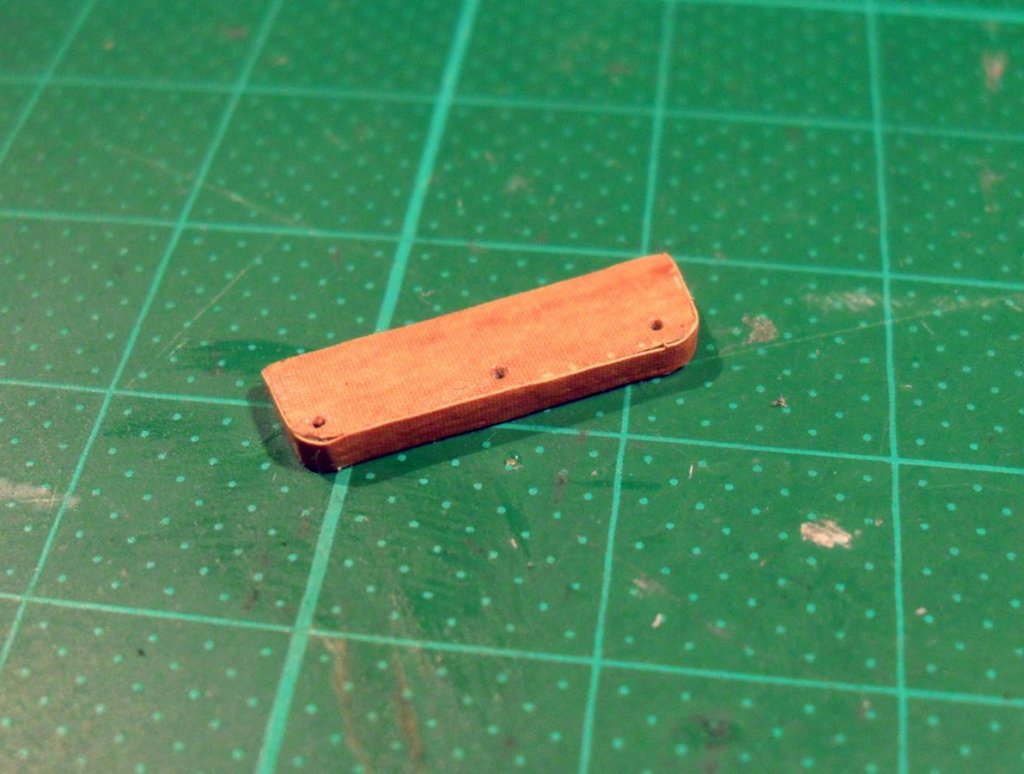
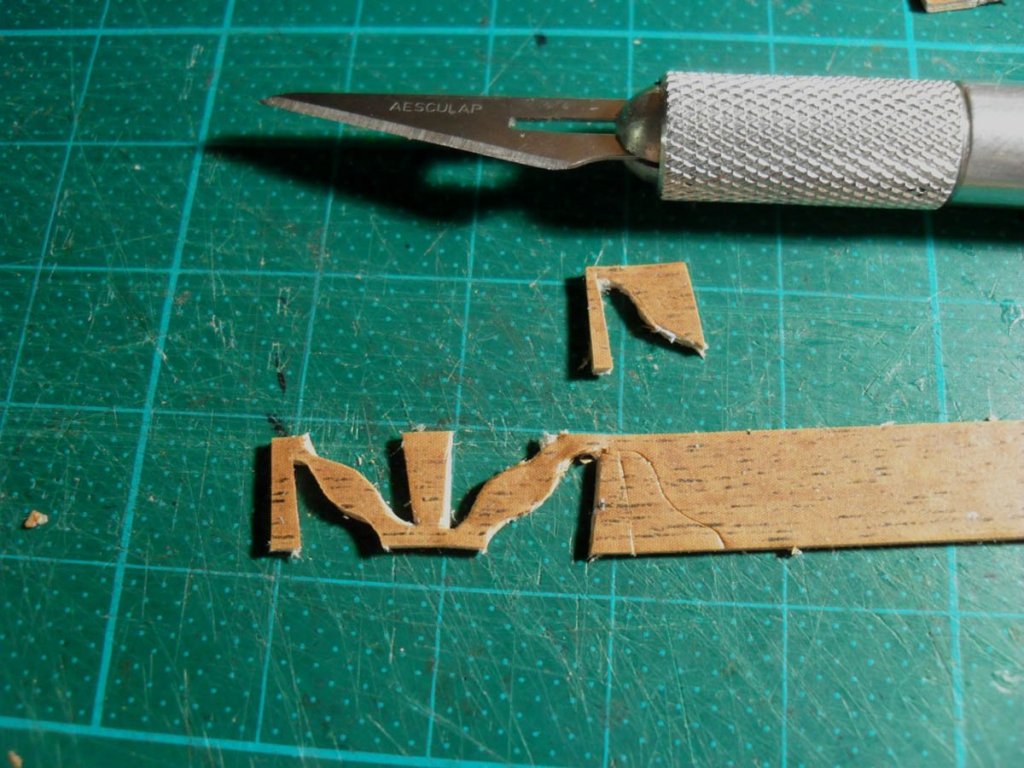
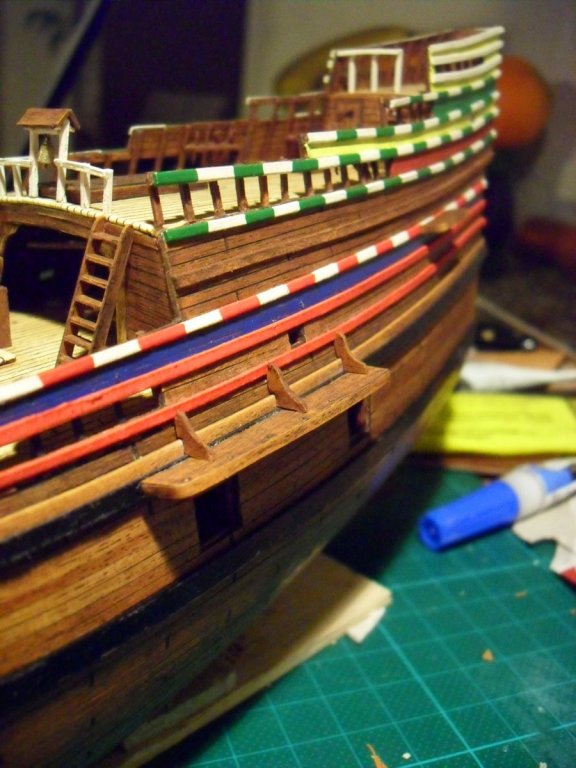
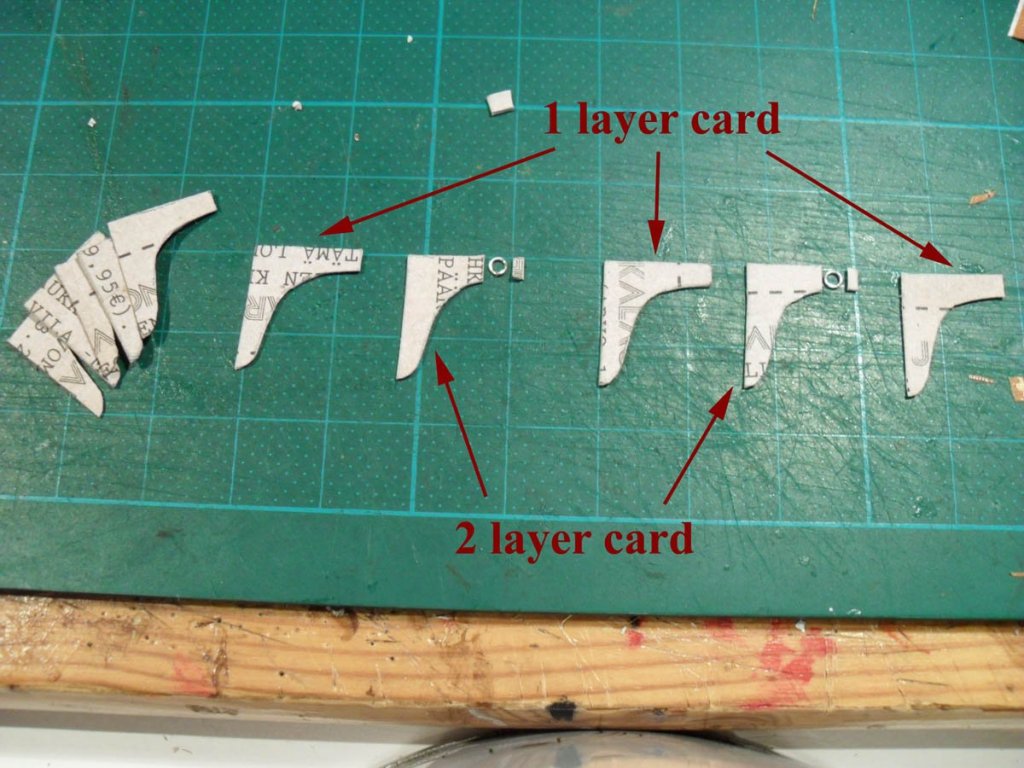
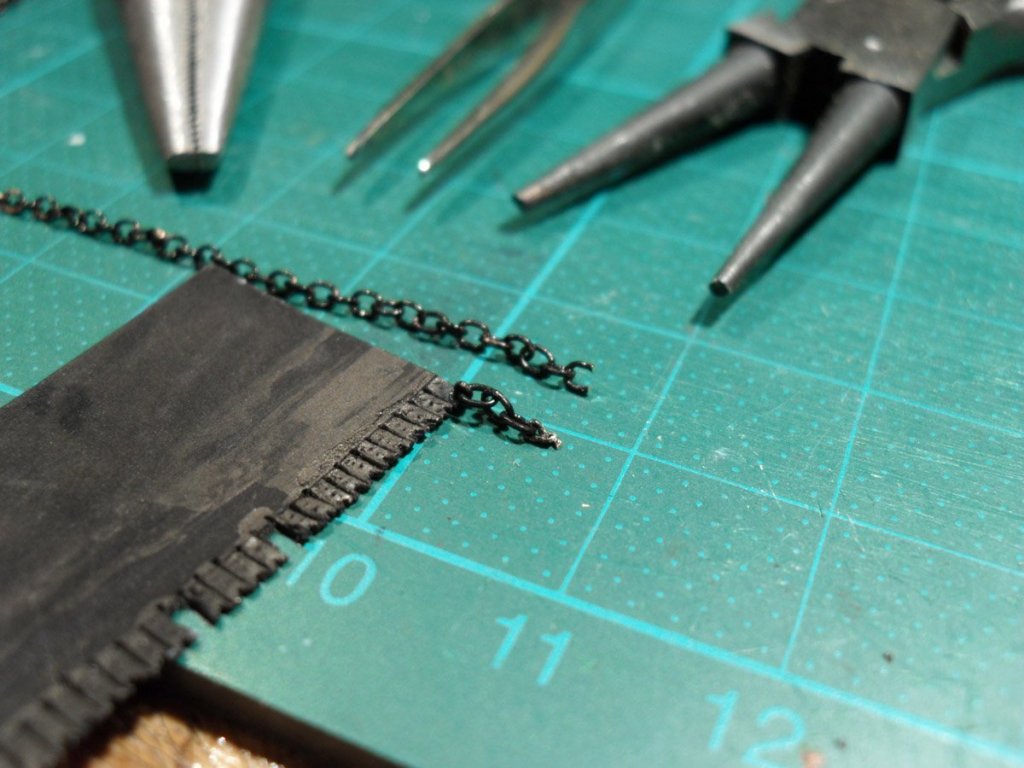
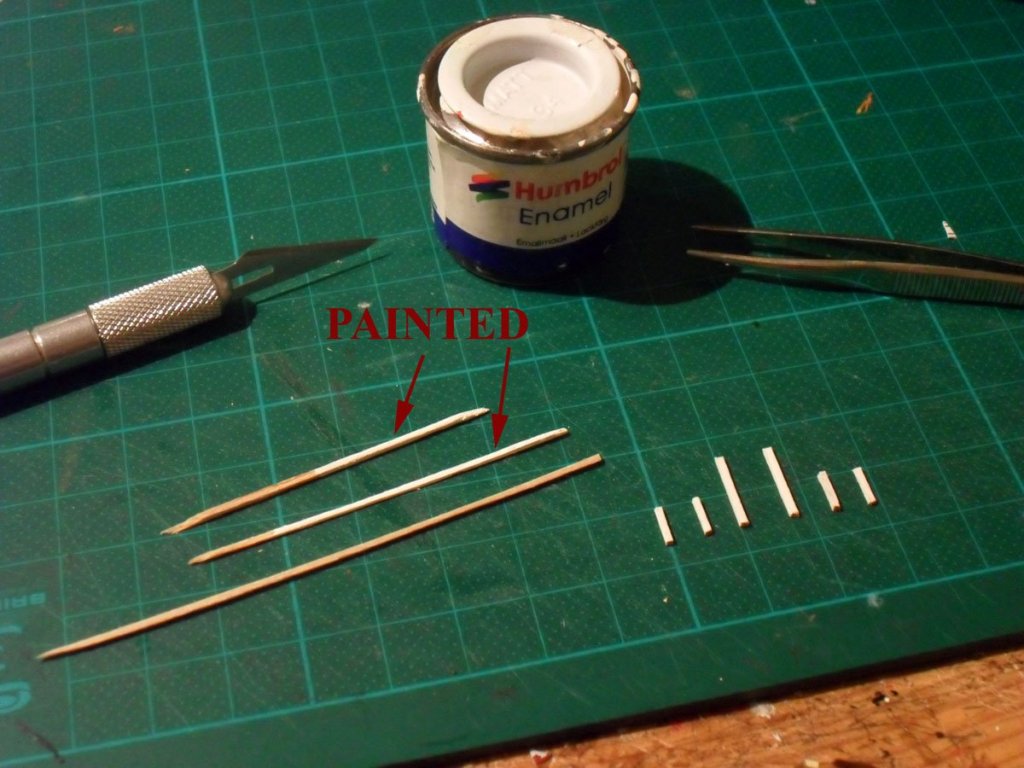
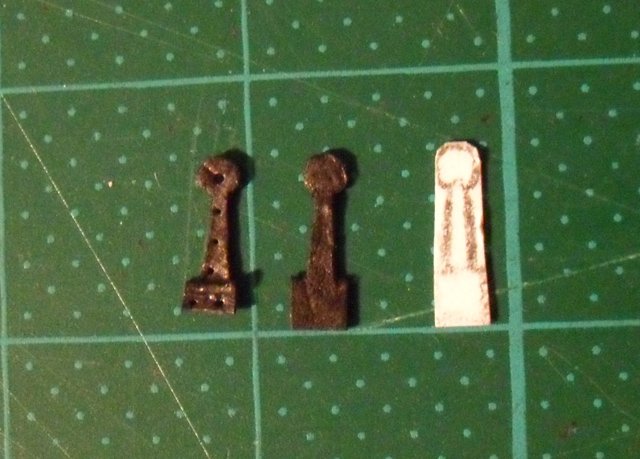
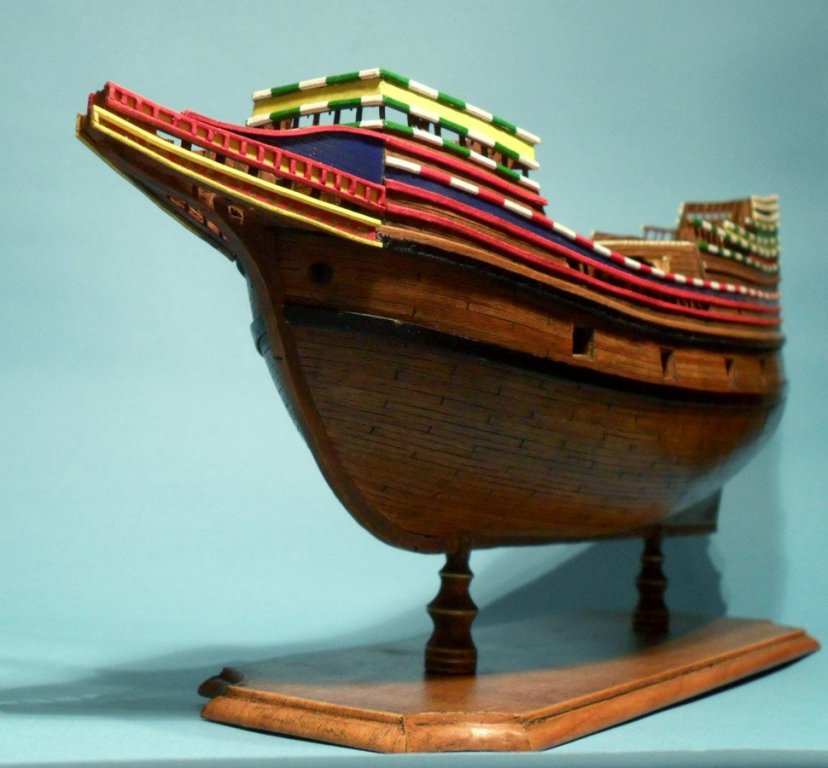
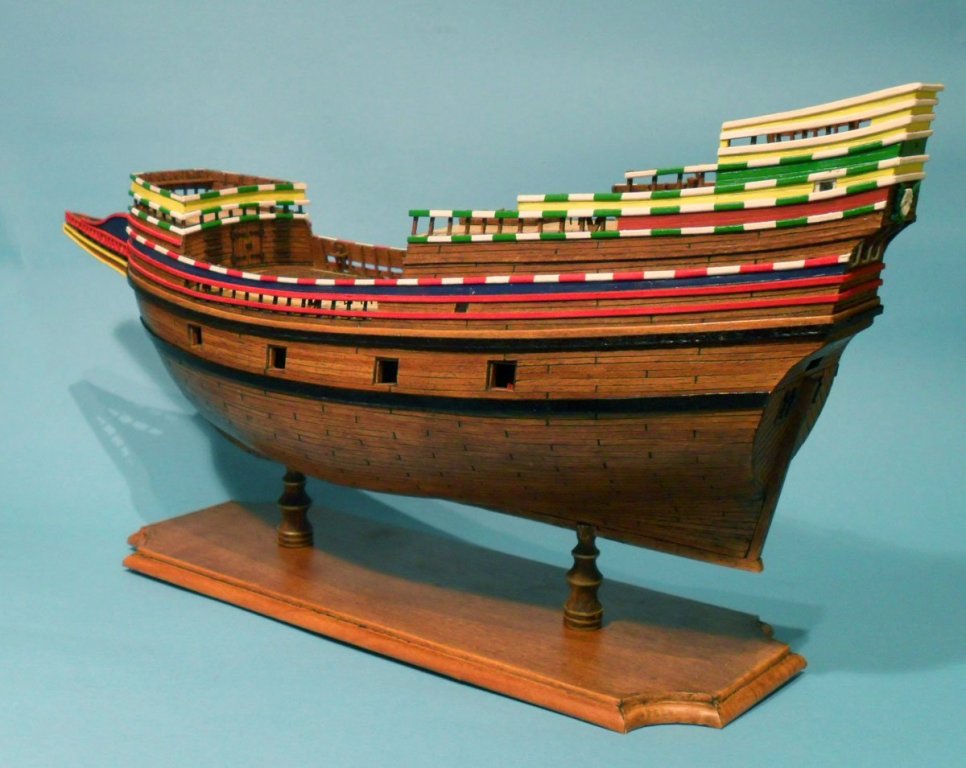
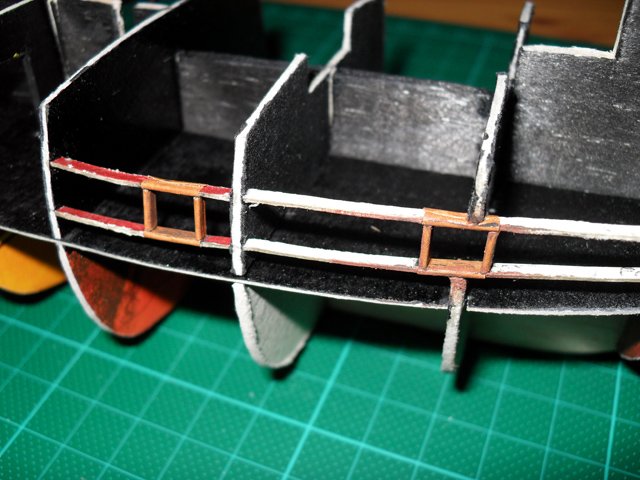
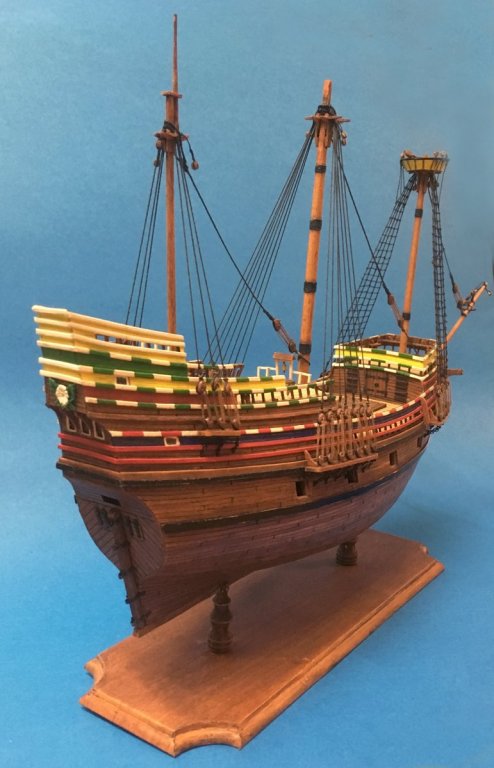
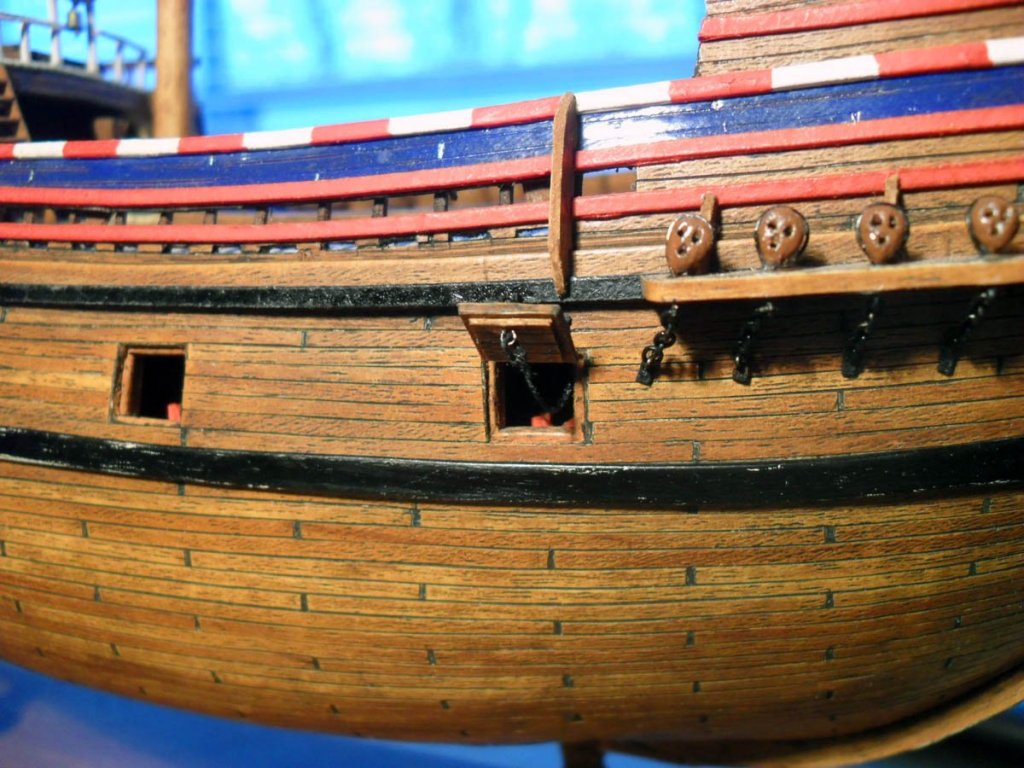
Rudder, Channels, etc... Hi everyone! Thanks @ Steven and Patrick! It is nice to hear when a card model does not look like card at all. That is, I believe, the goal of any card modeller, regardless of the model, whether it depicts a metal or a wooden one. Thank you for the compliments. I wish I could make better pictures. The rudder was copied from the plans onto 2mm thick card board using either a sharp needle or my compass. I simply put the card underneath the plan and copy the part by piercing the outlines onto the underlying card. After shaping it, white glue was applied to harden and smoothen the card. Then I attached the self adhesive foil with wood pattern, which was later altered with black oil paint. The pintle and gudgeon were made from ~0.3mm wire and 0.3mm paper respectively, painted with a black marker and the rivets imitated with a needle that has no sharp end (was a defect production in the box, turning out useful). Attached to the ship it looks like this: The visible part of the tiller was painted with oil paints burned umber and burned sienna. The channels have been made from 2mm card and pierced with the circle. Then... a) self adhesive foil attached, b) marked from the other side, where the holes are, c) and d) holes pierced from the right side INTO the piece where the marks are to avoid a crater-like appearance on the surface. So that the final result looks like this prior to altering with black paint: Support beams were made from 1mm card with ready attached and altered foil on both sides. Attached to the ship it looks like this: The catheads were made from several pieces of 0.3mm card/paper and the pulley sheave was imitated with a 0.4mm wire painted black with a marker. The self adhesive foil was used all around the cathead. Later I decided to try out modelling a real cat head, but they look more like some dirty little 2-3mm sized bear heads... The chains underneath the chain plates were made from a tiny chain and paper, painted black. Right now I've finished the rigging on the stem, but had some problems with the top sail halliard. More on it in the next post as well as how I made the deadeyes... Kind regards, Radek


- 33 replies
-
- 15
-
-
HMS ROYAL KATHERINE 1664 by Doris - 1/55 - CARD
RdK replied to DORIS's topic in - Build logs for subjects built 1501 - 1750
Thanks for describing your method. The pictures show clearly how you do this amazing details. "Pictures tell more than thousand words" The idea with the brush is excellent! I will try it out myself (and of course I do not expect to achieve even a fraction as splendid a result as yours!) once I've finished my Mayflower and continue on the Neptune. Thanks again! -Radek- 1,035 replies
-
- 6
-
-
- royal katherine
- ship of the line
- (and 1 more)
-
Hi! Looking forward to seeing your first wooden build! I am still stuck with card and paper. Wood is scary... -Radek
-
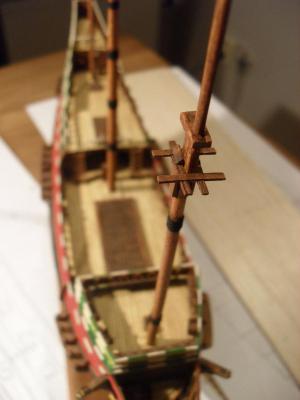
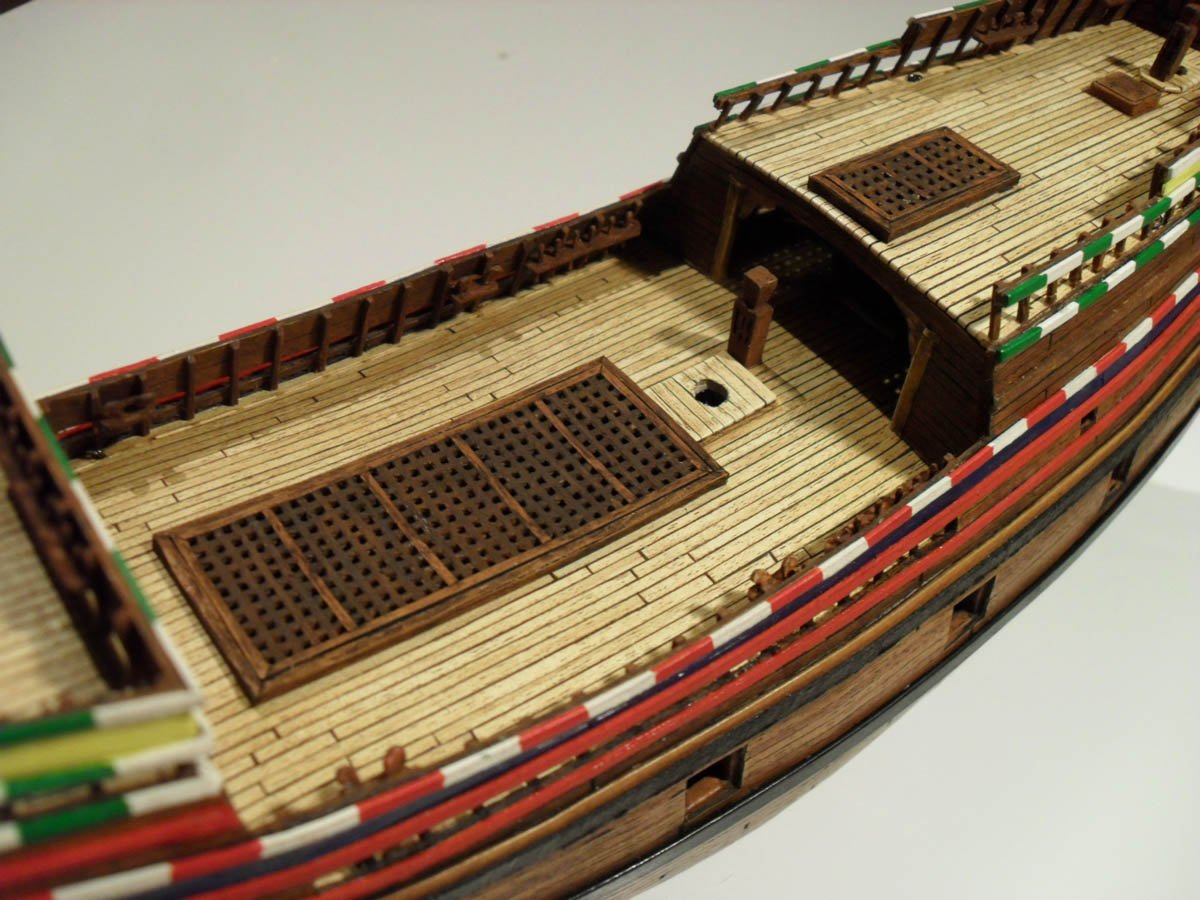
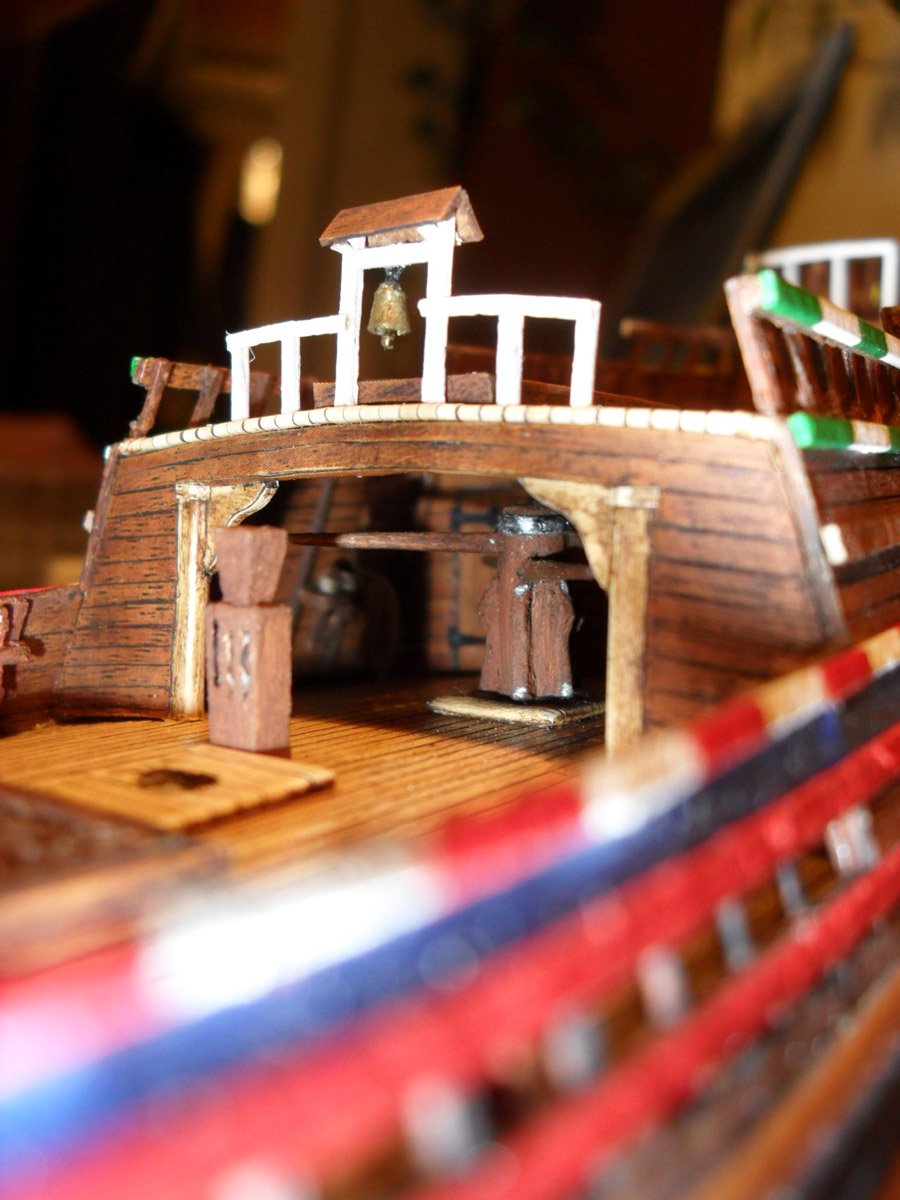
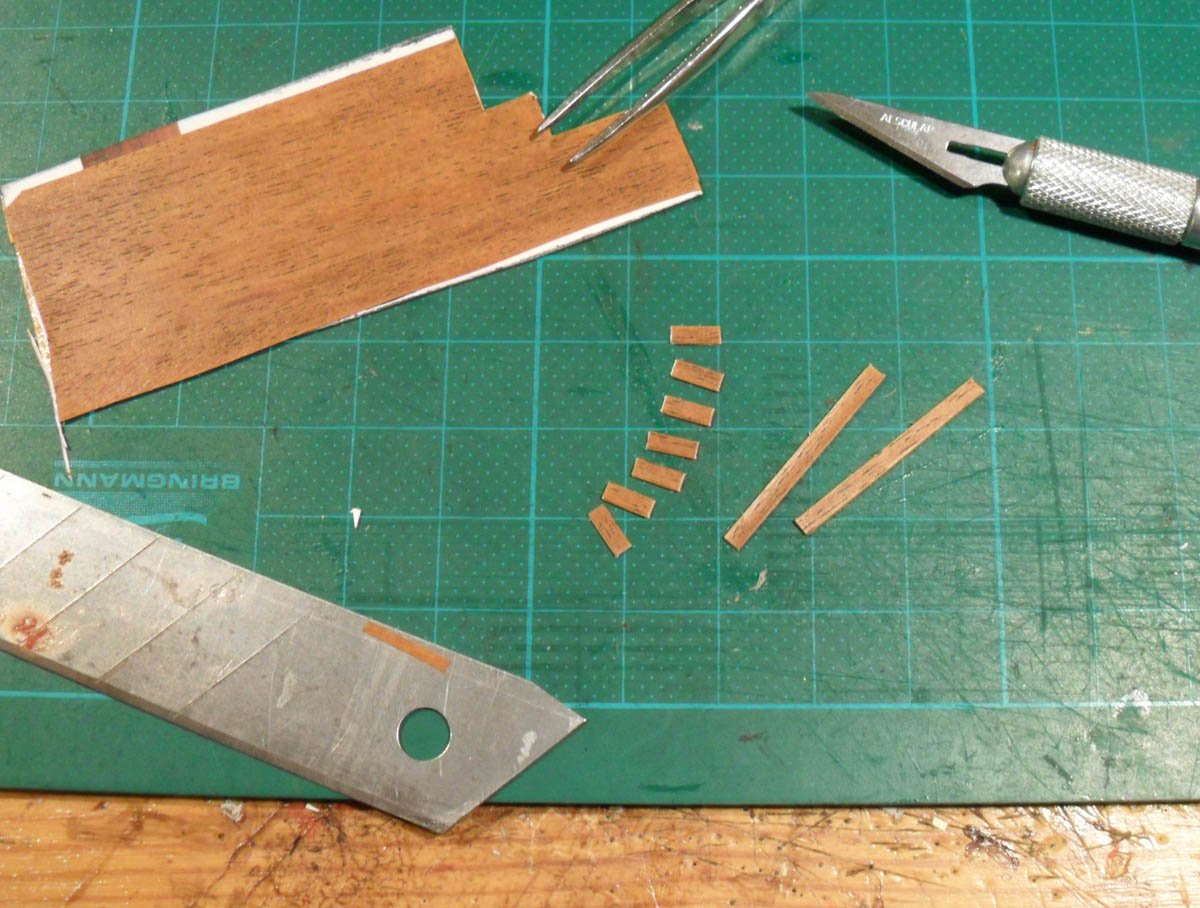
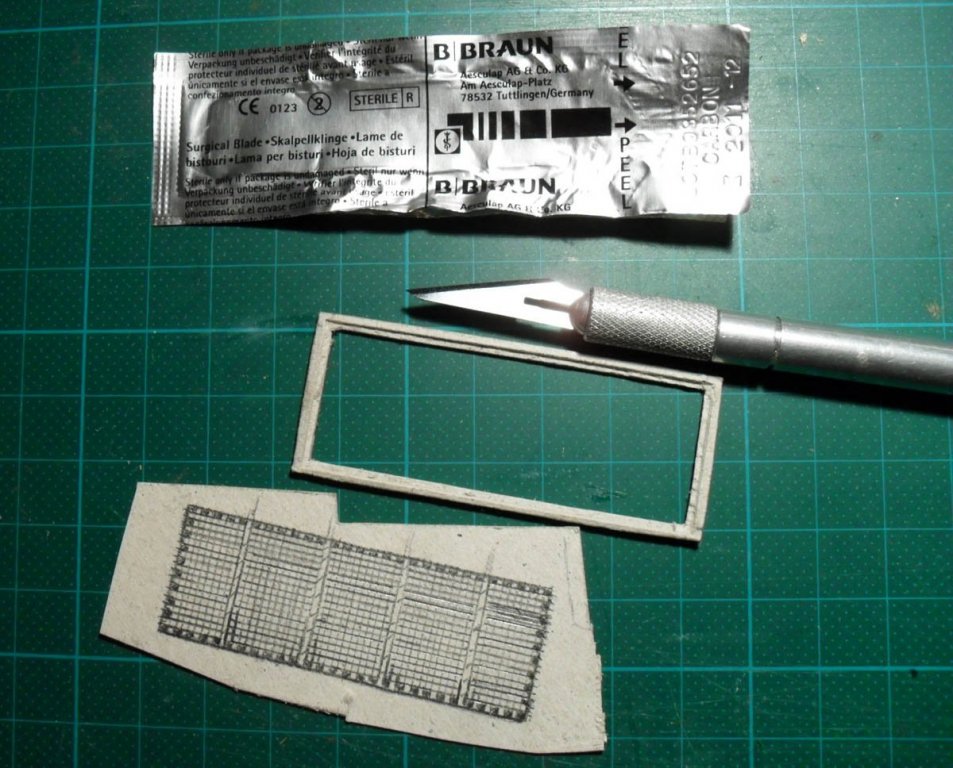
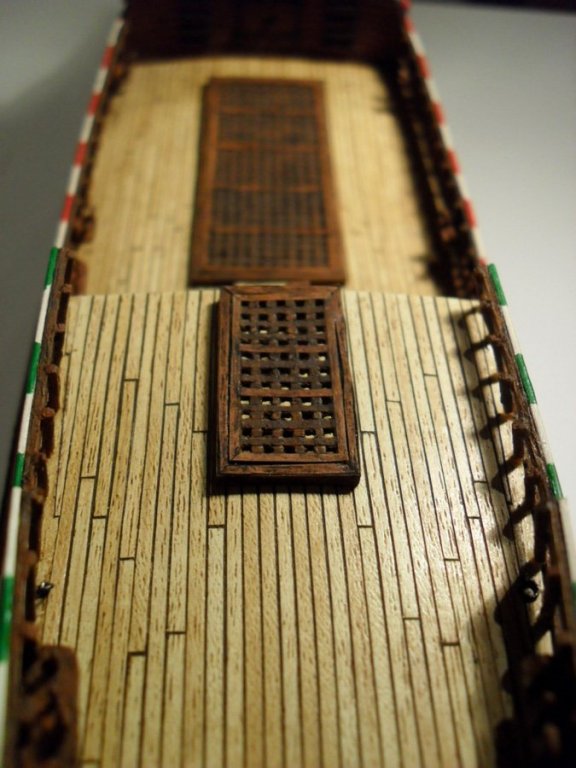
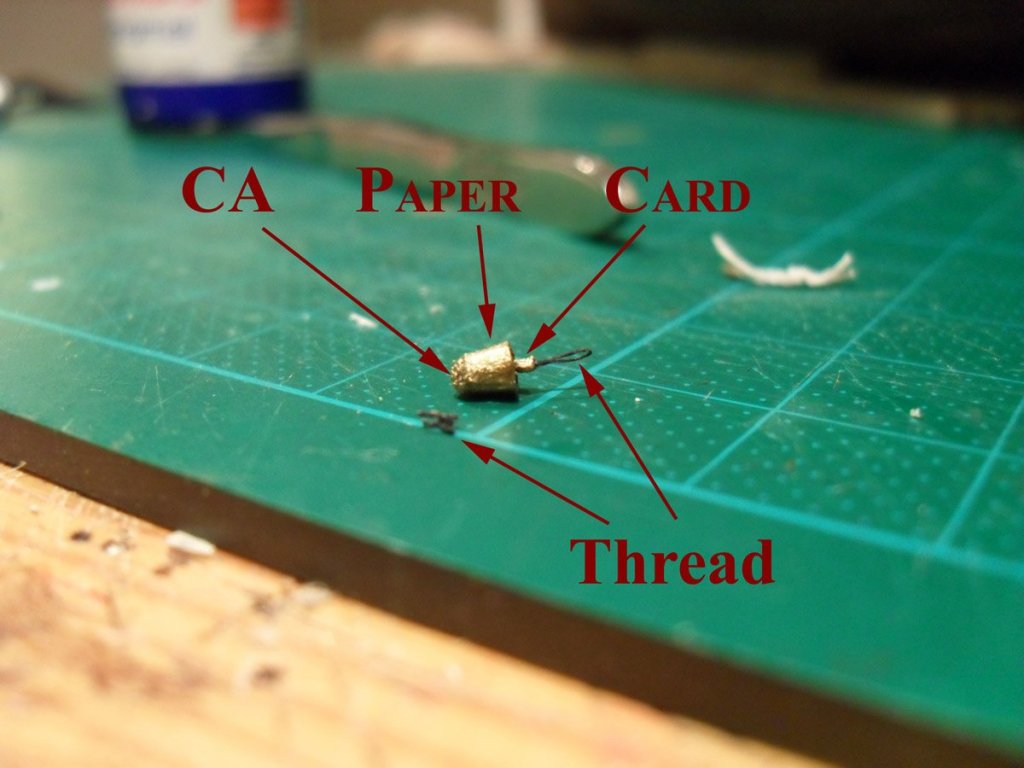
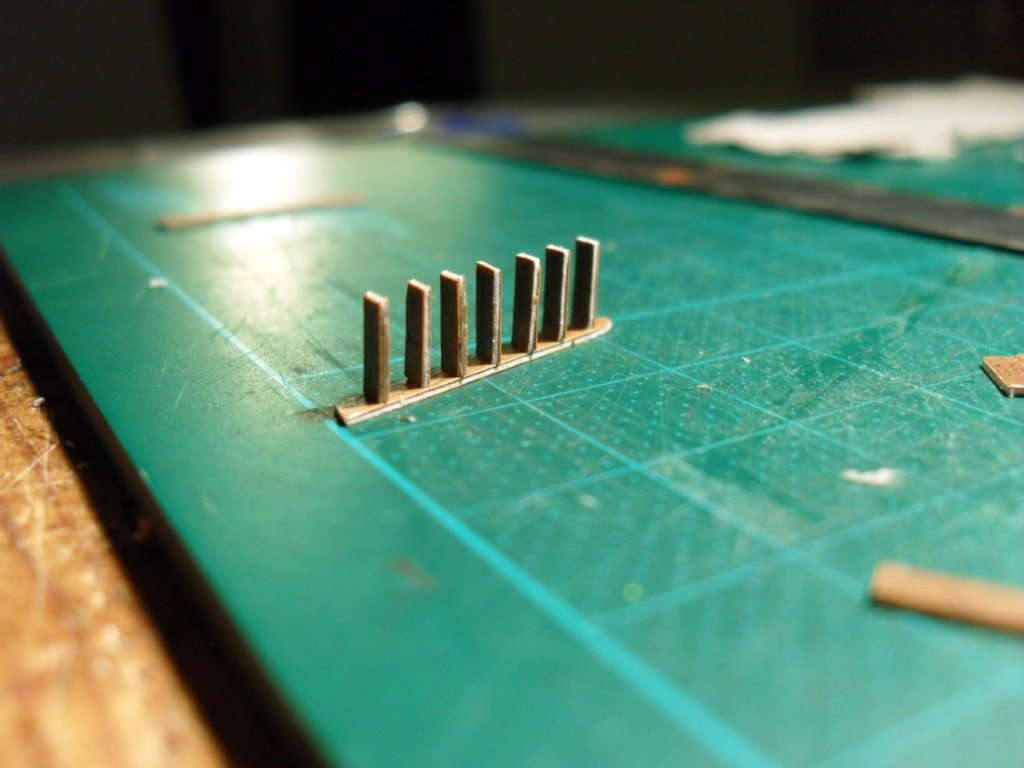
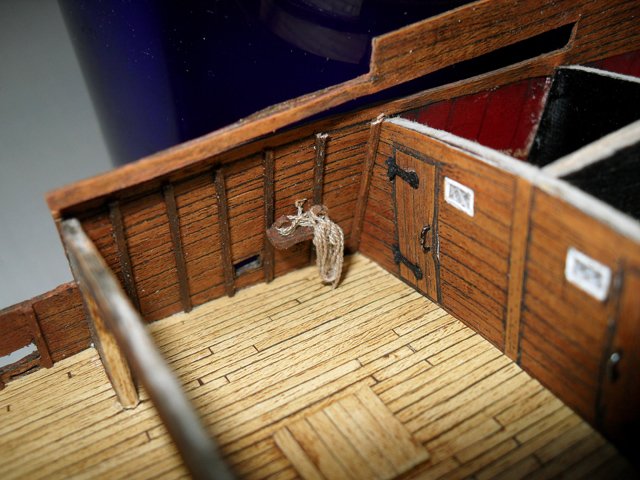
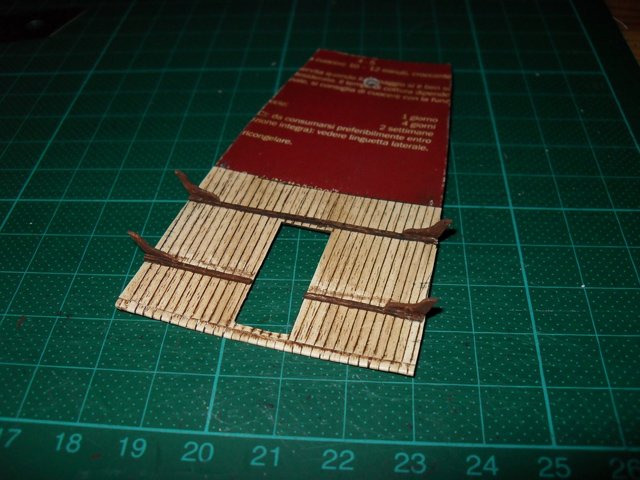
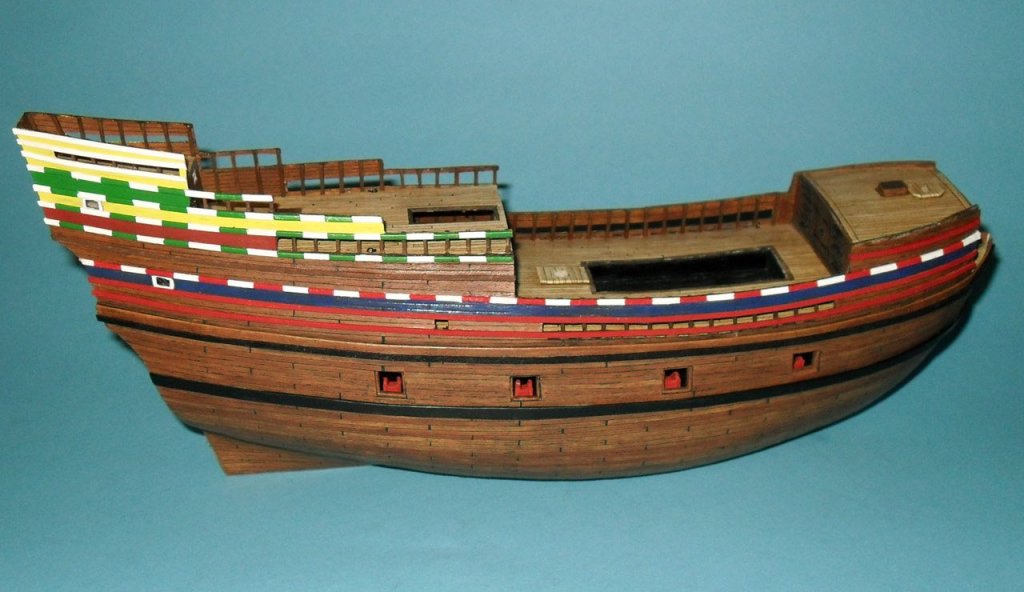
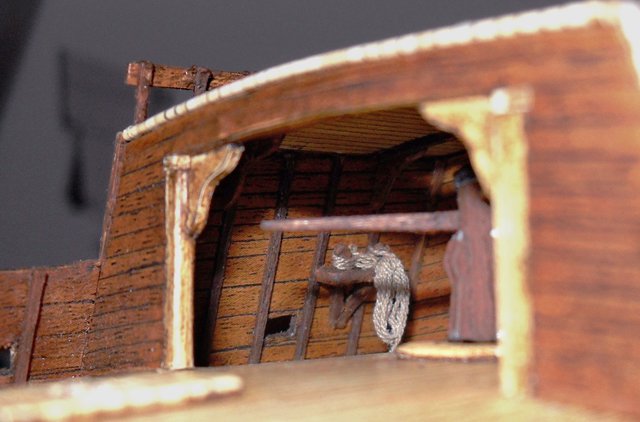
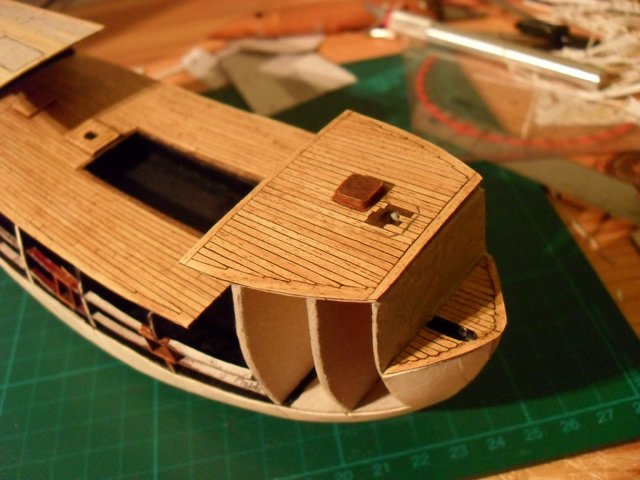
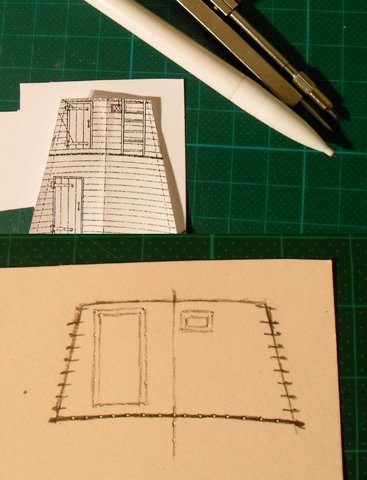
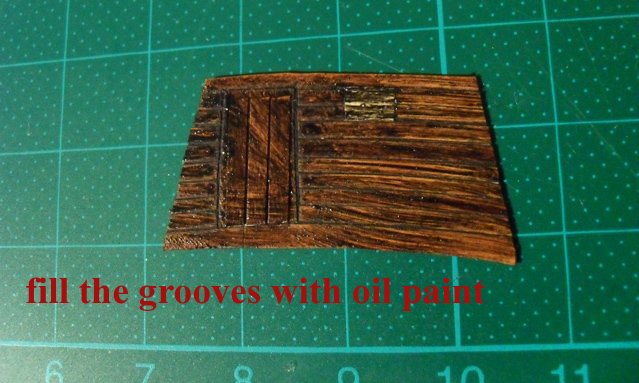
Deck Fittings and Details Hi @ all! For quite a time I was thinking about the gratings. Wooden ship modellers have a nice way to cut stripes and glue them perpendicularly together. However, this did not work for me with card although I have seen others doing it. Another way is to just paint the gratings on a sheet of paper. I came up with the 'hard way' to just take the scalpel and cut out the holes individually. It worked more or less... The self adhesive foil has been used for the frames and all was painted with oil paints. The bell has been made from paper. The bell shoulder has been simulated with CA glue and the tongue with a piece of card. All painted gold with a marker and hanged with a thread that has been hardened with CA glue. I removed the cord from the bell's tongue later on as it was too long. The rails have been made from balsa wood painted white. The bell's roof was made from 1mm card and self adhesive foil with wood pattern. Belaying pins have been made from card, a wire and a drop of glue on top. This is a typical way in card modelling to do them. Cleats and knight heads were made from 1mm pizza card and painted with oil paints. I do not have pictures of the process, but later on I used the same method to do the blocks for the halliards. More on that in a later post. Ladders were made from a 0.3mm thin card and the self adhesive foil taped on both sides then altered with black oil paint. The edges were painted with brown oil paints (burnt sienna and burned umber). All black hinges were made from thin card painted black with a marker, bend over a carpet knife to simulate the hinge and using a compass to simulate the nails. And this is the model in it's current state. Rigging is progressing slowly but steady. Since the rudder can be moved, I removed it for the rigging process because of moving the model back and forth all the time and the risk of damaging the fragile paper hinges. More on the rudder, channels, etc. soon.... Rgds, Radek


- 33 replies
-
- 11
-
-
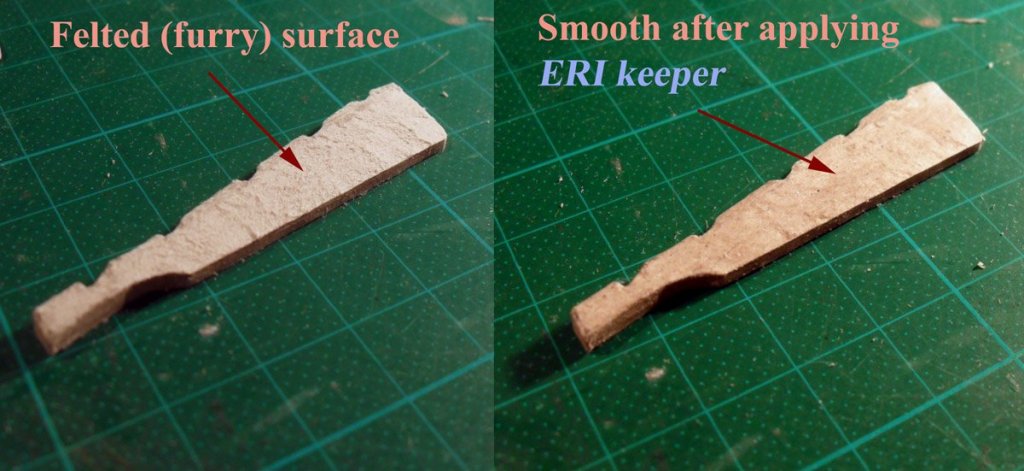
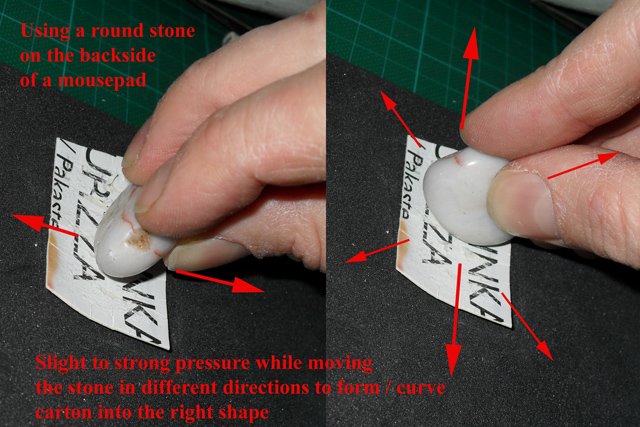
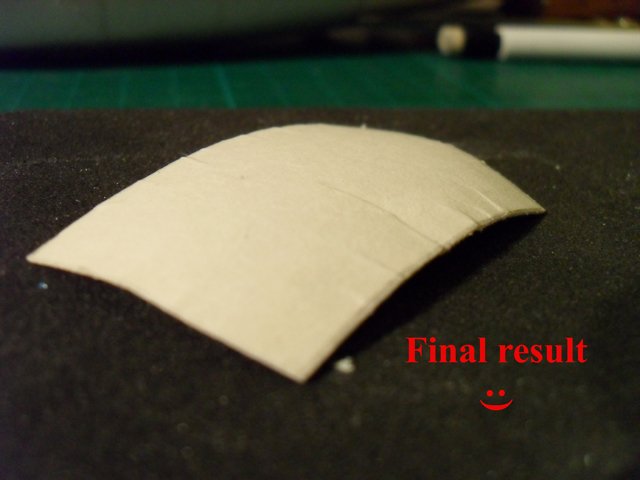
Hi Ab, Nice to hear from you again. An excellent tutorial! You bring card ship modelling to the next level with it. I can already see a new publication... ;) As regards the hull shaping: If, as you nicely describe, apply the "Iron ball method" on every hull strip, you will significantly minimize the amount of filler and sanding later on. In my model of the Mayflower I just needed to sand the card itself only a bit around where the frames are, without applying any filler. That way you save time, money (on the filler) and ensure the peace in the household in your wife's kingdom. After sanding gently the card it feels a bit "furry" so you can simply apply some white glue and smooth it a bit. This gives also a bit more strength to the card. It is also easier to work with other types of card for this parts, some that do not break that easily. I used some old pizza box card (0.5mm I think) which was slightly similar to the texture you describe here, yet it did not break. However, it was not the typical grey card, it was also some sort of creamy white. Should you ever want to make nice round shapes with card, you can apply this method with thicker card sheets, also the grey card (several mm thick), and a smaller round object as desired. Card is a wonderful material that can be shaped round contrary to what many believe is possible... :) GrandpaPhil, The channels can hold the tension pretty well in card models once glued in place. In my case they broke off mainly before I started the rigging. But that might have something to do with it that I use CA for my models and it was standing in a dry basement for five years before I was able to finally start setting up the rigging. I was thinking maybe to use also wire pins in larger builds in a scale 1:50 or so... Ab, your color scheme is simply stunning. I really enjoy seeing your way of coloring the model. Thanks for mentioning which colors you exactly use for that. With all that little dirt altering in the corners and where the water flows, you really make the model truly alive! Few questions regarding the color of the hull: Would such "work horses" with time become more dark? Or did the bright color of the ocher prevail? How much is known about this from research? Was there any tar or other substance used on the hull that darkened the wood like in the early medieval ages? In contemporary paintings one can see mostly nice and clean vessels but that might be just 'bragging' of the own nations achievements? Rgds, Radek
- 65 replies
-
- 7
-
-
- fish hooker
- fishing
- (and 2 more)
-
Cześć Tomek! Nice to see you here, too. Excellent work on the sails! I really like the detailed rigging work you did to the cutter. Beautiful! Rgds, Radek
-
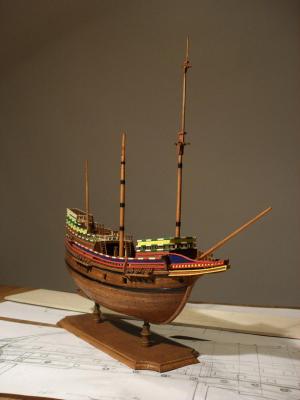
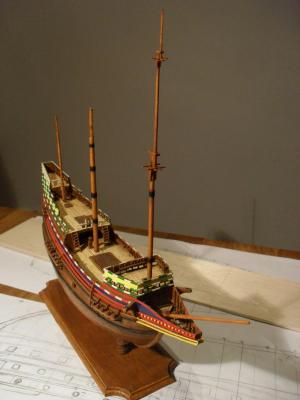
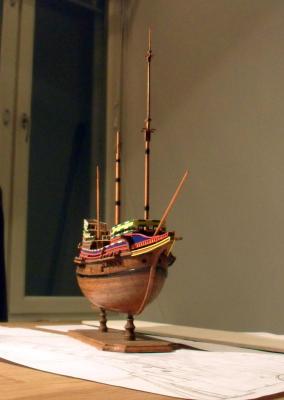
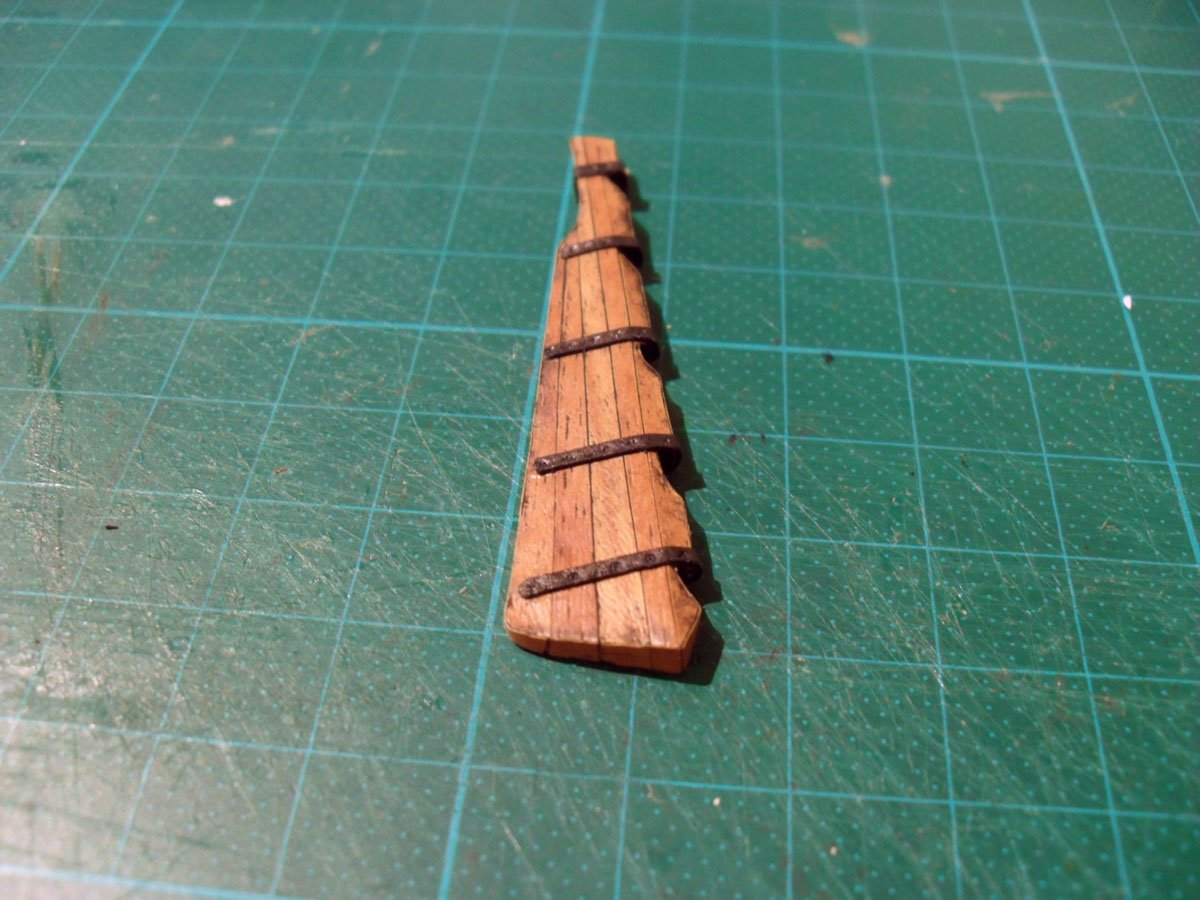
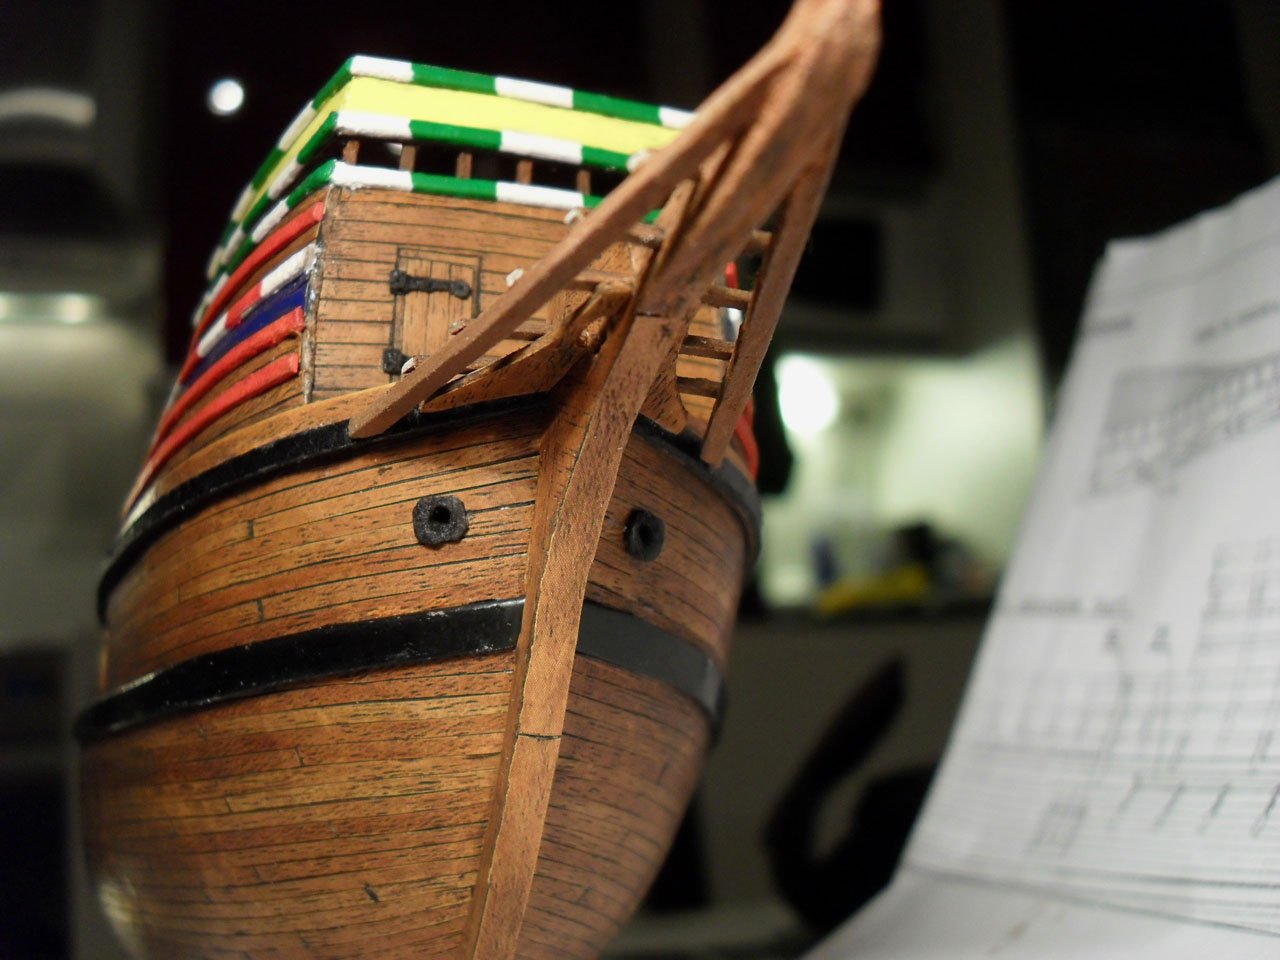
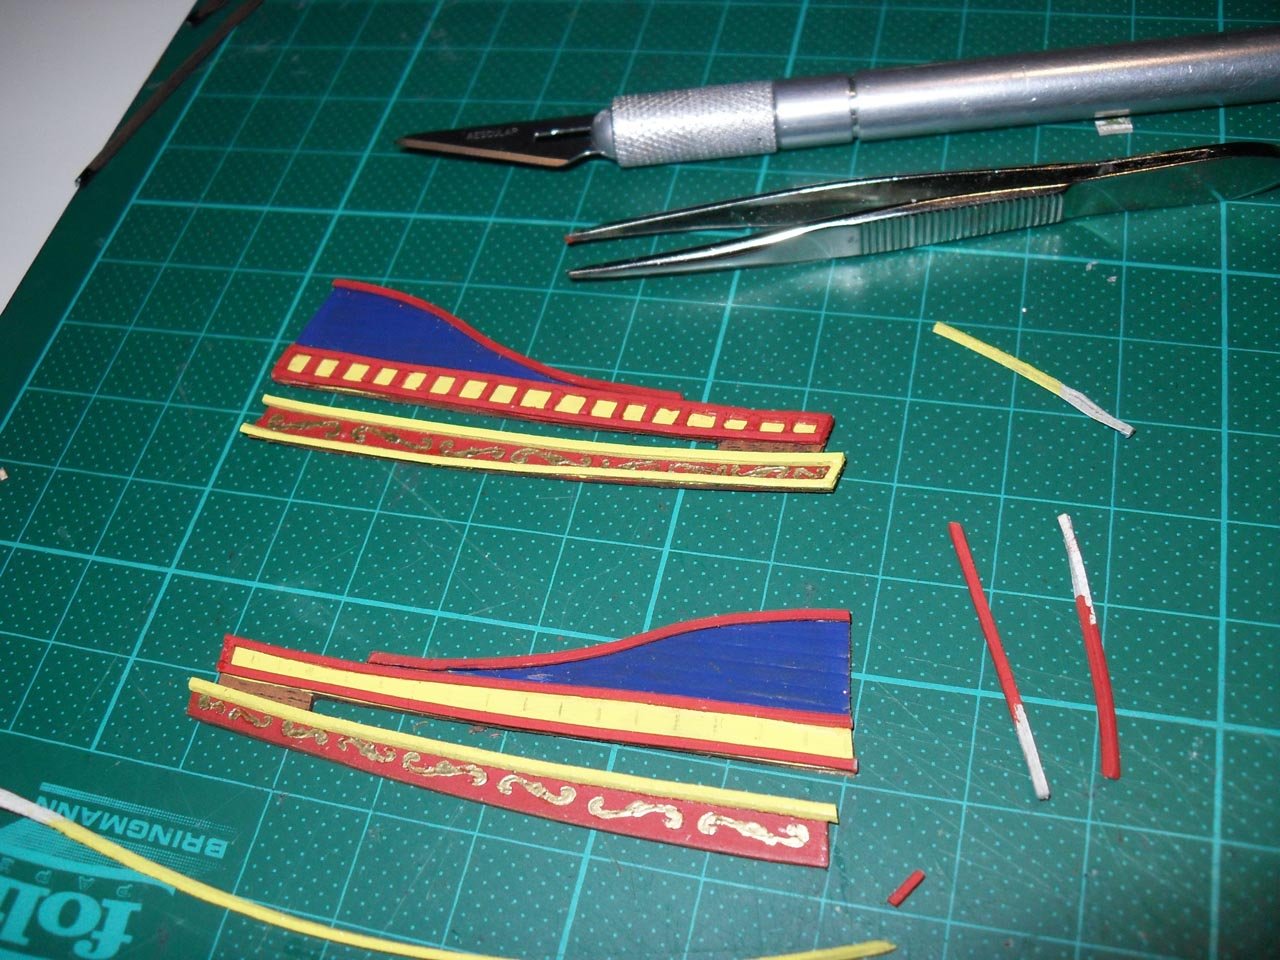
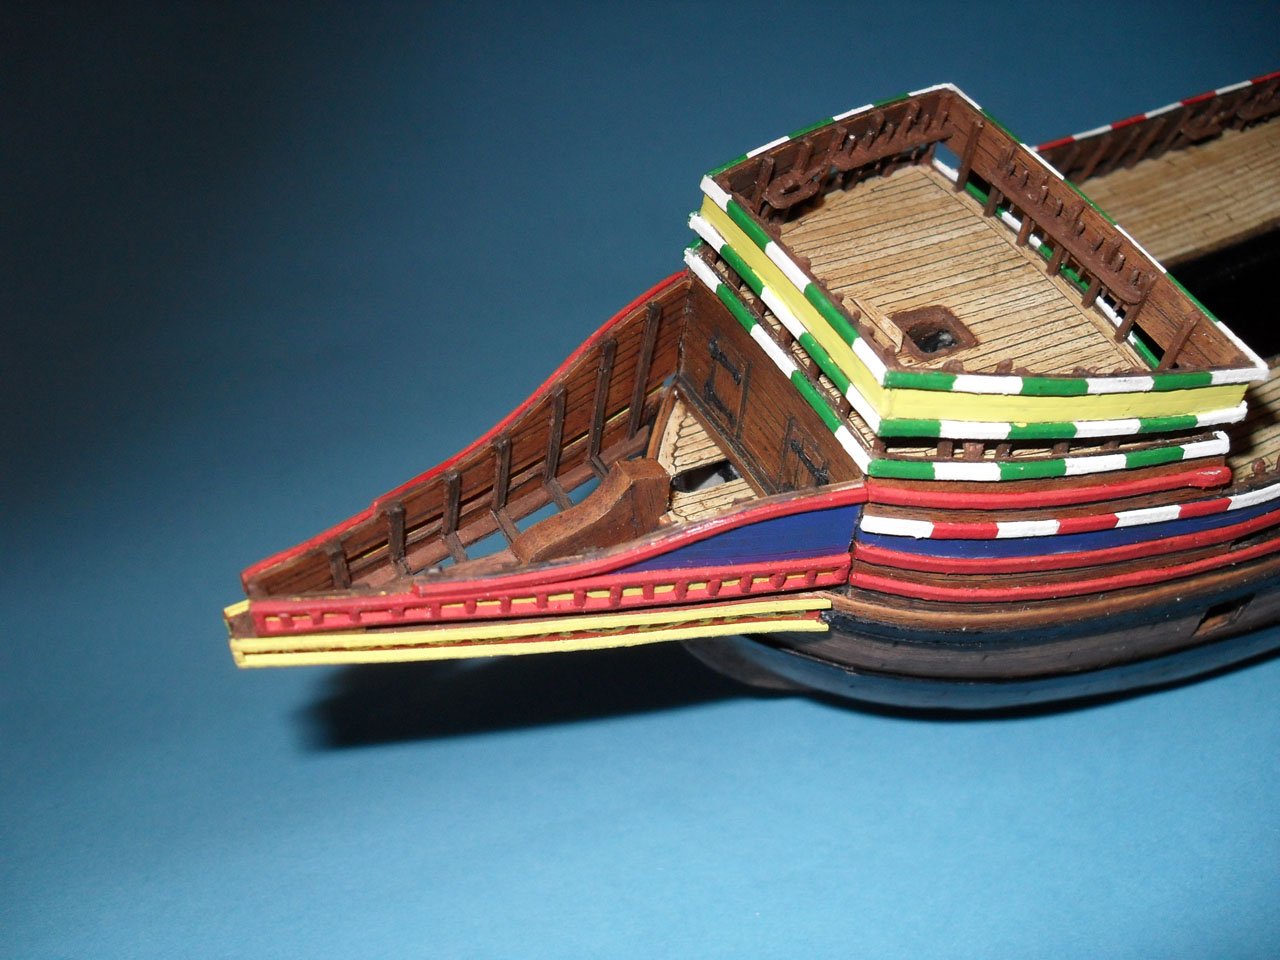
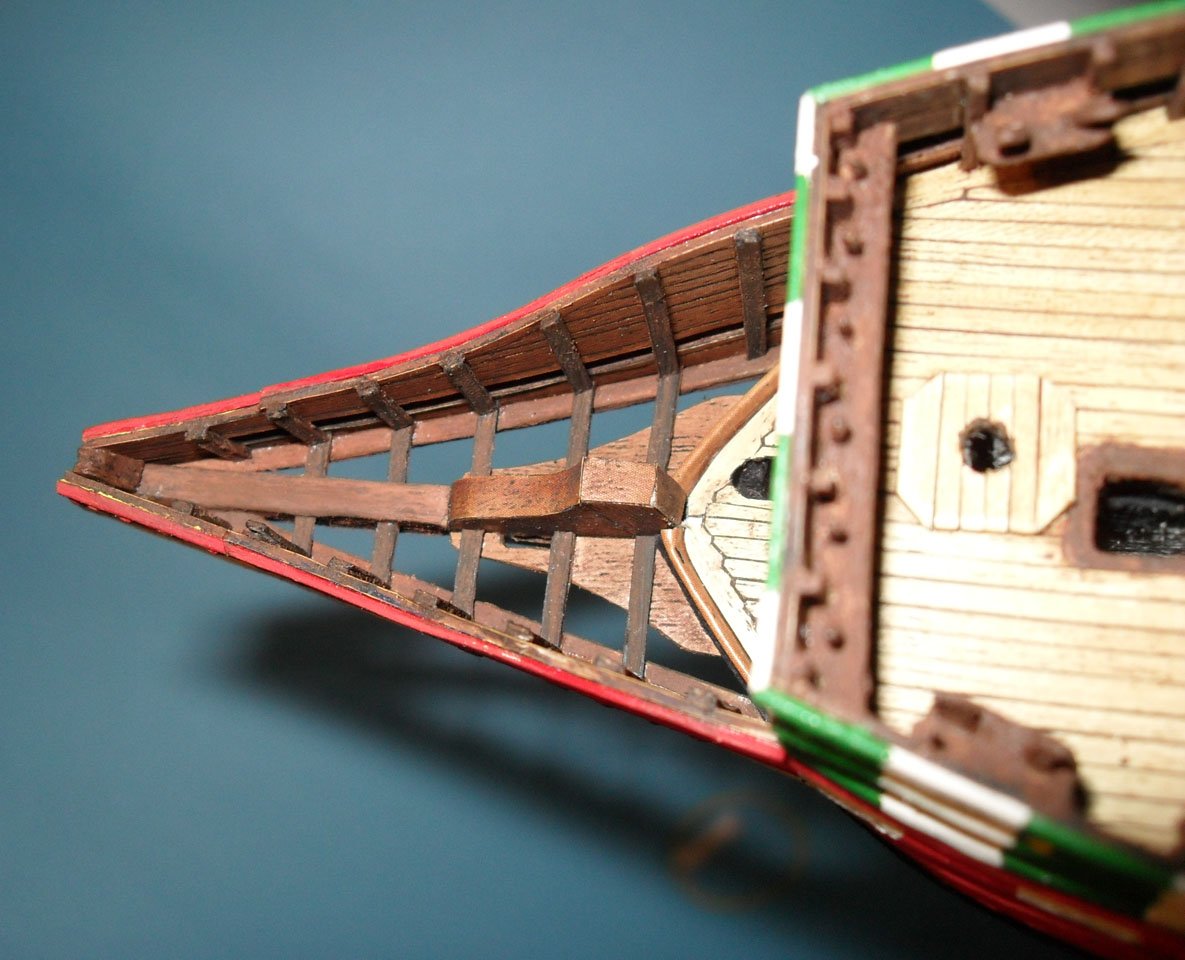
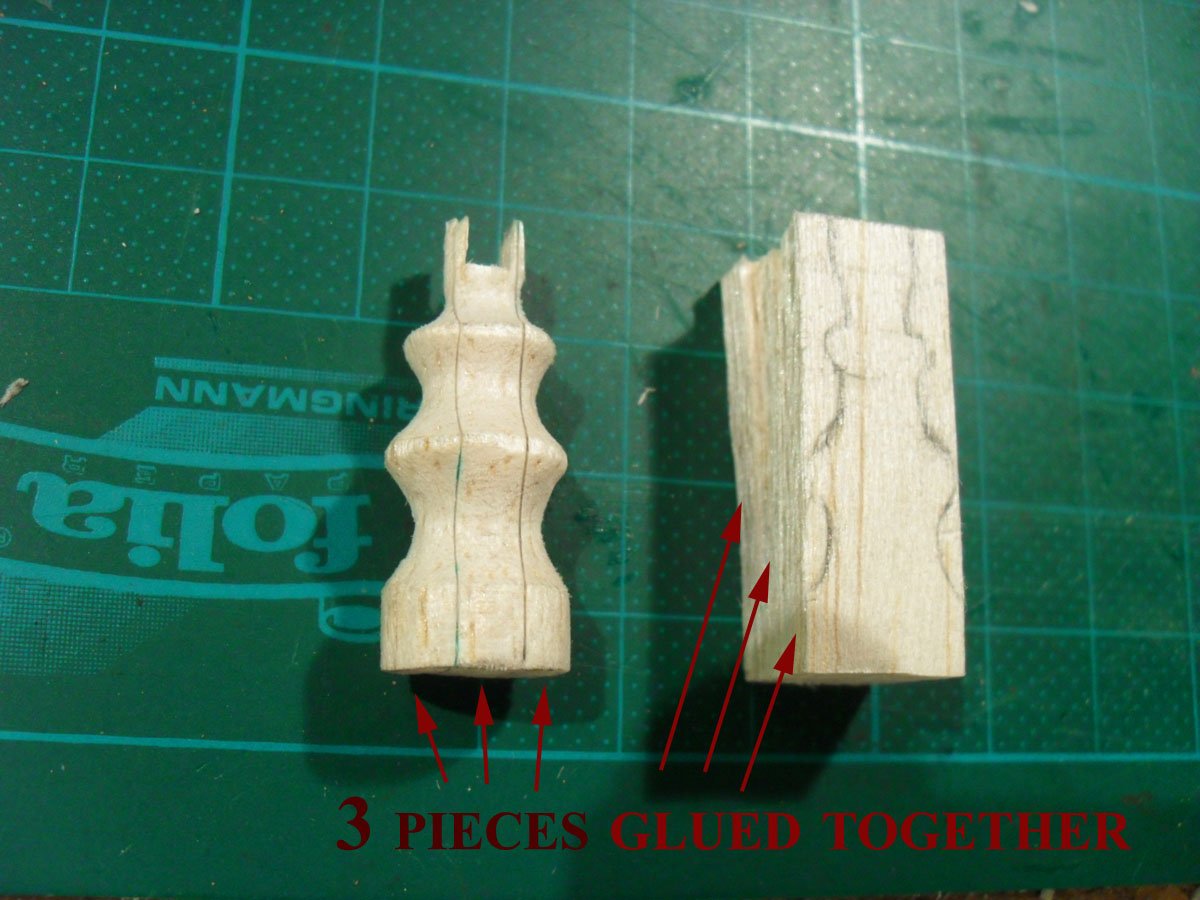
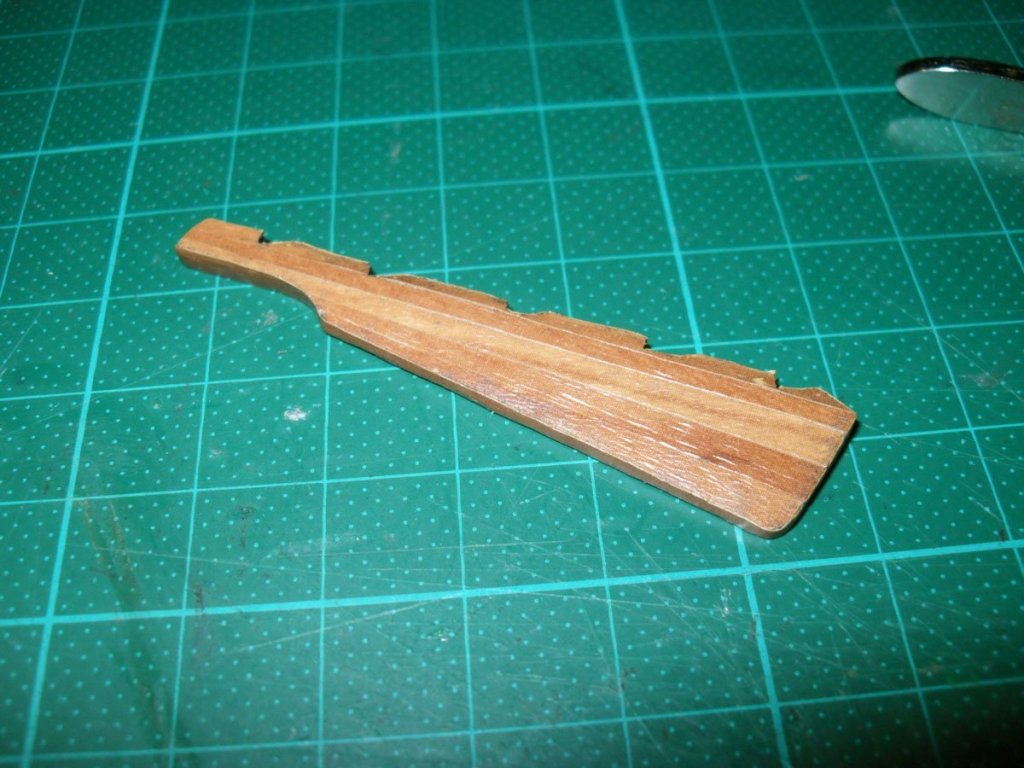
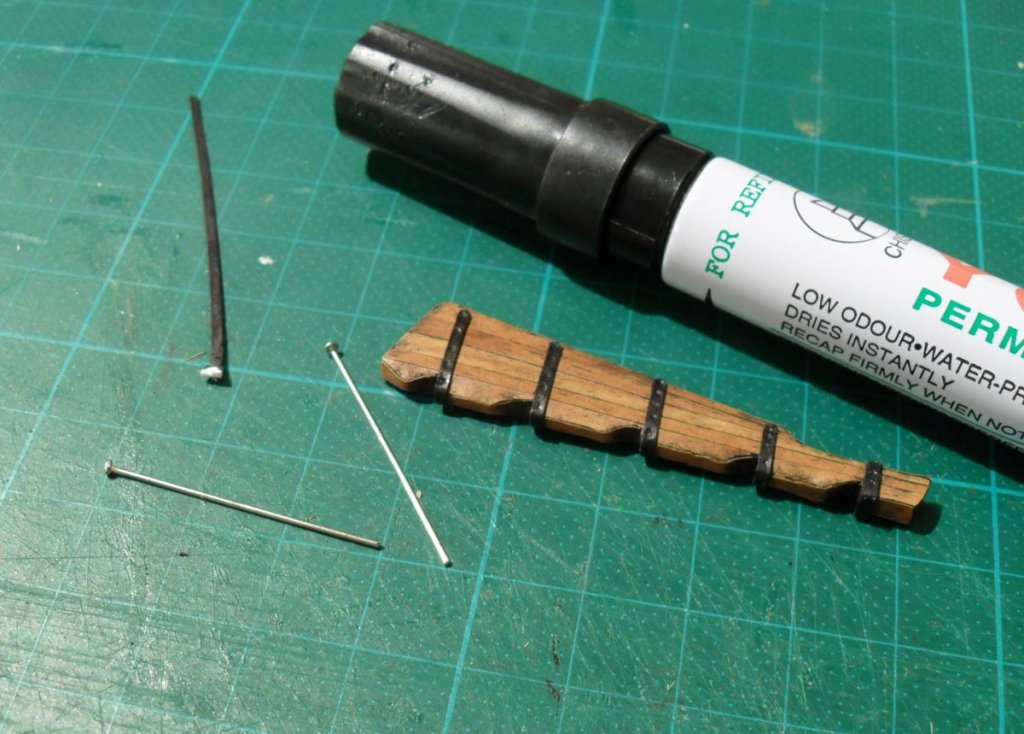
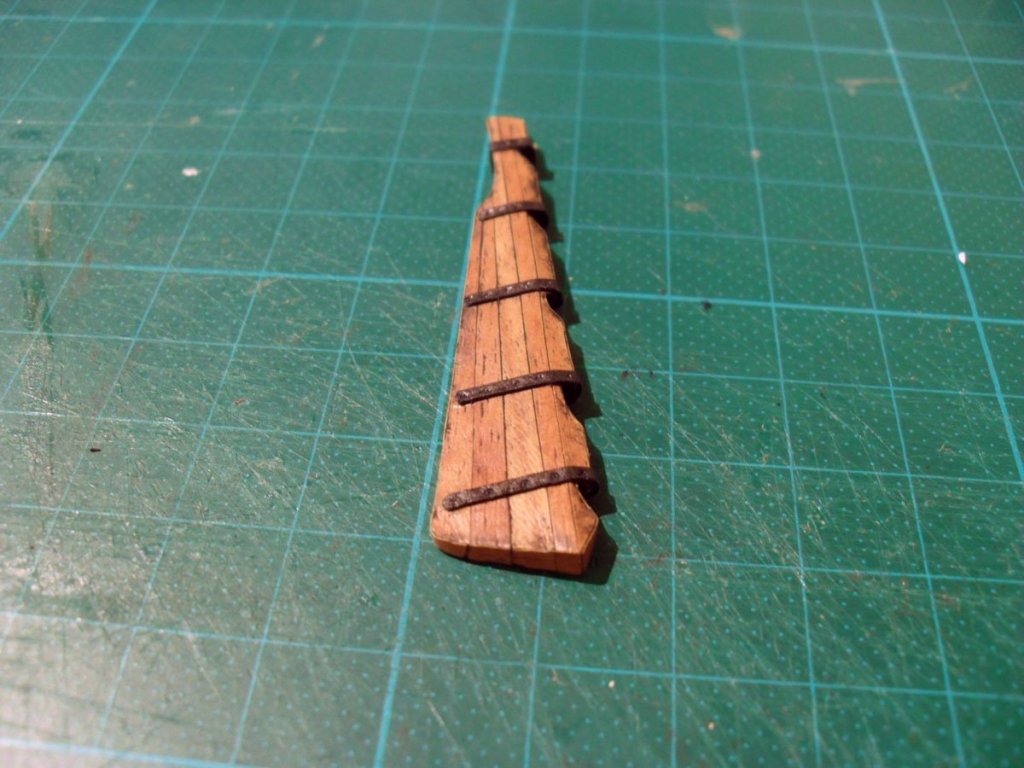
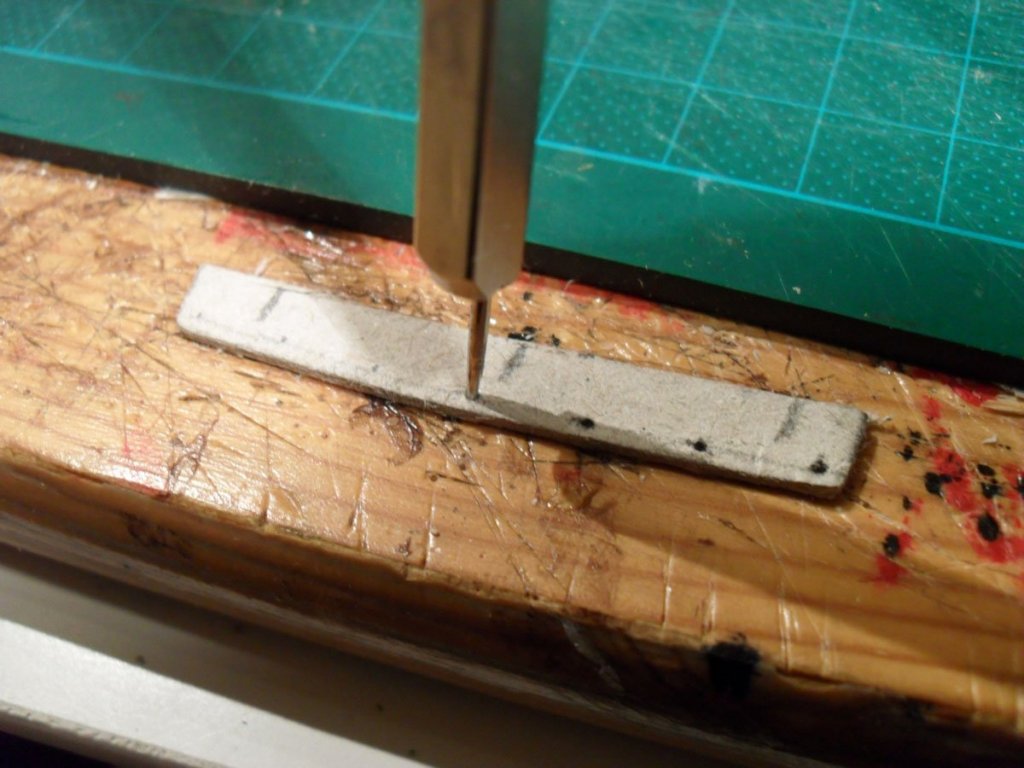
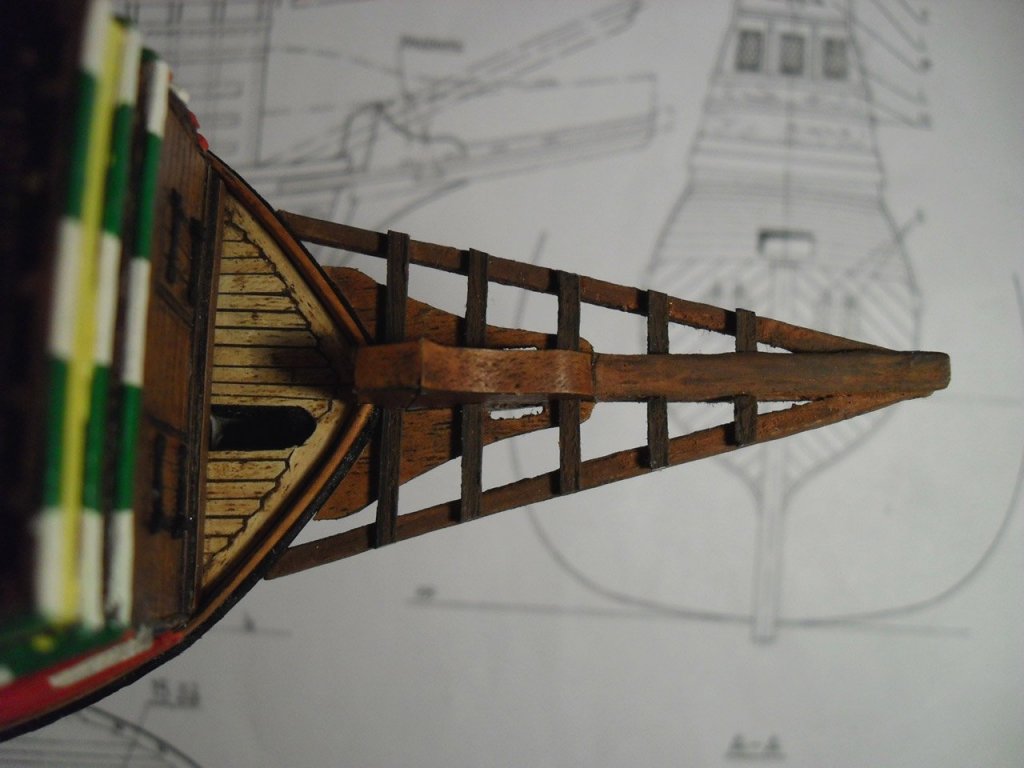
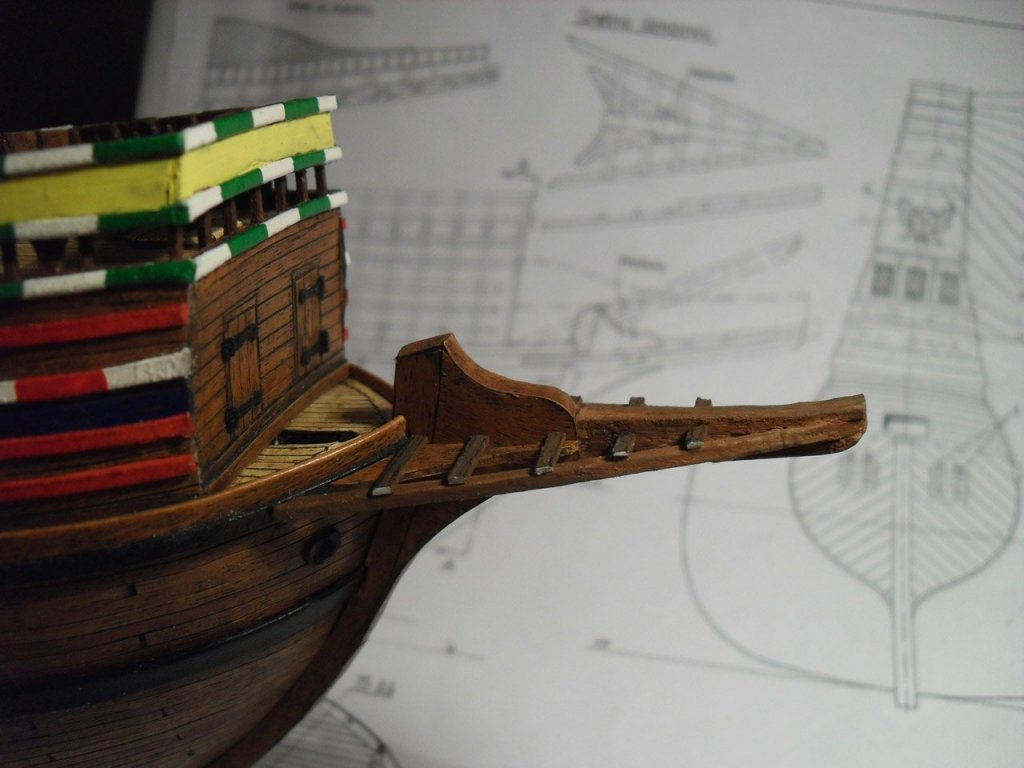
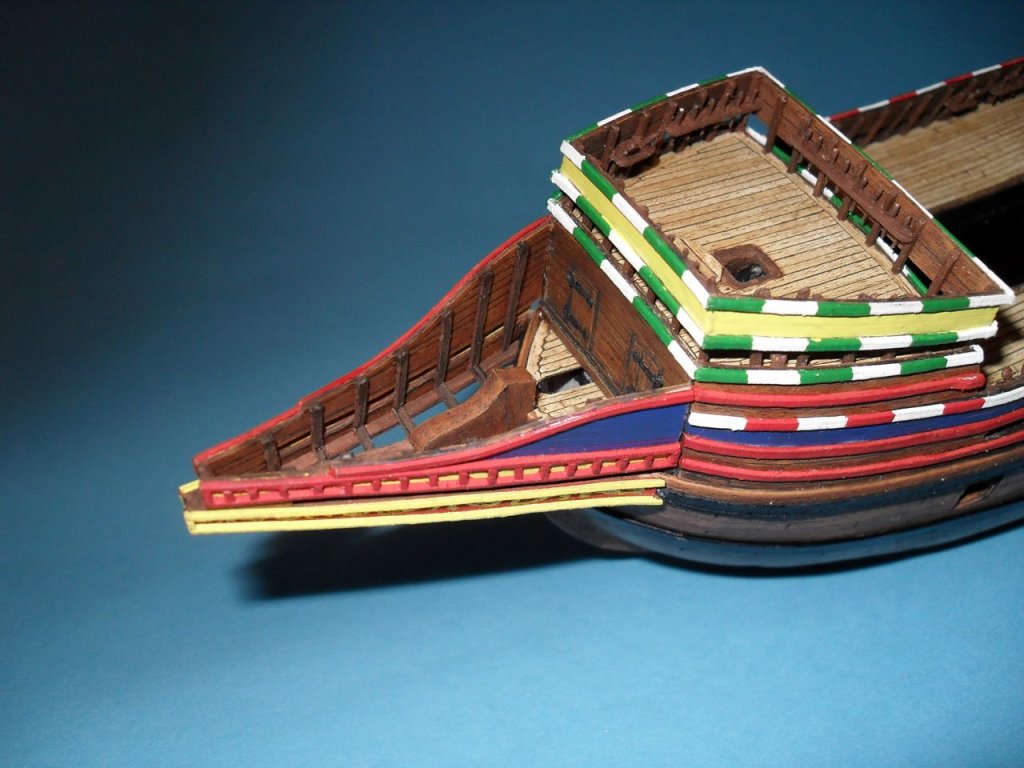
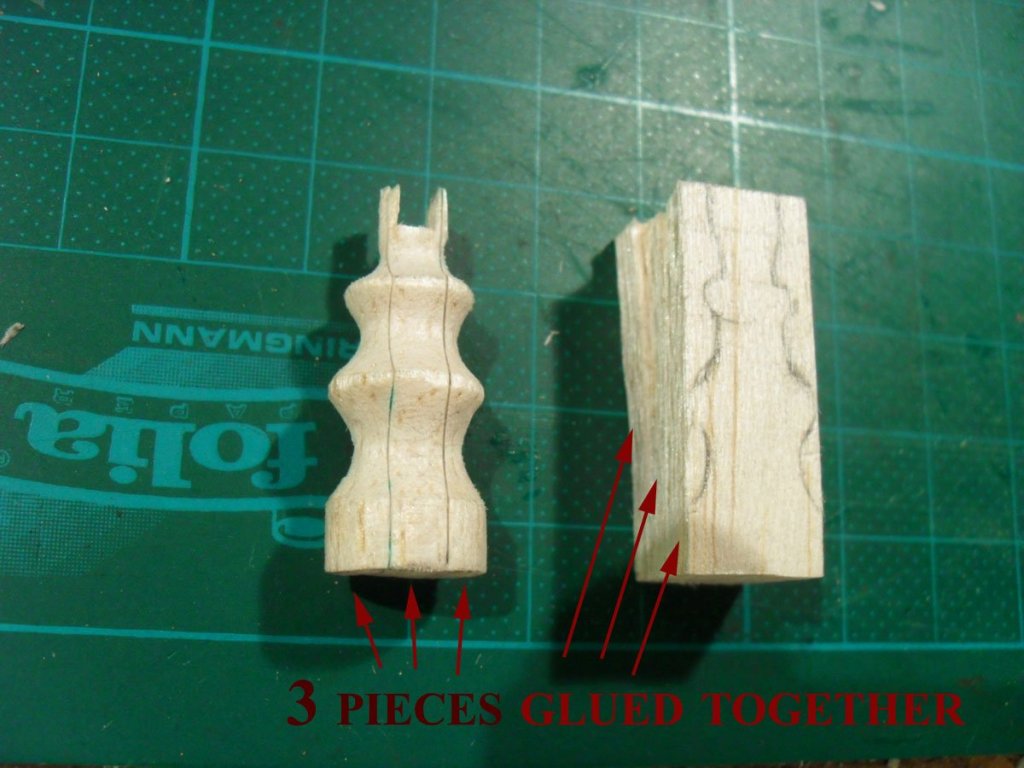
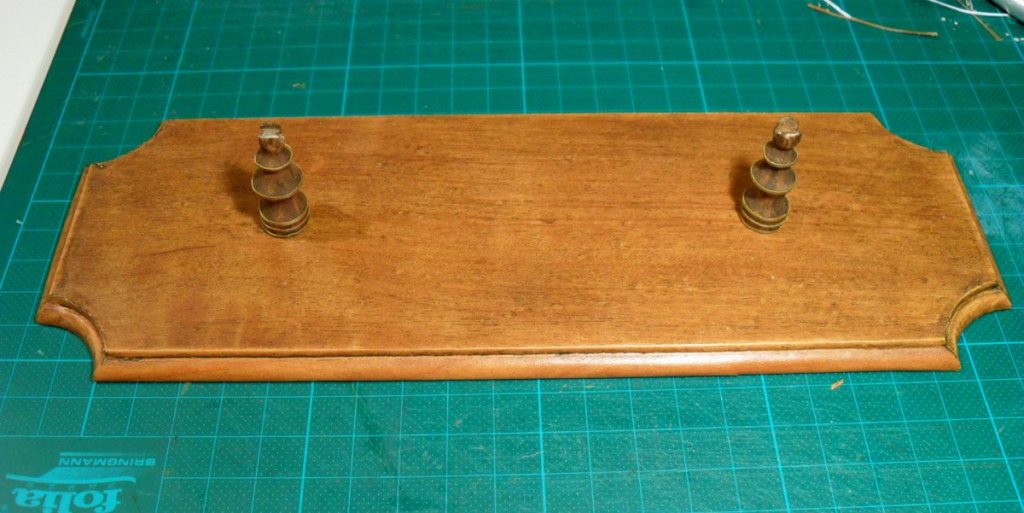
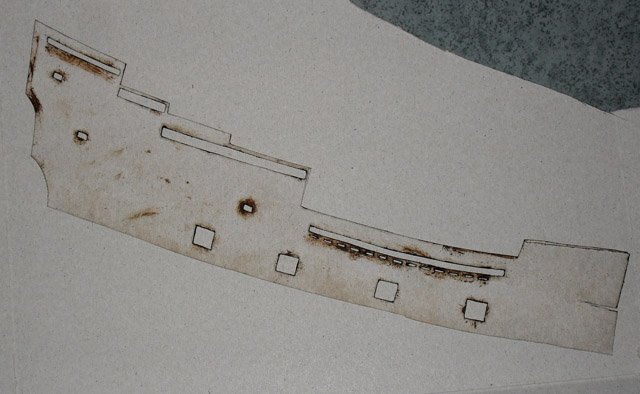
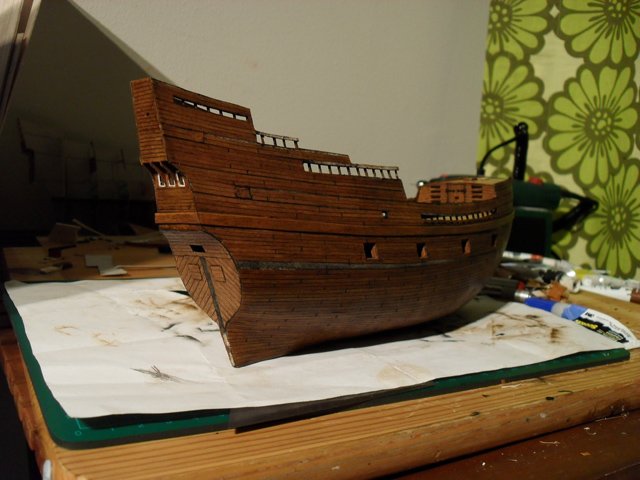
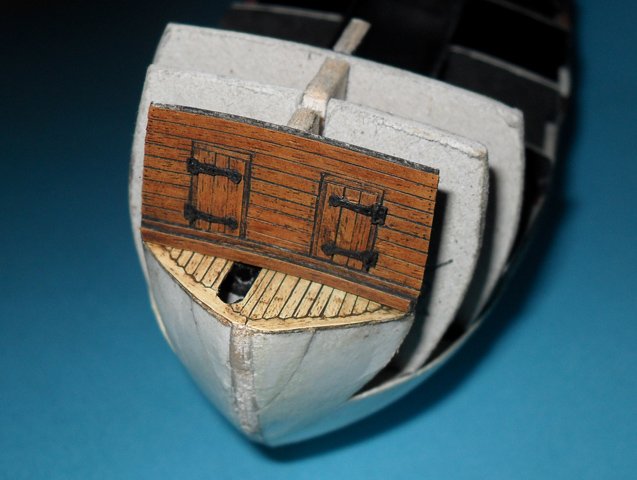
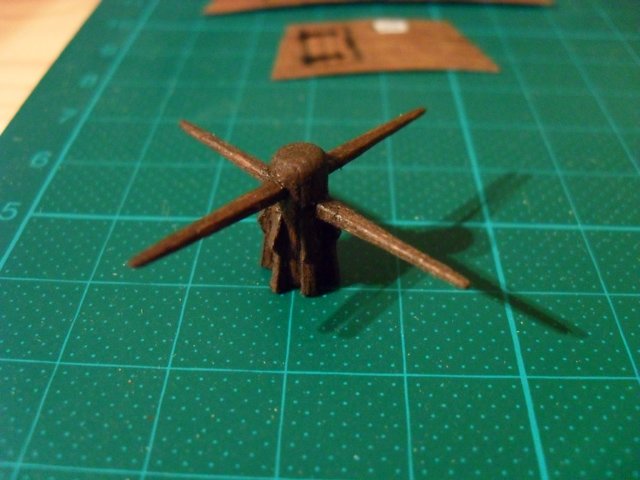
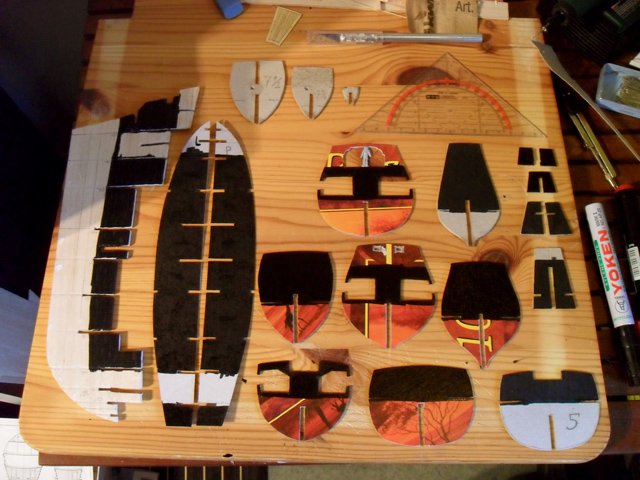
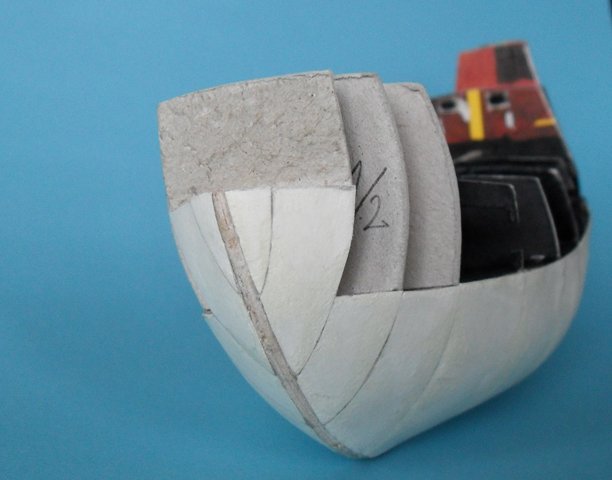
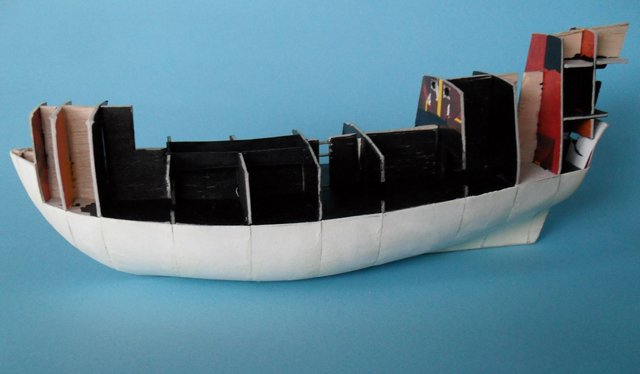
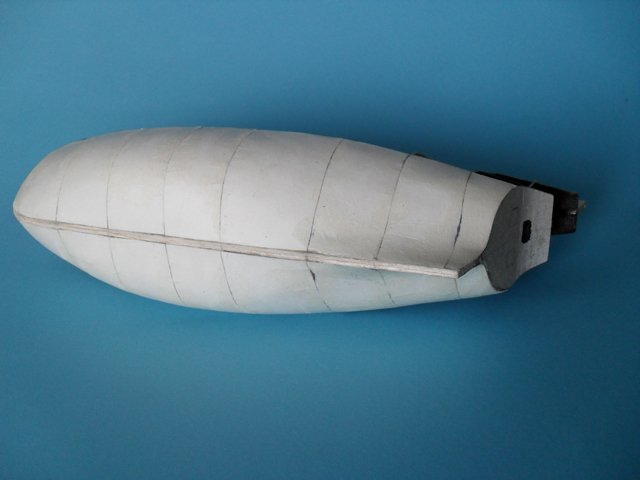
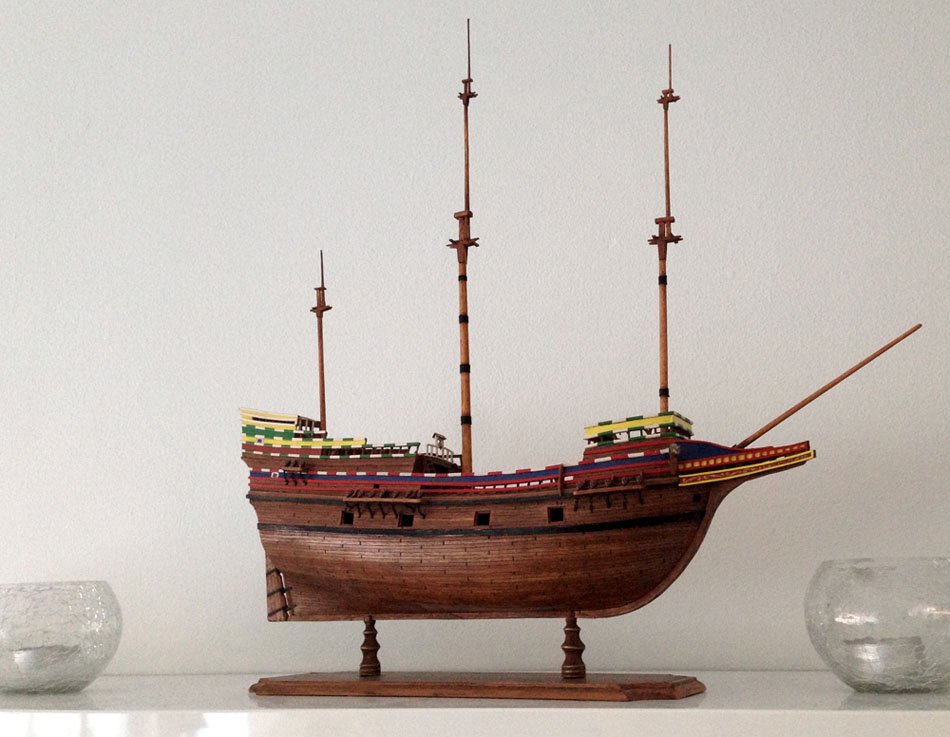
Keel, Beak and The Stand Hi @ all! Thanks Mark! 😊 The keel has been made from thick card glued together to achieve the thickness of the keel, taped with the foil and altered with black oil paint. In the front part I tried to bend the foil to make it look as if the rounded part of the keel has been made from a rounded grown tree. The beak has been made from card and painted with the brown oil paints and the side panels with the Humbrol enamel paints. For the side panels of the beak I used also the self adhesive foil. The stand base was purchased from a local hobby shop. Ironically it is made of a thick cardboard. The supports were made from balsa wood glued together. I used the self adhesive foil for the base, altered with black oil paint and painted the supports with the brown oil paints (burned sienna, burned umber). I have no picture of it, but I used a 1mm wire that I glued into the keel and drilled holes into the supports in order to have a solid stand of the model. So much for this post. More will follow soon. Rgds, Radek


- 33 replies
-
- 12
-
-
HMS ROYAL KATHERINE 1664 by Doris - 1/55 - CARD
RdK replied to DORIS's topic in - Build logs for subjects built 1501 - 1750
Splendid as always, Doris! And an inspiration to try out 'carving' - or rather modelling - for myself! Thank you so much for showing what is possible! Looking forward to seeing more! :) Rgds, Radek- 1,035 replies
-
- 5
-
-
- royal katherine
- ship of the line
- (and 1 more)
-
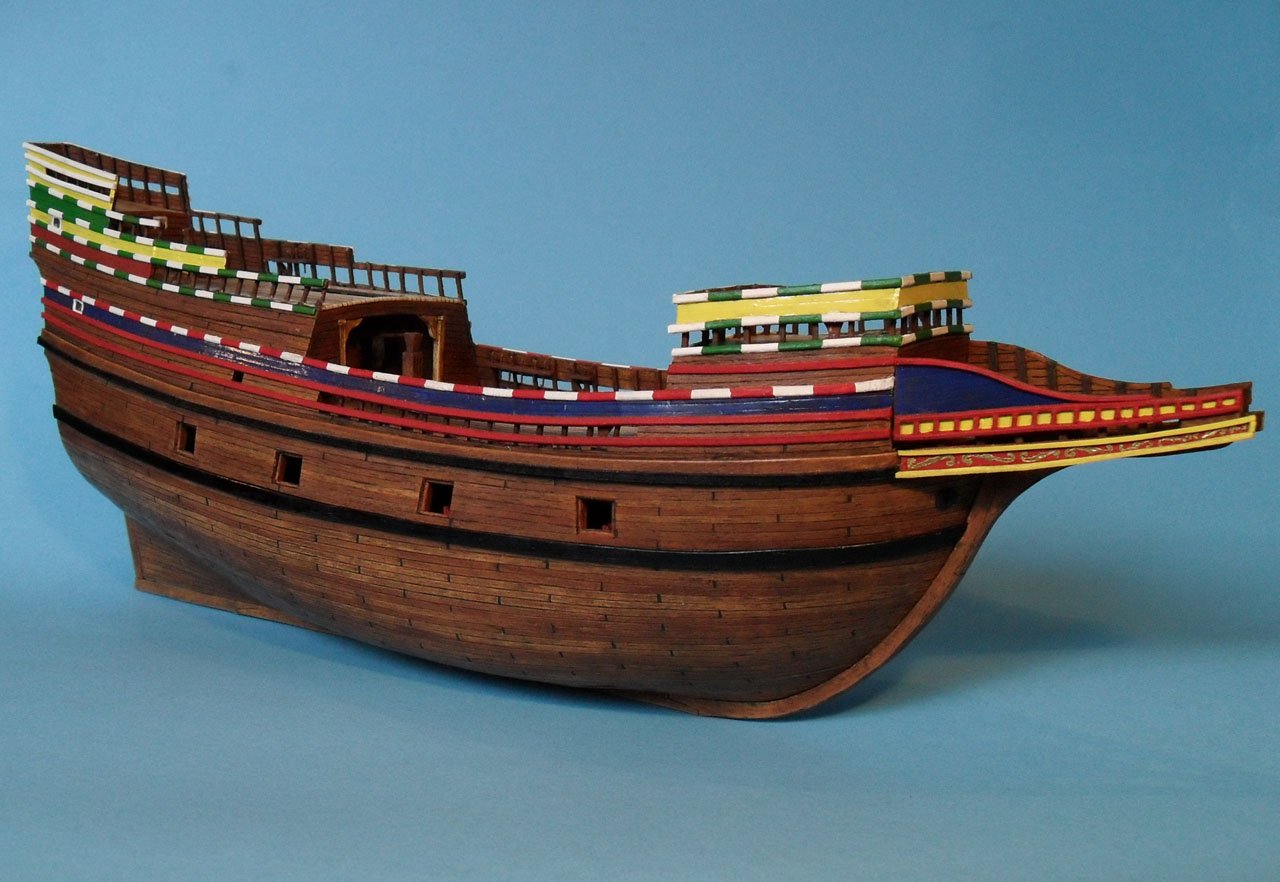
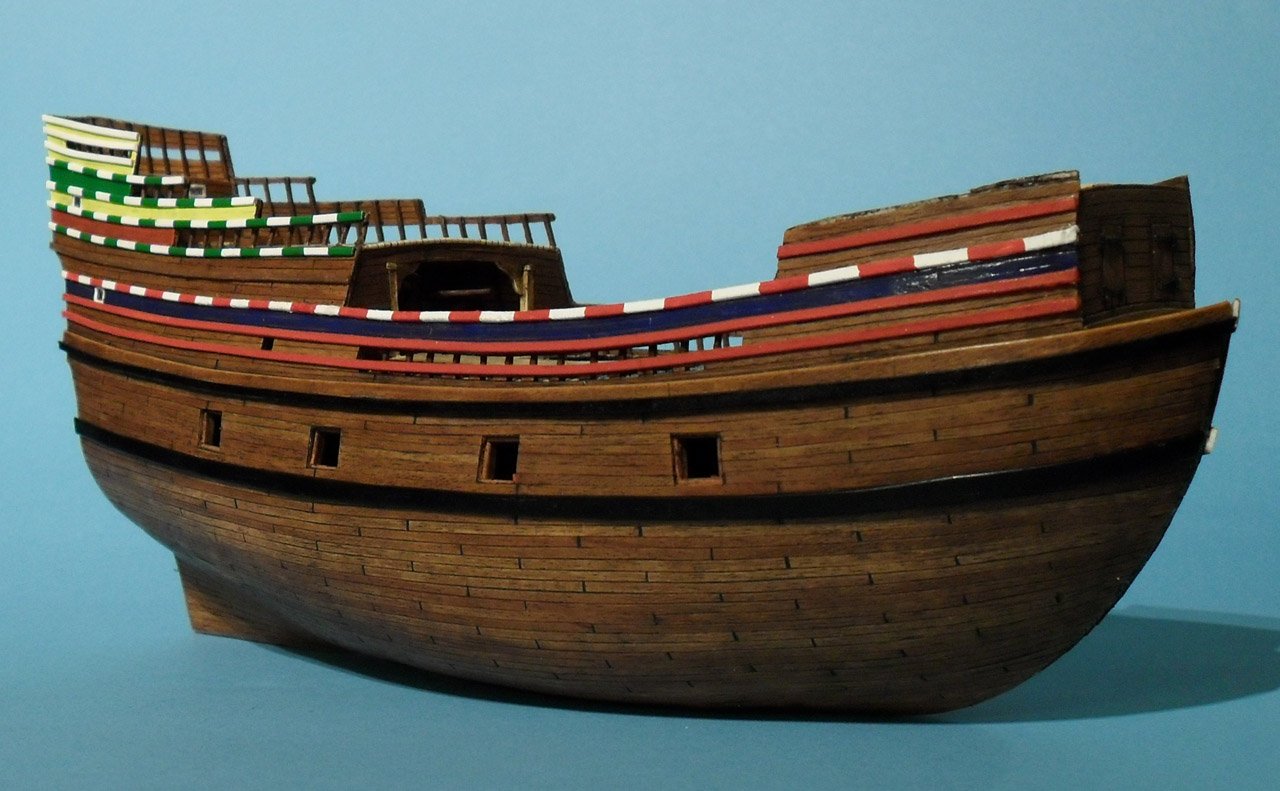
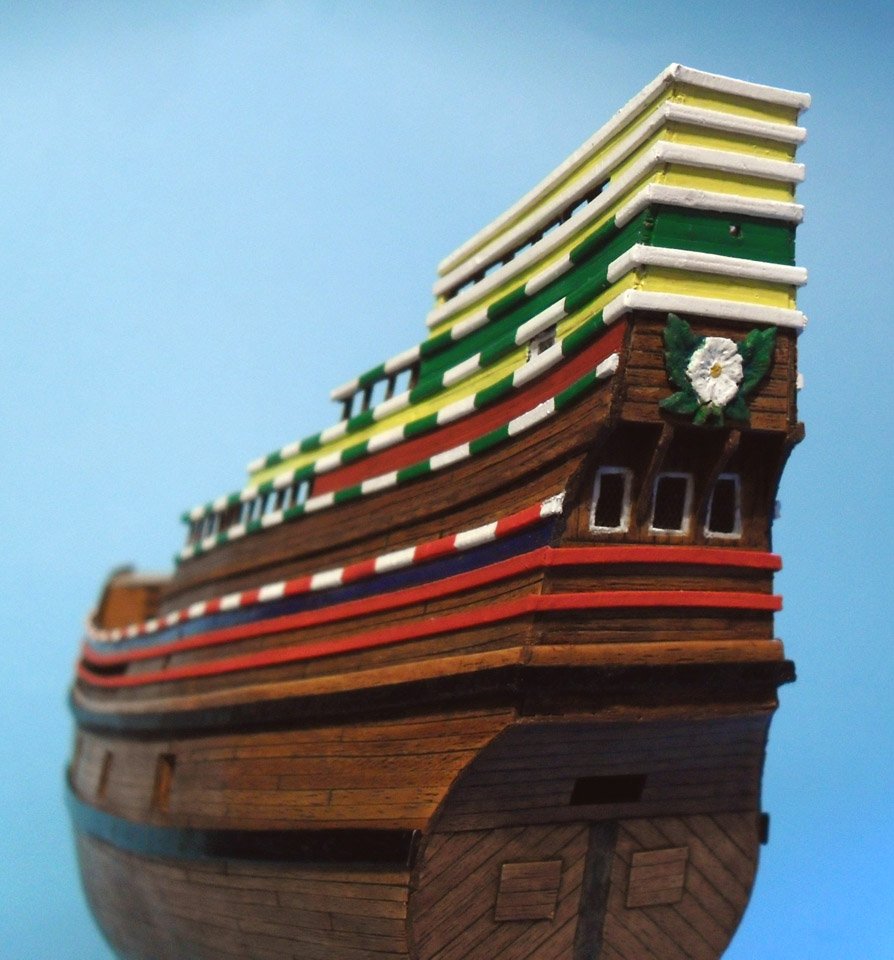
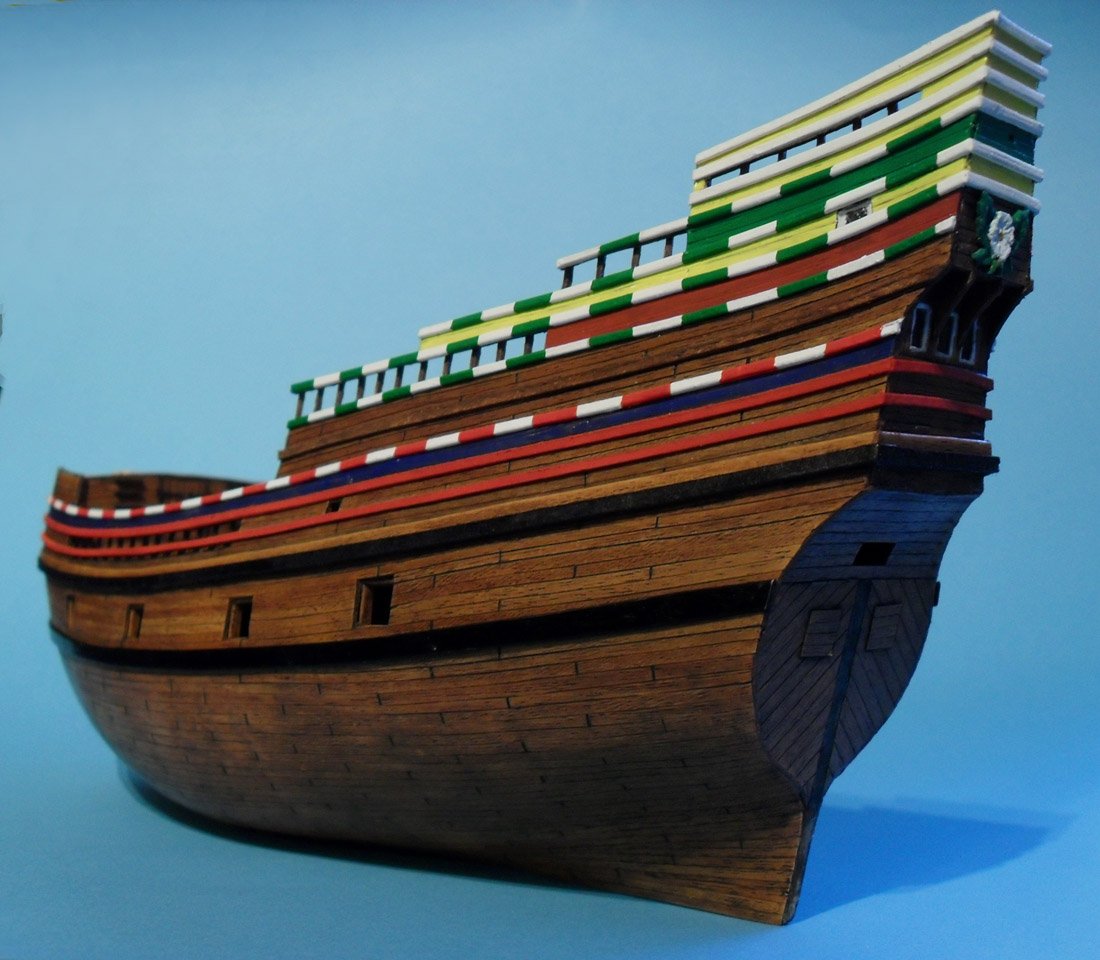
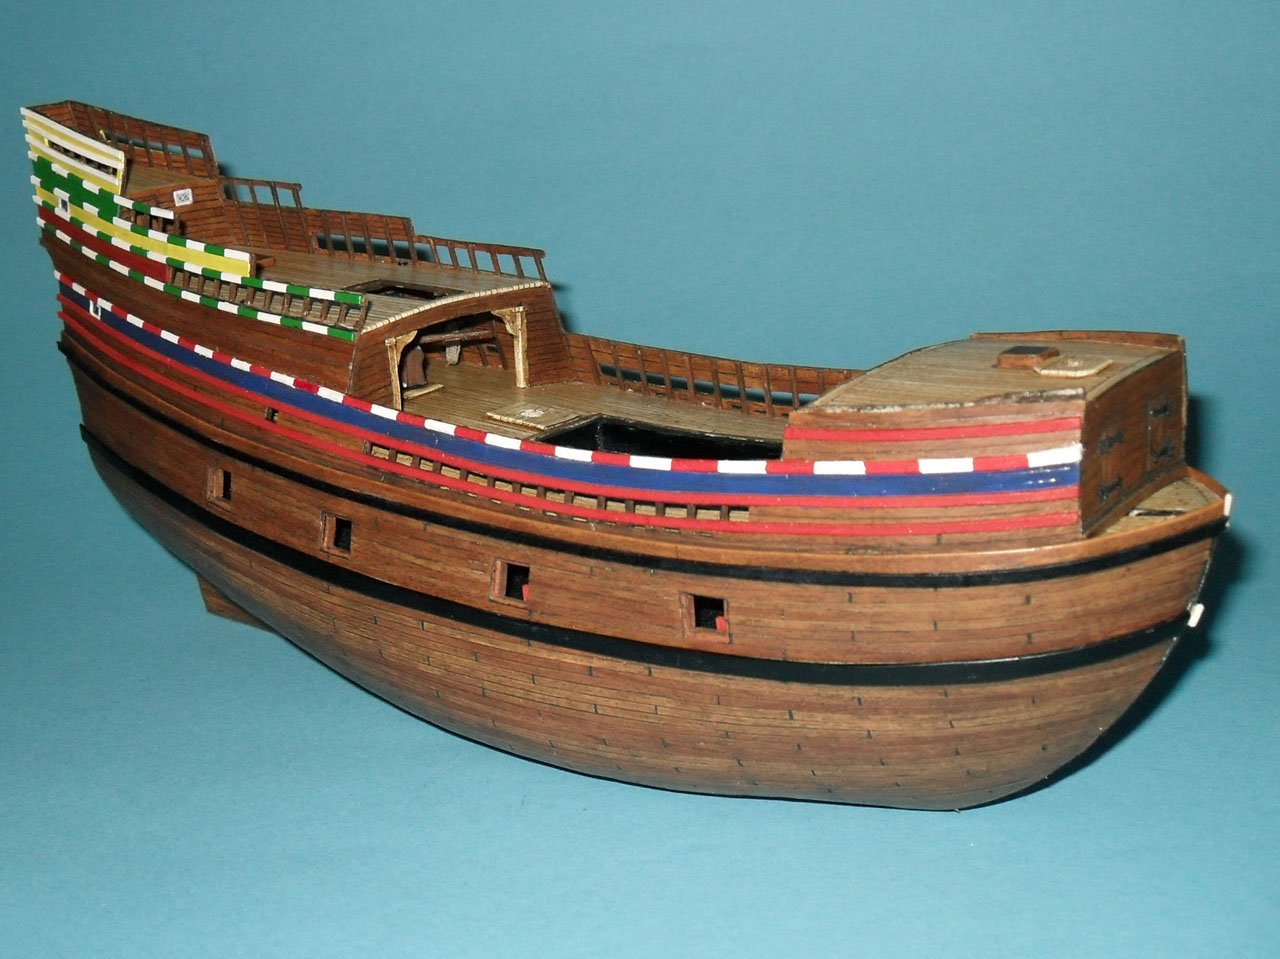
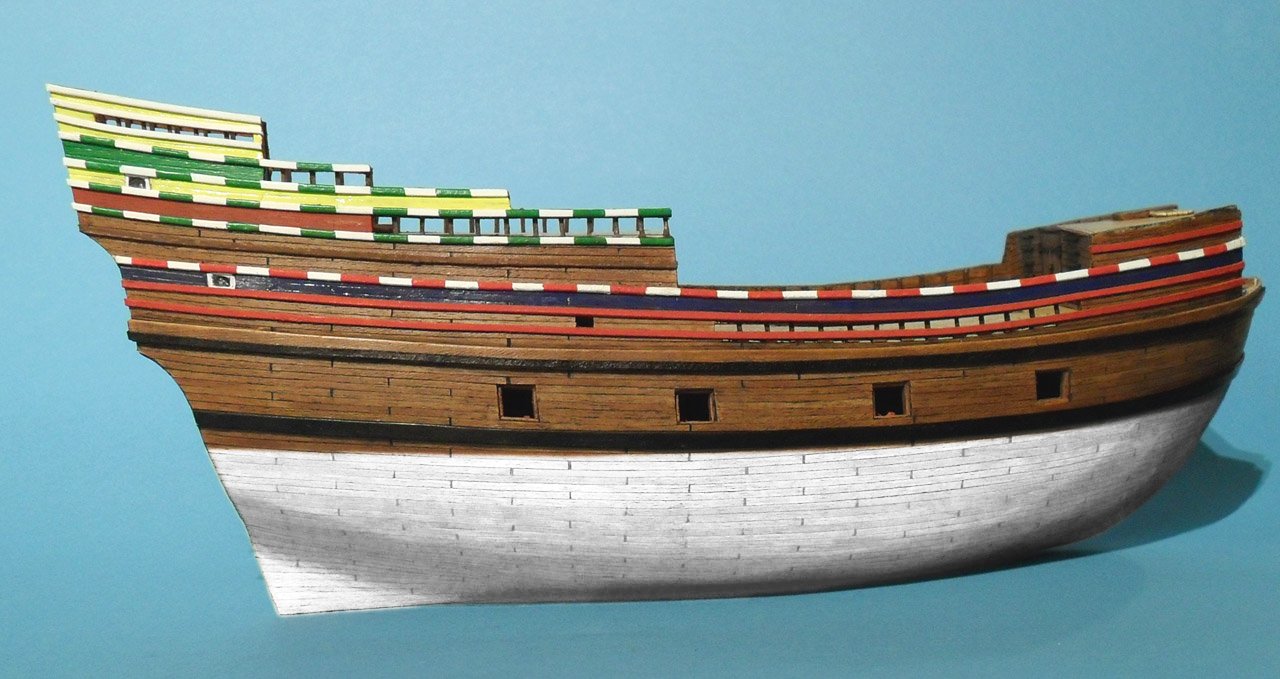
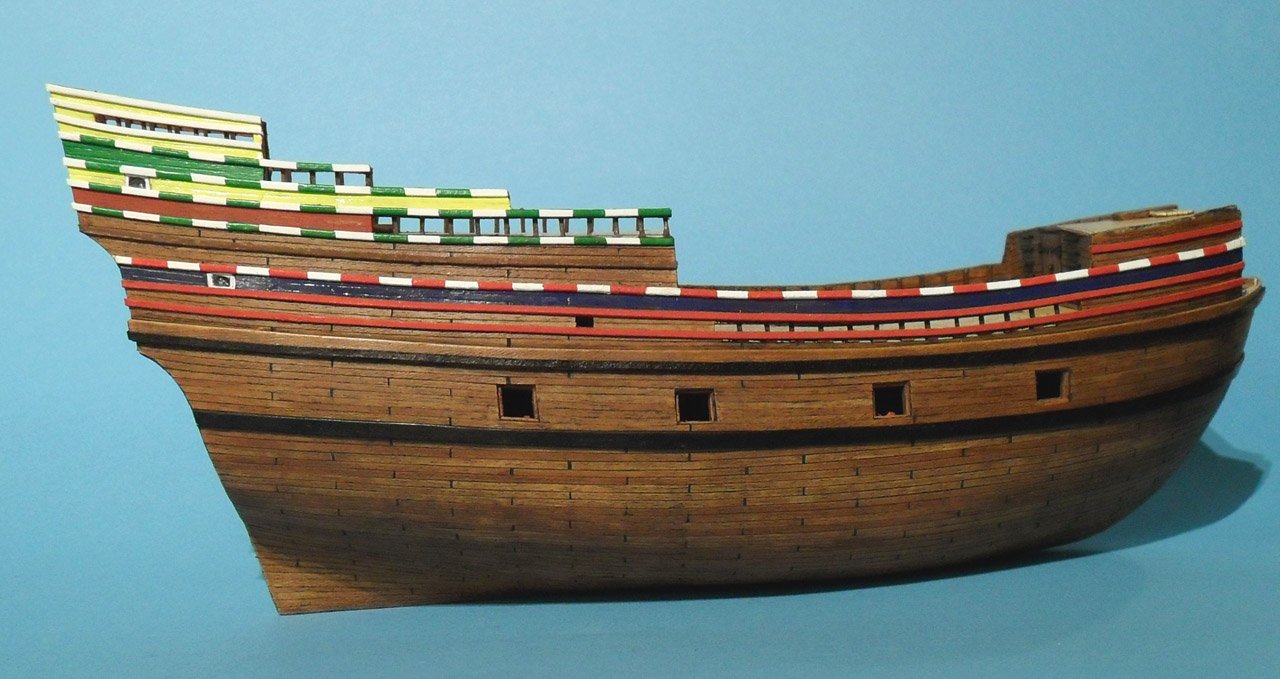
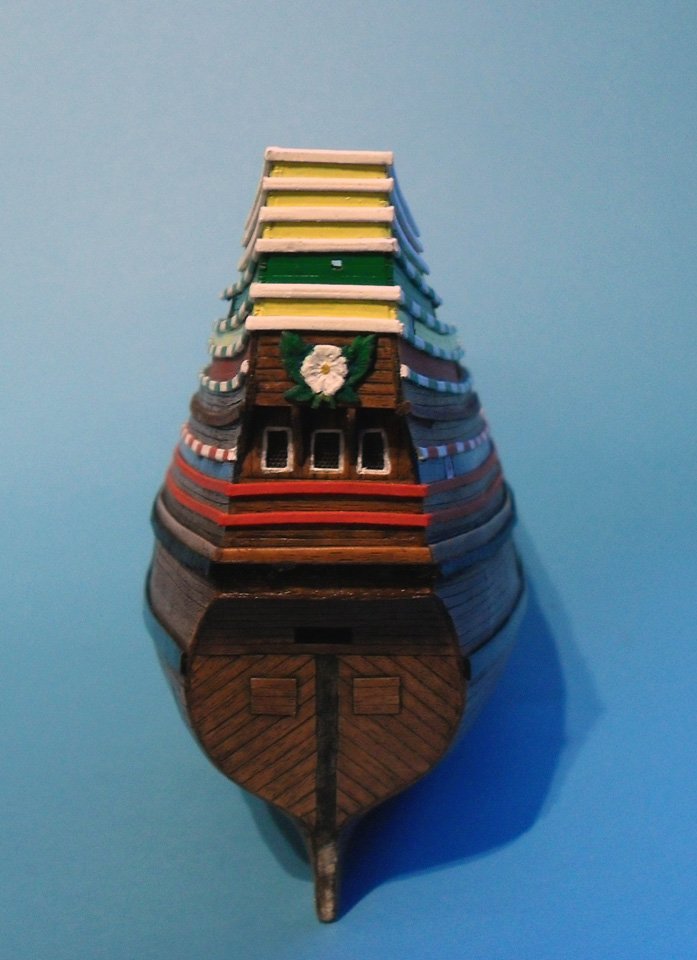
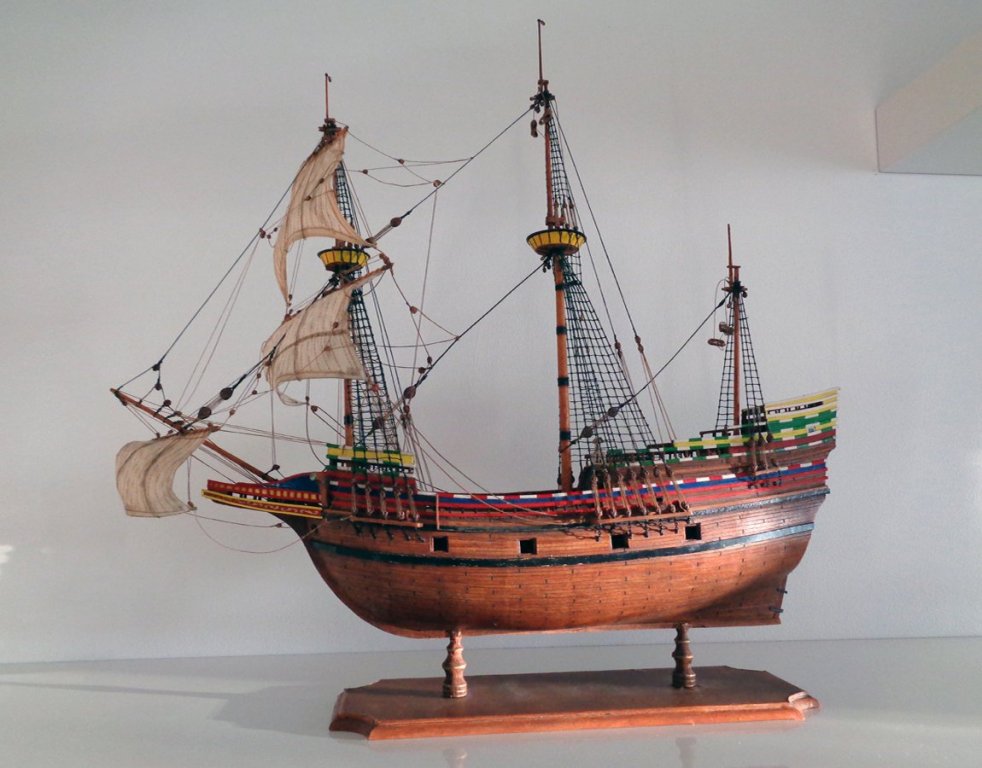
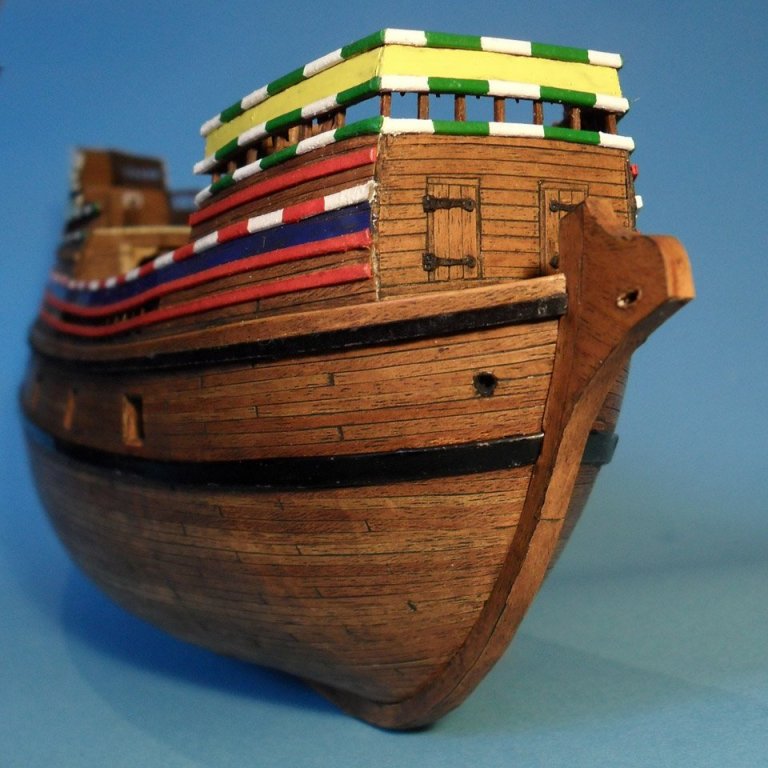
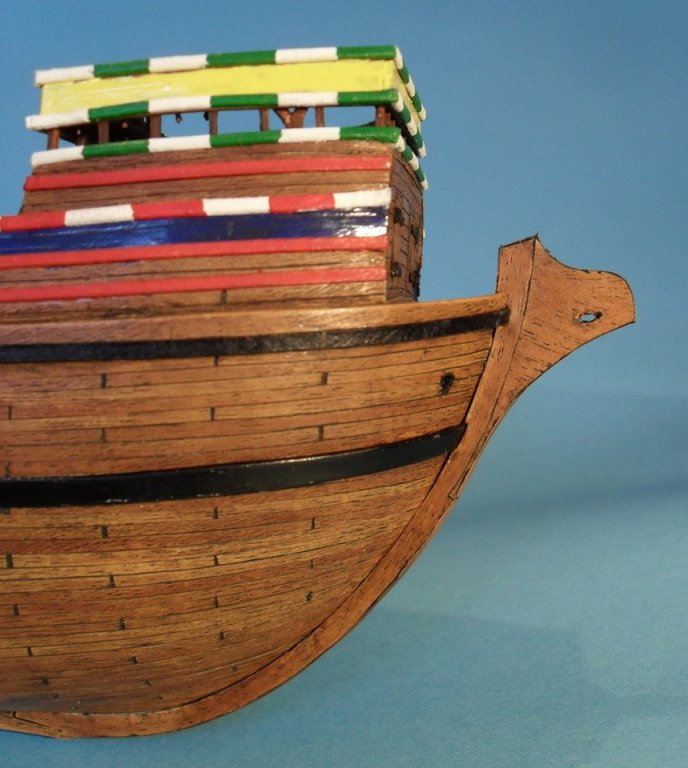
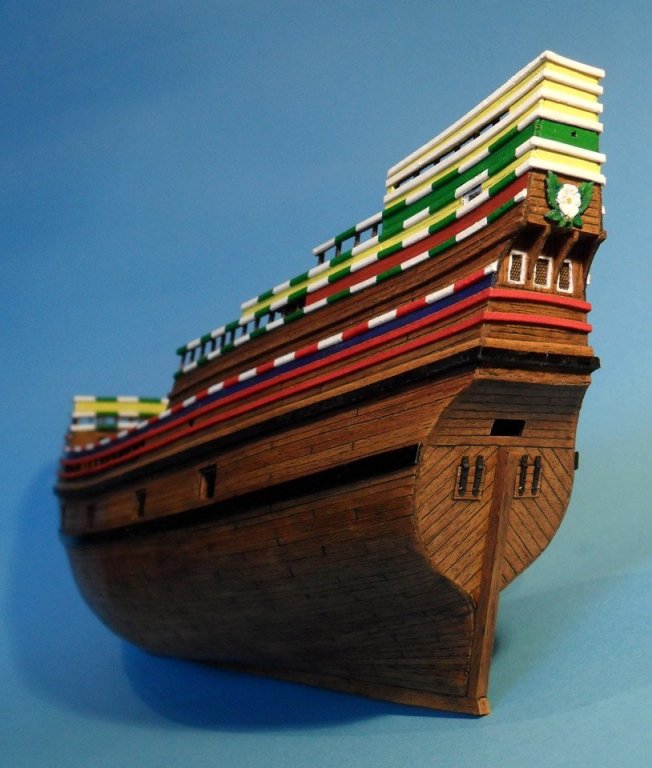
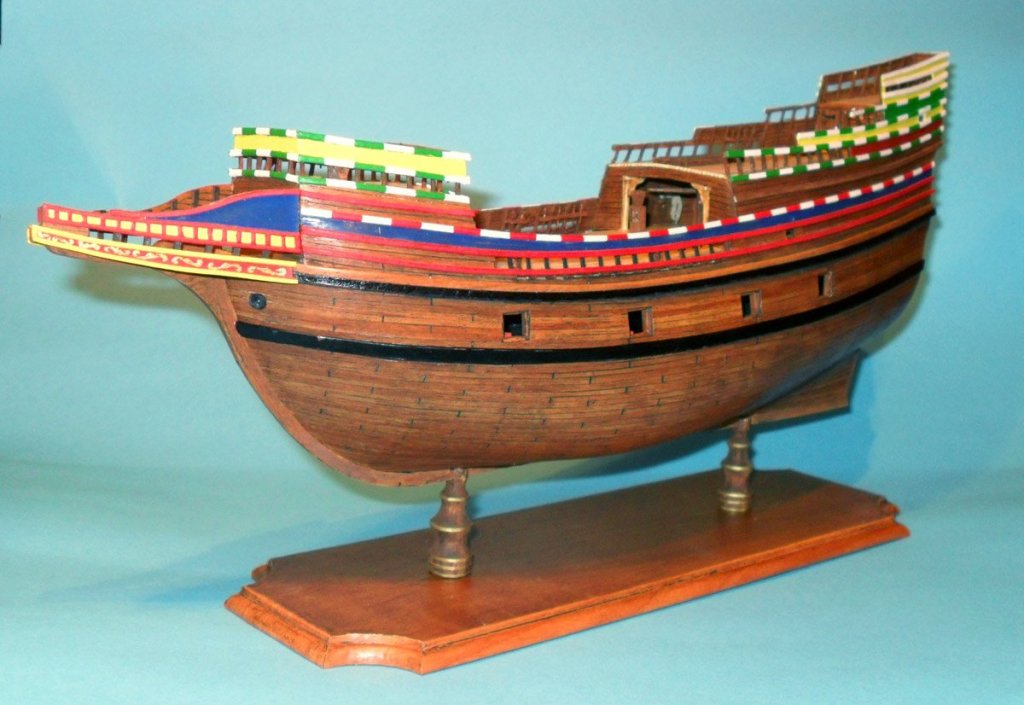
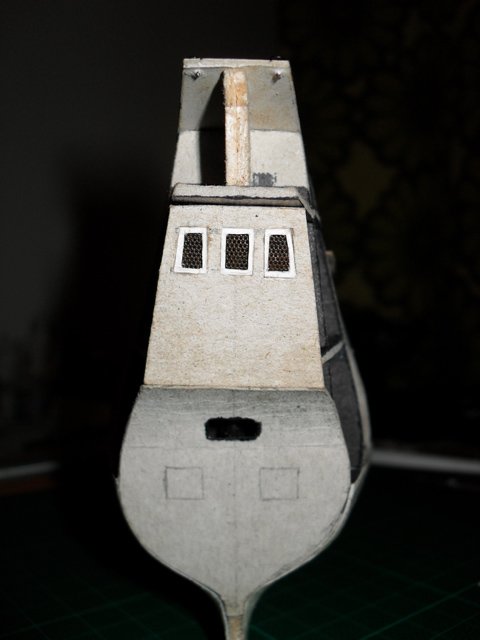
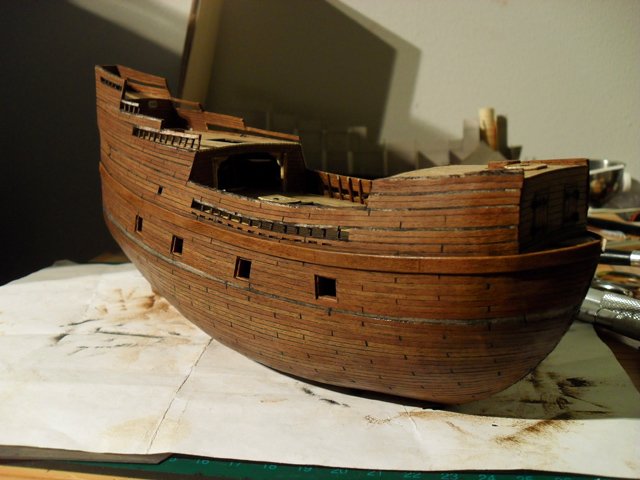
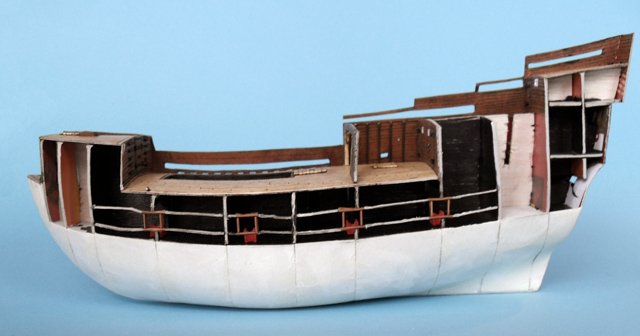
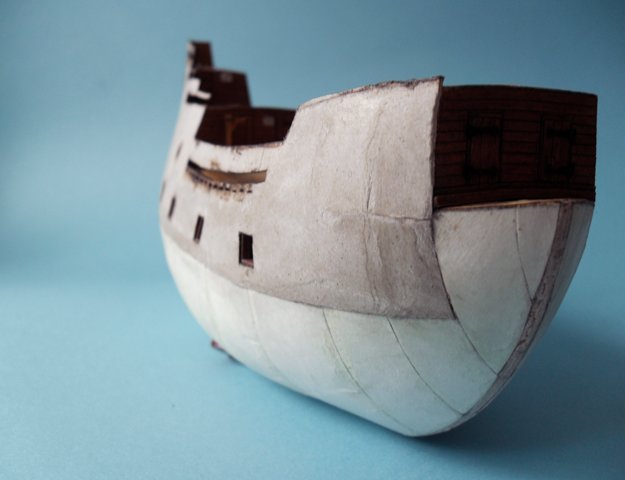
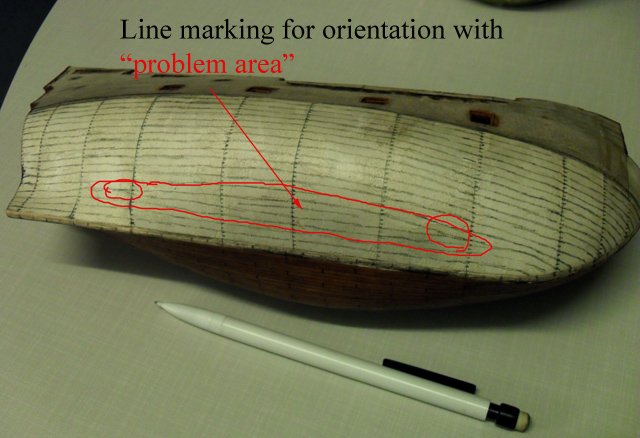
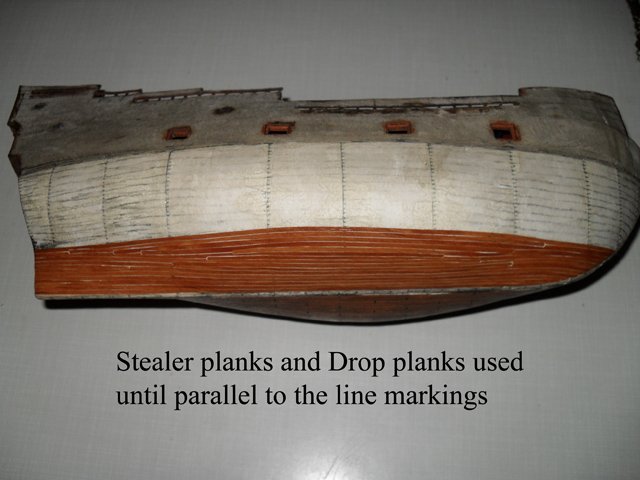
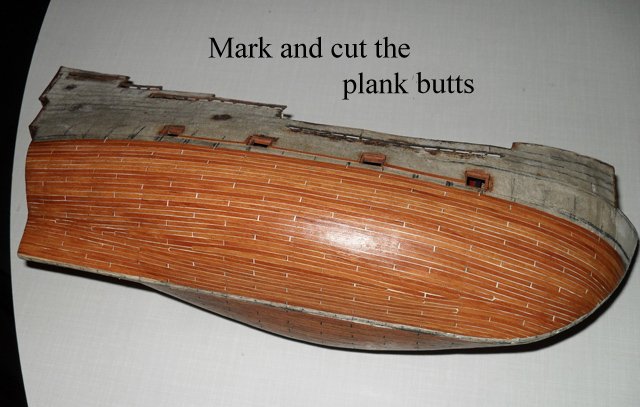
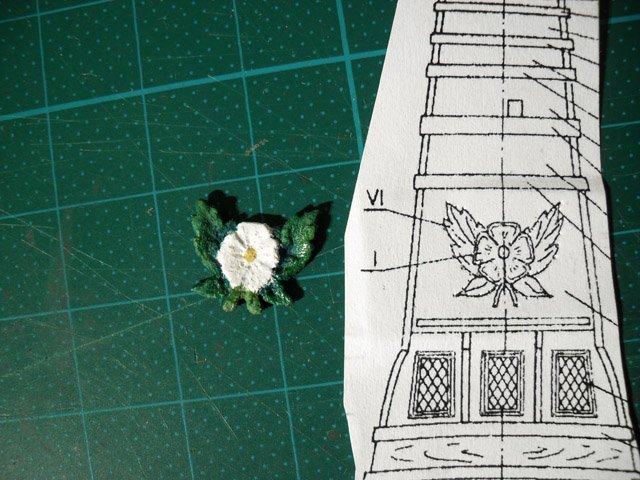
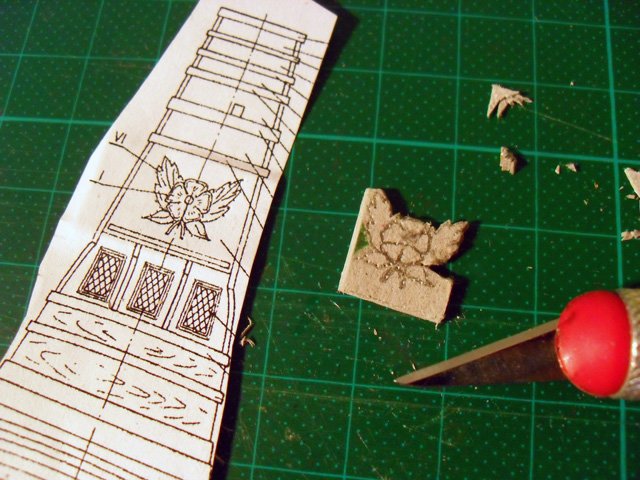
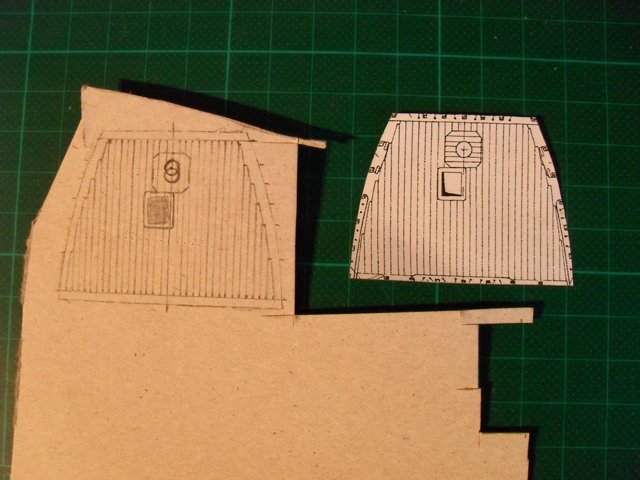
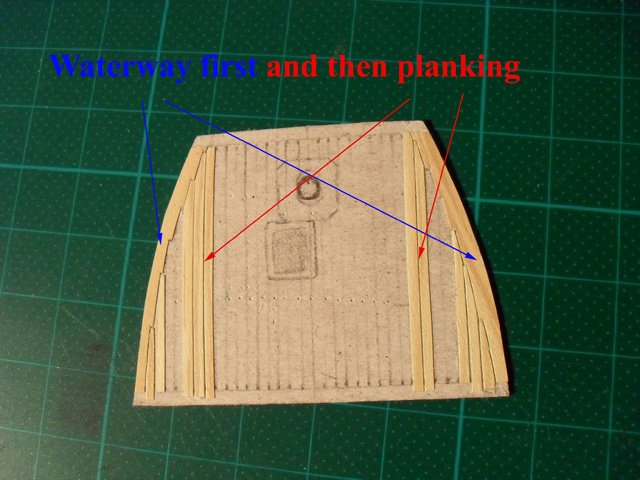
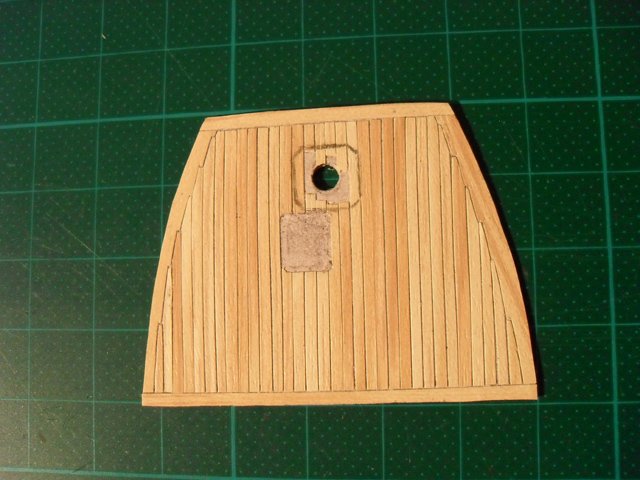
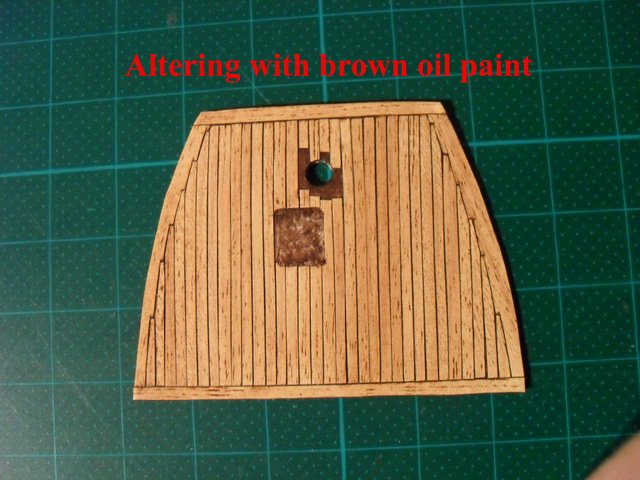
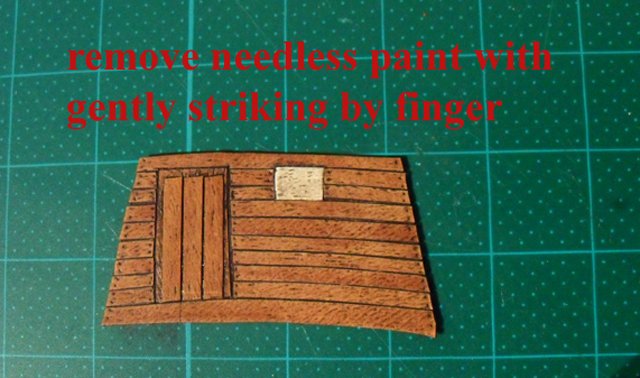
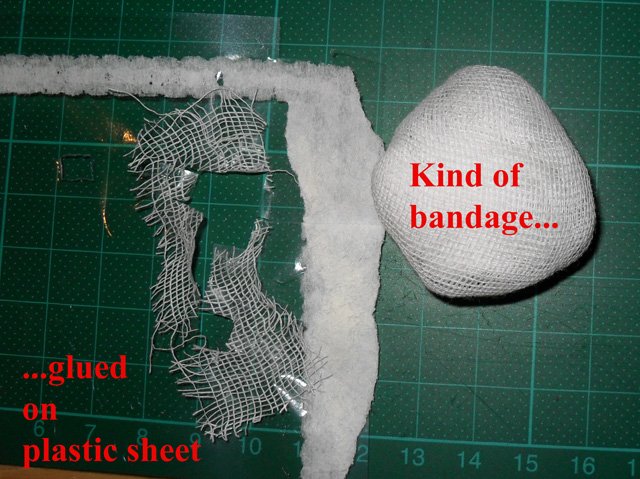
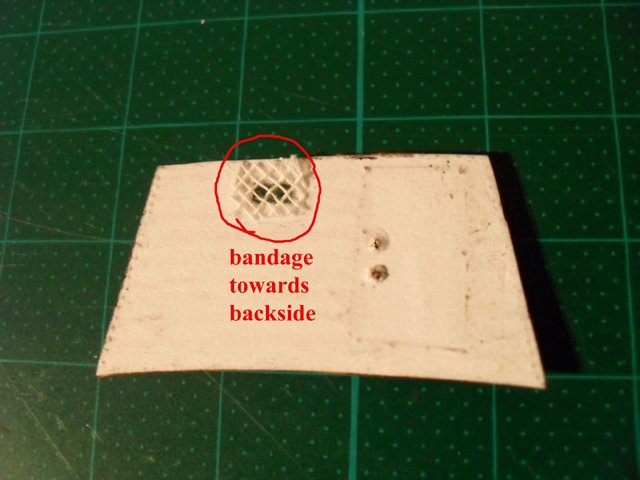
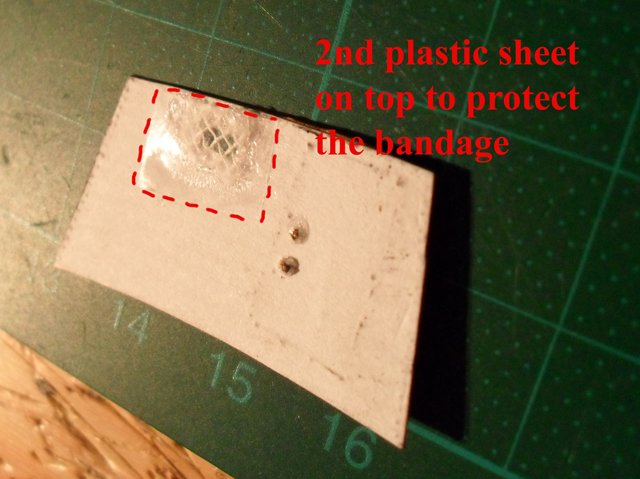
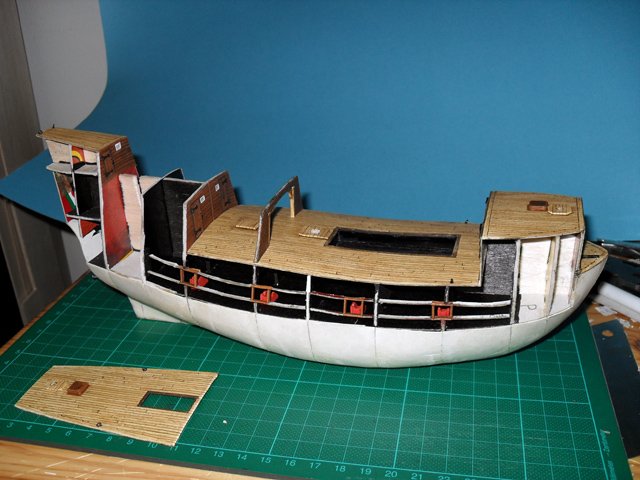
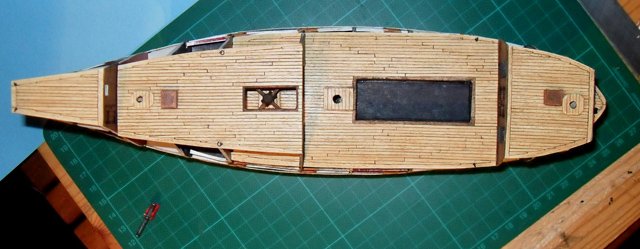
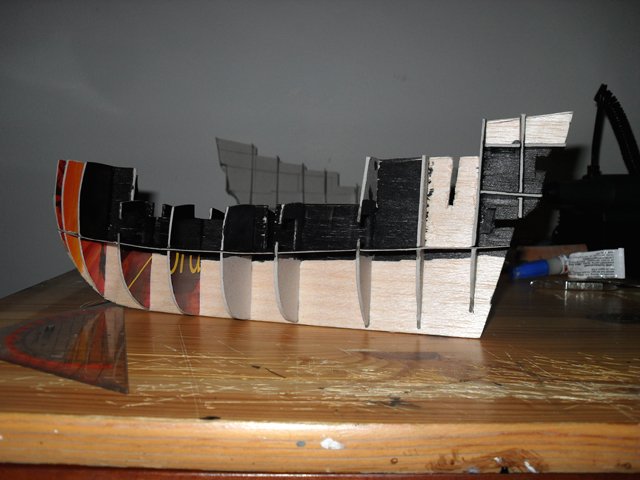
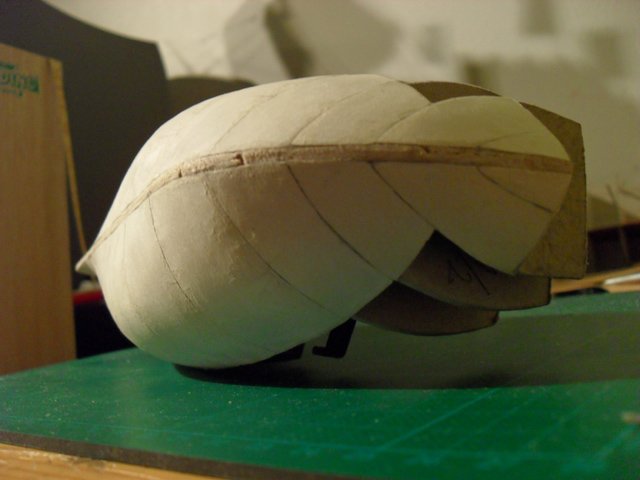
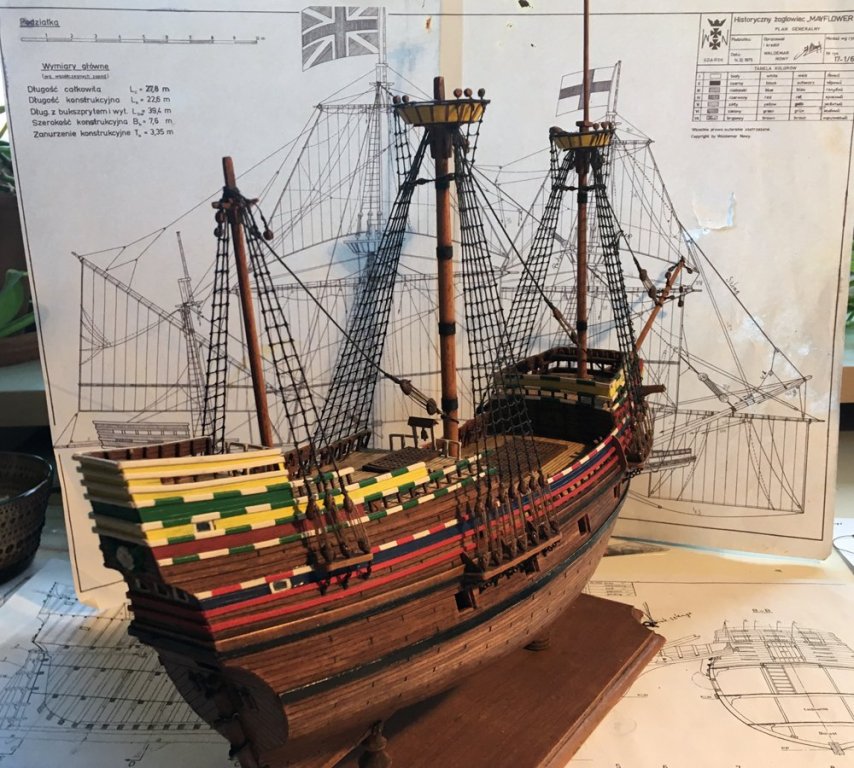
Hull Planking and The Mayflower Hi everybody! The upper hull was made out of one single piece of 1mm card. It was first planked and prepared on the inside, then attached to the model. The half deck was prepared and glued in place above the capstan. Also at this point I had to make sure the running rigging is attached to the cleat because later there will be no space to fiddle around the capstan. I could have made more hanging knees underneath the half deck, but no one can look inside there anyway and I learn for the next time to do it better. To imitate the stern windows I used the inner plastic part of a wound plaster painted slightly brownish. While researching how to plank the ship I found this forum and some useful information regarding 'planking rules'. I also used stealer and drop planks. Now I am not sure if that was common in the early 17th century but it appeared to me as the best way to make the card model look more like a wooden one. The plank butts are way out of proportion for this scale, but that way you can see them also from a distance when looking at the model and that is what I wanted to achieve. The hull was then altered/painted with black oil paint. The wales have been made from 1mm thin card stripes and painted with Humbrol enamel paint for plastic models. The thicker wales were colored with the black waterproof marker. At that point I considered a white underwater hull, but my wife convinced me that the wooden appearance of the model looks better, so I left it like it is. The Mayflower has been done from a 2mm thick card by hardening it a bit with CA glue, then using an engraver tool, a pen, and a not so sharp knife I got once from a wooden sail ship modeler back when I was a kid. Once the flower was shaped, I hardened it again with CA glue and painted with white Humbrol enamel and oil paints (viridian, sap green, yellow ochre). So much for now. ...to be continued... Rgds, Radek


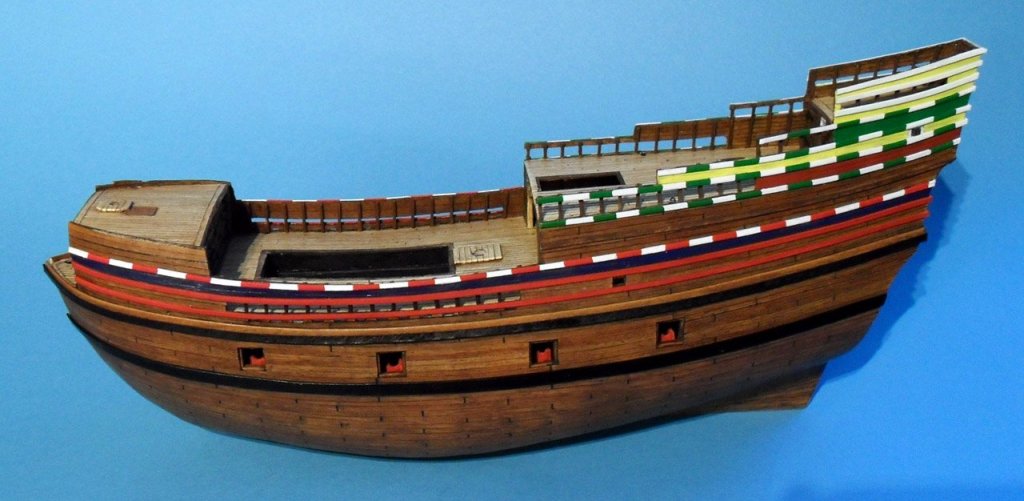


- 33 replies
-
- 11
-
-
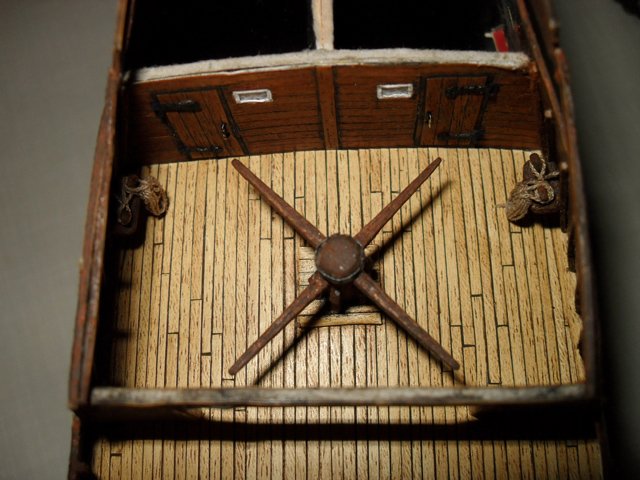
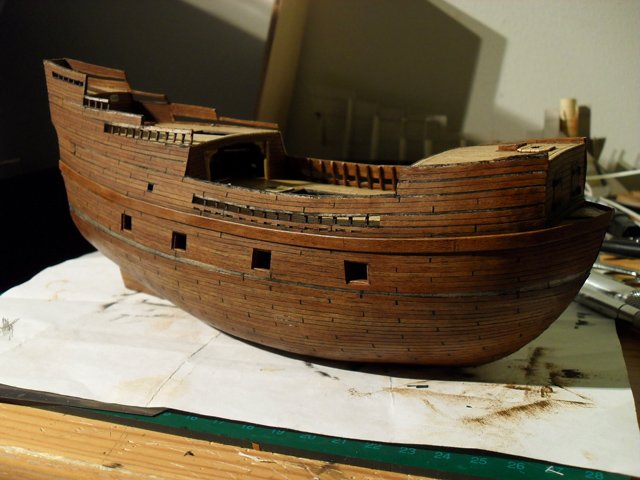
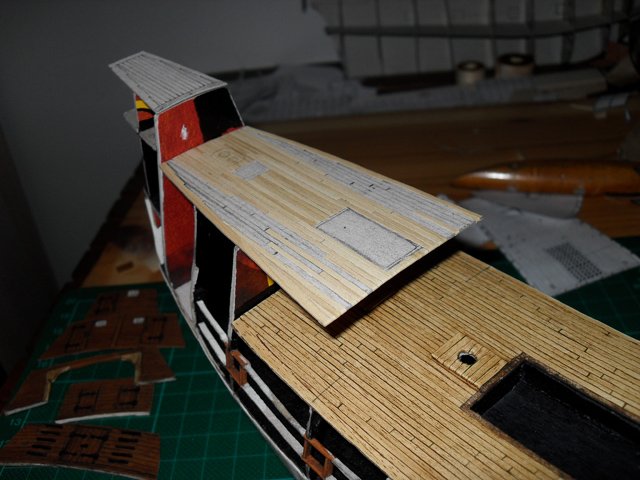
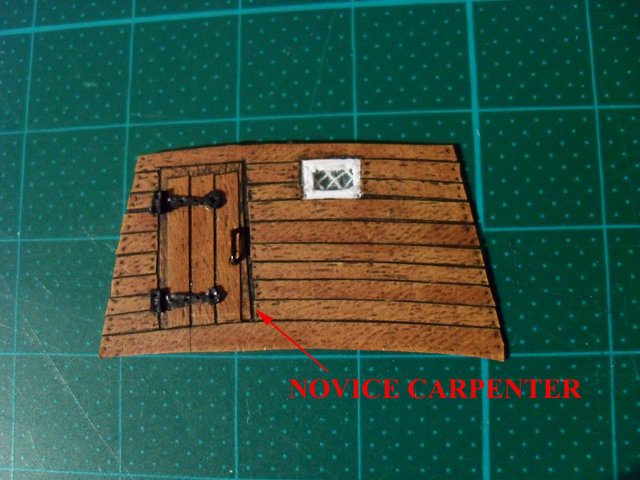
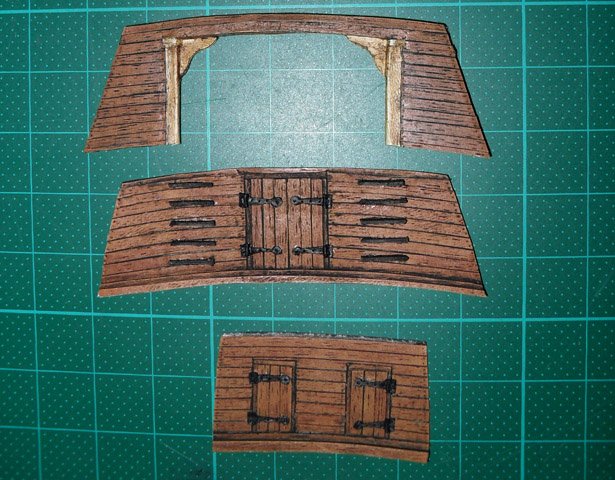
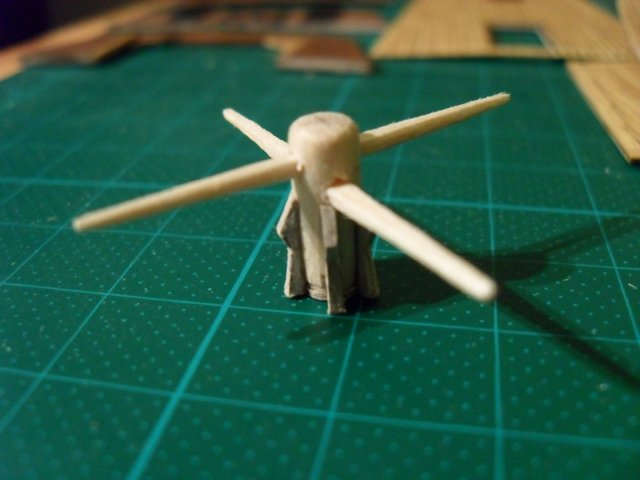
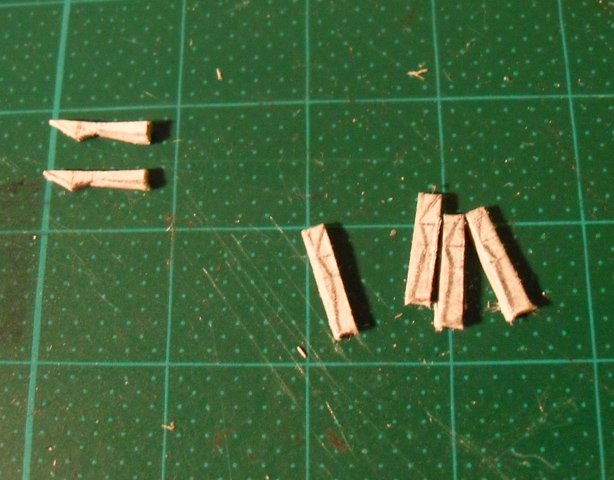
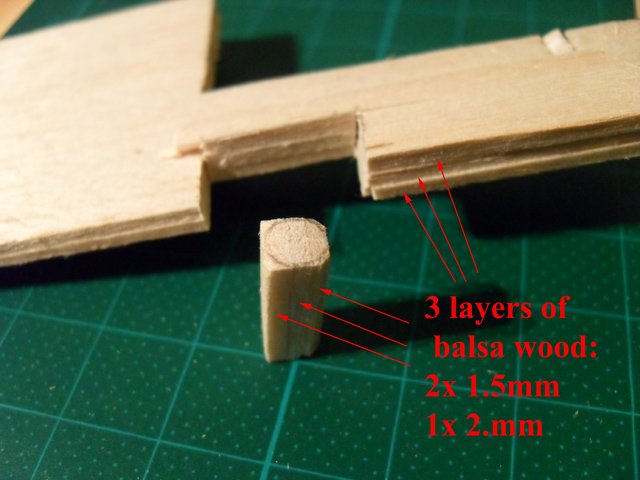
Decks Planking and Capstan Hi @ all! The planking of deck and hull is made with the self adhesive foil with wood pattern (color: 'Pear Medium' and 'Medium Nut Tree'). For the decks I use the foil 'Pear Medium'. First the deck is transformed to a 1mm card by using a needle to outline the dimensions and the plank distances. Also, the plank pattern is drawn on the deck. I cut tiny stripes of 1.5mm, attach them on the card and alter with brown oil paint 'burnt sienna'. Today I would maybe use black paint for altering as it gives the deck a more greyish 'worn out' appearance. But at that time of the build I liked the more brownish color of the decks. The darker wood parts such as the walls, doors, and the outer planking have been done with the 'Medium Nut Tree' foil and black oil paint for altering. Here are some pictures of some of the deck elements: The irregularities in the process - which of course are the fault of the novice carpenter ;) - add a bit to the style of the early 17th century shipbuilding, which was not as precise and accurate as the later magnificent builds of the 18th century ships of the line. Gun carriages have been placed and a small box to imitate depth underneath the gratings. The capstan has been made from balsa wood and card and painted with brown oil paints 'burned sienna' and 'burned umber'. Next post about finishing the hull... -Radek

- 33 replies
-
- 10
-
-
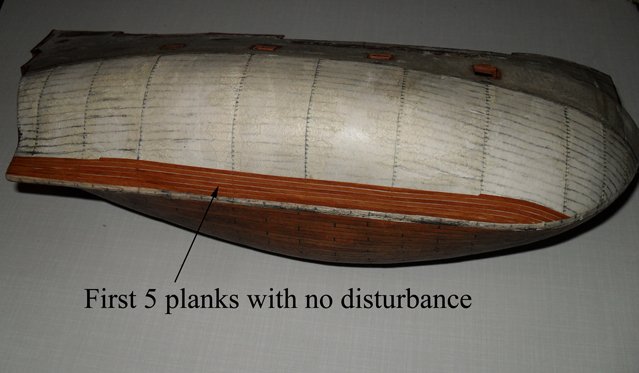
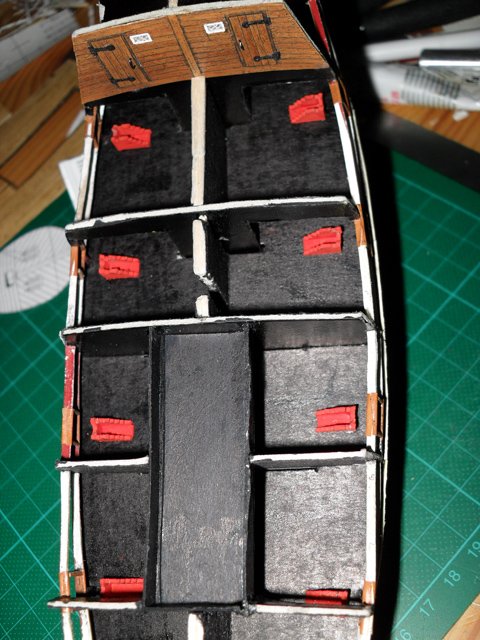
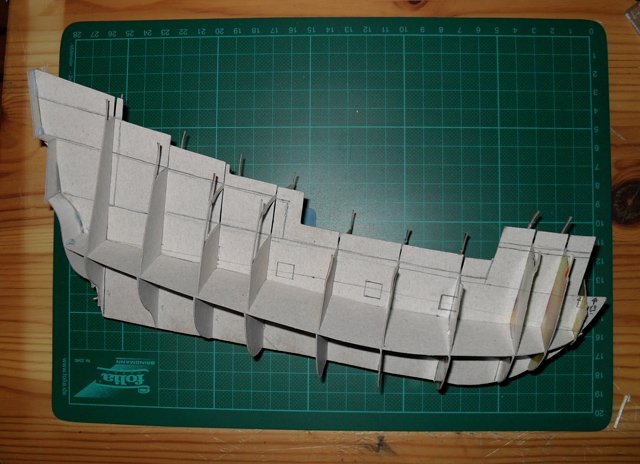
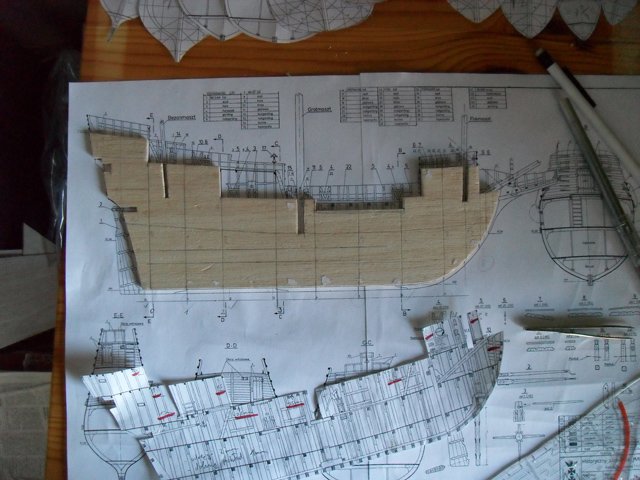
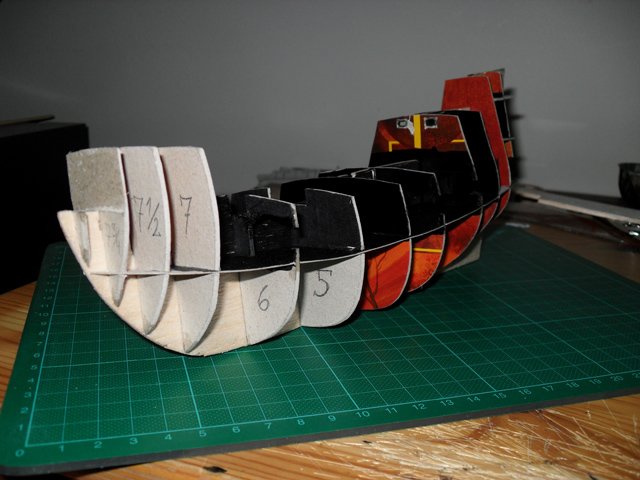
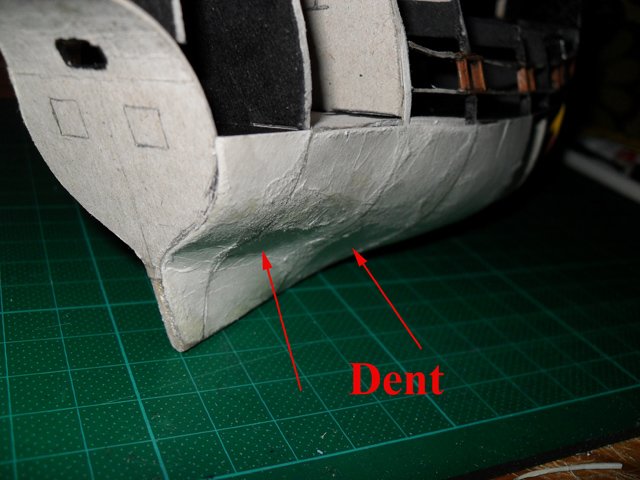
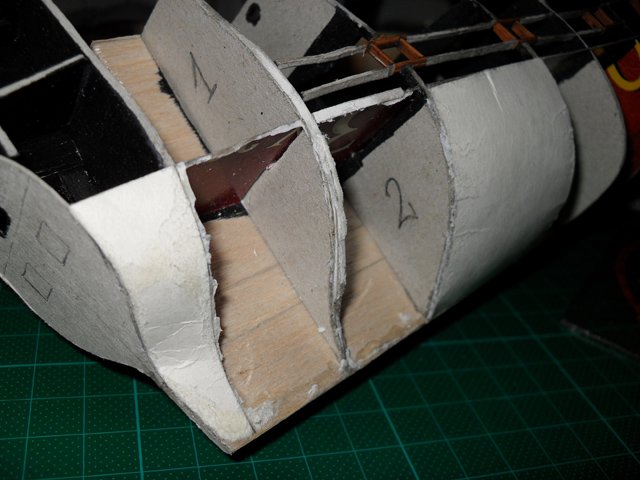
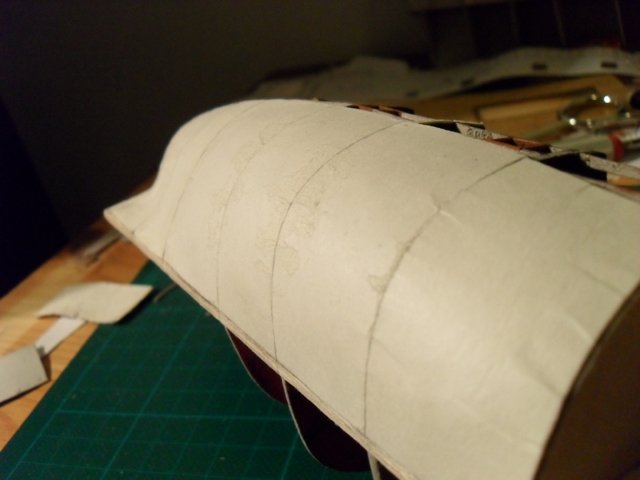
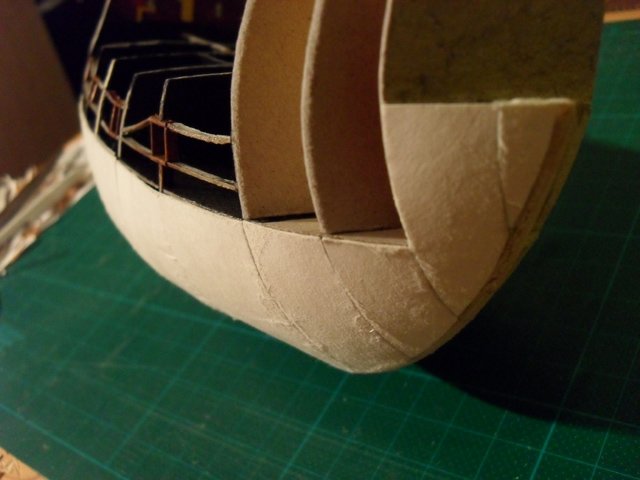
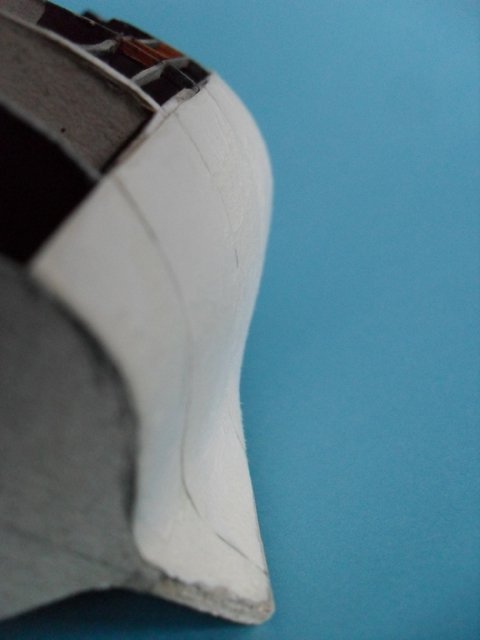
Frames and Underwater Hull Hi everyone! Here's a small description of how I started the build back in 2010, some insight into my way of hull shaping. I start with a 1mm cardboard test-frame (from frozen pizza boxes) to see where the gun ports, decks and masts will be. Then I cut the middle frame from balsa wood (two 1.5mm plates glued together) to give the model stability, because card tends to deform and bend the whole structure. The other frame parts (bulkheads) were cut from a 2mm cardboard (old puzzle box) and painted black using a marker where the openings from the gun ports or the gratings will allow to see the frames. The lower tiny edges of the bulkheads were hardened and strengthened with CA glue. The main gun deck was done from a 1mm card. Next were the gun ports. For that I used 1mm card stripes that were glued to the frames with the gun ports in between. The ports itself were taped with the self adhesive foil with wooden patterns and 'altered' with black oil paint. Then followed the 'planking' of the hull. For that I use a different approach than most modellers: Instead of using several layers of horizontal and vertical card stripes or fillers with lots of sanding I use a bit less messy approach due to the fact that I do not have a hobby room and have to keep my work space in the apartment clean. The next pictures show how I do the individual stripes, or rather panels, for the space between each frame, or bulkhead. A scratch build like this involves a lot of 'trial and error' where I need to adjust few parts when the result is not as good as hoped for or mistakes are made. Once all the 'rounded' card panels are glued onto the frame, I did not entirely get around sanding and had to sand a few places around the bulkheads to make the card smooth. Of course, the 1mm card cannot get fully rounded and shows small folds or 'wrinkles' around the edges. This made the card feel 'furry' so I used a water based white glue to smoothen the surface. In addition to the smoothening, the glue also hardens the card, giving it more integrity. No other hull planking is added to the model at this stage. The following step for the hull is applying the foil with wooden pattern. But first the upper side of the ship including upper hull and decks had to be done. So much for now. More will follow soon. Right now I am making the sails and running rigging. Rgds, Radek PS: Thanks Steven and Patrick for the encouragement! PPS: I've corrected the year of the beginning in my first post. It was 2010 and not 2011.

- 33 replies
-
- 10
-
-
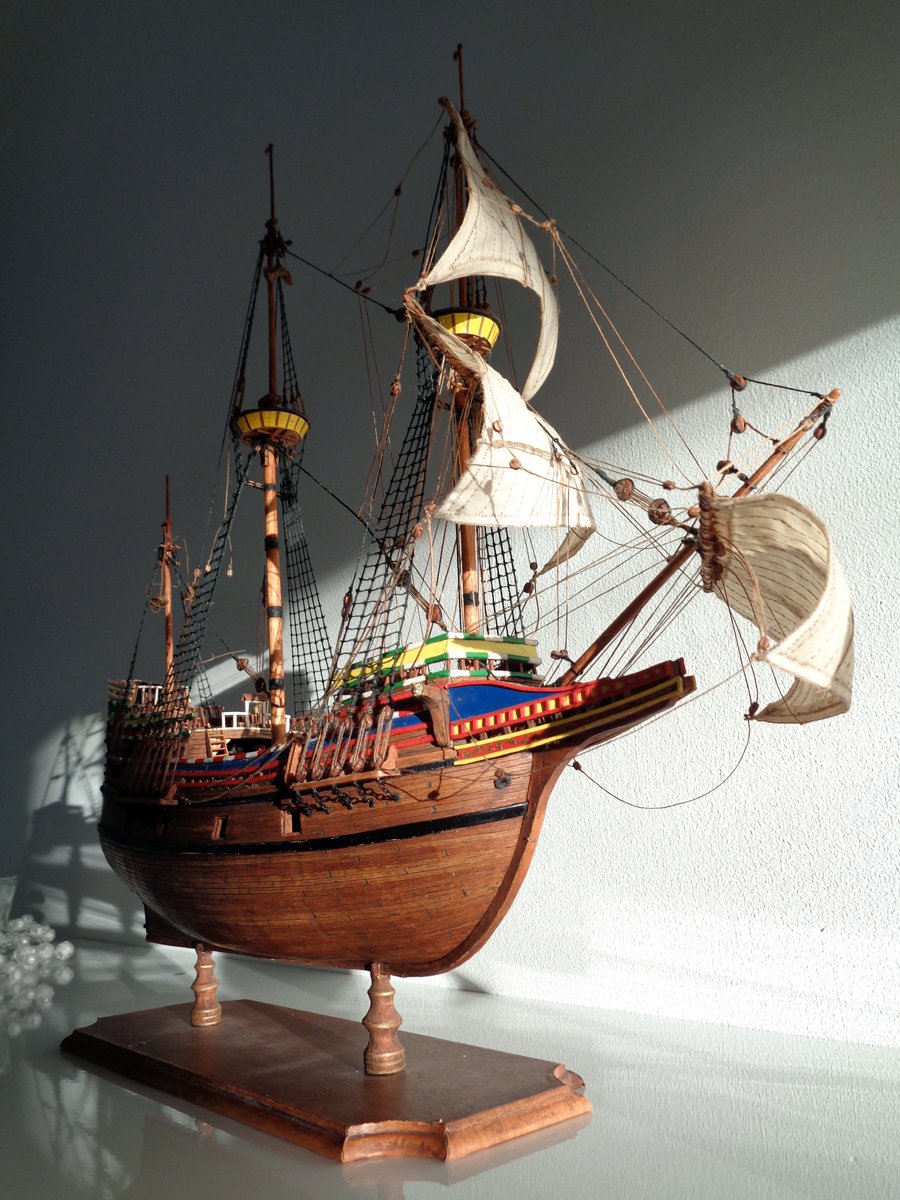
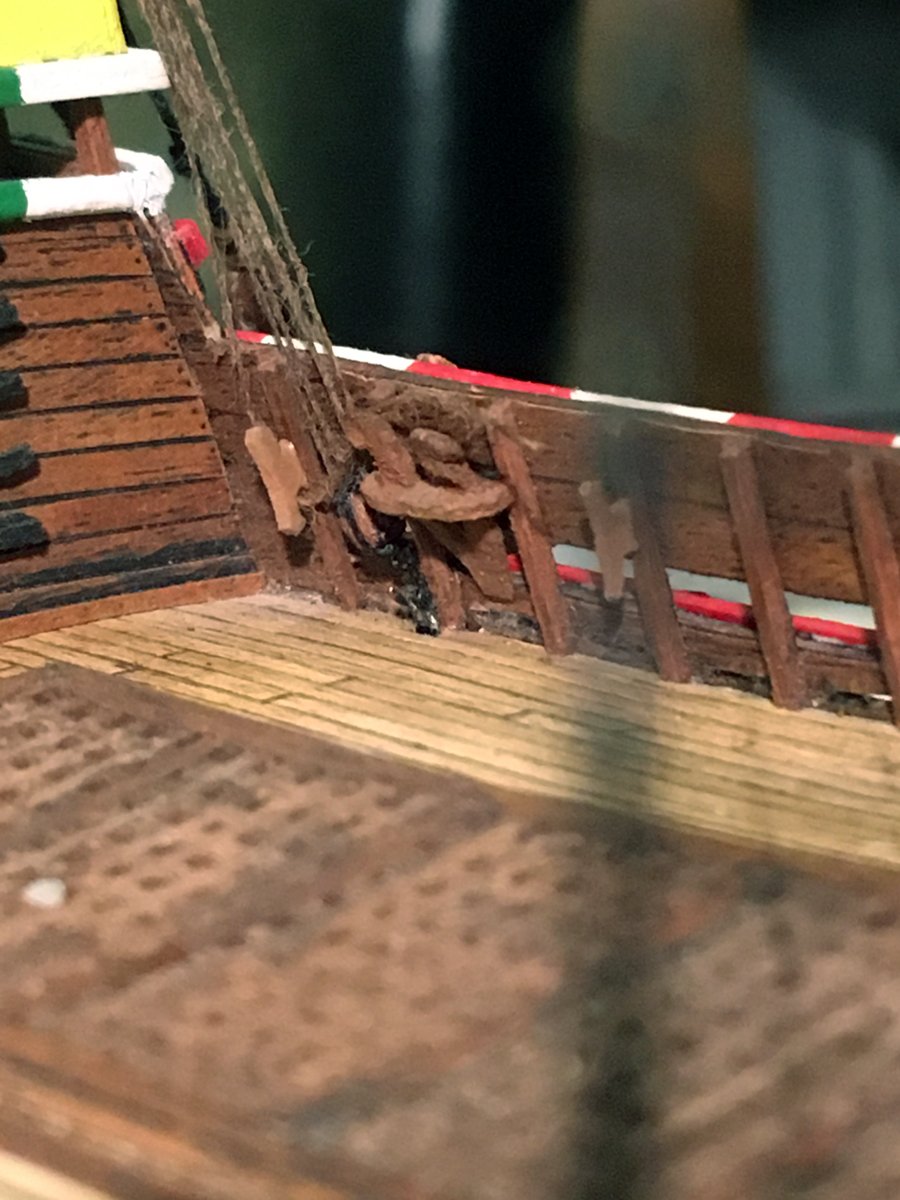
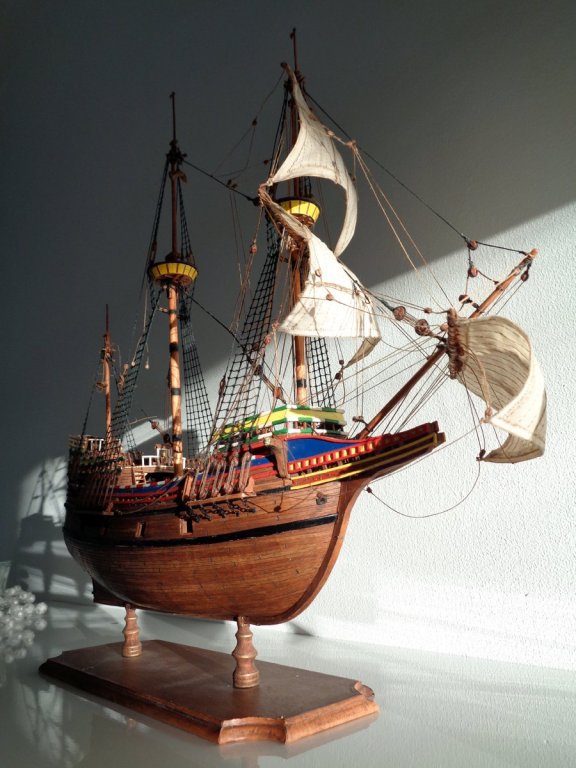
Hello everyone, I was able to continue on the Mayflower and almost finished the standing rigging. One interesting detail that is not in the plans are the catharpins. Now I know my model is not very accurate as it comes to history, but I tried to do cathharpins that are from about that era and found the answer in R.C. Anderson's book about seventeenth century rigging. Last time I rigged a ship model (except my Elbing Cog in 2010) was as a teenager in the last millennium. Hence my rigging is very clumsy; especially the ratlines, because I did not use a pattern mask. Here are some pictures from the progress so far and my apologies for the bad photographs, all made by my old smartphone camera. I have bought a snapshot camera today and hope to post better pictures next time. When time allows I will also post some older pictures of the techniques I've used in this card model. Rgds, Radek


- 33 replies
-
- 11
-
-
Hello Ab and welcome here! Your models are stunning! As is the work of your son! There is a gallery option here, how about you post your ready models there, somehow categorized? That way it would be interesting to see a nice collection of Dutch vessels. I would like to see your paper modelling techniques presented, as it is always a great joy to learn from the best! Rgds, Radek
-
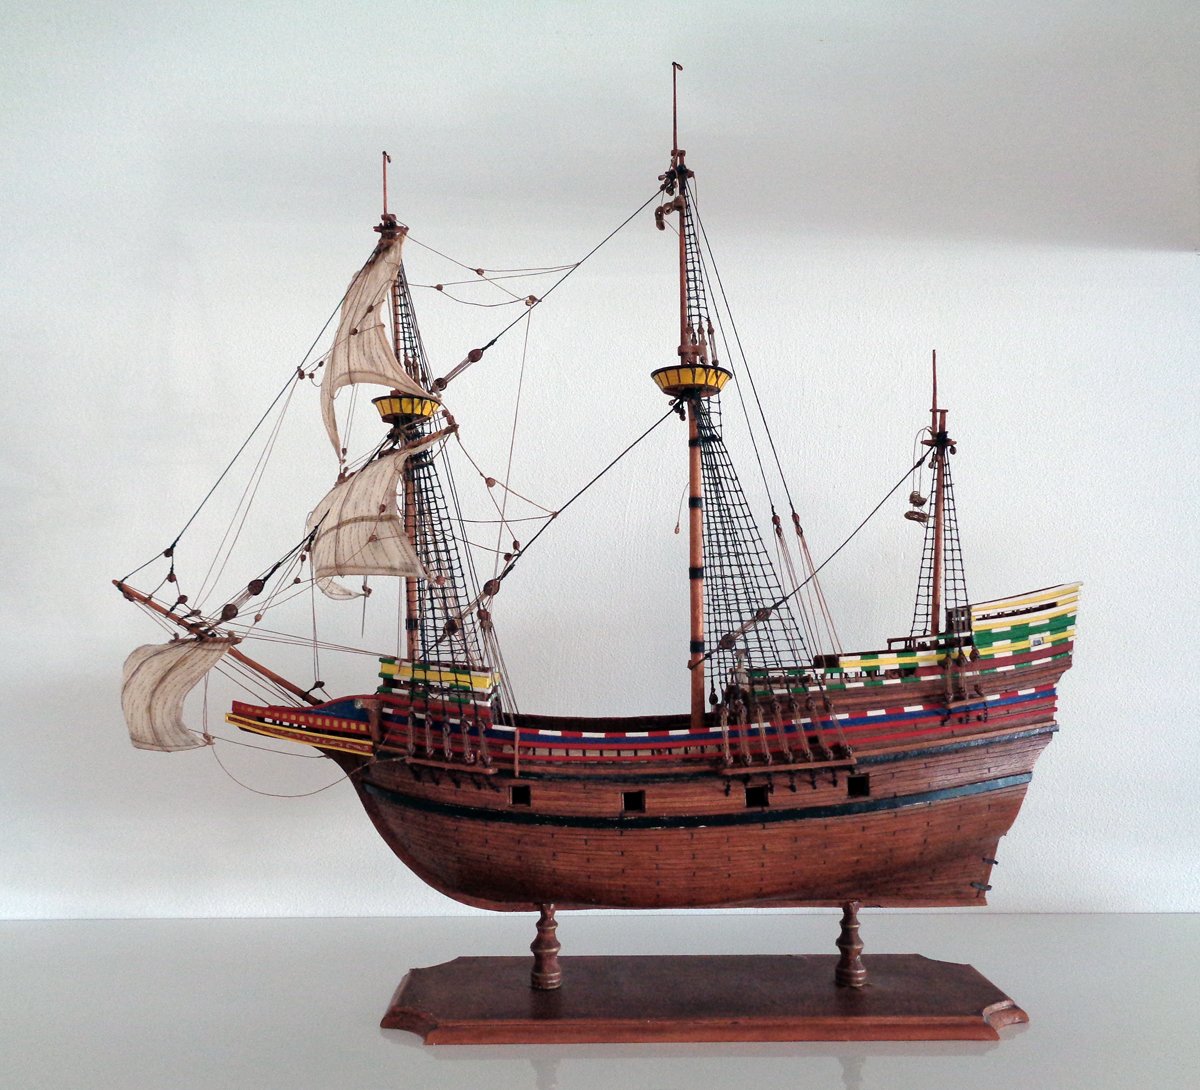
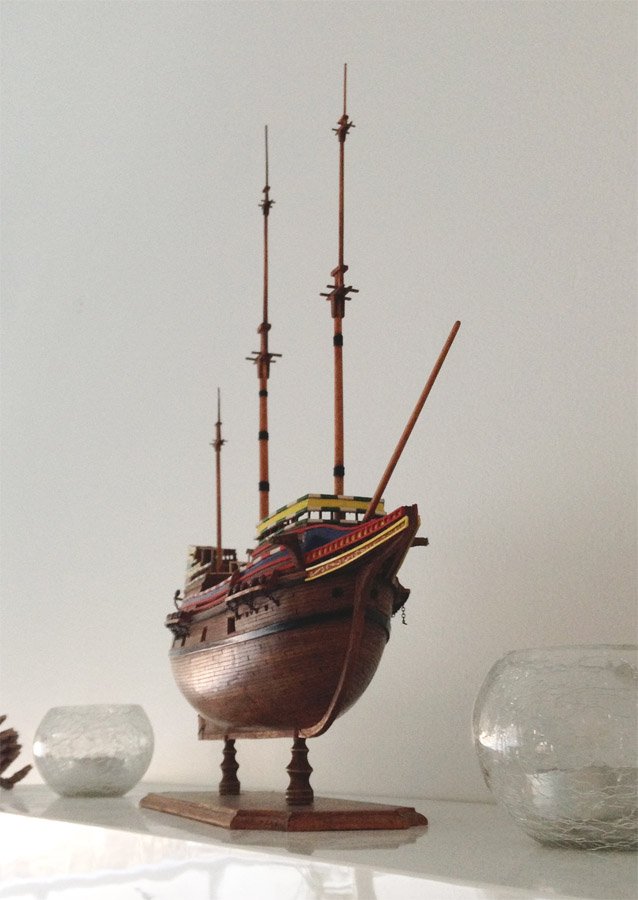
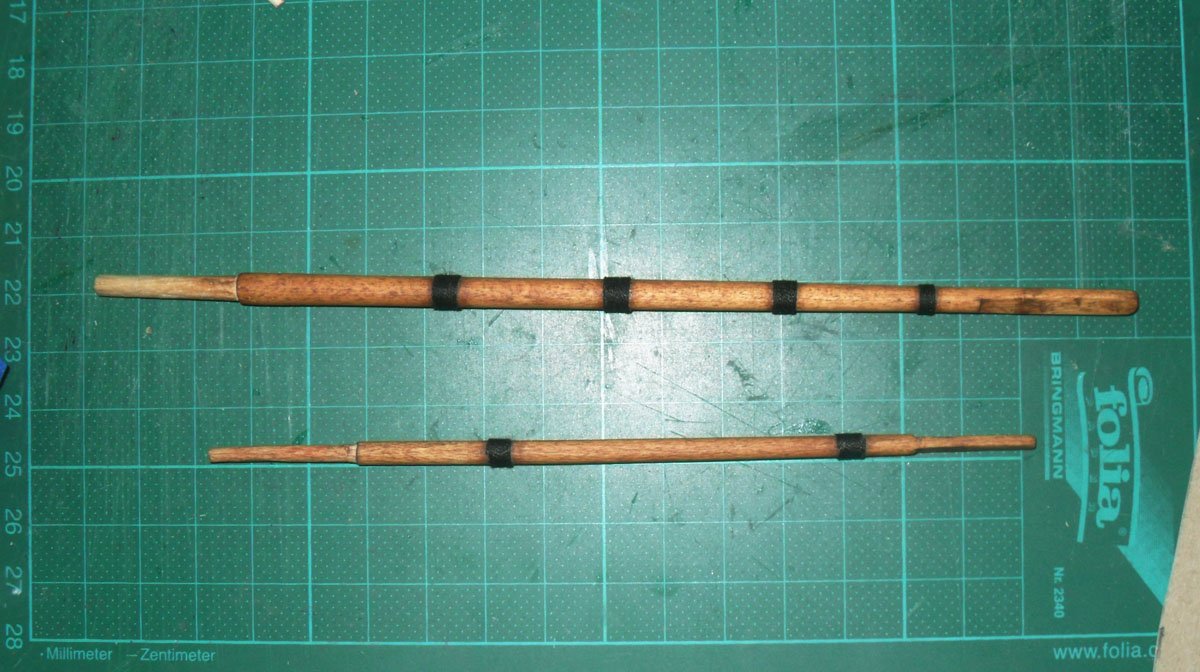
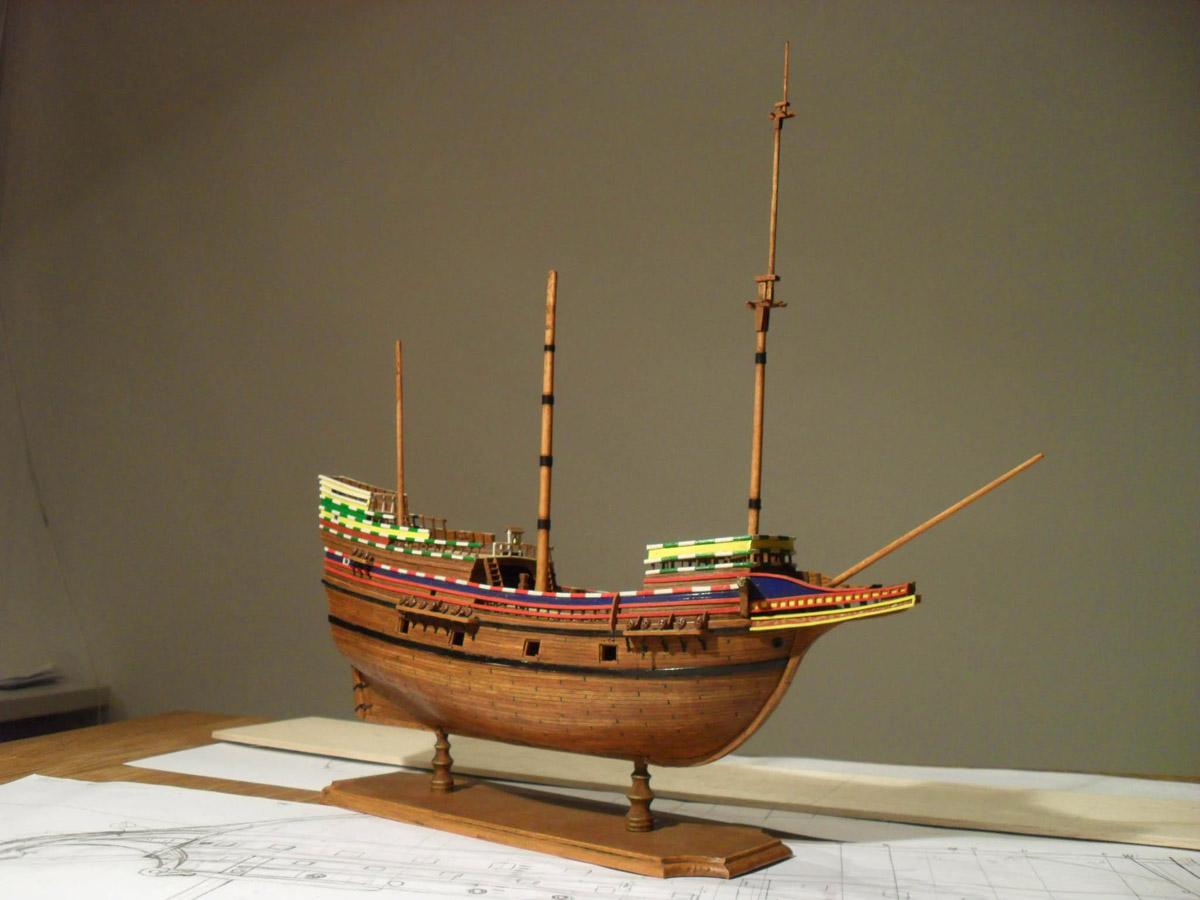
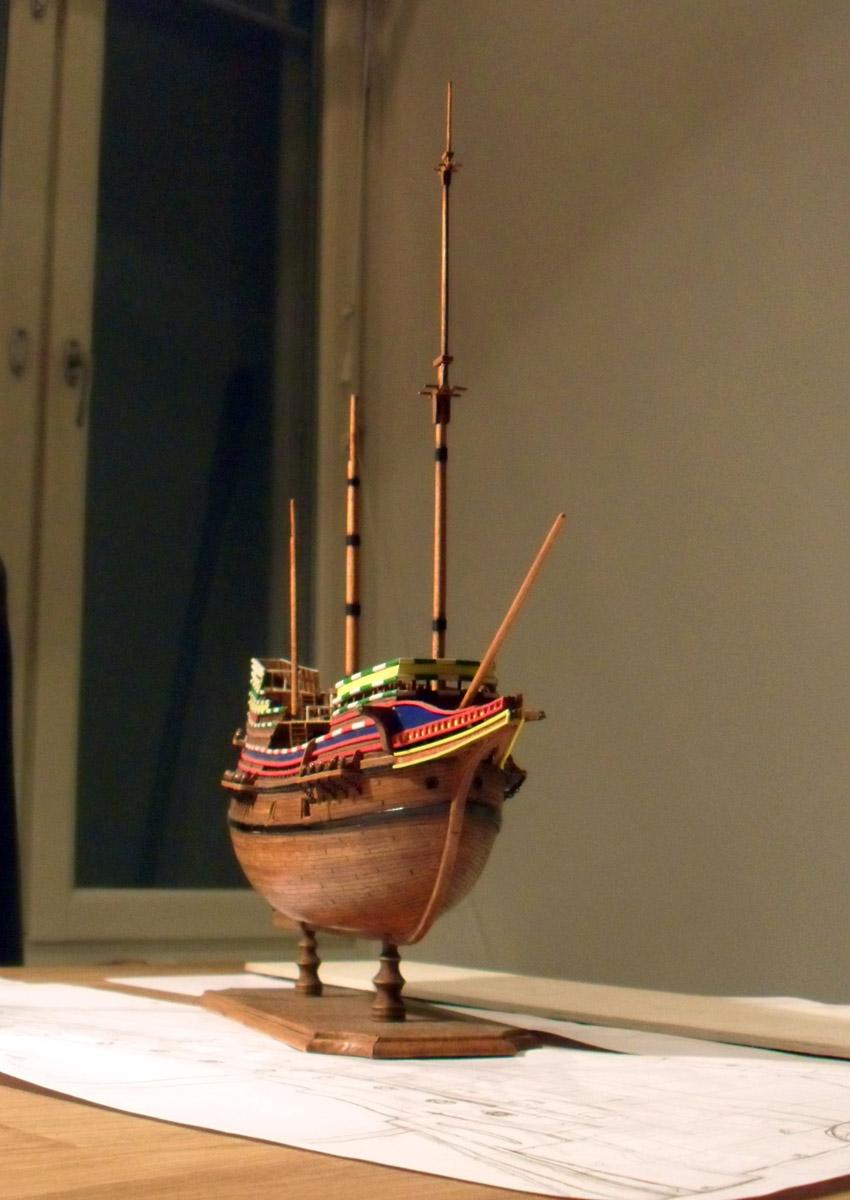
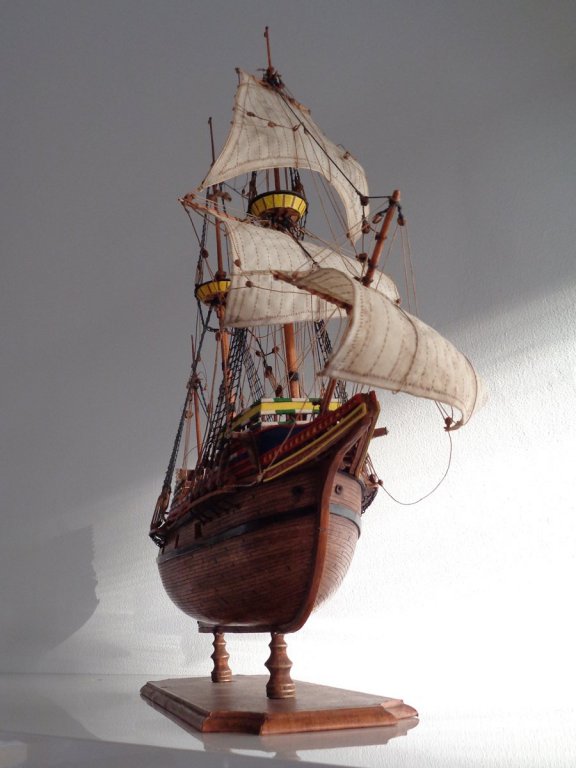
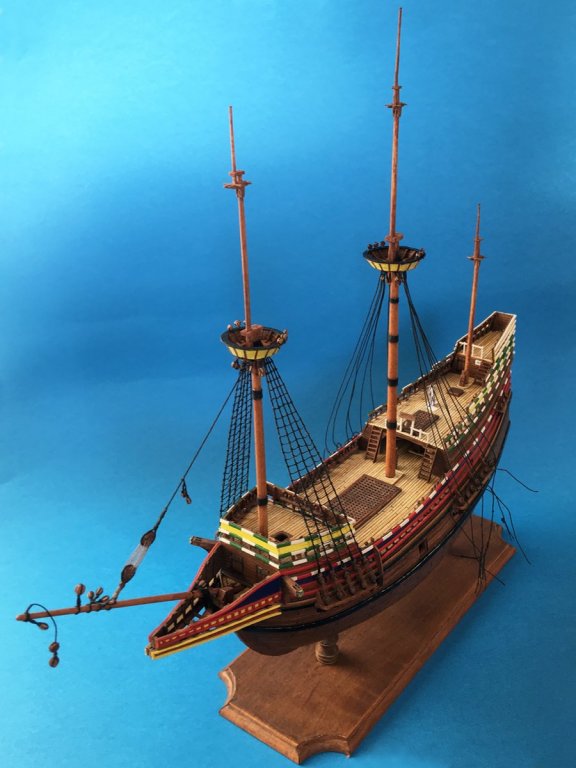
Hello everyone, my sincere apologies for being absent for so many years, but my work/studies did not allow me to enjoy ship modelling and other of my hobbies. I only managed to make the masts ready at some point in 2015. The masts are made from wood, whereas the ship is made from card and paper. I use oil paints (my other hobby I did not have time for during the last decade) to color the wooden looking parts of the ship and the masts. The idea in this model is to make it look 'used' or 'in action' and not like the clean and beautiful museum pieces (which I really adore much!). On two of the pictures you can see how I tried to make the masts a bit darker (more dirty) around the woolding. And the other shows the 'altering' of the planks, which are made from a self-adhesive foil with wood pattern. Having finally a bit more time this autumn I plan to continue on the Mayflower by doing the dead eyes and rope for the standing rigging. Here are another two pictures of how tall the ship actually is, and in which state of the build. I hope to be able to post more soon and also explain a bit my techniques for making such a card model. Rgds, Radek


-
HMS ROYAL KATHERINE 1664 by Doris - 1/55 - CARD
RdK replied to DORIS's topic in - Build logs for subjects built 1501 - 1750
Hello, my dear fellow card/paper modeller! Nice to see you here, too. Looking forward to seeing more inspirational progress from you! 😃👍 All the best greetings from the North! -Radek- 1,035 replies
-
- 5
-
-
- royal katherine
- ship of the line
- (and 1 more)
-
Who posted this beautiful pics of Roman Polansky's pirate ship "Neptune"?? Can he post them again?...
-
Hi @ all! I would like to present here my ongoing project. It is the Mayflower from 1620 after the plans of Waldemar Nowy (Danzig, Poland) 1975: "Historic Sailship MAYFLOWER" (based on the Mayflower II) I started this build about in November 2010. I had several breaks during the build due to my private situation. At the moment I work on the cannons and the masts. Here are some pictures of my progress so far. I would also like to post some of my techniques I used as soon as time allows me to. Rgds, Radek