Moonbug
-
Posts
1,028 -
Joined
-
Last visited
6 Followers


.thumb.jpg.63de63bd9ff3a8188868ac58dfcc309c.jpg)


About Moonbug

- Birthday 09/17/1971
Recent Profile Visitors
3,435 profile views


-
 muratx reacted to a post in a topic:
HMS Pegasus 1776 by Moonbug - Amati Models - 1:64
muratx reacted to a post in a topic:
HMS Pegasus 1776 by Moonbug - Amati Models - 1:64
-
Maciek reacted to a post in a topic:
HMS Pegasus 1776 by Moonbug - Amati Models - 1:64
-
Maciek reacted to a post in a topic:
HMS Pegasus 1776 by Moonbug - Amati Models - 1:64
-
 Knocklouder reacted to a post in a topic:
HMS Pegasus 1776 by Moonbug - Amati Models - 1:64
Knocklouder reacted to a post in a topic:
HMS Pegasus 1776 by Moonbug - Amati Models - 1:64
-
 brunnels reacted to a post in a topic:
HMS Sphinx 1775 by brunnels - Vanguard Models - 1:64 scale
brunnels reacted to a post in a topic:
HMS Sphinx 1775 by brunnels - Vanguard Models - 1:64 scale
-
 Beautiful work!
 -
Moonbug reacted to a post in a topic:
HMS Sphinx 1775 by brunnels - Vanguard Models - 1:64 scale
-
Connor reacted to a post in a topic:
Santa Maria by Moonbug - FINISHED - Artesania Latina - Bashed
-
Zarkon reacted to a post in a topic:
HMS Pegasus 1776 by Moonbug - Amati Models - 1:64
-
Zarkon reacted to a post in a topic:
HMS Pegasus 1776 by Moonbug - Amati Models - 1:64
-
Zarkon reacted to a post in a topic:
HMS Pegasus 1776 by Moonbug - Amati Models - 1:64
-
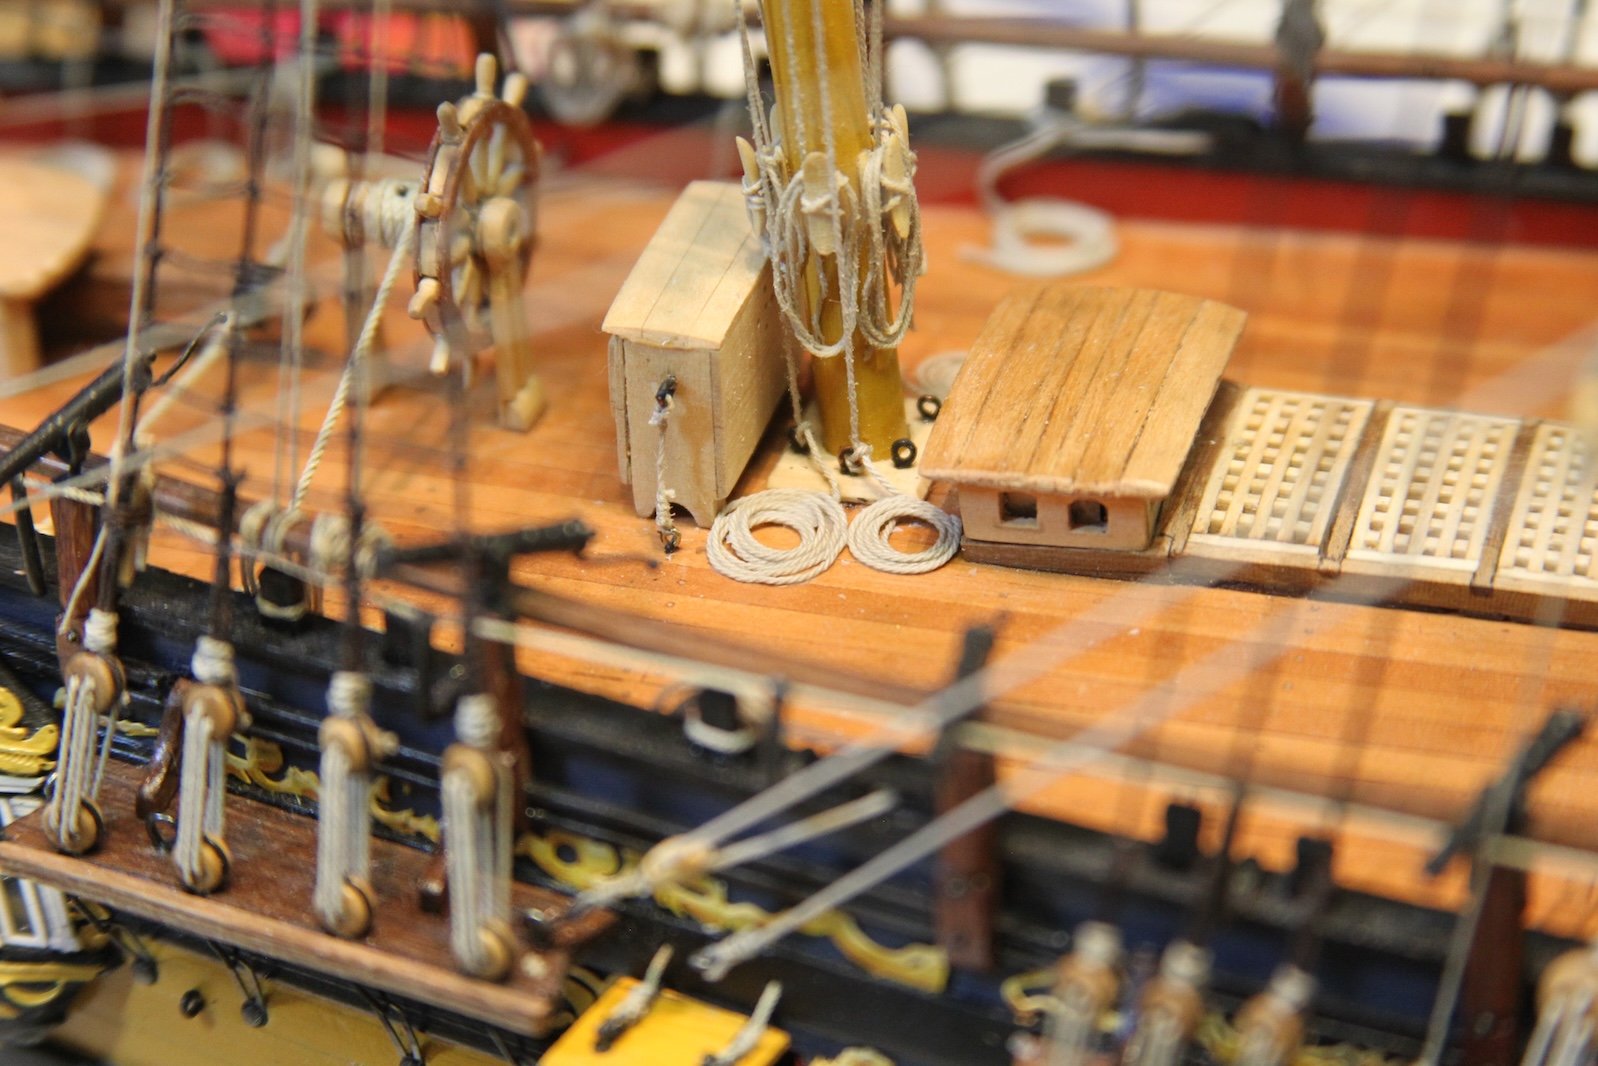
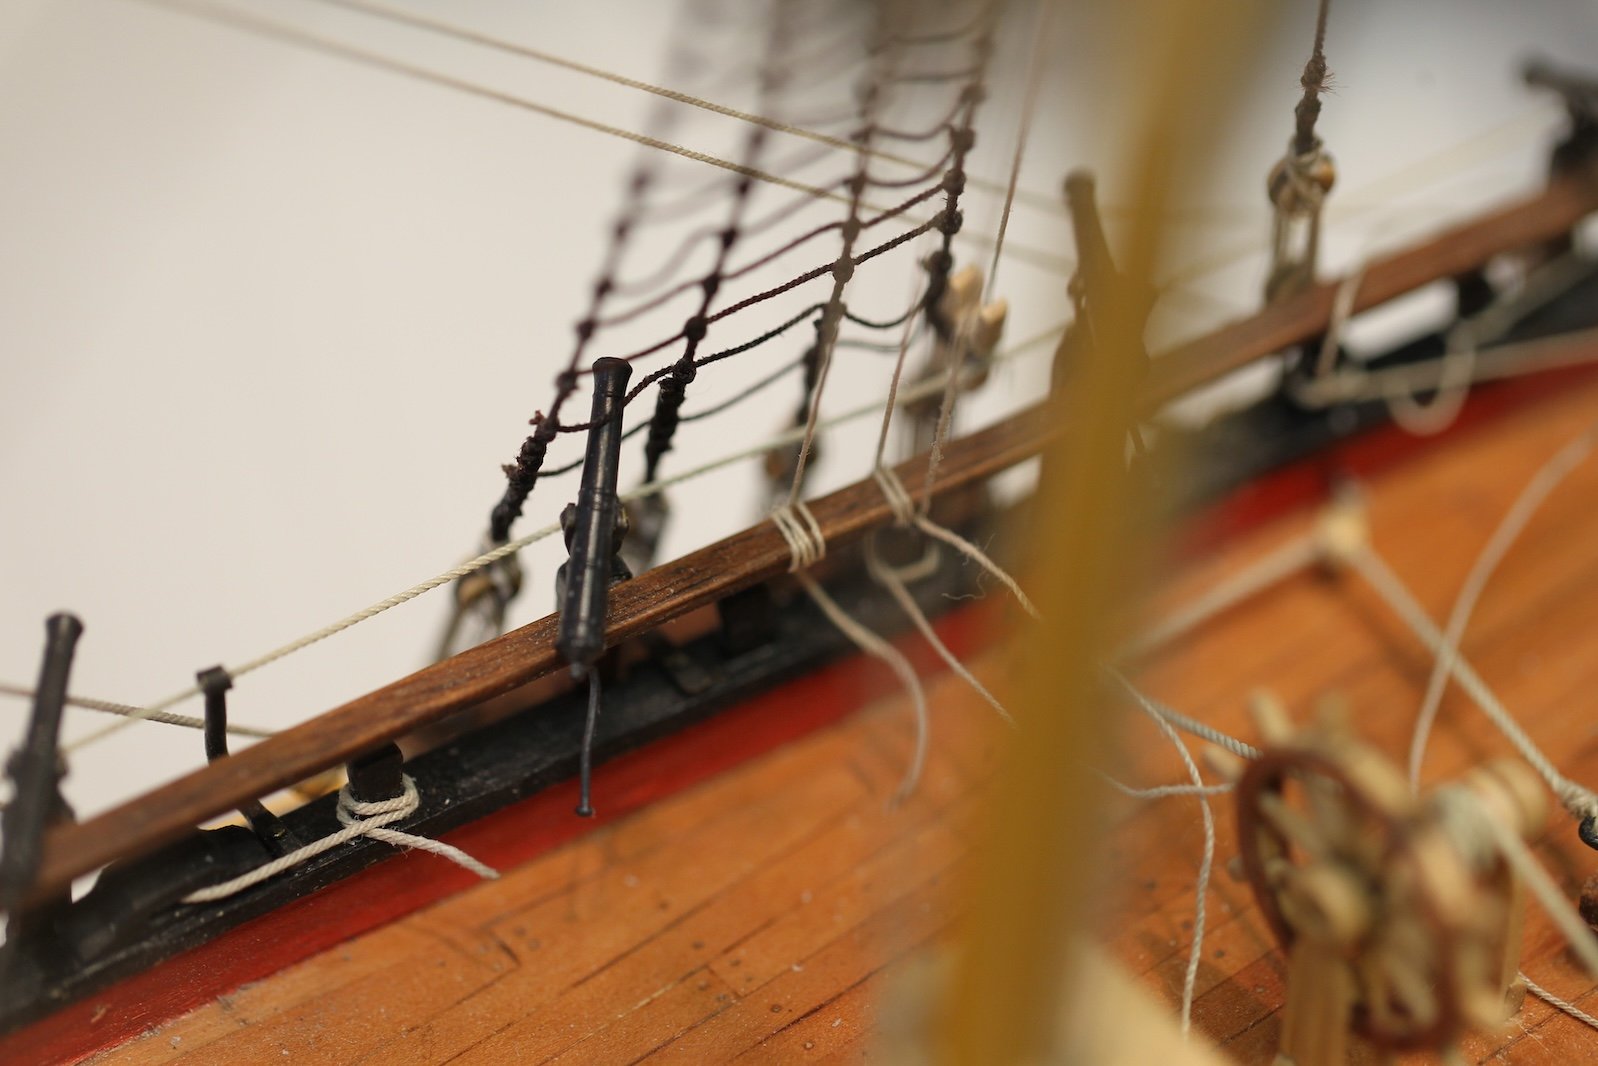
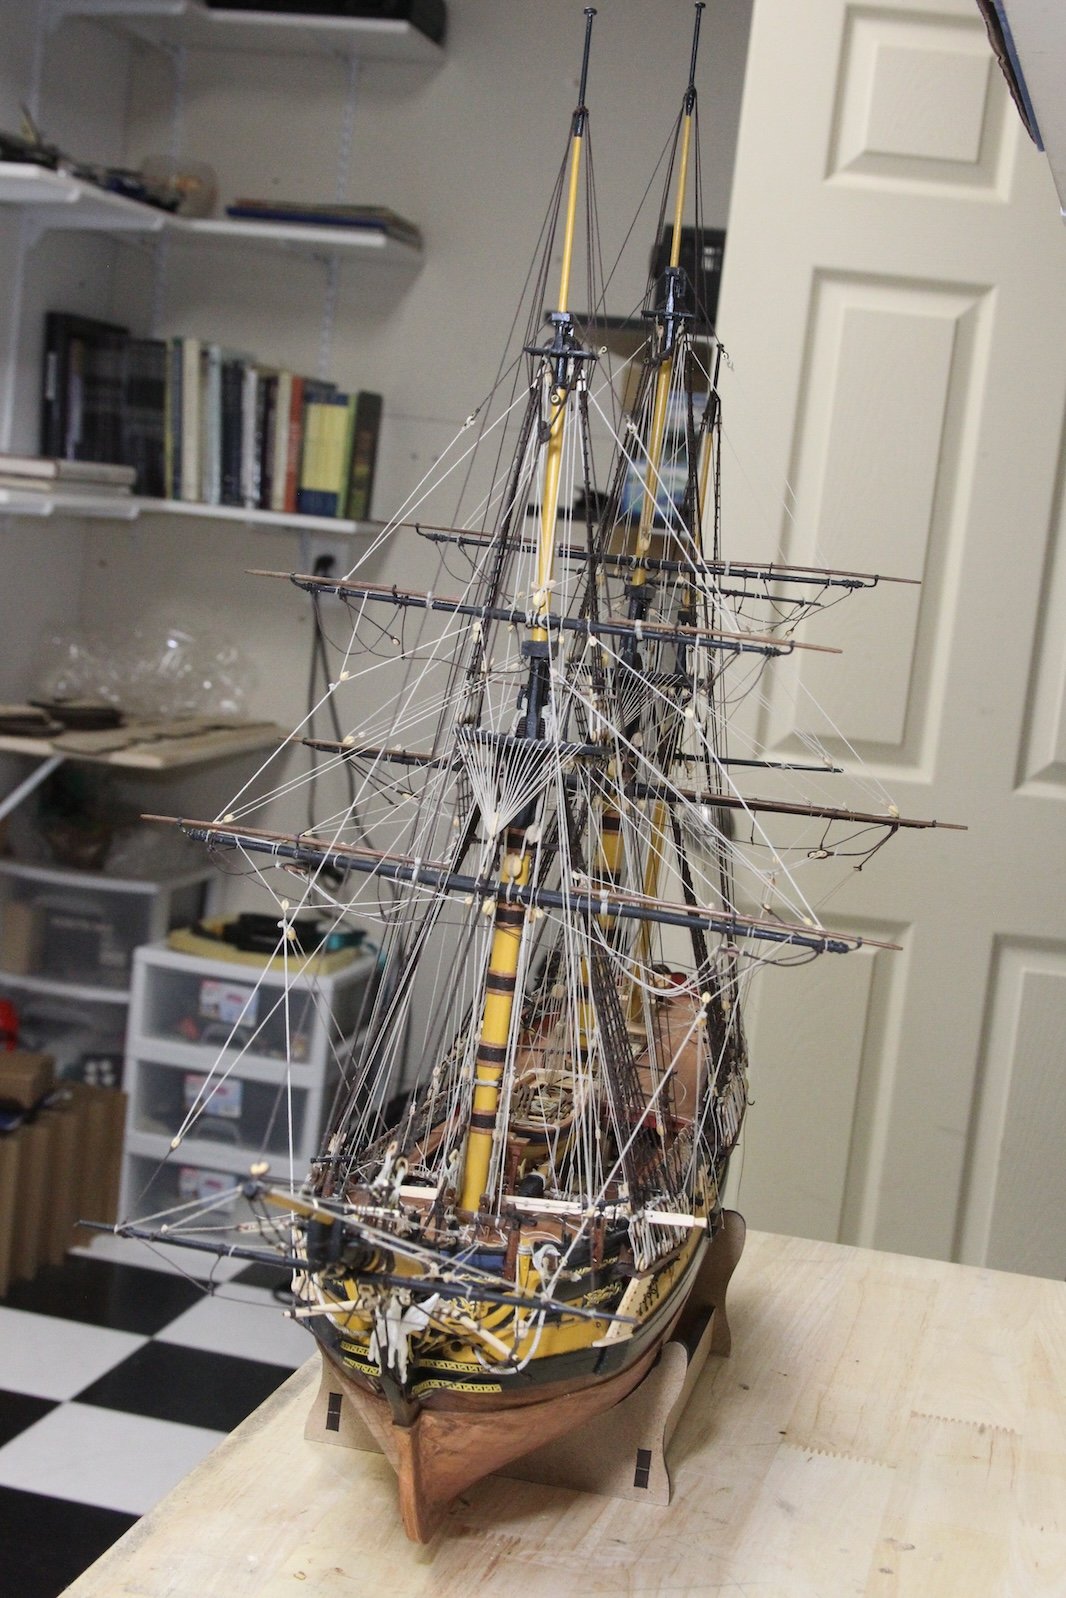
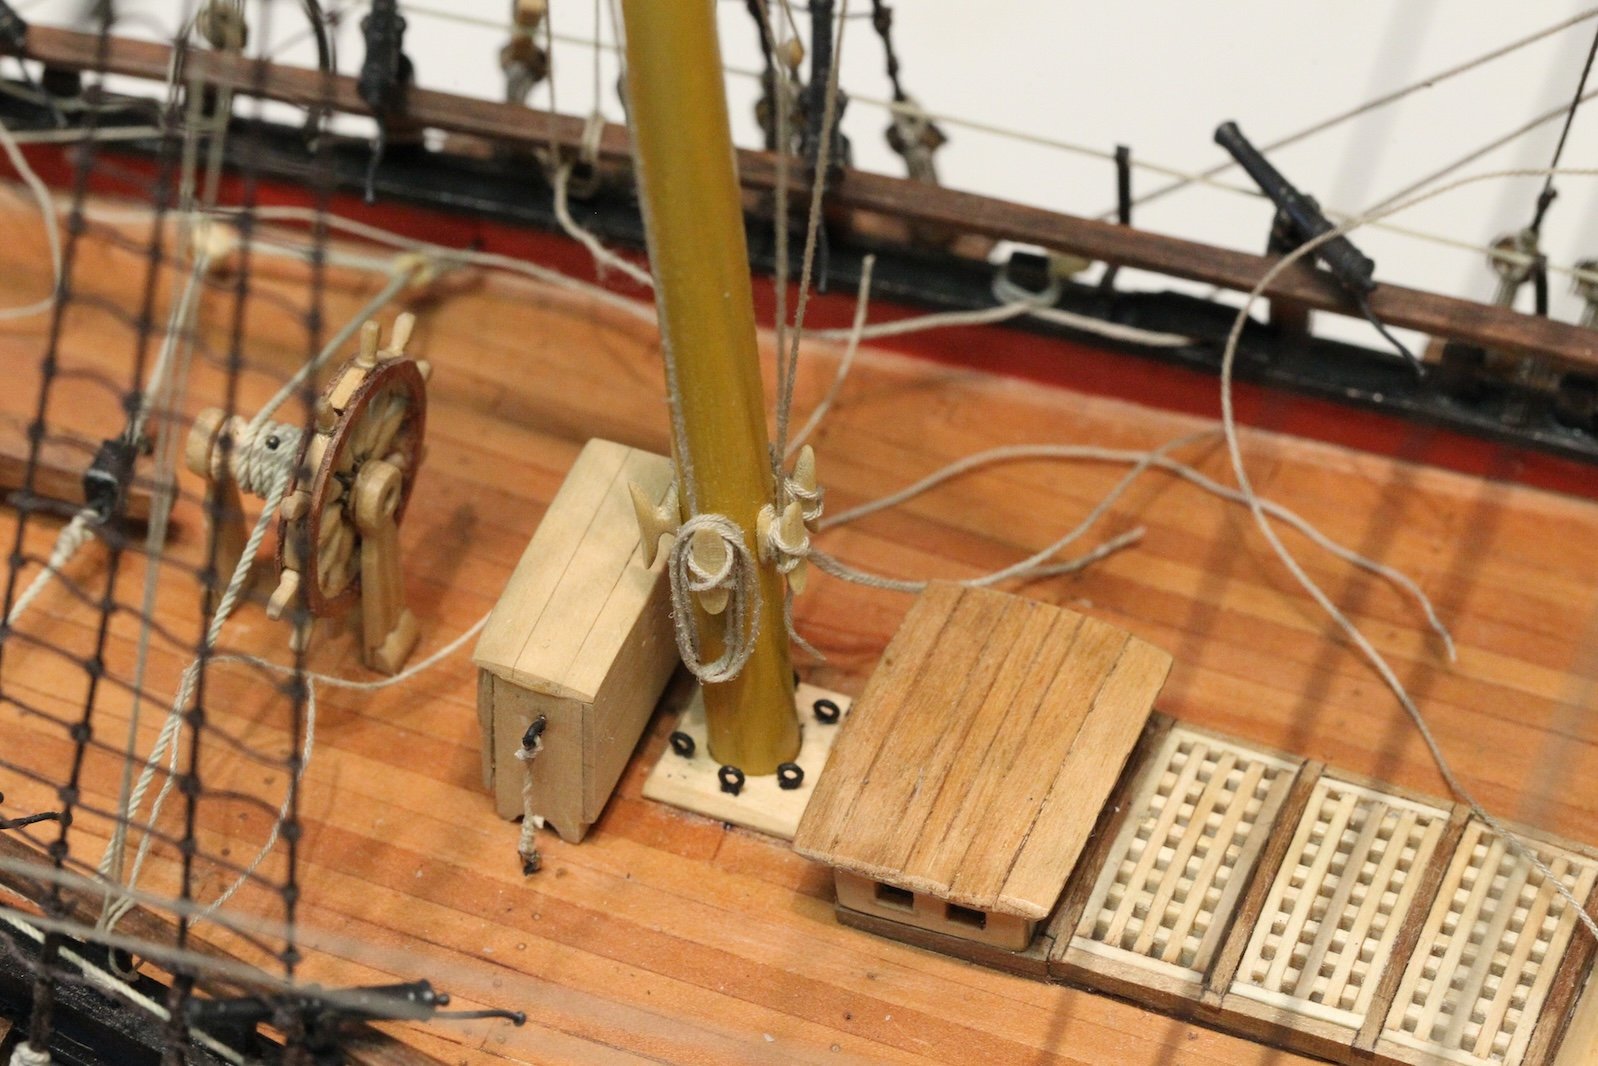
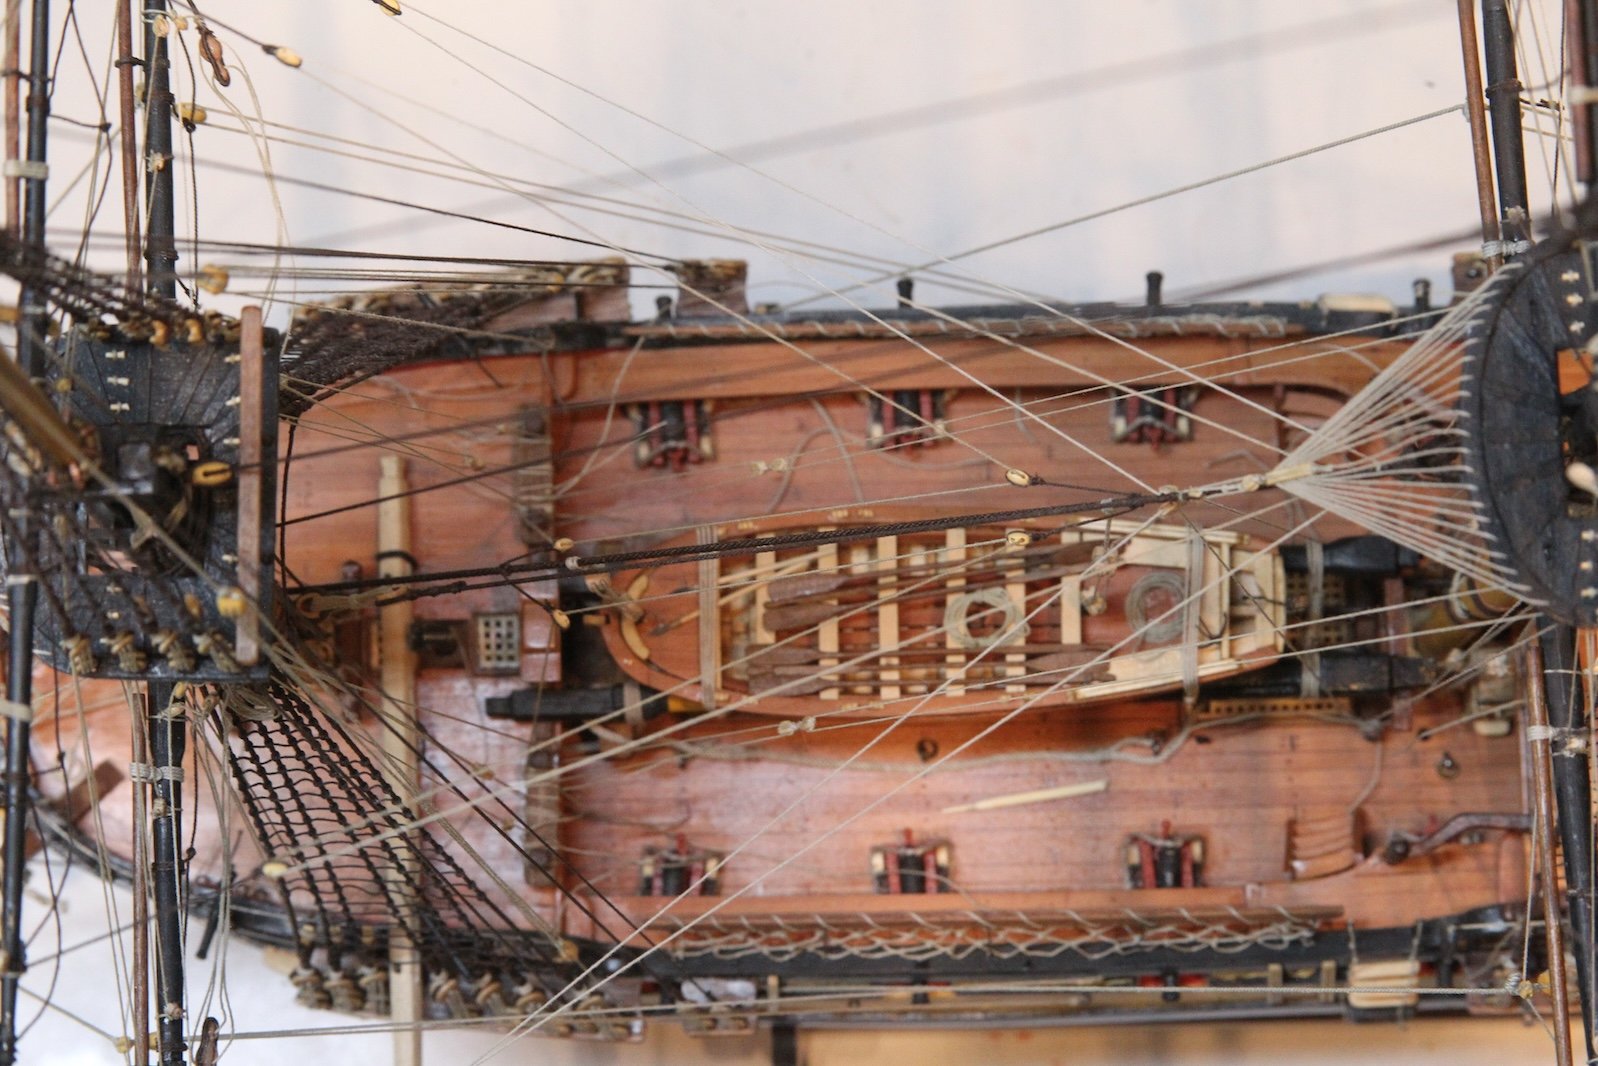
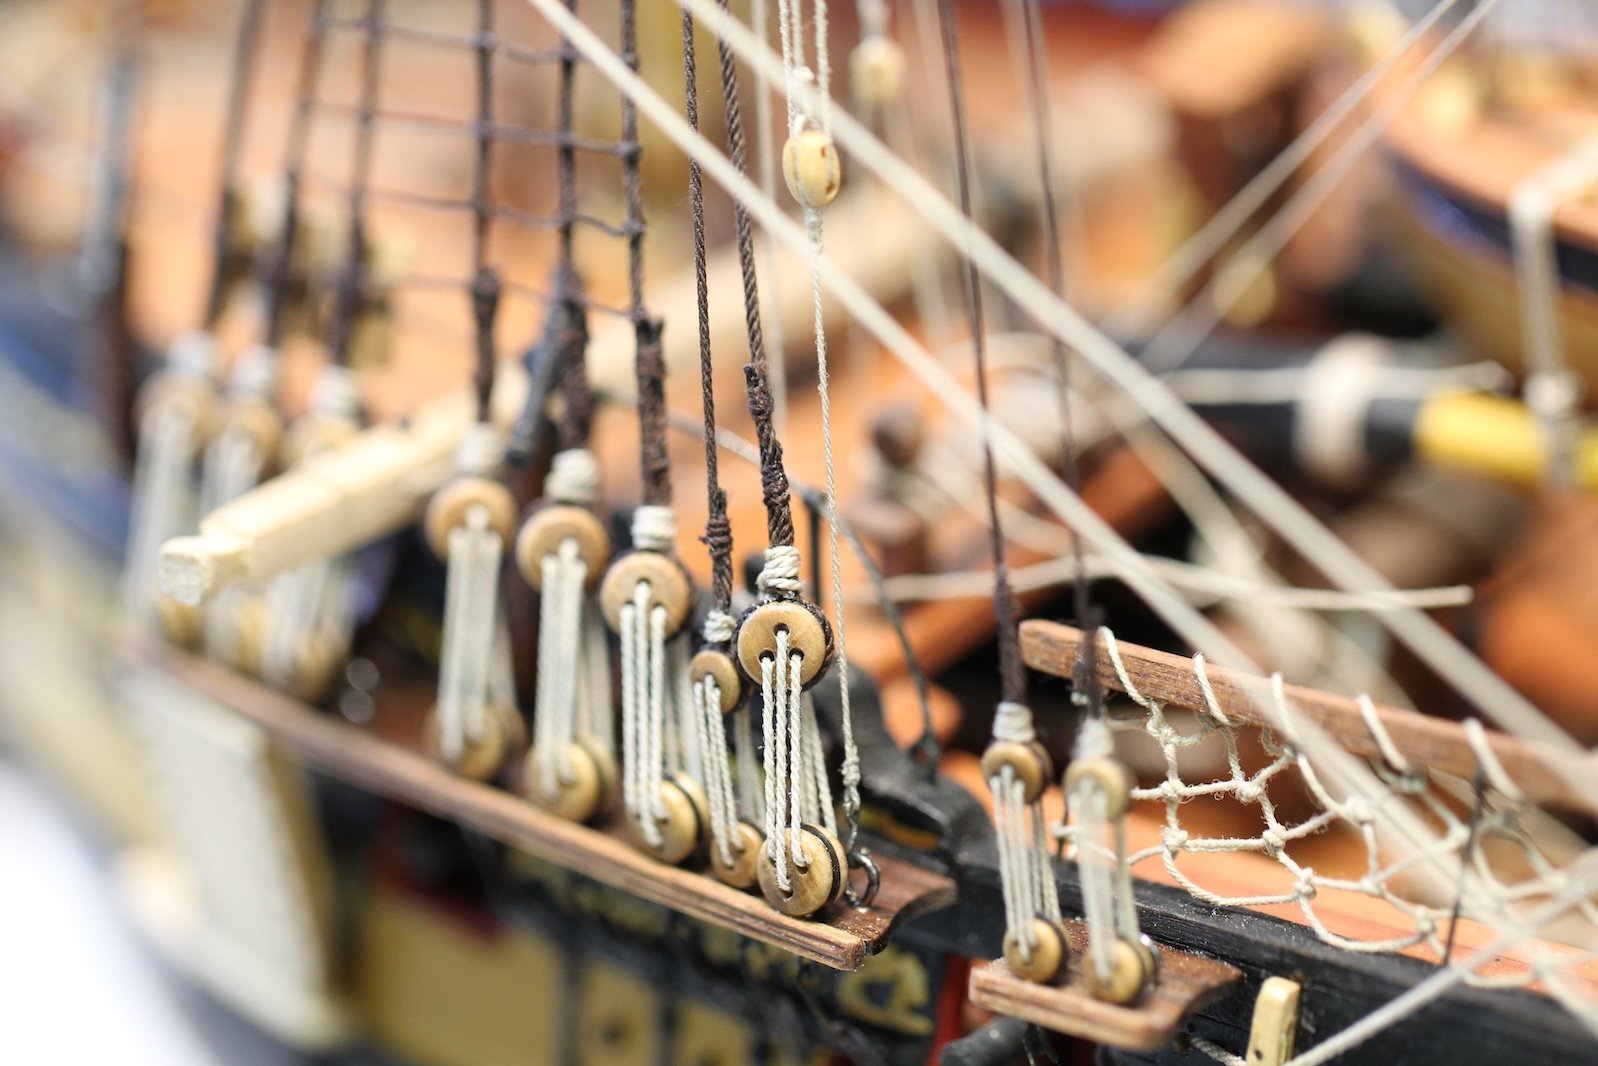
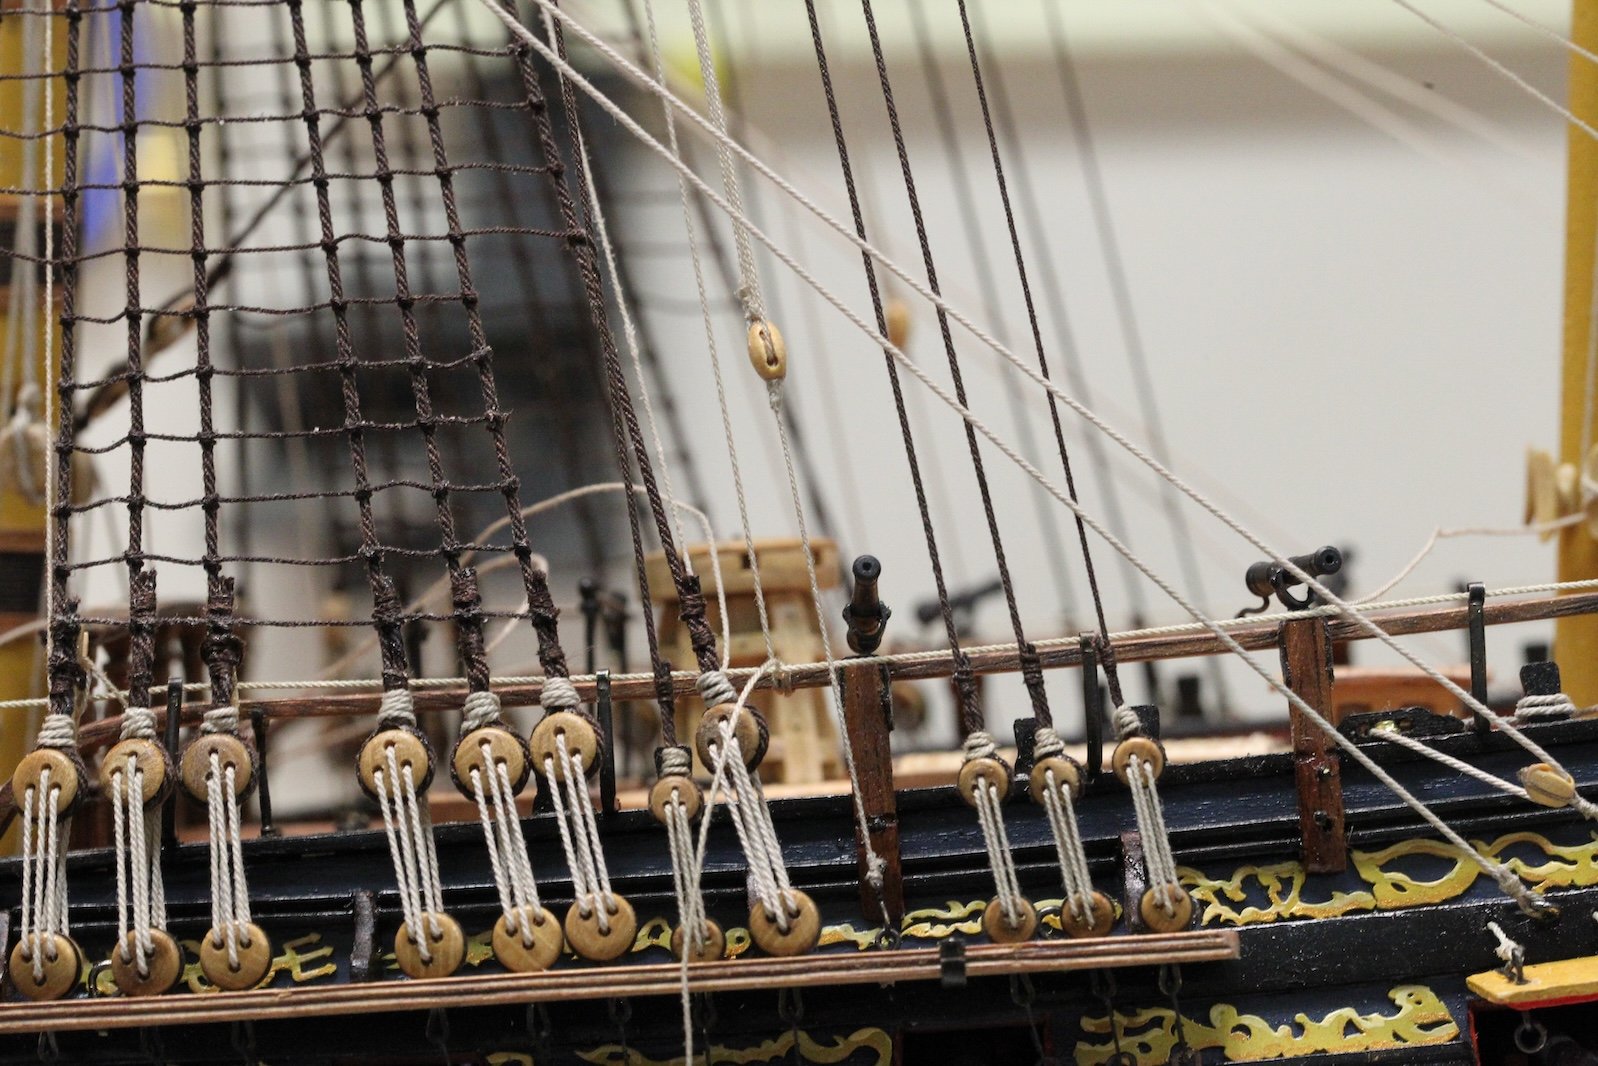
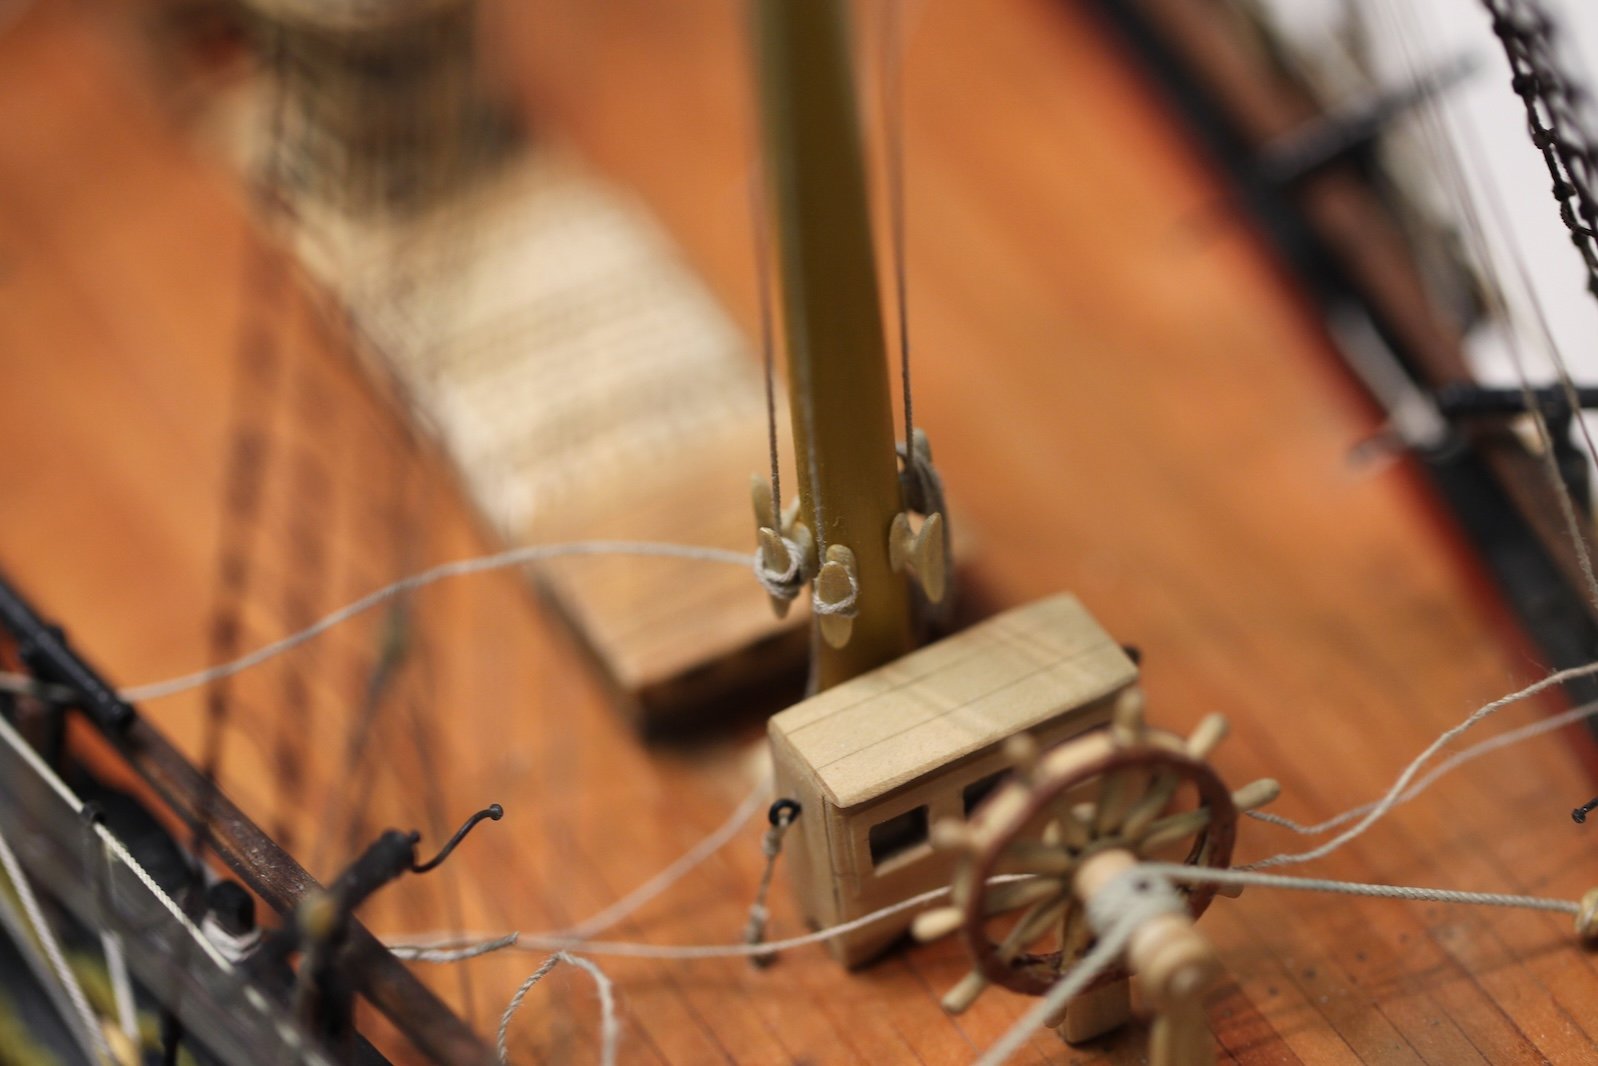
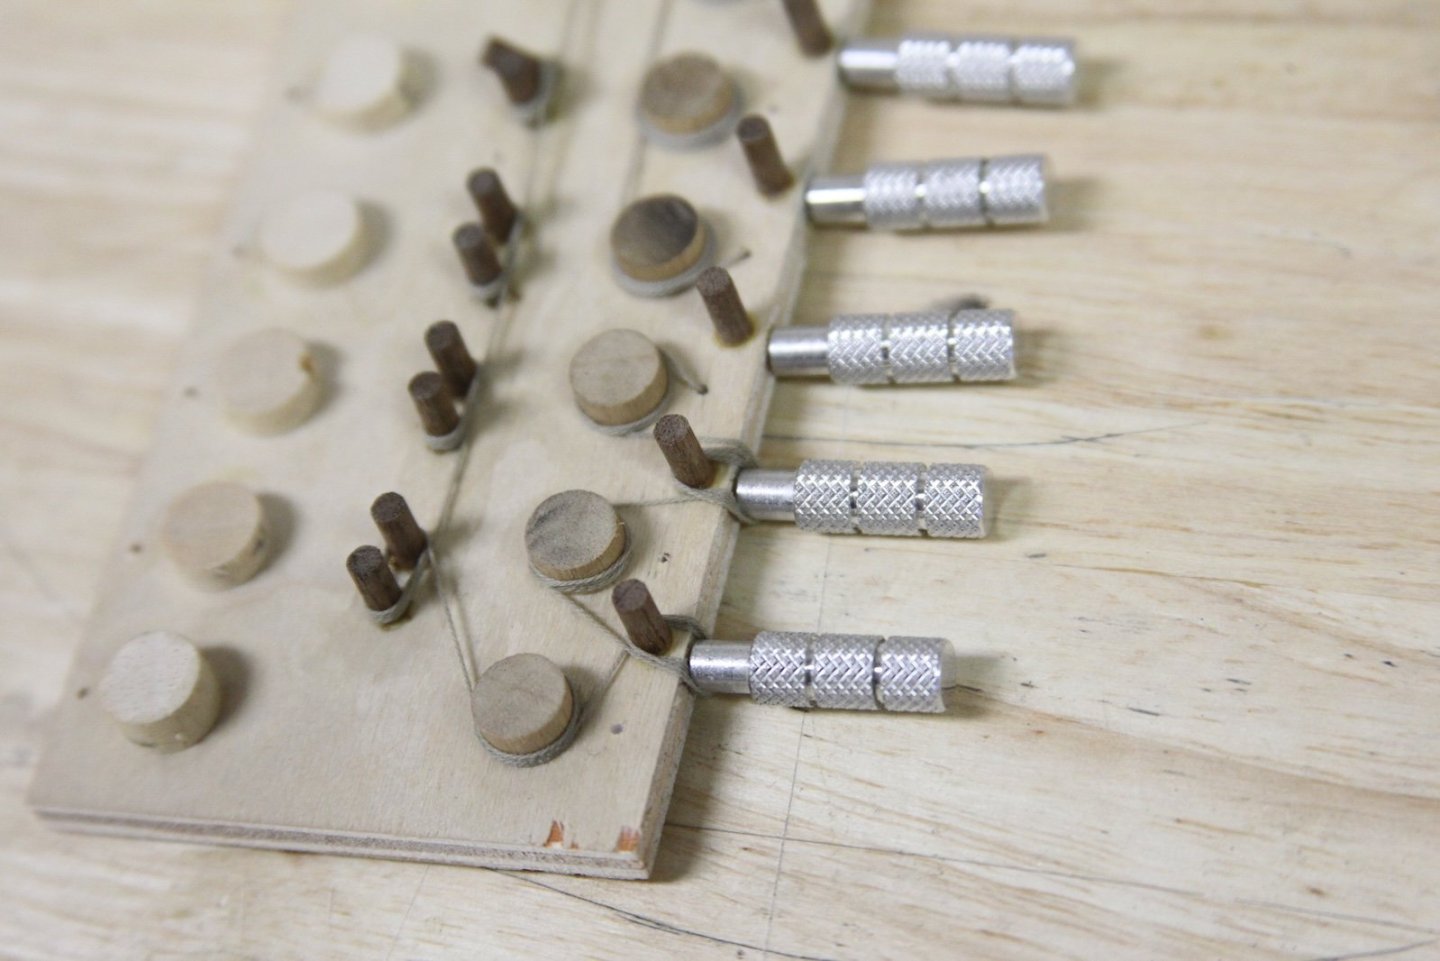
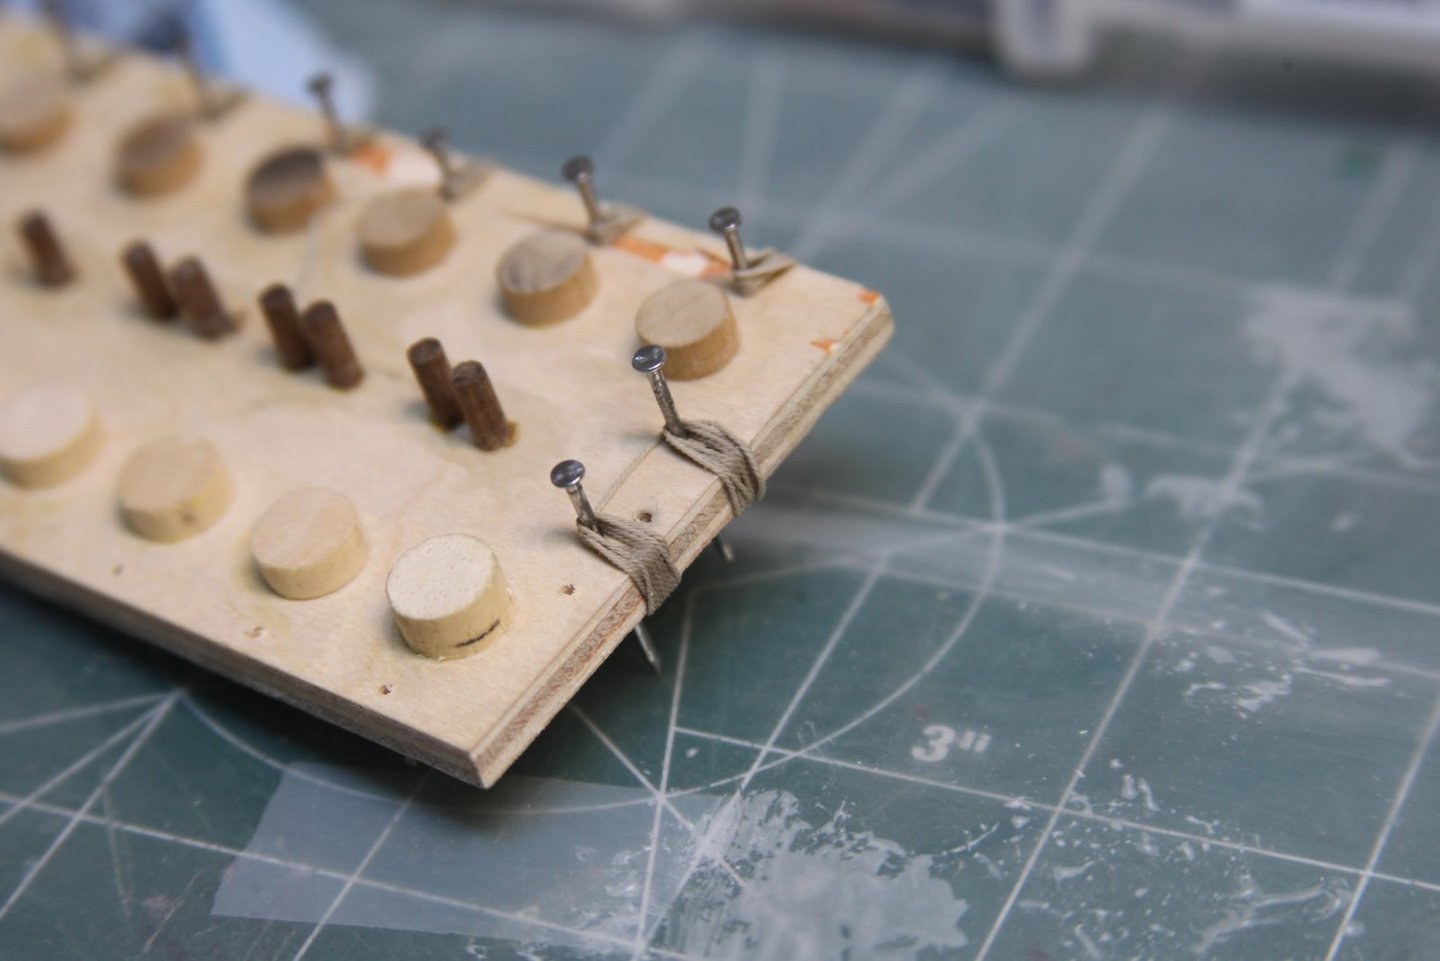
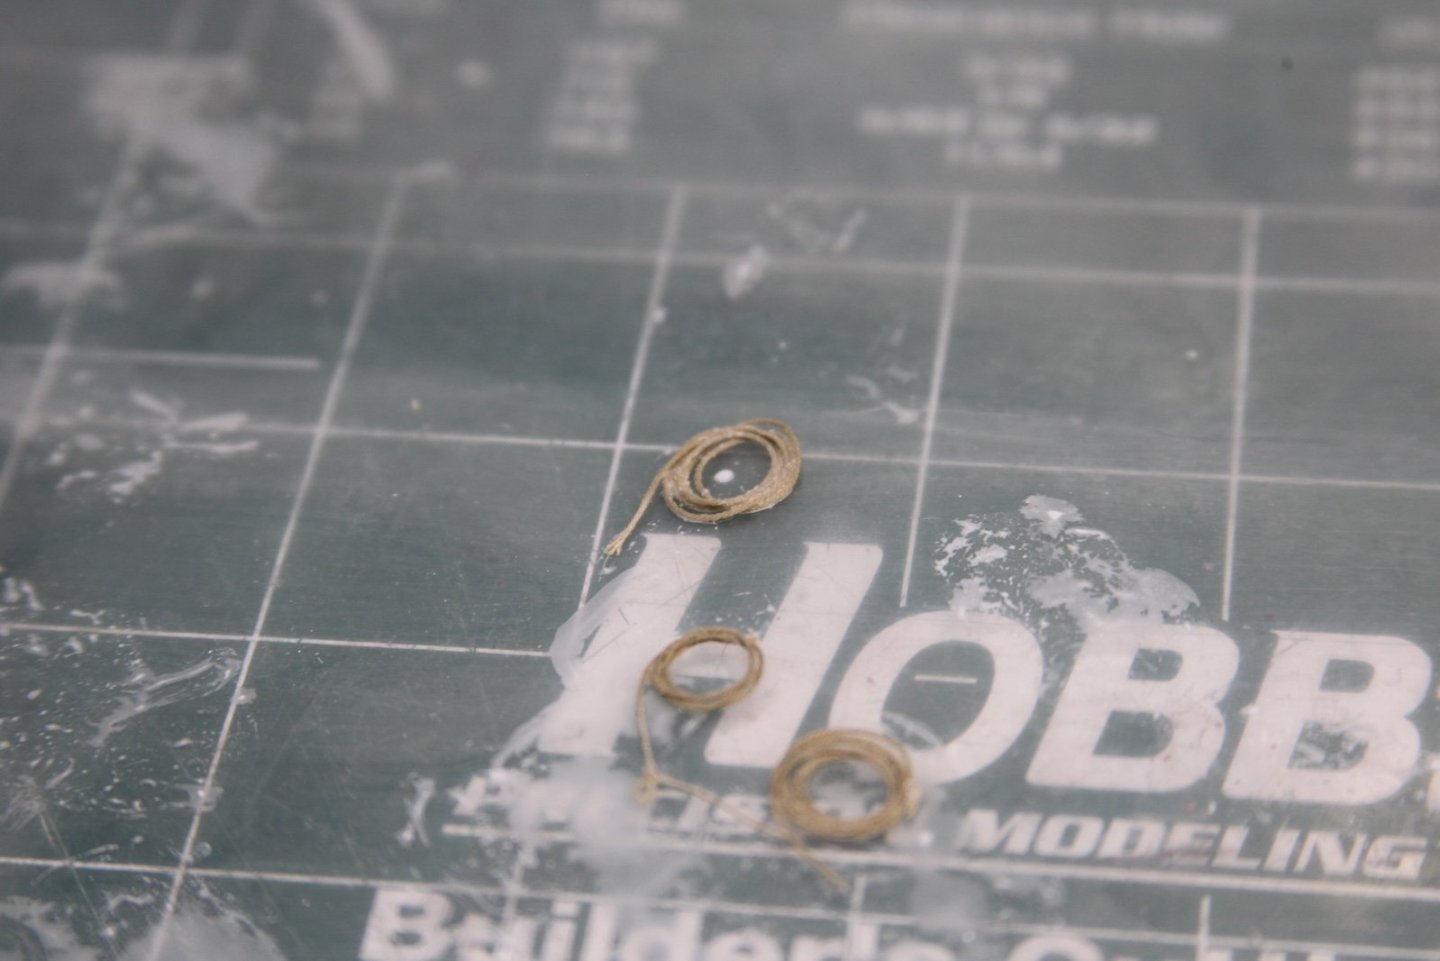
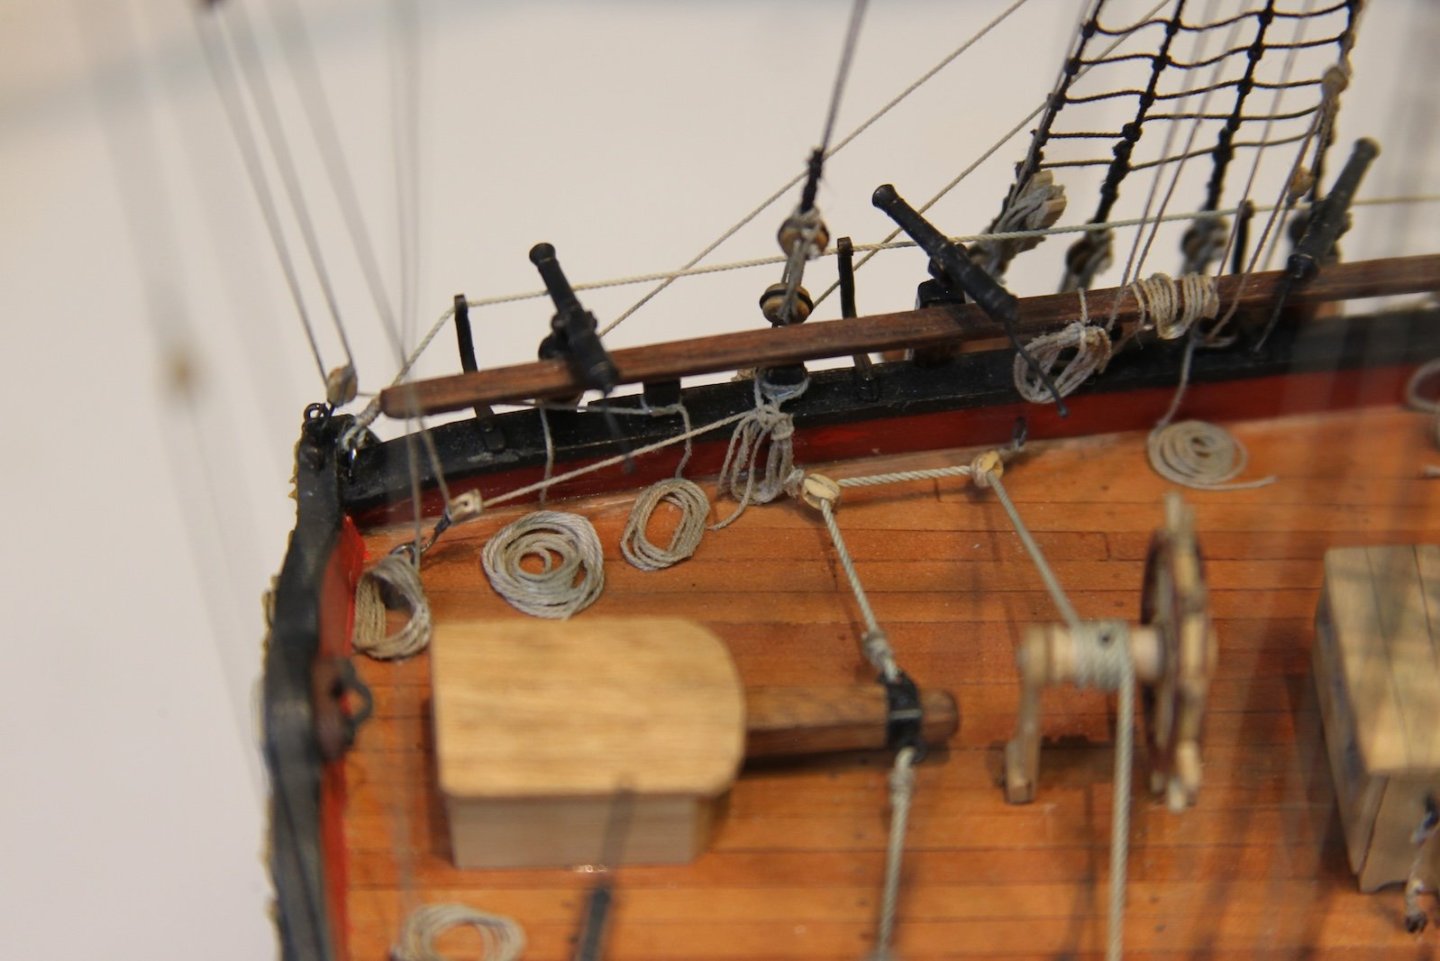
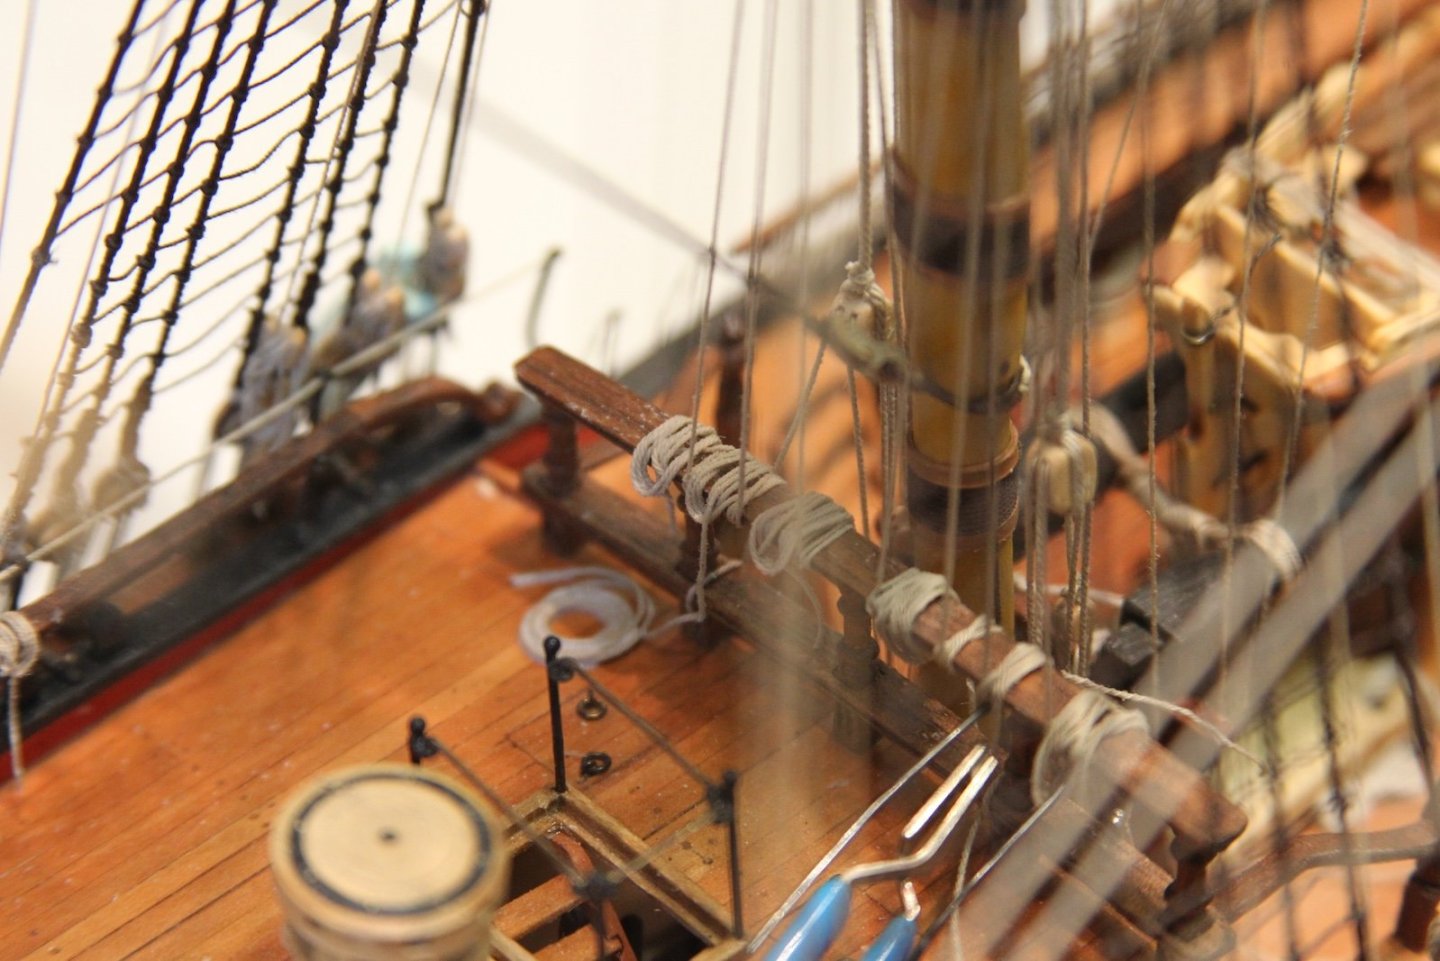
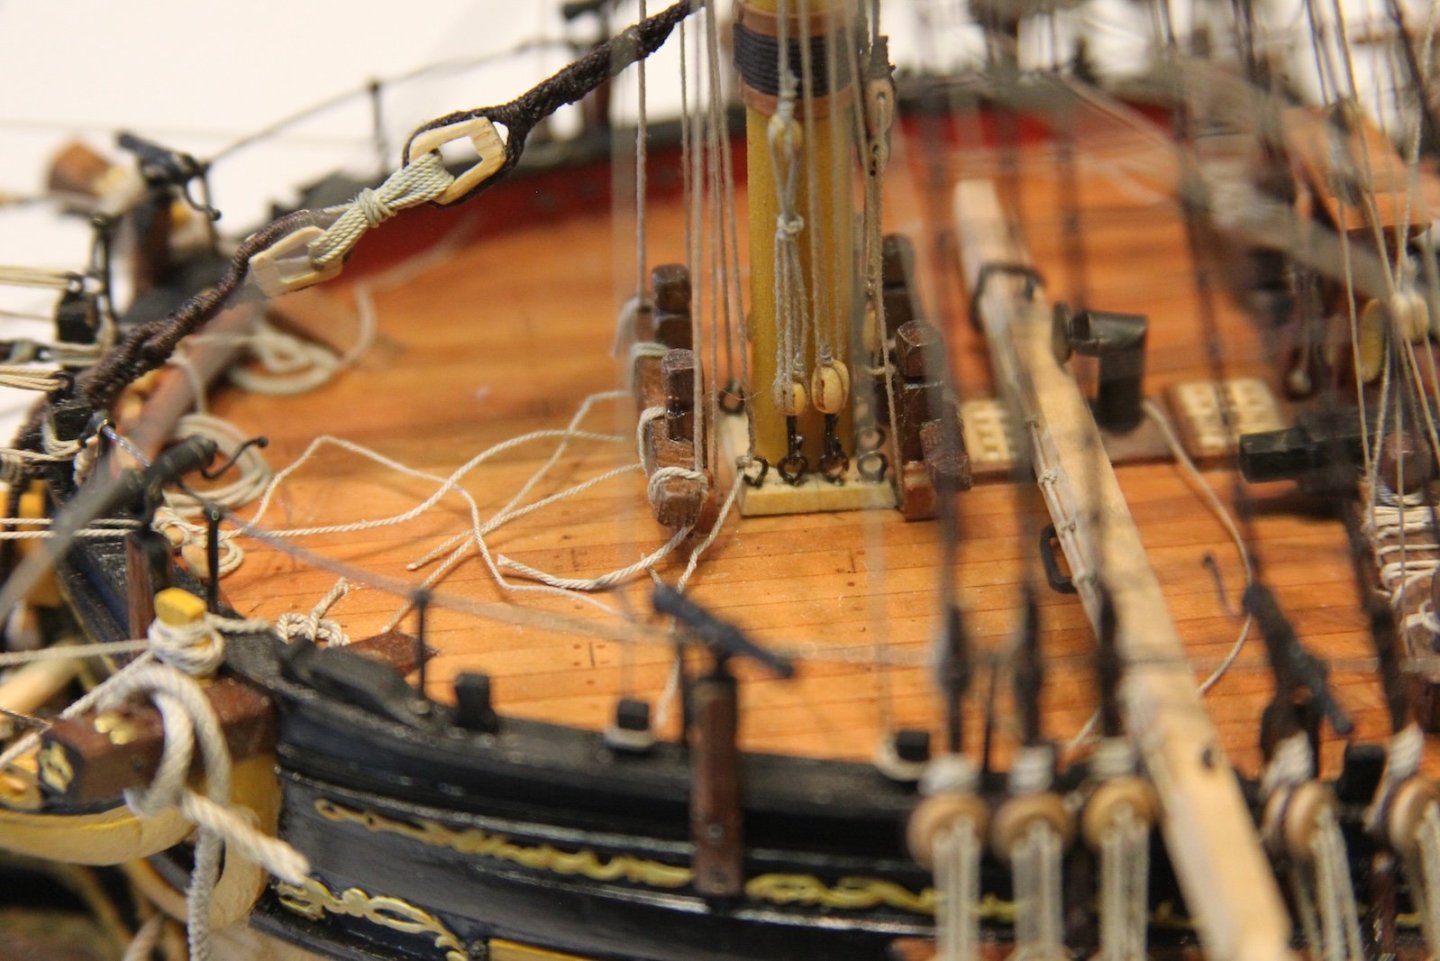
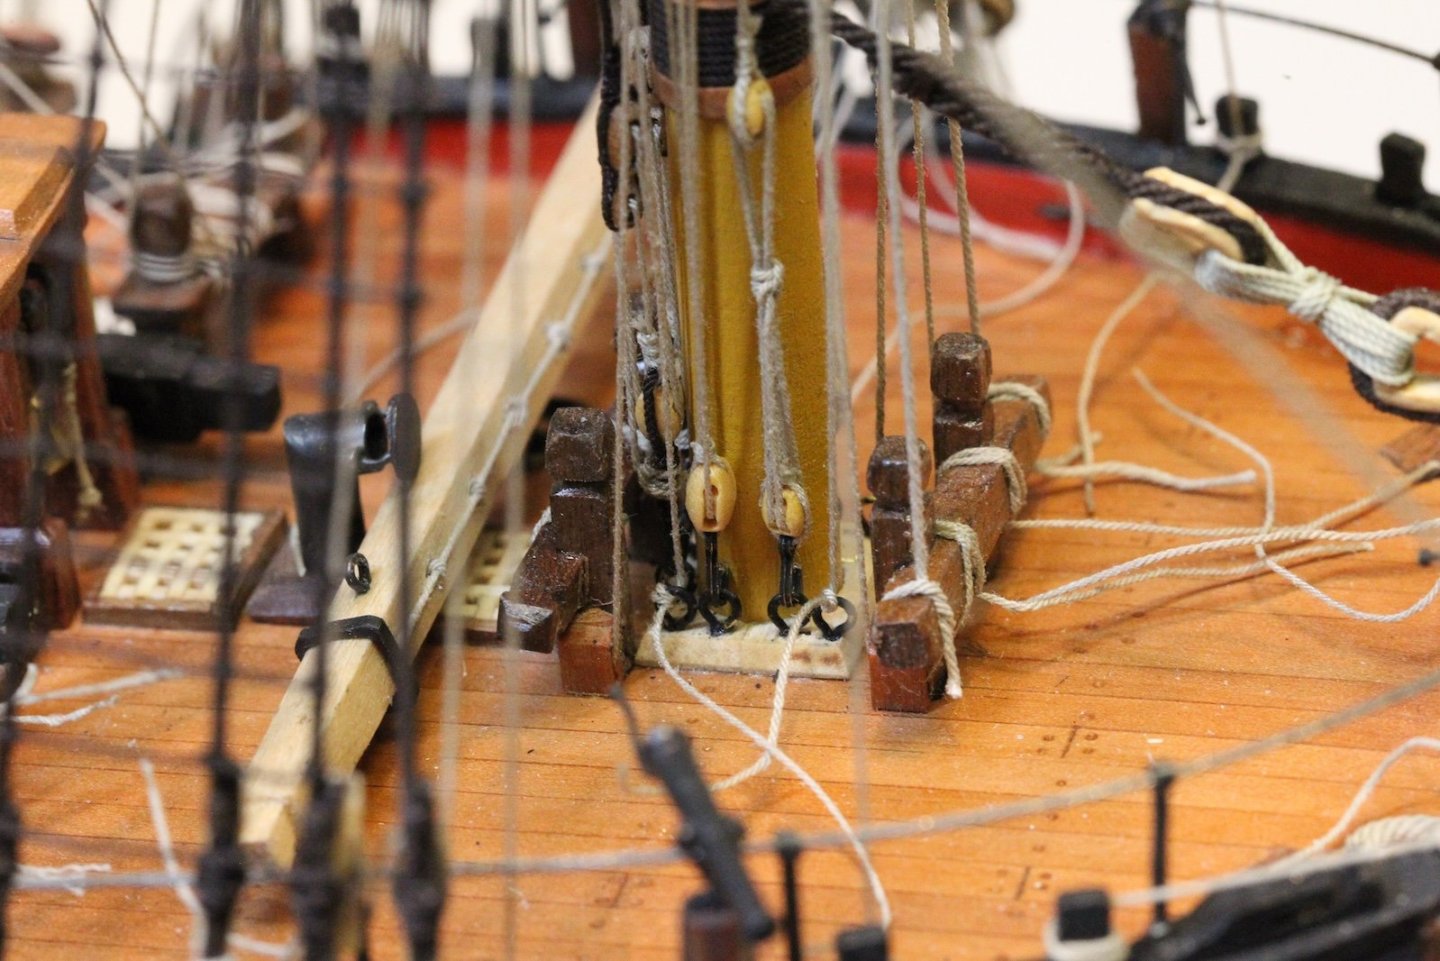
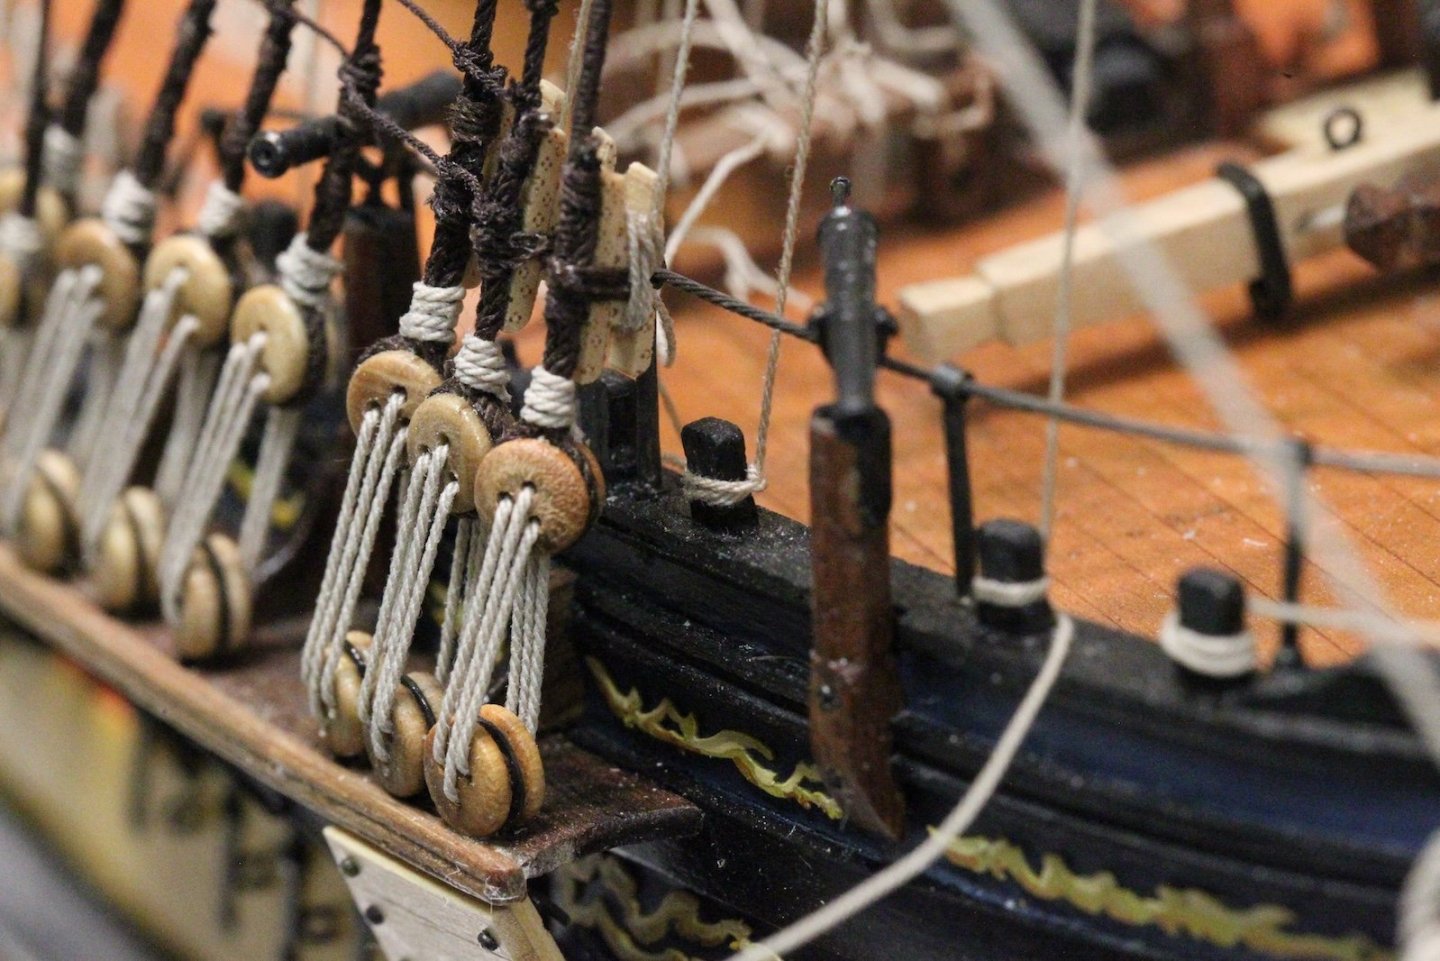
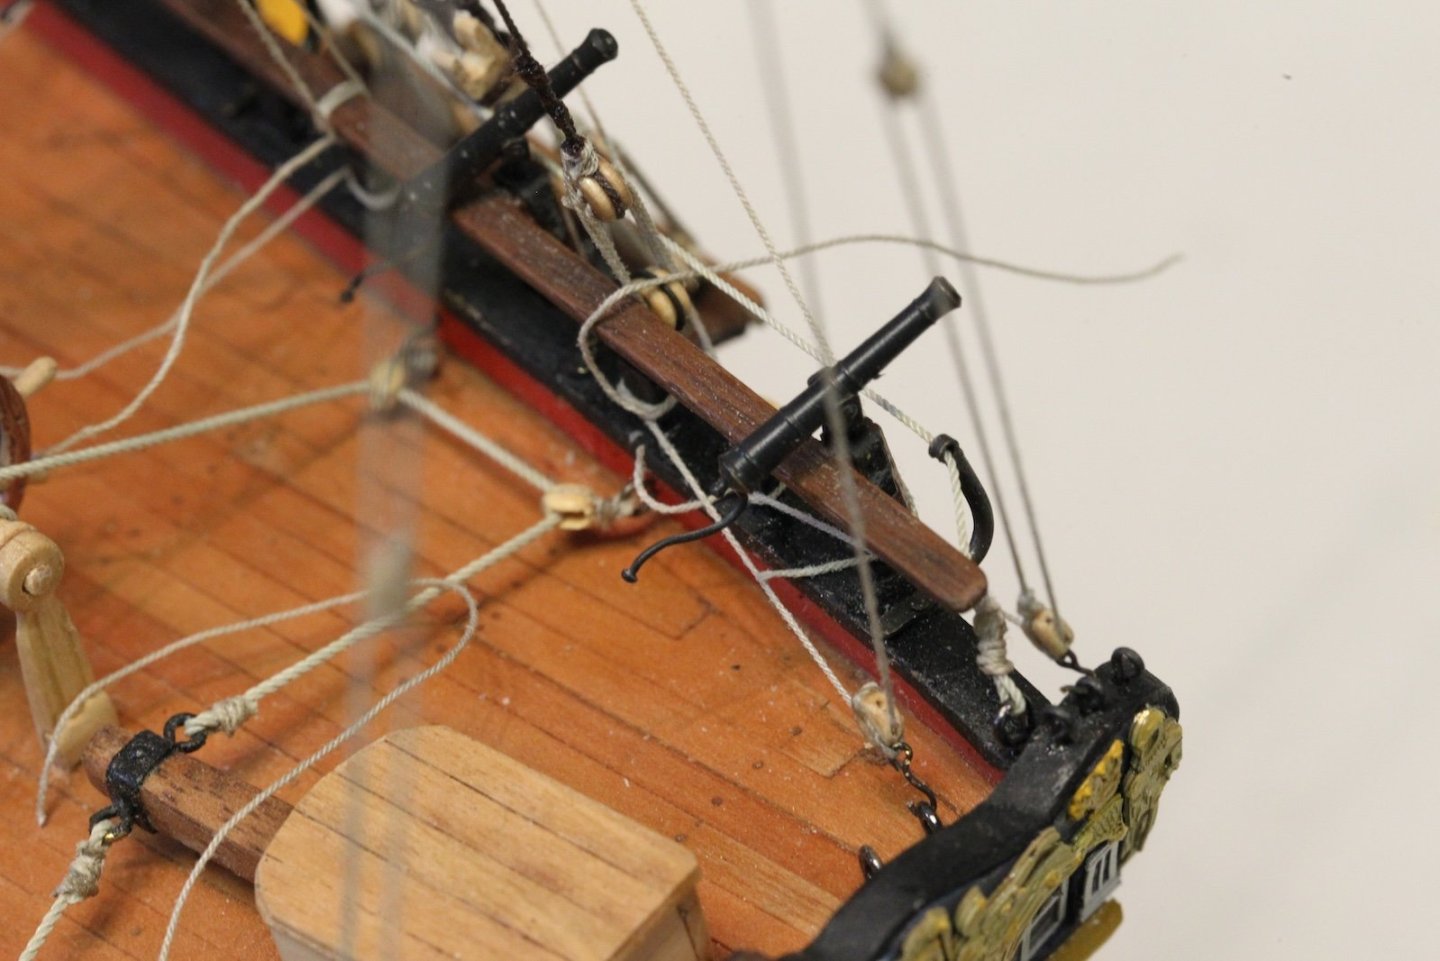
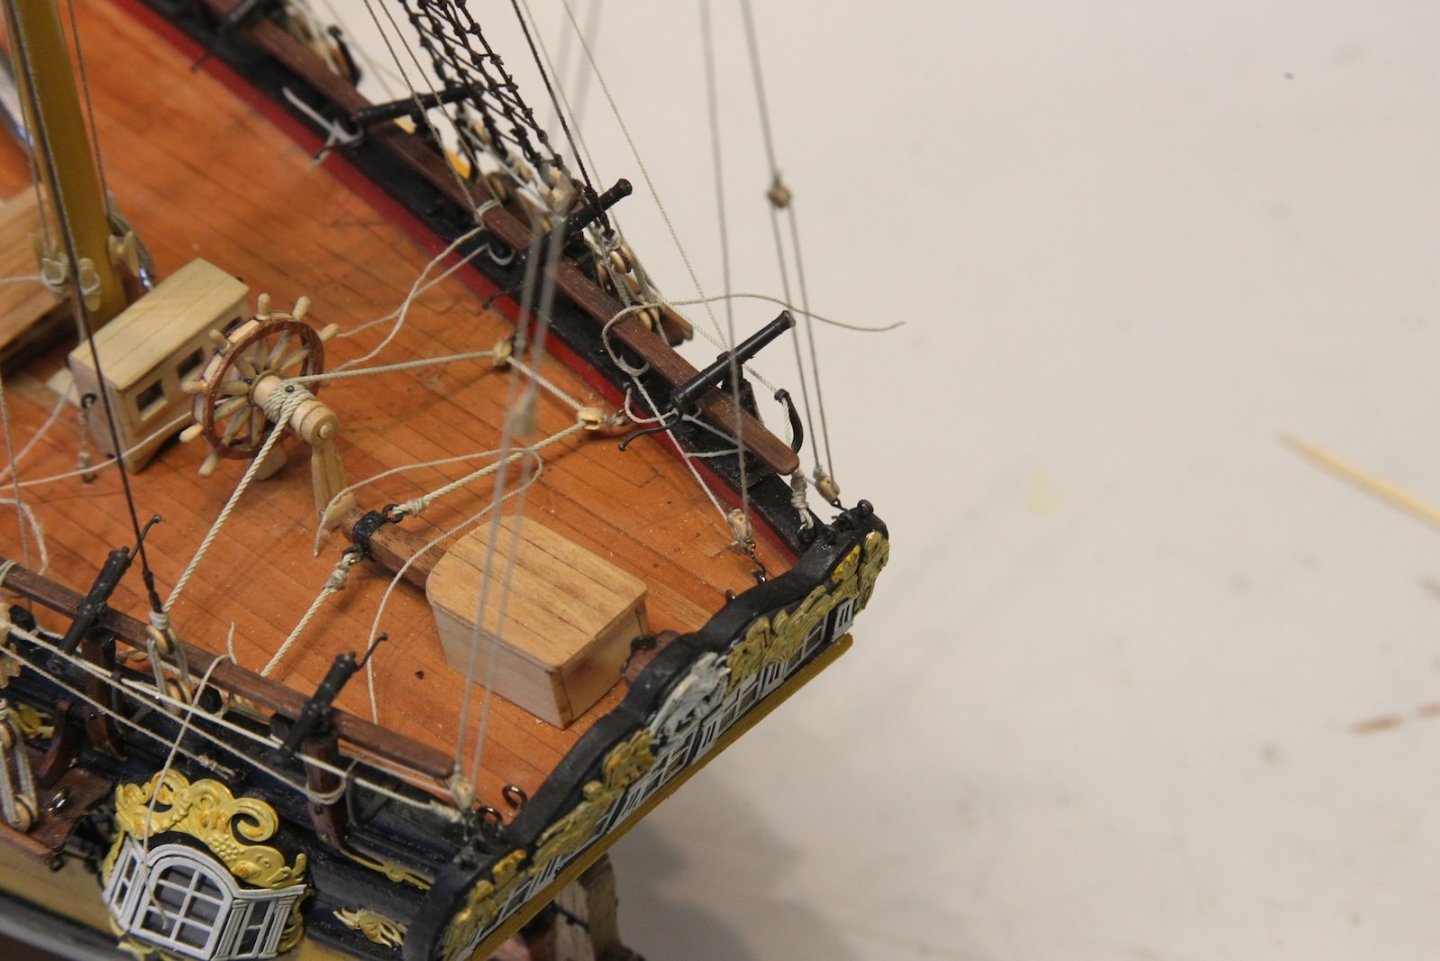
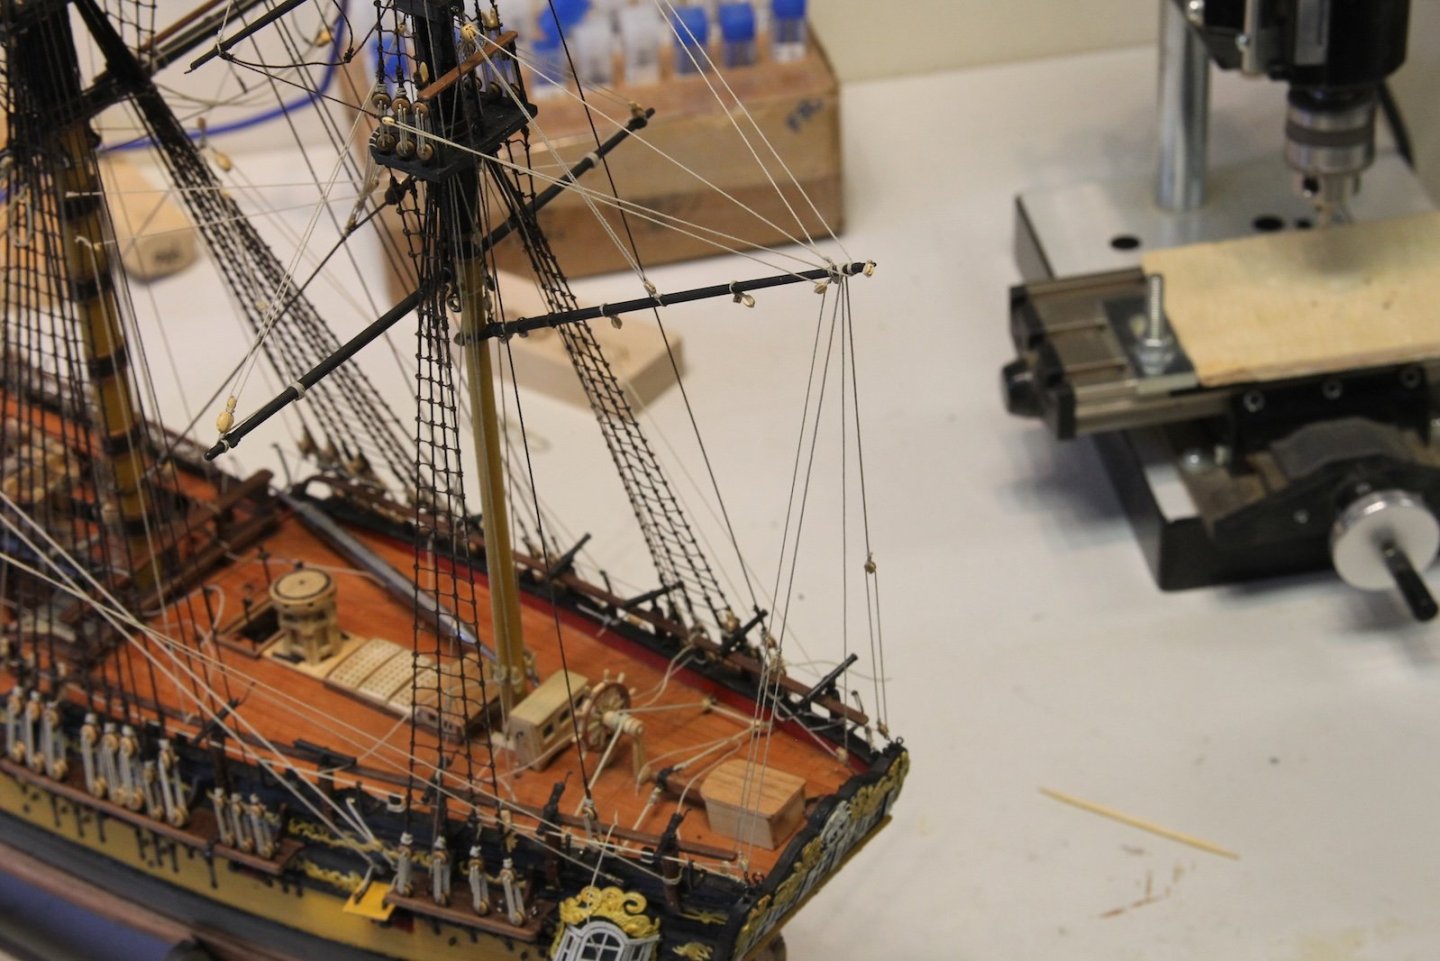
Not of lot of progress being made right now, just concentrating on faking down the rope coils. Everyone has their own individual processes and jigs for this. I have created a rope jig where I coil different size ropes in three main ways - coils for cleats, rope coils on the deck, and coils flopped over rails. Each rope is wrapped over the jib then slathered in diluted PVA. It is important to get the dilution of the pva correct as too thin means it doesn't hold and too think produces a sloppy coil with bits of glue visible. I also hand loop coils for the deck, place them on a plastic sheet (so the glue comes up easily after it's dried) then coat them with the PVA. Obviously its also important to carefully match the rope sizes with the ropes that are seized. They are then placed in their various locations around the ship. As shown above, the coils are coated again once they're in place and held with various clips and pins. A small metal wire holds the railing coils in place until they dry. Honestly, I've never been a fan of coils that are too tidy. I did that on my San Juan build (which was my first) and never really dug it. Some bit of disheveled seems much more realistic to me. Meantime, I'm slowly moving from the aft to the fore of the ship, with much more work to go.


- 419 replies
-
- 11
-
-
-
- Victory Models
- Pegasus
- (and 2 more)
-
Moonbug reacted to a post in a topic:
HMS Pegasus 1776 by Moonbug - Amati Models - 1:64
-
Thanks Walter, BE, Ross, and Andrew - Very much appreciate you all checking in and the kind words. Obviously I've found MSW invaluable over the last 12 years, and so the idea that my build(s) maybe helpful to others is flattering and humbling. I'll have an update soon - right now I'm coiling a lot of small rope - which is tedious and unglamorous.
- 419 replies
-
- 3
-
-
- Victory Models
- Pegasus
- (and 2 more)
-
Moonbug reacted to a post in a topic:
HMS Pegasus 1776 by Moonbug - Amati Models - 1:64
-
Moonbug reacted to a post in a topic:
HMS Pegasus 1776 by Moonbug - Amati Models - 1:64
-
Moonbug reacted to a post in a topic:
HMS Pegasus 1776 by Moonbug - Amati Models - 1:64
-
Thanks @LucZoRama - always gets a bit exciting when you start to see the light at the end of the tunnel.
- 419 replies
-
- 2
-
-
- Victory Models
- Pegasus
- (and 2 more)
-
Moonbug reacted to a post in a topic:
HMS Pegasus 1776 by Moonbug - Amati Models - 1:64
-
Moonbug reacted to a post in a topic:
USS Constitution by JSGerson - Model Shipways Kit No. MS2040
-
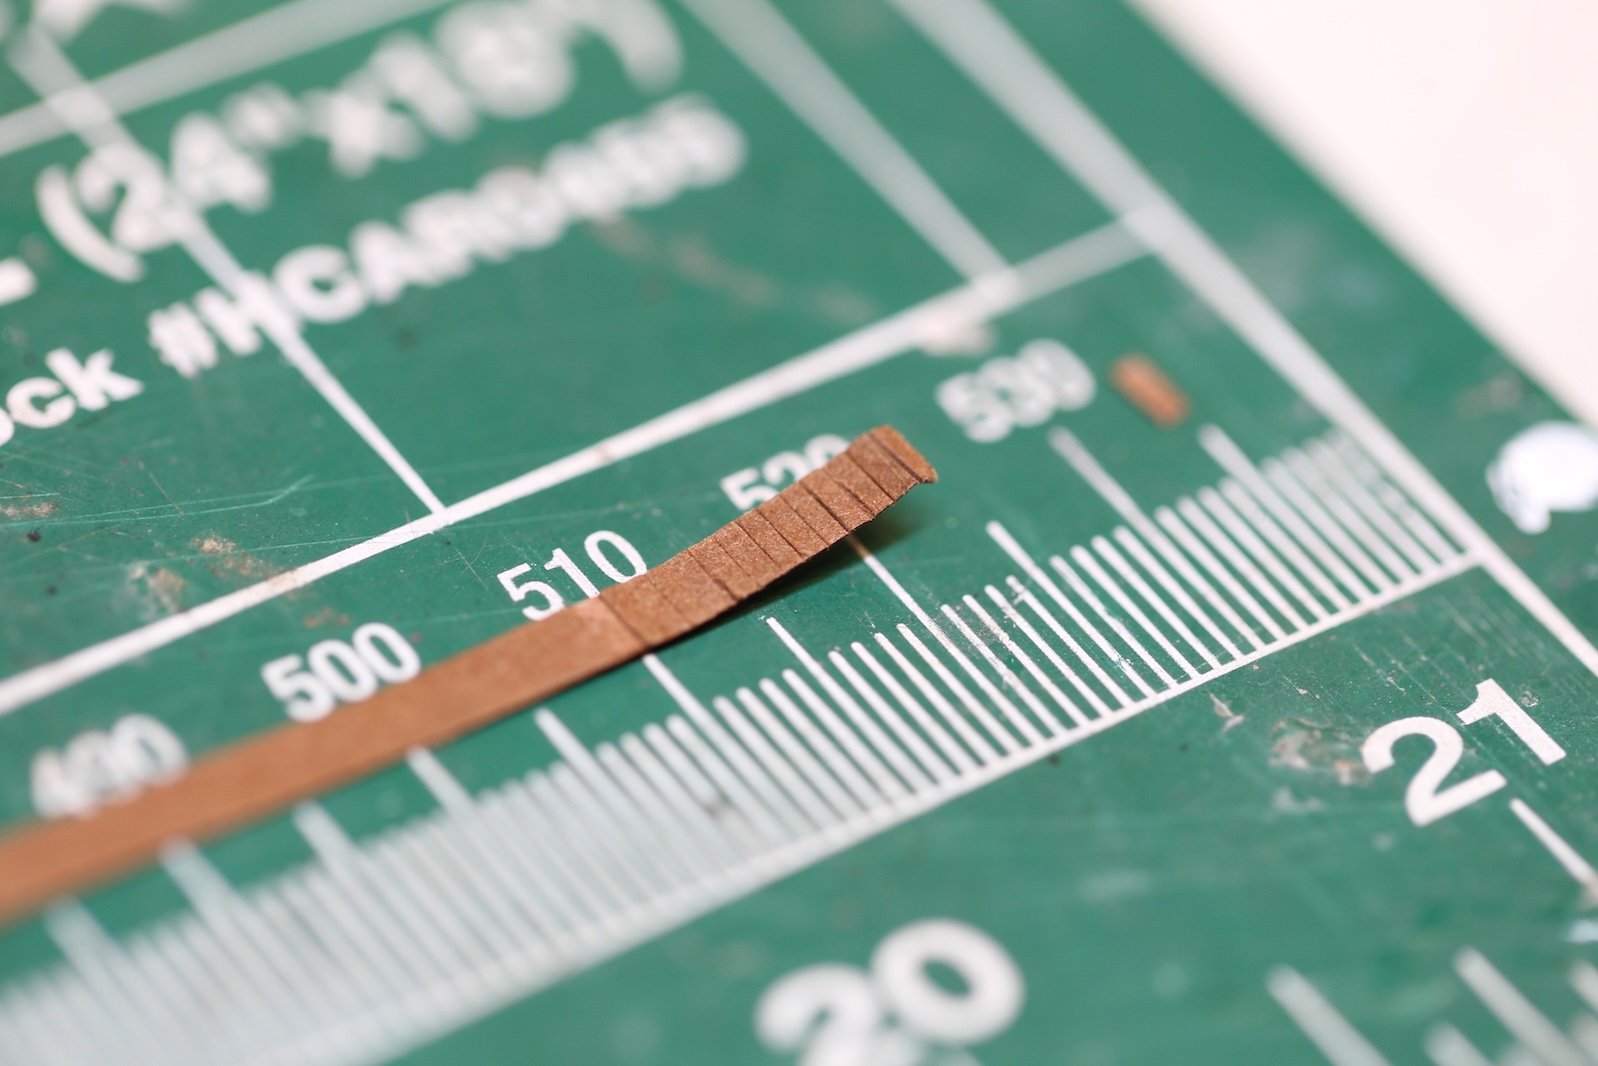
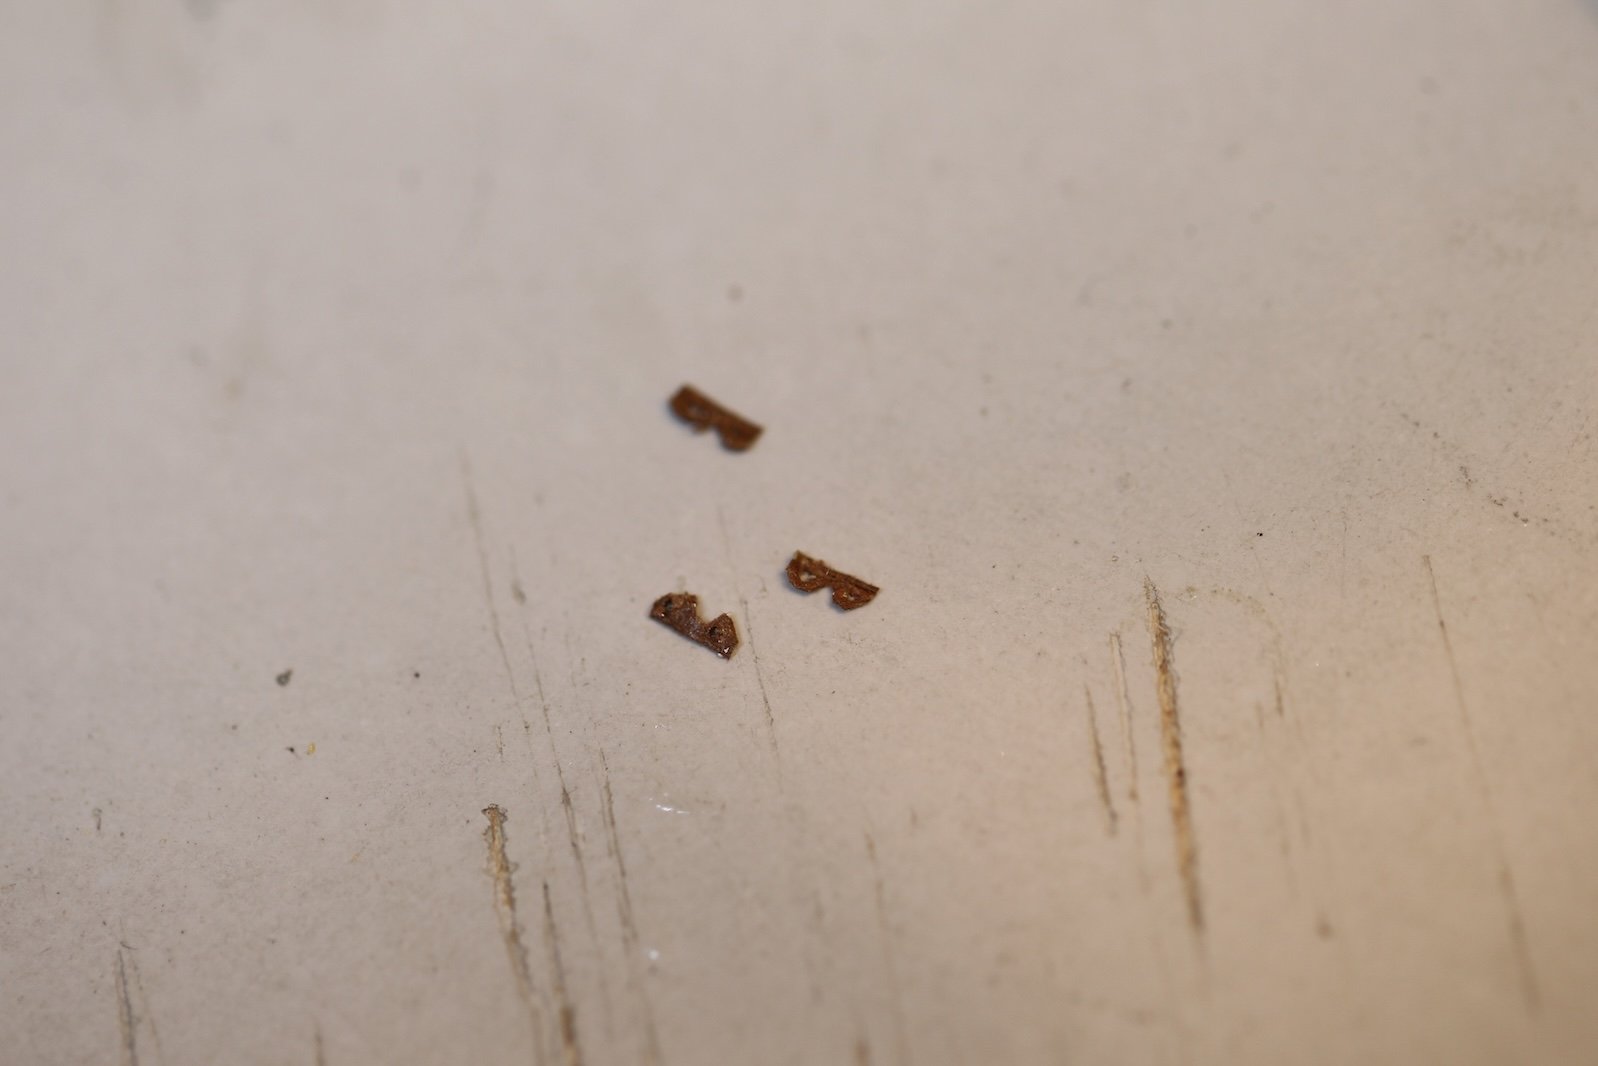
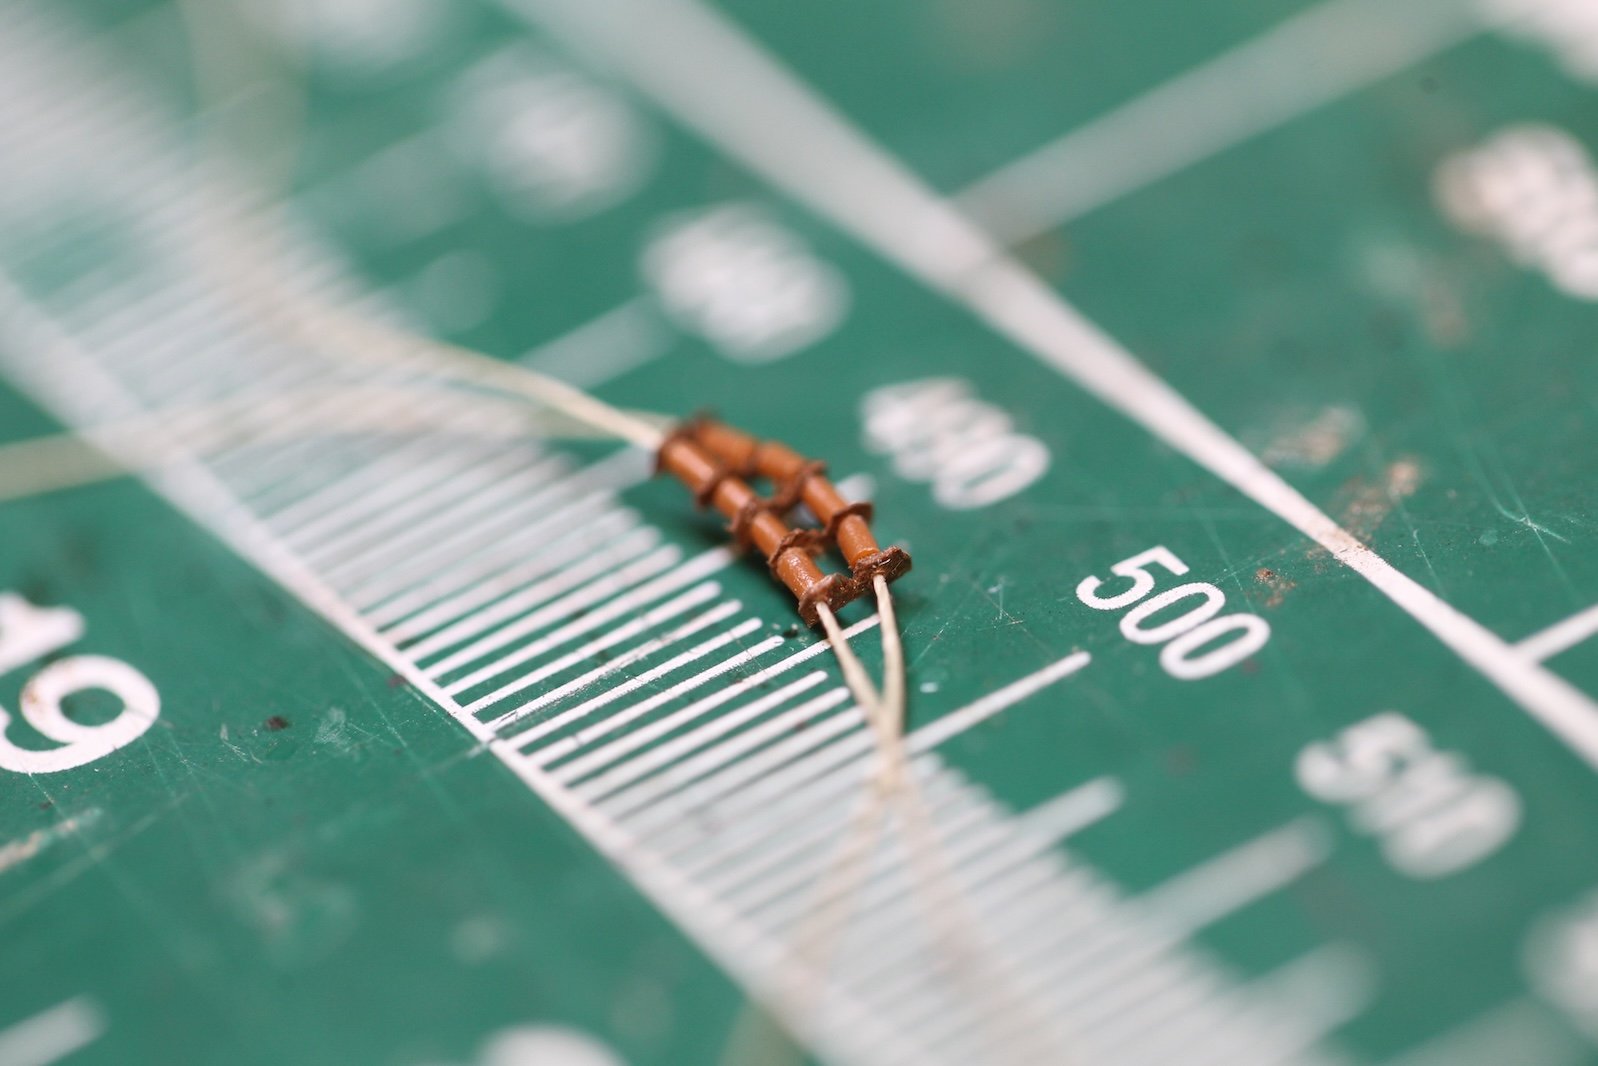
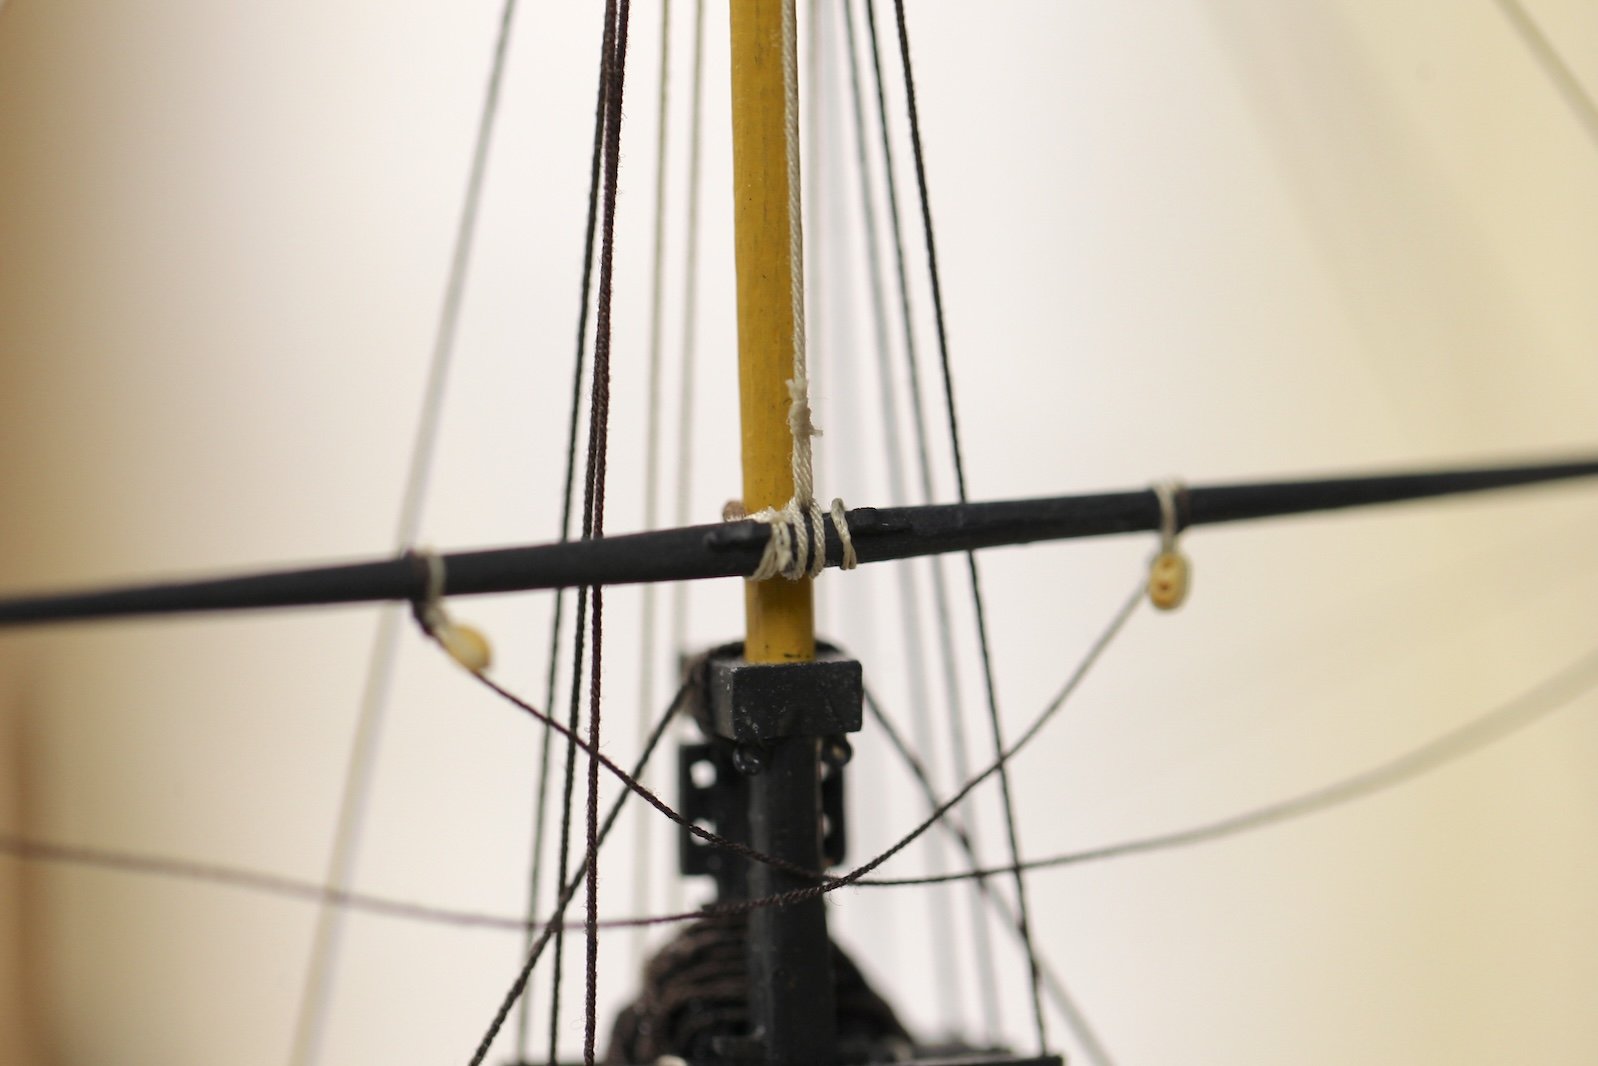
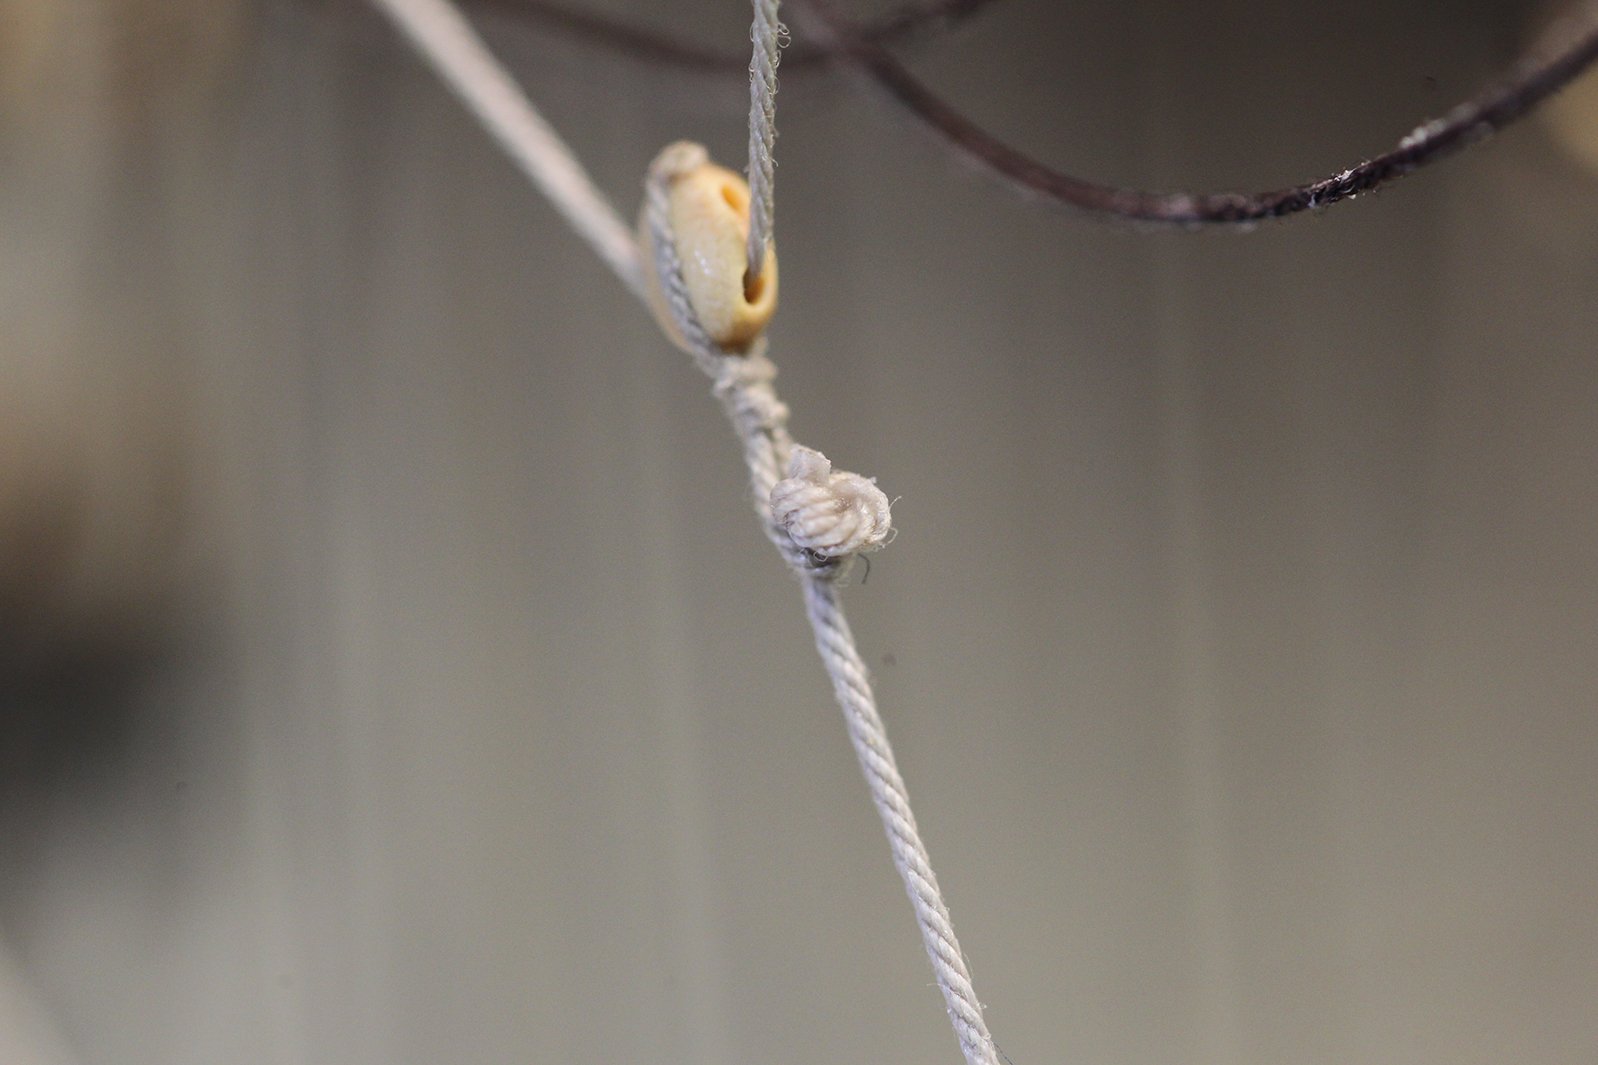
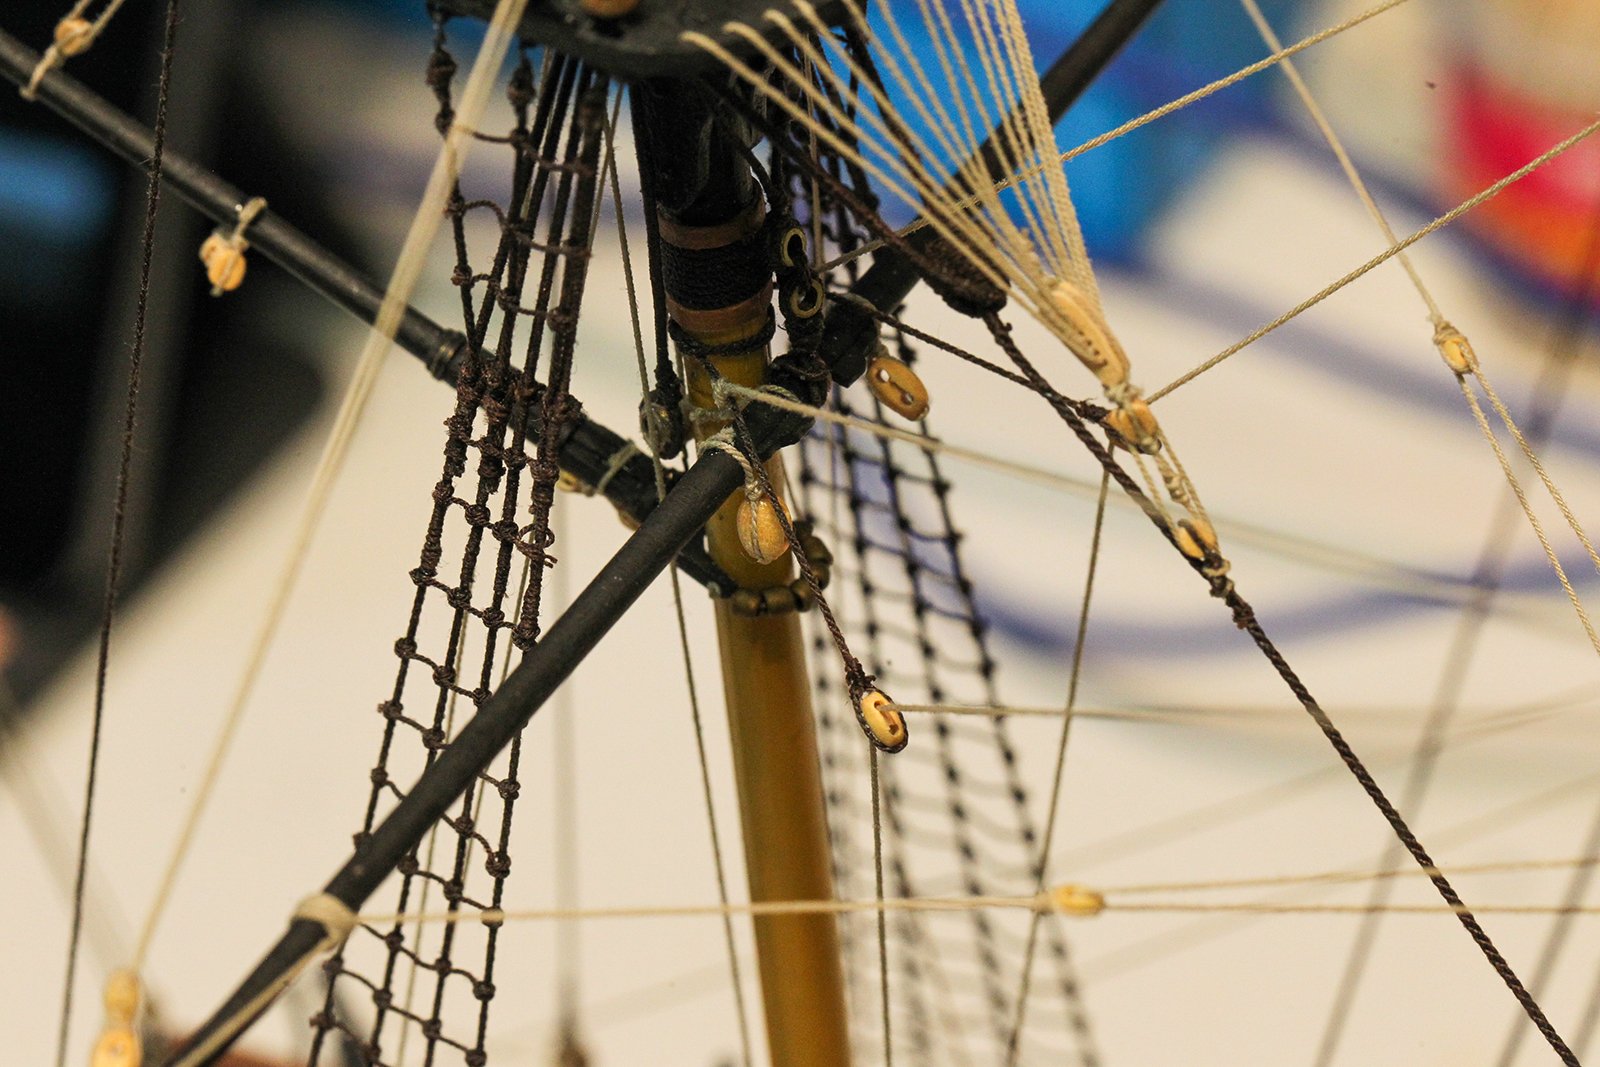
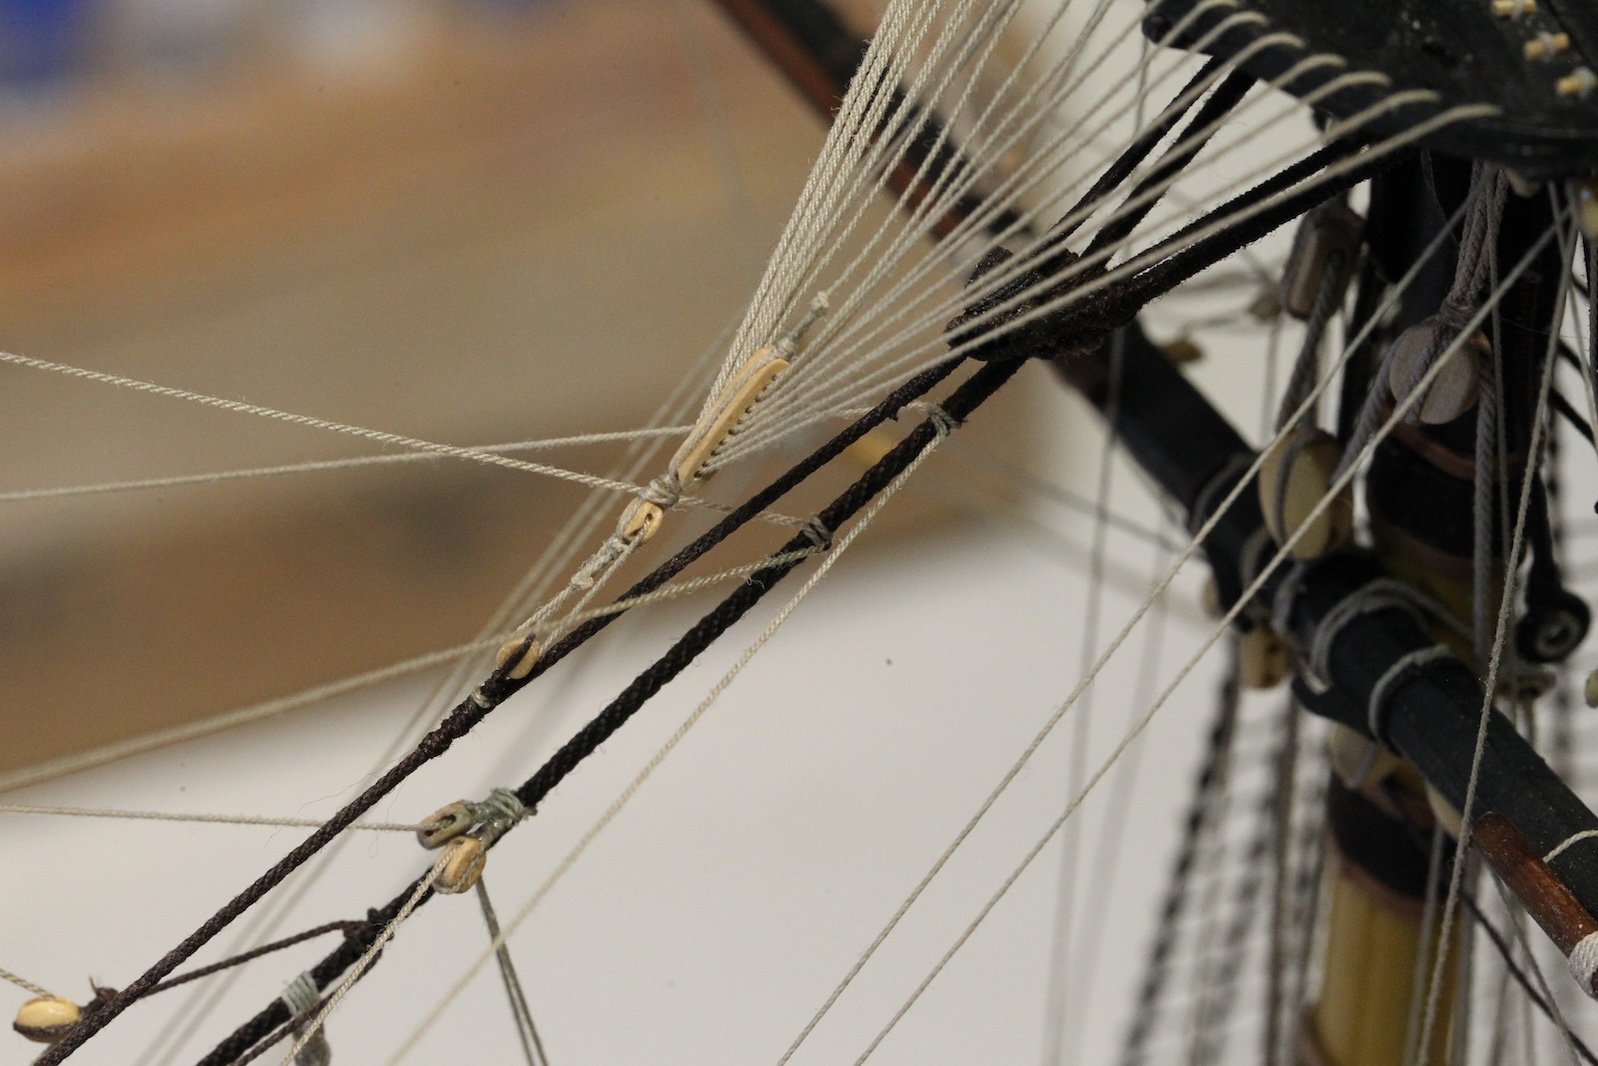
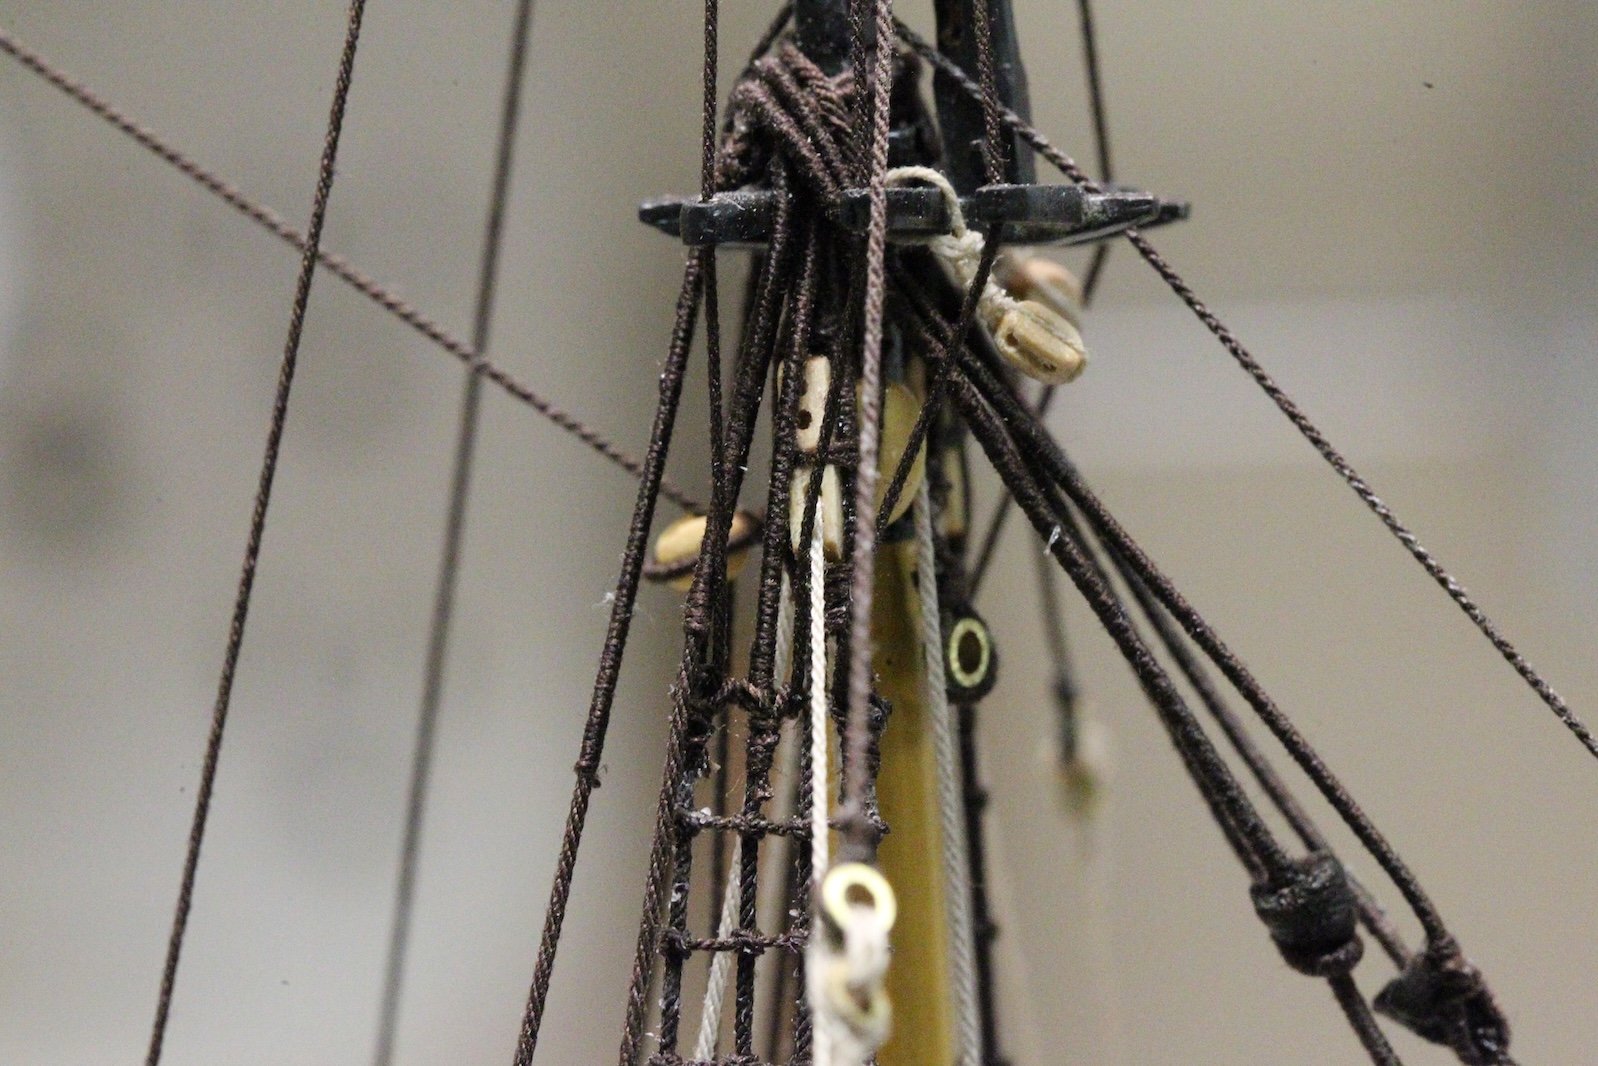
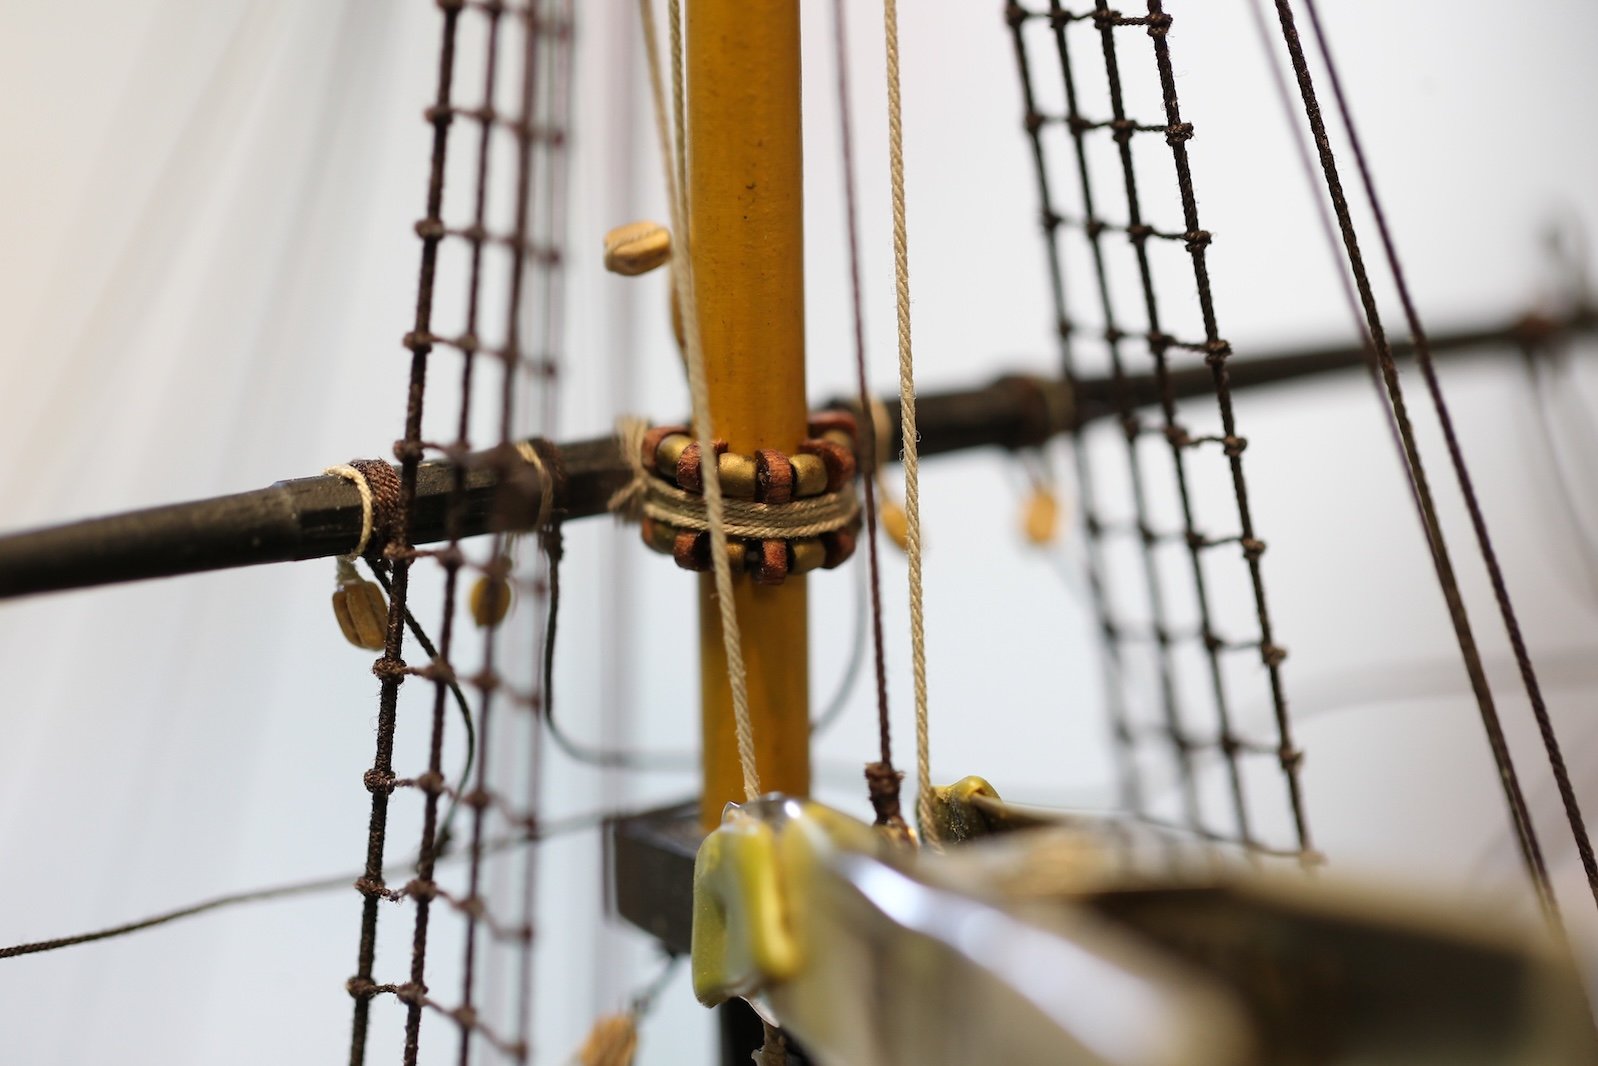
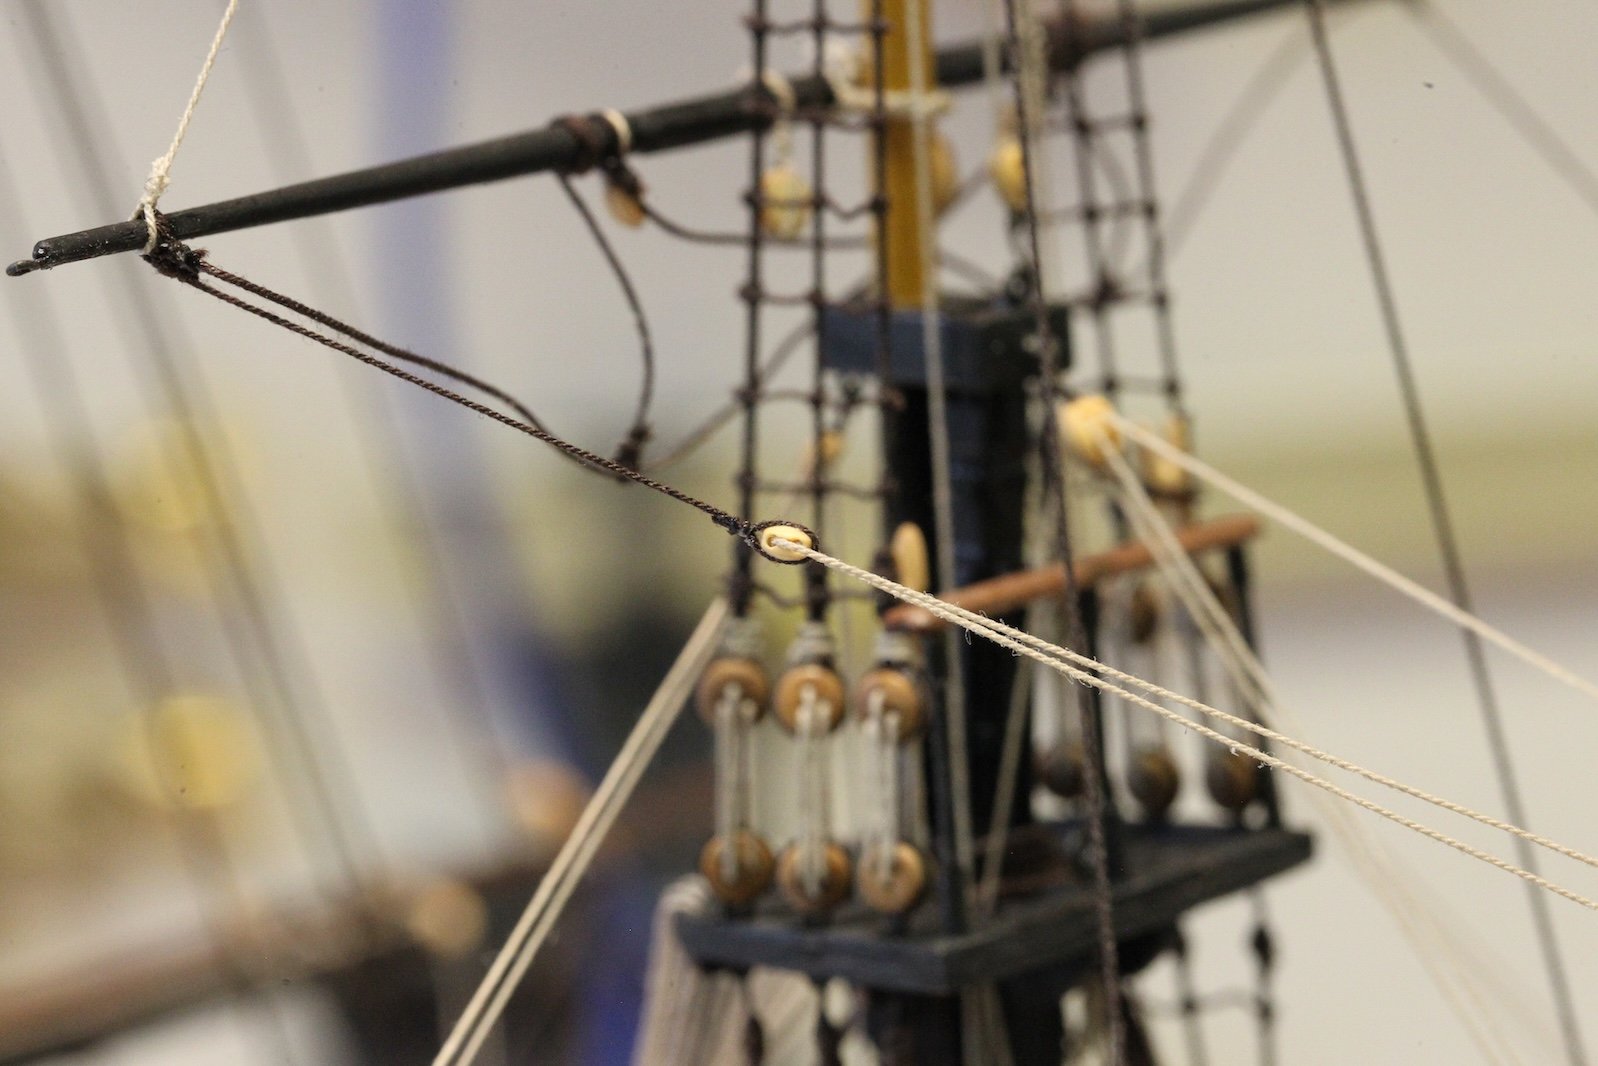
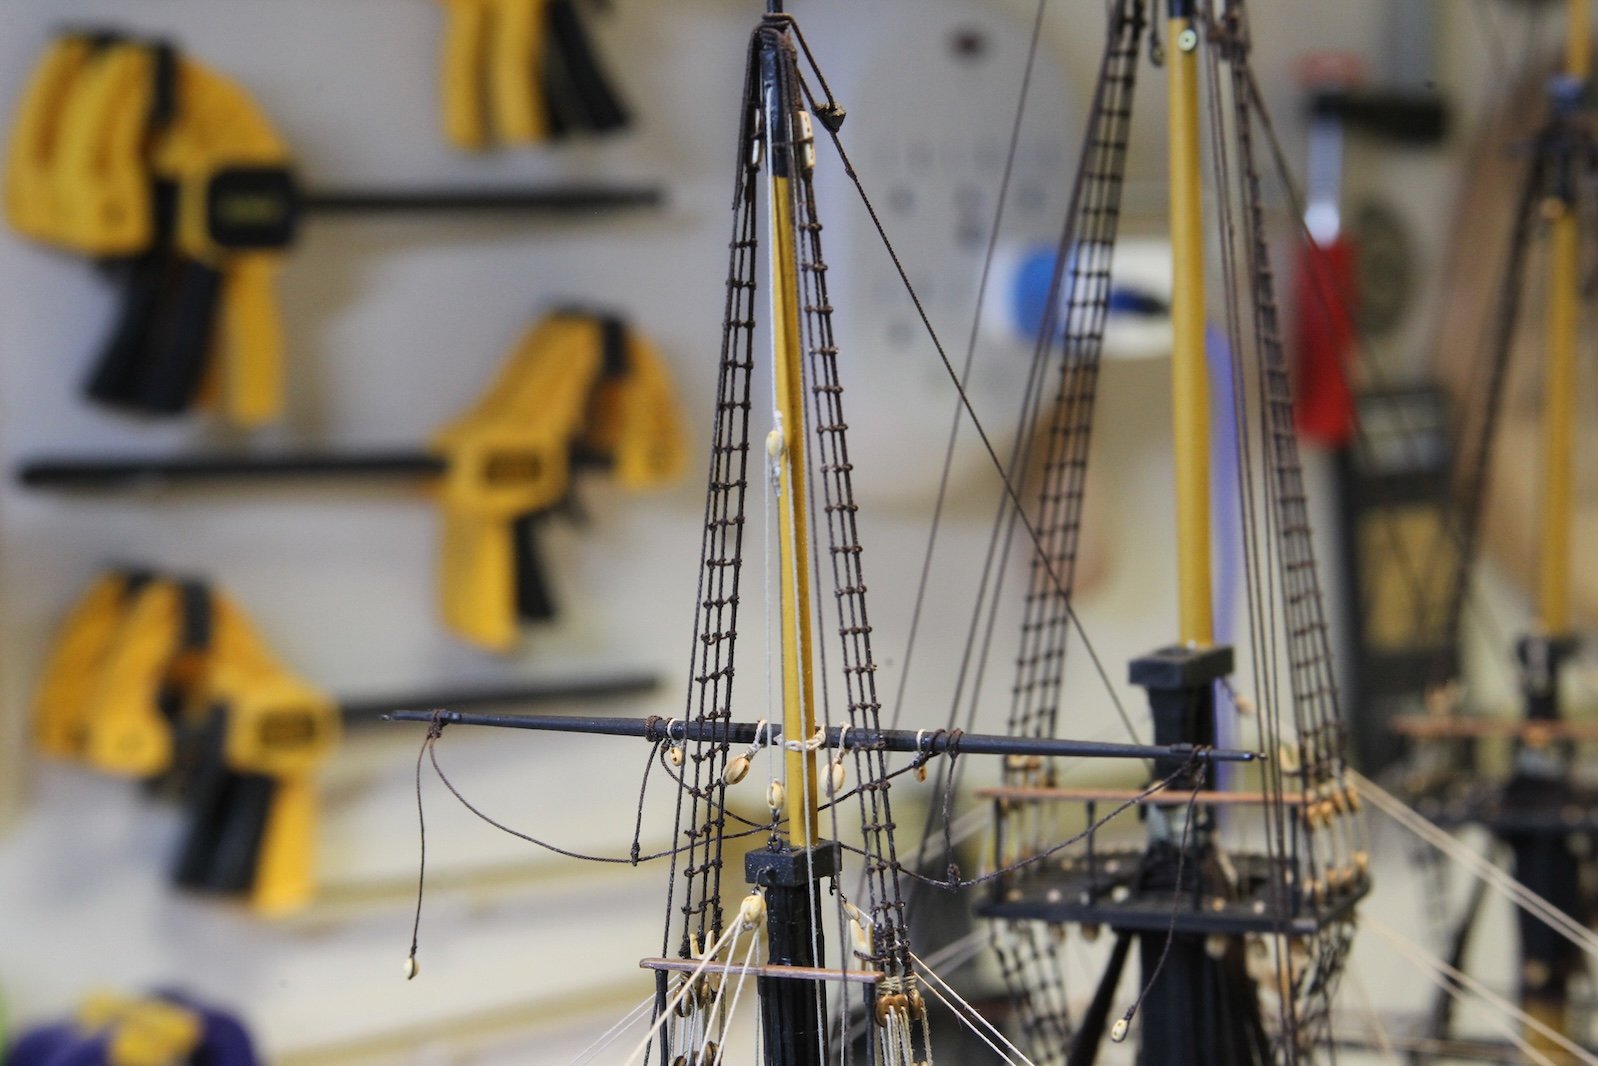
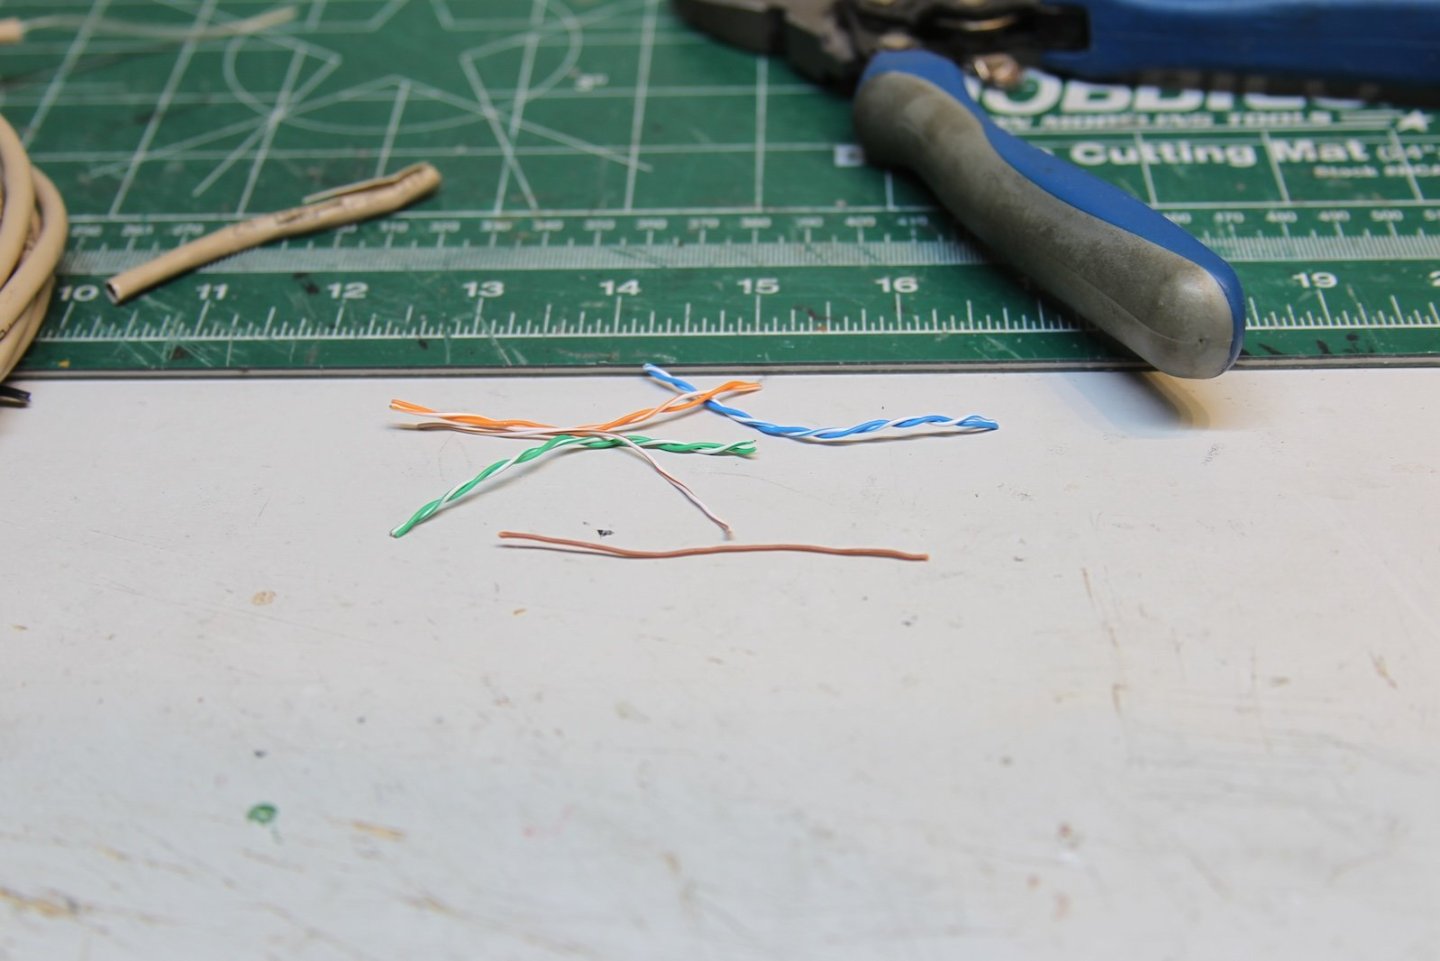
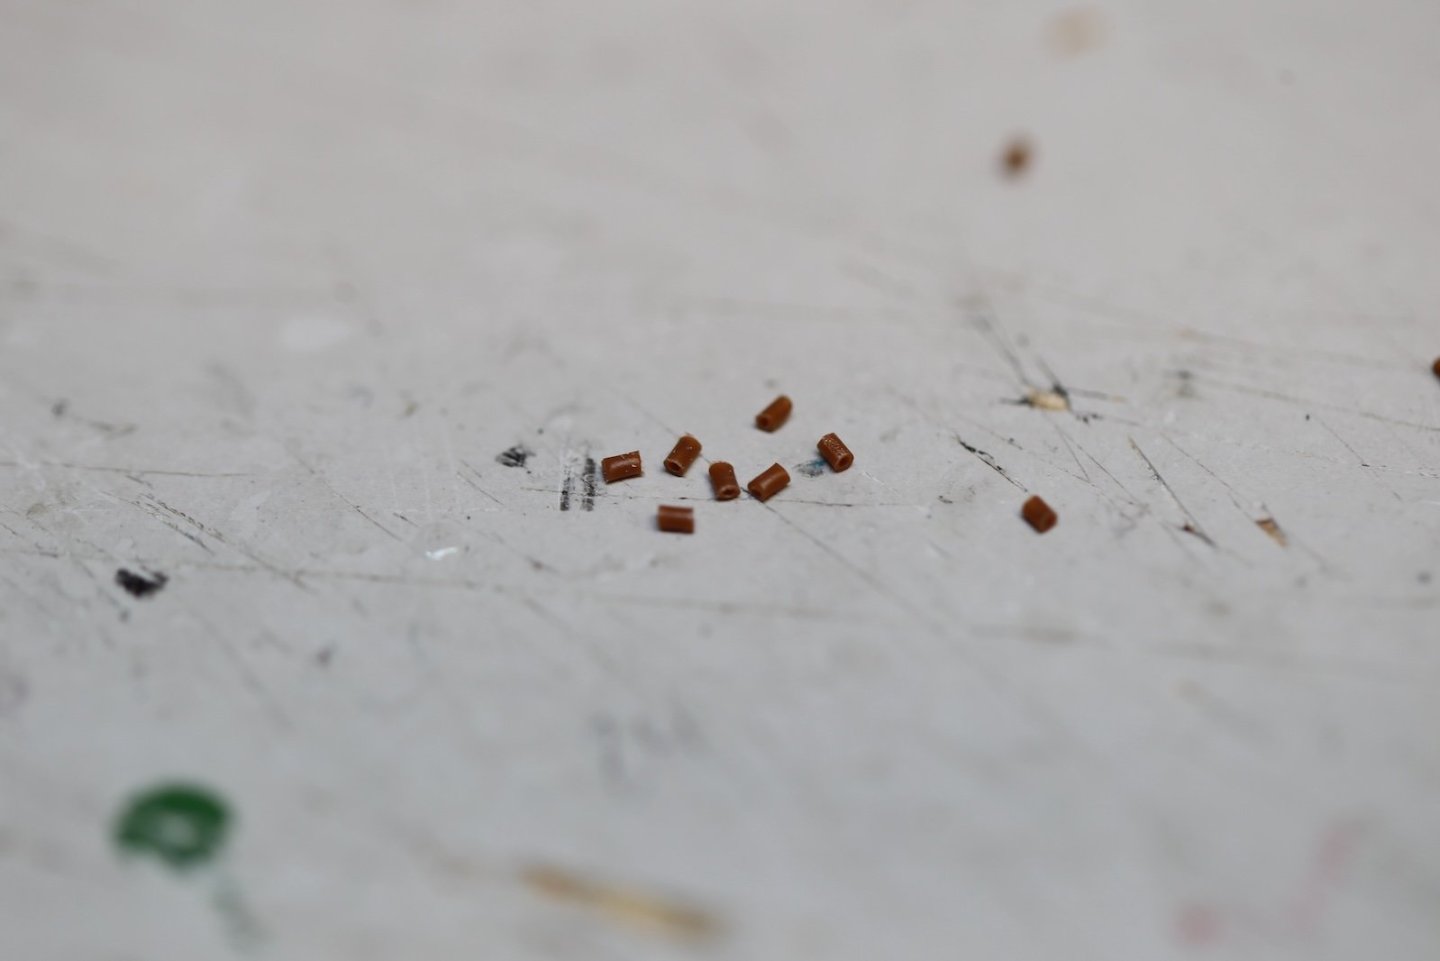
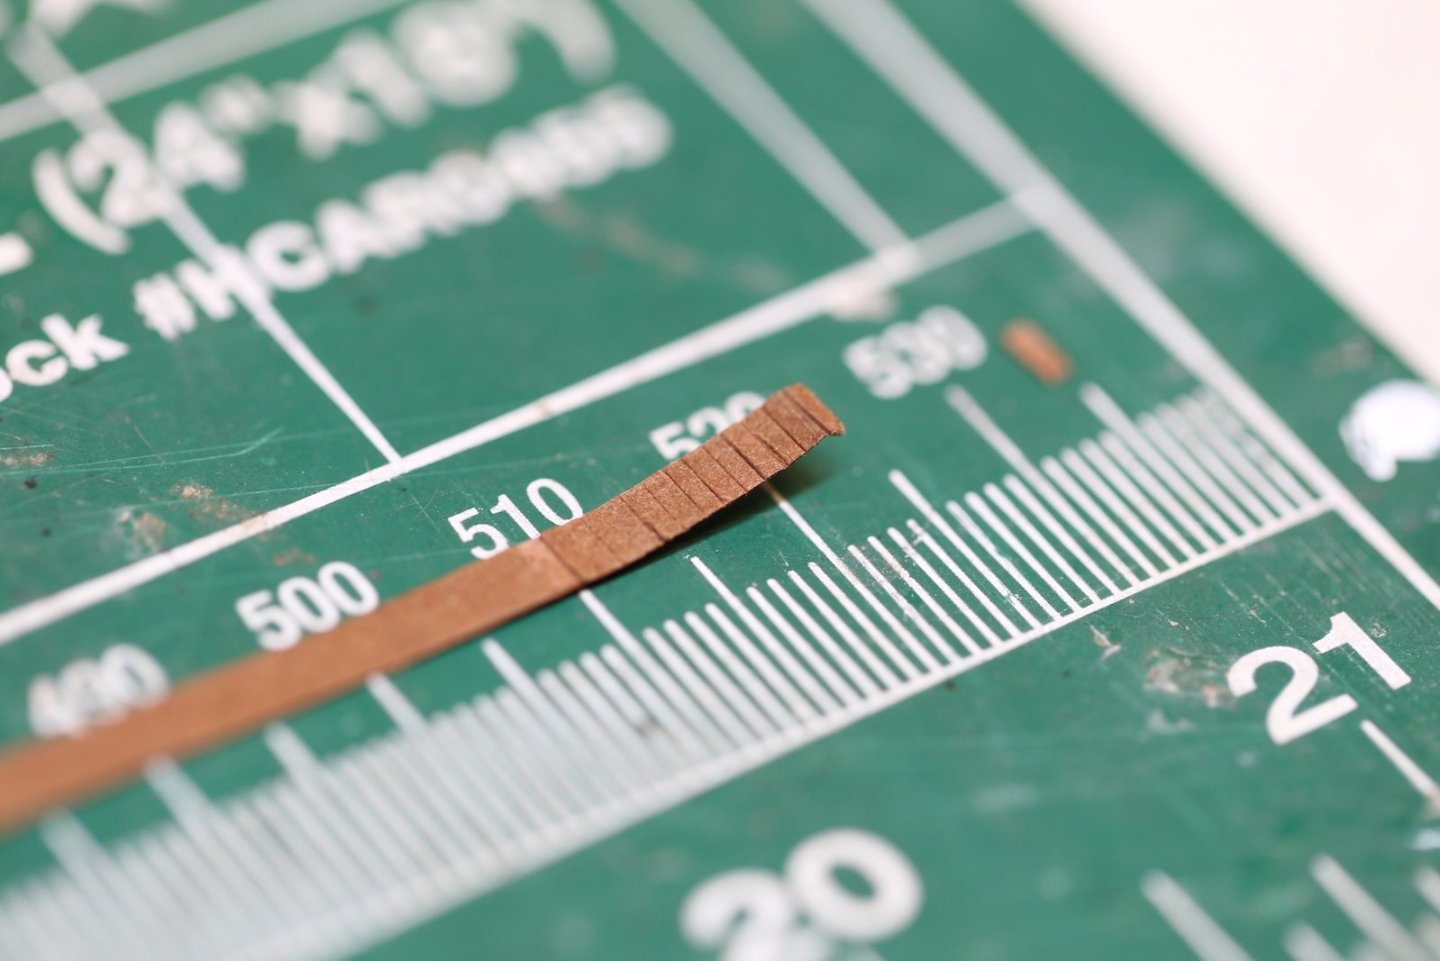
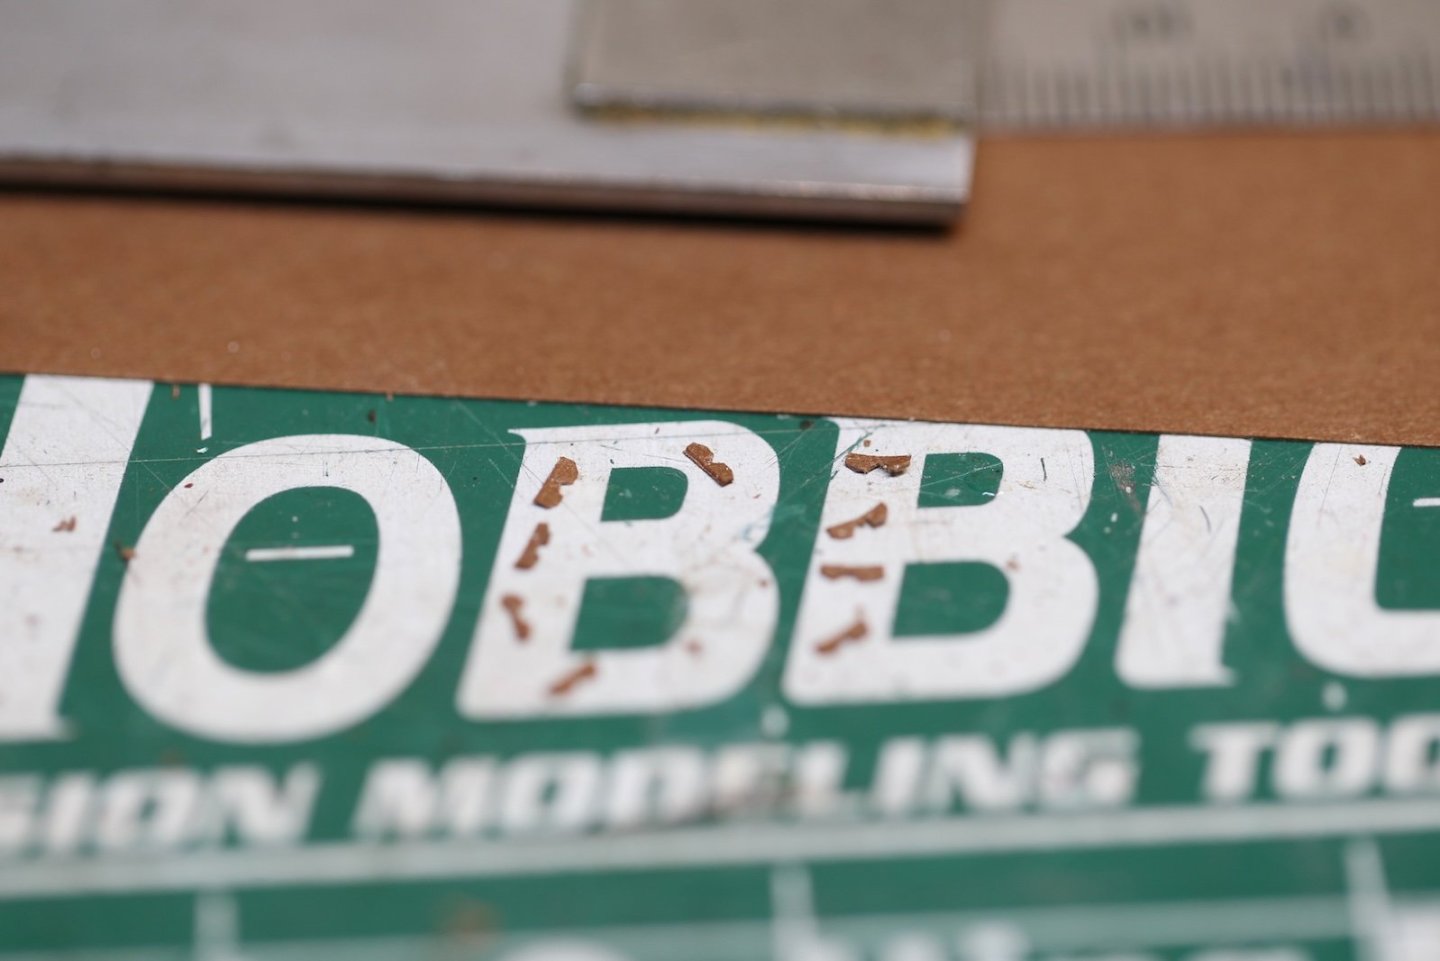
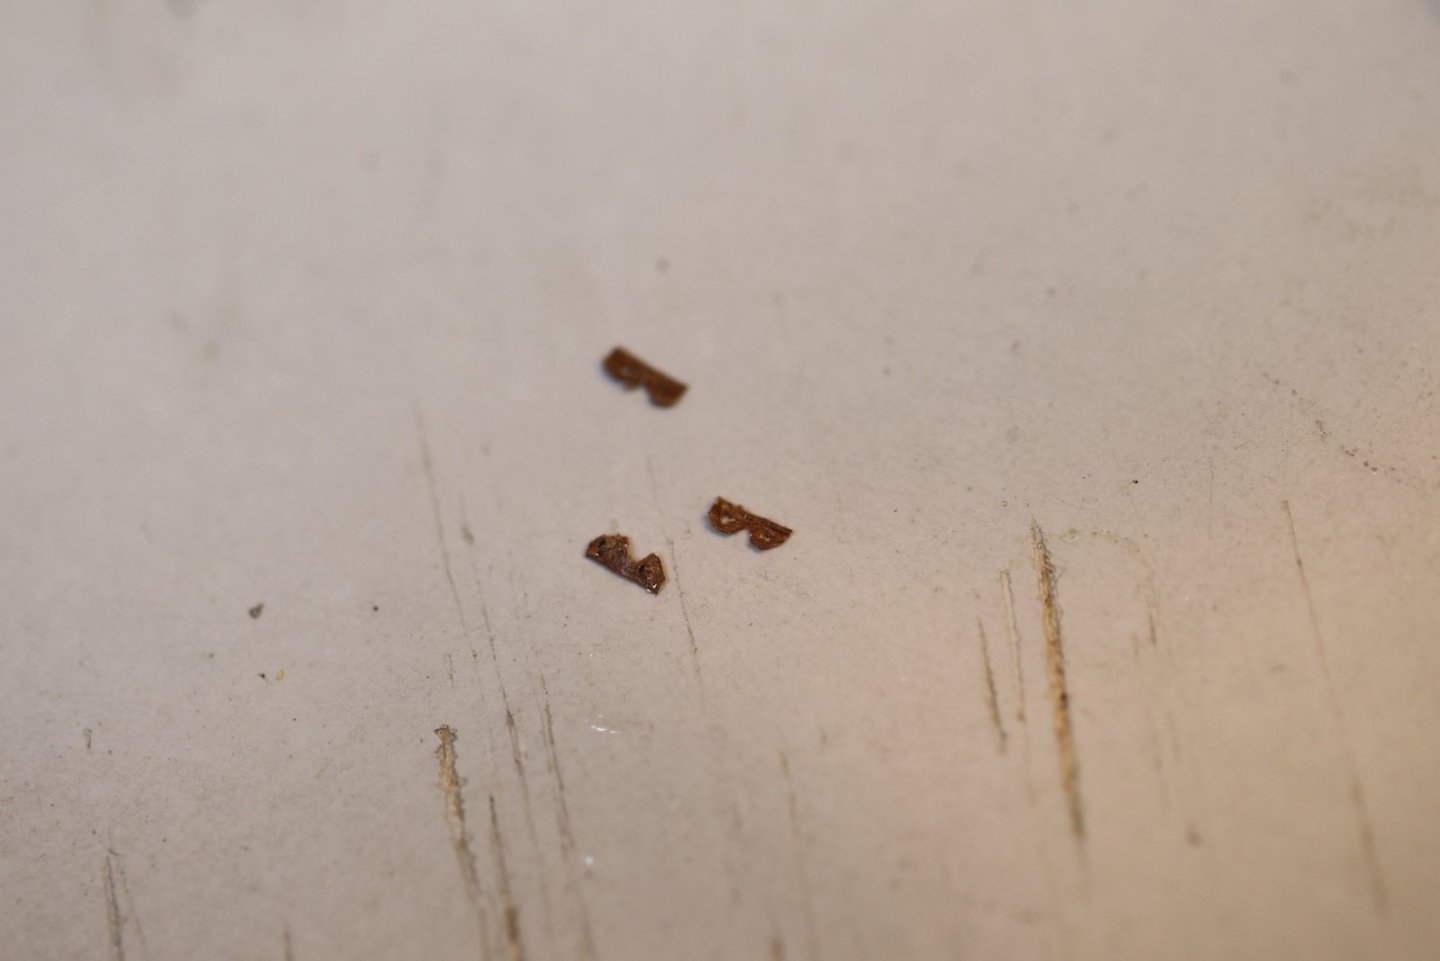
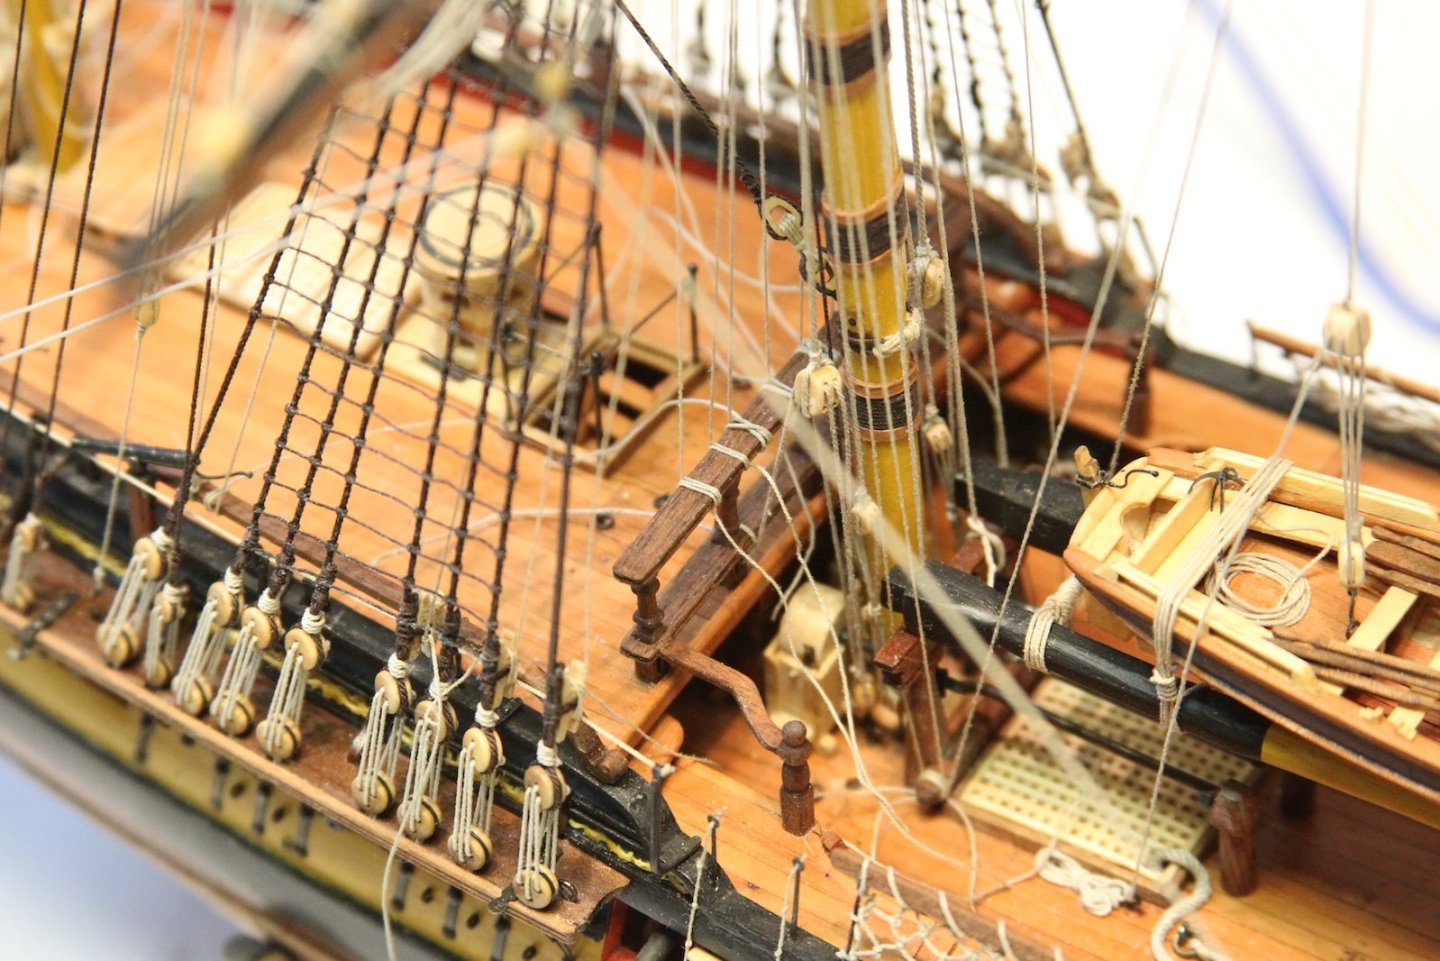
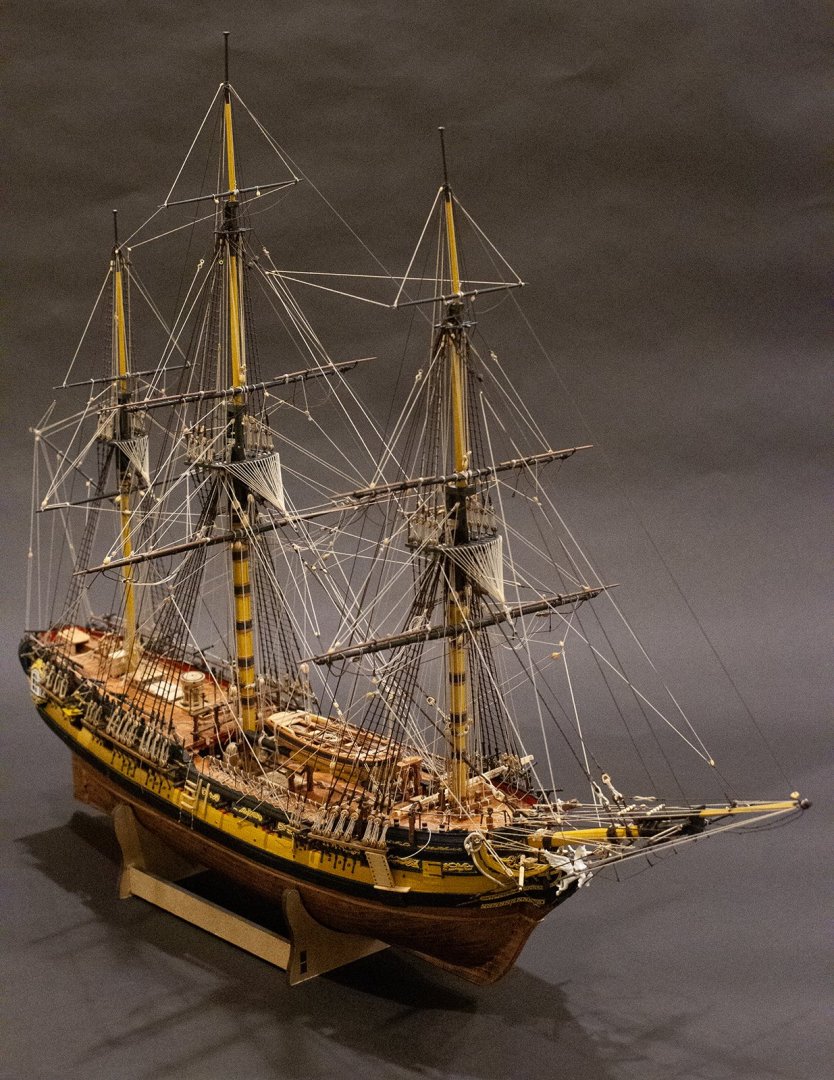
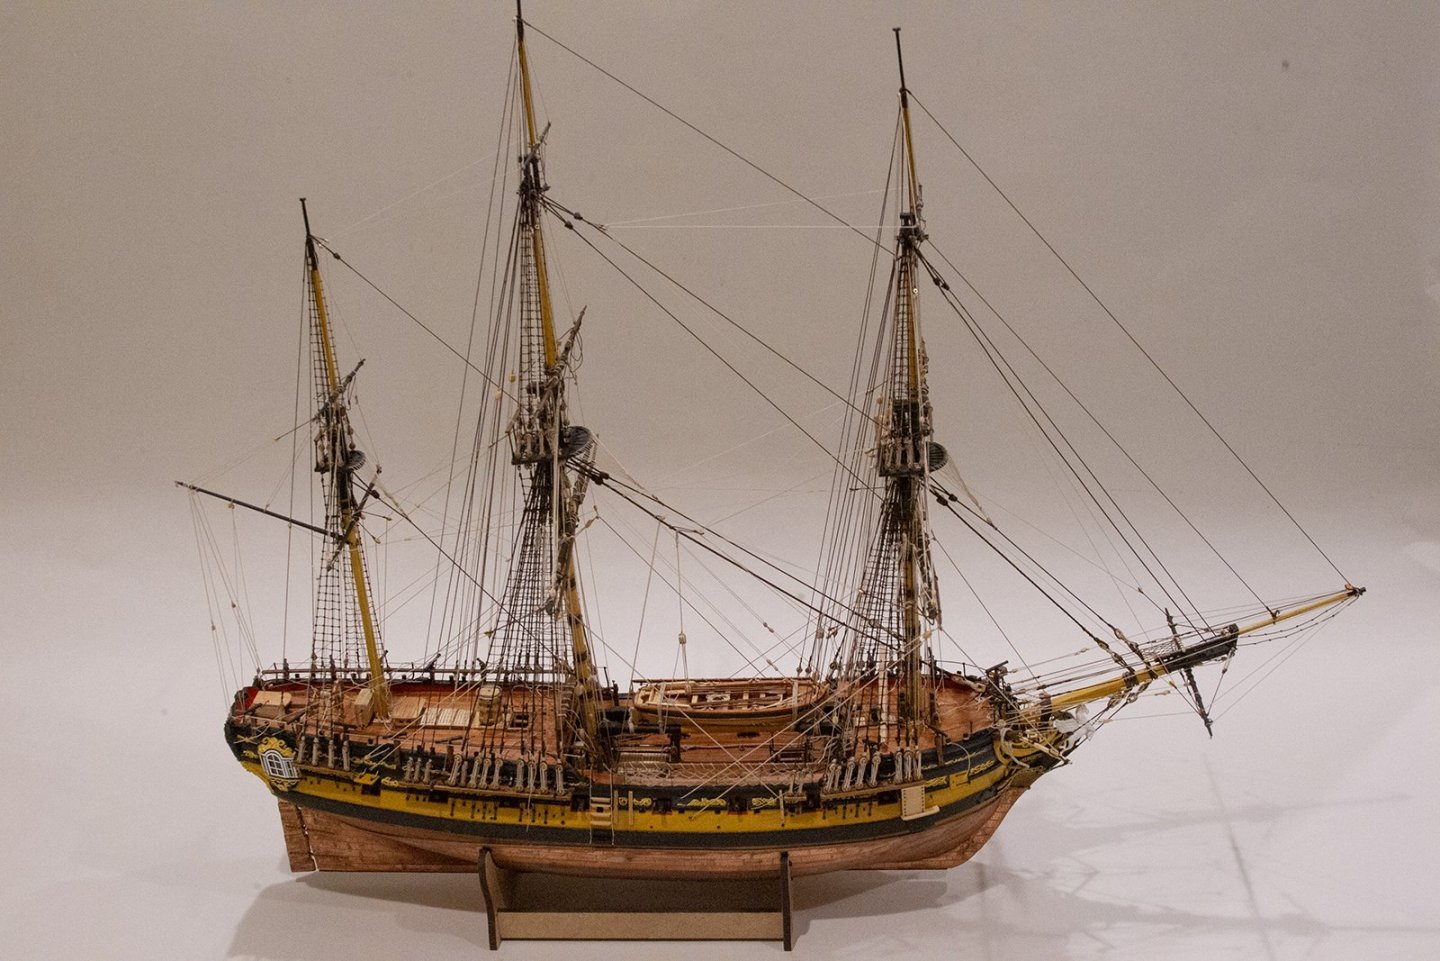
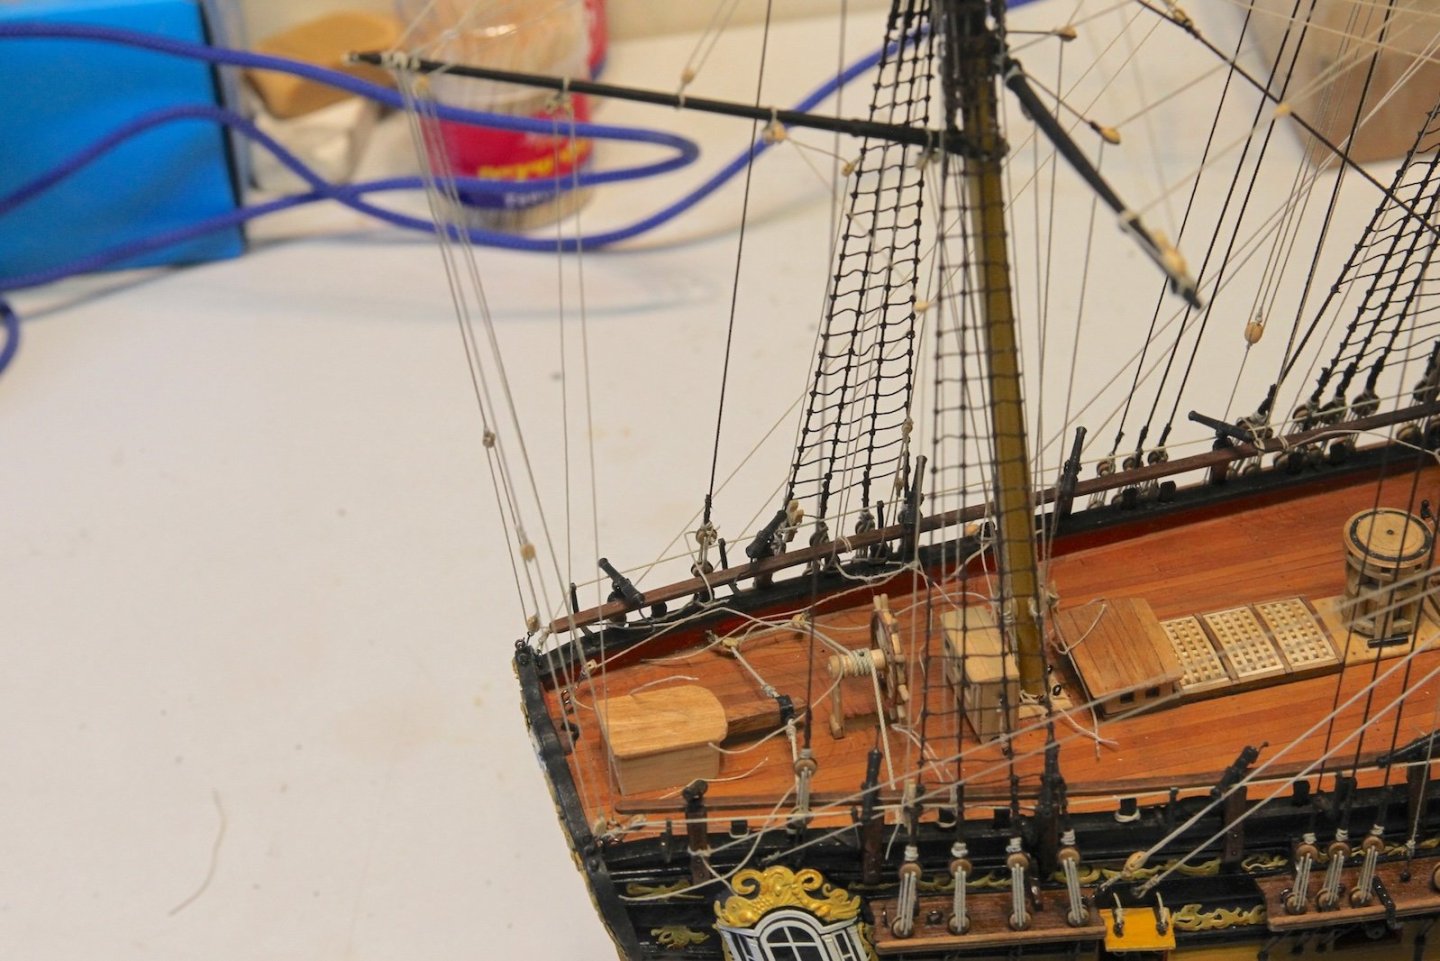
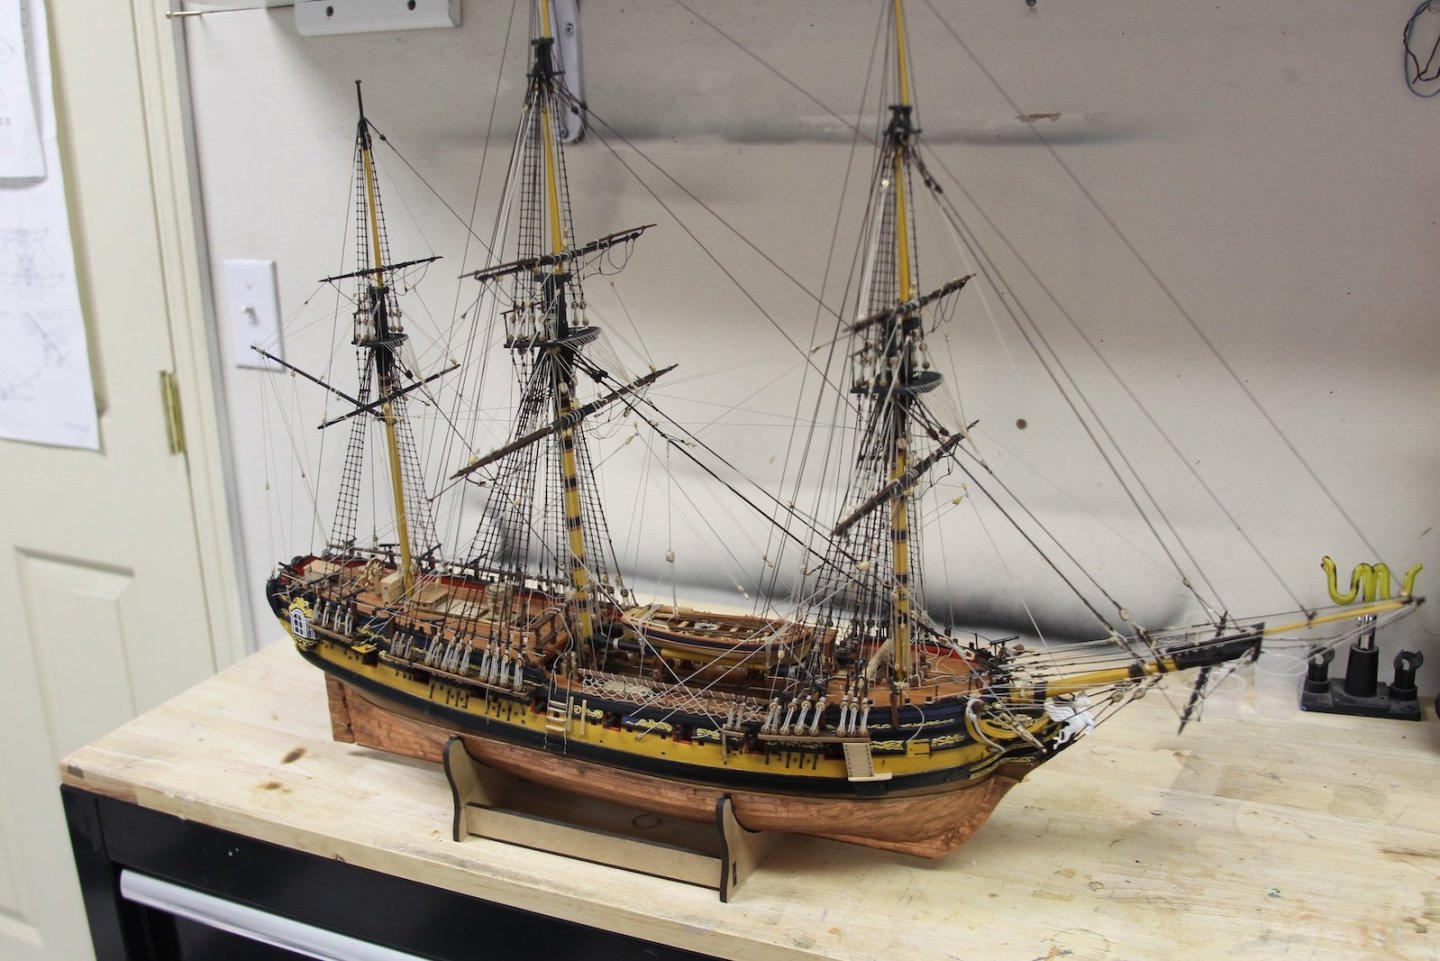
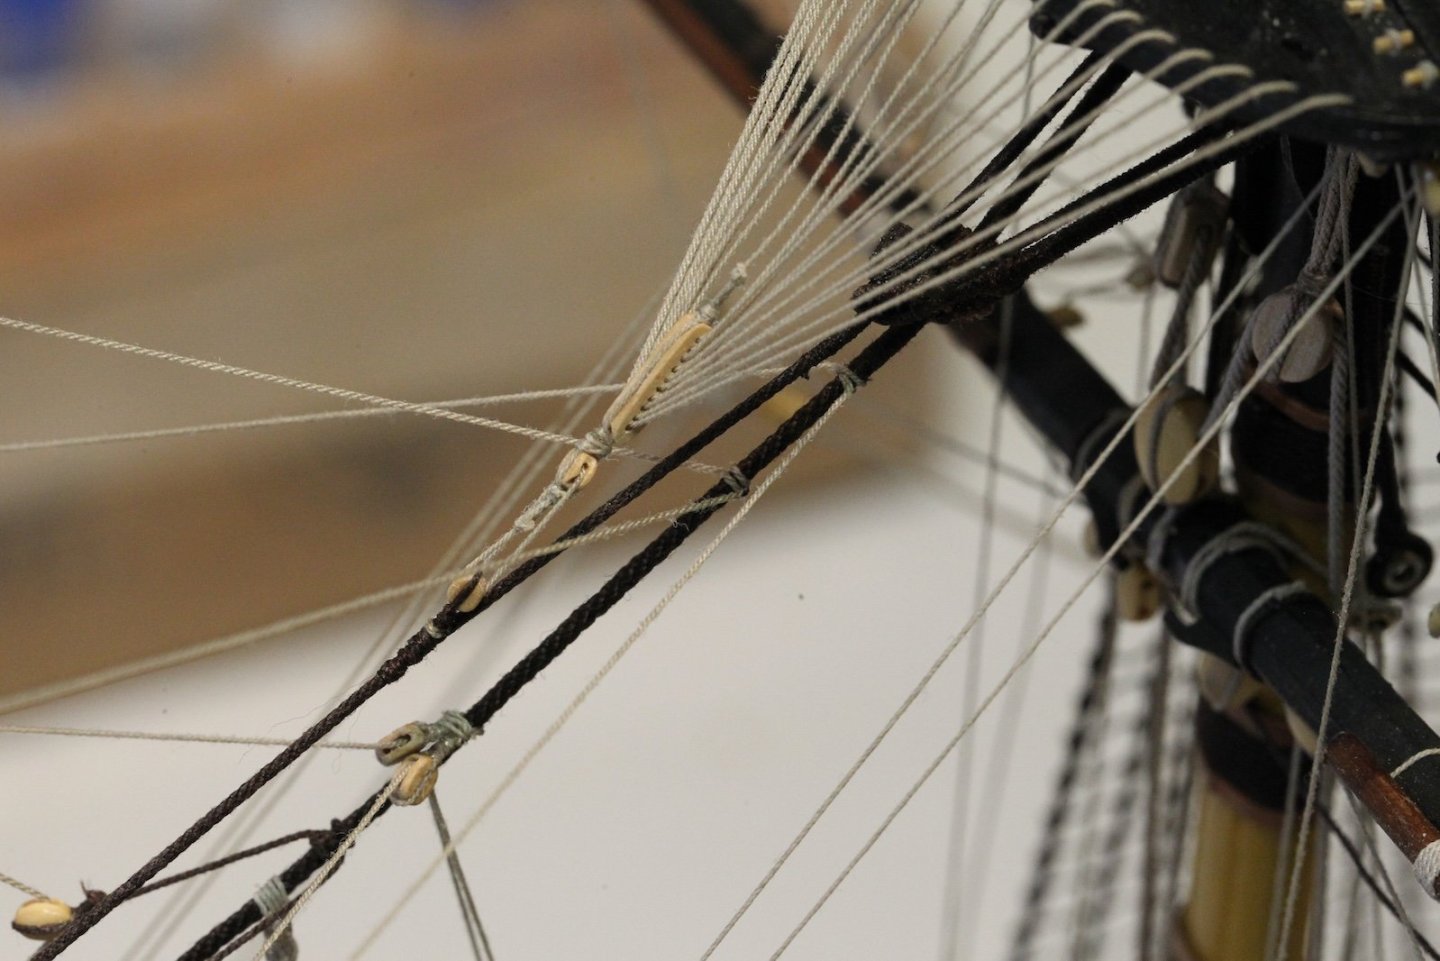
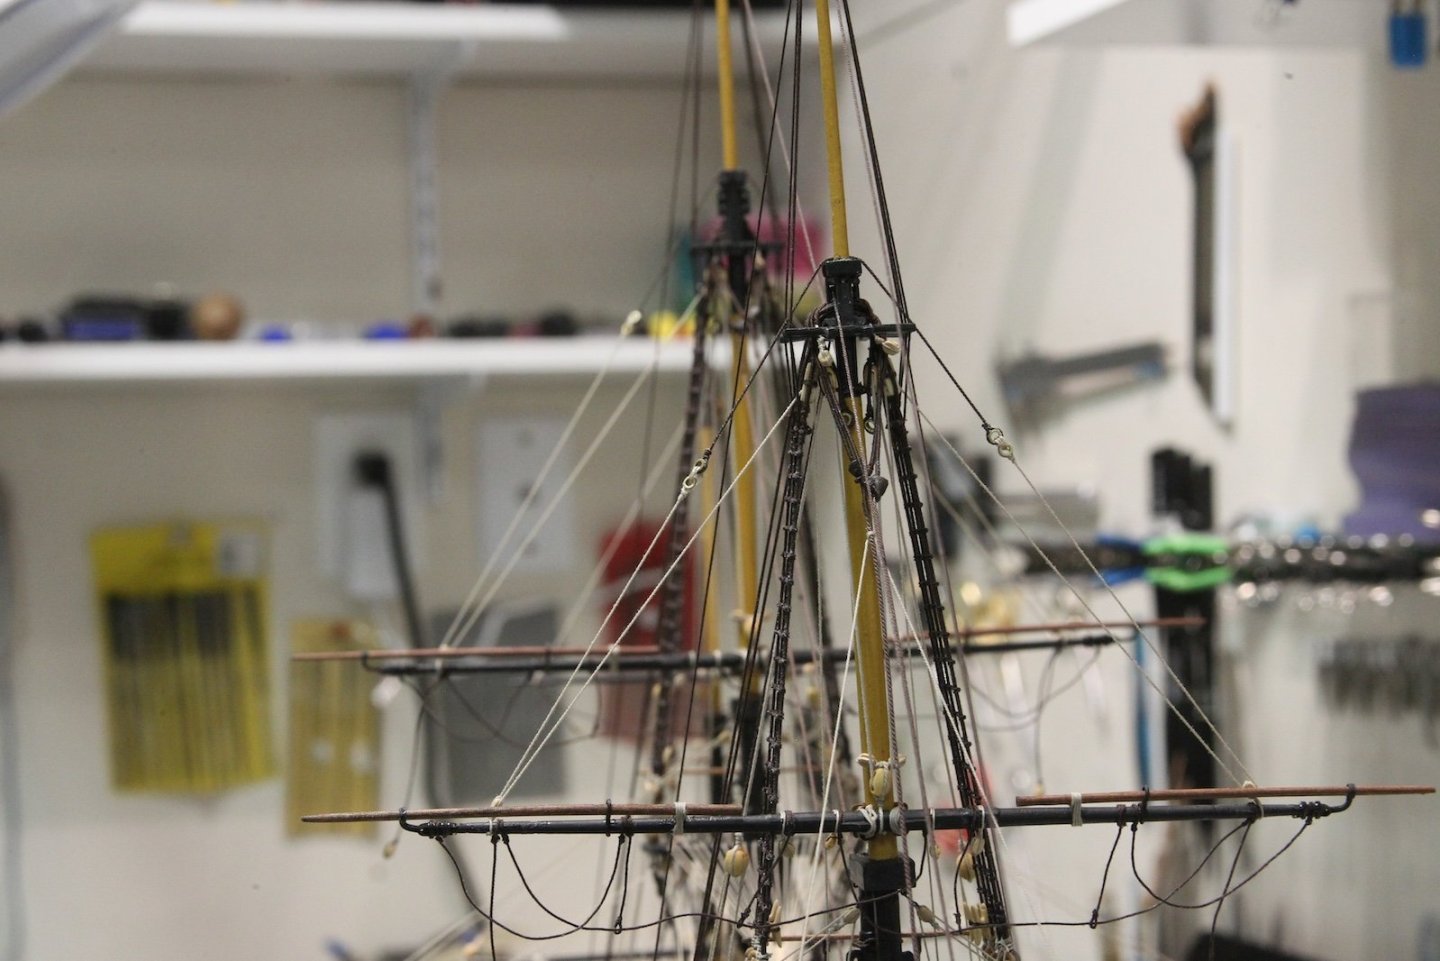
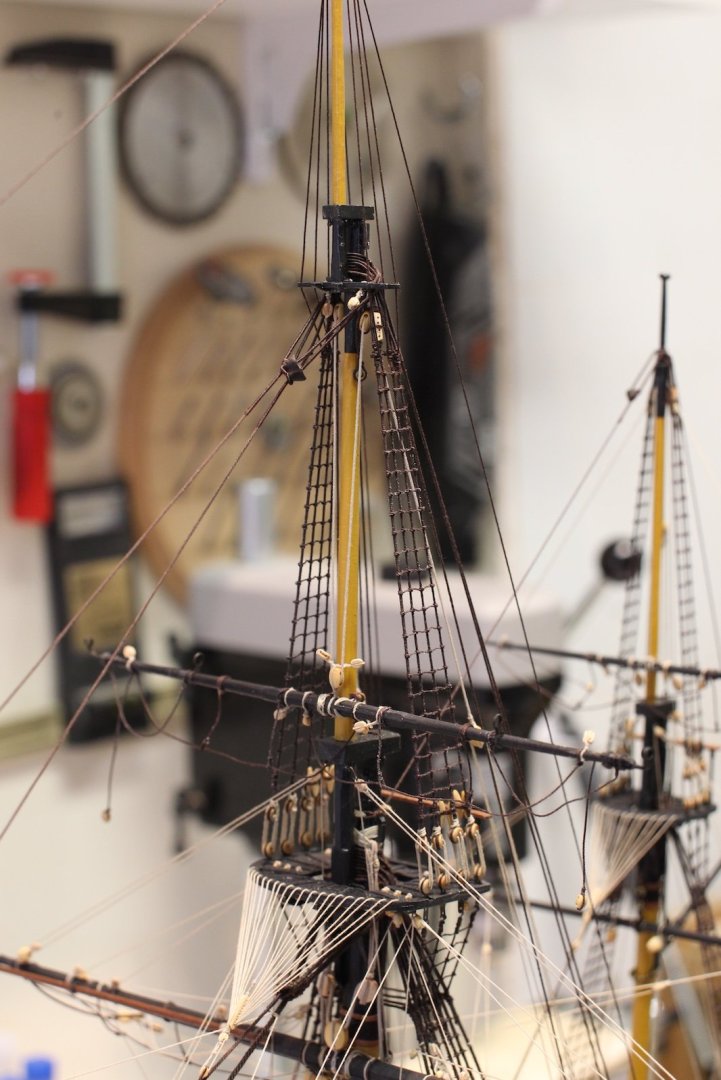
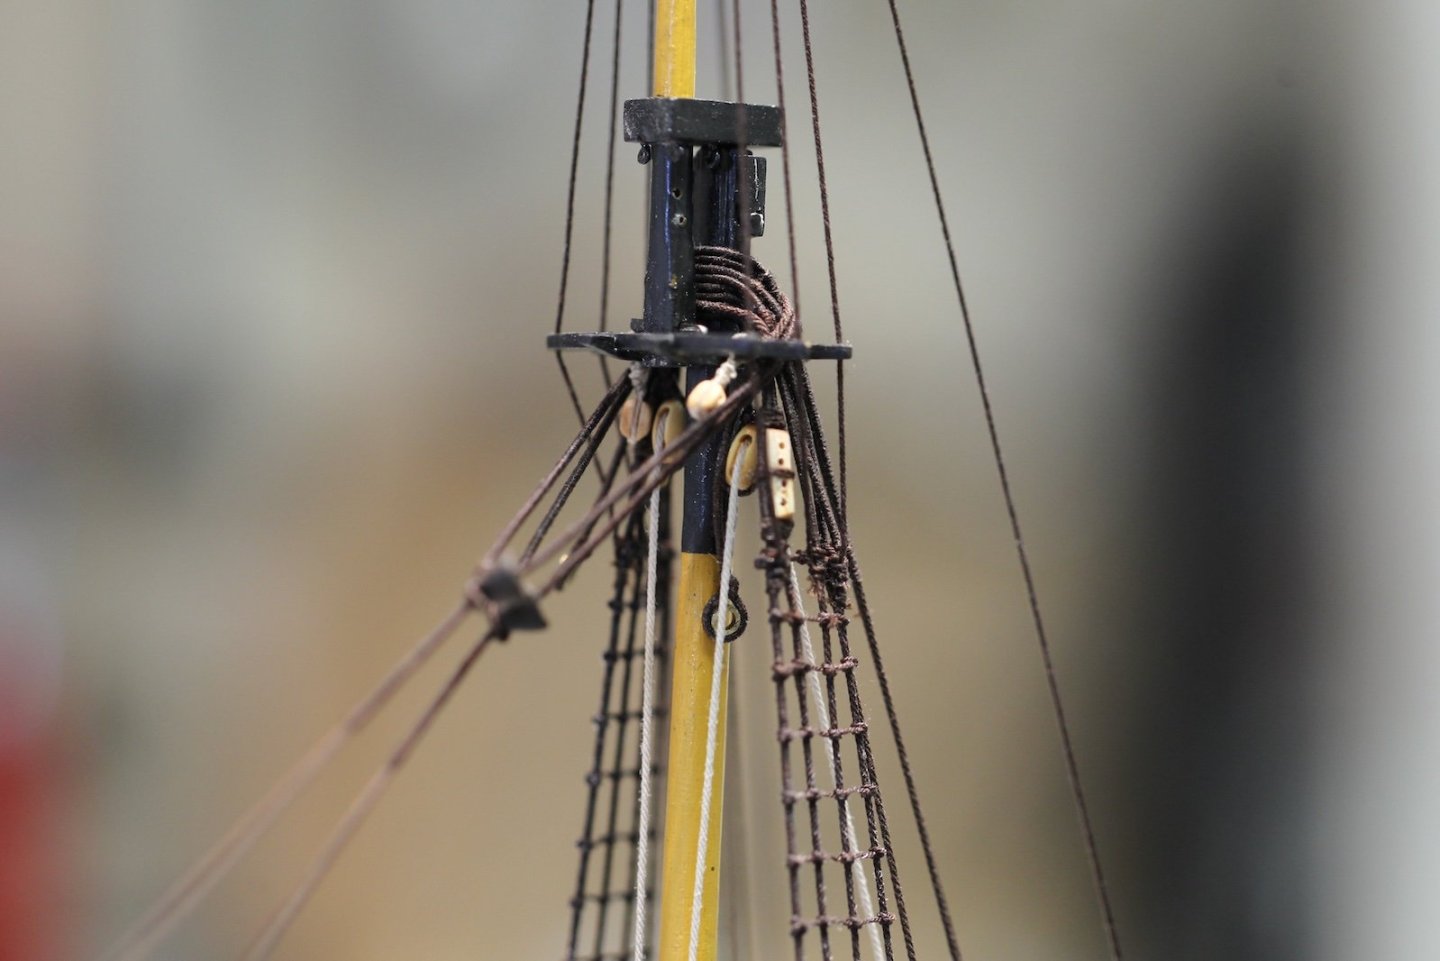
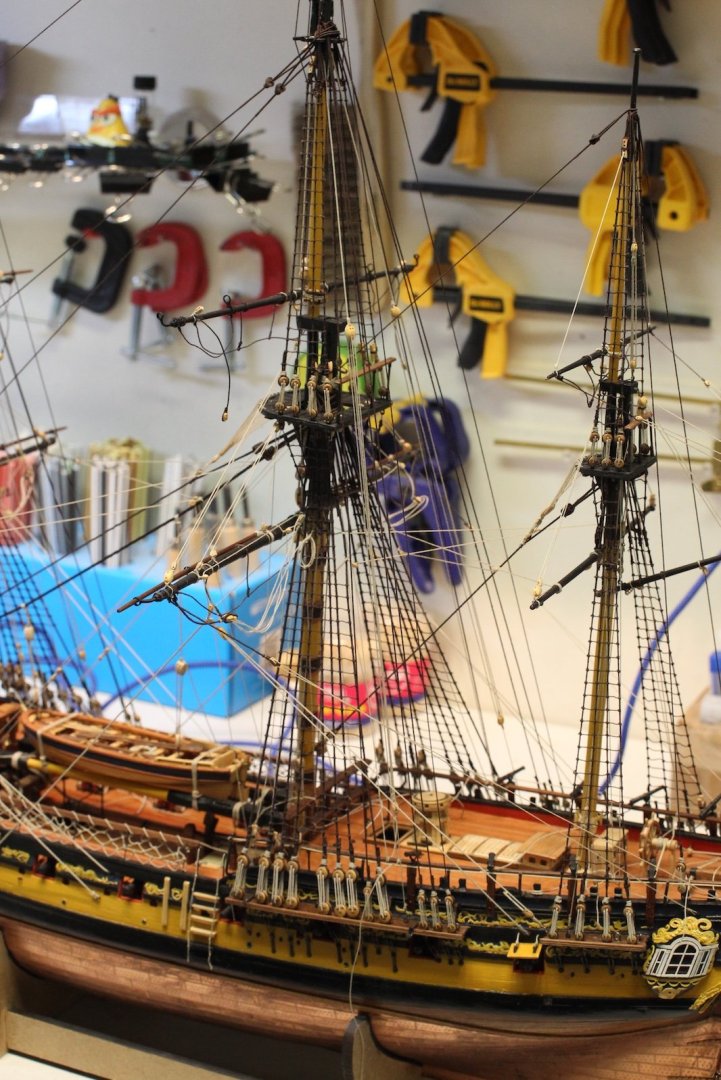
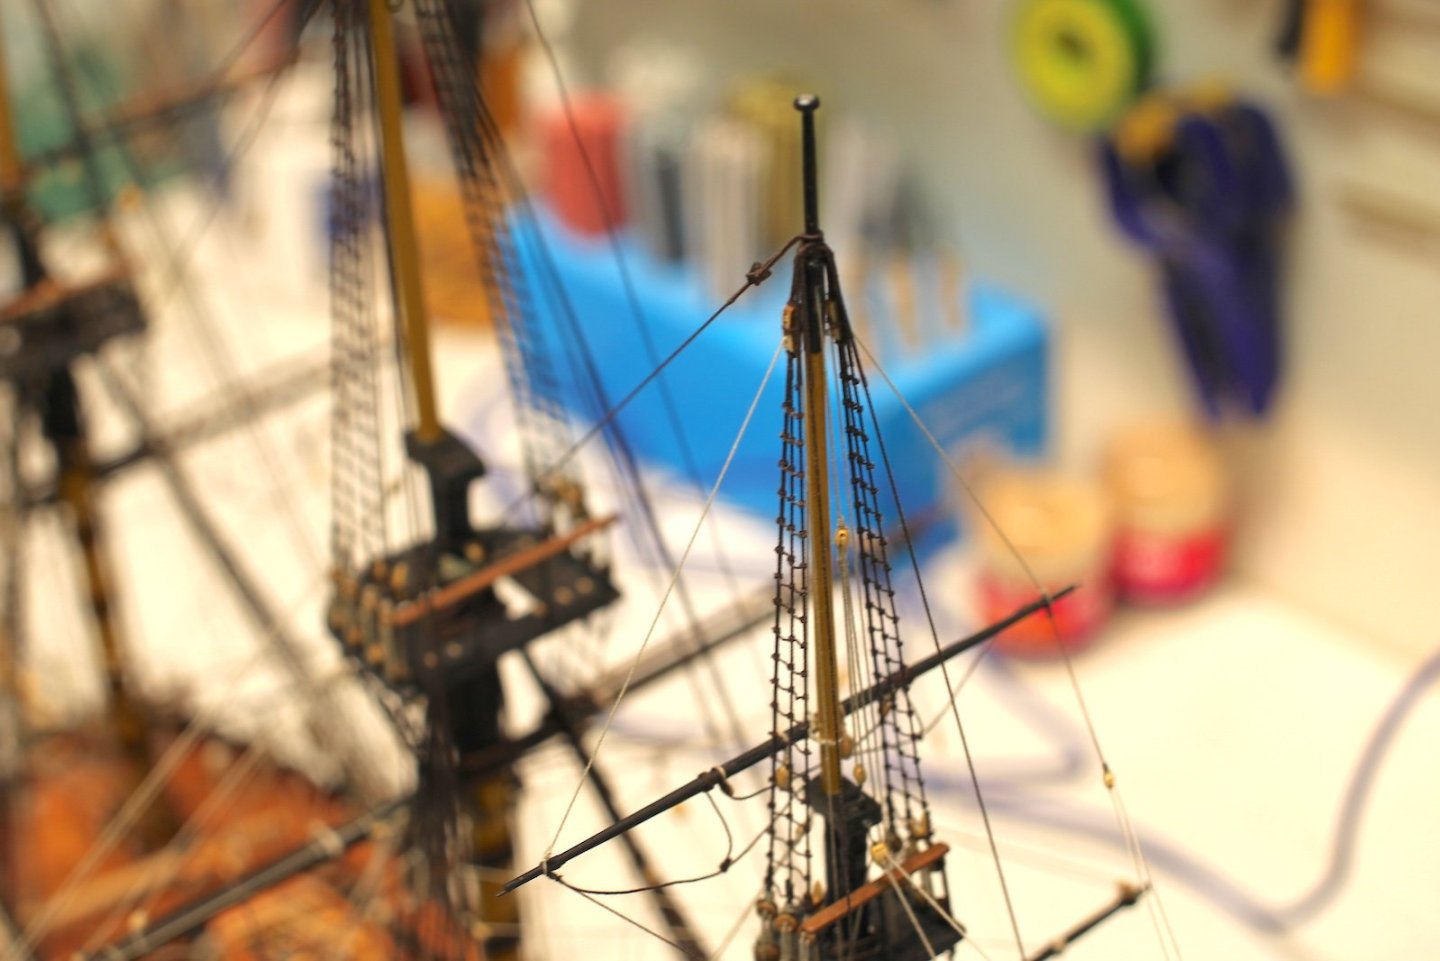
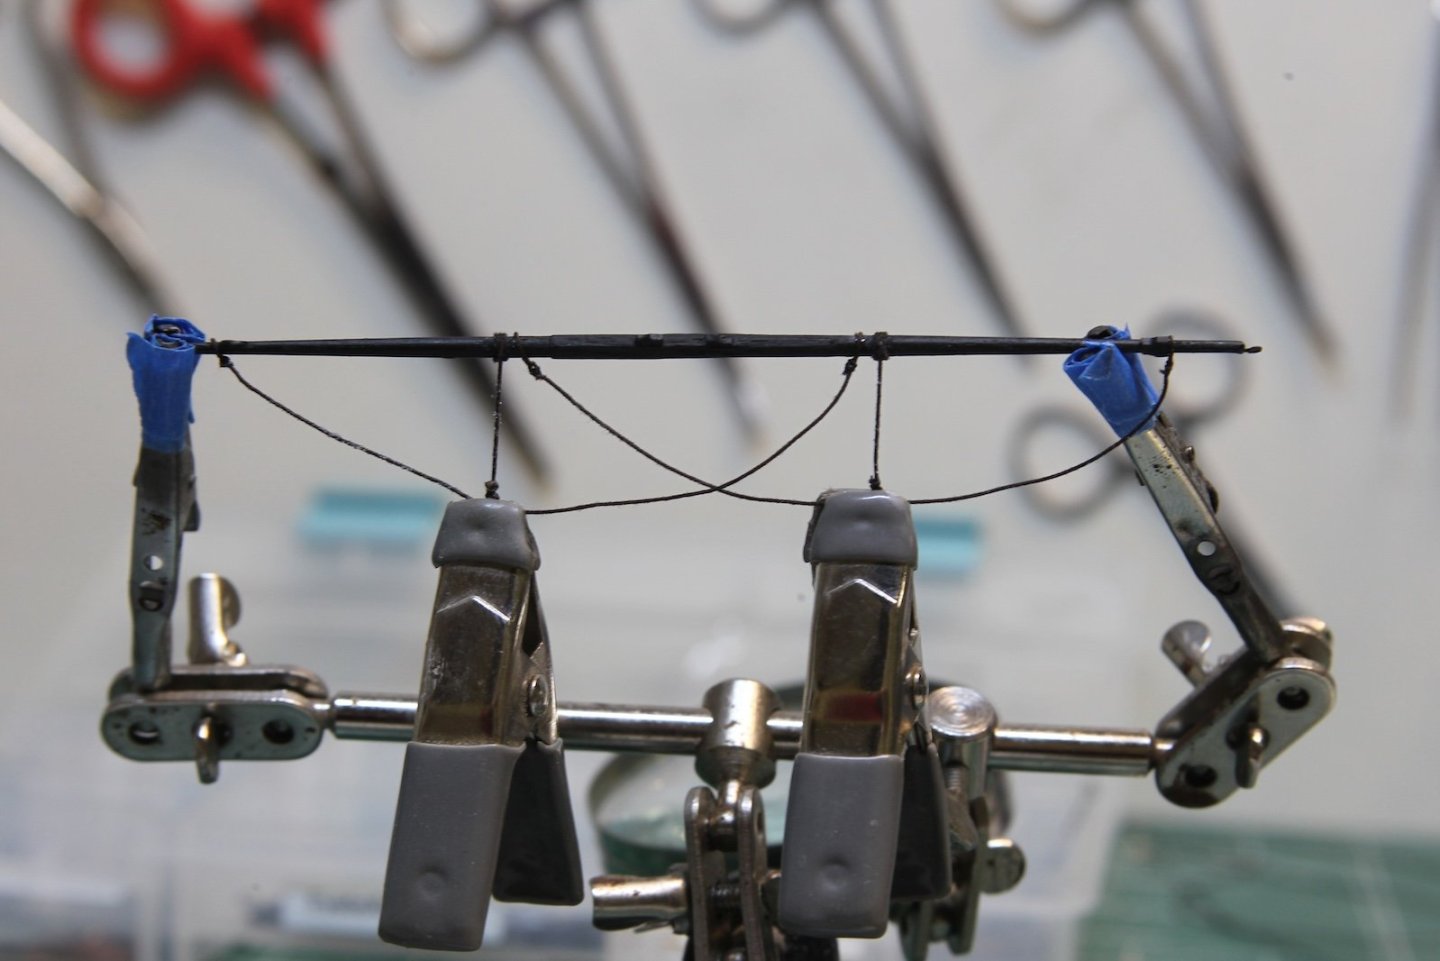
Thankfully the T'Gallant masts are much simpler to outfit than the other masts. Both the fore and main T'gallants have just a pair of clueline blocks a short distance from the center. The horses do not have stirrups, with just a single on each side overlapping in the center. The blocks are 5" (once again 2.5mm is the smallest I use out of sheer practicality) and the horses are 1.5" (.20mm) lines. There is nothing simple about the parrels however. A smaller version of the others, these little things have minuscule ribs that are 2.5mm long at scale, and trucks that are under a millimeter. I spent half a morning just scouring my shop looking for things to use to meet these requirements. I tried a few things that just didn't work before settling on a couple things that panned out. For the trucks, I found brown wire within an old ethernet cable. After pulling the copper out, I was able to slice the insulation into the appropriate sized trucks. At this scale (even measuring out a millimeter guide) I ended up cutting about 20 and then pulling out the ten that were the most consistent. For the Ribs, I finally settled on a piece of thick, brown construction paper. Everything else I tried was either unmanageable at this scale (fell apart when I tried to cut, or manipulate) or was too think and looked out of scale. I started by cutting 3mm long by 1mm wide strips, cutting off the corners then creating a 'notch' with a scalpel to create the shape. The holes are made with a dental pick. The parrel is put together on a .10mm line then attached to the t'gallant mast in the same way as the other parrels. First looped around the yard, then mounted to the mast wrapping the line around the 'valley' of the ribs and tying off each end. I took the picture of the parrel over the ruler on my hobby mat just to give some idea of just how small and fiddly this darn thing is. The t'gallant yard tyes are 2" line (.25mm) with the fore being about 54' (256mm at scale) long and the main about 57' (270mm) long. The tye is hitched to the yard by looping the line under the back of the yard, bringing it up under the front, around behind itself then under the yard again, finally to be seized against itself. The Fully Framed Model has a very helpful illustration on page 132. The tye runs up the fore side of the mast, through the sheave in the hounds, then down the back to a 5" (2.5mm) single block. Another 2.5mm single block is seized to an eye in the mast top. The falls of the tye run from the upper block, down through the bottom single, back up through the upper single, then down through the mast top to belay on the ever populated rail on the quarterdeck for the main and the bitts for the fore. With the masts lowered, the block on the halliard should be about midway down the length of the mast. The yard lifts are a simplified version of the other yards. The top of the lifts is either a pair of thimbles or small blocks hitched around the top of the mast - I chose blocks because they are (in my opinion) cleaner and easier at this scale. The lifts are eye spliced to the ends of the yard arms (instead of blocks like the other yards), taken up through the aforementioned blocks. then down through the mast tops to belay on the cleats fixed to the upper shrouds. The yard braces are also a simplified version of the other yards. They too are just eye spliced around the ends of the yard arms. However, the fore and main have different routes along their rigging path. The fore yard braces run aft to a pair of 2.5mm blocks on a span clove hitched around the main topmast stay near the mouse. Each fall is then taken forward to a block seized to an eyebolt on each side of the aft part of the fore top. From there, it descends to belay on the cleats either side of the belfry. I apologize for the photos above flipping back and forth from the port and starboard perspectives which is a bit confusing, but hopefully you still get the idea. The run of the main t'gallant braces is less complicated. They start as eye splices around the yard arm, run to a similar pair of blocks on a span hitched around the top of the mizzen, then descend to belay on the rail near the aft shrouds. At this point there is obviously a LOT going on with all the rigging, especially as it travels through the mast tops. So it took (and will probably still take) a lot of rerouting lines so they aren't fouled or bind against one another. I'll continue to take a look as this as I start to secure lines and add coils of rope - which will be my next step. It's also worth noting that according to Marquardt, T'gallant sheets were not used between 1735 and 1790, and I can't find any solid references to determine how the uppermost clue lines may have been rigged without sails; so those will not be included. With that, this marks the end of the running rigging for the Peg. Here are a couple of overall shots. The white background emphasizes the standing rigging and the black background emphasizes the running rigging.


- 419 replies
-
- 14
-
-
-
- Victory Models
- Pegasus
- (and 2 more)
-
Moonbug reacted to a post in a topic:
HMS Pegasus by Barbossa - Amati/Victory Models - 1/64
-
Moonbug reacted to a post in a topic:
HMS Harpy 1796 by Blue Ensign – FINISHED - Vanguard Models - 1:64 scale
-
Moonbug reacted to a post in a topic:
USF Confederacy by Zarkon - Model Shipways - 1:64 Scale
-
Nice work on a tedious process Jeff. I finished the Confed several years ago as a joint build, and am actually going to build her again later this year after I finish the Pegasus. Haven’t seen many logs of her recently, so it’s good to see a fresh build of one of my favorite kits.
-
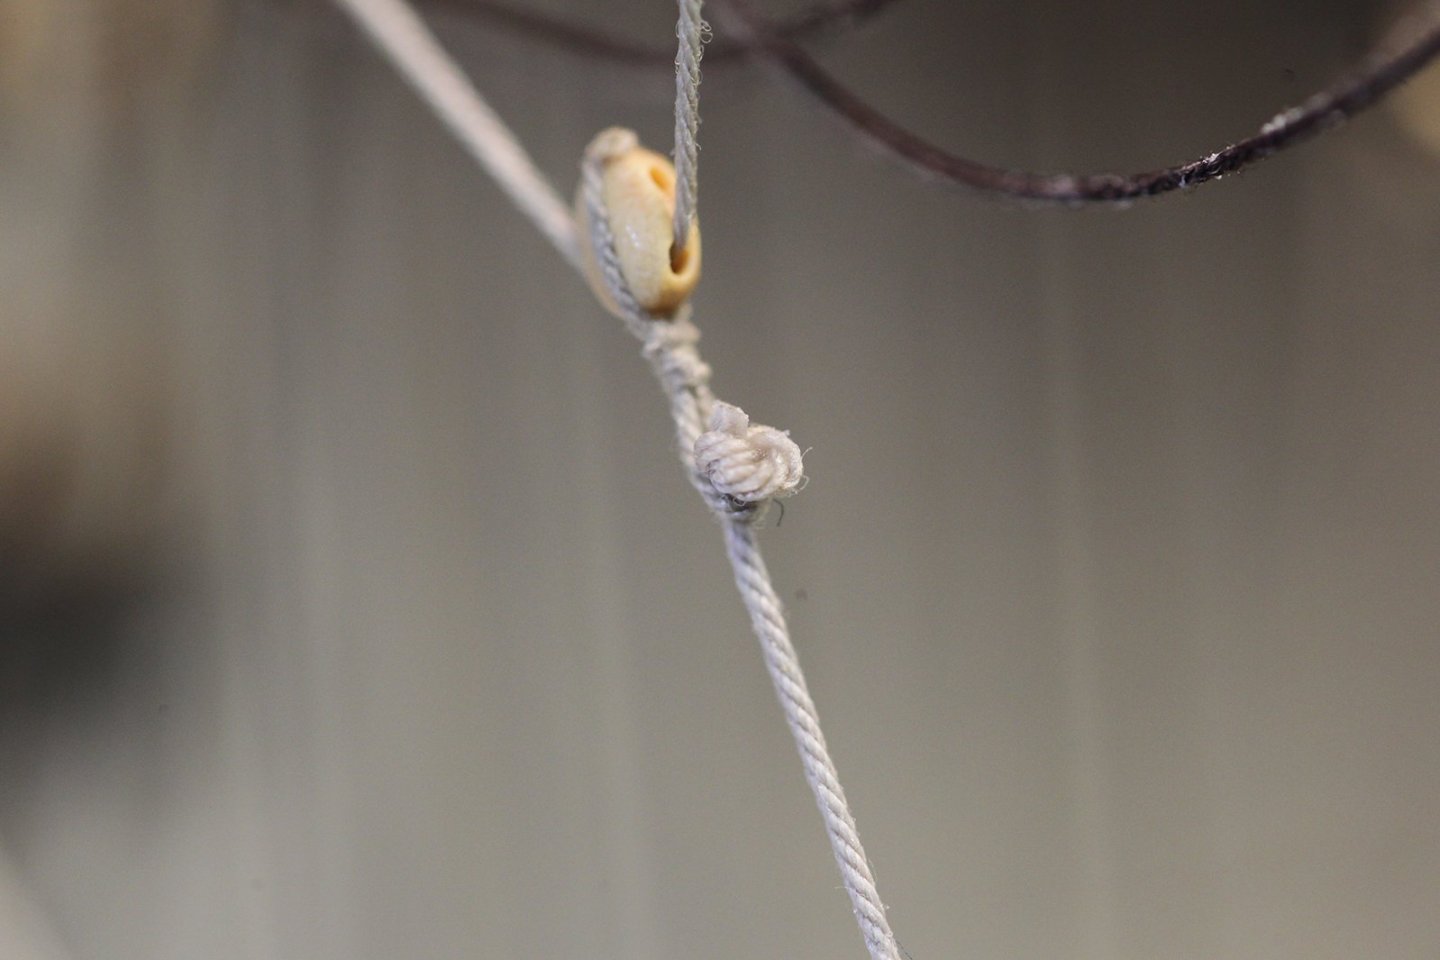
Hi @RossR - Thanks for the kind words and for looking in. I also liked adding sails - and have on two previous builds, for the same reason. This is the first time I've tried this option - mostly after seeing Blue Ensign's work on his Pegasus. It has taken a fair amount of research to figure out how to run the lines without sails, and some of the references give conflicting accounts, but I think I've come to some reasonable conclusions. This model is also the first time I've taken the "plunge" and made my own rope using Chuck's "Rope Rocket" from Syren. Once you get the hang of it, it's pretty easy and lets me make whatever size I need. Here's a previous post: https://modelshipworld.com/topic/30091-hms-pegasus-1776-by-moonbug-amati-models-164/page/10/#findComment-1036232 It is pretty important to get top quality thread though. Even so, I've ended up saving money in the long run, especially with the amount of rigging that I'm doing.
- 419 replies
-
- 3
-
-
-
- Victory Models
- Pegasus
- (and 2 more)
-
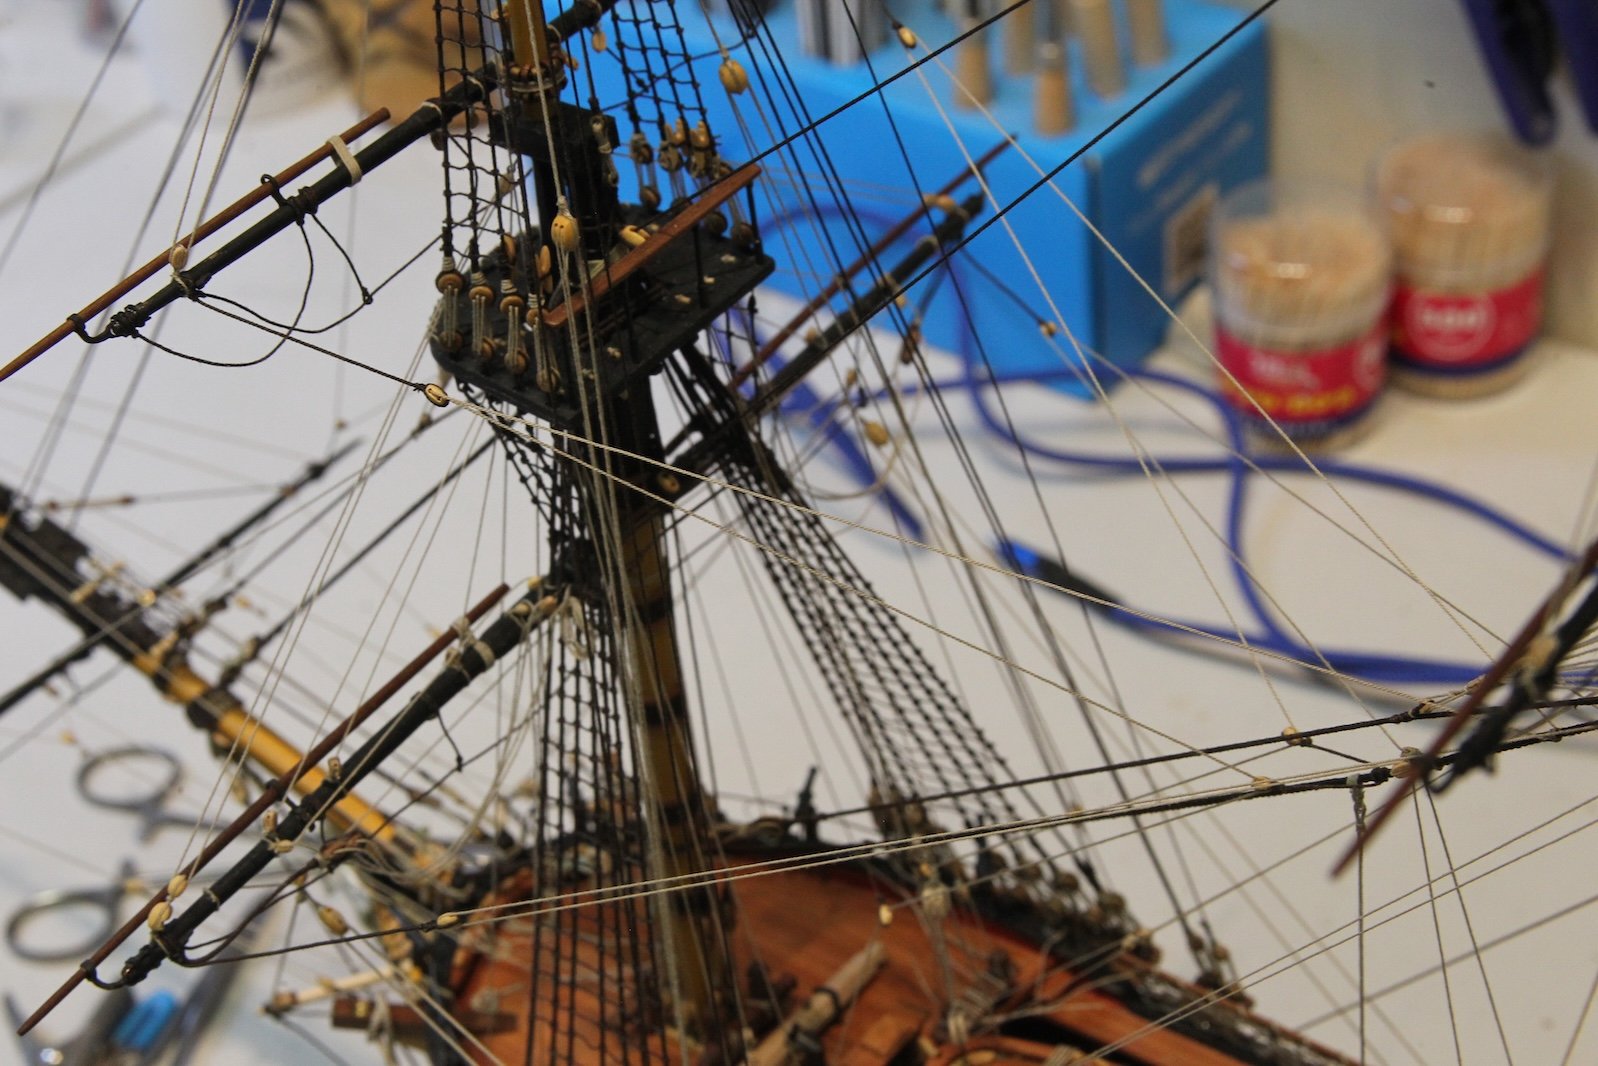
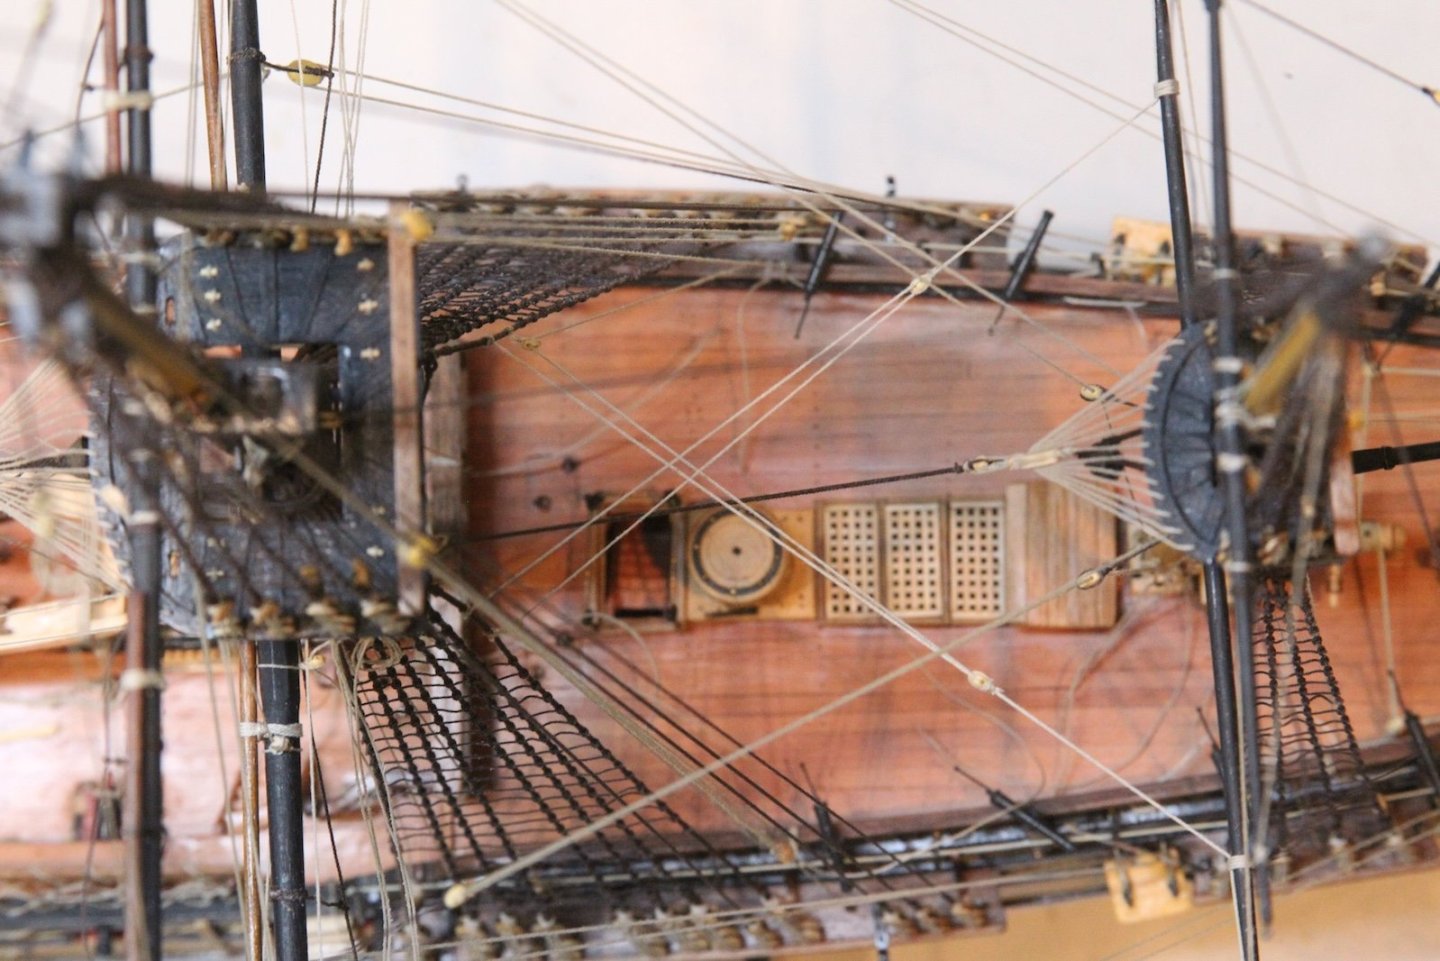
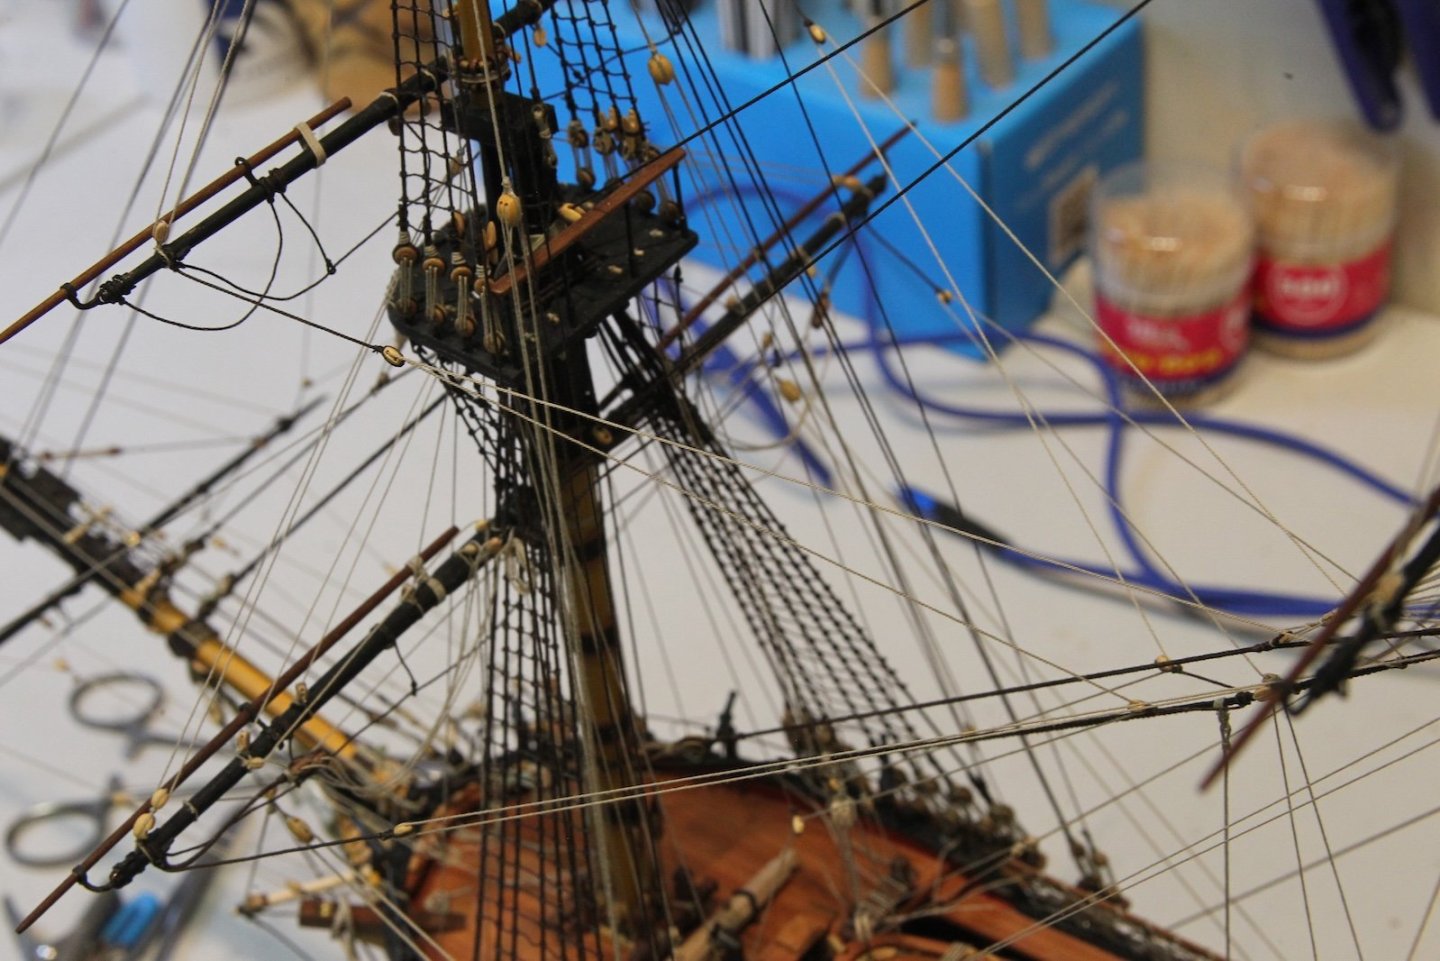
I'm heading on vacation for a week, so I wanted to knock out the cluelines & sheets and buntlines for the topsail yards before I left. While these are all pretty straightforward in terms of path - they do take a fair amount of preplanning to run the lines so they are functional and don't foul other lines. The main topsail clue lines follow the same general pattern as the lower yards. The sheets (.40mm) are crown knotted (mine is simulated) and fed through the strop of the clue block (3.5mm). The clue lines are .30mm with the standing end timber hitched to the yard, run through the clue block, then back up through the clue block on the yard before heading down through the hole in the mast top to the deck. The Sheets run from the crown knot down to the lower shoulder block on the end of the lower yards, behind the yard to the quarter block then down to belay. The main topsail lines run down to the breastwork at the mast or one of the available eye bolts. I'll be completely honest here - at this point, I'm finding any available railing, bitt, or eye bolt that allows for belaying without fouling any of the lines. There is VERY little room at the base of the masts at this point and belaying points are at a premium. The Mizzen clues run in the same fashion, and once again I find real estate to belay lines. I've shifted the lines around at the base of the mizzen several times at this point, and will likely shift them more. Once again (as with the lower yards) I'm running bunt lines even though there are no sails. Following the same policy as the lower yards, the buntlines for the topsail yards will knot at their respective blocks, then run their course. In the case of the topsail yards, the bunt lines are knotted at the two blocks attached to the center of the yard, then run up to two more blocks at the mast top before heading down along the mast to belay. Following my policy of running sail lines without sails - I'm also running the mizzen's brail lines. Not something I've seen on very many (if any) models without sails. But, once again, I don't like seeing "empty" blocks, and the three pair of brail blocks on the gaff would typically hold the sail. The three pair are the throat brails (closest to the mast), the middle brails, and the peak brails. According to Marquardt (pg 214) and Lees (pg 109) the peak would belay at a cleat on the aft spirketting - I'm substituting an eyebolt in that area. The middle would run through a lead block down to a shroud cleat, and the throat brails would belay at the mast. As with the buntlines, I'm knotting the lines at the blocks and then running them along their designated path. T'gallants are up next after I return from Vacation. In the meantime, here are a couple of gratuitous shots of the intricate spiderweb.


- 419 replies
-
- 12
-
-
-
- Victory Models
- Pegasus
- (and 2 more)
-
I agree @Thukydides - As I said, I'm amazed that all those lines actually functioned in a workable way. A couple more yards, and a handful of clues, sheets, braces to go!
- 419 replies
-
- 4
-
-
- Victory Models
- Pegasus
- (and 2 more)
-
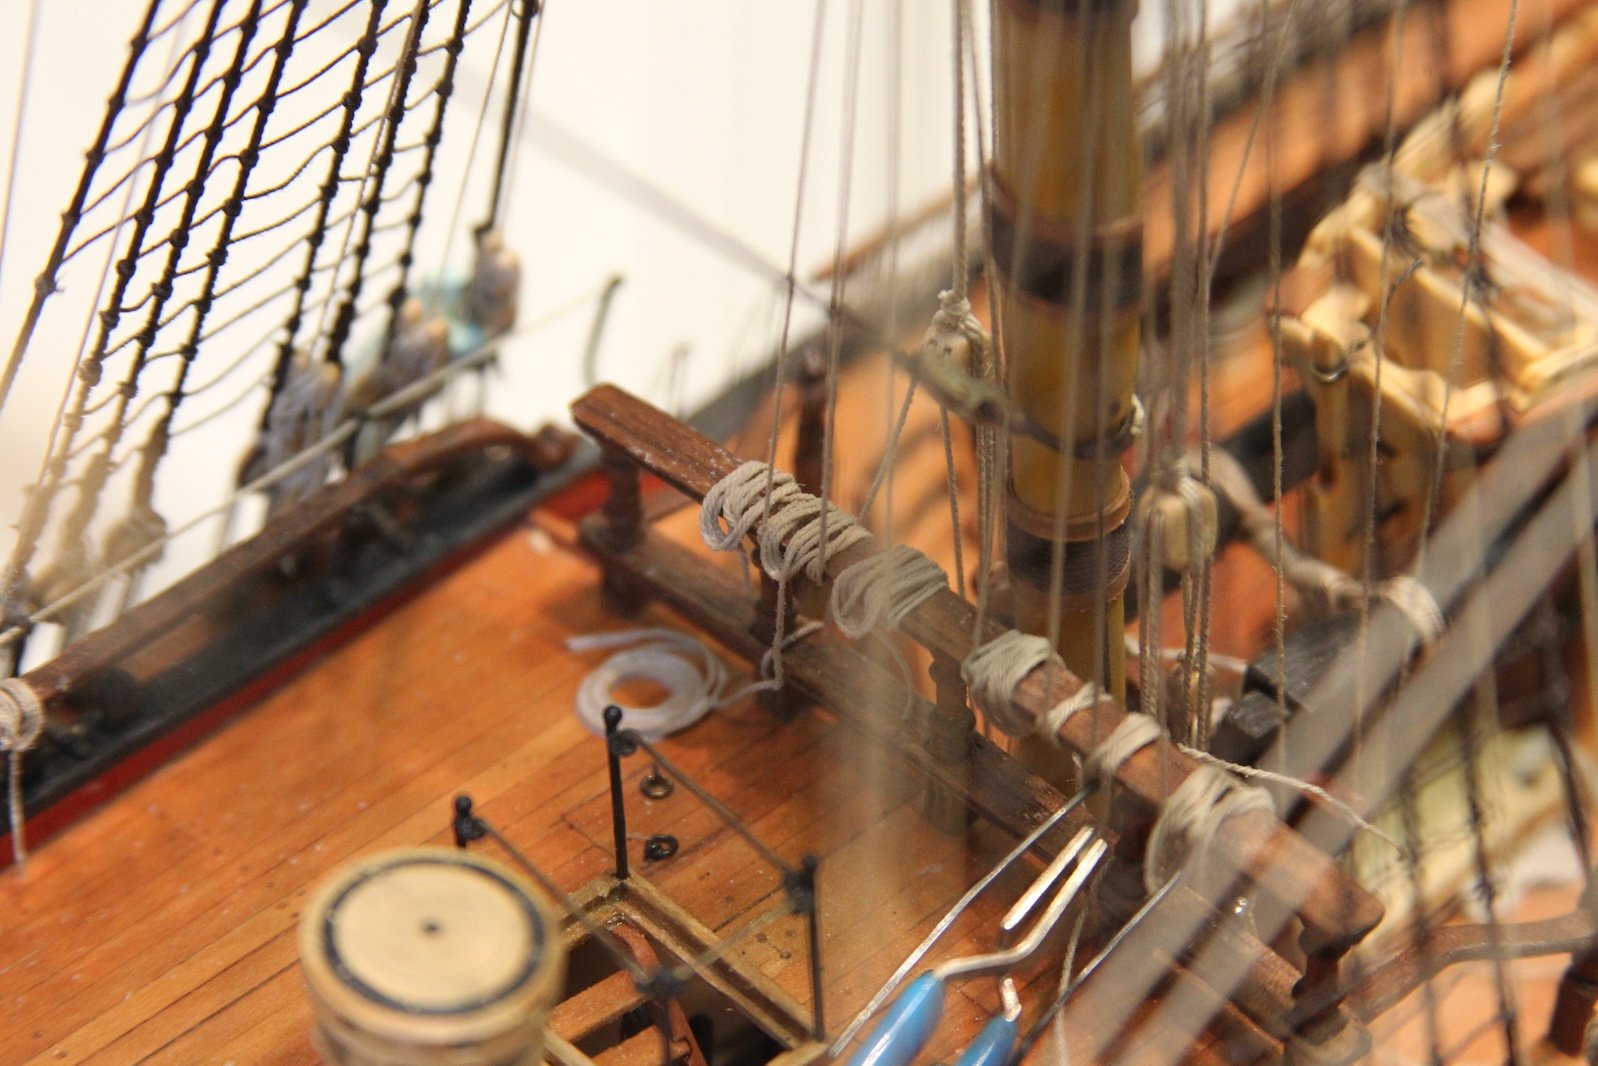
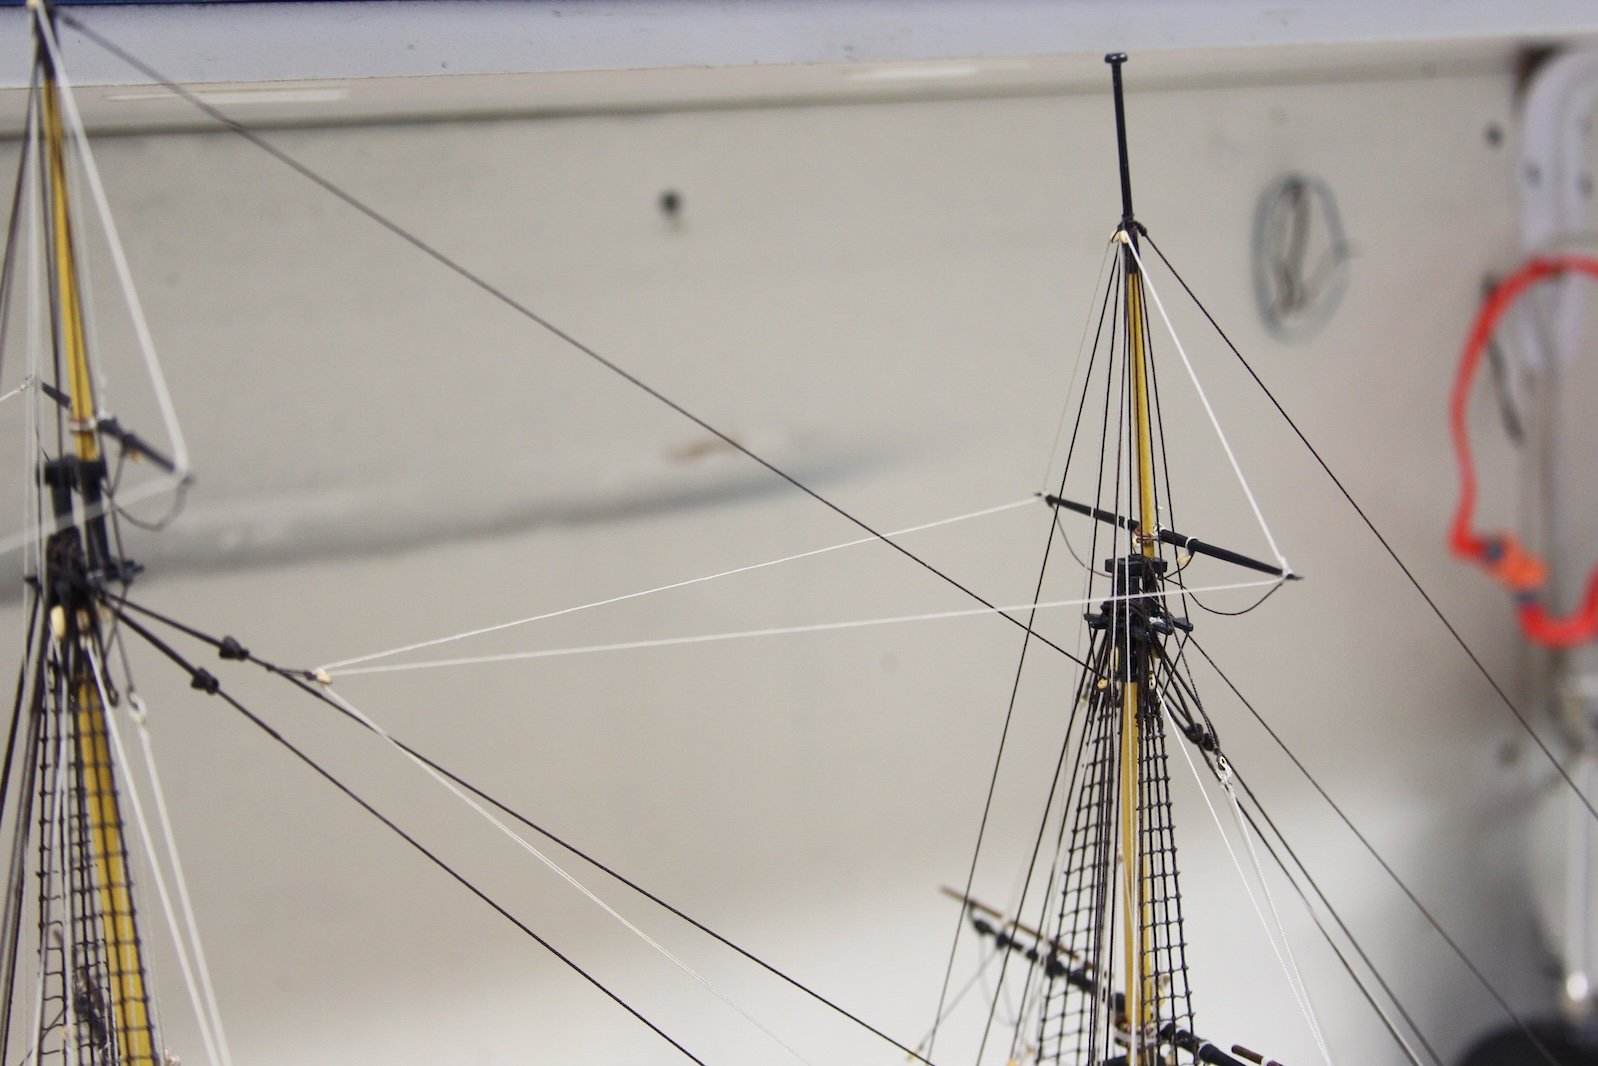
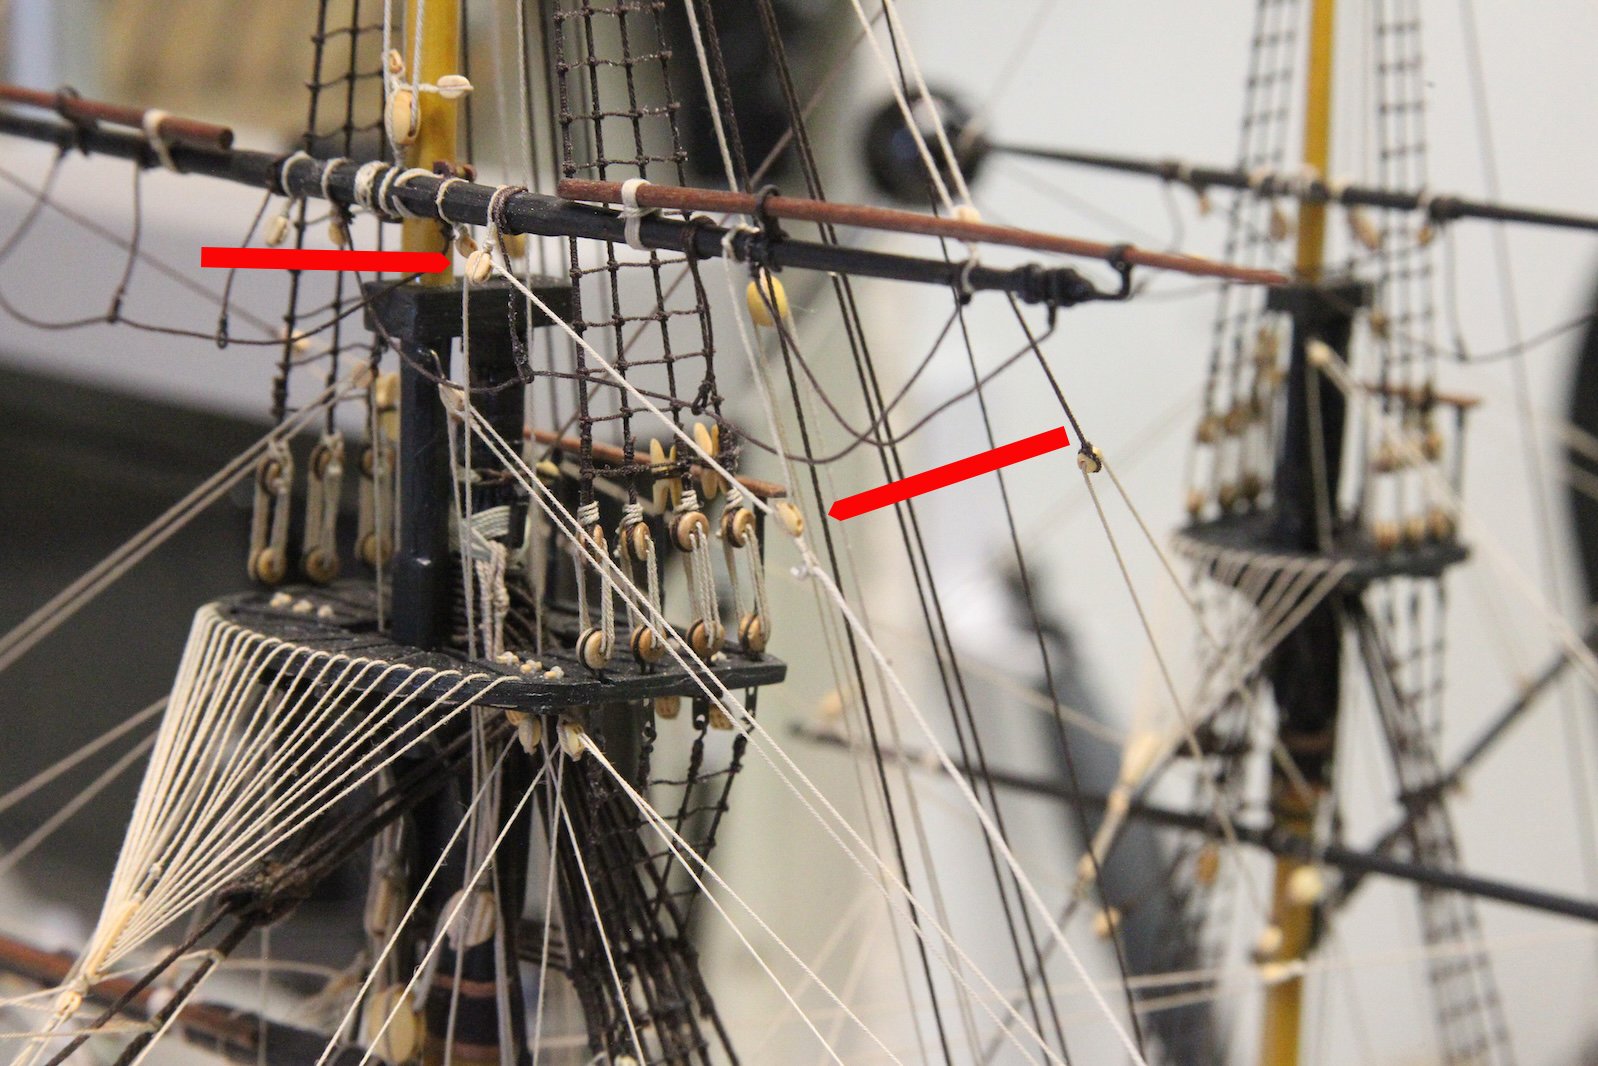
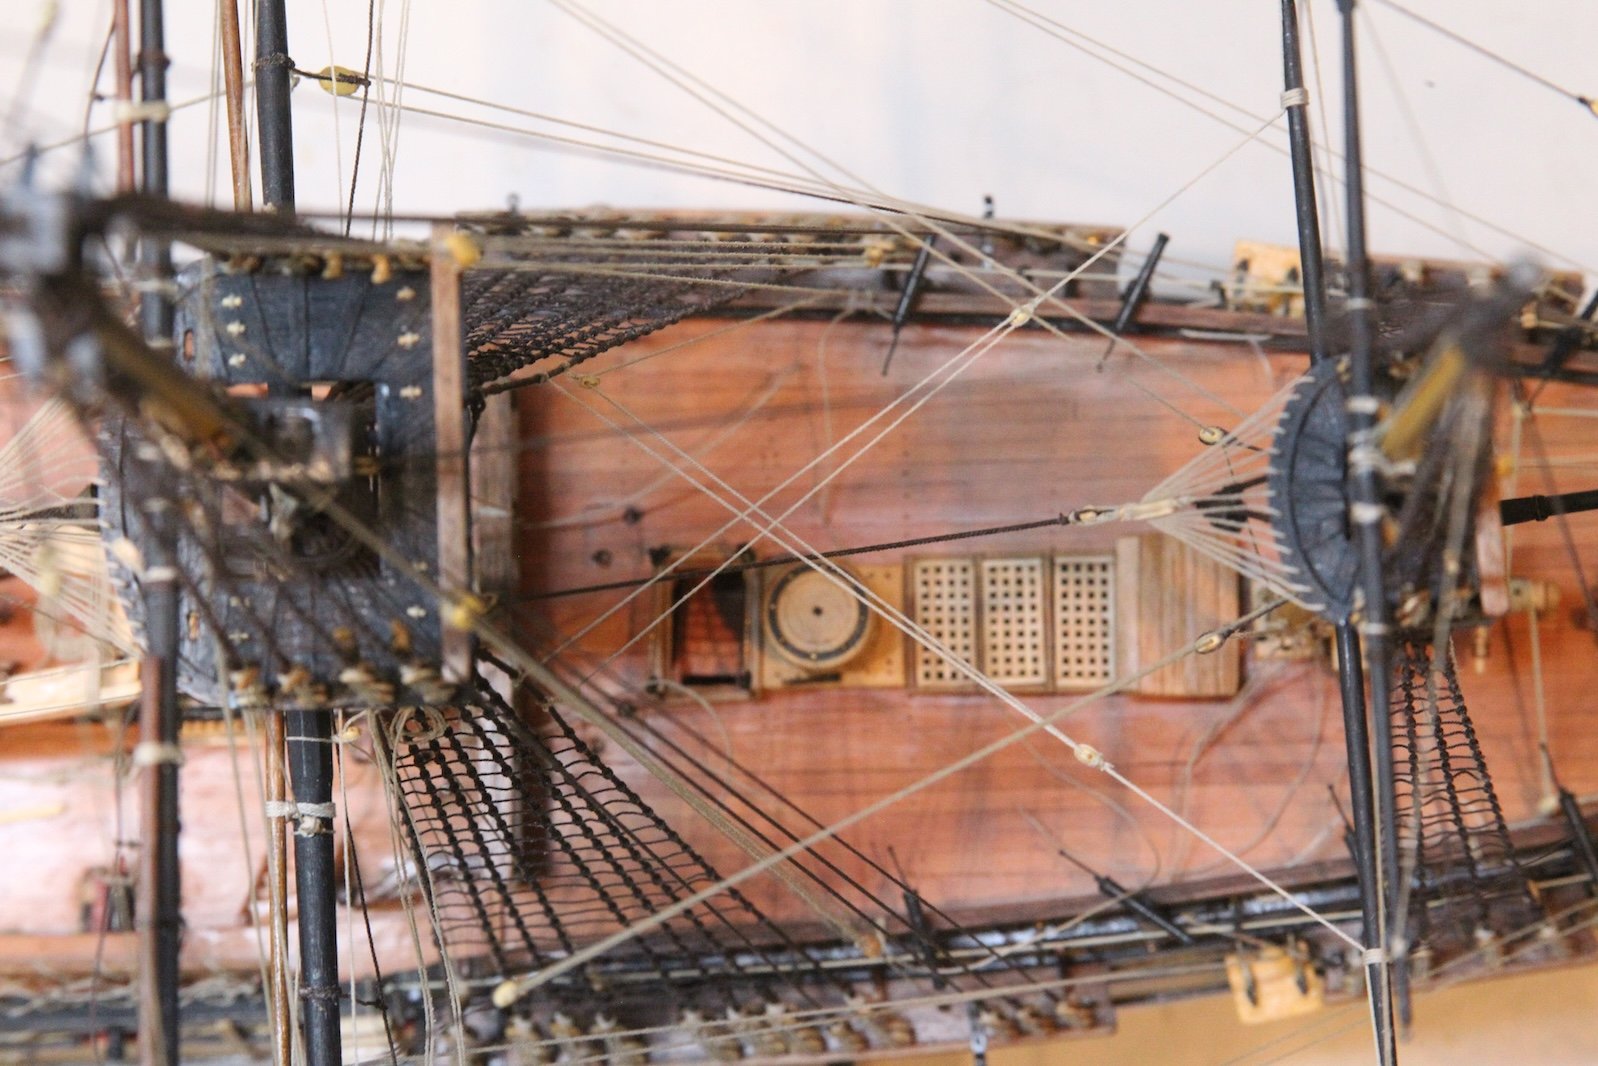
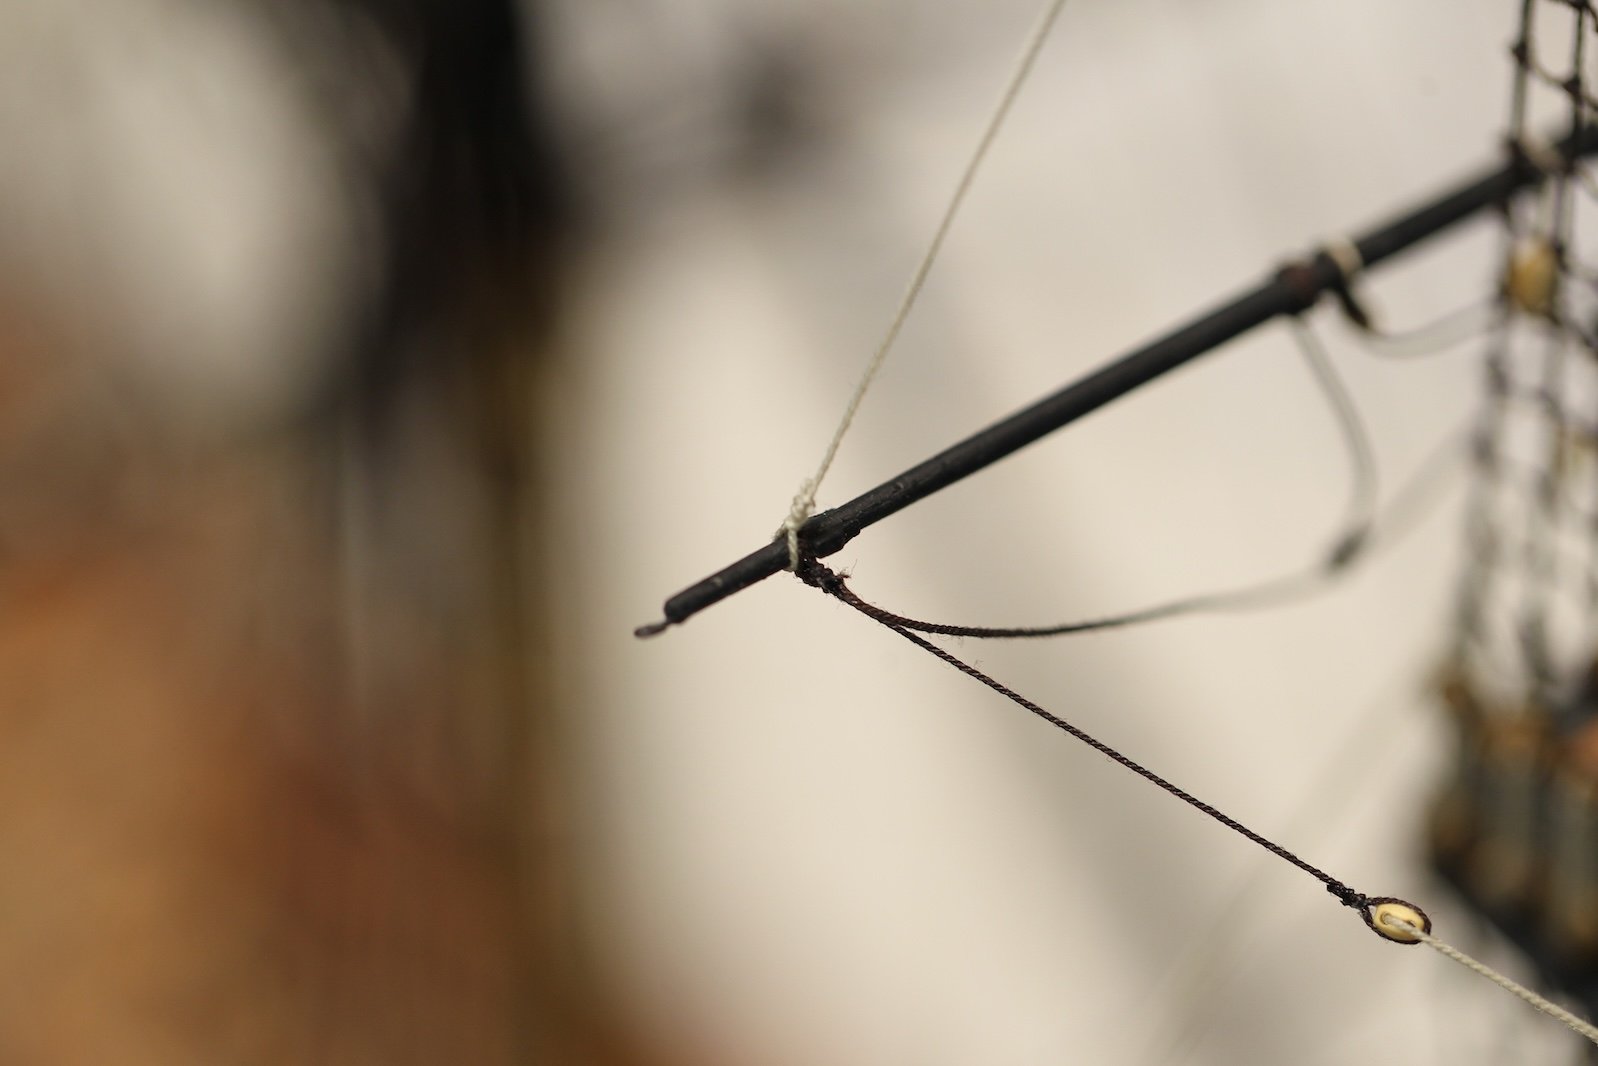
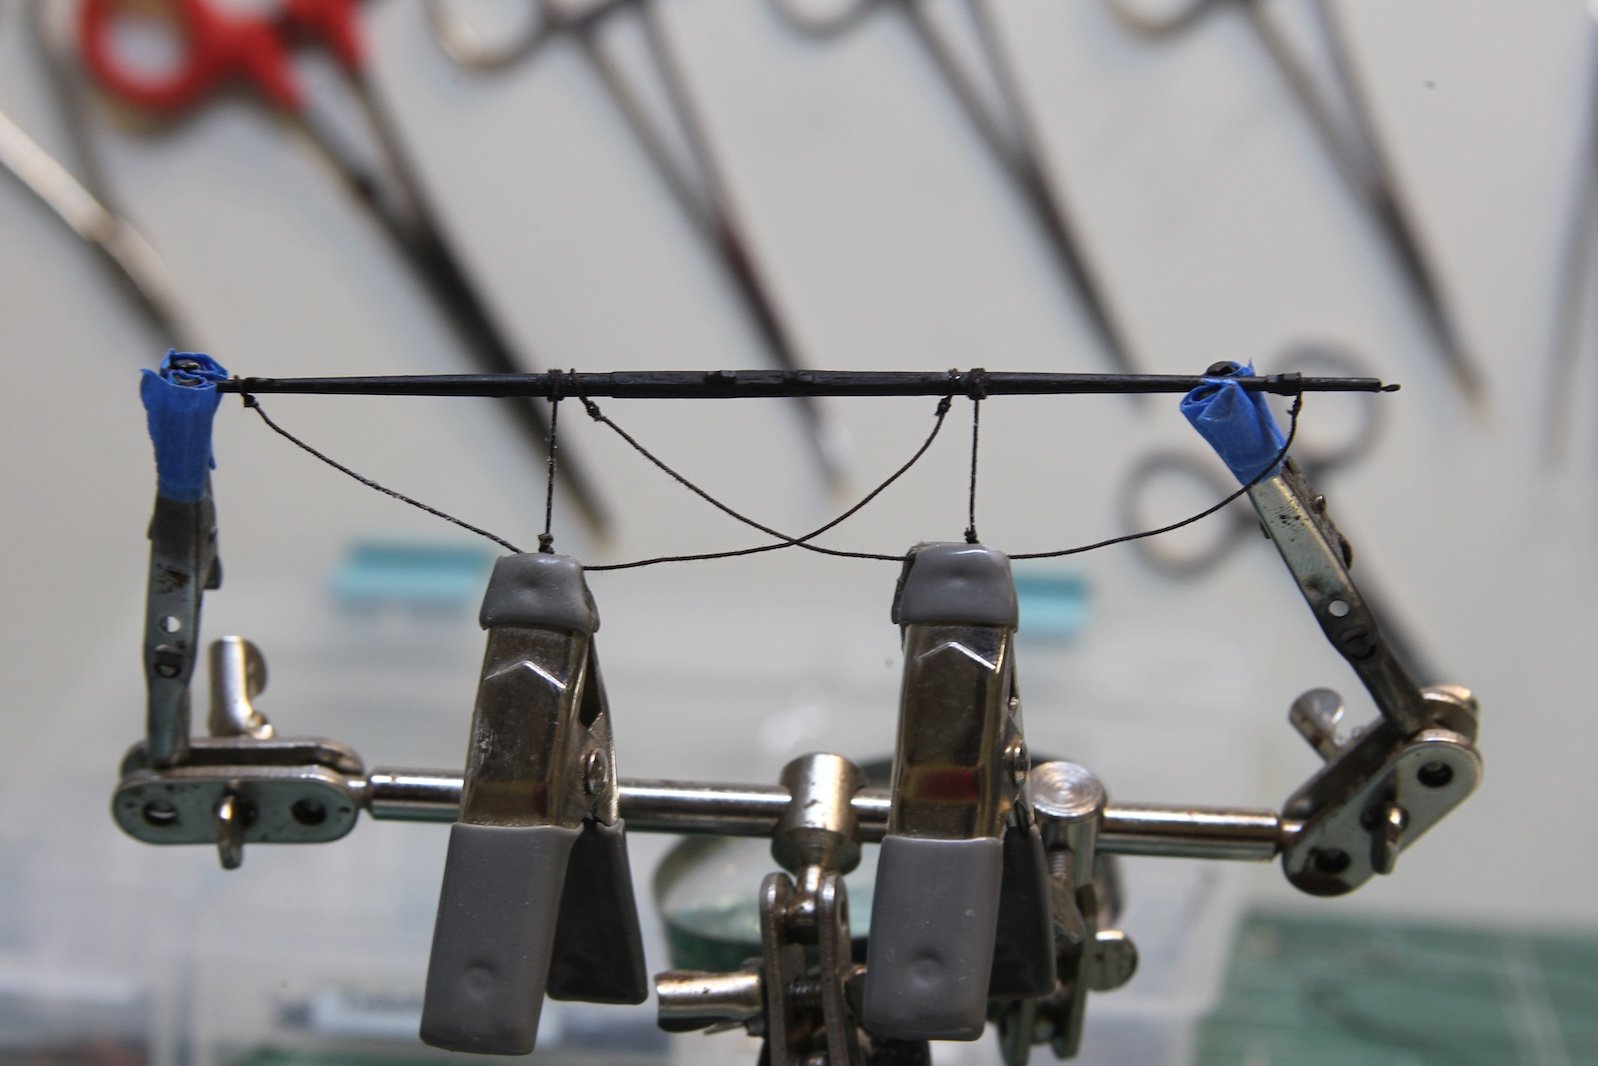
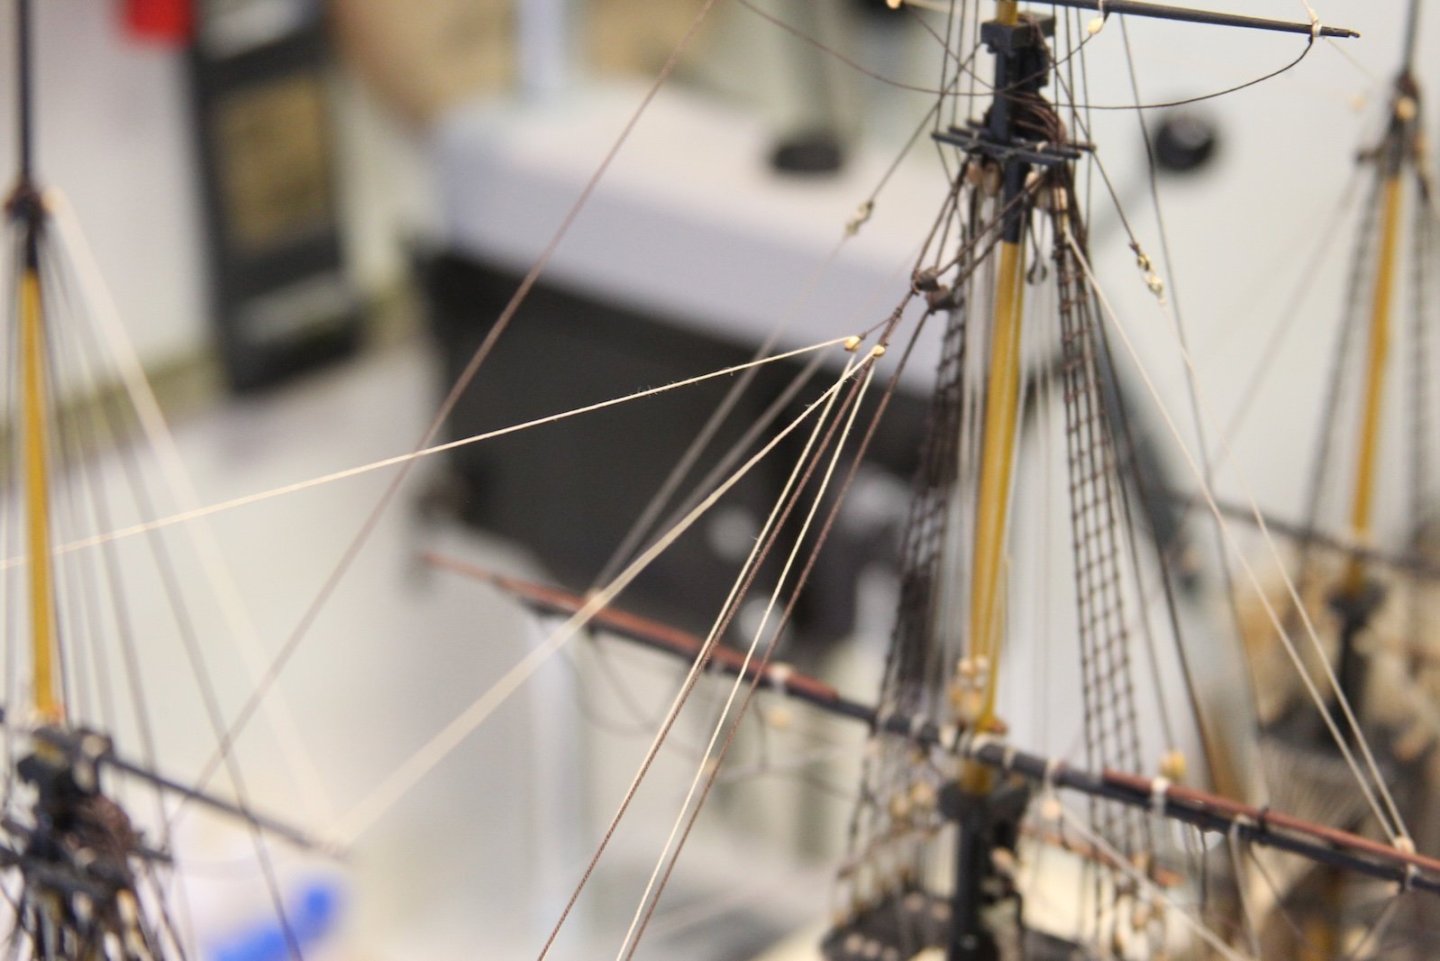
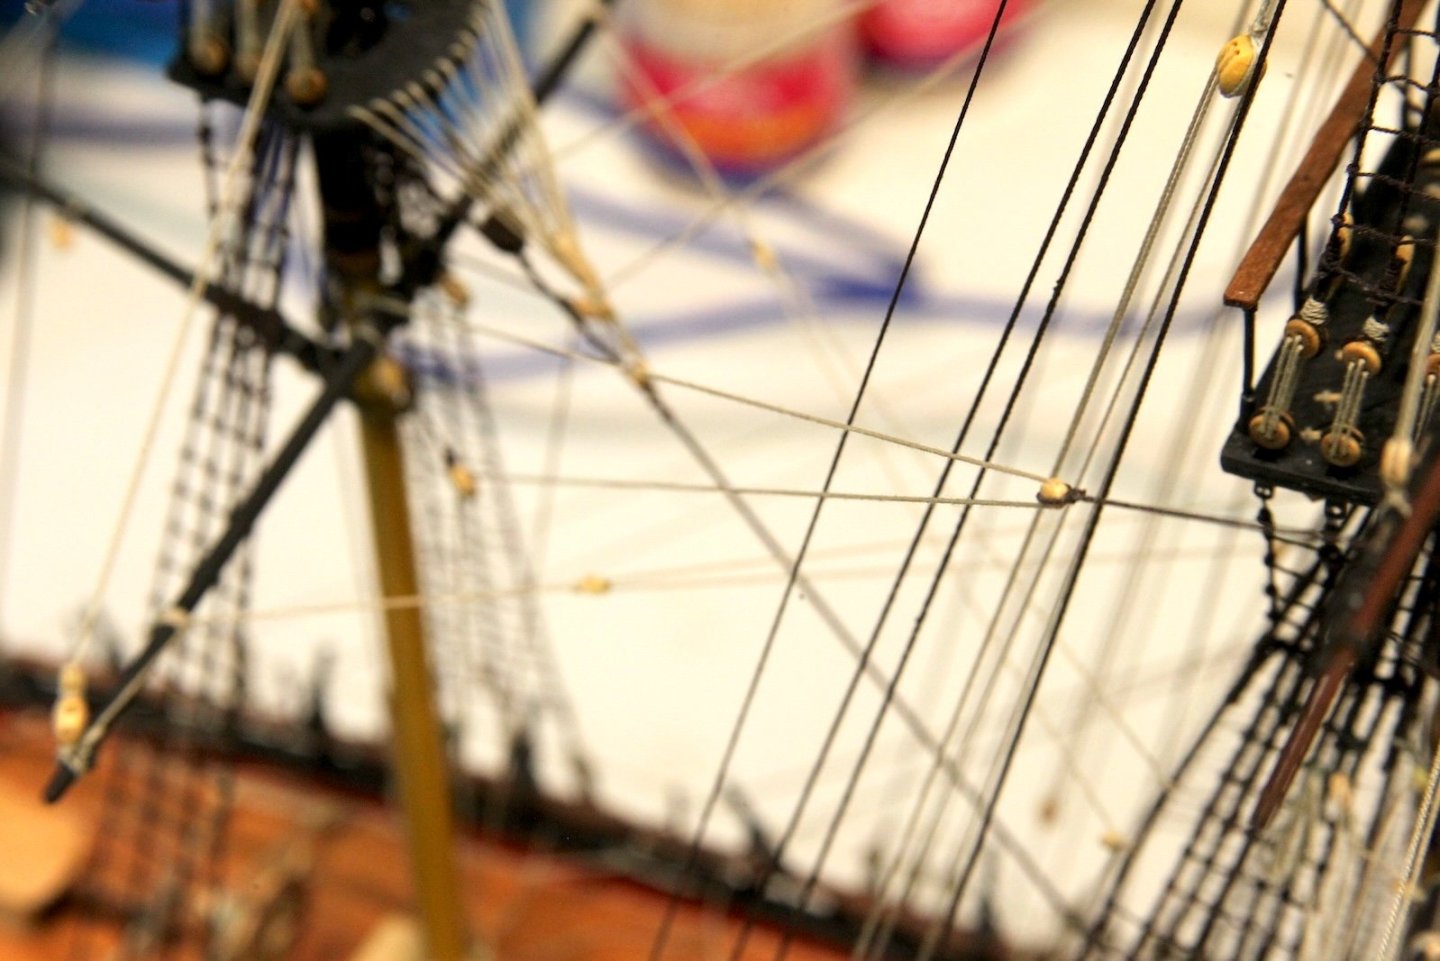
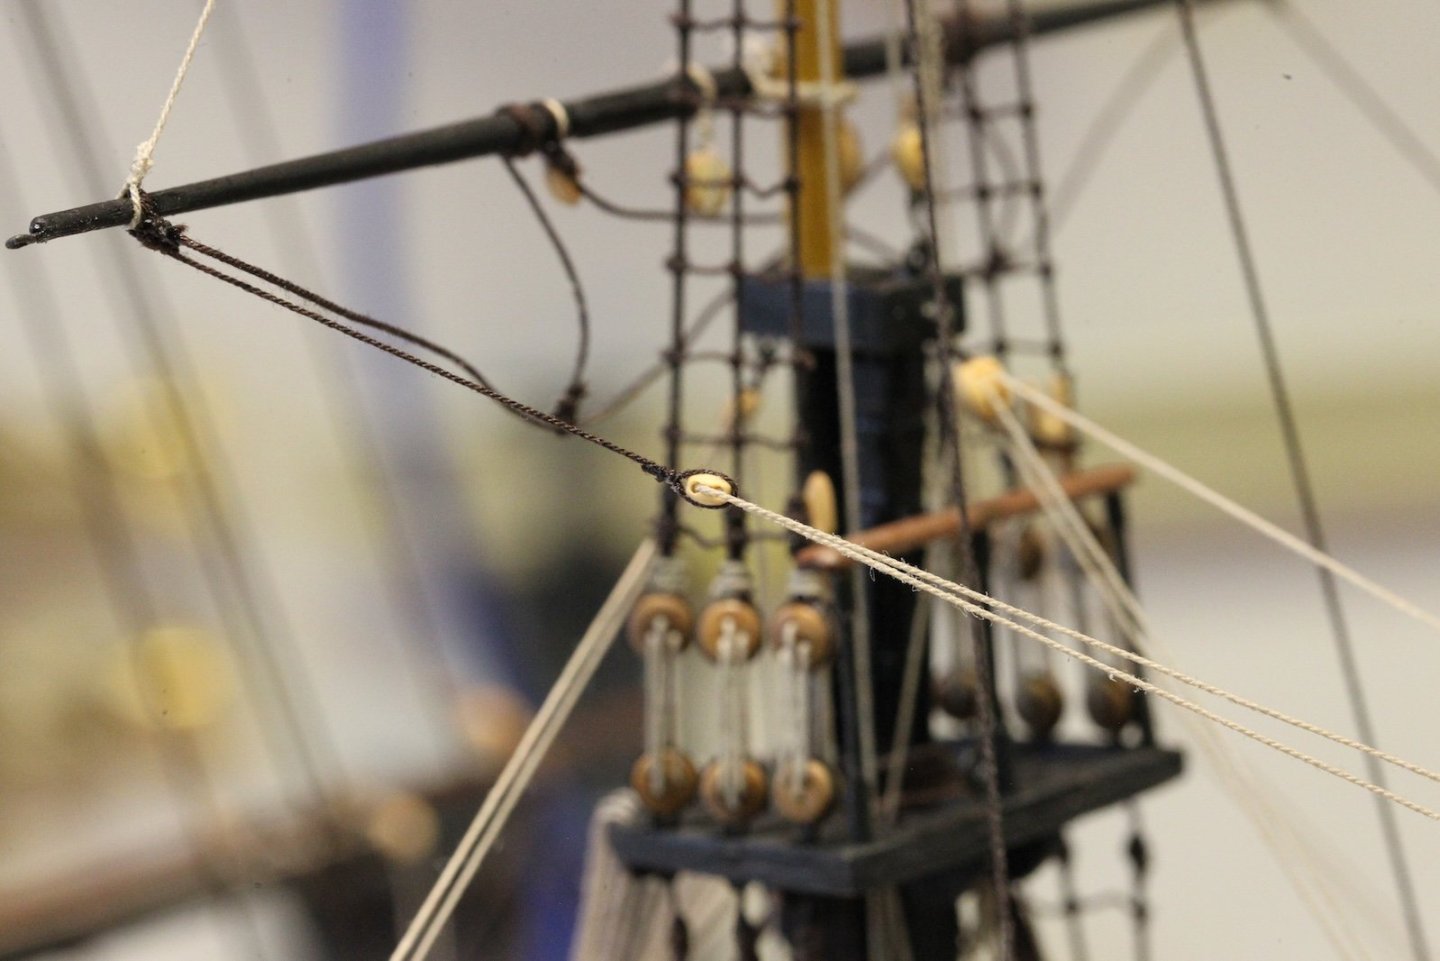
The topsail yard braces for both main and fore are similar in that they involve a separate span with single blocks on the ends to facilitate the run of the lines. In this instance it was much easier for me to start with the main. The span for the main braces is a 21' long (just about 100mm) 3.5" (.40mm) tarred line with an 8" (3.5mm) blocked seized to each end. This span is clove hitched around the mizzen mast just above the cross jack. Both the length of the span and its exact location needs to be pretty precise to prevent the braces from fouling with any other lines - especially the crow's feet. It is definitely tricky trying to tie a clove hitch in this area especially with blocks seized to the end and still get each end of the span equidistant from the other. The standing end of the braces (.30mm line) is hitched to this span above the blocks (see above right) then runs through the brace pendant on the end of the yard. It runs back through the block on the span then down to belay at one of the mizzen cleats at the bottom of the mast. Here's an overhead look at the run of the main topsail braces along with the cross jack braces. The fore topsail braces are a similar process but a little more complicated. These braces utilize TWO spans, both of which are hitched to the main stay. One is located just below the fore yard brace blocks, the other is located just above the belfry. Both spans are still .40mm tarred line with 3.5mm blocks on each end. The spans are a bit shorter (about 40mm for me) as they only wrap around a line instead of a mast. Still quite tricky to get the ends equidistant. The standing end of the braces starts on the main stay just below the standing ends of the fore braces. Note: Just like the fore braces, I chose a clove hitch of a single very long line rather than two separate standing end hitches which (to me) creates a little bit of a bulky mess. From there, the braces run up to the brace pendants on the yard, back to the blocks on the upper span, down to the blocks on the lower span, then down to belay on the inner ends of the fo'csle breastwork rails. As you can see, the railing is getting a little crowded. And I suppose it goes without saying that things are starting to get quite complicated over the main deck of the ship at this point, and rigging is becoming an expert level version of cat's cradle. Understanding that it's getting difficult to follow the run of the lines, here are a couple of photos to indicate the locations of the spans and hitches. Once again, the level of engineering on these ships amazes me. Planning the runs of the lines in ways that keep them fully functional without fouling is something that has always (and continues to) impress me.


- 419 replies
-
- 10
-
-
-
- Victory Models
- Pegasus
- (and 2 more)
-
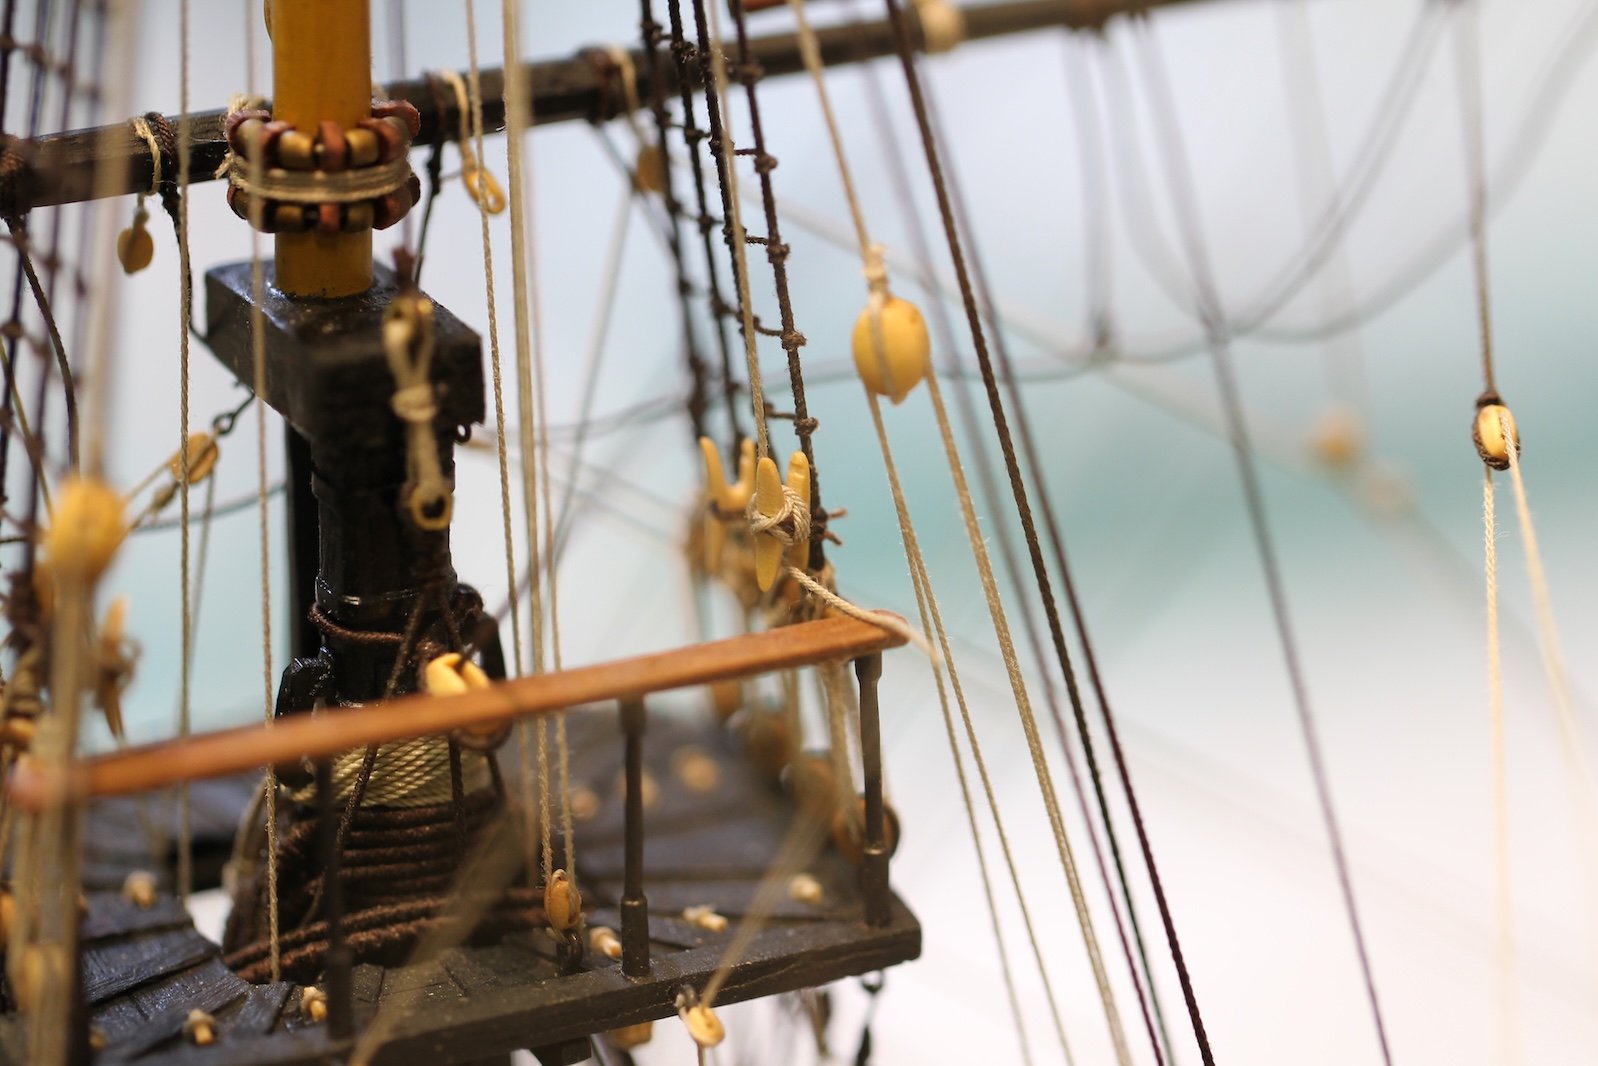
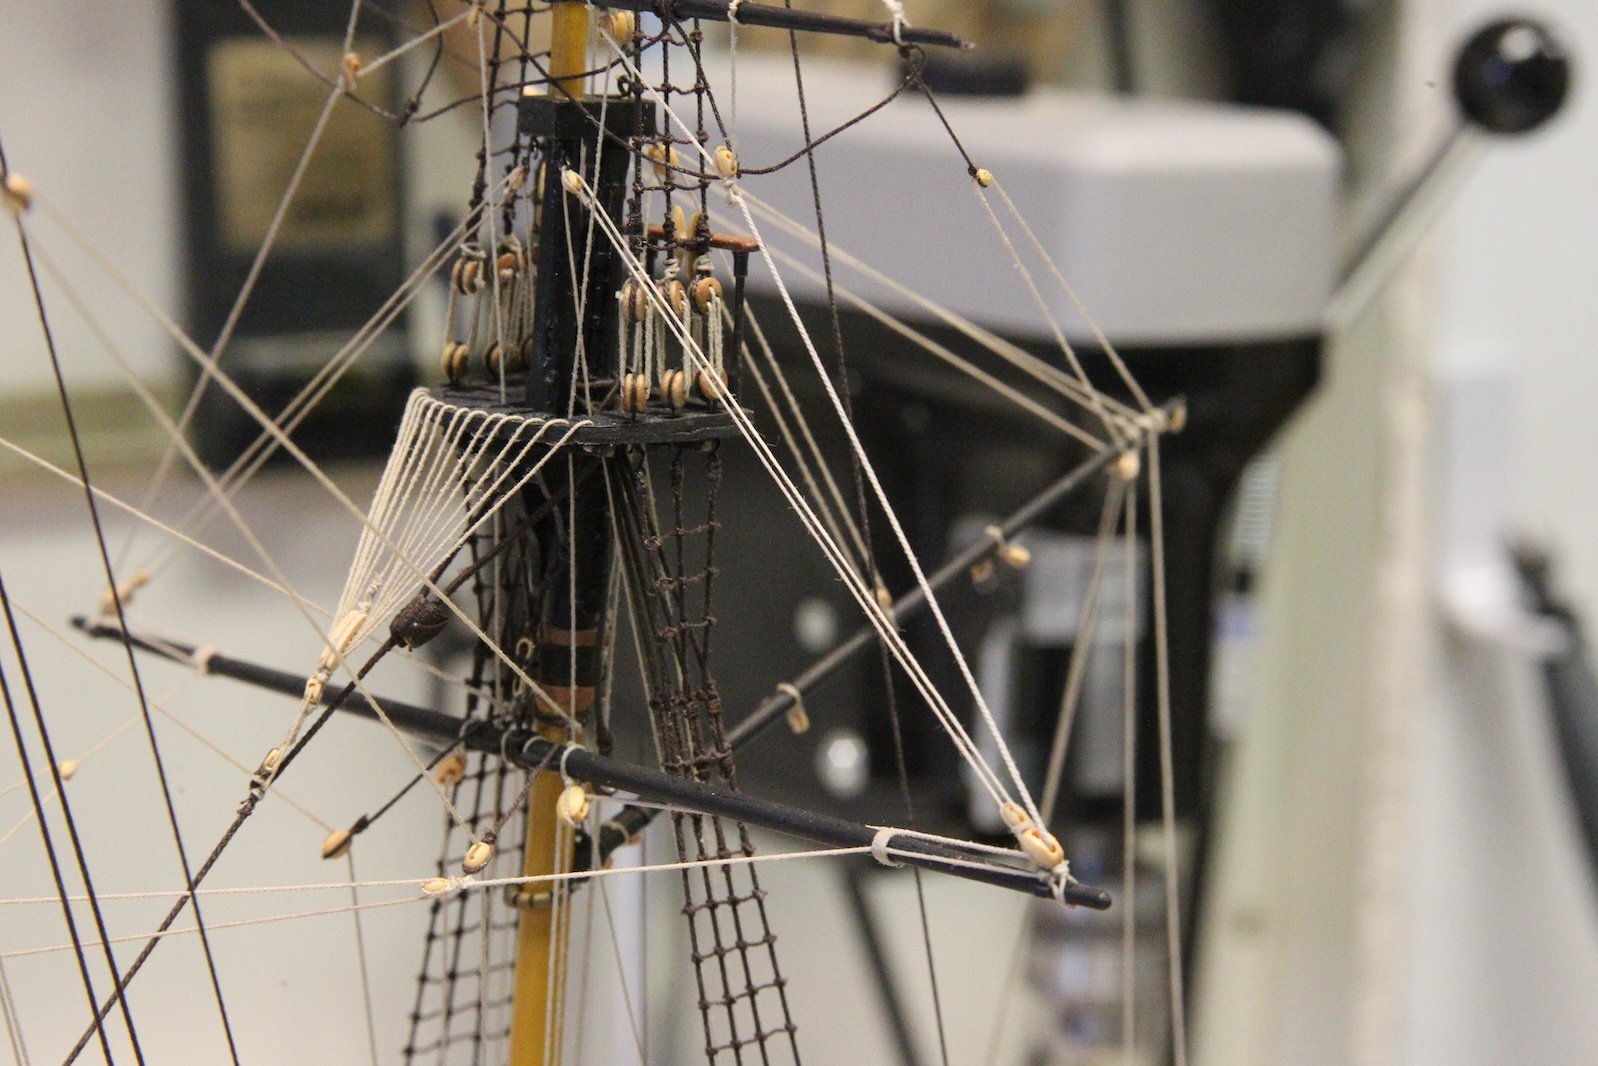
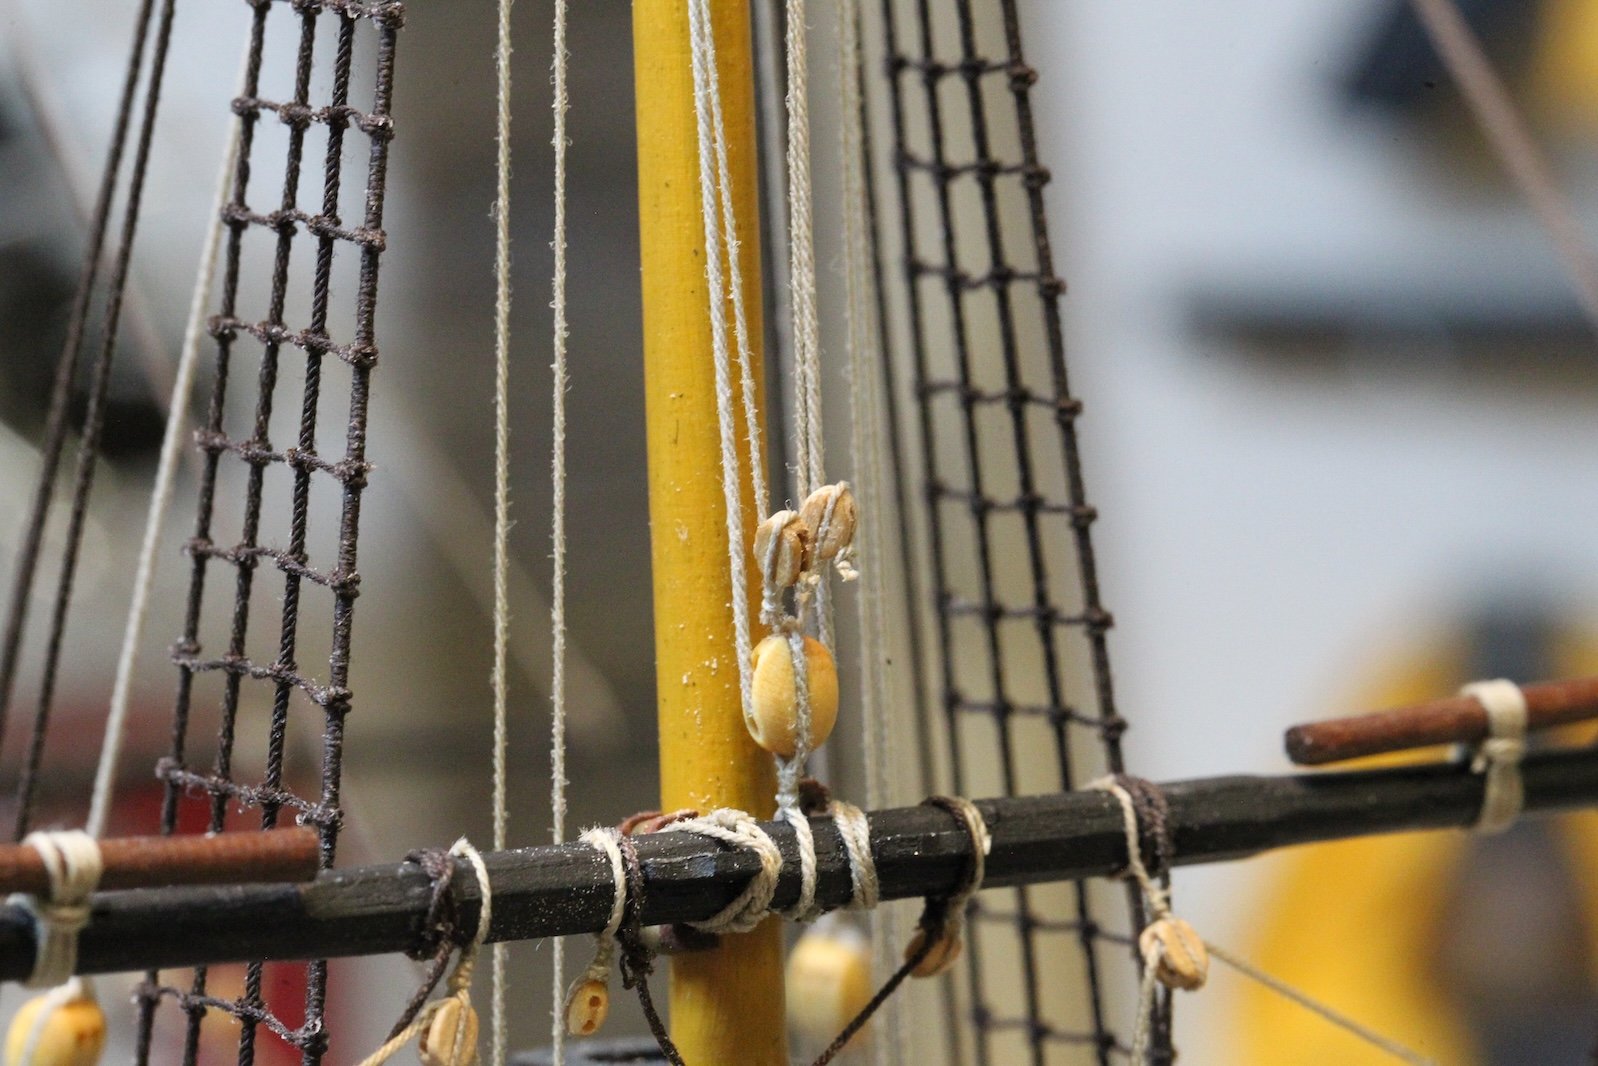
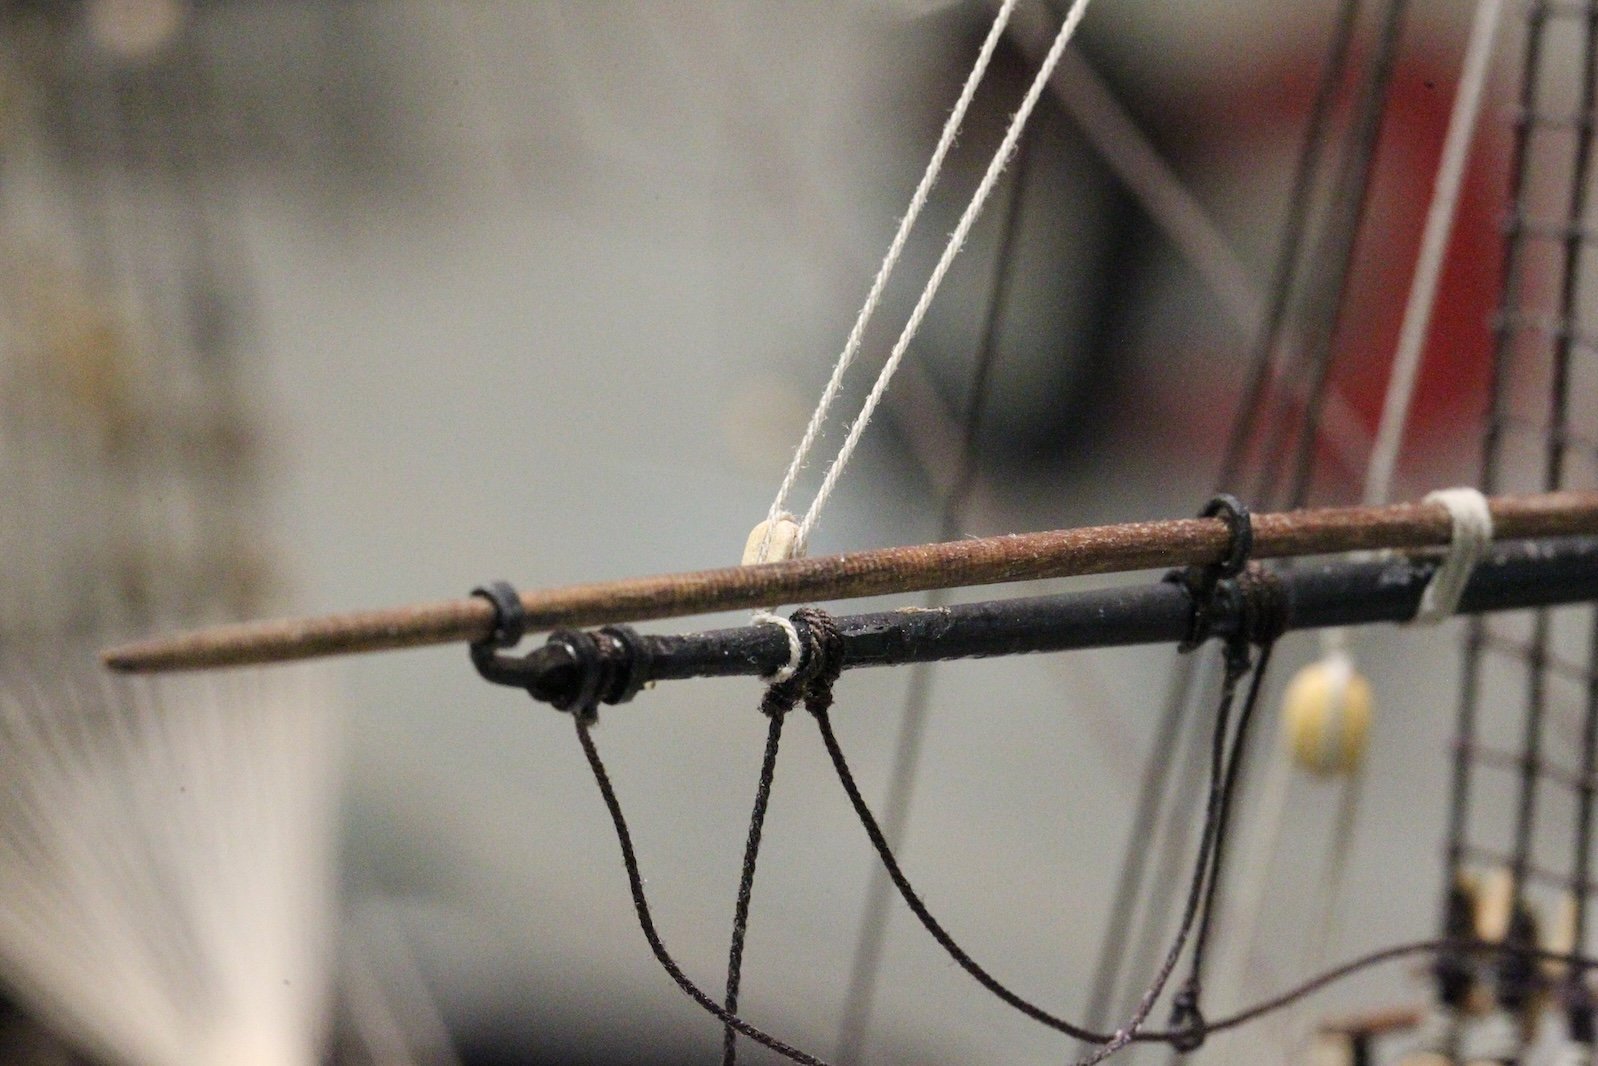
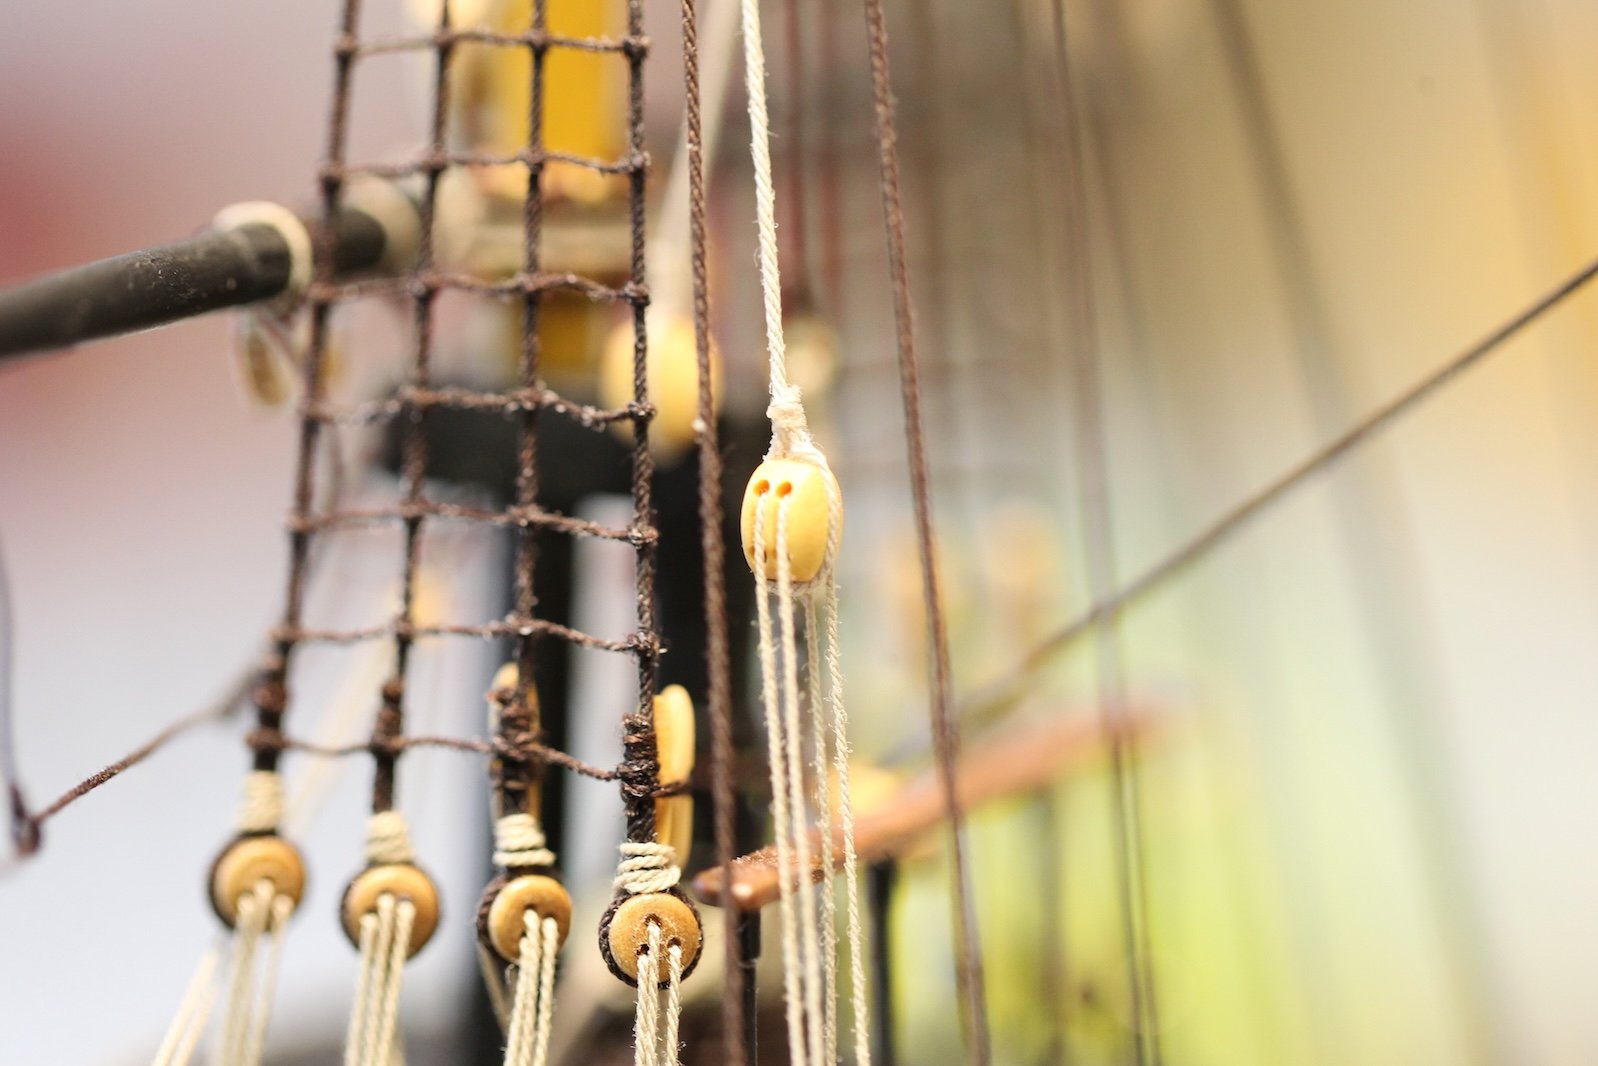
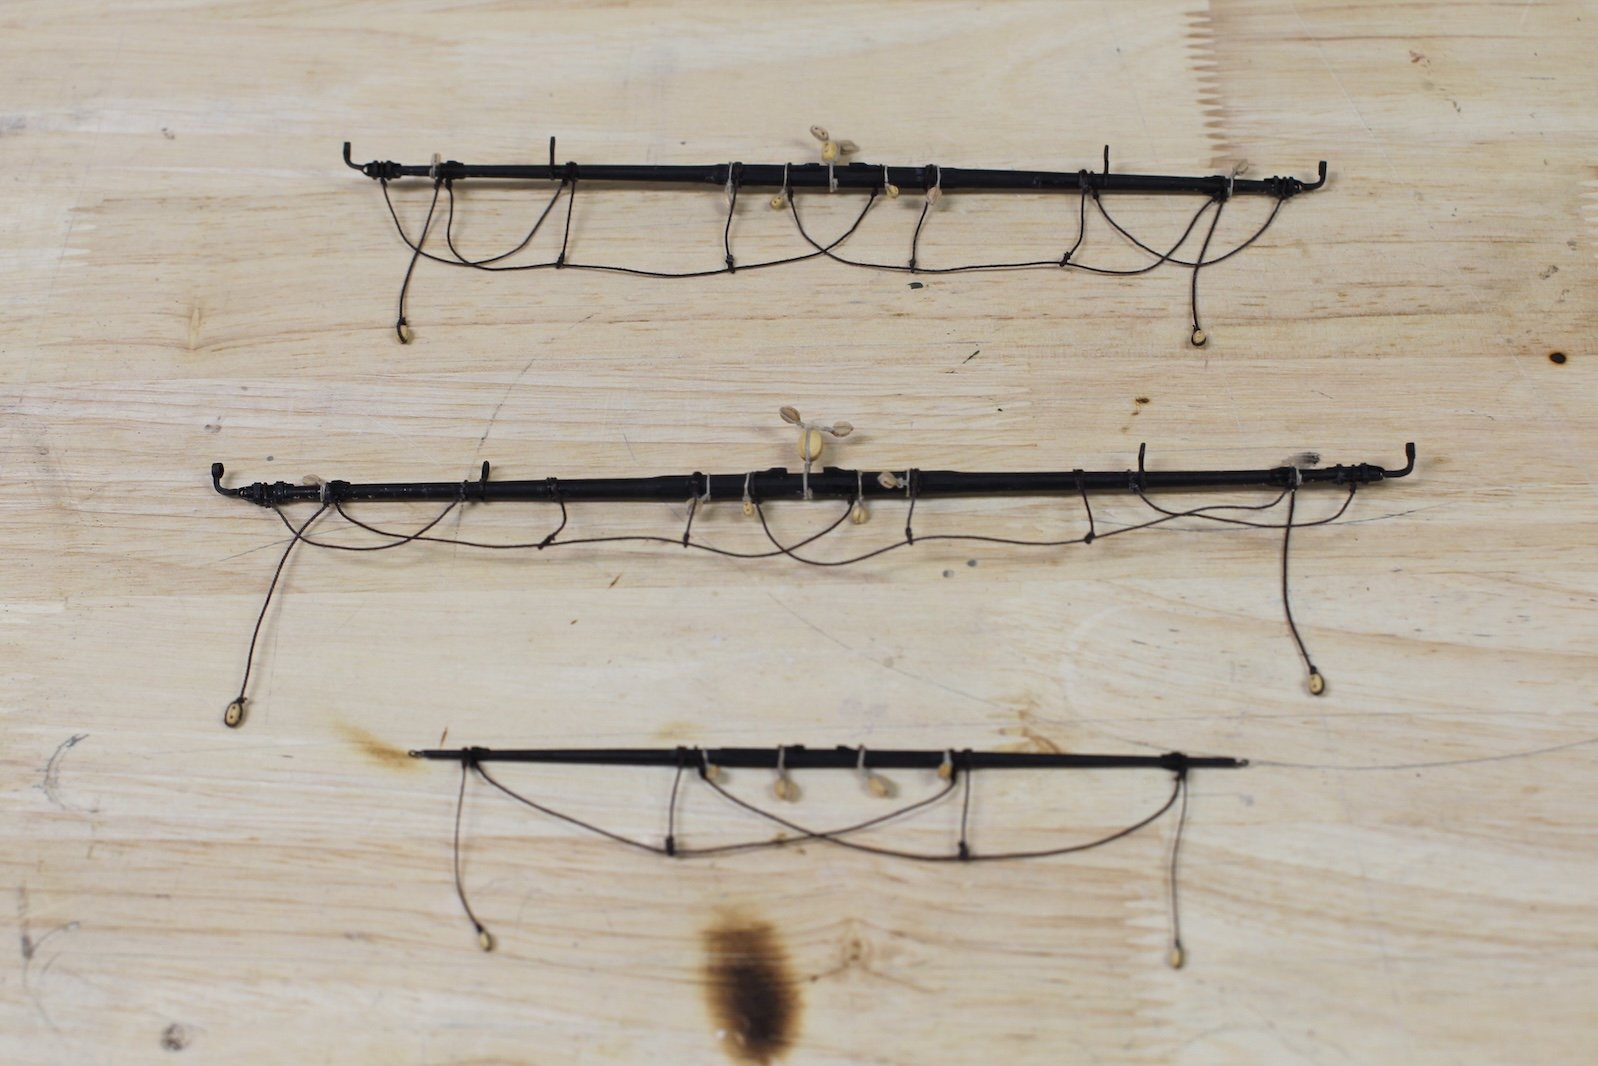
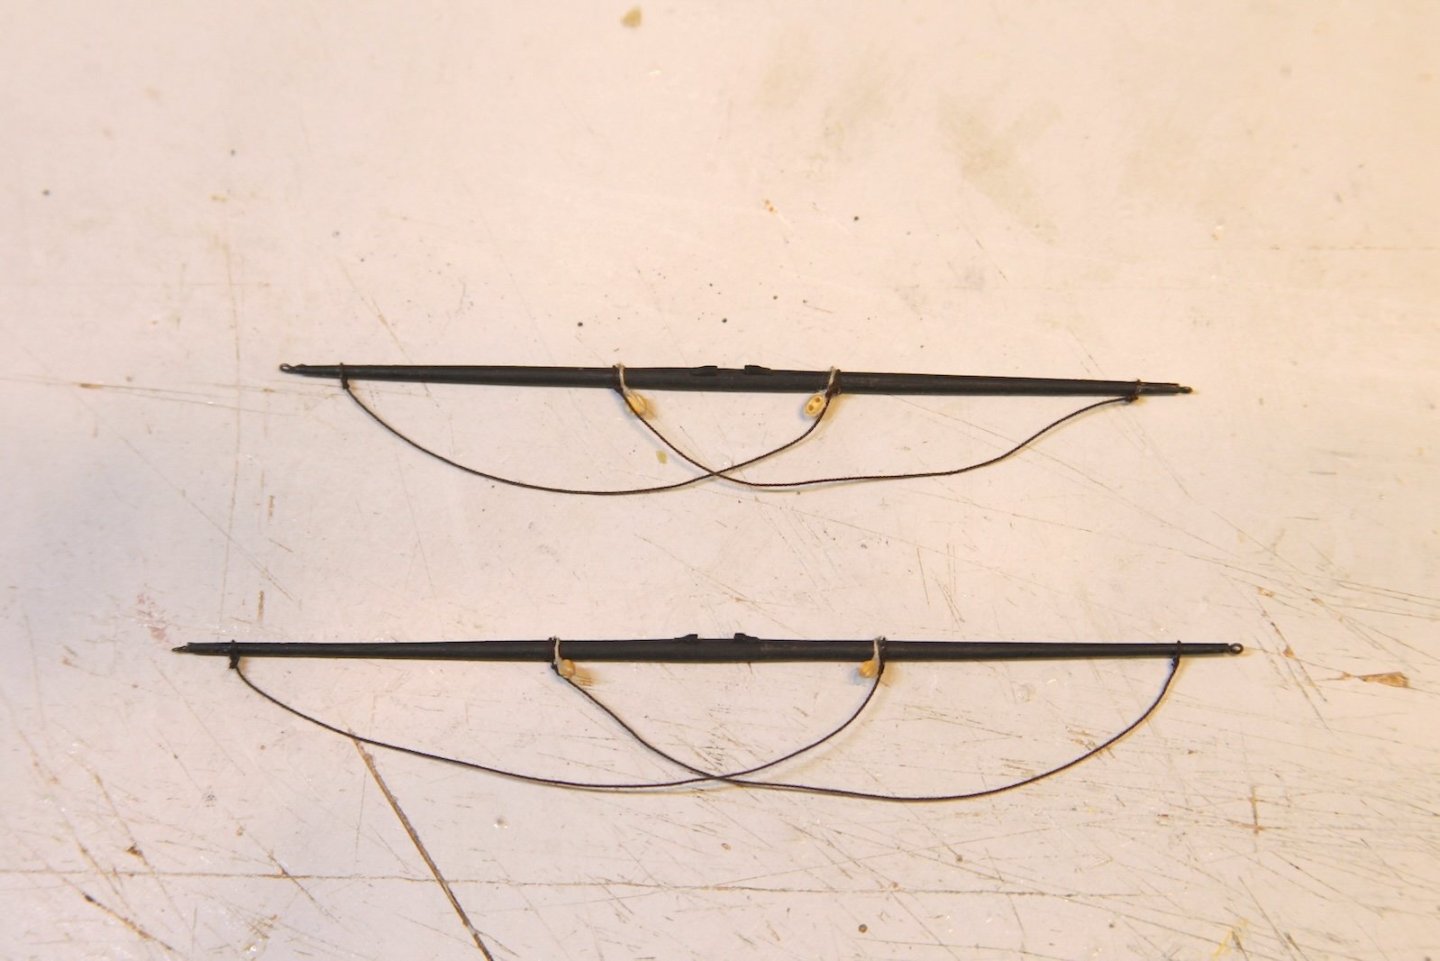
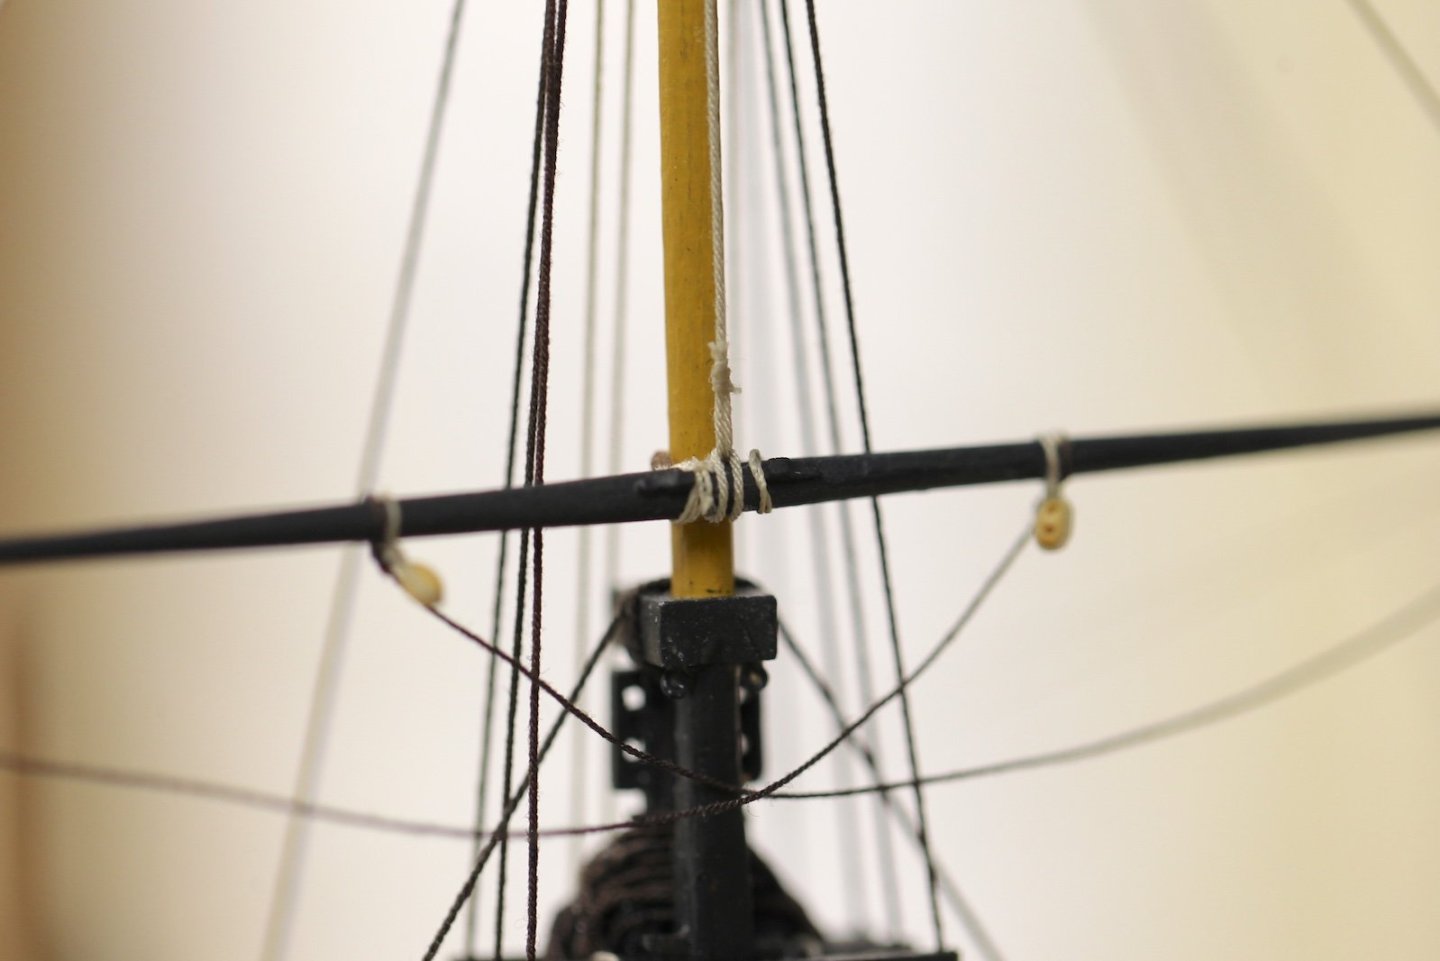
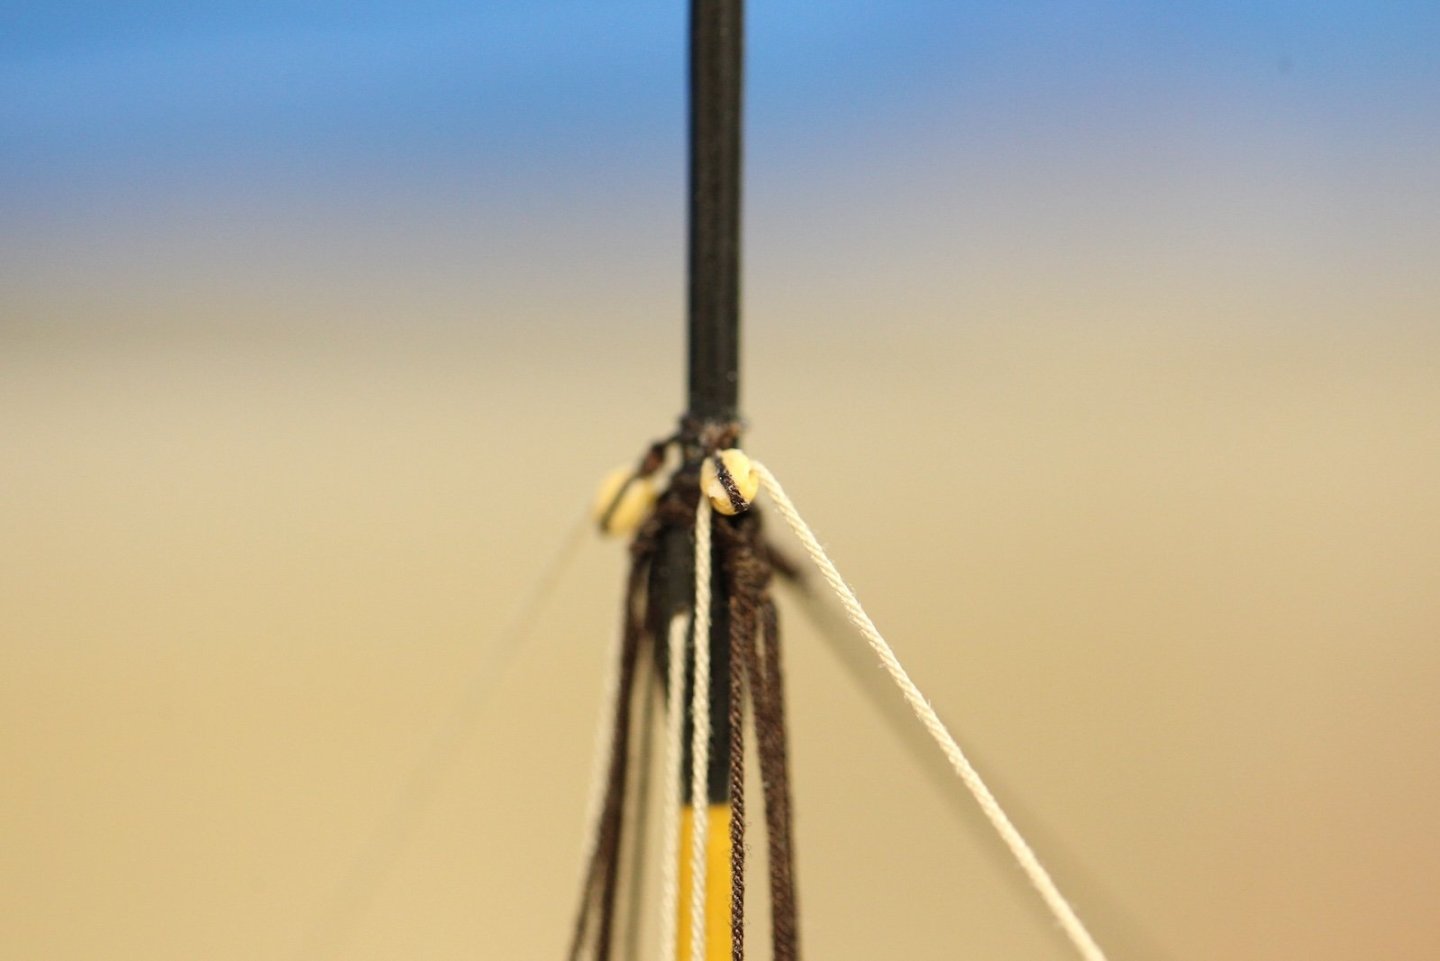
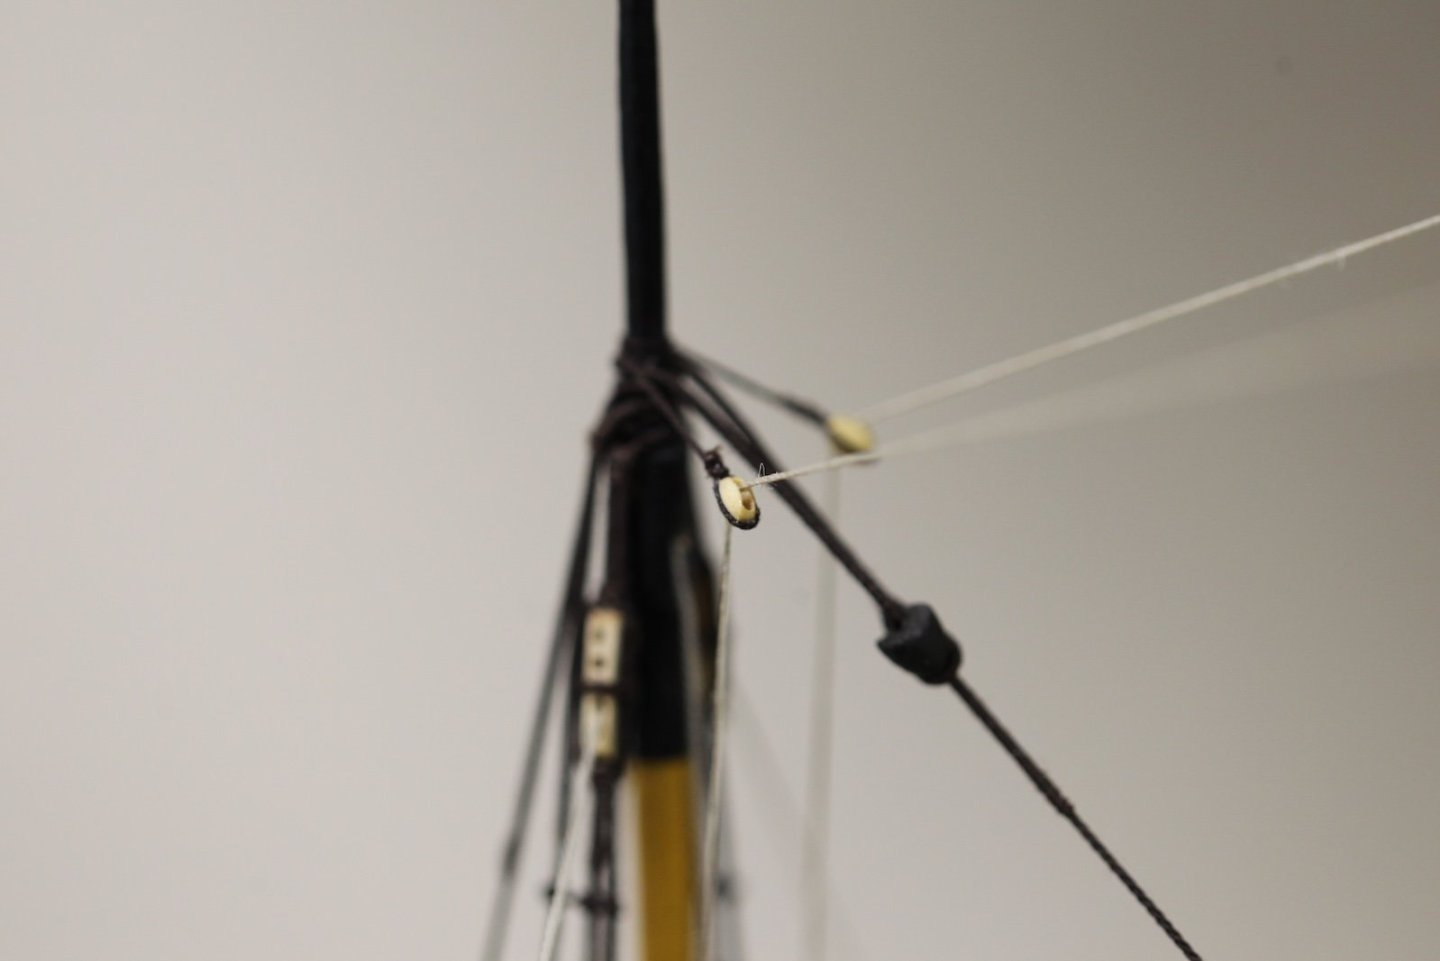
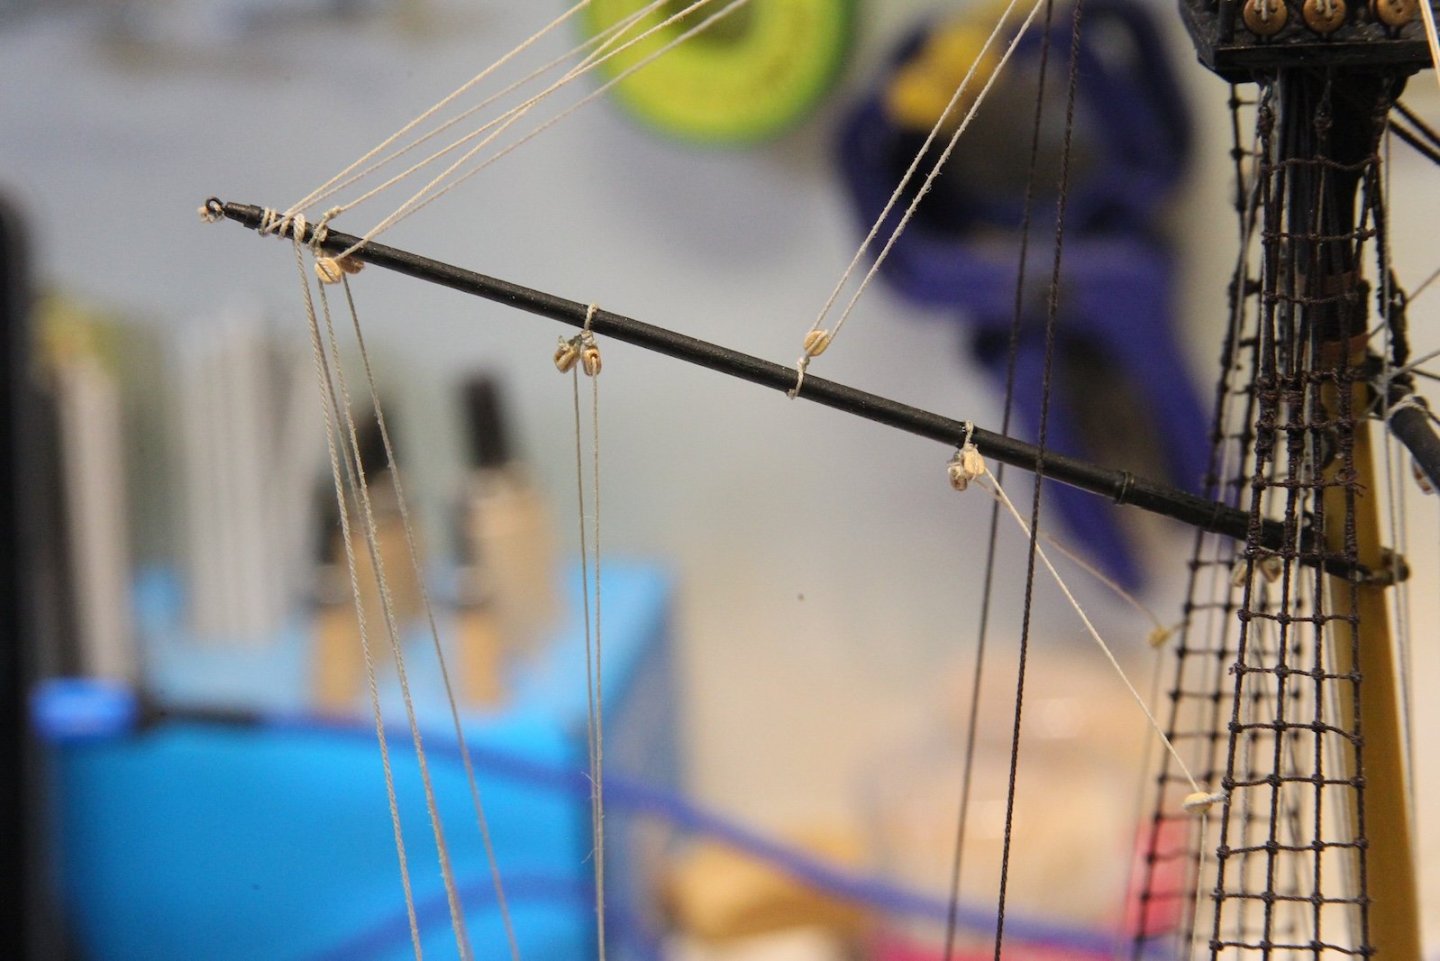
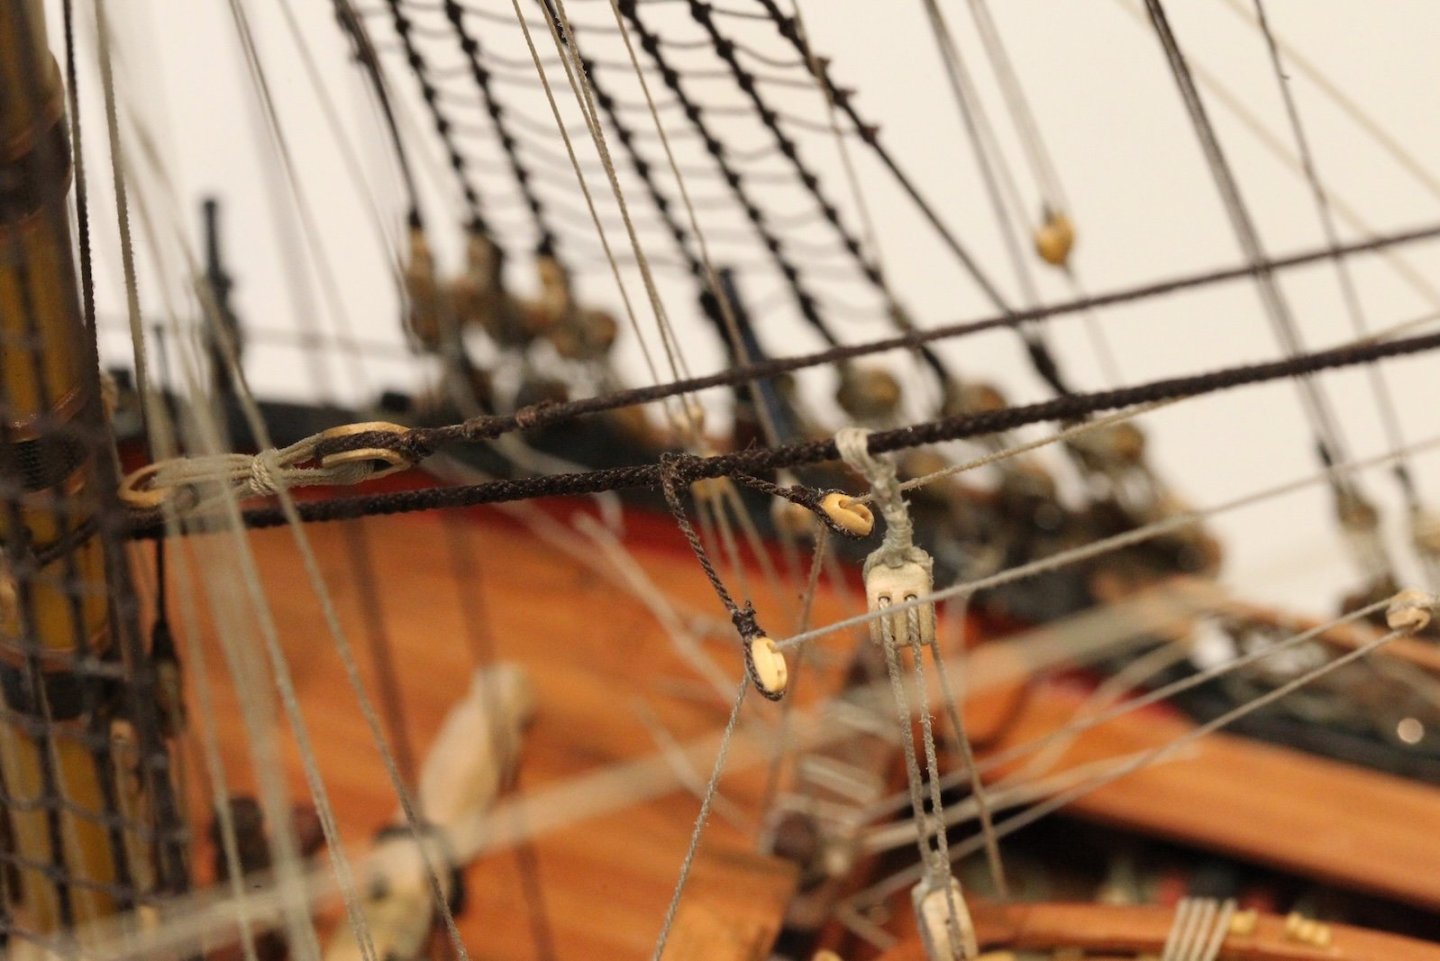
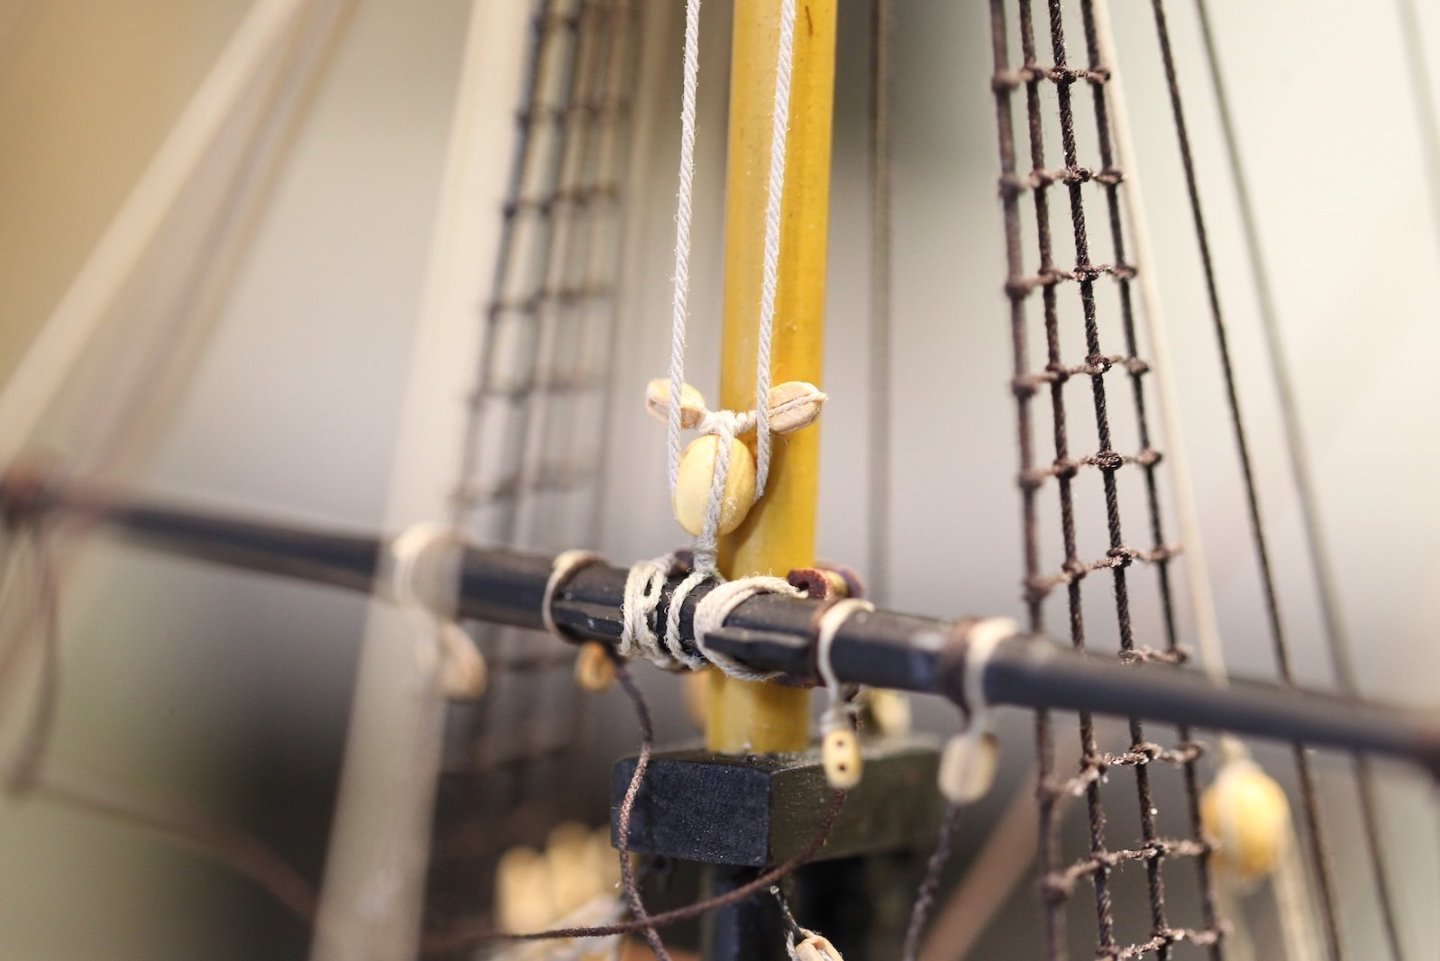
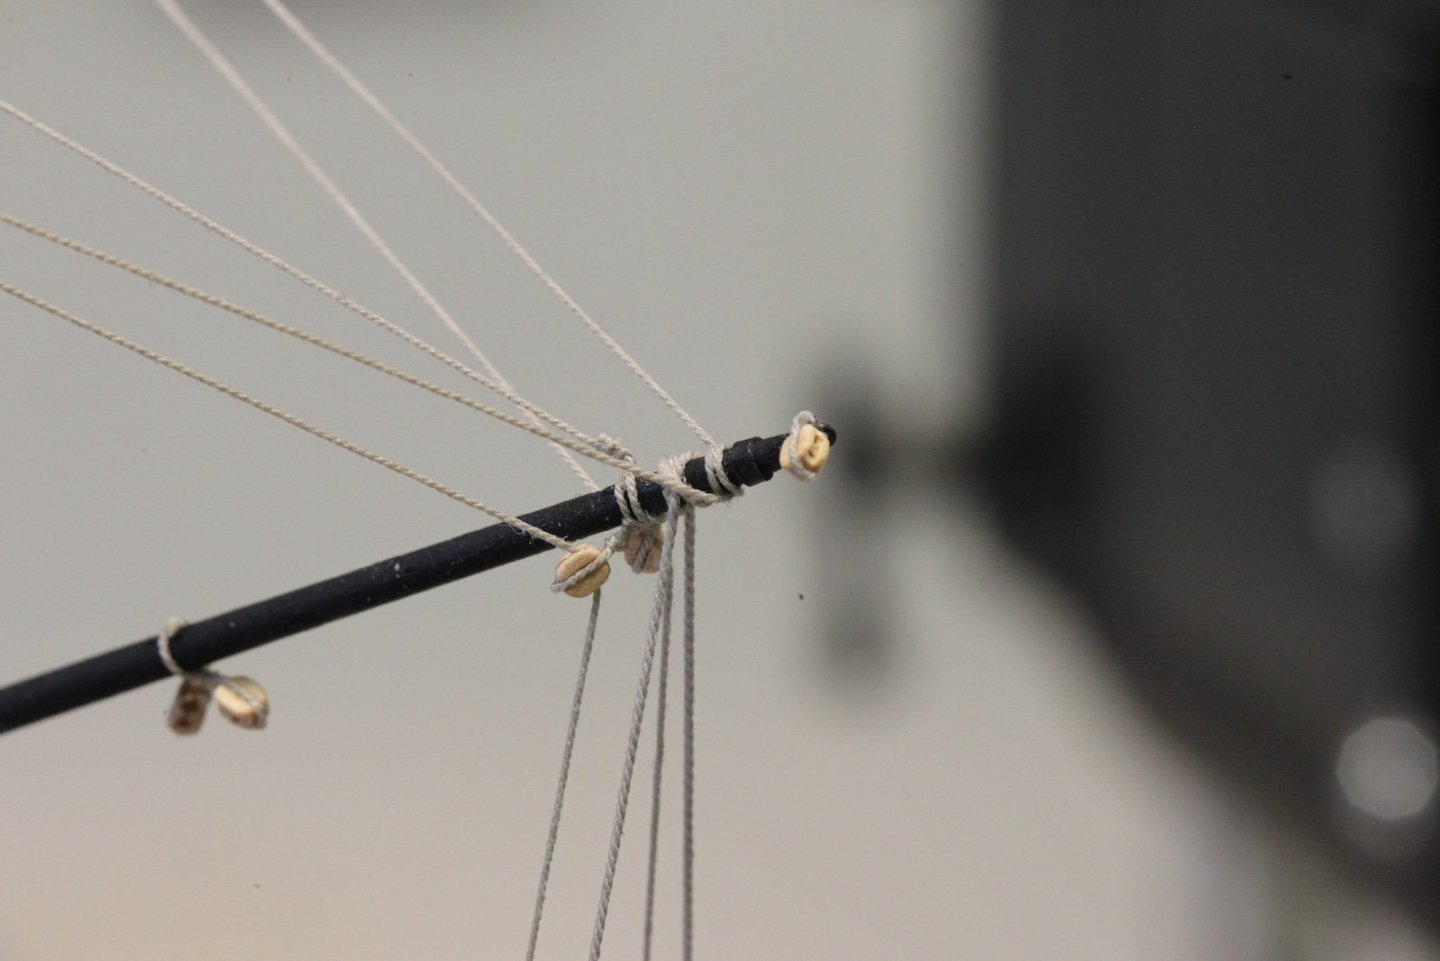
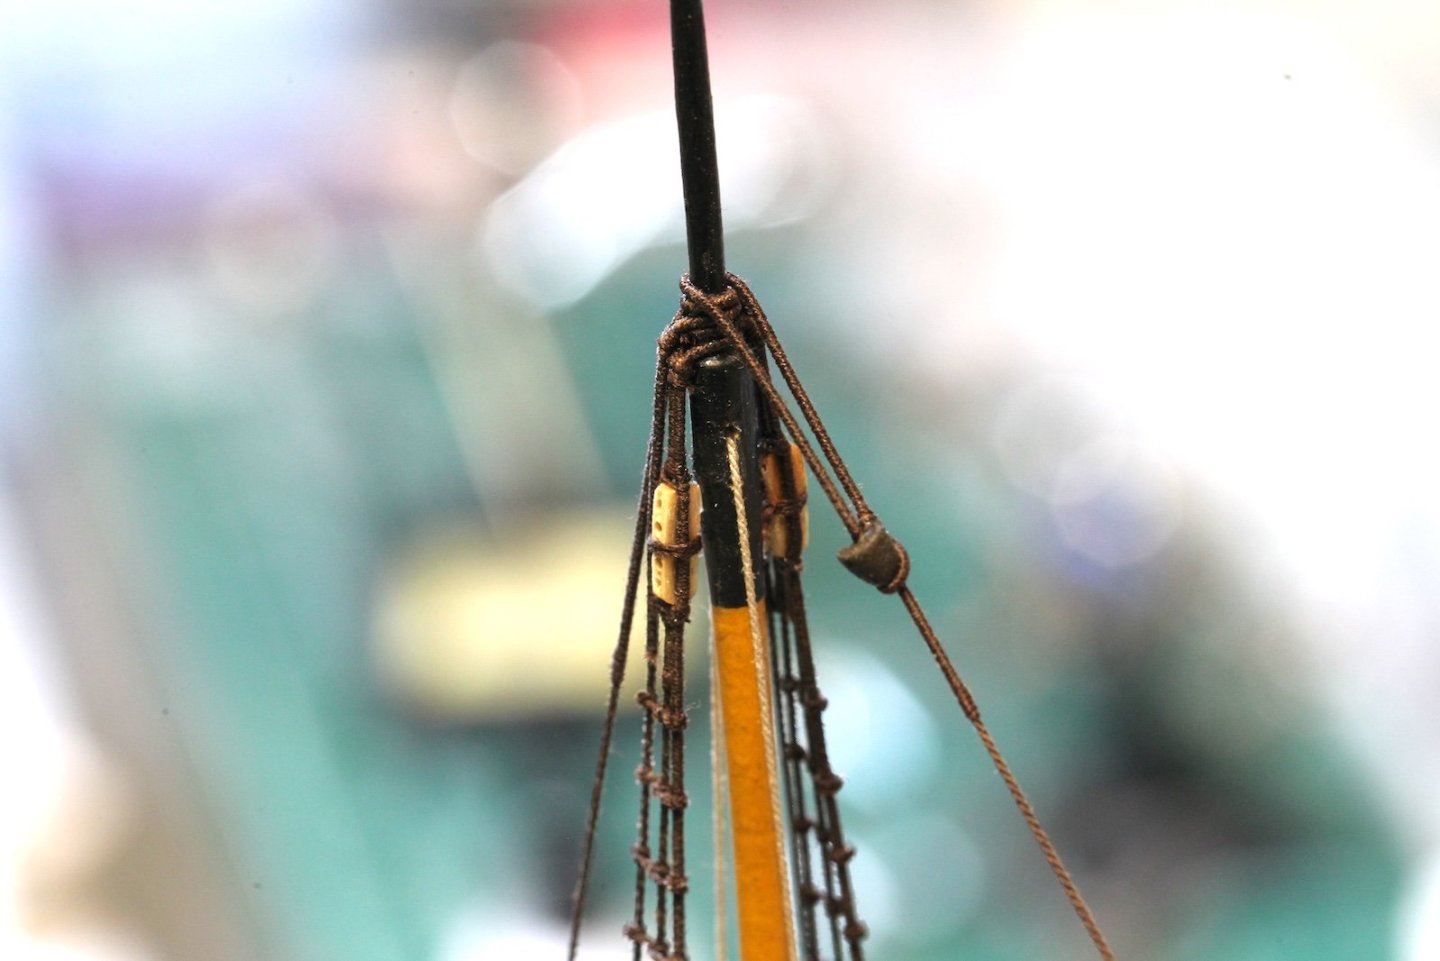
The Topsail yard lifts serve the same purpose as the lowers of course (to square the yards) but are rigged a little differently than the lower ones. Instead of running through blocks at the mast heads, they are run through thimbles. Each of the fore and main upper yard lifts start with a 30' (140mm) span of 2.5" (.30mm) tarred line that end in thimbles. The span clove hitches around the topmast cap. The thimbles are lashed to corresponding thimbles seized in the standing ends of the lifts themselves - which are of 2.5" (.30mm) untarred line. The lifts then run down to the lift block on the end of the topsail yard, back up through the lower block of the sister blocks seized into the shrouds, then down through the every shrinking amount of space in the hole of the mast top. The fore topsail yard lifts belay to a timber head on the fo'csle railing, while the main lines belay to a shroud cleat. You'll also notice here that I've attached the studdingsail booms to the yards at this point - prior to rigging the yard lifts.

- 419 replies
-
- 3
-
-
- Victory Models
- Pegasus
- (and 2 more)
-
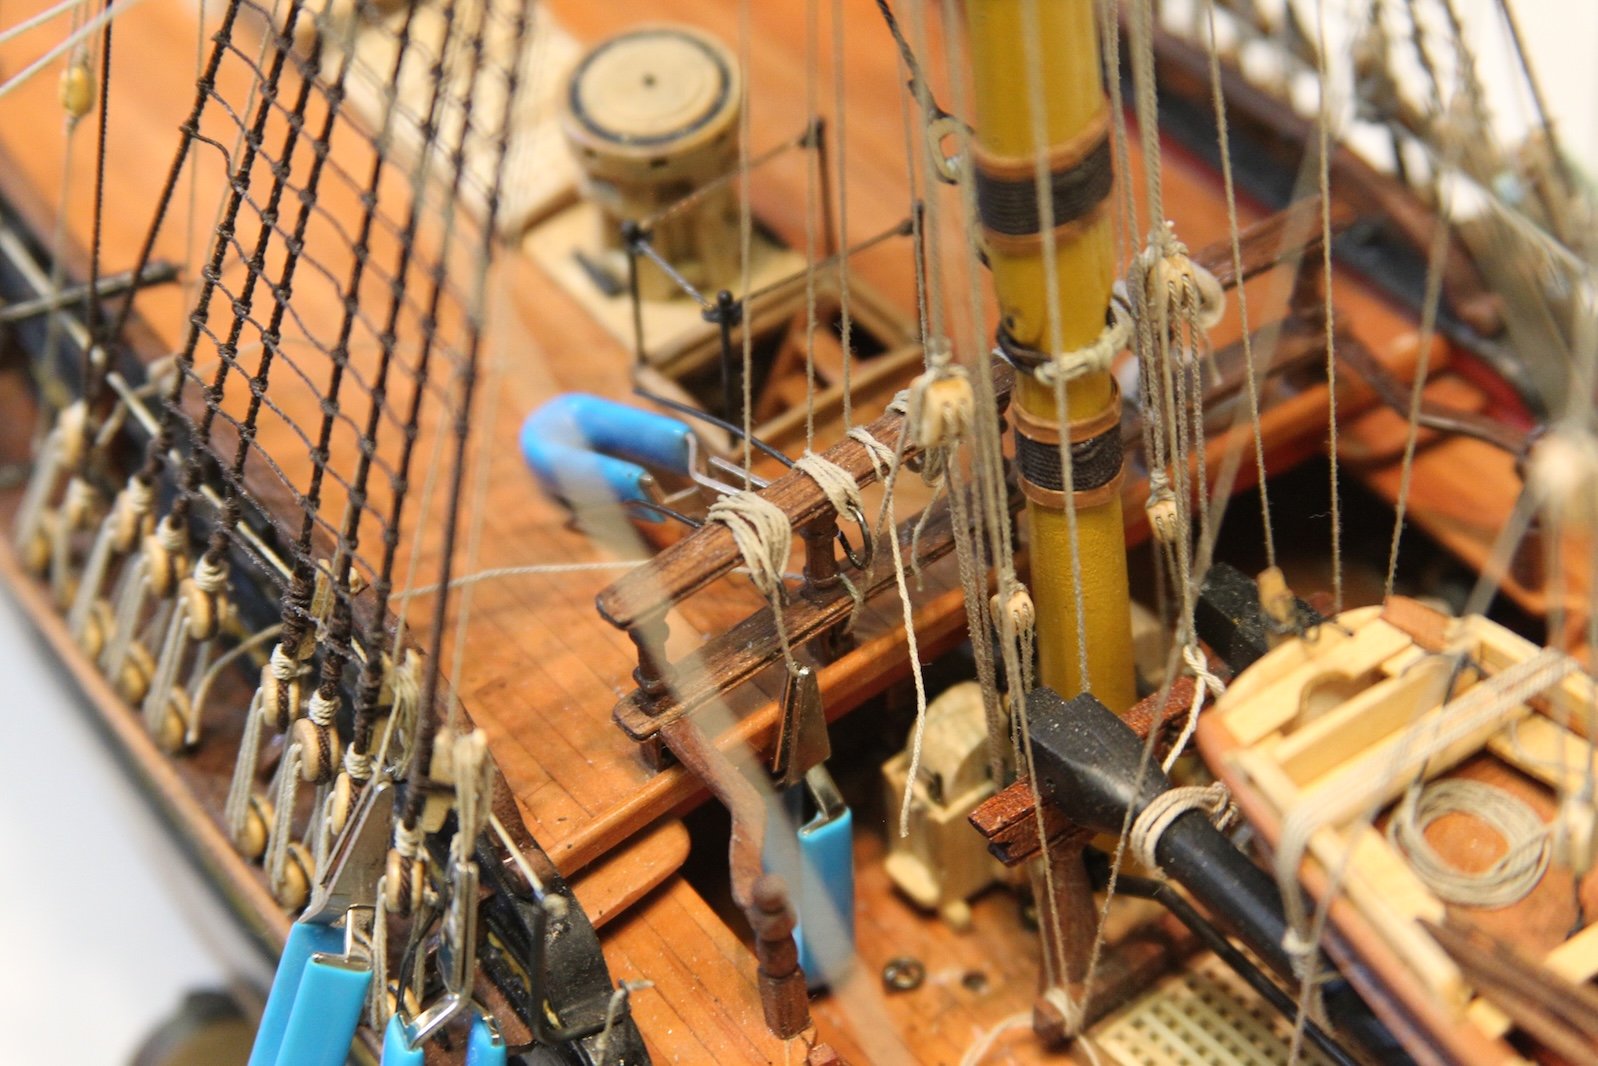
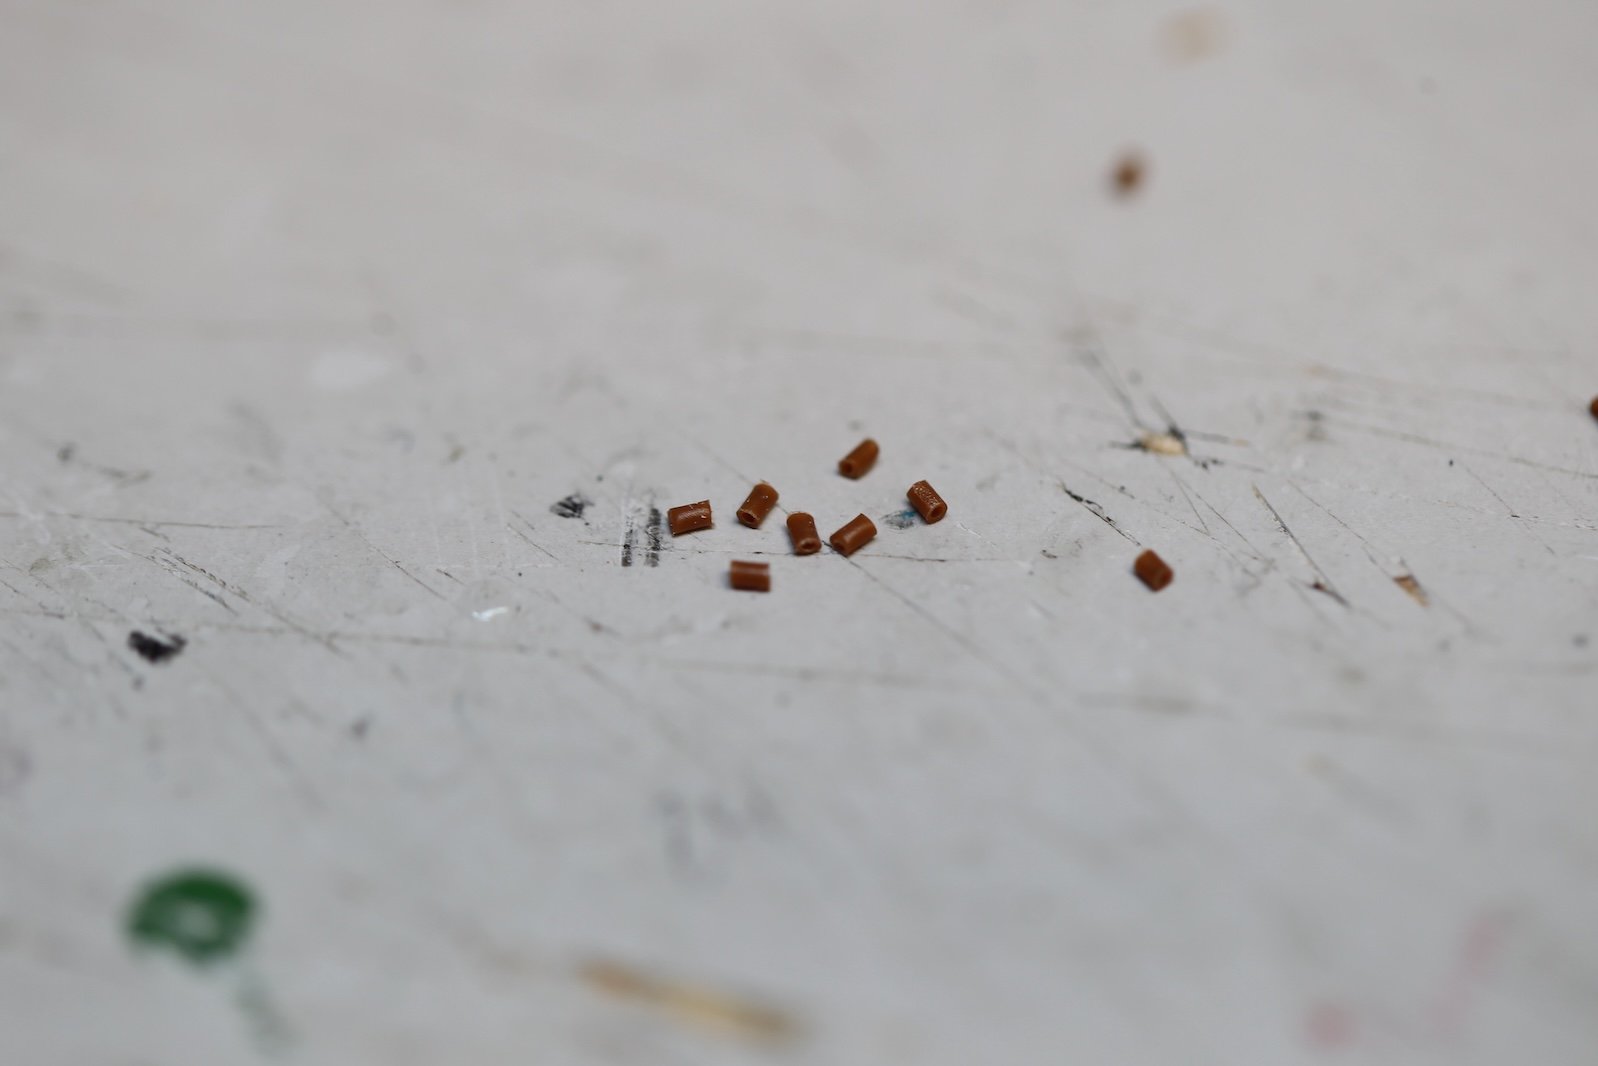
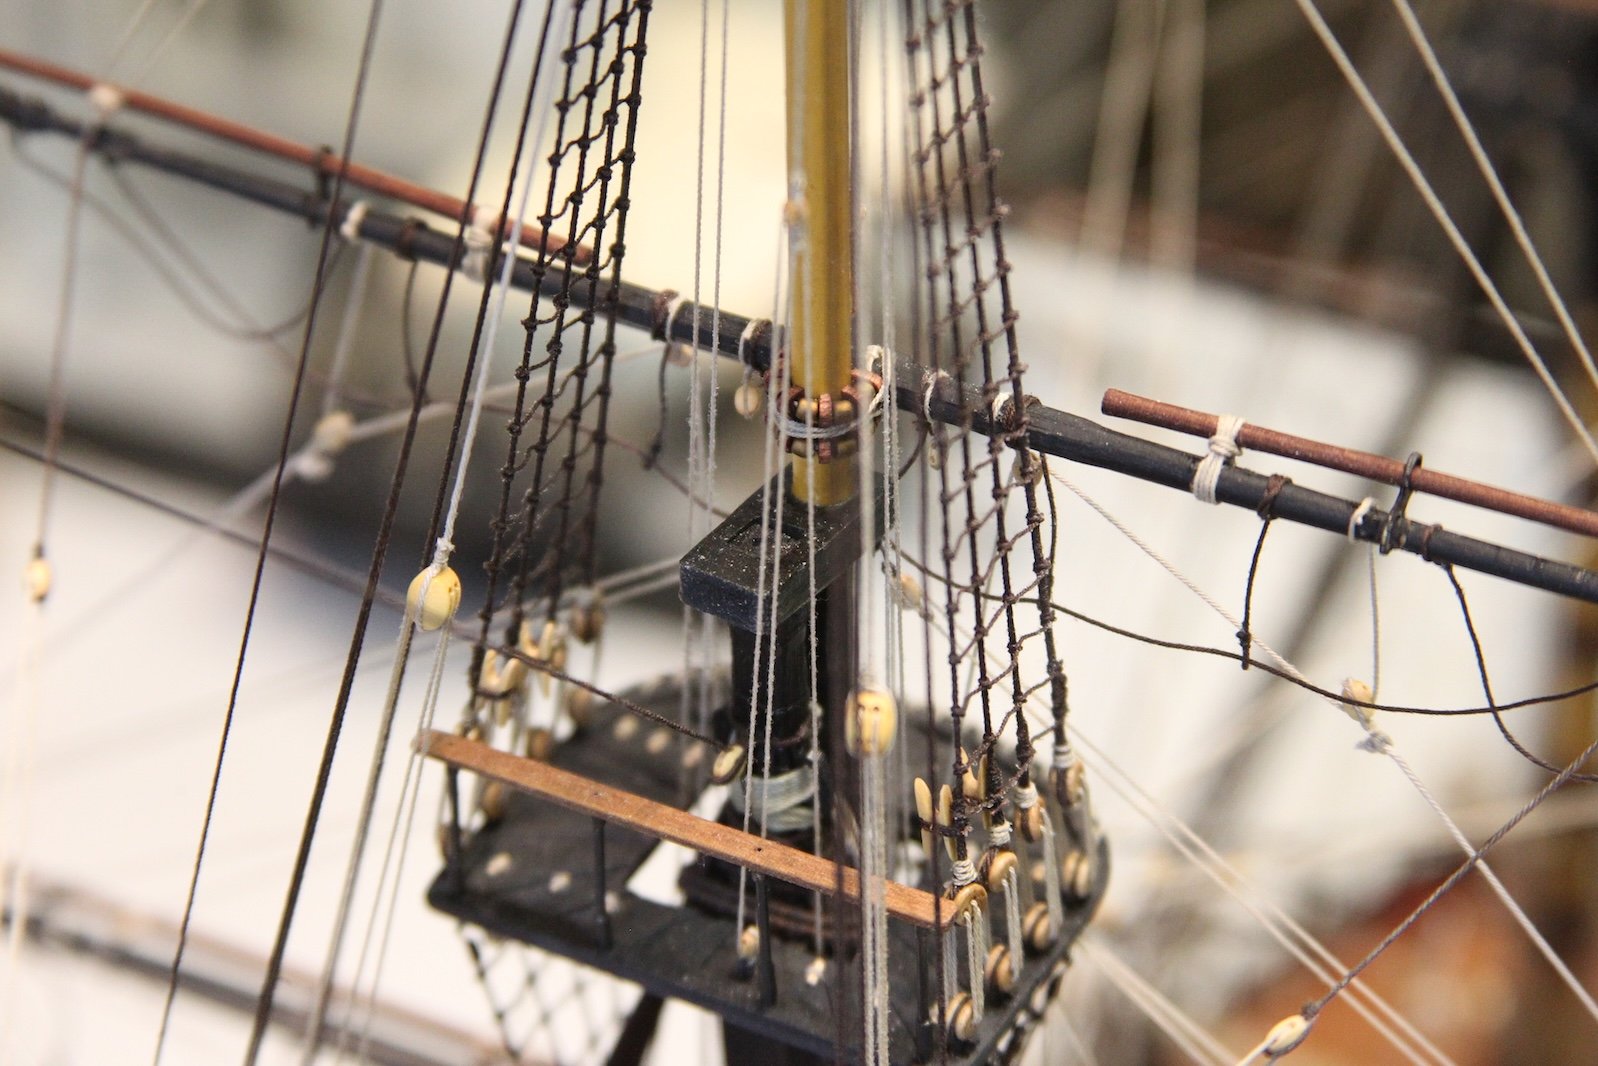
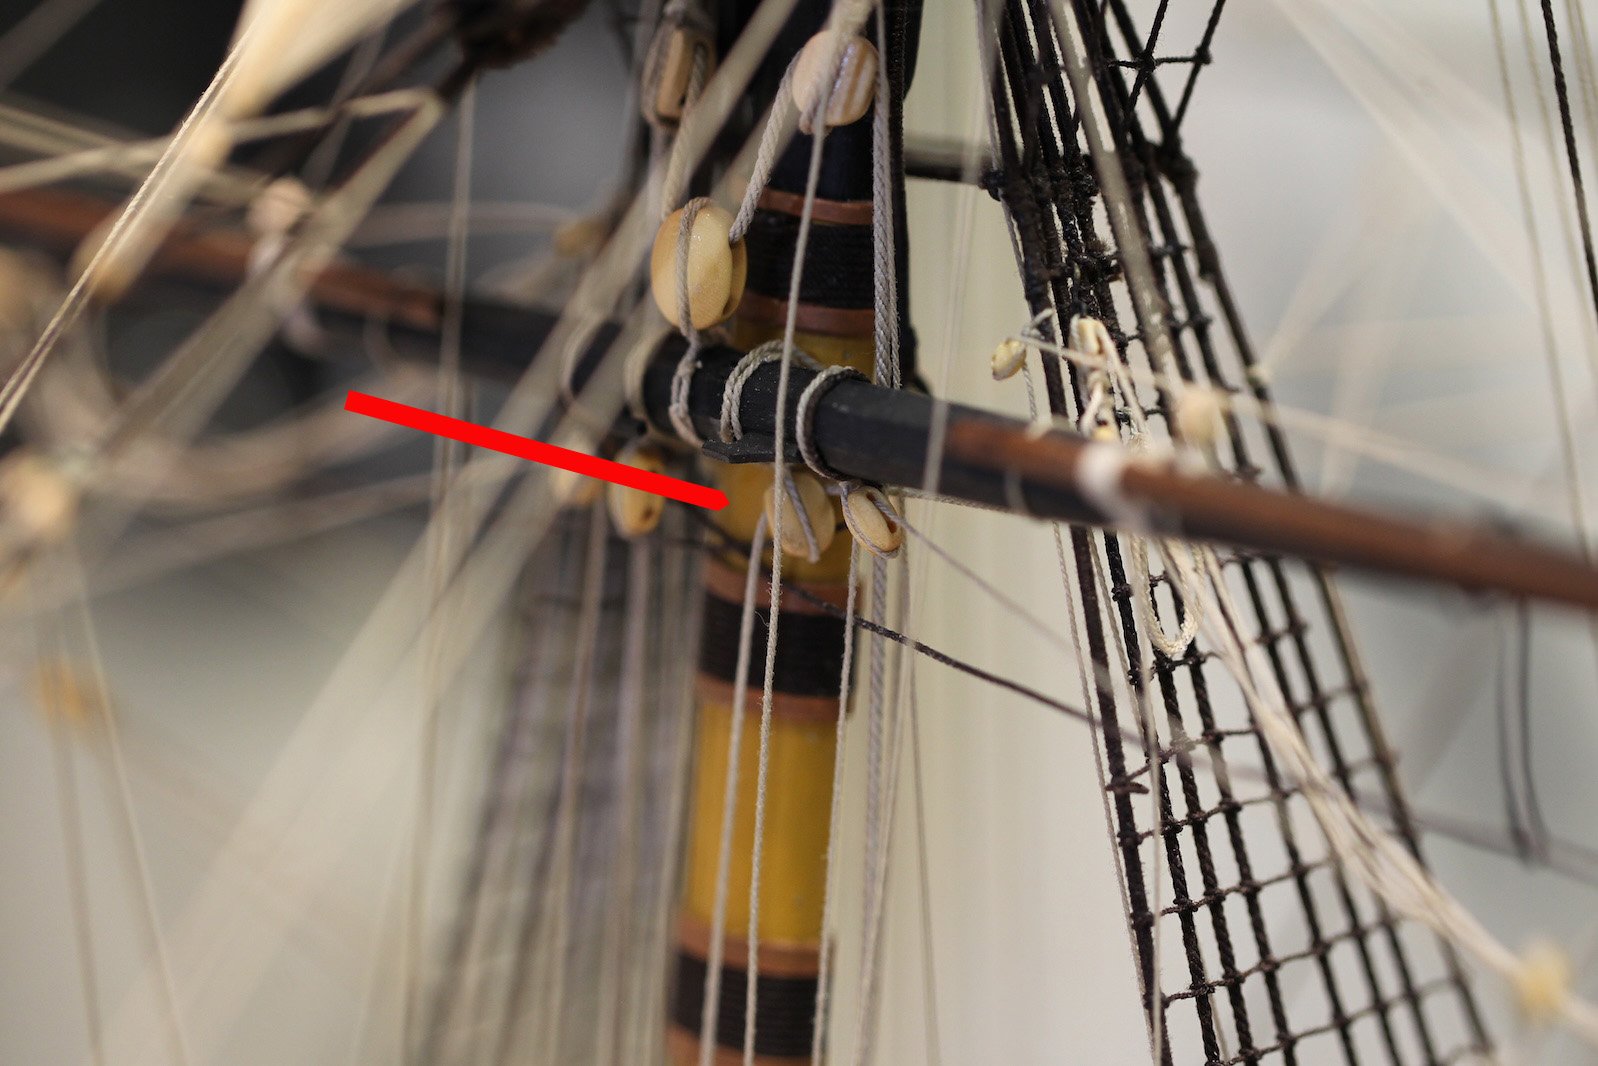
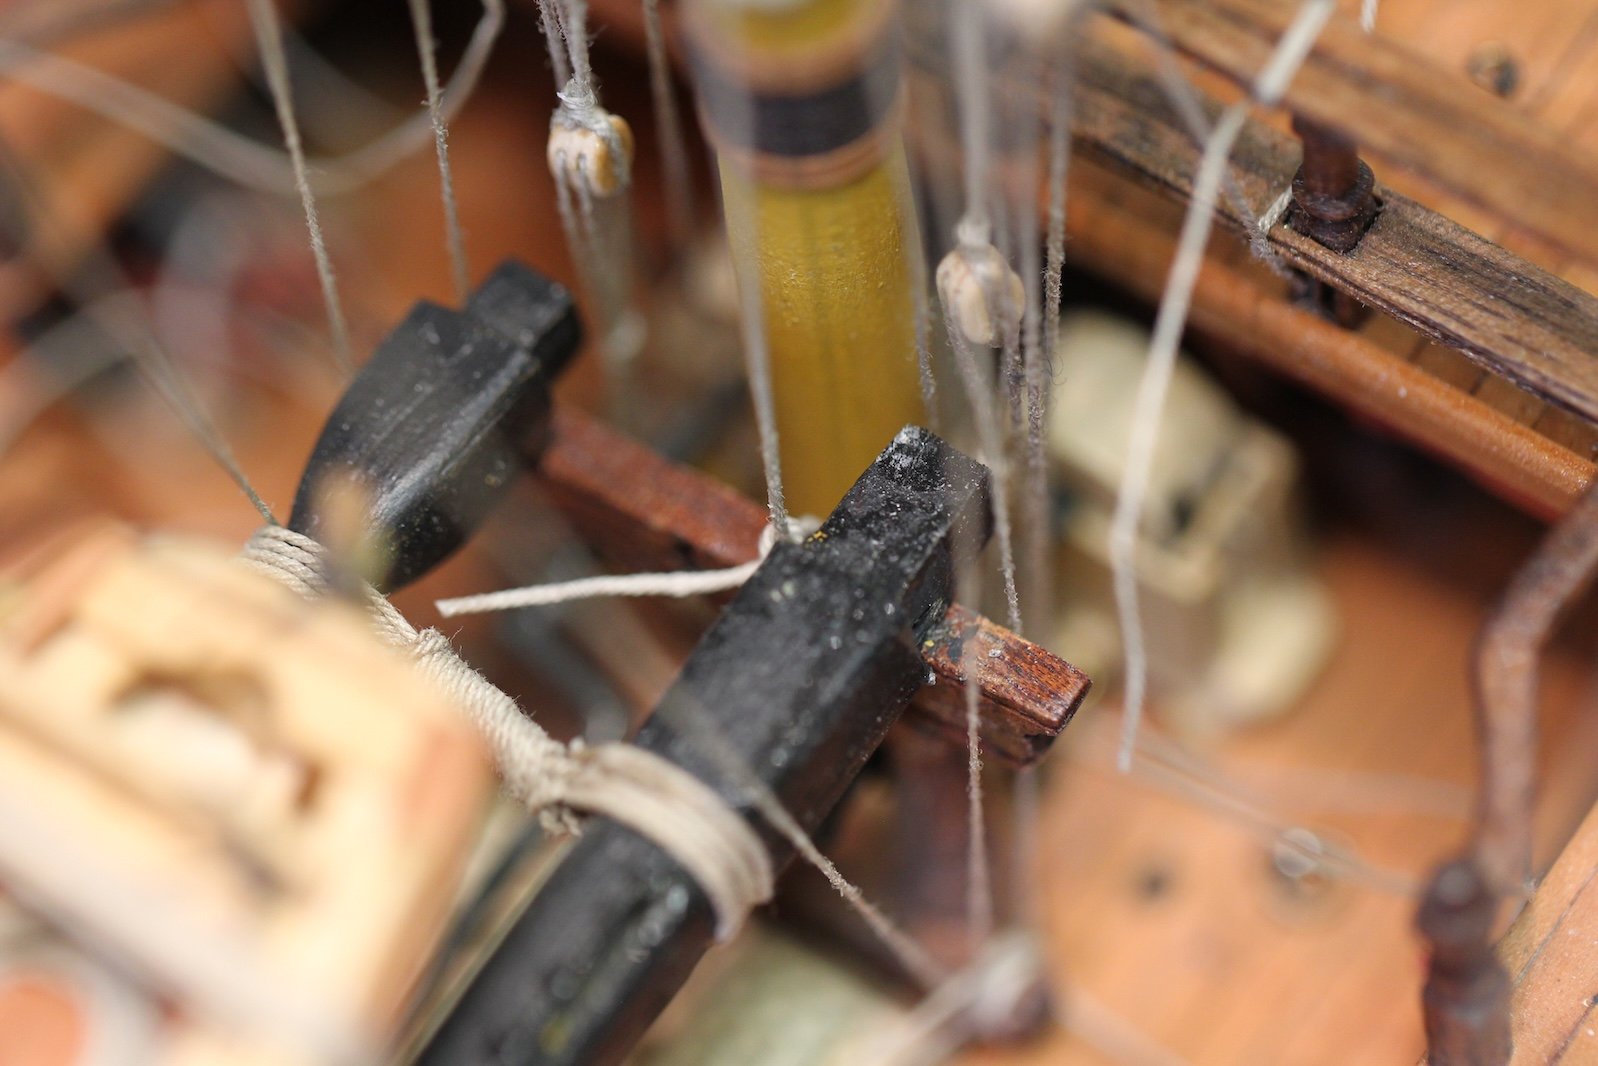
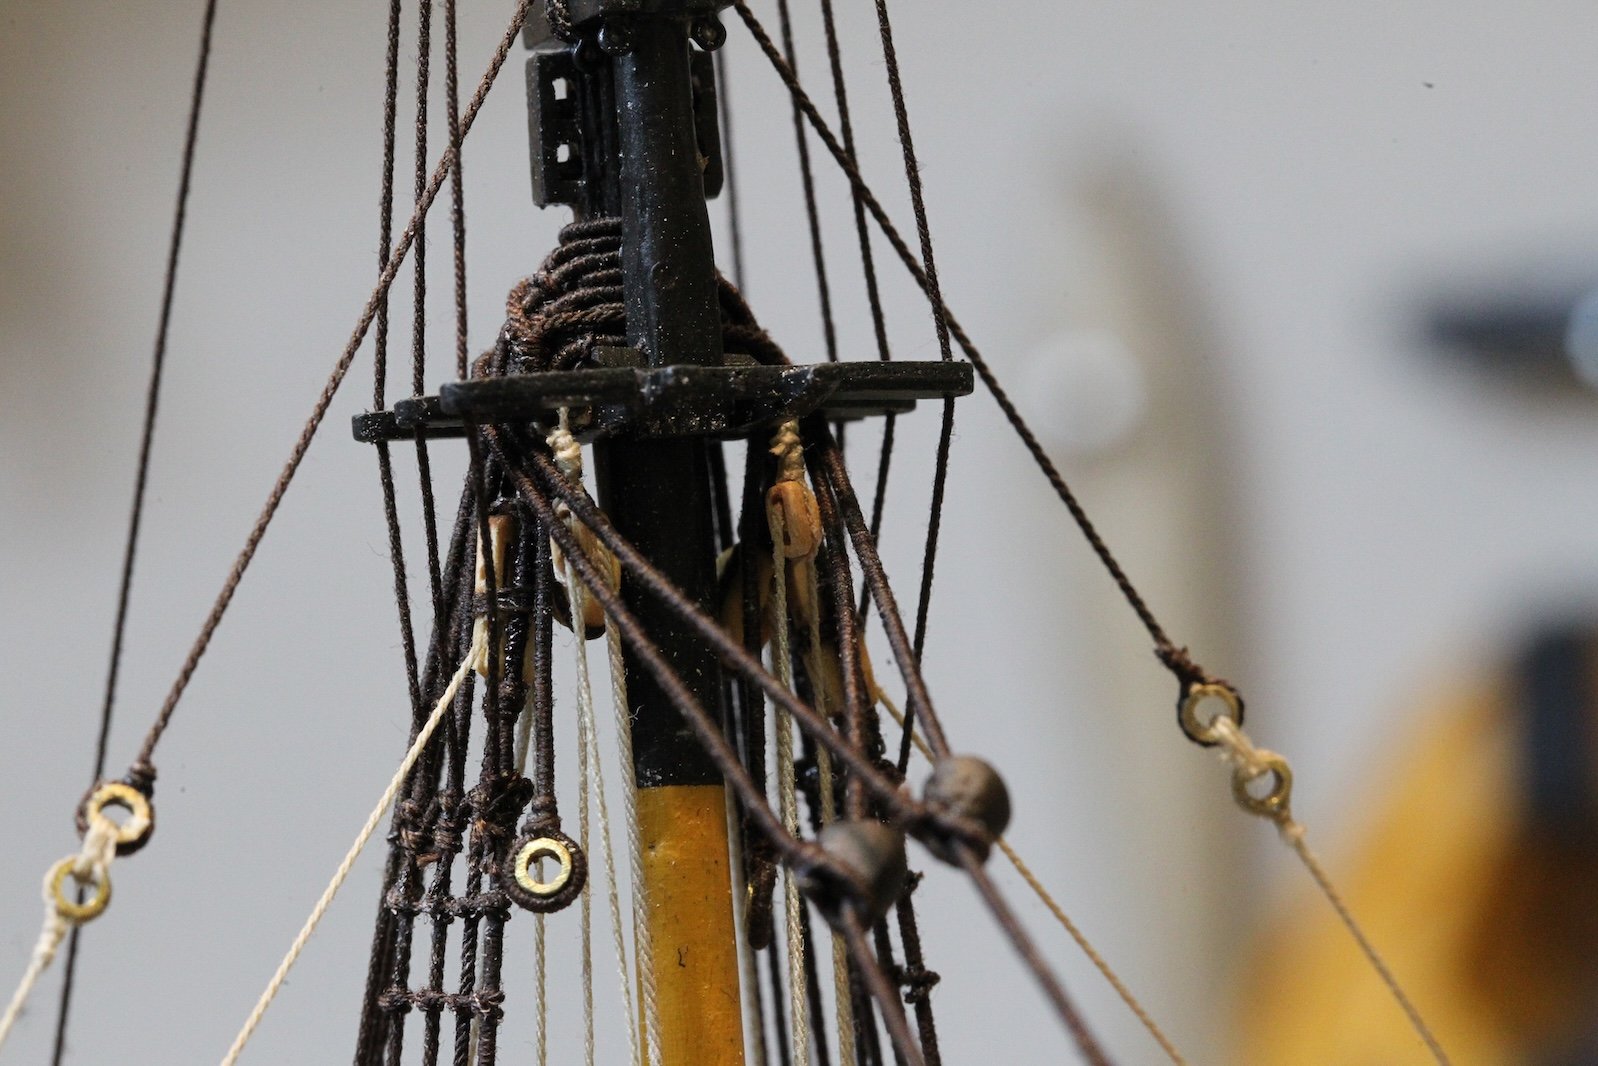
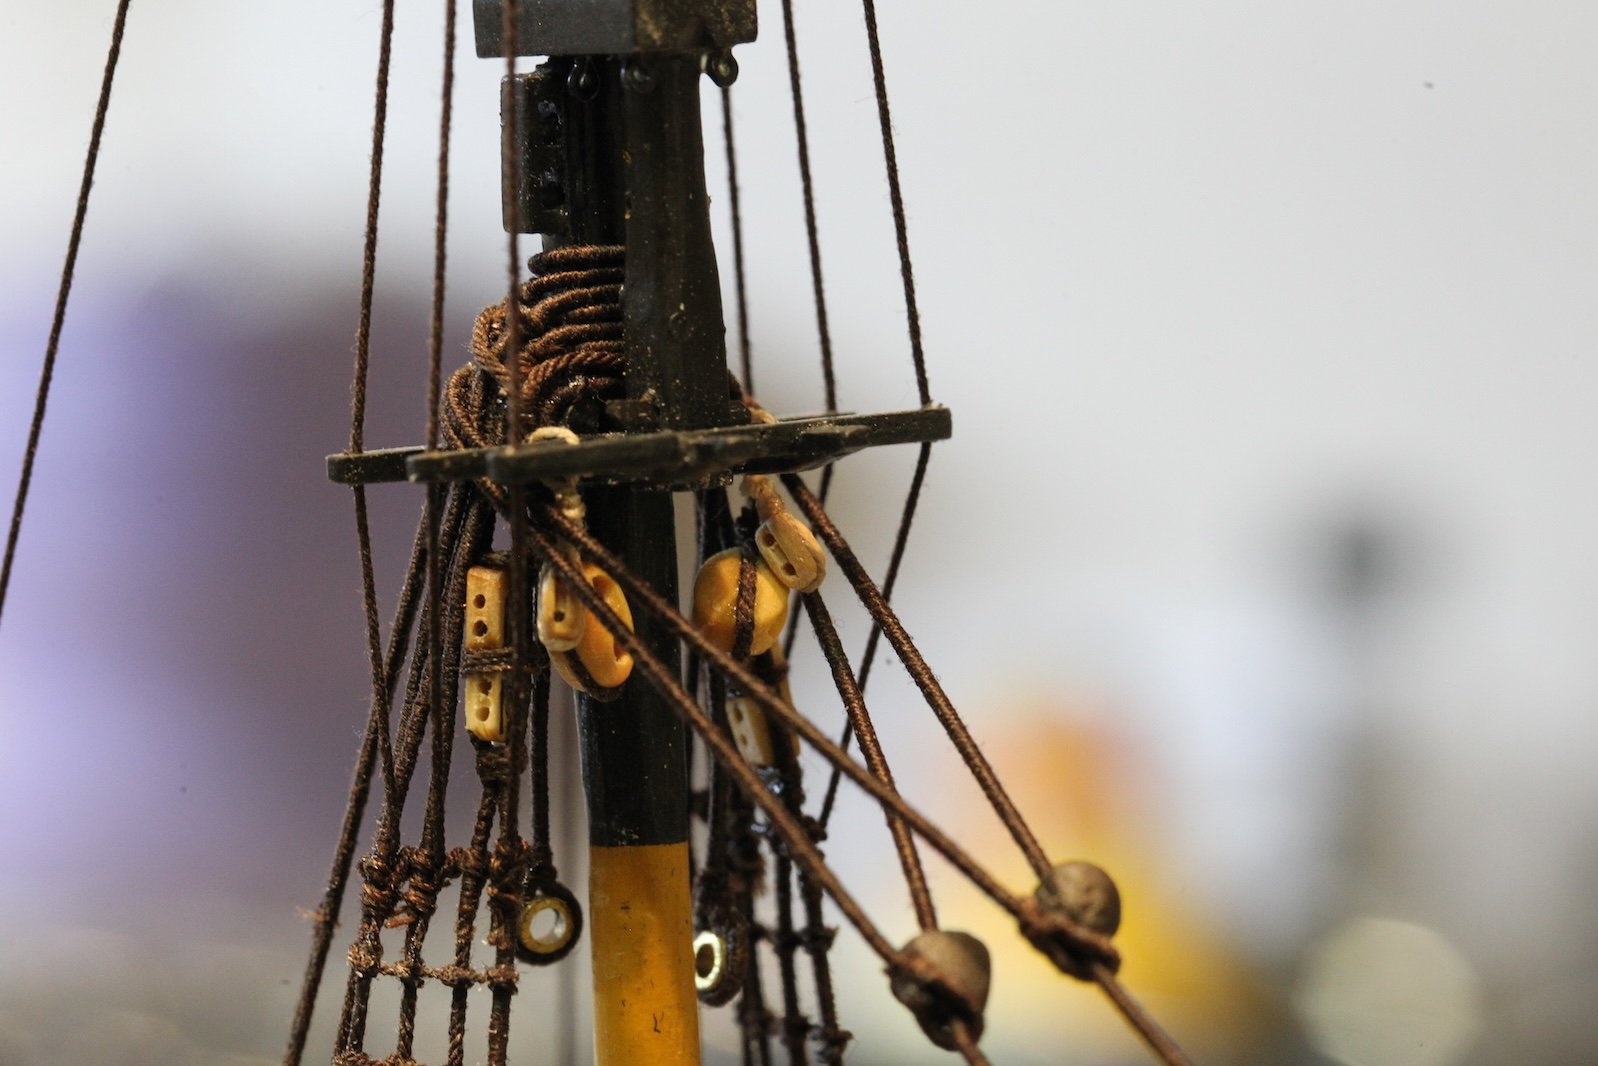
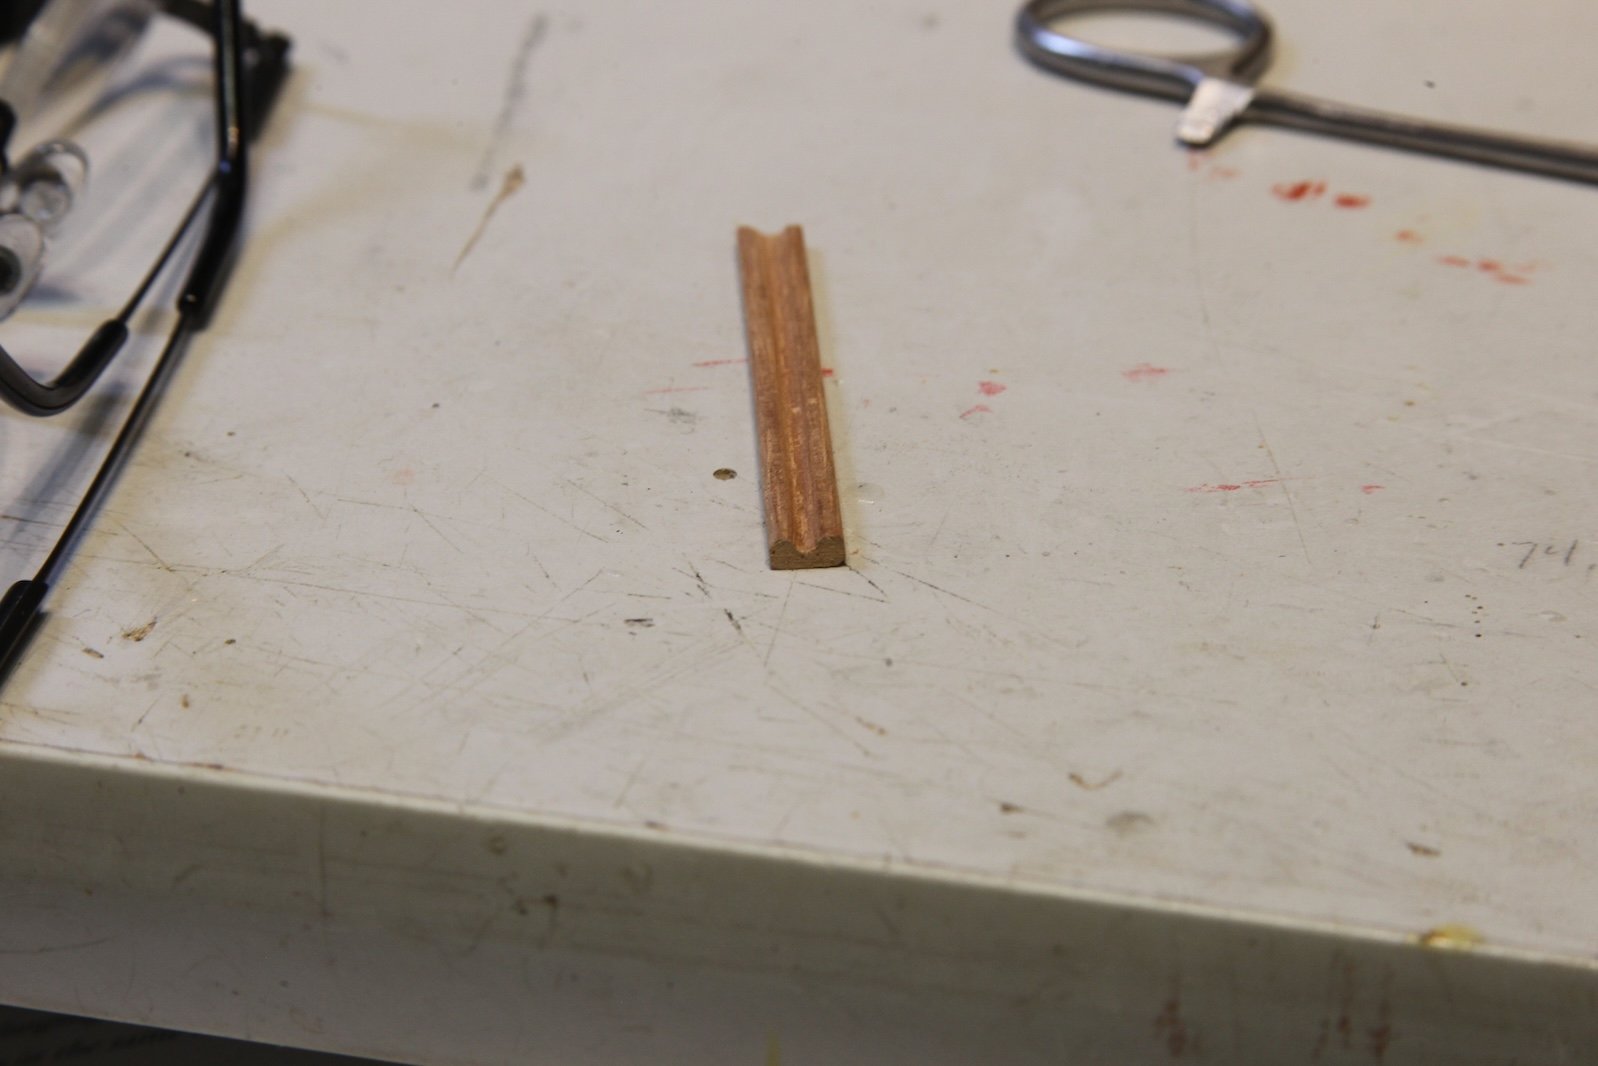
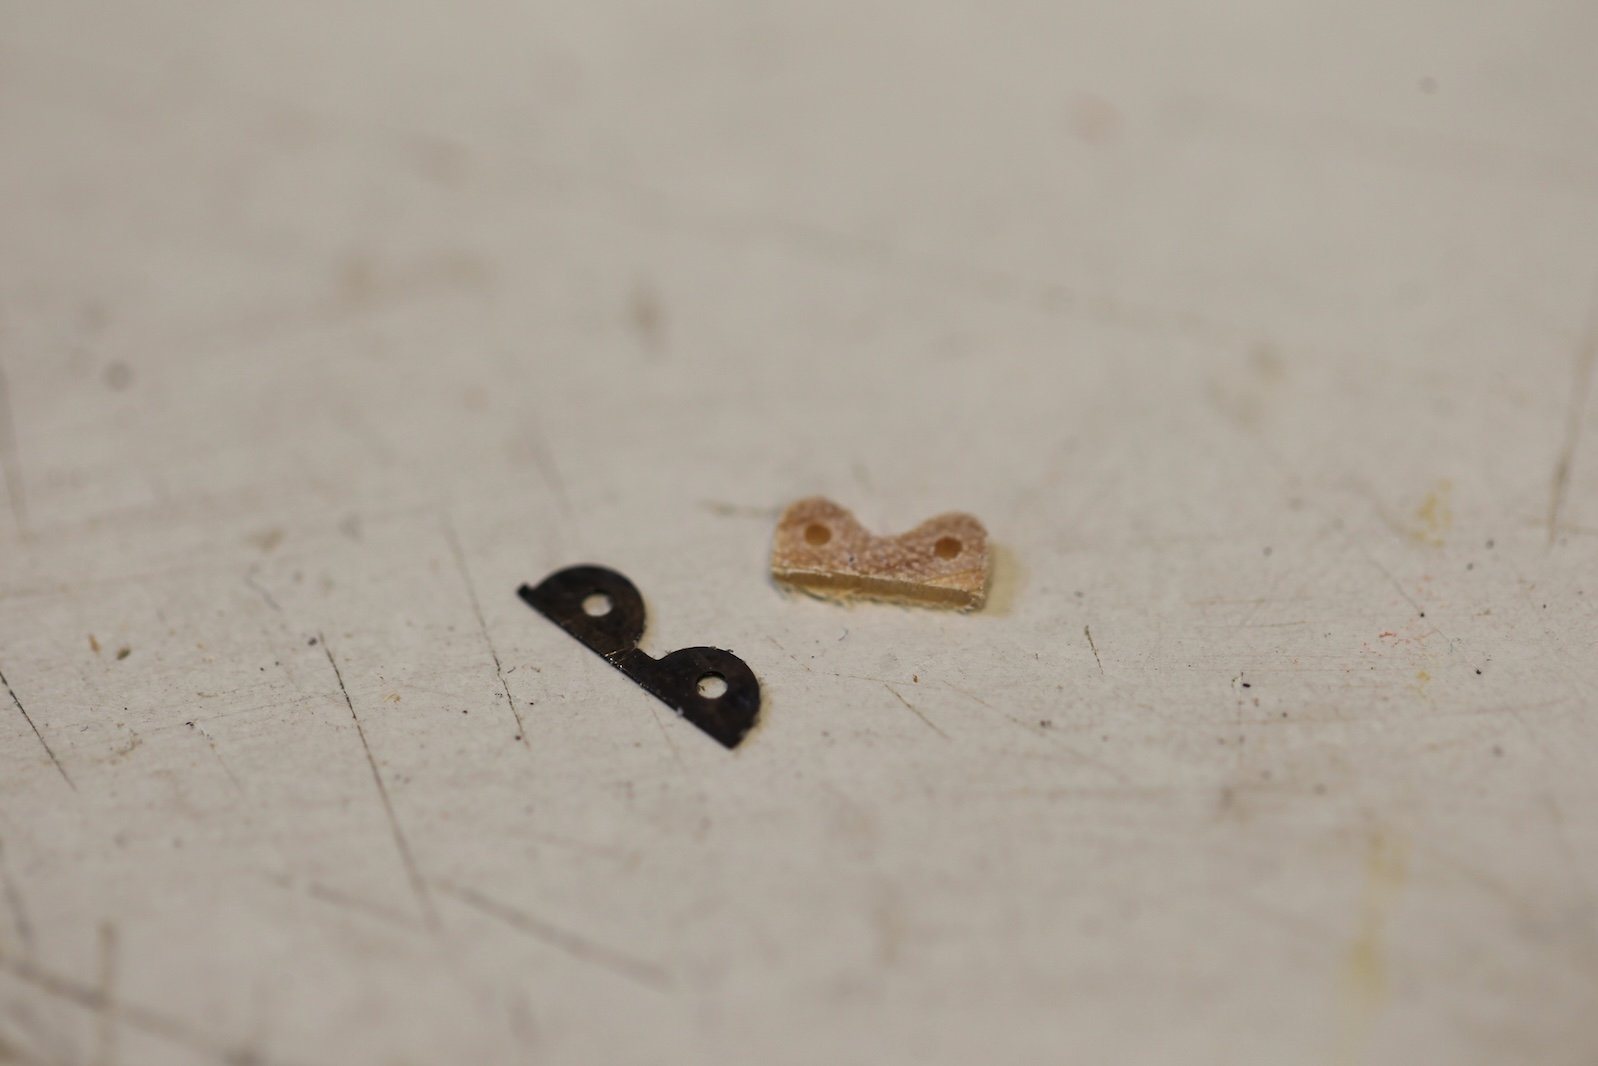
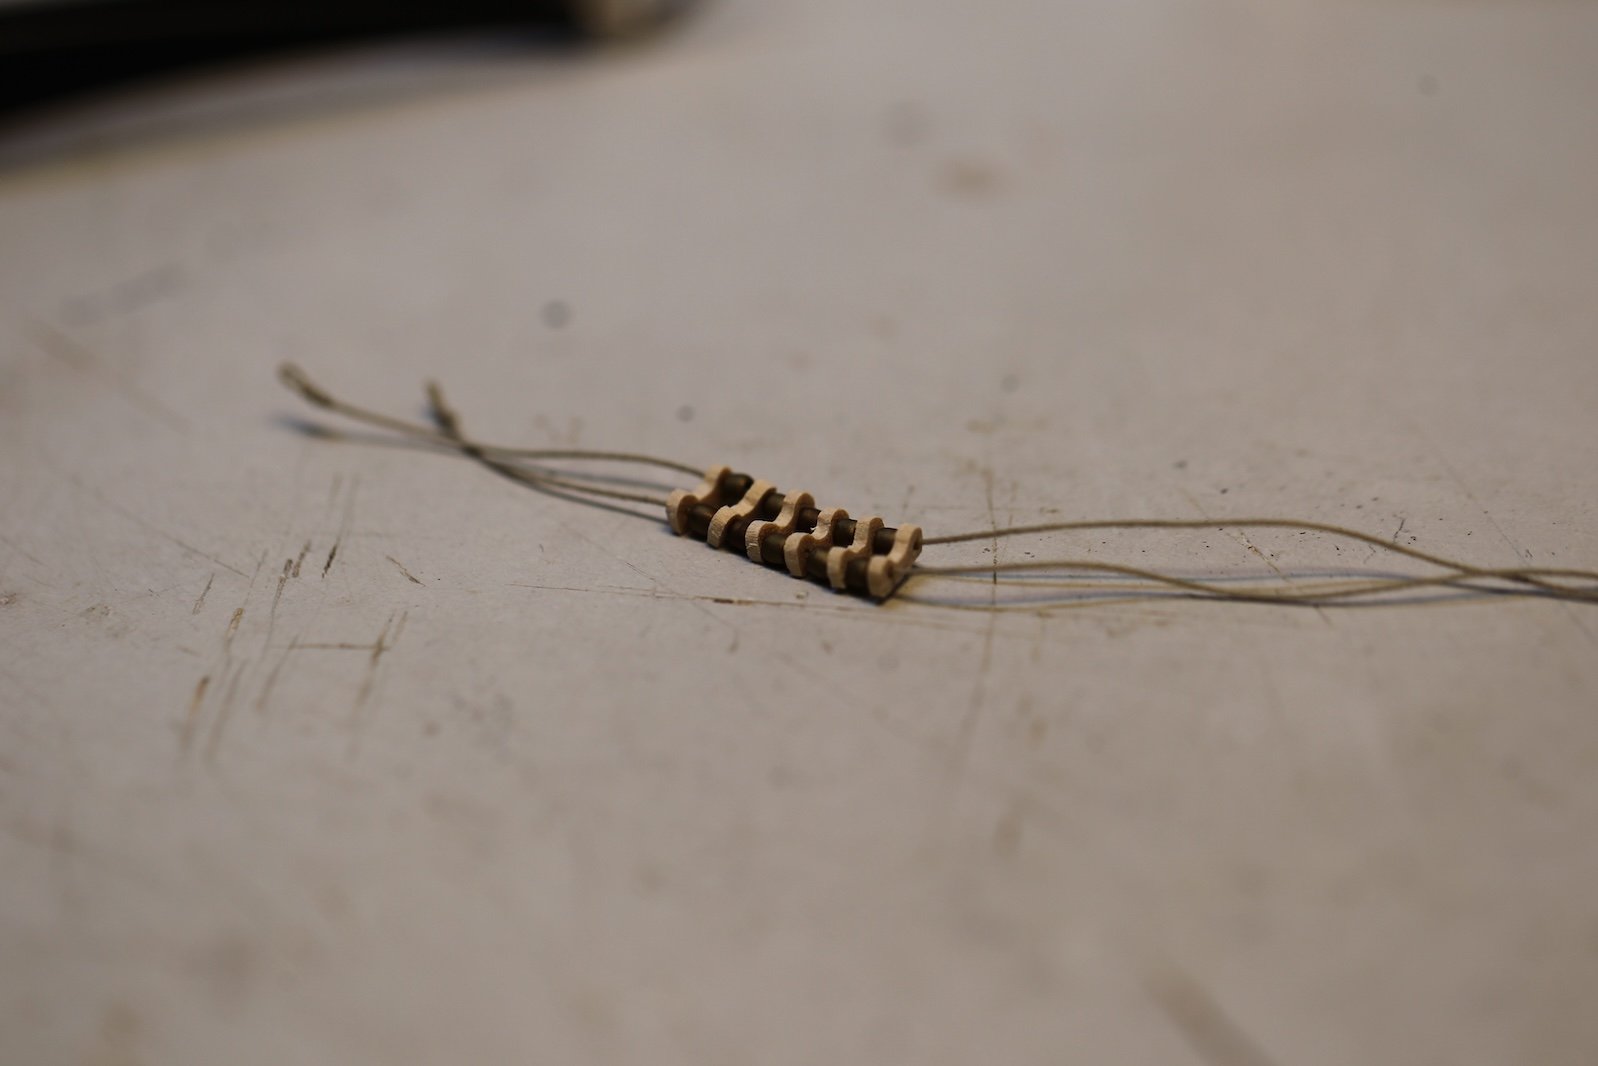
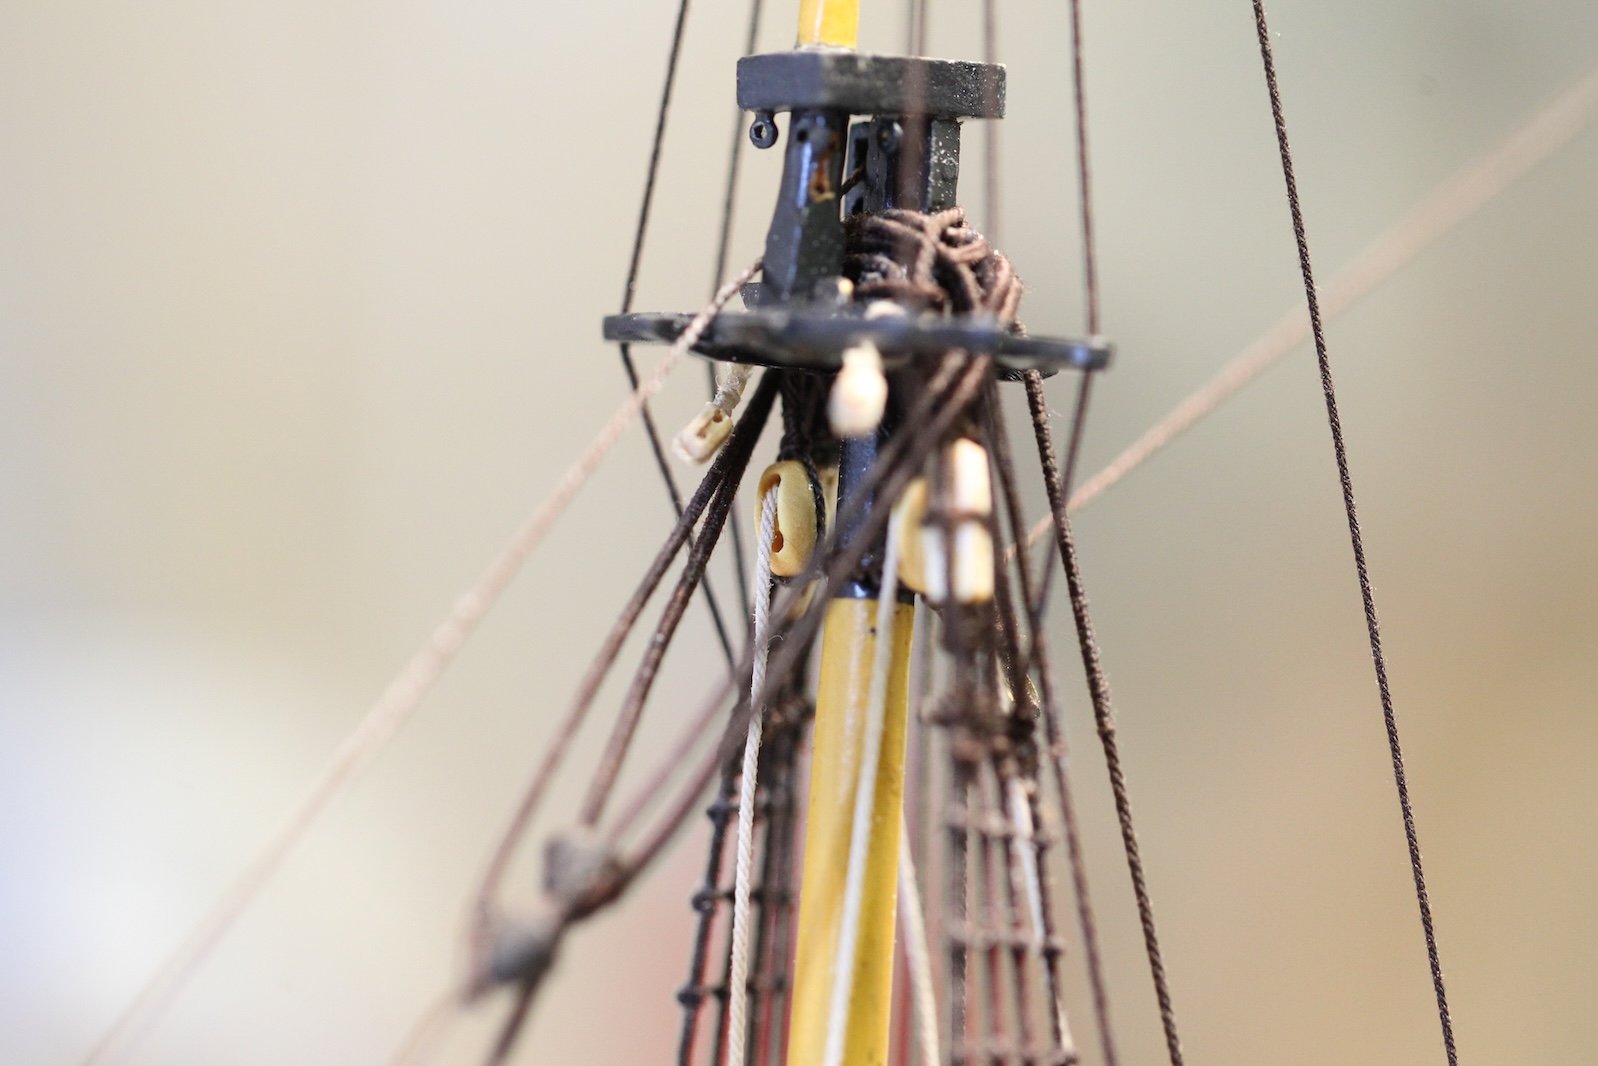
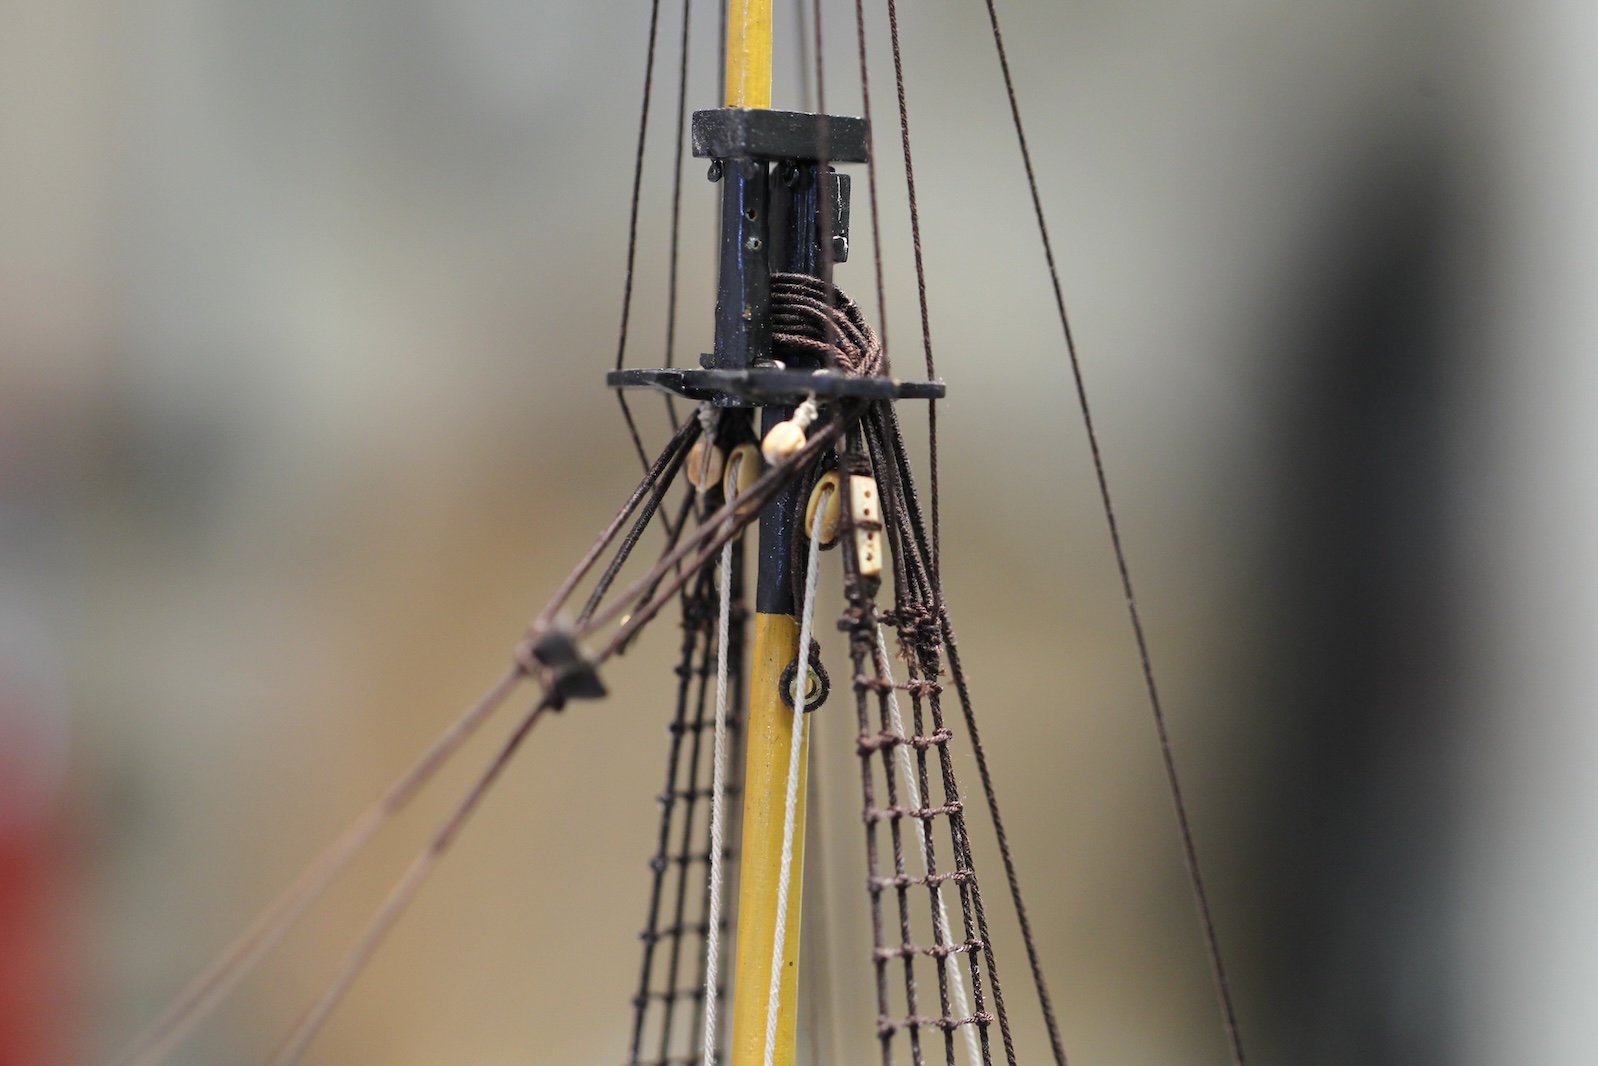
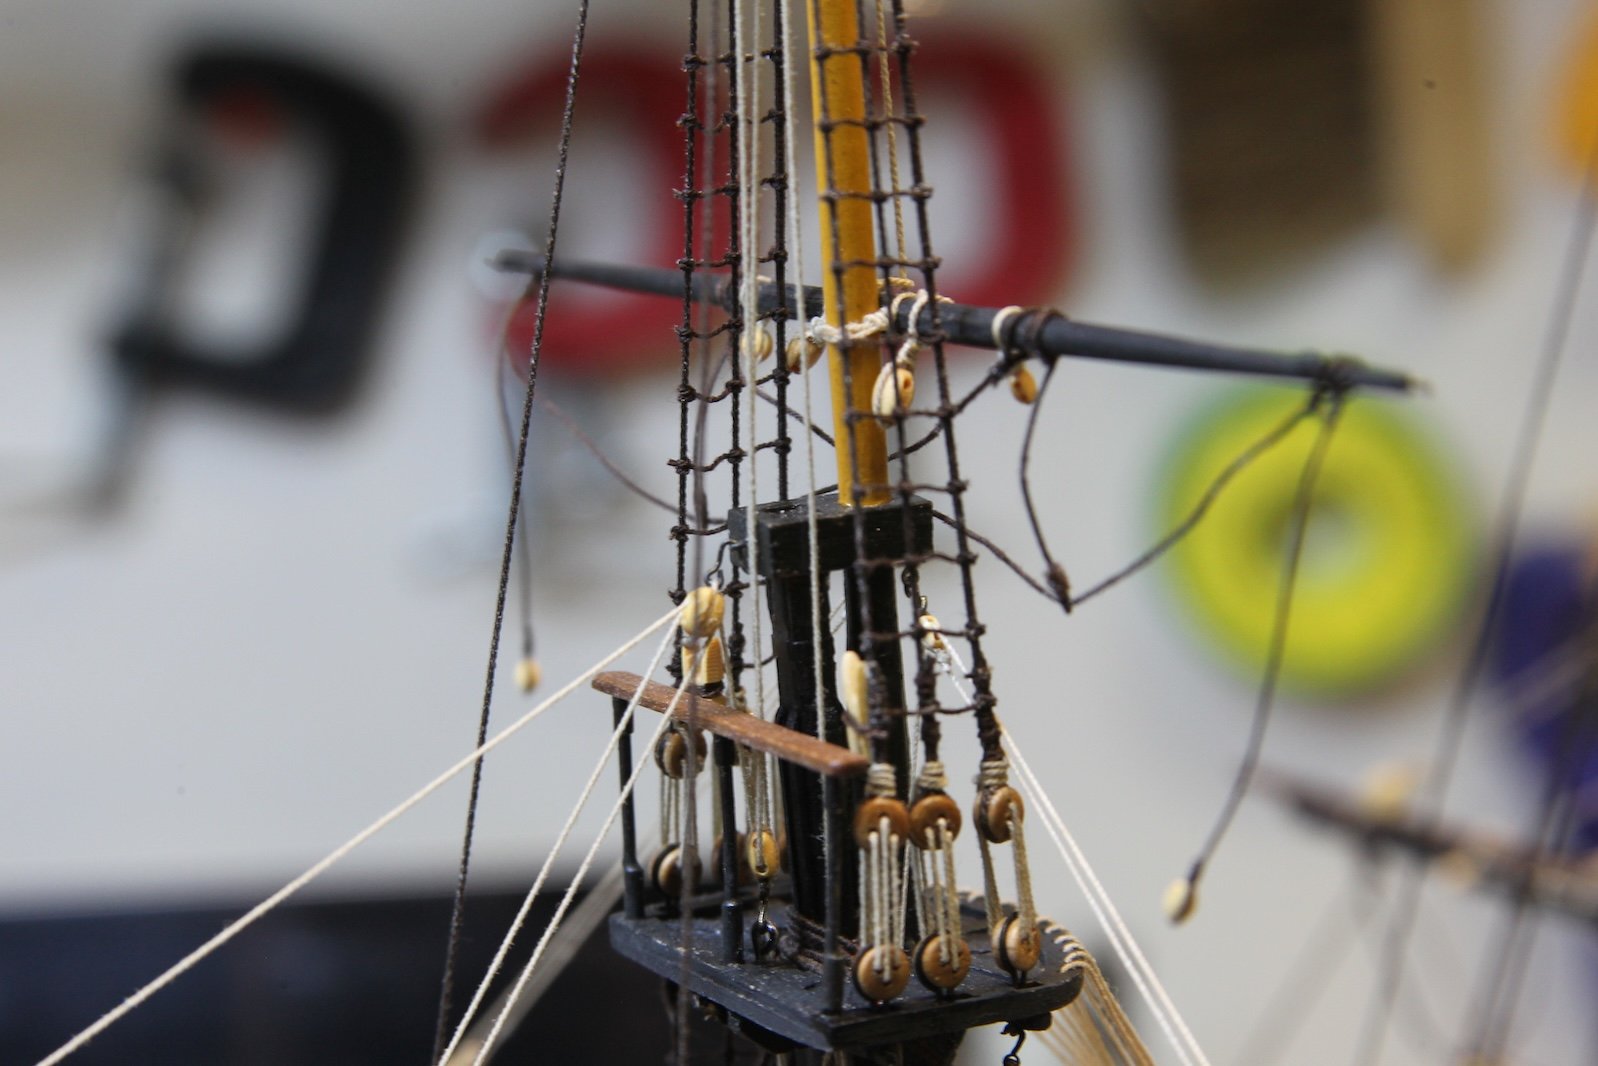
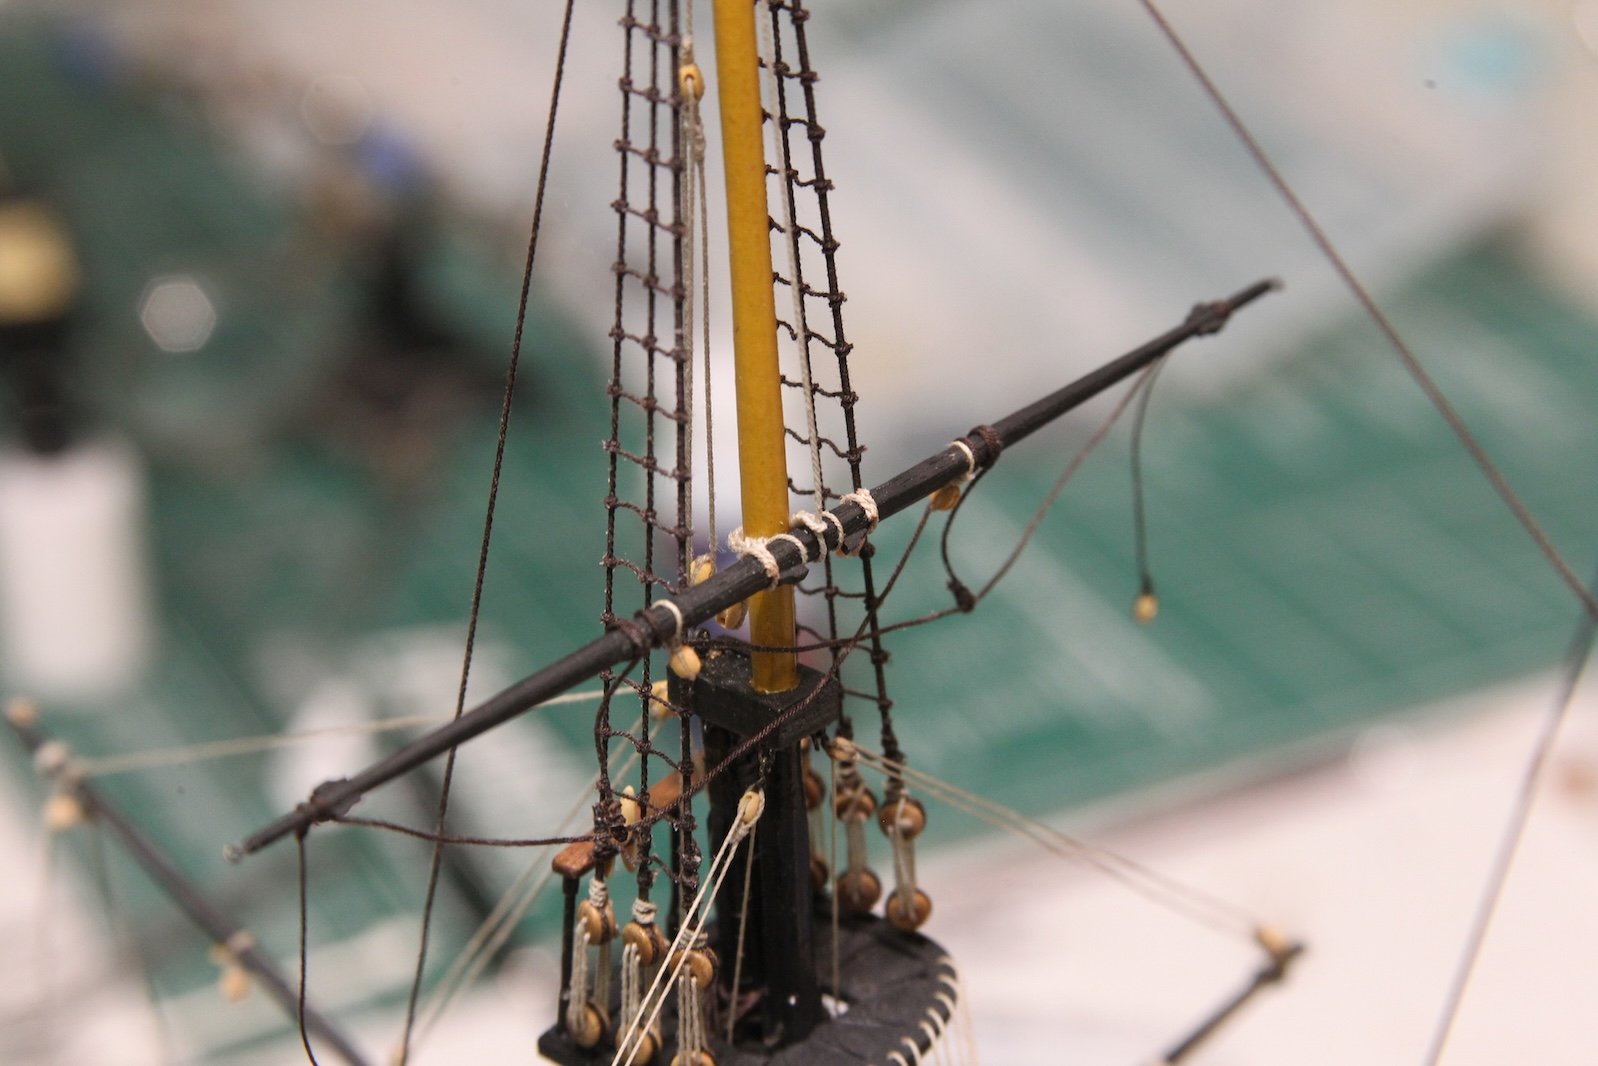
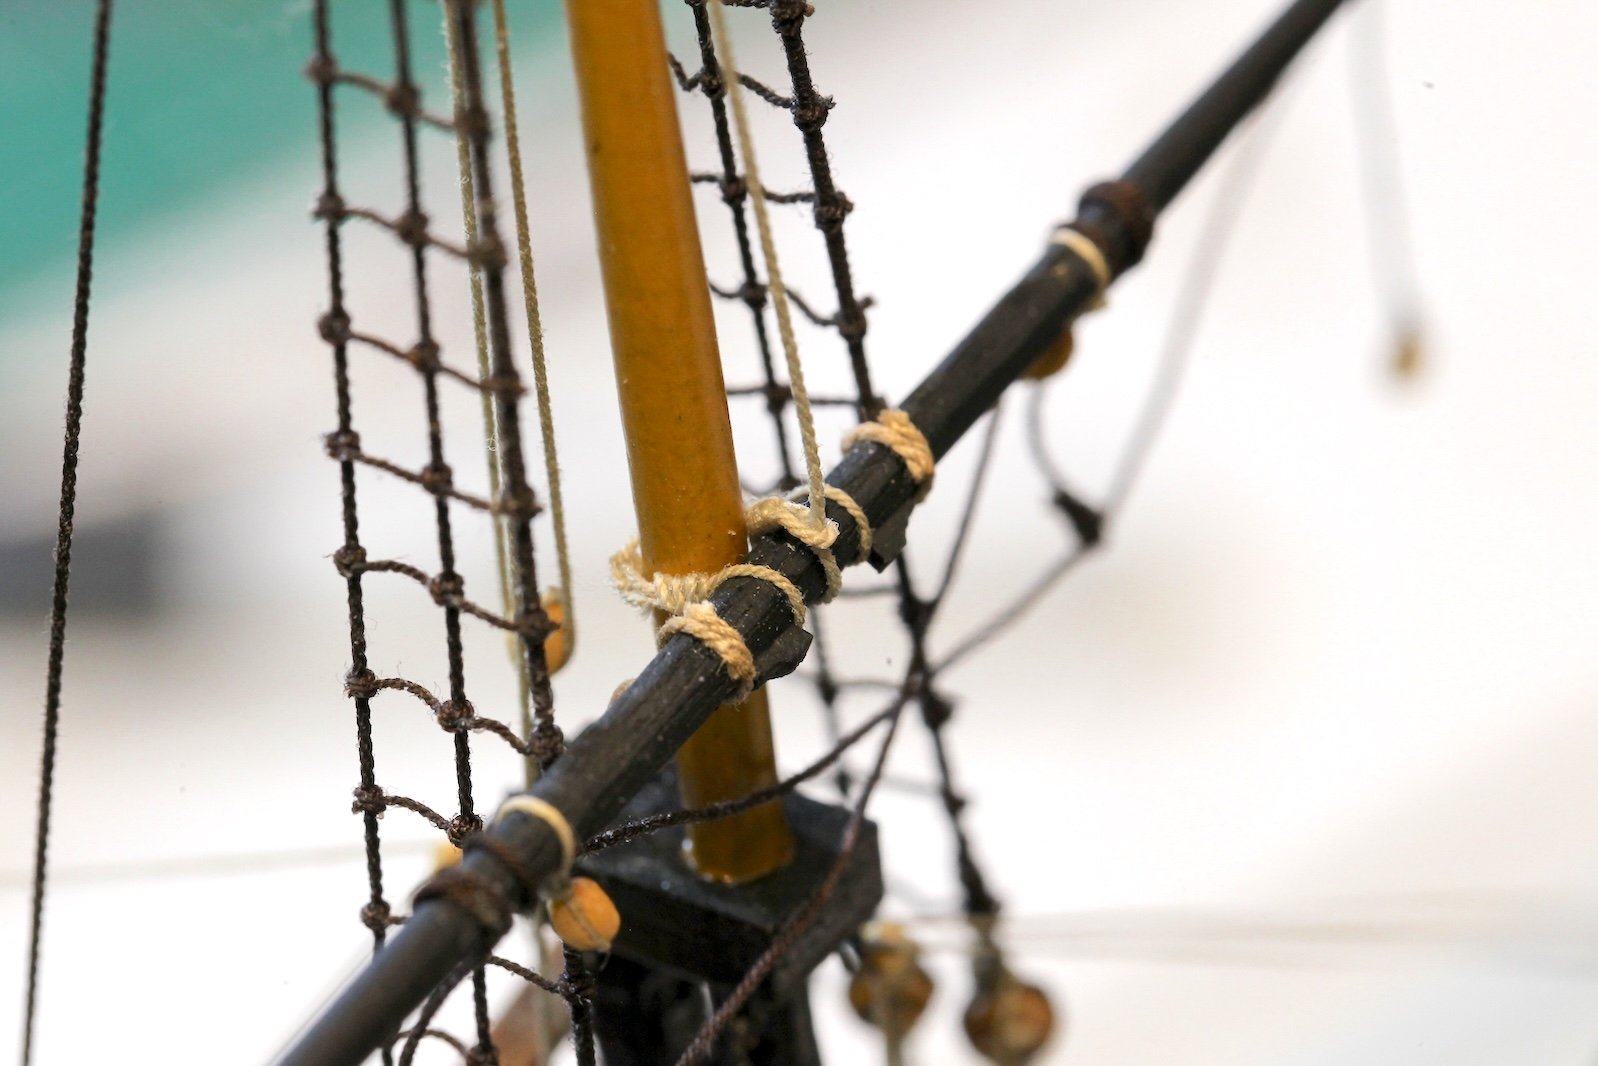
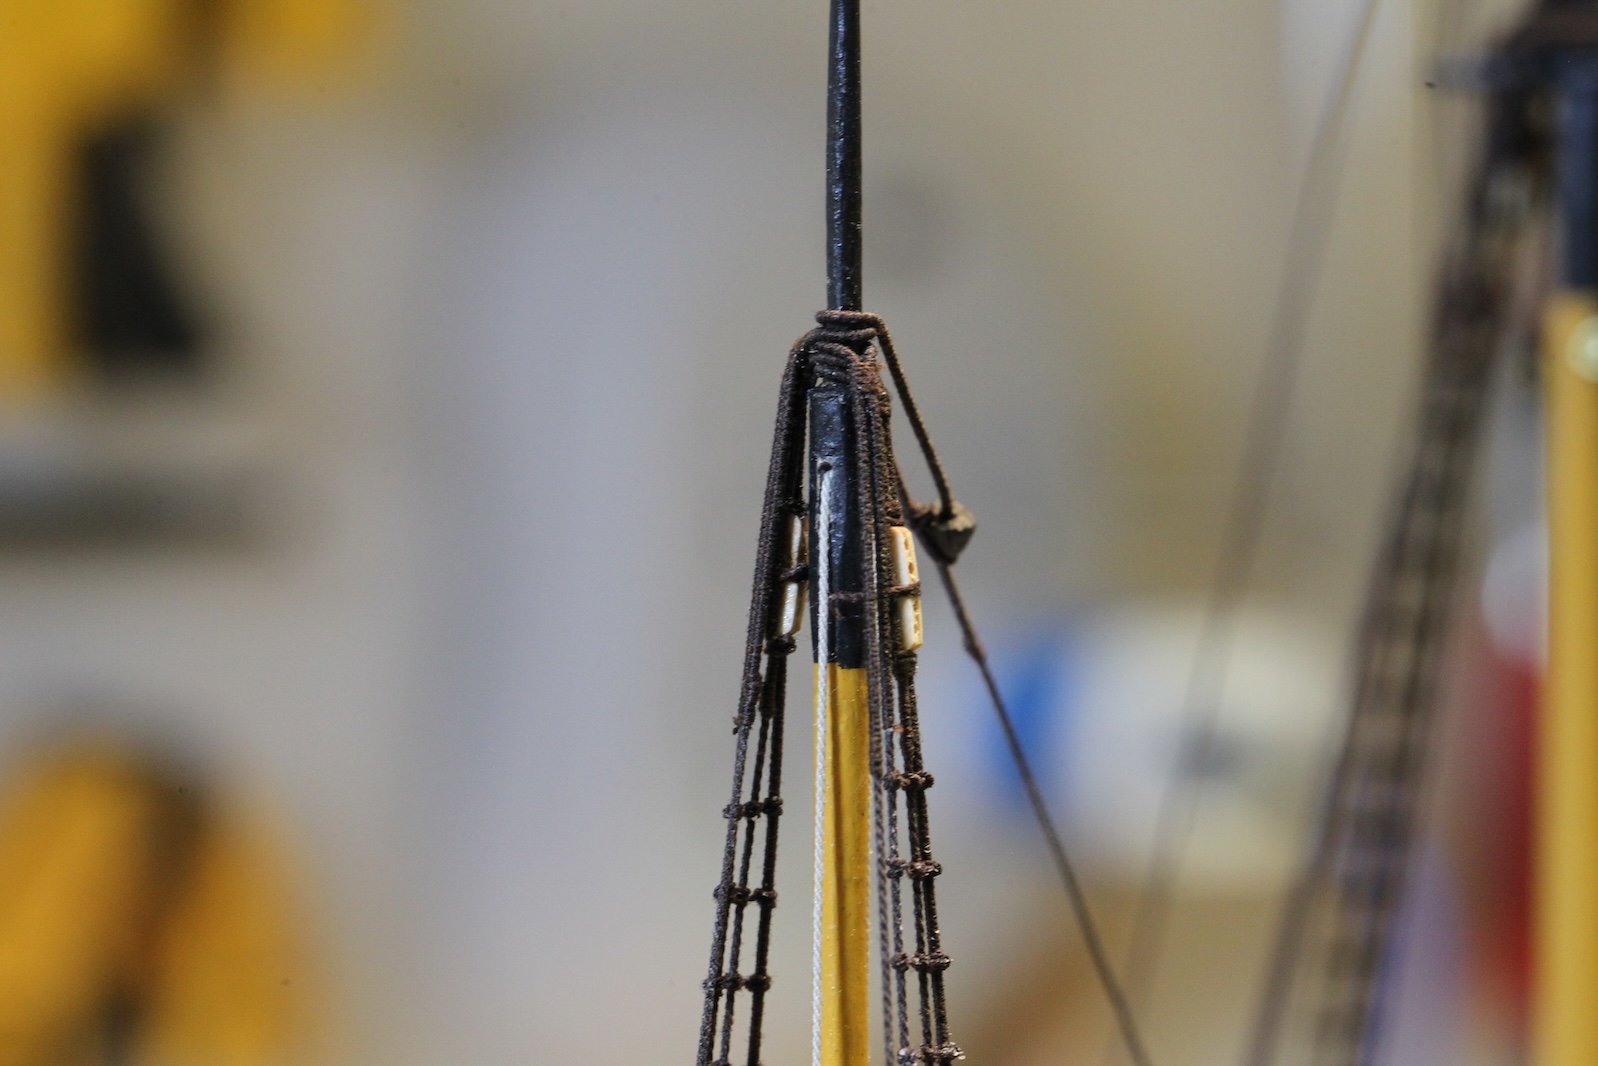
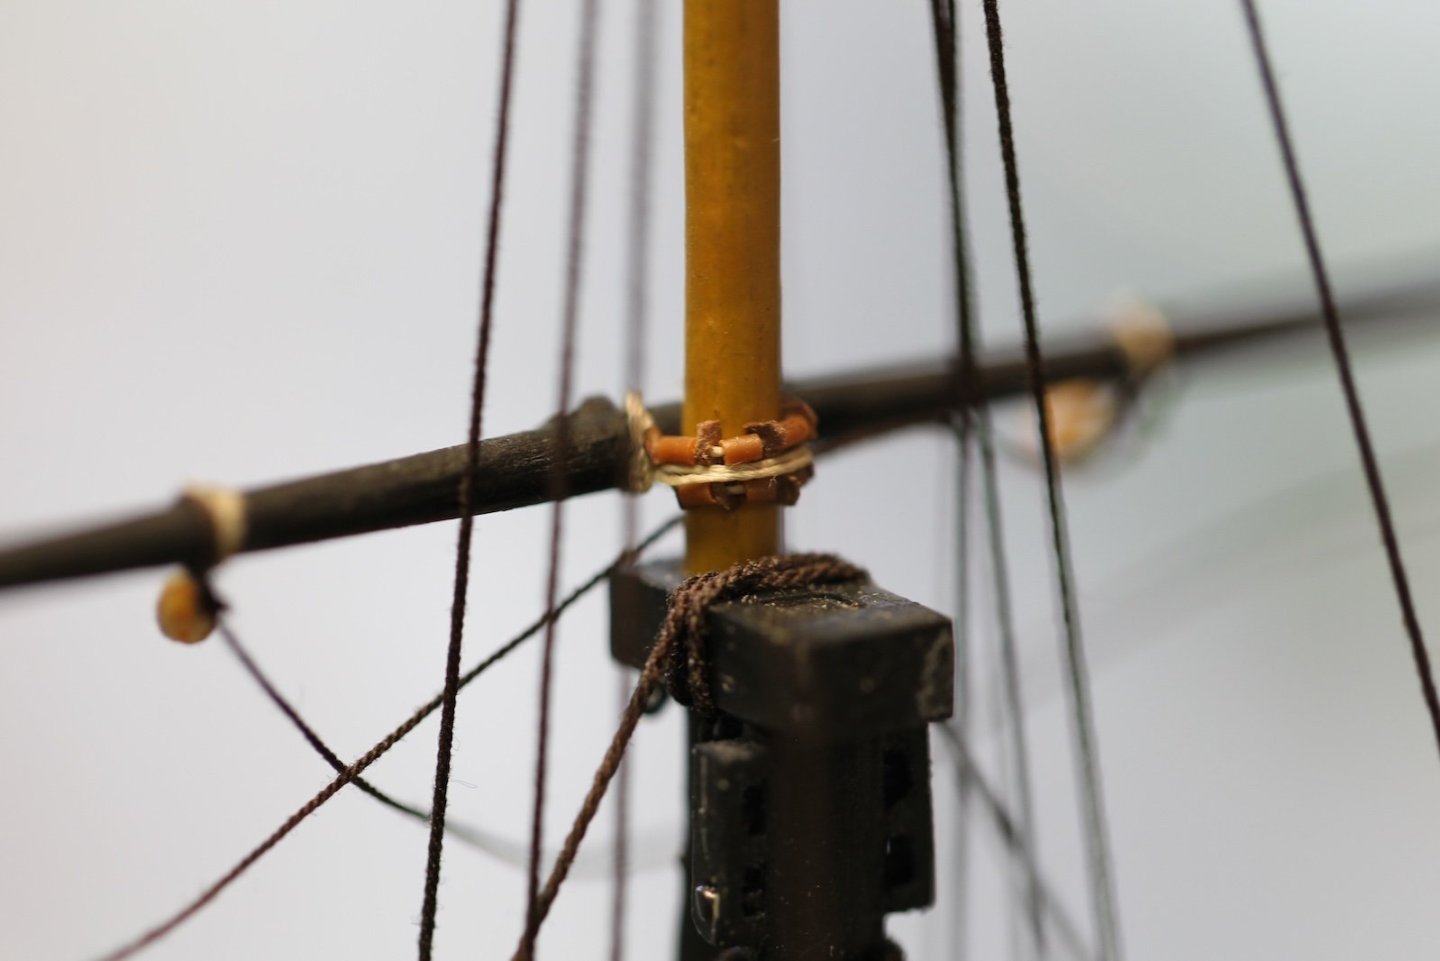
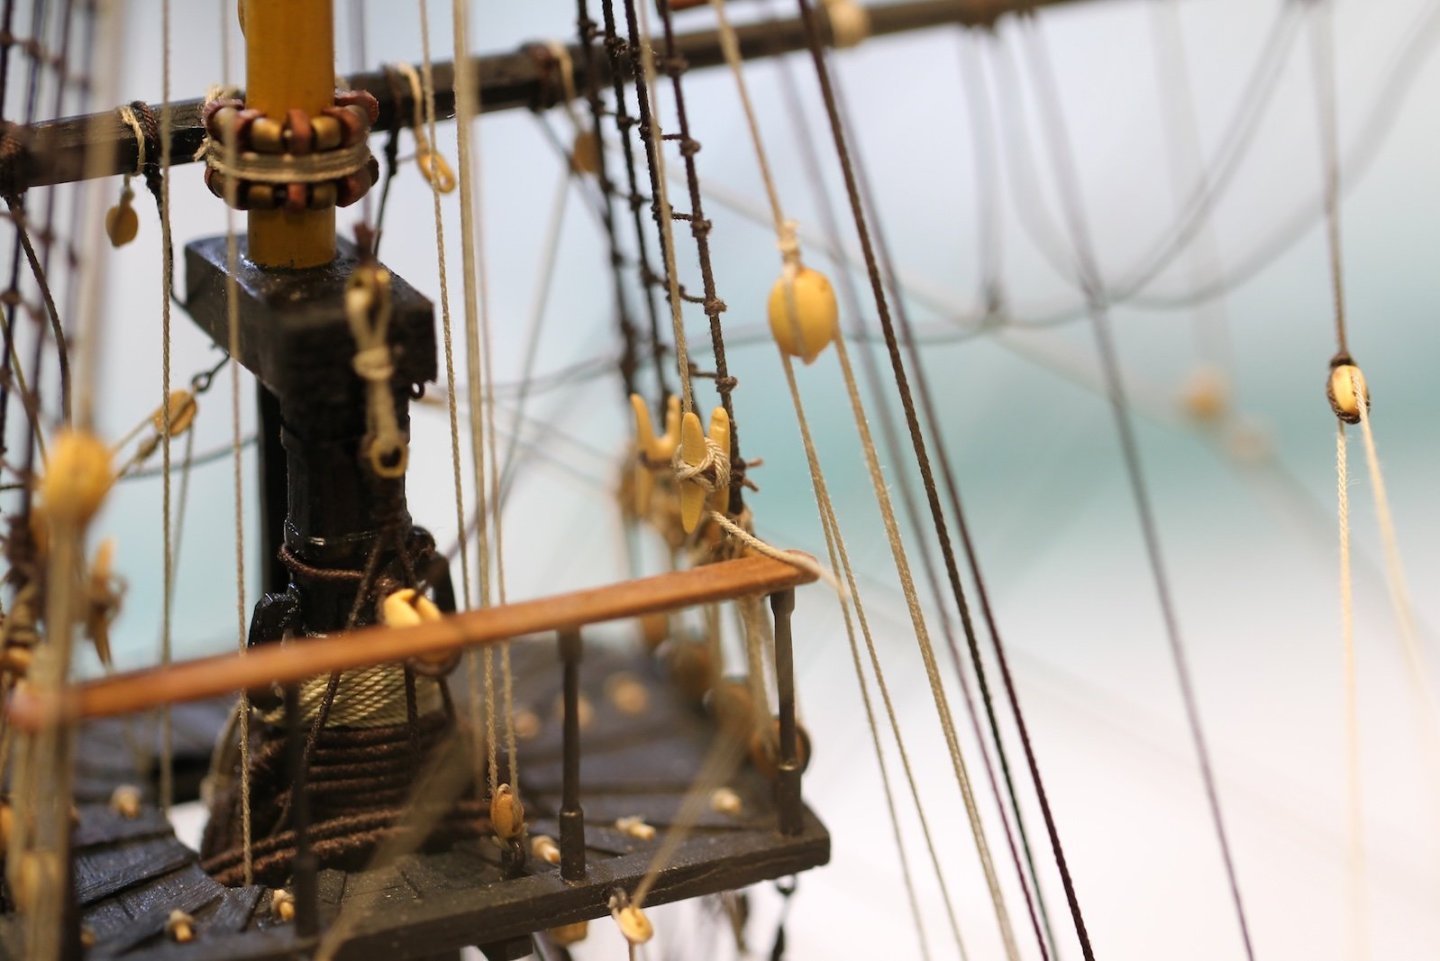
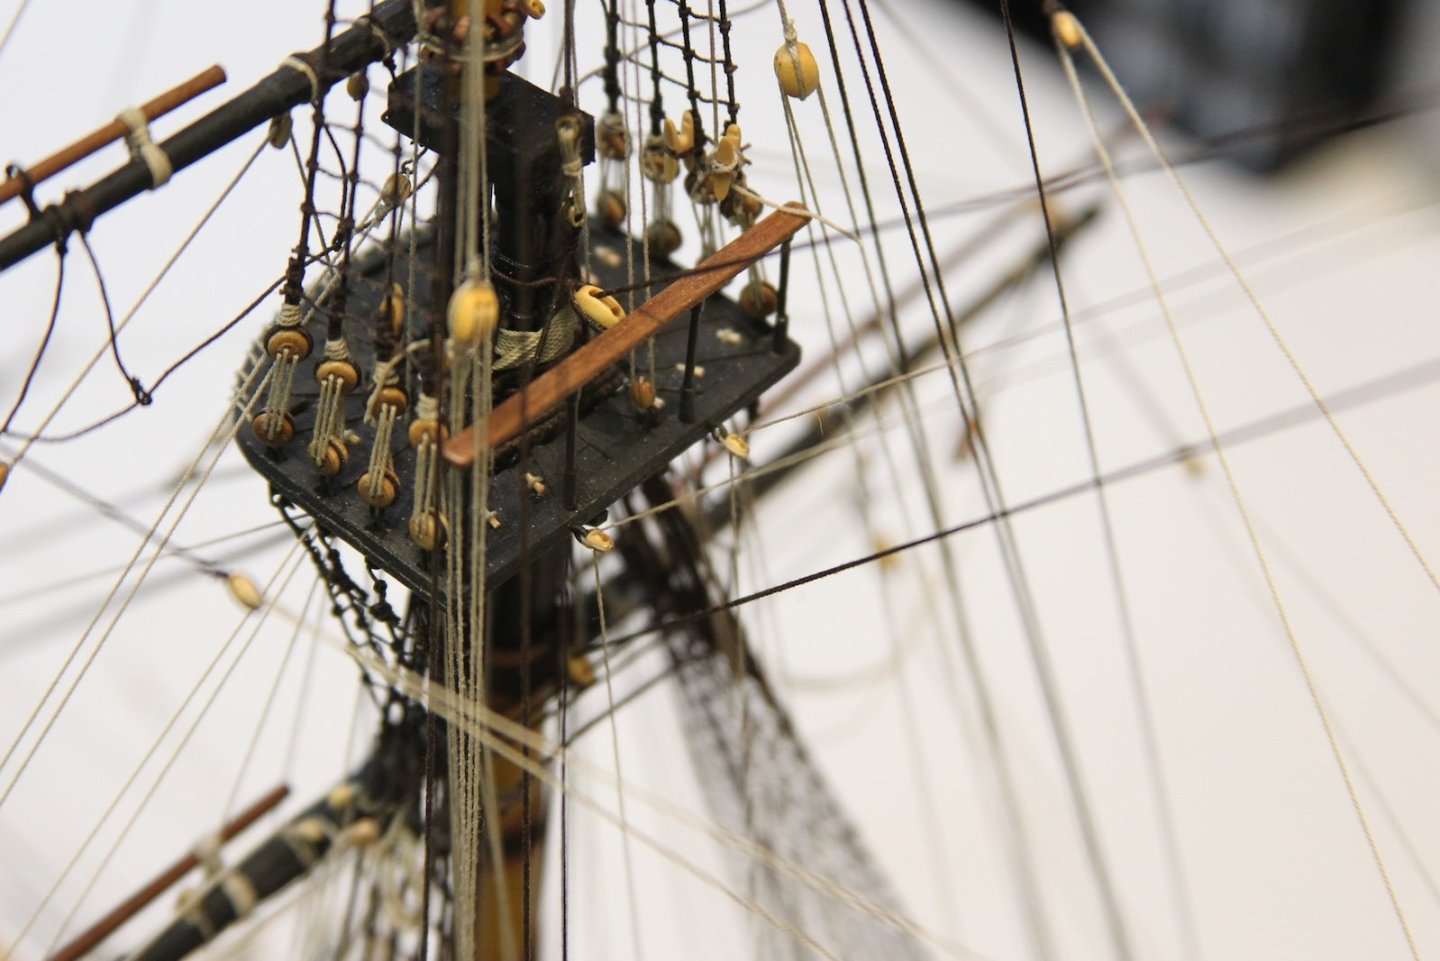
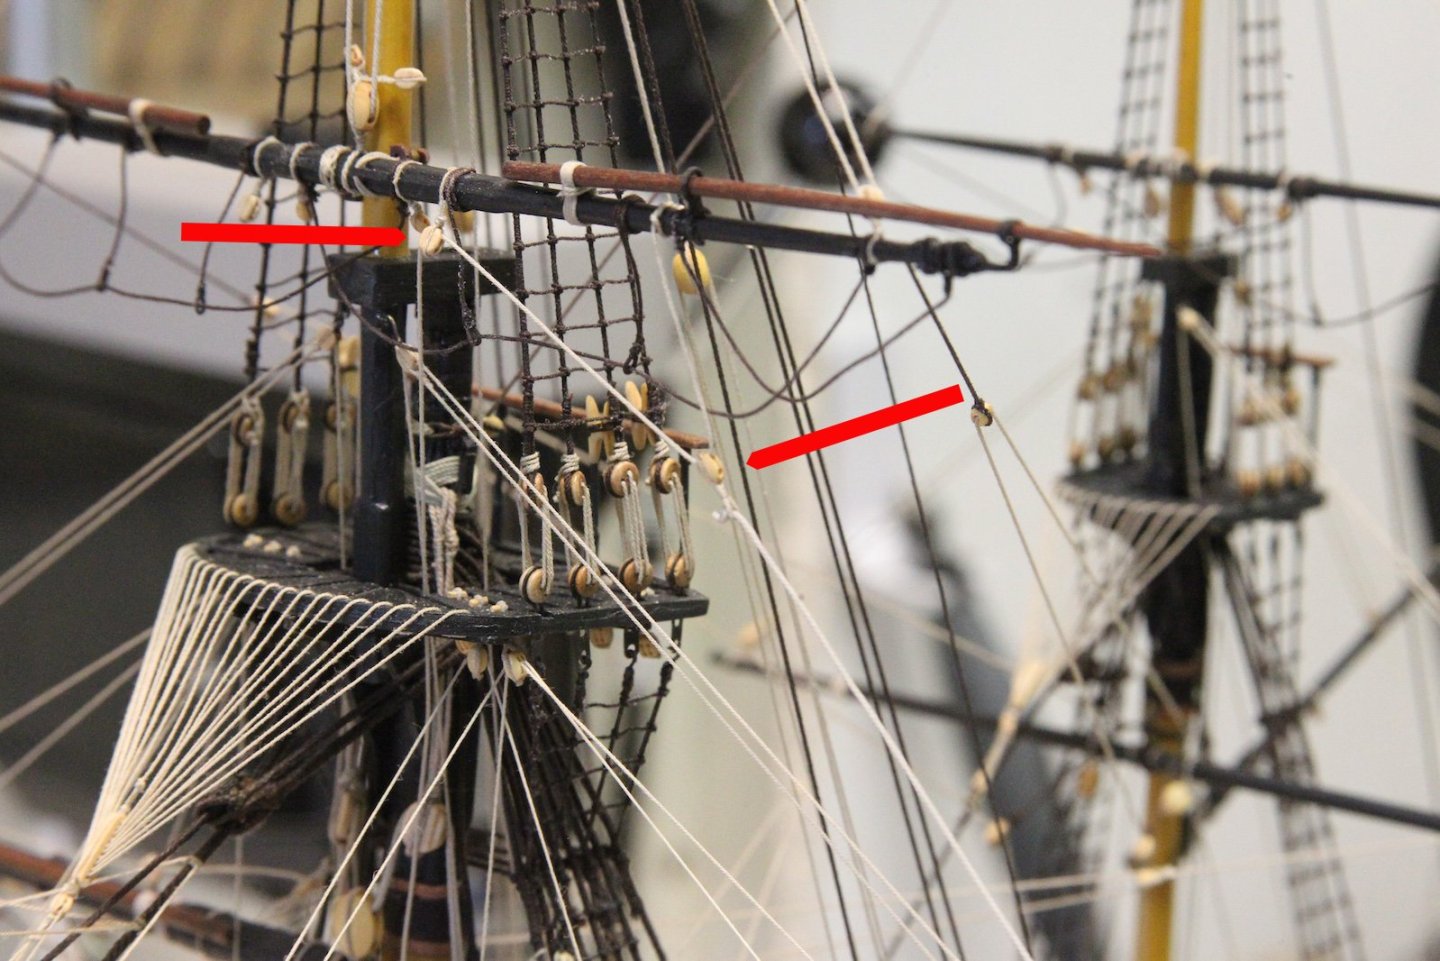
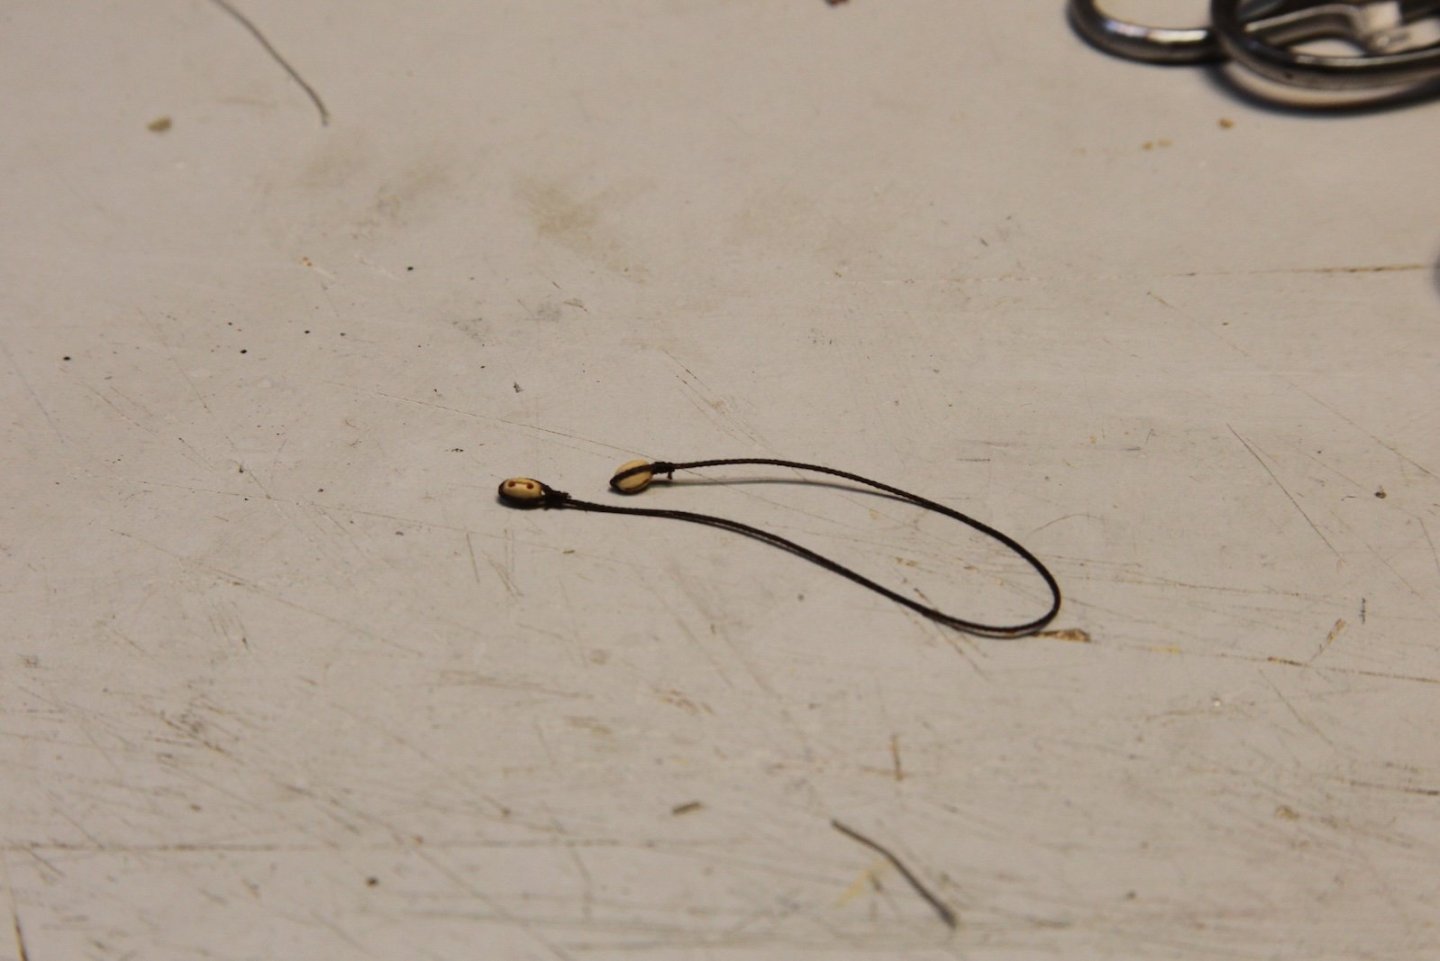
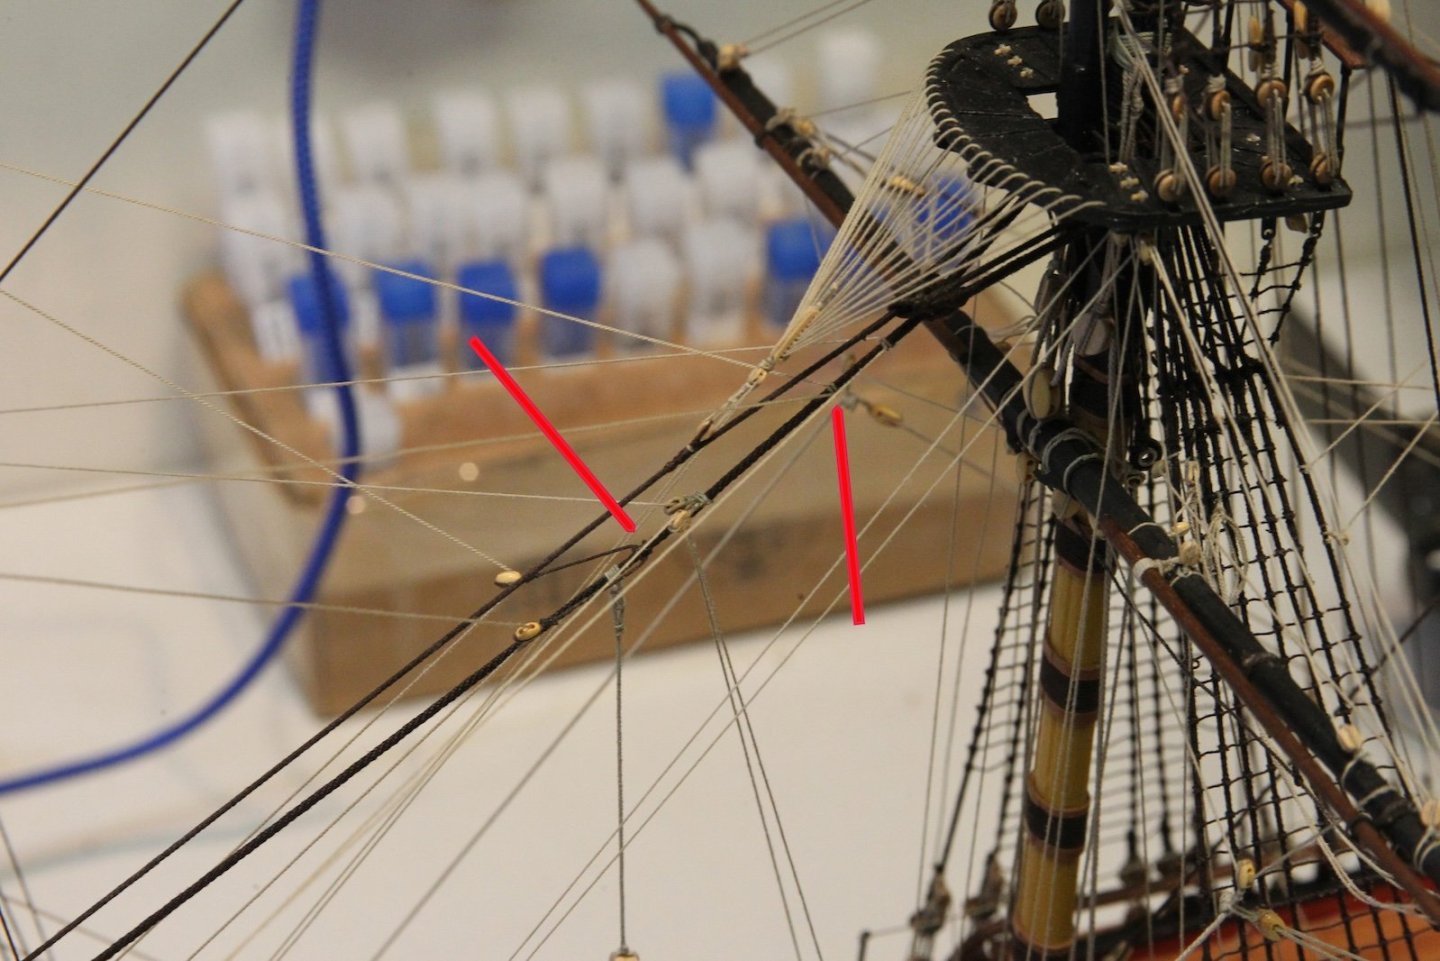
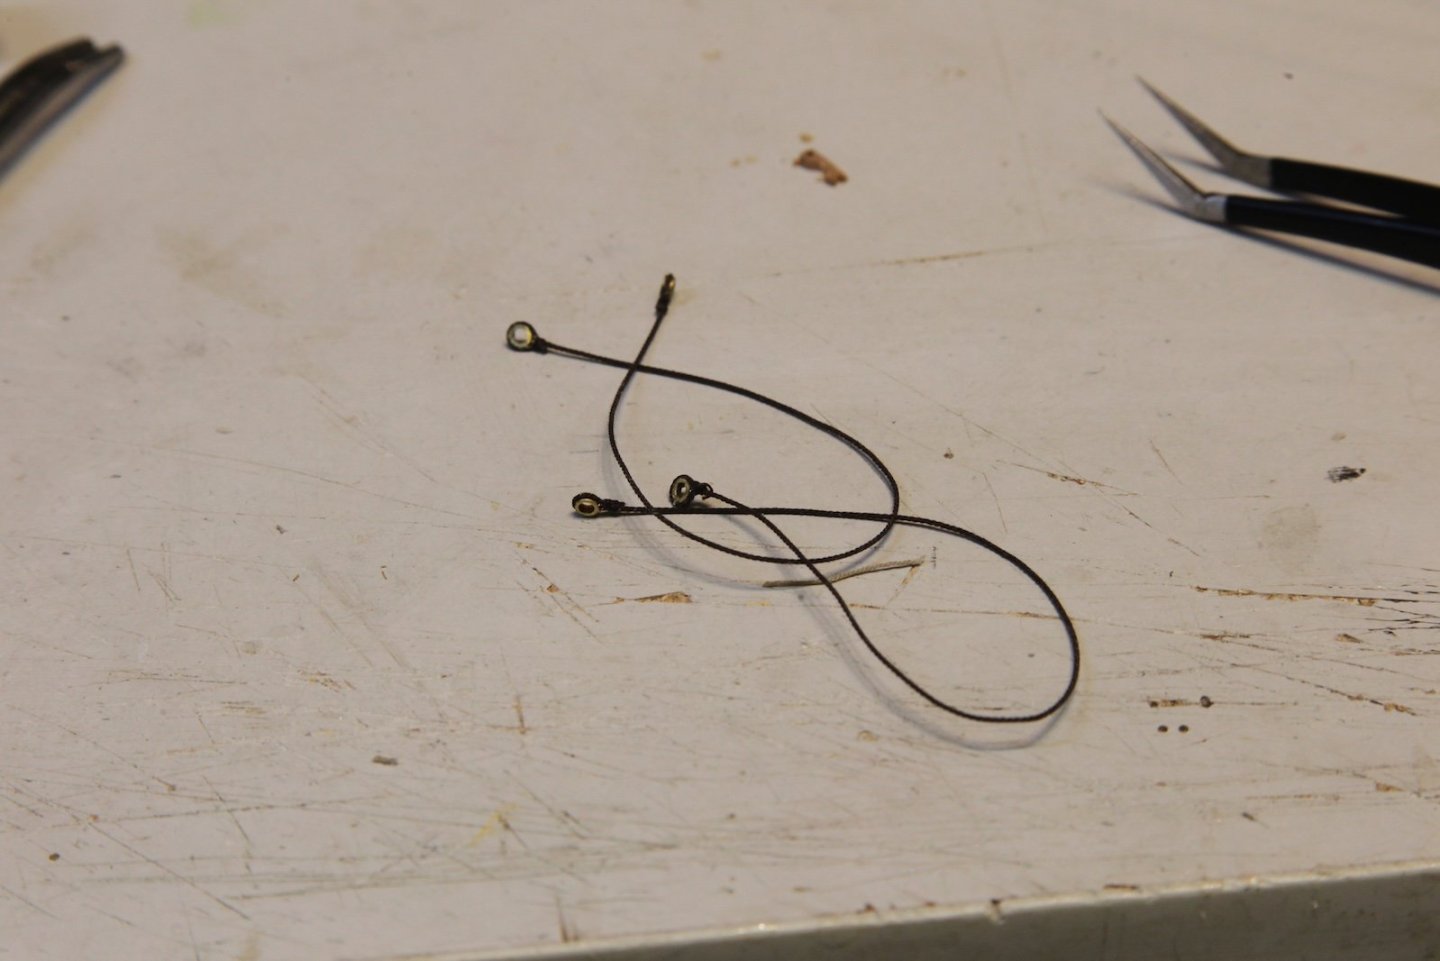
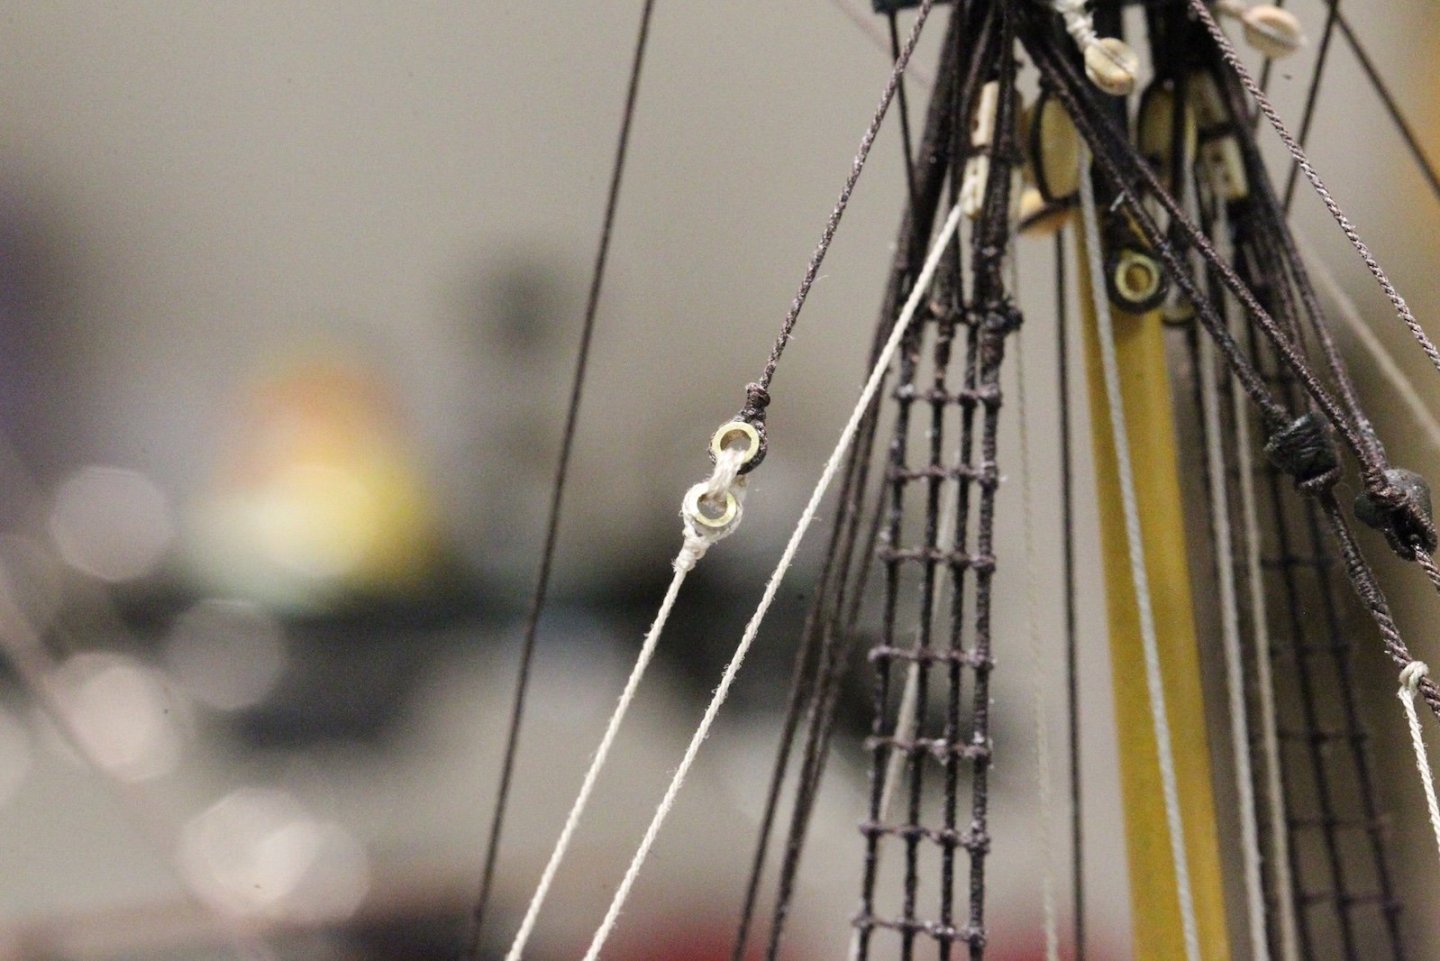
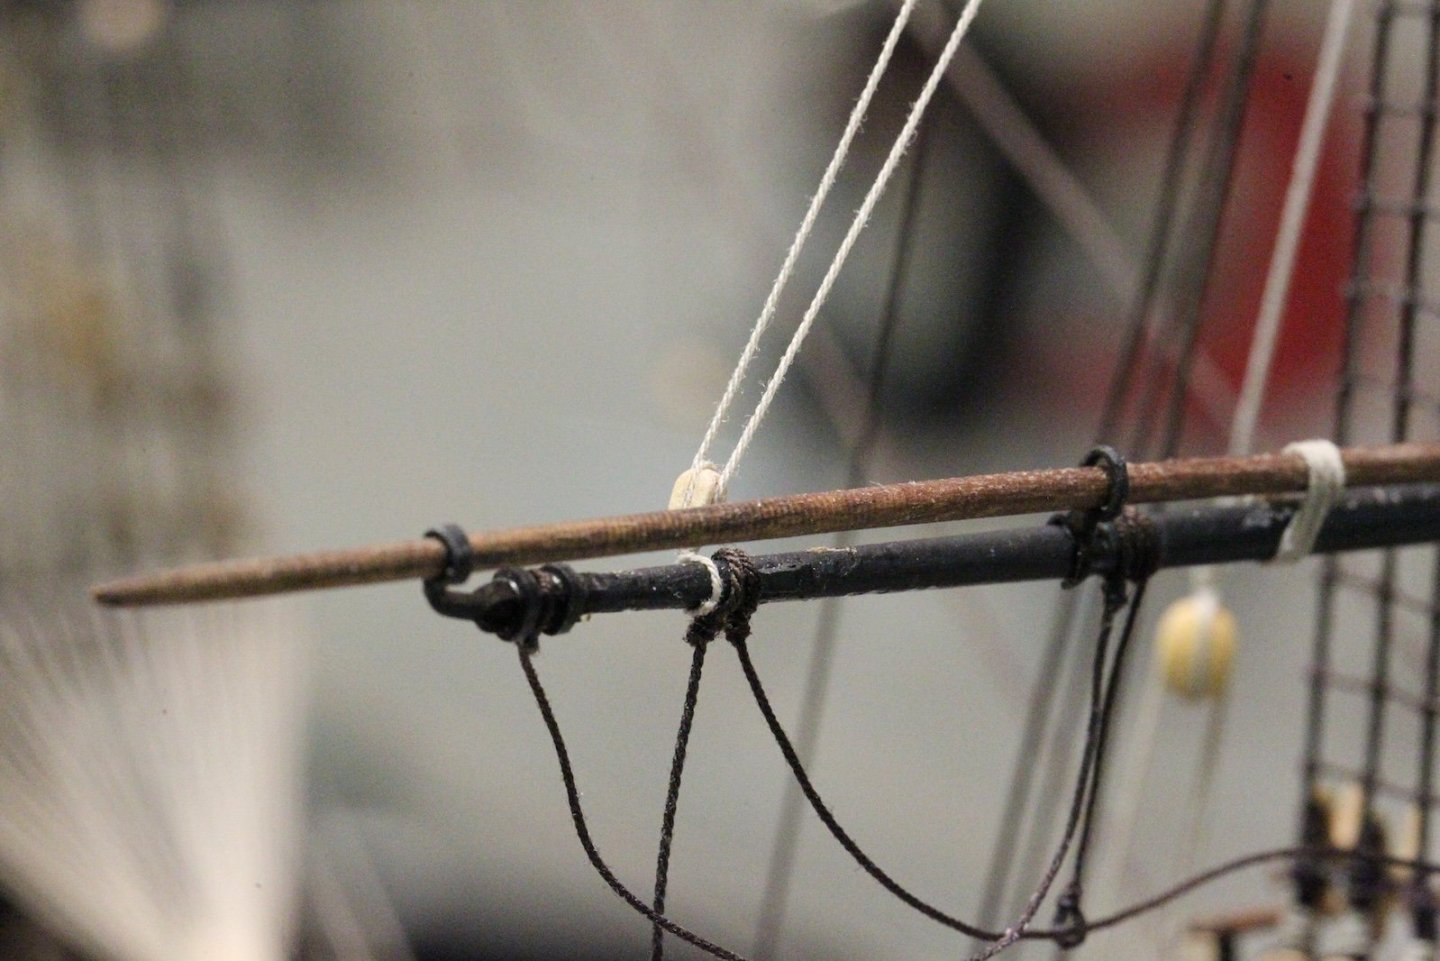
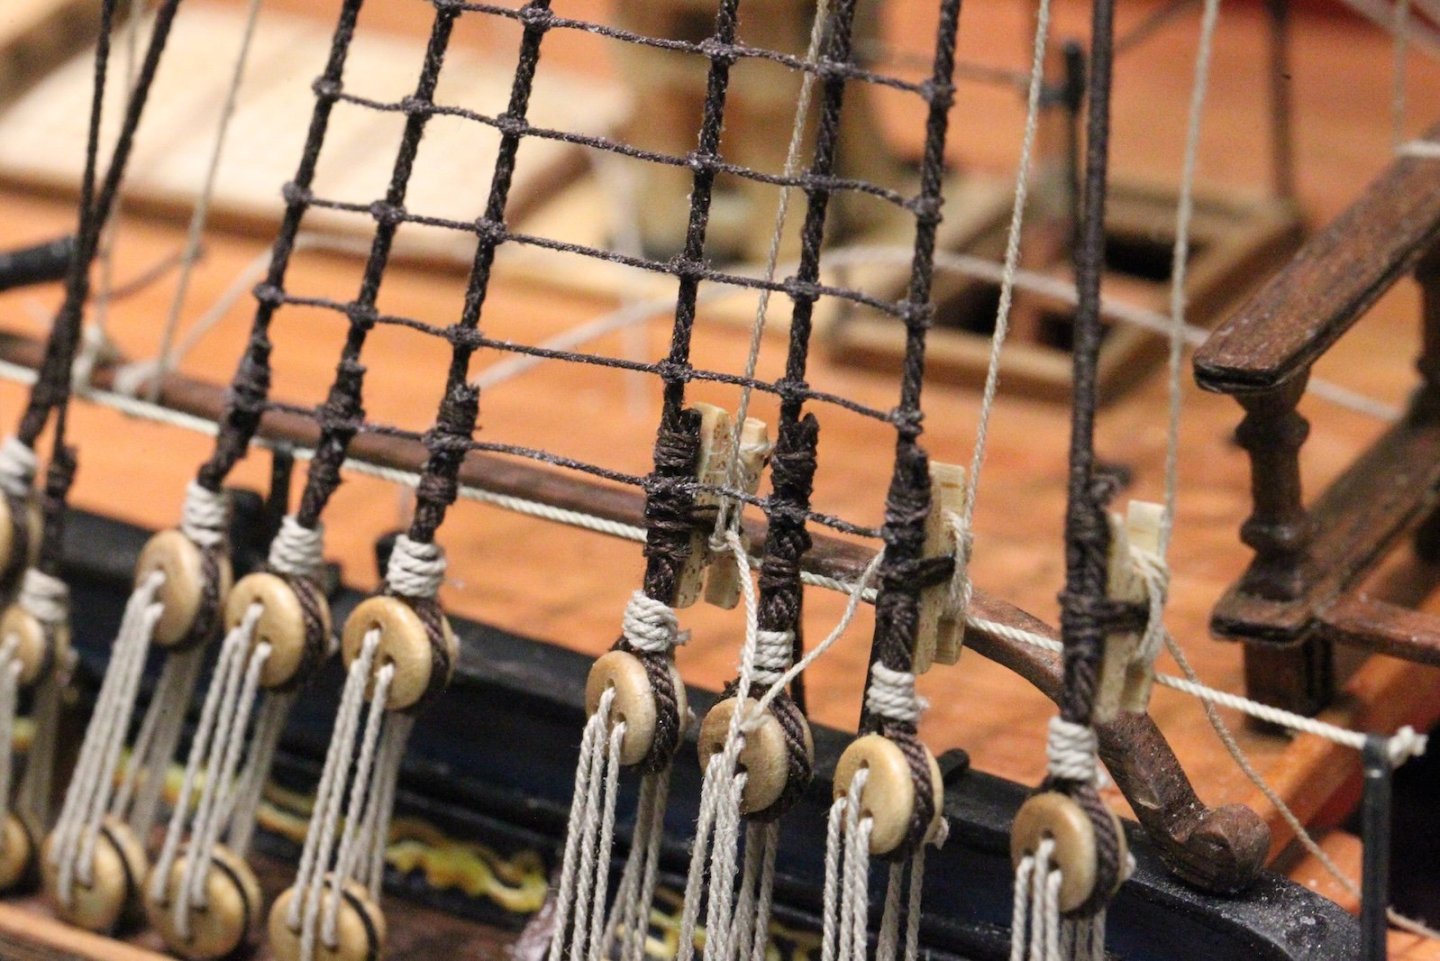
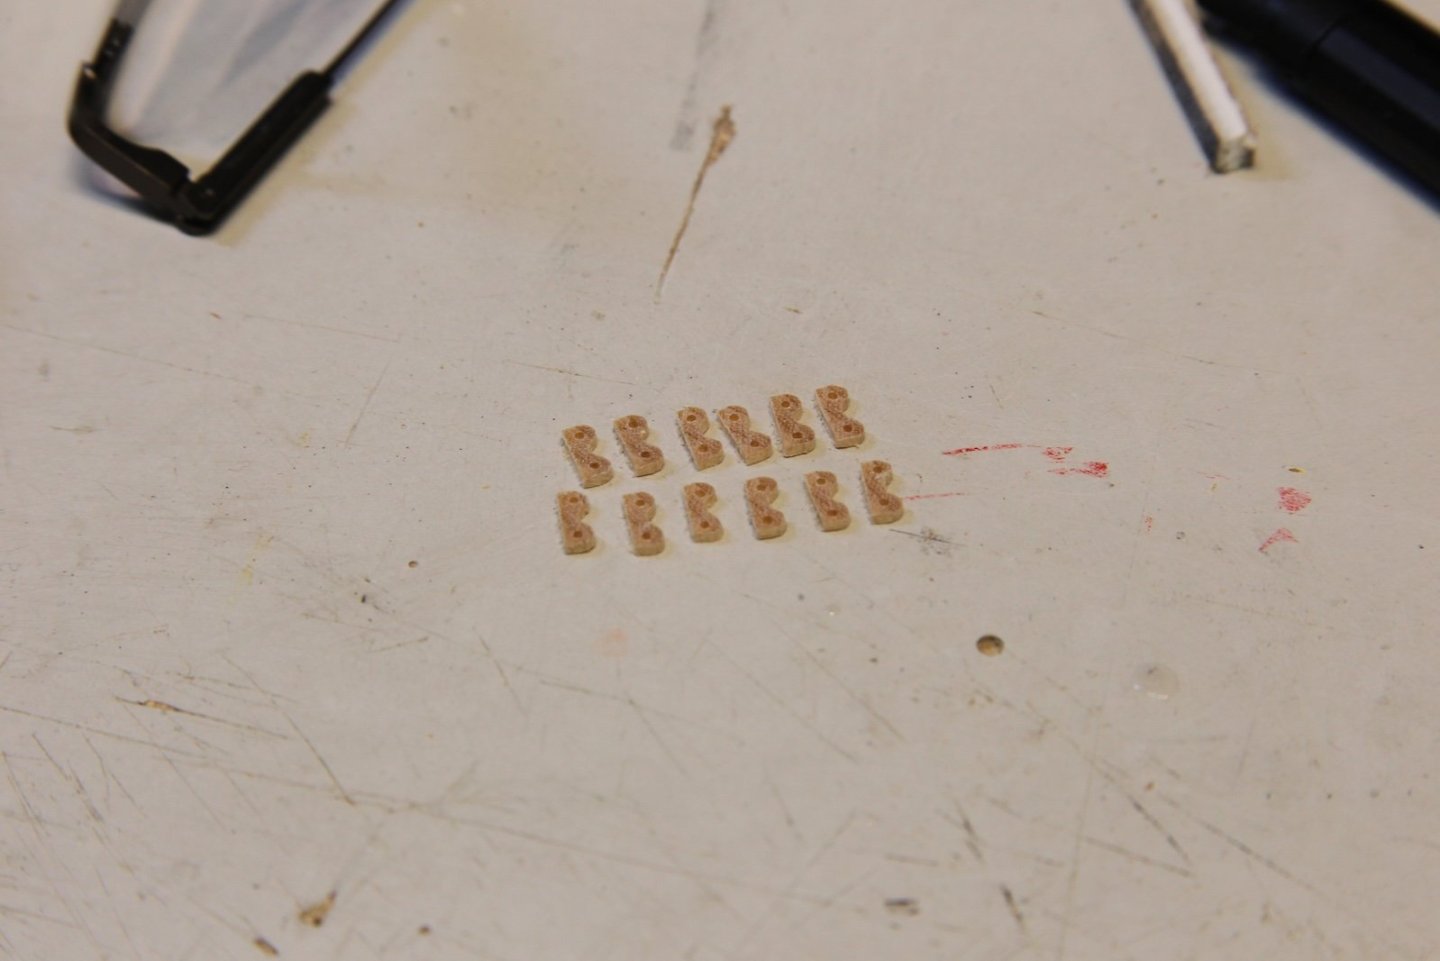
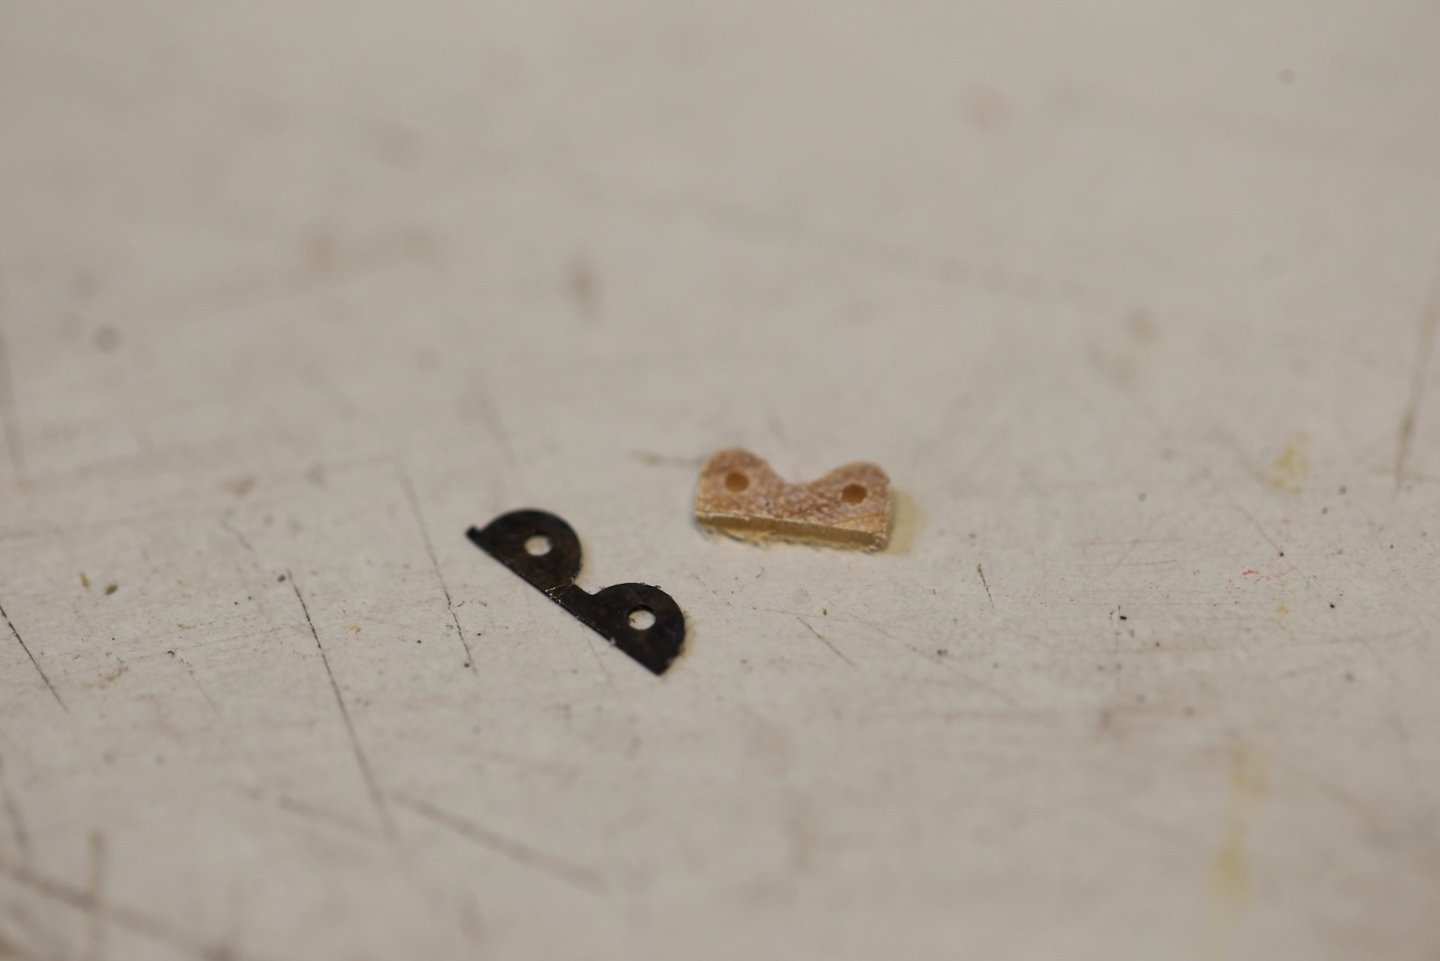
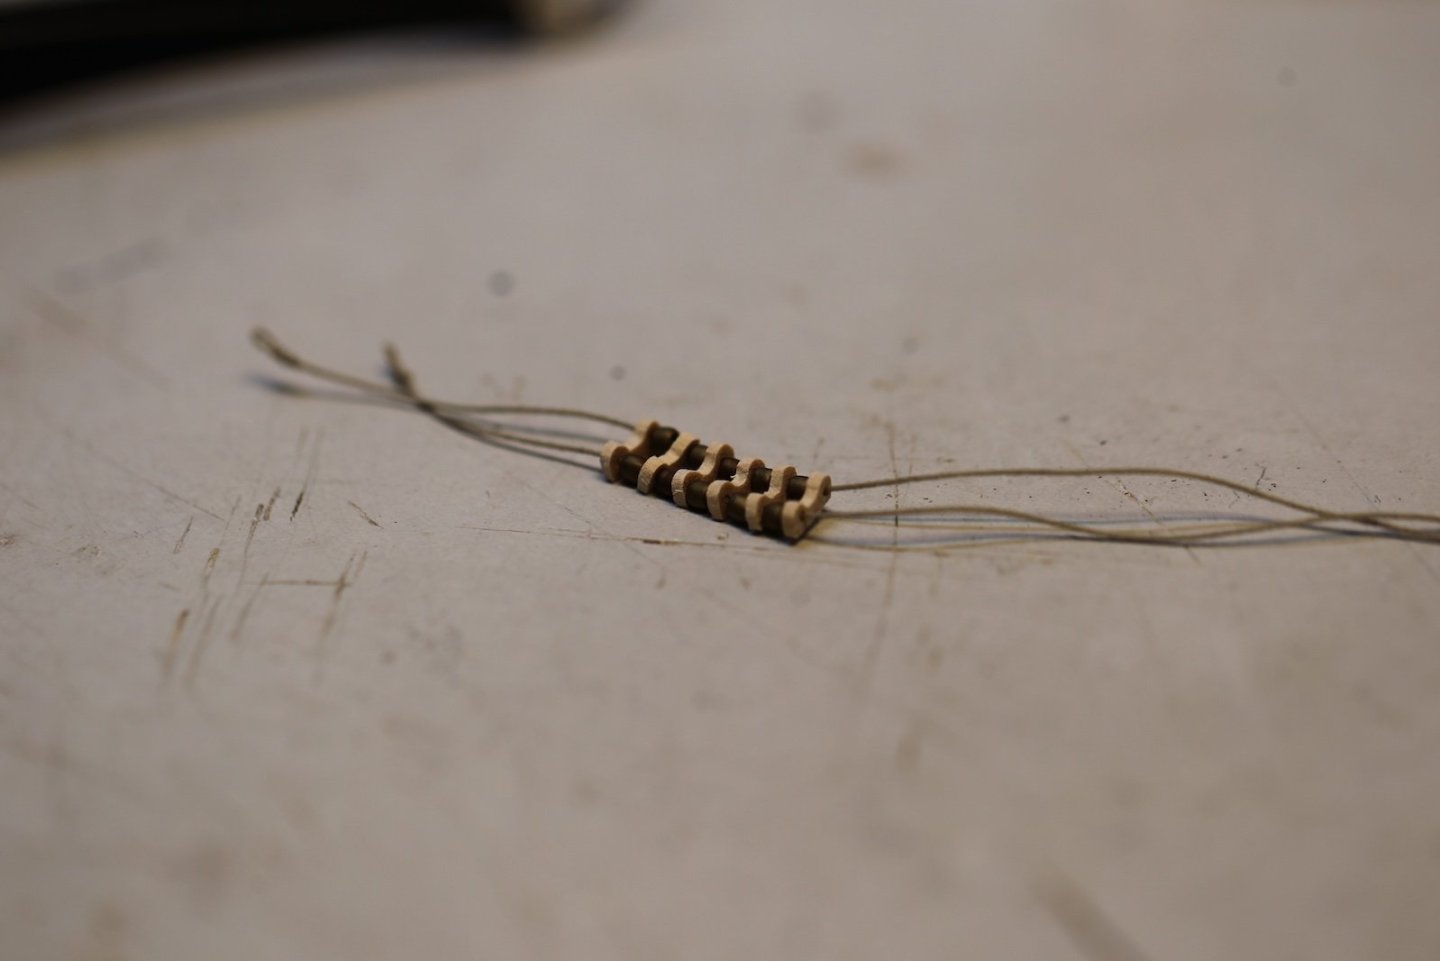
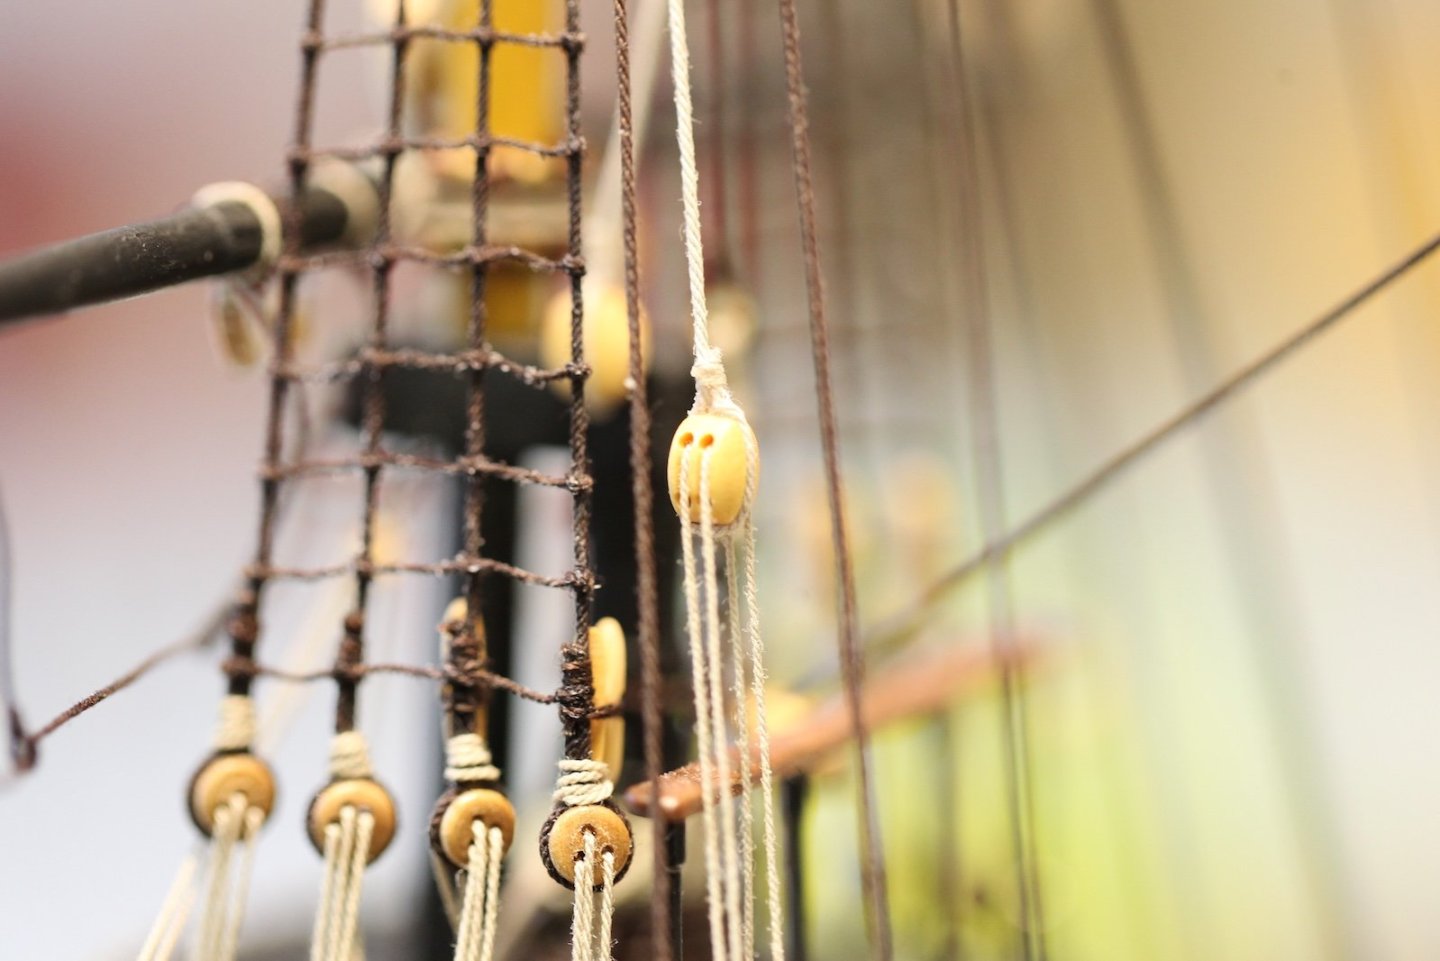
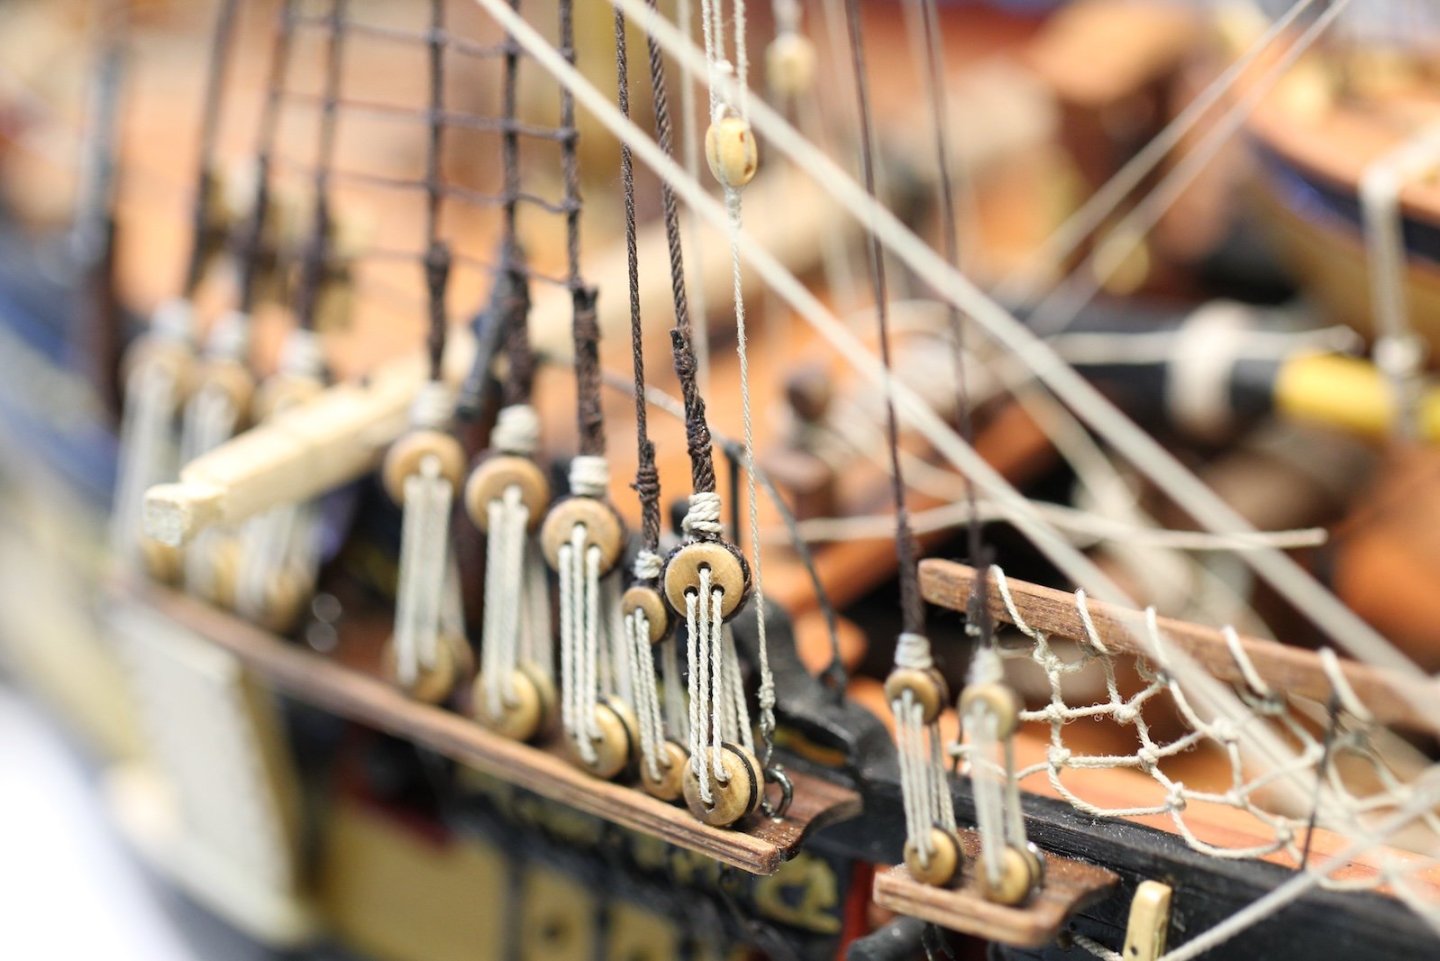
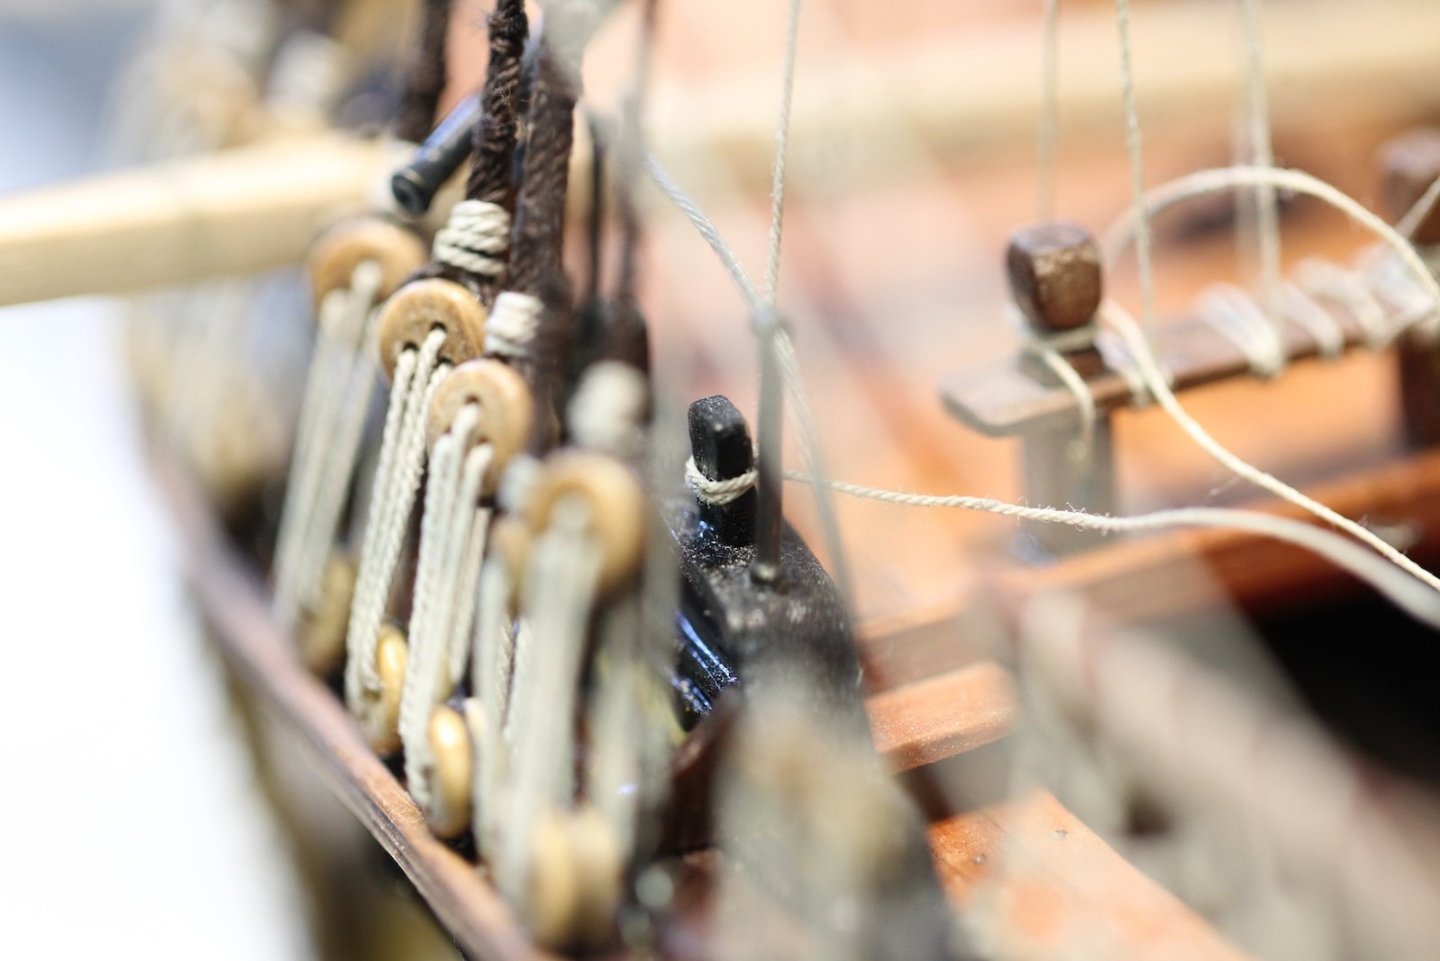
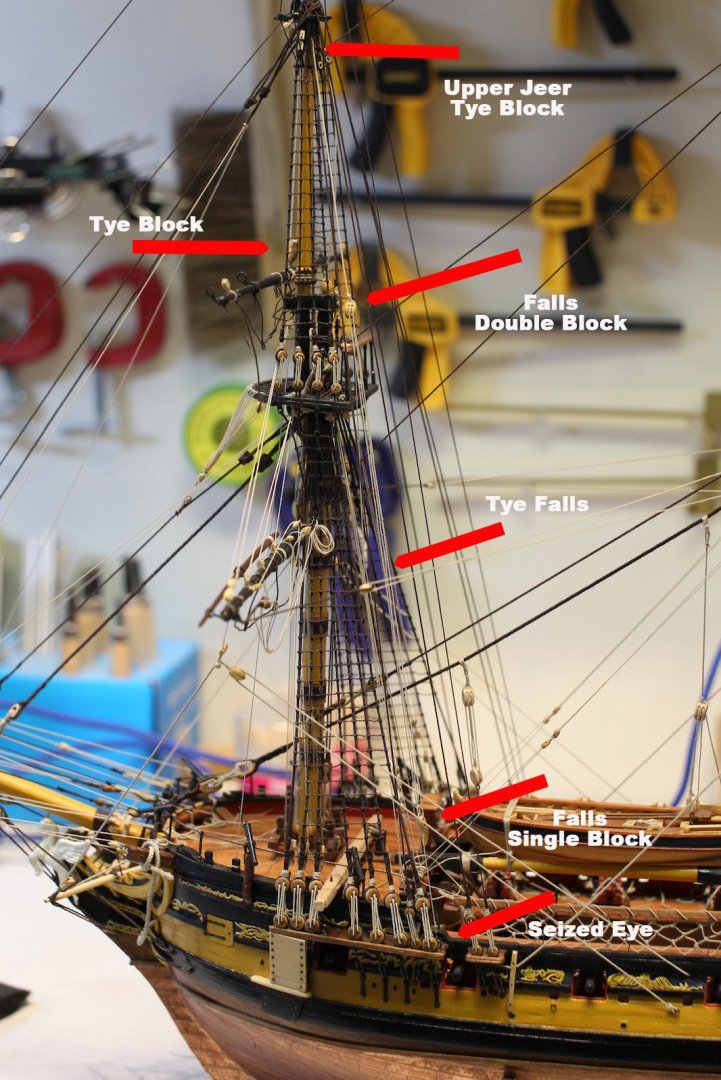
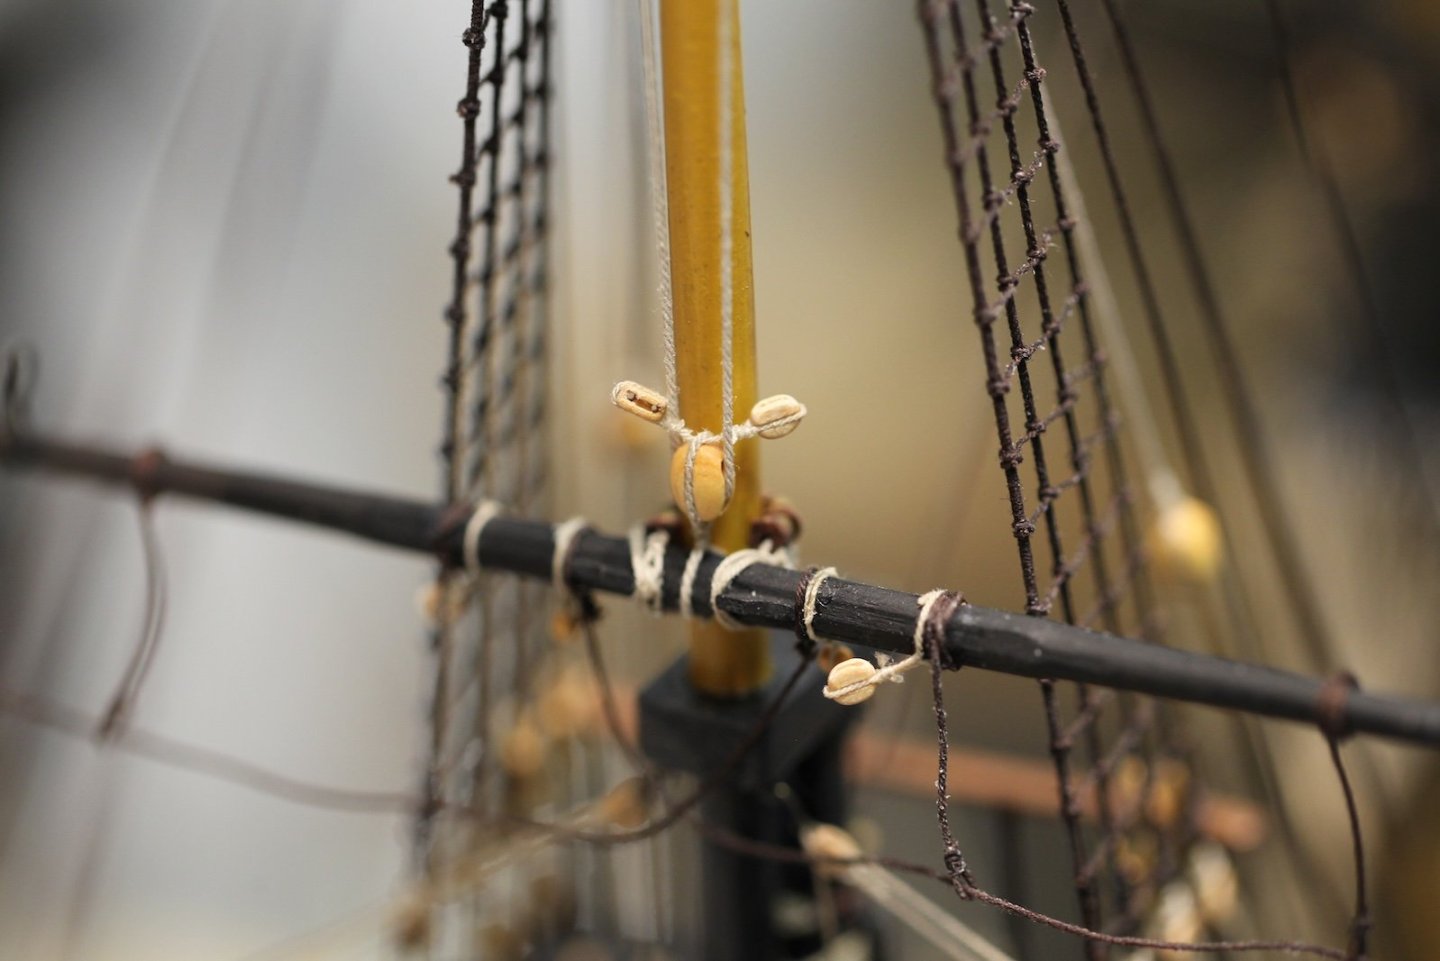
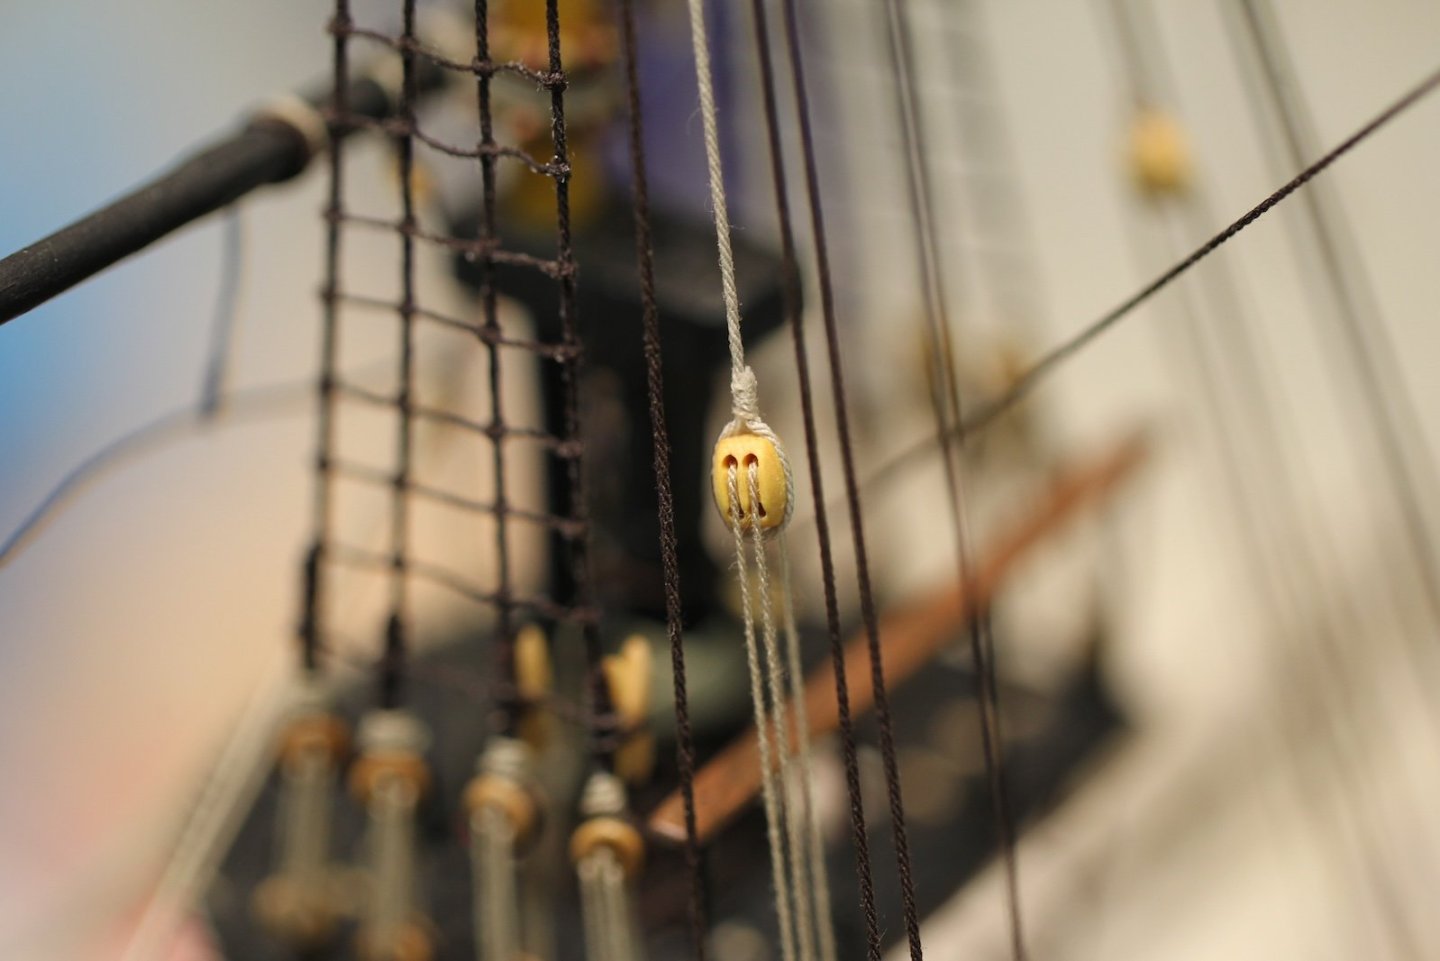
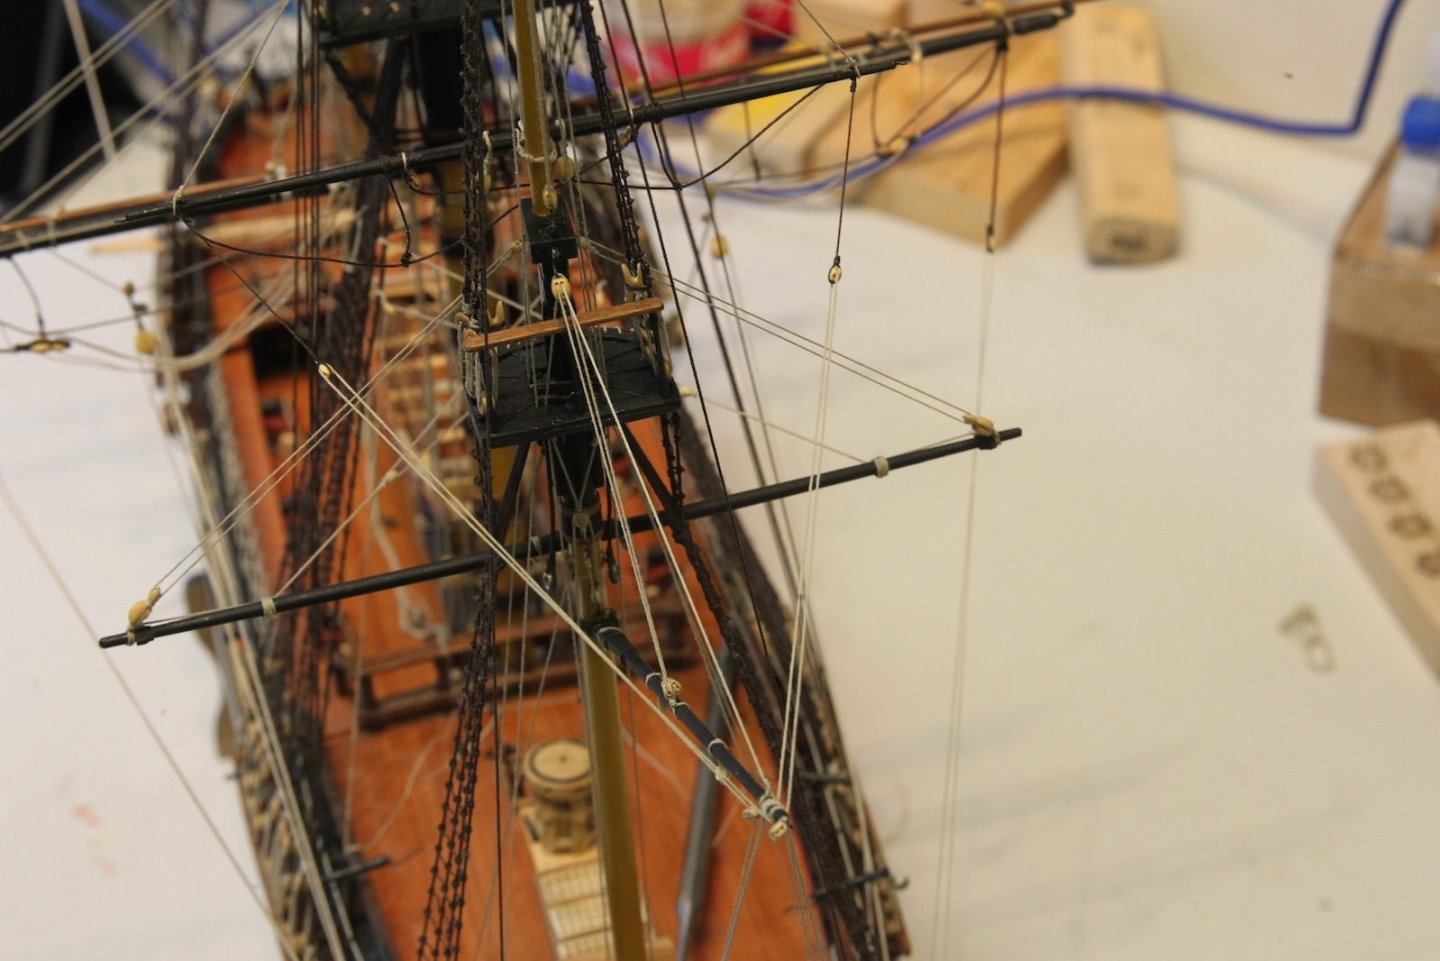
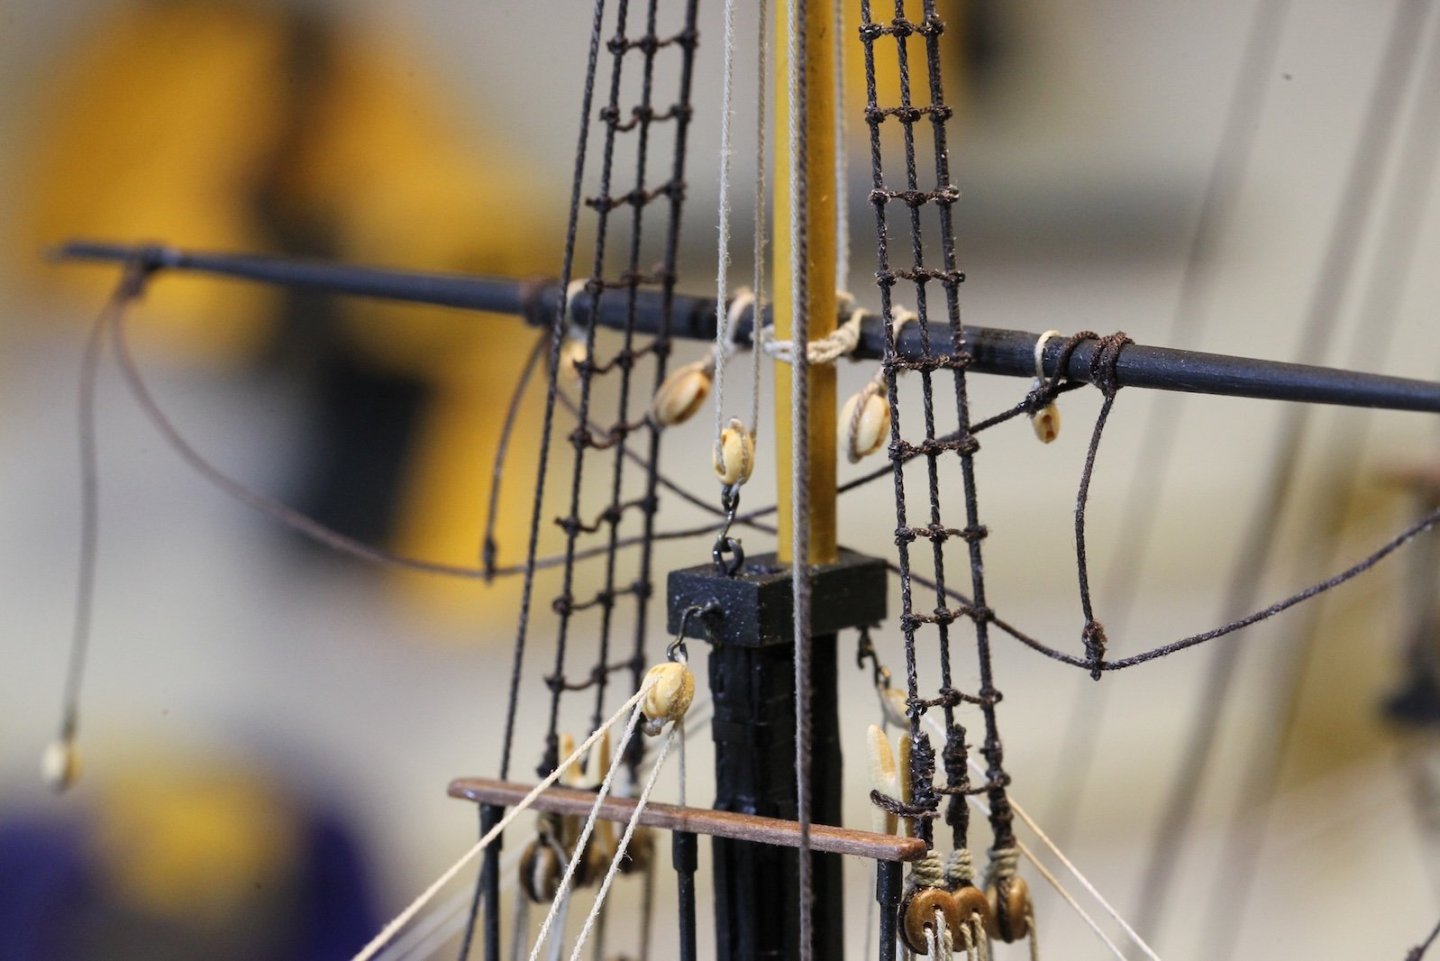
Before beginning the rigging on the topsail yards I noticed I was missing a couple of blocks not shown in the Fully Framed Model plans - which does not include bunt lines and leech lines. Two buntline blocks are added under the heads next to the jeer tyes. Unlike the mizzen mast, the fore and main topsail yards are fitted using the more traditional truck and rib parrels rather than just a truss pendant. The parrel is made up of six "b" shaped pieces of wood that make of the ribs and separate the trucks which are barrel shaped separators (the same as the gaff parrel). While the kit comes with small metal ribs, they are not quite the right size of scale for my application. I also wanted to use wood rather than metal to be more authentic. Although there are only a couple of pictures here, this was a LOT of work. The ribs are 5mm wide and about two millimeters tall. I started out by shaping a length of harder wood in those dimensions then using a round file to create the valley in the center. The piece was cut into one millimeter slices with holes drilled into the rounded portion. Finally, each parrel was individually sanded and shaped into it's final appearance. After test fitting the parrel on two 2" lines, I stained them darker so there would be lest contrast between the trucks and the ribs. Mounting the parrel itself is a fiddly process. The two lines start with an eye seized in one end. Those two ends wrap around the yard and are seized together. The loose ends wrap through the 'valley' of the ribs around to the other side of the yard where one goes over and the other goes under. It then wraps back through the valley to repeat the process two more times before being seized together. This is a very confined space to accomplish all of this and took a fair amount of patience. As I hinted at above, there is some confusion regarding the rigging of the topmast tyes for the fore and main topsail yards. A well documented error in the Fully Framed Model has a 14" single block is listed in the text of section 19.15 regarding the fittings on the yard. However, when referring to the actual rigging in section 19.25 it lists a double block. The use of the latter is confirmed in Lees' Masting and Rigging of English Ships as well as David Steele's description. Steele and Lees describe the tyes as originating as loops over the topmast head above the shroud wrappings then descending through the double block, back up to the single jeer tyes, then down to seize at a double block where the falls occur. Here's my problem - I simply don't have enough room to loop anything else over the topmast head without interfering with the double sheaves. Further - Steele actually refers to a single block instead of a double for the topmast yards on smaller vessels - specifically sixth rate ships with fewer than 20 guns. This was the perfect excuse for me to go with the single 14" block rigging. In this case, it means that the tyes themselves are rigged more similar to the lower yards. A 14" double block is spliced into each end of the tye. I start with one end of the 4.5" (.60mm) tye line secured onto the double block, the other end is fed up through the jeer tye, then down to the 14" single block in the middle of the yard, back up to the opposing block under the mast top, then down to the second double block - thus creating the same "M" as with the lower yards. The falls themselves are made of 2" (.25mm) line with the standing end secured to a single block with a long stropped hooked to an eyebolt in the channel just aft of the shrouds. The line then runs up through the outboard hole of the double block, down through the single, back up through the inboard hole of the double, then back down again to belay on the rail. Since I substitute my fore rail with a snazzy cable line, my fall will belay on a convenient timberhead. Here's a layout of the entire tyes and falls with some notes as it's difficult to see the fall of the line amidst all the other rigging. Note that when taught, the two double blocks at the ends of the tyes are located about the height of the masthead. It takes some care to adjust all the lines so that the two blocks are even with one another. Once again, the topsail yards are fitted in the lowered position when sails are not present. The main tyes, halliards and their falls are essentially a mirror of those of the fore mast with the exception of where they secure and belay. In case of the mains, the eyebolt is located in between the sets of stays at the swivel gun. One must pre-measure the falls to avoid any fouling, particularly with the swivel gun. The following pictures show the run of the line from the 14" block in the center of the yard, up through the jeer tye blocks, down through the tackle between the double and single blocks before they belay on the rail.


- 419 replies
-
- 12
-
-
-
- Victory Models
- Pegasus
- (and 2 more)
-
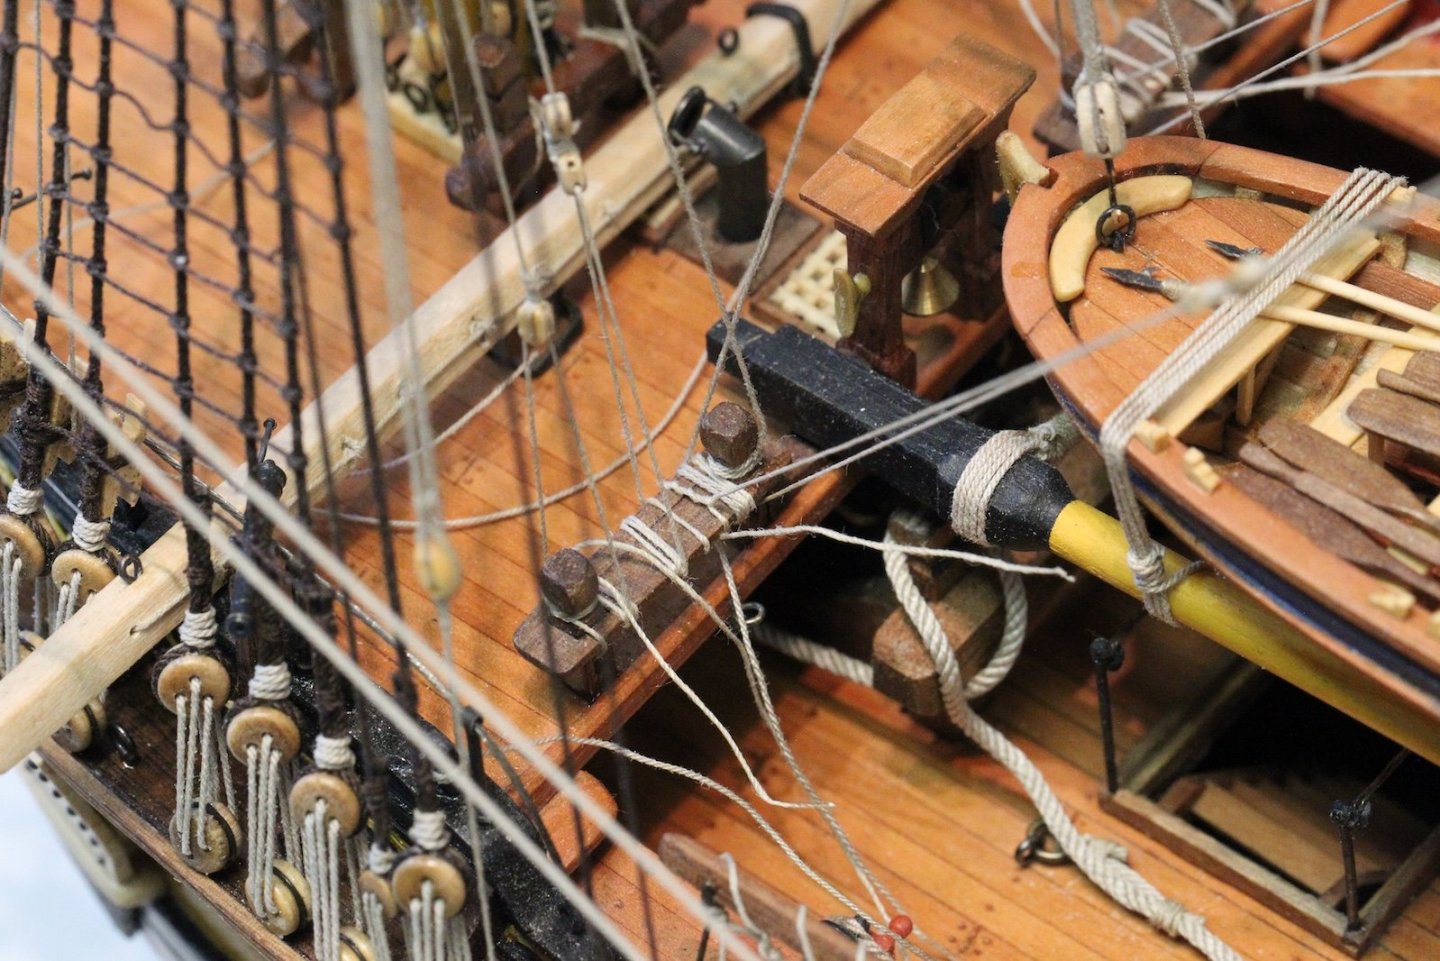
Thanks so much Bob, as always. The yard lifts of the mizzen are a simplified affair. Instead of lift blocks on the ends of the yard, the lifts (.25mm) are simply eye-spliced over the ends of the yard, then run up through the bottom of the sister blocks seized into the shrouds before falling to belay on one of the cleats at the base of the mizzen mast. The braces are relatively uncomplicated as well. While the FFM suggests each brace eye splices over the gaff, I chose to measure out the entire line for both port and starboard braces and used a clove hitch on the gaff. This gave me some extra flexibility when adjusting the tension of both sets of braces before belaying them. So, the standing end of the braces starts at the aforementioned clove hitch, runs up through the brace blocks on the ends of the pendants, back down through the pair of brace blocks on the end of the gaff, then down toward the deck. The FFM shows the braces heading down to run through a lead block seized to an eyebolt on the quarter piece before running through the fixed sheave on the rail. Once again, I don't have that sheave back there, so I made another adjustment. My lead block is seized to an eyebolt at the aft of the deck before belaying on one of the timberheads. This has the added benefit of separating the braces from the vangs a little bit as well, creating an overall cleaner look.


- 419 replies
-
- 5
-
-
-
- Victory Models
- Pegasus
- (and 2 more)
-
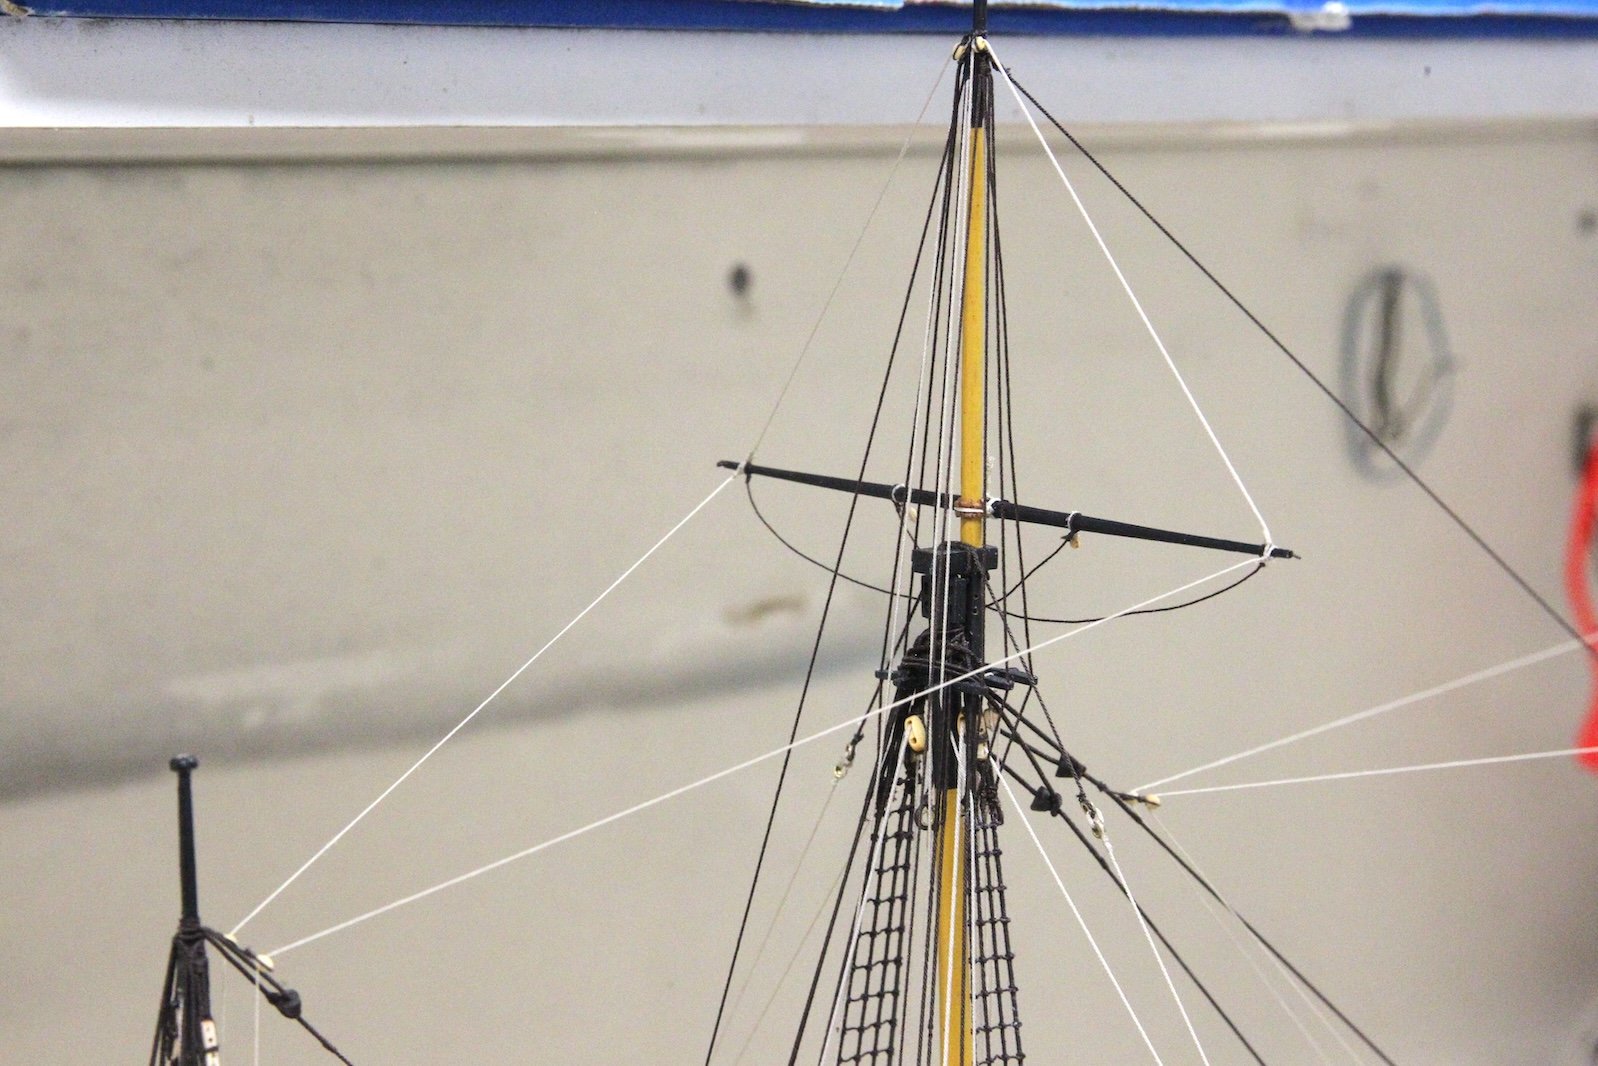
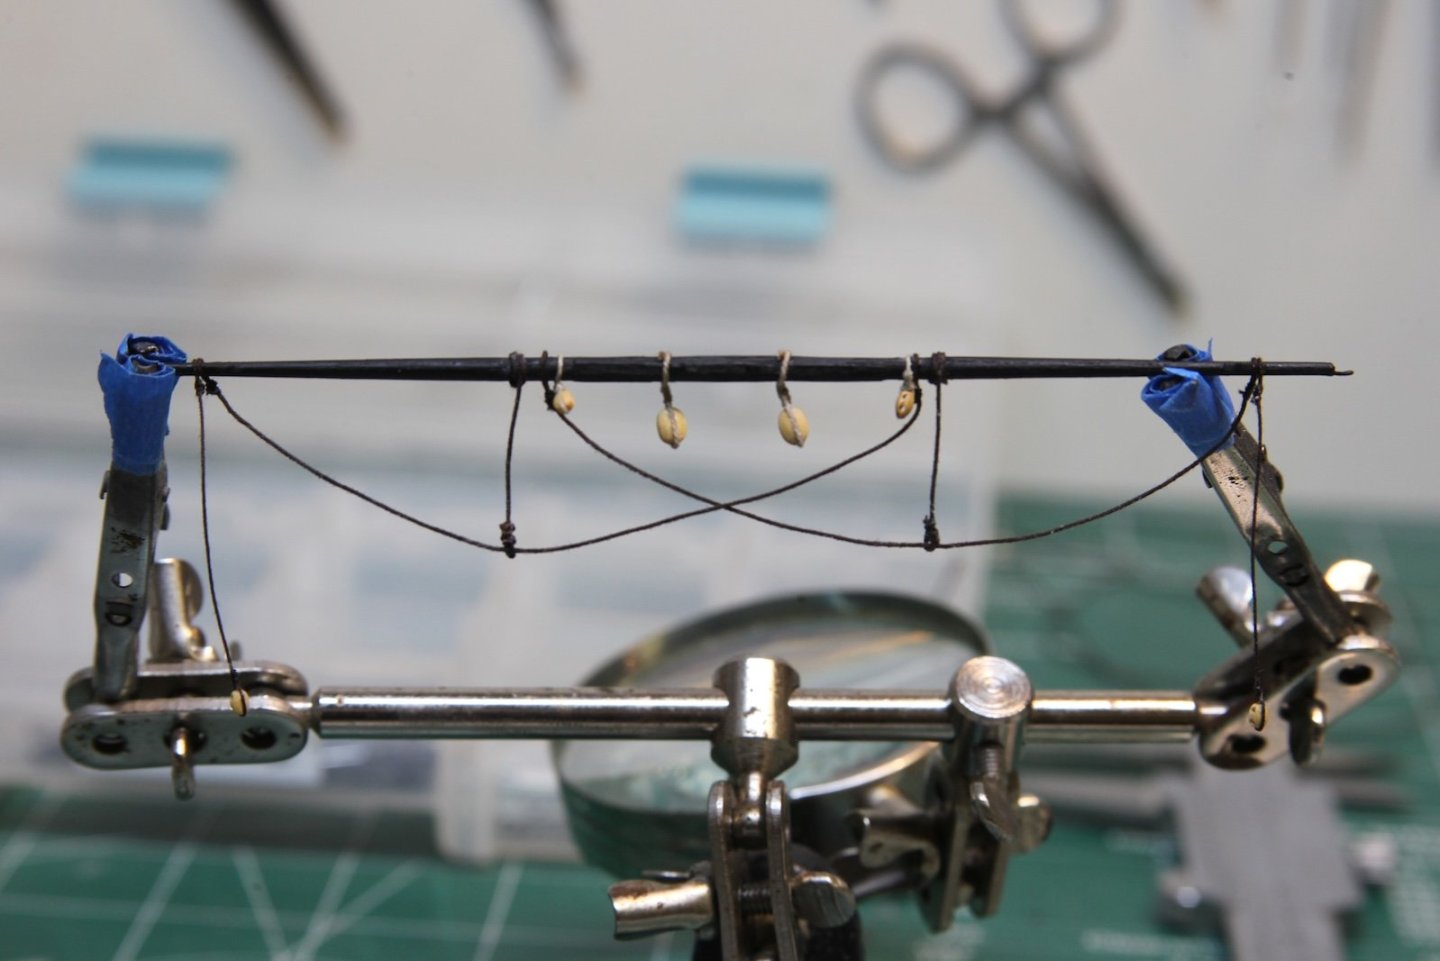
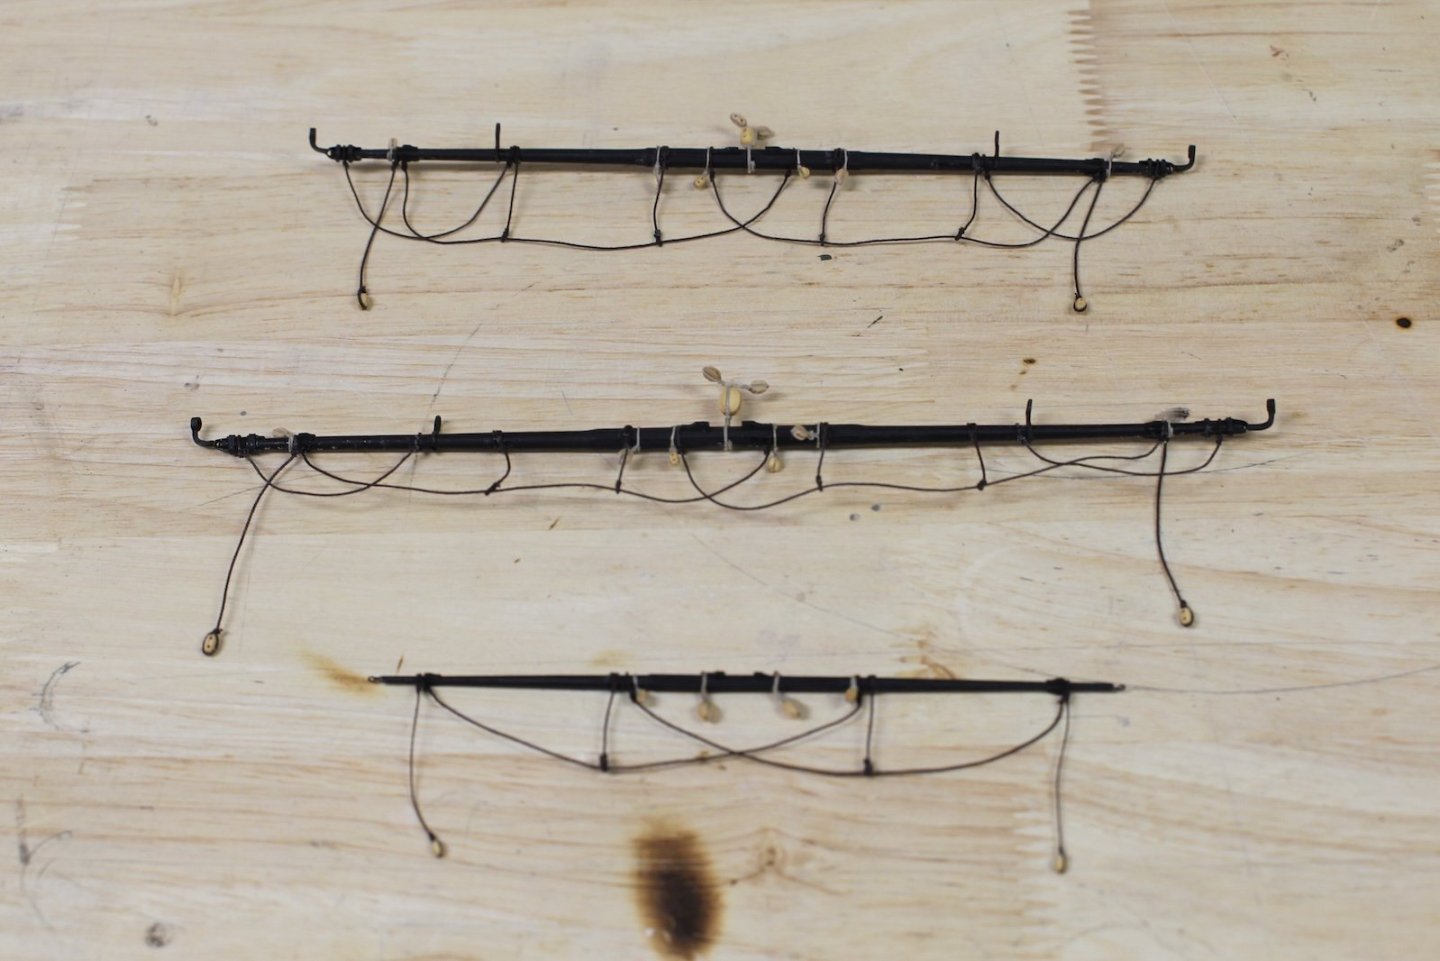
Starting on the topsail yards with a little different approach that the lower yards. Instead of doing one at a time - I went ahead and attached all the necessary accouterments to the three topsail yards before rigging them. My process this time was to start with the stirrups and horses on each so I could stiffen them with diluted PVA before moving on to blocks. For the mizzen, the stirrups and horses are 2" (.25mm). Sheet blocks are 10" (4mm), clueline and brace blocks are 5" (2.5mm is the smallest block I use). Brace pendants are 1.5" (.20mm). One more quick note here - While the kit shows an additional t'gallant yard on the mizzen, most other sources show that a ship this size would not have that additional level of mast or yard (I mentioned this when stepping the upper masts). As with the lower yards, the main and fore topmast yards have the same blocks as follows: 14" (5.5mm) Tye Block with two 7" (3mm) buntline blocks attached, two 6" (2.5mm) sheet blocks, and the pairs of clueline, lift, and brace blocks are all 8" - which is a bit of an in-between size, so I'm using 3.5mm blocks simply because I have more of them. Note: There is some controversy here on whether the 14" Tye block is single or double and a well documented error in the Fully Framed Model) - but I will cover that later when I address rigging the fore and main topsail yards. For now, just know that I used a single block and will explain why then. One to rigging the mizzen. Based on the FFM as well as Lees, I'm using a truss parrel instead of trucks and ribs based on the smaller size of both the yard and the ship itself. The truss parrel is a 2.5" (.30mm) set of two lines (one short and one longer) that end in a seized eye. Each wraps around the yard and seizes to itself before both eyes are seized together. The yard tie and halliards originate in the middle of the yard with an eye seized and the line wrapped around the center of the yard and up through the eye. From there the line runs up through the sheave in the top of the yard and down to a set of blocks, the bottom of which seizes to an eye bolt on the tressletree inside the top rail. Even though every source calls for this location of the eye bolt, this immediately created an immediate issue with the lines fouling against the mast cap. So I relocated the eyebolt to the mast cap itself which solved the issue. As with all the topsail yards, the mizzen is mounted in it's lowered position, which is proper without sails. This means the upper block on the aft of the mast has to be high enough to allow for the run of the yard when it's raised. The fall of the line belays to one of the cleats at the base of the mizzen mast (not shown).


- 419 replies
-
- 2
-
-
- Victory Models
- Pegasus
- (and 2 more)
-
Great work, and as always - very well thought through before and during.
- 332 replies
-
- 2
-
-
-
- Harpy
- Vanguard Models
- (and 1 more)