HOLIDAY DONATION DRIVE - SUPPORT MSW - DO YOUR PART TO KEEP THIS GREAT FORUM GOING! (Only 20 donations so far - C'mon guys!)
×


_SalD_
-
Posts
828 -
Joined
-
Last visited
Content Type
Profiles
Forums
Gallery
Events
Everything posted by _SalD_
-
 Nice job Robert. I like the idea of the template. I hear you about fingers in front of the lens, I end up deleting half my pictures because of that.
 -
George, Augie, Thomas and wq3296 thanks for looking in and the kind words. Augie thanks for checking on the rudder material from Jim. wq3296 thanks for the info. I believe the ship builders knew of the adverse reaction between iron and copper in salt water. I would think that if they did use iron fittings on the coppered hull they would probably need to provide some sort of separation between the fitting and copper. I'm not sure about bronze in a salt solution need to do a little more reading.
- 659 replies
-
- 2
-

-
- syren
- model shipways
- (and 1 more)
-
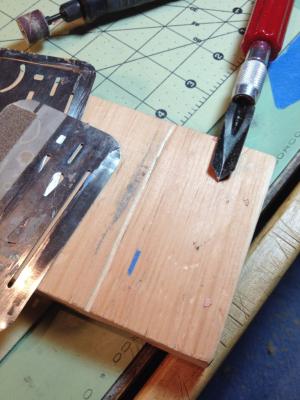
Not a big update today. I installed the rudder pretty much as outlined in the instructions. I did add some simulated nails which were sewing pins with very fine shafts cut to length. Next time I think I won't use so many. And in case you’re wondering why the nail heads are dark and not copper in color it’s because this shipyard used bronze nails instead of copper. The bronze being a little stronger than the copper brings me to a question. Would the actual pintles and gudgeons really be made from copper or would they have used bronze? Copper just seems to soft a material to use for parts that would take such a pounding from the constant movement of the ship.

- 659 replies
-
- 11
-
-
- syren
- model shipways
- (and 1 more)
-
Timbers, lots of great planning. Good idea for drilling the mast holes ahead of time. And for someone who has never craved before your figures are excellent. I was wondering what kind of tools do you use for craving?
-
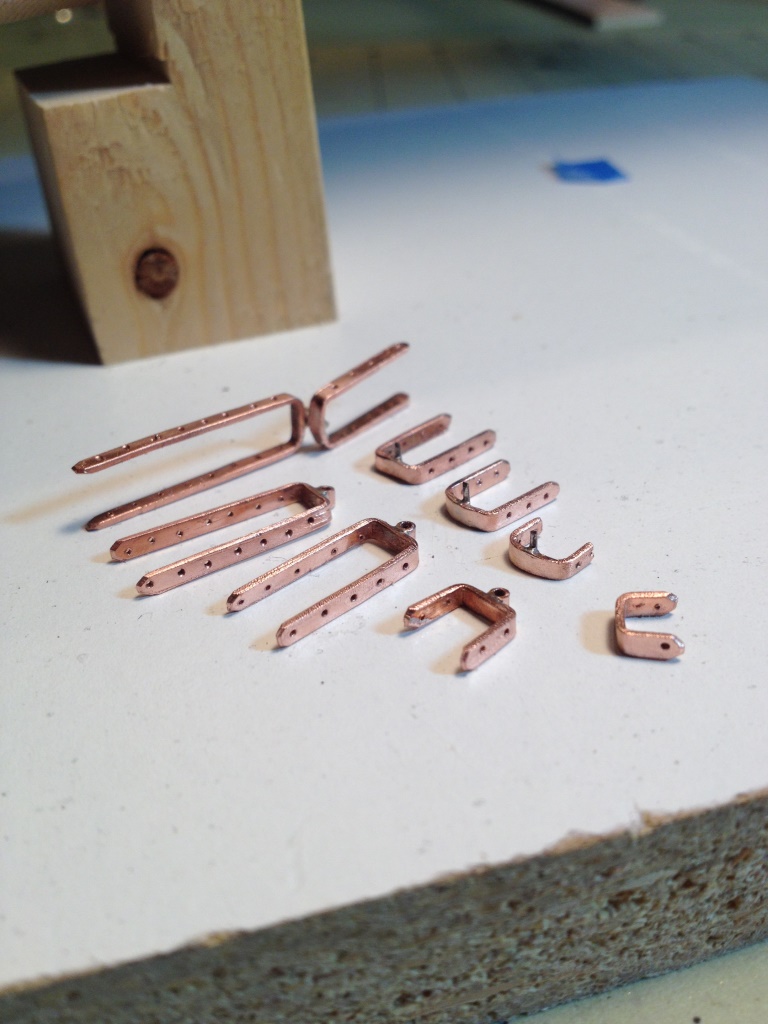
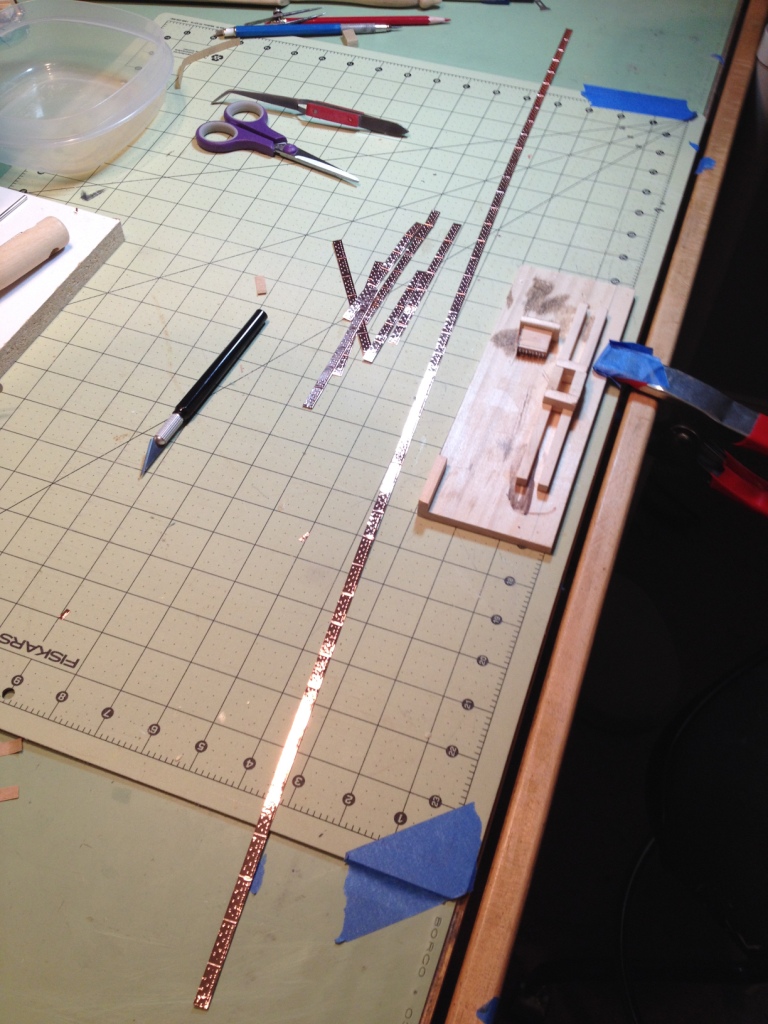
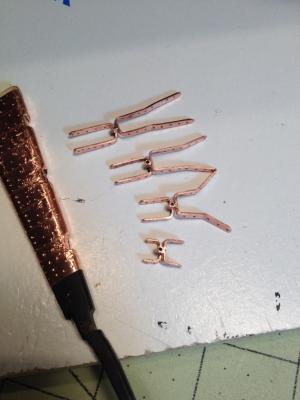
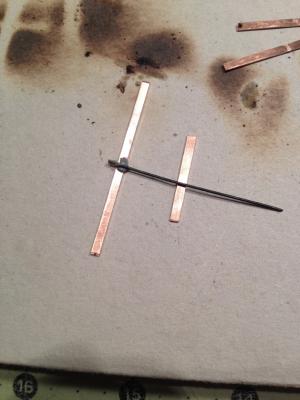
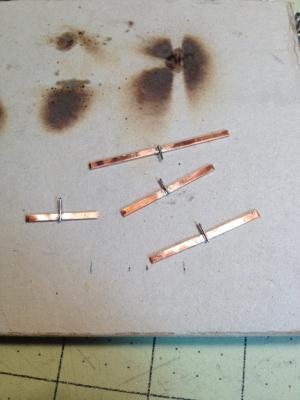
Richard thanks for the advice, you saved me from breaking some drill bits. I did break one because I guess I wasn't going slow enough, though I thought I was. What I finally did was when lowering the drill bit I would barely touch the surface with the bit until it bit into the copper then very slowly advanced the bit. I found also that even though I scribed a mark at each hole location the bit would still wander somewhat. I used plenty of 3 in 1 oil too. Now I just need to find some tiny nails. Drilled and all cleaned up Pre-bent the gudgeons to fit the hull. I would like the thank everyone for all the 'likes' also.
- 659 replies
-
- 17
-
-
- syren
- model shipways
- (and 1 more)
-
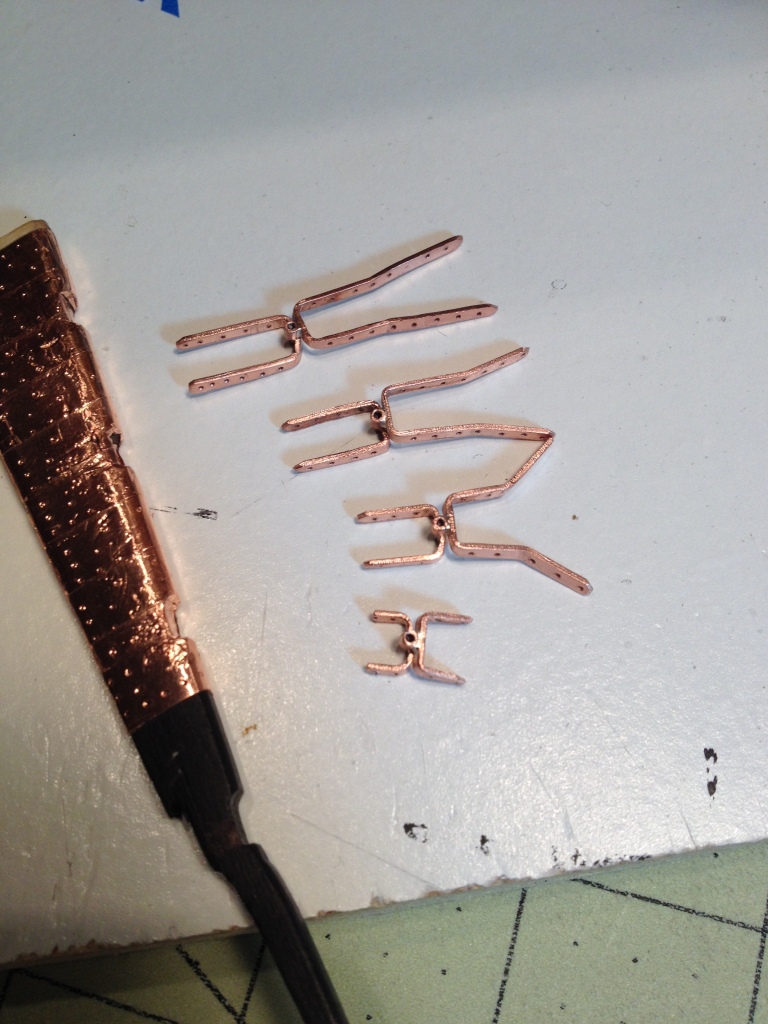
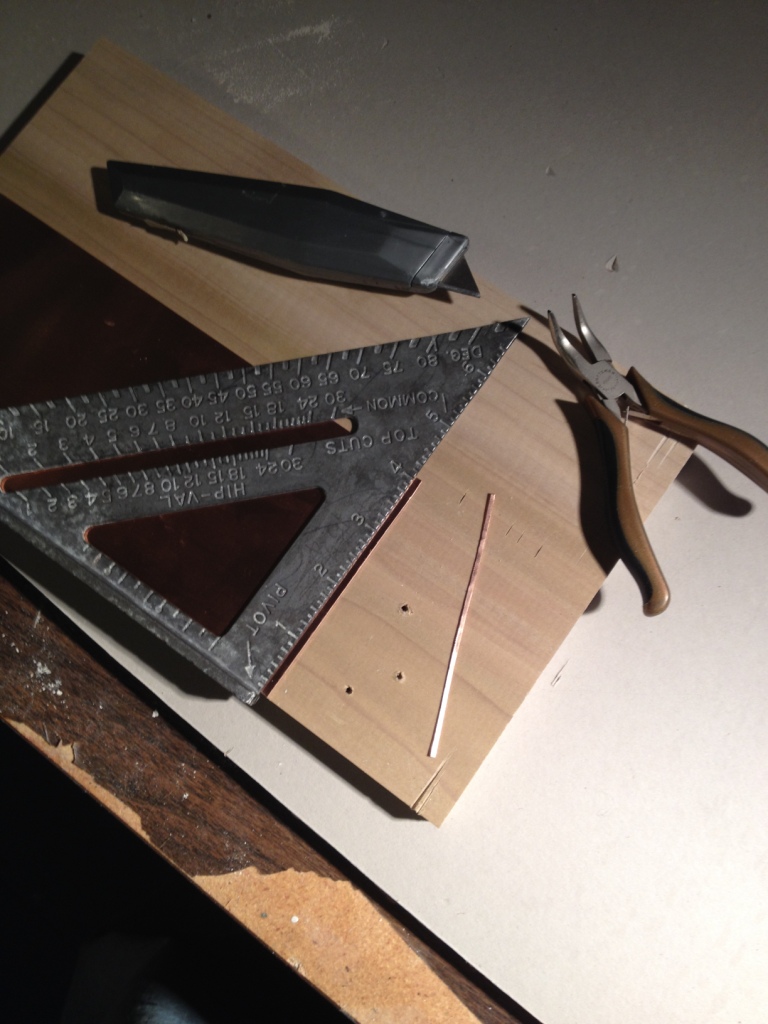
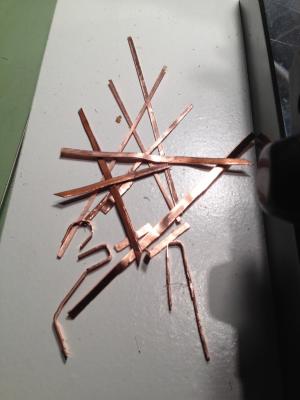
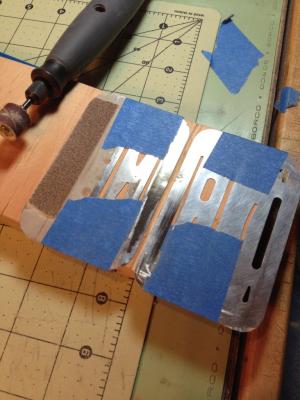
Thanks Thomas, I made quite a pile of scrap trying different methods of cutting the copper before I tried scoring it. I tried tin snips, jewelers saw, hacksaw, dremel cutting blade. This method gave me the cleanest cut and smoothest edge. I also finally found out what bent nose pliers are for. I've had one for years and never knew what it was for.
- 659 replies
-
- 5
-
-
- syren
- model shipways
- (and 1 more)
-
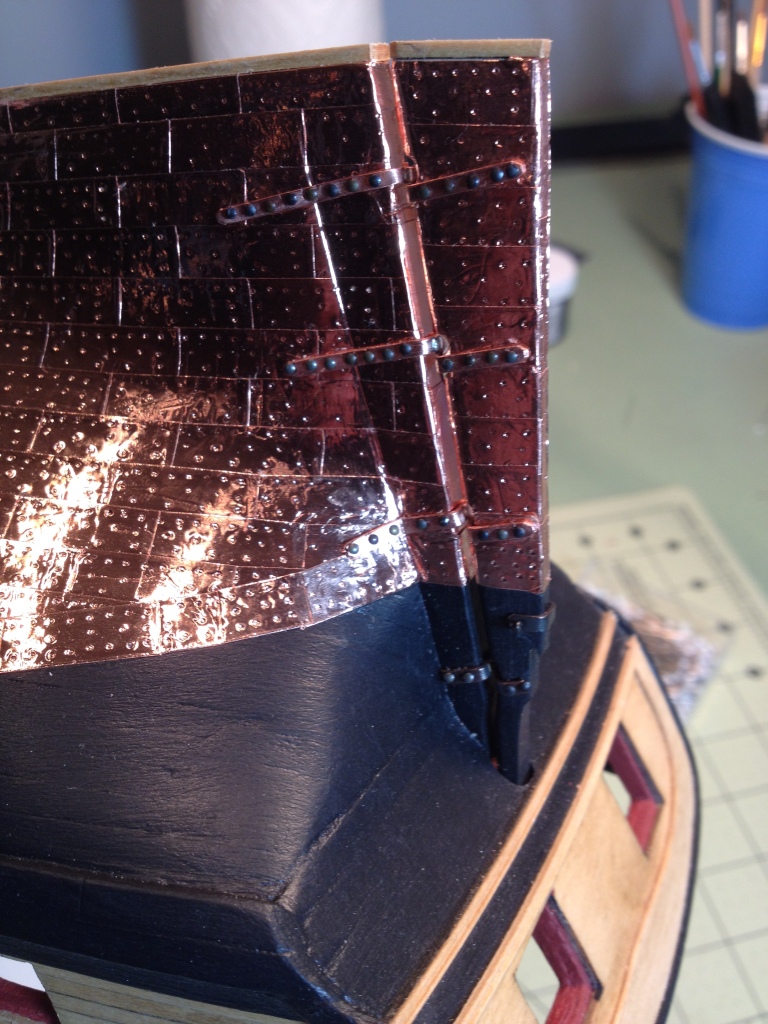
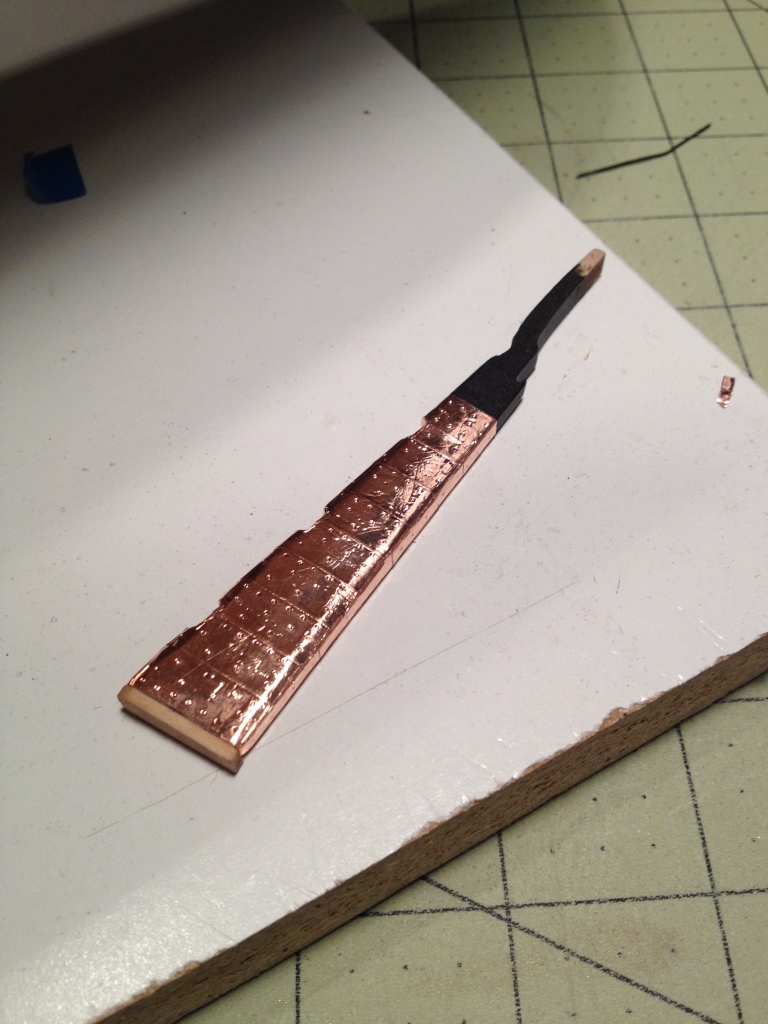
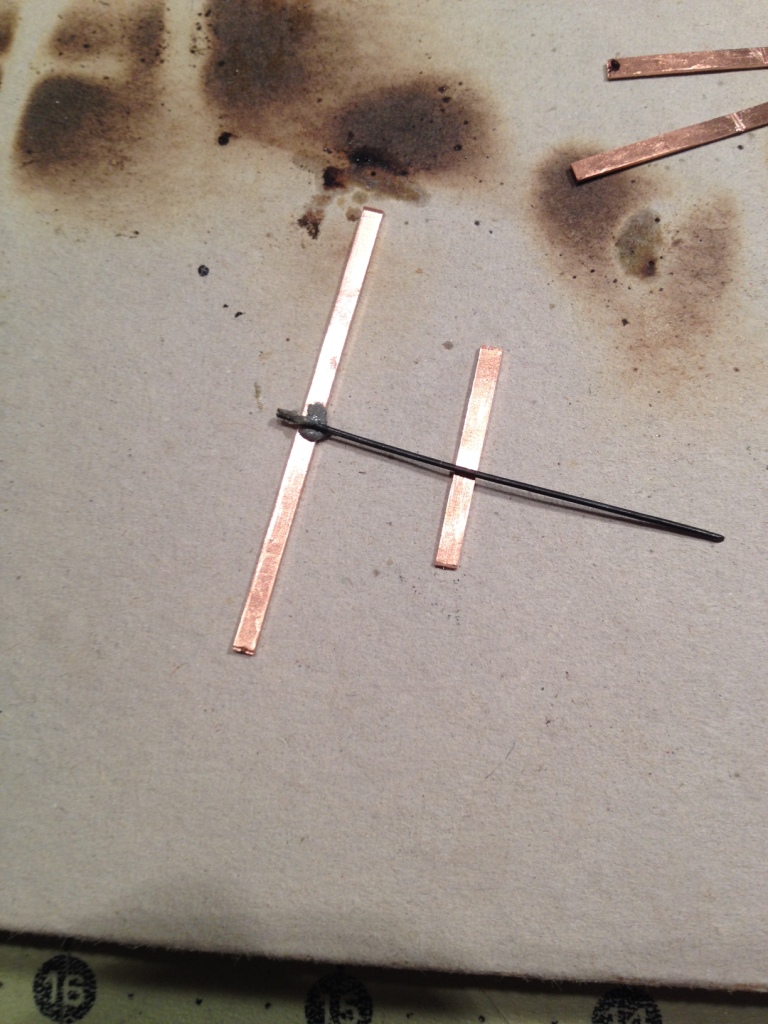
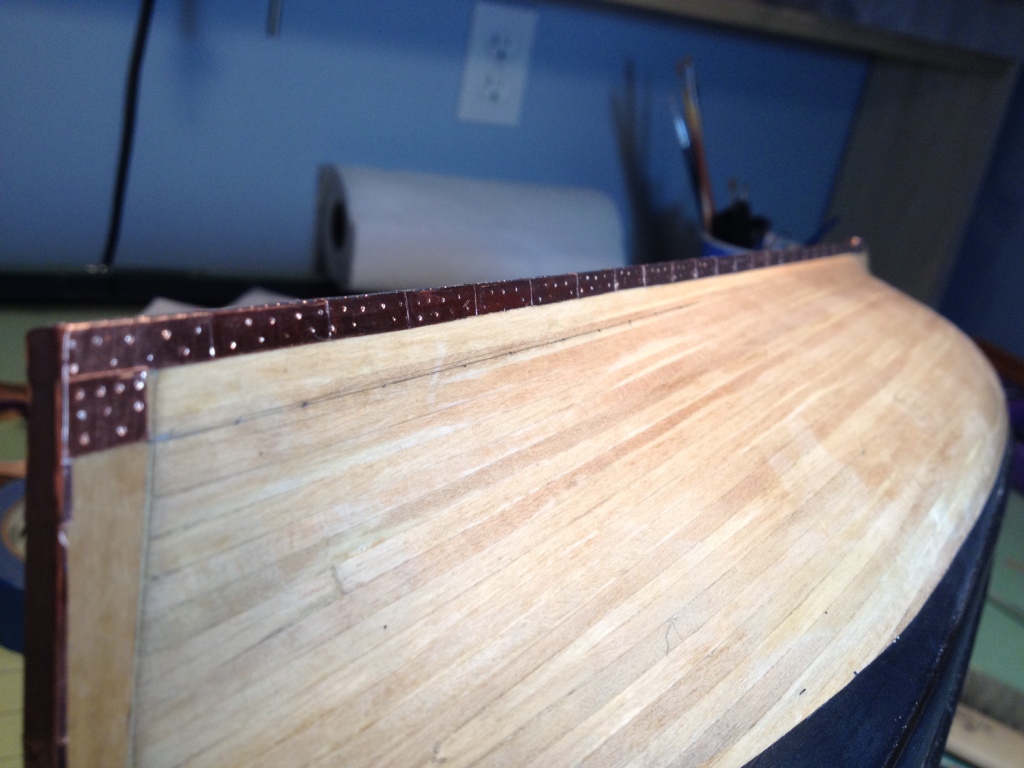
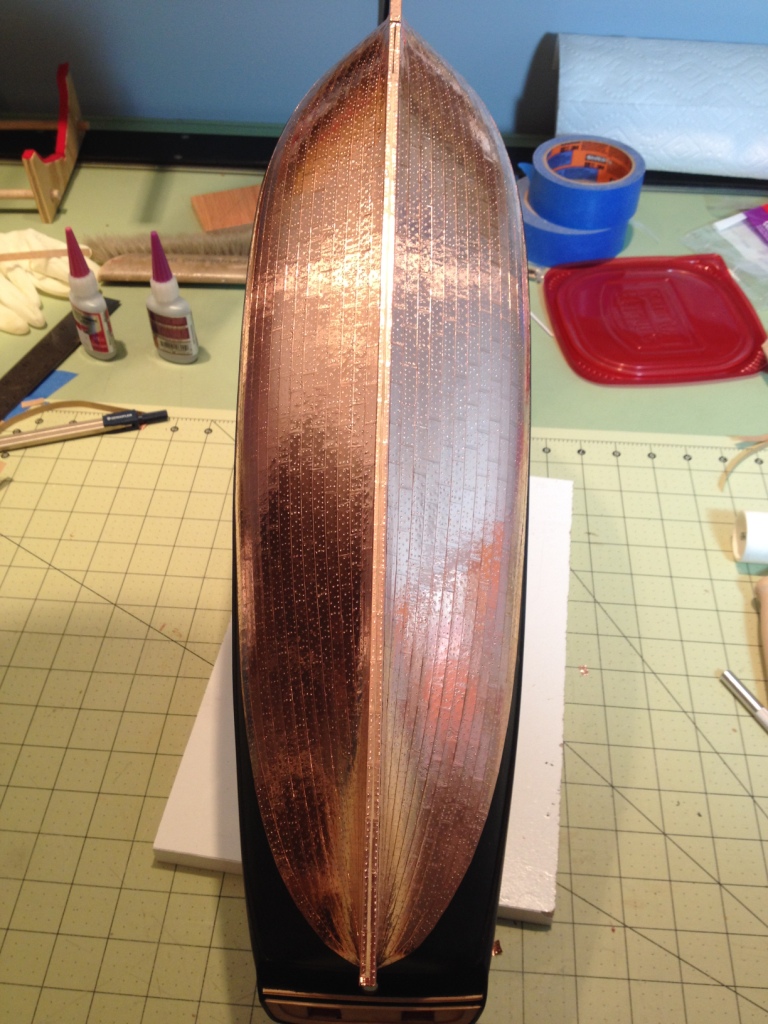
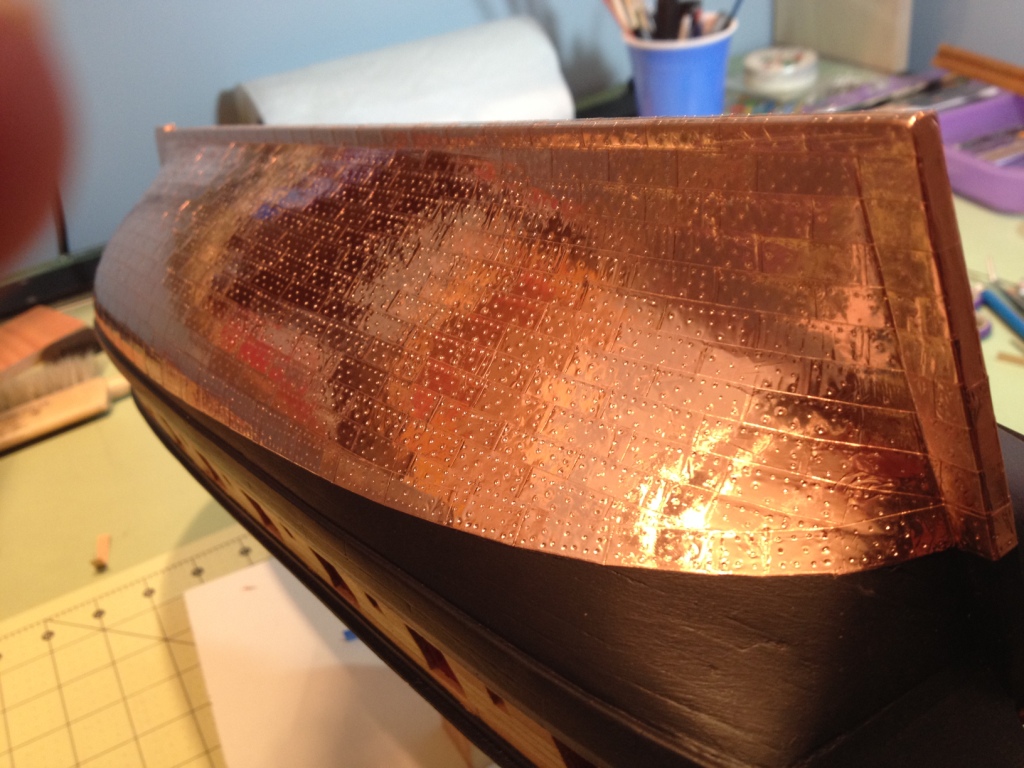
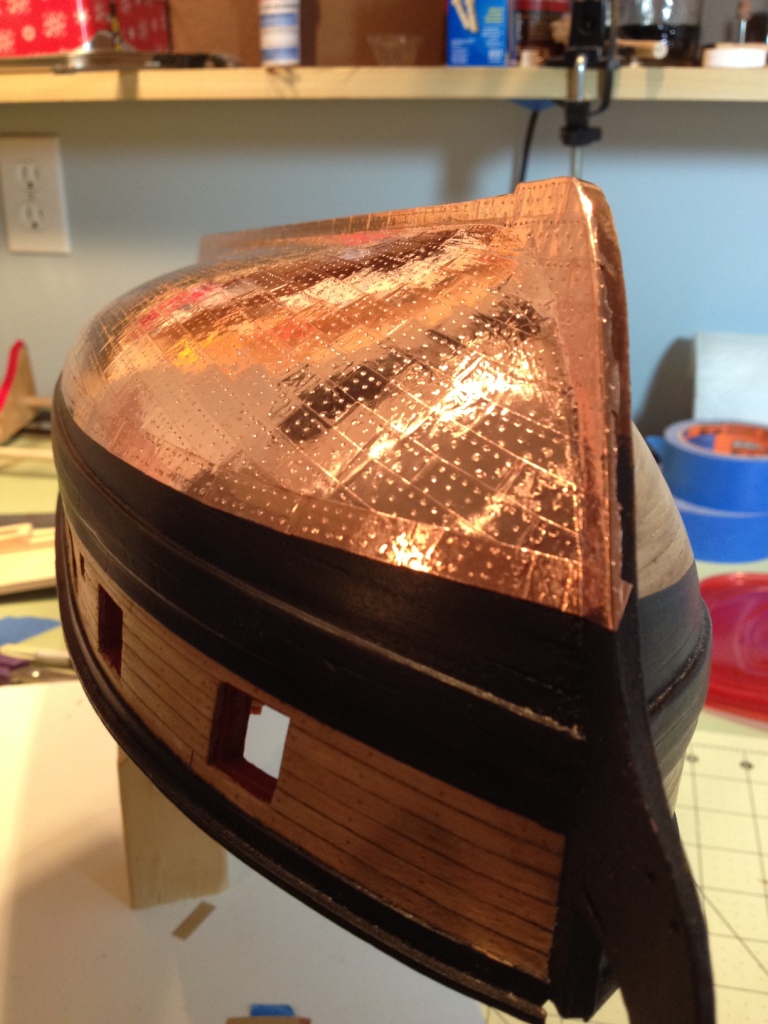
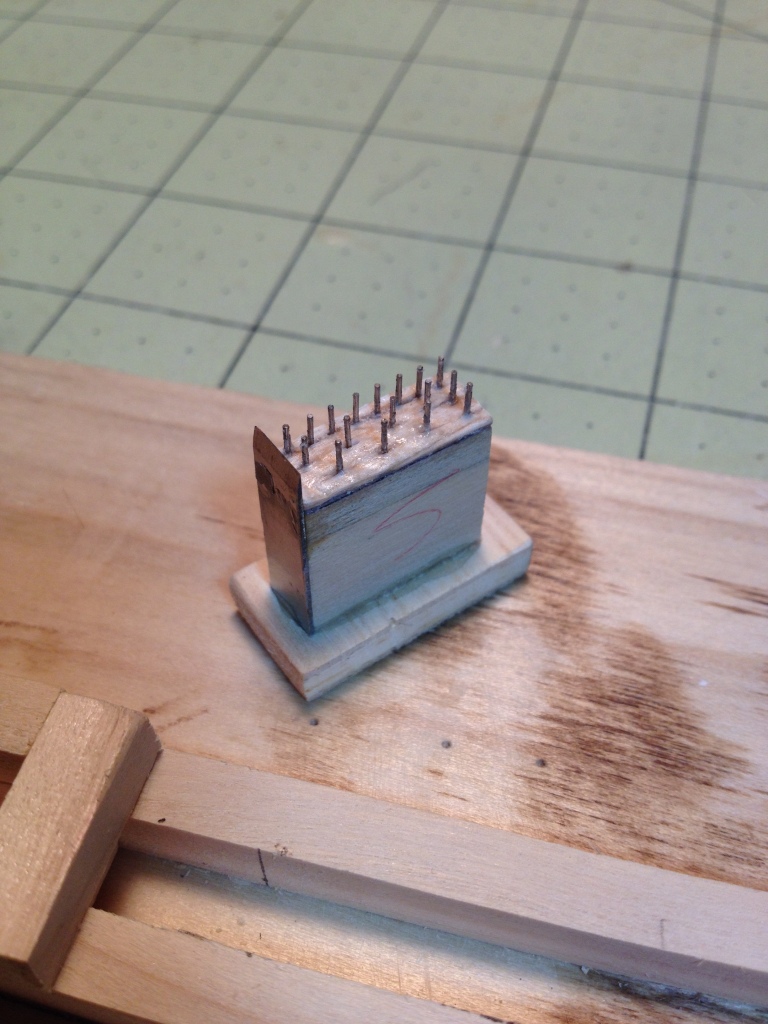
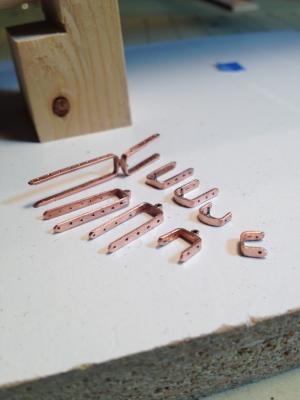
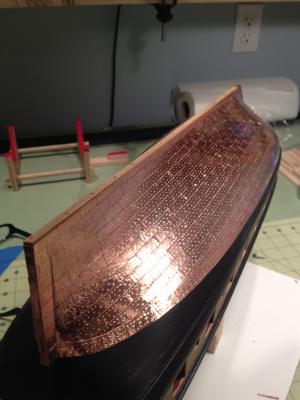
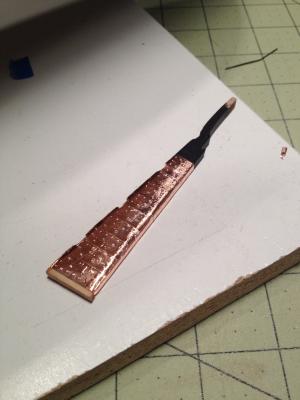
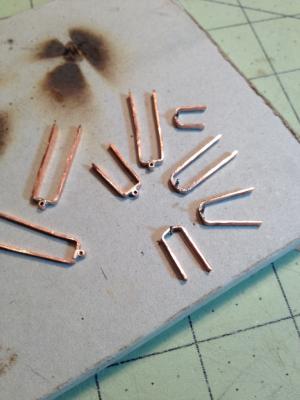
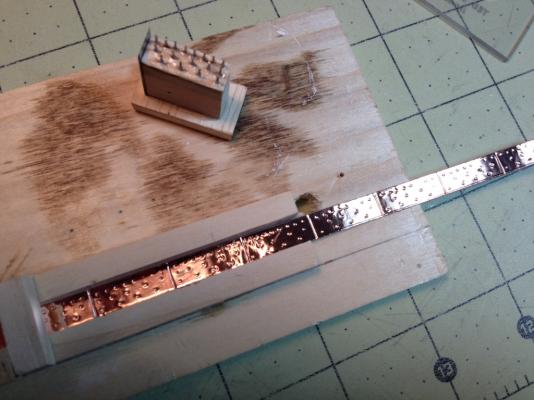
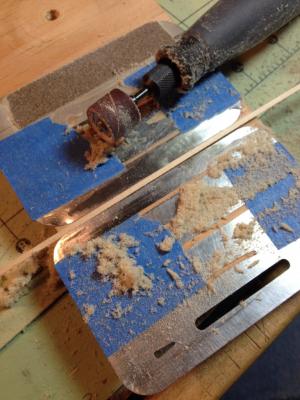
I sanded the rudder to the tapered shape called for in the instructions and then applied the copper plates. The top was painted black prior to placing the plates. The false keel was fastened to the keel and to the rudder. I used the brass nails that were included with the kit to secure the false keel in place, they’re a little oversized but not too many people are going to see them once the ship is finished and mounted. After reading Richard’s (rtropp) log trying to use the brass strip covered with the copper foil for the pintles and gudgeons I decided to forgo that headache and use copper strips. I discovered however, as Richard did, that it’s impossible to buy copper strips small enough to make them. After some internet searching I came up with a method for making my own strips. I purchased a copper sheet from Hobby Lobby and using a carpenter’s triangle (quick square) to hold the sheet in position I scored the sheet using a utility knife. After running the blade along the copper sheet 4 to 5 times I used a bent nose pliers to break off the strip by gently bending it back and forth along the score line. The strip needs a little sanding along its edges but you can make several strips rather quickly. For the gudgeons I soldered a 1/16” diameter copper tube to the strip. For the pintles I soldered a piece of 22 gauge wire to the strip. I still need to drill the holes, cut the straps to length and clean them up a bit but I’m waiting for my drill bits to arrive in the mail.

- 659 replies
-
- 15
-
-
- syren
- model shipways
- (and 1 more)
-
Augie, George, RR, Thomas, thanks for the kind words. I also find this task to be rewarding and relaxing especially when it turns out nice. For my Phantom I didn’t do anything special for the copper and it seems to be darkening nicely but I did get a lot of finger prints on it while completing the model. If I do leave it ‘au naturel’ my only concern is keeping my grubby fingers off it while finishing it. Augie it's a date 25 years from now I'll post a picture. And thanks to all for the likes.
- 659 replies
-
- 4
-
-
- syren
- model shipways
- (and 1 more)
-
Thanks Augie, funny you should ask about the finish. Reading through Chuck's old build log he had mentioned that he discovered (by accident) that using spf 50 sun tan lotion on the plates gave them a nice finish and did not show fingerprints. Well I PM him to make sure he would still recommend doing that and he replied that he would. I am going to make up some test strips to see how the lotion works and if I like it that's what I'll be doing.
- 659 replies
-
- 2
-
-
- syren
- model shipways
- (and 1 more)
-
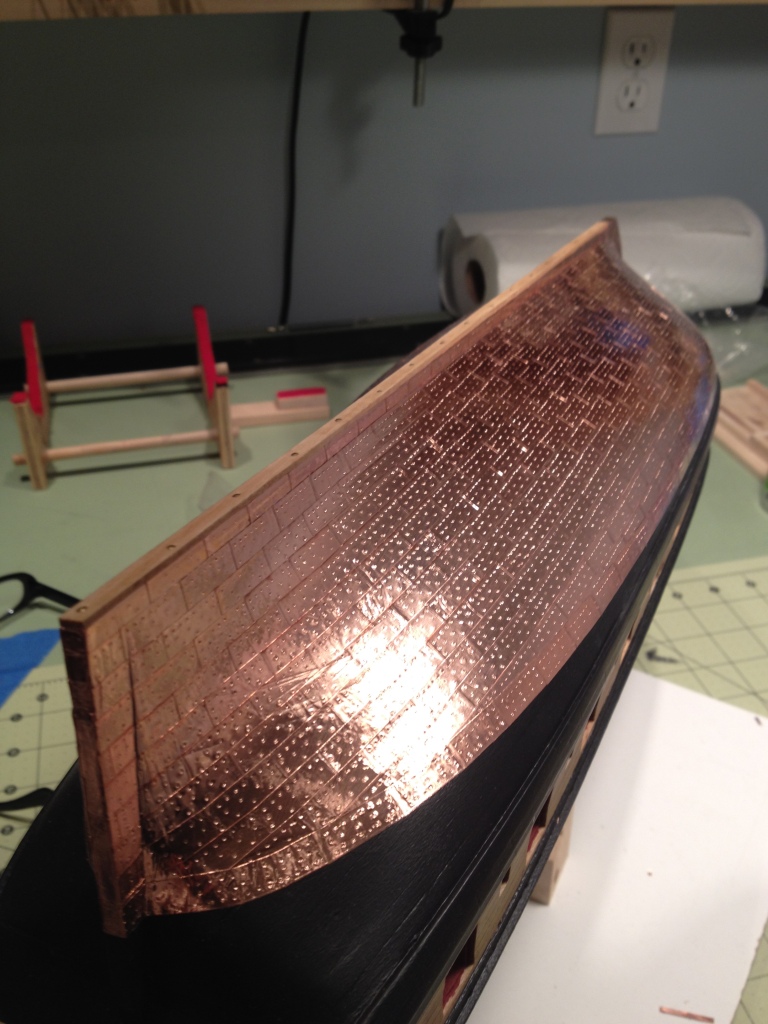
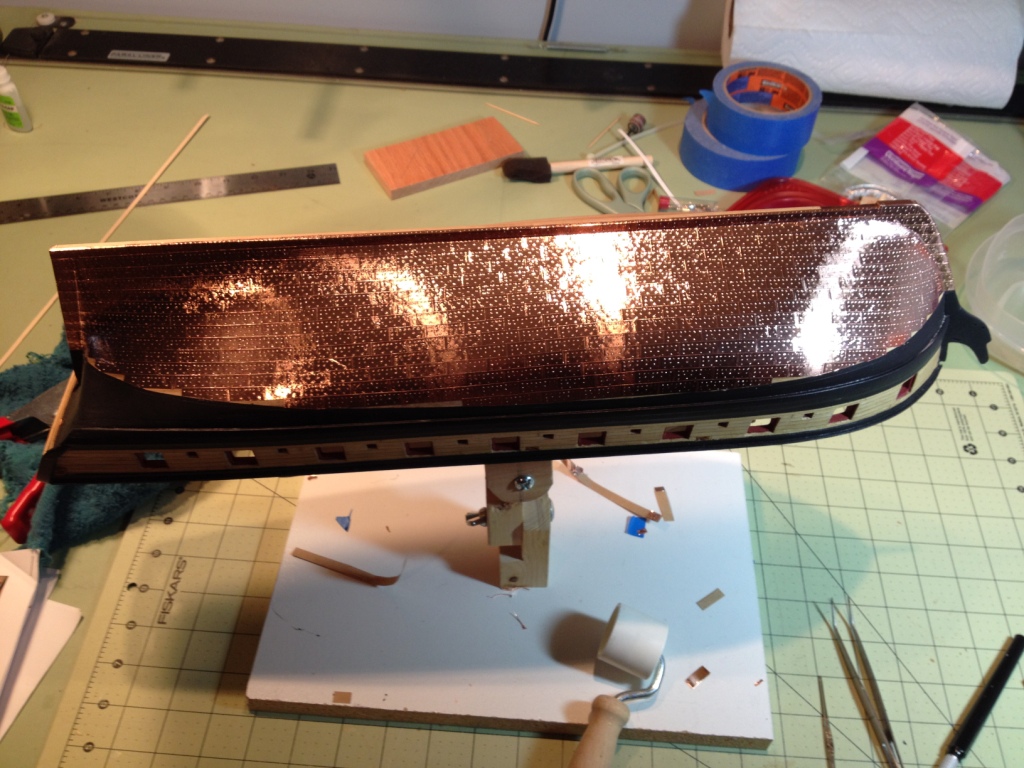
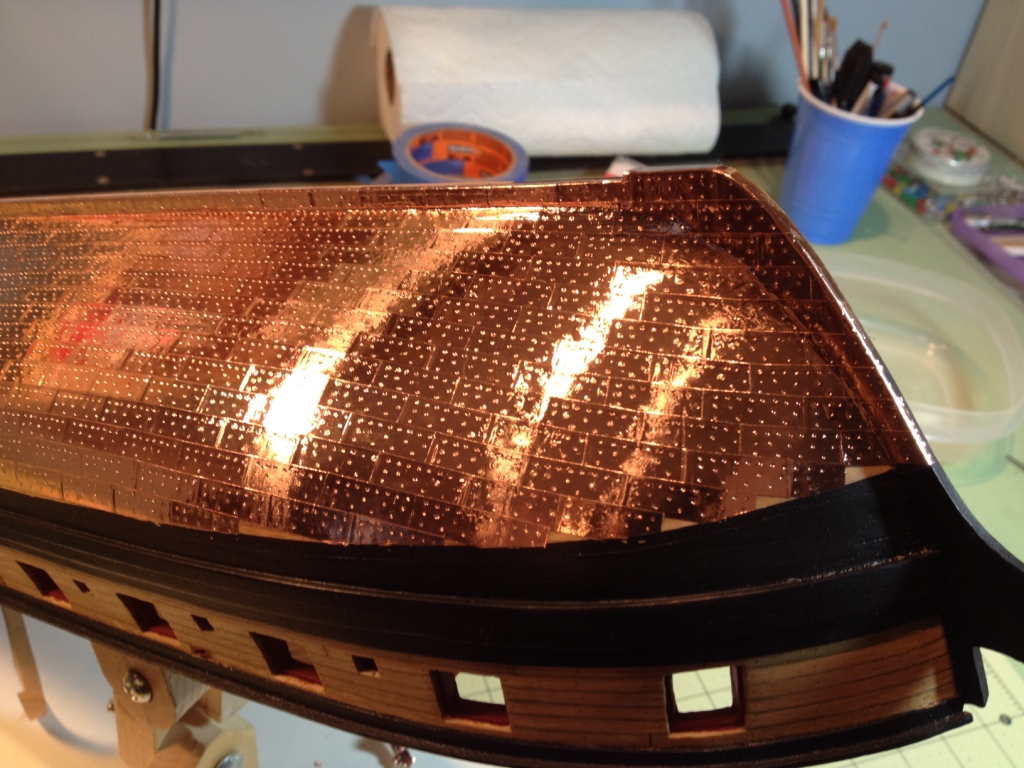
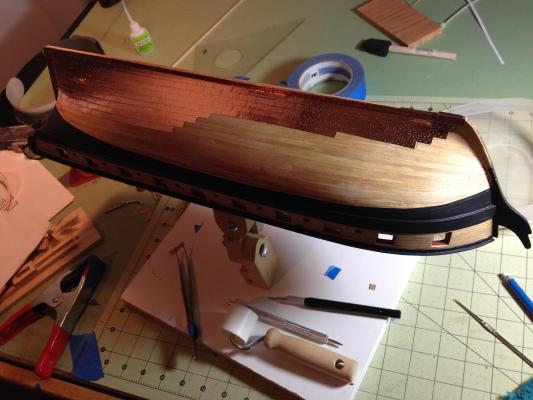
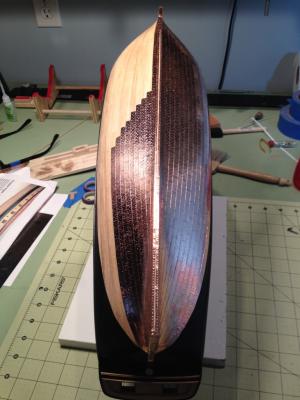
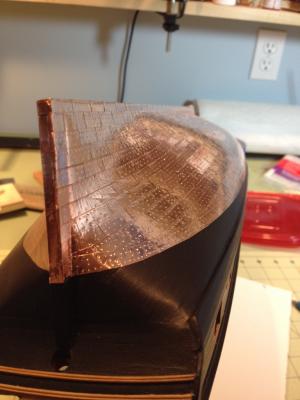
After a little procrastination I started plating the hull. For me, plating is a little like taking a bath when you’re a kid, you hate to get in but once you are you hate to get out. To start I cut 30” long strips of copper tape to put through the jig. I then cut that strip into smaller more manageable segments. I have to say that the chisel blade on the stamp worked out very well. Before I started the coppering I attached a temporary piece of wood to the deck so I could hold the ship in my keel vise. This made it much easier to work on the inverted hull. The screws holding the wood are positioned where the hatches will go and the deck will be repaired after the wood piece is removed. The actual plating went well with no major boo boos. In fact I found this ship to be easier than when I did the Phantom’s plates. Not as much cutting of the plates and the larger size plates are easier to handle. To keep finger prints off the copper I wore latex gloves and to fix the plates in place I went over them with a wallpaper seam roller. Please excuse the photos, it's hard taking good pictures of the plates Started with the keel Continuing on Finished the port side No dressing belt yet When I got to the dressing belts I thought to myself, self, the only real difference between the hull plates and the dressing belt are four additional holes along the top of the plate. So instead of making two new stamps for the dressing belt plates, even though I had all the material ready to make them, I just used a burnishing tool to place the four additional holes in the plates I already had. One thing I found that helped a lot with placing the dressing belt that I really didn't plan but worked out well was that when I painted the waterline I had taped off it's exact location. Afterwards I thought it would be a good idea if I painted a little below the waterline to give me some room for errors. What happened was I got a nice tape line marking the position of the waterline between the two applications of the black paint. Dressing belt Started the starboard side Finished the starboard Done, time to get out of the tub , on to the rudder


- 659 replies
-
- 17
-
-
- syren
- model shipways
- (and 1 more)
-
Thanks George, now I just have to make a bazillion plates.
- 659 replies
-
- 1
-
-
- syren
- model shipways
- (and 1 more)
-
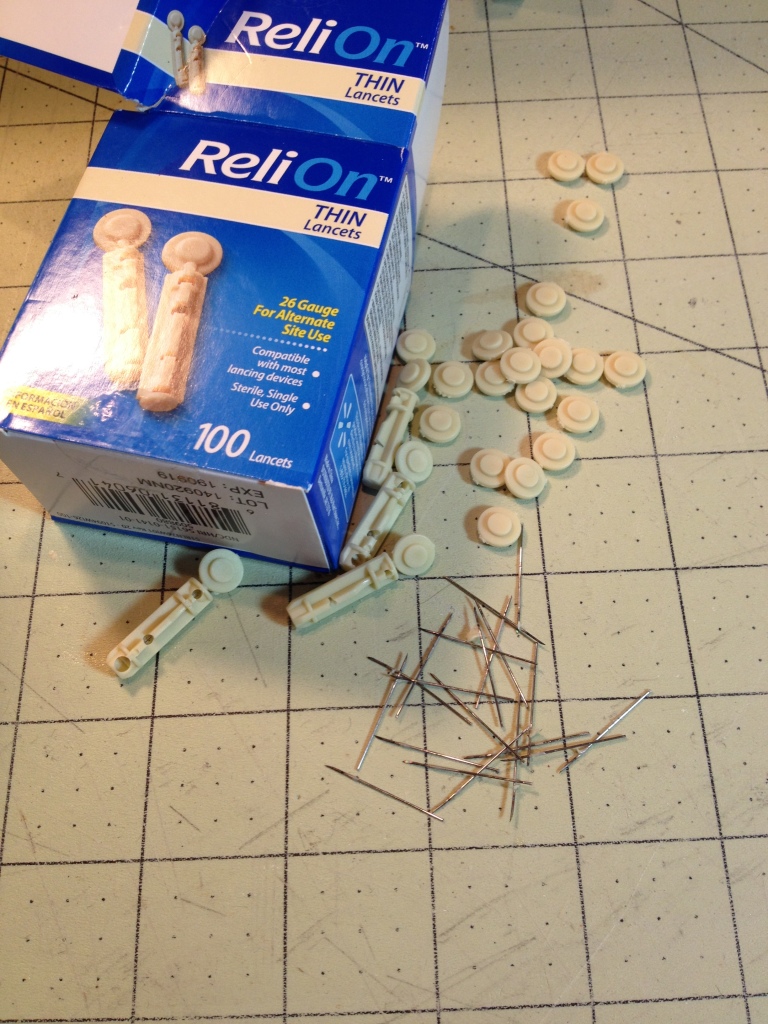
Chapter 8 – coppering the hull Prior to coppering the hull I need to make the stamps for the simulated nail heads in the copper plates. I will be using the nail pattern that Chuck shows in the instructions for the port and starboard plates and after studying Dirk’s (Dubz) build I will be making two additional stamps for the port and starboard dressing belts. The patterns were drawn to 3/16” scale using AutoCAD. For the pins I used 26 gauge Lancets, bought at Wal-Mart, as mentioned in Richard’s (rtropp) and Thomas’s (Gahm) builds. I went with the thicker 26 gauge lancets and not the 30 gauge as Thomas used because I wasn’t showing as many nails he did. Extracting the needle from the plastic holder proved to be a challenge and what I finally did was; using my propane torch I heated the metal tip thus softening the plastic around the needle so it could be pulled out easier. Disclaimer: If you use this technique please be aware that the plastic does burn so use caution and have a cup of water on hand to place the plastic holder in. I used some scrap poplar to make the stamp and cut it to the dimensions shown in the instructions. I glued the nail pattern on it as a guide and then I got to use the Christmas present from the Admiral (Proxxon drill press with compound table). After drilling all the holes I inserted the pins and glued them in. Prior to inserting them I did cut about a ¼” off the needles (sharp end) so they wouldn’t stick out so much. One modification I made to the stamp was to attach an X-Acto chisel blade to one end of the stamp at the same height as the pins. I believe it’s a #17 blade and it fit the ¼” wide stamp perfectly. I attached the blade to mark the copper where I would need to make the cut for the individual plates, I found however that by applying just the right amount of force the blade will cut the copper but not the paper backing. I also made the opening in the jig a 1/16” larger to account for the blade thickness.


- 659 replies
-
- 13
-
-
- syren
- model shipways
- (and 1 more)
-
Ken, The wales look much better and it's important to get those correct since all the rest of the planking is dependent on those two. Good idea to use the basswood for the wales that will be covered.
-
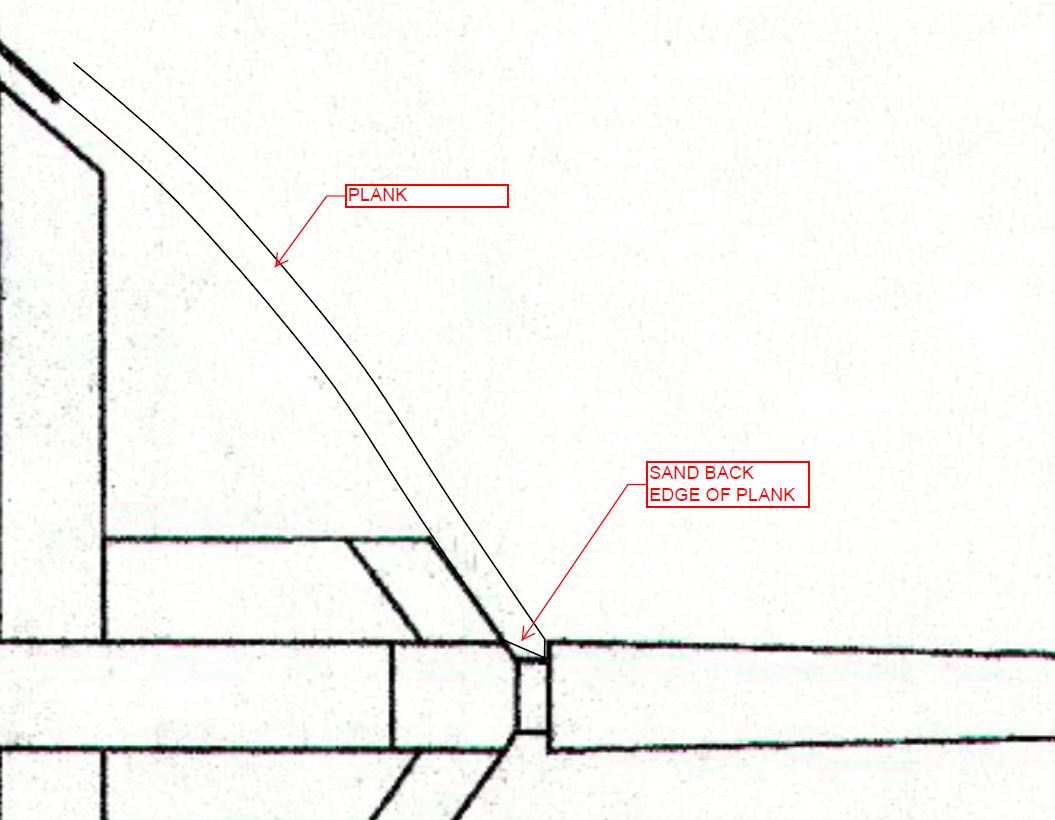
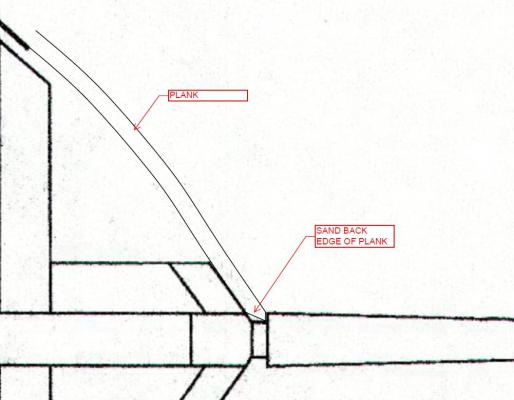
Ken, 1. did you use the temporary batten to mark the position of the first wale before gluing it to the hull? It will show you if you need to make any adjustments from the prescribed marks on the bulkheads. 2. for the bow end of the plank I chamfered the back edge a little to make it fit better into the rabbet. see sketch below. Also, maybe it's just my old eyes but, it appears from the pictures that the plank above the first wale is the same width, it should be smaller (1/8" wide).
-
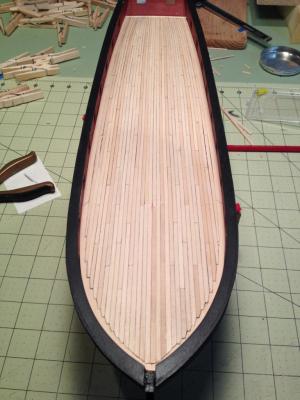
Thomas, I used a 50 - 50 mixture of MinWax natural and golden oak. I didn't want the deck too dark.
- 659 replies
-
- 1
-
-
- syren
- model shipways
- (and 1 more)
-
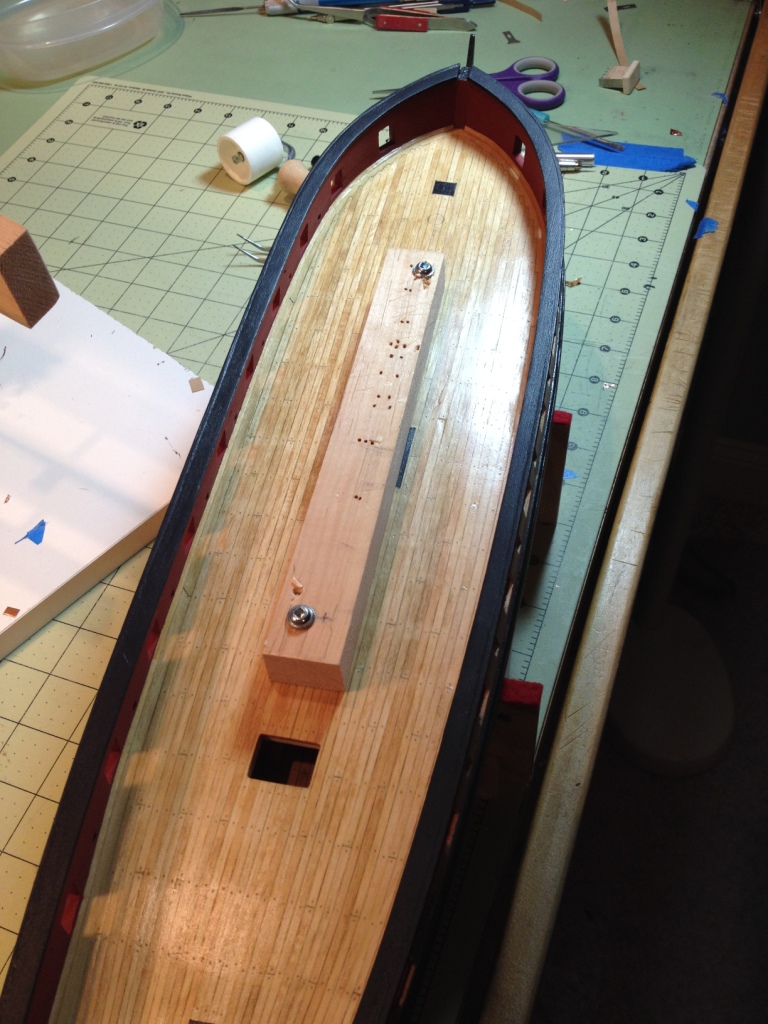
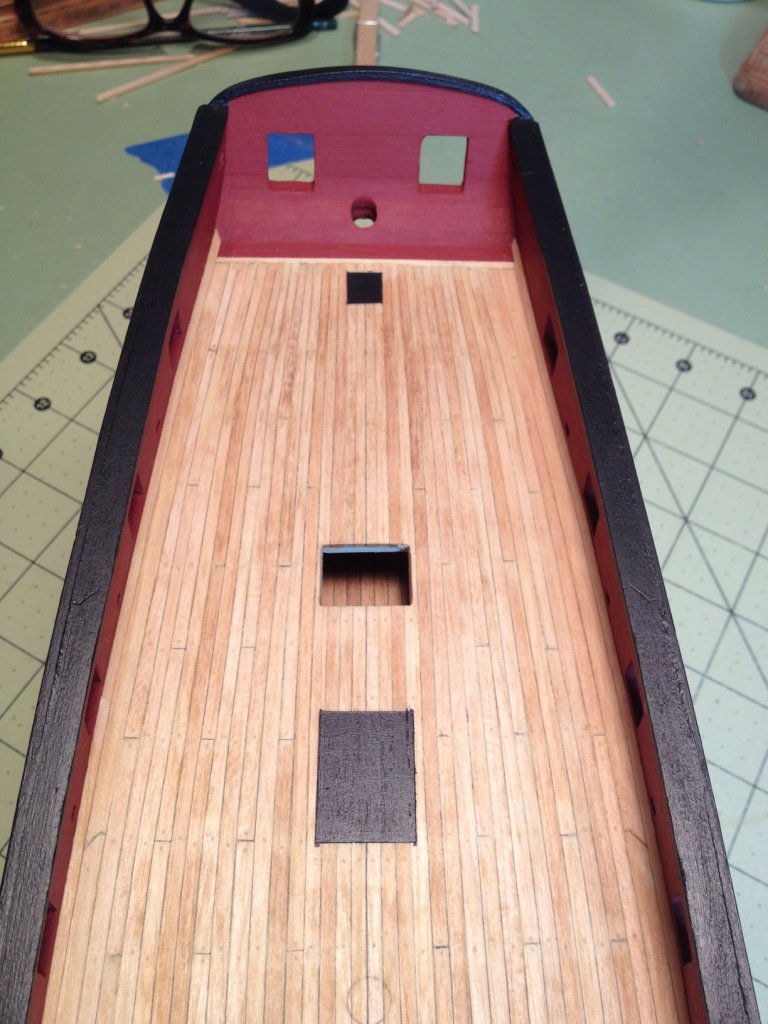
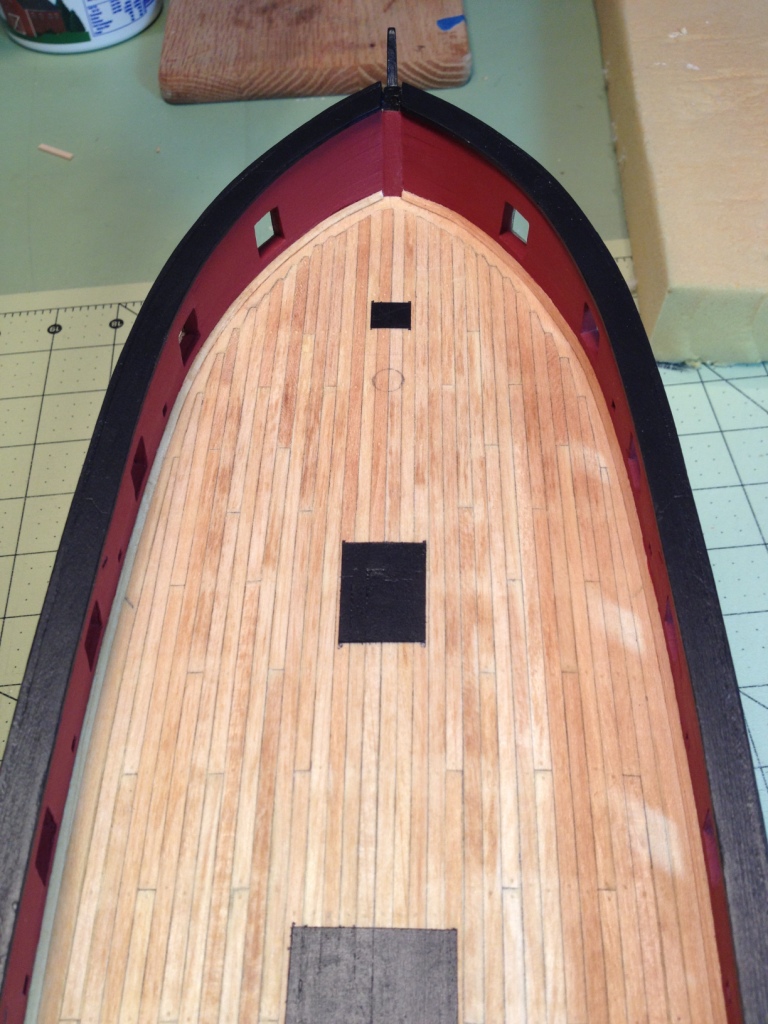
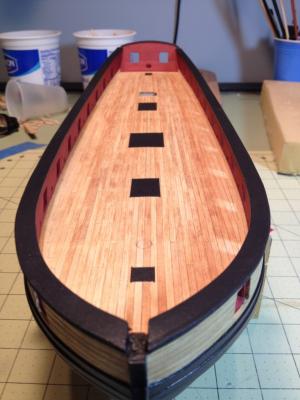
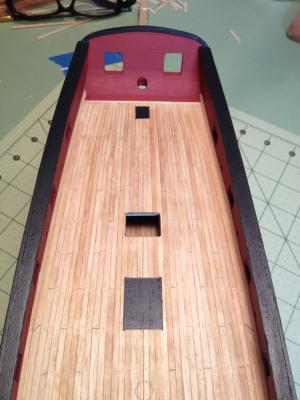
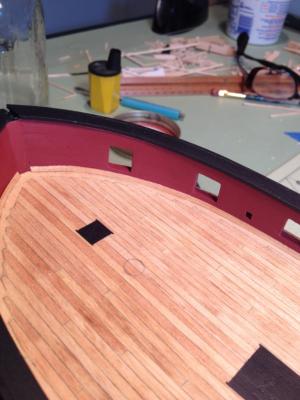
I was a little disappointed in the way I finished the deck and I learned what not to do next time. I drilled all the holes for the treenails prior to staining the deck which in hind sight I don’t think was a good idea. Prior to staining the deck I stained a test strip with holes in it similar to the deck and found that the stain was bleeding into the holes making a dark ring at each hole. To avoid this I filled all the holes with wood filler before staining. There was no bleeding into the holes but the stain was a little blotchy (yes Augie I tried pre-stain this time). I believe it was from not sanding the deck enough to remove all the wood filler that was on the surface. I was a little reluctant to sand too much in fear of sanding through the deck plank but again in hind sight there was plenty of material left to sand. For the treenails I decided to show only the treenails located along the deck beams where I had a butt joint and not at every beam between the bulkheads. I thought it would be too much, not to mention I didn’t want to drill all those holes. The only problem was that after I filled them with wood filler and stained the deck the treenails didn’t show up too well. I may redo them. For the waterway I tried a few different procedures to make the triangular chamfer strip from the 1/16” square stock. There is probably a real simple way of doing this but what I came up with was; first I cut a V-groove in a piece of scrap pine using a V gouge, making the depth of the groove slightly less than the finished shape of the waterway. Next I taped two erasing shields on either side of the groove to avoid sanding into the pine. The shields are 0.1 mm thick. Then I laid the wood strip in the groove and removed the top half using my dremel’s drum sanding attachment. What was left was a nice 1/16” X 1/16” chamfer strip.


- 659 replies
-
- 18
-
-
- syren
- model shipways
- (and 1 more)
-
Popeye, what can I say that the others haven't already, very impressive, the map is terrific. And I hope you don't mind but I find it very interesting to look around on your work top. I always find things that help me with my build, for instance the inverted clothes pin, who would have thought, I love it.
- 956 replies
-
- 3
-
-
- andrea gail
- trawler
- (and 1 more)
-
Not a problem Jim. I'll bring it with me on Saturday.
- 659 replies
-
- 1
-
-
- syren
- model shipways
- (and 1 more)
-
Thanks Patrick, the Admiral is always making me swab the decks gerty, thank you Jim, I'll see you on Saturday and I will bring the manual. Do you know you can download each chapter from the Model Expo website? They're located under the document tab on the Syren page. Thanks George and welcome aboard. There's always room for another cigar smoker. How about a scotch to go along with it?
- 659 replies
-
- 1
-
-
- syren
- model shipways
- (and 1 more)
-
Thanks Thomas, I like how the tapered aft planking came out. I'm glad I did it that way. Thanks Augie and ..."I just leave some DNA.", I'm not going to ask how. And thanks to everyone for all the 'likes'
- 659 replies
-
- 3
-
-
- syren
- model shipways
- (and 1 more)
-
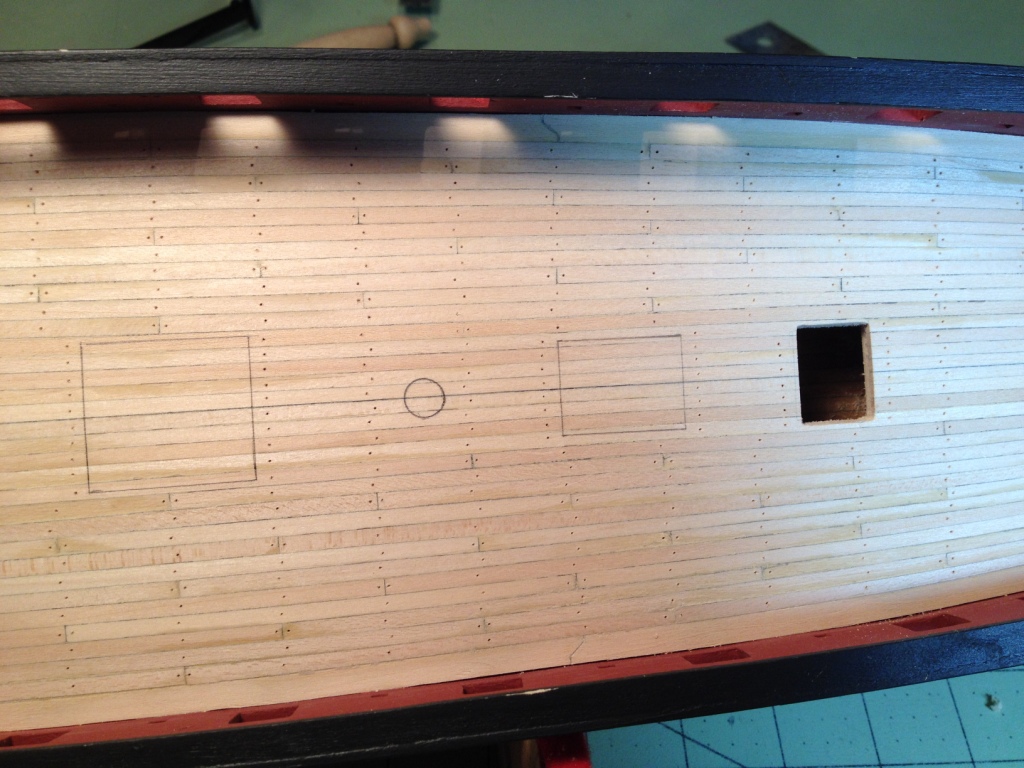
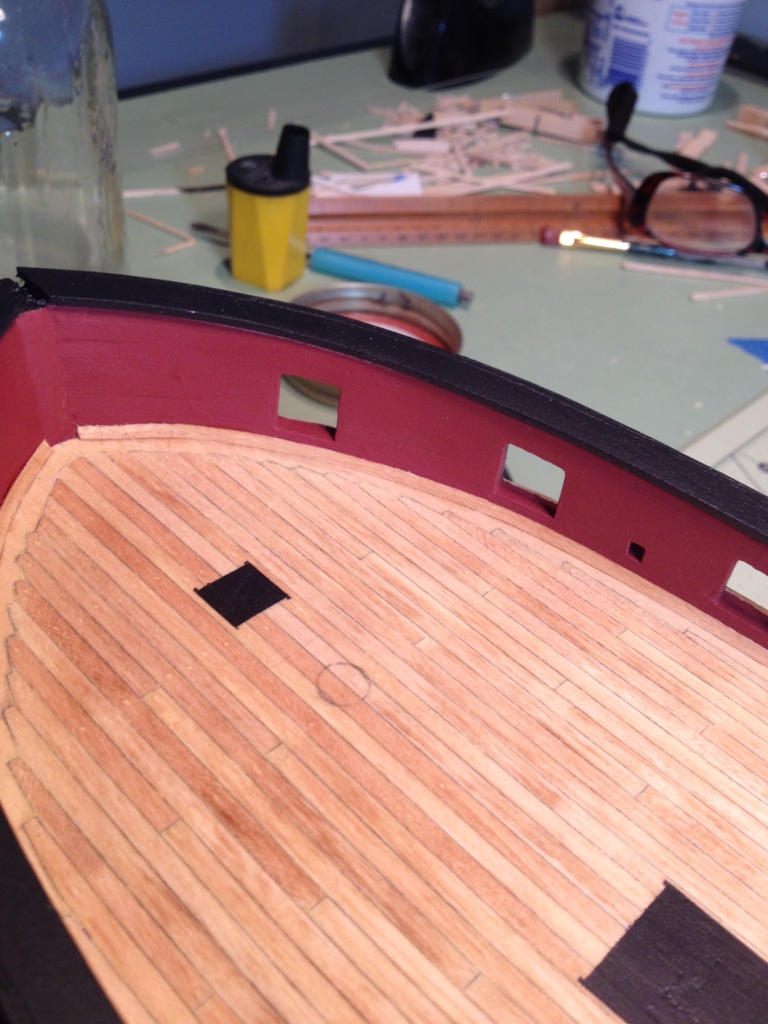
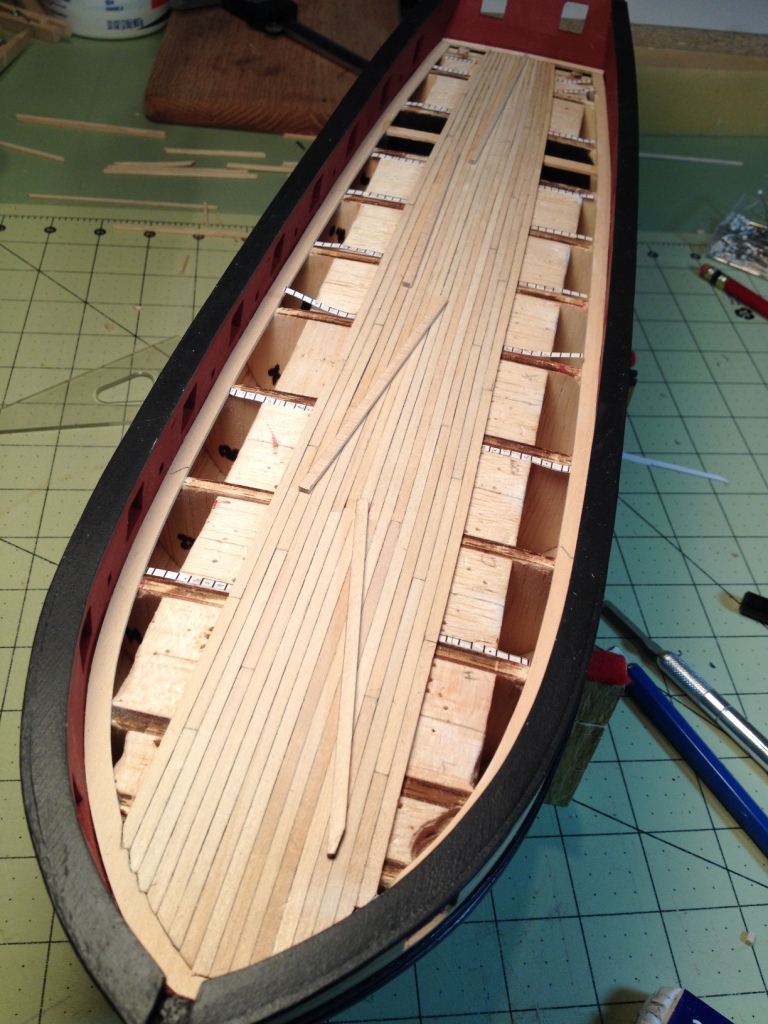
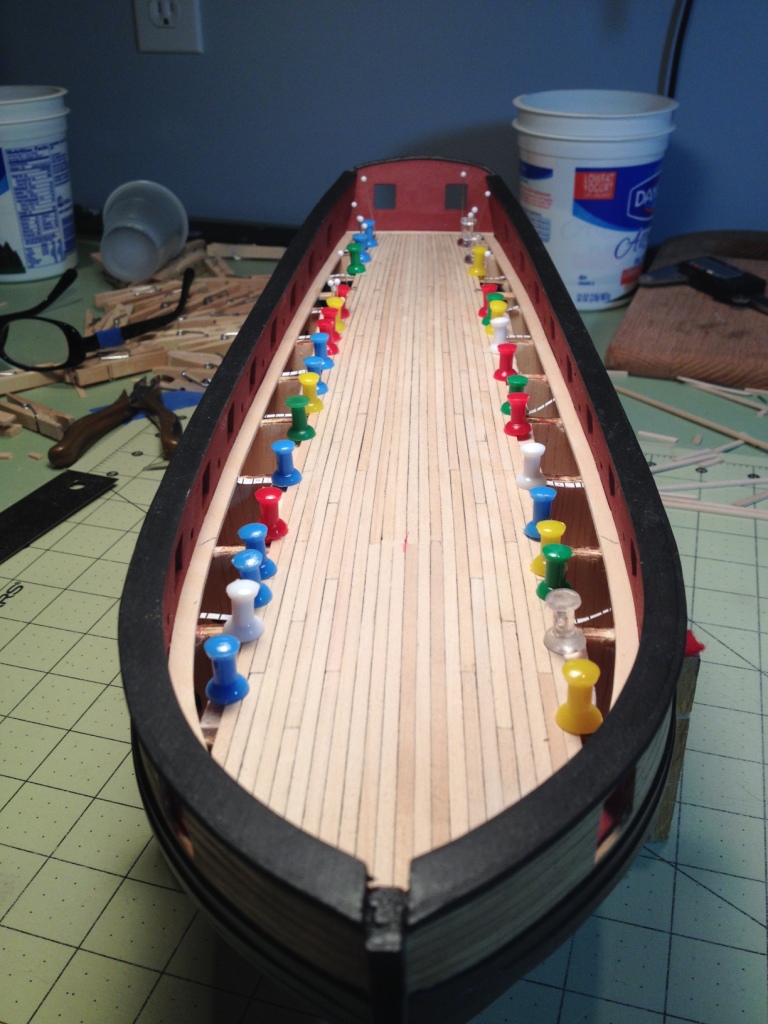
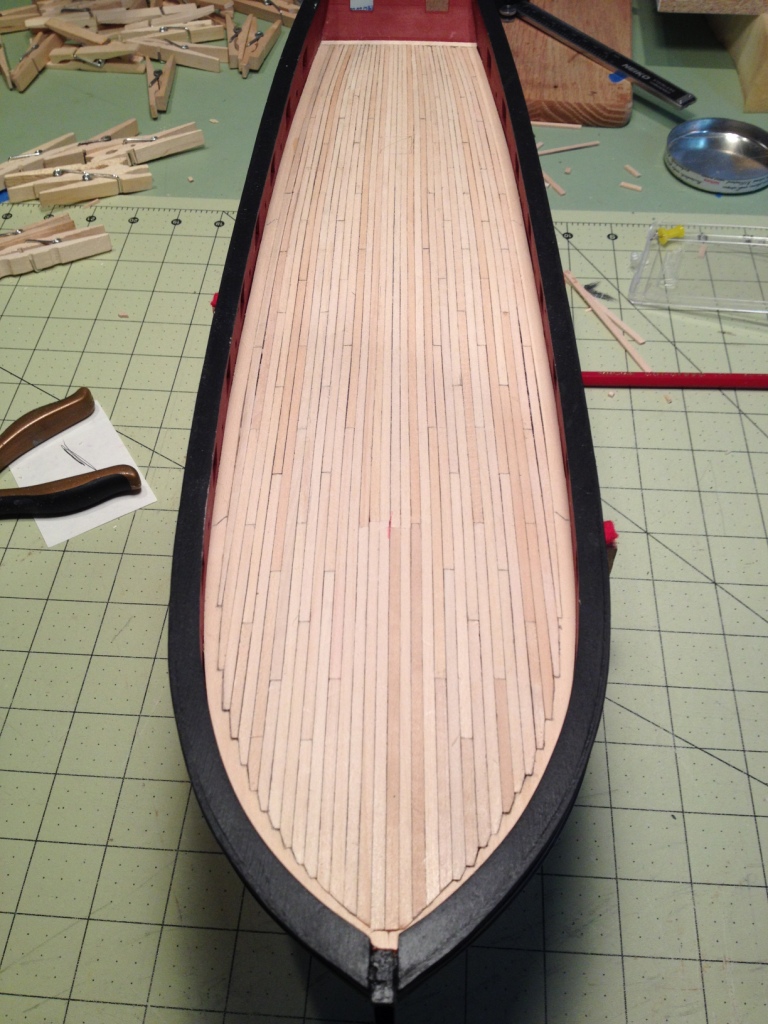
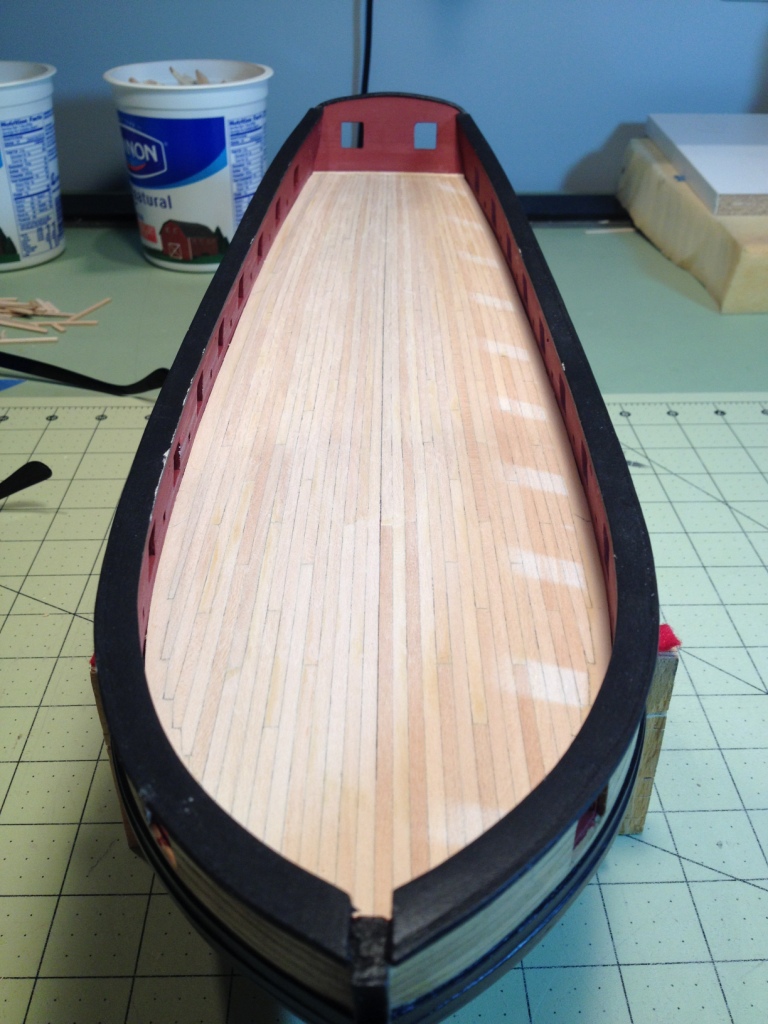
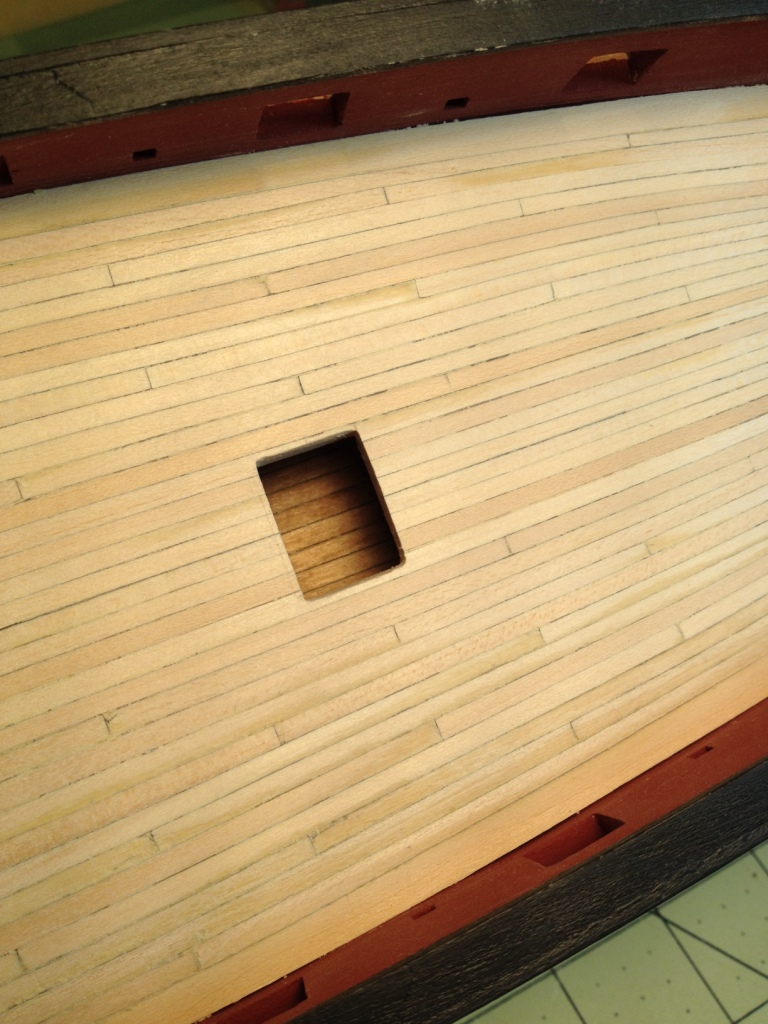
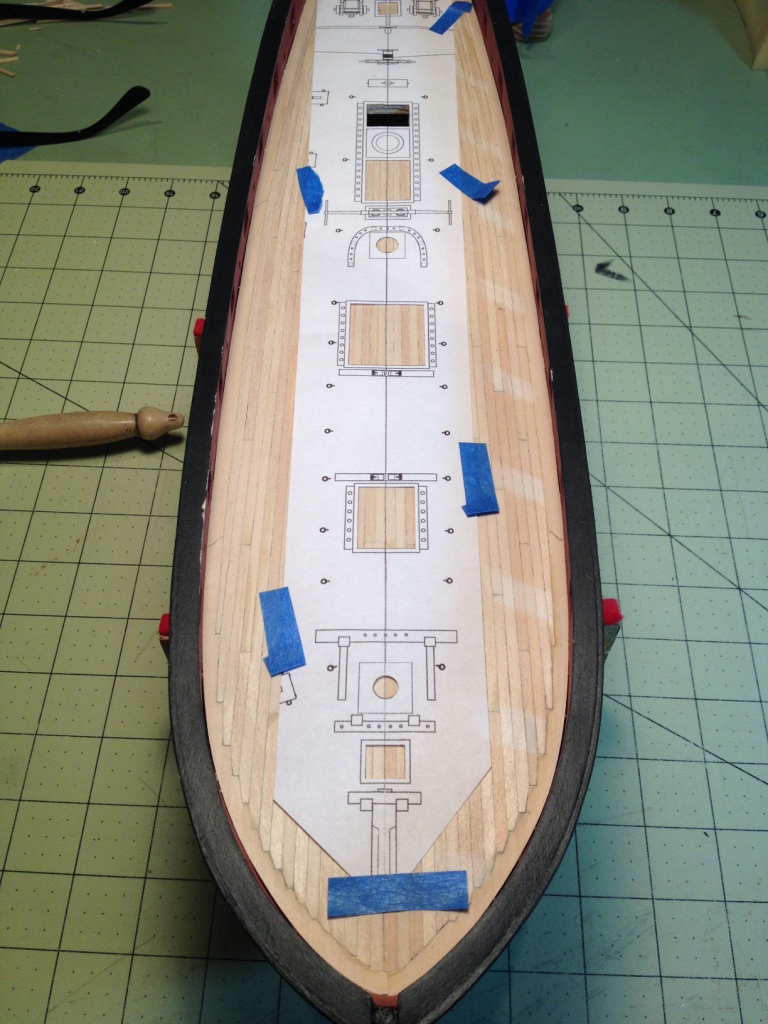
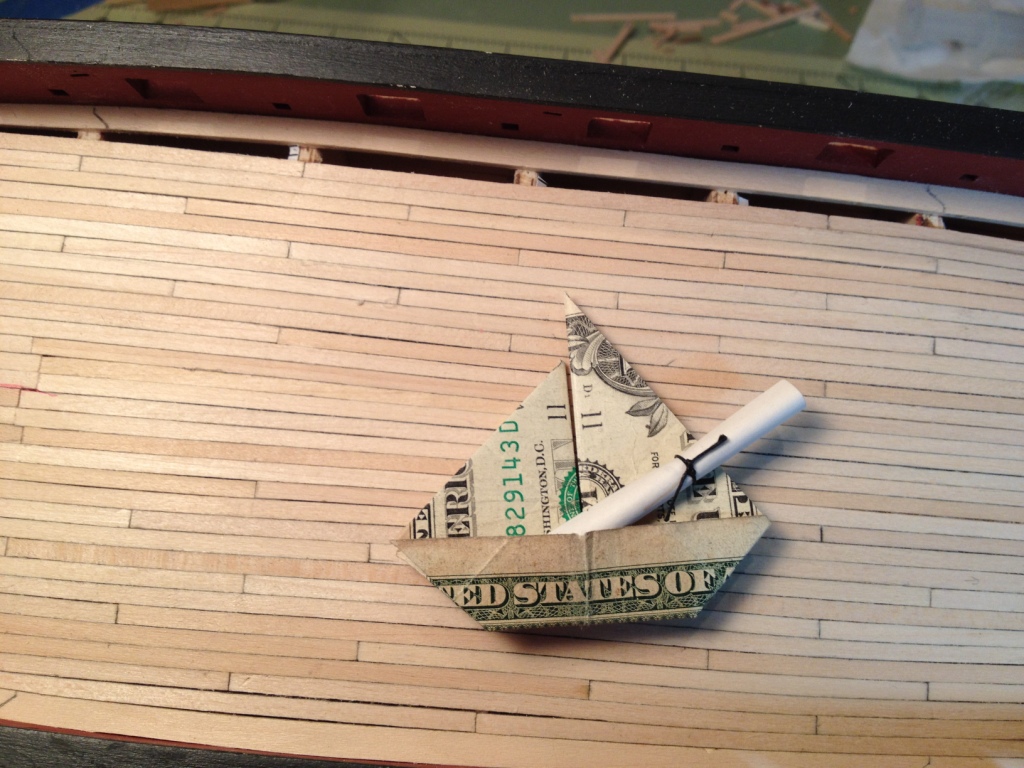
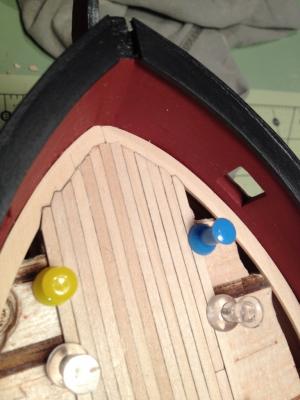
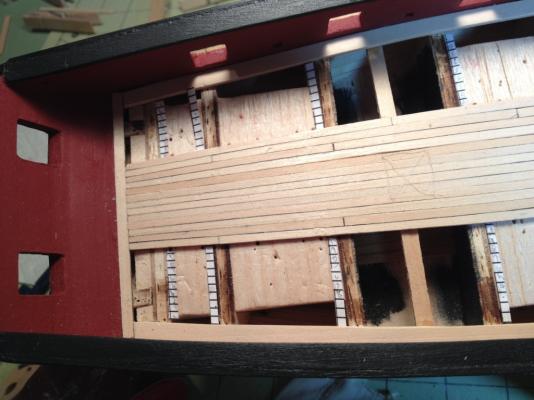
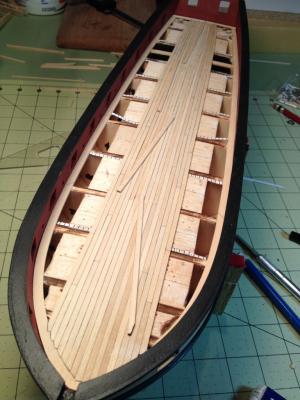
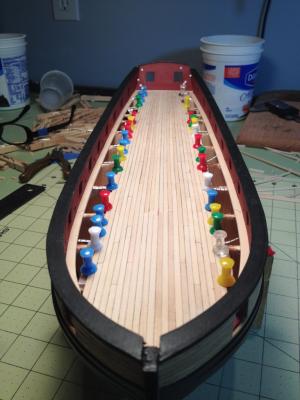
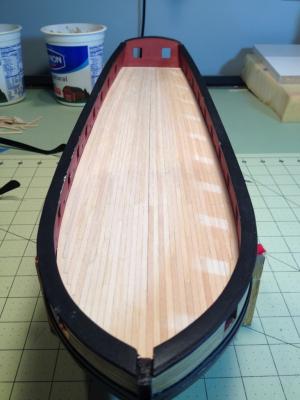
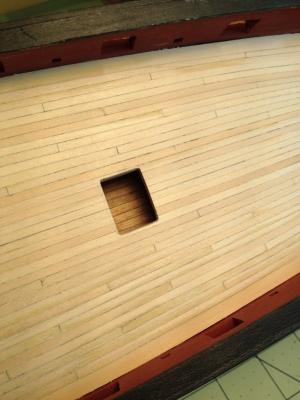
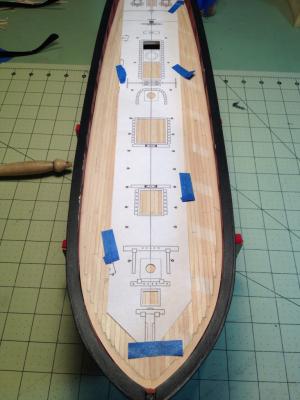
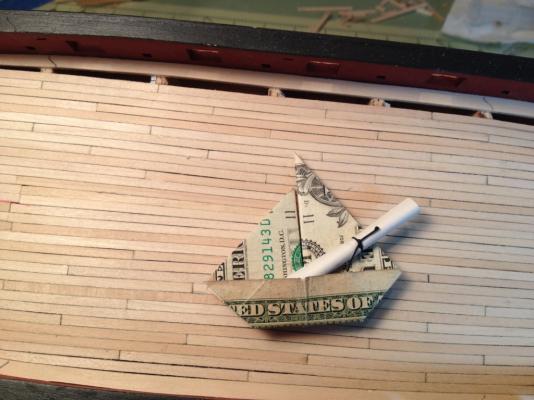
The deck planking went surprisingly well. I’m glad I used the tick strips along the bulkheads because they were a big help in keeping the stern planking in line. I’m also glad I the used balsa wood infill between the bulkheads because it gave me something to set the push pins in to hold the planking in place. Nibbing the planks at the bow wasn’t as hard as I thought it was going to be either. The only problem I discovered after I had installed most of the nibbed plank was that I didn’t pay close enough attention the diagonal length of each nib on corresponding planks, either side of the centerline. This resulted in the flat portion of the nib, on corresponding planks, not starting in the exact location along the margin plank. Lesson learned for next time. Planking in progress Push pins used to hold planking in place Planking complete, not sanded Planking sanded, no finish Aft companion way opening cut out Marking hatch and mast locations This is a little off topic but whenever I do any major home improvement projects, e.g. finishing off the basement, which involves framing walls and installing drywall I have a little habit of hiding a little something in the wall just in case someone in the distance future knocks the wall down. So prior to putting up the last piece of drywall I will put an empty (clean) beer bottle, with a dollar bill and note inside of it, in the wall. To that effect I decided to place a little something in the hull of the ship before finishing the planking. The beer bottle I couldn’t fit but the dollar and note went in okay. Who knows maybe a hundred years from now a budding model ship builder will buy the ship at a thrift shop and find the treasure and note while restoring it to its former glory.
- 659 replies
-
- 11
-
-
- syren
- model shipways
- (and 1 more)
-
US Brig Syren by Gahm - Model Shipways
_SalD_ replied to Gahm's topic in - Kit build logs for subjects built from 1801 - 1850
Very nice carriages Thomas. Where do I put my order in? -
Tom, Stern is looking good. I did something similar with the name on my Phantom but I only used plain paper. http://modelshipworld.com/index.php/topic/6582-phantom-by-drwatson-sal-%E2%80%93-model-shipways-completed/page-6#entry223365 And where did you still find floppy discs??
- 1,348 replies
-
- 1
-
-
- constitution
- model shipways
- (and 1 more)
-
Very nice Patrick
-
Thanks Augie. He's a good guy and he's learning a lot so I think we'll keep him around.
- 659 replies
-
- 2
-
-
- syren
- model shipways
- (and 1 more)