


Landlubber Mike
-
Posts
4,100 -
Joined
-
Last visited
Content Type
Profiles
Forums
Gallery
Events
Posts posted by Landlubber Mike
-
-
Cristiano, thanks so much! That's really amazing work you did there. I think you're exactly right about those figures.
Are the two gods, in particular, Hera, resting on anything? That's one thing that seems a mystery, though it looks like they might be resting with one hand on the port hole, and one on the ground (or something else).
Thanks again!
-
Hi Frank!
Let me be the first to say that I am looking forward to your build - this looks like a really nice kit, and I'm sure you can add lots of interesting details given the scale. Should be a lot of fun!

- mattsayers148 and riverboat
-
 2
2
-
Gorgeous work Jason, very crisp and clean! I'm sure that it will be a hit at the show!
On the bowspirit, I can't tell you how many times I busted a line/block off of it by accidentally bumping into it. I'll probably move it to the latter stages of my next build.
-
Mike,
The boats are plastic shells that Model Expo used to sell. Not sure of the manufacturer, but I think it was one of the European companies.
I hollowed them out further from their original form with my Dremel, and added details from wood. They came scribed with that planking pattern on the outside of the hull.
Hi Joe, thanks for that info. They came out really well. I'll have to investigate whether I can use resin shells as offered by Caldercraft to give me a good base as a shortcut.
-
Mike,
On my trip to the Manchester Central Library I spent a happy afternoon reading through Lavery. On the ship's boats ( page 231) he says that during the period in which this Unicorn existed a frigate of 28 to 36 guns would have had 3 boats being:-
1) 21 or 22ft longboat.
2) 28ft pinnace
3) 22 or 23ft yawl
Some interesting stuff to scratch build there!
As a subject close to my heart (
 ) I also checked on the stove sizes. He has a table page 198 that gives the appropriate sizes for the different types of ships. For the 28 gun frigate the stove would be 4ft 6ins long and 5ft 3ins high (to the top of the hood). However yet another close examination of the Chapman diagram suggests the stove should be on the lower deck not the upper (main gun) deck ie totally out of sight. Oh well. If this was so it must have been dreadfully difficult for the cook with the very restricted lower deck headroom on the Lyme class.
Thanks Ian, this is all good to know. The Badger's resin boats took me forever to complete - I can't imagine how long these three boats are going to take me if I end up trying to scratch build them
That's helpful info on the stove too. It sounds like things weren't too cozy for the Unicorn crew does it?
-
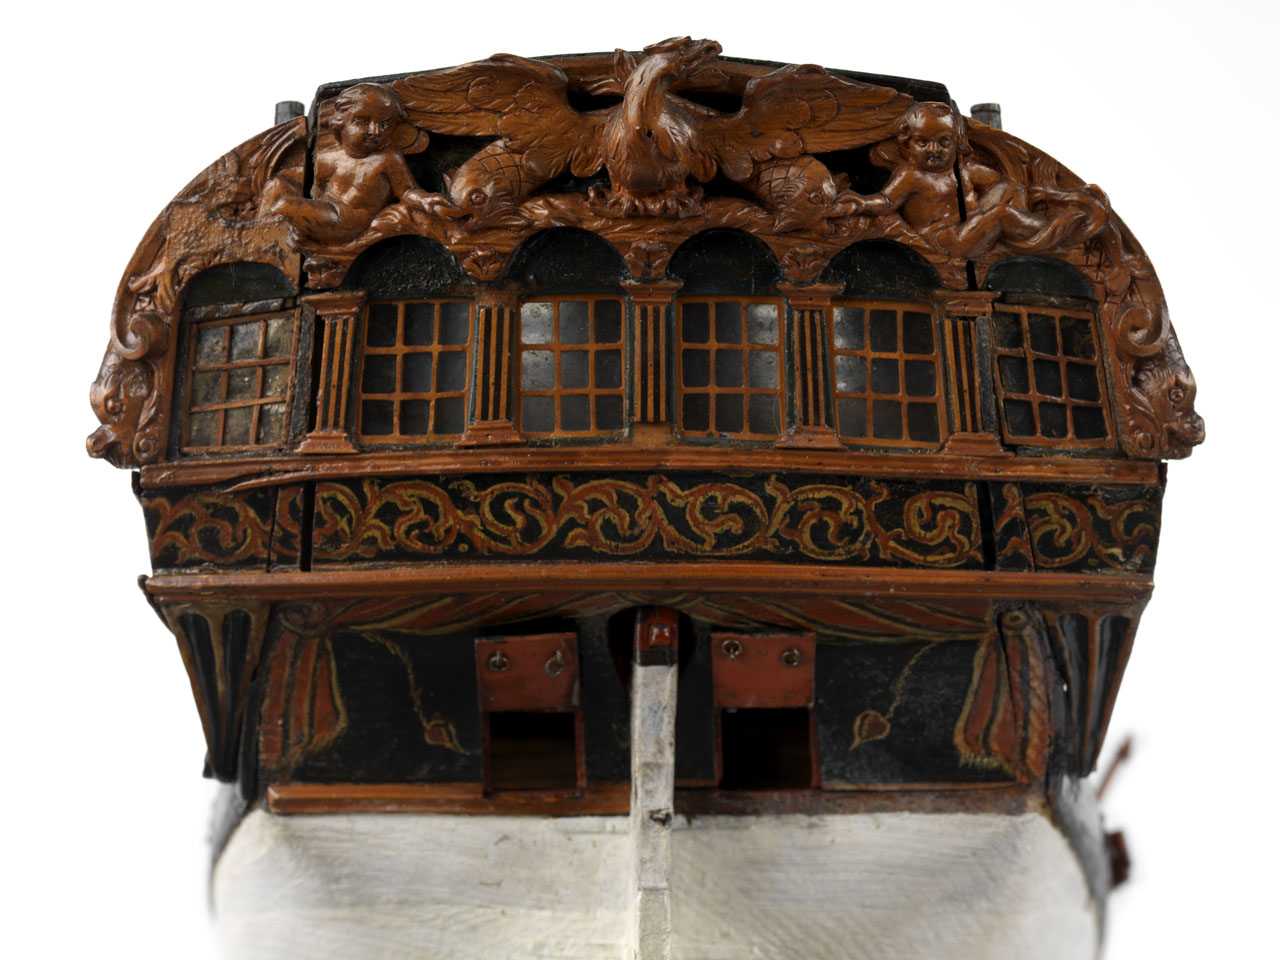
Hello Mike,
glad to help you, if I can.
Below the stern.
I added colours, in order to exalt the differences in the various figures, but the colours are just to exalt the figures.
The jumping fishes (two or one?) on left should be dolphins, since a dolphin was a symbol of Poseidon.
I "completed" some line, in order to show better the figures.
So, basically the stern represent two mitological gods and their related symbols...
Cristiano, thanks so much for this - this makes it really clear for me! The pictures I was using really weren't helpful, but your modified picture really shows the four (or maybe five) figures! The peacock is now completely obvious. Funny how I saw a lion on the left and a unicorn on the right
I can't thank you enough for taking the time to clear this up for me, I really appreciate it! -
-
Joe, by all means please feel free to continue to post pictures on my build log. Your Unicorn/Fox is gorgeous, and the pictures are really helping me (and I imagine others) get a sense of what kind of improvements can be made to the kit. Please don't feel like you're hijacking my log in the slightest
I love the touch of adding the small boats. Do you remember if you built them from scratch, or bought them elsewhere? I have the AOTS Pandora book, and I believe that the plans show 3-4 small boats nested in the waist similarly to yours.
-
Hello Mike,
my though regarding the stern:
the crowned man on the left should be Poseidon, the god of sea. Theirs symbols should be three (or two) jumping fishes placed on the extreme left.
The naked woman on the right should be Hera, the sister of Poseidon, since effectively in mythology her simbol is a peacock, which is the bird on the extreme right of the stern.
Everything is more clear if you edit with Photoshop (or something similar) the drawing of the stern, changing contrast.
Cristiano, thanks so much for your thoughts on this. It sounds like I was completely wrong on the far left and far right figures (except to the extent that they are all animals and not people!). I can kinda see the peacock on the right - I'm having trouble with the fishes on the left.
You mentioned using Photoshop to clean up the picture of the stern. Did you use it on the picture in the link that I provided earlier? If so, and if it is not too much trouble, would you mind posting what the cleaned up picture looks like or send it to me via PM? I am not that good at this kind of thing, and when I tried through iPhoto, it didn't really make things clearer for me.
Thanks again! This is very exciting, as I have been struggling with what the stern figures are for quite some time!
-
Good to know about the rigging Ian. I'll have to pay careful attention to all that. I like Joe's build adding the two small boats side by side - I'm thinking of doing something very similar as well. Glad to see that there is such a big Unicorn club
No worries Eamonn, I don't have pics of my build yet since I'm waiting on tools and materials, so I certainly encourage lively discussion and pictures!
-
Thanks Ian, that's very helpful. I took a look at a bunch of models and most don't seem to have flag lockers along the stern area like that. So it seemed odd to me. Plus, taking a look at the Chapman plans, it looks like he drew a stern chaser port right where the Corel kit has the insignia (click link below, and then click the picture to get an extreme close-up view of the plan drawings):
http://www.sjohistoriska.se/ImageVaultFiles/id_3085/cf_1803/55.JPG
Not sure if I can pull it off, but maybe I'll think about adding redesigning the stern to use a stern chaser port in the center (with a crown right above the porthole), and then the figures on the sides. It looks like a lion to the far left, a man to the near left, a woman to the near right, and some other animal to the far right (possibly another lion, or perhaps a unicorn as per the UK coat of arms). I'll have to learn to either carve or use that sculpty clay stuff.
-
Oh wow, you're a pro then
Hopefully someone else can guide you the right way.Have you taken a look at the Euromodel kits? The kits are probably the best I've seen, and give you plenty of options to add details to the build. I have the Friedrich Wilhelm zu Pferde, and it looks like an incredible kit with fantastic plans. I just need a few more models under my belt before I can attempt to do the kit justice.
-
-
Hi Joe, thanks for checking in and for the picture. Gorgeous model - feel free to post more pictures, as I can use all the help and inspiration that I can get
I love your color scheme and change to a thicker black wale. I think that is how I'm going to proceed with my build, and so it's good to see how this might turn out. Did you end up scratching the stern area?Peter, thanks for chiming in. I have both those books, so I think they will come in very handy. I wonder how the rigging diagrams compared with your kit (which I think was a little older)? I'm probably going to add sails, so at first blush, it struck me that I might need to add some extra rigging points.
-
I guess it depends on what kind of ship are you interested, the scale, POB vs. POF, kit vs. scratch, etc. I'm moving up in difficulty by starting the Corel Unicorn and the MS Charles Morgan as my next builds.
If you like Caldercraft, I've seen Badger builders move to ships like the Granado, the Cruiser and the Snake for next builds.
-
Ian - good idea on sticking with better resources. Hopefully you don't run into any issues on the rigging
One thing I was wondering was whether there are enough pins and cleats on the model for a typical ship of this size.ZyXuz, thanks for following
I haven't tried fitting the bulkheads yet - my keel is warped so I am planning to cut out a new one. I was thinking this weekend that I would start looking at the fit of the bulkheads on the bad keel, to just get a sense as to what I might be dealing with. Another thing I need to figure out is how to cut the new keel such that I can add the stem, false keel and stern post in pear. If I remember correctly, the kit's keel is one piece that includes all those items, so I will need to modify the shape of the keel quite a bit. I'm thinking that I will cut out the keel to end just at the edge of where the planking will end, and then add the rabbets and other tapering so that the planking will end right at the new pear pieces. Probably a lot harder than it sounds.Gentlemen, what did you think about the flag lockers on the stern of the ship? I was thinking of dropping them - does that require modifying any of the bulkheads?
Thanks again for looking in!
-
-
Excited to follow your progress Rusty - great model and great modeler together are a perfect combination
-
Hi Ian, thanks very much for looking in. I'm still waiting on my orders for the Byrne's machines, plywood, and upgraded wood from Hobbymill, but I should have all that in hand to start the build in earnest come May. In the meantime, I bought a second workbench for my power tools and a shop vac, so I'm getting myself ready to dive in (not to mention, the research and experimentation that I will do until then).
If you're stuck on something and are curious as to what the more recent plans show, let me know and I can see how to best get you that information.
Hope all is well!
Mike
-
Nice job! Any plans for your next build?
-
I purchased the Friedrich Wilhelm Zu Pferte about 20 years ago thinking it would be a easy model to build. Wrong, after building the hull I have discontinued with it as I look back at my work critically and see many mistakes I made.
I wish I had Peters excellent build notes back then. Its probably one of the very best kits in existence, but please make sure you are a very experienced builder before tackling her. Some of the construction is supplied as timber blocks with comprehensive plans for to to cut and shape parts. Its almost a part scratch build.
I would recommend this kit to an experienced modeller with half a dozen builds under the belt.
Thanks for sharing your thoughts on the kit Brian. I ended up getting a great deal on the FWZP on eBay a few months ago that I couldn't pass up. But, I'm going to reserve working on that kit until I get a few more kits under my belt, as I really want to do the kit justice and get all I can out of the Euromodel kit experience.
-
Very nice Ian - I love the modifications you are making. You're going to be a tough act to follow
I should be starting my Unicorn in the next couple of weeks. I need to source some plywood as my keel is a bit warped and twisted. I also am waiting on some tools and my wood order from Hobbymill
-
Absolutely gorgeous work Frank! I really love the weathering that you did with great effect. It adds a ton of character to your model. Thanks for sharing your journey with us - looking forward to your Alert build! Just saw that it is 1:24 scale - that should be a lot of fun, especially for the opportunity to add cool details.
-
HMS Lyme (1748-1760) by Landlubber Mike - bash of Corel Unicorn - Scale 1:75 (CLOSED TO START SCRATCH BUILD)
in - Kit build logs for subjects built from 1501 - 1750
Posted
Cristiano, thanks again for all your thoughts and help on this. I really appreciate it, and look forward to your Unicorn build