


Landlubber Mike
-
Posts
4,467 -
Joined
-
Last visited
Content Type
Profiles
Forums
Gallery
Events
Posts posted by Landlubber Mike
-
-
Aldo, like everyone else, I'm so happy to see you back posting here. It was a lot of fun posting with you as a fellow Badger brother. Glad to hear that you are doing better.
Your Triton is looking very nice my friend. Very nice clean work as usual. Hope you decide to stay here and post more regularly, we all enjoy your work and company!
Best wishes for a happy holiday and 2015 to you and your family.
-
Thanks Mark. I did think about that, but the problem is that it can then be hard to match the cannon carriages, deck beams and other red items. What I probably should think about doing in the future is dying the bulkheads that won't be seen (which would be mostly the ones at the ends where the curvatures really come into play), and only replacing the ones near the waist (where there are no curvatures generally). Live and learn

-
Thanks very much Aldo. I've put this kit aside for the time being while I learn and get more experience working on the Pegasus. I've sorta gone a bit crazy in thinking that I can not only improve the accuracy of the kit, but also to convert it to its rounded-bow sister. Once I get through the first planking and the stern construction on the Pegasus, I should be able to turn back to this build and rejoin Ian and my other Lyme class brothers.
-
-
Thanks Martin. Do you mean cut a hole in the gunport pattern where the quarterbadges are? I wasn't planning on it, given that I am not outfitting the captain's cabin, but maybe it's a good thing to do to add a little depth behind the windows...hmm...
For the planking screws, I found they had a hard time penetrating the plywood patterns for some reason. I poked a hole in them with a push pin, and then screwed them into the MDF. The MDF probably could have used a small starter hole as well. Thankfully none of my planking screws broke.
-
Thanks Spyglass
Looking back at my pictures, it appears I was able to get more curves into the pattern than I first thought. The curves at bulkheads 2 and 3 can use a little more work, but that I think I can get from sanding. The patterns are of 1.5mm ply, so that gives some room to play. -
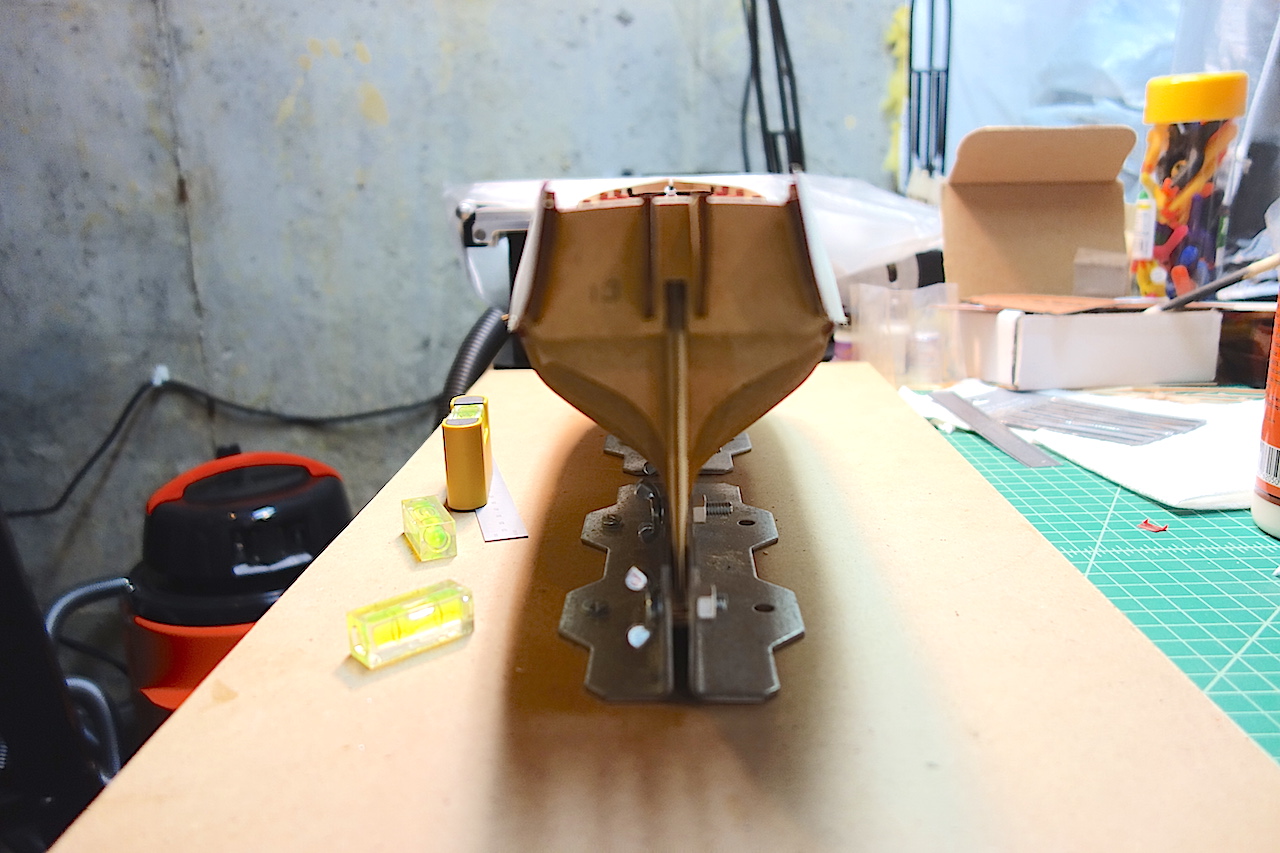
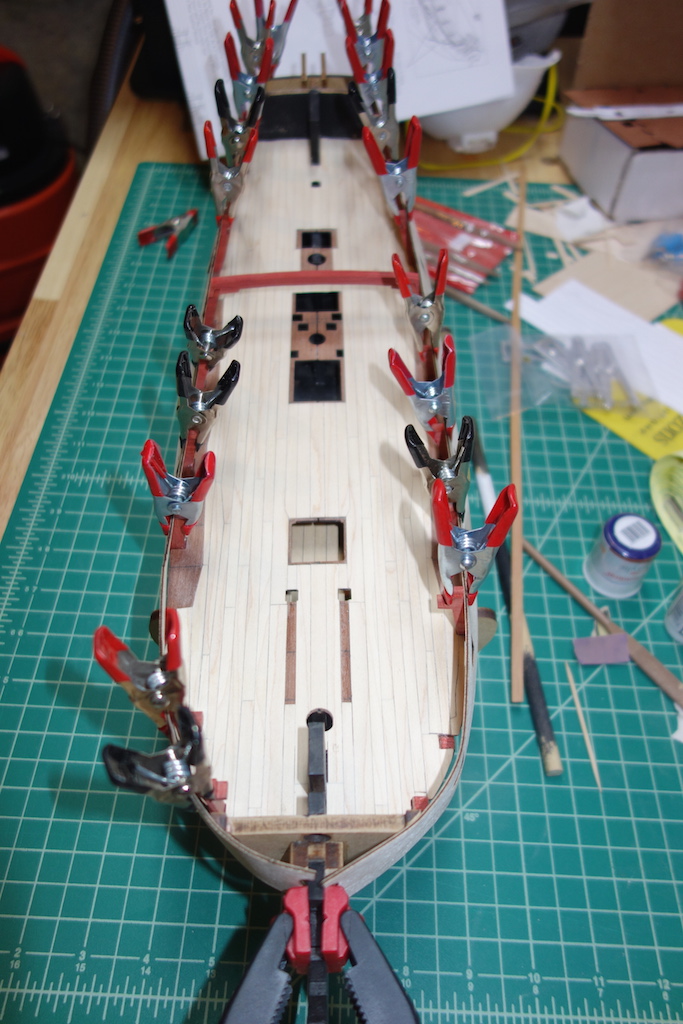
Here are the final pictures. Overall, I'm pretty pleased with how they came out. They are symmetrical and are level with one another, which are the most important factors. I wasn't able to get the patterns to fit the full curves of the first few bulkheads at the stem however. As I feared, the redheart extensions were very fragile. I busted off a few more while fitting gluing the patterns on, so molding the patterns against the extensions was not in the cards. Also, the extensions had a bit of flex to them, causing them to bow in slightly as the patterns were attached. So, the forecastle deck pattern will need to be sanded back a bit to get it to fit. All in all, nothing too major - I think some creative sanding and filling could help me get the hull curves back.
Thanks for looking in!


- mtaylor, Blue Ensign, ianmajor and 4 others
-
 7
7
-
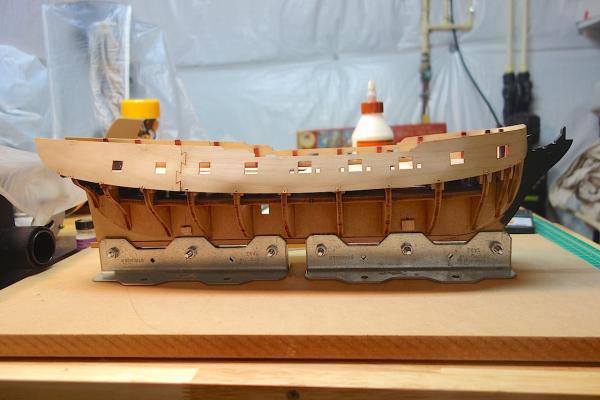
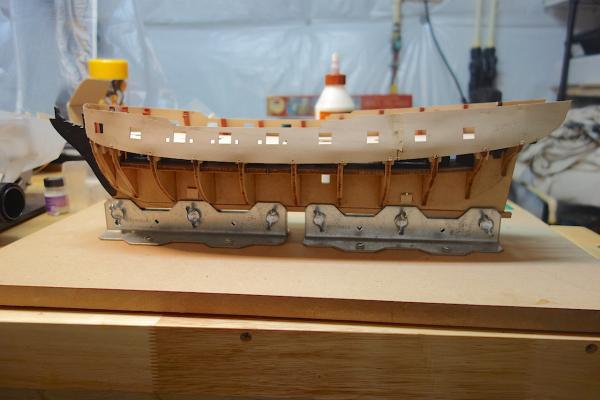
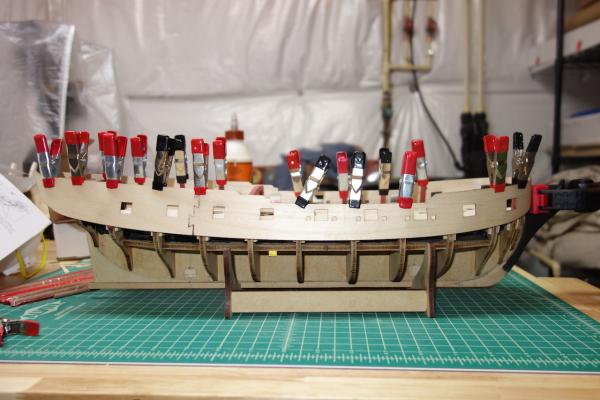
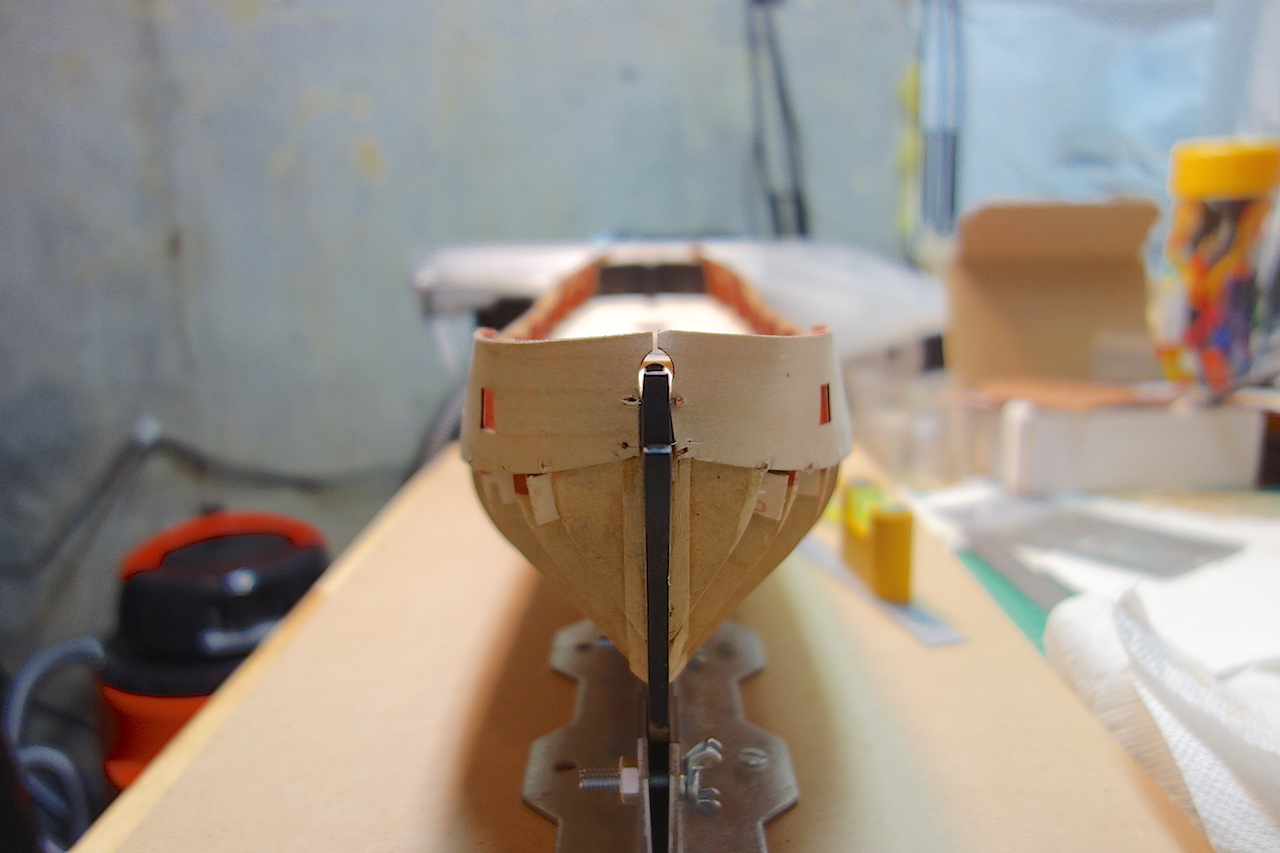
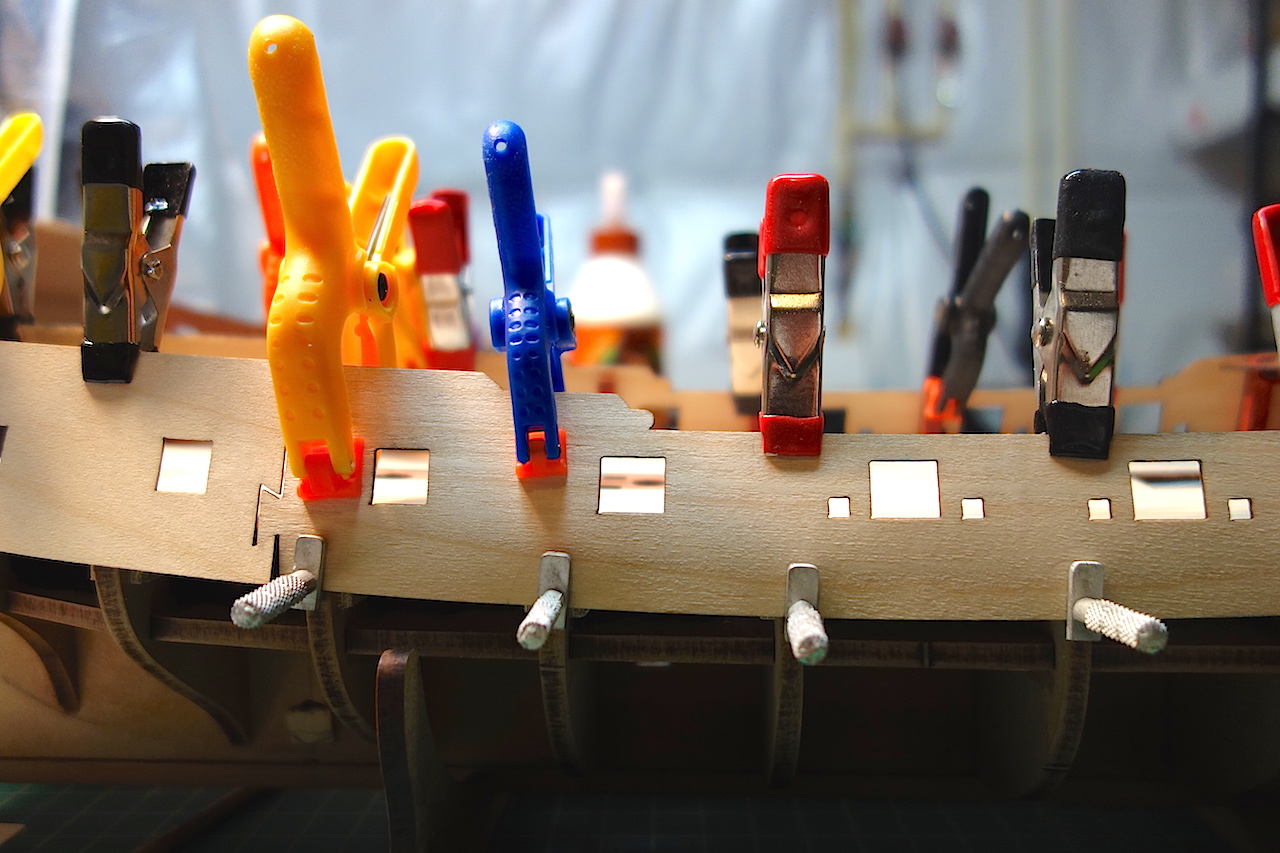
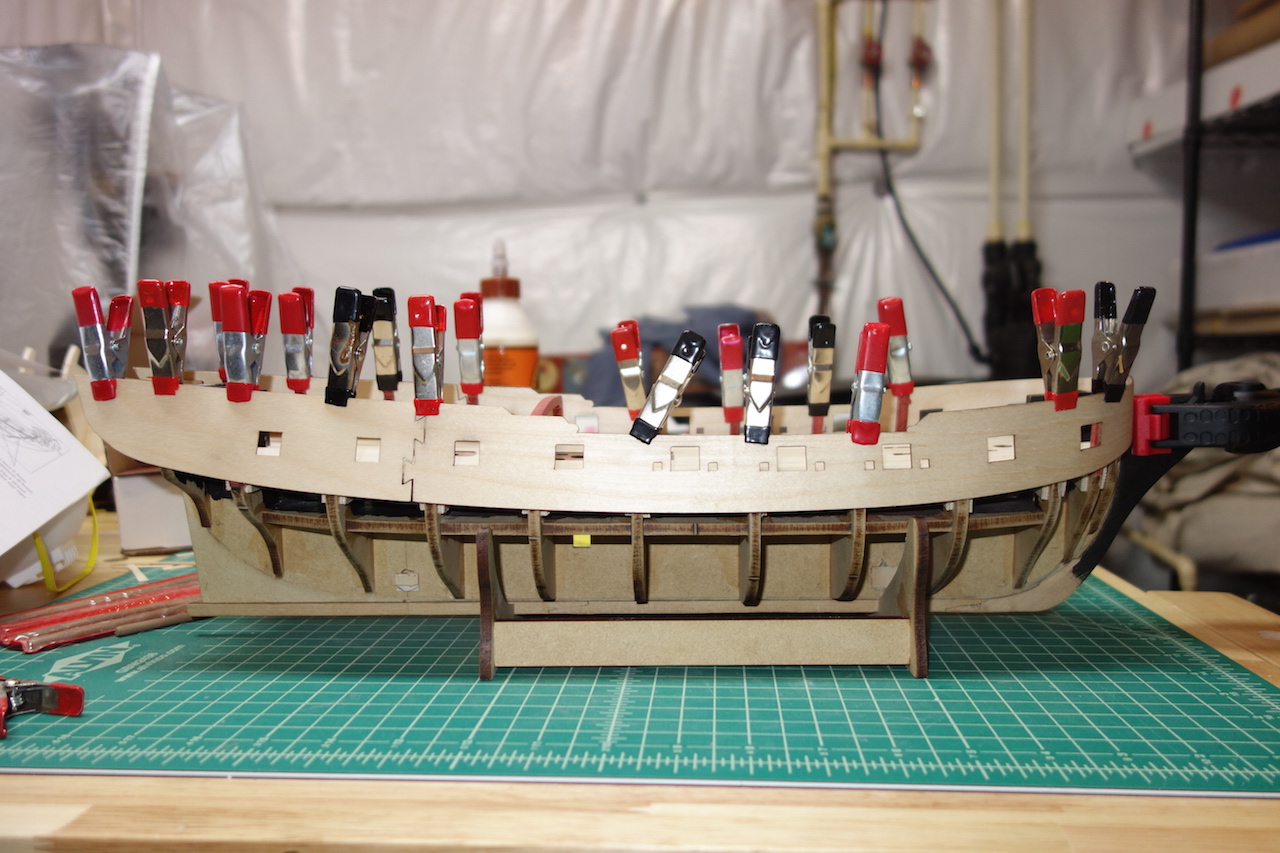
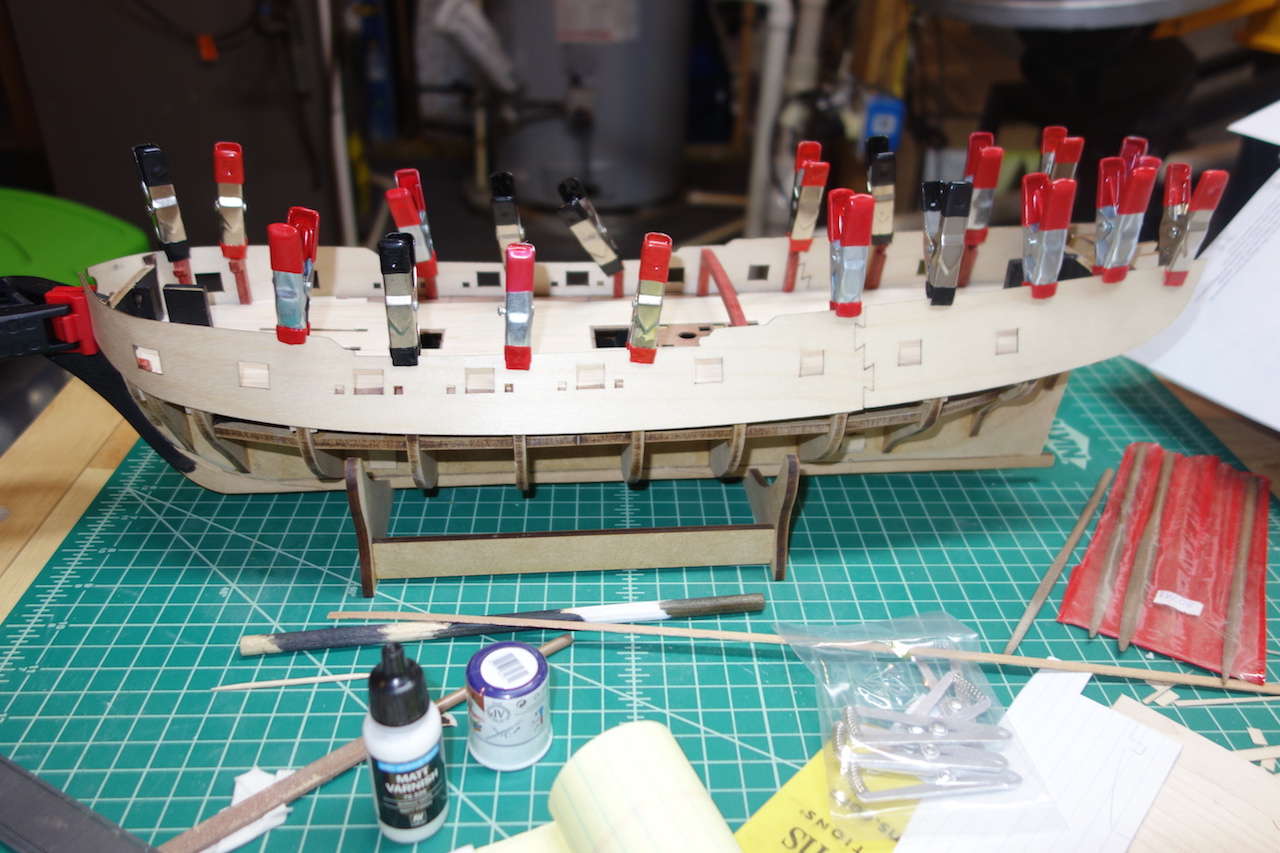
Well, after two nights of frustration, colorful language and adult beverages, the gunport patterns are on! As with my Badger build, fitting the gunport patterns is the most stressful part of the build, and it's good to get this stage behind me. So much of the alignment is keyed to the proper fitting of them, and unlike most items where if you don't like the part, you can remove and replace it, the gunport patterns are pretty much there to stay.
I know that kit manufacturers use the patterns to make things easier overall, but it really would be helpful if they provided a little more instructions and guidelines to help people along. The Caldercraft Badger instructions were fairly good, but the Pegasus instructions really only said to fit the patterns against the tops of the bulkheads. They should tell you how much extra material is built into the bulkheads, how to fit them at the stem, how to fit them at the stern extensions, etc. The plans also incorrectly show the jigsaw connection sitting on bulkhead 9 - from my fitting and other logs on here, the connection is just aft of that bulkhead. In addition, I found that the bowsprit hole in the patterns is pretty worthless - you can see in my next post how much I had to sand back the fore edge of the pattern.
The first soaking and fitting got the patterns in a very good shape aside from the bottom (I didn't pin the bottoms of the patterns, so they lacked that gentle curve against the middle of the hull). When I soaked them for the second time however, the patterns relaxed a bit and straightened out a bit. So, while I had planned on soaking and fitting them three times, I ended up just doing it twice.
Here are some pictures when I started with the starboard side. My approach was to get the two halves pinned and clamped, then start with the end of the front pattern and work my way forward. Then I worked the back pattern starting from the jigsaw connection to the stern. When I got to the stem, I slowly sanded the fore edge back until it fit snug against the stem. I don't think you can fit the patterns starting at the stem and working towards the stern - aligning the patterns at the middle was a much better approach I think.
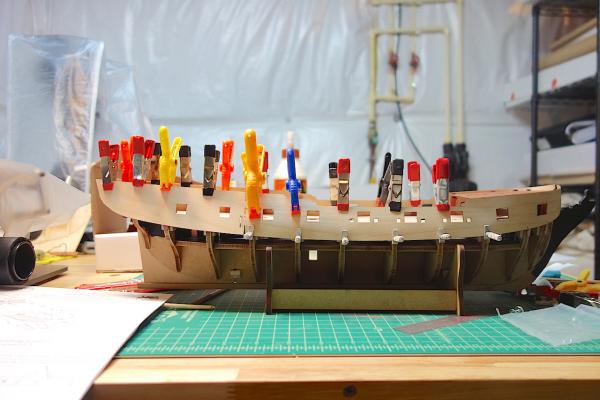

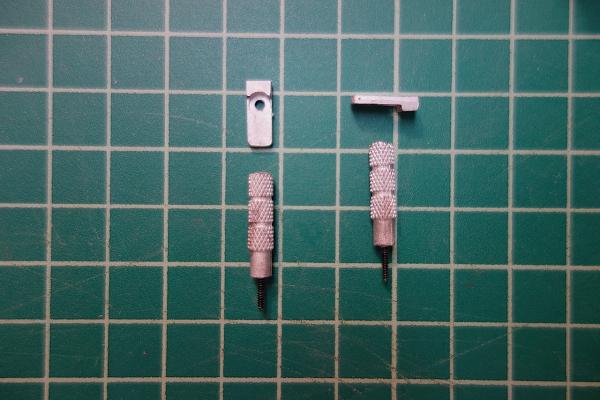
I bought these planking pins from Micromark for my Badger, but never used them. I found them absolutely indispensable for attaching the bottom of the patterns on the Pegasus. They really helped ensure that the patterns fit tightly against the bulkheads, and for the ends of the patterns against the stem. They have a very strong screw with tight threads, so once you get it into the bulkheads, they worked like a charm. They are knurled though, so they are pretty rough on your fingers when trying to get them started into the MDF.
I'll post the final pictures in the next post.
- Martin W, ianmajor, Blue Ensign and 3 others
-
6
-
Thanks very much guys. Hope you and your families had a nice holiday.
Jason - I would think that most of the details will be covered up as I am thinking of having a very busy deck showing a working ship in sails (probably a mixture of full of furled). But, it was fun to try out and improve my skills a bit.
Spyglass - I did adjust the clamps a bit to help get the curves in. I'll detail a little more in my next post, but it was a bit tricky with the redheart extensions.
Martin - first try, but hours of finagling, running back and forth to the plans and your log and others, etc. The pictures above don't show all the blood, sweat and tears that went into fitting them (well, no blood this time).
Aldo - thanks very much. Hope you are doing well my friend. I hope you don't mind, but I copied some pictures off your log showing your main bitts construction. They will be very helpful resources, thank you!
-
Wow, looking really great Joe. Very crisp details, and your deck is fantastic.
-
-
Enjoy the sausage rolls Spyglass. And Martin, I can't wait to get through this initiation period. It's not difficult, but the importance and finality of it make this a nerve-wracking process! Here are some pictures of my work yesterday.
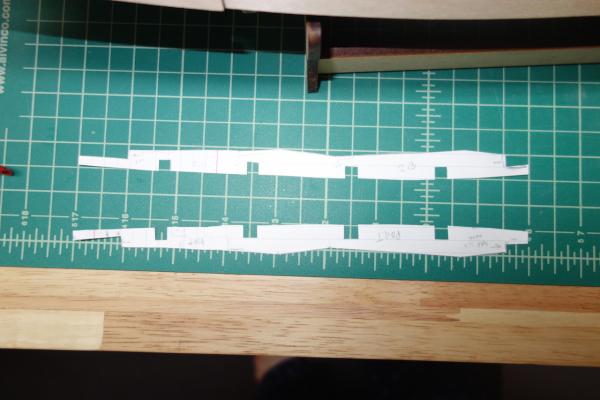
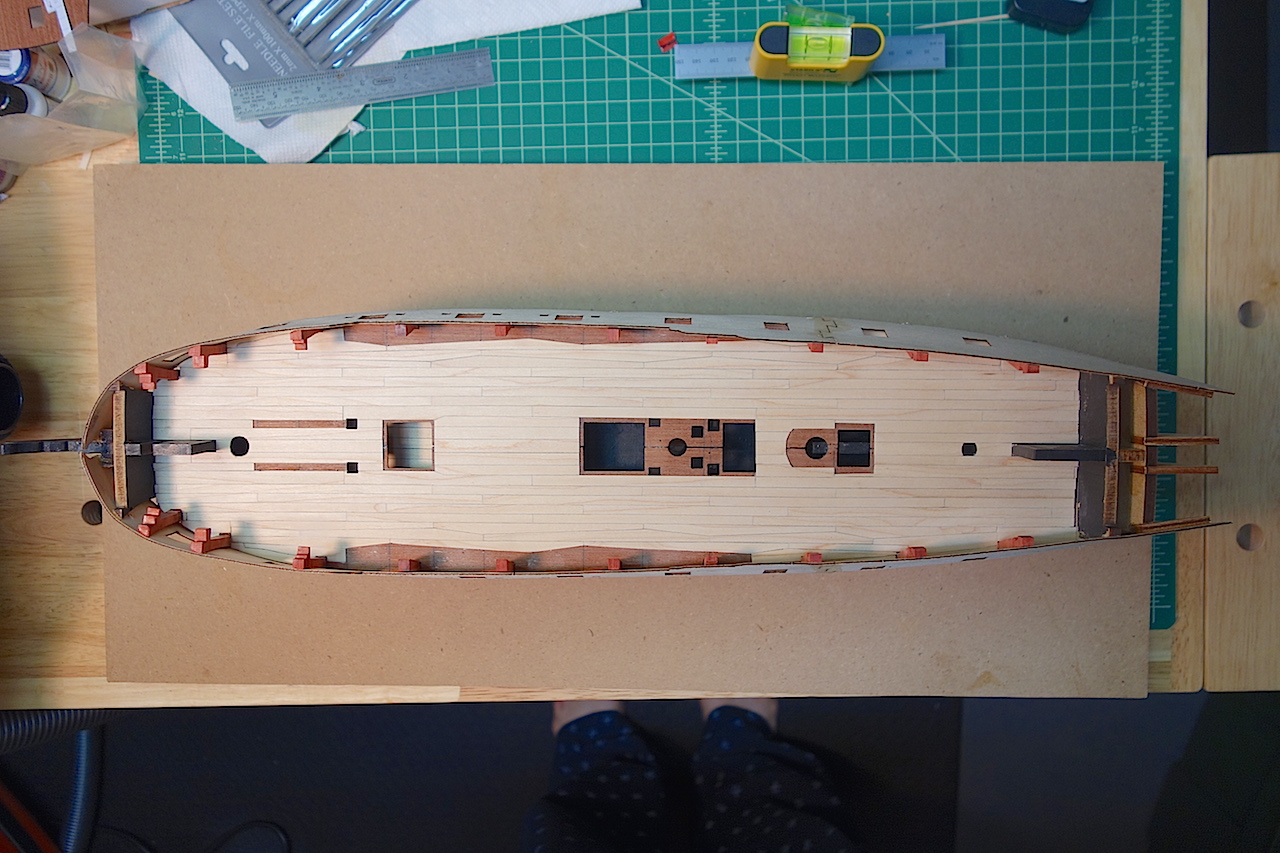
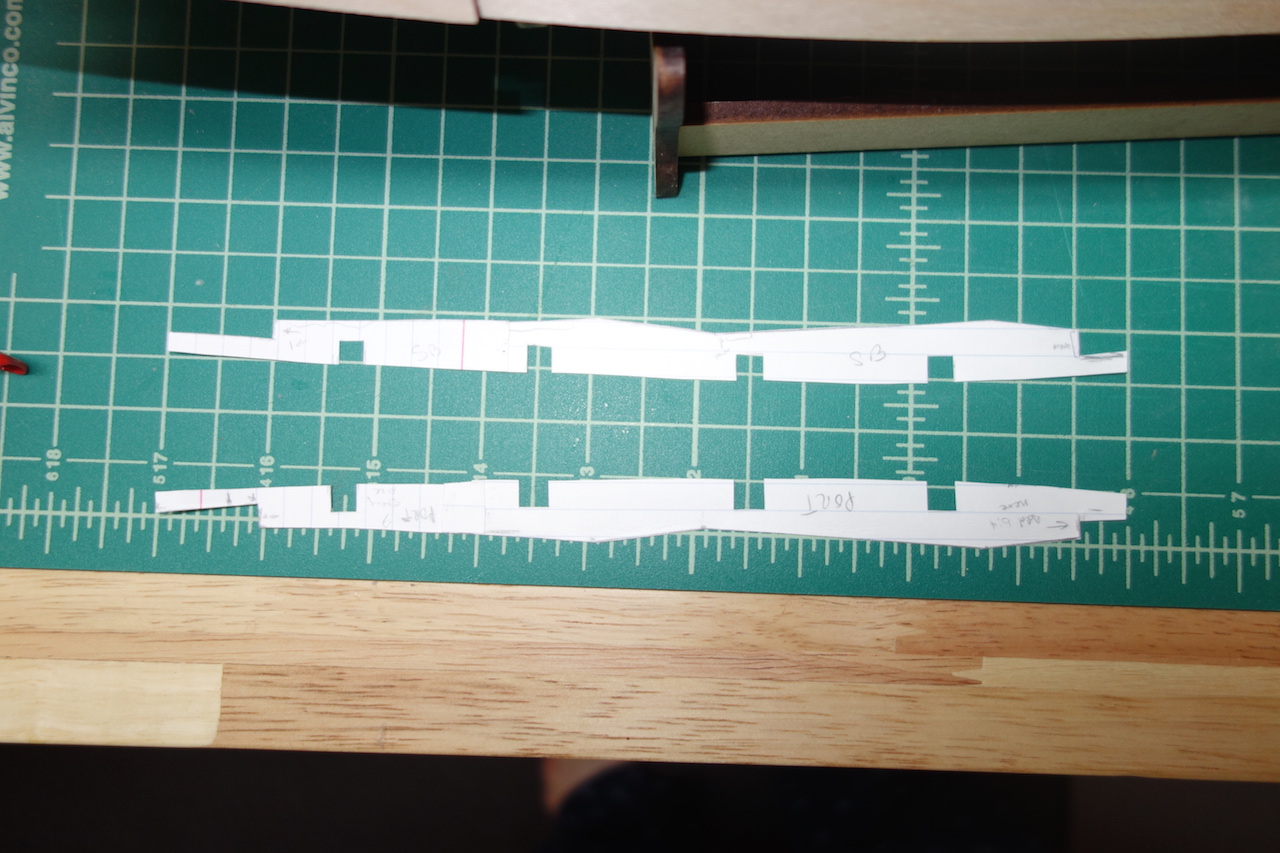
Card templates of the remaining planking work:
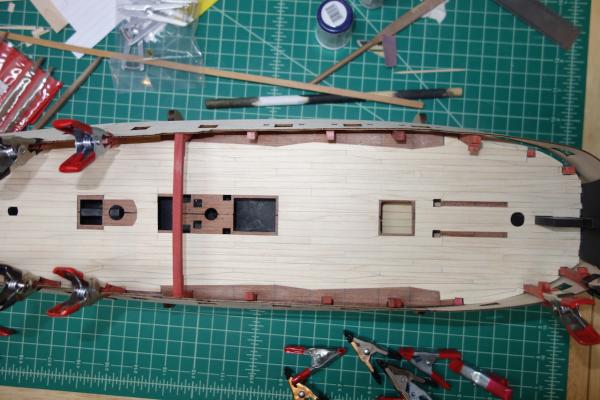
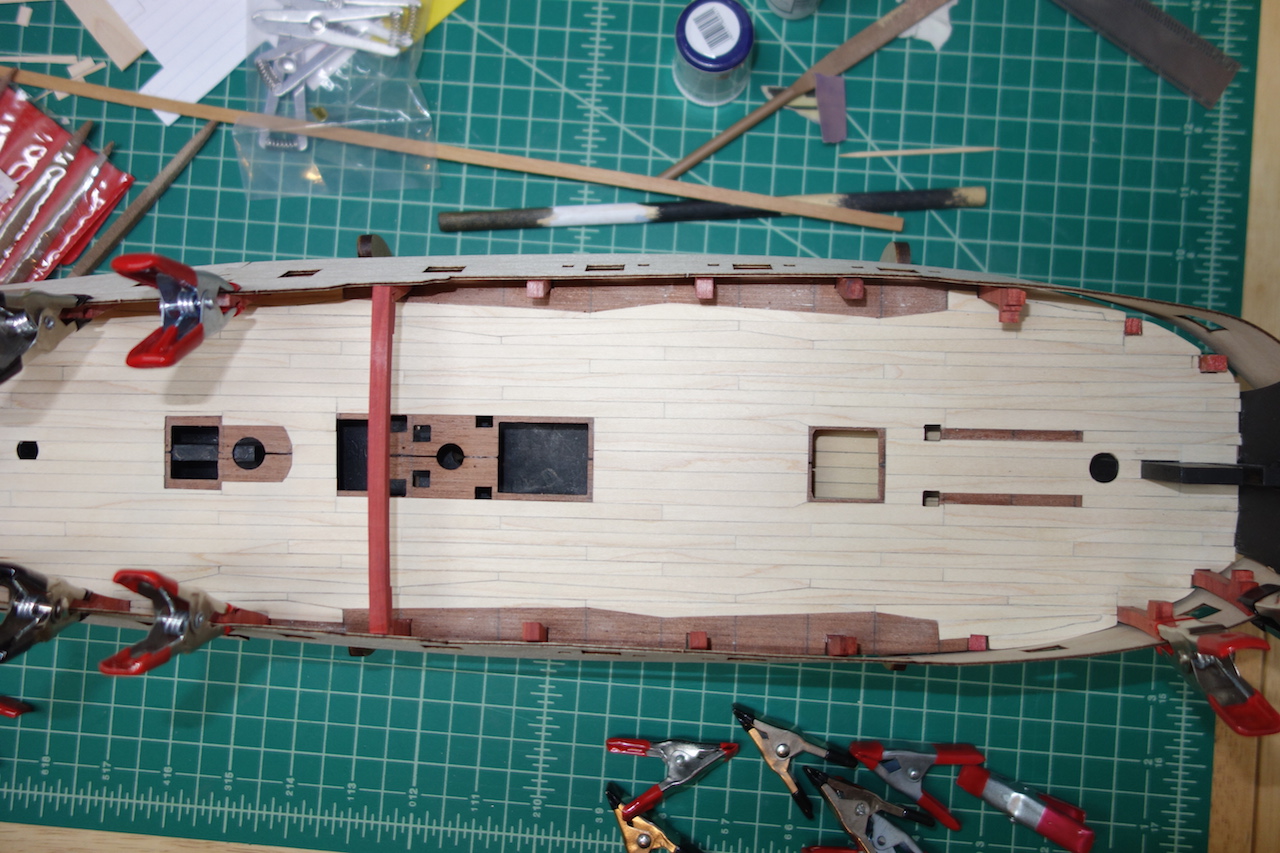
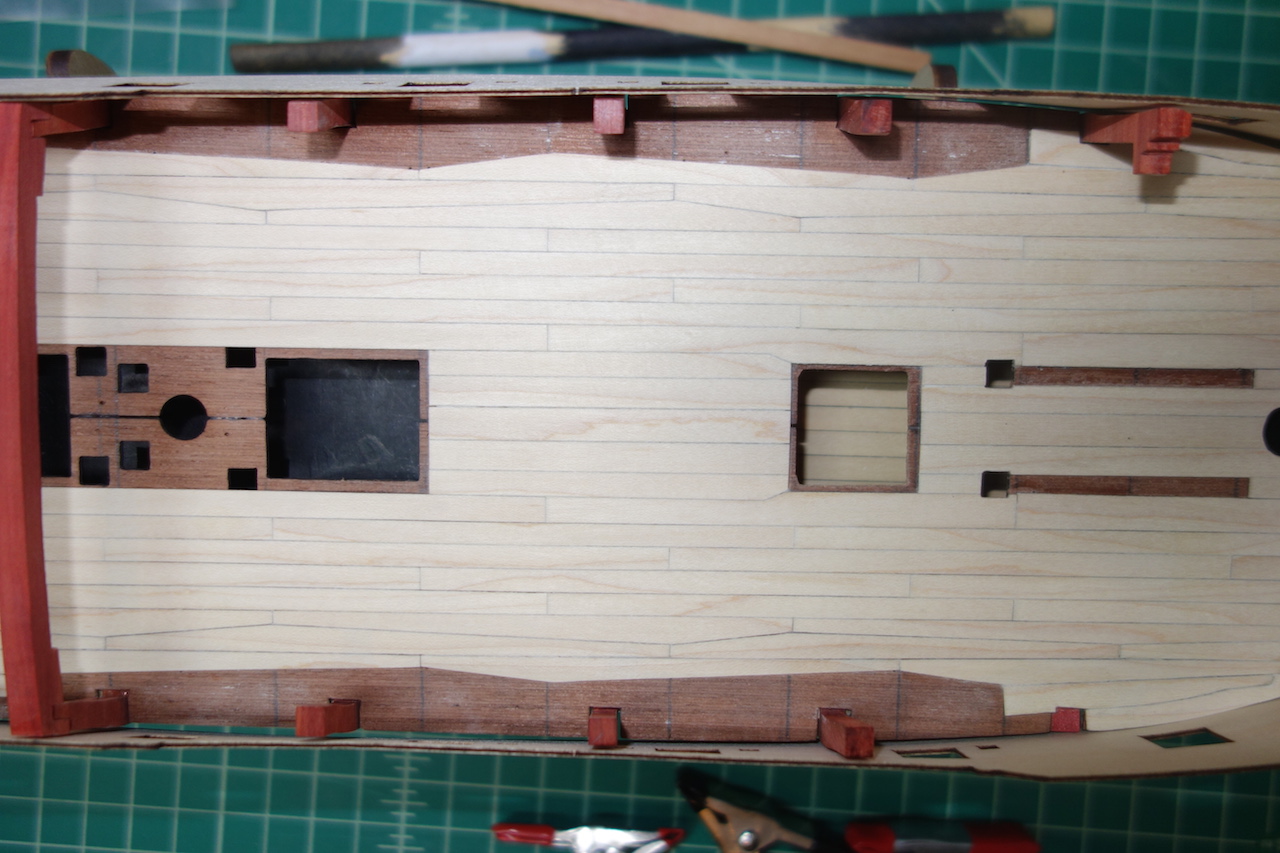
Sanded deck (sanding the planks to an even surface as made the planking look nice and tight, and has made the caulking lines look more subdued and even in color - I think a nice result):

Round one of the gunport template fitting. From what I can tell from other plans, I think the patterns are in the right place - but please tell me if I'm mistaken! For round two, I'll try to get the front end of the stem pieces to have that nice rounded look, and will start working the lower part of the templates and the curves a bit more. I got pretty close with round one, but another round or two of working the templates should do the trick.


- billocrates, mtaylor, egkb and 3 others
-
6
-
Here are some very good and comprehensive tips and reference points that Spyglass kindly shared on Martin's Fly log. Hope he doesn't mind, but I thought I would post them here as well (thanks Spyglass!):
I traced the sheets onto thick paper and used that as a quick check for alignment. Cut seperate ones and also a joined set with the two halves set in line from the plans. I would strongly advise trying to fit the strips without the bulkheads being firmly fixed. There is to much pressure needed to shape the strips
.
I cant see my notes on this in my log - perhaps it got lost in the big bang.
* I queried the ply sheets sizing with Chris Watton who told me that he makes the strips a bit long.
* I found the following the most important line up is of course along the top of the bulkhead - t if those are seated correctly the strip line is fine.
* The "jigsaw" join does NOT lie on the bulkhead 9 as shown in the plan but well aft of it ,with only about 1mm of the stern strip top "tongue" actually on bulk head 9 ( pics on my log)
* Even with the jigsaw joint set back as above - and with what I think is a good amount of fairing on the front bulkheads - the front strips STILL overlap at the stem - I needed to shorten the strips by 1 - 2mm and recut the bowsprit hole every time. TIP - putting a "stub" bowsprit in place and letting the strip cut outs sit against it before trimming gives a good vertical reference point at the stem
* Repeated soaking and clamping CAN get all the curves in place and suddenly the b*** strips can fit perfectly - but it is really hard to do. I usually ended up doing three sets of soaking and clamping to get it OK.
* Do take the trouble to clamp to get the vertical "s" curves in following the bulk head shapes - it makes for lovely lines and more importantly putting the curves in seems to help the sheet to get the right fit..
* The stern ply sheet is too long obviously and needs trimming.
* Strangely - moving the sheets back as described above doesnt seem to put the ports in the wrong position !!!
So theres my two pennyworth.
You may like to note that I use bulkhead 6 and fit and check the deck beams for BH 4 and 8 as reference points for the strips,
AN ADDITIONAL EDIT
II could have been clearer about my reference points i think, Try again
Right at the stem fit a short stub bowsprit and let the sheet cut outs sit clasping it even though they will bt a few mm forward before they are trimmed.
Amidships I temporarily pin the sheet flush with top of BH 6
At BH 8 with the "fancy" beam in place allow about 2mm for deck ply and planking and that I beleive should be then flush with top o sheet at that point.
At BH 4 its not really a hard reference point but i make sure its even both sides which ensures the curves match I have about 3.5 mm above the deckbeam fitted and my present build. That should bring teh rear top edge to correspond also to the top of BH 9
For the rear strip obviuosly it start from the aft top edge of the forward strip and it really just needs to continue a nice line until the stern when it should match the stern counter supports THOUGH IT WILL BE TOO LONG
-
To quote the title of my favorite western, last night was the good, the bad and the ugly (*cue music from the Sergio Leone classic*). No pictures at the moment as it was late when I got done, but I'll post some tonight or later this week.
The Good: I cut out card templates for the remaining upper deck planking. The templates should help a lot as the two remaining top and butt planks per side won't have a straight long side, but instead it will be curved to fit the curvature of the hull and accommodate the margin planks that will be a consistent width. I figured I would do it now, as bulkheads 5-7 get removed after the gunport pattern is fixed to the hull (and the template would be much harder once the gunport patterns are attached).
I then went ahead and sanded down the mostly completed upper deck planking. I started with 220 grit to get the deck smooth, then went with a light sanding of 400 and 600 grit, and finished with rubbing down the deck with an old t-shirt (mostly, to remove the remnants of small dust that settled in the caulk lines). There were four or five tiny gaps in the planking edges that were easily fixed by adding a tiny bit of PVA and sanding the area so that the dust closed up the gaps - nice little trick that works very well. I really couldn't be more pleased with the deck - it's coming out much better than I was expecting.
The Bad: Feeling excited by the deck, I decided to soak the gunport patterns while I went ahead and faired the port side bulkheads (I had already faired the starboard side a couple of weeks ago). Like the starboard side, I started the fairing process with a drum sander attached to my Dremel. As feared, the redheart bulkhead extensions are very fragile. For whatever reason, I had no problems on the starboard side last time, but snapped two of the extensions (bulkheads 2 and 3) while sanding on the port side (one I think was already weakened from a prior repaired break). Each time when I got to the top of the bulkhead, I think the torque of the drum was just too much and it snapped the extension close to the base.
The Ugly: Undeterred, I decided to fit the gunport patterns which to this point had been soaking for a few hours. I figured I would fit them, let them dry overnight, and then probably repeat the process another two times to get a nice smooth curvature. What a pain! I sorta knew what to expect going in having fit the one-piece pattern to my Badger build and having read about the difficulties from other Swan class builders here. What was frustrating was that (1) neither the kit instructions nor the plans have any reference points aside from fitting the top of the patterns to the top of the bulkhead extensions, and (2) the plans themselves were incorrect in that they appear to show the jigsaw connection of the two patterns sitting on the bulkhead 9 extension. Spyglass posted a good set of reference points on Martin's Fly log that I wish I had remembered seeing earlier - but, after some fiddling, confusion and a few choice words, I came to his same conclusion that the jigsaw pattern actually sits aft of the bulkhead 9 extension.
My language got very colorful when in working on the starboard side, I snapped the extension for bulkhead 4
 So, that's three extensions I will need to fix. I have a feeling that I will use epoxy to fix them, and then add any final fairing touch ups by sanding with just my fingers and sandpaper. Structurally, once the patterns and planking are on, I think things should be strong enough not to have to worry about them in the future. The stem area is going to be a little tricky as the patterns are slightly longer at the stem and need to be filed back a bit - looking back, I wish I left the stem off until after the planking. The good news is that the stem is perfectly aligned with the keel, but bad news is that there's not much room to work the pattern with the stem on, and I have a feeling planking is not going to be that much fun.
 All in all, the patterns looked pretty good this morning. I still need to do a little more fairing of the bulkheads in some sections, but I can see soaking and fitting the extensions another two or three times to ensure a smooth fit. I'll post Spyglass' tips below, and later post my findings (which after reading his tips this morning, my fitting experience is very consistent with his) and some pictures. This is an agonizing process as the patterns really set the stage for the build and so you want to get it right.
-
Happy holidays to you and Bounce! My furry companion is a stubborn cat - i hesitate to call him an assistant as he thinks he is a plank nibbler, and don't get me started on how helpful he is when I bring out the rigging line

The boxwood is going to look great on the hull. It's already looking fantastic. Love how the stem came out.
-
Really great work Jason, coming along very nicely.
Can I ask you how you did your filler blocks? I'm thinking about doing them on my Pegasus (and will definitely need them for my Lyme). I've seen different approaches like marking out the outlines between the two bulkheads on thinner strips of wood, and then sandwiching them all together for the final product. I'm not sure I want to spend the effort to do all that, but was hoping to maybe just got basswood blocks down to size, and then sand them down to shape - hard to tell if that's what you did or not, but that would be my preferred approach
-
Thank you very much Chris!
Martin, are you sure you are using redheart and not bloodwood? My understanding is that redheart loses its "redness" and turns more of an orangy-brown. Bloodwood looks like it turns very dark brown over time though - take a look here, which shows both woods (midway down the page is redheart, immediately followed by bloodwood):
http://www.hobbithouseinc.com/personal/woodpics/_color%20change/index.htm
I'm glad I went with redheart over bloodwood after looking at these pictures. Frankly, even if the redheart loses some of its color, I'll still at least have some contrast against the other woods - I'll just have to take lots of pictures upon completion and keep the model in the dark
 You might be right that a better approach if you want long-term red is to stain something like boxwood or pear. Does boxwood take stain well? The pear seems to, but I've heard mixed things about boxwood.
It also seems like finishes with UV protection only delay the inevitable. The guy at Woodcraft said the UV protectant breaks down as the UV hits it, which seems consistent with what the guy in the link was experiencing. Even 10 coats of UV-blocking polyurethane didn't have much effect on box elder.
I have the rip taper jig on my Byrnes saw also. That's probably the absolutely precise way to cut these planks. Since the maple was only 0.5mm, aside from it going under the fence, I found it at times tents up a bit making it critical to hold the piece down on the saw. At 0.5mm, it's super easy to cut by hand so just went with that approach.
Happy holidays to you and your family. My twins are just under two and don't fully get Santa yet, but my eldest at almost five gets it a little too well. It's definitely a fun time of year. If you have kids, hope you're enjoying this time with them
-
Thanks Joe! I've been taking notes on how you did the tiller assembly and rails on your Granado. I might have to shamelessly steal some ideas from you
Merry Christmas and a happy 2015 to you and your family!
-
Mike -- It's amazing what oil will do to wood. The pear with the tung oil looks mighty nice, though over the years it could lose some of the depth. Some of the grain seems to get lost in the stains -- at least in these photos. And it is striking how dark that redheart gets on the end grain -- I had no idea it would go like that. But the middle test strip, with the redheart & oil looks spectacular. It's surprising that the pear would get so dark with the blue stain -- though the maple looks very nice indeed, with the grain still visible.
All very informative.
Hey Martin,
Last night I tried out some old matt varnish that I had leftover from my Badger build on some scrap redheart. The darkening effect on the end grain is much much less than what I was getting with tung oil. So, that could be an option if you have end-grain pieces that are exposed.
When I cut out the extensions for bulkheads 4 and 8, I wasn't thinking about the end grain issues and cut the extensions so that the grain runs parallel to the deck - so, the part of the extensions facing the midline of the ship are all end grain and highly visible. I could probably get away with oiling them in that the effect might come across as more of a shading effect from the forecastle and quarterdeck, but I might just varnish those sides and oil the remaining sides as the redheart looks much nicer oiled on the non-end grain sides. I'll have to see if the contrast of the finishes will be acceptable or not. I thought about maybe cutting out new extensions, but given that I already locked in the current extensions and the upper deck is on, the new ones would have less contact area with the main body of the bulkheads and I fear would be less stable. So, I think I'm nixing that idea and hopefully the varnish would work.
Even though it came with my Badger kit, I never used the varnish before. The results were very encouraging, but the varnish seemed a little old and milky. So, I ordered matt varnish from Humbrol and Vallejo to test out. I'll probably also test out Wipe-on Poly. Stay tuned
-
Thank you B.E. and Nils, happy holidays and a 2015 to you and your families! I was just messaging a member that this hobby is so great in that it lets you meet so many nice people from around the world
I've been calling it anchor stock planking, but top and butt planking is probably more accurate, thanks B.E. You guys should try it - while a lot more time consuming than merely laying straight planks, it wasn't all that difficult to execute. If you think about it, it all comes down to the properties of triangles. Once you have the three lengths, you can only make the triangle one way. So, I cut them slightly bigger, then used a sanding block to slowly work them back until they fit well. I cheated a bit in some cases where I bent the plank laterally to close the gap with the plank above it, but that ended up leaving me with a curved side on the other end of the plank, causing me issues with the next run of planks where I needed to custom sand to fill that curve. So, stick with the straight planks as much as possible and you should be ok.
I just found a good picture of the difference between "anchor stock planking" and "top and butt planking" - always nice to get my terminology right, thanks B.E.!

- Martin W, Mirabell61 and mtaylor
-
3
-
Thanks Jason - good points
-
Thanks very much Timmo, glad to hear that it gave some inspiration. Beautiful work on your Granado by the way. Best wishes to you and your family this Christmas and 2015!
-
Thanks very much Frank. Merry Christmas and Happy 2015 to you and your loved ones as well!
-
Hi Martin, thanks very much for the kind words. For the straight planks, I used my Byrnes saw to rip planks of consistent width. It's been a little tricky as my maple sheets are only 0.5mm thick, so the sheet has a tendency to slide under the fence even using the Grr-Ripper.
So, for the anchor stocks, what I did was cross-cut the maple sheet to a little longer than the longest anchor plank. From there, I marked out the width of the plank, then marked out the two angled lengths adding about 1mm on either end to account for the eventual sanding. For what it's worth, I marked out the angled cuts on the same side where I cut the width of the plank - in other words, the apex of the anchor stock would be on the same side as the side I marked to cut for the full width of the plank. Not sure it mattered - I just thought that if the other side was sanded to a nice smooth straight finish, then I could screw up the cut on the other side and it wouldn't make much difference as long as the width to the apex was correct.
Next I used that straight edge tool and an X-acto to first cut the plank from the sheet, then I cut the two angled cuts. If you look at the anchor stock plank runs, they go in pairs. The straight edge of the first run goes against the prior row of planks, and then the second row's planks are essentially flipped upside down so that they fit into the first row, and then the second row gives you a straight edge to start the third row:
-- the first row is pretty easy. All you have to do is make sure that the ends and apex line up onto your pre-marked frame lines, and that the ends are the same width. Adding the extra 1-2mm helps to give you wiggle room as sometimes I found I cut the apex slightly to one side or the other.
-- the second row is where things get a little more tricky as the apex has to sit neatly into the open triangle area of the first row. So, some sanding/cutting to get the apex just right, and of course, you need to get the ends to match up to each other and to the frame lines. I found giving yourself a little extra room on either end was critical here. The second run definitely required a lot more work than the first.
All in all, while time consuming, it was a lot easier to execute than it looks. As long as you properly measure the lengths and widths of the plank, the apex/triangles should fit pretty neatly together even without much sanding. I was worried that I would go through a lot of scrap as I was down to the second of three sheets (and still needed to do the quarterdeck and forecastle), but I only messed up one plank in the whole process. So thankfully I should have plenty to finish - a reason for pushing forward on the deck at this time was to make sure I didn't need to order anything else from Jeff before the end of the year.
It's always tricky to explain stuff like this, but hope that this was clear and that it helps.


HMS Pegasus by Landlubber Mike - Amati/Victory Models - Scale 1:64
in - Kit build logs for subjects built from 1751 - 1800
Posted
Thank you Shihawk, it's a bit stressful to start gluing and work your way around, all the time checking for accurate alignment. Glad it's done!
Those pins I got from Micromark. They might have similar ones at a shop more local to you. I really am glad I had them - they made the work much easier.