


Landlubber Mike
-
Posts
4,551 -
Joined
-
Last visited
Content Type
Profiles
Forums
Gallery
Events
Posts posted by Landlubber Mike
-
-
Happy holidays to all my friends here. Best wishes to you all this holiday season and upcoming 2015

It's been a while since I last posted, but I wanted to wait until I had some good progress to report. Plus, i ran out of stains to test
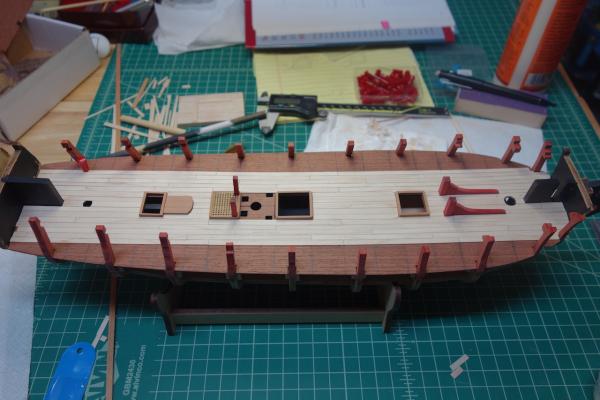
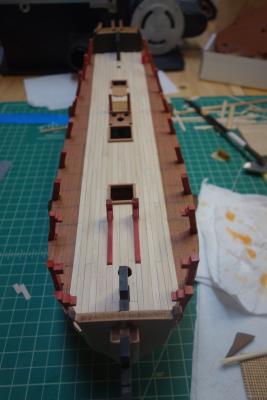
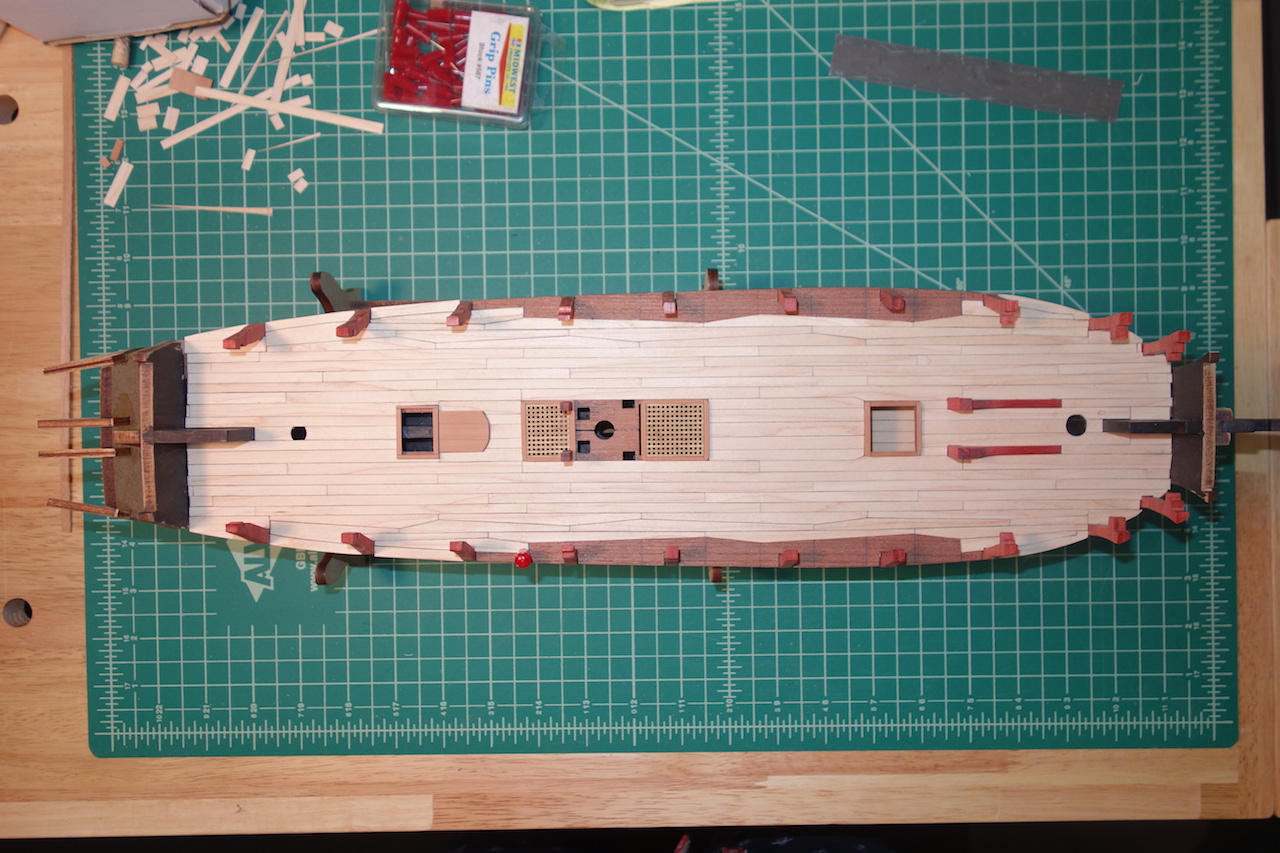
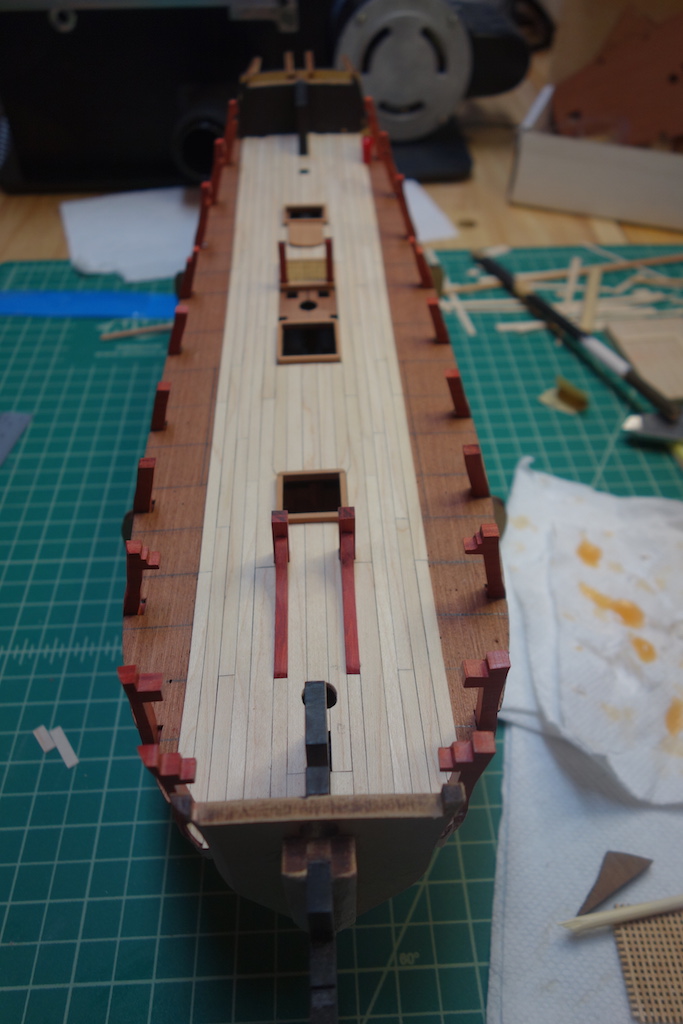
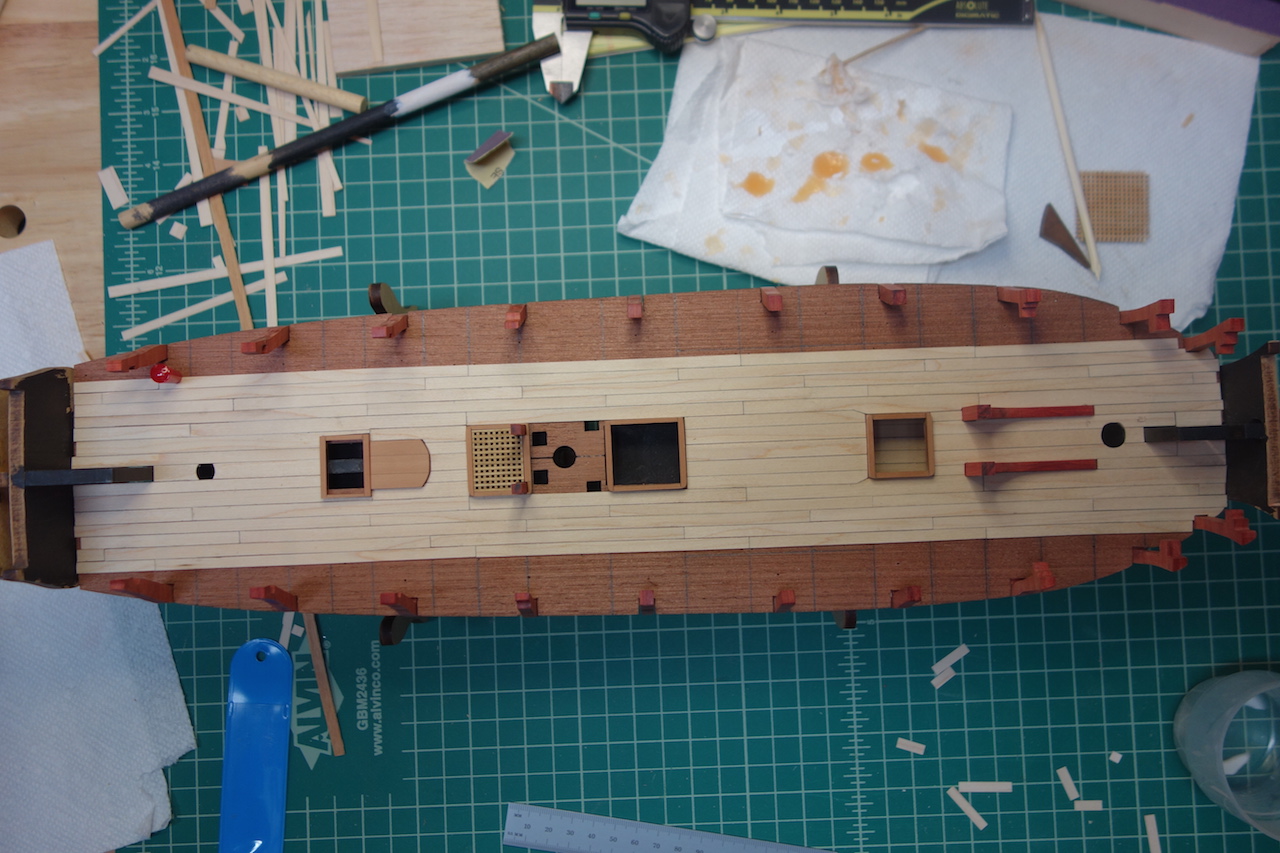
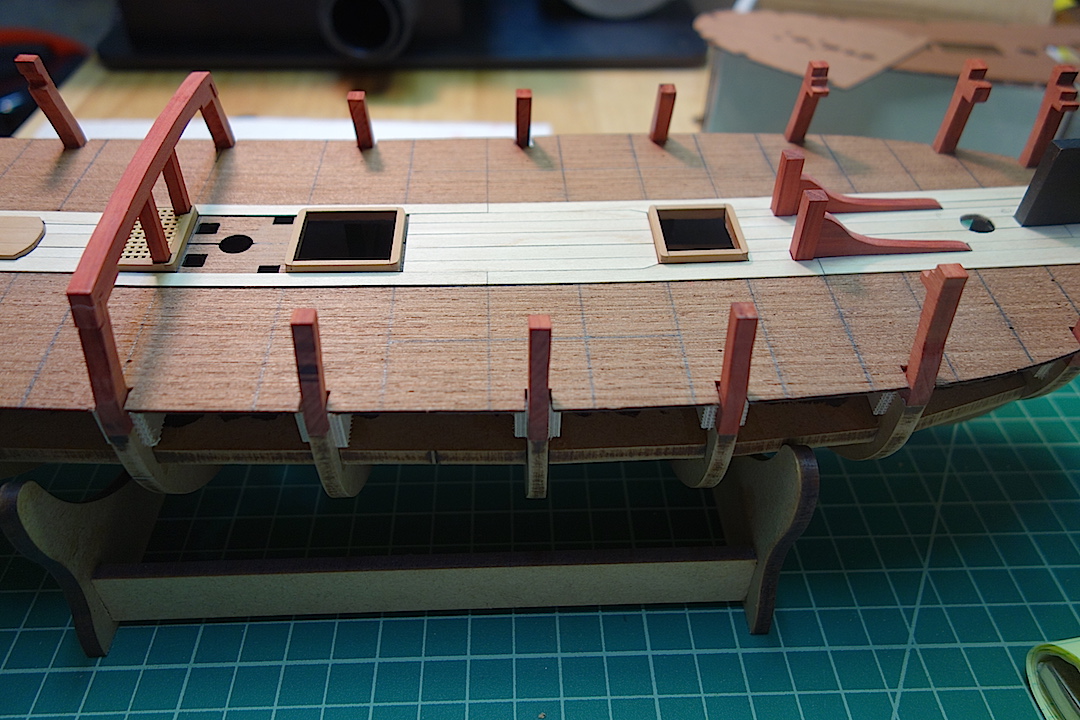
 I mentioned that I was going to attempt to plank the upper deck according to the plan in TFFM. I decided against adding curved planks given my skill level, the fact that I had limited sheets of maple, and probably most importantly, the fact that really the only visible planking will be at the waist, which is pretty much straight runs, while the ends will be hidden by the forecastle and quarterdeck. So, I cheated a bit at the ends of the ship as you can see below (particularly at the stern, which will be hidden completely I think), but I did manage to add the four rows of anchor stock planking from TFFM.
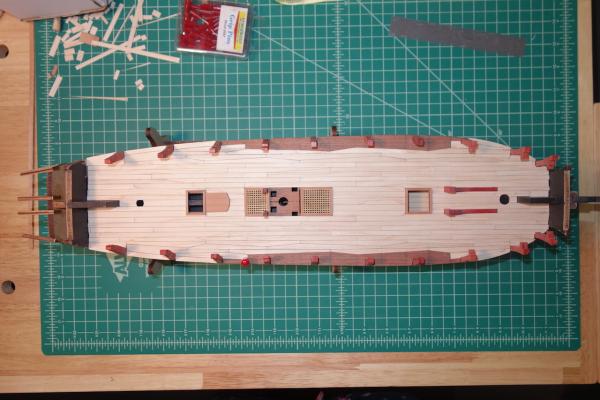

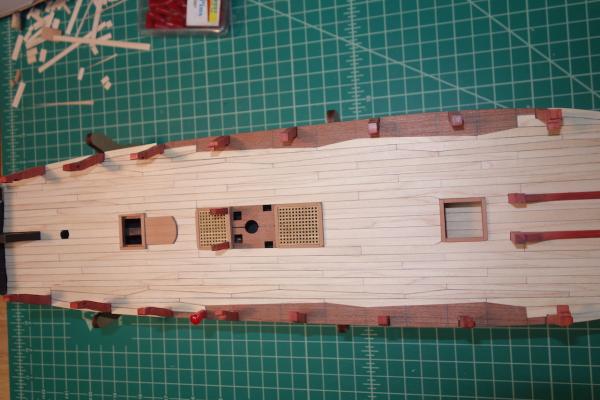
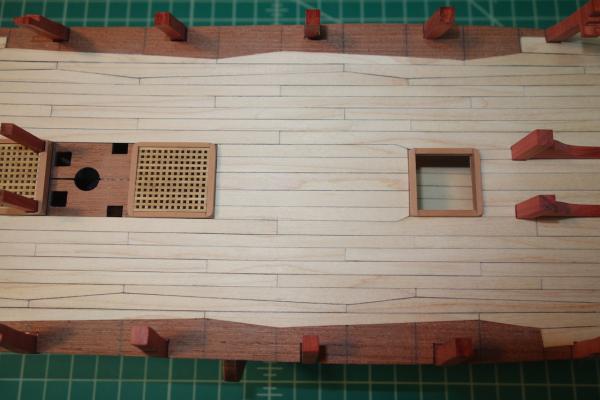
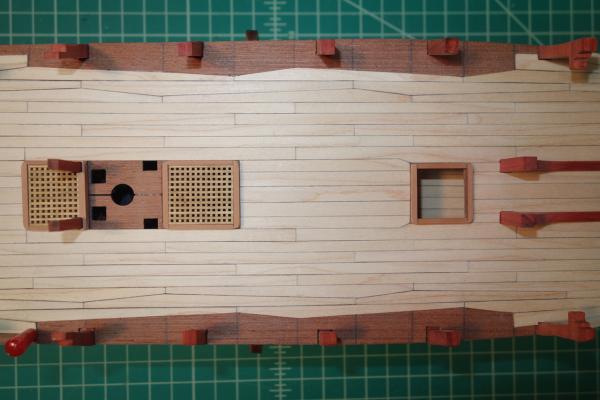
I'm pretty excited as to how the upper deck is coming out. The anchor stock planking was cut and sanded by hand, with some of the trickier ones taking a good hour or two each to create and fit. Despite the labor, all in all, they weren't as hard to do as I feared (it certainly helped that I was doing them as straight runs). I like the look of the anchor stock planks, and will probably use anchor stock planks for the wales if that ends up being historically accurate on this ship.
Some of the darker lines I think/hope are from the edges of one plank sitting higher than the adjacent planks from the deck camber. I think after sanding the deck down, everything should look a lot more uniform.
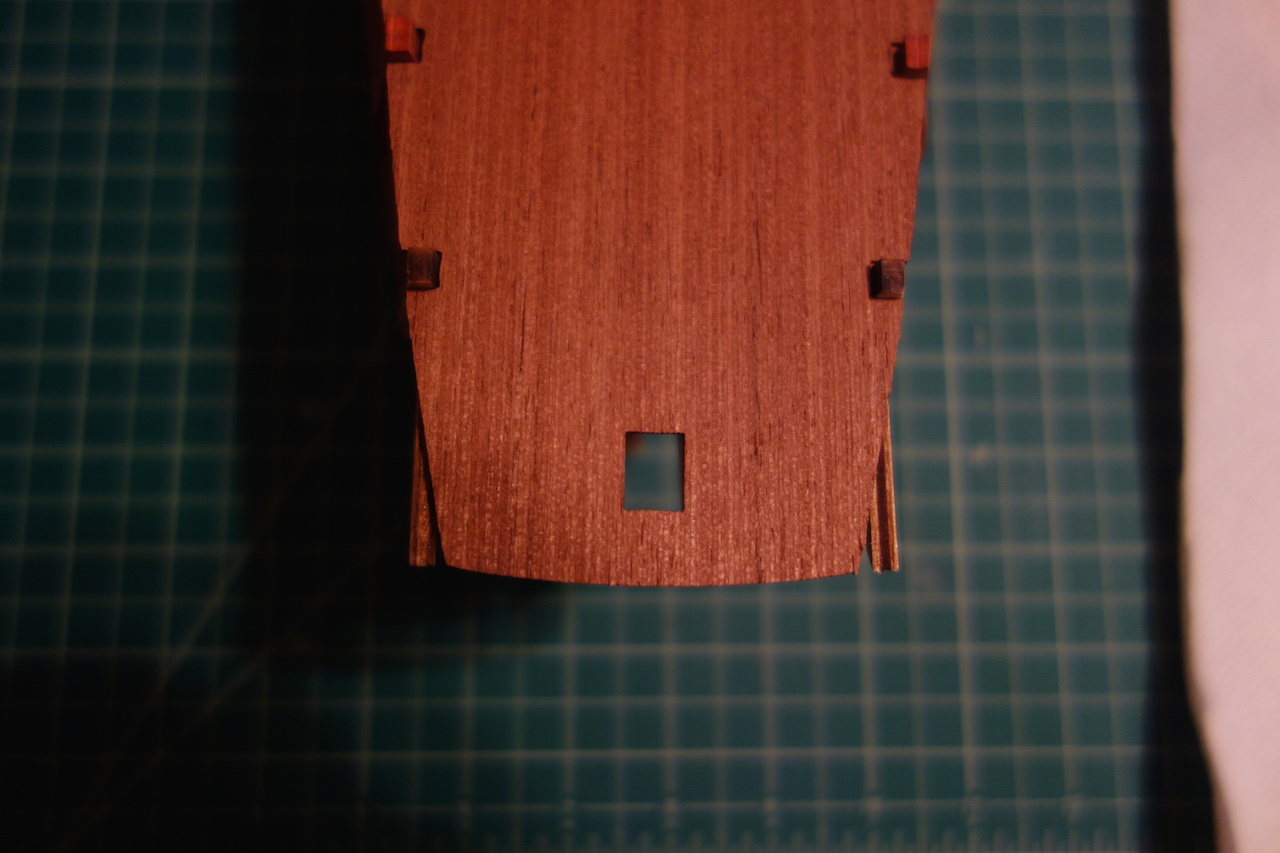
I'm at the point where I'm going to switch gears and work on the gunport patterns. The extensions for bulkheads 5 through 7 end up getting removed, and so I'll probably mark out on card the patterns for the two remaining anchor stocks remaining margin planks wait to install them until after the bulkhead extensions are removed.
Thanks for looking in!
- billocrates, mtaylor, egkb and 6 others
-
 9
9
-
-
Thanks BE. I have to thank Alistair for the butt planking for the hatches - don't think I would have come up with that on my own
It certainly takes longer than the standard technique, but it seems well worth it.I'm leaning towards the darker blue as well. I'm also happy to share the results of the stain and wood tests. The stains seem to be a very nice alternative to paints if you want to avoid the thickness and uniformity of using paint, but don't mind highlighting the wood grain. I'm encouraged so far, but we'll see how this experiment plays out on the model though when I get to that point
-
Thanks guys. The General Finishes stains are very easy to use, clean up nicely, and have no smell to them. I haven't decided on the full color scheme yet. For the friezes, the fallback would be black. For the friezes, the darker might be more accurate as I think the frieze background was usually a grayish blue. But the light blue could work too.
I stained the gratings with an oil-based Minwax stain a few months ago, and they still stink. I bought replacement gratings so am going to redo them using GF stain.
-
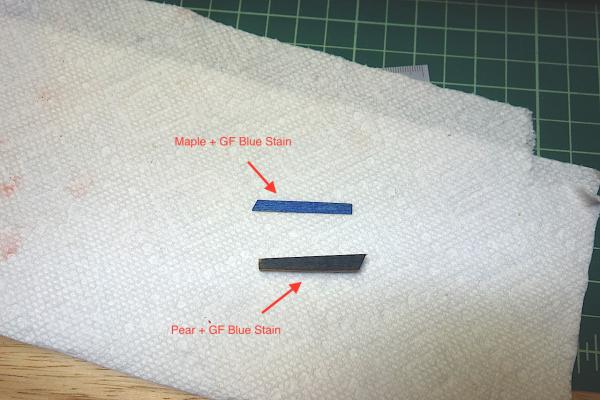
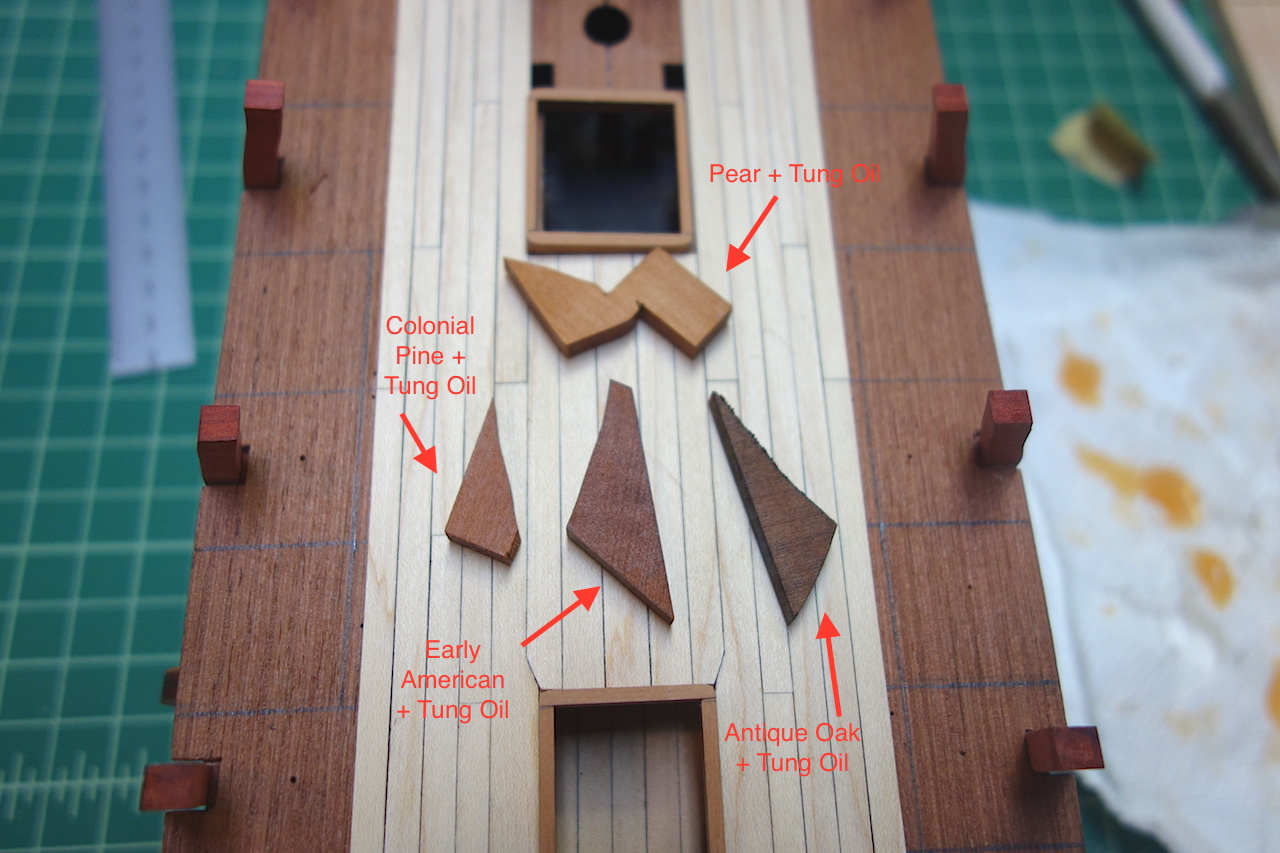
Here are some pictures of my stain tests using tung oil. In the picture below, you can see the hatches are in natural pear, the top piece is natural pear with a tung oil finish, and the three below are different General Finishes stains with a tung oil finish (the "Colonial Pine" is actually called "Country Pine." Still not sure which I'll go with. I think i'll be staining black the wales and upper deck hull planking between the wales and the copper line, so it might be better to go with a lighter brown. But, the Antique Oak still looks pretty good with black.

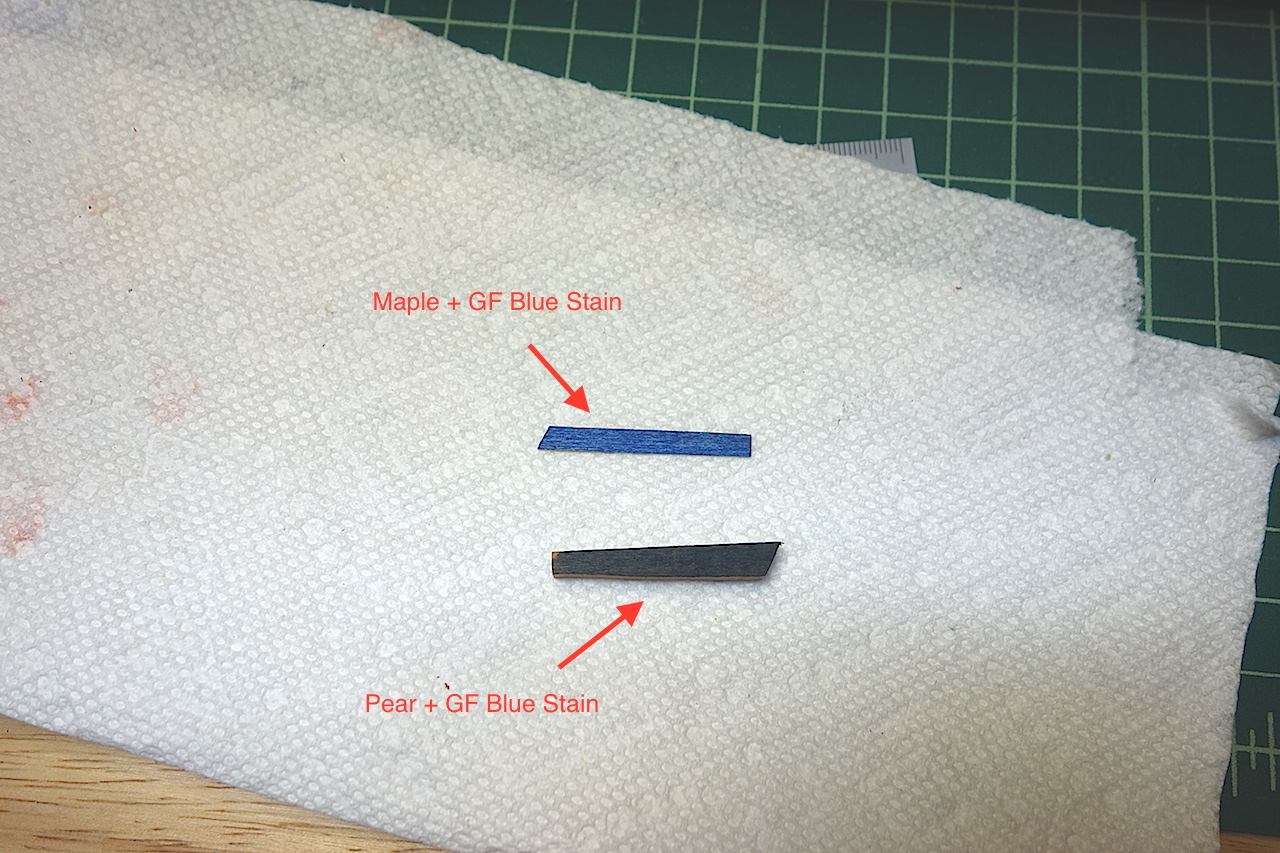
The next pictures show General Finishes Blue Stain applied to both maple and pear (no tung oil applied). The stain on the maple comes out a nice french blue, while the stain on the pear comes out as a darker blue/green/gray - a color very similar to the blue on the back jacket cover of TFFM 2.
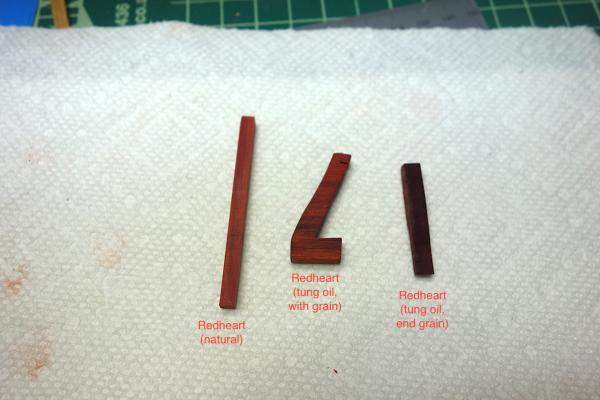
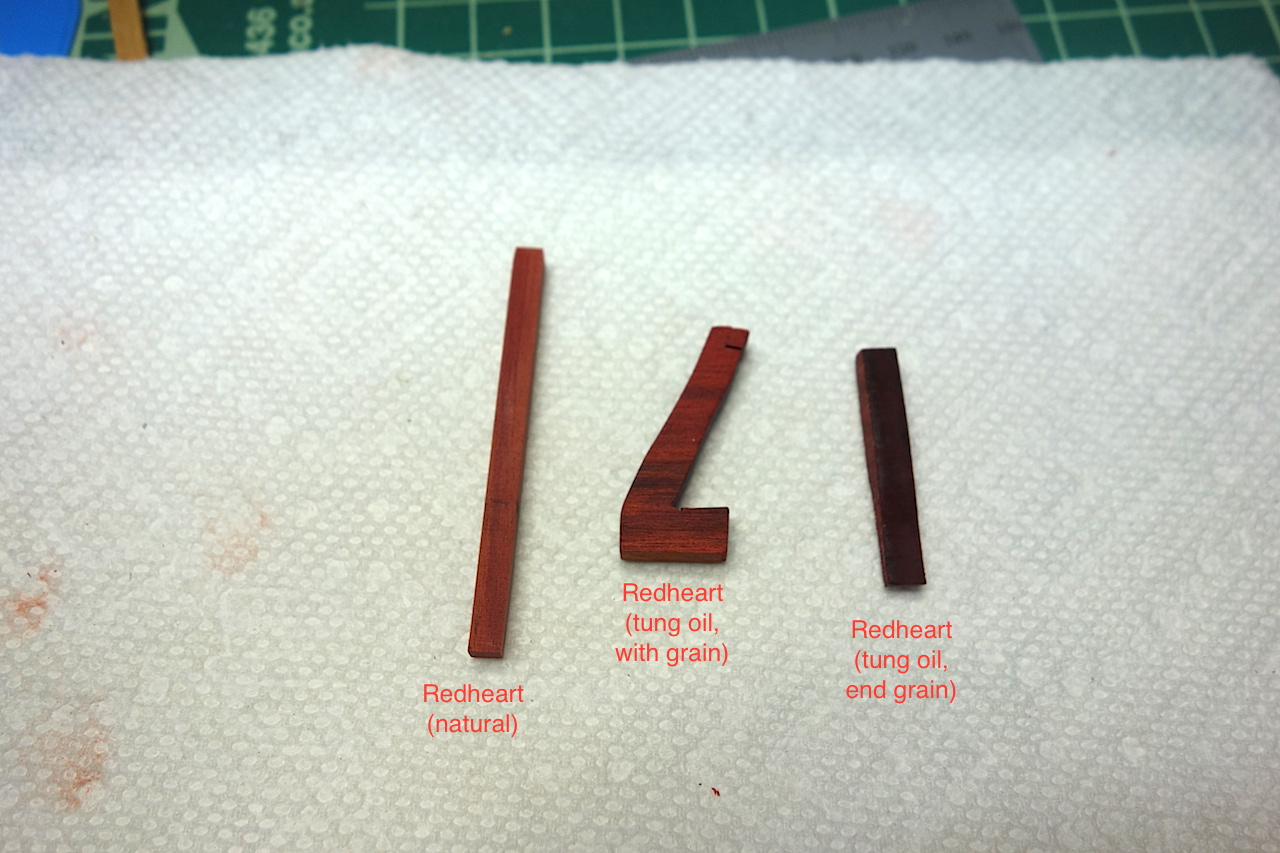
Finally, here is a picture of my experiments with redheart. The first picture is the wood without the finish, and the next two include tung oil finishes. The tung oil finish on the second picture really makes the wood come alive, but it's quite dark when applied to end grain sections.
-
-
Thanks very much Martin. I still need to sand down the deck and add a finish to it (likely tung oil). I'm very happy with how it's looking. Maple is a pleasure to work with - there are different types though with different colors and characteristics (hard vs. soft, silver, more mottled grains, etc.). Relative to holly, it's very light in color but with more darker waves of grain - at least this is comparing Jeff's maple with his holly. I actually prefer the waves as I'm not looking for that painted look but want wood characteristics to come out. It was a lot cheaper than holly also.
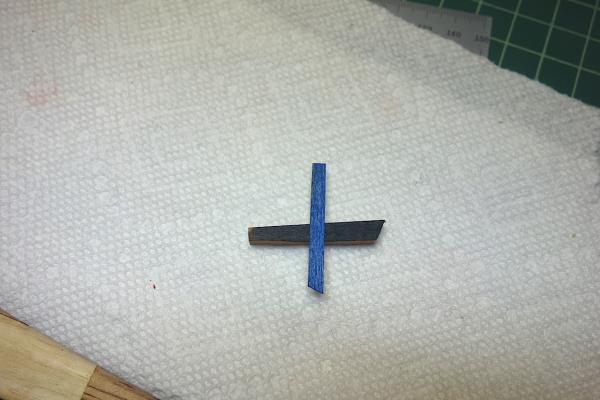
I spent some time last night with my stains and tung oil to see how the end product after the stained pear was oiled. I'll try and post pictures tonight. The brownish stains that I used on the pear look absolutely gorgeous when oiled - much nicer than had I gone with walnut I think. I'm very excited by the results, and will have a hard time picking which one to ultimately go with. I also tried the blue stain on scrap maple and pear for interesting results as well. As can be expected, the maple, being a lighter wood, came out a very nice french blue. It didn't have that painted look, but did look like wood. The pear on the other hand came out a sorta darker bluish-greenish-grey, similar to the blue on some of the models here (I think Alistair's Fly is relatively close) and the Pegasus blue on the back of the TFFM jacket (volume 2 I believe, not sure if the others have the color scheme). Interesting options for sure.
I also oiled some scrap redheart. With the grain, the redheart takes on a very nice color and tone. The end grain turned very dark, almost black though
 I wish I had experimented on the redheart earlier, as I might have to take a look at how the grain is running on the visible portions of the bulkhead extensions and other redheart areas and see if I might need to replace some of the pieces. I'm going to test to see if wipe-on poly or varnish or shellac minimize this darkening effect.
I found some good links on redheart below in case you are interested:
Color changes in wood: http://www.hobbithouseinc.com/personal/woodpics/_color%20change/index.htm
Preventing color changes in exotic woods: http://www.wood-database.com/wood-articles/preventing-color-changes-in-exotic-woods/
Finishing exotic and tropical hardwoods: http://www.wood-database.com/wood-articles/finishing-exotic-tropical-hardwoods/
-
Hi Ian, thanks very much. I think my Badger has a few parts Red Ochre to it, along with a few parts Landlubber Mike
I should have mentioned that I made a couple of basic mistakes that probably significantly contributed to the blade skipping over the straight edge and a couple of times almost cutting off the tip of my finger. First, I used a very thin beam ruler, so the blade didn't have far to jump. I also found that I was using a dull blade - another big no-no. Live and learn I suppose - just glad I didn't do significant damage.I like the Maun safety rule and Swann Morton - they seem like a very worthwhile investment. I better find Santa soon and ask for them - unless he was planning on giving me the usual lump of coal.
-
Thanks very much Jason. I'm actually thinking that I'll stain the pear a darker color (like a walnut color) as I want the model to take on a darker hue like the Le Cyclope below. I'm going to match the hatch coamings, ladders, deck items, etc. to the upper hull planking I think. I'm also considering using black stain for the wales and the part of the hull planking between the wales and the coppered section - I like the look on the Le Cyclope, and Realworkingsailor did it to good effect on his Pegasus as well:
- Beef Wellington, egkb, mtaylor and 1 other
-
4
-
I've made some more progress on the deck planking. I'm planking the upper deck according to the TFFM plans, with the exception that I'm not curving the plank runs fore and aft. I figured that might be too much for my skill level at this time, plus, really the only planks that will be seen are the ones at the waist which are generally straight. Another big factor is that I'm down to two sheets of maple from Jeff and still need some for the quarterdeck and forecastle planking, as well as the gangways. Hopefully I should have enough. Also, since the planks under the the quarterdeck and forecastle won't be seen, I haven't been as concerned about getting pristine planking.


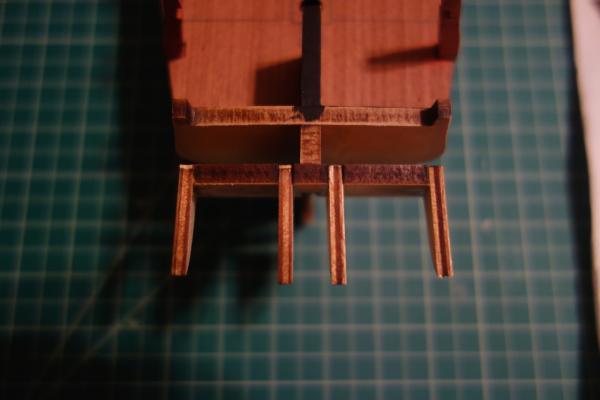
Next up is to add four rows of anchor stock planking and the margin planks. I'll probably also add the gunport patterns soon so that I can more easily finish the upper deck planking. I made a mistake when first gluing the stern extensions as you can see in the pictures below in that I glued them perpendicular to the last bulkhead. When I dry fitted the quarterdeck template, I realized the outer extensions needed to curve inwards, so that change was made - thankfully without much issue.

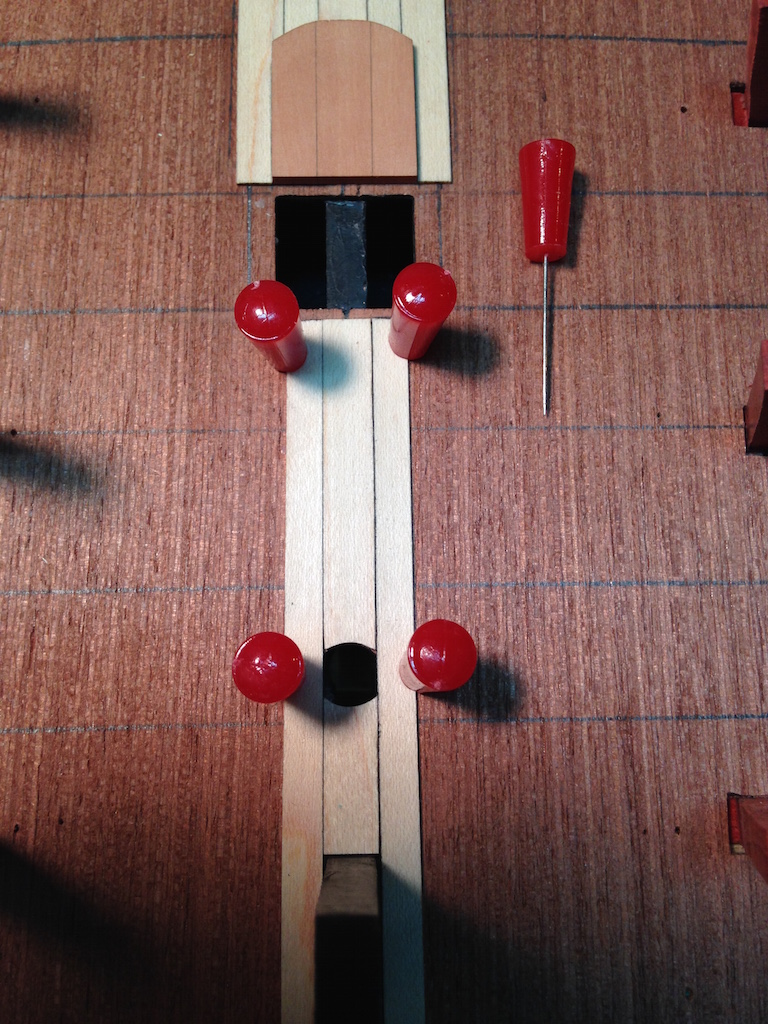
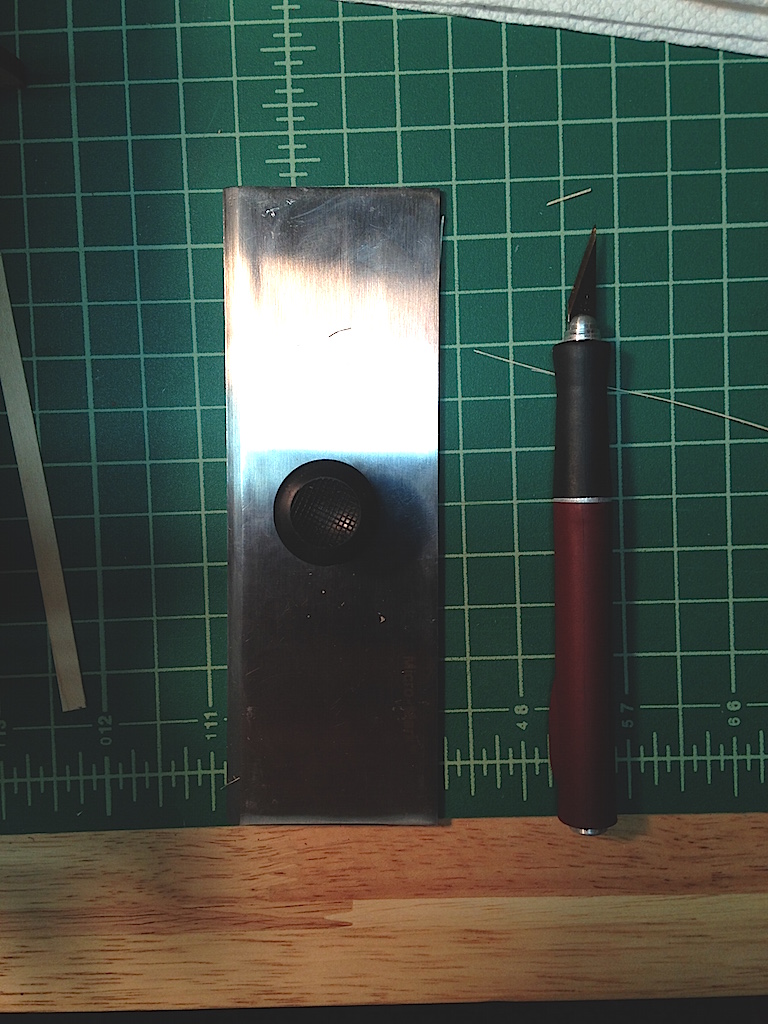
For the planking, just wanted to show a couple of tools that I've found very helpful. The first picture is of these thin red headed pins I found at Hobbylinc.com - they are very sharp and thin, so I was able to push them through the deck ply template, and use them to keep the planks pressed up against one another, as well as down onto the template when glued. The second picture is a handy straight edge that keeps your fingers well away from the x-acto blade when manually cutting your planks. This can be found at Micromark. After gashing my fingers a couple of times when the x-acto blade skipped over the edge of a thin ruler, this has been a finger saver.

-
Let me add my welcome to the Swan club. Looking forward to your build log
-
The perfect recipe for a workshop for scratch or semi-scratch builders:
1 part Byrnes table saw
1 part Byrnes thickness sander
1 part Byrnes disk sander
After simmering, add in 1 part Sherline Mill and 1 part Proxxon planer
Finish with Sherline lathe and mini drill press
The above recipe will require a large portion of lettuce (green) but the finished product should last a lifetime
I hope this doesn't derail the thread too much, but I was wondering if someone could explain to me why a mini drill press is needed if you have a Sherline Mill? I have a Sherline mill, and was hoping to use it instead of my Dremel drill press.
I have all of the above except for the Planer. The tool most used out of them all is the Byrnes Table Saw
.Apart from the obvious uses you can't beat it for making very exact rebates, for example in Mast Tops :
Or for cutting planks to half thickness for the Top Floors :
 Danny
DannyThat's really nice work Danny. This may be a dumb question, but how did you support the pieces as they approached the blade? I've seen examples of this kind of work and always wondered how people accomplished it as I worry about my fingers being anywhere the blade.
-
Pristine work Kester. Very nice job! Precise rigging really makes for a nice model
-
Hi Martin, hope you and your family had a wonderful Thanksgiving
Really nice work on the first planking - you're really flying along! I forget, what are you going to use for the second planking?
By the way, I was near Woodcraft over the weekend and picked up a can of the General Finishes "Whitewash." With Jeff closing HobbyMill, I have been thinking about wood for future builds, which for me includes the Charles Morgan. The Morgan has a lot of white, which would be expensive to replicate with holly (or difficult to source straight enough stock for), so I have been thinking about alternative. The Whitewash looked perfect (to me at least) on Jeff's maple, where it gave it a nice white that wasn't garish at all and let the character of the wood come through (where paint covers it up). It even looked pretty good on pear and walnut. I think it combines the best of paint and stains - easy to apply and keeps wood character like stains, and colors well like paint. Just thought I'd pass that along in case you are thinking about white on your build.
-
Nice work Jason. Very clean first planking!
Are you going to copper her (or is it a him)?
-
-
-
Beautifully done deck Jason. What wood is that?
-
Thanks Martin. With you slightly ahead of me on your Fly build, I've learned a lot from your log. The discussion on hatches and gratings was very informative!
Along with generally having a different color for the bitt cross pieces, I've been thinking of a modification for the riding bitts cross piece in particular. That cross piece had an elm "backing piece" - essentially a replaceable piece of wood given all the wear and tear on the aft side of the cross piece from the anchor cables. I've been toying with the idea of highlighting this by either using redheart for the cross piece and pear for the backing piece, or pear for the cross piece and boxwood for the backing piece.
-
I agree 100% Alistair. It's funny, a couple of years ago when I bought the Pegasus kit, I was originally planning on building it straight from the box with some modifications around the margins. The more I looked at BE's log (and yours and the other Swan class builds here as well) though, I realized I wouldn't be happy with that, and decided to push myself to building the best model I can.
That's what's really great about MSW and the community here - you learn a lot from folks who are generous with their time in sharing their builds in a very friendly and supportive fashion. I tried to share as much as I could on my Badger build to give back - it would really make me feel good to see others read about my bumbling efforts and build much better Badgers in the future. Even with limited progress on my Lyme build, I've had a lot of fun spending the dozens of hours researching and trading thoughts with Ian and others.
-
Thanks Martin. Yep, the bitts, along with the quarterdeck and forecastle beams, are of redheart. I'll do the bulwark planking and cannon carriages in it too.
I'm wondering about the cross pieces though. I'm wondering whether I should go with redheart, or maybe switch it up a bit and use pear for the cross pieces.
-
I have the Northwest Short Line version - it's pretty good, and definitely is better than hand sanding. I don't use it much though, as I find the Byrnes disc sander to be my go-to option. Frankly, I can't see how I would ever be a decent modeler without the disc sander - if you have the money and space, I would highly recommend it.
-
Thanks guys. Alistair, thanks for pointing out the technique of butting the planking against the hatches. I think it makes for a very clean look, and you don't run into the issues of having the hatches sit halfway on a plank.
BE, your build is the gold standard of the Swan class builds. I think I speak for most of us builders that if our builds came out half as nice as yours, we would be very happy.
-
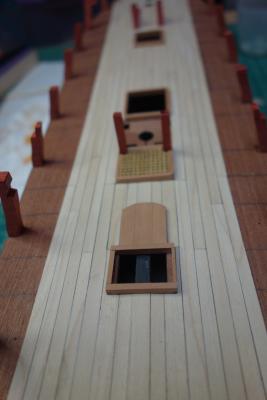
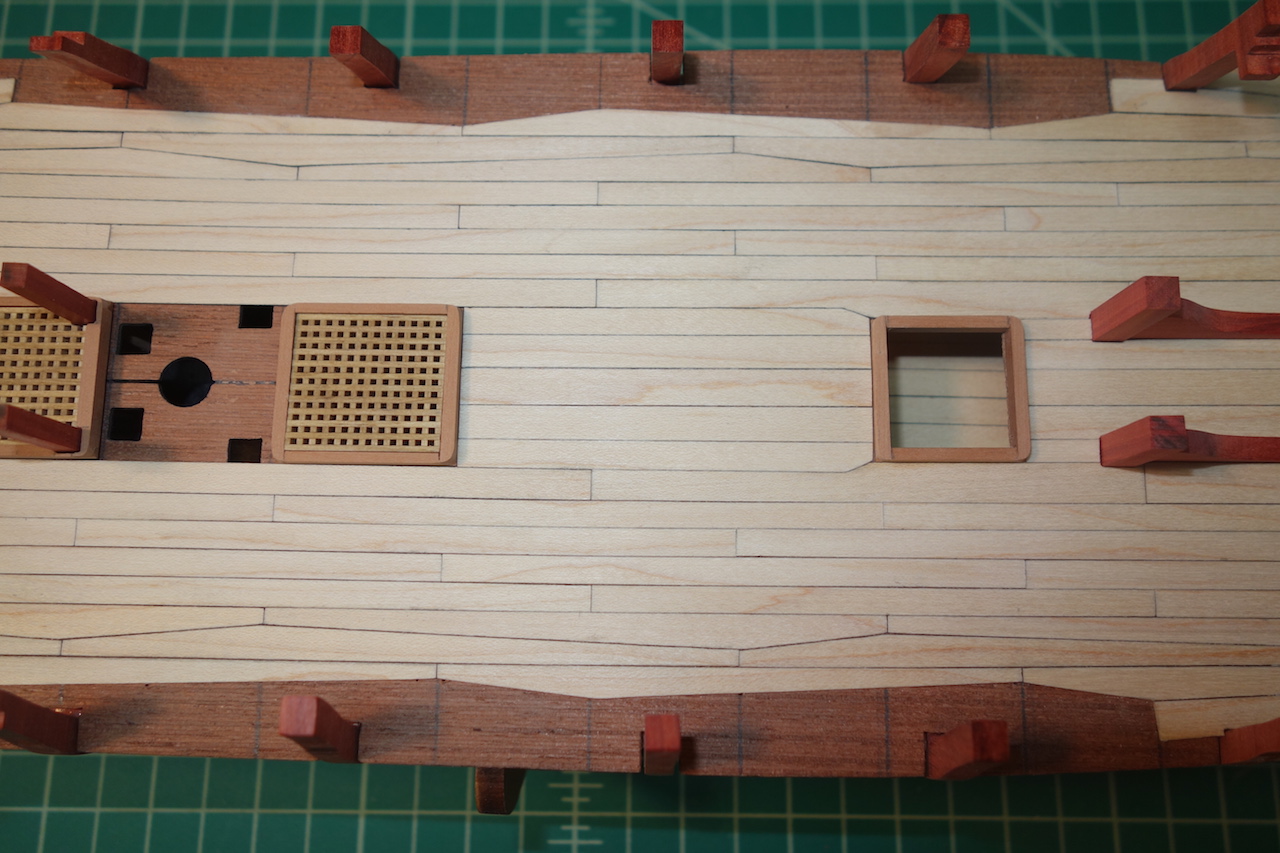
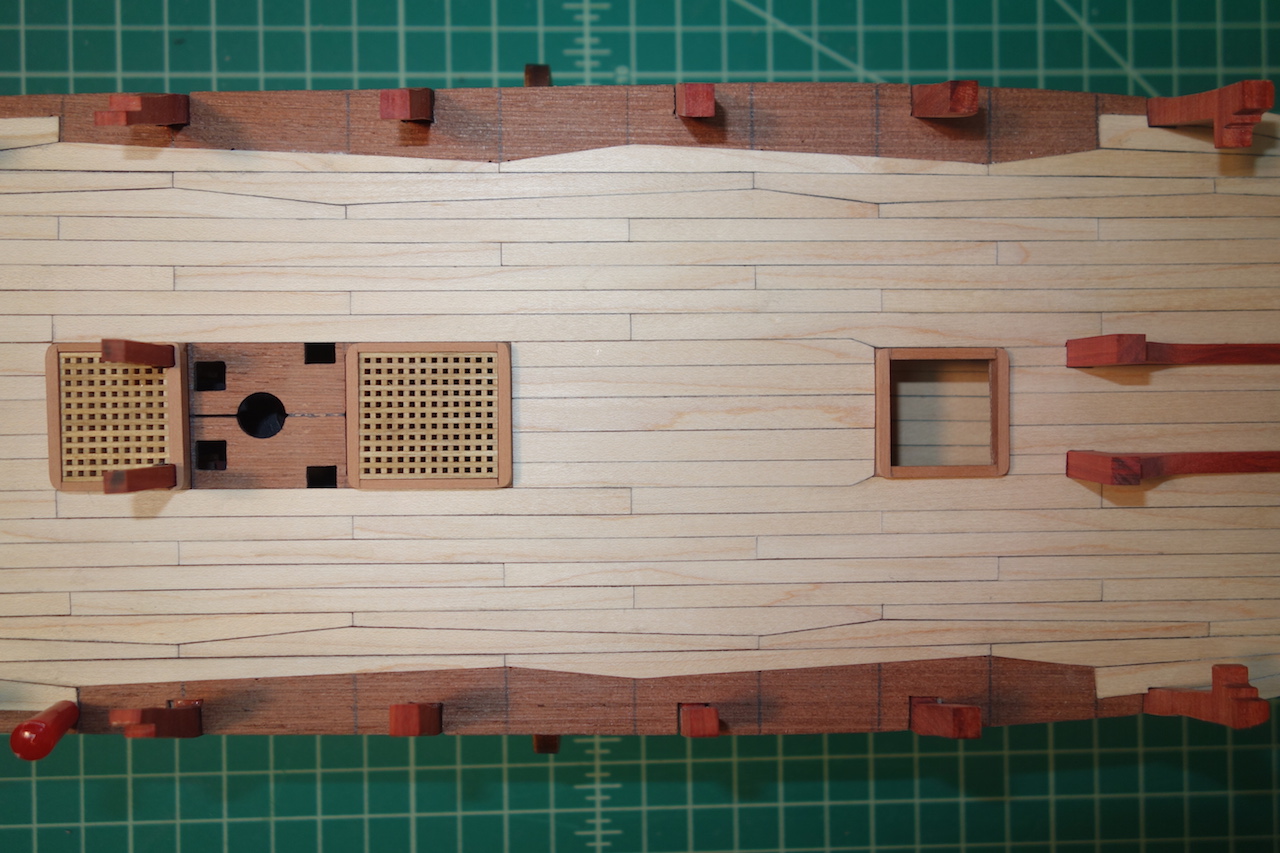
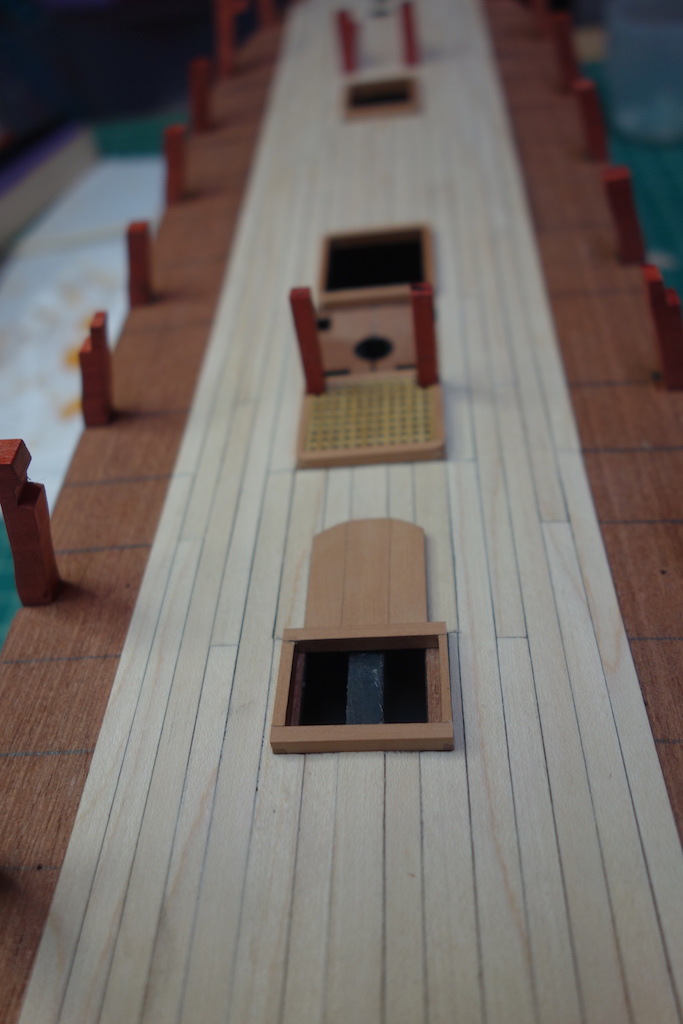
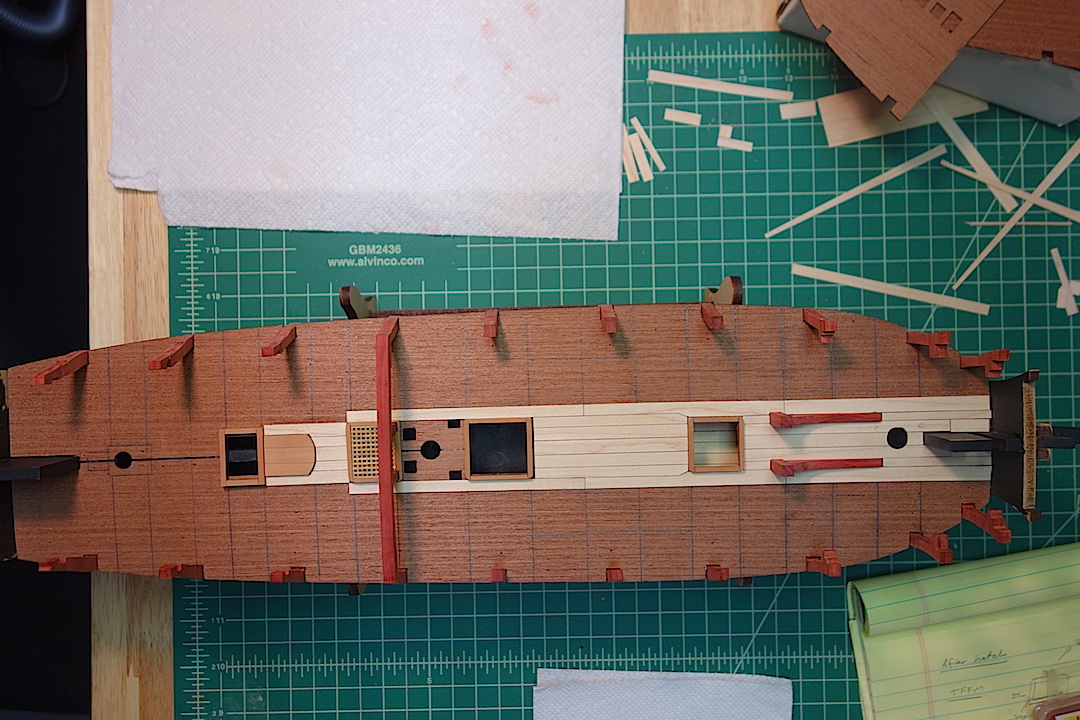
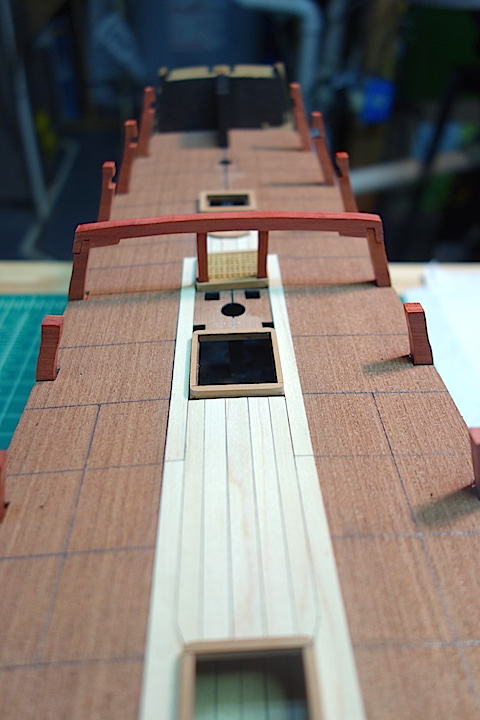
It's been a while, but I've made a little progress (work and kids are taking a lot of my time these days). I've managed to get some additional planks down, and have been adding final touches to the hatches and capstan step. Also have been slowly tweaking the main jeer bitts and riding bitts. Things are coming along pretty nicely I think. Here are some pictures - nothing aside from planks has been glued down to the deck yet.


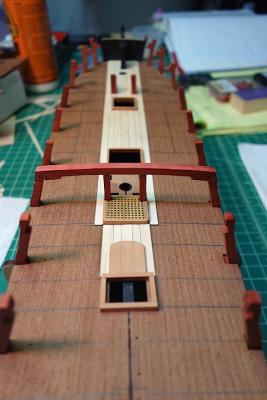
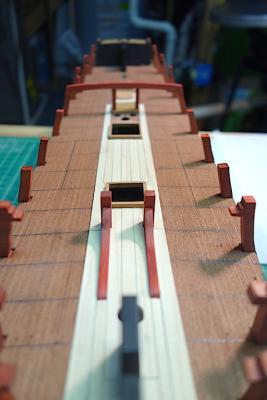

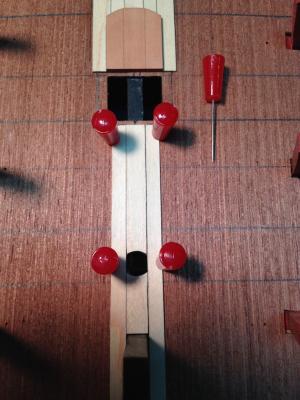
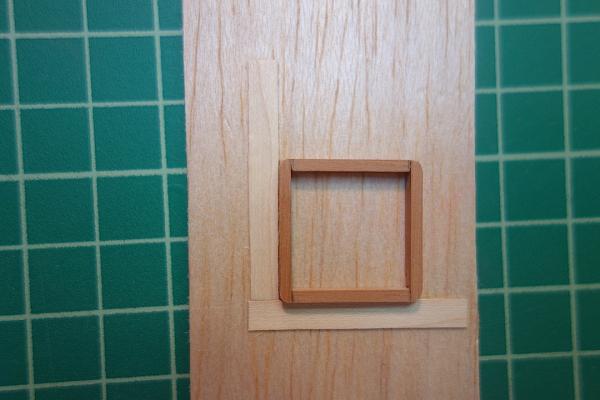
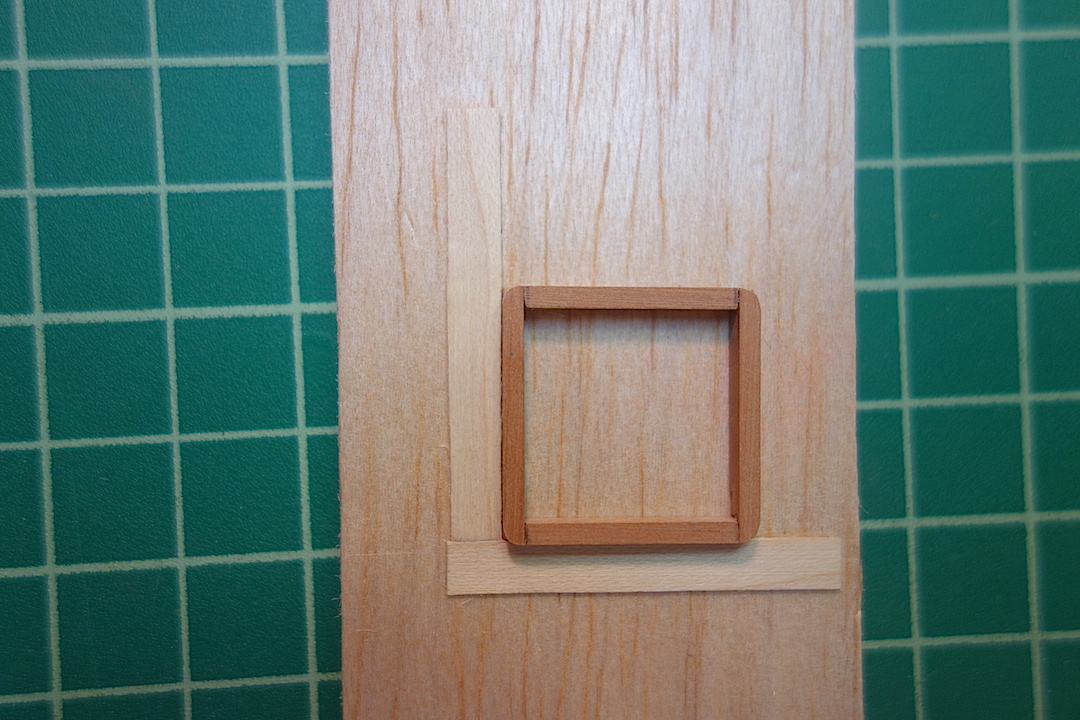
I started rounding the corners of the hatches. With the planks butting up against the hatches, the hatches are square at and below the level of the deck planking, and have rounded corners above the deck planking. So, here is my incredibly complex jig that I came up with to round the corners. Essentially, all it amounted to is adding two pieces of planking material at 90 degrees to each other, dropping the hatch into the corner, and using a sanding block to round the corner. I still need to sand camber into the tops, which will come next.
On the deck planking in general, my plan was to add curved planks as in the TFFM model planking pattern. I'm not sure my skill level is up to the task, so I nixed that idea and thought I would take a short cut by using angled planks under the forecastle and quarterdeck. But in thinking a little bit more about it, different rows of planks in the TFFM pattern start to curve at different points along the deck. I started thinking that if I had them all become angled at the same point, then the deck would have an odd look to it. So, I've decided to use straight planks instead, but will use the TFFM pattern for locations of ends of planks, the anchor stock planking, etc.
I still need to gear up the courage to work on the decorative details of the bitts, and figure out whether I want to use stains on the hatch coamings and upper hull planking. I go back and forth, but I think the hatch coamings at the least will need to be made darker in some fashion.


HMS Pegasus by Landlubber Mike - Amati/Victory Models - Scale 1:64
in - Kit build logs for subjects built from 1751 - 1800
Posted
I agree with Alistair. There's a lot more surface area connected with the anchor stock planks which probably is a bit more rigid than just straight runs.