


Landlubber Mike
-
Posts
4,504 -
Joined
-
Last visited
Content Type
Profiles
Forums
Gallery
Events
Posts posted by Landlubber Mike
-
-
-
Beautiful work!!
- Old Collingwood, Jack12477, kgstakes and 1 other
-
 4
4
-
3 hours ago, Javlin said:
Mike I go MrColor 1500 primer grey as a base coat when dry buff with a worn out 800 grit scotch brite smooth it out.I then spray Tamiya acrylic either gloss or semi-black and then hit with the AlClad back again to a lacquer.This plane being so big I used gloss black from a rattle can something I just had on hand.
")
Thanks for that info! Came out really well!
- Old Collingwood, Jack12477 and Canute
-
3
-
Just now, Javlin said:
I used AlClad 105 (polished AL.),#101 Standard AL.(panels) and Steel.Thanks I have been wondering where you have been of late?
I've been drowning in kid stuff the past couple of months, but now their travel sports are done so I have time to catch up on things here and at the bench. I'll try to post some of the things I have been working on, including, of all things, a Revell VW Samba bus for one of my kids.
I need to try those paints out. I like using Vallejo metal colors for smaller things like engines where you don't need a uniform finish on a large area. I find that 95% of the time, Vallejo Metal sprays perfectly, but there are times when you sorta get these dark swirls where the paint doesn't seem to want to stick to the undercoat. It's probably user error - maybe I spray too much/close, or I have some oil or other residue from my fingers on the model. Can't tell which.
I also tried the Mr. Color super metallics and they spray perfectly, but I don't think you quite get the range of metallics that Alclad puts out.
-
On 11/14/2025 at 7:25 PM, woodartist said:
I started doing model ships 4 years ago when the arthritis started. Before that for 30 years my hobby was woodcarving. I carved everything but enjoyed doing birds most of all. I lost use of my right arm in 2010 so relearned to carve with just my left hand, not as fast as before. Working with wood soothes the soul like nothing else.
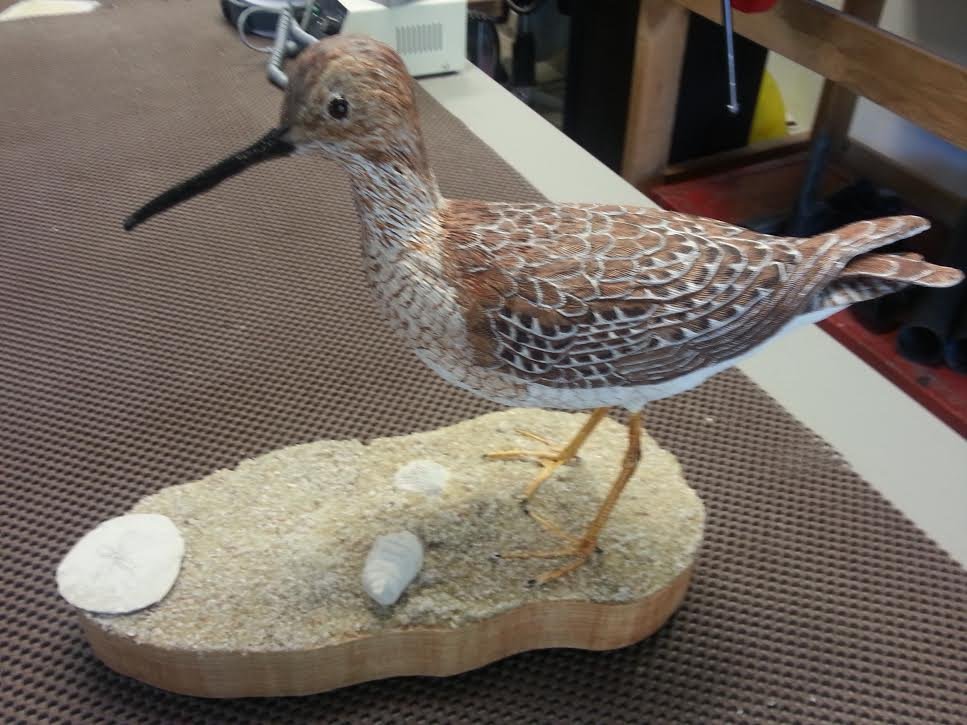
That's amazing work! I'm always impressed by wood carvers. Modelers usually add material to build a subject, but wood carvers take material away (and it's not easy to put it back if you make a mistake!). Really impressive!
There was another modeler here that posted some of his bird wood carvings years ago. It's something that I might try when I retire, but it seems very daunting not only from the carving aspect, but also the painting aspect to make them look so lifelike. I really love your sandpiper (I think that's what it's called).
- Canute and Old Collingwood
-
2
-
On 11/6/2025 at 3:58 PM, kgstakes said:
 On 11/6/2025 at 3:58 PM, kgstakes said:
Really nice build!! So many cool details on this subject, I bet it was a lot of fun to put together. Great job!
- kgstakes, Canute and Old Collingwood
-
2
-
 1
1
-
Holy cow that's nice! Really shiny bird! Well done my friend!
Can I ask - what paint did you use for the aluminum? Looks really nice!
- Old Collingwood, Canute and AJohnson
-
3
-
-
Coming along really nicely Biggles. The Chipmunk is another cool subject - great start!
- Canute, Jack12477, thibaultron and 3 others
-
6
-
-
Wow fantastic! Really nice job Alan, you've turned these into little works of art.
- Canute, Jack12477 and Old Collingwood
-
3
-
-
-
Wow, that came out fantastic!! Really nicely done man! With winter I think I can get back down in the workshop and will dust off my Pegasus - your build is very inspirational!
- Keith Black and Ryland Craze
-
2
-
Joelle, this is looking so good as per your usual high standards. I have the Hasegawa 1/700 kit with the Infini set in the stash. Your 1/200 build is a "big" inspiration!
Nice catch on the scale difference for the compasses - that would have driven me crazy had I experienced that!
-
-
-
7 hours ago, Canute said:
Interesting build. I'm in.
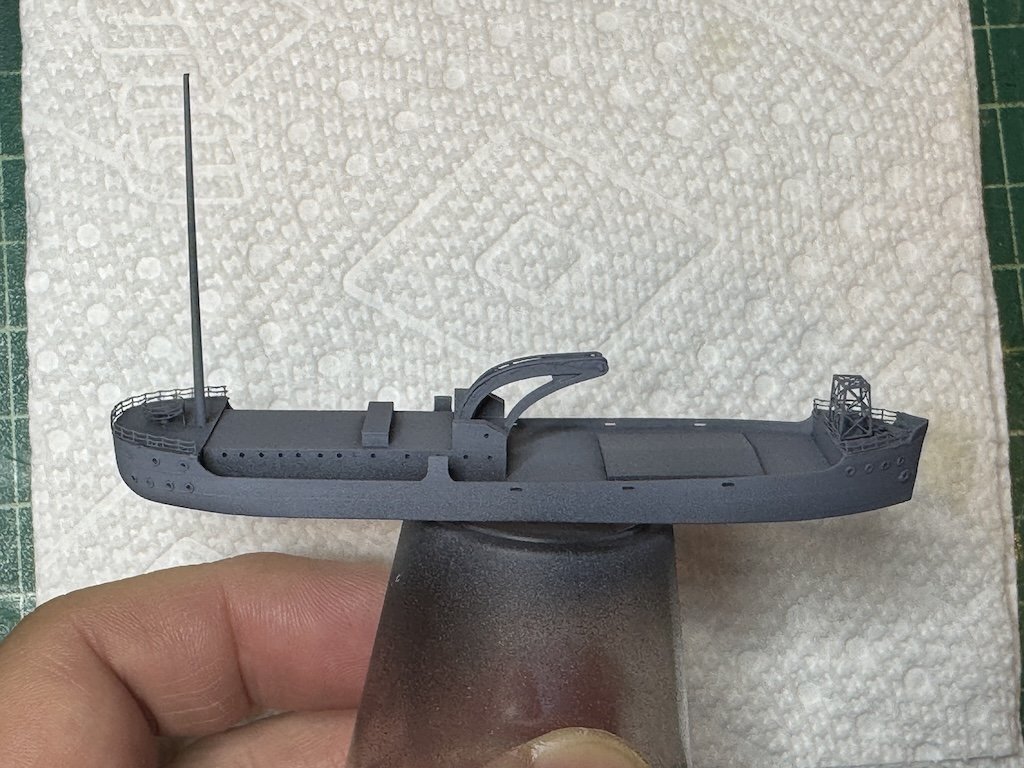
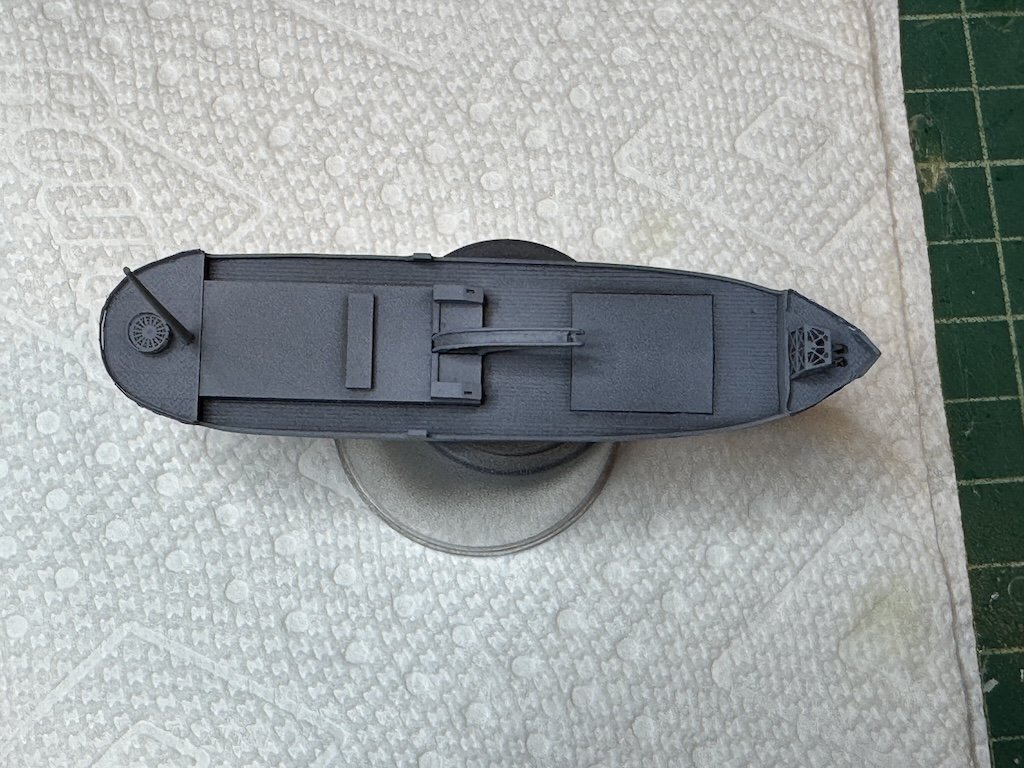
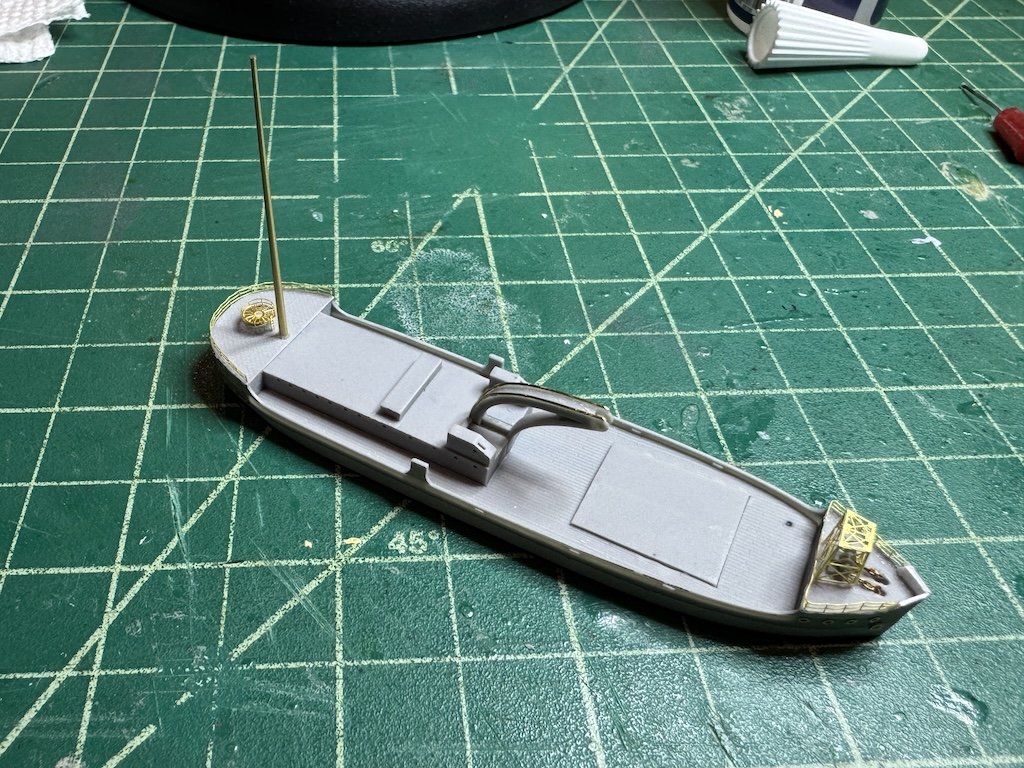
Kind of strange to see the vessel going bows on to the pier to load/unload. No pivot capability. The AB-1 appears to have a turntable. I guess the broader beam of the old battleship allows the weight of the lifted load to be off to one side.
The Seishu Maru is definitely a cruder version of the crane ship compared to the AB-1. No turntable, as the crane arm just slides towards the bow while pivoting upward.
Part of it might have to do with size. I’ll have to take a picture of the two side by side. I’m guessing the AB-1 is probably around 2.5 times the length of the Seishu Maru.
- AJohnson, Glen McGuire and Canute
-
3
-
1 hour ago, Glen McGuire said:
Where do you come up with cool things like this and why have you not told me about it before!! That looks perfect for my SIBs - a heckuva lot better than the pencil lines I've been drawing for a deck plank look.
Oh, and by the way, what a cool project you are working on, Mike! Can't wait to see how you present it in a diorama (with a hanging locomotive I hope)! The Seishu Maru looks like the type of industrial vessel that @Javelin might model, albeit a vintage one.
Hey Glen! Sorry to not shared it before. I have to say, having worked on a bunch of models in 1/700 scale, I think whenever I return to SIB modeling I will probably use a lot of photo etch, decking etc. from that world. Working in 1/700 has also gotten me to use other types of materials, adhesives, etc., which I think will come in handy.
@Javelin might indeed enjoy building this subject. I'm building this as a warm up to building this US crane ship - the AB-1 that was converted from the USS Kearsage. Five Star makes a very very nice kit for it so I'm hoping to learn a lot from this build to take to that one. It's a much bigger ship, and the crane arm is really impressive but a lot more complicated to build than the Seishu Maru:

- AJohnson, GrandpaPhil, ccoyle and 5 others
-
8
-
2 hours ago, hollowneck said:
Niiiice!!! Kool build. Get small Mike!
What would we do without those Bounty "Quicker PickerUpper" paper towels?
Thanks Ron! Part of the reason I had the paper towel was to get a better visual. My hobby mat is pretty stained at this point. The model at this scale is tiny, probably about 3" long, maybe 3.5".
Eventually I need to get back to wooden modeling, but it's a bit hard given that my father-in-law lives with us now and his bedroom is right next to where I have all my power tools. Really limits the amount of time I can spend there making any noise - at this point it's usually bad words coming out of my mouth for one reason or another.
- hollowneck, king derelict, Canute and 2 others
-
5
-
2 hours ago, ccoyle said:
Great idea! Something a little off the beaten path always makes an interesting diversion.
Thanks Chris! I tend to prefer these auxiliary ships, especially on the Japanese side where they converted ships intended for peacetime and other purposes for wartime auxiliary work. They have some quite odd looking ships!
-
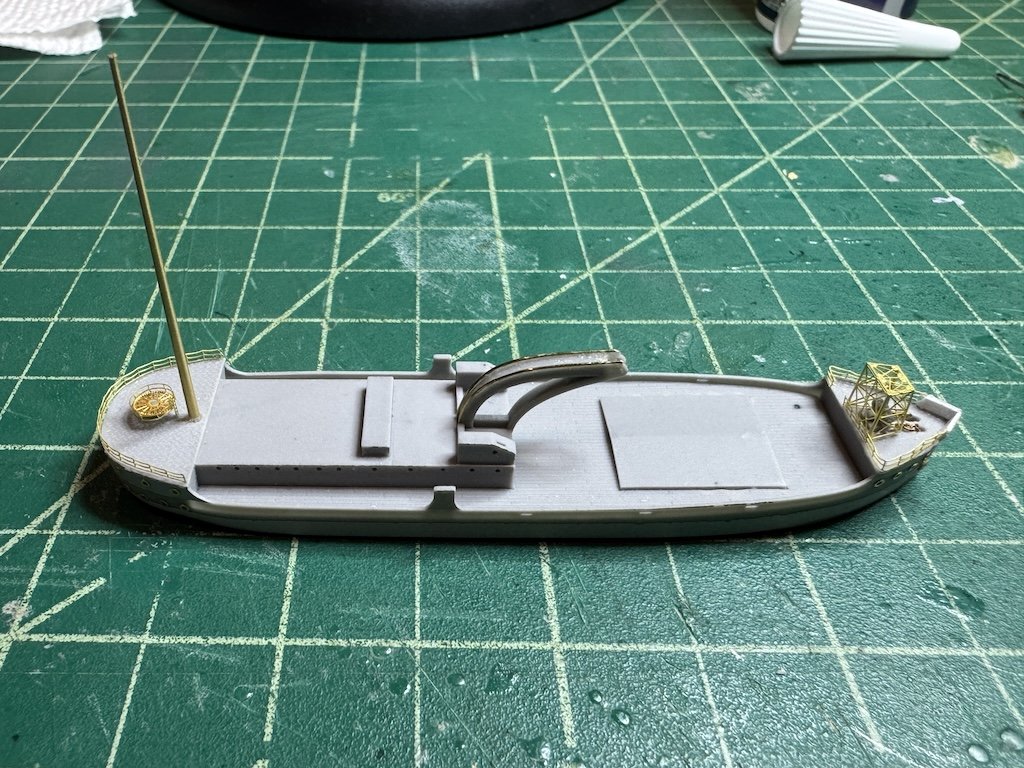
Where I am at the moment - took a lot longer to get here than I would have expected, but so far so good I think.
Thanks for looking in!
- ccoyle, madtatt, king derelict and 8 others
-
11
-
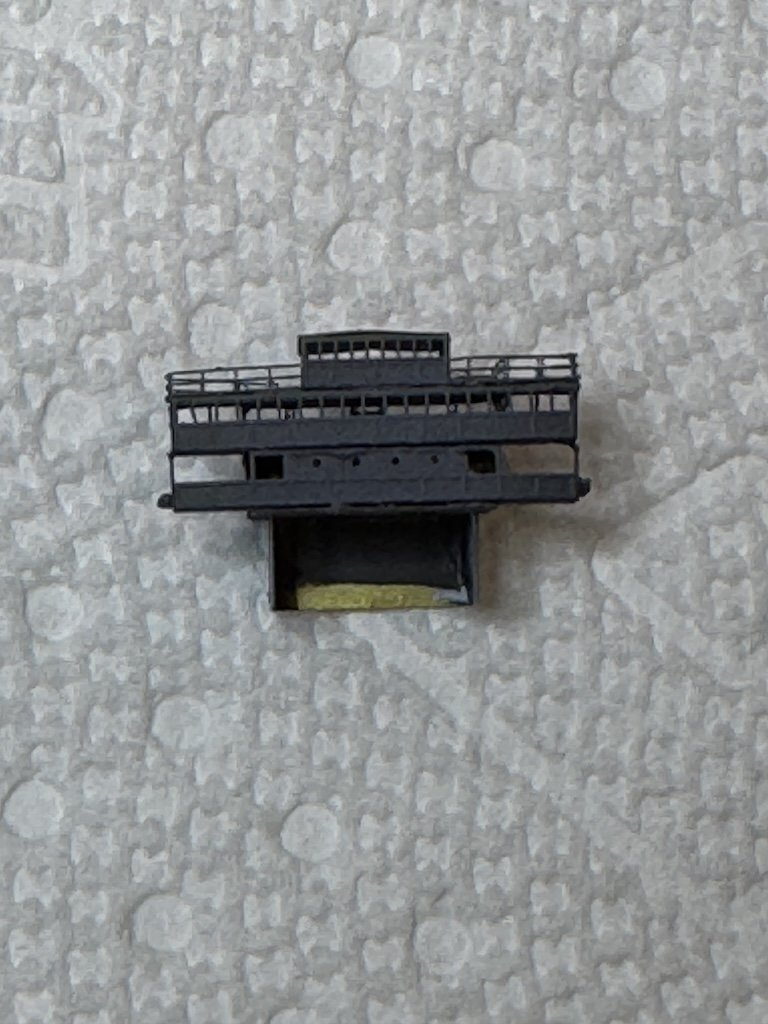
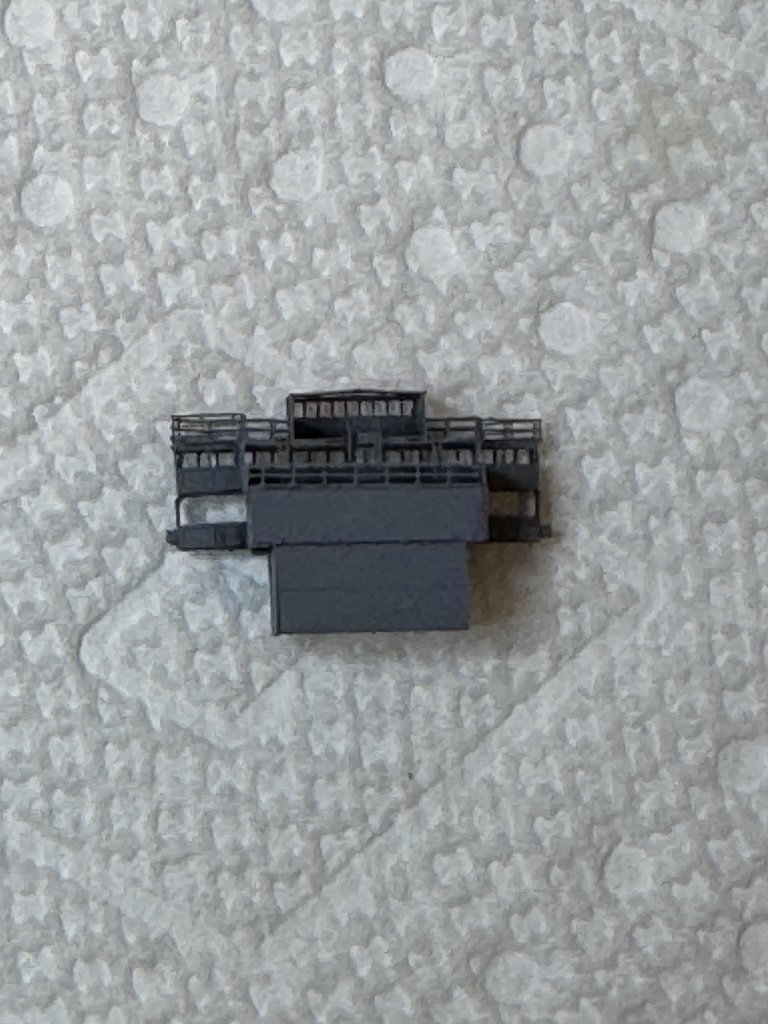
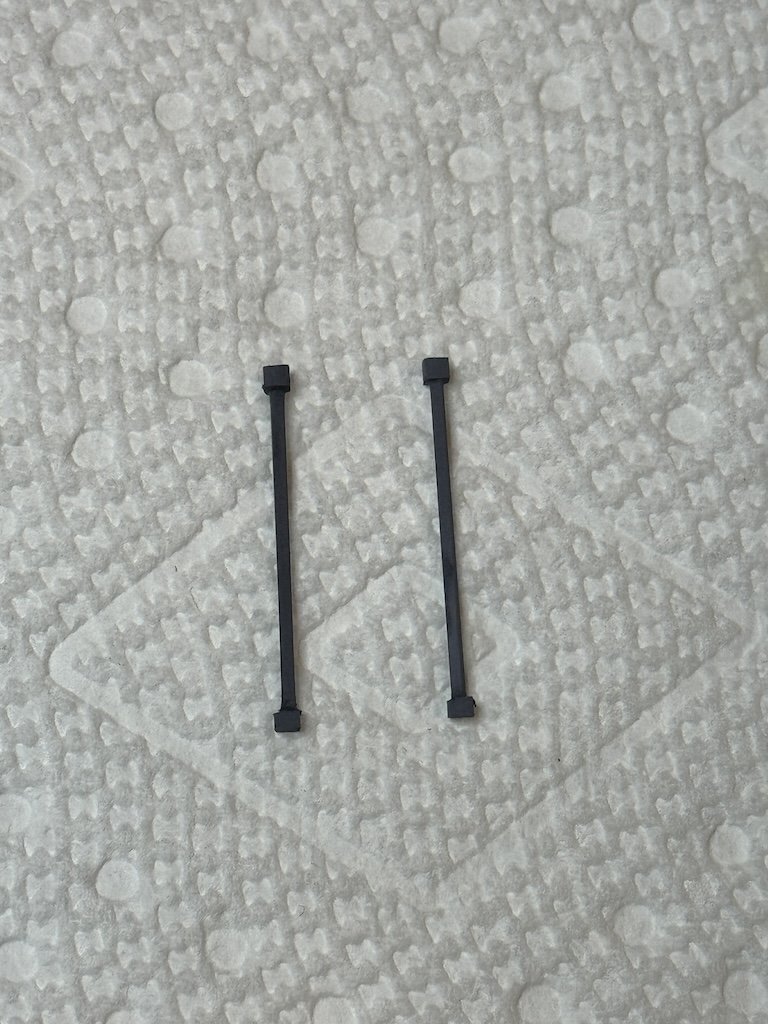
Along with the tall bow mast, from the pictures it looks like the mast on the bridge was lengthened considerable. So, I added a base built up from perforated structural beams from Ocean Spirit:
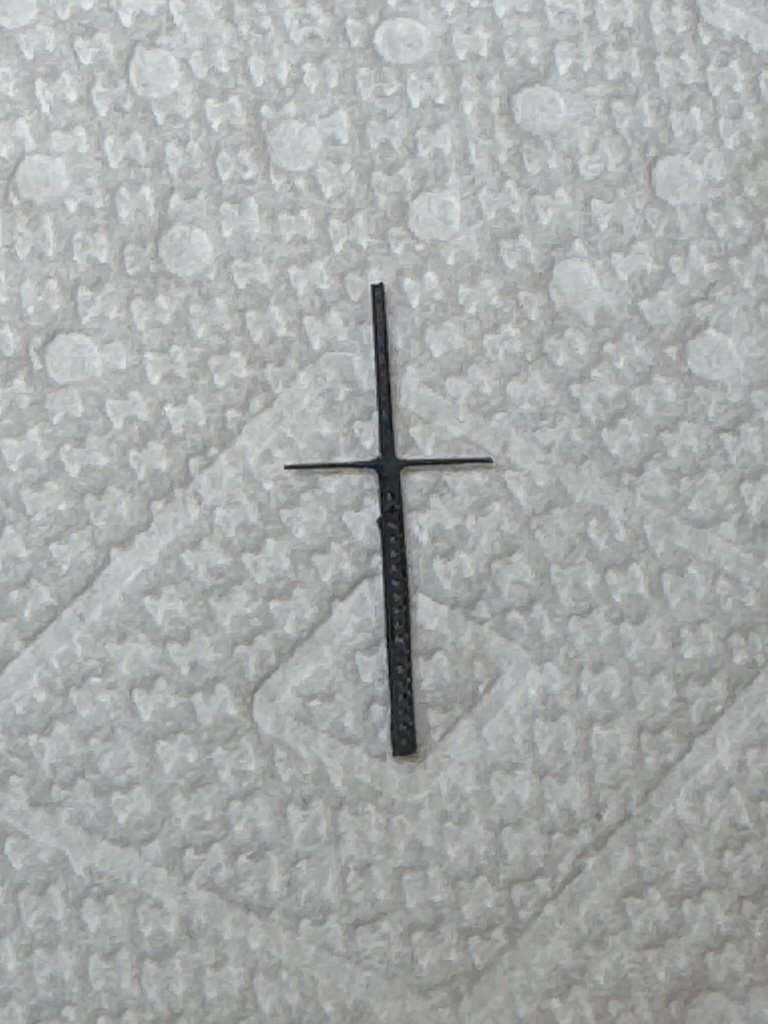
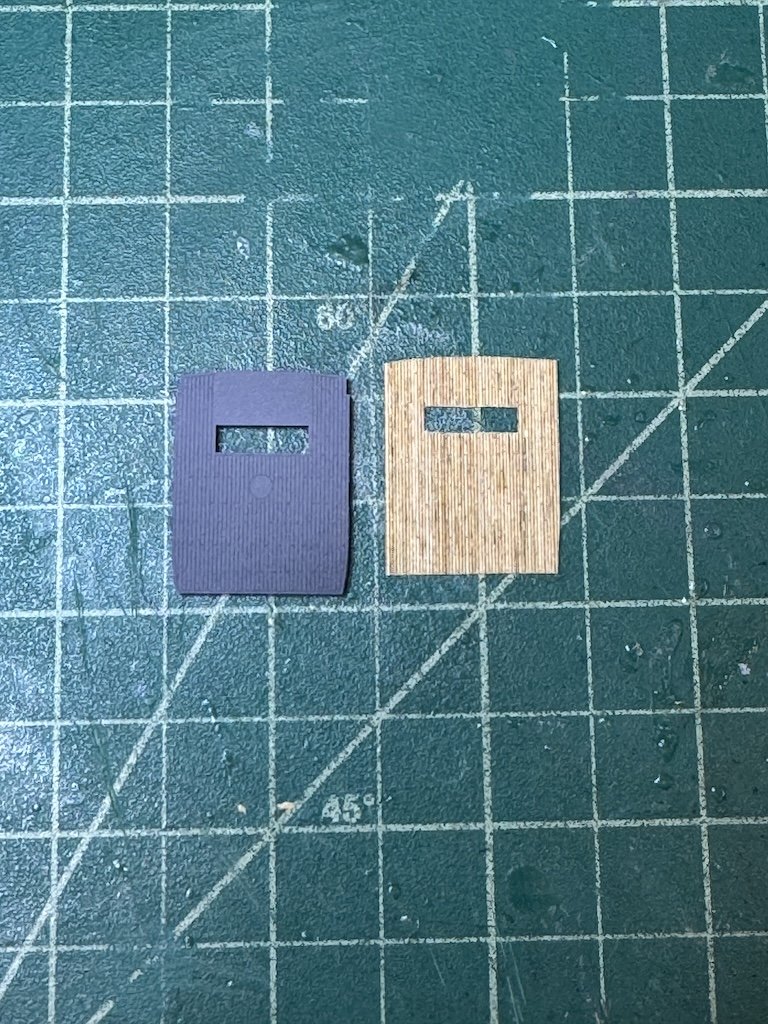
Here is the bridge:
 '
'
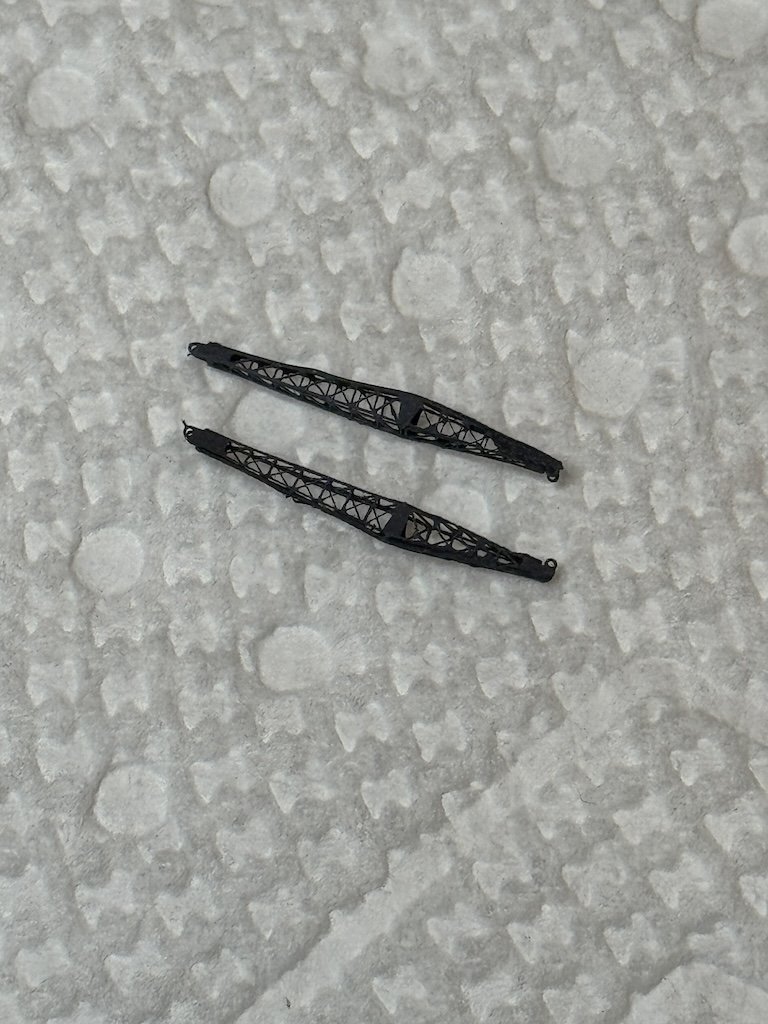
I noticed from the Hong Kong pictures that there were two derricks hanging off either side of the bridge. The Five Star kit only gave one. So, I built up two derricks from a Tom's Model Works set:
I also noted that the crane arm should have a cross piece, so that was added to the arm and it was painted:
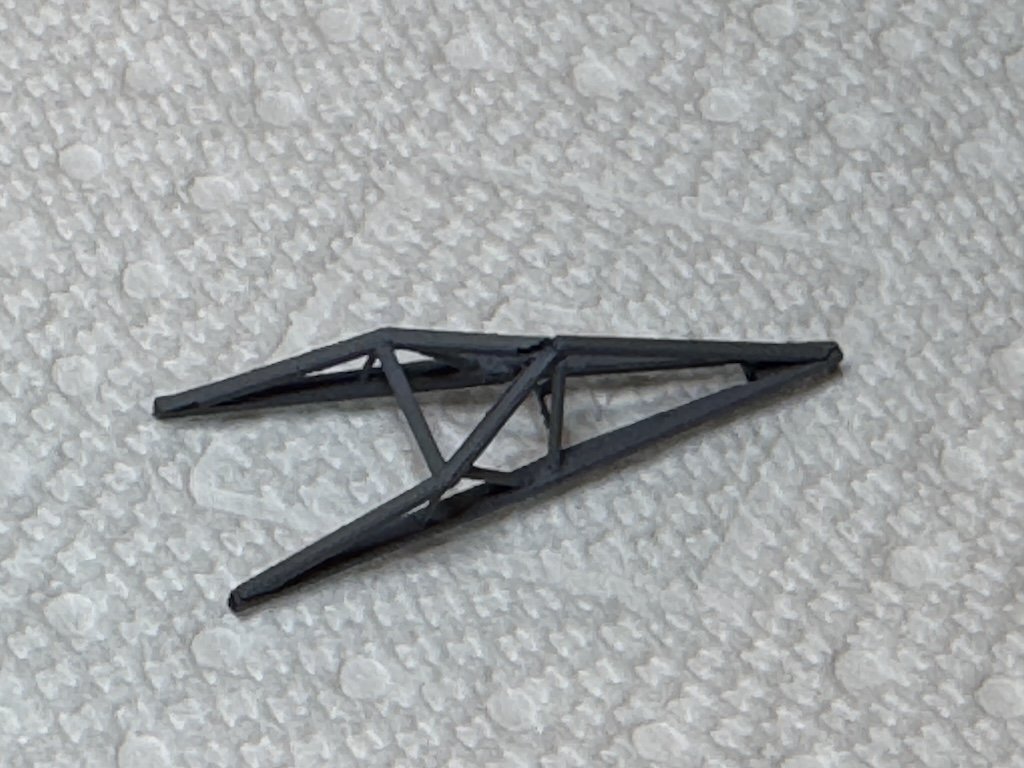
Finally, the pictures show that the crane arm slid out towards the stern along railings. I scratched built these out of square brass rod and styrene:
-
Before I got too far adding the various details and the bridge, I cut out the wooden decks for the ship using an Artwox generic wooden deck sheet. I figured it would look nicer than trying to paint the deck itself.
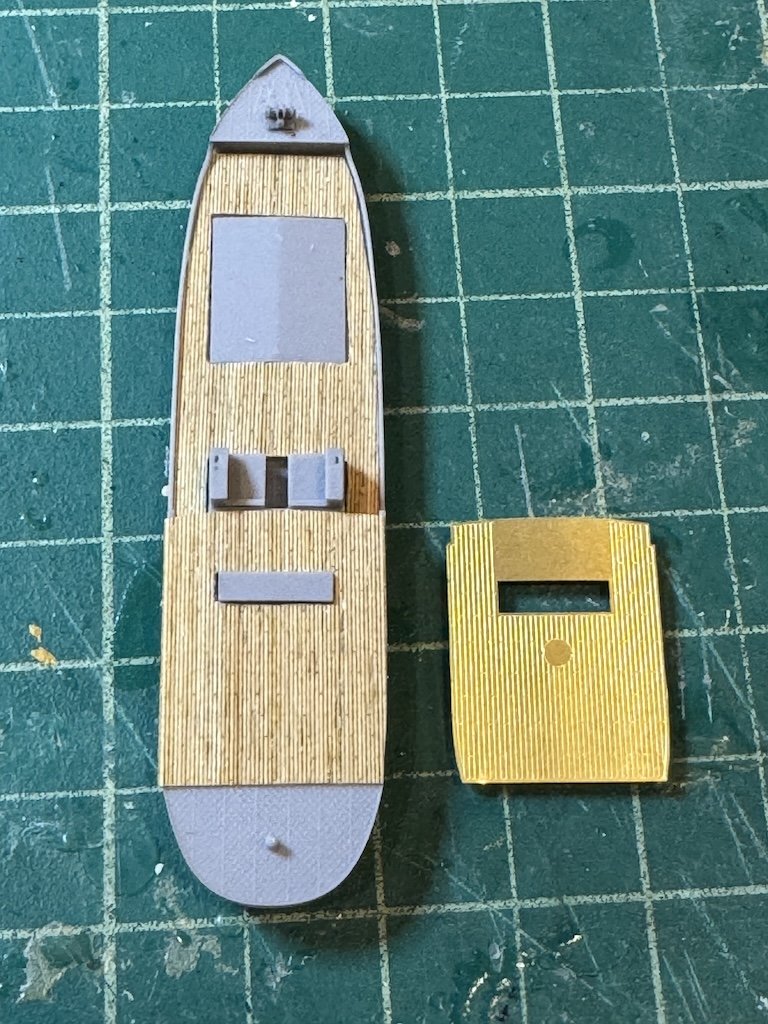
Then I noticed that the 1945/6 configuration included a very tall mast at the box. This was added using a mast set from Five Star. I also added the bow and stern railings, as well as cut some links for the anchor chains that were included in the Artwox deck packet.
- king derelict, Glen McGuire, davec and 6 others
-
9


HMS Monmouth (F235) by king derelict - Trumpeter - 1/700 - PLASTIC
in - Kit build logs for subjects built from 1901 - Present Day
Posted
Great subject Alan! For the missing pieces, I wouldn't worry too much. I'd either look online for potential PE/resin replacements, or just scratch build something close. At 1/700 scale, we tend to be so focused on even the tiniest parts, but in the end, when the model is completed, painted, etc., nobody will be able to look that closely and see that the item isn't quite spot on. So don't torture yourself on this.
Hope your father is feeling better.