HOLIDAY DONATION DRIVE - SUPPORT MSW - DO YOUR PART TO KEEP THIS GREAT FORUM GOING! (89 donations so far out of 49,000 members - C'mon guys!)
×


testazyk
-
Posts
337 -
Joined
-
Last visited
Content Type
Profiles
Forums
Gallery
Events
Everything posted by testazyk
-
 I use a brand called BSI only because it's available here. It is pricey which is why I only use it for attaching decorative metal pieces. They come in three kinds, green, blue and red and those colours mean increasing strength. Blue seems best because it's a little thicker in consistency. These adhesives are designed to be but on bolt assemblies to prevent them from vibrating loose. Blue and red are thin and runny to help them flow into the screws. Also check because some of them specify that they aren't for use on plastics. Hope that helps.
 -
I let the test sit overnight and the results are 100% success! It was two flat pieces of smooth plastic and they've bonded nicely. Hope this helps.
-
I'm not sure, Hubac--I haven't tried that. My guess is that it wouldn't work as well as model cement because it doesn't bond that way and it has a drying time, too. But it works best on nonporous surfaces, so it may well bond plastic. To test it out, I've stuck two scrap pieces of plastic together in my high tech materials lab (aka basement) and I'll let you know how it goes.
-
Congratulations on a major milestone--looking good and putting my progress to shame! To weigh in on the CA debate, I've stopped using it altogether after developing an allergy to the fumes. I've found that anaerobic glues, also called threadlockers are best for attaching metal to wood. They are virtually odourless an much easier to work with than epoxy.
-
Congratulations--beautiful work! I like the way you put scarph joints in the wales too.
-
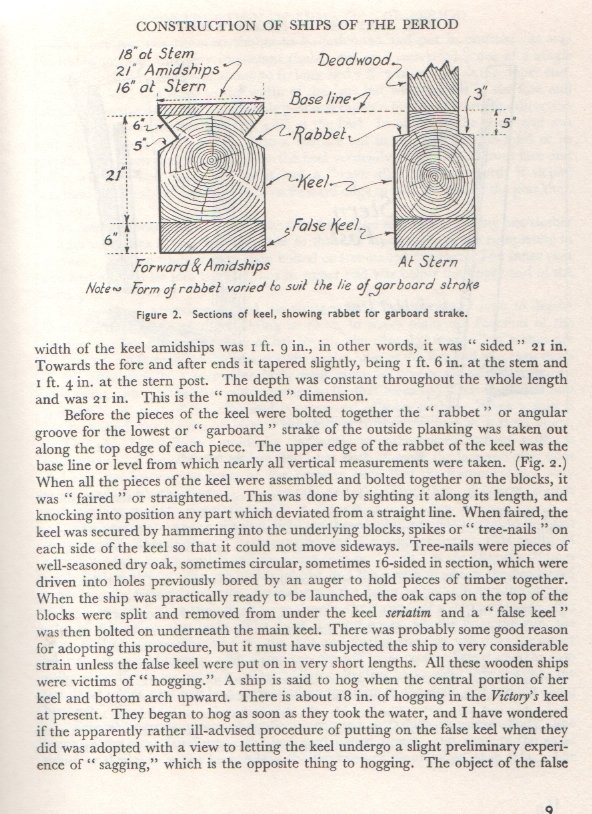
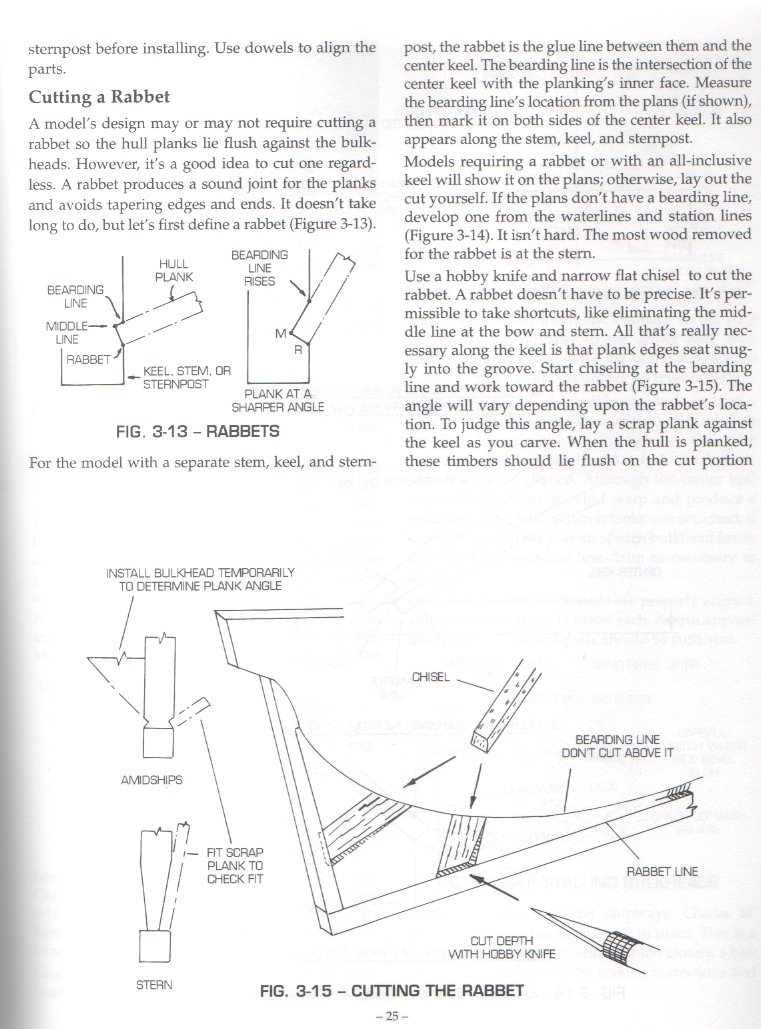
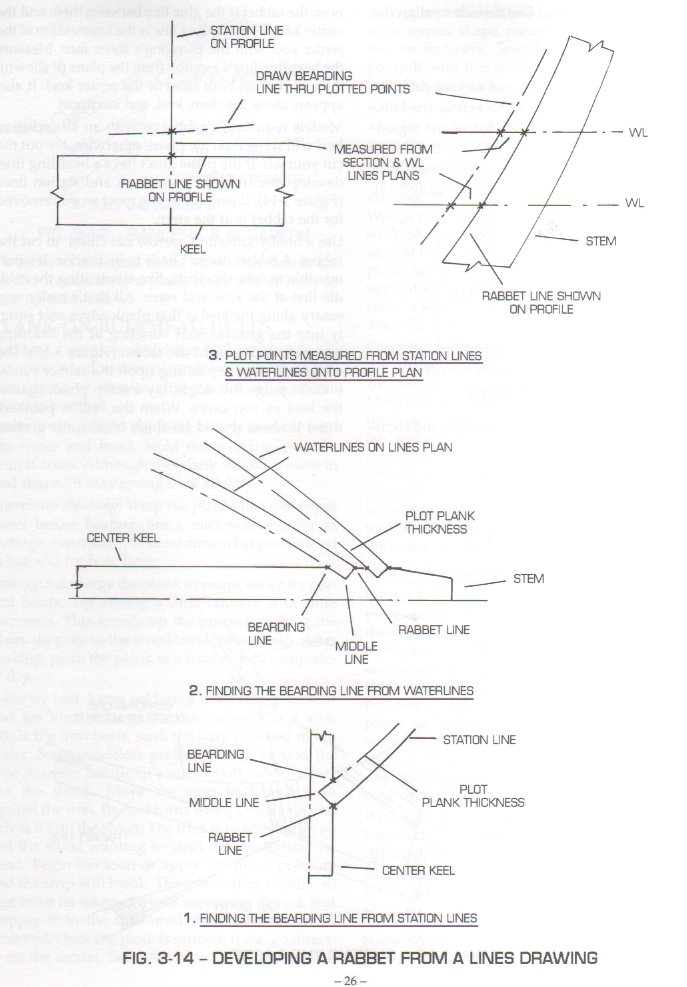
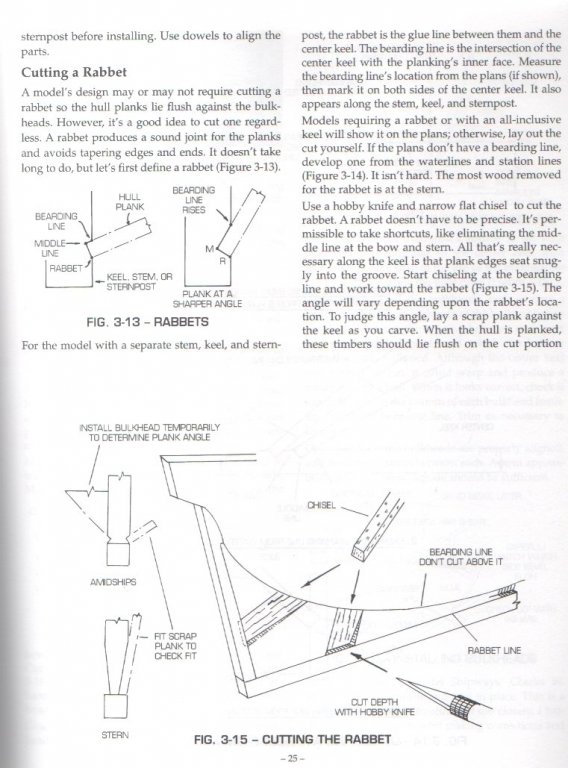
Hi EJ-- Not sure how well they will come out, but I scanned a couple of pages from books that talk about rabbets. The first is from Longridges Anatomy of Nelson's Ships and the second two are from Ben Lankford's book. Hope this helps!


-
Not to be a purist, but neither of your keel drawings is exactly right. Apparently on actual ships they cut a groove in the keel that was called the "rabbet line." At the stern it was practically a vertical right angle but angled out forward and amidships so that the first plank sat flush in the cutout. I've never done a rabbet line on any of my ships mainly because I've found it practically impossible to get it just right.
-
Hi Cedric--I think it's the combined effect of the way the picture is taken and the optical illusion that occurs because the gun ports aren't parallel to the wales (they aren't supposed to be). If you count the number of planks between each wale they are consistent.
-
You left the hardest part for last! Are you going to work toward the middle or top to bottom or bottom up?
-
I agree with Hubac and the others that ultramarine is the way to go. Really works with the wood tone you have.
-
Congratulations! And thanks for bringing these quality kits back!
-
Hi EJ--Carving would be a fantastic addition to your build. It's an idea I've considered and I've even taking a carving class, but like rocket science, it's a talent I don't possess so I'm sticking with the castings!
-
Hi EJ--I've been giving a lot of thought to the colour scheme too. I've settled on the darkest navy I can find and painting as little as I can. I don't like the powder blue they have in a lot of the pictures I've seen. One think I was wondering about looking at your pictures. It looks like you've lined the gun ports on the upper deck and made them the same size and shape as the lower ports. Are you going to use the brass gun port frames they provide in the kit? I found I had to slightly round the top of the opening to get them to fit neatly. Great job on the planking! Tom
-
Hi EJ--I'm thinking the same thing. I've got two AAA batteries and my experience with that kind of battery is that you can't leave them in the holder unused for too long so I'll probably be putting them in and taking them out a lot. I'm thinking of a box in the base I can easily slide in and out. You're probably a better electrician than I am but I've been testing my lights regularly to make sure that the G-forces of drilling, sanding, etc., haven't knocked loose any connections. (FYI, they have and I've always found the problem immediately after making the connections inaccessible!--great fun). Good luck.
-
Hi EJ--Loving your work on this build. I'm bashing this kit right now and had the same problems you did on gunport alignment and I agree with you that the problem is lack of a fixed reference point--you have to worry about the decorative pieces on the gunwales, the locations of the chainwales and the height of the upper deck guns all in relation to whether the gun deck ports are in position around the mythical line of those decks. Bottom line--we should invest in a wood filler company. I'm not sure if you addressed it in your narrative, but I'm wondering where you are going to put the power supply for your lights. I'm planning to make the base a box that can accommodate the batteries, but not sure how close to the ship I want to put the switch.
-
Decking 101 question
testazyk replied to testazyk's topic in Building, Framing, Planking and plating a ships hull and deck
Thanks for that! -
Hi Pompey-- Do you have a photo of how you rigged the transformer into the base? I'm trying to do something similar but want to hide the batteries in the base but will need to access them. Also wondering on different ways to set up the on/off switch. Just looking for ideas. Thanks.
-
Does anyone have a good way of dealing with gaps between the inner wall of hull planking and the plywood deck provided in the kit? The outer hull of my ship is wider than the plywood by about 5-10mm and I need to put in some timber so I can plank over the top. Any suggestions on a clean way to do it? Thanks
-
I would say it exactly the way Ulises did!
-
Beautiful job! Congratulations and I'm going to use some of your ideas on my current build. Good luck with the Endeavour and I look forward to following your progress.
- 153 replies
-
- 1
-

-
- royal caroline
- panart
- (and 1 more)
-
The parapets are a great addition to the build--well done! Have a great holiday season!
- 153 replies
-
- 1
-
-
- royal caroline
- panart
- (and 1 more)
-
Really looking fantastic! If I were you I wouldn't be just content--you should be very proud of what you have accomplished. Have a great holiday season!
- 153 replies
-
- 1
-
-
- royal caroline
- panart
- (and 1 more)
-
Hi Larry-- As Keith says its up to you, but what I've found is that the two big factors are (1) structural integrity to avoid warping or instability and (2) what you can realistically do in the space you will have available. The planking provides a lot of support and if you start taking it away the load is carried by decks and keels which, if you are bashing a kit, may not be designed to take those stresses and you'll have to do some retrofitting. Best of luck. Tom
-
It just keeps getting better--your boat turned out beautifully!
- 153 replies
-
- 1
-
-
- royal caroline
- panart
- (and 1 more)
-
Boats are one of the hardest things to get right and yours is looking really good!
- 153 replies
-
- 1
-
-
- royal caroline
- panart
- (and 1 more)