HOLIDAY DONATION DRIVE - SUPPORT MSW - DO YOUR PART TO KEEP THIS GREAT FORUM GOING! (89 donations so far out of 49,000 members - C'mon guys!)
×


testazyk
-
Posts
337 -
Joined
-
Last visited
Content Type
Profiles
Forums
Gallery
Events
Everything posted by testazyk
-
 Really looking great! I love the way you are handling the detail--the SF would be child's play for you after what you've done with the Royal Caroline!
 -
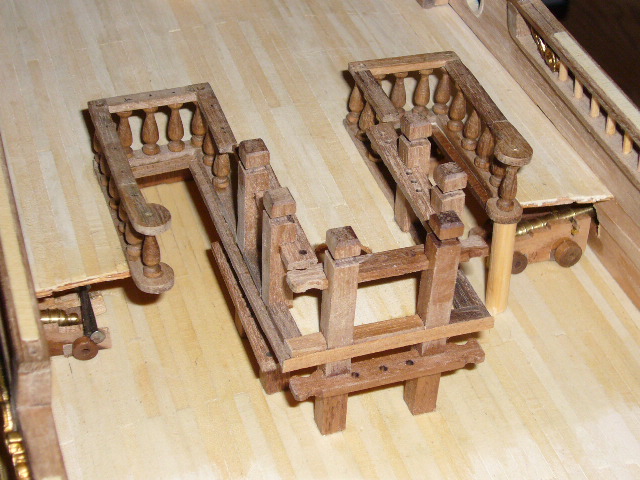
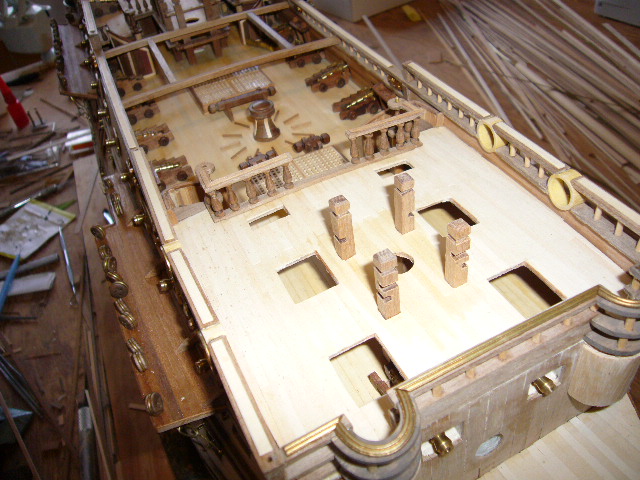
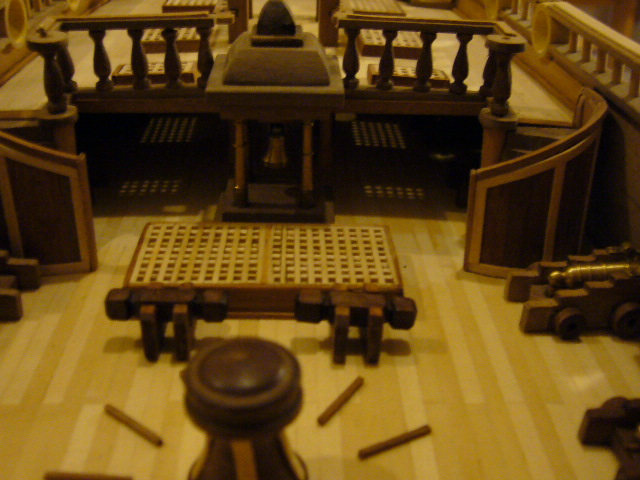
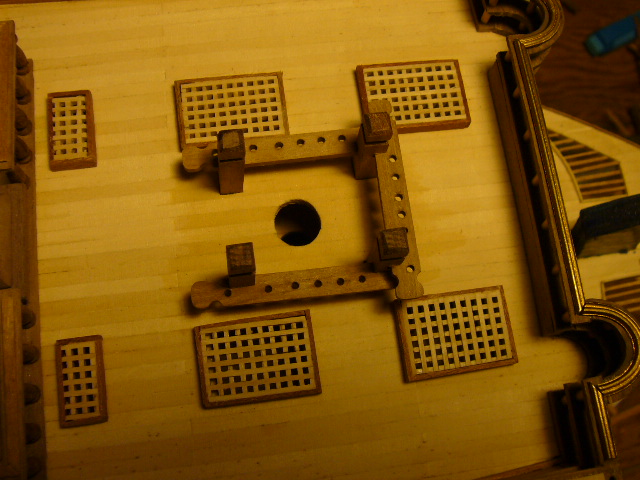
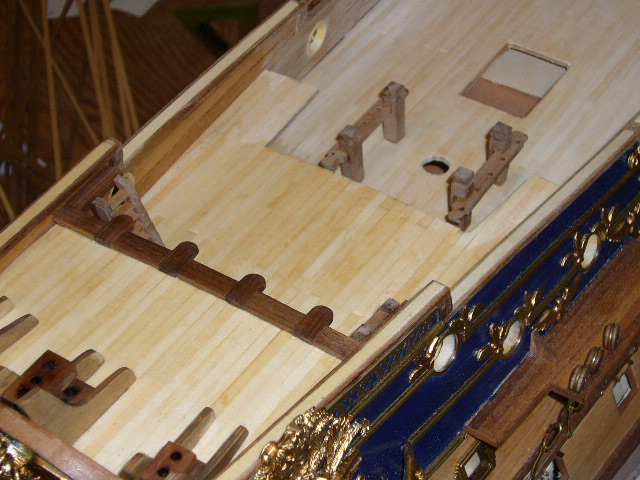
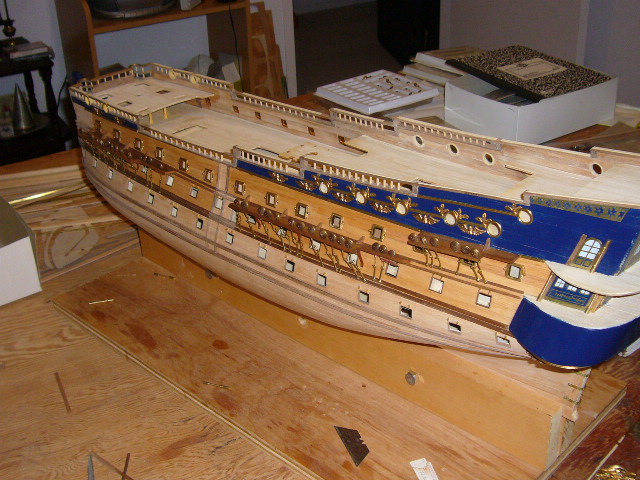
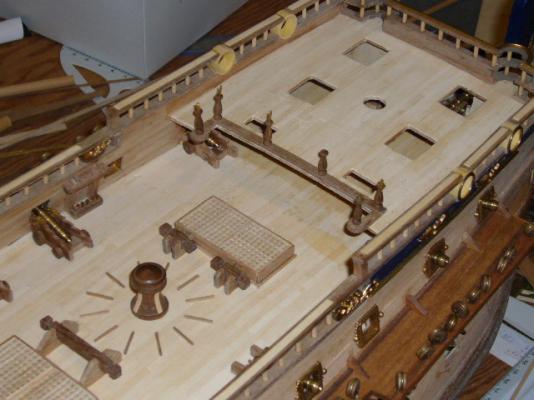
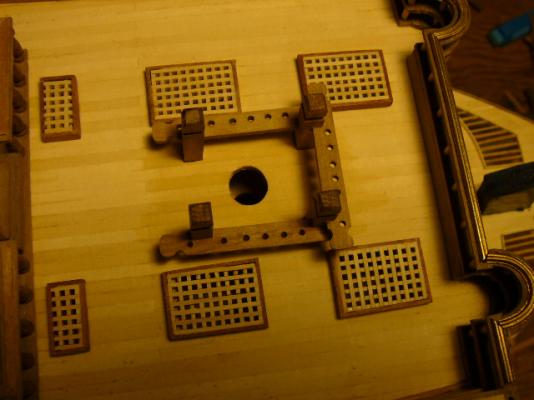
You continue working from the stern to the bow putting in lots of interesting details as you go. There are two more sets of fife rails, four more stairways and several grates to install as you go. The main challenges with this work are the capstan and the belfry. There is a circle of boards around the capstan to give the sailors traction on the wet deck. You want to take extra care to get them all the same size and perfectly aligned like a clockface. The capstan is highly visible on the completed ship and if your boards aren't even it will be obvious. I made a template on tracing paper by drawing a circle and measuring out the lines. Then I placed it on the deck and held it down and poked little holes with a push pin to show where the boards should go and it seemed to work all right. The belfry is built out of five wooden blocks and you have to carve them to shape. At the time I hadn't done much carving so I opted for a very simple look but you can be as creative as your imagination and skills permit. Once completed the deck is a very interesting place with lots of detail.


- 71 replies
-
- 6
-

-
- panart
- san felipe
- (and 1 more)
-
Looking good so far Jaydee! Re: that unidentified part, unless it's just some of the plastic tree, it could be an anchor.
-
Hi Rick--Looks like you nailed it! In more ways than one.
-
What I want to know is how you guys collect so many popsicle sticks!
-
I think your question runs to both rope thickness as well as sizes of things like blocks and deadeyes. A lot of out of the box tackle is too large to begin with so doubling it might exaggerate a problem. So I guess applying your look right rule should keep you out of trouble!
-
Wappen von Hamburg by andy - Corel
testazyk replied to andy's topic in - Kit build logs for subjects built from 1501 - 1750
This ship is on my to do list and I look forward to following your build. Best of luck and enjoy! -
I imagine that cheap labour was not a problem.
-
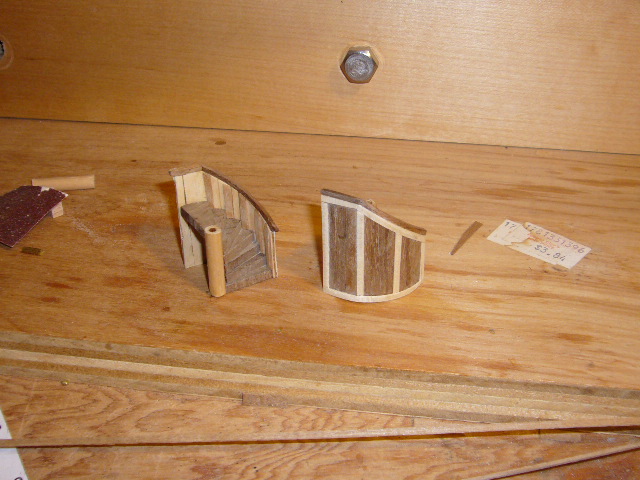
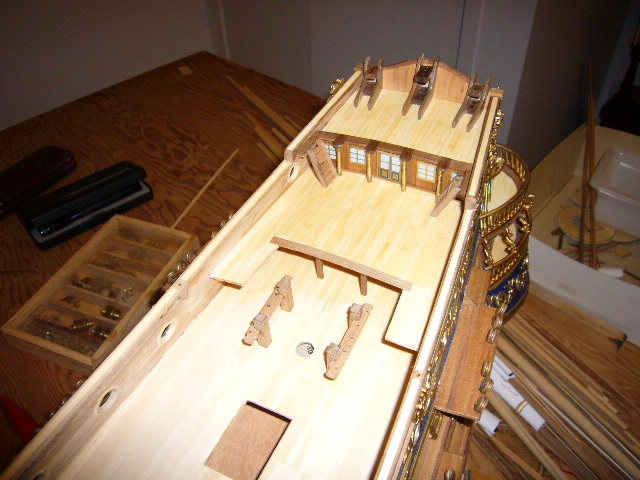
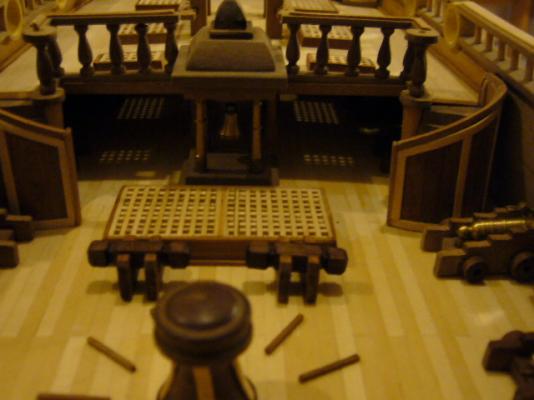
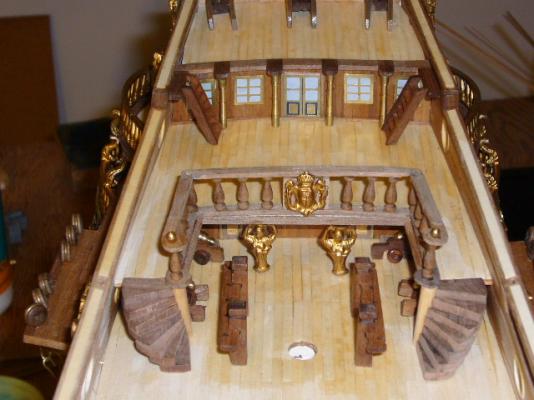
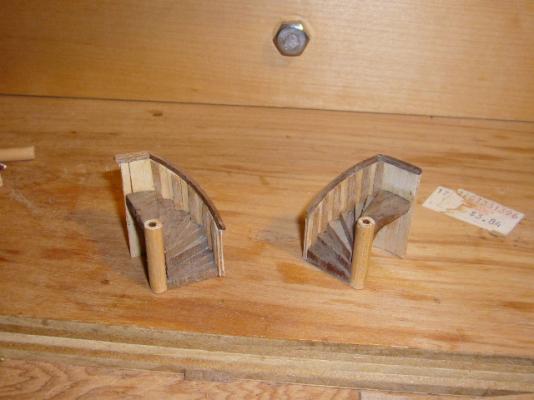
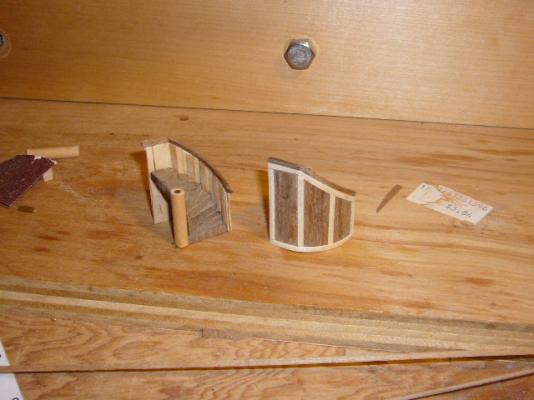
[My last post may have left you wondering how you were going to get down from the poop deck to the quarter deck. The answer is with curved stairs. I have to admit that of all the challenging features on this ship I was most concerned about doing the stairs. You have three pairs to do and the good news is that they aren't difficult at all, but do require a lot of care and planning. The kit includes trapezoidal shapes which are the steps. The first step is to cut dowel rods which form the central support. Carefully assemble the steps in a spiral taking care to have the steps all even sized. You also need to have the top step and bottom steps at a ninety degree angle. I taped the sections together to try out the spacing and also to make sure the height would be correct. This is a good shot of how you have to play around to get the spacing correct and spacing problems. Here I am happy with the height but need to even out the spacing. Once you are satisfied with everything, glue the steps to each other and to the dowel. Then you build the curved walls around the steps. The walls are dark walnut on the outside and lighter walnut on the inside and the kit includes a plastic cylinder that you use to build the curves. Follow the instructions and you won't have any trouble, even if the instructions seem counter intuitive. You glue the white walnuts strips to the cylinder and then glue the dark strips over the top and let them dry, I was terrified that I'd end up gluing the whole thing to the cylinder--which theoretically you could do. Just use enough glue to secure the first layer of walnut strips so they don't move around. And its a good idea to move the assembly on the cylinder as the glue dries. Once everything is dry, you cut the assembly to the right size, glue it to the steps and add the decorative strips. And then you can install the steps. I thought that the end faces of the walls looked a little too much like plywood so I made a stringer to go on the ends of each stair case.

- 71 replies
-
- 5
-
-
- panart
- san felipe
- (and 1 more)
-
Thank you Max and David!
-
I agree with Michael. Plus I've read several times that the carvings on a lot of 17th and 18th century ships were sometimes covered with gold leaf or otherwise painted gold. The Sovereign of the Seas, which I understand was undefeated in battle, was called "The Golden Devil" by the Dutch who apparently she beat fairly often because of the ornate gold coloured carvings. Remember also that ship was very advanced for her time and broke the budget and made Charles I very unpopular, another point supporting Michael!
-
Beautiful craftsmanship--you should be very proud of your work.
-
Very nice work and a very interesting log. I love your workshop!
-
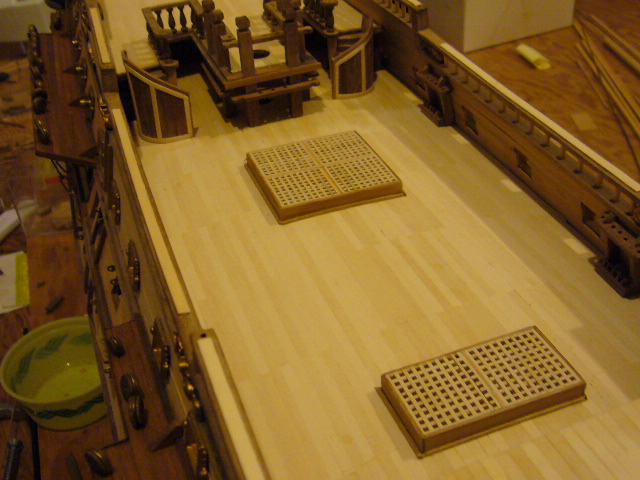
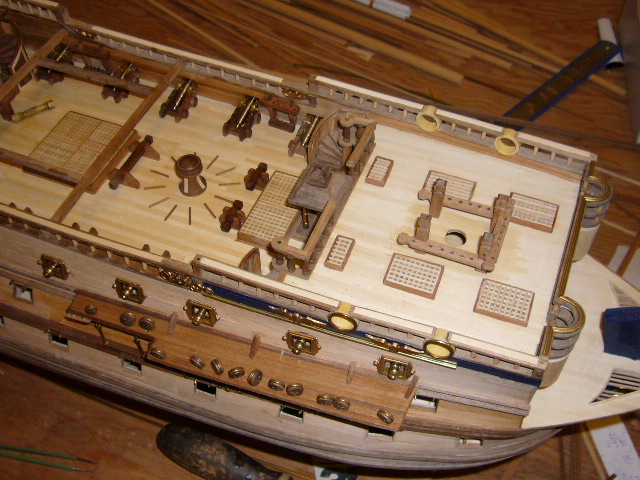
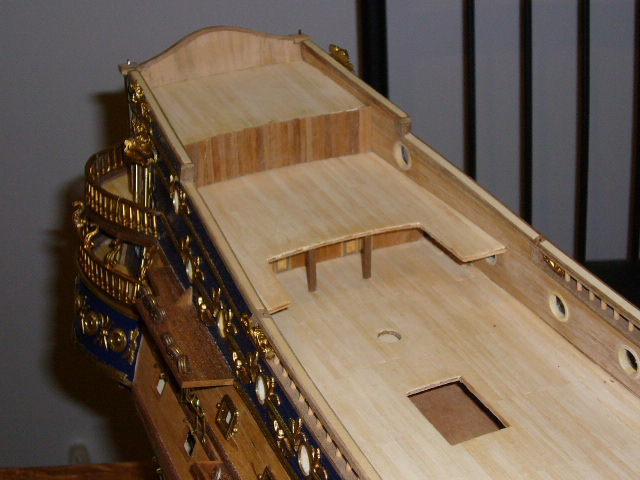
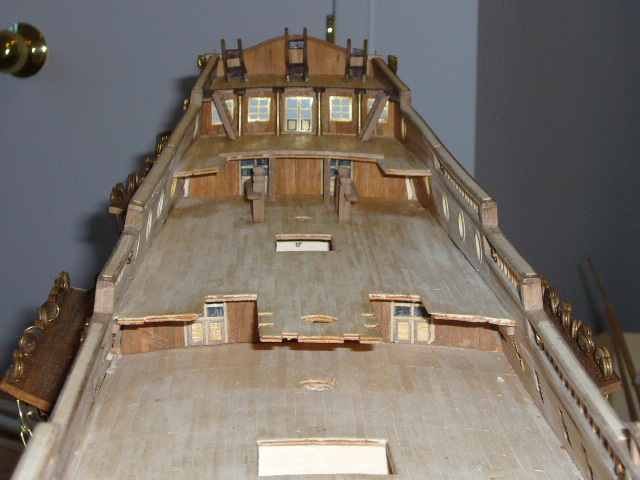
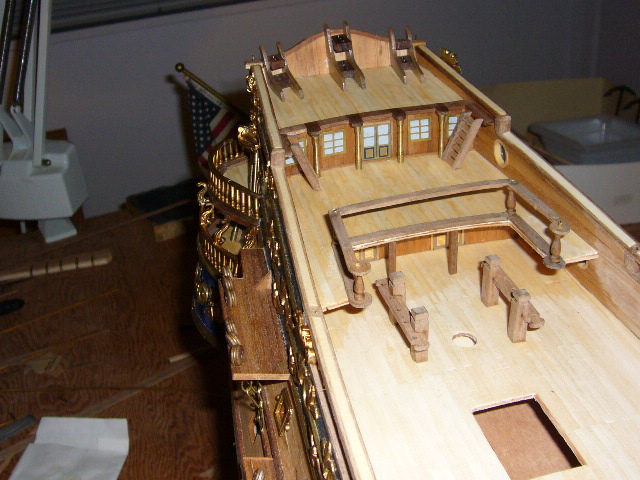
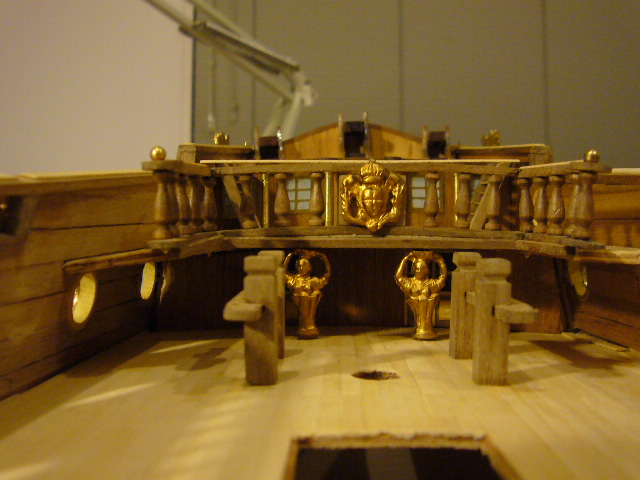
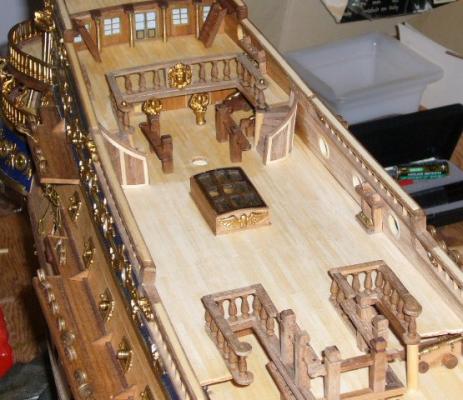
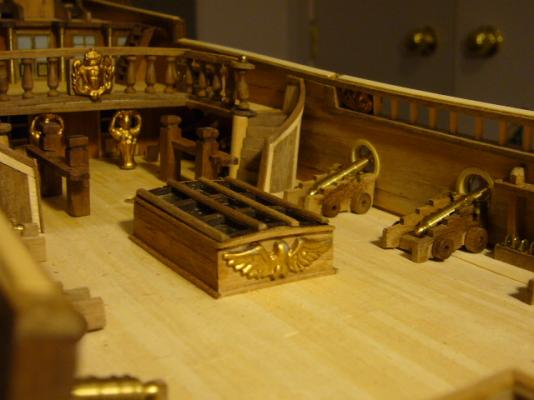
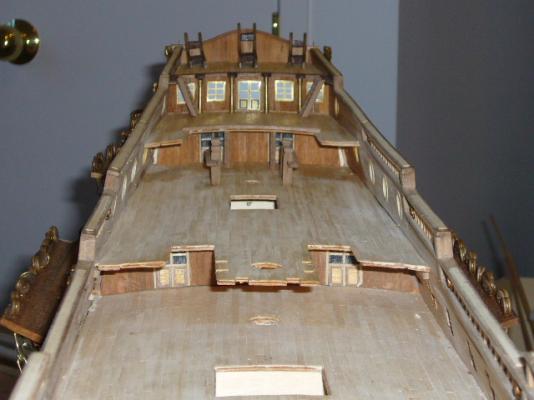
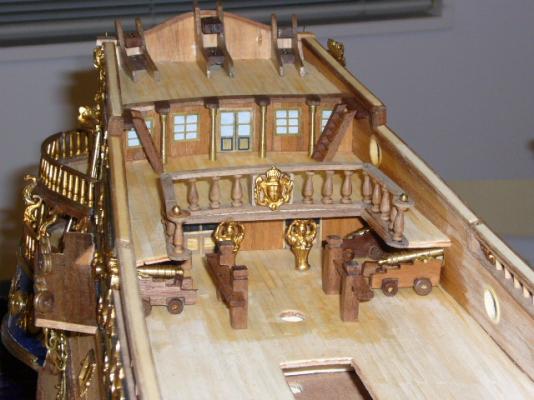
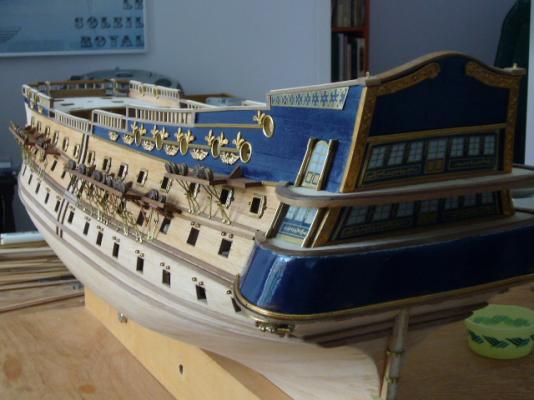
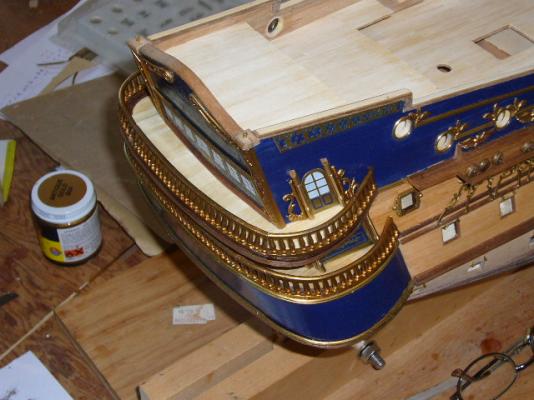
Thanks for the feedback! Once most of the exterior work is finished, it's time to work on the deck. Like the rest of the ship, the deck furniture is very interesting and presents some interesting but not impossible challenges. First you finish off planking any exposed bulkheads. Here is an overview of the deck--you work from the stern towards the bow. I enjoy this kind of work because there is lots of variety--here is a shot of the stern flag and lantern supports, the main mast bits and fife rails and the architrave above the poop deck. The next step is to form the railing around the deck balcony. You use strips to make the frame and the kit includes very nicely precut balusters. The railings have a nice circular return at the top of the stairs. You make it by cutting an L-shaped piece and sanding it to the correct size and shape, In addition to these railings at the stern you have to make two more--one in the waist and another up to the focsle which means twelve rail ends altogether (top and bottom). It's a good idea to make them all at the same time so you can ensure they all the same size and shape. And here they are installed. There are round metal balls in the centre of the returns and the instructions call for drilling holes and inserting a wire peg in the end balusters and the two in the corners to provide stability to the structure. Be careful when you do your drilling because the balusters are thin and can chip if you're not careful. I did just that with the first one and afterward drilled them by hand with a pin vise. Unlike just about everything else, the kit did not provide a lot of extra balusters and I didn't want to have to make a whole set because I was short one or two! Here are the completed railings.


- 71 replies
-
- 7
-
-
- panart
- san felipe
- (and 1 more)
-
That is some nice work GTM!!
-
The link refers to problems with the plans but someplace else I saw something about the fittings not being up to scratch. If I find it again I'll let you know.
- 71 replies
-
- 1
-
-
- panart
- san felipe
- (and 1 more)
-
Thanks Brian! You will love it and it is a great addition to any collection. But beware--some people have said that the latest version of the kit since Panart became part of Mantua Sergal has some quality issues: http://modelshipworld.com/index.php/topic/6214-panart-san-felipe-175-updated-version-review/?hl=%2Bsan+%2Bfelipe
-
Thanks Ulises and Ed! Appreciate it.
-
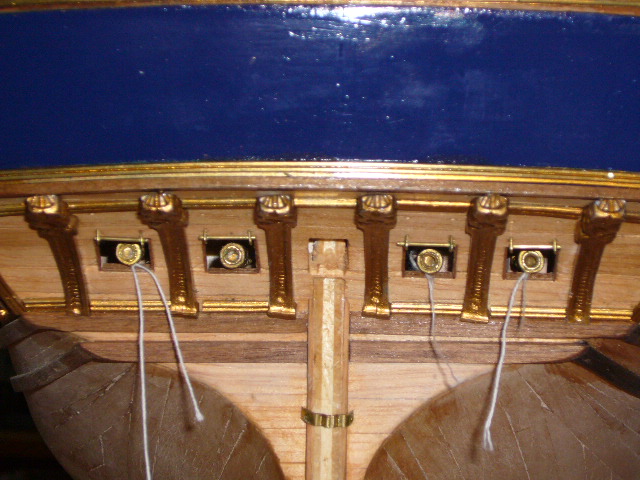
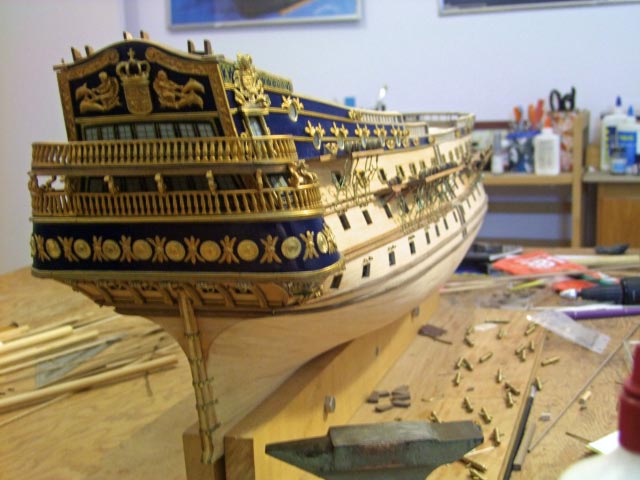
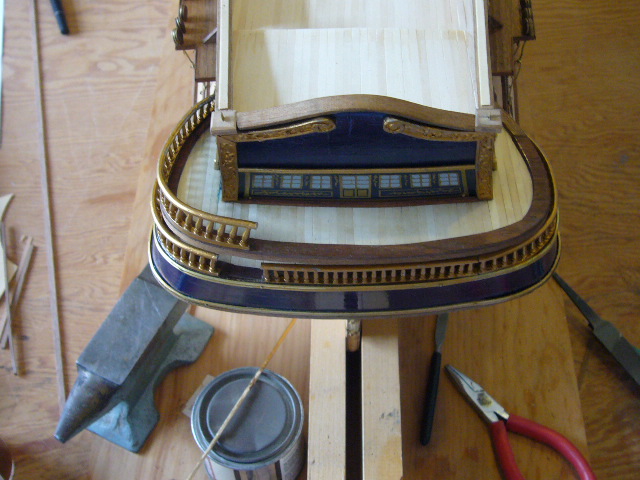
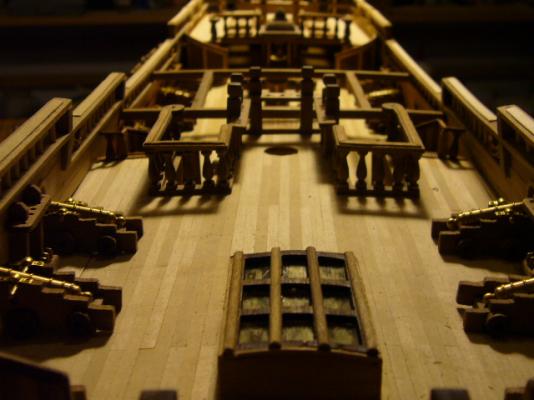
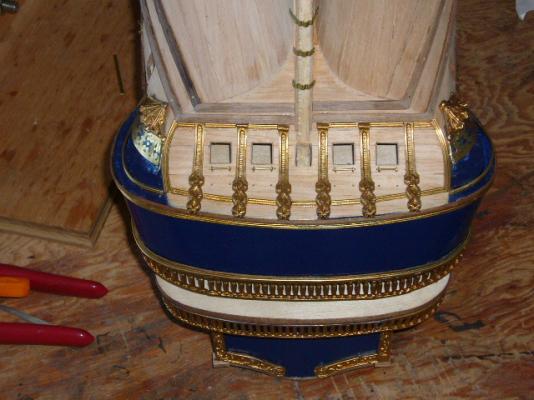
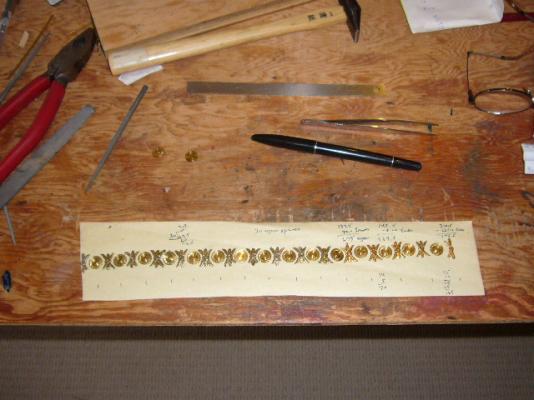
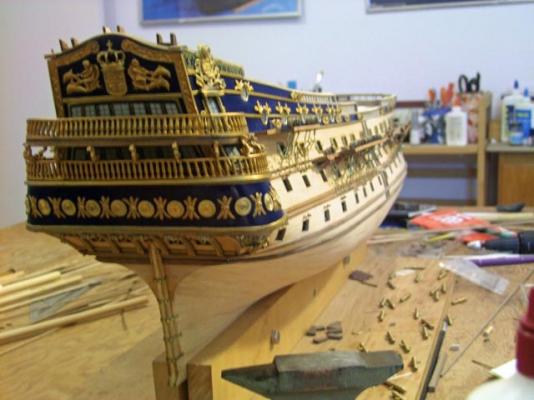
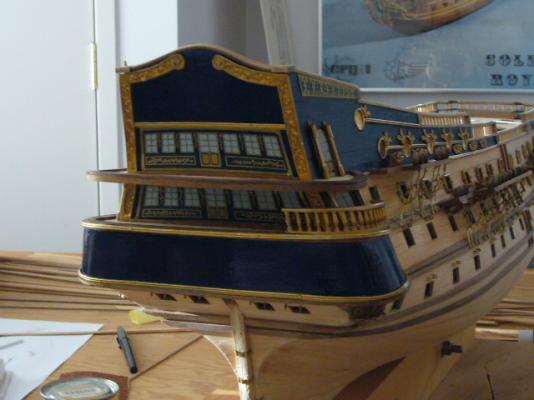
The next task was the decorative work on the stern. It's very straightforward work and really makes the ship look good. The stern gun ports present a minor challenge. Because of the sweep of the stern the blocks for the dummy cannon are quite deep so the guns are practically flush with the ports (i.e., not run out). Trying to fit the cannons by hand resulted in me losing a couple in the bowels of the ship. I was able to shake them out after much shaking and turning and twisting, but one wouldn't come out and to this day it's still sitting in there, rattling every time I move the ship. Fortunately the kit provided a couple of extra cannons. I then decided to prevent further losses by tying strings to the cannon so I could fish them out if necessary. Another interesting project is installing the decorative trim along the stern balcony. the kit provides little disks and flowers and you alternate them around the curve of the balcony. The challenge is to get everything perfectly even and equally spaced, so I did a one dimensional template to plan things out. The end result turned out well. Here is the completed stern work.
- 71 replies
-
- 3
-
-
- panart
- san felipe
- (and 1 more)
-
I agree with WQ but to be honest when I did my Victory I thought that looked as strange as what they show on the ST box so I ran the chains to the bottom of the stern gun ports as if they could pull them through the ports if necessary.
-
Rigging Tension-how do you do it?
testazyk replied to capnharv2's topic in Masting, rigging and sails
All good advice here. My squishy addition is snug but not tight. If you are pulling the mast it's probably too tight. -
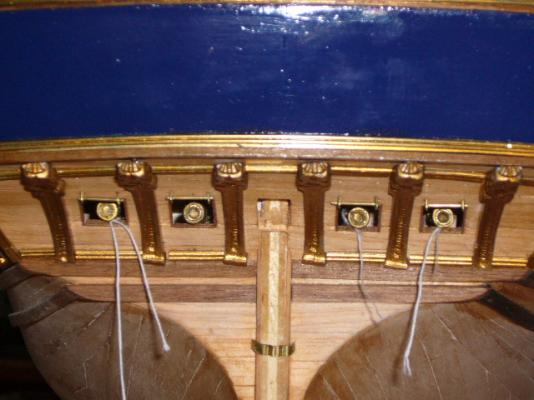
The next step was installing the dead eyes and chain plates. The hardware was of reasonable quality but once again if I knew then what I know now I would have fabricated my own to get them to be neater and more uniform because the wire in kit was a little soft. Then I continued with the decorative metal pieces. There is lots of interesting detail in the stern. If I had unlimited time and skill I wouldn't use the stamped windows that the kit provides but rather make my own with fake glass. I've never been happy with painting them black or blue because I don't think either is particularly realistic. So I went for even less realism and made mine grey. The theory is that they are glass reflecting a cloudy sky, but as a practical matter, I wanted them to be fairly subdued and not draw too much attention. Then came another interesting challenge--installing the curve stern railings on both balconies. If you take nothing else away from this log, I'd urge you to make your own railings. The metal railings provided in the kit are nice but a little too heavy I think. Plus they are very soft and bending them is too easy--mine kept breaking so I ended up installing the railing in sections. That wouldn't have been too big a problem except the posts are slanted to accomodate the curves in the balconies and the posts didn't match up between two sections. That determined which side of the finished model goes toward the wall!


- 71 replies
-
- 3
-
-
- panart
- san felipe
- (and 1 more)
-
Panart San Felipe 1:75 Updated Version Review
testazyk replied to Salty Dog's topic in Wood ship model kits
That's a shame that they messed up such an interesting and quality ship model. Way too much of that going on across the board. -
latino nail nailer
testazyk replied to djs's topic in Building, Framing, Planking and plating a ships hull and deck
Hi Dennis-- I've had two different nail nailers. One with an orange wooden handle was excellent and accepted the largest nail I would ever want to use on a ship model and was magnetic. The mechanism packed up and I bought a new one, this one with a black plastic handle. I don't use it because the aperture is too small for all but the smallest of nails (i.e., with virtually no head) plus the magnet isn't very strong. What I do instead is use a push pin to make a pilot hole and then press in the nail with long nosed pliers and give it a tap with a hammer. Most of the nailing I do on a model is to temporarily hold the first layer of planking in place till the glue dries so most of the time I don't even pound in the nail all the way but pull it out to reuse after the glue dries. I also use nails in various places to secure things and even to simulate door handles. If you are using the nailer on a surface that will be visible on your ship (e.g., not the first layer of planking) be careful because, especially with the newer one I have, the opening for the nail is a sharp tube and if you press too hard you can mark the finish of the wood. Good luck and welcome! Tom -
Really looking good! I see what you mean about the gold pieces--nice effect.