Martin W
-
Posts
1,412 -
Joined
-
Last visited
Content Type
Profiles
Forums
Gallery
Events
Everything posted by Martin W
-

X-Y Attachment for Dremel
Martin W replied to Martin W's topic in Modeling tools and Workshop Equipment
Just to complicate matters, JPett, let me toss this in: if at least some ego wasn't at work, we'd end up making slapdash models. And if it brings you joy, then I say go for it! (And just to emphsize my point: I have a horse, 3 saddles, 4 pairs of boots, and I don't know how many bridles and bits -- and I love 'em all) And I could also say that you could get the tool and try it out for the benefit of all the rest of us --- HAR! Cheers, Martin -
X-Y Attachment for Dremel
Martin W replied to Martin W's topic in Modeling tools and Workshop Equipment
When I started my first model, I bought an x-acto and a bottle of glue. Then I needed some files, then . . . The points made by Harvey & Wacko seem just about right to me: in a way we're all aiming toward that Scratch-Build that's going to stand next to something David Antscherl might have done. BUT when, oh when will my skills and even understanding of what to do be at that level?? These machines would be investments to be sure, and some of the ones I've looked at on different sites (Sherline) are downright beautiful and would make my boatyard all the more attractive (and crowded). But for now the challenge is to get my basic skills up to the level where having something like a mill would actually make sense. I cut out the blocks for my gun rigging by hand, and boy I can tell you that Chuck's definitely look easier and less time-consuming and nicer than what I got. I just bought a supply of blocks from Lloyd Warner, because that experience taught me that I could either spend the next 3 months carving blocks or get on with the rigging itself. JPett -- I think we're on the same page (and even the same model!) -- If that Vanda-lay mount does indeed work to keep the Dremel tight enough to drill with real, real accuracy -- enough to make the x-y table matter -- then it would seem to be a good step up from the pin-vise in a home-made jig (which is what I'm trying to devise right now, and if it works, I'll post a picture). And the Proxxon table does seem to be the one to go with. If you get it, let me know ASAP, 'cause I just might be able to justify that -- at least until I start a thread with a title like "Kingfisher Scratch-Build at 1:48" Cheers, Martin -
X-Y Attachment for Dremel
Martin W replied to Martin W's topic in Modeling tools and Workshop Equipment
Bob -- That's excellent advice. Really, I should make a sign that says exactly that -- maybe I could dig out my router that I've used maybe 3 times. JPett -- I'll be waiting to hear how you like the Vanda-lay set up. My only concerns with that is that if it didn't work, ie, if it didn't actually hold the Dremel as steady as it claims to do, then you'd have to go back and spend the same amount on a drill press. I have a very limited amount of room (my wife is complaining about the Byrnes saw on her sewing table), and am thinking that for now I'm going to try one more shot at drilling holes in a row with what I've got, and if it doesn't work I'll invest in an x-y table, and if the Dremel is still too inaccurate, well, I guess I'll see if the table will fit on the Vanda-lay or something. Cheers, Martin -
Hi Bob -- That's a beautiful build there, one that anyone would be proud of. The Kingfisher kit was one that I had wanted to get, but I lost the opportunity when Lauck Street stopped selling them. Do you have any idea if anything like those kits are available someplace else? I'll look forward to your progress, you're clearly a craftsman. Martin
- 81 replies
-
- 1
-

-
- kingfisher
- lauck street shipyard
- (and 1 more)
-
X-Y Attachment for Dremel
Martin W replied to Martin W's topic in Modeling tools and Workshop Equipment
Hi WackoWolf -- those Sherline mills & lathes make my mouth water. I spent a good part of last night dreaming of sugar plums dancing around my new toys. And this morning I woke up to the reality of having promised myself not to spend more than I can afford. The Vanda-lay setup is intriguing, and it looks like it would stabilize the errant Dremel, but the stand plus the x table plus the y table -- each of which has to be bought individually -- would end up being almost as much as a Proxxon or MicroMart drill press. So I guess the question there would be is it worth it? would I be getting something more, like more capacity to do more things? David -- thank you for the advice, especially the suggestion abou the video, since as I mentioned my big question is how much will I be able to do? how good of an investment would this be? Cheers, Martin -
X-Y Attachment for Dremel
Martin W replied to Martin W's topic in Modeling tools and Workshop Equipment
Hi Harvey -- A mill would be nice, but that would pretty much enter into the thousand dollar range, right? The missus loves me, but not that much! -
X-Y Attachment for Dremel
Martin W replied to Martin W's topic in Modeling tools and Workshop Equipment
And I would like to expand Tom's question to this: following Janos's comment, I checked out some drill presses at Amazon & Micro Mark. Apart from the $95 varieties, which I assume would be no more accurate than the Dremel setup, the two premier models are the Micro Mark and Proxxon, which both run at about $250 (and actually the proxxon would be a bit cheaper, since the xy table comes with clamps but the Micro Mark lists them as an additional attachment for $34). So my question is this: can I justify investing in a drill press? How much would I use it, and for what sorts of tasks that I can't take care of with my hand drill or the Dremel? Right now I'm struggling to drill the holes in the euphroes that have to be an exact and consistent distance from one another. But will the drill press collect dust until the next time I need to make euphroes? Suggestions, advice, reviews all welcome! Martin -
Hi JPett -- having a system, as the others have said, is the best procedure, though sticking to it can be a surprising challenge. I think you're right to use sideways pressure: those seams can present tricky problems, suddenly growing wide where you'd least expected. Since I blackened the edges of my planking, those gaping seams would become all the more apparent, and would also make me see those little flaws in the bulkheads that hadn't been noticeable before. Have you put aside your heat gun for this stage? I noticed you asked about double planking in another log, so I thought I'd mention that I'd done double planking on my previous build, but on the R-Snake used basswood fillers between the bulkheads so that I had a base for the strakes all along the hull. Keep at it, man -- I'm looking forward to your progress. Martin
-
Hi Eric -- that carriage looks good! I too used a dowel for my carriage wheels, just cutting a whole bunch of them on my Byrnes table saw (I assumed that I would lose a good many of them). And I had to find a dowel that was pert near perfect with tight grain. Congratulations on that mini lathe -- a real find! Cheers, Martin
-
X-Y Attachment for Dremel
Martin W replied to Martin W's topic in Modeling tools and Workshop Equipment
Thanks, Janos & Geoff, those are both good tips. Actually I read some reviews of the Dremel drill stand, and they made just that same point, that it had too much flex to do the kind of work we need in precsion modelling. What this means, though, is that my work space is going to start getting pretty crowded (and how long will I be able to hide a drill press from my wife??). And Geoff -- I must ask: does your dog really help out with your modelling? He looks like you've worn him out!! Cheers, Martin -
JPett -- I toyed with the notion of leaving this build un-rigged, but decided I really needed the experience. One big advantage to an un-rigged model, though, is that it's easier to find a place to display it, since it'll fit on top of bookshelves. And, believe me, I know what you mean about those bunnies -- everytime my wife tries to dust my other build, I hear a loud "oops." The Rattlesnake is a nice enough looking ship that doing without the rigging would make it easier to see the attractive profile. What other kind of rigging is there besides ships -- or rigging boxing matches, elections, etc? Cheers, Martin
-
Zev -- the best way to overcome cold-medicine induced drowsiness is to balance it with some Goat Brie! You might find it useful to use a draw plate to get your toothpicks down to a proper size -- go check out the one on Jim Byrnes' site, http://byrnesmodelmachines.com/drawplate1.html It's always important to fill your workspace with as many tools as possible so that you can spend more and more time trying to find the one you need and that you know you put somewhere. But even with your injuries, I think you'll enjoy building the Rattlesnake -- it's an interesting model in lots of ways, and there are several of us now who are at various stages. Good luck, I'll be following your progress. Martin
-
Mog -- that is one handsome boat. It's got some very nice details, like the barrels, and oars. Well done! Martin
-
Thanks a lot, JPett. As for the rigging, I'm spending just about all my time right now figuring out a systematic way to proceed. This mostly means that I read a section from Antscherl's book on rigging, look at Petersen's layout, re-check Hahn's rigging plan, scratch my head, then repeat the whole process. The benefit is that I feel I'm actually getting a handle on Rigging As A Concept rather than just blindly following someone's instructions. So I'll expect to be making plenty of errors and redoes.
-
JPett -- A picture's worth a thousand, eh? That shot makes me remember the old barns I saw when I was a kid, and that had been built with treenails -- they were easily that size. And I think you're right to consider the patterning -- as long as you're going to do something that visible, you might as well make it work in an interesting way. Cheers, Martin
-
Hey Aaron -- Bill Short's practicum is just for carving for ship models, and using a rotary tool, like the Dremel, with micro burrs. It's called The New Carving Ornamentation for Ship Models, and is available from Bill himself. Here's his email: modelshipwright@symaptica.ca and his mailing address is: Bill Short 3 Karsam Court, SS! Niagara-on-the-Lake, Ontario LOS 1J0 Canada I just emailed him about info, and he responded almost immediately with pricing, and he gave me the option of having him send me a CD or a PDF by email. It's a detailed practicum covering the techniques of rotary carving for ships. And it's got some pictures that will make you drool. Cheers, Martin
- 104 replies
-
- 1
-
-
- rattlesnake
- mamoli
- (and 1 more)
-
Blue E -- Thanks for the nice words. The whole head construction was an area that intimidated me, but there ended up being parts of it that I enjoyed enormously. And I do hope you will serve your lines, since you've got a keener eye & hand that I do. I still intend to seize other appropriate parts of the rigging, it's just that trying to accommodate 3 hearts, the circumference of the bowsprit, and then to get the stirrups to line up exactly where I wanted so they could be lashed as handsomely as Antscherl shows, all proved to be a tooth-gnashing experience. Aaron -- the figurehead is part of the bashing. I got Bill Short's practicum and followed it for both the figurehead and the stern carving. I don't know the Model Shipways kit has, but the Mamoli just has some ugly, barely formed metal pieces. And the carving is just the part that I found I enjoyed a lot, though that I also found lots of room for improvement. Cheers, Martin
-
JPett -- those treenails do look good, and knowing how little time they took you they look even better. (I always get cramps in my hands from drawing them through the plate over and over, and then say lots of ugly words when they break) One think I'd say, though, is that your drawplate looks like the once from Micro Mark -- you might want to check out the one Jim Byrnes sells, which is higher quality, so that you can get those little babies down even smaller. Somewhere in MSW.1 there was an interesting discussion about treenails and some people made the point that you shouldn't bother unless you can get them down to scale. Well, at 1:64 that would amount to a mere splinter. I actually like the look of treenails no matter. On that point, how far down did you manage to cut them? Cheers, Martin
-
X-Y Attachment for Dremel
Martin W replied to Martin W's topic in Modeling tools and Workshop Equipment
Thanks Wacko & Bob, that's really good advice. I'll check out the Proxxon, and look on both Ebay & Amazon (apart from Lowe's, these are 2 places that take most of my money anyway!) Cheers, Martin -
Thanks a lot, Russ, coming from an accomplished modeller, a compliment like that makes a guy's day. Cheers, Martin
-
Hi Folks -- Has anyone attached an X-Y table to their Dremel workstation? I've been looking at the one listed in the Micro Mark catalogue and wondered if it would work with the Dremel, and if it was worth getting -- if it was a decent piece of equipment. Any other suggestions or recommendations would be welcome! Cheers, Martin
-
I bought a plank bender from Model Expo that worked well, and could shape the planks more accurately than my wife's curling iron (which is what I use now). But halfway through the first planking job the heating element melted the joint with the handle so that all I managed to do with it after that was burn my hand. I do like that reeving tool, though. Martin
-
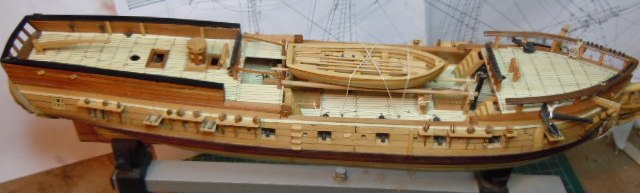
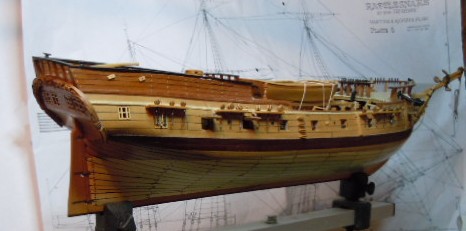
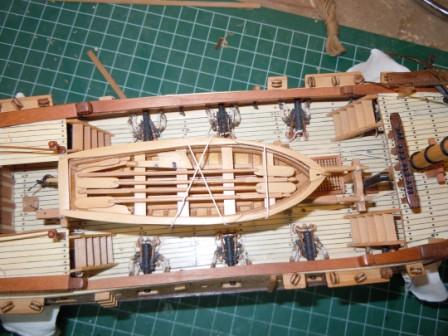
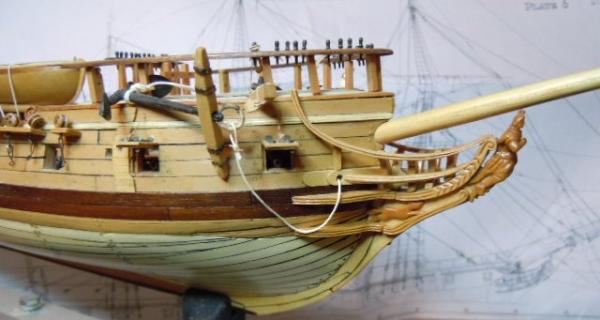
Thanks, Russ. The only one of the sources you mention that I don't have is the Steele -- I've seen that it's available online, but haven't tried downloading it; at Amazon it's available, but not in this month's budget (I just got back from a bruising trip). And the Model Shipways does go along with Hahn, Antscherl, and Petersen and Lees, so you're right there too. And fair enough Aaron, I'm on it: I only started this log recently, with the rigging, so I don't have any photos of what I did up to this point. But I just now went into the shipyard -- which happens to be slightly tidy at the moment (because I actually cleaned the place up before I went on my trip -- me wife said she wanted to be able to walk through there while I was gone -- can you imagine?) and took a few snaps of the hull in its current shape. Here you go (comments always welcome!) First, here's a view of the stern with my attempt at carving: And next is a view from midships And from above, of the boat, with the stairs that I got some special assistance with from Alan Yedlinsky: And then here's the head rails with the figure head: And that's it for now. Looking at these pictures, I see lots and lots of details that stand out mostly for what I HOPE to do differently, if not better next time. Cheers, Martin

- 104 replies
-
- 4
-
-
- rattlesnake
- mamoli
- (and 1 more)
-
AHA!!! Yes I have done the 5 minute process, and felt really lucky if I got the thing down to anything like a scale size (ie, tiny, tiny and oh so fragile). So there is yet another use for that Dremel! Thanks, Martin
-
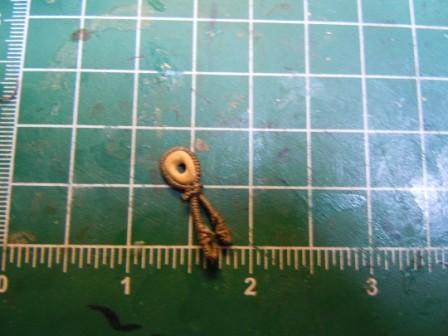
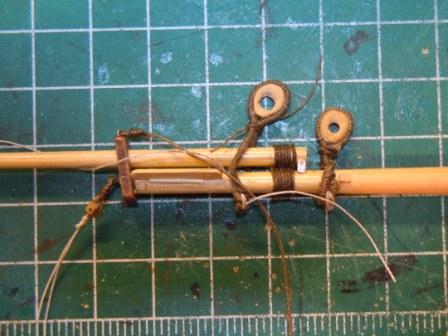
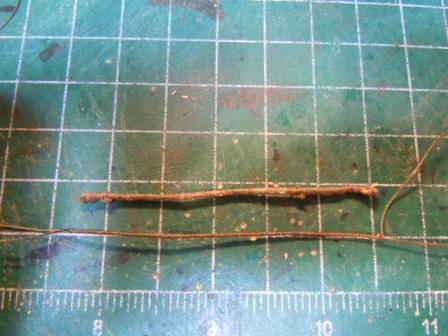
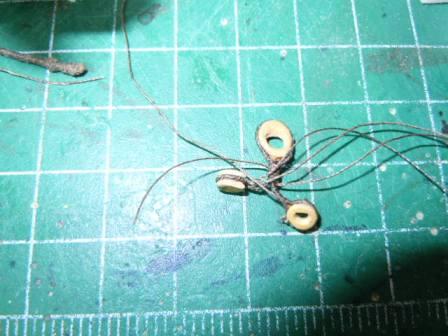
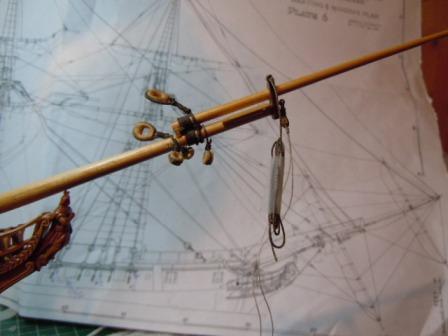
Greetings all – Much of these past weeks have been spent hunched over Hahn’s plans and comparing them with Petersen and whatever other account I could find that might help me decide just exactly where to set the Forestay collar in relation to the collars for the shrouds. I came up with something of a plan that made a kind of sense, though I’m not really confident that everything will end up where it should. Anyway: my new serving machine works wonderfully. Once I served up the length of line that I thought would be right (I’d taken a measurement by wrapping a piece of line around the bowsprit, allowing for the heart, and then using that for my length – not the most scientific procedure, but the only one I could think of) I put the carved heart in place and I thought, well, hey, that's not too bad: then after seizing the stirrups used to lash the collar onto the bowsprit, I put it into place. I did this as well for the Fore Preventer Stay. And then . . . Whoa! How wrong it all looked I’d carved the heart to match the size of the metal one included in the kit. I’d used .4 mm line and seized it with thinner cotton line that looks like it’s about .25, though the size isn’t marked so that’s a guess. Needless to say, it’s all TOO big. The forward collar is even more too big, and the stirrups look huge – never mind the general sloppiness, since I’d intended this to be an experiment anyway, but I hadn’t imagined it would go this badly. Live and learn – or maybe, model and learn. I next tried serving a thinner line, and leaving the sections that would be seized un-served to avoid bulking everything up too much. In theory that seemed like a pretty good idea – in theory. Here are the 2 thicknesses served to show the comparative thicknesses: And here's how the forestay heart with the 2 smaller hearts that go to the shrouds looked (again by way of experiment) In harsh reality, I couldn’t the seizing tight enough and consistent enough around the servings to make for a symmetrical collar holding one big heart and 2 smaller hearts (since the big & small is what looks right on the plans). After 2 tries that were equally ugly – and I mean ugly . . . so ugly I couldn’t take a picture – I decided that I’d just the .4mm line unserved and seize the 3 hearts. And this is how it ended up. I like the servings well, and I think that I’ll keep trying to use served line where appropriate, but getting those stirrups to fit just right, and getting everything seized tight seems to lie just beyond my capacity. Advice, comments, all welcome!