HOLIDAY DONATION DRIVE - SUPPORT MSW - DO YOUR PART TO KEEP THIS GREAT FORUM GOING!
×


Martin W
-
Posts
1,412 -
Joined
-
Last visited
Content Type
Profiles
Forums
Gallery
Events
Everything posted by Martin W
-

What do you use your mill for ?
Martin W replied to captainbob's topic in Modeling tools and Workshop Equipment
The problem is that my budget won't allow for diamonds, or even rubies, but more like aluminum earrings with a matching glass bead necklace. -
What do you use your mill for ?
Martin W replied to captainbob's topic in Modeling tools and Workshop Equipment
It's not only what you can afford, but it's what you can tell your wife you can afford. My waivering comes from the fact that I read several reviews of the Proxxon on Amazon by Americans who complained that the motor didn't work right, that knobs had too much play in them, and so on. That surprised me, since I had assumed Proxxon was a quality product. Sherline would be ideal, but ideals tend to be pricey, and I'm just finishing my second build so would have a hard time explaining the thousand dollar price tag. Like Meredith, I'm undecided. But this is a valuable discussion. Cheers, Martin -
What do you use your mill for ?
Martin W replied to captainbob's topic in Modeling tools and Workshop Equipment
Hi Guys -- This is a very valuable discussion for me, since, like Bob, I'm thinking hard about buying a mill. The comments that you can do things without a mill just as well make sense to me, but I remember saying to myself, "do I really need that Byrnes saw? surely I can cut wood without it." It seems to me that, like the Byrnes saw, a mill would facilitate precision, and isn't that what we all aim for? The User's Guide Mark gave the link for has lots of info. Terrific, Mark. But that guide is for the Grizzley, Micro Mark machine, which I have looked at among others. My question is this: what is the best micro mill? And I (speaking for myself, not for Bob) am interested in the 3 that all seem to run about the same (a smidge under $500): Micro Mark, Proxxon, and Vanda Lay (which isn't an actual mill but a set up to use the Dremel as a mill). Cheers, Martin -
Hey, third time lucky, right? And maybe it's your willingness to redo the details that make your build so handsome. Cheers, Martin (fellow Ratter)
-
Great stuff, Bob!! It's those little details that make seeing fine work like yours more than simple joy -- oh, I laughed with pleasure at the chart. Terrific. Martin
-
Nice bulkhead, Brian, and you make it look simple! And your drafting skill might be a wee bit off center (I couldn't tell), but you can still map out a neat design. Well done. As for the walnut -- I used that on my fo'c'sle rails, thinking I'd stain it, and find that my eye is continually drawn to the HUGE grain that I just couldn't sand out. You might just try boxwood with stain. Cheers, Martin
-
That's a good narrative of the process involved in those pesky catheads. I think I taught myself a new category of Sailor's Language when I worked on those, and planking over and around them also proved aggravating. But you're definitely right to add as much as you can BEFORE installing the catheads permanently. -- And by the way, those rails look really nice in this last photo. Cheers, Martin
-
JPett -- It is a pretty hull, and the nice thing about wood is that it will mellow over the years -- unless it's painted. And I looked pretty hard to see your "mistake," and didn't see anything that made me gasp. If you look at my hull, you'll see some of those gaspable spots where, following Bob Hunt's suggestion, I'd blackened the edges of the holly planking, only to find that blacking bleeds into the glue. Sometimes you can sand the blight away, sometimes you just have to avoid looking. But really, it's a nice Ratt. Cheers, Martin
-
No fooling -- wood is always attractive to look at, and the variation in the wood shade in the hull planking really make this eye-appealing. The black wales adds a nice contrast and framing for the wood below. Just my thoughts, Martin
-
It's great to have that Amerikan Icon, Alfalfa, back!!! Ahoy!. Where's Darla? Your build is looking better and better, Brian. The problem with the gun port seems completely resolved, and the planking all looks nice and even and smooth. As for those pesky hances, I'd make 2 points: first, you'll be happier if you use a piece of wood long enough to extend from the quarterdeck into the hance itself, otherwise you'll have a seam that will always draw your eye, no matter how much you tell yourself, "oh, no one will notice." Second, in carving my decoration (which is supposedly a spiral), I actually found it easiest to pencil in the design, then use a micro gouge and an exacto. I love my rotary tool, and used it on the stern carving and the masthead, but that came in handiest on the hances as a finishing tool. Cheers, Martin
-
Thanks for that, BE. If I can find some tubing small enough, and a metal-cutting saw, I'll give it a shot. Styrene tubing actually sounds like it would be the easiest to work with. Plastic seed beads? Hmmm -- well now, i do have a big box of beads, and the local hobby store has an entire aisle of Beadery Supplies, so that's something to check out as well. Could you use an American machine like those from Shipahoy? I would think the shipping alone would make them prohibitively expensive. And I haven't heard anyone who has actually used them. Along a similar line, I'm really thinking about a Proxxon mill, but have read some negative reviews on Amazon so have wondered if maybe the American versions don't run as well (since we insist on 110 volt current, just as we resist the metric system and May Day). Cheers, Martin
-
Here's the link: http://shipahoymodels.com/equipmentforsale.htm You'll be astonished at how easy it is to use. Cheers, Martin
-
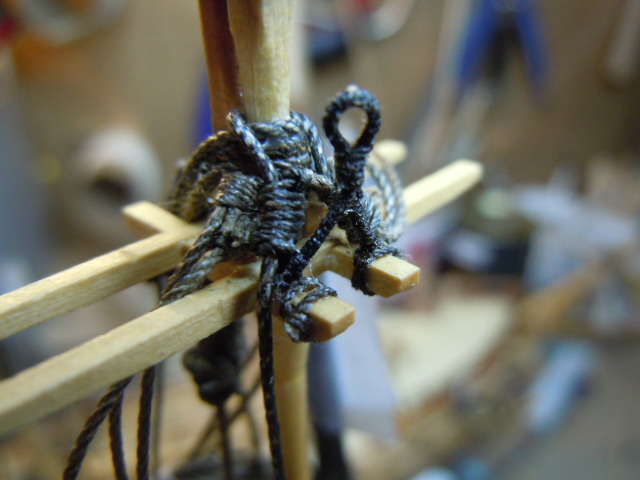
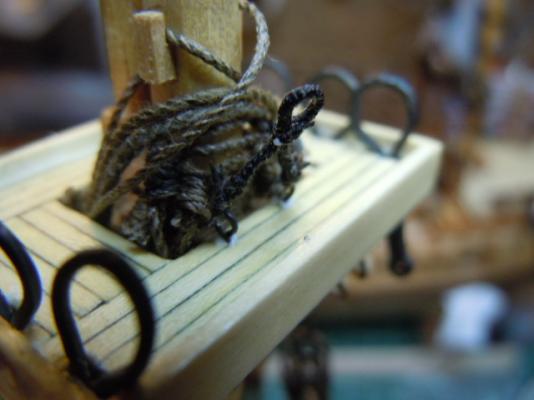
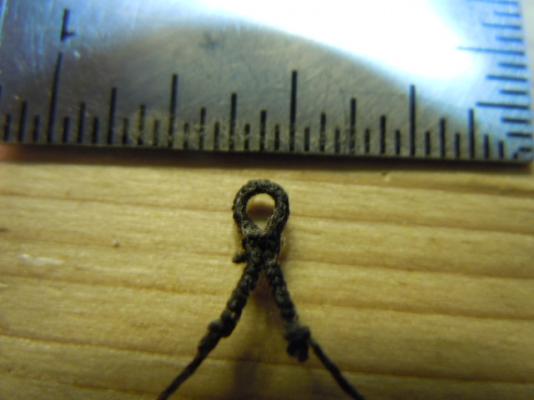
In studying the different plans in hopes of checking off all the details prior to starting on the running rigging and raising the spars, I noticed (from MS) that the Main Topgallant Stay runs through a thimble in the Fore Topmast Head and then “sets up with thimbles and lanyard on a spot between the Fore Topmanst Trestle Trees.” There are two illustrations in the plans of the thimble set in the trestle trees: this takes a span of 2 legs coming off the thimble that then tie onto the aft portion of the trestles trees. I then noticed that both the Mizzen Topmast Stay & the Main Topmast Stay tie off in a similar fashion at the top to the fore of them (ie, Mizzen to the Main top, and Main to the Fore top). Ok, these thimbles pose a problem. I’ve got a pile of bullseyes on hand, but they’re much too big. Bob Hunt just uses blocks, but they look odd as the end-points of the rigging. And there seem to be thimbles all over the place. For the three with the spans, I came up with a solution that I hope will work. Using my serving machine, I served some very thin line – .025 – with some of the same diameter, both tarred. I then seized a loop at one end, using a small gauge thingy that is meant for forming loops in wire. And I left enough unserved line to go around the Trestle Trees so that I could seize loops and try to get the seizing to match with the serving. Here’s the span prior to going on the Trestle Trees: And here it is mounted on the Fore Trestle Trees: To make the “thimble” stiff enough to hold the lanyard taut, I coated it with diluted glue that dries clear. It will give some, but should keep its circular shape for the most part. Now, the two spans in the tops posed a slightly different problem, in that there was no access to the Trestle Trees provided by the way I’d attached the top, and given that the shrouds and other parts of the standing rigging were already piled up around the mast. My solution, which violated the standard of accuracy, but was the only apparent option short of redoing the tops, was to seize each leg of the span to an eyebolt that I then set into the planking of the top. Here’s the result: As for the numerous other thimbles, such as those through which the Topgallant Lifts run, I don’t know . . . . Suggestions welcome. Cheers, Martin

-
Hi Russ -- I just thought I'd look in, and once I started I couldn't stop. This is a very attractive build, with pretty lines and quite nice details. Not only are you a consummate researcher, but a craftsman as well. Best, Martin
-
JSGerson -- Your rails look pretty doggone good! Those scarf joints are in fact real teasers -- if I recall, I ended up ruining all the pear I had for them, and then ended up having to go with walnut that I stained and sealed to try to hide the grain. The scarf joints should look attractive, but I had to hide mine -- yours on the other hand look nice. And you're right about those 2 deviations -- that's also when I put the davits in. And that's when I should have put a brace or footing of some sort for the bowsprit, since I decked the entire fo'c'sle and now have no access at all. You might also want to think about boomkins sometime soon -- Bob doesn't address them in any way, but Hahn's plans show them, as do the MS plans, and they will play a role in the rigging. I wish I had your skills. Cheers, Martin
-
Russ gives good advice. I used some pins that I had on hand, and frankly don't remember if they were from the Mamoli kit, or left over from another kit. They're black, and look ok, I guess. I think medium brown ones would look better. Since they're all going to be covered up with the extra rope, I didn't think indulging in wooden ones was that compelling of a detail. And i agree that drilling the holes for the pins before installing the rails will make life easier. I lacked your foresight on this bit, and ended up having real headaches drilling the holes without breaking the rails, and keeping everything lined up. I might start keeping a list of steps that would have been better done earlier on, as in before pieces are installed. Cheers, Martin
-
Thanks, JPett, that's nice encouragement coming from someone who has taken plenty of care with his own build. I might also mention that I'm getting closer and closer to making my big decision about which mill to buy. Some of the reviews of the Proxxon suggest that, at least the American models, have motor problems. I've been checking out the Micro Mark version. And I'm still interested in the Vanda Lay. I don't know which will be the one that shows up on my doorstep. But first I need to make some progress on my workshop. Cheers, Martin
-
It's looking good, Brian. Sanding can get dangerous, primarily because it's SOOO tedious that you can lose track of how much stock you're taking off. I also miss Alfalfa. Cheers, Martin
-
Let me add my vote to the others, JPett: the treenailing looks good. Maybe you just aren't used to seeing those little spots all line up, but they do look good to me. Glad to have you back, Martin
-
Hi Bob -- It came off the frames pretty easily, eh? With the ribs in plain sight, that makes for an attractive boat. Cheers, Martin
-
You're right, BE, they are of an almost lead-like softness. And I'll do just that, and will wait till the futtocks are ready to futtocked. "Crowsfeet" definitely bypasses that little problem of the drifting apostrophe. Cheers, Martin
-
Half a milimeter? I'd call that an exact equivalence!! Martin
-
Hi BE -- thanks loads for the tips. I actually have put the groove around the euphroe -- and there was a fine example of eye strain. My real concern about those is how much the lack of perfect alignment in the holes will show up in the crows feet (and by the bye, is it crows feet, or crow's feet, or crows' feet?). And the length of those plates does worry me. Just eye-balling them makes me think they're too long, but I'm not sure how I would shorten them. I'd secretly hoped that when I tightend the loops around the deadeyes that they would magically rise upward just the right amount. As for the hooks, I've seen D Antscherl's description, and will give that a shot. Cheers, Martin
-
Hi Brian -- There are LOADS and LOADS of details, and they never stop. Sometimes I do wake up at night and tremble at the thought. YIKES. And Russ, as I said, it's your suggestion that I get the MS plans that has made a huge difference. The research makes not only for more fun, but also makes you understand why and how those countless details come together. Cheers, Martin
-
-- I'm hoping that this entry will effectively bring me up to date. Comparing the MS Plans to the ones from Mamoli & Hahn, I’ve noted a few differences, to be expected, I suppose, but that might be of interest to other Ratt Riggers, since they could shape individual decisions on the rigging. – MS & Mamoli show no crows feet; Hahn does. – MS & Mamoli show buntlines & leechlines connected to six 7" blocks hanging under the fore edge of the fore & main tops. Hahn does not show these. – Hahn shows preventer stays and fore & main stays; MS & Mamoli show only fore & mainstays. – None of the plans shows stunsils (I’m relieved). – On the Hahn plans, stanchions along the aft sides of the tops are just visible. On the MW plans these become clear as what holds up the netting on each top. Since my tops have long resided on the masts, I’m not sure it would be worth the risk of breaking something to try installing these, though I wish I had, since they not only make sense but look good. Here are the sizes and dimensions for the blocks & lines I used on the Fore & Main Topsail Yards Braces: .20 mm line, 4mm blocks clue garnet blocks: .3mm line, 4mm blocks buntline blocks: .3mm line, 3.5mm blocks lift block: 3mm sheet block: 4 mm topgallant sheets: 3mm blocks horses & stirrups: .3mm line As I was about to put the sheet & lift blocks on, I noticed the chocks looked off, as though I’d put them in the wrong place. I checked the plans, pulled my chin, then saw that the cleats were also the wrong way. Then I finally grasped the fact that I’d seized all the block on the wrong side of the yard. Another day, another bass ackwards lesson. As the MS plans state under the illustration for the Fore Topsail Yard Attachments: Main yards & Mizzen are similar. And that’s how I rigged them. The MS plans show a tye halliard for these and for the topgallant yards, which I’ll attach at the mounting (or “lifting” as Antscherl vividly describes it). Here are the sizes & dimensions for the Topgallant yards: Clew blocks: .2 mm line, 3.5 mm block Braces:.2 mm line, seized on the fore side, and waxed (I’ve waxed all the running rigging) Lifts: .2mm line, seized on the top Horses & Stirrups: .3mm tarred line Here they are for the Crossjack yard: Braces: .2 mm line, 4mm blocks Sheet blocks: .3mm line, 4mm blocks Lift & Topgallants: .3mm line, 4mm blocks Horses & Stirrups: .5mm line Hahn shows the brace lashed inward about 1 1/4" from the cleat, which is the same configuration Antscherl shows, but that neither MS nor Mamoli shows. MS states: “No buntlines or beelines or clew garnets on Cross Jack.” This coincides with Hahn’s plan, which I worked out after seizing the buntline blocks & sheet block. – While waiting for the above to dry, I thought I’d try finishing of the spanker boom by putting the 3 metal bands on the jaws. I cut a narrow strip off a sheet of .005 brass I have on hand, and shaped it around the jaws. This is basically the method I used on the cross-timbers of the anchors, and it gave me serious fits. The difficulty is two-fold: first the metal is hard to glue on because it wants to spring out of place before even the speediest of glues can set. Second the tapered angles that the band has to circumnavigate make the metal want to move out of line. Here’s a shot of the boom with 2 bands attached (yes, you’re right, I didn’t blacken the left one, but keep reading): When I worked on band #3, the gluey mess started annoying me badly, so I tore the bands off, and went with blackened paper cut into strips about 1/32: wide and attached in the simplest and easiest fashion with white glue. Here’s the Gaff with the bands attached (I’d prefer a color for the bands that wasn’t actually black, one that simulated tarnished metal perhaps, but couldn’t think of how to do that with paper). You can also see the Vangs – 4mm blocks, .3mm waxed line (though looking at MS plans now, I see these are supposed to have a becket; so I’ll have to redo them with a line seized below the block to simulate the becket) – and a 5mm block seized in the middle, the parral. For this latter, I strung some little tiny beads (sorry, don’t know the size – I bought them for my previous build) on some .3.5mm tarred line, then I drilled a hole angled from the outer tip of each jaw and passed the line through that and knotted it on the inside of the jaw. I’ll finish off the other end when I attach the spanker to the mast. And there will be an eyebolt attached between the 1st and 2nd bands. The boom also has a cleat on the underside, which I supplied with one from the kit. It looks a bit large to my eye, but since my efforts at carving cleats for the Bitts did not result in a handsome product, I figured the manufactured ones would cause less heartache. Here’s the bitts with the ugly cleat attached: And that's it for now. I should be back at my workbench soon, and Promise (well, ok, I hope) to keep this log up to date on a more regular basis. Meanwhile, I'll be reading all of yours! Cheers, Martin


- 104 replies
-
- 1
-

-
- rattlesnake
- mamoli
- (and 1 more)