


Jack12477
-
Posts
5,444 -
Joined
-
Last visited
Content Type
Profiles
Forums
Gallery
Events
Posts posted by Jack12477
-
-
-
-
In Bob's 1st photo, to the right of the stand there is a black knob (horizontal - just above and behind the drill), when you loosen that knob it allows the drill to rotate - on my stand that mechanism has "detents" that "click" at different positions as you go around the arc. Never measured the resulting angle(s) but one of them is 90 degrees and one is 45 degrees. Check you model and see if it works the same way. They're like "click stops"
-
-
Great idea Bob. Thanks for the tutorial. Will have to use that myself, especially since I have that same Dremel stand and tool.
-
-
Ken, when I did my Model RR ballast I used a 4 parts water to 1 part glue plus 2 drops of detergent. Not sure if that would work for the rope versus your 50-50 mixture. It left the Model RR ballast firm but slightly elastic. Also not sure if 4-1 ratio will allow the rope to stick to the deck; it should hold the rope coils together without overly stiffening them, but not sure about the deck holding ability.
-
-
-
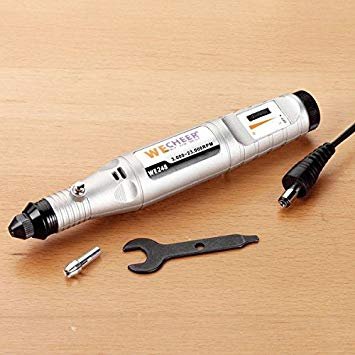
Richard, I have the WE248 model (3,000-23,000 RPM). I've used it to sand as well as drill (#76 bit) and it works fine for modeling. Yes they do list it as a woodcarving tool but it work great on my wood ship models. It's light weight and shape make it great for small jobs. The thing that sold me was the fact it accepts all of the Dremel colletts so I can use all my Dremel bits as well as various sized drill bits. I got in a WoodCraft store in Delaware for about $85.
Can't speak to the portable version, 243. Have not seen that model.
-
-
Jack,
Do you know the weight of the WeCheer?
Richard
Richard, sorry for delayed response - been away. The WeCheer is 2.88 oz or 82 g. That's just the unit, it has a plugin transformer which attaches via a small cord to the unit. I find it very comfortable to use and since it takes all the Dremel colletts I can use all the Dremel bits and still use small drills.
-
-
Very well done Erik. Came out a lot better than mine. I have to second what Danny said above.
- Erik W and Stuntflyer
-
 2
2
-
-
-
-
And while you are in the folder/desktop where your pictures are, hold down the CTRL key and while holding it down CLICK on each photo you want to upload, when you've finishes selecting all your photos then click OPEN and ATTACH and follow George's instructions above
- mattsayers148 and GLakie
-
2
-
-
-
It looks more pleasing to my eye also but I'll defer to Cog and Augie.
- popeye the sailor, GLakie and mtaylor
-
3
-
I did borrow my Admirals cutter and green cutting mat to cut some sails from a sail pattern. Worked like a charm - cuts smoothly and accurately like a hot knife through butter. Great tool
-
When I was doing plastic models I used Squadron Green Putty to fill in the gaps where parts didn't mate properly. Sands and paints nicely. Model is looking good Popeye.
- mtaylor, GLakie, popeye the sailor and 1 other
-
4
-
Yes, our neighborhood sounded like a re-creation of the bombardment of Fort Sumter all last night - our dog hid in her bunker till 6AM today. Boat's looking good, Dennis.
US Brig Niagara by xken - FINISHED - Model Shipways - Scale 1/64
in - Kit build logs for subjects built from 1801 - 1850
Posted
Nicely done, Ken. Looks great.