Piet
-
Posts
3,568 -
Joined
-
Last visited
Content Type
Profiles
Forums
Gallery
Events
Everything posted by Piet
-
 WOW, I'm overwhelmed by all the likes and your very kind responses, thank you all. Hoi Remco, no, I did not shove a rod into the tube because i already knew that it would be too bulky for the scale. Even a 0.5 mm tube would be too big. I just wanted to see if it would work and indeed to make the real thing I need to fill the tube with something and this case a rod would be the best instead of the traditional sand. A life size thimble is about 12 mm at its widest point, now divide it by 50 and we come to a very improbably small size to work with. I used a modified round jawed pair of pliers and the collapse is not that serious, I could even tap it back some into its round shape. This pair of pliers have round conical jaws so I can bend all kinds of different radii. I modified the tips by carefully grinding them to much smaller diameter. This miniature stuff is taking its toll on my fingers though but that's why I let my fingernails grow a little larger then usual for a man. It acts like a more solid guide then my poor skin Hi Daniel, thank you for your kind words, I appreciate it. Well, instead of hanging a torpedo on the aft gantry I figured to hang a mine on it dangling over the side where the mine tubes are. It'll be too busy with a torpedo and the dingy so close to each other. Hey Popeye, wow, what accolades, thanks!!! I need to be careful now that I don't get a swelled head with all those compliments but I'll fight that - - - nah - keep them cards and letters coming, I love it when people appreciate my work and it spurs me on to do better. Actually no, after I drew out the "come-along" assembly I already figured it would work. Sub boy?? No, actually my field was up in the air, airplanes, where instead my father loved it below sea level That day when he left to sail with the fleet to battle the Jap navy he made me promise not to seek a career at sea. Well, he already knew that I loved airplanes and wanted to become an aircraft engineer and pilot. Even with all the roadblocks thrown in my path, I, in a way, fulfilled my promise to him, which makes me very happy. Today we didn't accomplish much. I accompanied Gwen to the doctor for her back and other things. She finally decided to seek some medical attention. Ever since we moved to Florida we didn't have a "family" doctor and this was a good excuse to find one so I also signed up for the general aches and pains. I did start with the 3 mm pulley brackets for the dingy boom. This will REALLY challenge my ability to make all that stuff to scale. When yuns get a message from Admiral Gwen that I ran off into the boondocks screaming and tearing my hair out, you'll understand I already screwed up one part and have to redo it. There were some strong words used like "domkop," and "idiot." But so what, I just laugh and shake my head. Tomorrow is another day and a fresh start. My brass junk pile is mounting up Well, that's it for tonight. I'll be editing some posts where the pictures disappeared. Cheers,
 -
Hoi Hans, thanks for visiting my VOC ship "Soerabaya." Reason that you haven't seen this log is that I started on my father's submarine, the O19. I thought in working both at the same time, every other day, but somehow the O19 took front burner. I'll get back to the VOC ship after my dad's sub model is finished. Thanks for the URL for more pics on VOC ships, they have a very keen interest for me, also for personal reasons, as explained in the build log. Amateur Jan and Amazon Dirk have been very helpful with info and guidance in making the model more realistic. Some of the detail stuff may be somewhat out of scale but to the novice it will not be noticeable. I really like the "Friesland" but at this stage in my life I have enough in the pipeline to last me for the rest of my life When you have the time check my dad's submarine log. Cheers,
-
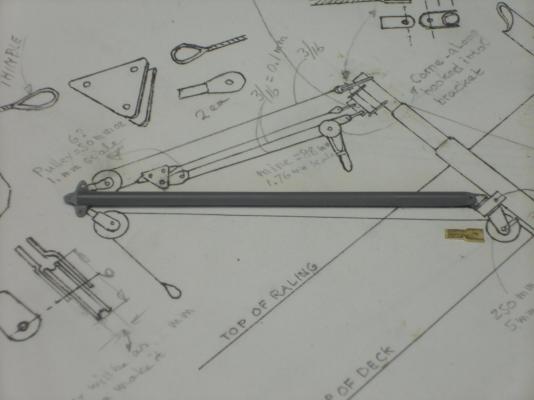
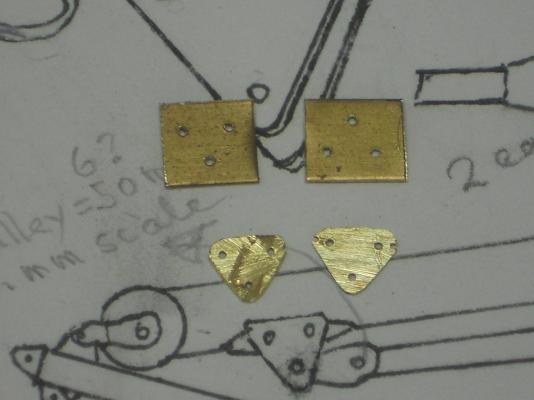
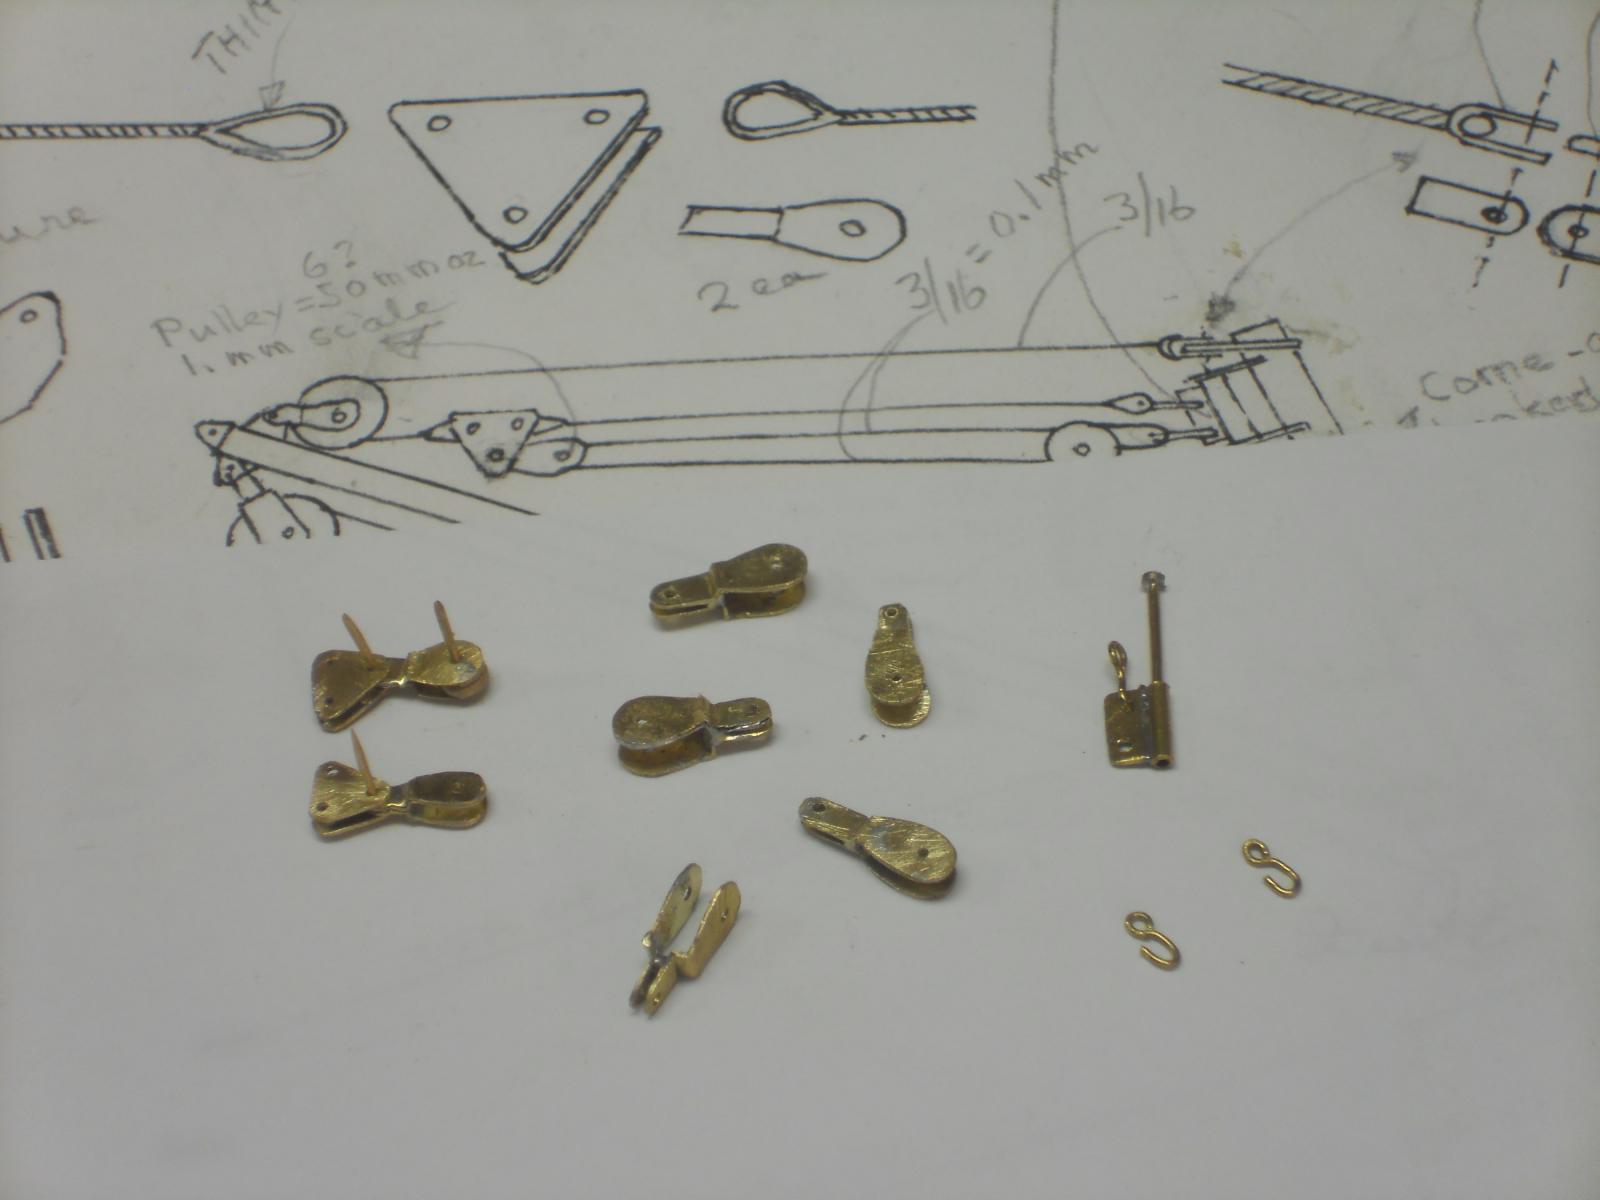
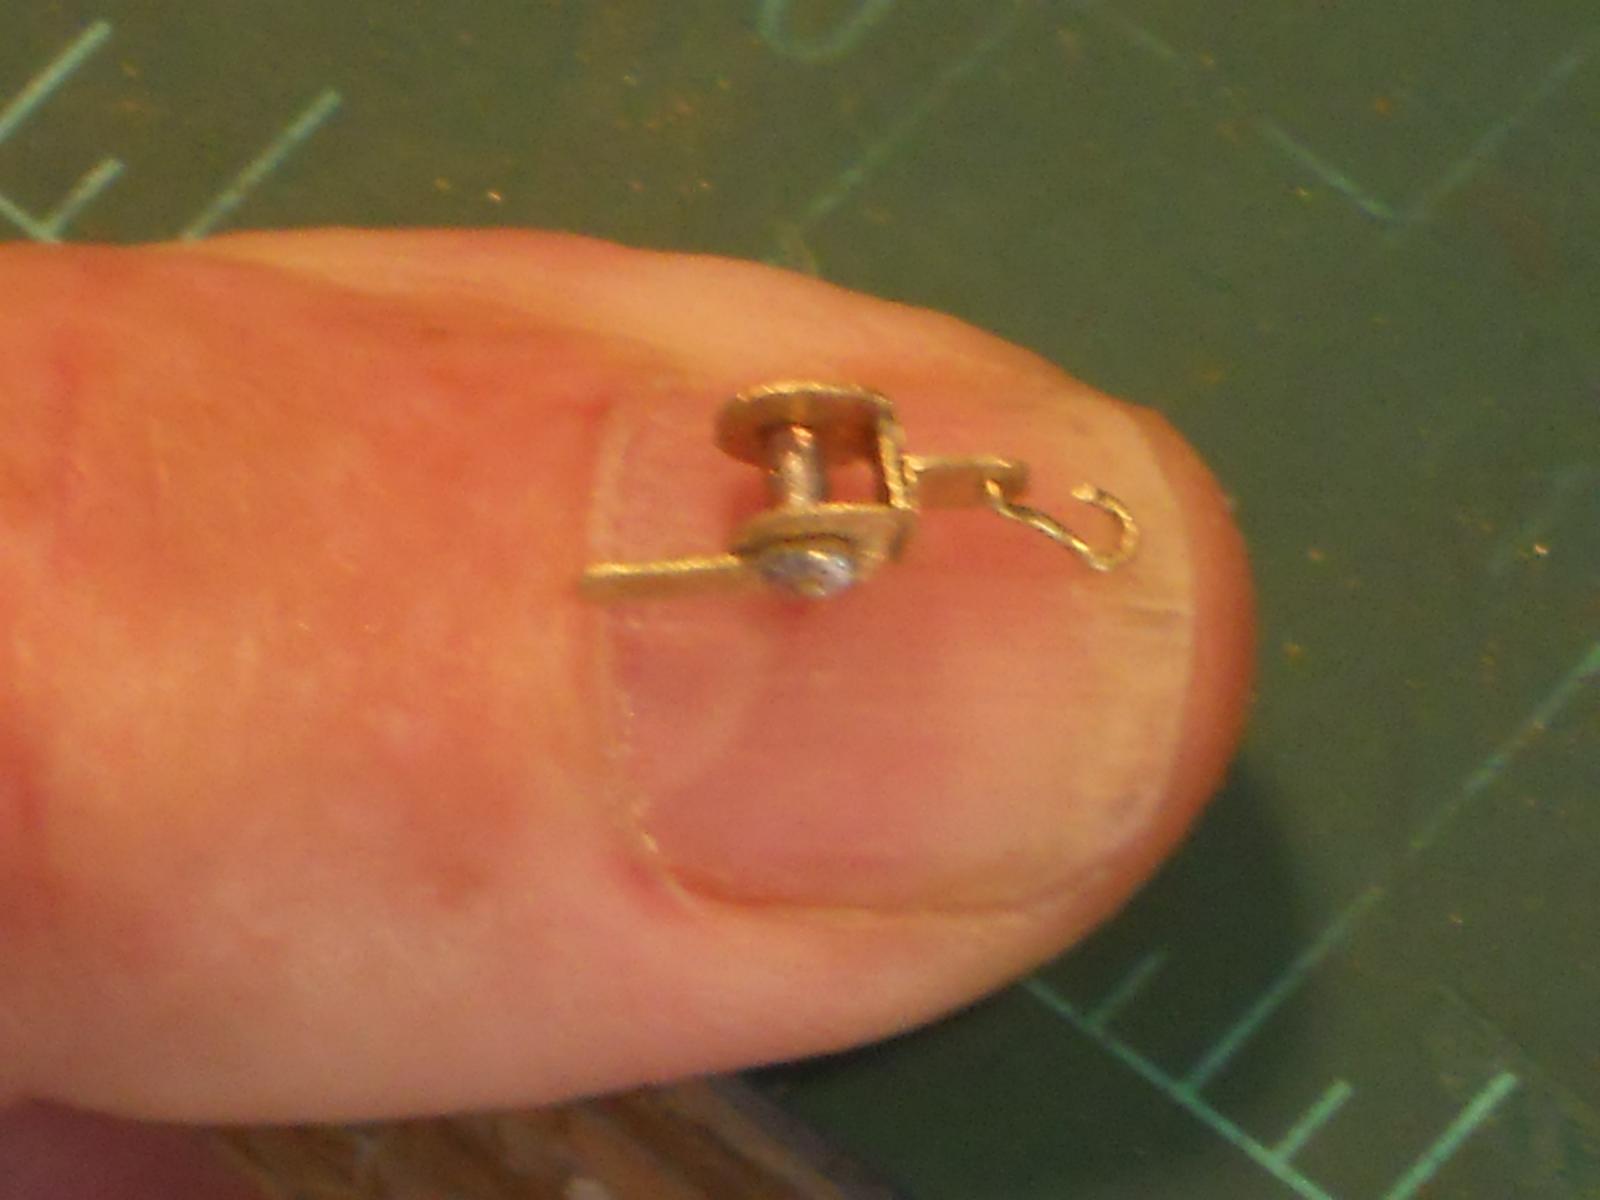
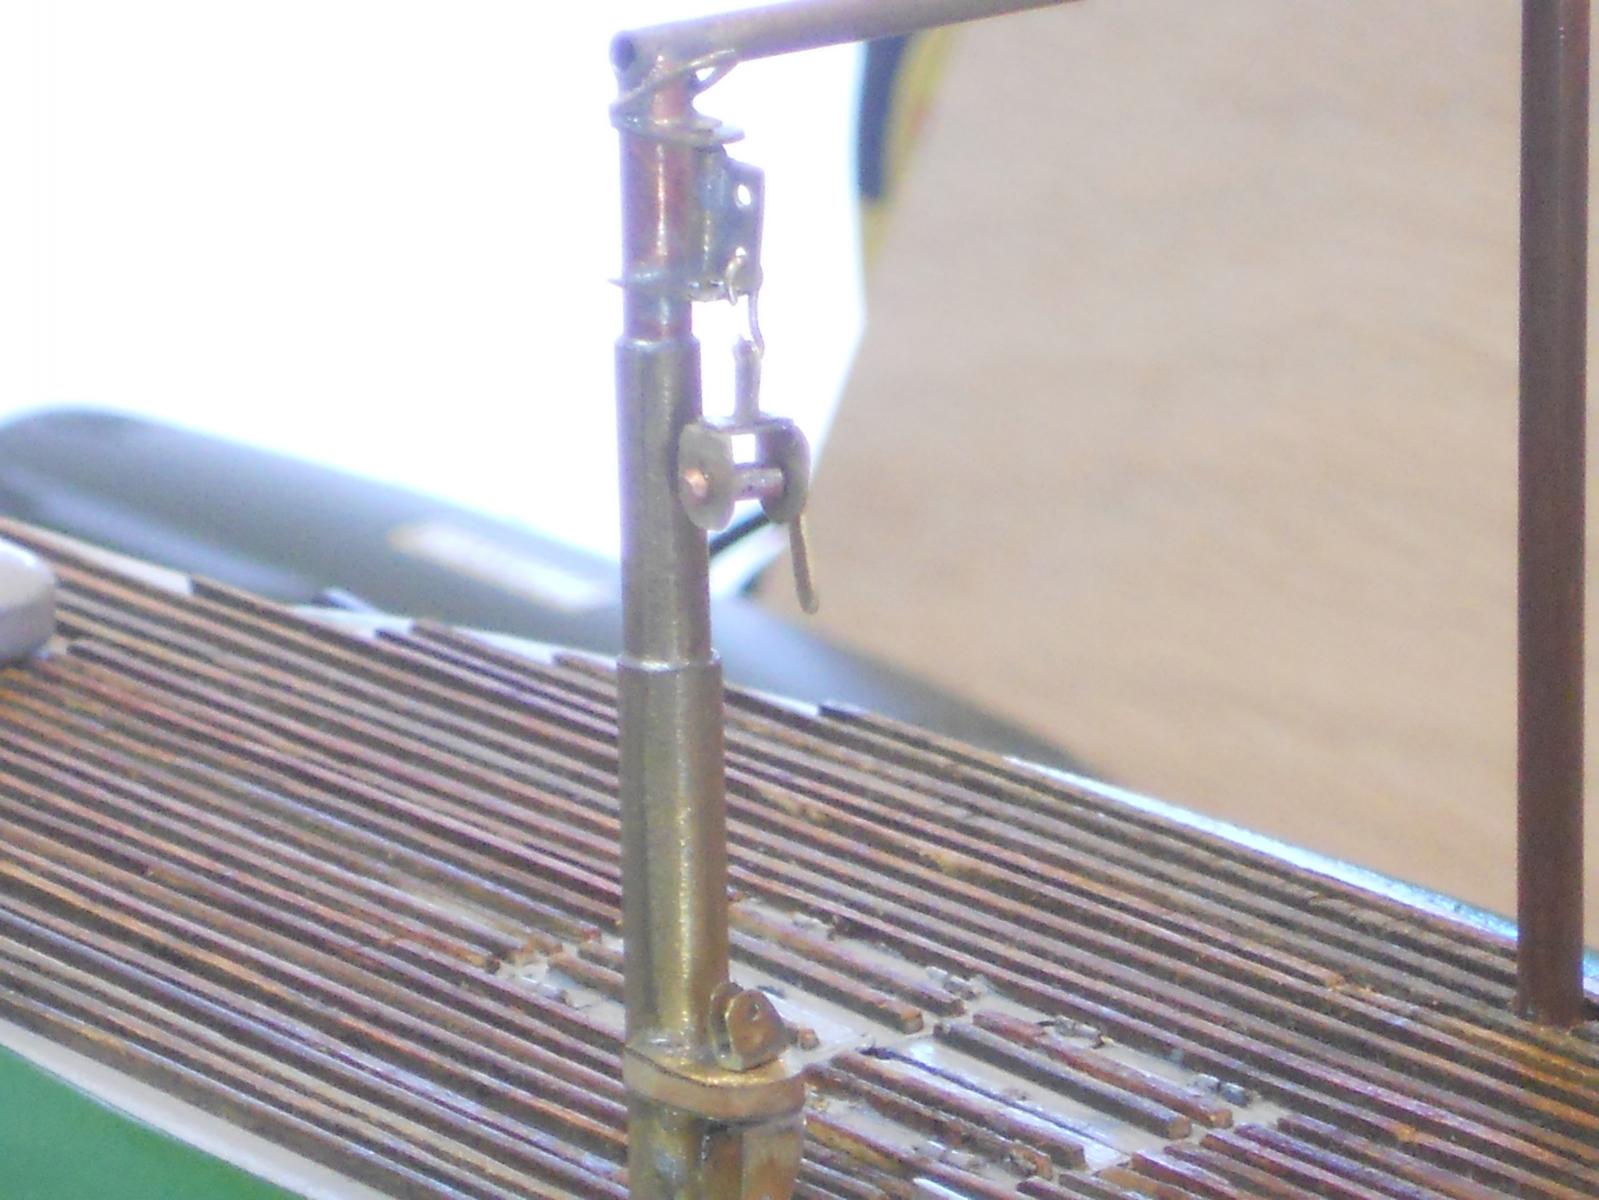
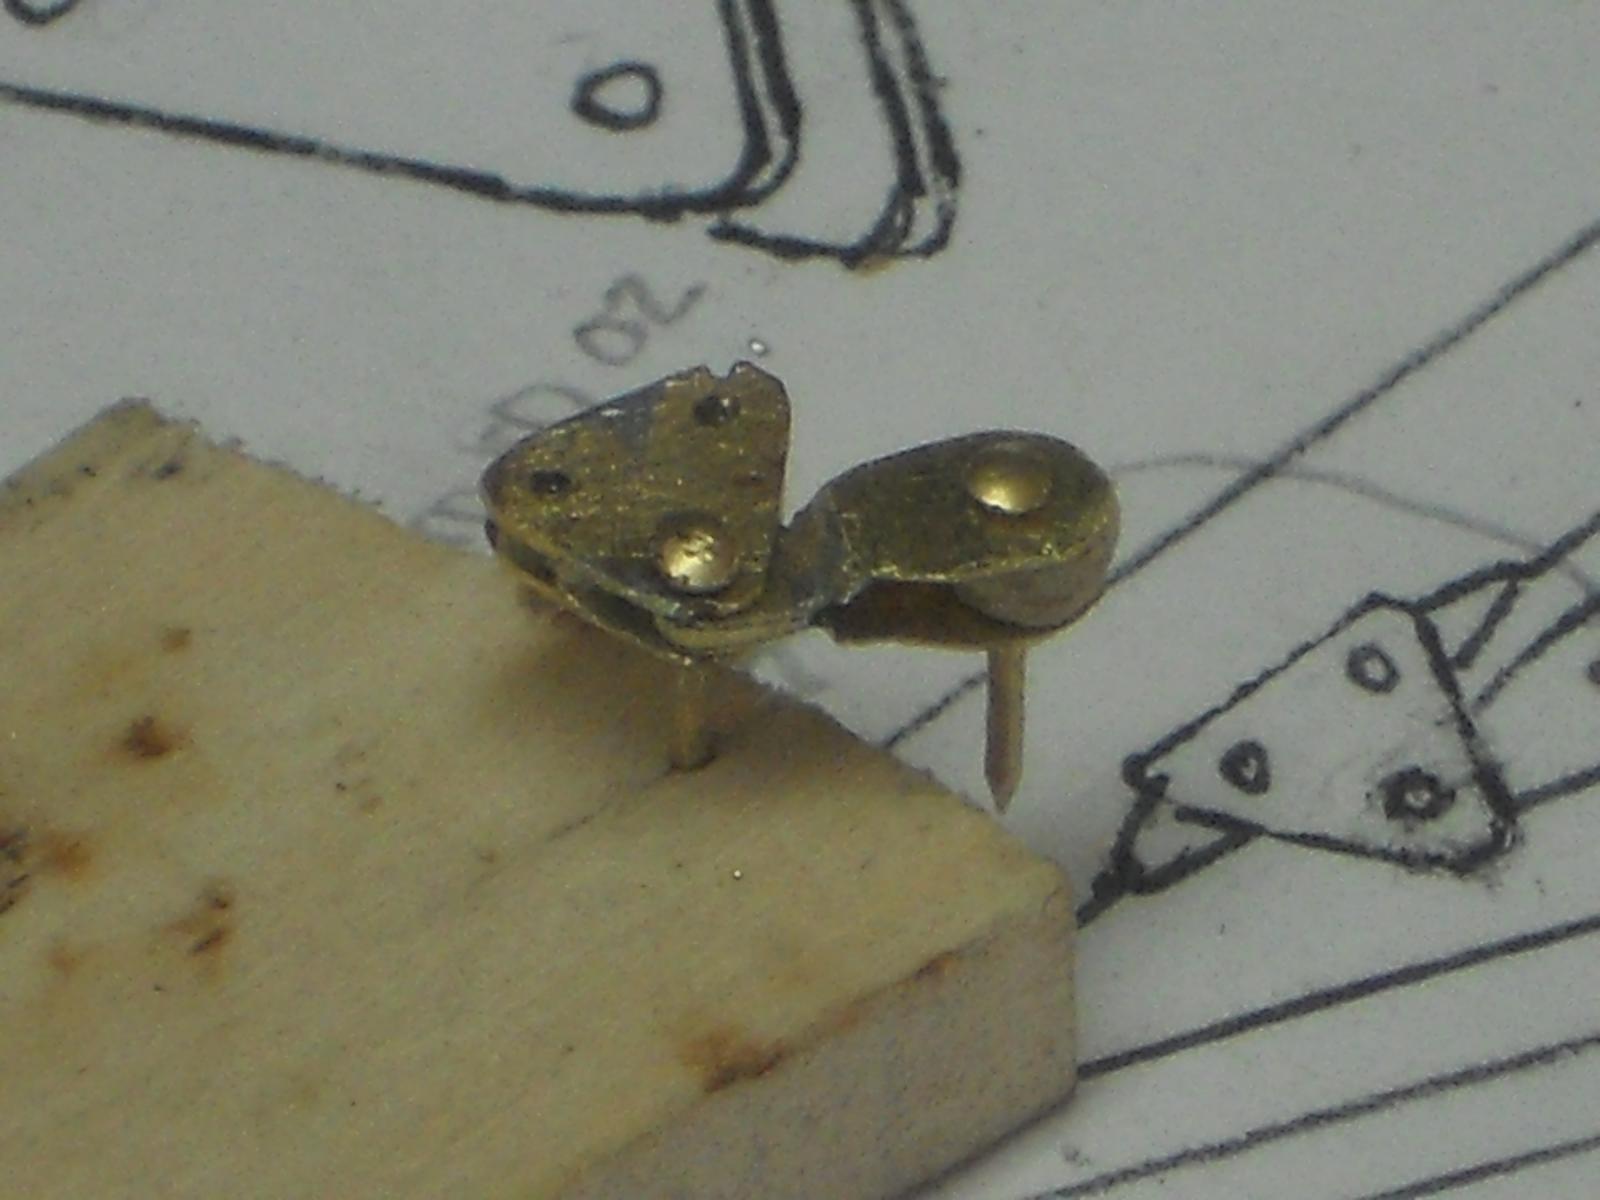
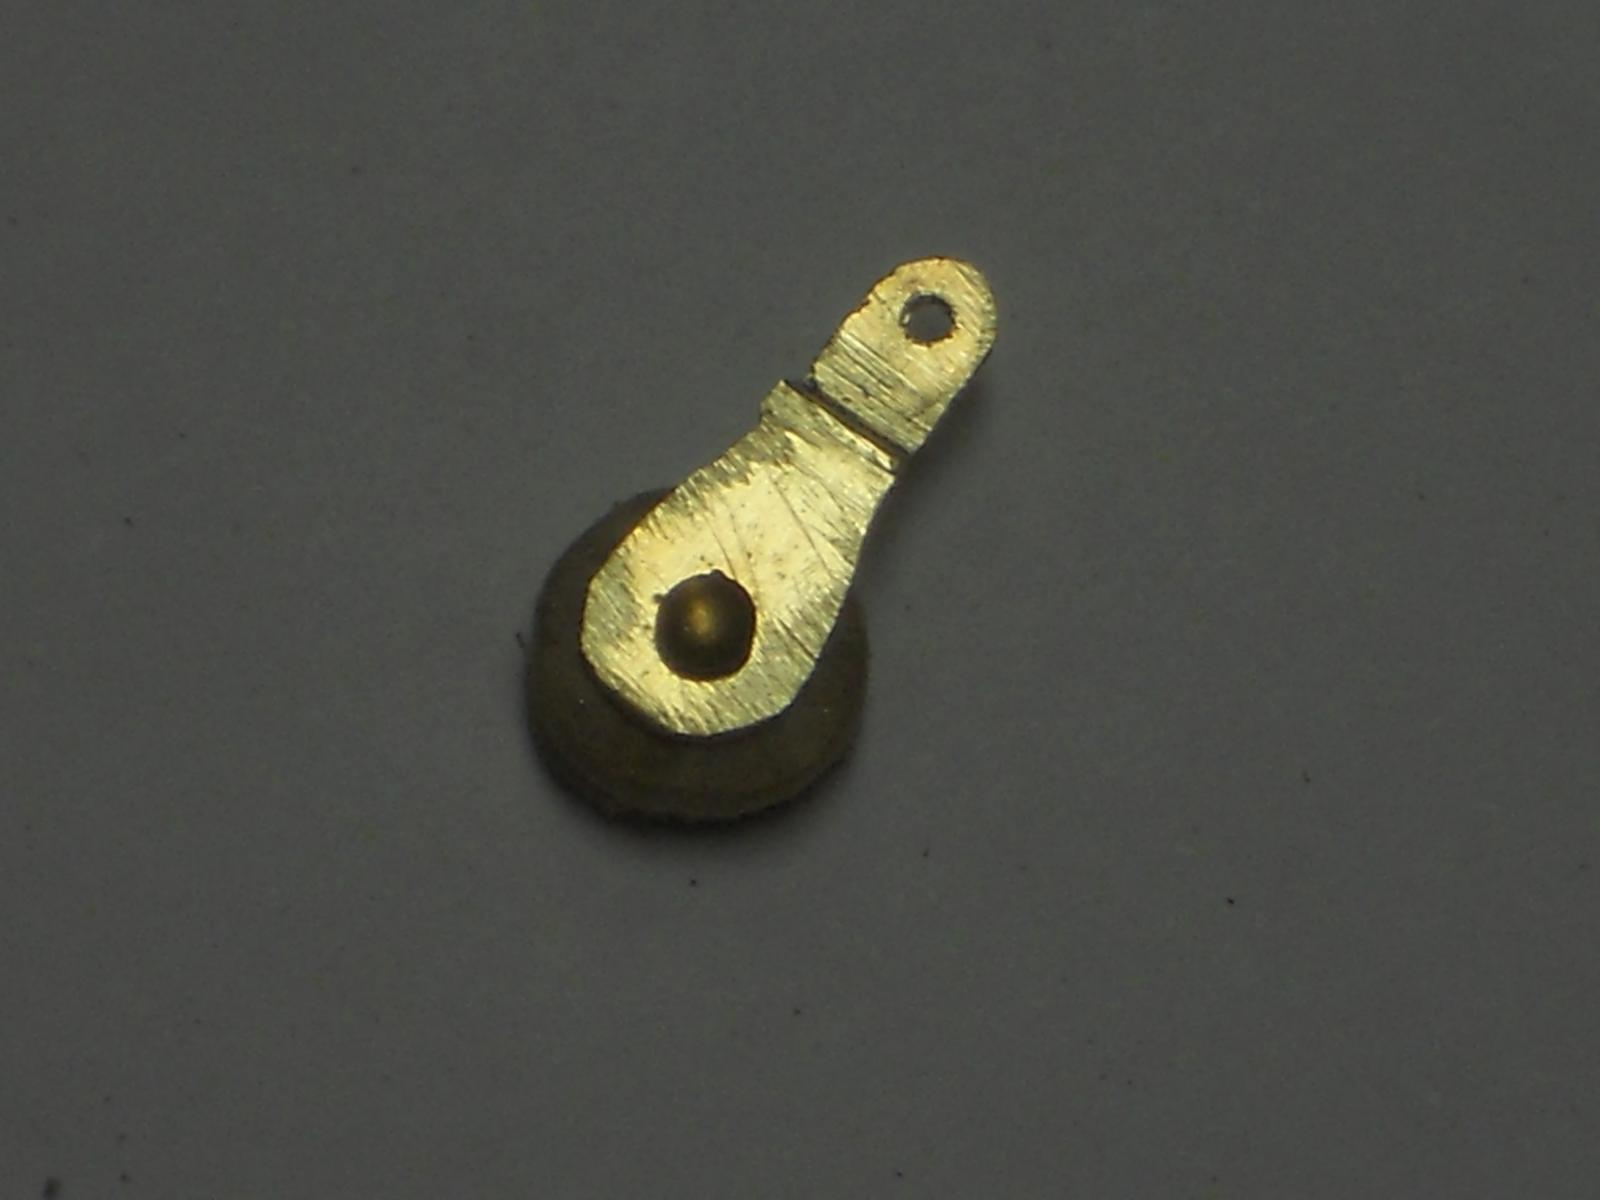
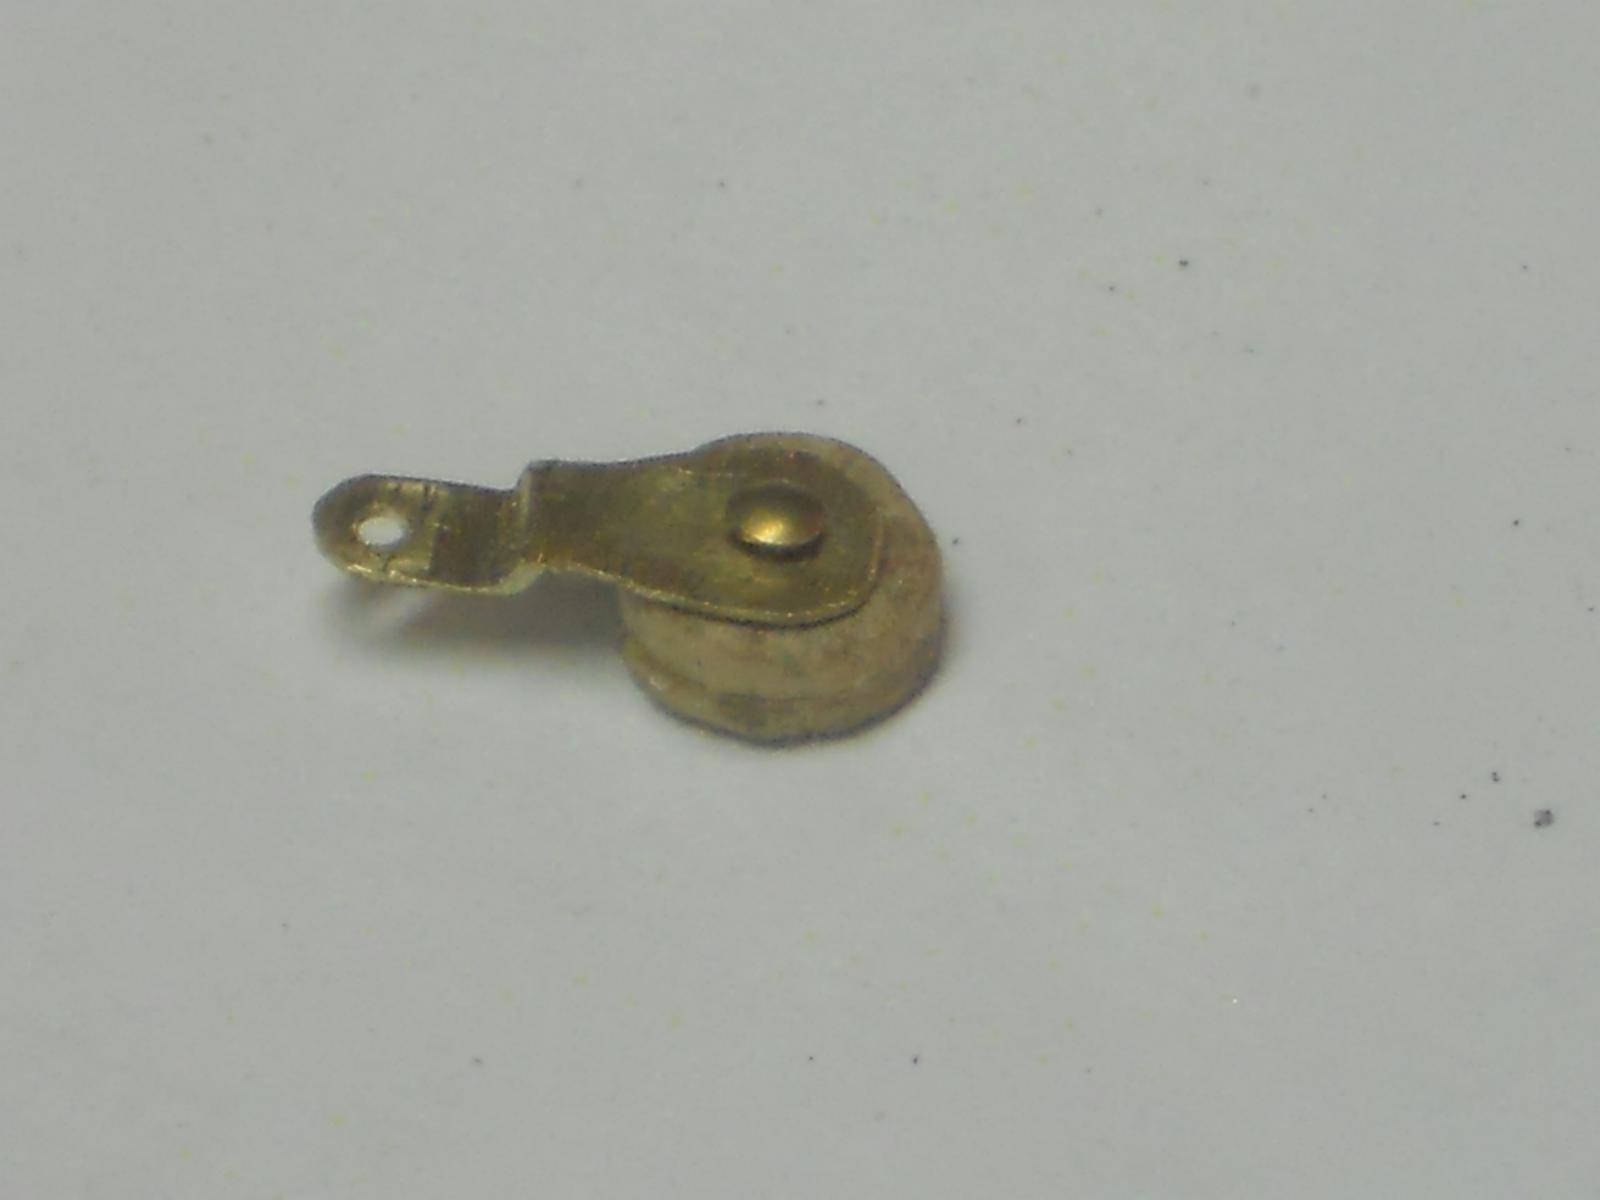
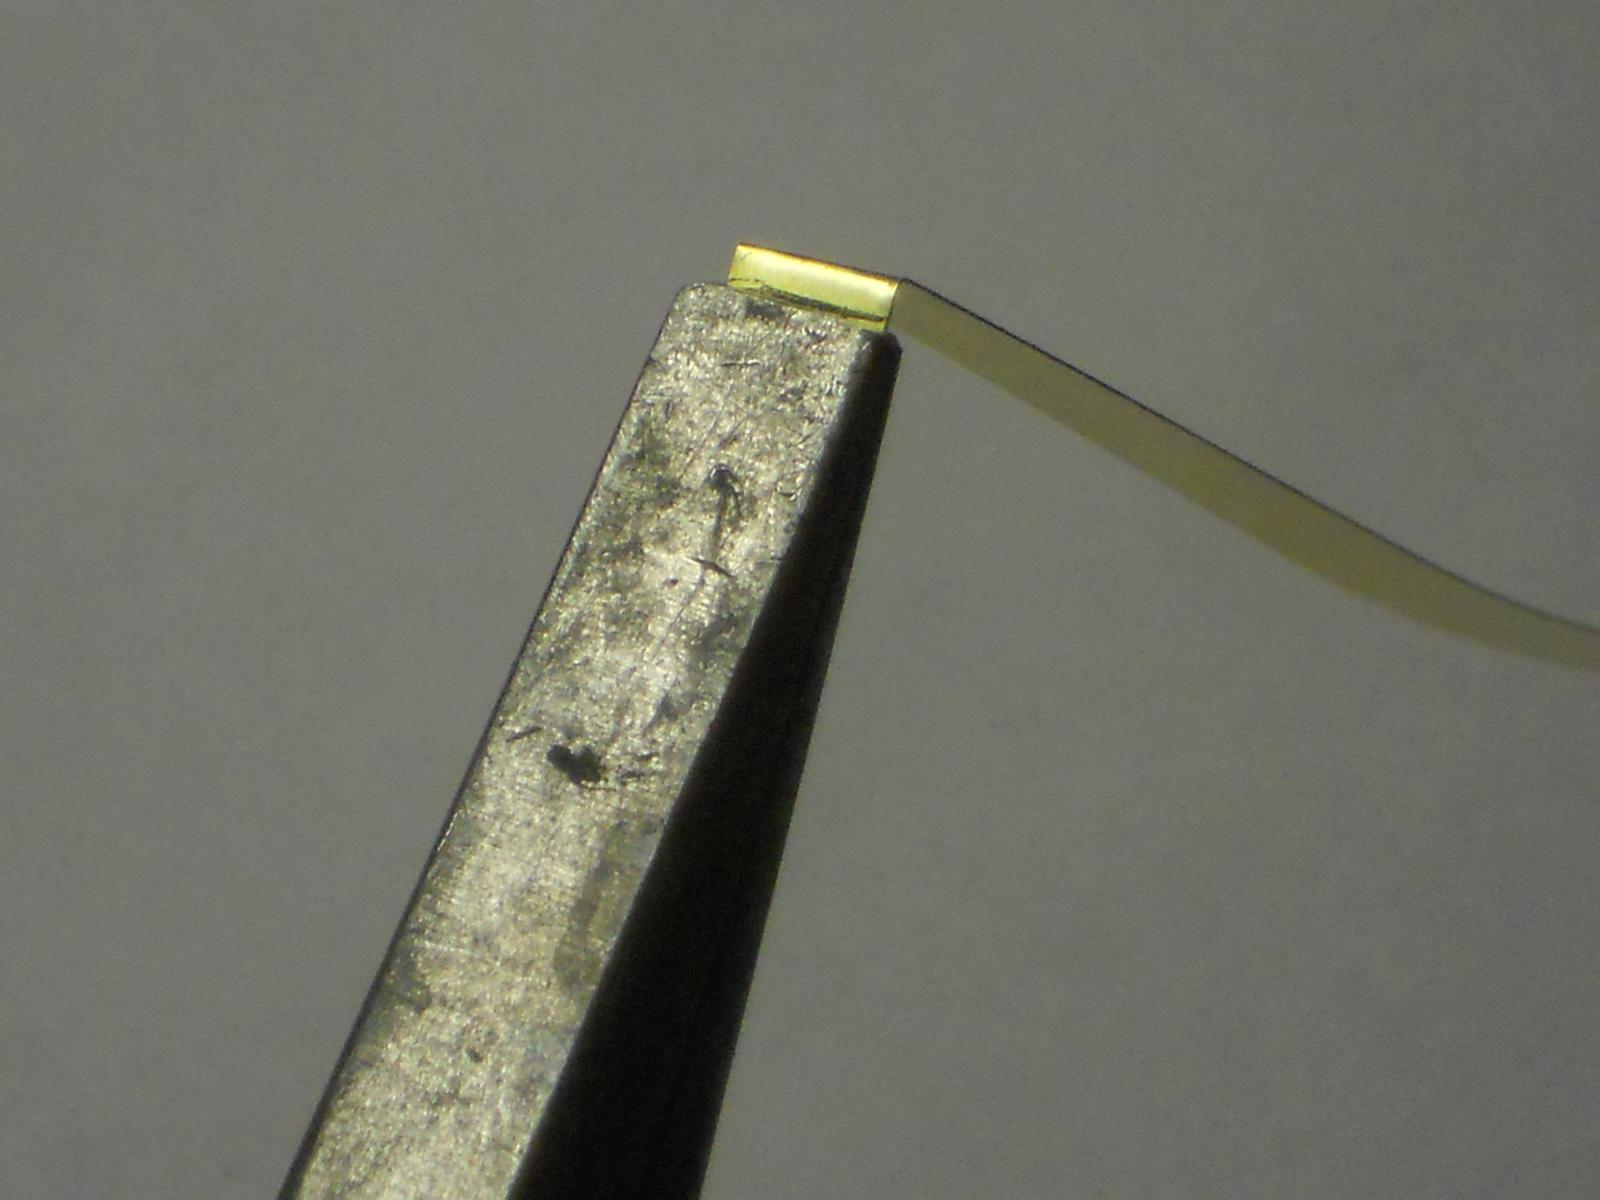
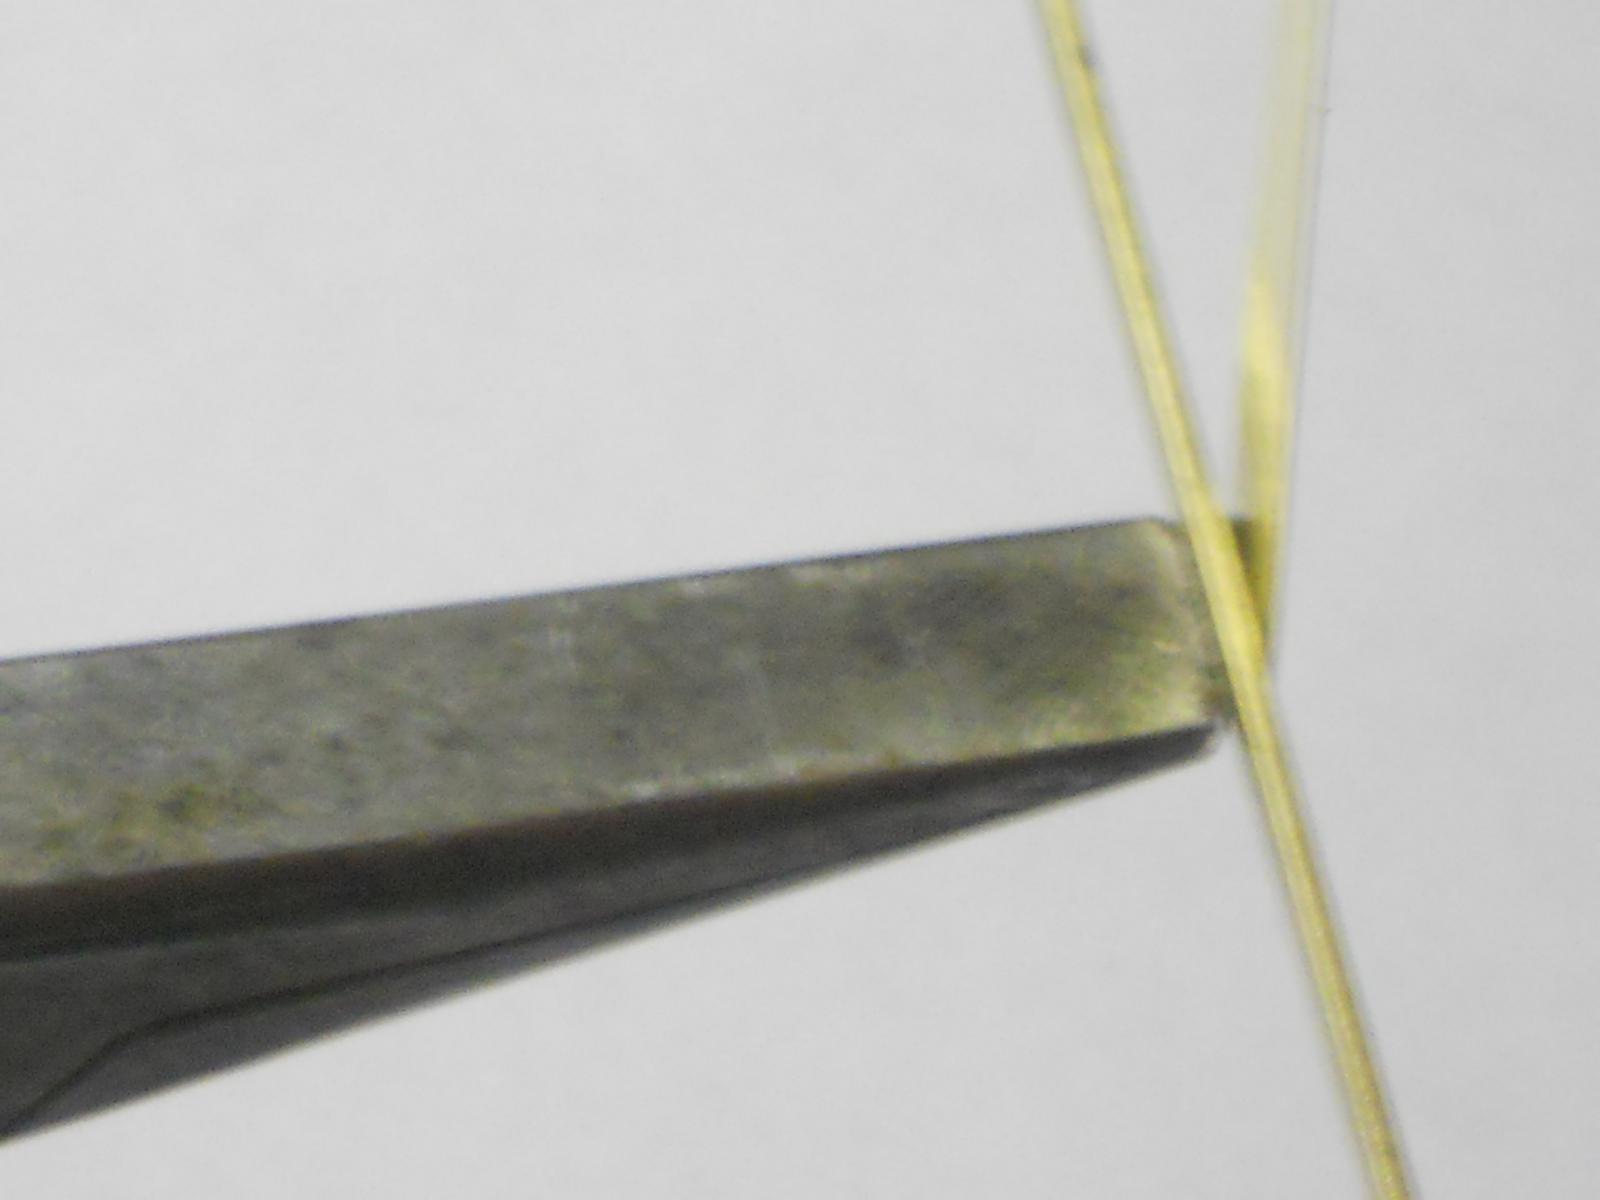
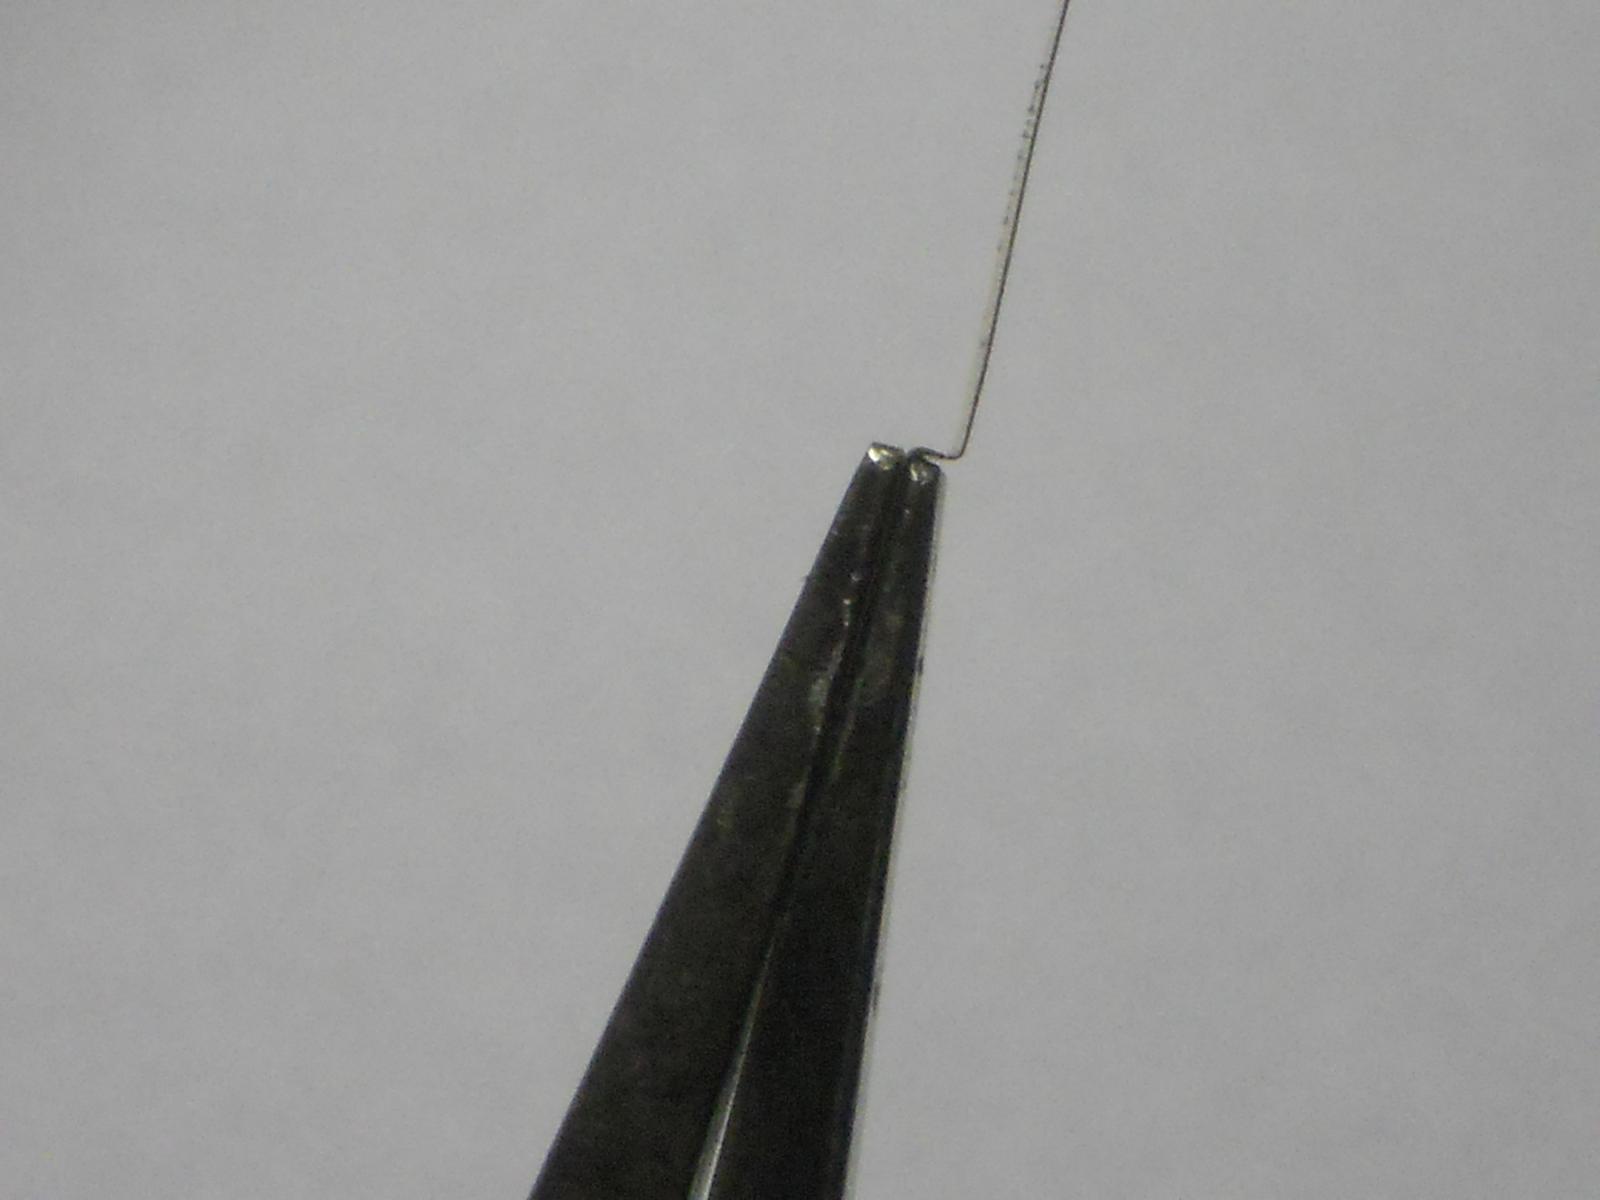
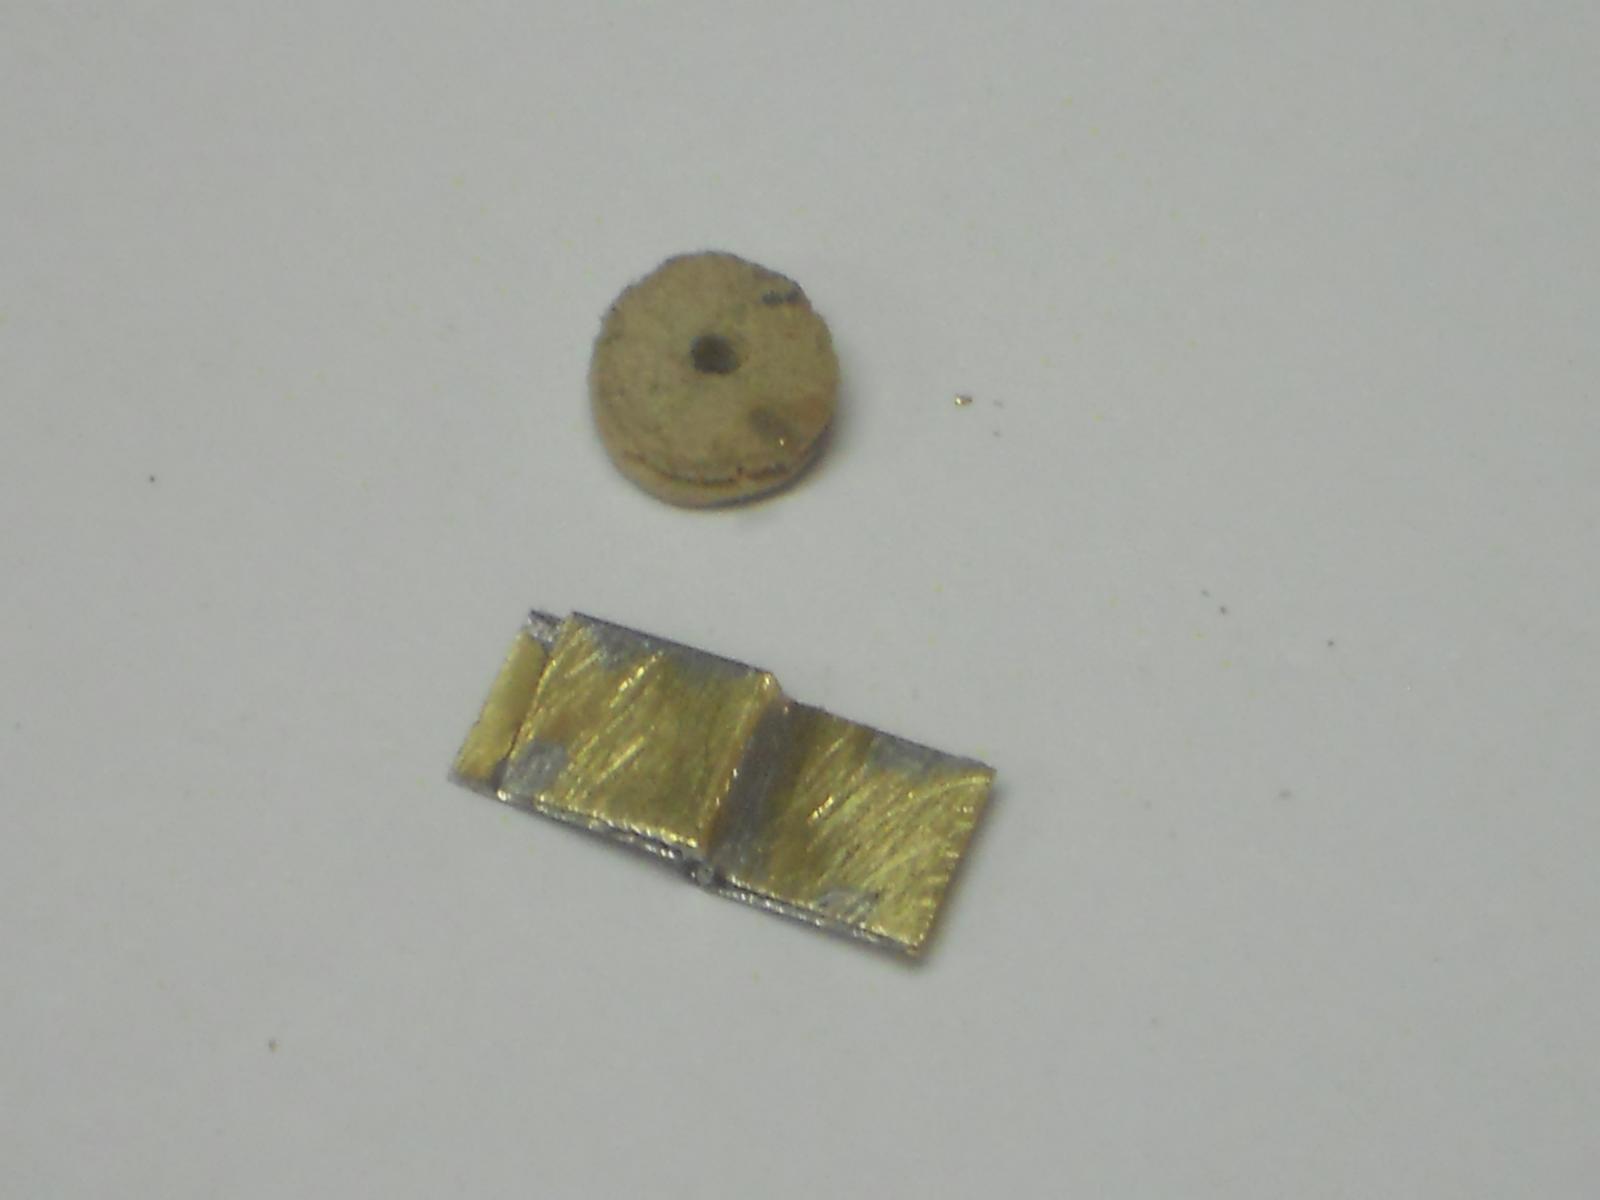
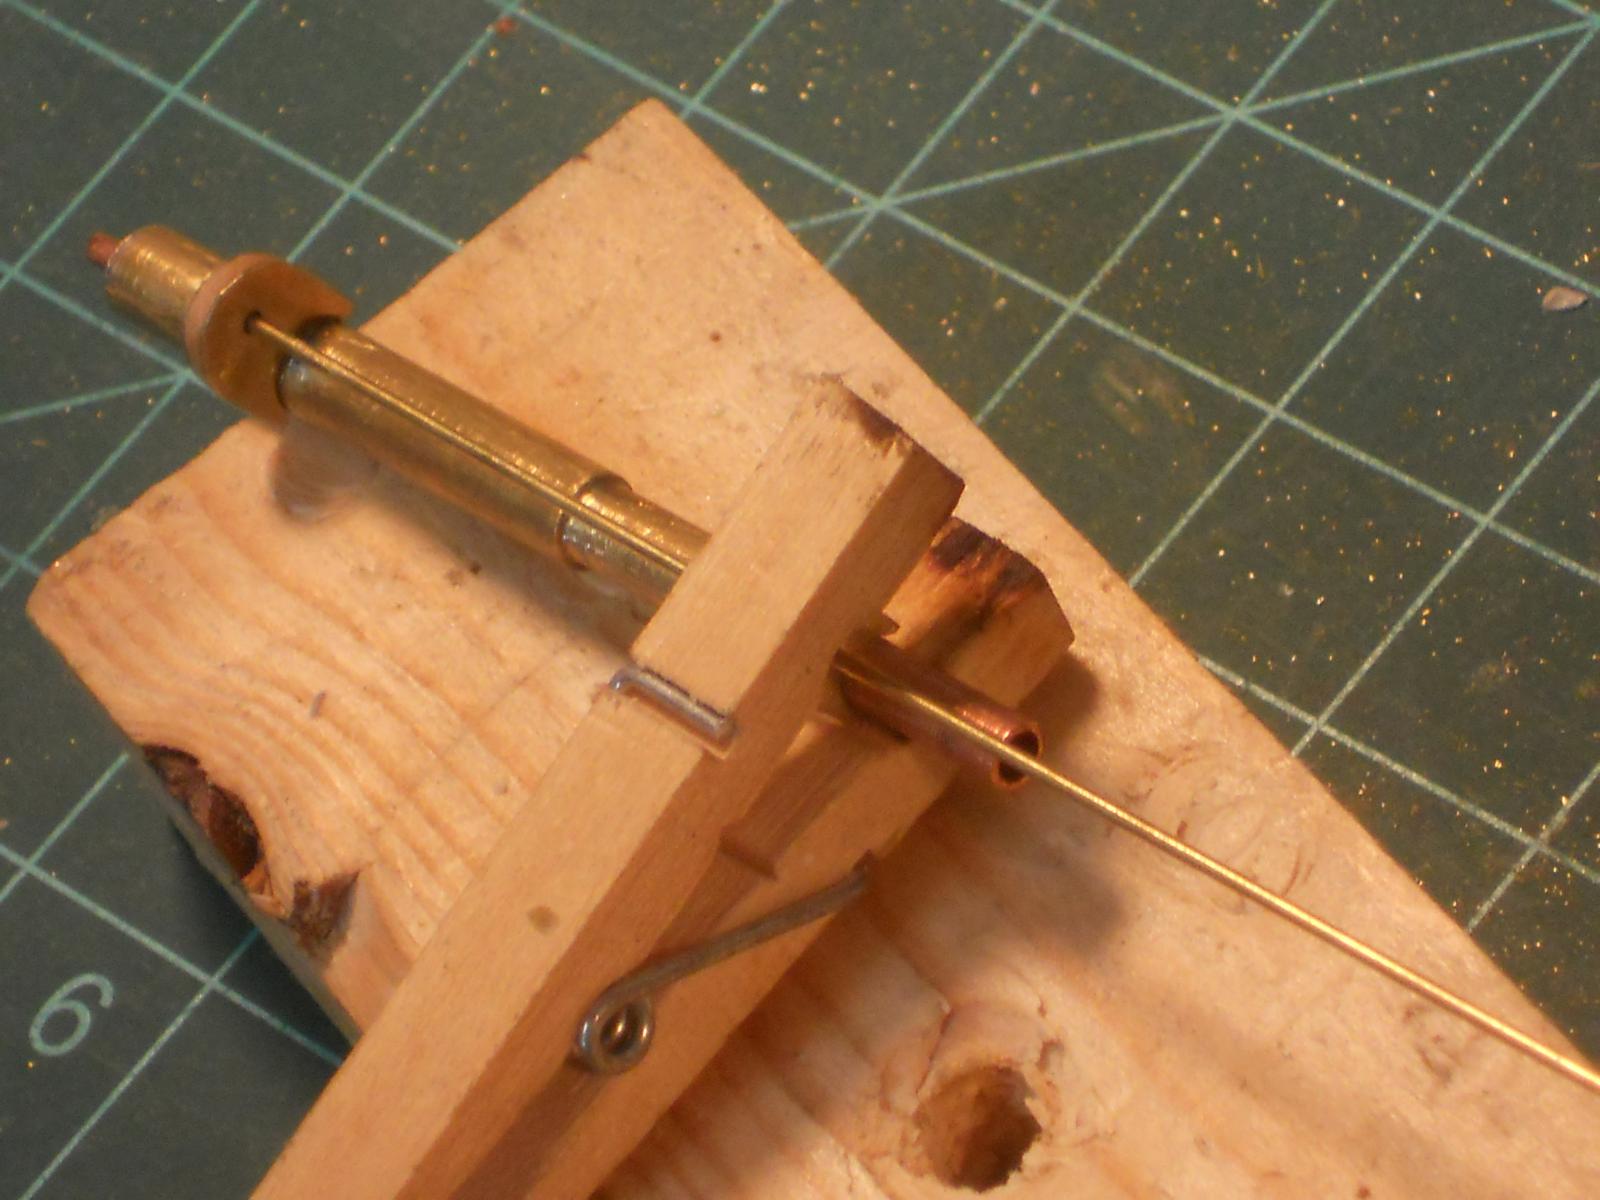
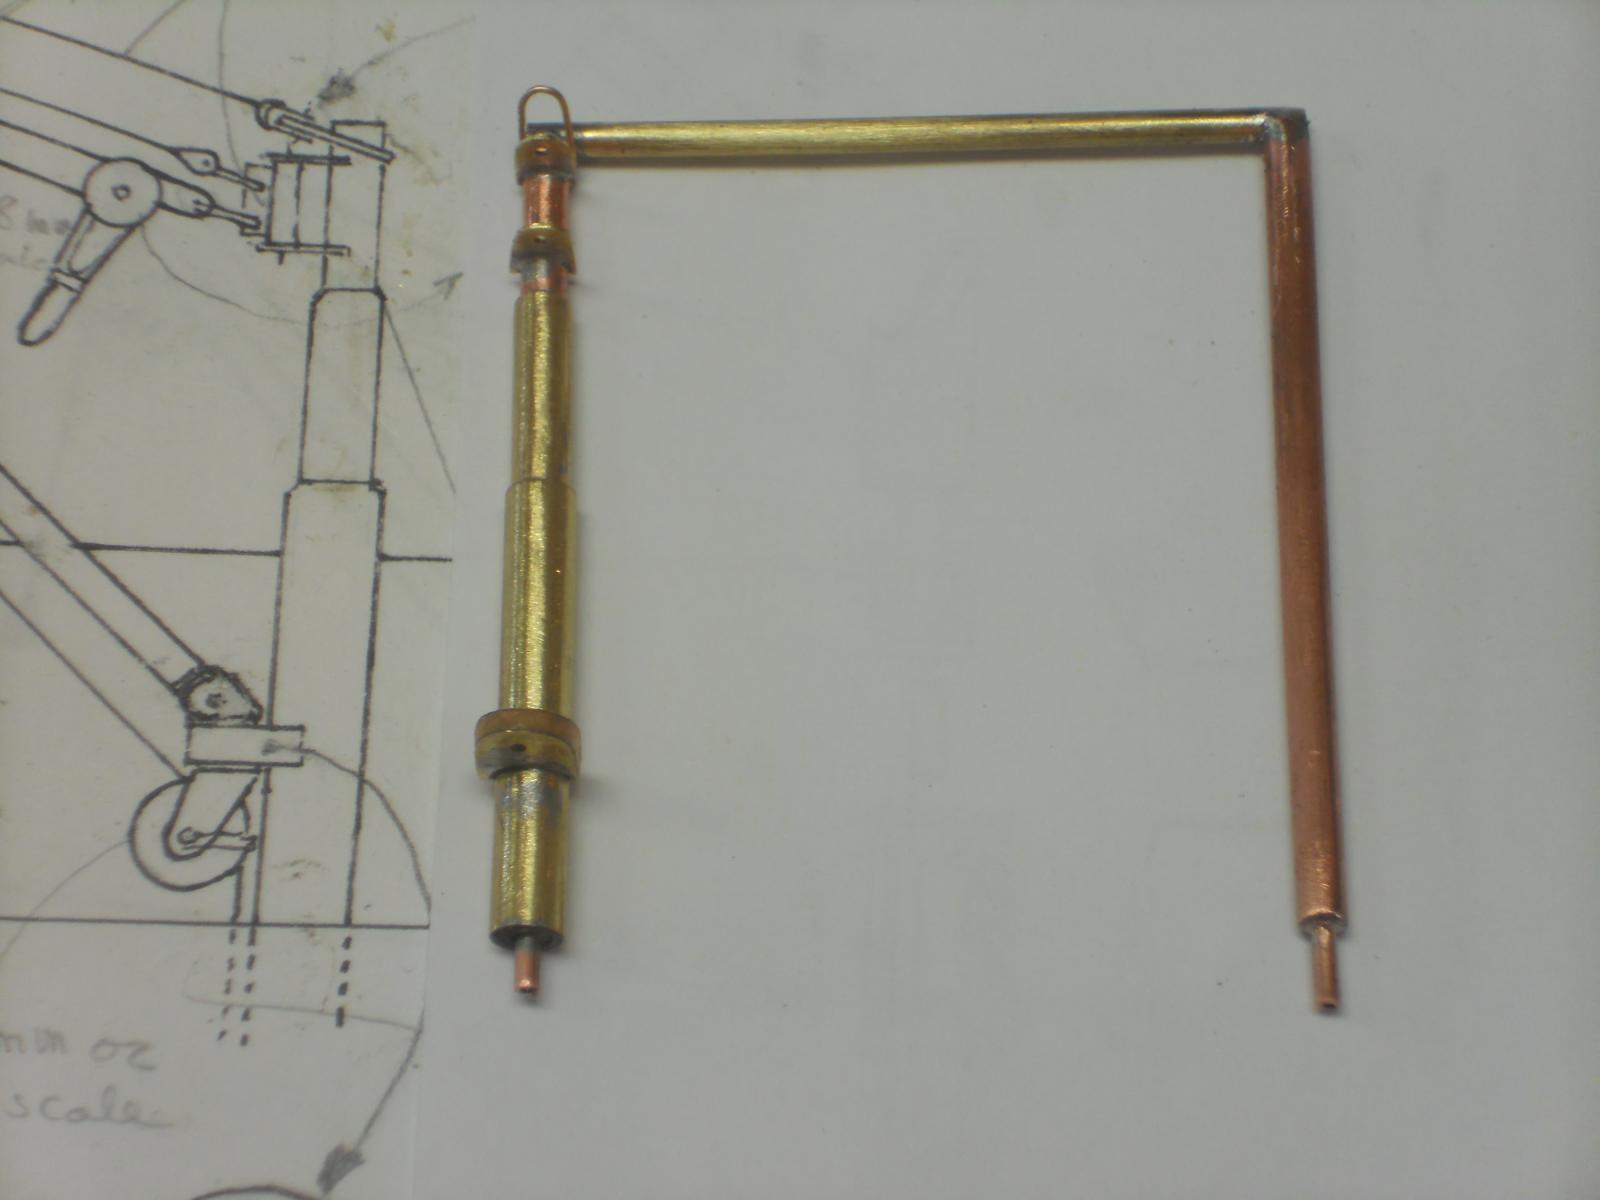
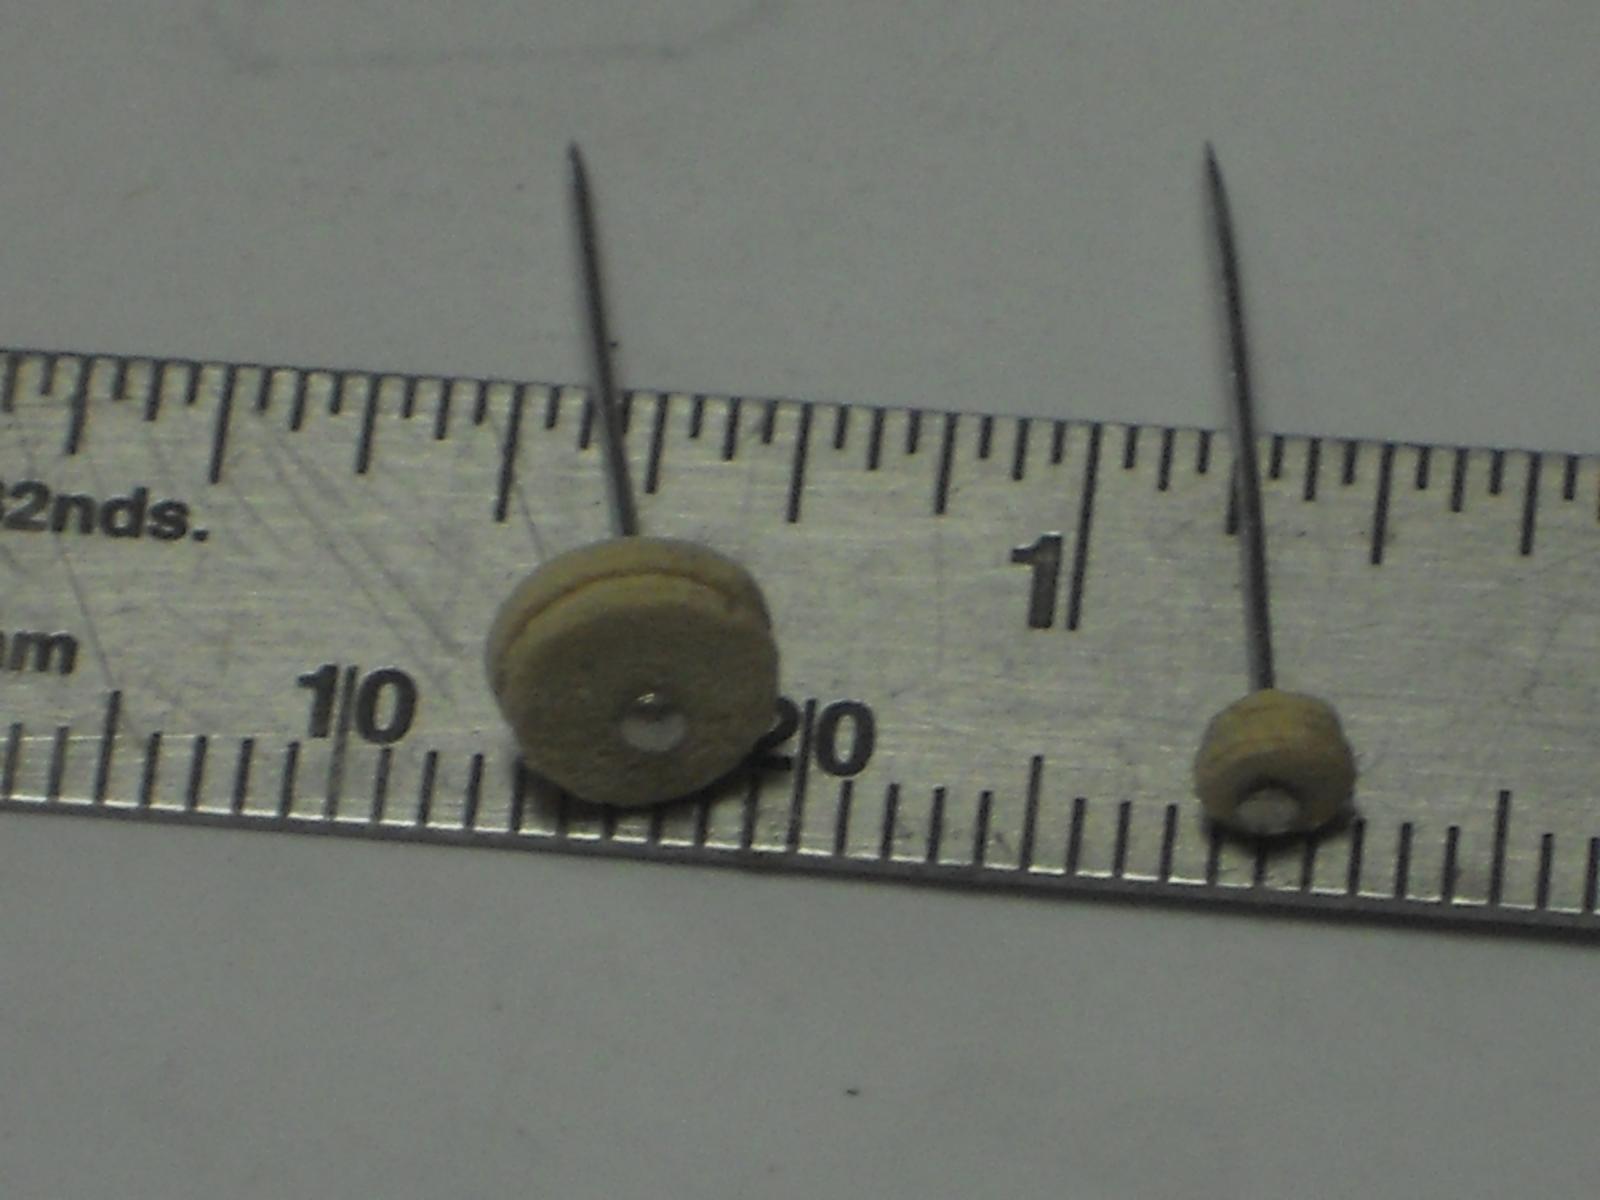
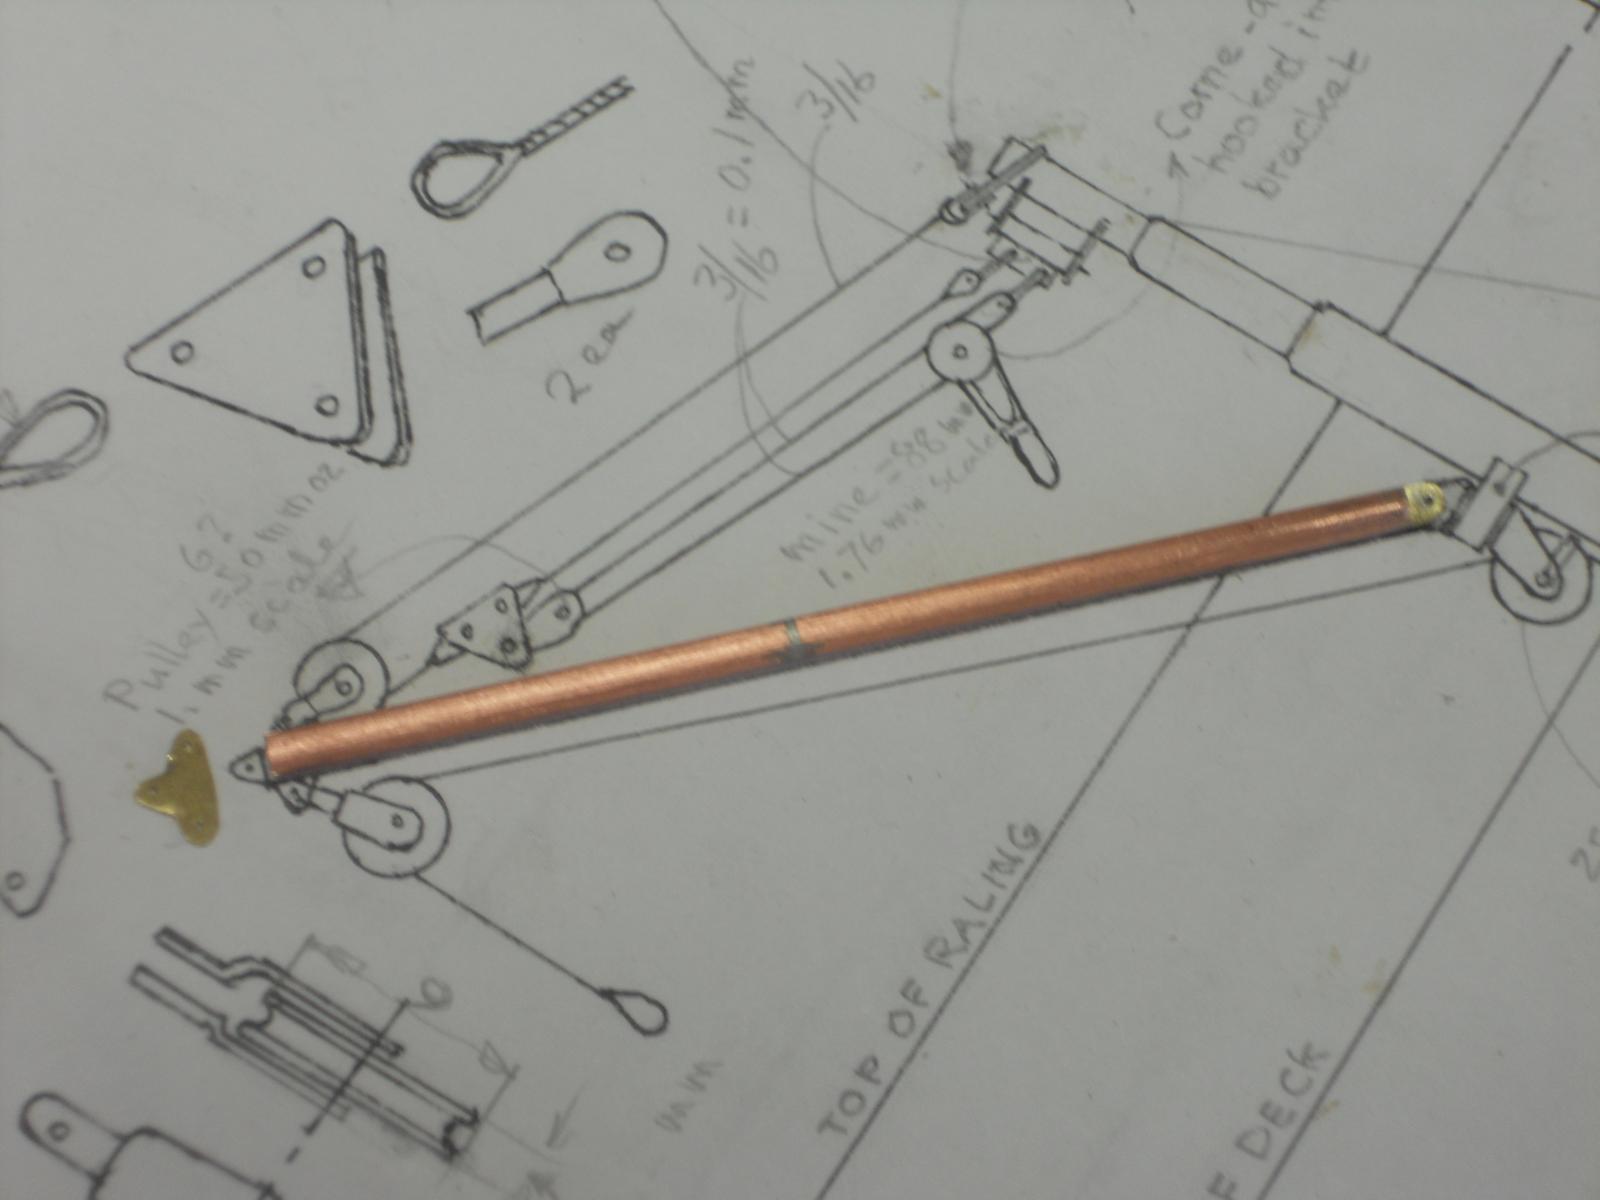
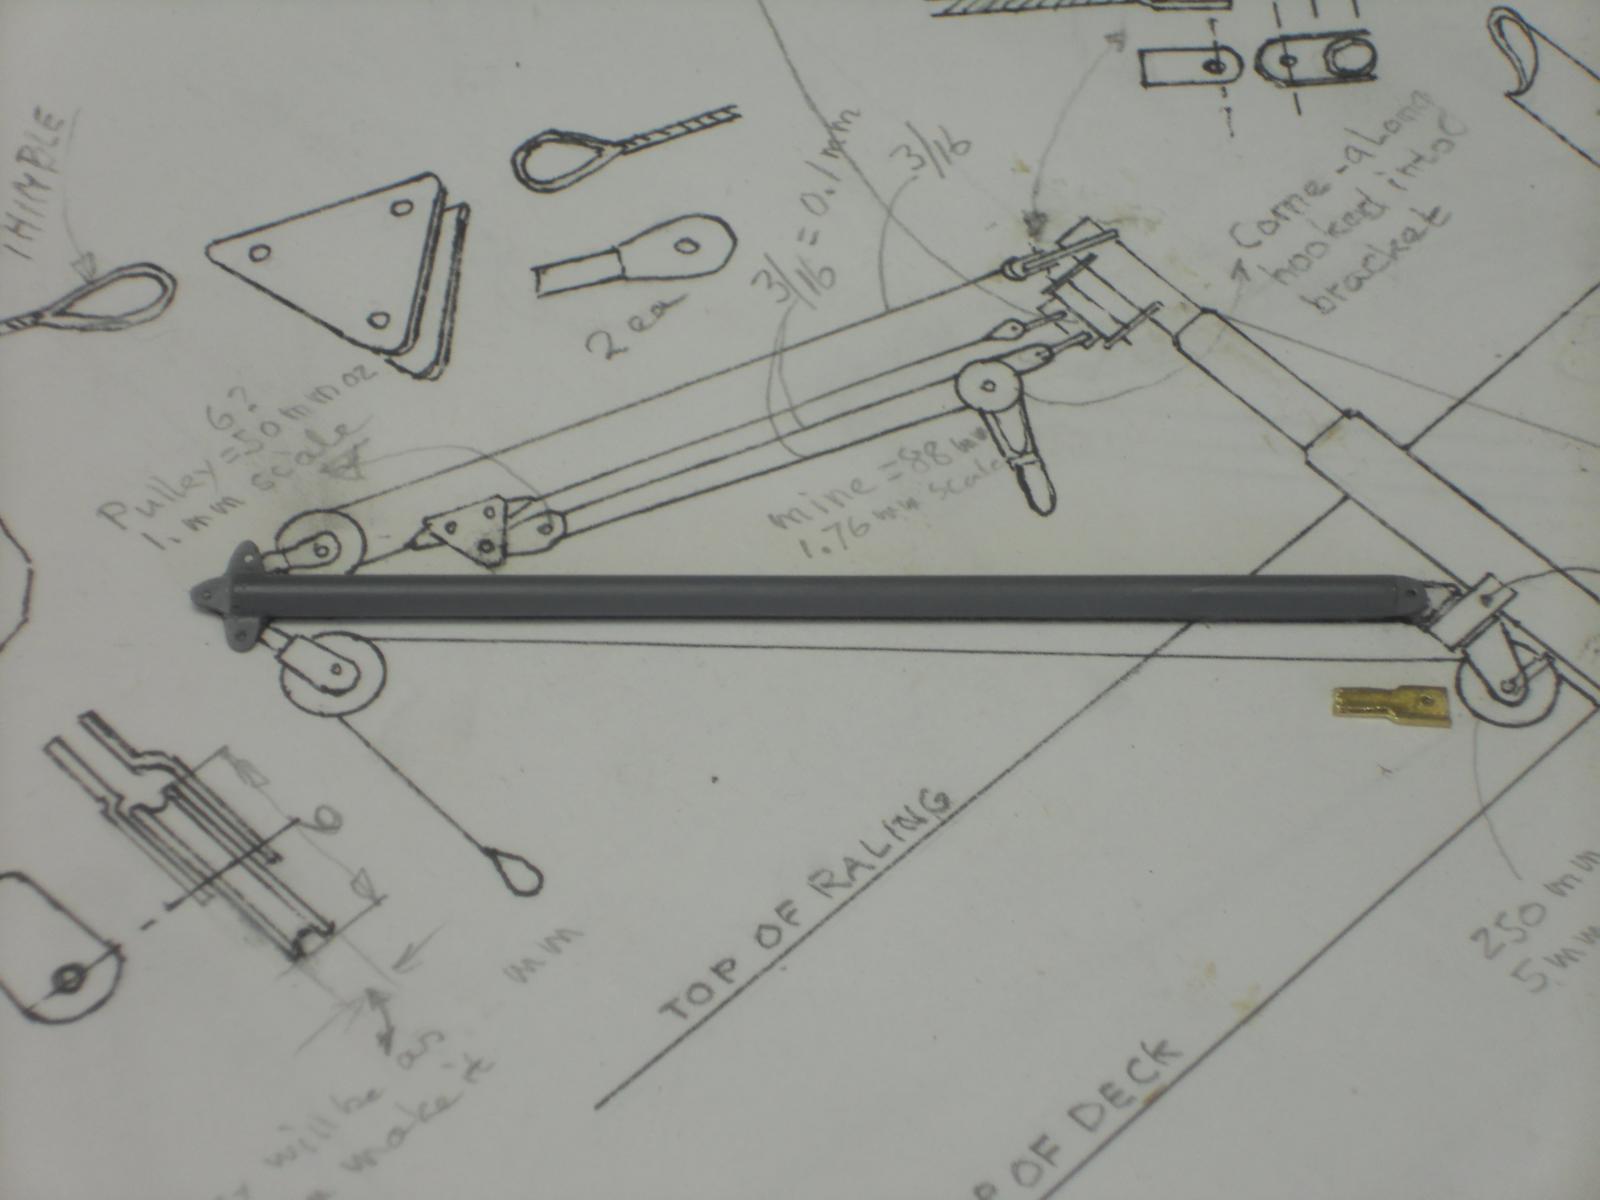
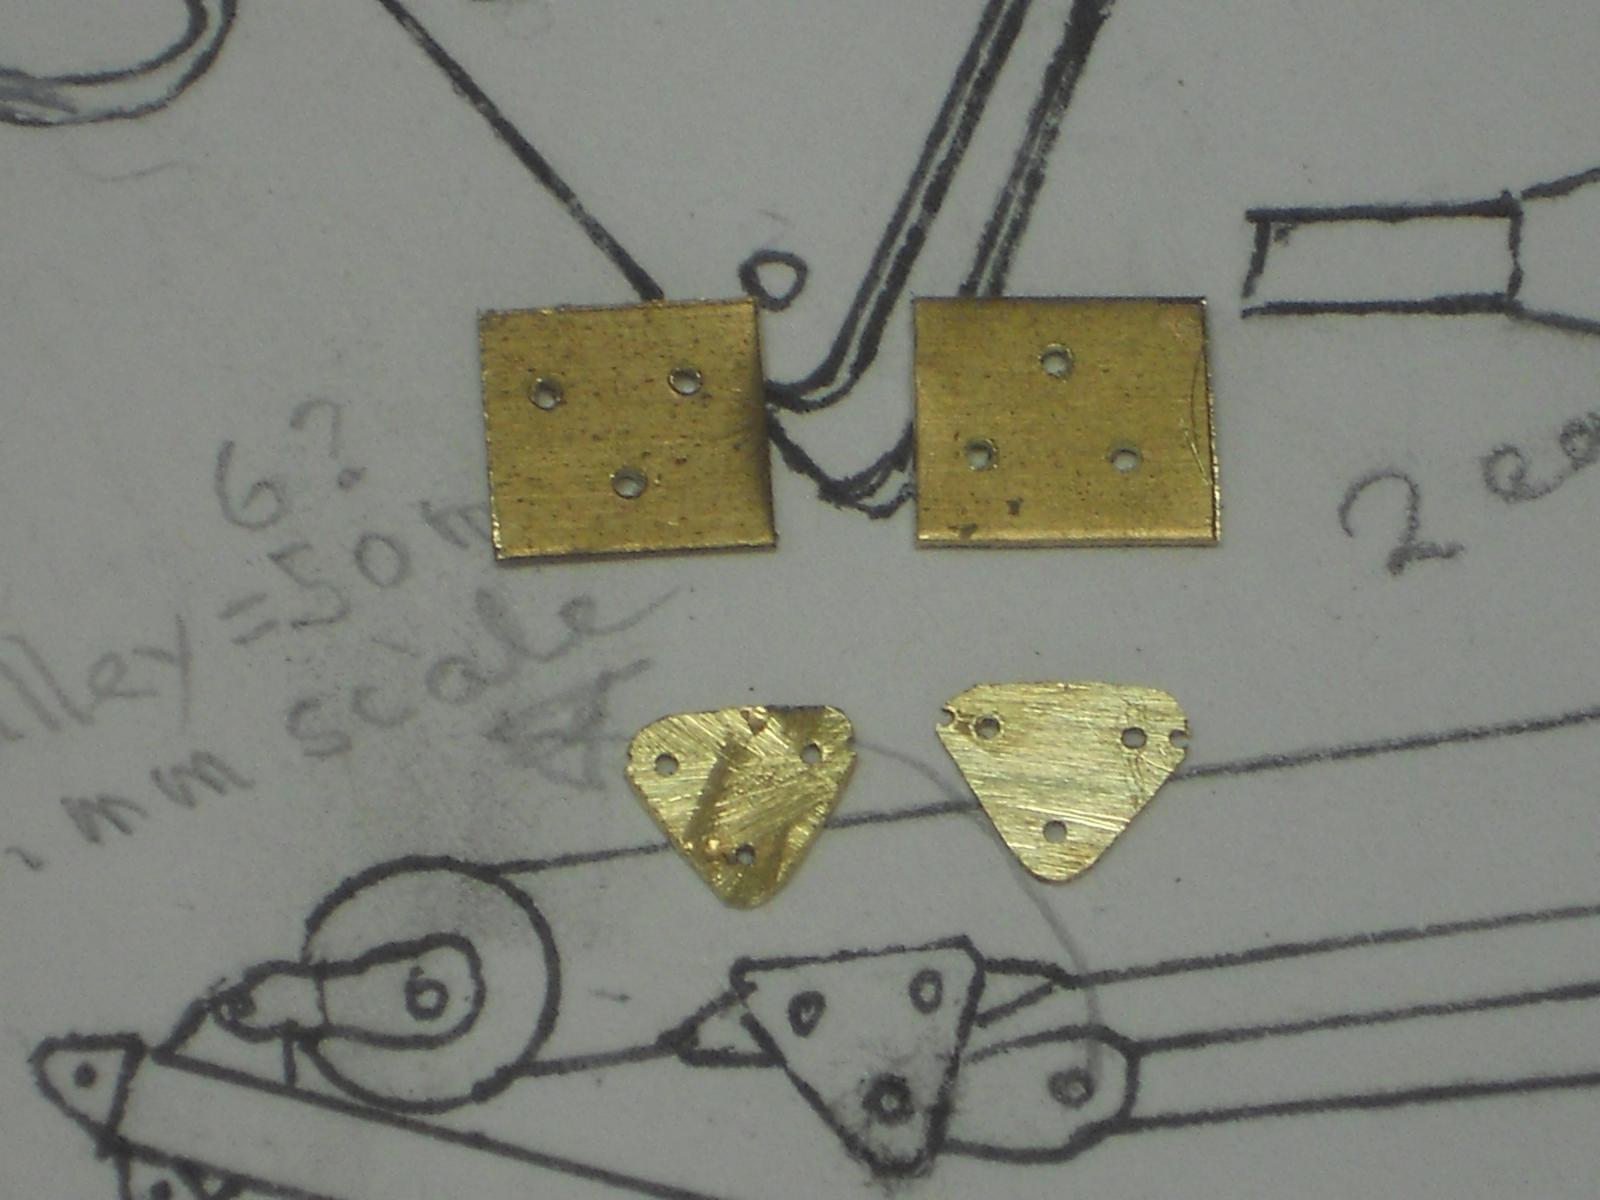
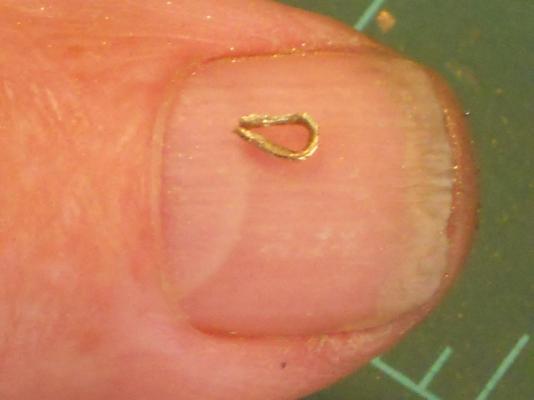
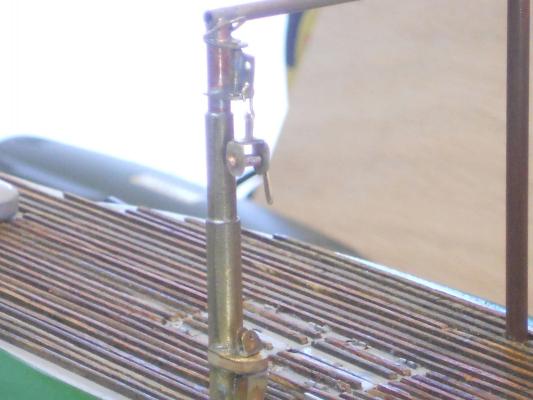
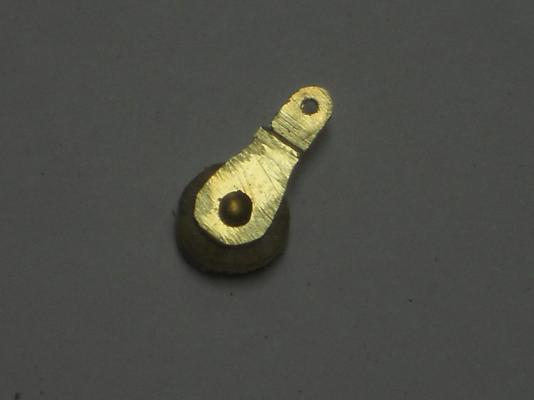
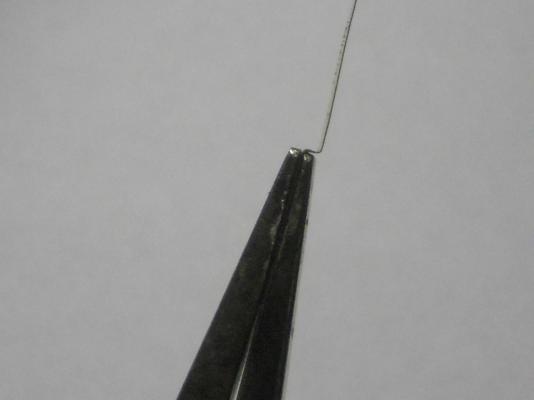
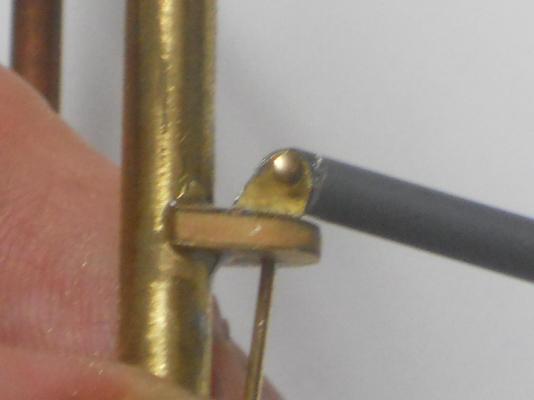
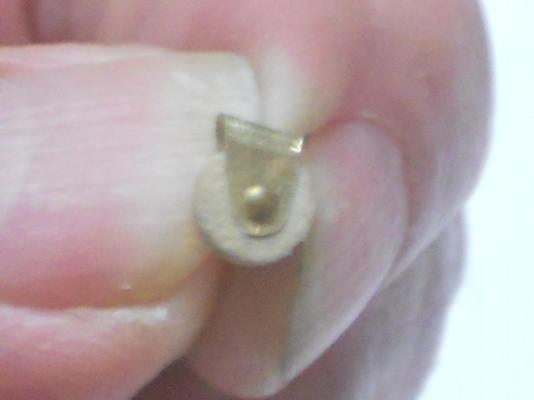
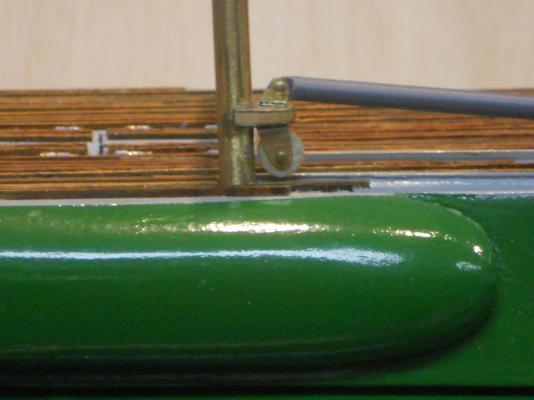
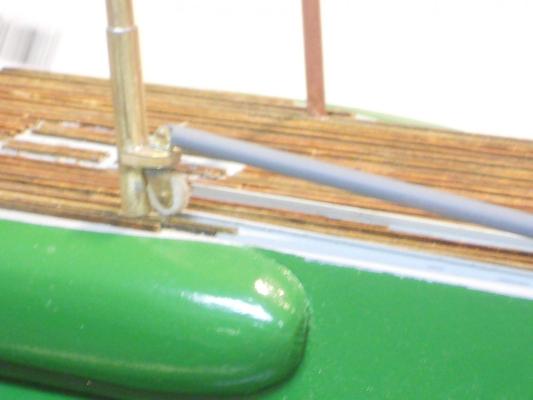
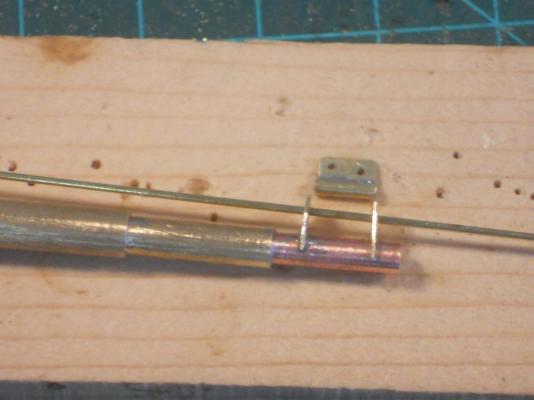
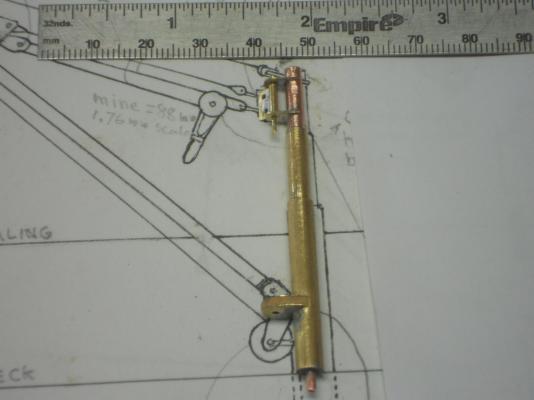
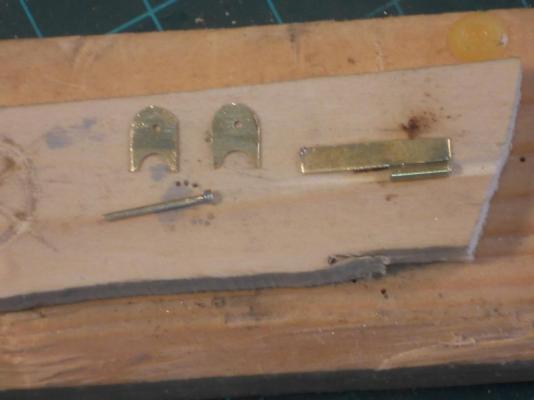
Thanks to everyone for visiting and your likes, it's really appreciated. This sounds like a broken record but I want to show my appreciation, if only through words. Hey Popeye, surprise is coming babe I lucked out making the prototype, wonders will never cease. Even at this "large" scale of 1:50 the details can be rater small. I know how big some of these things can be and then divide by 50 and wow - - - that small??? Okay, the surprise is the "come-along" ratchet device to raise and lower the boom. Once I figured out how to make it I started making all the parts and pieces. Sorry, I did not make a picture of all these parts before assembling them, got too engrossed in getting it all together. It also actually works No, I didn't make the racheting part but when I fasten a "cable" to it I can rotate it and actually make the boom go up or down and that should be good enough for a demo. I'll try to make the second one a little smaller, if that works then I may make a third one to replace this prototype. I'll have to wait till me left index finger heals some I also completed all the 6 mm pulley brackets and a few hooks. I think it was a very productive day and I'm a happy camper. I also tried making a thimble and got one that looks like it but is not the pretties thing though. But, it's just a prototype for me to see if I can make one at this scale and the answer is - - - probably not. I may have to think of something else that looks better at this scale. I used a 1 mm brass tube and bend it into a thimble shape. Then ground off the outside till I had a U formed shape that actually looks like a thimble but it's too big for scale. I may just have to use a thin brass rod and cement the "cable" to it, making belief that it's a thimble. No, you cannot just bend a cable around a pin and seized or spliced together like you do with hemp rope. Steel cable needs a larger diameter in the bend, that's why a thimble is needed and then it can be seized when it comes around. My guess is that they used at least 5 mm steel cable. Well, here are a few pics for all yuns to see what we have accomplished. This shows the "come-along" ratchet fully assembled and ready to receive the cable. The hook is just temporary so i can hang it to the swivel attachment on top of the port side gantry post. As you can see it's about half my thumbnail, not counting the ratchet handle and I have small, slender fingers. This shows the "come-along" hooked to its swivel attachment bracket. These are all the 6 mm pulley brackets, one is already installed to the gantry, and the two triangular interconnect brackets for the "come-along" with the 3 mm pulley brackets. One for the rear and one for the front. This is the prototype thimble, not very good looking up close. Cheers.


-
Batavia by *Hans* - FINISHED
Piet replied to *Hans*'s topic in - Build logs for subjects built 1501 - 1750
Hoi Hans, great looking model !! And thanks for the history lesson on the flag. It sure brought back memories from school having to "endure" the great history of a small nation. Cheers, -
Hello Chief Don, Just caught up on your build, very, very nice. Love the detail at this small scale, it works!! If you like submarines then check by build log of my father's sub. Link below my signature. Cheers,
-
Thanks to everyone for your likes!! Hoi Remco, Oh boy, Oliver Twist, that brings back memories. Yup, I read many of the classics, even have the complete set of all Shakespeare's plays! More pulleys eh?? Well, have patience my friends. I have been working on three more 6 mm brackets and the triangular shaped "come-along" boom lifting interconnect and - - - a surprise Hoi Jan, thanks for your encouraging word! Actually - - - it's I who's getting tired of working on these little hummers, they are all the same. Okay, as soon as I have something worthwhile to show I'll post a few pics. Ah yes, the surprise I'm working on, hopefully tomorrow. Hi Popeye, thank you too for your encouraging words, appreciate it. And everyone is more then welcome to visit in real life, there's plenty of space. Yeah, I like taking pictures, not only for my own archive I can look at way after the model is completed - - - and sharing with all yuns good friends. Well, as mentioned I started with putting 3 more 6 mm pulley brackets together for the forward side, they just have to be filed into what should look like the brackets for the pulleys. I also started on another project, another model - - - no, not a new ship model but as Remco so aptly says, treat each part as a model. This is just another part for the O19 and it's a "proto type." If it works out to my liking then I'll have to make one more, and pictures. Doing this small work and mostly all by hand, I "gravely" injured my left hand index finger First I burned it with my soldering iron and then filed right through the skin next my nail - - - blood all over the place, auch, auch, auch. Oh - please - - stop laughing - - it hurts - - - nah, not relly. No, it's not all that bad, I'll live I'll just grit my teeth and keep working, blood or no blood Reason being that these things are too small to clamp in anything to hold them. They are smaller then my thumbnail, to give yuns an idea what I'm working with. I found the best way for me is to hold these little parts between my thumb and index finger and then use my finger as guide for the file. The surprise I'm working on may force me to make another "model" (part) , we'll sew. Yupper Popeye, always thinking and I bet you have no idea what it is This thing is getting way out of hand with all the extra details I initially had not even thought about doing. Okay, enough of my banter and time to prep for my beauty sleep. Keep tuned for the surprise - - - Cheers,
-
Again my thanks to everyone for your like votes, I'm overwhelmed. Today I had to split my time in doing some needed garden chores till my back told me to quit before it caused roubles, and the sgipyard. After lunch I tried my other method in making the 3 mm pulley brackets. I soldered the two strips of 0.1 bras sheets together, making in 0.2 mm. The joggle had to be narrower of course because the 3 mm pulleys will be 1.5 mm wide. So instead of using the 0.8 brass bar to bend the sheet I used a knife shaped file. This really worked great. Hey, you have to use whatever works Next I soldered the two pieces together and started to file the brackets into shape to what the drawing shows. I had no longer the problem of them twisting when filing them crosswise. However, I still had to be kinda gentile with it though. Now I also could make it a little smaller, which really tickled me, I'm a happy camper Okay, three more of the 6 mm pulley brackets and 4 or 5 more for the dingy gantry and then making the pulleys I think that I'll use the front torpedo loading gantry operable with a torpedo in a sling because other wise the aft part will be too busy with the dingy hanging in its tackle. Hmmmm, the dingy, that's another model to be made Oh, btw, I also reduced the diameter of the brass nails to 0.5 mm and reduced the diameter of the head as well. Now it looks mucho better. No more pictures till all these pulleys are done and the gantries put together. Yuns are sick and tired by now looking at nothing but pulleys and their brackets Cheers,
-
Hello Michael, you see, duck soup baby! It IS easy, once we know how. Have I ever lied to you??? It becomes more interesting when we have to bend thicker and harder metals. Then we need to calculate the bending radius on what material and thickness other wise it will certainly crack at the outside of the bend. That's why we had several blades with increasing radii on a rack near our bending brakes. Oh well, there is a lot more to bending sheet metal then meets the eye and fortunately we don't encounter this much in ship model building Yup, there's math involved being a good "tin pecker."
-
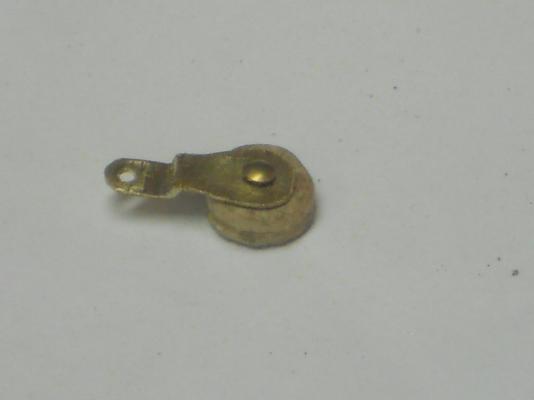
Hello again all y'all and thanks to all who visited and liked my efforts, much appreciated! Well, we'll continue with the saga of the pulleys. Today I completed one more 6 mm pulley assembly and one 3 mm pulley assembly. That 3 mm bugger was a real doozy to do but after a few tries I think I got it. I may remake this one after I try another method tomorrow. I'm not quite happy with it but we'll see. Here is a picture of it and you should realize that the pulley inside the brackets is 3 mm in diameter and 1.5 mm wide for comparison to the size of the brackets. I also mounted it temporarily to the three way junction unit. The brass nails are 0.6 mm in diameter. I made the brackets from 0.1 brass shim but that's too flimsy and difficult to file to size. I'll do the same as with the 6 mm pulleys and solder two of the 0.1 shims together for one bracket to make it stiffer, that way it's easier to file without it twisting out of shape. Cheers,
-
Thanks to everyone for visiting and your likes! Hi Popeye, yes, I could buy a lot of things already made but then I miss the fun in making these things myself and time is not an issue with me. Besides, this is a scratch build from raw materials I think the only bought items are a few small nails and some N gauge railroad track. I have a Unimat DB 200 lathe and as soon as I have the 6 and 3 mm brass rod I'll be turning the pulleys, so there won't be any wooden pulleys. I just made the one for checking size for my scale. Actually I did think about buying the pulleys and railing stanchions but thought the better of it. Not only that there are no stanchions available that look like the ones on the original boat and also the challenges in trying to make everything myself, when possible. Hello Frank, good to see you and thanks for your compliment. Hoi Remco, thanks you too for the compliment, appreciate it. Well, yeah, I thought that showing my method in making these parts would entice others to do the same. It's really not all that difficult, just very tedious. I'm looking forward to making the pulleys from brass, they'll look even better. I guess I'll blacken them as well before assembling them in their brackets. I think that the 6 mm is about the right size for the 1:50 scale. Cheers,
-
Very nice metal work Sherry, she's coming along great! Cheers,
-
Thanks to all for visiting and your likes! Hi Mark, "small tricky piece" is a royal pain in the neck And then to consider I have to make 4 of these 6 mm buggers and 8 of the 3 mm ones. Can you just imagine working in a smaller scale, like I initially thought to do, 1:100 ??? It took me better part of today to finish just one pulley assembly. In order to keep these halves together I soldered a spacer between then where the joggle is. I used a 0.3 mm brass rod for the spacer but now was the trick to hold these slippery little buggers together and all in line First I tried pinning everything together with the small brass nails and small clothe pins but they kept shifting on me. No way I could keep that piece of brass rod in between the two halves and everything lined up. Sooooooh - - - I put two small steel office clamps to one half and soldered a length of rod to this half, holding it with tweezers. It was nicely tinned and now I made a 0.3 wooden spacer for one end and a 2 mm space for the pulley end and clamped it together with small wooden clothe pins, making sure that both halves lined up. Then a touch of heat and presto, they were solidly connected. I could now carefully dress them up and file them a little smaller yet. The pulley fits nicely and rotates smoothly, even though it's from wood. It also slides nicely over the bracket on the boom and swivels. One down and three more to go of the 6 mm pulley assemblies. At this rate I'll be 90 years old No, I'm kidding of course, now that I have a routine it should go relatively quick and I say relatively. It all depends what "relatively" means in this case It actually looks quite respectable, even in the unpainted condition. Okay, here is a picture of today's accomplishment. Cheers,
-
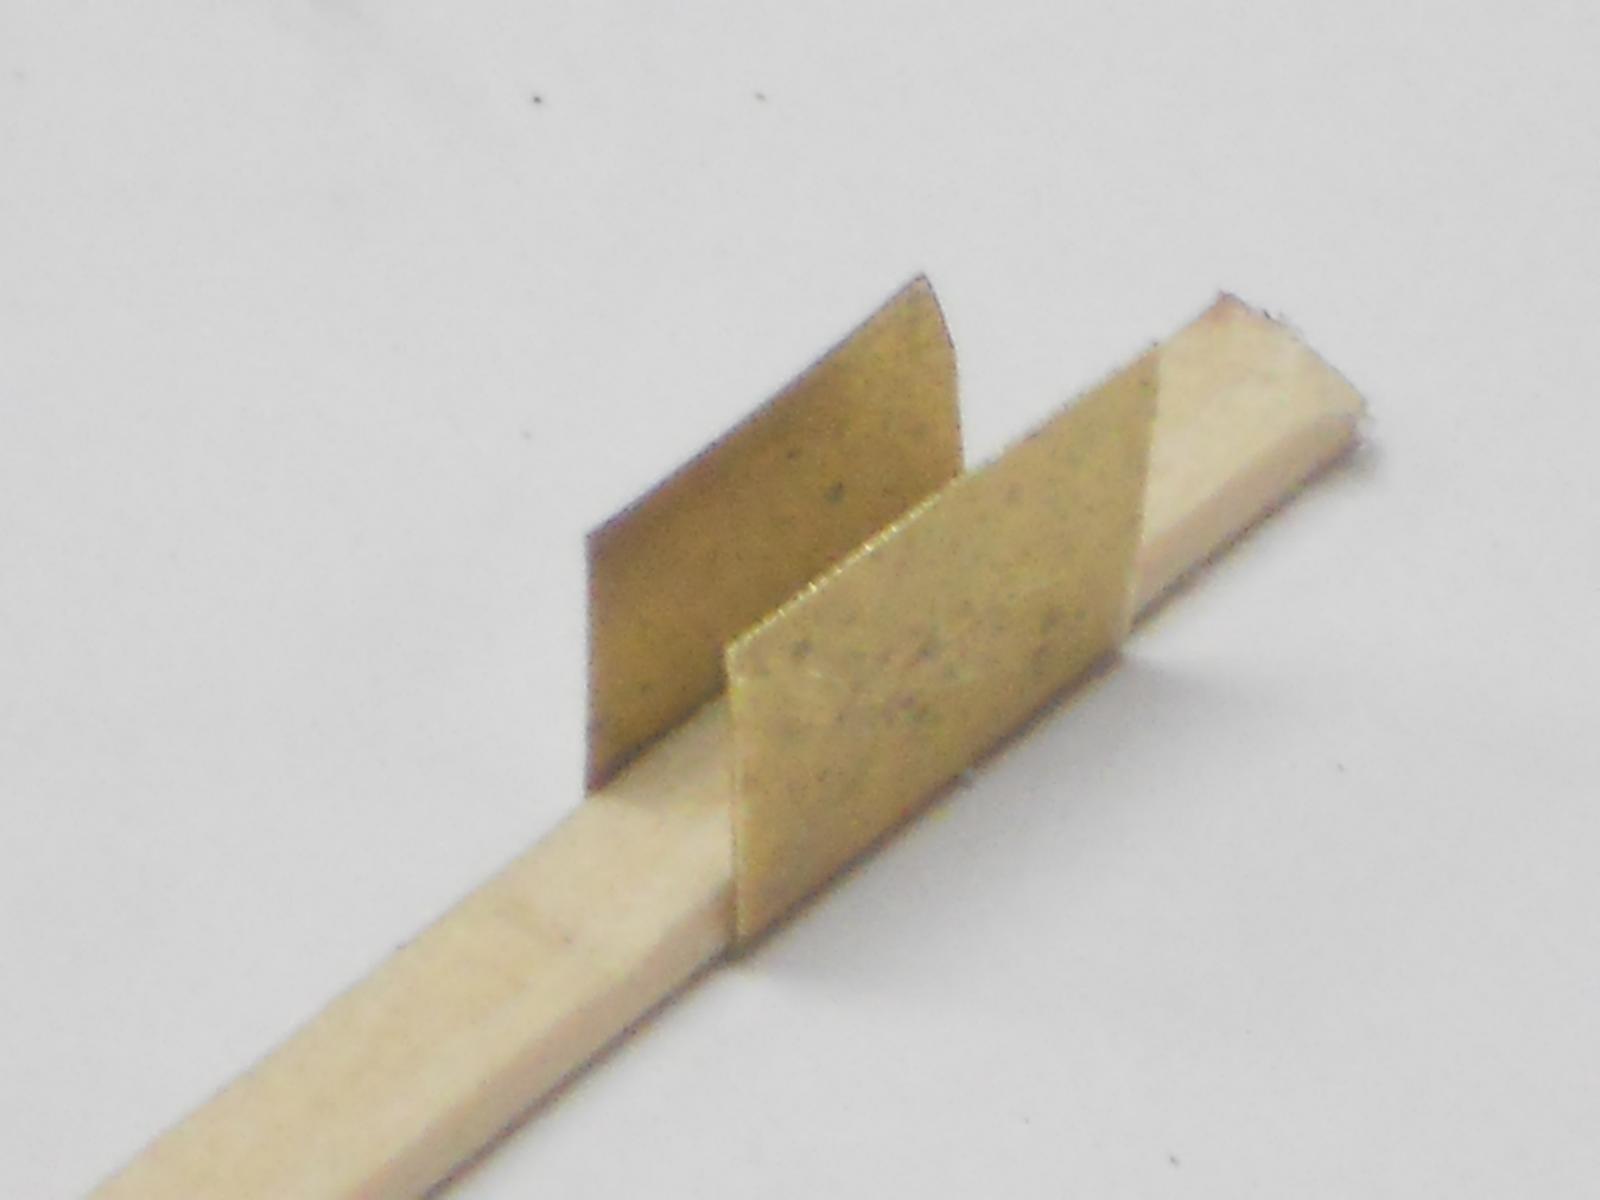
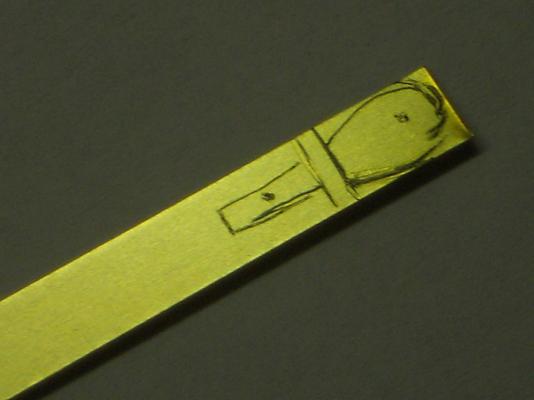
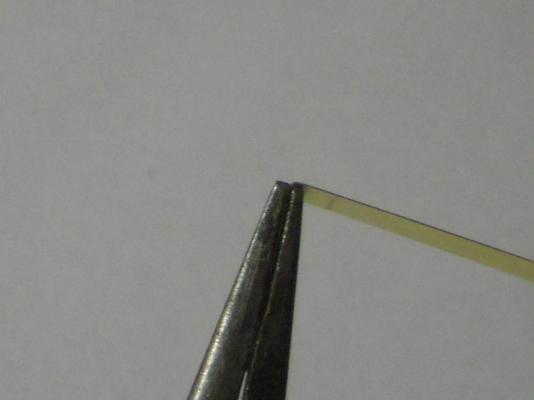
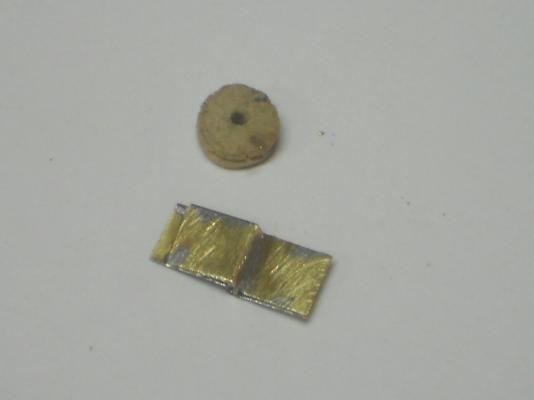
Hello again everyone and after dinner I watched a Greenland fishing trawler catching prawn in the Arctic Ocean south of Greenland, very interesting. But I also want to thank all those who visited and clicked the like button. It does give a warm fuzzy knowing that all y'all like my efforts. Today I spend quite some time shortening the booms and the forward gantry. I could then start making the 6 mm pulley attaching hardware that are fastened to the top of the boom. Instead of making them the traditional way I decided to make them in two pieces, each one with a joggle so the pulley can be pinned in between and the other end pinned to the boom bracket. The question was, how to make this joggle small enough for a 2 mm wide pulley and also have enough space for the two plates to slide over the top bracket that sandwiches in between. I have no box and pan brake nor a regular sheet metal brake, these parts are too small anyhow for that sort of equipment. So, I took an old duck-bill plier, squared the ends on my bench grinder and used that as my brake. See pics below for the process. That was okay for one bend but now I had to make the next bend in reverse order. So, I reversed the plier and fitted a 0.8 mm wide brass bar between one of the plier ends and the sheet metal. I used the bar as the blade of a brake and bend that part down to 90 degree. There is of course a lot more to it with some additional handling between these bends, like tapping the bends with a small hammer to make the corners of the bends as sharp as possible. Then it was just a matter of filing these peaces into what the drawing tells me they should look like. I had an additional problem in that 0.4 and even 0.3 mm brass sheet was too heavy for these tight 1 mm joggles. So, I made the pieces from 0.1 mm sheet by 5 mm wide and soldered then together making one piece. This also stiffened them due to the solder. Okay, it would be better to show this process with pictures. This shows only one half of the assembly and magnified too. I used a tiny brass nail for the pin and the pulley is still that wooden 6 mm one I now use as a guide. The holes are 0.5 mm. This is another shot. Here I have laid it next to the image on the drawing. They can still be filed down some more and prettied up before primer and painting. Here is the sequence of my method. I started out with a strip of 0.1 mm by 5 mm wide brass sheet. I drew a rough outline of the shape of the part. The two straight lines indicate where to about put the ends of the plier. Here is my pair of pliers with the ends nicely ground flat and true. I placed the plier ends and the furthest away line for the first bend. Here I made the bend a little beyond 90 degrees. Now, what's not shown is that I tapped the bend with a small hammer against the plier to make the radius as square as possible. Next I reversed the part to be bend and placed the plier close to the second line. The final position here is determined by holding a 0.8 mm by 4 mm brass bar between one leg of the plier and the upstanding sheet. see next pic. Sorry, I moved the camera, it's difficult to hold the plier with one hand and shoot extreme close-up with the other hand. In any case, you can see that I have placed that 0.8 by 4 mm brass bar between the plier and the sheet. Now it's just a matter to use that brass bar as a part of a bending brake and holding everything as tight as possible twist the bras bar down against the bottom leg of the plier. It should come out with a nice enough bend. I put my small flat file against this joggle and tap it with a small hammer to flatten the joggle. Here is final joggle, it looks quite nice and measures 1 mm, just enough for a 2 mm wide pulley with the second part on the other end of the pulley. Now, remember that I had to make two of these to make one of the two pieces that holds the pulley, thus a total of 4 of these buggers for one pulley. These two parts will be soldered together to make the one piece. Here are the two pieces soldered together and ready to be shaped into that part as shown in the top pics. Simple but very time consuming. Cheers,


-
Hey John, good to hear from you and your kudos for my work, much appreciated my friend. Hmmmm yeah, metal work. Well, all this is rather simple stuff to make but it becomes tedious because of the size. I lack a full machine shop, have only a mini lathe and the rest is small hand tools. Next post I hope to demonstrate how I made the pulley brackets that are attached to the top of the boom. Have fun on your trip to the West Coast and drive defensively and carefully. We expect a travel log though. If my memory doesn't fail me there is supposed to be a ship model museum in San Diego right on the shore. I visited it many years ago and there was a large model of the KXVIII submarine. Thanks for the prayers, yuns are also covered from our end, say hi to Di Hi Mark, thank you very much for visiting and your appreciation. Yes, the German Navy had a bunch of large subs made specifically to resupply the subs far away from home with fuel, ammo and provisions. These were called "milchkuh" or milk cow. The Type 21 was an attack sub bat came in too late to make any difference in the final outcome of the war. Hoi Sjors, my Dutch friend and thanks for visiting. Yes, I like the like button too and know you have been showing up in my shipyard because of it. How to make that tiny stuff??? Very carefully No really, it's not all that difficult, just knowing metal and what you can do with it. Having the right tools helps too and sometimes we have to invent a tool to do a job or improvise like I had to do today. This tiny stuff is challenging though. Hello Popeye, thank you for your compliment. Yeah, after it's all made it seems easy but you are right, it's not as simple as it looks. Oh, just take a piece of brass sheet, bent it this way then that way, file some here and there, drill a few holes and presto, done - - - NOT! I could have added this to Sjors' answer, it helps having worked with metal all my life, having been a mechanic, certificated tool and die maker and etc. helps. Like with everything new or different, there is a learning curve and we must expect having to scrap a lot of either wood, plastic or metal. Yes, you should gat your hands on metal work, it's a real challenge but fun. You'll waste a lot of metal at first but once you get the hang of it it'll work out. I am having problems with styrene and am in awe at Andy with his Great Lakes ship and Kevin with his Bismark and not to forget paper!! Okay, dinner is ready and then I'll post today's progress, which is not much. Cheers,
-
Hello Dan, lovely work!
-
Hoi Sjors, awesome bow shot! Nice going with the roundhouses! BTW, I match your 64 guns with my 1 on the O19 sub Cheers,
- 1,616 replies
-
- 1
-

-
- caldercraft
- agamemnon
- (and 1 more)
-
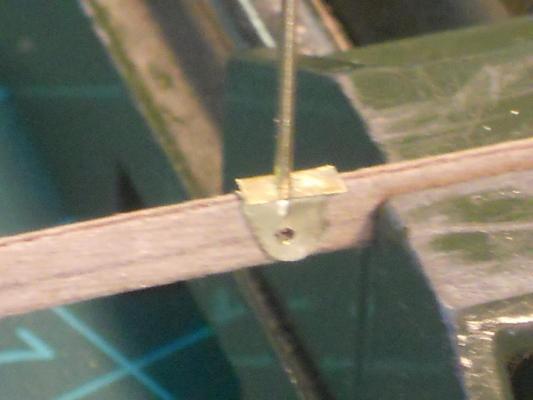
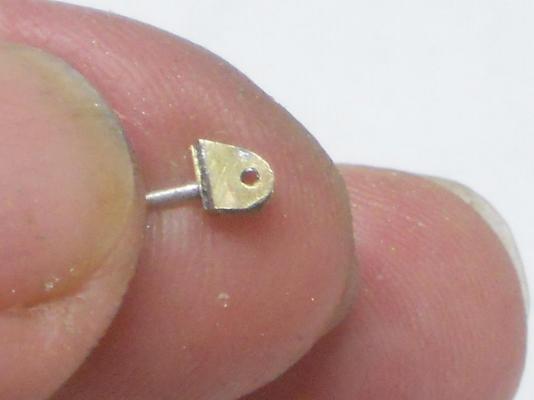
First of all I want to thank everyone for your "like" votes. Hello Andy, good to see you and yes, that was indeed the Type 21 boats. The German engineering were way ahead of any other country. Not only in subs and surface ships but in aircraft, armor and rockets. Brilliant minds. I think that some time ago I did mention the Type 21 subs from the Kriegsmarine. Thanks for the input, great stuff. Well, today I continued with the small stuff for the gantries. It was not easy and then to think that I have to yet make another set for the front As mentioned above, I had to remake a few pieces because they either didn't turn out to my liking or I cut too much away or some other goofy reason. In any case, the rear gantry assembly is now mostly done except for the "come-along" and the pulleys with their brackets. I also forgot that my drawing was a little larger then my scale so I had to cut the gantry posts down a few mm's and I'll also need to shorten the boom some. Oh well, that's what happens when you are not paying attention, being a "domkop" as the Dutch would say I made a bunch of pictures for my own records and share a few with yuns here. Unfortunately some are a little out of focus or I moved the camera but you get the idea. This shows the gantry boom attach bracket being made ready to solder. I cut a small strip of brass shim to add some material to the bottom so I can solder the pivot pin securely. The pin protrudes a few mm into the wood of the jig / holding fixture and this way the solder could creep under the small plate and into the other side of the bracket. I actually had to ad some more solder to the inside of the bracket though and machined the excess of the pin away with a narrow Dremel cut-off wheel. After everything was securely soldered I trimmed the whole thing to make it look goed. This shows the completed boom attach bracket. Yup, it's small. Here I have temporarily attached the boom to the bracket and then stuck the assembly to the post bracket. Later on I also removed some of the excess epoxy cement because it interfered with the rotation of the brackets. Here I started with making the pulley bracket. This is one of the parts I had to remake because as you can see it is wider then the 2 mm for the pulley. However, it's the idea behind it in how I bend the pieces of brass shim into a U form. After this fiasco I shaped this piece of wood to 2 mm wide and bend a new piece of brass shim. This piece of wood also functioned as a jig and holding fixture to make the pulley bracket like I did for the boom attach bracket, except of course for the pivot pin. That was still going to be a real worry in how to solder the two together with the post bracket between them without desoldering the whole mess but It worked out okay. I had to assemble everything on the gantry and clamped a small steel office clip to the boom bracket as a heat sink and a wooden clothe pin under it to keep the boom bracket tight against the post bracket. Then, with the gantry upside down and in a small vice I soldered the pulley bracket to the pin while gently pushing it against the post bracket with a toothpick and guiding it in line with the boom bracket. It worked without a hitch, which made me smile and gave myself a high-five Here I am holding the pulley bracket with the dummy wooden pulley in it, looks rather neat. That's a 6 mm pulley. Here I have both brackets successfully installed to the post bracket and just for fun I have installed the boom and the pulley. Yes, that whole assembly does pivot too, wonders are not out of this world yet Here is another out of focus close up looking diagonally aft. The cable for this pulley is the actual lift cable for the torpedoes and runs down below deck to an electric winch. I'll have to take a look tomorrow and see if I can thread a "cable" to the loading tube access hatches. That way I can demonstrate the operation with a model torpedo. Cheers,

-
Hello everyone and thanks to all who visited and left a "like," much appreciated !! Ahoi Marc, thanks for dropping in and a great question. As an aerodynamicist, among other things, I have been questioning the same thing and shaking my head in disbelief at the lack of reducing drag on these boats. That's why the submerged speeds were so pitiful. But then again, they were primarily surface vessels that were capable to submerge to nominal depth for a limited time. No, these gantries were fixed. At the refurbishing of the O19 in Scotland in 1943 they removed the rear gantry and supplied them with a portable hoist with block and tackle. To use this portable hoist they just stuck it into a tube in the deck. They had to leave the front gantry on the boat because it also served as the radio antenna support. The shipyard in Scotland removed some other superflous stuff to lighten the boat a bit. What's normally not knows is that later in the war the Germans developed and build a large submarine that was truly a very modern design and was very clean on the outside with the result that she could sail very fast while submerged. Hello Vivian! I'm glad to see you here in my shipyard and trust you are recovering quite well. Thanks for your compliment and stay well! I truly understand what you had to endure and I speak from personal experience. Hi Popeye, good to see you here as well and yes, we are making some progress but it's slow going though. I had to redo some of these little buggers and had to buy some more flat stock brass sheet. Hello John, glad seeing you here as well and yes, things are beginning to take shape. I'm happy with the results. Cheers,
-
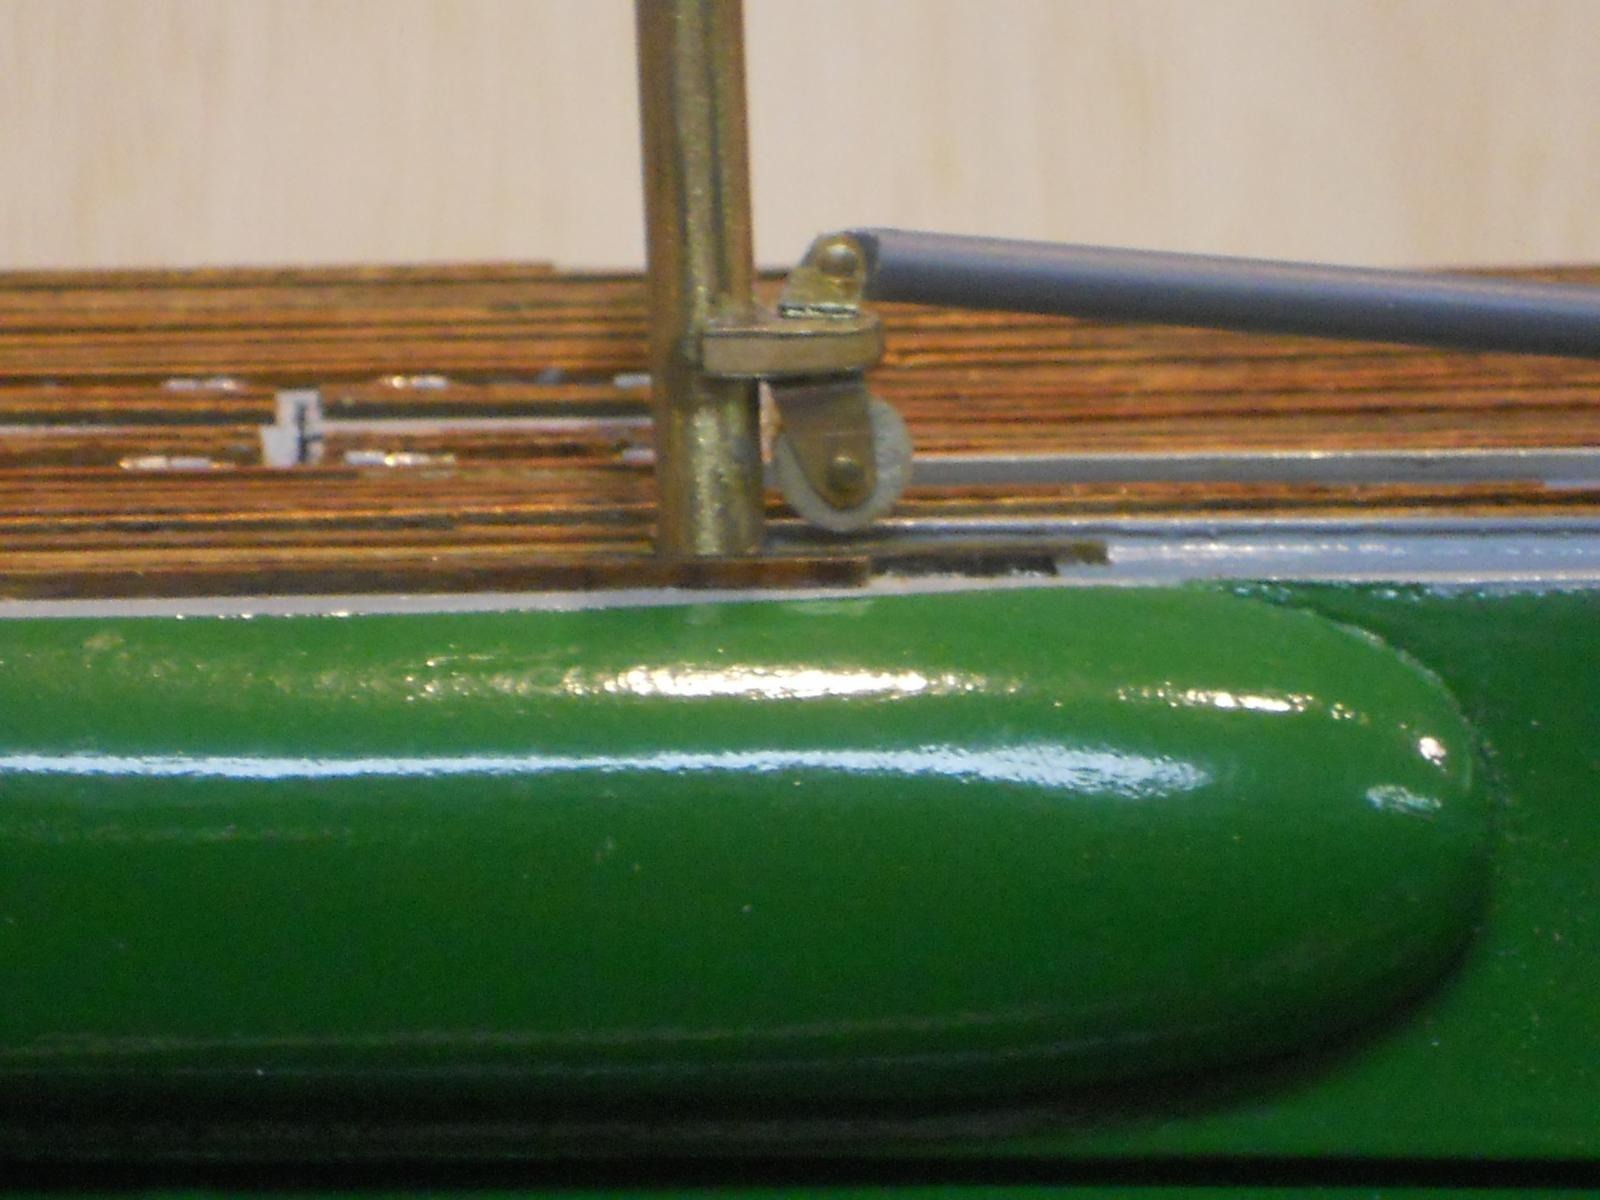
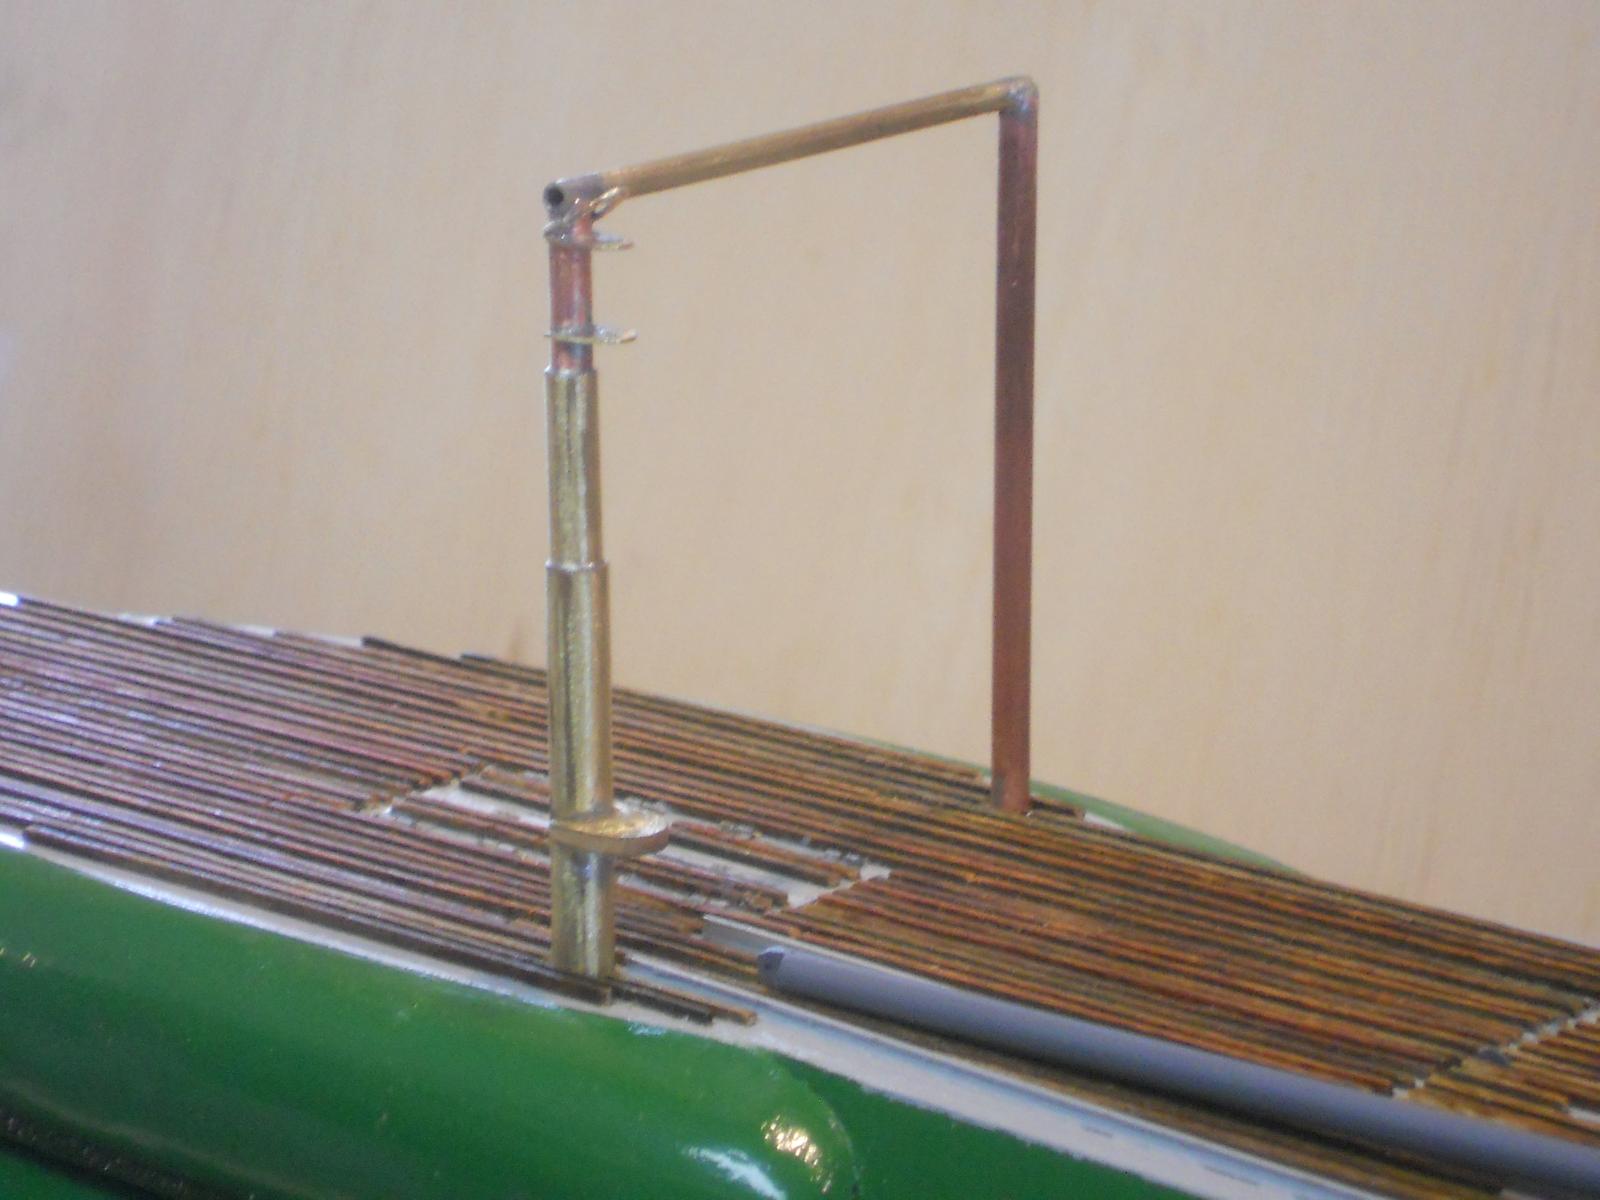
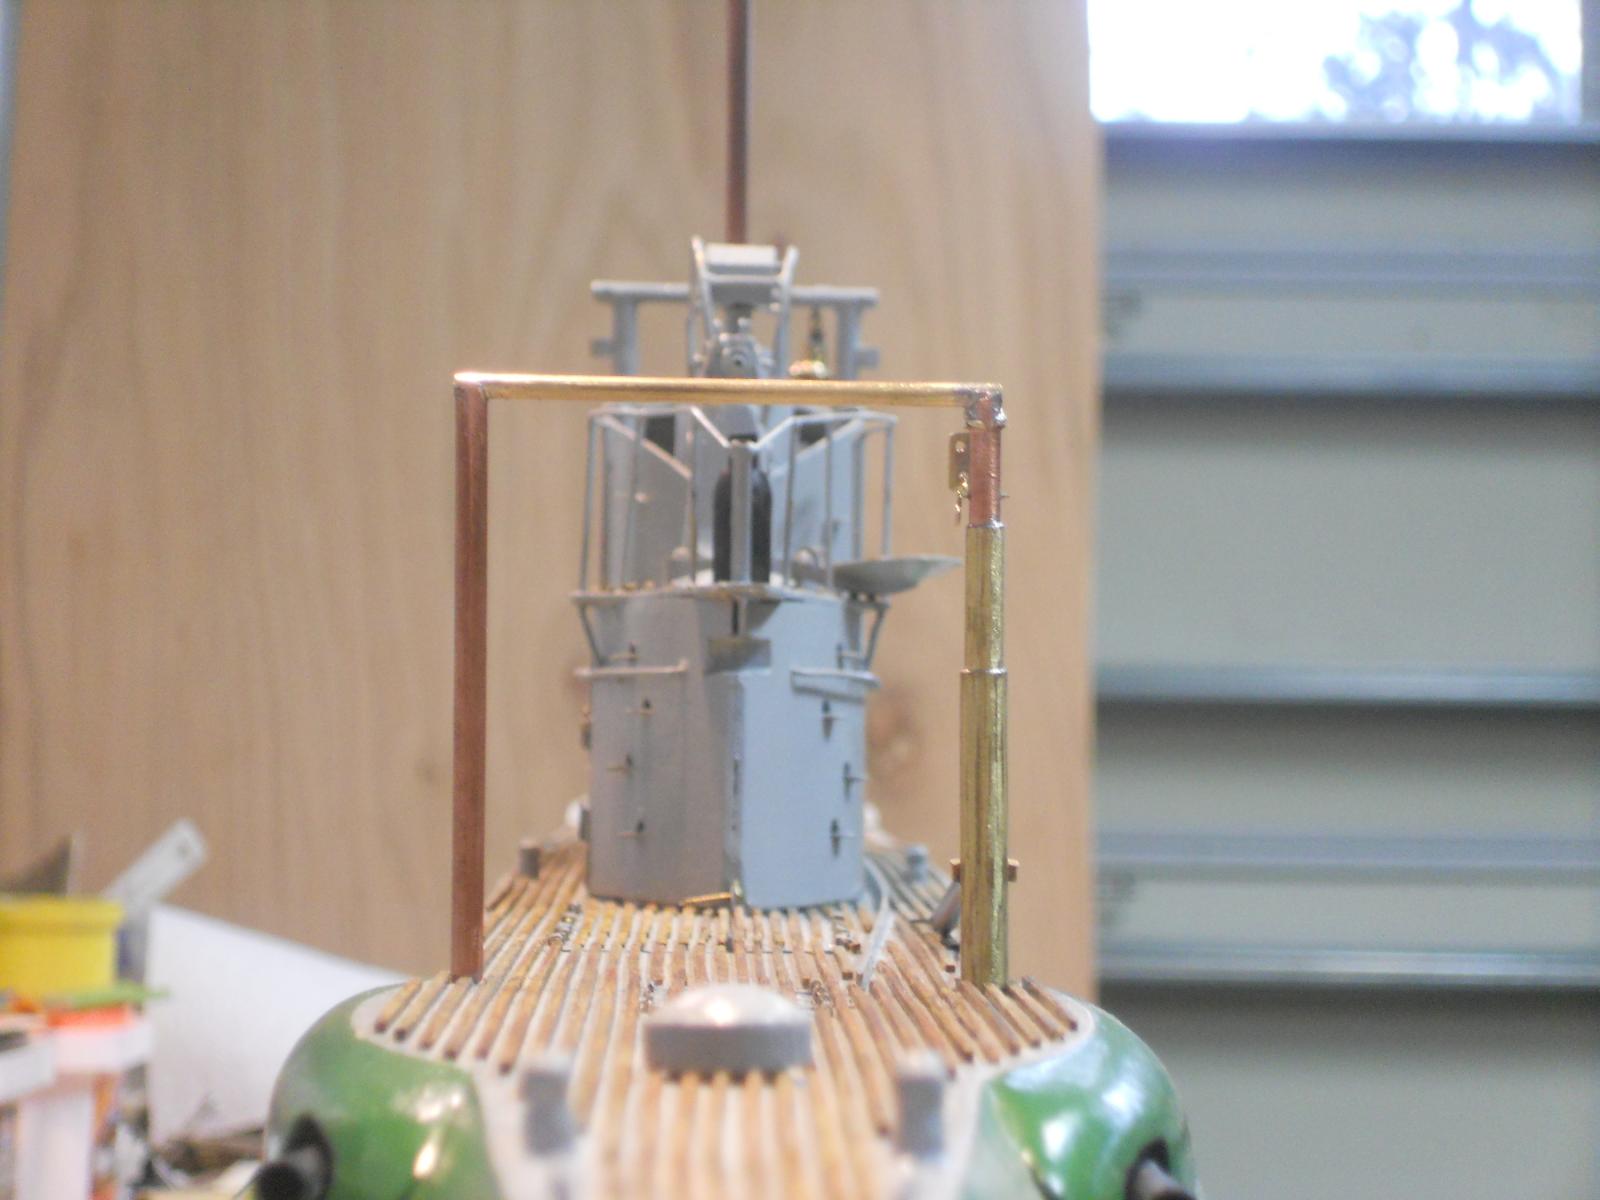
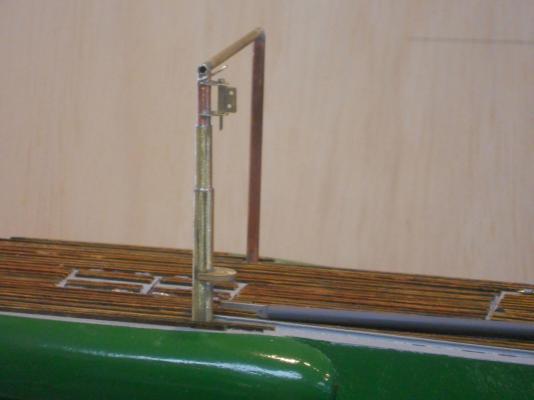
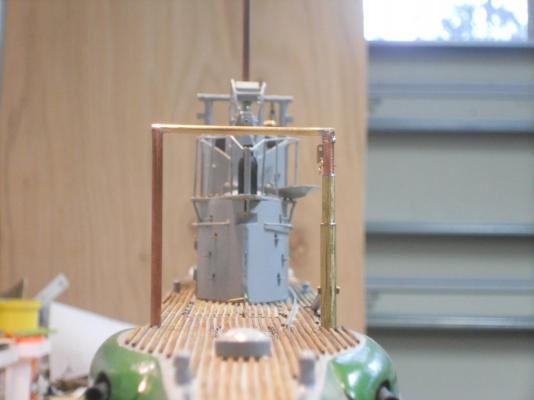
Hello everyone and thanks for visiting and your like votes, it's much appreciated. It looks like everybody got caught up Continued with the gantry today and making progress. Looks like I'm concentrating on the aft gantry, I just like to see how it looks on the boat all finished. The torpedo will have to wait till the forward one is finished. All these little parts are rather time consuming and challenging. So far, things seem to be working out okay and I'm happy with the results. I hope that the forward one goes as easy. Here are a few pics to show the progress I made today, even having to take a few hours away from the shipyard to pick up my wife after se dropping off her car at the dealer in Ormond for its six month check. She is a stickler when it comes to "her" car's upkeep, which is a good thing And - - - she's driving back up to Pittsburgh, PA next month to help the grandson move his stuff out of the dorm for summer recess. This shows how I rigged a "Rube Goldberg" clamping arrangement to solder one of the swivel brackets for the come-along to the gantry post. A 0.8 mm brass rod is used to keep it in line with the boom attaching bracket. This pic shows both brackets soldered to the post. I placed the swivel unit next to it to show where it'll be pinned to. This shows the gantry post with the come-along swivel unit installed. The top cable attaching bracket is next. It was a little tricky having to solder it so close to the top bracket but it worked out okay, see next pic While I was soldering the top bracket I thought, why not also solder the crossbeam to the post. Then I figured, why not complete the gantry. So, I soldered everything together on the boat. Checking, double checking for square to the deck and holding it steady with a wooden clothe pin. Wonders above wonders it actually came out rather well. I'm happy Here is one shot with the gantry stuck to the deck. The boom is laying on the deck ready to be attached as soon as I have it's bracket made and installed. This is another shot of the gentry and we can see all the hardware on the post. This is a shot toward to front. Looks square to me. The foreshortening of the lens makes the gentry look large but when seeing it on de boat it looks okay scale wise. Cheers,


-
Hey Kevin, great to see you back again in the O19 shipyard! No apology necessary my dear sub friend and your complements. I have seen your many like hits, appreciate it much Well, yes, I like to add as much extra info to the build as I can and thanks to all who add to it. I know you are busy with the Bismarck and the Victory, both are really looking super great, well done. I am following both builds whenever I see an update and let you know I visited with a like or a comment. Keep up the good work and yes, please keep dropping in, you are always welcome. Cheers,
-
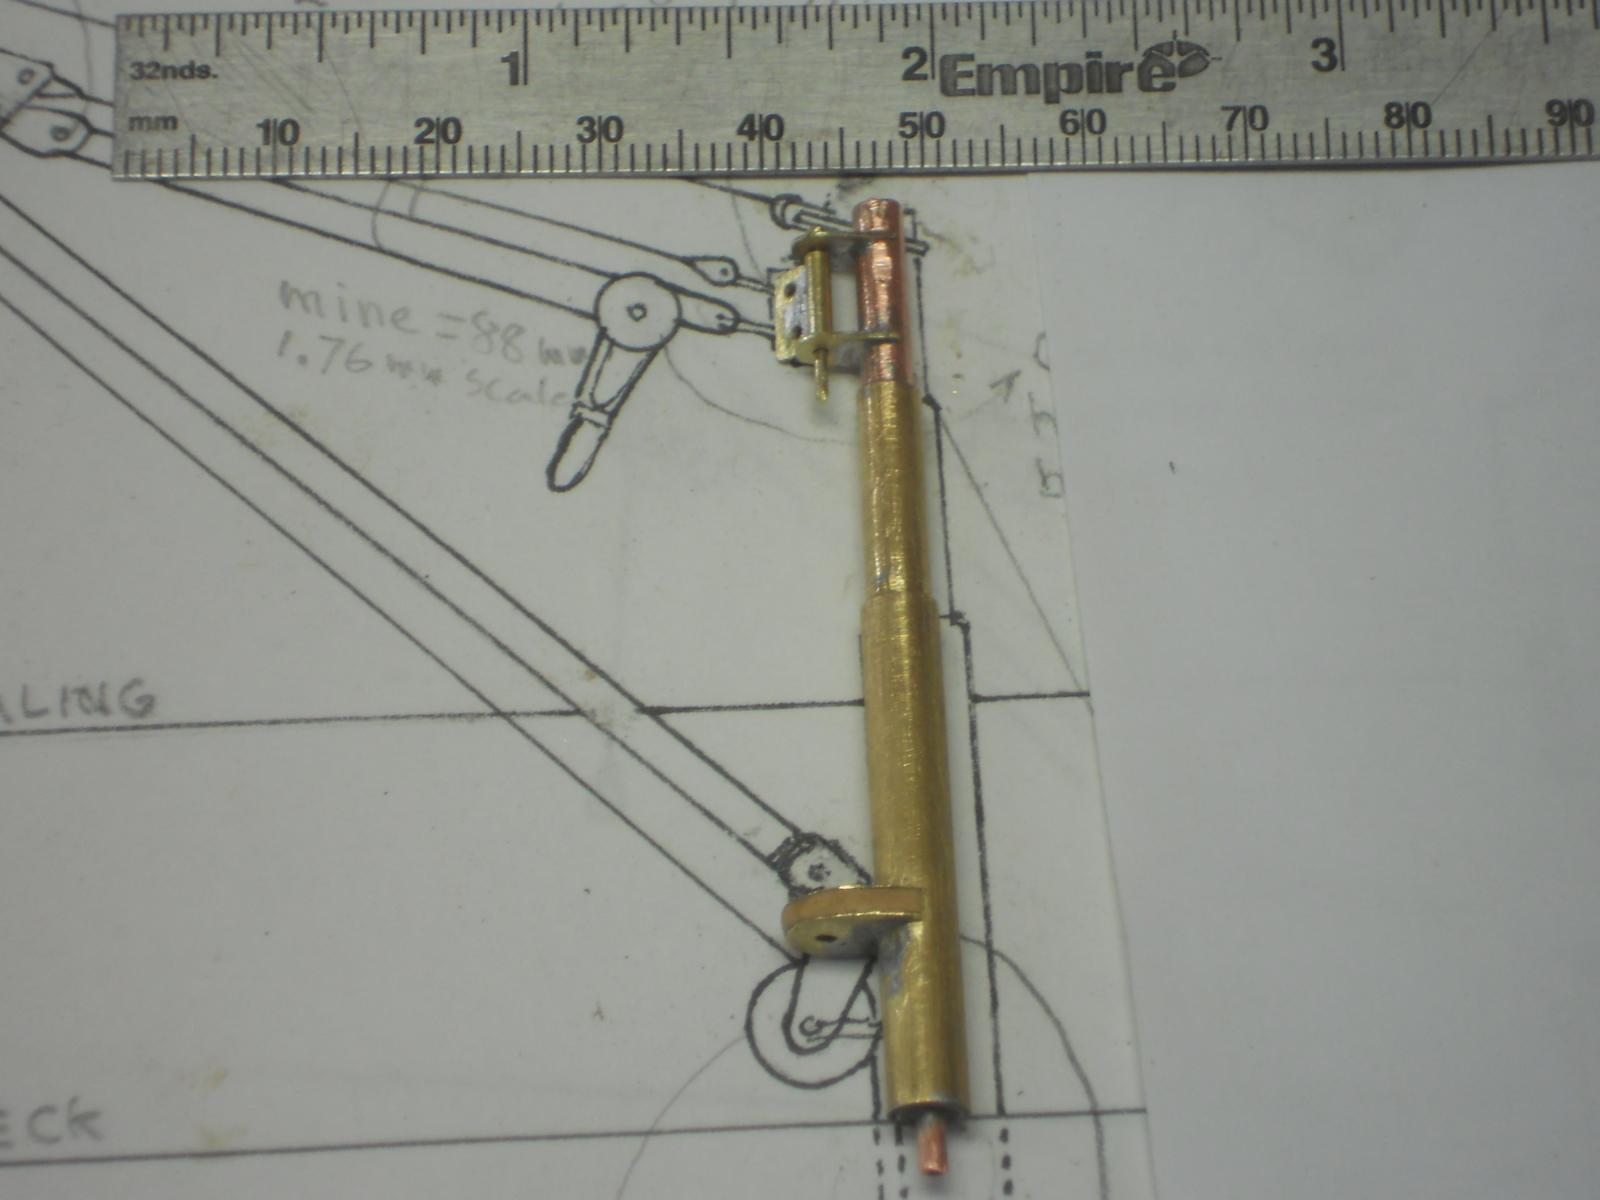
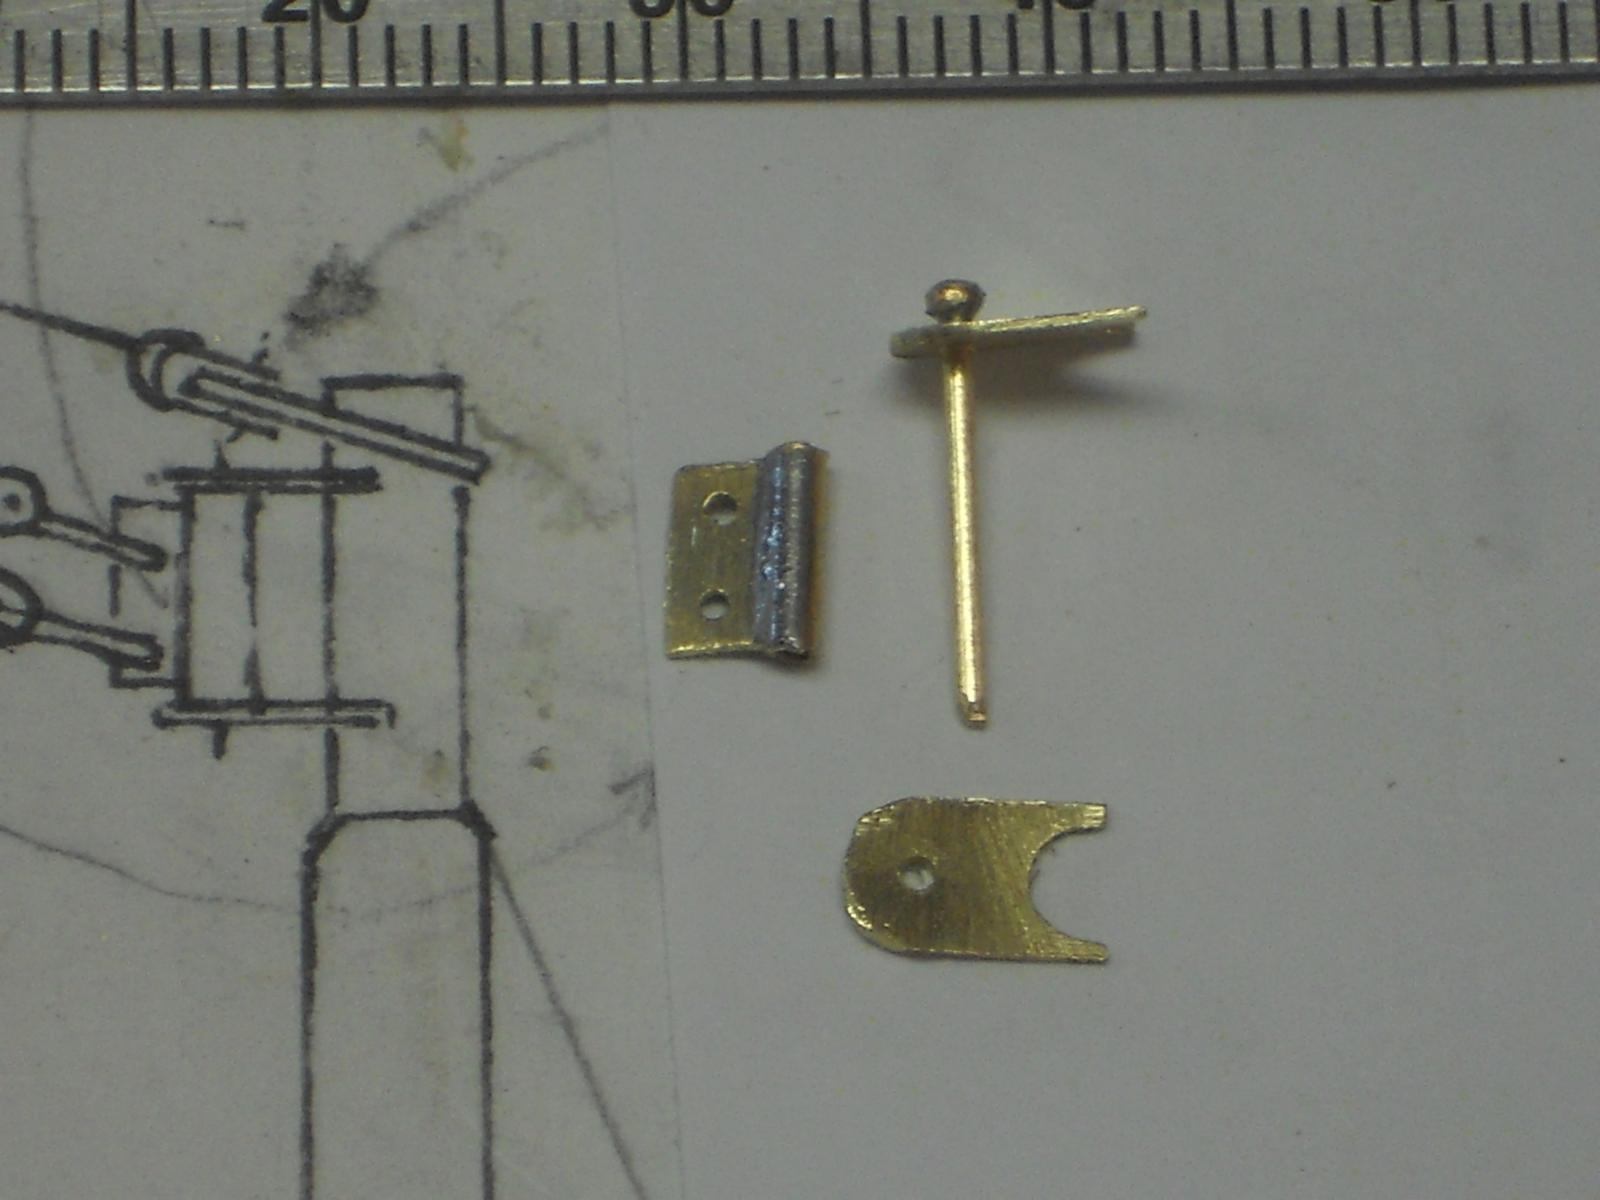
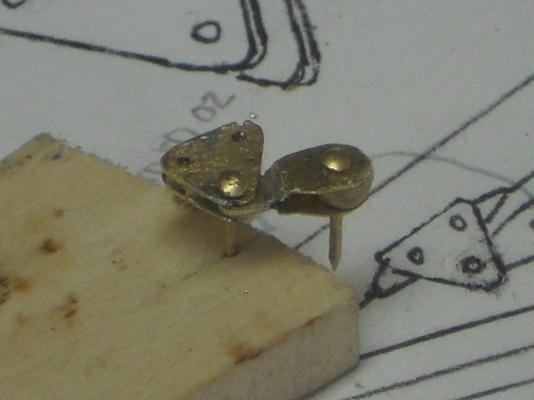
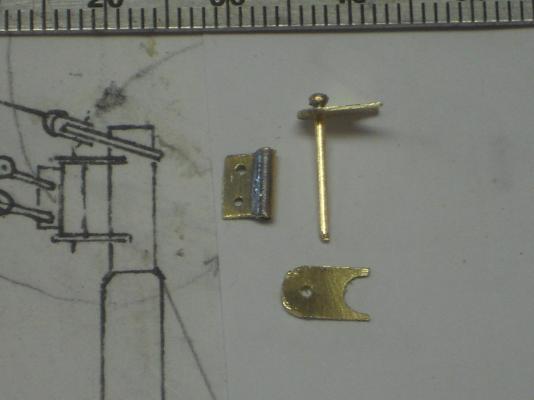
Thanks again all y'all for your likes After my colonoscopy procedure this morning, which showed potential problems, I ventured back into the shipyard, aka the garage to do some more work on the gantry. Instead of working on the boom and pulley attaching hardware I started making the boom elevation attaching and swivel hardware on top of the gantry post. I only got to completing all the parts but didn't have the time to attach them to the post. Hopefully we can do that tomorrow. Here are a few pics of the parts. This shows the parts that make up the swivel attachment for the boom elevation equipment. I laid them out to the right of the drawing to show where they are suppose to be. It must of necessity be able to rotate following the swing of the boom and at the same time allowing cable hooks to move up and down when the boom is raised and lowered. Needles to say all the parts are still in their rough state. Only after they are soldered to the top of the post will I clean it up and filed to size. I made an attaching pin from 0.8 mm brass rod to attach the swivel unit to the two brackets. I made the head from a small piece of copper tubing and soldered that to the pin. I notice now though that I have to file the top of the head down some more. Once the assembly is all installed this pin will have a safety pin run through a small hole on the bottom. Hmmmm, yeah right, keep dreaming babes Actually, the drill bit that could do that is broken - - - so it'll have to be done after I order a couple new bits. The holes you see are 0.8 mm. I plan to cut grooves into the tube of the post to allow for a better solder connection, it also facilitates holding these small parts for soldering. This shows my soldering jig for the swivel unit with the other parts of the whole assembly. I filed a groove into a piece of wood for the small piece of tubing to lay in and then placed a 0.3 mm thick brass plate next to it. In order to solder this I used a wooden clothe pin as a clamp to hold it all in one place, this worked like a charm. The two brackets will also be filed down some more to reduce them in size but that'll happen after they are soldered to the posts so I can clean them up together with finalizing the shapes and sizes. Cheers,
-
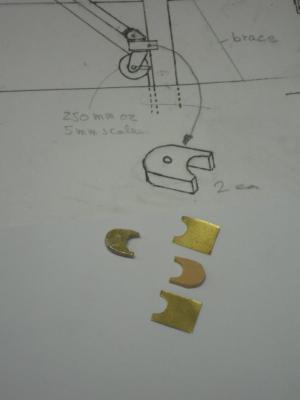
WOW, thank you all for visiting and liking my stories and build, it's really appreciated. @ Daniel: re the pencil markings on the drawing - - - that's why they call it a working drawing I always make notes and scribble changes on it. I managed to do some more work on the gantries today. I had been pondering how to make the boom attachment bracket, that's the piece where the boom and lower pulley attach to. So, I made a core from boxwood and plated them with brass shim. I used CA to cement the brass shim to the wood core. I drilled a small hole in the post and soldered a brass pin into it. Then I also drilled the boom pivot pin hole and the hole for the attaching pin in the bracket. The attaching bracket is then epoxied to the gantry post and spot soldered on the underside only. It appears to be rather solid. I was also wondering how to finish that triangular fitting for the boom elevation tackle attaching hardware. I cut three small pieces of square brass stok and soldered them in between the two triangular pieces, like a sandwich. I hope that the picture below explains it. Well, it looks like things are coming together, slowly. Next are the boom pivot attach brackets and the pulley sheaf brackets. Hmmm, how to make them rotate as if one unit - - - I'm thinking, Im thinking - - - don't disturb me now Talking about pulleys, Remco is mailing a few pieces of 6 and 3 mm brass rod [[a birthday present, he says]] But I have still quite few parts to make before they arrive. It's all working easier then I expected and I'm having a ball Okay, here are a few pics to show the progress. This shows one of the boom attach brackets assembled but not dressed yet and the raw pieces for the second bracket. This shows one of the brackets installed and how these brackets are fastened to the post. Obviously that long pin is cut off just long enough to reach the pivot hole. As I write this both posts have now these brackets cemented and soldered to them. No - - - no time yet for primer paint. There are two more brackets to be soldered to the top of the post for the elevation gizmos and the cross beam to the other post. This shows the triangular attaching bracket for the boom elevation equipment. Here you can see the three small pieces of brass that I soldered to the inside to make this thing so that I can pin the pulley hardware to it and the two thimbles for the cables. This was a tricky thing to do but worked easier then thought. Cheers,

-
Hello Daniel, glad you appreciate my rambling about my life and careers. It's been a trip but enjoy my retirement, although a little late in life. Come and visit again, okay? Cheers,
-
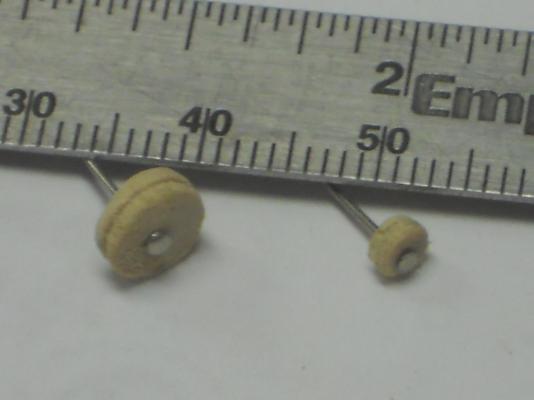
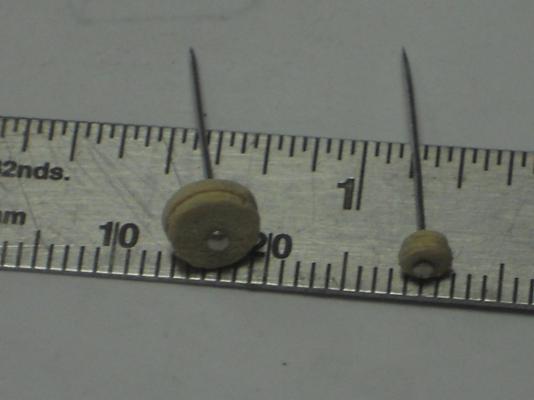
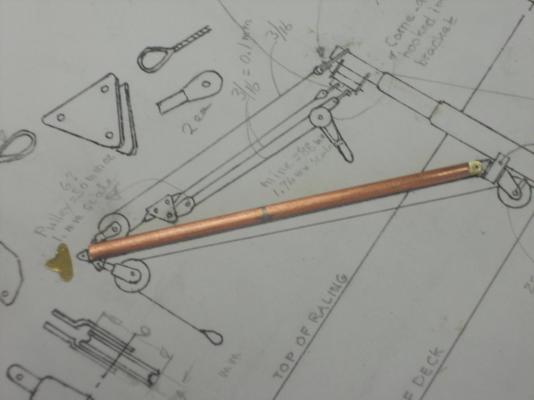
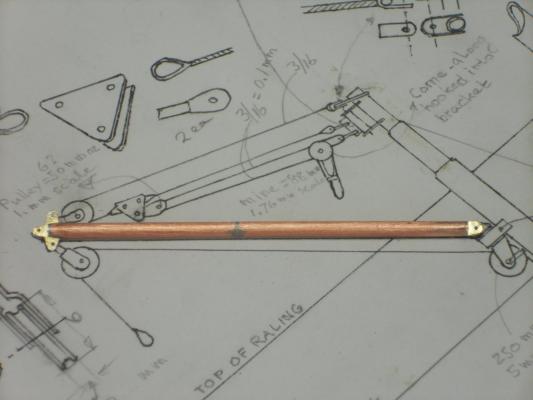
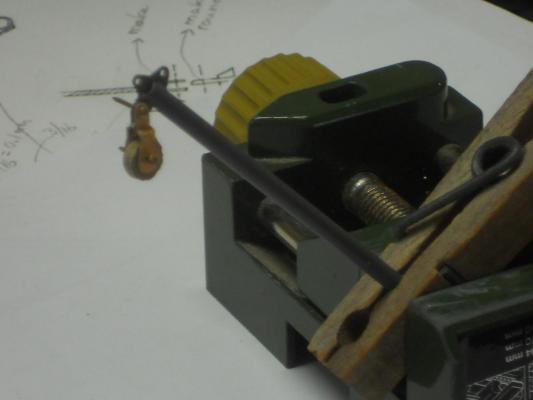
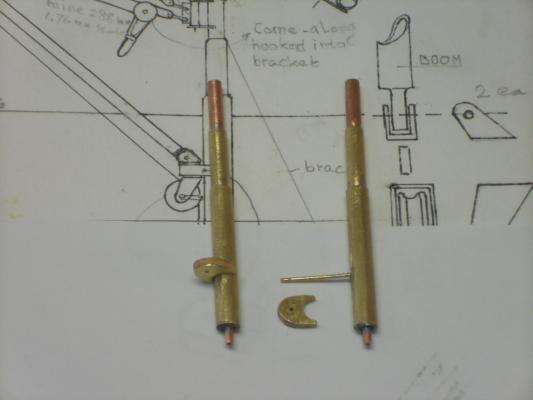
Thank you all for visiting and for your like votes, please come again. It's been a few days but last Friday I started with making some of the items for the torpedo loading gantry. But first I made one 6 mm and one 3 mm pulley out of a wooden dowel just to see how these sizes would look. I think that they should be okay. The wood I used was not very hard and the result is a little fuzzy but the aim was to check for size. Then I made the two booms and primed them. I also made two sets of connecting fixtures for the boom elevation come-along. I think that making the small thimbles will be a real challenge. I don't know just yet how I'm gong to do that. They will be slightly smaller then what they show on the drawing above. The cable is to loop around them and then either spliced or nico pressed together to form a loop. I may have to cut a groove in a 0.5 mm brass rod Okay, here are a few pics of my efforts. This hows the two pulleys made from a wooden dowel for size test. Another view of the wooden pulleys This shows one of the two booms with the attaching hardware. The pulley attaching bracket will be hand filed down a little more now that I have better handle on it. This shows the boom with all the hardware soldered on. Next step is dressing everything down some more and then primer paint. This shows a boom all dolled up and primes. I also placed the lower attaching piece in it's raw state below the boom end to show how it looks before dressing it up. It'll be soldered into the next boom. I forgot to make a picture of all the parts that make up the boom. These are the parts to allow connecting the elevation rig to move the boom up and down. One pair is ready for final shaping and then for the primer, the other set is yet to be completed. I forgot to lay a ruler next to them but they are small, 4.5 mm. Cheers,