Piet
-
Posts
3,568 -
Joined
-
Last visited
Content Type
Profiles
Forums
Gallery
Events
Everything posted by Piet
-
 Thanks to everyone for visiting and your likes, it's much appreciated. @ Anthony: Thank you for your comments. Ah yes, the Rijksmuseum, I have been there many times when visiting family. Lot's of treasures there and spend many hours just ogling and reading stuff. I seriously doubt they would be interested in my model though. Right now I have no idea what'll happen with it when I kick the bucket The Admiral? Daughter? Grandson? The Dutch Navy museum? @ Senior O S: Thanks for dropping in and your kind words, come again please. @ Remco: Thanks for your interest and suggestions. Yes, it's definitely the structure of the wood. Wood has naturally hard and soft strands in it and when not cut right they can run every-which-way. The stain or dye doesn't soak into the harder sections as much as into the softer parts. Yes, I almost gave the slats a bath in the stuff and wiped the excess off and let it dry. Then I put a coat of poly on them to seal the dye. I am using poplar with the idea of staining it to look like teak. Too expensive to buy from Jeff therefore this route. Boxwood would have been ideal and I may have enough but it's all in two big chunks so I'll have to rip it into planks of 1 mm so I can finish it to 0.8 mm. So I went the easy way and am using up the poplar I still have. I did some experimenting this morning by slightly sanding down the tops of the slats to remove the poly and then reapplying the dye with a rag. It seems to be working in my favor and with some additional touching up here and there with a small brush it may just be acceptable. It looks more even now with a few slight differences. I asked Gwen, the Admiral, to give her opinion and she likes it very much. She opined that it now looks more like a slight weathering from being out for almost one year for sea trials. See next post with pics of the completed aft deck. Cheers,
 -
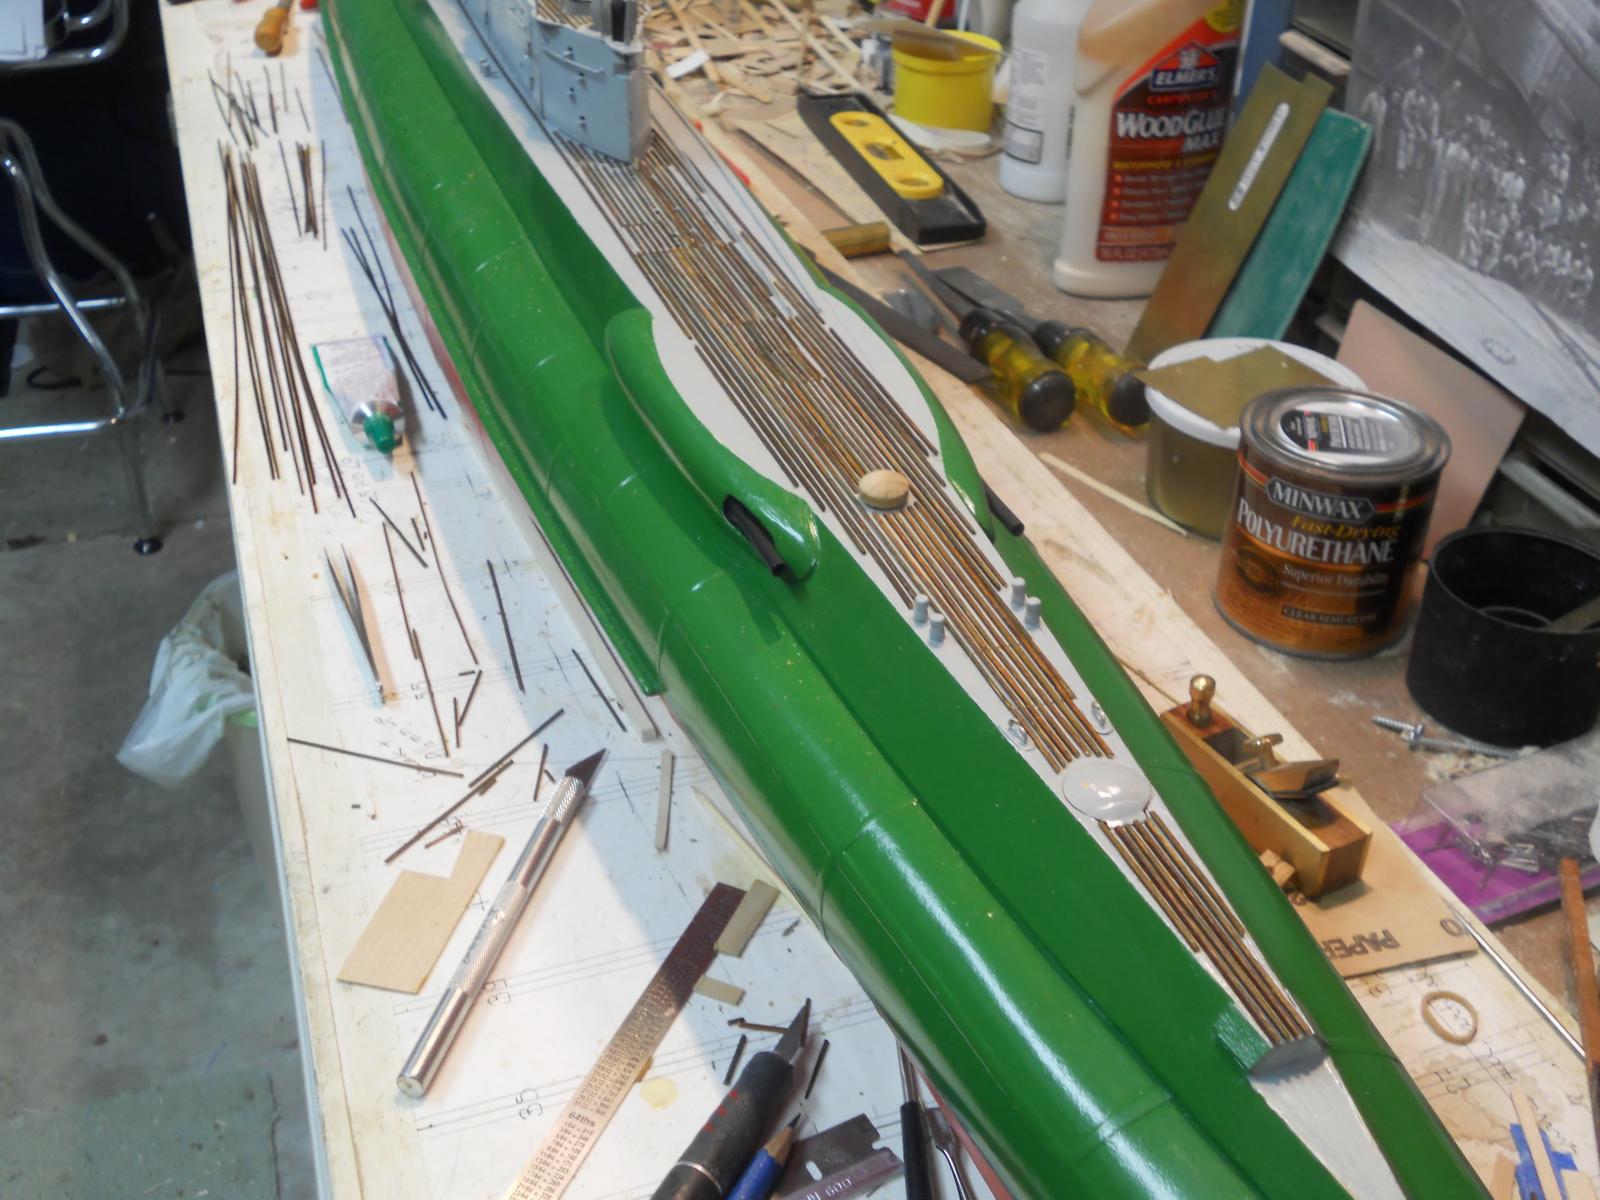
Thanks Gino for the explanation, sources and the link. I also did some reading via the web, quite interesting stuff. All y'all may have been wondering why no updates in a few days Well, I had to do some yard work and spend only the mornings in the shipyard I have been cementing those crappy deck slats to the boat. I started with the aft end thinking it would be the easiest part with fewer hatches. I can only cement a few per day so the progress is quite slow. This is all very tedious work making sure each slat is parallel to the centerline and 1 mm apart. Needless to say that I had to reposition a few after eyeballing it and using a straightedge but overall they run nice and straight.. As far as that's concerned I'm quite happy with it. Also, the dye I'm using decides to stain the slats unevenly, even though the wood is from the same board, go figure. I'll finish the aft end first and then see if I can sand the top of the slats and carefully apply another coat of dye to even it all out. If not - - - then I'll have to remove all the slats and get a few boards of cherry from Jeff but that'll bring me into May to continue with this project. Tomorrow morning I'll try the sanding and dye touch up thing first before continuing to see of I can match the lighter brown colors. If that works then I may just proceed with the decking. If not - - - rip it all off. Bottom line is, I'm not happy with the way it looks, too blotchy. Below is a picture I took late this afternoon today. It's not quite done yet but at least you can see what I'm talking about. Of course we can say that they have weathered with the salt spray and sun but this model is to represent the boat as she was in June of 1939 when my father sailed on her to the Dutch East Indies. Not much time to weather the deck or the boat. One consolation is that I can still do a lot of other detail work IF I have to go and buy some wood from Jef. Aft of the to be painted emergency telephone is completed. At first glance there are a few apparent bare spots but there are tracks for the dolly and a few hatches. Space must be made for the hatch hinges, the tracks have a curve and the deck slats must run parallel with the centerline. This will cause the slats to hit the tracks with an angle and cannot abut the tracks on the inside, there must be enough space for the dolly wheels. This will become quite noticeable when it's all done. Cheers,

-
Hello Mark, thanks and you crack me up Yeah, the dropping up thing wasn't invented yet till the ballistic missile subs So - - - you're an airplane guy too eh? Fixe'm, design'm, or fly'm? Heavy orin? Whirly gigs? But I have always had hunker'n for ships and boats though and now have the time to enjoy it. Cheers,
-
That's a nice looking ring Nenad, bravo! Cheers,
-
Hello John and thank you. Hi Jud, understand the arming thing. I read that during WW II the Germans had event delay mines, i. e. it let a certain amount of ships pass and when that set amount had passed it would blow at the passage of the next one. This deceived the mine sweepers in thinking the area was free of mines. Tricky stuff. Hello Popeye, thank you. Cheers,
-
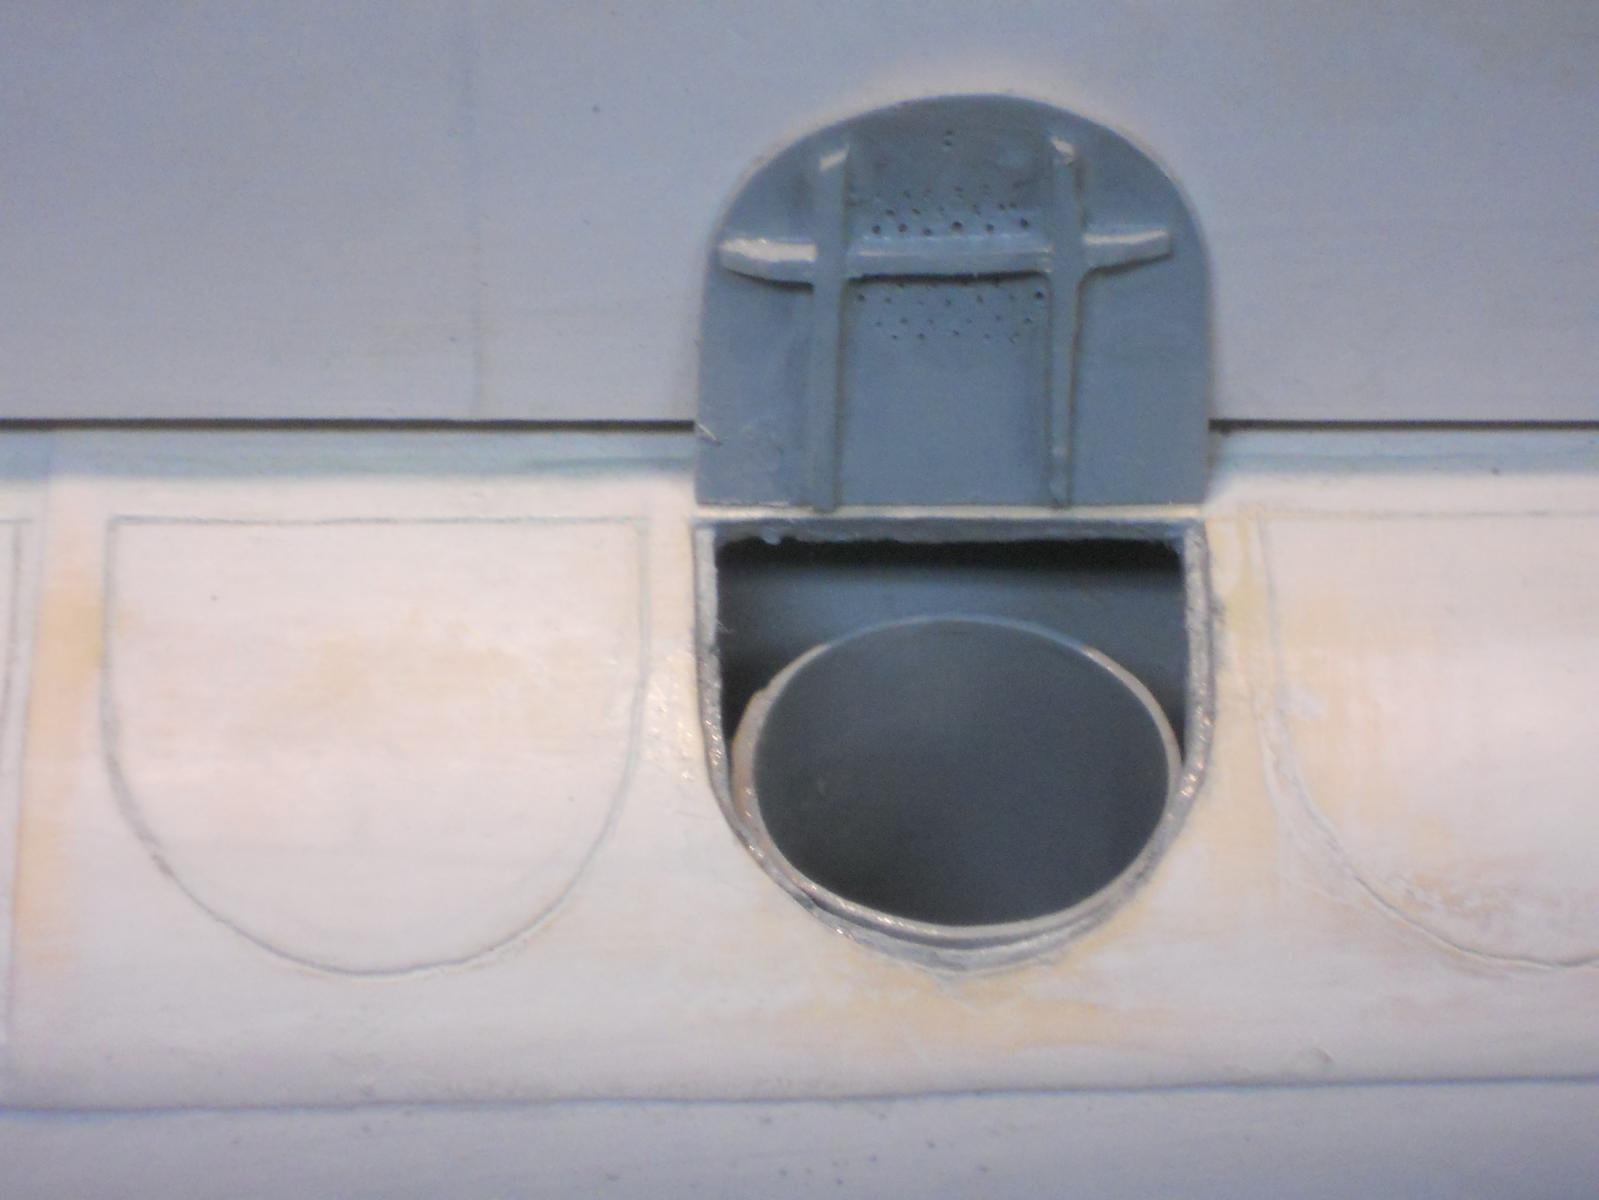
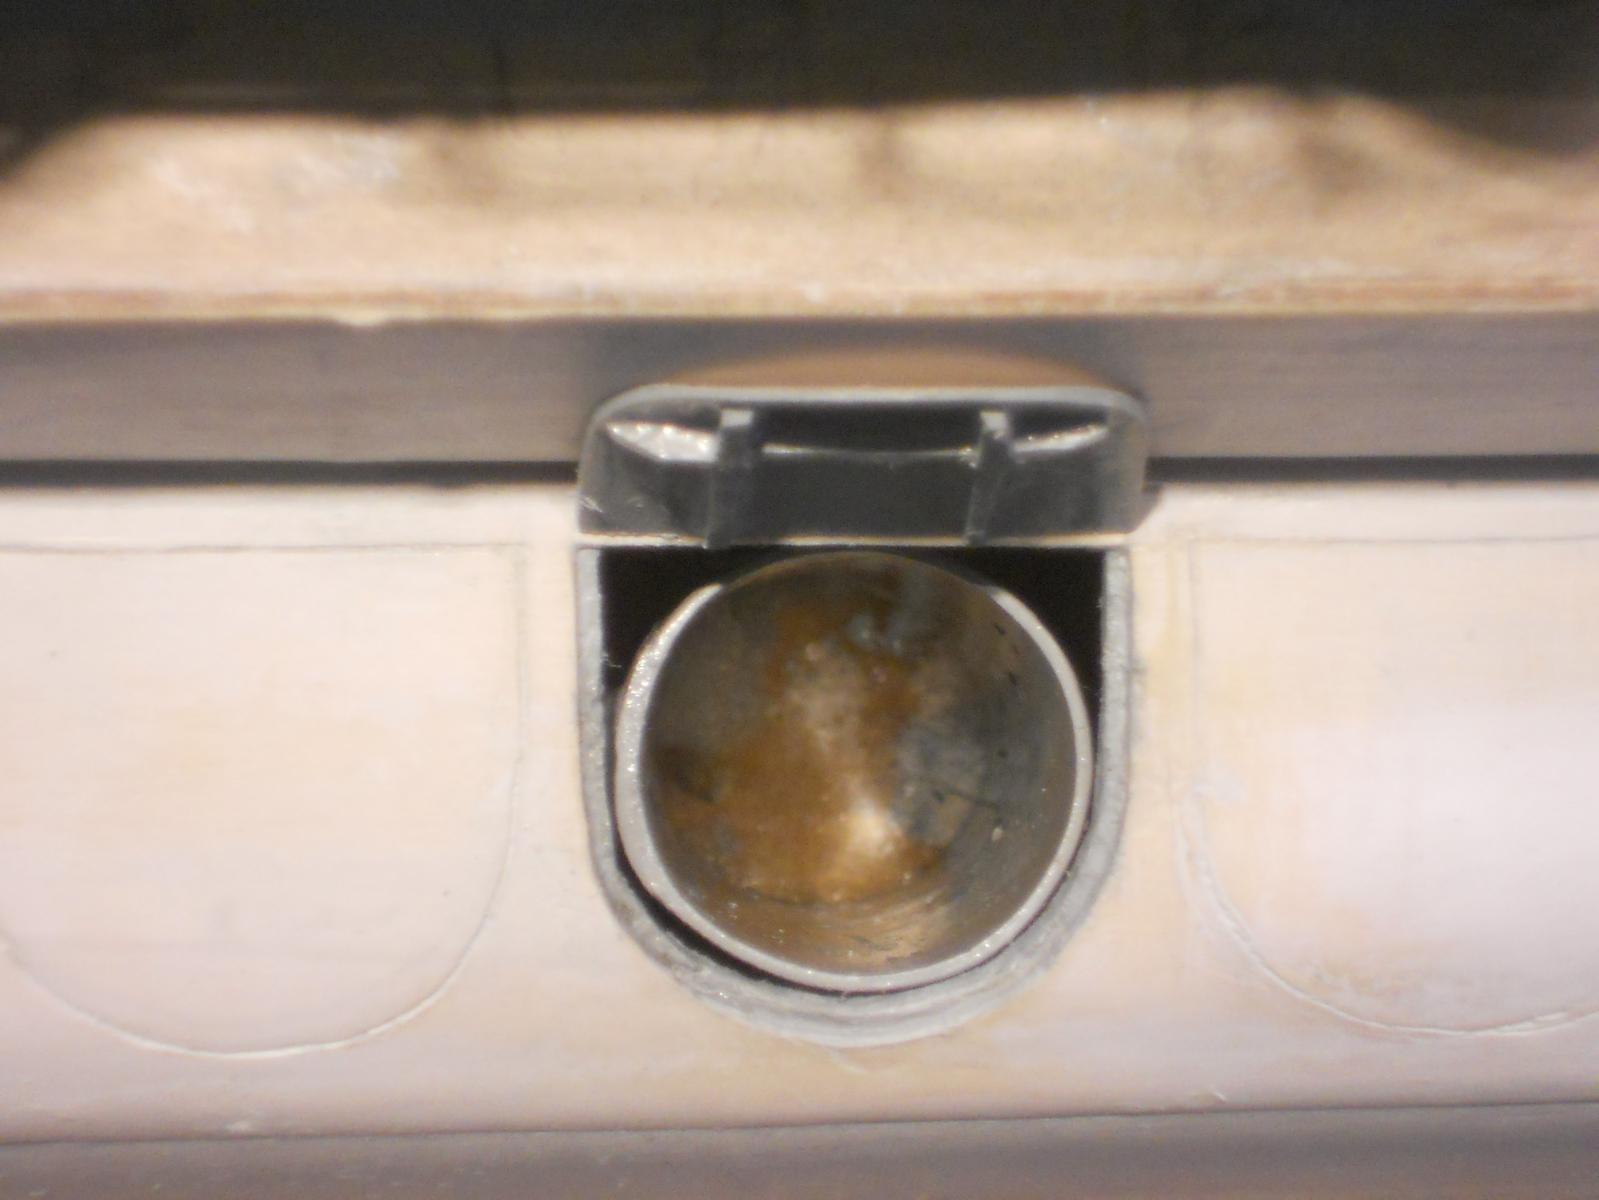
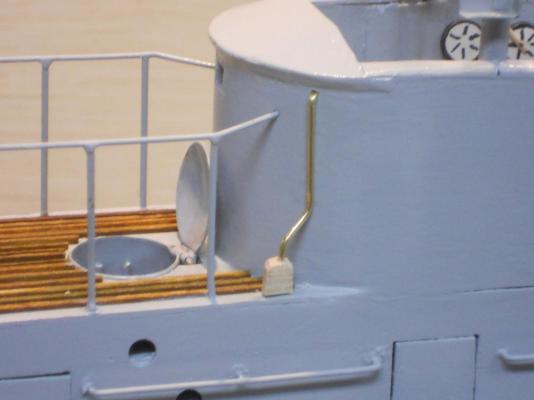
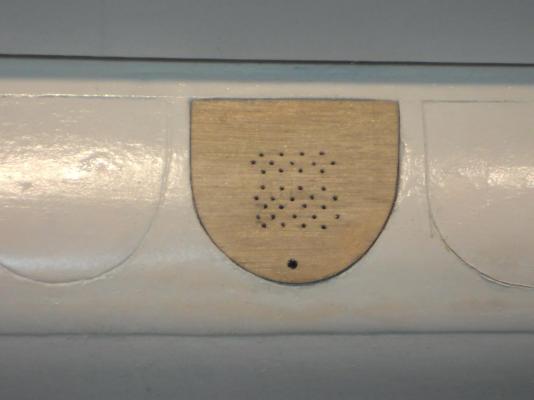
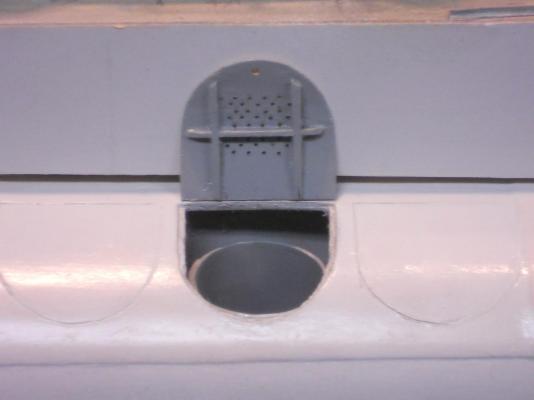
Hey Boris - - - see what I have done this afternoon - - - This shows the conduit with the box temporarily put into place for a fit look. I made one for each side After some adjustments they are glued in place using ca and they need some paint. I still need to add the black squares yet. This shows a small supply of 1 X 1 mm slats for the deck. I started with the aft deck and glued only a few. More to come Sunday, I think. If the weather is good I need to do some yard chores Cheers,
-
Hello Boris, Those look terrific!! Super nice looking models!!! What else can I say Cheers,
-
Hello Andy, thanks for the mine pic. That looks like a monster - - - won't fit in that little old sub though I have the actual drawings for the Vickers mines for the O19 and O20. I'll have to model a few, one for in the bun and one for the display stand. I may have to make an extra anchor too for the display stand. Hi Boris, no, I didn't forget the tube thingies on the side of the bridge. I have the picture on my workbench with a note to me to make and add them and also those little black square thingies There are a few other things as well I need to make and install. I can just remember to look at my notes - - - if I can remember where I put them Thanks for noticing it and reminding me - - - I need al the help I can get in remembering things Talking abou forgetting things - - - I forgot to mention yesterday that I had painted the deck and con sides light grey! I put all the hatch doors in temporarily so I can paint them at the same time and also to close off the compartments below them to keep the paint out. It really looks great now, I'm very happy. Most of the time yesterday and today I spend cutting the 1 X 1 mm deck slats. I took the batch I made and brushed on the teak dye and then brushed on the poly urethane to seal them. Tomorrow they should be ready to glue them on to the deck. Another tedious job. However, this may not be done till after lunch - - - I have a doctor's appointment in the late morning in Ormond Beach.
-
Hello Mark, yeah, common sense I guess but I should really dig into the issue of deploying mines from a submerged vessel for curiosity sake. I'm an airplane guy not much on ships except for the engine room, had schooling in that. Cheers,
-
Great looking decks Popeye and what an idea using a kit for your ship parts. I'm very curious in seeing how your ships will look like. Re feeling like a dolt - - - I guess you and I are one of a kind as far as "dolting" is concerned Cheers,
-
Oh yes, that's looking great John. Like your build dock! Cheers,
-
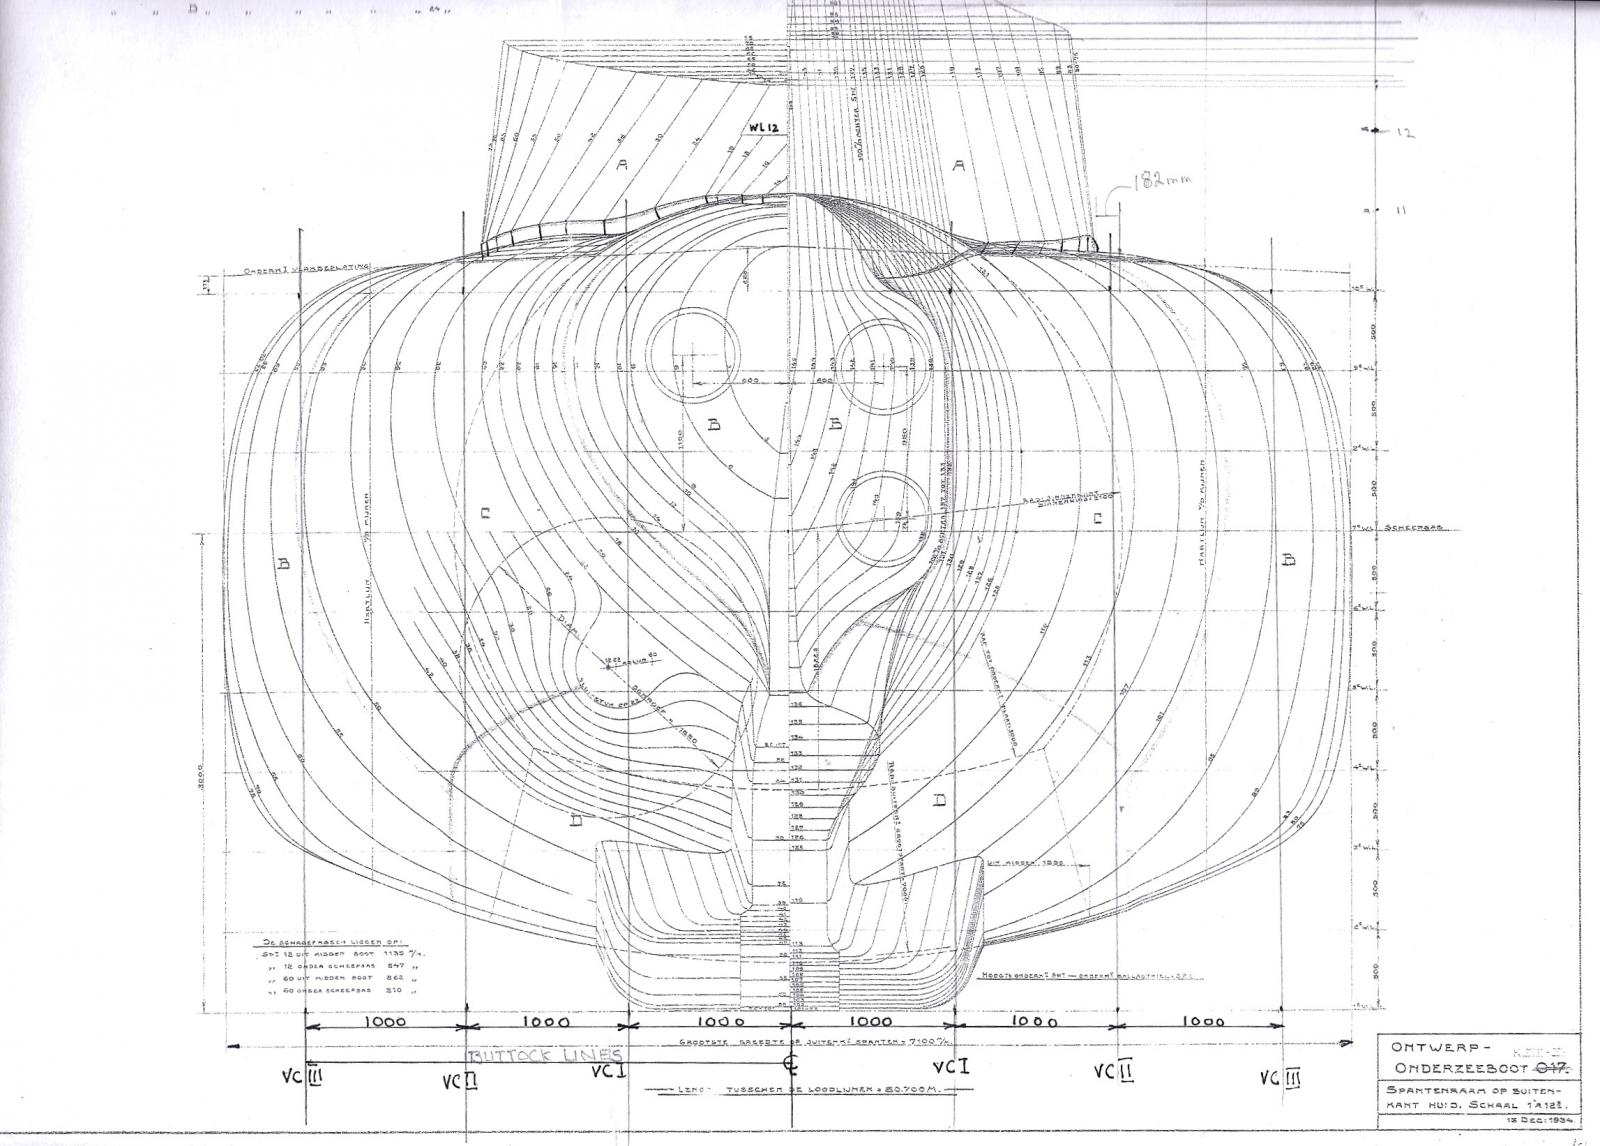
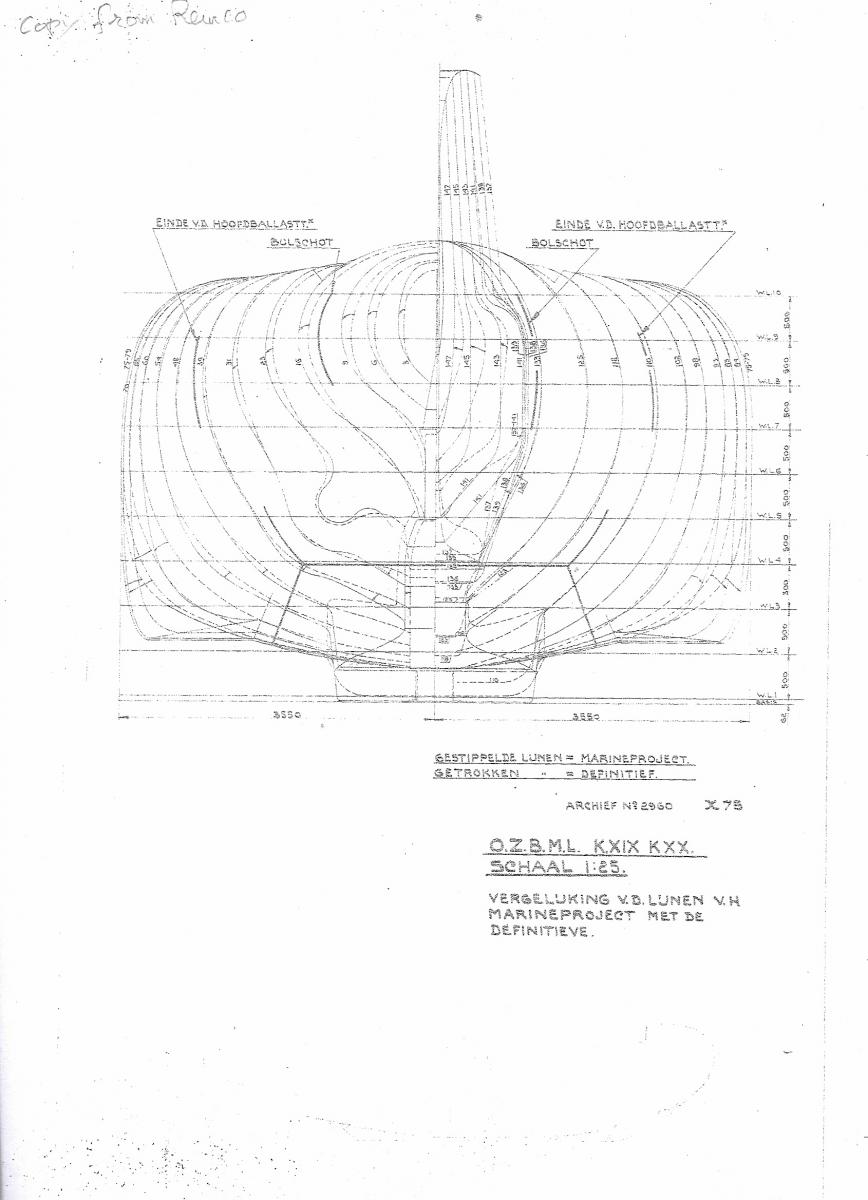
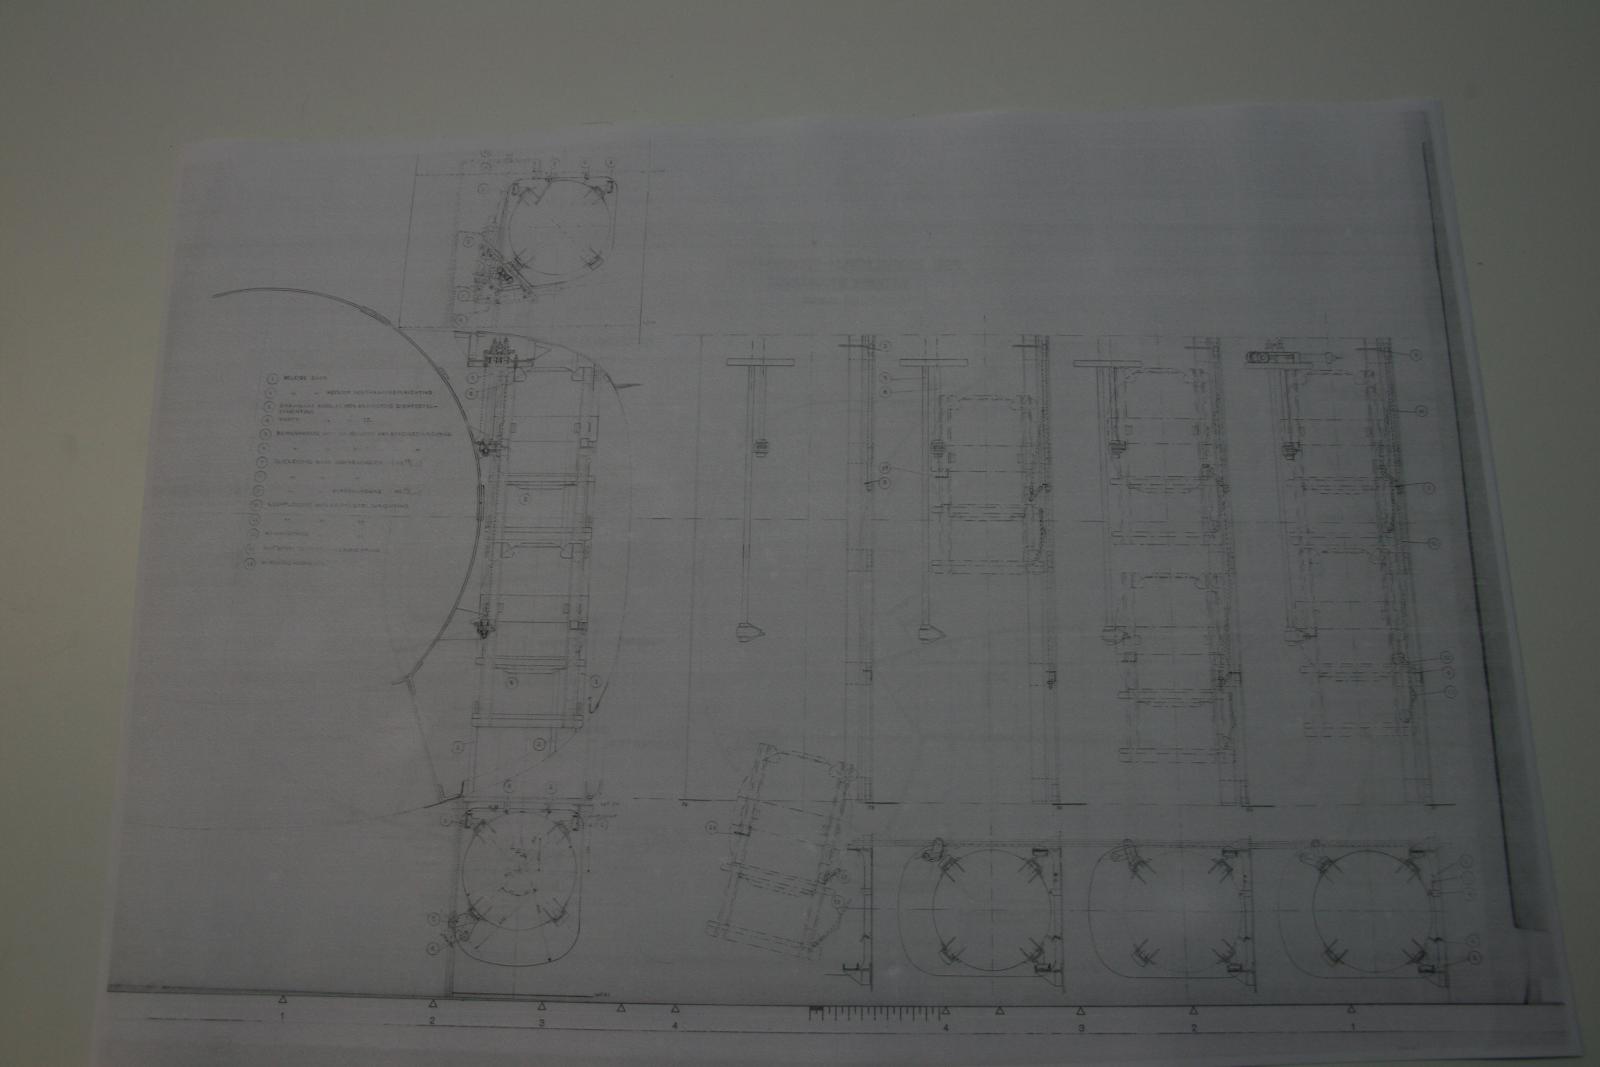
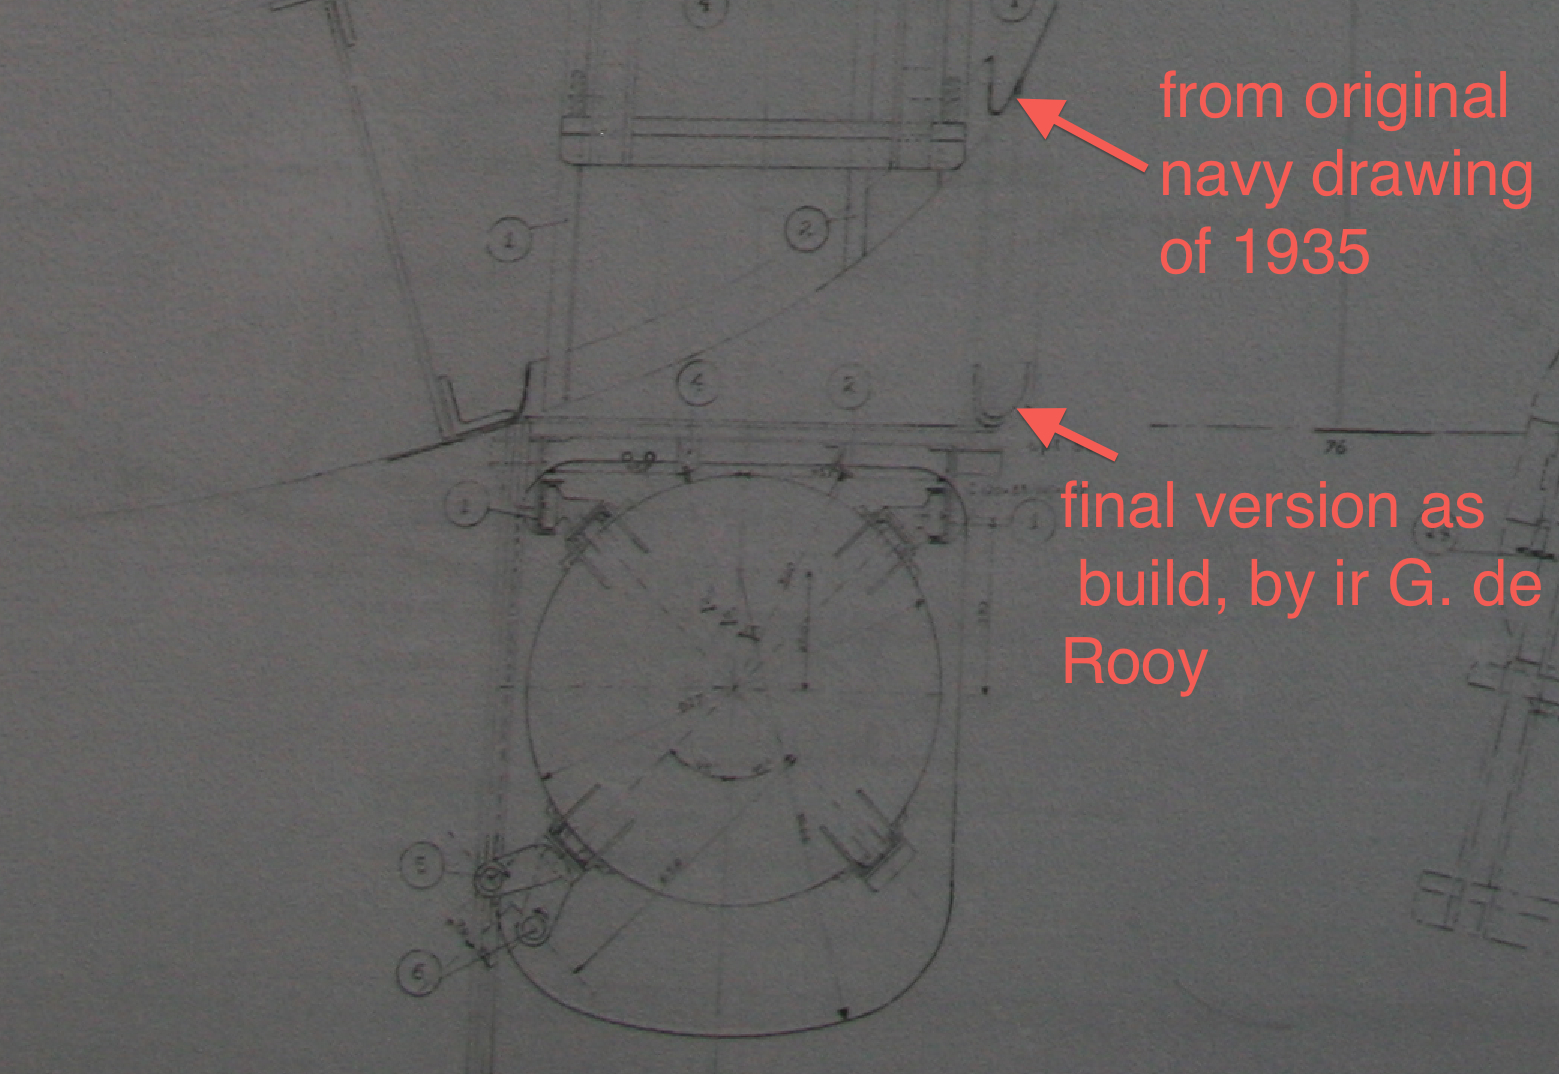
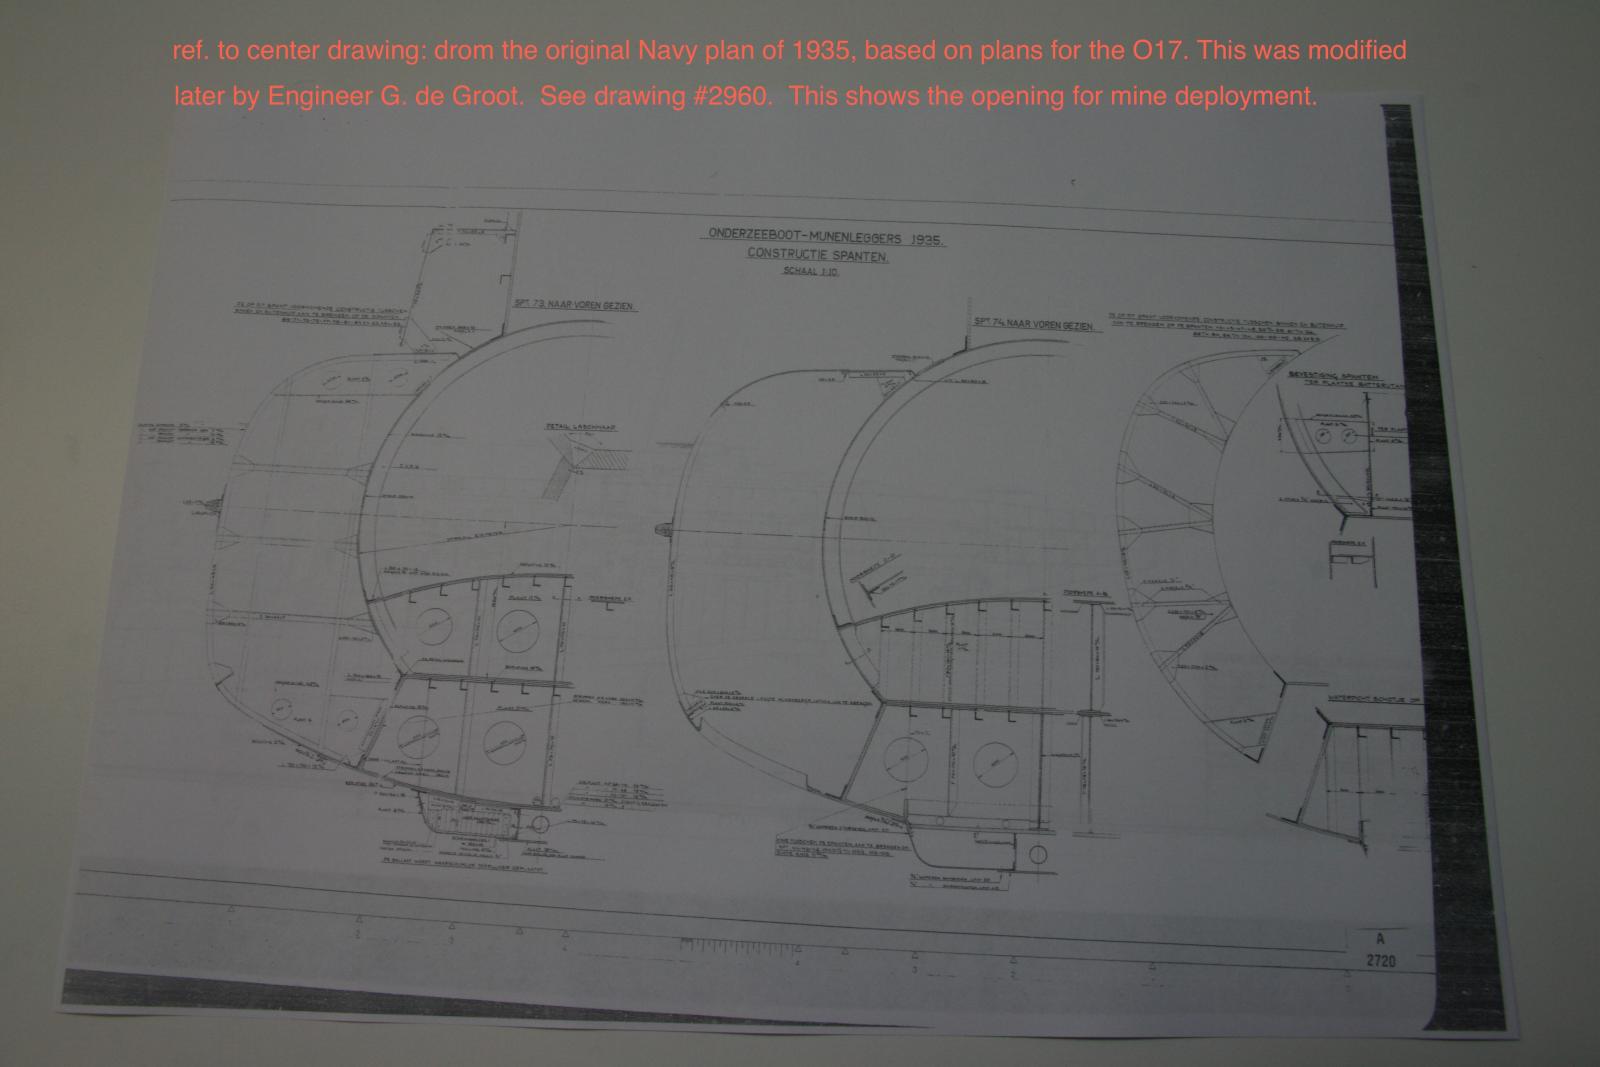
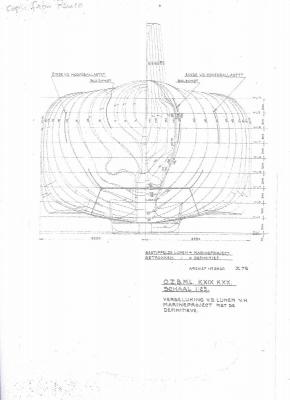
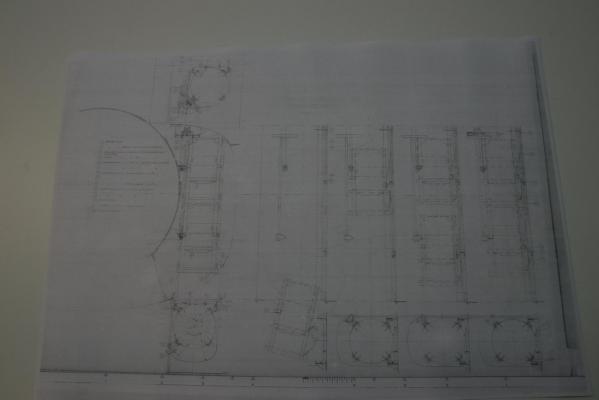
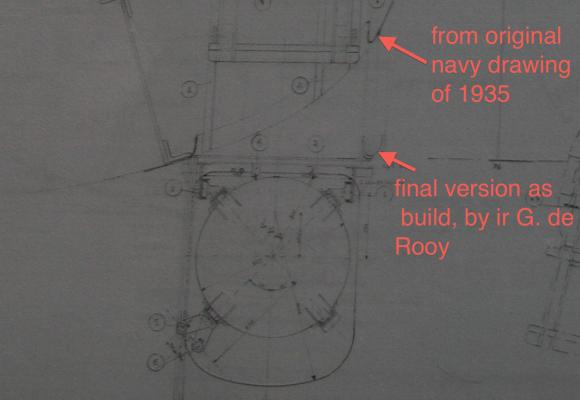
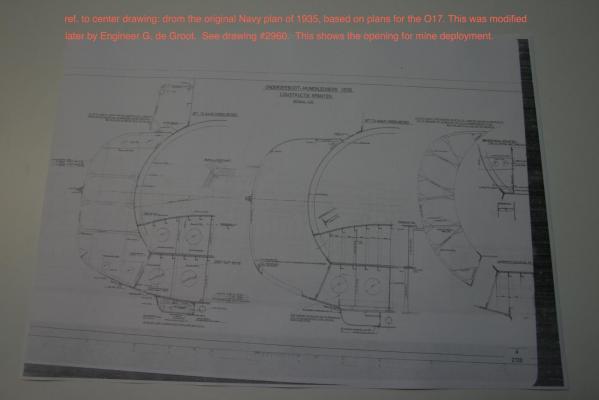
Okay, to show everybody the design details for deploying the mines, I'll add a few copies of drawings for yuns to get a good idea. There are still a few questions I have about the actual design inside the ballast tank but for our purpose that's not an issue. There is a lot of detail on the drawing Remco posted with his comment and I could decipher most of the language, which helped my to get a real good understanding of the design and the mine securing mechanism. Okay, here are a few pics. This is the body plan of the original Navy project for a mine laying sub they designated as the O17. This was in 1934. That's 80 years ago - - - and the year I was born! This is the revised body plan by Engineer G. de Rooy. This is what was used to build the K XIX, later renamed to O19. This is the same copy Remco showed. It's rather small and I had this drawing blown up and printed out by a local printshop. There is a lot of detail on these pics that makes it very clear how it was done. You can also see that it was from the original Navy plan but on the bottom on the left drawing you can see the redesign by de Rooy. I have enlarged that portion and is shown below. This is another drawing showing the bottom of the ballast tank / mine bun area having a hole in it. It also shows the original Navy project before de Rooy's changes were made. Admittedly I have not done any research on how mines were deployed and activated but my guess is that the mine assembly, i.e. the mines with the sinker were dropped as a unit and upon hitting the seafloor the sinker would release the mine which then rises up tethered to a cable. Doing it as Mark mentioned would not work for submerged deployment of the mines, it would be like instant death to the sub. Cheers,

-
Wow, I'm overwhelmed with the responses and all those who visited and "liked" my progress, thank you all. @ Joe JPZ65: Thank you very much for your kind words, and Yes, I like to believe that my dad would be rather pleased with my efforts and hopefully not much criticism I also like to see the finished product But it's coming closer. @ John (Lad) : Thanks for visiting John. Yes, sometimes a little paint may seem that giant steps have been taken but still a lot of works is ahead. @ Michael: Thanks also for dropping in, and yes, the red and green really make her rather unique. I also like it. @ Boris: Hello Boris and thank you as well for your kind words and I can't wait for yours! @ Mark: Thank you Mark for your compliments! Well, I have to admit of being a dummy or domkop for not going to my drawings. They are right behind me and as soon as I saw Remco's post I slapped my forehead And also Gino's comment, it makes absolute common sense that the mines had to be deployed from the bottom. More about this most likely in a follow-up post with pics. @ Remco: Thank you my friend in adding that drawing. Like I mentioned to Mark, I'm so forgetful lately and feel stupid in not remembering that I have these drawings you got for me from the Navy Archive. I looked at them closely and yes, there are openings in bottom part of the ballast tank / mine bun area. I also see doors at the bottom and the mine securing mechanism. btw, that drawing was the original Navy version dated 1934 for the O17. This was later modified by ir G. de Rooy as the final design and build as such. Looking at the two versions de Rooy's design makes a lot of sense. @ Daniel: Thank you for visiting and thanks for your kind words. Well, that blue bucket was handy for taking pictures, I really have to find something more suitable I used RustOleum spray cans, the old rattle cans The area to be painted es just too much for my little airbrush and too small for my high capacity industrial spray guns. No, I am not considering the actual build dock or slipway. Reason is two-fold, 1. when the boat was launched she was not completed that was done later. So, my model will be as she was when completed and on her way to the DEI (Dutch East Indies) when my father served on her. 2. A moot point but yes, too much work. Yes, she's coming closer to completion but there is a lot more work to be done yet. Hatches, torpedo loading gantries, the dingy and rigging and not to forget, the deck-launch torpedo assembly. @ Popeye: I hope you didn't hurt yourself with dropping your jaw to the floor Thank you very much for your compliments! @ Gino: Thank you my friend for your accolades, appreciate it very much. Yes, as I mentioned above, I was being dumb in not remembering those drawings Remco send me. I also remembered that I was not planning on making the bottom drop-down doors. That would have been really the cat's meow but also a lot more work. The original plan was to just build the O19 too look as close as possible from the outside by using the model drawings for the O21 and guessing the shape of the mine bun area. Then Remco sweet talked the archive folks in getting inside a making copies of the lines drawings. Then it just evolved from there. He also got me some more drawings as I went along to get more details. However, the basic hull was already build when I decided to add more of the details, which actually made the build more difficult and challenging. If I had to do it over again I certainly would do things different with the express purpose of a lot of detail that i am now not doing. As it is right now I have already far exceeded my original goal and am very satisfied with the result. The lettering I am looking for are the load draft numbers, Remco made me the bow numbers too. Cheers to all,
-
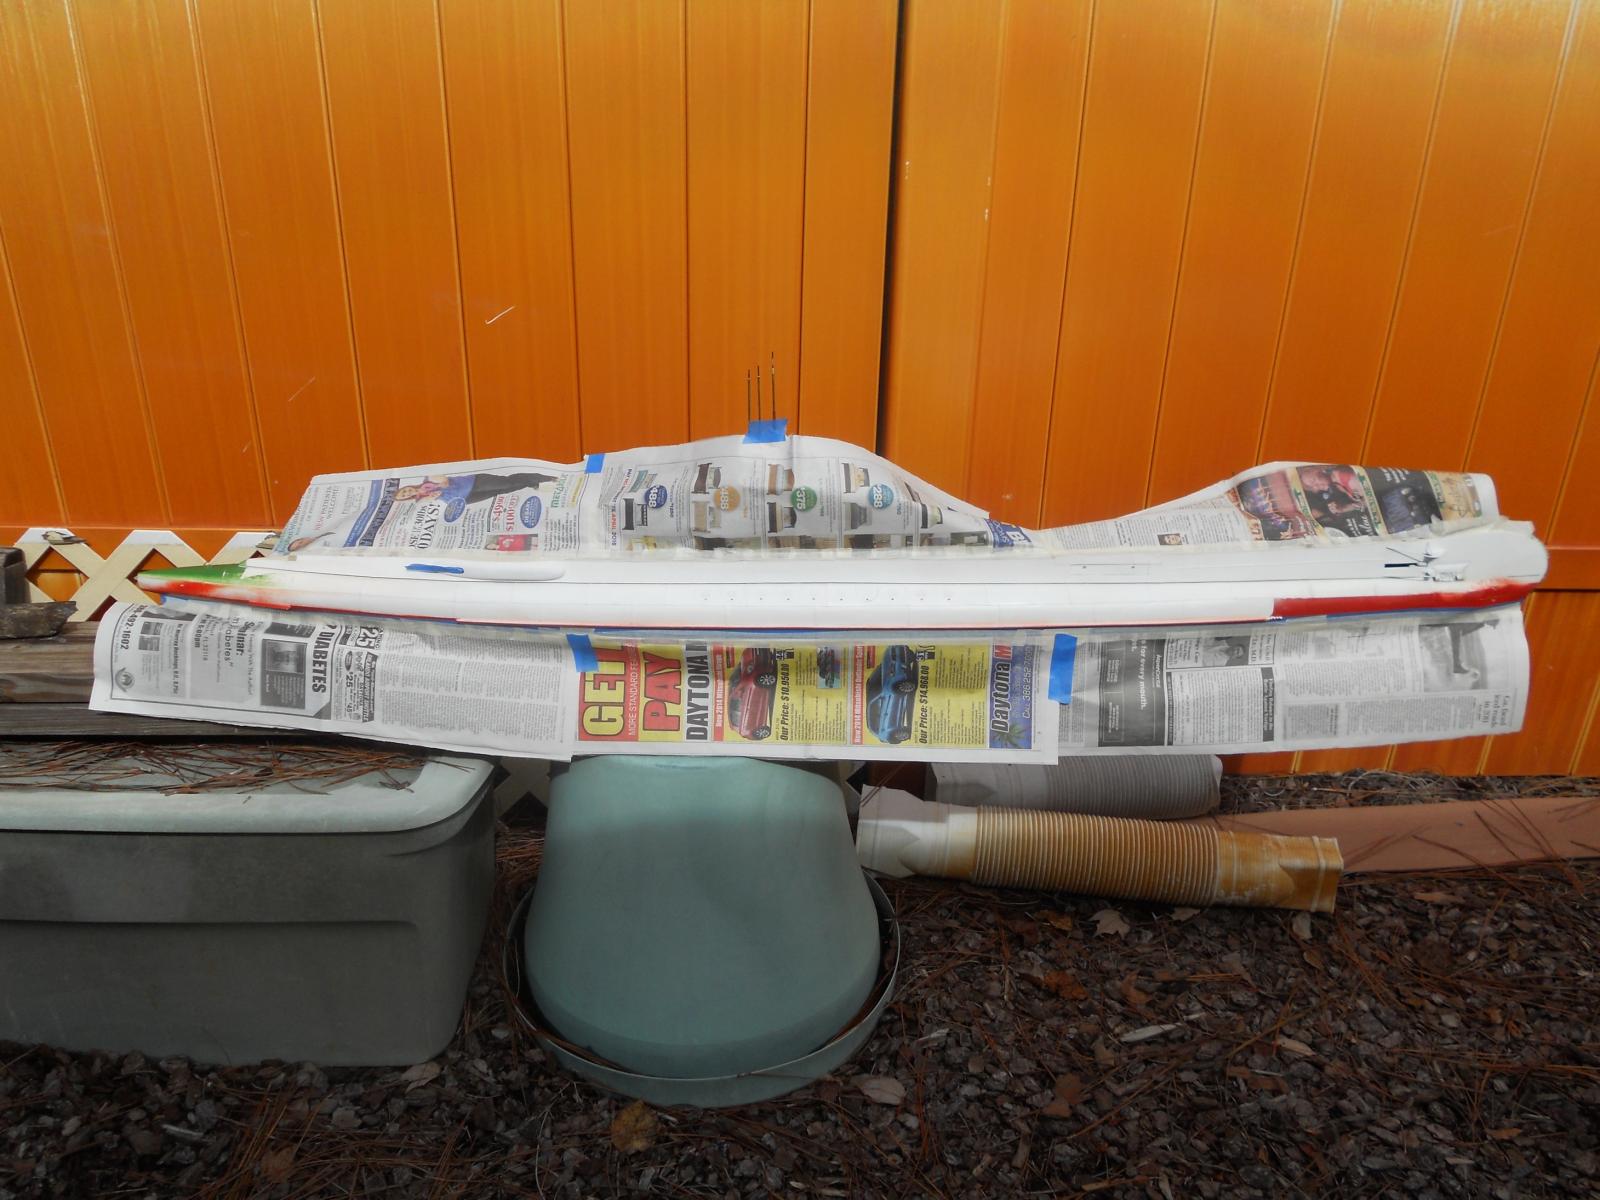
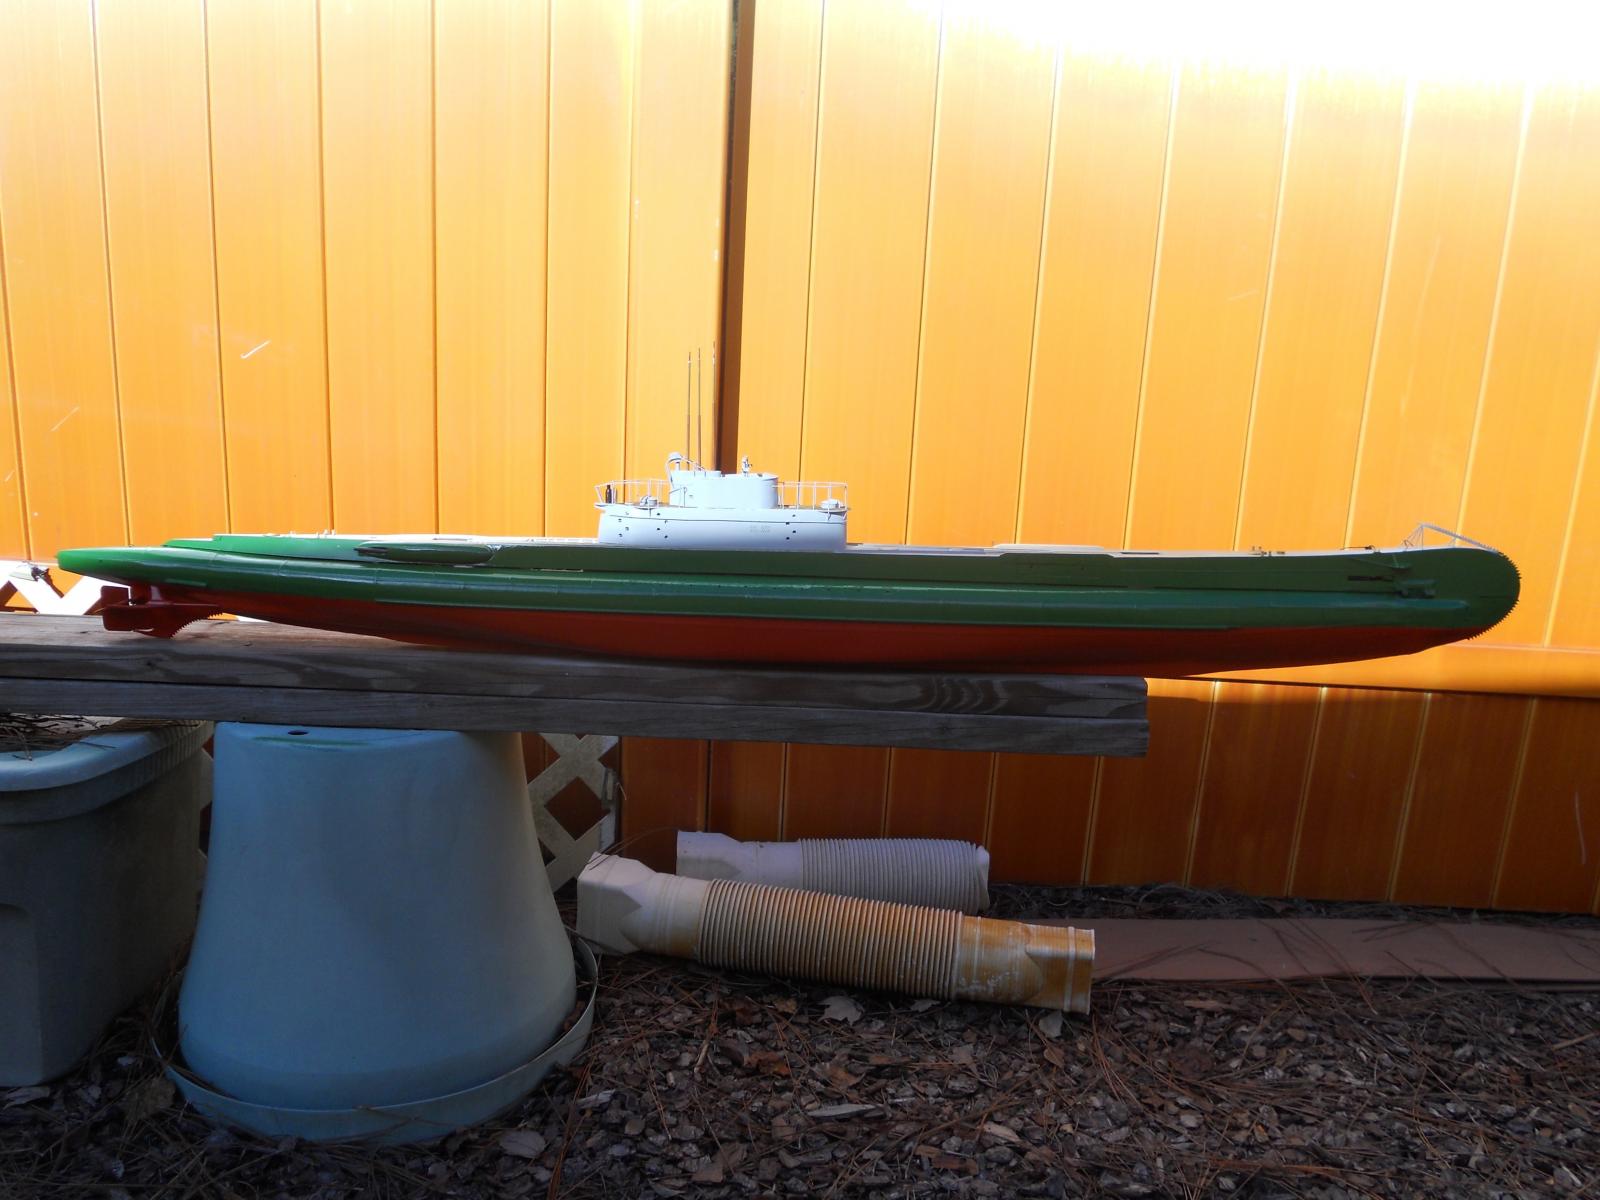
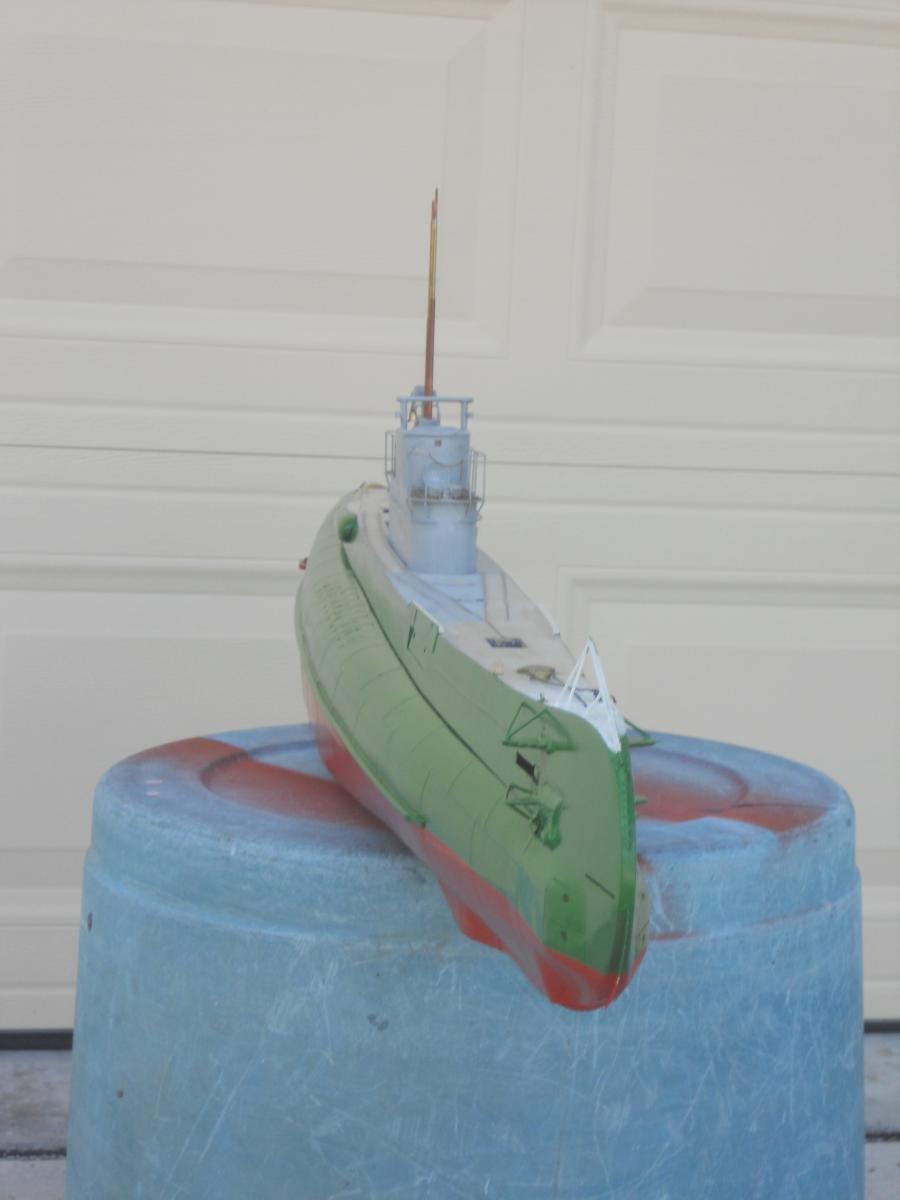
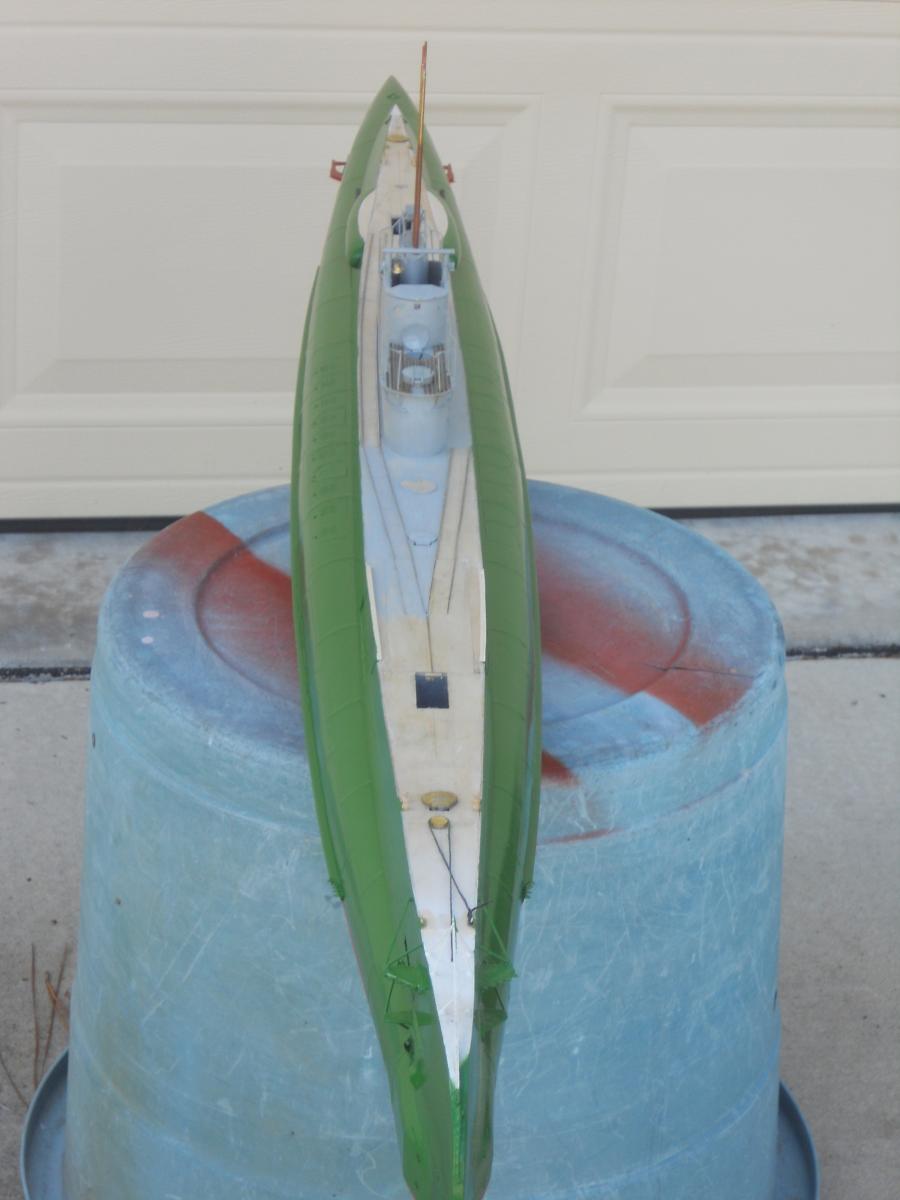
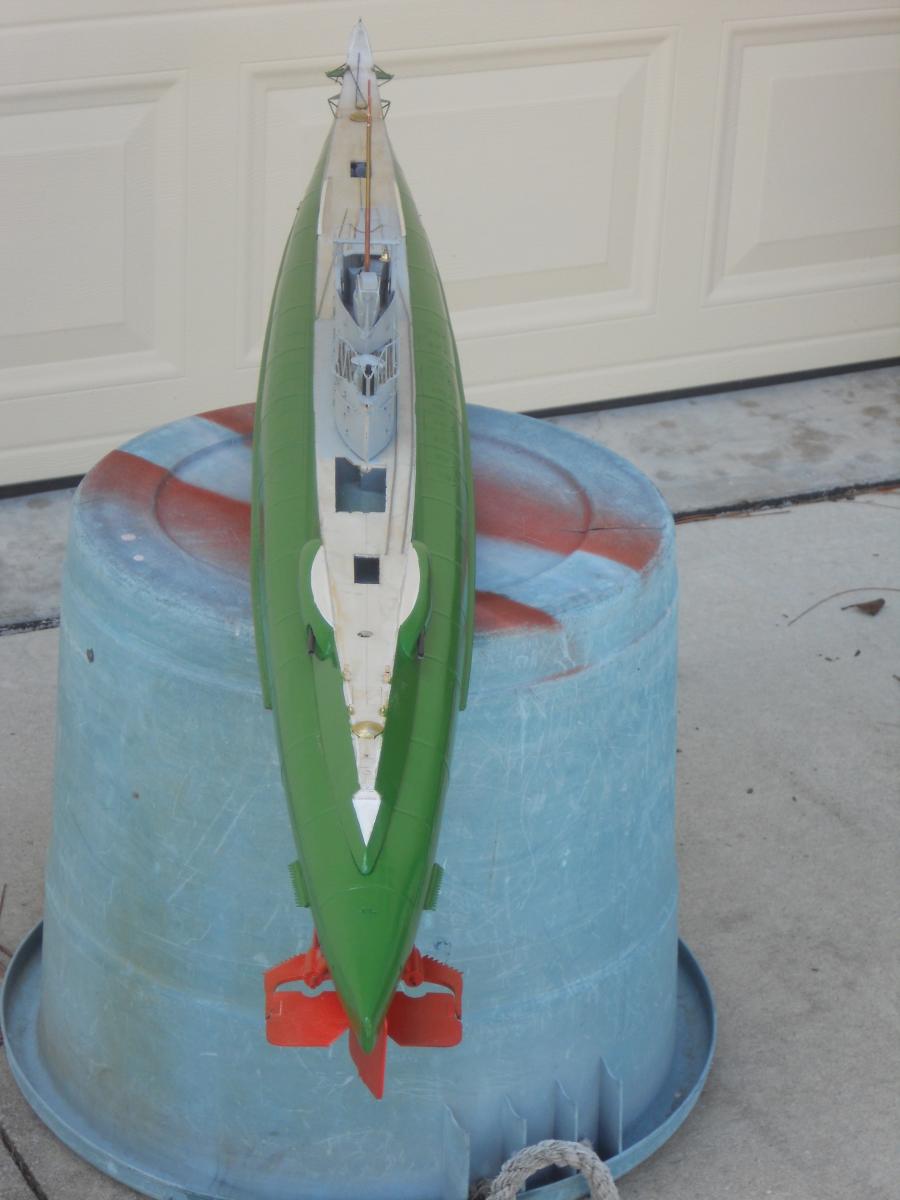
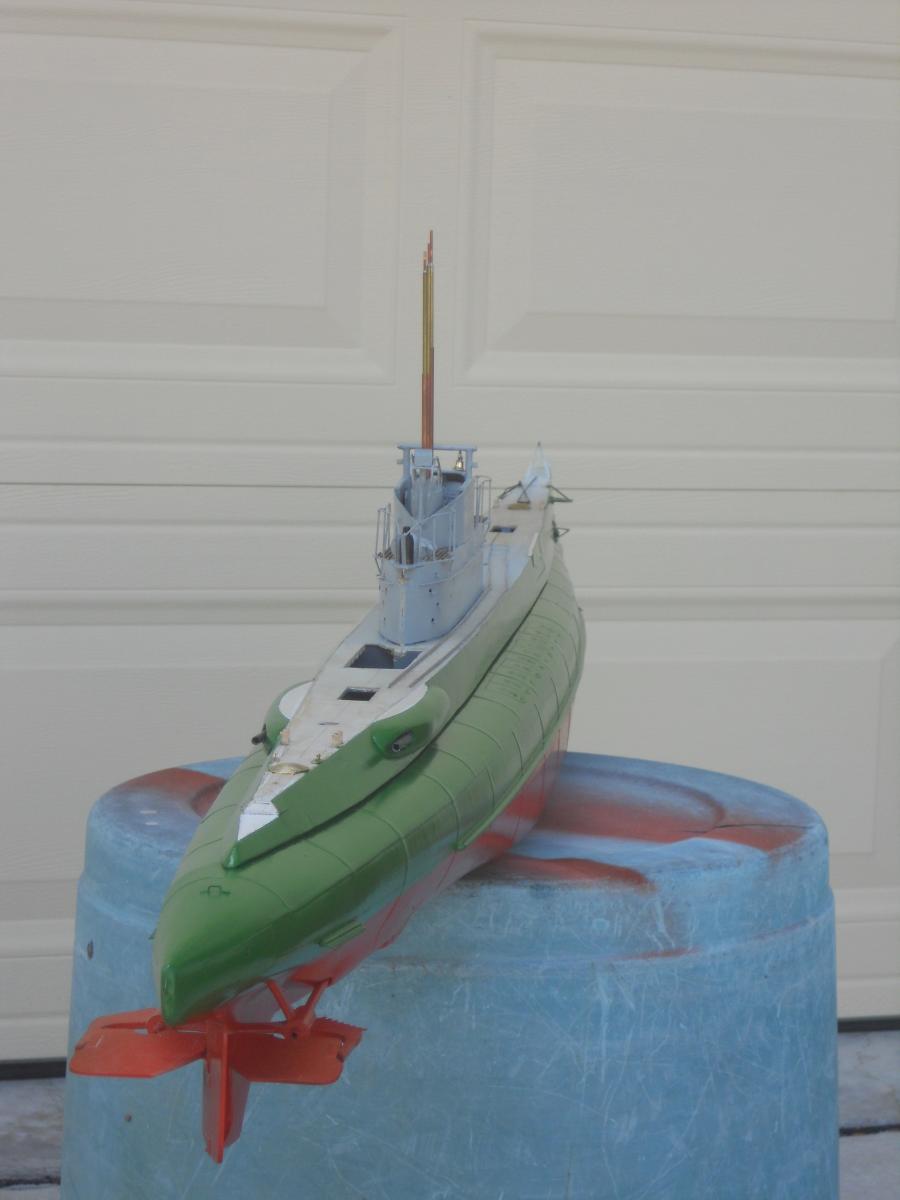
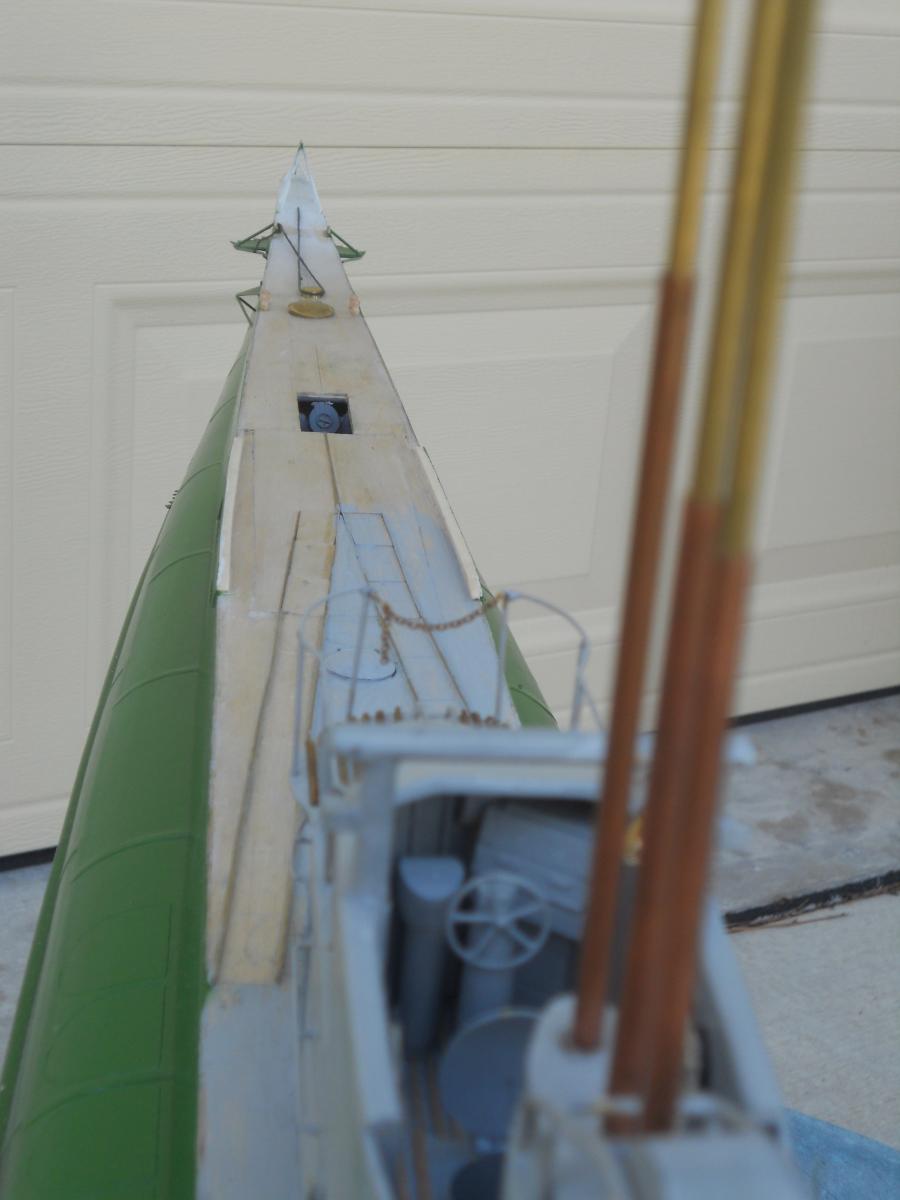
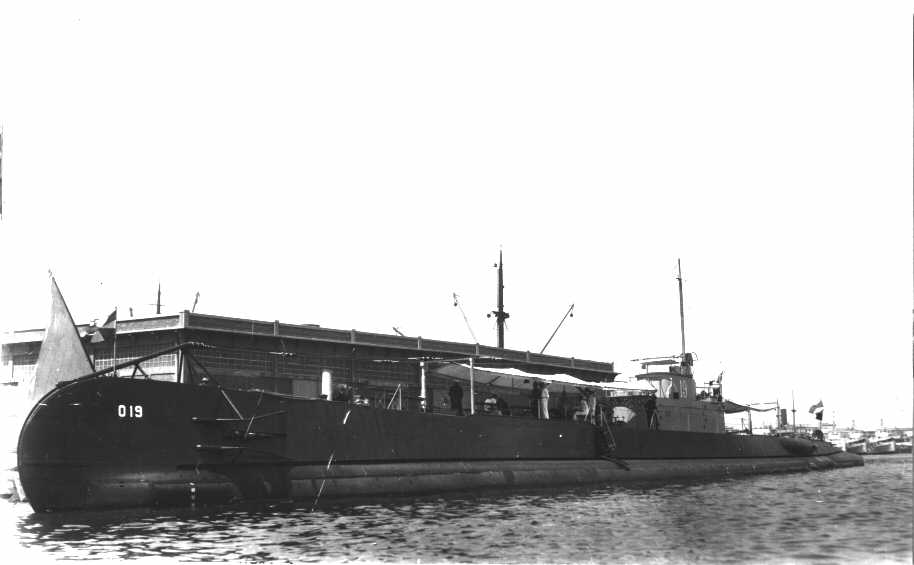
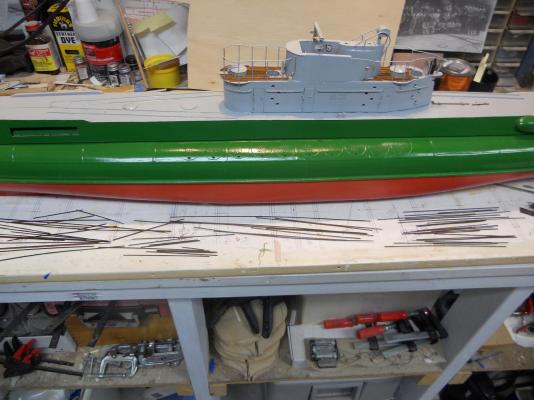
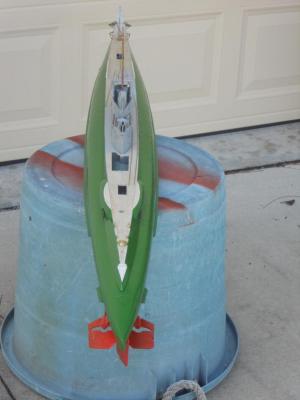
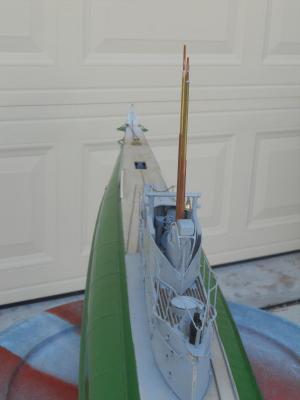
First of all, thanks to everyone for visiting and clicking on "like." Today I cemented the torpedo loading dolly tracks to the starboard side of the deck going aft. I used N scale flex track for the rails. I think I mentioned in a previous post some time ago that the actual tracks were U channels where the wheels for the dolly fitted inside the U. This was to prevent the dolly from tipping when hoisting the torpedoes from the dock. In any case, these'll have to do - - - I won't be making the dolly anyhow - - - he says with a straight face With the tracks now cemented on I can paint the deck grey in preparation for the wooden deck slats. But before I can do that I needed to paint the starboard side green above waterline 7, the demarkation between red and green. Sooooh, I took the boat outside and masked her off and wiped the white primer with some enamel thinner and then proceeded with the painting. I first sprayed few light coats on till tacky and then a fuller coat. Let this get tacky and repeated that three times. I then removed all the masking and brought the boat back inside and on the build dock to let the paint cure where no dirt could settle on the still soft paint. This was all done before lunch. After lunch I rotated the build dock so i could drill the gezillion holes in the port side mine bun lids. That in itself was a tedious and exacting job but it seems to look okay. Now I have to repaint that area, which is no problem, just masking out at the skin plate seams and the wale. That'll we do tomorrow. Okay, I have made a few shots from different angles, yuns are probably sick and tiered seeing the same profile pics Starboard side masked, ready for paint. All masking is removed showing the freshly painted starboard side. I took the model to the front of the garage and set het on a plastic container for a few shots. I'm thinking of a painting of her and am looking for ideas. Here I am approaching in my P-38 for a buzz job As the lookout may see the bow plowing through the seas Cheers,


-
Hello Mark and thanks for dropping by and your kind words. Hmmm, dropping mines, very good question. Not having the drawings of the hull and ballast tanks I'm going out on a limb and guess that they were deployed from the bottom. At least that's what my common sense engineering mind would think. When we consider possible rough seas when on the surface that would make it a rather hairy operation. It would also allow the mines being deployed while submerged. I would say, no compressed air but just good old gravity. On the other hand there are tracks on the starboard side for the torpedo loading dolly and that thing had a hoist arrangement on it. But that leaves the question, what about the port side, no rails there? My short answer is, I really don't know for sure right now. Perhaps Gino can shed some light on this. Hoi Sjors, good to hear from you! Well, not only mines but 5 inch shells, 40 mm AA shells and 21 inch torpedoes. She was a lady that could and did bite. No "cottoning" with her my friend You can have your cotton cannon balls, rather dainty, eh what? Hi Popeye, thanks for dropping in and your kind words. Yeah, I always wonder about some of the builds that never show a boo boo and a pile of discards. The ultimate discard was with Mark Taylor, took a lot of guts. If I can only concentrate and pay attention more often then my rate of boo boos will go down Glad no one can hear me when I screw up, it's then "oh shoot" and I can't spell worth a hoot either Talking about paint - - - check the next post Cheers,
-
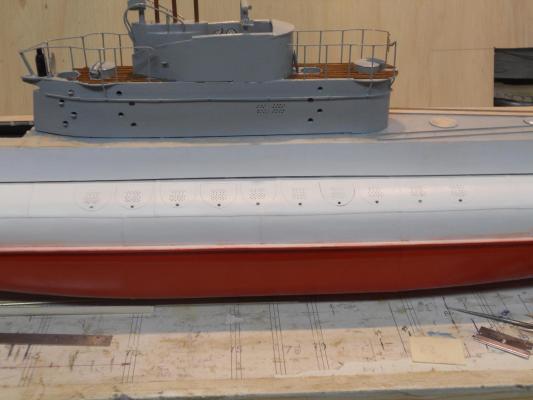
Hello everyone and thanks for visiting. Today was more of a prep day to paint the starboard side but I needed first to drill the small holes in each lid. I laid out the pattern on each lid and then pricked dimples in the right places with a sharp awl. This made the drilling easier, not slipping all over the place. I also made a "fixture" of sorts to do the port side, I forgot that before I painted that side. Domkop me I guess it'll be ready for the green tomorrow if the weather is warm enough. I also put another coat of red on the bottom andI need to wait for the primer coat and the red to cure before I can mask and paint it. As soon as the green paint is cured I can mask the sides so I can paint the deck but first I need to cement the torp loading dolly tracks to the aft deck though. Here is a shot as it currently is with the new lid in primer. Cheers,
-
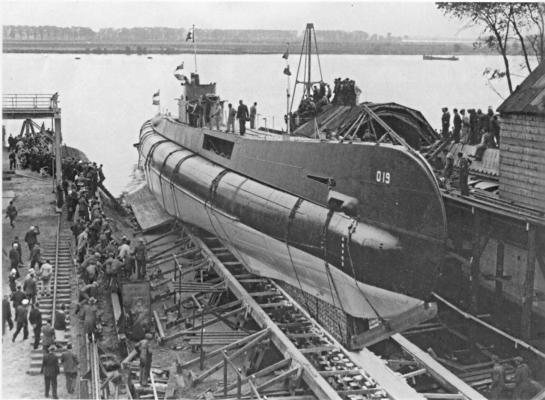
Thanks bob, on the new lid. I think too, it's a keeper. I'll use the ones Remco made, they are superb and hoping that I don't screw it up. Here are two pics with part of the draft hummers. You can see how hard it is to read because of the resolution. I think there is a software program that fills in the missing pixles, not sure though. My father is on the boat during the launch. Cheers,

-
Thanks to everyone who have visited and clicked on "like." It's really very encouraging. I spend most part of the day making a new lid and playing with building a mock-up for the hinges. The lid is finished and temporarily put on the bun hole. Now I need to finish the mock-up and figure out how to make the hinges. Looks like a bowed bracket may do the trick. I may leave this for a while and do some main deck work like cementing the torpedo loading trolley tracks and paint the deck. In the meantime I'll do some thinking on the hinges. Well, here is the new and third lid. The fit is passable, I may fiddle some more with it and I could even paint the starboard side of the hull As you can see the braces are now much better and so are the little holes. I think I'll keep this one Cheers,
-
Hello John, Thanks for your kind words but that screwed-up lid is certainly not first class. However, I have made a new one that is much better. I pictured my dad standing there, shaking his head and muttering under his breath, domkop Hi Popeye, thanks for stopping by and your compliments. A little difference doesn't fly with me, it was a terrible looking lid but thought to show it anyway. Some folks may want to conceal their mistakes but we can't learn from that. Pic below of the new lid Hi Freek, thanks for liking it and yes, I know of course that the Heineken didn't last long with all those thirsty sailors And they were not stored outside the pressure hull either, it was meant as a joke On the color scheme, your are correct, except for the builder's model we still have a photo of and I try to match that as close as I can. From what I have heard and read she was painted grey during her war time patrols. Hello Bob, nice to see you back again, welcome. No, I have no graphics or CAD programs and not planning on buying any, at least not for the foreseeable future. But what a generous offer, thanks - - - however, Remco already made me the decals for the con and the bow. So I'm all set except for the draft numbers. We don't know what the numbers are and what size. They are also white, which is a difficult color to make for decals I understand. I cannot make them out and neither can Remco with his superman vision. Those are the only things on this build that is wanting. I have not yet contacted anyone in the Netherlands on the different Navy forums but plan to do so. I don't expect much help though. Cheers,
-
ROYAL CAROLINE 1749 by Doris - 1:40 - CARD
Piet replied to DORIS's topic in - Build logs for subjects built 1501 - 1750
Hello Doris, Thank you very much for the tutorial video, it's much appreciated. Let's see - - - about 10 minutes for each - - - I have to make a gezillion for my VOC ship - - - hmmm, that'll keep me occupied into my next life Fortunately, there are are no belayingpins on the submarine Your spiral staircase looks wonderful! Cheers,- 883 replies
-
- 1
-

-
- royal caroline
- ship of the line
- (and 1 more)
-
Hoi Freek, looks like that'll work just nicely for you. Yes, they are called lap joints and for strength there should be at least two rows of rivets in staggered pattern. She's really coming along great, nice project. Cheers,
-
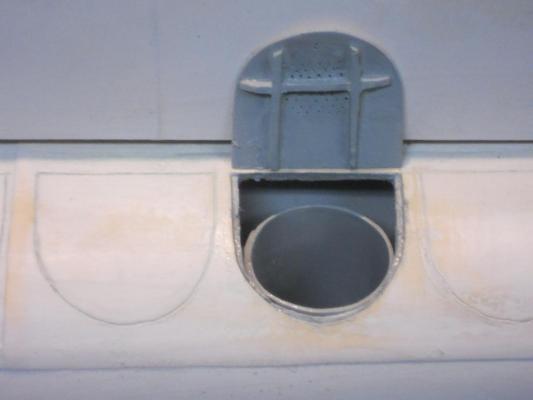
Let me first thank everyone for visiting and hitting the like button. Today I un-clamped the styrene bun and checked it over. It looks acceptable after I cleaned it up and trimmed it down to fit inside the ballast tank area. It just fits with no room to spare, just what the doctor ordered, I'm happy. I needed to glue a thin piece of wood to the bulkhead and to a longitudinal stringer on the side to give the bun something to cement to. Next I glued the small braces to the inside of the lid cover with CA, trimmed it and fitted it. It fits like a glove and looks really good - - - but - - - - - - upon closer scrutiny I didn't put the braces in the correct location. Instead of de-glueing them I decided to remake the lid, which is already done. Next will be new braces and cementing them on making sure this time to do it correct. In the meantime I also painted the inside of the ballast tank and the bun. After the paint had dried I glued the bun into place. It'll be a close fit to load the mines into it. I may still wind up making the lid from brass but for right now I'll keep trying with wood. It is now more of a challenge to me then anything else This thing is not going to get the best of me. Okay, here are a few pics of today's work. This shows the completed lid loosely laid in place. Looks good, right? But - - - the outside looks are deceiving. Wait till you see the inside but ashamed as I am I'll show it to yuns anyway The styrene bun still needing cleaning and trimming. This shows the bun cemented in place and everything painted. Now take a close look at the underside of the lid. What do you see? kinda clear to me that I royally screwed up and need to remake this lid. This makes you look straight down the bun to the bottom of the ballast tank and you can see how close a fit it'll be for the mines. Cheers,

-
Hello Jud and thank you for dropping in and thanks for your compliments and the suggestion. Yes, that's the normal way I attach the hinge material when making wooden doors. I'm always very leery in cementing brass to wood, it has a tendency of coming loose. Using brass for the inside braces may not work too well because there is very little material to cement the brass to the wood, 0.7 mm thickness of the brass. I'm thinking of another way, also using brass but thinner yet as the base for the hinge part on the lid. The hinges have to be a little more outboard from the two center braces because the bun is in the way. I'll need to put my engineering hat back on and make a test piece. Yes, sometimes things just don't go as we want them and spending so much time on building a model my father would approve of doesn't allow me to just slough things off. There is no harm done in remaking something both he and I can be proud of. What is a few more minutes between friends, eh what? I'm pleased you like my build, drop by any time, the coffee is always up and hot, with cookies too Cheers,
-
Nice planking job Sjors! Like the color and the treenails really make it. Cheers,
- 1,616 replies
-
- 1
-
-
- caldercraft
- agamemnon
- (and 1 more)
-
My dear friend Remco, do you know what you are doing to me You are pushing the envelope for me - - - brass mine bun lids - - indeed Now, that would be the easy way out, at least for me and if this wooden thingy is not working out I may just go that route. It seems a shame to make it from brass because it'll be painted anyhow. But then again, it aint over till it's over - - - or after the fat lady sings. As it is I had to remove one ply from the plywood so it would cooperate with me in making the bend. I now have a piece of bywood This morning I cemented the little braces to the lid cover but then had to go to the dentist for my FINAL visit on the restoration project - - - hip, hip, hurray I'll be going to the shipyard right now and clean that little sucker up and dry-ft it. If it doesn't look good I may just go for the brass. It really would solve my hinge concern too - - - hmmmmm - - - thanks for the hint though You know, when I was puts'n with the inside of the ballast tank yesterday I had this fleeting but sickening thought popping into my mind - - - why not do the one next to it as well. Well, like I said, it was a fleeting though. No, I'll leave it with on. You all know what happens when you do two, from there it's three then ten, then - - - you want to see me totally nuts and berserk and run into the sunset to Beserkistan - - - never to be seen again???? Doomed to a life making brass thingies The styrene bun is also made and dry fitted, seems okay. I also figured out how to cement that one in place. I hope to have a few pics this evening. Oooh - - what tangled webs we weave but thanks for the hint Remco Cheers,