HOLIDAY DONATION DRIVE - SUPPORT MSW - DO YOUR PART TO KEEP THIS GREAT FORUM GOING! (Only 68 donations so far out of 49,000 members - Can we at least get 100? C'mon guys!)
×


Piet
-
Posts
3,568 -
Joined
-
Last visited
Content Type
Profiles
Forums
Gallery
Events
Everything posted by Piet
-
 Thanks to the many who came to visit and your appreciation of my work by clicking the like button. Hell David B, welcome to my shipyard and thanks for your compliment. Oh, I understand in missing builds, there are so many fantastic build on this forum that we can spend hours and days just reading and learning. I am happy you found my build and hope you'll be a frequent guest. Hi Pete, thanks for the compliment, appreciate it very much. Doing metal work???? Hmmm, reminds me of the story about a lady who asked Zubin Mehta how her daughter could come to play at Carnegy Hall. Zuba responded with, Practice madam, practice I guess that after having worked with metals for over 60 years and studied metallurgy, eventually one can luck out sometimes Cheers,
 -
WOW Pete, another sweet looking boat! Cheers,
-
Hey Robert, thanks for dropping in and your compliments and suggestion. Yes, that subject was brought up some time ago, about the small bolts and nuts. I did visit several websites that sell small hardware but couldn't find the sizes I needed. At a scale of 1:50 one would think there shouldn't be a problem but when we are talking about hex heads of 0.2 or 0.3 mm then it becomes difficult. The shanks of the bolts are like a human hair, as a figure of speech. Besides, I am determined to make everything myself as much as my tooling and ability allows. I'm retired and nowhere else to go but have fun to tackle a challenge. I can also buy preprinted cotton flags in my size but this too is something I'll make myself. Not only for the challenge but the Dutch flag and Navy Ensign are very special to me. My own hands have to make them, not someone in China or Mexico. No offence to anyone here. This model is special to me, I hope you understand why I am so dead set on making everything myself. Please come and visit again the challenges seem to escalate Cheers,
-
This morning I had to go to the Urology Center for my second BCG treatment after got home I felt great and like doing some more work on the torpedo launcher. Remember that yesterday I had trouble soldering the door actuator slide shoe bracket to the tubes? No matter how I tried it just wouldn't stick. so I gave up and went inside to drown my frustration in a glass of red wine, which is, btw, good against cancer. So, I wanted to give it another shot. Thinking on it last night I figured I was holding these small gizmos all wrong so I tried another way and lo and behold I could now place these little buggers quine nicely on the tubes. The small Proxxon vice acted as a heat sink on one end and I clipped a small steel office clamp to the front. Fired up the soldering iron that I cranked up to 440 degrees F. Well. I lucked out again and one by one I soldered them to the tubes without a hitch. Done in one hour, including cleaning off some extra solder on the tubes. Now it was time to rush inside and drain my bladder from the BCG crap the nurse pumped into me, bless her little heart Now all yuns are wondering how it came out, I bet Okay, I took a few ics but will only show one though, don't want to spoil all y'all Here it is, I figure y'all can see the brackets and compare it with the original photograph. You can also see a few of the worst rejects. This makes me a happy camper Cheers,
-
Thanks Remco and Jan for looking in and your comments! @ Remco: Easy ????? Do you know how much I struggle here, fabricating a few of the gezillion parts ???? Kidding I guess it's all a matter of perspective, and seriously easy it aint but doable. Experience with working metals may be helpful too. Yep, I have been studying that photograph and it sends shudders up my spine of fear - - - how much of it should I attempt to make or better yet, how many can I make ???? I may have to leave some off and let our imagination fill in the rest @ Jan: Six sided bolts? Oh boy, now that you mentioned six sided I forgot to file the door lever nuts six sided But - fortunately the door hinge pins are not cemented to the doors yet. Yes, indeed, how much can be done and in scale to make it worth the extra effort. There comes a time when it can look overdone and crowded. Once the launcher is pinned inside the boat no one can see the details on top and between the tubes, only when it's removed, which can be done, I have made provisions for that. You and Remco are challenging me and my abilities with the few tools I have at my disposal. But - - - I have never shied away from a doable challenge. Thanks guys for your comments, it's really appreciated!!! And also my thanks to all who visited and clicked the like button, I appreciate your appreciation !! Cheers,
-
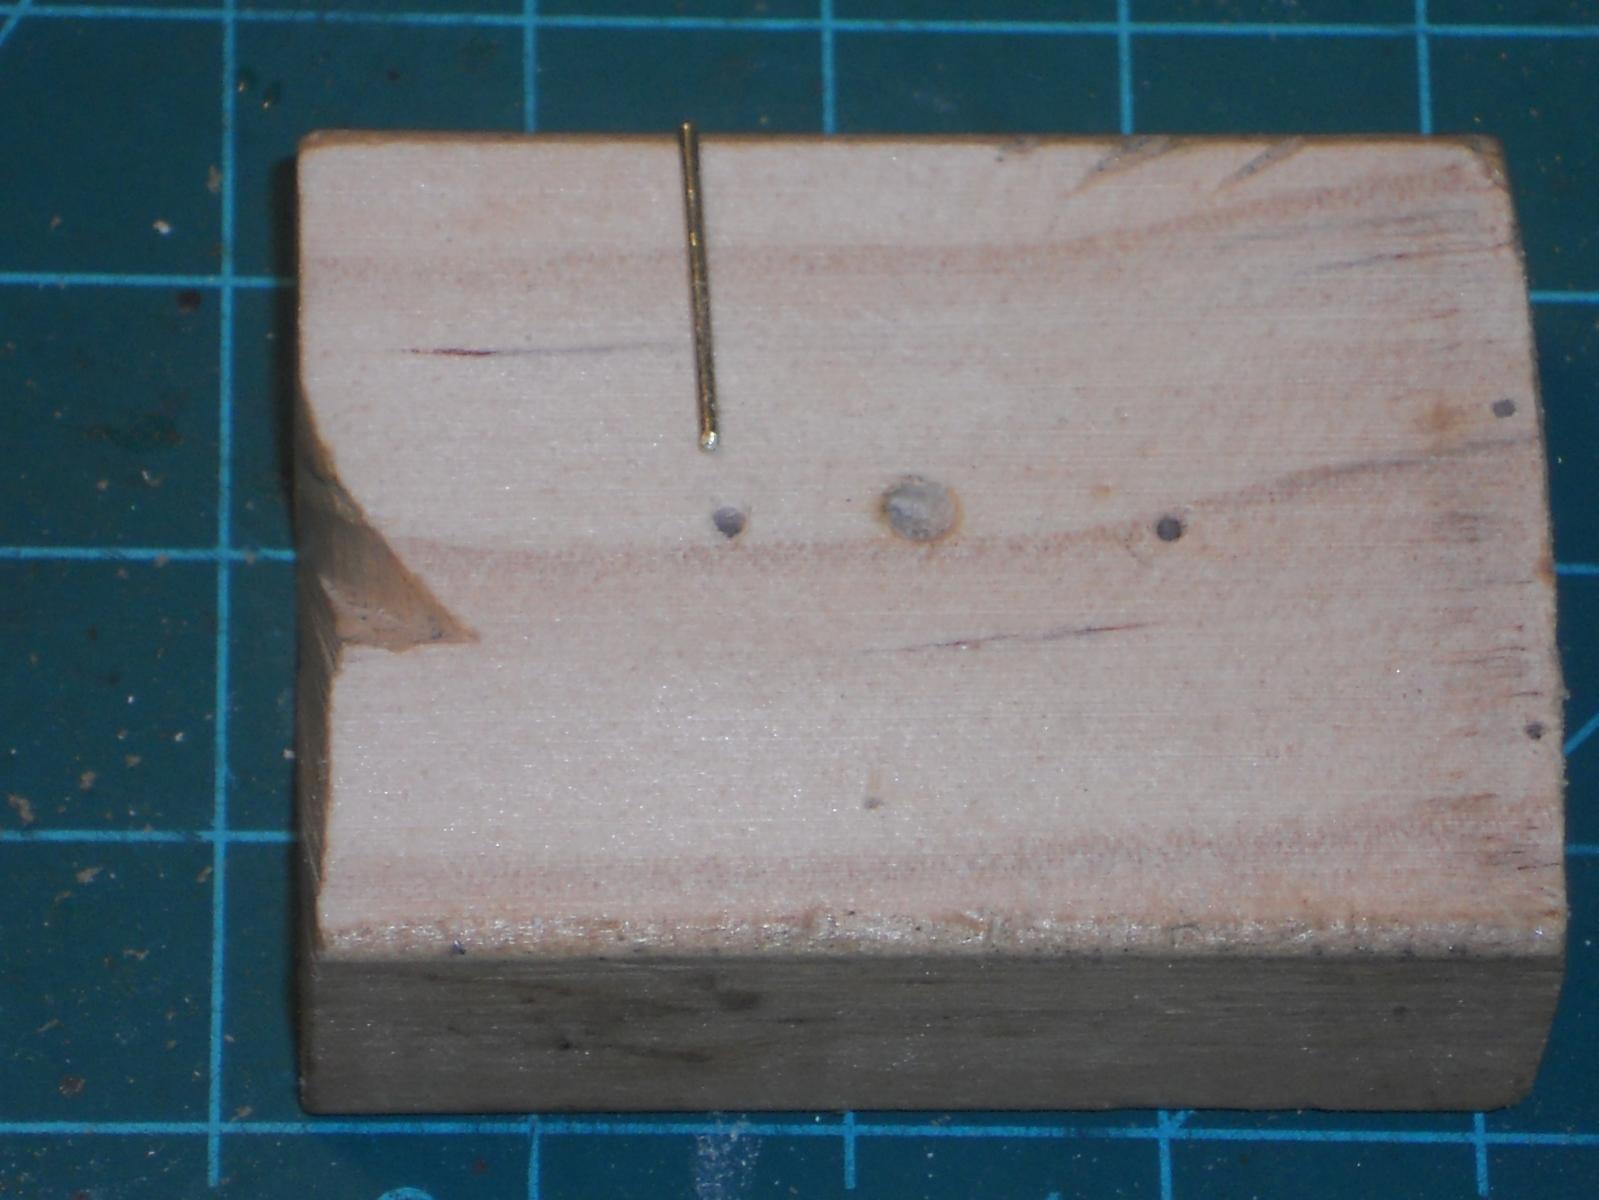
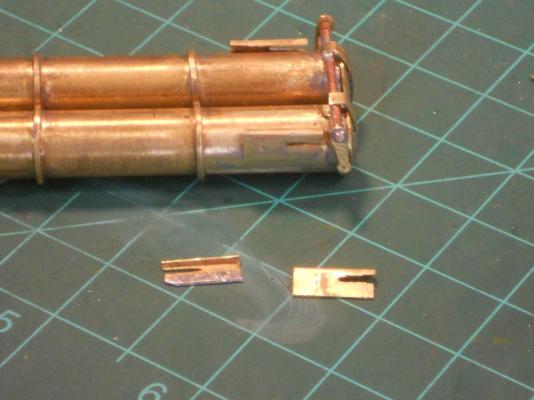
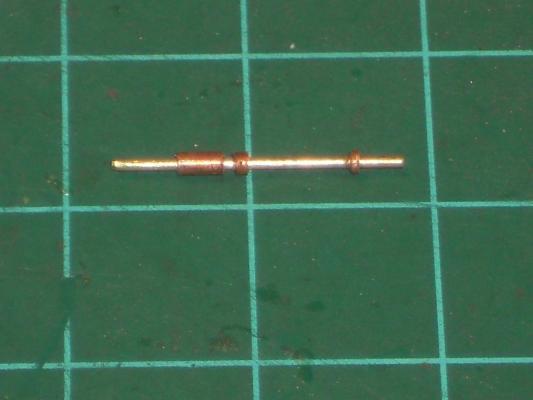
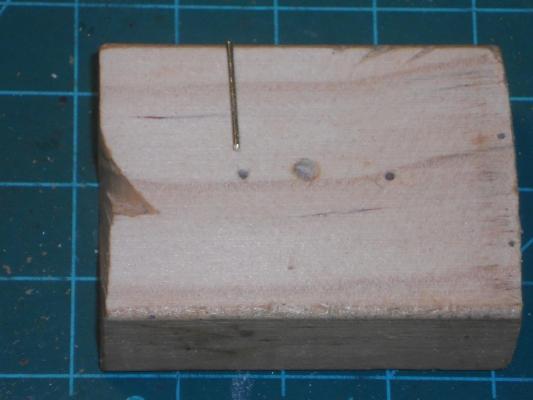
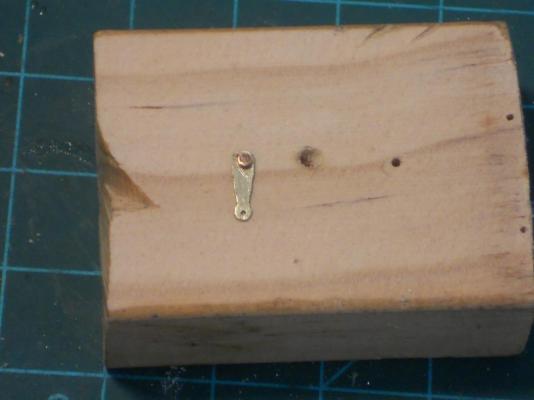
I had a semi productive day today. I say "semi" because I was really struggling with the parts I was making in the afternoon but I'll get to that in a minute. Remember that I lost a door pivot arm yesterday? That was actually a blessing in disguise because the new ones I made this morning came out much better, not perfect yet but better. They still need some more dressing. I added a rounded area around the hole for the actuator shaft. This may or may not be necessary but I like the looks of it I can always file them away if need be. I'm thinking about how to connect the botton of the arm to the actuator shaft. That's one of the reasons why I may not need it. Still pondering on it. Okay, I made two arms, two small parts of a copper tube to act as nuts and two pivot pins to make two complete assemblies to act as the door hinge pin and door actuator. To solder all three parts together I made a crude solder jig from a piece of pine, drilled a hole in it to receive the hinge pin and then place the arm and a piece of copper tube on the pin, acting as a nut. Yesterday I mentioned that that little copper tube is 1 mm, well it's actually 0.5 mm. Soldering this was a breeze. I found out that I had to add a spacer between the arm and the outside pintel bushing. So I made two of them of about 1 mm. This gives me a little space between the arm and the tube flange to accommodate the actuator attaching hardware, which I'm still pondering over. I also drilled holes in the small copper hinge tubes on the doors so that I can eventually either solder or CA cement them to the hinge pins. Okay, time for lunch and looking at my mail. Then off back to the shipyard for the next project while I'm pondering the door actuator issue. I thought of making the door actuator shoe bracket as shown on the original photo and the actuator cylinder. This proved to be a real can of worms. I went though a few bad ones till I had two brackets I was happy with. Next came trying to solder them to the torp tubes and that's where I started to have a struggle. I tinned bot the torp tube and the shoe brackets but being careful not to apply too much heat as not to desolder other parts on the torp tubes. By that time it was 1730 hours and a little irritated and thought it was better to call it quits. There is always another day and in my case perhaps Sunday or Monday. Tomorrow is out because I have to get my second BCGI treatment and that'll throw me for a loop. I have some correspondence to do anyway so I can stay close to the "tinkeltarium." Here are few pics of the torpedo tube door hinge / pivot arm project. This shows how I cut the 0.5 mm pieces from the 1.5 mm copper tube. Just eyeball how much you need or measure, set your razor blade on it and start rolling while holding downward pressure on the razor blade. The 0.6 mm brass rod keeps the small part from flying off. This shows the remade pivot arm with the 0.5 mm copper tube and the 0.6 mm brass rod for the hinge pin. This is my crude solder jig for the hinge pin and actuator arm assemble. I drilled a 0.6 mm hole in the wood to a depth shy of the length of the pin so I could put the arm and the piece of tubing on it and solder it. This shows the pivot arm / door hinge assembly all soldered up. Here I am holding the completed assembly. This shows both pivot arm assemblies installed on the launcher. It'll most likely needs some adjusting on the spacers because I don't want them to stick out too far. I have annotated the manufacturer's drawing to show what I'm working on and struggling with. It's that actuator shoe bracket that's my nemesis. But so help me it will not get the best of me and it will be soldered to the torp tubes. Cheers,

-
Thanks everybody for dropping in and your comments. @ Mark: Yeah, these little parts are a challenge with the usual rejects. Sometimes the thought crosses my mind that I'm going way overboard with too many details. Some appear at first not even doable but when trying them - - - hmmm, it works. Ref the brass monster, there may be brothers of him named wood, copper, cookies, steel - - - In retrospect, loosing the part was a blessing though, the new ones are much better @ Remco: @ Sjors: Thank you, thank, thank you. I actually surprise myself Hmmm, lessons? The ratline king wants lessons????? Can be arranged, you pay for travel costs and of course room and board at your place, then the lessons are free Mmmmbwahahaha. @ Pete: Thank you Pete. @ Popeye: Yep, I thought about that sheet business but rejected it. Fortunately I don't have too many dropped and missing parts. Thanks for your compliments my friend. @ Dave: Yeah, but the ironic part is that I wear 3X magnifiers only when working on the model. When hunting for lost parts I take them off. Go figure. Thanks to everyone who visited and liked my work. Cheers,
-
Congrats Pete, she looks very sweet, nice job. Cheers,
- 142 replies
-
- 1
-

-
- buzzards bay
- herreshoff
- (and 1 more)
-
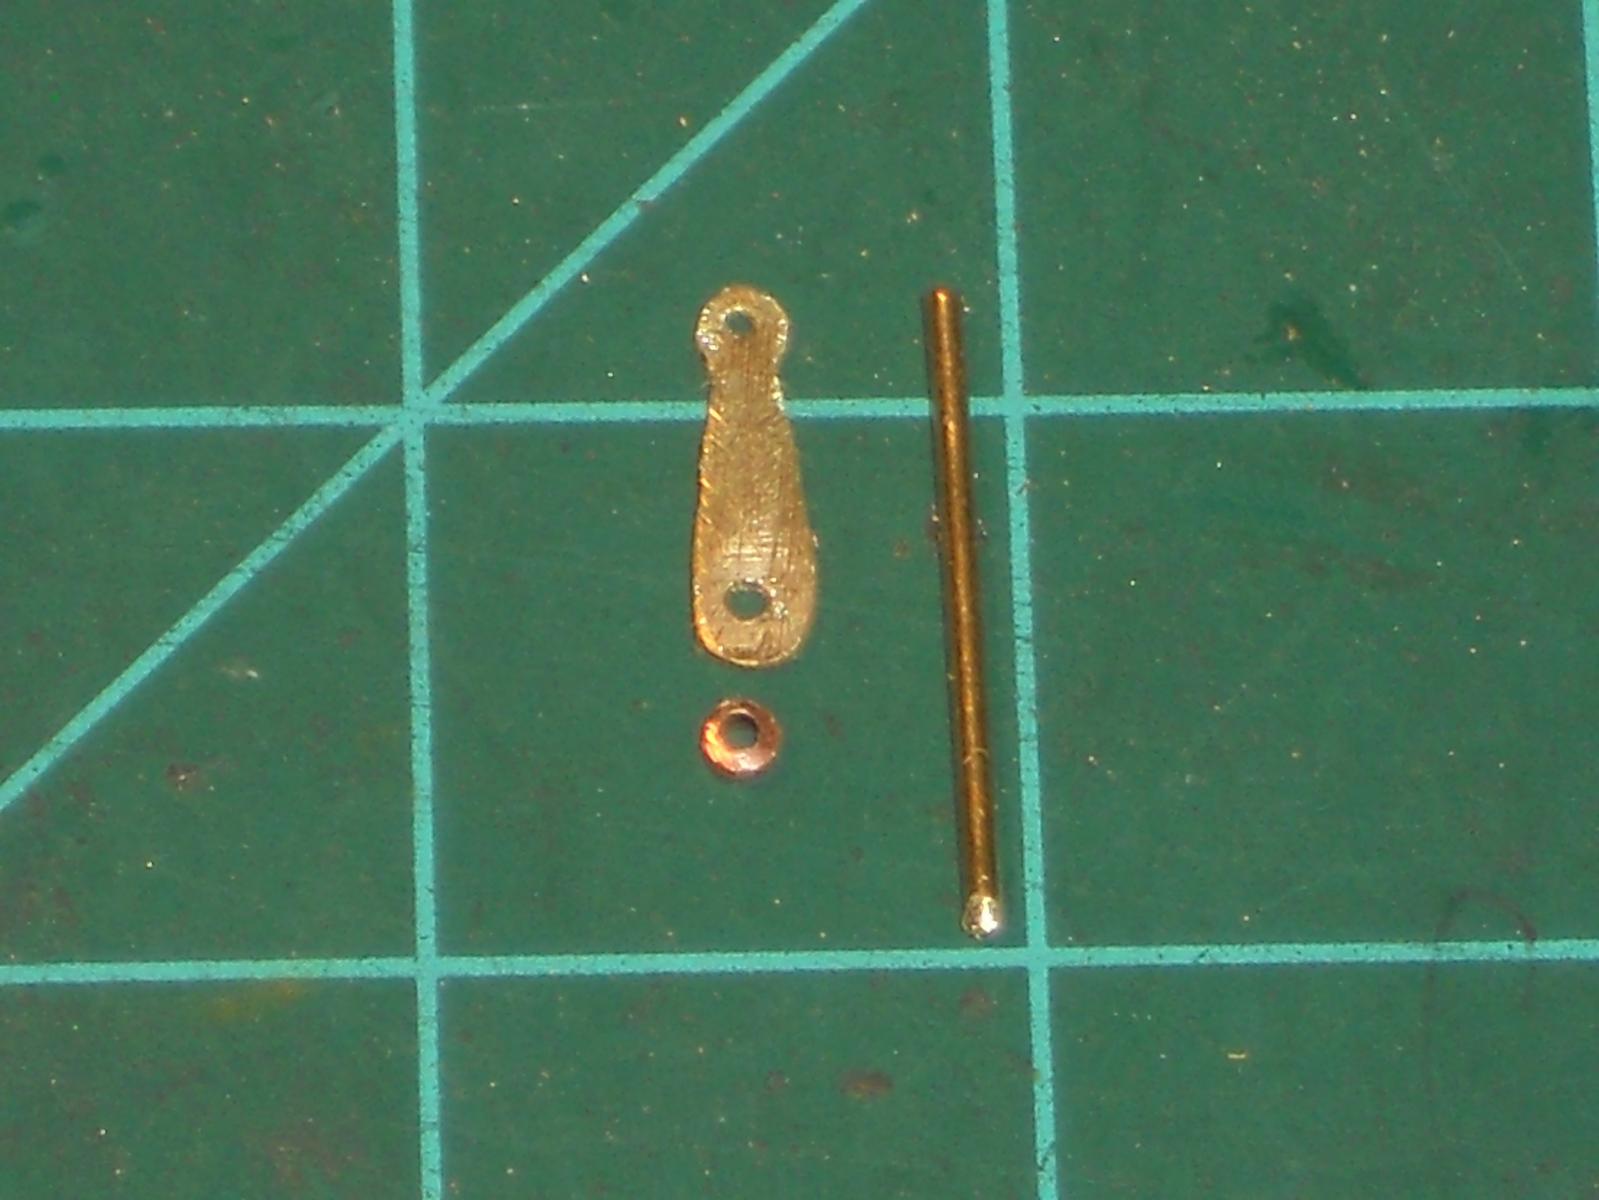
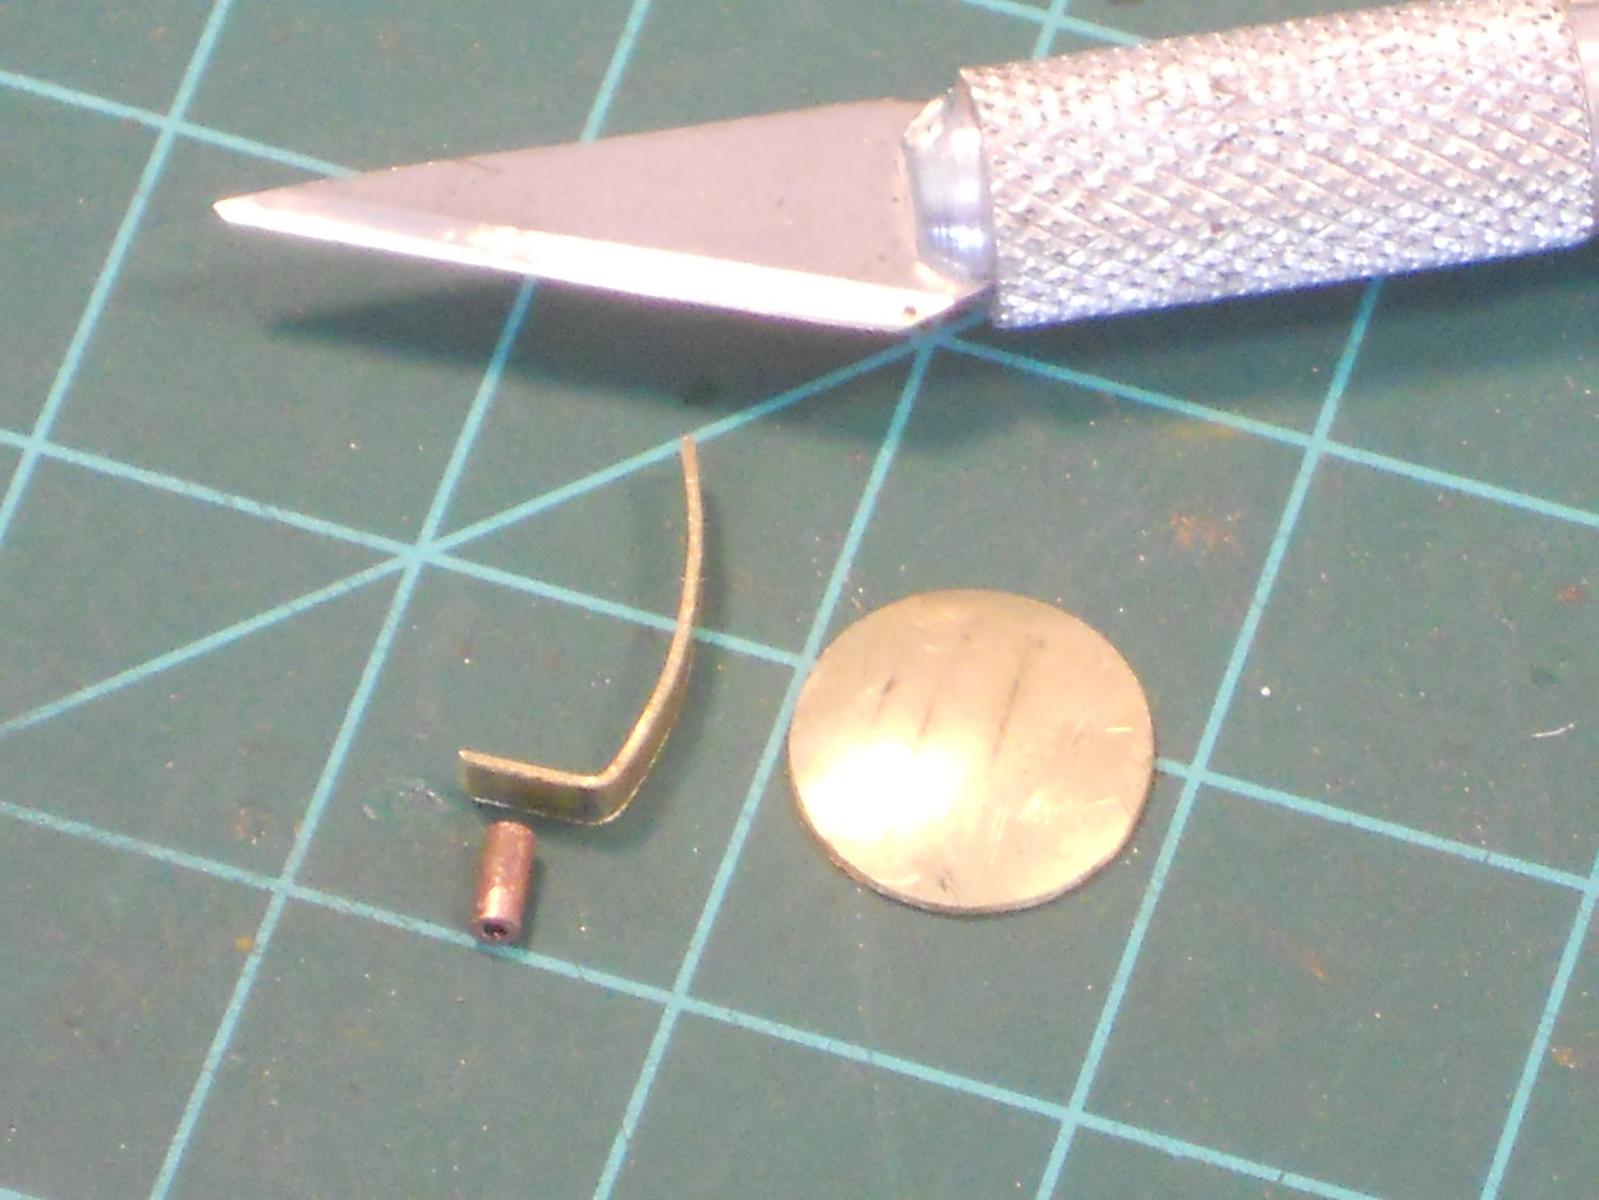
This morning I figured to continue with fabricating the torpedo tube door hinges and soldering everything together to complete that project. However, looking at the launcher again, triggered by the pictures I took, I was not in the least bit happy with the center and right pintel tubes. I decided to replace the center one and cut the right one down a smidgin. Here is the reason for my rework. Here you can see that the door hinge tube space is off center and larger then the left side. I just couldn't leave it like that. You'll see a vast improvement in pics #5 and 6 below. As mentioned in yesterday's post, I started fabricating the door hinge bracket and used the domed door jig I made for all the round hatch doors. Picture 1 shows how I did it, I just laid the strip of brass in it and with a small ball-peen hammer carefully tapped it into a nice curve that'll match the door's curve. Pictures 2 and 3 show the result and also I added the hinge pin tube. Next came the task of soldering the hinge pin tube to the bracket. Picture 4 shows that I placed the launcher assy in a small Proxxon vice so I could have both hands available. I put the hinge tubes on the launcher with a drill bit as pin. First I tinned both parts and by holding the bracket between my fingers I laid it onto the hinge tube and soldered - - - - Yeah, and you believed that No, I held in in a very small pair of needle nose pliers and then laid onto the tube. That way I had control in centering the brackets and I didn't have to use a heat sink. It took very little heat, which is a good thing. Well, that part worked, lucked out again. Now I had to solder the brackets to the doors. I tinned both parts here as well, slid the doors under the brackets and holding it tight against the tube flanges I just placed the soldering iron tip on the brackets till I saw the solder flow. The tubes acted as a heat sink. Now came the task of cleaning everything, filing the extra solder away and dressing it up a little with fine sandpaper. Yes, it'll need some more extra fiddling but the major part of the door installation is completed. Now i'm pondering whether to make the doors operate simultaneous or one at a time as it was done on the real boat. Okay, before everybody jumps on me, I'm going to try to do it as was on the real boat Note that I said try. This means a lot more little hardware and wizzywigs to make This means of course that I have to drill a hole in the door hinge tube on both doors so I can solder that to the hinge pin and leaving the pintles free. I started with making the hinge pin arms and the "nut" that locks the arm to the hinge pin. The "nut" is just a piece of 1.6 mm copper tube cut to 0.5 mm long. I accomplished this by putting a 0.6 mm brass rod inside the tube and with a razor blade rolled it over the tube till it separated. Then I had to debur this tine piece of tube without it collapsing on me. I had to hold it between my fingers and then with my other hand used a twist drill bit. It worked Lucked out again but now I have to make sure I don't loose it or sweep it away. I made the little arm from a small / narrow strip of 0.2 mm brass sheet, drilled the hole in it for the hinge pin and started to shape it to make it look like what's on the original launcher per the manufacturer's photo. When I took it out of the pliers I was holding it with a pair of tweezers I heard a - - twang - - and it went flying. It bounced against my chest, dropped to my leg and - - - - - - disappeared under my work bench or floor or - - - somewhere. I spend half an hour looking for that little bugger but it vanished. Then I figured, I'll try to mimic the drop by dropping another small piece of brass the same way - - - and wouldn't you believe it, I can't find that either. There must be a brass eating monster hiding under my workbench. Sooooohhhh, that ended my afternoon work session. I'll have to start all over tomorrow making new hinge arms. I was thinking of attaching a sheet to the workbench and draping that over my lap. But with my luck i'll forget it's there and when getting off my stool I can drag everything off the bench. Okay, no sense in crying over spilled milk and forge ahead - - - making new hinge arms. Here are a few pics of today's efforts. Kinda self explanatory - a simple way of making a smooth curved part that matches the previous part made with it. Here are all the parts laid out needed for the doors and hinge assemblies. Just added the #11 Exacto for size comparison. This shows how I soldered the the hinge brackets to the hinge tubes and then the doors to the brackets. The completed tube door project with doors closed. The completed tube door project showing the doors open. I just stuck the launcher inside the hull for a look-see. Cheers

-
Hello everyone and thank you all for visiting and your likes. Hello Daniel, good to see you again and your very kind words. Well, to tell you the truth card and plastic are somewhat of a mystery to me except then for the standard plastic kits. Let's hope my model will last for some time, my grandson will inherit it when I check out for the great shipyard above Hi Nenad, also good to see you here at my O19 shipyard! Thanks for your comments and glad to be able to contribute a little in the art of modelmaking and history. My plating went a little faster then your CS - - - fewer and larger platse Another advantage is - - - no masts to rig Cheers to all,
-
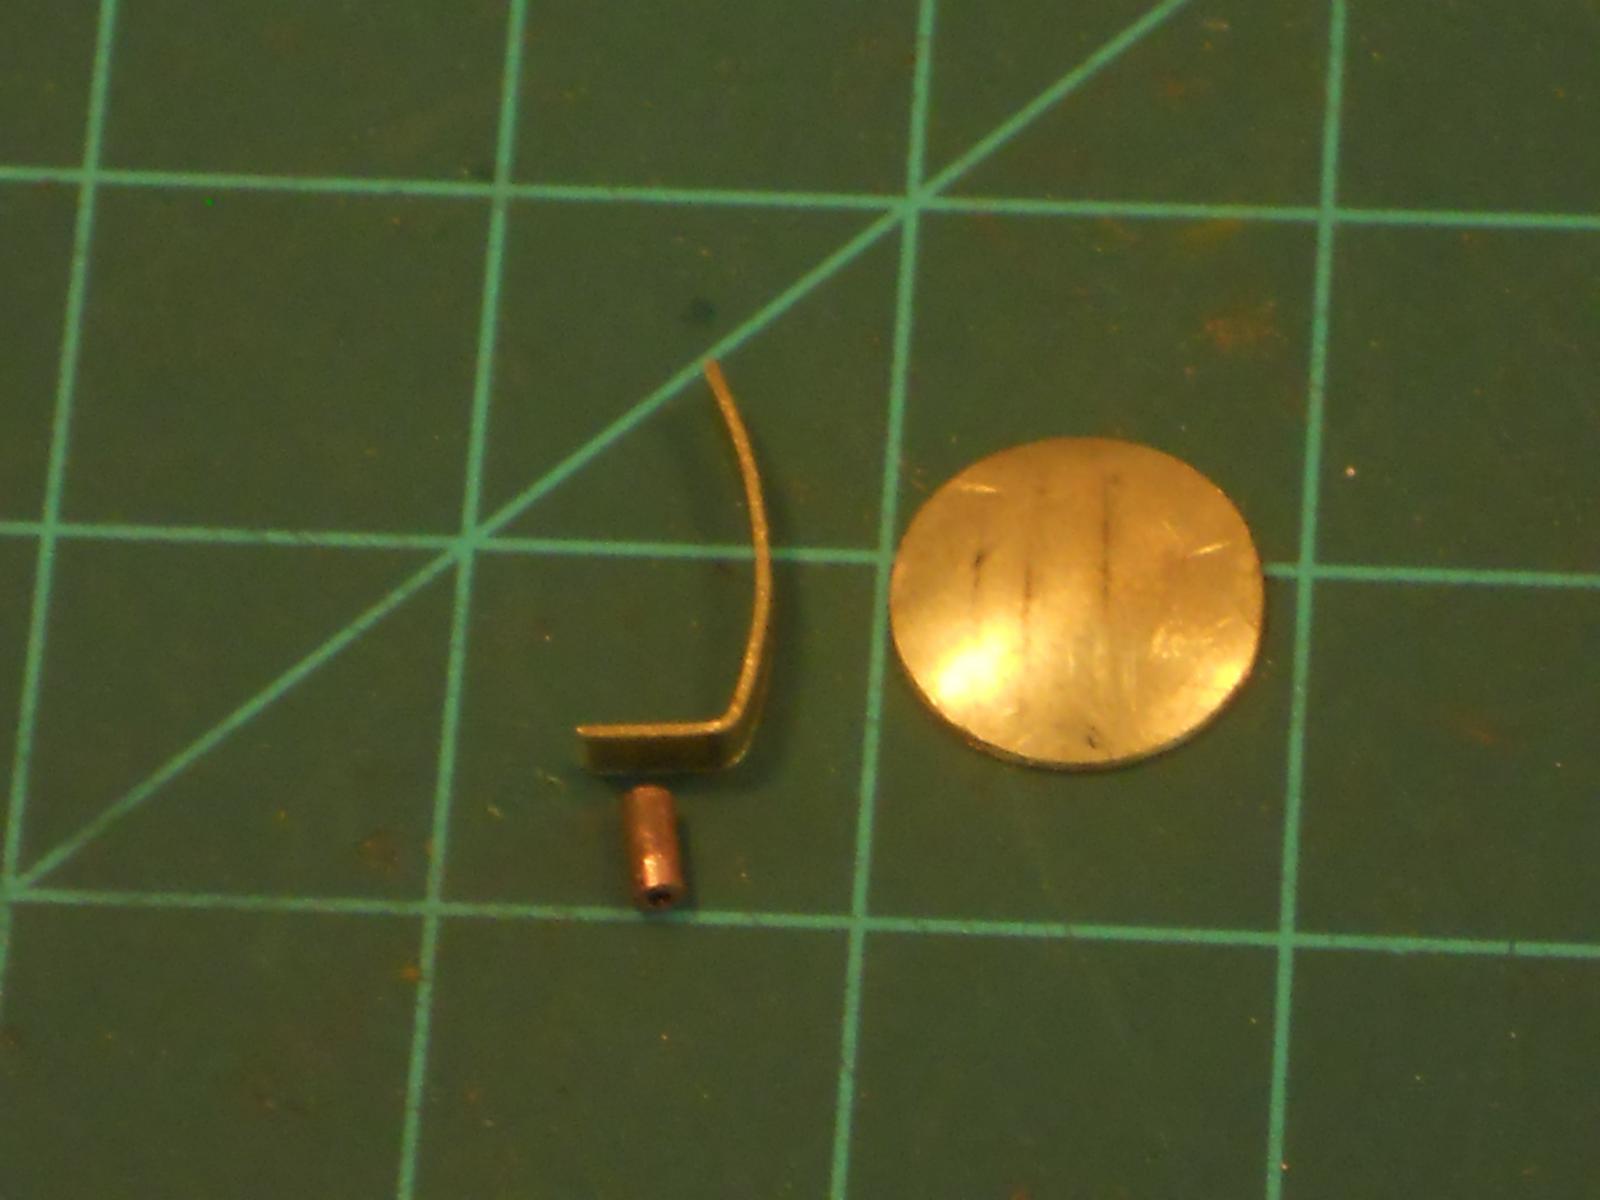
This morning I had a dental appointment, just the bi-annial cleaning. After lunch I had to do some correspondence but then I mozied into the garage, aka the shipyard, and started fabricating the outside fixed hinge pintel tubes. I didn't like the brackets I made the other day and "redesigned" another set that should work better and looks better, considering some of te other hardware coming behind them. These brackets are just small strips of 0.2 mm brass sheet stock that I bend to 90 degrees. I then cut two small pieces of 1.5 mm copper tube and soldered them to these little elbows and filed them even narrower. Now came the job soldering these small brackets to the torpedo tubes without desoldering the front flanges and the pintle tubes. I strung them onto a 0.6 mm brass rod as the locating fixture. This assures me that all the hinge pintles line up. I clamped them to the torp tubes with very small wooden clothes pins to hold them in place. Now came the delicate task of soldering these small brackets with the pintel tubes already soldered to them to the torp tubes, without desoldering the whole mess. I used a dab of solder paste to distribute the heat evenly and quickly, hoping that the clothes pins will do their job. Well, it worked as I hoped it would, nothing shifted, everything lined up and had very little solder to clean up. I guess I just lucked out - - - again Next on the agenda is fabricating the hinge brackets for the doors. These have to be soldered to the outside of the doors of course. I cut two small strips from the same 0.2 mm brass sheet and formed them into the same bow as the doors and bend a 90 degree angle at one end for the pintle tube, which will have to be soldered to the bottom of these strips. I got only as far as cutting and shaping one of the strips and cut two pieces of copper tubing for the hinge pintles. By this time it was close to 1800 hours and time to go inside. I'll have some pics tomorrow of that operation. The description of today's work may be a little vague but I hope that the pictures below will make it somewhat clear. This shows the center hinge pintle I soldered to the launcher assembly a few days ago. This'll serve as the steady fix for locating and holding the two outside pintle tubes. This shows the small brackets and the pintle tube for the outside part of the hinge assembly. The #11 Exacto blade is an indication of the size. There are two of these brackets. This shows my crude soldering jig to solder the tube to the bracket. As it turned out I had to the soldering freehand using a strip of wood to hold it in place. The solder tip would just glue itself to the little tube and not let go However, after both parts were tinned this worked out just fine. This shows both the outside pintle brackets pinned and clamped to the torp tubes. It may be hard to see the 0.6 mm brass rod through all of them but it's there and everything worked as planned. This is the result of today's work. All the fixed pintles are now permanently attached to the launcher. As you can see I have not cleaned all the brass filings away, that'll come later. I'll most likely keep fiddling with this some more. After looking at it a day or so later I usually see some things that need more dressing. Cheers,


-
Thank you all for visiting and your likes, it's truly appreciated @ Pete: Well - - - amazing it's not but acceptable to me but thank you. The extreme close-ups do make it look kinda crude but in reality it's rather nice. It'll be covered by a coat of primer and paint, that'll hide a few flaws @ Chief Don: Yes, I know you are a "Bubble Head." This is meant with the highest respect and not meant in a derogatory manner! My father was a Bubble Head extraordinair and I have the utmost respect and admiration for all who have served and are still serving in the "Silent Service. I must have half salt water and then high test aviation gas and JP-4 in my vanes, I'm an "Airhead," aviation Just tell me when I'm doing something wrong. @ Azzoum: Thanks for visiting my shipyard and your very kind words. We are all still learning my friend and if you are not happy with the first try do it again, and again - - - till you are happy with the results. I have a pile of rejected parts too, @ Dave: Thank you too Dave for stopping by and your very kind words and compliments. I guess the metal skills may be attributable to 65 years of working with metals, both theory and hands-on. I just love working with my hands, whether it's metal, wood or whatever. I love to see you around my shipyard any time. @ Kevin: Yep, I saw all the likes and figured you caught up with my work, thanks for dropping by. Thank you Kevin for your kind words and also coming from a submariner it means a lot to me. Cheers to all,
-
WOW Pete, she's really looking nice. Yep, prep work is the key, planking will then go on like greased lightening. Cheers,
-
How sweet she looks Pete. Gwen and I would love one of those 1:1 and sail the Inter-coastal nearby or the St. John's river. Cheers,
- 142 replies
-
- 1
-
-
- buzzards bay
- herreshoff
- (and 1 more)
-
After I mowed the front yard and trimmed a few bushes and shrubs, it was time for lunch, check the mail and look at the news on the computer. I'm also doing more research on cancer and specifically bladder cancer. But my model keeps calling me After lunch I ventured into the garage, aka shipyard, and started with fashioning the center fixed part of the torpedo door hinges. That turned out to be a very difficult and trying job. Too many already soldered parts that needed heat-sinks but eventually I managed to solder the 1.6 mm copper tube to a separate copper flange to the front of the torp tubes. Next I'm in the process of making the two side brackets for the outer fixed hinge tubes. They'll be soldered to the upper outsides of the tubes and then the small pieces of copper tube will be soldered to them and hoping that everything lines up. I'll shove a piece of stainless steel wire through them all to keep them lined up. A light coat of grease on it will prevent any possibility of it sticking, one never knows. Sorry, no pics. I got so involved with this thing that I plum forgot. Next time better because they are for my own archive for remembrance. Thanks everyone for your visiting and your likes. Cheers,
-
Thanks Pete for your encouragement, I'll surely try. Cheers,
-
Hello Hjalmar, welcome a'board. Love those old Dutch ships, that's why I started a self design of an imaginary VOC ship of around 1665 era. Put that aside to make a model of my father's submarine of the Koninklijke Marine he was on from 1938 to the end of 1941. Both are listed under my signature. That's a nice large scale for your model, that gives you ample chance to do some great detailing. I'll be following your build with interest. Seems my whole family is from Amsterdam, loved to visit and spend many an hour in the "Scheepvaart Museum." Well, I emigrated to the USA in 1957 and am retired now and live in Palm Coast, Florida, love it. Cheers,
-
Hello Kevin and a WOW to the nth power! Magnificent! Cheers,
- 1,319 replies
-
- 1
-
-
- caldercraft
- Victory
- (and 1 more)
-
Lovely lines Pete, she already looks like doing about 40 knots! Cheers,
-
Thank you all for visiting and your likes, wow, I'm overwhelmed. Hello Pete, thans for looking in and your kind comment. I'll try to do it justice. Hi John, good to hear from you and I hope you and Diana have a great time traveling. Encore????? Well, there is still my VOC ship waiting and then a Dutch fishing boat or jacht (yacht) in a lamp. I may not have the time to do everything I want to do. Time seems to be just flying by. Didn't do anything on the O19 today, just looked at her and my torp launcher project as I walked by this morning to go to Ormond Beach to the urologist. I had an appointment for the second series of BCG treatments for bladder cancer. Long story and you can read it in "What Have You Done Today." The good news is that the cancer is most likely gone but the doc felt to do the BCG treatment anyhow with interferon added. We'll be back in the shipyard Sunday, after mowing the lawn first and trimming a few hedges. Hey, if it's not Sunday then it'll be Monday.
-
Hi Pete, VERY nice job and "( I am very happy with the Keel )" rightly so, it's superb! Cheers,
-
WOW!!! That's one good looking ship Kevin. Great job on the gunport lids. Cheers,
- 1,319 replies
-
- 1
-
-
- caldercraft
- Victory
- (and 1 more)
-
Hello everybody and my thanks to all who visited and clicked on like, it's much appreciated. Was not able to accomplish much today. This thing, the deck torpedo launcher, is slow going, because of the painstaking detail work. I soldered the tube section flanges and cleaned the little excess solder off with a small file. So far I'm happy with them. Next I had to fashion flanges for the aft and the front of the tubes. I used some round brass rod of 0.3 mm instead of the square rod. After I dressed them down they looked square as well. I'm happy with them as well. I didn't need a thick flange because the aft end is only for solderen the end plates to it. The front flange is for a seal of the tube doors. Talking about tube doors, I made two and used my oak mandrill to press them into a dome shape. This is the same tool I used for the crew hatches and torpedo loading tubes, way back when. Another reason why I didn't accomplish as much as I wanted to is that I was pondering on how to make the hinges for the tube doors. Just sitting there and looking at the launcher and thinking. I think that I have to make a few brackets from brass sheet stock for the stationary hinge tubes and solder them to the front ends of the tubes. I would like to finish the front end first before tackling the aft end. Also still pondering the deck side openings. May have to buy another large sheet of 0.5 mm plywood or make my own plywood. I don't need much if it's only for the doors. That in itself doesn't bother me, I have made plywood before and it won't set me back much and besides, it's kinda fun. Okay, I made a few pics for my own archive and like to show yuns what has been accomplished today. It first look there doesn't seem any difference with the previous post but believe me there are about 5 hours of work involved. This shows all the flanges soldered to the tubes with the two doors in front of the launcher assemblyThe small piece of tubing and the wooden dowel is what I used to bend the brass rods around for the flanges. This shows the launcher assembly with the domed doors laid loosely on top of the tubes. This shows the launcher assembly with the aft end closed off. Cheers,