Louie da fly
-
Posts
7,993 -
Joined
-
Last visited
Content Type
Profiles
Forums
Gallery
Events
Everything posted by Louie da fly
-
 Yes - no surviving fore channels, so your guess is as good as anybody else's. I look forward to seeing what you do with this - your theoretical cardboard replica looks good. Steven
 -
Oh, yes. And oftentimes more than one attempt (I've thrown away my fair share of carvings I was unhappy with!). Also true. You can get on with the carving while glue is drying or when you get bored with the other stuff. Looking good. Steven
-
Ferrus, no swivel guns were found. The Beat to Quarters Tumblr article gets several things wrong - the guns were never mentioned in the archaeological report as being cargo; in fact they were distributed through the wreck in positions that suggest they were for the ship itself. On the other hand, big cannon wheels were found in the wreck, more appropriate to land-based cannons, and as the ship was under hire to the King of France who was having himself a war in Italy, it's likely these were cargo - and perhaps that the barrels were recovered by a salvage team that tried to recover what was most valuable from the wreck soon after she went down. Regarding the matter of bonaventures, I'm still thinking about it. That a ship could have them because of her size is no guarantee that she did. The great majority of representations show a single mizzen. Steven
-
Remains of 500 year-old shipwreck: Dated 2019
Louie da fly replied to Allegheny's topic in Nautical/Naval History
Unfortunately a few seconds after opening the link it went to NY Times advertising and demanding I log in and let them have access to my personal stuff. Looked interesting up to that point, though. Steven -
Orks Dakka Jet by RGL - FINISHED - Warhammer
Louie da fly replied to RGL's topic in Non-ship/categorised builds
Cyberpunk. -
Remains of 500 year-old shipwreck: Dated 2019
Louie da fly replied to Allegheny's topic in Nautical/Naval History
I originally thought this was the Gribshunden, a Danish royal ship, but apparently not. See https://sv-m-wikipedia-org.translate.goog/wiki/Okänt_skepp_från_1500-talet_i_Östersjön?_x_tr_sl=sv&_x_tr_tl=en&_x_tr_hl=en&_x_tr_pto=sc Interesting in its own right! I hadn't heard of this one before. I've bookmarked it. Thanks for posting. Steven -
Orks Dakka Jet by RGL - FINISHED - Warhammer
Louie da fly replied to RGL's topic in Non-ship/categorised builds
Good grief! Steven -
I did consider it, and she was willing to do so, but I just wanted the damn thing finished, so I went with what I had. Steven
-
All true. We can argue the pros and cons and possibilities of what the drawing "really" shows forever, but that way lies madness. I'm not trying to prove a point, just to get an idea of how high to make the gunwale. Steven
-
Johnny, yes I agree. And yes, some have shields attached to a higher rail. If you look at the very first picture in this thread (don't look too hard, it's loaded with inaccuracies!) you can see that 'Lomellina I' has them on the forecastle and aftercastle, and I'm thinking seriously about following suit with her younger sister. The flags belong to the Lomellini family, but perhaps the shield designs are those of the men-at-arms on board. And does the ship carry those shields when not expecting to be in combat? Who knows? Steven
-
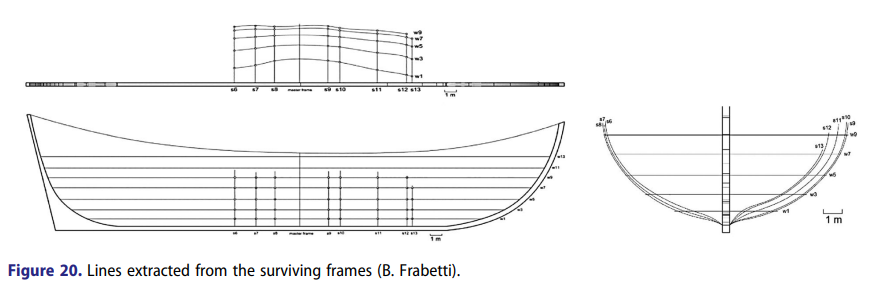
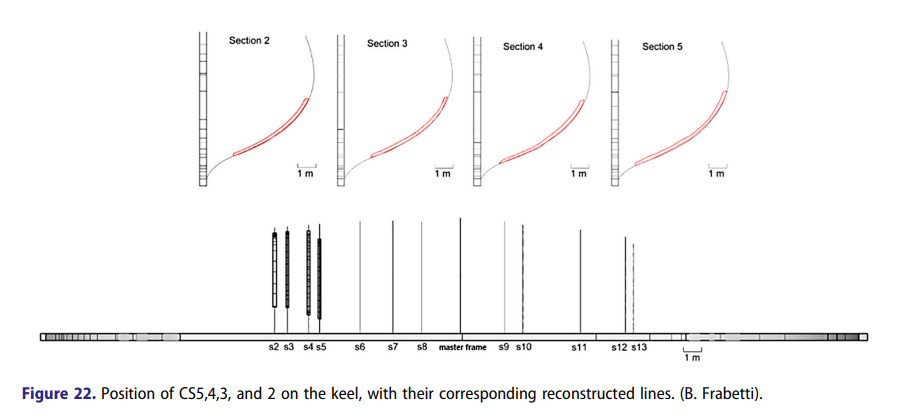
Ferrus, this is an issue I'm very aware of, and in fact I've been arguing the point for over 10 years. See . Regarding the museum model, I'm not taking any notice of it at all. It's wrong in so many ways - I don't like to criticise , but the guy who built it had no idea of the configuration of a carrack. I've been reading through the latest paper on the shape of Lomellina's hull (see link in post #17 above). Here's what is known from the archaeological results (with a bit of tweaking of frame shapes to allow for the fact that the shape would have been deformed by the weight of the overburden of silt). They recorded 12 cross-sections, 8 of the "surviving" frames - that reached all the way to the keel (CS 6 to CS 12 also referred to as S6 to S12), 4 of partially existing frames (CS 2 to CS 5). Here are the results. Though I'm prepared to accept their research data I do have reservations about their conclusions as to the lines of the hull. If you're interested you can see them in the paper linked in post #17 above. So I'll 'go off on my own' and see if I can't work out a set of lines I'm happier with, that fit in better with what I know of the shapes of carracks from contemporary representations, particularly those of Carpaccio and Botticelli (see pics in earlier posts). Steven
-
You're quite right, and I hadn't been figuring the height of the gun pedestals into the equation. Thanks. And in fact, zooming in on the Zumia picture the guns do seem to be up off the gunwale (OTOH, the first of the Beauchamp Pageant pics shows the barrels resting directly on it). And I've found another pic with 2 normal sized people up against the gunwale. "1486 Pilgrim Book by Breidenbach. Ship building in Venice" The guy on the right seems to have it coming up only to his hips, while the other has it up to his chest. The second guy seems to be painting the side of the hull, though, and I believe he might be kneeling down to do it without overbalancing. All of this inclines me to accept a lower gunwale height - possibly even less than 1.2 metres. The legal requirement for balustrades on balconies (at least here in Oz) is 1.0 metres - to stop people tipping over the edge and falling. I'd say that would be my absolute minimum height for the gunwale. Getting there . . . Steven
-
That looks good, particularly the 'draped fabric'. Are you planning on doing more carving on the dove? Steven
-
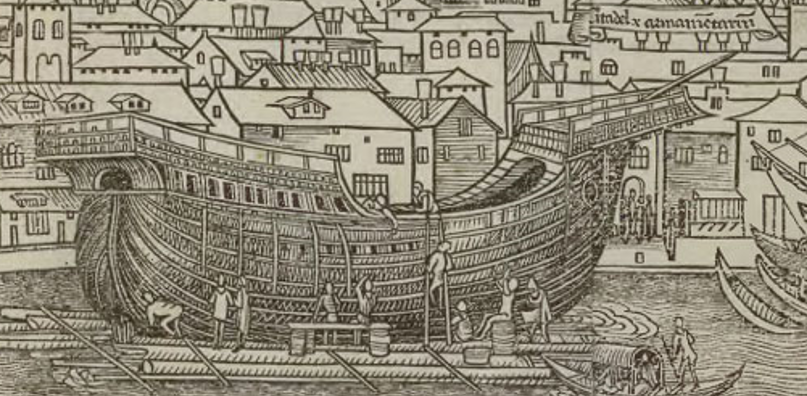
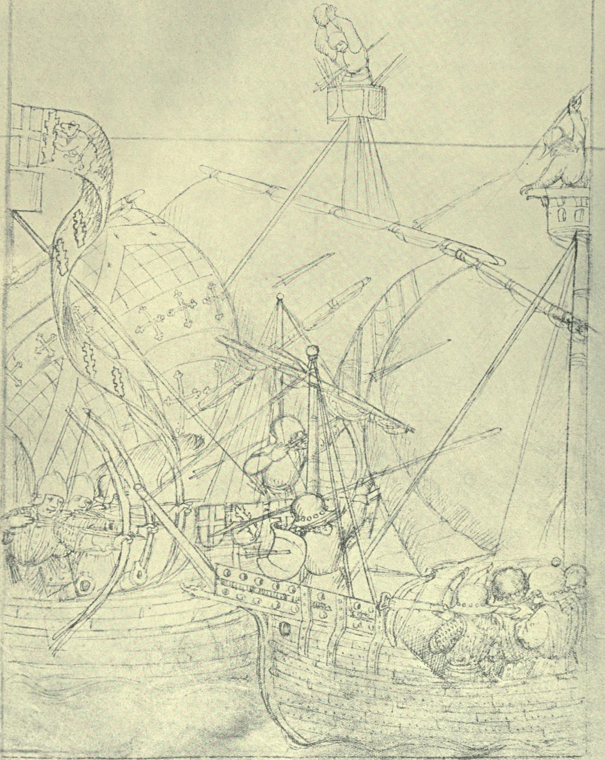
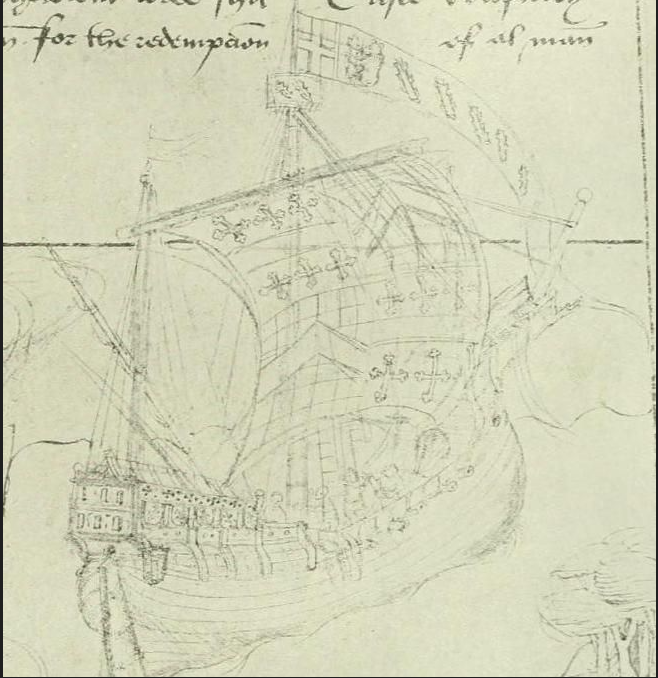
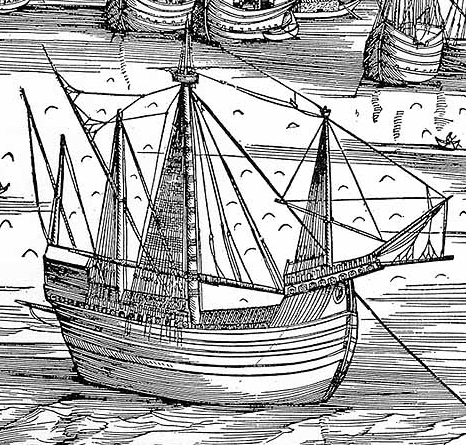
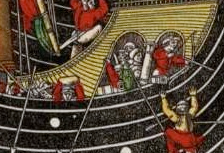
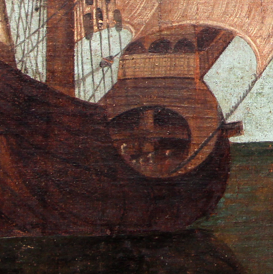
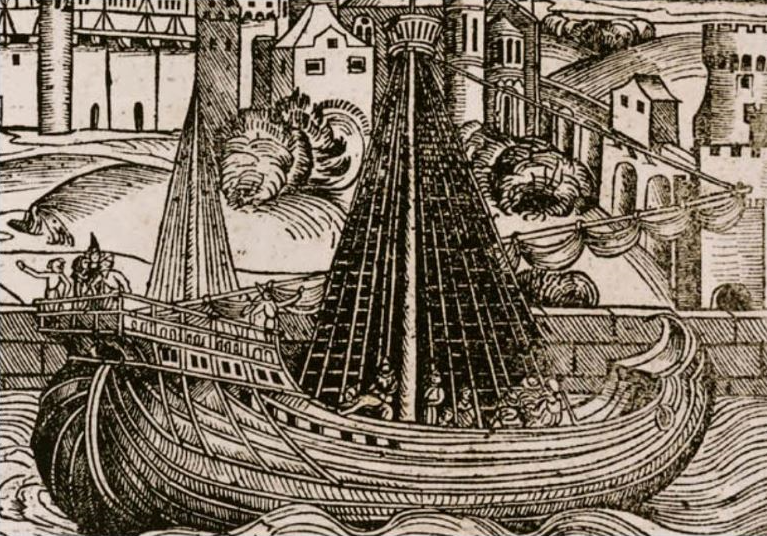
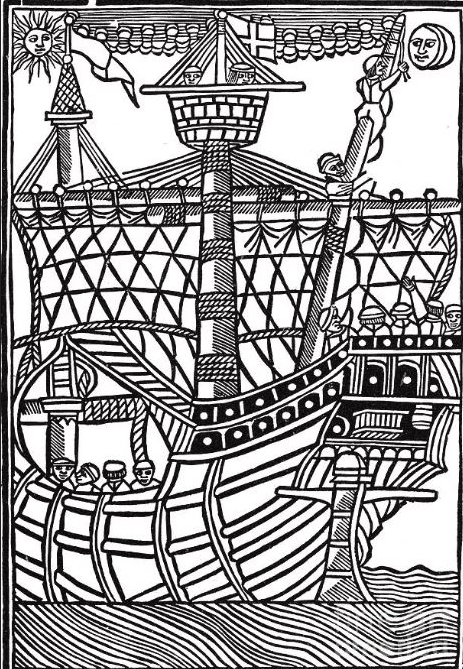
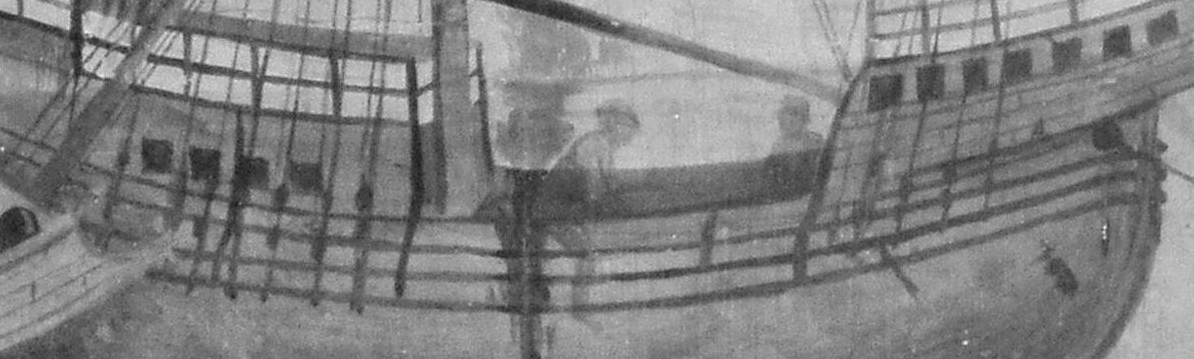
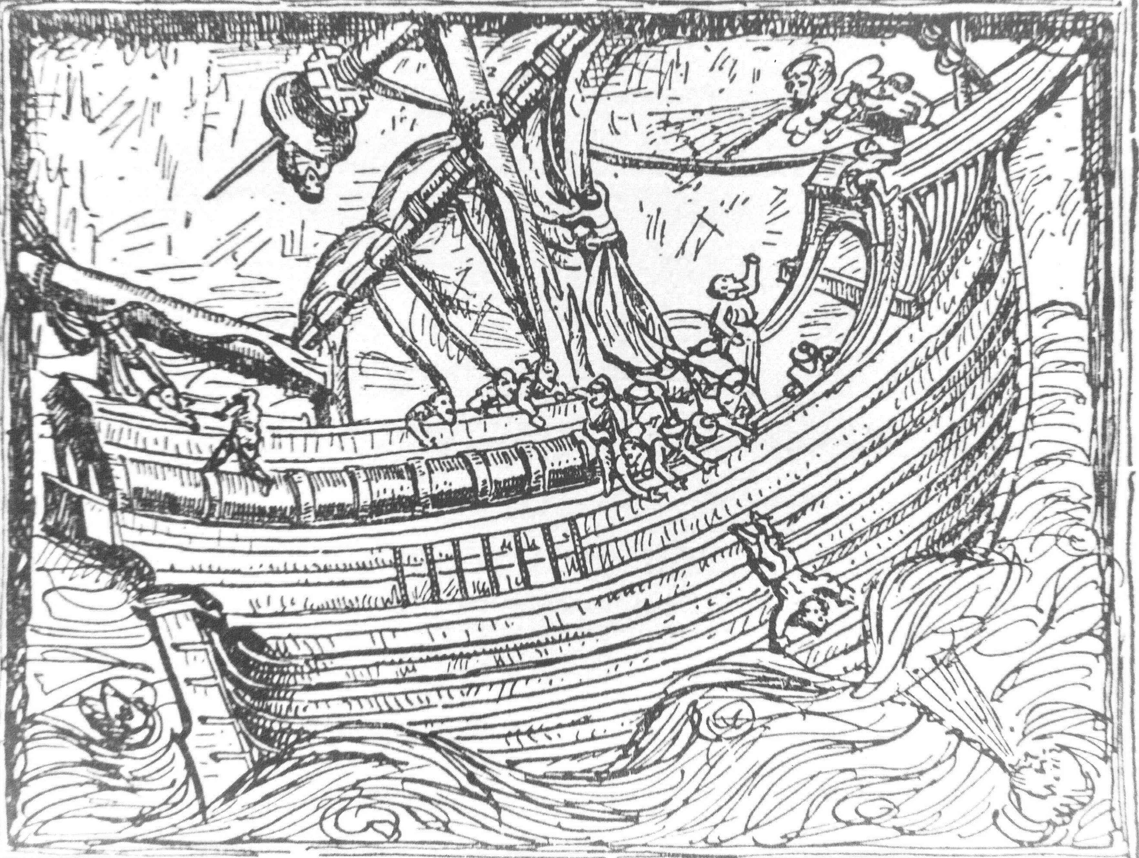
Thanks everybody for the likes and comments. Early stage at the moment. I'm currently thinking about the height of the gunwales to the weather deck. As well as the 'theoretical' height in the cross-sectional view in my first post, there are a few contemporary pictures which I'm hoping will help. There's this image from the so-called Beauchamp Pageant (Cotton MS Julius E IV), but that's not a lot of help, as the human figures are obviously over sized (as was usual at the time). There are VERY few contemporary pictures that accurately show human figures at the correct scale. This one from the same source is not high resolution, but I believe the scale of the figures is probably about right - The picture of the Battle of Zonchio (1499) shows the gunwale as being almost shoulder height But there's a detail from Carpaccio's Ursula Legend that seems to show the gunwale coming up to about people's waists. Then there's this one from 1493 that seems to show the same. This one of Columbus' ship from the 1502 Libre de Consolat dels fets maritims Barcelona shows it about middle of the chest - Then there's this one from Zeiriksee in the Netherlands of 1506, showing it nearer the waists of the human figures. And from Jonah by Bellano Basilica of San Antonio, Padua, 1514 - chest height. As Lomellina was Genoese, I'd be inclined to follow Italian images for preference. And it needs to be borne in mind that the gunwales are just that - wales that were the base for (swivel) guns. So they should be somewhere above waist level for the gunner but below shoulder level. So, assuming an average height for this time and place of perhaps 5'6" (1.68 metres), I'd be looking at between 1.2 metres (about 4 feet) and 1.3 metres (approx 4'3"). Returning to the issue of masts, there could possibly be one or two mizzens. A votive table of 1475 of the parish of San Pedro de Zumaia in Spain, commemorating a battle between Spanish and Portuguese forces, shows the largest ship with a mizzen, and a bonaventure mizzen behind it. And a detail of a panorama of Venice of 1500 by Barbari shows a similar thing on a merchant ship. However, the great majority have only a single mizzen. Is the Lomellina big enough to warrant two? She was certainly pretty big for the time, bit I'll have to think about it. Steven
-
Thanks everybody for the likes and comments. It's nice to have finished the build and though I'm painfully aware of places where I didn't get it as right as I'd have liked to, I'm actually very happy with this. MikkiC, I've already started work on plans for the next one - see It'll be a while before I start making sawdust, but the design process is under way. Steven
-
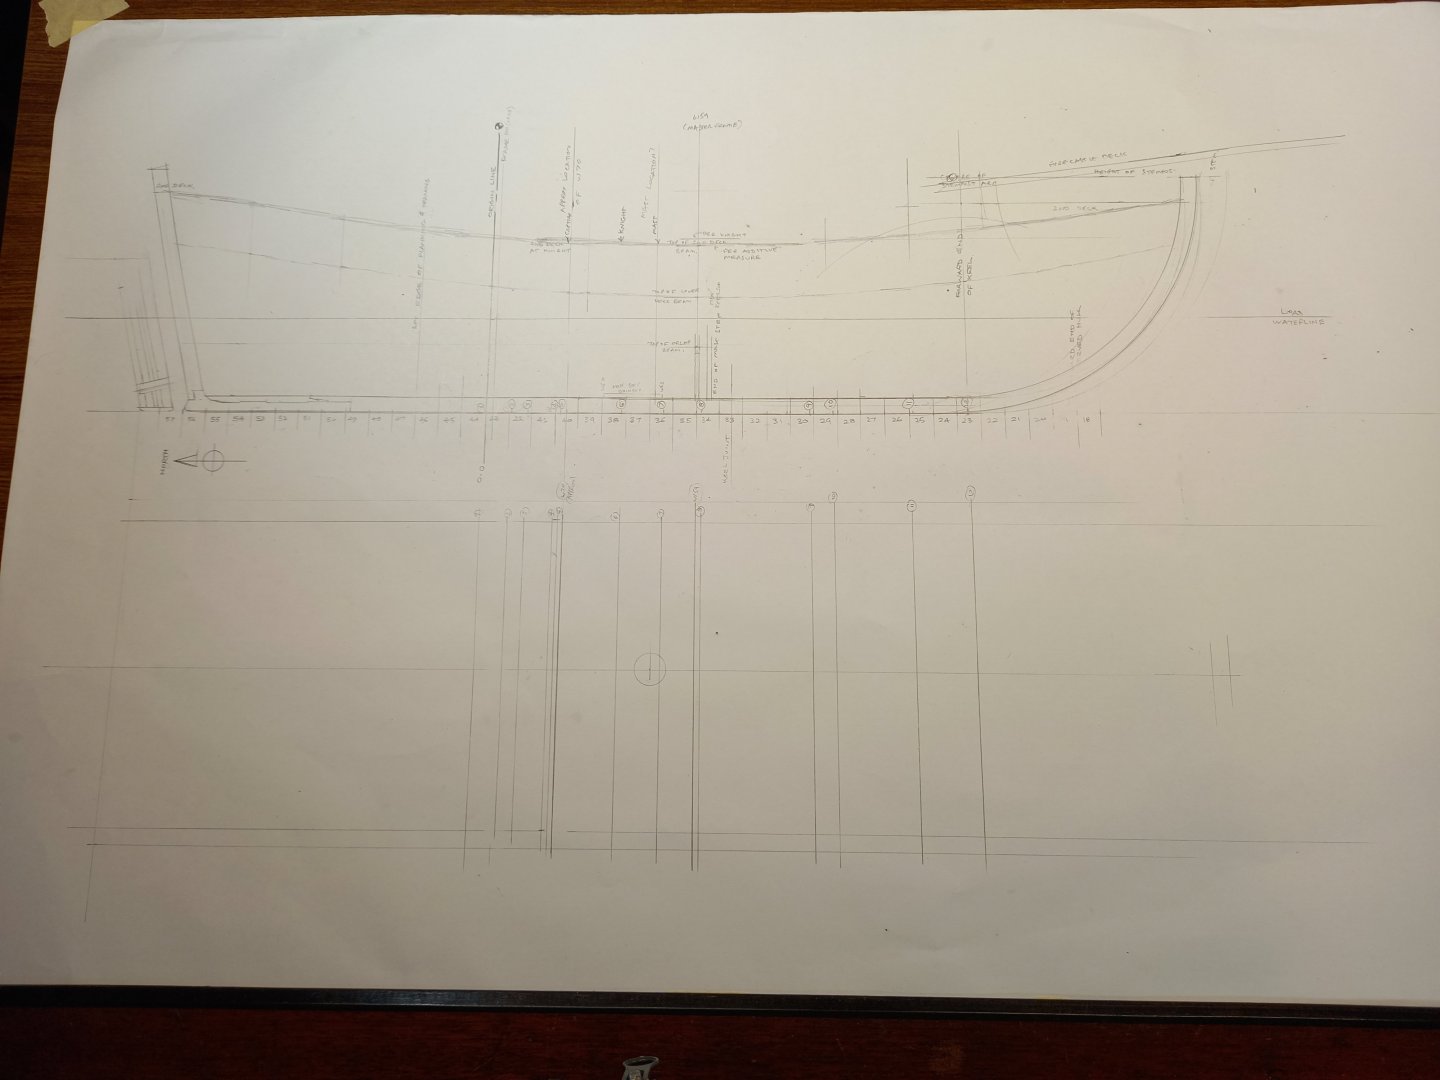
Still figuring out the plans. I've now got a pretty good idea of the lines of the main and lower decks and the orlop, the configuration and position of the stempost (awaiting confirmation from France!), and the location of the mainmast, the halyard knight and the capstan, plus where on the keel the 12 cross-section views were taken. Still a bit up in the air, but I believe I'm on the right track. And she's starting to look rather pretty! Though there's no archaeological evidence of a foremast or mizzen - they would both have been relatively small and it's unlikely they'd have been stepped on the keel - I am completely certain a ship of this size at this time would have had both. Now I'm thinking about the height of the bulwarks above the main (weather) deck, and the height, angle and configuration of the forecastle. The Botticelli painting The Judgment of Paris contains a carrack which can be seen, unusually, from above, and it looks like it has a poop deck. Perhaps I'll give the Lomellina one as well. Steven
-
So this is what you've been doing all this time! I can't believe I've missed this build. Soon fixed - I'm following from now on. Beautiful work, Dick. Steven
-
Making very good progress. Beautiful ship. Steven
-
Perzackerly (that's a combination of precisely and exactly). But often the word stands alone and I have to work out the meaning by context, if I can (sigh). I think the Lomellina's bow will also be surprisingly pointed. There's this idea people have that they were tubby, but it seems not to be true, but instead influenced by contemporary artists having trouble accurately showing a ship's bow seen from forrard. And apparently this particular vessel had proportions more like a galleon than a carrack - overall length 46 metres, beam about 12.5. Slim and fast. See https://www.tandfonline.com/doi/full/10.1080/10572414.2023.2186748#d1e2365 - However, that bow shape in the latest iteration is pretty speculative - if you look at the cross sections in this document, you can see that the surviving remains are very thin and a very slight difference in angle of orientation compared to vertical could make a huge difference to the shape of the hull. I'm still investigating all of this - I'd like to make up my own mind about it all, rather than just copy what others have decided - but definitely making progress. I've now drawn the full length of the keel, got the deck heights and drawn the stempost. Not sure about the last - one of my sources seems to suggest that the stempost was found, but that's not backed up by any of the archaeological reports I have in my possession. I'm just going to have to write and ask. Steven
-
Perhaps fairleads? From Merriam-Webster online dictionary: fair·lead or less commonly fairleader ˈfer-ˌlē-dər 1. : a block, ring, or strip of plank with holes that serves as a guide for the running rigging or any ship's rope and keeps it from chafing 2. : a course of running ship's rope that avoids all chafing. Steven
-
Looks to me like you're making scuppers. Beautiful work, Patrick! Just beautiful! Steven
-
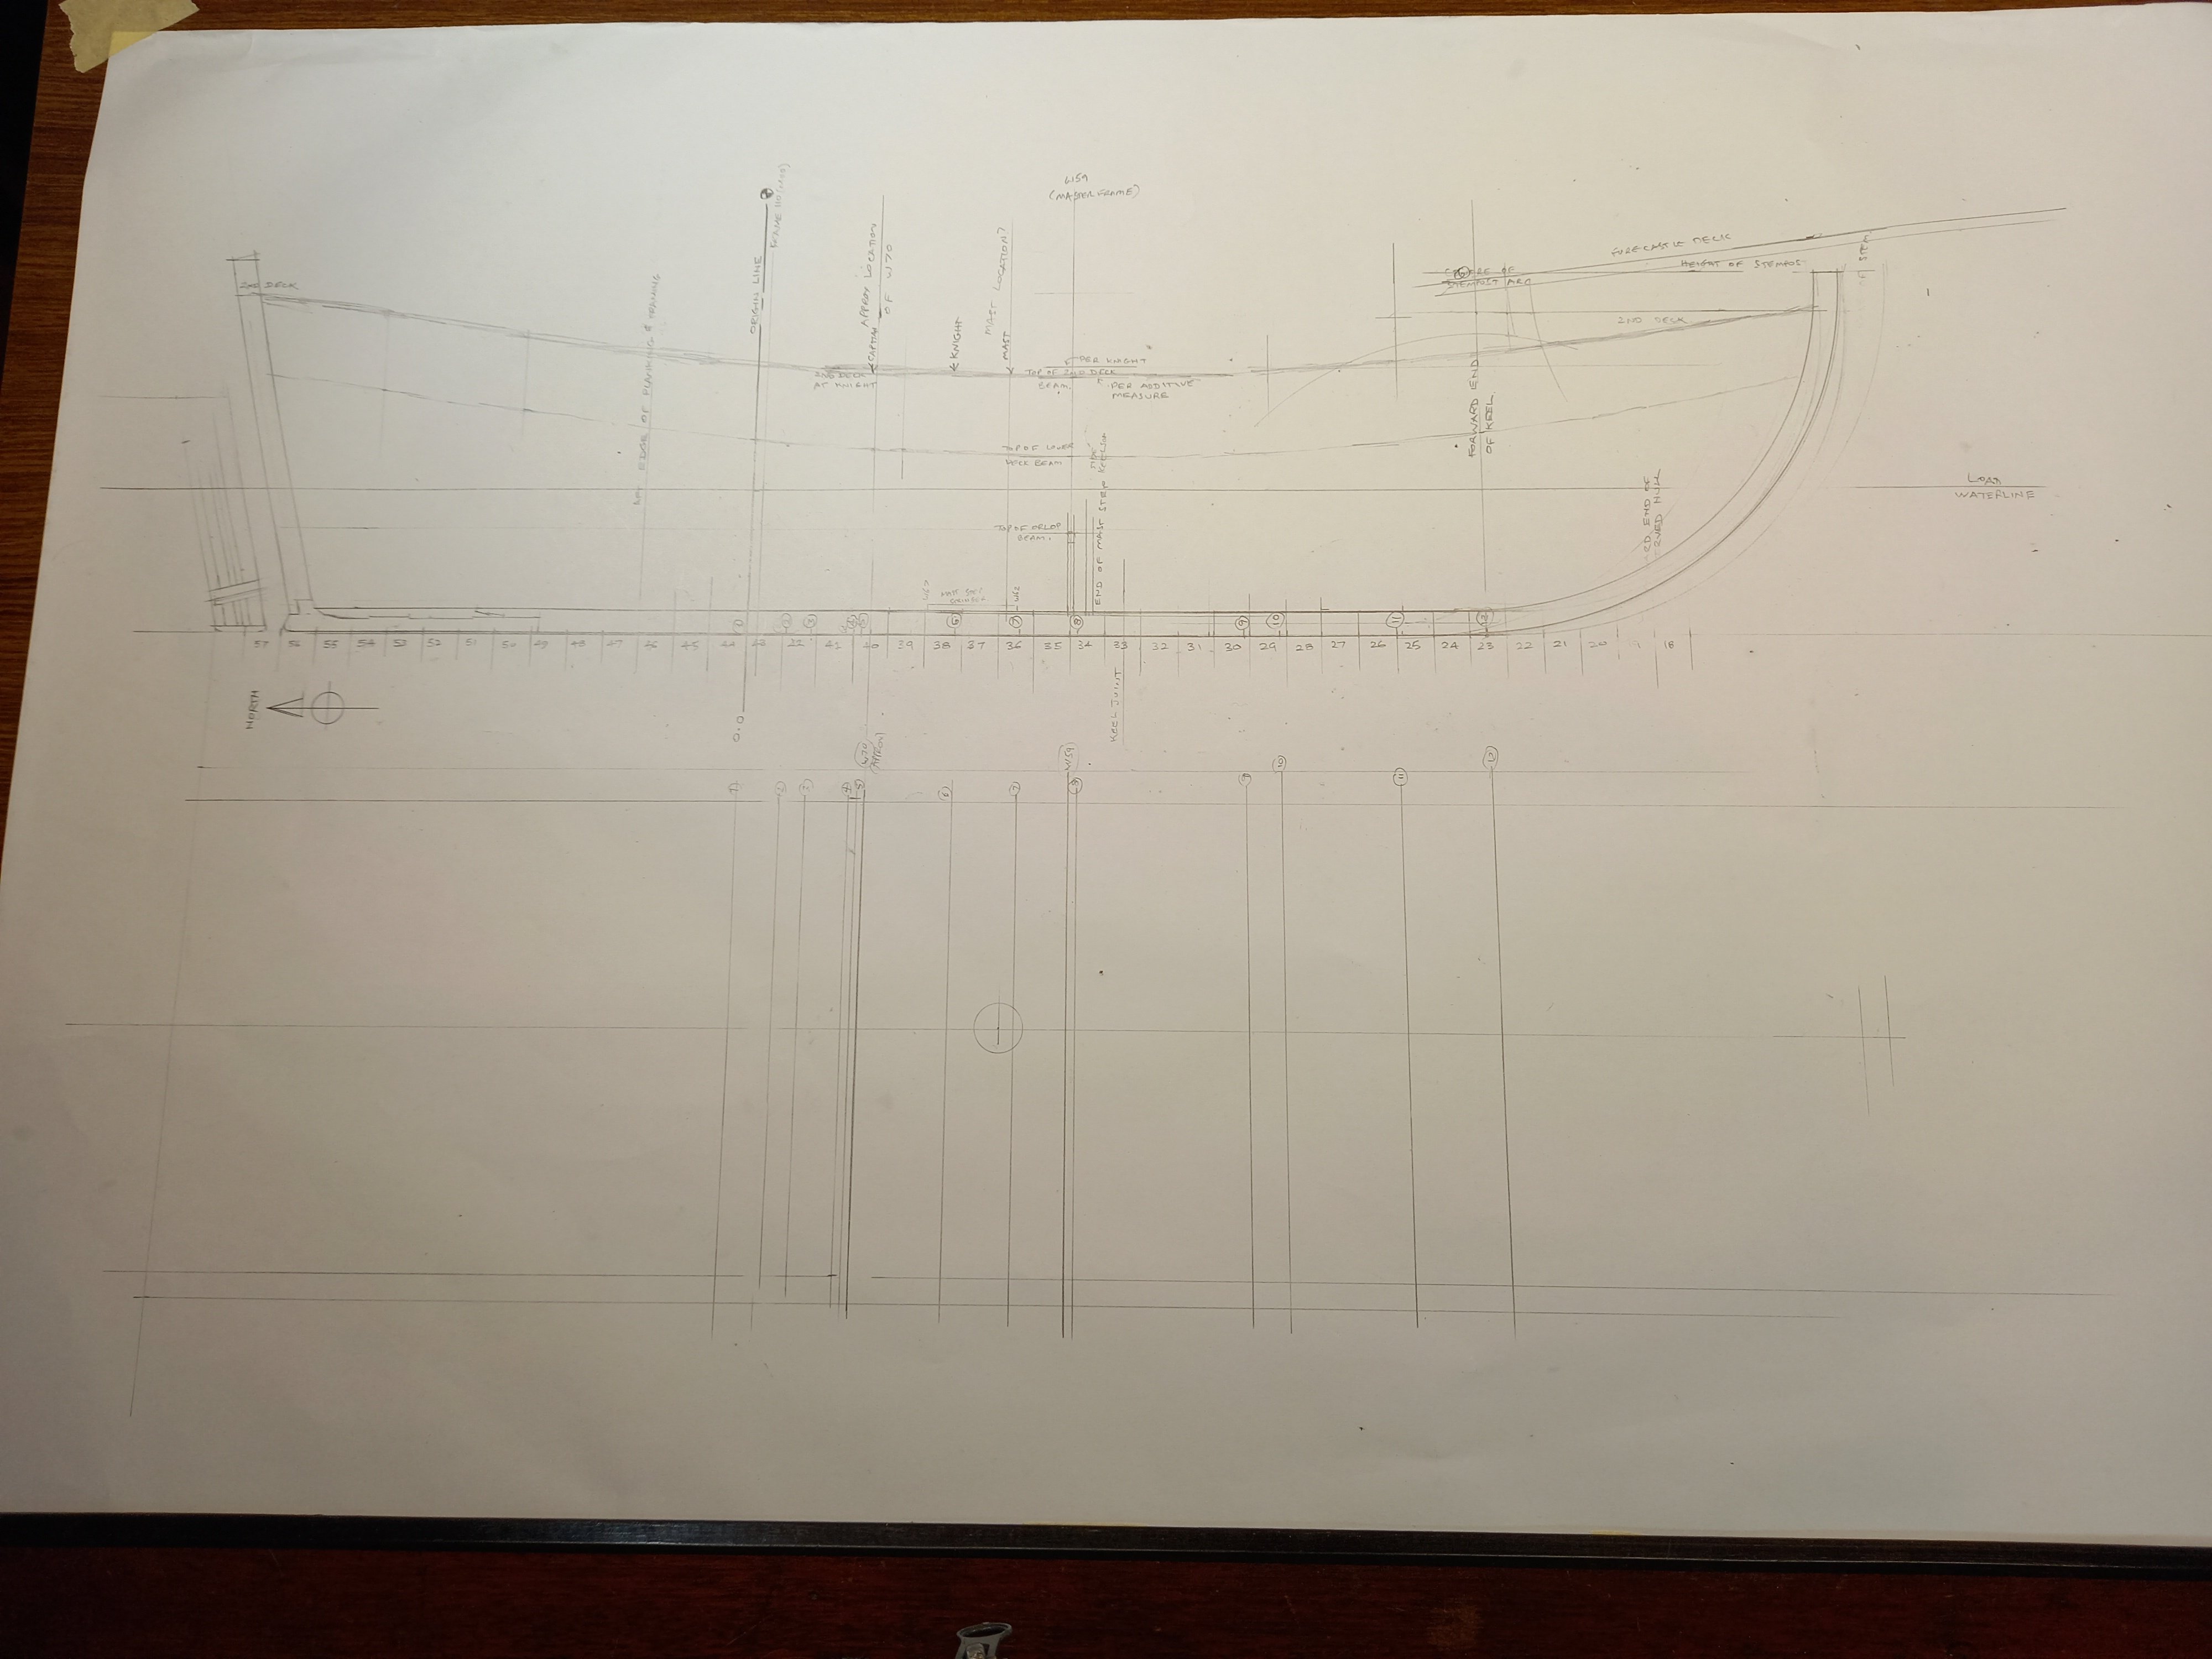
Thanks for all the comments and likes. News is that I've been in touch with Max Guérot, and he's sent me the latest reconstruction info, and with that plus having tied down reference points even more firmly (I have the locations of the 12 cross-sections relative to the keel now, AND to the grid lines, for example, plus levels for the decks), I've been able do more work on laying out the side view. Steven
.thumb.jpg.0ea44d8c8bb556ada0eab86c9ea07e0e.jpg)
-
Looking very nice, Mikki. I hadn't noticed this build before. I'll pull up a chair if I may. Steven
-
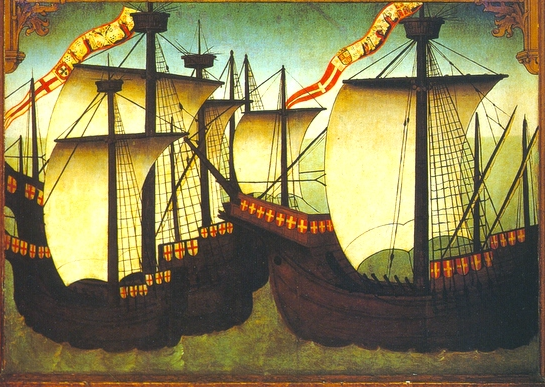
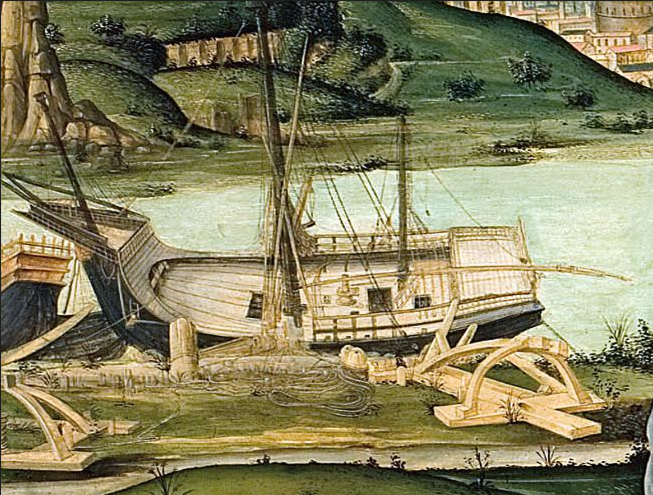
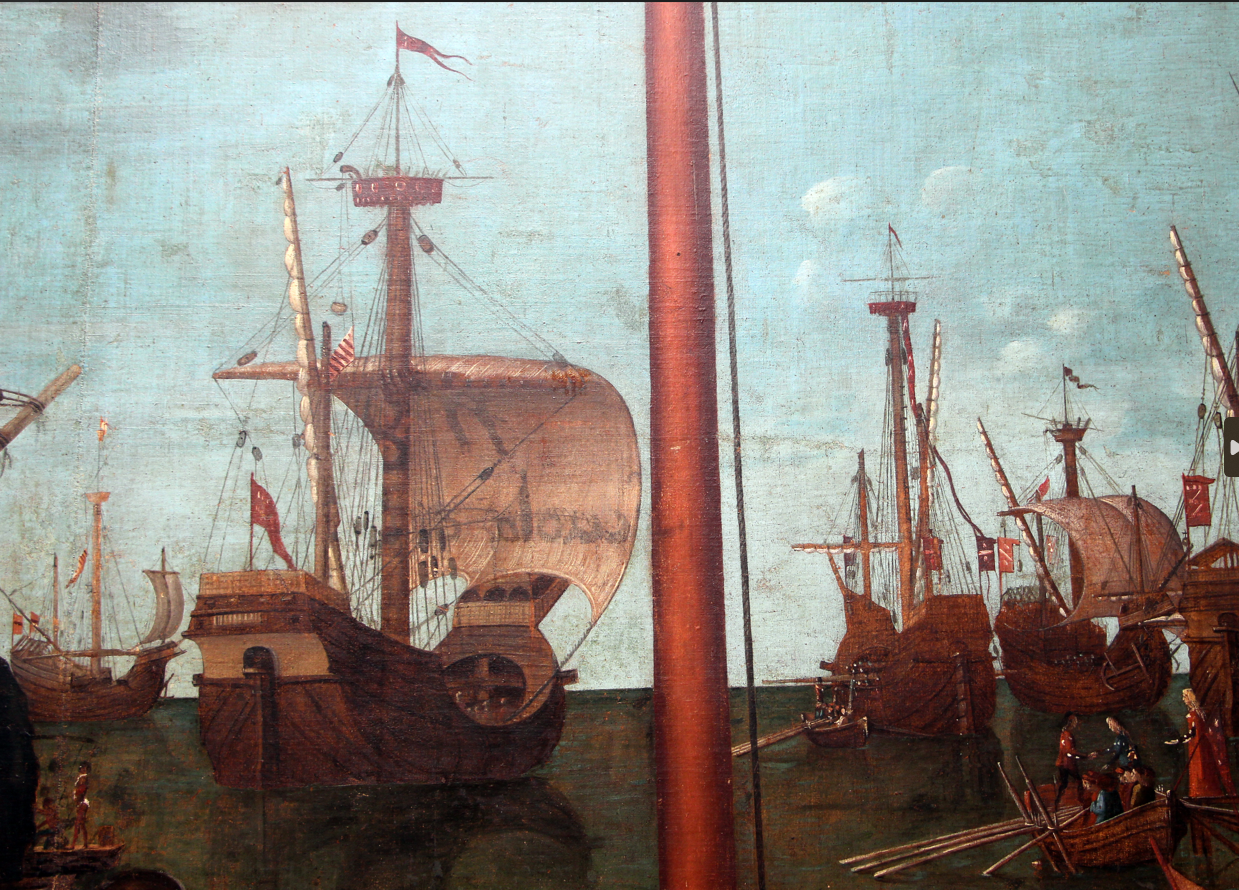
I've spent a frustrating evening trying to get a zero point to base my measurements and frame positions on. The archaeological team worked very systematically, dividing the wreck site into a grid of squares 1 metre x 1 metre, starting well aft of the a*se aft end of the wreck and ending well forward of it, so as not to miss anything. The diving season is limited (presumably because of weather), so beginning in 1983 they covered an area of 40 square metres each year, starting at the stern. The after end of the keel is one known point, but the other 'zero' they chose for all other measurements - and in particular, the locations of 12 cross-sections shown in diagrams - was oriented to the outer end of a particular strake, and I couldn't find any way to relate it to the keel. Eventually, in a discussion of the framing, they gave the distance from the after end of the keel to the assumed master frame (or, as in French the word for frame is feminine, the mistress frame), labelled W59. So I now have my reference point, and I can move forward. One thing that becomes plain is that for the time, the Lomellina was BIG. An overall length of something like 46.5 metres (152 feet). The Santa Maria was only 36 metres (117 feet) and the Gribshunden, the Danish royal flagship (which was built around 1486 and sank in 1495) was only 32-35 metres (105 -115 feet). That's all for now, except to show what she would probably have looked like. These ships are from the Ursula Legend series painted by Carpaccio in Venice in 1497-8 (5-6 years before the date I believe the Lomellina was built) and presumably depict typical Venetian carracks of the time. Although there were differences in construction between Venetian and Genoese vessels, they would have been very much like this. Steven
-
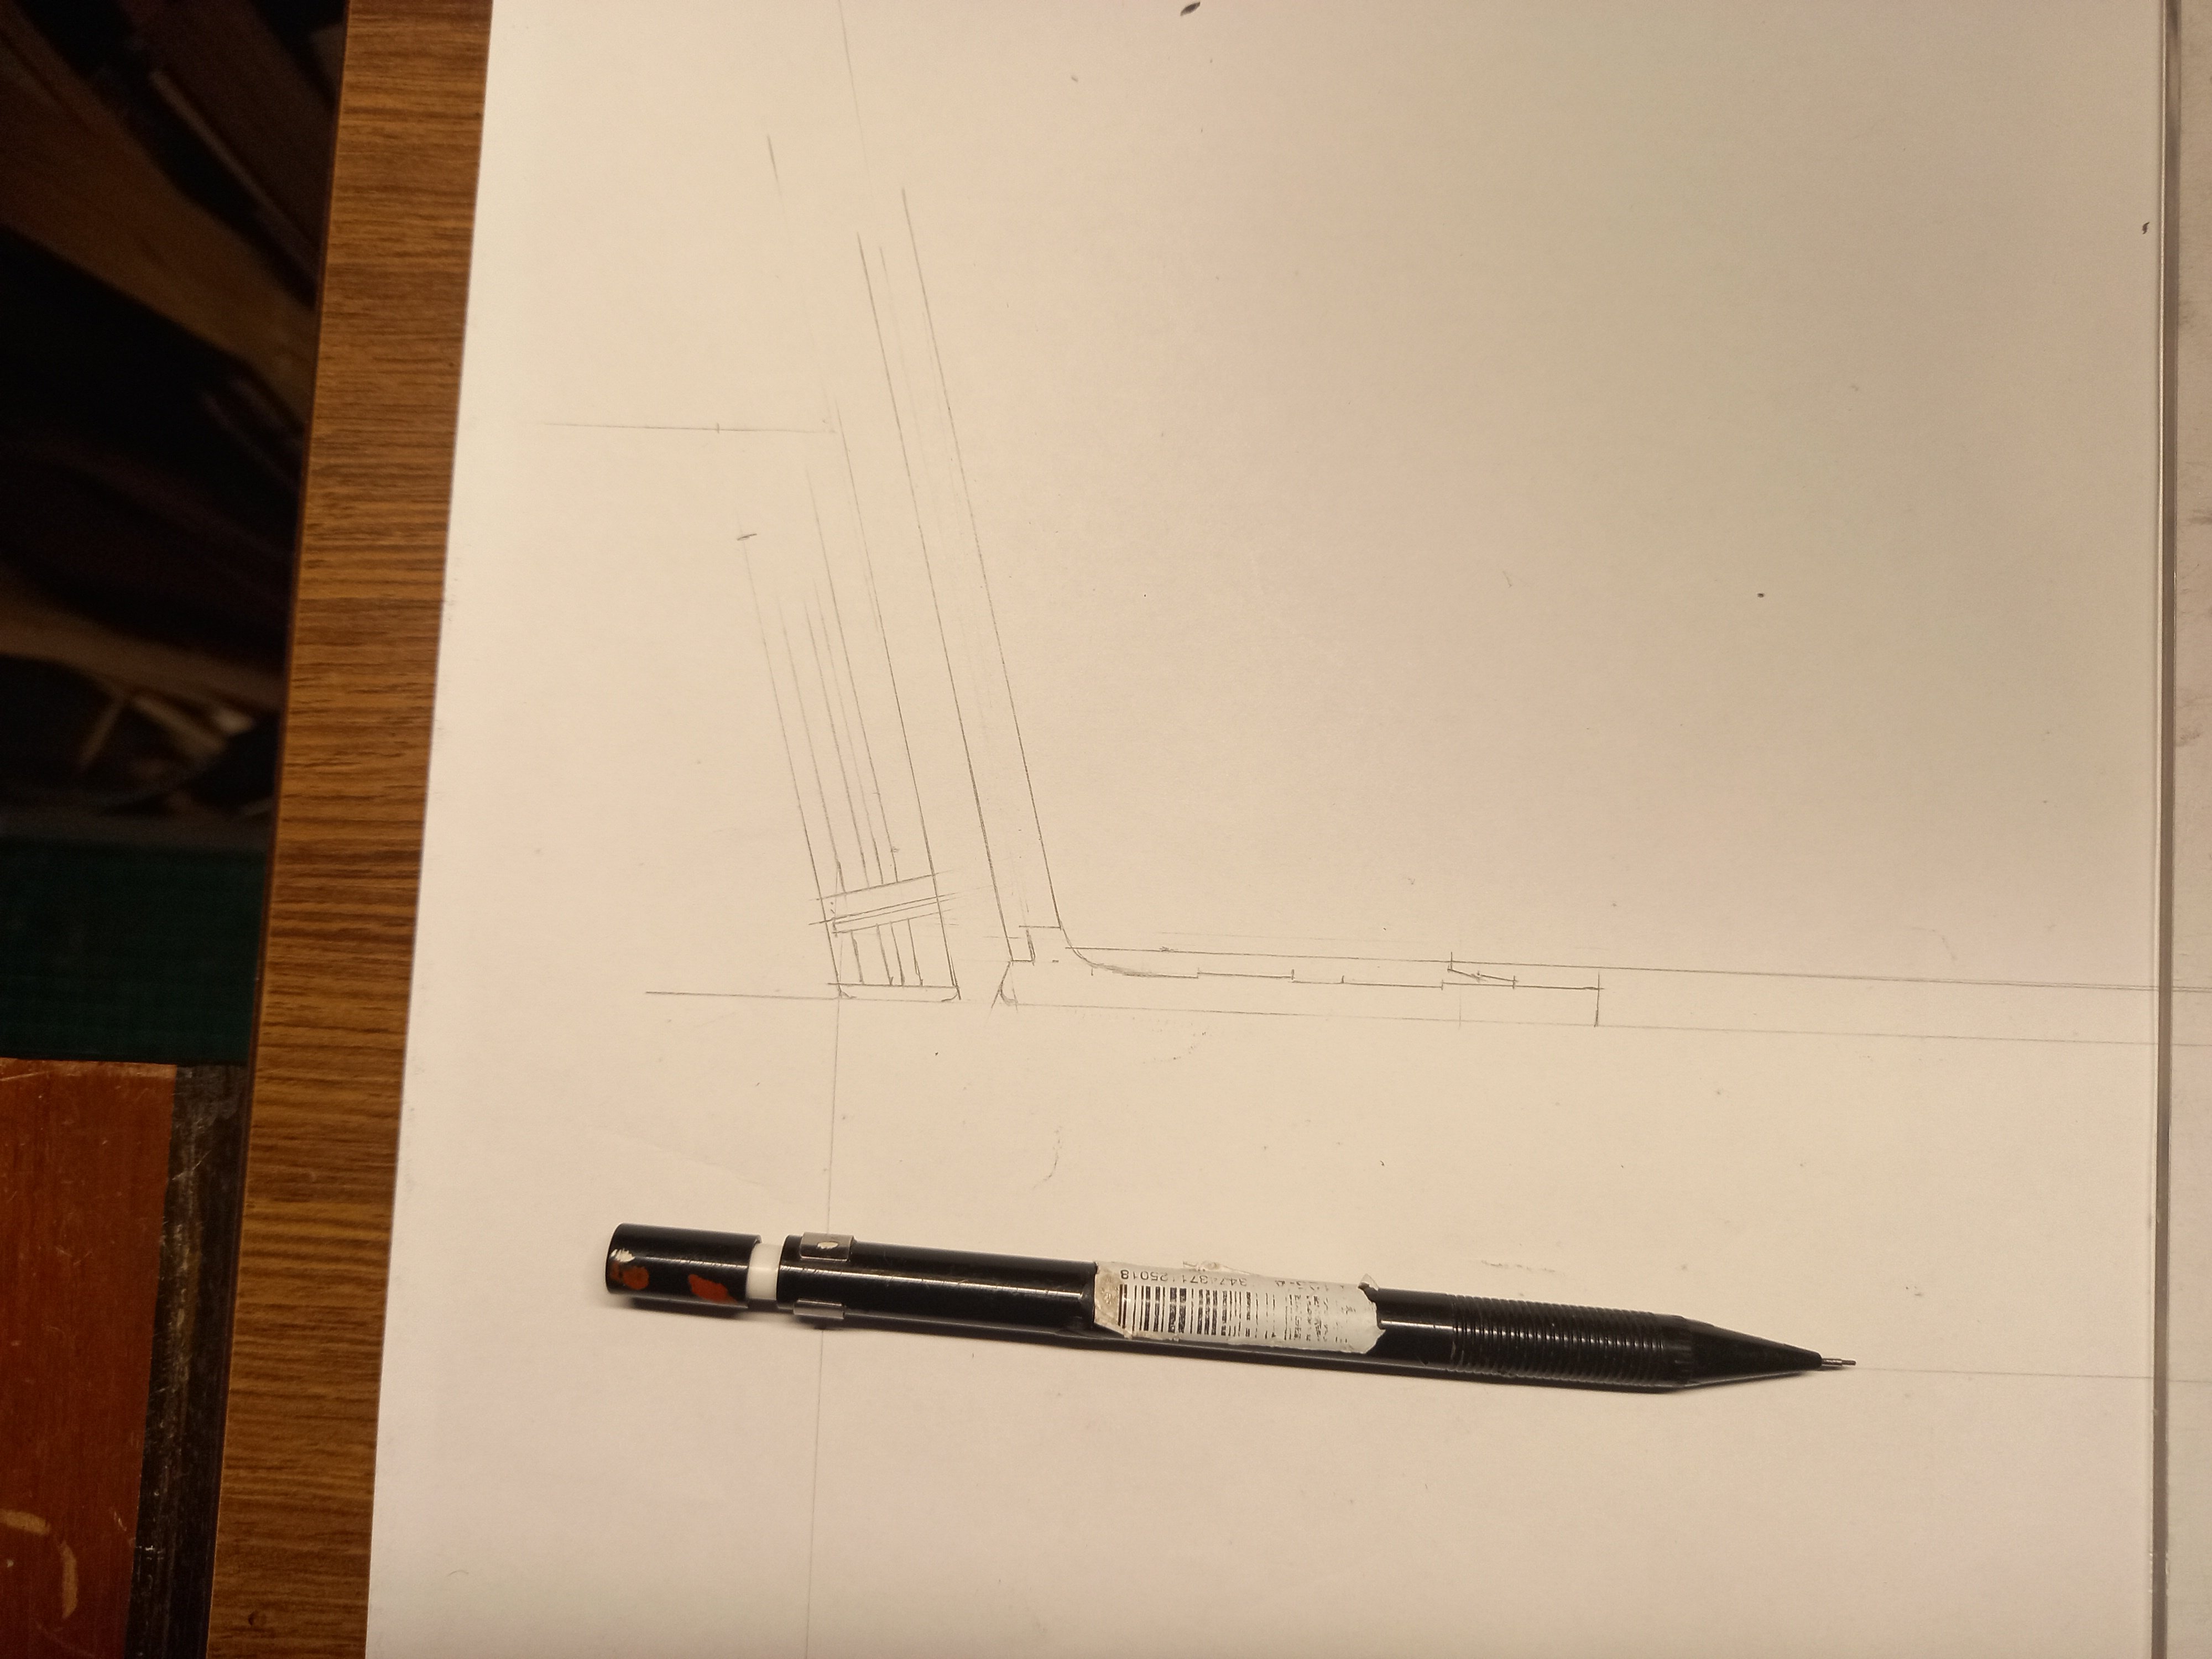
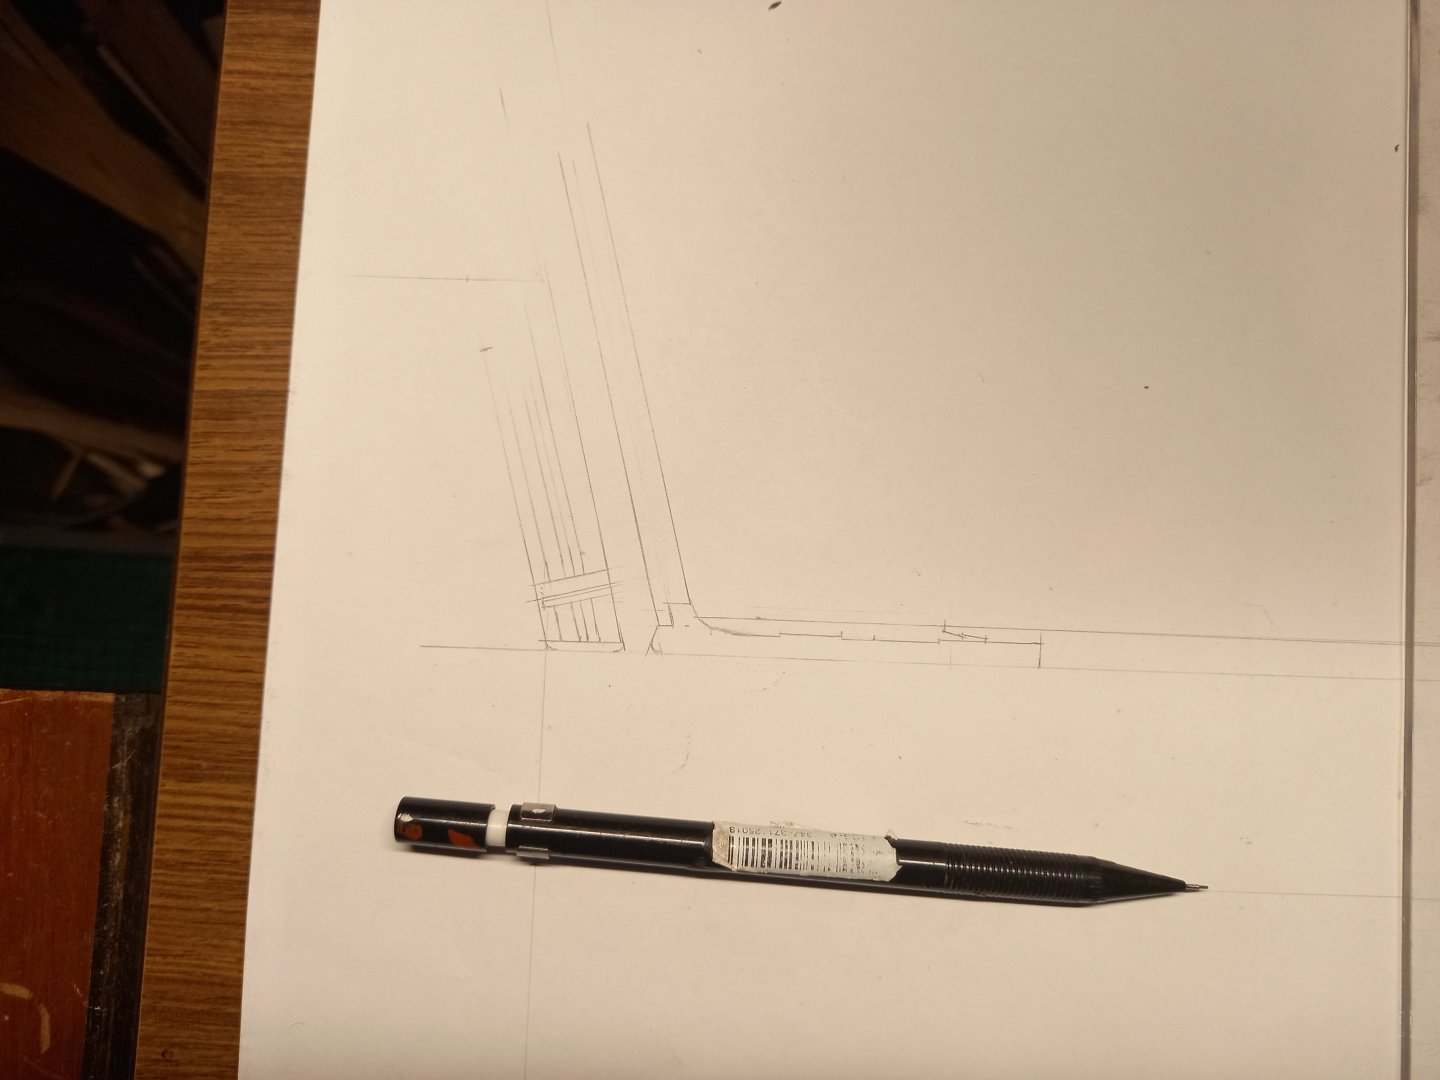
Little steps, little steps. Here is as far as I've got with the drawings - the aftermost piece of the keel, plus the rising wood attached to the top of it, plus the notional (because missing) sternpost, plus what remains of the rudder, in the process of being creatively reconstructed into a full rudder. Which I'm now having to look at contemporary pictures of carracks to get an idea of, because I don't agree with their interpretation as shown in the diagram in the previous post. This has taken me two or three days of struggling over (and bit by bit correcting) two or three pages of a Google translated archaeological report, interpreting it as an image from the diagram and the descriptions, and turning it into a 1:100 scaled drawing. It's all fun and games till someone loses an eye . . .


.jpg.a8a4b4d0f290992d7eee6be618f3c90c.jpg)