


David Lester
-
Posts
659 -
Joined
Content Type
Profiles
Forums
Gallery
Events
Everything posted by David Lester
-
 Hi Gregg, The Model Shipways plans for the Bluenose indicate that all the blocks were internally stropped and any pictures I've seen would appear to confirm that. If you are thinking of replacing the blocks anyway, why not use BlueJacket's internally stopped blocks. I used them on my Bluenose and I think they're great. They're made of cast metal and need to be painted. From the old photos, it appears to me that they were white, so that's how I finished mine. If I remember right, I ignored the sizes of the provided blocks and took the sizes from the plans and then approximated as closely as possible from what was available with the exception of the 3/32" size, which are very small and difficult to use. I sometimes found it necessary to drill out the hole of the strop and it was almost impossible to do on this size without "tearing out" the strop. For these ones I ended up substituting 1/8" blocks and look fine and they were wasy to work with and of course, anything over 1/8" presented no problem at all. You can also get internally stopped blocks from Syren, but I don't believe they are available in small enough sizes. Also, they appear to be so beautiful that I didn't have the heart to paint them, so I opted for the cast BlueJacket ones, which need to be painted, so they seemed like the perfect choice. They come with a becket, which you don't always need, so when that was the case, I just snipped it off and filed that end of the block smooth. With respect to deadeyes, I also used BlueJacket's. The lower deadeyes are attached with a "shackle" type fitting and I knew I could never get a satisfactory result trying to duplicate that with wire and/or brass rod, so I opted for the BlueJacket cast ones and I was quite happy with them. So that's one suggestion. David
-
Thanks guys. Bob - they are beautiful. I've never built a model like this before, but I'm finding it quite interesting as I've been reading a little bit about the America's Cup yachts from this period. It's hard to find photos of them though. The Shamrock is still in existence (or at least another one called Shamrock) but it's so dissimilar that pictures of it are not of any use. While the Amati kit seems to be of decent quality, I'm pretty sure it's a very simplified, stripped down version of the real thing. While it appears to be accurate as far as it goes, I suspect that there is much detail omitted. It's fun nevertheless. David
- 31 replies
-
- 4
-

-
- Shamrock V
- Amati
- (and 2 more)
-
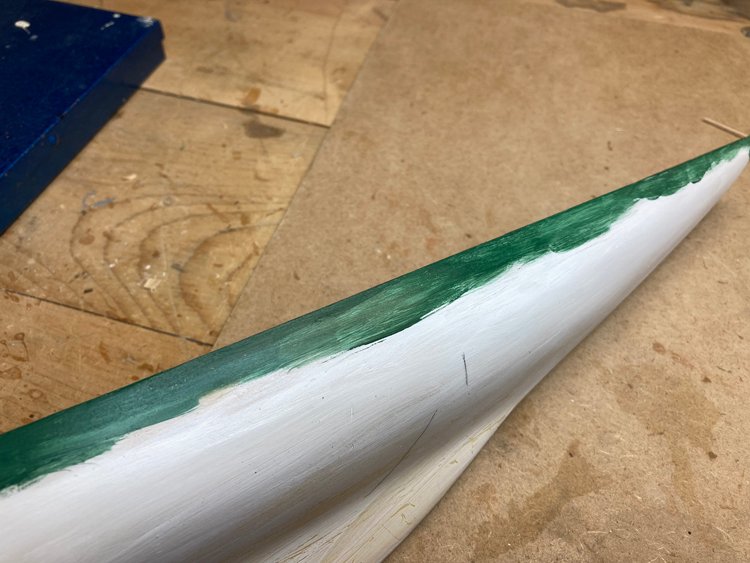
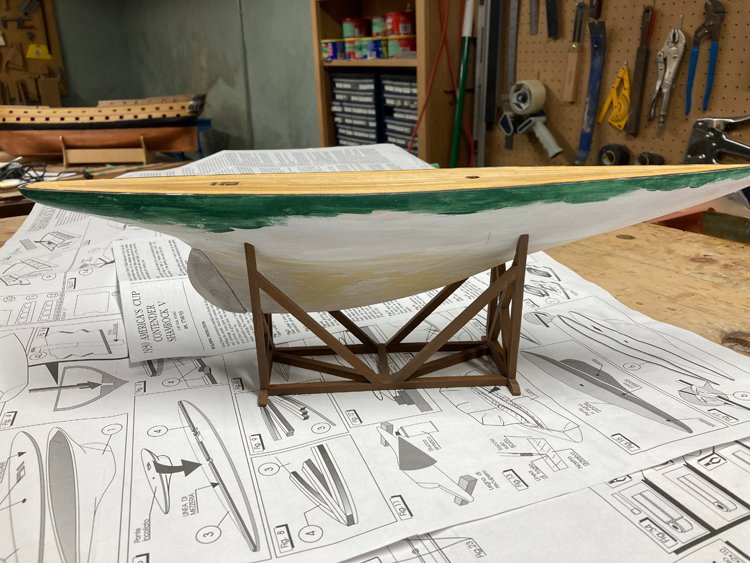
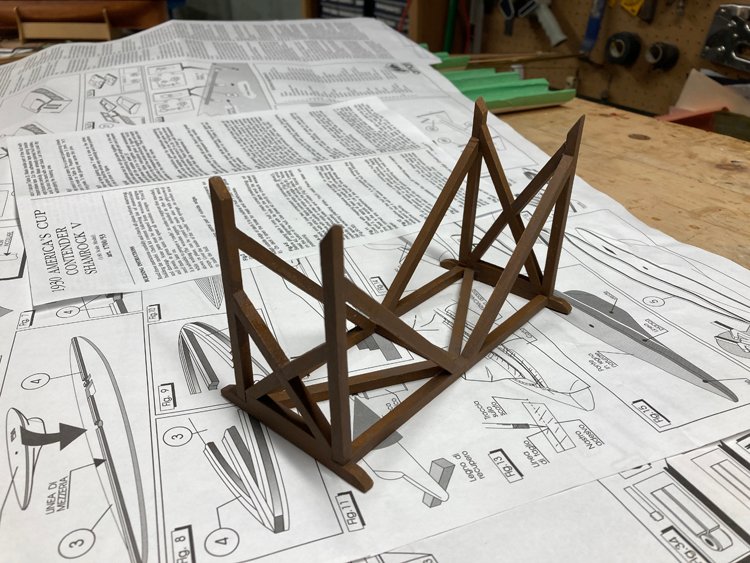
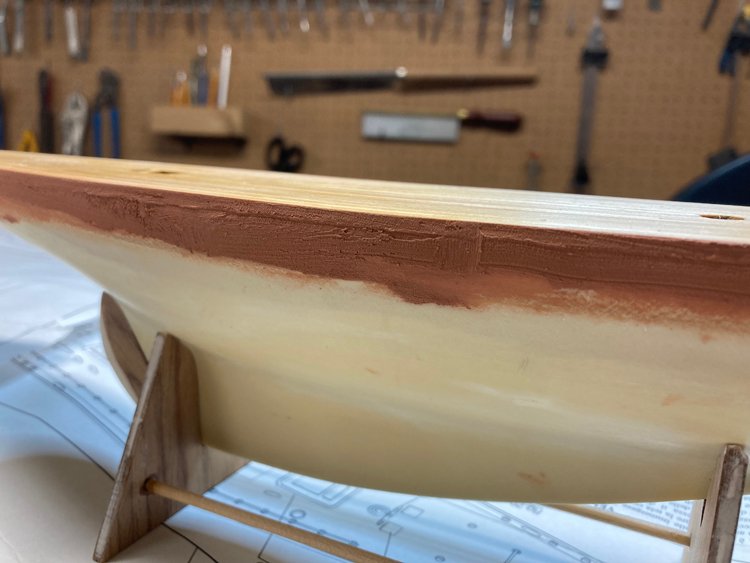
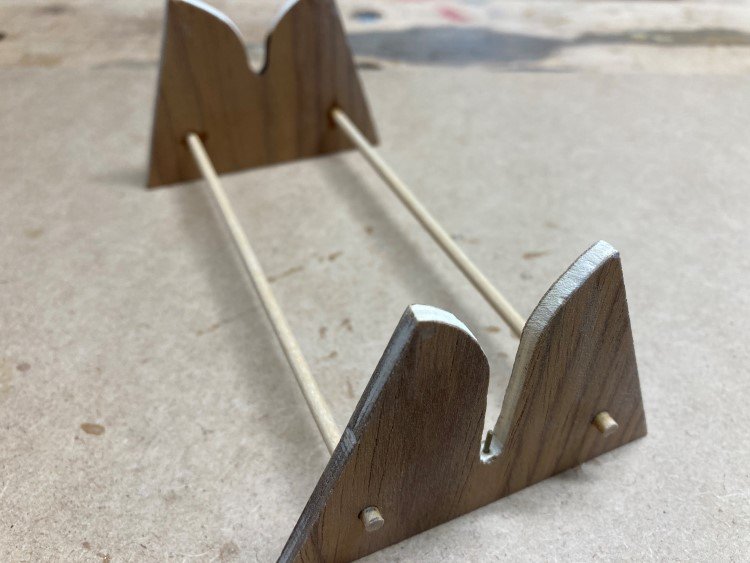
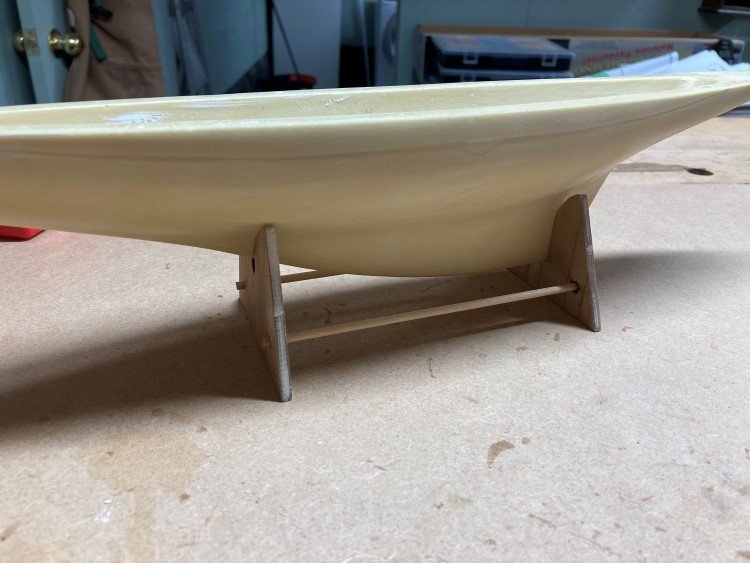
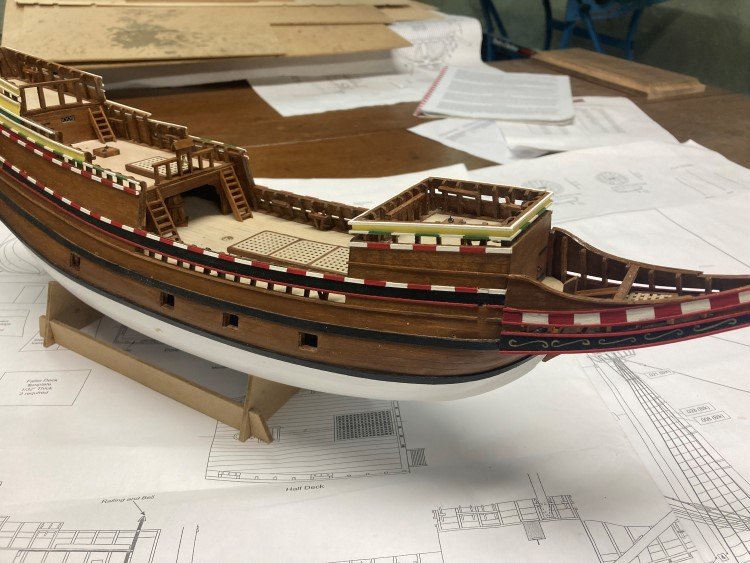
Good Morning, I've been focusing on two things over the past few days - First, I've been working on the upper edge of the hull. As I mentioned before, the sub deck is glued directly onto the hull and then the deck planking on top of that. It's necessary to get a smooth upper edge to the hull which is supposed to meet crisply with the deck. I had filled the edge with some filler, but before working any further on that, I added the black painted border that goes around the deck - Then I sanded, refilled and painted the top of the hull - It's not hard to do, but it takes quite a few coats to get it smooth. It will appear to be prefect in one light, then as soon as I adjust the light, I can suddenly see all kinds of imperfections. I applied one quick coat of green to the top and this seems to make it easier to find the tiny imperfections. It's all but finished now, just some very minor touch-ups needed. The other thing I've been working on is a stand. I thought I would use the one provided in the kit, but it's really pretty flimsy, doesn't really fit the hull very well (despite my efforts to modify it) and it isn't very attractive. I was at a loss as to what a suitable stand for this yacht might look like, but then I found something that I thought was suitable in forum member Ekis's build log for his Endeavour J Class. I though it was quite handsome, so I set out to try to do something similar. In the end I came up with something that is a little less sophisticated than his and perhaps not quite as beautiful, but it's simpler and I think it does the job quite acceptably. It was a bit challenging without a plan to work from, so I just took a trial and error approach. There seemed to be too many variables and no fixed starting point. So I just started in and quickly learned that all I should expect from my prototype was that it would have suitable overall measurements and not to worry about how it looked. I basically just slapped the bracing etc on. Once I had an established model to work from, ie its height, width and length, I then built a new one, this time paying attention to how it looked. I used some 3/16" square stock from my stash. It's not perfect, but I kinda like it and it's a definite improvement over the little kit supplied one. Thanks again, David
- 31 replies
-
- 10
-
-
- Shamrock V
- Amati
- (and 2 more)
-
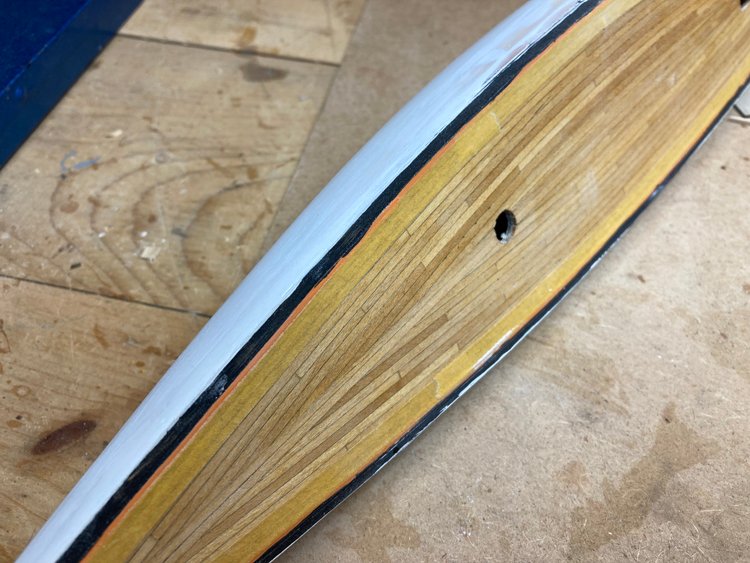
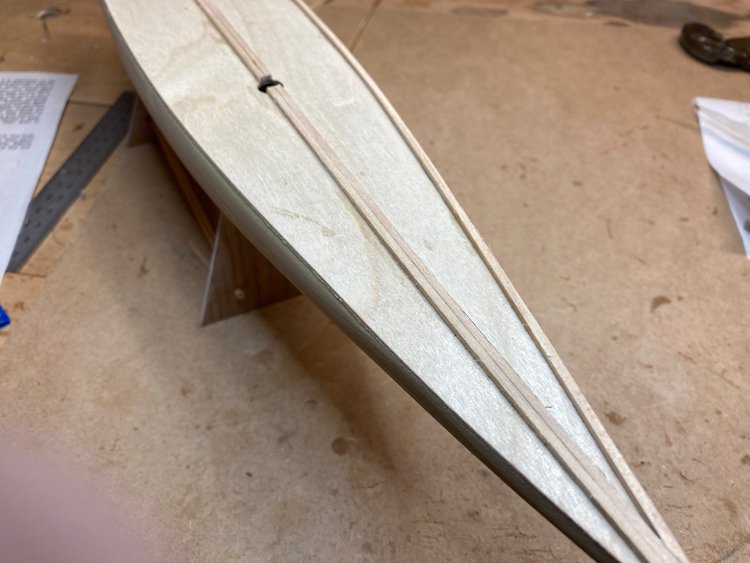
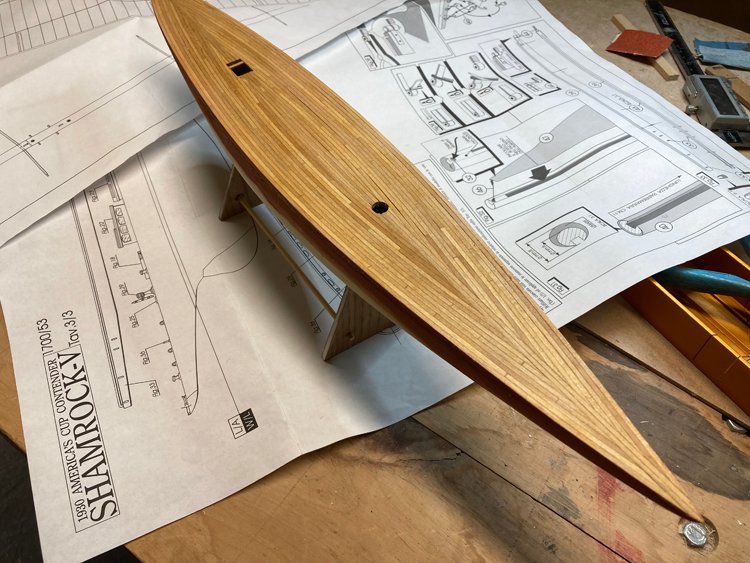
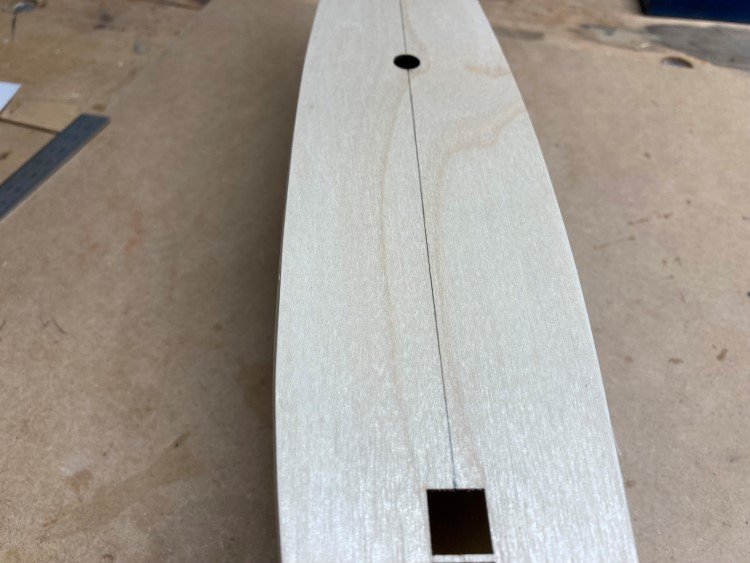
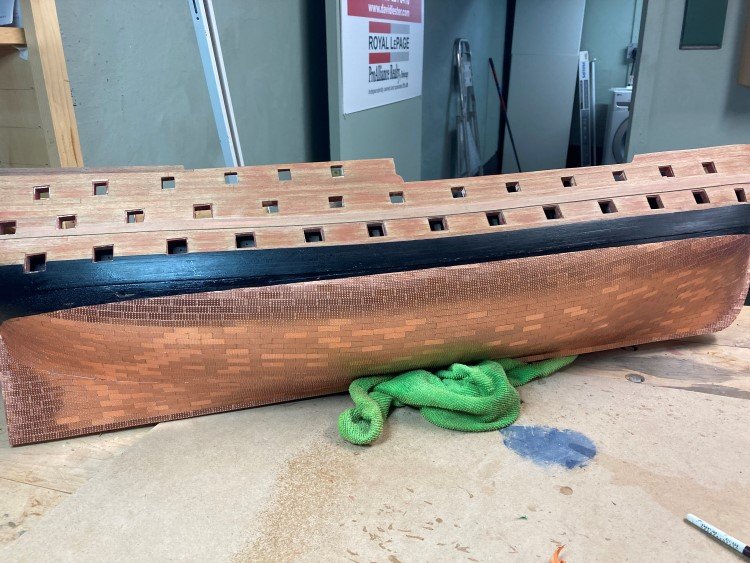
I've added the deck planking, and it's a bit different than that of other models I've done. The planking is square - it's 2x2 mm. The first step is two strips laid down each side of a centre line. Then the outermost plank and it's simply laid flush with the hull. From here it's a matter of laying the planks working toward the centre. The planks were easy to install and they take the curve of the hull without any soaking or pre-bending. On one side of the centre line, the planks went out even and the last one fit in width perfectly. On the other side of the centre line, the last gap was just a bit too big and I finished it off by adding a last 3/64" plank from my stash. It went very quickly as the hull is only just over 17" long, so there really wasn't much area to cover. Quite a bit of sanding was required. There was a lot of variation in the thickness of the planks, but with 2mm to work with, there wasn't much fear of sanding right through. This was a very easy deck to sand - it's flat and there are no sides of the hull to interfere. In fact I used an electric palm sander. I applied one coat of shellac to seal the wood before adding the filler at the point where the hull meets the deck. I have applied the first coat of wood filler ( or stucco, as the Italian instructions call it.) I think it will likely take at least one more coat before it's ready to paint. So that's my progress so far. With a pre-made hull, it really doesn't take very long to get to this point. Once the filling is done, then I think it's time to paint the hull Thanks for looking in, comments and likes. David
- 31 replies
-
- 8
-
-
- Shamrock V
- Amati
- (and 2 more)
-
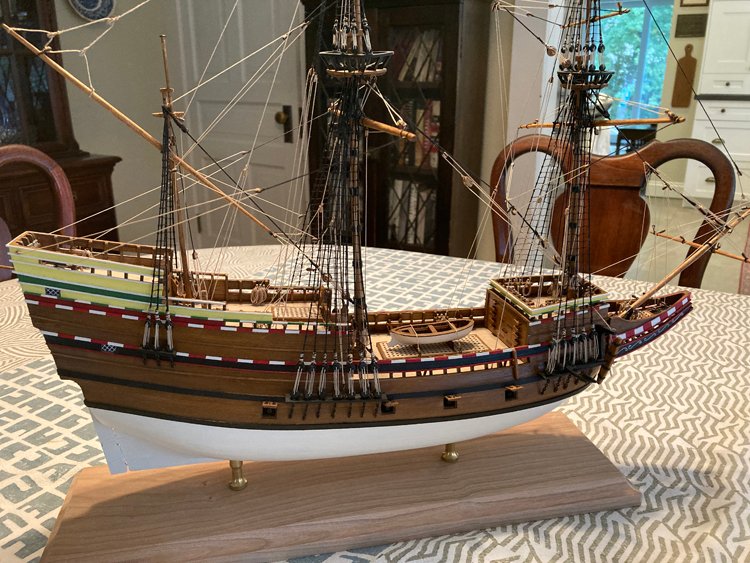
Thanks Mike - the people I made it for picked it up this morning and they seemed very happy with it. They had been looking at the ones you can buy in gift stores, so they were surprised and pleased by the level of detail that this kind of model has. I packed it up in a box with styrofoam, so it will travel safely. They had asked me what I wanted to build it for them and I said only the cost of buying the kit and stand. I didn't want anything for building it. In fact it was a treat having the joy of building it and not having to worry about where to put it. They did bring me a gift however - a $100 gift certificate to the LCBO (provincial liquor store) so this was a win-win experience all around. Thanks again, David
- 43 replies
-
- 3
-
-
- Mayflower
- Model Shipways
- (and 1 more)
-
Fitting of combined lift and sheet blocks to the yard.
David Lester replied to DaveBaxt's topic in Masting, rigging and sails
Hi Dave, Good! Sorry, I called you Bruce instead of Dave. I mistakenly referred to the post directly above mine. David -
Fitting of combined lift and sheet blocks to the yard.
David Lester replied to DaveBaxt's topic in Masting, rigging and sails
Hi Bruce, I don't know if the technique I use is "correct" or not, but it gets the job done in a fairly tidy way. First I seize the lift block in the centre of a piece of line. Then I bring one of the free ends up, forming a loop and seize it to itself as well as the other line about 1/4" or so below the first seizing. This creates a gap in the middle for the sheet block and a loop at the bottom for the yard. I place the sheet block in the centre gap and snug the second seizing up against it, then place the bottom loop over the end of the yard and pull on the two ends of the line to draw it tight around the yard. I hope this is what you are looking for. David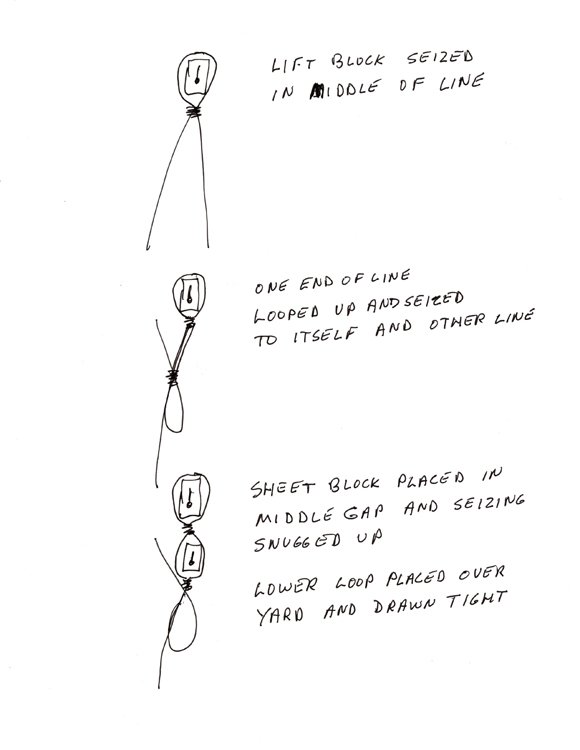
-
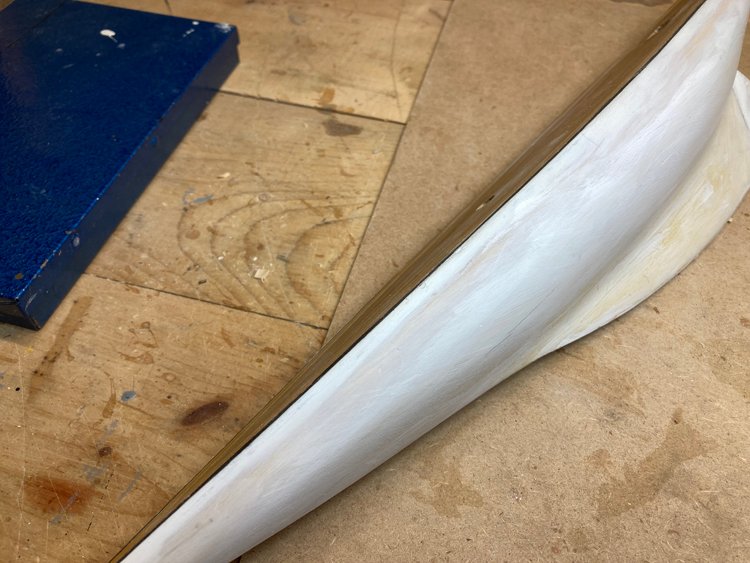
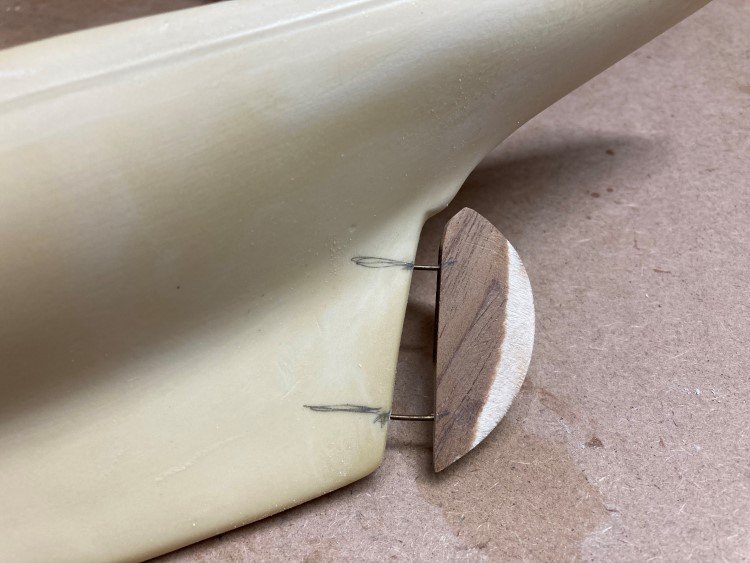
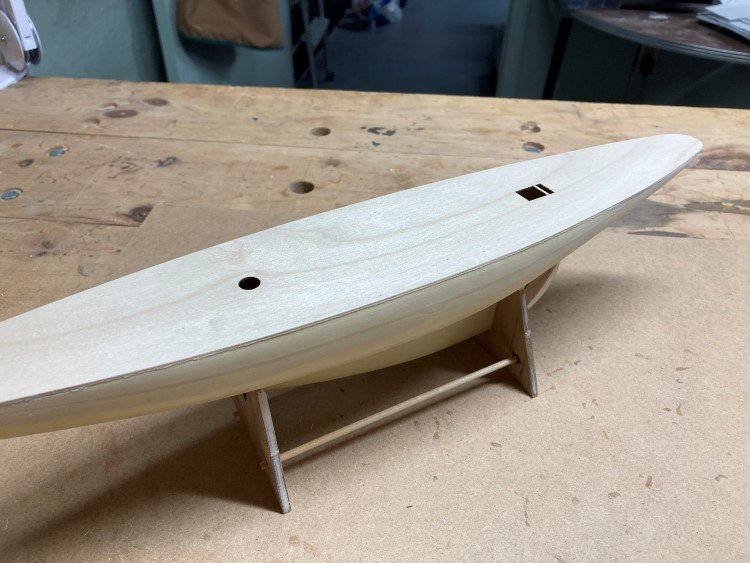
I started in last night and am beginning to get a feel for this kit. I noticed that the included stand needed quite a bit of tweaking to fit the hull correctly. I decided to tend to this first, rather than later after things are attached to the deck and the hull is painted. Both the model and the stand are very light in eight and it proved to be helpful to drill a small hole in the bottom of the keel and place a pin between the stand and the keel. The first item in the instructions is the rudder, which is made from some kind of plywood with a fairly coarse grain on the outer layer. The rudder needed to be tapered. A little more fine sanding and maybe even filling will probably be required. I'm going to leave that until I get one coat of paint on first, to better see what is needed. I could not imagine this rudder adhering well to the resin hull with some pinning - Next was the sub deck which just gets glued directly to the hull. There's a hole in the hull for the mast to sit in, so it was just a matter of putting the mast in place through the sub deck to line them up. The sub deck fits the hull beautifully. It was just ever so slightly oversized so that it could be sanded to perfectly match the profile of the hull. Centre line drawn and ready to begin the planking. The planking on this one is different than I've seen before. It's 2mm x 2mm basswood (or lime) and the planks are supposed to curve following the curve of the hull, not run straight. Because of this it's going to be necessary to work from the outside in, rather than from the centre line out. We'll see how that goes. David

- 31 replies
-
- 8
-
-
- Shamrock V
- Amati
- (and 2 more)
-
J Class Yacht Rigging Question
David Lester replied to David Lester's topic in Masting, rigging and sails
Thanks for the input, guys (and the stories too.) That's pretty much what I guessed to be the case. I don't think I'll try using wire for the standing rigging however; I'd never get it lay straight and even and I imagine just a slight touch might put a slight bend in it. I'll probably just end up using black line, but maybe I'll experiment a bit with a metal-like colour. Allan, thanks for the information about the NYYC model collection. I had a look at their website and I think That would certainly be a great place to visit, however, I don't see a New York adventure in my near future (let's be honest, I rarely leave the basement!) Thanks again, David -
I am launched into a new project building a J Class yacht for a friend (Amati Shamrock V) and I have a question about the rigging that maybe someone knows the answer to. The kit provides only natural coloured line (ecru, tan, off-white or whatever you want to call it) and the picture of the model on the box shows all of the rigging (both running and standing) done in this colour. Somehow this doesn't seem right to me. Since this is a 1930's era yacht, would it be correct to believe that the standing rigging would actually have been wire cable. Somehow that seems likely to me. Does anyone out there know? On my Bluenose model the plans stated that all the standing rigging on that vessel was wire cable and had serving. (I didn't have a serving machine at that time, so just ignored this and simply used black line.) If the rigging on Shamrock V is wire cable, is it likely to have been served as well? Somehow that seems less likely to me. Again, if anyone knows, I'd be grateful. If the standing rigging is wire cable and is not served, what do people think would be the best colour line to use for it. Simply black, or stick with the ecru line provided or would you do something unusual, such as gray. (I'm not going to try my hand at using actual wire.) Anyway, any thoughts you have would be much appreciated. Thanks, David
-
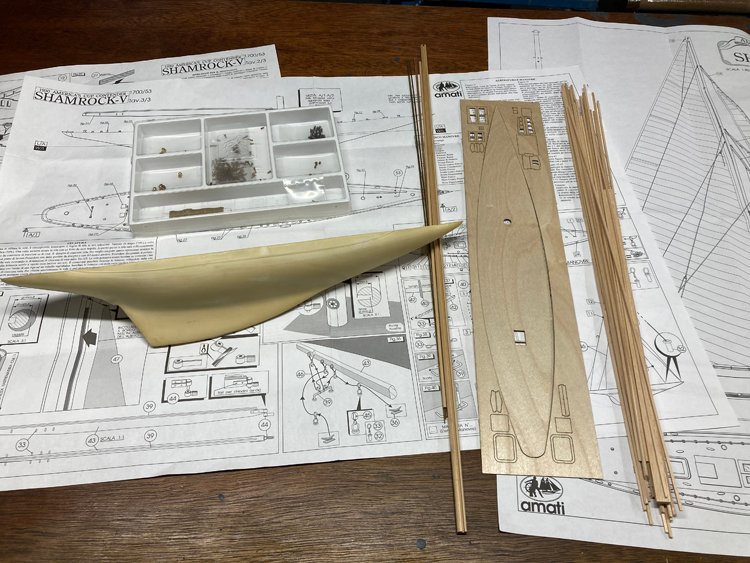
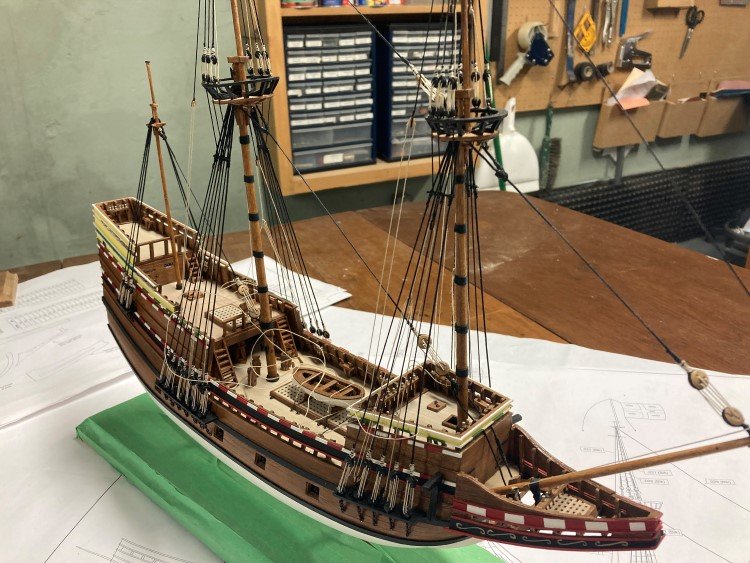
Hello Again, Well, I certainly didn't expect to be building a J Class yacht until yesterday when a friend called and asked if I'd build his Shamrock V for him. He has had the kit collecting dust on a shelf for many years and doesn't anticipate ever getting to it, so asked me if I'd build it for him. I have learned that Amati makes a range of America's Cup yacht kits, but the Shamrock V is one that has been discontinued. Since yesterday I have been poring over the kit. It will prove to be a relatively simple build, but appears to be a high quality kit. The fittings are excellent and the instructions and plans are very clear and easy to understand. (I do have a question about the rigging, but I'll ask that in a separate post under the right topic.) This kit has a pre-cast hull ( a type of resin, I guess) which will cut down on the amount of work needed considerably. I have never added sails to a model before, but I think this is one model that definitely needs them, so I'll be reading through everything I can find on making sails. The fabric provided in the kit is very fine and I don't think it will need to be replaced. Here are a couple of shots of the kit: So, an unexpected change of pace. David

- 31 replies
-
- 13
-
-
- Shamrock V
- Amati
- (and 2 more)
-
Thanks everyone for the nice comments. I really appreciate them. This was really just a diversion for me; I built it for a friend as a gift for her dad, but it turned out to be a very enjoyable project. James - good luck with your Mayflower; that's very interesting that your wife is a descendant. I think there were only about 100 or so passengers on the ship. It's wonderful to be able to trace the family line that far back, but even more so with such a rich history. You definitely need to be displaying this model! Ian - Glad to hear you and your mom and dad are liking Cobourg. You're more ambitious than I am; I have never biked to Rice Lake. I've lived in Cobourg all my life and it really is a great place. We live right downtown within easy walking distance of the beach and waterfront etc. I really wish I had been around at the turn of the last century when it was known as "Newport North." It was filled with mansions just like Newport RI which were the summer homes of wealthy American families. Sadly, unlike Newport, almost all of them have been demolished over the years. Essentially there are only three left, and not surprisingly they're smaller ones. Two of them are vacant and all but derelict, but one of them is still owner occupied and sits on four acres on Lake Ontario. It has been used in many movies and TV shows. In fact if you want to see it, it's featured in the new Netflix movie "The Luckiest Girl in the World." Not really a great movie, but great scenes of both the interior and exterior of this mansion. When I was a kid, my best friend's family lived in this house and I spent almost as much time there as at home. Since I grew up in an 1100 sq. ft. 1950's clapboard bungalow, this mansion was mesmerizing to me; filled with antique furniture, Persian rugs, toy soldiers, solar topees, an actual tiger skin rug, military mementos, scale models of the Tower of London and the London Zoo and a seemingly endless variety of exotic things. It was equal parts Addams Family and Viceroy of India. But most importantly it was also filled with ship models which my friend's dad built. He could see how fascinated I was with them, and he patiently went over them with me in great detail. I credit this experience with why I am still so interested in them. Anyway, sorry for this little digression. Thanks again everyone for the comments and likes. David
- 43 replies
-
- 3
-
-
- Mayflower
- Model Shipways
- (and 1 more)
-
Thanks for comments, Dave; much appreciated. Half an hour ago, I would have said for sure my Agamemnon, but I have just been called by an old high school/university friend asking if I would build his Amati Shamrock V for him. It has been sitting on his shelf untouched for many years. I'm going to have a good look at the kit this afternoon, so we shall see.
- 43 replies
-
- 1
-
-
- Mayflower
- Model Shipways
- (and 1 more)
-
Hi David, By all means keep working on your Mayflower. I just checked your build log again and it's in great shape. I think you'll find it comes together quite quickly. Looking forward to following your progress. Thanks, David
- 43 replies
-
- 1
-
-
- Mayflower
- Model Shipways
- (and 1 more)
-
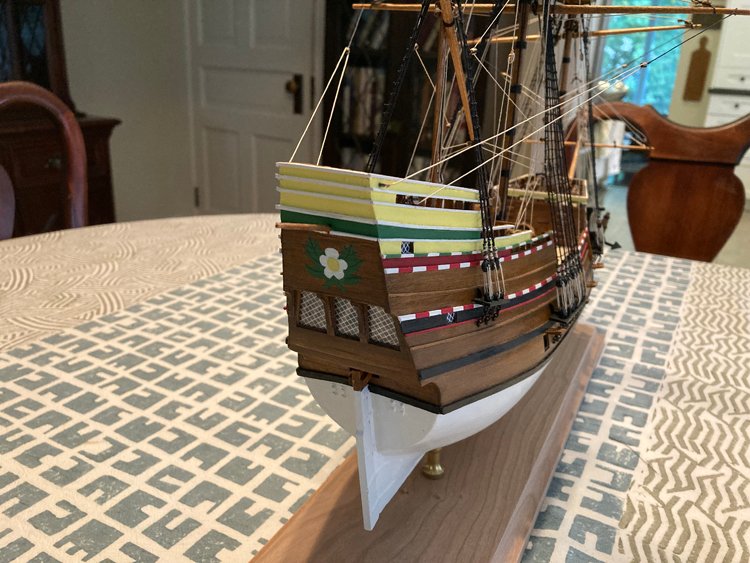
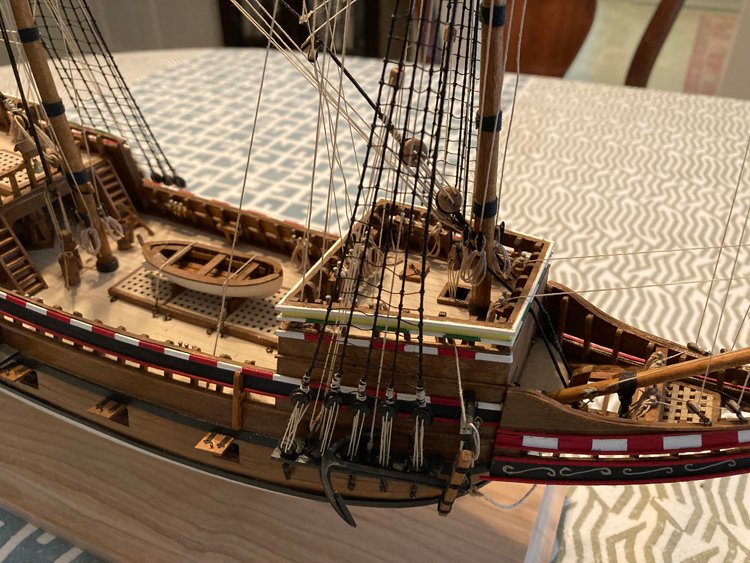
Hello All, Well, it appears that I have finished the Mayflower more quickly than I had anticipated. I'm afraid I haven't given many updates on the rigging, but really, there would be very little to be gained by anyone. This is a small model and the rigging couldn't be more straightforward. It was just a matter of working through it until suddenly it seemed to be done! So, I have a few thoughts on this model. I think I mentioned at the beginning of this build log that I was building this model on commission for someone who wants the Mayflower specifically. I don't believe I would have chosen this kit otherwise, because it's not the era or type of ship that particularly interests me, but nevertheless, it was a really enjoyable kit to build and it makes up into a very attractive and eye-catching model. I think this is a kit that deserves much more interest than it seems to attract on the forum. It has a lot going for it - it doesn't break the bank to buy it, it's not so big that it's difficult to display, it isn't too difficult and the instructions are foolproof. This would be an ideal kit for someone fairly new to the hobby; perhaps a second build for example. It was designed by Chuck Passaro and his instructions are excellent; among the best I've come across. With most Model Shipways kits, you can essentially throw the instruction book away and spend all your time deciphering the plans - especially for the rigging. In this case, it was not nearly as necessary to refer to the plans because the instructions were that complete and clear. I found this to be a fun change of pace and now with it behind me, I will return to my much bigger challenge, which has been on hold for a few months - the Agamemnon
- 43 replies
-
- 18
-
-

-

-
- Mayflower
- Model Shipways
- (and 1 more)
-
Those look beautiful, Ben. Did you glue them? If you did, I don't understand how you did it without the glue being evident. D
-
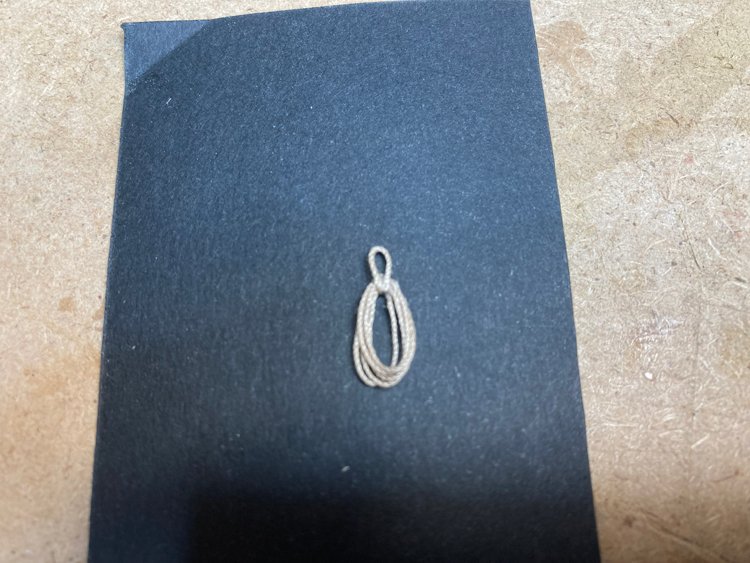
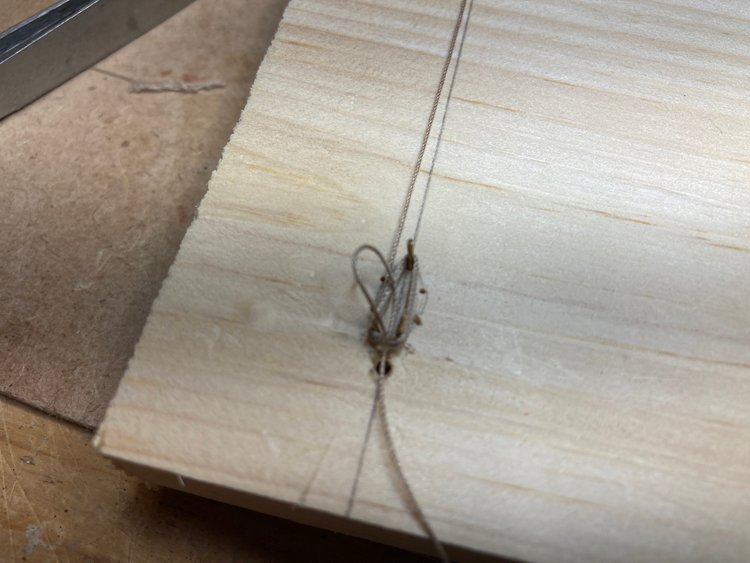
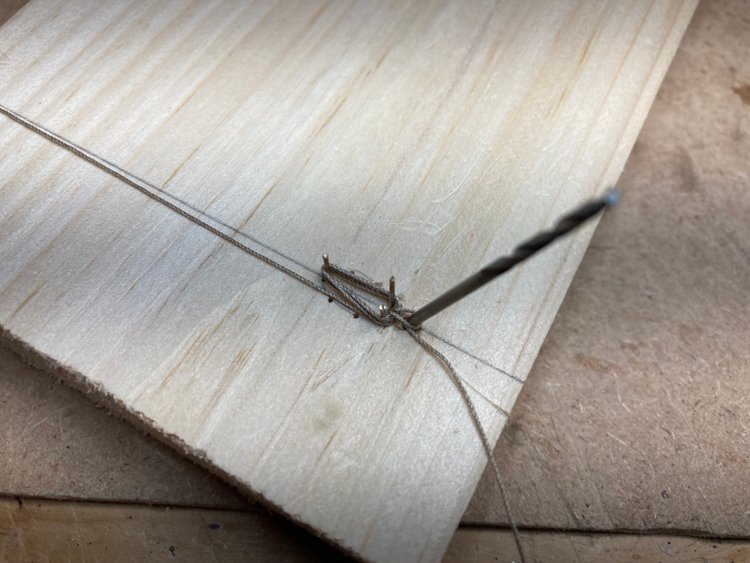
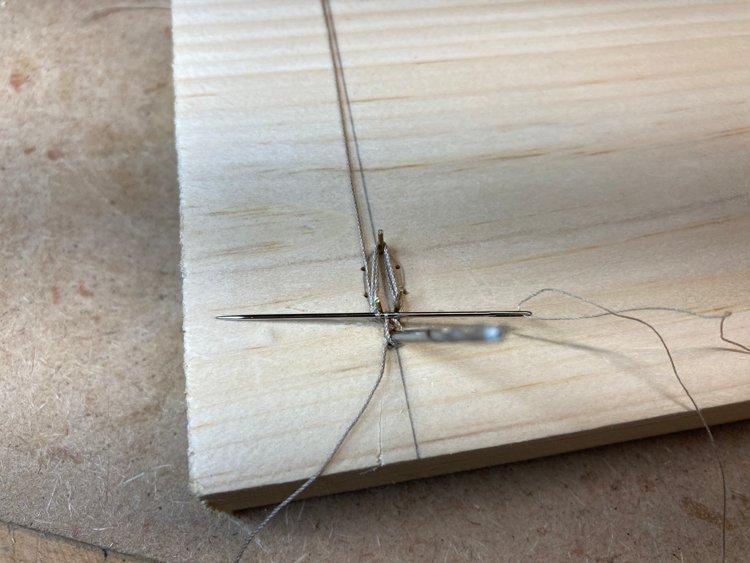
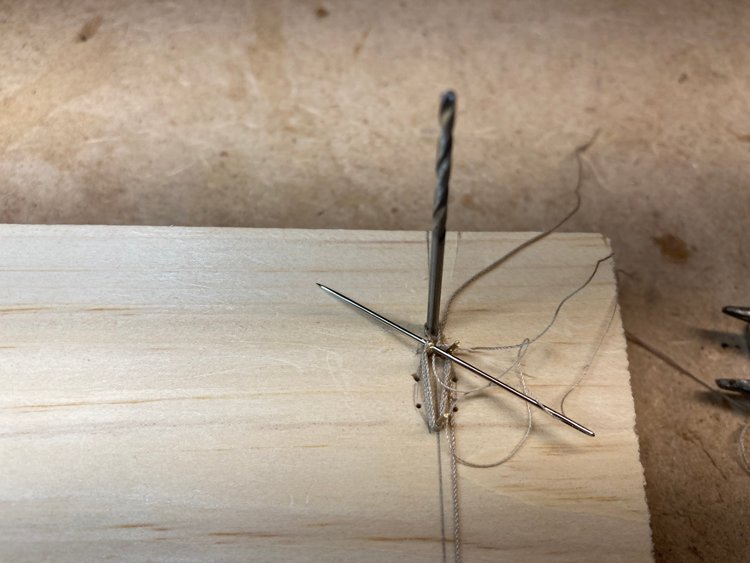
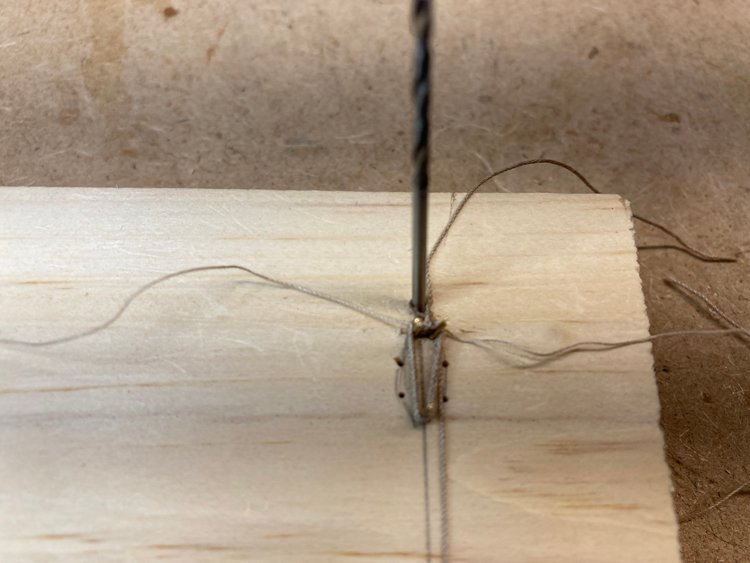
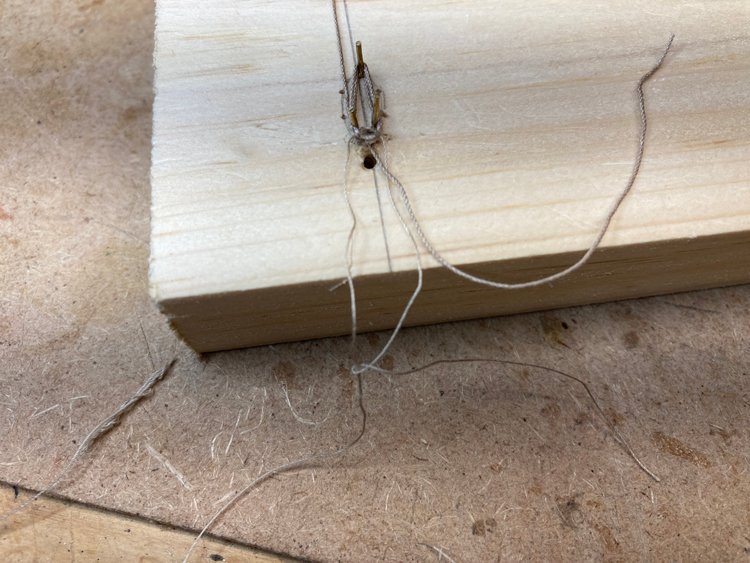
I have always struggled making rope hanks. I've tried every method I can find on this forum and on YouTube, but it always boils down to the same problem. Every method seems to work for me until that point at the end when it calls for "a small dab of glue." Well, for me diluted PVA glue never seems to hold and a small dab of CA glue never seems to hold the whole thing together either. So I end up using enough glue to hold everything together, but the result is usually the glue wicking into the line, darkening and hardening it and it generally looking terrible. The best I have ever been able to do is to try to minimize this effect, which means that at least half of the hanks I make for every model end up in the garbage and I'm only somewhat happy with the ones I do use. So here is the result of my experimenting yesterday and I think it just might be a good solution to my problem. I was trying (for the umpteenth time) the method outlined by Tom Lauria in his YouTube video. I was having the best luck with this method of any of the others I've tried, but still having the glue problem at the end, so here's how I adapted his method to try to avoid the glue problem. I wrapped the line five times around three nails - two at the top, with a narrow space between them and one at the bottom. The distance apart is the length I need excluding the loop that goes over the belaying pin; in this case 3/8". Tom outlines a perfect oval with a series of closely spaced nails, but I found it's not necessary to do that. The hank comes out more or less the same with the three nails as it does with several. Many methods only use two nails anyway, one top and bottom. However I found it necessary to have a space at the top, hence two nails at the top. Then I wrapped a length of matching sewing thread around the coils at the top and tied a knot. I'm not worrying about the loop for the belaying pin at this point. This knot around the coils ensures that they will not come apart and it's actually easy to get a small dab of CA glue on this knot without touching the main line. The glue only has to hold the knot; the thread is holding the coils. When the CA glue was set in a couple of moments, I trimmed the threads off, leaving just the knot. Then I pulled one of the long ends of the line underneath the coil at the top and up through the centre - Made a loop out of it and pulled the end back through underneath the coil at the top - And then, just like Tom Lauria did, I secured the loop with a drill bit in a previously drilled hole and pulled the loop snug against the drill bit - Here I took a length of matching sewing thread in a needle and stuck in down through the middle of the line on one side of the loop and through, at least part of, the coil below - Then I transferred the needle to the other end of the sewing thread and did the same thing on the other side of the loop - This ensures that when I tie the two ends together, the knot will be on the back of the hank - Then I just tied the sewing thread into a knot on the back side of the hank. Just like before it's easy to put a small dab of CA glue on this knot without touching the main line. When the CA glue sets, it's just a matter of trimming off all the lines - This hank cannot come apart because the coils are tied together in a bundle and the loop for the belaying pin is sewn directly to the hank. There's no glue visible on the surface and the sewing thread is completely invisible. I think this is the best hank I've ever made and the process didn't end up with the garbage men wondering "what's with all the gluey coiled thread coming out of this house?" So that's my good news for this weekend. Happy Thanksgiving to the Canadians out there! ( or should I say "Happy Hanksgiving?") David
- 8 replies
-
- 27
-
-
-
-
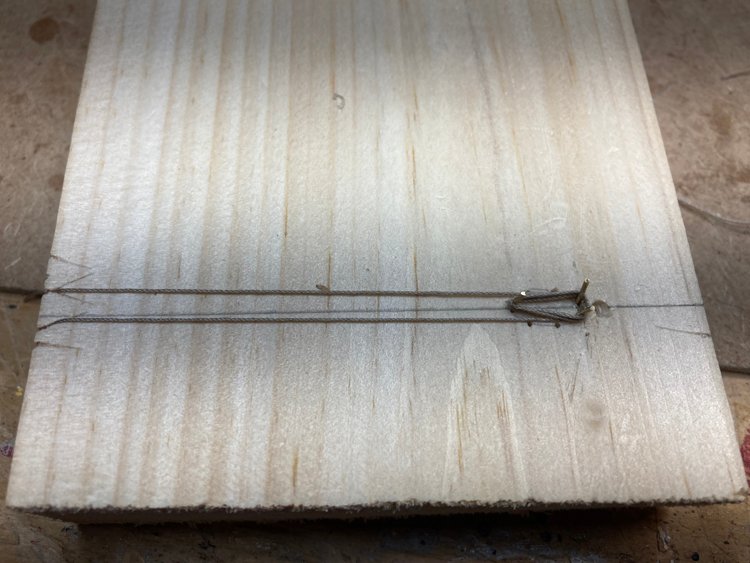
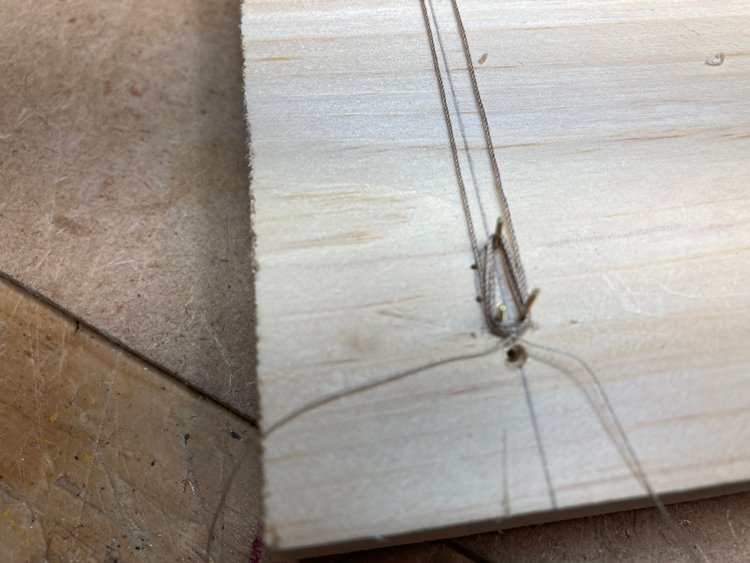
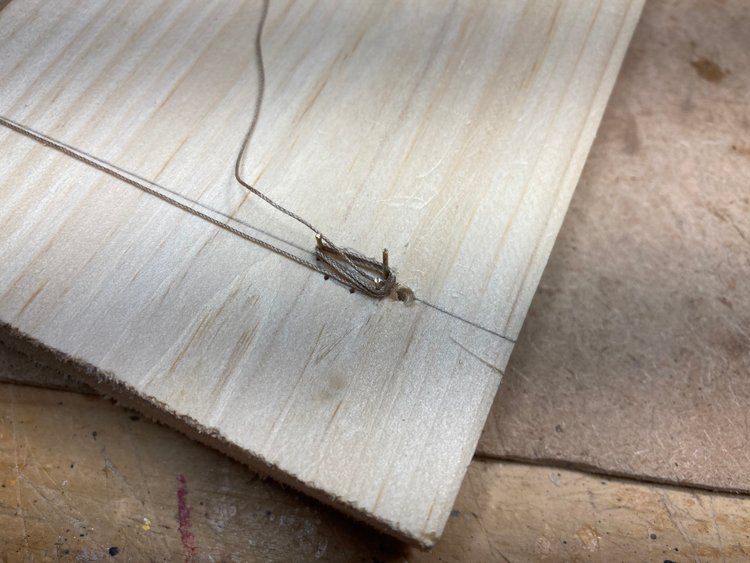
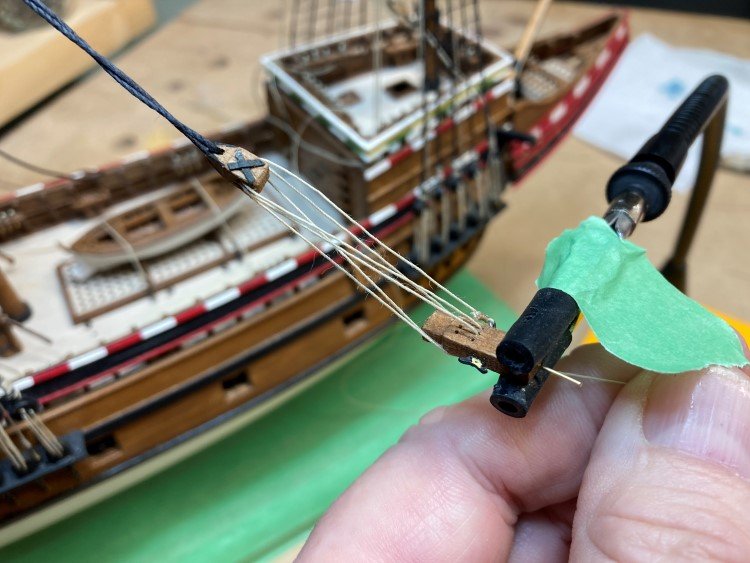
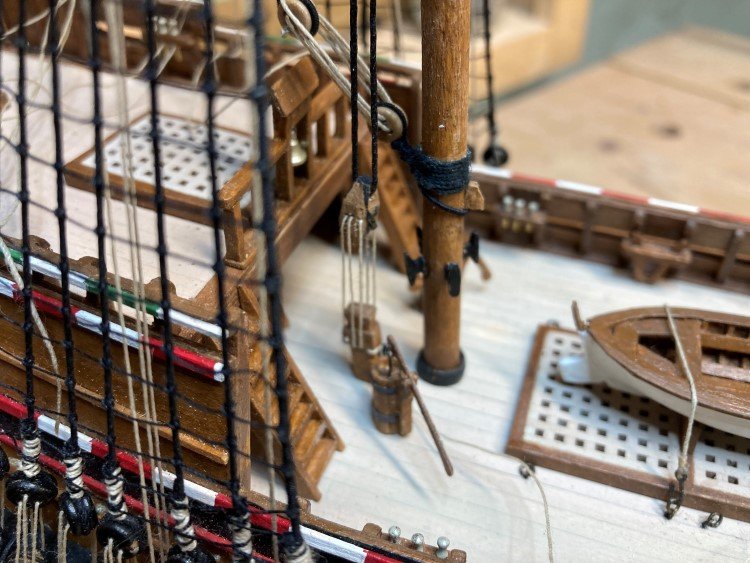
Good Morning, I've been working on the rigging and here is the halyard for the main yard tie. On rare occasions, I've been known to demonstrate forethought and I'm happy to report that this was one of those occasions. I threaded the lanyard through the ram's head block and the knight before I glued the knight in place! It would have been much more difficult to do after the knight was in place. Then with the line loosely in place, I glued the knight to the deck and snugged up the lanyard. I notice that as I get older, it's taking less and less to delight me! David
- 43 replies
-
- 7
-
-

-
- Mayflower
- Model Shipways
- (and 1 more)
-
Yeah, I noticed that they're black on the Mayflower II. The colour of these lines always confuses me. For example when I visited the Constitution I noticed that those ones are black too. I may be wrong, but the rope didn't look tarred to me - it just looked like black rope. So were the originals left natural, or were they natural then tarred, and are the current ones simply black rope in an effort to simulate tarred ropes. Similarly, I have the same questions about the Mayflower. On the Victory, however, they're currently all natural. So I'm not really sure what's the "correct" way to do it. I've done them both ways on my various models, but for the Mayflower, I think I'll leave them natural. David
- 43 replies
-
- 1
-
-
- Mayflower
- Model Shipways
- (and 1 more)
-
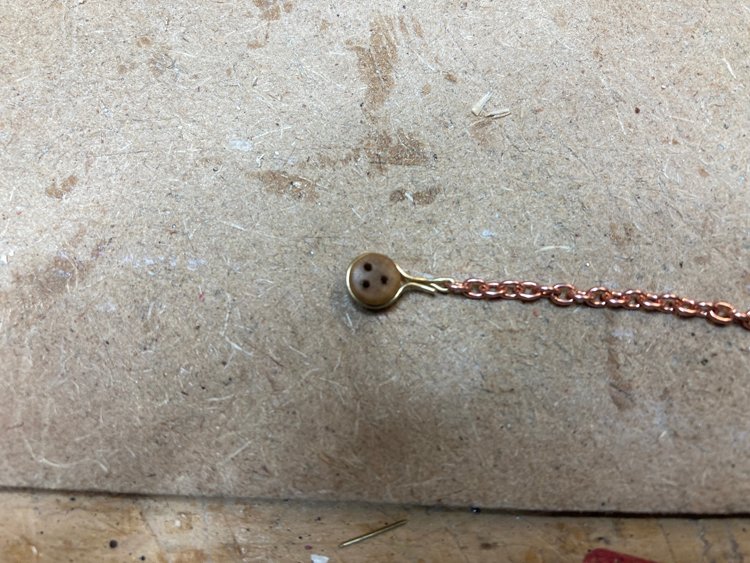
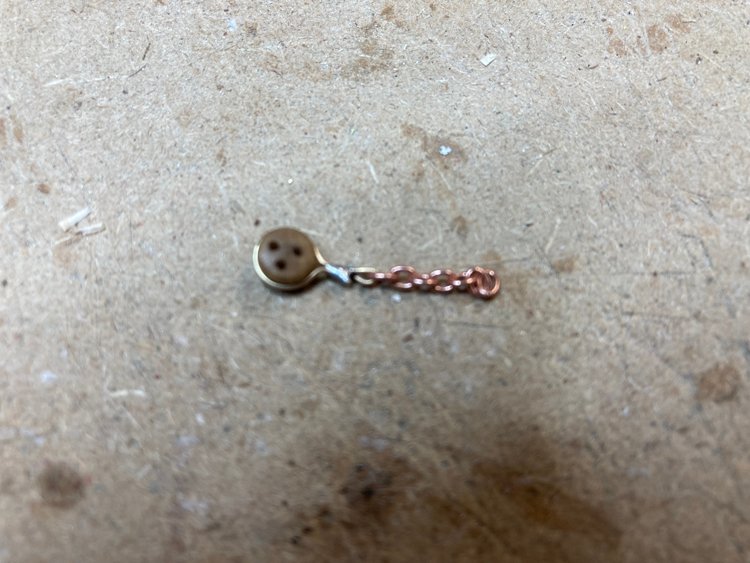
Apparently, all of the deadeyes on the original Mayflower were elongated ones, which they appear to have used on the Mayflower II as well. It's the ones on the main and fore stays that I was referring to; they're quite a bit bigger and have five holes, like in this picture below. I didn't even contemplate making the smaller elongated ones for the shrouds from scratch. But I did experiment with the larger five-hole ones for the stays, but as I mentioned abandoned that plan. There don't seem to be many options to buy such deadeyes either. I haven't seen any of the five-hole ones anywhere. Both Cornwall Model Boats and Ages of Sail have some three-hole ones, but they're too triangular and don't look quite right for the Mayflower. Bluejacket does have elongated three-hole deadeyes, which look pretty good. I could have used them, but instead I just chose to use the kit supplied ones all around. David
- 43 replies
-
- 2
-
-
- Mayflower
- Model Shipways
- (and 1 more)
-
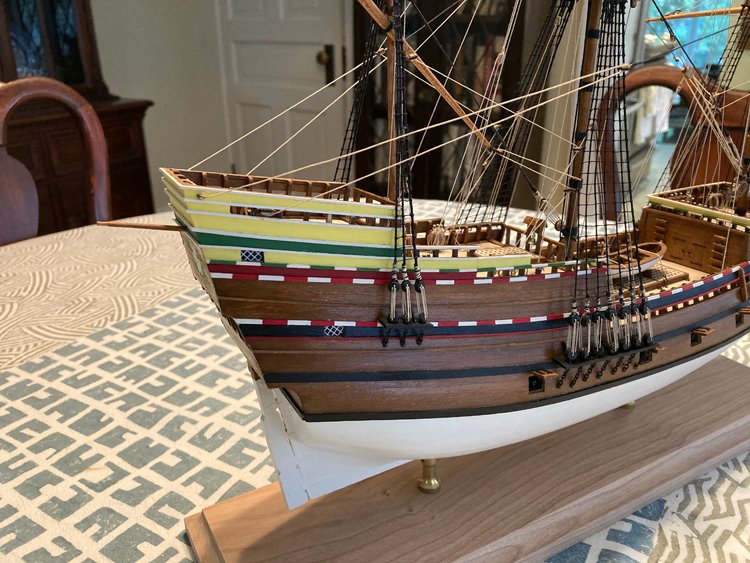
Hi All - Standing rigging is finished: For the deadeyes on the fore and main stays, the kit provides large standard three-hole deadeyes, but the instructions indicate that five-hole deadeyes with a tear drop shape would be correct and suggests making them. I tried that but had trouble getting them to look good enough. No matter what, they still looked too rough to my eye, so in the end I opted to use the less correct, but better looking standard deadeyes. I did add serving to the lines in the usual places. I wasn't completely sure it it's correct for a ship of this period, but the pictures of the Mayflower II replica appear to have it and I had the the serving machine and decided to include it. I made a mouse from wood for each of the stays. I always find them pretty easy to do. I drill a hole about 1/4" deep into the end of a small dowel and then shape the mouse on the dowel with an xacto knife and sand it smooth. Then I just cut it off the dowel. Now it's on to the ratlines: Thanks again for your comments and "likes." David
- 43 replies
-
- 7
-
-
- Mayflower
- Model Shipways
- (and 1 more)
-
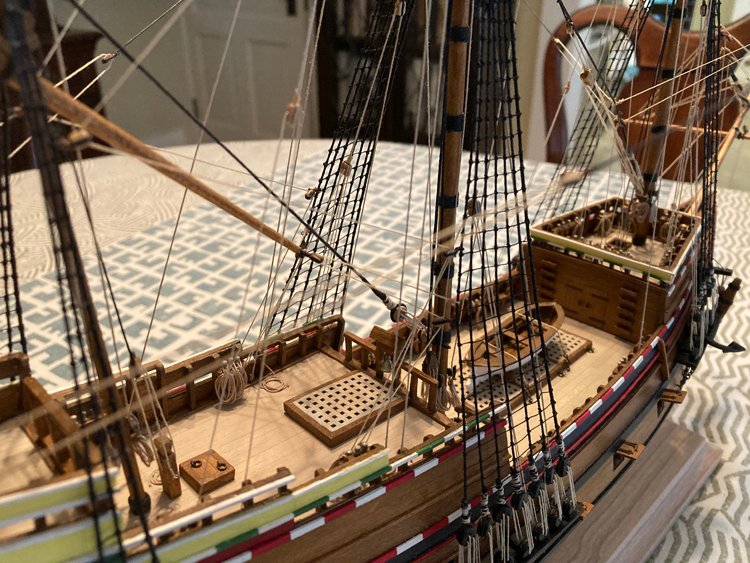
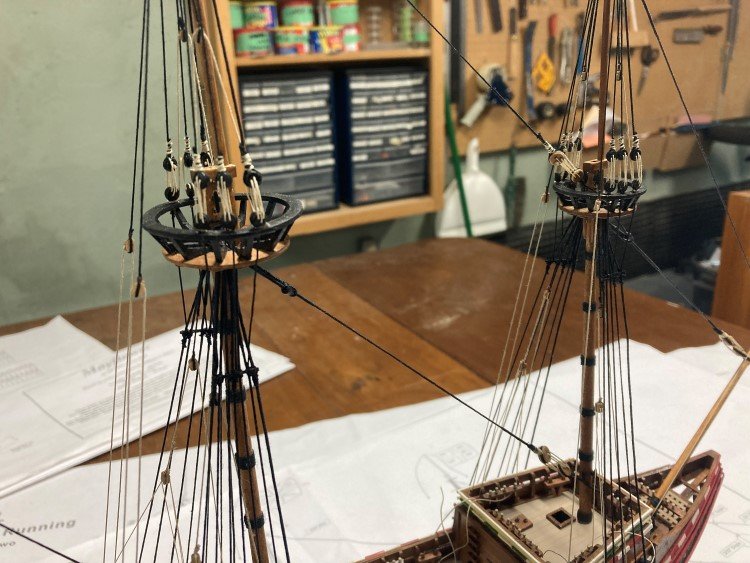
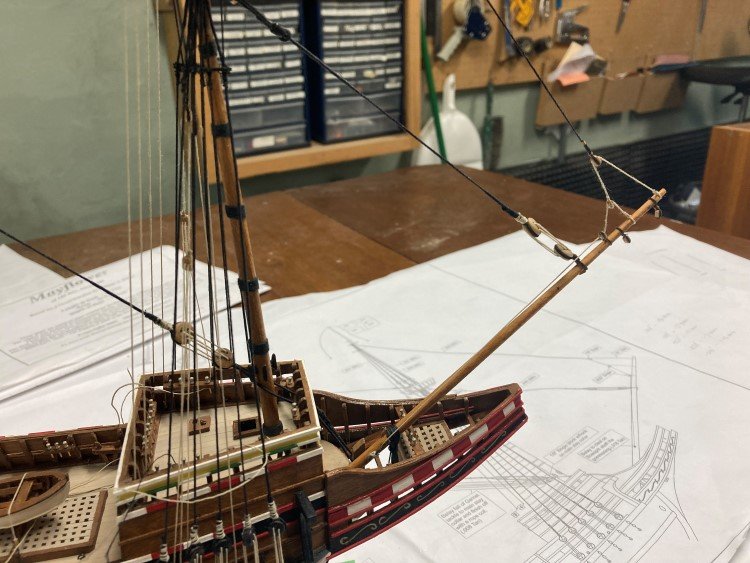
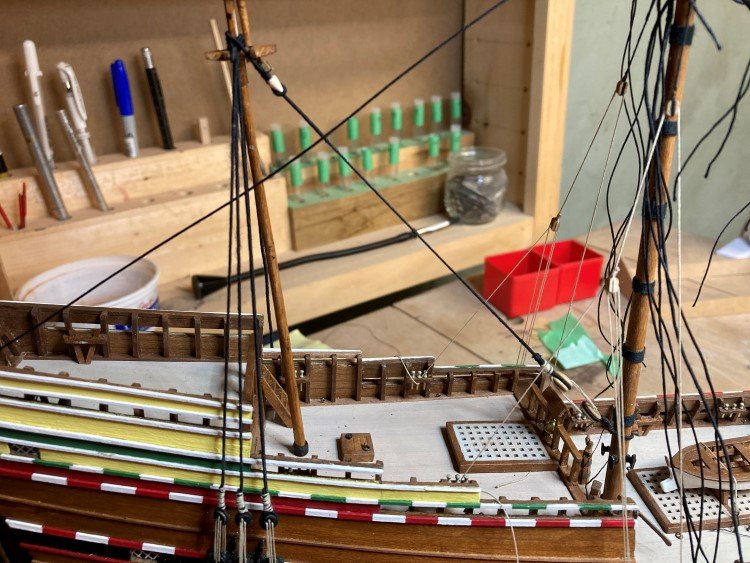
Good Morning - I'm into the rigging in earnest now. In the past I have always tended to start with the bowsprit and work my way to the stern. The instructions for this kit however suggest installing the bowsprit and then moving the the mizzen mast and working forward, so I decided to try that and see how I like it. So far, so good. The instructions suggest starting with the mizzen shrouds and then adding the mizzen stay before adding the lower main shrouds, so that's what I did. The logic makes sense - this way you can fix the stay to the main mast without the main shrouds getting in the way. One problem I did encounter however is due to how small and flexible the mizzen mast is. It isn't very robust. In order to get the slack out of the lanyard on the stay where it meets the main mast, it tended to pull the mizzen mast too far forward and, of course, there is no backstay on the mizzen mast to counteract this. I ended up undoing all the lanyards on the mizzen shrouds, securing the lanyard on the stay where I was happy with it and then redoing the shrouds, starting with the aftmost one and pulling it taut, then finally, the other two shrouds. This seemed to solve the problem and the mizzen mast is now stable and in (more or less) the right position. Moving on to the main mast, the instructions suggest first adding the tackles before doing the shrouds - The main tackles are now in place and next up are the main shrouds. I don't anticipate the same problem with the main stay as I had with the mizzen as there is back pressure on the main mast and it's considerable more robust than the mizzen. That's all for now. David
- 43 replies
-
- 12
-
-
- Mayflower
- Model Shipways
- (and 1 more)
-
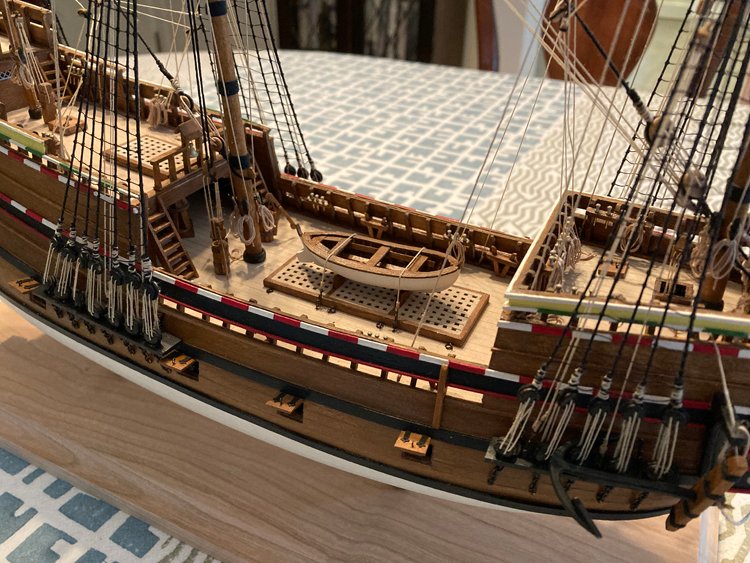
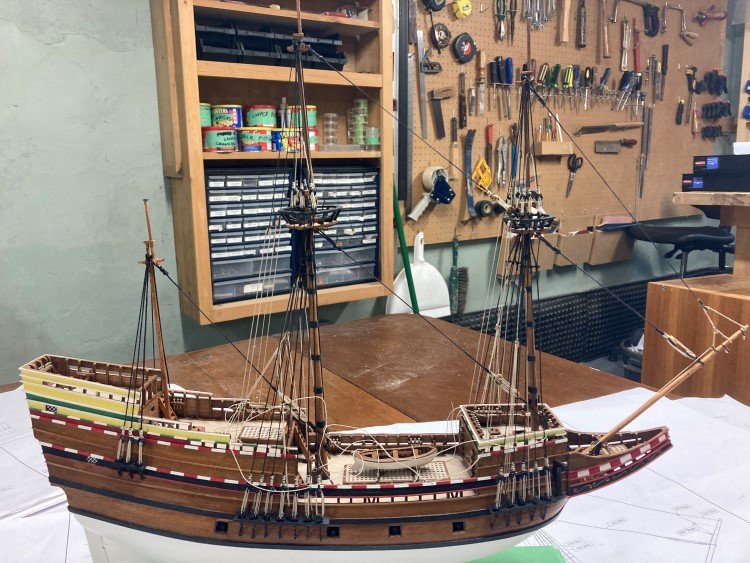
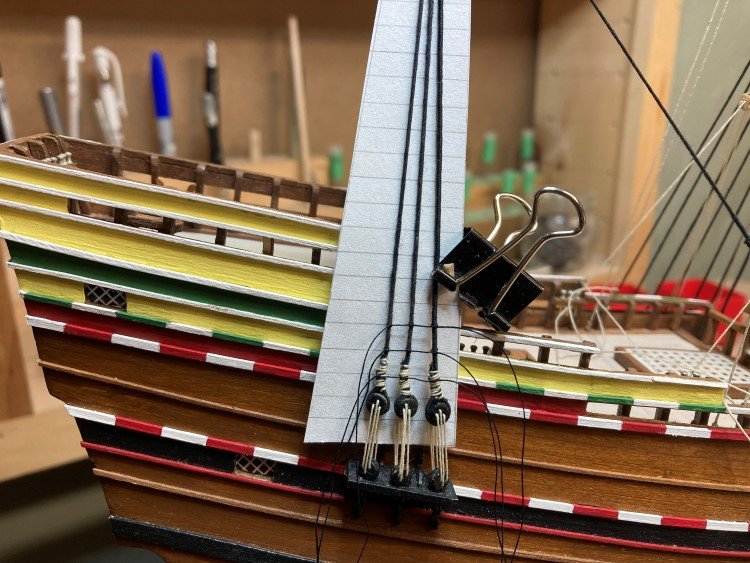
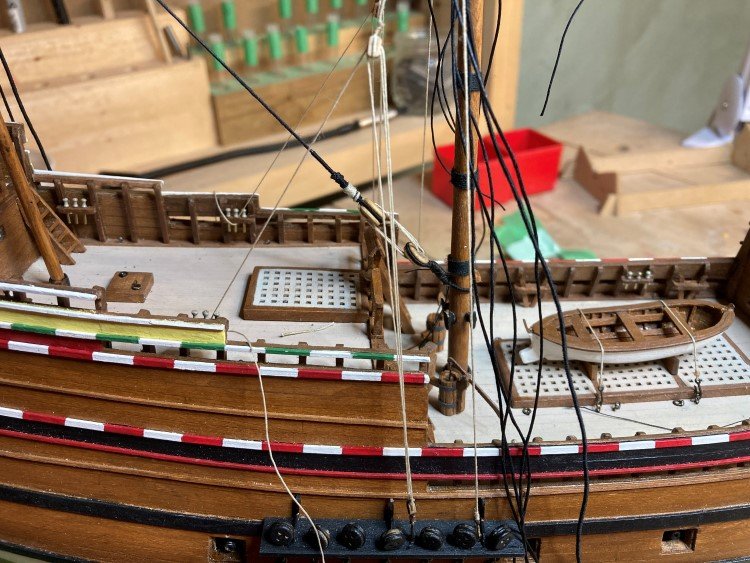
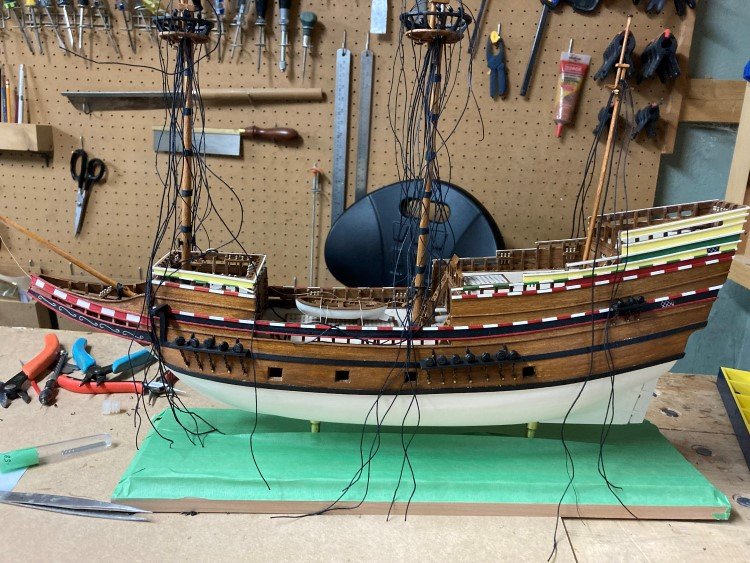
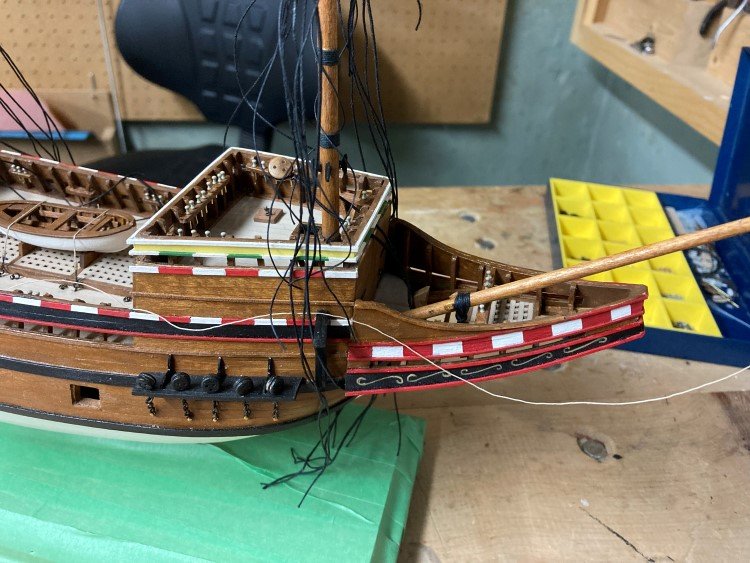
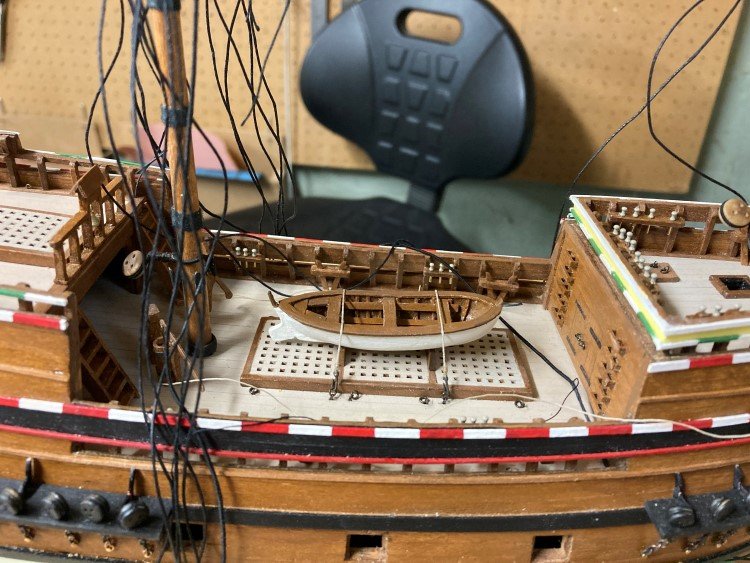
I brief update. I've added the bowsprit and the deadeye/chainplate assemblies. I've also added the boat. I don't actually take any pictures of its progress. It's built using the standard MS approach and building it proved to be as unpleasant as all of the others I have done over the years. So I have done nothing to immortalize the experience. At least there was only one of them. The Charles Morgan had seven! I don't know why I dislike building these little boats so much, but I just do. The shrouds are attached to the masts and are ready to be finished. For such a small vessel there seem to be a lot of them - five on the foremast, seven on the main mast and three on the mizzen. Thanks again for checking in, likes etc. Much appreciated. David
- 43 replies
-
- 13
-
-
- Mayflower
- Model Shipways
- (and 1 more)
-
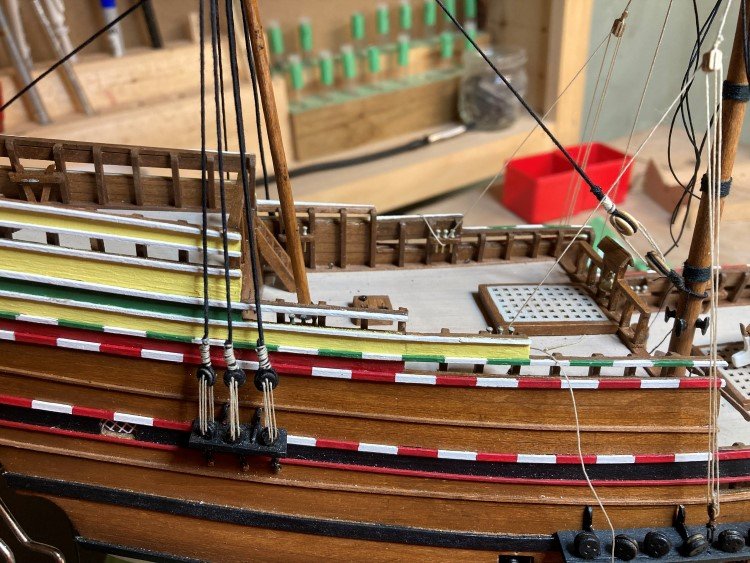
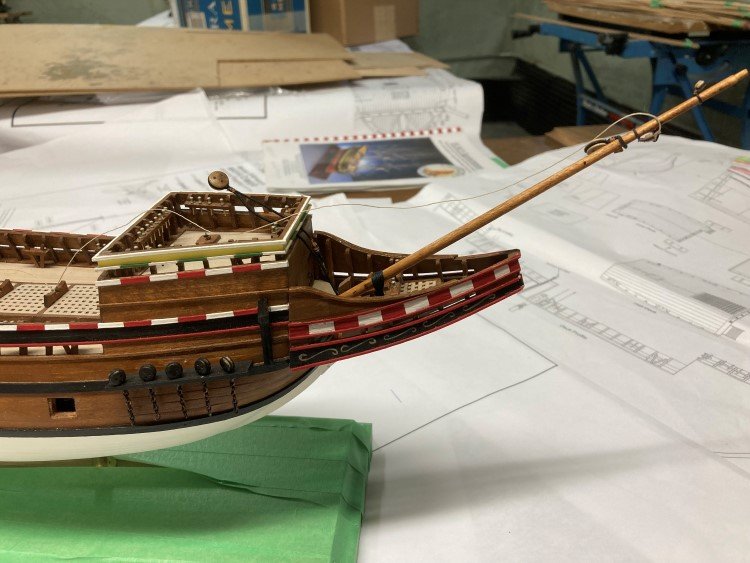
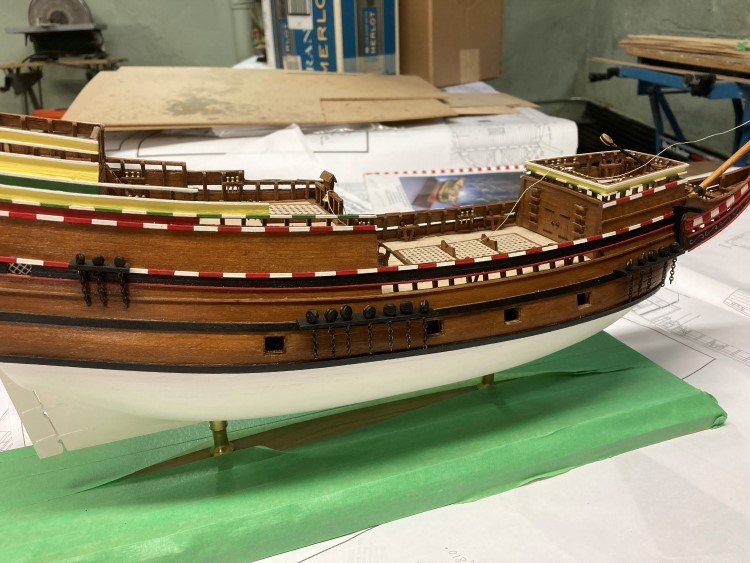
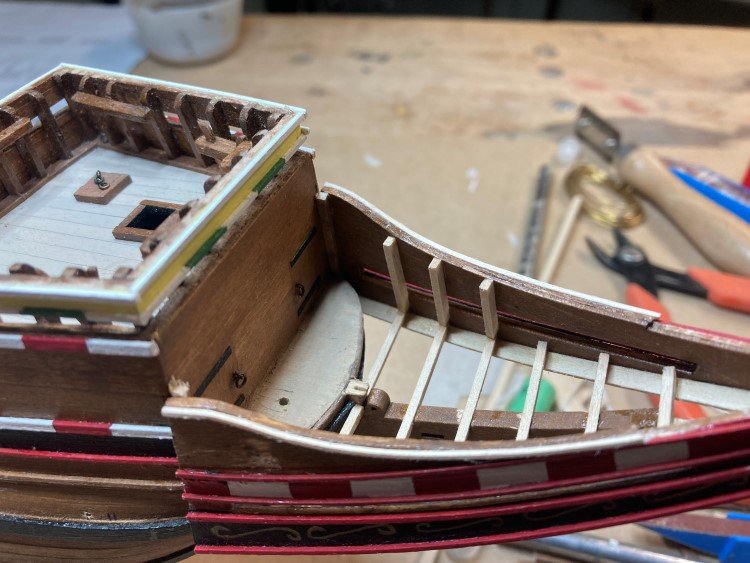
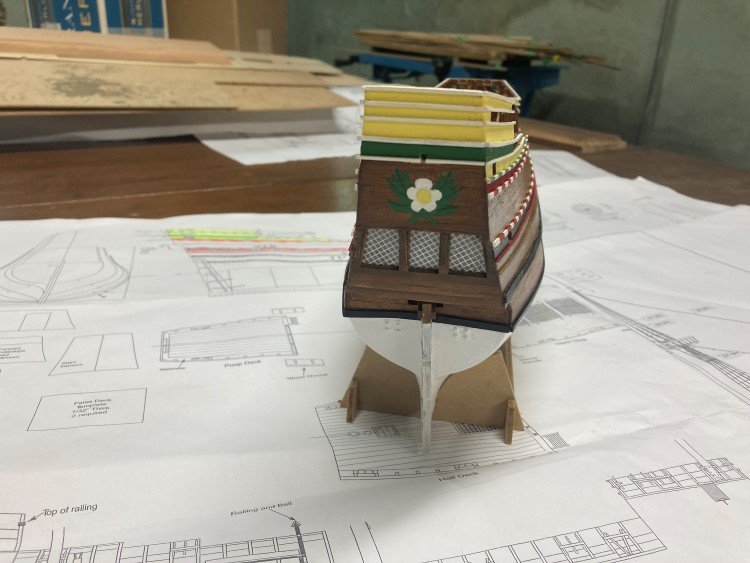
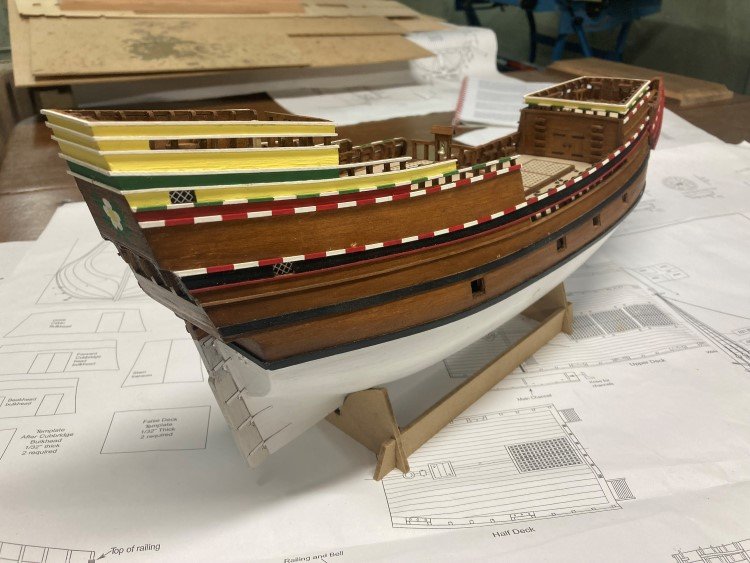
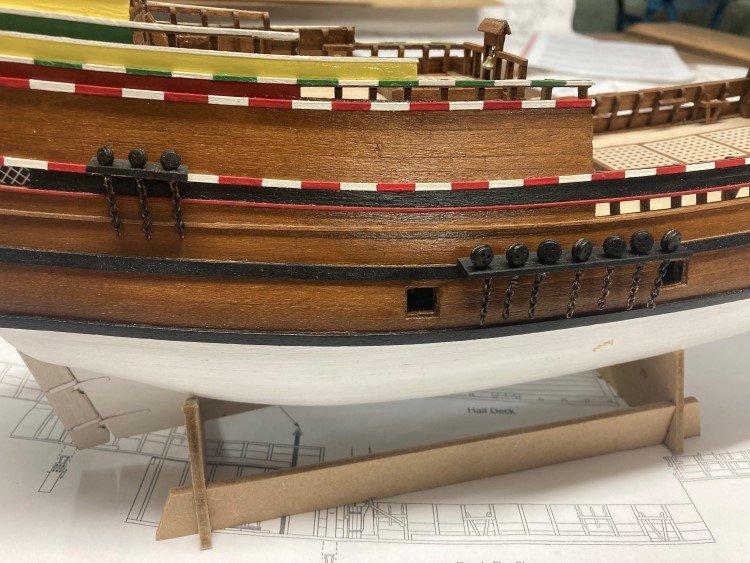
Hi All, I'm working away on the Mayflower. I've pretty much finished up the hull. I've added the moldings and completed the bow section. The bow section is a bit tricky to get started. It would have helped if I had three hands. It's one of those situations where you can't glue one piece on until another is in place and you can't glue that one in place until the other one is in place. Nevertheless once the positions of the side pieces are established and they're tentatively glued in place, it becomes easier and easier and in the end (as the manual suggests) the whole structure is surprisingly robust. I've also finished up the deadeye/chainplate assemblies and attached them to the channels. They aren't actually glued to the hull yet, just positioned there for the picture. I've used wire to help secure them to the hull. I have left the chainplates all about one or two links long and will adjust and attache them later when I establish their correct location by the angles of the shrouds. So, I now have a number of details to add to the deck, as well as some paint touch ups and then I will be ready to add the masts. Thanks for looking in. David

- 43 replies
-
- 8
-
-
-
- Mayflower
- Model Shipways
- (and 1 more)
-
If I remember right, for some reason there are two of each but you only need one of each. D