David Lester
-
Posts
679 -
Joined
Content Type
Profiles
Forums
Gallery
Events
Everything posted by David Lester
-
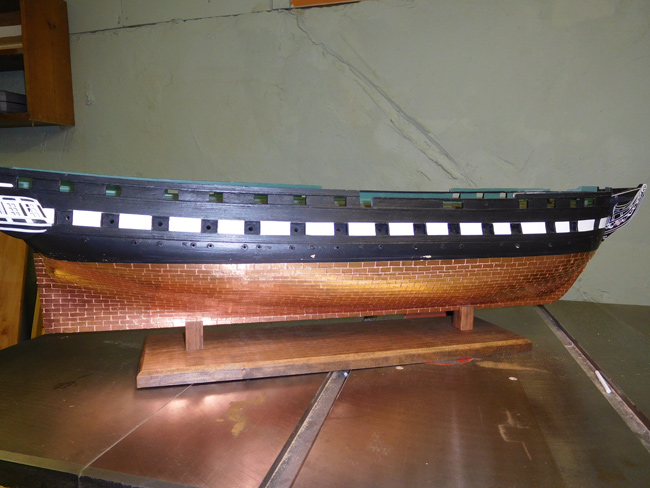
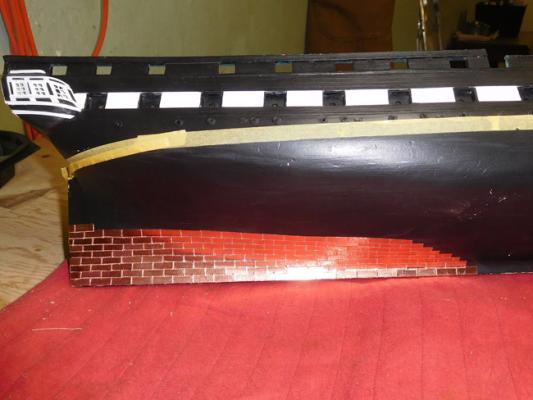
 Happy Tuesday Everyone, A bit of progress to report. I've finished plating the starboard side of the model. I followed the LSS practicum and found it to be quite helpful. The concept of dividing the hull into gores was easy to grasp and it worked out well. The results are acceptable, if not stellar. It looks fine from a "normal" viewing distance of 50' or so , but up close it's full of flaws. It isn't too hard a process in theory, and in most aspects it isn't too hard in practice either, but it is challenging to get the plates in consistent even rows. If you look closely at mine, you'll see a few sine waves!. The foil is very fragile and I'm a bit worried about protecting this side as I work on the other one. I think I'll thumb tack some padding along the bottom of the keel, run it up the side of the hull and tape it to the hull above the copper line. I have a soft pad to set the model on while I'm working, but even it will abrade the foil as the model moves. I think I need to have the padding stationary, tight against the foil and moving with the model. Also, does anyone have any thoughts on masking in order to paint the red section along the top of the copper. In his practicum Bob suggests that masking tape will tend to pull the plates off when removed and instead he uses frisket film. I have never used such a product and judging by the pictures in the practicum, it doesn't look all that user-friendly to me. I'm just curious how others have handled this. David
- 117 replies
-
- 11
-

-
- constitution
- model shipways
- (and 1 more)
-
I think the bands on the pumps look terrific. D
- 306 replies
-
- 3
-
-
- armed virginia sloop
- Patrick Henry
- (and 2 more)
-
Hi Ken, the transom is looking beautiful! David
-
Your workmanship is flawless! The pumps look pretty nice as they are, but I don't think black bands would be out of place at all. I would probably be adding them if it was my model. David
- 306 replies
-
- 3
-
-
- armed virginia sloop
- Patrick Henry
- (and 2 more)
-
Hi Greg, Boy, you're really motorin' along. I can barely read your posts as quickly as you're progressing. Here's a picture of my model at the stage you're at now. For those top window pieces, I rough cut each one to length more or less and then just continually sanded the tops and ends until I had a half decent fit. I put a small brad in each piece to use as a handle to hold it in place as I test fitted it. Once I decided it was ok, I glued it in and when the glue was set, I pulled the pin out. You can see the pin holes in a couple of places. If I remember right, I left each one a wee bit too thick from top to bottom, then when the glue was set, sanded the bottom of each piece until the windows just nicely slid into place and fit snugly. I was interested in your finding that you needed to bevel the inner two transom frames. I didn't feel I needed to do that and I was quite happy with the flow of the windows across the back. They are an odd shape and it would seem they can be placed effectively with or without the beveling. I'm really enjoying watching your progress. David

-
It worked pretty well; I just wish I'd thought of it before I bought the dry transfer letters which I found almost impossible to work with. Any thoughts for the numbering that runs down the bow? David
-
Hi Greg, You're going right along beautifully. Everything looks pretty good to me. I don't see any reason why cutting the two notches in the deck beam won't work. I put support blocks between my bulkheads as well, though I didn't go so far as to completely fill the spaces near the bow. Are you going to paint your model or leave it natural. If you're painting it, you can just fill any nicks etc with filler; if you're leaving it natural it's a bit trickier to handle of course. (This is one of the reasons I like to paint.) A word of warning - you are almost guaranteed to break off at least one the bulkhead extensions before you have the planking done. Don't worry about it too much, just glue it back on. If it's a ragged break, sometimes the piece will fit back in quite snugly and with a bit of glue work just fine. If the break is a little cleaner, it can be hard to get the piece to stay back in place, so just cut the head off a small brad and use it along with some glue to secure the piece in place. One mistake I made on mine was the sanding of the insides of the bulkhead extensions. I didn't sand them thin enough at the deck level; they were fine at the top, but I left them too thick at the deck level. As a result my gunports seem too deep. I'm glad to see you've organized your wood. I think it's essential. It's also important to return your wood strips to their proper place once you've finished with a certain job and not leave them lying around; otherwise you'll spend most of your time measuring and re-measuring them. I used a series of 8 1/2 x 11 envelops with the flaps cut off. One envelop for each size and placed them all upright in a cardboard box and it works great. David
-
Thanks guys! Ken - The two rolls of copper match do match. They both remained sealed in their plastic packages until I opened them at the same time. A short length on each roll (the first "wrap around") was quite a bit darker than the rest of the rolls, so I didn't use it and I'm cutting plates from both rolls as I go, so I don't anticipate any trouble with colour. Keeping the rows straight and even is another matter though! Dave - I haven't started my Rattlesnake yet, but I do need to have a couple of things on the go at the same time, both to relieve the tedium of the repetitive jobs and also because sometimes it takes only five or 10 minutes to paint or glue something then you can't carry on with it until it has set up. On this model, I have been working ahead on the small boats - the four of them are about half done and I've also been working on the gun carriages. David
- 117 replies
-
- 4
-
-
- constitution
- model shipways
- (and 1 more)
-
Happy Wednesday Everyone, I have a bit of progress to report. I've started the copper plating and so far so good, although there's a long way to go. The gunport lids are the next thing after the plating and since they're a multi-step process - sanding, several coats of paint both sides, adding hinges, drilling etc. I decided to get them going simultaneously so they'll be all ready to add when I have the copper finished. In the picture they're edged sanded with one coat of poly applied to the first side. Also thanks for all the likes. David
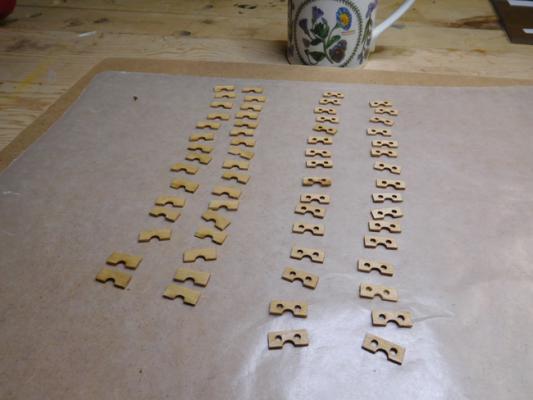
- 117 replies
-
- 9
-
-
- constitution
- model shipways
- (and 1 more)
-
Looking good Tom - only 22 of them - should take no time at all! Dust and other flaws don't seem to show up in real life, but they sure do in pictures. I think the secret to dust control is to never photograph your model. David
- 1,354 replies
-
- 3
-
-
- constitution
- model shipways
- (and 1 more)
-
Hi Ken, Sorry you've had so much trouble. I'm not sure I'd have tackled relocating the galleries, because they actually didn't look too bad even though they were sitting a bit high and I don't think they would have caused any further problems down the road. However, I also understand the urge to get it right too. It's a lot of work, but it will all look great in the end. That's the beauty of working with wood - it's possible to change almost anything. I don't quite understand where you went wrong. I didn't have trouble with my vertical placement, but I sure did with my lateral placement. It took quite a bit of fudging to get them right (or I should say at least looking acceptable) front to back. I had to add pretty big filler pieces to the "roof" and "floor" of the galleries. David
-
Hi Greg, I've been away for a couple of days; just catching up on the forums this morning. Your work looks spot on. I made the same adjustments on some of my bulkheads too. They sand into line without much trouble at all. David
-
As a rule of thumb for me, the more obscuring the better. D
- 306 replies
-
- 2
-
-
- armed virginia sloop
- Patrick Henry
- (and 2 more)
-
OK, I figured there must be a reason, but it's not an issue from my point of view. D
- 306 replies
-
- 4
-
-
- armed virginia sloop
- Patrick Henry
- (and 2 more)
-
Hi Dave, I'm interested to see that you've used (or at least of thought of using) Benjamin Moore paint in sample sizes. That is exactly what I did on my Constitution, but have been hesitant to mention it for fear of causing some of the purists out there to have a stroke. I was sure I was breaking a rule, but I knew it would take a bit of experimenting to get the colours right. There isn't a model paint supplier anywhere near where I live and ordering by mail coupled with trial and error was going to be a nightmare. We do have a Benjamin Moore dealer in town, but instead I used the house brand from our local Home Hardware (a Canadian chain.) The clerk there was enormously helpful and even researched pictures on line herself to help me find colours. While my green is only ok, I'm very happy with the dull pale red I found for the gun carriages. I also found a great colour to simulate natural wood which I'm using for the trim on the small boats as that basswood doesn't take even a light stain very well. David
- 306 replies
-
- 4
-
-
- armed virginia sloop
- Patrick Henry
- (and 2 more)
-
Hi Greg, I didn't make a build log on this site, but I did on Lauck Street forum. I believe it's still accessible (although that can change at any moment.) if you're a client, you should be able to register to access the forum. I'm not going to that forum any longer for reasons that have been well discussed elsewhere on this site. While there seem to be two schools of thought on Bob's practicums, I for one think they're invaluable. I simply couldn't have completed the AVS with any kind of success without it. I'm now building the Constitution with his practicum and again it's very helpful. In time though, after I have two or three models completed, I think I should be able to handle a build without a practicum. There are one or two typos in the practicum with respect to measurements, but if I recall correctly they were all obvious to me with the exception of one. When it comes time to drill the holes for the hawse ports, in chapter 5 I think, there is a glaring error there. The practicum says to drill a 3/16" hole which I did and it is simply too big. It needs to be closer to 3/32". Otherwise, I don't think you'll find any problems. David
-
Hi Greg, Welcome to the AVS club. I loved building this model. In many places I had read that the AVS is like a gateway drug that leads to nothing but hardcore modeling in the future. I think it's true. In my case I can clearly blame it all on the AVS! I'll be following your "downward spiral" (just kidding) with interest. David
-
No music for me Don, I'm addicted to CBC! David
- 117 replies
-
- 2
-
-
- constitution
- model shipways
- (and 1 more)
-
Thanks John. Thanks for checking in Mike - I've been spending quite a bit of time on it lately and I'm glad to reconnect with everyone from LSS over here. David
- 117 replies
-
- 3
-
-
- constitution
- model shipways
- (and 1 more)
-
Thanks Tom, I also found the rails and timbers very hard to do, and I am getting tired of touching up with filler and paint. It seems every time I add something I ruin something else. For example, I wish I had drilled the holes for the hawse ports much earlier. When I drilled them on the starboard side, I managed to take a pretty big chunk out of the cheek knee directly above it. Despite all that I think I can live with the results - as they say, "a blind man would be glad to see it." David
- 117 replies
-
- 5
-
-
- constitution
- model shipways
- (and 1 more)
-
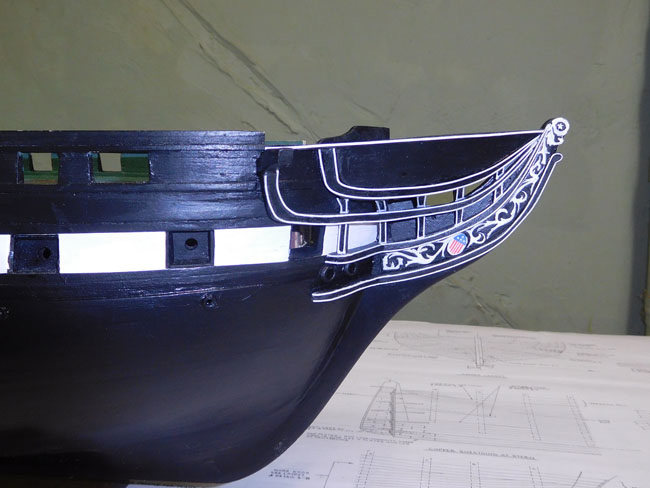
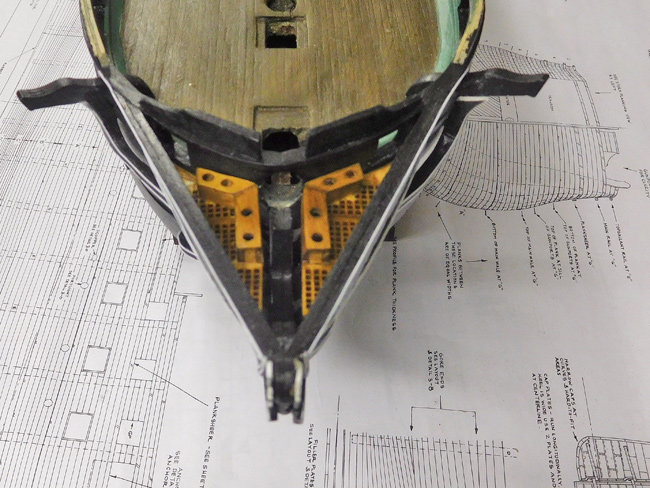
Happy Wednesday Everyone, I have a brief update for today. I have finished all of the bow work. As I had mentioned earlier I needed to adjust the middle rail on each side. I not sure if their profiles are exactly correct, but at least they now fit the model. With the stern and bow both finished, I'm now about to start the copper plating. David
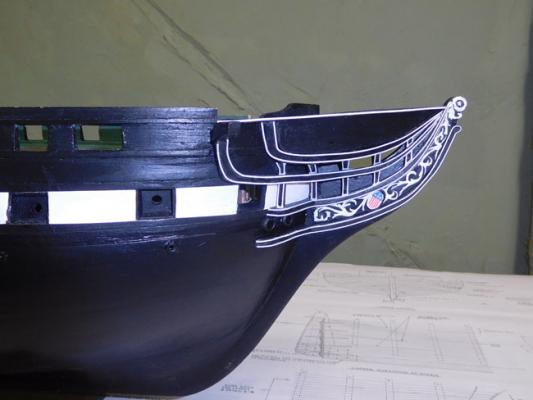

- 117 replies
-
- 16
-
-
- constitution
- model shipways
- (and 1 more)
-
Hi Ken, Thanks very much, your descriptions and pictures are quite helpful. David
-
Hi Jonathan, I saw your comments in another build log, but thought I'd respond in here. I think your observations of Bob Hunt's practicums are valid. The Constitution is my second build using his courses and there are definitely some minor issues with them. There are quite a few typos and from time to time he skips over things I would like more detail on then spends more time I need on others, but these are minor complaints and overall I simply couldn't be enjoying this hobby nearly as much without them. I'm following your build log, as the Mamoli Rattlesnake is my next build. I had decided early on that I wanted to build this model at sometime in the future. I wanted the Mamoli one, mainly because I already had two MS kits and wanted experience with a different manufacturer. And then, I heard that Mamoli was out of business! I watched ebay in the hopes that a Rattlesnake would turn up and in time one did. I didn't buy it as soon as I saw it and when I did decide to buy it later in the day, I was too late and it was gone. Now, not only did I want one but I had to have one. I was not given much encouragement by any suppliers including a retailer not far away from me in Toronto. They told me the chance of finding one was slim, then about two weeks later they called and said they'd located one, so I bought it. I'm not sure when I'll get to building it as I have "miles to go before I sleep..." on my Constitution. I have the practicum for it too, but I'm not sure yet to what extent I will kit bash it. I guess time will tell. Your model is looking beautiful. David
- 974 replies
-
- 4
-
-
- rattlesnake
- mamoli
- (and 1 more)