
HOLIDAY DONATION DRIVE - SUPPORT MSW - DO YOUR PART TO KEEP THIS GREAT FORUM GOING! (89 donations so far out of 49,000 members - C'mon guys!)
×


David Lester
-
Posts
679 -
Joined
Content Type
Profiles
Forums
Gallery
Events
Everything posted by David Lester
-
 Thanks Derek, That Morgan build log by Gerald Spargo is one of the best ones on the forum; it's just too bad it isn't finished. However, I can never seem to remember his sequence for attaching the futtock staves from model to model and have to look it up each time. I also followed his method for building the tryworks on my Morgan. It results in the most realistic brickwork I've seen. His instructions for it are available under resources on the NRG site. Thanks again, David
- 91 replies
-
- 1
-

-
- Speedy
- Vanguard Models
- (and 1 more)
-
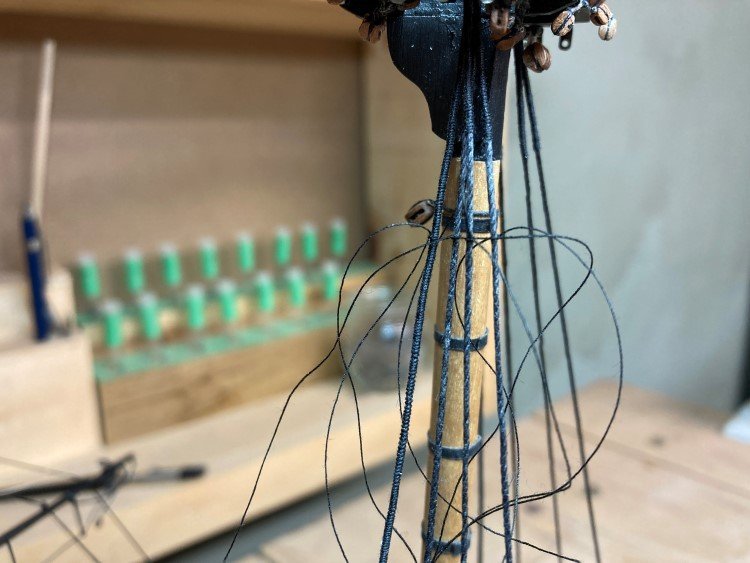
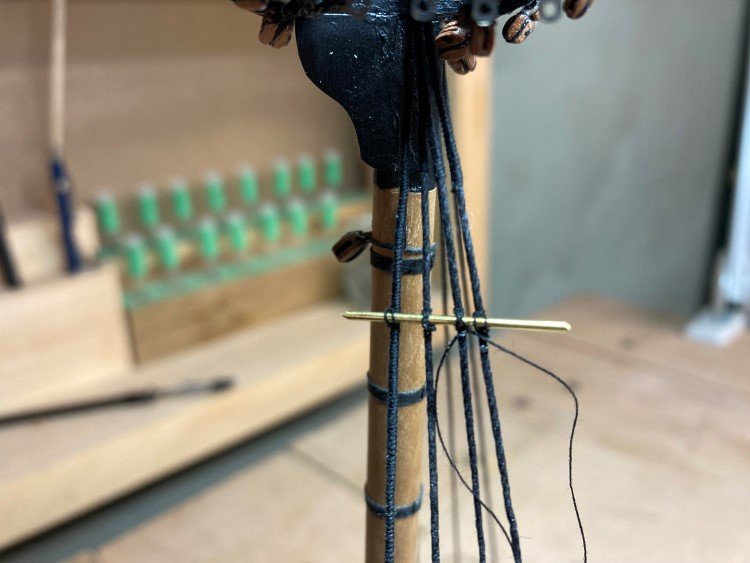
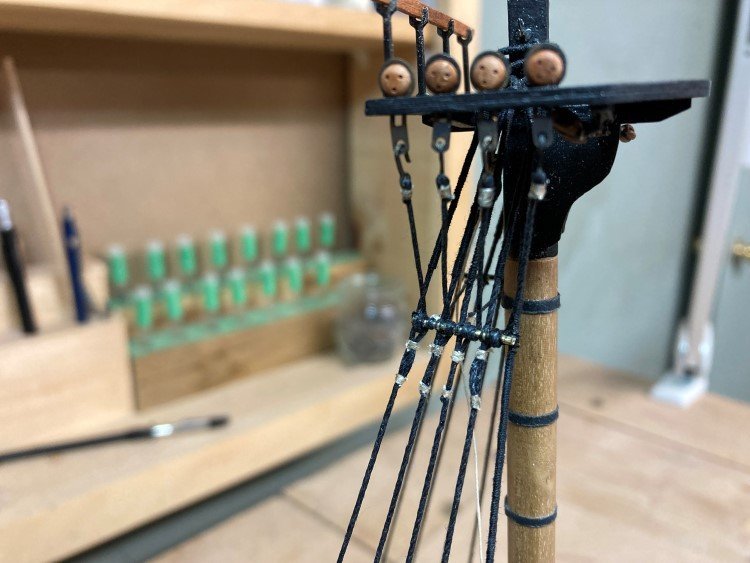
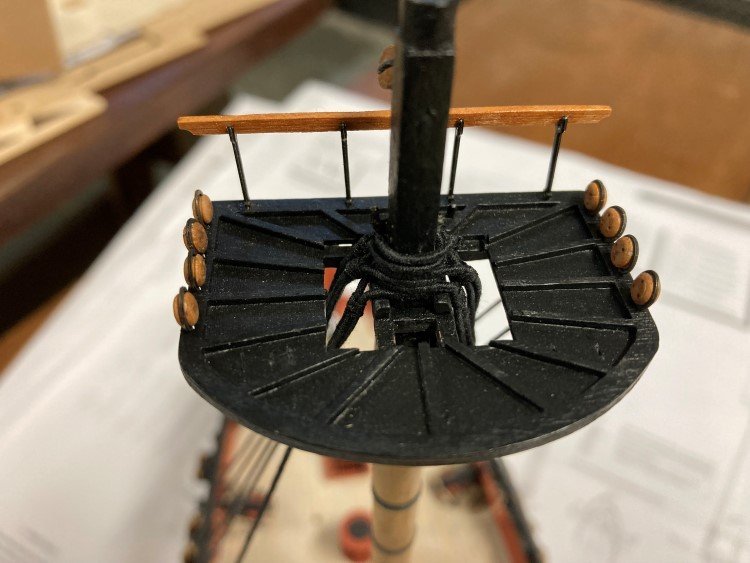
Good Morning, I have just finished the lower shrouds. This is the first time I've served the shrouds and it was quite easy to do. The only tricky part for me was when it came time to seize them. I'm in the habit of attaching the seizing in a convenient spot and then sliding it into position. It's not really possible to slide the seizing on a served line, so it was necessary to seize it in its final location. Not an insurmountable problem, obviously, but it was a minor departure for me. It's a matter of wrapping the line around the mast, then grabbing it with a pair of tweezers, sliding it off and attaching the seizing as close as possible to that point. The futtock stave, catharpins and futtock shrouds came next. I always found it difficult to attach the futtock stave until I read a technique in a build log for the Morgan by Gerald Spargo. It's the method he used to attach the ratboards (instead of ratlines) on that model and it's really good. I highly recommend checking it out. For the futtock shrouds, I can never seem to attach seizing when the line is in the vertical position, so for these I set the model on its side. The stand actually held it in place quite securely and this made the job quite easy. I just backed it up against the heavy base of my helping hands. I left the tails on the futtock shrouds quite long, which I thought would make it easier as I could attach the seizings further down on the shroud and then slide them up into position. This worked quite well (except for the served shroud, of course), but it did cause me one problem. It wouldn't be a David build if I didn't have at least one major redo. When trimming the ends of the futtock shrouds, I accidentally cut one of the shrouds instead, which was a real pain to redo. I try to limit it to one per build, so hopefully that's it for this one. I used white line for the seizings; it really makes it easier to do with the colour contrast and then I later coloured the seizings black with some India ink. I didn't blacken or paint the brass futtock stave ahead of time. I just dabbed a little "ironworks black" on the exposed bits after and that worked quite well. So that's it for now. Thanks again for looking in, likes etc. David

- 91 replies
-
- 14
-
-
- Speedy
- Vanguard Models
- (and 1 more)
-
Syren Serv-O-Matic Server Machine
David Lester replied to Casey's topic in Masting, rigging and sails
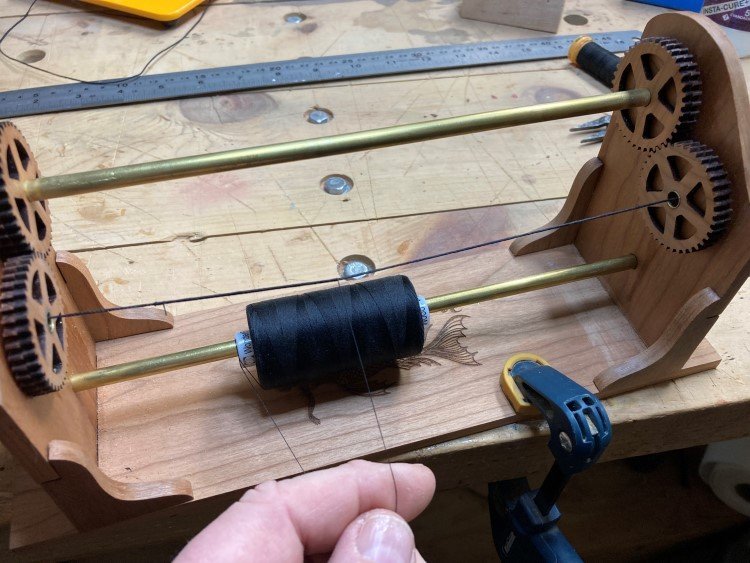
It works perfectly! I'm currently using mine for the first time. A tiny bit of practice is all that's needed. -
Benjamin - The plans indicate that the plates should be 7/32" x 3/4" so I used 1/4" copper tape. I can't remember if I cut them at 25/32" which would have given the same small overlap as the 1/4" width gives, or if I just kept it simple and cut them right at 3/4", still overlapped them slightly and didn't worry about it. I kinda think it was the latter. In any case a length somewhere around 3/4" should be ok. David
- 145 replies
-
- 1
-
-
- model shipways
- charles w. morgan
- (and 1 more)
-
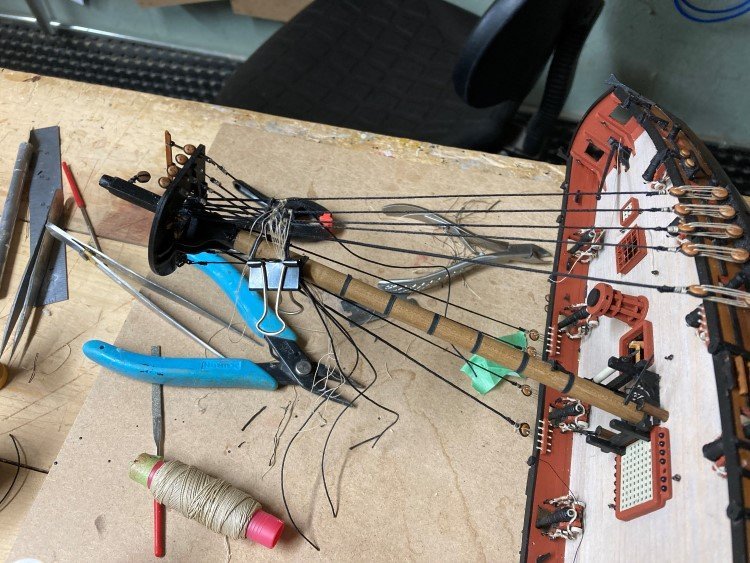
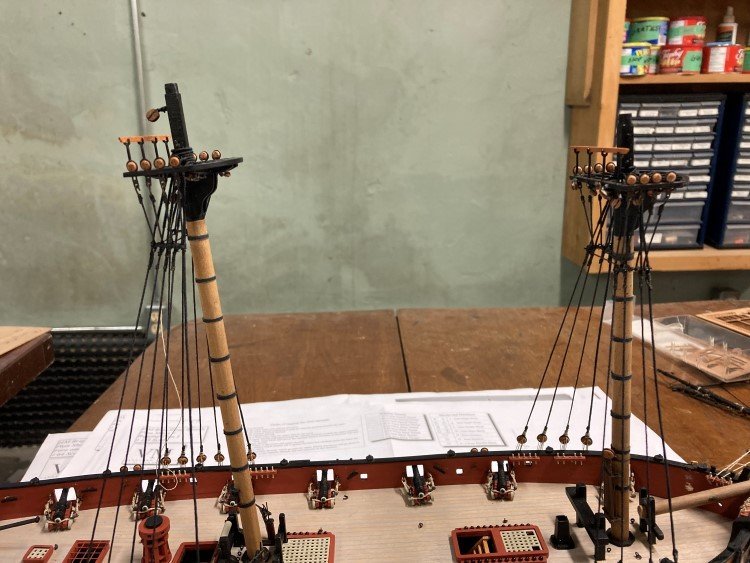
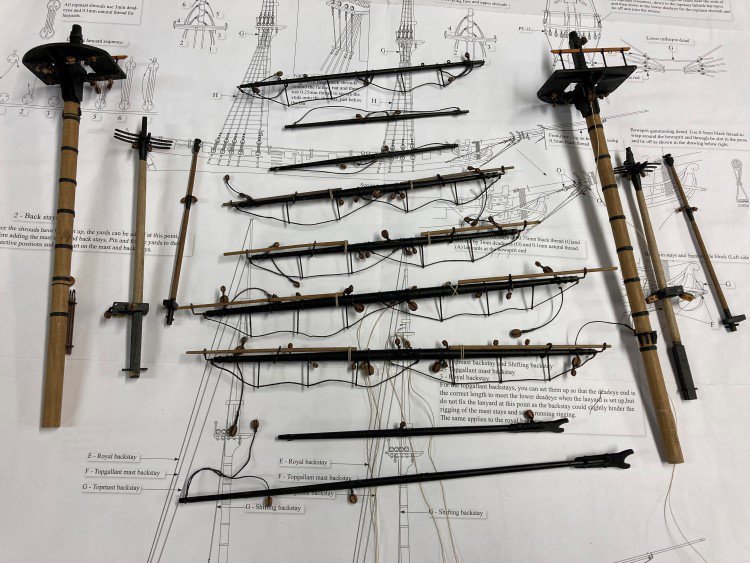
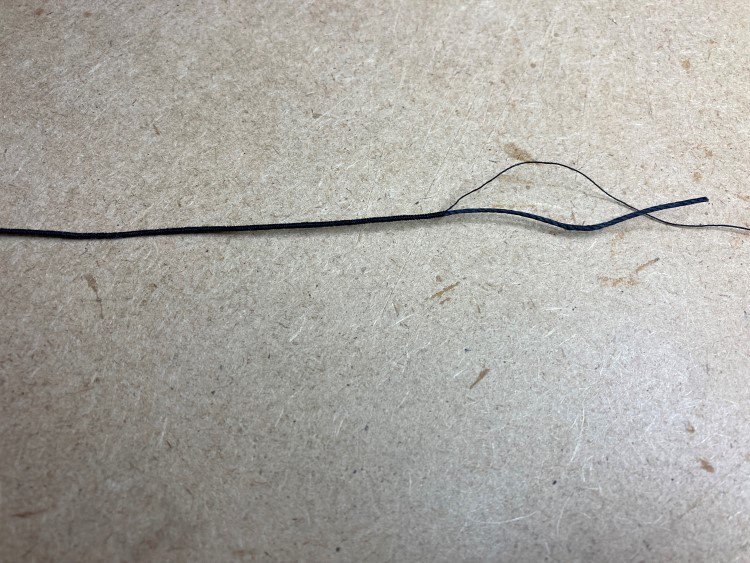
Good Morning, Time for a Speedy update. I have launched myself into the rigging. There really isn't too much to explain or talk about here; it's all pretty straightforward. First, I attached everything that I could to the masts and yards - Then, the bowsprit - (Just have to re-attach the port cathead and the block on the starboard boomkin.) The I fired up my serv-o-matic. It's not very difficult to do, but I found I needed a little bit of practice (which always frustrates me, because I figure if I can read, I can do it.) What worked really well for me was to practice using white line with black serving thread. This made it very easy to see just how to lay down each loop without big gaps and without overlapping. After a few trial runs, It became quite easy and goes surprisingly fast. The plans indicate 1 mm line for the lower shrouds. I tried using both 1 mm line and .75 mm line, thinking the serving would bulk up the 1 mm too much. In the end I settled on the 1 mm. I didn't notice an appreciable increase in the diameter, as the serving tends to compress the line a little. As Derek suggested in his Speedy log, I used a fine needle and "stitched" the serving thread to the line at each end of the run and it made a surprisingly tidy end. So, I'm happy to be adding this detail to my Speedy. Thanks for checking in (and happy St. Patrick's day - the Lesters are from County Cavan, but they were all tea teetotallers, so it falls to me to celebrate!) David

- 91 replies
-
- 11
-
-
- Speedy
- Vanguard Models
- (and 1 more)
-
Your LN is looking pretty good! Here are a couple of things about rigging that help me - In my experience it isn't very hard to do, but I always find it can be confusing. Even with several builds under my belt, I still find it's imperative that I write out my own rigging instructions every time. As everyone does, I break it down into individual steps, but I actually write it out for each build - ie. fore shrouds, main shrouds, stays, back stays, lifts etc. etc. I include lots of details, what size block, what size and colour of line etc. etc.I write two separate sets of instructions - one for everything that can be added to the mast and yards before they are installed and a second set for everything that can only be added after the masts and yards are in place. It helps to add as much as is possible before the masts and yards are installed on the model. Some elements are so self-evident that it might seem crazy to be writing it out, but I find it really helps; I just work through my list and it helps keep me sane. The running rigging can be finicky, but it's not particularly difficult and the shrouds usually don't cause any trouble, but I always find the stays to be the hardest. It seems that as you pull one taut, another one goes slack, or you pull the top end of the mast too far out of whack. Once the bowsprit is rigged and the shrouds are in place, it's time to do the says and after much trial and error, I've found what works for me is to attach the uppermost stays on all masts first. Then they can be adjusted so that they have the right amount of tension and the tops of the masts are in line and not pulled forward or aft. It may seem more intuitive to start with the lower stays and work up, but I find working from the top down works better for me. After the uppermost stays are in place, then I fill in the others and make them just taut enough, without too much tension. Only after all the stays are in place and adjusted, do I add a drop of glue to all the seizings. Anyway, there are a couple of thoughts for your consideration. David
- 362 replies
-
- 4
-
-
- Amati
- Lady Nelson
- (and 2 more)
-
Hi Shane, I can't comment on the Stefano. I know others have had good luck with it, but after my expensive nightmare with the Ontario, I would never choose it for myself. Also, it does look like a pretty big project. Vanguard would be an excellent choice - any of Alert, Flirt and Speedy. My experience with Speedy, which I'm working on right now, has been excellent. It offers enough challenge, but you don't have to "fight the kit" to get a good result, meaning it's well engineered. And both the plans and instructions are excellent. I'm also a fan of Model Shipways kits. They have great plans. The instructions are a little weak, but the plans are very comprehensive and the models go together well. They offer many good options. Anyway, have fun making your choice. David
-
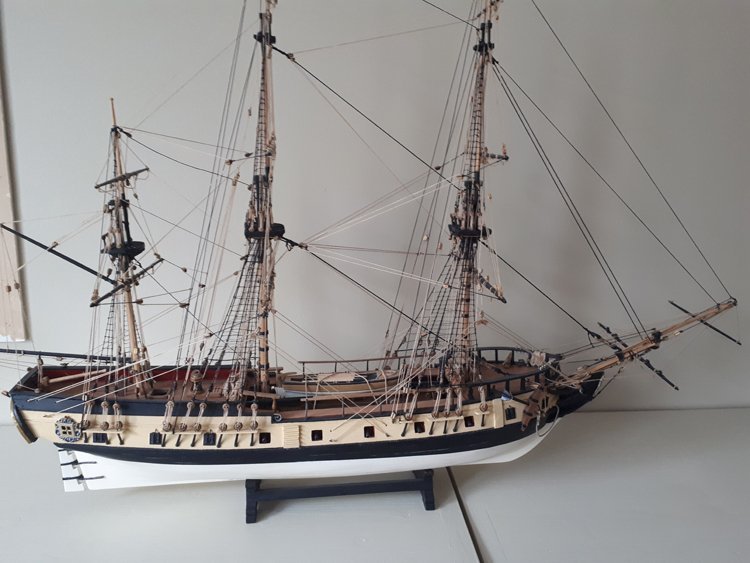
Hi Dave, I would definitely buy the Model Shipways version. I built the Mamoli several years ago and it was fine. I didn't really have any issues with it, but I didn't like the metal "frames" for the gun ports and if I had it to do over again, I would have reduced the size of all the blocks. They look much too large on the finished model when used according to the plans. I have built many MS kits and I think they're really great and I think their plans are excellent. While I haven't build their Rattlesnake, I have had a peek at its plans. One order I received from MS was packed not with newsprint, but oddly, with crumpled up Rattlesnake plans. I took a good look at them and they appeared to be in line with the usual standard. Here's my Mamoli one - I have always had a special feeling towards the Rattlesnake, because it's really the reason for my interest in model ships. When I was a kid in the late 50's and early 60's my friend's dad built models ships and I was mesmerized by them and I wanted to build them too. He had many of them, but the only one I really remembered well was the Rattlesnake, because of its name. My friend still has his dad's old Rattlesnake model. Here's a picture of it - I don't know if this is a kit or from scratch. I can tell it's not either the MS kit nor the Mamoli kit, but it's definitely the Rattlesnake. It's about 60 years old now. The MS and Mamoli versions look very much alike when finished, and I think you'll have a good experience with either one, but my vote would go for the MS version. David
.jpg.cb7e2fd54a664b1682c4cde92acdd39b.jpg)
-
Gun Port Yellow?
David Lester replied to Dave_E's topic in Painting, finishing and weathering products and techniques
Hi Dave, I have quite a few of the admiralty paints and I think they're great. I was also a bit surprised by the yellow ochre at first, but I think when you see it on the hull and contrasting only with the black it will look quite yellow and more like you expected. As to the black, I'm pretty sure "dull black" doesn't refer to the finish, as in matte or flat, but rather to the colour, meaning it is just slightly off a true deep black. One frustration I've had is that so many model paints are only available in two finishes - either flat or glossy and for many purposes, especially the hull, neither seems right. These admiralty paints have a very nice soft satin finish that I like quite a bit. David -
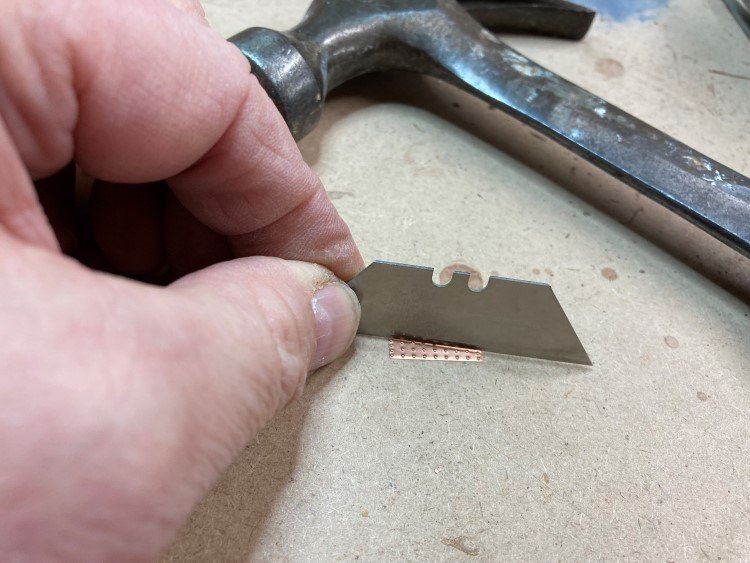
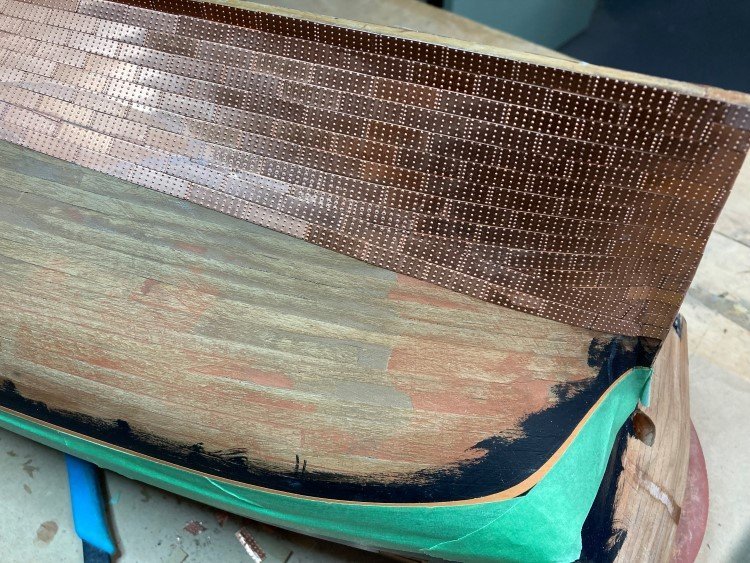
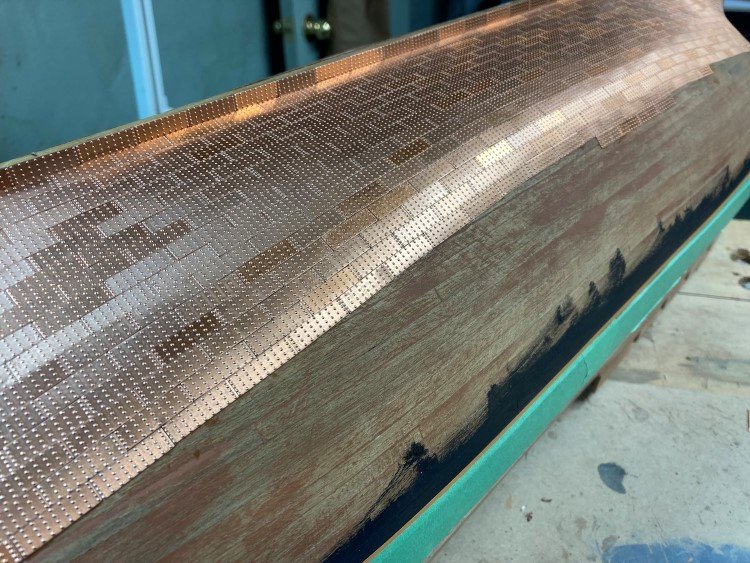
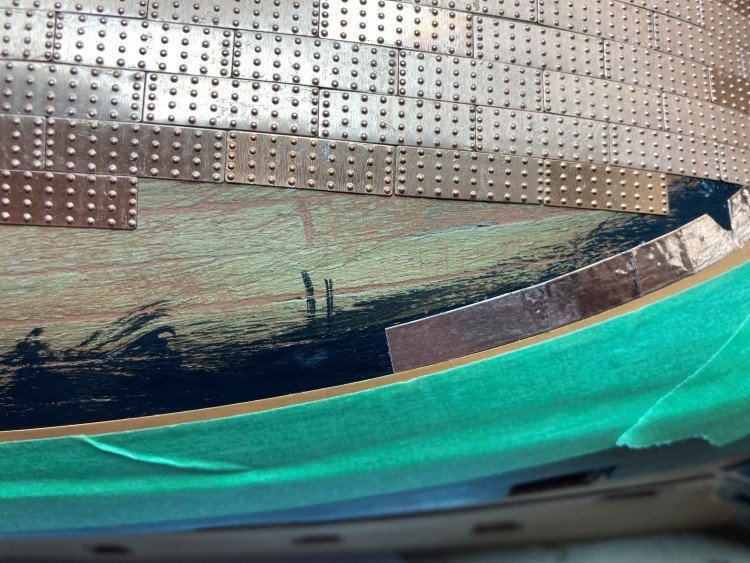
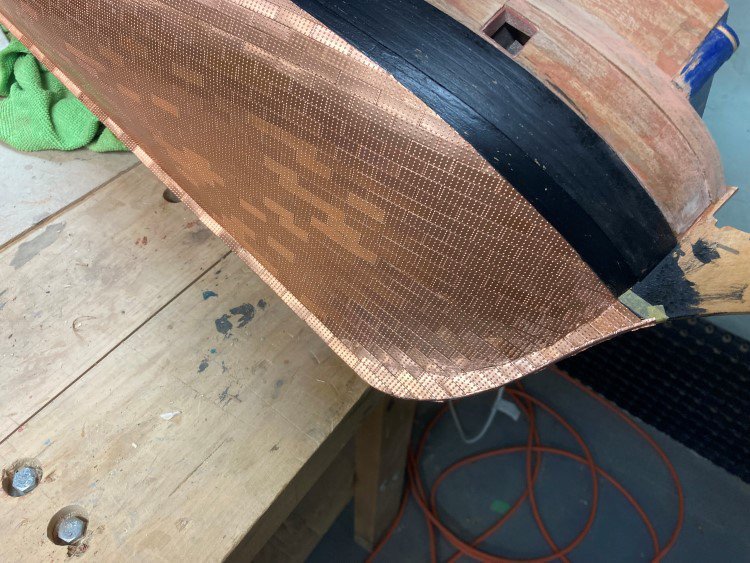
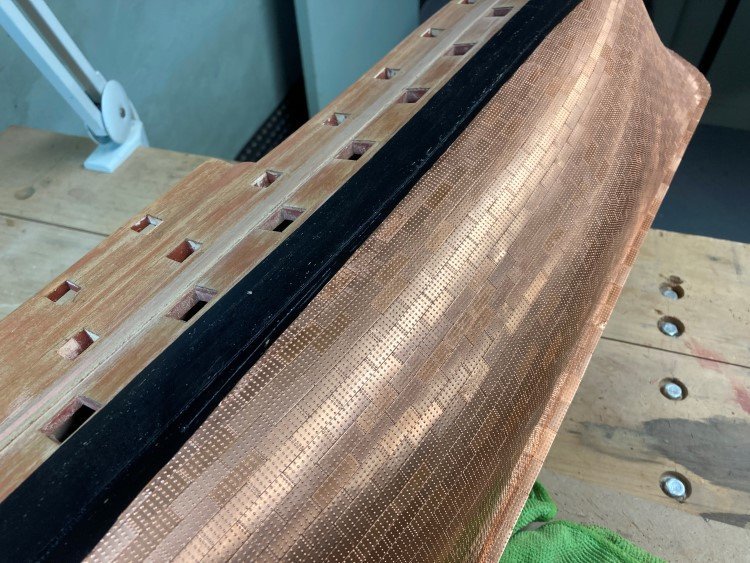
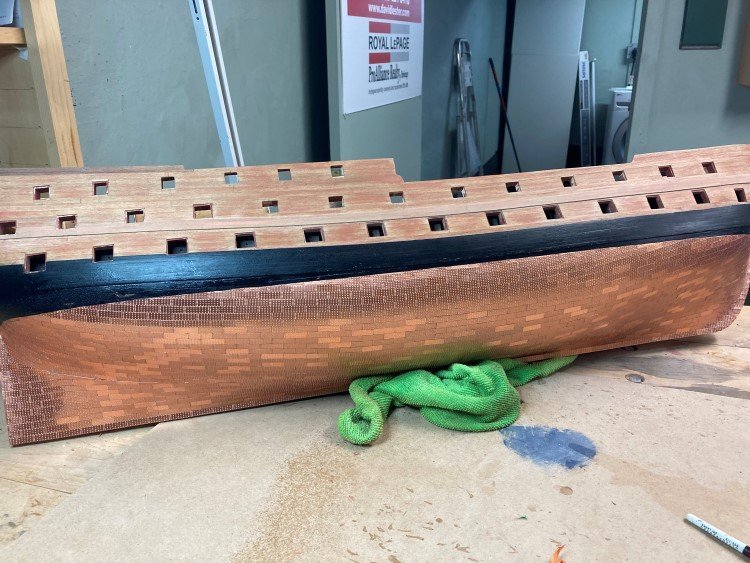
Time for a coppering update. I've spent the past two weeks coppering the starboard side, and here is my take on the experience. I had so much trouble getting a decent job using copper plates on my Speedy, that I abandoned them and resorted to using copper tape, which I had used successfully a few times before. So I wasn't sure if wanted to use the copper plates again this time, or just go immediately to copper tape. In the end I opted to try the copper plates first, with the idea of falling back on the tape if I ran into serious trouble. As it turns out, I managed to get an acceptable job using the copper plates. I think part of the reason that I had an easier time here than with Speedy is the fact that the hull is so much larger but the plates are the same size. Overall, though, I think I now have a decided preference for using the tape. It's much more forgiving and to my eye gives a very nice result. That being said, I'm pretty happy with this result too. Since the plates can only be applied perfectly if they're in a dead flat, straight line, I wasn't sure how to accommodate the curve of the hull. It seemed I would have to leave gaps in certain places or overlap them. These Caldercraft plates don't lend themselves to overlapping very well, because there is a row of pretty big bumps right at the edges. I thought an overlap would be too pronounced, so I settled on small gaps, but how to minimize them? Just about everything I read suggested to just start laying them in rows from the bottom to the top, with no mention of belts or gores etc. However, on the other hand almost every build log I could see showed signs of partial in-fill rows being necessary. So, with trepidation, I decided to just start in, play it by ear and see what happened. When I got to the 8th row, I started to find a problem at the stern. In order to keep going, I would have to leave very big gaps to continue, as the hull curved. So I decided to let the 9th row take its natural path and do some in-filling. I did the same thing at the bow, and had to do it one more time further up at the stern. This seemed to be a good approach. Because I didn't overlap the plates, I found it best to start laying them in the centre and working in two directions. This helped minimize any accumulating error in aligning each plate over the one below it. I found if I worked in one direction only, despite taking care there would be a noticeable shift in the plates and by the time I got to the other end, they would be poorly centred over the one below. I'm sorry that I can't recall what build log I found it in (I think it was a Victory build log, but I'm not sure and apologies to that builder), but it contained two really great tips. The first was how to cut the plates. They tend to curl if cut with scissors, but if you use a Stanley utility knife blade and a hammer, you can get a beautiful cut. I did find however, that the two pieces would tend to fly off in all directions, so I found that if I taped them to the cutting board with Scotch tape, it held them in place, and I could still see exactly where to place the blade. A really nice thing about this method is if you cut the piece a little bit too big, you can still trim a really small sliver off with no trouble at all. The second great tip I found from that build log is the idea of placing a strip of copper tape along the the waterline and gluing the last row of plates over it. The cutting at the waterline is especially tricky and this really helps hide any minor imperfections. One other thing that helped me get a smooth waterline turned out to be the particular masking tape I used. I know Tamiya tape is great, but for this job I used narrow Probrand Fine Line tape. It sticks incredibly well and takes the curve of the hull beautifully. It's a little thicker than Tamiya and I was able to butt my row of copper tape up against it easily and accurately. (It's the narrow orange tape between the copper and the green masking tape.) So that's my experience with coppering using plates! I think I'll put Agamemnon aside for a little bit and return my attention to Speedy. I never thought I would like working on two models at the same time, but I'm finding I really like being able to change gears completely. Thanks for looking in, likes, etc. David
-
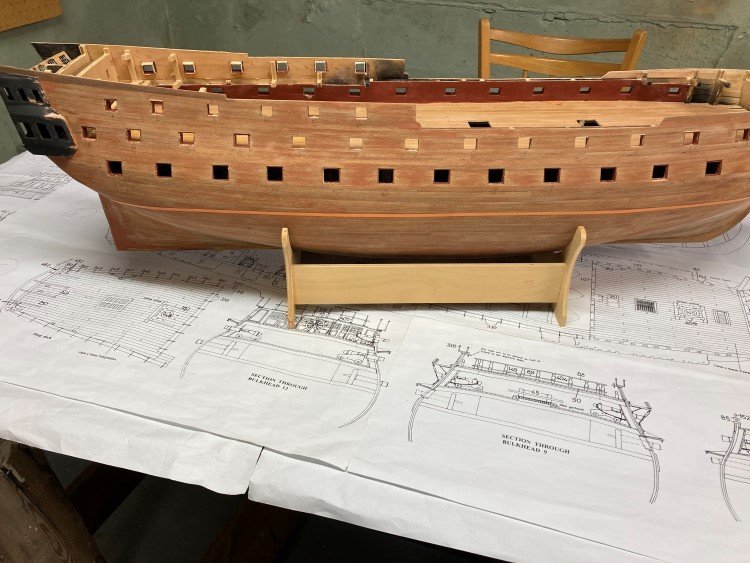
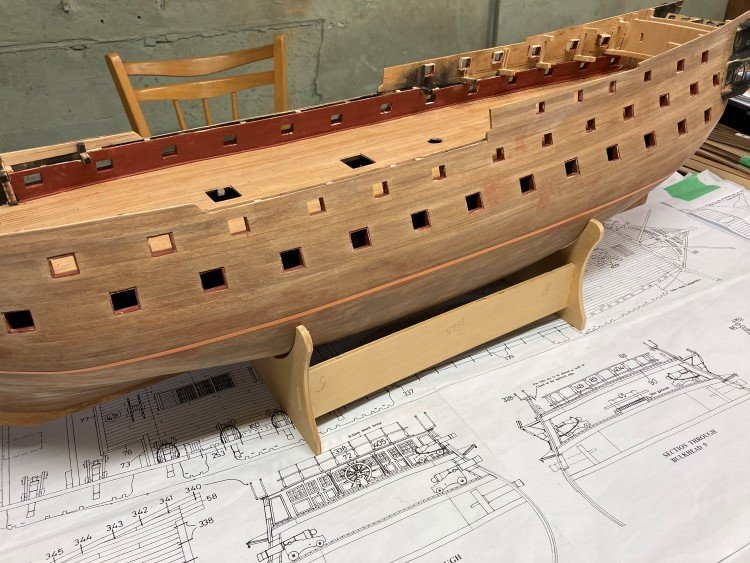
Hello All, I'm taking a little break from Speedy and doing some more work on Agamemnon. I've now finished the second planking on both sides and I'm currently installing the wales. The second planking is filled and sanded and is pretty good shape for painting. There is a main wales and an upper wales and getting them located properly is fairly important and it takes a bit of care. The two wales run parallel the whole length of the ship. I started by marking the water line with masking tape (I realize this will need re-marking when I do the painting and coppering, but I want it in place now to ensure that the main wales ends about where it's supposed to. I then marked the position of the top of the upper wales with masking tape - I installed the upper wales first. I then set a compass to the distance between the wales and ran it along the lower board of the upper wales to mark the top location of the main wales. Before adding the main wales, I glued up a short "panel" of the same width and noted its location with respect to the waterline. It's just fraction higher than shown on the plans, but I think it's perfectly acceptable. I have a bit of filling and more sanding to do. It's always a nightmare painting the upper edge of the wales when it's a contrasting colour from the hull and I never know the best way to tackle it. In the past I have tried painting that area of the hull first (in this case that would be the yellow) and then painting the edge of the top board black before applying it. It looks great initially, but when I paint this soon, despite my best efforts, I always seem to mess up the finish somehow (drops of glue, holes drilled in the wrong spot etc.) and much touch up is needed. Sometimes the touch up is so much that I am essentially repainting anyway and the whole advantage of having painted first is lost. So this time, I'm adding the wales before painting and we'll see how that goes. It looks like I'm getting quite close to coppering time and I am of two minds on this. On the one hand I would like to use the kit supplied plates. On the other hand, I had so much trouble with them on Speedy, that I think I might be better off just using copper tape, with which I have had good success in the past. I'm still thinking about this one. David David


-
Perfect planking!
-
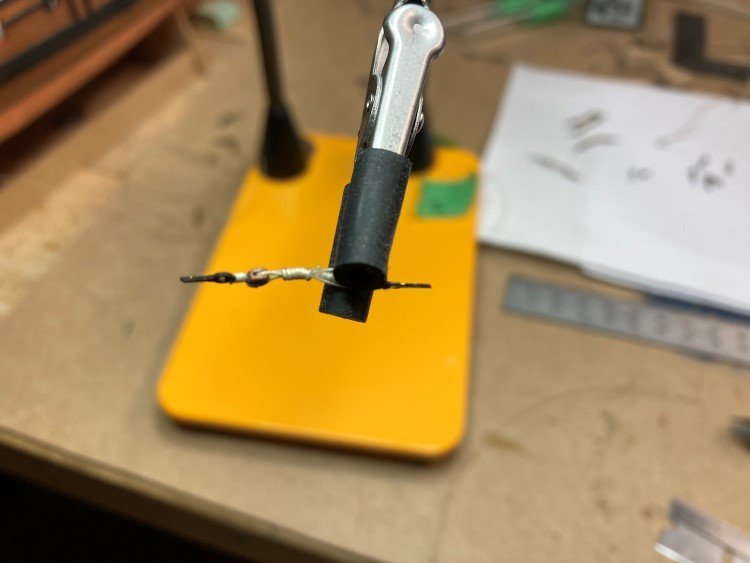
Thanks for the comment, guys. Dave - those rubber tips on the alligator clips came with the tool. This is a tool from a company called quadhands (www.quadhands.com) I've had a couple of different sets of "helping hands" before this one, but quadhands is the best by far. I can't recommend it highly enough. They come in different sizes. Mine is the smallest with two arms and a small base and I find it to be ideal. Others have four arms and there are different styles of bases as well. The arm attaches to the base with a magnet, which means they can be repositioned easily and they can be removed which makes it great for storing when not in use. David
- 91 replies
-
- 2
-

-
-
- Speedy
- Vanguard Models
- (and 1 more)
-
New Member Introduction and Need Some Advice
David Lester replied to Artisan's topic in New member Introductions
Hi Greg, There are a couple of Civil War models by Model Shipways at Model Expo - Harriet Lane and USN Picket Boat, but as others have mentioned, they aren't the scale that you indicated you prefer. Davdi -
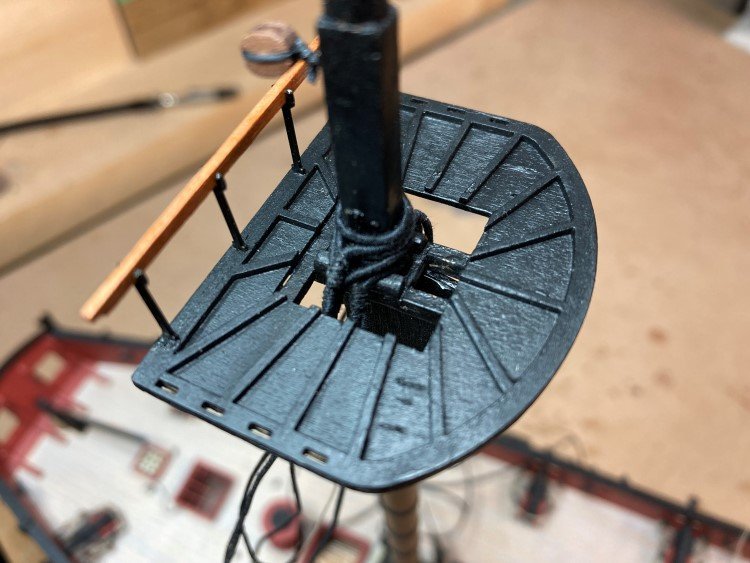
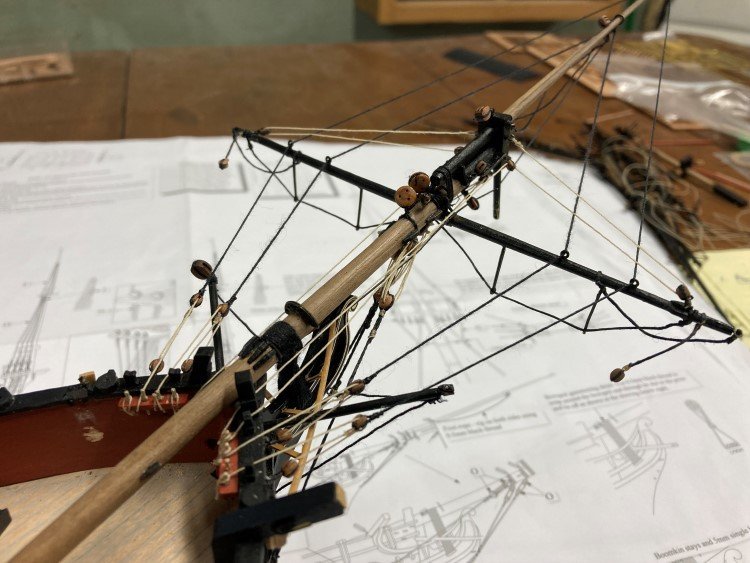
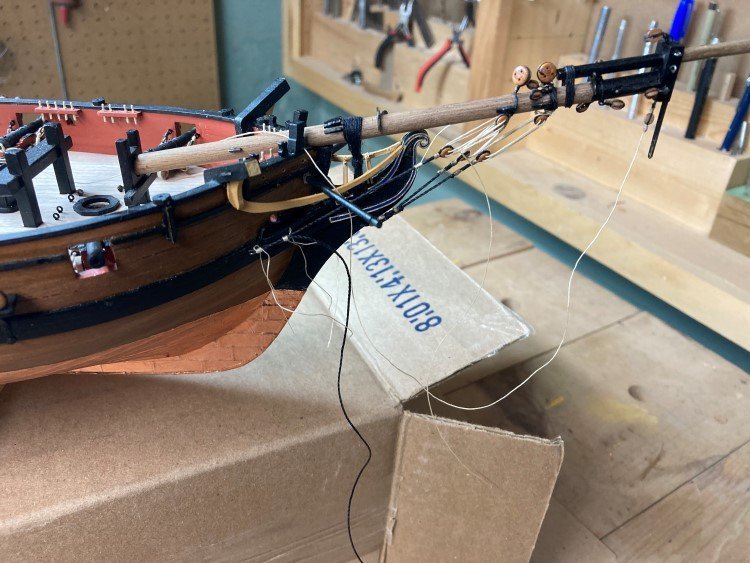
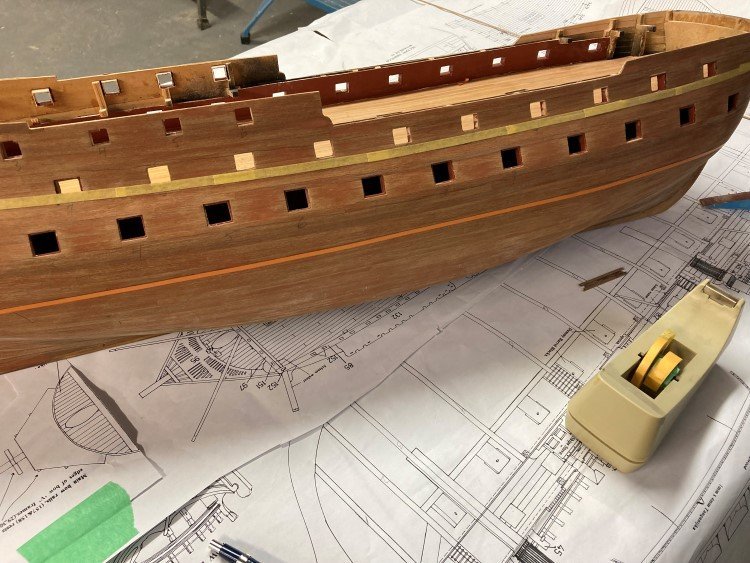
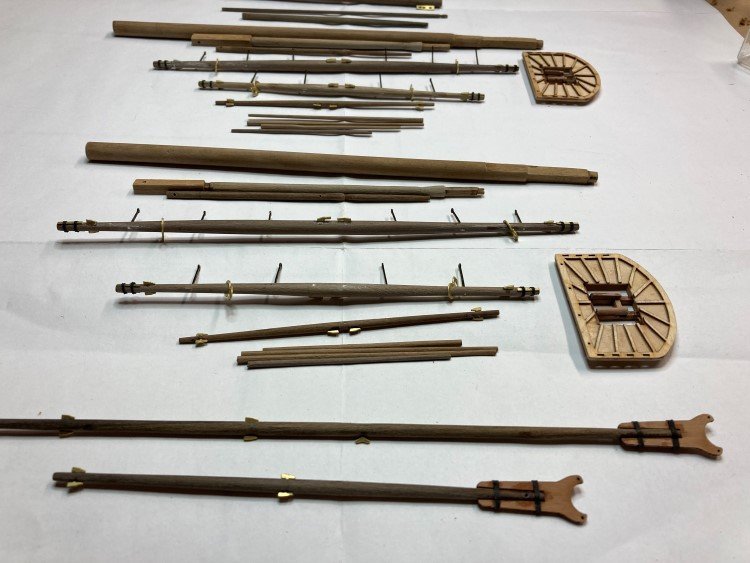
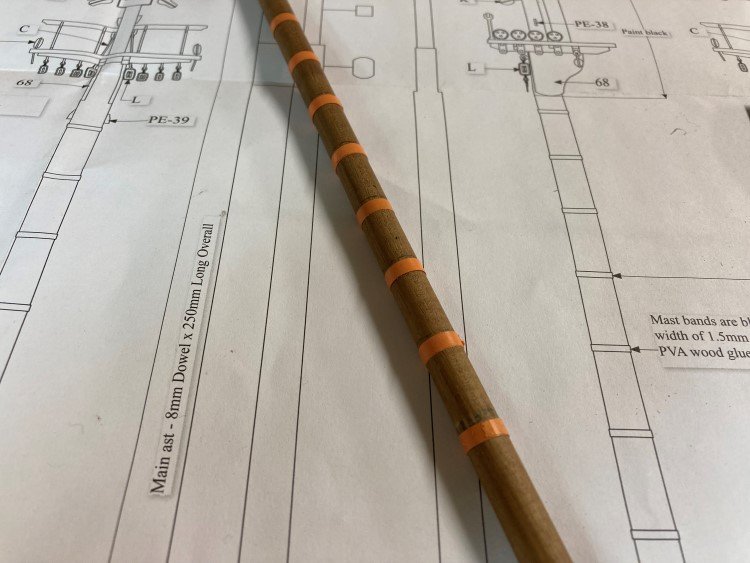
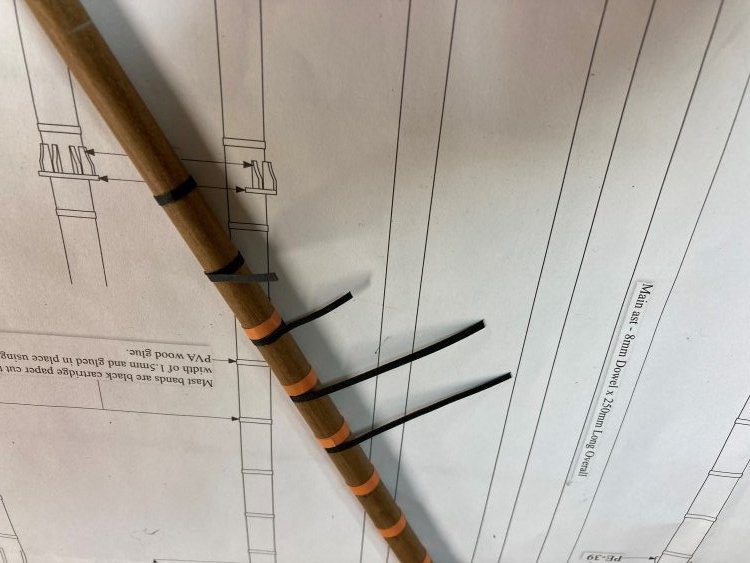
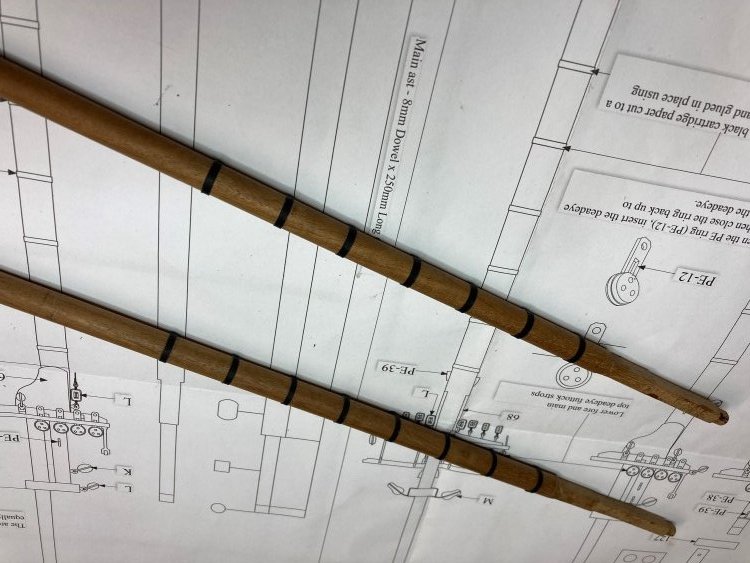
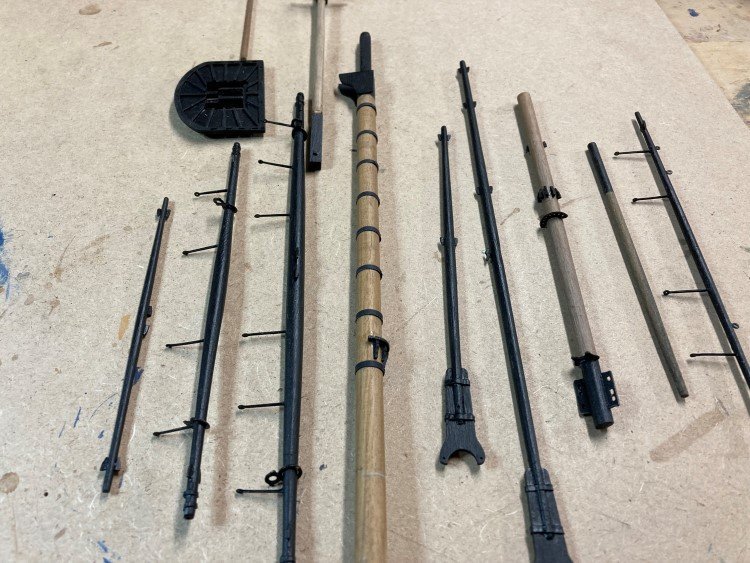
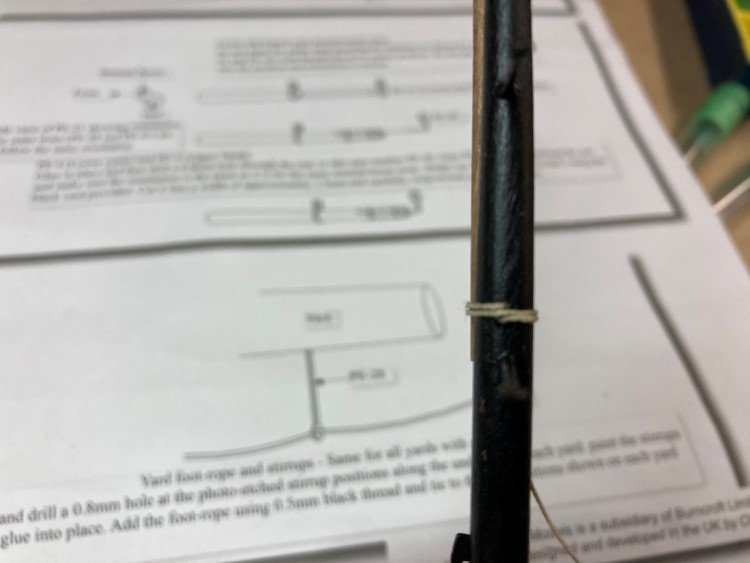
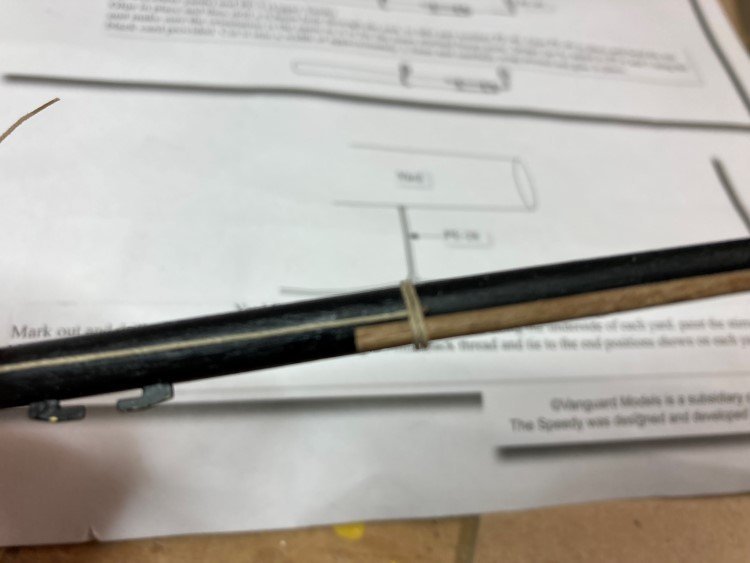
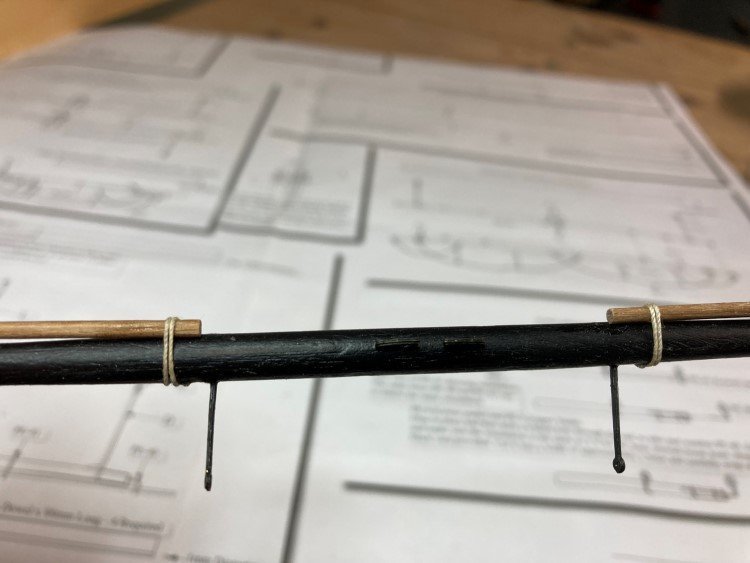
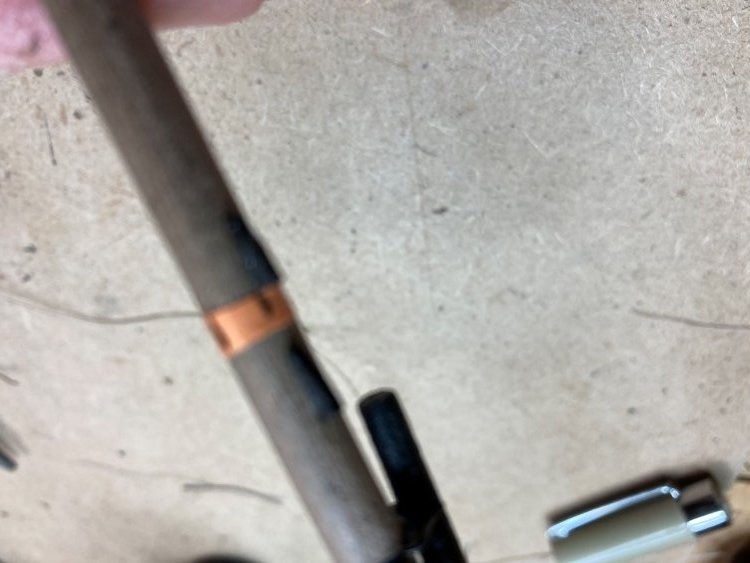
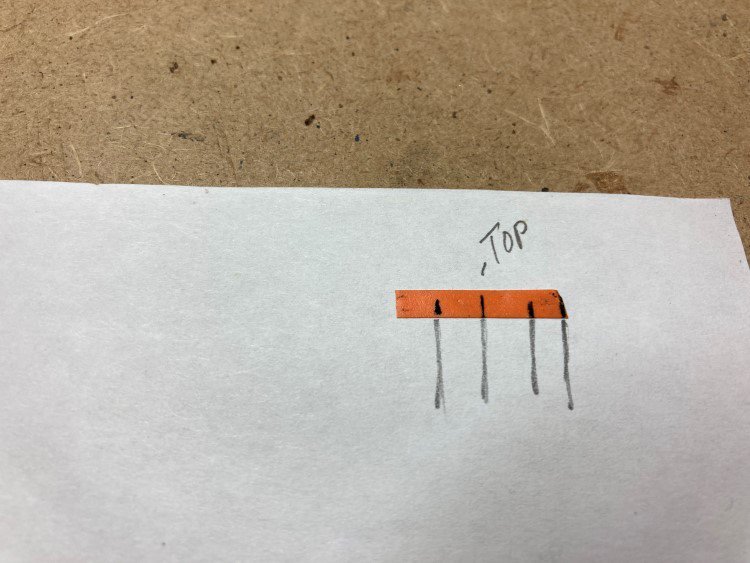
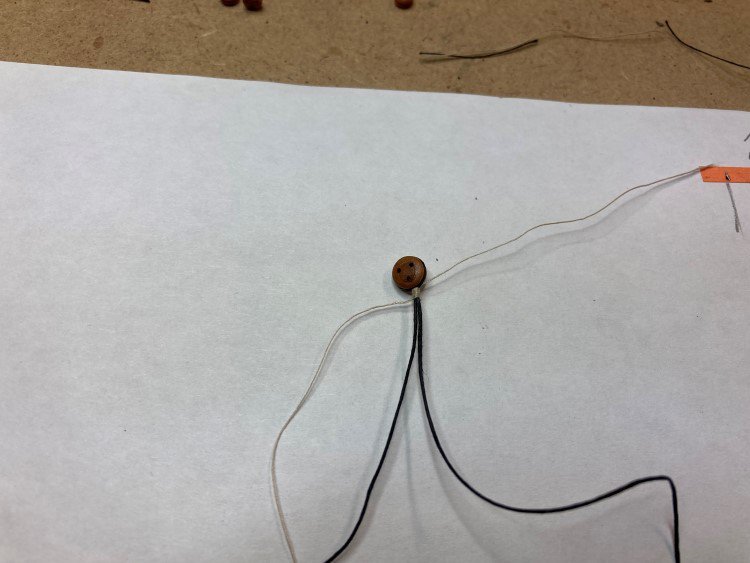
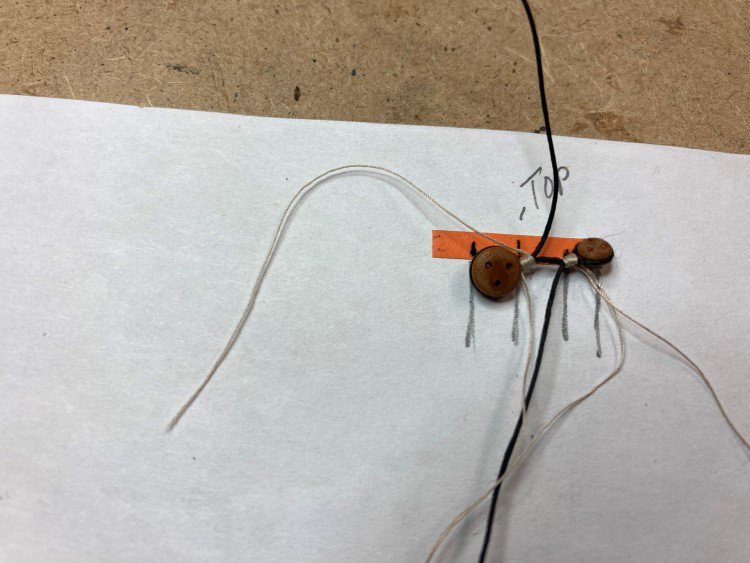
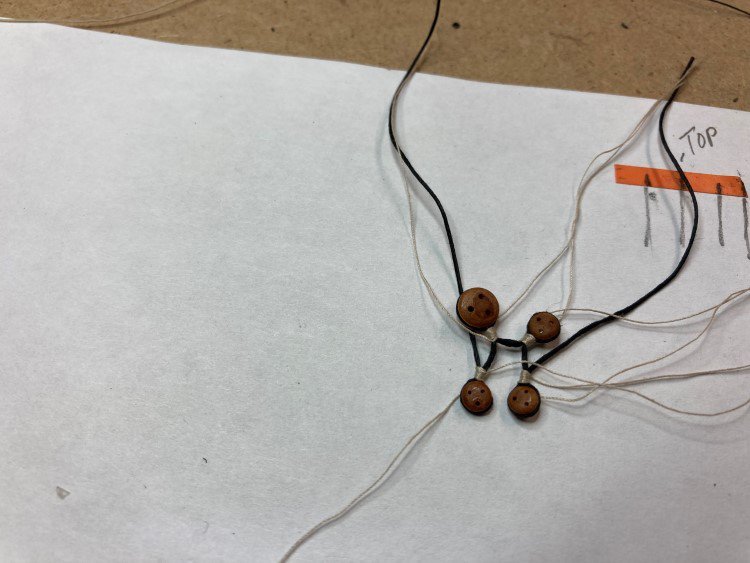
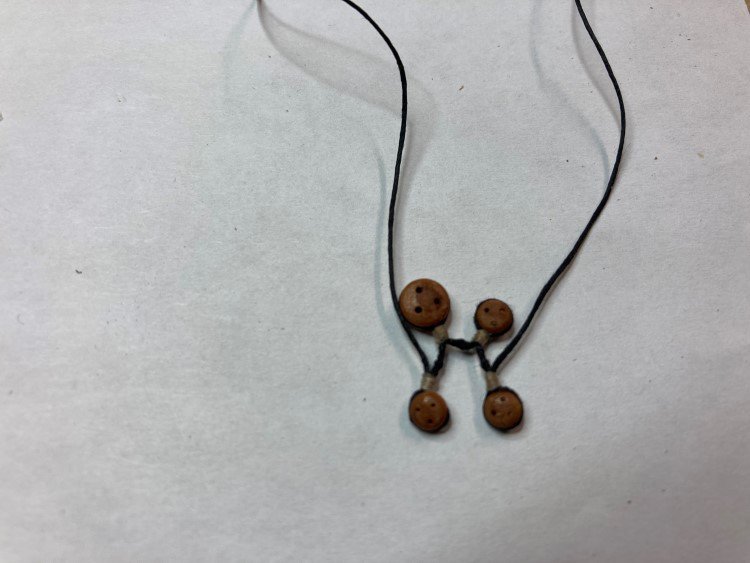
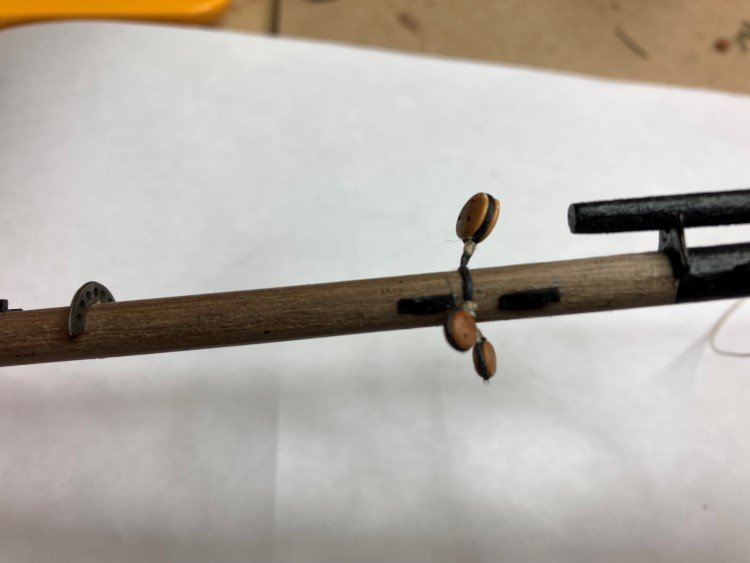
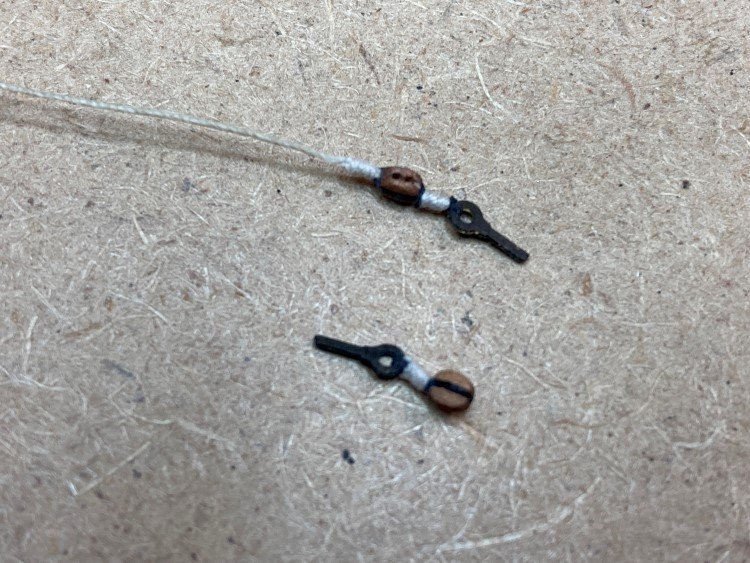
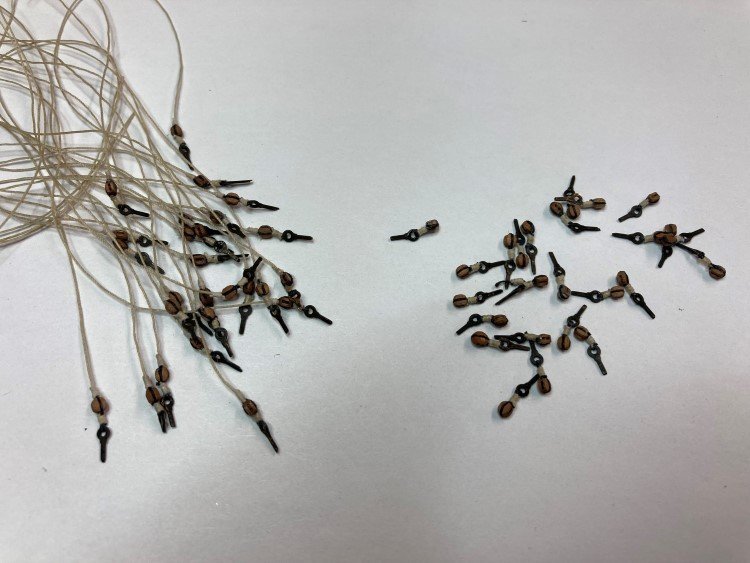
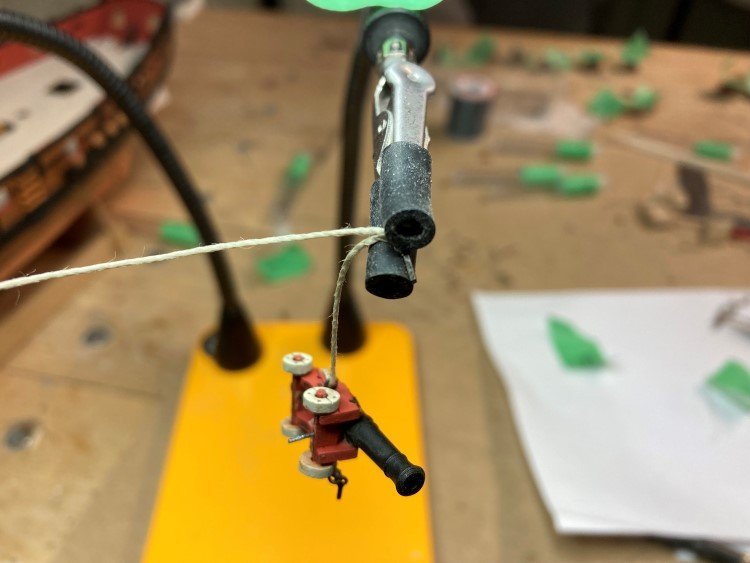
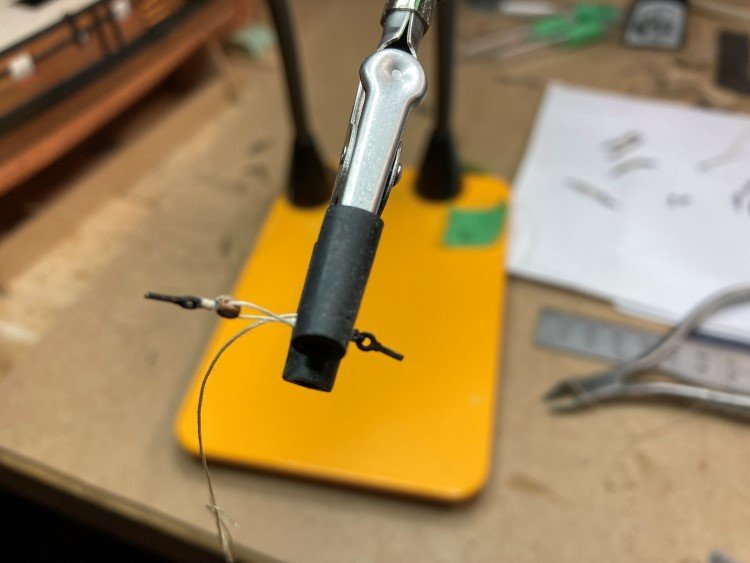
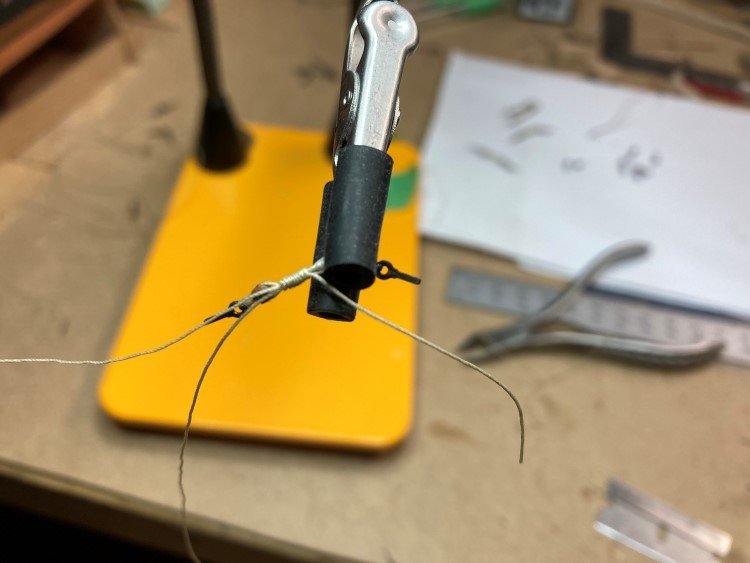
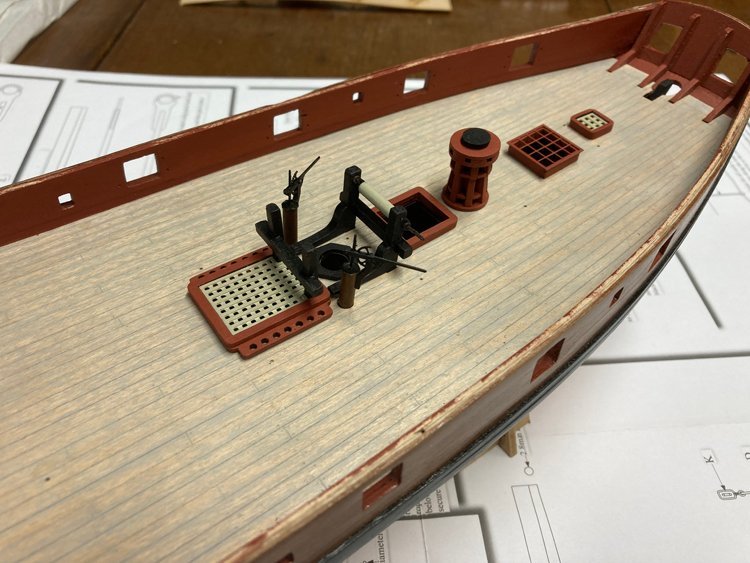
Good Morning Everyone, So here's an update on my progress - I have pretty much finished the hull. The last things I added are the deck furnishings, the lower deadeyes and chainplates and I've located all of the eyebolts on the hull. Depending on how they will be used some are installed now and others just have their holes drilled at this point. The eyebolts on the deck are not glued in yet; it's often best to wait until their lines have been attached. I have also been working on the masts and yards. I don't have any machine tools, so I rely on an xacto blade, sandpaper and calipers to taper the yards and I square up the ends of the masts freehand by eye. I know my results are never perfect, but I always enjoy this part of the build and I find the results are acceptable (to my eye, at least.) One detail that I almost always omit is shaping the yards to an octagon at the centre. I have never been happy with my results and by the time I sand out the imperfections, it pretty much ends up round anyway. So I save myself a lot of aggravation and just skip it. (I haven't heard any complaints yet.)😄 I love using this cartridge paper for the iron bands on the mast. I always think it looks very realistic and the scale always seems better to me than using a brass strip. In the past I have used black construction paper, but this time I used the supplied cartridge paper. I often have a bit of trouble getting the bands to wrap and stay level and if they are glued on, it's a bit messy relocating them. This time I first wrapped the mast with masking tape immediately below where I wanted the band to be and made any necessary adjustments with it. Then I glued the band on right next to the masking tape. This worked quite well. Here's my "cheat" for attaching the line around the ends of the stunsail booms in a tidy way. I drilled two holes in the bottom of the yard. The first one just went part way in and the second one right next to it went right through to the top. I inserted the line into the first hole, wrapped it around the yard a couple of times, then pulled it taut from the top through the second hole. A dab of glue holds it in place and I snipped it off. There is a tricky bit of rigging on the bowsprit. It's this loop with four deadeyes. I thought about how to do this quite a bit and studied how others approached this. In the end here is what I did - I wrapped a piece of masking tape around the bowsprit and marked the locations of the four deadeyes - Then I placed the masking tape on a piece of paper and extended the four location marks - I seized the top deadeye in the centre of a line - I then located the location of the other three deadeyes relative to the first one - two to one side of it and one to the other side - Then I wrapped the whole thing loosely around the bowsprit and simply seized the two loose ends together. Once the seizing was tight, I just pulled on the two ends, snugging it up to the bowsprit. A dab of glue holds the seizing in place. It took me two attempts to get it right. The first time my spacing was off a little bit, but I could tell that the system was working, so a second attempt with a little bit of tweaking did the trick. Many thanks for looking in, "likes" etc. We're all shovelled out now here in southern Ontario; I hope you guys in the eastern US are managing ok after your heavy snowfall. David

- 91 replies
-
- 20
-
-

-
- Speedy
- Vanguard Models
- (and 1 more)
-
Looking amazing, Derek. I think I'd like to tackle this one next myself. David
- 345 replies
-
- 2
-
-
-
- Duchess Of Kingston
- Vanguard Models
- (and 1 more)
-
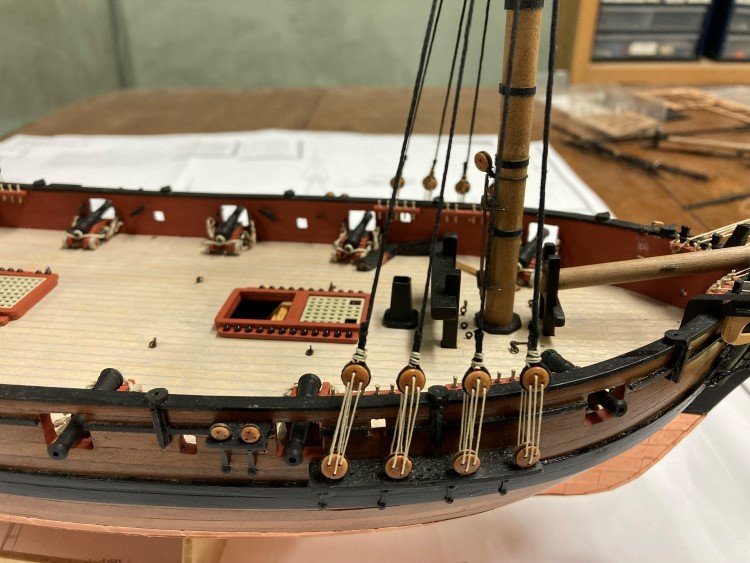
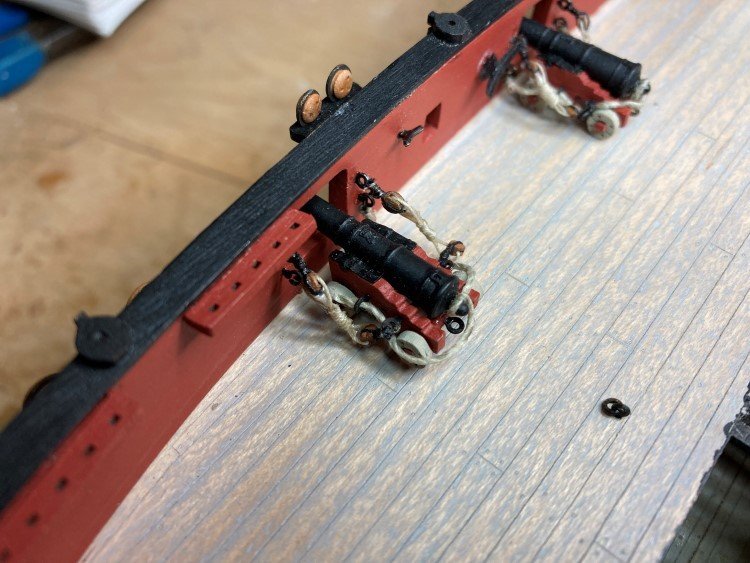
Just came in from snow shoveling; we got about 18" last night. Not unprecedented, but close to it. It's going to be a long process getting the driveway open. So while I'm drying off from the last stab at it, I'll do a little update on my Speedy. I've been working on the cannons. I simplified it slightly. They size of these one is very small and there isn't much room between the blocks. I knew I couldn't fashion an acceptable hook small enough, connecting the blocks to the eyebolts, so I simply omitted this detail and seized the blocks directly to the eyebolts. I used contrasting seizing, so I could better see what I was doing and then coloured it black later. The sets ready to be assembled: In the past I've usually terminated the tackle line in a coil on the deck, but this time I wanted to try my hand at frapping. I wasn't sure how to do it, so I just gathered the line and then seized it using a separate seizing line of the same size and it worked really well. .75mm line for the breach lines: All 14 are done: Well, it's back out to my temperamental snow blower! David
- 91 replies
-
- 9
-
-
- Speedy
- Vanguard Models
- (and 1 more)
-
You're off to a really great start, Tom. I built this model from the MS kit and it is one of my favourite builds. if your experience is anything like mine, you should find the plans to be very accurate. I found plenty of pictures on line that helped me confirm many details. With your easy access to the ship and the ability to photograph exactly what you need, you'll be in great shape! David
- 200 replies
-
- 2
-
-
- Whaling Bark
- Charles W Morgan
- (and 1 more)
-
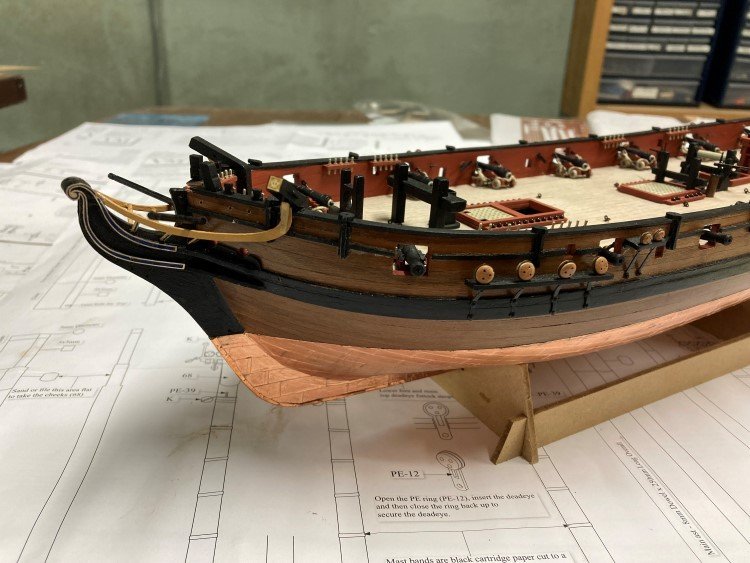
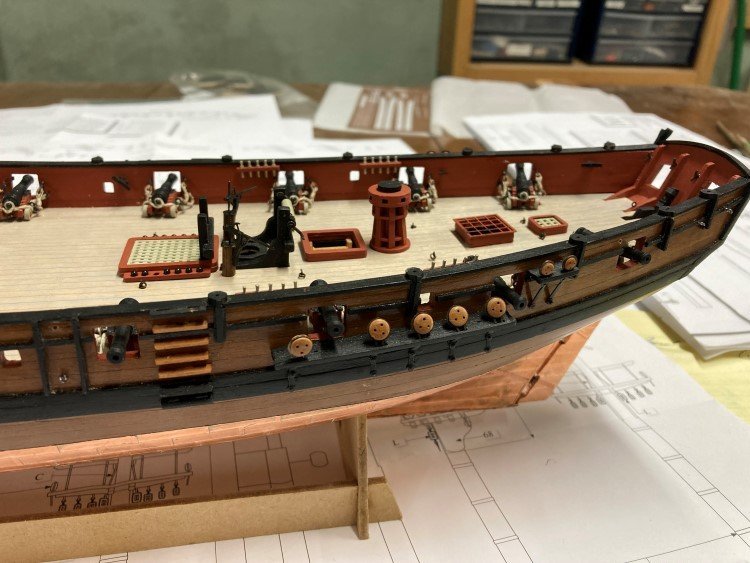
Good Morning, I've been working away at some of the hull details. The hair bracket decorations caused my quite a bit of grief. I'm normally not too bad with a paint brush, but the details on these brass pieces pretty much defeated me. After many, many attempts to paint the centre section blue and the edges yellow ochre, I finally gave up. I simply could not get a sharp enough result, despite trying several different techniques. In the end I settled for blue in the centre and I simply left the edges as brass. (I could just scrape the blue of the raised edges, leaving it in the centre.) The brass colour is only slightly different than the yellow ochre and I can live with it. I decided to use the same technique on the decorations on the ends of the catheads, only this time I used yellow ochre paint, scraping it off the raised sections. It works quite well here, highlighting the detail, but in a subtle way. I've added the pin rails and cleats and catheads to the bulwarks, as well as the steps and the swivel gun post patterns on the hull. I'm now working on the channels and lower deadeye assemblies and then I think the next thing on the agenda will be rigging the cannons. Thanks everyone for your comments and likes! David
.jpg.510f2beaaec66c2ffd1cfd123b52e3b9.jpg)
.jpg.898df2573c415d72fe2fa08ac42ce849.jpg)
.jpg.e4d9581f1fff408c1c85faa9d1df40f6.jpg)
- 91 replies
-
- 9
-
-
- Speedy
- Vanguard Models
- (and 1 more)
-
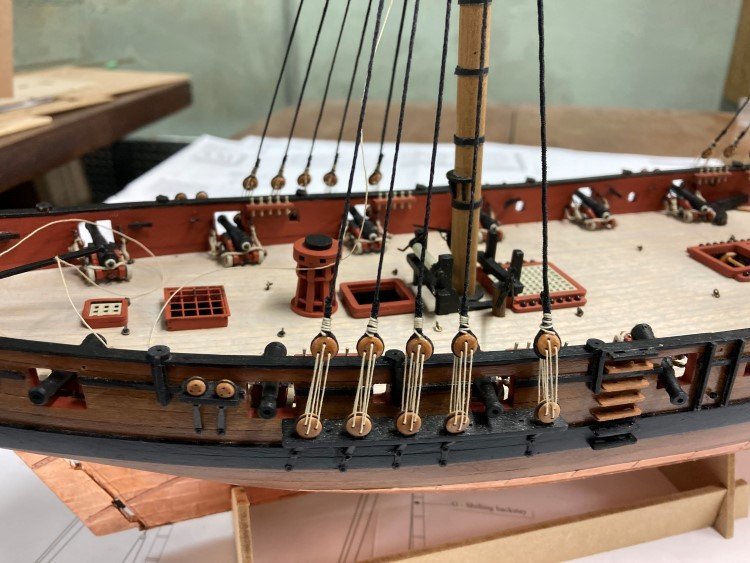
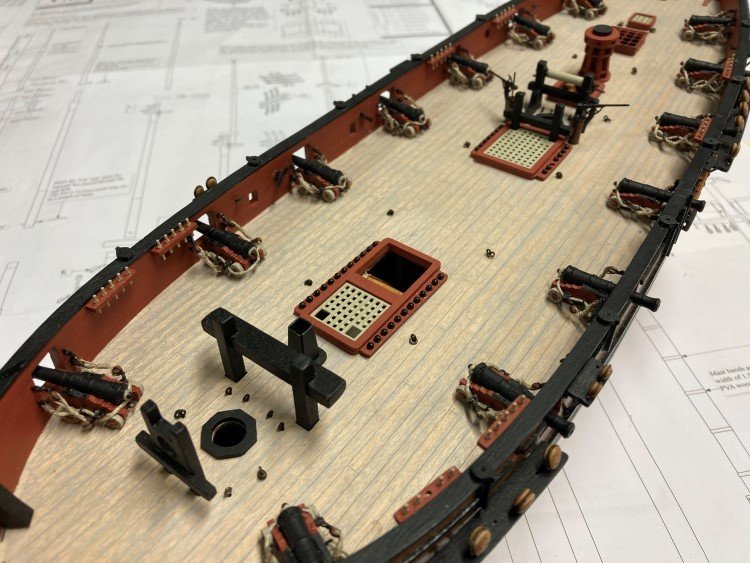
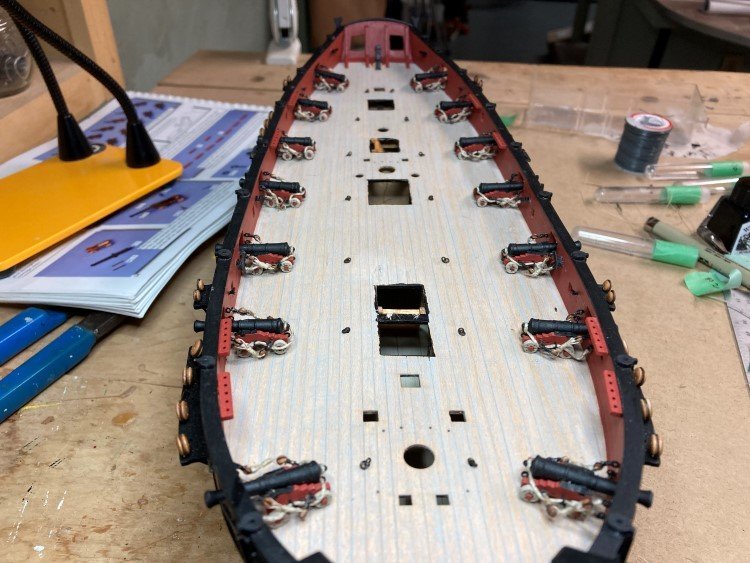
Good Morning, Lately, I've been working on the cannons and other deck furniture. The items have not been installed yet, they're just sitting in place for the pictures. It will be very easy to locate them accurately and securely, as the deck is cut out to accommodate them and they go all the way down to the "deck" below. This is quite different than my Model Shipways experience where the fife rails in particular always cause me a lot of grief. Just gluing them to the surface is never quite secure enough. Drilling them and adding pins helps, (in fact, it's essential) but locating those holes in the deck in order to get them to sit square and accurately is always a challenge. Definitely not the case here. I used Tamiya Deck Tan on the trucks and the grates. I thinned it down on the trucks to get a natural wood look. I'm pleased at how well the etched details show through. I'm taking a short break from Speedy for now, as I continue with the second planking on Agamemnon. Thanks for checking in. David
.jpg.46bb6af515fd06e978c581979a13b380.jpg)
.jpg.55beaf8c888d8711e40431a24ecce5dc.jpg)
.jpg.8614796df7299990d4b4603b338e7d8b.jpg)
.jpg.a33009931b36c3182dcbc2b71a2a38e0.jpg)
.jpg.3fade000302ddb97b9029d97a2bcff69.jpg)
.jpg.9ebe396b36b463933fe255c41a17f606.jpg)
- 91 replies
-
- 17
-
-
- Speedy
- Vanguard Models
- (and 1 more)
-
It's all looking pretty good to my eye. D
-
I don't think they presented this as a workshop for making models. By "model shop" they mean it's an example of a woodworking shop on which to model your own. Interesting that they included a Shopsmith. David
-
That's looking great, Andy. What a beautiful ship. David
-
Hello Yves, This product is called Venture Tape MasterFoil Plus Copper Foil by 3M. It comes in several widths. This one is 1/4". I'm not sure how thick it is, but it's pretty thin. It's self-adhesive and comes with a paper backing that you peel off. I use one of those cutting tools, like Chop-It from MicroMark, to cut it into lengths of about 3/4". This tape is sometimes hard to find. I have only ever found it at stained glass suppliers but they don't all seem to carry it. There is a similar one called Edco which some suppliers carry. I have some of it as well. It's virtually identical to the Venture Tape, but is perhaps just a bit thinner. It isn't too difficult to work with, because it's quite forgiving. You can vary the overlap just slightly to account for the curves in the hull. Also if you ruin one, you can easily scrap it without worrying about running out. You can get about 1700 of them from one roll. I don't think you have to do anything special to the hull, but you want it to be as smooth as possible because imperfections will show through the tape. I just put a coat of matte varnish on the hull before applying the tape. It sticks really well. The tape is a bit shiny, so I'm going to experiment with coating it with a matte finish to quiet it down. The individual plates that many kits provide give great looking results if they're skillfully applied, but I found it really hard to do. I think it's a little easier to get an acceptable result with the tape approach. Thanks, David
- 91 replies
-
- 6
-
-
- Speedy
- Vanguard Models
- (and 1 more)