


David Lester
-
Posts
661 -
Joined
Reputation Activity
-

 David Lester got a reaction from usedtosail in USS Constitution by David Lester - FINISHED - Model Shipways
Thanks Tom,
I also found the rails and timbers very hard to do, and I am getting tired of touching up with filler and paint. It seems every time I add something I ruin something else. For example, I wish I had drilled the holes for the hawse ports much earlier. When I drilled them on the starboard side, I managed to take a pretty big chunk out of the cheek knee directly above it. Despite all that I think I can live with the results - as they say, "a blind man would be glad to see it."
David
-
 David Lester got a reaction from robin b in USS Constitution by David Lester - FINISHED - Model Shipways
Happy Wednesday Everyone,
I have a brief update for today. I have finished all of the bow work. As I had mentioned earlier I needed to adjust the middle rail on each side. I not sure if their profiles are exactly correct, but at least they now fit the model. With the stern and bow both finished, I'm now about to start the copper plating.
David
-
 David Lester got a reaction from Elijah in USS Constitution by David Lester - FINISHED - Model Shipways
Thanks John.
Thanks for checking in Mike - I've been spending quite a bit of time on it lately and I'm glad to reconnect with everyone from LSS over here.
David
-
David Lester got a reaction from Elijah in USS Constitution by David Lester - FINISHED - Model Shipways
Thanks Tom,
I also found the rails and timbers very hard to do, and I am getting tired of touching up with filler and paint. It seems every time I add something I ruin something else. For example, I wish I had drilled the holes for the hawse ports much earlier. When I drilled them on the starboard side, I managed to take a pretty big chunk out of the cheek knee directly above it. Despite all that I think I can live with the results - as they say, "a blind man would be glad to see it."
David
-
 David Lester got a reaction from Levie in USS Constitution by David Lester - FINISHED - Model Shipways
Happy Wednesday Everyone,
I have a brief update for today. I have finished all of the bow work. As I had mentioned earlier I needed to adjust the middle rail on each side. I not sure if their profiles are exactly correct, but at least they now fit the model. With the stern and bow both finished, I'm now about to start the copper plating.
David
-
 David Lester got a reaction from Dubz in USS Constitution by David Lester - FINISHED - Model Shipways
Happy Wednesday Everyone,
I have a brief update for today. I have finished all of the bow work. As I had mentioned earlier I needed to adjust the middle rail on each side. I not sure if their profiles are exactly correct, but at least they now fit the model. With the stern and bow both finished, I'm now about to start the copper plating.
David
-
 David Lester got a reaction from captgino in USS Constitution by David Lester - FINISHED - Model Shipways
Hello Again,
Over the past couple of weeks, I have been working on the stern and bow details. As many of you know the practicum suggests using Evergreen styrene for much of the details. While it's quite effective, it really isn't very much fun to work with. It's difficult to do without getting CA glue all over the place and it doesn't set up as quickly as I would like. Also, the "memory" in the strips causes them to not want to stay in place around curves. I found it helped to wrap the trip around a cylinder for a day or se before using it. One minor change I made from the practicum was the size of the stripe on the rails. For some reason it's suggested to use .040 half round on the cheek rails and then switch to .010 x .020 for the headrails. Once I added the smaller stuff to the headrails, I noticed how much better it looked than the hearvier on the cheek rails, so I redid it, using the smaller scale. I'm not sure if it's more authentic to use the two different sizes or not, but I'm sure happier with the smaller size throughout.
The headrails are interesting to make. Most of them were not actually too difficult, but that middle rail is of the devil's own design. It's a series of compound curves and the practicum suggests making it ahead of attaching any of the rails to the model. The problem with this is that you're flying blind. The timbers connect the top curved rail with the top cheek rail. The middle rail goes between and I believe it is supposed to make contact with the timbers. My middle rail, which looked quite good off the model, didn't even come close to reaching the three middle timbers. It didn't seem to curve far enough toward the centre throughout it's horizontal run. I didn't have the heart to start over, as these rails were the result of several failed attempts, so my solution was to modify them. I laminated planking material to the inside surface of the rails where they were to meet the three timbers, then I sanded them to the necessary contour. Once I was satisfied, I then sanded the outside surface down to create the right width throughout its length. This effectively reshaped the piece. For anyone else using the practicum, I would suggest installing the other rails and timbers first, and only then making the middle rail to fit.
On the gallery, I know my work here isn't especially beautiful, but it's the result of several failed attempts and if there's one thing I've learned it's to know my limitations and when to cut my loses, so this is what it's going to be. The nameplate looked like it was going to be a bit of a challenge. The laser cut plate provided required painting and I knew I'd never get a satisfactory job. The trailboard isn't so difficult as all the curving detail allows a fair bit of margin for error, but the lettering is another story altogether. The practicum suggests using dry transfer lettering. I ordered some, but it is very difficult to hold it in place correctly and to get a straight string of letters. Also, often despite rubbing the letter, only a portion of it actually comes off which leaves quite a mess. In the end I turned to Microsoft Word. I created the lettering in a Word document, approximating it as closely as I could. I cut it out, glued it to a piece of wood and then sealed it with polyurethane. It seems to work ok.
So that pretty much brings my build log up to date.
David
-
 David Lester got a reaction from CaptainSteve in USS Constitution by David Lester - FINISHED - Model Shipways
Thanks Tom,
I also found the rails and timbers very hard to do, and I am getting tired of touching up with filler and paint. It seems every time I add something I ruin something else. For example, I wish I had drilled the holes for the hawse ports much earlier. When I drilled them on the starboard side, I managed to take a pretty big chunk out of the cheek knee directly above it. Despite all that I think I can live with the results - as they say, "a blind man would be glad to see it."
David
-
 David Lester got a reaction from Canute in Armed Virginia Sloop Patrick Henry by DocBlake - FINISHED - Lauck Street Shipyard - Scale = 1/32 - POF Admiralty Style
Hi Dave,
Looks great!
David
-
 David Lester got a reaction from GuntherMT in USS Constitution by David Lester - FINISHED - Model Shipways
Happy Wednesday Everyone,
I have a brief update for today. I have finished all of the bow work. As I had mentioned earlier I needed to adjust the middle rail on each side. I not sure if their profiles are exactly correct, but at least they now fit the model. With the stern and bow both finished, I'm now about to start the copper plating.
David
-
 David Lester got a reaction from JeffT in USS Constitution by David Lester - FINISHED - Model Shipways
Hello Again,
Over the past couple of weeks, I have been working on the stern and bow details. As many of you know the practicum suggests using Evergreen styrene for much of the details. While it's quite effective, it really isn't very much fun to work with. It's difficult to do without getting CA glue all over the place and it doesn't set up as quickly as I would like. Also, the "memory" in the strips causes them to not want to stay in place around curves. I found it helped to wrap the trip around a cylinder for a day or se before using it. One minor change I made from the practicum was the size of the stripe on the rails. For some reason it's suggested to use .040 half round on the cheek rails and then switch to .010 x .020 for the headrails. Once I added the smaller stuff to the headrails, I noticed how much better it looked than the hearvier on the cheek rails, so I redid it, using the smaller scale. I'm not sure if it's more authentic to use the two different sizes or not, but I'm sure happier with the smaller size throughout.
The headrails are interesting to make. Most of them were not actually too difficult, but that middle rail is of the devil's own design. It's a series of compound curves and the practicum suggests making it ahead of attaching any of the rails to the model. The problem with this is that you're flying blind. The timbers connect the top curved rail with the top cheek rail. The middle rail goes between and I believe it is supposed to make contact with the timbers. My middle rail, which looked quite good off the model, didn't even come close to reaching the three middle timbers. It didn't seem to curve far enough toward the centre throughout it's horizontal run. I didn't have the heart to start over, as these rails were the result of several failed attempts, so my solution was to modify them. I laminated planking material to the inside surface of the rails where they were to meet the three timbers, then I sanded them to the necessary contour. Once I was satisfied, I then sanded the outside surface down to create the right width throughout its length. This effectively reshaped the piece. For anyone else using the practicum, I would suggest installing the other rails and timbers first, and only then making the middle rail to fit.
On the gallery, I know my work here isn't especially beautiful, but it's the result of several failed attempts and if there's one thing I've learned it's to know my limitations and when to cut my loses, so this is what it's going to be. The nameplate looked like it was going to be a bit of a challenge. The laser cut plate provided required painting and I knew I'd never get a satisfactory job. The trailboard isn't so difficult as all the curving detail allows a fair bit of margin for error, but the lettering is another story altogether. The practicum suggests using dry transfer lettering. I ordered some, but it is very difficult to hold it in place correctly and to get a straight string of letters. Also, often despite rubbing the letter, only a portion of it actually comes off which leaves quite a mess. In the end I turned to Microsoft Word. I created the lettering in a Word document, approximating it as closely as I could. I cut it out, glued it to a piece of wood and then sealed it with polyurethane. It seems to work ok.
So that pretty much brings my build log up to date.
David
-
 David Lester got a reaction from CDW in USS Constitution by David Lester - FINISHED - Model Shipways
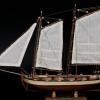
Good Morning Everyone,
This is my first posting for my build log of the USS Constitution. I'm using the Bob Hunt practicum and started the model in September of last year and until recently was posting regularly on the LSS forum. At the time I left that forum, I was just about ready to begin the stern and bow details. So, this first posting will serve as a sort of recap of my progress to that point. My next posting will show what I've been working on over the past couple of weeks.
I'm really enjoying how much material there is to be found on this forum (especially Constitution builds) and look forward to following them all.
David
Here are the "recap" photos:
-
 David Lester got a reaction from DocBlake in USS Constitution by David Lester - FINISHED - Model Shipways
Happy Wednesday Everyone,
I have a brief update for today. I have finished all of the bow work. As I had mentioned earlier I needed to adjust the middle rail on each side. I not sure if their profiles are exactly correct, but at least they now fit the model. With the stern and bow both finished, I'm now about to start the copper plating.
David
-
David Lester got a reaction from CaptainSteve in USS Constitution by xken - Model Shipways - Scale 1:76.8
Hi Ken,
Thanks very much, your descriptions and pictures are quite helpful.
David
-
 David Lester got a reaction from xken in USS Constitution by xken - Model Shipways - Scale 1:76.8
Hi Ken,
Thanks very much, your descriptions and pictures are quite helpful.
David
-
 David Lester got a reaction from GLakie in USS Constitution by xken - Model Shipways - Scale 1:76.8
Hi Ken,
Thanks very much, your descriptions and pictures are quite helpful.
David
-
David Lester got a reaction from Canute in USS Constitution by xken - Model Shipways - Scale 1:76.8
Hi Ken,
Thanks very much, your descriptions and pictures are quite helpful.
David
-
David Lester got a reaction from robin b in USS Constitution by David Lester - FINISHED - Model Shipways
Hello Again,
Over the past couple of weeks, I have been working on the stern and bow details. As many of you know the practicum suggests using Evergreen styrene for much of the details. While it's quite effective, it really isn't very much fun to work with. It's difficult to do without getting CA glue all over the place and it doesn't set up as quickly as I would like. Also, the "memory" in the strips causes them to not want to stay in place around curves. I found it helped to wrap the trip around a cylinder for a day or se before using it. One minor change I made from the practicum was the size of the stripe on the rails. For some reason it's suggested to use .040 half round on the cheek rails and then switch to .010 x .020 for the headrails. Once I added the smaller stuff to the headrails, I noticed how much better it looked than the hearvier on the cheek rails, so I redid it, using the smaller scale. I'm not sure if it's more authentic to use the two different sizes or not, but I'm sure happier with the smaller size throughout.
The headrails are interesting to make. Most of them were not actually too difficult, but that middle rail is of the devil's own design. It's a series of compound curves and the practicum suggests making it ahead of attaching any of the rails to the model. The problem with this is that you're flying blind. The timbers connect the top curved rail with the top cheek rail. The middle rail goes between and I believe it is supposed to make contact with the timbers. My middle rail, which looked quite good off the model, didn't even come close to reaching the three middle timbers. It didn't seem to curve far enough toward the centre throughout it's horizontal run. I didn't have the heart to start over, as these rails were the result of several failed attempts, so my solution was to modify them. I laminated planking material to the inside surface of the rails where they were to meet the three timbers, then I sanded them to the necessary contour. Once I was satisfied, I then sanded the outside surface down to create the right width throughout its length. This effectively reshaped the piece. For anyone else using the practicum, I would suggest installing the other rails and timbers first, and only then making the middle rail to fit.
On the gallery, I know my work here isn't especially beautiful, but it's the result of several failed attempts and if there's one thing I've learned it's to know my limitations and when to cut my loses, so this is what it's going to be. The nameplate looked like it was going to be a bit of a challenge. The laser cut plate provided required painting and I knew I'd never get a satisfactory job. The trailboard isn't so difficult as all the curving detail allows a fair bit of margin for error, but the lettering is another story altogether. The practicum suggests using dry transfer lettering. I ordered some, but it is very difficult to hold it in place correctly and to get a straight string of letters. Also, often despite rubbing the letter, only a portion of it actually comes off which leaves quite a mess. In the end I turned to Microsoft Word. I created the lettering in a Word document, approximating it as closely as I could. I cut it out, glued it to a piece of wood and then sealed it with polyurethane. It seems to work ok.
So that pretty much brings my build log up to date.
David
-
 David Lester got a reaction from coxswain in USS Constitution by David Lester - FINISHED - Model Shipways
Good Morning Everyone,
This is my first posting for my build log of the USS Constitution. I'm using the Bob Hunt practicum and started the model in September of last year and until recently was posting regularly on the LSS forum. At the time I left that forum, I was just about ready to begin the stern and bow details. So, this first posting will serve as a sort of recap of my progress to that point. My next posting will show what I've been working on over the past couple of weeks.
I'm really enjoying how much material there is to be found on this forum (especially Constitution builds) and look forward to following them all.
David
Here are the "recap" photos:
-
David Lester got a reaction from CaptainSteve in Rattlesnake by JSGerson - FINISHED - Mamoli - 1:64 - Using Robert Hunt’s practicum
Hi Jonathan,
I saw your comments in another build log, but thought I'd respond in here. I think your observations of Bob Hunt's practicums are valid. The Constitution is my second build using his courses and there are definitely some minor issues with them. There are quite a few typos and from time to time he skips over things I would like more detail on then spends more time I need on others, but these are minor complaints and overall I simply couldn't be enjoying this hobby nearly as much without them.
I'm following your build log, as the Mamoli Rattlesnake is my next build. I had decided early on that I wanted to build this model at sometime in the future. I wanted the Mamoli one, mainly because I already had two MS kits and wanted experience with a different manufacturer. And then, I heard that Mamoli was out of business! I watched ebay in the hopes that a Rattlesnake would turn up and in time one did. I didn't buy it as soon as I saw it and when I did decide to buy it later in the day, I was too late and it was gone. Now, not only did I want one but I had to have one. I was not given much encouragement by any suppliers including a retailer not far away from me in Toronto. They told me the chance of finding one was slim, then about two weeks later they called and said they'd located one, so I bought it.
I'm not sure when I'll get to building it as I have "miles to go before I sleep..." on my Constitution. I have the practicum for it too, but I'm not sure yet to what extent I will kit bash it. I guess time will tell.
Your model is looking beautiful.
David
-
 David Lester got a reaction from Eddie in Trabakul by donrobinson - FINISHED - MarisStella - 1:32 scale
Hi Don,
Yes, I started my build log up again today. You should find it under USS Constitution.
David
-
David Lester got a reaction from Eddie in Trabakul by donrobinson - FINISHED - MarisStella - 1:32 scale
Hi Don,
Well this certainly looks like an interesting model. I'm looking forward to following along.
David
-
 David Lester got a reaction from Martin W in Rattlesnake by JSGerson - FINISHED - Mamoli - 1:64 - Using Robert Hunt’s practicum
Hi Jonathan,
I saw your comments in another build log, but thought I'd respond in here. I think your observations of Bob Hunt's practicums are valid. The Constitution is my second build using his courses and there are definitely some minor issues with them. There are quite a few typos and from time to time he skips over things I would like more detail on then spends more time I need on others, but these are minor complaints and overall I simply couldn't be enjoying this hobby nearly as much without them.
I'm following your build log, as the Mamoli Rattlesnake is my next build. I had decided early on that I wanted to build this model at sometime in the future. I wanted the Mamoli one, mainly because I already had two MS kits and wanted experience with a different manufacturer. And then, I heard that Mamoli was out of business! I watched ebay in the hopes that a Rattlesnake would turn up and in time one did. I didn't buy it as soon as I saw it and when I did decide to buy it later in the day, I was too late and it was gone. Now, not only did I want one but I had to have one. I was not given much encouragement by any suppliers including a retailer not far away from me in Toronto. They told me the chance of finding one was slim, then about two weeks later they called and said they'd located one, so I bought it.
I'm not sure when I'll get to building it as I have "miles to go before I sleep..." on my Constitution. I have the practicum for it too, but I'm not sure yet to what extent I will kit bash it. I guess time will tell.
Your model is looking beautiful.
David
-
David Lester got a reaction from Levie in USS Constitution by David Lester - FINISHED - Model Shipways
Hello Again,
Over the past couple of weeks, I have been working on the stern and bow details. As many of you know the practicum suggests using Evergreen styrene for much of the details. While it's quite effective, it really isn't very much fun to work with. It's difficult to do without getting CA glue all over the place and it doesn't set up as quickly as I would like. Also, the "memory" in the strips causes them to not want to stay in place around curves. I found it helped to wrap the trip around a cylinder for a day or se before using it. One minor change I made from the practicum was the size of the stripe on the rails. For some reason it's suggested to use .040 half round on the cheek rails and then switch to .010 x .020 for the headrails. Once I added the smaller stuff to the headrails, I noticed how much better it looked than the hearvier on the cheek rails, so I redid it, using the smaller scale. I'm not sure if it's more authentic to use the two different sizes or not, but I'm sure happier with the smaller size throughout.
The headrails are interesting to make. Most of them were not actually too difficult, but that middle rail is of the devil's own design. It's a series of compound curves and the practicum suggests making it ahead of attaching any of the rails to the model. The problem with this is that you're flying blind. The timbers connect the top curved rail with the top cheek rail. The middle rail goes between and I believe it is supposed to make contact with the timbers. My middle rail, which looked quite good off the model, didn't even come close to reaching the three middle timbers. It didn't seem to curve far enough toward the centre throughout it's horizontal run. I didn't have the heart to start over, as these rails were the result of several failed attempts, so my solution was to modify them. I laminated planking material to the inside surface of the rails where they were to meet the three timbers, then I sanded them to the necessary contour. Once I was satisfied, I then sanded the outside surface down to create the right width throughout its length. This effectively reshaped the piece. For anyone else using the practicum, I would suggest installing the other rails and timbers first, and only then making the middle rail to fit.
On the gallery, I know my work here isn't especially beautiful, but it's the result of several failed attempts and if there's one thing I've learned it's to know my limitations and when to cut my loses, so this is what it's going to be. The nameplate looked like it was going to be a bit of a challenge. The laser cut plate provided required painting and I knew I'd never get a satisfactory job. The trailboard isn't so difficult as all the curving detail allows a fair bit of margin for error, but the lettering is another story altogether. The practicum suggests using dry transfer lettering. I ordered some, but it is very difficult to hold it in place correctly and to get a straight string of letters. Also, often despite rubbing the letter, only a portion of it actually comes off which leaves quite a mess. In the end I turned to Microsoft Word. I created the lettering in a Word document, approximating it as closely as I could. I cut it out, glued it to a piece of wood and then sealed it with polyurethane. It seems to work ok.
So that pretty much brings my build log up to date.
David
-
 David Lester got a reaction from bhermann in USS Constitution by David Lester - FINISHED - Model Shipways
Good Morning Everyone,
This is my first posting for my build log of the USS Constitution. I'm using the Bob Hunt practicum and started the model in September of last year and until recently was posting regularly on the LSS forum. At the time I left that forum, I was just about ready to begin the stern and bow details. So, this first posting will serve as a sort of recap of my progress to that point. My next posting will show what I've been working on over the past couple of weeks.
I'm really enjoying how much material there is to be found on this forum (especially Constitution builds) and look forward to following them all.
David
Here are the "recap" photos: