


David Lester
-
Posts
675 -
Joined
Reputation Activity
-

 David Lester got a reaction from etubino in Shamrock V by David Lester - FINISHED - Amati - 1:80 - J Class Yacht
Good Morning Everyone,
I've made good progress on the sails.
Roger, I appreciate your comment, and as a rule I prefer models without sails. However, I think this yacht needs the sails, and it's a good opportunity for me to experiment with them.
As I mentioned earlier, I found the kit provided material all but impossible to work with, so I had ordered some silkspan which arrived on Monday and I spent much of Monday and yesterday working on the the sails. I found the silkspan easy to work with and I believe I will have an acceptable result.
Following Tom Lauria's method, I painted the silkspan with some acrylic paint. When dry I pressed it flat with an iron. Tom mentioned using something called dry waxed paper. He doesn't mean regular waxed paper, which would leave quite a mess. Instead of dry waxed paper I used parchment paper which we already had and it did the trick. It can withstand quite a bit of heat and it protects the silkspan.
The next step was to cut out the sails. I made cardboard templates, but here I had to differ from Tom's approach, as I ruined my first sail. He outlined his sail with a pencil, but when I did that, as soon as I ran glue along the edge for the reinforcing strip, the pencil just smudged and made a mess of the sail. The next time I ran my pounce wheel along the template and this cleanly laid out the sail.
I marked the template where the seams go, according to the plans and transferred those marks to the material, but outside the edge of the sail.
Then it was a a simple matter of cutting out some reinforcing strips and gluing them along the edges of the sail.
When it came to marking the seams, I differed from Tom again. He recommended drawing on pencil lines to show the seams. However when I did this, the line looked too heavy and seemed, to my eye at least, to look too much like a pencil line drawn on the sail. I know that others have tried actually sewing seam lines on, but I wasn't about to get into that and it often looks over scale in any case.
So, I turned to the pounce wheel again and marked the seams with it. I'm pretty happy with the result. It shows up just enough, not so much as to be distracting, but still noticeable.
I then flipped the material over and applied the reinforcing strips and "seams" to the other side and then cut the sail out.
I then ironed the sails again, between two sheets of parchment paper, and I think they're finished.
There are four sails on this model - the three small ones which I've done and one large one. Unfortunately, I will have to re-do it as it's marked out with pencil and isn't too clean looking. Fortunately, I ordered enough material.
Anyway, that's my first experience using silkspan and I have to say that I found it to be a very nice product to work with.
Thanks again for looking it.
David
-
 David Lester got a reaction from BobG in Shamrock V by David Lester - FINISHED - Amati - 1:80 - J Class Yacht
Good Morning Everyone,
I've made good progress on the sails.
Roger, I appreciate your comment, and as a rule I prefer models without sails. However, I think this yacht needs the sails, and it's a good opportunity for me to experiment with them.
As I mentioned earlier, I found the kit provided material all but impossible to work with, so I had ordered some silkspan which arrived on Monday and I spent much of Monday and yesterday working on the the sails. I found the silkspan easy to work with and I believe I will have an acceptable result.
Following Tom Lauria's method, I painted the silkspan with some acrylic paint. When dry I pressed it flat with an iron. Tom mentioned using something called dry waxed paper. He doesn't mean regular waxed paper, which would leave quite a mess. Instead of dry waxed paper I used parchment paper which we already had and it did the trick. It can withstand quite a bit of heat and it protects the silkspan.
The next step was to cut out the sails. I made cardboard templates, but here I had to differ from Tom's approach, as I ruined my first sail. He outlined his sail with a pencil, but when I did that, as soon as I ran glue along the edge for the reinforcing strip, the pencil just smudged and made a mess of the sail. The next time I ran my pounce wheel along the template and this cleanly laid out the sail.
I marked the template where the seams go, according to the plans and transferred those marks to the material, but outside the edge of the sail.
Then it was a a simple matter of cutting out some reinforcing strips and gluing them along the edges of the sail.
When it came to marking the seams, I differed from Tom again. He recommended drawing on pencil lines to show the seams. However when I did this, the line looked too heavy and seemed, to my eye at least, to look too much like a pencil line drawn on the sail. I know that others have tried actually sewing seam lines on, but I wasn't about to get into that and it often looks over scale in any case.
So, I turned to the pounce wheel again and marked the seams with it. I'm pretty happy with the result. It shows up just enough, not so much as to be distracting, but still noticeable.
I then flipped the material over and applied the reinforcing strips and "seams" to the other side and then cut the sail out.
I then ironed the sails again, between two sheets of parchment paper, and I think they're finished.
There are four sails on this model - the three small ones which I've done and one large one. Unfortunately, I will have to re-do it as it's marked out with pencil and isn't too clean looking. Fortunately, I ordered enough material.
Anyway, that's my first experience using silkspan and I have to say that I found it to be a very nice product to work with.
Thanks again for looking it.
David
-
 David Lester got a reaction from Roger Pellett in Shamrock V by David Lester - FINISHED - Amati - 1:80 - J Class Yacht
Good Morning Everyone,
I've made good progress on the sails.
Roger, I appreciate your comment, and as a rule I prefer models without sails. However, I think this yacht needs the sails, and it's a good opportunity for me to experiment with them.
As I mentioned earlier, I found the kit provided material all but impossible to work with, so I had ordered some silkspan which arrived on Monday and I spent much of Monday and yesterday working on the the sails. I found the silkspan easy to work with and I believe I will have an acceptable result.
Following Tom Lauria's method, I painted the silkspan with some acrylic paint. When dry I pressed it flat with an iron. Tom mentioned using something called dry waxed paper. He doesn't mean regular waxed paper, which would leave quite a mess. Instead of dry waxed paper I used parchment paper which we already had and it did the trick. It can withstand quite a bit of heat and it protects the silkspan.
The next step was to cut out the sails. I made cardboard templates, but here I had to differ from Tom's approach, as I ruined my first sail. He outlined his sail with a pencil, but when I did that, as soon as I ran glue along the edge for the reinforcing strip, the pencil just smudged and made a mess of the sail. The next time I ran my pounce wheel along the template and this cleanly laid out the sail.
I marked the template where the seams go, according to the plans and transferred those marks to the material, but outside the edge of the sail.
Then it was a a simple matter of cutting out some reinforcing strips and gluing them along the edges of the sail.
When it came to marking the seams, I differed from Tom again. He recommended drawing on pencil lines to show the seams. However when I did this, the line looked too heavy and seemed, to my eye at least, to look too much like a pencil line drawn on the sail. I know that others have tried actually sewing seam lines on, but I wasn't about to get into that and it often looks over scale in any case.
So, I turned to the pounce wheel again and marked the seams with it. I'm pretty happy with the result. It shows up just enough, not so much as to be distracting, but still noticeable.
I then flipped the material over and applied the reinforcing strips and "seams" to the other side and then cut the sail out.
I then ironed the sails again, between two sheets of parchment paper, and I think they're finished.
There are four sails on this model - the three small ones which I've done and one large one. Unfortunately, I will have to re-do it as it's marked out with pencil and isn't too clean looking. Fortunately, I ordered enough material.
Anyway, that's my first experience using silkspan and I have to say that I found it to be a very nice product to work with.
Thanks again for looking it.
David
-
 David Lester got a reaction from CiscoH in Shamrock V by David Lester - FINISHED - Amati - 1:80 - J Class Yacht
Good Morning Everyone,
I've made good progress on the sails.
Roger, I appreciate your comment, and as a rule I prefer models without sails. However, I think this yacht needs the sails, and it's a good opportunity for me to experiment with them.
As I mentioned earlier, I found the kit provided material all but impossible to work with, so I had ordered some silkspan which arrived on Monday and I spent much of Monday and yesterday working on the the sails. I found the silkspan easy to work with and I believe I will have an acceptable result.
Following Tom Lauria's method, I painted the silkspan with some acrylic paint. When dry I pressed it flat with an iron. Tom mentioned using something called dry waxed paper. He doesn't mean regular waxed paper, which would leave quite a mess. Instead of dry waxed paper I used parchment paper which we already had and it did the trick. It can withstand quite a bit of heat and it protects the silkspan.
The next step was to cut out the sails. I made cardboard templates, but here I had to differ from Tom's approach, as I ruined my first sail. He outlined his sail with a pencil, but when I did that, as soon as I ran glue along the edge for the reinforcing strip, the pencil just smudged and made a mess of the sail. The next time I ran my pounce wheel along the template and this cleanly laid out the sail.
I marked the template where the seams go, according to the plans and transferred those marks to the material, but outside the edge of the sail.
Then it was a a simple matter of cutting out some reinforcing strips and gluing them along the edges of the sail.
When it came to marking the seams, I differed from Tom again. He recommended drawing on pencil lines to show the seams. However when I did this, the line looked too heavy and seemed, to my eye at least, to look too much like a pencil line drawn on the sail. I know that others have tried actually sewing seam lines on, but I wasn't about to get into that and it often looks over scale in any case.
So, I turned to the pounce wheel again and marked the seams with it. I'm pretty happy with the result. It shows up just enough, not so much as to be distracting, but still noticeable.
I then flipped the material over and applied the reinforcing strips and "seams" to the other side and then cut the sail out.
I then ironed the sails again, between two sheets of parchment paper, and I think they're finished.
There are four sails on this model - the three small ones which I've done and one large one. Unfortunately, I will have to re-do it as it's marked out with pencil and isn't too clean looking. Fortunately, I ordered enough material.
Anyway, that's my first experience using silkspan and I have to say that I found it to be a very nice product to work with.
Thanks again for looking it.
David
-
 David Lester got a reaction from Dave_E in Shamrock V by David Lester - FINISHED - Amati - 1:80 - J Class Yacht
Good Morning Everyone,
I've made good progress on the sails.
Roger, I appreciate your comment, and as a rule I prefer models without sails. However, I think this yacht needs the sails, and it's a good opportunity for me to experiment with them.
As I mentioned earlier, I found the kit provided material all but impossible to work with, so I had ordered some silkspan which arrived on Monday and I spent much of Monday and yesterday working on the the sails. I found the silkspan easy to work with and I believe I will have an acceptable result.
Following Tom Lauria's method, I painted the silkspan with some acrylic paint. When dry I pressed it flat with an iron. Tom mentioned using something called dry waxed paper. He doesn't mean regular waxed paper, which would leave quite a mess. Instead of dry waxed paper I used parchment paper which we already had and it did the trick. It can withstand quite a bit of heat and it protects the silkspan.
The next step was to cut out the sails. I made cardboard templates, but here I had to differ from Tom's approach, as I ruined my first sail. He outlined his sail with a pencil, but when I did that, as soon as I ran glue along the edge for the reinforcing strip, the pencil just smudged and made a mess of the sail. The next time I ran my pounce wheel along the template and this cleanly laid out the sail.
I marked the template where the seams go, according to the plans and transferred those marks to the material, but outside the edge of the sail.
Then it was a a simple matter of cutting out some reinforcing strips and gluing them along the edges of the sail.
When it came to marking the seams, I differed from Tom again. He recommended drawing on pencil lines to show the seams. However when I did this, the line looked too heavy and seemed, to my eye at least, to look too much like a pencil line drawn on the sail. I know that others have tried actually sewing seam lines on, but I wasn't about to get into that and it often looks over scale in any case.
So, I turned to the pounce wheel again and marked the seams with it. I'm pretty happy with the result. It shows up just enough, not so much as to be distracting, but still noticeable.
I then flipped the material over and applied the reinforcing strips and "seams" to the other side and then cut the sail out.
I then ironed the sails again, between two sheets of parchment paper, and I think they're finished.
There are four sails on this model - the three small ones which I've done and one large one. Unfortunately, I will have to re-do it as it's marked out with pencil and isn't too clean looking. Fortunately, I ordered enough material.
Anyway, that's my first experience using silkspan and I have to say that I found it to be a very nice product to work with.
Thanks again for looking it.
David
-
 David Lester got a reaction from gsdpic in Shamrock V by David Lester - FINISHED - Amati - 1:80 - J Class Yacht
Good Morning Everyone,
I've made good progress on the sails.
Roger, I appreciate your comment, and as a rule I prefer models without sails. However, I think this yacht needs the sails, and it's a good opportunity for me to experiment with them.
As I mentioned earlier, I found the kit provided material all but impossible to work with, so I had ordered some silkspan which arrived on Monday and I spent much of Monday and yesterday working on the the sails. I found the silkspan easy to work with and I believe I will have an acceptable result.
Following Tom Lauria's method, I painted the silkspan with some acrylic paint. When dry I pressed it flat with an iron. Tom mentioned using something called dry waxed paper. He doesn't mean regular waxed paper, which would leave quite a mess. Instead of dry waxed paper I used parchment paper which we already had and it did the trick. It can withstand quite a bit of heat and it protects the silkspan.
The next step was to cut out the sails. I made cardboard templates, but here I had to differ from Tom's approach, as I ruined my first sail. He outlined his sail with a pencil, but when I did that, as soon as I ran glue along the edge for the reinforcing strip, the pencil just smudged and made a mess of the sail. The next time I ran my pounce wheel along the template and this cleanly laid out the sail.
I marked the template where the seams go, according to the plans and transferred those marks to the material, but outside the edge of the sail.
Then it was a a simple matter of cutting out some reinforcing strips and gluing them along the edges of the sail.
When it came to marking the seams, I differed from Tom again. He recommended drawing on pencil lines to show the seams. However when I did this, the line looked too heavy and seemed, to my eye at least, to look too much like a pencil line drawn on the sail. I know that others have tried actually sewing seam lines on, but I wasn't about to get into that and it often looks over scale in any case.
So, I turned to the pounce wheel again and marked the seams with it. I'm pretty happy with the result. It shows up just enough, not so much as to be distracting, but still noticeable.
I then flipped the material over and applied the reinforcing strips and "seams" to the other side and then cut the sail out.
I then ironed the sails again, between two sheets of parchment paper, and I think they're finished.
There are four sails on this model - the three small ones which I've done and one large one. Unfortunately, I will have to re-do it as it's marked out with pencil and isn't too clean looking. Fortunately, I ordered enough material.
Anyway, that's my first experience using silkspan and I have to say that I found it to be a very nice product to work with.
Thanks again for looking it.
David
-
 David Lester got a reaction from Prowler901 in Shamrock V by David Lester - FINISHED - Amati - 1:80 - J Class Yacht
Good Morning Everyone,
I've made good progress on the sails.
Roger, I appreciate your comment, and as a rule I prefer models without sails. However, I think this yacht needs the sails, and it's a good opportunity for me to experiment with them.
As I mentioned earlier, I found the kit provided material all but impossible to work with, so I had ordered some silkspan which arrived on Monday and I spent much of Monday and yesterday working on the the sails. I found the silkspan easy to work with and I believe I will have an acceptable result.
Following Tom Lauria's method, I painted the silkspan with some acrylic paint. When dry I pressed it flat with an iron. Tom mentioned using something called dry waxed paper. He doesn't mean regular waxed paper, which would leave quite a mess. Instead of dry waxed paper I used parchment paper which we already had and it did the trick. It can withstand quite a bit of heat and it protects the silkspan.
The next step was to cut out the sails. I made cardboard templates, but here I had to differ from Tom's approach, as I ruined my first sail. He outlined his sail with a pencil, but when I did that, as soon as I ran glue along the edge for the reinforcing strip, the pencil just smudged and made a mess of the sail. The next time I ran my pounce wheel along the template and this cleanly laid out the sail.
I marked the template where the seams go, according to the plans and transferred those marks to the material, but outside the edge of the sail.
Then it was a a simple matter of cutting out some reinforcing strips and gluing them along the edges of the sail.
When it came to marking the seams, I differed from Tom again. He recommended drawing on pencil lines to show the seams. However when I did this, the line looked too heavy and seemed, to my eye at least, to look too much like a pencil line drawn on the sail. I know that others have tried actually sewing seam lines on, but I wasn't about to get into that and it often looks over scale in any case.
So, I turned to the pounce wheel again and marked the seams with it. I'm pretty happy with the result. It shows up just enough, not so much as to be distracting, but still noticeable.
I then flipped the material over and applied the reinforcing strips and "seams" to the other side and then cut the sail out.
I then ironed the sails again, between two sheets of parchment paper, and I think they're finished.
There are four sails on this model - the three small ones which I've done and one large one. Unfortunately, I will have to re-do it as it's marked out with pencil and isn't too clean looking. Fortunately, I ordered enough material.
Anyway, that's my first experience using silkspan and I have to say that I found it to be a very nice product to work with.
Thanks again for looking it.
David
-
 David Lester got a reaction from VTHokiEE in Shamrock V by David Lester - FINISHED - Amati - 1:80 - J Class Yacht
Good Morning Everyone,
I've made good progress on the sails.
Roger, I appreciate your comment, and as a rule I prefer models without sails. However, I think this yacht needs the sails, and it's a good opportunity for me to experiment with them.
As I mentioned earlier, I found the kit provided material all but impossible to work with, so I had ordered some silkspan which arrived on Monday and I spent much of Monday and yesterday working on the the sails. I found the silkspan easy to work with and I believe I will have an acceptable result.
Following Tom Lauria's method, I painted the silkspan with some acrylic paint. When dry I pressed it flat with an iron. Tom mentioned using something called dry waxed paper. He doesn't mean regular waxed paper, which would leave quite a mess. Instead of dry waxed paper I used parchment paper which we already had and it did the trick. It can withstand quite a bit of heat and it protects the silkspan.
The next step was to cut out the sails. I made cardboard templates, but here I had to differ from Tom's approach, as I ruined my first sail. He outlined his sail with a pencil, but when I did that, as soon as I ran glue along the edge for the reinforcing strip, the pencil just smudged and made a mess of the sail. The next time I ran my pounce wheel along the template and this cleanly laid out the sail.
I marked the template where the seams go, according to the plans and transferred those marks to the material, but outside the edge of the sail.
Then it was a a simple matter of cutting out some reinforcing strips and gluing them along the edges of the sail.
When it came to marking the seams, I differed from Tom again. He recommended drawing on pencil lines to show the seams. However when I did this, the line looked too heavy and seemed, to my eye at least, to look too much like a pencil line drawn on the sail. I know that others have tried actually sewing seam lines on, but I wasn't about to get into that and it often looks over scale in any case.
So, I turned to the pounce wheel again and marked the seams with it. I'm pretty happy with the result. It shows up just enough, not so much as to be distracting, but still noticeable.
I then flipped the material over and applied the reinforcing strips and "seams" to the other side and then cut the sail out.
I then ironed the sails again, between two sheets of parchment paper, and I think they're finished.
There are four sails on this model - the three small ones which I've done and one large one. Unfortunately, I will have to re-do it as it's marked out with pencil and isn't too clean looking. Fortunately, I ordered enough material.
Anyway, that's my first experience using silkspan and I have to say that I found it to be a very nice product to work with.
Thanks again for looking it.
David
-
David Lester got a reaction from etubino in Shamrock V by David Lester - FINISHED - Amati - 1:80 - J Class Yacht
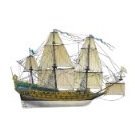
Good Morning,
A little more work on my Shamrock to report. I've finished up the deck details and have a good start on the rigging. The rigging on this model is minimal and quite simple to do. Also the instructions are quite clear so not too big a challenge -
I've upgraded the blocks to internally stropped ones, from BlueJacket.
This is as far as I can go until I add the sails. Most of the running rigging must be added at the same time as the sails.
I'm finding the sails to be a very big challenge. The kit provides some material that seems quite suitable to me. It's a very fine synthetic fabric which does not seem to be over scaled (to my eye at least.) But they only give you just barely enough, certainly not enough for a practice round. I followed the instructions in the kit and also followed someone's Youtube series about his build of the Amati Endeavour yacht, which appears to use the same fabric and method. His seemed to turn out beautifully, but it's lot easier watching it being done than doing it!
The approach is to coat the fabric with a 50/50 mixture of white glue and water. Cut out narrow strips to represent the reinforcing at the edges and other points and glue them on. Then cut the sail out. I have two problems, which aren't actually well reflected in my pictures below. First it's very difficult to get the sail to lay flat and not wringle. The first one below is by for my best effort and I even think it could pass as acceptable, however the others are not nearly as good. The second problem is that I underestimated how easily this gluey fabric would pick up every last bit of dust and dirt in my shop. As a result the sails, in addition to being wringly, also look pretty dirty.
I think it's possible that I could manage to get an acceptable set of sails using this method, but I would need about three times the fabric to allow for do-overs.
So, I have ordered some silkspan from BlueJacket and I'm going to have another go at it, this time following Tom Lauria's approach as he outlined in one of his videos. It's quite similar to the first method I tried, but he coats the material in paint instead of glue. I think I've ordered enough to allow at least one do-over. If I can't get a decent job with the silkspan, I'm not sure what I will do, but I remain optimistic!
Once I conquer these sails, the build will be virtually finished.
Thanks for checking in.
David
-
 David Lester reacted to CiscoH in Armed Virginia Sloop by CiscoH - Model Shipways - 1:48
Good Evening Model Shipworlders!
The holiday Time Suck has hit full force and I haven't gotten much done. Last weekend I attended a social event for my wife's side of the family (they own, of all things, a tugboat company) at the Corinthian Yacht Club in Philadelphia. There were a lot of really cool half hull models:
And in the buffet room the 2 below models. They even had partial outer layers of planking; the top one at each end and the bottom one in the middle. No placards identifying the models, unfortunately. I wondered if they were wooden half hull models of metal ships?
On my AVS I finished adding the sheer strakes and cut the gunports with an xacto blade, then various sticks with 220 sandpaper stuck on with double sided tape, and squared the corners with needle files. They are not all the same size or width but its close and I don't think its too noticeable.
My past measurement sins have come back to haunt me. The upper inner bulwark planking is supposed to be even with the sheer strake. It almost is. After all the sanding and leveling has been done in preparation for the main rail the port planking is pretty even and about the size it supposed to be. The starboard sheer strake ended up a little fat above the first gunport and the corresponding upper bulwark plank a little thin. Again, no one but me will ever notice.
Next step is finishing the poop planking (I assume its the poop, since its above the tiny quarterdeck) and making the main rail. I plan to scarf the main rail like I did the waterways. This joint will really show so no excuses.
Currently I am working my way through Grant Walker's Rogers Collection Vol 2. Amazing pictures and a little more relatable than Vol 1 for me as these are models I could, in theory, attempt to build some day.
I helped out Santa and ordered some presents for myself-
and Rob Napier's new book which I have shown amazing self control and will not start until I'm finished the above Roger's book:
and finally a picture of me and family.
I don't know where all that white in my beard came from. It sure wasn't there last year.
Happy Holidays! till next year
cisco
-
David Lester got a reaction from CiscoH in Shamrock V by David Lester - FINISHED - Amati - 1:80 - J Class Yacht
Good Morning,
A little more work on my Shamrock to report. I've finished up the deck details and have a good start on the rigging. The rigging on this model is minimal and quite simple to do. Also the instructions are quite clear so not too big a challenge -
I've upgraded the blocks to internally stropped ones, from BlueJacket.
This is as far as I can go until I add the sails. Most of the running rigging must be added at the same time as the sails.
I'm finding the sails to be a very big challenge. The kit provides some material that seems quite suitable to me. It's a very fine synthetic fabric which does not seem to be over scaled (to my eye at least.) But they only give you just barely enough, certainly not enough for a practice round. I followed the instructions in the kit and also followed someone's Youtube series about his build of the Amati Endeavour yacht, which appears to use the same fabric and method. His seemed to turn out beautifully, but it's lot easier watching it being done than doing it!
The approach is to coat the fabric with a 50/50 mixture of white glue and water. Cut out narrow strips to represent the reinforcing at the edges and other points and glue them on. Then cut the sail out. I have two problems, which aren't actually well reflected in my pictures below. First it's very difficult to get the sail to lay flat and not wringle. The first one below is by for my best effort and I even think it could pass as acceptable, however the others are not nearly as good. The second problem is that I underestimated how easily this gluey fabric would pick up every last bit of dust and dirt in my shop. As a result the sails, in addition to being wringly, also look pretty dirty.
I think it's possible that I could manage to get an acceptable set of sails using this method, but I would need about three times the fabric to allow for do-overs.
So, I have ordered some silkspan from BlueJacket and I'm going to have another go at it, this time following Tom Lauria's approach as he outlined in one of his videos. It's quite similar to the first method I tried, but he coats the material in paint instead of glue. I think I've ordered enough to allow at least one do-over. If I can't get a decent job with the silkspan, I'm not sure what I will do, but I remain optimistic!
Once I conquer these sails, the build will be virtually finished.
Thanks for checking in.
David
-
 David Lester got a reaction from BobG in Shamrock V by David Lester - FINISHED - Amati - 1:80 - J Class Yacht
Good Morning,
A little more work on my Shamrock to report. I've finished up the deck details and have a good start on the rigging. The rigging on this model is minimal and quite simple to do. Also the instructions are quite clear so not too big a challenge -
I've upgraded the blocks to internally stropped ones, from BlueJacket.
This is as far as I can go until I add the sails. Most of the running rigging must be added at the same time as the sails.
I'm finding the sails to be a very big challenge. The kit provides some material that seems quite suitable to me. It's a very fine synthetic fabric which does not seem to be over scaled (to my eye at least.) But they only give you just barely enough, certainly not enough for a practice round. I followed the instructions in the kit and also followed someone's Youtube series about his build of the Amati Endeavour yacht, which appears to use the same fabric and method. His seemed to turn out beautifully, but it's lot easier watching it being done than doing it!
The approach is to coat the fabric with a 50/50 mixture of white glue and water. Cut out narrow strips to represent the reinforcing at the edges and other points and glue them on. Then cut the sail out. I have two problems, which aren't actually well reflected in my pictures below. First it's very difficult to get the sail to lay flat and not wringle. The first one below is by for my best effort and I even think it could pass as acceptable, however the others are not nearly as good. The second problem is that I underestimated how easily this gluey fabric would pick up every last bit of dust and dirt in my shop. As a result the sails, in addition to being wringly, also look pretty dirty.
I think it's possible that I could manage to get an acceptable set of sails using this method, but I would need about three times the fabric to allow for do-overs.
So, I have ordered some silkspan from BlueJacket and I'm going to have another go at it, this time following Tom Lauria's approach as he outlined in one of his videos. It's quite similar to the first method I tried, but he coats the material in paint instead of glue. I think I've ordered enough to allow at least one do-over. If I can't get a decent job with the silkspan, I'm not sure what I will do, but I remain optimistic!
Once I conquer these sails, the build will be virtually finished.
Thanks for checking in.
David
-
 David Lester got a reaction from Benjamin S in Shamrock V by David Lester - FINISHED - Amati - 1:80 - J Class Yacht
Good Morning,
A little more work on my Shamrock to report. I've finished up the deck details and have a good start on the rigging. The rigging on this model is minimal and quite simple to do. Also the instructions are quite clear so not too big a challenge -
I've upgraded the blocks to internally stropped ones, from BlueJacket.
This is as far as I can go until I add the sails. Most of the running rigging must be added at the same time as the sails.
I'm finding the sails to be a very big challenge. The kit provides some material that seems quite suitable to me. It's a very fine synthetic fabric which does not seem to be over scaled (to my eye at least.) But they only give you just barely enough, certainly not enough for a practice round. I followed the instructions in the kit and also followed someone's Youtube series about his build of the Amati Endeavour yacht, which appears to use the same fabric and method. His seemed to turn out beautifully, but it's lot easier watching it being done than doing it!
The approach is to coat the fabric with a 50/50 mixture of white glue and water. Cut out narrow strips to represent the reinforcing at the edges and other points and glue them on. Then cut the sail out. I have two problems, which aren't actually well reflected in my pictures below. First it's very difficult to get the sail to lay flat and not wringle. The first one below is by for my best effort and I even think it could pass as acceptable, however the others are not nearly as good. The second problem is that I underestimated how easily this gluey fabric would pick up every last bit of dust and dirt in my shop. As a result the sails, in addition to being wringly, also look pretty dirty.
I think it's possible that I could manage to get an acceptable set of sails using this method, but I would need about three times the fabric to allow for do-overs.
So, I have ordered some silkspan from BlueJacket and I'm going to have another go at it, this time following Tom Lauria's approach as he outlined in one of his videos. It's quite similar to the first method I tried, but he coats the material in paint instead of glue. I think I've ordered enough to allow at least one do-over. If I can't get a decent job with the silkspan, I'm not sure what I will do, but I remain optimistic!
Once I conquer these sails, the build will be virtually finished.
Thanks for checking in.
David
-
 David Lester got a reaction from yvesvidal in Shamrock V by David Lester - FINISHED - Amati - 1:80 - J Class Yacht
Good Morning,
A little more work on my Shamrock to report. I've finished up the deck details and have a good start on the rigging. The rigging on this model is minimal and quite simple to do. Also the instructions are quite clear so not too big a challenge -
I've upgraded the blocks to internally stropped ones, from BlueJacket.
This is as far as I can go until I add the sails. Most of the running rigging must be added at the same time as the sails.
I'm finding the sails to be a very big challenge. The kit provides some material that seems quite suitable to me. It's a very fine synthetic fabric which does not seem to be over scaled (to my eye at least.) But they only give you just barely enough, certainly not enough for a practice round. I followed the instructions in the kit and also followed someone's Youtube series about his build of the Amati Endeavour yacht, which appears to use the same fabric and method. His seemed to turn out beautifully, but it's lot easier watching it being done than doing it!
The approach is to coat the fabric with a 50/50 mixture of white glue and water. Cut out narrow strips to represent the reinforcing at the edges and other points and glue them on. Then cut the sail out. I have two problems, which aren't actually well reflected in my pictures below. First it's very difficult to get the sail to lay flat and not wringle. The first one below is by for my best effort and I even think it could pass as acceptable, however the others are not nearly as good. The second problem is that I underestimated how easily this gluey fabric would pick up every last bit of dust and dirt in my shop. As a result the sails, in addition to being wringly, also look pretty dirty.
I think it's possible that I could manage to get an acceptable set of sails using this method, but I would need about three times the fabric to allow for do-overs.
So, I have ordered some silkspan from BlueJacket and I'm going to have another go at it, this time following Tom Lauria's approach as he outlined in one of his videos. It's quite similar to the first method I tried, but he coats the material in paint instead of glue. I think I've ordered enough to allow at least one do-over. If I can't get a decent job with the silkspan, I'm not sure what I will do, but I remain optimistic!
Once I conquer these sails, the build will be virtually finished.
Thanks for checking in.
David
-
David Lester got a reaction from Prowler901 in Shamrock V by David Lester - FINISHED - Amati - 1:80 - J Class Yacht
Good Morning,
A little more work on my Shamrock to report. I've finished up the deck details and have a good start on the rigging. The rigging on this model is minimal and quite simple to do. Also the instructions are quite clear so not too big a challenge -
I've upgraded the blocks to internally stropped ones, from BlueJacket.
This is as far as I can go until I add the sails. Most of the running rigging must be added at the same time as the sails.
I'm finding the sails to be a very big challenge. The kit provides some material that seems quite suitable to me. It's a very fine synthetic fabric which does not seem to be over scaled (to my eye at least.) But they only give you just barely enough, certainly not enough for a practice round. I followed the instructions in the kit and also followed someone's Youtube series about his build of the Amati Endeavour yacht, which appears to use the same fabric and method. His seemed to turn out beautifully, but it's lot easier watching it being done than doing it!
The approach is to coat the fabric with a 50/50 mixture of white glue and water. Cut out narrow strips to represent the reinforcing at the edges and other points and glue them on. Then cut the sail out. I have two problems, which aren't actually well reflected in my pictures below. First it's very difficult to get the sail to lay flat and not wringle. The first one below is by for my best effort and I even think it could pass as acceptable, however the others are not nearly as good. The second problem is that I underestimated how easily this gluey fabric would pick up every last bit of dust and dirt in my shop. As a result the sails, in addition to being wringly, also look pretty dirty.
I think it's possible that I could manage to get an acceptable set of sails using this method, but I would need about three times the fabric to allow for do-overs.
So, I have ordered some silkspan from BlueJacket and I'm going to have another go at it, this time following Tom Lauria's approach as he outlined in one of his videos. It's quite similar to the first method I tried, but he coats the material in paint instead of glue. I think I've ordered enough to allow at least one do-over. If I can't get a decent job with the silkspan, I'm not sure what I will do, but I remain optimistic!
Once I conquer these sails, the build will be virtually finished.
Thanks for checking in.
David
-
David Lester got a reaction from Dave_E in Shamrock V by David Lester - FINISHED - Amati - 1:80 - J Class Yacht
Good Morning,
A little more work on my Shamrock to report. I've finished up the deck details and have a good start on the rigging. The rigging on this model is minimal and quite simple to do. Also the instructions are quite clear so not too big a challenge -
I've upgraded the blocks to internally stropped ones, from BlueJacket.
This is as far as I can go until I add the sails. Most of the running rigging must be added at the same time as the sails.
I'm finding the sails to be a very big challenge. The kit provides some material that seems quite suitable to me. It's a very fine synthetic fabric which does not seem to be over scaled (to my eye at least.) But they only give you just barely enough, certainly not enough for a practice round. I followed the instructions in the kit and also followed someone's Youtube series about his build of the Amati Endeavour yacht, which appears to use the same fabric and method. His seemed to turn out beautifully, but it's lot easier watching it being done than doing it!
The approach is to coat the fabric with a 50/50 mixture of white glue and water. Cut out narrow strips to represent the reinforcing at the edges and other points and glue them on. Then cut the sail out. I have two problems, which aren't actually well reflected in my pictures below. First it's very difficult to get the sail to lay flat and not wringle. The first one below is by for my best effort and I even think it could pass as acceptable, however the others are not nearly as good. The second problem is that I underestimated how easily this gluey fabric would pick up every last bit of dust and dirt in my shop. As a result the sails, in addition to being wringly, also look pretty dirty.
I think it's possible that I could manage to get an acceptable set of sails using this method, but I would need about three times the fabric to allow for do-overs.
So, I have ordered some silkspan from BlueJacket and I'm going to have another go at it, this time following Tom Lauria's approach as he outlined in one of his videos. It's quite similar to the first method I tried, but he coats the material in paint instead of glue. I think I've ordered enough to allow at least one do-over. If I can't get a decent job with the silkspan, I'm not sure what I will do, but I remain optimistic!
Once I conquer these sails, the build will be virtually finished.
Thanks for checking in.
David
-
 David Lester got a reaction from Knocklouder in Shamrock V by David Lester - FINISHED - Amati - 1:80 - J Class Yacht
Good Morning,
A little more work on my Shamrock to report. I've finished up the deck details and have a good start on the rigging. The rigging on this model is minimal and quite simple to do. Also the instructions are quite clear so not too big a challenge -
I've upgraded the blocks to internally stropped ones, from BlueJacket.
This is as far as I can go until I add the sails. Most of the running rigging must be added at the same time as the sails.
I'm finding the sails to be a very big challenge. The kit provides some material that seems quite suitable to me. It's a very fine synthetic fabric which does not seem to be over scaled (to my eye at least.) But they only give you just barely enough, certainly not enough for a practice round. I followed the instructions in the kit and also followed someone's Youtube series about his build of the Amati Endeavour yacht, which appears to use the same fabric and method. His seemed to turn out beautifully, but it's lot easier watching it being done than doing it!
The approach is to coat the fabric with a 50/50 mixture of white glue and water. Cut out narrow strips to represent the reinforcing at the edges and other points and glue them on. Then cut the sail out. I have two problems, which aren't actually well reflected in my pictures below. First it's very difficult to get the sail to lay flat and not wringle. The first one below is by for my best effort and I even think it could pass as acceptable, however the others are not nearly as good. The second problem is that I underestimated how easily this gluey fabric would pick up every last bit of dust and dirt in my shop. As a result the sails, in addition to being wringly, also look pretty dirty.
I think it's possible that I could manage to get an acceptable set of sails using this method, but I would need about three times the fabric to allow for do-overs.
So, I have ordered some silkspan from BlueJacket and I'm going to have another go at it, this time following Tom Lauria's approach as he outlined in one of his videos. It's quite similar to the first method I tried, but he coats the material in paint instead of glue. I think I've ordered enough to allow at least one do-over. If I can't get a decent job with the silkspan, I'm not sure what I will do, but I remain optimistic!
Once I conquer these sails, the build will be virtually finished.
Thanks for checking in.
David
-

 David Lester got a reaction from AJohnson in Rope Hanks Conquered!
I have always struggled making rope hanks. I've tried every method I can find on this forum and on YouTube, but it always boils down to the same problem. Every method seems to work for me until that point at the end when it calls for "a small dab of glue." Well, for me diluted PVA glue never seems to hold and a small dab of CA glue never seems to hold the whole thing together either. So I end up using enough glue to hold everything together, but the result is usually the glue wicking into the line, darkening and hardening it and it generally looking terrible. The best I have ever been able to do is to try to minimize this effect, which means that at least half of the hanks I make for every model end up in the garbage and I'm only somewhat happy with the ones I do use.
So here is the result of my experimenting yesterday and I think it just might be a good solution to my problem. I was trying (for the umpteenth time) the method outlined by Tom Lauria in his YouTube video. I was having the best luck with this method of any of the others I've tried, but still having the glue problem at the end, so here's how I adapted his method to try to avoid the glue problem.
I wrapped the line five times around three nails - two at the top, with a narrow space between them and one at the bottom. The distance apart is the length I need excluding the loop that goes over the belaying pin; in this case 3/8".
Tom outlines a perfect oval with a series of closely spaced nails, but I found it's not necessary to do that. The hank comes out more or less the same with the three nails as it does with several. Many methods only use two nails anyway, one top and bottom. However I found it necessary to have a space at the top, hence two nails at the top.
Then I wrapped a length of matching sewing thread around the coils at the top and tied a knot. I'm not worrying about the loop for the belaying pin at this point. This knot around the coils ensures that they will not come apart and it's actually easy to get a small dab of CA glue on this knot without touching the main line. The glue only has to hold the knot; the thread is holding the coils.
When the CA glue was set in a couple of moments, I trimmed the threads off, leaving just the knot.
Then I pulled one of the long ends of the line underneath the coil at the top and up through the centre -
Made a loop out of it and pulled the end back through underneath the coil at the top -
And then, just like Tom Lauria did, I secured the loop with a drill bit in a previously drilled hole and pulled the loop snug against the drill bit -
Here I took a length of matching sewing thread in a needle and stuck in down through the middle of the line on one side of the loop and through, at least part of, the coil below -
Then I transferred the needle to the other end of the sewing thread and did the same thing on the other side of the loop -
This ensures that when I tie the two ends together, the knot will be on the back of the hank -
Then I just tied the sewing thread into a knot on the back side of the hank. Just like before it's easy to put a small dab of CA glue on this knot without touching the main line.
When the CA glue sets, it's just a matter of trimming off all the lines -
This hank cannot come apart because the coils are tied together in a bundle and the loop for the belaying pin is sewn directly to the hank. There's no glue visible on the surface and the sewing thread is completely invisible. I think this is the best hank I've ever made and the process didn't end up with the garbage men wondering "what's with all the gluey coiled thread coming out of this house?"
So that's my good news for this weekend.
Happy Thanksgiving to the Canadians out there! ( or should I say "Happy Hanksgiving?")
David
-
 David Lester got a reaction from DARIVS ARCHITECTVS in Rattlesnake by David Lester - FINISHED - Mamoli - Scale 1:64
Good Morning All,
Well, I've finally finished painting the hull. This took quite a bit more time than I anticipated. My problem was the line at the top of the wales where the black meets the yellow. The lower line where the black meets the white was easy to tape and achieve a decent result, but not so easy at the top of the wales. The wales is thicker than the planking above it, with a ledge. I wanted the top of the ledge to be black, not yellow, but taping to the 90 degree transition was very hard to do. I must have made four or five attempts and no matter how carefully I thought I was taping, I always ended up with an unacceptable result. It occurred to me that if i could tape flat on the yellow, just a fraction of an inch above the transition point it would be easier to get a clean tape line and perhaps it wouldn't be noticeable to the eye that the line was just barely higher than the top of the wales. So I ran a slightly dull pencil along the top of the wales and it placed a parallel line on the yellow, above the wales barely 1/16 of an inch or so. I taped to this line and it worked like a charm. The eye cannot easily detect what I have done and the result, while not perfect, is acceptable.
We're off to a family reunion this weekend. You know what they say - "Family isn't a word, it's a sentence!" If I survive, I'll be back with more updates.
David
-
 David Lester got a reaction from Mr Whippy in Rattlesnake by Dave_E - Model Shipways - 1:64
Hi Dave,
Your stern windows look great.
I'm glad you were able to bend the stern piece with success. I don't believe it's identical to the one on my Mamoli Rattlesnake, but it's very similar. Mine had to be bent to fit too, but I wasn't quite as successful and broke it. However it wasn't really a problem (it actually made it easy to fit) and I was able to fit it without the repair showing up
I know there are many different ways to paint this kind of part, but here's a method that I discovered in a BlueJacket newsletter and I found it worked really well for me.
https://myemail.constantcontact.com/News--tips--and-happenings-from-BlueJacket-Shipcrafters--Inc-.html?soid=1105166336677&aid=EmTQZTxYvqc
David
-
David Lester got a reaction from DARIVS ARCHITECTVS in Rattlesnake by Dave_E - Model Shipways - 1:64
Hi Dave,
Your stern windows look great.
I'm glad you were able to bend the stern piece with success. I don't believe it's identical to the one on my Mamoli Rattlesnake, but it's very similar. Mine had to be bent to fit too, but I wasn't quite as successful and broke it. However it wasn't really a problem (it actually made it easy to fit) and I was able to fit it without the repair showing up
I know there are many different ways to paint this kind of part, but here's a method that I discovered in a BlueJacket newsletter and I found it worked really well for me.
https://myemail.constantcontact.com/News--tips--and-happenings-from-BlueJacket-Shipcrafters--Inc-.html?soid=1105166336677&aid=EmTQZTxYvqc
David
-
David Lester reacted to Knocklouder in The Mayflower by Knocklouder- FINISHED - Amati - 1:60
Well not much to post, started the bow, and the capping of the hand rail. It all looked good when finished, but today the port side handrail has lifted, I will just patch and paint that part,because it's to much to take it all apart. I will fix it lol.
My worries are that MSW and the NRG will band me pretty soon as I can't seem to do things historical correct, LOL.
I am finding a few mistakes in the plan, again the picture on the box , the plan it self and building instructions are all different. Big problems for someone who has to look at pictures to see how its done. As well there are parts missing, but I can make those, they are for the the anchor lines. Small parts, but they aren't there lol.
Now I have to put those tiny little 1×1 on the sides . Talk soon take care everyone stay safe.
-
David Lester reacted to Dave_E in Rattlesnake by Dave_E - Model Shipways - 1:64
Here are a couple photos I took just so you could see what I did to make the stern piece “fit”. First one shows that mine did not end up per the drawing which is what the laser cut part was. I never figured out how to make the laser cut part fit. Second photo is how the Britannia fit after bending.
-
David Lester reacted to Ed Ku20 in Rattlesnake by Ed Ku20 - Model Shipways - 1:64
Step 11: Fairing the Hull
I completed Step 11 in my build procedure over the last couple of days. This concludes what I call Stage A: FRAMING the HULL. Step 11 consists of checking over the bulkheads and then fairing (sanding) the BHD edges to get a flat surface for the planks to be glued on. Here are the individual tasks I completed in this step.
Step 11: Check every BHD and then Fair the hull
a. Bearding Line – make sure it’s deep enough all the way around. Test fit planks including the Garboard strake
b. Make sure BHD’s are at the right length and do not run past the bearding line
c. Bow & Stern Blocks – sand and add wood filler as needed to get a smooth transition at both ends
d. Attach test Battens to see where BHD’s need sanding or shimming
e. Shim & sand the Quarterdeck and Forecastle deck so they are aligned under a straightedge
f. Do a final sanding (FAIR the hull) by doing the BHD’s & filler blocks all together
Here is what the Bearding Line looks like on both sides of the ship. I had to make the cut a little deeper at the keel in a several spots. The Bulkheads looked pretty good here with only a little sanding required
I had added another filler block behind BHD A to help make the curve into the bow easier for planking. I put a bunch of wood filler in some gaps there. I sanded everything down. There are still a few holes, but I think there is enough surface that these will not be a problem.
I marked the location of the A, B & C planking belts. I attached test battens to see where there were bumps or dips. The bulkheads mostly required shimming in a number of spots. These got sanded smooth along with the BHD’s at the bow & stern where they need to be angled.
Example of a shim glued to one of the BHD’s and the faired frame P/S
Finally, I added a lot of shims on the quarterdeck and the forecastle deck. I did not attempt to make the height at the tops of these bulkheads equal. I studied & measured the plans and it seems to me that there is a definite slope on both of these decks toward the midship (BHD G). I shimmed and sanded until my straight edge lay flat across all the BHD’s. I hope I haven’t screwed the whole model up, but I had to go with my gut on this one!!
Quarterdeck after shimming and sanding. The center bubble on the level shows the slope toward midship.
Please give me your comments or suggestions! I’m on to STAGE B: Upper Hull Planking and Deck Details
-
David Lester reacted to Papa in Charles W Morgan by Papa - FINISHED - Model Shipways - 1/64th scale
Starting to hang the yards.