hornet
-
Posts
682 -
Joined
-
Last visited
Content Type
Profiles
Forums
Gallery
Events
Everything posted by hornet
-

Treenails
hornet replied to wallyh's topic in Planking Techniques's Click Here for Topics dedicated to planking!!!!
Hi JPett Just wondering, do you have many twist offs when you engage 'Warp Drive' or do you just draw very short pieces of bamboo through the plate. I tend to pull long pieces of bamboo through and I would think they would twist off very easily when attached to a dremel, even on the lowest speed setting. -
Treenails
hornet replied to wallyh's topic in Planking Techniques's Click Here for Topics dedicated to planking!!!!
I think on 1:48 you would need to take it down quite a bit further than No 55. Someone more qualified than me may disagree (I have treenailed the deck of a 1:48 and 1:36) but I would suggest around 0.6 diameter which means about number 25 I think deck treenails (or plugs) were from 25mm to 35 mm in diameter in real life (1:1). I have a really great little Ap on my phone and iPad. It is called Modelscaler. You input the 1:1 size and the scale and the Ap will give you the scaled down size. In this case 1:48 and using about 30mm as the actual size of the treenail/ plug, the size of the scaled down treenail would be 0.625mm. This would be about No 24 - 25 -
It took you 3 years to play with it????? Hell of a lot more self control than me!!! I have the smaller Proxxon table saw - the KS 230. I looked at the FET but didn't think I could justify the extra $$$$. I have been using the KS for about 3 years and it is adequate for my needs - mainly bashing. I note that the FET is now around $600 Aussie Dollars - about 330 of your pounds. If I had spent that much on an FET, I would be using it on my next build and then making a decision on whether it is up to scratch or not. According to many, many threads on this site, the Byrnes machine is unmatched but I'd have to agree with Ponto on this one.
-
Treenails
hornet replied to wallyh's topic in Planking Techniques's Click Here for Topics dedicated to planking!!!!
In my opinion treenails would be visible on the deck of a 1:48 scale model. Check out the pic of the deck of the Endeavour replica that I uploaded on another thread which recently discussed the merits of treenailing. http://modelshipworld.com/index.php/topic/8317-to-treenail-or-not-to-treenail/ In addition, I also had some difficulty with the Byrnes drawplate initially. I ended up making a small tool to cut down the bamboo to a size easily pulled through the plate. See it on the following thread: http://modelshipworld.com/index.php/topic/2959-treenail-detail-option/ I use a pair of pointy nosed pliers to pull the bamboo through. Pull through each hole a couple of times and only go down one hole size at a time. -
Treenails
hornet replied to wallyh's topic in Planking Techniques's Click Here for Topics dedicated to planking!!!!
Less tedious than fitting copper plates I suppose but both look really exceptional if done well. Something every modeller should attempt .... at least once! -
Treenails
hornet replied to wallyh's topic in Planking Techniques's Click Here for Topics dedicated to planking!!!!
Agree with Brian. The Byrnes draw plate makes a tedious task pleasant. Well not quite pleasant, but at least you end up with very good quality tree nails relatively quickly. Whatever you do, don't be tempted to buy a cheap draw plate on eBay. Not worth a pinch of.........!!!! -
Just one final word from me too NHDave, If you want to combine the VOB files that you have copied into one large file on your computer so they will play seamlessly, there are programs available (for free) on the internet that will do it for you. Or, you can do as I do, and combine them from the command prompt(assuming you are running windows) - This is a little more complicated - but not much! The resulting file will not work on a DVD Disk, but will play happily on your computer's media player or any other media player and means you do not have to click on separate files if you want to watch the whole video. Just type the following into google - or whatever search engine you use: - combining vob files into one file or - combining vob files from command prompt (this one is for windows computers only)
-
Yep, sure did Brian!! Won't be buying any more though.
-
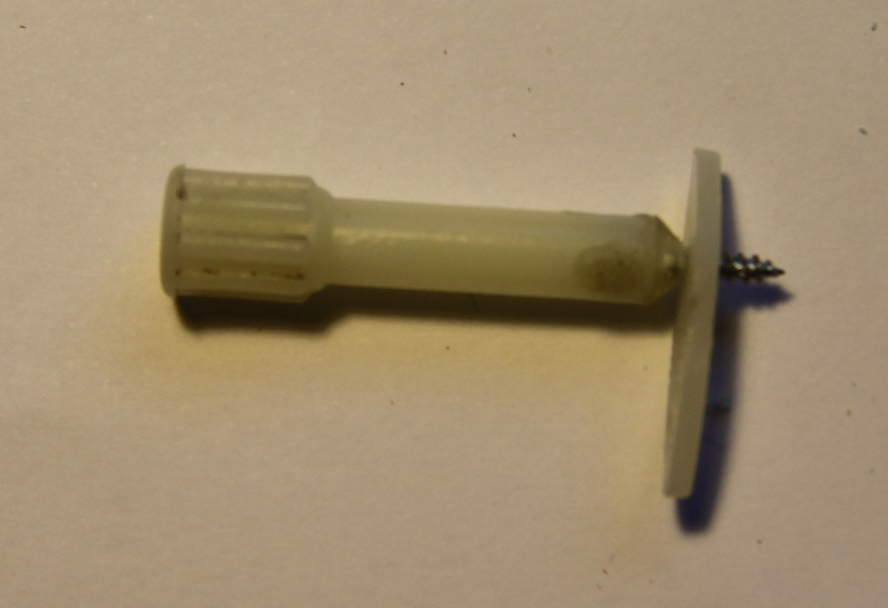
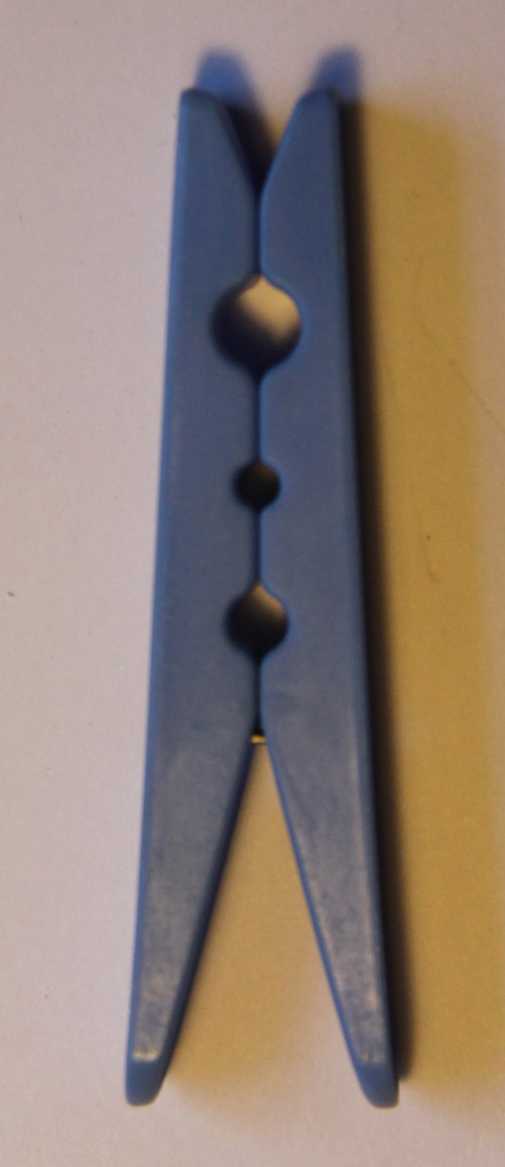
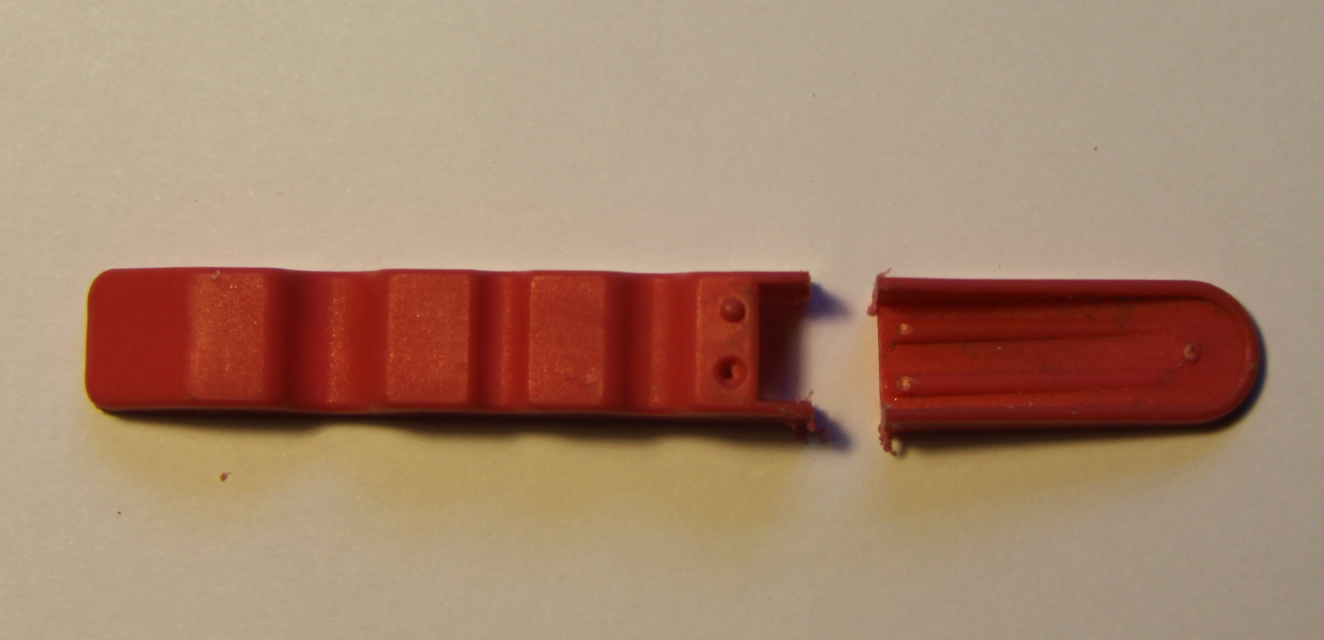
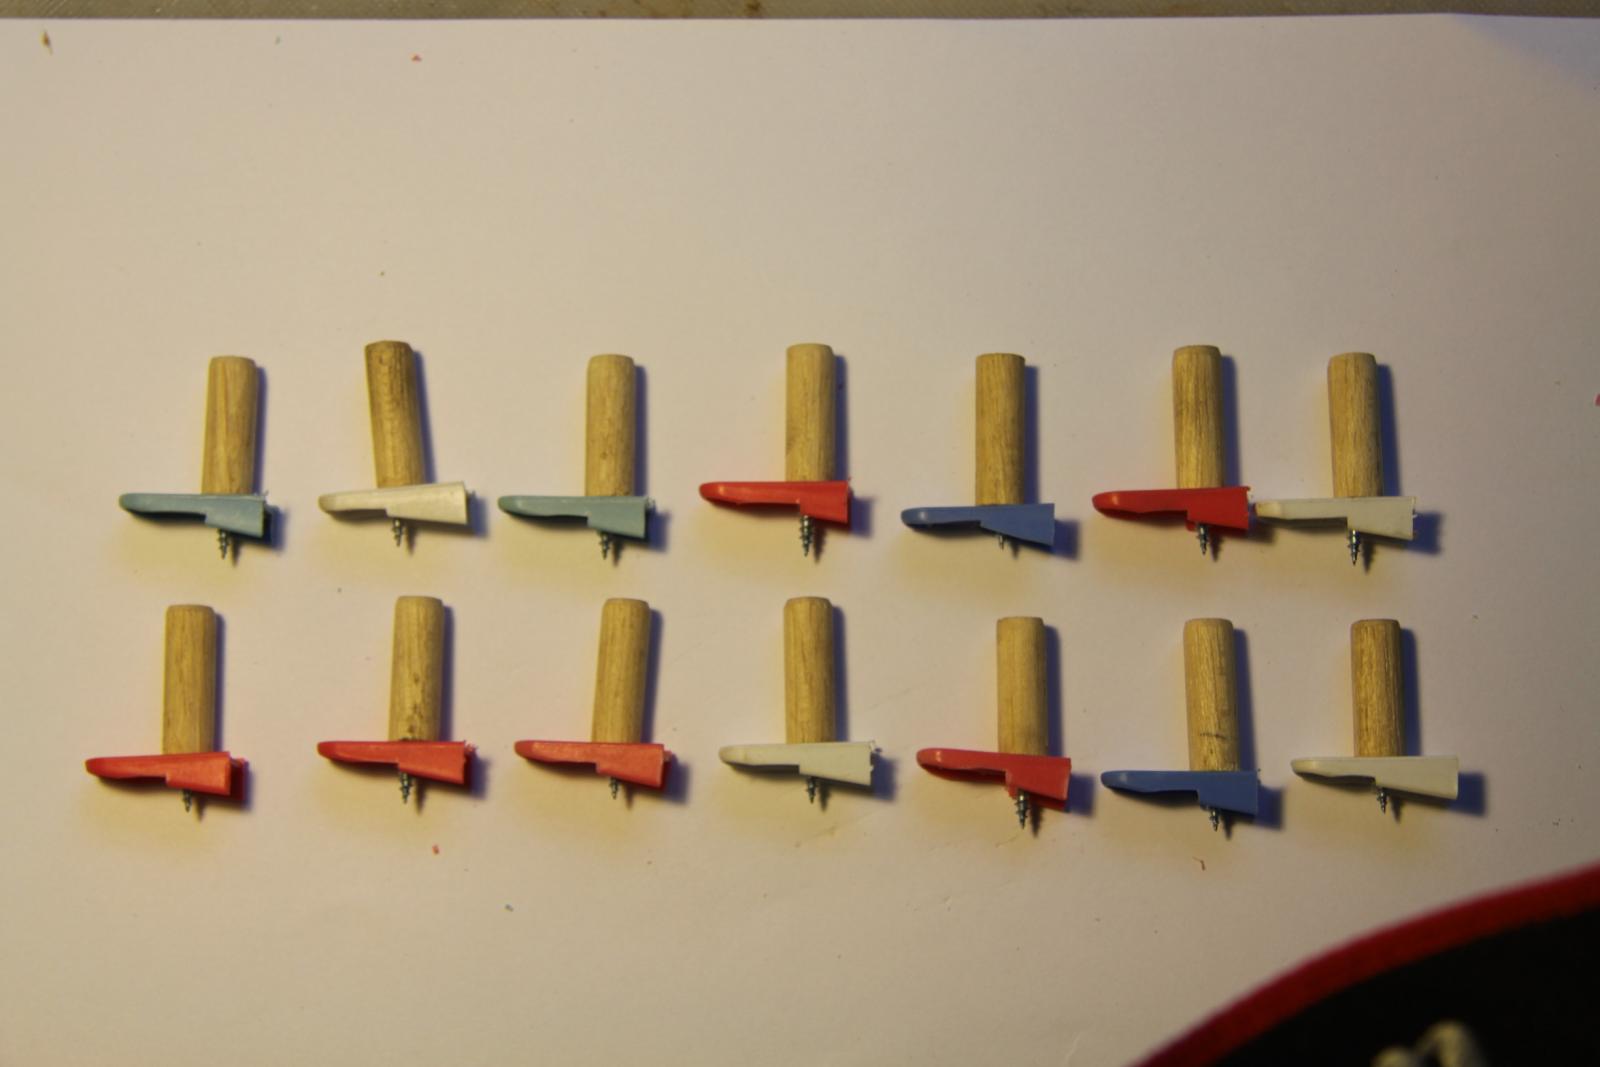
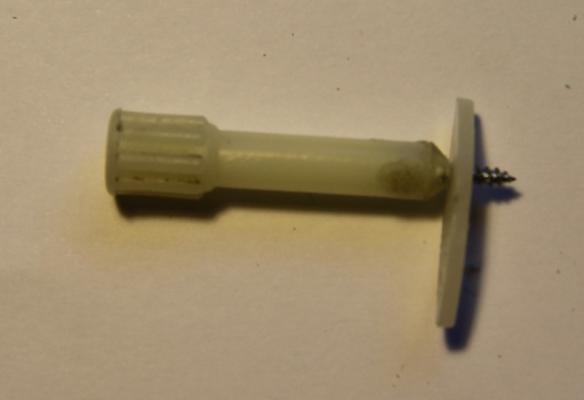
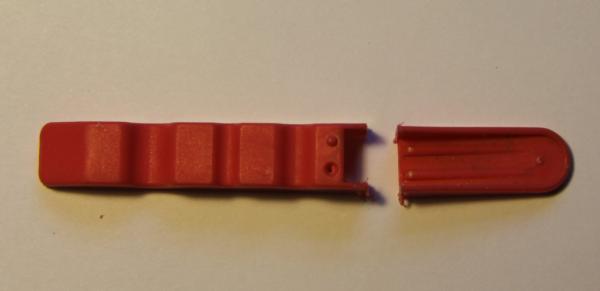
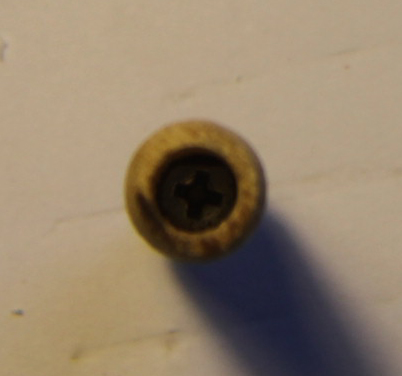
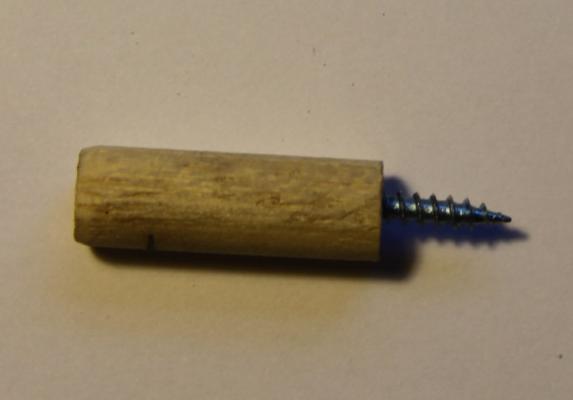
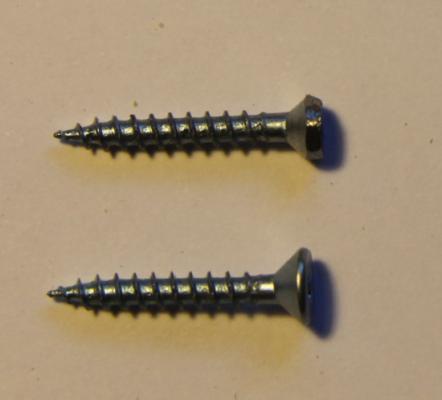
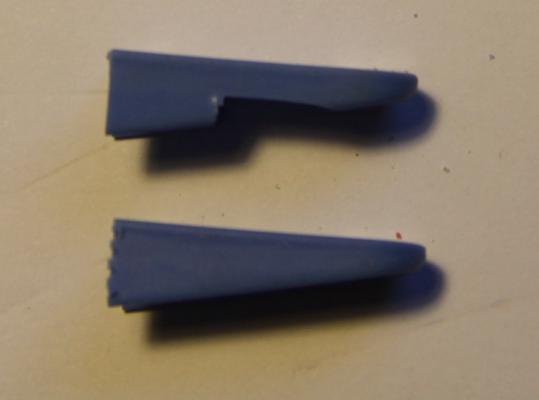
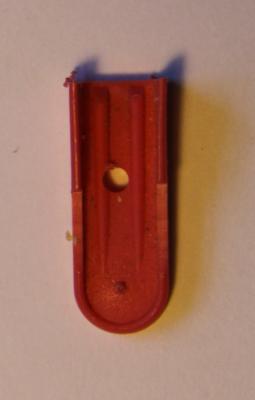
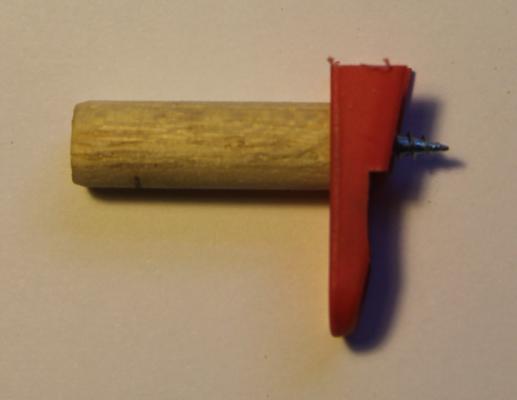
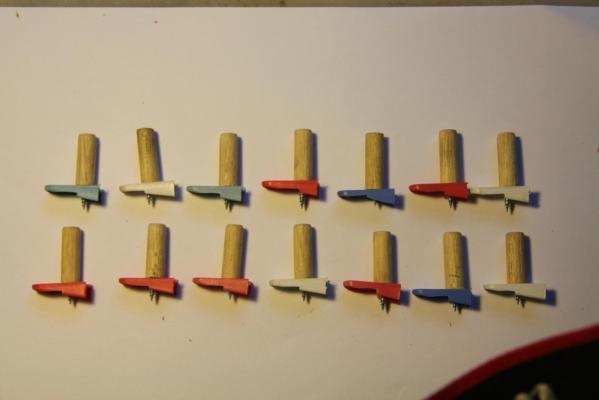
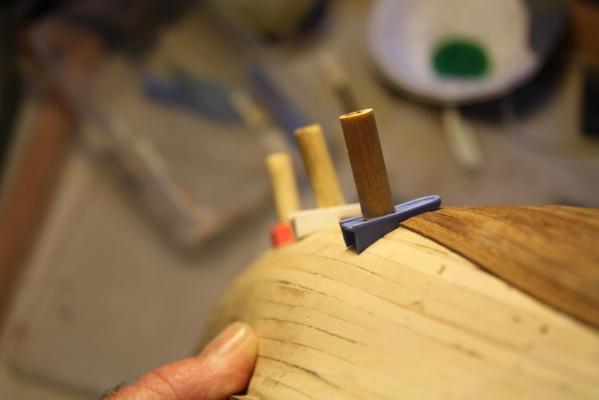
I have been using commercially made plastic planking screws for years. They work quite well but after a while the head of the screw starts slipping in the plastic casing. It is not accessible and super-gluing it on the outside is only partly successful. I thought about investing in the Micromark metal clamps, but they are a bit expensive. I then came up with the following idea and made a set of my own planking screws. Sneaking into the back yard under the cover of darkness, I pilfered some of the Admiral's plastic pegs from her peg basket. I dismantled the peg and cut off the ends I then used some 8mm dowel and some 4G by 20mm wood screws to make the `handle' of the planking screw. 4G by 20mm was the thinnest/longest screws I could find so I had to recess them into the dowel so they were long enough to go through the bottom. I had to grind the screw heads a little so they would fit through the dowel. I then cut notches, using my hobby knife, into the `wedge' of peg that I had cut off and drilled a hole as close to the end of the notch as possible (this gave the most leverage when screwing in the planking screw) The pic above shows a peg end with and without the slot I then fitted the dowel `handle' to the peg `wedge' to create the planking screw. It did not take long to make up a set They worked quite well, especially on straight runs I thought I was very clever until the Admiral questioned me about all the half pegs in the rubbish bin! Gulp, I knew I should have buried the evidence!

- 19 replies
-
- 14
-

-
Geoff, I think you may be correct about Credit Cards having customer protection. I favour Paypal and use it whenever possible. To me it adds an extra layer of protection. It is a shame that DHDave has been unable to contact the publisher though. It would be better for him if he got his problem sorted out by them. Brian, thanks for the thought, but best leave the pirating to those who reside in the Caribbean. Steve
-
Well guys, I have no idea how many chapters are on the disk or even if the disk is single or dual layered as I don't have it. However, NHDave copied it to the hard drive of his computer and says he way able to access more of the video than from the disk. Give it a go and you might be pleasantly surprised at what you find.
-
Ok NHDave but just for your info and anyone else out there who may have bought this disk and is having difficulty playing it, when you look at the files you have copied from the disk onto your hard drive, you should see the following files: Video_TS.IFO Video_TS.VOB Video_TS.BUP These files define the structure of the disk and tell your disk player which file to play first and in what order. The BUP file is a backup for the IFO file VTS_01_0.Vob - If the disk has a menu, it will be in this file. VTS_01_1.Vob VTS_01_2.Vob .....and so on. These are the files on which the audio and video of the disk are stored. These are the ones you want to view. The disk may also contain other files such as: VTS_02_1.Vob VTS_03_1.Vob These files usually contain extra features such as behind the scene footage. I don't think your DVD would have any of these though. I suspect that either or both of the Video_TS.IFO & the Video_TS.VOB files are faulty on yours and other disks from this seller. Hopefully you should be able to view the whole content of the disk by viewing each of the VOB files in turn. There is a way of putting these files back onto a DVD but you would need video editing software to do this. I might add that if this is the case then it is very poor form that the producers continue to sell the disk. Little wonder that ordering through Paypal does not work. Paypal has probably disowned them.
-
Good News! Actually, I should have used the term COPY rather than RIP in my previous post. Ripping changes the format and combines the VOB files into one file on your hard drive. Copying does just that, it copies the files `as is' onto your H/D. If you have ripped it and it works, great! If it still faults, try COPYING it to a folder on your hard drive. Then you will see files like this: VTS_01_0 VTS_01_1 VTS_01_2 ..... and so on. Right click on each one individually with your mouse and chose whatever media player you use to play them. They should work (touch wood)
-
NHDave , did you try ripping the DVD to a computer hard drive? If you can do this successfully you may be able to view each of the VOB files from the disk individually using a media player such as VLC. There should be 4 - 5 VOB files on a DVD.
-
Just tried to order with Paypal too. No go. After reading NHDave's comment I don't think I'll go down the credit card track. Pity, it looked good.
-
Thirty or so years ago, when I started building wooden ship models, it was pretty difficult to research a ship. The Internet didn't exist so going to the local library was pretty much all you could do. You had to rely on the honesty and integrity of the manufacturer to a large extent. Nowadays, because of the internet, the world is at our fingertips and it is so much easier to chose a kit with confidence. I tend to do a lot of research into the history of a ship and look at a lot of pictures and photos ( including those on this site) before I hand over my hard earned dollar. In this way I am reasonably sure I am going to get something that did really exist an is reasonably accurate. I normally keep a folder on my computer where every tiny bit of information on the history and construction of my current build is stored and I update it as I go. The 'Endeavour' is on my build list and I was fortunate enough to get the opportunity to go aboard the Endeavour Replica recently. I took about 200 photos!!! If I think some component of the kit s not quite right or is poorly made, I try to scratch build it. This just adds another dimension to the hobby. I know that fictitious, and poorly designed models are out there, but I don't really care. I won't be buying one of them.
-
Good point Mark, I usually finish my decks with polyurethane and PVA sticks quite well to it but maybe some varnishes or oils are a different story.
-
Zach, I don't know if it will help your quest or not, but Sir Ernest Shackleton wrote a book about his expedition. In it there are a number of photographs of the 'Endurance' both before and after she was trapped in the ice. The book is called 'South' and is an excellent recount of this amazing survival story. It was originally printed in 1919 but reprinted by Time Life in the 1980's ( I have a copy of this reprint). You may like to search your local libraries or see if it still available for sale. The photos of the hull and rigging are quite good and may help you fill in some details. Even if they don't, it is a great read.
-
I think finishing the hull planking, staining, varnishing and coppering ( if applicable) should be completed before fitting the deck planks - if possible. Deck planks ( if fitted over a ply false deck) tend to be thin and can easily be damaged while working on the hull. If you have already fitted the deck planks then giving them a coat of varnish or a spray of polyurethane would help protect them from any damage you may do while working on the hull. If you have over sanded the deck planks, you may consider fitting new ones over the top of the old (as I said, they are very thin) but do it AFTER you finish the hull planking and finishing. In my opinion you should definitely varnish or polyurethane the deck before fitting other items such as companionways or masts.
-
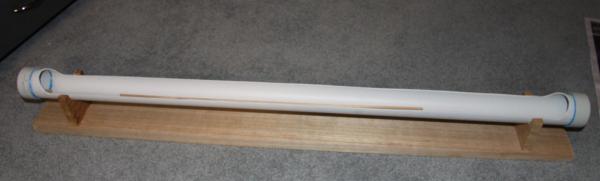
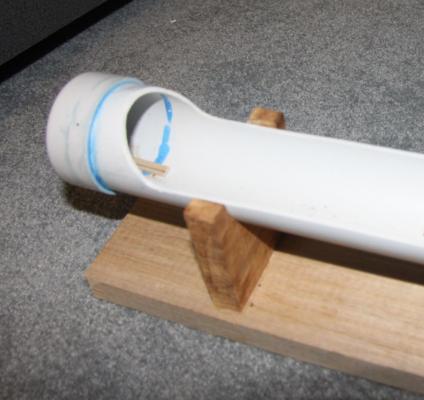
I've put these pics on another thread but will repost here. Another way to use a piece of PVC pipe to soak planks. I too used to use a piece of pipe with a screw on end but found getting the wood strips out a little fiddly at times. As a result I came up with a trough setup using a piece of scrap timber as a stand and a PVC pipe with the side cut out. It is more convenient to use.
-
Yes, I used debonder to remove CA glue from copper plates. Problem was it also removed the copper plates from the ship's hull. You have to be very careful when applying that stuff!!
-
I recently bought a proxxon pen sander. It seems to work well in removing a small amount of wood - especially in tight corners - light sanding the stains is the best option. I know it is a bit 'shut the gate after the horse has bolted' harbm, but might I suggest that the easiest way to avoid CA stains is not to use it unless absolutely necessary. I use a gel, which is much less messy that other CA glues, but I only use it at the very end of a plank if I can't get a clamp on it. I use ZAP CA when fixing copper plating, but other than that I avoid the stuff. PVA is much more forgiving and easy to remove.
-
I'm with Joe V! I'm on my 9th build. 7 of these are double planked and 2 are single planked. I only ever use water and my trusty Aeropiccola plank bender ( which is over 30 years old) and I've never had a problem. Two of my models date from the early 1980's and they are holding up fine. Why use smelly chemicals when you don't have to?????
-
paint or stain
hornet replied to lionfish's topic in Painting, finishing and weathering products and techniques
Painting adds another dimension to the hobby. Especially playing with an airbrush or using a steady hand to create fine detail. Some models look great stained or sprayed with polyurethane. Others look great with some paintwork - as long as the colours are accurate. I have models which have parts painted and others with no paint at all. I try to build everything as if it was going to be stained - it encourages me to work slowly and carefully! -
Yes Geoff, you did see one kit under construction and two on the shelf. They were all bought AT THE SAME TIME from Miniature Steam in Melbourne, Australia. Miniature Steam were great to deal with. I have no quarrel with them or the quality or price of the kits other than maybe the quality of the walnut second planking which is very splintery and poorly cut, in my opinion - and incidentally in the opinion of other contributors to this forum. My beef is the after sales service or lack of it from the company - or John Wright in particular. If I had not been very persistent, I don't think I would have received the parts that were missing from the kit. I'm not going to say any more about it as I think I and many others have expressed feelings of frustration rather forcefully already. Mr Wright, from what I read in your post, does not seem perturbed. Good luck to him, I will NOT be dealing with Caldercraft/ JoTika again. There are plenty of other quality manufacturers out there to choose from!