hornet
-
Posts
690 -
Joined
-
Last visited
Content Type
Profiles
Forums
Gallery
Events
Everything posted by hornet
-

Making filler harder
hornet replied to jdiven's topic in Building, Framing, Planking and plating a ships hull and deck
I have used a filler called plastibond (2 part) I was successfully able to mix a stain (Feast Watson) into the filler before applying it. The results were quite good. -
Tips and Tricks for Airbrushing
hornet replied to JPett's topic in Painting, finishing and weathering products and techniques
I use a 50/50 mix of clear windex and demineralised water when painting with acrylics. Works well for me. I also store unused mixed up paint in labelled syringes which I stopper with a nail. I can suck as little as 1/2 ml of unused paint from an airbrush. Sometimes this is all I need for a small job. Waste not want not!!- 39 replies
-
- 2
-

-
- Airbrushing
- Tips
- (and 1 more)
-
Anybody built these kits - moved by moderator
hornet replied to latestarter's topic in Wood ship model kits
I am currently building the Caldercraft Supply. Fittings and instructions are good. I am a little disappointed with the quality of the wood, much of which is brittle and splintery. They have provided ample quantities though so breakage has not been a problem. There are three companies producing the 'Supply' as far as I know. Caldercraft, Artesania Latina and modeller's shipyard. All three versions look different. Through my research, I have made many modifications to this kit to make it more authentic. I also have the Caldercraft 'Bounty' and Caldercraft 'Endeavour' on the shelf. Wood quality in these kits seems to be similar. I also had some 'issues' with missing components as have others. These are discussed in a thread called Caldercraft Customer Service' if you are interested. Overall though, I am quite happy with this kit. -
Captain Steve, I posted a method of coiling ropes using transparent plastic `counters' (used in schools and available on ebay) on another thread a while back. Thought you may be interested http://modelshipworld.com/index.php/topic/1310-making-rope-coils/?hl=%2Bmaking+%2Brope+%2Bcoils
- 396 replies
-
- 4
-
-
- Idea
- Bright Idea
- (and 1 more)
-
Hi Duncan, just one of your pesky hijackers returning! Have you finished Mary Byrne? If so I would love to see a couple of pics of your efforts. Good luck with HMB Endeavour. I have the Caldercraft version but will finish the Caldercraft Supply and then the Caldercraft Bounty before she gets 'on the bench'. I have a couple of hundred hi res that I took of the Endeavour Replica a while back. If you would like a copy, PM me. Steve
-
Has anyone got or used headband magnifiers?
hornet replied to vossy's topic in Modeling tools and Workshop Equipment
Will definitely make the ball look bigger Vossey, but I suggest you also get a bat like Davey Warner's........ KaBoom!!!!!! -
I've found that I can successfully PVA glue items to a deck that has been sprayed with polyurethane as long as it has a fairly large footprint eg cargo hatches, companionways. For items with smaller footprints such as deck pintails and bowsprit bitts and cannon, I always pin them down with 1mm brass wire or tubing as well. Unless it is going to be hung upside down from the ceiling items will remain in place. I've got models that are 30 years old that have been done this way. When I turn them upside down and shake 'em nothing falls off except dust, and maybe a pi**ed off spider!!
-
If you decide on a Proxxon, I would also recommend getting the three jaw self-centering chuck as well. In addition Proxxon has put a clip of this lathe - the DB 250 onto YouTube.
-
Don't know much about the jigsaw, but the lathe has been around a long time. I considered it, very briefly, when I was in the market for a lathe. From my research I concluded that the fact that it was only a 12 volt motor meant that it did not have sufficient 'grunt' to be of much use. It was described as 'chicken powered' in one review that I read. I settled on the proxxon lathe which comes with full mains power (240 volt) in my case - Australia, is well built, has a small footprint and comes with many quality accessories. I have had it for about 2 years and I am very happy with it. When you add the cost of the transformer to the Mantua lathe, it comes out at a similar price to the Proxxon.
-
Proxxon compound table -- Opinions?
hornet replied to rtropp's topic in Modeling tools and Workshop Equipment
I have used mine a lot with my TMB 220 drill stand. I found it works well as long as adjusted and fitted correctly. Agree with Mike though, the adjustment wheels are a bit fiddly. I find that I have more problems, accuracy wise, with drill bits flexing than any play in the table itself. -
Miniature Steam in Melbourne sells Admiralty Acrylic Paints. These paints are in authentic Royal Navy colours and are, in my opinion, very good quality. They can be purchased online. Simply 'google' Miniature Steam and follow the links.
-
Keith, yes Bunnings has stopped selling Wattyl products. However, you can still get Wattyl matt, satin and gloss in spray cans from Home Hardware. I assume that you have them down your way a well. I like the Wattyl product and was most unimpressed when Bunnings stopped stocking it.
-
Agree with KeithW. I bought a range of these little sample bottles. They are good value for we model builders as they will go a loooong way when used on small modelling jobs. They are easily thinned. I mixed and experimented with them till I got the colour I wanted then stored the left over 'mixed' stain in syringes for later use. The syringes I 'stoppered' with nails which I cut down and ground to a point.
-
"Spray on filler"?
hornet replied to ortho85's topic in Painting, finishing and weathering products and techniques
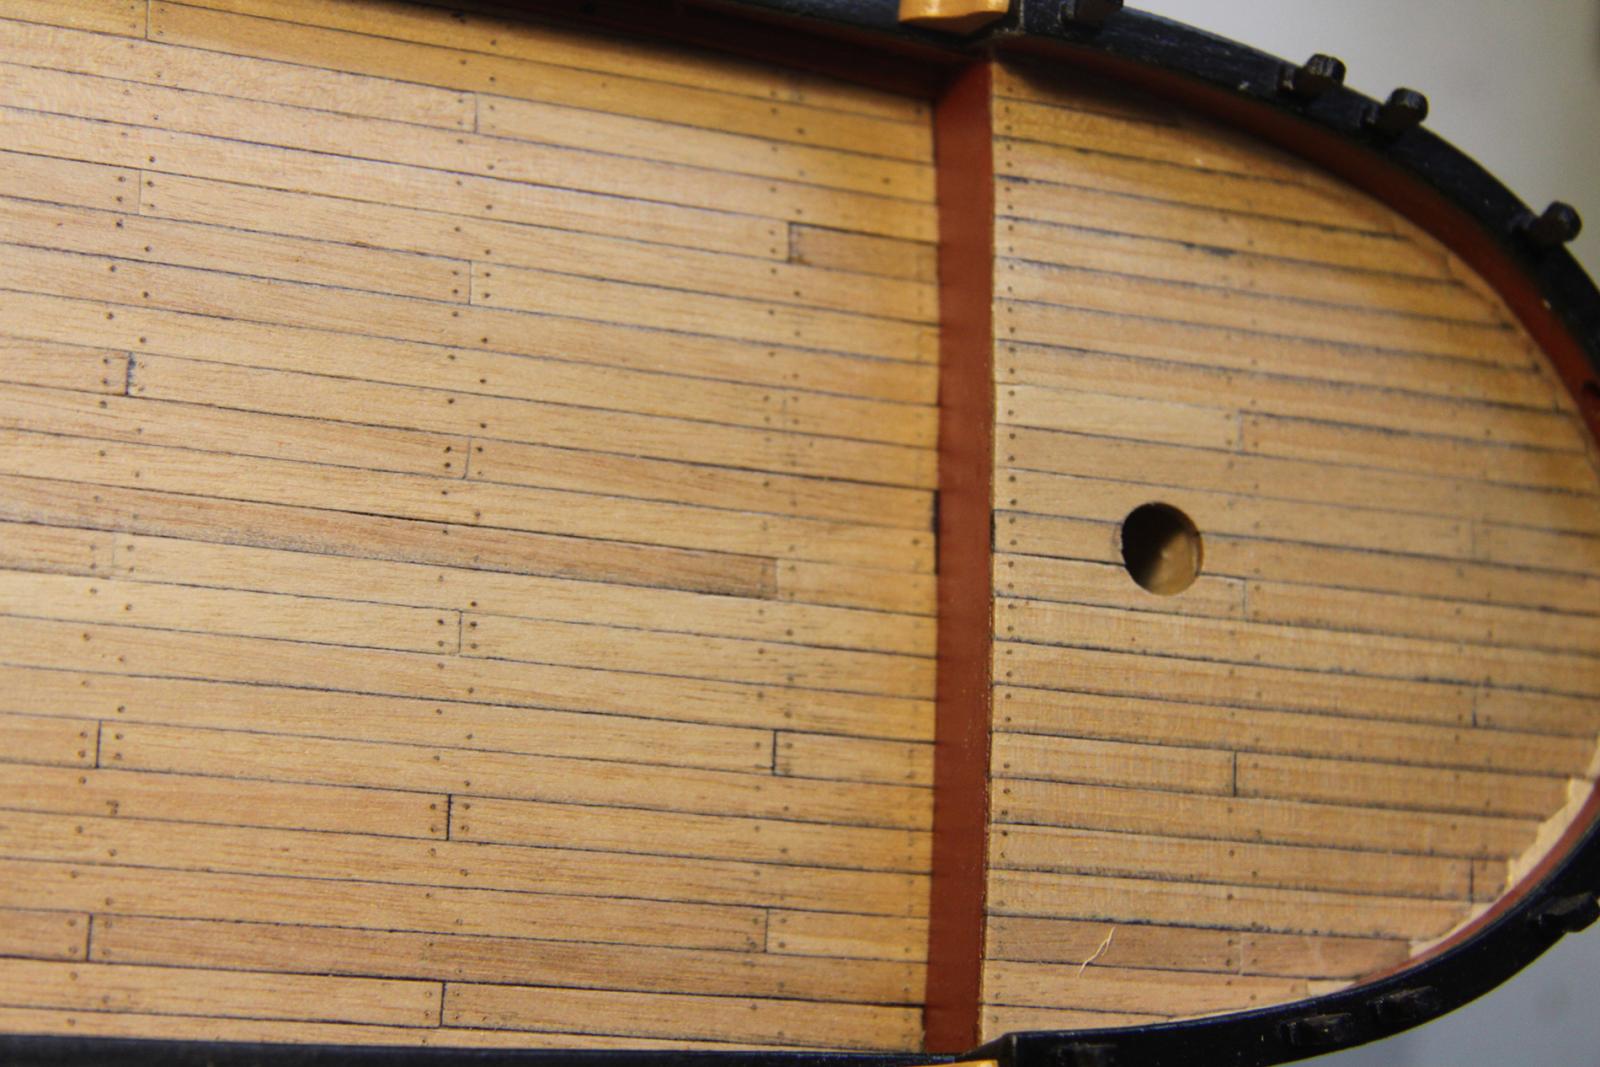
Could they possibly have meant sanding sealer - such as Feast Watson - available at Bunnings. I have recently finished the deck planking of my latest build. I simply used a few coats (sanded in between each) of satin polyurethane (estapol) mixed 50/50 low odour turps and applied with an airbrush. Works for me!
- 1 reply
-
- 1
-
-
double planking a hull
hornet replied to pugman11's topic in Building, Framing, Planking and plating a ships hull and deck
All of the above are excellent reasons for using the recommended double layer of planking on your first (and maybe even more builds after that!!) Hull planking is a skill that, in my opinion, takes a lot of practise to perfect. I sometimes wonder how many half planked HMS Victory's are out there in hobby land because a beginner became frustrated and lost interest. I am still learning tricks when planking even after 10 builds!!!! Although I have seen many excellent 'first attempts' on this forum, I think you should take very opportunity to practise. This means having a go at double planking. . -
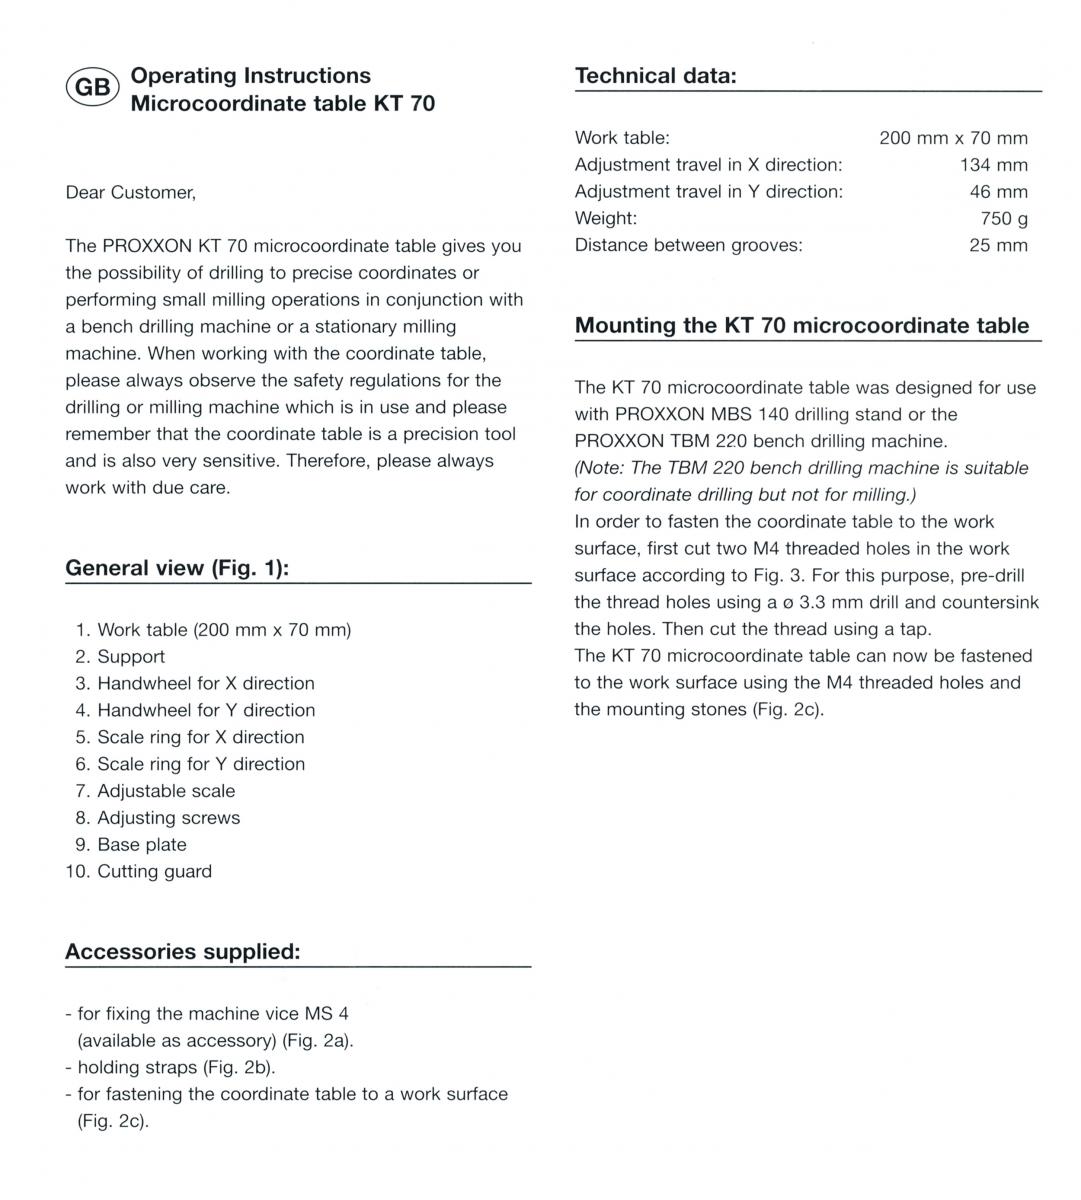
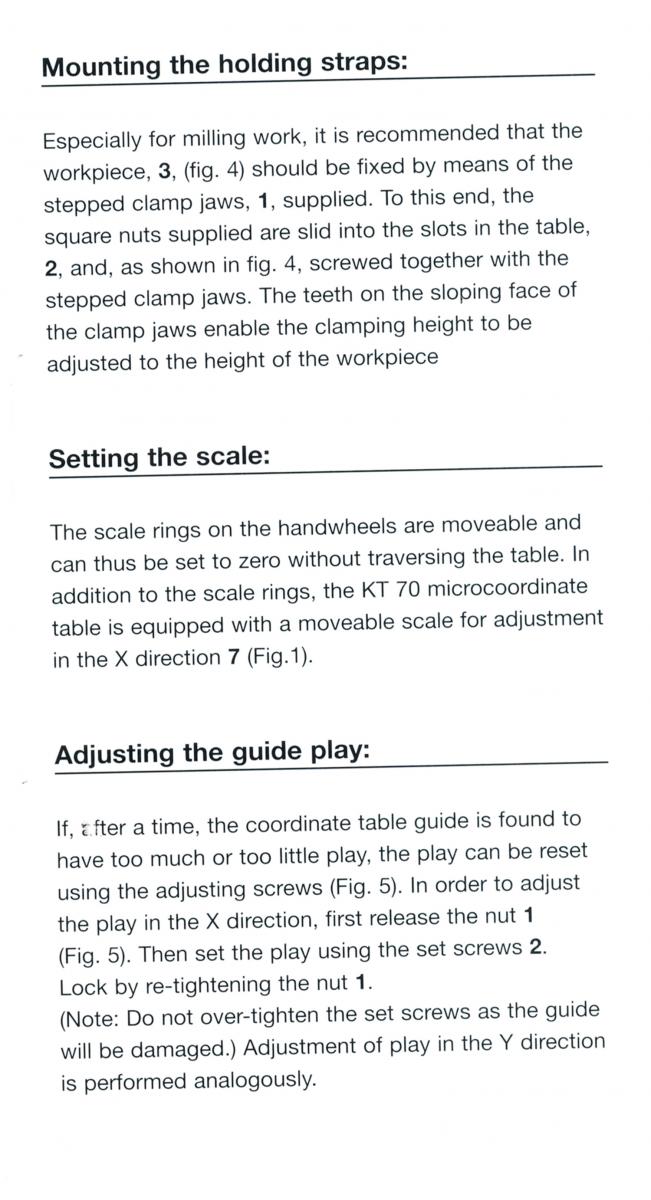
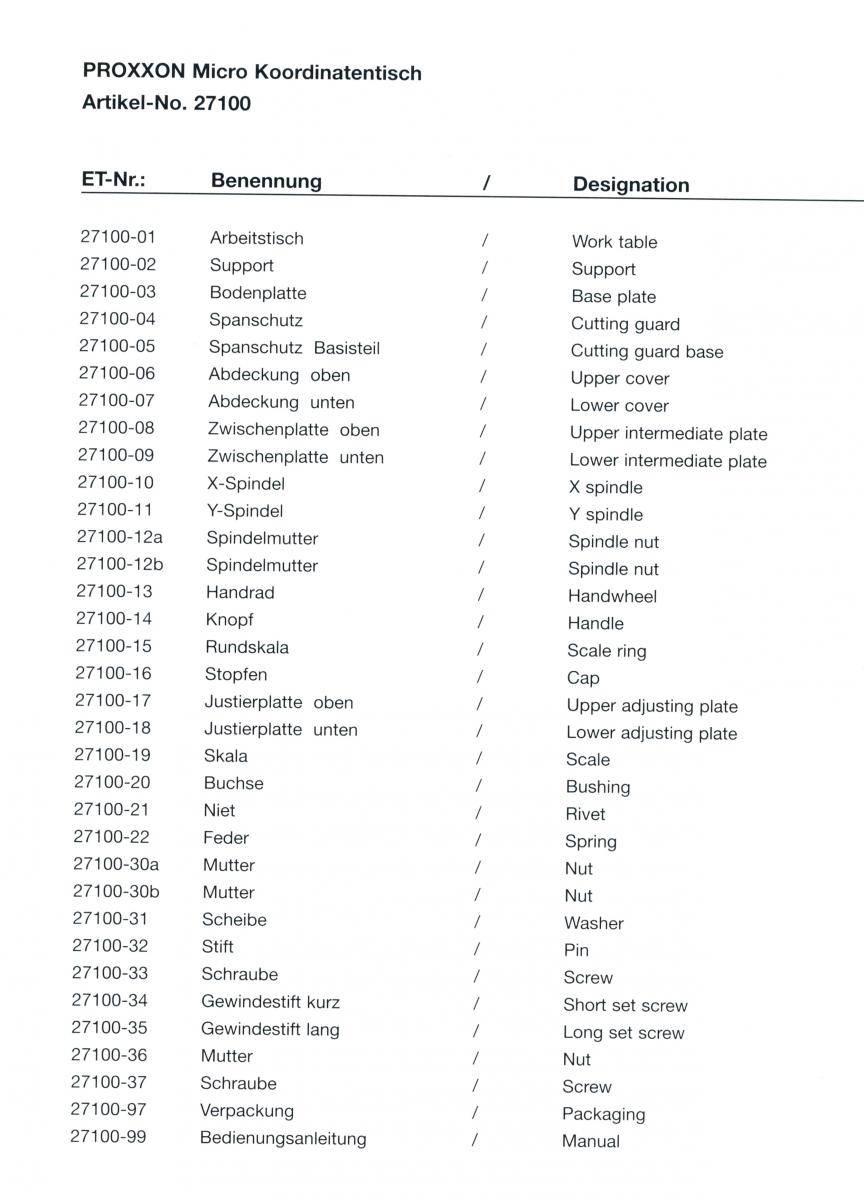
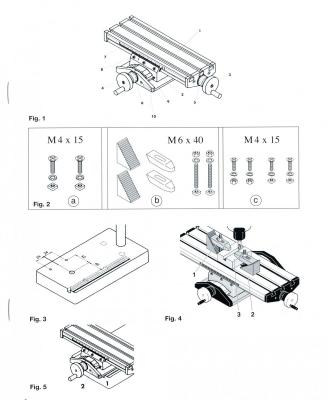
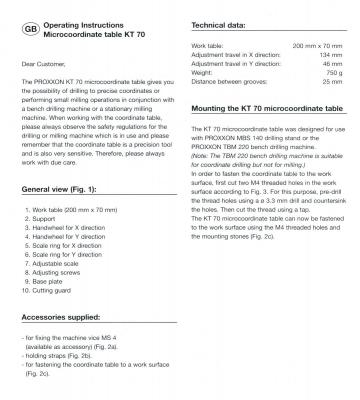
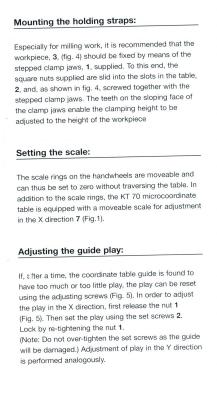
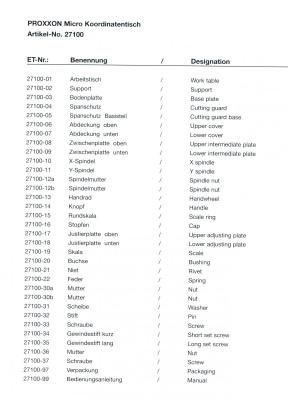
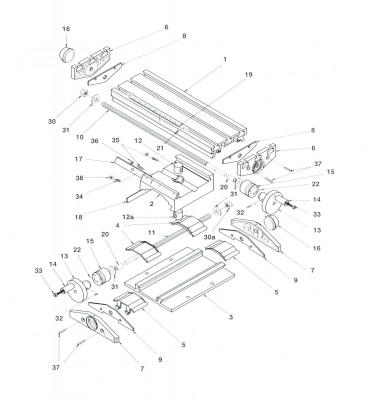
John Just got home from chasing a little white ball around the course.... stupid game!!! Anyhow, I have scanned and added the relevant pages of the manual below. I'm sure it doesn't break copyright as these are available to download on the net. I think the section most relevant to your needs is titled `Adjusting the guide play' Click on pics to enlarge and read. Hope this gets you out of trouble Steve
-
Hi Jhearl You can download the xy table manual from the net. Type Proxxon KT 70 compound table manual into your search engine. I found one but I can't get the link to work on this post. How to make adjustments is explained (briefly) in the manual. You will need a small allen key to adjust the screws. I have this table but can't remember if the allen key was included. I have several sets of them.
-
My big problem is that I never return stuff and I DON'T KNOW WHERE IT IS!!!!! :(
- 396 replies
-
- 2
-
-
- Idea
- Bright Idea
- (and 1 more)
-
Wouldn't have a clue - The AP has a custom scale option, feed in your numbers and see if it works. I have found the AP meets all my needs, so far in modelling. I thought it might be useful for others who may not have heard of it or used it. Seems to cover all the common scales. If it doesn't seem useful to you don't download it.
-
Looks too complicated or this little black duck! I just use the Woodland Scenic Model Scaler AP. It is available on windows, iOS, Android and kindle for free!!! http://woodlandscenics.woodlandscenics.com/show/page/modelscaler
-
I'll add a couple more examples from the Endeavour Replica. Made from canvas I think.

-
I have a canon 50D and take my model ship pics with a canon EFS 17 - 85mm lens. It is a great camera and takes very good pics. My son recently bought a compact DSLR with interchangeable lenses. I think if I had my time over I would investigate this format further. These cameras have the ability - and therefore flexibility - to change lenses like the standard size DSLR but are much smaller and lighter to carry around. Because taking photos of model ships is not ( I assume) the only thing that you will use this camera for, they are worth considering. The only drawback with them - in my opinion - is they don't have a viewfinder (I'm old school and like to have one!) and they are quite expensive when compared to a 'fixed lens' compact camera.
-
Rigging Conundrum Caldercraft H.M.S Supply
hornet replied to hornet's topic in Masting, rigging and sails
Thanks Shipaholic - They are -
I am currently working on the Caldercraft Brig HMS Supply. I am starting to think about rigging and am not too pleased with the rigging plan supplied with the kit. It seems to have been `dumbed down' - maybe for beginners. Anyhow, I was thinking of using the plan from my model of the Brig 'Perseverance' as a guide - in conjunction with reference to Lennarth Peterssson's `Rigging Period Ship Models.' I know that rigging on all ships developed and changed over time but my concern/question is, would the rigging of the `Supply' in around 1788 have been much different than the `Perseverance' , in 1806. Any thoughts or input would be gratefully appreciated.
-
Great idea Matt, the Admiral has a salad bowl made out of the same stuff, maybe I could cut .......... On second thoughts maybe not
- 396 replies
-
- 8
-
-
- Idea
- Bright Idea
- (and 1 more)