HOLIDAY DONATION DRIVE - SUPPORT MSW - DO YOUR PART TO KEEP THIS GREAT FORUM GOING! (89 donations so far out of 49,000 members - C'mon guys!)
×


hornet
-
Posts
690 -
Joined
-
Last visited
Content Type
Profiles
Forums
Gallery
Events
Everything posted by hornet
-

Caldercrafts Snake - Register For Updates?
hornet replied to Kitzilla's topic in Wood ship model kits
Register if you like. I registered three kits, the Endeavour, the Bounty and the Supply about 9 months ago. Then I discovered parts missing from Supply. I'm still waiting for replacement parts even after 3 emails and two phone calls. If they won't e even replace missing parts then I reckon you've got as much chance as an ice cube in hell of getting updates. -
Quick Sanding Question
hornet replied to Kitzilla's topic in Building, Framing, Planking and plating a ships hull and deck
In my experience pretty much all timber needs at least a very light sand. If you are painting, staining or using polyurethane this is particularly necessary. CNC parts can often have bumps and lumps where they are still connected to the board/card so cutting them off then sanding very lightly is probably the way to go. -
I used JAX Green Patina on the copper hull of my Norfolk. It worked well provided the copper was clean before application. See pics of my Norfolk in My Gallery. Actually it worked a little too well. I ended up 'toning it down' a little by giving it a very light rub with fine steel wool. I too have used Birchwood Casey Brass Black quite a lot. It works well providing the copper/brass is clean and/or has the 'coating' applied by some manufacturers removed. Guns and pump on my Mermaid were blackened with Birchwood Casey - again, see My Gallery. Both are available on EBay.
-
I can understand what you are saying Hollowneck, but sitting here in my loungeroom 15 000km away from the supplier in the UK, after having ordered kits through their OFFICIAL AUSTRALIAN SUPPLIER and having sent 3 emails and made two Phone calls to England. Having been assured twice by the manufacturer Mr John Wright that the parts were on their way, your advice is cold comfort. Whether it is Caldercraft or JoTika I have been communicating with, to me it is all the same company and service should have been better. Why couldn't they have sent me a follow up email to check if the parts ad arrived after having already gone missing once? That would have cost them nothing. Very disappointing Caldercraft/ JoTika ! Having gotten that off my chest, I have taken your advice Hollowneck, and emailed shipwrightshop. Hopefully that will help.
-
I checked my other two kits - the Endeavour and the Bounty, they were al present and accounted for. Given the comments expressed in this thread, I should consider myself lucky. It's a shame because, in my opinion, the kits themselves are quite good value for money. Maybe it is a case of a company getting too big and being unable to keep up with demand. I hope they read this thread and realise that potentially thousands of model builders will as well. It may encourage them to lift their game!!!!
-
I recently purchased three JoTika kits from a supplier in Australia. I have started building the HM SUPPLY. When I began sorting out the parts and checking them off the list, I discovered that 5mm board containing stem post, rudder and winch components was missing. I emailed JoTika a couple of times but got no reply. I decided to ring (from Australia to England) the fellow I spoke to - John - told me he would have them posted ASAP. After waiting for them for about 5 weeks, I rang again. John apologised and told me that he had previously had problems getting wood products through Australia's Customs. He told me he would resend them. That was about 6 weeks ago, still no parts. I am not doubting John's word that they were seized by customs in Australia but it is still annoying. Has anyone else had difficulty getting wooden parts through Aussie customs???? I thought of contacting the Australian supplier but didn't feel like waiting another couple of months. I decided to scratch build the components myself - I think I can produce a more authentic looking winch anyway!!!!
-
CA glue question
hornet replied to MikeB4's topic in Building, Framing, Planking and plating a ships hull and deck
CA glue, particularly the gel variety is great for pinning a plank down at one end while the PVA Glue on the rest of it dries. I use Zap CA when applying copper plates as the PVA doesn't hold 'em. My biggest issue is the fumes. I have found that I am very allergic to them. They bring on flu like symptoms and completely block my sinuses. I find that even a well ventilated room does not help. I have to work outdoors on my deck, with a mask, in order to avoid the fumes. Not so bad in OZ with a mild climate, but I'd hate to be in the USA - in winter, applying a couple of thousand copper plates. In addition I have found CA glue to be a lot more expensive than PVA. Use very sparingly I say!! What I would appreciate is some advice on an adhesive - available in Australia - for glueing Copper Plates that is NOT CA! -
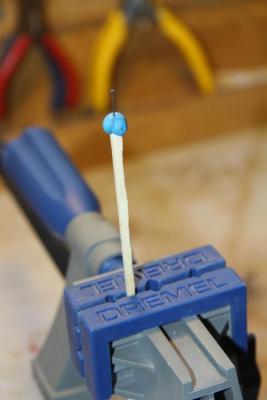
I use them when testing a new batch of paint when I am airbrushing. Spraying onto wood gives a more accurate idea of what the paint looks like on ship's timber than does spraying onto paper. I write on the sticks and keep them as a reference for future painting jobs. I do the same when testing the different colours and shades of wood stain.
-
Michael, I'd be removing the lower planks then doing as Druxey says - check out the planking articles. Also look at the gallery of completed builds so you can see what the bow should look like. You really need some tapering of those planks, both fore and aft for it to look the goods.
-
double planking glue
hornet replied to leroy's topic in Building, Framing, Planking and plating a ships hull and deck
When applying the thin (0.5 mm) second layer of planking, I use a small drop of the gel type CA glue on the bow end of the plank and then use PVA (the quick drying variety) on the rest of the plank. This means that the plank is instantly secure at the 'pointy end' but can still be manipulated along its length. This works especially well on the more 'blunt' bows. Also, with these very thin planks, you need your first layer of planking to be nice and smooth. No hills and valleys. You really can't afford any more than a light sand with about a 400 grit sandpaper or you will end up sanding back to the first layer. Definitely DO NOT use a wood block or a delta sander of any sort. Light hand sand only. -
Don't know if this is helpful or not, but a while ago I bought a great little tool called a SQUADRON PRECISION CYANOACRYLATE APPLICATOR. it is a small stainless steel rod with a sort of hook shaped end. It if fantastic for applying CA glue a drop at a time. I use the Zap brand of glue and usually pour some onto the bottom of an upturned empty glass jar when I need to use it. Dipping the applicator into the glue transfers a drop to the applicator and then you can transfer it to your work in the same manner. I used it to complete the coppering of my Norfolk in combination with tweezers and 'pokey, pointy' things from my dentist's set. I hardly got a drop of CA on my fingers and so avoided the messy clean up. I have used it to successfully apply a drop of glue to many other bits n pieces as well.
-
Sorry Nigel, you are quite correct. Industrial compressors are rarely fitted with moisture traps 'off the shelf'. However, I thought the purpose of this thread was to make recommendations/give ideas to someone wishing to buy a HOBBY COMPRESSOR. All the quality hobby compressors that I have checked out come with moisture traps because the manufacturers assume they are going to be used for hobby applications and this means airbrushing. If JerseyCity Frankie chooses to purchase an industrial compressor - more suited to pumping up car tyres in the garage, then he is going to need to purchase a separate moisture trap.
-
If you purchase a quality compressor with tank, it should already be fitted with a moisture trap. Mine was. In addition, someone made a comment earlier about not needing a tank for hobby spraying. I think that, if you can afford to spend the money, it is worthwhile getting a compressor with a tank. In my opinion you are more likely to get consistent results. When I am using mine (at 20 psi) the compressor rarely cuts in to top up the tank and when it does it's only for about 10 - 20 seconds. This means that for the most part working with it means NO noise at all( unless you count the hiss from the airbrush). It also means, in my opinion, that the motor should last forever because it is getting very little work.
-
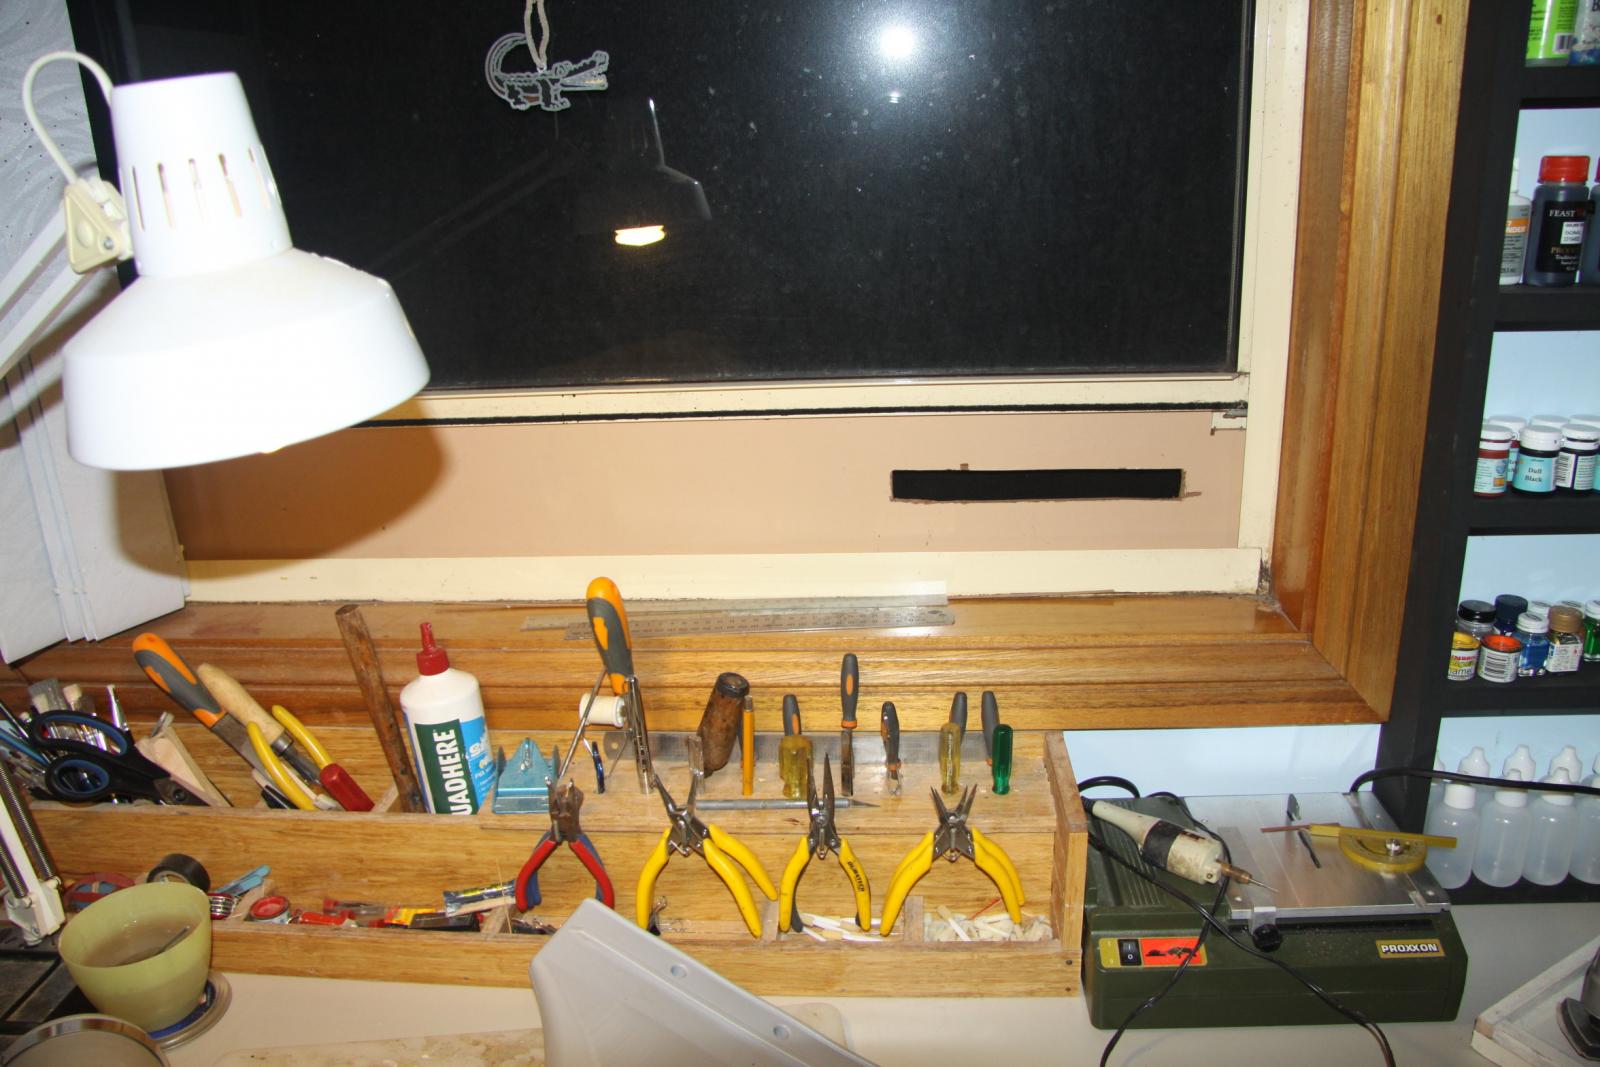
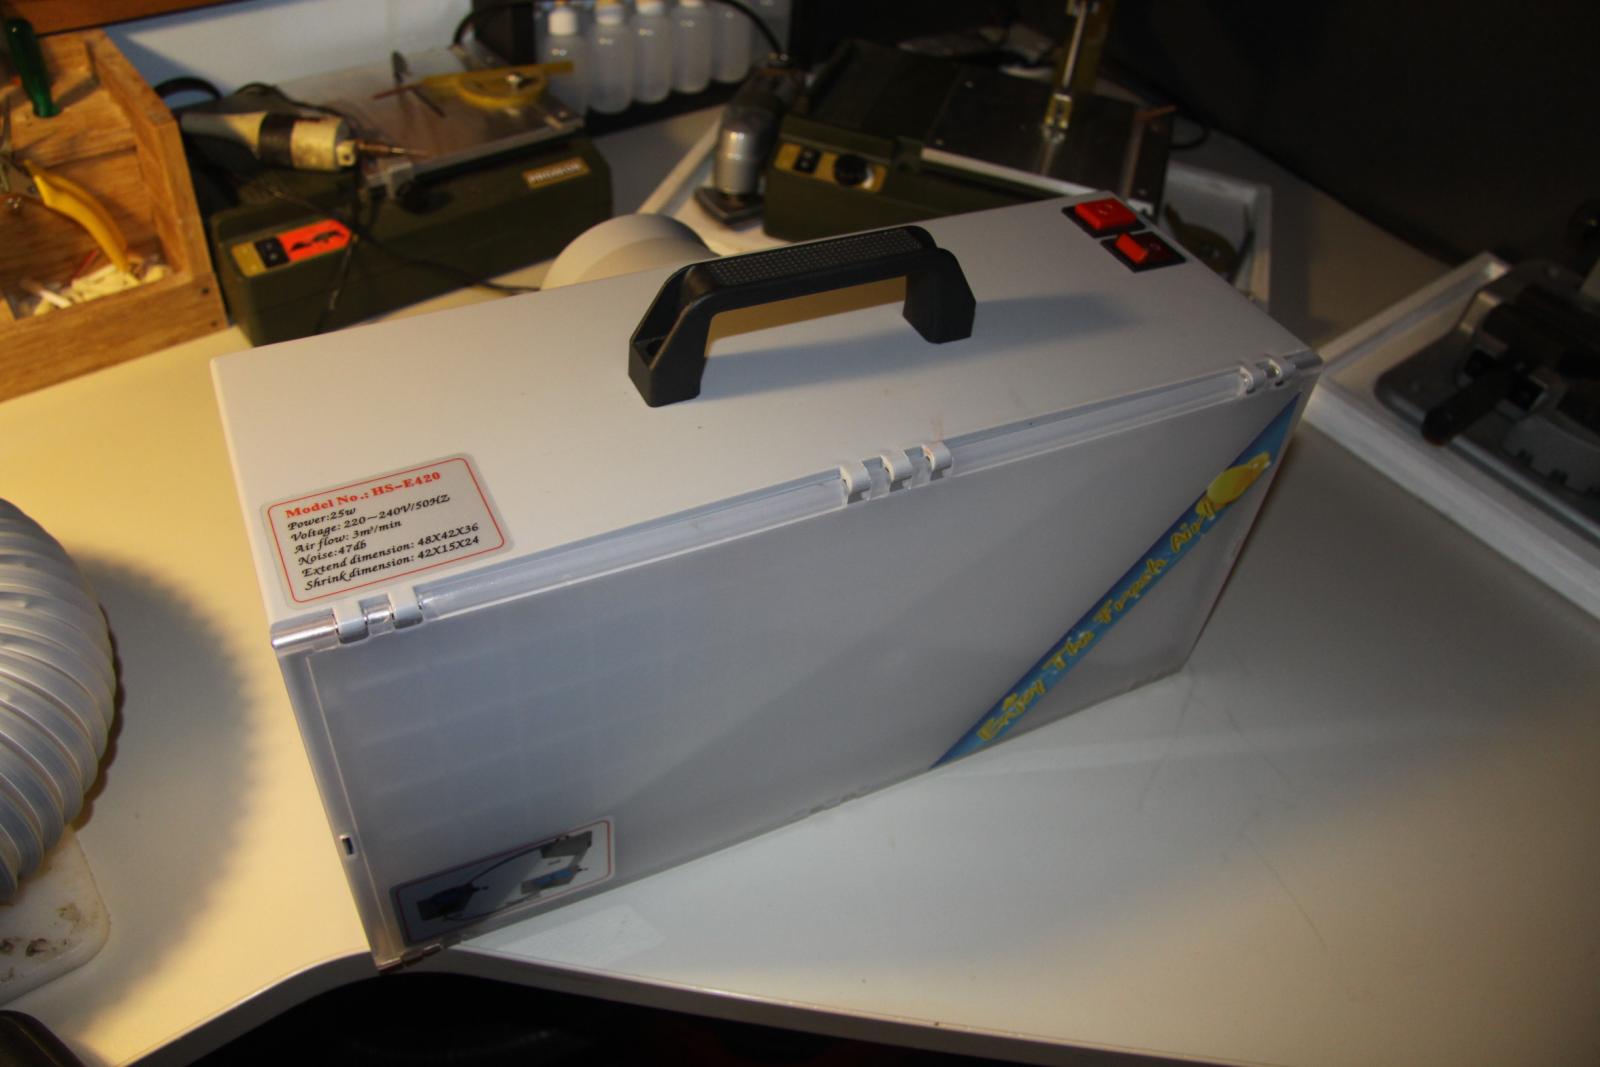
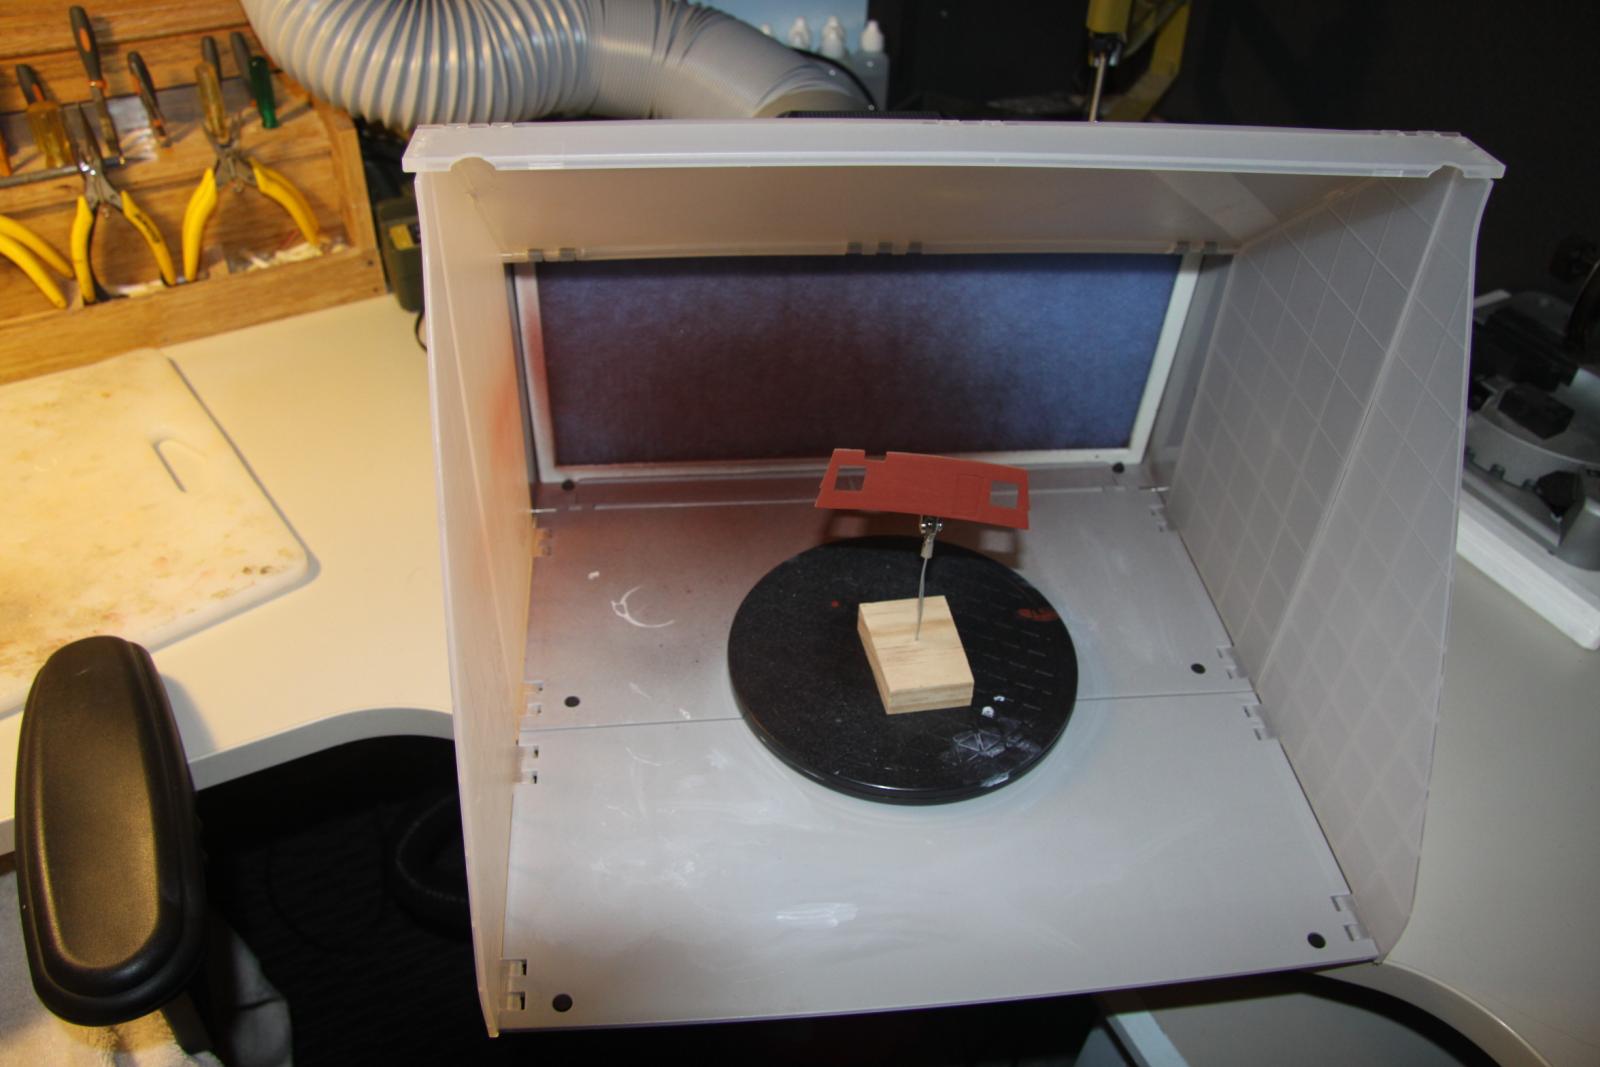
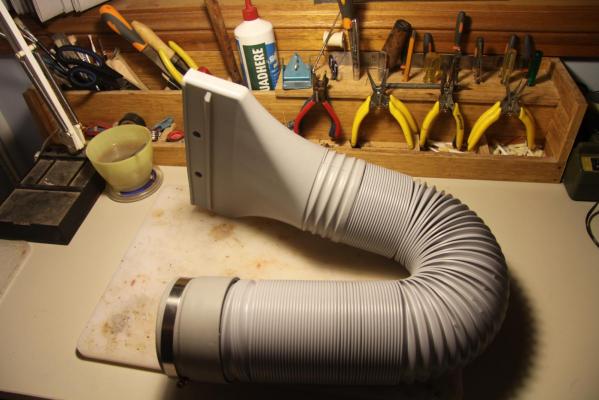
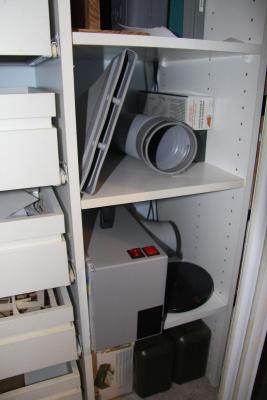
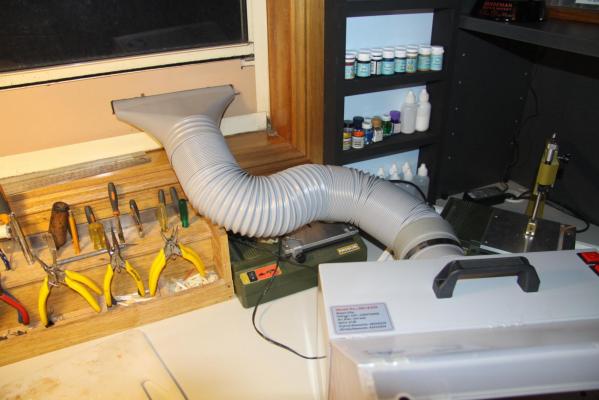
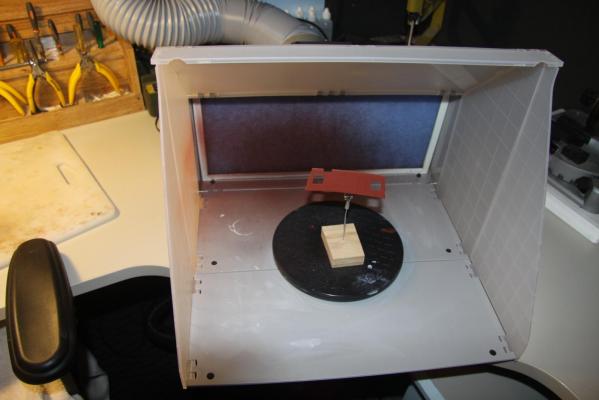
About 6 months ago I splashed out and bought a sparmax 610 compressor (with air tank) and a sparmax DH-103 airbrush to go with it. Initially I thought I had wasted my money as I struggled to achieve a consistent result. I persevered and now I love it. I totally agree with Jay, air pressure and paint consistency are the key factors. When I began, I was mixing my paint way too thick and the result was splatters, clogging and lots of swearing. Consistency of skim milk is pretty right, I thought it would be way too thin, but it isn't. I mix my paint 50/50 with a 50/50 mix of distilled water and clear windex. I use about 20psi pressure. You have to do 5 or 6 thin coats for best results but now I always get a smoothe result. The best thing is that you can still clearly see the Wood grain even after half a dozen coats - something I really like. I am currently using admiralty acrylics which give great coverage. The only thing else that I would add is that if you are working indoors, you may like to consider purchasing a mini spray booth. I got one from eBay for around $100 AU. It folds up into a little case that is easy to store. It has a retractable power cord and a flexible exhaust hose that can be wedged into a window. It also comes with a turntable. See pics below. I made a piece of timber that fitted into my sash window. A slot was cut into it to insert the end of the exhaust hose The hose is then connected to the spray booth and inserted into the slot in the board. ] This spray booth works really well in exhausting overspray. The filters are cheap to replace (available on ebay) The whole booth packs away into a small case and is easy to store


-
Unicorn by ameletters - Corel
hornet replied to ameletters's topic in - Kit build logs for subjects built from 1501 - 1750
Modellers Shipyard in Sydney will sell you planking screws. They are a little expensive for what they are but they do work. Have a look at their website, you may be able to make up something similar. I have used pushpins with a plastic piece glued to the underside of the plastic on the pushpin. I hammer rather than screw them into the bulkhead below the plank being attached. -
I sm currently using Admiralty paints, both with brush and airbrush. They are acrylics and give very good coverage and finish. Authentic colours too.
-
Yep Brian, little kids all round the world will now be screaming ....... MUM, grandpa stole my Lego!
-
Clamps and Lego blocks work well for me when squaring the frames to the keel.
-
Your question does not compute. I am a firm believer in the philosophy "He who dies with the most toys WINS!!!!"
-
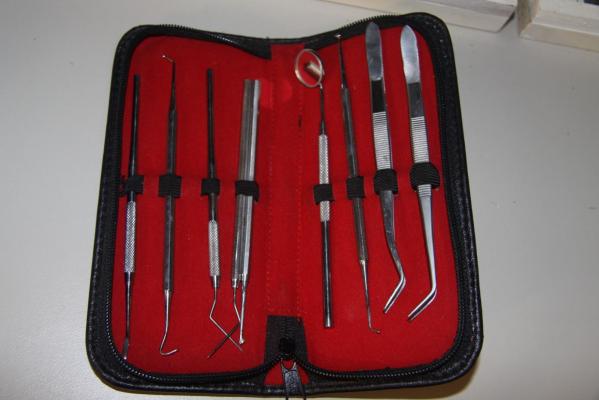
My only other suggestion is to invest in a set of dental tools. Using a combination of tweezers and the other pointy/pokey things in the set gets most fiddly jobs done for me. These are available on ......yes, you guessed it ....... ebay. Just remember most problems can be solved if you throw enough money at them AND he who dies with the most toys.... WINS!! PS - The dental tools are also great for getting bits of steak out from between your teeth. Just make sure you wipe the CA glue off first!
-
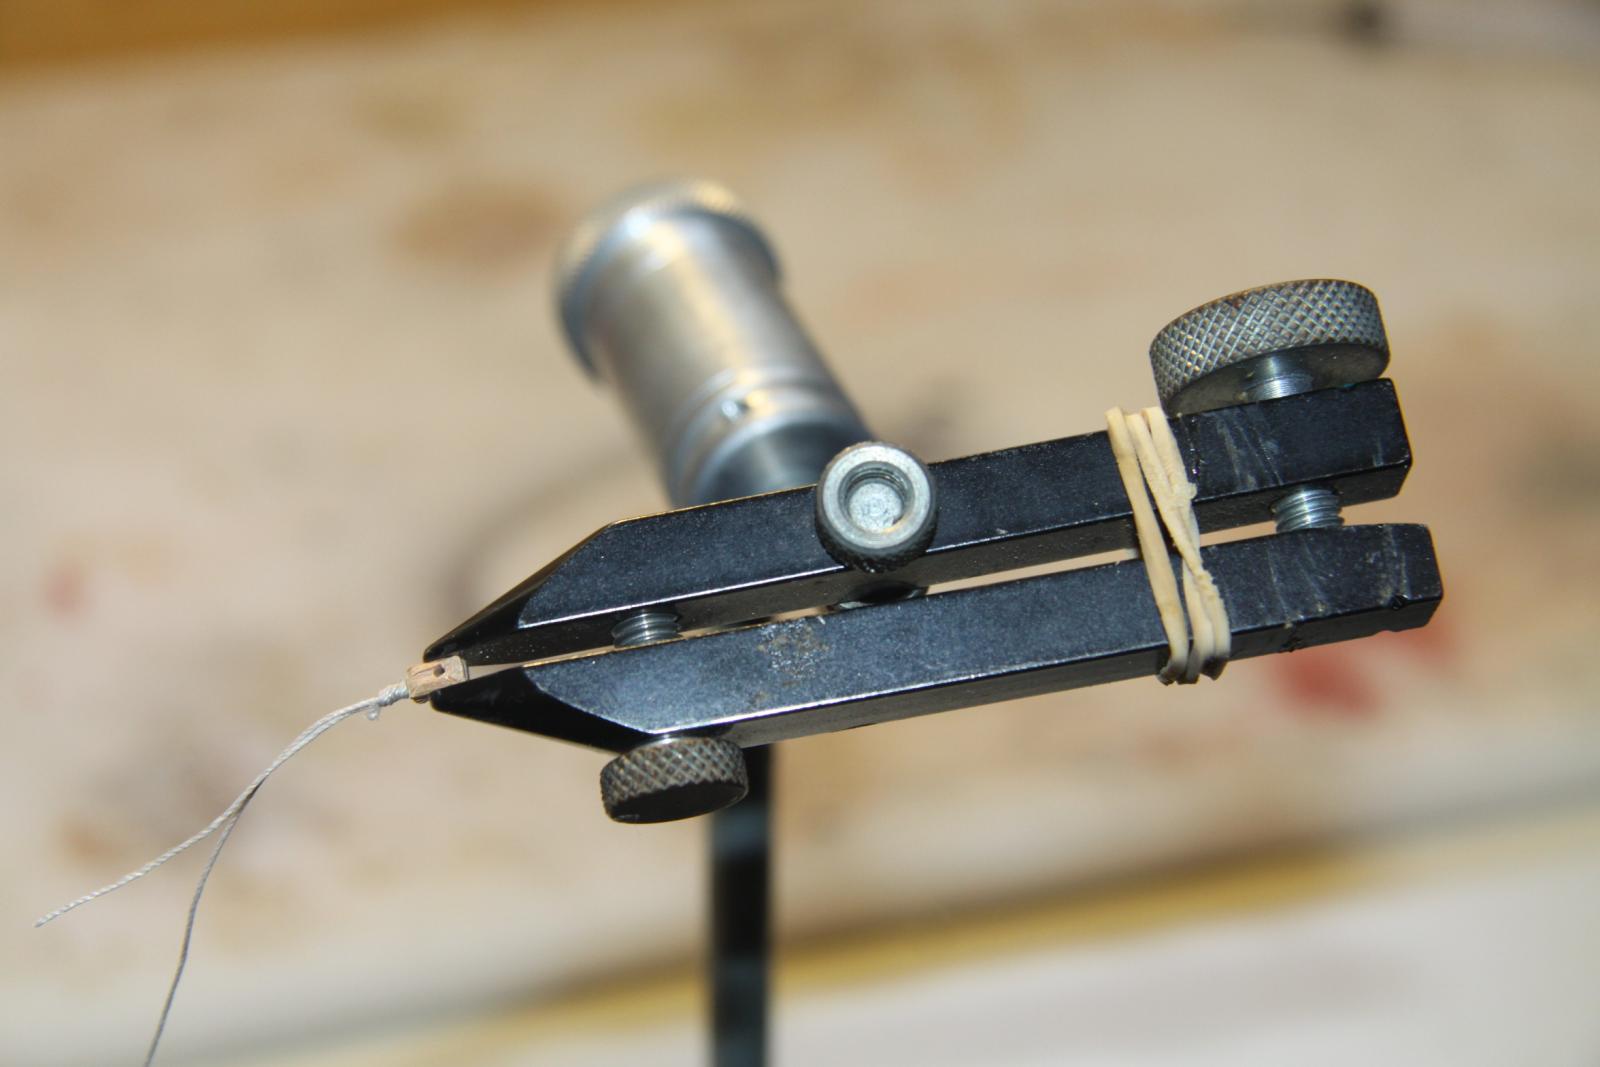
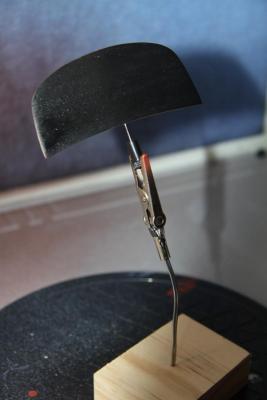
I hold small parts in a variety of ways. What I use most is a cheap fly tying vice (obviously originally designed for tying fly fishing lures) Because it can be adjusted in an almost infinite variety of ways it is very handy for working with fiddly little parts. You can pick one up on ebay for $30 - $50. Money well spent I think! I also use alligator clips attached to small wooden stand with tie wire (so they are easily adjusted/bent into a variety if positions) This I mostly use for holding parts to be painted with my airbrush. I even use a lump of blu-tac on the end of an extra long match (held in a vice) on some occasions. The fly tying vice is probably what I use the most! Hope this helps!

-
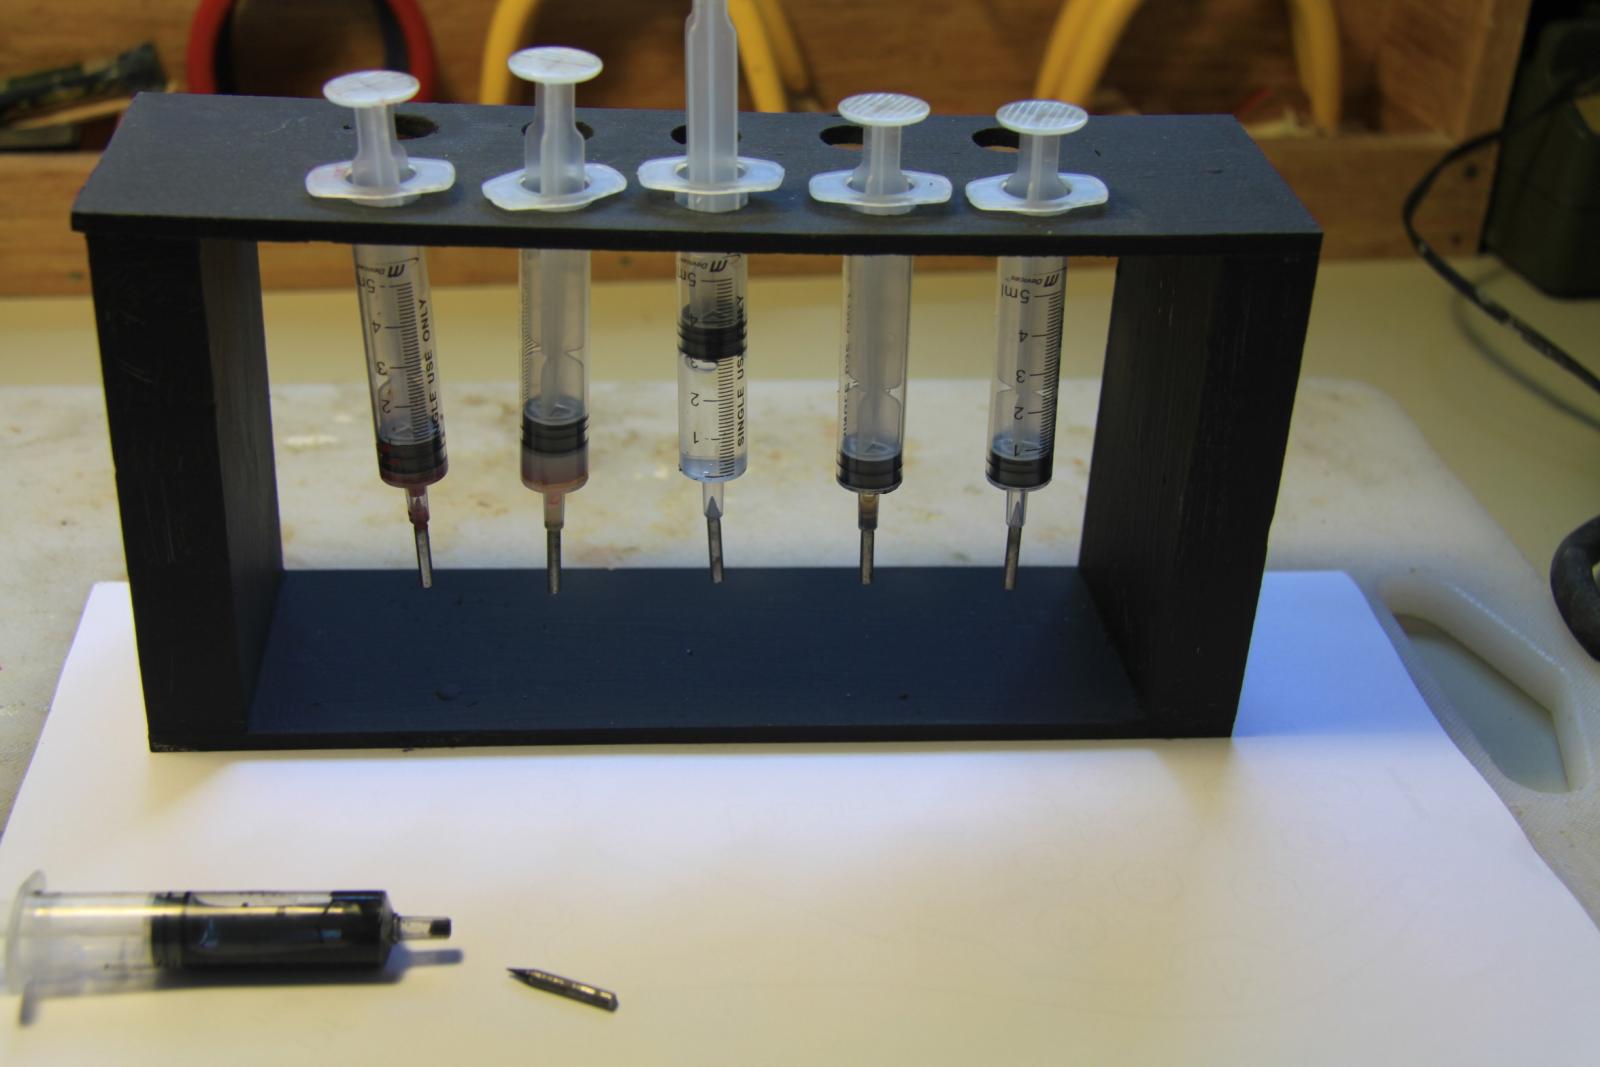
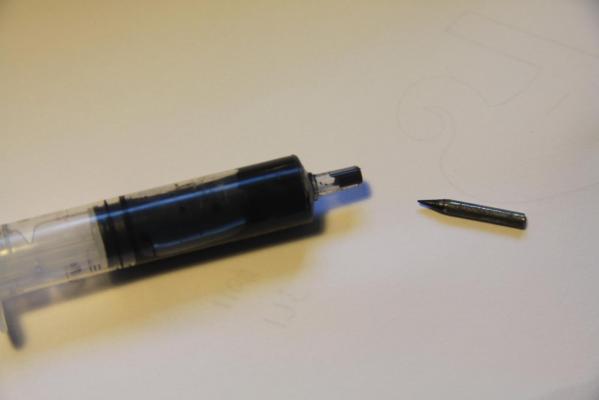
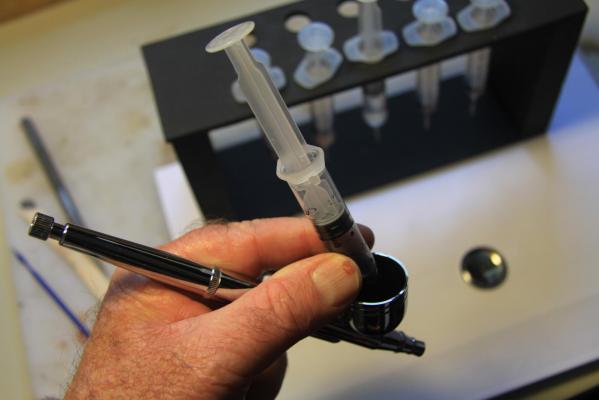
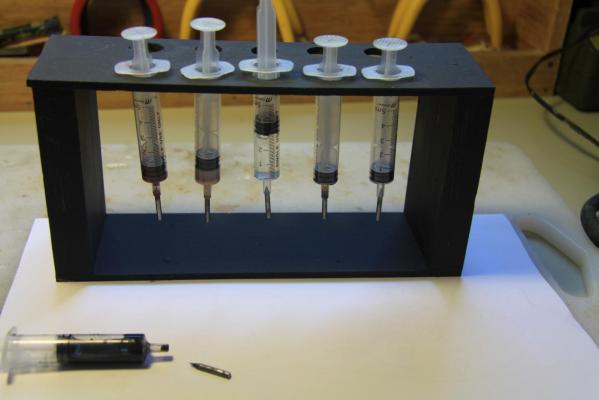
Another Storage Solution: A while ago I invested in a compressor and airbrush. Once I worked out the correct air pressure to run it at and the correct dilution of paint, I found it to be a great addition to my workshop. However, I found that I could cover a lot of area with a relatively small amount of paint and I often ended up with some left over. The paint was mixed with a 50-50 solution of clear windex and distilled water to use in the airbrush, so I didn't really want to pour it back into the original bottle. I am using Admiralty acrylic paints at the moment and they aren't cheap so I wasn't happy to pour leftover paint down the drain either (even if I only had 1 ml left in the airbrush bowl !!) I ended up buying a heap of syringes from ebay. The beauty of these was that I could suck the unused paint right out of the airbrush cup with very little wastage. I cut the ends off nails and ground them to a point so I could use them to seal the end of the syringe once the paint was salvaged. Another benefit of the syringe was that I could carefully squeeze the plunger and bleed off all the air from it before `stoppering' it with the nail. As a result, the paint lasts indefinitely. All I do is give the syringe a shake to mix and then squeeze into the airbrush bowl and I'm off and running! syringe with leftover paint and nail `stopper' removing the paint from the airbrush bowl I made a simple stand to house the paint syringes
-
I suggest you look at the thread ' adding interior lights to a build' - on this site. Some good ideas, particularly those referring to LED's used in model train construction. A couple of good websites mentioned for purchasing lights and lighting systems.
-
Diluting paint
hornet replied to jdiven's topic in Painting, finishing and weathering products and techniques
I use a fifty-fifty mix of distilled water and clear windex glass cleaner when thinning paint for my air brush. This works fine. -
New Article in Database...Understanding Thread for Rope Making
hornet replied to Chuck's topic in Masting, rigging and sails
An interesting article BUT at the end -under the heading 'What threads to use for modelling rope',Pat states, "the suppliers I have identified below are for threads that modellers throughout the world have as meeting their needs for scale rope" However, he has not listed any of these suppliers. Is he referring to the websites mentioned under the heading 'Sizing Make Up' or to something else that he has left off the file? - hate to sound obtuse, but I am a little confused.