hornet
-
Posts
690 -
Joined
-
Last visited
Content Type
Profiles
Forums
Gallery
Events
Everything posted by hornet
-

Miniture machine screw sizes
hornet replied to grsjax's topic in Metal Work, Soldering and Metal Fittings
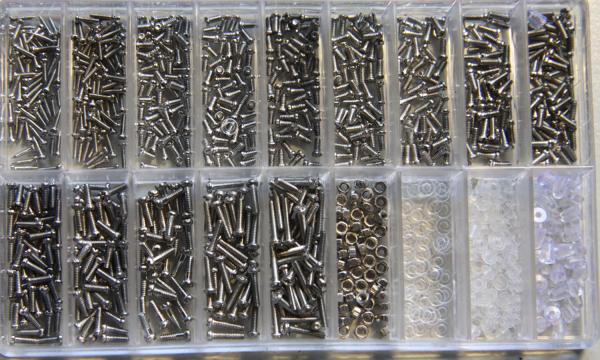
I just checked out the cost of these screws on the link provided. WOW!!!!! They are expensive. If you search for 'eyeglasses screws' on EBay you will find a box of various sized miniature screws costs around $5.00. They are stainless steel. I bought a box. There are enough screws (and some nuts) to last the average builder a lifetime!! -
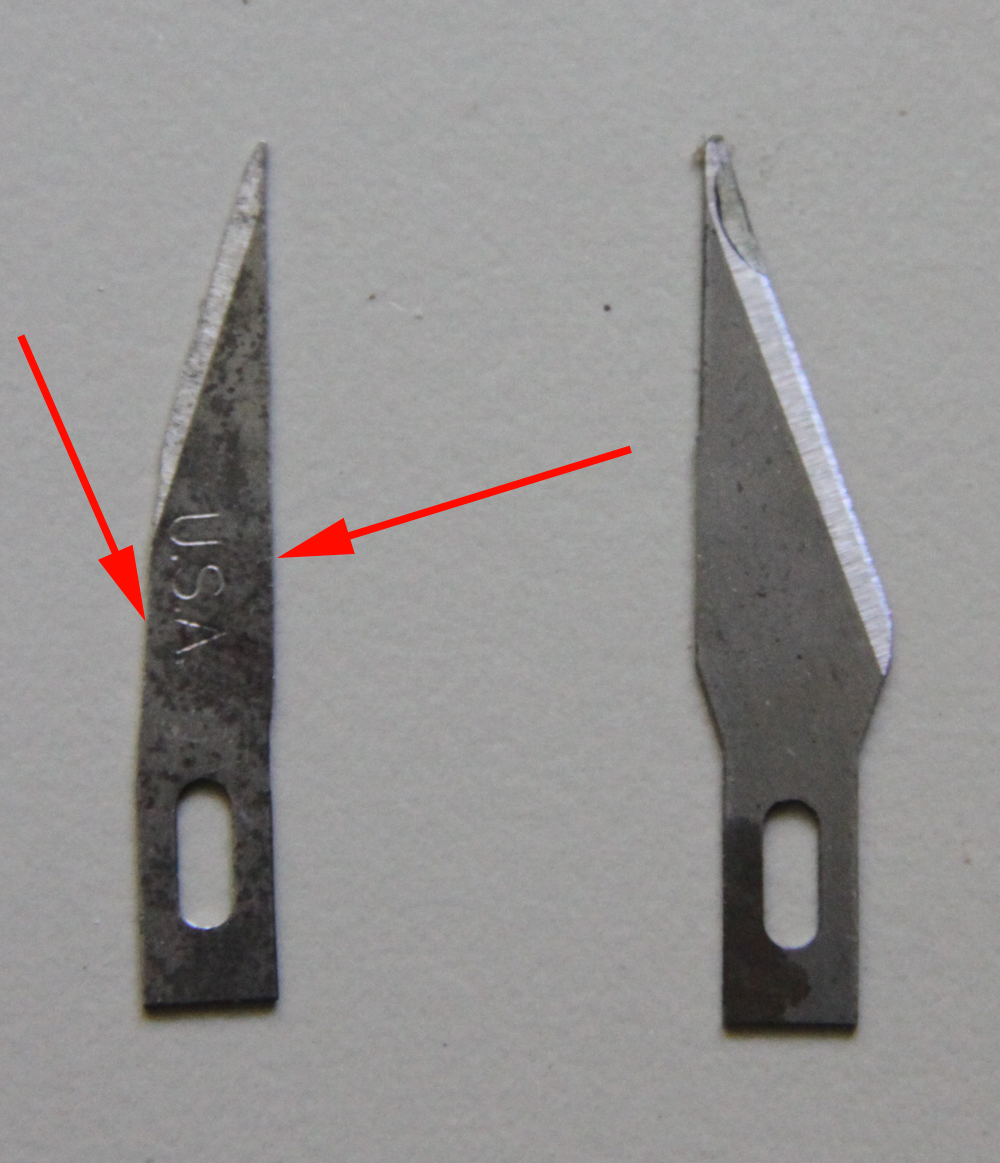
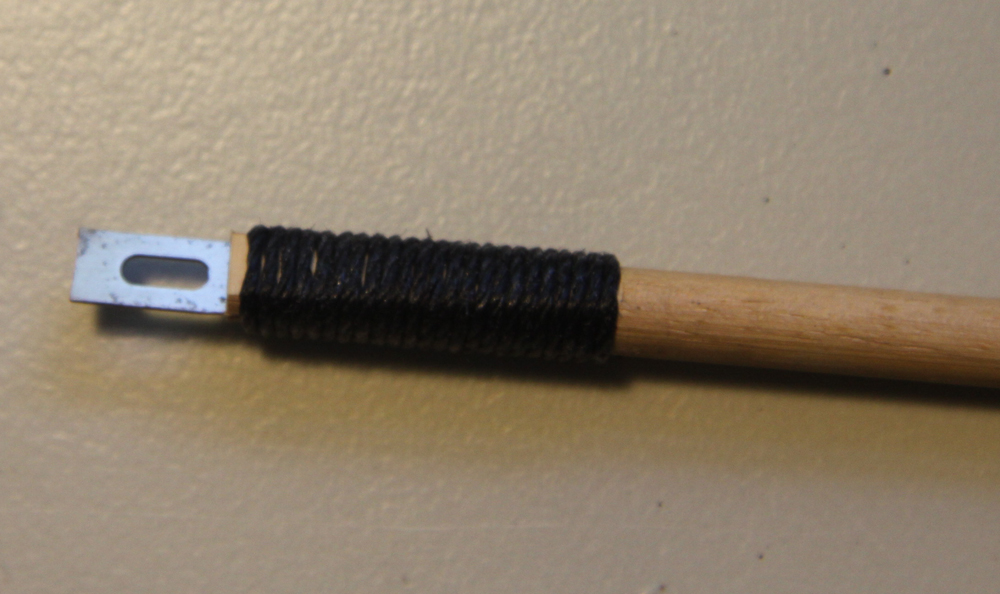
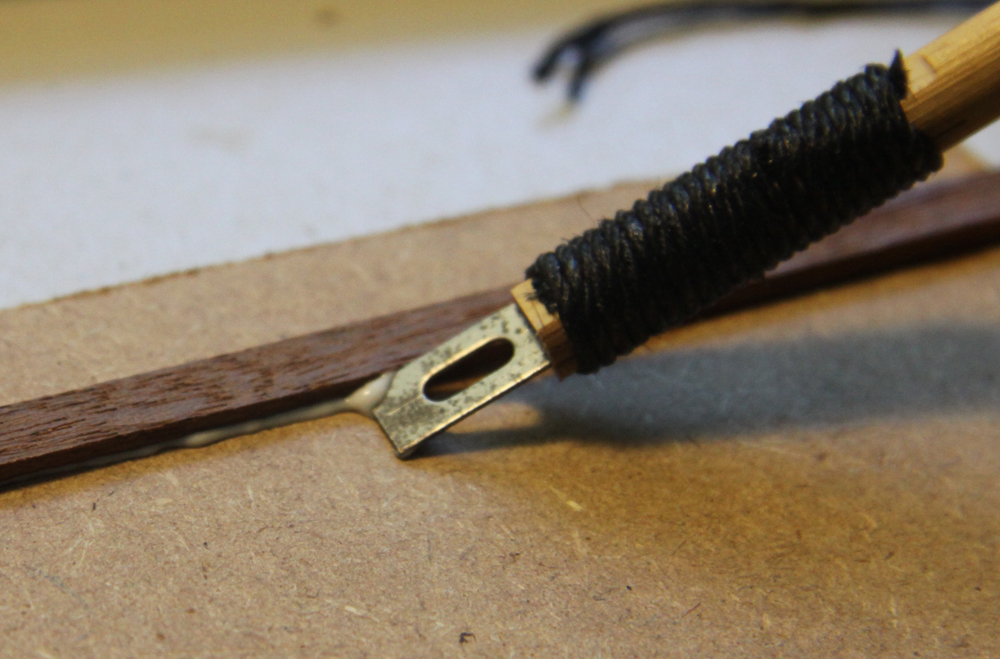
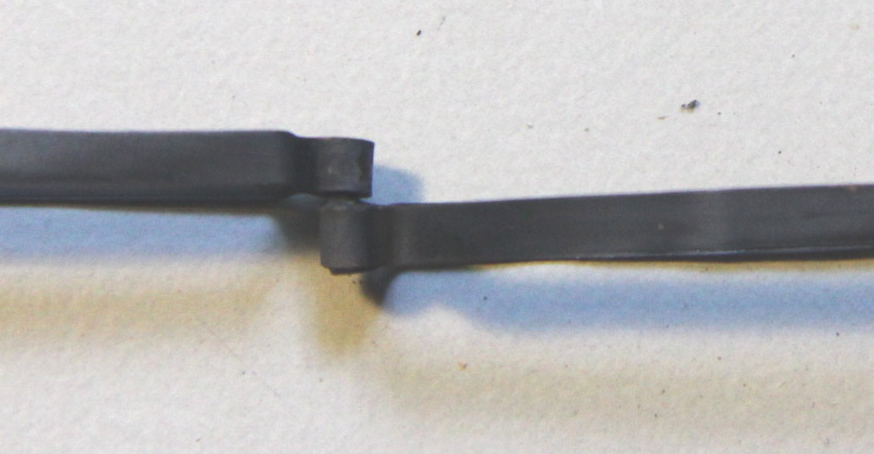
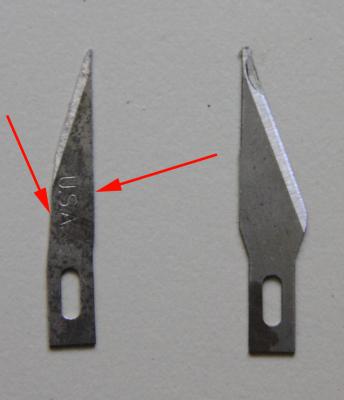
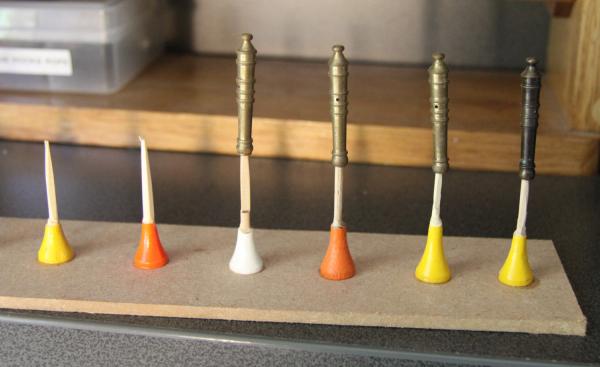
A couple more simple ideas Take a used No. 11 blade and grind it down as shown in pic below: Slit a piece of dowel and insert the blade so that the square(reverse) end is protruding from the dowel. Bind with cord. Because the `butt end' of the blade is `square,' it makes a good scraper to remove excess glue for jobs such as fitting the second layer of planking. Pegs screwed to a T shaped base board are good for holding parts for gluing and painting. Golf tees have a large base which is easy to glue to a board. I grind down the tee shaft to the desired diameter then use them to hold cannon for airbrushing.


- 396 replies
-
- 10
-

-
- Idea
- Bright Idea
- (and 1 more)
-
As mentioned in other posts on this site, LEGO blocks and clamps work well for squaring a frame. They are, by design, very flexible and perfectly square.
-
Try reading this, sounds a bit complicated but makes sense. http://www.austinsms.org/Straightening-Warped-Plastic-Parts.php
-
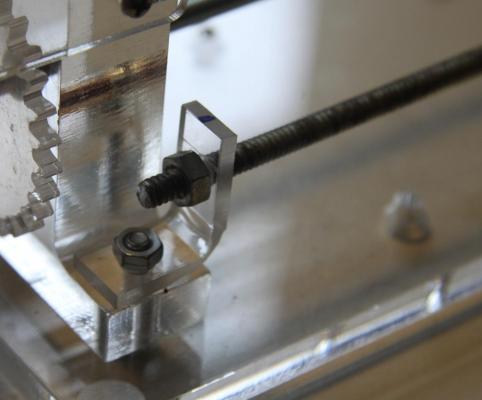
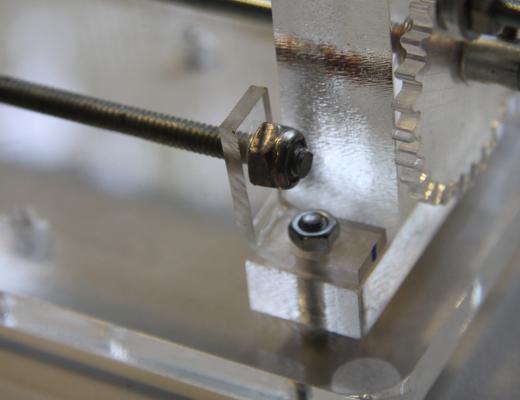
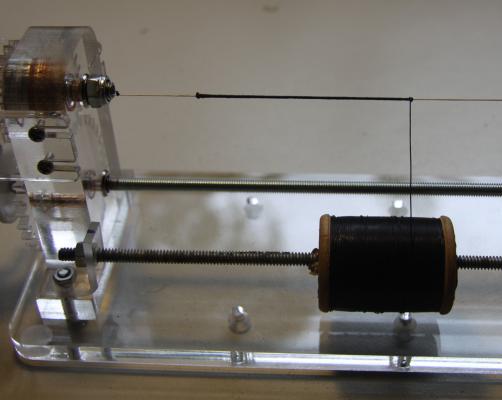
Domanoff Rope Serving Machine
hornet replied to Ensign's topic in Modeling tools and Workshop Equipment
No problem Alexey, I think that this machine is well worth the money. The fact that I could pay via payal and shipping was included was great ( postage/shipping can be a BIG issue 'Down Under') I thought the postage was very quick and I also liked the fact that you sent an email with a photo of the package attached when you dispatched it. I get a lot of stuff via mail and this is the first time I have seen it done. -
Domanoff Rope Serving Machine
hornet replied to Ensign's topic in Modeling tools and Workshop Equipment
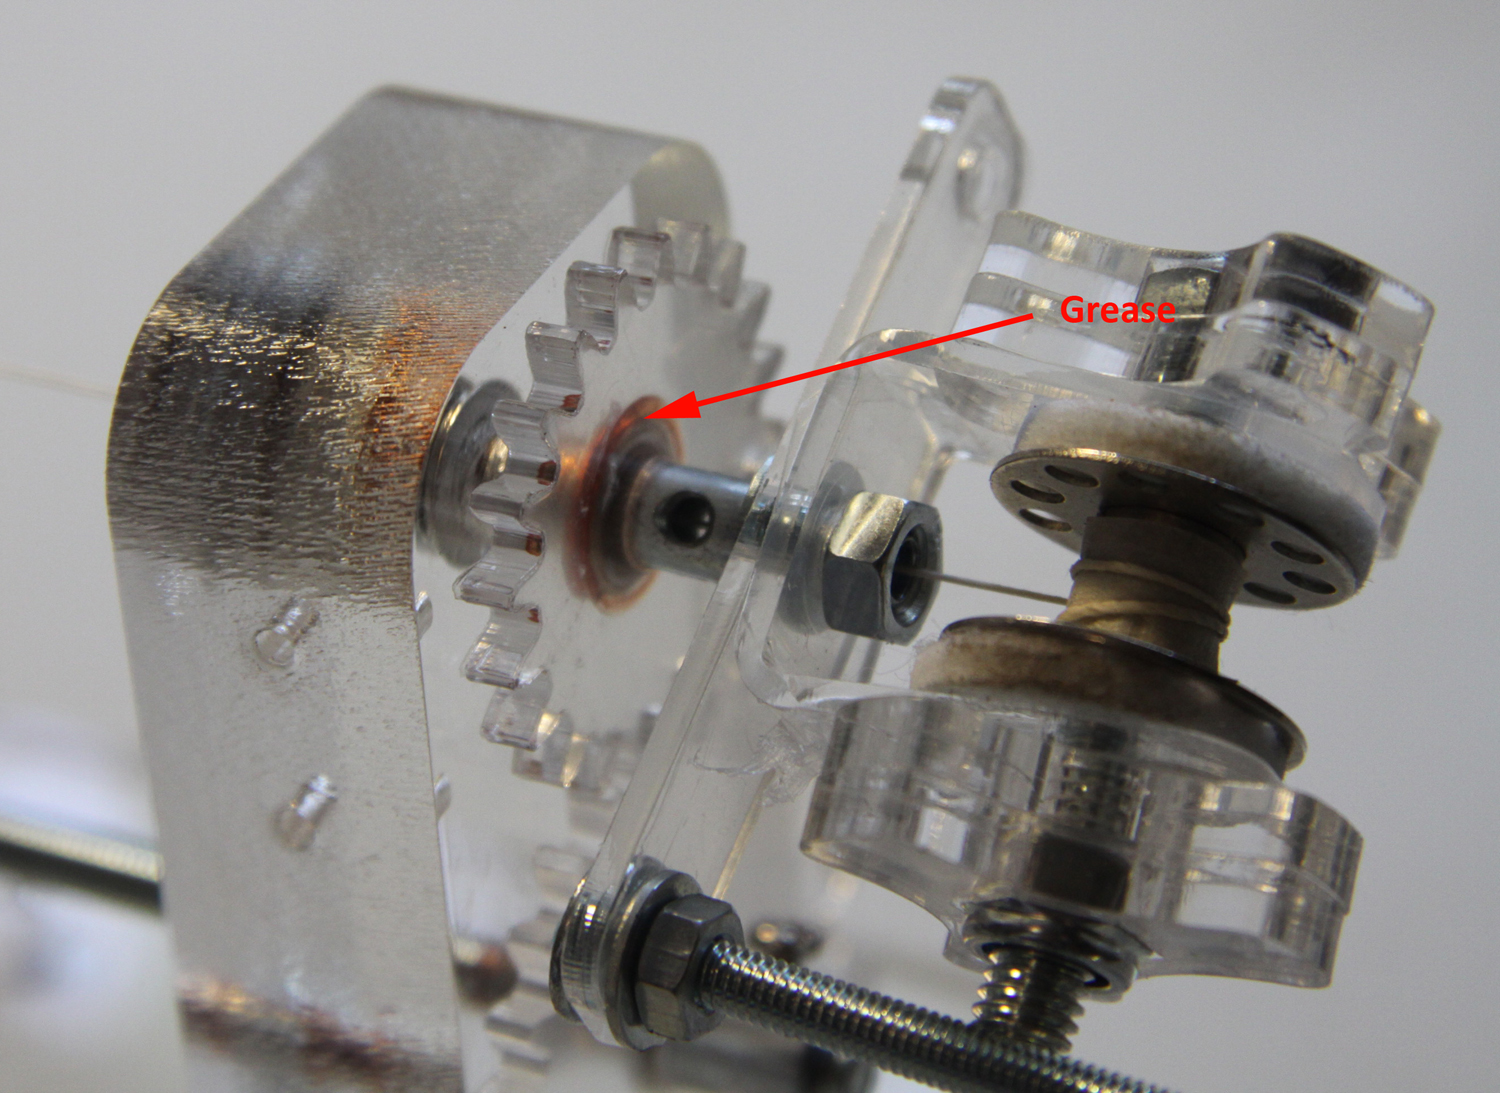
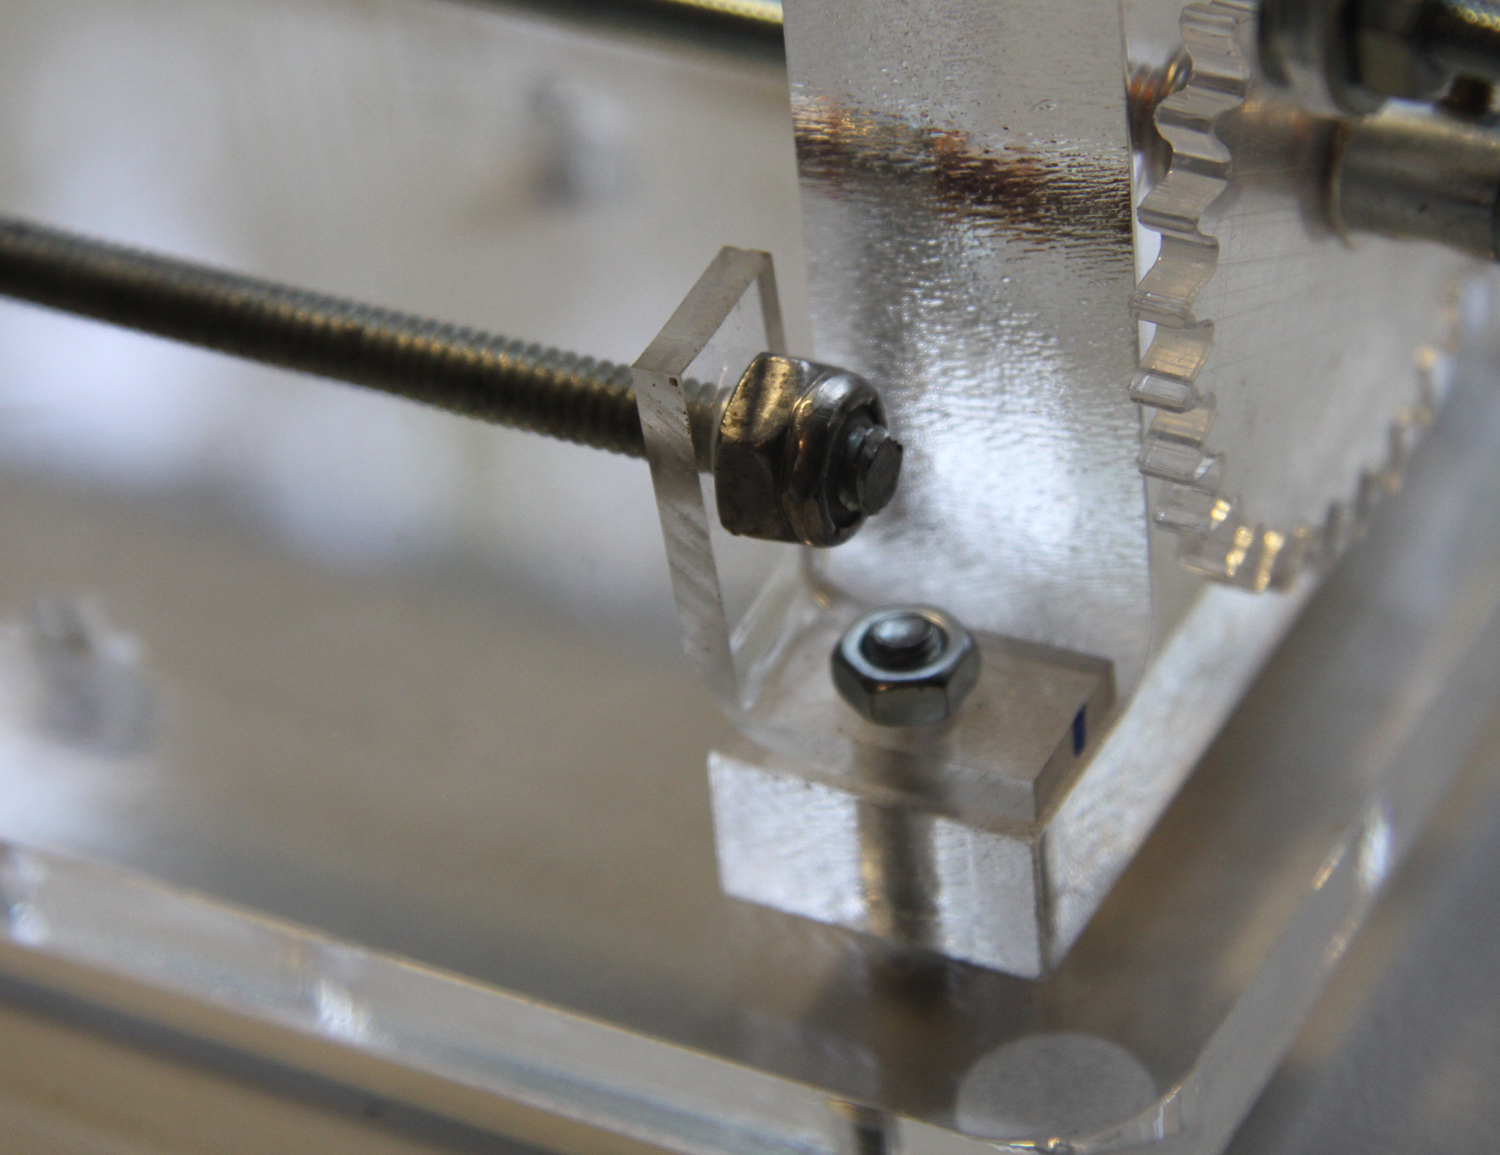
Mine arrived about 3 weeks after I put in the order. I got the serving machine 2.5. The power supply is shipped separately from China because Australia uses a different (240 volt) system. I found that the machine worked much better after I lubricated all the shafts (where they go through the `posts') with fishing reel grease. This grease is designed to use with small gears and worked particularly well when I engaged the power option which would not turn very well on the very lowest settings before greasing. I also made an addition/modification to the machine by adding another shaft to hold my seizing cotton rather than having it sitting loose in front of the machine. There was just enough room on the `feet' of the `posts' to add a couple of right angled brackets that I cut and folded from some scrap perspex. I used the same diameter threaded rod as was used in the other shafts on the machine.
-
Zinc-plated hull
hornet replied to Seamus107's topic in Building, Framing, Planking and plating a ships hull and deck
Hi, might I suggest copper plating the hull as Russ says, then painting the plates - either by brush or better still an airbrush - the colour that you are trying to achieve. I know that hobby stores such as Frontline Hobbies here in Newcastle offer a mind blowing array of colours in both acrylic and enamel. I'm sure one would match the colour you are trying to achieve. -
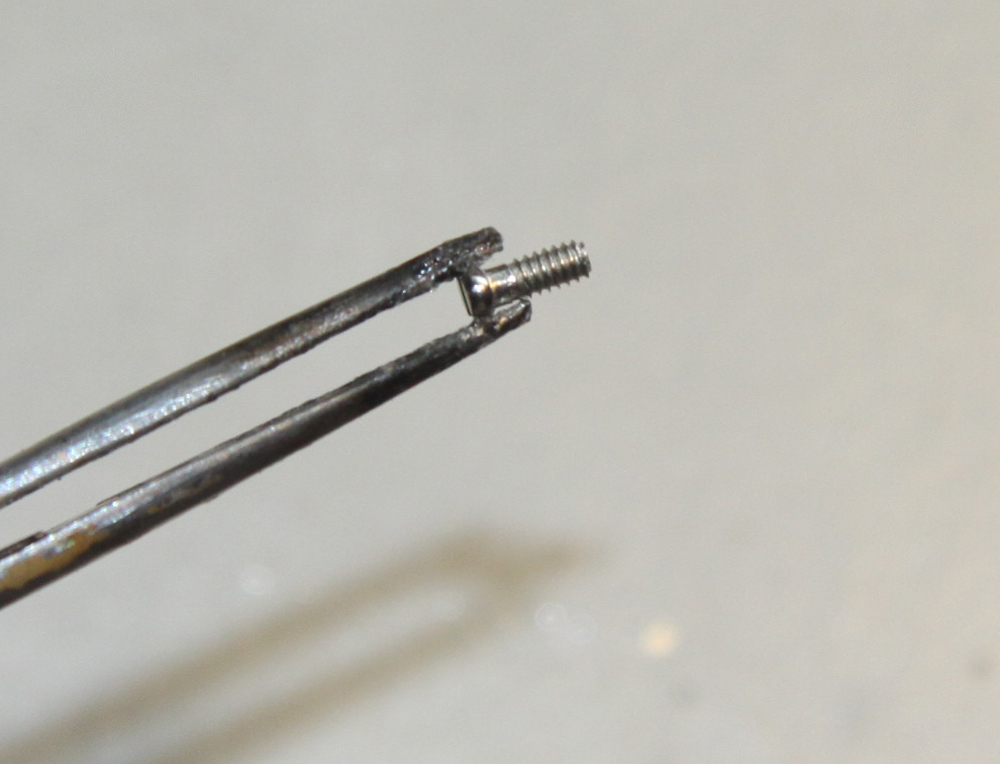
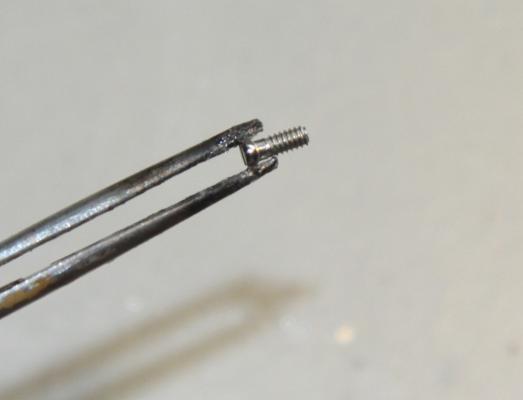
STAINLESS STEEL SCREWS FOR EYGLASSES HINGES Available on ebay for around $5.00 per box - enough to last a lifetime. I sometimes have trouble getting nails holding gudgeons and pintles to stay in the rudder (even with glue) I have experimented with using these micro screws instead Screws have CA glue applied to thread. Once in place I file back the heads. Then paint!! I'm sure there are other ways to use these micro screws in a build.


- 396 replies
-
- 7
-
-
- Idea
- Bright Idea
- (and 1 more)
-
I have the proxxon DS 230/E which appears to be the same as the 115. It performs very well.
-
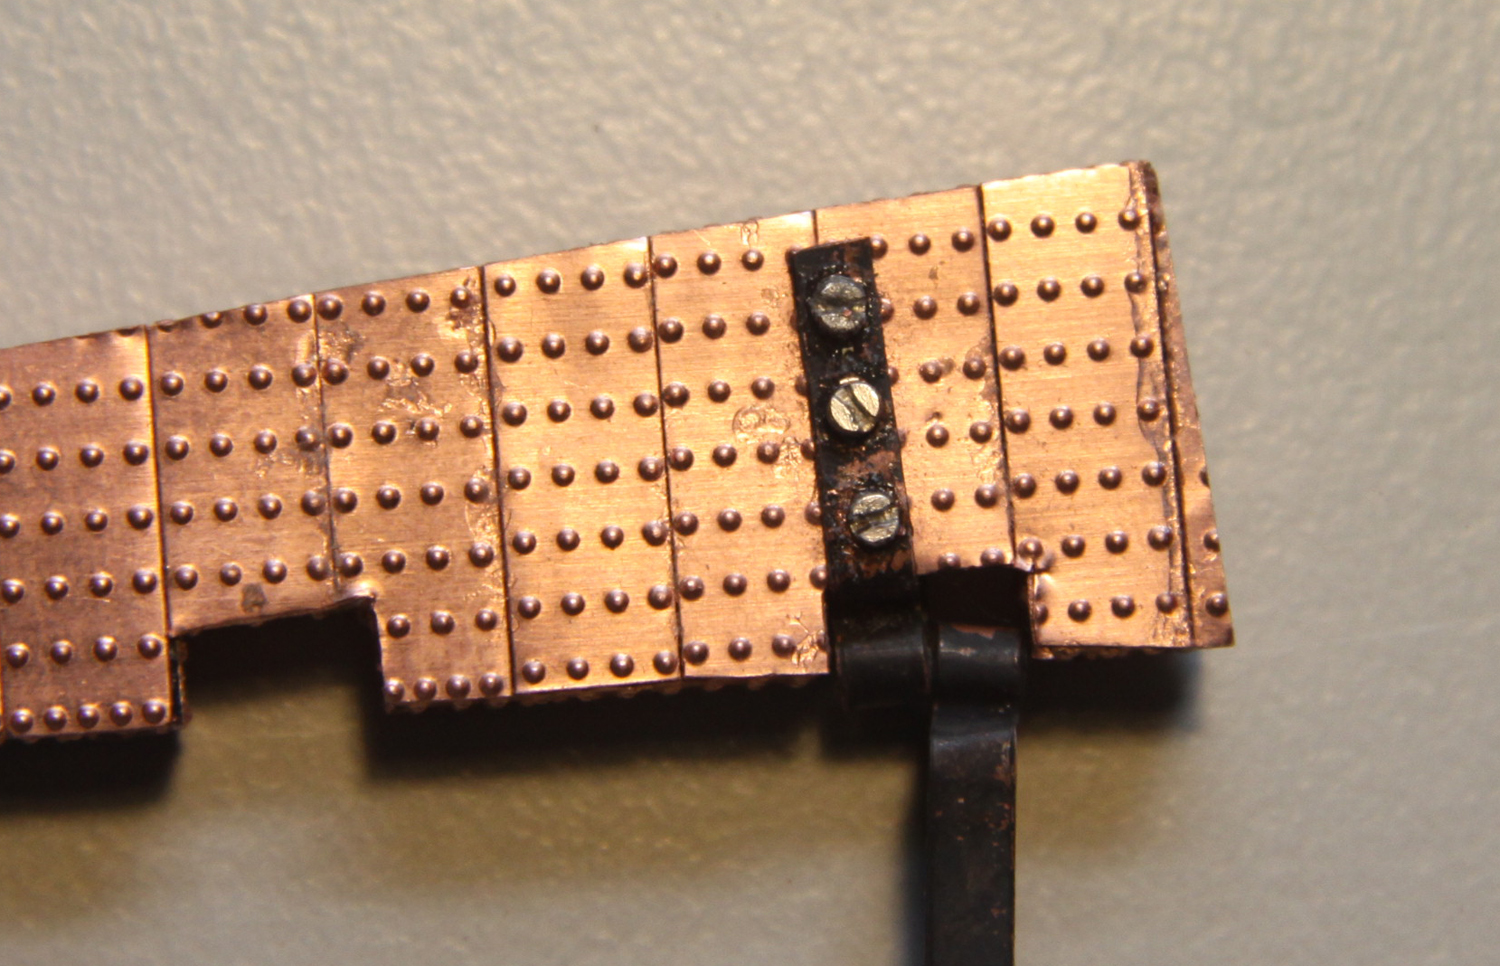
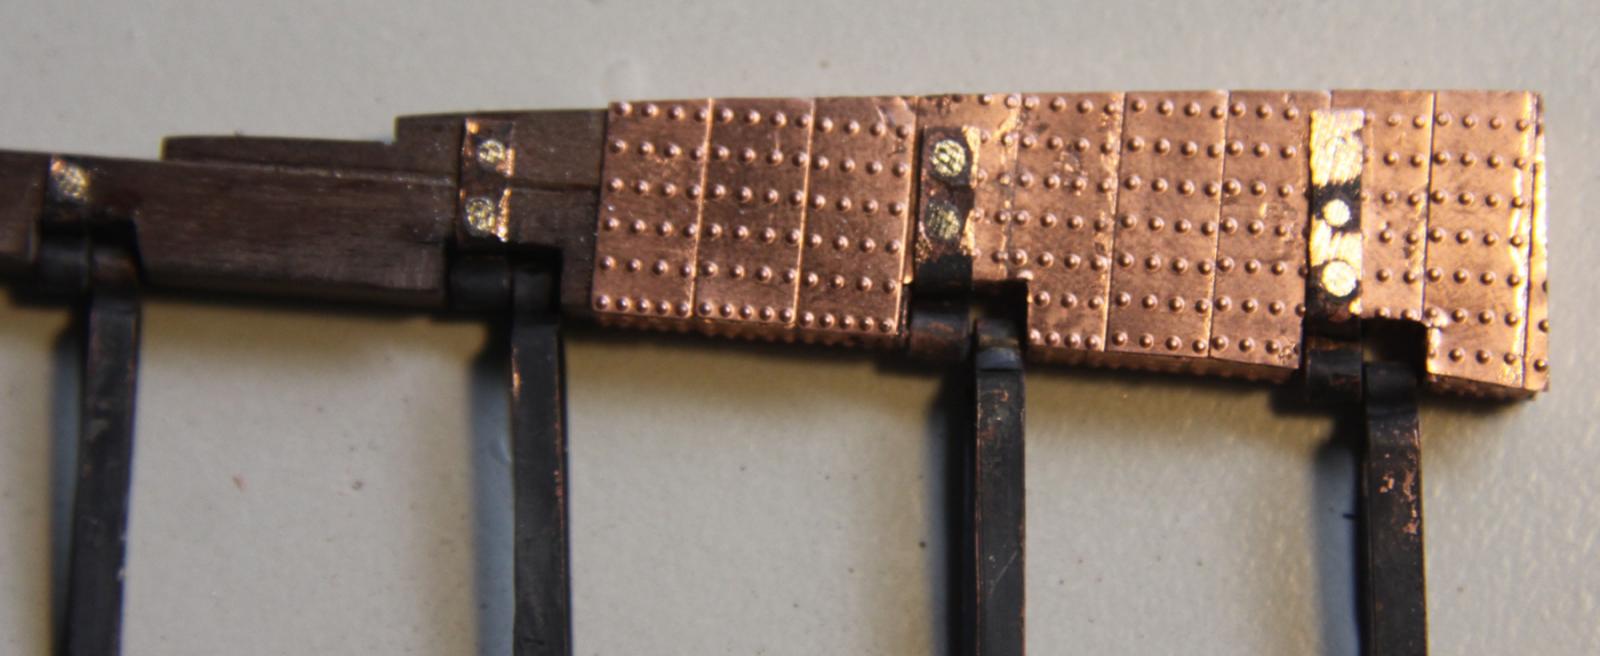
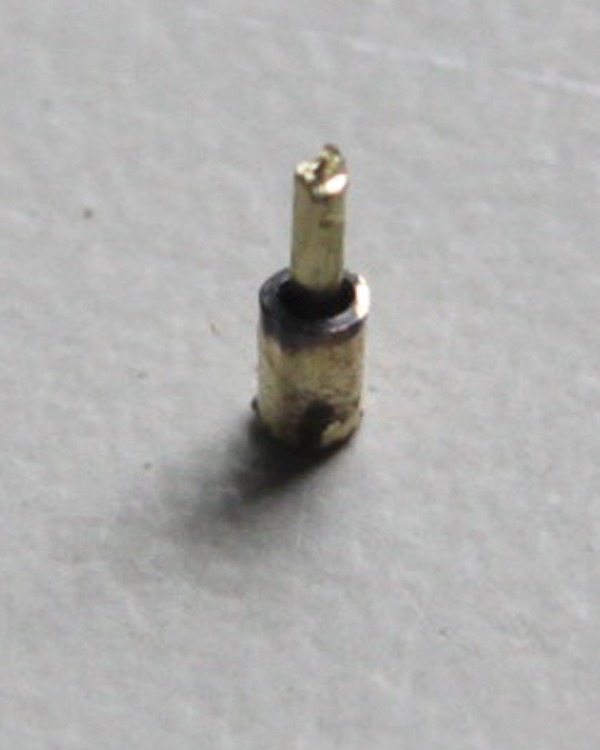
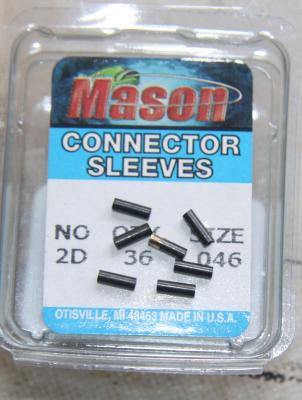
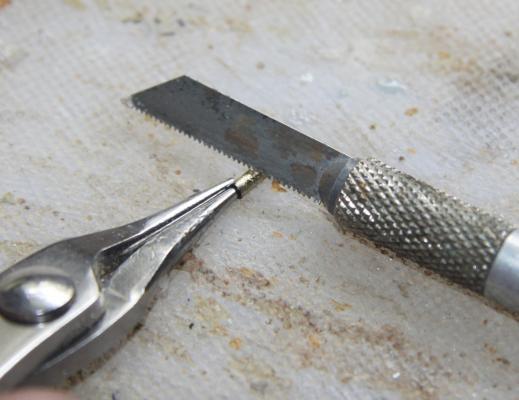
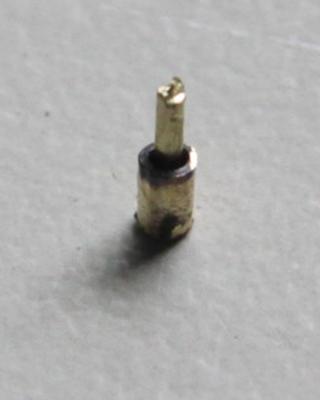
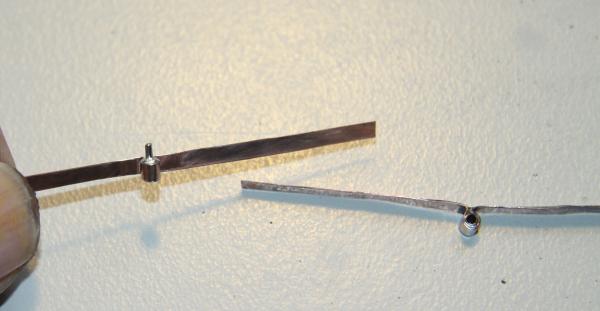
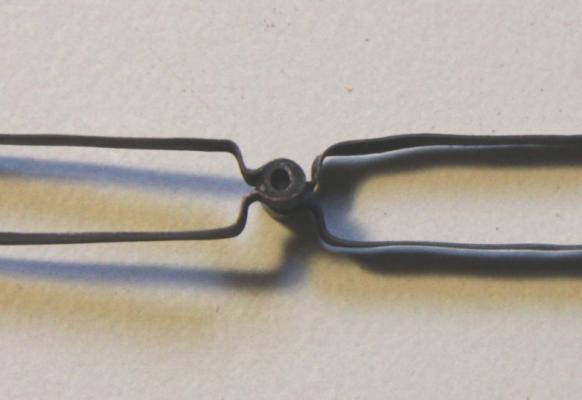
CONNECTOR SLEEVES These are used to loop nylon fishing line. They are crushed to hold the line in place but are made of brass and come in different lengths and diameters. Once the protective covering is removed (inside and out) they can be used with brass wire and copper sheeting to make gudgeons and pintles. They are available at most fishing tackle stores I cut one in half to produce the `hinge' part of the pintle and gudgeon. After a bit of silver soldering and blackening, they come out quite well!!

- 396 replies
-
- 8
-
-
- Idea
- Bright Idea
- (and 1 more)
-
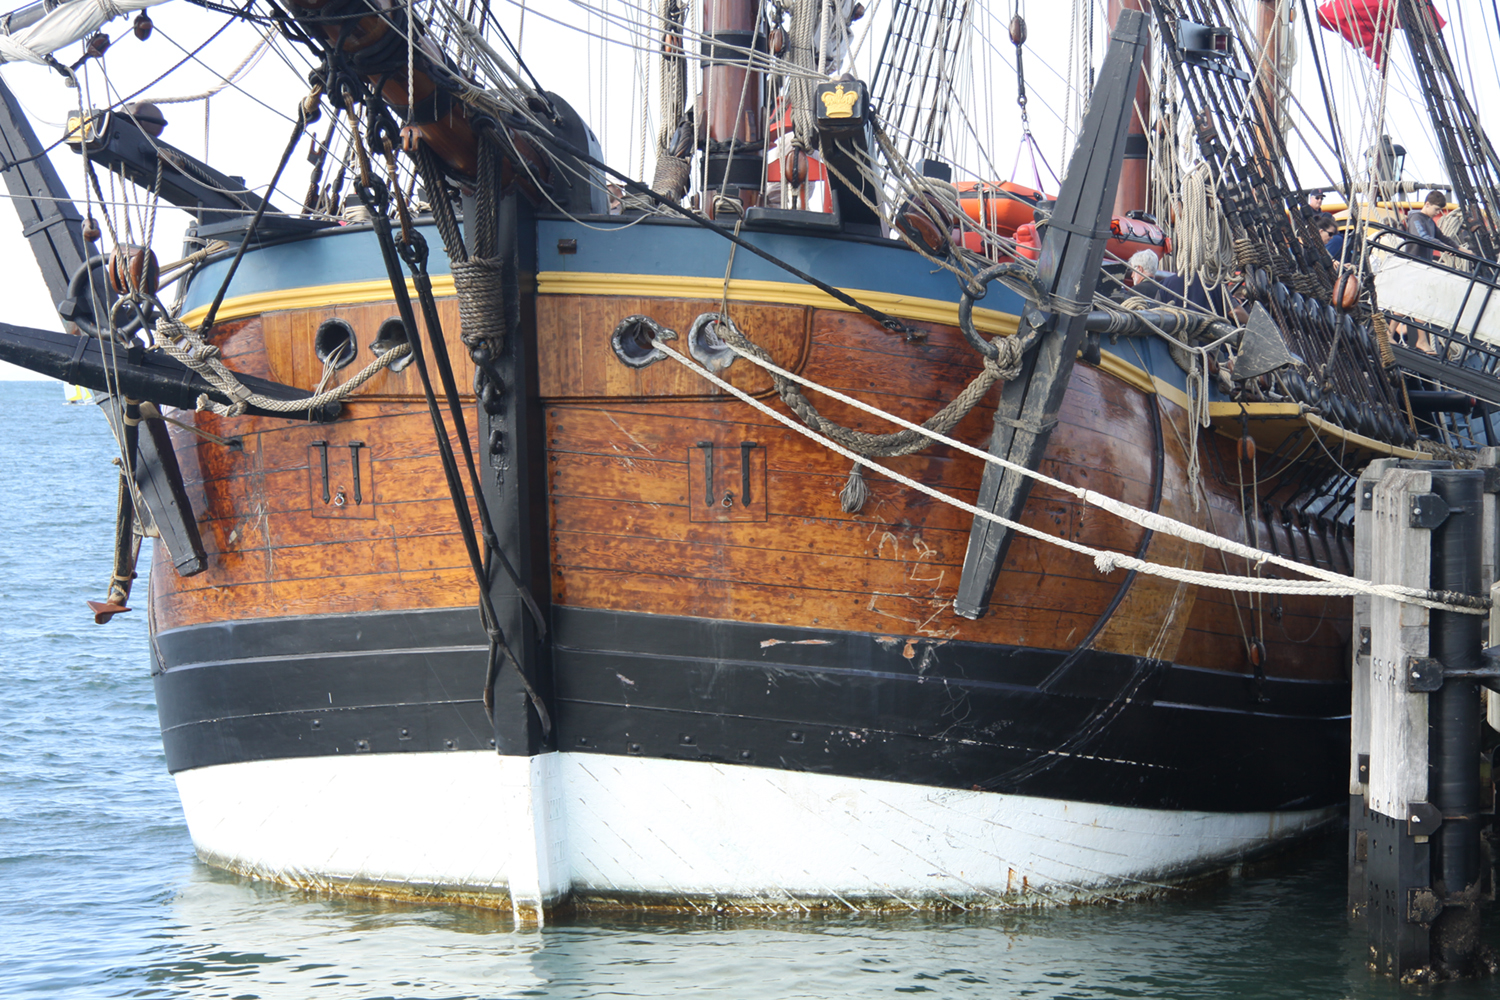
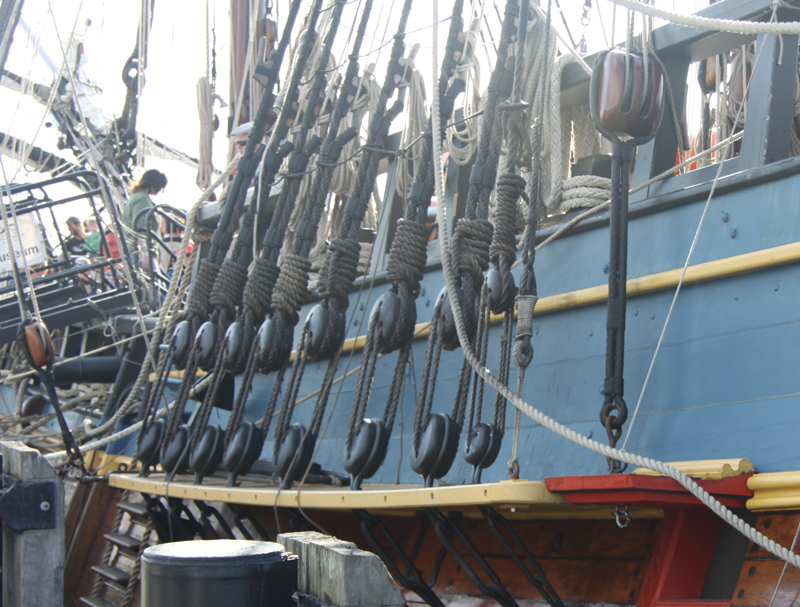
Hi Graham You picked a tough one to start on!! I have the Caldercraft Endeavour on the shelf but won't start her till I have finished the Supply & the Bounty. I was recently aboard the Endeavour Replica when it visited Newcastle Harbour. While others were taking `selfies,' I was taking about 150 snaps of bolts, ropes, window frames and the like!! I think people thought me mad!! I've included a pic of the replica's bow. It may help your build. If you need any other pics along the way (I photographed pretty much everything) PM me.

-
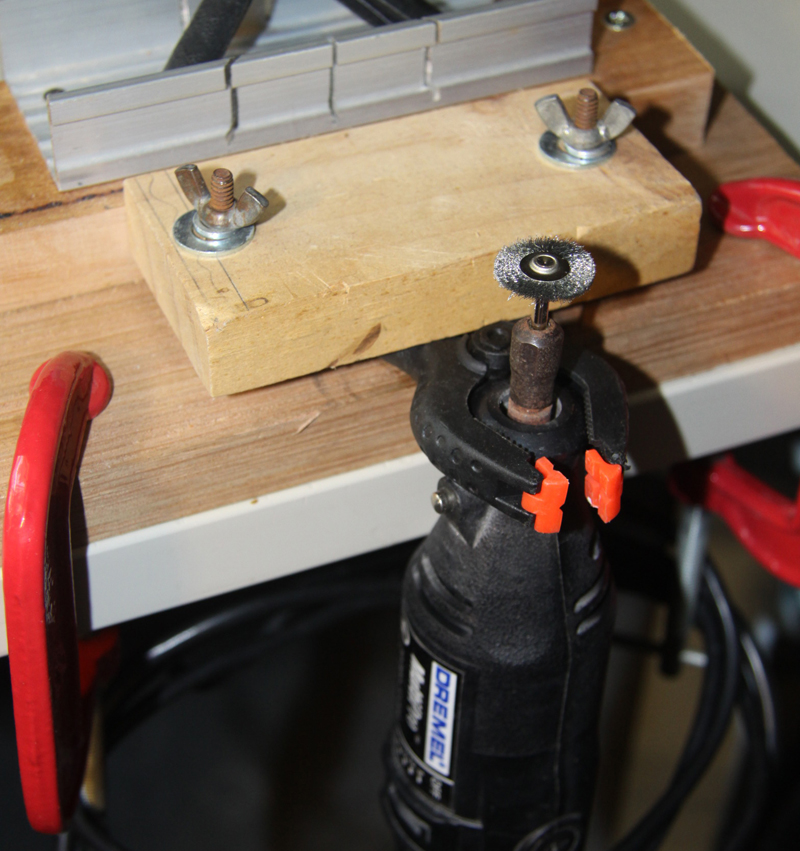
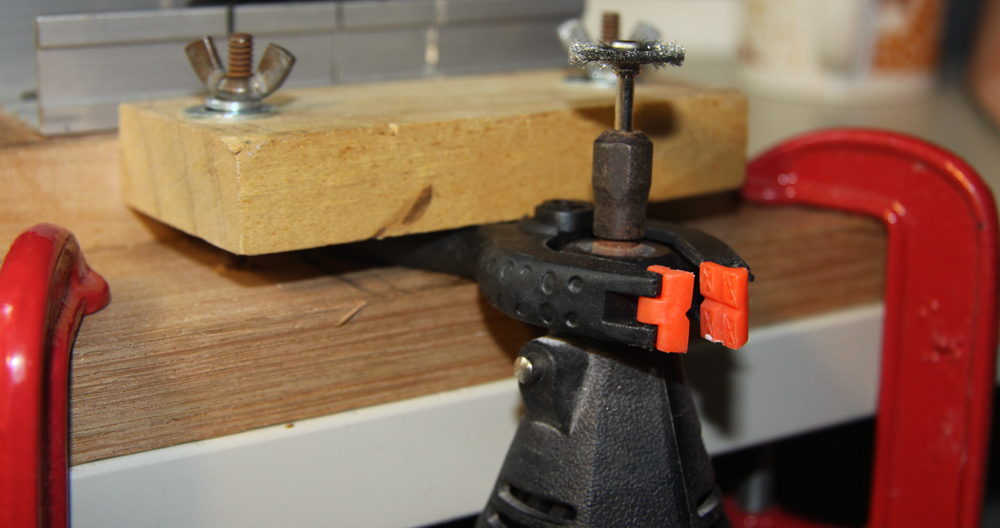
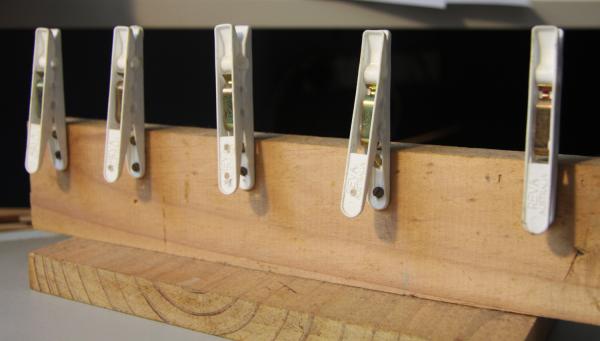
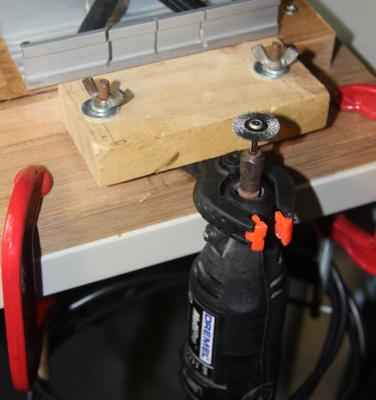
A cheap and cheerful dremel clamp/holder. Pics are self explanatory

- 396 replies
-
- 5
-
-
- Idea
- Bright Idea
- (and 1 more)
-
Casting epoxies from Smooth-on
hornet replied to src's topic in Modeling tools and Workshop Equipment
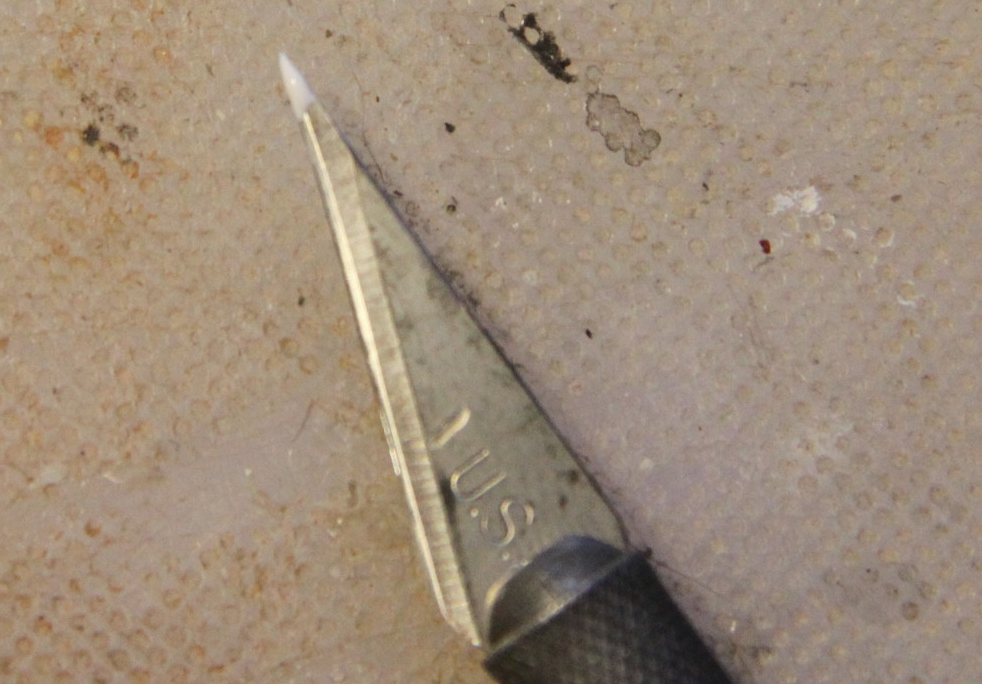
After considering this observation, I attempted to make the two part epoxy more cloudy. Firstly I mixed a small amount of acrylic paint to a 1 1/2 centimetre puddle of epoxy. On the first picture I used about twice the amount as on the hobby knife below. It came out quite opaque. The second picture I used about the same as on the hobby knife. The acrylic mixed OK but I think it was a little grainy (visible on the second picture only.) Only a small amount of paint was used I then tried mixing enamel paint with the epoxy. I used about the same amount as with the acrylic. It mixed in much easier. The pic below sort of shows the result but it was difficult to get a clear shot. The epoxy is still transparent but slightly milky/cloudy.

-
Casting epoxies from Smooth-on
hornet replied to src's topic in Modeling tools and Workshop Equipment
Thanks for the tip twintrow. I suppose tulle could be stretched between the cling wrap and the window frame then the epoxy could be poured thinly over the top. I'll have to give it a go!! -
Casting epoxies from Smooth-on
hornet replied to src's topic in Modeling tools and Workshop Equipment
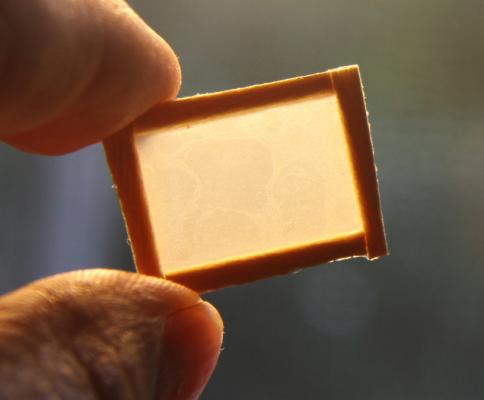
Hi Banyan. There were minute bubbles when I first mixed the epoxy. I have had a lot of experience with the stuff having built many, many custom fishing rods. Often letting the mix settle for a minute or two allows the bubbles to dissipate. You can also blow on the mix which helps, or use a blow drier on a warm setting to get rid of them. I have found that if you 'fold' the part A & B mix together gently rather than stirring furiously, you get less bubbles. As to creating a more cloudy appearance in the glass, you could experiment with food colouring as I did - maybe a very small amount of black. I had a puddle of leftover epoxy about as big as a 5 cent piece (about 1cm or 1/2 inch for Non-Aussies) I used only enough food colouring to fit on the end of a couple of pins to get the yellow colouring that you can see on the epoxy blob on the bottom right corner (almost under the hobby knife) of the 4th picture in the post. The erskine epoxy is about $16 for the two 30ml bottles so you have plenty to experiment with. -
Casting epoxies from Smooth-on
hornet replied to src's topic in Modeling tools and Workshop Equipment
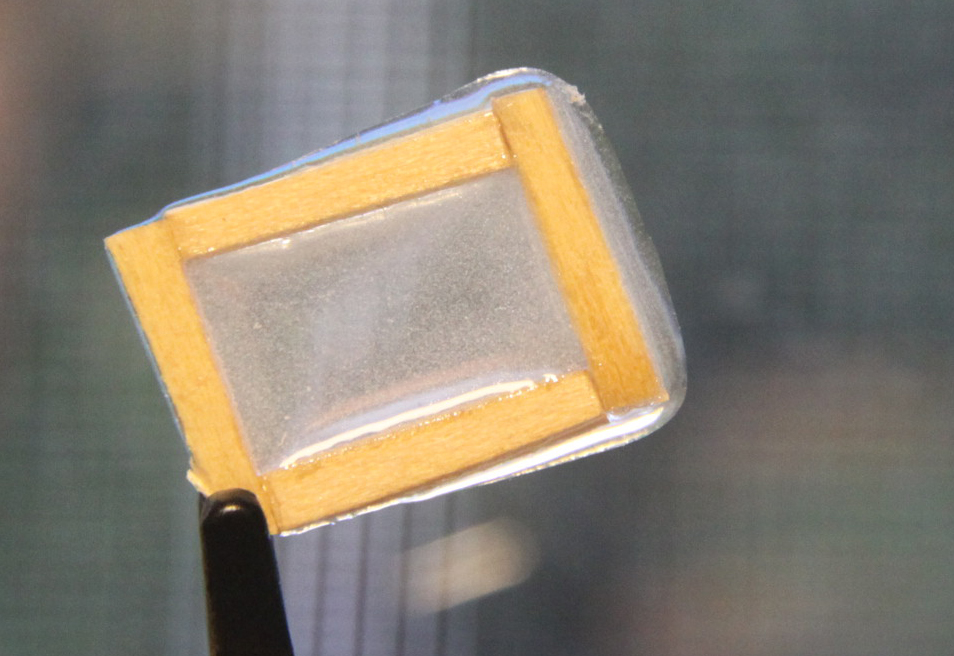
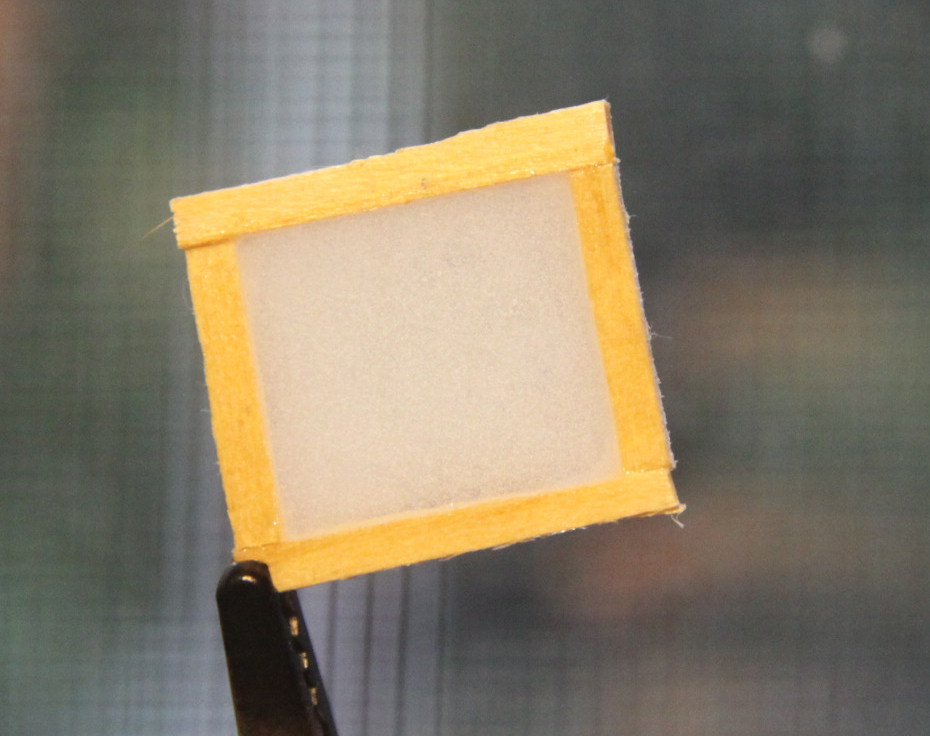
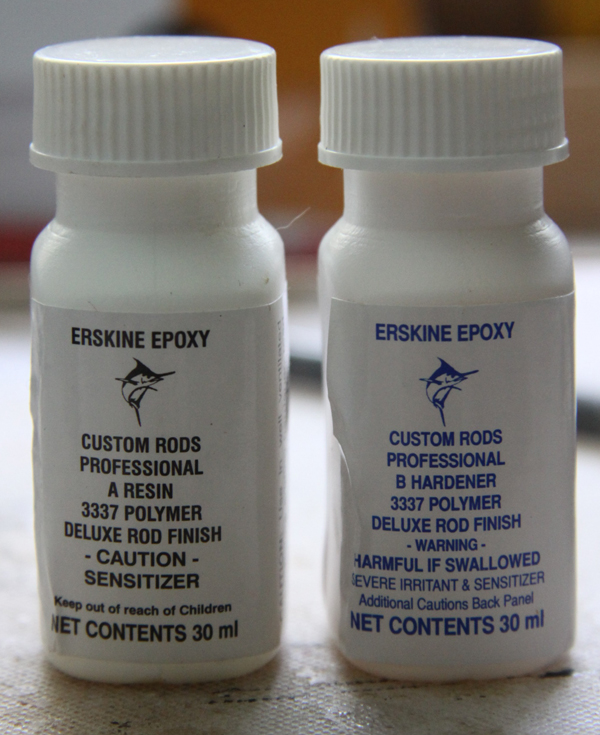
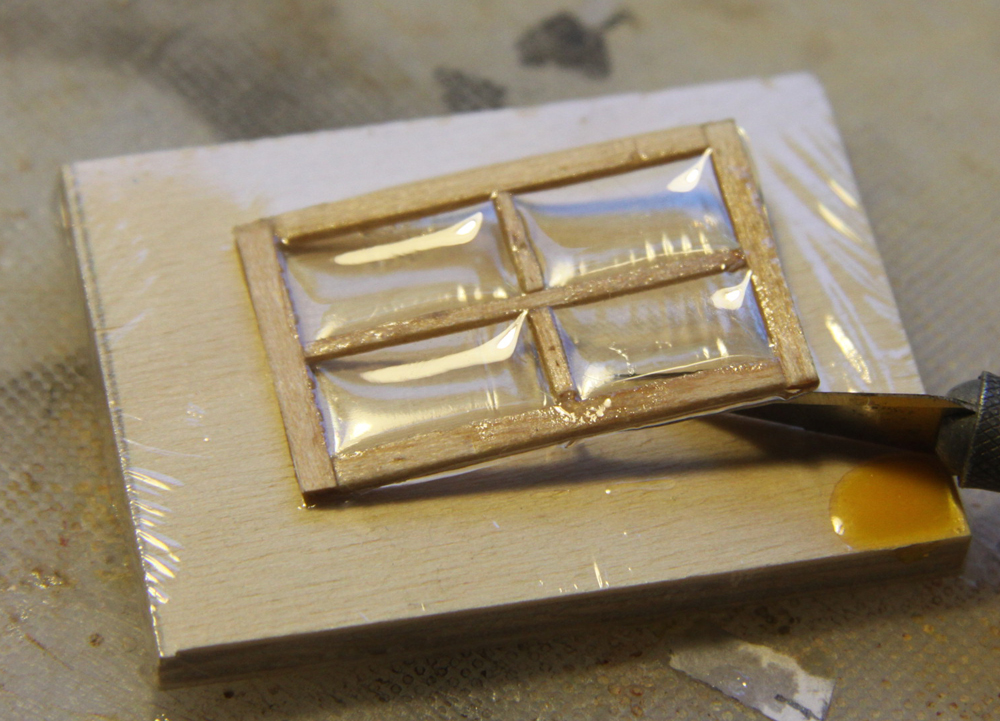
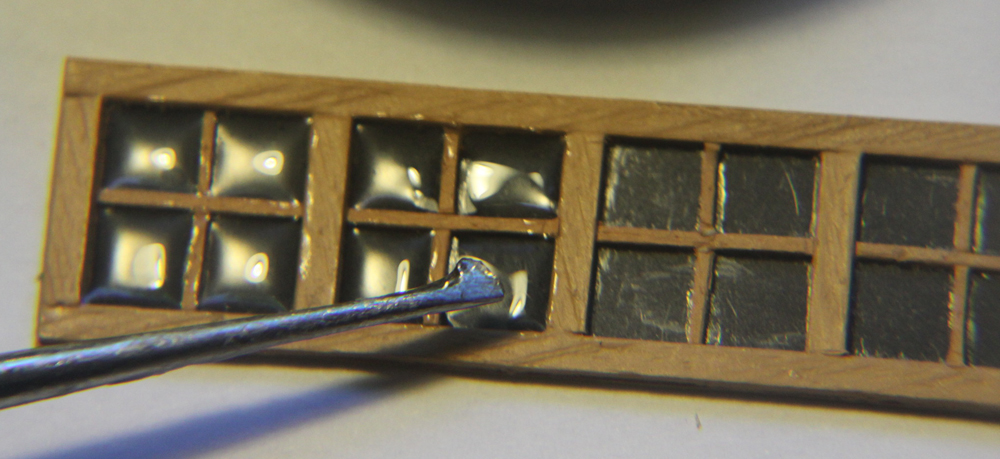
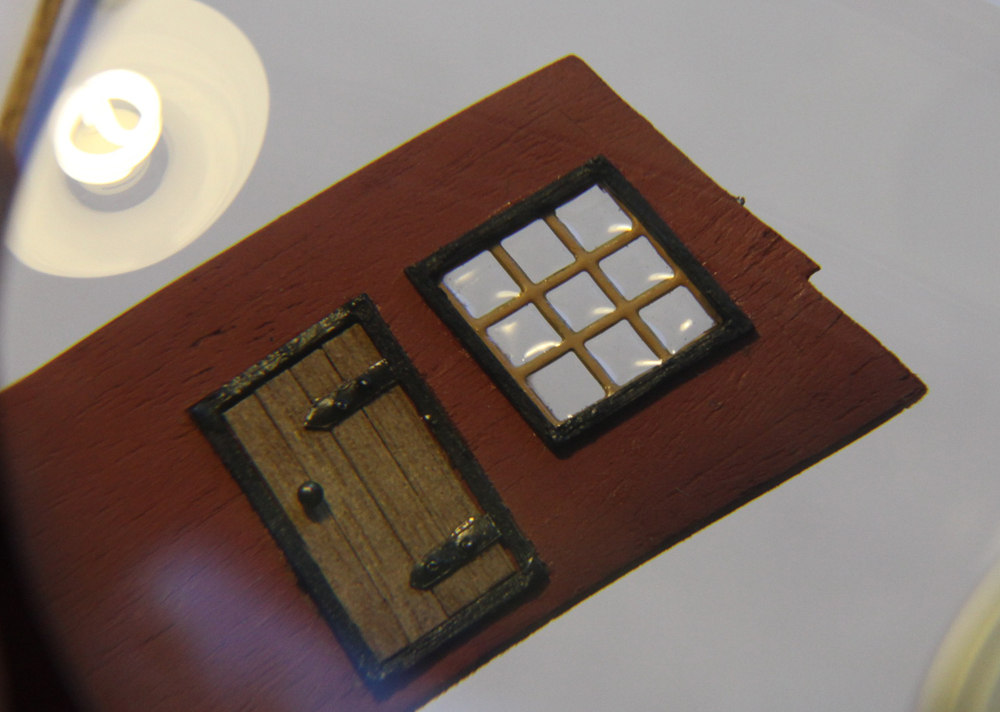
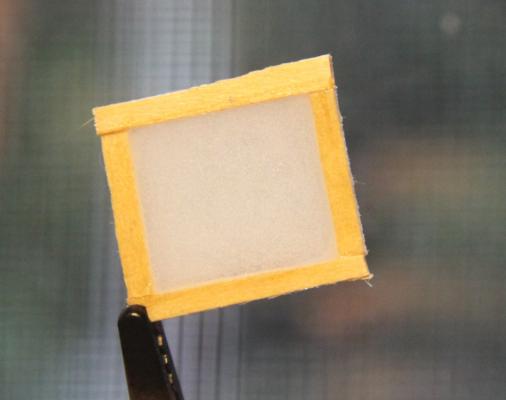
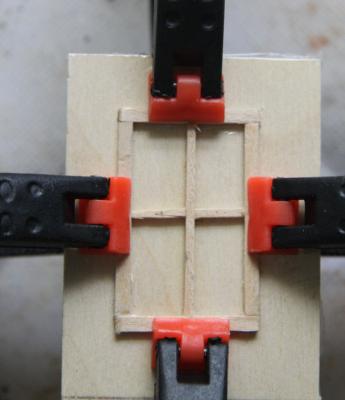
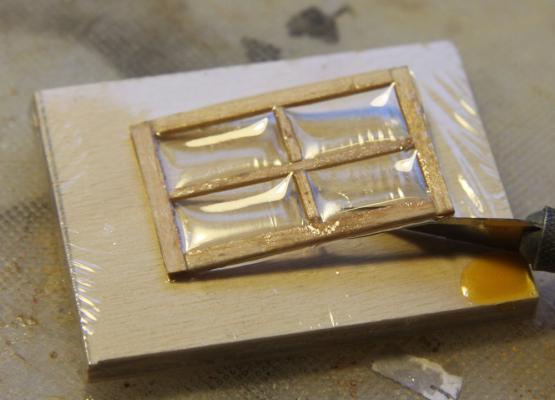
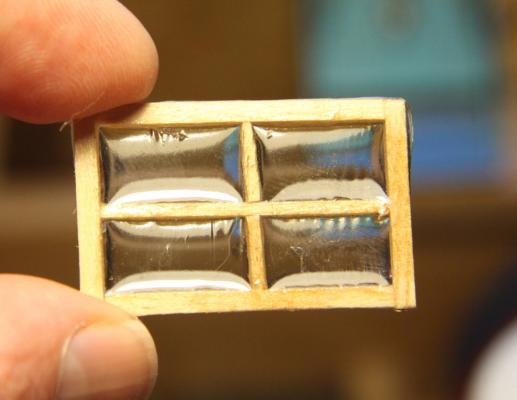
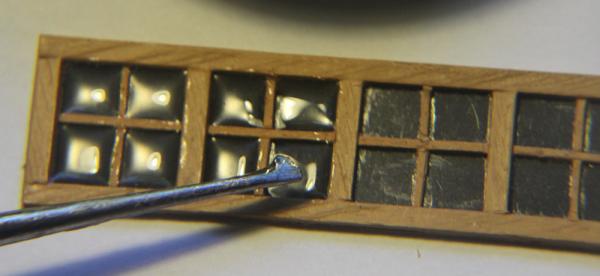
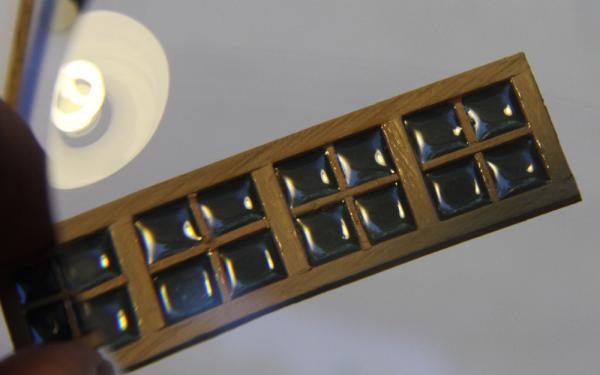
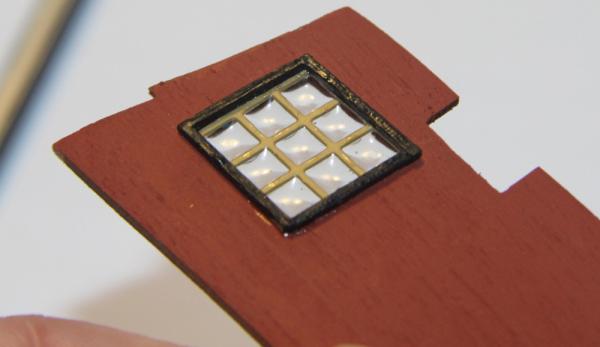
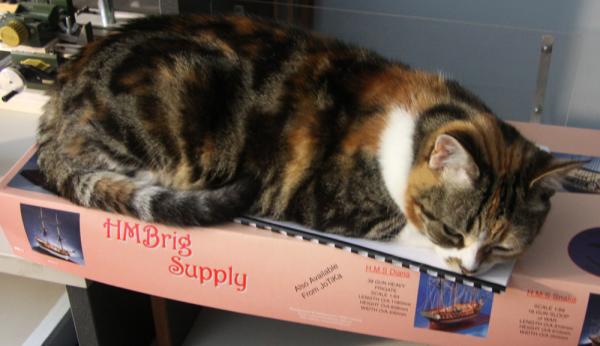
In a previous post on this thread I suggested that the two part epoxy that is used to provide a flexible, crystal clear coat to the whipping/bindings on fishing rod guides/runners might be used to create `glass' for ship windows. I decided to experiment with the idea. The epoxy I used was Erskine Epoxy. I think it is an Australian product but I am sure similar products are available overseas. The epoxy can be purchased from most fishing tackle stores (my second home!!) I use syringes so as to get a precise (50/50) mix of Part A & B of the epoxy. I made a `window frame' out of scrap material for the experiment. It was mounted onto a board that had been covered with cling wrap. I hoped that the cling wrap would not stick to the hardened epoxy and that the window frame with its `windows' would come away easily. The window frame was clamped to the board covered with cling wrap to prevent epoxy seeping under the sides. I applied the epoxy mix to the window frame using my `squadron' CA glue applicator. After leaving overnight to harden, I removed the window from the cling wrap. Happily it came away very easily. The result of the experiment is shown below. Having succeeded with the experiment, I decided to apply the epoxy to windows and stern lights that are soon to be fitted to my current build, HMS Supply. I had already used clear plastic backed by black card on the stern lights of the supply so I applied the epoxy directly over the plastic. It worked well, giving a more 3D look to the windows. Because this epoxy is used on fishing rods, it is flexible and will bend and twist without cracking. Another advantage of using it. The first picture (above) shows the job half done and the second one is complete. I think that the epoxy finish looks far better than the `flat' finish visible in the windows not epoxied in the first picture. I had not as yet put clear plastic behind the ship's other windows but did so after seeing the results above. The epoxy was again applied directly over the clear plastic and also produced a more 3D effect for the windows. I had an amount of left over `mixed' epoxy. rather than letting it go to waste, I raided the Admiral's kitchen cupboards and found some food colouring. I added a very, very small amount to the epoxy and was surprised to see that it actually mixed smoothly and evenly with the epoxy. It also dried hard and flexible. I have no need for `stained glass' in this build but will keep this in mind for the future. I hope the results of my experiment are helpful to others. I would also like to thank `Neek" the ship's cat for her valuable input in this experiment!!


-
Casting epoxies from Smooth-on
hornet replied to src's topic in Modeling tools and Workshop Equipment
I use a two part epoxy to give a crystal clear protective coat to the whippings (bindings) on fishing rod guides (runners) that I custom build. I see no reason why it would not also work for this application. Sometimes it gets tiny bubbles in it after application, but these are easily removed by blowing with a hair dryer on a warm setting. It is available in a variety of brands at most fishing tackle shops. -
Birchwood Casey Brass Black Metal Finish works well. It is available on EBay. See my post in the thread below for more info and pictures. http://modelshipworld.com/index.php/topic/4815-painting-and-blackening/
-
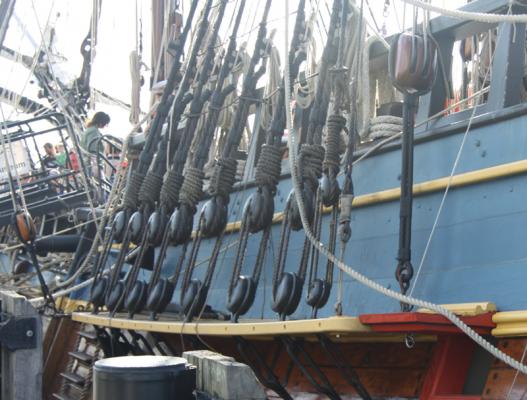
Belaying pins vs. shroud cleats - moved by moderator
hornet replied to timboat's topic in Masting, rigging and sails
do these pics help at all? Taken aboard the Endeavour replica.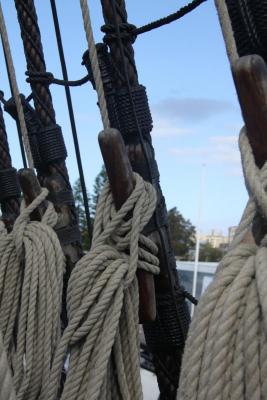


-
Christmas tool and equipment list
hornet replied to schnu's topic in Modeling tools and Workshop Equipment
I wish that Jim Byrnes would be made an honorary Santa's Elf and would open a workshop in Australia! -
Help! Jokita HMS Supply
hornet replied to mick868's topic in Building, Framing, Planking and plating a ships hull and deck
In reality you may be correct Mick. I am no expert on the history or the plating of ships in the 'real world.' This is only the second ship I have coppered and I have looked at a lot of models on this site for guidance and watched the 'Modellers Shipyard' DVD guide to coppering a hull. They all seem to be coppered in a similar fashion. Thanks for the information though, I will do some research. It wouldn't be hard to remove the plates and replace them with something else if necessary. I haven't built the rudder yet either. If anyone else out there could shed some light on this issue in relation to modelling, I'd appreciate the input!! -
Help! Jokita HMS Supply
hornet replied to mick868's topic in Building, Framing, Planking and plating a ships hull and deck
Hi Mick As to coppering of the hull. I original tossed up between buying the Caldercraft Supply and the Modeller's Shipyard version (see link below) The modellers Shipyard version is coppered but was a lot more expensive. While in communication with modellers Shipyard, I was told that Supply was indeed coppered. If you check out the history of coppering hulls of Royal Navy you will see that the process begun in 1779. Wikipedia states " all ships up to and including 44 gun ships were ordered to be coppered when next in dry dock" By 1786 the entire fleet was apparently sheathed. The Supply remained in service to the Royal Navy until 1791 and was the used as a coal carrier until 1806. One would have to assume therefore that she was coppered at some stage in her long career. I presume that Caldercraft did not include copper plates to keep costs of the kit down. I actually pinched the copper plates from my Caldercraft HMS Bounty kit (next in line to be built) and in the same scale. I ordered some more for her from Cornwall Model Boats. They supplied and are delivering the plates for less than half the price that I can get them in Australia - Go Figure??? http://www.modelshipyard.com.au/ship-models/modellers-shipyard/hms-supply-first-fleet-1788/ -
Help! Jokita HMS Supply
hornet replied to mick868's topic in Building, Framing, Planking and plating a ships hull and deck
Hi again Mick868 Further good pics of the Supply can be found at the address below. It is in a slightly different configuration but the pics are fairly high resolution and are worth a look. Picture Number 6 is a stern view of the model and may also help you with your build. Hope this helps http://www.powerhousemuseum.com/collection/database/?irn=238338&img=182799 -
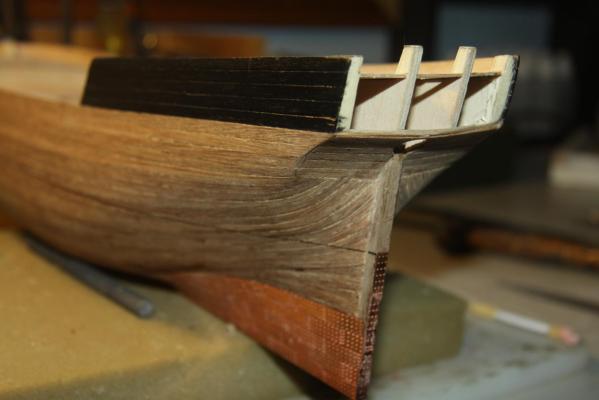
Help! Jokita HMS Supply
hornet replied to mick868's topic in Building, Framing, Planking and plating a ships hull and deck
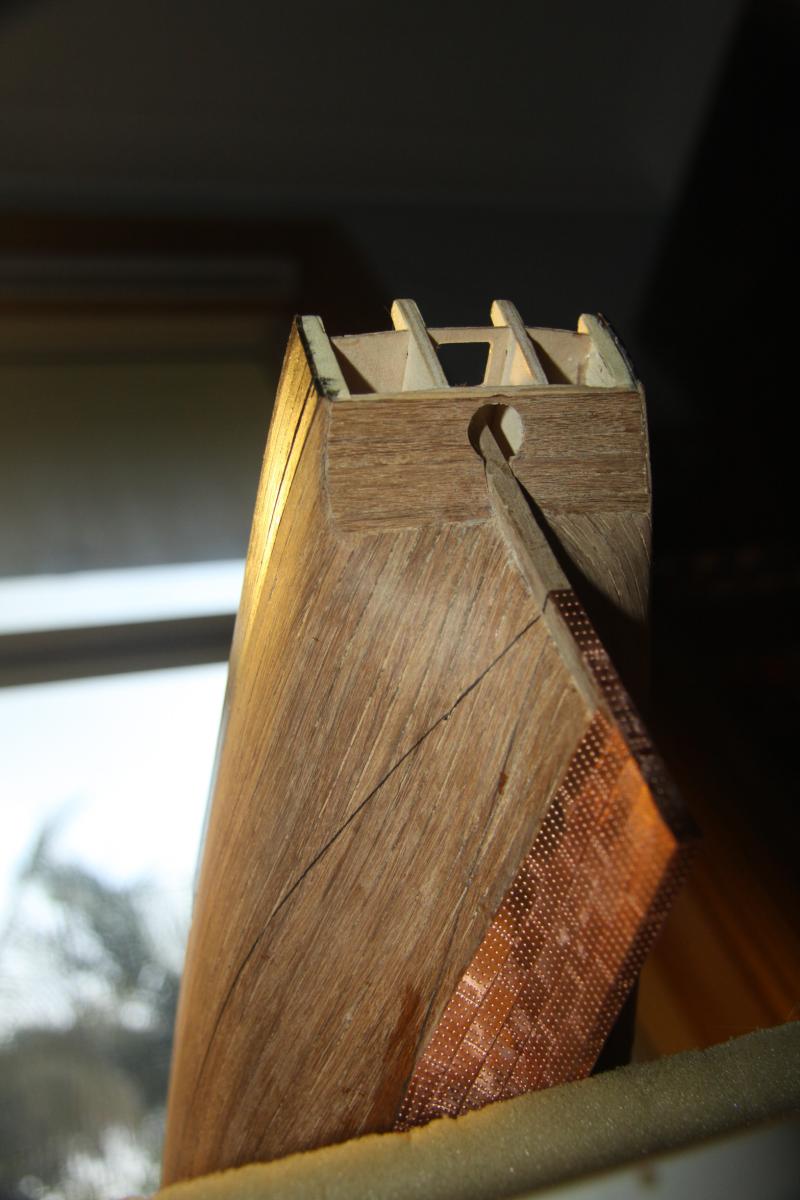
I am a little ahead of you on the Caldercraft Supply. Just installing copper plating. Hope these pics of the stern section are of help. I did not use the stern counter pattern supplied (part 73) I used the supplied one as a template and then cut one out of thinner basswood and planked it. Cheers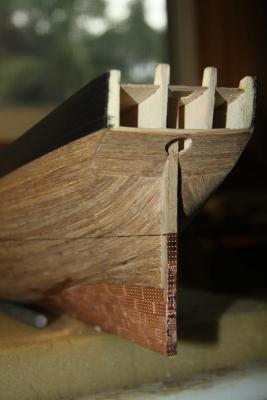

-
Treenails
hornet replied to wallyh's topic in Planking Techniques's Click Here for Topics dedicated to planking!!!!
I don't sand the deck beforehand. After fitting a treenail, I use a pair of small cutters that I keep very sharp with a diamond sharpening stone ( so as not to crush the bamboo treenails). I can cut the treenails practically flush to the deck with this cutter. I then sand the deck and treenails with very fine grit sandpaper - try not to over sand as deck planks are often very thin. I have recently bought a proxxon pen sander which I will use to get into tight corners of the deck of my current build - the 'Supply' - when I reach the deck planking/ tree nailing stage of the build.