Bob Blarney
-
Posts
467 -
Joined
-
Last visited
Content Type
Profiles
Forums
Gallery
Events
Everything posted by Bob Blarney
-
Jay, thanks, the treadmill motor works fine. I just scavenged the entire electronics including the MC45 controller board and the user control console, and then also added a dpdt reversing switch. It turned out conveniently that the motor's flywheel-pulley used poly-vee "J" belts that matched the pulleys on the lathe. (the belt was bought from beltsforanything.com). My only issue is that at very slow speeds (125-250 rpm), it tends to bog down under load, and then overshoot the rpm. I suppose that it has something to do with the soft-start and the speed modulation algorithm, and maybe also the 1:2 ratio of the pulley diameters. But all-in-all, I'm very happy with the setup because it's largely eliminated moving the belt across the cone pulleys, except for special circumstances,
-
Klingspor is good source for abrasives, and a 'bargain box' off odds & sods might be a very good deal for modelmakers, and they have a selection of products of interest to modelbuilders: http://www.woodworkingshop.com/product/bb00010/ http://www.woodworkingshop.com/category.aspx?id=52
-
Without turning this into an electronics discussion, how does the PWM method differ from other speed control methods with respect to maintaining torque? I'm curious, in part because I just repurposed a 2HP/5000RPM treadmill motor to power my 10x42 wood lathe.
-
That's an interesting machine and he did nice job of building it. But one thing to keep in mind for sanding is the surface speed of the paper, which is pi x diameter x rpm. When it's too fast, the sandpaper is not effective, or it wears out quickly due to the heat. For sanding a 1-3" wooden object on my lathe, I set the speed around 250-750 rpm, depending upon the wood species. The machine might be improved by adding a variable speed control.
-
Guitar repair tools
Bob Blarney replied to Ulises Victoria's topic in Modeling tools and Workshop Equipment
i occasionally buy guitar supplies from Stewart McDonald, but more often from Luthiers Mercantile International, Inc www.lmii.com You might find their tools for binding interesting, especially the ones for inlays, and dimensioning small strips of wood and plastic.- 1 reply
-
- 3
-

-
Wood filler recommendations?
Bob Blarney replied to a topic in Modeling tools and Workshop Equipment
Here's a tutorial by a respected luthier repairman: http://www.frets.com/FretsPages/Luthier/Technique/Structural/SpruceHole/sprucehole.html -
Wood filler recommendations?
Bob Blarney replied to a topic in Modeling tools and Workshop Equipment
Filling an area so that it won't show is an art that I've never quite mastered. That said, I would fill the defect in layers, using sawdust of the same wood species mixed with hide glue. Of all glues, Hide glue accepts stains & varnishes better than any other glue. People who repair guitars, violins, and other instruments occasionally select a sliver of wood that very closely matches the color and grain lines, and then they make a carefully controlled cut with a >new< scalpel or razor blade to obtain a smooth gluing surface. Then they lay the patch in with hide glue (use the tip of a #11 scalpel blade to apply the patch), wait 24 or more hours, and then sand or scrape the patch flat with a cabinet scraper or flexible >new< razor blade. When done carefully, the results are often amazing. Try these techniques on a bit of scrap, obviously. It may possibly make a difference if you use sawdust that was sanded from the endgrain vs the long grain, so you might experiment with both to see if there is a discernable difference. -
Shop Made Dremel Drill Press- Not my idea
Bob Blarney replied to Mike40's topic in Modeling tools and Workshop Equipment
That's a useful idea, particularly if your can lock the drillpress quill at a desired height/depth. But I would use solid wood such as maple, instead of plywood. -
What is your preferred work height?
Bob Blarney replied to Nirvana's topic in Modeling tools and Workshop Equipment
Hah! Ask a tall or short first or second assistant about the ergonomics of the operating field. An extended procedure spent holding a retractor without being able to see what's going in the field can get somewhat uncomfortable. Hmm, another thread might suggest surgical instruments that are useful for modeling work... let's start with curved Halsted mosquitoes, a 6" right angle, 6-7" crile-woods needleholder, mayo scissors, iris scissors, and Brown Adson forceps, and maybe some ligature hooks. -
What is your preferred work height?
Bob Blarney replied to Nirvana's topic in Modeling tools and Workshop Equipment
A surgeon usually works at about elbow height and everybody else adjusts to that level. I like to do fine work at a little higher level, somewhere between elbow and armpit height. My daughter who is a glass artist, has vertically adjustable forearm rests for intricate work, and places her forearms on them about mid-way between elbow and wrist. A couple of other minor tips. To do fine work between thumbs and forefingers (such as threading a needle), sometimes it's helpful to touch the pinky and ring fingers of your hands together. And sometimes when careful one-handed work is needed, rest the wrist of your dominant hand upon the wrist of the other hand, or use a maul stick as painters do. -
Inexpensive powered rope walker
Bob Blarney replied to hornet's topic in Modeling tools and Workshop Equipment
That's ingenious. -
I've used UV glues for assembly of biomedical devices. An advantage is that they don't cure quickly (if at all) until they are exposed to UV light, and this allows for a leisurely assembly process. But a disadvantage is that >most< won't cure in any area of the workpiece where light can't penetrate. I say >most< because some UV glues can also be cured by heat, and this means that initial surface bonding can be achieved with the UV light and then the piece is placed in an oven to complete the cure. Another consideration is that it doesn't bond well to some materials, and so, as is always prudent, one should test on scrap material first. Finally, remember that there is a big intense UV light high in the sky, and so if your puny little handheld UV light is insufficient to the do the job, then assemble your items on a tray, and then carry the tray to the window or outdoors. You can also use a magnifying glass, judiciously. Oh, and one last point - be mindful of the potential danger of intense UV light. All UV light wavelengths damage tissue, so use shielding whenever possible, particularly for your eyes.
-
Tools and techniques used in the 18th Century
Bob Blarney replied to tkay11's topic in Modeling tools and Workshop Equipment
This looks very interesting Anatomy of an Admiralty Model by Robert Bruckshaw There are several sites for this valuable publication as a free download PDF. Here is one: http://www.woodenboats.lt/Knygos%20public/Modeliavimas/Anatomy%20of%20admiral%20model.pdf -
I've been using the new 3M Pro Grade Precision Ultra Flexible Sanding Sheets, that have shiny rubbery plastic backing, and I like them.
-
I often use psa sandpaper on chisels or flexible rulers, and also on square x-section steel bar in 1/8, 1/4, 3/8, and 1/2 inch by 6-12 inch lengths. For files, I visit a jeweler's supply.
-
Little Machine Shop 2" Quick Vise Review
Bob Blarney replied to jhearl's topic in Modeling tools and Workshop Equipment
just a footnote - the cosmoline is easily cleaned off with most any solvent, naptha, mineral spiriits, lacquer thinner etc, but I bet that automotive brake cleaner in a spray can might be very effective too, and maybe without the need for complete disassembly.. -
There is one thing about 'wobble' blades -- they produce a square bottom at only one width. At other width it will be concave or convex. Perhaps you might mount two blades on the arbor, with spacer washers in between. Chisel out the waste in between, or mill it out with a single blade in the saw. If the saw is underpowered, go easy with several cuts. There is also a gadget called a Kerfmaker by Bridge City Toolworks -- there are vids about homemade ones. Also, look at the 'Jointmaker Pro' saw. The tools are exquisite, and the prices heavenly. https://www. bridgecitytools.com
-
Glue efficiency (most useless topic ever!)
Bob Blarney replied to Robin Lous's topic in Modeling tools and Workshop Equipment
HIde glue is the superglue for woodworking. i use for guitarbuilding. Another advantage of hide glue is that it does not interfere with finishes, and repairs/regluing is not difficult. Avoid Franklin Liquid Hide Glue. Old Brown glue is acceptable, but I usually use hot hide glue at 145F, and preheat the well-fitted parts. -
Tools and techniques used in the 18th Century
Bob Blarney replied to tkay11's topic in Modeling tools and Workshop Equipment
Maybe this collection of essays will be of interest: https://books.google.com/books?id=j-_w-pimp1AC&lpg=PP1&dq=ISBN%20%3A%209780879351618&pg=PP1#v=onepage&q&f=true -
Glue efficiency (most useless topic ever!)
Bob Blarney replied to Robin Lous's topic in Modeling tools and Workshop Equipment
Cellulose nitrate / nitrocellulose is known as collodion in the medical world. It is also used to finish musical instruments. A solvent is ether, which is not a good thing to have inside the house. It is heavier than air and extremely volatile and a spark or flame cag ignite an explosion. You may find ether as 'starting fluid' for gasoline engines. -
Glue efficiency (most useless topic ever!)
Bob Blarney replied to Robin Lous's topic in Modeling tools and Workshop Equipment
Hmm, the glue contains solids and a vehicle, and the vehicle carries the solids and evaporates, leaving the solids to congeal or react. If you want to put glue exactly where you want it and nowhere else, then 1) test fit the parts first, and 2) then figure out a way to hold them position until the glue solidifies. 3)Then place a small dot of glue on a card, and use a needle or toothpick to pick up a droplet and apply it to the parts. Don't use the applicator of the tube. if you use a lot of CA glue, you can draw it up in polypropylene transfer pipettes with fine tips and invert them. They keep for a long time uncapped, or you can crimp the ends. Incidentally, many yellow or white PVA glues can be released with alcohol and/or heat. CA eventually degrades in water (but that's not practical here), but acetone will loosen it. Most epoxies melt at about 250F, but some much at higher temps (e.g. grey J-B Weld). Silicone RTV glues (e.g. aquarium cement) can withstand heat up to about 500F. Polyurethane glues are essentially permanent and must be mechanically removed.
-
Try making a plate from model plywood from Midwest Products. The 1/8" plywood is surprisingly strong.
-
Mike, it sounds like either machine would suit your needs.
-
Umm, which sander?
-
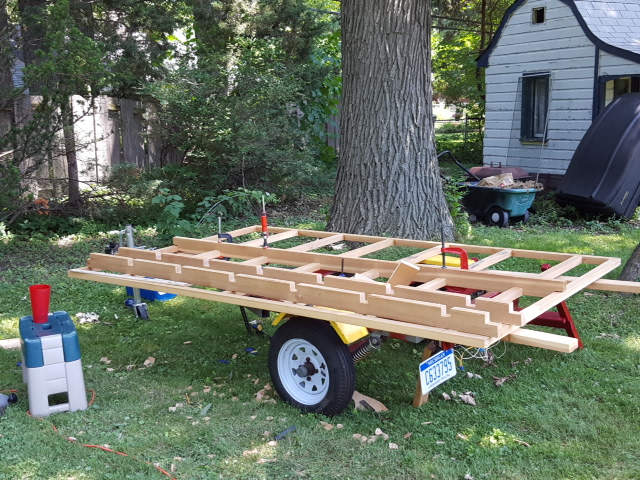
Most of my interest has been in building guitars, and shipmodeling is something I'll get around to, probably this coming winter. At the moment, mostly I'm working on building a small foam/canvas camping trailer (tnttt.com), which is turning into a timesink. I have a full armory of sanding (and other hand, portable and stationary power tools) with the exception of inflatable drums, but the Rigid is probably the one I use the most, along with a disc sander, for shaping parts for guitars such as necks, braces and all those other non-linear/planar surfaces of guitars. You might have a look at tools that luthiers use to make small parts, in particular a Robo-sander. Go to stewmac.com or lmii.com and have a look around. Here's a pic of the ship/timber-framed deck for the trailer. It's cedar, with mortise & tenon and notched half-lap joints. the spaces within the grid have been filled with polystyrene foam house insulation wit gorilla glue, which makes a very lightweight but strong structure. No metal fasteners are necessary except those needed to attach it to the steel trailer chassis: