Bob Blarney
-
Posts
467 -
Joined
-
Last visited
Content Type
Profiles
Forums
Gallery
Events
Everything posted by Bob Blarney
-
Gaetan, i tested the link above to the Rigid website, and it worked perfectly, but I'll post it agains below. For spindle sanding, the belt sander is removed and placed in a storage socket on the rear of the machine. This exposes the 1/2" steel shaftm and yes, a 1/2" abrasive sleeve is mounted directly on the steel shaft w/o a rubber drum. For 3/4-2" sanding, there are rubber drums provided that mount on the steel shaft. There are also corresponding rings that fit into the table for each size of sleeve. No tools are needed for changeovers; only if you overtighten the knob then a tool will be needed. Here is a link to the tool's page on the Rigid website, where you can find links to the comprehensive owners manual and parts list. https://www.ridgid.com/us/en/oscillating-edge-belt-spindle-sander
-
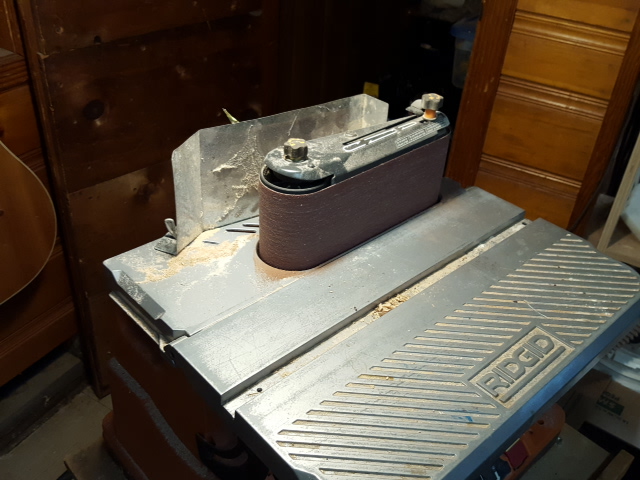
Not so: The Rigid machine has 1/2, 3/4, 1, 1-1/2, & 2 inch sizes for the spindle sanding capabilities. The larger (left) end of the beltsanding device provides for the 3 inch capability. Here you can see the sheetmetal dust shield/director that I added. One end is held by a winged thumbscrew {1/4-20 thread} placed into the hole provided for the standard material stop, and the other end is attached to the back of the table with a self-tapping sheetmetal screw driven into a hole drilled through the edge of the aluminum top. Really, in my opinion, this machine provides the most optimal performance:price:service ratio of any sanding machine that a hobbyist or small shop owner could find or desire.
-
The Rigid machine has a spacious top that can be fitted with jigs and fixtures for precision sanding. The dust collection can be improved by making a sheetmetal or PVC shield around/behind the spindle or belt. The machine is not heavy and so it can be moved and stored without much effort. The bottom of the machine is formed so that it can be set up on sawhorses or bolted to a bench. And a good source for the abrasives is Klingspor.com
-
I've looked at it and it's ok for what it is. But if your budget can bear it and you have the space, i think you should consider this tool instead. It can do what the Woodcraft machine does, and significantly more. A reasonable price is about $200-235, and you might find a secondhand one (e.g. on Craigslist) for less: https://www.ridgid.com/us/en/oscillating-edge-belt-spindle-sander
-
Laser Cutters - A caution
Bob Blarney replied to mtaylor's topic in Modeling tools and Workshop Equipment
A word to the wise is sufficient. -
Source for belts for Dentist Drill
Bob Blarney replied to thibaultron's topic in Modeling tools and Workshop Equipment
Beltsforanything.com Good, prompt service, reasonable prices. -
Given that I have not seen or used this Proxxon lathe, I am unimpressed and think it is a waste of money. i would never buyone. I have a Sherline 4000 for finer work (relatively expensive accessories), and a Delta 46-250 midi-lathe for woodwork. Try AnthonyUK's advice first about handwork, or go look for a secondhand cast iron and machined steel midi-lathe, or pen-turner's lathe, such as made by Jet, Delta, Grizzly, Penn State or even a chinese Harbor Freight lathe. in the long run, you should consider not only the cost of the lathe, but also the accessories such as a steadyrest, chucks, live and deadcenters, toolrests, chisels, etc. just my opinion. if you want to see some delicate lathe work, then look up Cindy Drozda.
-
A vise similar to this one might be suitable. I found one in a local homecenter for $15. https://www.google.com/search?q=Hobbico+-+Multi-Angle+Hobby+Vise+-+HCAR0680&rlz=1CASMAE_enUS553US554&oq=Hobbico+-+Multi-Angle+Hobby+Vise+-+HCAR0680&aqs=chrome..69i57&sourceid=chrome&ie=UTF-8#q=Hobbico+-+Multi-Angle+Hobby+Vise+-+HCAR0680&tbm=shop I posted a link to this tabletop workbench a few weeks ago. Note that it has a vise, and other clamping fixtures, and mounts for a small anvil and rotary tool. https://books.google.com/books?id=UyYDAAAAMBAJ&lpg=PP1&pg=PA158#v=onepage&q&f=false I've intended to make this for my daughter (an aspiring jeweler), and i guess i should get to it. Instead of a clamping block on the bottom as shown in the plans (for clamping it in big workbench vise), I will pad underside with cork and then use 'L'-bolts to clamp it to a dining room table. The clamps will be similar to those used on an architect's lamp. https://books.google.com/books?id=UyYDAAAAMBAJ&lpg=PP1&pg=PA158#v=onepage&q&f=false
-
and a No-Wobble workbench with some means to hold the workpiece, such as a heavy desk or table with a vise or benchstop. Don't use your shirt-tail as a workbench.
-
Help in Identifying an Unknown Tool
Bob Blarney replied to BANYAN's topic in Modeling tools and Workshop Equipment
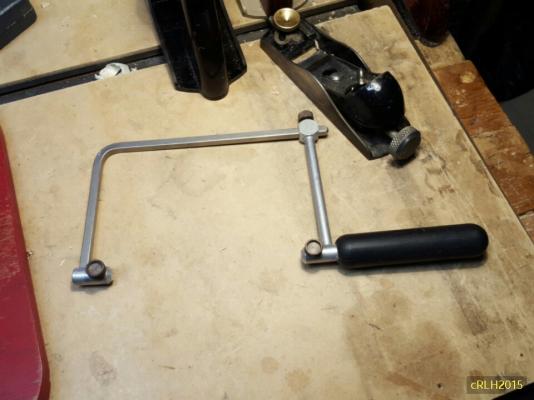
For information about how it is used, just look at Paul Seller's current video about making cam clamps such as luthiers use. -
Calipers. I believe that the crossbar was used to fix the jaws after application to the unknown material, and then the opening was fitted to a set of feeler gauges, such as for automotive work (ignition contact points). A much larger instrument of this sort is still used by woodturners, and for use with a planer.
-
Sand/Cut a Corner Edge
Bob Blarney replied to mikiek's topic in Modeling tools and Workshop Equipment
I think that a hand plane would be the best choice -- a 60-1/2 is an excellent choice for all-around work, or a 102/103. It would be used with a shooting board and block on the plane to hold it at the desired angle.. By the way, look at these miniature beauties from Lee Valley (under the Small Planes category) ; they would probably be excellent: http://www.leevalley.com/us/Wood/page.aspx?p=70138&cat=1,41182 http://www.leevalley.com/us/Wood/page.aspx?cat=1&p=41182 -
Help in Identifying an Unknown Tool
Bob Blarney replied to BANYAN's topic in Modeling tools and Workshop Equipment
By the way, if the planes need some TLC, then go look at the videos by Paul Sellers. -
Tools and Supplies for My "Shipyard"
Bob Blarney replied to daveward's topic in Modeling tools and Workshop Equipment
I've thought of one thing that you could buy, but maybe you should build instead. It's a combination bench hook and mitering board, for sawing and sanding pieces to fit. I'll see if I can cobble up an example for you to look at. As for Dremel moto-tools, I've never been a fan of them, but you might do better One piece of advice --- when using them for routing: Never cut deeper than 1/2 the diameter of the bit on a single pass. Hmm, did I see a post that mentioned digital vernier calipers? They're essential, and not at all expensive at ~$15. A digital protractor/bevel is useful too. -
Tools and Supplies for My "Shipyard"
Bob Blarney replied to daveward's topic in Modeling tools and Workshop Equipment
You might find some good quality tools at sites/business that cater to the jewelry-making crowd. Many of them have reasonable prices. -
Tools and Supplies for My "Shipyard"
Bob Blarney replied to daveward's topic in Modeling tools and Workshop Equipment
It seems most things have been covered. Here's my little bits of advice: 1. A workbench - essential equipment! Here's a thread that I posted before which might be good if you're cramped for space: http://modelshipworld.com/index.php/topic/12394-shipmodelers-workbench-ps-jan61-and-a-source-for-fine-tools/ 2, Zona 37-434 square and zona 37-433 triangle http://www.hobbylinc.com/htm/zon/zon37-434.htm 3. plastic toothpicks, one end pointed and other 'feathered' - excellent for applying glue 4. A workboard/box for the model that can be put away on a shelf if necessary. 5. A very fine tooth Japanese saw . Harbor Freight sold a very good one japanese-made Topman brand before, but now it's just a low-grade chinese knock-off. I like this: http://www.vaughanmfg.com/shopping/Products/13-Saw-With-Extra-Fine-Blade--21-TPI__BS180S.aspx -
what is the ideal modelling table?
Bob Blarney replied to AON's topic in Modeling tools and Workshop Equipment
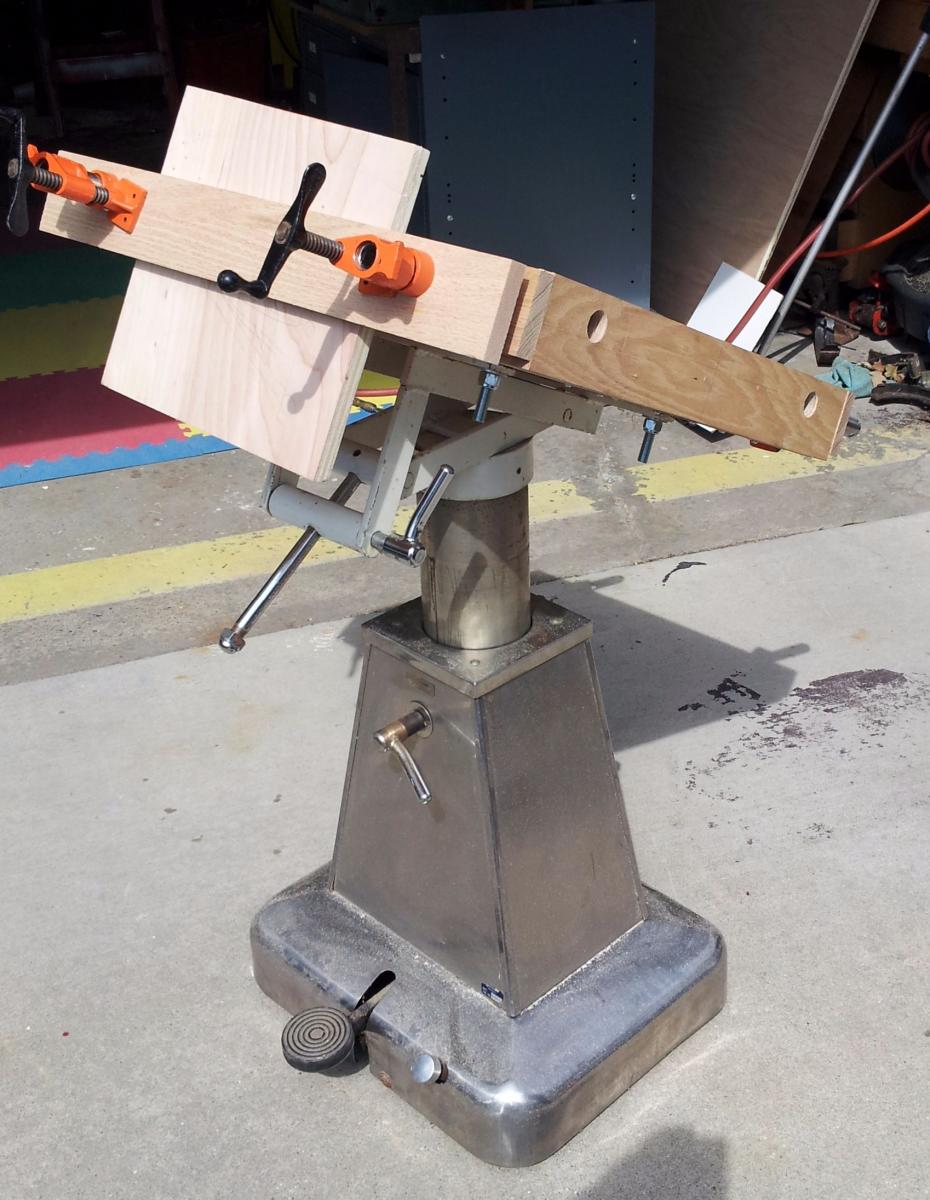
I would separate the tool rack & storage from the assembly table. This pic is just for ideas, for holding and working on a (big) model. It was built upon the scavenged base of a veterinary operating table. It rotates 360d, tilts 0-85d, and elevates from ~22>36". It can lift about 500lbs, due to the long-ram hydraulic jack in the base. The top is 24"x24". It could be scaled down. The gimbal mechanism is quite clever and not too complex.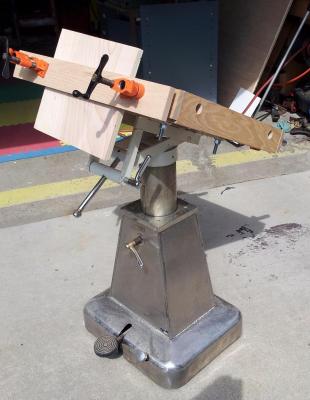
-
I'm partial to this Grobet saw at about $25.
-
Are you gluing wood and/or plastic? Titebond is a trade name for a variety of glue formulation that may not be available in all countries. I've used the common Titebond often for furniture assemblies, but not for building models. I've also used some of the different formulations,such as the 'high tack' formulation to stick ceiling-wall mouldings in place. The high-tack formulation might work for you. I am unfamiliar with a glue called 'butapren', which may be a trade name. It appears to be similar to 'Shoe Goo'. Another glue of this type is Eclectic E6000 craft adhesive which I think is superior to Shoe Goo I'm doubtful as to whether either of these glues are a good choice for wood, because over time the solvents will evaporate and the solutes will shrink and no longer adhere to wood. But if you're gluing plastics together, then it may work (but I doubt that too). All that said, I doubt the sole cause of the 'shifting of parts' is due to the type/choice of glue. It's also about the fitting of the parts and the clamping methods.
-
Titebond will work for you. There are some tricks to learn that might be useful, but you needn't bother with that now By the way, these PVA glues are degraded when they smells sour - of vinegar/acetic acid. But it still may work for non-critical joints. That said, here's what I think about when gluing stuff, although very special glues may require special consideration. I speak here from my experience as a former research scientist in the testing of implantable devices for cardiothoracic and vascular surgery, and as a hobbyist. My knowledge is not at all definitive, but I learned some useful things over the years. The glue to use, is the one which suits several requirements of a particular application: First, do the parts fit together closely, and do the parts have similar rates of thermal expansion and flexibility? Gaps between parts are weak and unsightly, and so joints between materials that are not similar in expansion and flexibility often fail. This is probably not a problem with most static ship models, but it might become so over months and years of changes in environment. 1. Compatibility with materials. A glue may be simply a solidifying layer that engages the surface irregularities between two materials. Most modern wood glues do exactly that - they flow into and grip the pores and grain of the woods. Some glues will dissolve one material, and 'reform' the surface to engage the surface irregularities of the other material (e.g. on guitars, dissolving nitrocellulose binding to engage the wooden edges on a guitar soundboard and sides). Other glues actually dissolve the materials and 'solvent weld' them together (e.g. methylene chloride that is applied to polymethylmethacrylate (Plexiglass/Perspex)). 2, Is the glue compatible with finishes? Synthetic glues often resist paints and varnishes, and so the layer that joins the parts must be very small, so that the finish can 'bridge' the glue joint. Thus, excessive squeeze-out that contaminates surfaces is not desirable. Usually this is avoided by a judicious application of the correct amount of glue, and a quick and thorough wipe-off of the excess squeeze-out 3. Is the glue stable enough to hold the joint? As mentioned above, 'white' PVA glues (e.g. Elmer's), and to some extent Titebond, can 'cold flow' when the joint is stressed. For modelbuilding, I doubt that this is a problem. But I know that Titebond is not a structural glue (e.g. for bonding timbers (here, I mean the American term for the massive wooden parts of a building, not a 4x2). 4. Does use of the glue require safety measures when handling and applying? Titebond and other PVA glues are quite safe, but epoxies are most certainly not. They must be mixed in the correct proportions, and one should avoid any contact with body tissues - always wear gloves. Epoxy components are sensitizers for allergenic responses that may occur upon the first or hundredth exposure, and then permanent sensitization occurs that may become progressively severe. CA glue is somewhat compatible with tissues, and has a use as a surgical glue, but it breaks down upon extended exposure to moisture. Also, the removers of CA glue (e.g. acetone) are not kind to body tissues. Silicone glues (e.g. aquarium cement) have the least reactivity in my experience, but they often generate acetic acid as a byproduct that may be irritating. Generally, it's best practice to always avoid contact with glue, if only to prevent contamination of the mode's surfaces and your clothing.
-
Bandsaw blade tension problems
Bob Blarney replied to grsjax's topic in Modeling tools and Workshop Equipment
As you discovered, the spring is an important part of the saw, particularly with regard to shock absorption while cutting. It's likely that you could order a spring from Porter-Cable-Delta-etc that would be suitable at a reasonable cost. I wouldn't buy a spring from a hardware store for permanent replacement. Many people don't know or bother about relieving the tension on the bandsaw when it's not in use, to prevent wear and tear on the spring, blade, and flattening tires, and other parts of the saw. There is a convenient device, a lever arrangement, that can be adjusted to quickly set the tension and relieve it after every use of the saw. I don't have one, but I think it's a good idea. Usually, I just back off the tension at the end of the work session, but sometimes I do forget. There is a supplier of high quality parts and accessories for 14" saws: Louis Iturra. So far as I know, there is no website, but if you want good parts and advice, do a search. -
liquid hide glue comments
Bob Blarney replied to rtropp's topic in Modeling tools and Workshop Equipment
1. Hide glue does not penetrate deep into the surfaces of wood, but I find that it is still necessary to remove excesses glue by light chipping or sanding. That said, it's far better than any synthetic glue. 2. Hide glue should not have a strong odor. If it does, that may indicate fungal/bacterial contamination and it should be thrown away. When I prepare I hide glue, usually Behlen's or a glue from a luthier supply, I make it in 50ml batches in polypropylene orange-top tissue culture tubes. After initial preparation according to the instructions, I heat it for 4-8hrs at 140F and then tightly screw down the caps. In these tubes the glue will keep for months on the shelf. Other luthiers put their mixed glue in ice cube trays and keep them frozen until needed. And finally, here's information on hide glue (esp Old Brown glue), including methods of a Smithsonian Conservator: http://www.popularwoodworking.com/article/hide-glue-in-liquid-form -
liquid hide glue comments
Bob Blarney replied to rtropp's topic in Modeling tools and Workshop Equipment
Oh, I forgot to mention an experiment that I did, but didn't fully explore. Since hide glue works by evaporation of the water (and thus shrinks and grips tighter), then I put some test pieces in the microwave. It cured the glue in a jiffy. But I decided to drop the idea, since I couldn't fit a large assembly in the microwave, and also I was uncertain about warpage. But if you want to try it, give it go. -
liquid hide glue comments
Bob Blarney replied to rtropp's topic in Modeling tools and Workshop Equipment
I've built several guitars with traditional hot hide glue (HHG) from ground granules/flakes. I believe that it is superior for building stringed instruments, because it dries very stiff and tight (there is no creeping under mechanical loading), it is reversible and repairable (there is no need to completely scrape/sand off the previously applied HHG), and it is compatible with clear finishes (Hallelujah! no glue stains such as from synthetic glues). However, these qualities are not necessarily useful for modeling. The parts to be joined must be fitted carefully because HHG will not fill gaps. HHG must be applied at ~140F, and it does not bind when it cools to ~100-120F unless additives such as urea or salt are added. I use no additives to extend the open time (about 20-30sec), and so when it comes time to glue up, I practice every step and have every clamp at hand and preset. I sometimes pre-warm parts to be joined. I would >never ever< use Franklin Liquid Hide glue for a musical instrument, but it may be okay for modeling. It takes days for it cure, and if it's after it expiration date (stamped on the bottle), it may never cure completely. Old Brown Glue is similar to the Franklin glue, but I have not used it, and I would not use it for a musical instrument. Both of these glues are engineered to provide extended open time, and so that might be useful for complex furniture assemblies. I hope that's useful info for you. -
Work station clutter
Bob Blarney replied to Senior ole salt's topic in Modeling tools and Workshop Equipment
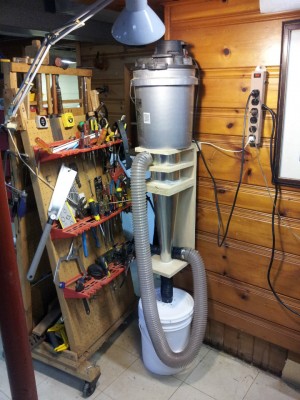
Regarding mitigation of clutter, it is true that neatness is a virtue, but unfortunately it's not one of my virtues. To help with that, tools that are not in my hand are not placed the main work surface. There is a gutter (a piece of rain gutter actually on one bench) or a mobile tool rack next to the bench. Over the vac inlet, window screening or hardware cloth (1/8 or 1/4" grid) will catch small parts. In fact, when cutting off small pieces on a table saw this method works very well to keep the pieces from jamming in the slot or disappearing inside the saw. Here's pic of the rack where I build guitars, and my shopbuilt cyclone separator HEPA vac system that takes up 1 sq.ft of floorspace (it's attached to the wall).