


lionfish
-
Posts
123 -
Joined
-
Last visited
Content Type
Profiles
Forums
Gallery
Events
Posts posted by lionfish
-
-
-
More happy fun times to be had. I hate to seem like I'm whining here but this kit seems to be a piece of junk made with the crappiest materials around. This piece of laser cut plywood has a pretty significant bend at the bow section so I soaked it in some hot water for about 5 minutes to help out with the bend. The part literally went to pieces after a few minutes. So my options are to probably snap it in half at the bow dry or soak it and have it still fall apart. Really wondering if its worth wasting my time on this POS kit. Seriously considering putting her in a box and forgetting about it for a few years lol. I have another kit on standby so we will see.
is that the side? if it is, you might be able to use different wood for it.
-
If you guys have any experience or tips when it comes to shaping filler blocks I am all ears at this point. I started out by more or less gnawing at the wood but if there is an actual "method" please share the secret
 To keep the profile straight in my mind I have to rotate the sides I am working on or I am worried about taking to much material off one side. Tomorrow should be fun and hopefully not laced with profanity lol
a dremel works wonders for me. i used it to reshape the hull of my bounty, just gotta go slow and take your time. also take some thin strips of wood and get the profile at as many point as possible, use the same technique you would for faring the bulkheads for planking.
dremel i have; http://www.homedepot.com/p/Dremel-3000-Series-Variable-Speed-Rotary-Tool-Kit-3000-1-25H/203040434
i suggest spending the extra dough to get one from another store due to the homedepot stuff being made cheaper than standard production. on that note the tool is great, variable speed and great attachments. only thing is its high speed low torque, home drills and tools like that are low speed high torque. so just dont push the tool too fast and it will work great.
here is an article on here that deals with filler blocks; http://modelshipworldforum.com/resources/Framing_and_Planking/BowandSternFillerBlocks.pdf
not sure if you have seen it yet, but it cant hurt.
- CaptainSteve, Philthy, Canute and 1 other
-
 4
4
-
-
-
thanks everyone, i hear a lot of reference to scroll saws and other power tools i dont have, so i wasnt sure if any of those would be mandatory.
-
-
since im working on my first model, id thought id ask, what specialty tools will i need or want to have? i have all the basic non-powered tools.
-
-
-
Matt or satin poly, diluted 50:50 with low odour turps and applied to larger areas (hull /deck ) with a single action airbrush. Very light sand between coats. 4 coats applied. The 50:50 mix dries a lot quicker than undiluted poly and gives a smooth even finish.
what psi is best for this?
-
Hi there Fish. Looks like some decent progress on the decking. If you don't mind, can you explain how you constructed your treenails? I have been doing some premature research on treenail methods that I may use on my Independence build. Looks like other builders use drilled holes with wood filler or holes plugged with the tips of tooth picks. I am planning on building a test deck before I start slapping down planks to deck. I still have a few weeks before I get to this step so plenty of time for research.
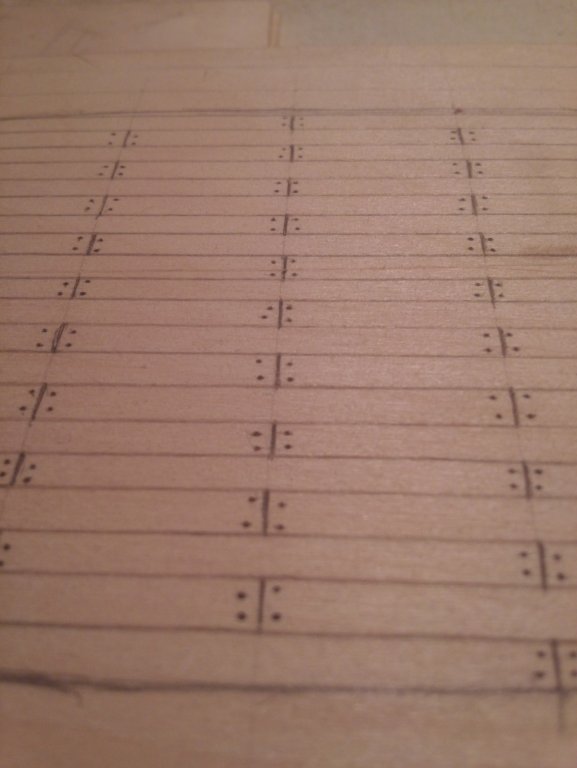
i modified a technique i found on here, basically i used a blunted thumb tack to push into the wood not through. then i took a mechanical pencil, sharpend the point and gently rotated the pencil. i had to resharpen the tip after 5-8 nails. there is a section on here with some really good techniques.
-
Flying my true colors, I have a bias against plastic or anything synthetic on my wooden ship models. This does not extend as any prejudice against the work of others who do use these products
raw wood - sanded 220 -> 320 -> 400 -> 600 and then scraped with single edged razor blade - rubbed with shammy leather cloth
1st coat pure Tung oil cut 1:1 with mineral spirits.
2nd coat straight Tung oil.
3rd coat super blonde shellac flakes made into a 5% solution in 100% 2-propanol (isopropyl alcohol) [ 10% solution diluted 1:1 ]
4th coat 10% shellac.
0000 steel wool between coats. Be sure to remove all of the steel fragments - they will oxidize and stain the wood.
do you use the same process for all wood? or do you have different techniques for say decking vs planking?
-
what do you use to finish the wood? i know some wood is painted, but what about the wood thats left natural or stained?
-
-
here is the false deck i made for my boutny,
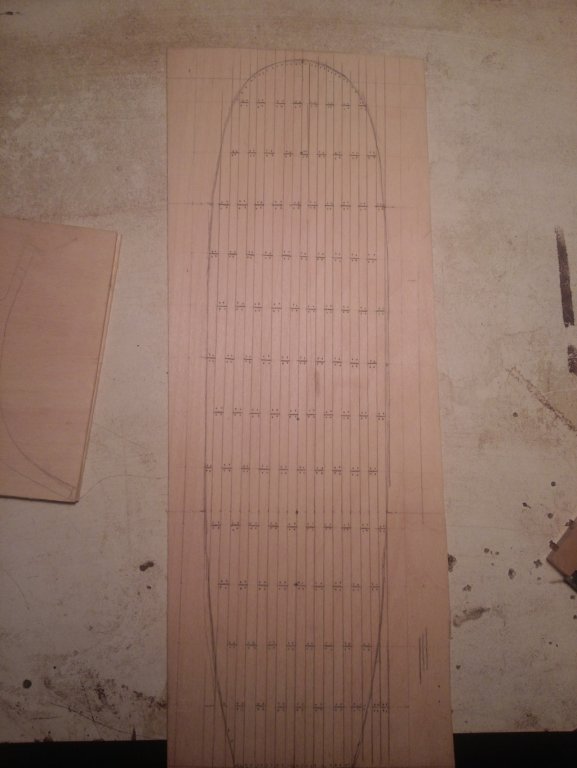
close up treenailing, and planks

what do you all think?
- dgbot, UpstateNY and avsjerome2003
-
3
-
nice, well should be interesting at least, i want to do English cutter Cheerful 1806, chinese junk, greek bireme, and a skipjack, but im sure there will be more ships i will want to build
-
i used an airbrush a lot on my plastic kits, but for wooden kits i like stained natural wood better, whats on deck for you?
-
Hello Matthew,
First off congrats on your first wooden ship model and starting a build log. I am pretty new to this and the forum has been fantastic in figuring out problems that pop up. I am working on a fishing boat myself and another member noticed something was amiss with one of my photos and was great in offering some accurate diagrams to assist in fixing my rigging mistake. I look forward to seeing your build progress along. There are a bunch of Bounty build logs to look at for inspiration if you haven't had a chance to look yet.
Cheers!
-Phil
thanks, i followed your fishing boat log, and its looking great. what airbrush/compressor do you run? ive been doing a lot of reading on this forum and the articles which are great. we will see how this build goes, but im already planning a few future builds haha.
-
-
today i was able to get the false deck mostly finished, i scribbed the planking and treenails, all i need to do is get the mast holes drilled and fit the deck, i will get some pictures later.
-
This is my first wooden ship build, as well as my first build log. the kit was given to me by my girlfriend for Christmas, even after she knows how i am with models in general. i finally decided to go for it and build the kit mostly stock, there are some mods i am doing, but nothing over whelming. you all know the story of the bounty so ill skip that part.
the kit comes in a nice package with a fold up lid and window, very colorful and full of pictures. half of the step by step instructions are on the box in the form of pictures that show various steps. this is good for those who are just starting out, but a pain to have to keep the box just for a reference. the kit also comes with a few tools, some paint, rigging materials, a few bags of small parts both wood and metal. the metal parts are for the ships wheel, cannons, hand pumps, cabin windows. there is also a few bundles of wire. the wood isnt the best being a little thick for the scale, but it decent if it isnt a big deal to you. all the main parts are pre-die cut. the pre-carved hull is fairly rough, the whole thing needed sanding, and some areas needed reshaping. its not a kit i would say is entry level, due to the roughness of the hull and such unless you have experience in carving. id say the kit is better for someone with experience who is looking for a very simple and quick build.
in doing my research i decided to copperplate the hull. many ships had this at the time so it seams only right to do so. in fitting and sanding the stem doesnt fit as it should, and in my opinion isnt usable. i sandwhiched two pieces of basswood sheets together and sketched a corrected stem on it. now i just have to take some time with my coping saw to cut it out. i might replace most of the pre-cut parts with my own, but we will see. the instructions say to carve planks into the solid hull, but instead im going to build a false deck and install it on top of the hull. it will allow me to really control the decking, and add that much more material to the lip for the sides. i will try and get some pictures when i can, my phone, which is my primary camera, tried its hand at swimming earlier this week, so snapping pics spur of the moment is out.
anyway i hope you all enjoy this new journey with me
-
ive built many plastic models in my day, and they are very straight forward. they are also as complicated as you want them to be. the "entry" level ship my girlfriend bought for me is a whole different ball game. i had to reshape the hull, and deal with major dimensional differences from the plans to the carved hull. i also have a thought that "entry" level is a way of a company to make something half-assed and still have it acceptable. many of my easy model kits have turned out to be harder to build than my advanced ones. with my first model ship i have to really work at it, though i have a sneaking thought in the back of my head that ill have an easier time with POB build when i get to it.
-


hms bounty anchor
in Discussion for a Ship's Deck Furniture, Guns, boats and other Fittings
Posted
ive been trying to figure out what anchor would be accurate for the bounty, the whats used is the standard curved, however the anchor that was raised and on display in Pitcairn is Spanish style. also what was included in the kit was kedge style. so needless to say im confused and cant find any reliable info on anchors the bounty carried. im tempted to use the spanish style because thats what was supposedly raised from the wreck.