NMBROOK
-
Posts
2,305 -
Joined
-
Last visited
Content Type
Profiles
Forums
Gallery
Events
Everything posted by NMBROOK
-
 Thanks Rob,Ian Major had posted about this and I have kept an eye out.Unfortunately could only find the preceding issue,but now I know it is out,I am off to the newsagent in the morning Kind Regards Nigel
- 1 reply
-
- 1
-

-
mary rose partwork by hachette - moved by moderator
NMBROOK replied to geoff's topic in Wood ship model kits
Hi Keith The Black Pearl is the ship from Pirates of the Caribbean.A few members on here have started a part work kit build on here but have experienced supply issues with the manufacturer. The Mary Rose part work model under discussion is by a company called Hachette. Official information on the additional forecastle deck is thin on the ground at the moment,my guess is that full research is being carried out being anything 'official' is being announced. Unofficial information was released when the deck was discovered (due to additional dredging of a shipping channel in the Solent) and whilst I did not see the news article,my wife did,and explained that it was believed this would alter the appearance of the design as she was believed to have looked.There is a separate thread discussing this forecastle debate.I do believe that if it is confirmed that the design is different from what CCraft based their model on,they would probably revise their kit.However it could be years before anything is stated officially,so a revised kit would be a long way off.The CCraft kit is an exact a replica of the vessel to the original information,but very much like Vasa,new discoveries are made throwing original research into doubt. The extra deck would indeed make her more true to the images shown in tapestrys of the period. Here is a link to the partwork model we are discussing http://www.maryrosecollection.co.uk/ One of the news articles I have found discussing the more recent finds http://news.bbc.co.uk/1/hi/england/hampshire/3552860.stm Kind Regards Nigel -
Excellent work mate,the doghouse looks great I am very familiar with the said moments Kind Regards Nigel
- 1,039 replies
-
- 1
-
-
- ballahoo
- caldercraft
- (and 2 more)
-
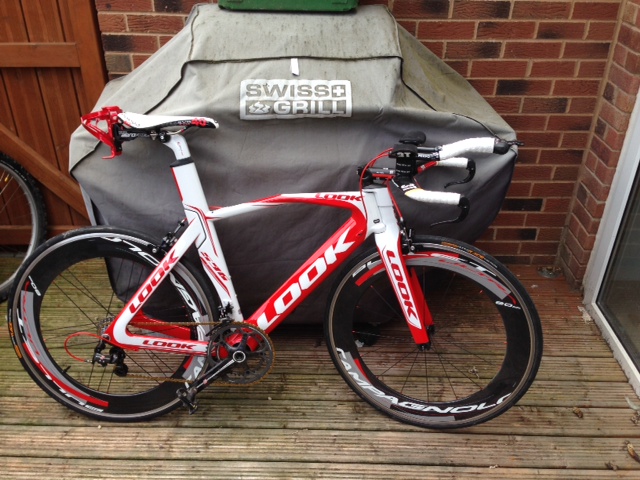
Thanks Buddy All was going fine on two wheels until middle of this week when I got struck down with a stomach bug On the mend now .Looking forward to watch team Confidis put my bike through it's paces in tomorrow's T de France TT Ok well,not my bike,but the same model Kind Regards Nigel
-
Santa Ana by AL. - moved by moderator
NMBROOK replied to le débutant's topic in Wood ship model kits
Congratulations on your purchase.In my opinion the Santa Ana is a beautiful ship and probably my favourite in Artesenia's collection.I did stumble on one build on the net that was mildly modified and was stunning.I regret I didn't save the address or I would have given you the link.From memory,very little was changed other than the gratings,but the colour scheme was changed to reflect Spanish ships of the period.All I can suggest is having a hunt on Google. Kind Regards Nigel -
Thank you Nils It is good to be back doing a few jobs on her and moving the build on a little Kind Regards Nigel
-
This is a very interesting build of a beautiful ship Kester The personal history makes this extra special .I look forward to following along Kind Regards Nigel
-
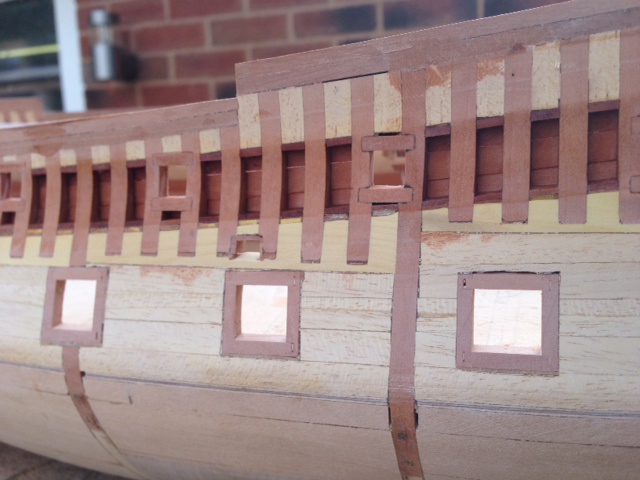
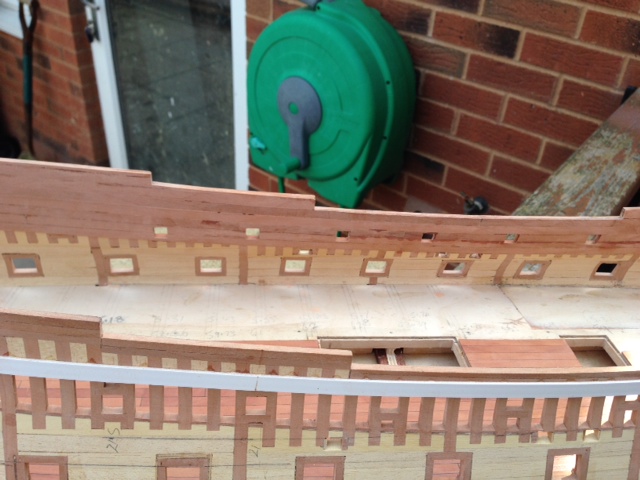
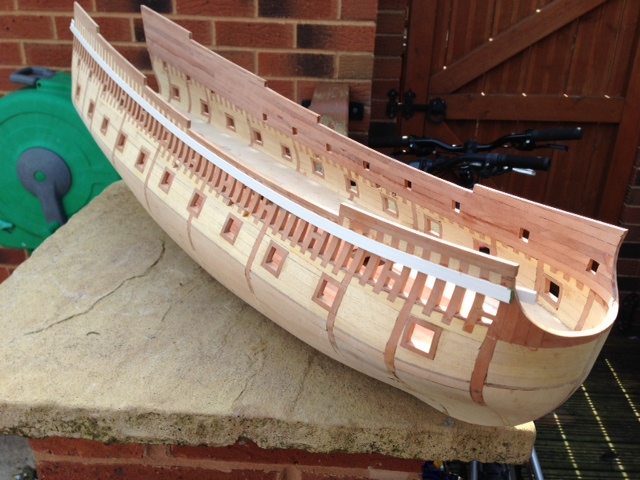
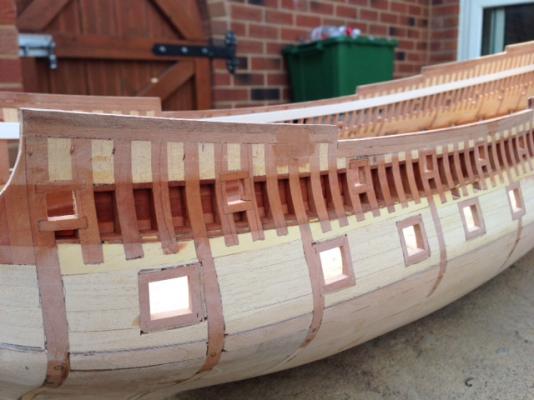
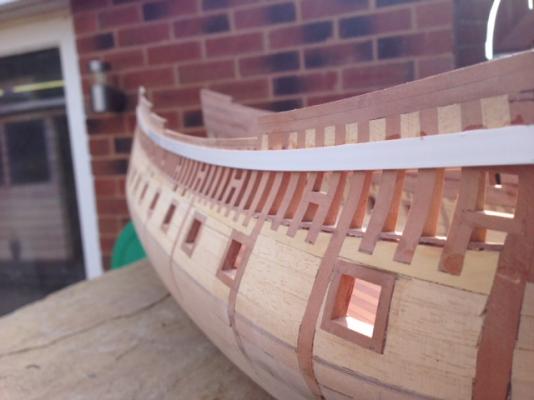
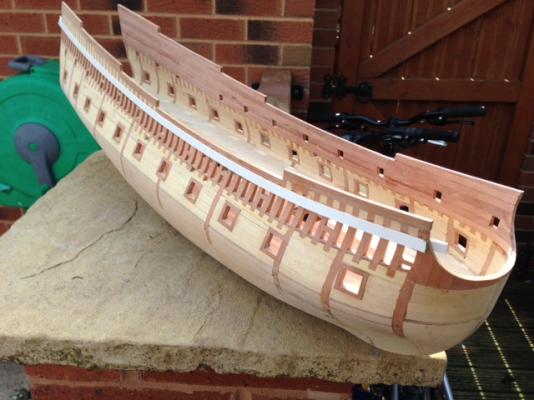
I thought it was about time I blew the dust off this log Work has been 'hopping' about a little on the hull.I have been concentrating on sorting the exposed areas of framing.Because of the line of the main deck,various knees,beams and a black ebony waterway would appear in this window between the frames.Although this would be historically correct,I decided it would add a 'ramshackle' appearance to the build and looked for an answer.I decided that an intermediate layer of thin Pear planking from the deck clamp upwards would alleviate the untidy appearance.The basis of this layer has been added on the portside but will be completed when the deck clamp has been installed.On the starboard side are temporary ABS plastic strips tack glued with CA.These guide the fitting of the pear cappings between the open frames.These ensure a nice flow along the top and bottom of the cutout to match the edges of the upper wales.When overlong caps have been fitted and the aliphatic glue has dried,these strips are removed and the cappings sanded flush inside and out.The Aliphatic wood glue does not stick to the plastic. The three rectangular holes in the hull are to receive the deck beams.There are many more to cut,I have just done these as they were so close to the cappings and also provide a reference point as these three beams delineate the hatchway opening and capstan. Kind Regards Nigel


-
mary rose partwork by hachette - moved by moderator
NMBROOK replied to geoff's topic in Wood ship model kits
Hi Geoff I was led to believe this was only being trialed at the moment,i.e.offered in specific parts of the country to gauge reaction.Unless something has changed,this probably wouldn't run the full quantity of issues,a bit naughty I know.The model does address the forecastle issue present on the caldercraft kit,the cc kit was developed to information present at the time,before the additional forecastle deck was discovered in the Solent fairly recently.The images I have seen though,are of a fairly simplistic model,especially concerning masting and rigging. Kind Regards Nigel -
Fabulous ropework Mark This is no mean feat given the many tensions to juggle all at the same time. Kind Regards Nigel
-
Hi Chuck No issues whatsoever scraping/sanding the deck once the glue is hardened off overnight,I even sanded with P60 grit in an early trial just to be sure!The glue fully penetrates the tissue making it a solid medium. In theory,gluing the tissue to the sheet should work,the hard part is ensuring it is glued flat to the surface.The tissue is sooo thin that even any slight unevenness in the glue film will make the tissue appear wavy when the planks are laid.If some method of flatting the tissue with a credit card sized piece of plastic could be used without the tissue disintegrating,I don't know.I didn't experiment with this as Mordaunt's deck planks are shaped,not parallel runs.The tissue can be applied and smoothed with a finger on the edges of these planks,but how this would fair when working on a much larger surface,only experimentation would reveal. Kind Regards Nigel
-
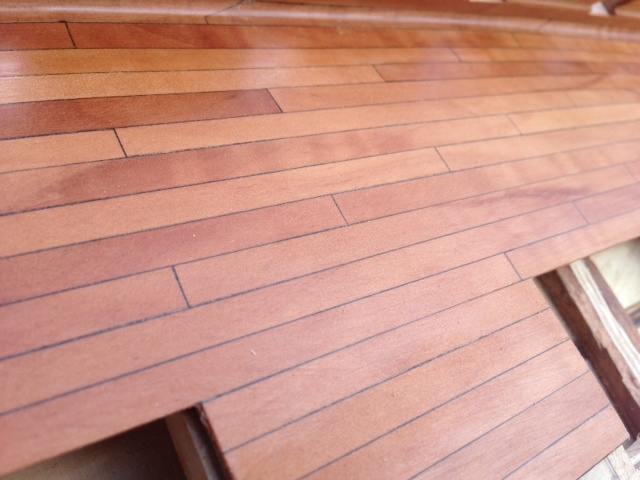
Hi All Just a follow up post showing the above deck section scraped and given a coat of poly.The planking does not go to the edges due to how this section fits into the Norske Love's skeleton Kind Regards Nigel
-
Hi Eamonn Just a thought mate,not tried this,but a 'lightbulb' moment You could try sticking some Tamiya masking tape to a flat clean surface,giving it a coat of black paint,then cutting out the hinge shape with a sharp scalpel blade.Simply stick in position and a thin coat of poly in position will seal the hinges in place.Don't know for sure this would work,just 'thinking aloud',but may be worth experimenting.Failing that,paper would be my choice,cutting out thin brass is a lot of work for minimal gain when the same effect can be achieved with a lot less hassle. Kind Regards Nigel
- 1,039 replies
-
- 1
-
-
- ballahoo
- caldercraft
- (and 2 more)
-
Thanks mate Maybe if I had my time again the T de F may have been an option but not on that bike,it is only UCI legal for time trials.I have had the challenging notion of entering an ironman before I am Fifty .Just Google Ironman,Kona,now that will make you feel tired If so,I have a lot of work to do Kind Regards Nigel
- 1,039 replies
-
- 1
-
-
- ballahoo
- caldercraft
- (and 2 more)
-
Nice to see an update buddy That's one more than me Your 'doghouse should look fine and dandy.Only suggestion I would make if you are fitting stairs,is to make the distance down from your combing to the first step the same as the stair pitches You may have thought of this anyway,if so I apologise Kind Regards Nigel P.S.have finished one build,but can't put a log on here Sorry for being off topic,but explains the reduced modelling hours

- 1,039 replies
-
- 3
-
-
- ballahoo
- caldercraft
- (and 2 more)
-
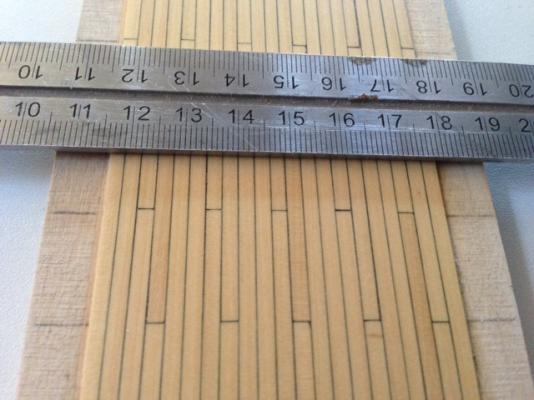
Hi Keith The deck section here is for a scratch built Norske Love at 1/72 The planks are 3mm wide.I shall post pics here when scraped and finished so you get an impression.Hopefully by next weekend if all goes to plan. Kind Regards Nigel
-
I can see the paint technique working well on less absorbant timbers David.I would be a little concerned about using it on Pear like on Mordaunt.I think experimentation would be required as it is like a sponge and I should imagine would be prone to bleeding.On boxwood,like in this tutorial,bleeding would be non existent. Kind Regards Nigel
-
Hi Keith Yes the excess glue is easily shaved off the plank faces whilst it is semi-hard.I realise Dr Mike does his caulking on mass,but he uses normal paper,not tissue which is thinner and more delicate.Any irregularities are overcome with scraping as my planks are overthick to allow for this.One point with Dr Mikes system,is that he invariably works to the larger scales and his deck planks are scale thickness,this will give him a strip around 2mm thick plus.Part of the reasoning behind using tissue is a thinner line,suitable for smaller scales.Dr Mike advocates glue with pigment in for these smaller scales and I didn't fancy that as it will follow any irregularities in the plank edges,the surface finish on the edges would have to be nigh on perfect. Kind Regards Nigel
-
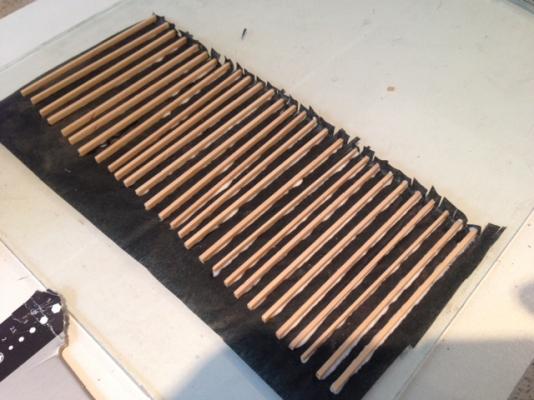
Hi Keith Alan is quite correct,the planks stay upright as the glue grabs instantly due to the tissue absorbency.I tried the on mass technique and it doesn't work.The difference with tissue is that you need to apply enough glue to penetrate the tissue,otherwise it will not cut cleanly.The glue ooze out at the sides acts as a reinforcer to enable the tissue to be cut cleanly.Using this quantity of glue on a bundle of planks results in a solid mass when the glue dries. Kind Regards Nigel
-
You are correct Andy,what was I thinking .Seriously though,the tissue can want to tear when you slice between,so this is added insurance Kind Regards Nigel
-
Thank you everyone for such positive feedback and the likes I agree Alan,trimming the tissue when the glue is 'green',is pretty vital to make the job easier.I found when the glue was hard,the scalpel would want to dig into the plank face,but when not fully cured,the blade followed the face of the timber.For the particular glue I used,trimming when the glue had just turned clear,i.e. no white areas left,seems like a hard and fast rule.For different brands,a little experimentation may be advised,as you say,too soon and the tissue disintegrates when you try and cut it. Kind Regards Nigel
-
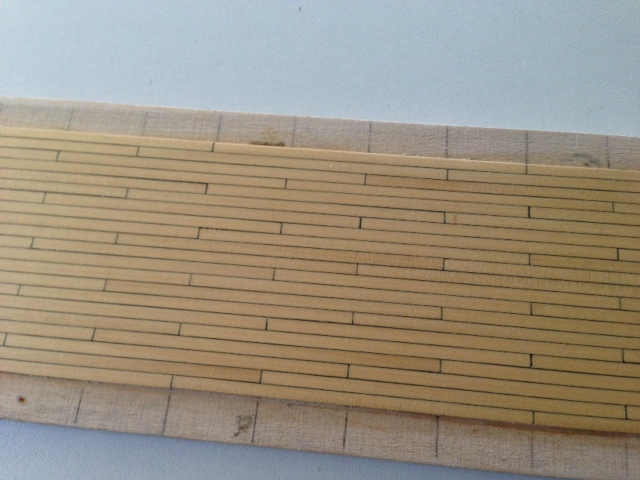
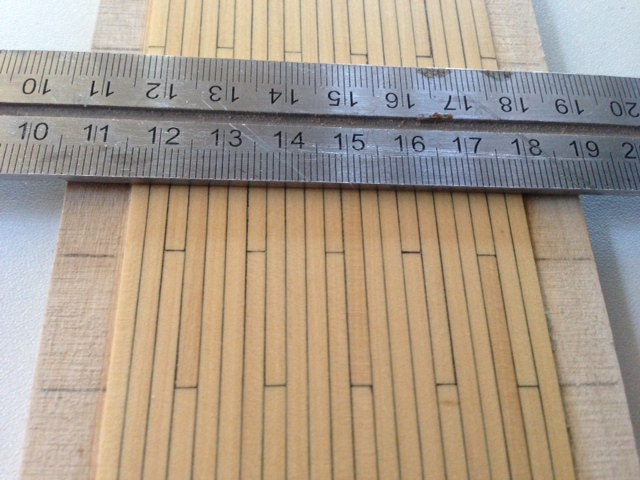
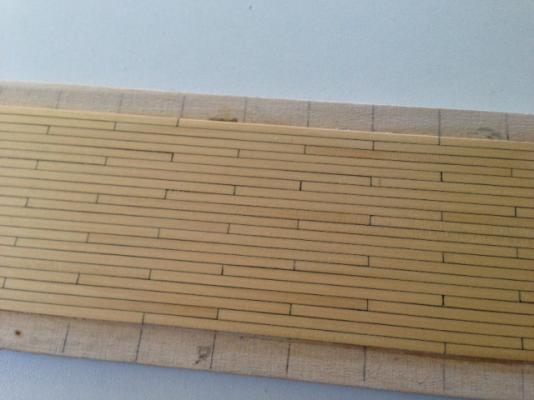
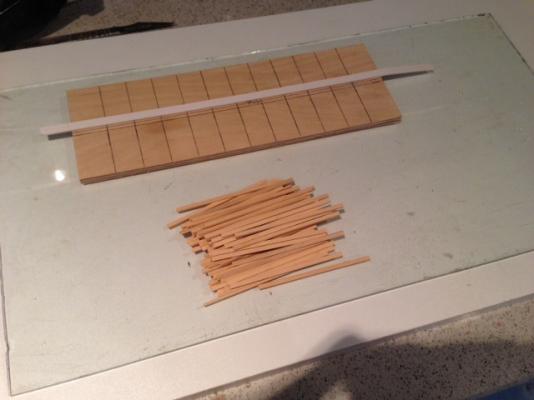
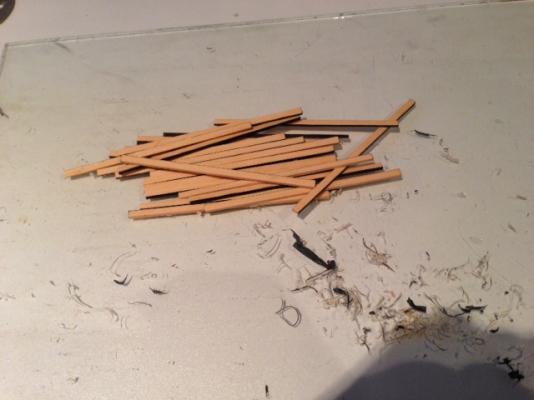
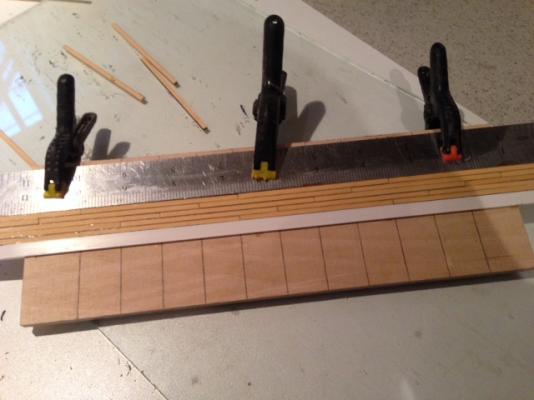
After experimentation and actually using this technique on my Mordaunt build,I decided I would post a small tutorial of this system I developed due to the interest it caused. Whilst I am not reinventing the wheel,this is a variation I adopted on the common method of using black paper.There are disadvantages with using black paper,firstly,that it reduces the glue penetration in a joint and secondly,it can appear too thick at the smaller scales.Some may say,the strength is not an issue for planking on a false deck,fair point,but I wanted a system that could be used for all joints where some caulking or similar would be used.This would include scarph joints in the keel where strength is important. There are many similarities in techniques between using paper and tissue,but there are small differences caused by the delicate nature of the tissue. This is a pic of the lower gun deck on Mordaunt using this technique.The timber is Pear and the planks are 6mm wide max(the planking is tapered) To demonstrate the technique,I will be planking a small deck section that goes under the main deck hatches on Norske Love.This piece doubles up as part of the structure and is made from 6mm birch ply.No camber is incorporated as this will be unnoticeable as the only real view is through a companionway.It does have some shear and this is conveniently catered for by the bow the ply has attained,being stood in the corner of the workshop for several months. The planks are cut from 3mm boxwood sheet.Cutting from the edge of the sheet,using the thickness as the plank width,helps maintain consistency.I cut the planks @1.5mm thick.To me this is less important as the deck will be scraped/sanded smooth.All gluing is done using Deluxe Materials Aliphatic Resin.The black tissue paper is acid free and bleed resistant.I obtained mine from WHSmith in the UK and can be found in the present wrapping section. A section of tissue was placed on a small piece of clean glass.Glue was added to one side and one end of the plank.The plank is placed edge down on the tissue,ensuring the tissue develops no creases and the plank is firmly down on the glass.I then slice the tissue with a new scalpel blade to form a 'finger' that can be curled up on the plank end.The process is repeated until you have a good quantity of planks 'edged'. ] When the glue goes clear,but not fully set,slice through the paper between the planks.The individual planks will simply break off the glass with a little twisting pressure.The tissue should remain intact on the plank.Whilst the glue is still in the 'green' stage (a bit like cheese as it hasn't fully hardened),carefully trim the tissue flush with the plank faces.Keep the scalpel blade cutting toward the plank,not away as this can drag pieces of tissue off the edge.You can wait until the glue has hardened overnight,but I found this much harder and more time consuming. Lay the planks in a conventional manner,ensuring to keep the tissue covered faces going the same way.I brush over the surface with a small wetted paintbrush.This consolidated any glue that has oozed out and is added insurance against the tissue dragging with the sanding and scraping. Kind Regards Nigel

- 33 replies
-
- 23
-
-
Fabulous attention to detail Matti Are you filing the grooves back in after shaping? Kind Regards Nigel
-
Hi all,I have recently managed to obtain an unstarted kit for Gina 2,Nordsokutter by VHT Billing Boats.The kit is complete including fittings apart from the plan sheet .It is not complete doom and gloom as I built Mary Ann(my first wooden build,with my father's help)thirty years ago.I do have the plan for this kit,somewhere .I propose to build the model in his remembrance as it was that model that got me hooked.The model will incorporate modern RC gear and techniques,but I do not want to loose the essence of the vintage model. I am more than happy to pay for the plan or any expense incurred sending it to me. Kind Regards Nigel
-
Hi Nick,don't worry the garboard shape will reveal itself when you get close to the keel.The one piece of advise I would offer is don't make it the last one to fit.It will be a pain to shape and fit keeping the gaps minimal.If you leave the adjoining plank as the last one,then you can simply trace the shape with a piece of paper and rubbing against the edges with the side of a pencil. Kind Regards Nigel