-
Posts
635 -
Joined
-
Last visited
Content Type
Profiles
Forums
Gallery
Events
Posts posted by CDR_Ret
-
-
Wow, Julie, what an intro! You seem to be what they called a polymath in back in the day.
If you need any assistance with getting started in DELTship, I may be able to assist. It's very good for developing fare hydrostatic hull forms but it bogs down when creating lots of fine details.
Terry
-
You should visit the many threads in this CAD/3D Forum that address your question. For basic hull creation from plans, I believe that DELFTship Free will produce the most faired and smooth results.
Then export the resulting model into other recommended programs to create the details.
-
Those guys all look pretty buff!. Aren't there any striplings in your crew? 🙂
- thibaultron and TJM
-
 2
2
-
-
And digital is even more forgiving and takes up zero space in the livingroom!😉
Terry
- Keith Black and mtaylor
-
 2
2
-
-
1 hour ago, popeye2sea said:
For inclined ladders, I have never once, in 24 years of naval service, gone down an inclined ladder backwards.
On submarines, we always slid down the main stairs between decks on the handrails with hands only. You controlled your speed with your grip. I even saw our COs do this on occasion! For vertical ladders, there were always hand grips positioned somewhere above the top rung to help the transition between ladder and the deck.
-
Hi Wefalck.
Thanks for the pointer. In Underhill, Figure 44, there is indeed an image showing the lower topsail yard supporting rod/stay/strut. This is in the context of an iron and steel-sparred ship. The figure shows the upper end of the rod hinged to a hefty lug at the bottom of the center band, as stated earlier. The hinge plane was in line with the yard and vertical. The lower end of the rod terminated at the steel cross support at the base of the topmast.
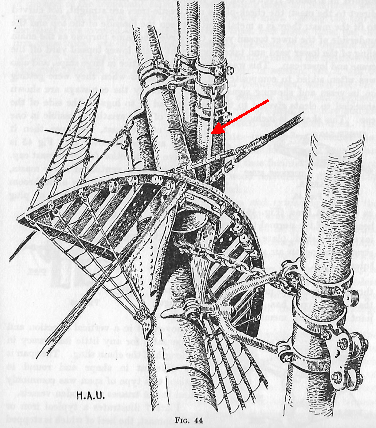
Scan from Figure 44, page 39, Masting and Rigging the Clipper Ship & Ocean Carrier, Harold A. Underhill, Reprint 1969; Brown, Son, and Ferguson, LTD
Interestingly, all the diagrams of the LTS yard (including Fig. 44), show the LTS yard mainly supported by a swiveling crane arrangement, rather than the universal-jointed truss as in the lower yard (and as was the case for Galilee). So a crane plus a support rod for the LTS yard seems to be overkill except, perhaps, in larger ships.
I finally found a side illustration of the LTS yard strut in Underhill, Plate 16, on page 80 (there is so much information buried in this book that it is easy to overlook things!). The plate illustration suggests that the lower end of the support strut is simply an eye-in-eye swivel, bolted through the forwardmost top platform crossbeam. So, lacking any other information, that's what I will go with.
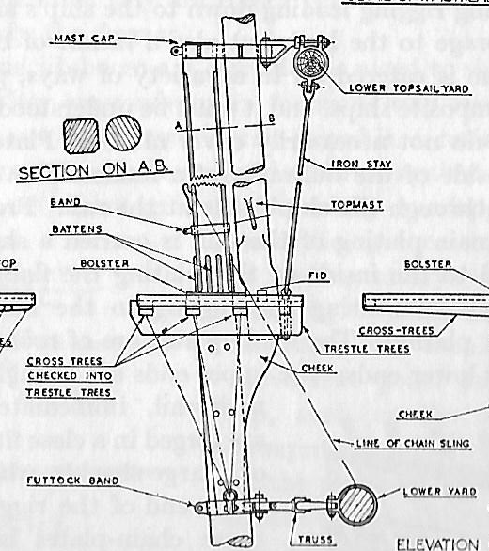
Plate No. 16, Ibid, showing the arrangement of the LTS yard support stay or strut.
In Galilee's case, the entire weight of the LTS yard, hardware, rigging, and sail rests on this one rod! When the yard tilts, I'm still not sure how that motion is accommodated by this support system.🤔
Thanks for the prodding!
Terry
-
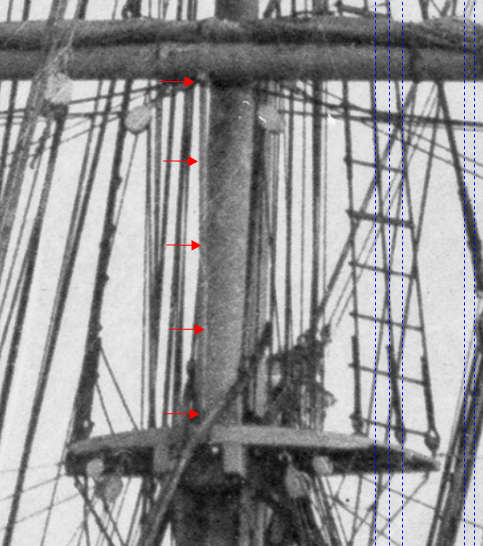
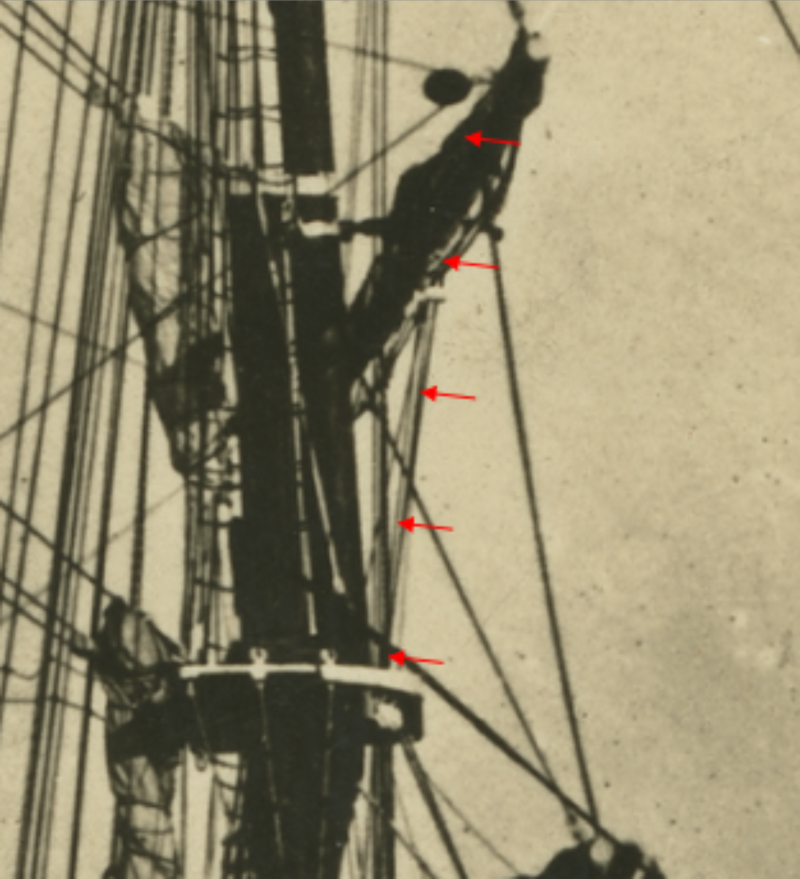
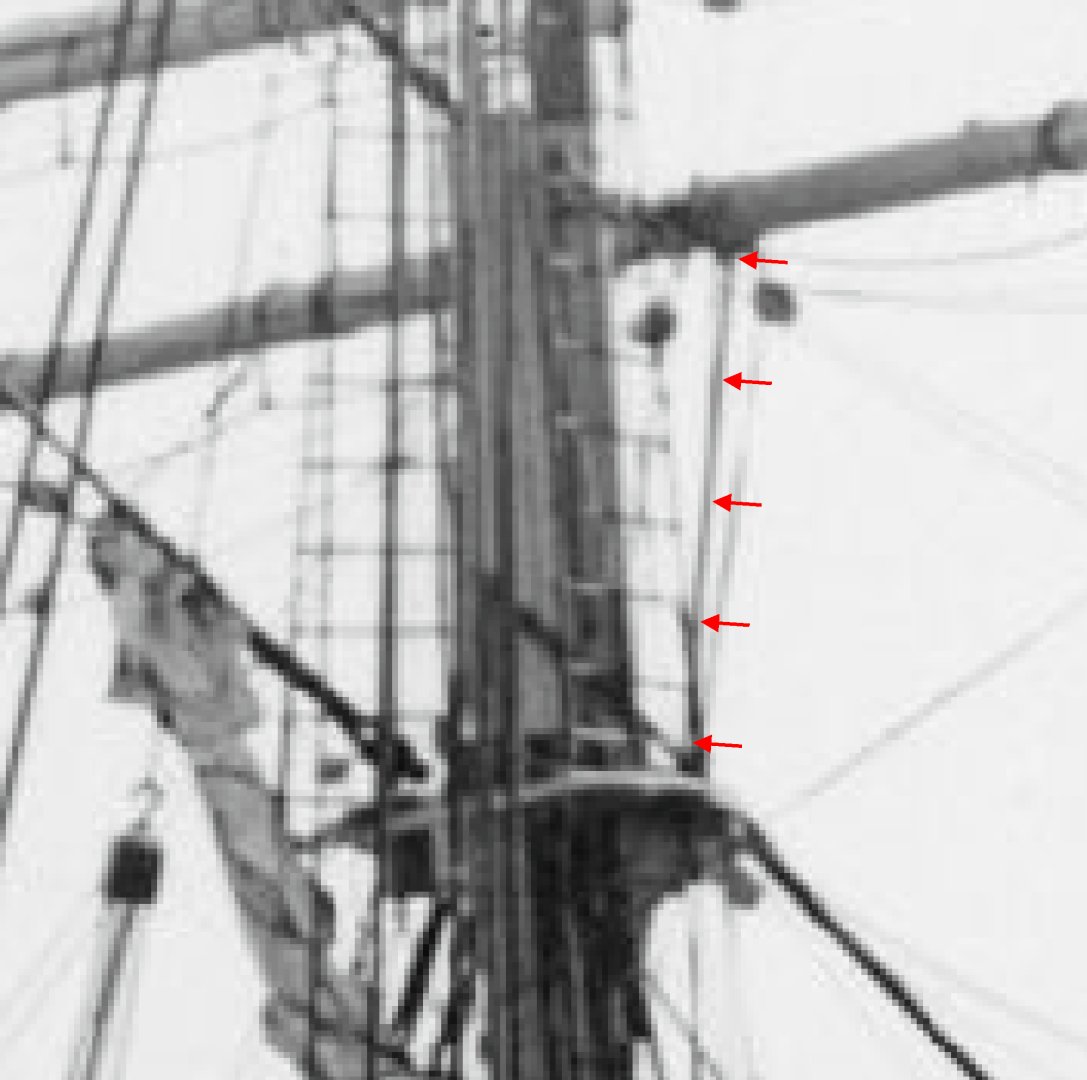
This is a plea for input from the general membership to identify the depicted iron hardware shown below and/or for direction to a source that illustrates (or at least describes) this object:
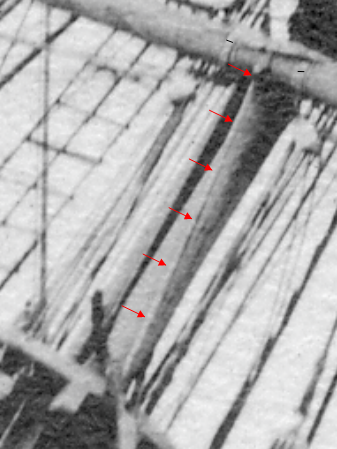
What's it? The upper end of the rod is attached or hinged to the centerline band of the foremast lower topsail (LTS) yard. The bottom end of the rod is somehow attached to a cross-brace in the decking of the foretop platform.
(Courtesy Carnegie Science Library, September, 1906)
The ship it was used in was the US West Coast merchant brigantine Galilee, built at the Matthew Turner shipyard in Benicia, California, in 1891. The reference photos I am using are mostly from the period when the ship was chartered by the Department of Terrestrial Magnetism, Carnegie Institution, Washington, DC, between 1905 and 1908 for geomagnetic data collection in the Pacific Ocean basin. Captain Matthew Turner, by all accounts, was the most prolific shipbuilder on the West Coast during the latter 19th century, and he frequently incorporated in his wooden sailing ships innovations that were common to iron-masted sailing ships during this period.
I have a variety of other images, all together indicating that this isn't some kind of running or standing rigging ropework. It's always absolutely straight and typically runs in a direction at an angle to all the other lines in its vicinity. At this point in the ship's life, virtually all iron standing and running rigging had been replaced with hemp in order to minimize the rigging's magnetic effect on the ship's instruments. Only structural iron that was absolutely necessary for the operation of the ship was retained.
Other images:
Various depictions of the LTS yard support rod. (Sources: left and right, Carnegie Science Library, c. 1905-1907; center, SAFR, prior to 1905)
Any assistance would be greatly appreciated.
Terry
-
I just noticed this problem tonight (3-Jan-25), but I was trying to add an image to a PM and noticed that all the usual buttons in the gray bottom margin for selecting and inserting images and attaching files to PMs and topical threads are missing. I can't even include a screenshot because this post is also missing the image/file controls.
Is it MSW or my browser/computer?
Terry
- Keith Black, mtaylor, Ryland Craze and 2 others
-
 5
5
-
6 hours ago, thibaultron said:
Will Blender create mechanical precision drawings? Like to 3 decimal positions? If so, I may check it out.
Yessir, to virtually any number of decimal places you desire in either imperial or metric units. I use Blender mainly as a free 3D CAD program after Sketchup was no longer free to hobbyists.
As others have mentioned, Blender has a steep learning curve, but there are helpful, experienced users in our community.
Terry
- Tossedman, thibaultron and mtaylor
-
 2
2
-
 1
1
-
48 minutes ago, thibaultron said:
I'm thinking of going to either the subscription versions of either SketchUp or Fusion. Hate to spend the money though.
Or you could move to the Dark Side for free and try 3D printing using the Blender extensions.🙂
- mtaylor and thibaultron
-
 2
2
-
Brings back memories as a young USN air intelligence officer doing ship recognition briefings for the carrier pilots 'way back during the Cold War. Kotlins and Kashins involved in "shouldering" incidents in the Med. Krestas shadowing the CBGs. Fun times--not!
- mtaylor and thibaultron
-
 2
2
-
CCClarke, please see my PM.
Terry
-
Robska,
You may have already noticed this, but there are some glaring errors between the various views in these plans:
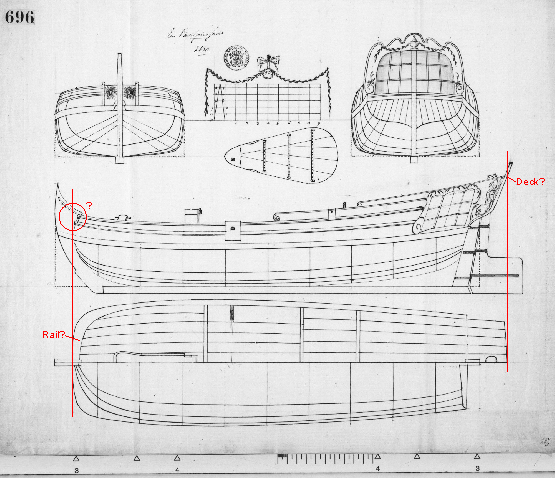
At the bow in the halfbreadth view, there appears to be a very wide rail wrapping around the bow of the vessel. But if you look at the profile elevation view, the planking of the bow wraps up and back toward the stern, forming a very cheeky profile. The upper railing is well aft of the forward edge shown in the lower view. The two views simply don't match (unless the railing details were omitted for some reason in the lower view).
At the stern, referring to profile elevation, the intersection of the poop deck's side railing and the molding around the stern windows corresponds to the extent of the deck planking in the lower view. So, unless the deck planking is flush with the railing (unlikely), there is a problem with the drawing in this area.
What is the provenance of this drawing? How old is it and from what was it taken?
Terry
-
10 hours ago, Robska said:
@CDR_Ret I have installed DELFTship and read the manual. Still a bit confused about how one adds the shape and validates the hull form. But I will take some more time.
One of the more difficult aspects of getting started in DELFTship for the novice user is inserting the background reference images.
May I suggest that you download the tutorial I created several years ago (attached). I haven't updated these files for the current version of DELFTship Free, so the manual references and illustrations showing program controls will not reflect the latest version. You should be able to sort things out, since the background image insertion feature hasn't changed much, if at all.
I recommend reading all five parts of the tutorial before starting a model. Please message me if you run into issues getting started. The tutorial is quite wordy, I'm afraid, but it does the job the Manual does not. Just take your time working through it. If you find any mistakes, please let me know so I can correct them. No one has reported any issues in the past two years!
This is how a complete hull appears displaying the Gaussian surface ("Gauss") tool. I used my 1891 brigantine Galilee model for this example. Surfaces that are either flat or curve in only one direction (like a cylinder) are green. Surfaces that curve in more than direction shade toward yellow, orange, and red, depending on the rate of curvature. This tool takes some practice to interpret the fairness of the hull shape—and how to make corrections. The image also shows the station, waterline, and buttock "intersections" with the outer hull surface. You can add as many intersections as you like to help define the hull shape. Just remember that you are trying to match the intersection lines to the corresponding lines in the plans, not the control net nodes!
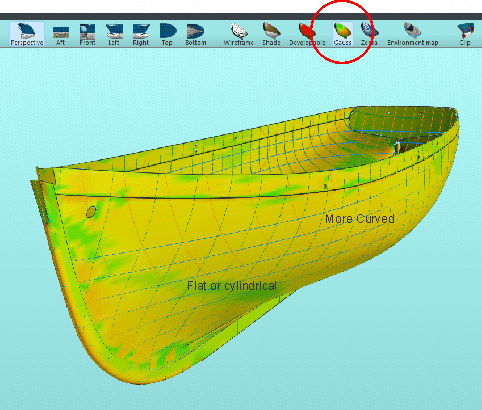
The "Zebra" and "Environmental map" surface reflections shown on the tool bar are more helpful in surfaces that are geometrically smooth, like fiberglass (think: racing yacht). The Gaussian tool is fine for wooden hulls. Don't be surprised if you find that the as-drawn plans aren't smooth and fair in this program. The plans reflect their age, drafting methods, and provenance. You will have to decide how great a departure from the plans you will accept to obtain a smooth hull! DELFTship is a mathematical program. Wooden ships are handcrafted.
Terry
Part 1-DELFTship_Bkgrd_Images.pdf Part 2-DELFTship_Bkgrd_Images.pdf Part 3-DELFTship_Bkgrd_Images.pdf Part 4-DELFTship_Bkgrd_Images.pdf Part 5-DELFTship_Bkgrd_Images.pdf
-
Hi Robska,
I am not familiar with 18th century northern European ship plans and drafting conventions, but the first questions that occurred to me after examining the drawing were:
- Are the station lines drawn at the outside or inside of the hull planks?
- What are the units used in the dimensions shown on the drawing?
Before getting too far into drafting in Blender, you may want to validate the shape of your ship's hull based on the plans you have by using DELFTship Free. Unlike other 3D drafting programs, it is first and foremost a naval architectural program that includes a number of tools for displaying station, buttock, diagonal, and waterlines, and for checking hull fairness. Its learning curve is fairly steep, but nowhere near as steep as Blender's. And when you have a hull you are satisfied with, you can import it into Blender to do the detailed structures and texturing (which are really hard to do in DELFTship). A number of us here on MSW are familiar with DELFTship and can help you if you get stuck.
Will be looking forward to your progress on this vessel!
Terry
-
Hi Tony.
Here is my two cents (US), for what it is worth. (In this economy, that's not much!)
When using photos for such references, it seems that you would need to know at least the focal length (F/L) of the camera lens before even beginning the process you describe. Also, knowing the distance to object factors into this, which determines the angular relationships between objects in the view.
Then there is the matter of how these same factors display in the 3D software. For example, Blender allows the user to set the F/L of the viewport and cameras used for rendering the image. You can also set the camera-to-object distance in the program.
On the other hand, the perspective view in DELFTship has a fixed F/L that is not stated in the program. (You may be able to communicate with the D/S staff to find out what the program's effective F/L is.) And you have no idea what the viewing distance is to the object.
Then there is Sketchup, which I haven't used in many years, that provides both orthogonal and perspective views, but again, the F/L of the perspective view wasn't given (at least back when I was using it). I have no idea if this information is available in the 3D programs like Rhino, Fusion 360, or others used by members in this forum.
Another problem to deal with is the foreshortening of objects in the line of sight. Trying to estimate the breadth of the hull at various points along the rail, for example, using a more-or-less broadside view of the vessel would be extremely problematic, if not impossible. The best you could arrive at would be a very rough guess.
I've had more than two decades of experience with this kind of frustration using 120-year-old photos of the brigantine Galilee to reconstruct the ship's plans. I have a treasure trove of more than 60 photos of the ship. But trying to conduct photogrammetry to obtain accurate dimensions of various structures has been extremely difficult, for the reasons stated above. Just trying to determine the list of the ship in broadside views turned out to be mostly a very rough guess. Thankfully, I had a reasonable (but not accurate) set of hull plans to start with, from which I was able to make the dimensional adjustments to conform to the photos.
Without some sort of baseline dimensions to work with, what you propose would be fruitless, I'm afraid. Perhaps the photographic experts here on this site may be able to weigh in on this topic.
Terry
-
1 hour ago, Louie da fly said:
NY Times advertising
Wierd. The first time I accessed it I read the article. Now I'm boxed out. The article mentions the survey was conducted by some organization in Stockholm. Can't recall the details.
- Allegheny, thibaultron and mtaylor
-
 3
3
-
You might try starting from this link:
https://www.nytimes.com/2019/07/22/science/shipwreck-archeology-shipwreck.html
The Mail story didn't provide any information on the organization that did the survey.
Terry
- mtaylor, Allegheny and thibaultron
-
 3
3
-
-
Welcome from Colorado Springs!
- mtaylor, k-slak and Keith Black
-
 3
3
-
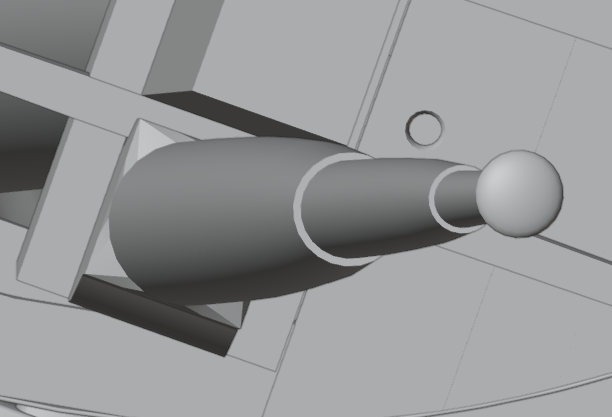
With reference to post #4 of this thread, this highly foreshortend digital view of my model's combined foretopgallant and royal mast shows the mast profiles according to Underhill's tables. A tool working on the principle of a pencil sharpener, if that is what is being described, wouldn't be able to produce the required profile.
My two cents.
Terry
-
Welcome to MSW Charles.
You probably are aware that "Tench" was the name of the lead ship of a late-WWII class of US submarines. The namesake conducted three war patrols from Hawaii. So that struck me as an interesting connection.
You will discover that MSW is a wonderful, friendly, and supportive community with an immense knowledge base for this hobby!
Terry
Colorado Springs, CO
- mtaylor, Ryland Craze, Keith Black and 1 other
-
 4
4


Wall O'text intro.
in New member Introductions
Posted · Edited by CDR_Ret
Sadly, this just kicks the inevitable can down the road. Digital media also has a half life. The only way to perpetuate information in any medium is to recopy it before the reading-writing technology becomes obsolete. There is the story about a well-known ancient British history book (The Domesday Book) that was digitized in a proprietary format, involving an immense amount of time and resources. However, within just a few years the digital format became obsolete, negating all that work.