


thomaslambo
-
Posts
384 -
Joined
-
Last visited
Content Type
Profiles
Forums
Gallery
Events
Posts posted by thomaslambo
-
-
Thanks CaptainSteve and Boyd for encouragement.
You know Boyd, this is becoming more of a scratch than a bash! Changes get made nearly every turn, so I too am interested how this will play out. My best thoughts seem to come in the a.m. after a quart or so of thick, dark coffee.
Speaking of "Bash', have you checked out my thread on the definition of "Kit Bashed", it's getting some very interesting comments (in the Wooden Model Ship Questions and Reviews section).
I too do my best and most creative thinking in the wee hours of the morning...and a good cup of Java gets the old brain in gear

Next up swivels perhaps....and maybe you can train the beavers to retrieve wood for the project
- Canute, mattsayers148, CaptainSteve and 1 other
-
 4
4
-
Al,
Thanks for the kind words and you're Bounty is looking beautiful.
Having read your log page by page....all I can say is you're a kind and humble gentleman
It's a pleasure following your build and I think you under estimate how much you've helped mine.
Boyd
-
-
Hi Dimitris,
Thought I'd pull up a chair for your build as well.
Amazing pics of the real ship...she's a beauty and it's nice to have pictures of the real ship to aid your effort...which I might add is looking top notch
Also, I saw the fiberglass and resin job you did on the hull...very clean job...I've been using fiberglass and carbon fiber on my RC Fast Electric Catamarans for years so I can fully appreciate the effort that goes into that type of work
Boyd
-
Nils,
I'm simply blown away....
But I must say you're scaring the heck out of me with this rigging business...
Boyd
- Omega1234 and Mirabell61
-
2
-
-
Matt,
You and the Nutz brothers did a great job on the decks. I'm feeling the pivot platforms...great idea and looking forward to seeing how you guys handle the application
Boyd
-
You guys have provided amazing information and insight into the term ‘Kit Bashed”….I can clearly see here at MSW this is a term open to interpretation (which I think is actually quite refreshing).
I’ve spent enough time competing in competitions that have very specific rule books, and while I understand the reason and purpose of such things….I much prefer artistic freedom to do as I choose.
Having read all the above comments the term "Kit Bashed" seems to imply the kit builder will spend a great deal more time and/or money on their build....to bring it to life as they imagine it should be.
Perhaps another way to look at it would be; it fills the very large gap between stock box kit builds and scratch builds.
So when I see a build log that says it’s a "Kit Bashed” project, I know the builder is going to step out of the box so to speak
I really appreciate all the comments and I’m going away from this question with a much better understanding of the intent.
Thanks again
Boyd
- augie, Jack12477, Salty Sea Dog and 3 others
-
6
-
Hello Boyd, just saw your build log and let me tell you... I'm amazed with the quality of your work!!
I'm pulling a chair if you don't mind!! :)Kind regards
Dimitris
Hi Dimitris,
Thanks for coming aboard and the kind words....your company is much appreciated.
You have quite a beautiful build going yourself....I'm amazed at how much you've accomplished in just five months
Regards,
Boyd
- mattsayers148 and Dimitris71
-
2
-
Guys,
This really helps clarify the term as I was struggling with the concept here on MSW.
I also have RC model airplane and model railroad experience so I was trying to make the connection with the logs I've seen titled "Kit Bashed" (that remained basically the same ship - with extreme details added).
I'm new to wooden ship building and already know after starting my first build log that more than likely I'll end up in kit bashing country....just to much opportunity to raise the bar with these kits.
FYI - I've seen many of you guys posts and build logs....thanks for the contribution.
And thanks much for the explanations
Boyd
-
I wasn't sure where to post this topic/question....so I put it here.
I was interested to here from members as to what type of modifications/changes to a stock model kit would qualify a project as being "Kit Bashed" (how extreme would the modifications need to be)?
Any comments would be appreciated.
Boyd
- mattsayers148 and GLakie
-
2
-
Al,
it's good to see you moving forward with the rigging....I'll be paying close attention.
And very helpful advise from Danny....thanks much.
Boyd
-
For those o' ye who ha' not a-followed Our Hero through his Bounty Launch build, and be yet to discover the vagaries of CaptainSteve, then ye shall soon learn-eth that he doth have a tendency to go off on tangents, at times.
I must hold you responsible for leading me (an OCD family member) down the "Rabbit Hole of Obsessive Details".
As such, I've been lost on the dark side for almost two weeks now without a single post on my log....however, when I do come up for air I think it will have been worth the time and effort.
Good luck on the horseshoes
Boyd
-
CaptainSteve,
Great idea on the inside lighting.
This could be a nice effect for my open hull Bounty....I think I'll ponder on the subject...it'll need to be very subtle
Boyd
- mattsayers148, CaptainSteve and GLakie
-
3
-
Nils,
Simply amazing work......and you're very close to the end of your journey (almost 2 years in the making).
Great tips with the mini blow torch....I've used them along with irons for many years on other types of models.
Thanks for the kind words on my build.....and some day I'll get to rigging it
Boyd
-
Now that the hull turned out cool I might redo the deck as well. I think the same wood would be to much though, we'll see.
I would agree, the same contrast on the deck would be a bit much....after seeing the level of creativity on your launch I'm sure you'll step out of the box topside with something special

- GLakie, mattsayers148 and CaptainSteve
-
3
-
Hi Matt,
Great start...I love the contrasting colors on the hull (gets me thinking about what I'll do with my finish).
I'm looking forward to seeing what you do with the pirate theme
Boyd
- mattsayers148 and GLakie
-
2
-
Wow, seeing the whole assembly together...all I can say is Superb
You've really got my brain in overdrive again....
Thanks much,
Boyd
-
Nils,
Beautiful job, you're moving along nicely.
Boyd
-
Now those chocks look strong enough to hold up an elephant, and pretty enough for an entry into a castle. Looks awesome!
Thanks much for the positive comments and ideas.....keep them coming.
Just finished three hours of middle deck planking....time for a double portion of rum
-
Matt,
Great job on the grapnel hooks....wondering what's next?
Watching you guys and all these details you add to your Launches will double the time I spend on my build....but I'm loving every minute of it
Boyd
- GLakie and CaptainSteve
-
2
-
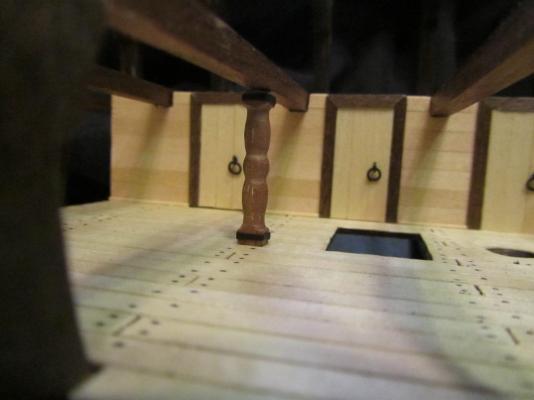
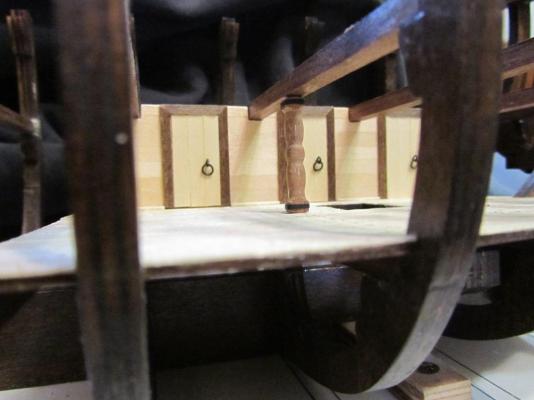
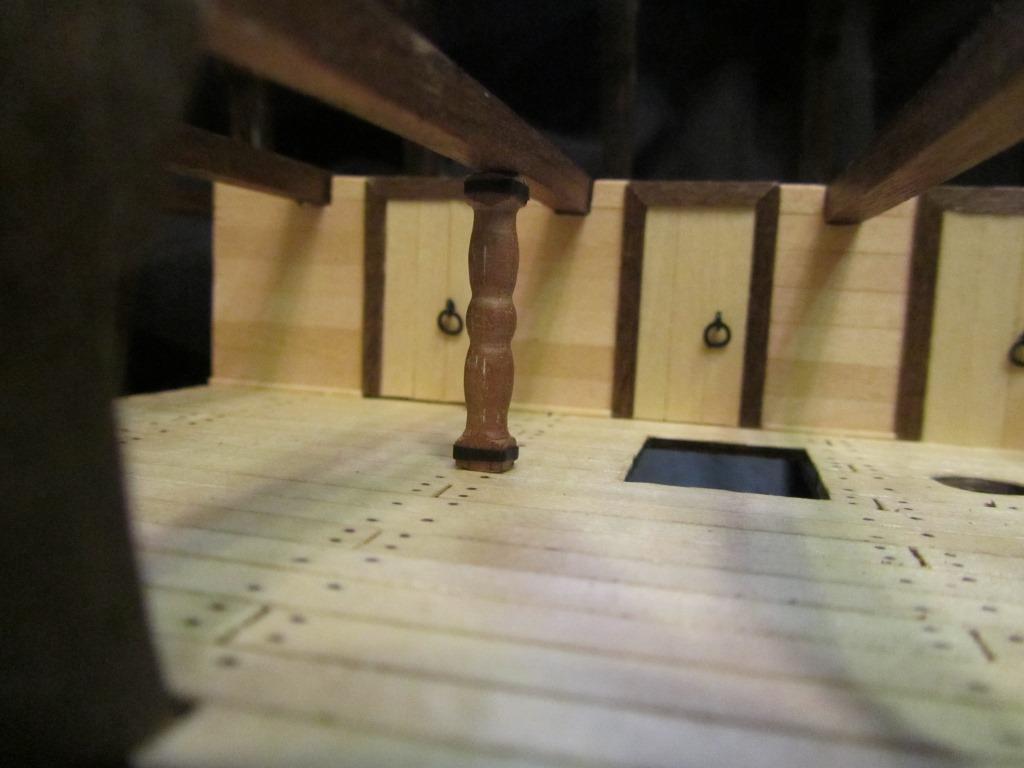
Alright, finely got my four-jaw chuck in the mail today and immediately headed to the ship yard to turn some 5mm x 5mm square walnut stock.
Well, I think I hit pay dirt with this version of the Pillar Chock....loving the square supports and Matt's suggestion of adding Iron Bands.
Maybe add a few nails on the bands to polish it off......what do you guys think?
Boyd
- mattsayers148, yvesvidal, Foultide and 3 others
-
6
-
Hi Cap'n Steve,
Just read your build log....can't wait for you to get back to another amazing build
Boyd
- GLakie and CaptainSteve
-
2
-
Matt,
Thanks for the kind words....and likewise you inspire myself and anyone else that follows your work.
Absolutely superb job on the swords

HMB Endeavour by BANYAN - FINISHED - Artesania Latina - 1:60 - circa 1768
in - Kit build logs for subjects built from 1751 - 1800
Posted
Pat,
I really appreciate you taking the time to give us more details on the steps you took to recover.
I've captured many of your pictures and narratives in my archives.
Coming from a very unforgiving profession (Information Technology), I learned many years ago that “The Devil is in the Details”...can't do enough research and planning...and it looks like this applies to wooden ship building as well.
Great advise on your part...step back and think it through before you jump.
I spend hours and hours reading logs like yours and preparing for each step on my build (my first) and still I find myself up to my elbows in alligators
But the nice part is I have no deadlines to meet…just taking my time and having fun.
Thanks again for your excellent build log
Boyd