


thomaslambo
-
Posts
384 -
Joined
-
Last visited
Content Type
Profiles
Forums
Gallery
Events
Posts posted by thomaslambo
-
-
Hi Al,
I’ve been building models for years, mostly railroad, airplane and RC fast electric (FE) boats.
Carpentry has been a hobby of mine since I was a kid (my Dad taught me everything I know). As such, I have quite an extensive work shop in the garage, and also a spare room in the house where I do much of my Bounty assembly.
I did purchase the mini lathe and a pin sander in preparation for wooden ship building. I love creating things out of wood so I’m no stranger to fabricating parts.
I suppose I may turn to the “Dark Side” eventually but it sure is nice to pull pre-cut keel and bulkhead parts from a kit and hit the floor running….
Stay with the rigging….as you know this ship building business is all about dividing and conquering (one careful step at a time – often times requiring much research).
I was born and raised in Southern California….I live in the San Gabriel Valley (about 15 minutes east of the Pasadena Rose Bowl - go UCLA Bruins).
Thanks for the support and stay tuned….I’m finishing off some details down below and will start laying the planking on the middle decks over the weekend
 Boyd
Boyd -
Guys,
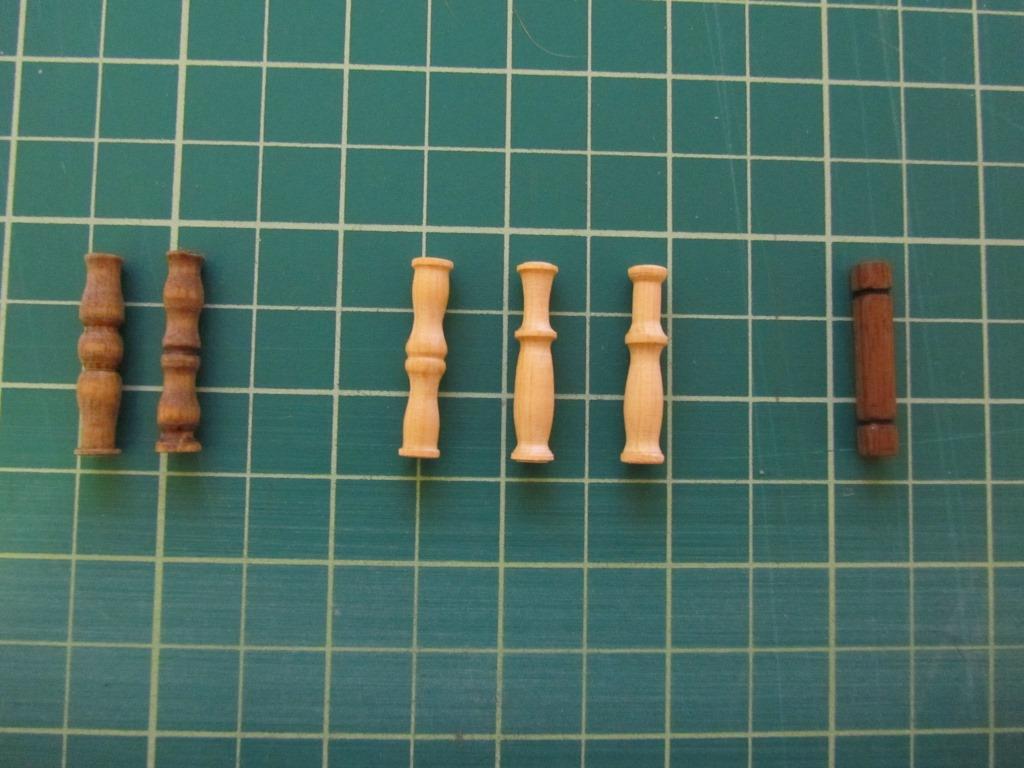
I turned four more chocks and so far I like the one in the last two pictures best as it's more rustic and less refined in shape.
What do you guys think, I would go with walnut with any of the shapes in the first picture?
The three tan ones look to refined for an 18th century ship to me.
Also, the one in the ship turned from walnut is a smaller diameter (5mm as opposed to the 6 mm).
I'm definitely going with Walnut, just need to close on the final design/shape.
I'll do one more round of test cuts with square Walnut stock to see how square bases and heads look.
I know this seems like a lot of work for one chock but the fact is I'm going to place 8 -10 of them on the lower and middle decks....so I think it will add another nice touch of character to the model.
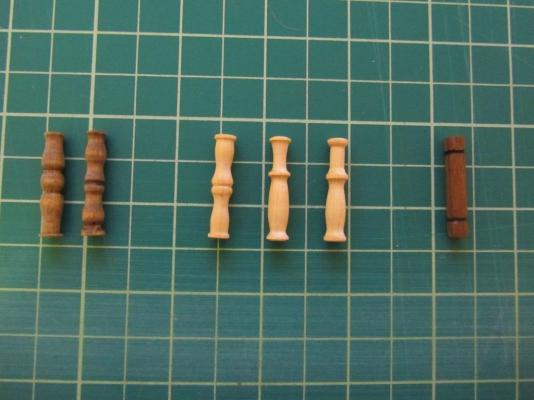
The two on the left were the first tests, the middle three are new, and the one on the right is something like what the instructions suggest.
Here is the last one I did and like the most (color is good and the shape is more rustic).
Another view.
- yvesvidal, cristikc, Mirabell61 and 3 others
-
 6
6
-
OMG -- I just tuned into your build! You mentioned my build log early on, so thanks for checking it out....but you are putting me to shame. As a first timer, with this same AL kit, I was really over my head. But you seem to have a great knack and eye for this. There aren't many suggestions I can make; just keep doing what you're doing. I think I may put aside my build and wait til you catch up so I can ask you questions in real time. I'm at the point of finishing up all the main deck features, including putting blocks around the mast holes and I'm finding it almost impossible to distinguish (from plans, instructions, parts list and photos) one type and size block from another. Wait, this isn't my build, its your's, so I'll just say it again -- great start and keep on posting.
Just thought I'd add that I did painstakingly glue the edges of my planking and it is well worth it. Only problem is that it makes you need to place the plank and snug it up a little quicker lest the small amount of pva on the edges dries. I always apply pva to both surfaces to be brought together.
Hi Al,
Can’t tell you how happy I am to hear from you.
You give me to much credit....I never would have attempted this build if it wasn't for your build log. Captain Fisher’s log was really valuable as well. Not to mention all the helpful comments from KeithW, Danny and a few others in your log.
You underestimate your skill as you’ve done a fine job so far…..and your planking job is beautiful….I can only hope mine comes out as well.
Regarding future steps in my build;
Basically, from what I can see the instructions drop off at 94-112 (which are highly summarized to be polite). They basically tell you to follow the picture book with no narrative.
Then after you complete 112 you’re on your own with the rigging (no instructions at all – just the one plan sheet and the parts).
I can fully appreciate your concern about rigging at this point.
Have you got a copy of John McKay’s book “The Armed Transport Bounty (aka The Anatomy)”. This is what I’m using as a reference so far…. and it has very detailed diagrams of all the rigging – far superior to the kit plan sheet. I plan to use the book in conjunction with the large plan sheet in the kit to try and accomplish the rigging as best I can.
Hopefully some of the experienced builders can help us as we go through the very detailed rigging activity.
Thanks again for coming aboard my build log...please pull up a chair

Boyd
-
CaptainSteve,
What can I say other than a Master Piece to be sure.....
What will be your next build?
Boyd
- GLakie, CaptainSteve and mattsayers148
-
3
-
Thomas, on my Bounty I failed to edge glue the planks. That's why over time, the gaps between the planks appeared. If I were to do it again, I would definitely edge glue the planks and wipe off the excess. As for what's inside, once you build it up and fill her with barrels, stones, etc you won't see the other side of the planking - so don't worry about it. More important to make sure those planks are snug and well glued.
I figured as much because I've seen your builds and know you wouldn't let gaps between the planks go on the initial build. I've read to many posts about builders mentioning planking coming loose after a few years.
I'm going to use Medium Ca (on the frames) and PVA (on the inside edges of the planks) when I get around to the challenging planking job.
I thought about changing out the walnut planks but decided not to make the investment in this particular build. However, I did order walnut sheets for spiling as my guess is almost every plank below the Bulwark (particularly on the bow) will need major work to fit.
Me thinks I'll be making a long journey into the dark side....and maybe take the blue pill before I cross over
Boyd
-
Hi Shaun,
Thanks for coming aboard my build log.
Your Golden Star is coming along nicely and you have a fine eye for detail.
The AL HMS Bounty is an interesting kit with it's open starboard side and limiting the builder to only one layer of planking....it will be a challenge to be sure
Boyd
-
Hi Tom,
Truth is, it's your call as you're the one that has to live with the model.
I'm over the top detailed oriented ("anal" some would say), so when I see something that bothers me I generally fix it if it hasn't been "laid in concrete" so to speak.
Now, temper this with the fact that the builder sees and feels every little irregularity of their build....most people that view the model would never pick up on half the stuff I fix
Have fun
Boyd
-
Matt,
Wow, that's really sweet...amazing detail and color contrast on top
Boyd
- GLakie and mattsayers148
-
2
-
Crack out the drugs, poor Boyd has caught the illness! Mate, you've bought the tools, you've started detailing things most people will never see ... you're well on the way to the asylum. All i'll say for now is ... welcome to the asylum. You're doing a great job, please keep posting.
Hi Keith,
Thanks for the positive encouragement…. and I really appreciate you keeping an eye on my log.
Yup, I feel myself being pulled toward the dark side….I’m really enjoying the level of detail and precision involved with this hobby. Your AL Bounty build and a few others inspired me to take the jump with this particular kit.
Question; did you glue between every plank with PVA, and if so, did you make any effort to wipe off excess glue on the inside of the planks or were you just very careful with the amount of glue used (Ok I’m being anal again)?
Boyd
-
I'll second Matt's call above. The only proviso is that, in looking at your very first support (Chock #1), the bottom part should actually be bigger than the top part.
Soooo ... mebbe you could just turn the whole thing upside down.
Hi Steve,
I agree, and thanks for the feedback…exactly what I need. I’ll try and turn a few more in the next day or so and post the results.
Thanks for keeping an eye on my log, I really appreciate it.
-
Most excellent Boyd. So if the vote is on, I say head and foot of chock #1 and the belly of chock #2. Also, I've learned in time that being called "anal" is actually a term of endearment.
-
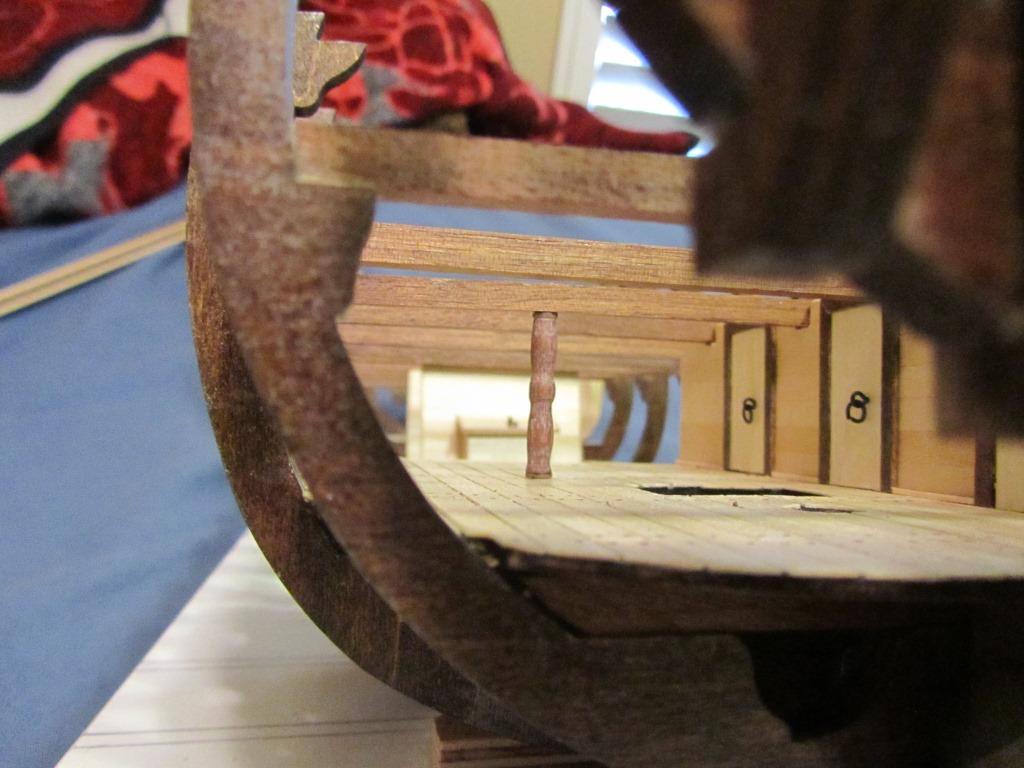
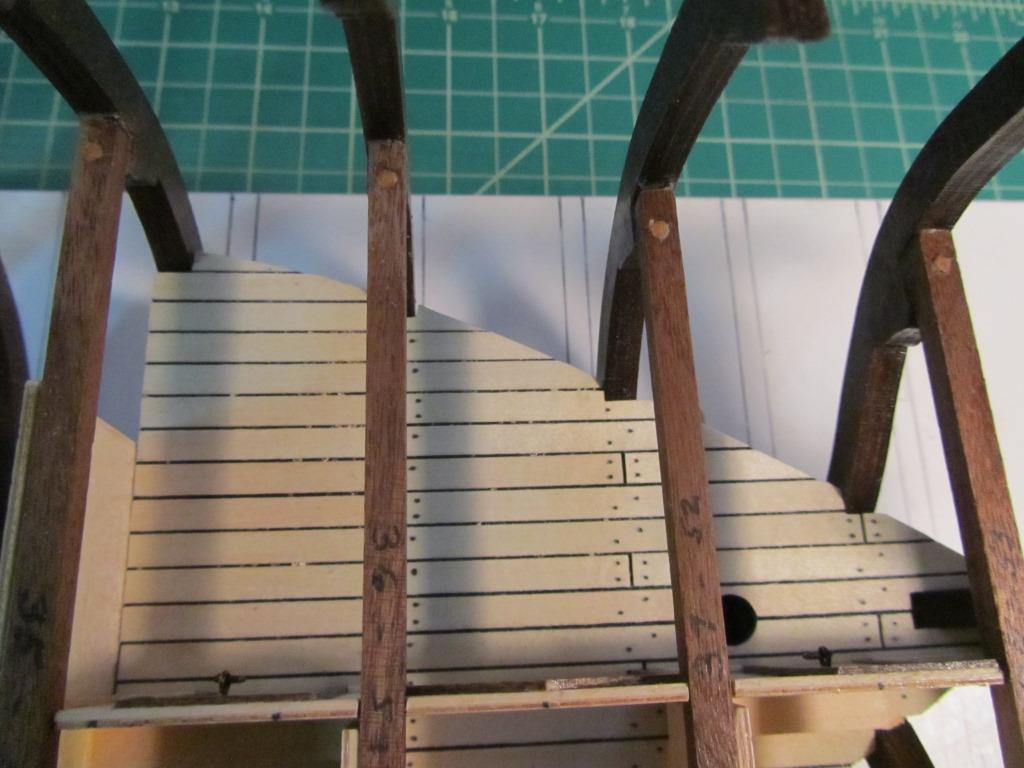
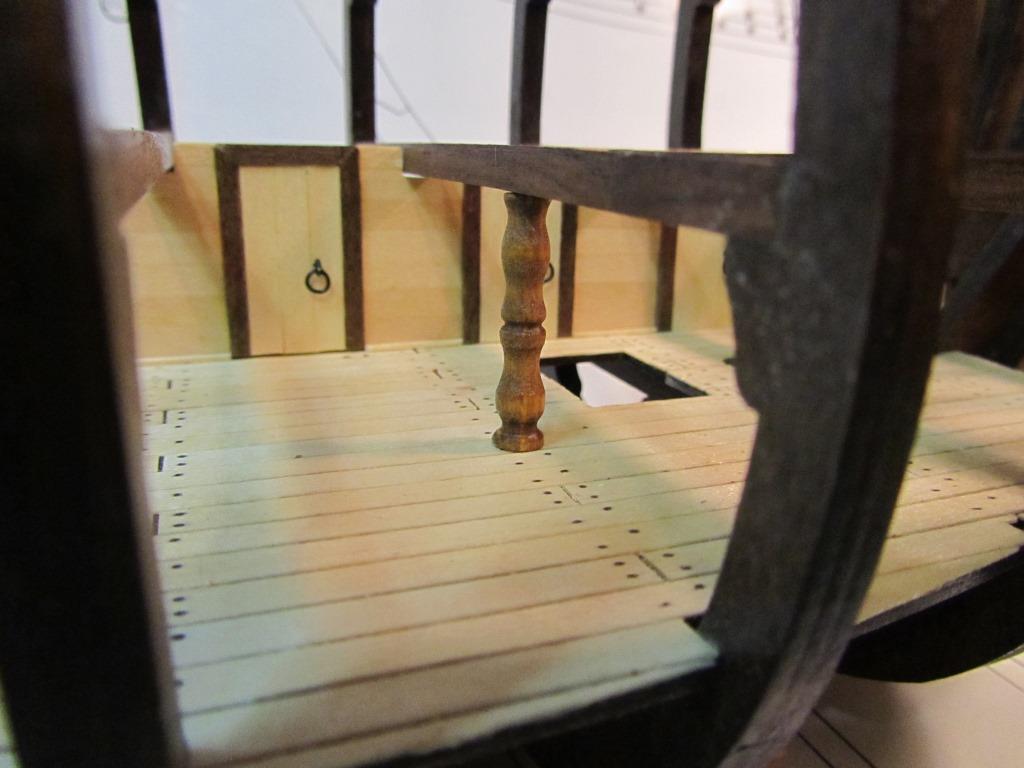
Some additional work I did in preparation for the middle deck install (gave me a chance to use several of my power tools):
First, I went ahead and added wood dowels on the middle deck support beam/frame joints. As noted in an earlier post I really think these joints are weak do to so little gluing surface area, so a little strengthening won't hurt (all 24 joints - inserted a 2mm dowel, set about one half inch deep at a slight angle).
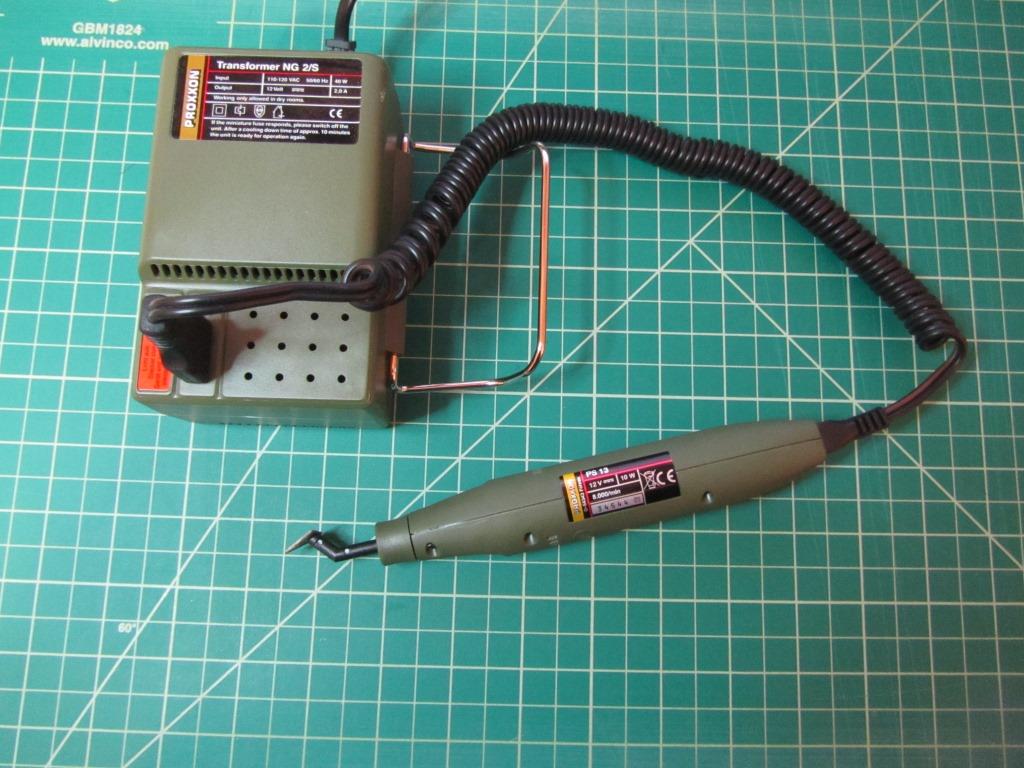
Note; the Dremel Stylus tool in the picture below; it's without question one of the best tools I ever invested in….it allows precision work with the gun grip and light weight design. I was able to drill the dowel pilot holes by free hand with the Stylus….using a small starter hole (set with a pin drill) to keep the drill from wandering off the mark. I then cut off the dowel with my razor saw and cleaned up the joint with my nifty little Proxxon pin sander (love this thing as it’s easy and efficient).
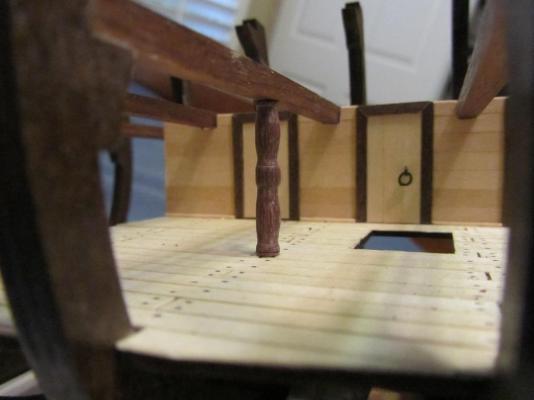
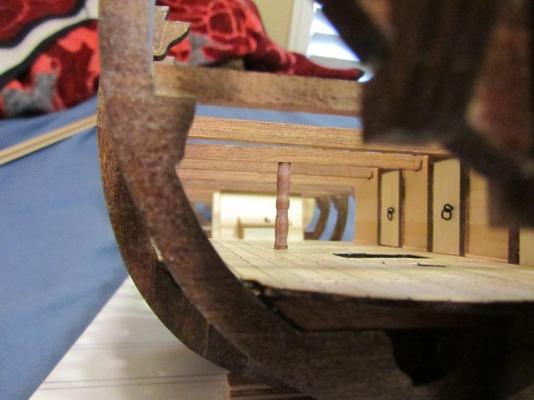
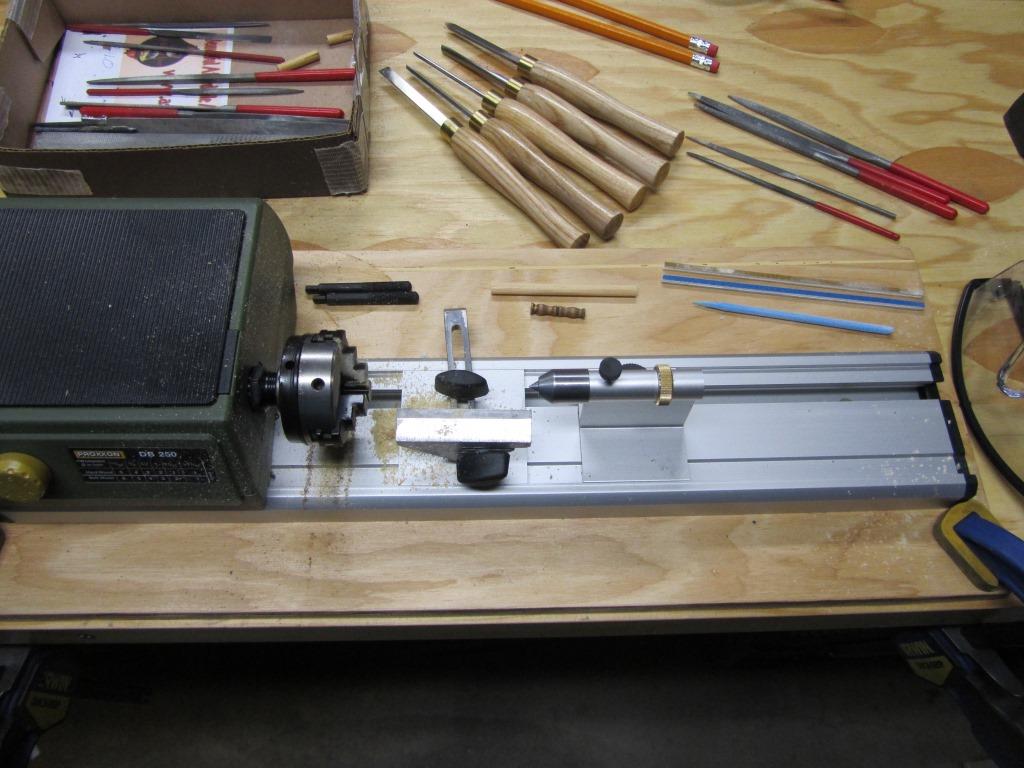
Second, I broke out my DB 250 Lathe and played around with making some “Pillar Chock” replacements (instructions call for rounding off a piece of 5mm x 5mm walnut supplied stock). Thought I might “kick it up a notch” with some fancy Pillar Chock’s. Note; I haven’t installed them yet…still editing at press time on the best looking design. When I settle on the design I'll build a template to duplicate a half dozen of them.
Third, I went ahead and started staining and painting the middle deck pieces in preparation for planking. I’m going to stay with the same method as the lower decks (black paint and gap for tar, along with an awl and sharpie for treenails).
However, I’m going to change methods on the main deck. I was so impressed with Chuck’s method for simulating tar and treenails (#2 pencil, and drilling and filling holes with putty) I decided I’m going to give it a try.

Keep in mind this is not about scale (you'll never see these dowels)...so I used a larger diameter for strength
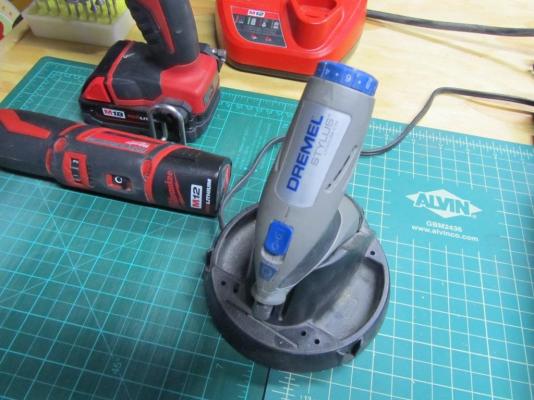
Dremel Stylus cut the pilot holes free hand with this tool

Nice little pin sander that is easy and efficient...it melts wood like butter so be careful
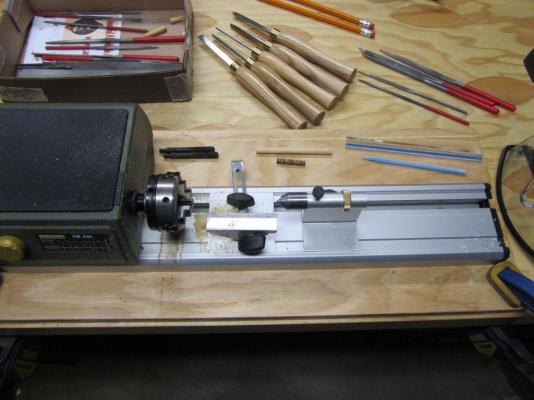
My new Proxxon DB250 Lathe...been waiting to use this little gem...love the way you can feed a whole piece of stock through it

First (free hand no template) test version of a fancy chock dry fitted so I can check the look out

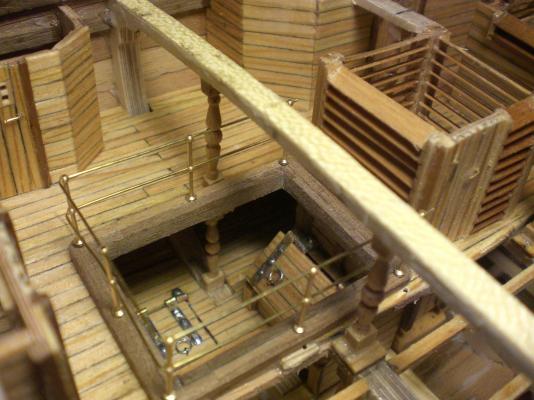
I didn't realize the value of closeup HD pictures of your work, as it allows you to check details you normally might miss with the naked eye. I'm thinking I need to stain the chocks darker to match the door frames and possibly need to close the gaps between the facade wall and the beams.....I show'ed this to The Admiral and she said "you gotta be kidding, you're off the chart anal"

Second version of a fancy chock
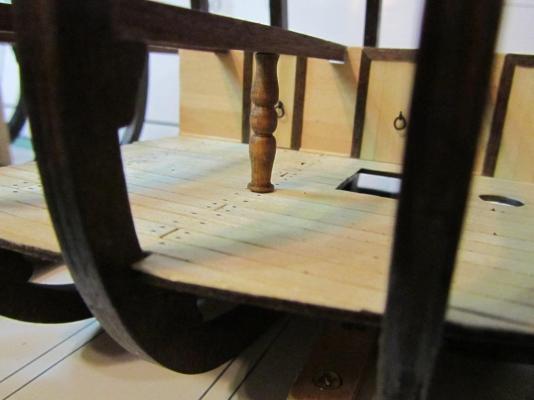
I'm thinking about using square walnut stock so the top and bottom moldings are square as opposed to round, not to mention the color will match

Middle deck stain (bottom side)

Middle deck black paint to simulate tar
- cristikc, mattsayers148, yvesvidal and 4 others
-
7
-
Hi Dimitris,
Great job, very nicely done....I'm a first time builder as well and can really appreciate your effort.
Boyd
-
Well, you "didst go-eth overboard a tad".....awesome work as usual, I think an extra portion of Rum is in order
- GLakie, mattsayers148 and CaptainSteve
-
3
-
Hi Markku,
Great work so far, very clean and precise....I'm amazed this particular kit has so many issues.
Keep up the great work, I'll be following with interest.
Boyd
- M. Pajulahti and GLakie
-
2
-
Matt,
Simply amazing craftsmanship....
- mattsayers148 and GLakie
-
2
-
Hi Ken,
I'm following anything "HMS Bounty" related so I'll be watching your progress....and I might add it's looking like you're right on track for a great build.
Good luck,
Boyd
- mattsayers148 and Canute
-
2
-
Nils,
Thanks much for the quick response. Although I have many tools for working with metal this task is also beyond my capability as well.
This is an interesting subject "build vs buy" in the world of scratch building and model ship building in general.
Personally, I have no issue with buying something that quickly adds value to my model....and also saves me some time.
Boyd
- Omega1234, Piet, popeye the sailor and 1 other
-
4
-
Nils,
I went through your posts but failed to find any details on the assembly of your safety railings. It looks like brass tubing or rods and I'm wondering about the small round pieces used on the Balustrades and the type of material you used for the railing.
By the way, the support beams are another beautiful touch of detail. Such an original and creative style on the build.
Just a wonderful piece of detail...any assistance would be very much appreciated.
- Mirabell61, canoe21, msberkman and 2 others
-
5
-
Hi Matt,
Thanks for coming aboard....and the encouraging words.
Great idea and I actually have a can of the stuff in my ship yard (I'm a retired IT guy...hence the attention to detail).
Well, guys like you just feed my addiction....one look at your build log (and a few others) and I knew I was toast....off to the dark side I go
Boyd
- Sirius and mattsayers148
-
2
-
Nils and John,
Thanks so much for following my log and all your kind words....new builders like myself need as much encouragement as we can get.
By the way, following your builds has been an education for me....this is one very precise and detailed hobby....but I'm feeling the addiction pulling me in every day now....and the Admiral has noticed it to be sure
- Mirabell61 and mattsayers148
-
2
-
Hi Matt,
Simply wonderful build.
Thanks for documenting all the details....invaluable to new builders like myself.
The tools, barrels, netting....all great stuff, I've been searching for creative ways to fill the lower decks of my Bounty build
FYI - we have several generations of squirrels living in our backyard.....and I just found out they love cucumber (wiped out part of my garden).
- GLakie, CaptainSteve and mattsayers148
-
3
-
-
CaptainSteve,
I hope so, I have many plans for additional supplies and furniture on (and under) the lower decks. Then I'll do more cabin additions on the middle deck (Captain's dining room and several items in the galley among others). I also plan to change the design of the middle cabins included in the instructions.
My concern now is how much detail do I include before the very messy planking and sanding activity. And if I wait, how hard will it be to add details after the planking is completed (no more access to the lower decks from the port side of the ship).
I'm hoping I can cover much of the detail with tape and cellophane plastic, but dust has a nasty habit of finding it's way into almost anything.
Any ideas.....


HMS Bounty by thomaslambo - Artesania Latina – Scale 1:48
in - Kit build logs for subjects built from 1751 - 1800
Posted
Matt,
Right on target as usual.
I'm going to turn square walnut stock next to see how square top and bottom supports look. Great idea about the iron bands. I think I'll try them on both versions (round and square).
I'm really having fun with my mini lathe (great power tool)....using a combo of turning tools, files and sanding sticks.
I really appreciate your support and ideas Matt....keep them coming
And some day I'll actually get to planking the middle deck!!