MORE HANDBOOKS ARE ON THEIR WAY! We will let you know when they get here.
×


thomaslambo
-
Posts
384 -
Joined
-
Last visited
Content Type
Profiles
Forums
Gallery
Events
Everything posted by thomaslambo
-
 Keith, I read all your comments as well as Danny's and several others on Capt. Al's log, and paid close attention to that recommendation (I ordered .5 mm x 6mm walnut planks to veneer the ply edges). I'm also going to veneer all the lower and middle deck edges as well. Your model is a fine example for me to follow, and I appreciate you following the log as I have many questions and some ideas I'd really like your input on. I'll be posting my lower deck planking tomorrow. Thanks much for joining in and I look forward to your input. Boyd
 -
Hi Matt, Thanks for stopping in, and the kind words. I couldn't agree more about information being a great asset here. Reading many logs made me comfortable both to build the Bounty and to start a build log. I notice you're building the Bounty Launch, at some point I plan to build it myself. ttyl, Boyd
-
Hi Brian, Thanks for stopping in. I agree, having read over 100 build logs by now, I've come to realize that no matter how expert you become, there's always room for improvement. It takes extra effort to maintain a log but I think it's well worth the effort. I'll be getting into the more creative areas soon. ttyl, Boyd
-
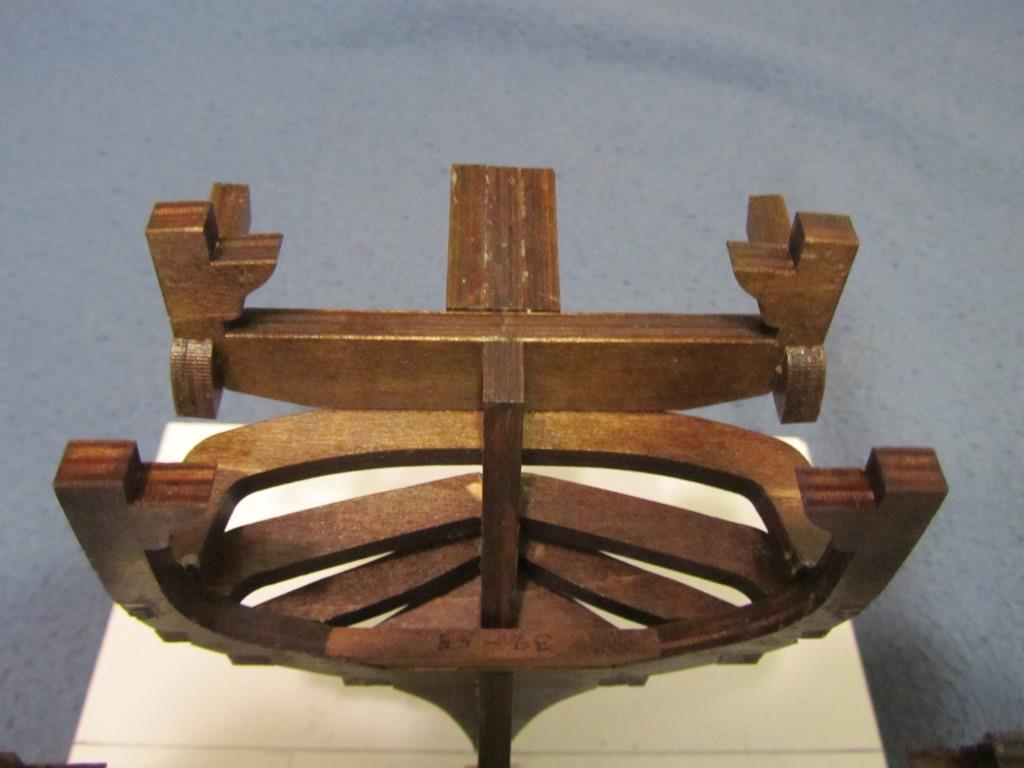
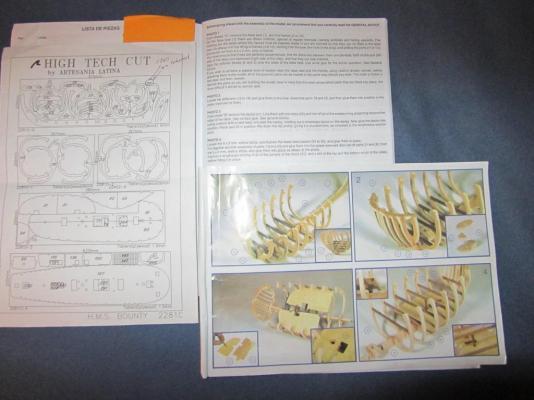
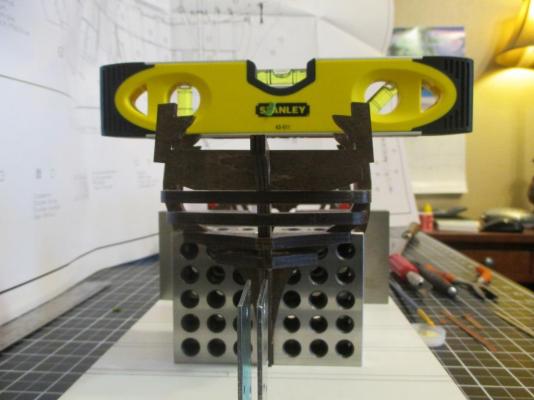
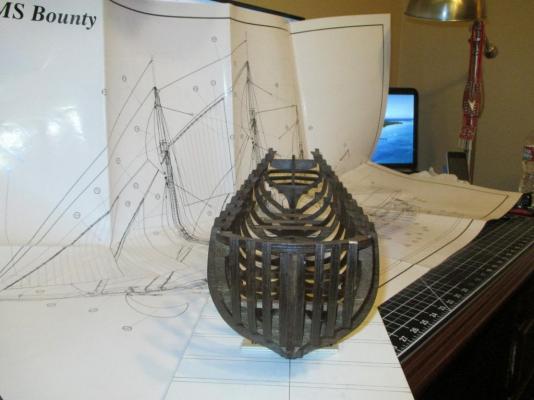
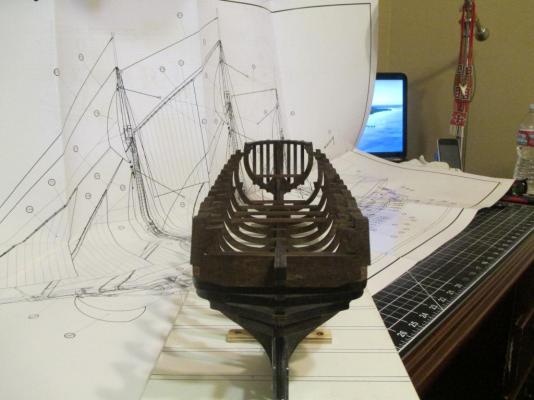
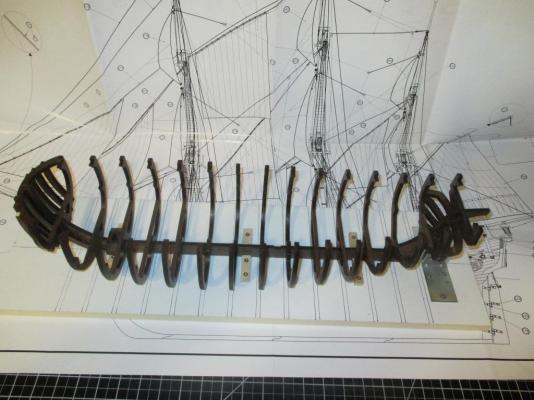
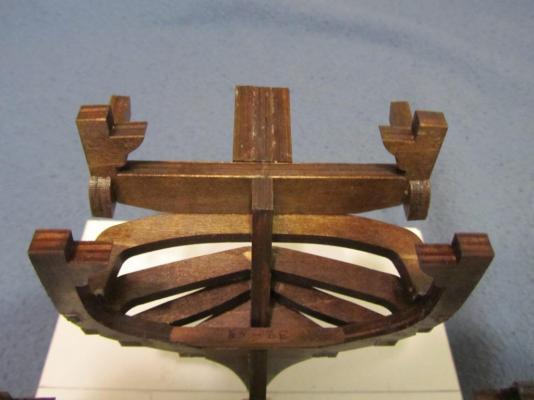
Next I assemble the keel and frames, and install the lower cross beam supports. First, I included a few pictures of the instruction narratives, picture book and one of the part spec sheets so people can get a feel for what one has to work with when building this model (most instructions are fairly clear but a few seem to have lost something in the translation). However, between the above directions, the plan sheets, and closely reviewing a couple other AL Bounty build logs I’v been able to navigate the waters so far I glued in the fore and aft most frames (4 and 39) and their lower cross beams first to be able to use the middle deck as a template to check the alignment of the remaining frames (note; I also clamped a few middle level cross beam supports in to help further support the middle deck as I aligned and glued each of the frames). After I completed gluing frames 4 and 39 I installed the bow stiffeners and the stern fittings/stabilizers as it made sense to get that out of the way at this point. Then I installed the fore, main and mizzen mast supports on the keel. I then installed the rest of the bow and stern frames 5 – 10 and 33 – 38 on the keel using the same square and leveling technique used on the first two frames. Lastly, I installed all the cross beam supports for the lower bow deck and the forward hold platform (bottom decks). Here is a sample of a narrative, a picture from the book, and a spec part sheet. Rear view of the aft most frame being glued in. Side view of the aft most frame being glued in (combination of machinist blocks, a square and a level to align each frame). Close up of the stern stiffeners Overhead view of the completed frame and keel with aft and bow stiffeners and stabilizers Stay tuned for planking the lower decks.....
-
Hi Steve, Wow, I just found your build log, all I can say is your attention to detail is amazing....the wood treatments, and other details like the anchor, rudder, coconuts....as well as the incredible "colouration" you did on the sails (not to mention the amazing display stand). Logs like yours really help beginners like myself.....gives me inspiration to try and raise the bar. Thanks for taking the time to maintain it. Boyd
- 625 replies
-
- 4
-

-
- bounty launch
- model shipways
- (and 1 more)
-
Hi Al I just found your log, very nice job so far. Nice to see you're back....I'm looking forward to seeing the completed model. I've got my hands full with my HMS Bounty right now, but I plan to build the Launch to accompany the display at some point. Thanks for taking the time to maintain the log. Regards, Boyd
-
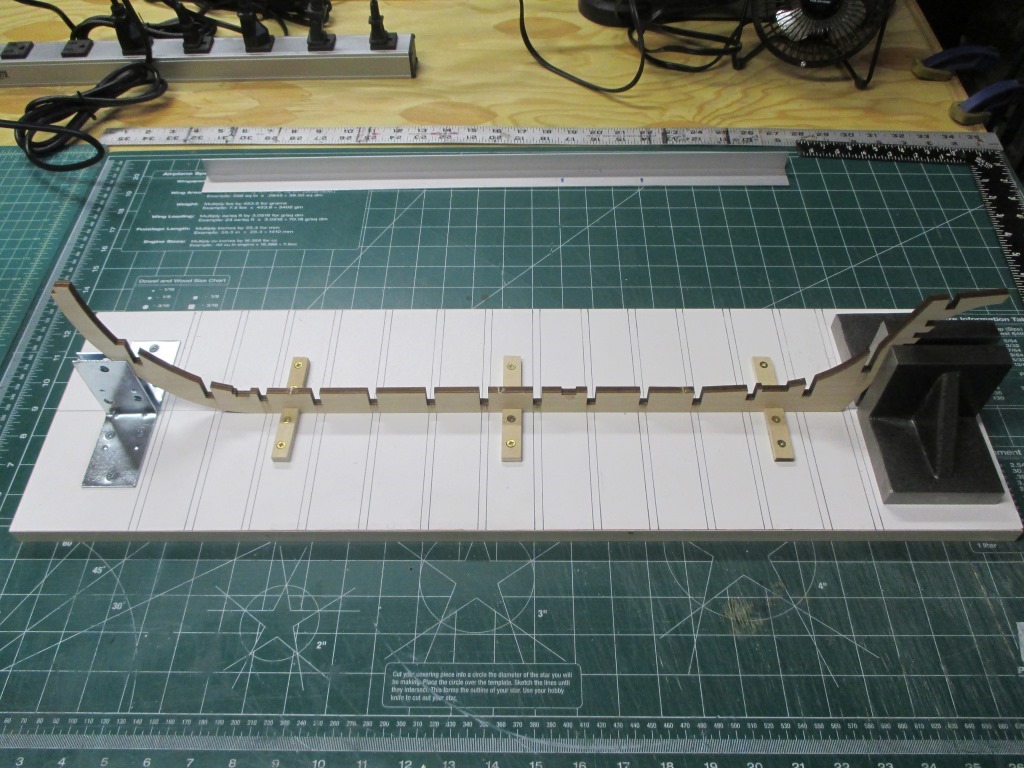
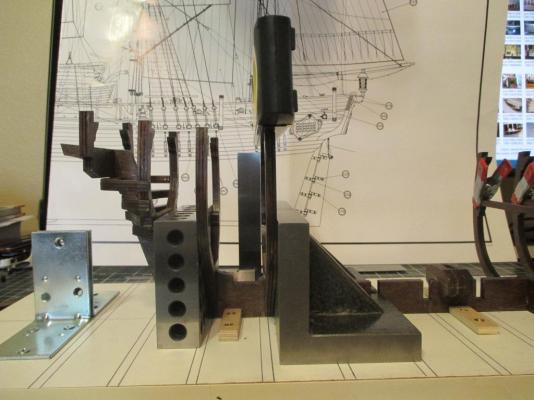
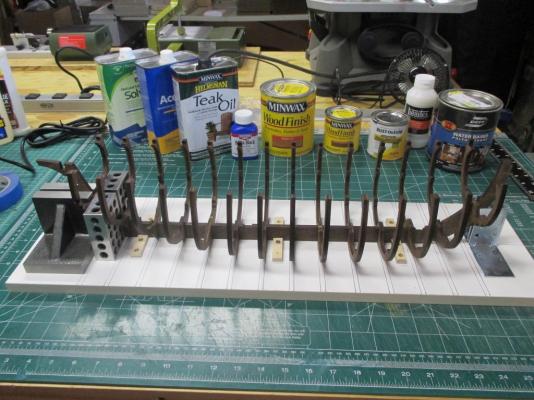
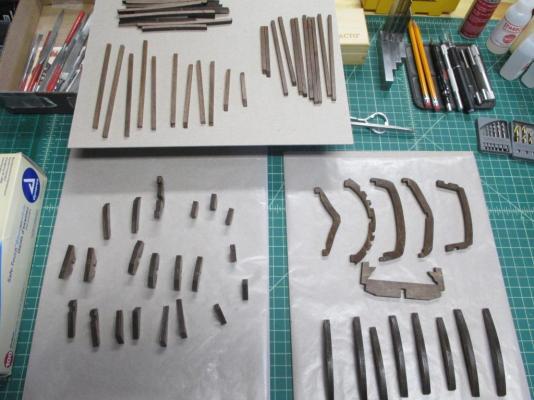
Hi Everyone, This is my first build log so needless to say I’m looking forward to sharing my experience as well as getting some constructive feedback from some of the more experienced builders. I choose the AL HMS Bounty kit because of the open hull design which I think will make a great display model. Also, I enjoyed all the Mutiny on the Bounty films so that provided additional motivation. I’ve spent time reading “The Armed Transport Bounty (The Anatomy)” which was recommended to me by one of the members (a great reference book for any Bounty model builder). I plan to do extensive modifications to the kit (many based on The Anatomy book), adding many additional details as well as enhancing/upgrading existing ones. I will also replace quite a bit of the supplied materials (e.g. Basswood and Walnut strips, Mast and Spar dowels, many deck furniture pieces, and most of the rigging lines/ropes, dead eyes, blocks, etc). I will note these changes/additions as I move through each stage of the build. Some might call this a "Kit Bash"....so call it what you will.... A few details about this model: Model: Artesania Latina HMS Bounty (AL22810) Scale: 1:48 Length: 36.5 inches Height: 27.75 inches I included a token picture of the box and the contents. After a few hours of reading the instructions and checking inventory all the parts appear to be included (although I didn't pay much attention to the wood strips,dowels and rigging material as they will be replaced). The quality of the materials and parts looks good to me (with a few minor exceptions) but what do I know. And the laser cuts on the pre-cut parts look very clean and seem to fit nicely on a dry fit (e.g. keel, frames and ply decks). Pre-construction activity: I believe in a solid foundation no matter what you’re building so I put together a build board first thing (as recommended in many build logs). I took a piece of laminated shelving I had and fastened three clamps made from ply to hold the keel tightly in place along with a couple of “L” brackets to hold either end of the keel. I’ll use weights and machinist blocks as I go along to support the keel and frames. I measured center on every frame and then checked each side to see if the height and width matched up. Unfortunately, several measurements were off by a half to 1 millimeter on a few frames. As such, I’ll definitely need to do some filing and shimming when the time comes. I also did a dry fit on the decks and they appear to fit quite nicely. When dry assembling the keel and frames most of the joints were tight with the exception of a few which needed to be snugged up. To get the frames nice and snug I used .5mm x 6mm shim pieces (.5 or less thickness x height of the notch on both sides to keep the frames centered). Build stand Dry fit of frames and keel after I stained all the pieces (ended up using a Natural Walnut stain) Additional parts for the keel and frames were also stained


-
Artesania Latina HMS Bounty questions
thomaslambo replied to thomaslambo's topic in Wood ship model kits
I got most of the answers to my questions from a couple of great books (The Armed Transport Bounty and Historic Ship Models). So, I'm ready to start my build log and please feel free to stop in and offer advise. Thanks, Boyd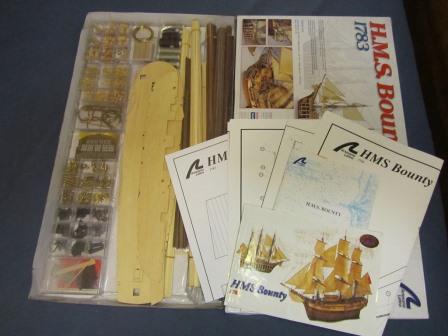
-
Hi Luca, Just finished going through your thread, really fine job so far. The Cutty Sark is one of my favorite ships and will be next on my list. Looking forward to your next update and following your progress. Cheers, Boyd
- 121 replies
-
- 1
-
-
- cutty sark
- artesania latina
- (and 1 more)
-
Hi Al, I found your build log in early January and have been waiting anxiously for further updates….as I just started the same AL Bounty build. You've been an inspiration for me as this will be my first major build as well. Your log is full of excellent advice/wisdom from both yourself as well as several others that have been contributing along the way. I recently started a build log and would really appreciate your input to aid in my humble effort. Keep up the great work Boyd
-
Regarding your comment about the Byrnes draw plate: I just purchased the Byrnes draw plate and I totally agree that it needs larger holes for bringing down larger diameter material. I also purchased bamboo skewers and was disappointed I couldn't use the draw plate (I don't have a small planner). However, with that said, it really is a great tool. Thanks for the detailed build log....the ship is looking great, and I'm sure you'll get the transom issue solved with a little elbow grease Added this comment - see Pat's post below...thanks much for the advise on how to size down the skewers prior to using the draw plate
-
Hi Ray, I'm new to MSW and this build log. I just finished taking a couple hours reviewing your log. What an incredible two year journey you've been on constructing the Diana....really an outstanding build to be sure. I can't thank you enough for taking the time to document at such a great level of detail....with both your informative narratives and simply top notch photography to go along with it Boyd
- 536 replies
-
- 2
-
-
- diana
- caldercraft
- (and 1 more)
-
Artesania Latina HMS Bounty questions
thomaslambo replied to thomaslambo's topic in Wood ship model kits
Hi Keith, Actually, it's Boyd. Ted made a comment on this thread regarding the recommendation of a book Funny you mention the motivation behind your purchase and build of the Bounty. That's exactly how I felt until I started doing research on the Bounty and other ships along with reading many other threads. I slowly began to feel somewhat obligated to try and pay more attention to scale and accuracy. Either way, I'll give it my best shot and learn along the way And thanks for the link, it's exactly what I have in mind. In fact I was just playing around with the pattern. I painted the deck black and will lay the planks with a slight gap to show the tar lines. Oh well the upload of a picture didn't work.....I need to do my homework on uploading pictures Thanks for dropping in and hopefully you 'll follow along when I start my build log. Boyd -
Artesania Latina HMS Bounty questions
thomaslambo replied to thomaslambo's topic in Wood ship model kits
Hi Ted, Thanks for the reply and the tip on the book. I just ordered it from Barnes and Noble. I've read the instructions several times and find them fairly detailed, but agree some of the translations are a bit confusing. However, the picture book seems to clarify most of the short comings of the narratives. I read a review on the AL HMS Victory kit and basically most of the plus and minus comments apply to this model as well. The instruction set basically ends when the rigging starts. So all we have to go on is the full size rigging sheet that's included. The book should help fill in the gaps. I also found an error in numbering on one of the "high tech cut sheets". Part 170 (the Bow Stiffener) is labeled/numbered as 77 which is actually the hold well box front bulkhead part. No big deal. Overall, I really like the kit, the wood, parts and laser cuts are very high quality and the instructions are good enough to get the job done (it’s a great kit for the price IMO). And as you know, the AL Bounty model makes a beautiful finished ship display. I’m really looking forward to the build I plan to start a build log at some point as well. Boyd -
I recently purchased the Artesania Latina HMS Bounty kit and I have a few questions that I hope some of the MSW members might be able to help me with prior to starting the build. Regarding this particular build; while I fully appreciate and respect historic accuracy and proper scale, I plan to put a little more emphasis on what looks good to me as opposed to accuracy and scale. I’m thinking about incorporating a few techniques of planking that may not have been used on the Bounty and aren’t addressed in the build instructions (e.g. joggling on the upper deck section, anchor stock pattern on the wales, and a three plank shift of Butts pattern on the decks and hull). I’m also going to add walnut veneer stripping to the exposed plywood frame and false deck edges on the open side of the model as recommended in one of the AL Bounty build threads I read. Here are the questions I would much appreciate some help or suggestions with. I know facts can be hard to find on the original specs so any best guesses are welcome: 1- Is this correct; the Bounty (actually the Bethia) was built in 1784 (18th century), so according to my reference books the average plank length appears to be around 20 to 24 feet for that period ship. So, at 1:48 scale the length of each plank would be approx. 6 inches (24 feet or 288 inches = 6 inches at 1:48 scale conversion). Note; this length works out well because the frames are 1.5 inches center to center. 2- What type of nail was used for deck and hull planking on the Bounty (the kit provides brass pins/nails)? 3- What type of planking patterns were used on the deck and hull of the Bounty (were the deck patterns consistent on all deck levels)? 4- What length were the planks on the deck and hull of the Bounty (not sure if the deck planks were typically shorter than hull planks)? 5- Any help pointing me to build threads (doesn’t need to be the Bounty) that outline the detail steps on how to complete joggling on the upper deck of a ship would greatly be appreciated? Any other tips, suggestions, warnings, ect., would be much appreciated. Just in case any of the following members read this post I’d like to thank them for their valuable input on a couple of AL Bounty build threads I’ve read: Captain Al – thanks for the AL Bounty build log, please keep it going. Captain Fisher – thanks for the AL Bounty build log, please keep it going. Dan Vadas – thanks for your valuable advise/comments and pics on the above logs. KeithW – thanks for your valuable advise/comments on the above logs. Also, for the great pics you posted of your finished AL Bounty…..well done. Thanks, Boyd
-
Hi Mike, Really beautiful build so far. The HMS Victory is one of my favorite ships. I'll be following this build with great interest. Thanks for taking the time to document the effort. Boyd
- 230 replies
-
- 2
-
-
- victory
- artesania latina
- (and 1 more)
-
Hi Dominic, I’m new to this forum and model ship building but I've been building some sort of model for the better part of 45 years. I’m reading many threads on this forum but paying particular attention to a few of my favorite ships; the HMS Victory, the HMS Bounty, the Cuddy Sark. Build threads like yours are invaluable to beginners like myself so I really appreciate the time you take to maintain the posts. You have a great start on your HMS Victory. I really like the technique you used for deck planking (the black paint on the false deck with spacing as well as the method you used to drill tree nail holes….very creative as well as efficient). I look forward to following your progress. Boyd T
-
Hi John, I'm another late arrival to the party. The build is looking excellent and thanks for all the great info on your website. I'm a longtime fan of Proxxon tools/products and have many of the power tools you list on the web site. I also just ordered one of the serving tools from Vitaliy thanks to you. I just signed up on MSW, you can check out my intro if you like in the “new to the hobby” section. Now that I have the time I’m finely getting into model ship building (always knew I would, it was just a matter of time). Thanks for taking the time to maintain the build thread and the website. To guys like me (new to the hobby) these build threads are simply priceless. Boyd
- 2,250 replies
-
- 2
-
-
- model shipways
- Charles W Morgan
- (and 1 more)