jbshan
-
Posts
1,222 -
Joined
-
Last visited
Content Type
Profiles
Forums
Gallery
Events
Everything posted by jbshan
-
 Welcome to the world of Philadelphia. There are several folks with logs here. If you saved or can get the issues of Ships in Scale that contain the build by Kurt van Dam that is another resource.
- 228 replies
-
- 7
-

-
- gunboat
- model shipways
- (and 1 more)
-
No, Mike. Ideally they each had two hammocks so one could be washed and the other used. British practice of course, and I have doubts everybody slung a hammock every night purely from lack of room below decks. Many 'standard and customary' practices I doubt were used on these vessels.
- 843 replies
-
- 4
-
-
- niagara
- model shipways
- (and 2 more)
-
Deck planking
jbshan replied to bluenose2's topic in Building, Framing, Planking and plating a ships hull and deck
John, Les (in Canada) is probably only going to find poplar in the 'Quaking Aspen' variety, 'populus tremuloides', (although there is also a 'Canadensis' hybrid of 'black poplar'). This is a softer whitish hardwood with unobtrusive grain, used for many wood products, furniture, pulp for paper, toothpicks, chopsticks, match boxes, snowboards and electric guitars among others. The green tinged 'Poplar' is a higher quality wood and is from an unrelated genus. 'Tremuloides' is a boreal forest tree so northern and colder climates. It turns Rocky Mountain hillsides a bright yellow in the fall. -
Don, there were something like 130 on board, on the day. 20 guns, 5 per gun gets you to 100 really quickly.
- 843 replies
-
- 4
-
-
- niagara
- model shipways
- (and 2 more)
-
Deck planking
jbshan replied to bluenose2's topic in Building, Framing, Planking and plating a ships hull and deck
Maybe a bone-straight, grade A select 2 by 4. The grain might defeat you though. It isn't apparent, but the grain is coarse enough to drag your tools off course, and it will allow an edged tool like a plane or scraper to work in one direction and not the other. Get two planks glued down adjacent that the grain runs in the opposite direction and it might be interesting. -
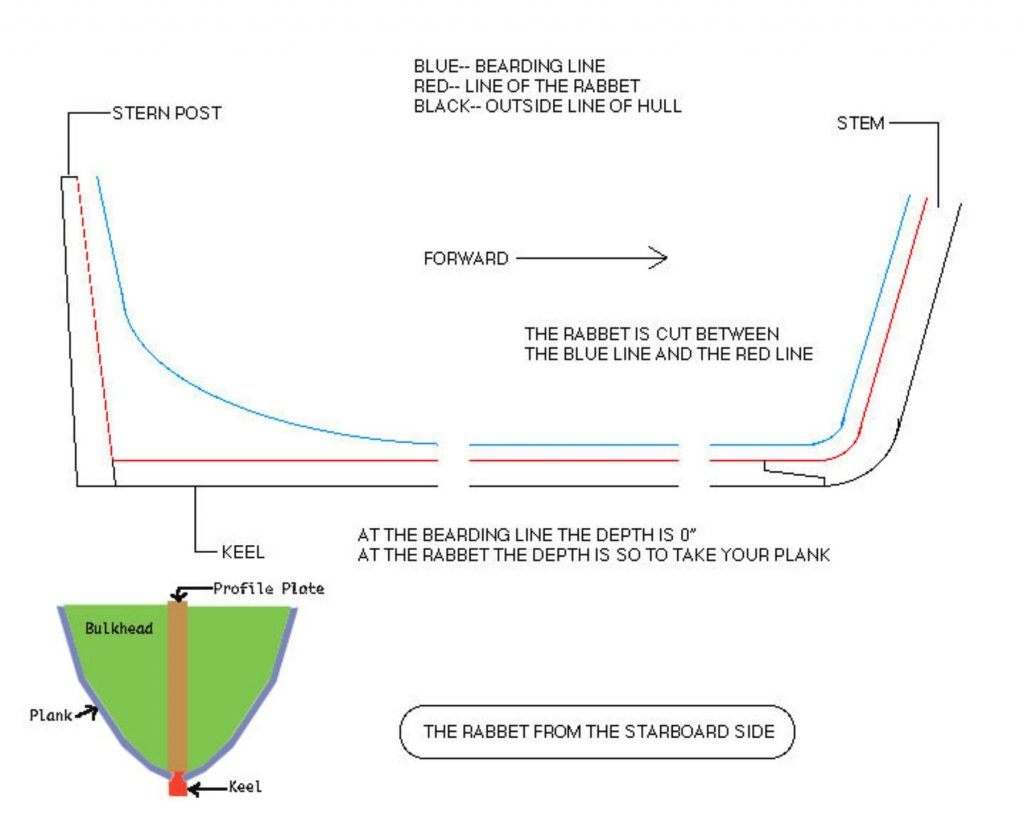
When I say 'keel' I mean the squarish shaped strip in the outside of the bottom. My kit of another ship had this as a piece to be added to the profile plate, center keel plate, I've seen it called lots of things. If you glue on that squarish strip all along the bottom, it becomes really difficult to then thin the center plate with sandpaper without also thinning the keel, which needs to remain square. The rabbet is a thinner area on the center plate, where the edges and ends of the hull planking will seat, between the ends of the frames and the stem, keel and sternpost. Along the stem and bottom of the hull it is a notch. At the stern it is a large area with a concave curve along the forward edge and meets the sternpost and rear portion of the keel, at a matching depth to the keel and sternpost. Here's a sketch I did for our club newsletter.
-
They look pretty good, Mike. You can tie a couple of ropes across the ends to close up the troughs, and don't forget if needed you can do them at an angle for clearance.
- 843 replies
-
- 4
-
-
- niagara
- model shipways
- (and 2 more)
-
Edge bending doesn't work well until the plank approaches a square cross-section. It causes a lifting of one edge which can be hard to get rid of after the plank is on the hull. Try it with your paper strips, it'll show up soon enough. The char isn't bonded very well any more with the wood it came from, so glue can be problematical. I have used it to help indicate the shape when fairing the hull, although a batten laid on the formers is more accurate, and you may have to dub off or pad out some places. The char won't show you those places. You will probably in many instances want to get the edge back to square; the laser cuts a slight bevel into the edge. I have used a machinist's square as a scraper to keep the edge squared up, on other places than just the char as well. I have a model sitting on the shelf that I 'inherited' and the first person working on it followed instructions and glued the keel on before cutting the rabbet. (That's the process Richie is describing.) Unless I debond the keel I will have to try to shape the rabbet with keel in place, far more difficult than before it is installed.
-
You might be able to cut and fit all three clinker planks, starting or at least keeping in mind the shape of the top one before gluing any of them on. Use paper or thin card to make patterns before you 'waste' a lot of wood with rejects. If you have some dividers or a compass, hold up a strip of card, taping it to hold it in place, wider than you will need, and mark the top edge to match the rail. When you have the top matching the rail, mark and cut to an even width. Work out the overlap between planks and mark the second from the first, with a little extra for the lap, etc. When you have them all fitting, make them of your thin wood. You might want to wet them a bit first and hold them onto the hull until dry before you glue them in. Mark and measure about four times what you think you need to. Welcome to the wonderful world of planking.
-
Your 'oarlocks' are 'thole pins' and are merely pegs or short lengths of small dowel. Just drill holes and stick them in. On the plans you show, there is also a short length of a 'wash strake' associated with the thole pins, which you would make from scrap strips. Again looking at the plans, it is a flat bottom and the footboards are laid right on the frames. Chuck's good. Most of, if not all of what you need is there, if you hunt for it, checking all the views of the particular feature. As far as doing a bread and butter boat (and yes, the wood is the bread and glue is the butter), I have done one, I didn't like it because I'm no sort of carver and now I do them from scratch plank on frame. A correspondent at the time advised to make the hull thin enough and even enough to look like an eggshell when held up to the light. The plank was less than an inch thick, so in your scale, less than 1/64" thick, just for future reference. A ship's boat of this time frame was never intended for saving life, as you point out it's far too small and there's only one of them. It was solely for transportation, ship to shore or ship to ship. It was also used for bringing stores out to the ship, water, vittles, firewood, etc. If you follow the link in my signature, there should be a couple of pics of my ship's boat for Lexington of 1776, just to show one example.
-
I have to echo and reinforce Kurt's recommendation for both editions. They aren't a be-all and end-all of model building, but there's tons of stuff in each volume, organized in sections for ease of reference, and they are spiral-bound so they open flat for ease of use in the shop where you may have glunk on your hands and don't want to have to hold a book open.
-
And ... having said all that, what you have seems to be a pond yacht. Those are sometimes restored with a fine finish rather than as a strictly scale model. In that case, I would suggest using the current deck surface, mounting the structures on top, to preserve the appearance of the nice piece of wood making up the hull or deck surface.
-
Prototype practice would be to install the structures then plank up to them. It gives a better seating for the framework of the structures, makes the caulking of the deck more efficacious and allows for the replacement of deck planks without disturbing the structures. Having said that, many build their models the other way around.
-
Deck planking
jbshan replied to bluenose2's topic in Building, Framing, Planking and plating a ships hull and deck
Maple is indeed excellent, nice and light in color, but it doesn't sand or scrape down as fast as a softer wood. Surprise, surprise. Rock, hard, sugar, all the same tree. You might look for birch, it's kind of halfway between the normal kit supplied stuff and a really hard wood like maple. They make a lot of furniture out of it, so it must be pretty durable. Look out for the source; if the wood is sourced in China, it'll be a different wood than something of the same name here. It might be just as good, but be careful on mail order or otherwise not being able to put hands on it. If it can be a little darker, you might seek out old rulers or other drawing/draughting supplies. They can be made from boxwood, and if you have the capacity to mill your own stock might be a source -
Perhaps better to put a dehumidifier in the room with your models, if you're lucky enough to be able to have them all in one place. If you're in a constant rainy region, however, that might not be helpful.
- 396 replies
-
- 2
-
-
- Idea
- Bright Idea
- (and 1 more)
-
It is also one of those details that, if done incorrectly, only shows up the builders unknowingness of his subject, like many treenailers or model sailmakers. Subtle, unobtrusive and delicate are almost always the watchwords of the day.
-
Always trying to save work for somebody else, that's me.
- 843 replies
-
- 3
-
-
- niagara
- model shipways
- (and 2 more)
-
If the hammocks stick up too far and get in the way, you could lay them on a slant.
- 843 replies
-
- 2
-
-
- niagara
- model shipways
- (and 2 more)
-
This sounds like a volume every maritime history buff should consider. There were two battles on Lake Champlain with many similarities, the one in 1814 described in this book, and the one in 1776. Both took place between an American squadron that was anchored in a bay that was protected by the terrain from an enemy arriving from all directions except the south, both took place in conditions with a north wind, which kept the enemy at the disadvantage. Both were attempts by the British to invade and were accompanied by large numbers of troops and both, being successful, forced the invasion to retreat back to Canada, in the earlier battle, until the next year, in 1814 until peace was settled later that year.
-
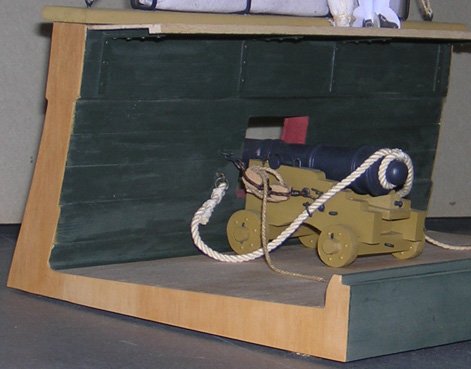
I haven't done any of this, so use grain of salt, please. Harder surface under copper when pouncing so less pronounced dimple. Work from front, so it's an actual dimple, not a bump when applied to hull. Burnishing with a tool shaped like the back of a spoon might give you the smoother look you are after. I suspect a pinkish color because of the constant abrasion of traveling through the water, but dull, not shiny. Your pic of the copper after a dull coat is getting close. When you get to that point, consider veneer stock for the ends. I finished a couple of sectional display mounts for ship's guns that way.
-
As you say, off the top of the head without doing any research, old muzzle loader about 1200 fps, no matter the caliber. Larger ball needs larger charge, but result in fps stays about the same.
-
Walnut ink is closer to the 'tar' color in those swatches. It lacks the redness shown in the burnt umber samples, but isn't quite as available. Perhaps, as suggested in one of the posts, a 'sepia' might get you there, but I don't know if you'll find it in an acrylic paint. I don't think you want to use watercolor or guache, an opaque water color.
-
As another source, Swix® the cross-country ski wax people make pine tar for wooden skiis. You smear it on, let dry for a while, then burn off the excess. Sound familiar? Burnt Umber paint, I use artists' acrylics, is very close to the pine tar/walnut color we are looking for. It can of course be thinned a bit for lines that haven't yet gotten twenty coats of tar, that are merely dirty. You might also find walnut ink. Being artists' supplies, these should have longevity enough for the worst of the purists.
-
That why I put it there. I'm not doing a traditional 'build log' since I have so many things going on (4 at last count), but I hope to be able to use it to post things that can help others over humps and bumps along the way. One other hint, not in any way related to where you are at on your model. I've seen a lot recently on how to steam or soak or otherwise prepare plank for bending. Try saliva. It's a naturally occurring solvent that penetrates the wood fibers and allows them to bend more easily. I've used it on two models so far. Just don't use the technique on ebony, the wood made by the devil.
-
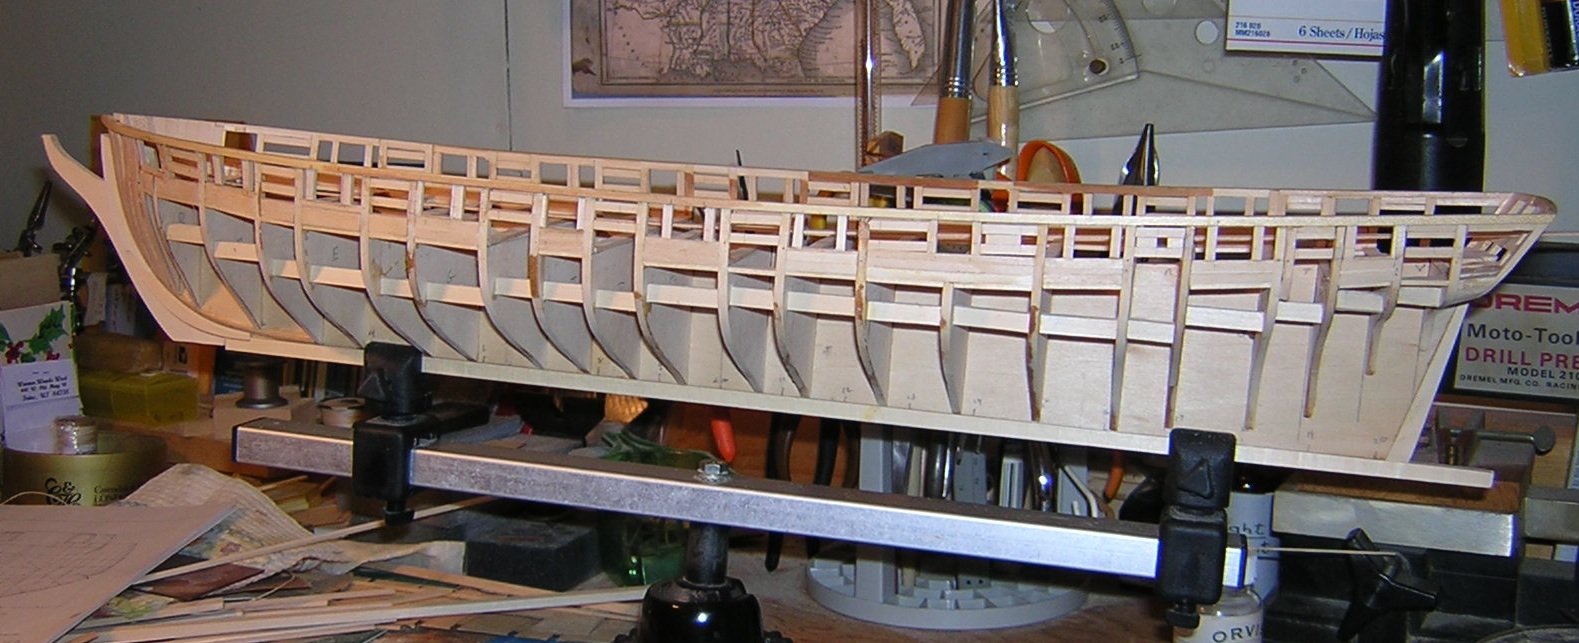
There you go! Nice shapes on that blocking. Before you get there, I used the plywood bulwarks to mark out on the hull for port locations then threw the (put into the scraps box) plywood. I inherited this model as the basic 'egg crate' with plans sheets so have had to mostly do it off the cuff. Note I have installed stiffener blocks, sheer piece, both for stability, blocking outlining the gun and oar ports, and blocking where the shrouds will be pinned. This will be in the thickness of the hull, covered both sides with the outer and inner planking. I also removed the plywood under deck and will use stripwood of the proper thickness for the deck. The bulkheads are close enough together not to need the sub deck, which is pretty thin in any event. The knee of the head and cutwater was not well done, and the bow blocks were too small, so I redid the stem with several pieces (which don't show well here) and you can see the hawse pieces I added to pad out the bows of the hull. It seemed easier to use the correct forms to get to the final result rather than make up some other system myself. Nirvana, you're pretty quick with the 'like'. Try it with the pic I intended to send with the text.