Lt. Biggles
-
Posts
346 -
Joined
-
Last visited
Content Type
Profiles
Forums
Gallery
Events
Everything posted by Lt. Biggles
-
 Won’t tell you how many crew will be on when completed but let’s just say more than 59... less than 61. I am liking the subtle change they add to the ship
- 211 replies
-
- 5
-

-
- prince of wales
- tamiya
- (and 2 more)
-
This is certainly the best place to be hanging out! 😂 While you have been all fighting over the seats I’ve been learning a lot while I try and work out what aircraft I’ll be building. Happy to have you all along for the ride! For now I’ll just be thinking out loud on here and can summarise what I learn about New Zealand’s part in the RAF as we tend to “slide under the radar” due to our small size and just tagged along and helped support all the major nations operations. In almost all the RAF squadrons there was a kiwi flying at some point during the war.
-
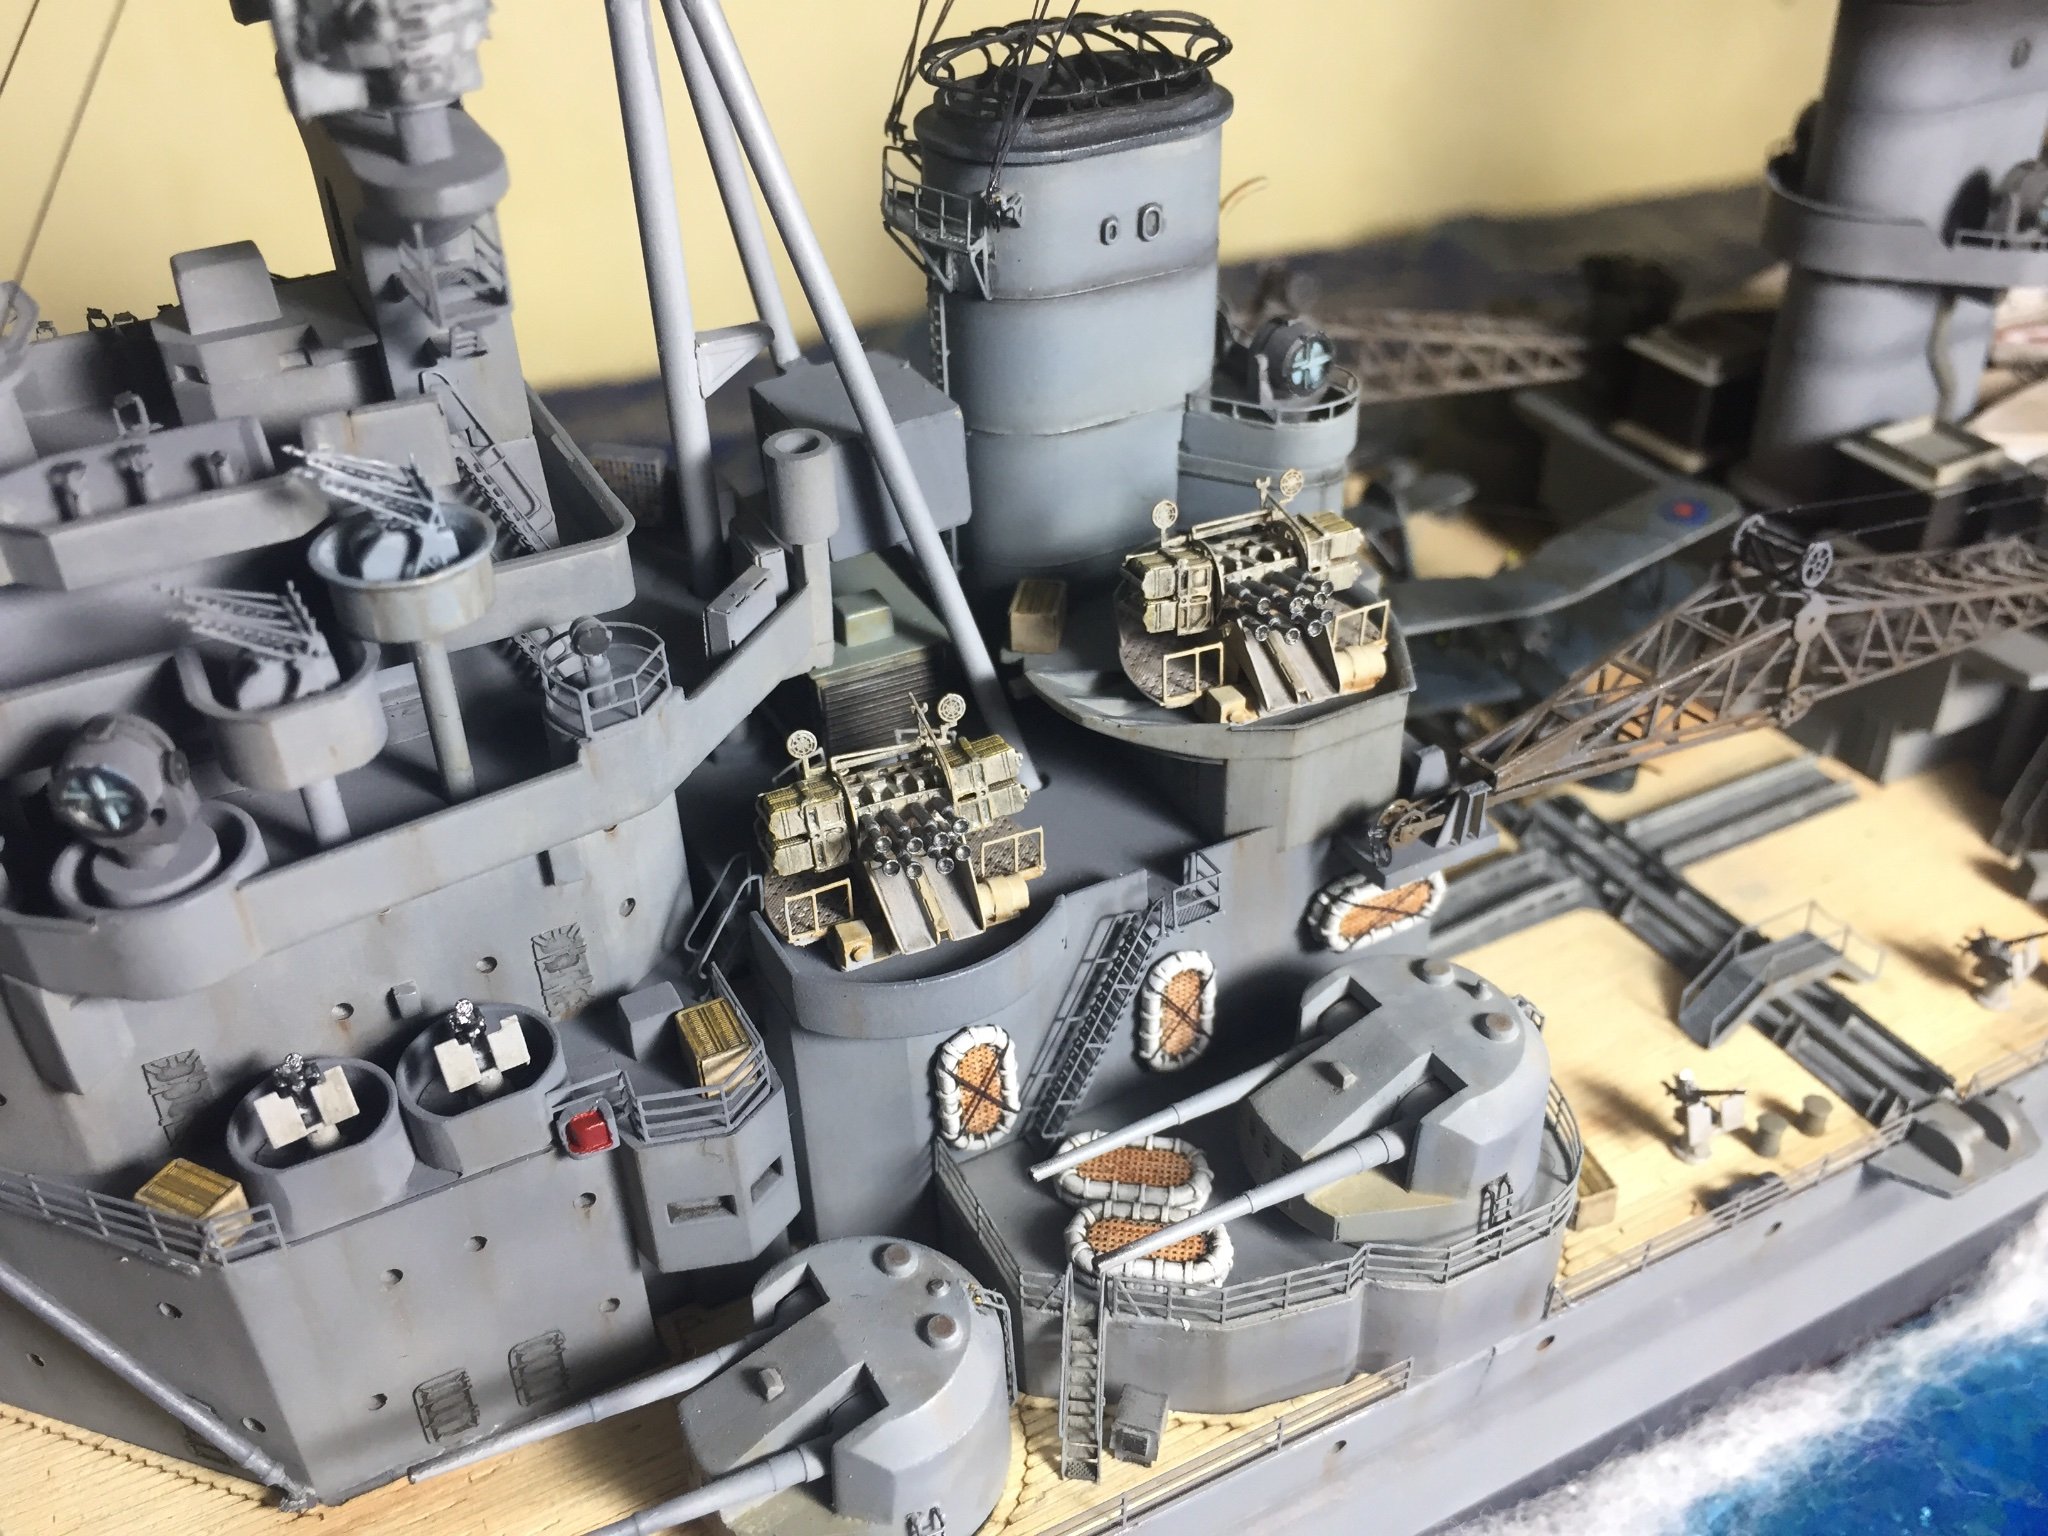
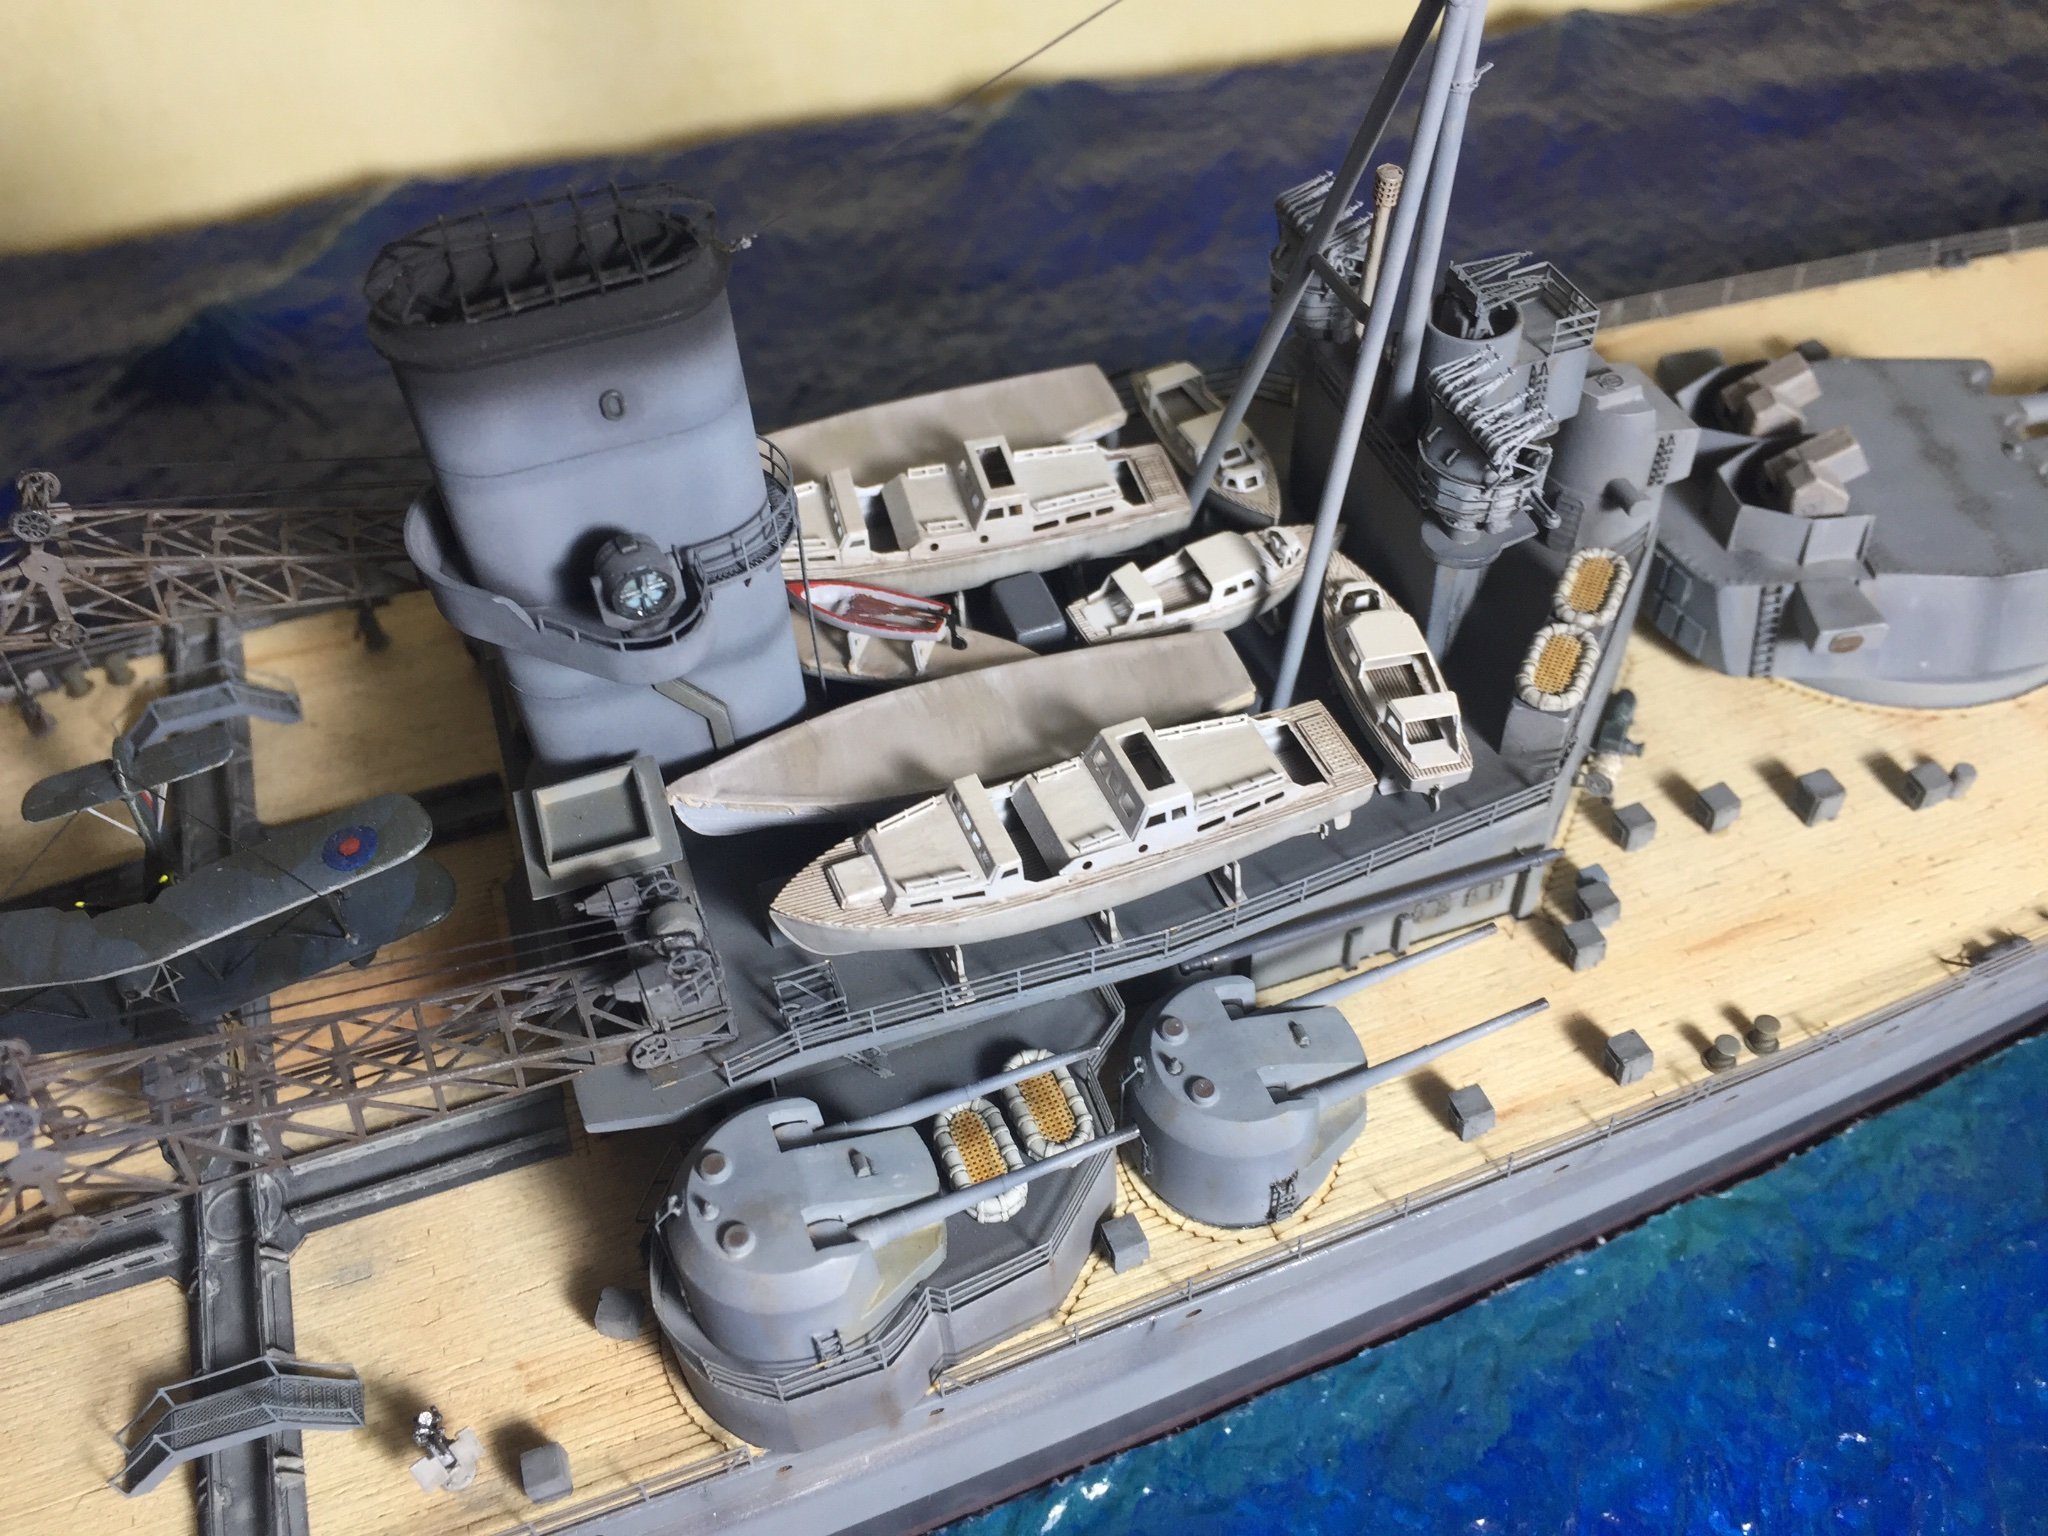
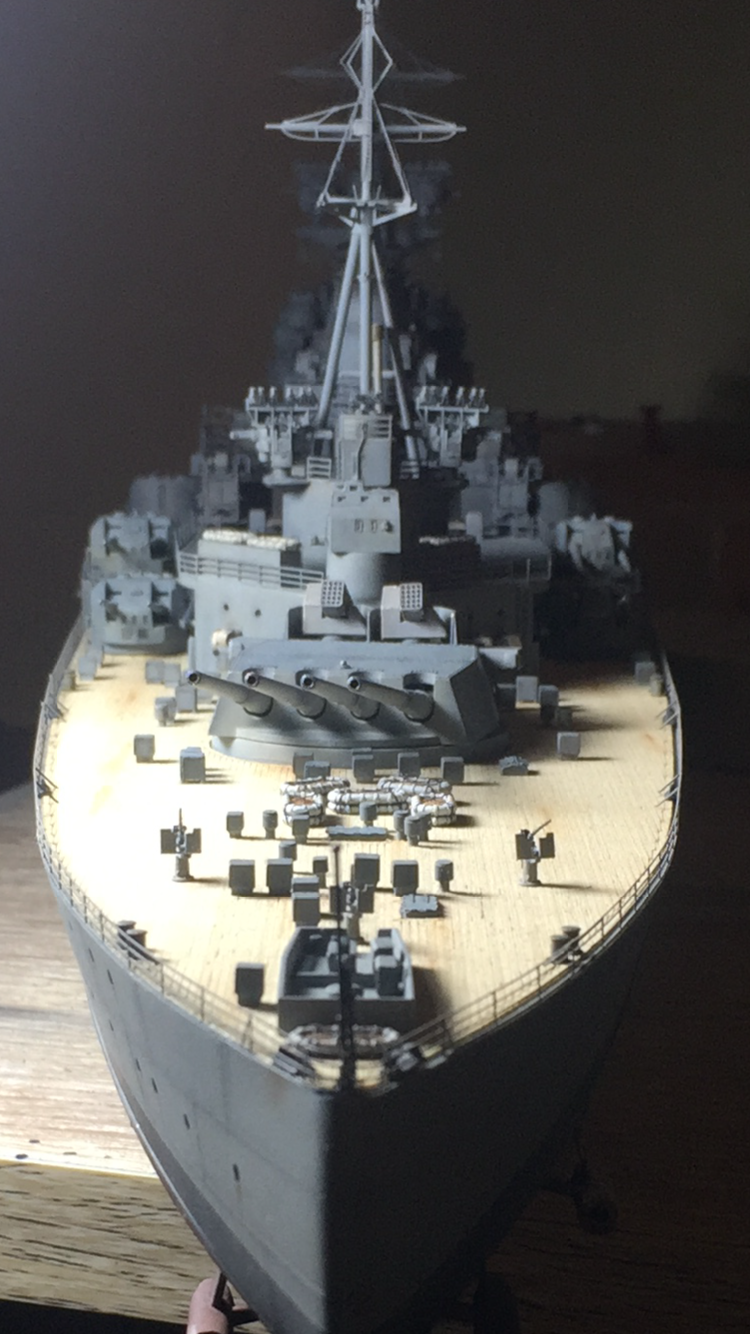
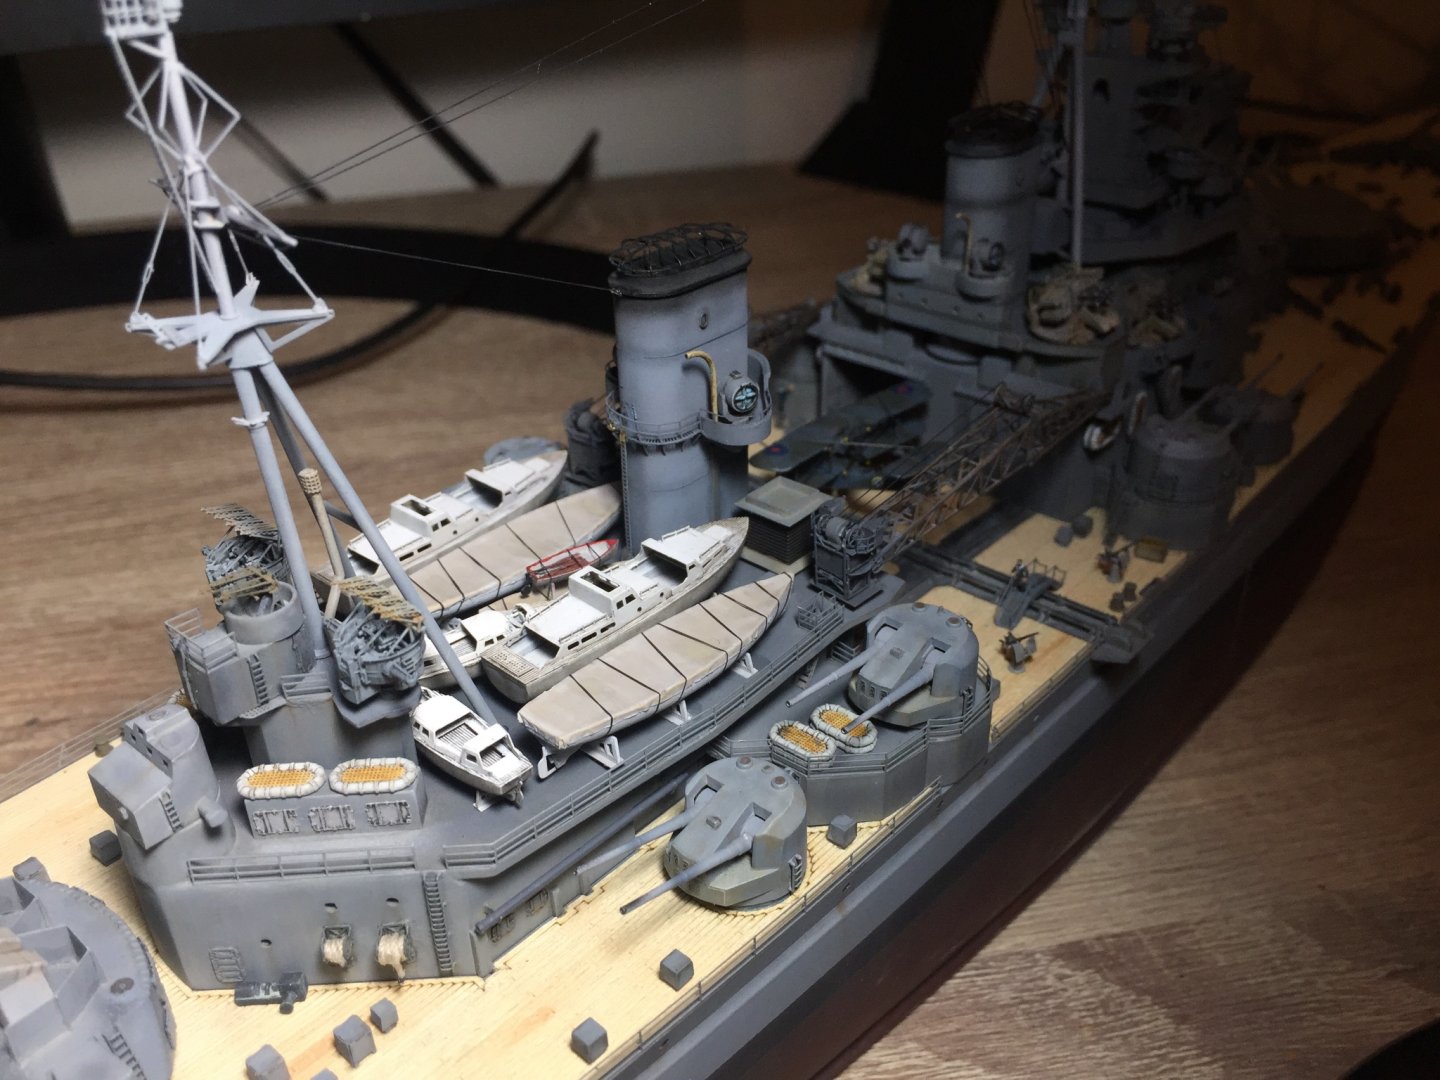
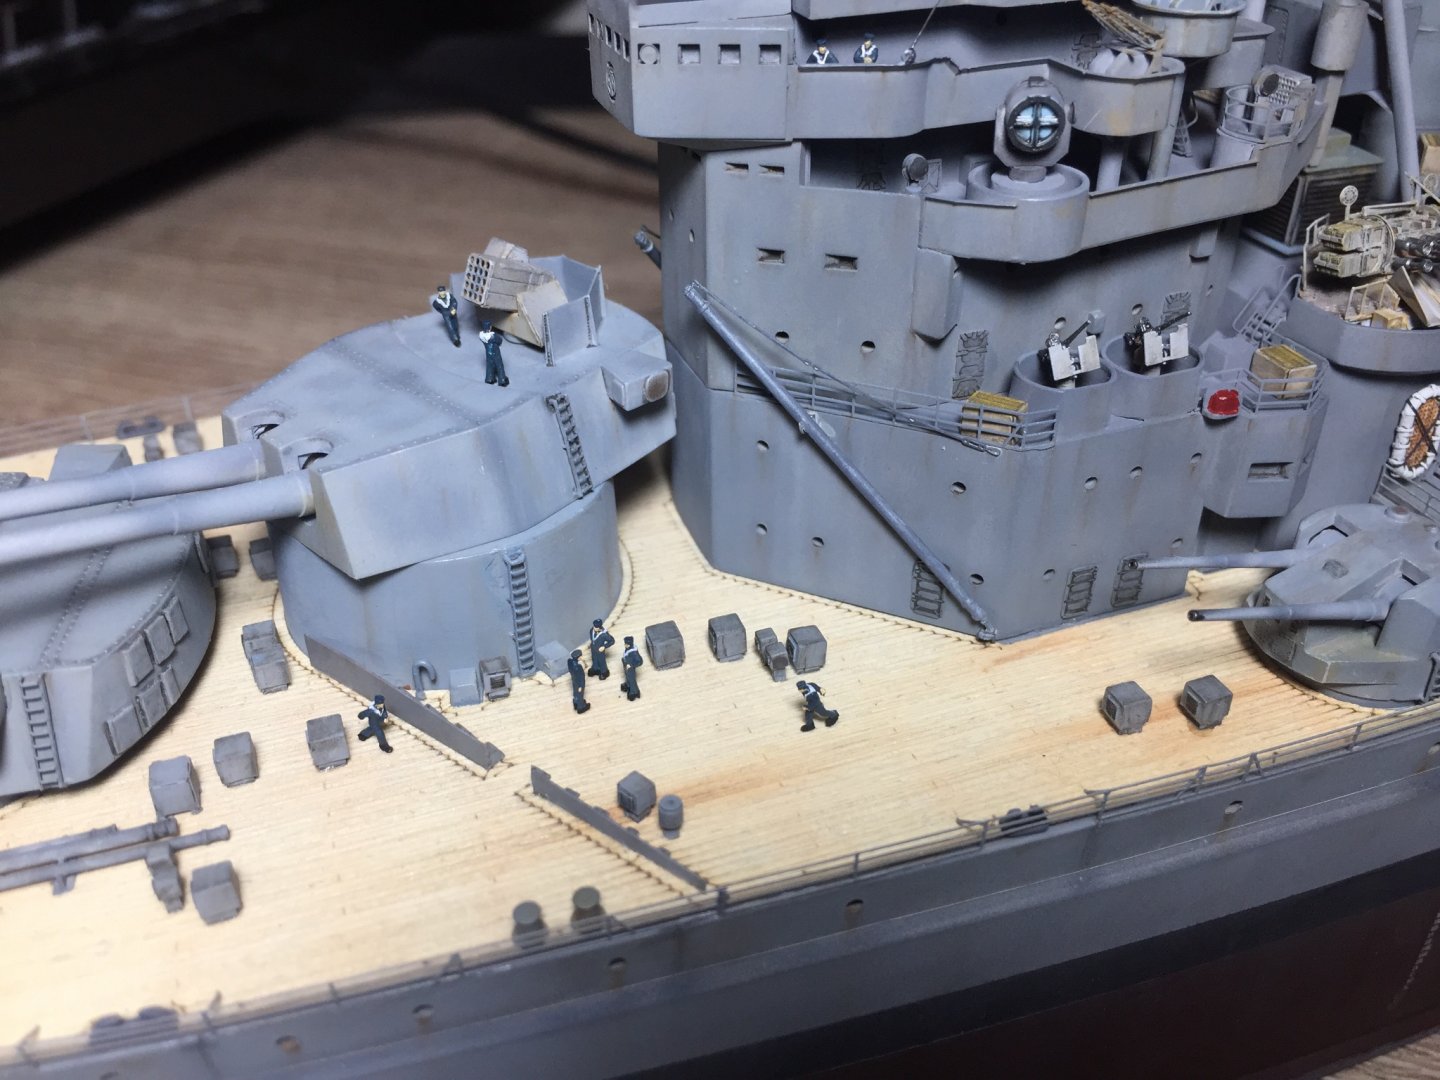
I completed the tie downs, put ropes around one of the boats that didn’t have a cover on it but it just looked wrong so only wrapped the covered boats. as for the sailors well they take ages to paint and then once on the ship and I sit back they disappear. But look good when you are up close! Here are some close ups of some groups and then the last pic is a full ship view were they and all the other details merge into being a ship. It quite interesting. super close to being finished now. About 45 more guys to paint, some highlights and touch ups and of course that white water...
- 211 replies
-
- 9
-
-
- prince of wales
- tamiya
- (and 2 more)
-
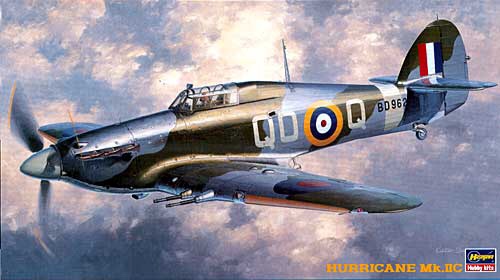
So decided to take you guys up on your invite to join you down the back here! im just a few weeks away from finishing my ship so was starting to wonder what I’d do once complete. Needed something smaller and fun after the investment of time in a ship build. Ordered the kit and just a few extras so far like seat belt and canopy masking. Won’t do any open hatches or internals apart from the cockpit and that I may enhance slightly but will see what the kit one looks like. This is my idea which I did back to front really. I don’t want to just make the plane from the box I want to find a real pilot and remake their plane at least for a guide. As I’m from New Zealand I’ve been doing some research on people in the RNZAF who flew the Hurricane Mk II and if I can find anyone from around my area “east coast of the North Island” then that will be my pick! If I can’t find one then just a fellow Kiwi who flew preferably in the European theatre. I just like it when there is more meaning behind a project. Feel free to chat all over over this log and help me out. I work as a pilot so at least I should know what most of the things do on an aircraft unlike my knowledge of ships haha, but I’ll not start this build until my ship is complete so a few weeks away yet I’d say.
- 107 replies
-
- 12
-
-
Found out over the last few days that there are “non ship builds” on the site! I started by building planes as a teenager. Great work on those internal details mate! Looking good, now I’m thinking I might try a plane next
-
That cockpit looks amazing!
-
Pro tip: do the tie down ropes on the boats before you glue them down... you can have that one for free! Haha Maybe black stands out too much and I’ll Change them to a a more hemp colour. Just might be a lot thicker. But I do have a question. would the tie downs be ok at random angles like I’ve got or would they be set perfectly parallel?

- 211 replies
-
- 6
-
-
- prince of wales
- tamiya
- (and 2 more)
-
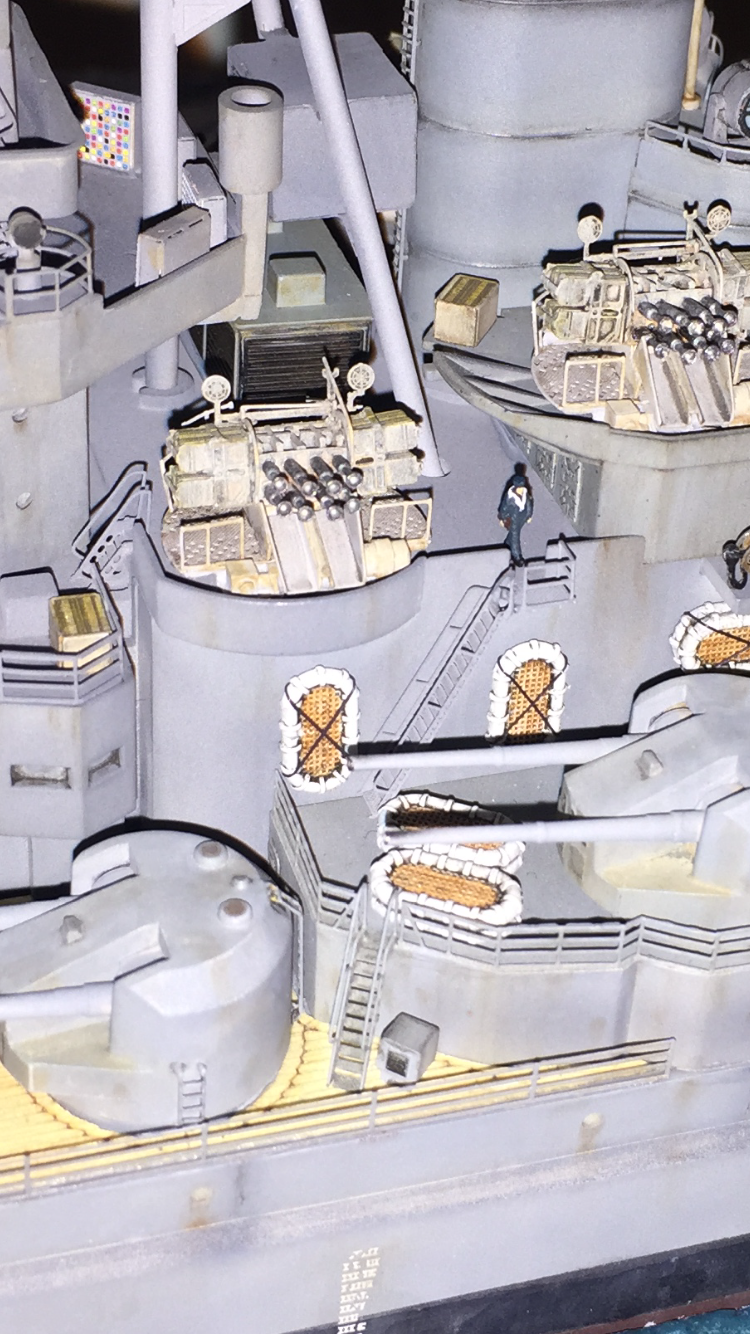
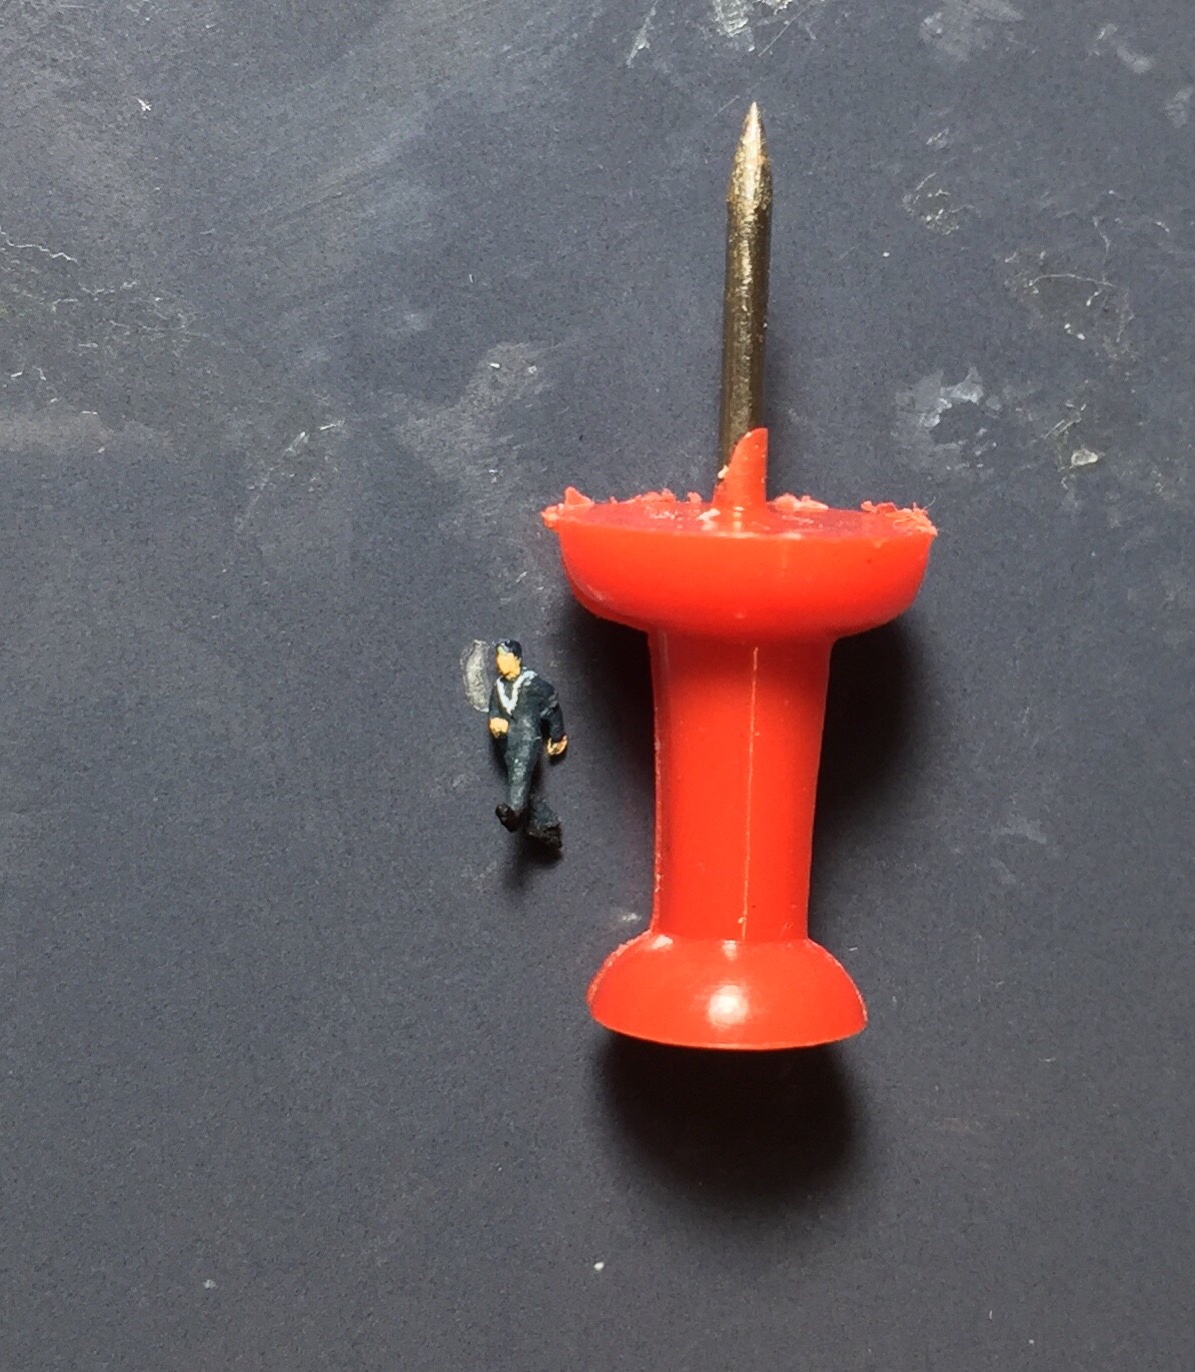
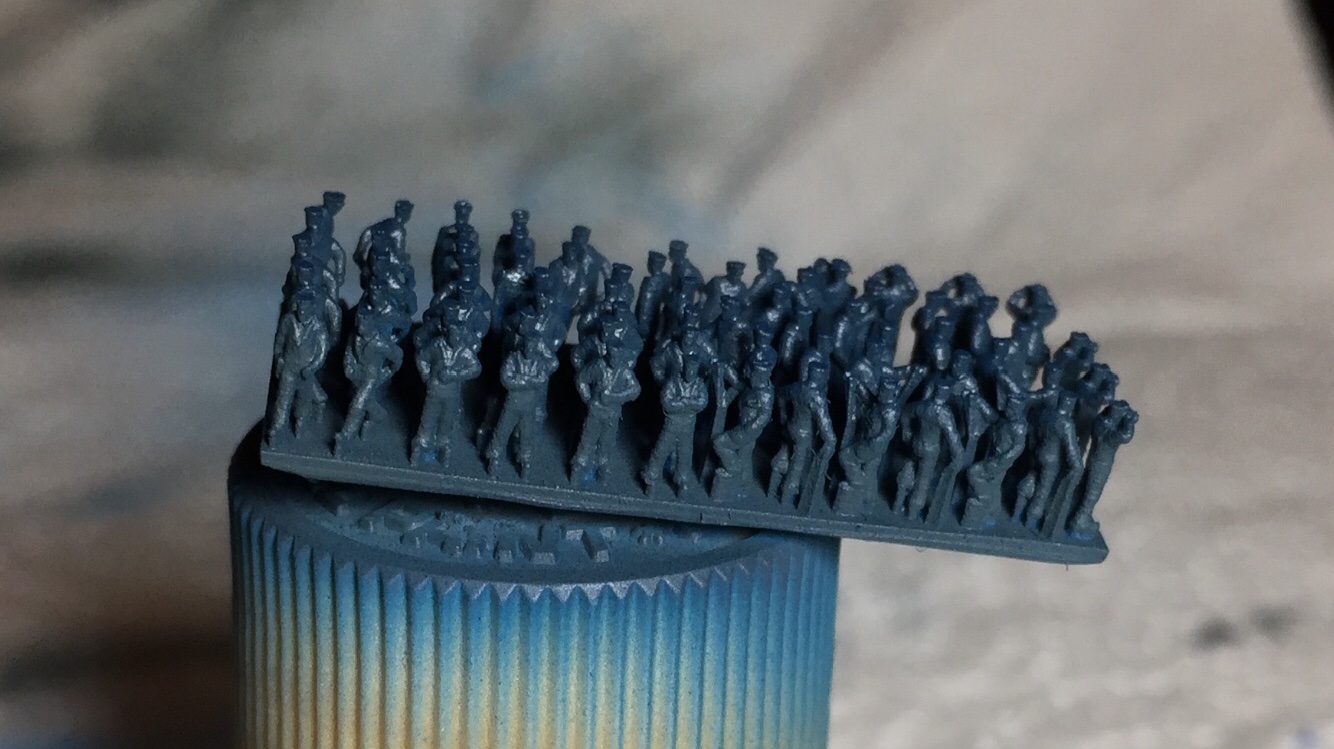
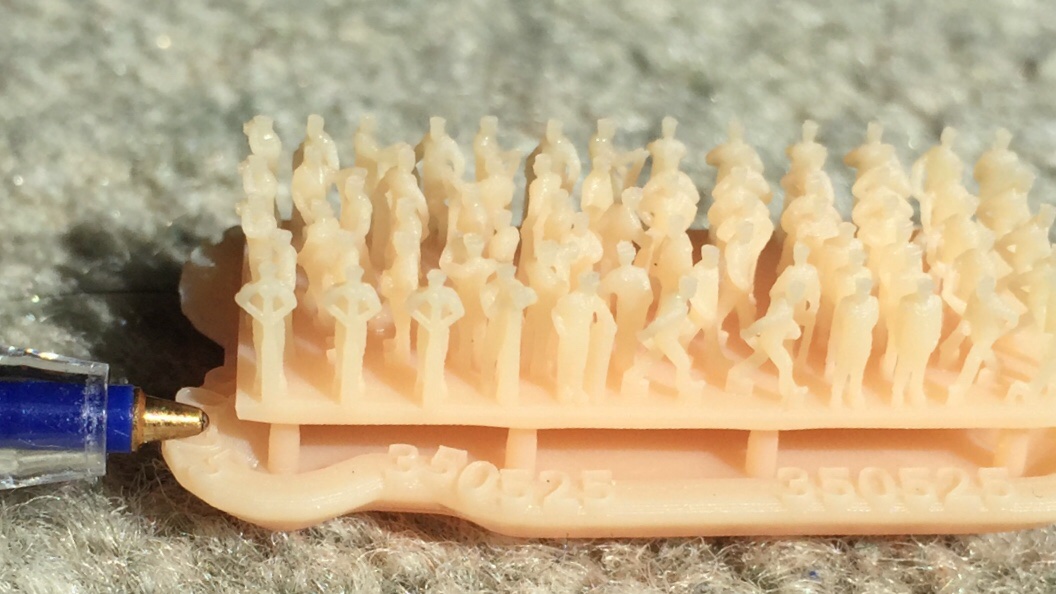
I do like them, as tiny as they are they are still plenty big enough to paint some details. I’ve got great vision and they are right on the edge of my sight so maybe magnified is the way to paint. The officers have buttons on their shirts and some have fingers... so detail is great and 1000 times better than being flat. I tried to find posts with others painting them for an idea on what to do but apart from a few builds with the figures on but already completed I could find absolutely nothing on how to paint from others posts so I just have to make it up as I go. Have learnt they are too small for washes and also a wash just makes them gloss and they need to be super matte. Tough part is they are all together and no way to separate them for painting and removing them from the base has caused a few broken legs. Nothing super glue won’t fix once you find the pieces... I really like them
- 211 replies
-
- 8
-
-
- prince of wales
- tamiya
- (and 2 more)
-
Thanks guys for the info! Makes sense and I’ve been checking out as many pics of ships where you can see crew to try get a feel for where people would be located. Also there were 3 sets of sailors and the one I got is mainly people standing around, lookouts and walking so have to try fit in their poses to what they can be doing.
- 211 replies
-
- 5
-
-
- prince of wales
- tamiya
- (and 2 more)
-
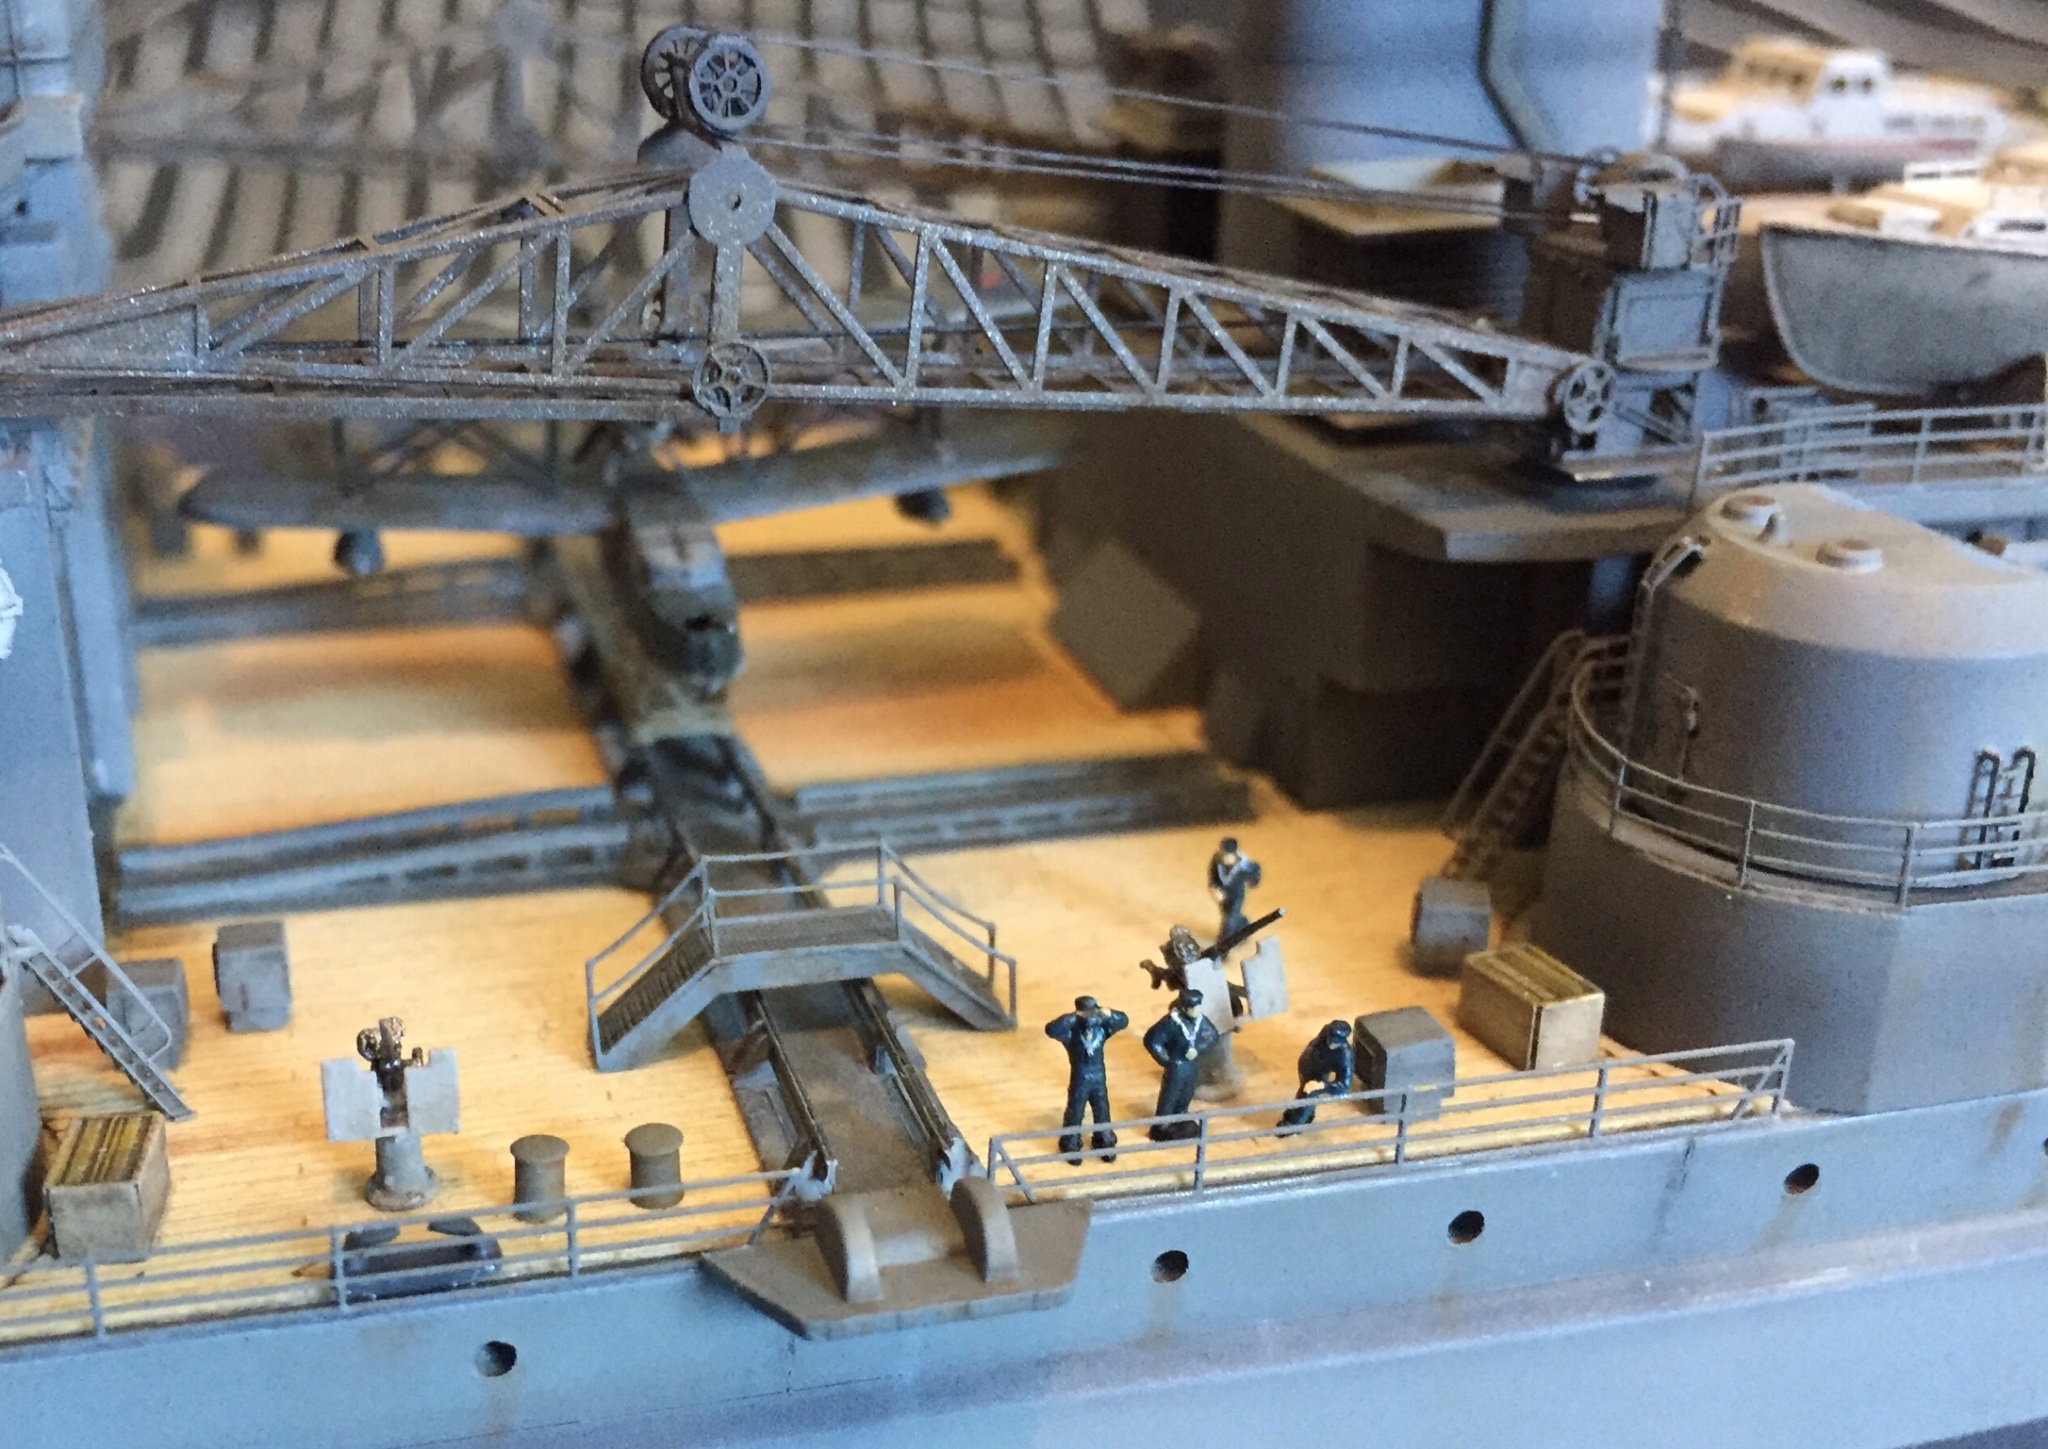
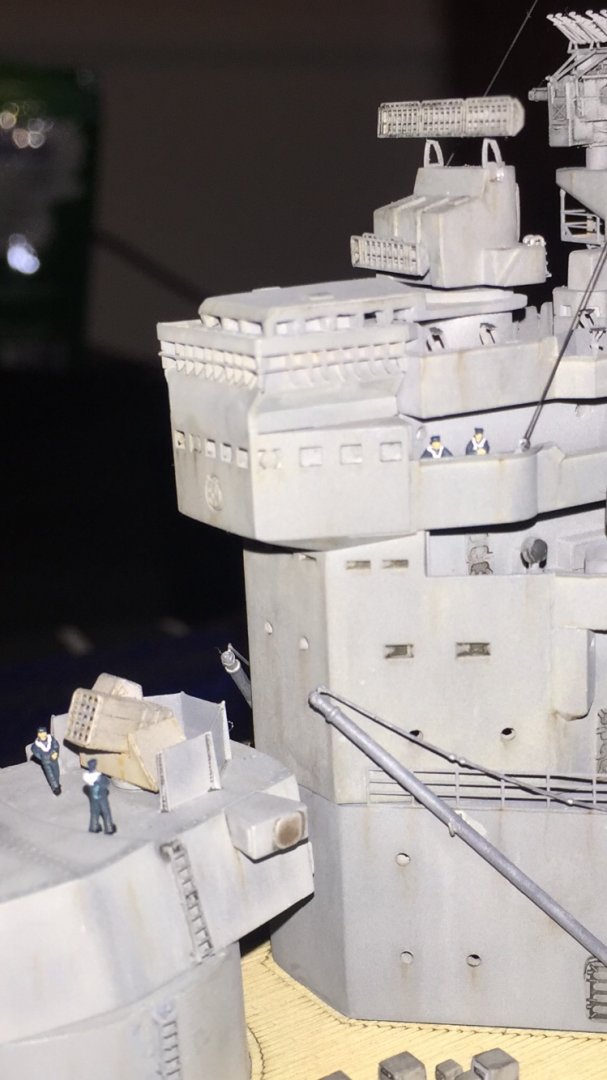
Awesome info thanks. I’d hate to have people in places anyone “in the know” would look at and think... those guys shouldn’t be there! Haha would the same idea be there if the ship isn’t in action? In my mind the ship is more in a standard cruise but on alert with no enemy insight. Would most men be stationed around the middle of the ship and none behind the rear main gun and forward of the front main guns? If it’s realistic I’ll keep them clear but had in mind some working parties or something like that? on a different note, I’m thinking it’s better if I have the figures more in small groups than only alone? From pics there always seems to be groups of guys is this pretty accurate? Thanks for all all your input! Much appreciated
- 211 replies
-
- 5
-
-
- prince of wales
- tamiya
- (and 2 more)
-
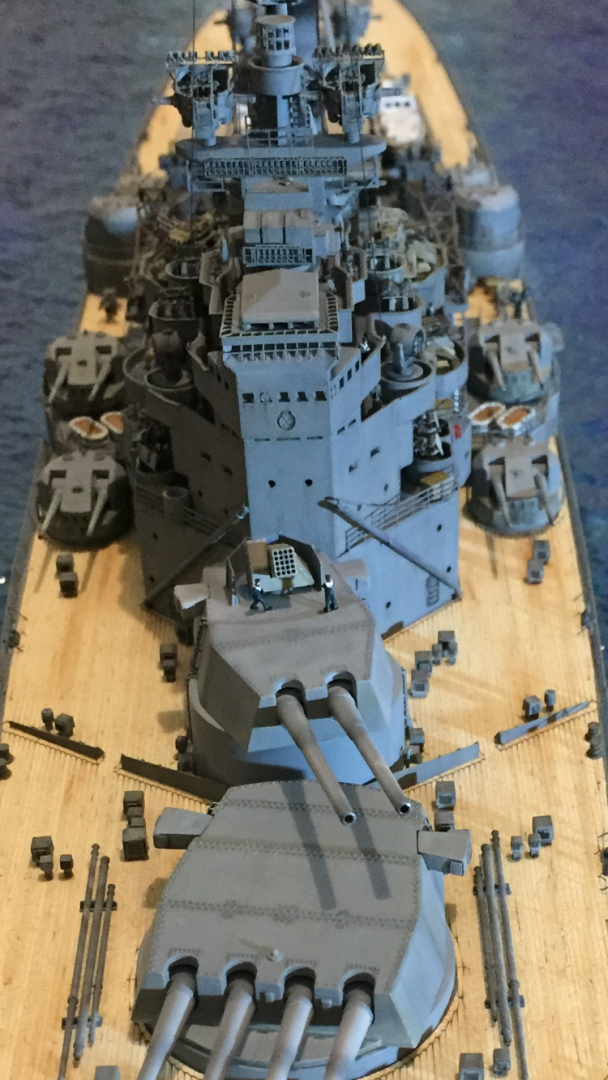
A few more progress pictures of figures. please let me know if people are put in places people wouldn’t be as I don’t know much about what would or wouldn’t happen on board! I know the olden day ships had places you couldn’t go unless you were working but I’m assuming in ww2 some of those traditions didn’t work without sails and the like. If anything they do give a good sense of just how big these ships were!

- 211 replies
-
- 8
-
-
- prince of wales
- tamiya
- (and 2 more)
-
So I’m back and semi settled into the new place. Returned to find my last package waiting for me, took a few months in the mail. NorthStarModels 3D printed 1:350 Royal Navy figures. Cant have a moving ship without people on board! they are tiny tiny and so painting them is slow and no moustaches or different coloured eyes I’m afraid!! but I think they help bring the ship to life! The plan is my painting should improve as I do more so the first lot I’ll put in the more hidden places and as they get better will be in the more visible places.


- 211 replies
-
- 7
-
-
- prince of wales
- tamiya
- (and 2 more)
-
Thanks for the feed back and comments. It’s been a long process but I’ve enjoyed it a lot.
- 211 replies
-
- 5
-
-
- prince of wales
- tamiya
- (and 2 more)
-
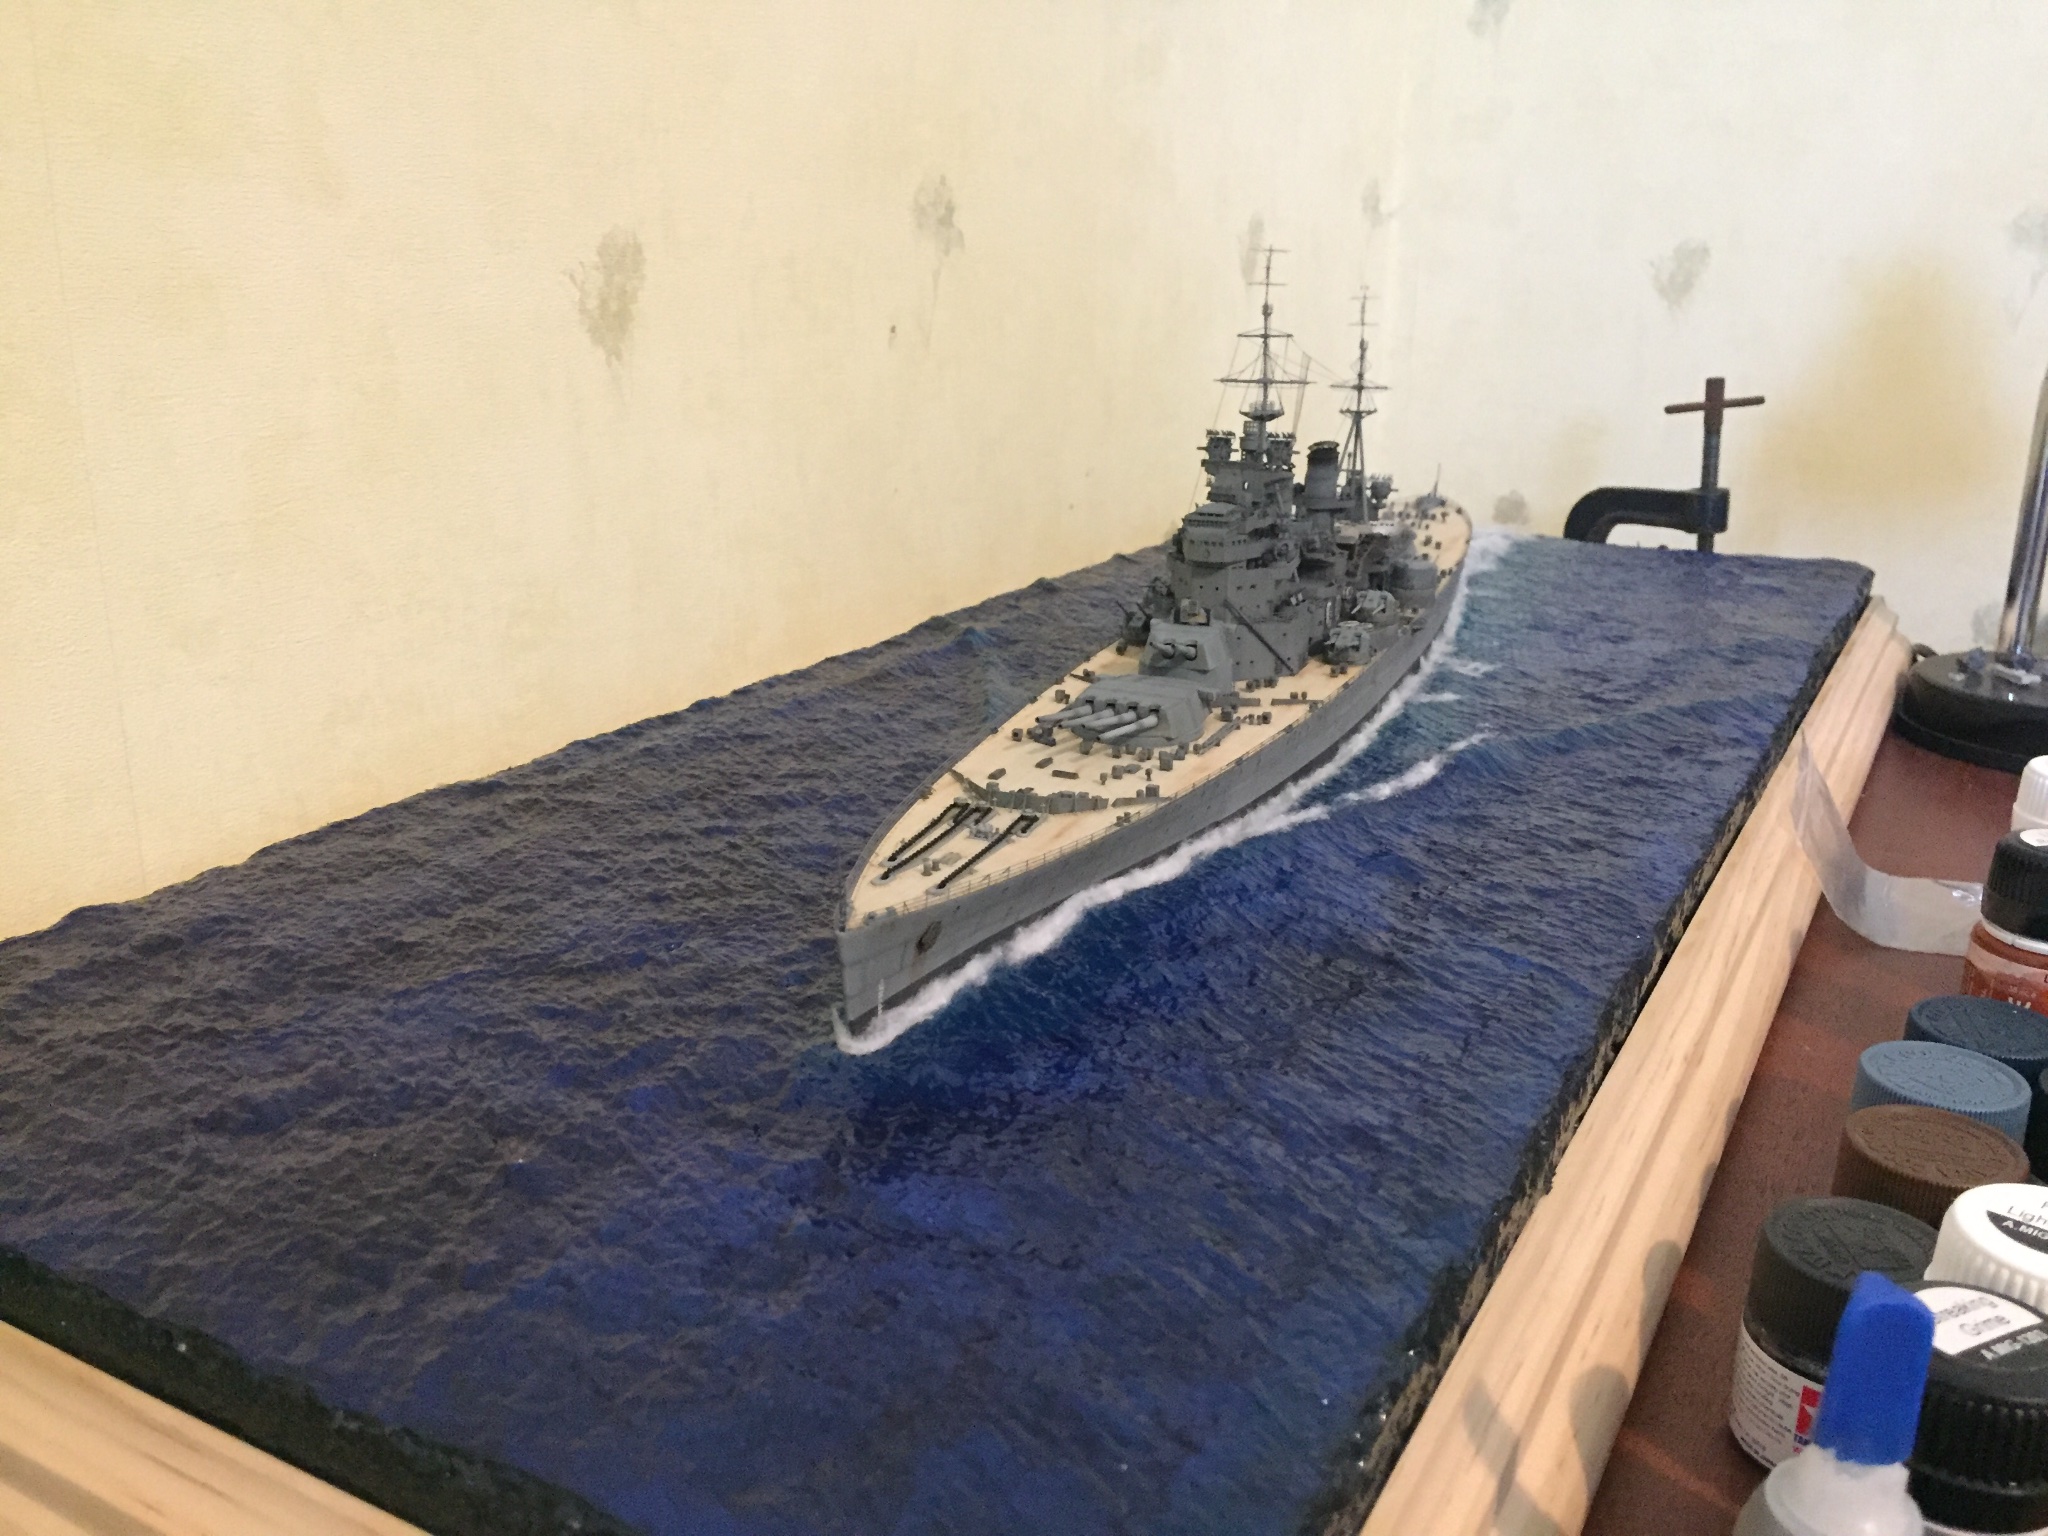
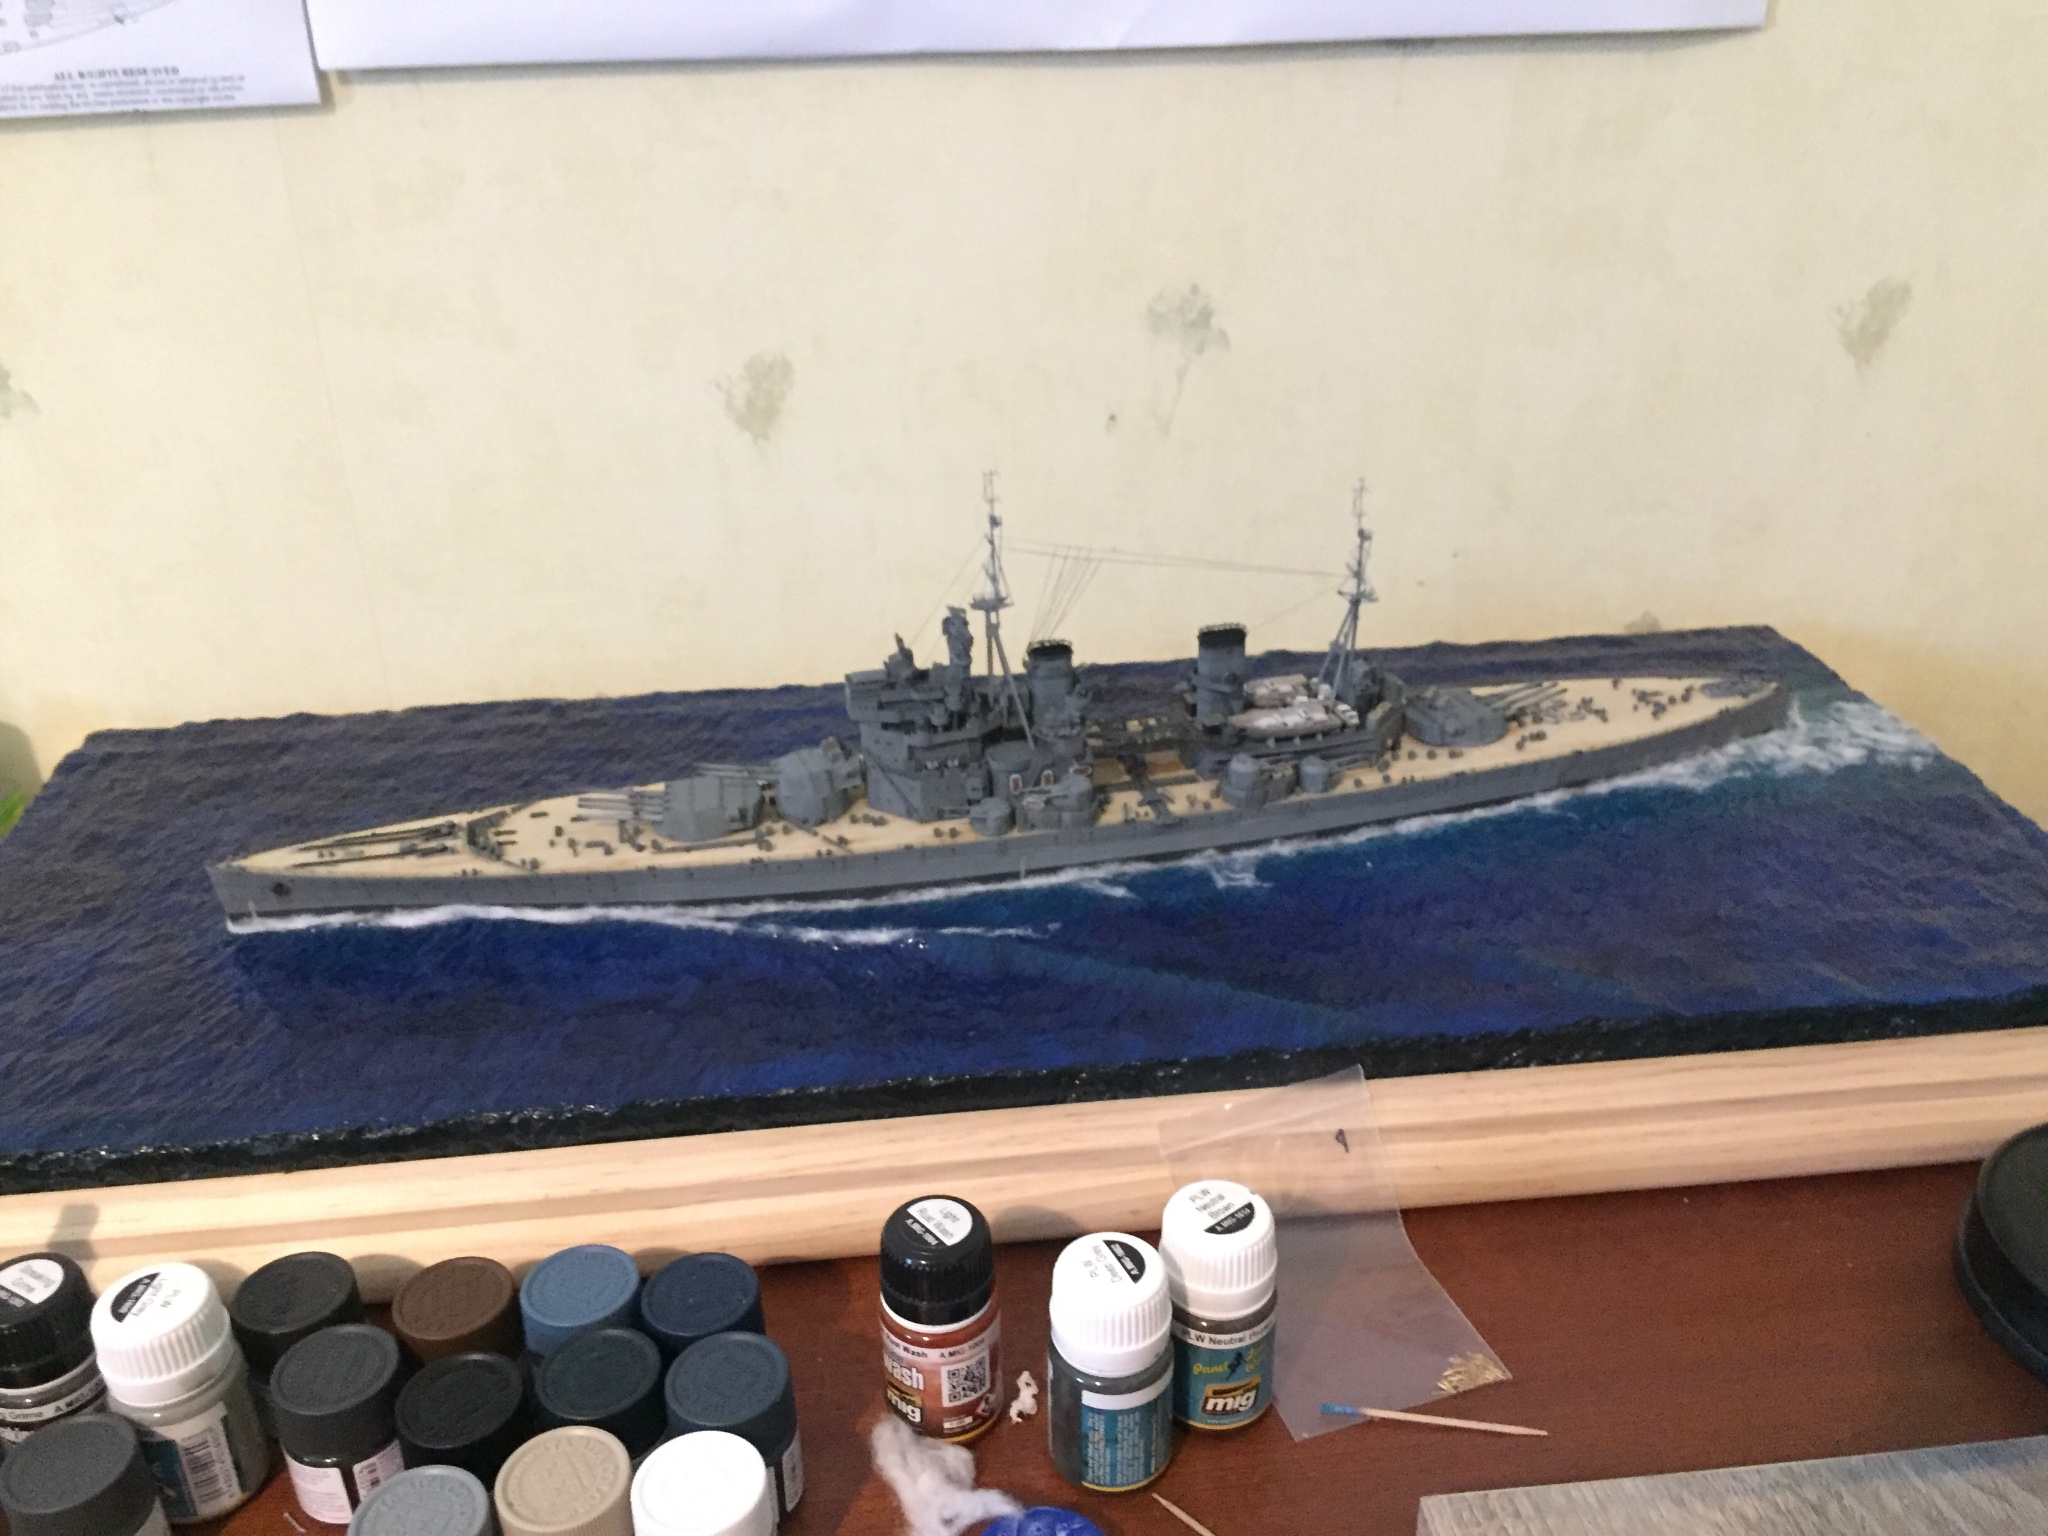
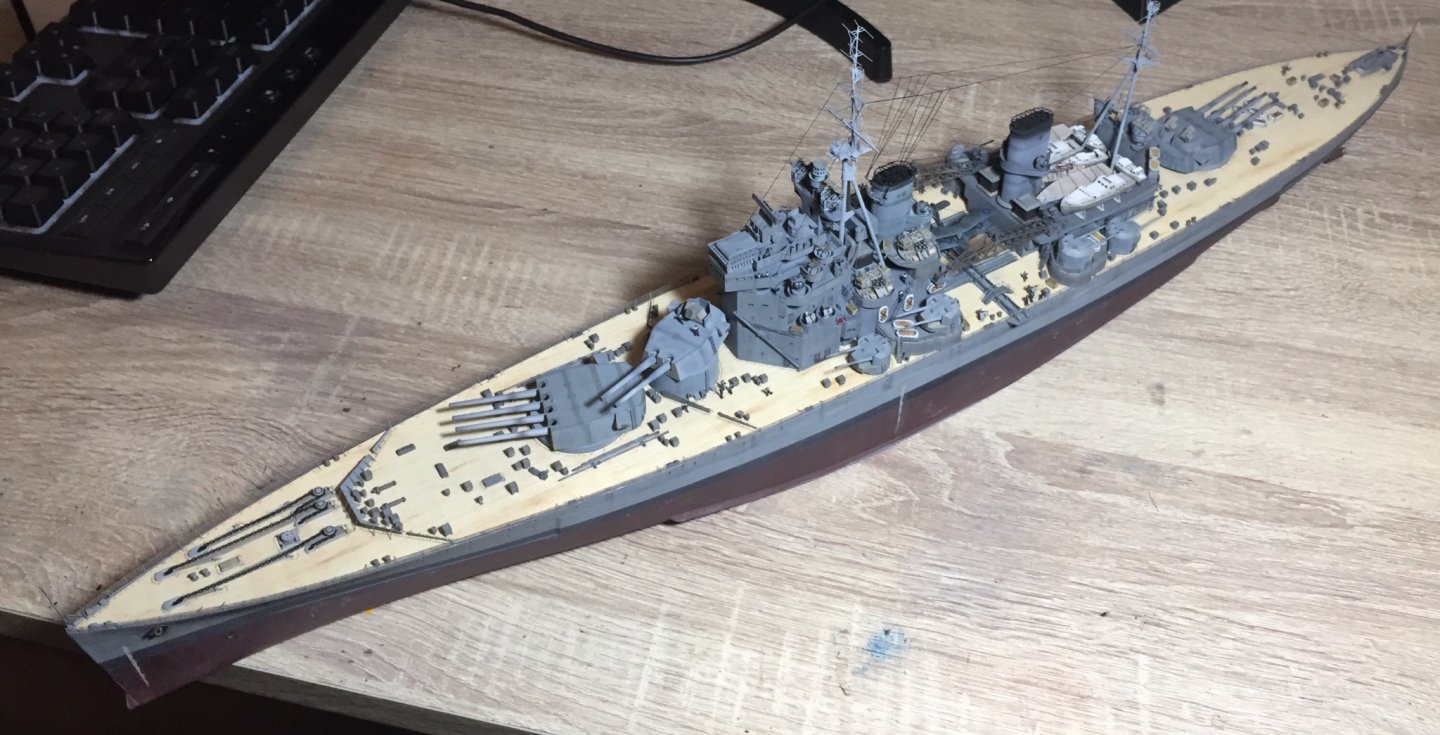
I’m going away for a few days and also in the middle of moving house so might be a bit until I’m settled and ready to put the finishing touches on my project. The white water is the main bit and the final touches and highlights on the ship. But anyway dont want to just make a post with no pics when the pics are my favourite part of watching other builds haha. So here is a dry run with some white water added. I’ll make the boundary layer smaller on the real one but I like how it give a sense of motion. back shortlyish...


- 211 replies
-
- 10
-
-
- prince of wales
- tamiya
- (and 2 more)
-
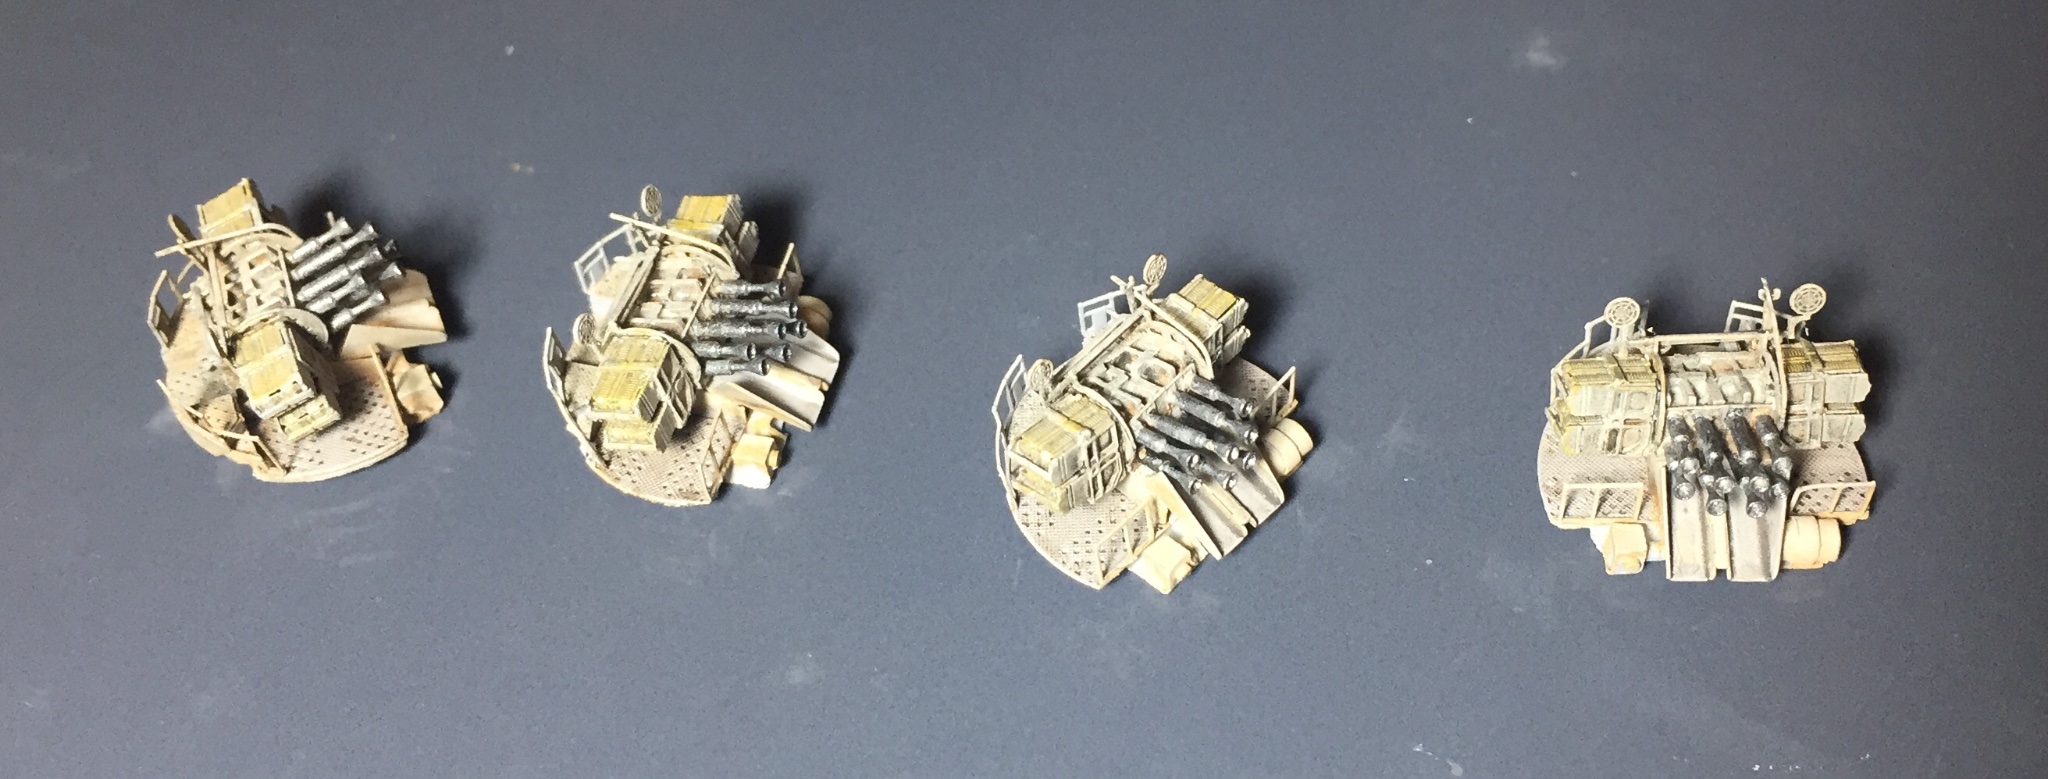
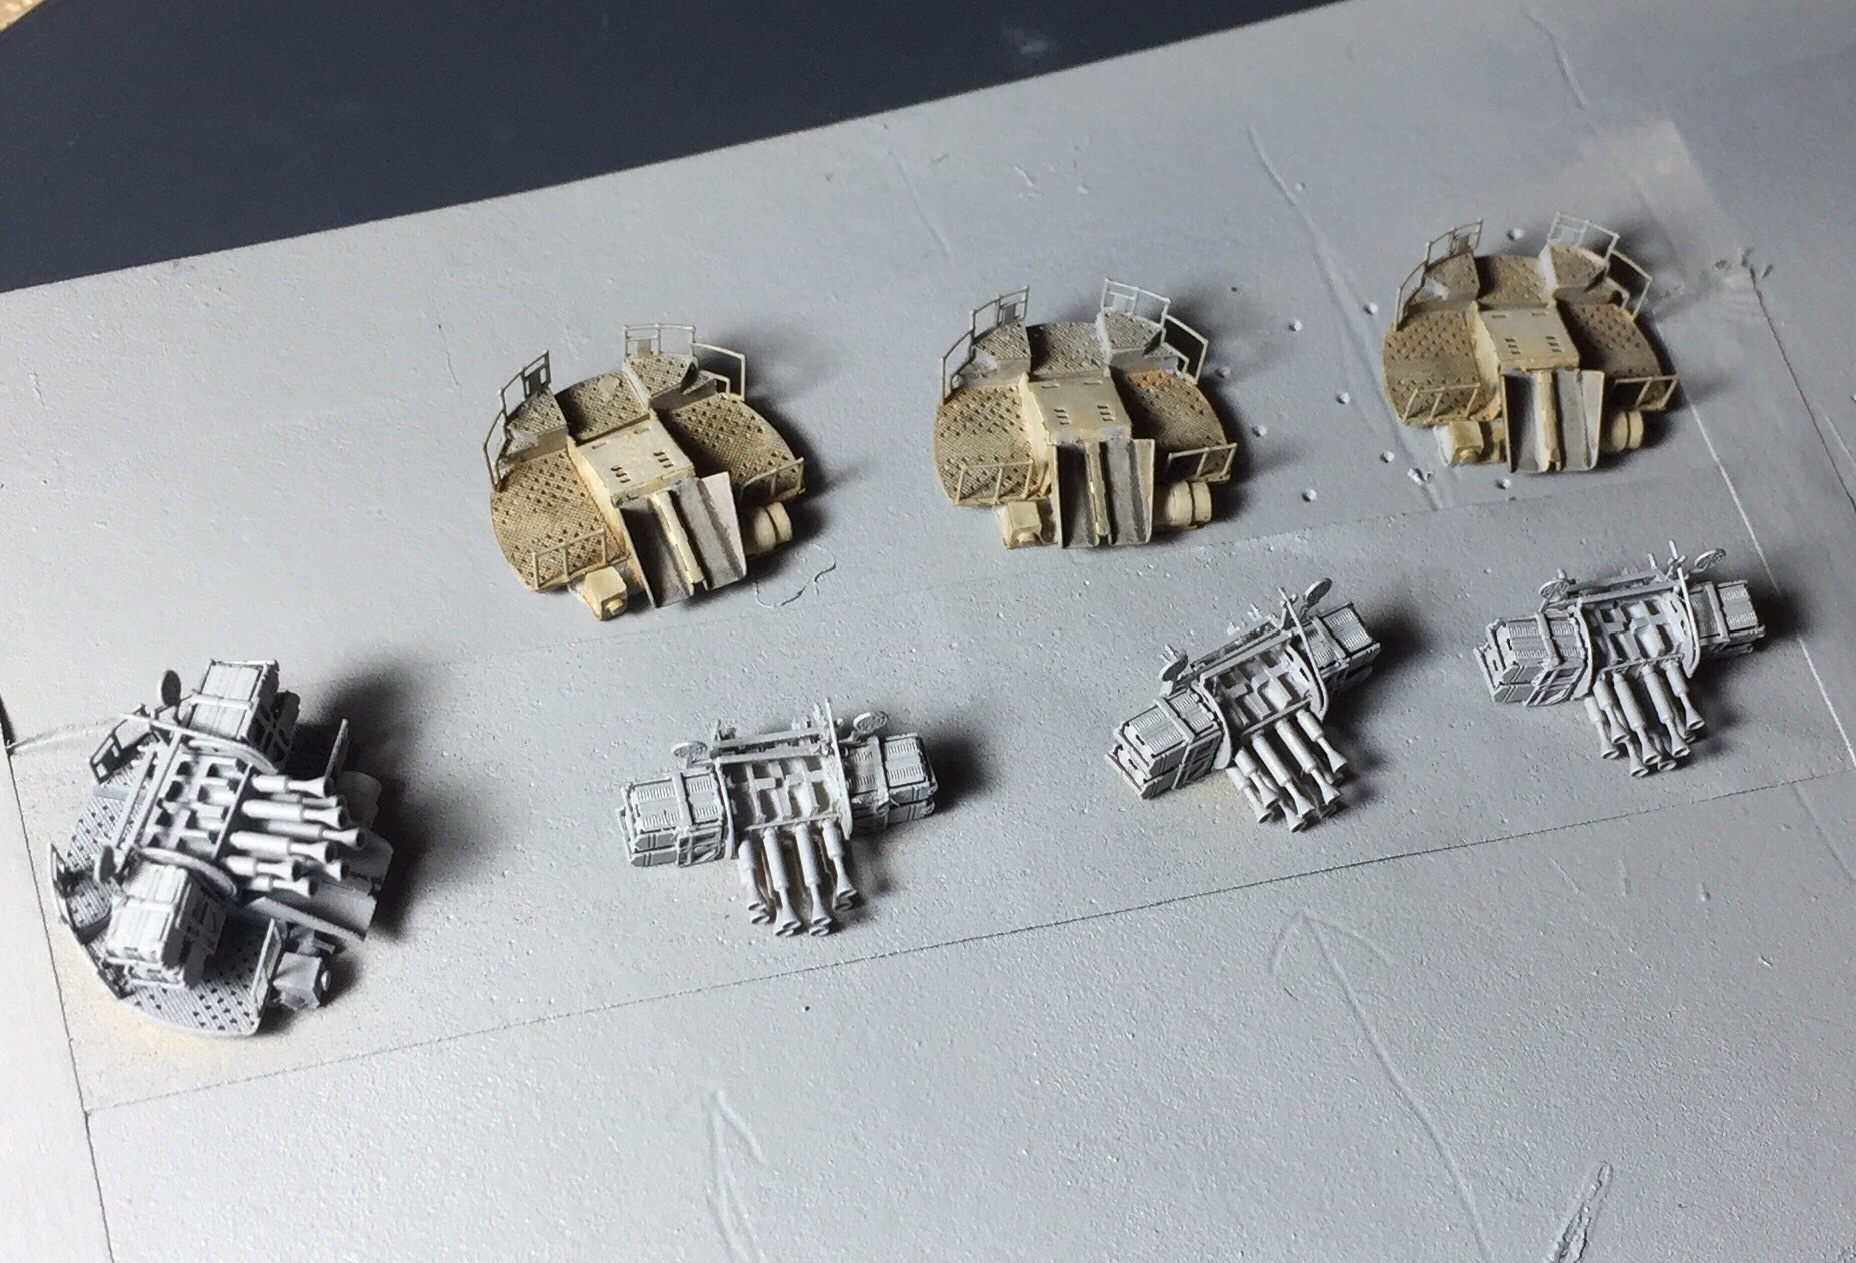
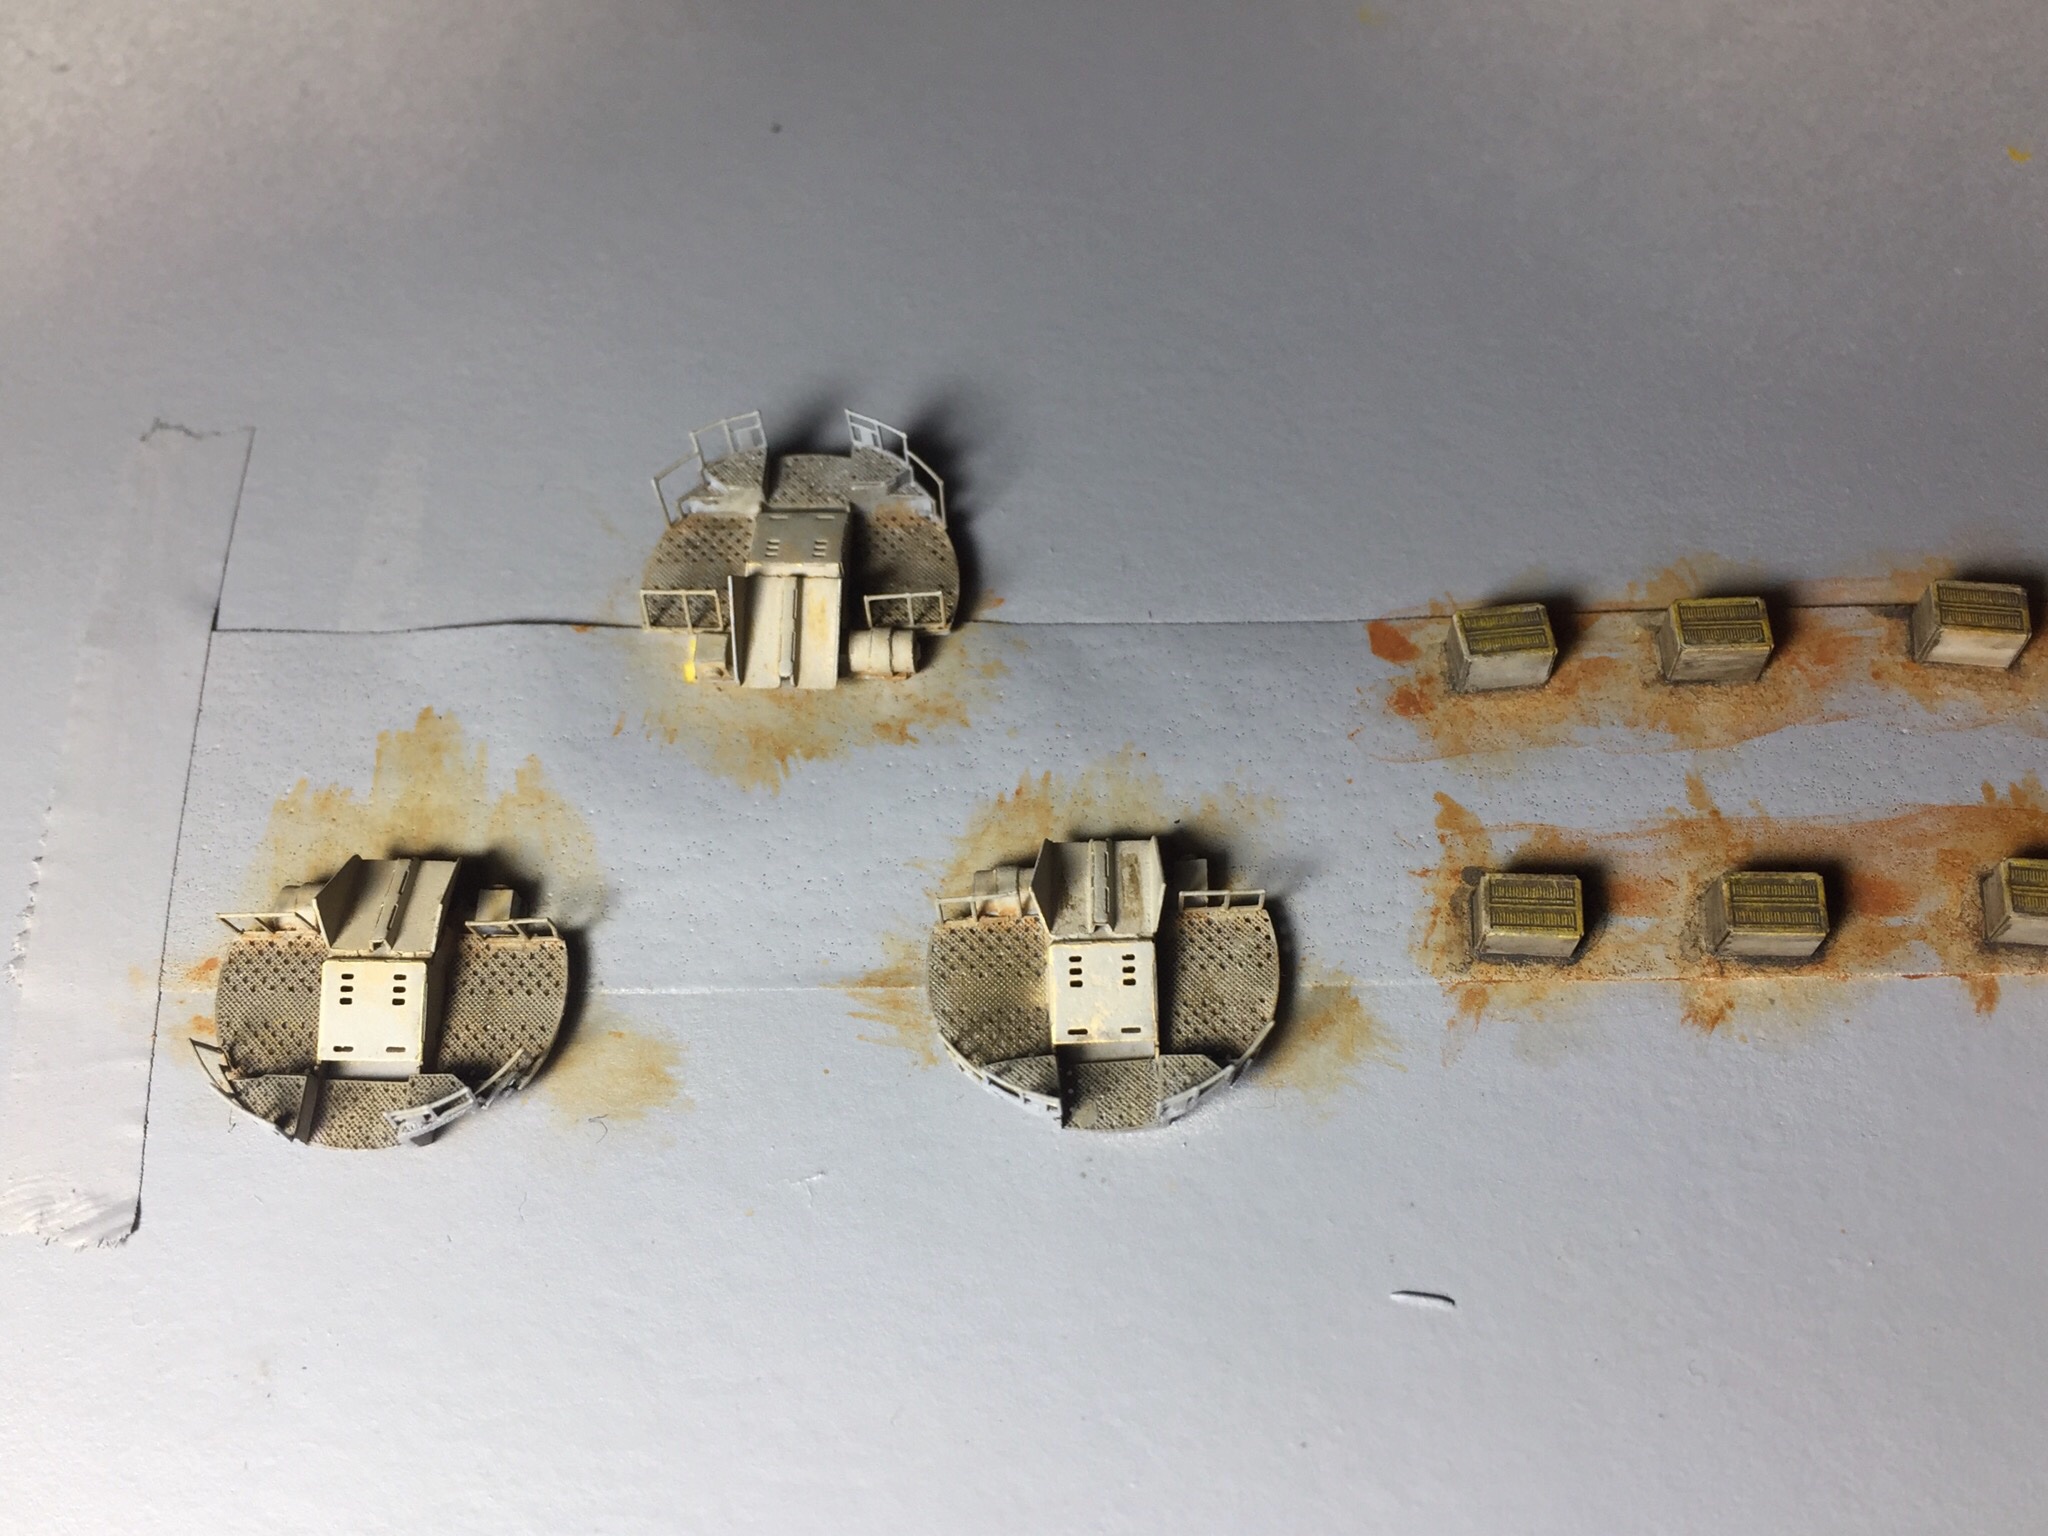
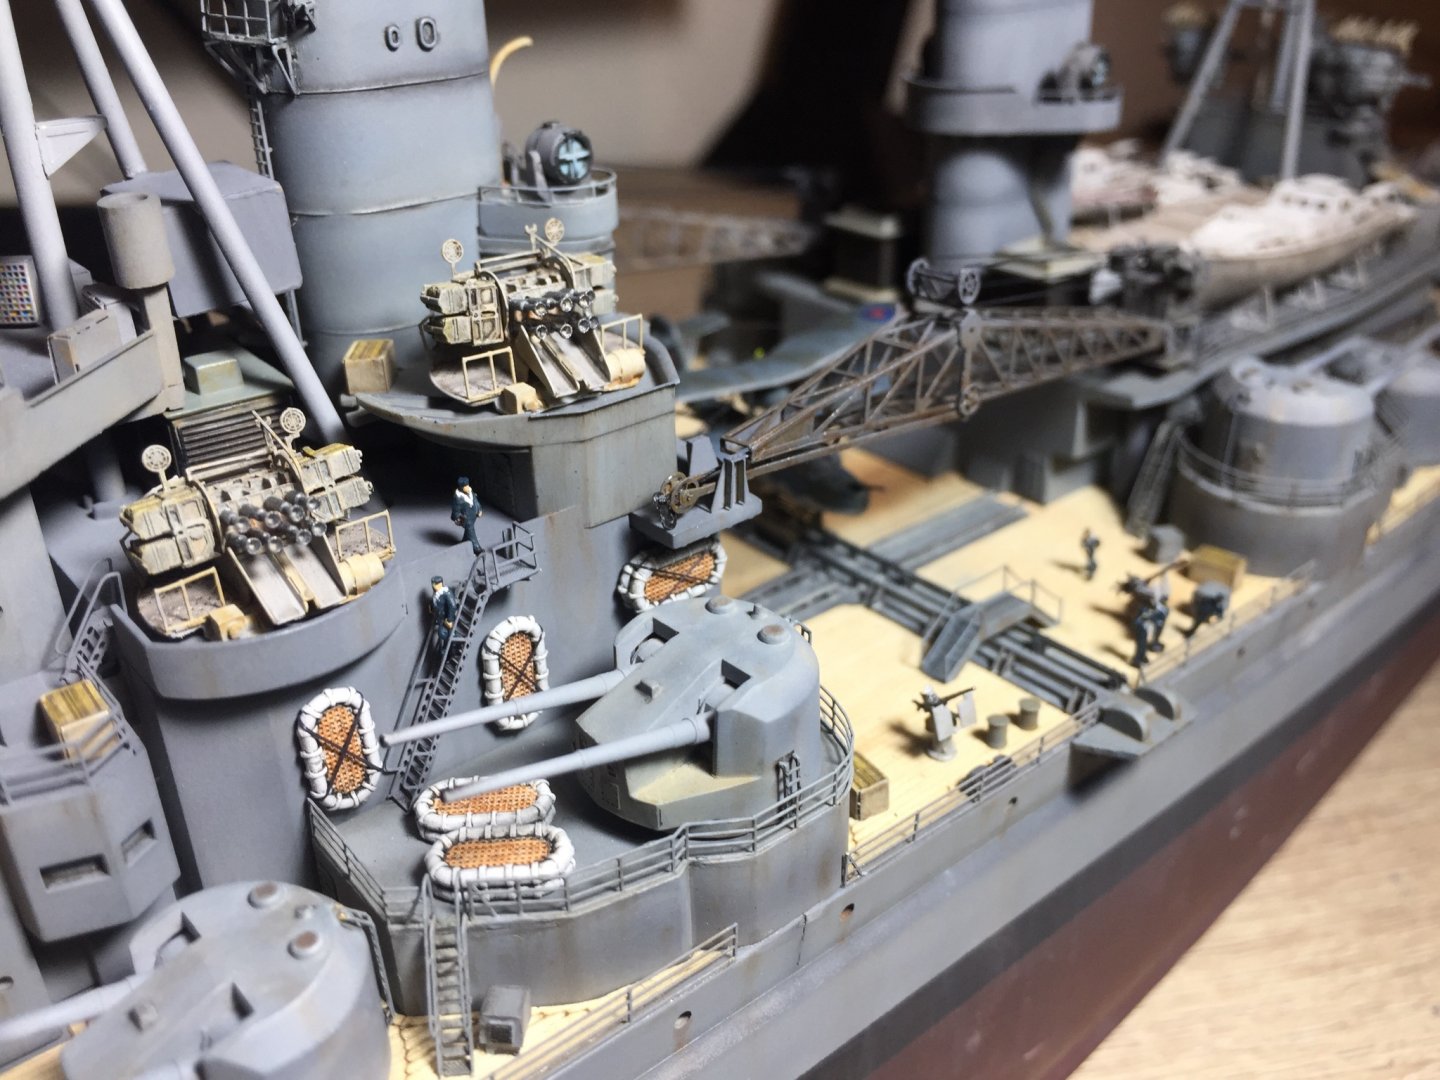
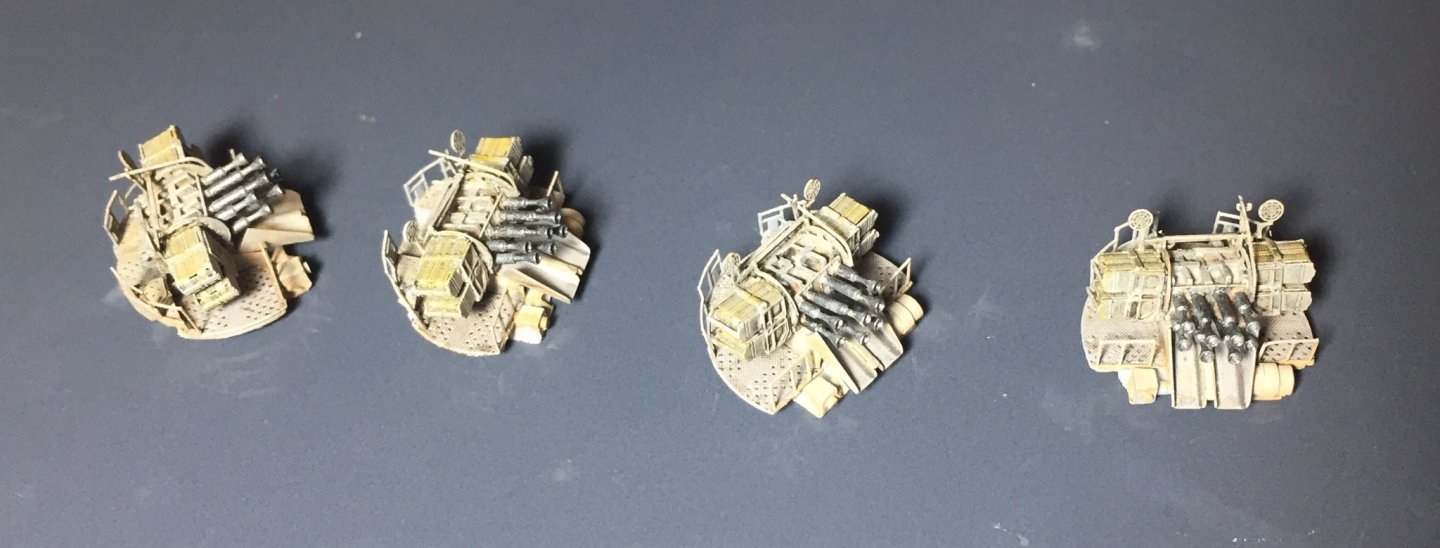
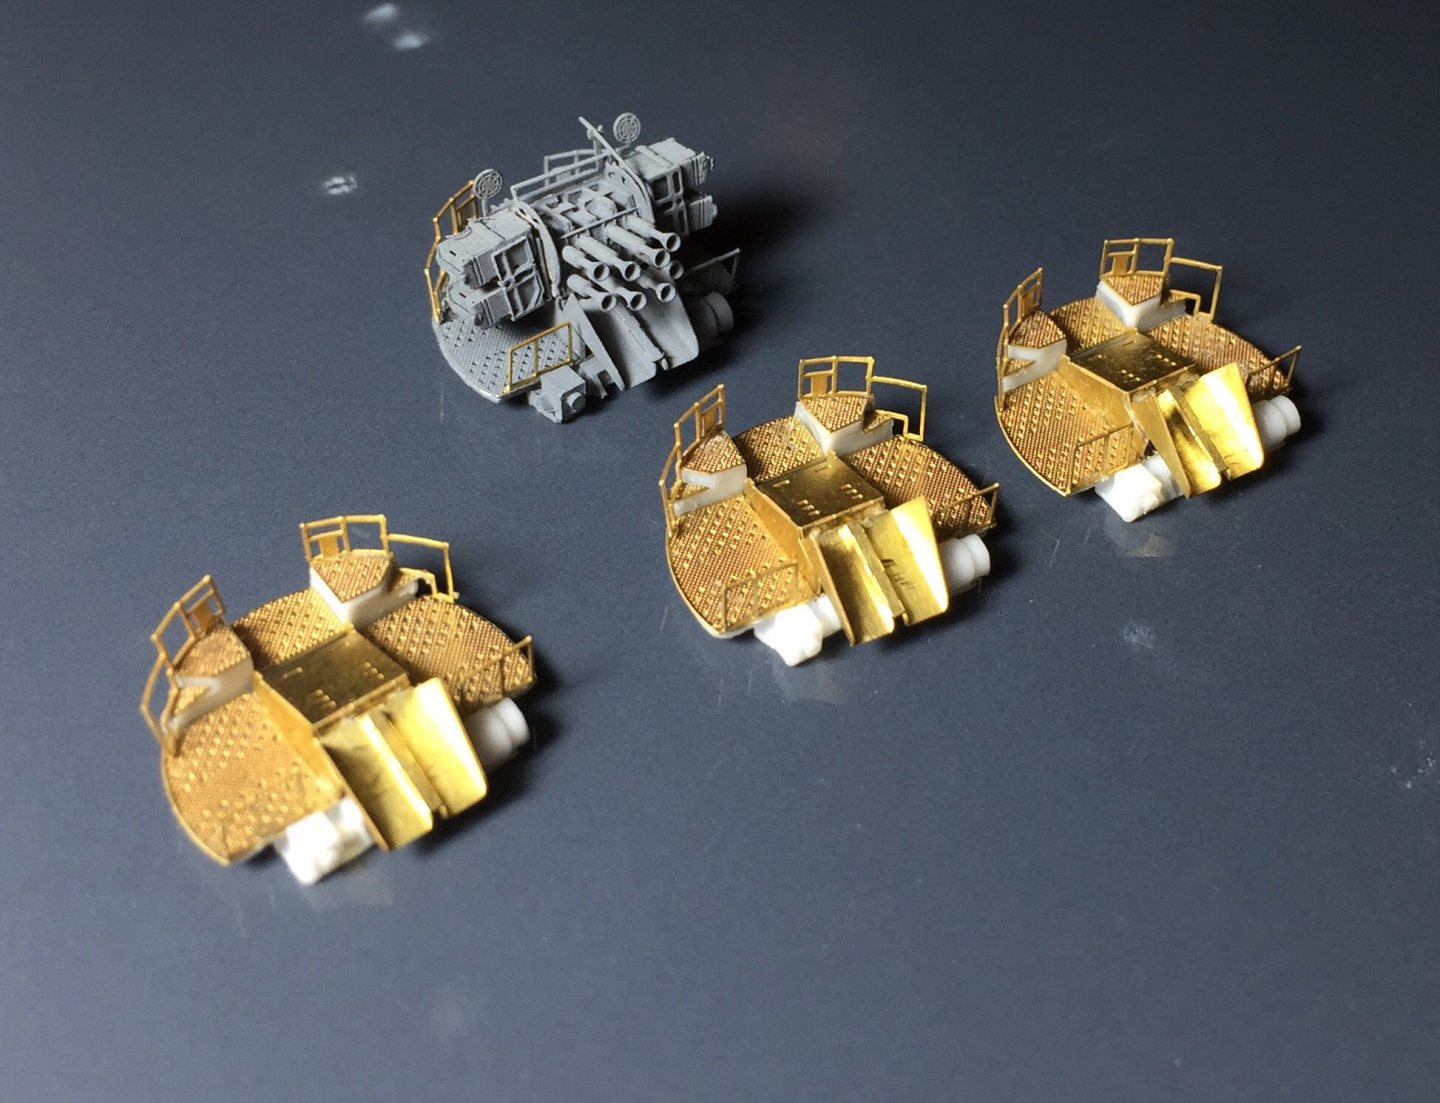
Completed the POM POMs decided to keep them a lighter shade of grey so they wouldn’t just blend in with the ship. and how they look look on the ship, not sure if they stand out abit too much yet. Might need a slight more blending in... thoughts?

- 211 replies
-
- 7
-
-
- prince of wales
- tamiya
- (and 2 more)
-
Haha you sure do, and you keep going back for more! Does it get easier?
- 211 replies
-
- 4
-
-
- prince of wales
- tamiya
- (and 2 more)
-
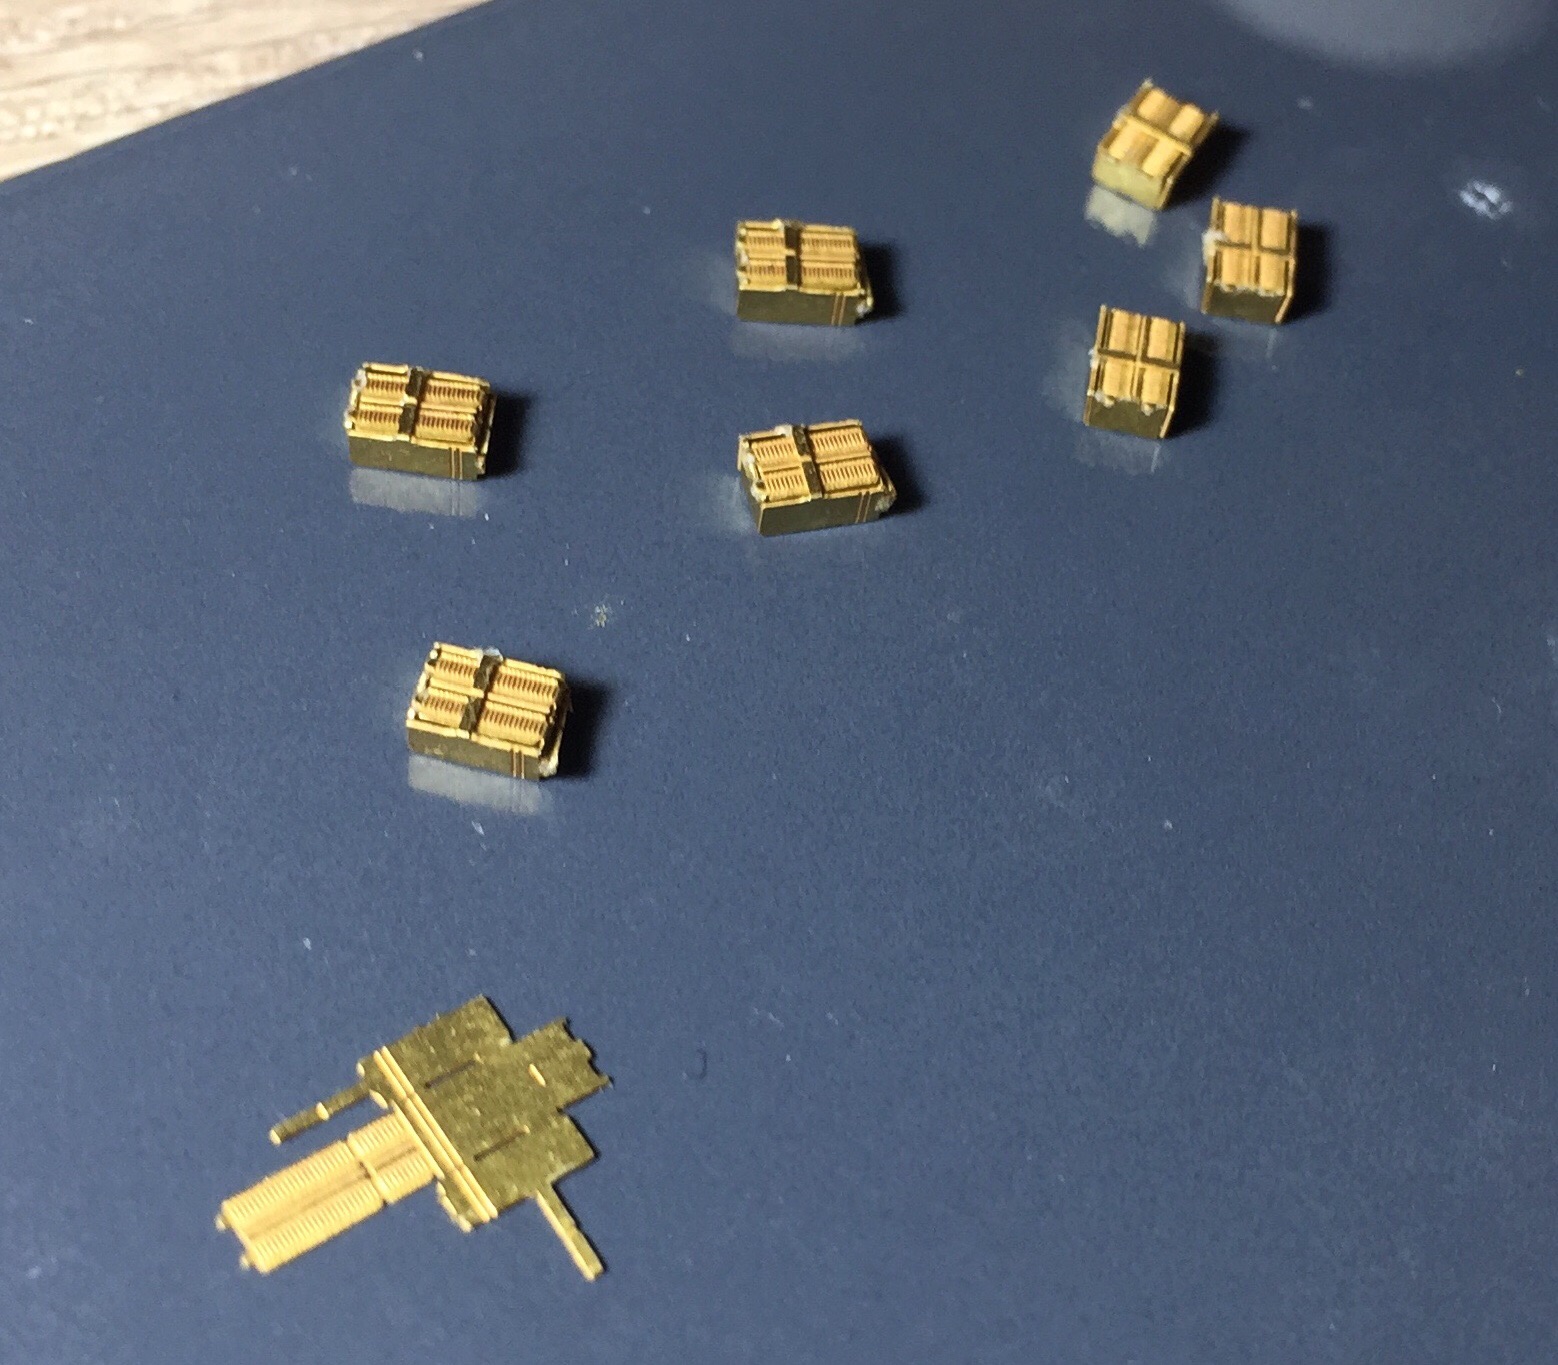
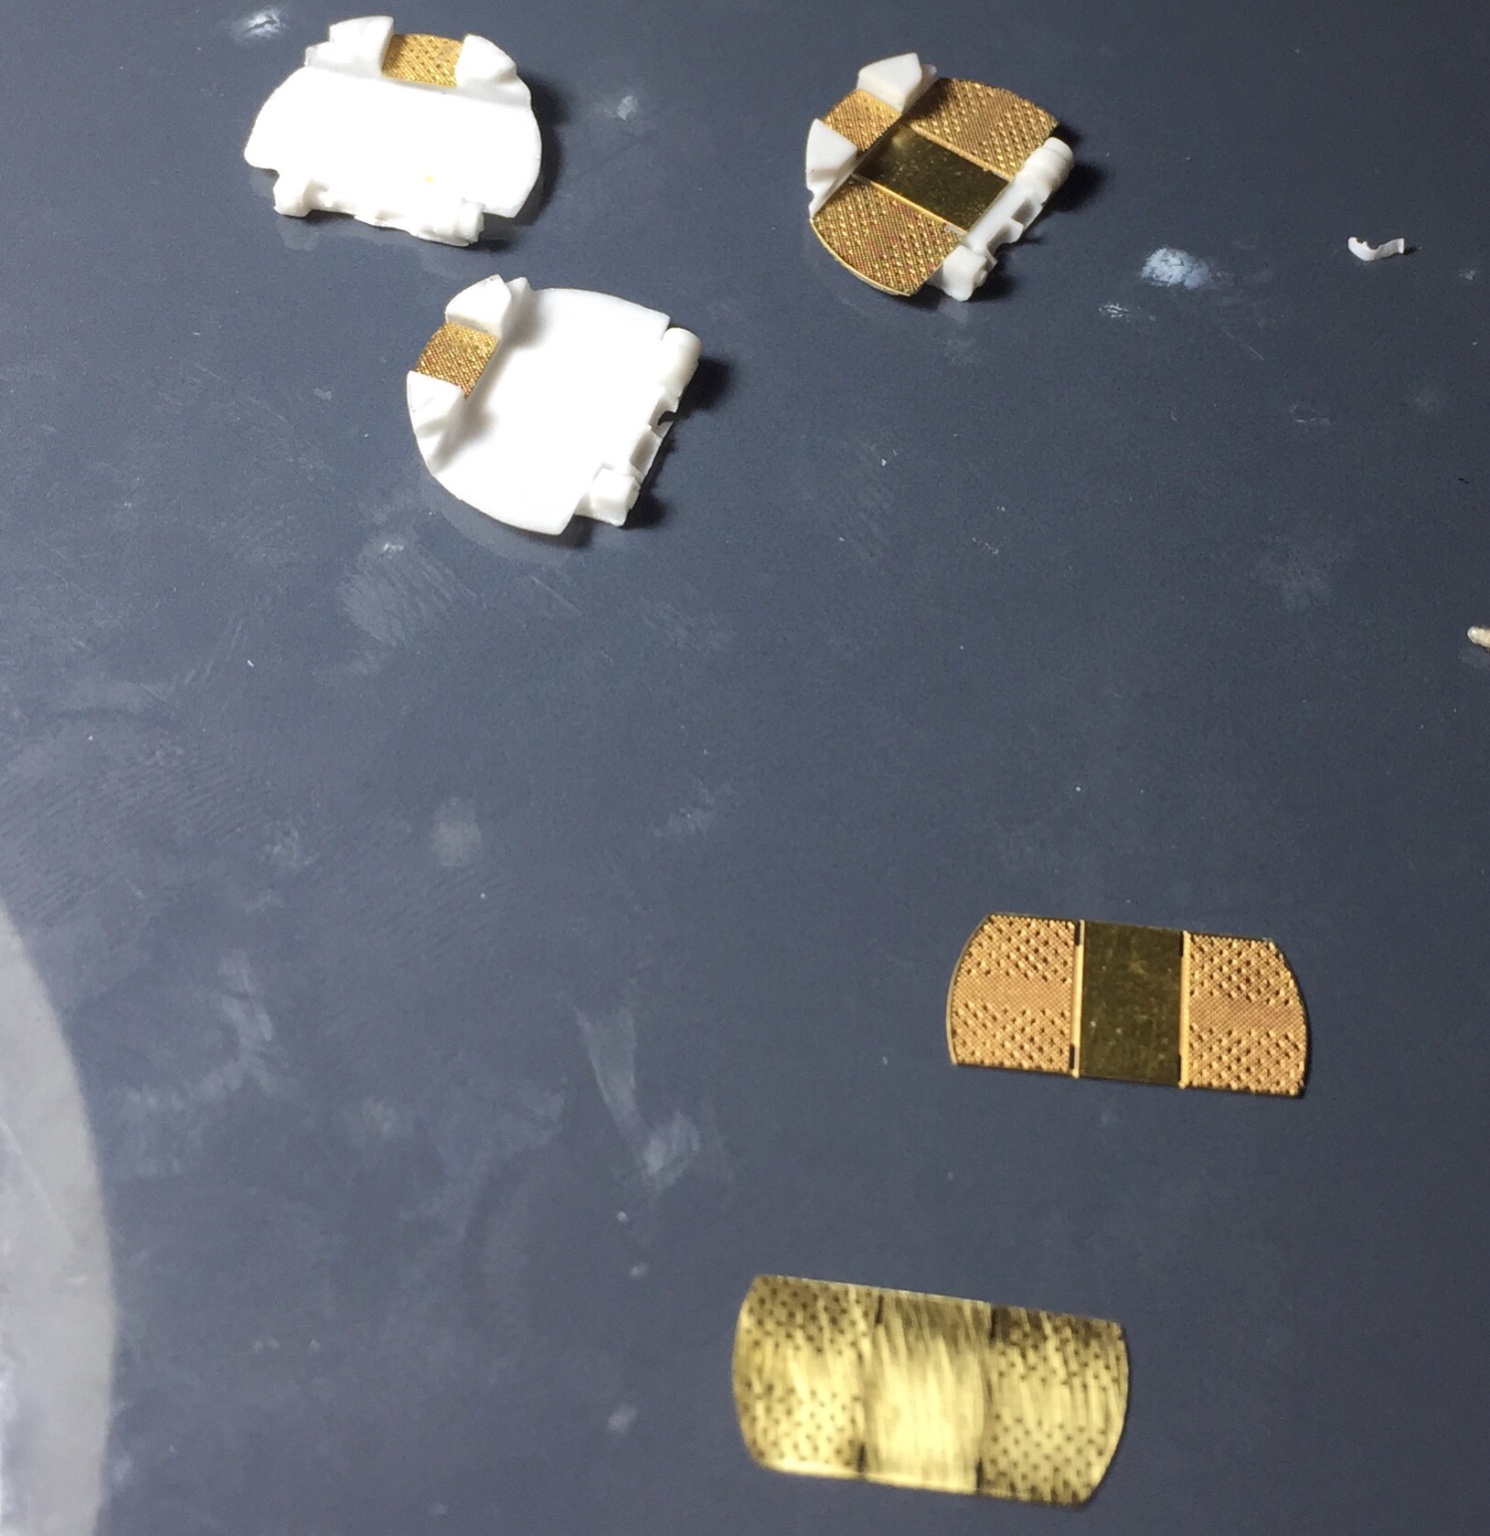
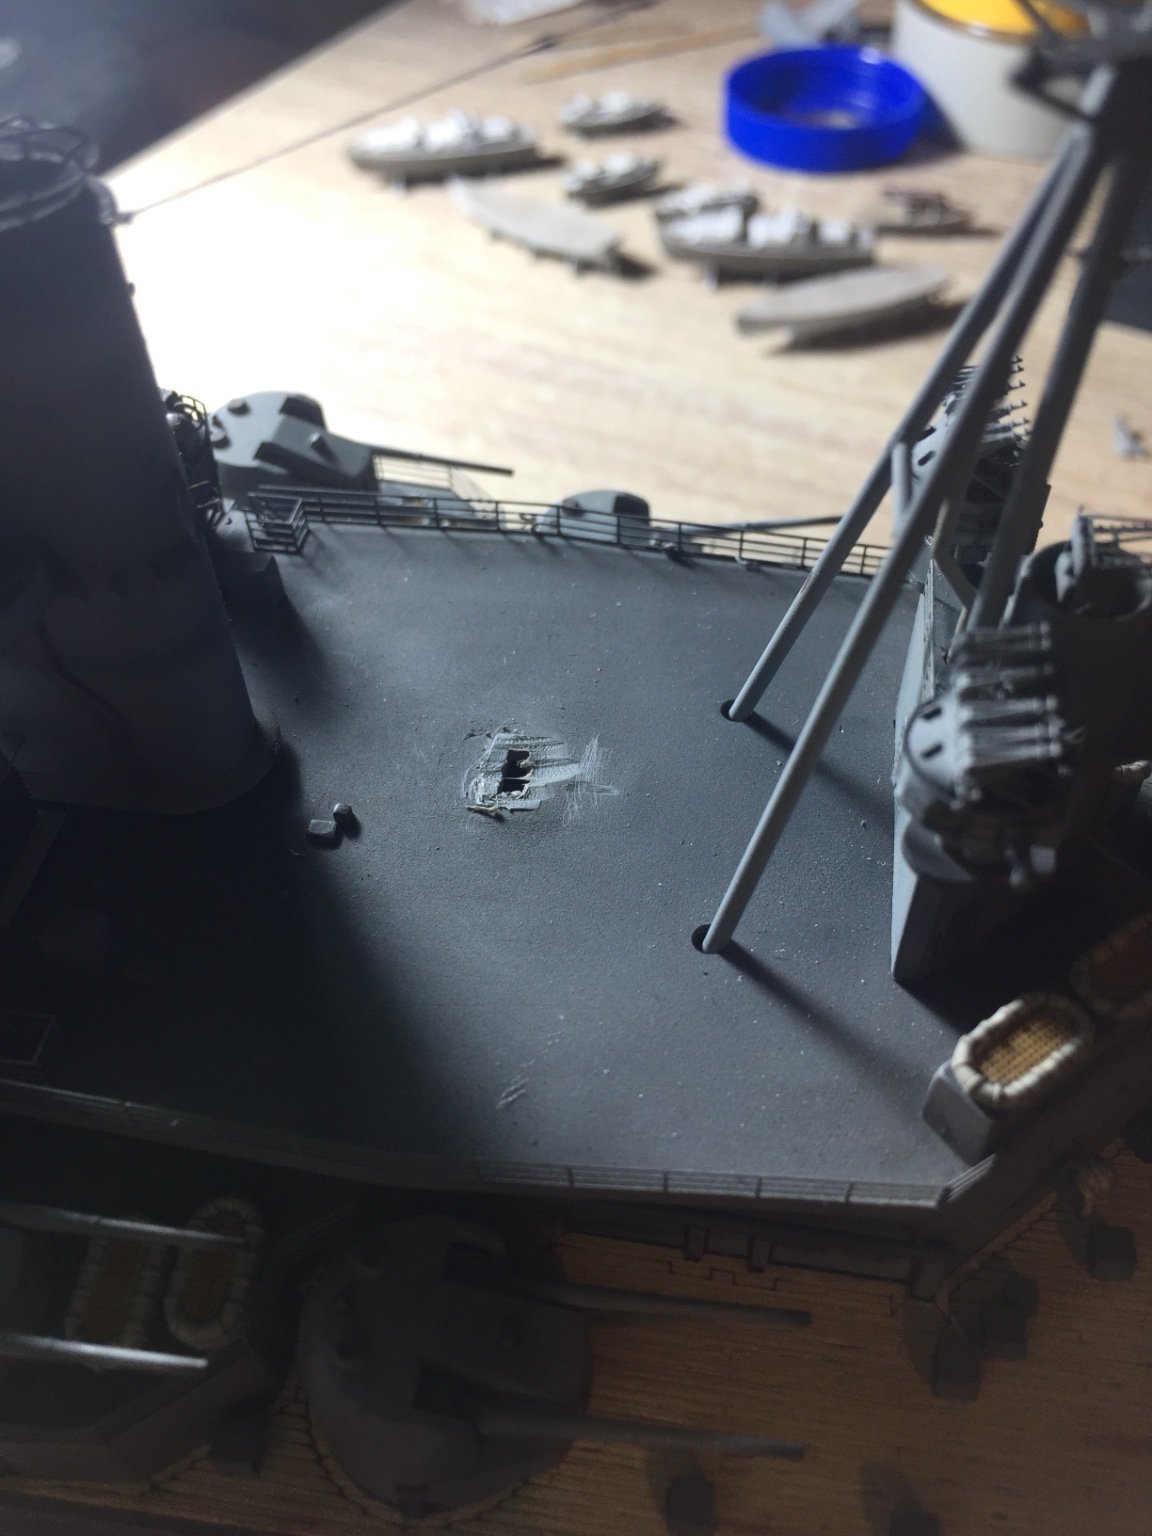
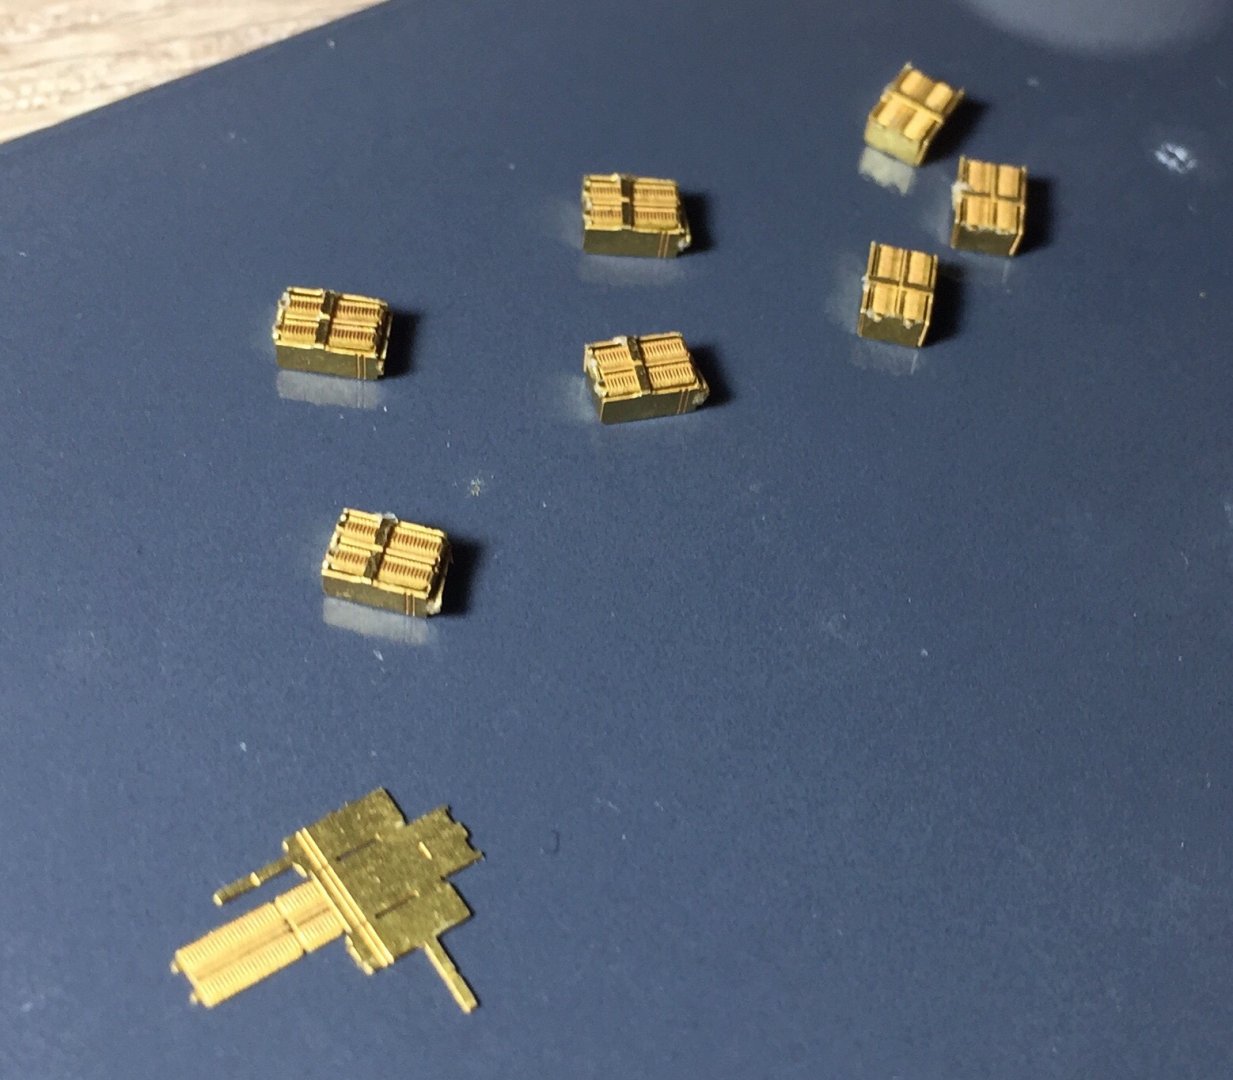
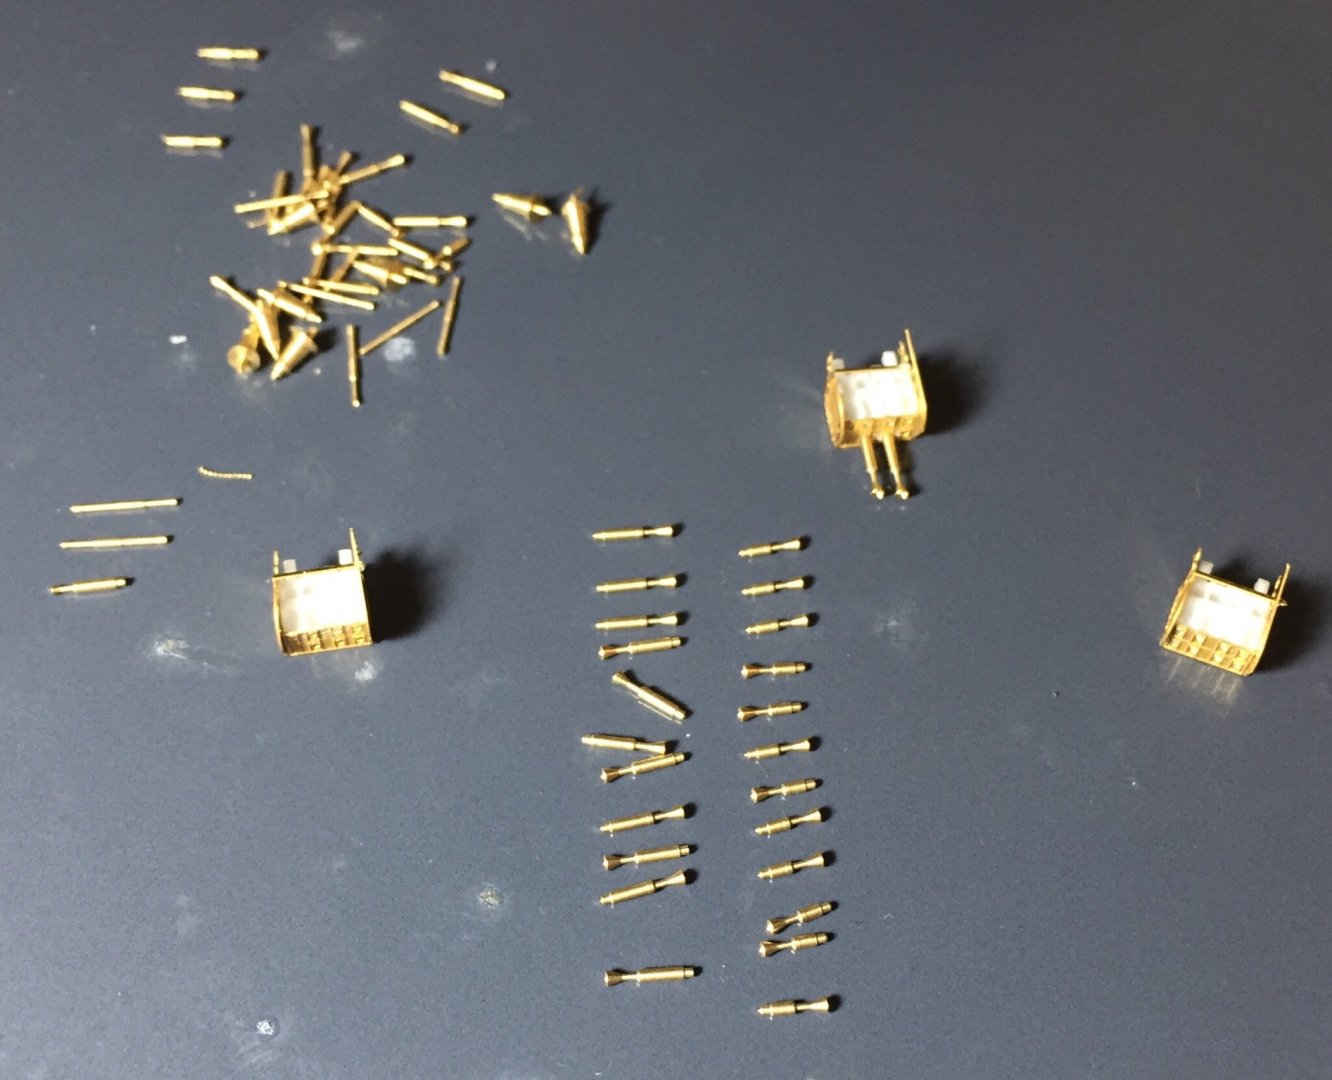
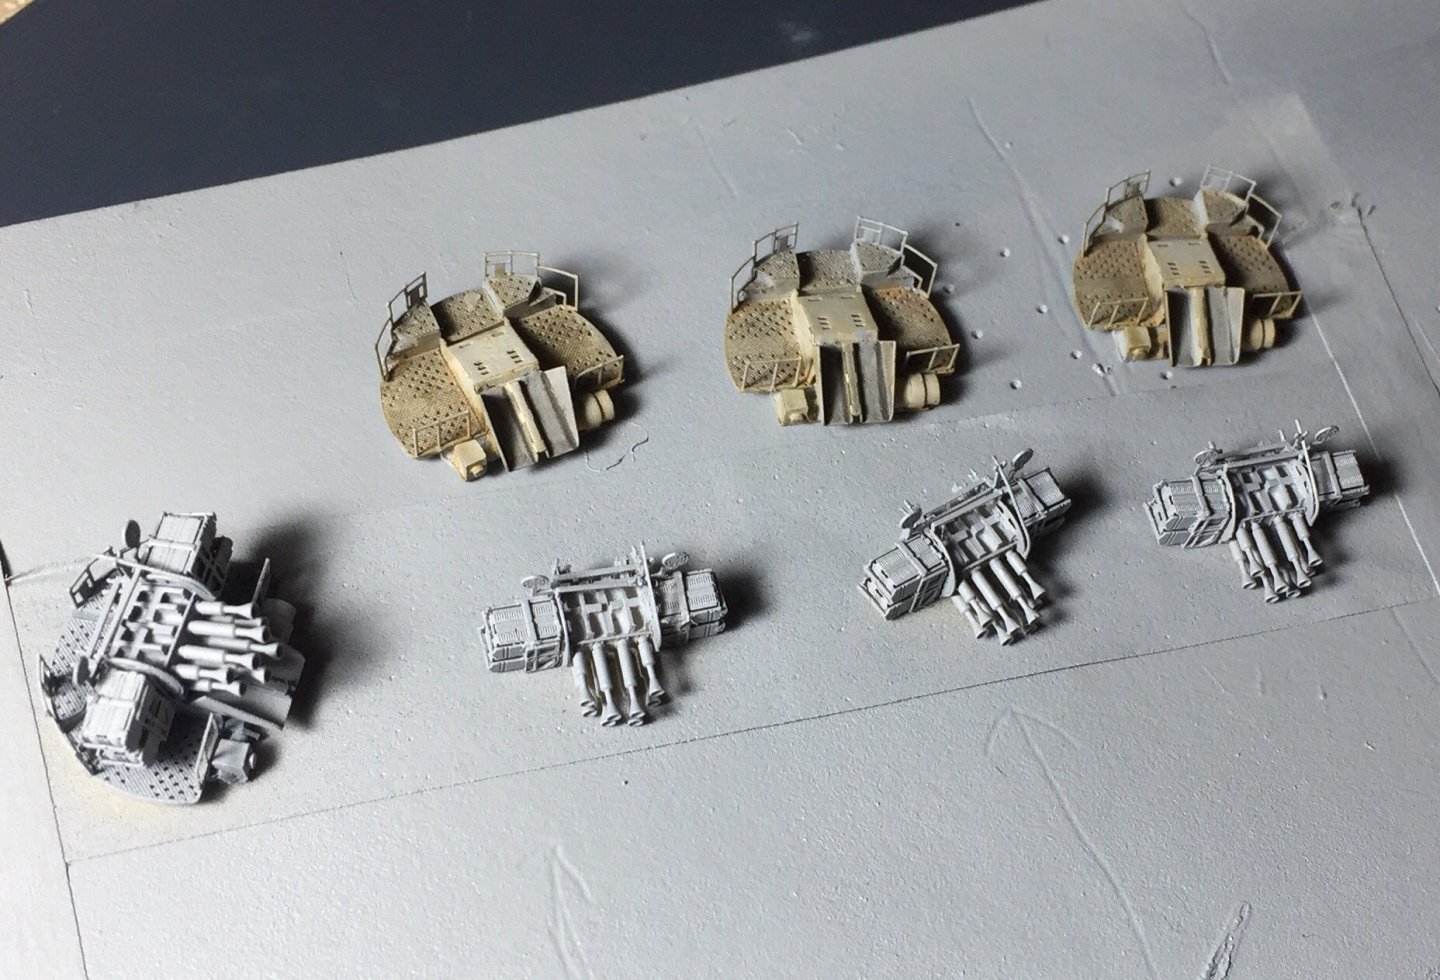
Had a long weekend away so back and ready to get these POM POMS done, been avoiding these guys more than anything on this build haha! But I have nothing else left to build... i built one months ago and it took a few days to complete and that is where my need to avoid originated! ive learnt a lot since then so over two big sessions I built the other 3 and got the bases done and primer on the guns. and completed the ammo boxes which are all now glued onto the ship. once painted and completed over the rest of the week ill show the result. definitely worth the time and effort doing the PE versions as the kit ones are no where near as good! Maybe I’ll make one as a reference.


- 211 replies
-
- 7
-
-
- prince of wales
- tamiya
- (and 2 more)
-
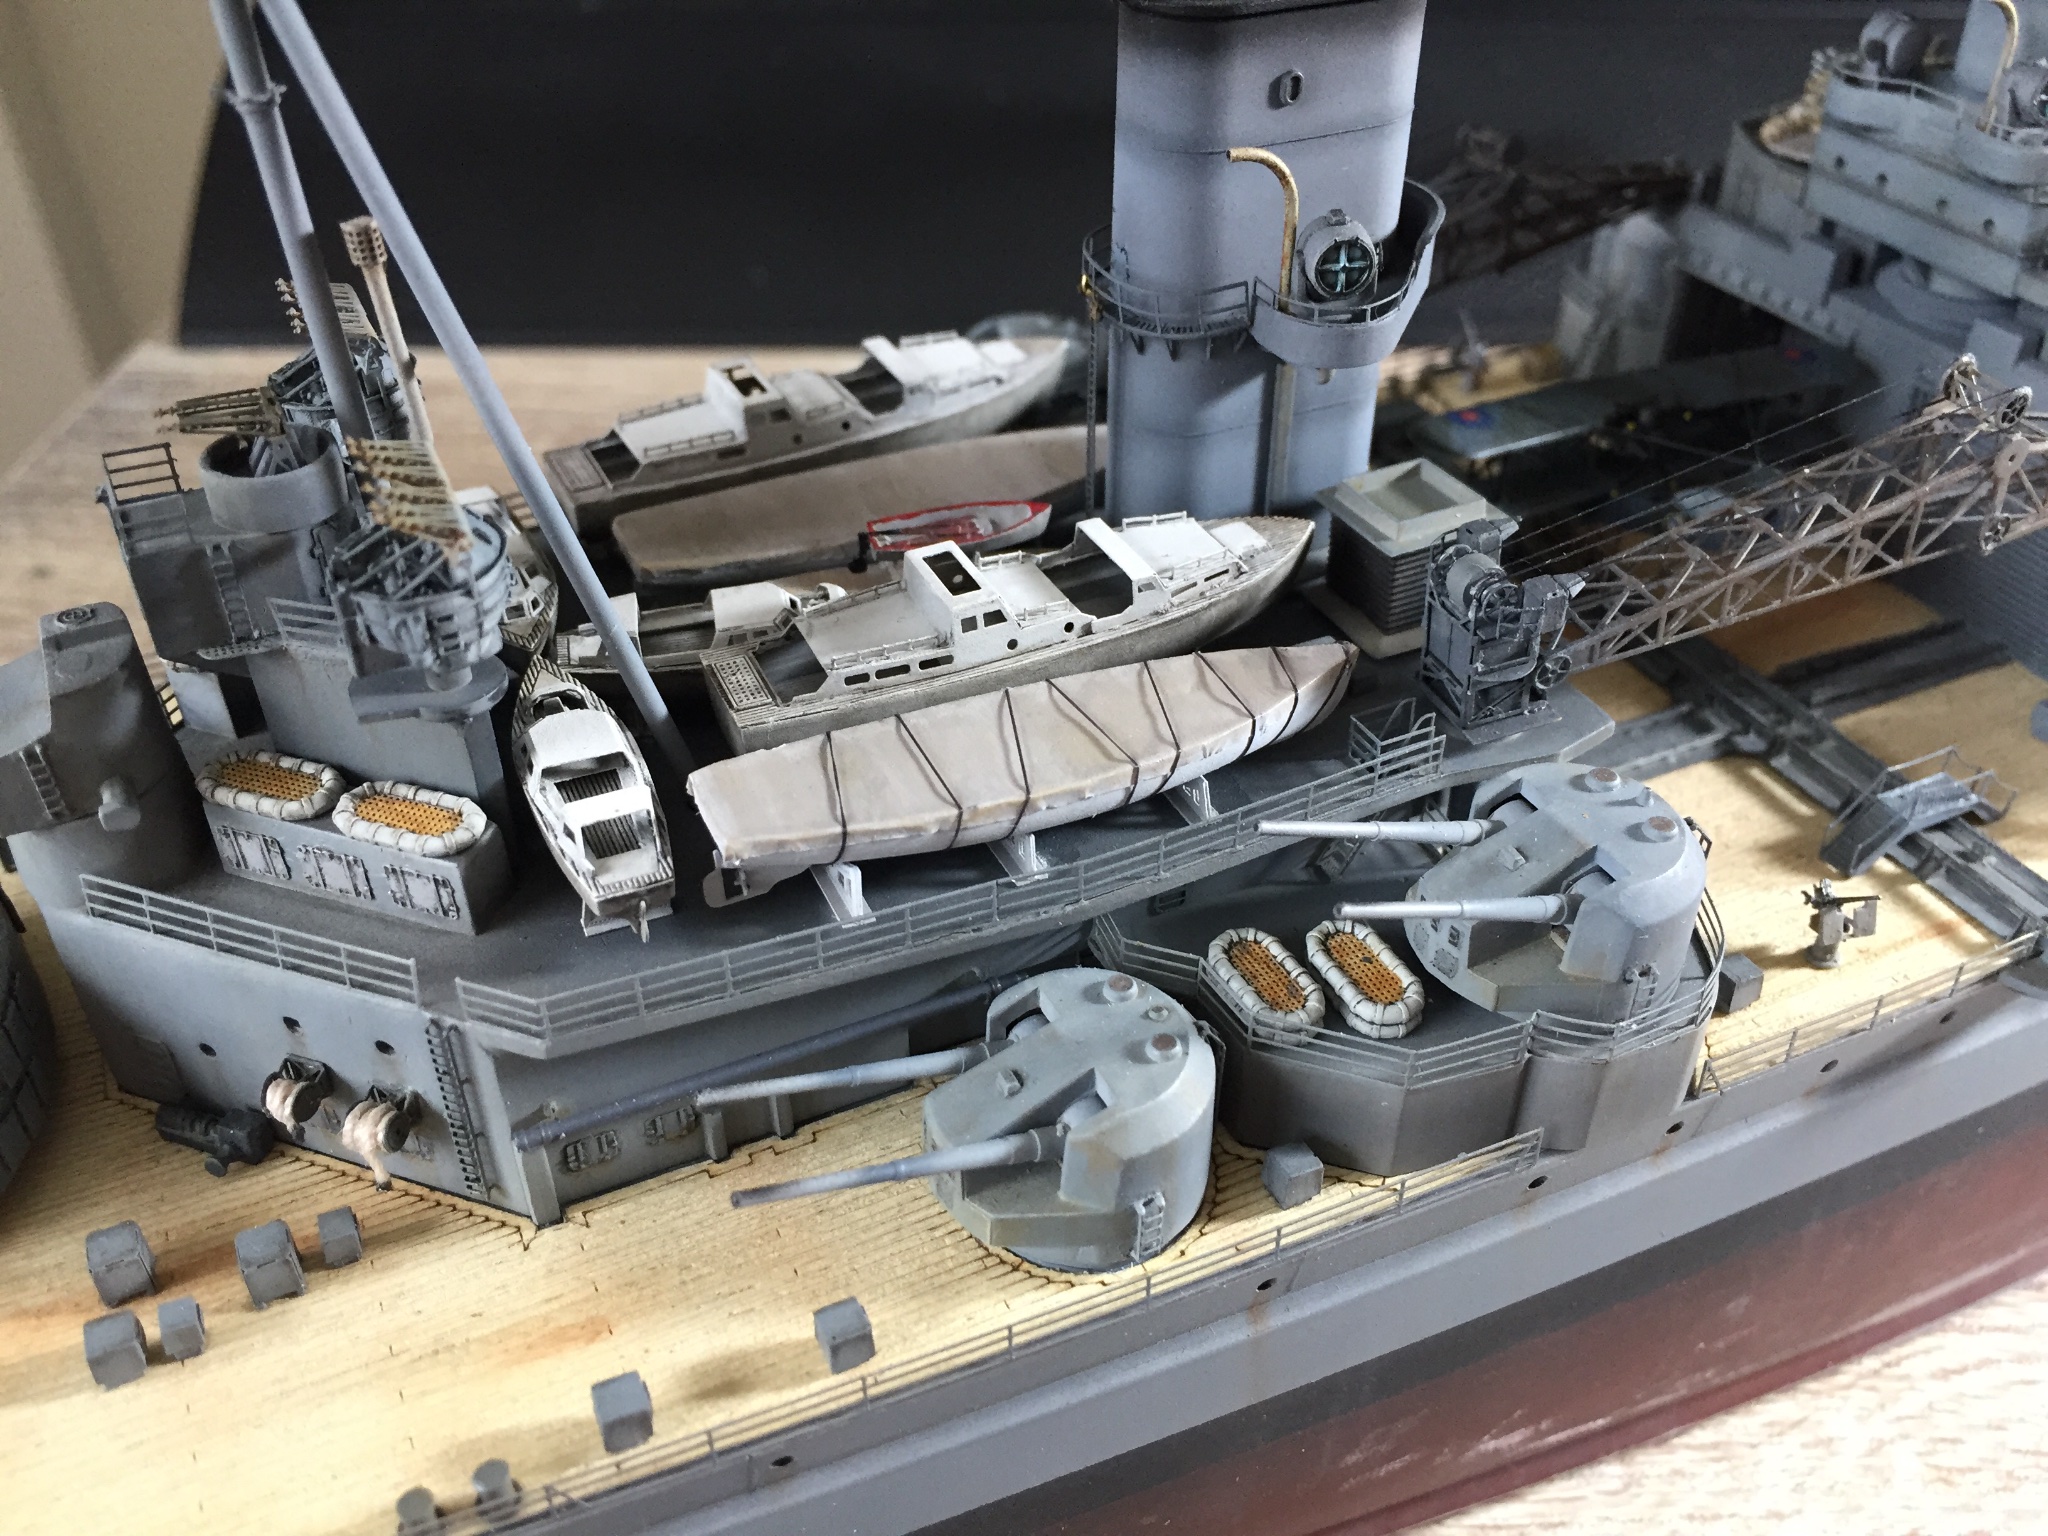
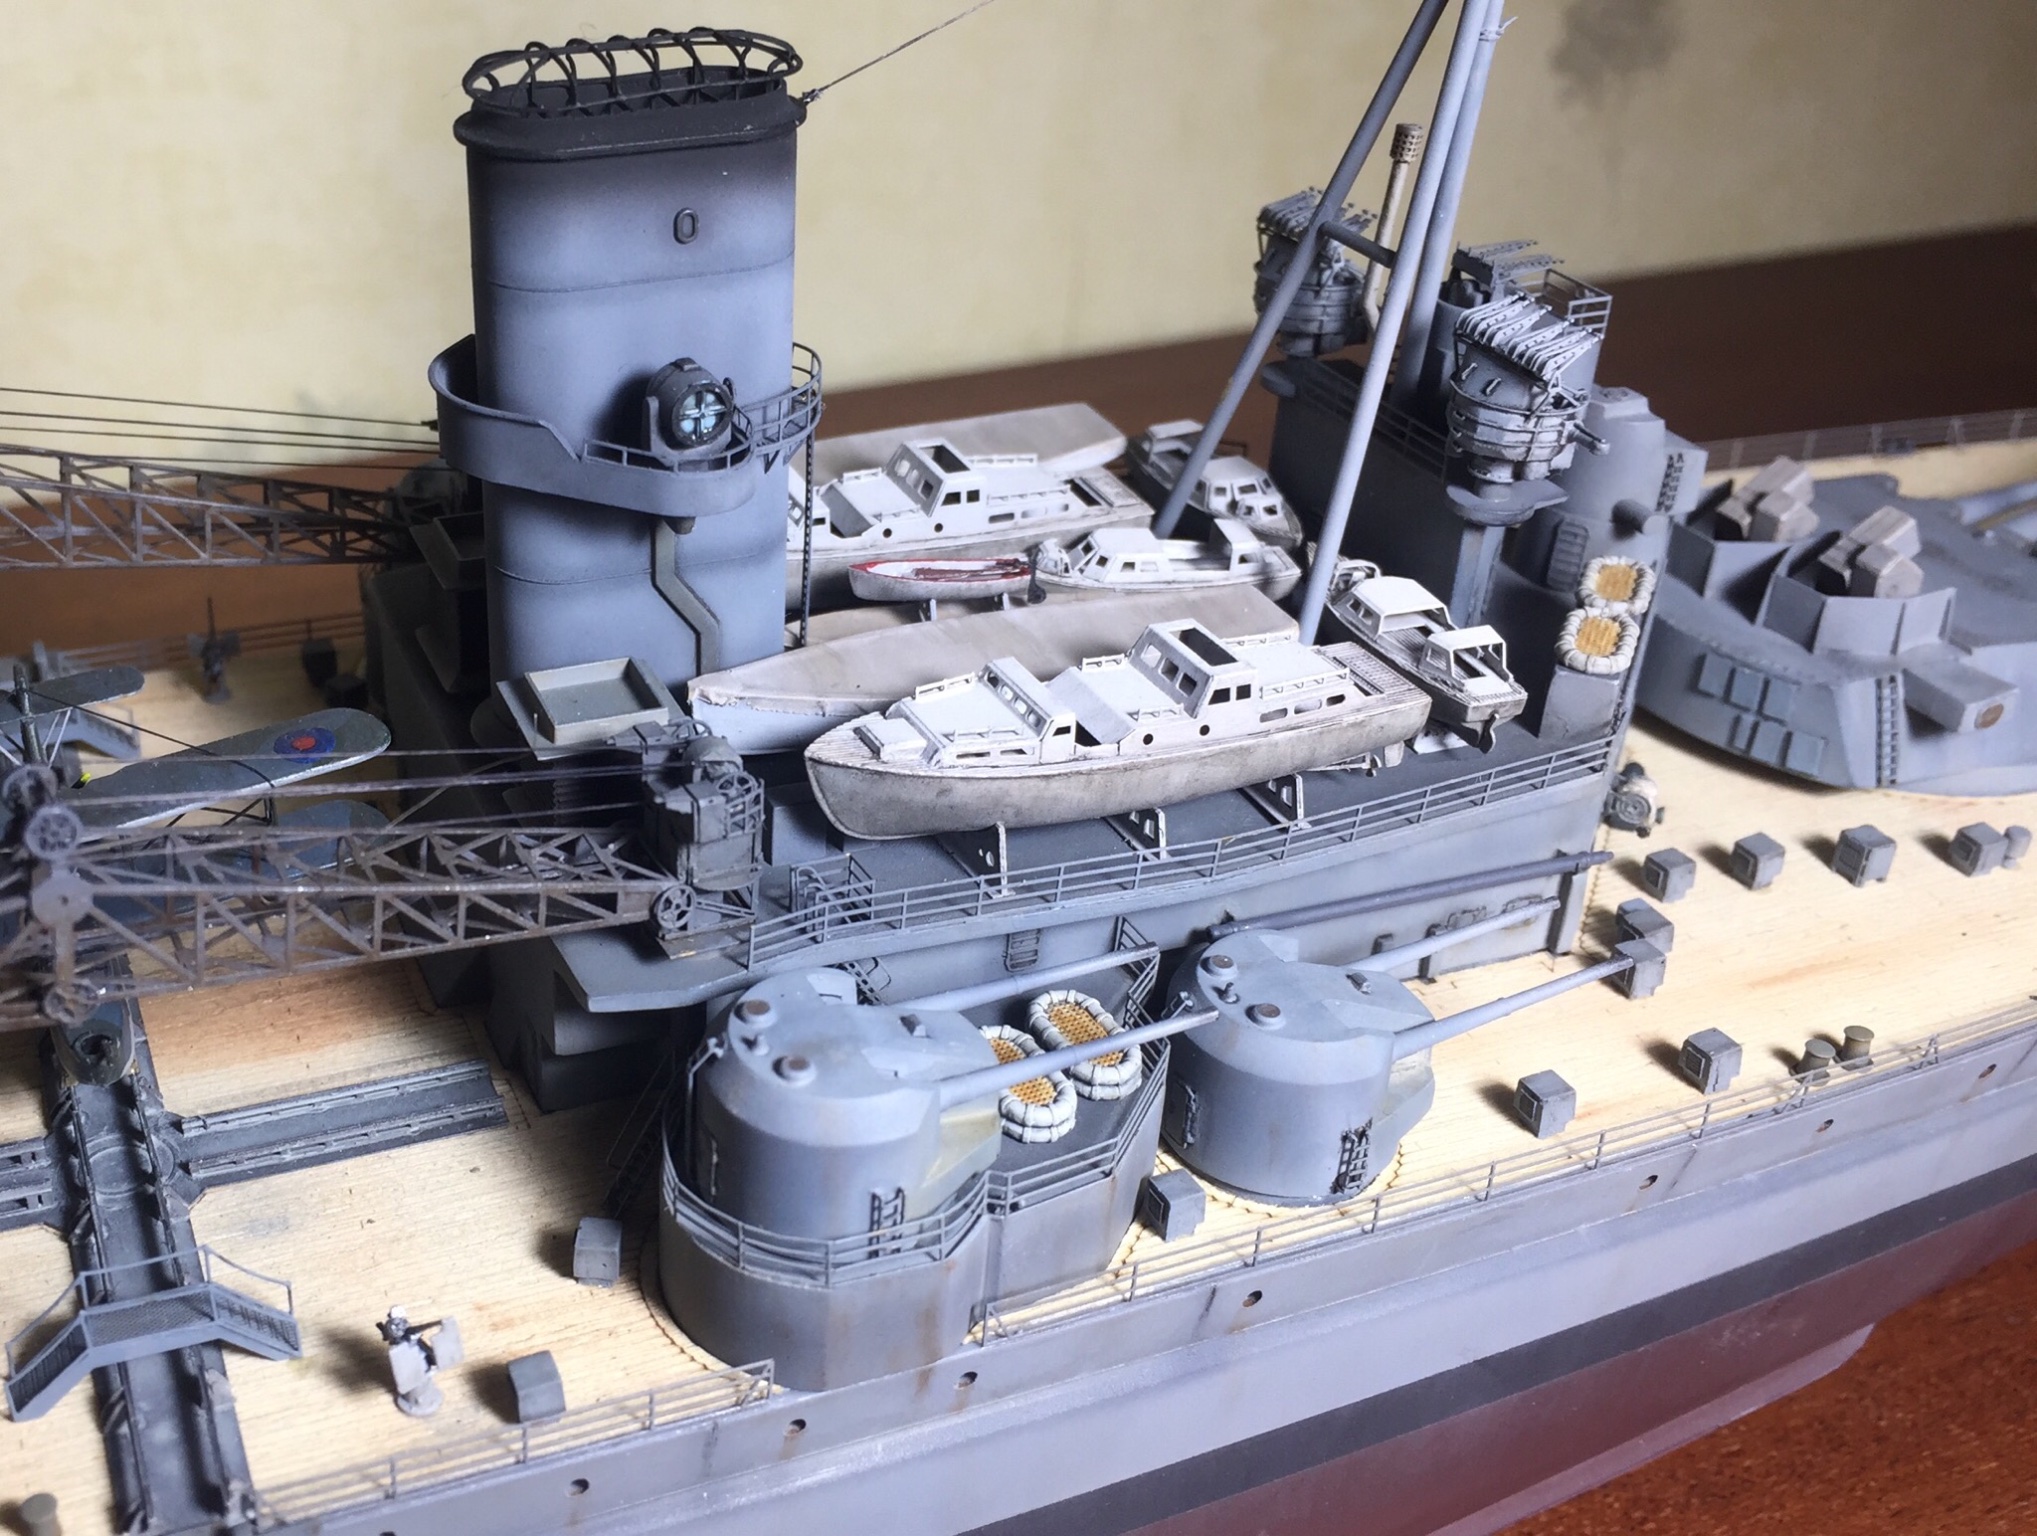
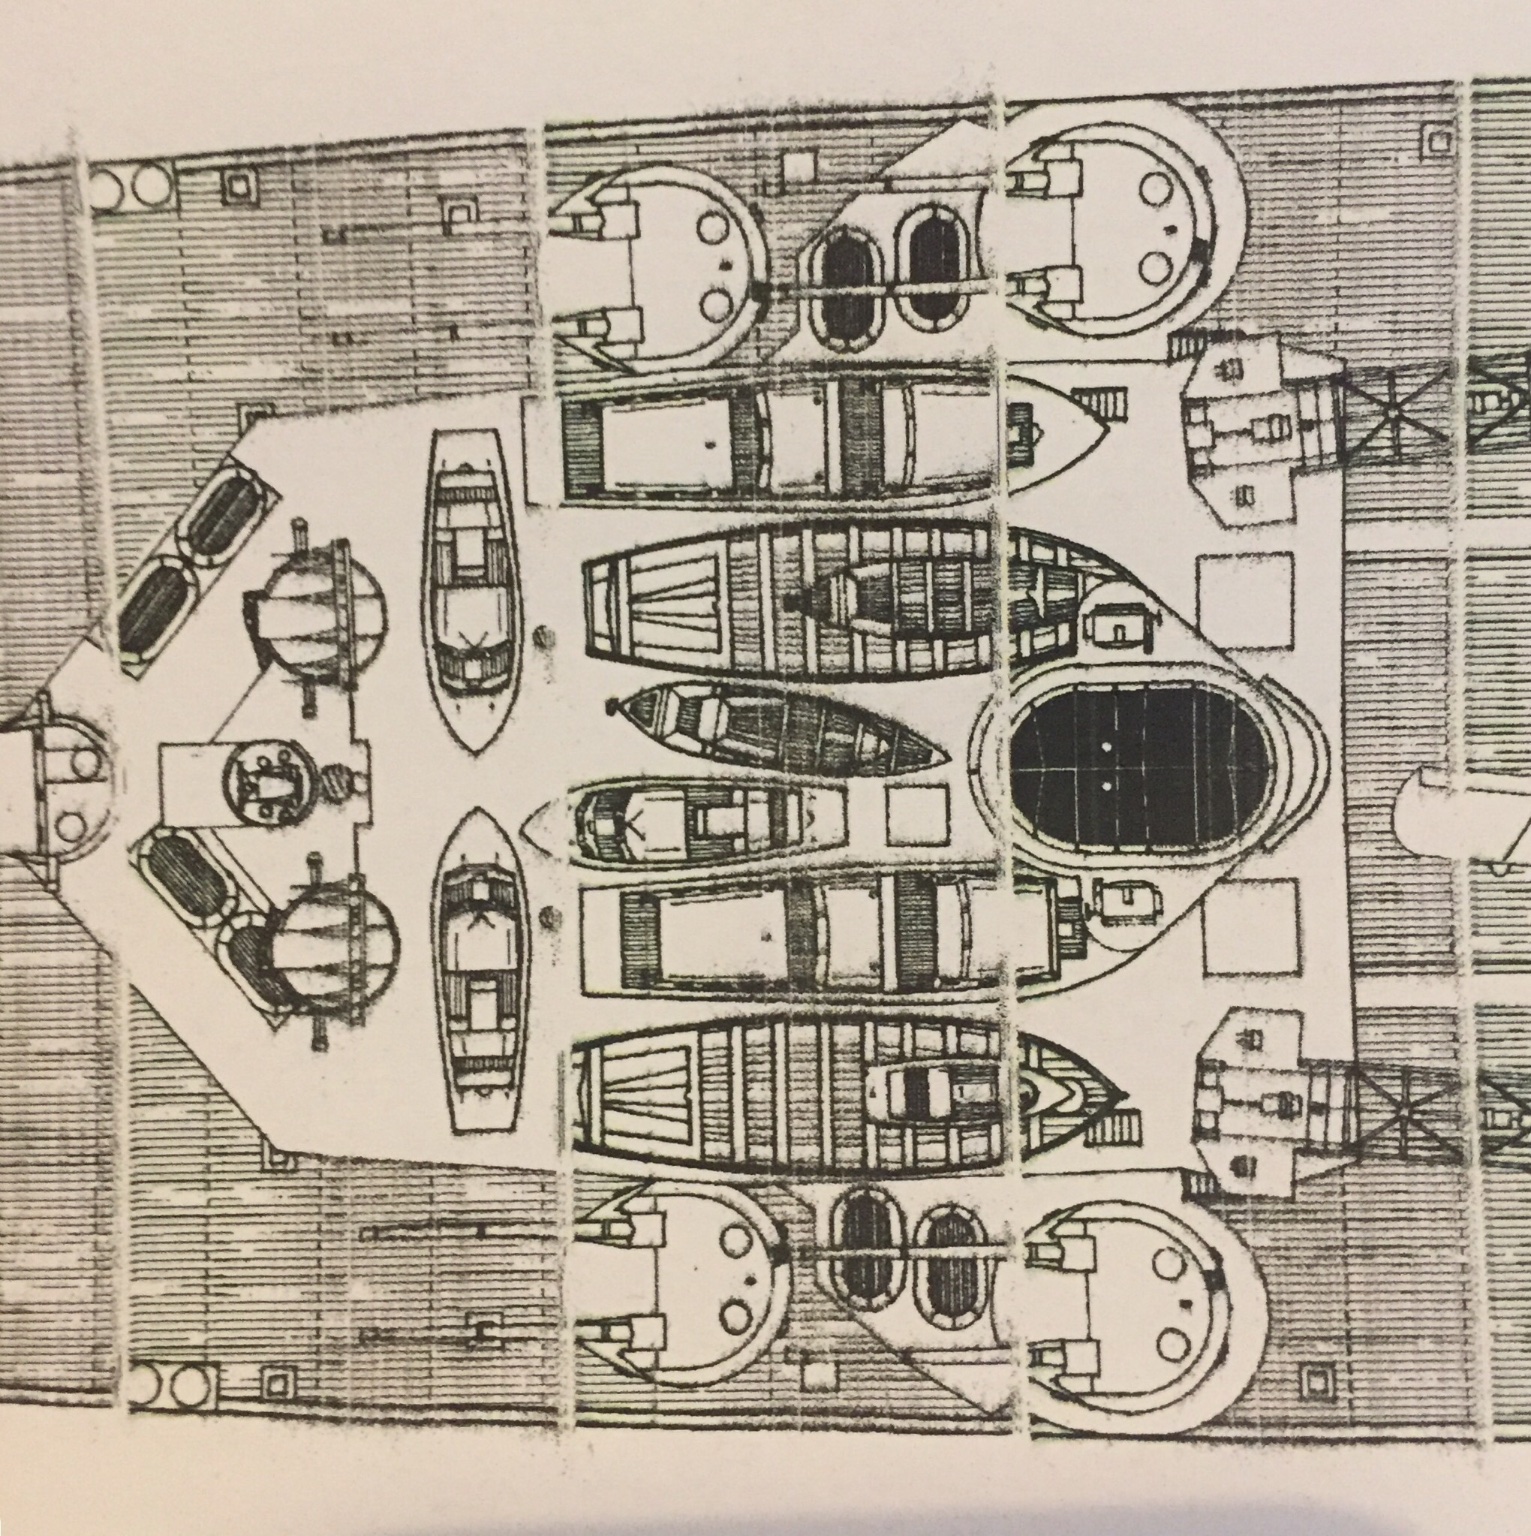
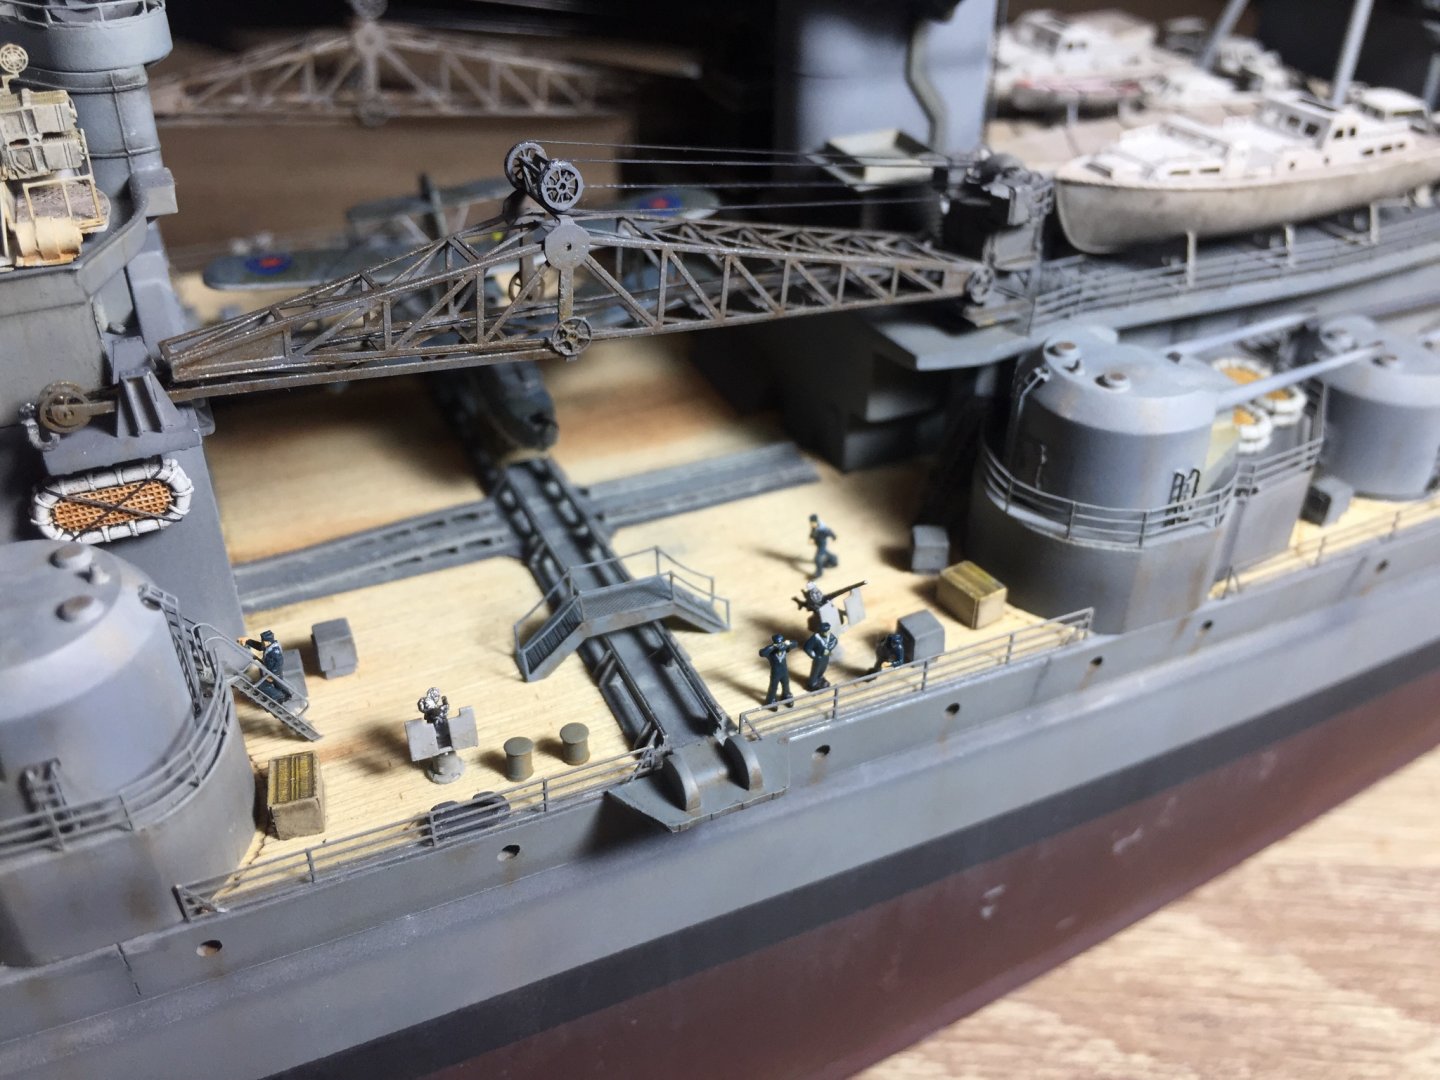
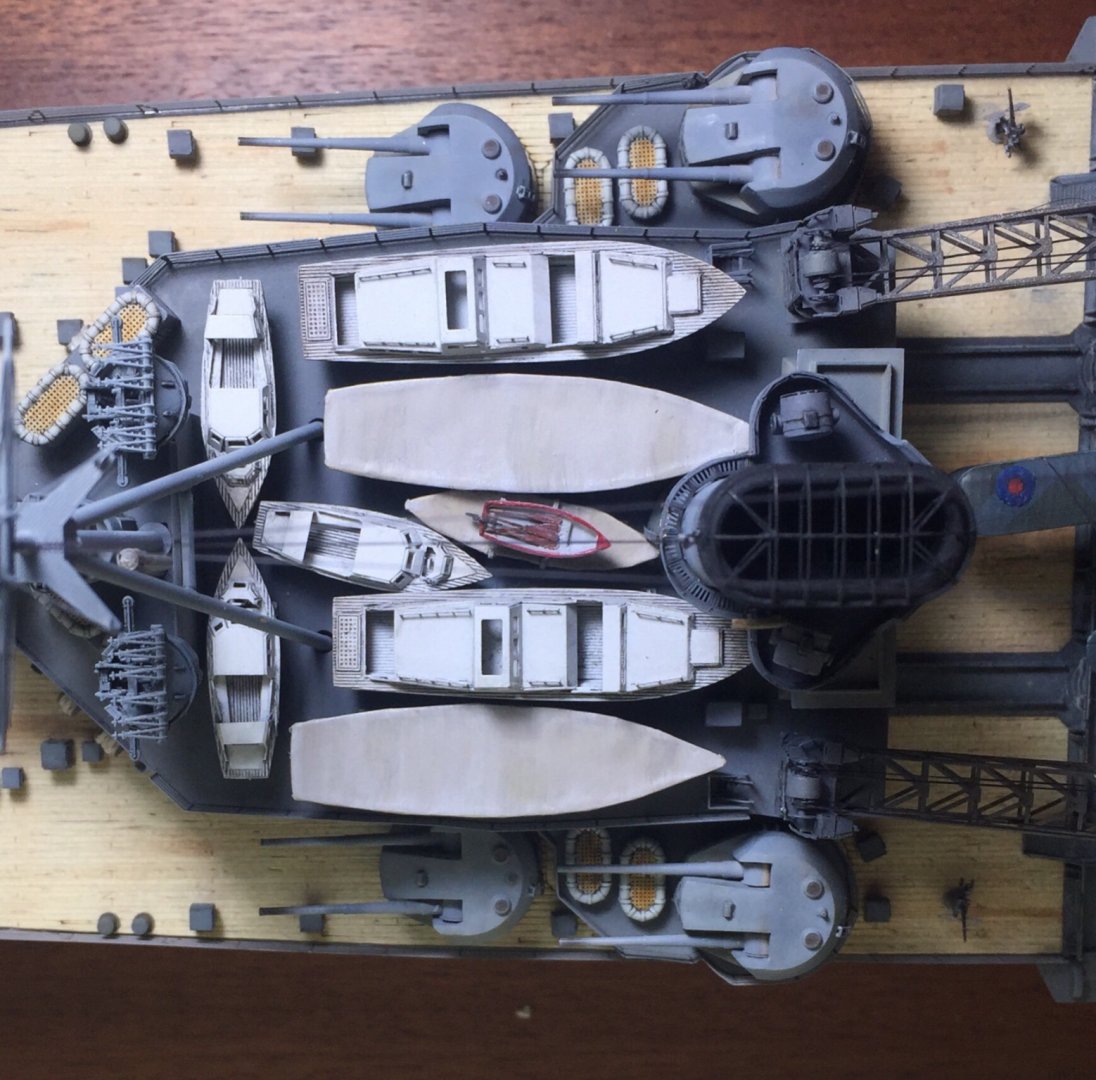
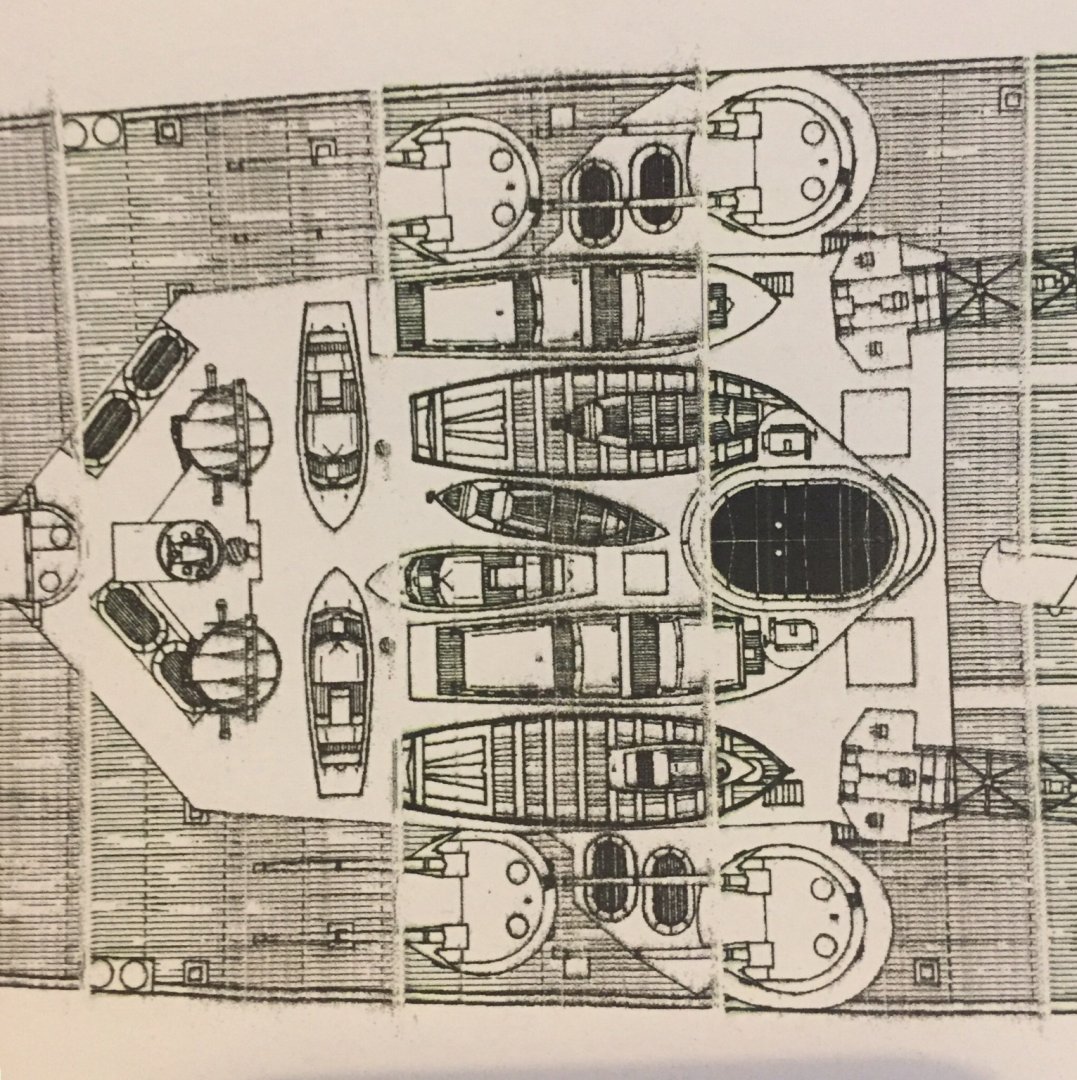
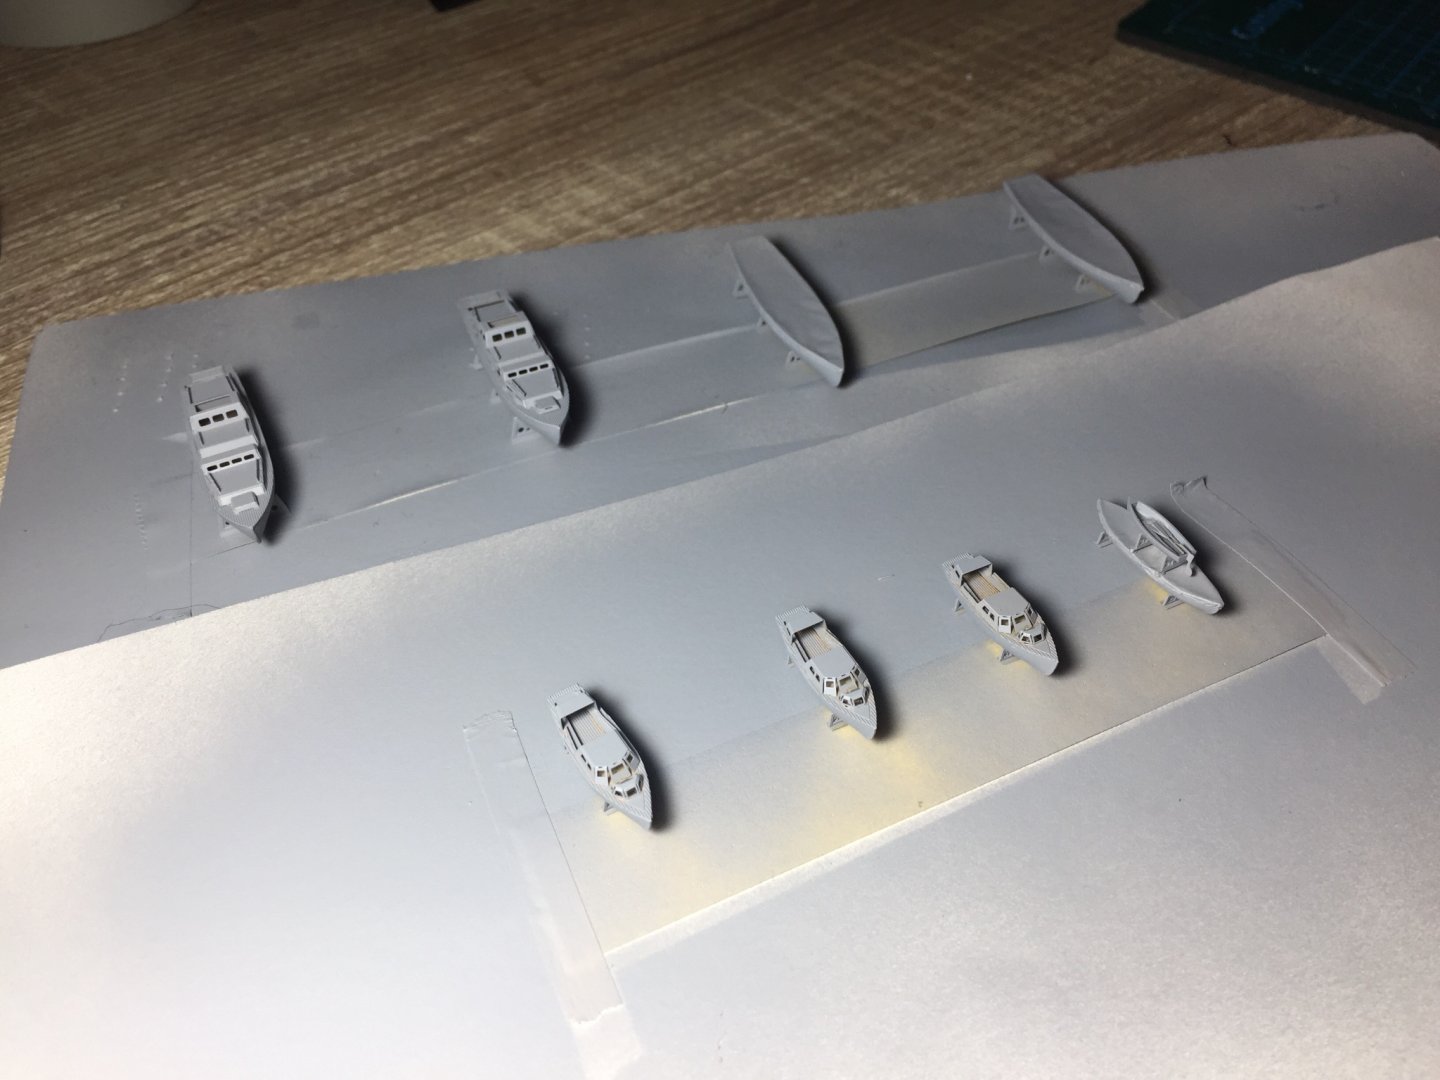
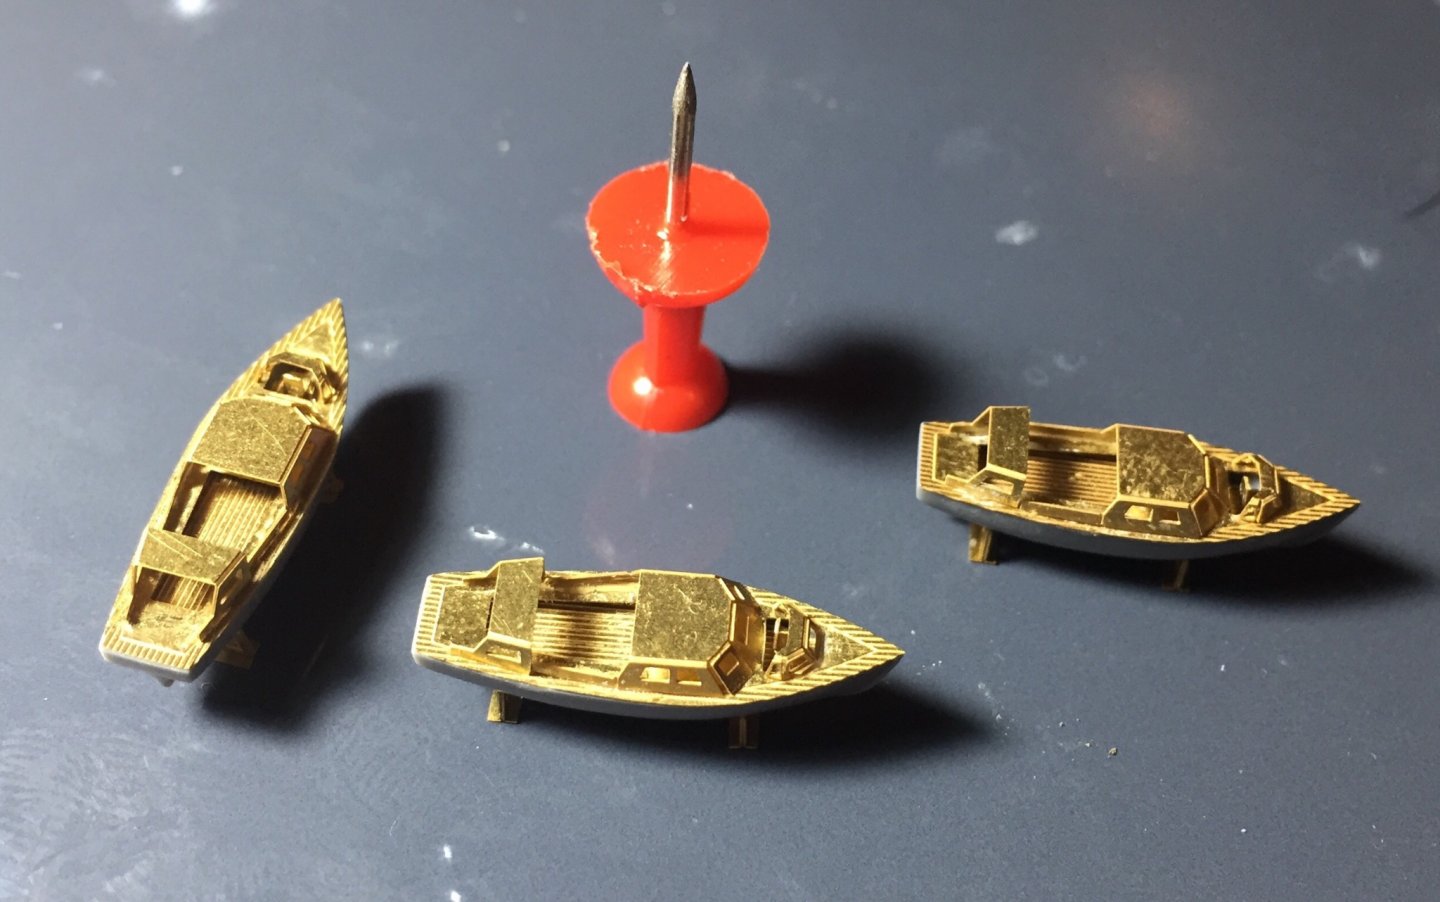
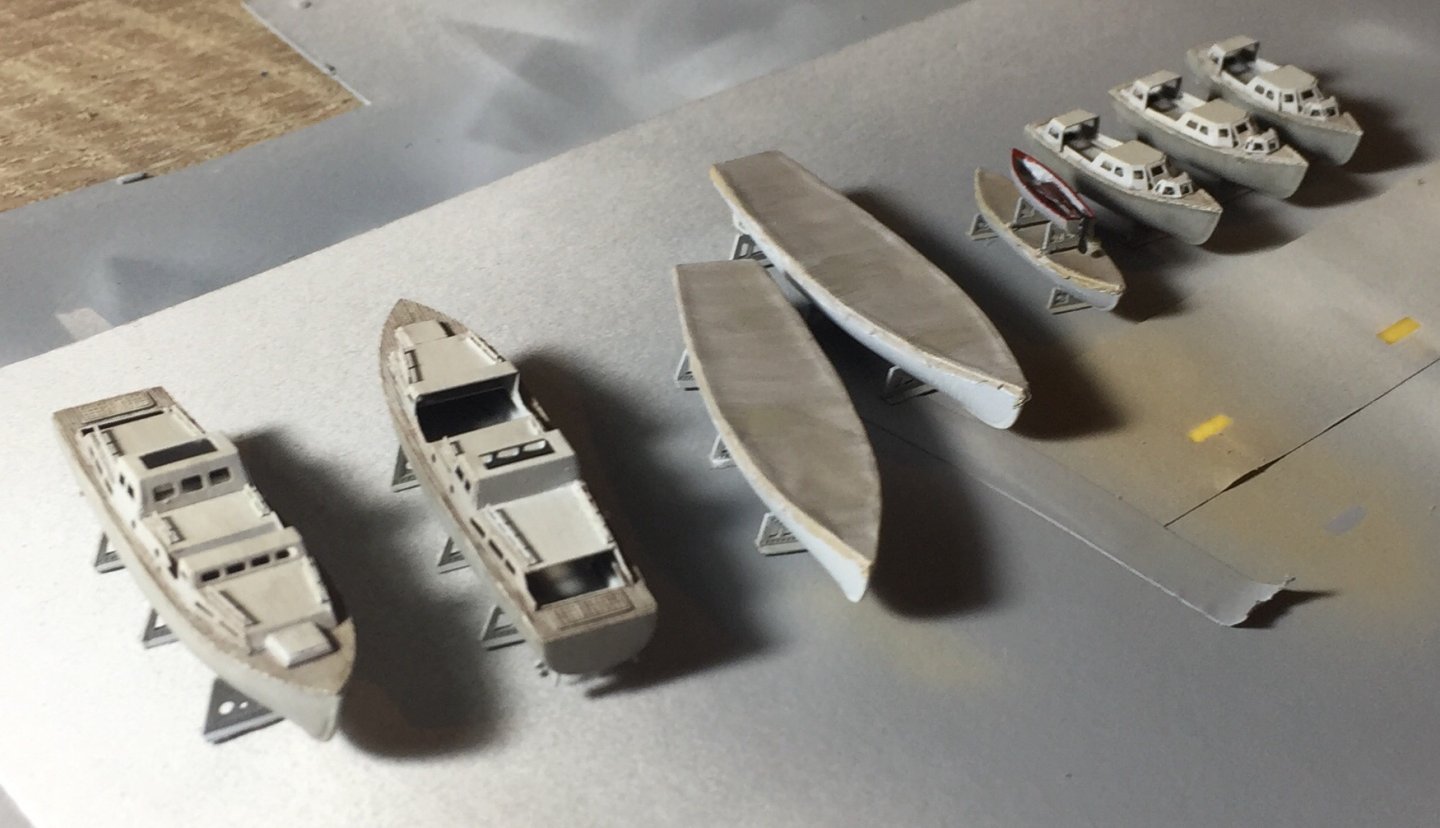
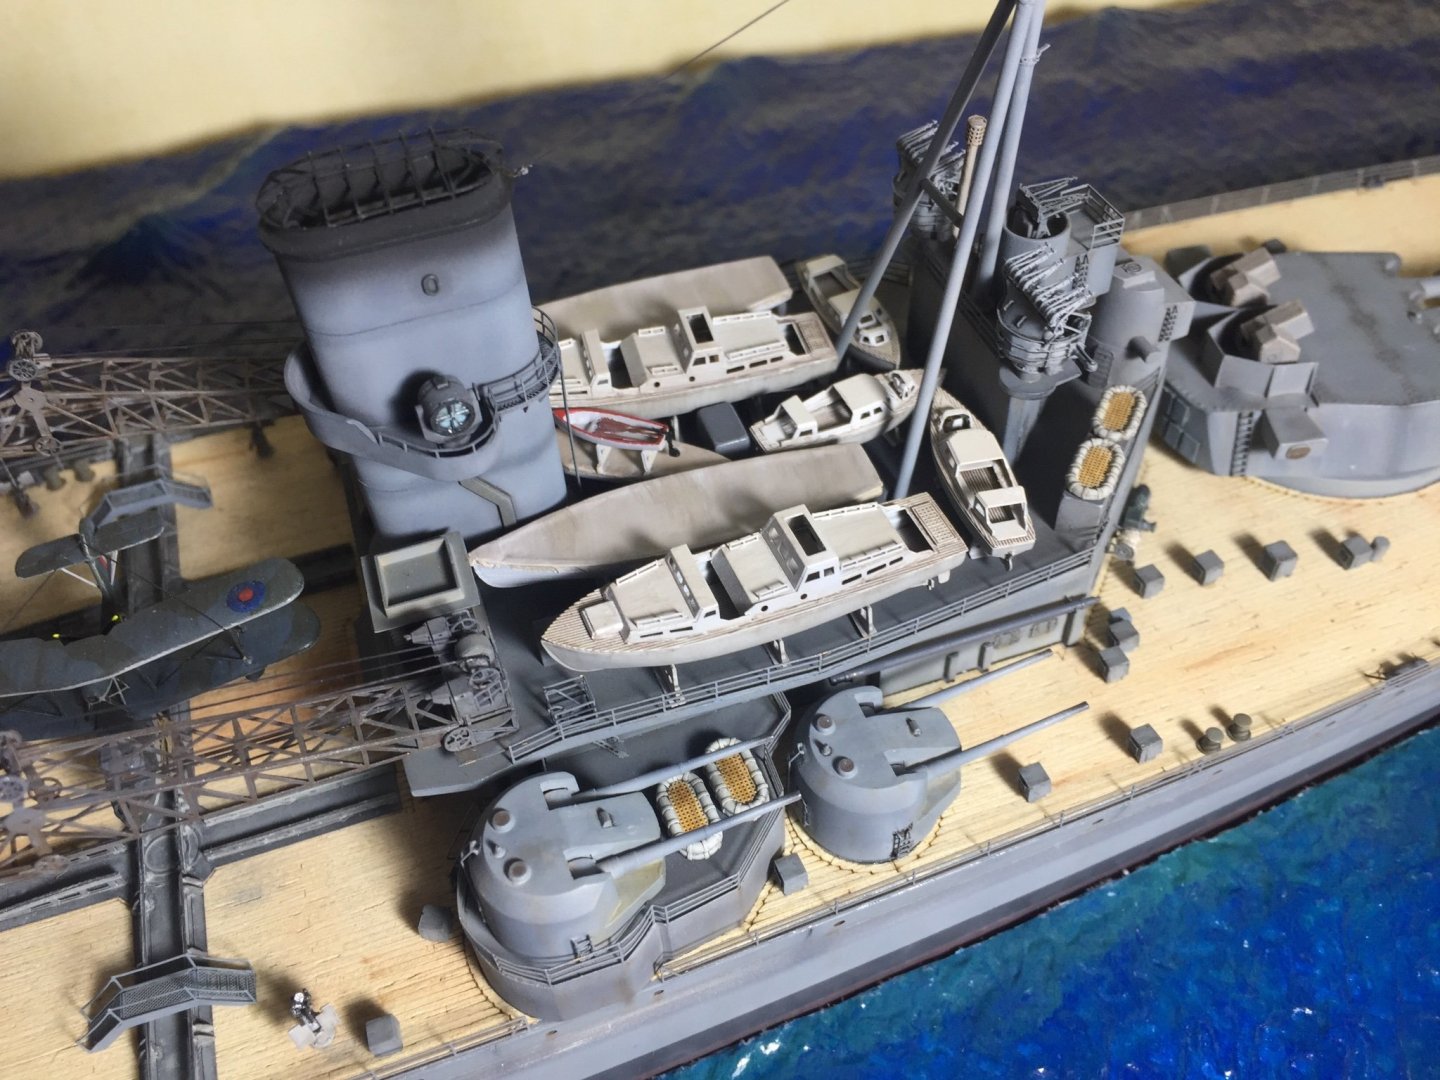
Did the final parts to the boats and they are all glued into place. Another big step complete. There was a bit in the middle of the deck which I had to cut out otherwise the boats wouldn’t fit at all. Then once I’d glued on the PE that had broken off during the renovations I got the boats and did another dusting of white from a vertical angle then a black wash which after 5 mins was washed off to leave just a hint of well maintained but won’t stand out as being to crisp. Then did a dark grey wash on the hulls and just didn’t wash it off. now they are glued into place. The plans show there to be ether smaller boats or a lot bigger deck... because mine don’t have the same space haha! Poms poms and ammo boxes left...

- 211 replies
-
- 10
-
-
- prince of wales
- tamiya
- (and 2 more)
-
Finished the ships boats and will give them one last blending wash in a few days to finish them. did lots of searching for how they were painted and didn’t find much. But eventually found someone saying hull should be grey and top side white. So went with that. lots of washes as if they look perfect they dont don’t look right at all so lots of greys, whites and tans mixed and smeared. The open boats I covered so a creamy tarp look was wanted, will need another wash to help bring them out.
- 211 replies
-
- 8
-
-
- prince of wales
- tamiya
- (and 2 more)
-
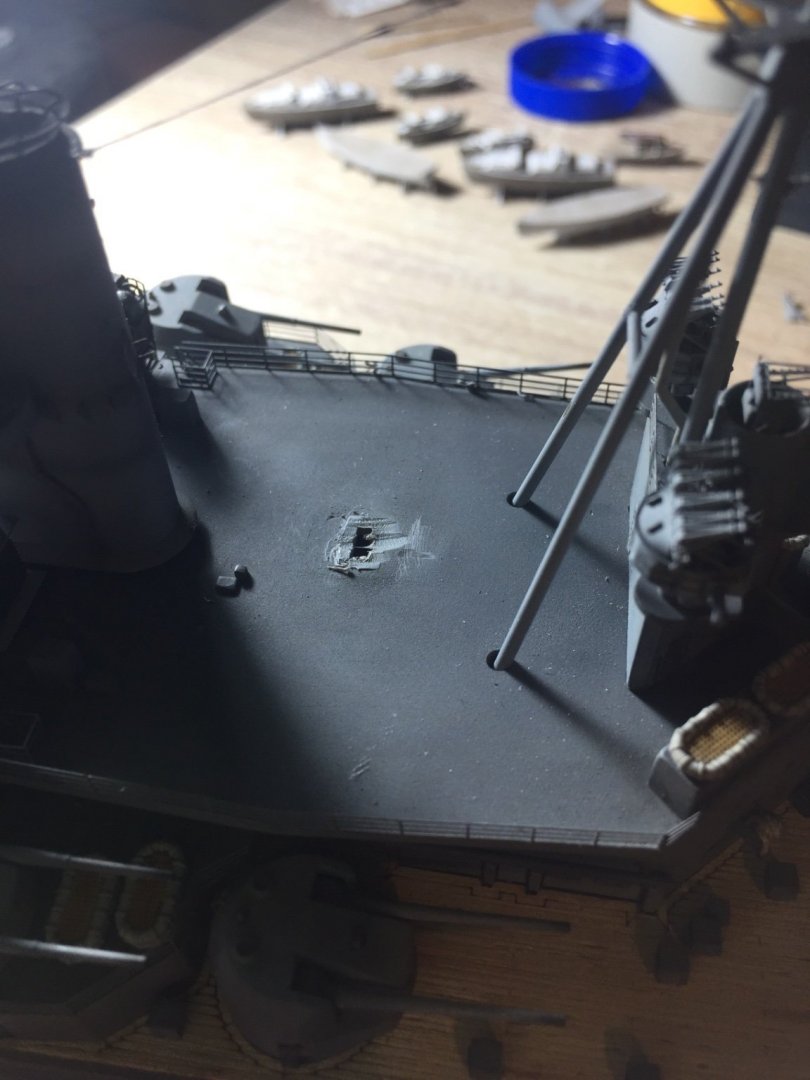
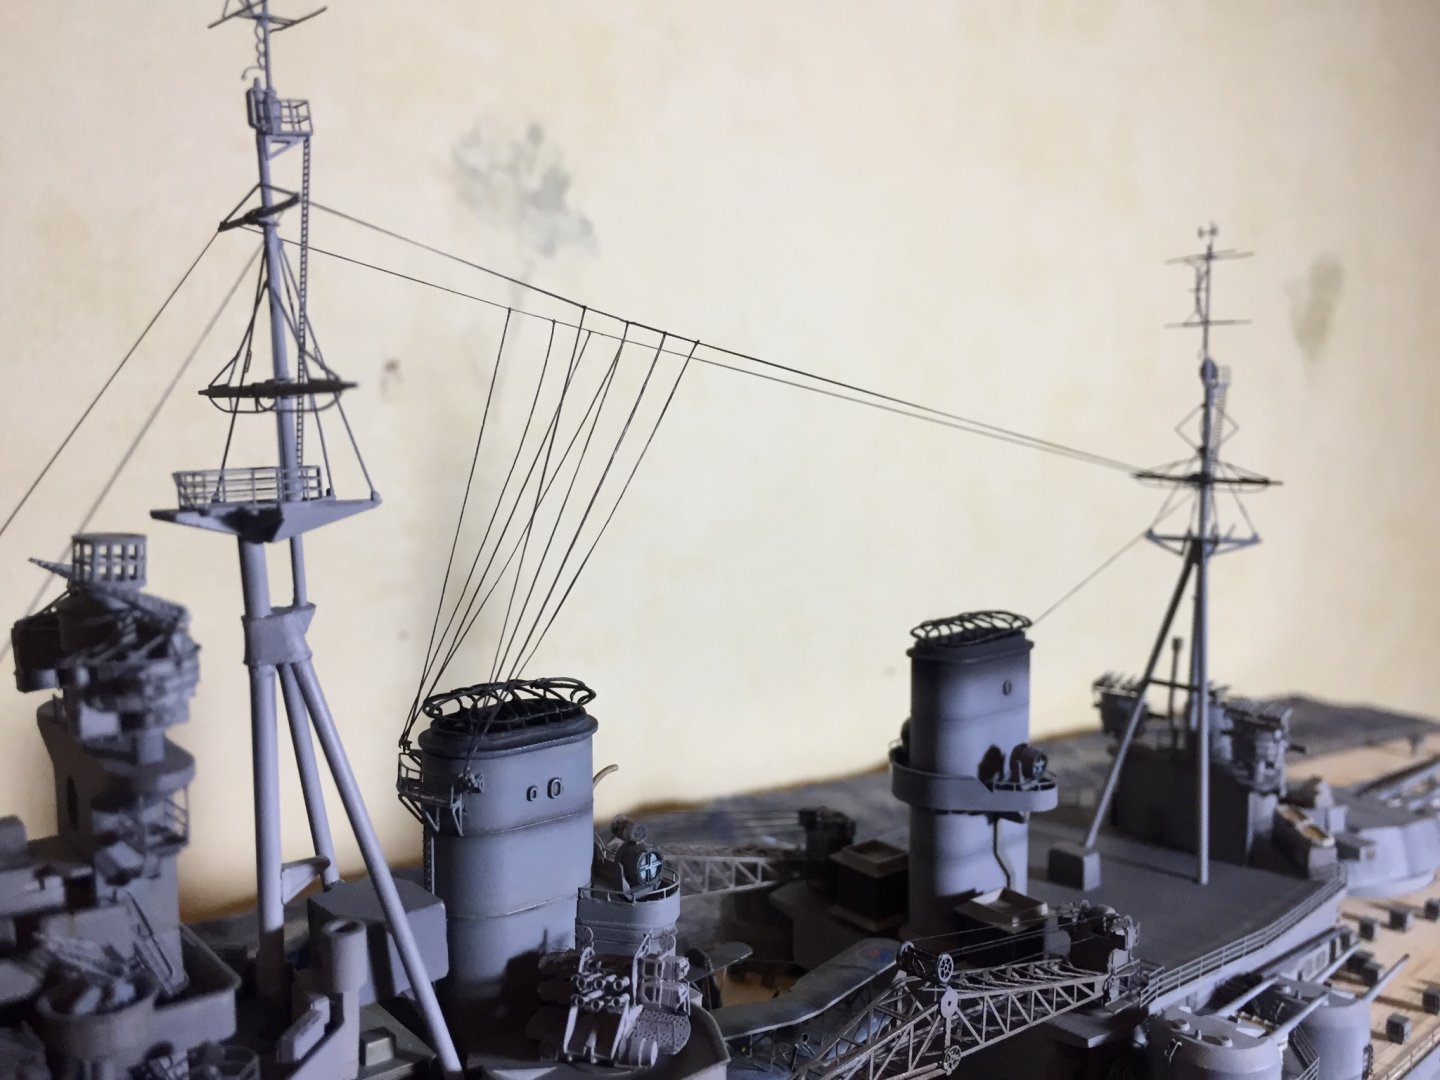
Rigged her up today. Not easy trying to get them all taut especially with how stretchy the line is but ‘EZ Line thin black’ so good! still no white water added but wont be too far away!
- 211 replies
-
- 9
-
-
- prince of wales
- tamiya
- (and 2 more)
-
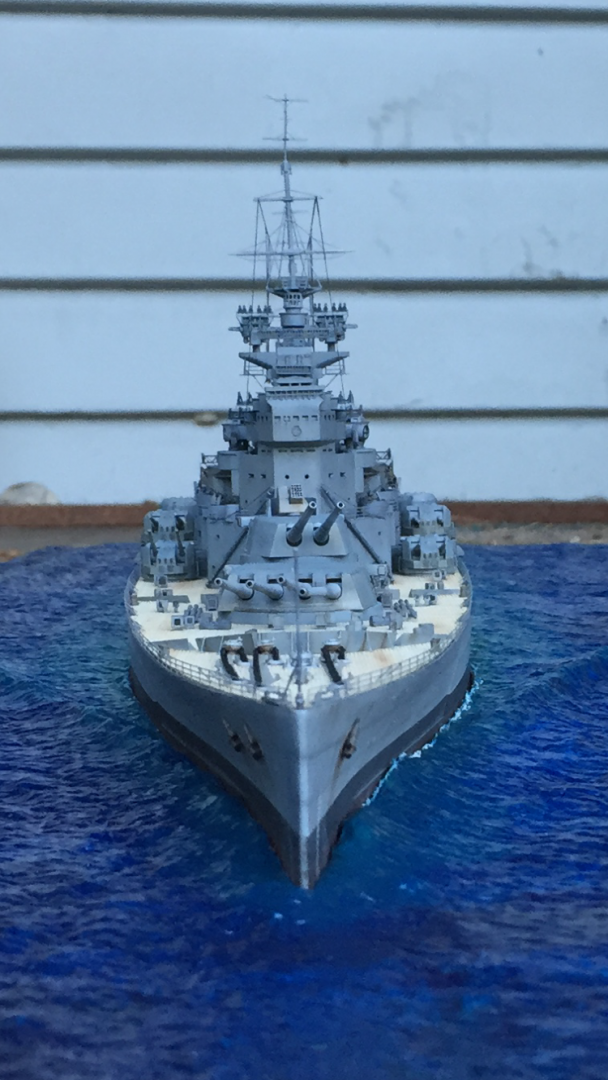
Thanks, I just wanted her to look well used as she was such a new ship I didn’t want to over weather knowing how well they were looked after. The temptation is always there to add more weathering though.
- 211 replies
-
- 4
-
-
- prince of wales
- tamiya
- (and 2 more)