xken
-
Posts
841 -
Joined
-
Last visited
Content Type
Profiles
Forums
Gallery
Events
Everything posted by xken
-
 Happy 242nd Birthday to all Marines! Semper Fi to those who fly!
 -
Dan, I am looking for railing about 1/8” .125 “ high. I was looking at #3501 and/or 3583 and since I will need a few sheets I want to get the correct one, and not go through the buy and return routine. Especially with his lack of communication. Any help would be really appreciated and thanks in advance.
-
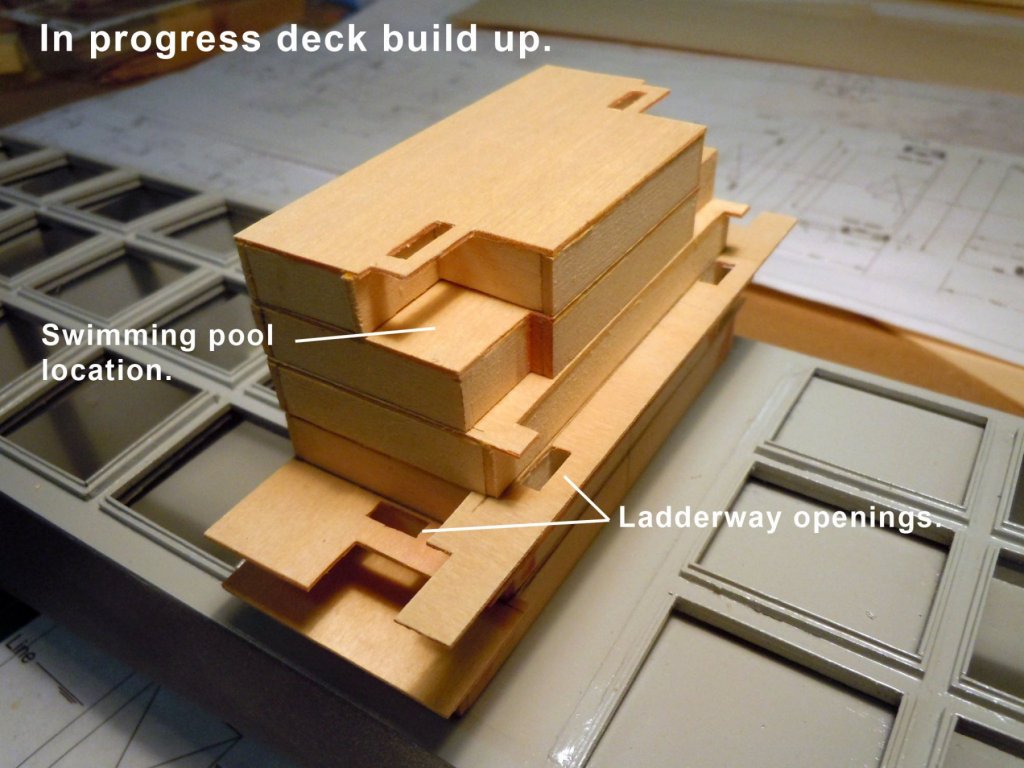
Thanks Michael and Jim! Michael only one bow thruster and yes a nice swimming pool.
-
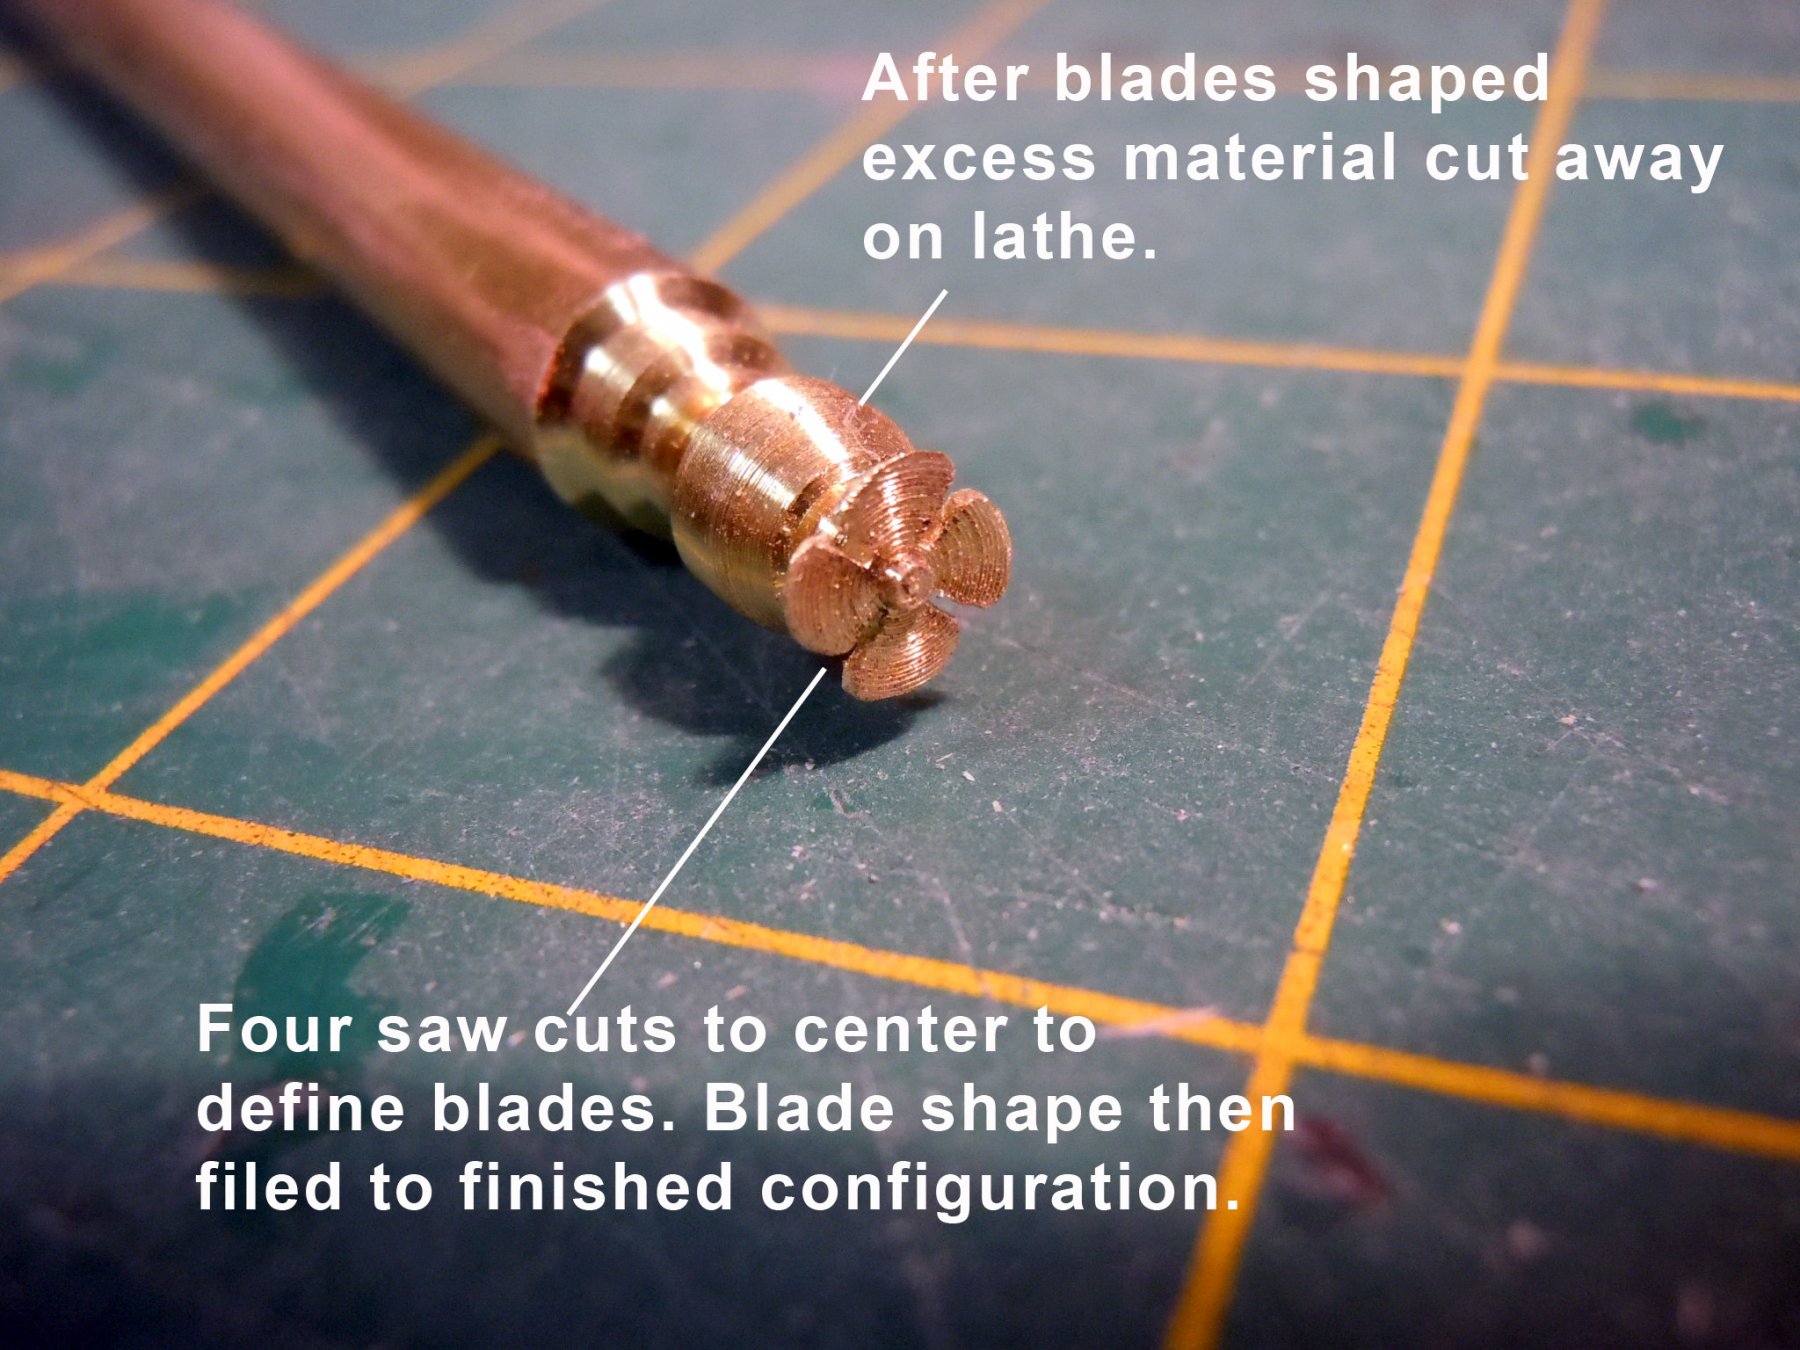
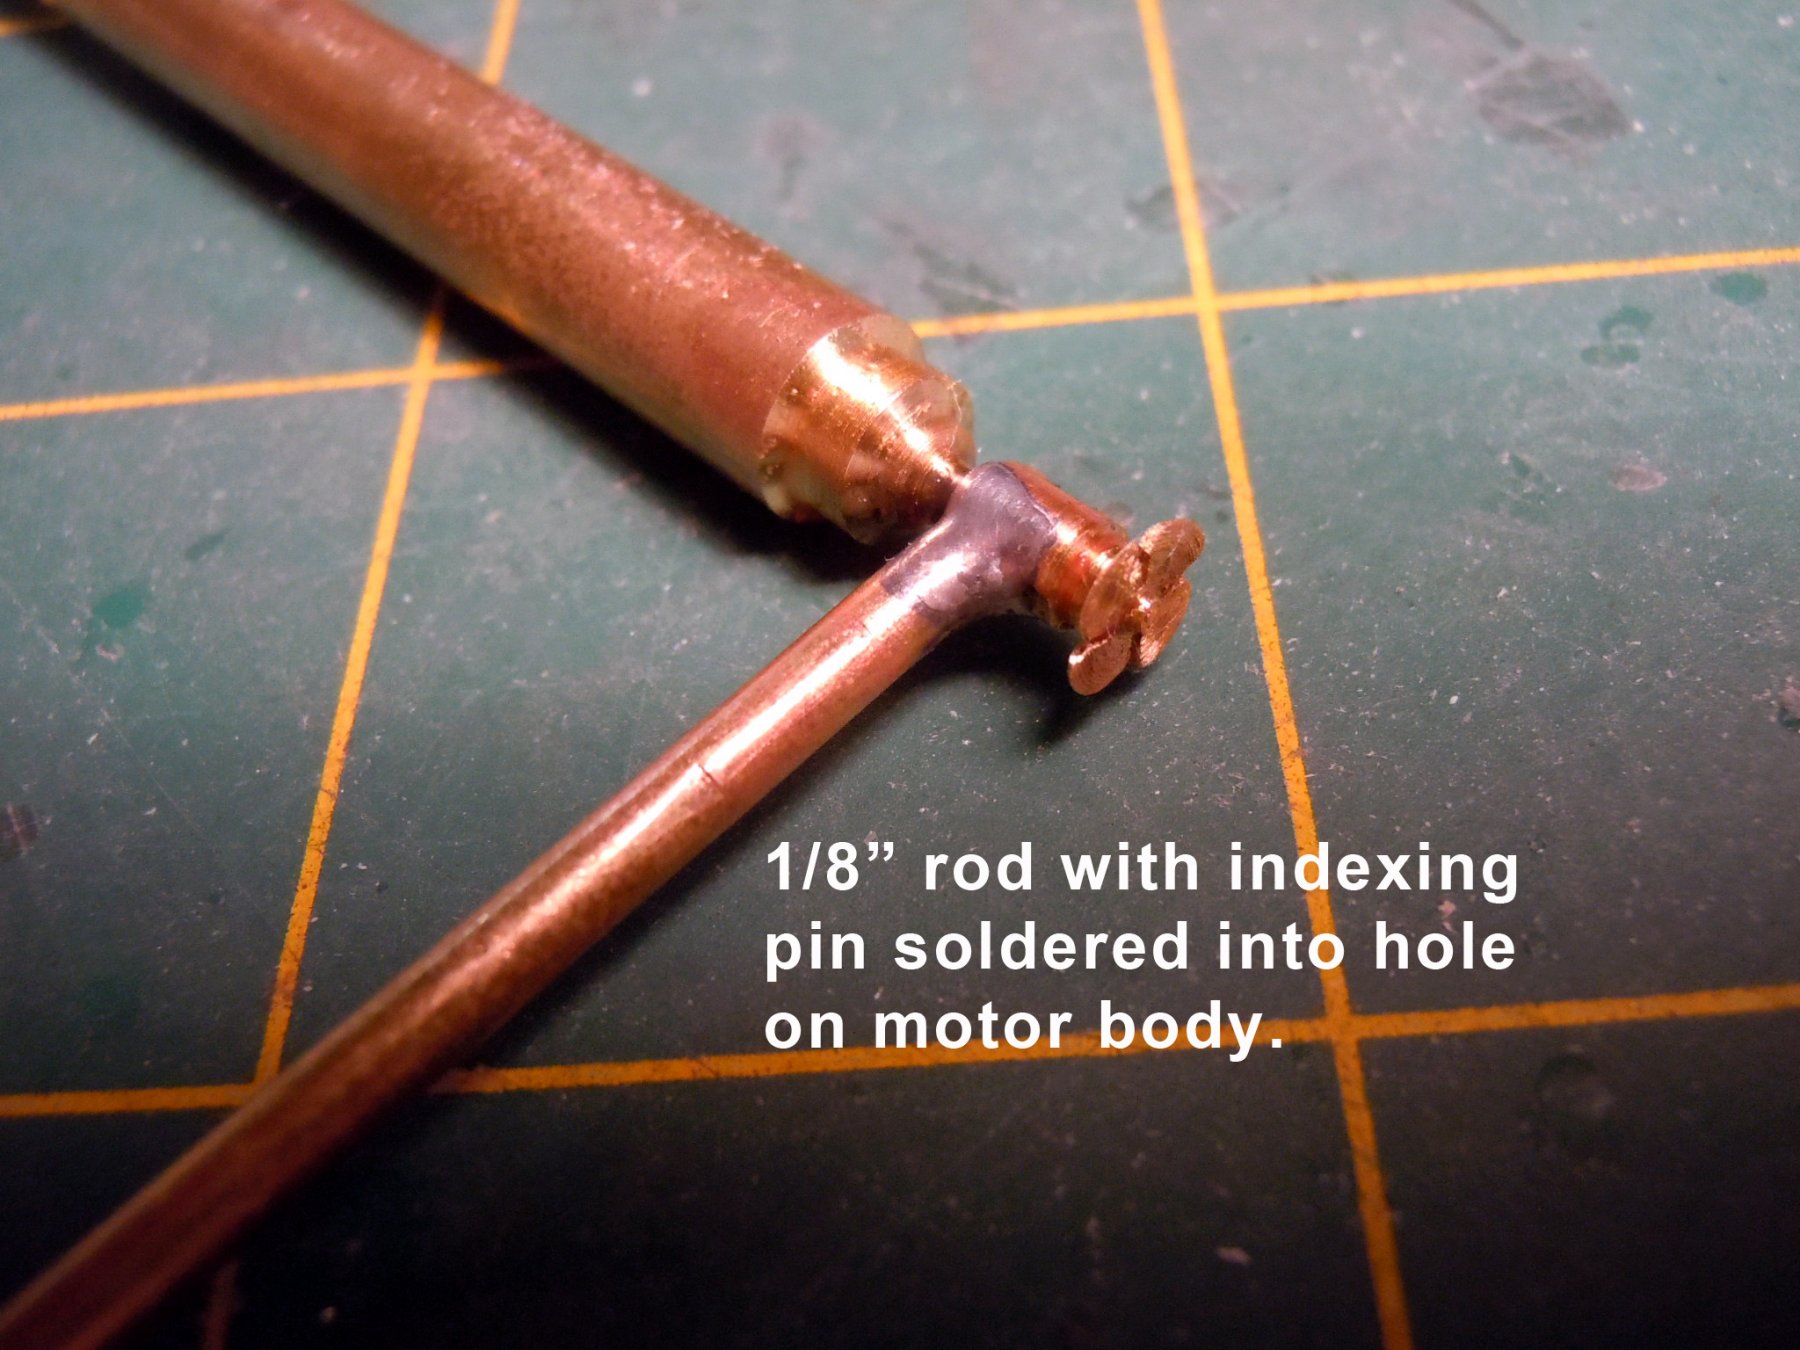
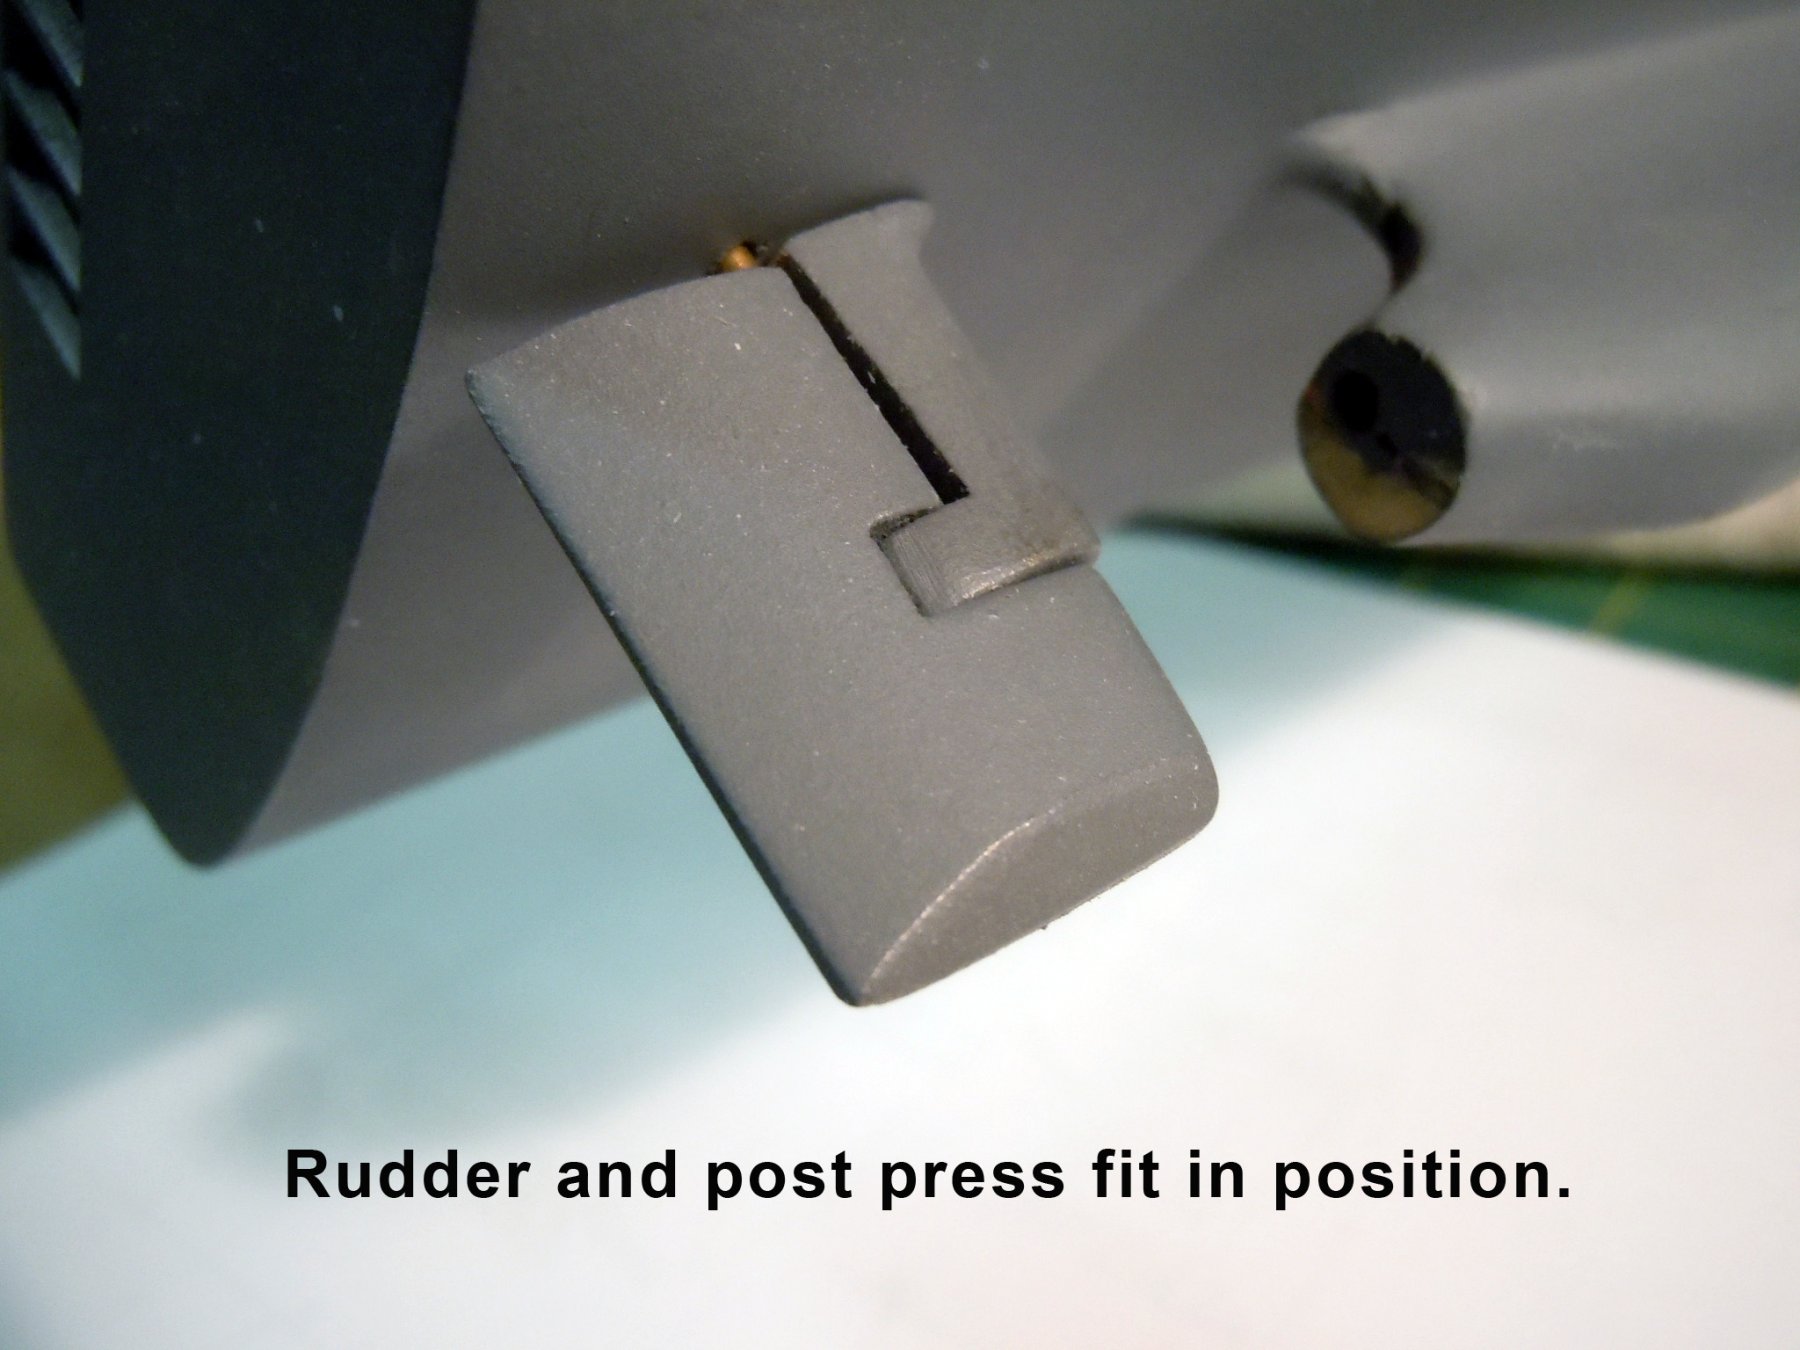
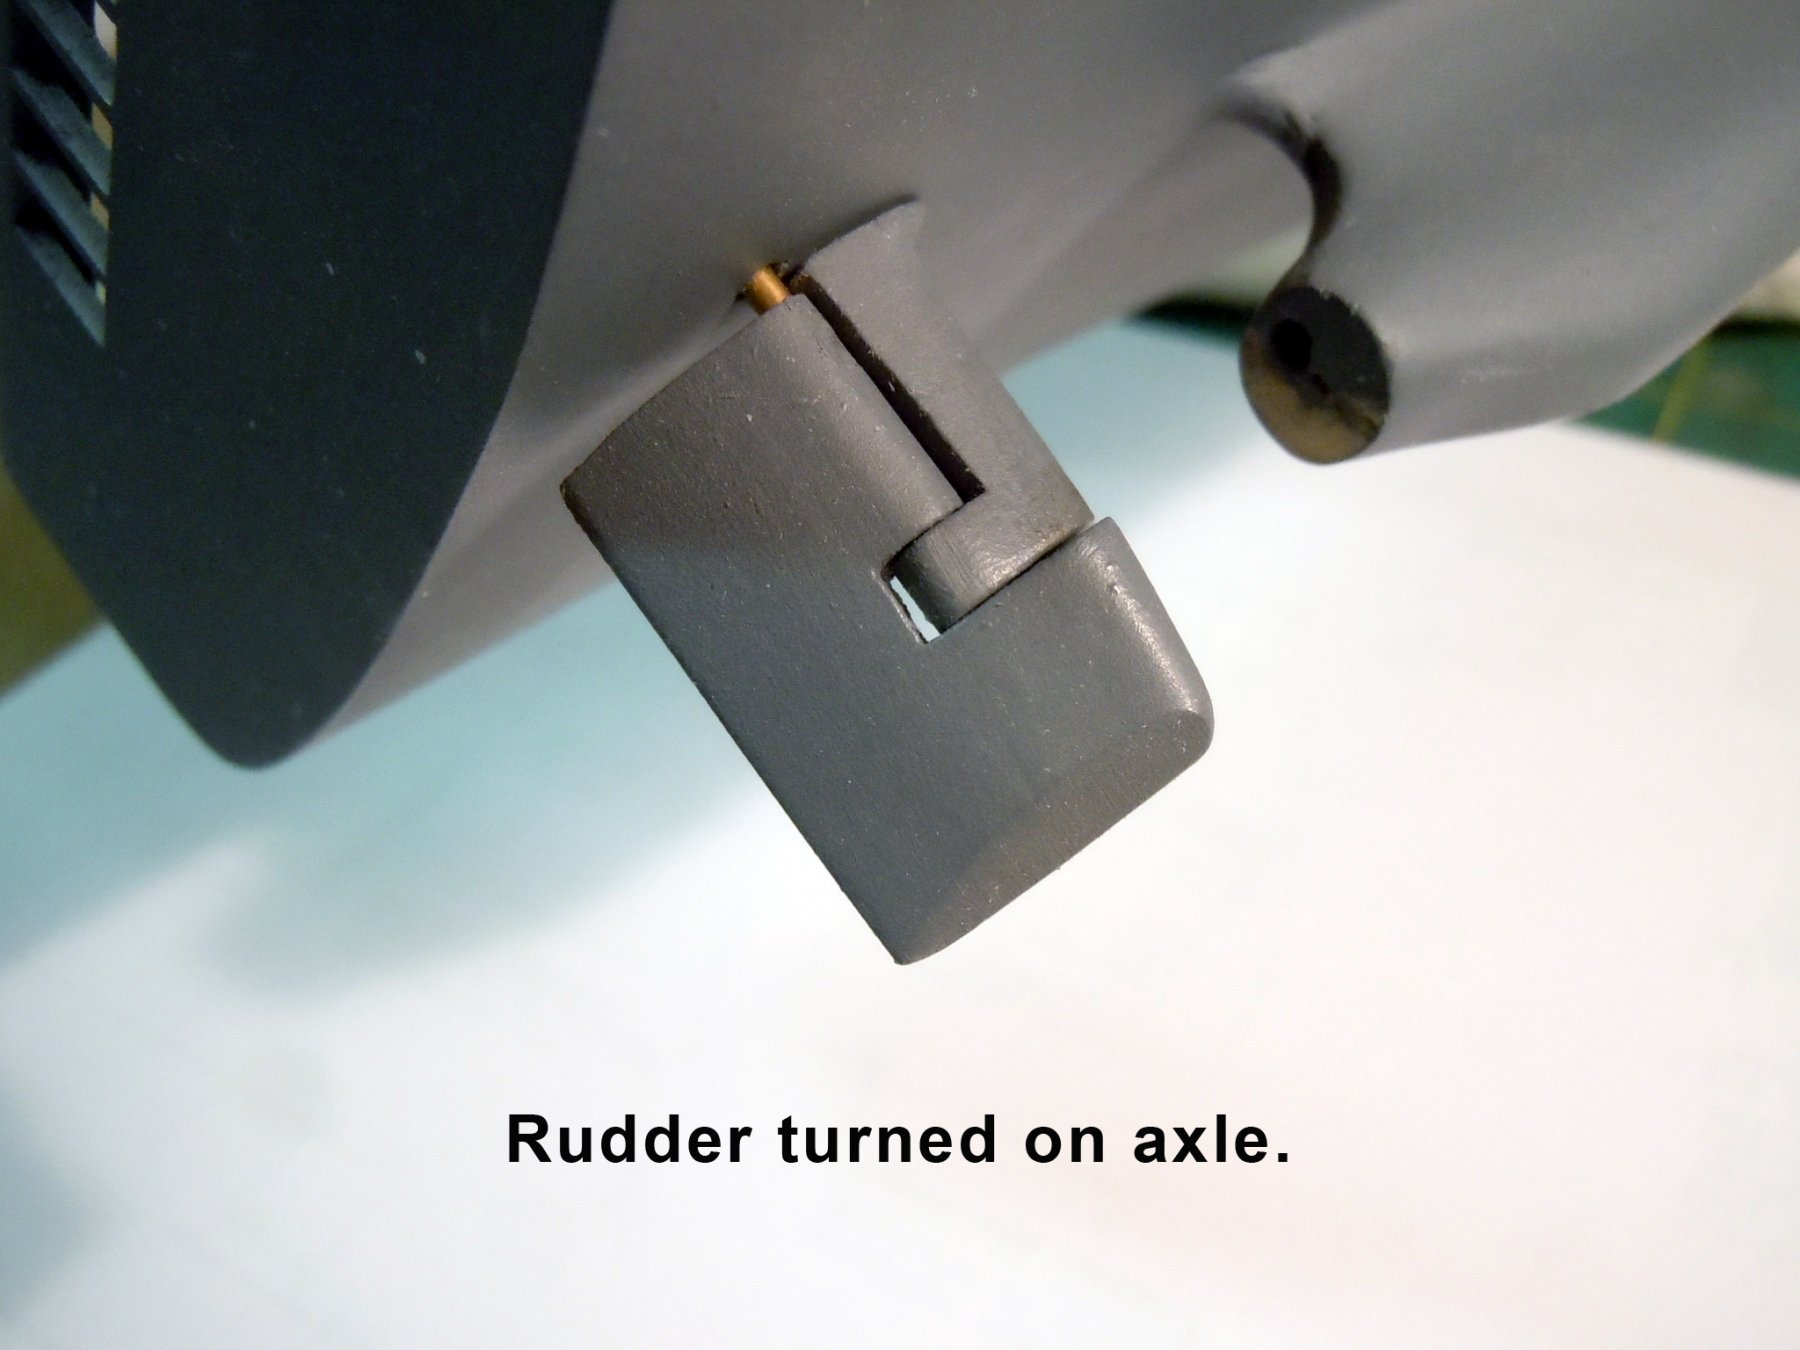
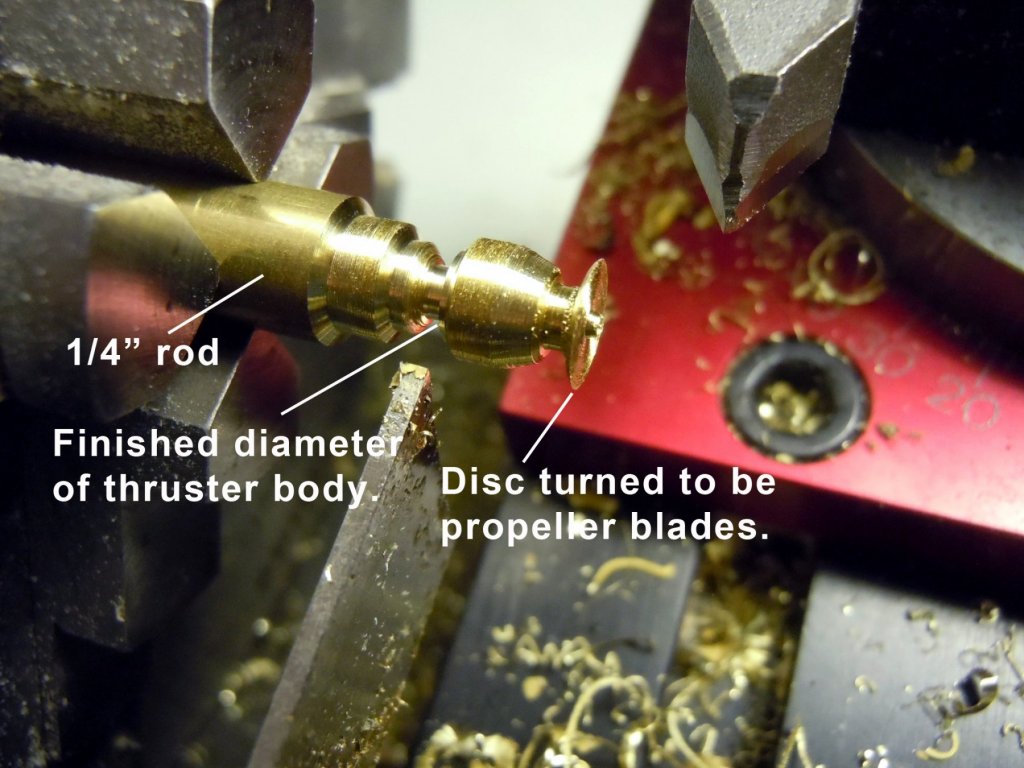
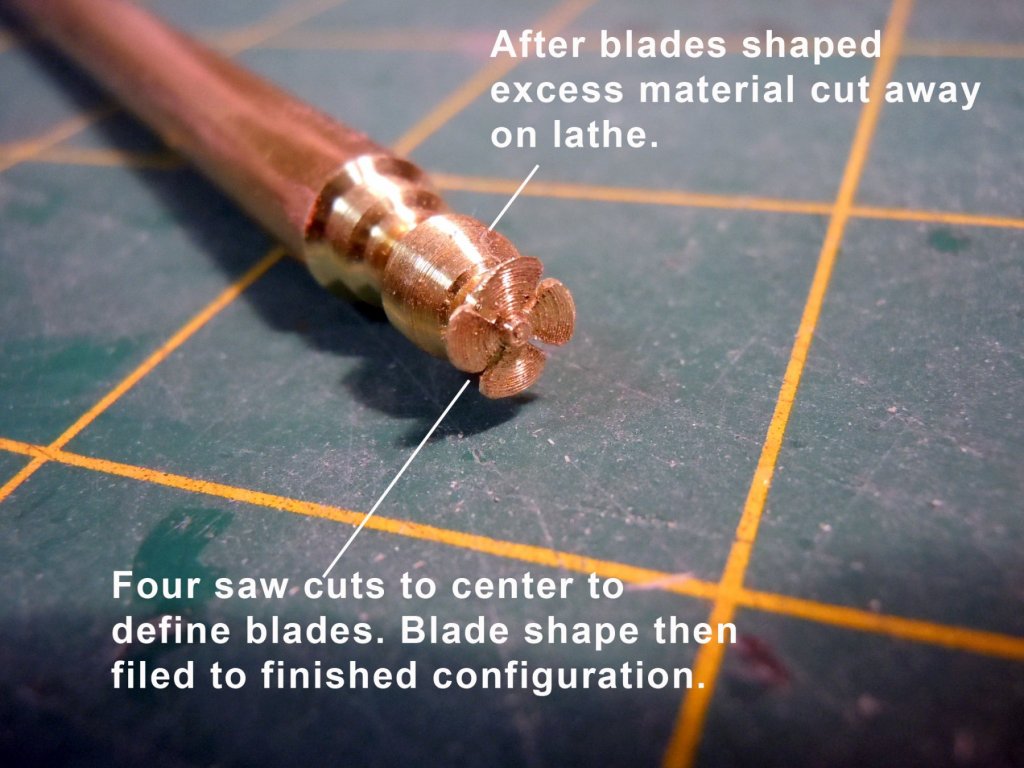
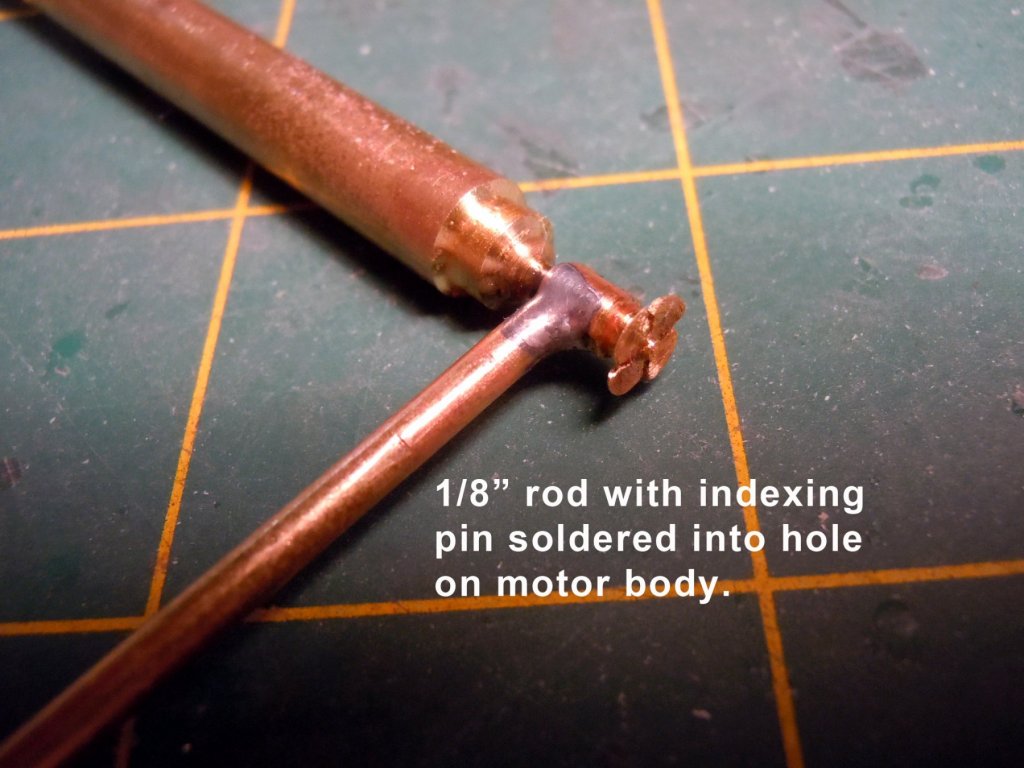
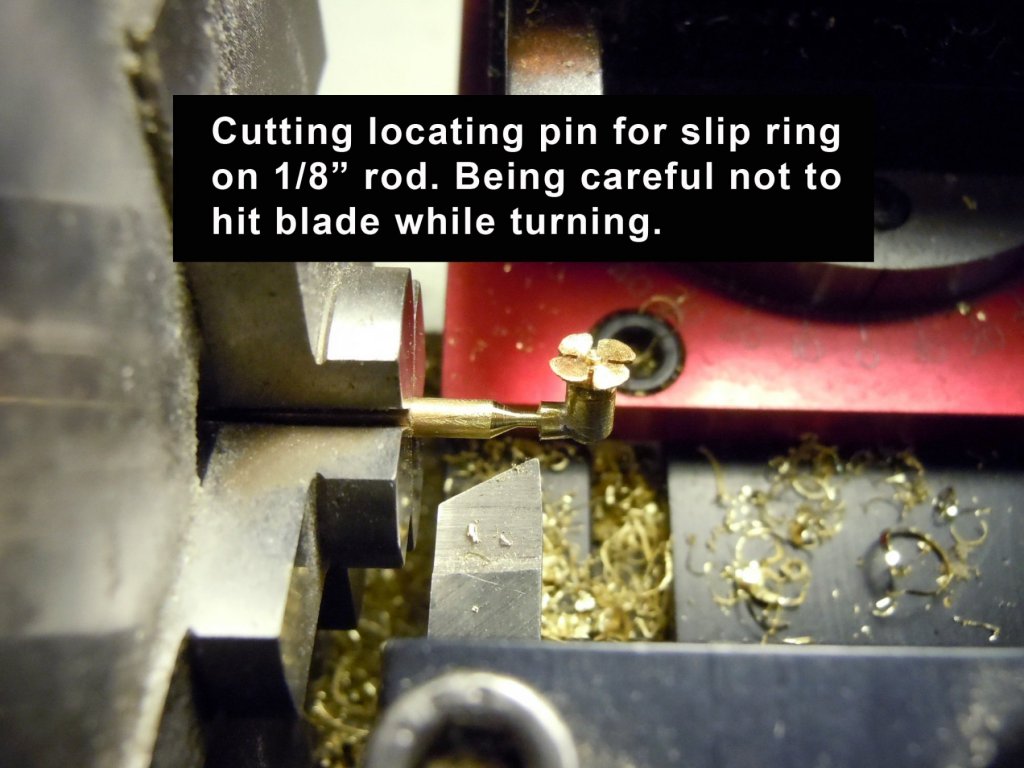
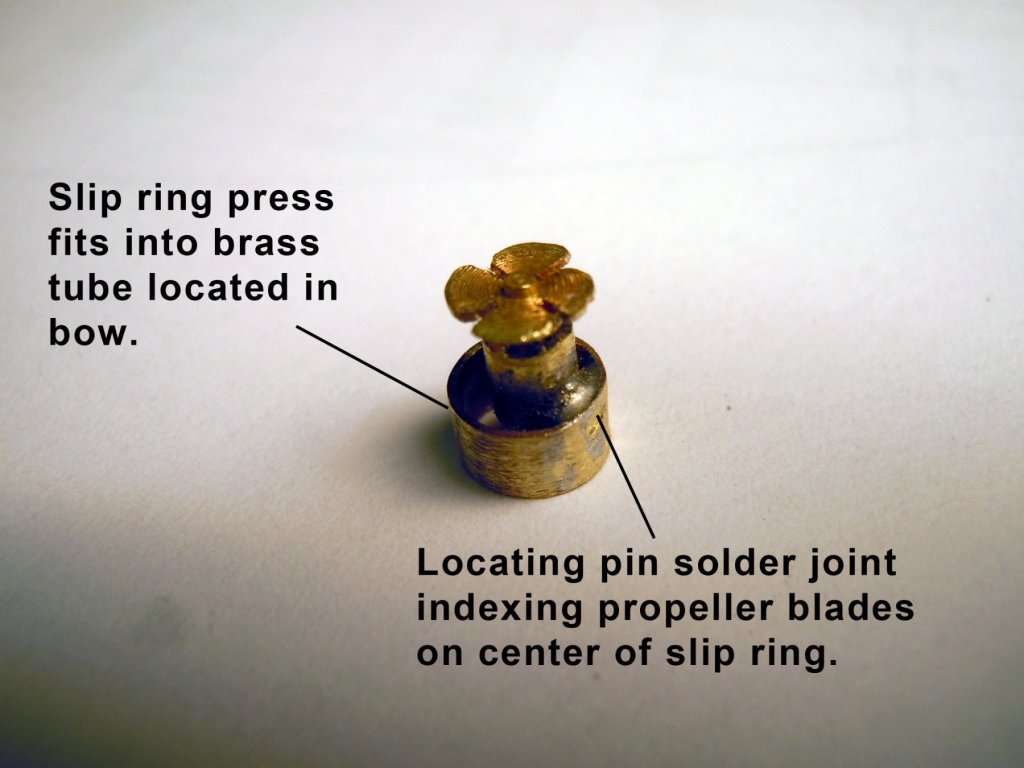
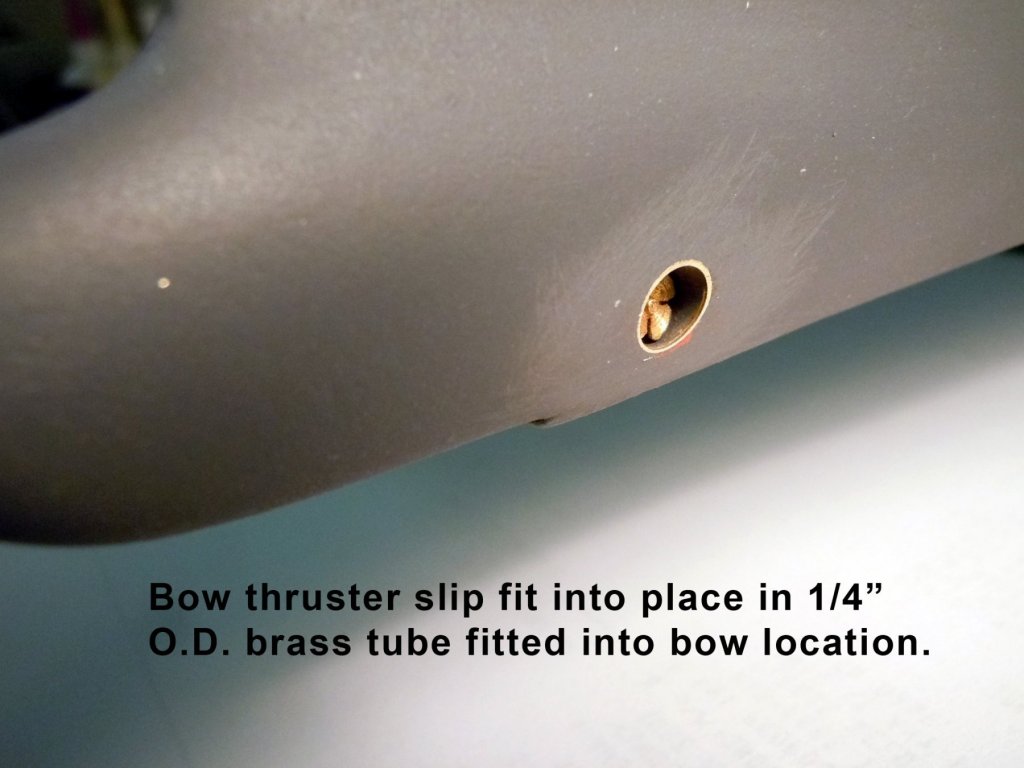
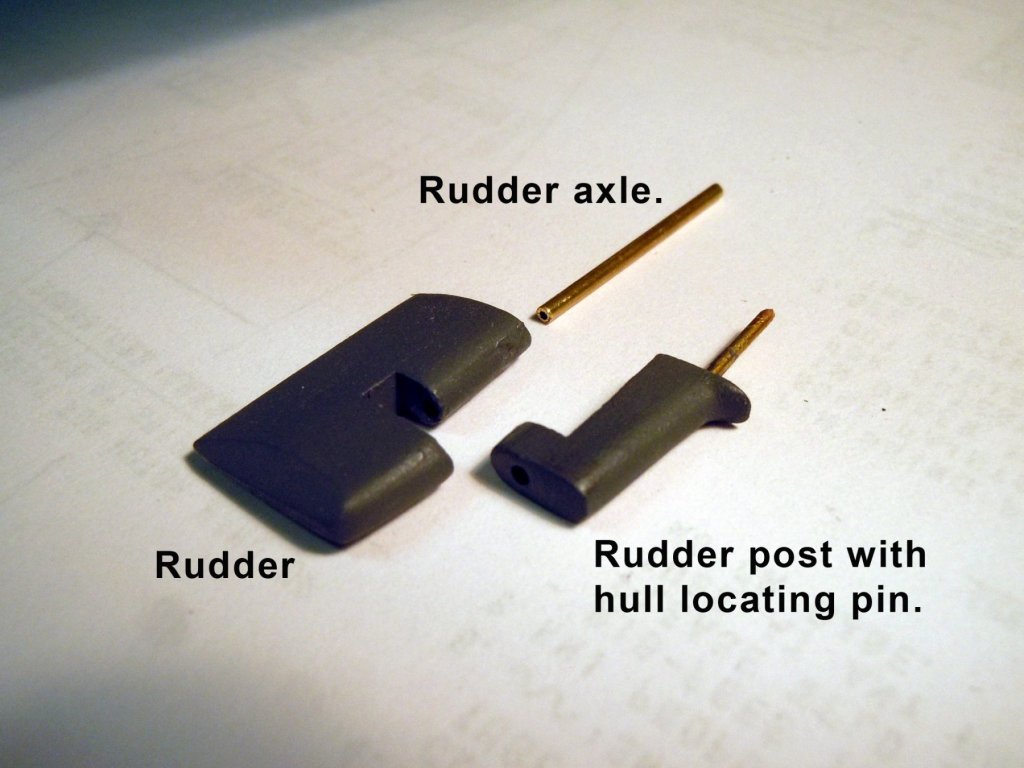
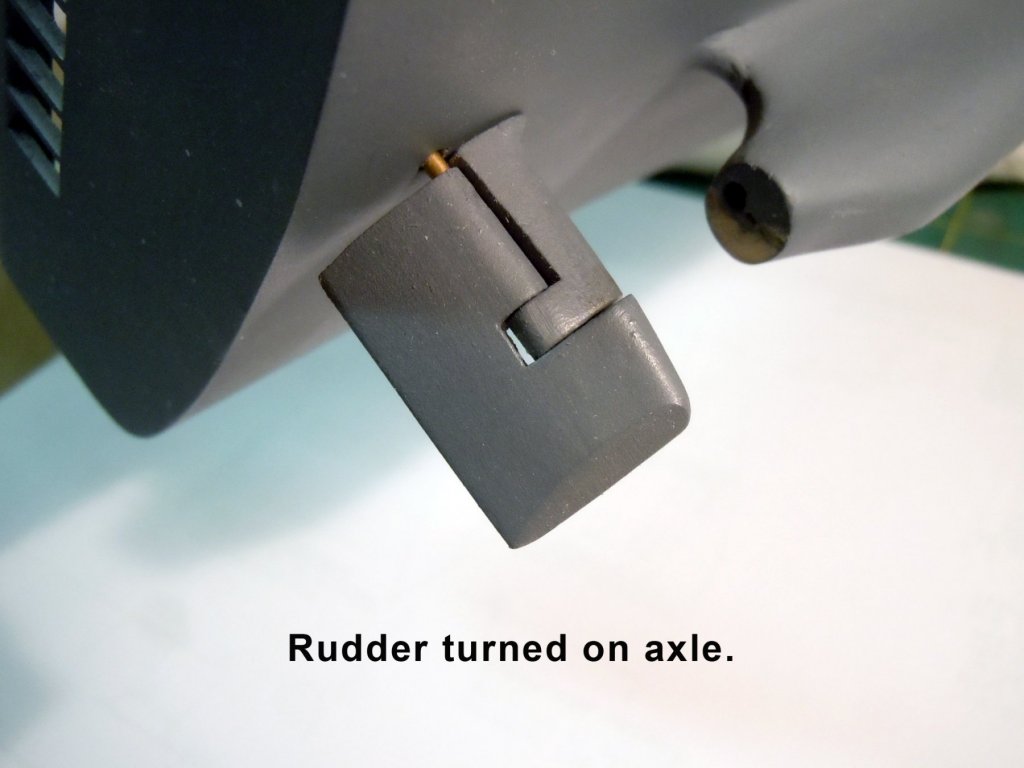
Just working away on small details for the hull and tower. Also had a big surprise; Evan's ship has been rescheduled for the shipyard refitting to January, so Evan flew home from Dubai just in time for his wife's birthday and will be here until January. The company wants him to be the Captain that takes the ship in for refitting and oversee the work. Here are the rudder components and the rudder will be able to be turned when finished. Next I added the Maresk logo to the stack. Yes they have a swimming pool halfway up the tower. Here is a sequence of the bow thruster with the challenge being the 3/16" diameter propeller. This was a tricky operation; turning down a locating pin without hitting the blade. Wood shims were used to center the propeller on center in the slip ring to hold in place while being soldered. The thruster motor is reversible so the propeller is on the port side only. Drilling the hole through the bow was a slow and careful process to get a tight fit for the 1/4" brass tube and then cutting and careful filing to get both sides to match hull surface. Next I will work on the stabilizing fins that are recessed in the hull 12" back from the nose of the bow. Will try to have them movable as well. Still no word from Tom's Modelworks on the rail sizes.

-
Here is a new Model Expo product that will make tying ratlines easier. I designed it based upon my experiences with the Constitution and thinking there had to be an easier way. We ended up doing three sizes for most common scales. http://modelexpo-online.com/MS7201-Ratliner--the-Shroud-Building-Tool--For-Approximate-Scales-of-176-to-190_p_1509.html
- 1 reply
-
- 5
-

-
Kurt, I love it! Even better it is under tow; this has to be the world's smallest "Container ship". However, I think since it is riding high in the water it is empty and on it 's way to becoming someone's new modular home.
-
Bill, just a matter of convenience of having the thin plywood sheets and wood stock in ample supply on hand. Polystyrene while white would still need to be painted to protect it from UV light since it yellows over time. Much for the same reason I used wood strips for the bow decoration on my Constitution build. Years ago when I worked for a living I was afforded many years of designing and building product prototypes using polystyrene for product models. Presently I live in a very beautiful part of California but it is a hobby wasteland with the closest hobby shop of sorts located 20 miles away that is mostly devoted to RC cars. Materials can be ordered on line some suppliers are very good; while others leave a great deal to be desired. Again, just a matter of convenience.
-
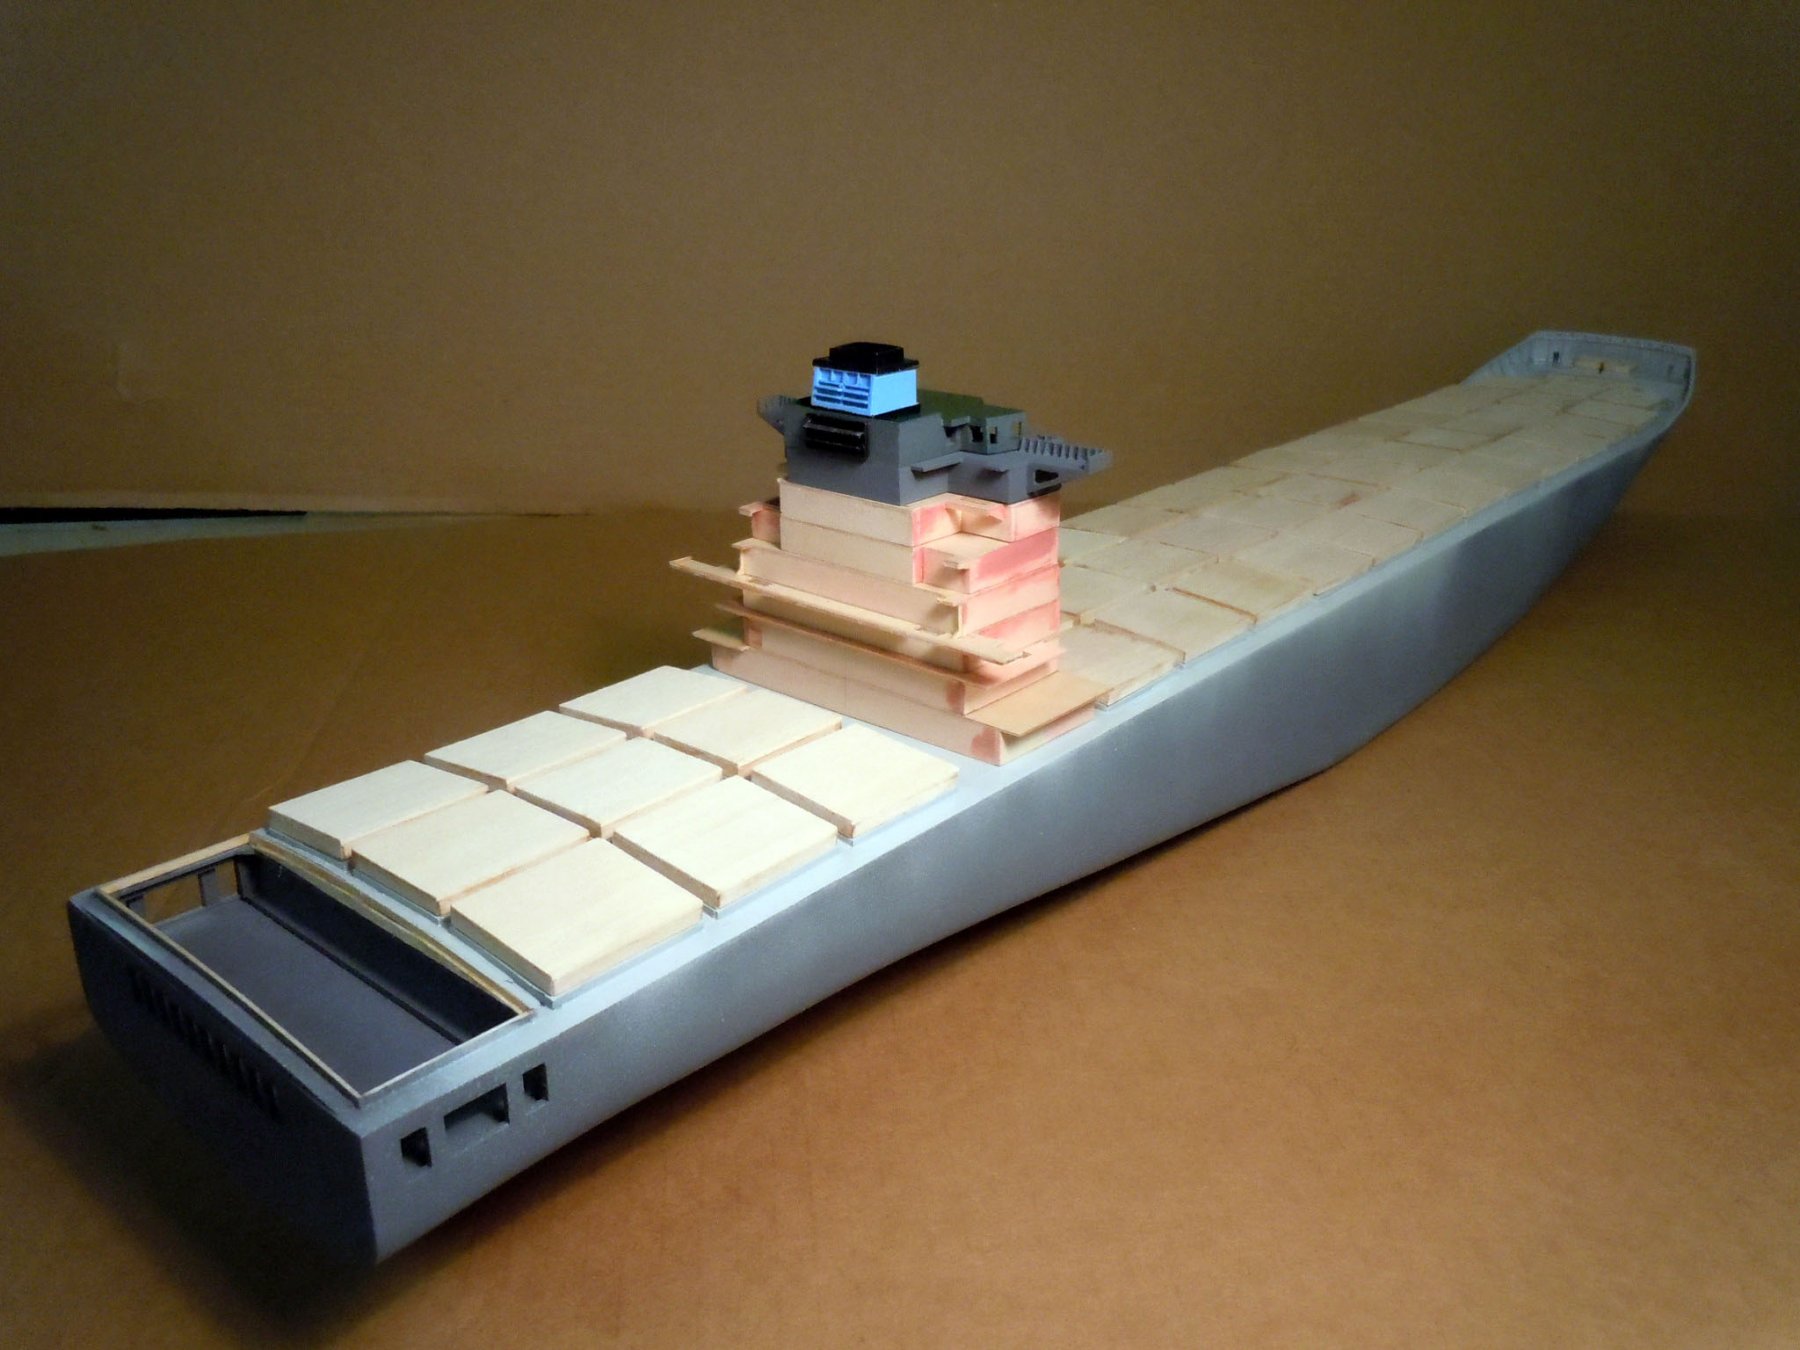
Added details to the various decks and then decided to apply the first working color coat of paint. Still no reply from Tom's Modelworks. Does anyone have a phone number for them? The tower will now be set aside to allow paint to set and wait for pictures of more details from Evan once in dry-dock. Here are some views. Now to prime, sand and paint the hatch covers.


-
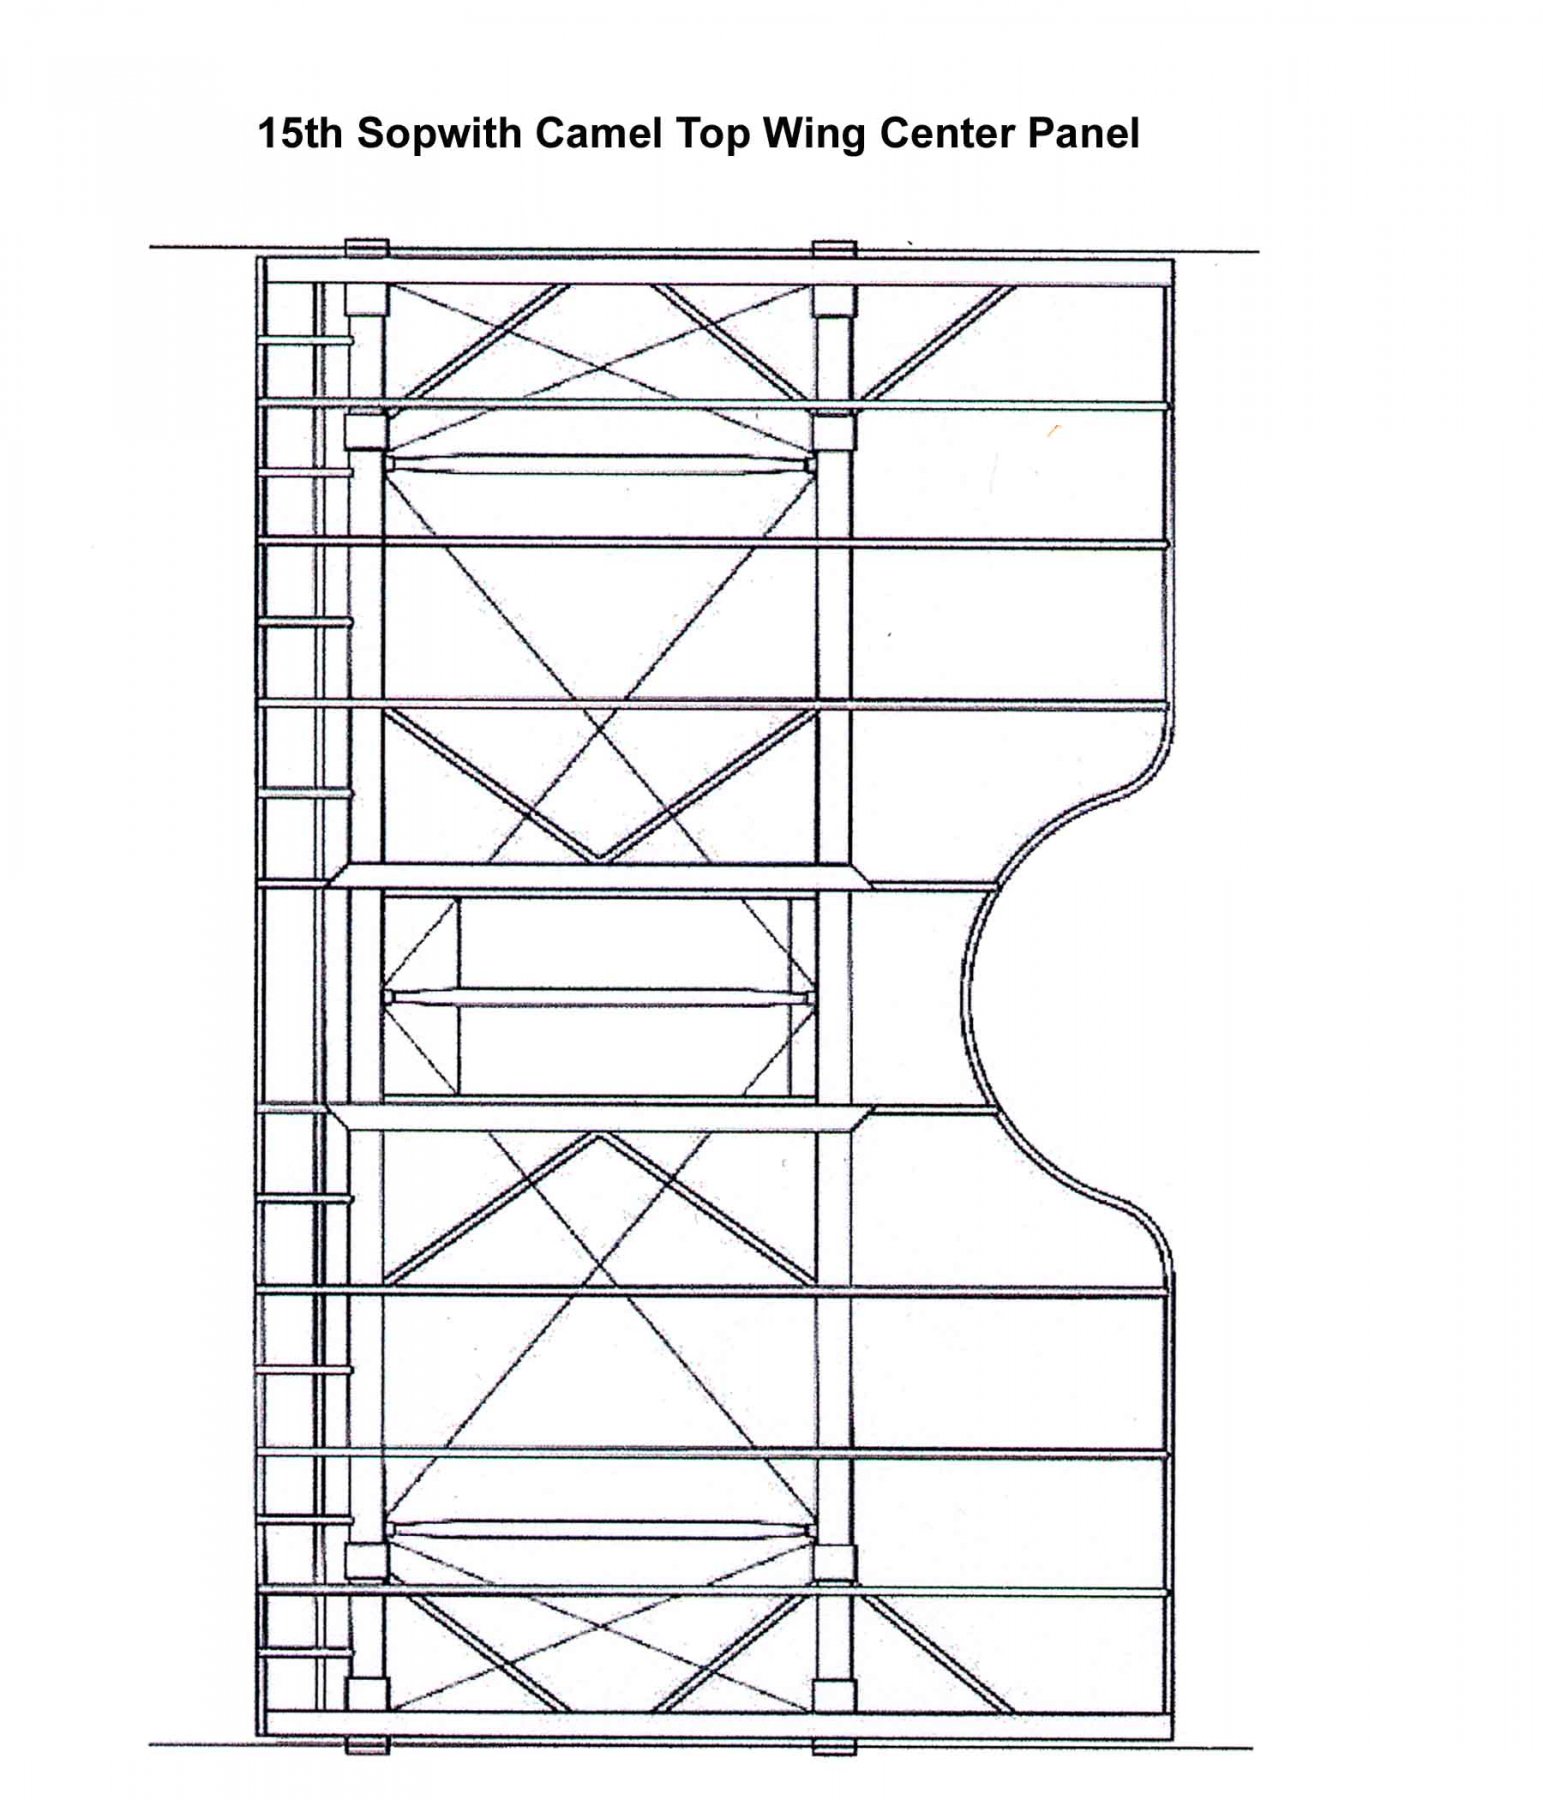
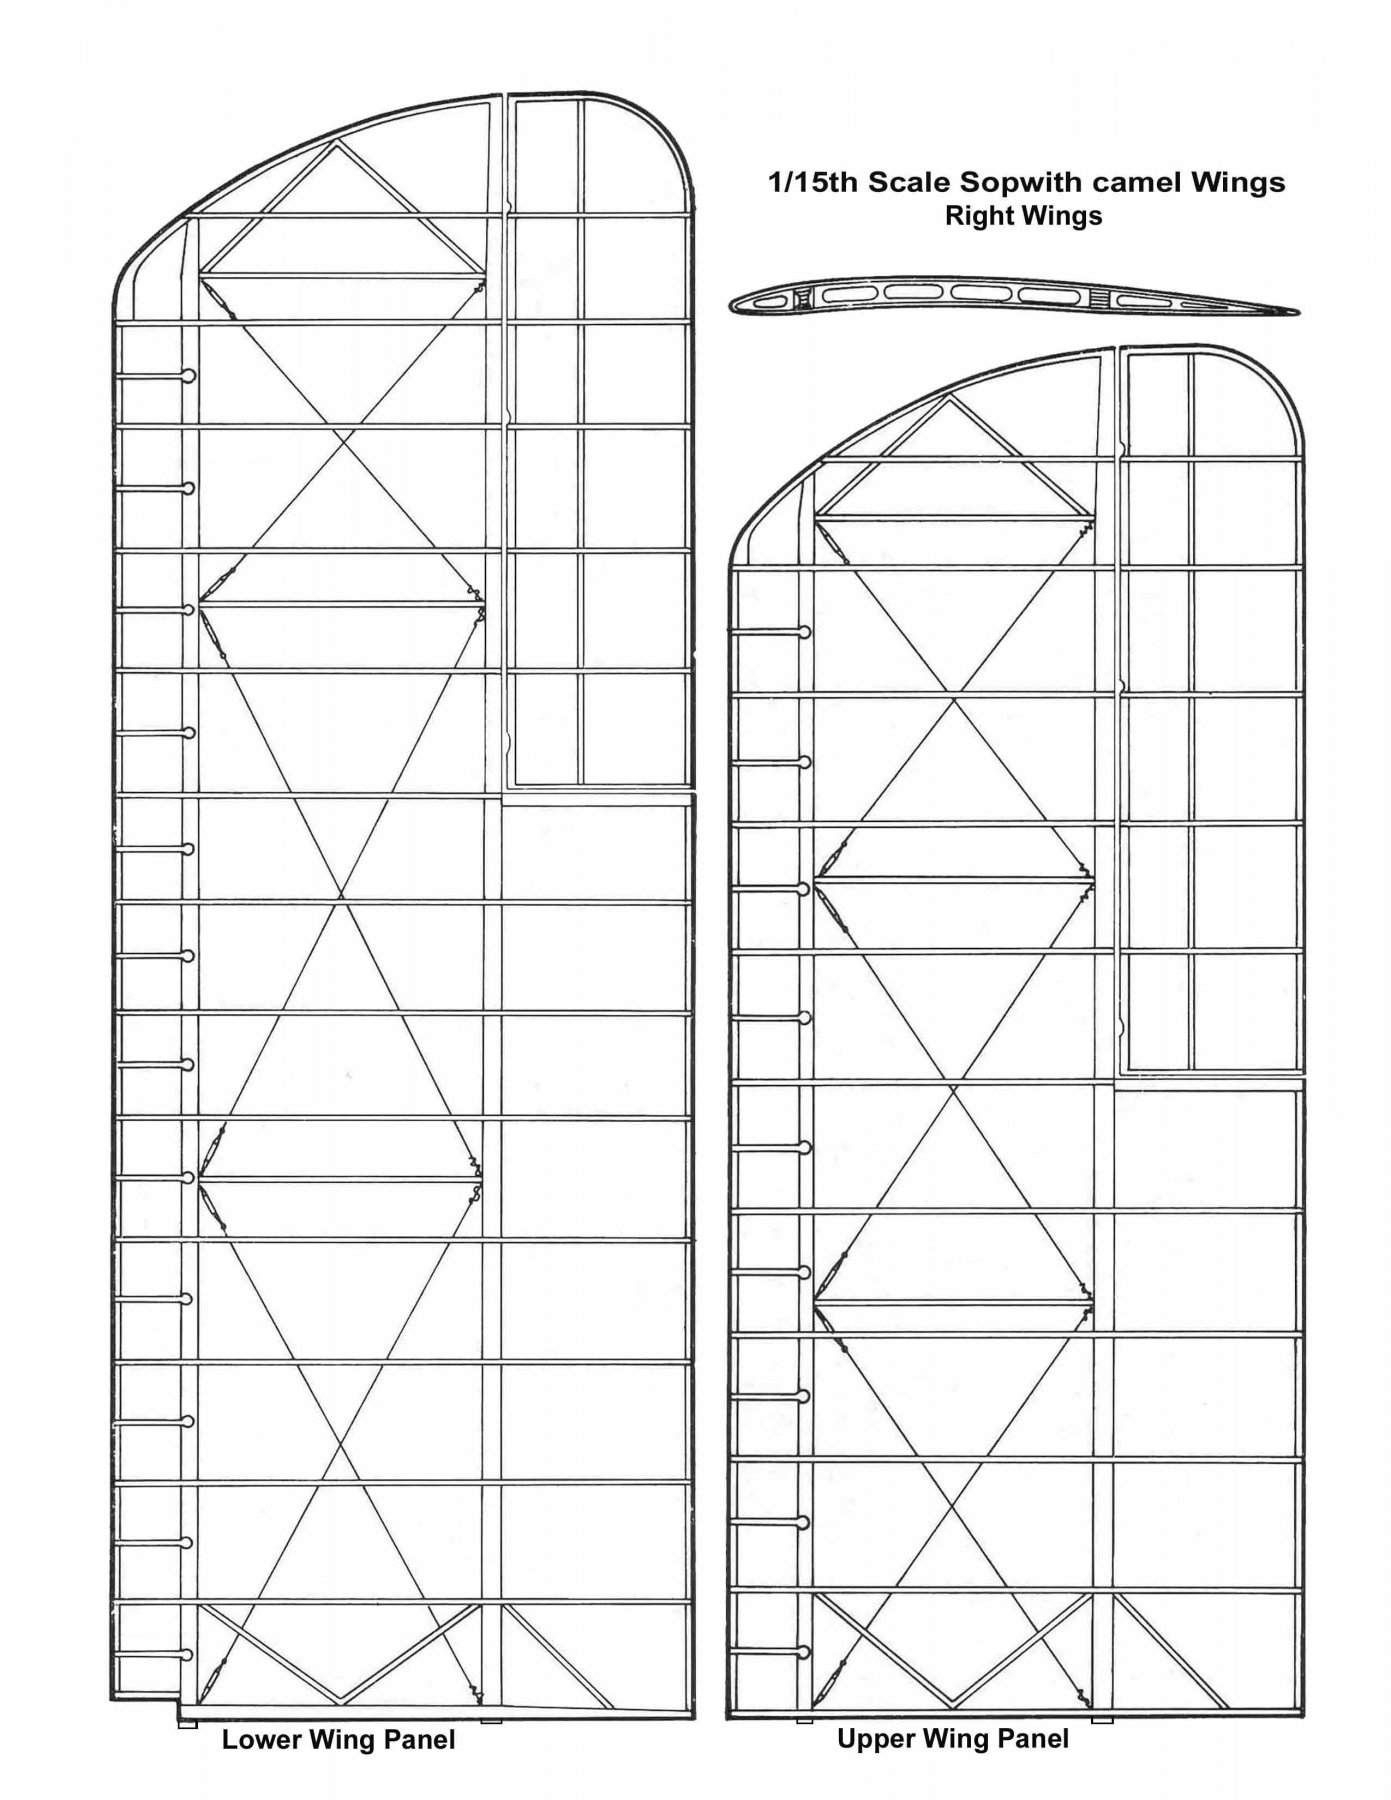
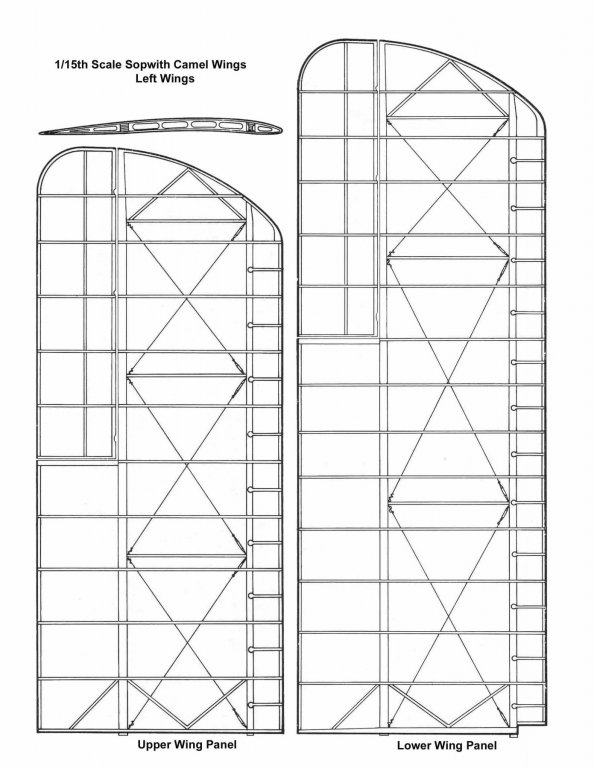
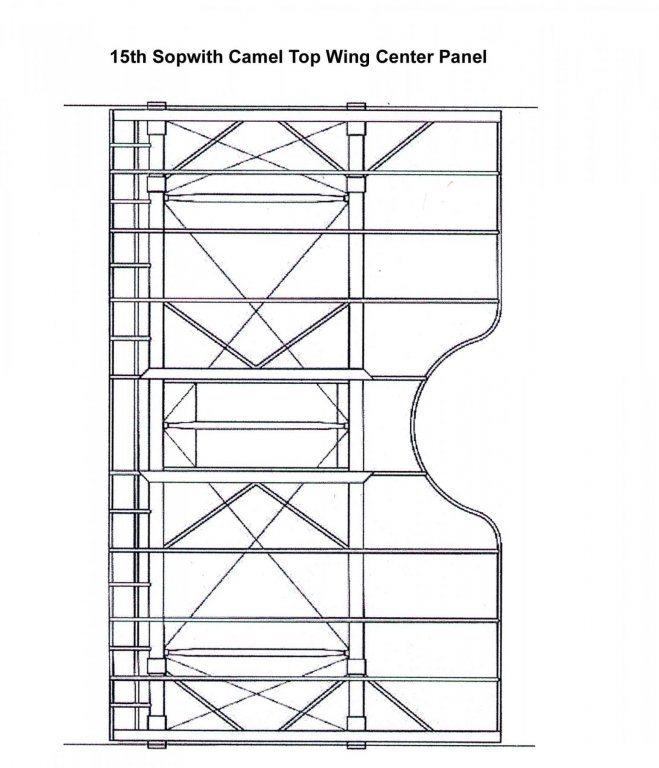
These may be of some help to sort out details if needed. I used these to build my camel. Braces are where the turnbuckles are attached.

-
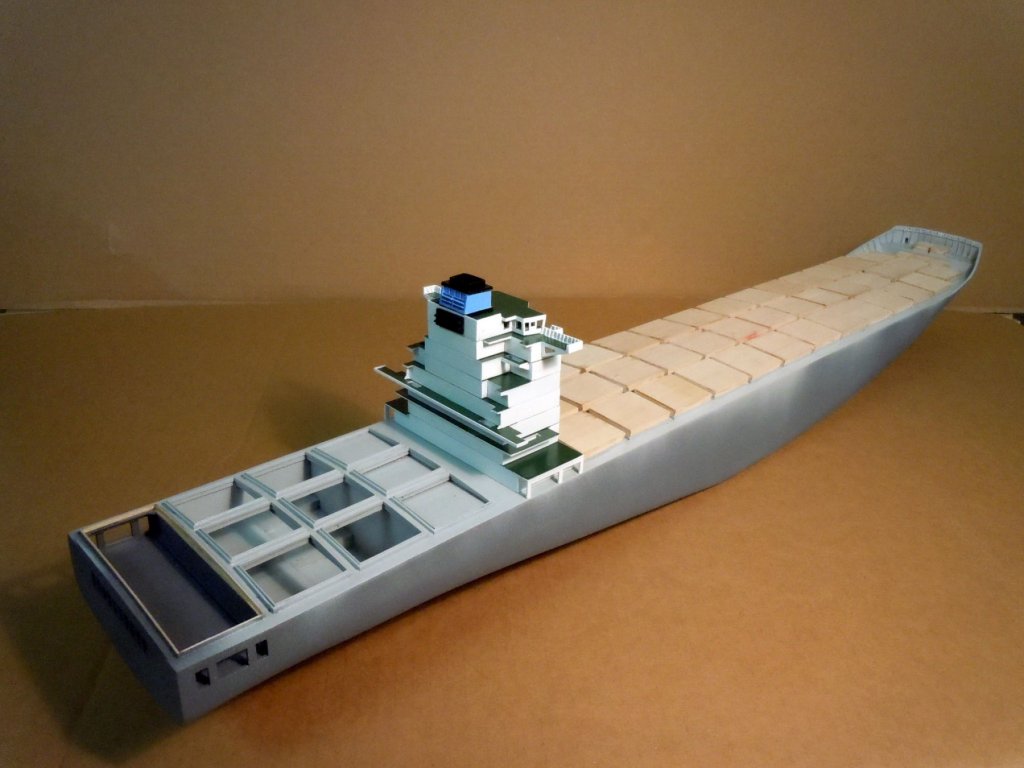
Michael, good eye! Yes the main deck has a slight arc side to side for water drainage. The containers actually set on structural framework that are leveled off for plume vertical stacking. I will be adding the framework down the road.
-
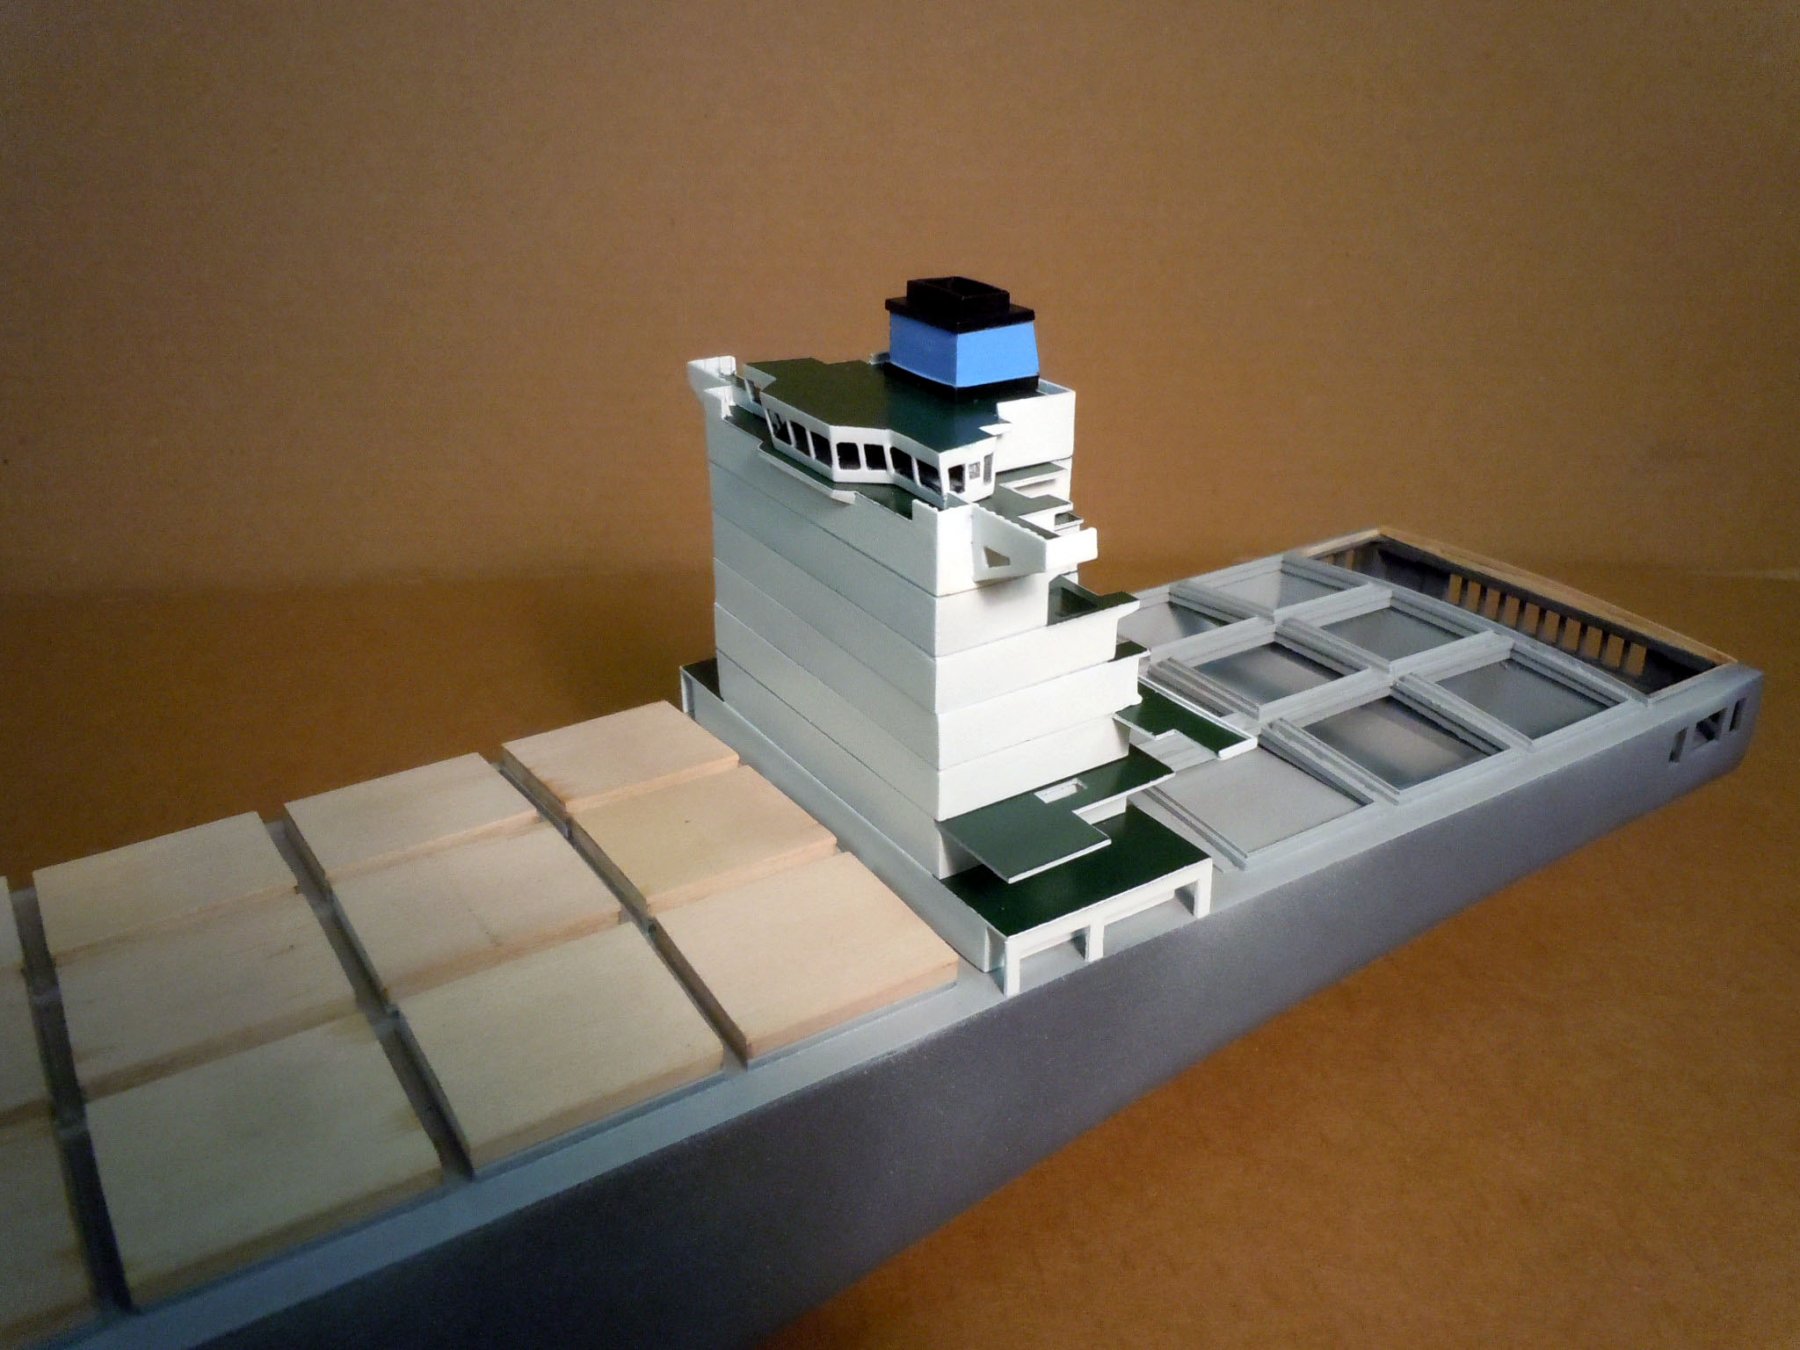
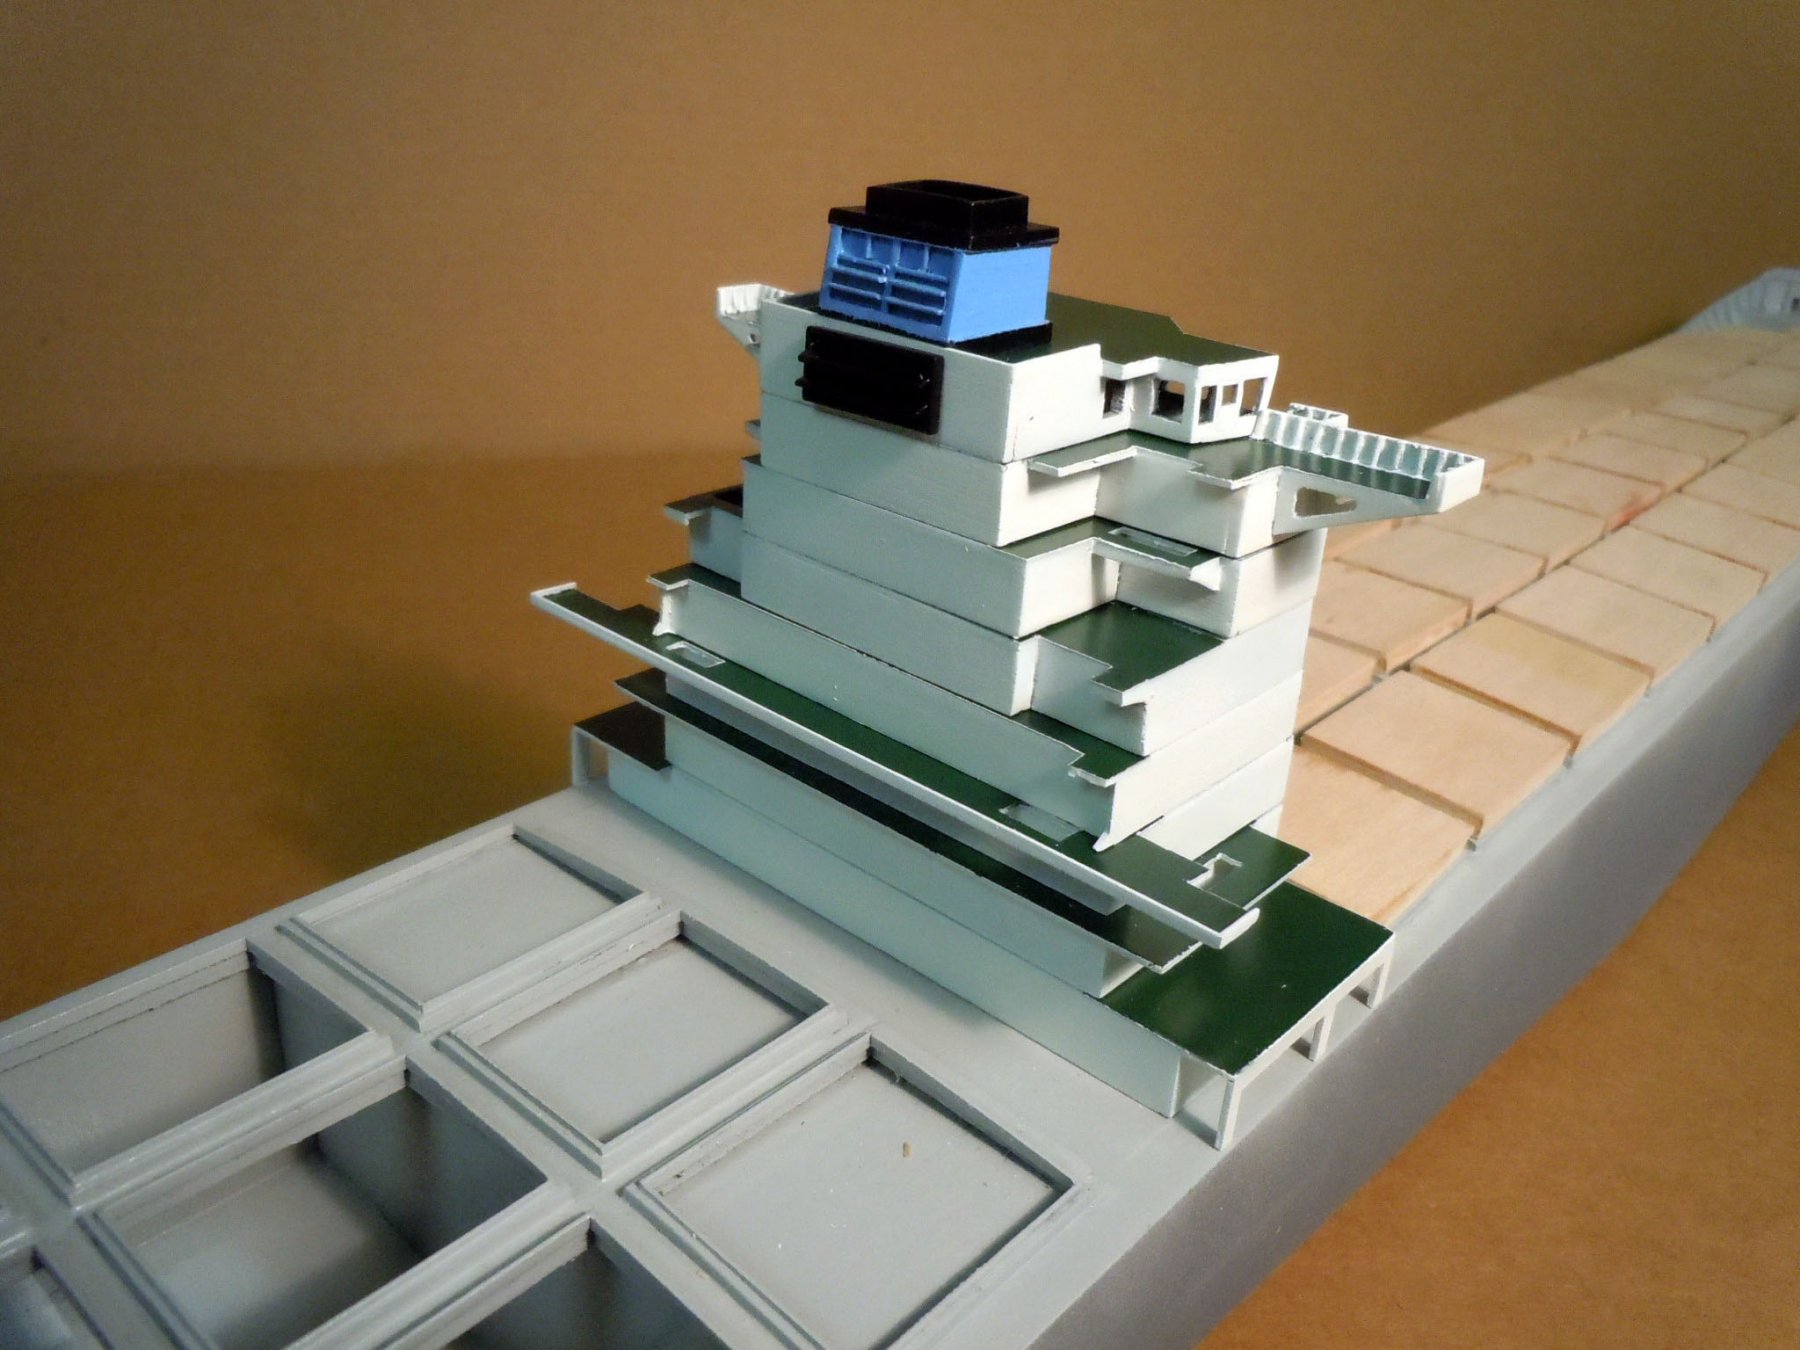
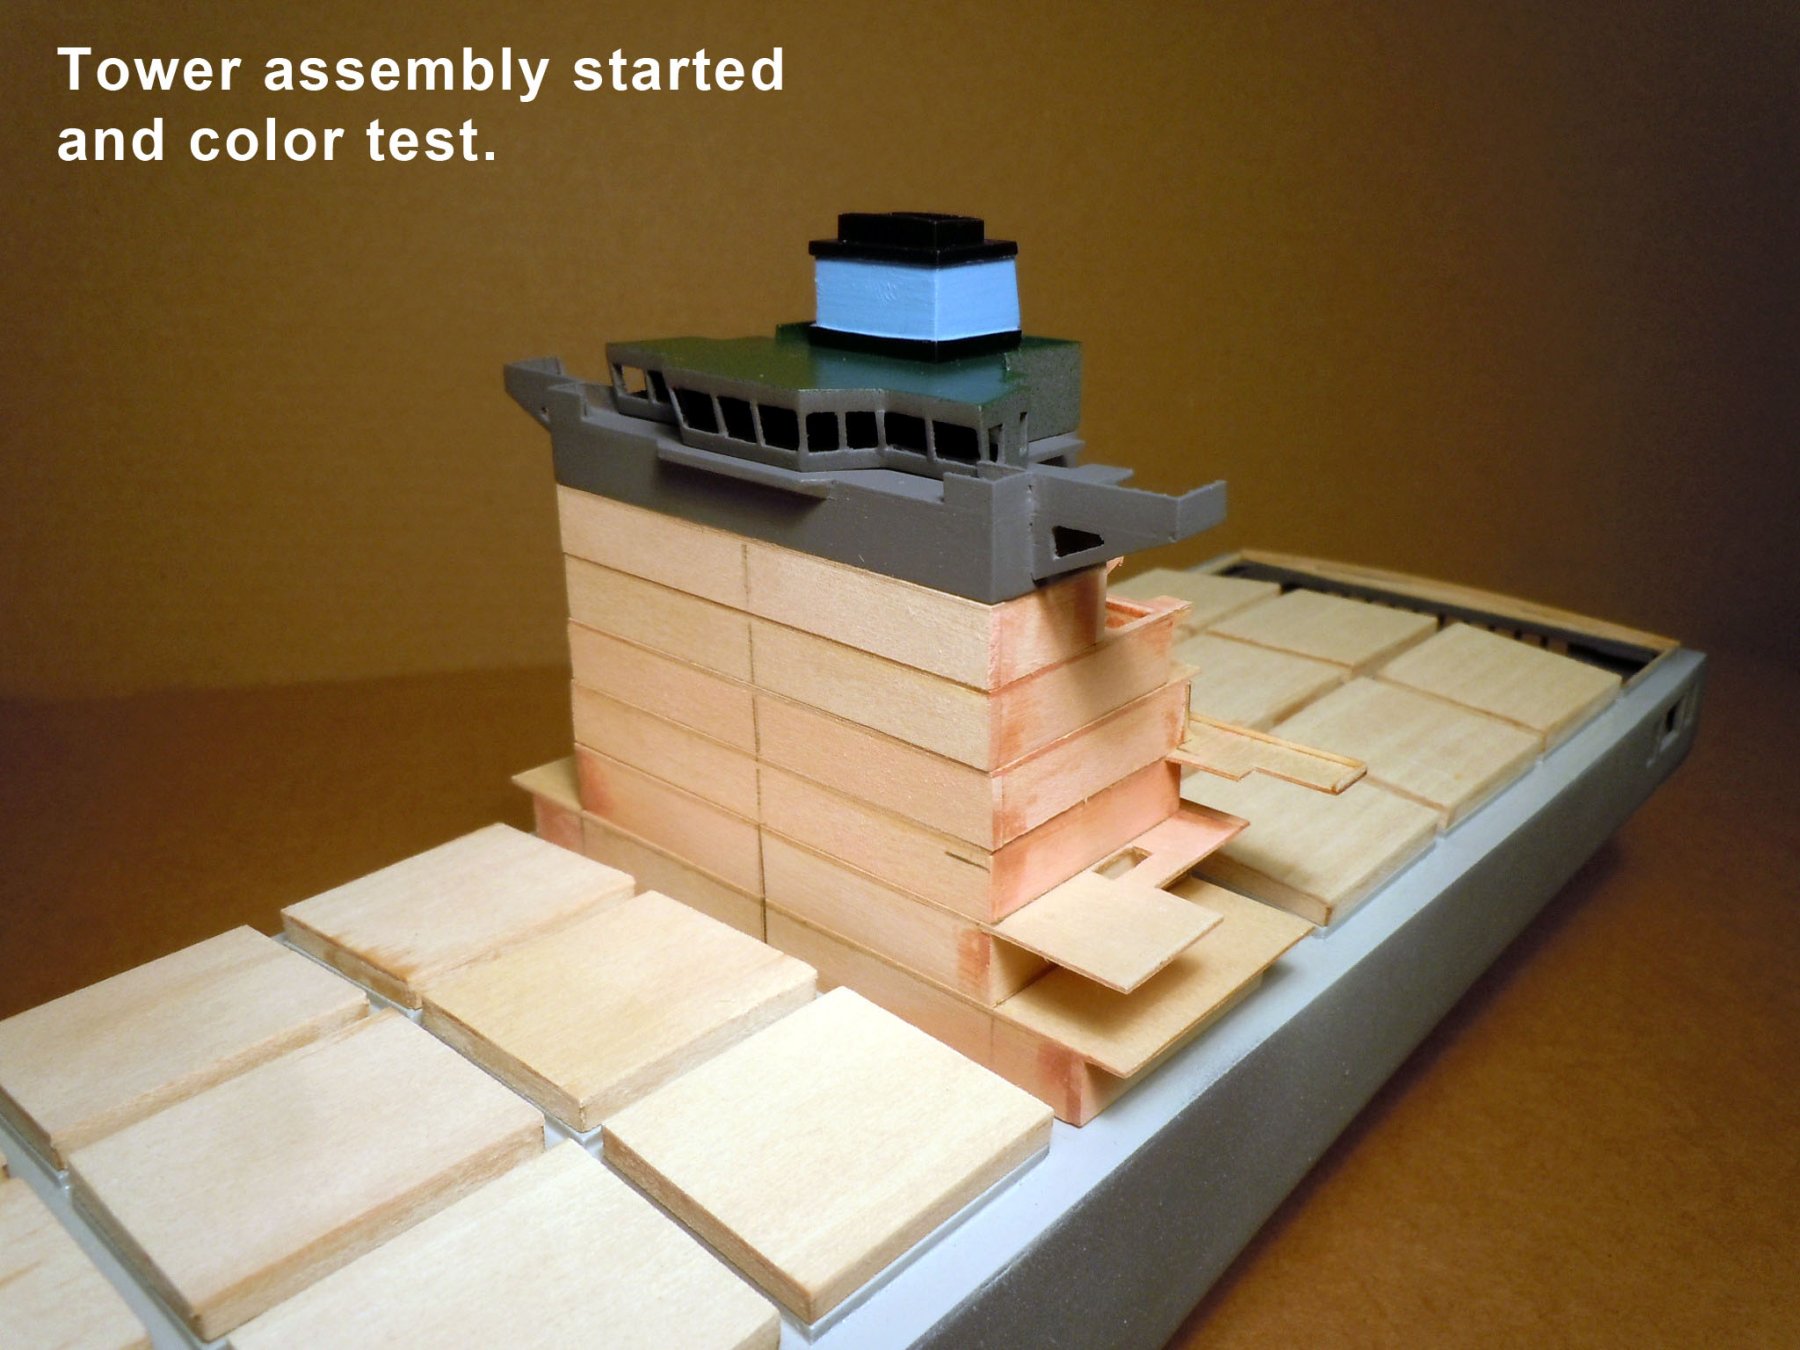
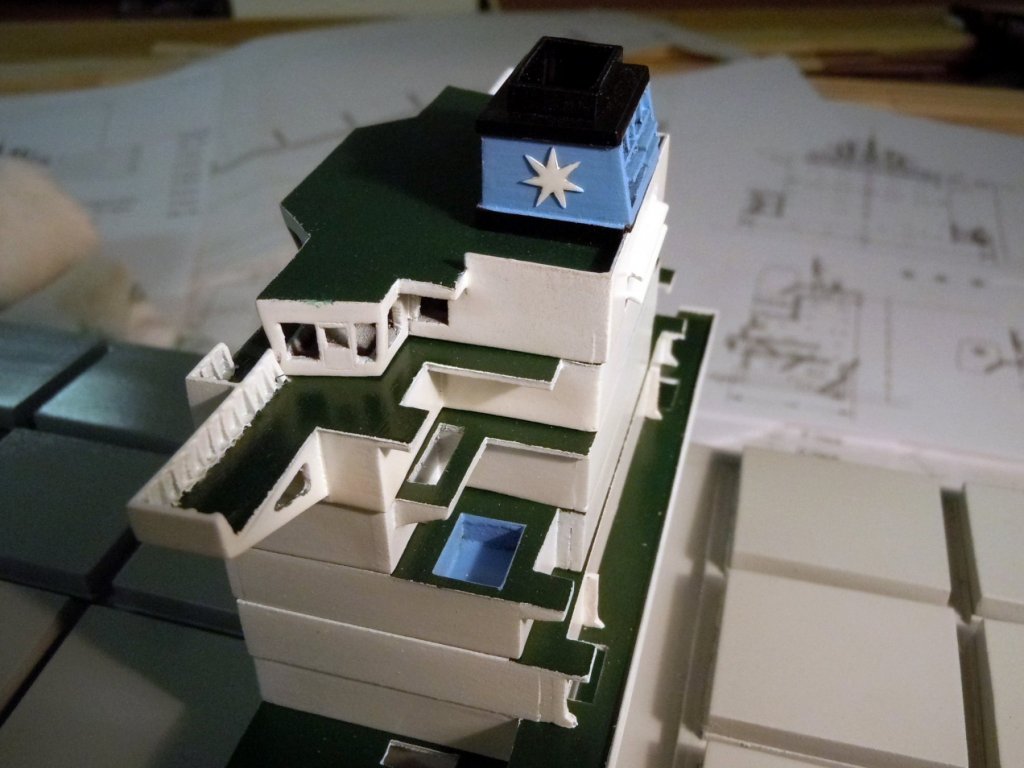
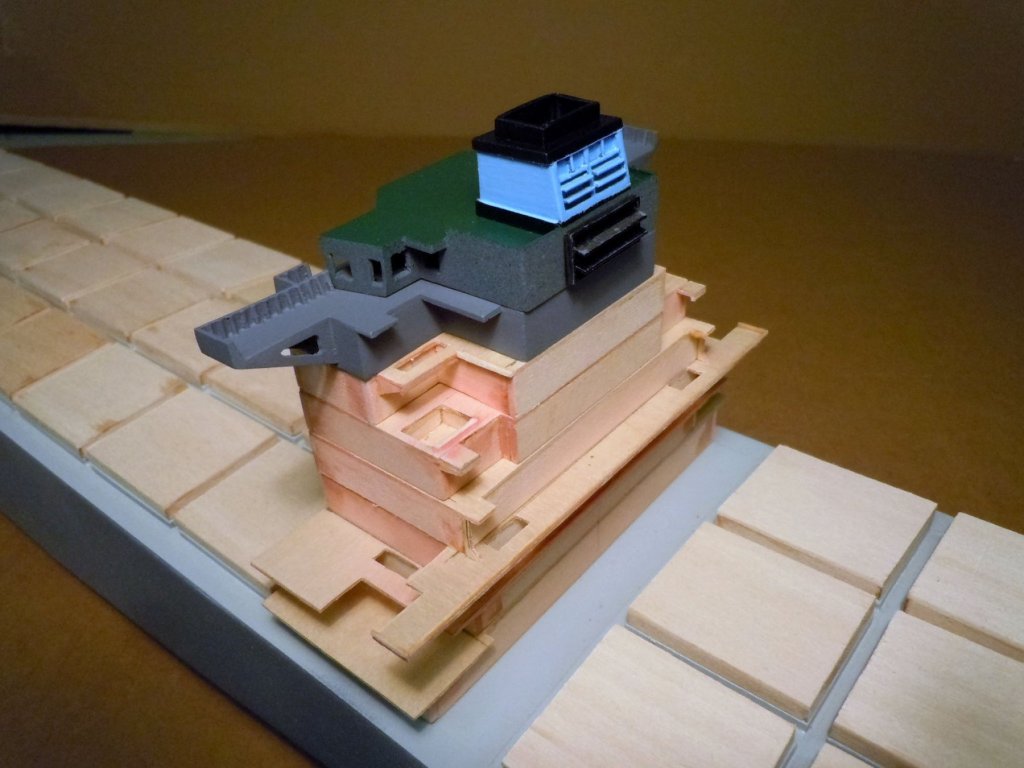
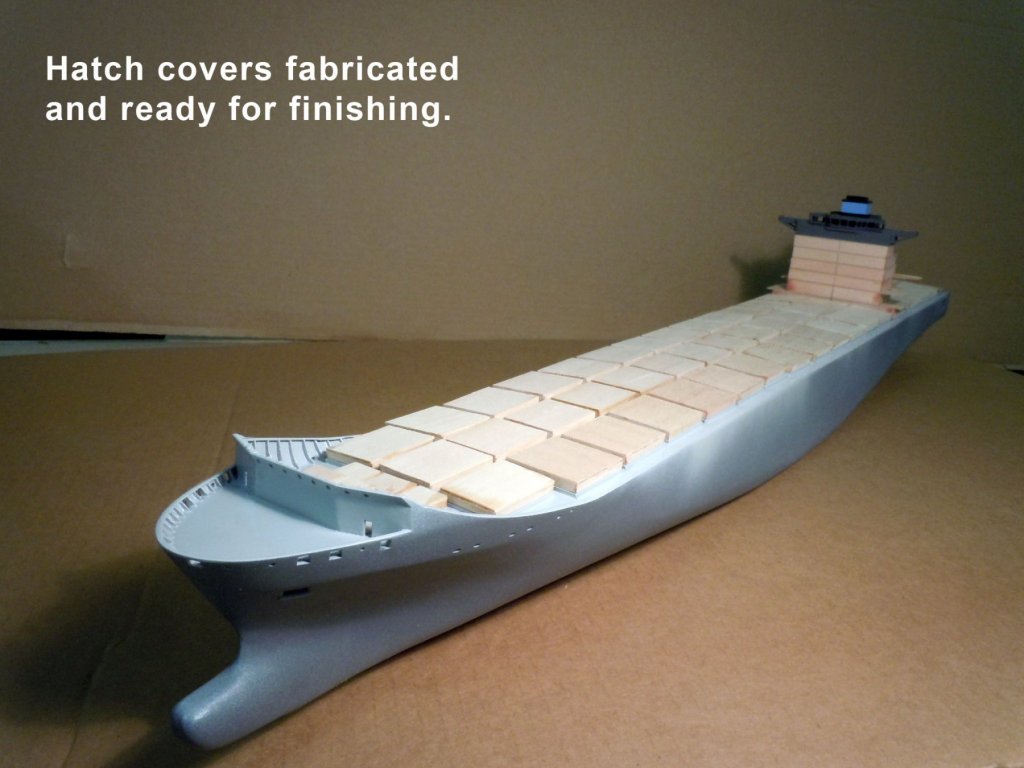
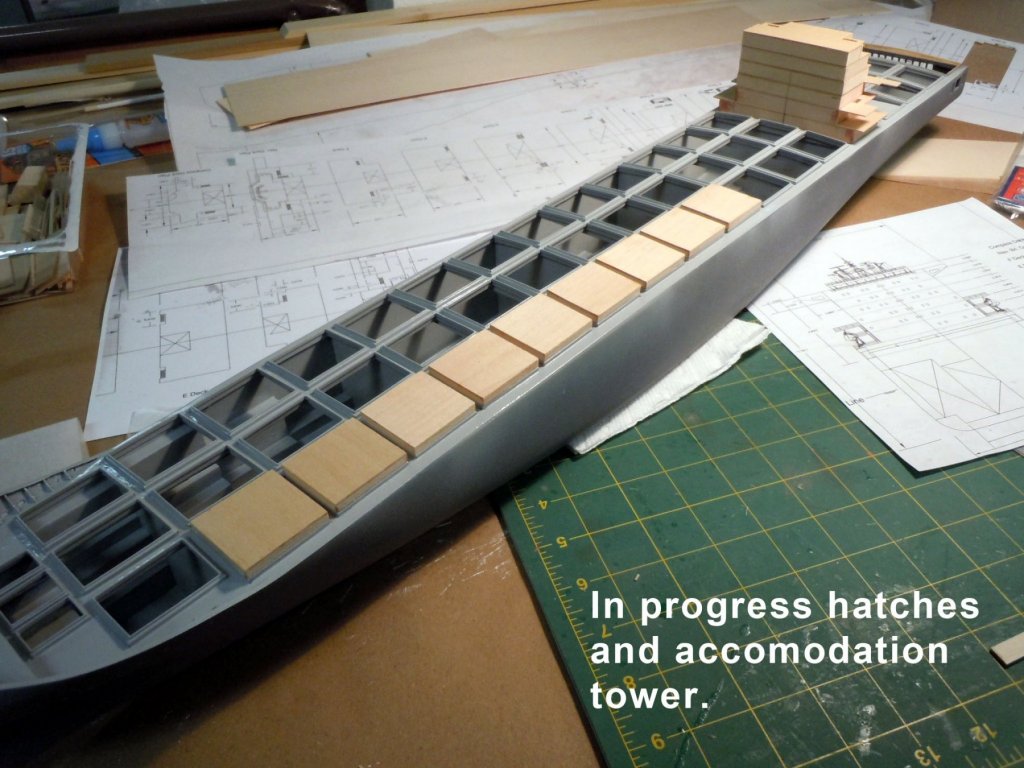
I finally finished up fabricating all the hatches and now they are ready for finishing. They will get painted grey like the main deck. I also have started adding details to the various tower decks like the swimming pool and additional windows. I have emailed Tom's Modelworks for information regarding the sizes of their railing and inclined ladders and hopefully the will get back soon. Here are some pictures of the completed hatches and tower. Here is a color test and I am pleased with the matches. The horizontal tower deck surfaces are Green. Now back to hatch finishing and tower detailing.


-
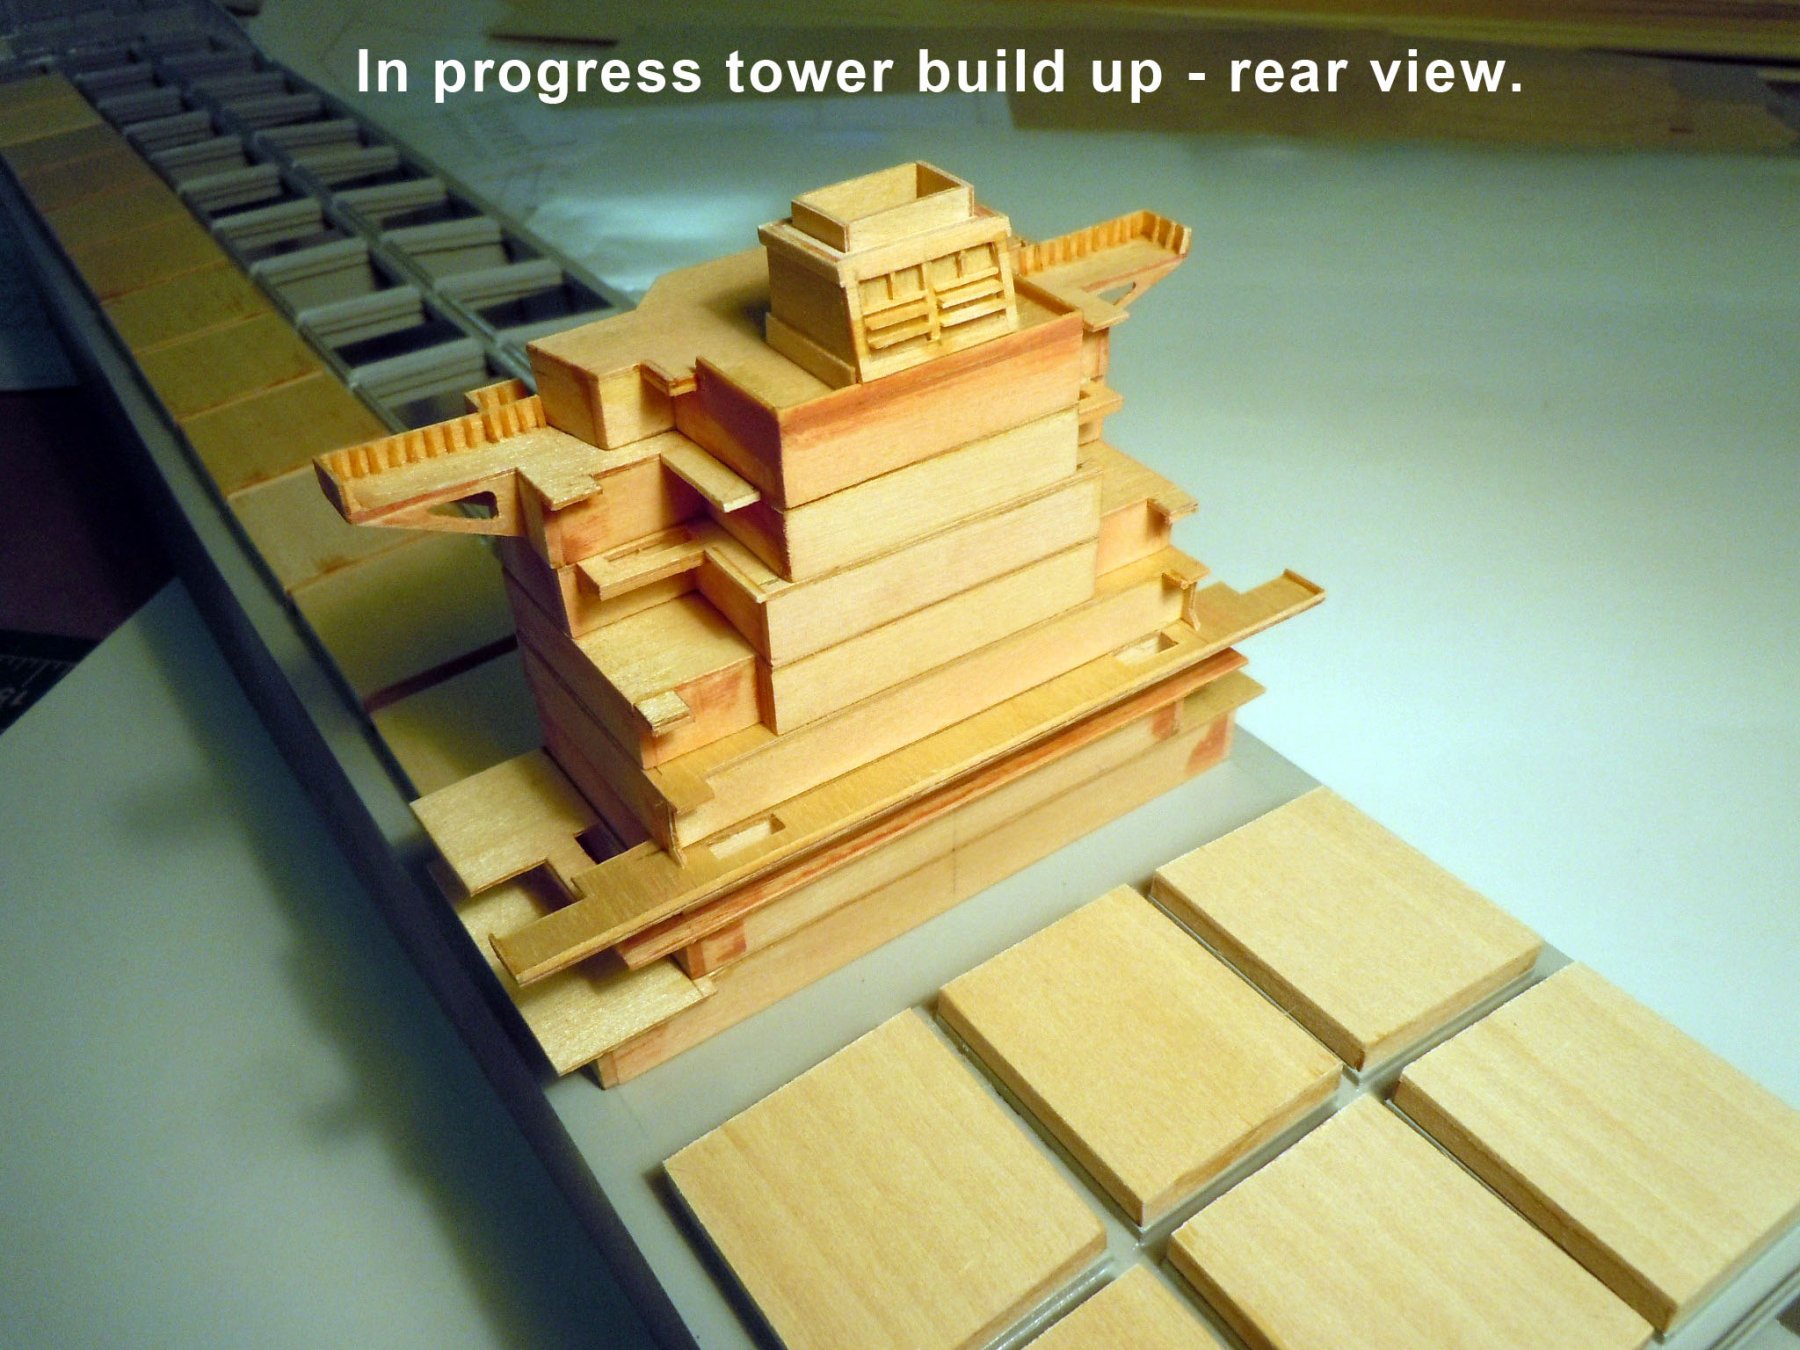
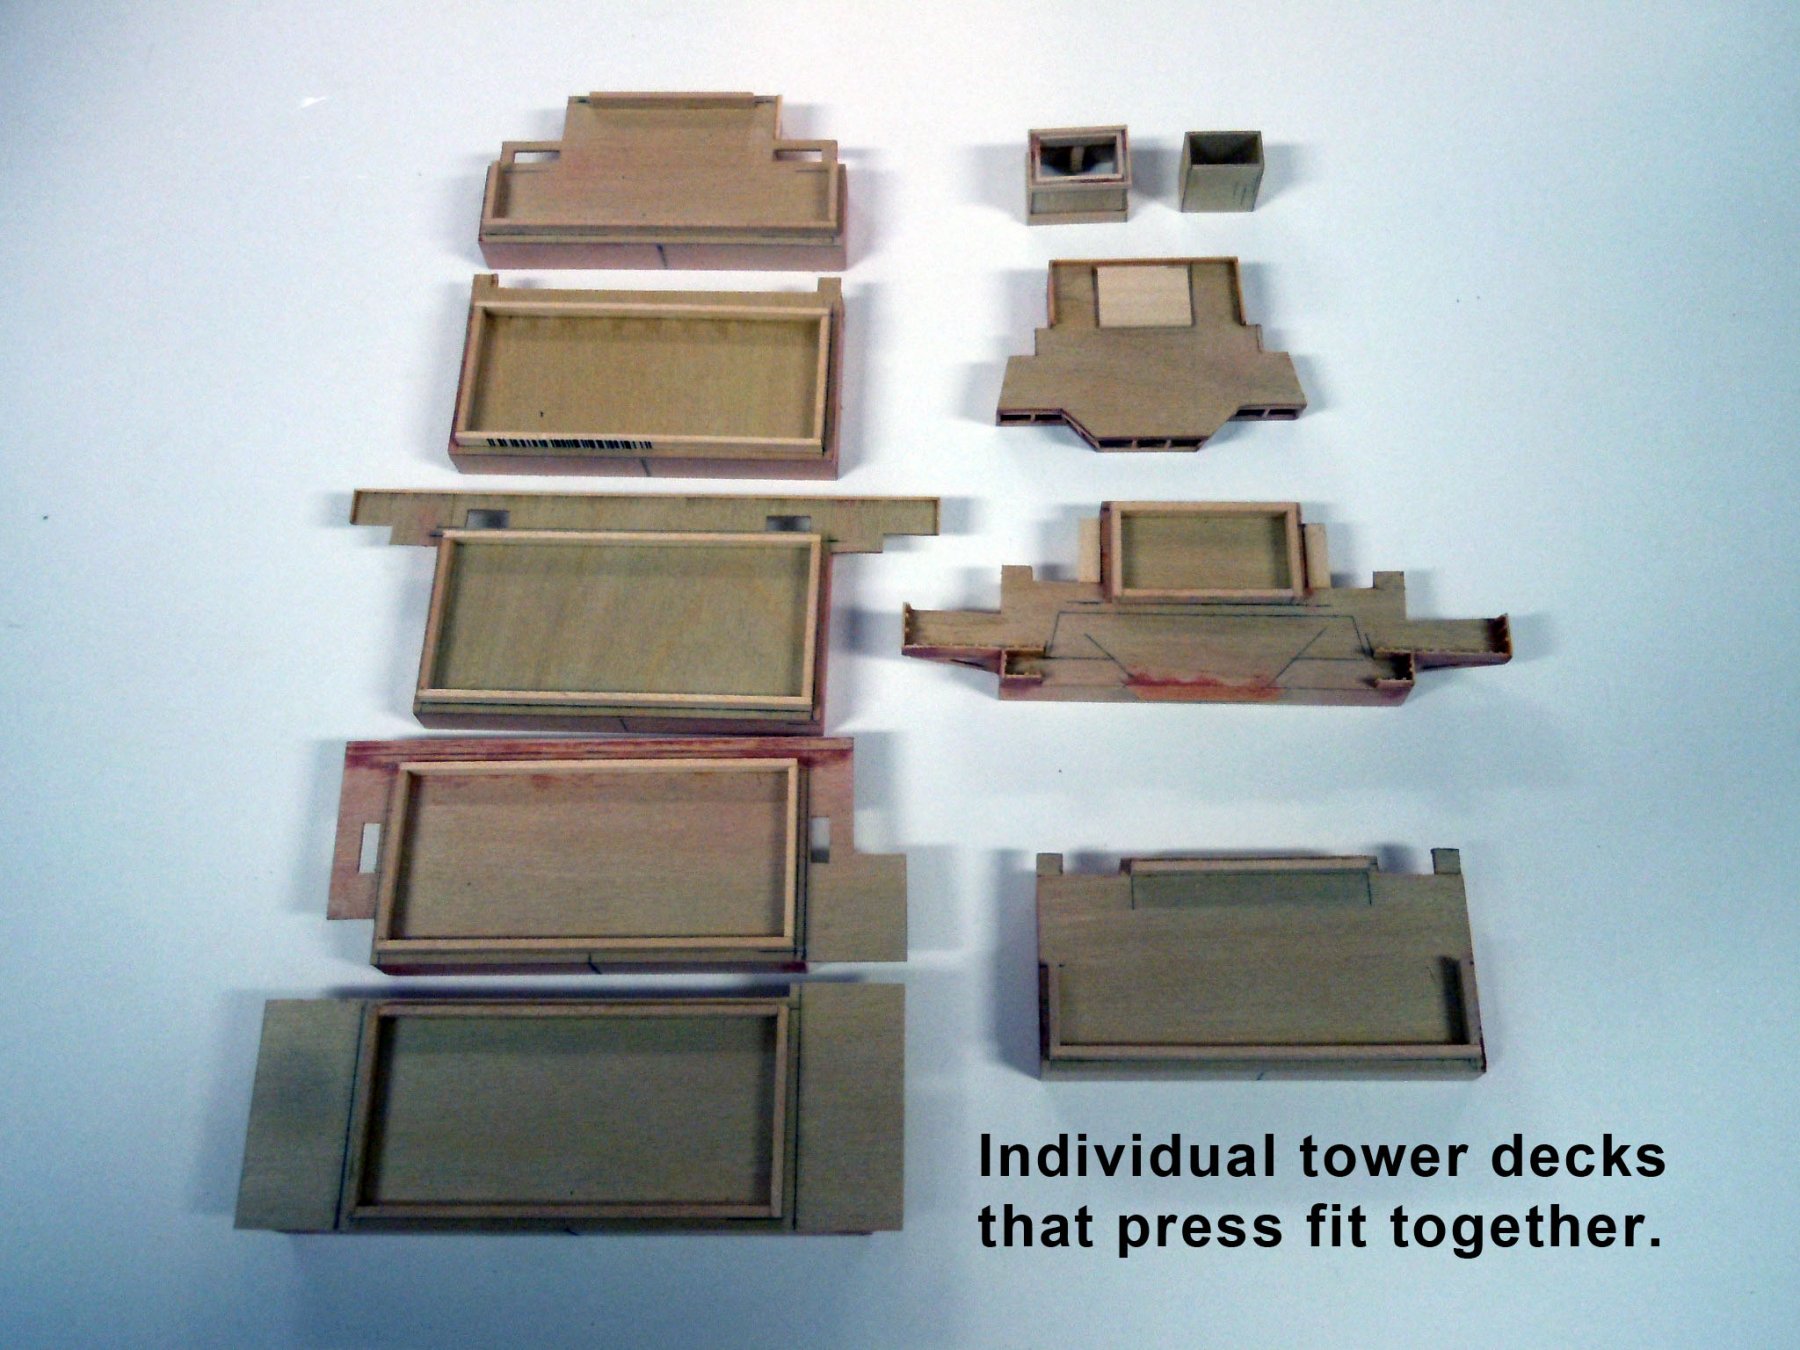
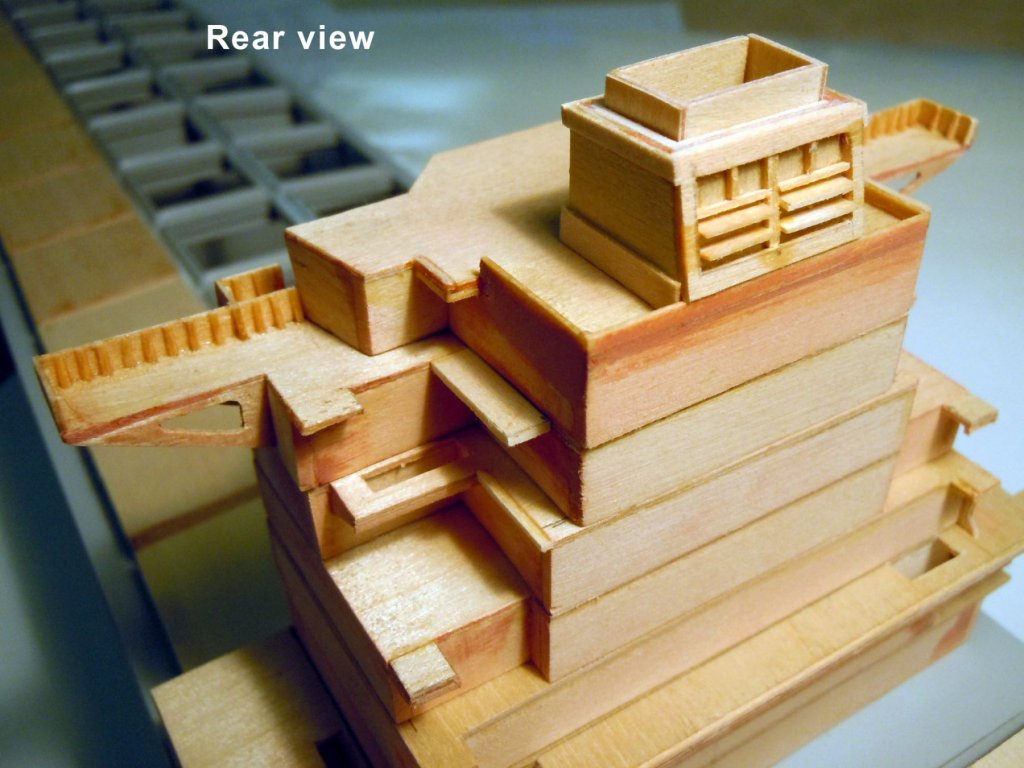
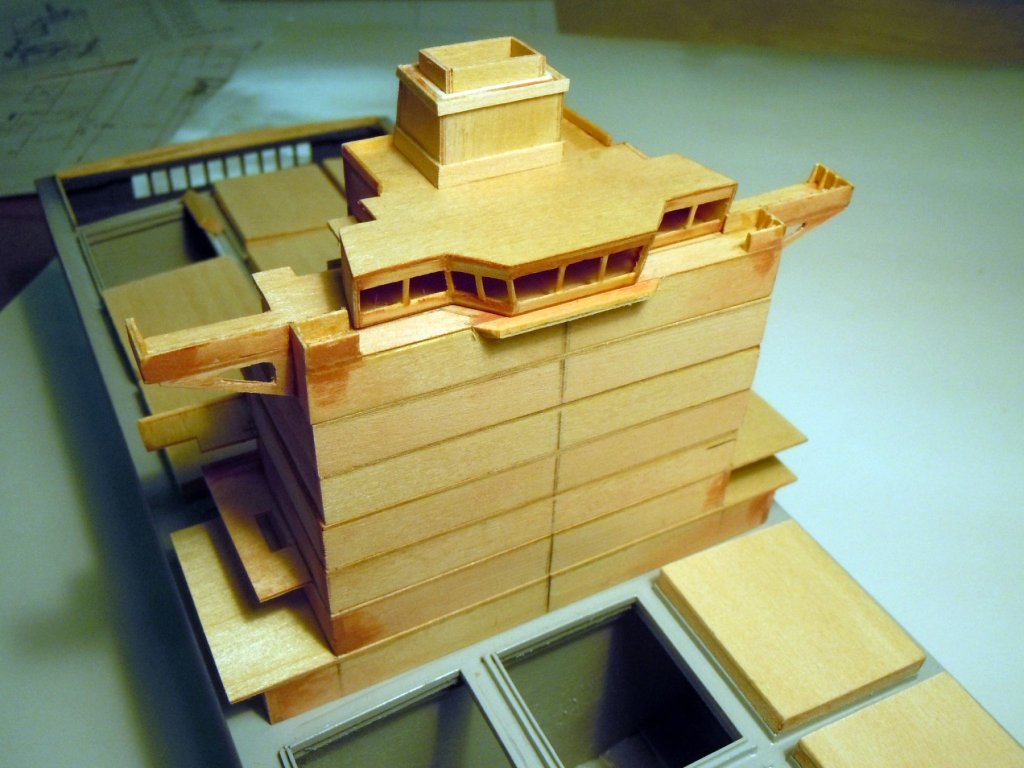
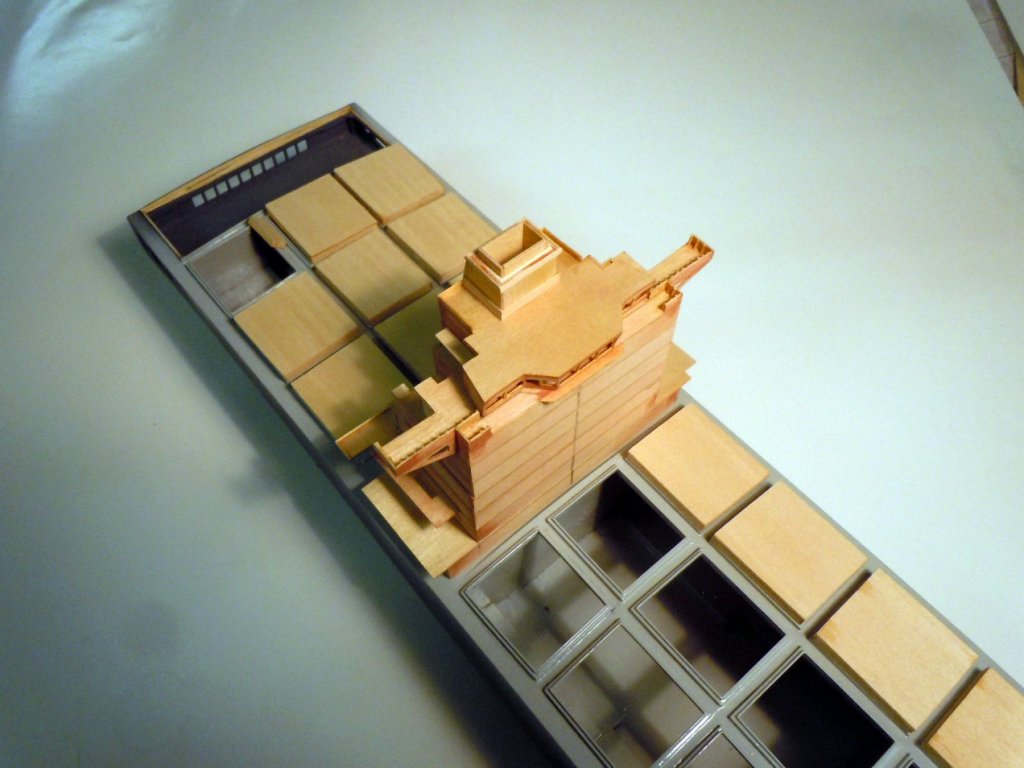
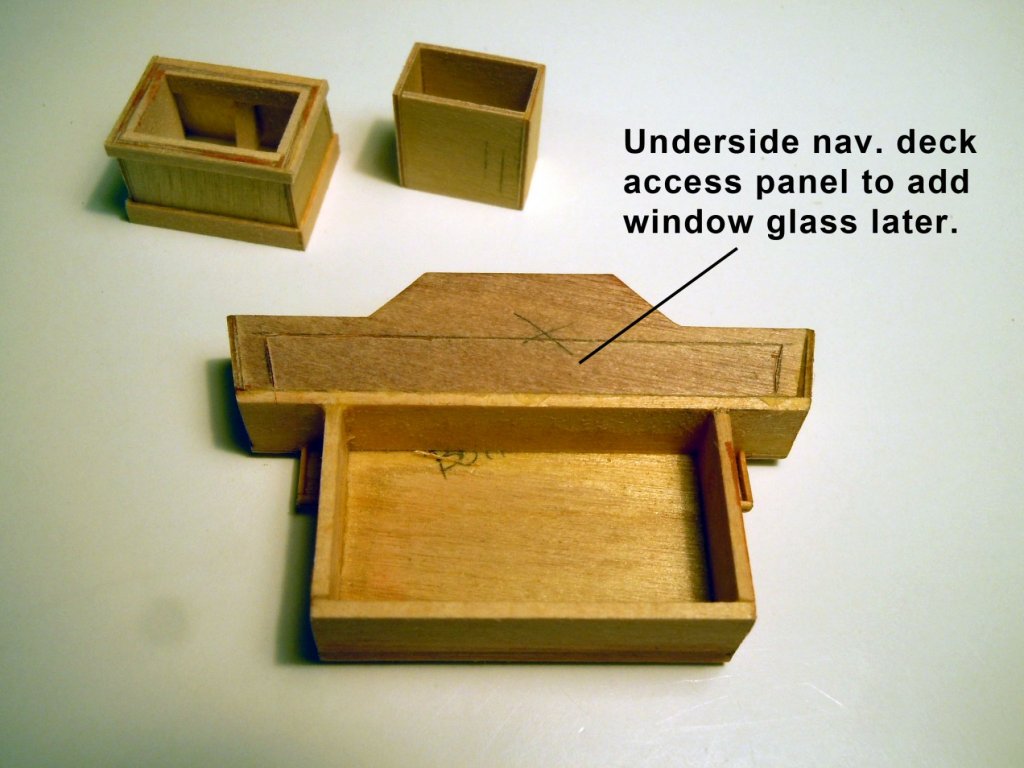
Slow going on the hatches and I have been working back and forth on the tower while waiting for glue to set on hatches. The tower is built up in deck layers that press fit together for now. Keeping them separate really helps as I add details as I discover them. Evan is taking the ship for a month in dry dock for refitting, upgrading, maintenance and paint for about a month. That is when he will be sending pictures of more details that are needed. Anyway here are some "In Progress" tower decks. So far the one big challenge was the NAV. deck and getting the windows angled forward using .0208" square framework. I also cut an access panel on the bottom of this deck to add the window glazing later on. The big challenge I see coming are the ladder ways and railing. I have checked Tom's Modelworks railing but they do not provide dimensions on height and stanchion distances. Has anyone out there used their 1:350 three rail railing? Here are various "In Progress" views showing the tower stacked up and the individual decks. You can also see where I am at with the hatches, about 1/3 of the way complete. Now back to hatches.


-
Mike, I was away all day. Sorry for the confusion there are two props being shown in the link. The one being step by step shown is for a Fokker D VII. The last bottom two are for the Sopwith one shows the front, side and rear views with the laminated layers per the real prop taken from period plans for the Sopwith Camel. The picture next to it shows the prop installed. I used cherry, basswood and black walnut for visual enhancement per client request. Others above are doing a good job of verbally describing the carving process; study the pattern of the laminations and that may also help. The laminations are also a great aid in carving providing a color pattern to follow and duplicate.
-
Michiel, not only lights but I even thought of RC controls. But since I know nothing about RC boats I moved on. Vaddoc, the primer is Krylon Gray Primer out of a spray can, nothing exotic and sands nice and seals the wood. Also works well with the Glazing Putty in filling any gaps. Thank you all for stopping by and words of encouragement.
-
Try this for a little reference. http://www.wwi-models.org/Images/Foran/Hand_Carved_Props/index.html
-
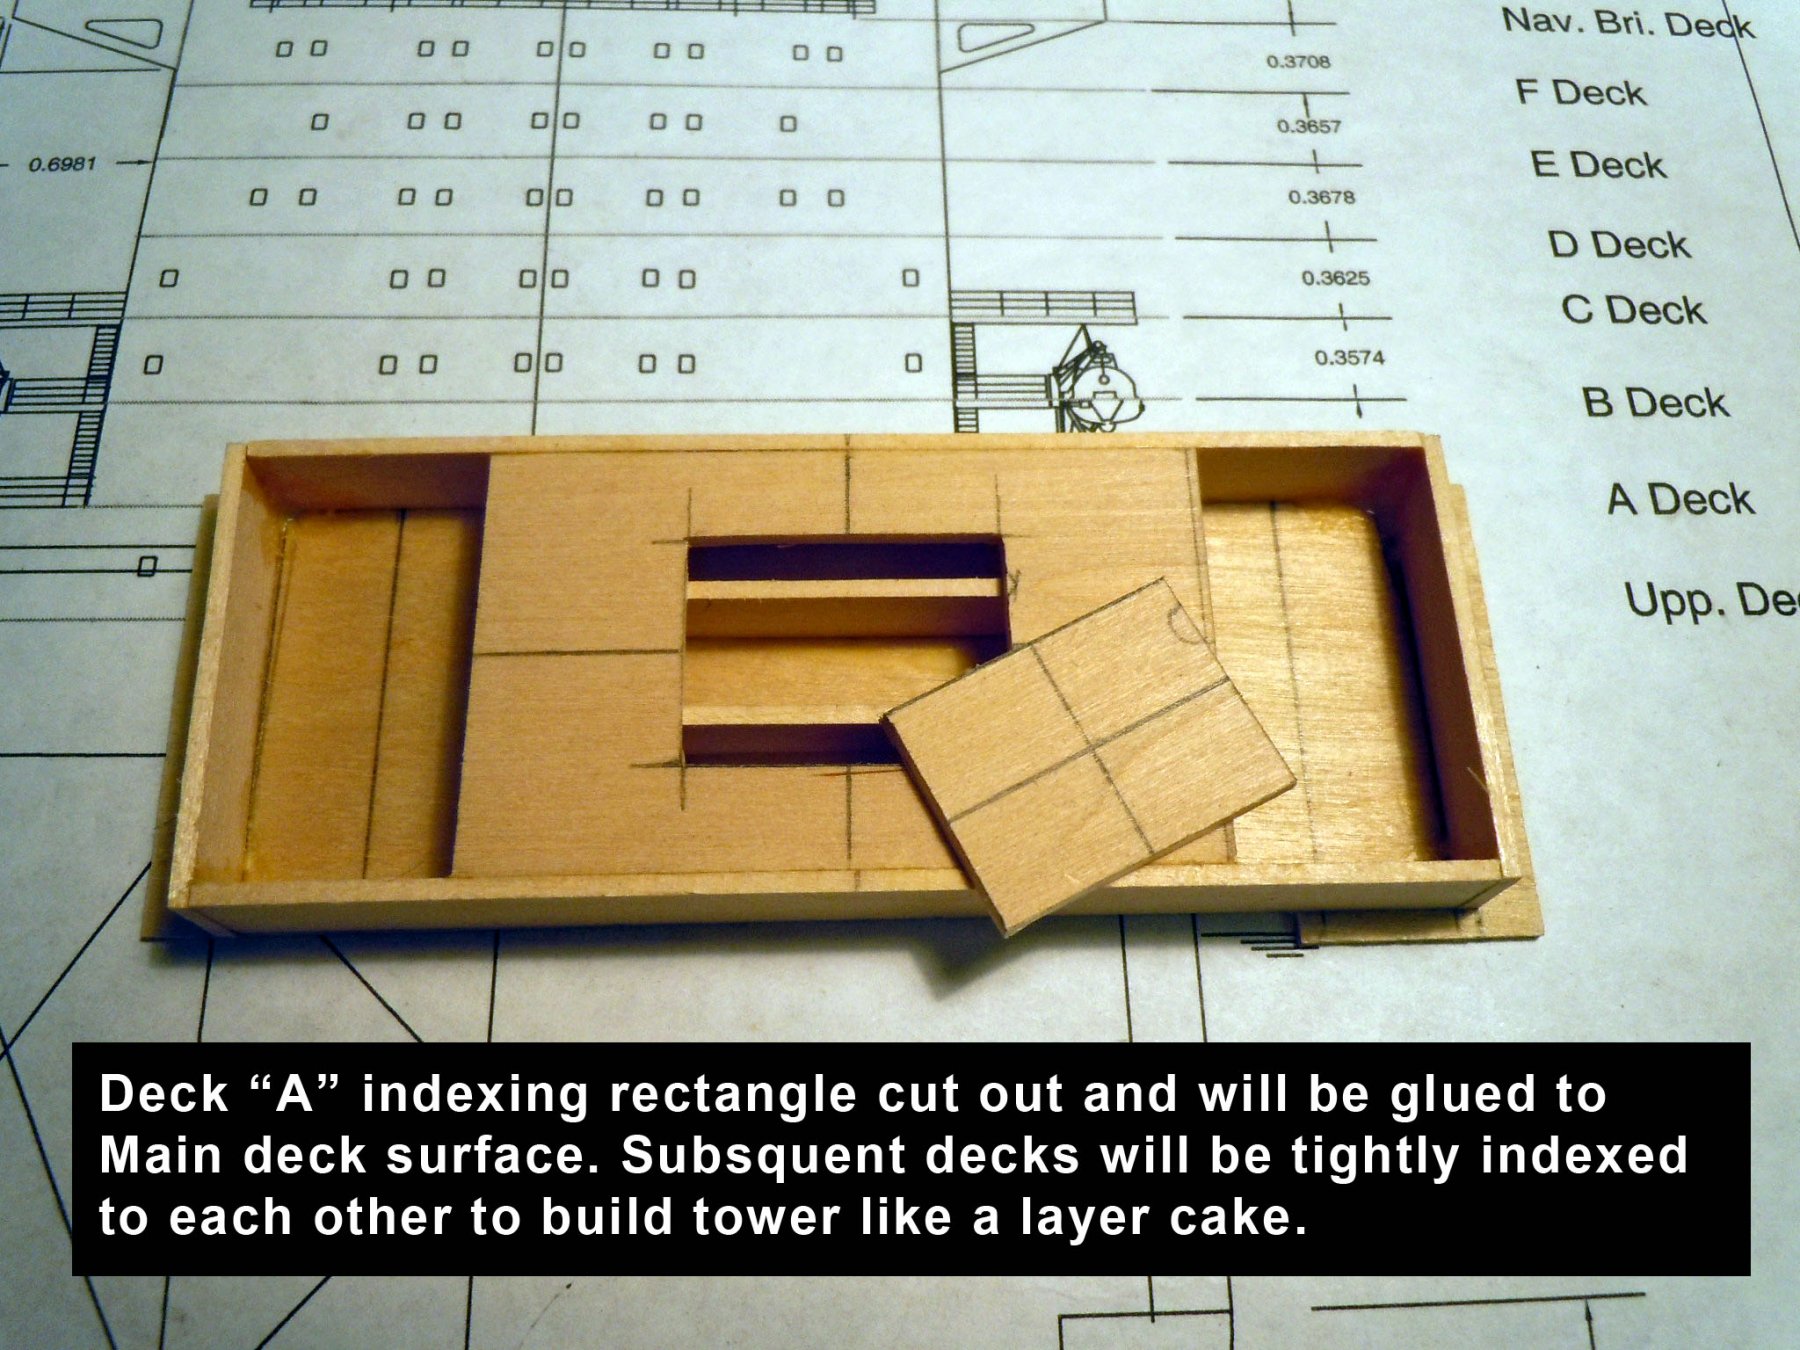
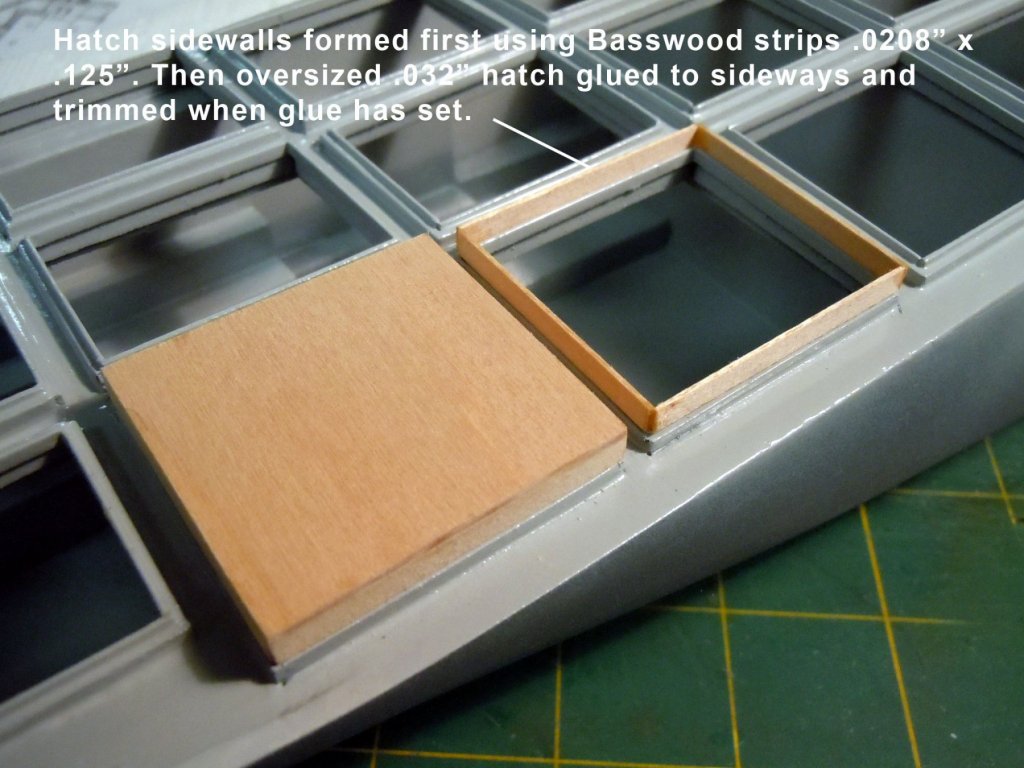
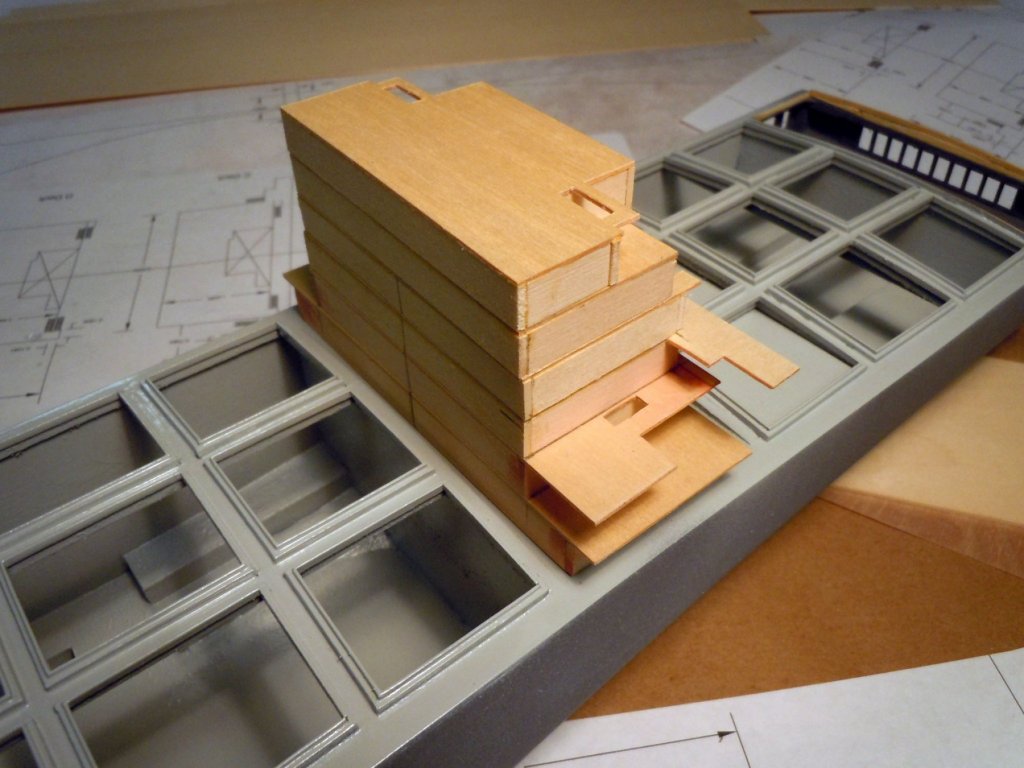
The presentation went extremely well and some are now more informed about the various aspects of modelling. In working on the hatches I first make the sidewalls fitting snugly on the coaming using Midwest #8006 Basswood strips. Then I glue a slightly over-sized 1/32" hatch cover to the sidewall frame while in place and set a small steel block weight on top until the glue sets. This assures a flat cover index to the coaming; the glue while drying can distort the the cover if not weighted down. Each cover is marked on the inside with B(bow) and S(stern) and location P (port) and hatch number from bow. There is enough slight variation in size to make each cover unique. I bounce back and forth between making hatch covers and the accommodation tower. The tower is being built with individual decks so down the road details can be added much easier than if the tower were one piece. Things like door hatches, ladder ways and rails. Here is deck "A" which will index on the main deck; the small locator rectangle will have glue added to the center while indexed into the deck and the glue will stick to the main deck and release the deck when the glue is dry providing a tight fitting locator. This will be the foundation for the tower. I used a wood strip spacer against the bay wall and masking tape for centering and gluing Deck "A" locator to the main deck. Here is a view of the in progress build up of the tower so far. The challenge is adding the indexing locators of each deck to each other with a tight fit. The tower decks will separate from each other to add details later on. Here is a front view. Here is a rear view showing various ladder way openings. The individual height of each deck is .375" Here is an overall view of where I am at so far. Many more hatches to go. Now back to making hatches and decks. Bring a whole new meaning to "Down the hatch!"


-
I have been doing a great deal of fussy work on the bay hatches coaming while waiting for more stock to come from Midwest. A couple of hundred pieces cut and fitted on edge around the hatch openings. While doing this it came to me that given the tight tolerances needed that I better paint the interior and coaming before fabricating the hatch covers. So after priming, glazing and sanding and fussing I finally was able to paint a Gray in the holds, coaming and bow mooring deck. At least this will be a working color coat for now and will have ample time to dry and set while waiting for the material to arrive on Wednesday. Tomorrow is my presentation to the local Rotary Club on Model Building which has also occupied some of my time as well. Here is the first working coat of Gray. Now back to the presentation for now and get ready to make hatches.


-
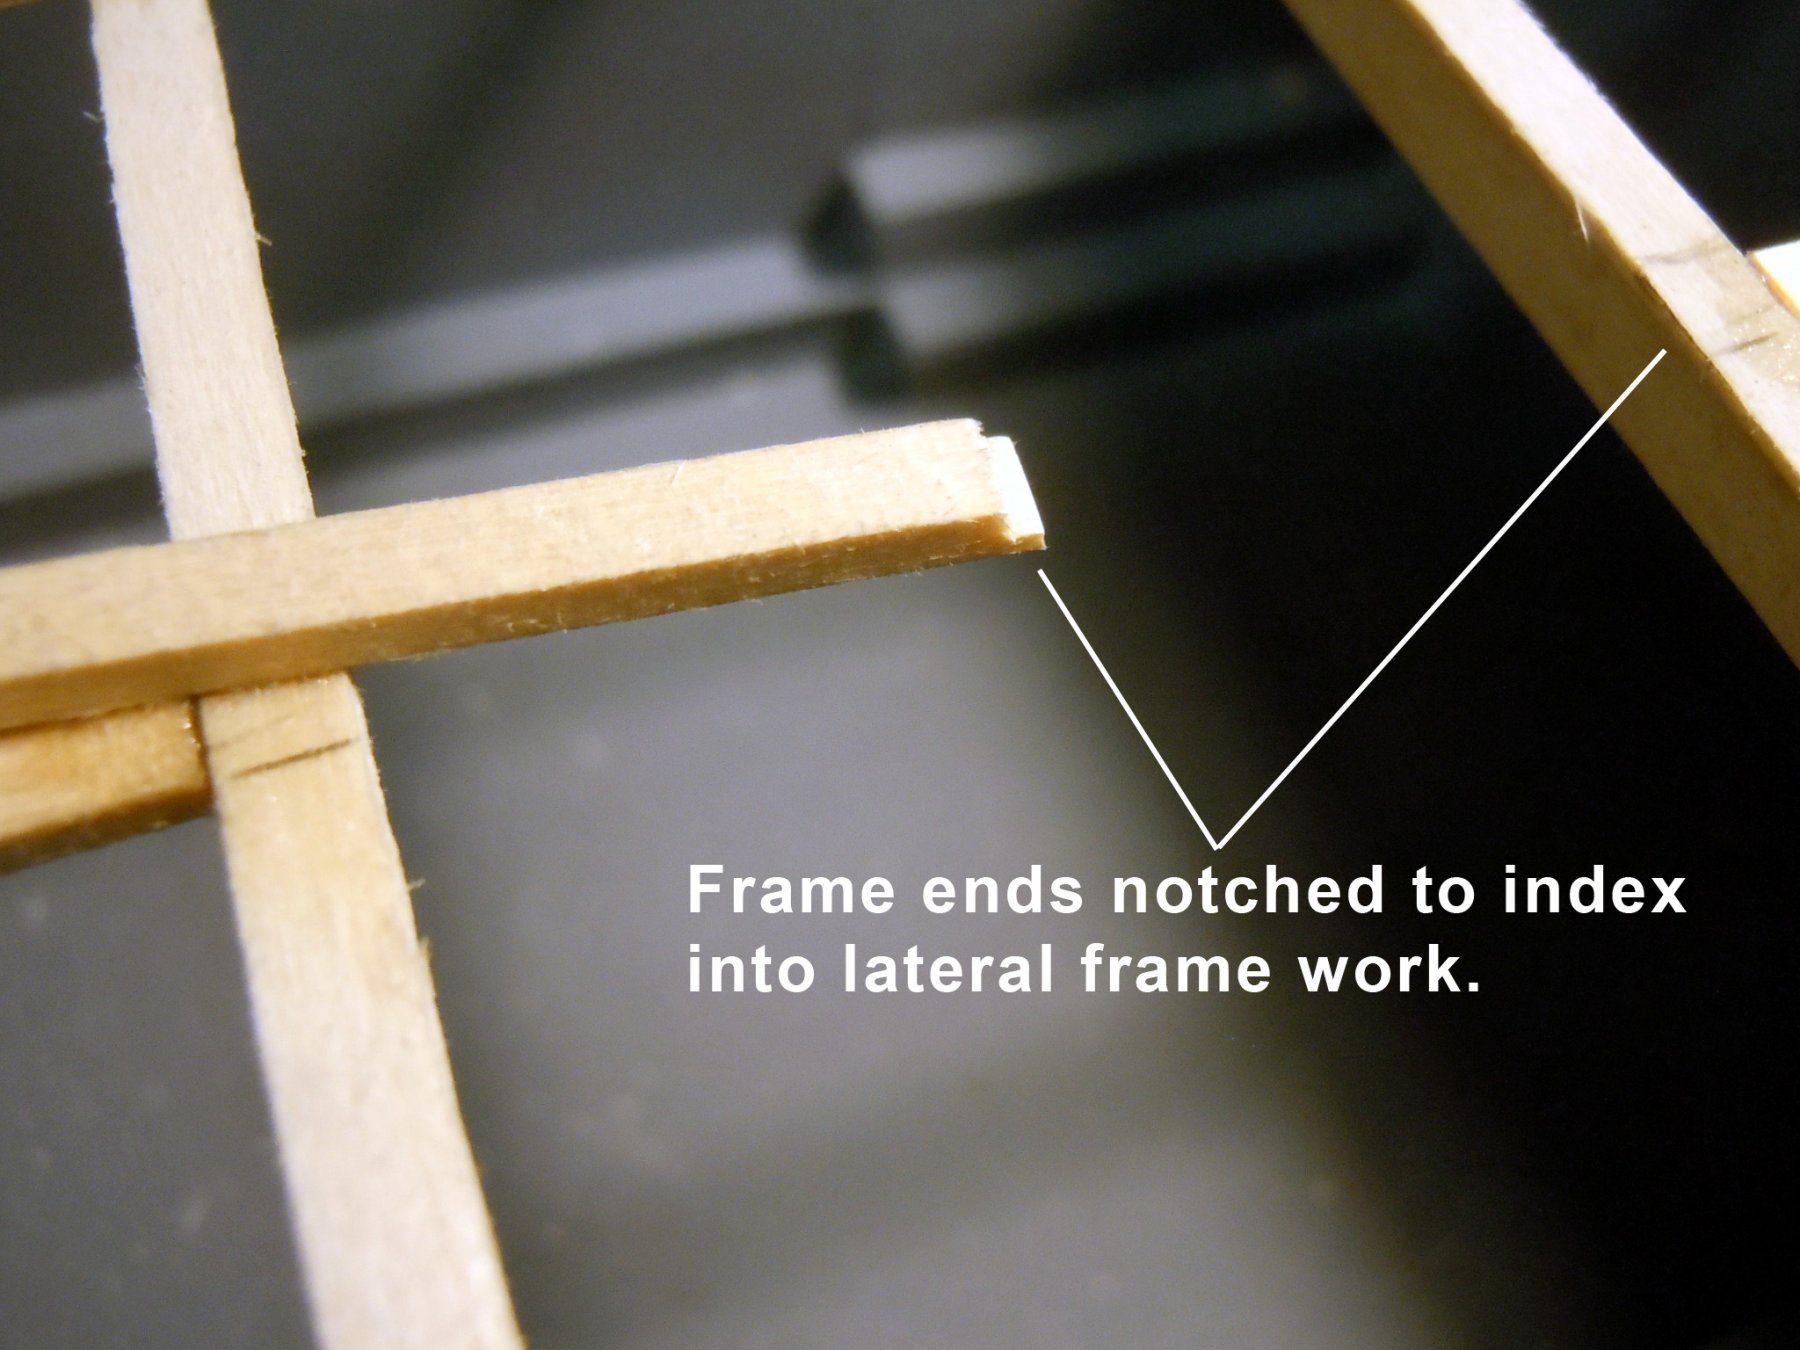
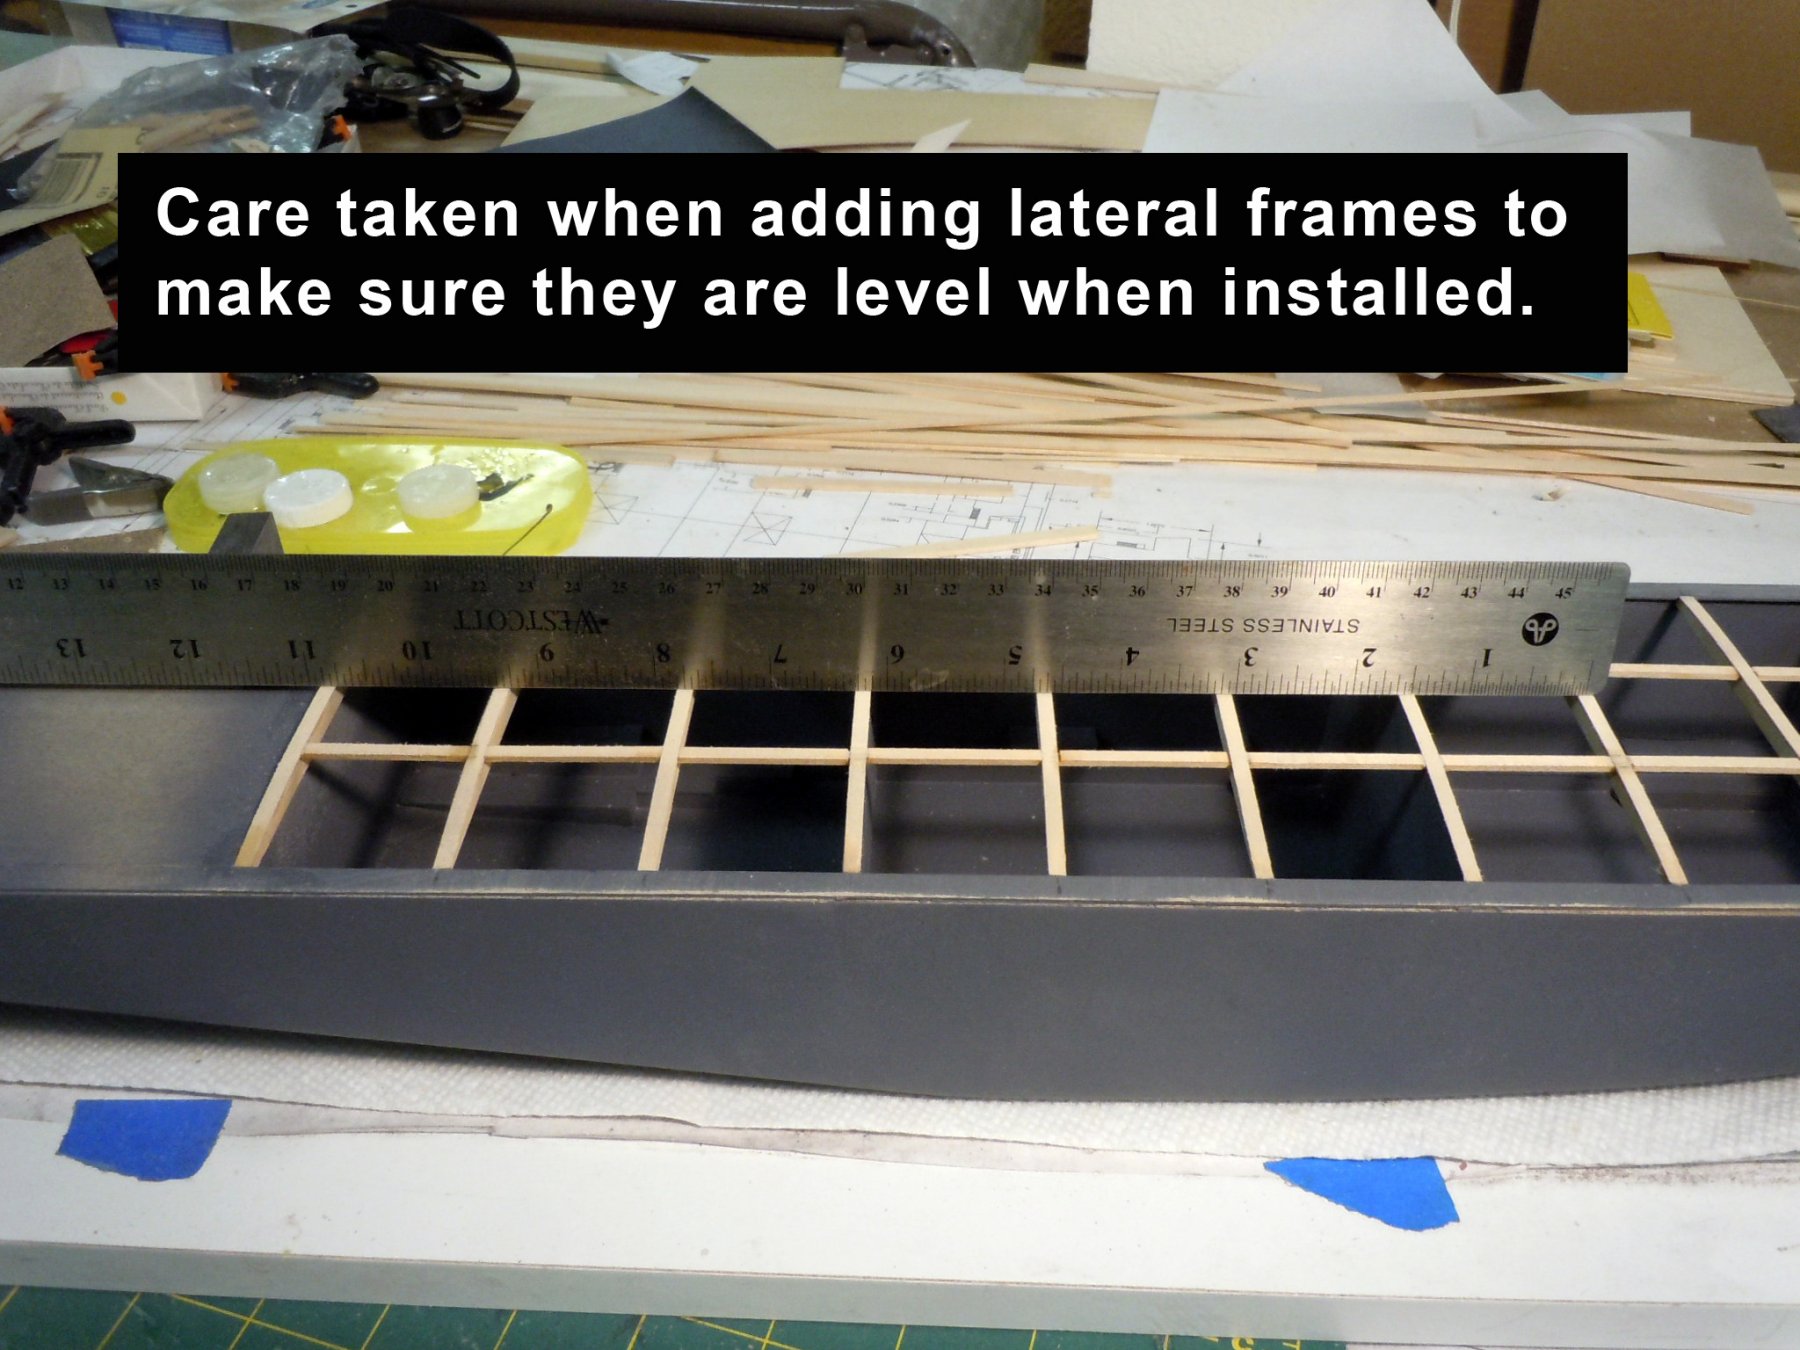
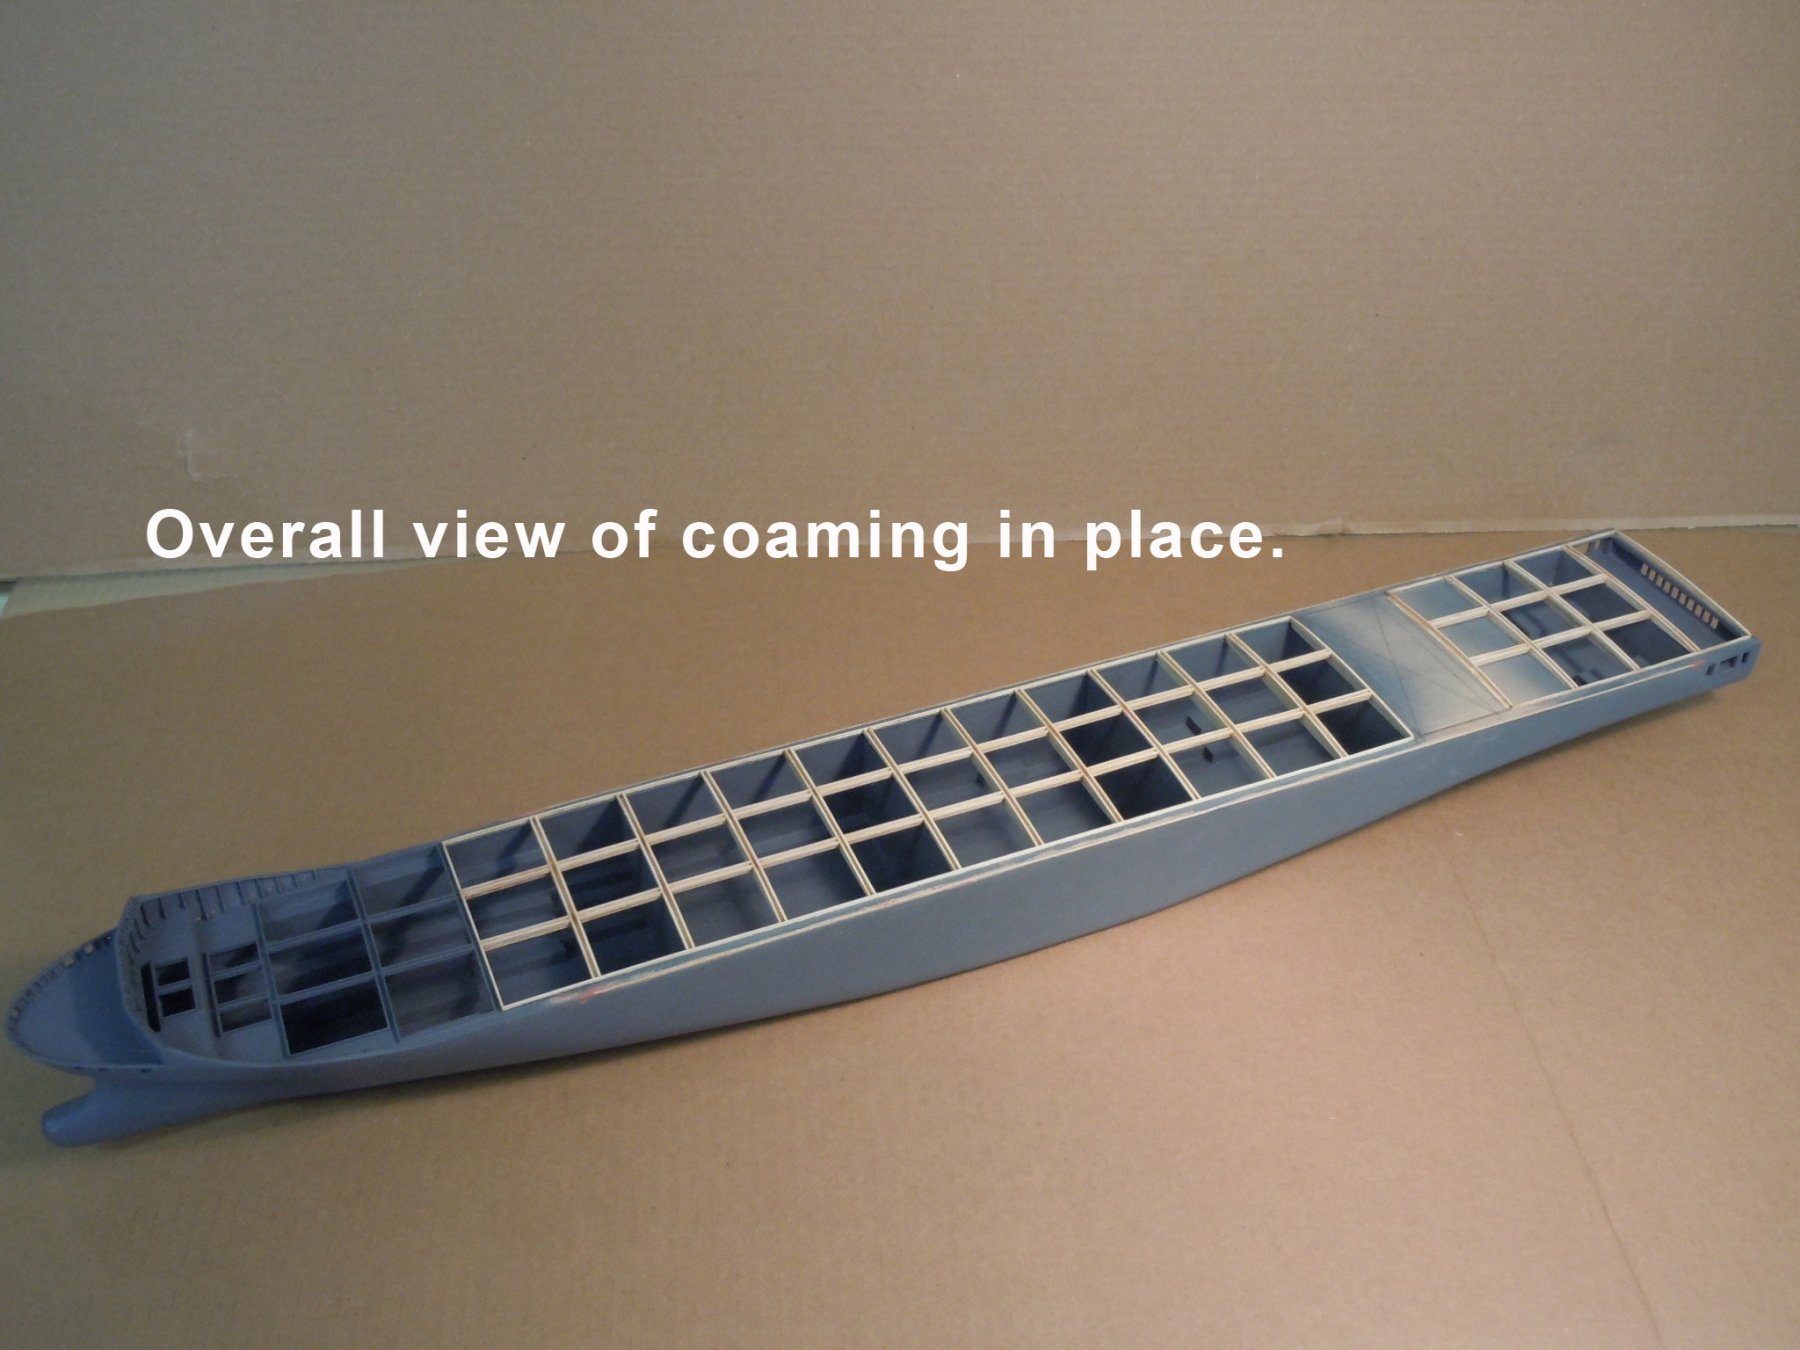
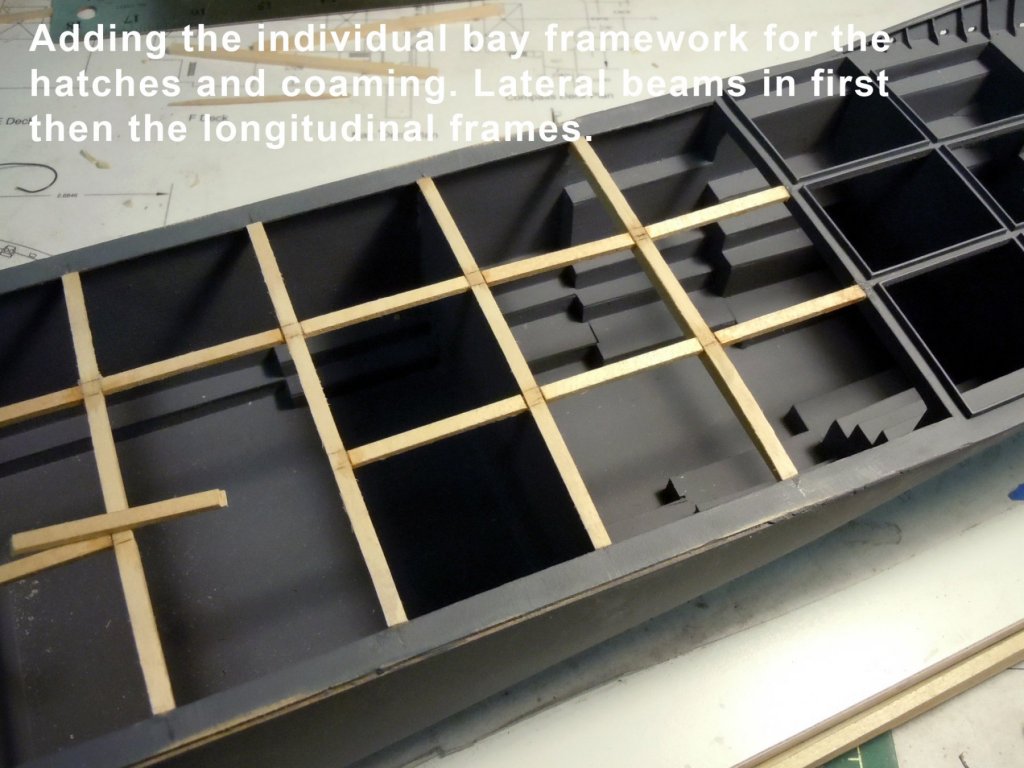
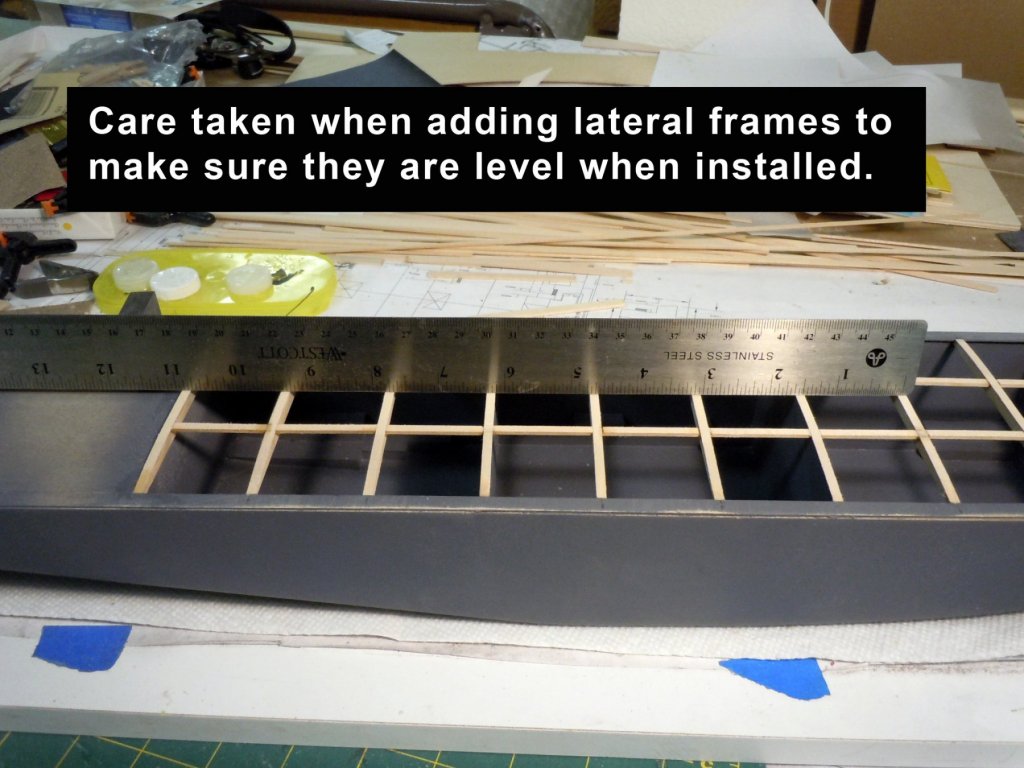
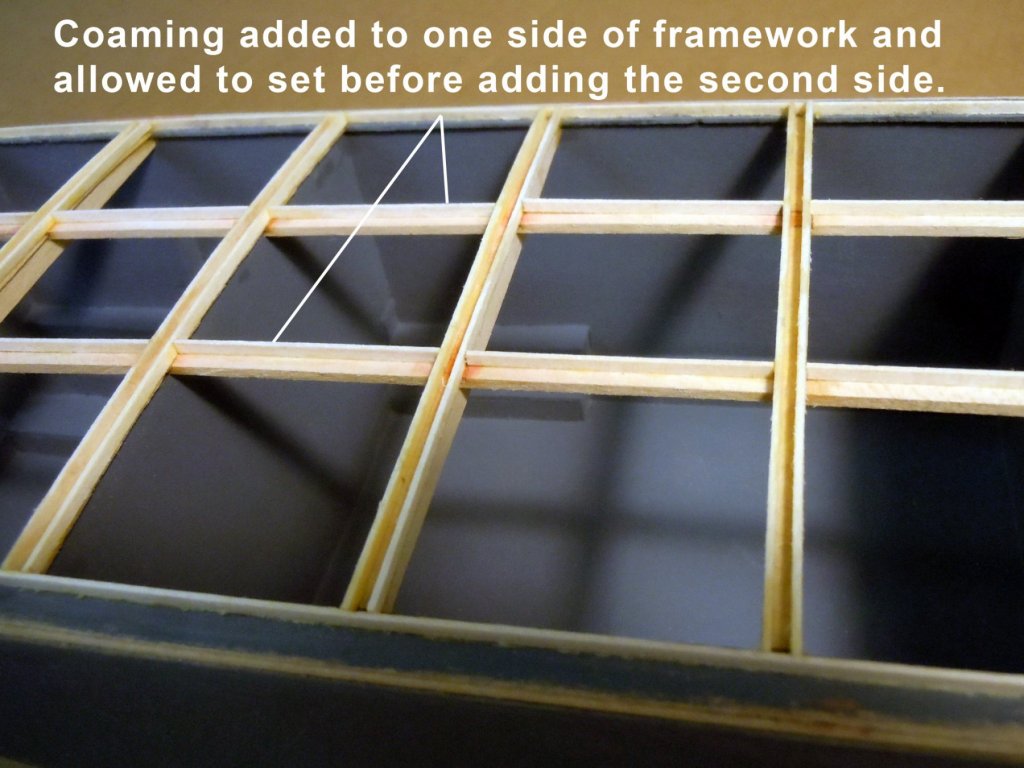
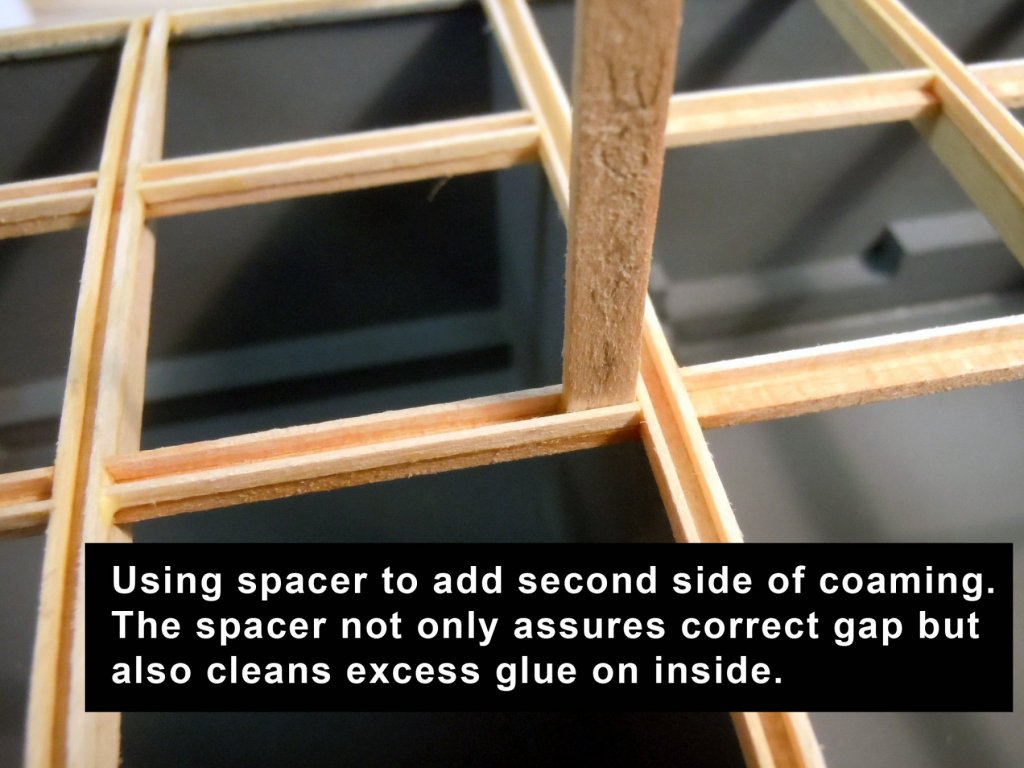
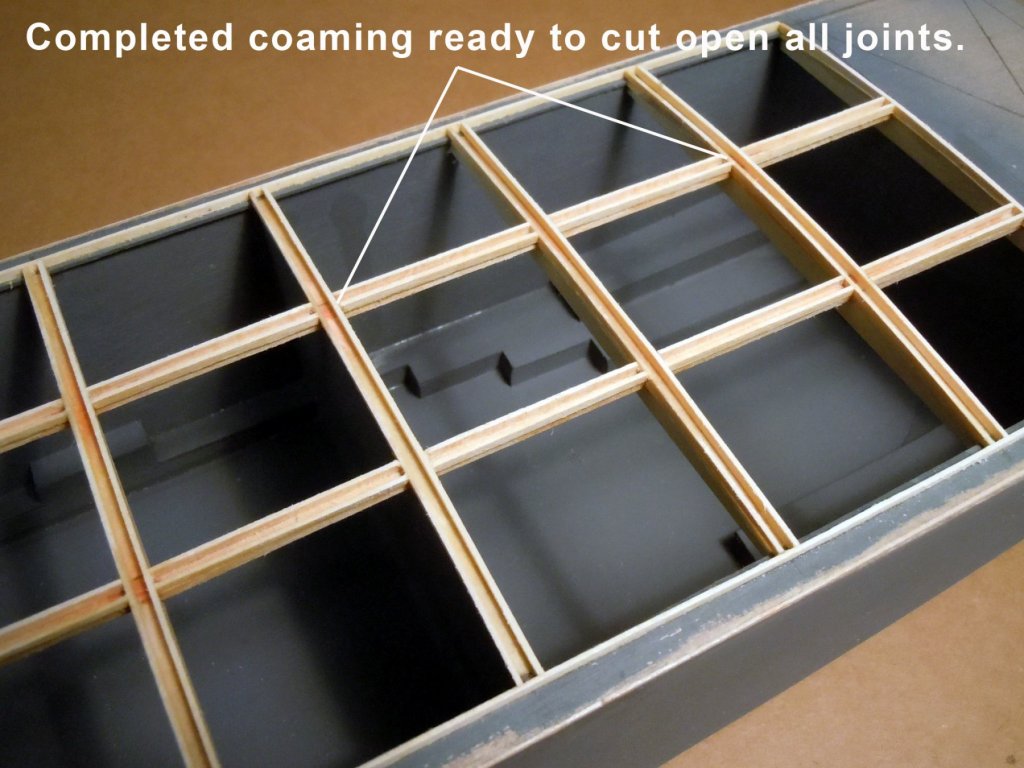
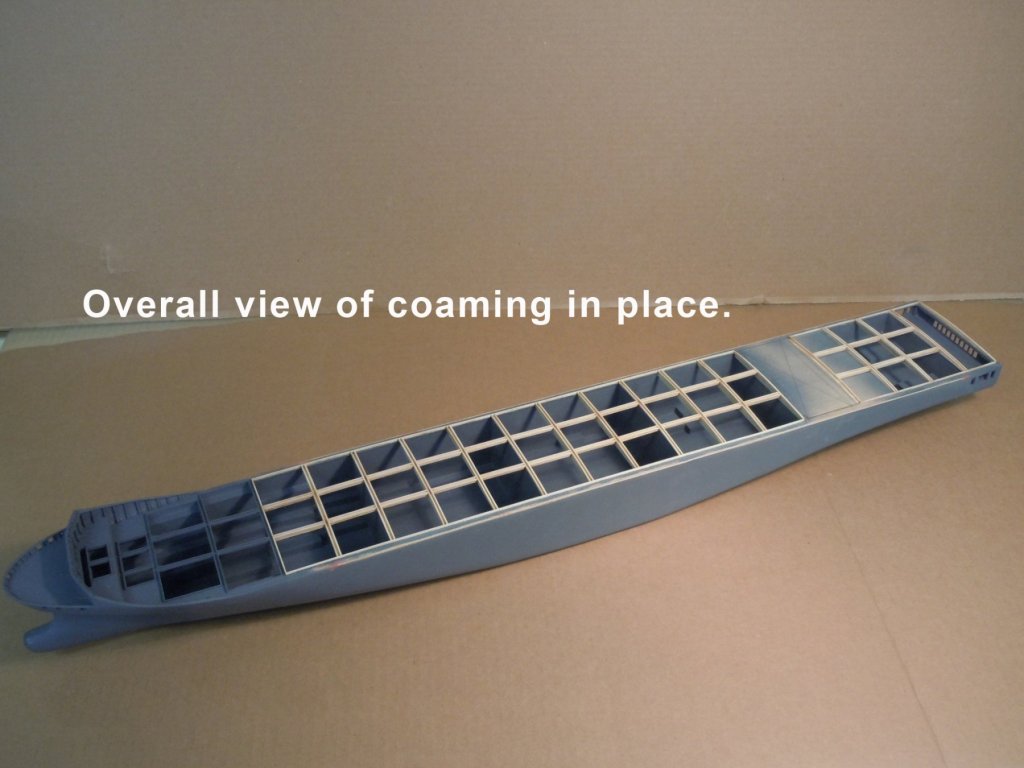
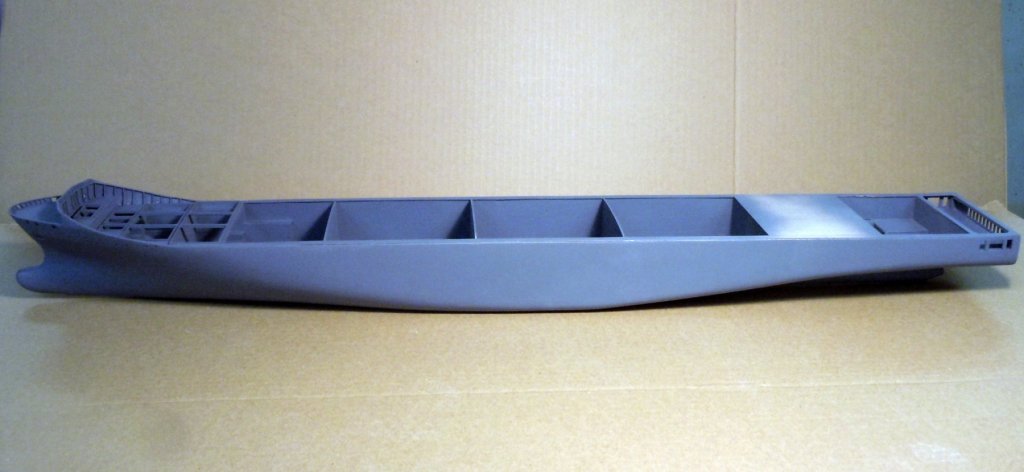
Next I added the individual bay framework of three bays across the hull. First I added the lateral support beams and then the shorter longitudinal beams. These form the deck support structure with each opening having coaming around them onto which the hatches were located. The short beams required notching into the cross beams to have a level surface. I should mention that when adding the cross members care had to be taken to make sure they were level to each other as added. Next I started adding the coaming using 1/32" x 1/16" doing the outboard ones first. I drew a pencil line aligning with the existing coaming on the bow section. I laid down 1/4" tape which provided an edge to "bump" the coaming against but also kept any excess glue from the finished surface. Once the outboard coaming was set I added the lateral ones fist on one side of the frame surface and allowed the glue to set. This allowed using a spacer when adding the second side to the frame. This shows the using of the spacer. Once all the coaming was in place and the glue allowed to set after adding CA to all the outside perimeters the entire frame work was sanded smooth and even. Next all the joint gaps were cut carefully with the tip of a #11 blade and filed with a needle file to make sure there was an even spacing. Here is an overall view showing all the bay openings. Next will come the tedious process of cutting and fitting of all the hatches. The hatches will form the water tight decking for the containers stowed below them and the surface for the containers open above the deck. I may address some of the accommodation tower to break up the boredom of making over 50 hatches.


-
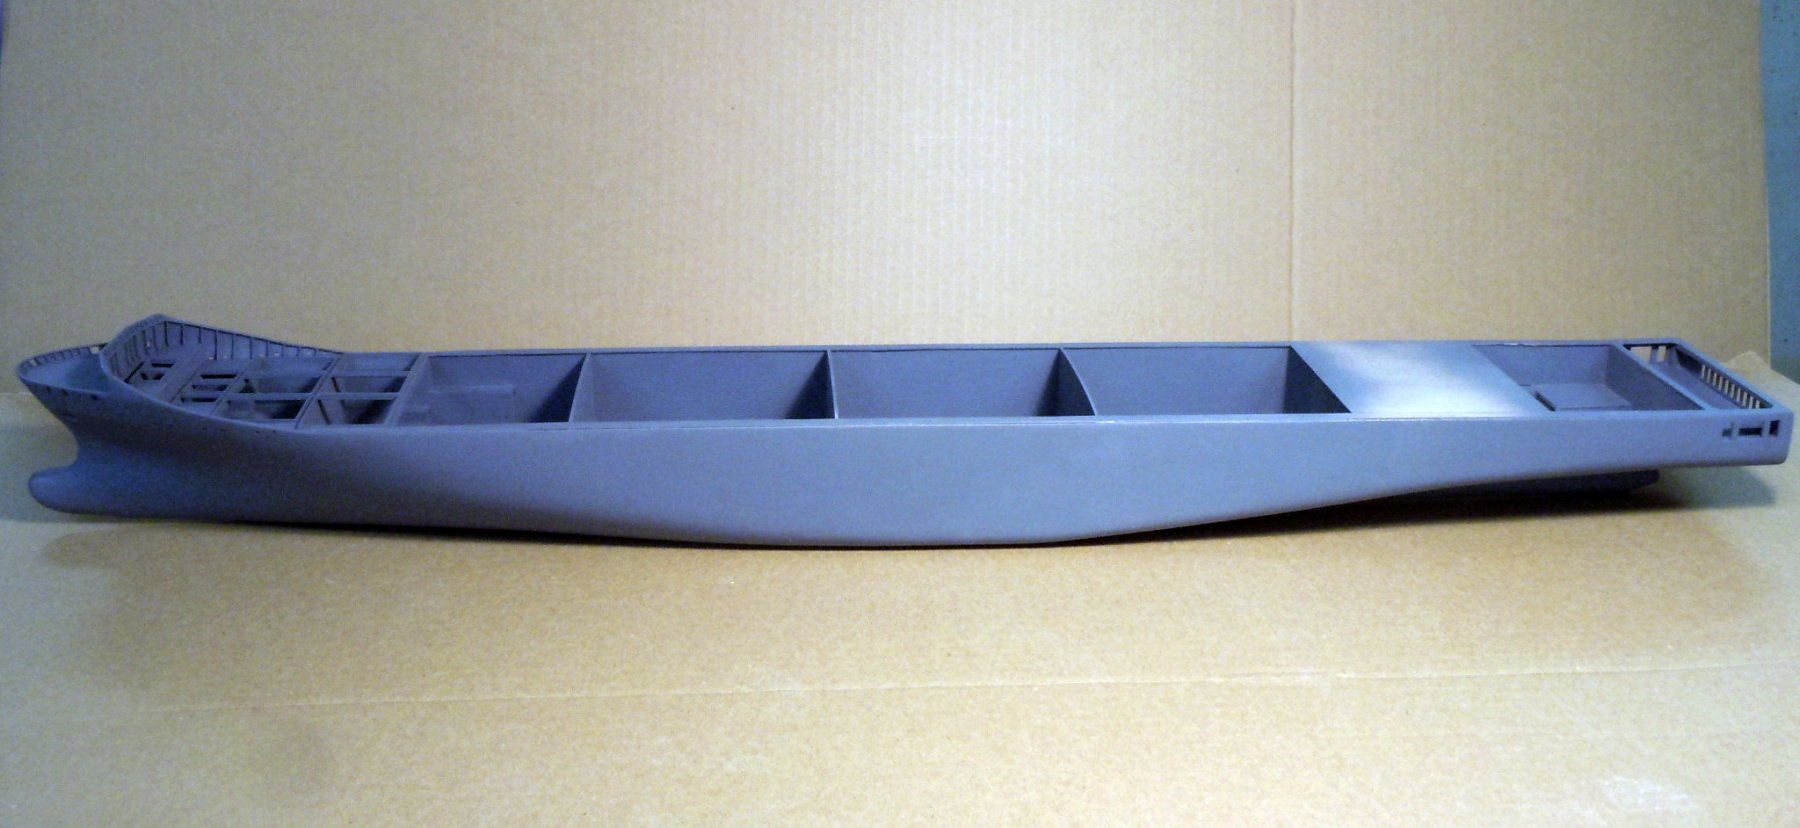
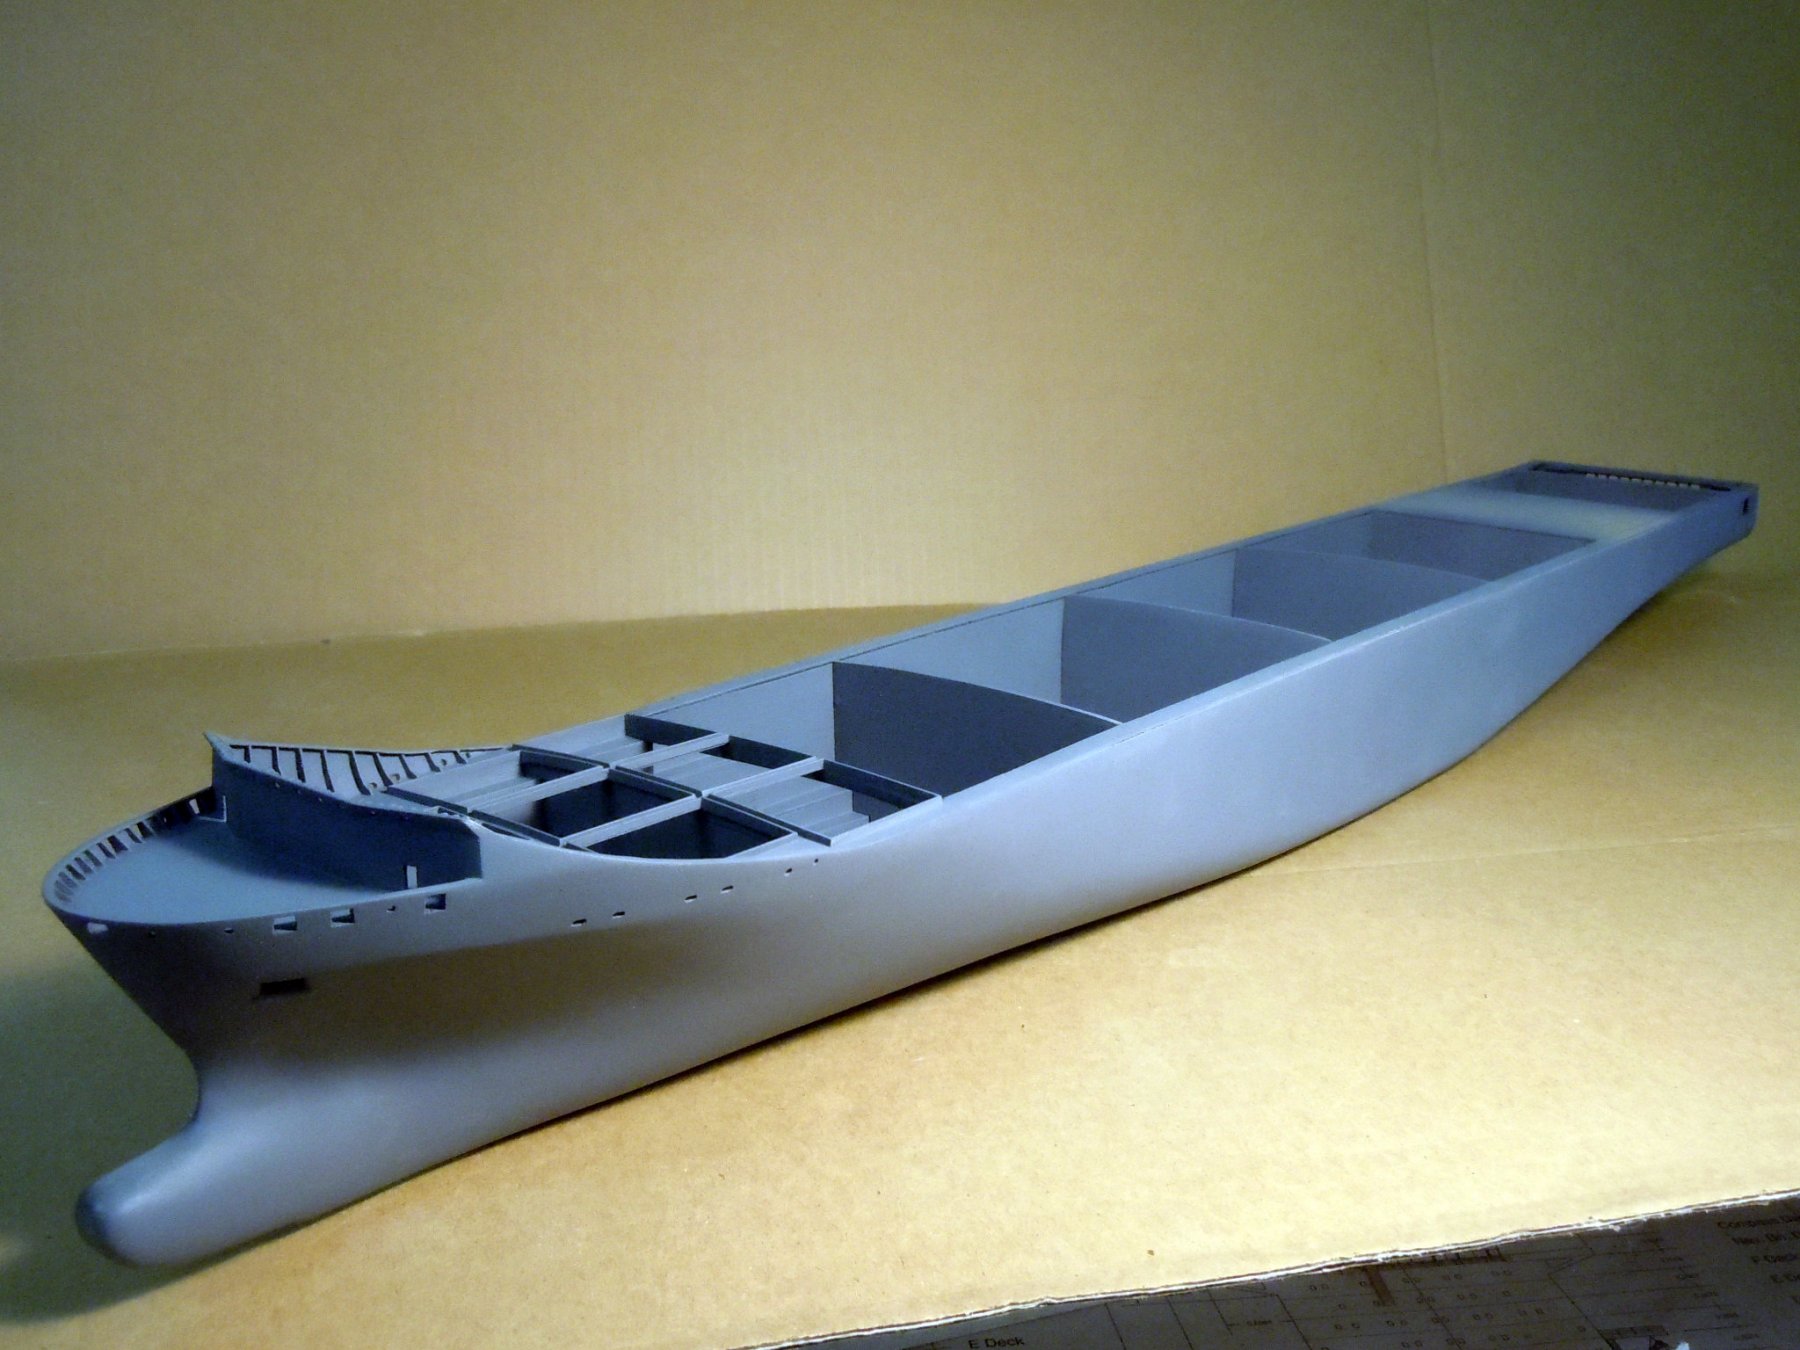
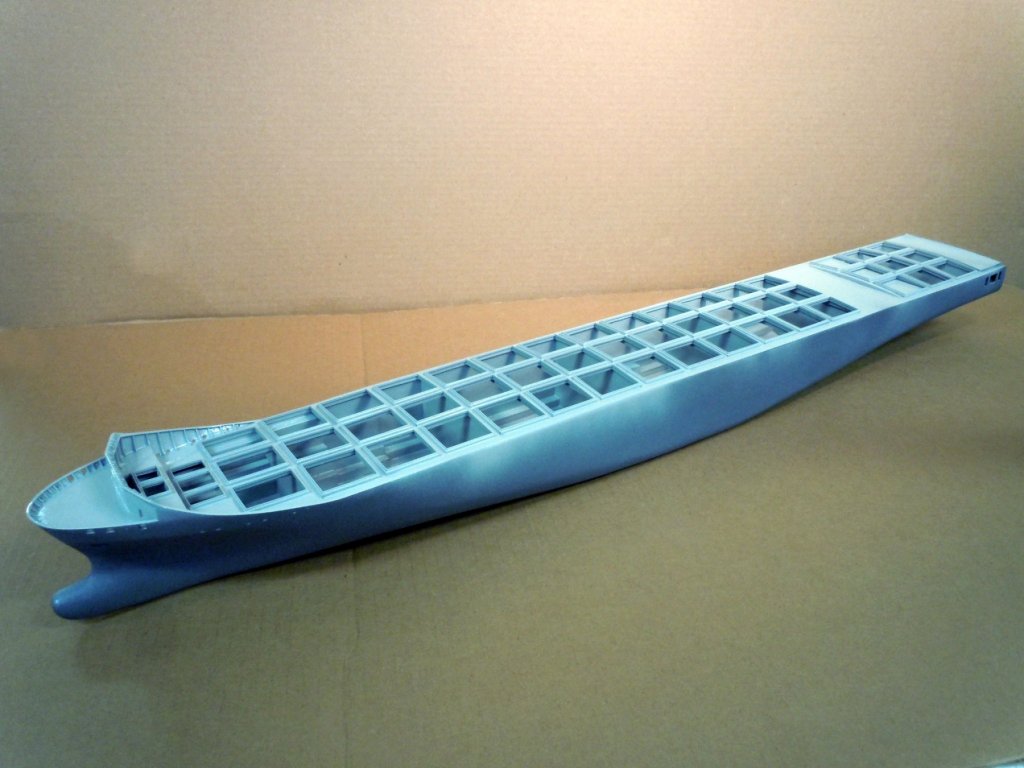
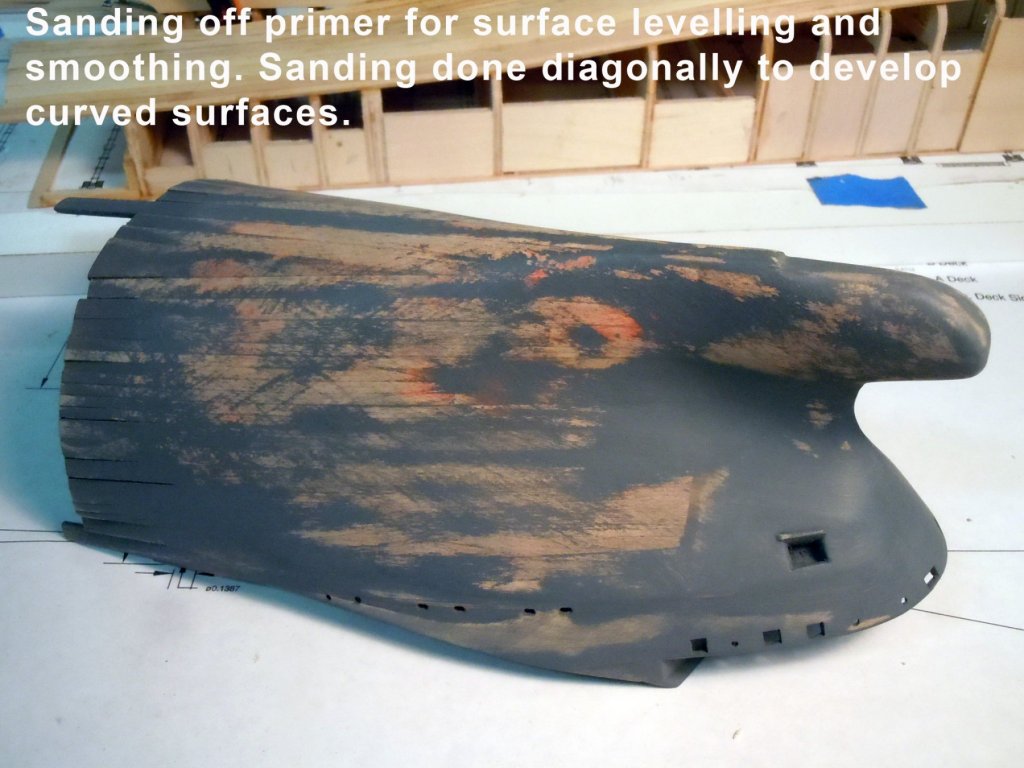
Patrick and Nils here are the results, Michael welcome aboard. I finished up closing the gap both outside and inside. Then sanded and blended the surfaces using 120 grit dry and then 320 using a block and sanding diagonally across the curves. Primed once again to seal the exposed wood then sanded with 320 grit avoiding to break the primed surfaces back to wood. Then a final prime coat. This will be a working surface until the balance of the construction is completed. This will allow normal scuffing while handling, but will really allow the primer to harden and the wood to set with the primer. Wood does expand and contract over time so hopefully it will set by the time I am ready for the final painting. Here are various views of where the hull is now. Now to move on and start adding the bay hold openings with coaming, basically extending those that are in place on the bow section. Evan is on his way to the ship today and I am looking forward to getting pictures of many details as his schedule allows.


-
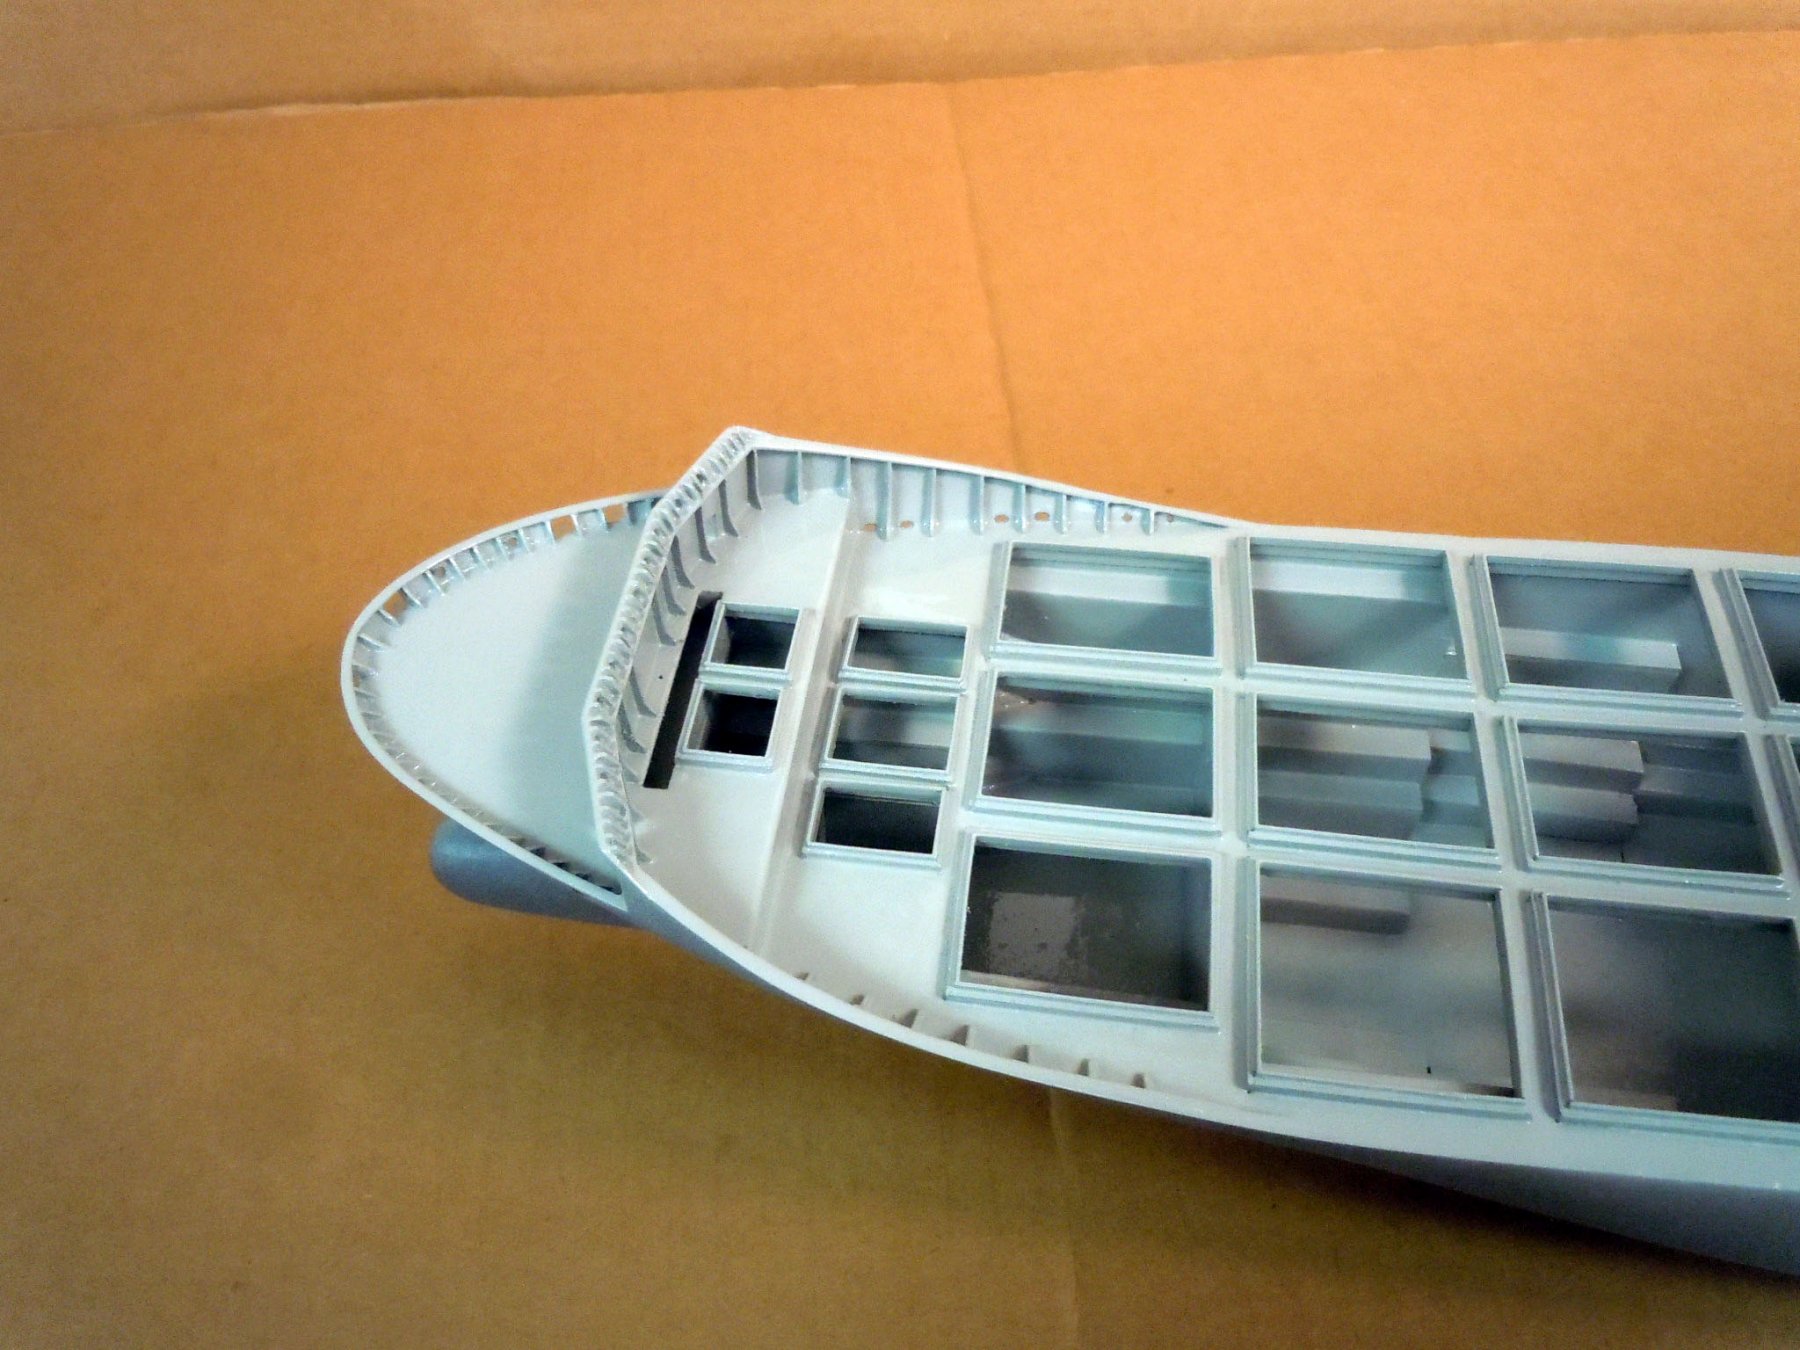
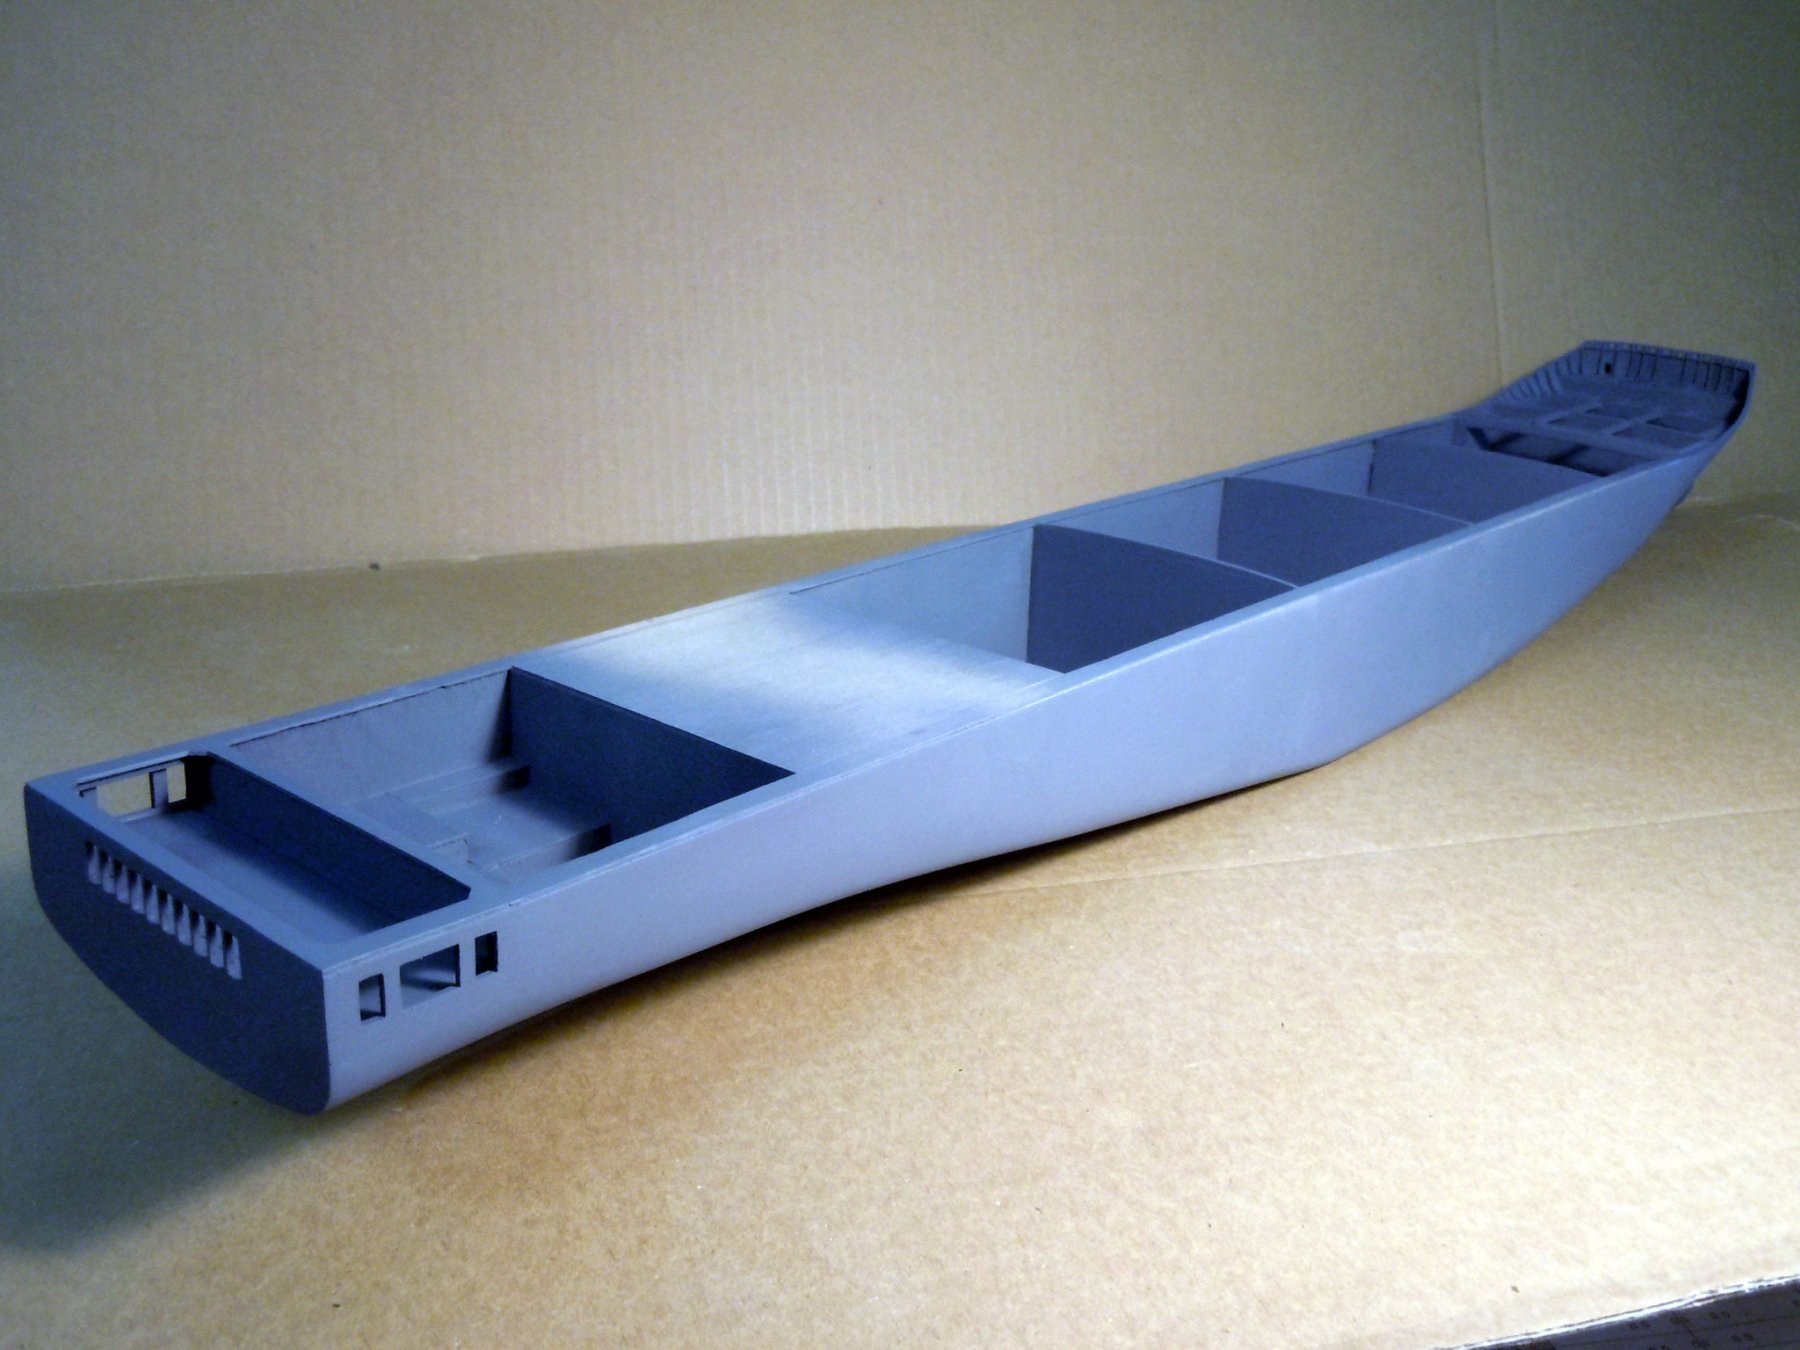
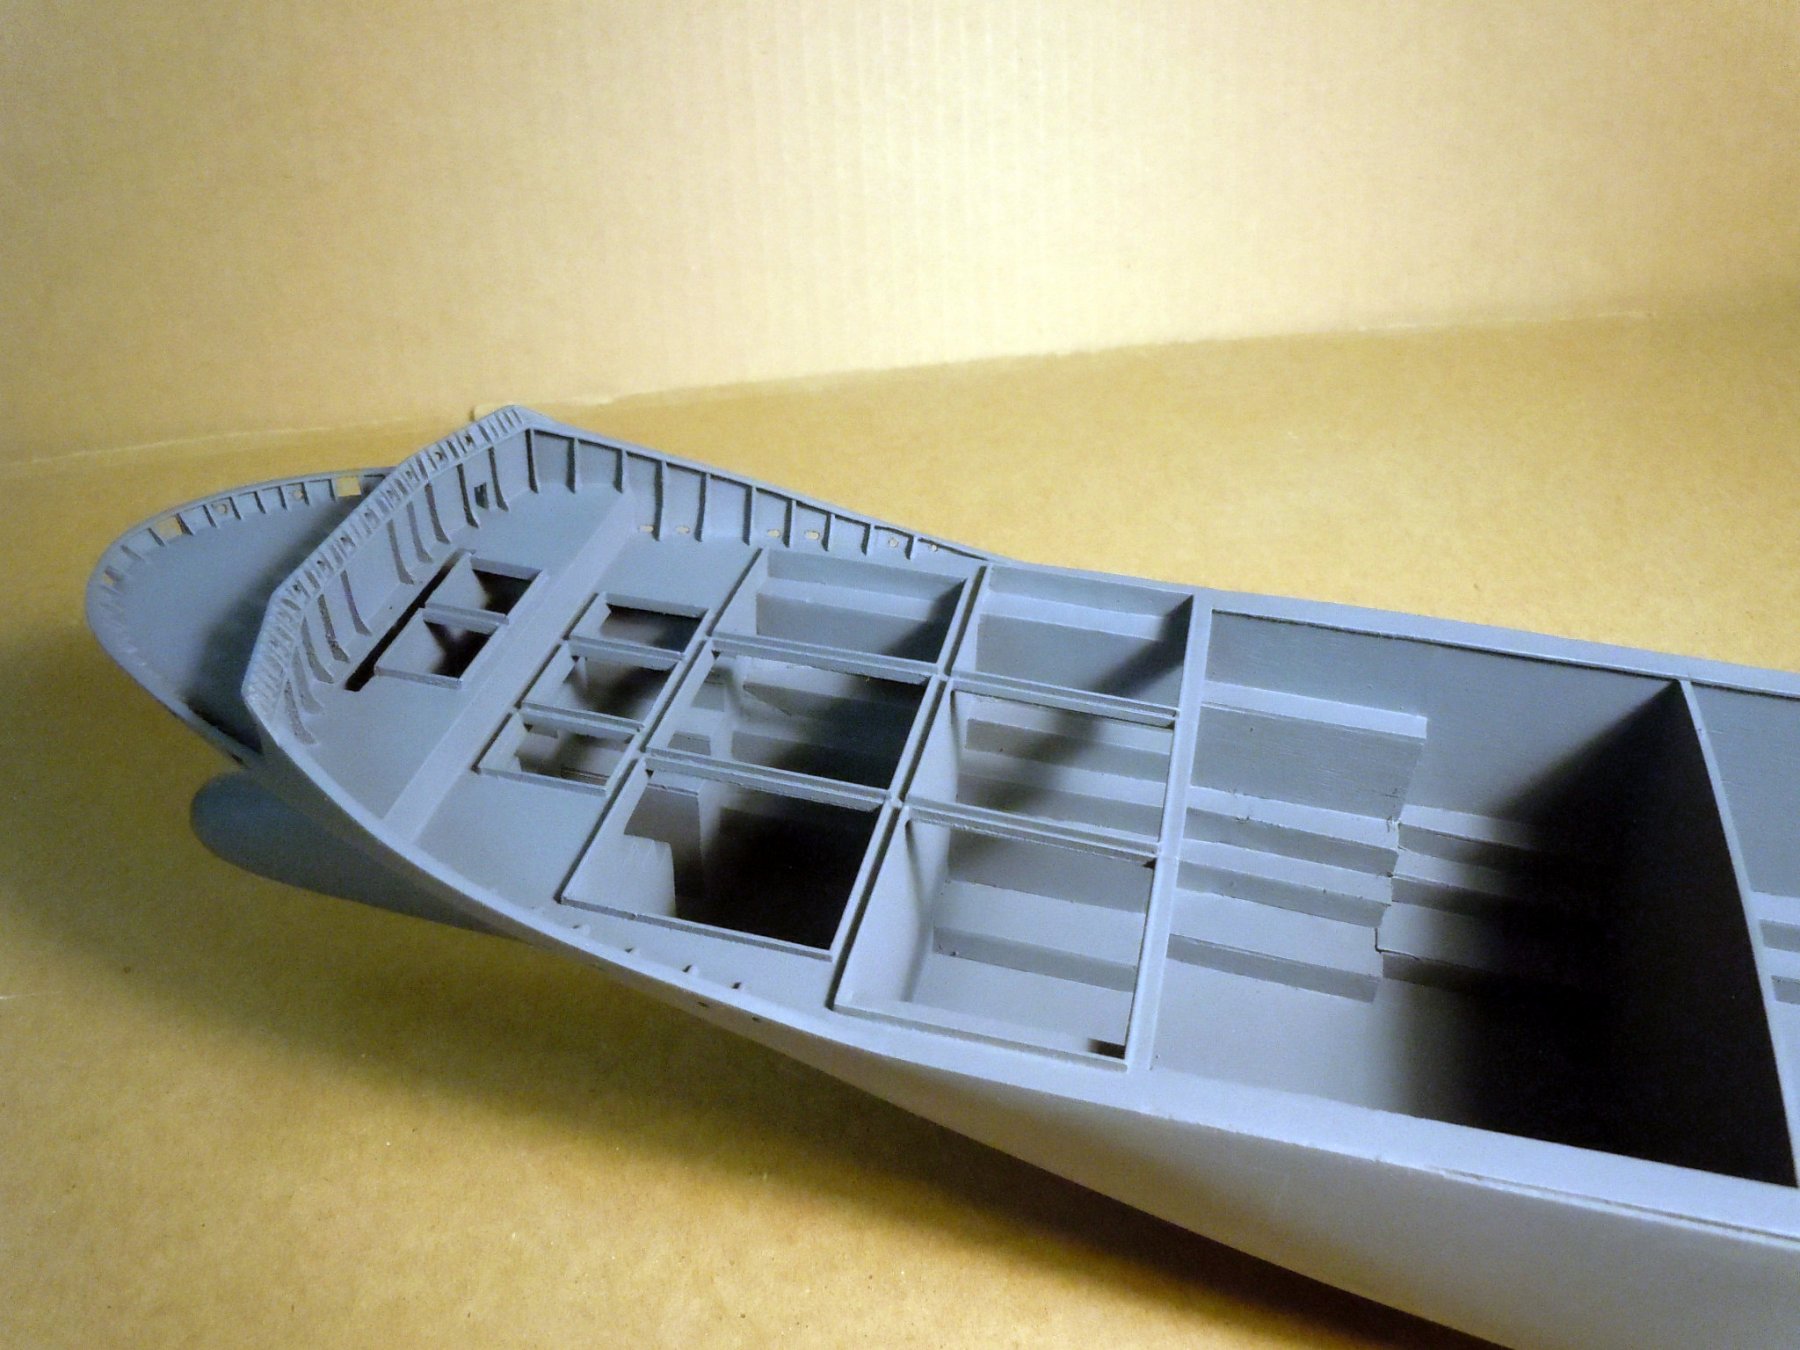
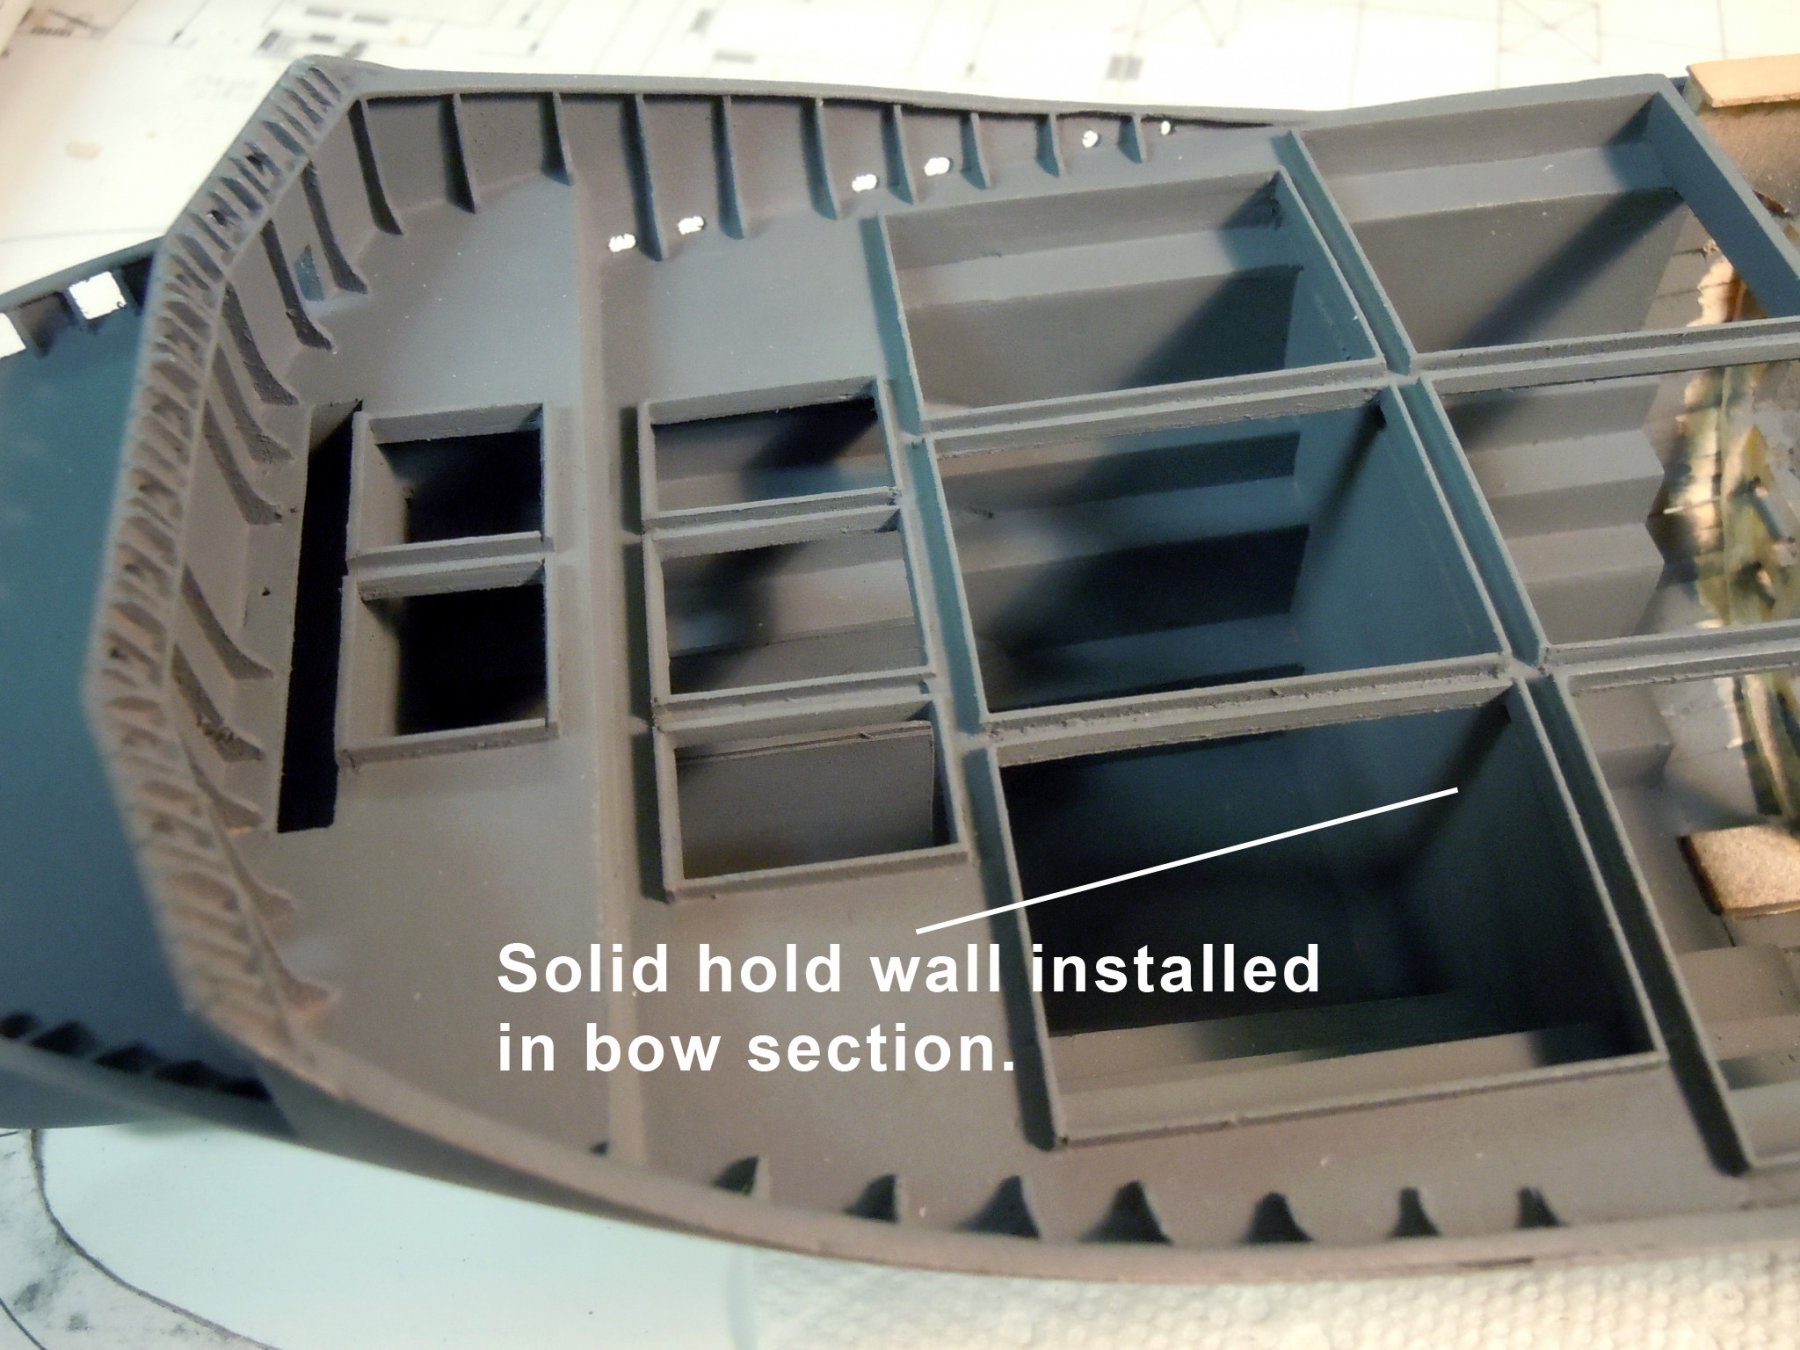
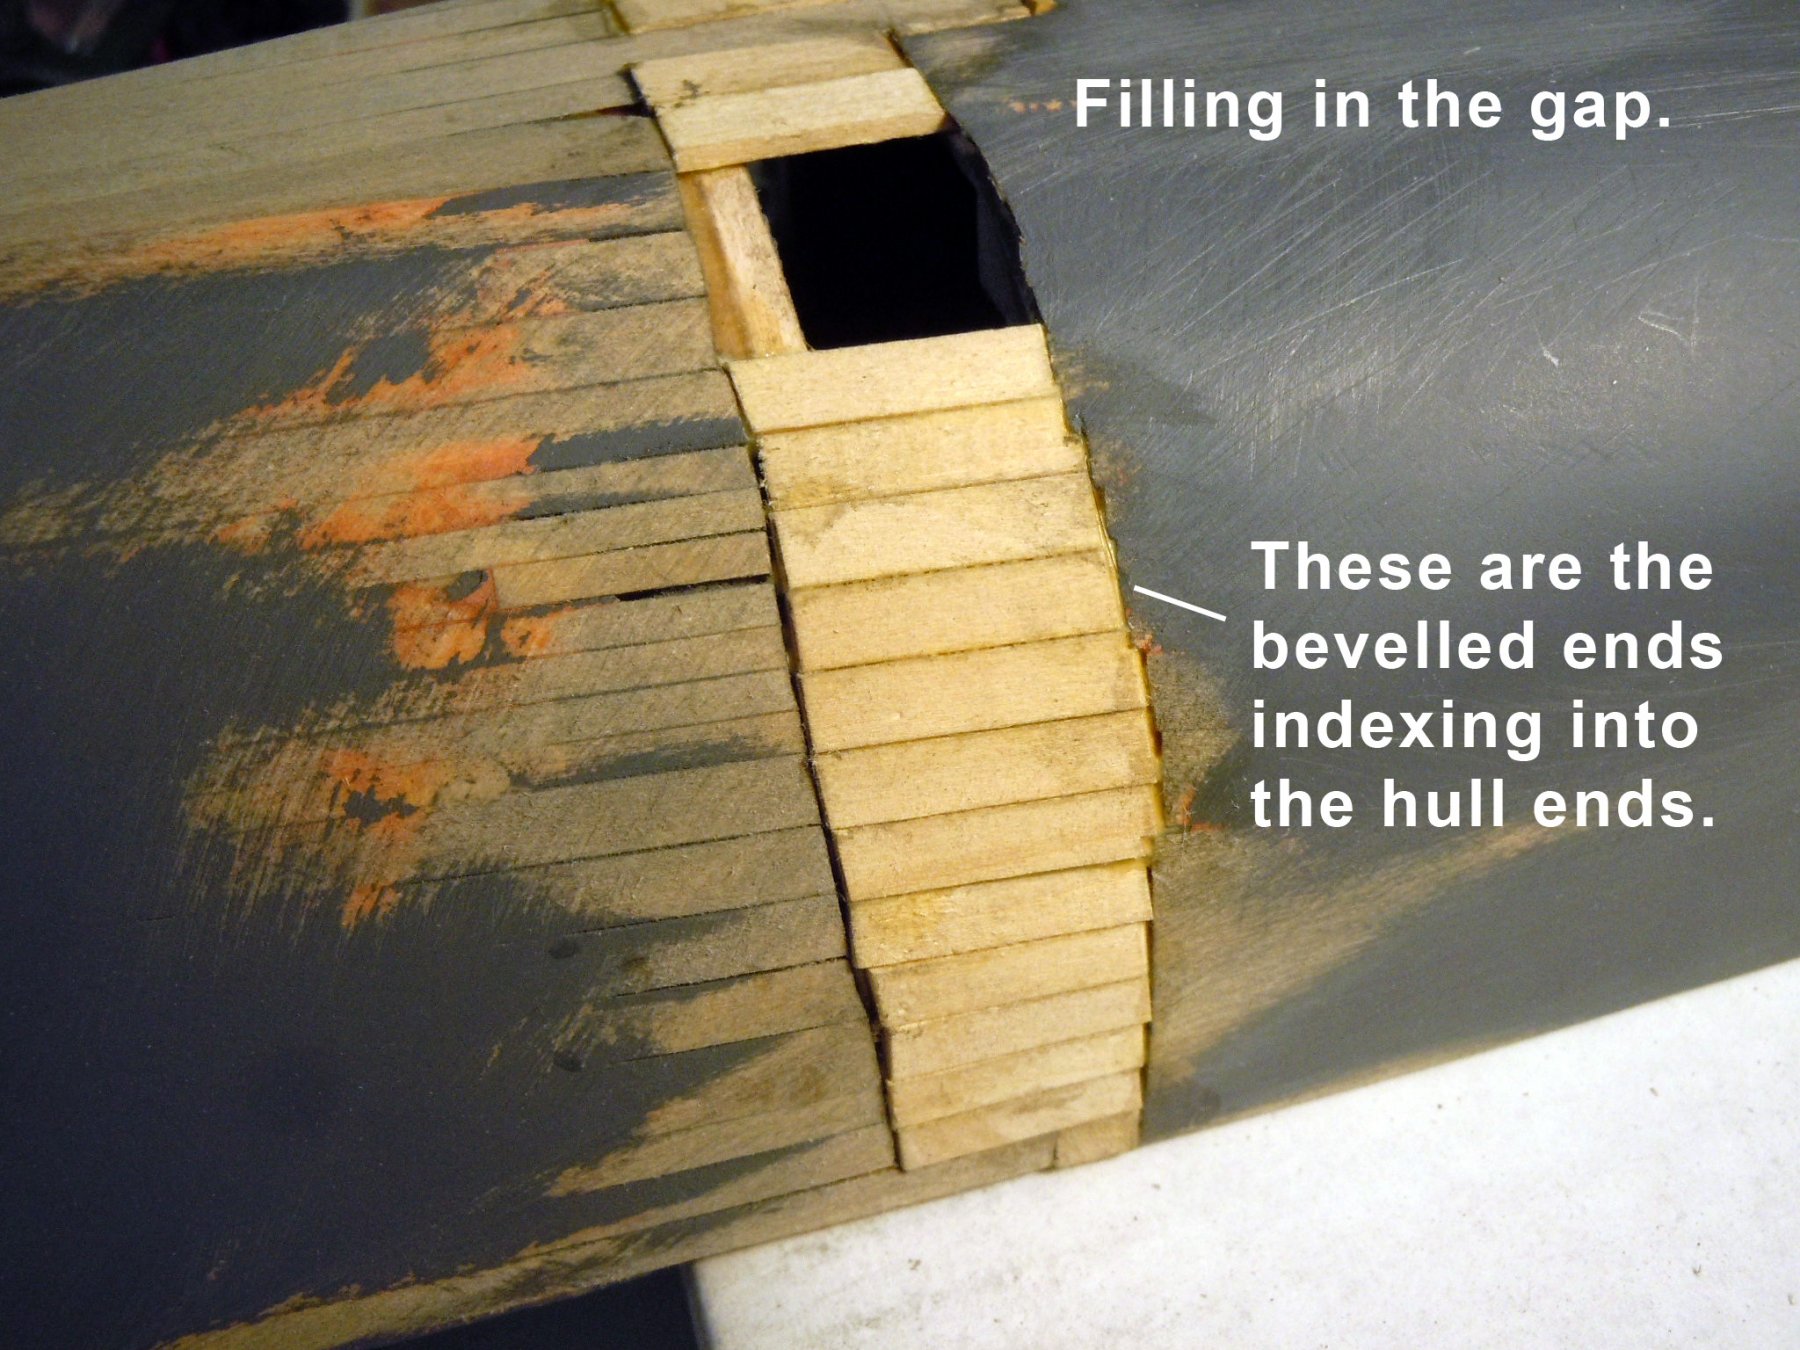
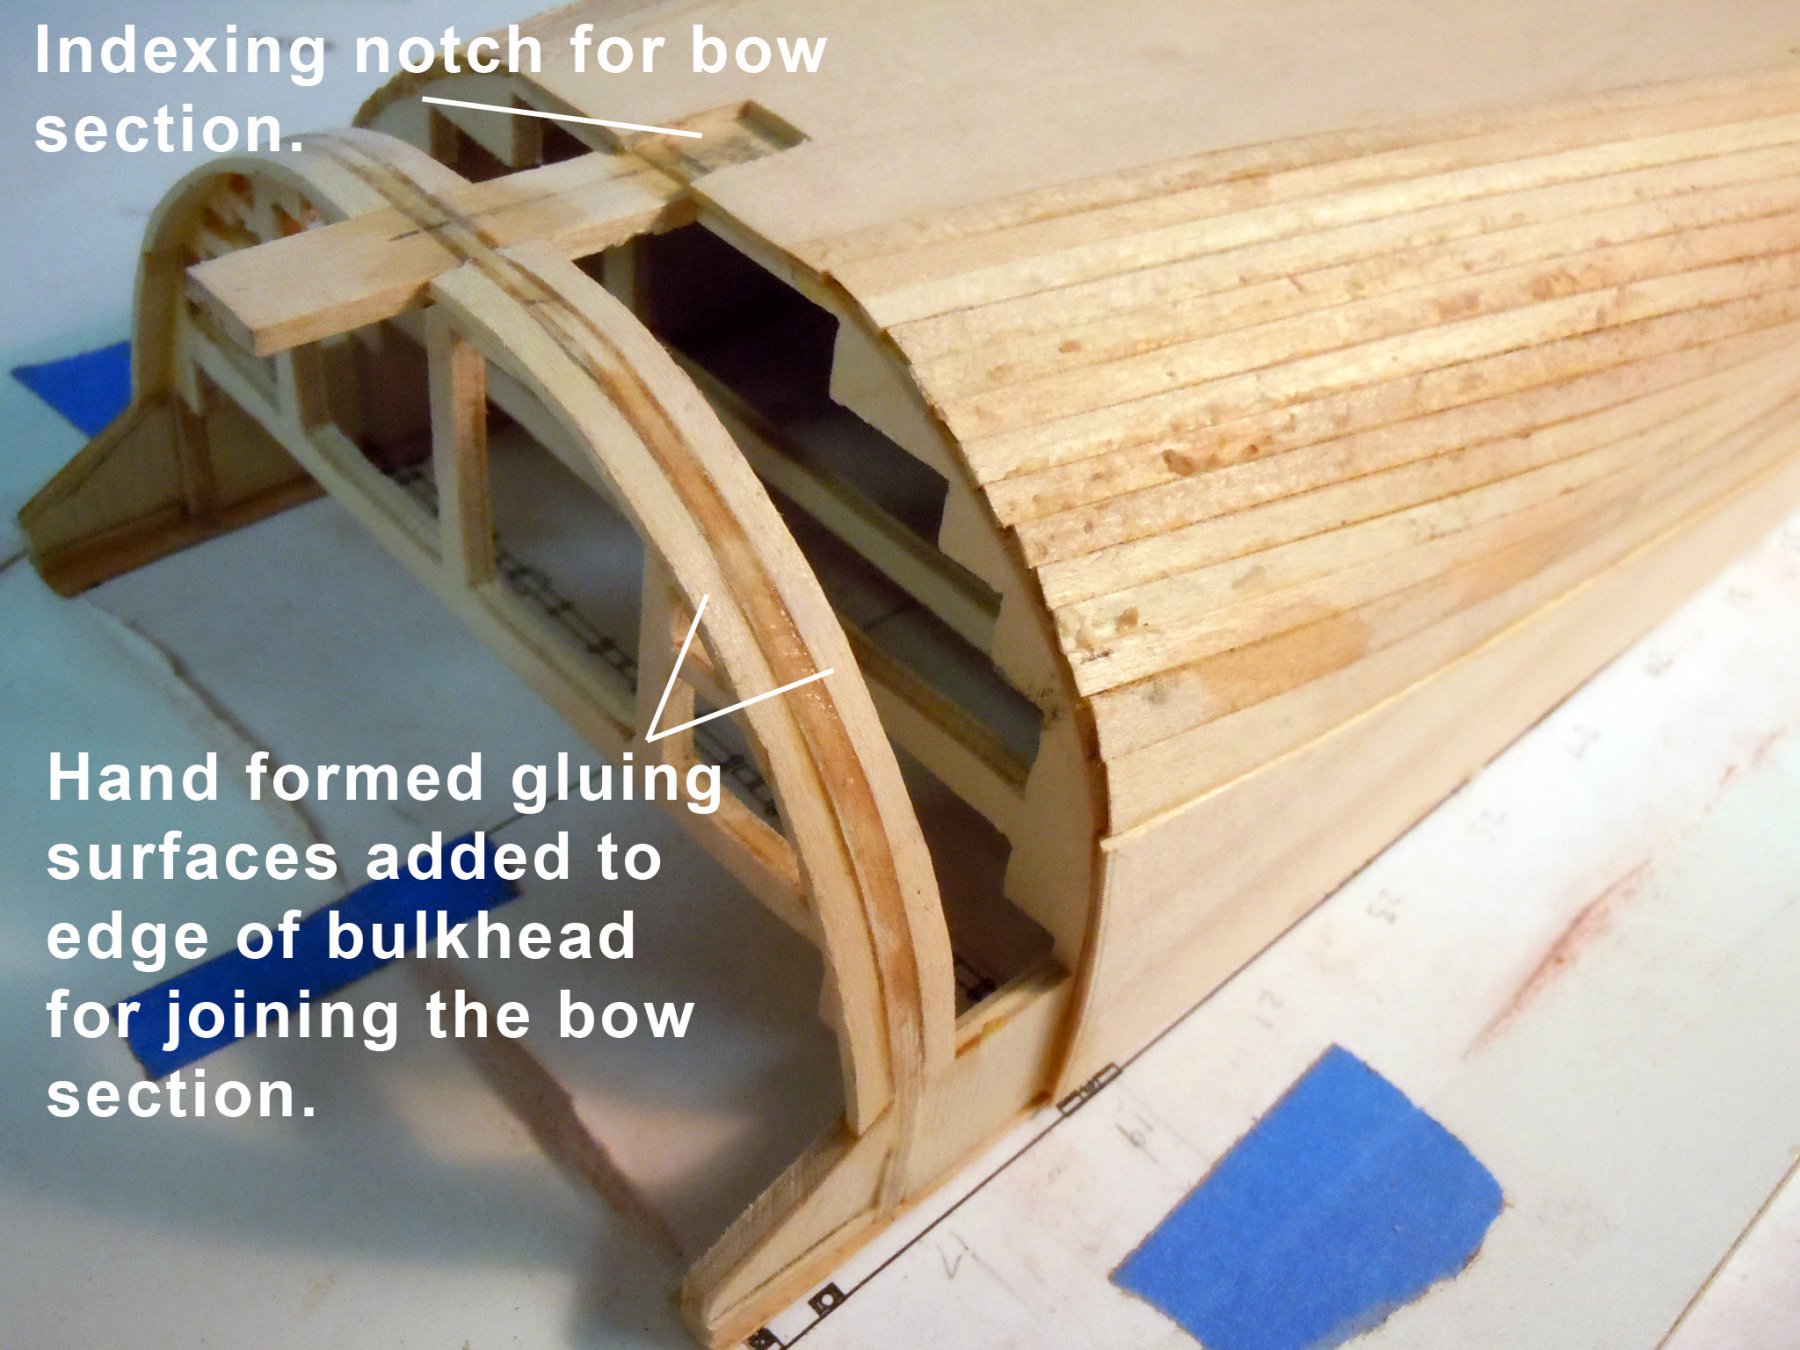
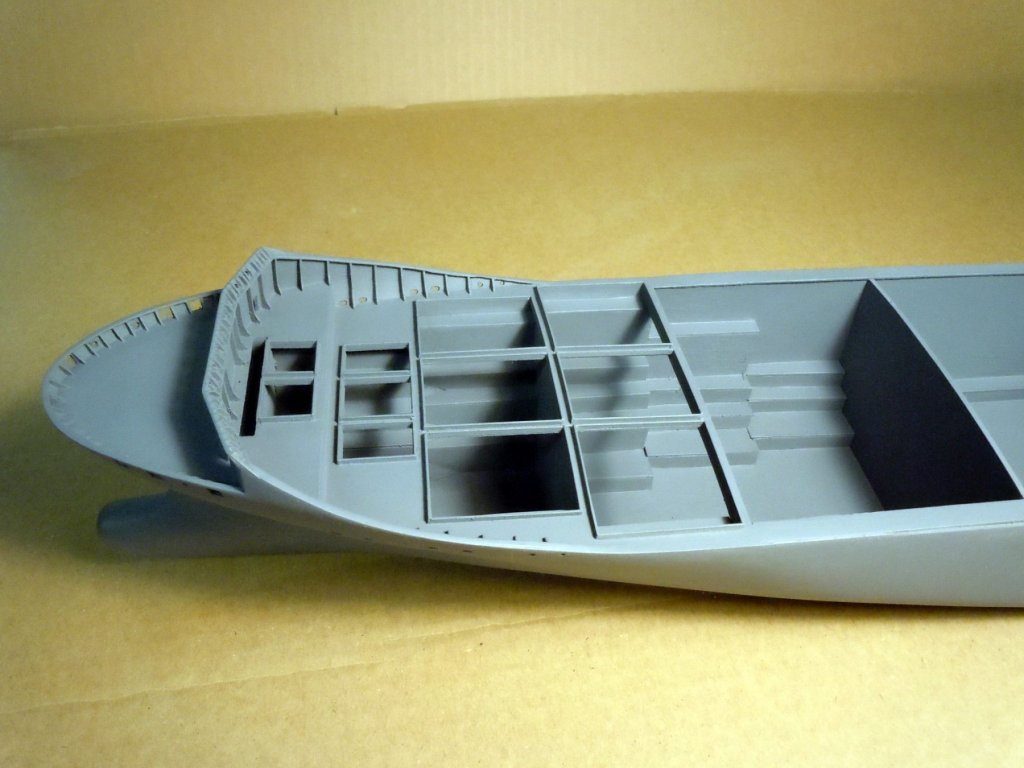
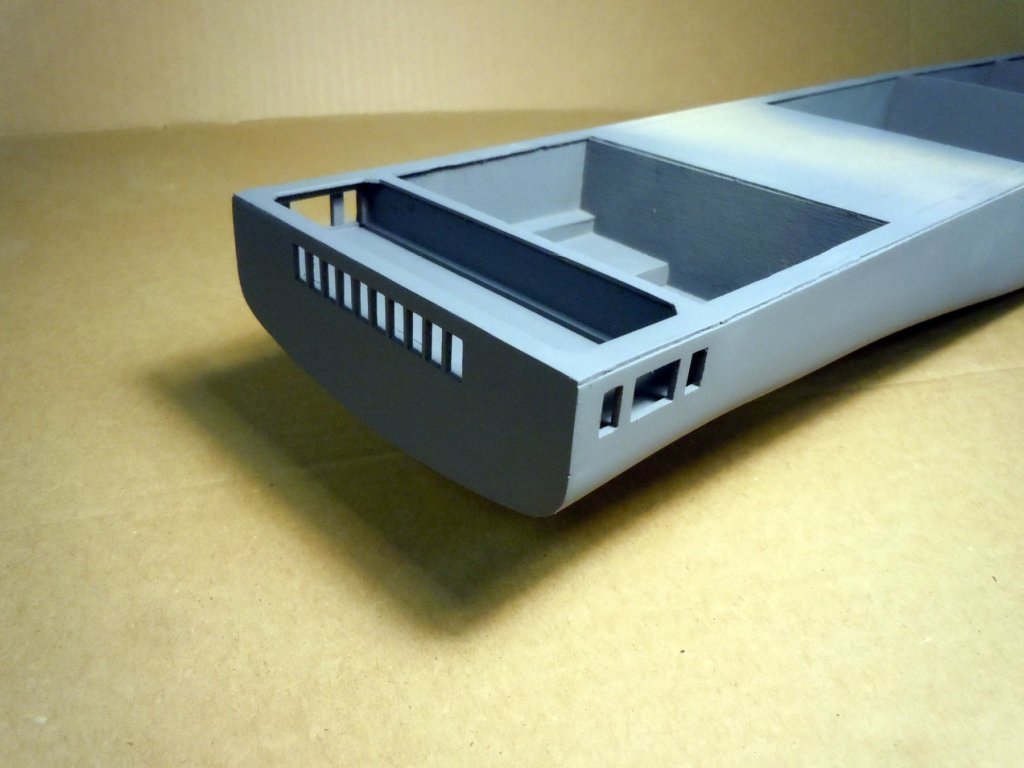
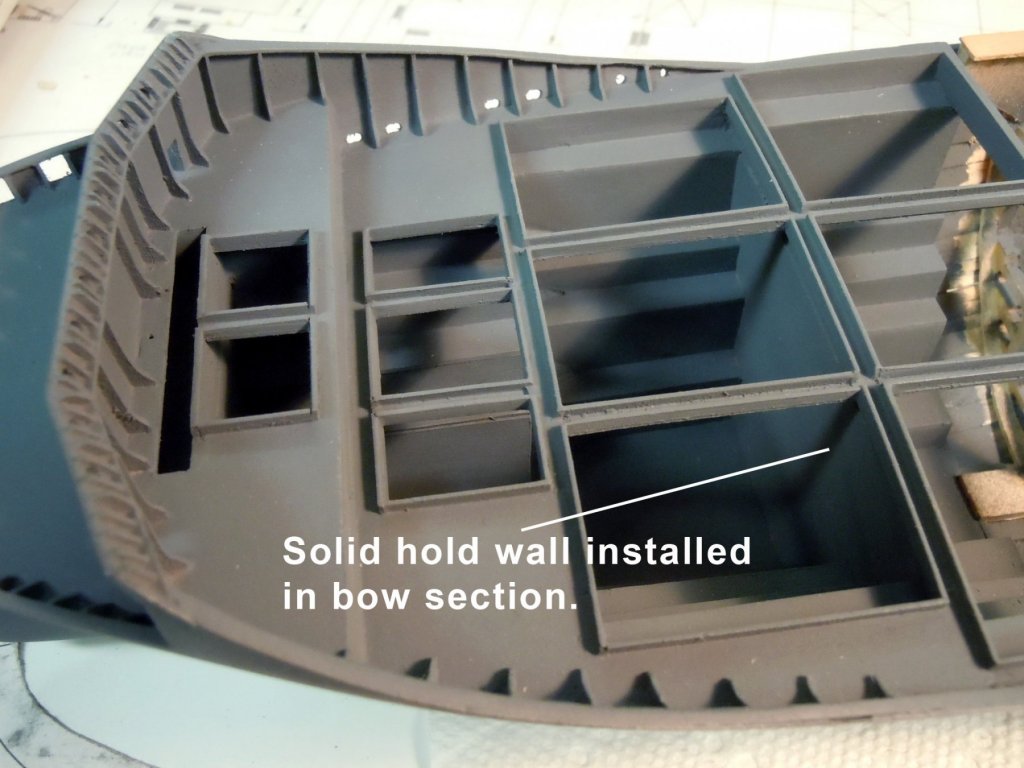
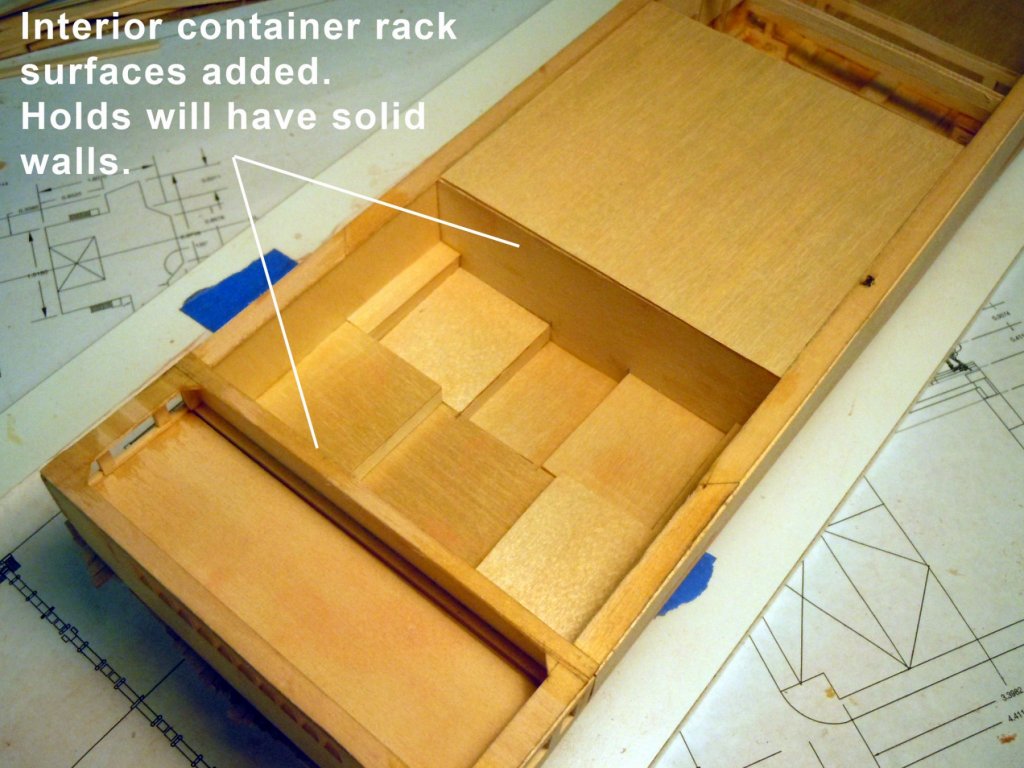
Finished up the inner walls and container racks and cut the solid hold walls and installed the hold wall in the bow section. One of the challenges I am having is that in the plans provided there are no view drawings, just a great deal of sub components. Evan, showed me where the solid hull walls were located. He goes back to sea on Tuesday and will be taking the ship into dry dock for some serious maintenance and updating and new paint. He will be sending me a bunch of photos to use. Here are two pictures showing the hold walls. I then sanded and fitted the bow section to the main hull just a little bit of fussing to get the three reference points to touch without any pressure to assure a good tight level fit. Once fitted I glued the two sections together and once the glue set overnight I then sanded the hull section to match the hull. The bow section plank ends splayed a little which I had thought would happen since they were not glued to anything and required a little sanding to blend before adding the filler plank pieces. Here I am adding the filler pieces and here is where cutting the beveled ends comes in handy for a tight fit on the hull section. Now back to finishing filling the gap.


-
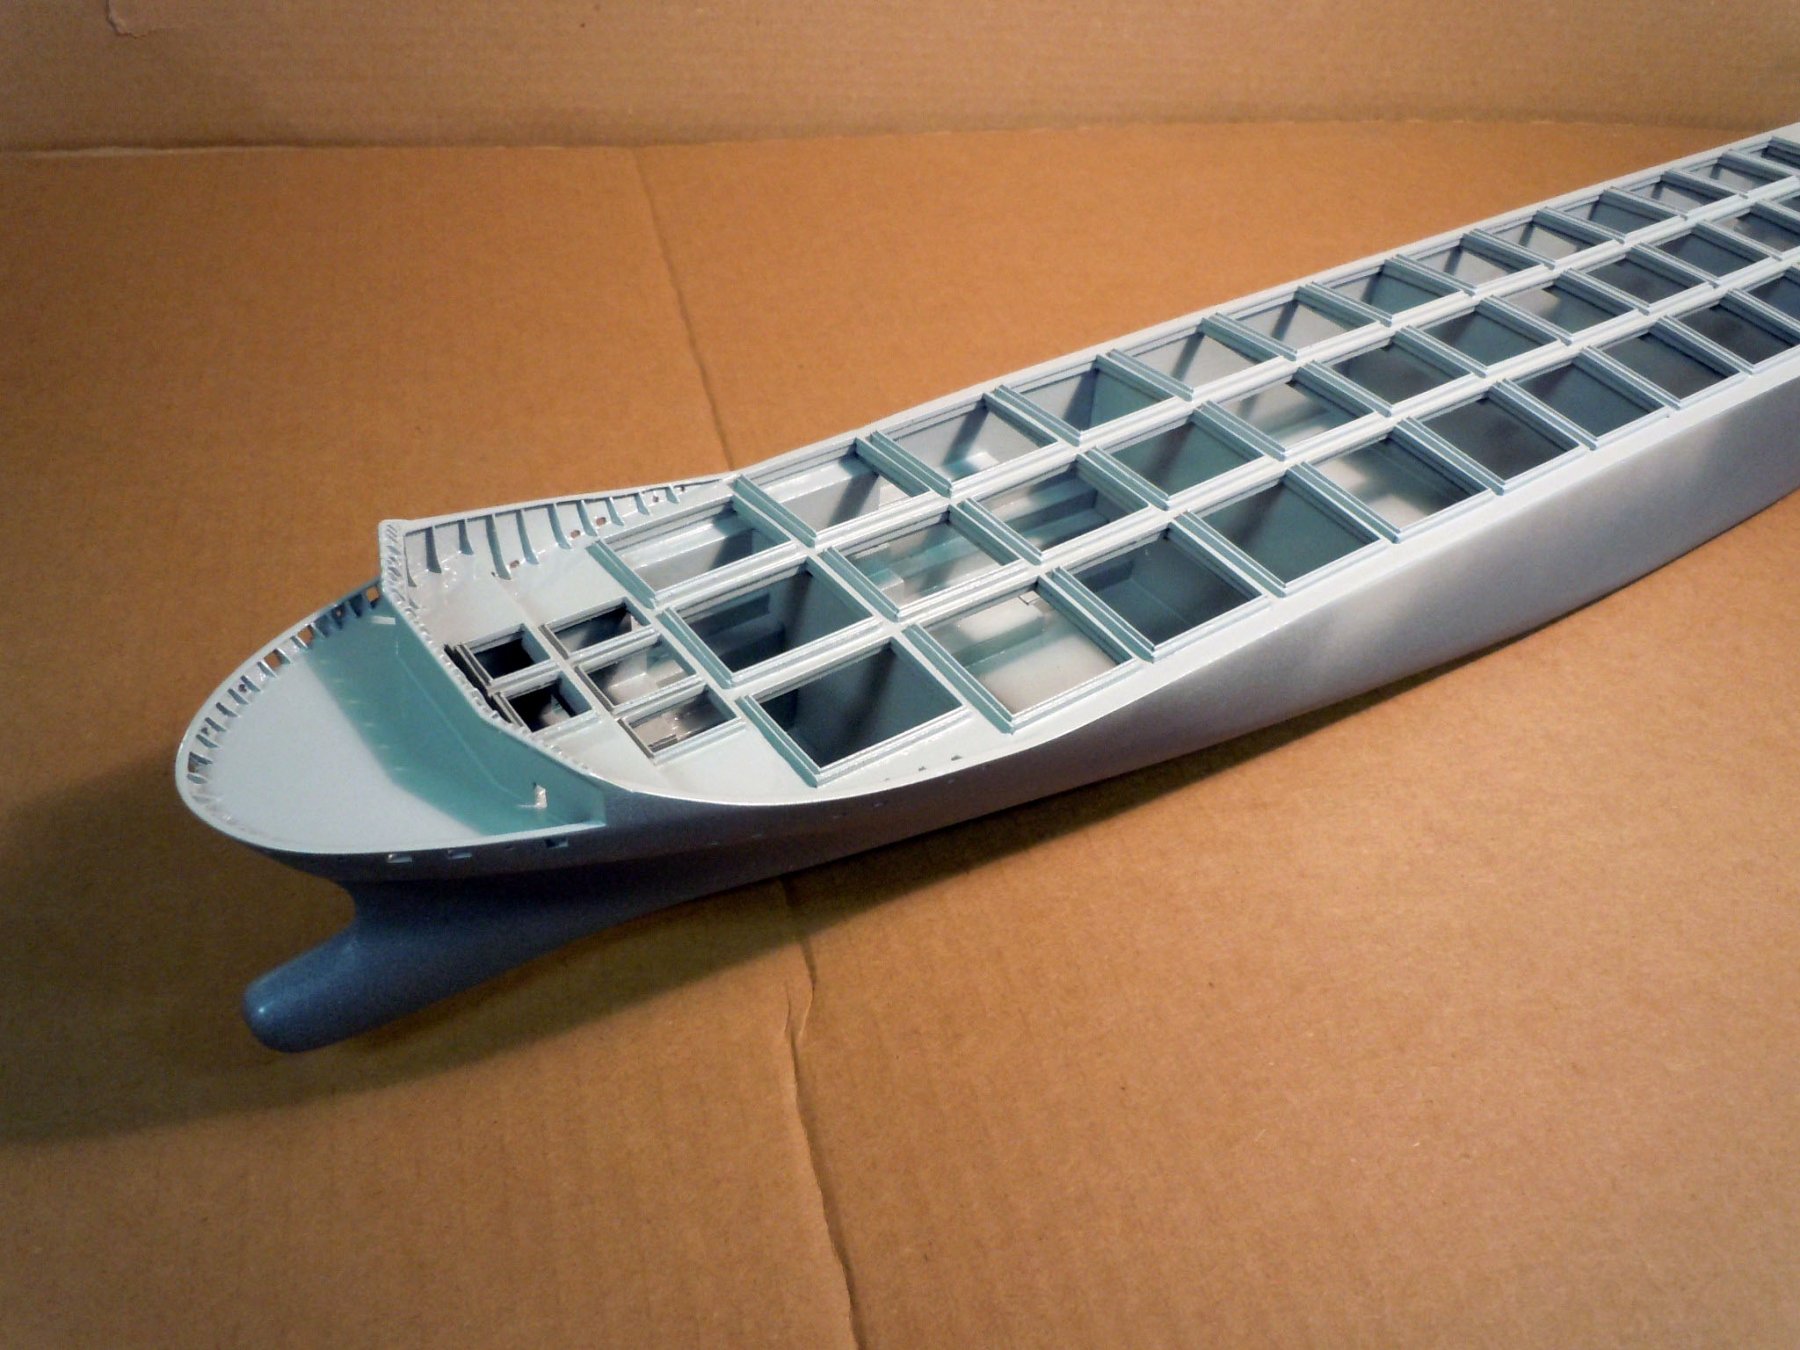
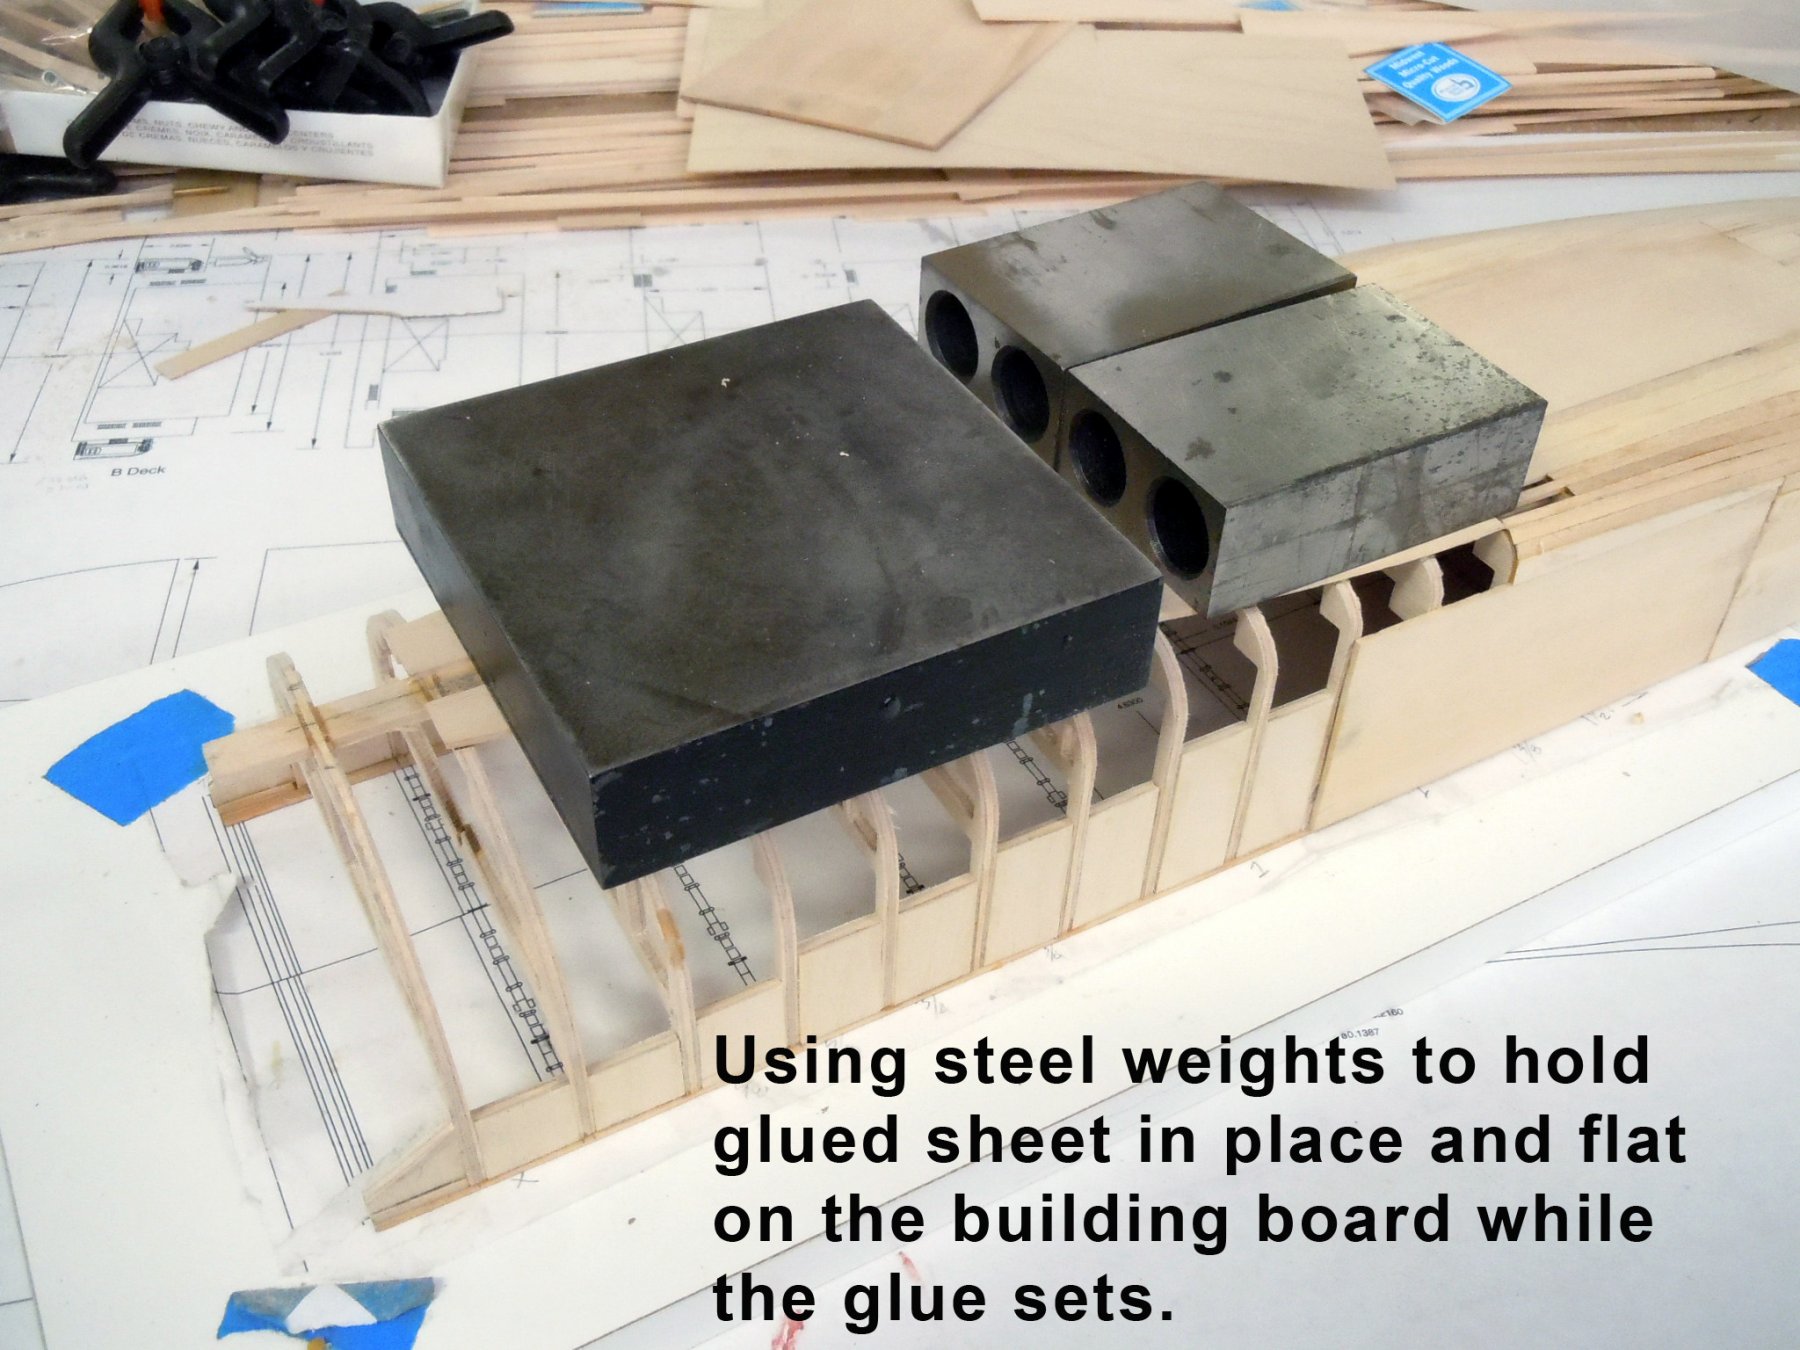
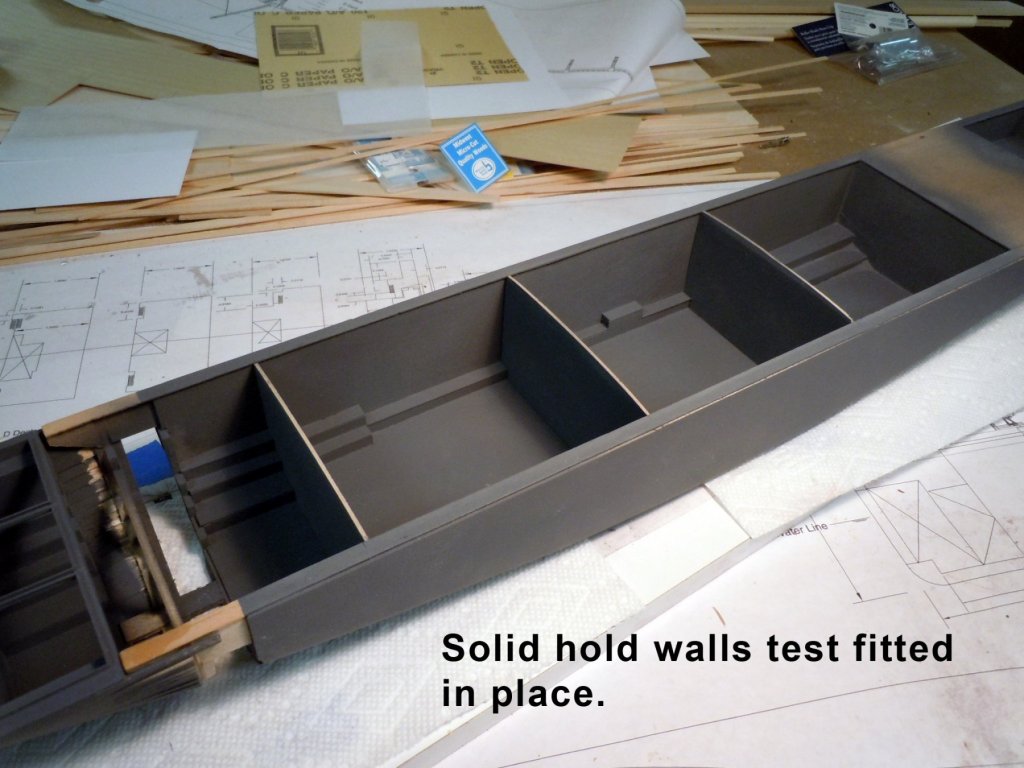
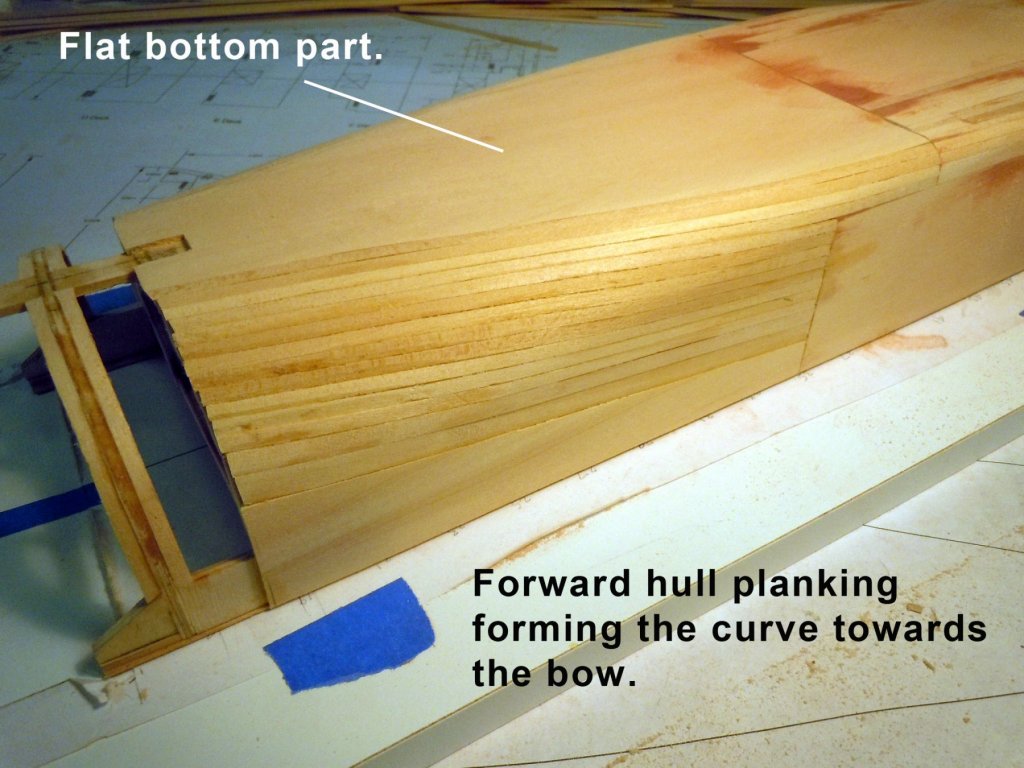
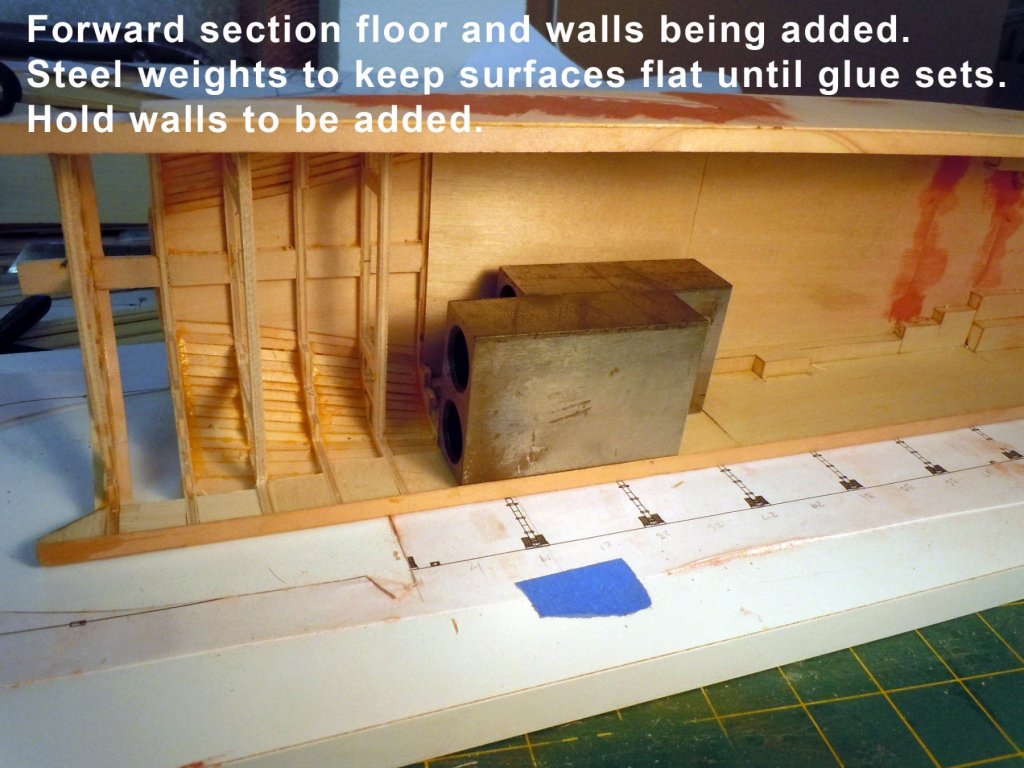
Planking along slowly but surely, just a great deal of cutting, fitting, forming and gluing. I worked both on the outer hull and while waiting for glue to set I cut and fit the rear interior sections. I decided that I will finish as much of the interior before adding the solid walls that define the holds. My son-in-law shared that these solid walls compartmentalize flooding and that the ship could still float with any two holds completely flooded. First I added the bottom flat piece based upon the tangents of the curves. Next I added the 1/16" thick planking starting at the top and working down from side to side. I also added gluing surfaces for the front bow section joint area. The gap will be short transition planks that will be filled in once the bow section is added after the hull is primed and sanded. Here I have added the rear portion of the holds interior walls. I am using the 1/32" plywood for the interior walls which really stiffen the hull once the glue is set. Once the forward planking was complete I started adding the interior surfaces starting with the flooring and then working up the sides using steel blocks as weights to maintain flatness until the glue set. I am cutting away the braces a bay at a time as I move forward to maintain the structural integrity and strength. I also am staggering the internal and external joints again for strength and not creating a bending point. The solid hold walls will add even more strength. Now back to cutting and fitting.

-
Chuck, not cheating just creative ingenuity! Great effect.
- 269 replies
-
- 6
-
-
- Queen Anne Barge
- Syren Ship Model Company
- (and 1 more)
-
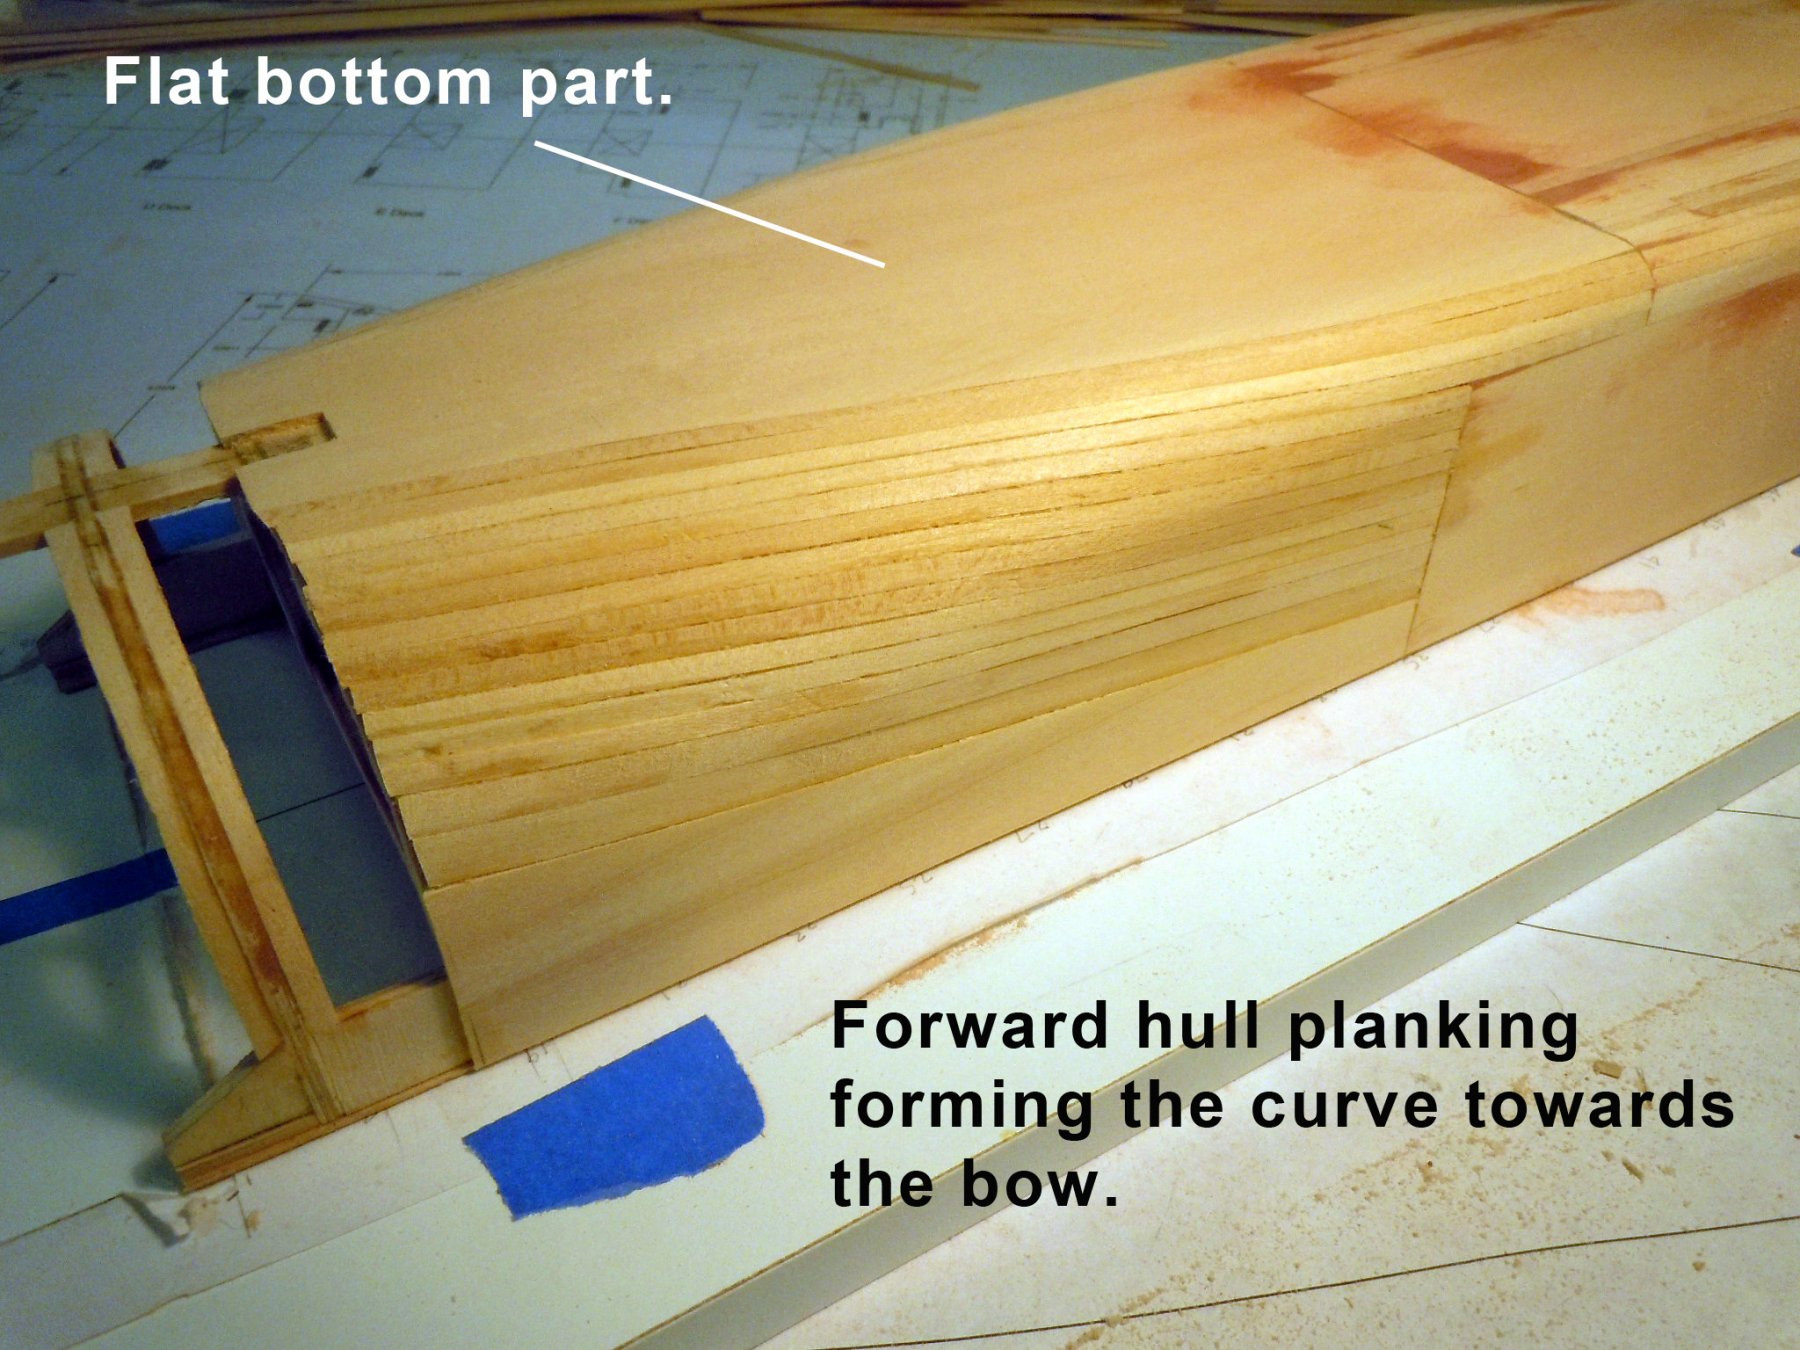
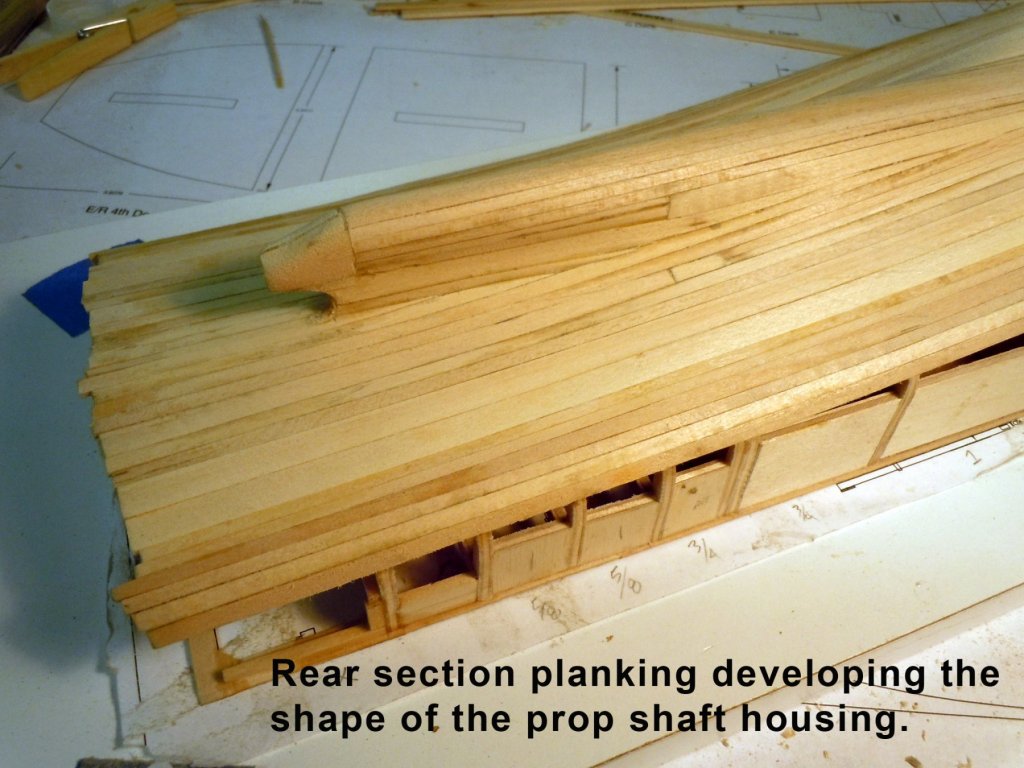
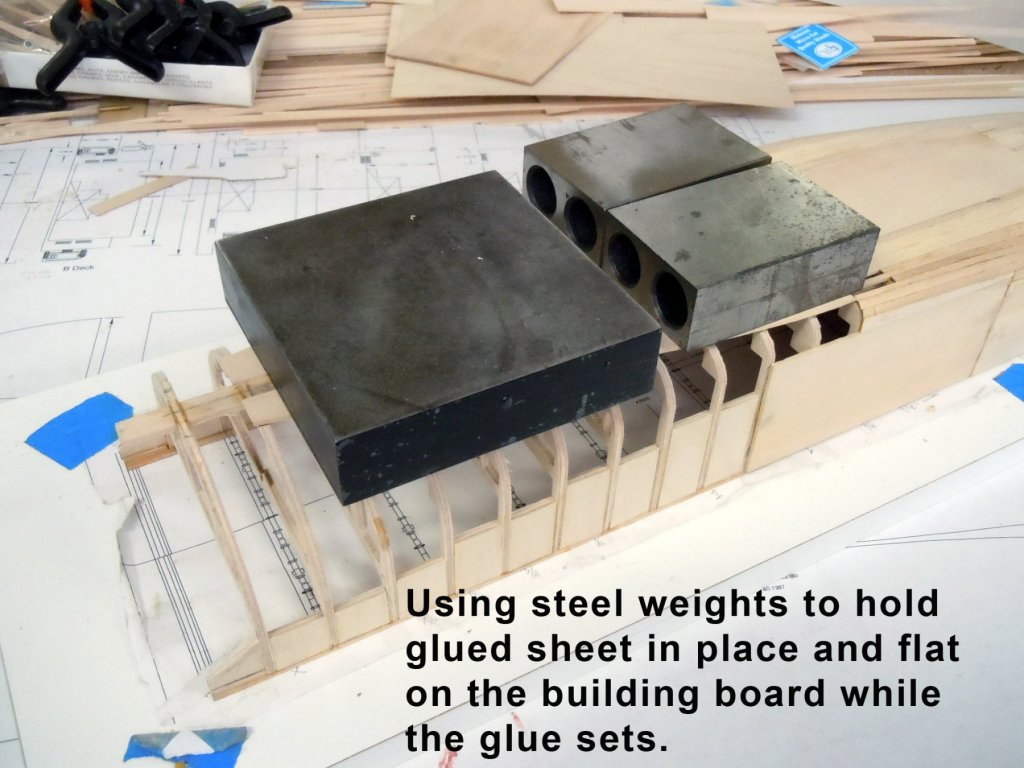
Eric thank you for your interest in this build. I finished up the rear hull section planking and forming of the propshaft housing which just required a great deal of cutting and fitting of the planks. While waiting for glue to set I moved back and forth with the sanding of the primer on the bow section. Here you can see the results of the sanding showing the highs and lows of the surface. Here are views of the hull planking with a close up of the prop area. The the large flat sheets were cut and glued for the flat bottom and then weighted with steel blocks and allowed to set on the building board. This weighing down assures the hull staying flat and true. I will plank as much of the forward hull section and finish off like the bow section and then thew inner racks before joining the two sections for easy handling.

-
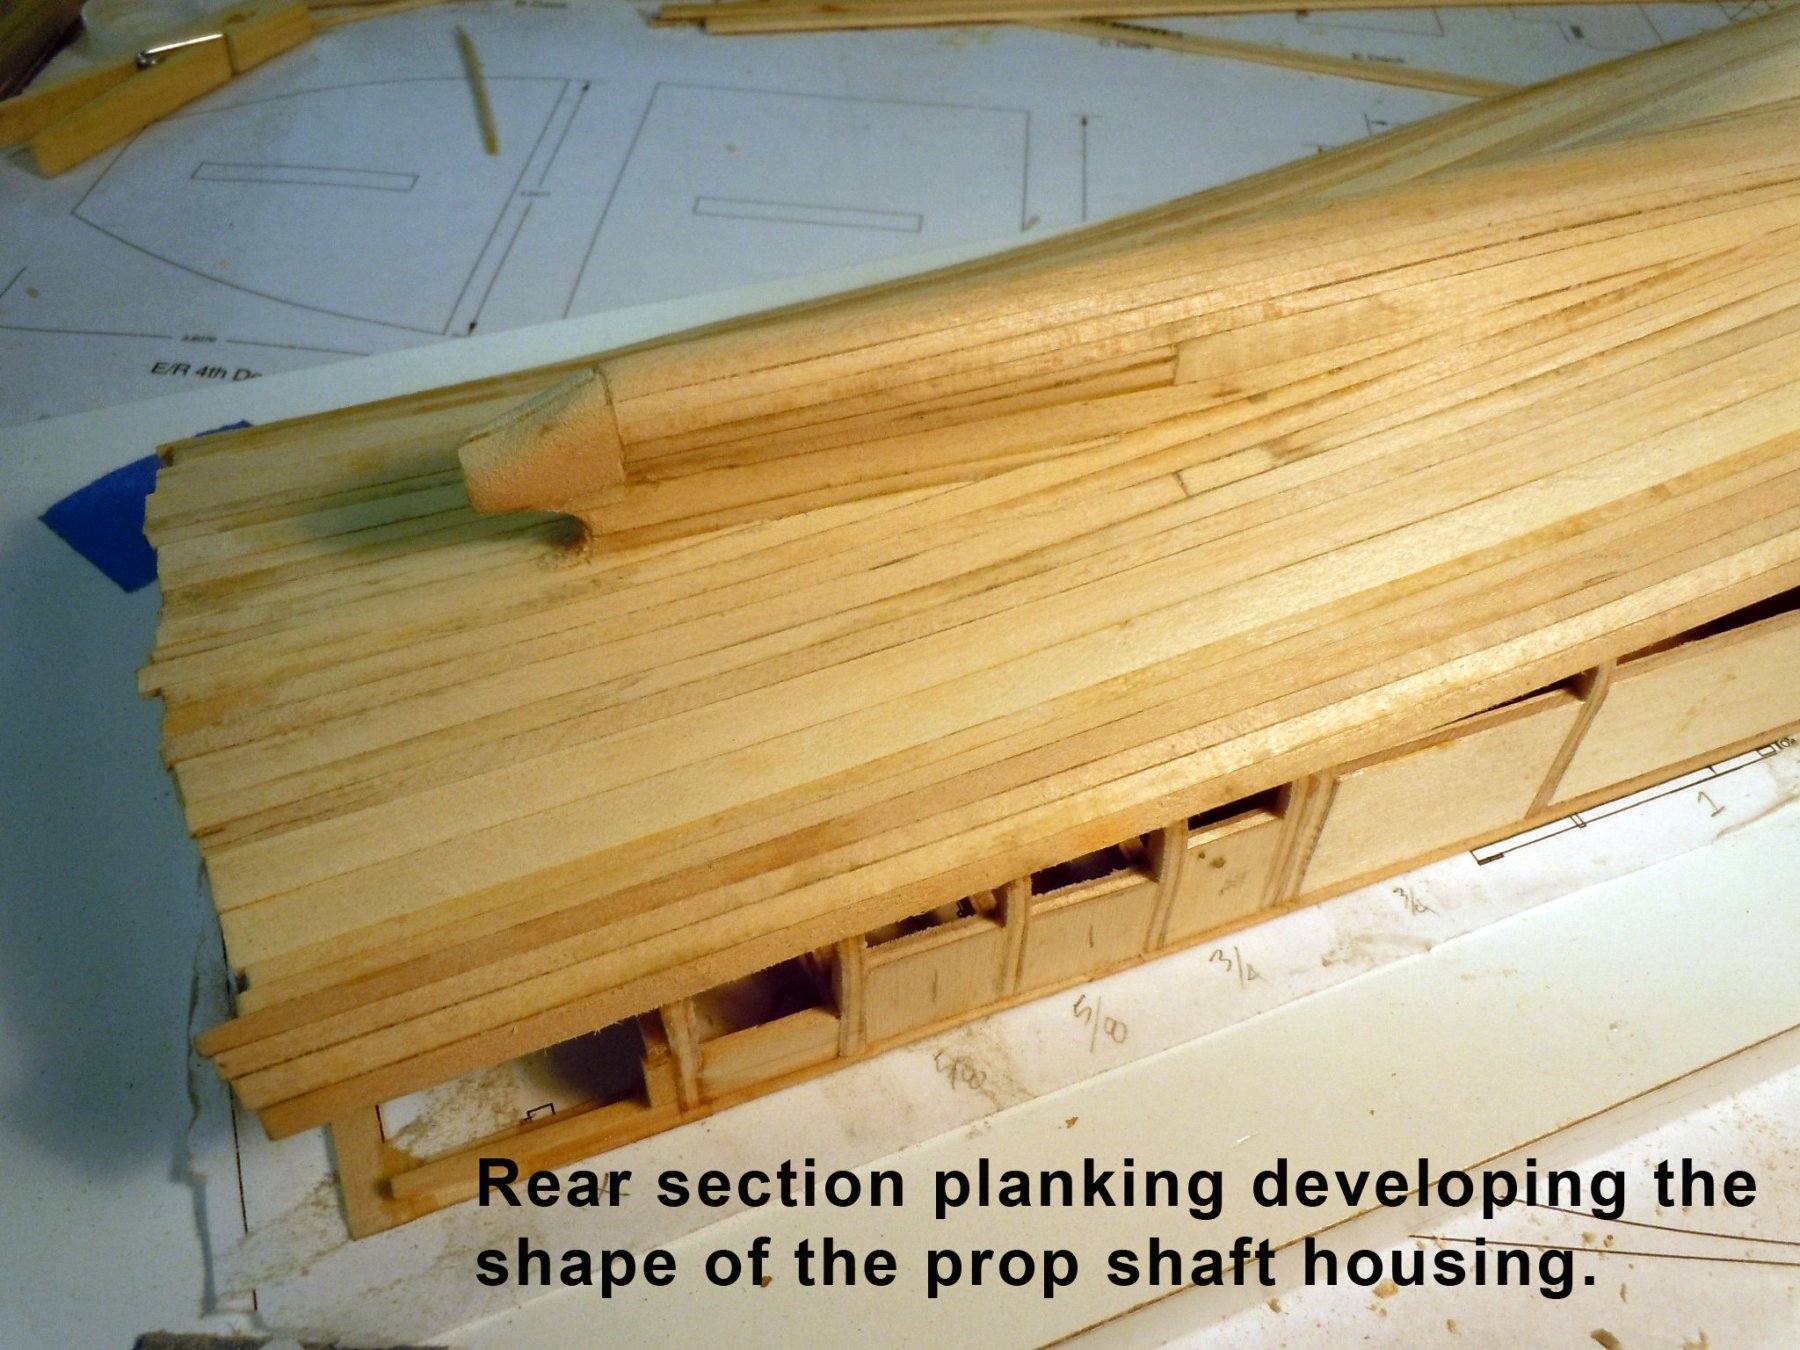
Per the length is 32" x 4.6" wide x 6.8" high. Not too big and the size was dictated by where it will be finally displayed at the kids house here in Morro Bay, CA. Once you use the glazing putty you will love it; just dusty when sanding. Also use a plastic or wood applicator to apply. Just make sure it is completely dry and set before sanding. Patrick once you start using them you will quickly understand the benefit, especially if the joining plank is too be bent.
-
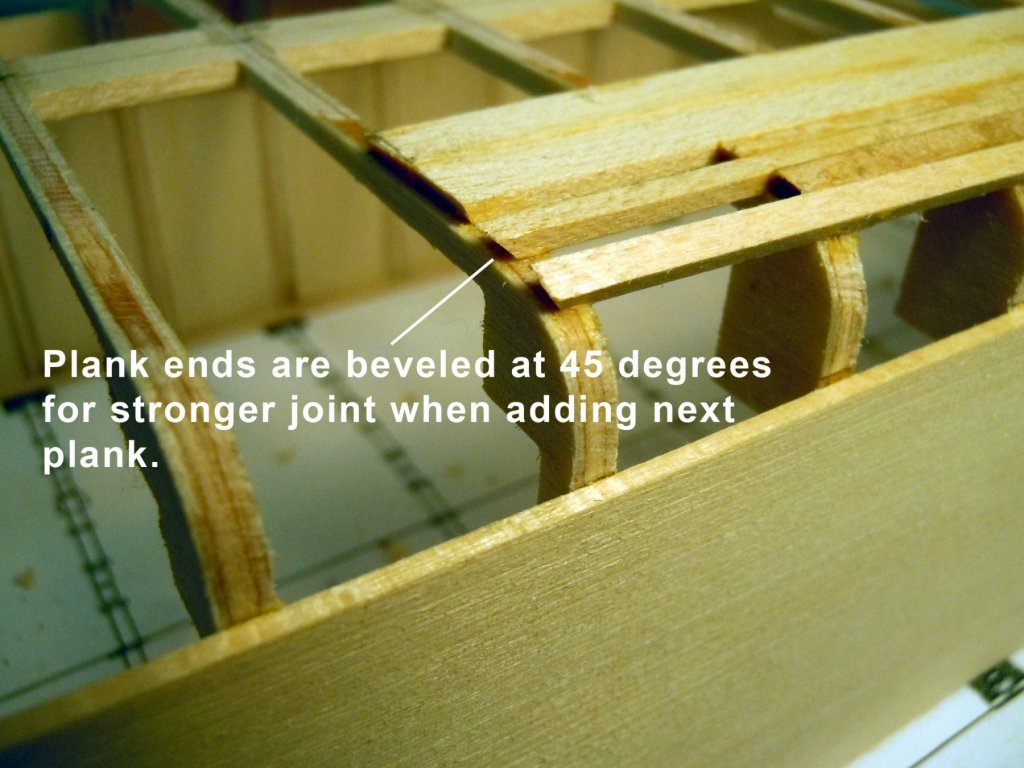
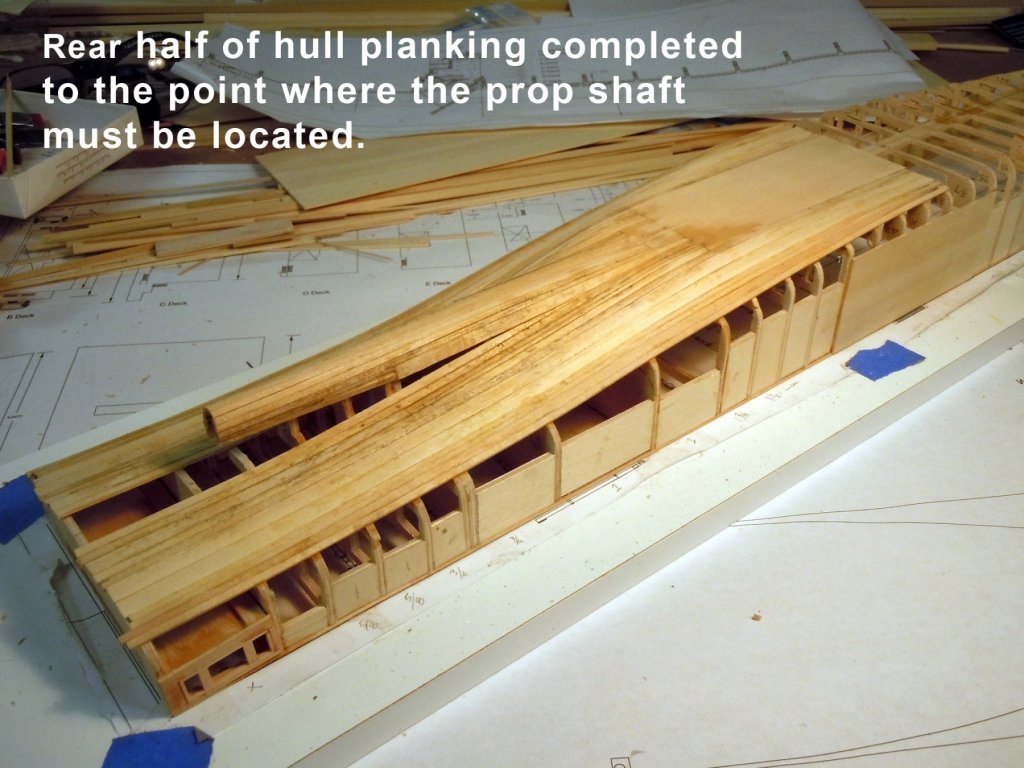
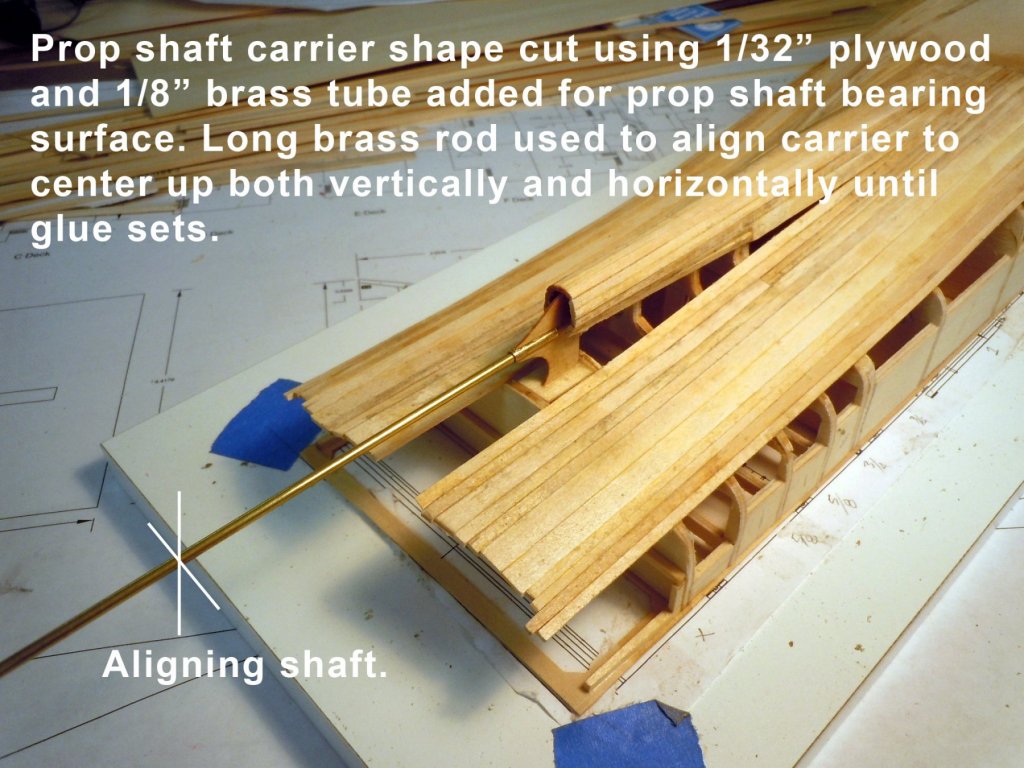
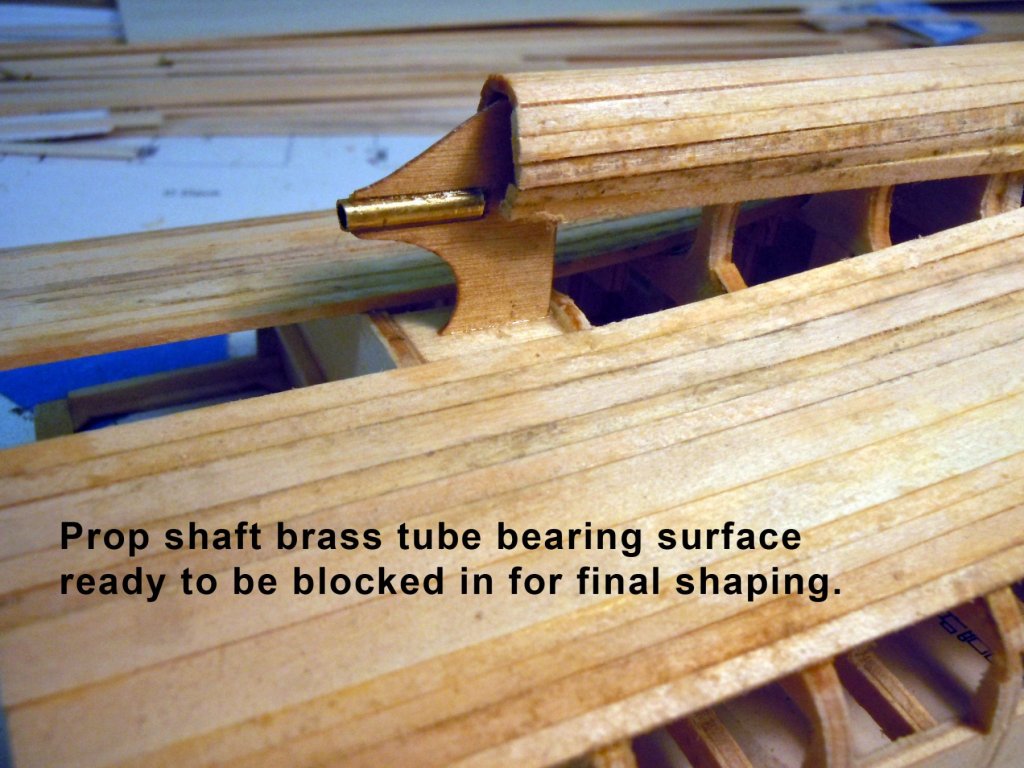
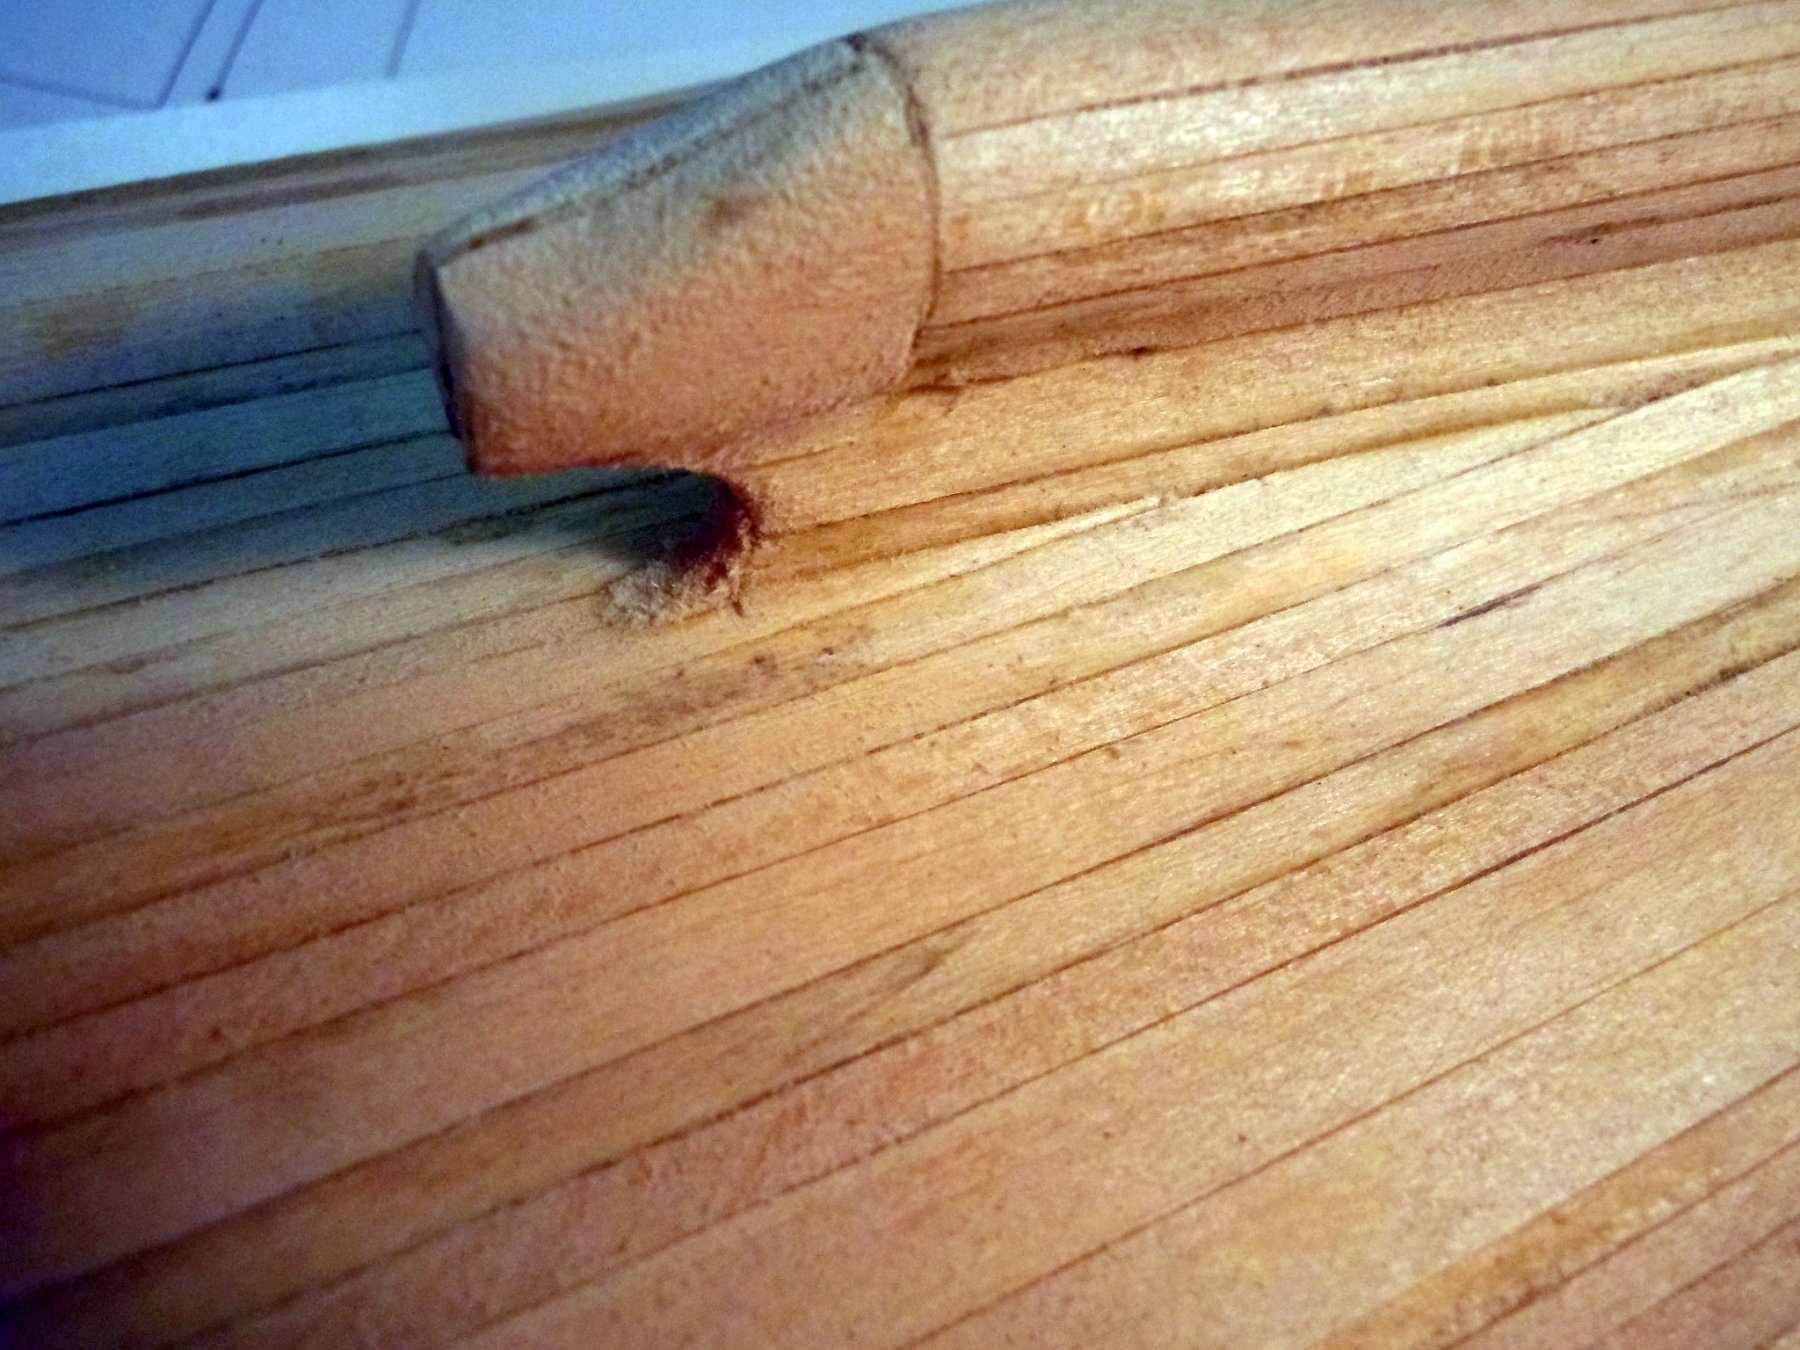
One of my commissions is now available to purchase. Here is the Ladder Wagon to compliment the Allerton Steam Pumper. Follow the link to view if interested. http://modelexpo-online.com/MODEL-EXPO-HOOK-AND-LADDER-WAGON-112-SCALE-WOOD-METAL-KIT-_p_1402.html The best laid plans often go astray. Initially I thought this would be an inside out build but the actual execution dictated otherwise. I added sidewall braces between the bulwarks but this did not eliminate the overall flexing so back to plan B of doing the outside planking while hull lay flat on the building board. I added the flat area outboard sidewall to stiffen the center area first. I then started planking form the sides inboard and from the center out board and slightly forward of center lengthwise. When planking and regardless of the width of the plank I always bevel the ends so when adding the next plank I will have a stronger joint. Here you can see the top edge of the side wall in place. I planked as much as I could defining both the hull and the prop shaft tunnel merging from the main hull shape. I reached the point where I had to add the prop shaft bearing for the propeller down the road. I cut the shape need to support the brass tube bearing surface from the plans using 1/32" plywood. Using plywood I can keep track of the centerline when shaping around the brass tube later. In positioning the carrier I glued the tube first to the plywood, then once dry I inserted a longer rod to visually center the shaft both on centerline as well as vertically parallel to ground. Here is a close up of the brass tube in place ready to be planked and blocked around. The curve will define the end of the planks. I will use solid wood for the rest of the shape. Now back to more planking while waiting for status updates on three more commission projects.