xken
-
Posts
841 -
Joined
-
Last visited
Content Type
Profiles
Forums
Gallery
Events
Everything posted by xken
-
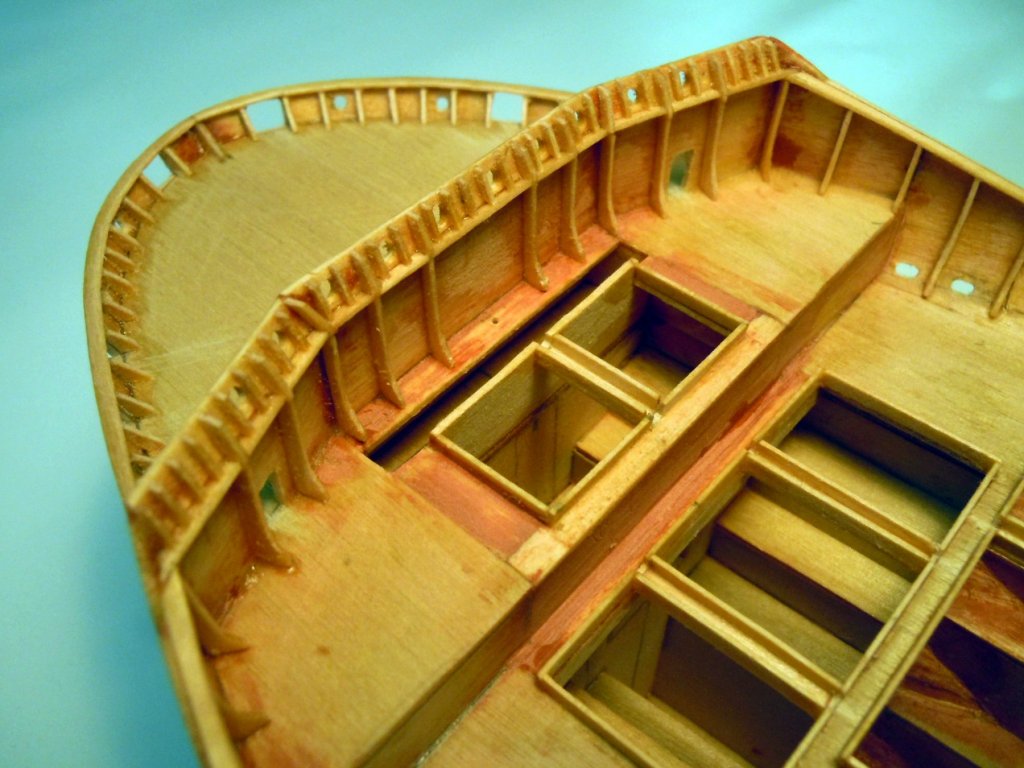
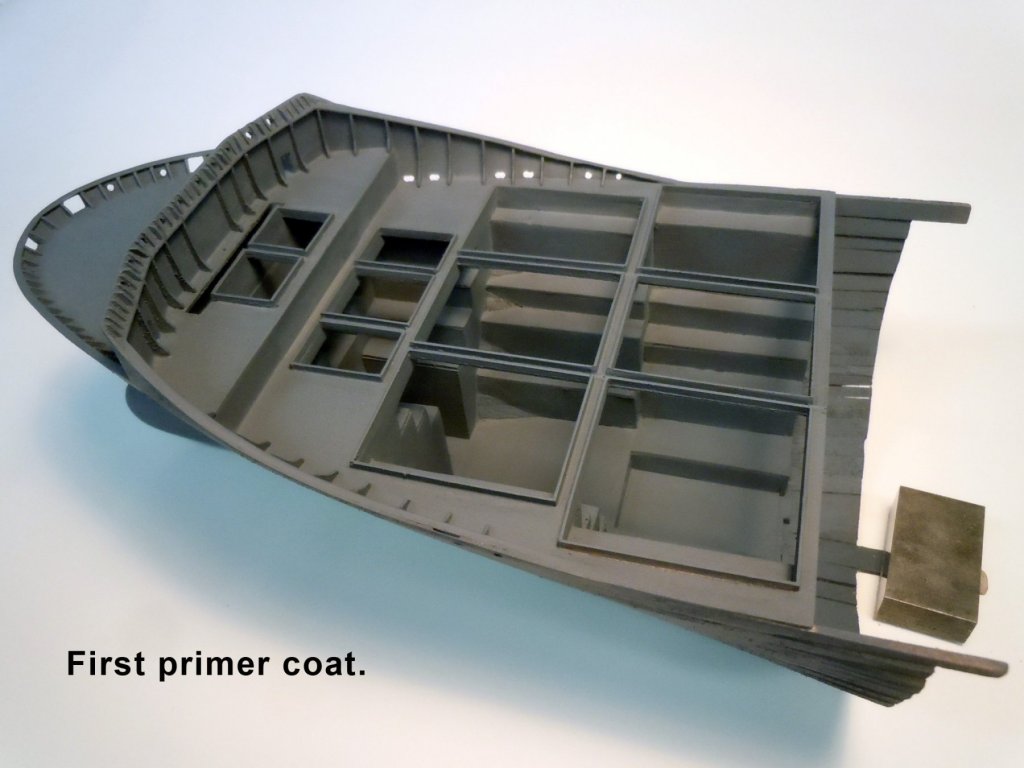
 Moved on to adding the balance of the framework and bracing on the walls and the coaming for the hatch openings. I also opened the third and fourth hold openings now that the structure is strong enough with the planking in place. I carefully drilled and filed the deck drainage holes on the sidewalls. Just a great deal of fussy work with small parts to be cut and fit. Here is a closeup. Next I located and cut in the anchor openings. Next after a final hand sanding and blending I did the first primer spray painting of both the inner and outer surfaces and set aside to dry and set overnight before the next sanding. This is when you find those little bits of gaps that you missed resulting in more glazing putty. Now while waiting for paint to set I will move on to planking the rest of the hull.
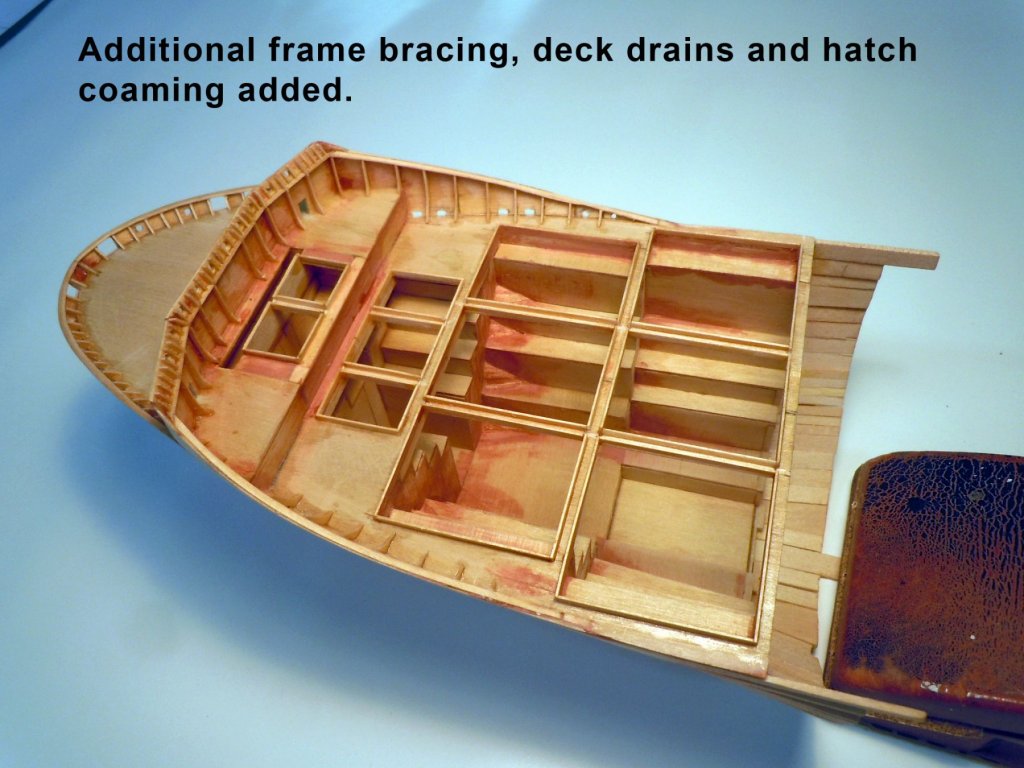
-
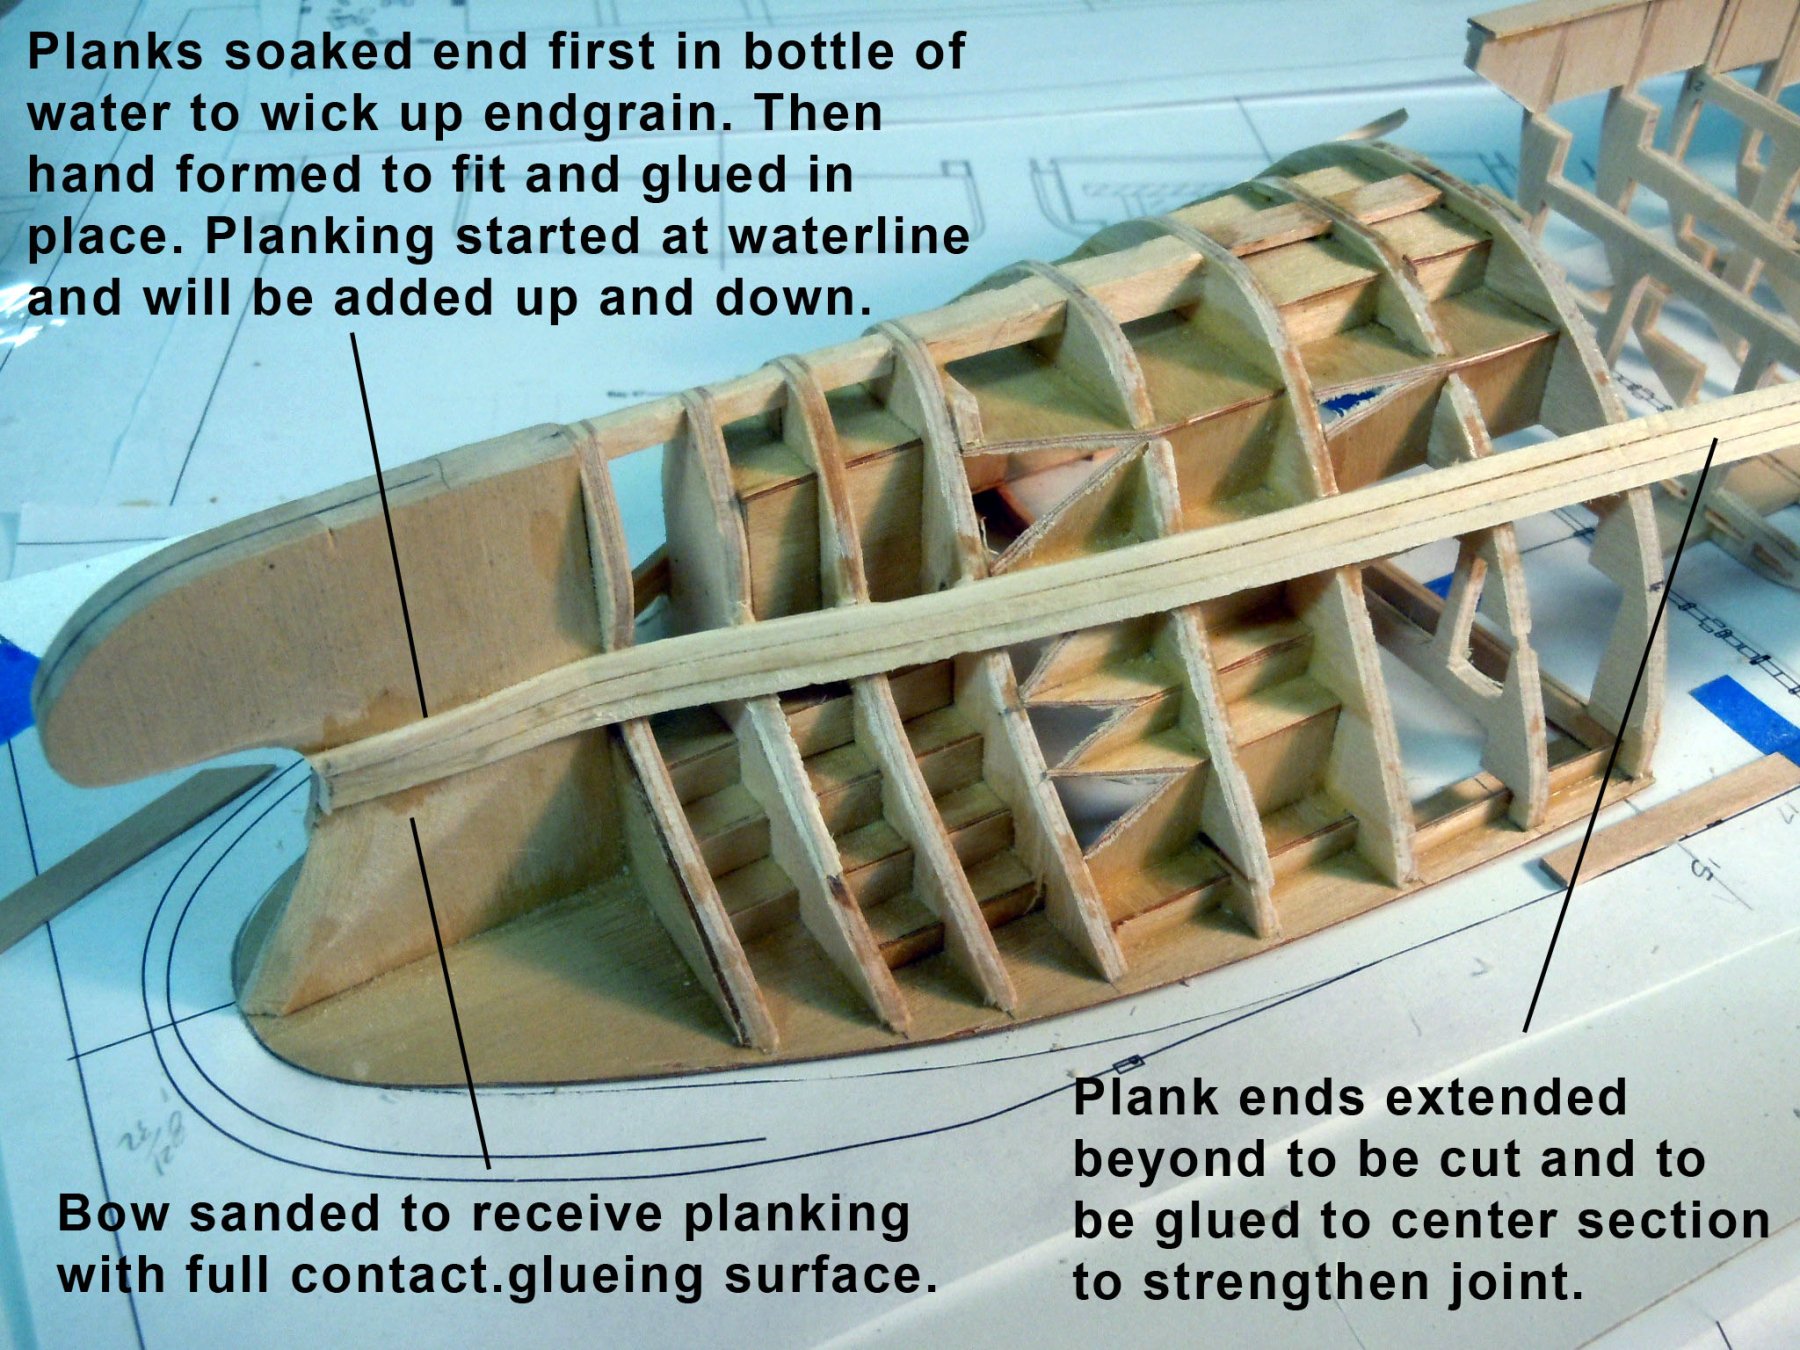
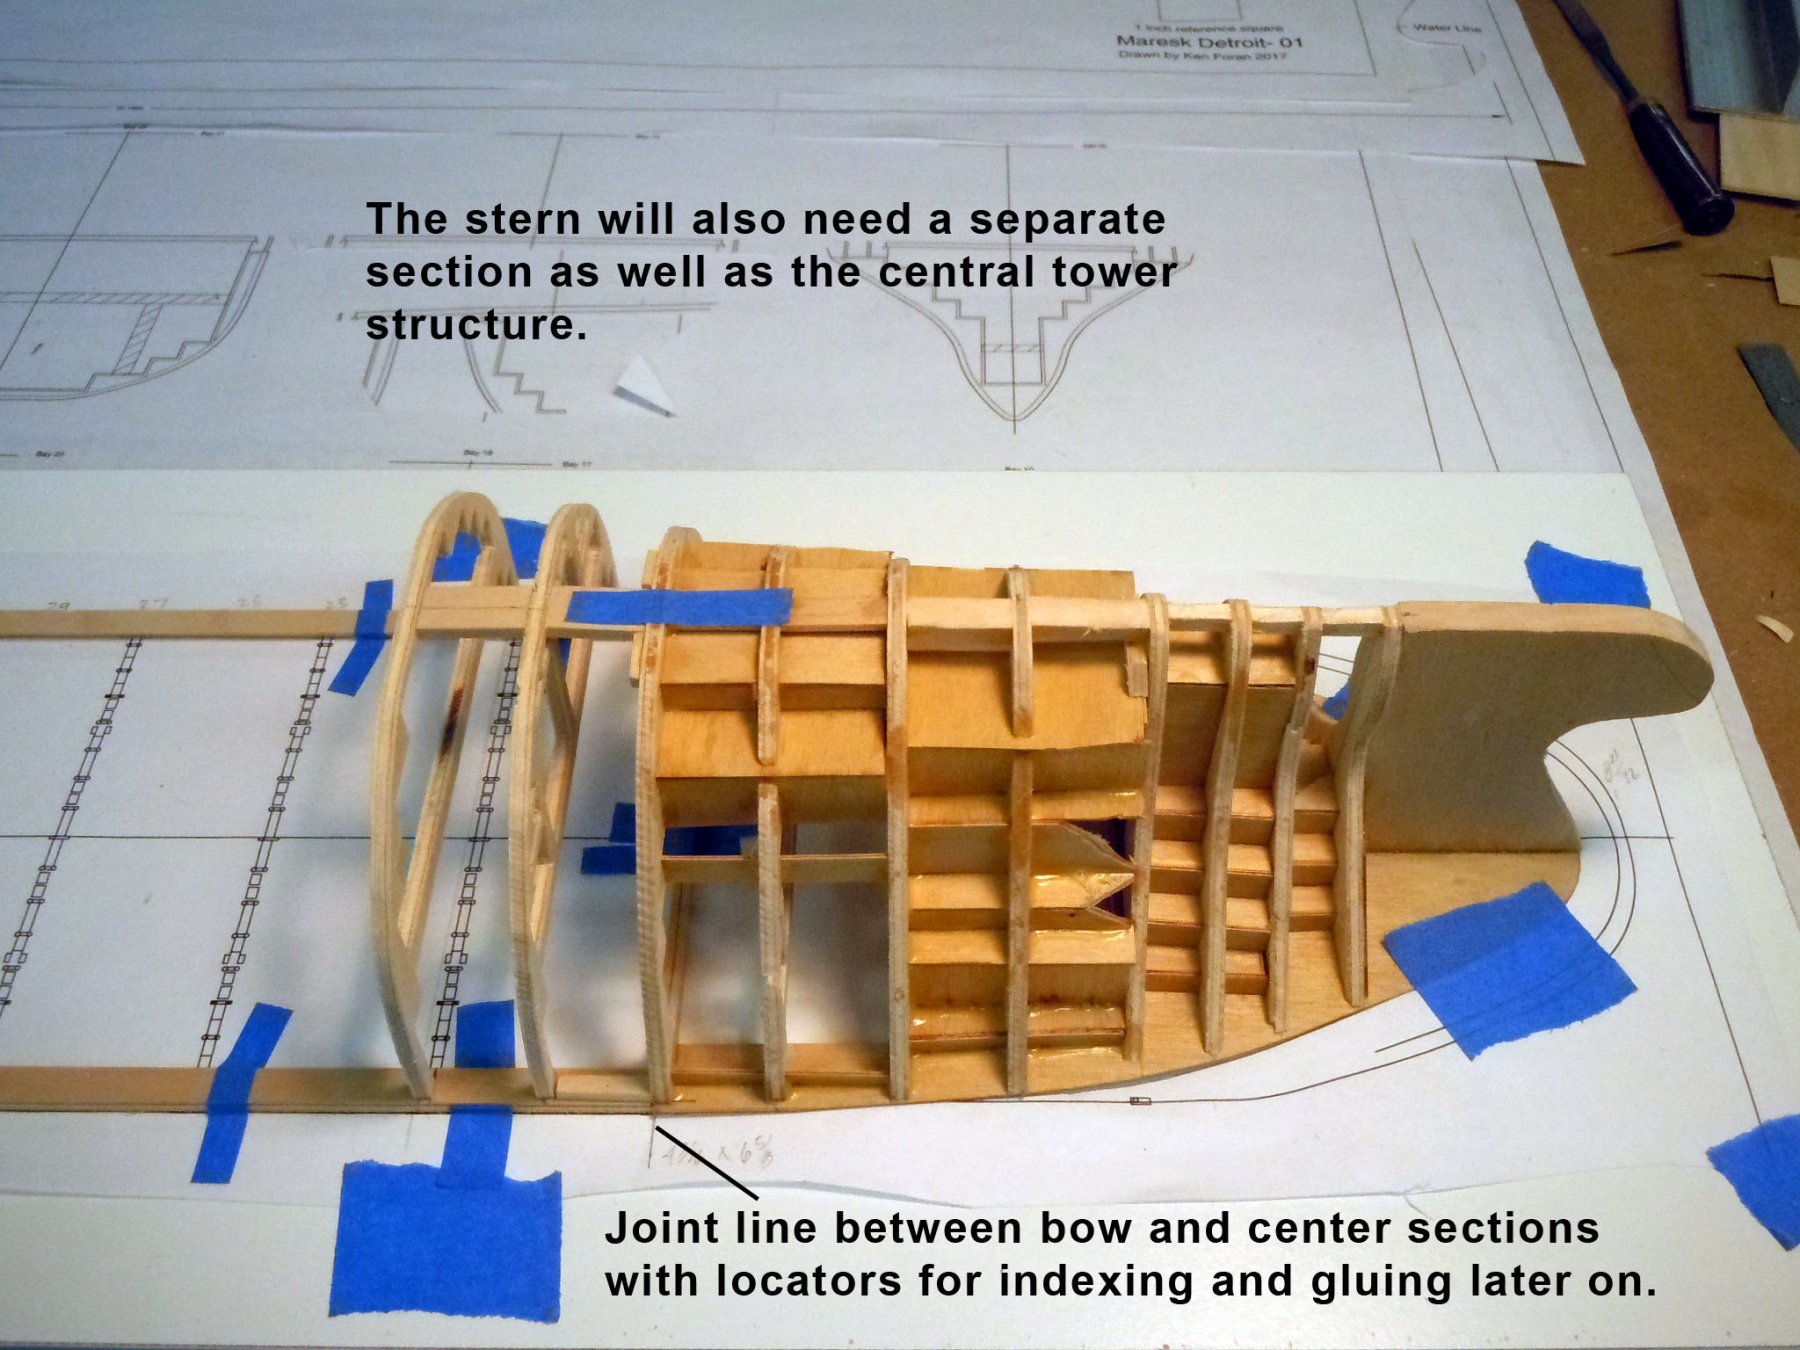
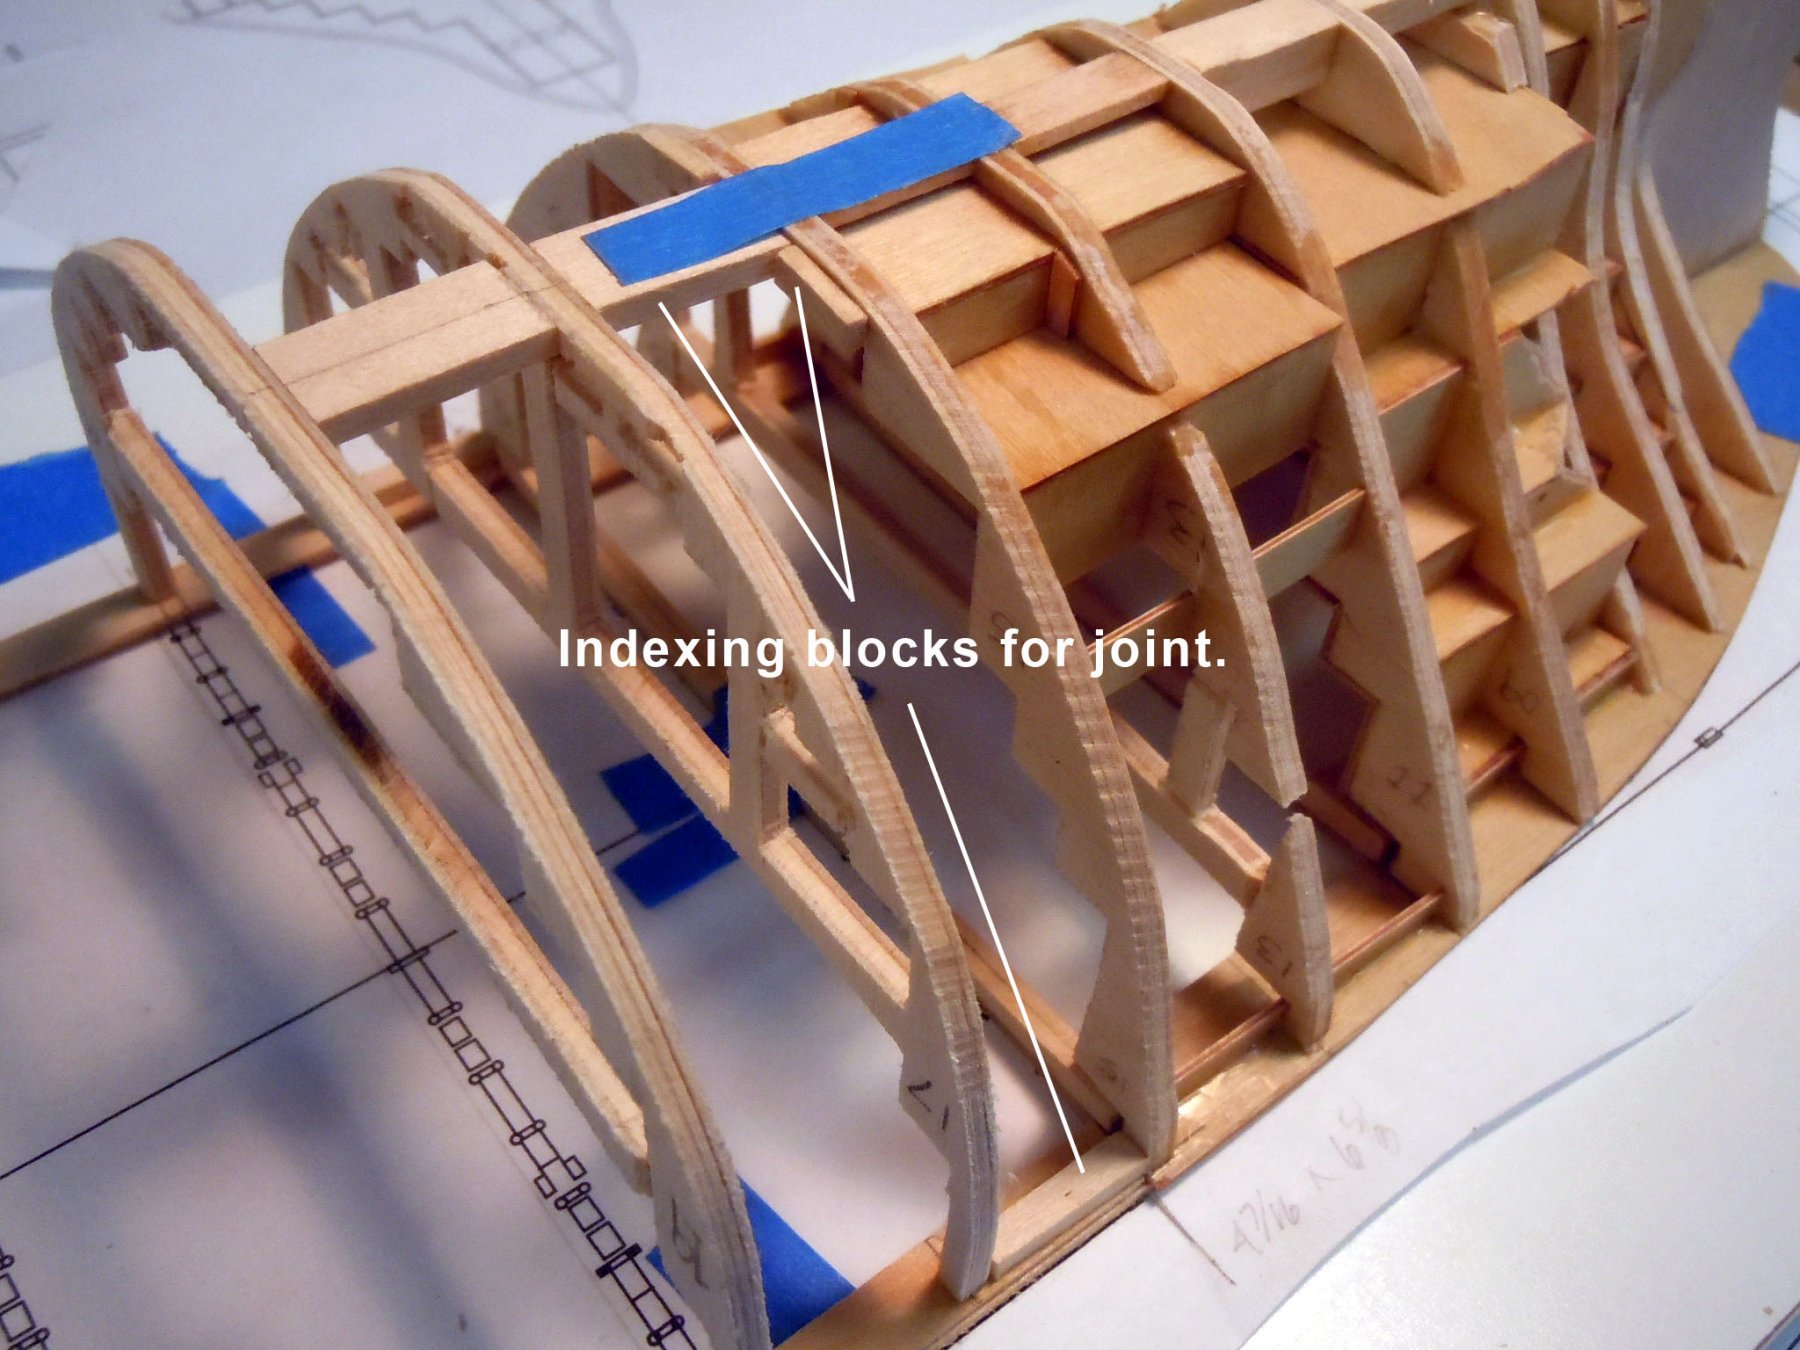
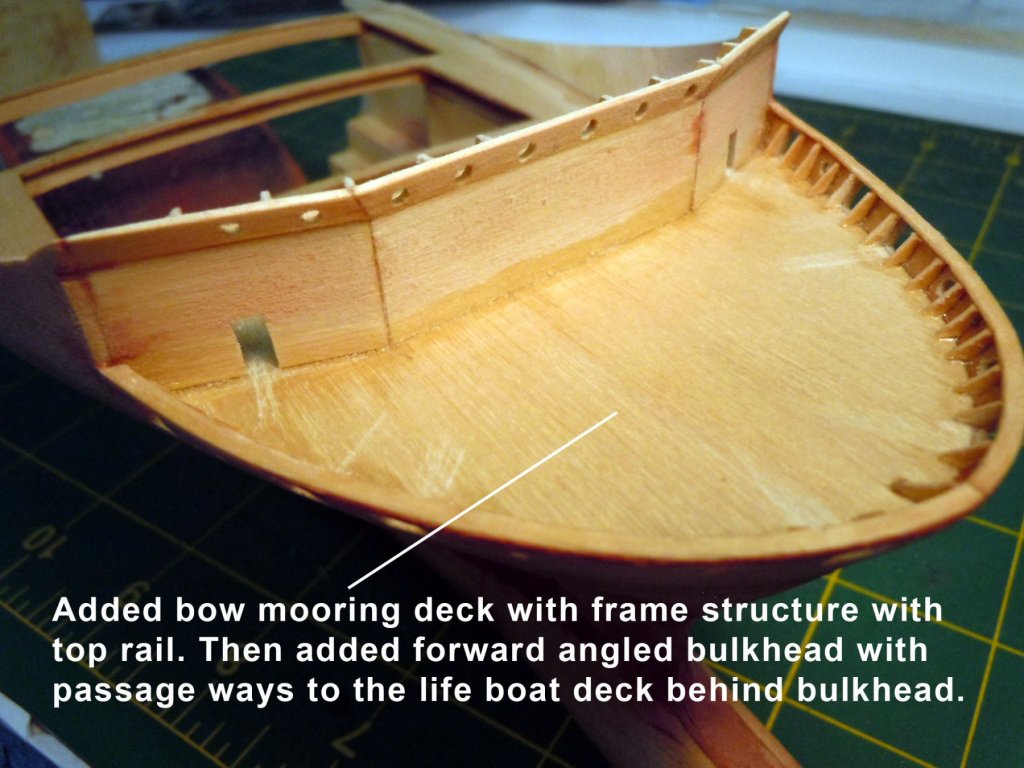
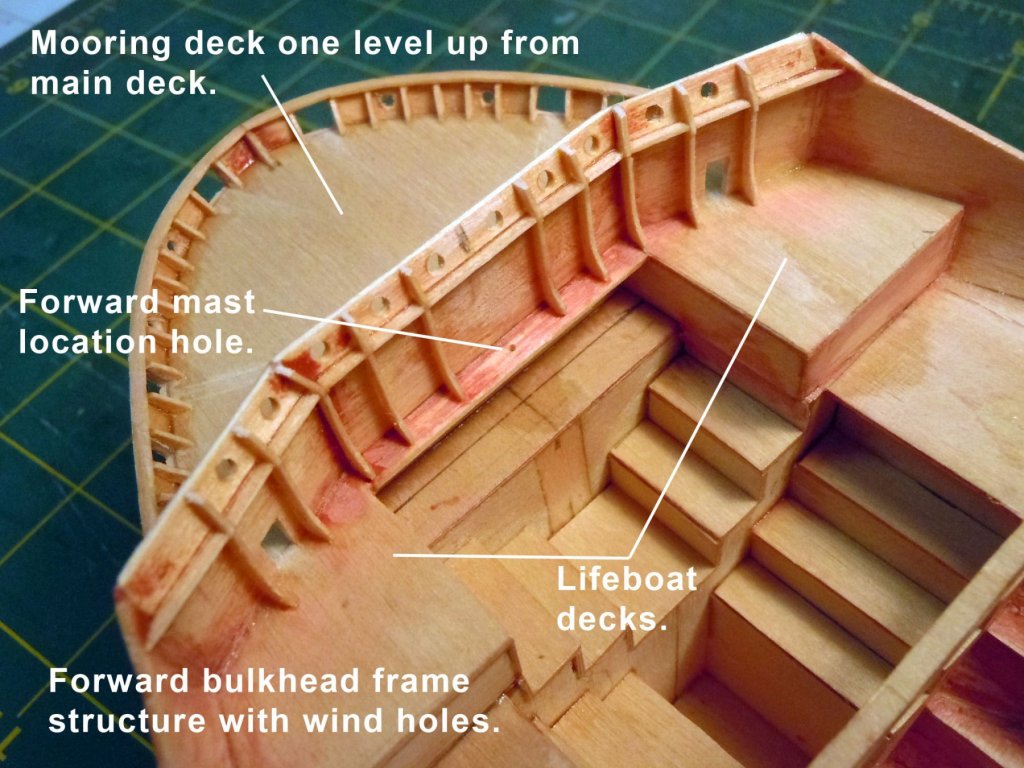
Thank you all for your kind compliments. I have been bouncing between a commission project and the Detroit. Going from CAD drawings; writing instructions and building. Anyway making slow progress and I am really glad I decided to do the bow as a section with all this tiny work required on it. First I added the mooring deck one level above the main deck. Then the framing structure and cap rail that was hand bent after soaking in water on edge in two halves. Then, while waiting for glues to set I finished up the container racks. The forward bulkhead was then added along with it's supporting structure. Just for size reference the two passageways are six feet high by 3 feet wide between the mooring deck and lifeboat deck. Here is a few pictures so far. Next I will add the walls and braces for the forward holds and standing walls for the hatch covers before joining to the center section. I may also decide to sort out the rear center section planking supporting the propeller shaft which defines the "ride of the ship" since it does not have a traditional keel before adding the bow section. The joy of scratch building is making it up as you go sorting things out.


-
Dave great job considering no lathe! Down the road consider a lathe purchase. I use my lathe for turning metal, wood and serving shroud lines. I cannot imagine starting a ship model of this level without one. Hat's off for your efforts!
- 742 replies
-
- 8
-

-
- constitution
- frigate
- (and 1 more)
-
Sounds like all the seats are taken so I. Will just look over the shoulders of others. I will be interested in seeing how you will handle the decorations, since I plan to build the Victory down the road and still have a great deal to learn.
- 692 replies
-
- 5
-
-
- eagle of algier
- chebec
- (and 2 more)
-
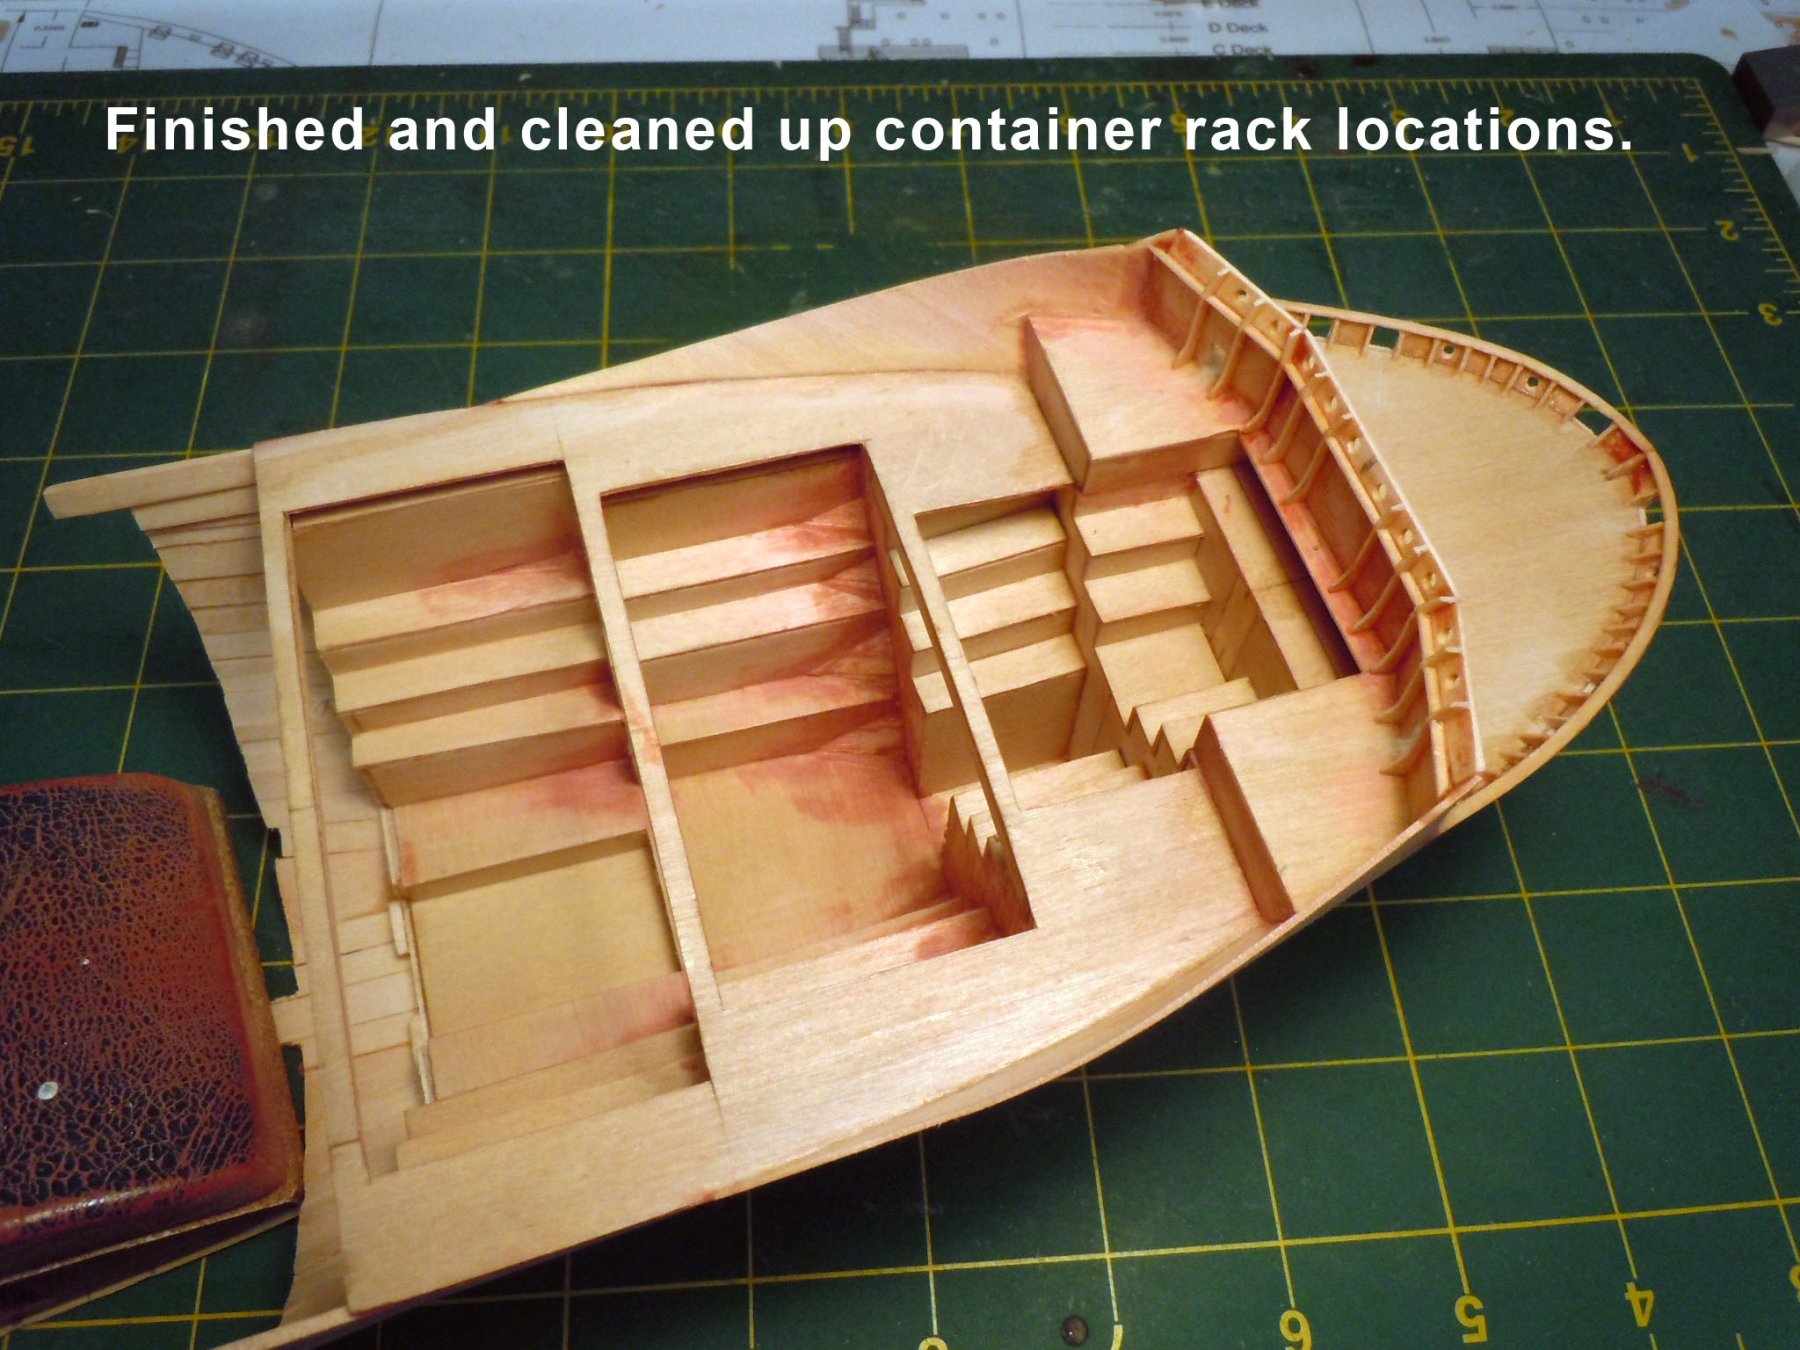
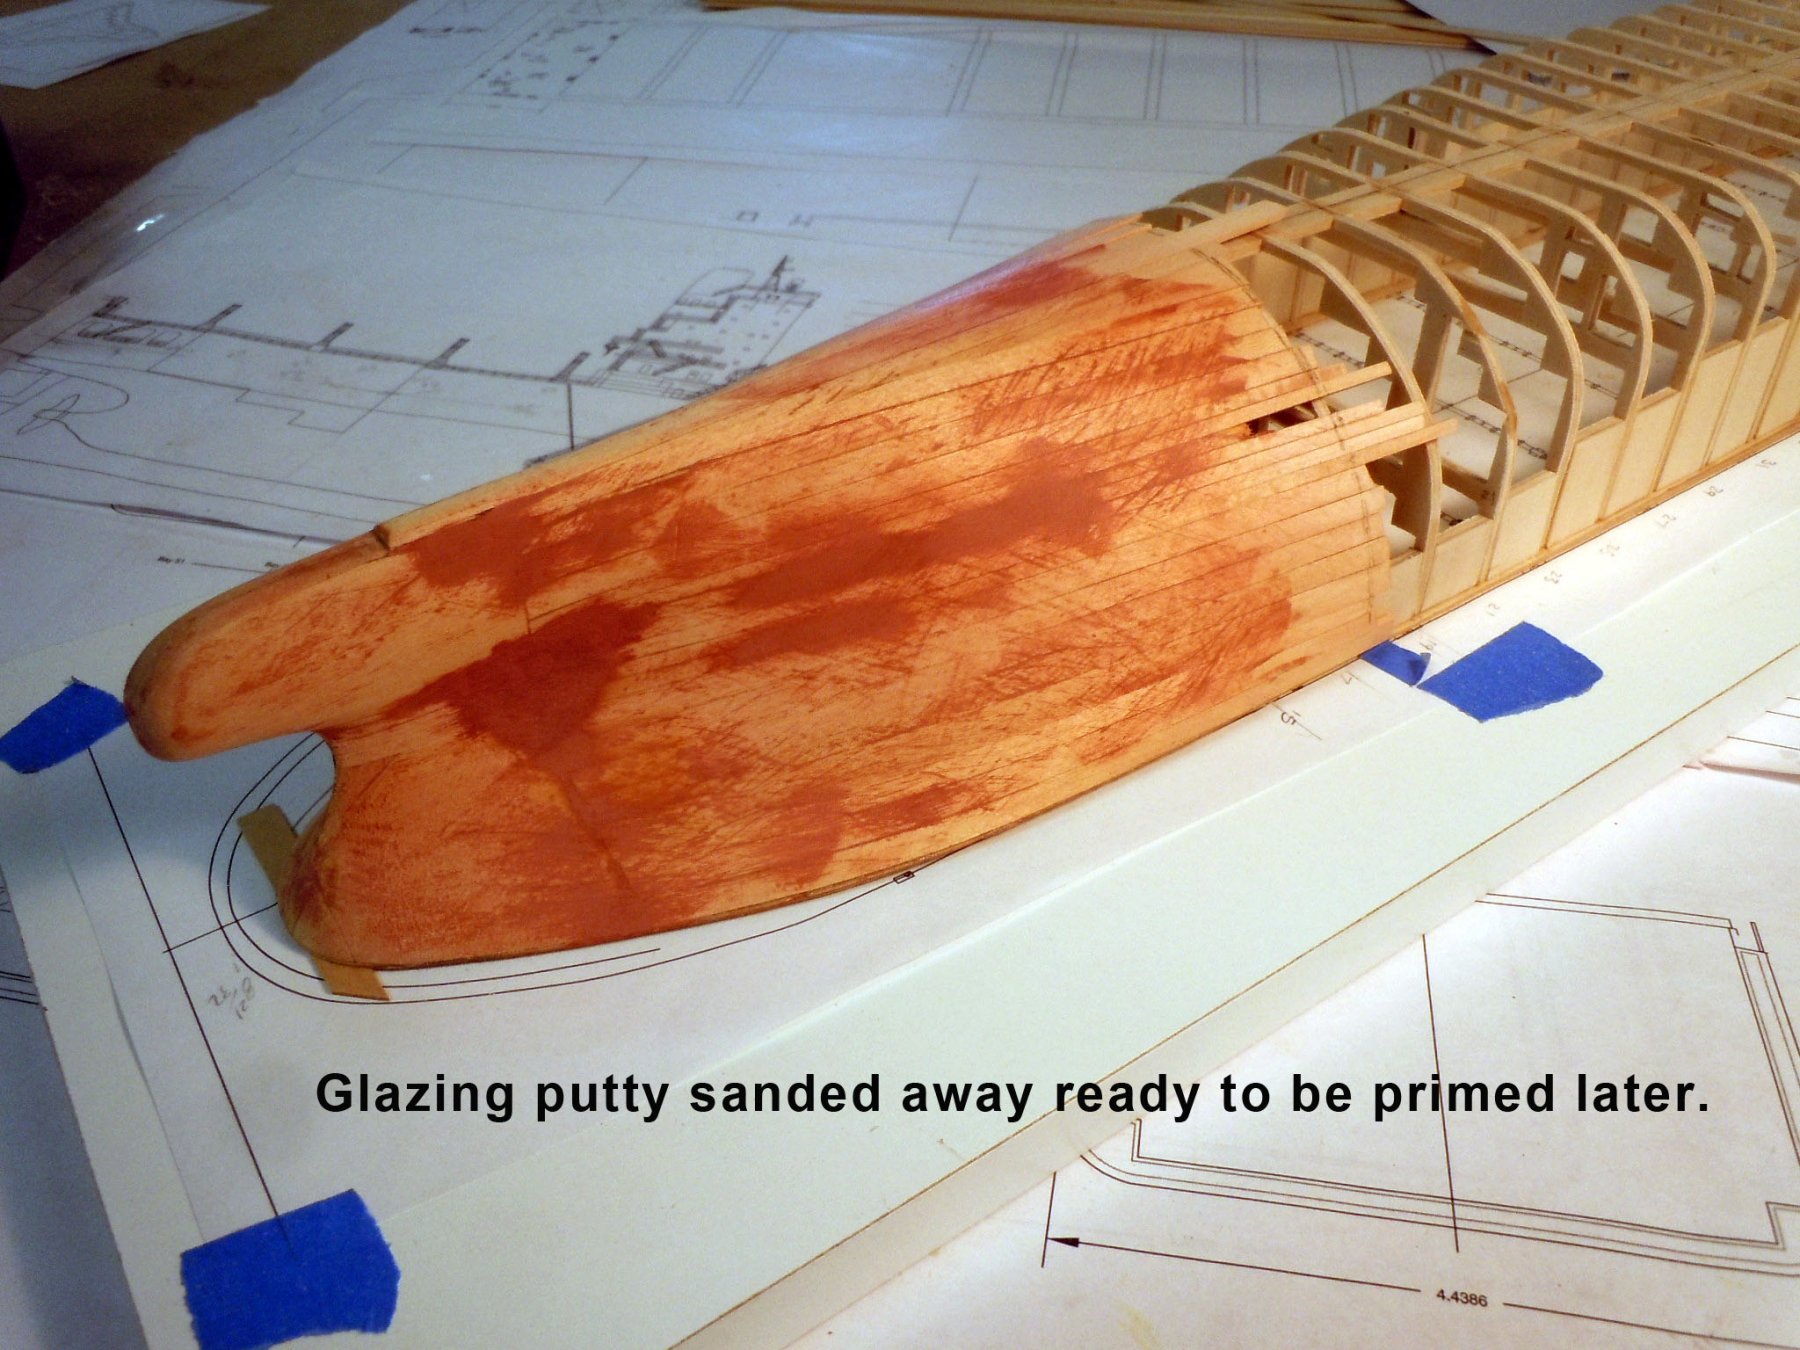
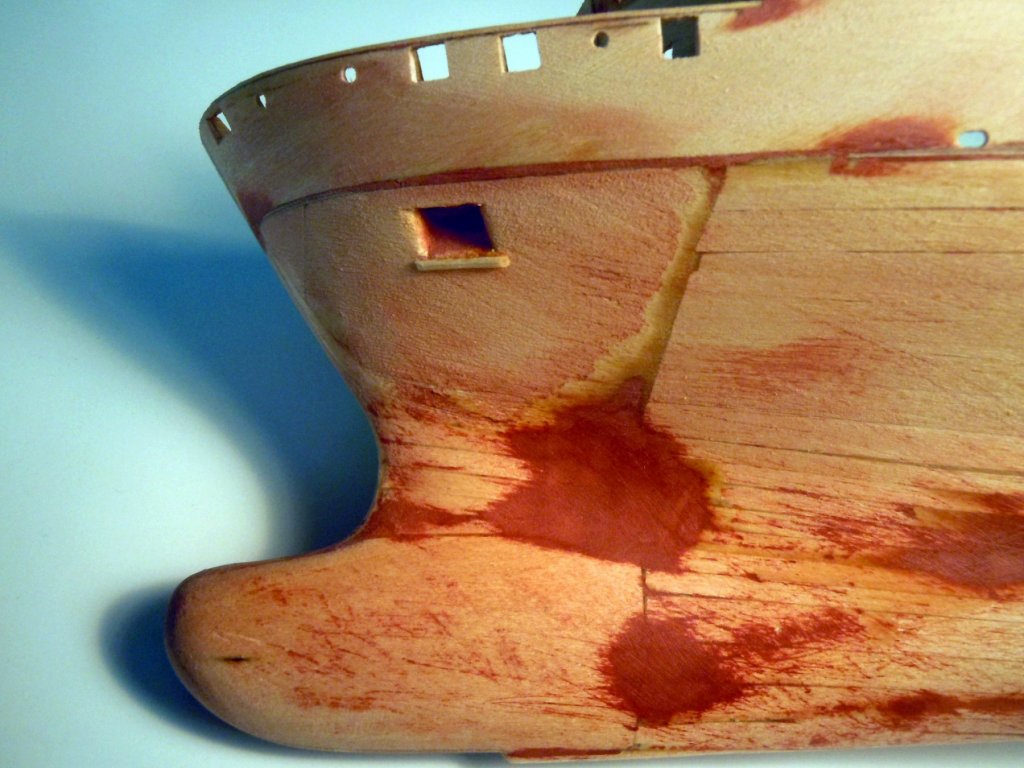
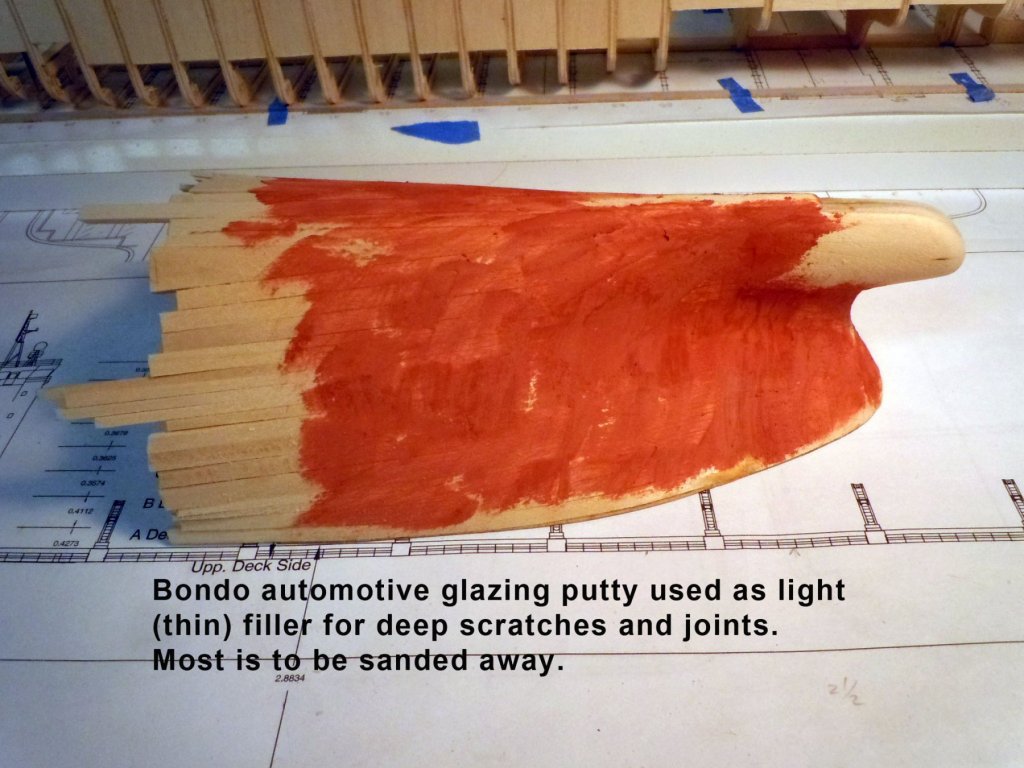
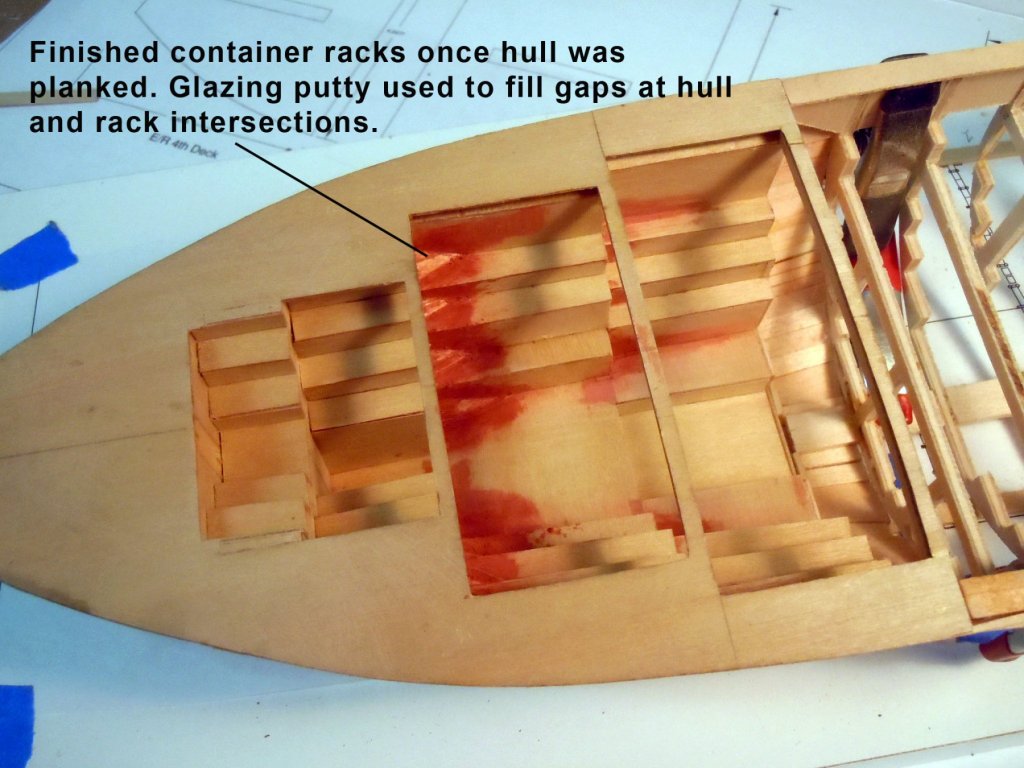
After finishing up the roughing in of the stern mooring deck; I moved to the bow section which will have an elevated mooring deck one level above the main deck and have the same winches and fittings as the stern mooring deck. So I thought it would be wise to finish both decks at the same time with their winches and fittings. I decided to plank the bow section and finish up the inner container racks while still easy to handle since these ha d to be done before moving on to the bow mooring deck. I plan to finish up as much as possible on the bow section before joining it to the center section. I prefer using the automotive glazing putty because it is softer than wood, easy to sand and on the inner surfaces is scrapped with a square blade rather than sanded for easy cleanup. Works equally as well on bare wood and spray painted primer. Think of it as a thick primer and most will be sanded off. I does a great job of filling any deep sanding scratches and plank joints. Now back to a couple of other projects that need attention.


-
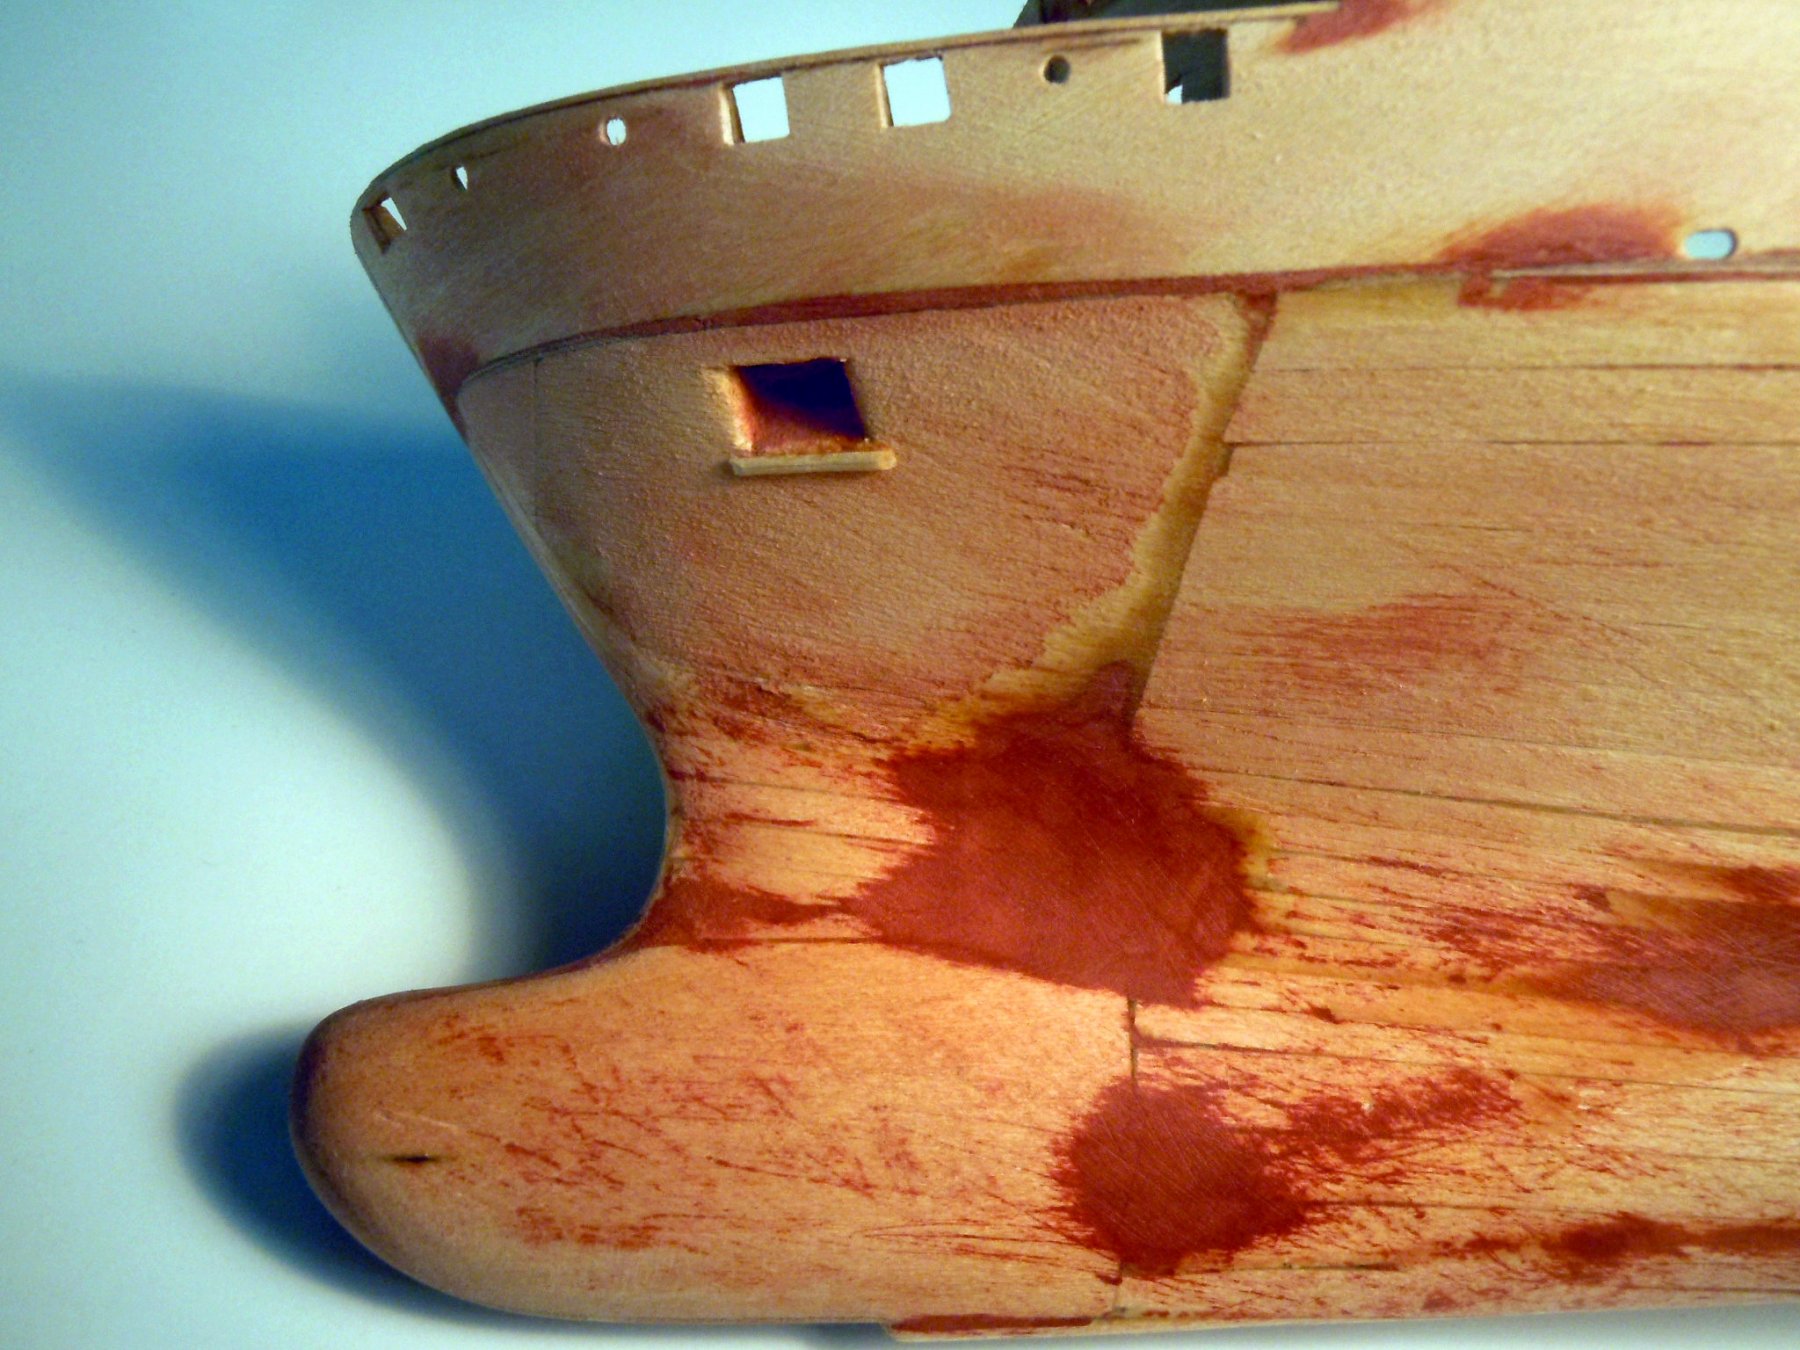
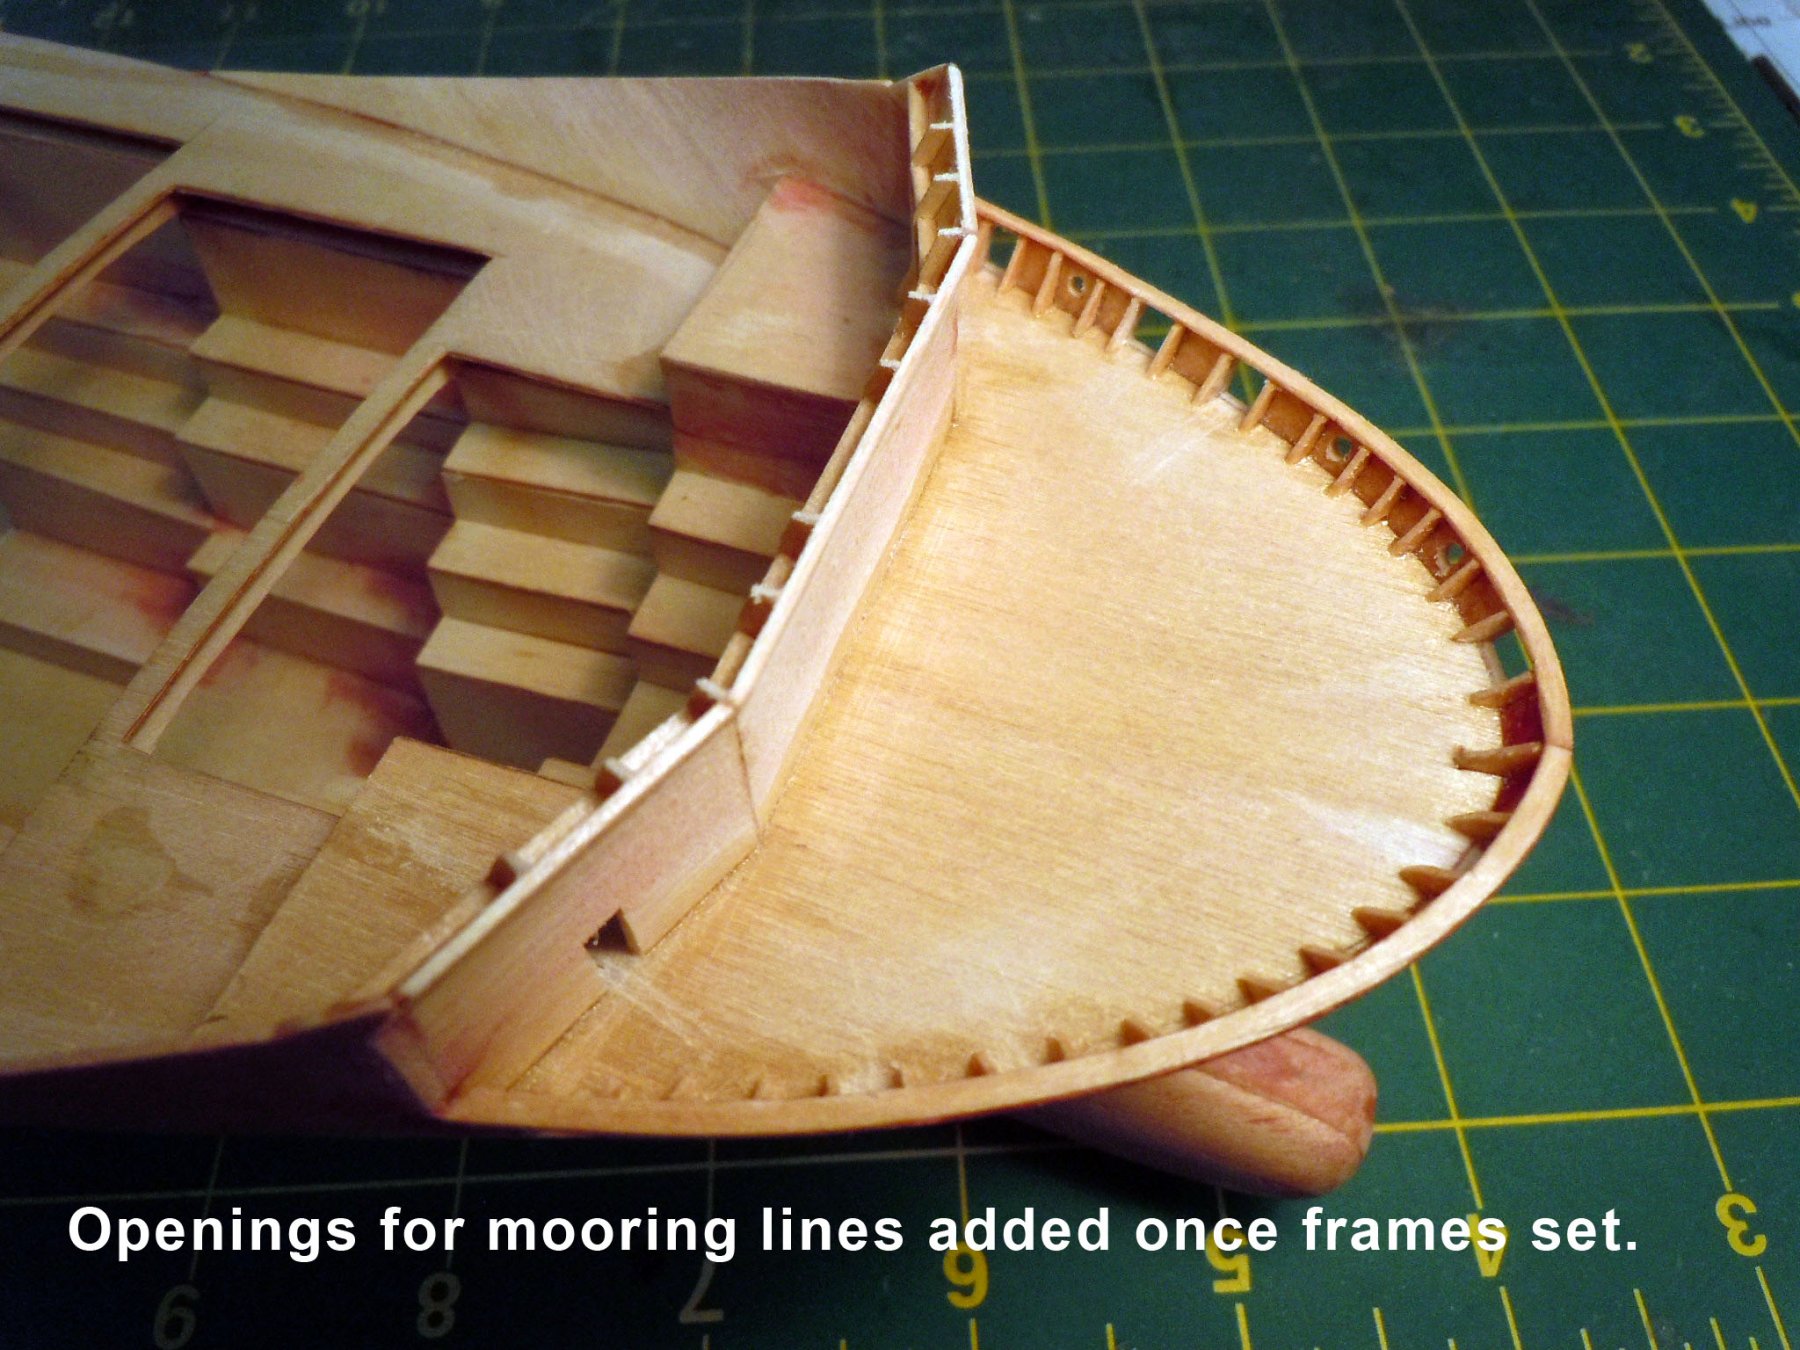
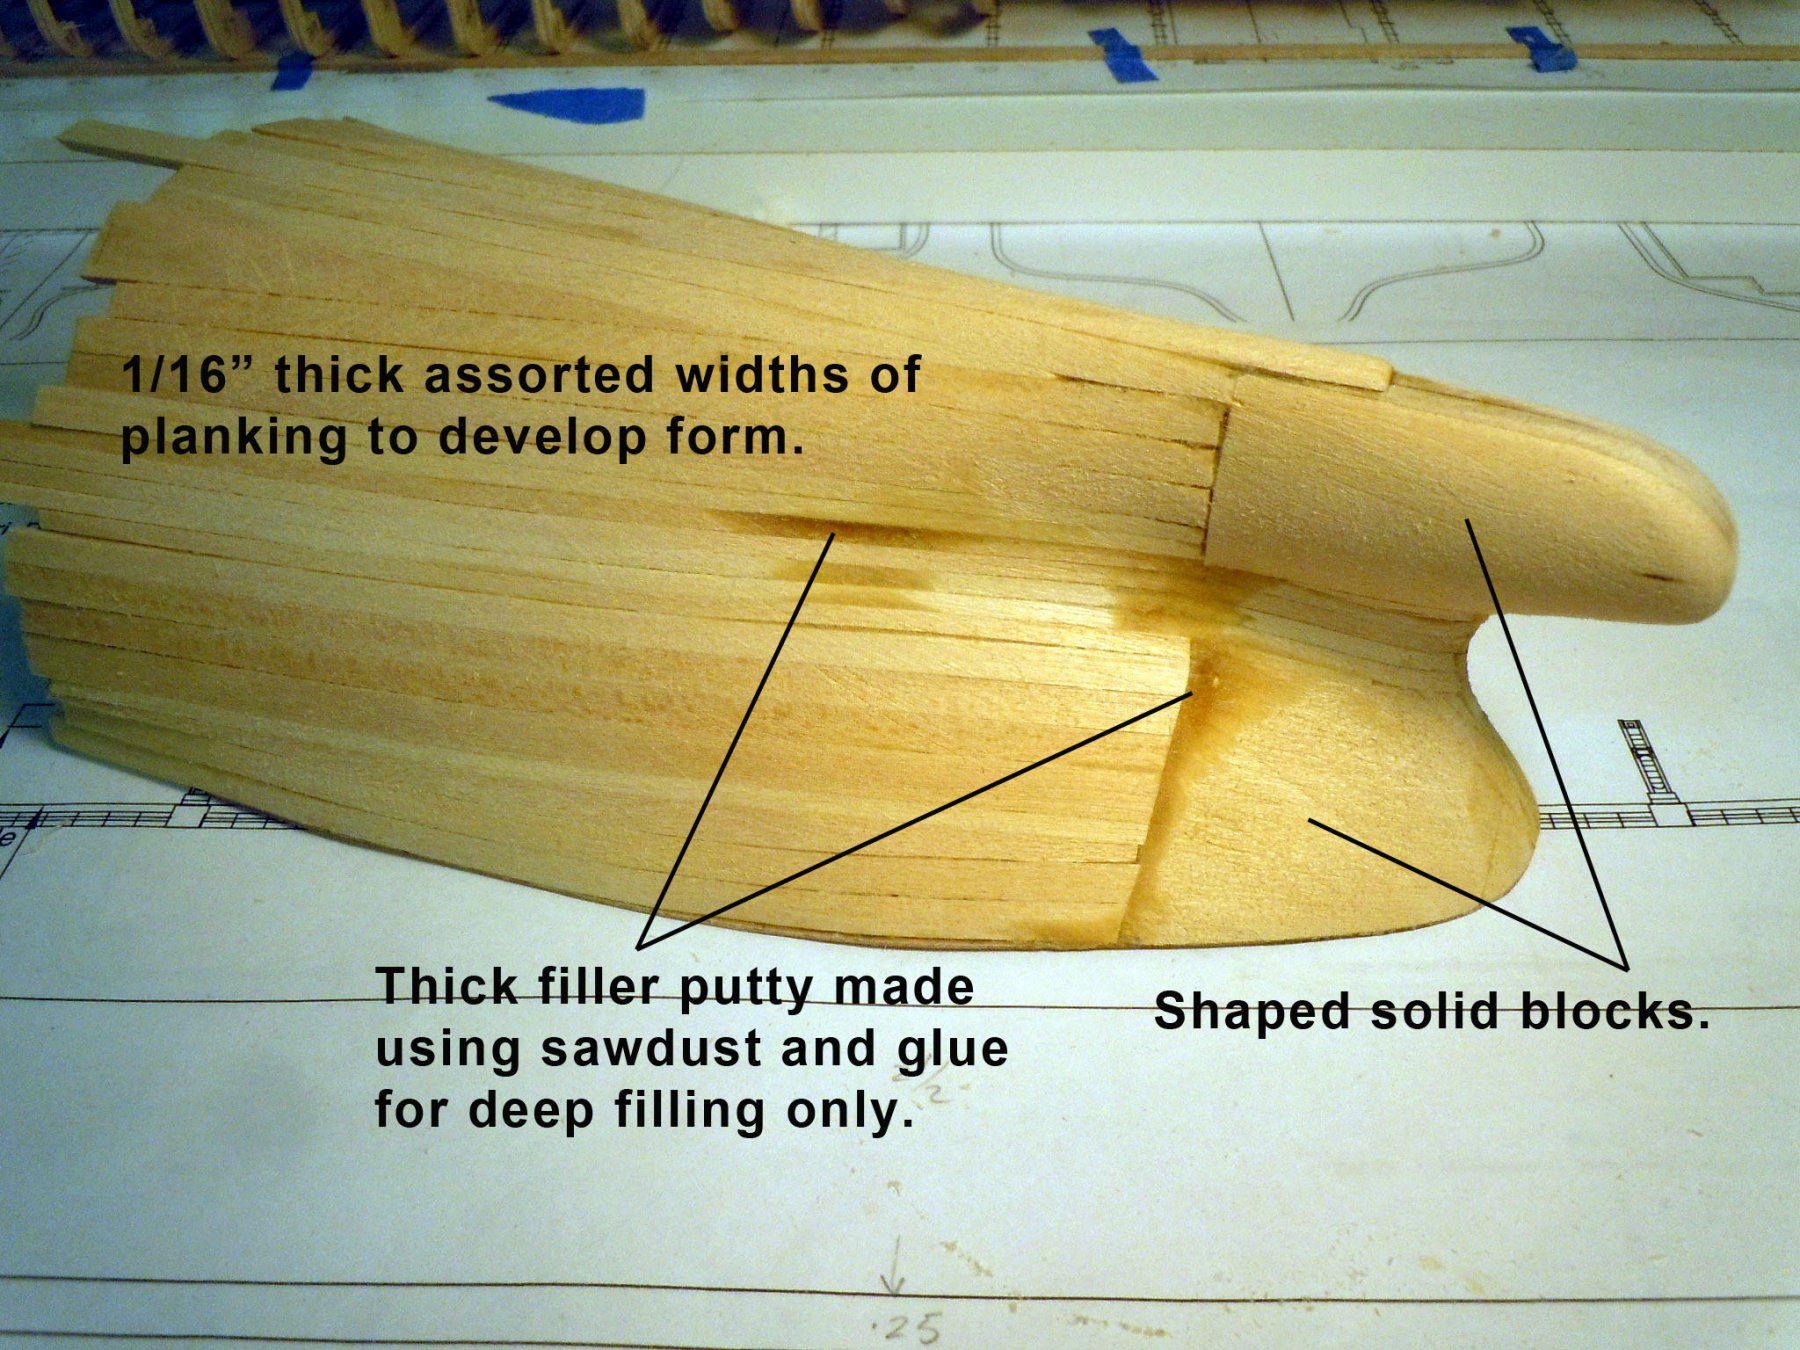
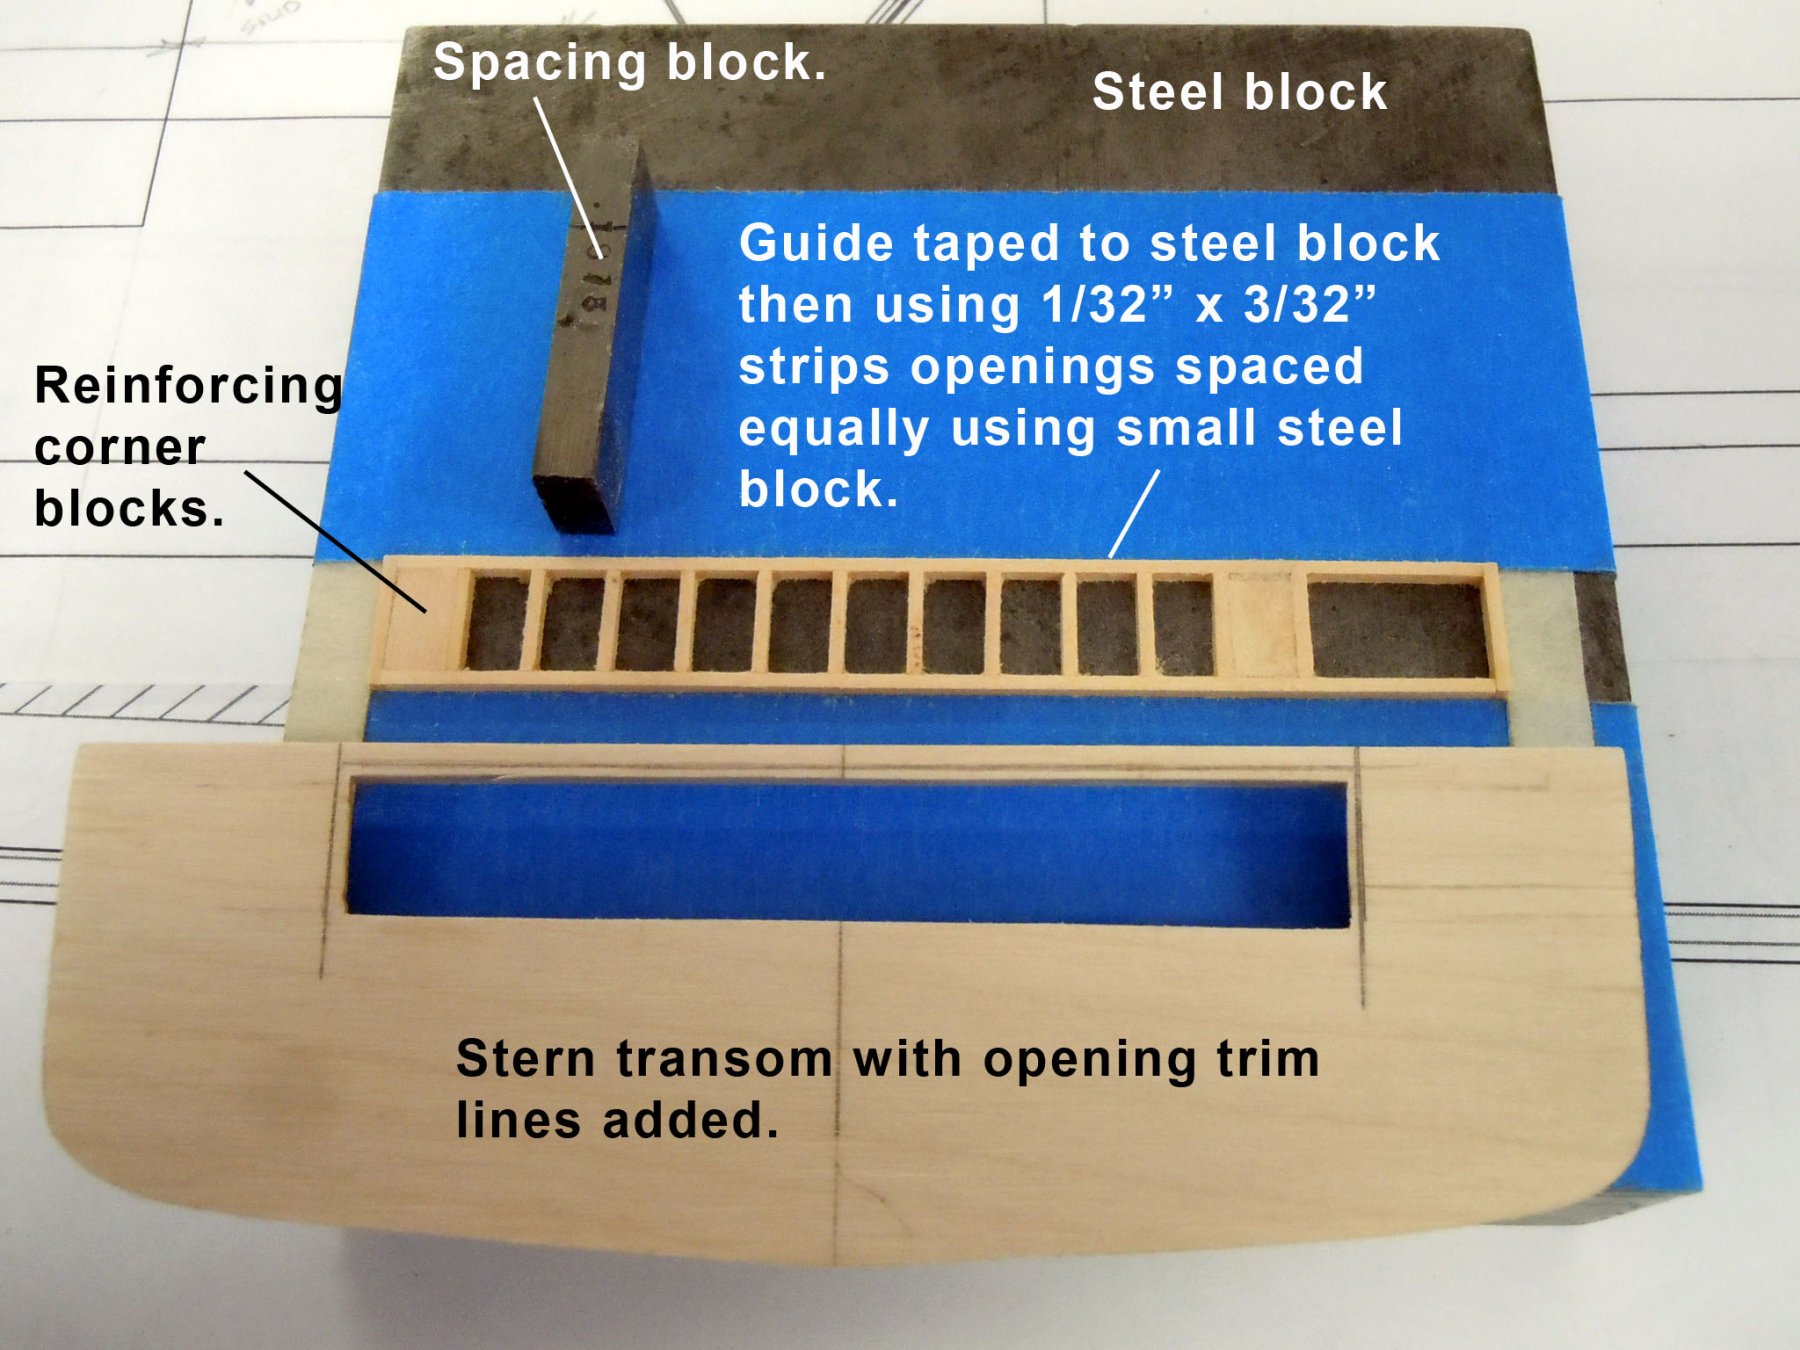
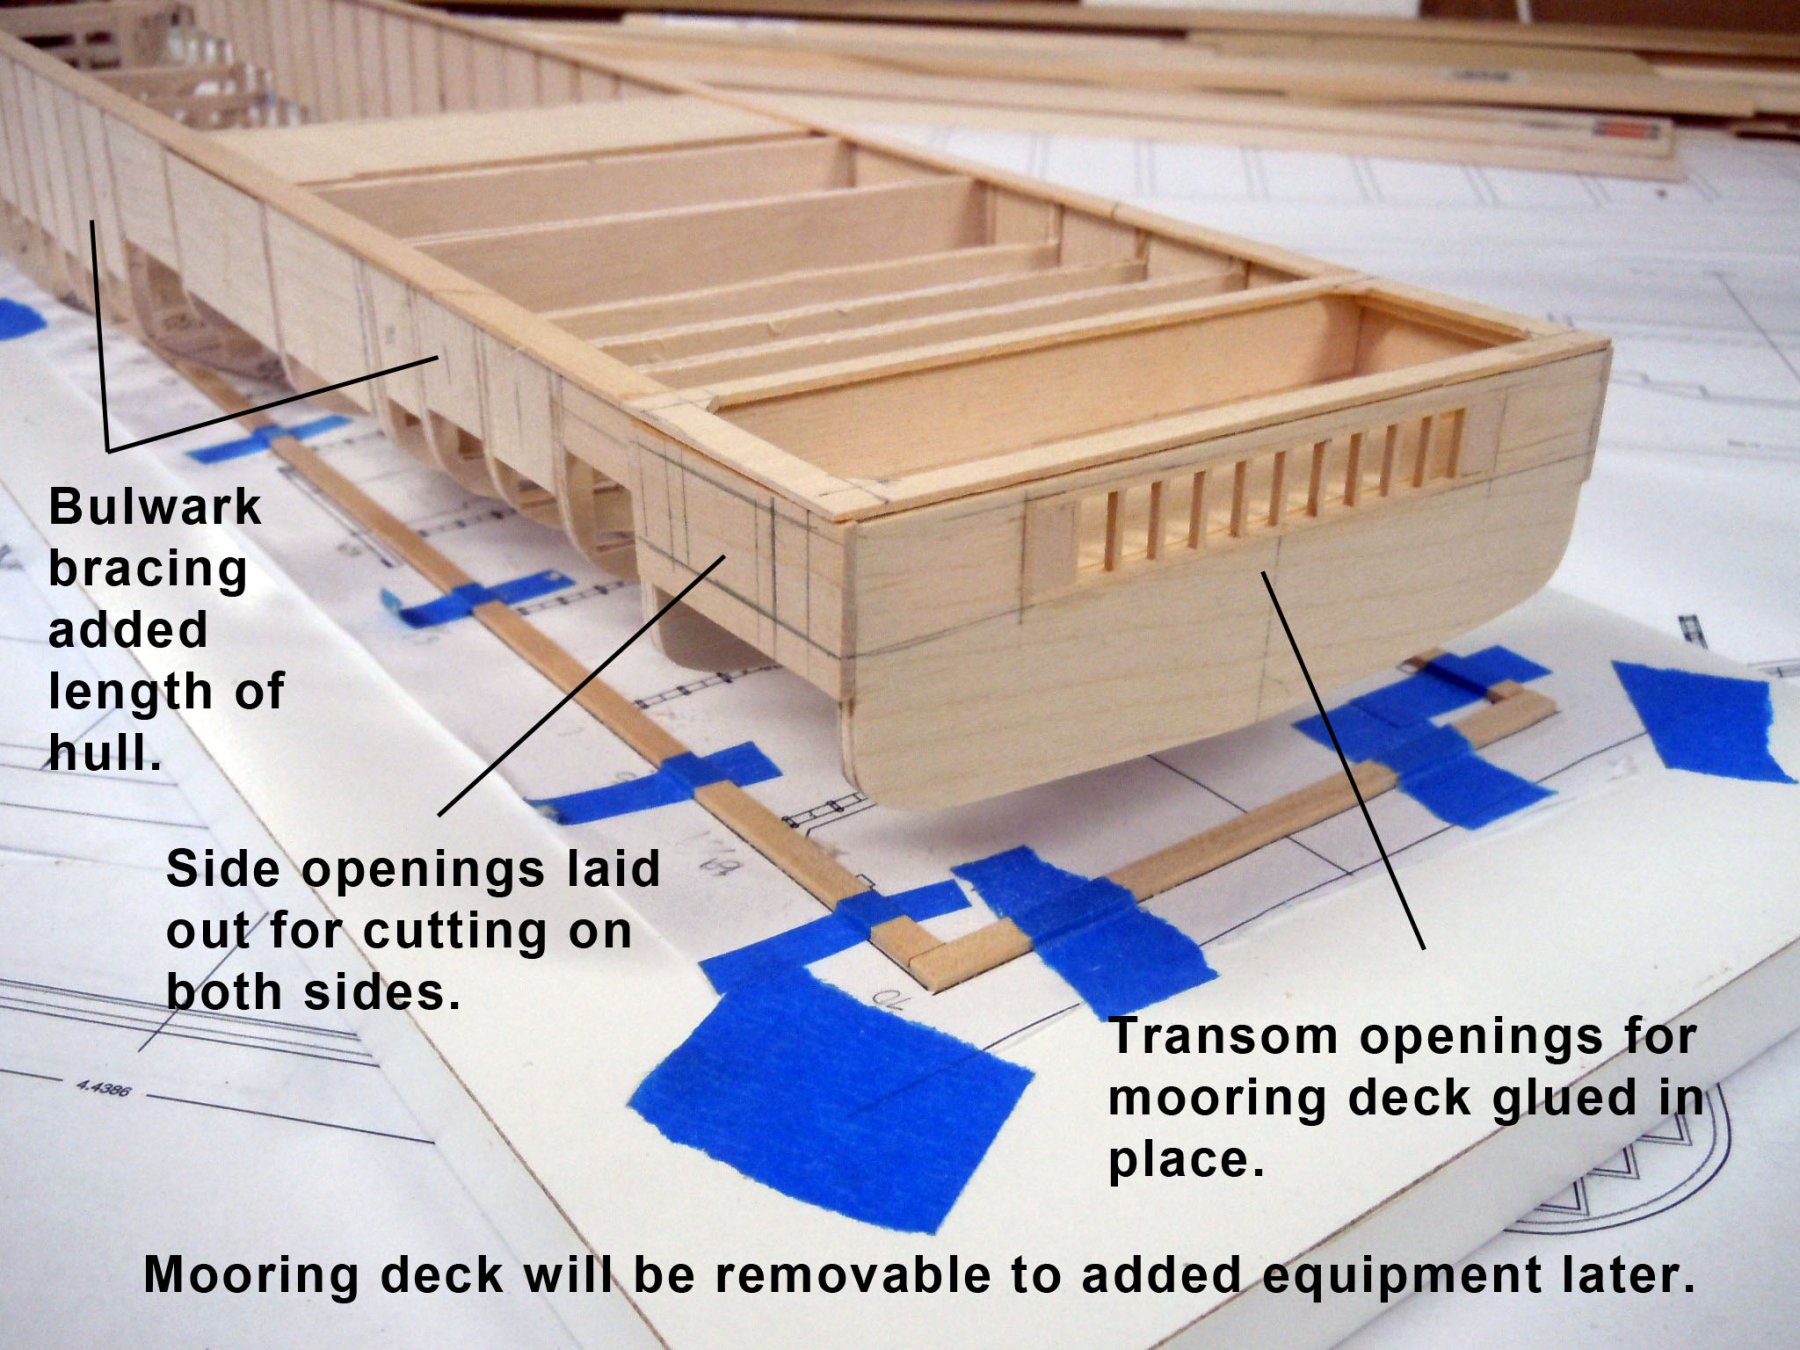
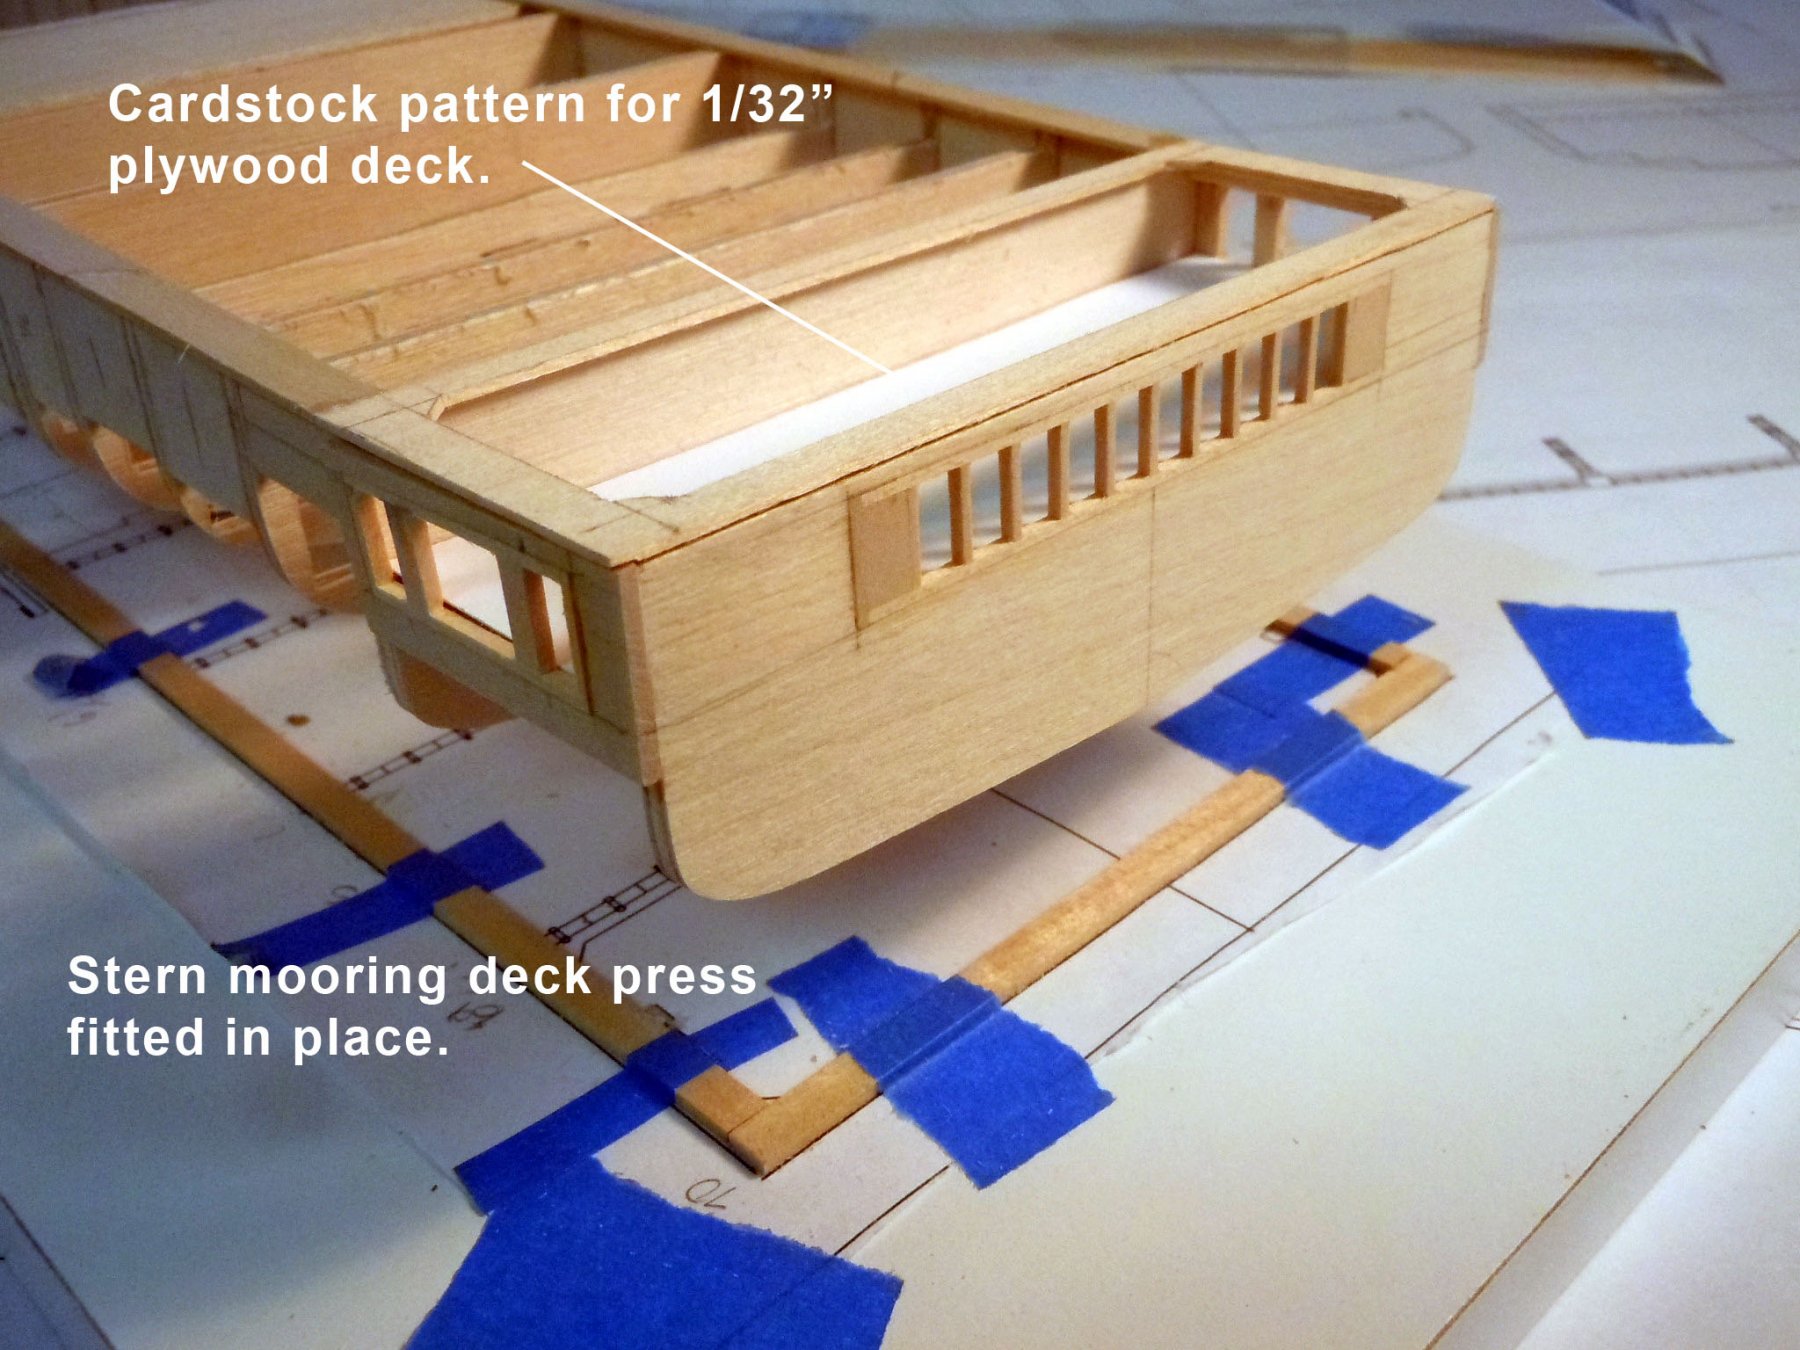
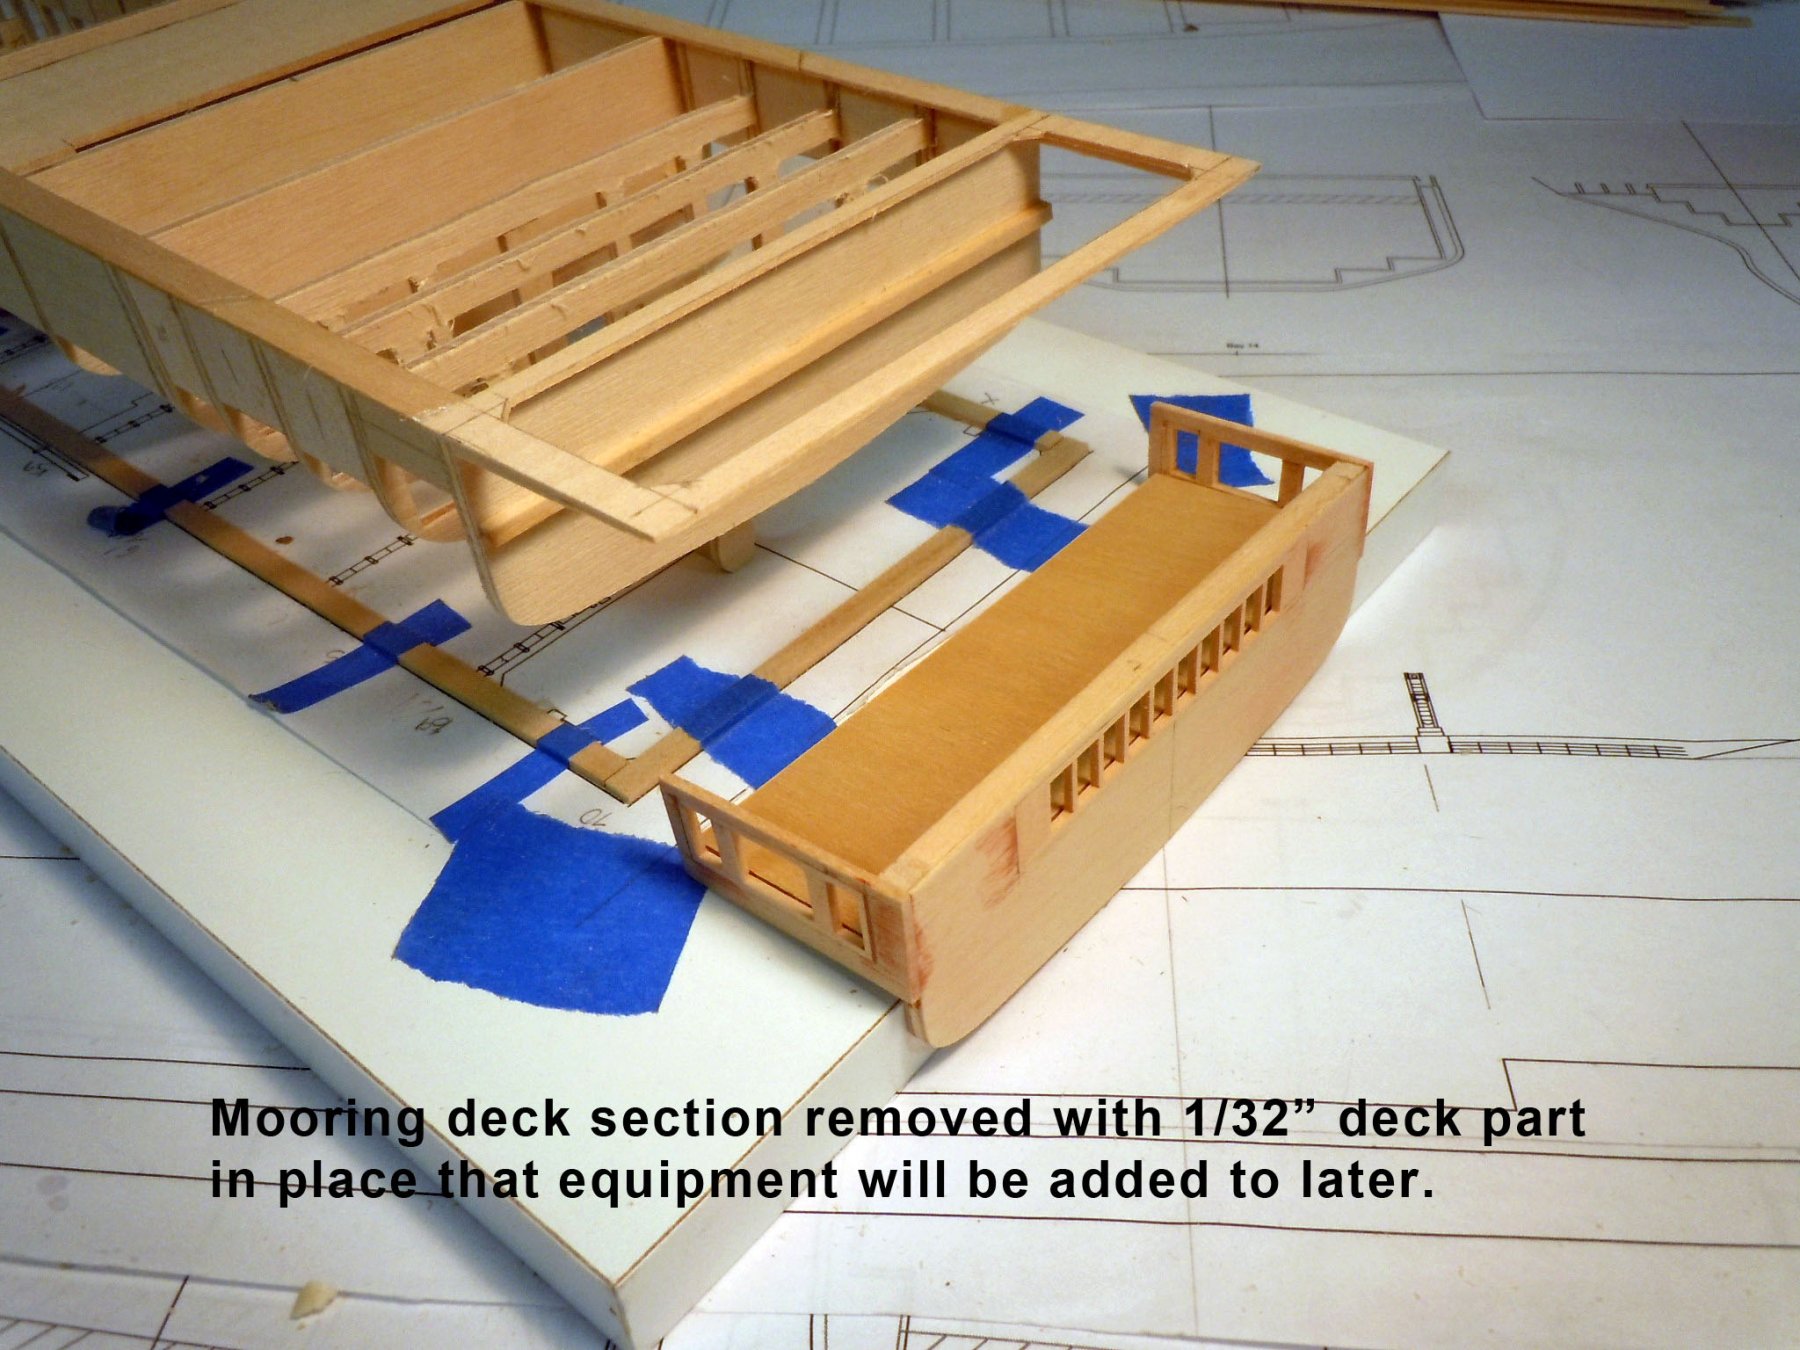
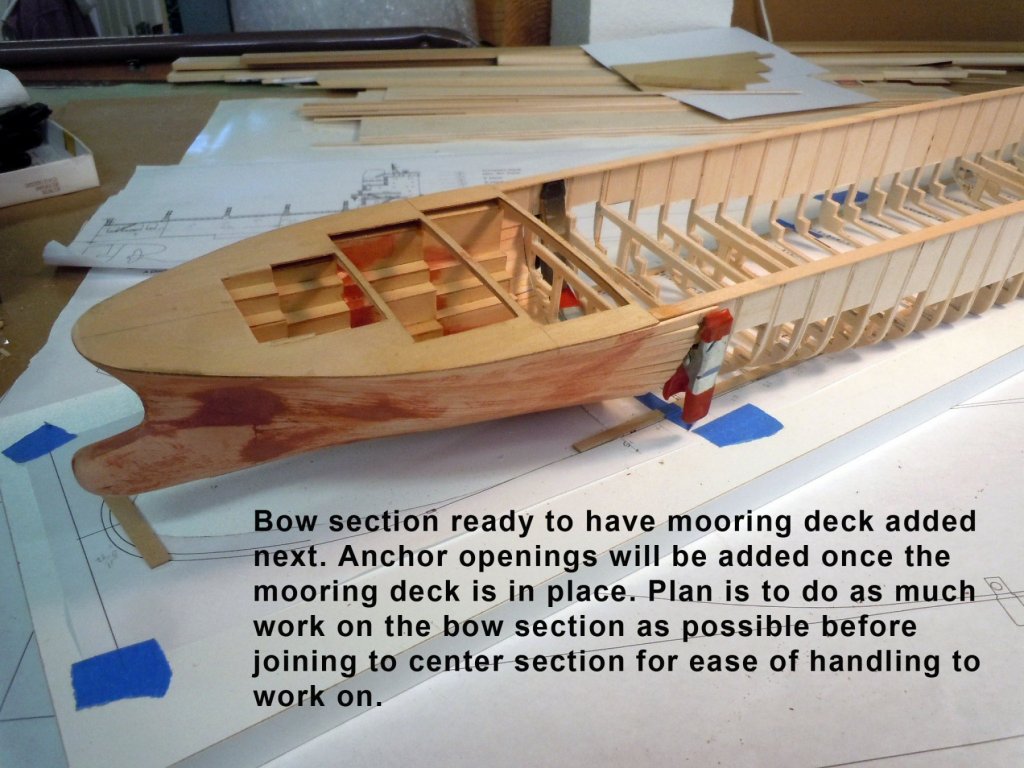
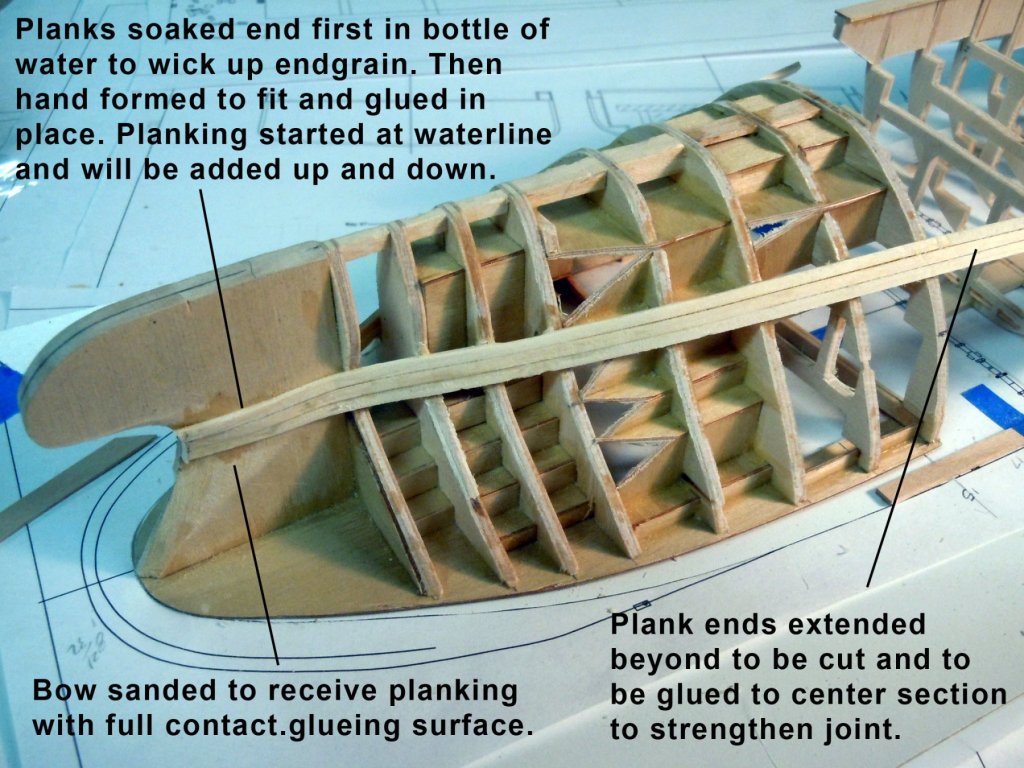
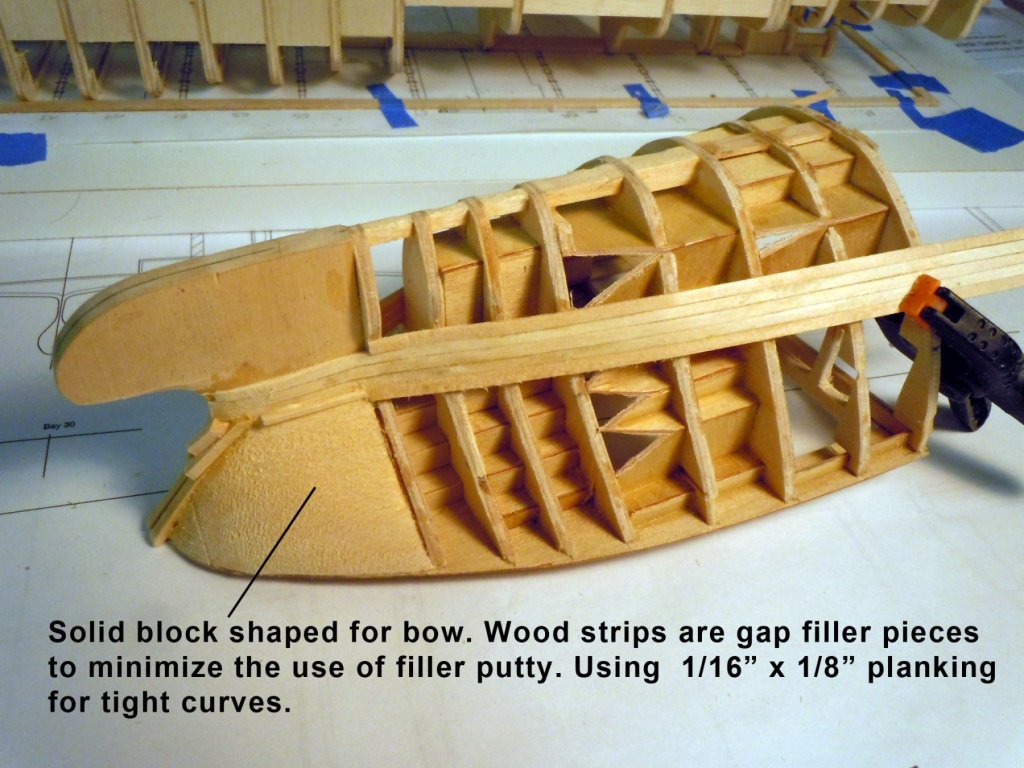
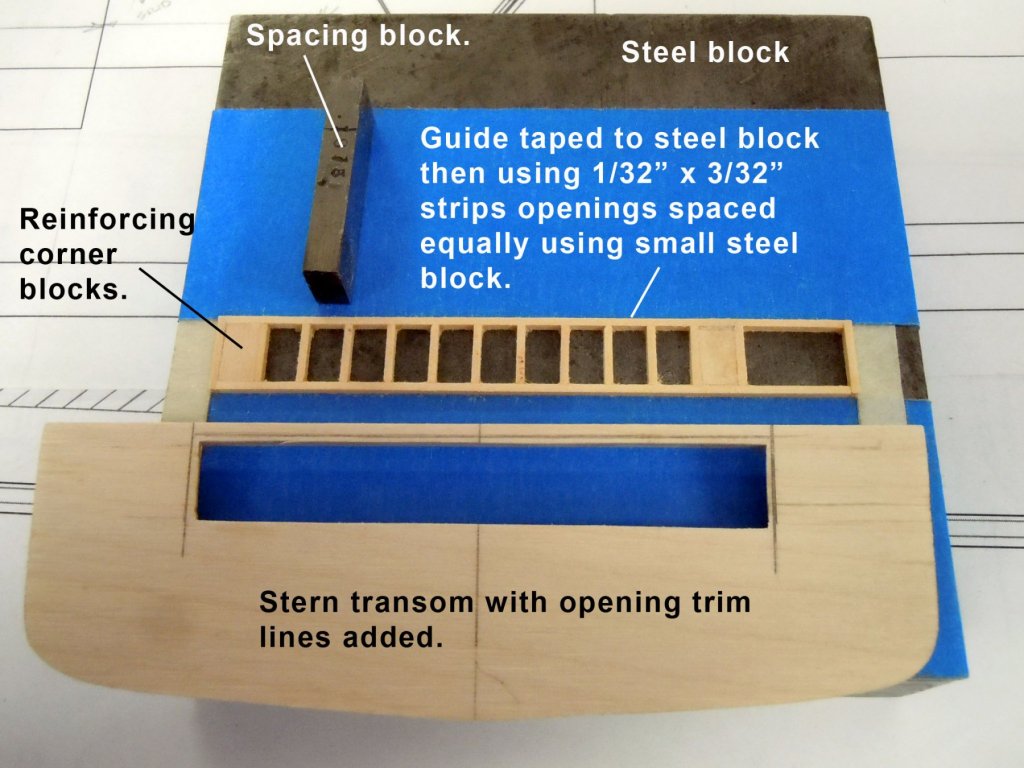
I got all the hull bracing in place, not exciting work but very necessary with this narrow and long structure. I worked back and forth between the bow section and building the mooring deck at the stern which I made removable so as to be able to add the deck equipment later, bits and winches. On the bow section I added solid blocks to form the bow and next will be the bow rider and adding more planking to support the bulwark parts secured with braces so that the braces can be cut away. I thought this would be an inside out build but now am bouncing back and forth dictated by the hull structure. The good thing about scratch building is that you can kind of go wherever the build leads you. Here is in progress of the bow section and why I built as a separate unit. Much easier to handle this short section for building. I am leaving the planking long to be able to attach to the center hull when joined. Here is the development of the mooring deck which is below the main deck at the stern. The side and transom openings are for mooring lines. On this deck are located winches and bits for mooring lines. The deck will be 1/32" plywood and be glued to the support structure which press fits horizontally into the center hull section kind of like a drawer sliding in and out. Once finished and painted will be glued in place. The real challenge was getting the 10 transom openings visually correct so I just started at one end and started down using a steel shim block as a spacer to get them correct. They are kind of like teeth in a smile. Back to projects and lets keep the Model Expo folks in our prayers since they are located in Miami and a site sponsor.


-
Jon, The boats are looking great! I can relate to your situation with your mom; I had to move my parents from N.C. to live with us in Ohio once they got too old to care for there home. They are tough situations but one can get through them. I am also thinking of Model Expo folks headquartered in Miami. Will keep all in our prayers.
-
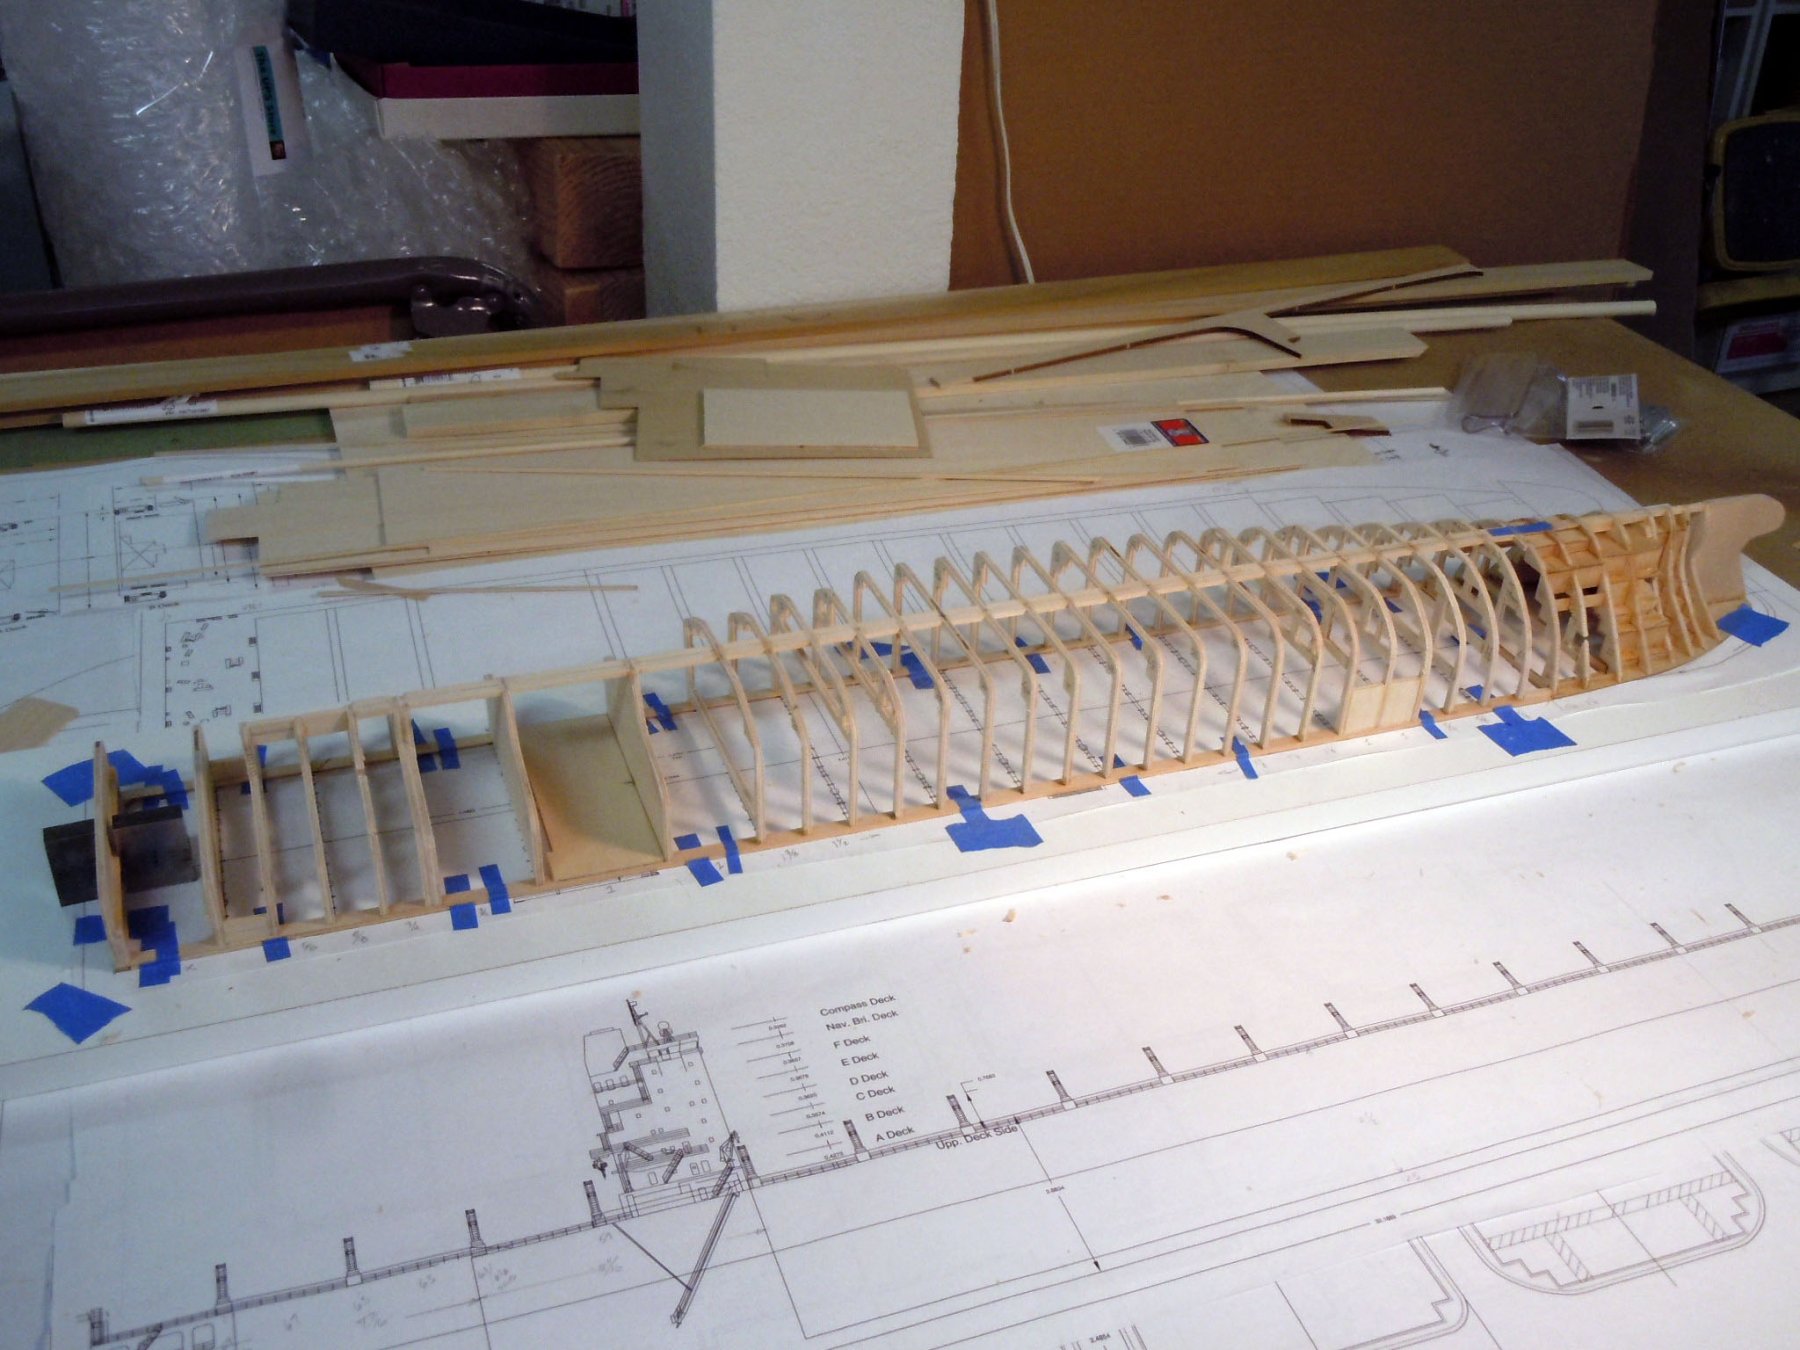
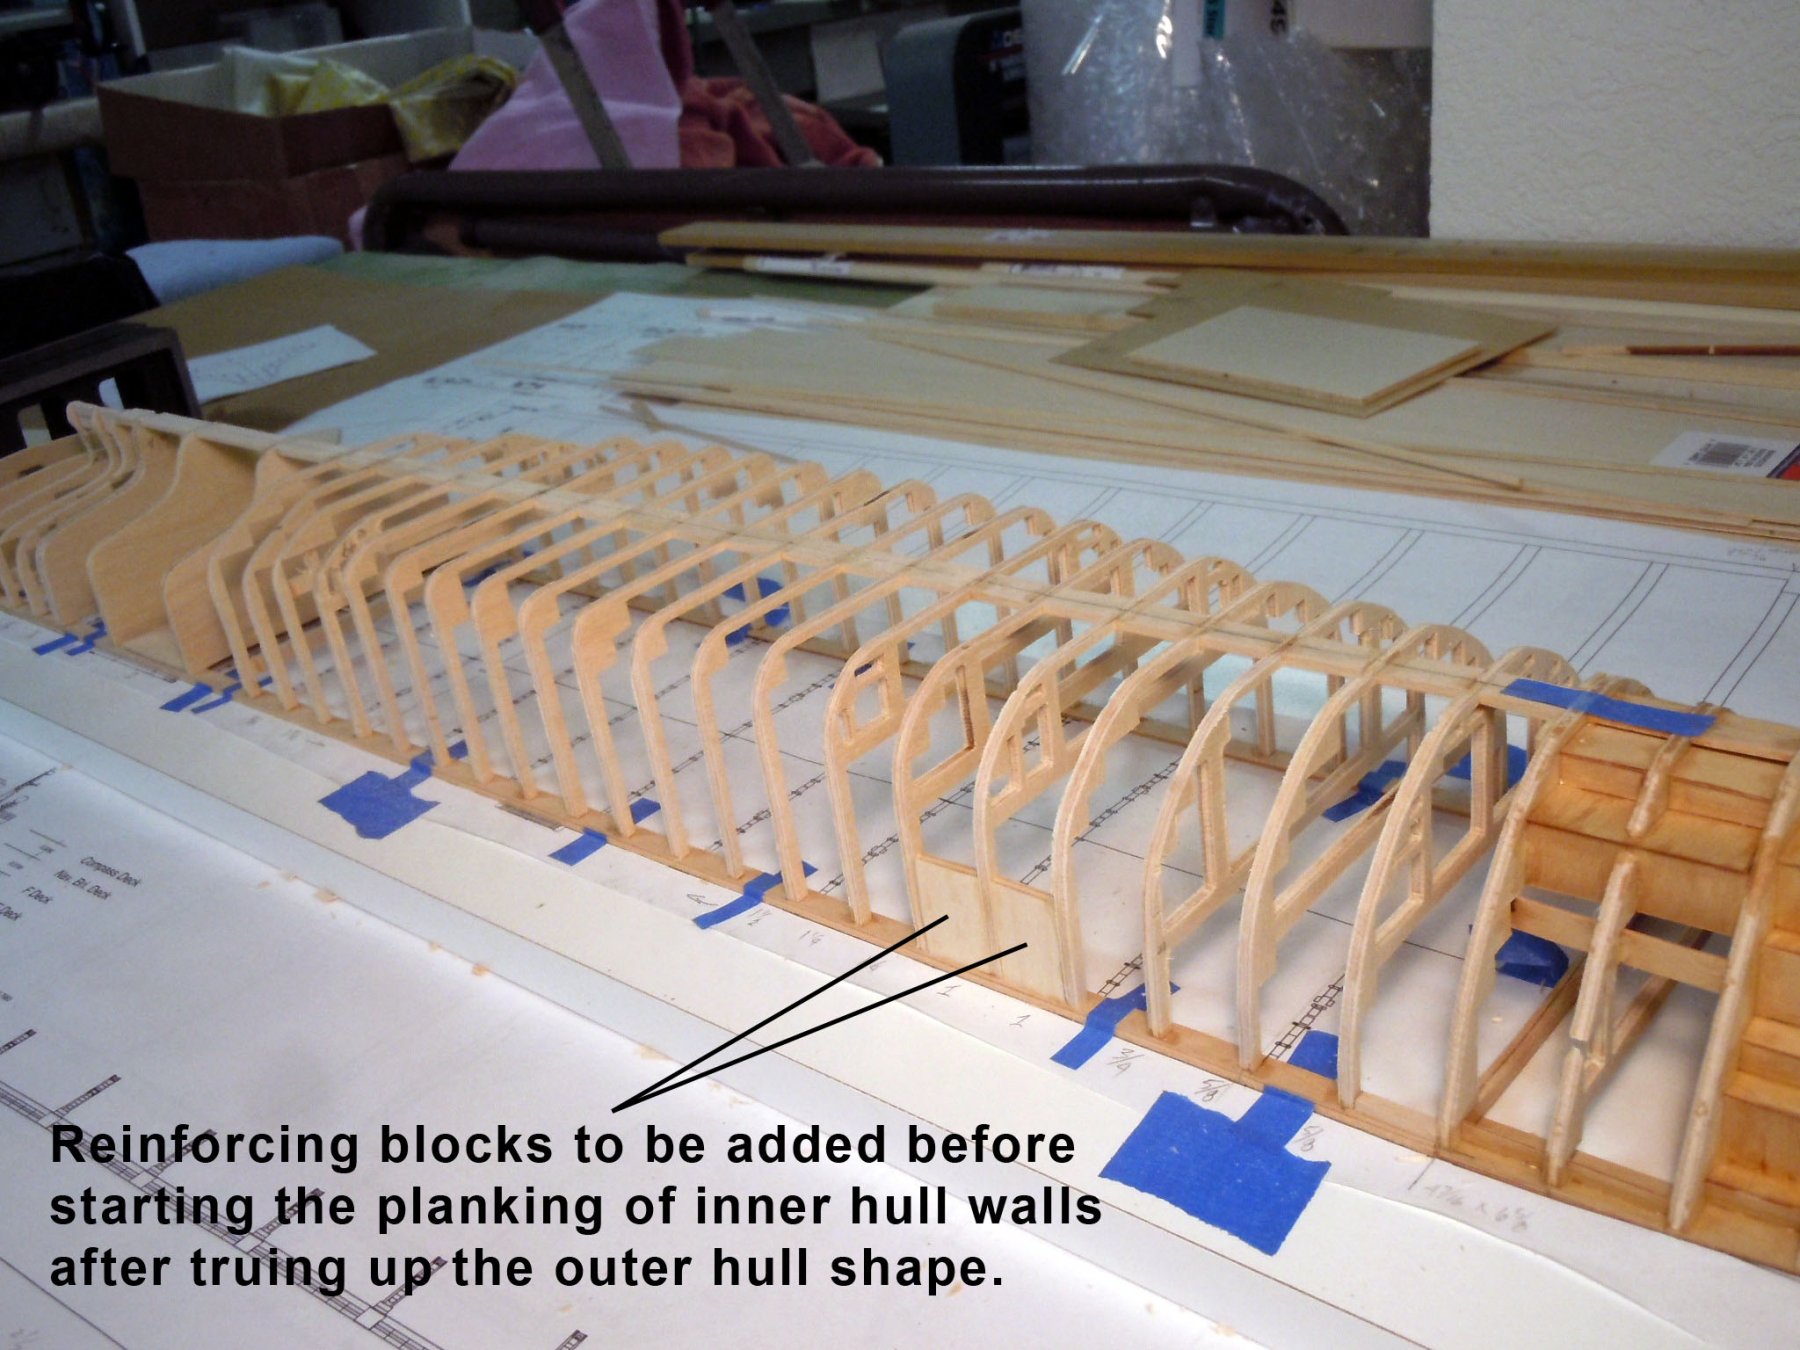
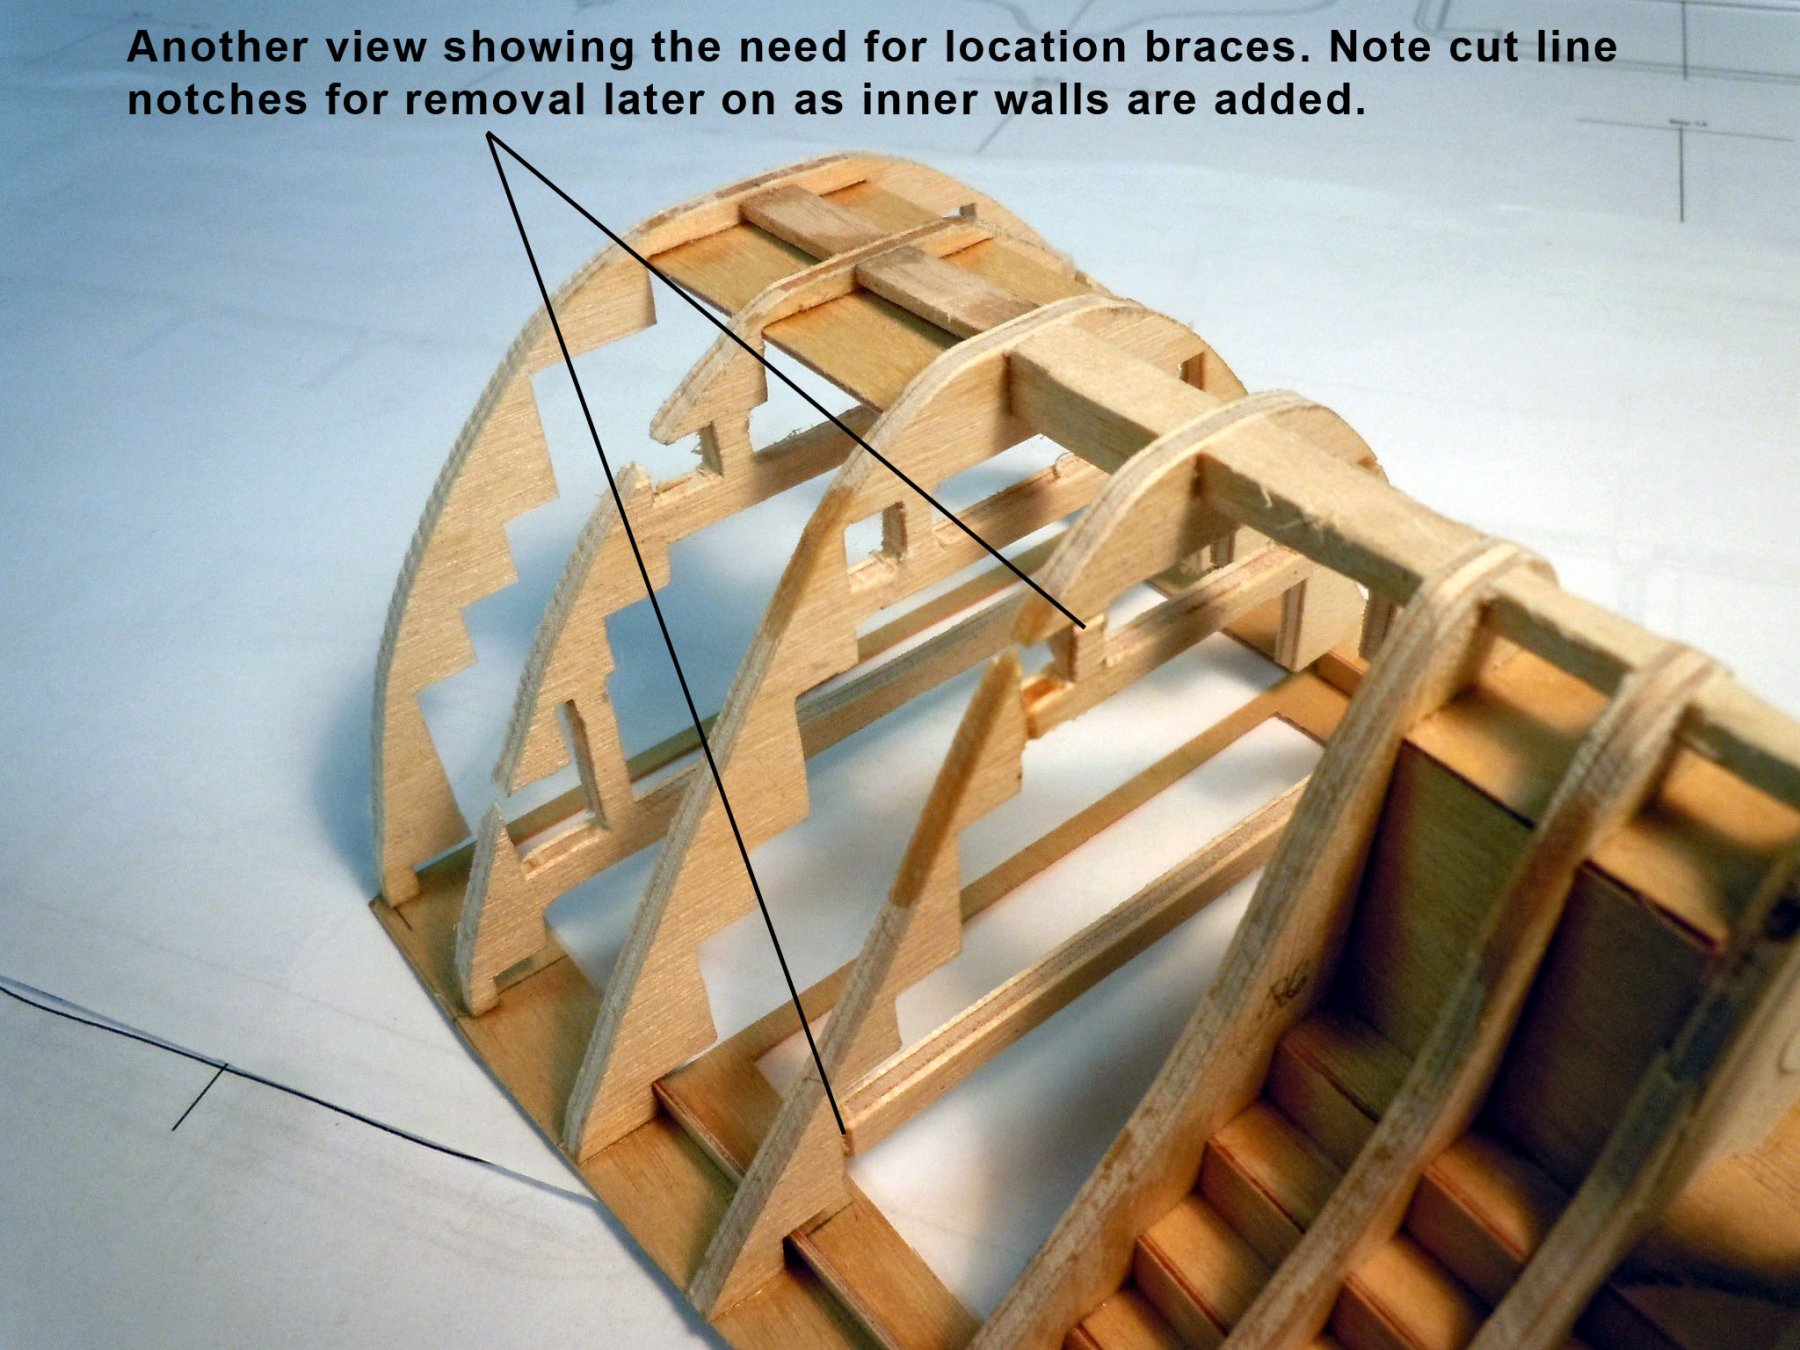
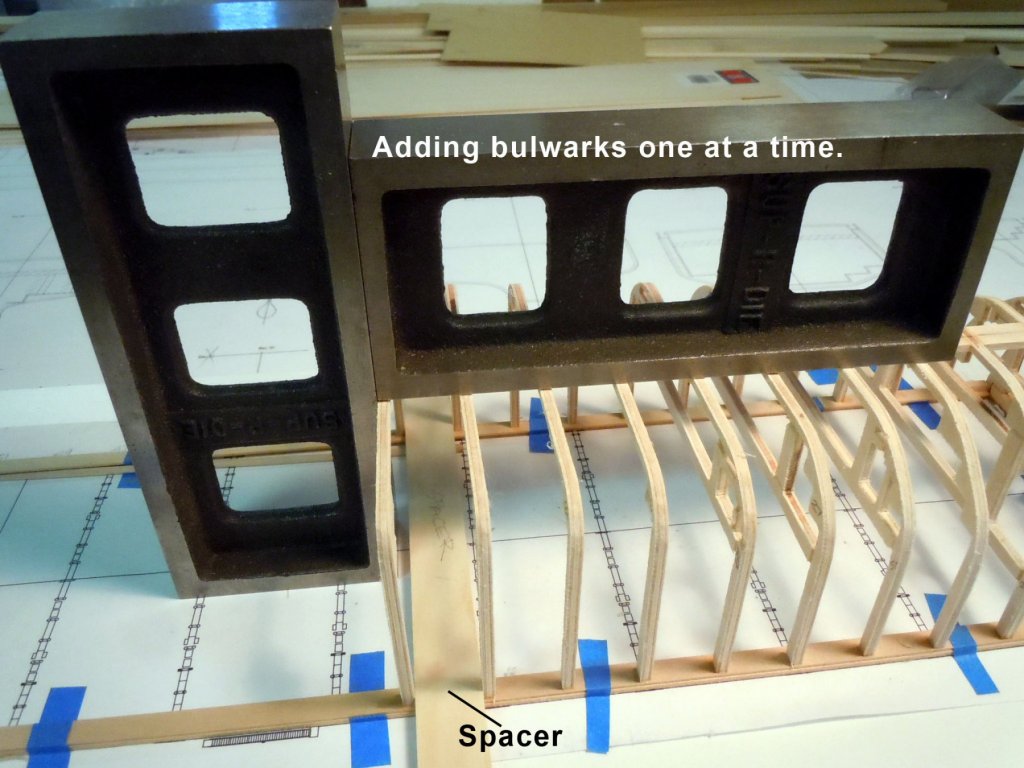
Back to building after a hot weekend helping the Admiral with her craft show. I finished up the rough sawing of the bulwarks and glued them in place except for the stern wall which I will cut openings in before adding it. I will also add bracing to the deck before removing from the building board. Reinforcing bracing to be added to retain shape before removing from building board in sections to add the inner walls. Now back to bracing and some work on a commission project.


-
Rich, just catching up after being away but if you still need hinges go to miniatures.com and search hinges; you may find some there. Ken
- 1,135 replies
-
- 2
-
-
- model shipways
- syren
- (and 2 more)
-
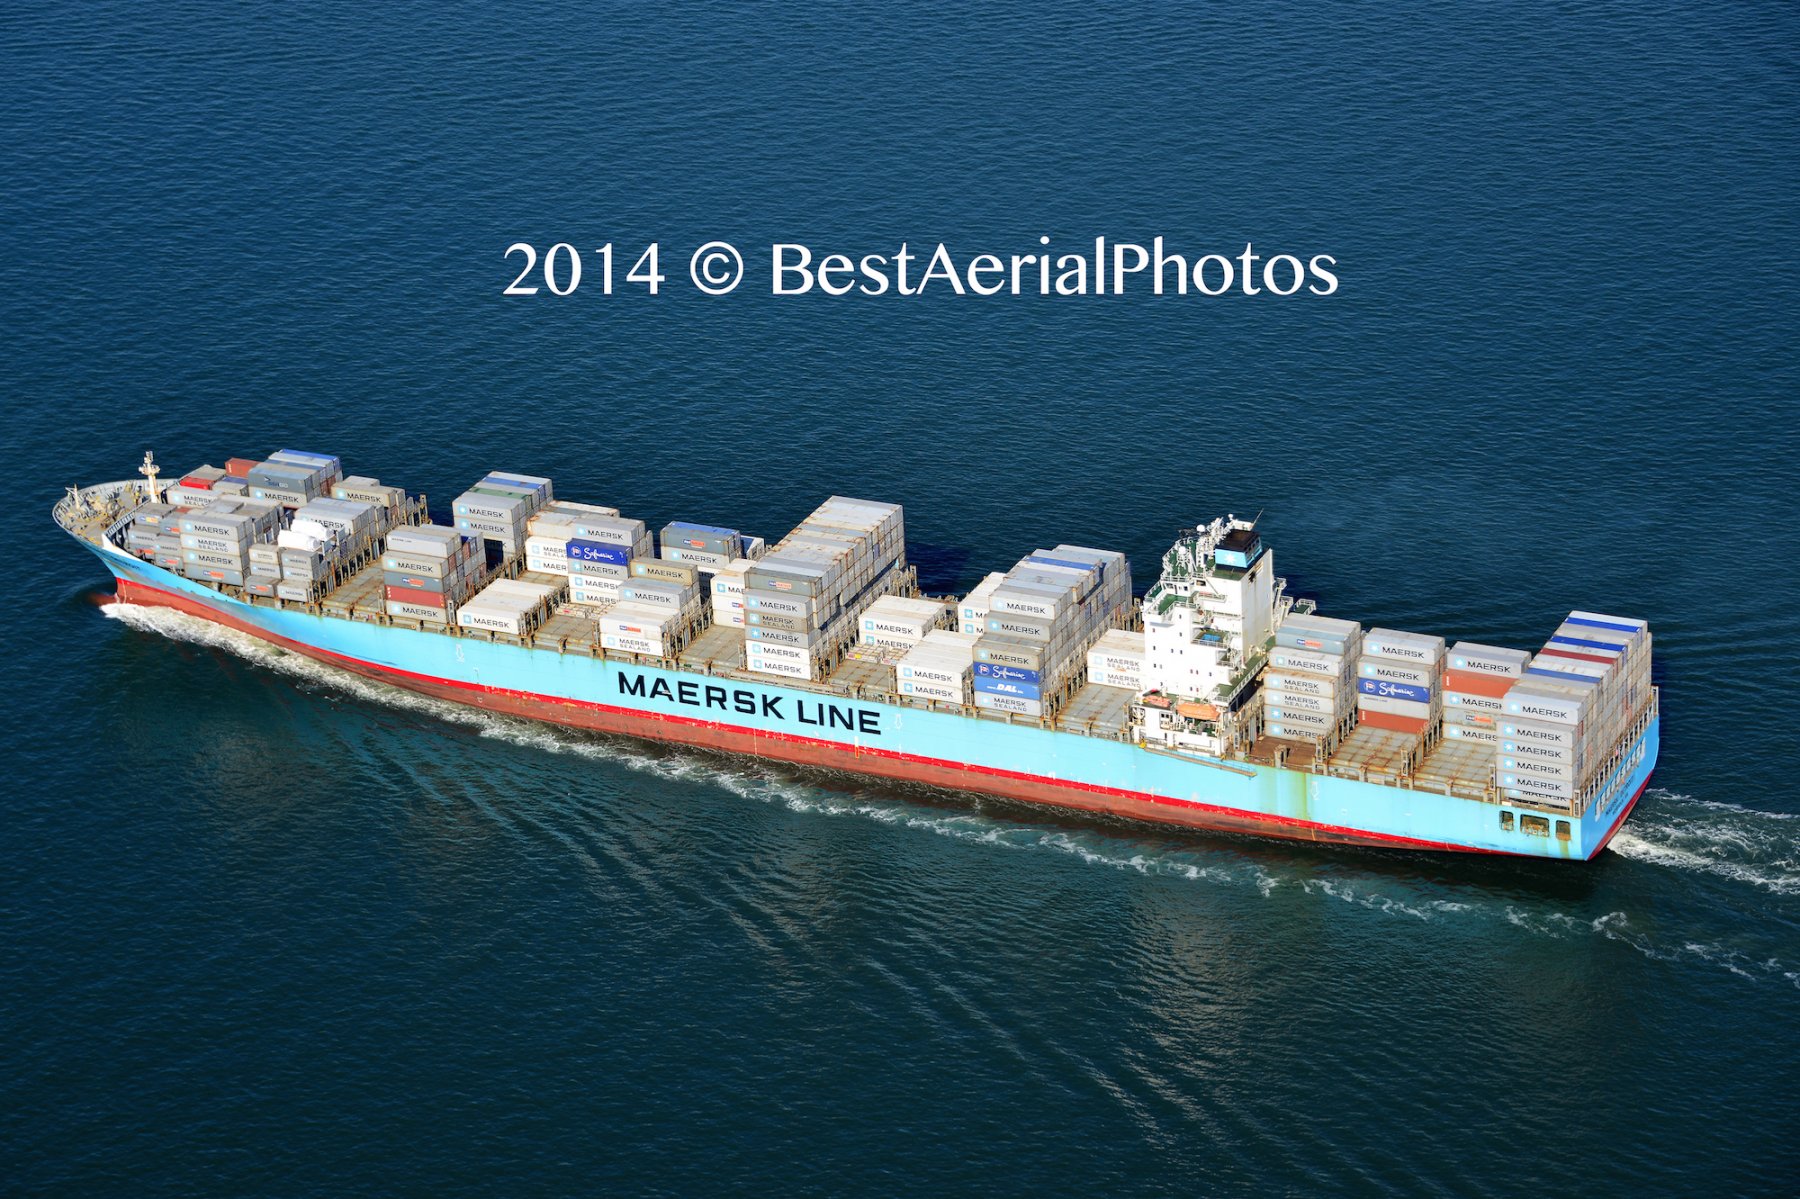
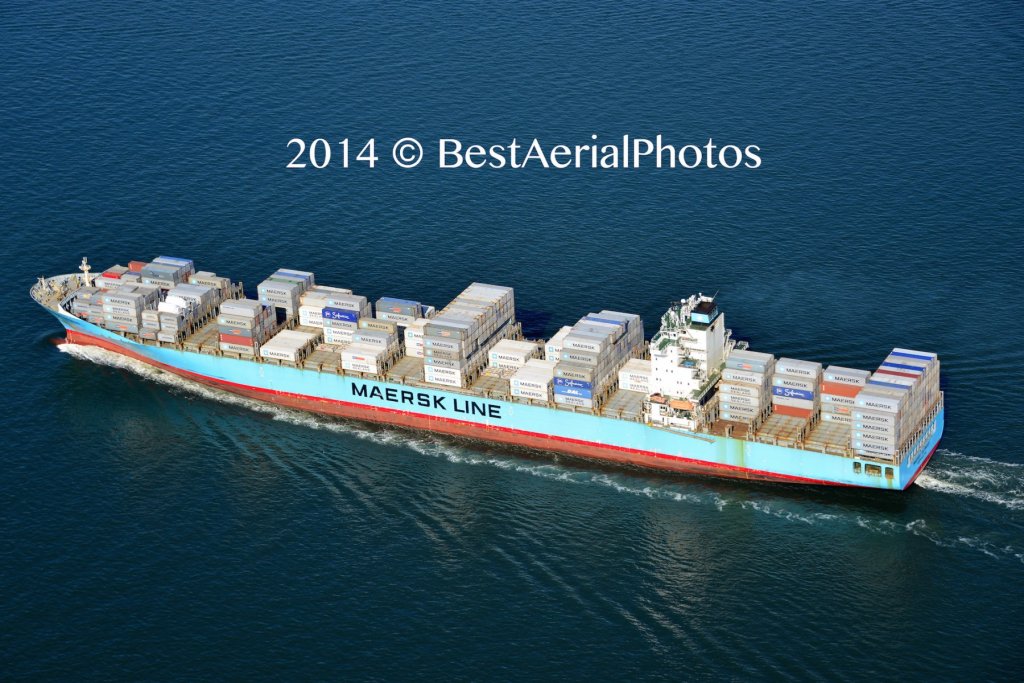
Thank you all for following along and welcome aboard for my new adventure into ship building. Here is a beauty picture of the ship courtesy of Best Aerial Photos. Visit their website link for their service and other great aerial photos. http://www.bestaerialphotos.com/typical-aerial-views-ny/maersk-detroit-cargoship/ Dan thanks for the links and I am an old customer of Tom's from my WWI airplane builds using his machine gun cooling jackets. I checked out his rails and once I get close to determining the number of rails I may order some. No it is not for RC but for container loading. I will let Evan sort out what load out he wishes down the road. John, the new Proxxon table saw is working perfect and a great help in sawing the 1/8" plywood for the bulkheads shapes for hand sawing. Even the Admiral is happy because I made picture shadow box frames for her new product artwork. I also mis-typed the scale and will have to edit, it really is 1:354 which makes the photo etched rails from Tom"s even better. Sawing out all the bulkheads with my jeweler's saw is time consuming so I saw one, file it clean and glue in place with the glue setting as I saw the next one. This weekend is my wife's big craft show so I will help her as grunt labor and gopher for the Labor Day weekend. If the Admiral is not happy no one is happy!
-
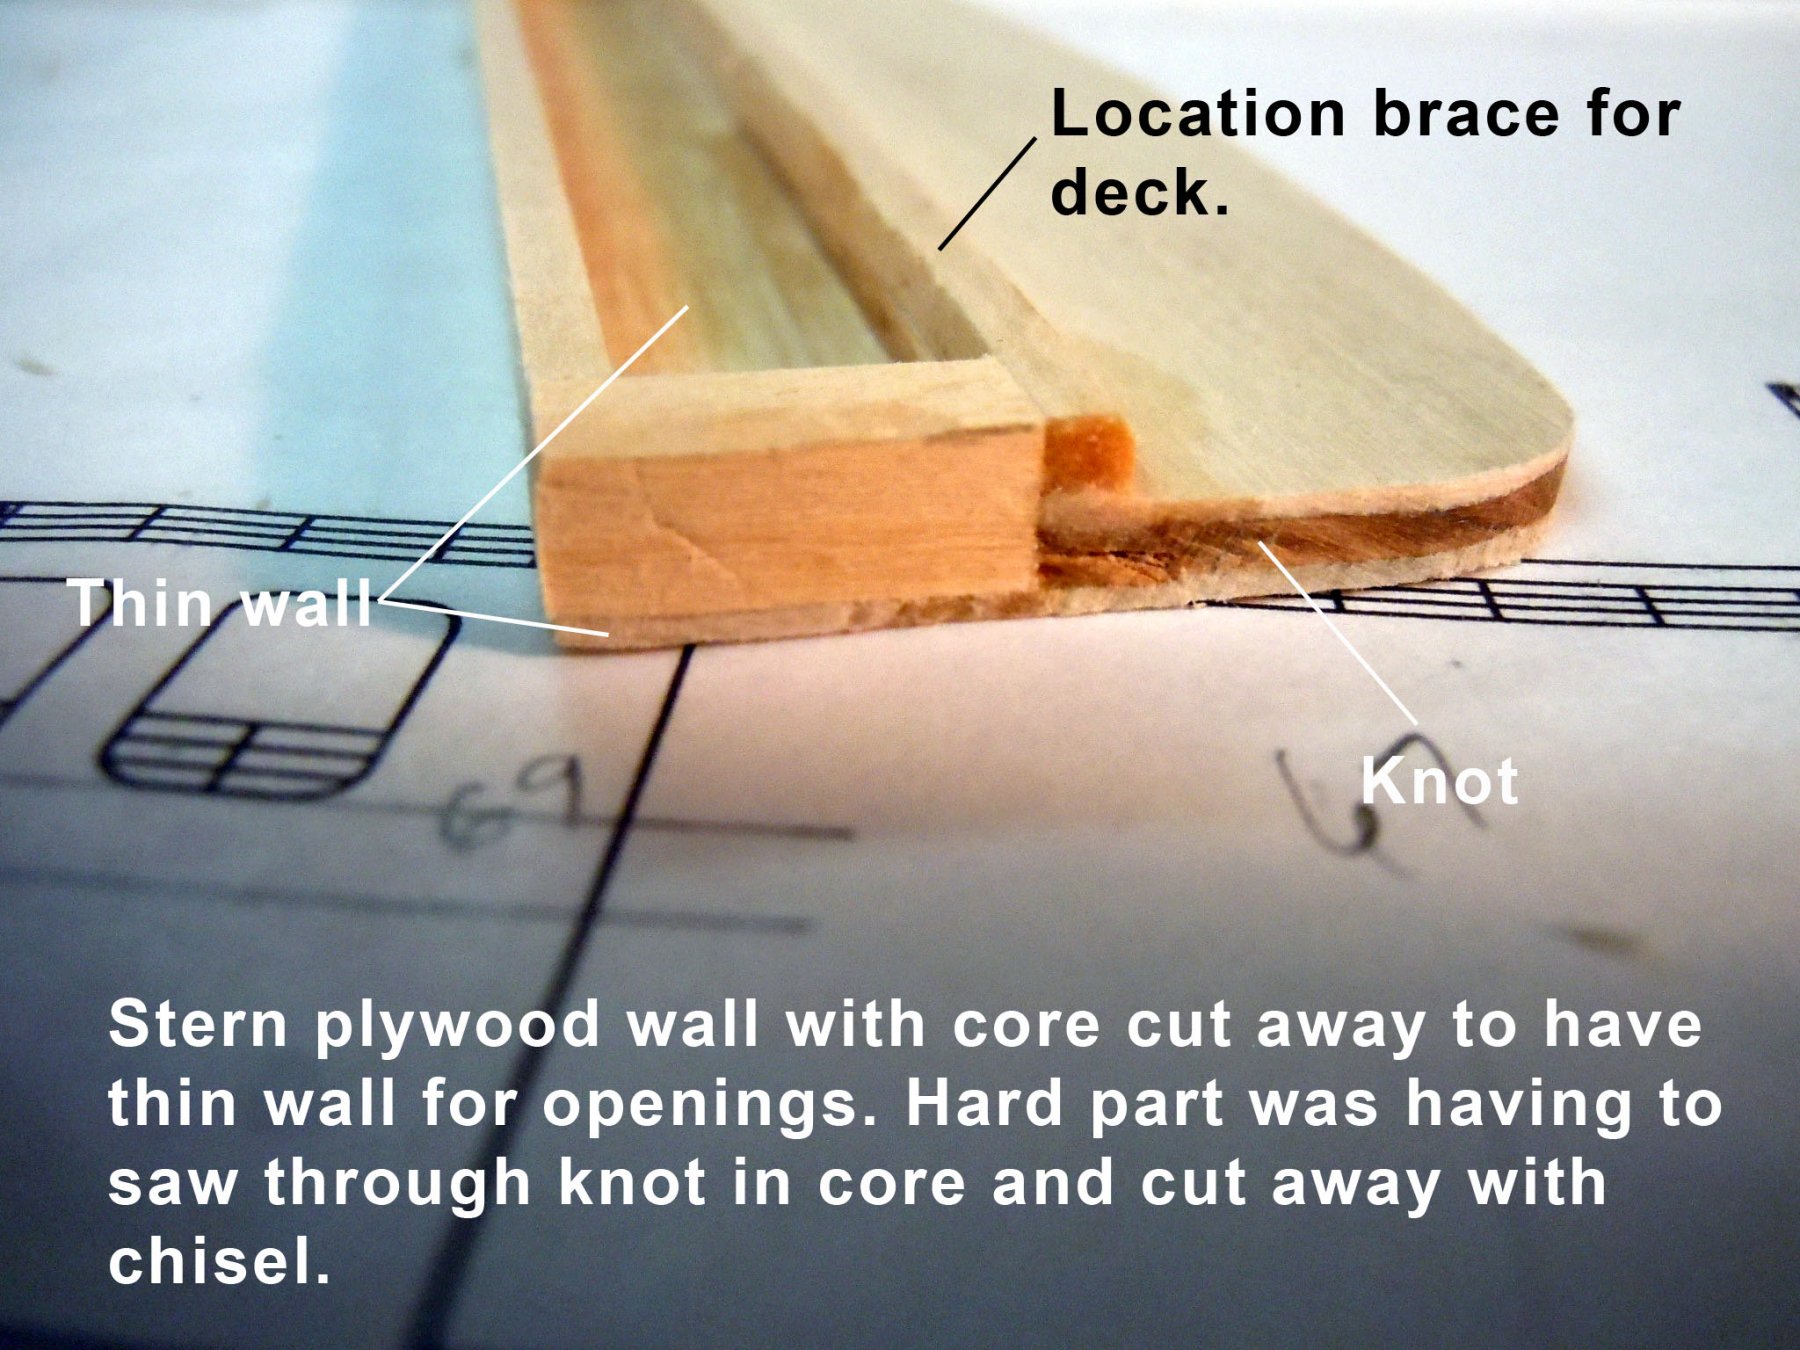
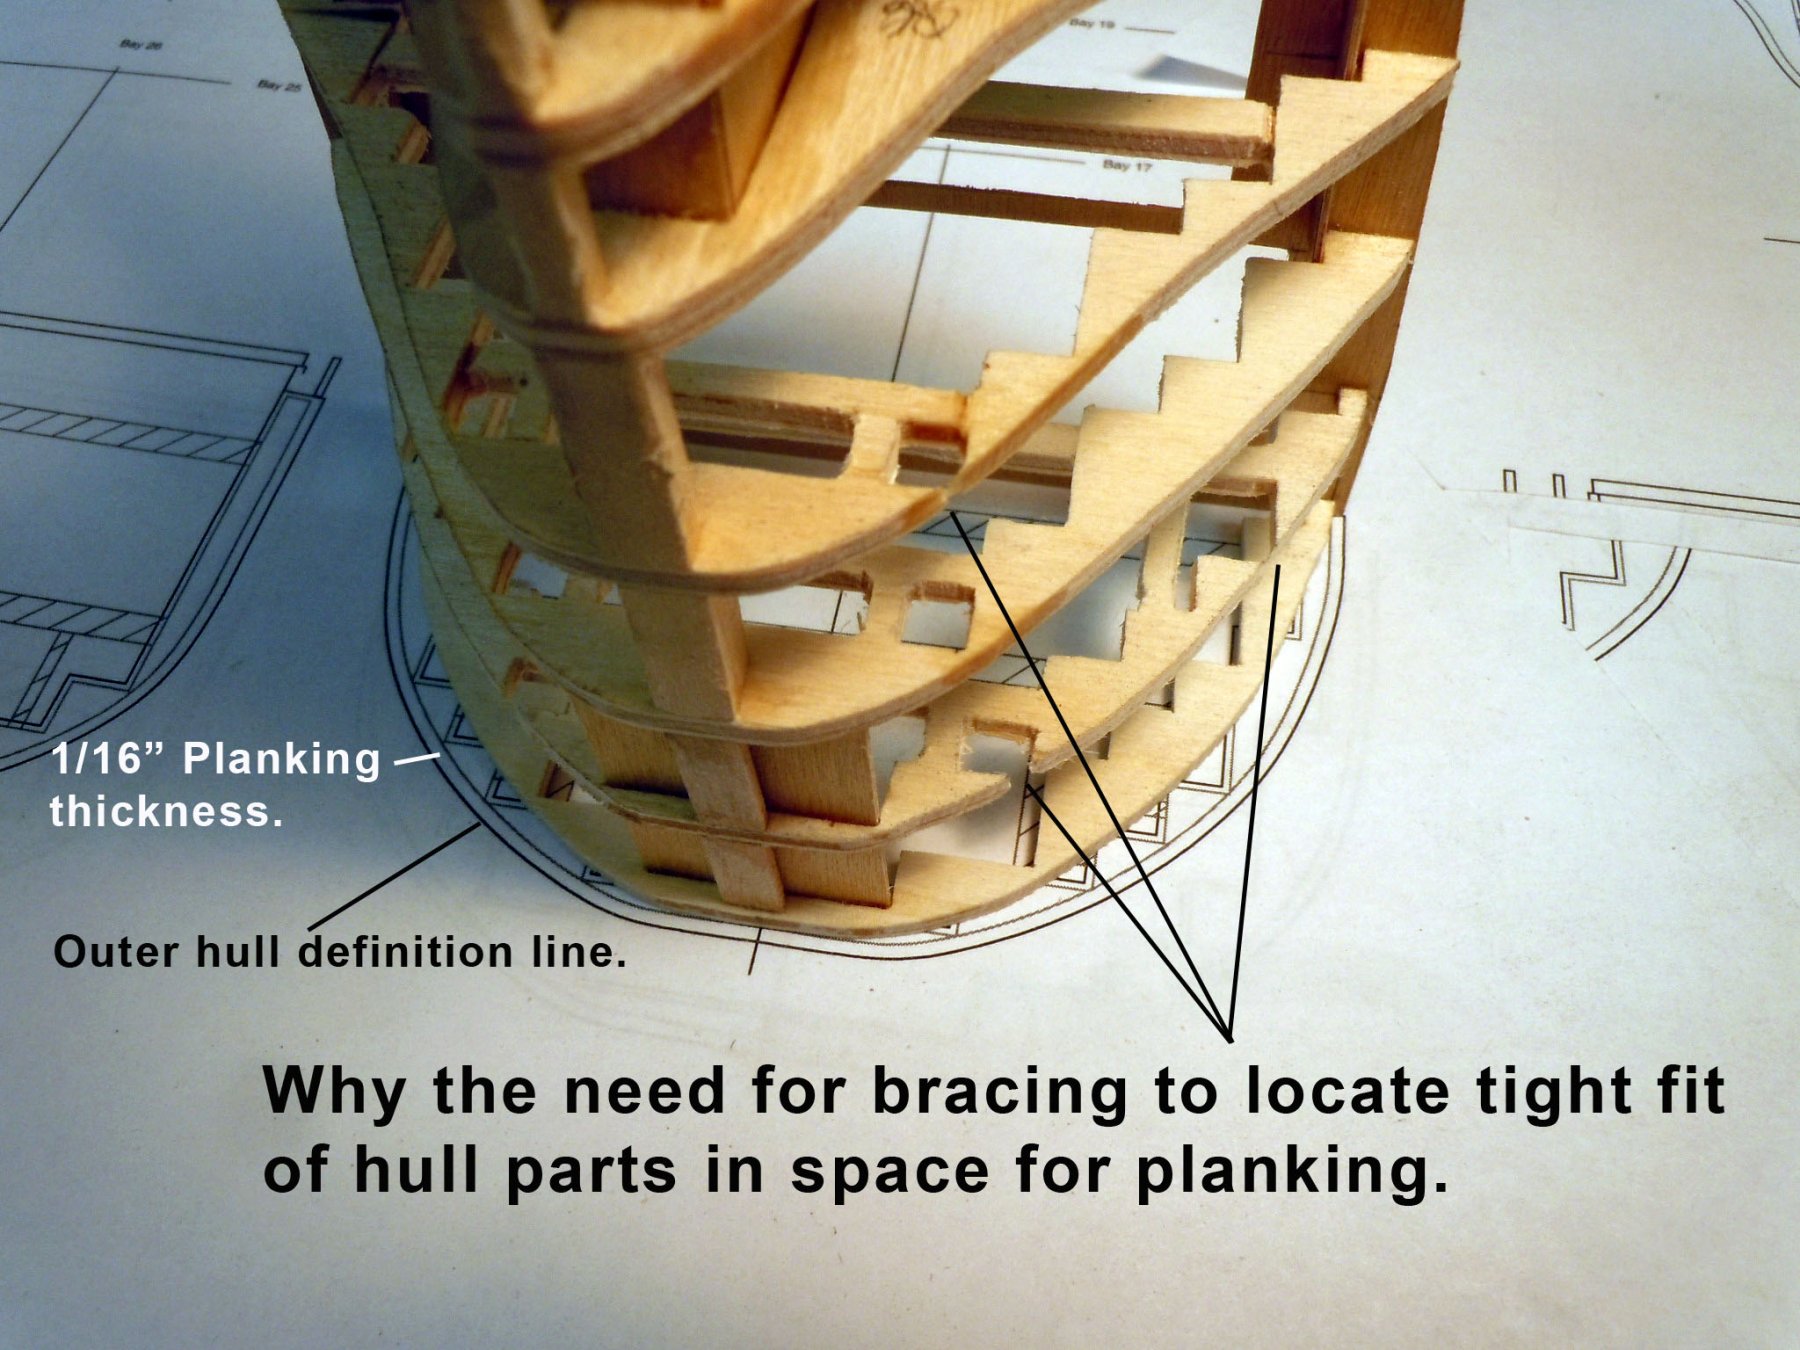
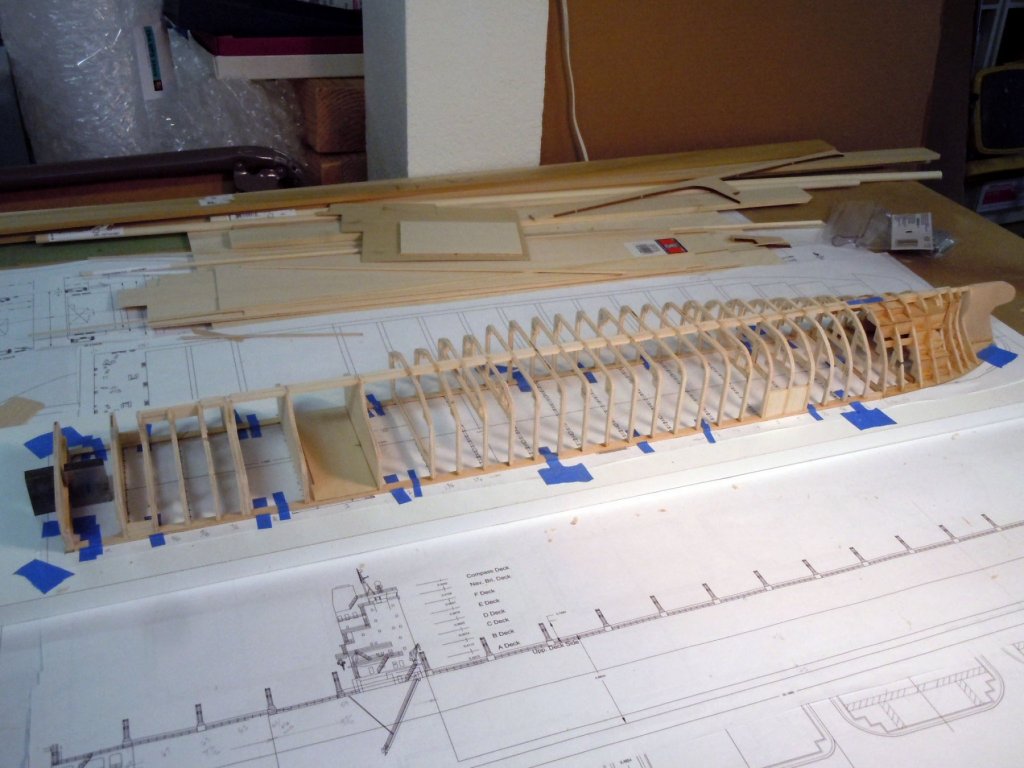
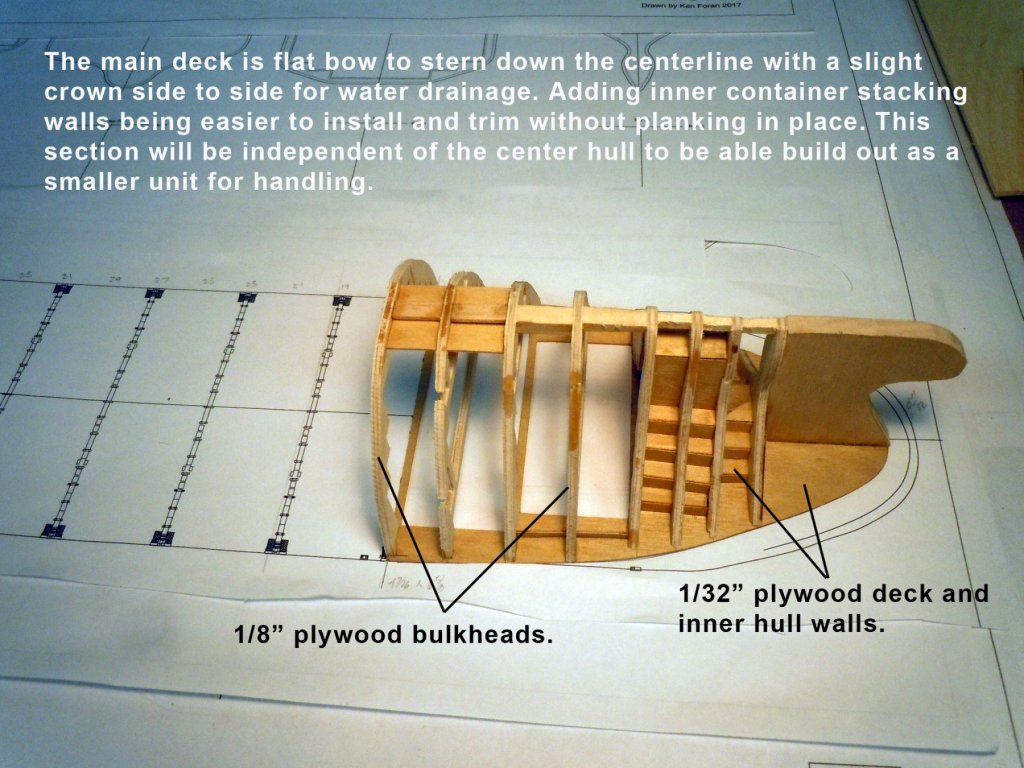
Finally completed enough CAD drawings to get started on building. The CAD drawings are based on technical drawings from the ship builder. Attached are a couple of PDF files showing all the section bulkheads for the container bays. Detroit Bay Sections 01.pdf Detroit Bay Sections 02.pdf This build is being done for my son-in-law who is now the Captain of this ship which is his first command since being promoted to Captain. I thought that he should at least have a model of the first ship he commanded. Since he took over Command and after two 72 day tours the ship has gone from the worse in it's class to number 5 in the entire Maersk fleet. The build will be a new challenge being completely scratch built and a major difference from a tall ship. It will be built in sections for ease of handling during the build process until the units are glued together. As I pondered the build while doing the drawings I finally realized that this would be an inside out build due to the container bays down in the hull. The good news is the main deck is flat down the center line with a slight crown side to side which will really help on this build. Being a scratch build things will be made up as I go and bounce back and forth between build and CAD drawing. Here is a sequence of the start on the bow section. The main deck and inner container walls are 1/32" plywood, bulkheads will be 1/8" plywood and planking will be 1/16" basswood strips. Because of the small scale dictated by eventual display location the length will be 32 inches. When drawn the hull walls and inner walls almost touch which required the use of location braces for some sections of the bulkheads that will be cut away as the inner walls are added. This will be an inside out build since it is easier to cut and trim the inner walls without the planking being in place. Now back to adding the center section bulkheads.


-
John, here is where I got the figures from; Ages of Sail one of this site's sponsors here is a link: http://www.agesofsail.com/ecommerce/figures/25mm-sailors.html You may wish to explore their site for other items as well.
-
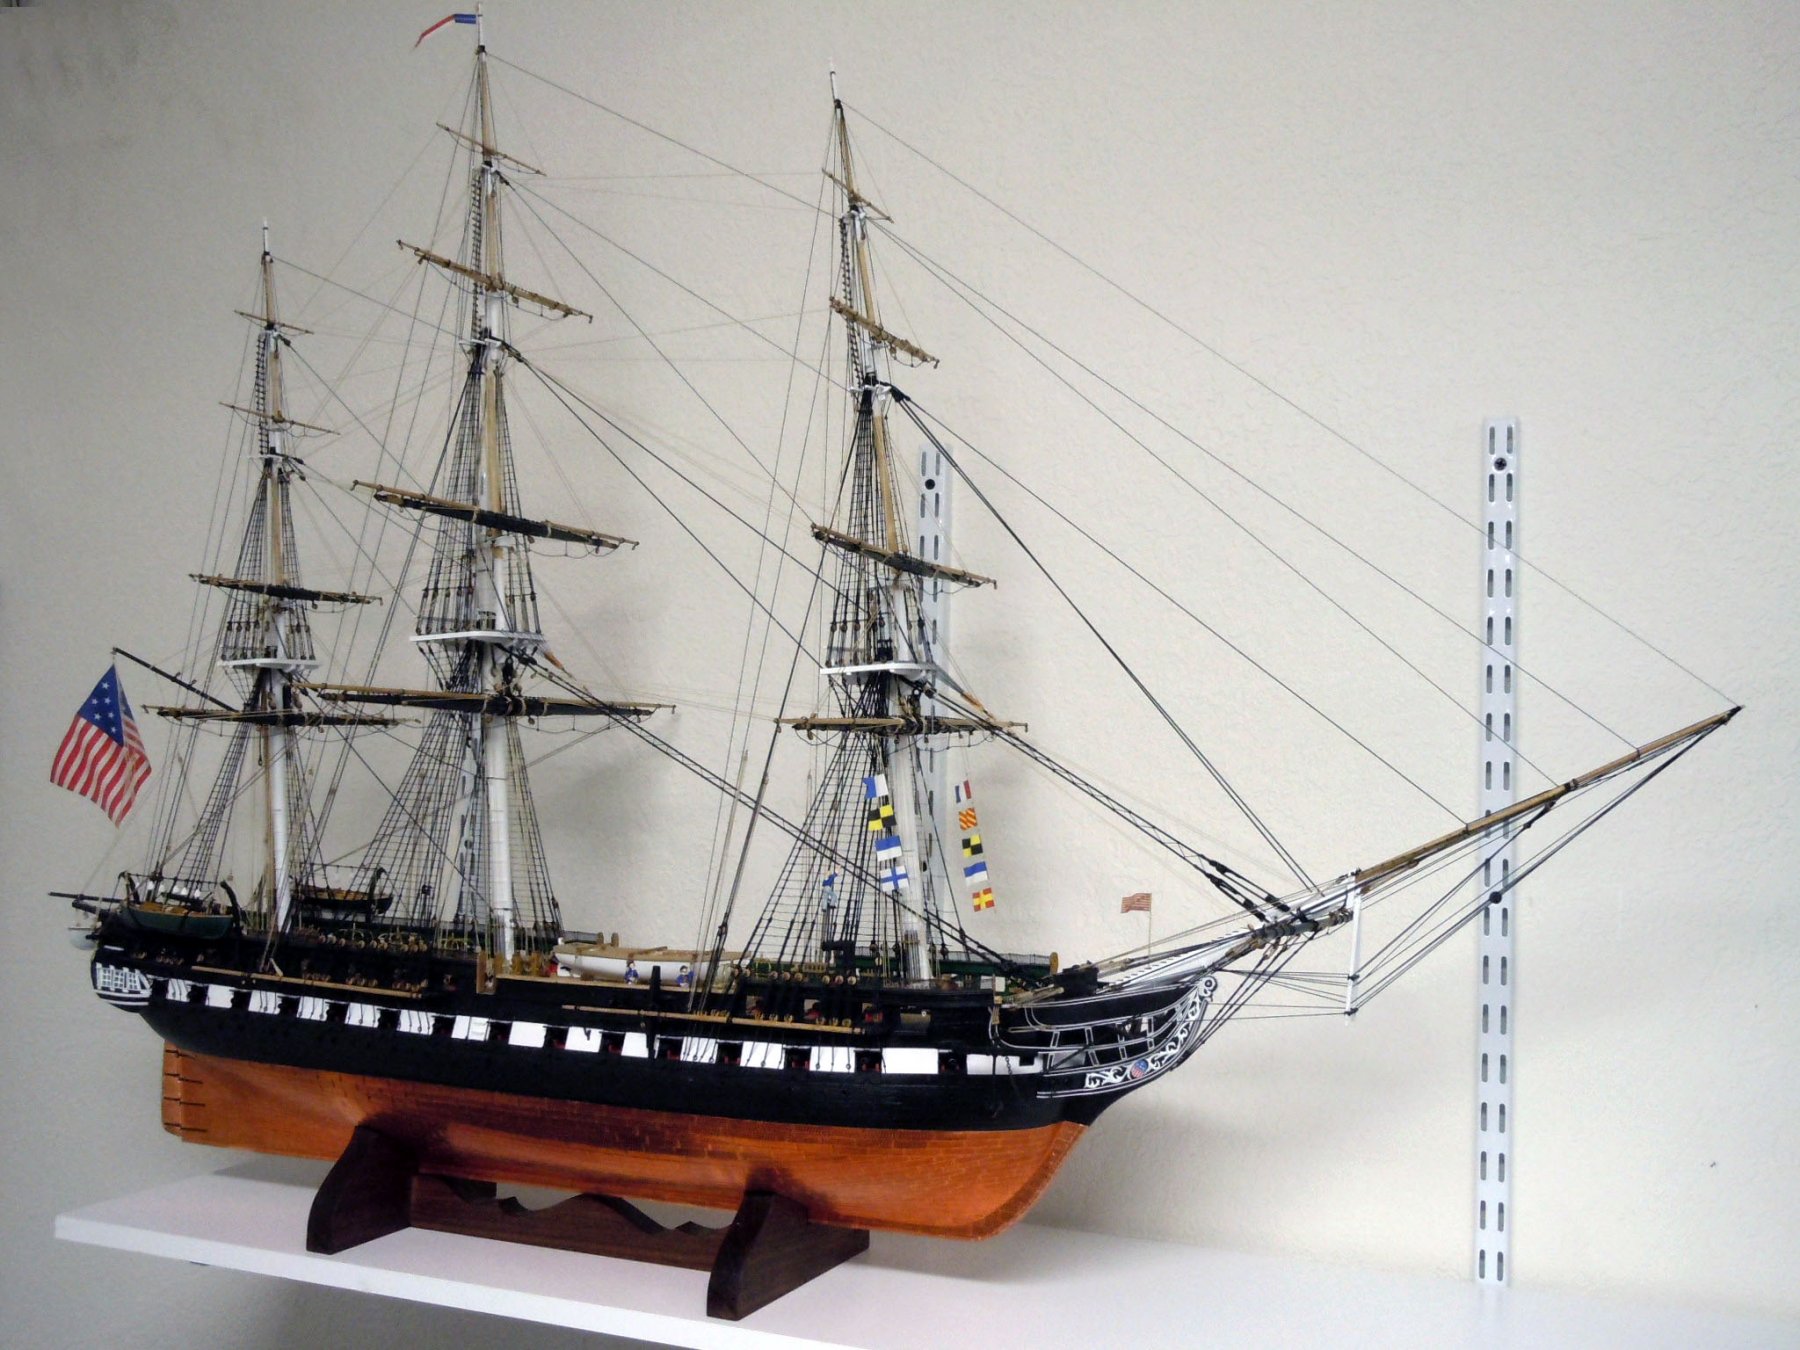
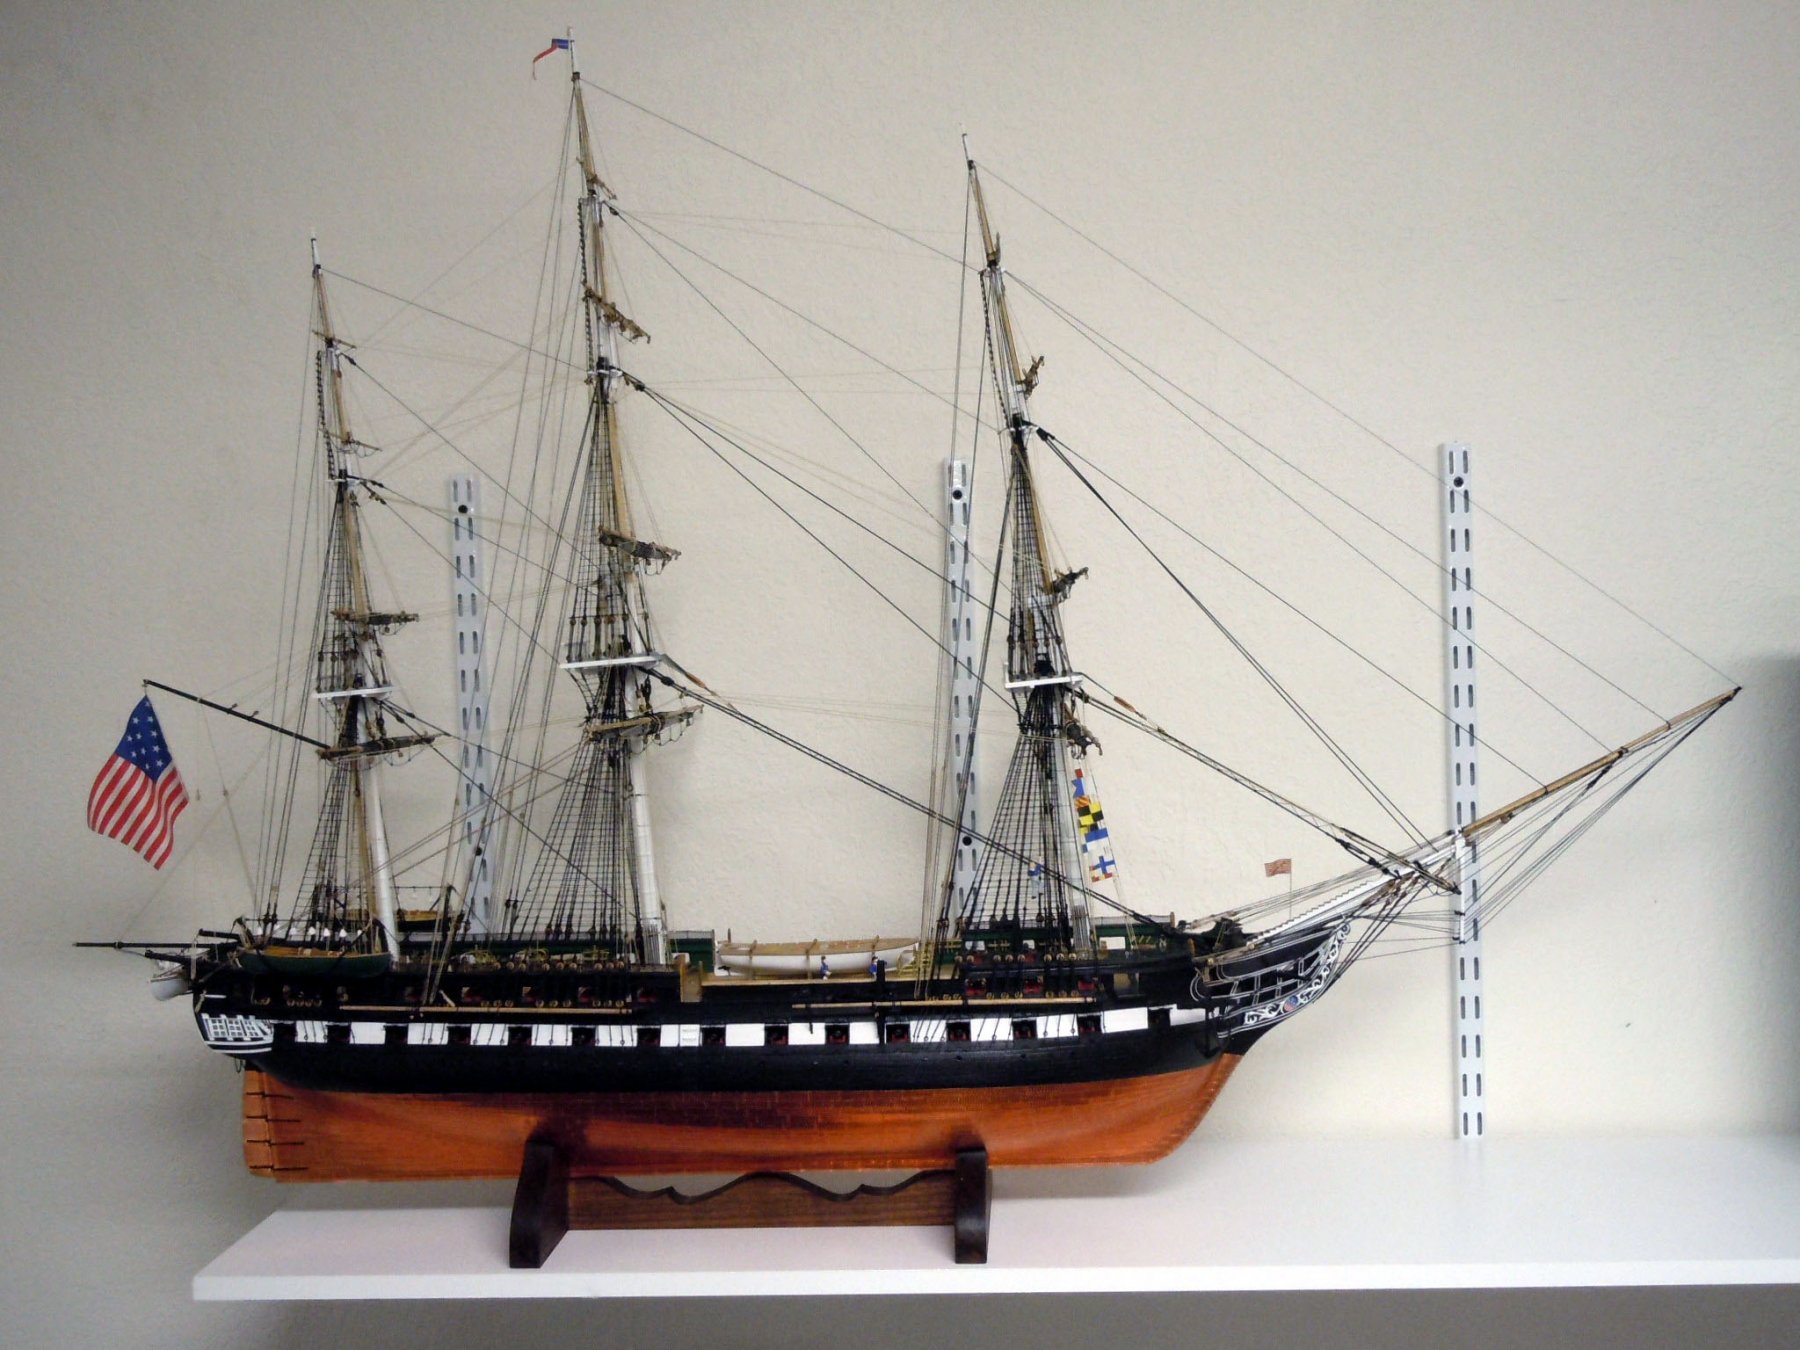
Thank you all for your kind words and following along this build and helping with my ongoing education on ship building. This will prepare me for the future build of the HMS Victory 1:90 scale by Mamoli which will include some kit bashing. My next build which I am starting to work on and doing CAD drawings for is the container ship Maresk Detroit which my son-in-law is the Captain. This is the first ship he has command of since being promoted to Captain. This will be a complete scratch build at 1:356 scale with an overall length of 32" long x 4" wide x 7.25" high. Size is dictated by future display location in their home. I will start a build log once I have something more interesting than just CAD drawings. I am also working on a couple of commissions which I will disclose at the time allowed. Jon, my son is building a display case and once we get the word that it is ready we will drive the model across country from Morro Bay to Southold, at the end of Long Island. Literally coast to coast. I am sure both nose and finger prints will be a constant with the grandsons as they grow. Not exactly sure yet where my son will have it displayed in the house. Anyway, for now the ship has be shelved out of the way here to clear the deck for my next projects. Again, thank you to all for your kind compliments and advice throughout this build.
-
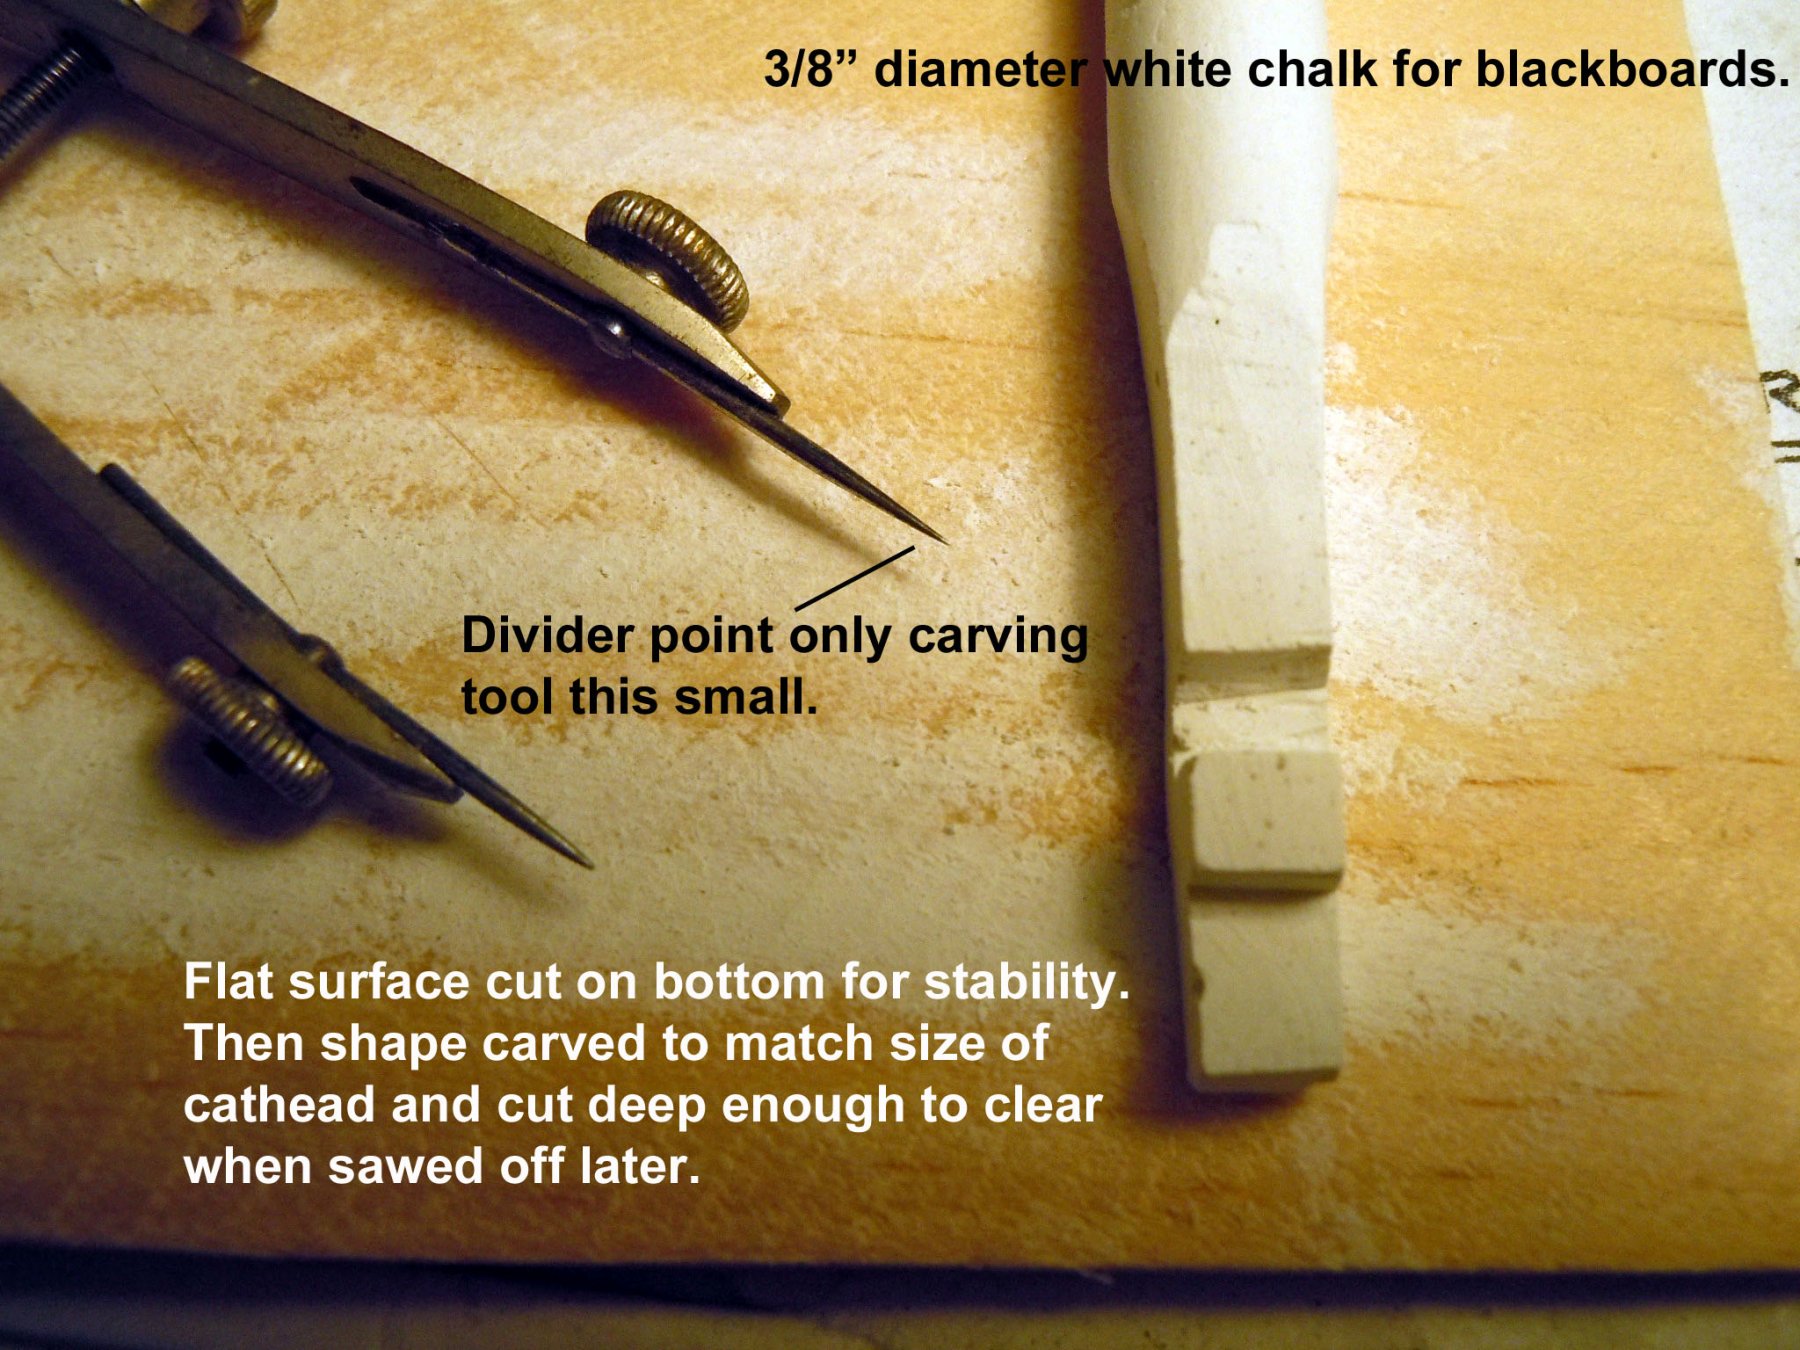
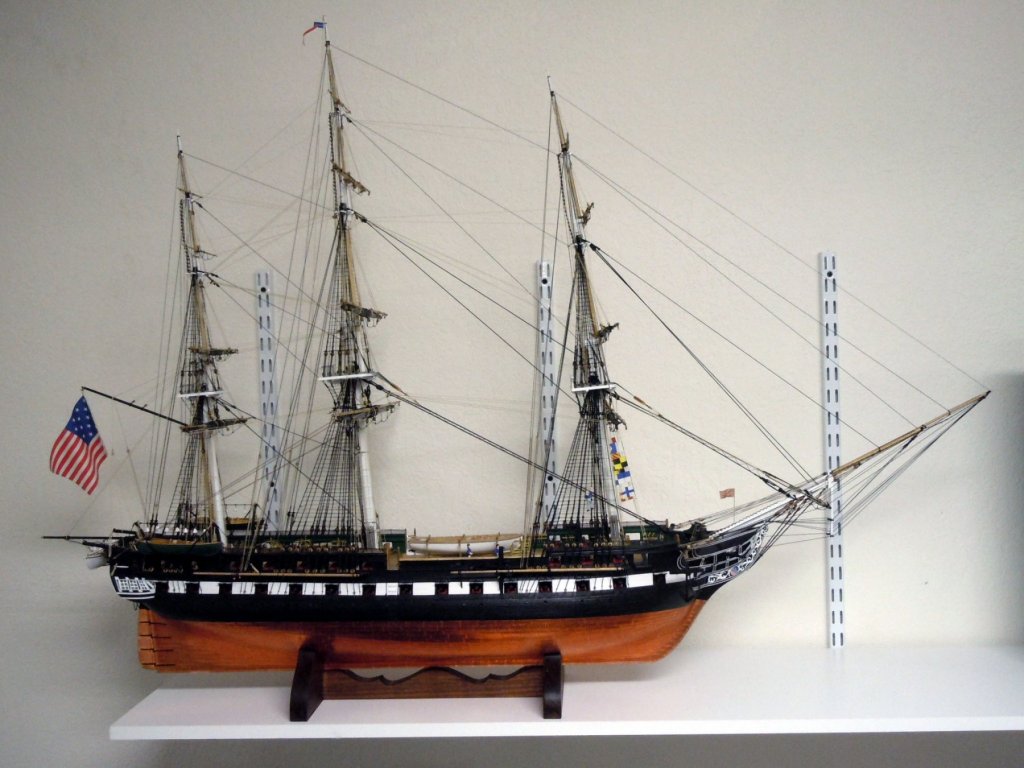
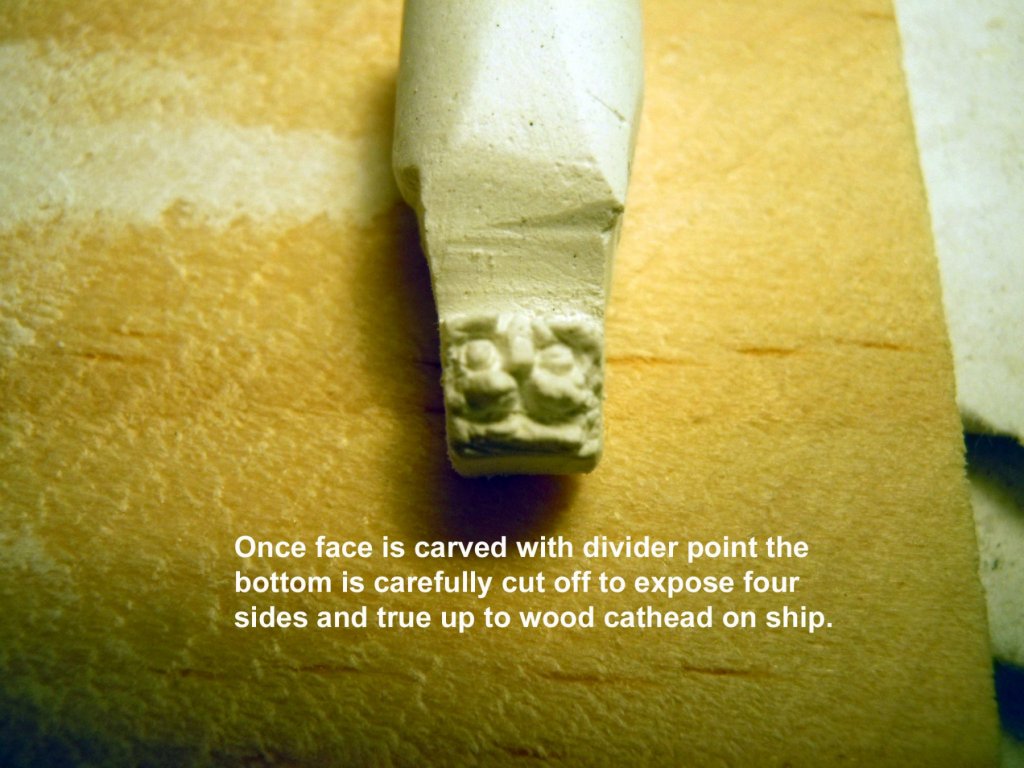
Workflow got interrupted by restarting an old commission that was put on hold. Will be working back and forth on the projects now. Anyway after a couple attempts with materials at this small scale that did not work I reverted to an old standby of a 3/8" diameter black board chalk. This has limited application due to size but can have great results. Here is my feeble attempt using only an Xacto blade and the sharp point of dividers as carving tools with a small chisel paint brush to clean away scrapings. First was to flatten the back of the round stick for a steady hold, then carved the sides and top to the square size need and deep enough to allow cutting with a jeweler's saw later. Then using just the point as a carving/scraping tool very carefully carved the two faces the best I could with the only magnification I had. I then carefully sawed off the bottom as seen. Next since the chalk is very soft I hardened them by soaking liberally with Gold Foil spray paint with a brush on all sides until I thought I had very good penetration through the chalk. They were set aside and allowed to dry completely. I then sawed them down the back side to the thickness needed, sanded flat and then sprayed them again with the Gold Foil Krylon paint a good wet coat. Once completely dried I glued them to there respective places with the best one on the starboard side which will be the primary viewing side. Here is an overall view showing the cathead in place. Now to take some good finished photos for the record.


-
Joshua, from Ages of Sail one of this site's sponsors here is a link: http://www.agesofsail.com/ecommerce/figures/25mm-sailors.html You may wish to explore their site for other items as well.
-
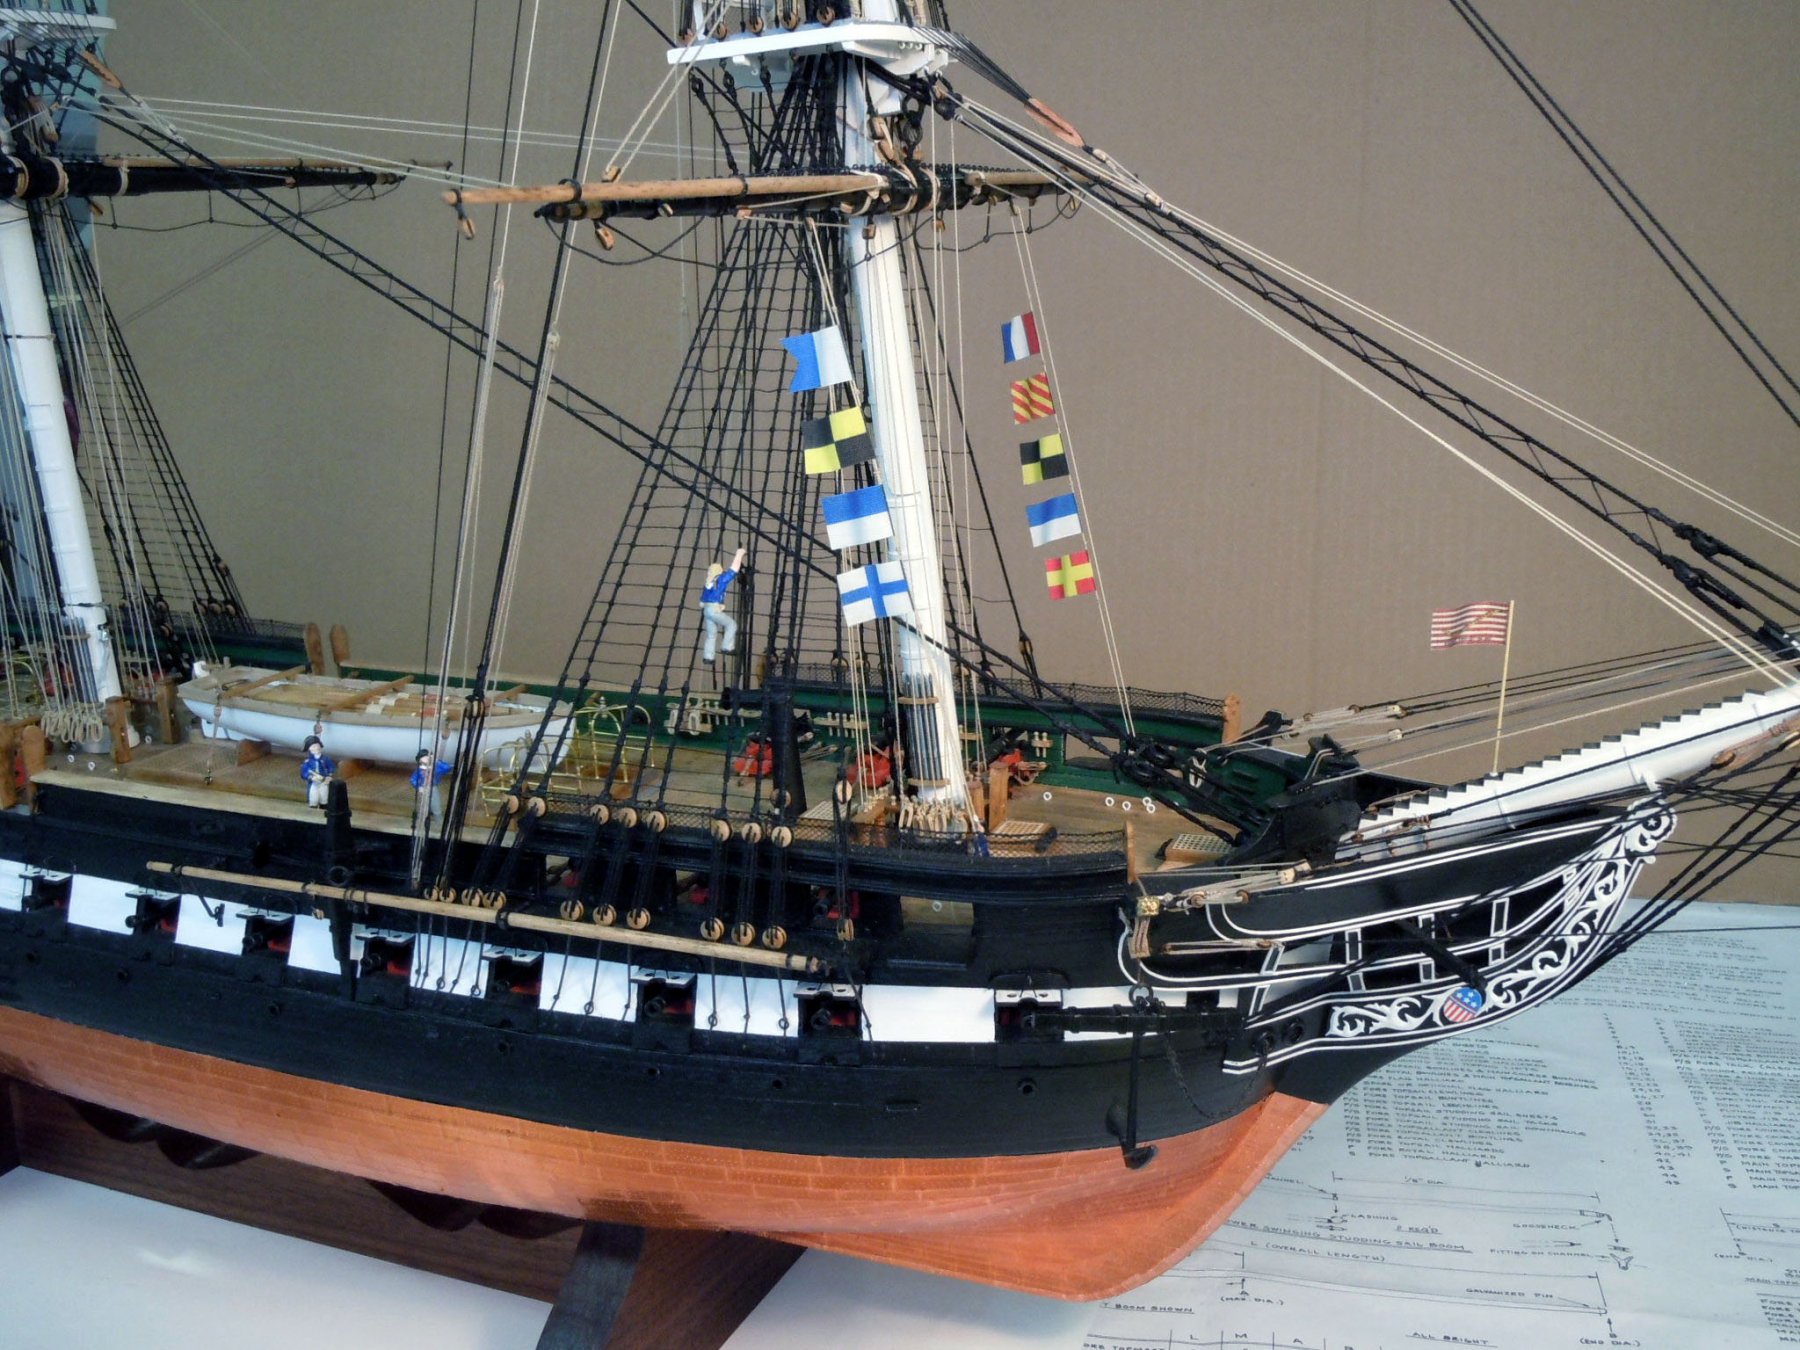
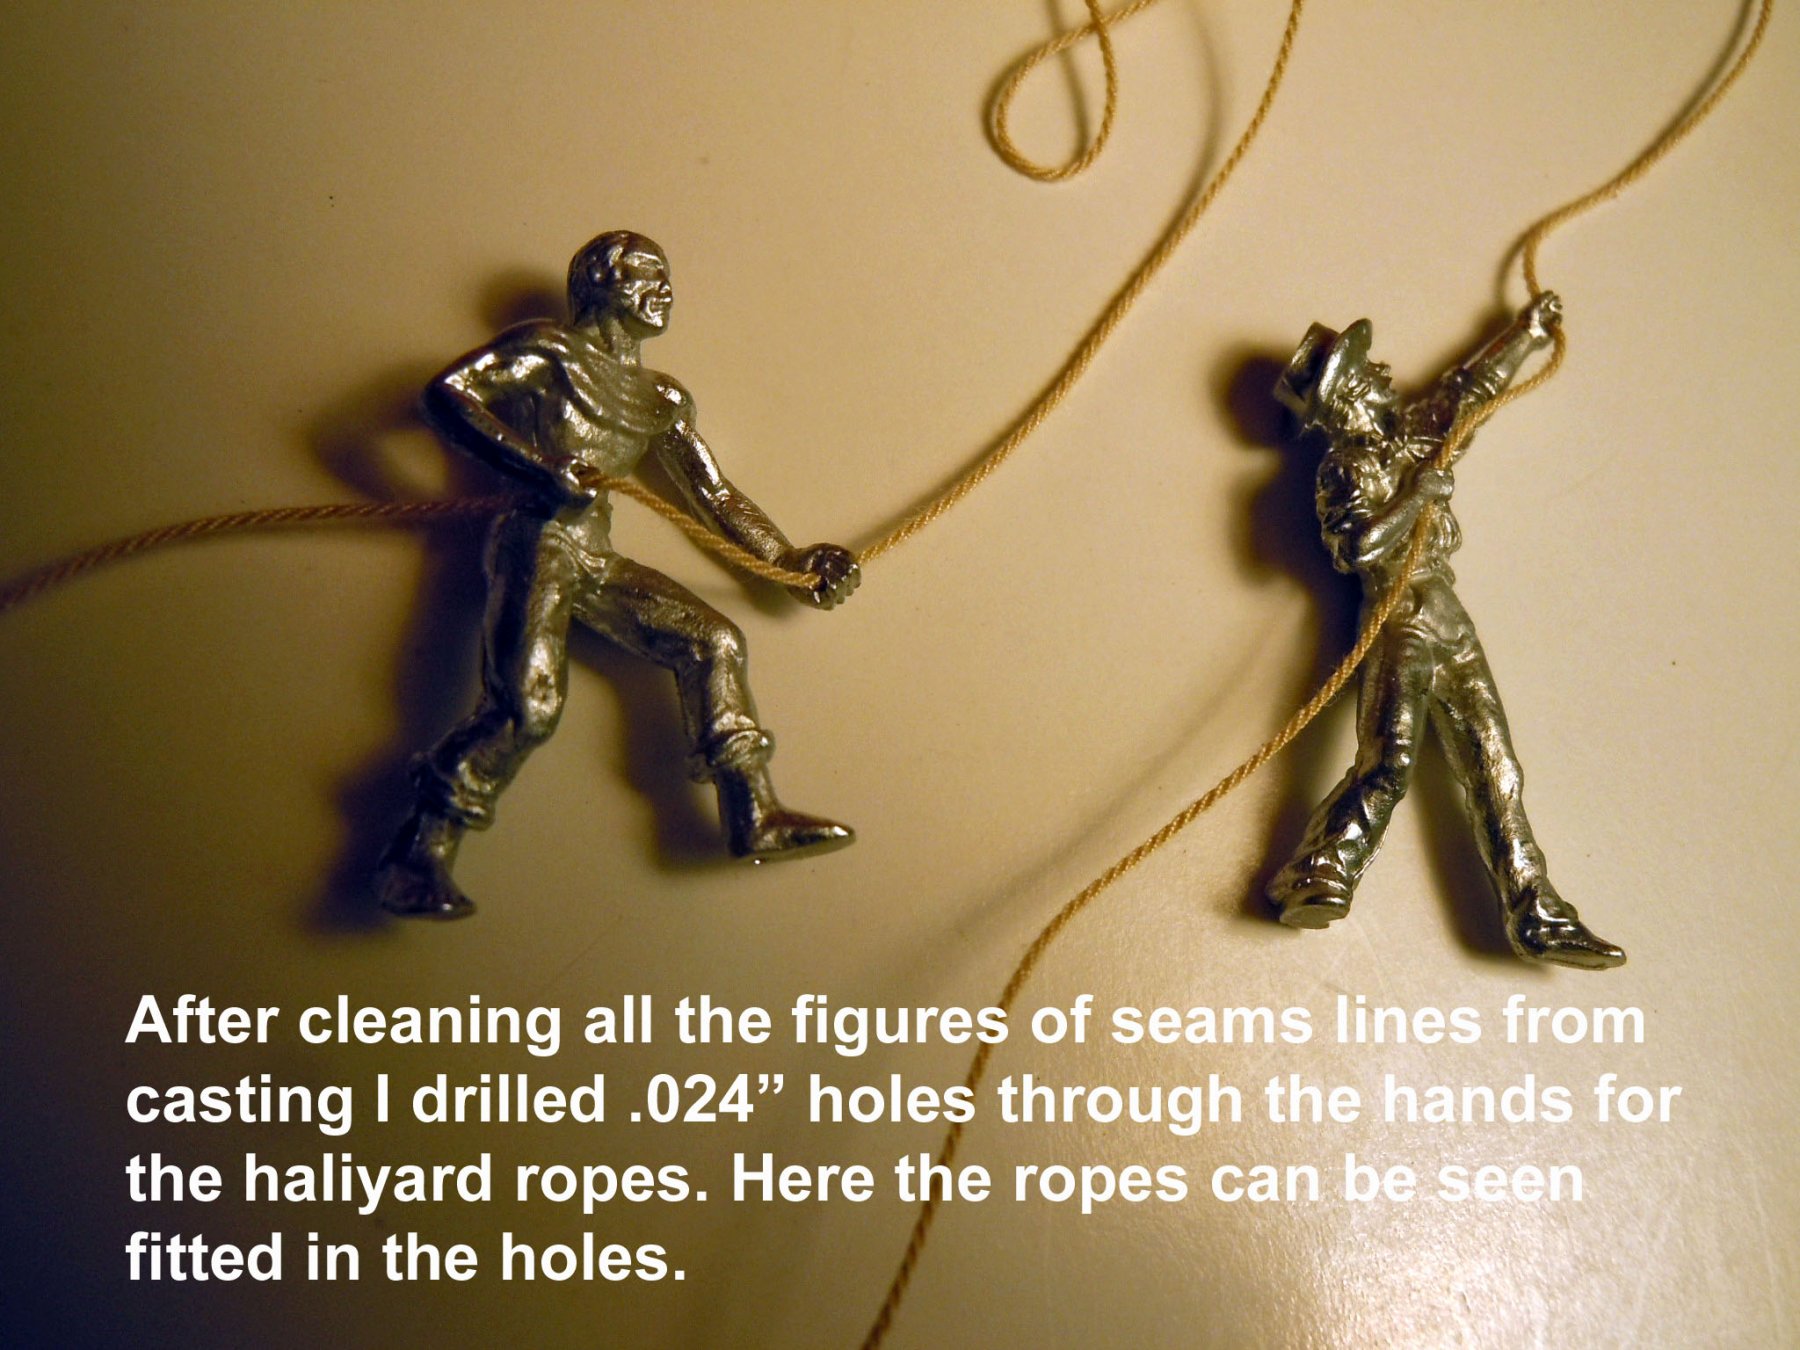
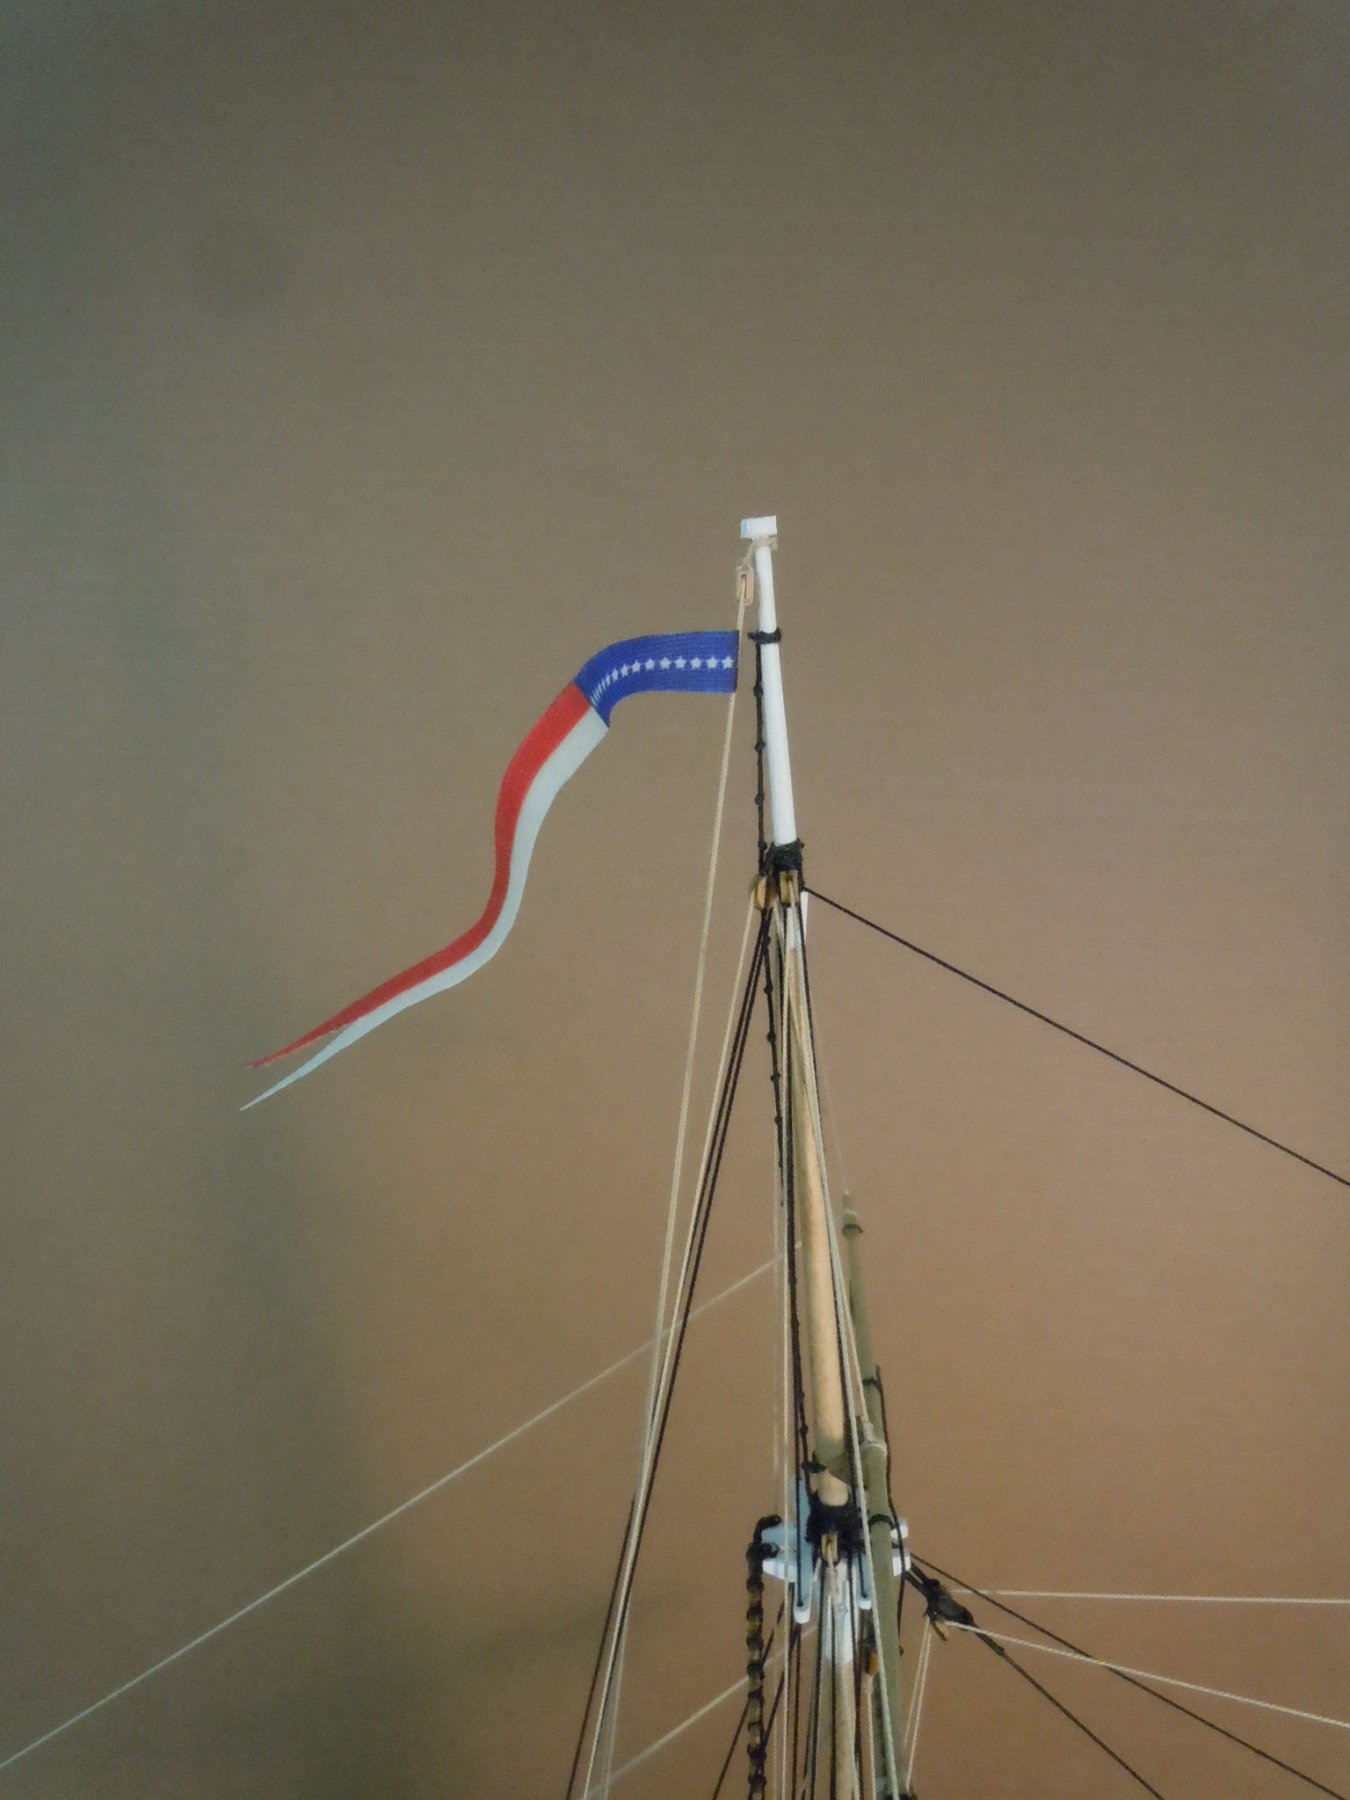
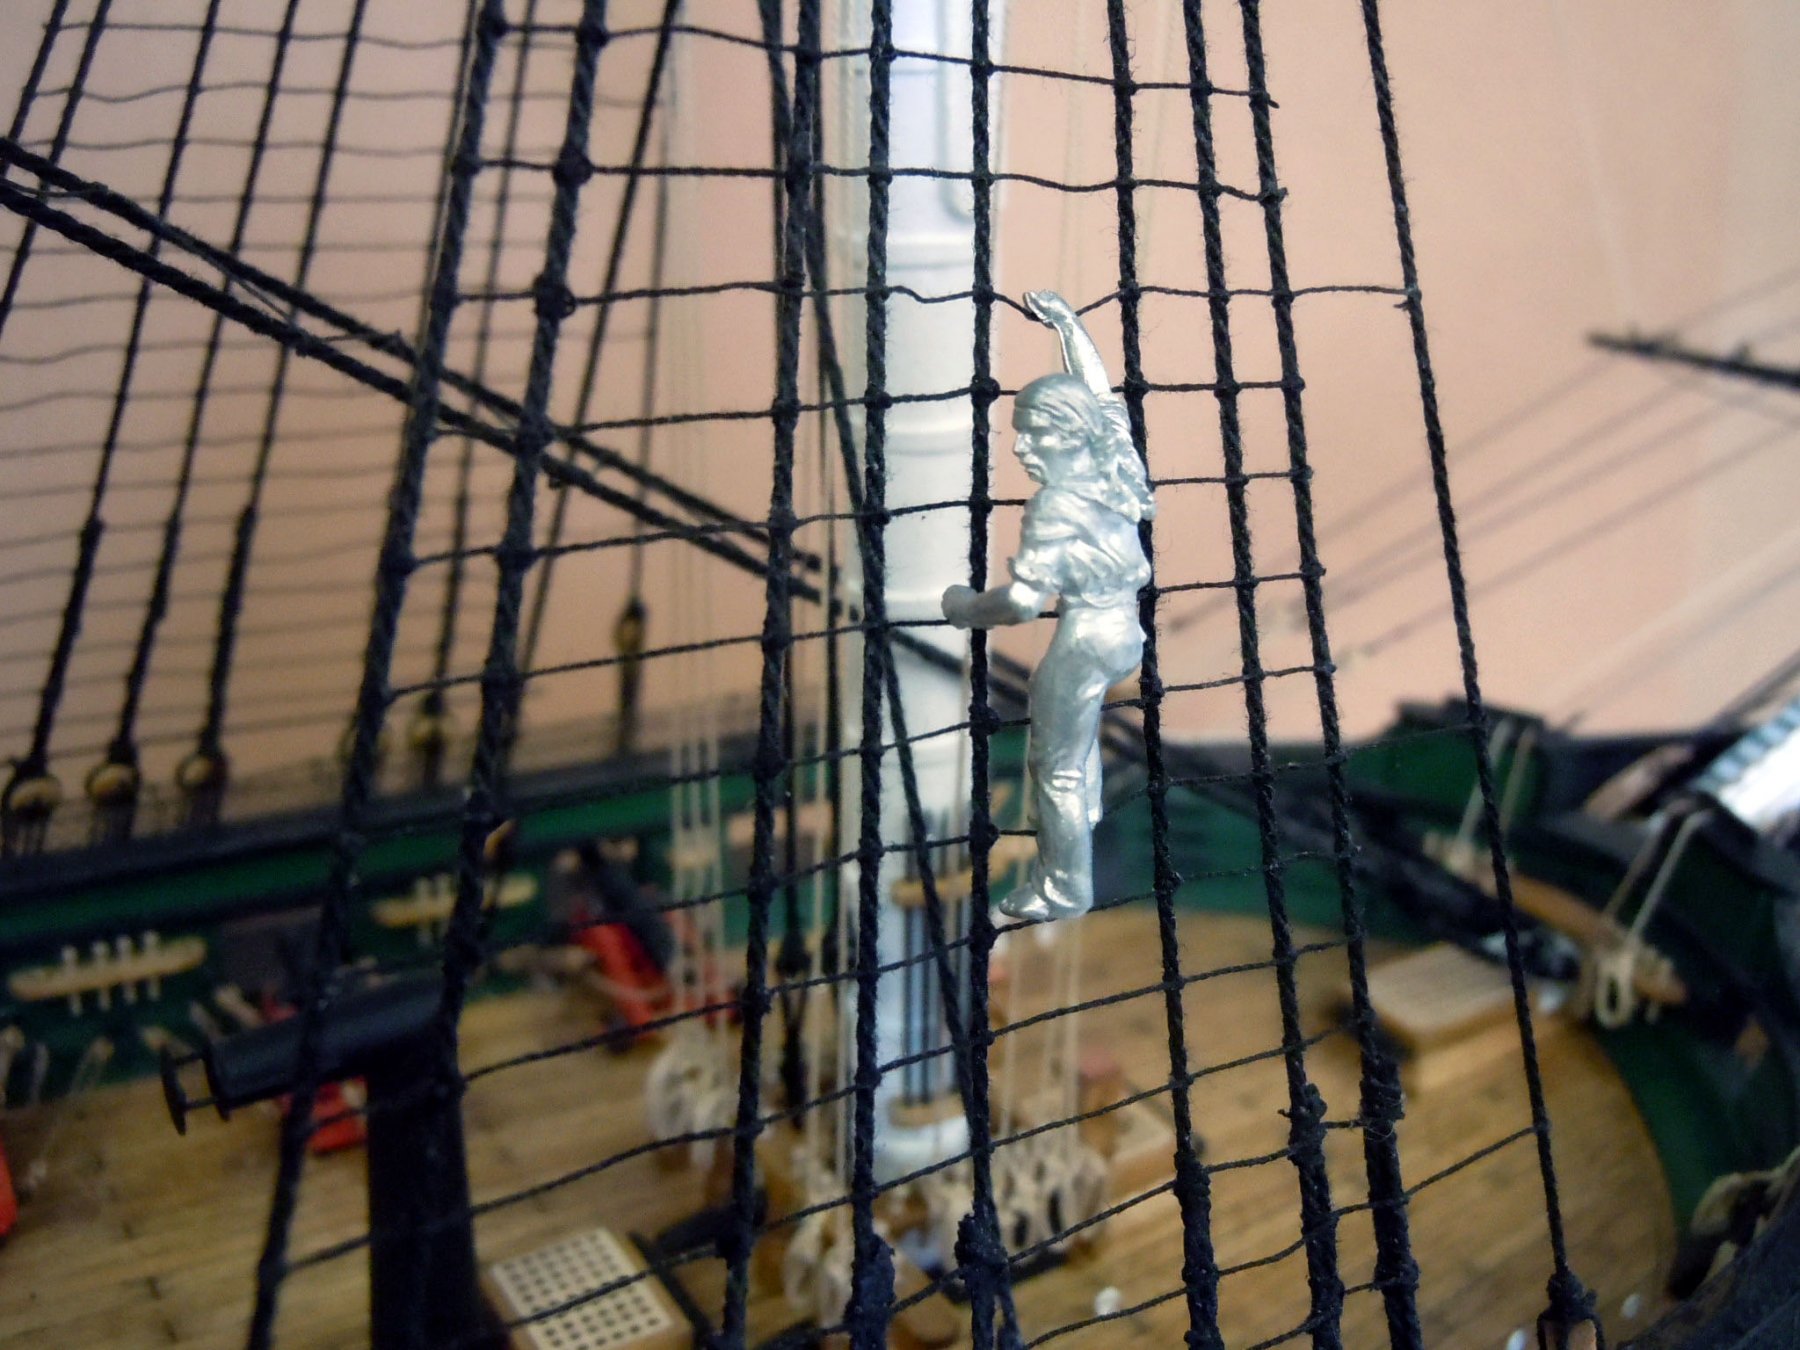
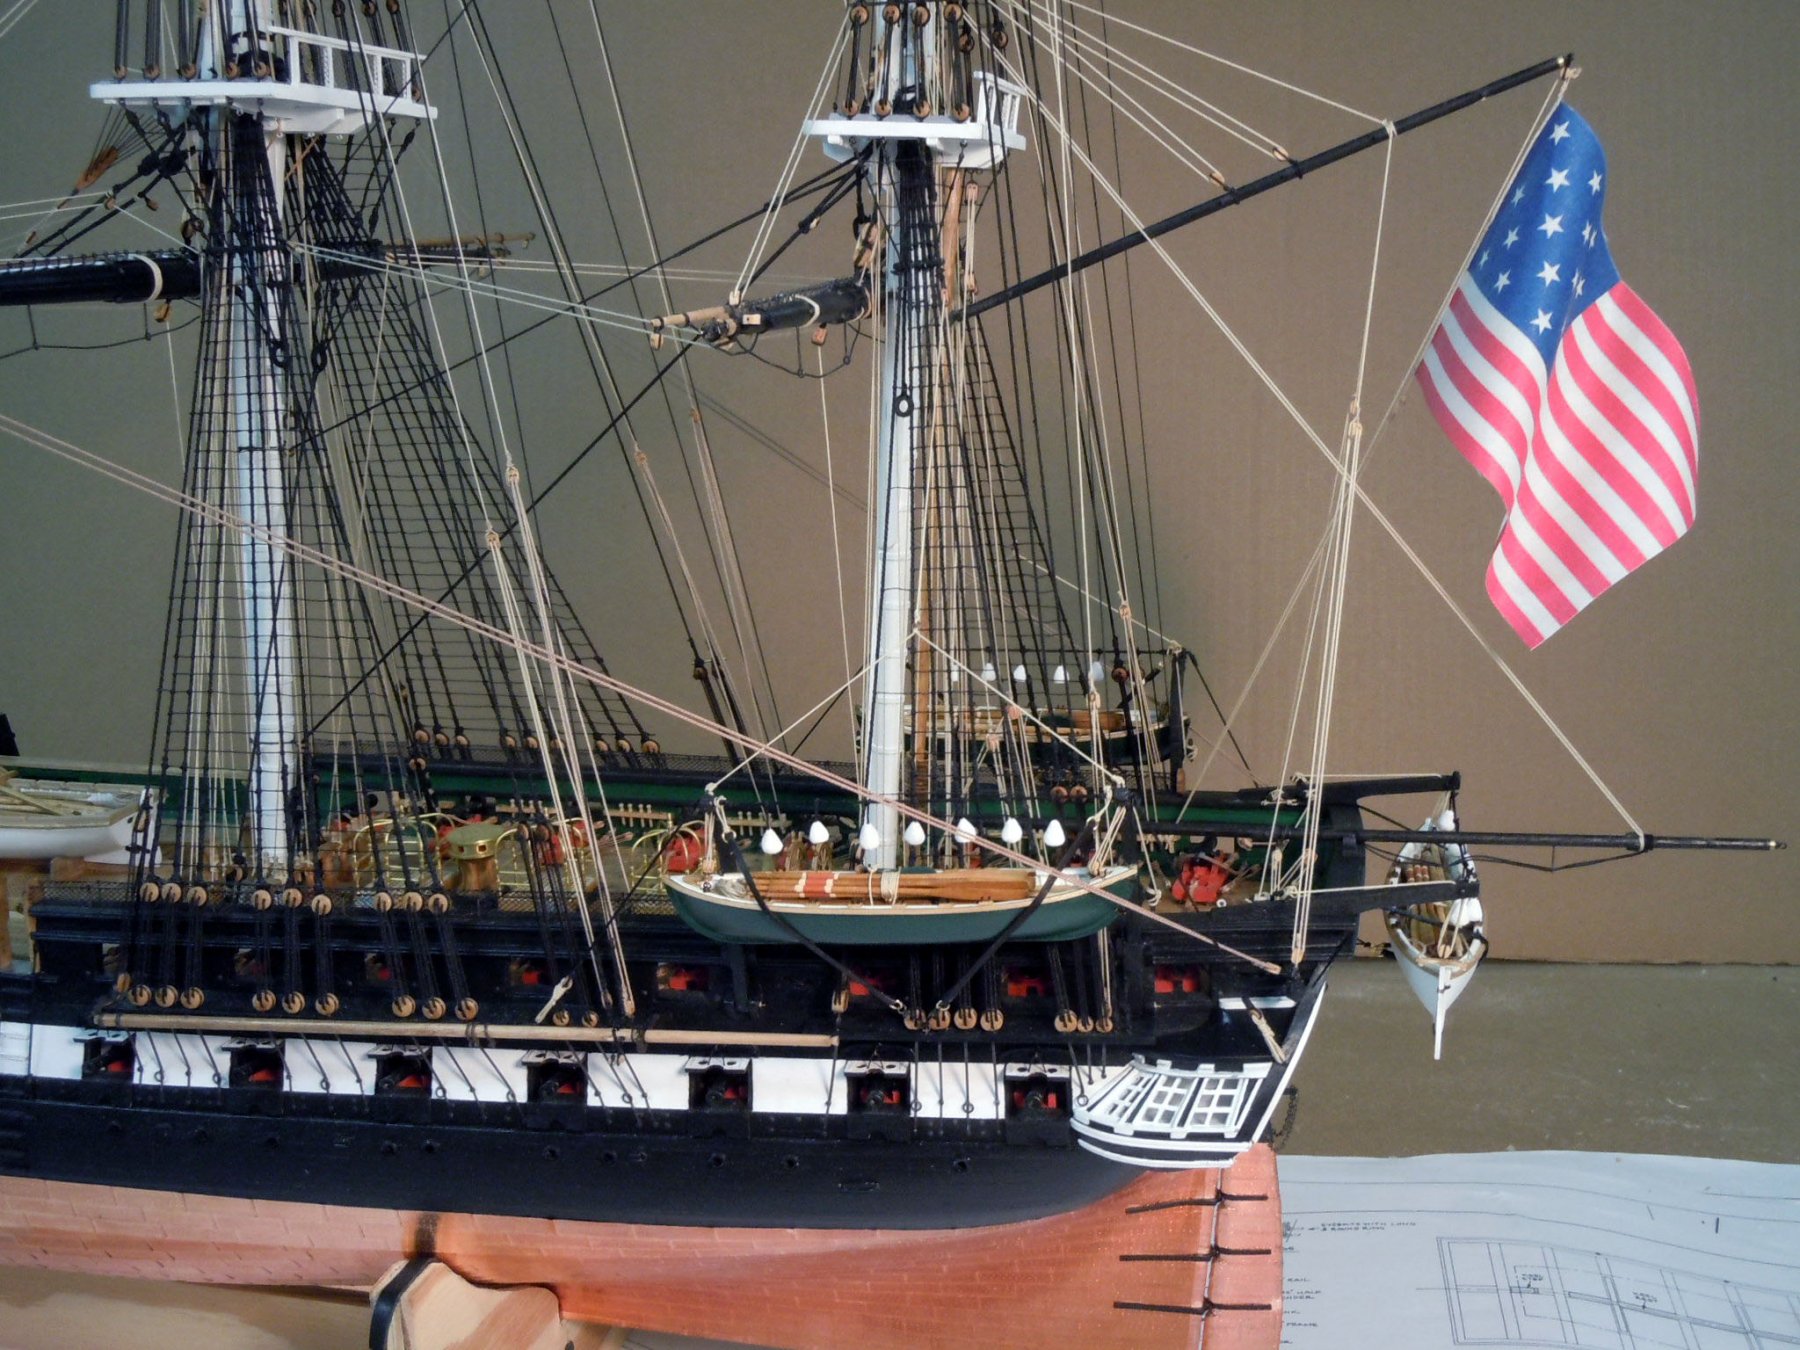
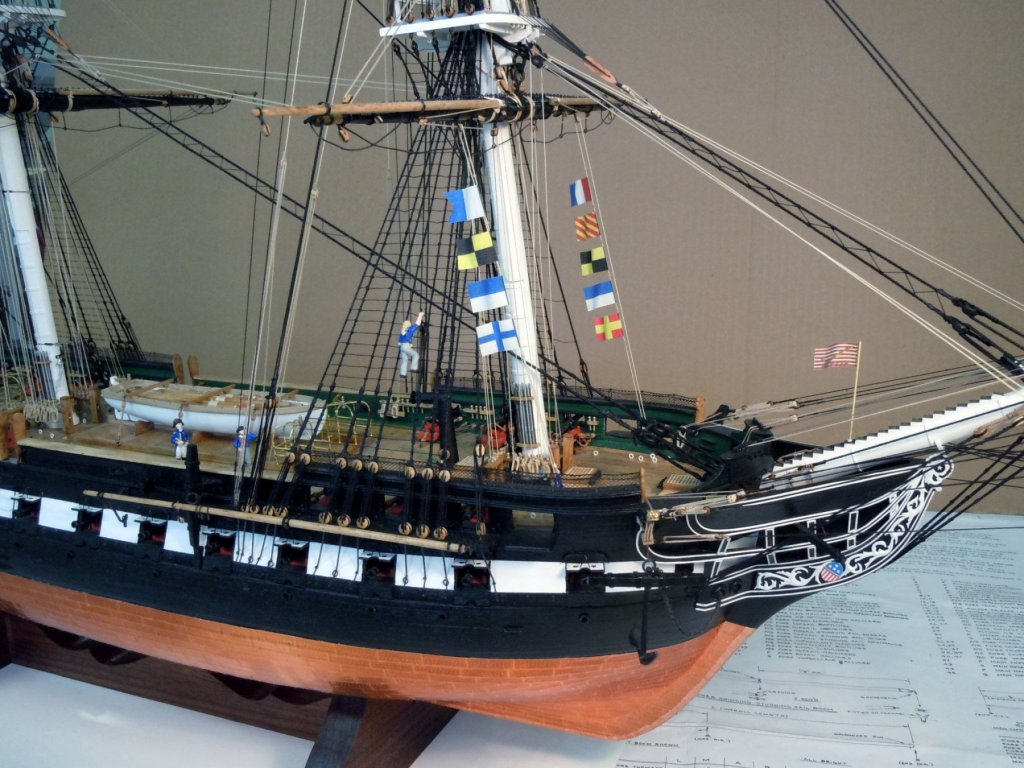
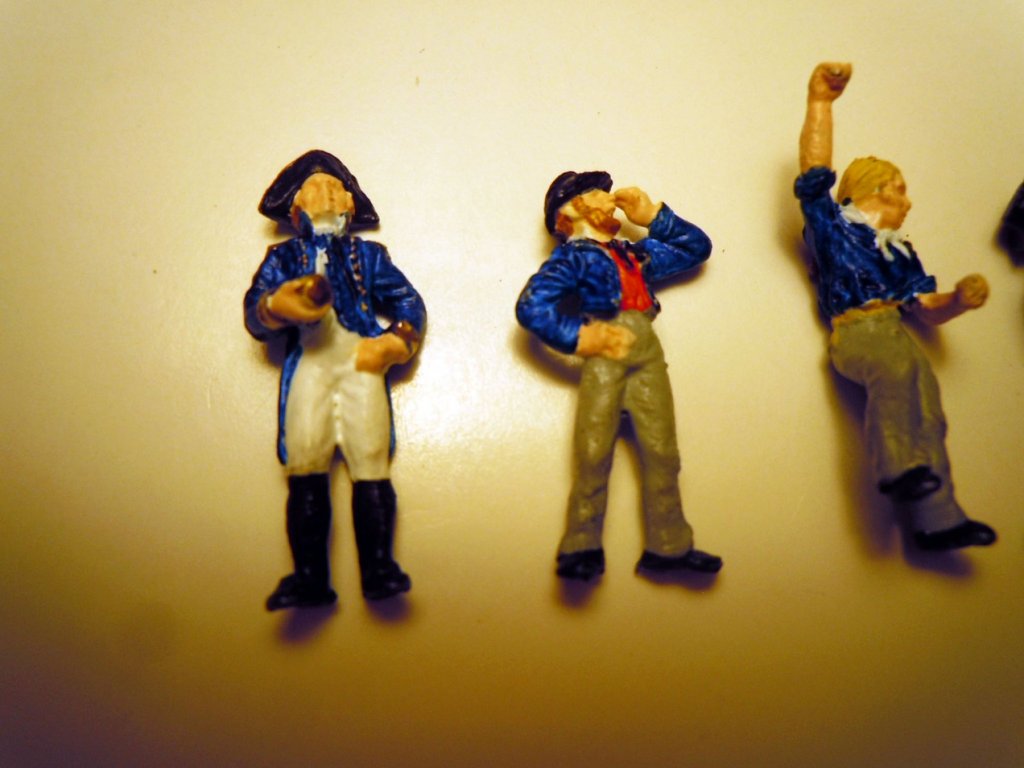
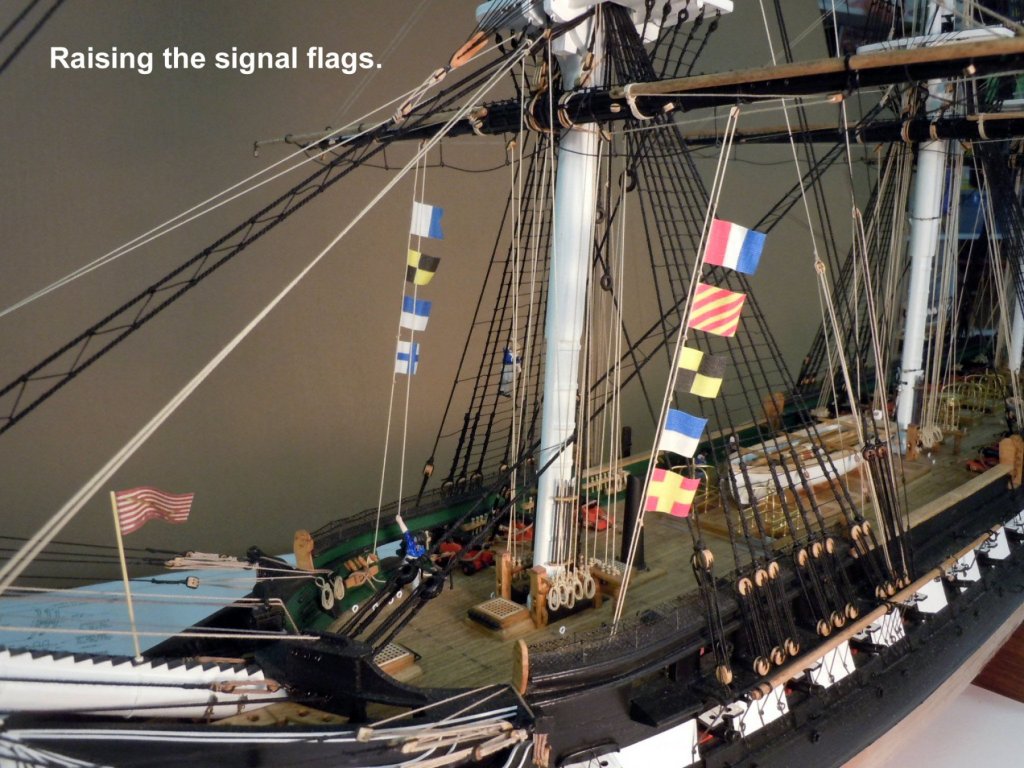
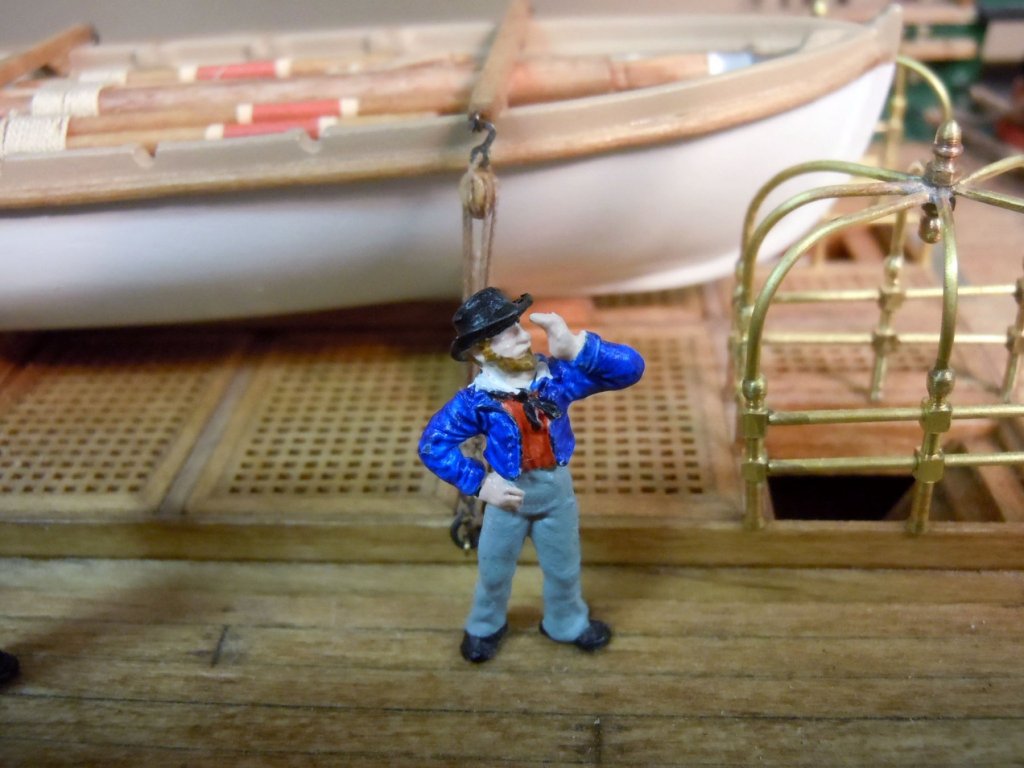
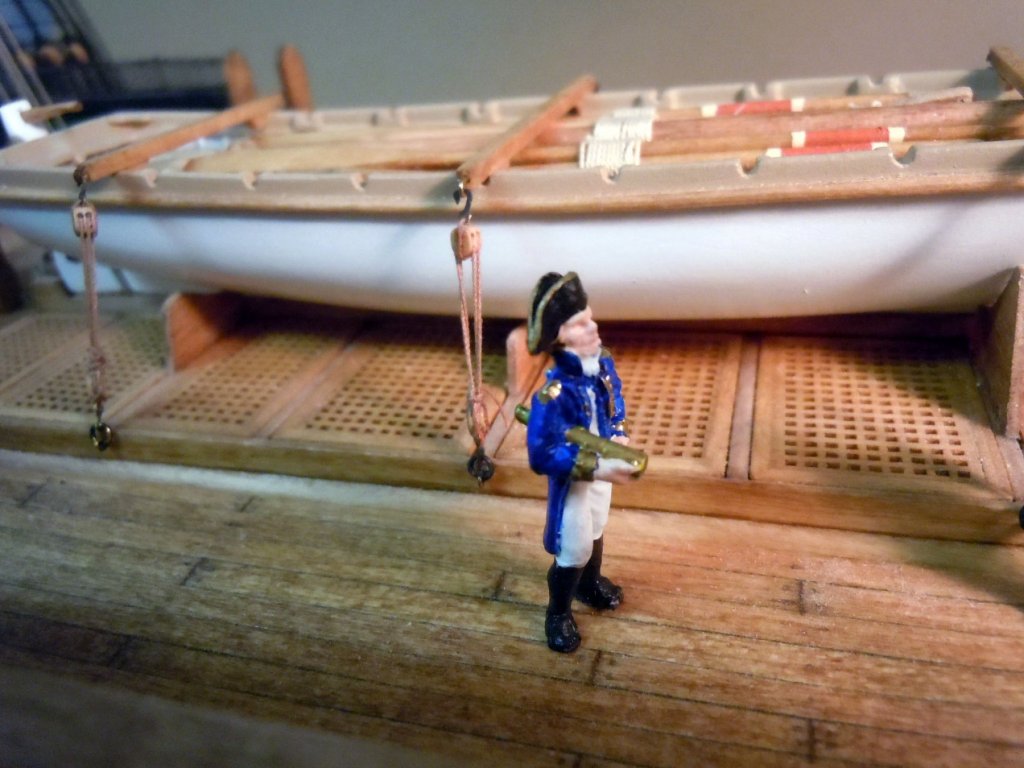
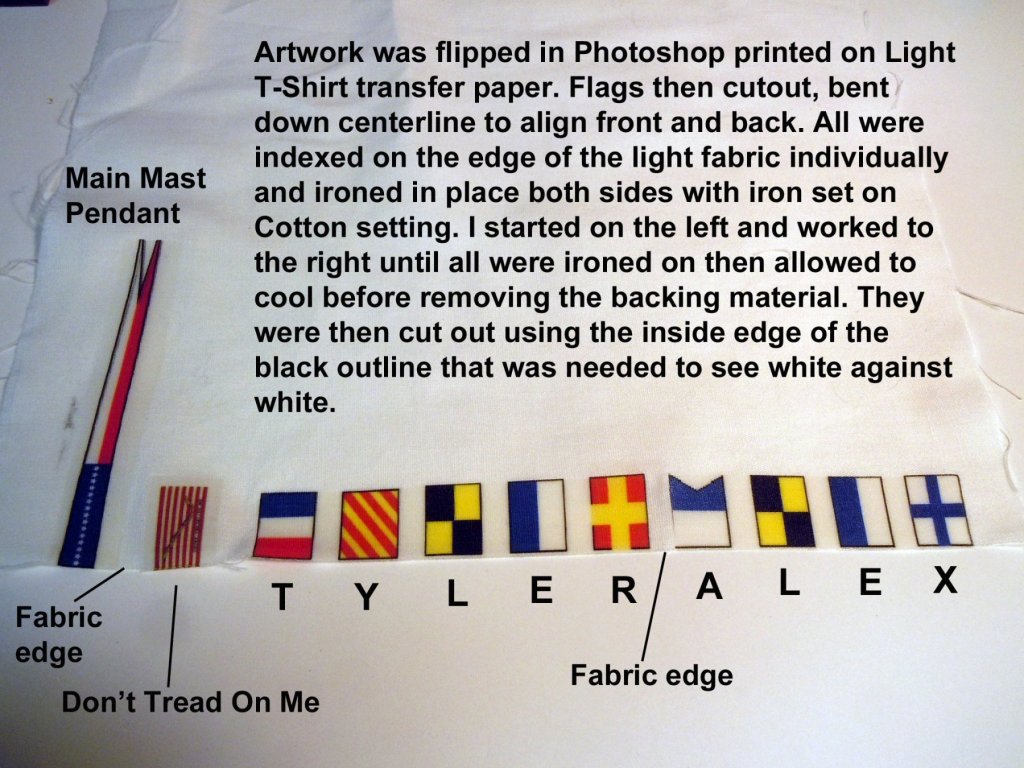
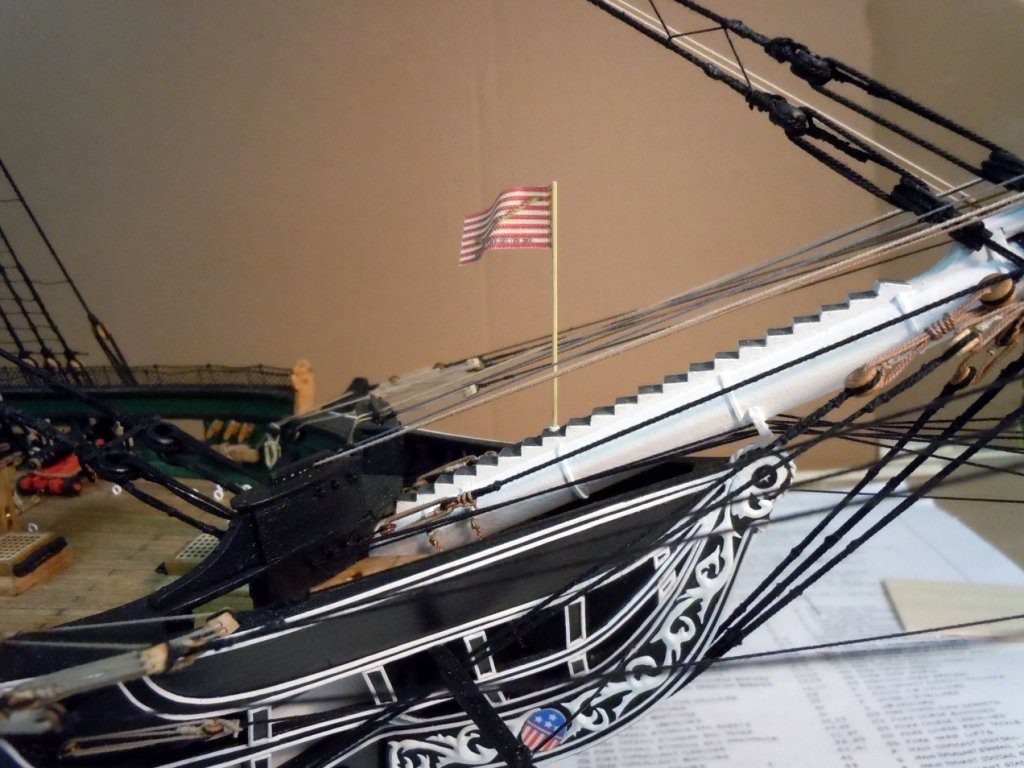
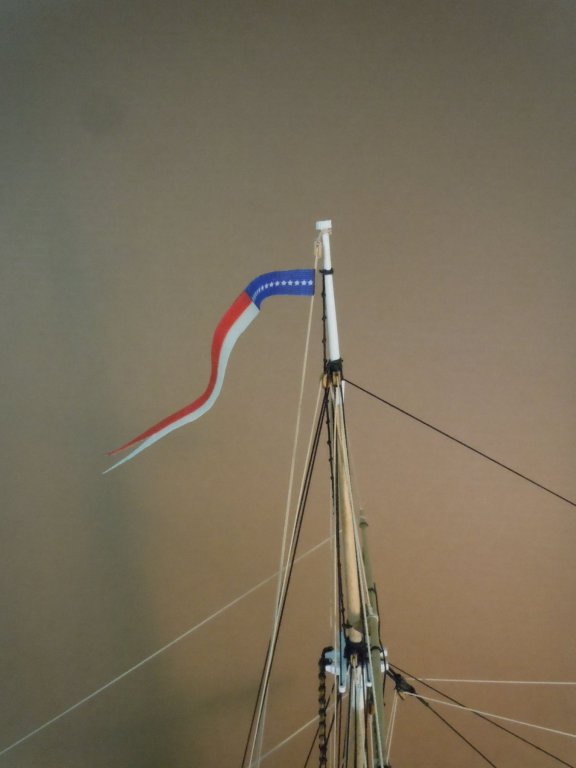
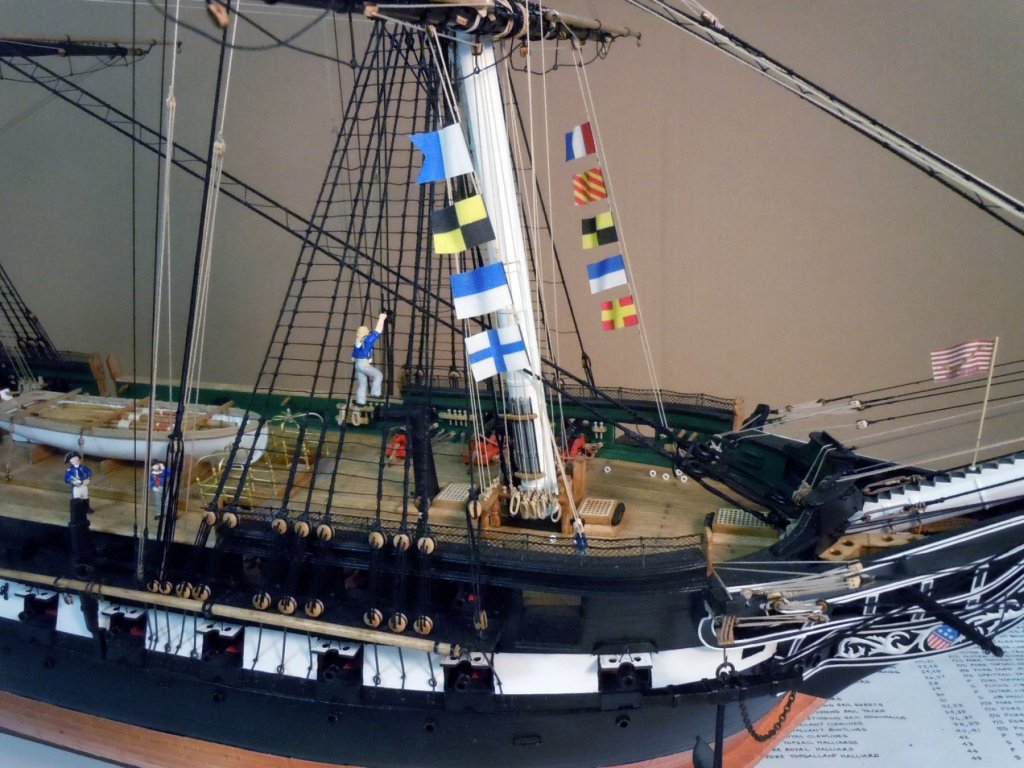
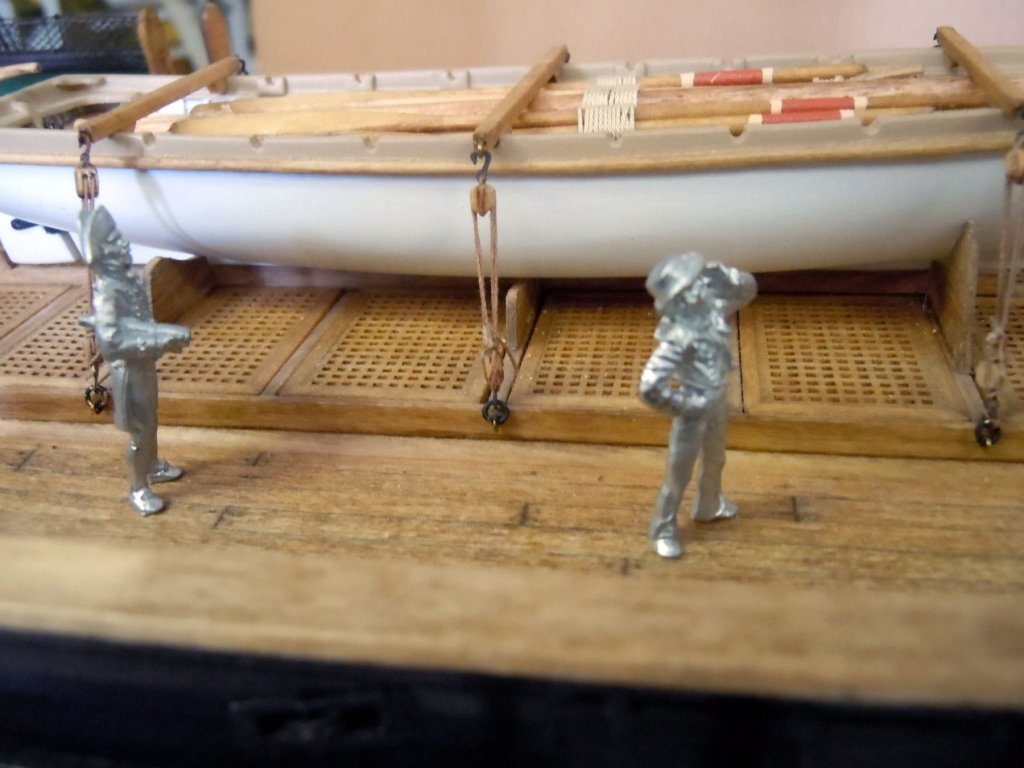
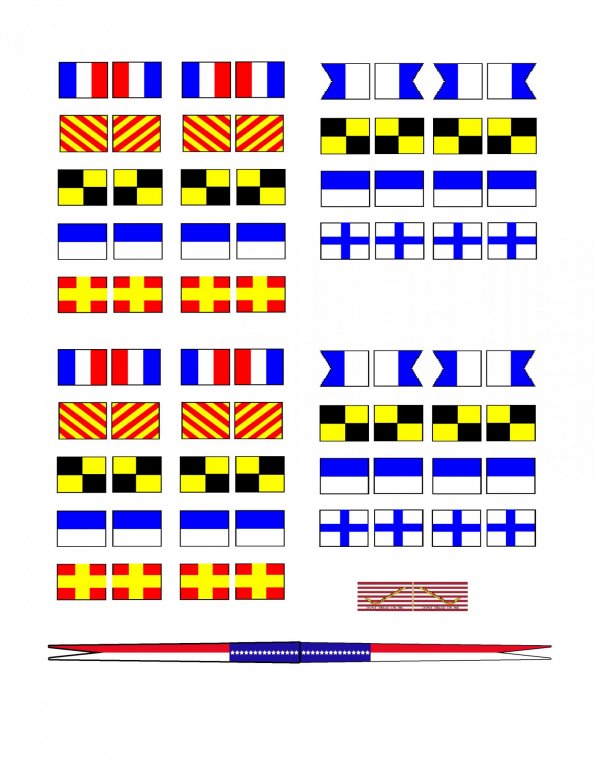
Jon, not really a diorama, just figures for a sense of scale and something for the grandsons to enjoy when they get older. After cleaning up the figures the next thing I decided to do was drill holes in the hands of the two crewmen to be able to feed the ropes through. I used a .024" dill bit and angled carefully into the hands. The one with his hand on his chest required drilling form both top and bottom to create a tunnel for the rope. Here is the test fit of the rope. Next came my first attempt at painting any kind of figures. I checked for the uniform colors of the period and here are the results; I used a gold marker stick to do the gold hat trim and buttons on the jacket. Here are the crew glued in place at their different activities. This shows the overall bow section with the one man climbing the ratlines. Simultaneously, while waiting for paint to dry on the figures I made the various flags and pennant for the main mast. First I flipped the artwork in Photoshop and then printed a copy on T-shirt transfer paper for Staples. I then carefully cut out each flag unit and folded them down the center lines making sure that the artwork aligned front and rear. Each was then added to the edge of the white fabric and carefully with the iron set on "Cotton" ironed each flag in place both on the front and the rear. All were ironed in place making sure they were hot enough for the ink to transfer and then allowed to cool before removing the backing paper. I cut them out along the inside edge of the black outline which I added in the artwork to differentiate the flag white from fabric white. Each flag was glued in place using thickened CA along the contact edge and allowed to set. Flags were then moistened with water on both sides and carefully formed slightly. Here are the results. Next onto the last detail the cathead faces.


-
Jack, no he goes from Huston,Texas to Mumbai, India across the Atlantic through the Med. sea the Suez Canal on to various destinations. Google it for specs.
-
Thank you Steve, Jon and Al! Steve, I am still working on CAD drawings, but it will be the Maresk Detroit my son-in-laws container ship that he is the Captain of now. This is the first ship he has command of after being promoted to Captain. It was the worst ship in it's class when he took command of and after his first two tours it is now fifth in the entire Maresk Fleet. Needless to say we are very proud of his accomplishments and I thought that he should at least have a model of his first ship. Here are a couple of the CAD drawings of where I am at so far. This will be a complete scratch build at about 1:356 scale or 32" long x 4.5" wide and 7.5 high. Maresk Detroit-01.pdf Maresk Detroit-02.pdf
-
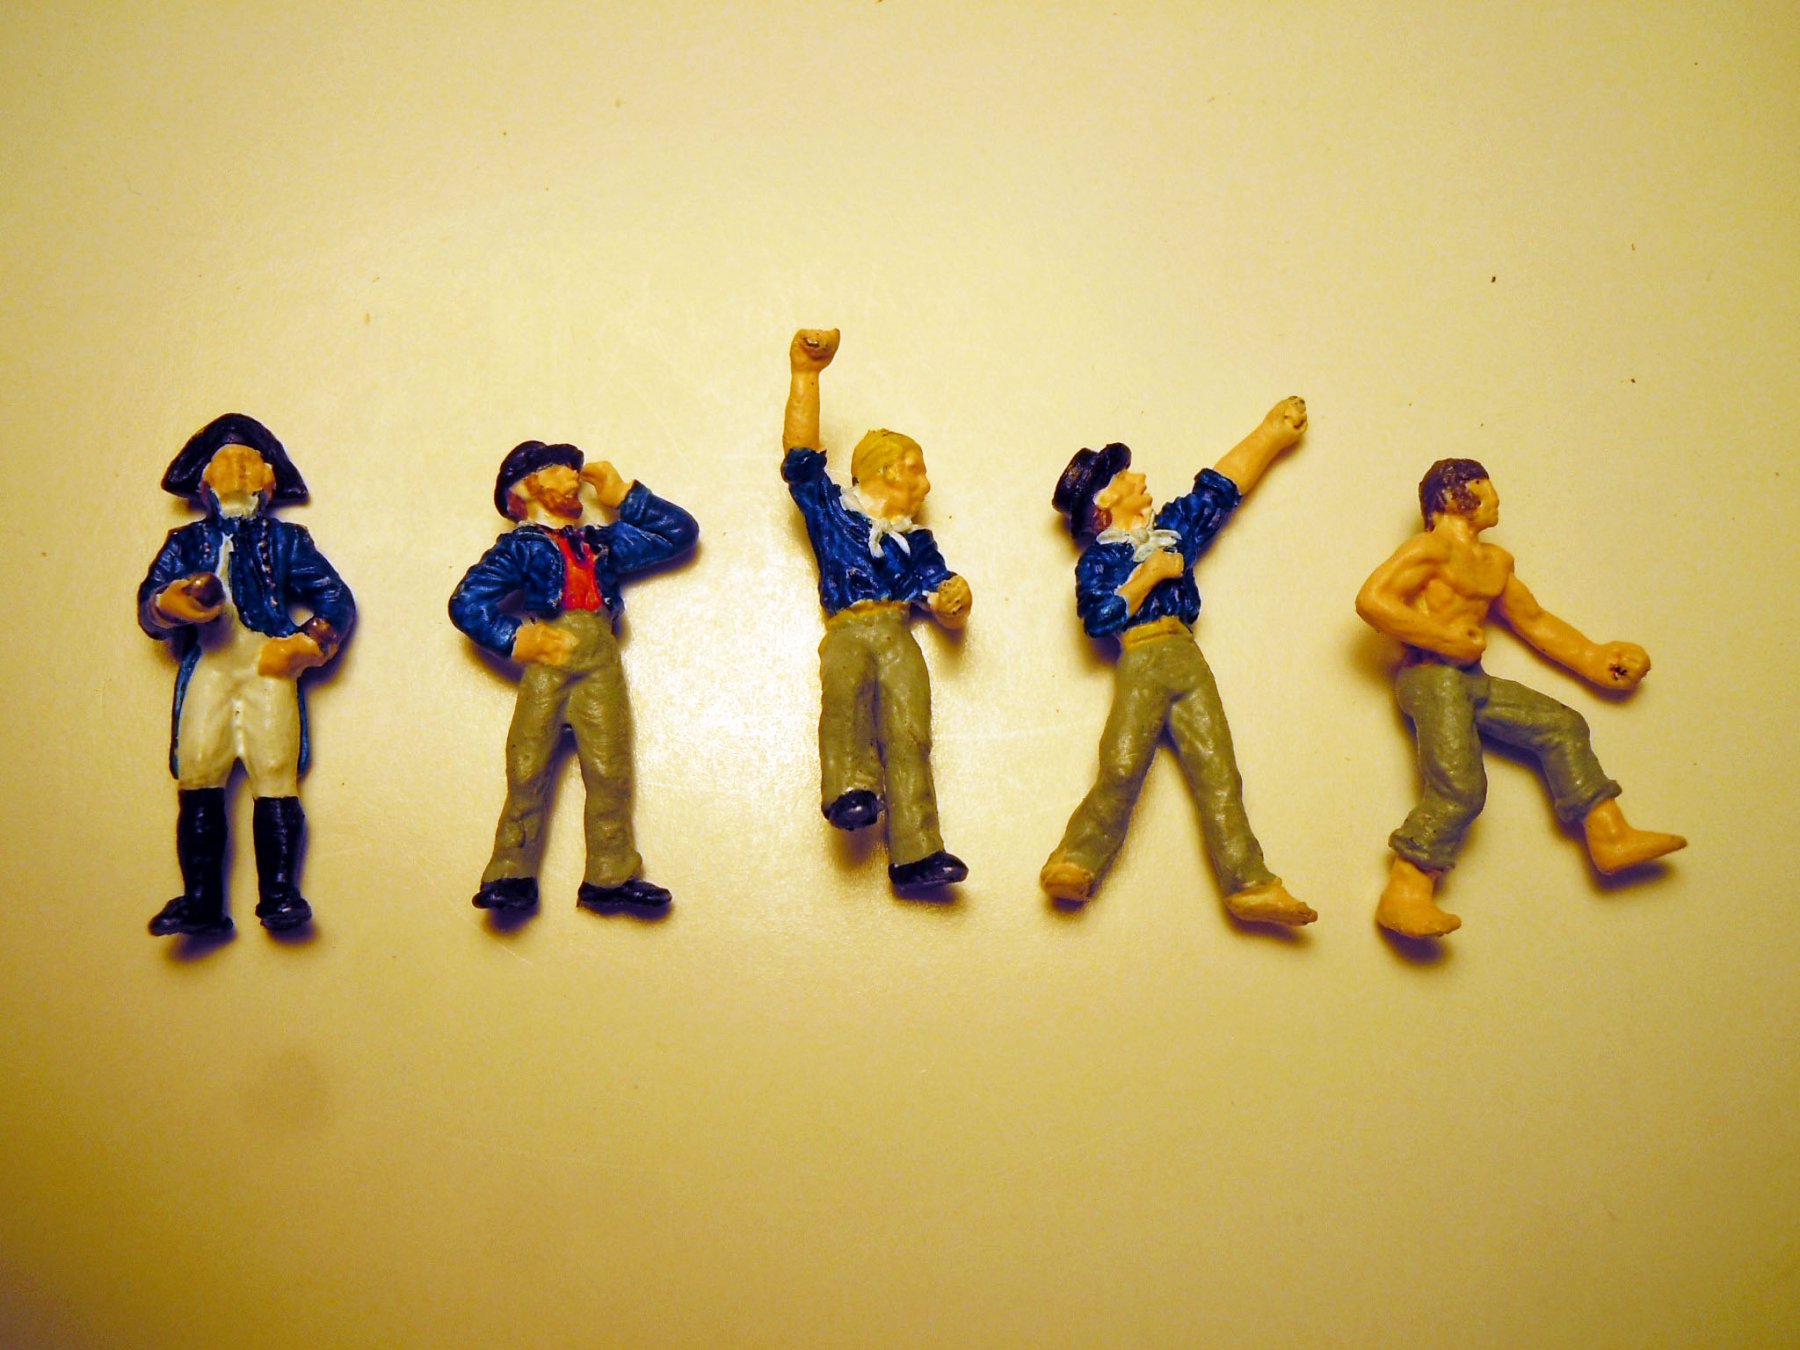
I just received 25 mm figures from one of the site's sponsors and they look just great. Just need a little cleanup on casting seams. Now I need to research the colors of the uniforms to paint them. Does anyone have a source for color reference? I also created the signal flag names for my grandsons Alex and Tyler as well as the mast pendants and bowsprit. My computer and printer have decided not to communicate with each other and I get a message that the computer cannot find the printer's ISP address. I love technology when it works and hate it when it does not. Here are pictures of the figures just set in place for now. Here are the signal flags and pendants; the names will fly from the foremast course yard to the deck. Note two sets of flags for the names. Now back to CAD drawing for my next project.


-
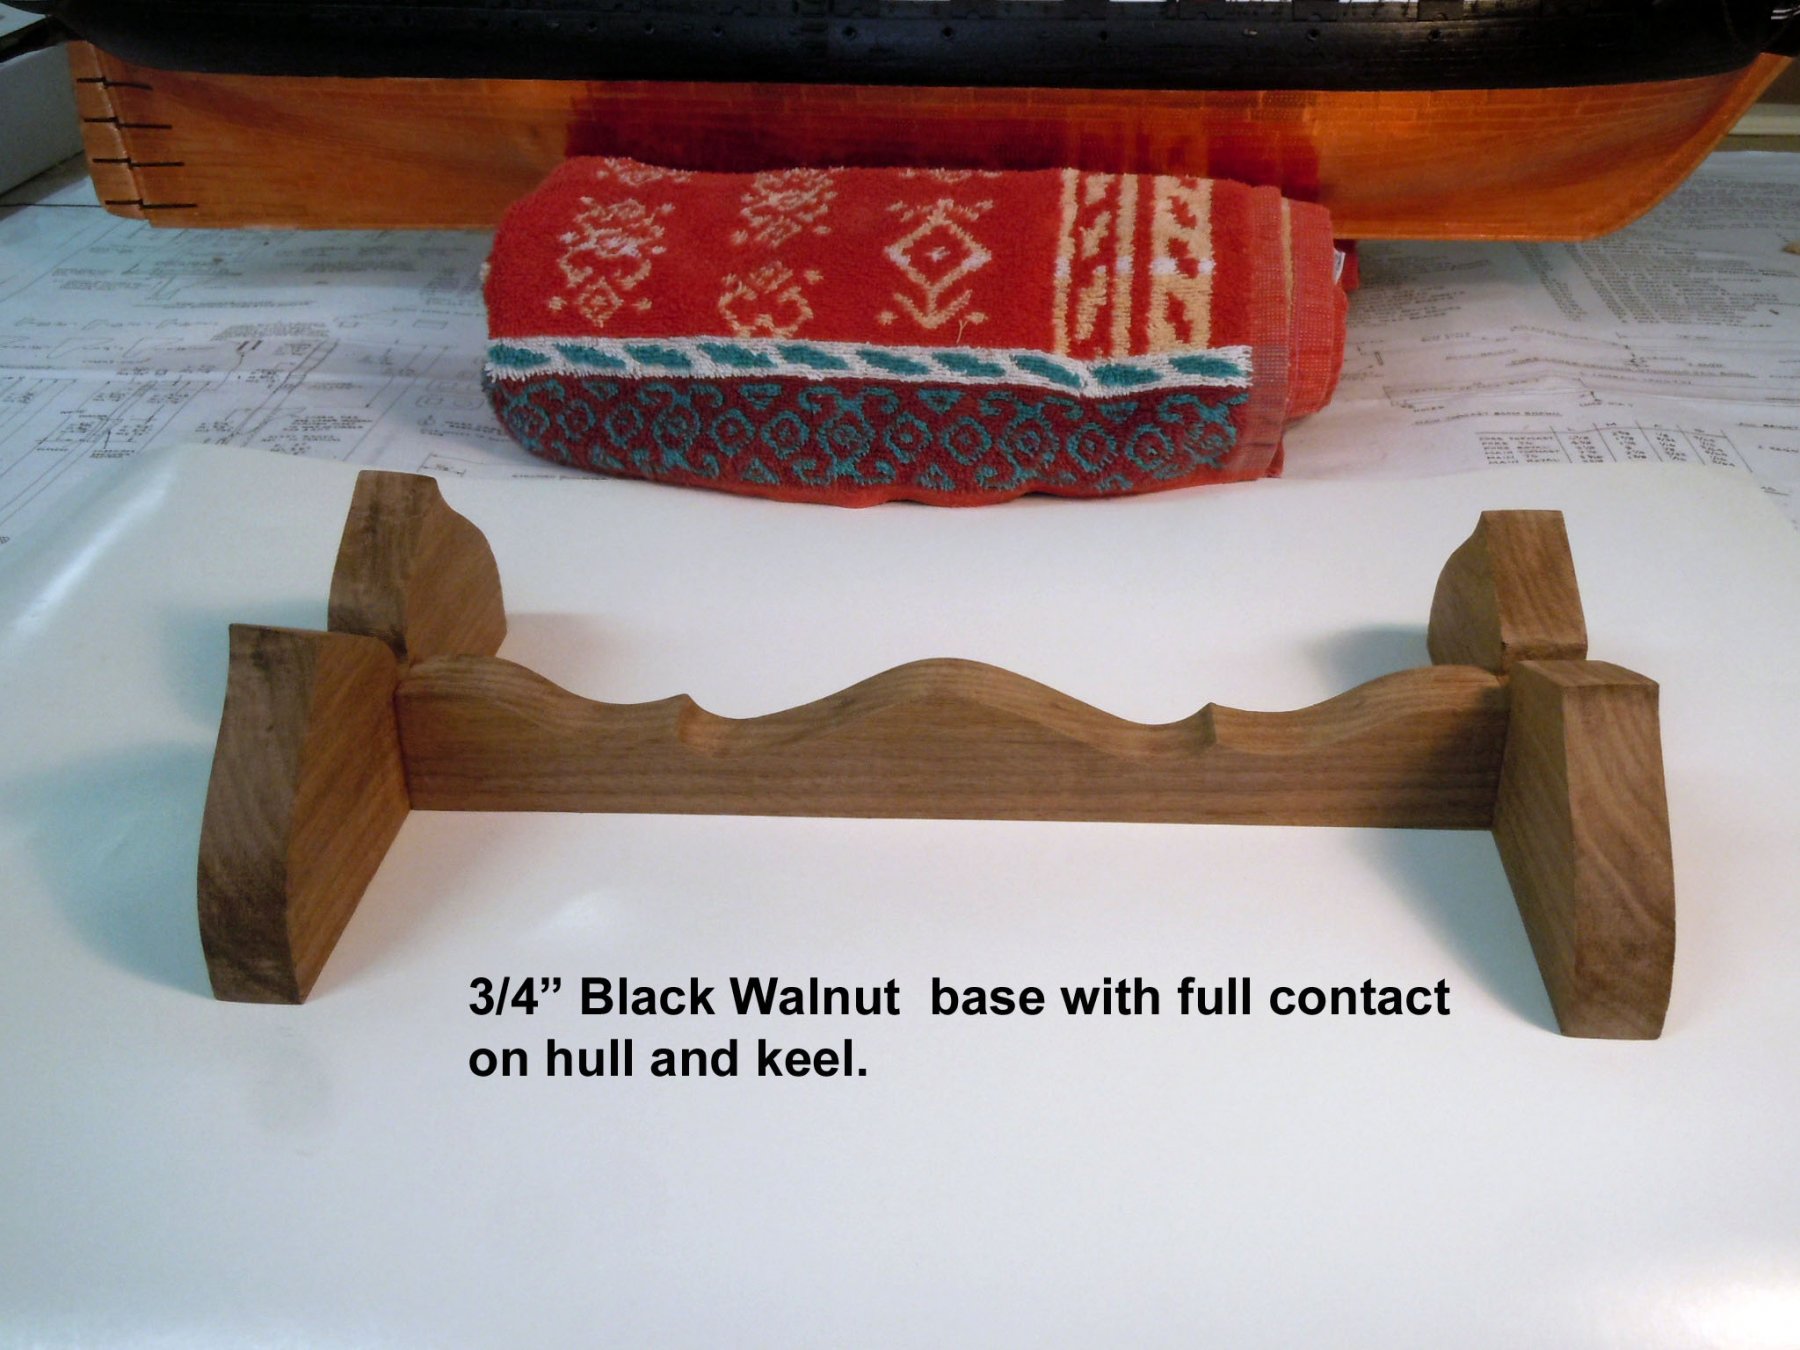
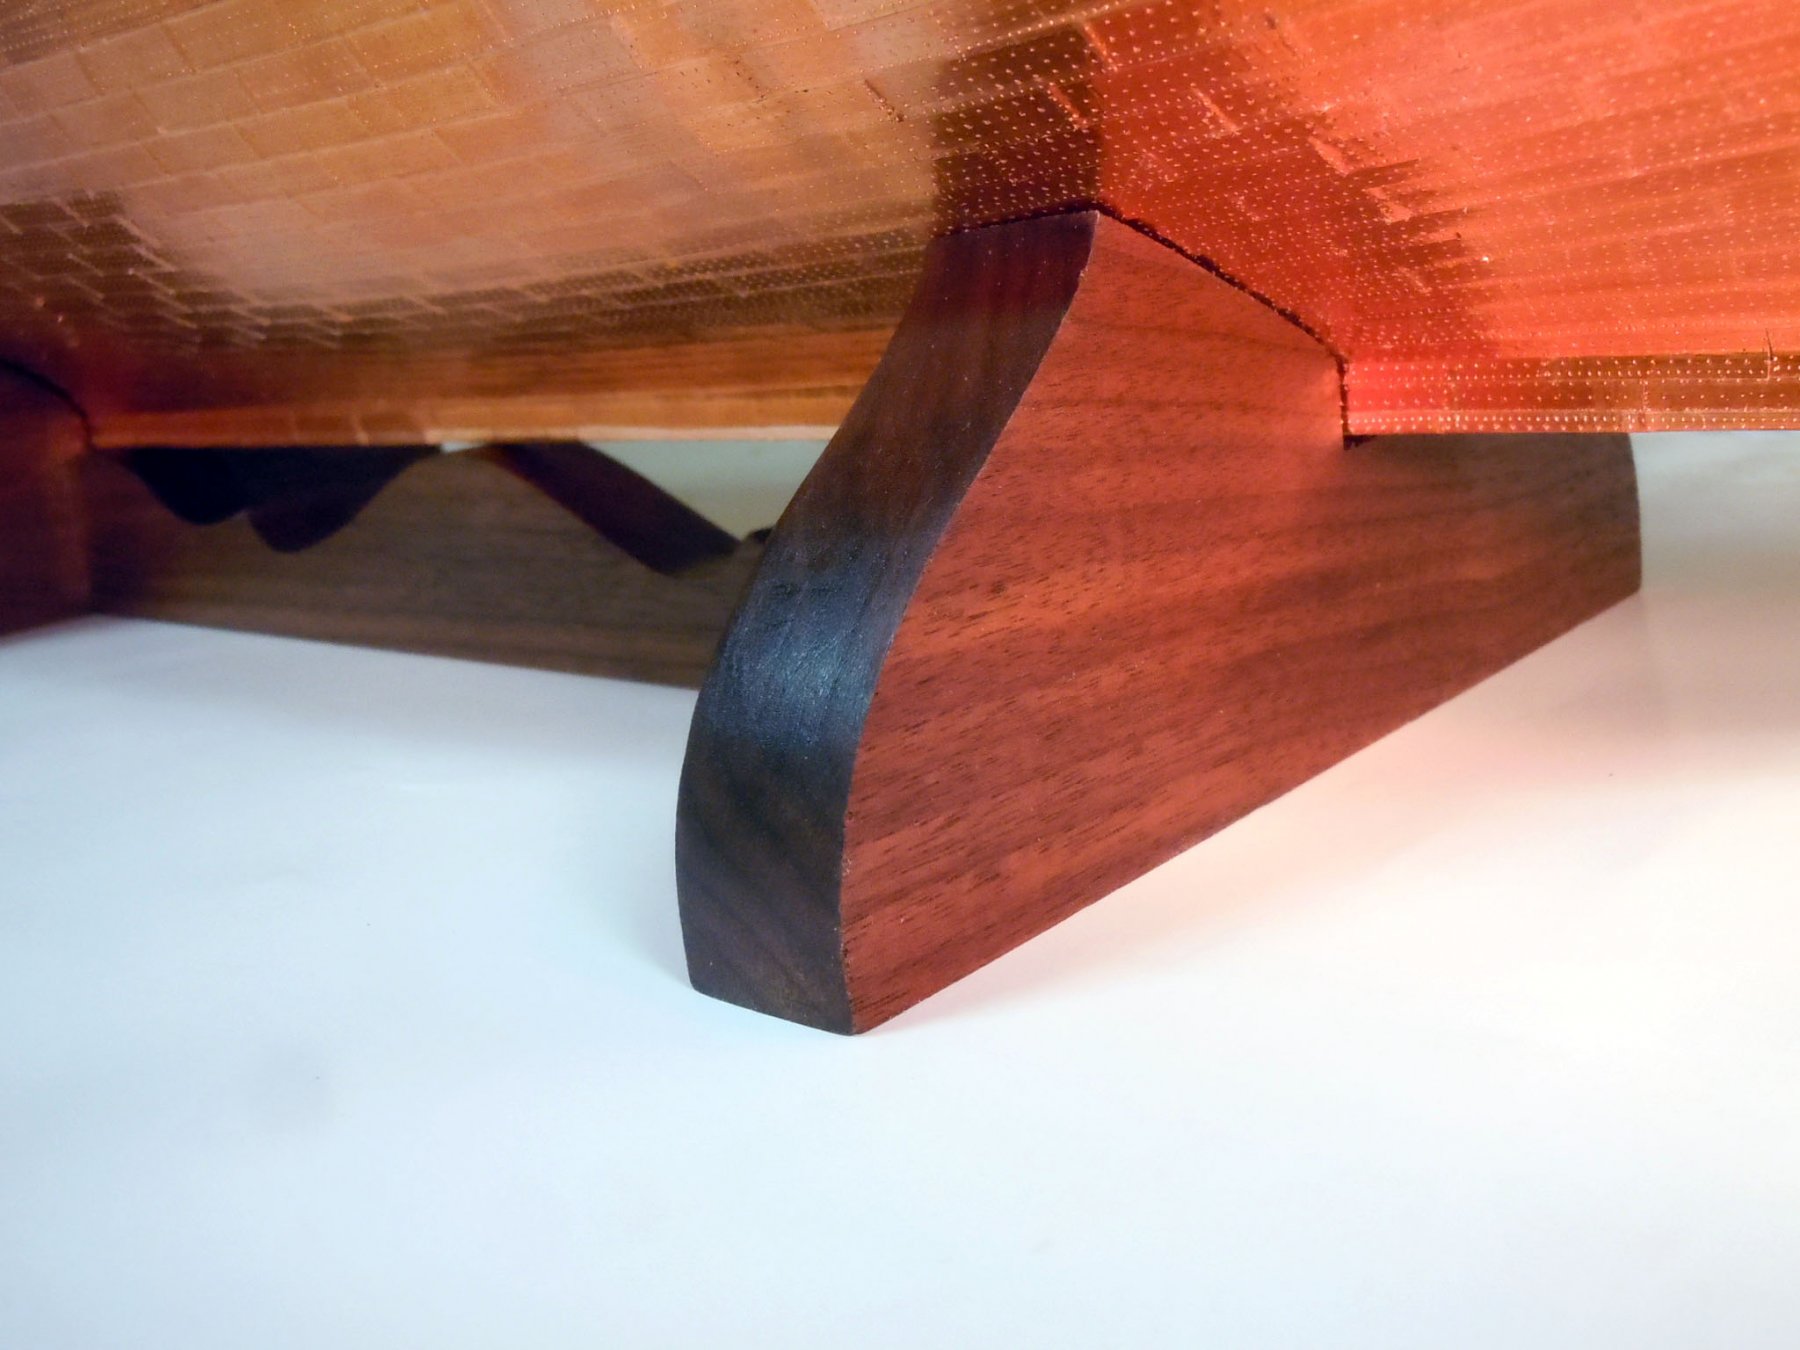
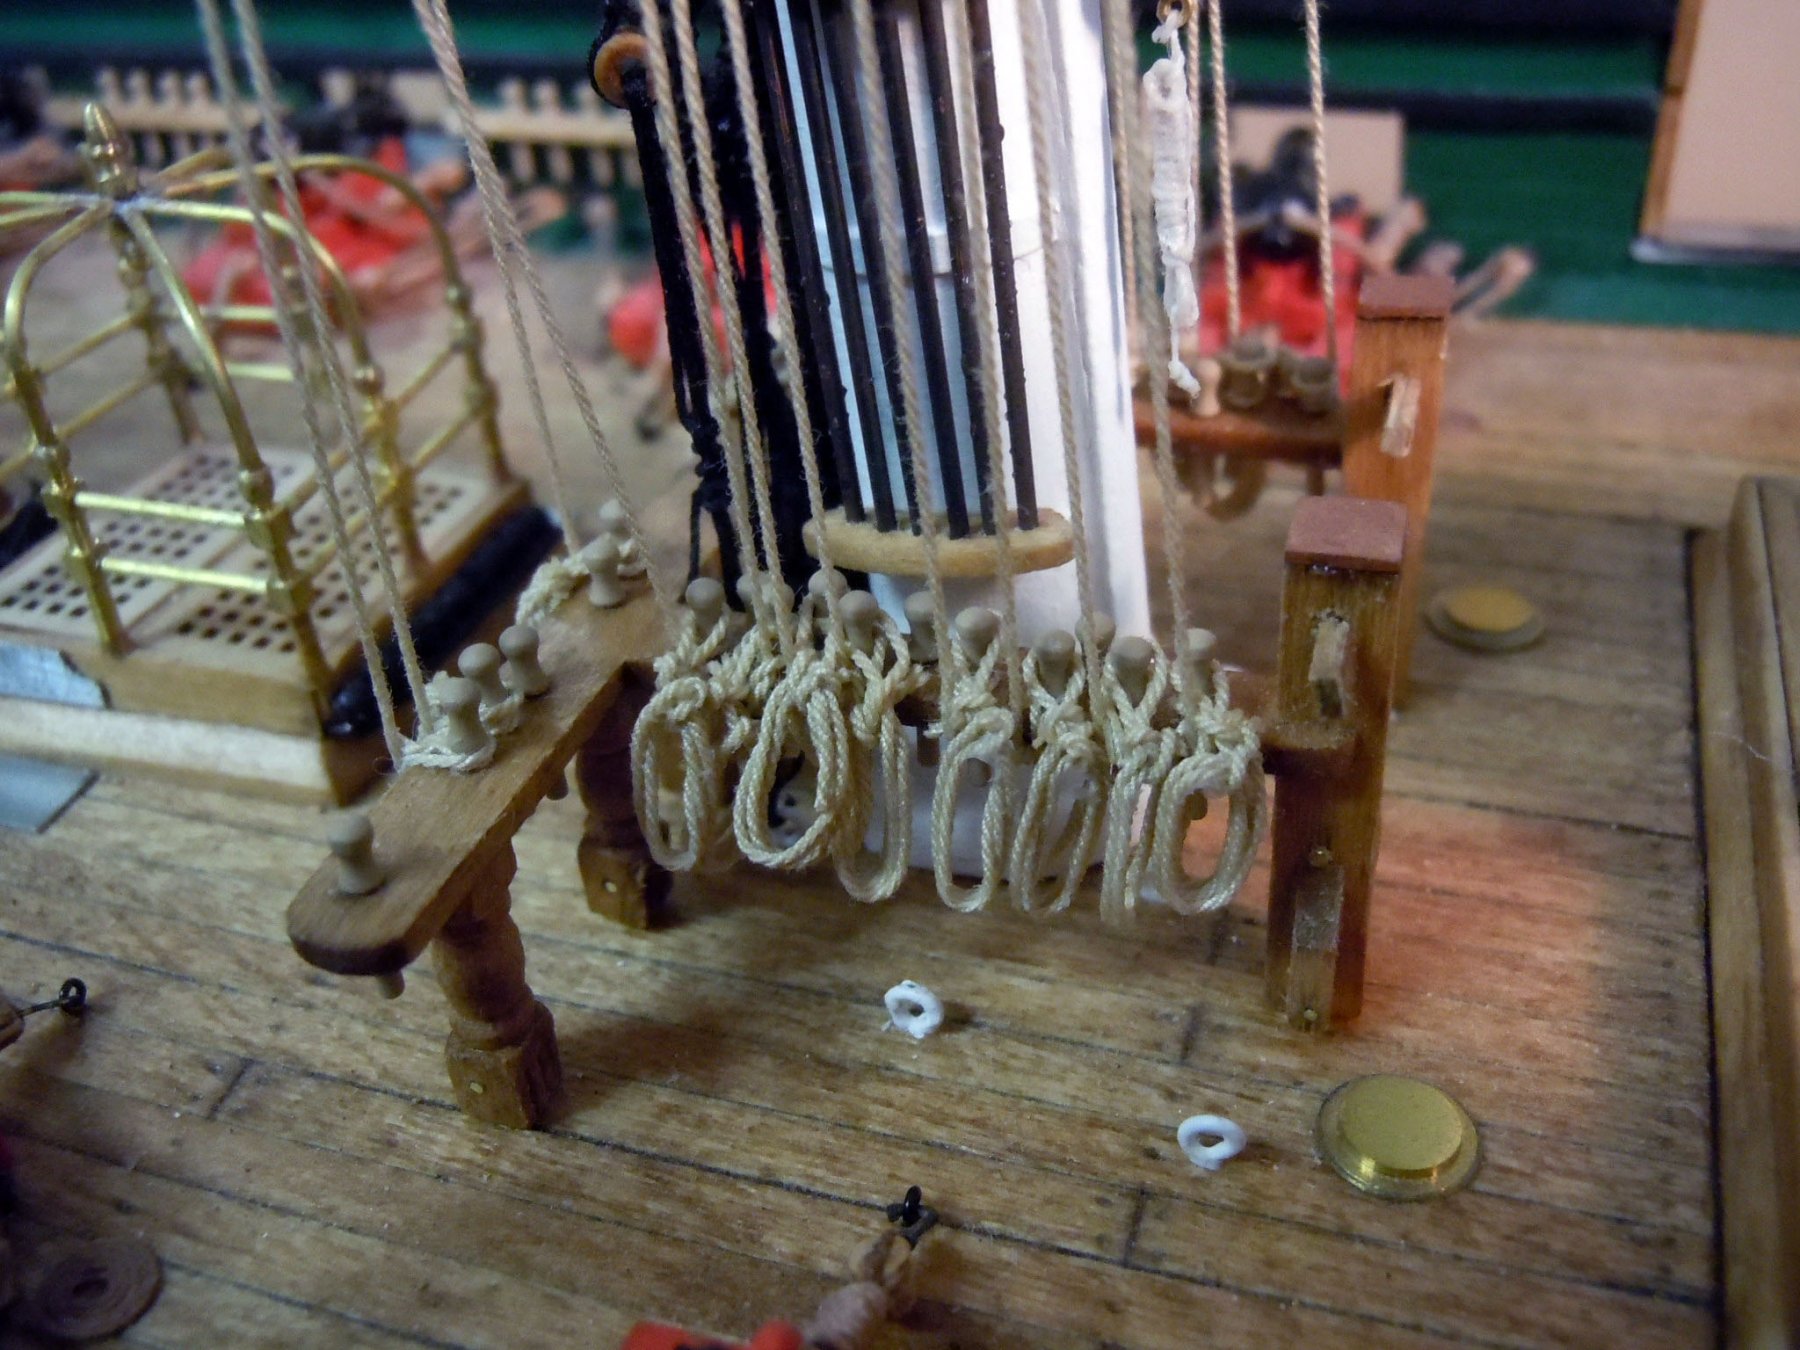
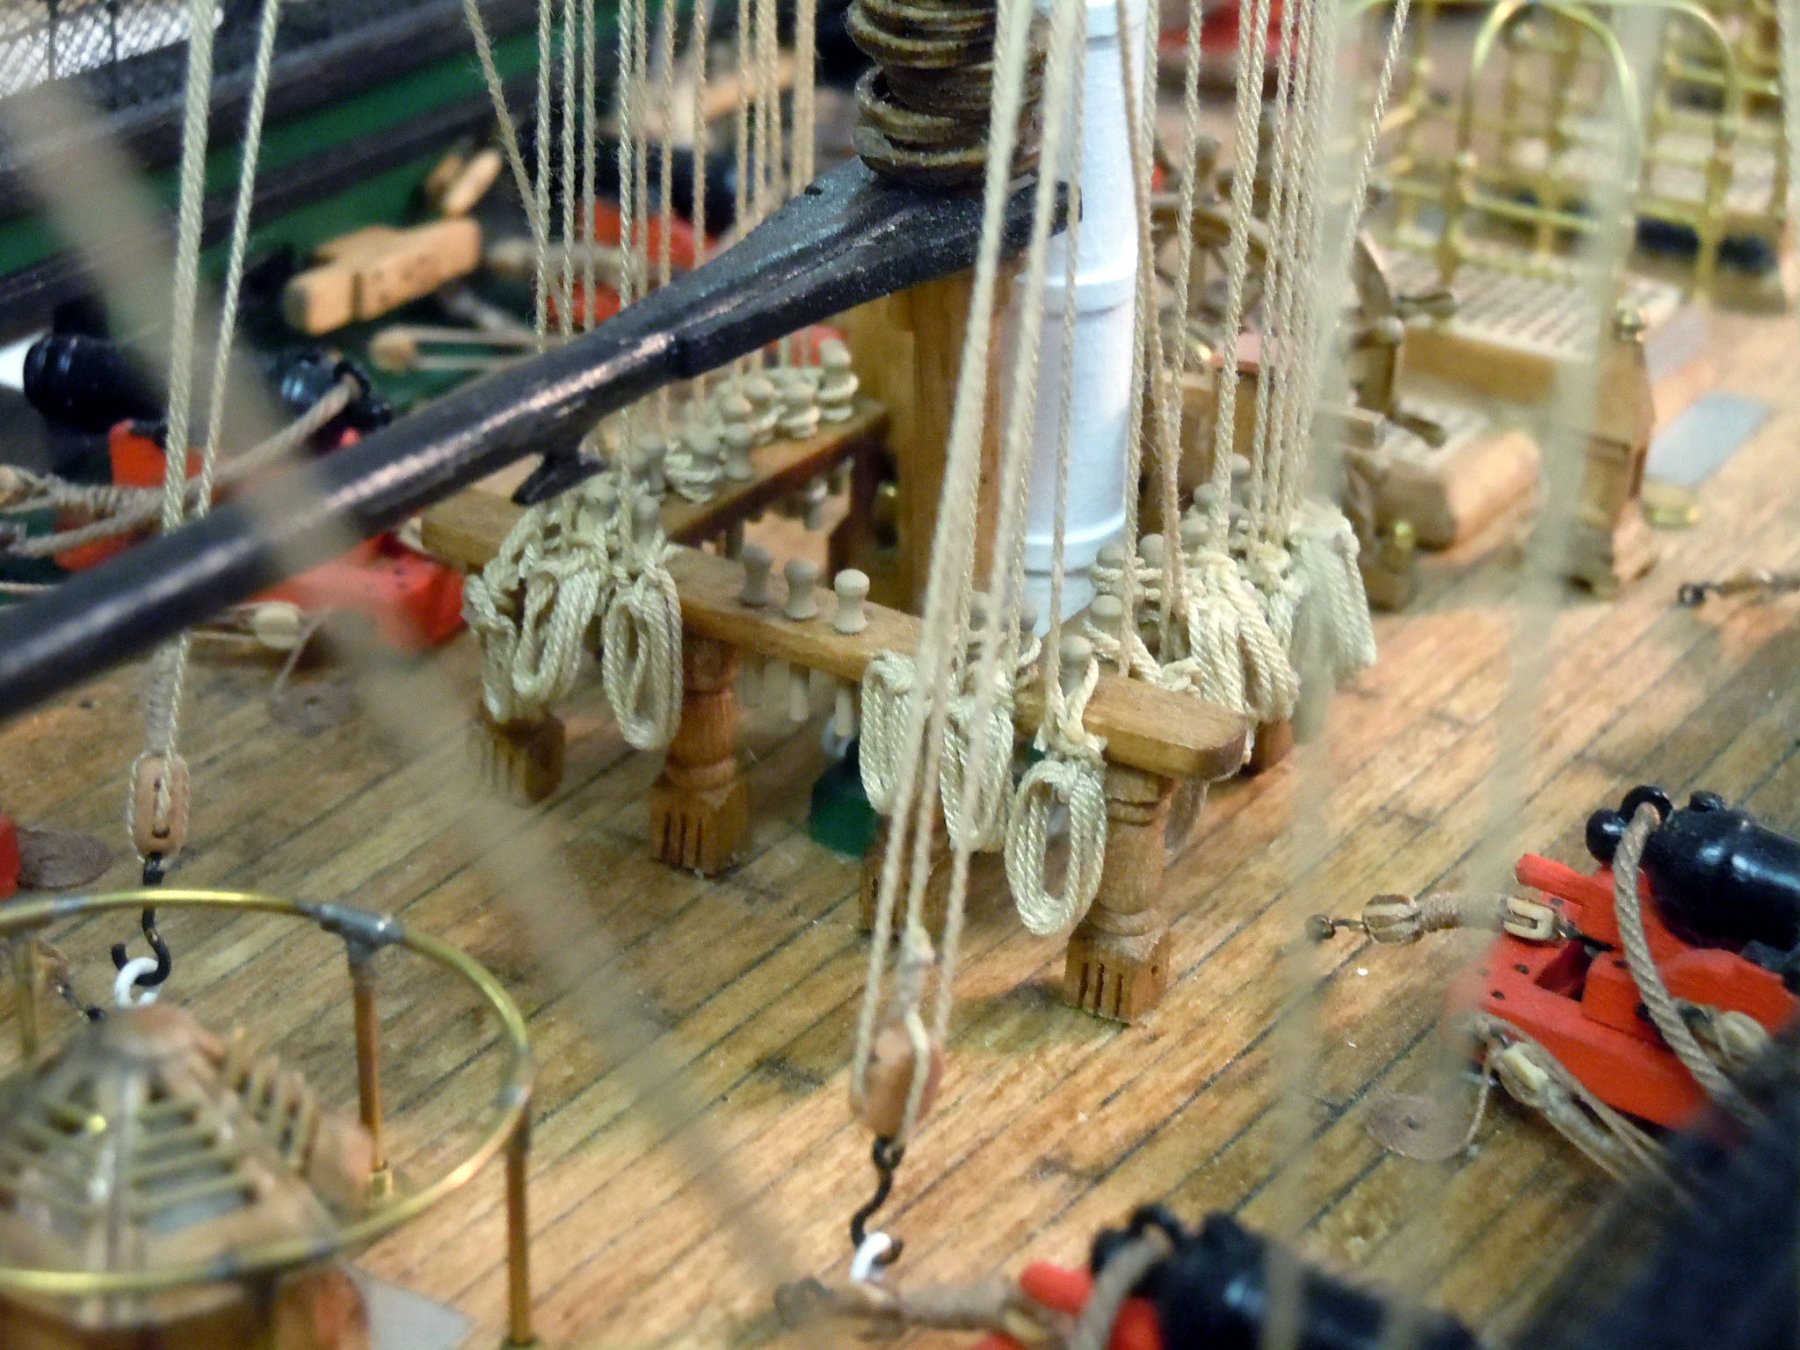
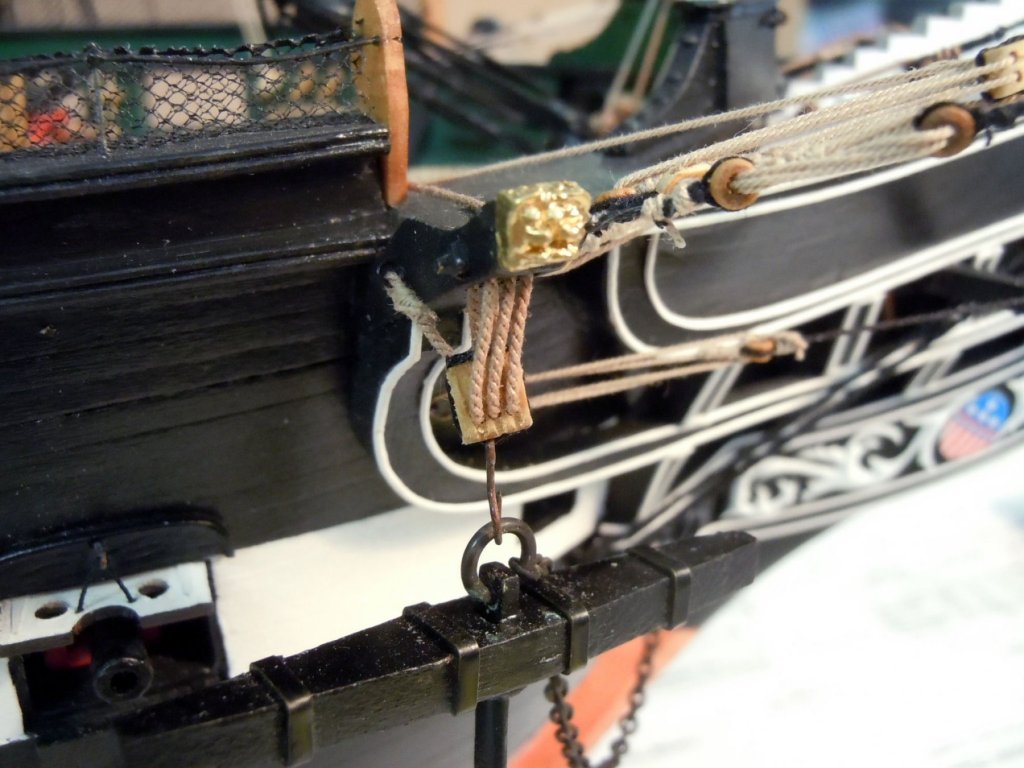
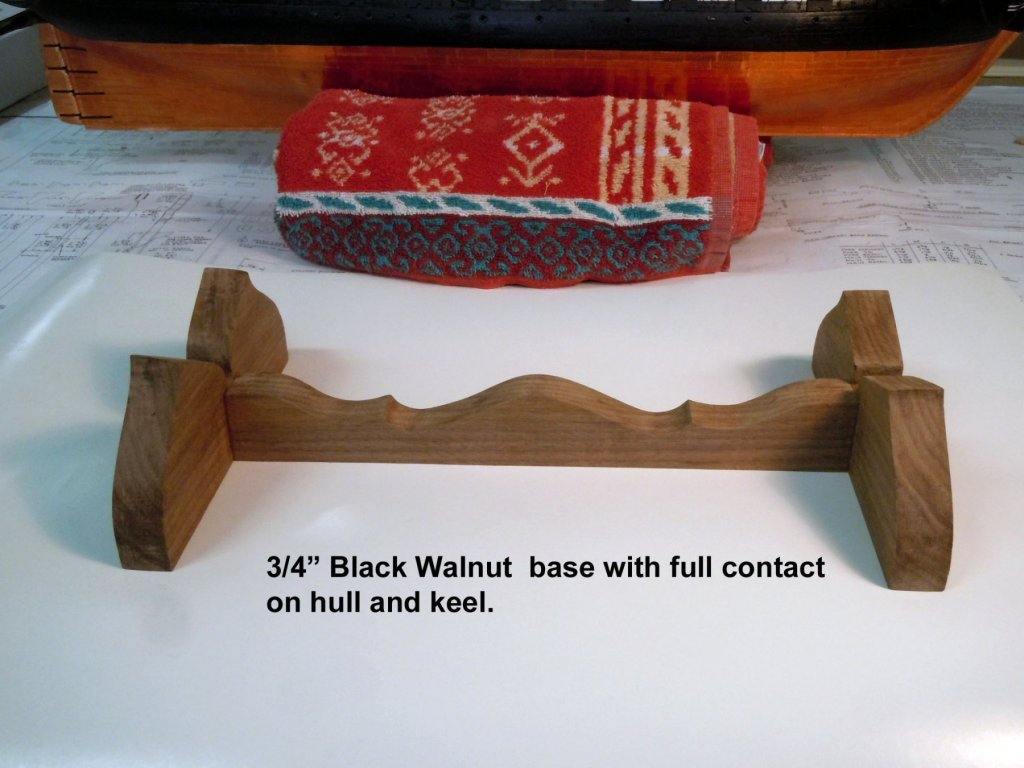
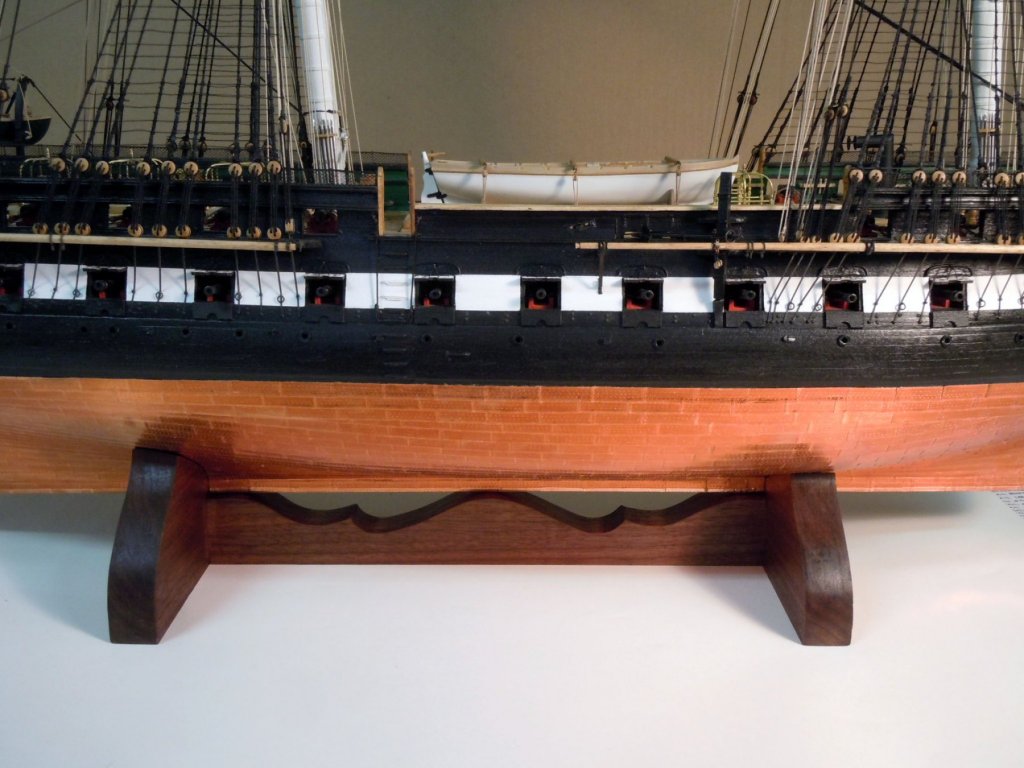
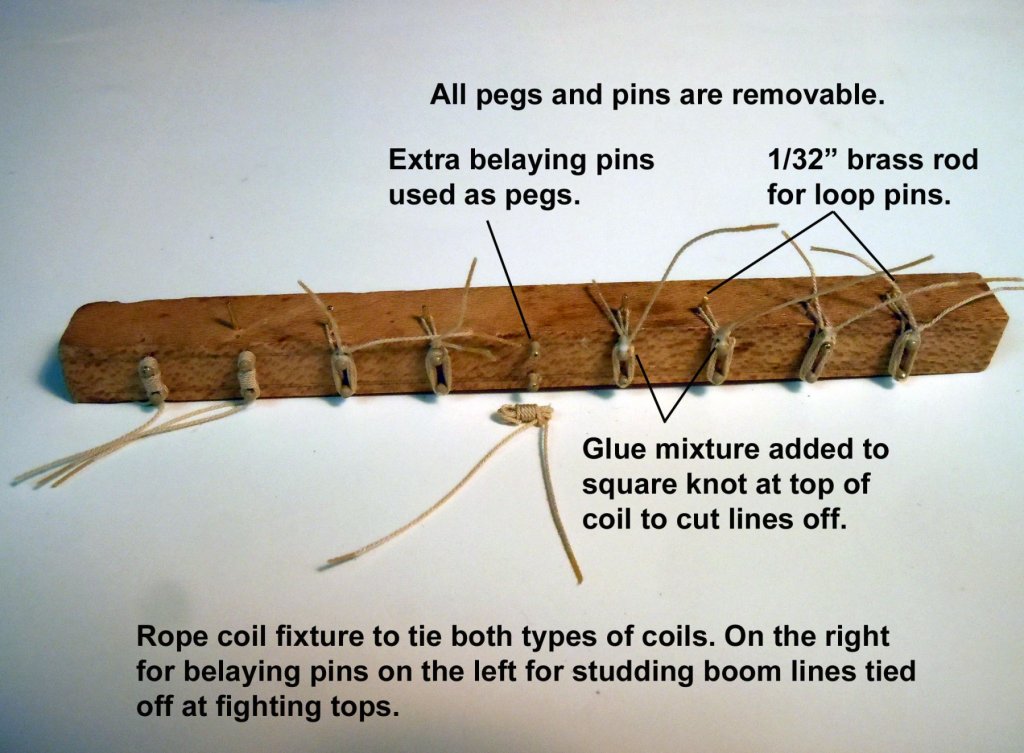
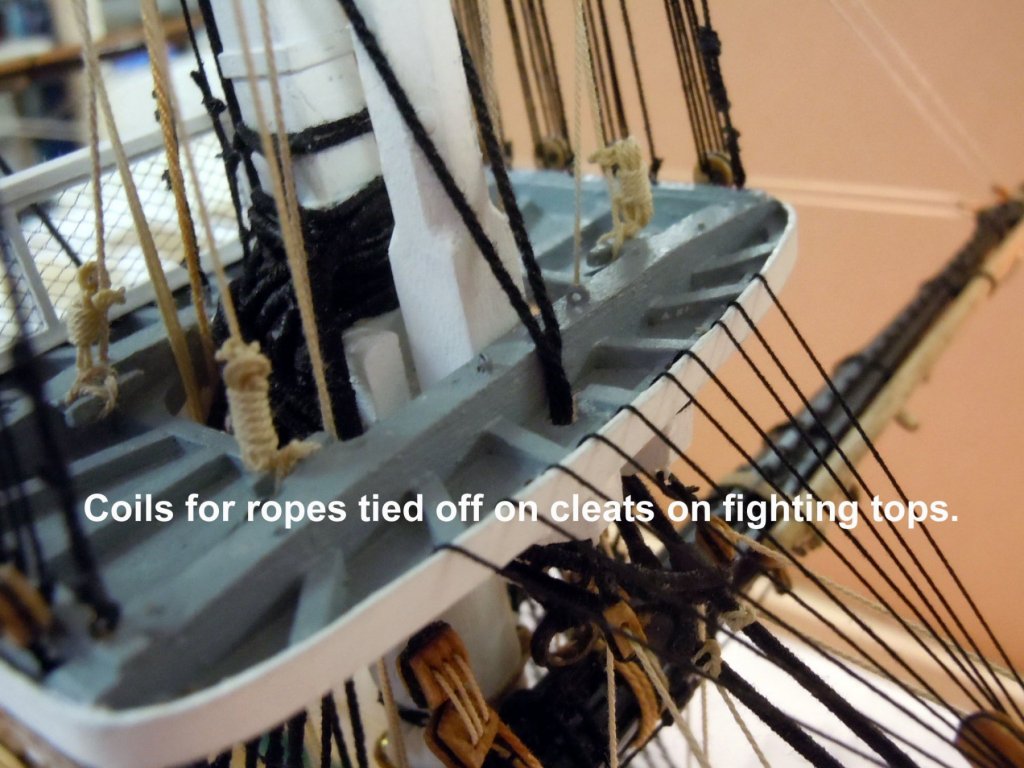
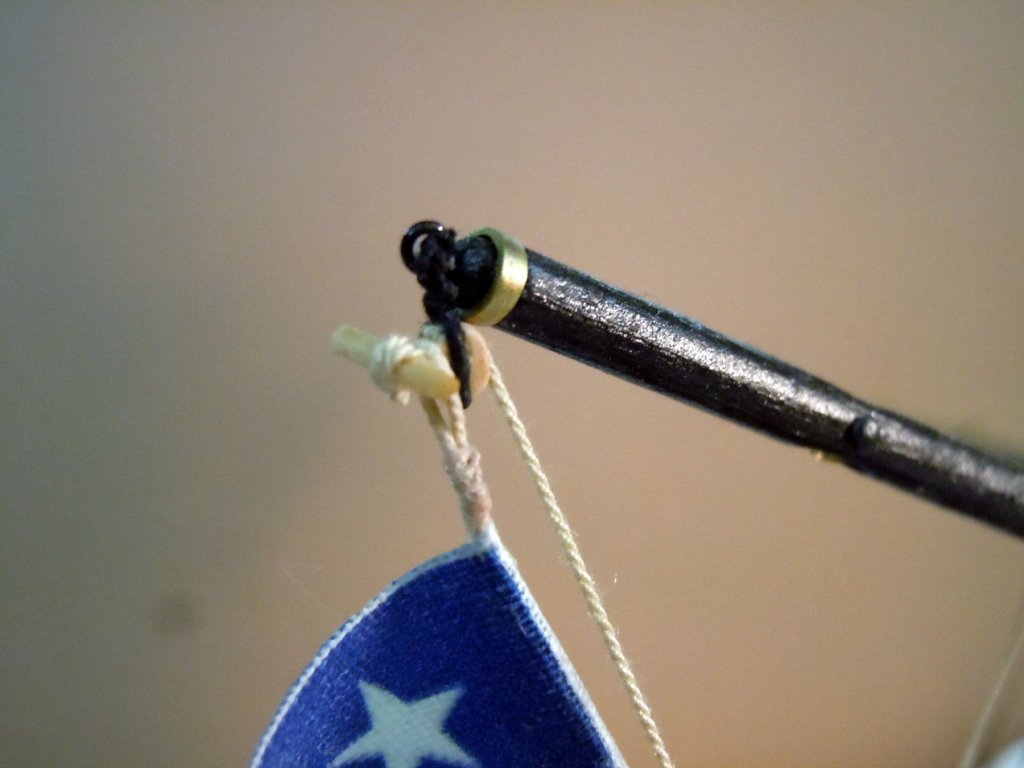
Thank you all for your kind comments! Michael, my camera is a Nikon Coolpix S6000 nothing real special. I use the "Scene" setting for overall images and the "Flower" setting for close up no flash and auto focusing. Pay real attention to the auto focus red and green on close ups. Here is the base finished up using 3/4" Black Walnut; fitting to the hull fore and aft and setting on the center keel was a slow tedious process. I incorporated a subtle wave element to support the center of the keel. Once fitted it was sprayed and sanded and sprayed again with Clear urethane. I worked on coils back and forth and still have a few more to do. I am glad I am making my own rope as needed so far I think I have used up about 40 feet of rope making coils and still not done. Here are some random pictures of the fixture I made using extra belaying pins as pegs which worked well. The major lesson I learned for future builds is to make sure there is clearance on the belaying pins and side rails they butt against. Here is a close up of the flag cleat. Now back to more rope coils.


-
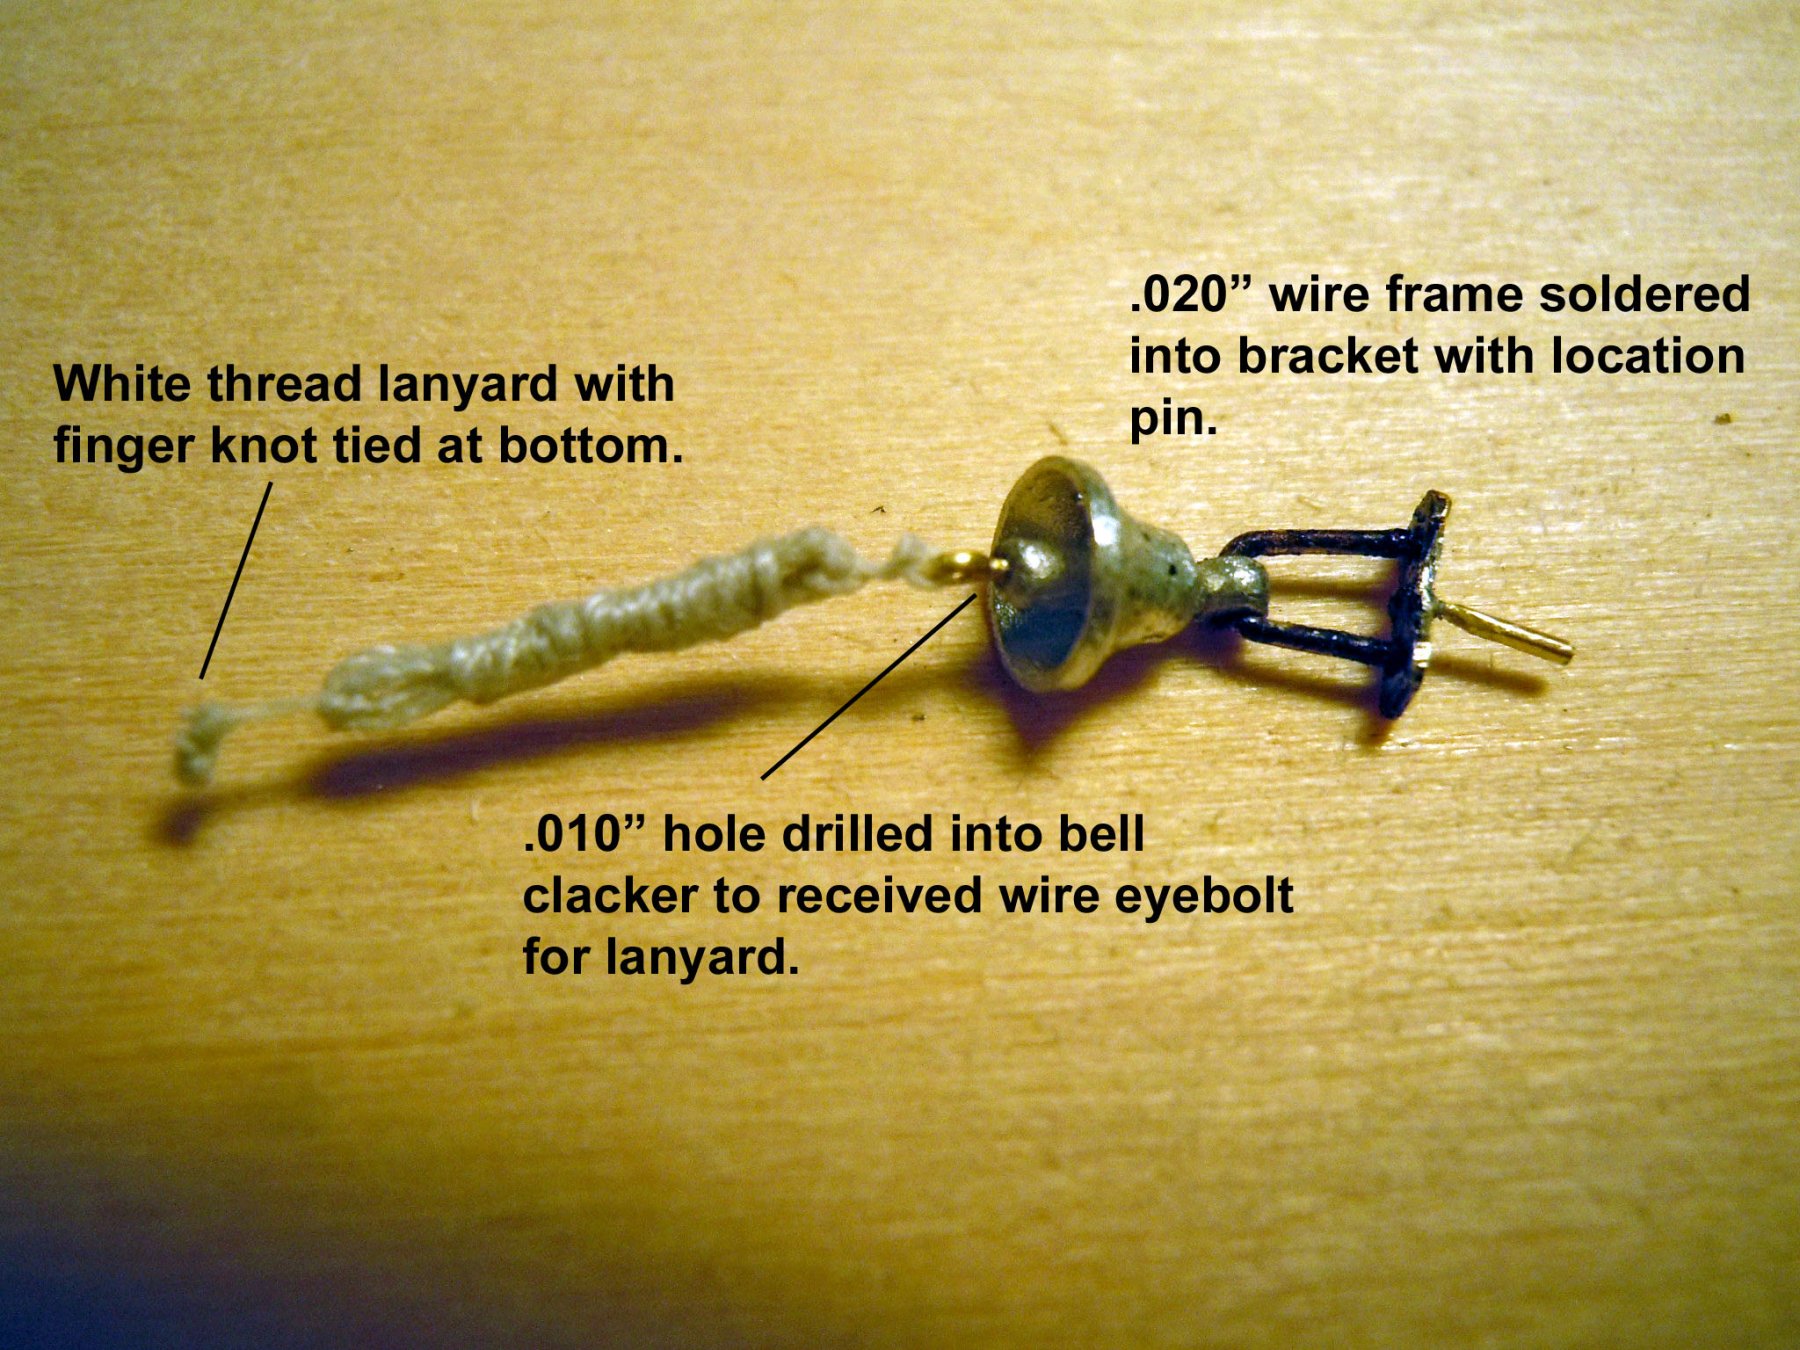
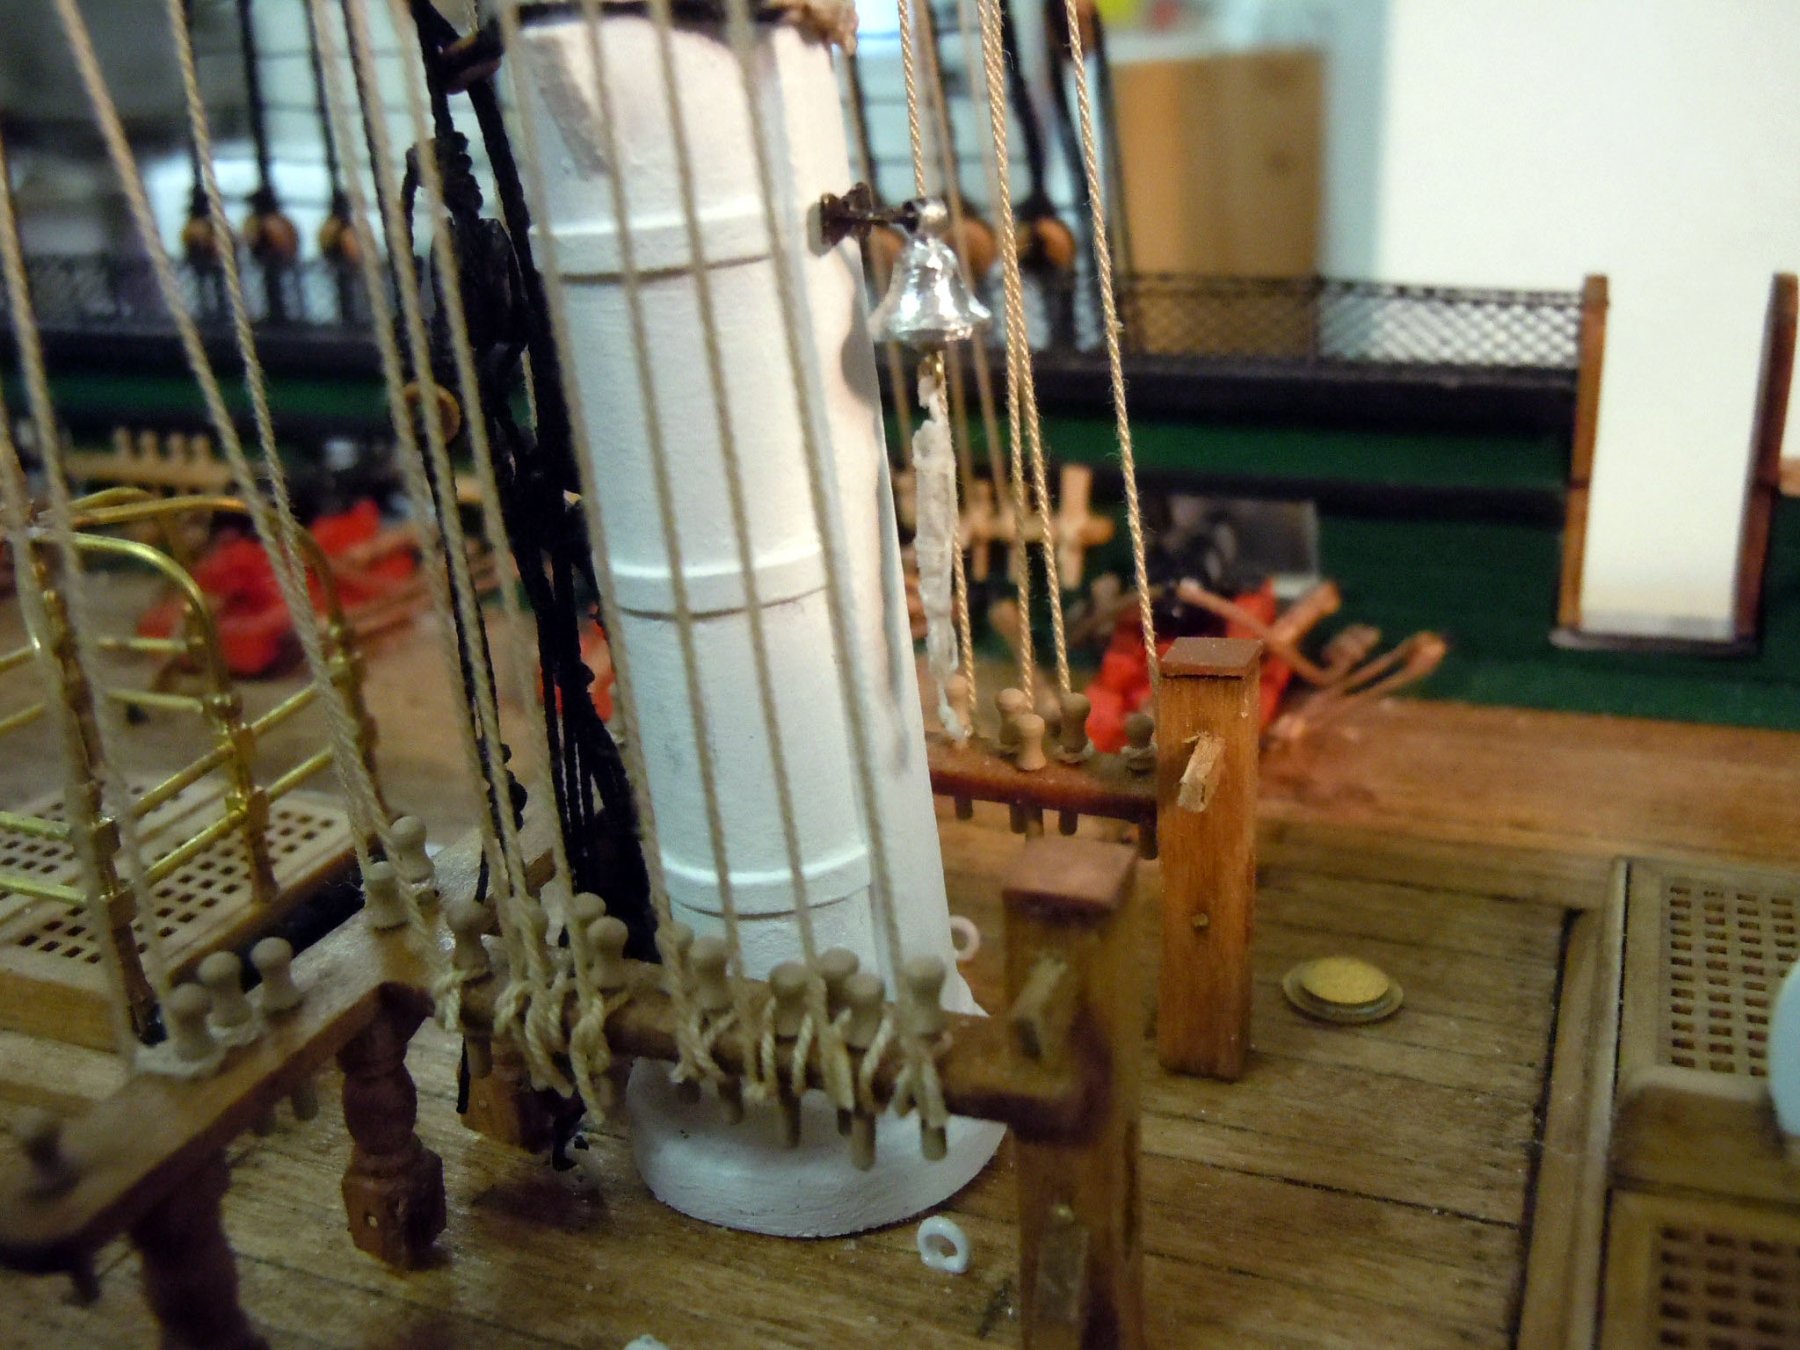
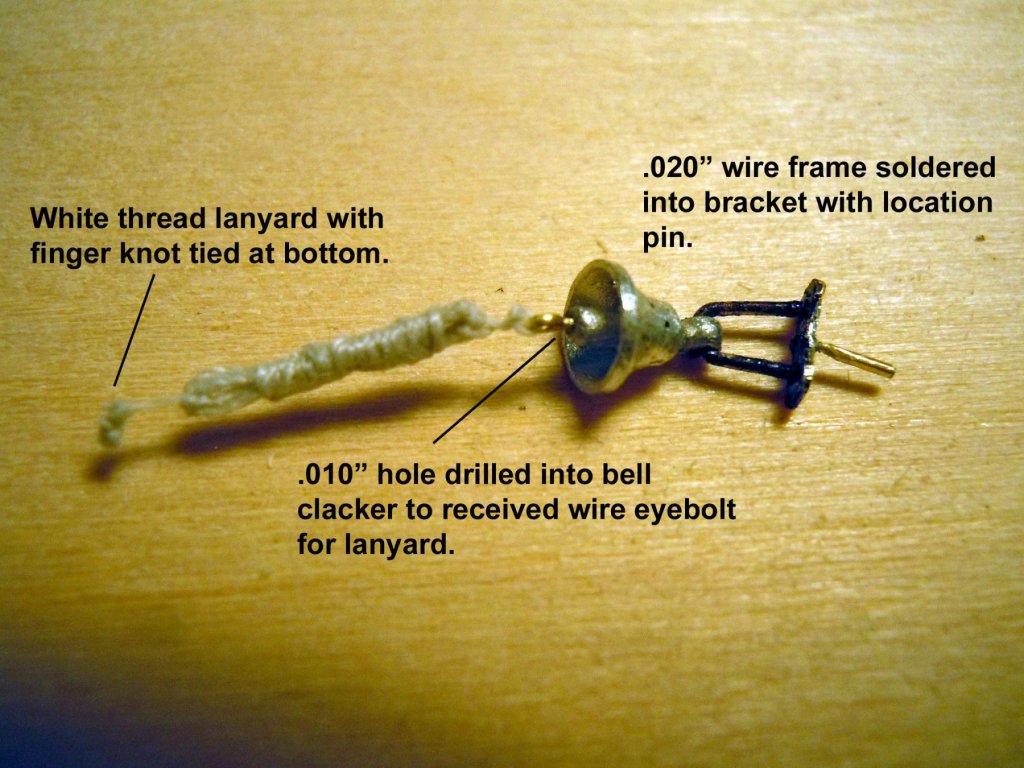
Thanks for the kind words! I have been busy with honey-do's so wrapped up some details like the bell and boarding pikes. I must be getting old; I had a note to add the pikes before adding the rigging lines and must lost the note or just plain had a brain fart. But I managed to get them in place. I have designed a Black Walnut base that I am working on while I make rope coils for belaying pins and ponder the Cat head faces.


-
Dave, what no chicken cooking on the spit? Great work and love the details!
- 742 replies
-
- 7
-
-
- constitution
- frigate
- (and 1 more)
-
Chuck, you may know already, but you can also tint resins with colorants to get the wood color as well or really close and then match with dusting. Keep up the great work! Ken
- 269 replies
-
- 6
-
-
- Queen Anne Barge
- Syren Ship Model Company
- (and 1 more)
-
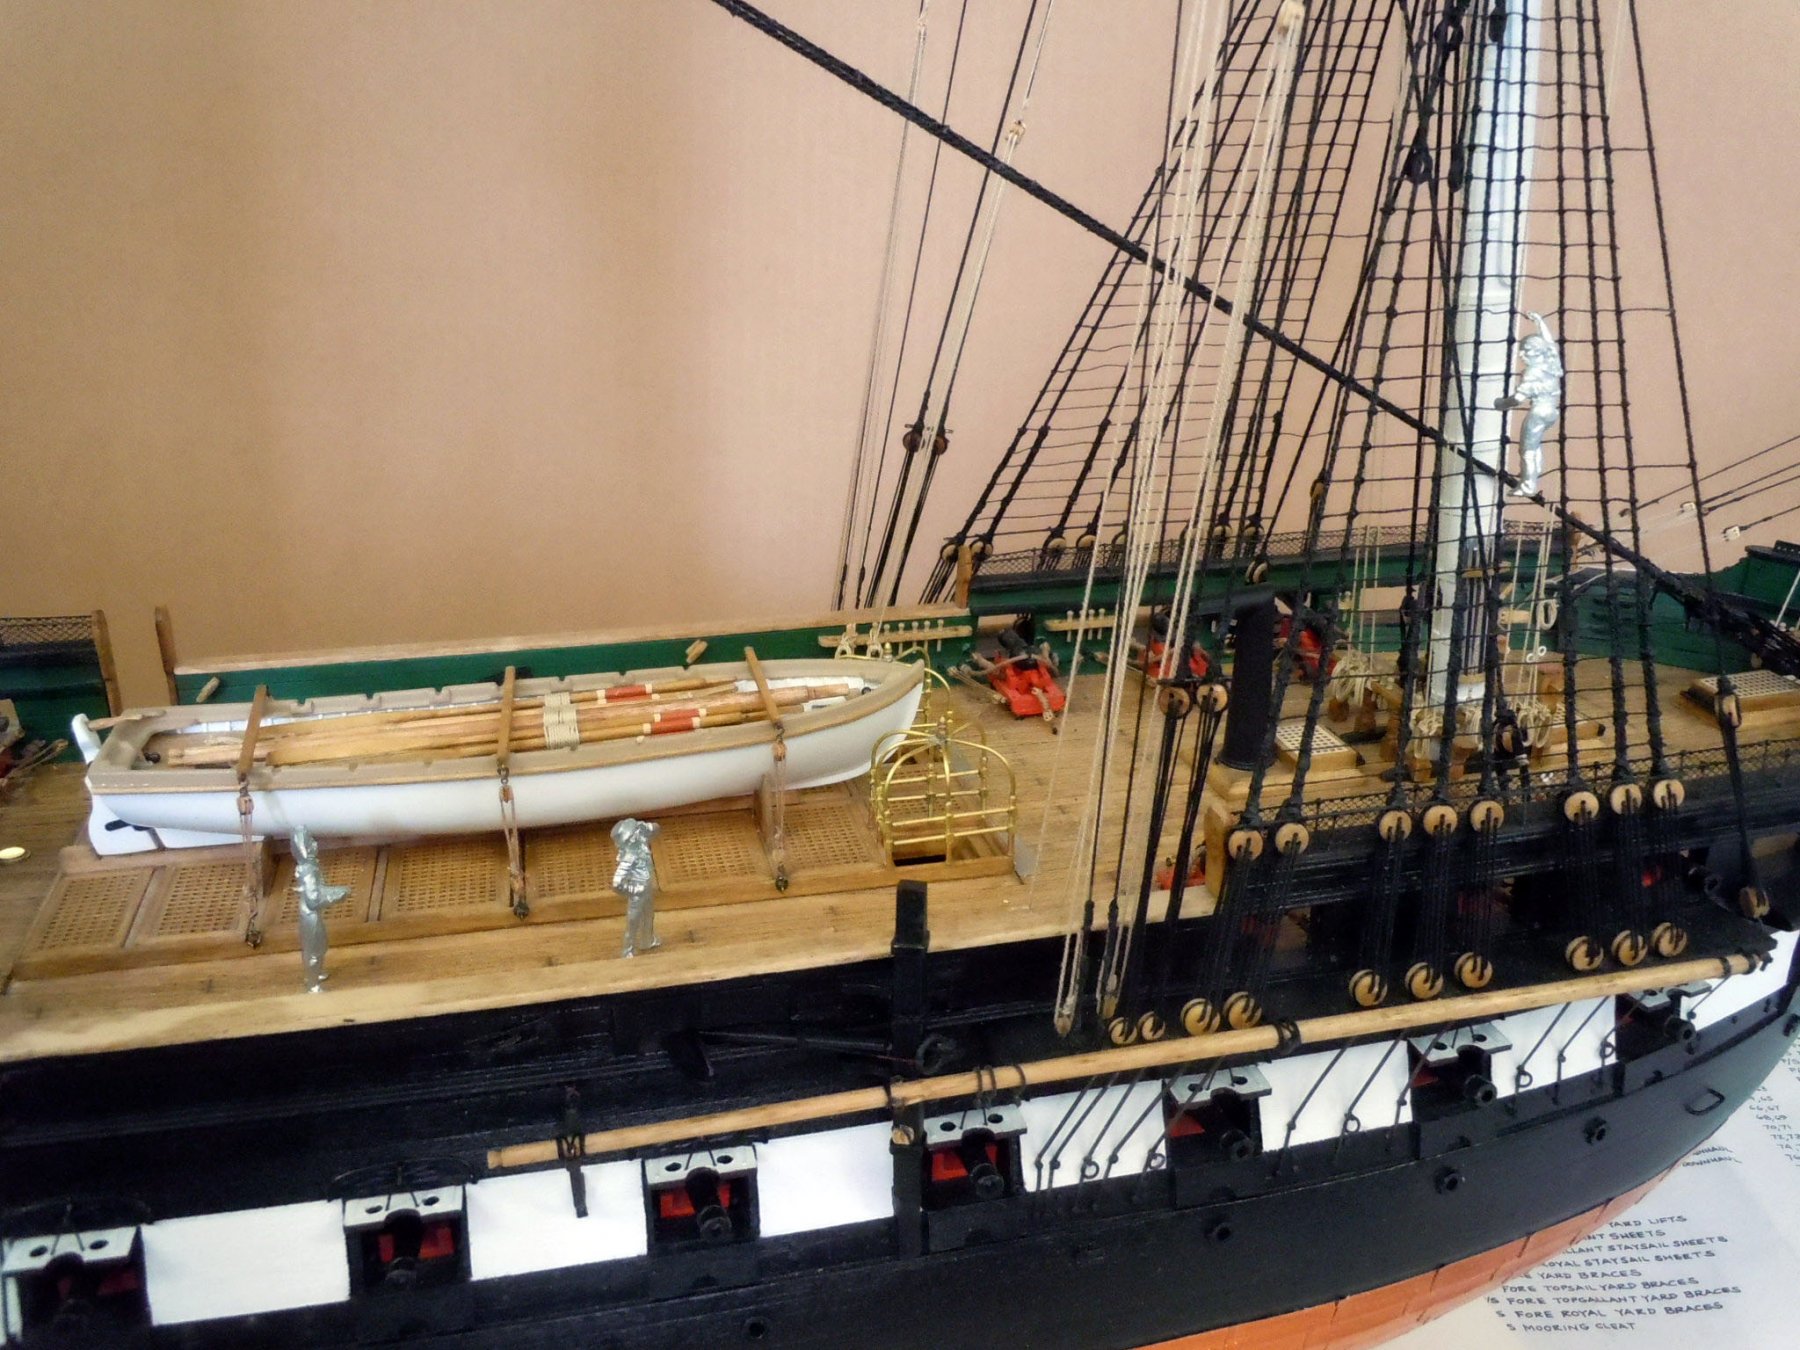
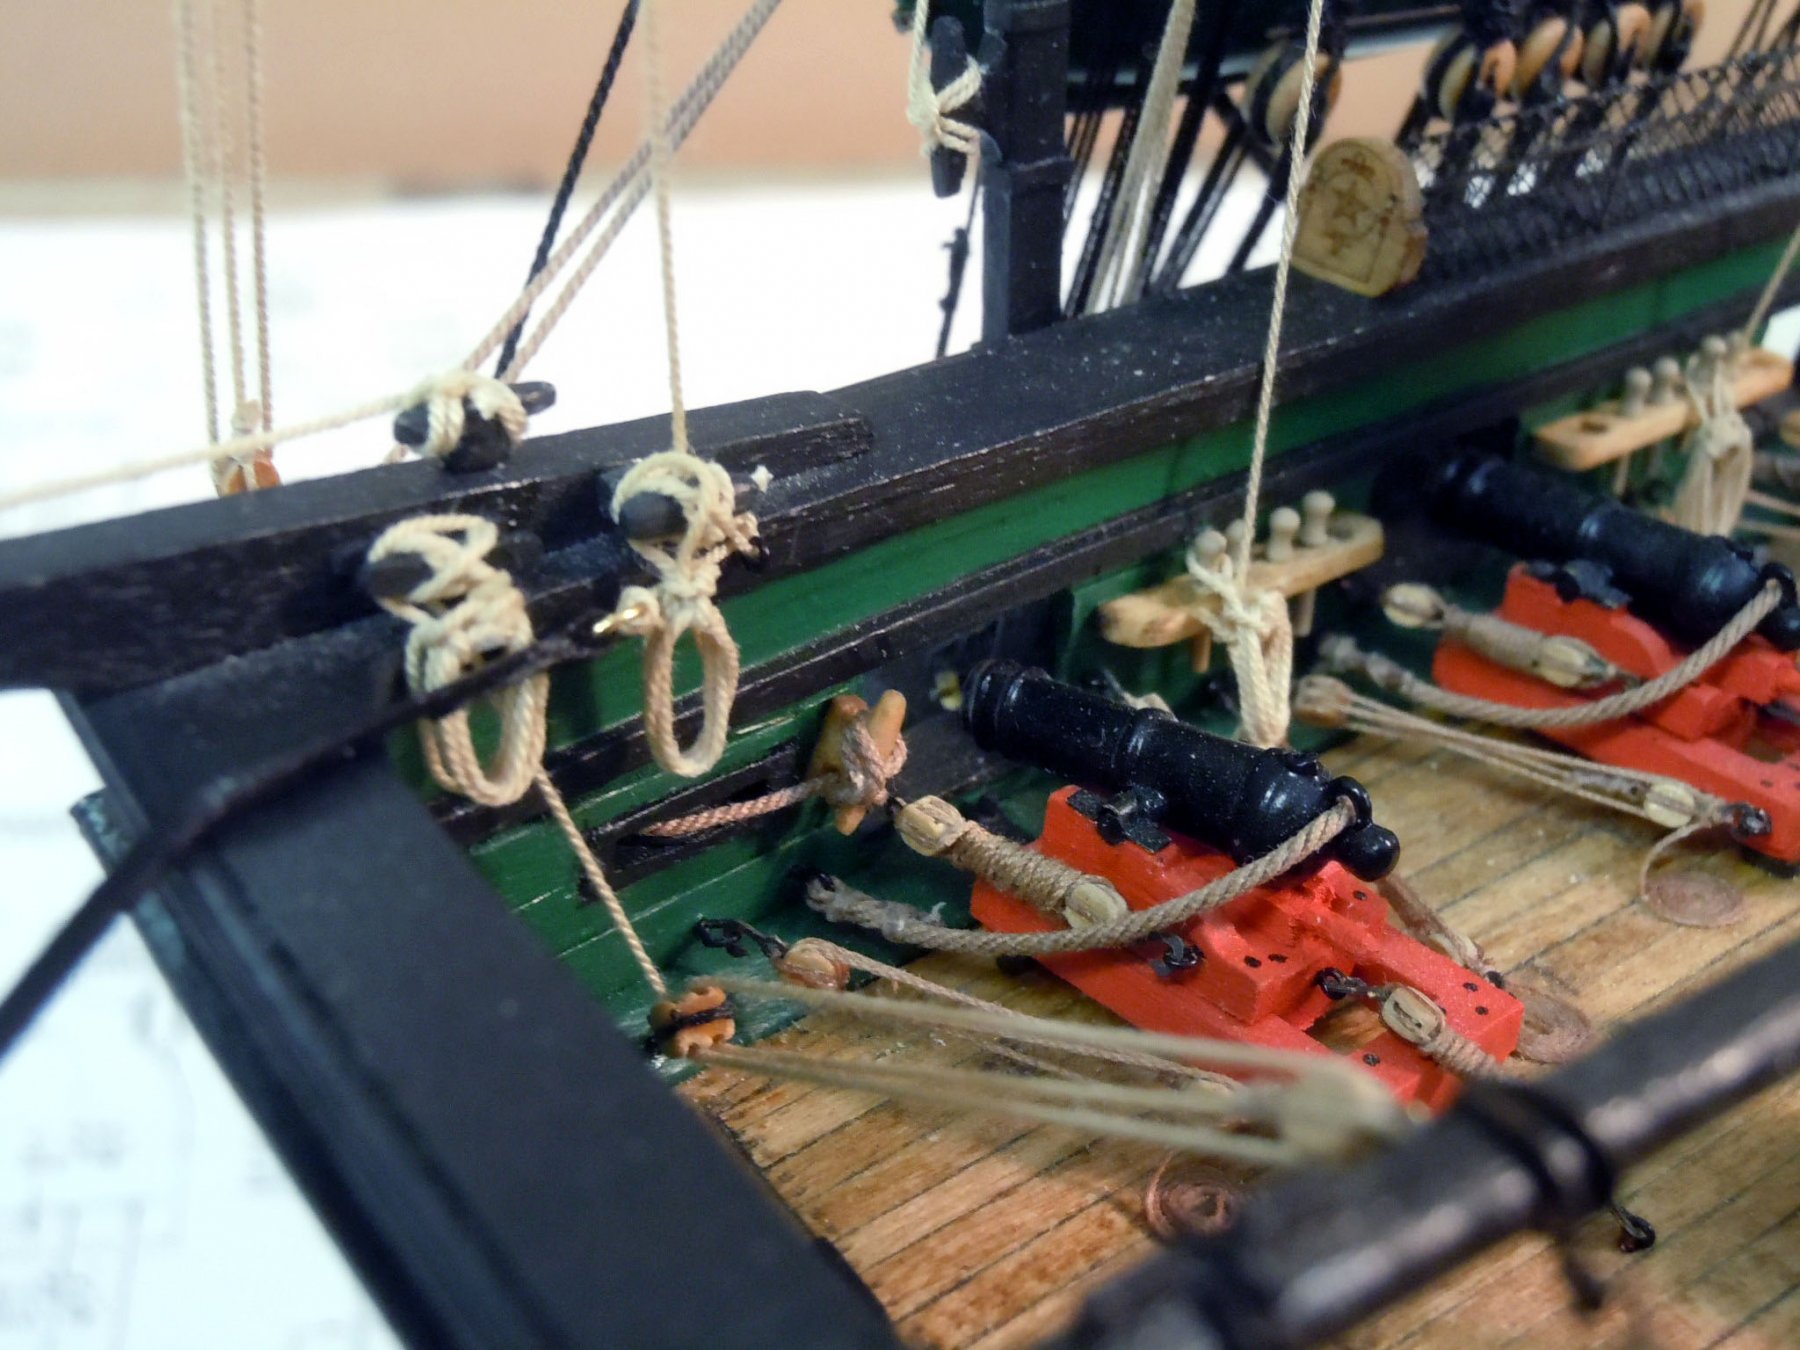
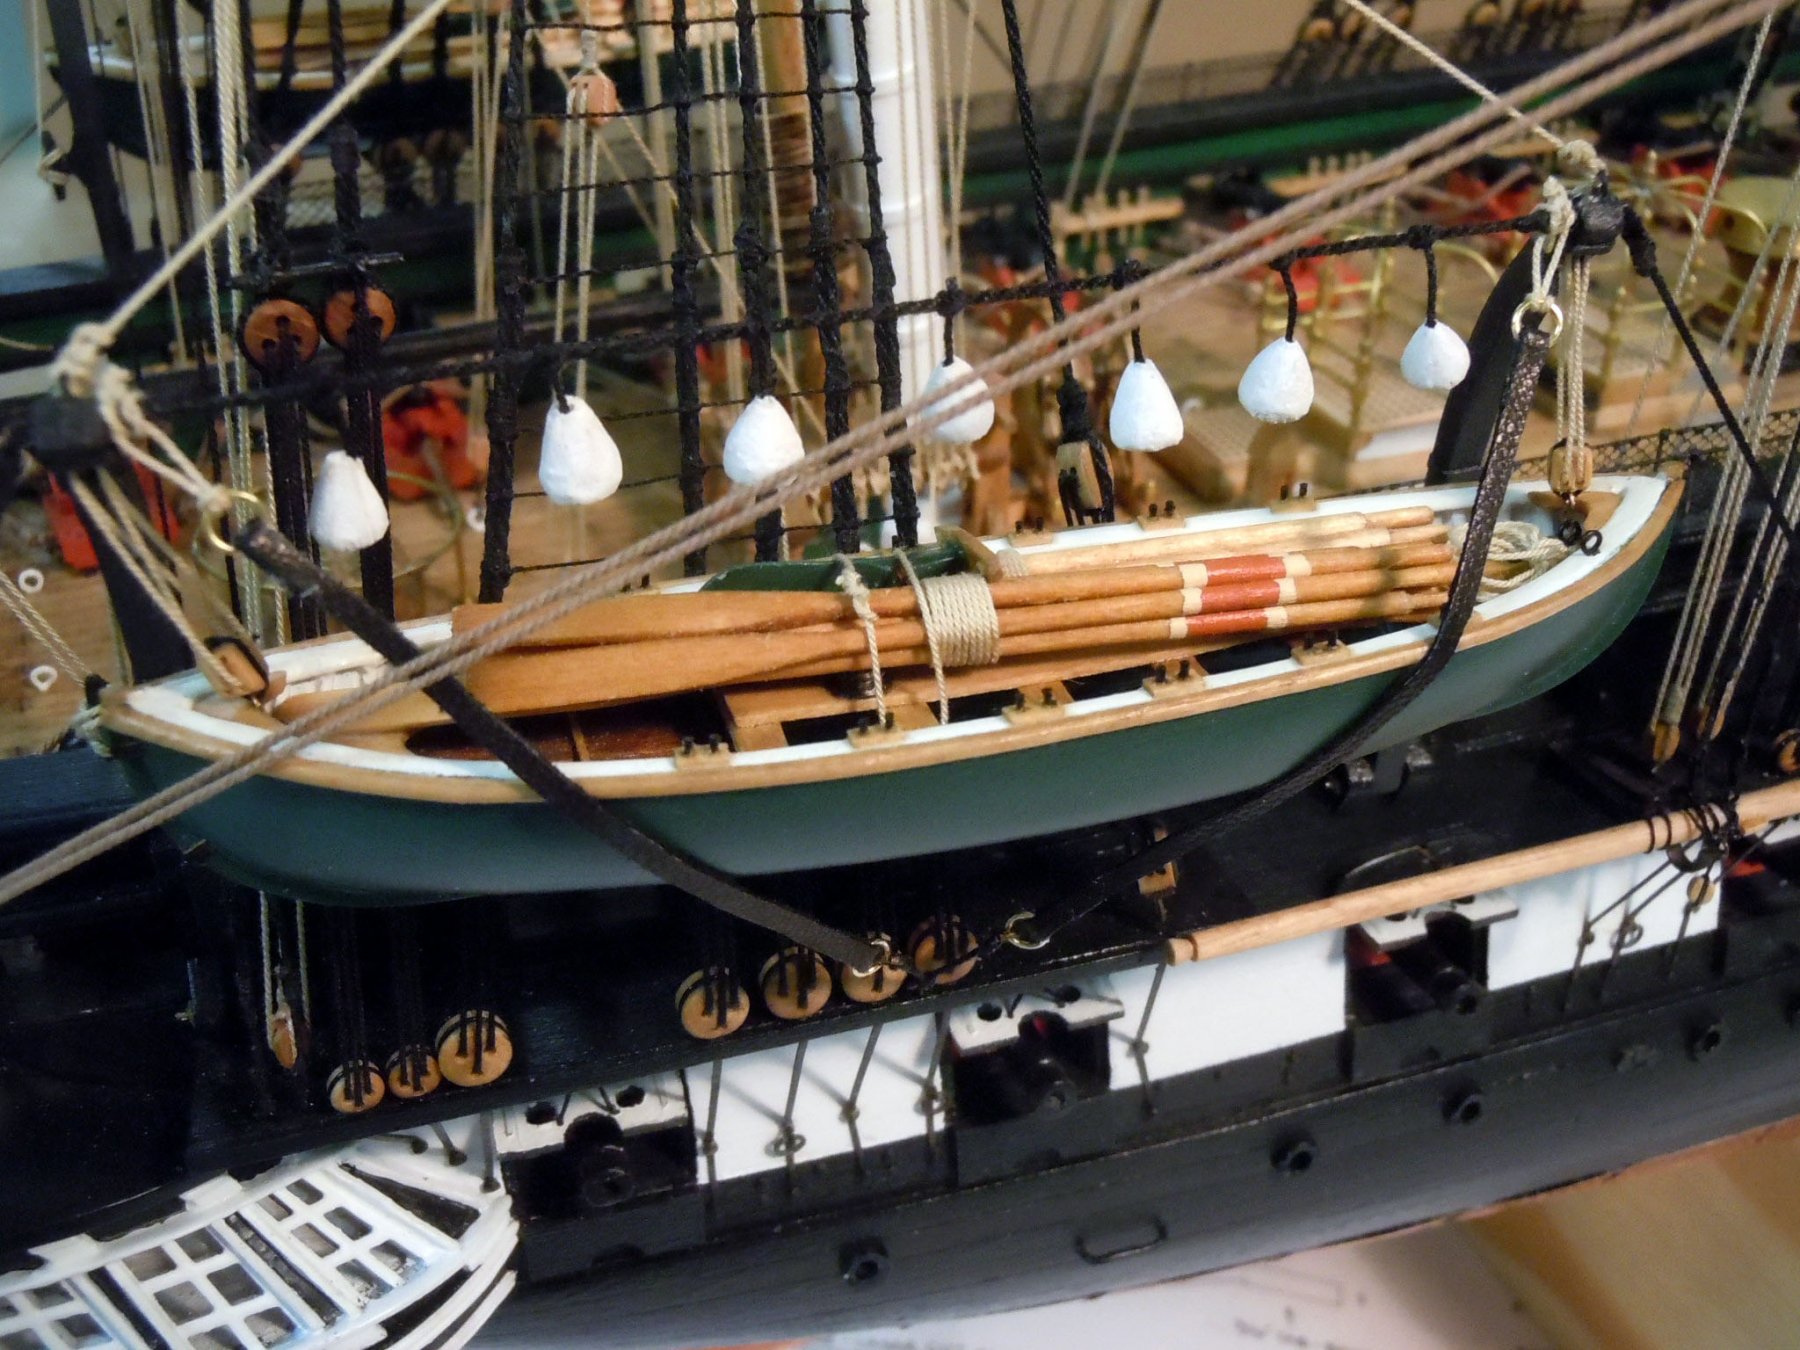
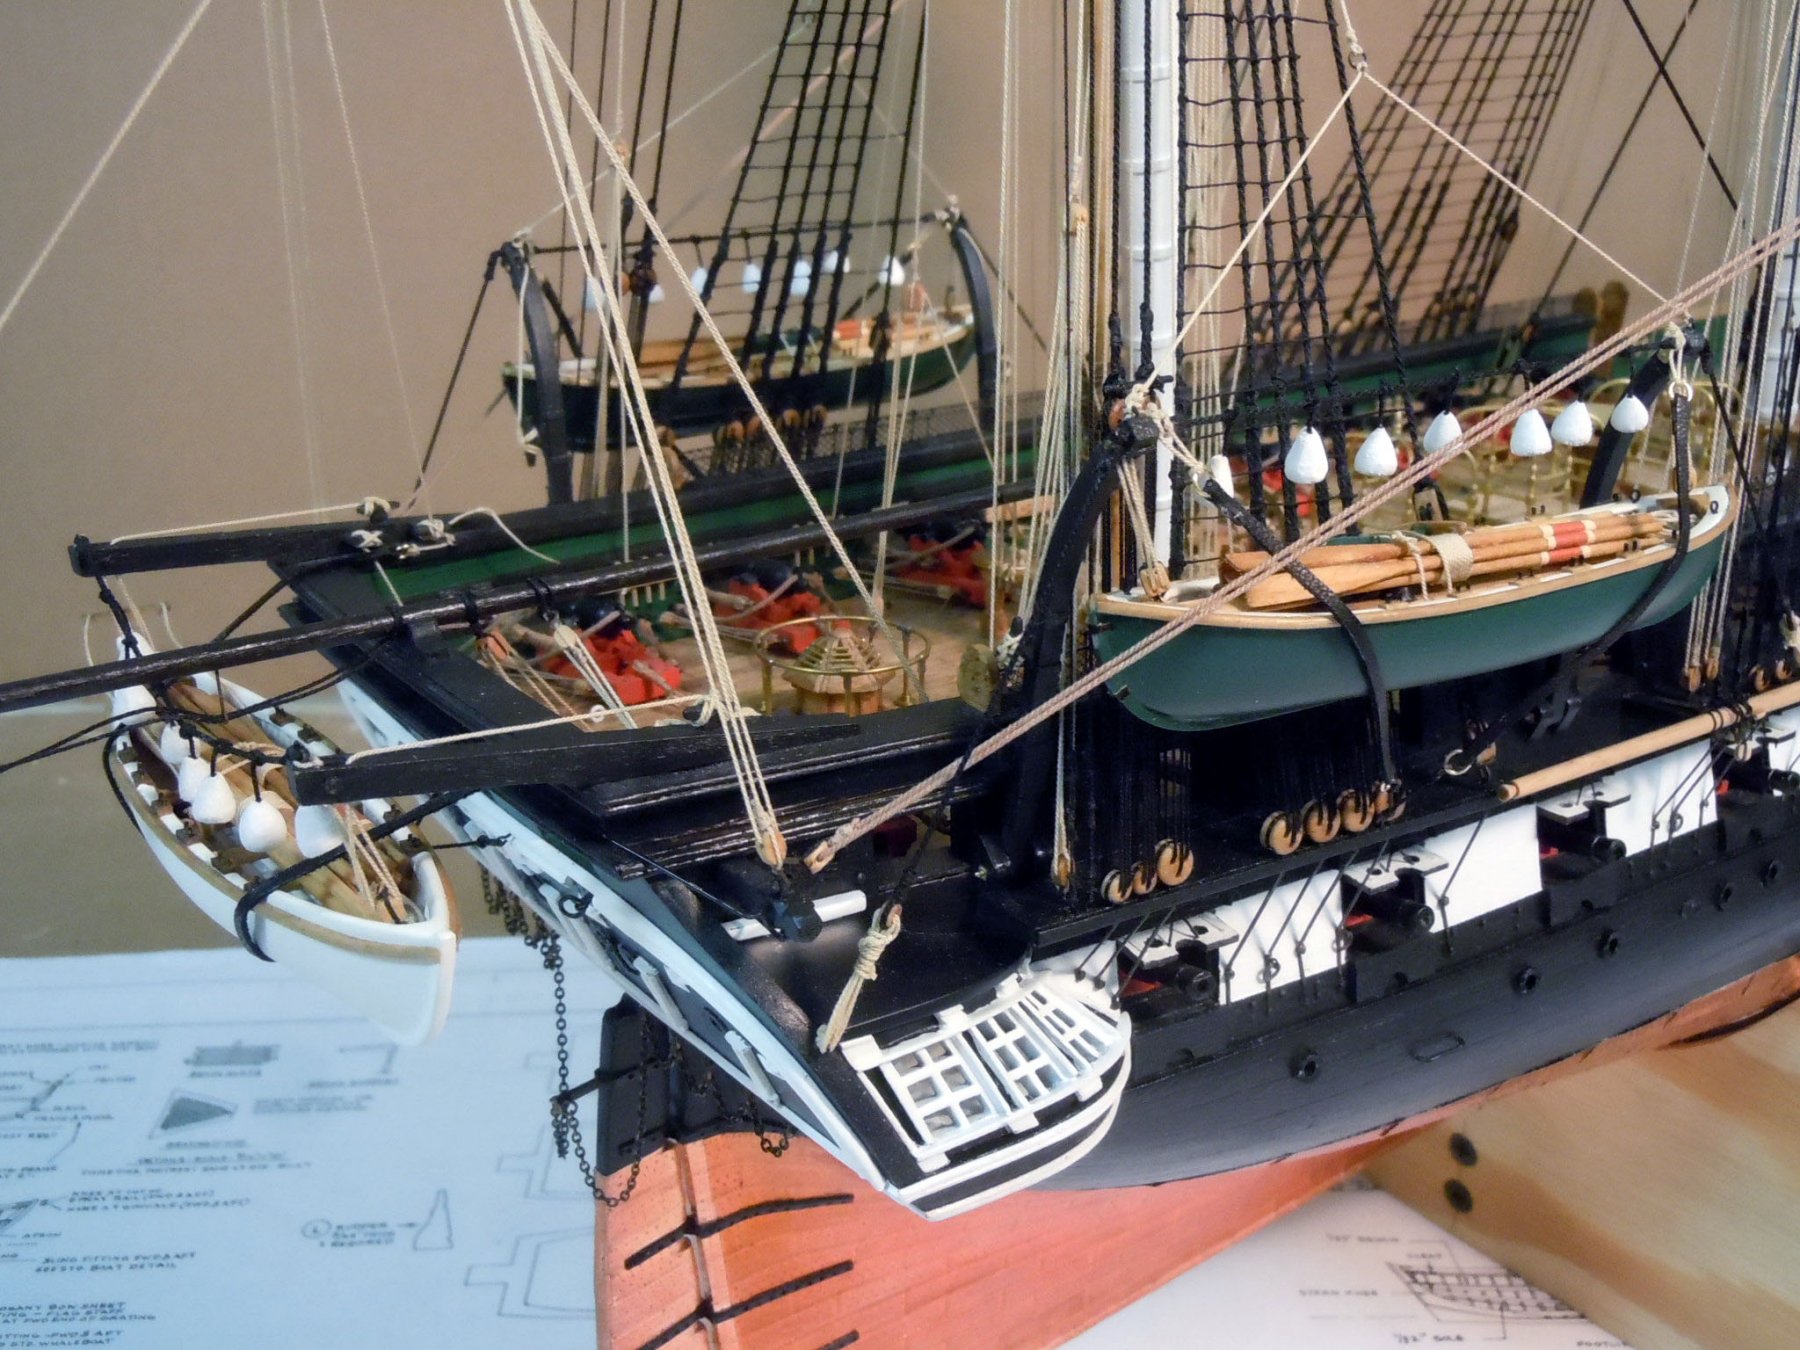
I spent some time rigging the studding booms, and I really like the results. The time taken was well worth the results. I them moved on to rigging the small boats in their davits. After checking photos of the restored Constitution I realized that the gripes were leather straps. I then found in my automotive stash some goatskin leather that was used in cars seats. This leather is very thin and supple and after cutting 1/16" strips they were slightly stretched to set. Then brass rings were glued to each end after being cut to the length needed. Next I added the attachment points per the plans with eyebolts and rings as needed. For the sake of clarity in photographing the brass rings have not been darkened yet. Since I used the spreader rope the upper strap ends were attached to the end of the spreader rope. Here are images of the results showing the three boats in various views. Here is an overall stern side view. Now back to finish up more details like rope coils for the belaying pins.


-
Rich looks like you are off to a great start. Just remember old dogs can learn new tricks if motivated enough. OLD FARTS RULE!
- 1,135 replies
-
- 3
-
-
- model shipways
- syren
- (and 2 more)