xken
-
Posts
841 -
Joined
-
Last visited
Content Type
Profiles
Forums
Gallery
Events
Everything posted by xken
-
 Like Jon I to am a life long member of the long and distinguished list of screw-ups. Screw-ups are just mis-judgements turned into learning lessons.
- 742 replies
-
- 5
-

-
- constitution
- frigate
- (and 1 more)
-
Another good source for copper foil with no clear coating are Stained Glass supply shops. They also carry the various widths as well.
-
John, looks like you are off to a great start. I will be following along. What kind of woods are you using?
-
Model Shipway Ratline tool
xken replied to fnkershner's topic in Modeling tools and Workshop Equipment
Gregory, if I understand correctly "for setting up properly on the mast" it does but you have to index the port and starboard mast loops in the proper sequence as you slip them on the mast when setting them in place. I hope this makes sense, that is one of the reasons I suggest in the instructions to tie the mast loops with a string before removing from the RATLINER once tied to keep them in sequence for later installing. -
Model Shipway Ratline tool
xken replied to fnkershner's topic in Modeling tools and Workshop Equipment
Doug, I am the guilty one that designed, engineered and wrote the instructions for the RATLINER. As I was working on my Constitution I thought that there had to be a better way. Having been in Product Development my entire working career the gears went into motion. I also have designed and engineered model for ME so it was an easy proposition to work with them. Also keep in mind that I to am relatively new to ship building; but not modelling. So I devised this tool to be able to do the lines off model; like any other tool there is a learning curve. Some will wish to use it and other will rather rig on the ship. We went through a few materials until we got the correct combination for the best product to bring to market. I have tested it and it works great, but I also have the benefit of designing it. I also suggest reading and understanding the instructions before starting. Here is a link to the instructions on how to use them. Enjoy! http://modelexpo-online.com/assets/images/documents/RATLINER-Instructions.pdf -
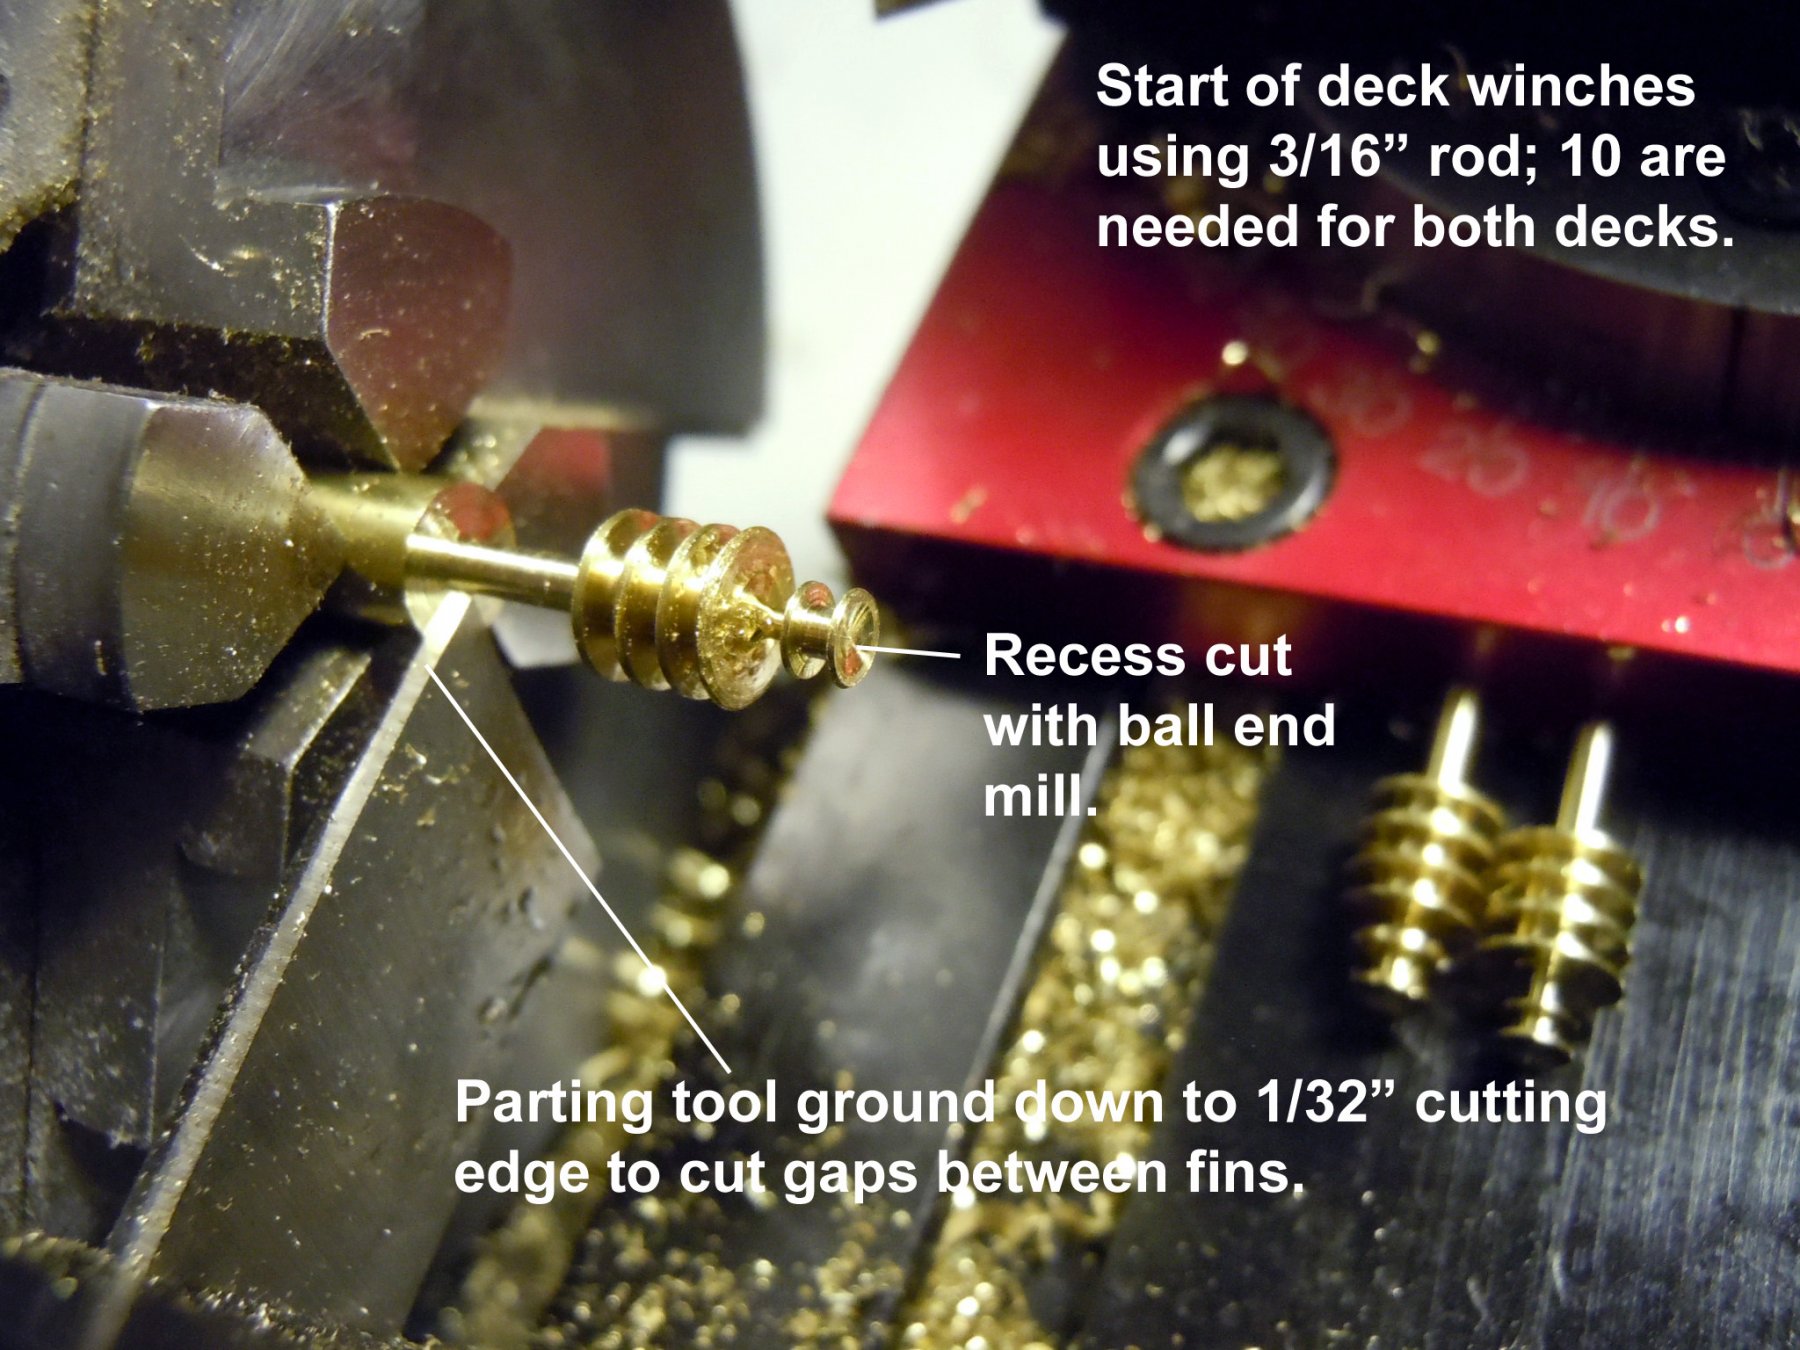
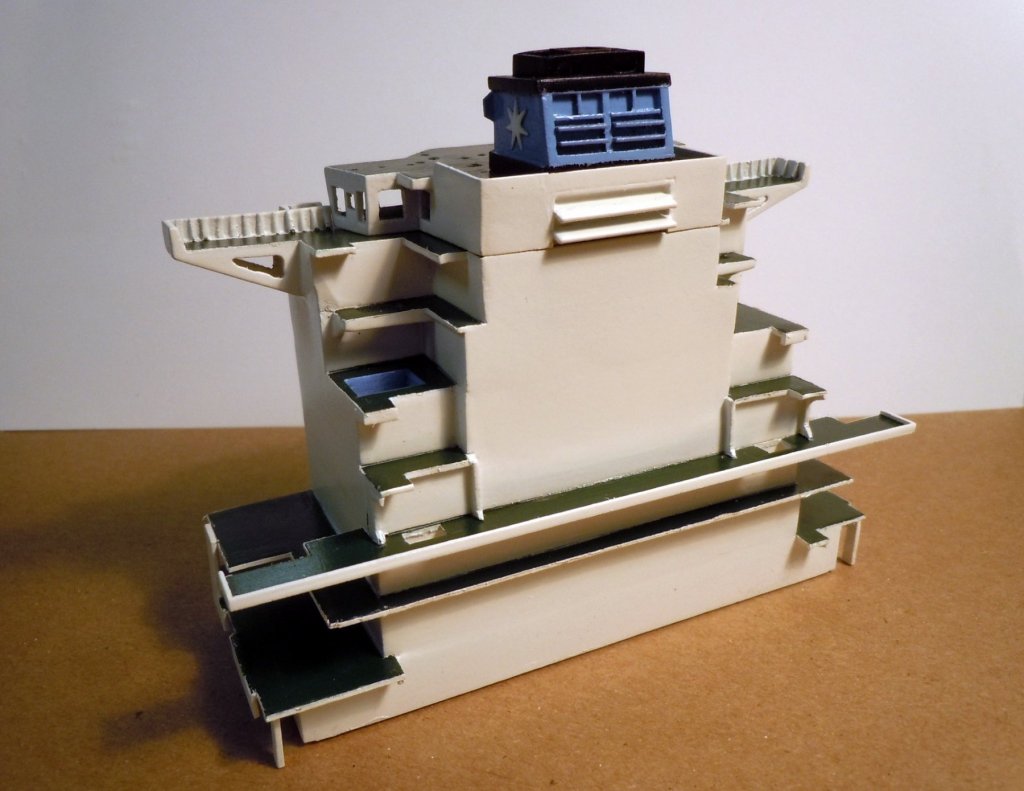
The ladders have arrived from Tom's Modelworks. While waiting for them to arrive I made the bollards for the decks and started the winches for the decks. There appears to be three different kinds of winch set-ups; two for anchors, 6 for mooring and two that I will call general purpose. All start out with the same basic construction with add-ons for specific purposes. After grinding a parting tool down to 1/32" to cut the gaps between the rope reels, I started by turning the basic reel set up starting with 3/16" brass bar and then started one of the frames for sizing. I used a turned piece of aluminum and moved the cutting tool horizontally to cut grooves for fins on the electric motor. 1 started 9 to go as well as finishing up the ladder ways. My build time and updates will now be sporadic at best until New Years; my son, his wife and the twin grandsons travel tomorrow from NYC and will be here until the 28th. This will be their first time seeing the Constitution completed that will eventually be at their home on Long Island.


-
Dan, great job on the rails. Having just done some I know how tricky there are to work with.
- 287 replies
-
- 3
-
-
- michelangelo
- ocean liner
- (and 1 more)
-
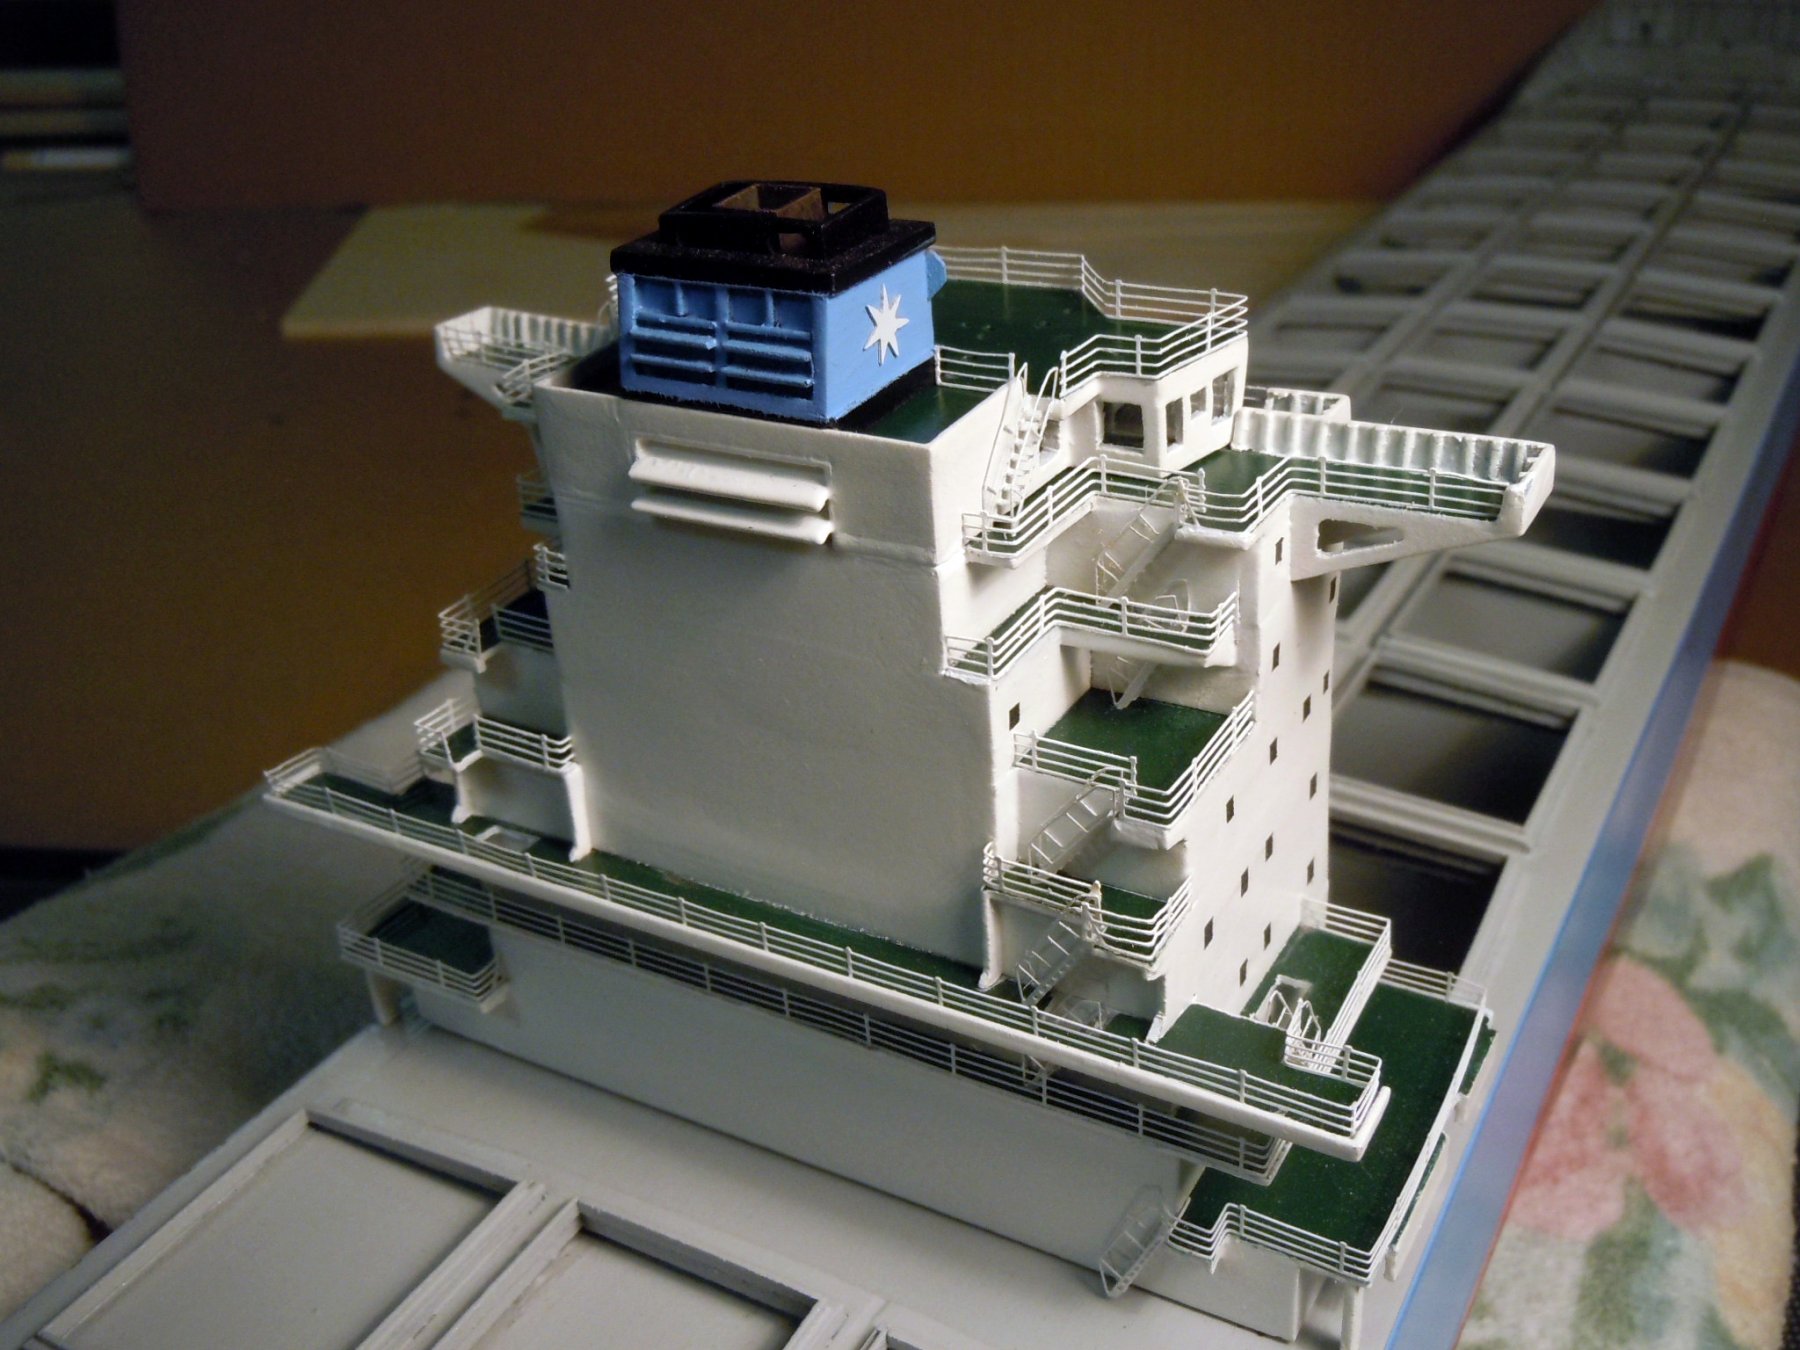
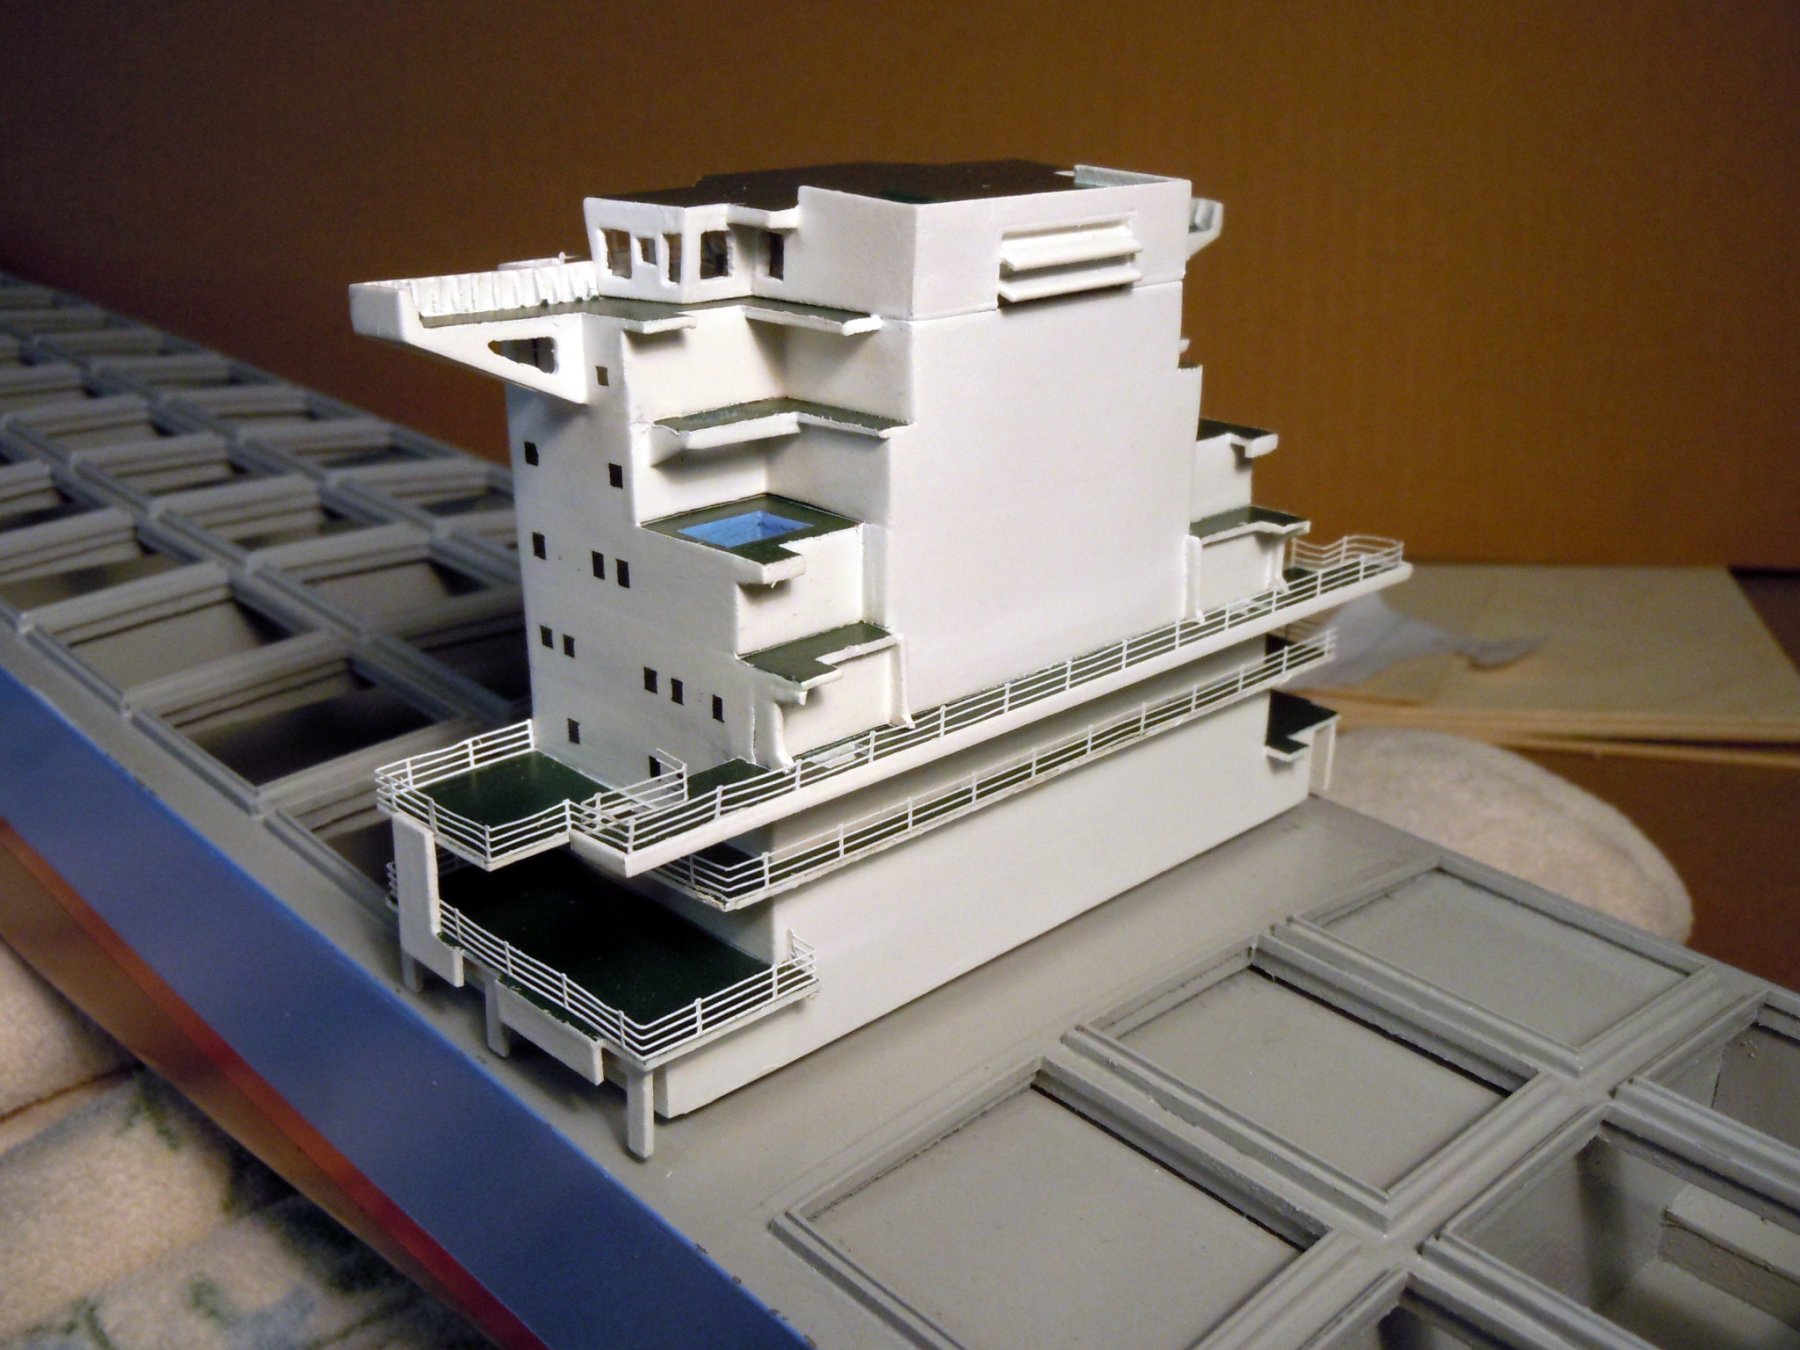
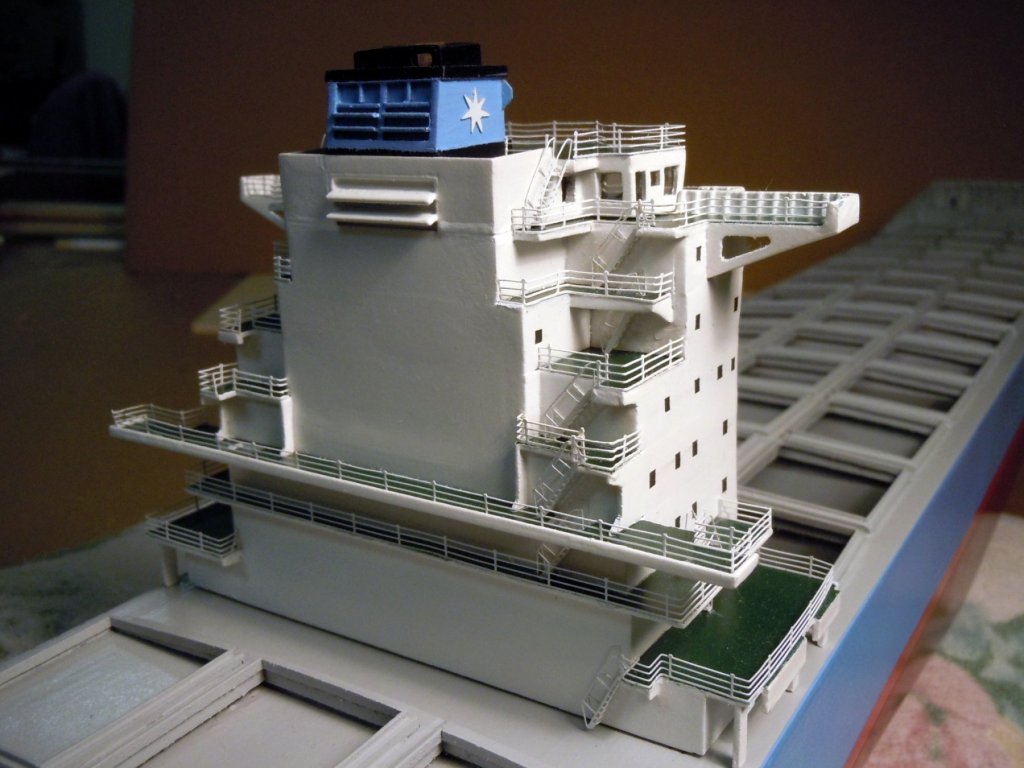
John, thank you and yes it is. I finished up the rails and then added the ladder ways until I ran out and have since ordered more of both. I found the best way to fold the rails and ladders was to use small steel blocks that have sharp edges keeping things a crisp as possible. Here are a couple of views of the starboard side of the tower done. This is my first experience with these kind of tiny PE parts. While waiting for the additional parts to arrive from Tom's I will start parts for the mooring and forecastle decks.

-
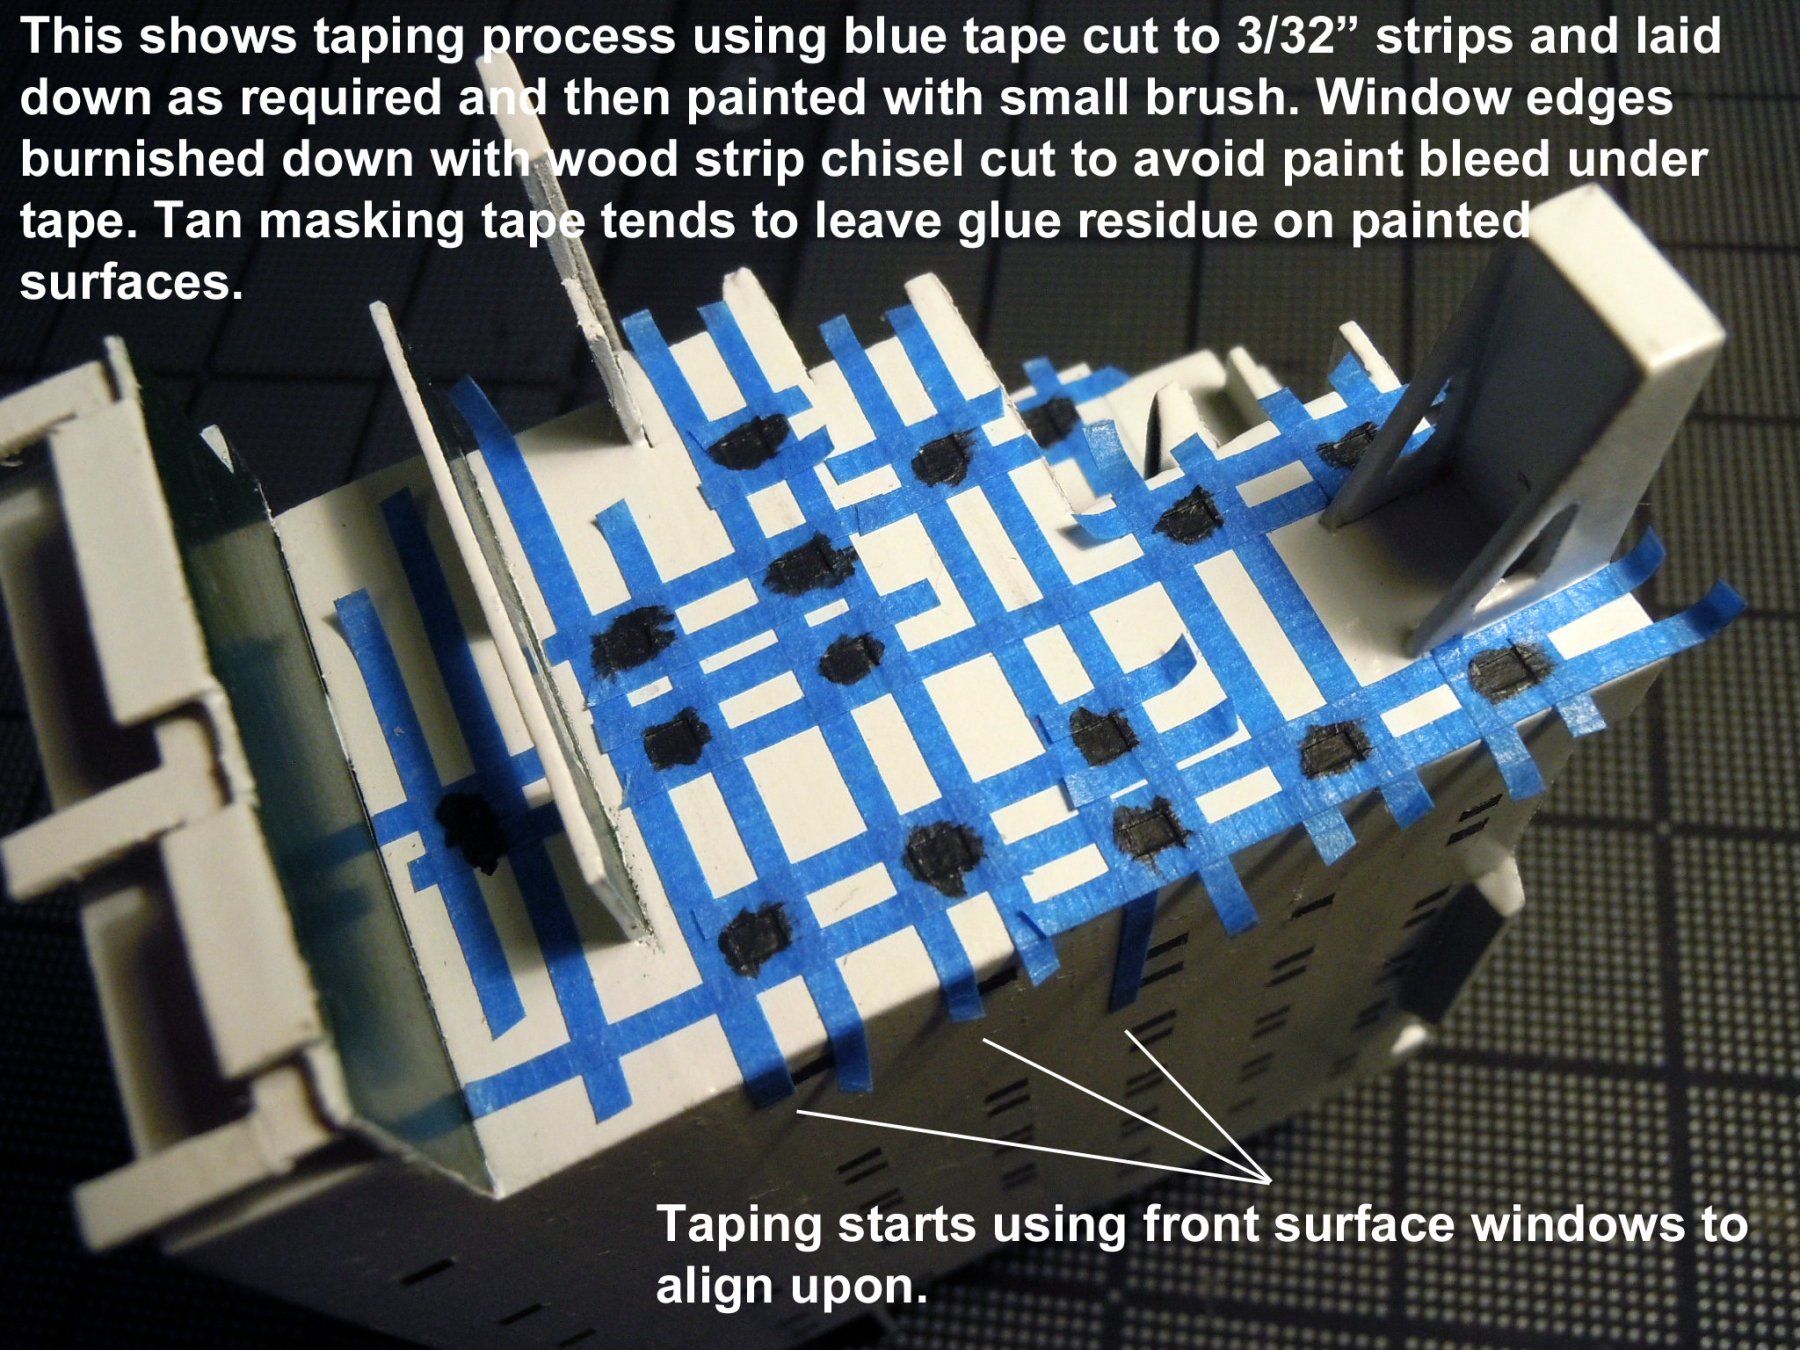
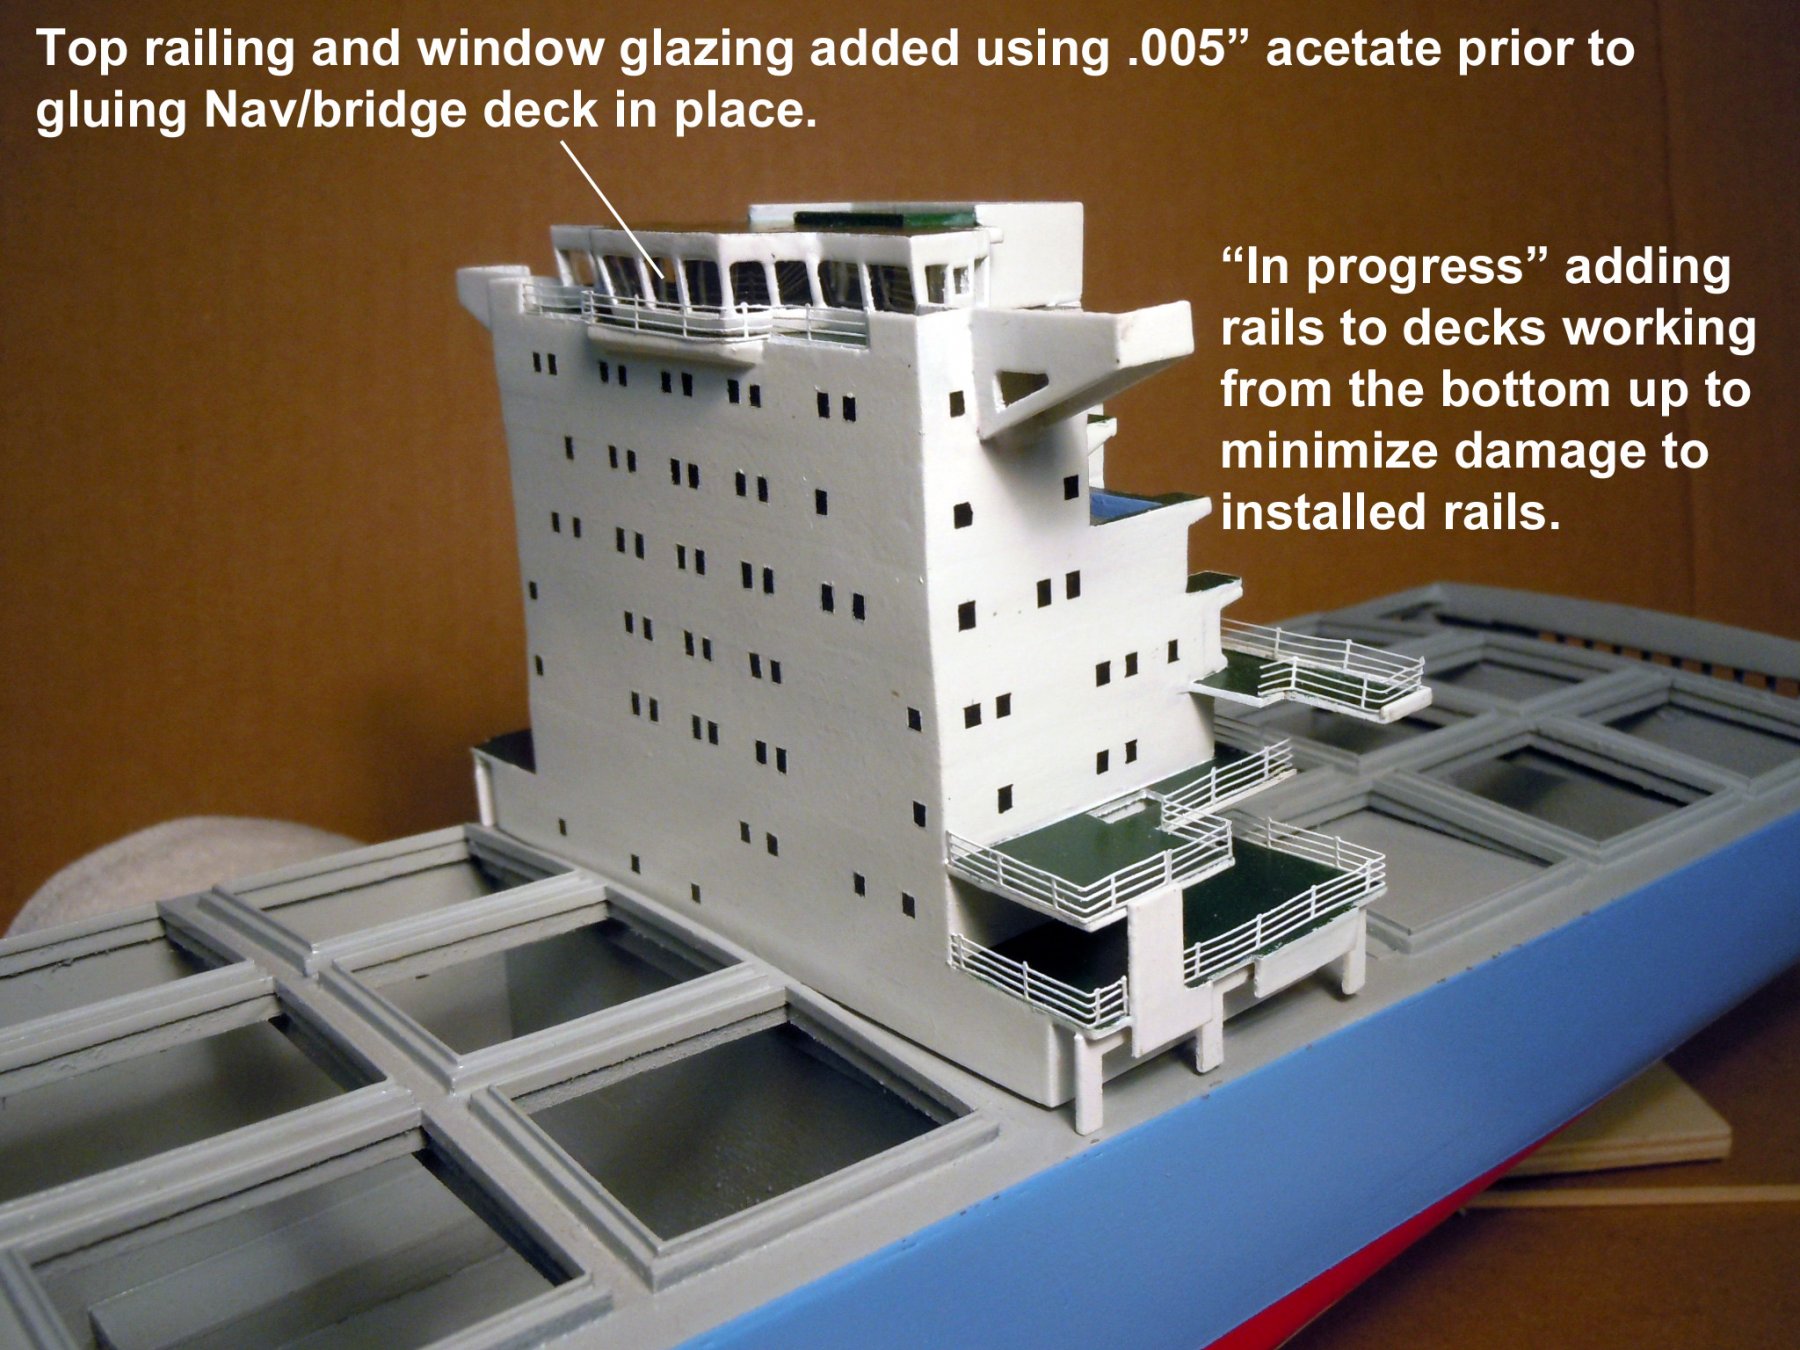
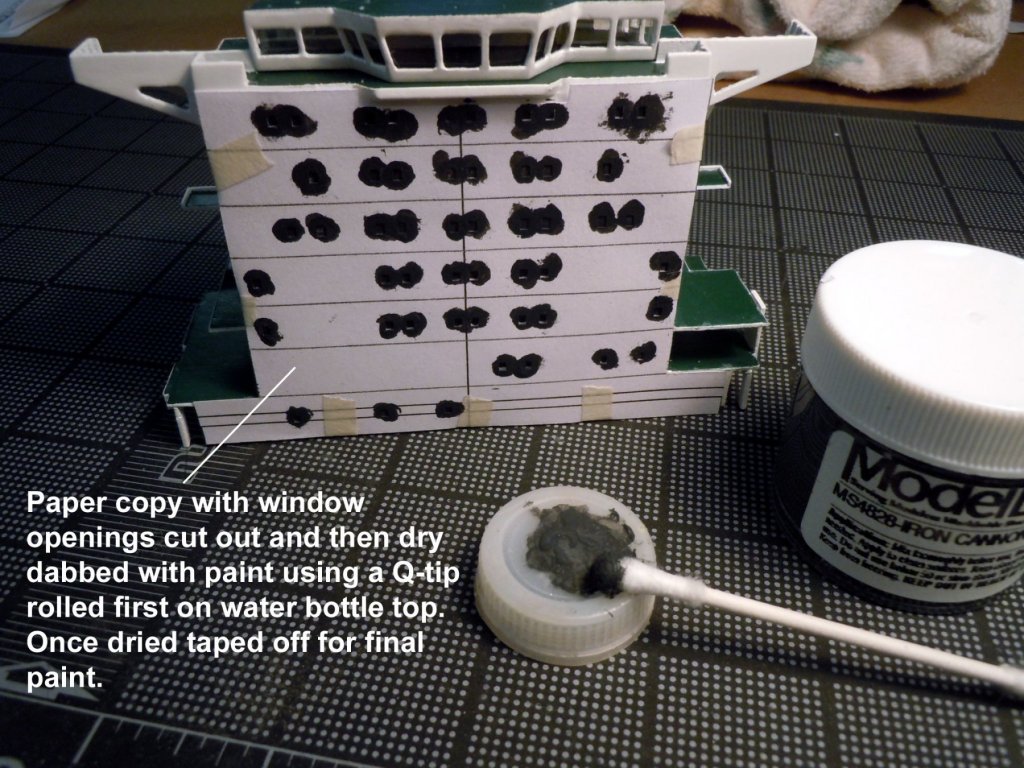
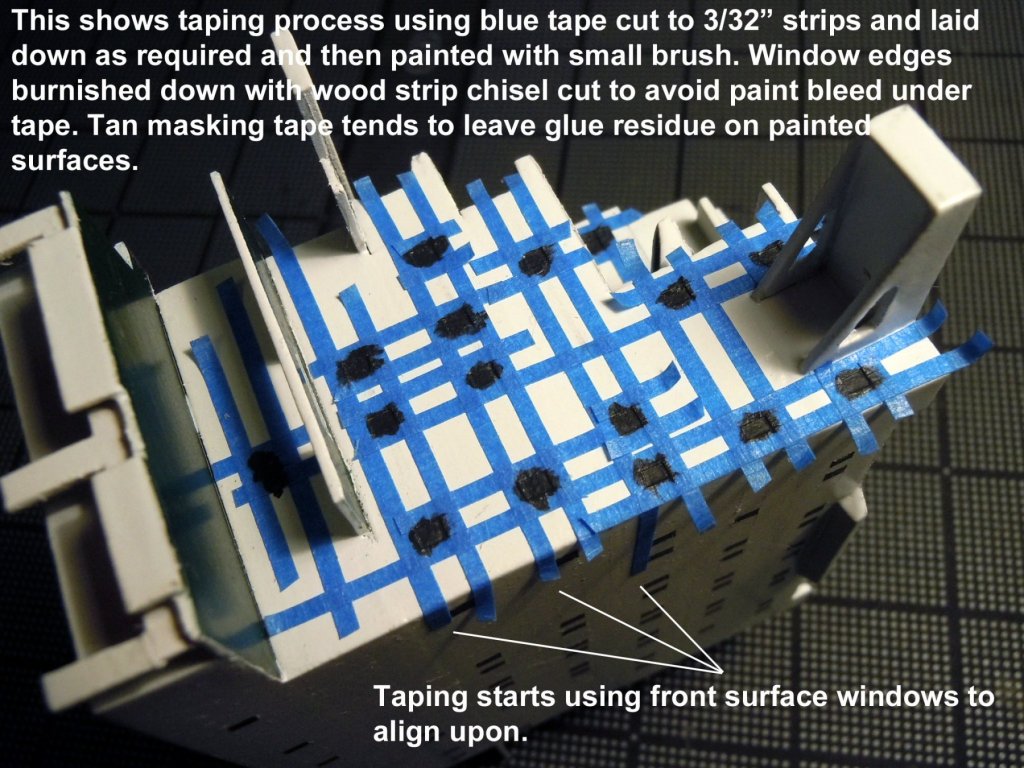
Well the smoke was only around one day and all is clear now. While waiting for the airbrush paint to show up I painted the bow splash wall and then realized that before adding the rails that it would be easier to locate and paint the tower windows first. I copied the tower face CAD drawing and made a paper location stencil cutting out the windows. Once taped to the front wall I dry dabbed black paint to define the locations and then used strips of blue tape for the final shapes of the windows and painted with a small brush using two light coats. Then the airbrush paint arrived and I then painted the previously primed rails. It has been 45 years since I last used an airbrush, but just like riding a bike it all came back. I glued the top rail in place and then added the top deck, easier to get this rail in place first. Now I am slowly working my way up from the bottom adding the painted rails. I am glad the tower is not glued in place yet, because adding the rails is a tediously slow process to get right. I might also mention that I added the window glazing before gluing the top deck in place. I used card stock for pattern development and then cut out each window as required and once finally fitted was glued in place with tiny wood strips to hold in place on the inside. Glad I built in the bottom access hole just for this purpose. I did have to enlarge the hole for better access. This shows the typical taping process used. Now back to adding deck rails.


-
Today the smoke arrived from Santa Barbara "Thomas" fire. Here is a picture that was posted from 10 am. this morning. It was eerie seeing the sun blood red through the smoke cloud.
-
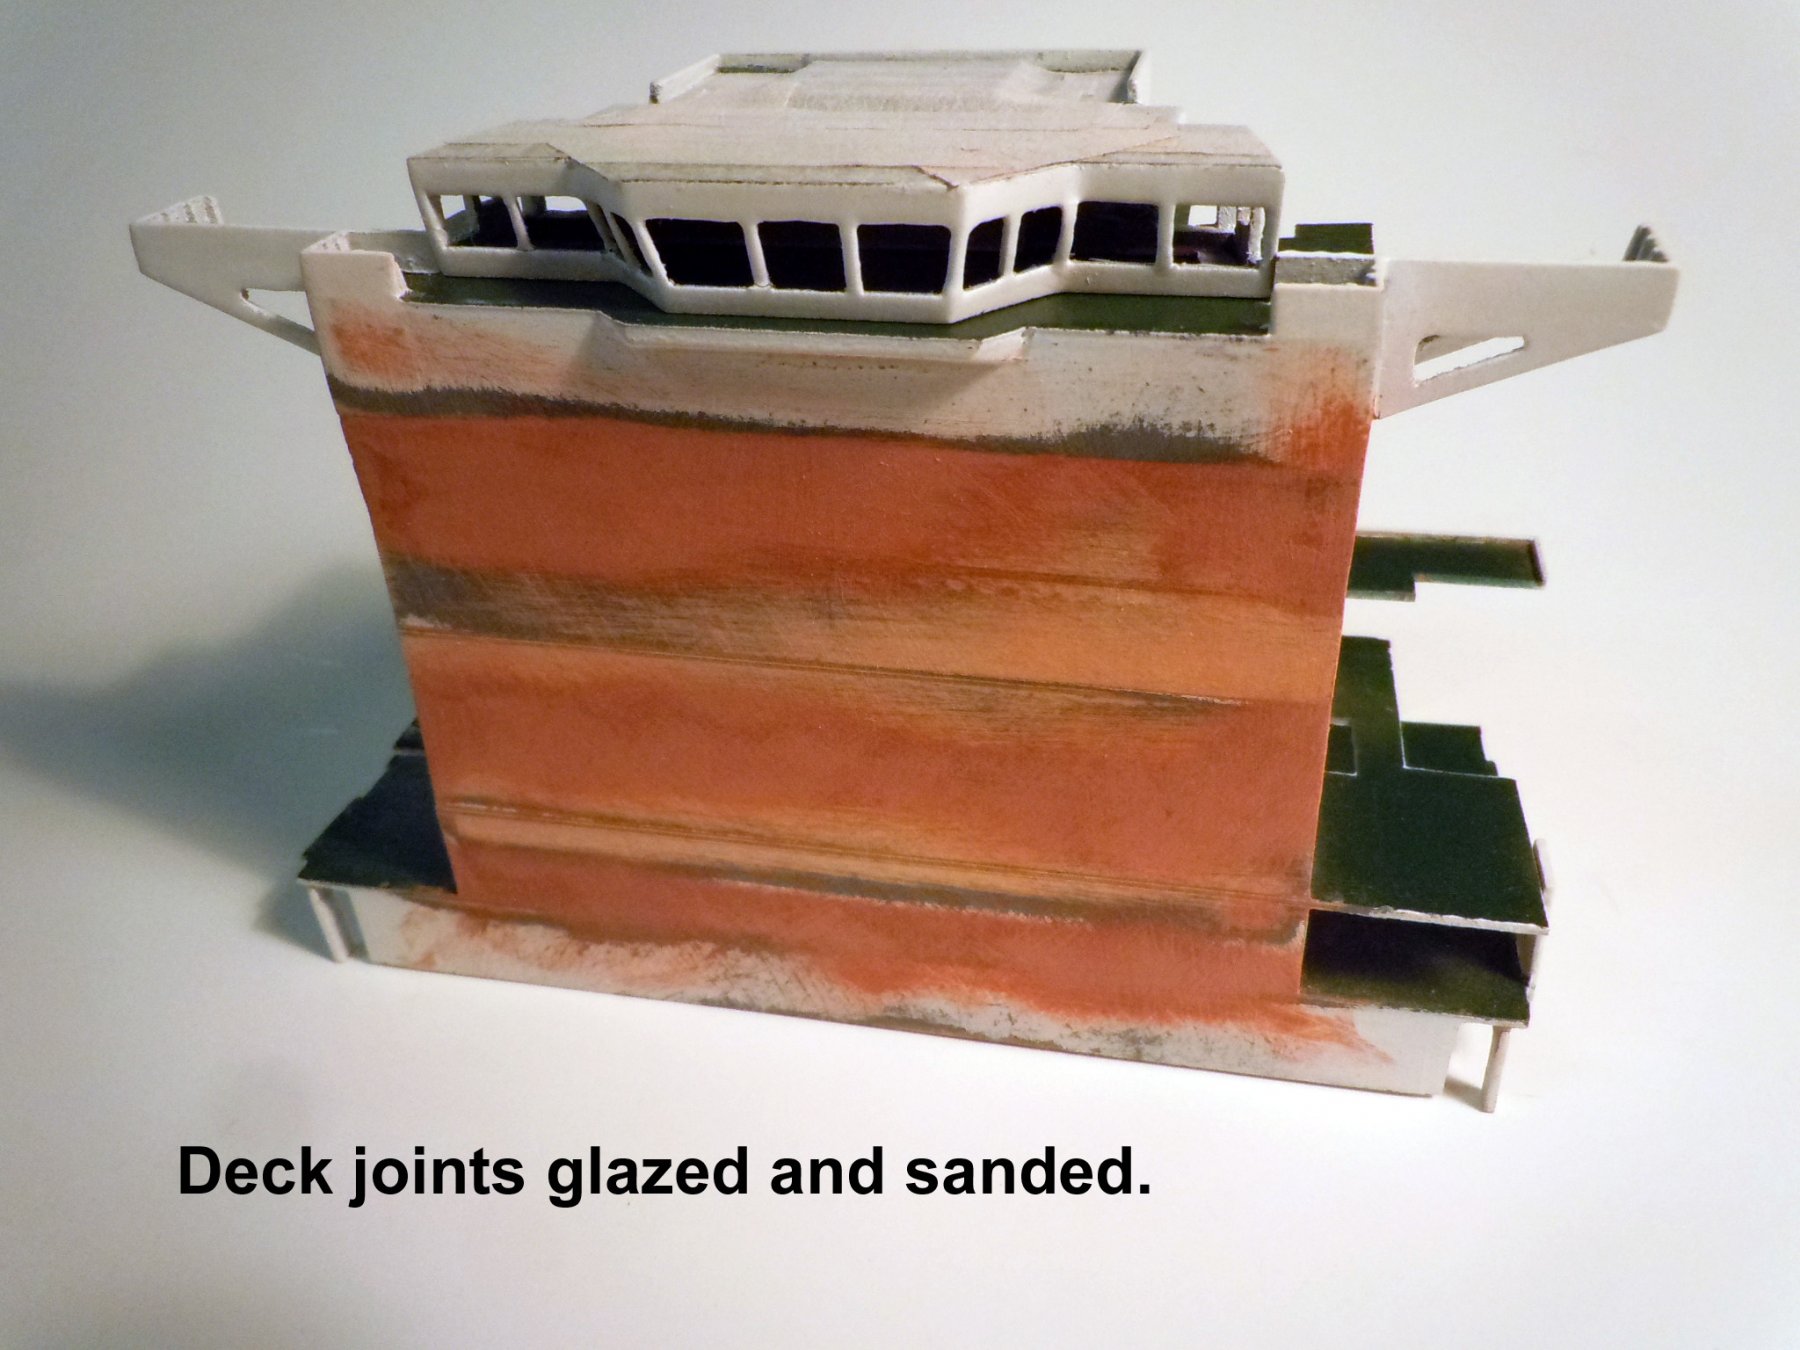
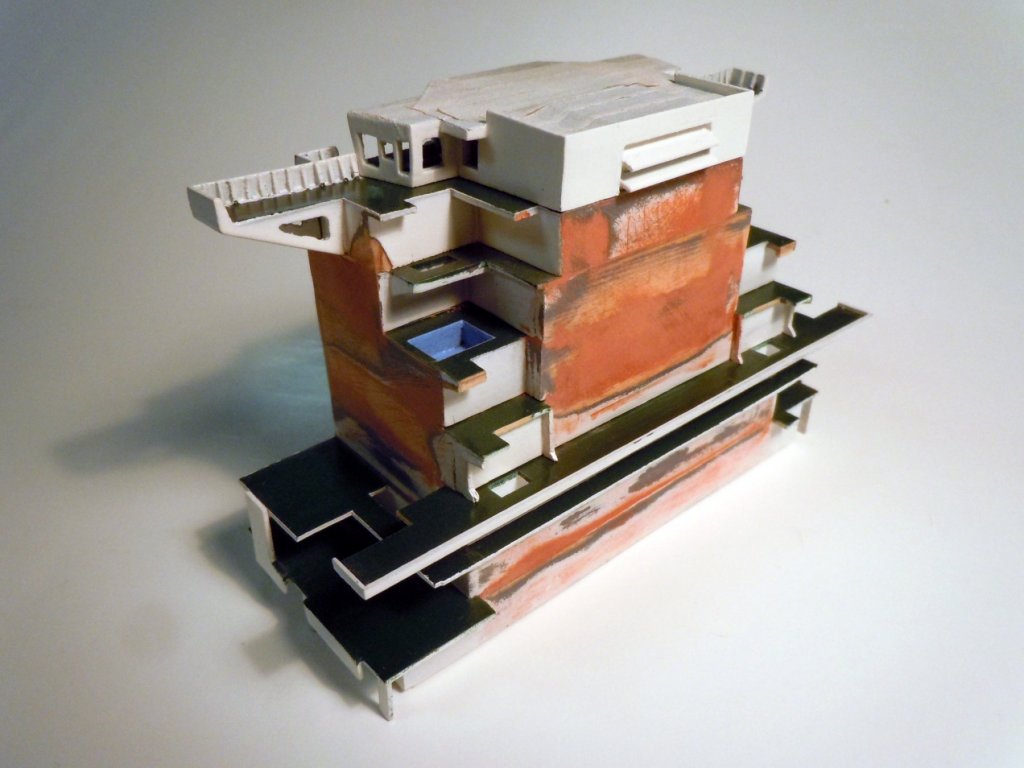
I glued all the decks together except the top Bridge/Nav. deck; need to still sort out the window installation. After the glue set I then sanded all the mating surfaces and then added glaze as needed, sanded, glazed and then primed and sanded. Finally once satisfied I painted white. When priming and painting I used the spray cans, first warming them and holding back with light coats to seal the glaze then painting again with light coats. The real fun was masking off the green decks prior to painting, I used 1/4" masking tape and made sure to burnish all edges to avoid any paint bleed onto the green. I cut a piece of strip wood with a bevel on the end as a burnishing tool. Before I can add the ladder ways I will need to sort out how to add the windows on all the smooth sides. Still waiting for paint to arrive from MicroMark, perhaps next week. Next I will decide whether to add window glazing or not, will do some testing.


-
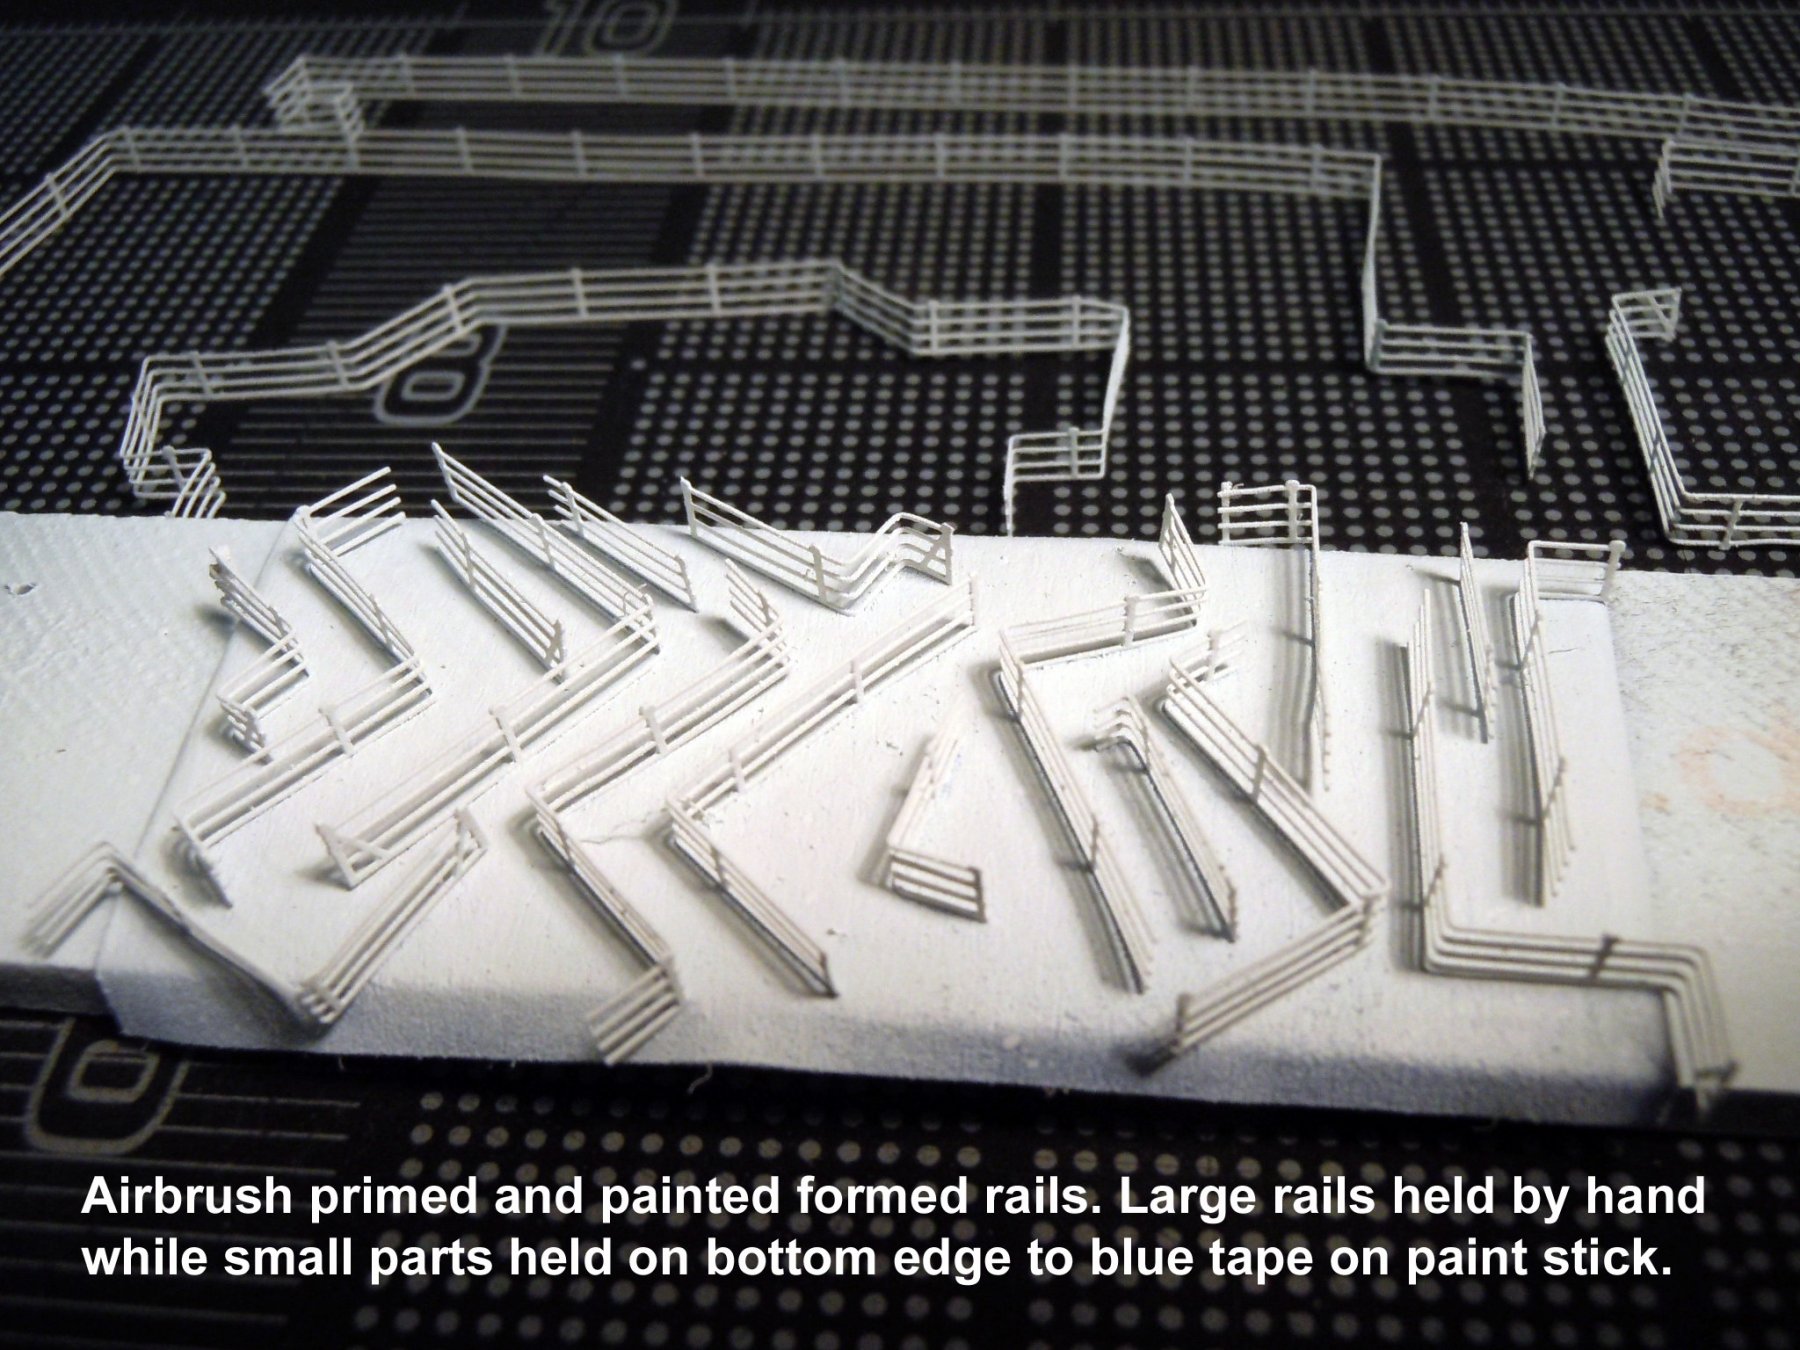
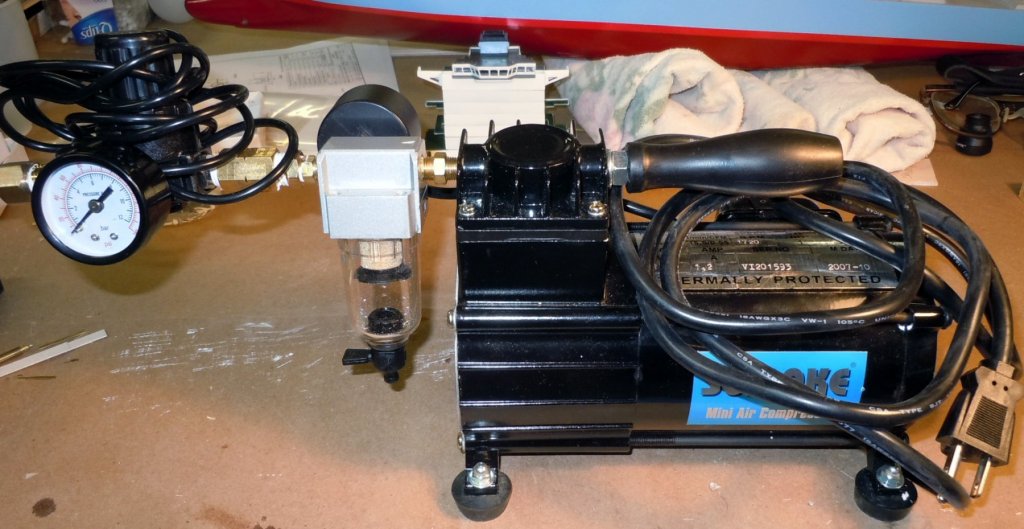
Finished up a box full of tedious rail bending and fitting for all the decks. Now the decks can be glued together and joint lines finished up. Once the tower assembly is painted the and the rails painted they can then be added. In preparation to paint the rails I had to rig up my air brush compressor with a regulator and pressure gauge. I won this air brush set up several years ago when I lived back in Ohio; but never had a need to use it until now. I have also ordered some air brush paints as well. I have not used an air brush since my college days so we will see if the "just like riding a bicycle" theory is really true. Now to working on the tower.

-
I have repainted the balls to red and green per feedback from Evan. He said that is the way they should be when repainted. I also bent up both a ladder way and railing for test fitting and sizing. Based upon my initial count I will need a second sheet of ladder ways. Here are a couple of pictures; one thing I found helpful was spraying a light coat of white primer on the railing to hold pencil marks for bending. This Nav. deck I think is the hardest one piece rail to bend and will be final fitted when being glued down once painted white. Now back to final fitting and fussing with the various decks.

-
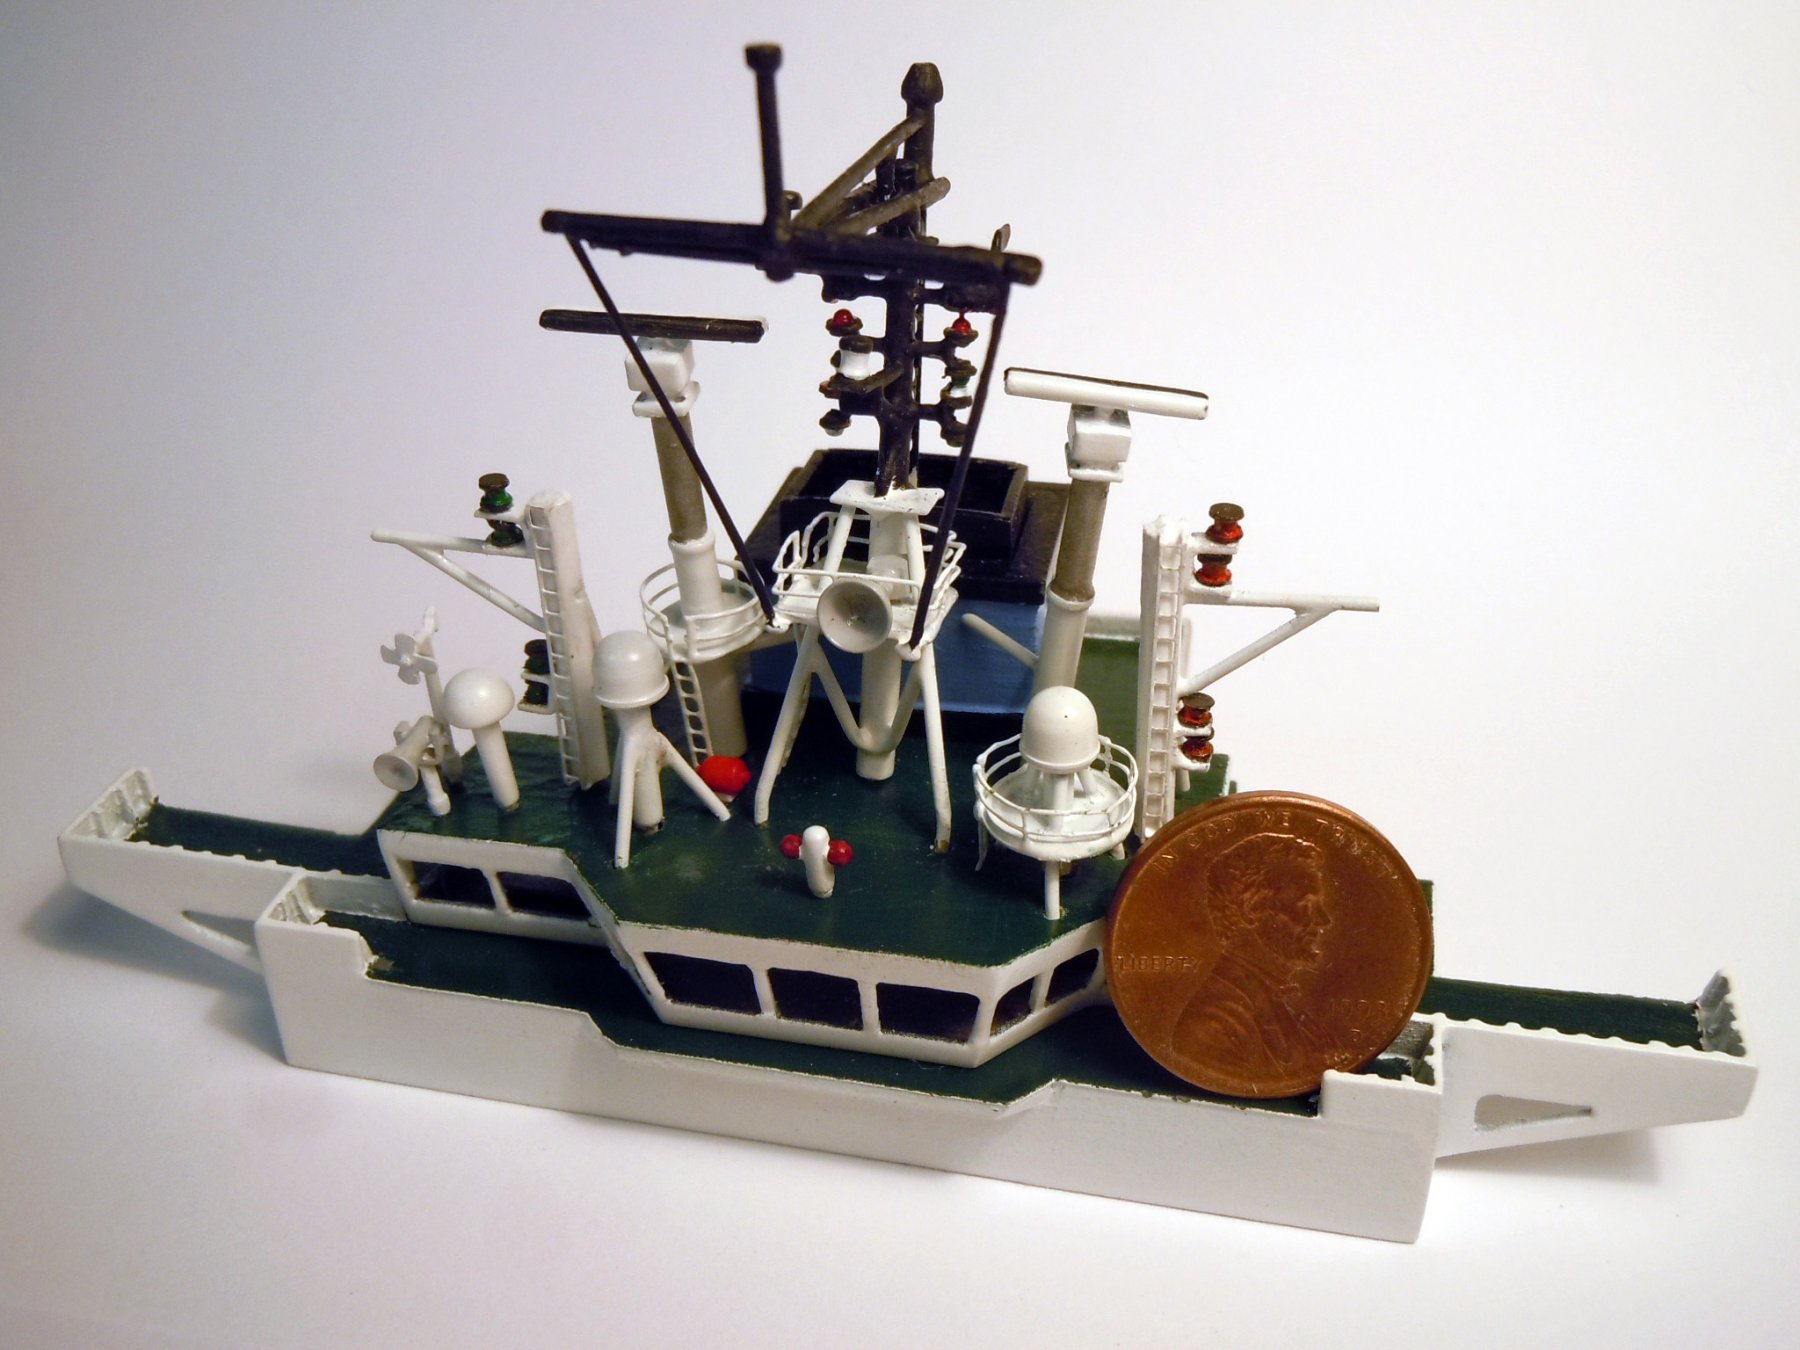
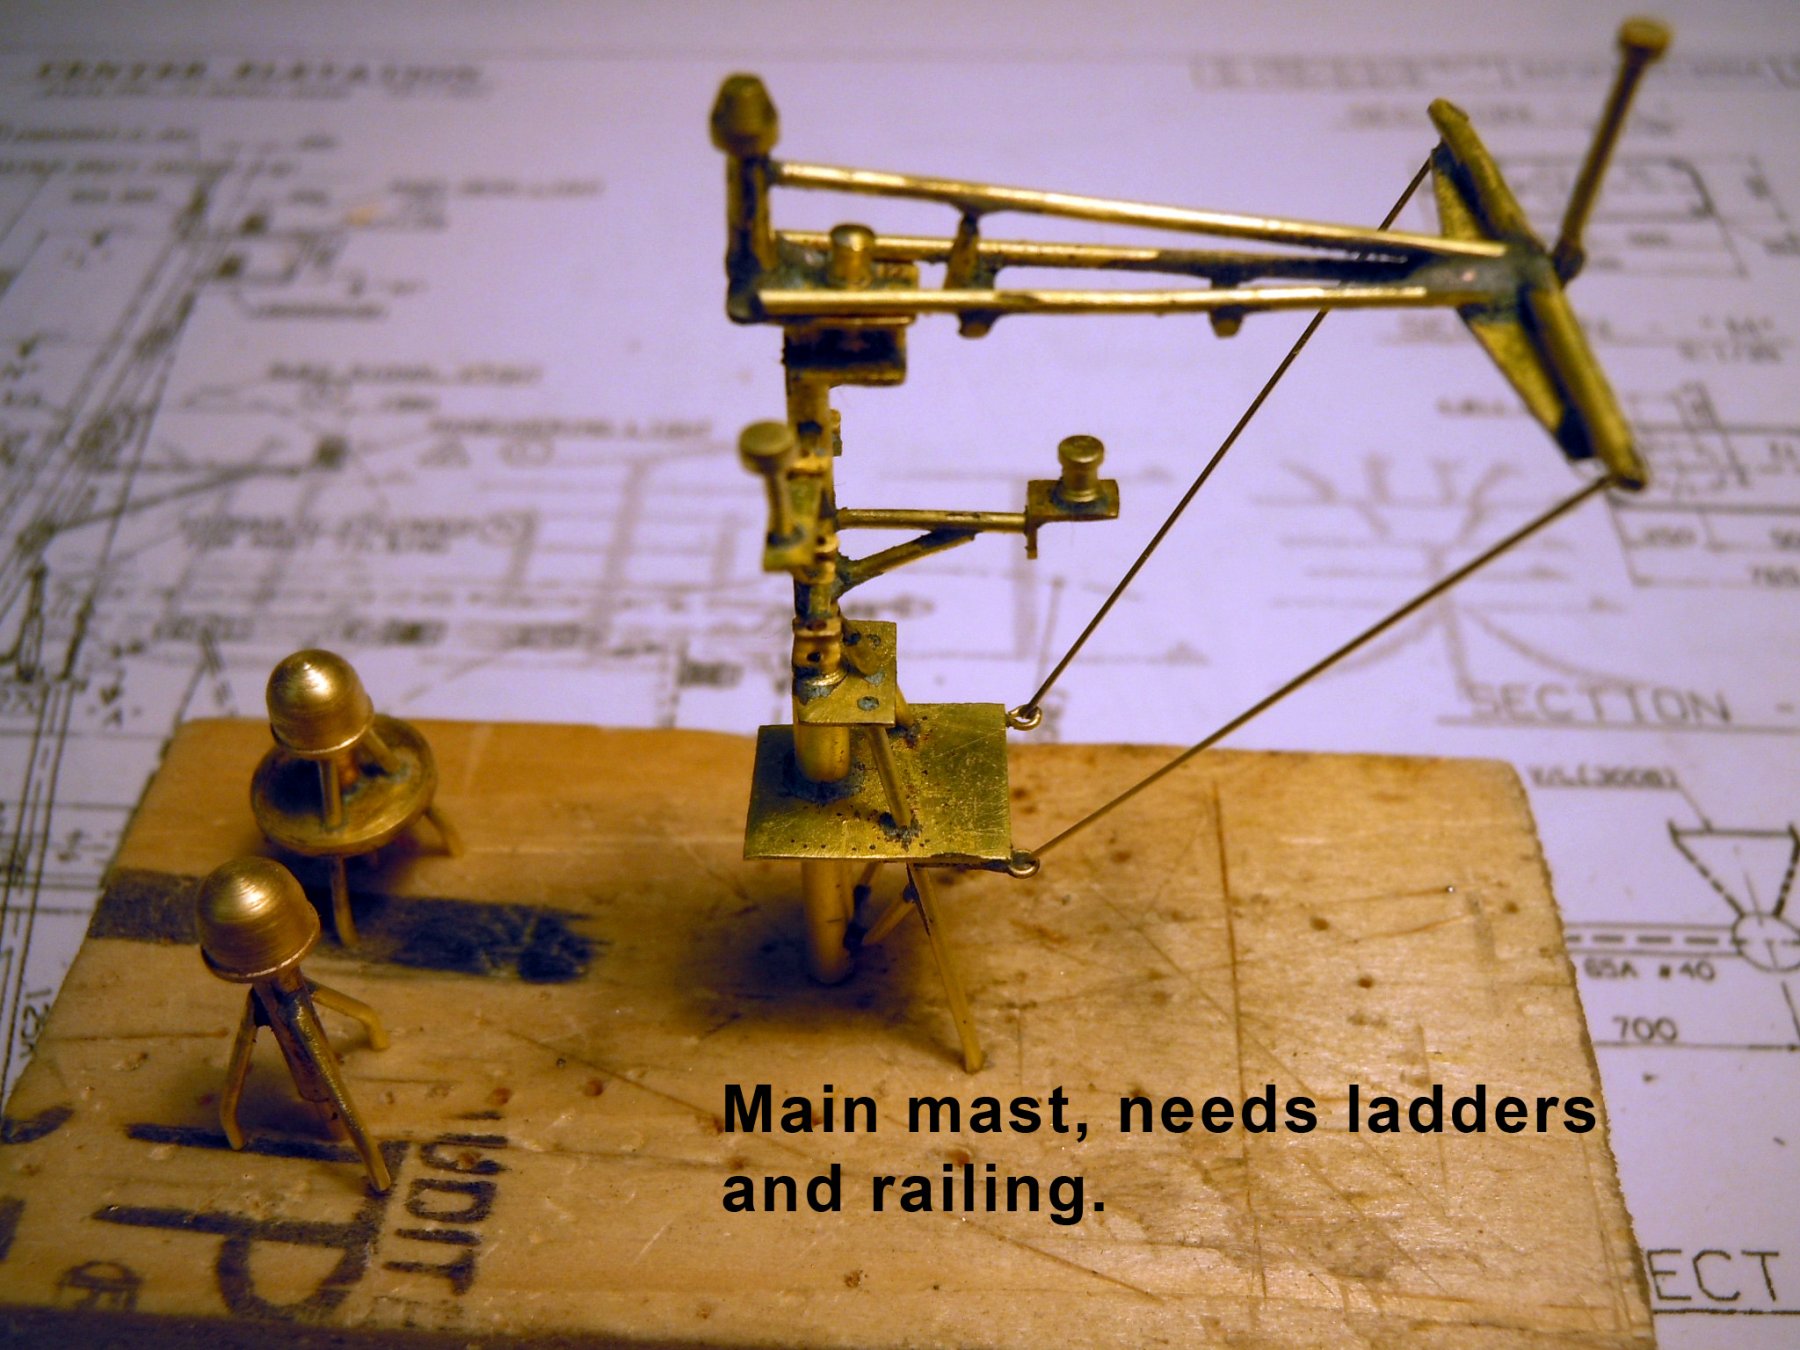
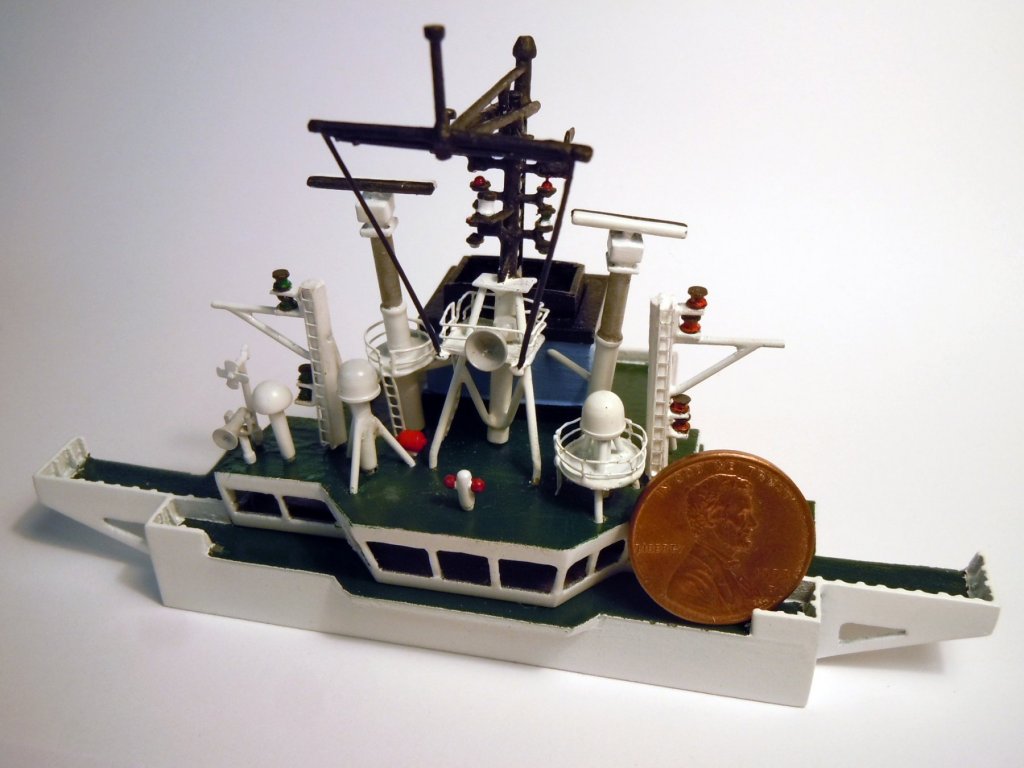
Pictures show both balls a rusted color; I will have to check with Evan. One of the things the ship will have done in dry dock is a complete repaint. I finished up machining all the tiny signal lights, I had to break out my magnification glasses to make them. Here are a couple of images, one with the penny provides a sense of scale. Now back to work.
-
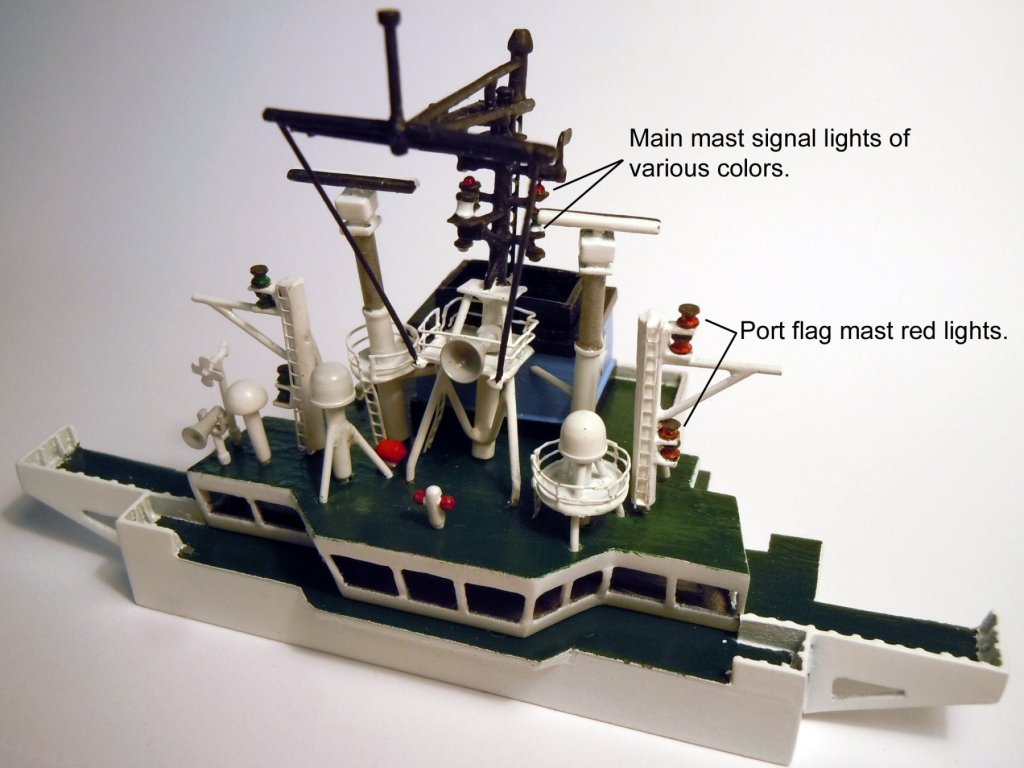
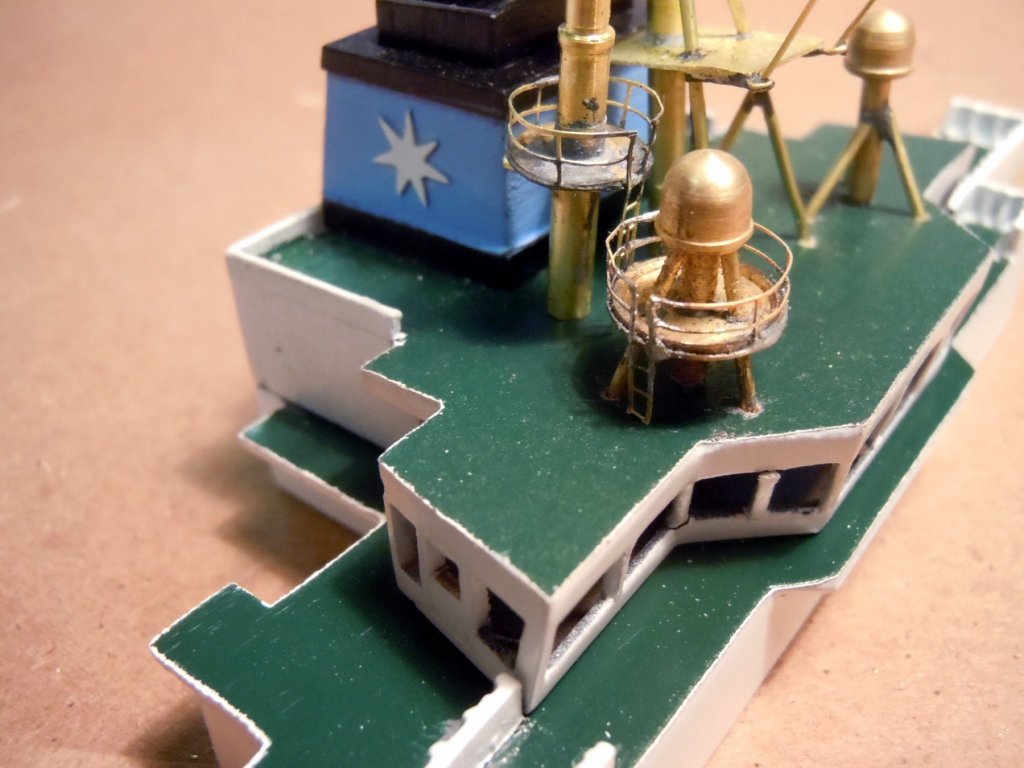
Just adding more bits and pieces on the Nav. deck. Over the holidays Evan stopped by and shared that the red oval was the data recorder for the ship that would be recovered if the ship ever sank. The the binnacle with the magnetic compass is in the center with the two rust colored spheres on either side of it. Evan said that these are referred to as "the Captain's balls". I also found out that I had the two tripod units in the wrong locations and have them switched now. He indicated that the plans provided are close; but refitting over the years have added and moved certain items so I should use photos as more accurate than the plans for fittings. Now to tackle the tiny signal lights on the main mast.

-
Tom, looking great now to do some "Yard Work"!
- 1,352 replies
-
- 2
-
-
- constitution
- model shipways
- (and 1 more)
-
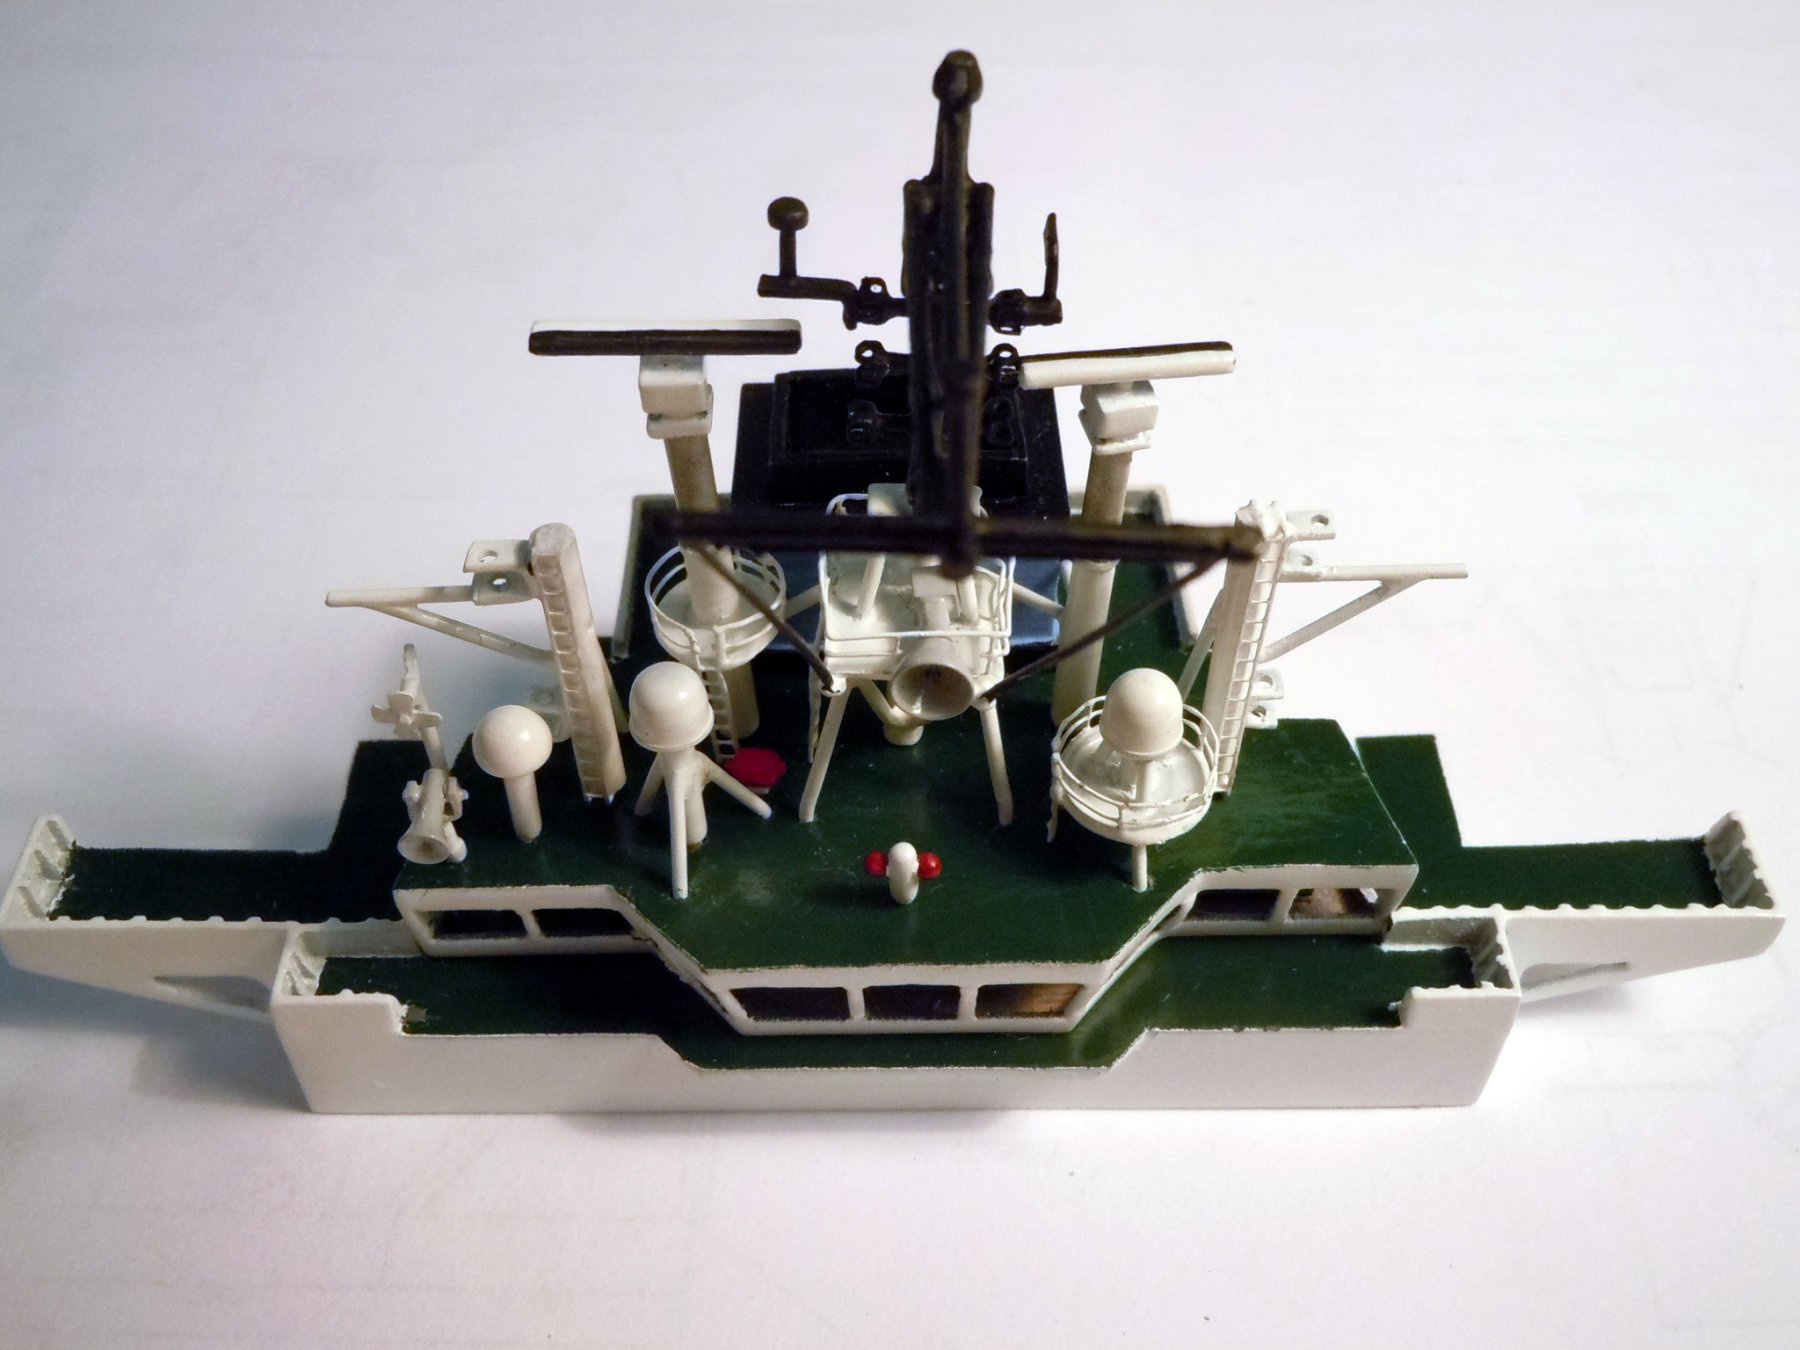
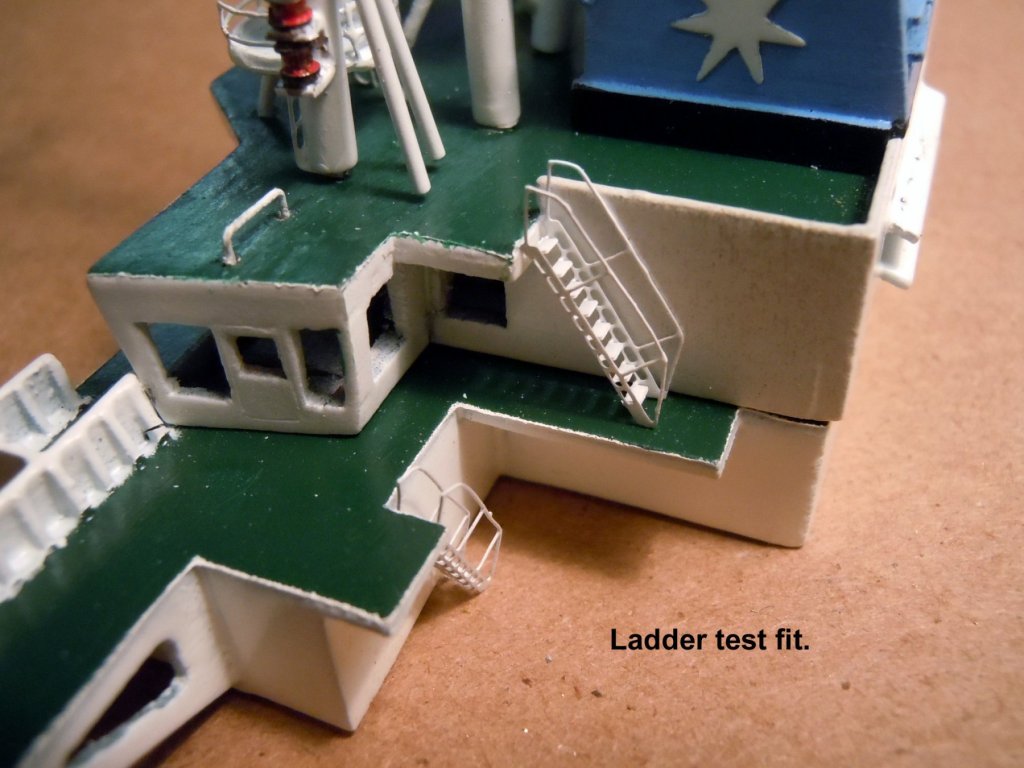
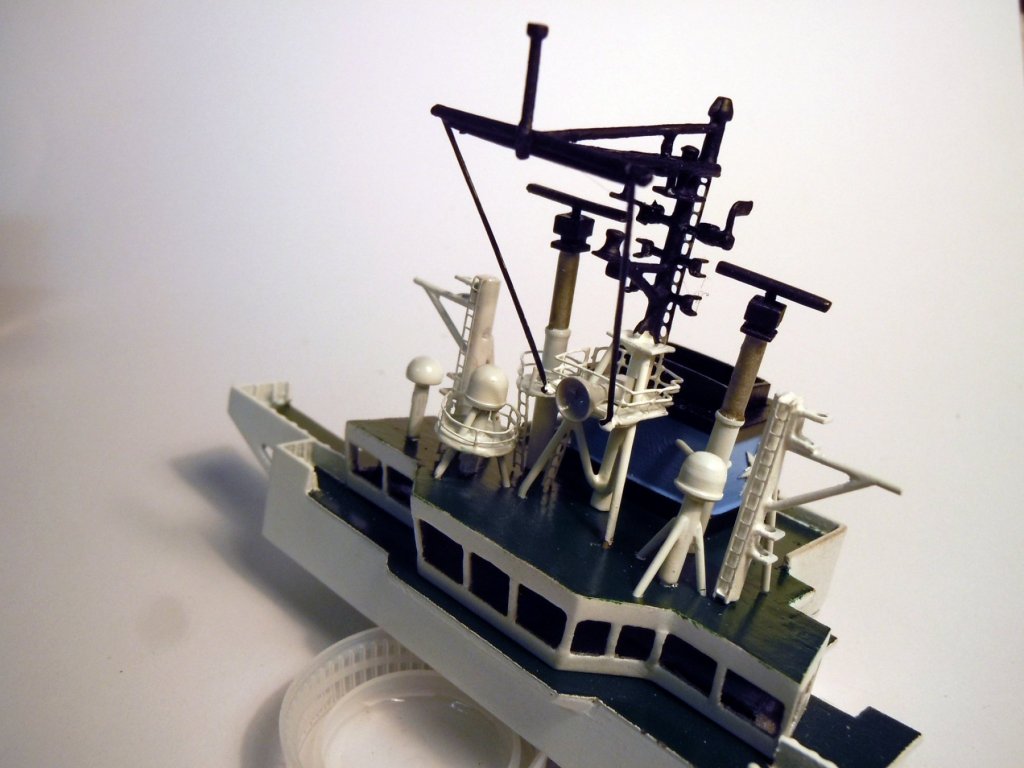
John, Thank you! Here is a quick "In Progress" showing the painted fixtures with ladders and railing panted. One lesson I have learned is that whenever possible do the spay painting first and then add the ladders to avoid excessive paint build up. I still have more details to add and these so far are just press fitted in place. Once all are completed only then will I add the deck railing to avoid damage. The horn is painted gray and just set in place for now. For a sense of scale the diagonal braces are .020" brass wire. Now off to the dentist for my bi annual cleaning. Maybe she will sharpen them up for turkey day.
-
Dave, yes I did and of course I always stop by not only you but others as well. I still have a great deal to learn about ships. Yes it must be fun otherwise it becomes just another stress factor; life is too short not to have fun. If not making mistakes one is not trying hard enough to learn.
- 742 replies
-
- 8
-
-
- constitution
- frigate
- (and 1 more)
-
Sorry Dave it was my intent to educate, not frustrate. I think I indicated that I was new to shipbuilding and that this was my second ship build. Thank you for your kind words and I am just an old fart that thinks God is in the details and that I just strive to do the best I can when replicating the subject being modeled regardless of what it is to the best of my ability. Hence the work on the gun deck which can be seen when the central grates are lifted. Yes, it looks that I will be building more ships; currently building the Maersk Detroit container ship for my son-in-law. I have also been asked by the local maritime museum to build an LCVP landing craft in 1/12th scale to accompany the Dirty Dozen as part of another display. Then I also have a Mamoli Victory awaiting when I can get around to it. Looking forward to seeing the finial and the rest of your canopies when completed. Keep up the great effort you are doing.
- 742 replies
-
- 6
-
-
- constitution
- frigate
- (and 1 more)
-
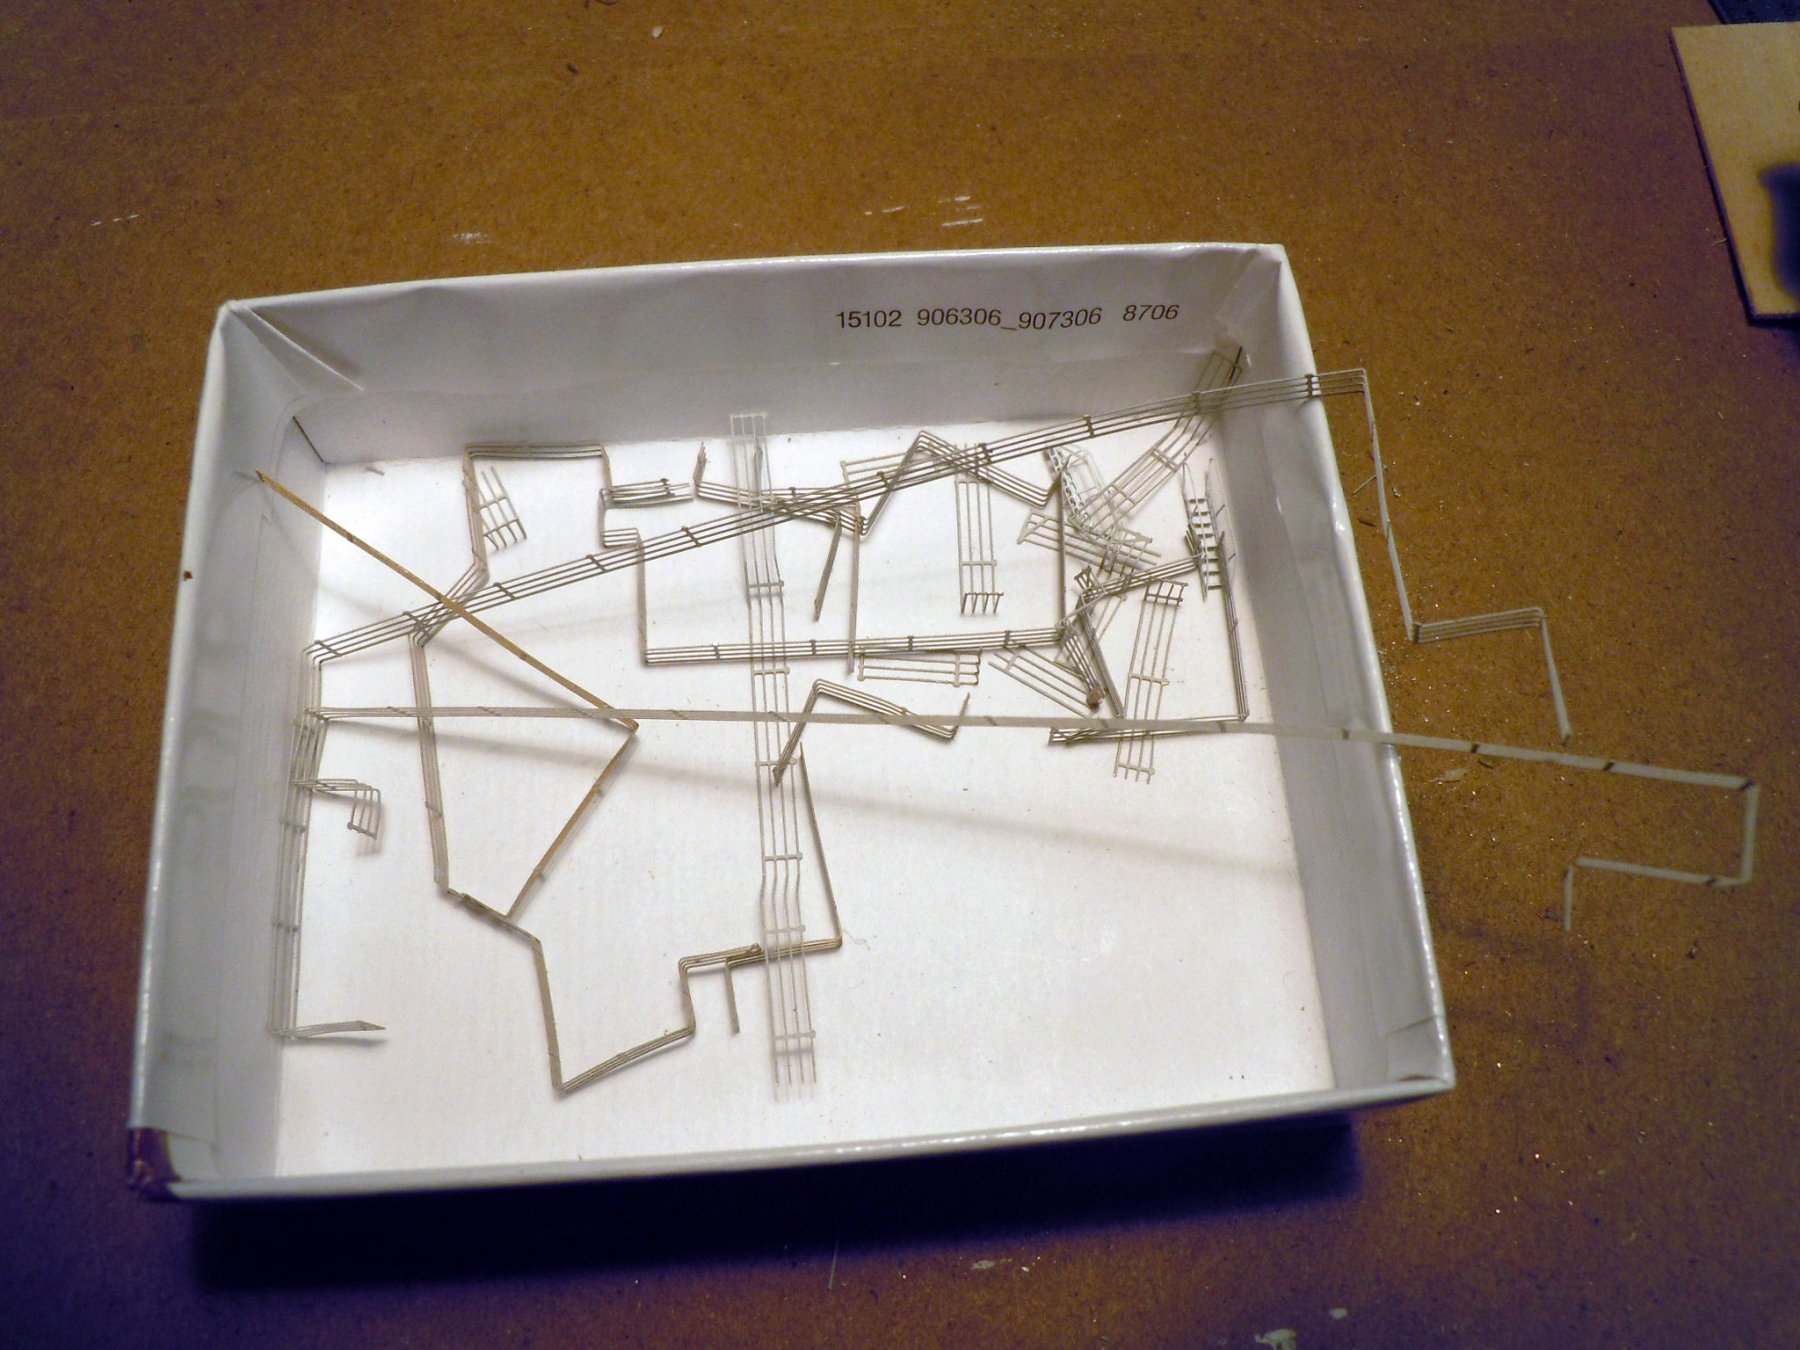
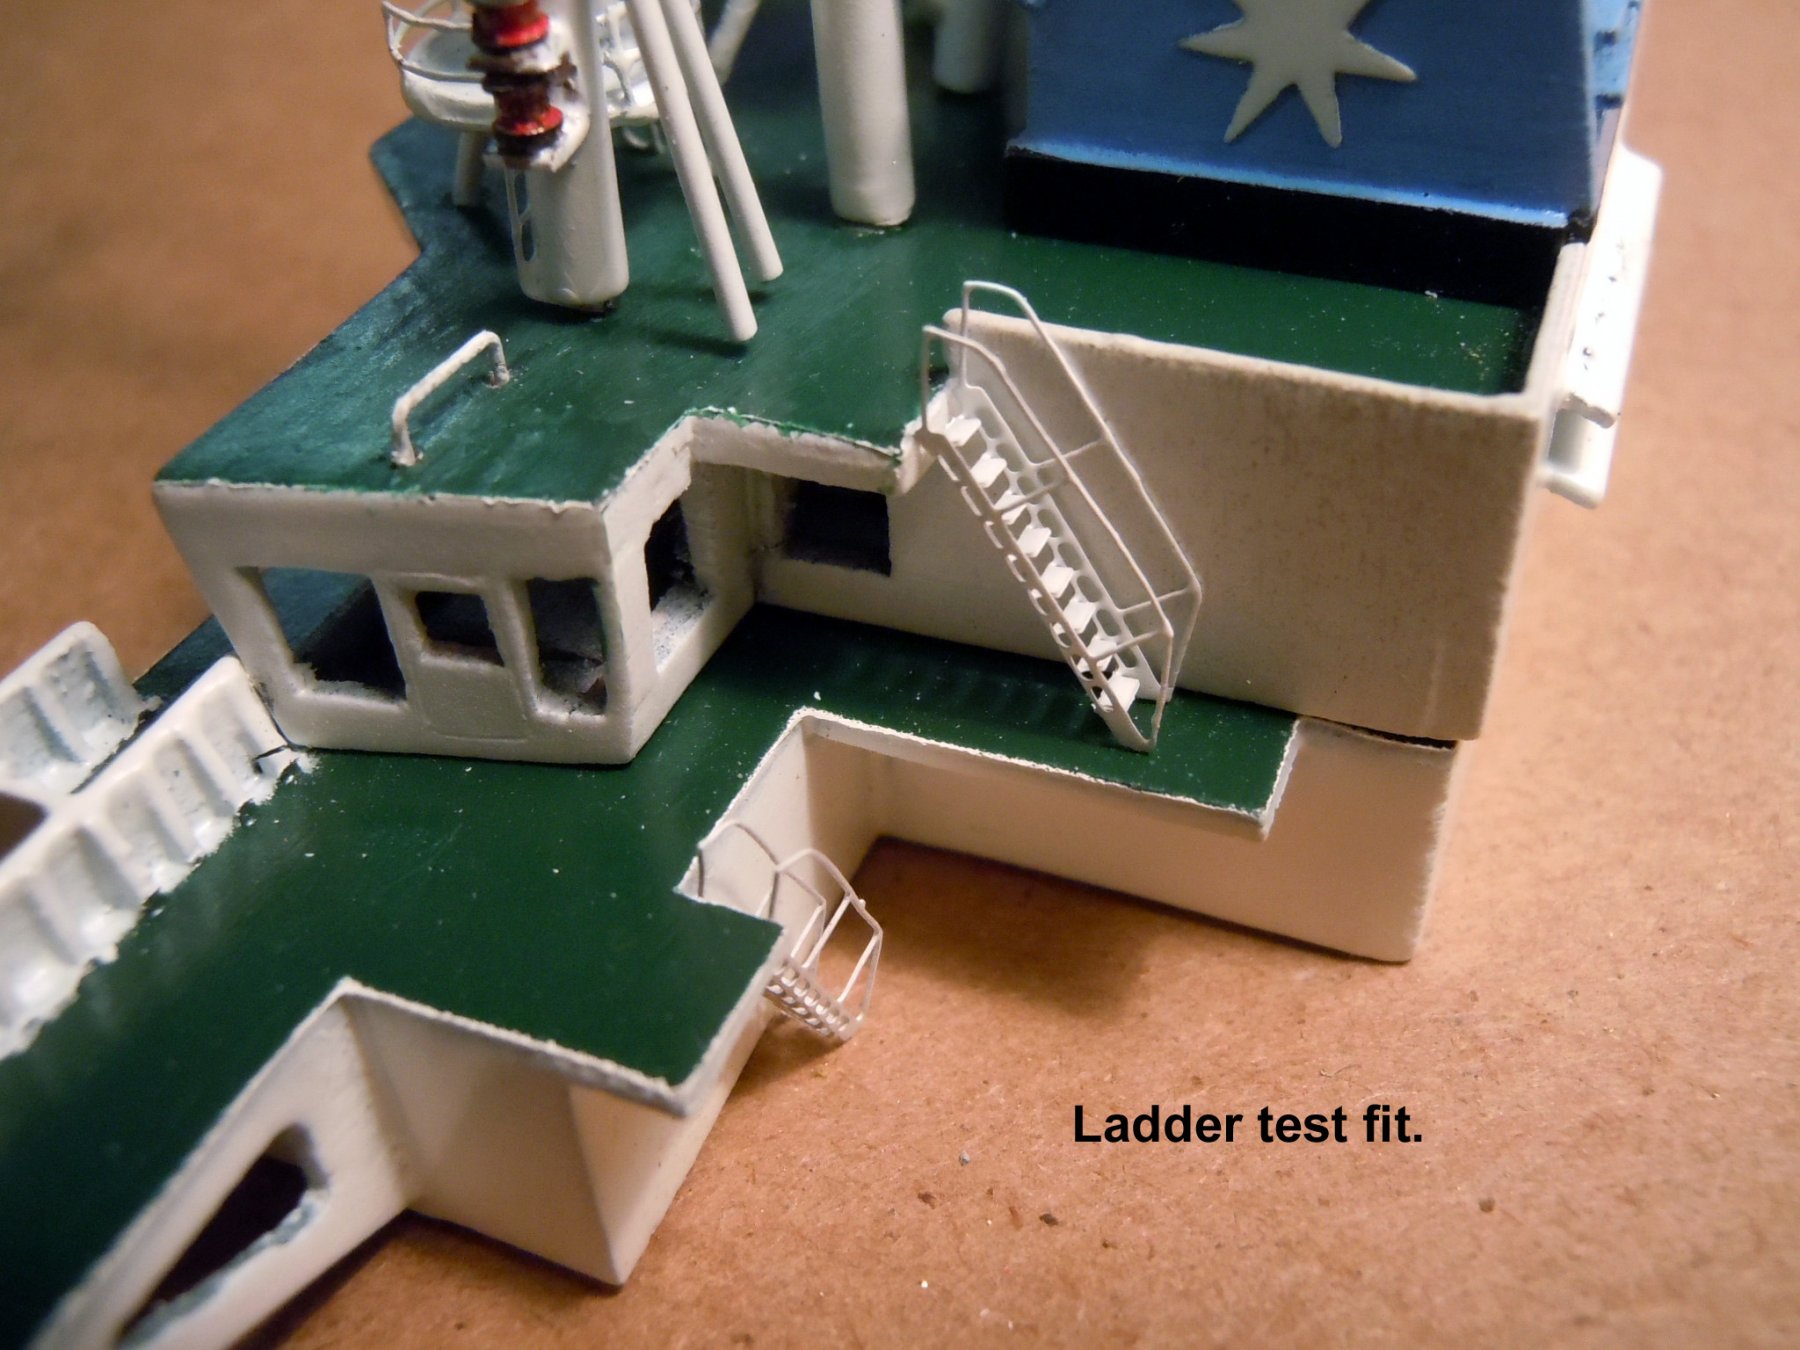
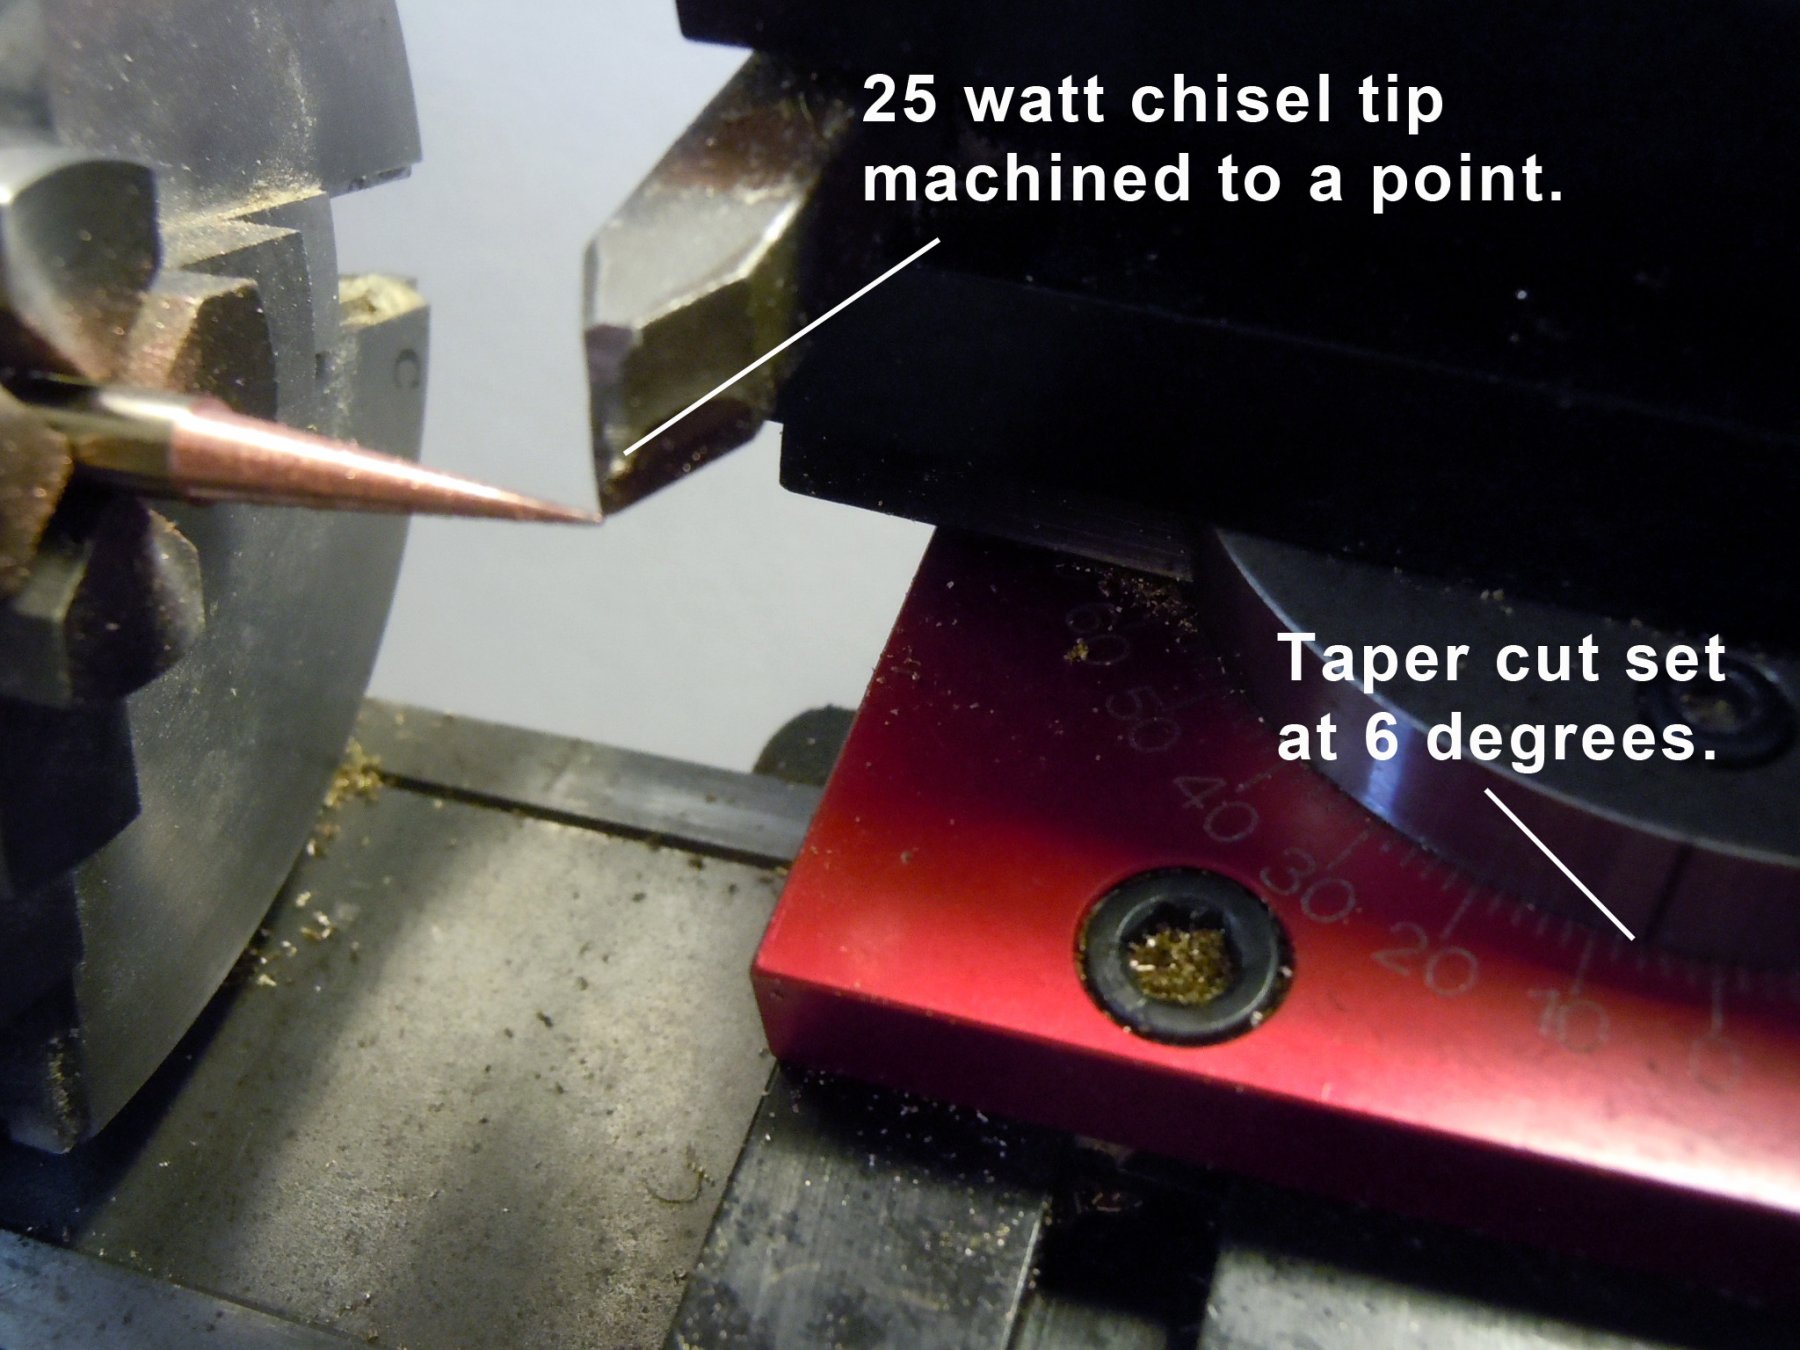
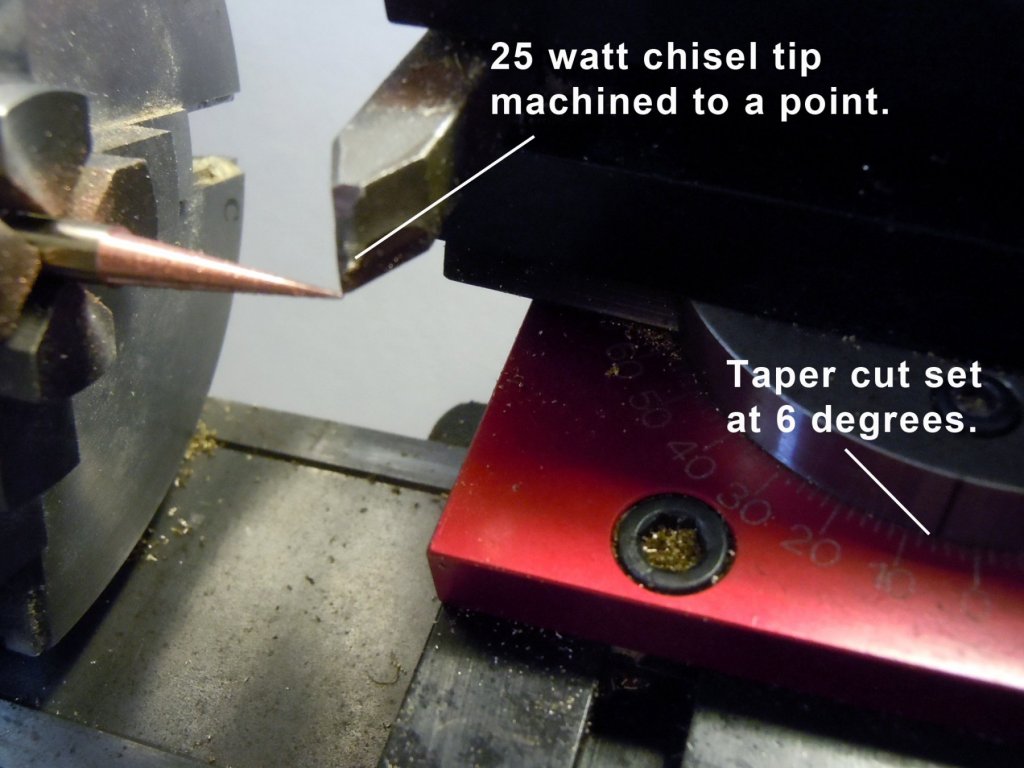
Just a quick update for Dan. I received the railings and ladders and the railing will work THANKS DAN for your help! Once I saw the size of the railings and ladders I decided the first thing I needed was a new 25 watt soldering iron and then machined the tip to a point to work with tiny drops of solder one at a time. Here is a picture of the tip. Next was my first attempt at PE parts this tiny. I picked the easy ones first; the round ones and soldered them to the edges and the top rail edges. I then soldered a length of ladder with one edge on a stanchion and soldered them together; then soldered the other side and cleaned with acetone. I then cut the top two rungs of the ladder away for the opening at the top of the ladder between the rails. Needless to say I have some cleanup and adjusting to do after seeing the pictures, but I am very glad that they are the correct size. Now back to making the rest of the deck fixtures.
-
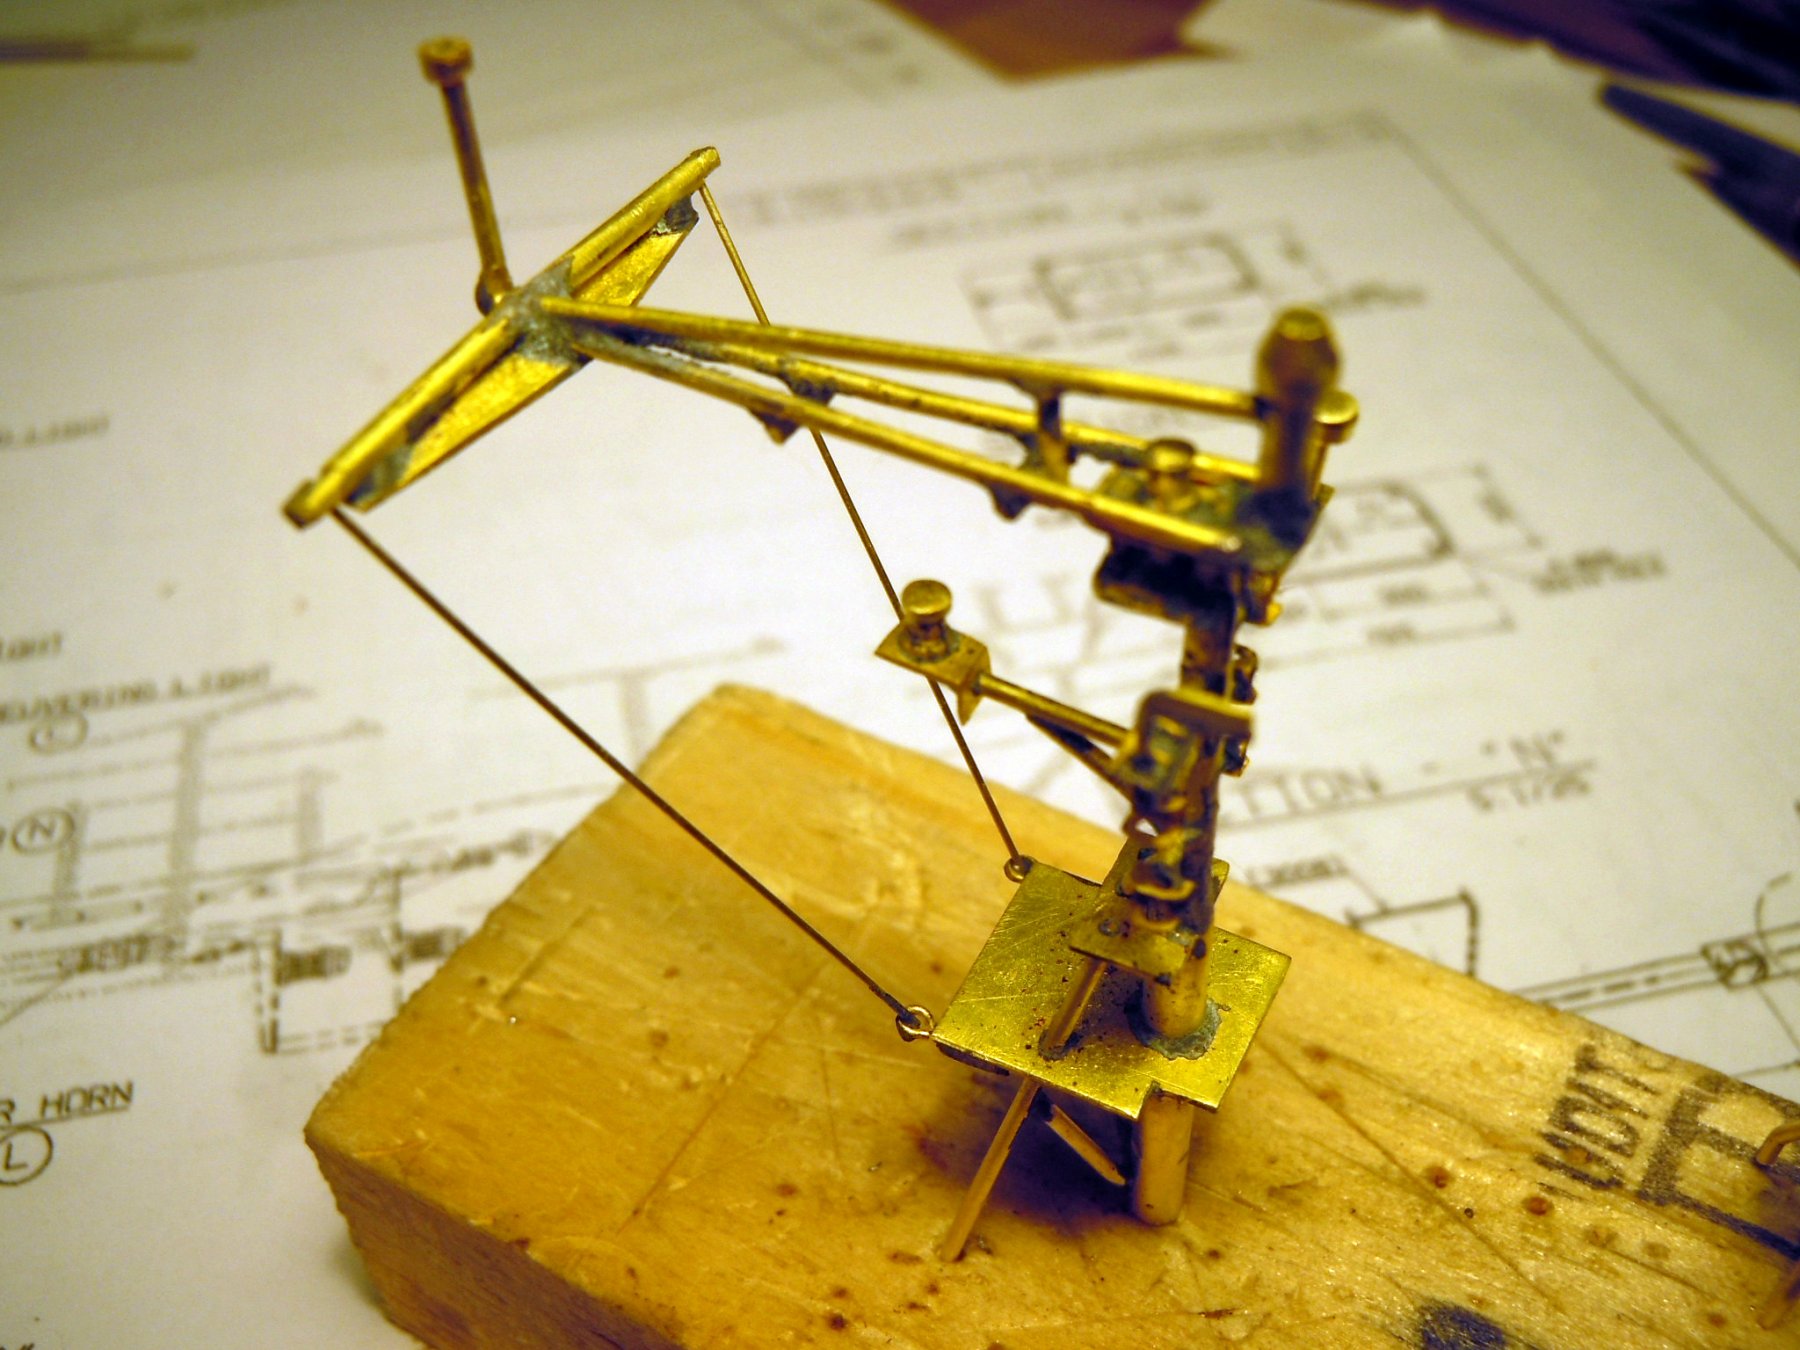
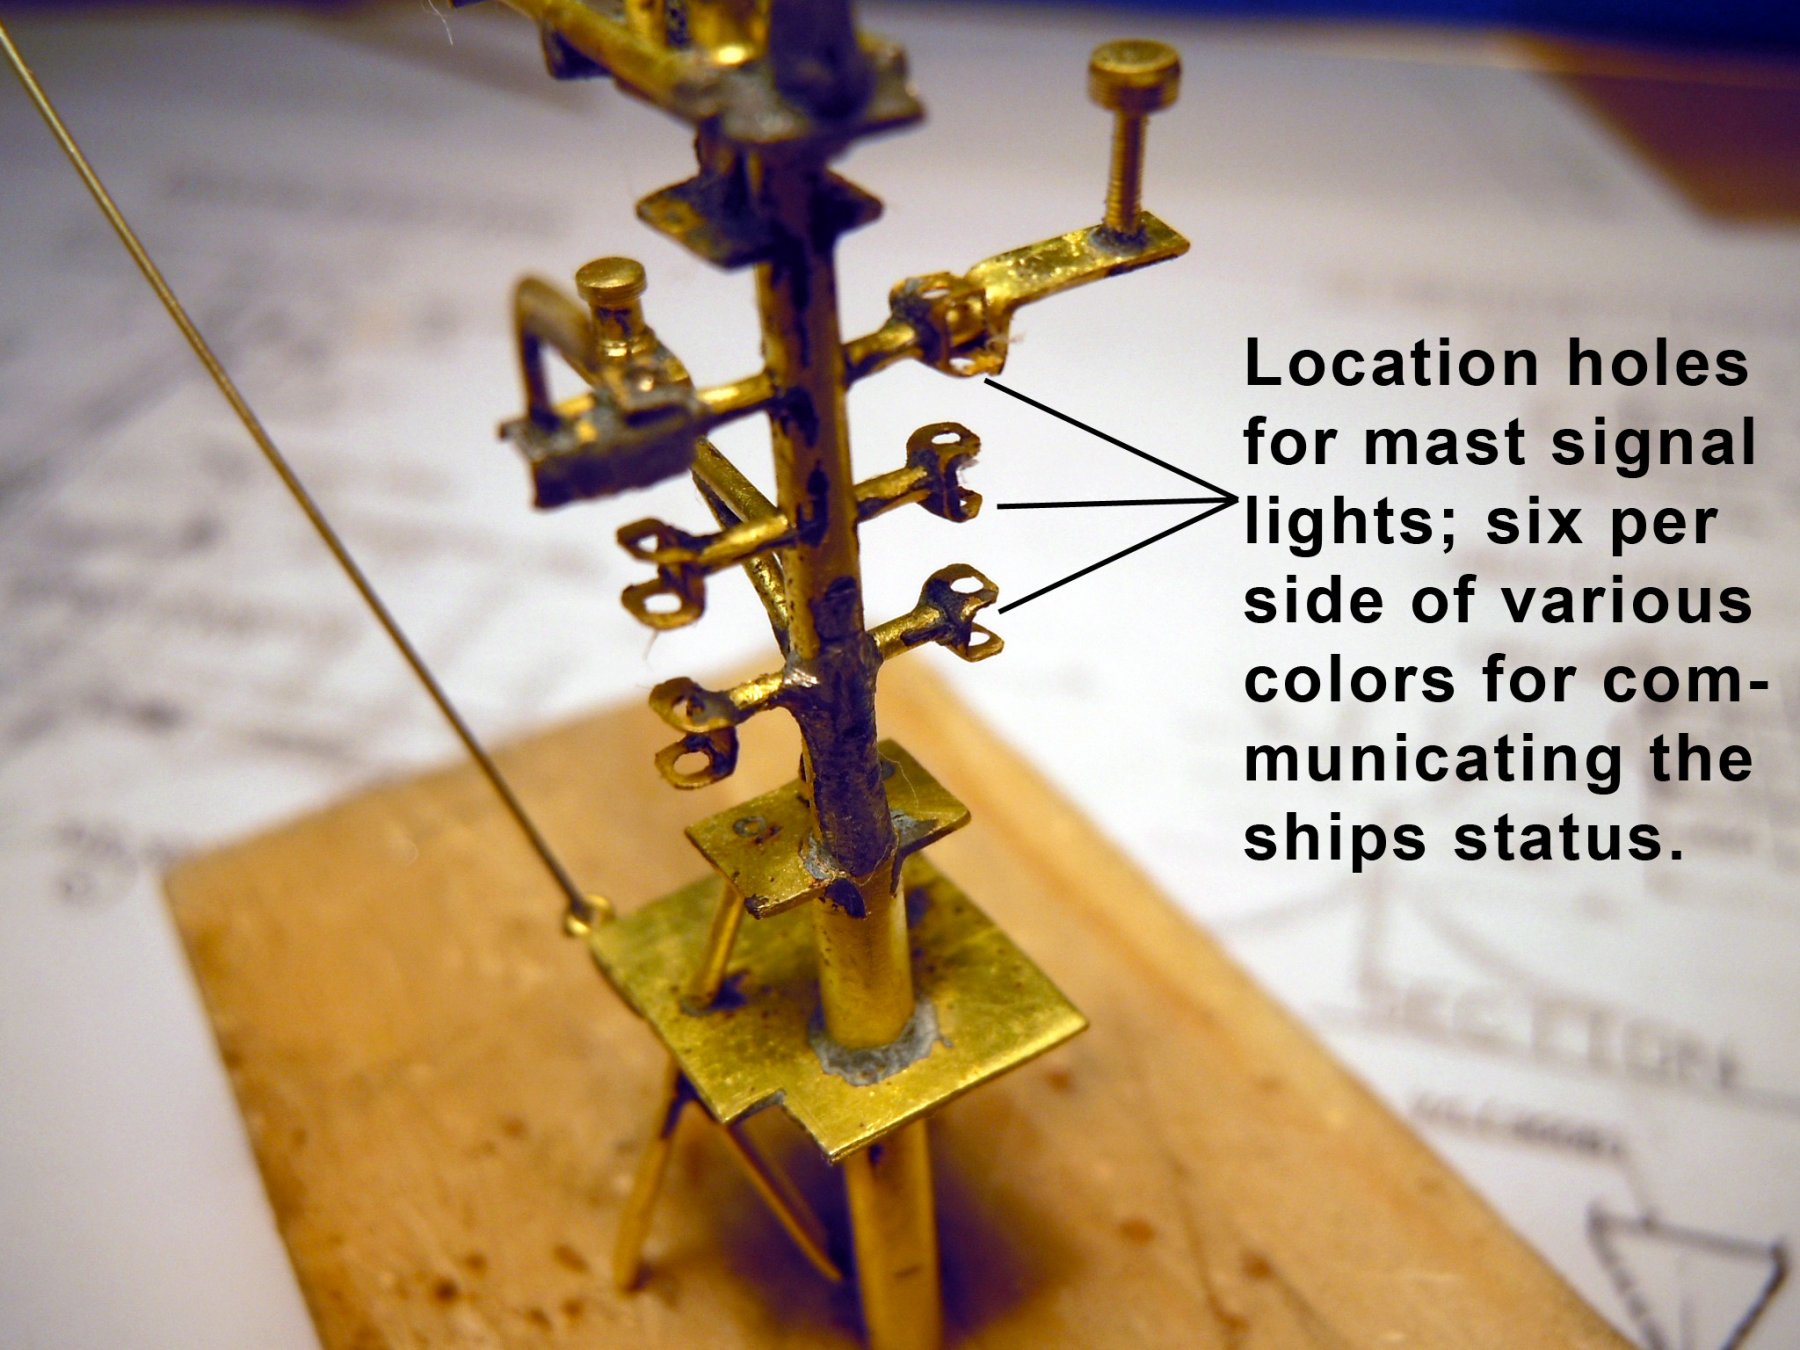
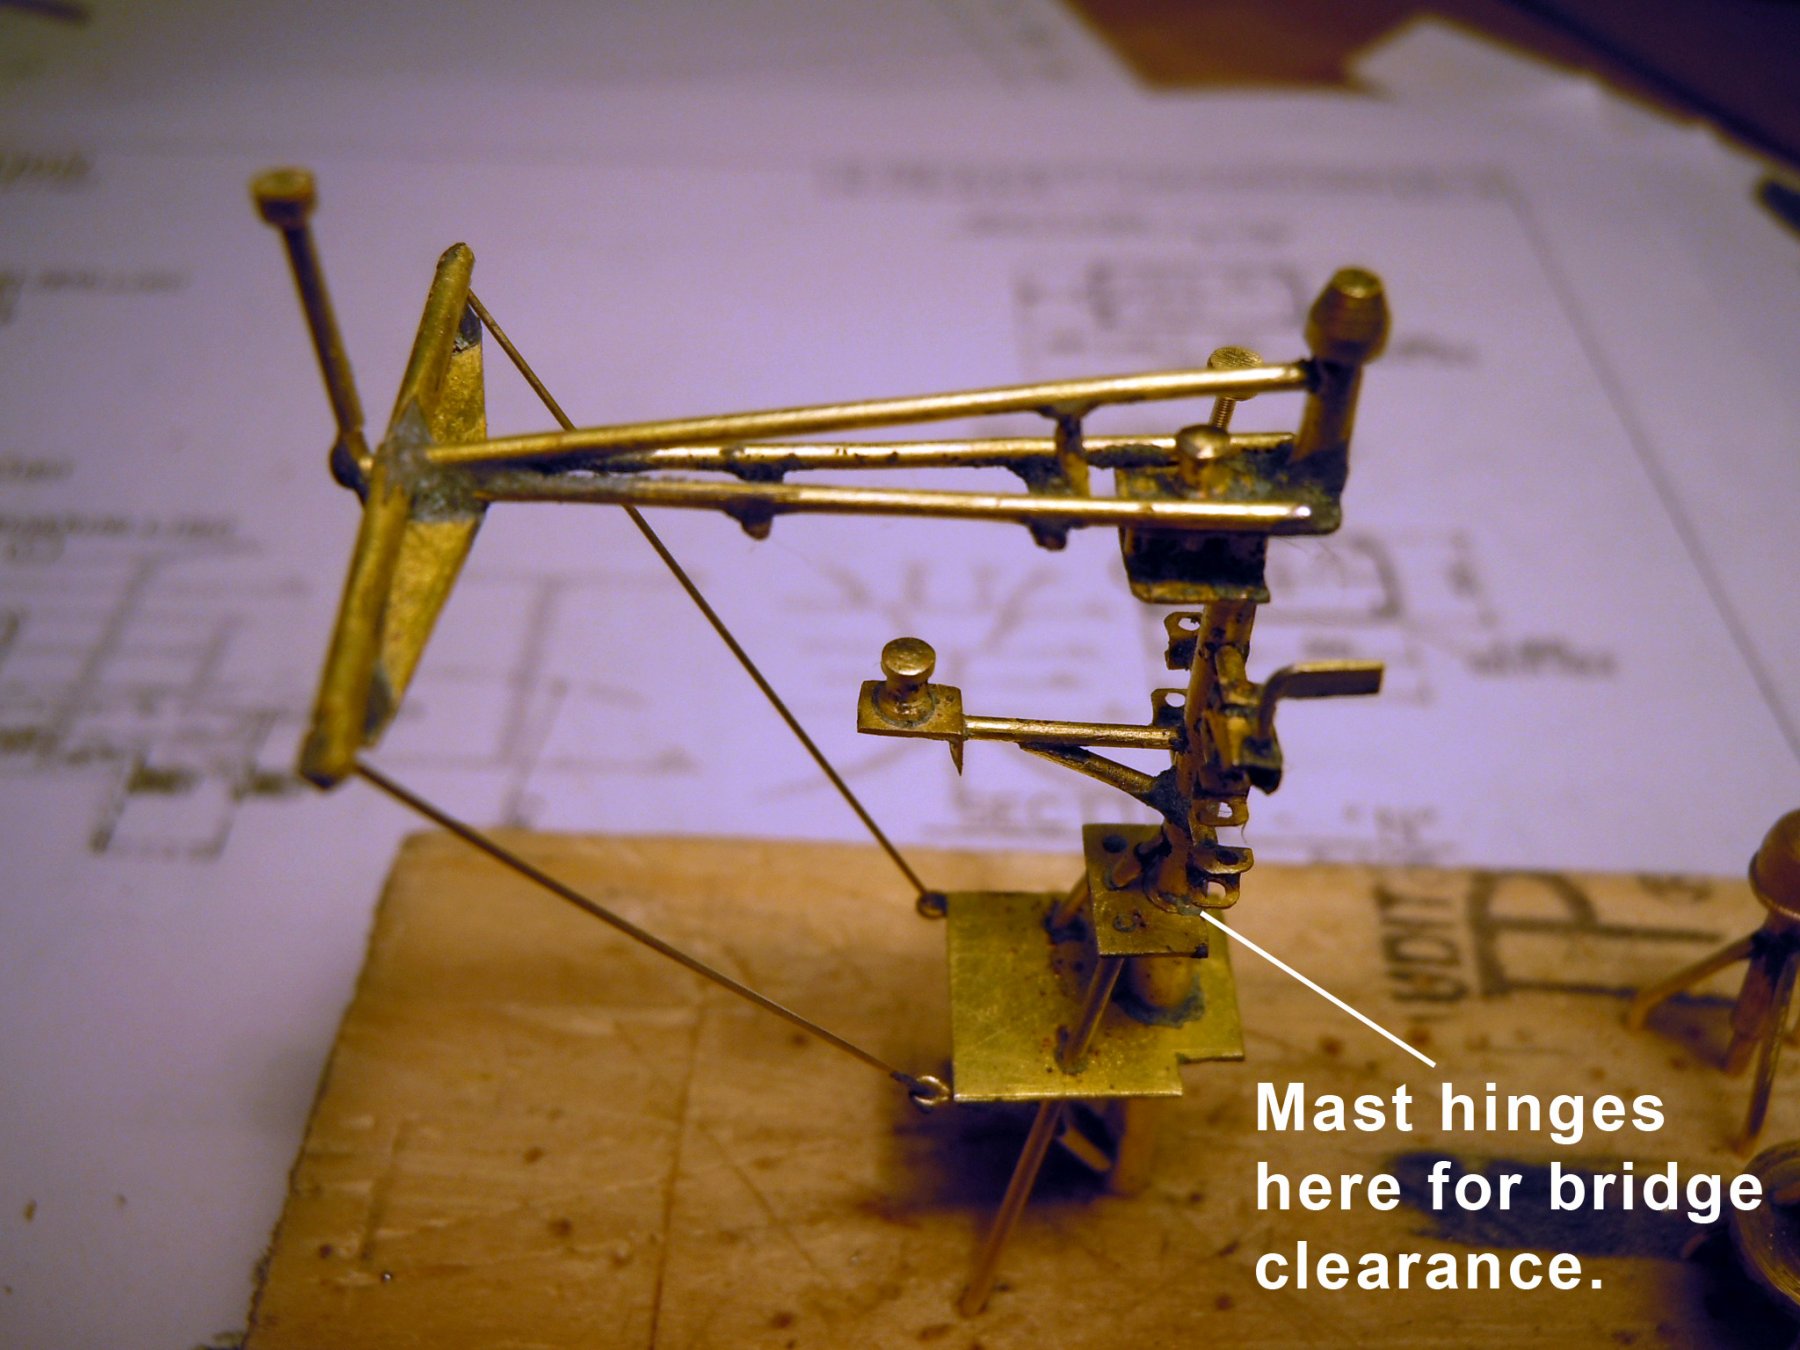
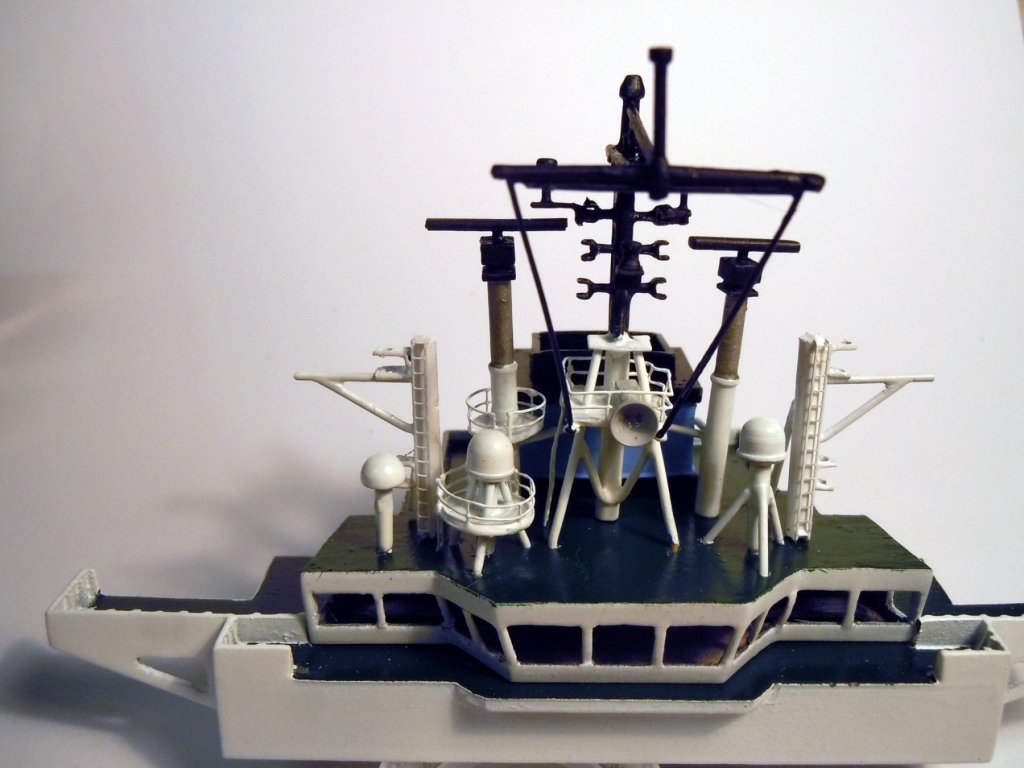
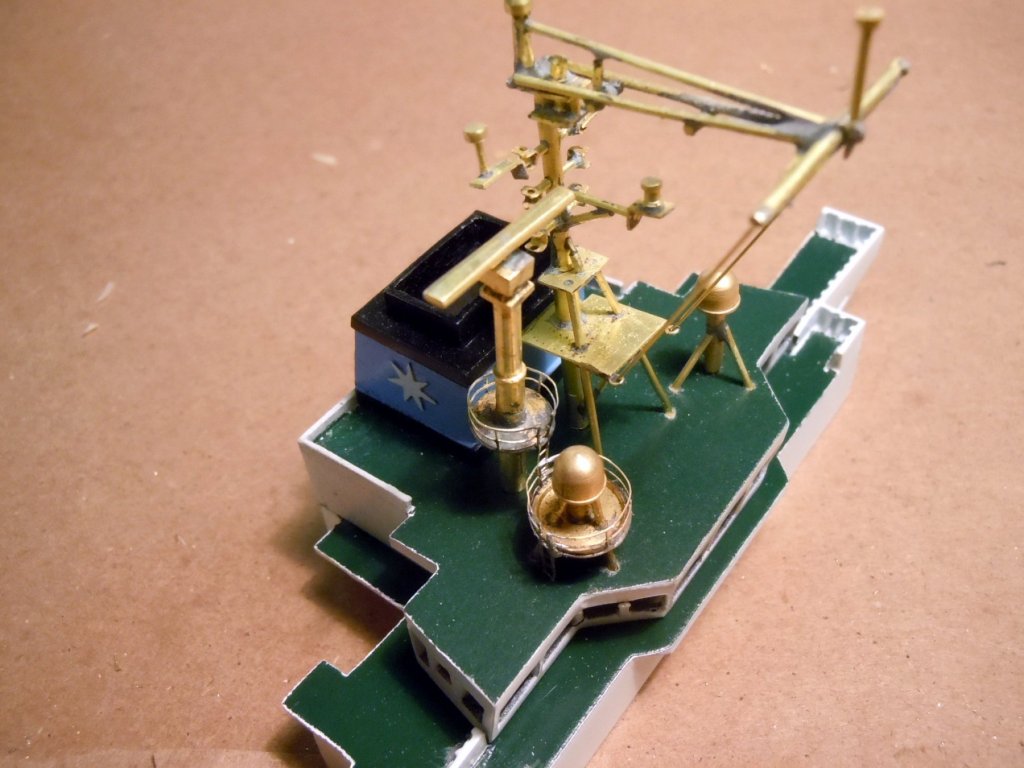
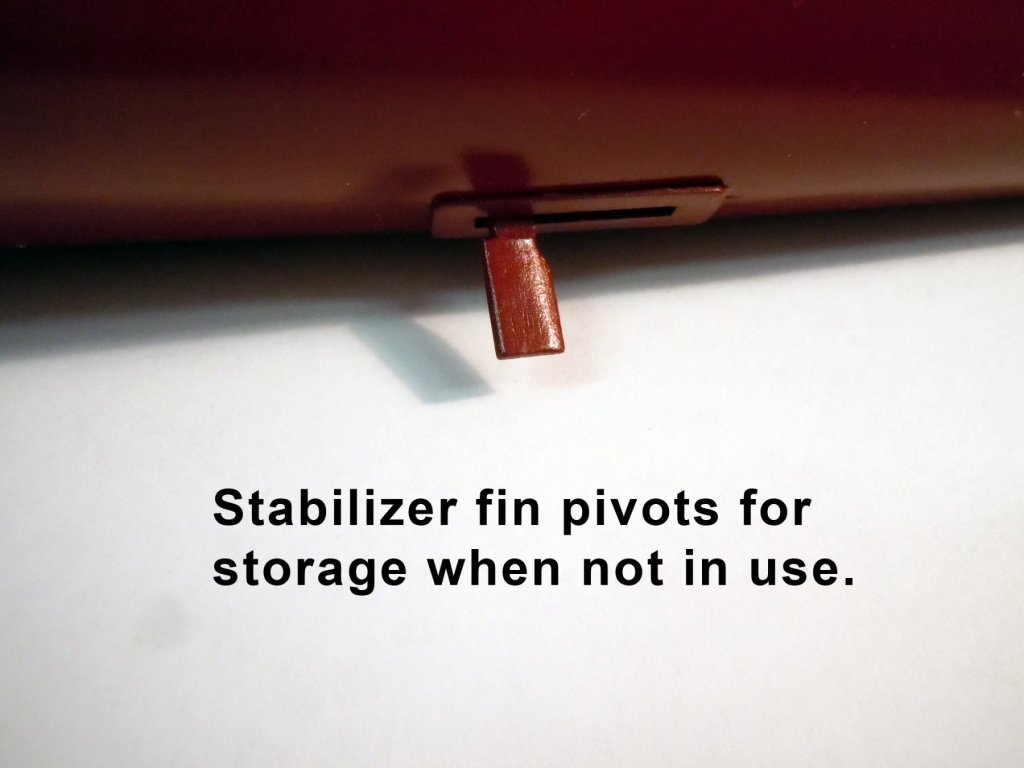
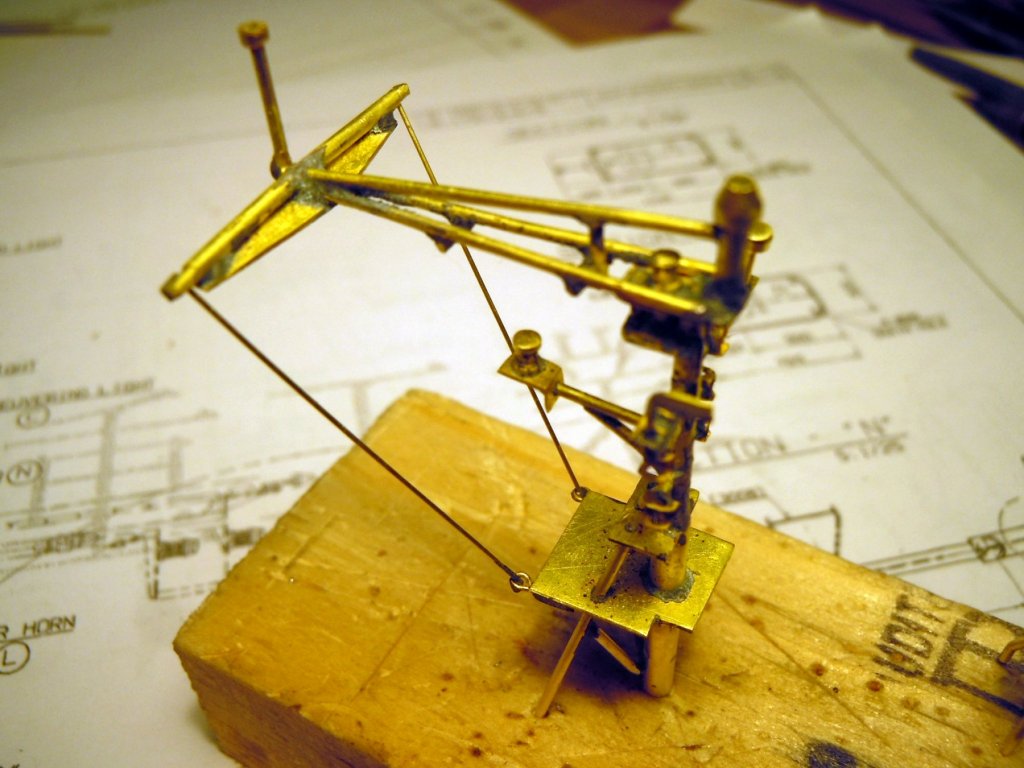
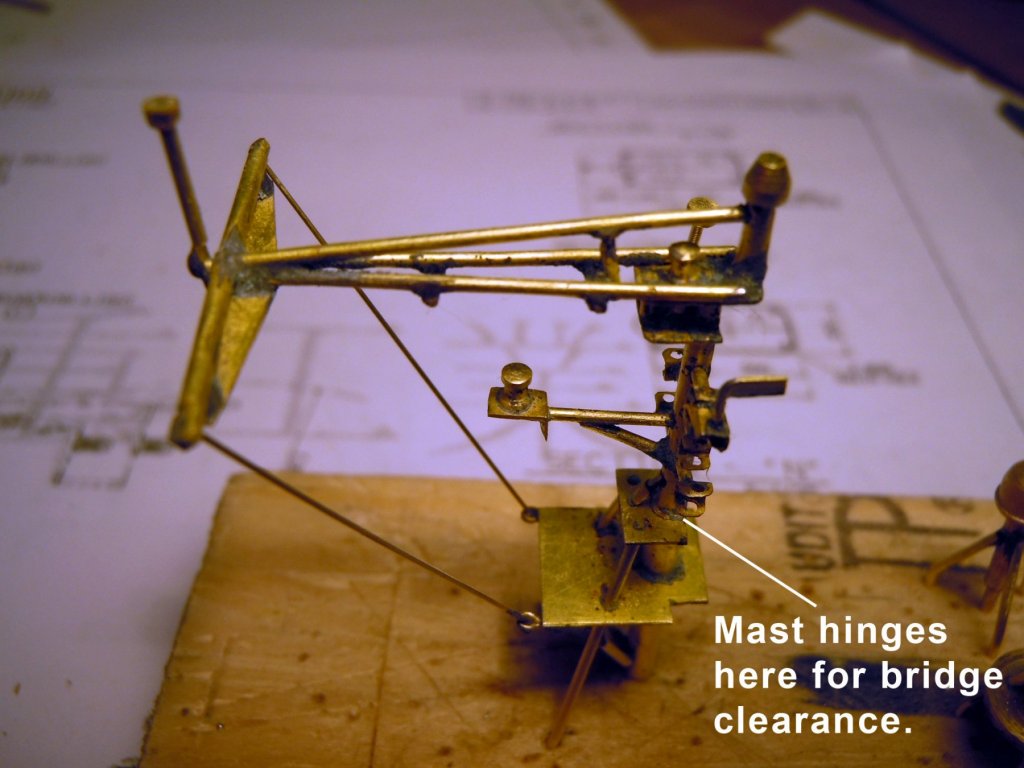
Thanks you all for your kind words. No secret to painting just patience and a couple of tips mentioned above. I am waiting for the PE ladders and railing to show up so I started the deck fixtures for the navigation deck which is quite busy on the real ship. Here is an "In Progress" update. I first made the two communication domes and the one with the deck needs both a ladder and railing. I then moved onto the main mast, also known as the "Christmas Tree" per Evan. The challenge here is soldering the various components at this small scale. As usual I made sure that there was mechanical interlocks as best that could be done. The main mast started with a 3/32" rod turned down to 1/16" for the upper section. The real mast hinges at the second small platform for clearance to go under some bridges. This assembly required a great deal of patience and thinking ahead for each next move when soldering so as not to loosen a previous soldered part. The thin bracing bracing wire is .005" brass rod. I still need to add ladders and railing this as well. The assembly will be painted white below the hinge point and flat black above. I will also need to add the various colors of the mast signal lights which will be super tiny. I also added a picture of the stabilizing fin that has one on each side. They pivot in and out. Now back to making more fixtures for this deck.


-
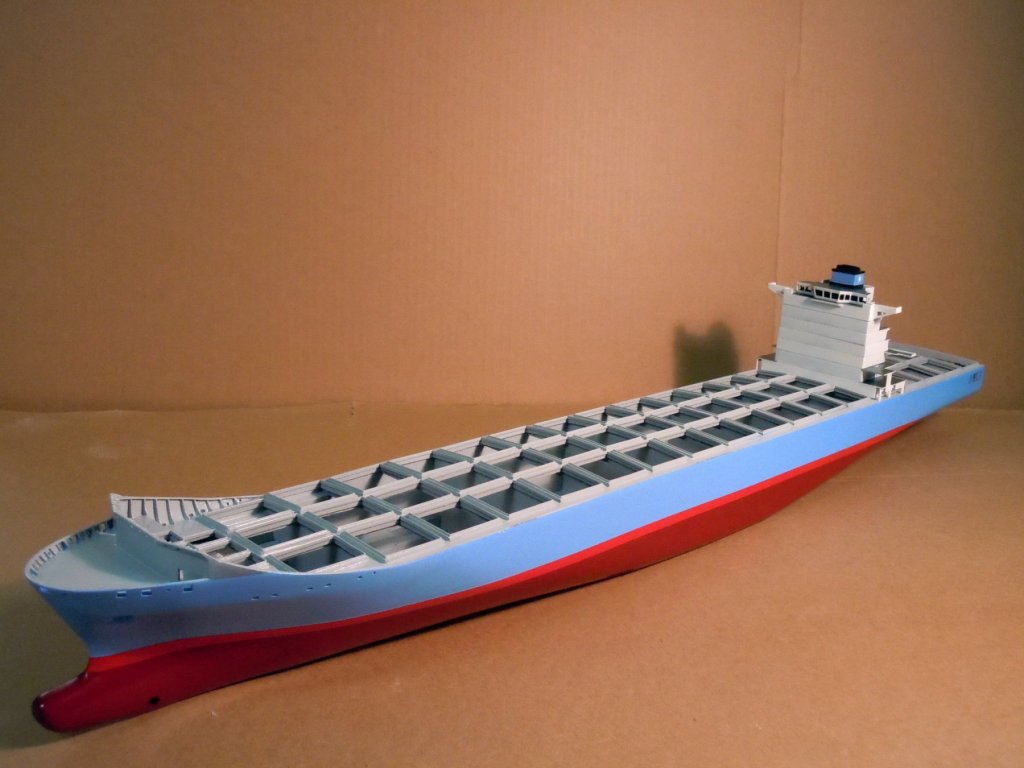
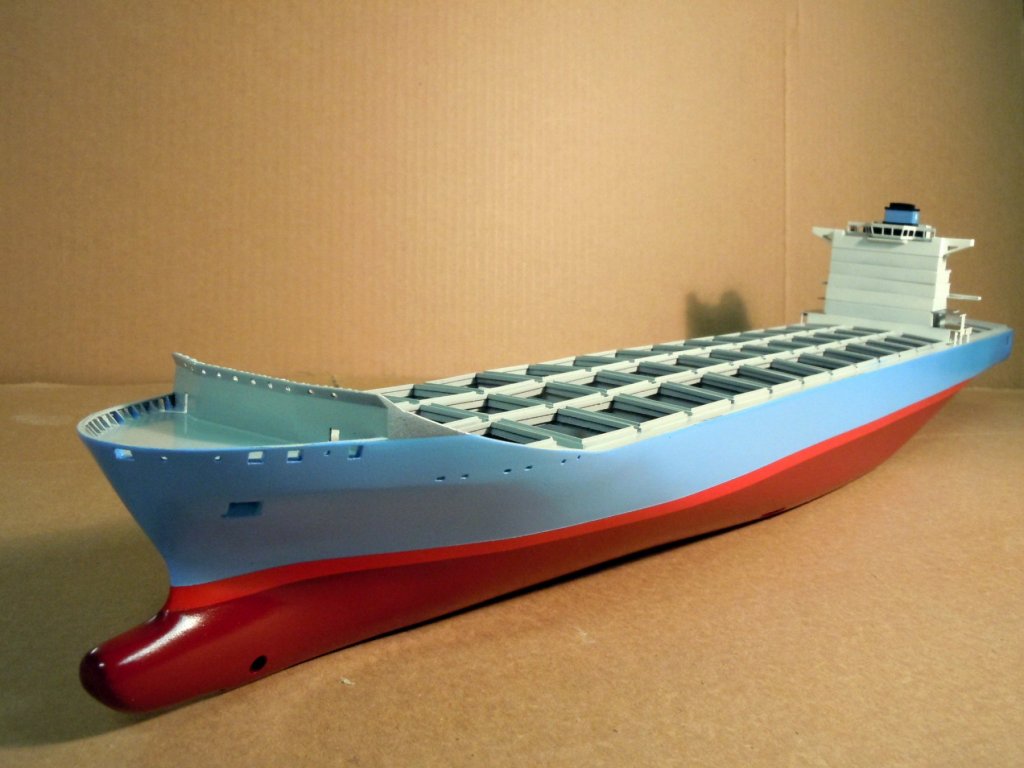
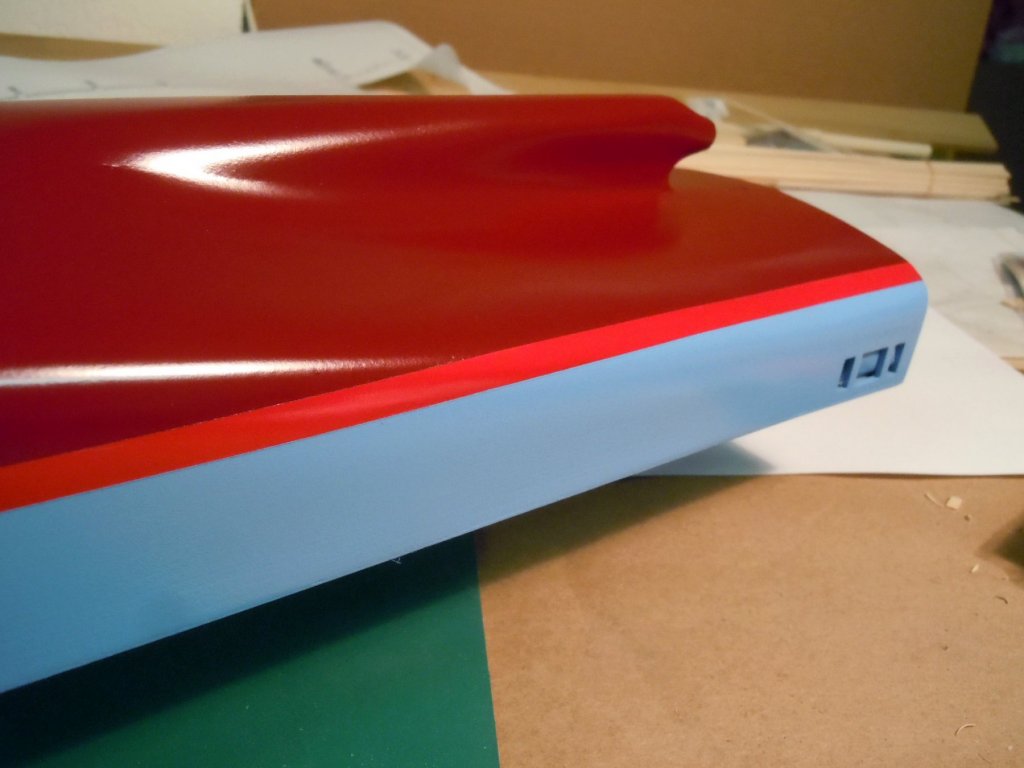
I finally ordered one sheet of rails(3501) and inclined ladders(3535) after not receiving any response from Tom's Modelworks and thanks to a reply from Dan. I also decided after finishing both the bow thruster and side stabilizing fins to paint the hull in order to add railing and main deck structures. First I painted the red stripe area masking from the top of the stripe up over the main deck. Once the red dried over night I taped off the red stripe with 1/4" masking tape matching the top edge. Then masked off the bottom to paint the blue and let it dry overnight. Next came the bottom burgundy. Using spray cans I warmed the cans under hot water and then shaking each time until I could not feel any temperature change. This does two things; it increases the spray pressure and warms the paint for better atomizing for spraying. Repeated the warming process between coats. I sprayed light coats so as to not bleed under the tape and this provides a clean crisp line when finished. I still need to paint the forward bow shield white and then the entire hull will be sprayed with a matte finish to even out all the finishes. Here are a couple of pictures. Next I will start on the various deck fixtures based upon pictures supplied by Evan until the rails and ladders get here.
-
Dan, Thank you very much that really helps! That is the address I left messages for Rich at; maybe he is on vacation or something. I really do not think length will be an issue on the rails. Do you have lengths on the stairways? There are a few different sizes and the one I need is 1/2" long (.500"). Thanks again for your help!