HOLIDAY DONATION DRIVE - SUPPORT MSW - DO YOUR PART TO KEEP THIS GREAT FORUM GOING! (Only 75 donations so far out of 49,000 members - C'mon guys!)
×


xken
-
Posts
841 -
Joined
-
Last visited
Content Type
Profiles
Forums
Gallery
Events
Everything posted by xken
-
Michael, Fantastic job on the drill press. Keep up the great work you are doing! Ken
-
 I cannot seem to be able to delete the bottom three duplicate pictures. Does someone know how and able to share the magic formula?
 -
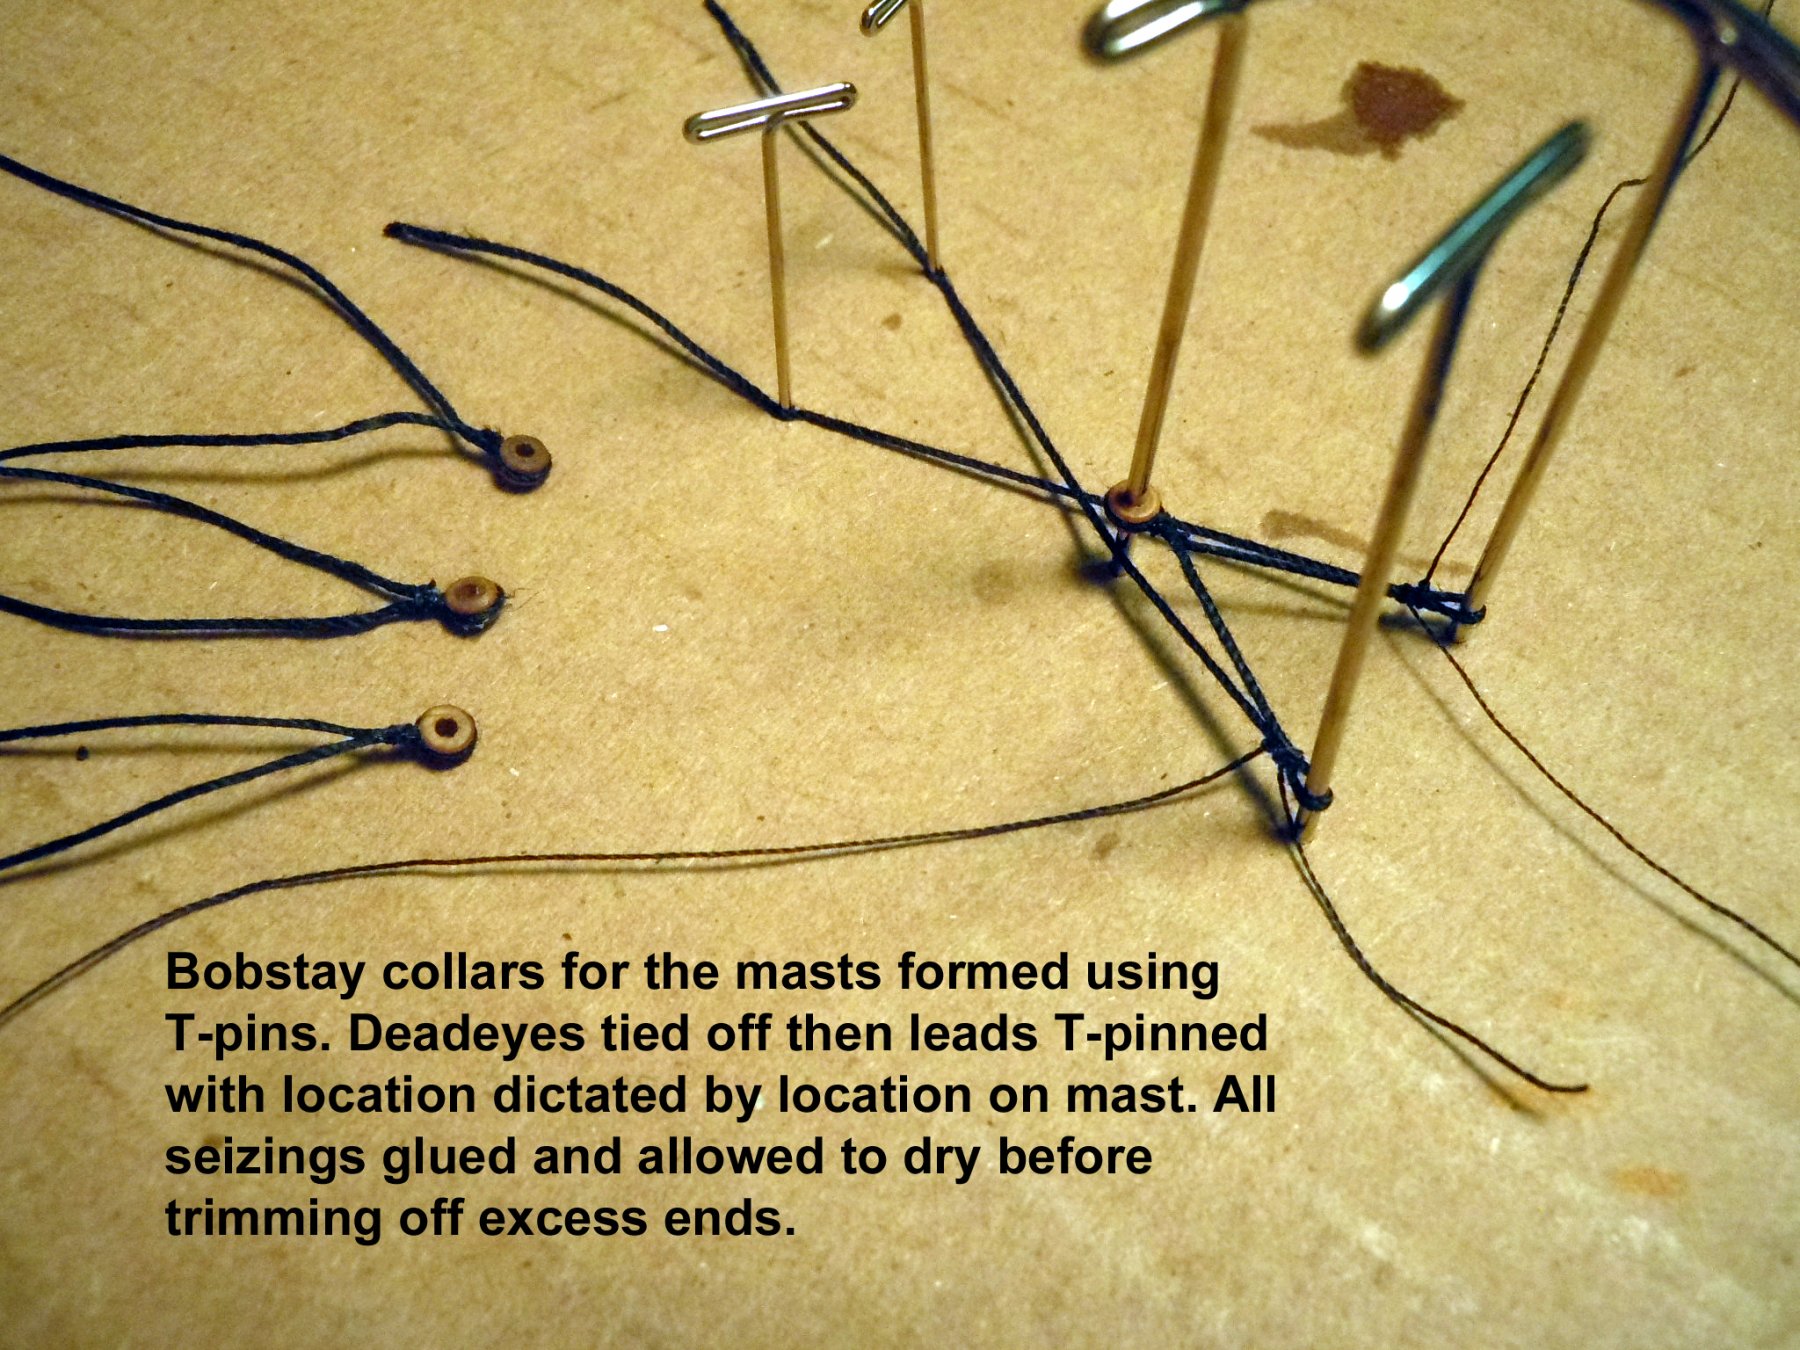
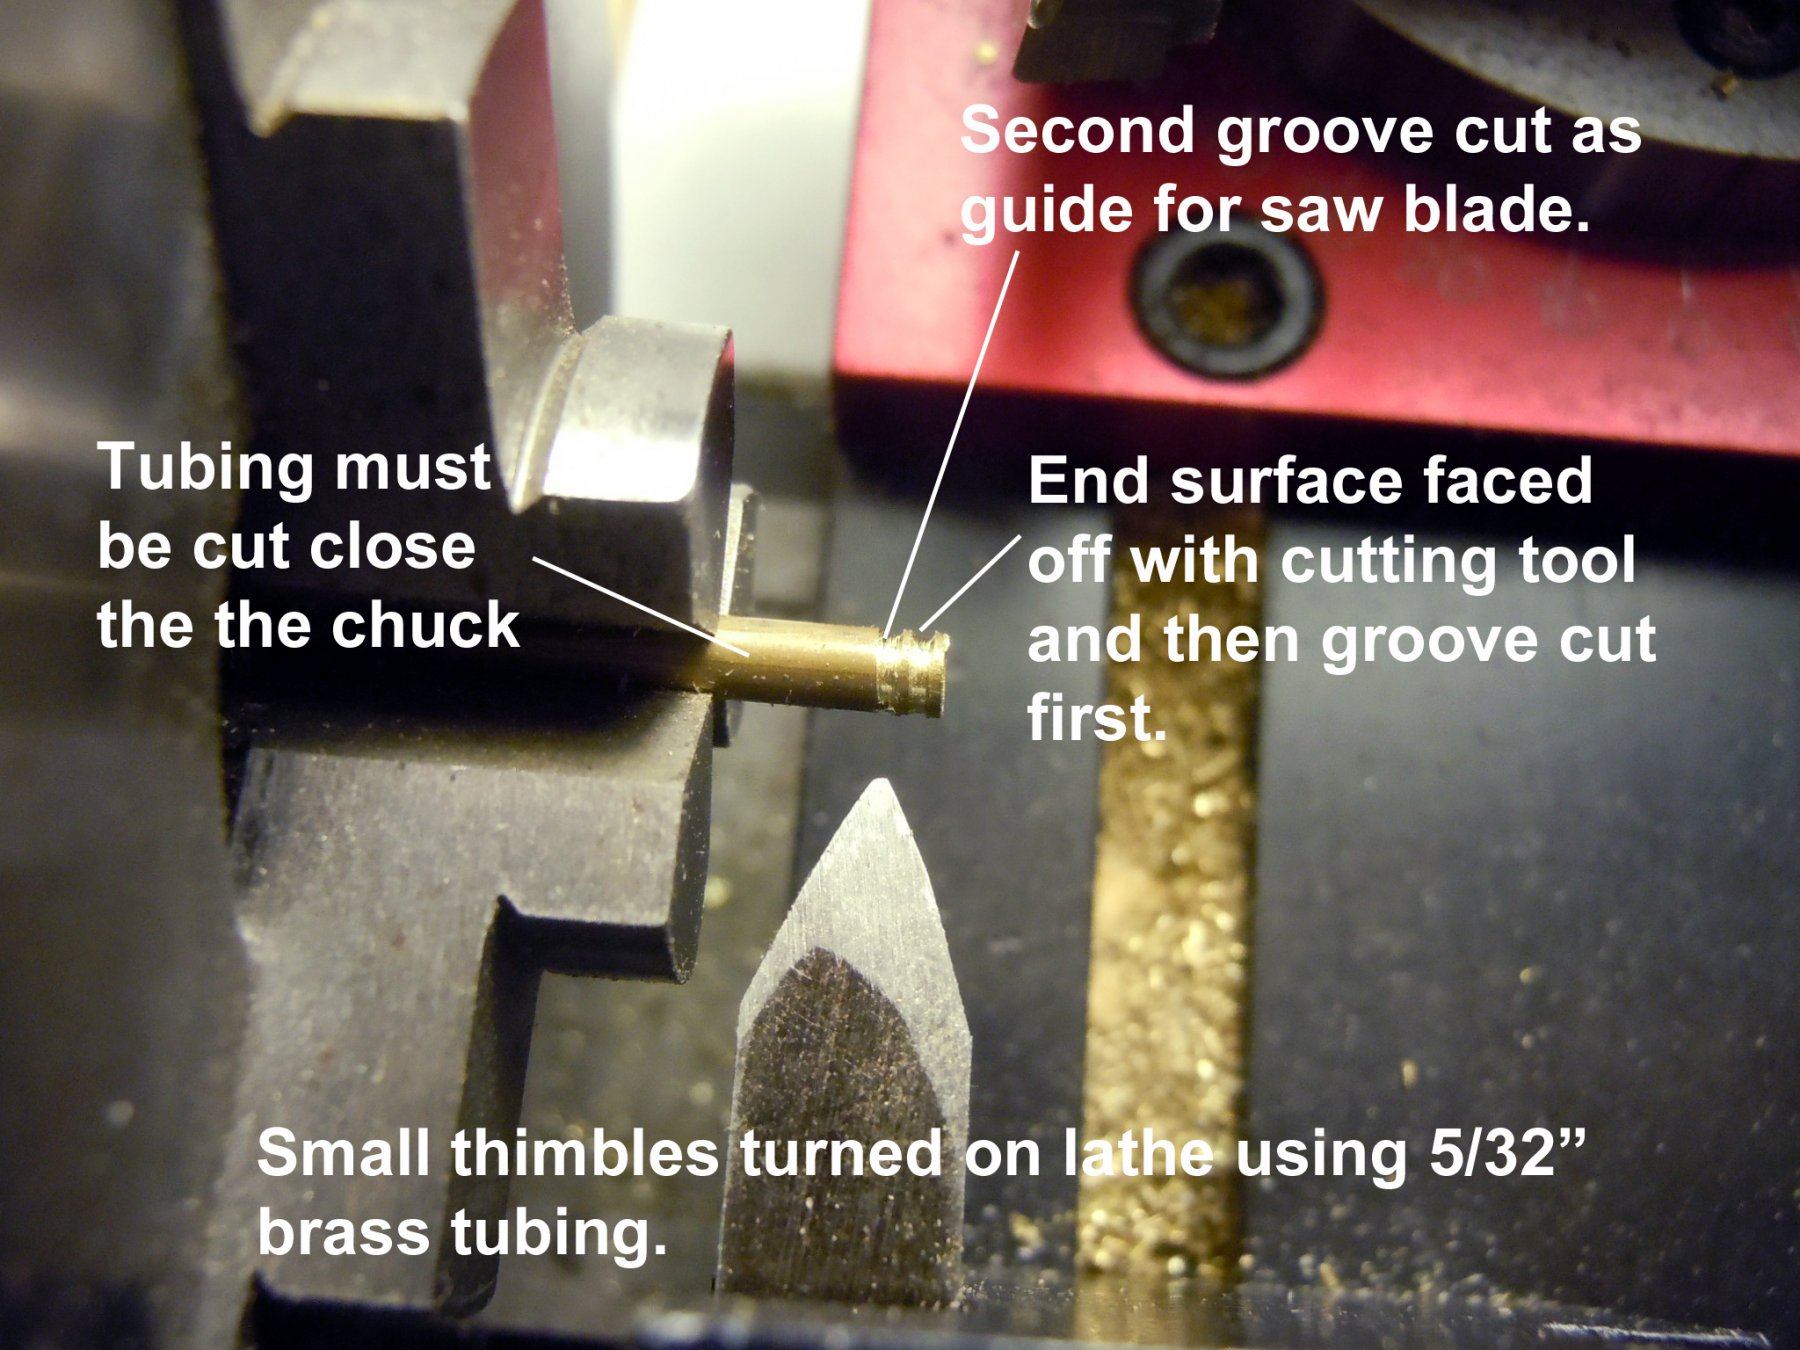
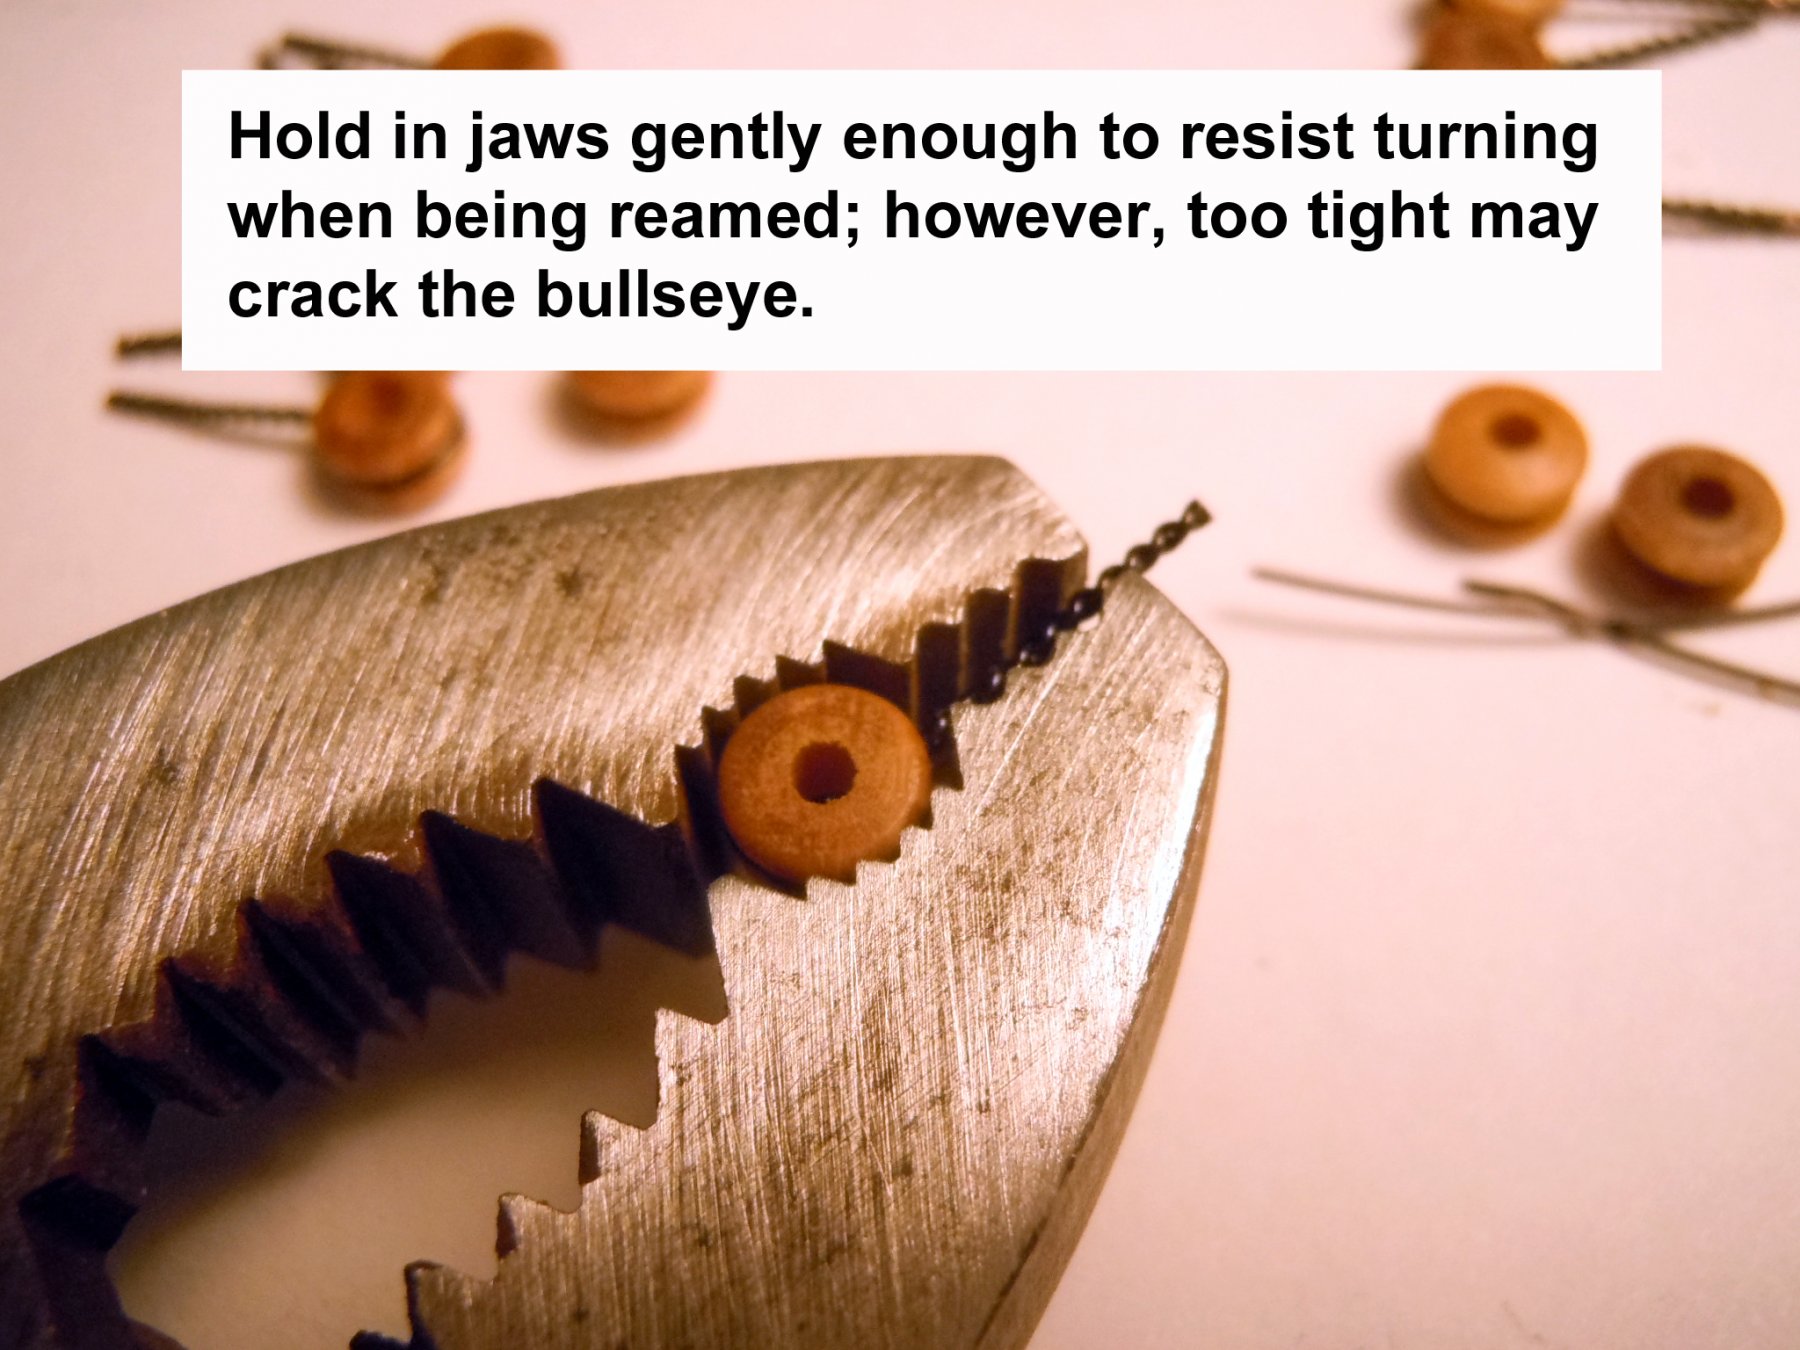
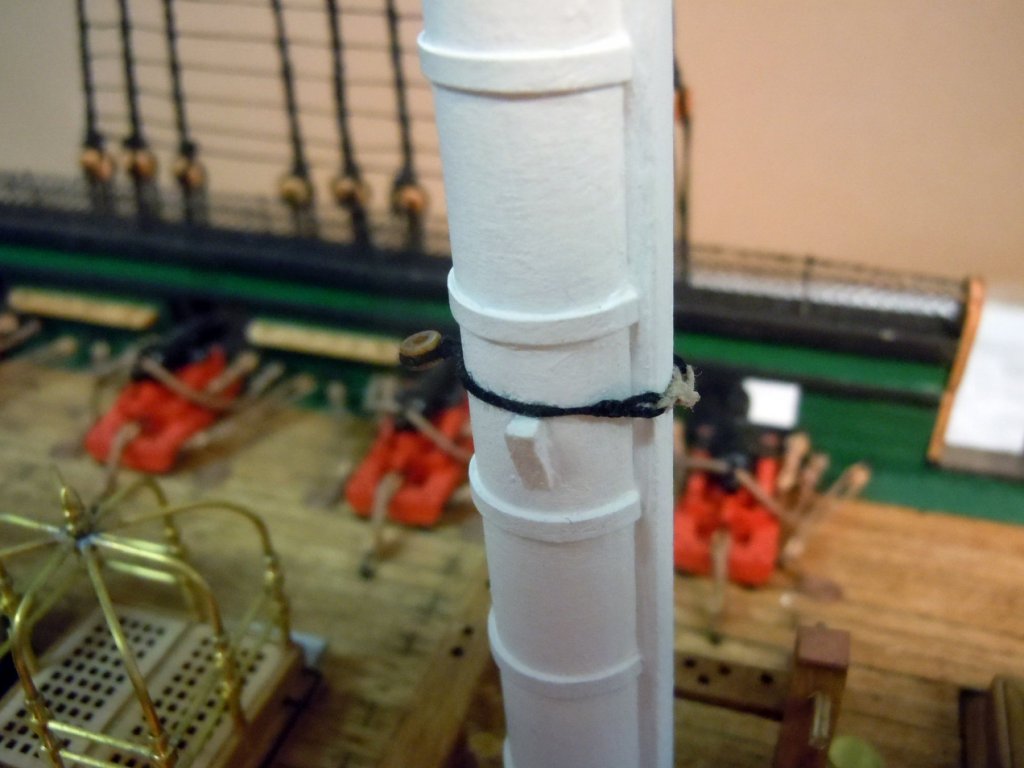
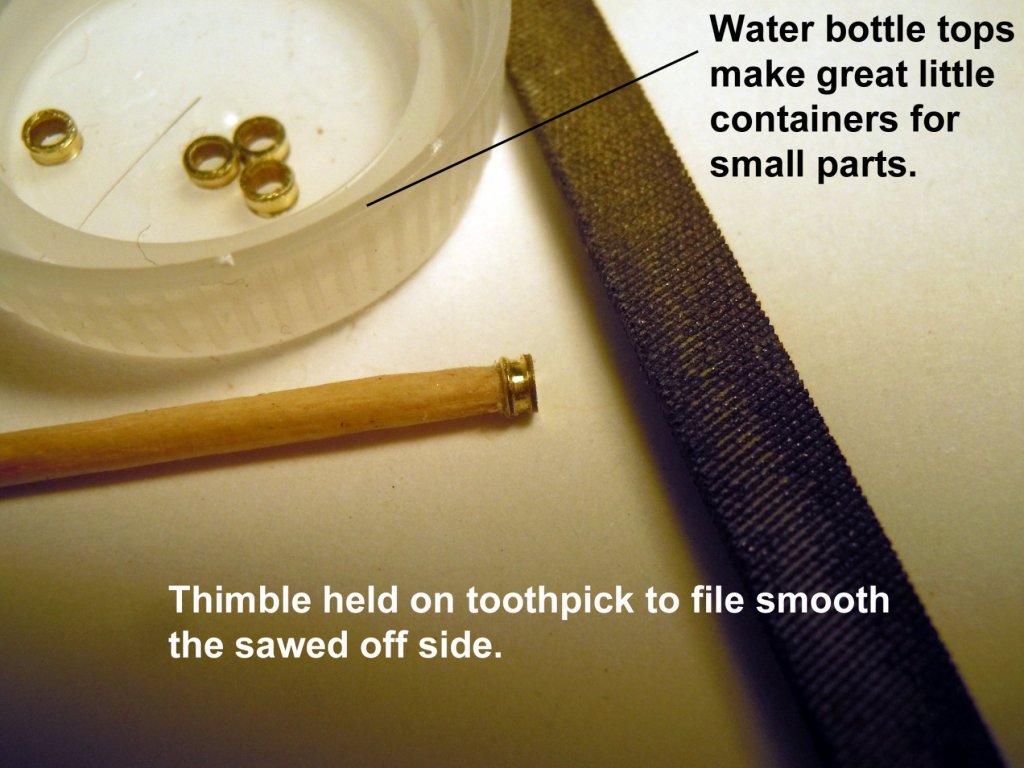
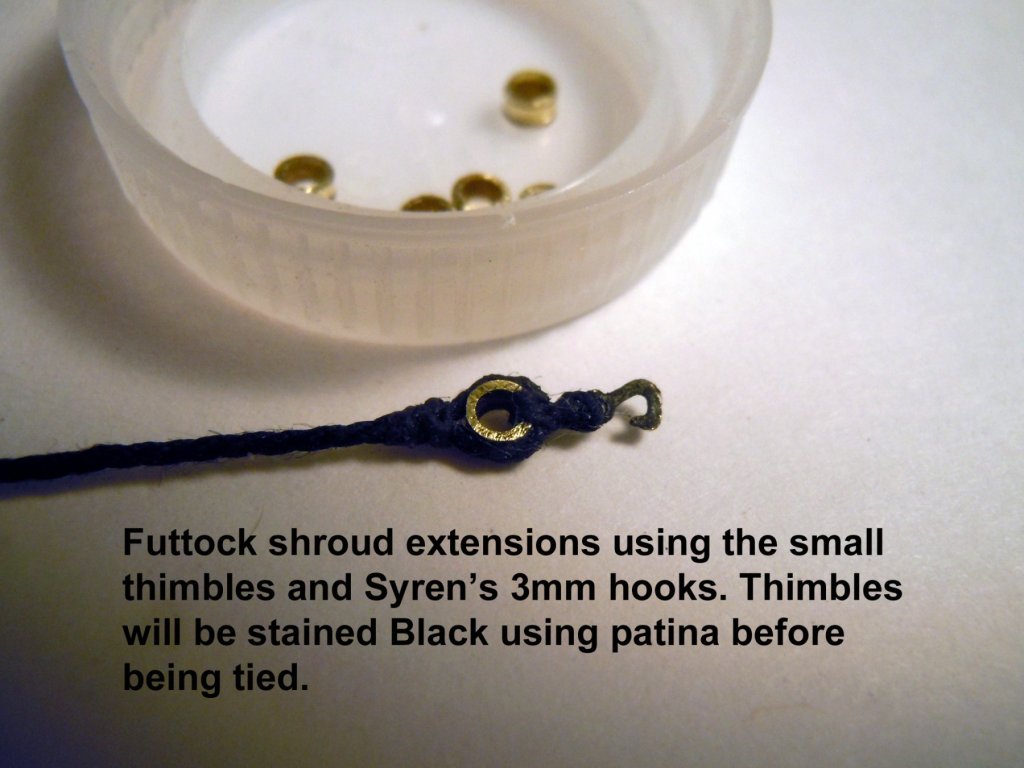
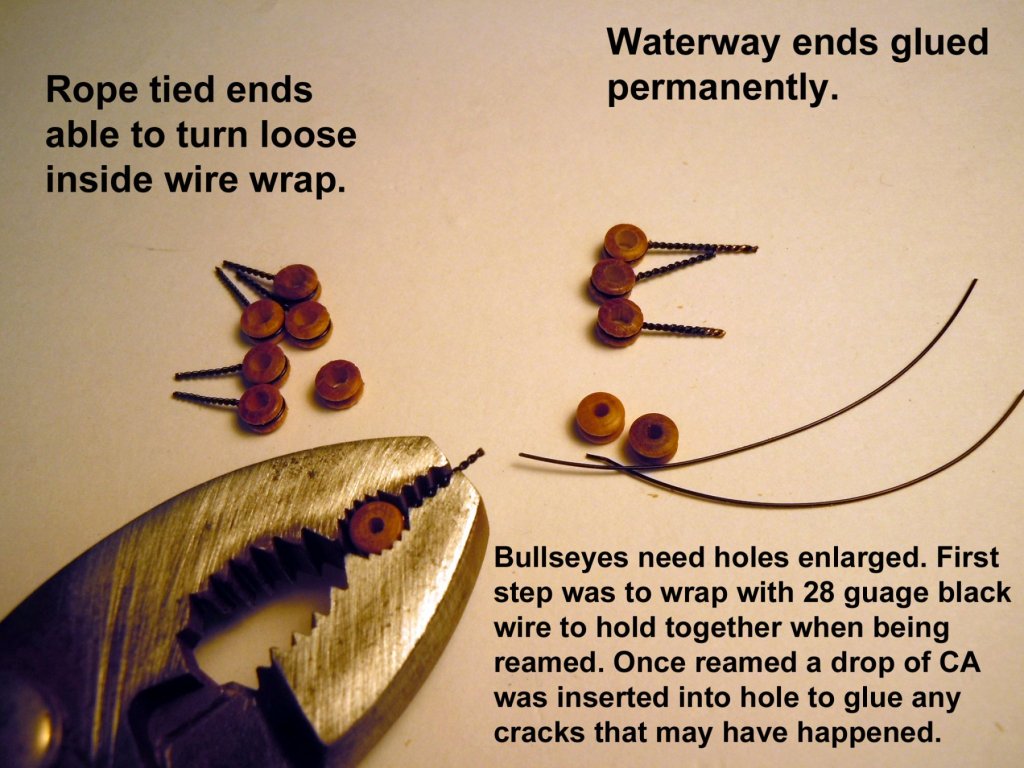
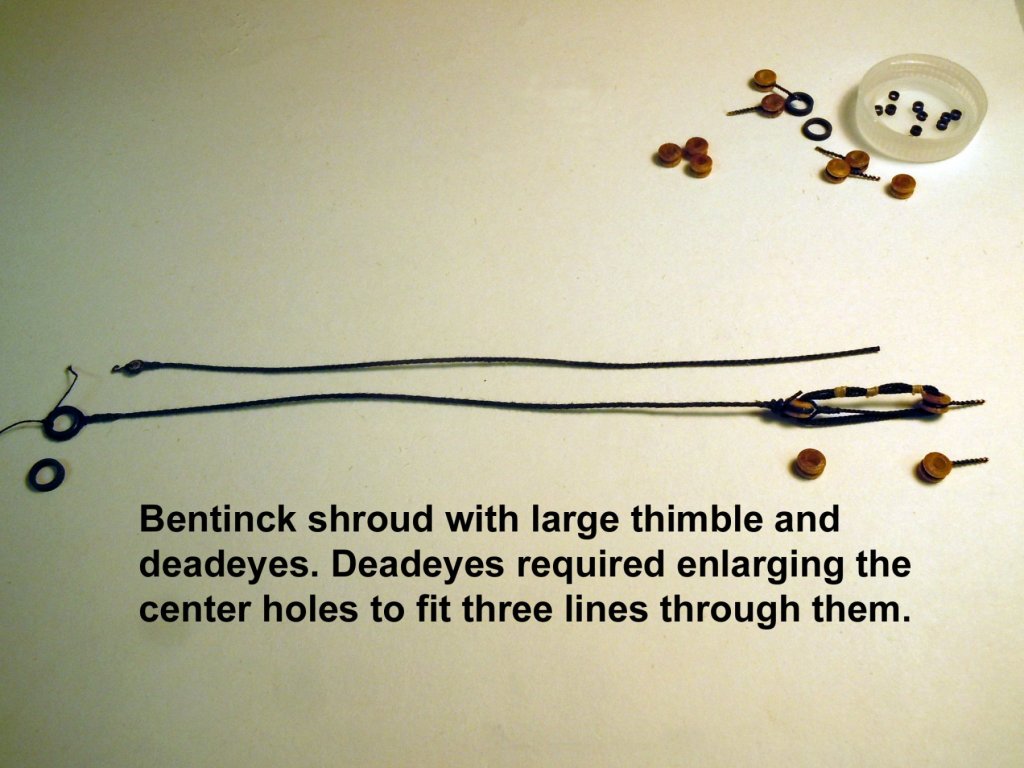
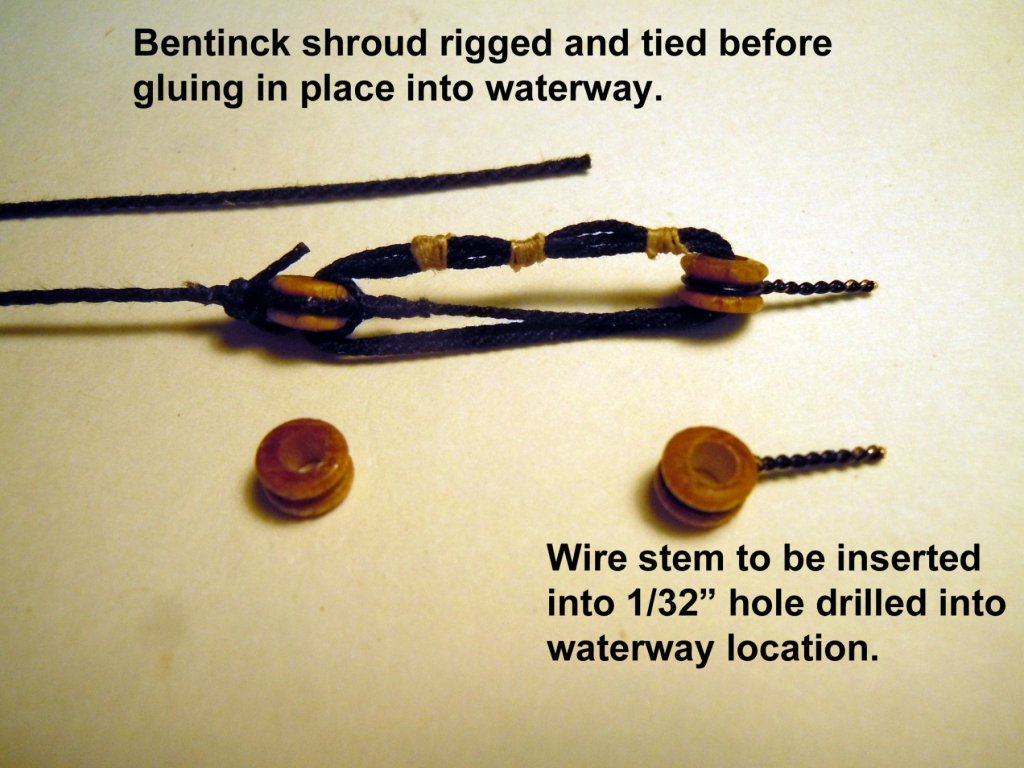
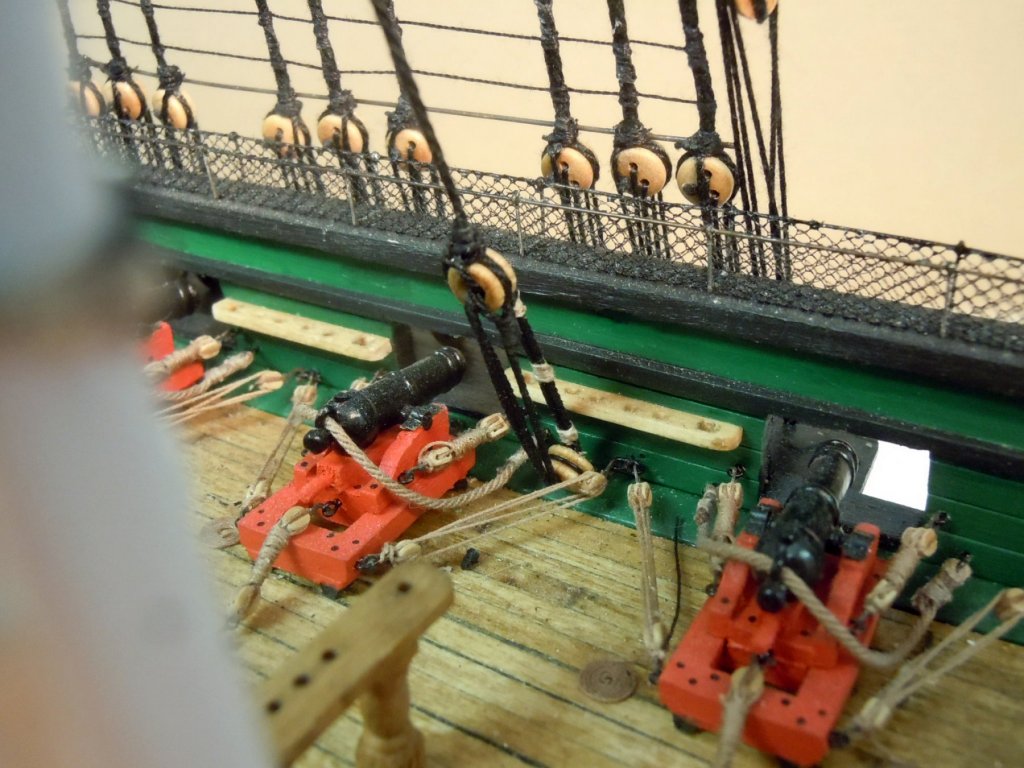
I have moved on to the Bob stays for the masts and used T-pins in cardboard to fixture for the different sizes based on mast locations. Next I started the by adding the futtock staves using 1/16" square wood strips painted black. Then started by making small thimbles using 5/32" brass tubing for the shroud extensions. There will be many to make. I then realized that to size the extensions I needed to make the bentinck shrouds with the large thimble. Here is a sequence of pictures. I discovered that the Bullseyes in the kit needed to have larger holes for three lines to fit through them so they had to be enlarged. The best way was to trap them with a twisted wire, ream them out and add a drop of CA before untwisting the wire. Next I moved on to rigging the bentinck shrouds which I quickly realized I had to rig before adding to the waterways. Now onto the foremast.


-
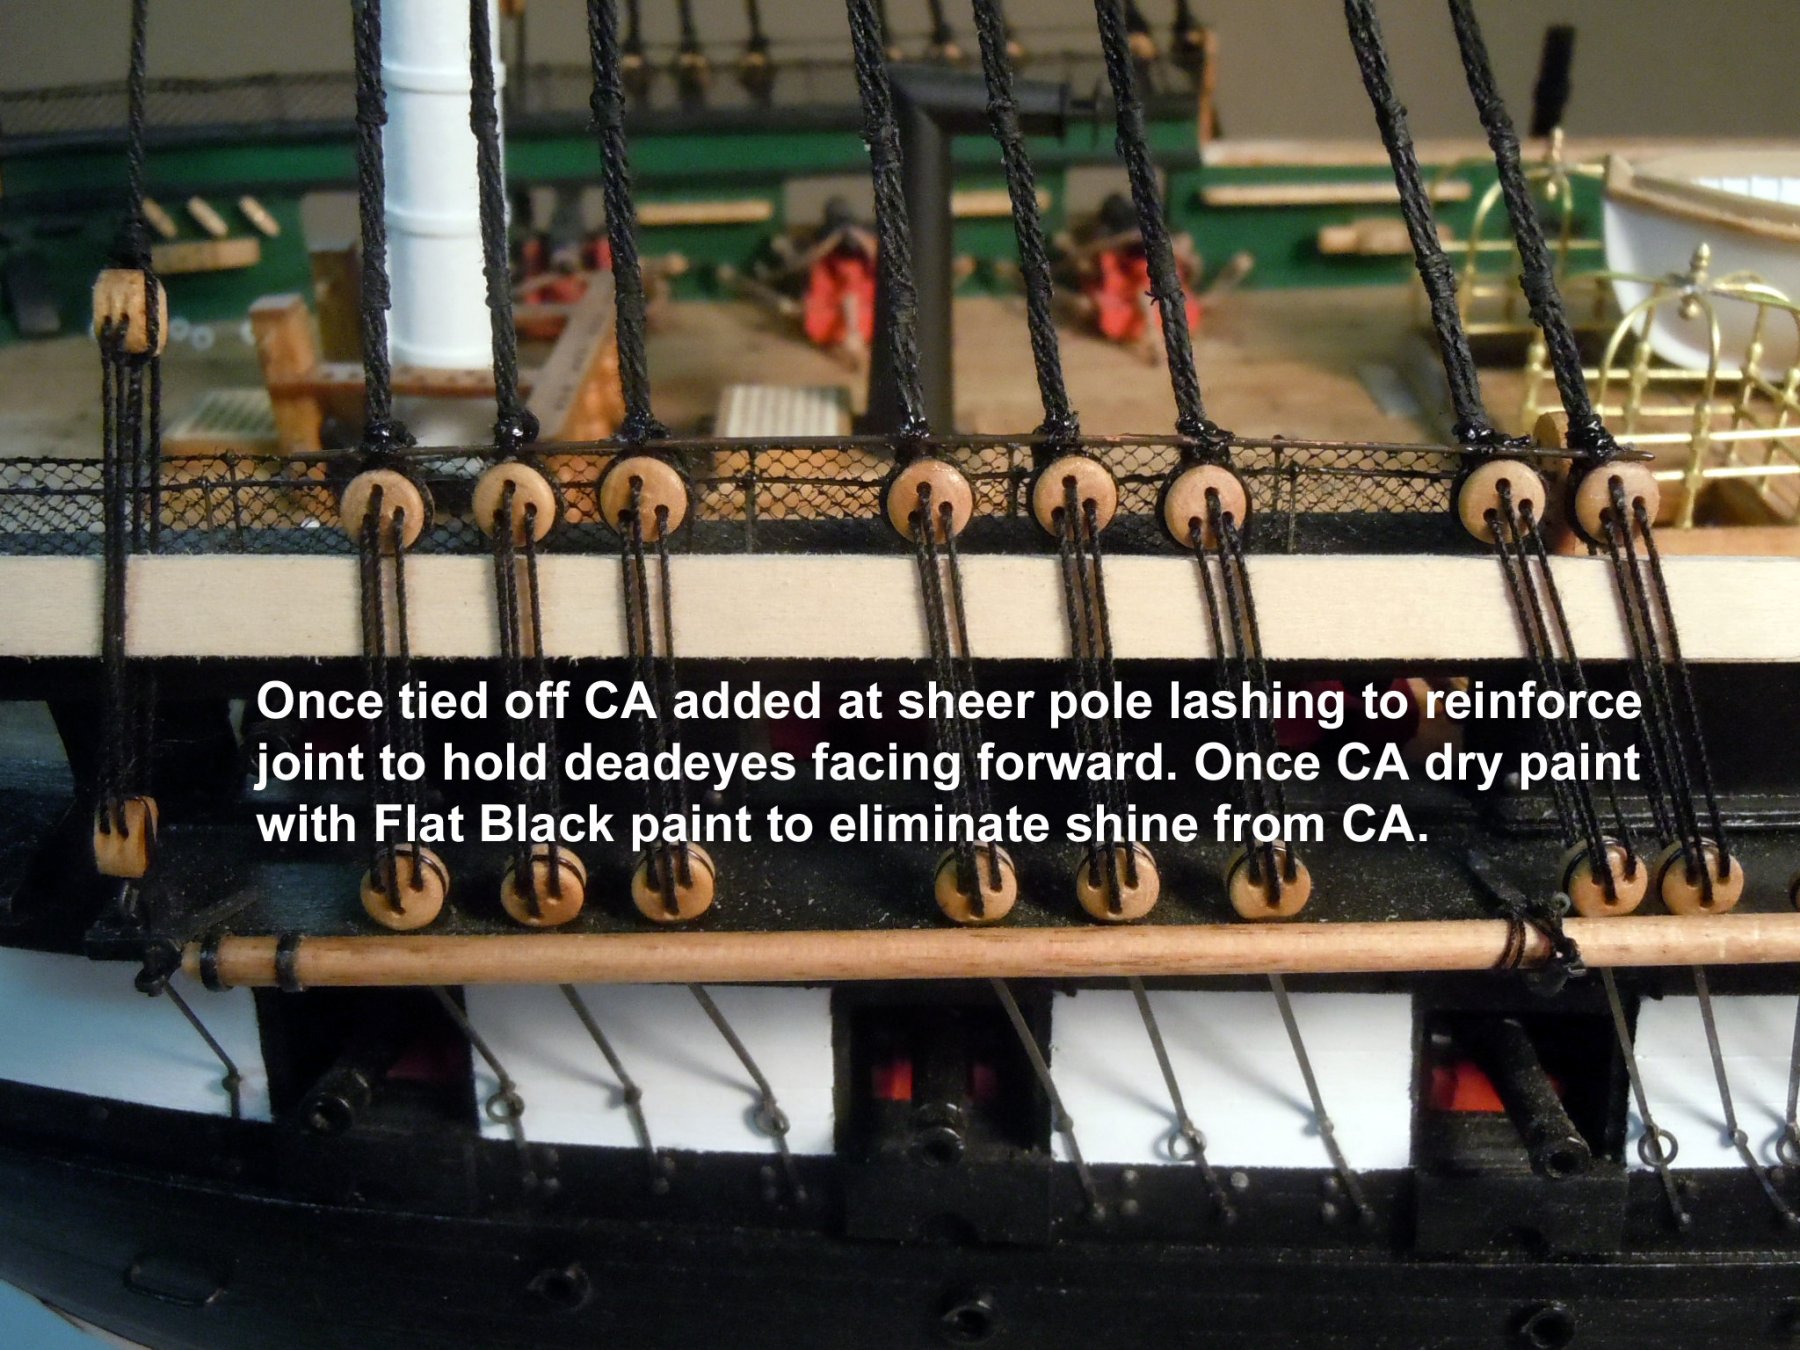
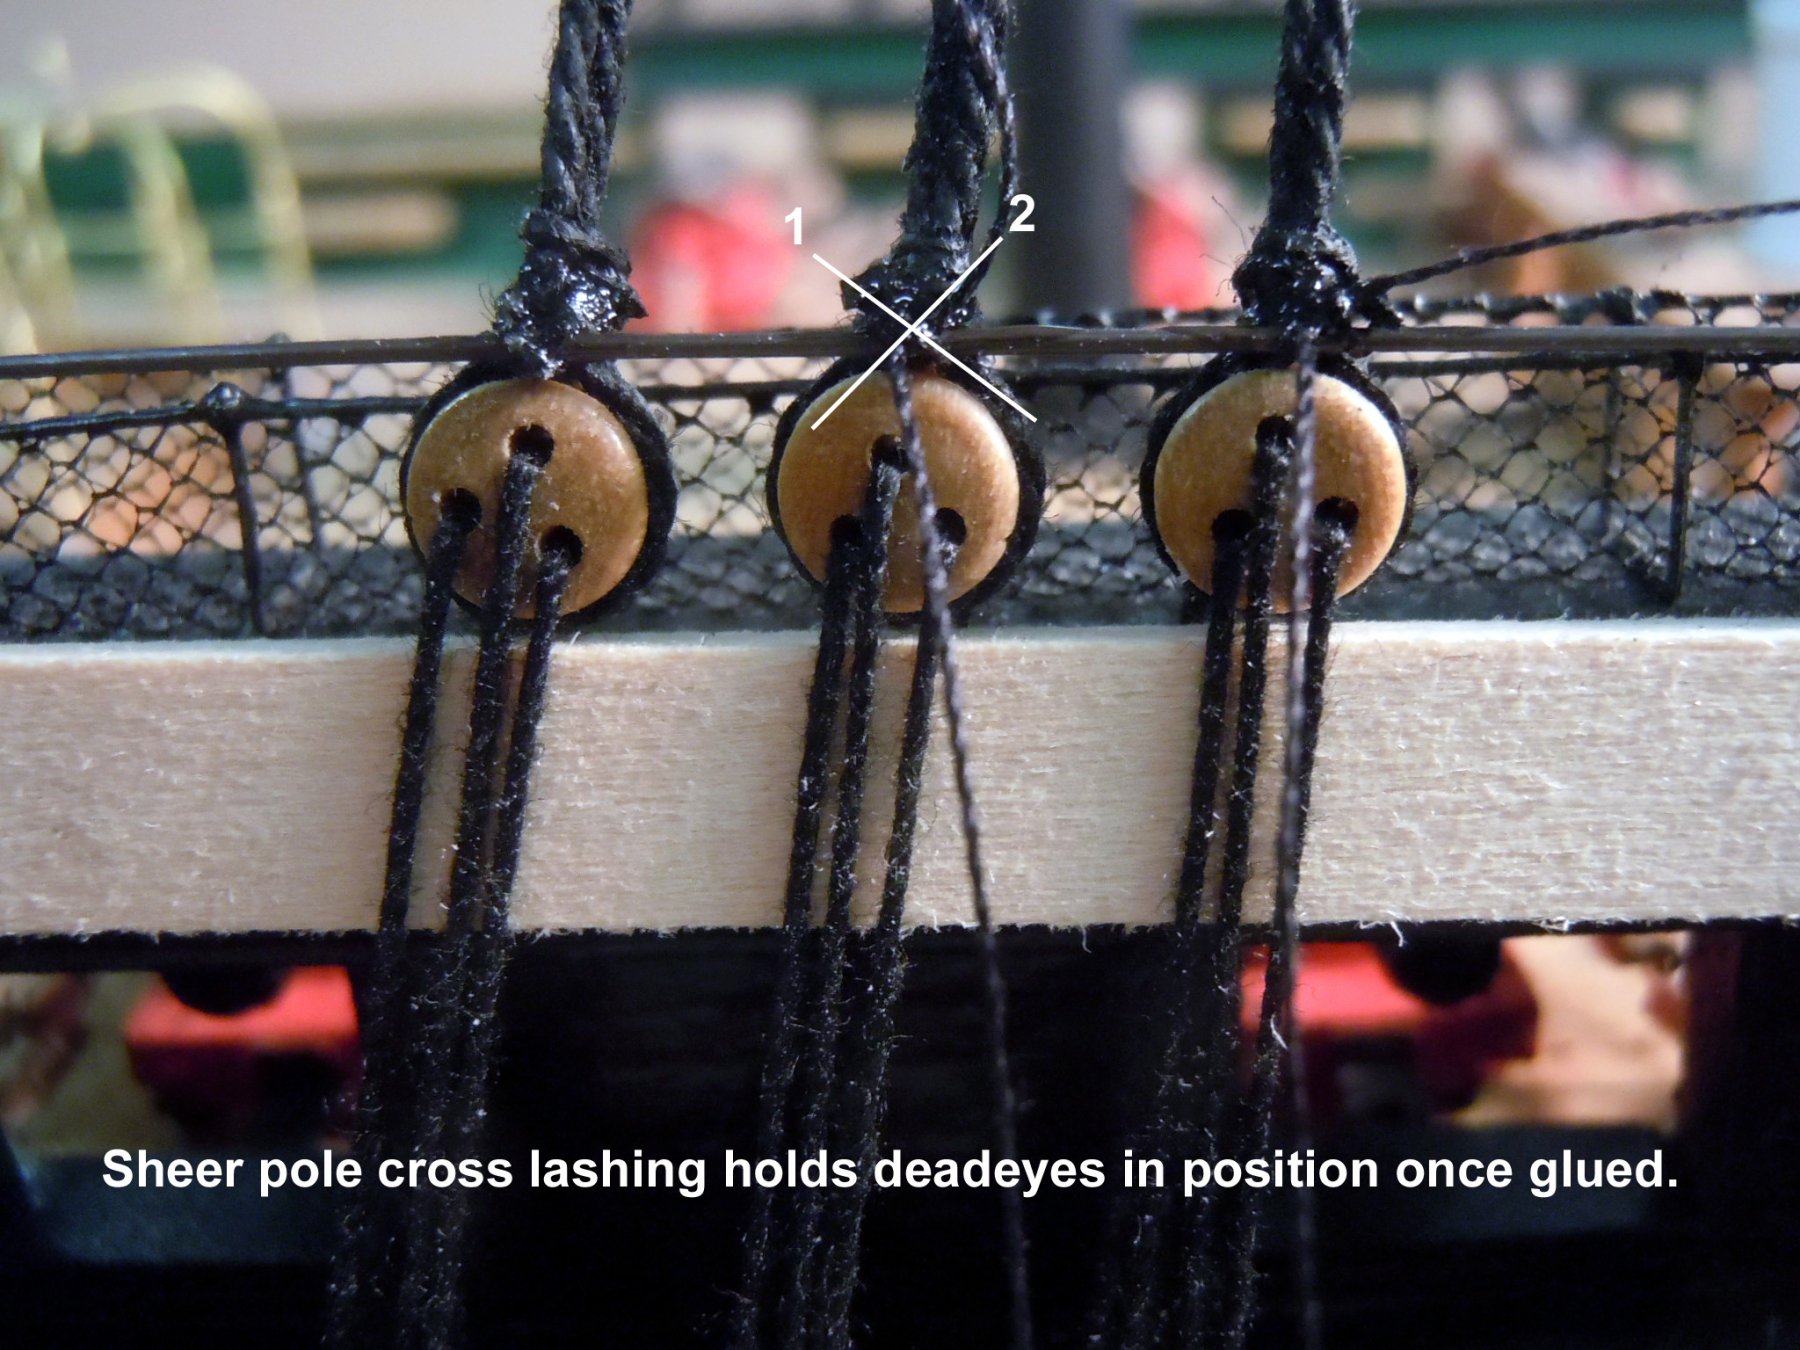
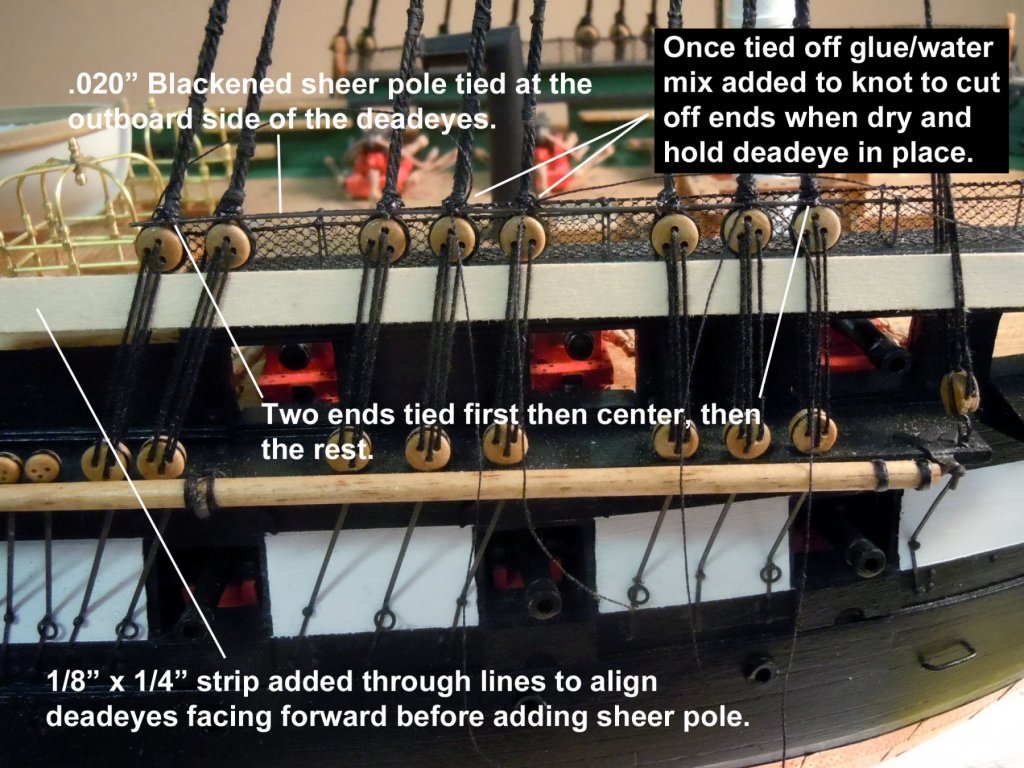
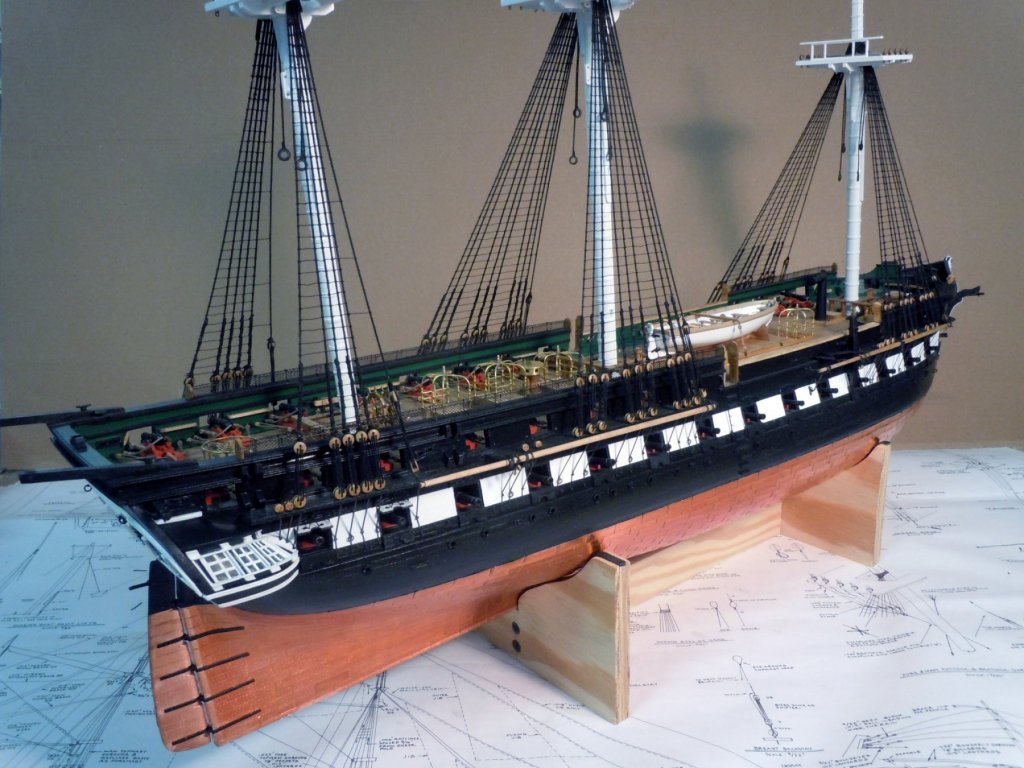
I am in the process of doing that with my Constitution build now and just finished the lower sections on all three masts.Note in the picture that I inserted a 1/8" x 1/4" wood strip between the dead eye lines to align the deadeyes facing forward and then tied each in place to the sheer pole. More pictures on my build.
-
Being right handed I did fore to aft on starboard and aft to fore on the port and I should mention that the clove hitches were up and outboard on the shrouds so that the lines lay on top of the shrouds. I hope this makes sense.
-
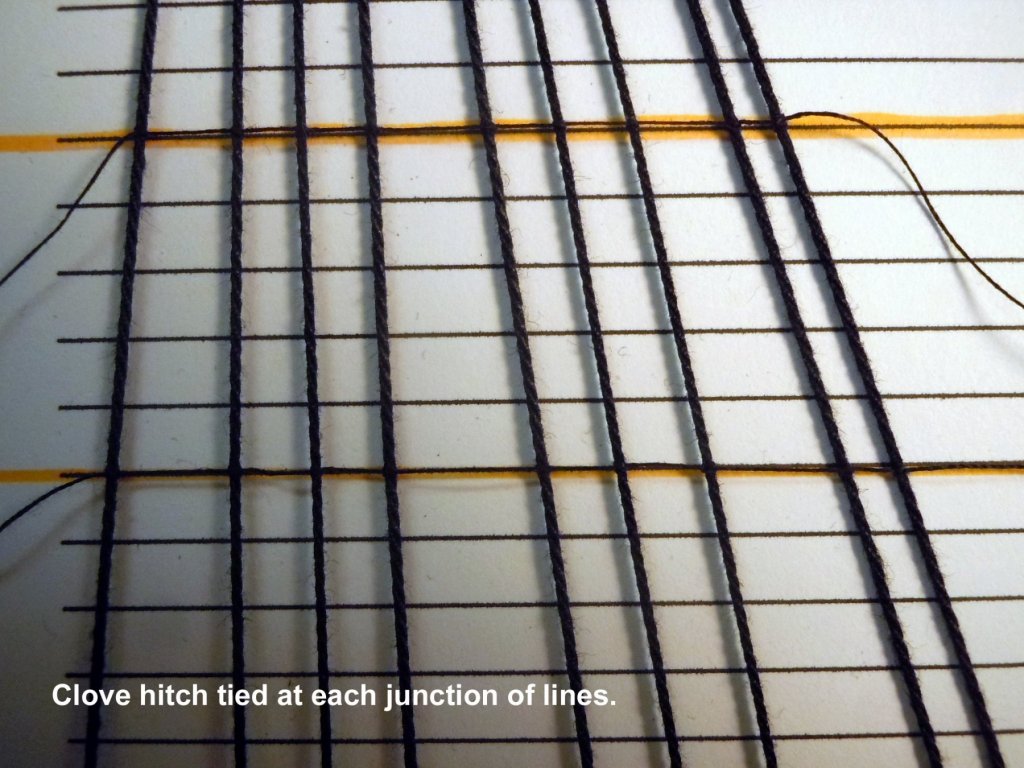
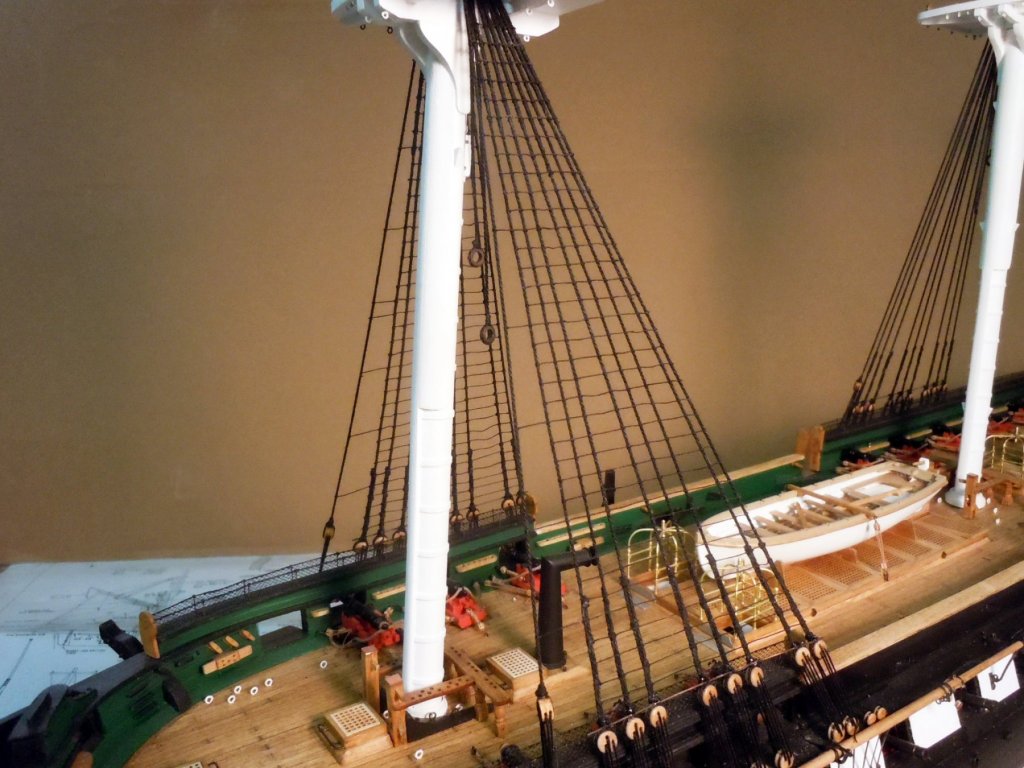
Michael, thanks! I just finished up the lower ratlines for all three masts after tying nearly 2,000 clove hitches with #50 black thread. I now have tying clove hitches down pat in any direction. Just a few observations I have made: working black thread on black shrouds requires keen eyesight and great depth perception working at times with a pair of tweezers in each hand. If you have trouble with chopsticks don't even start. I found that wetting the thread before tying really helped to reduce the spring effect and sizing in the thread as well as friction when tying knots. File the ends of the tweezers down to a point and file the ends square; then file the inside gripping surfaces flat so they match each other when squeezed. Test by picking a thread off a flat surface. Do this before even starting. Tie the extended lines first and once all the knots on one row are tied glue each knot and ends of thread to be cut off with watered down white glue. Watering down allows the mix to penetrate the tiny thread and bond to the shrouds. When seizing the clove hitch to the shroud tighten slowly and the final pull to the right to set the knot in the right location and then hold the shroud with the tweezers at the knot and tighten to the left. (opposite if you are left handed) As you are tightening the knot pay attention to the lines above and below to avoid over tightening and causing them to sag. Work from the bottom (dead eyes) to the top (fighting top) when adding lines; this allows the excess ends to hang down out of the way of the next one to be tied. Cut off excess lines after the knots once the glue has set with the tip of sharp scissors cutting only the line. Once at the shroud seizing near the top the use of magnification will really help. Once completed and all glue set if you have any sections that are not pleasing or have sag cut them away and add a new section making sure the clove hitches straddle the existing knots, this will align the new section with the existing lines. OK sorry more than just a few observations. Here are the results of it all. Now to add so more mast details before moving on.


-
Looks like she is in need of some serious TLC, a little clean up and repair. can you post some more pictures showing the hull? Unfortunately pewter stretches under its own weight, you will need to cut the decking away a section at a time and add bracing when replacing the decking with wood. Not knowing the alloy will be a challenge and using a hot knife may be the best alternative to cut away the sagging deck. Cut close to the hull joints without damaging the hull and then sand up to the hull with a small course drum sander. This can be a great fun project to restore. Too bad we do not live closer together.
- 10 replies
-
- 3
-

-
- africa
- passenger liner
- (and 1 more)
-
Fokker Dr.I by Torbogdan - FINISHED - Model Airways
xken replied to Torbogdan's topic in Non-ship/categorised builds
Visit and explore this site for Pocher cars and replacement parts. http://www.modelmotorcars.com/our-store/ Enjoy! -
Fokker Dr.I by Torbogdan - FINISHED - Model Airways
xken replied to Torbogdan's topic in Non-ship/categorised builds
Torbogdan, Thanks! WWI planes are my first love and I have more planes that I want to build than I have time left to build them. Here is a link to my other plane builds. Check out the Sopwith Camel it was built as a half and half from the upper left side it looks like a complete plane and from the lower right side you can see the structure details. This was requested by the client it was built for along with a spare engine for display as well. If you are going to cover do so before final assembly. http://www.wwi-models.org/Images/Foran/- 250 replies
-
- 10
-
-
Fokker Dr.I by Torbogdan - FINISHED - Model Airways
xken replied to Torbogdan's topic in Non-ship/categorised builds
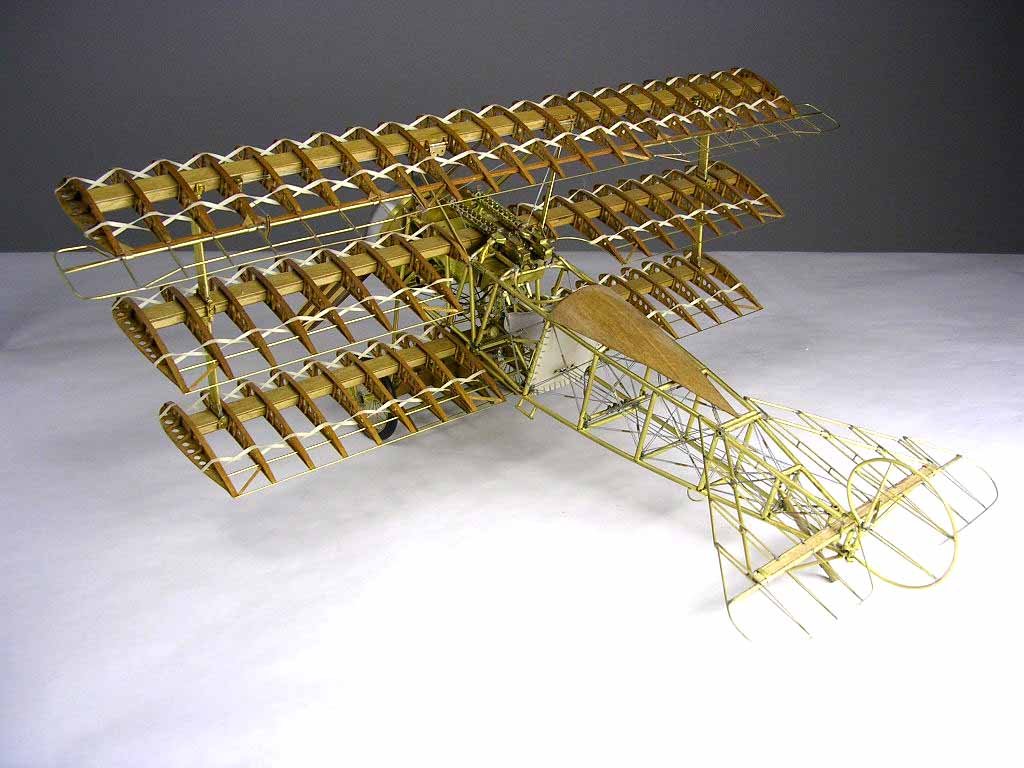
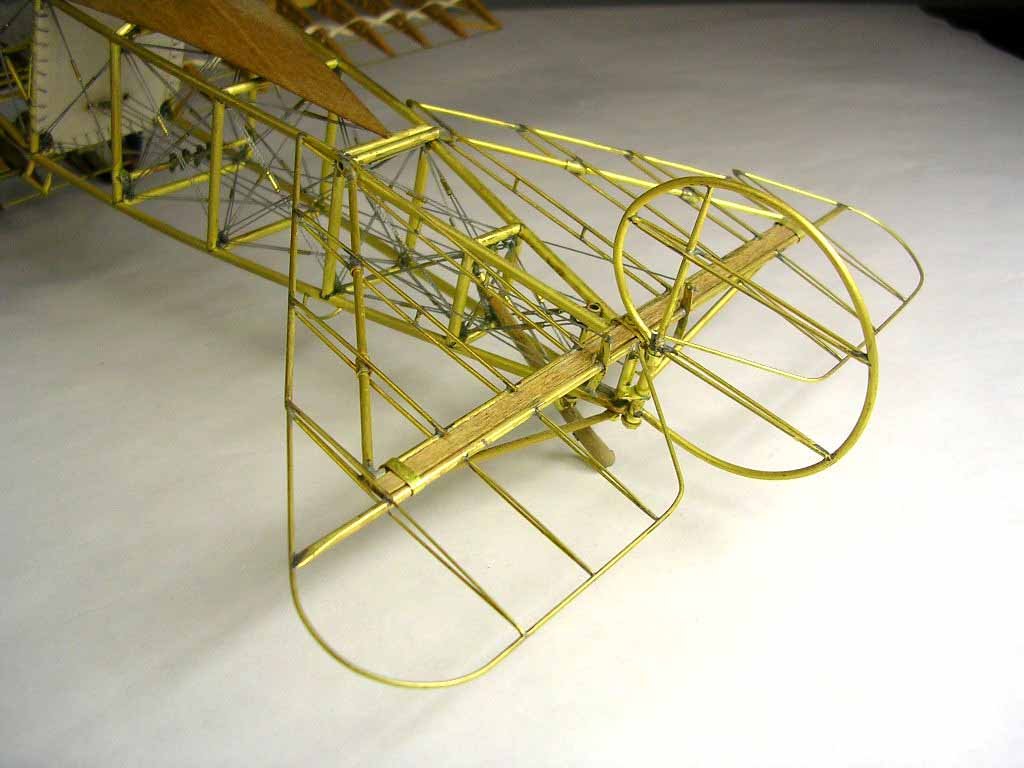
Torbogdan, Glad to see a plane build on this site. A few years back I scratch built this plane as part of the Fokker series with the Eiendecker E-IV and the D VII all being left either wood or brass as the original either wood or metal. One detail many of the kits overlook is the wind baffle behind the pilot's seat which was an attempt to reduce drag; while the British usually left a space at the rear of the fuselage to allow airflow. If you need any information or details let me know. Here are a couple of pictures of my build. Keep up the great job you are doing. Here the cowling is hammered out of .020" dead soft aluminum. Here is the wind baffle behind the pilot seat. The tail plane that you are working on. Let me know if you need anything.
- 250 replies
-
- 23
-
-
Jon, I am using a quilting thread 100% cotton #50 for the ratlines. https://www.amazon.com/Mettler-Silk-Finish-Solid-Cotton-Thread/dp/B00Q9TPTFC purchased at a local quilting supply store. I have found the kit supplied thread too stiff. Yes I am following the kit guidelines as best as possible.
-
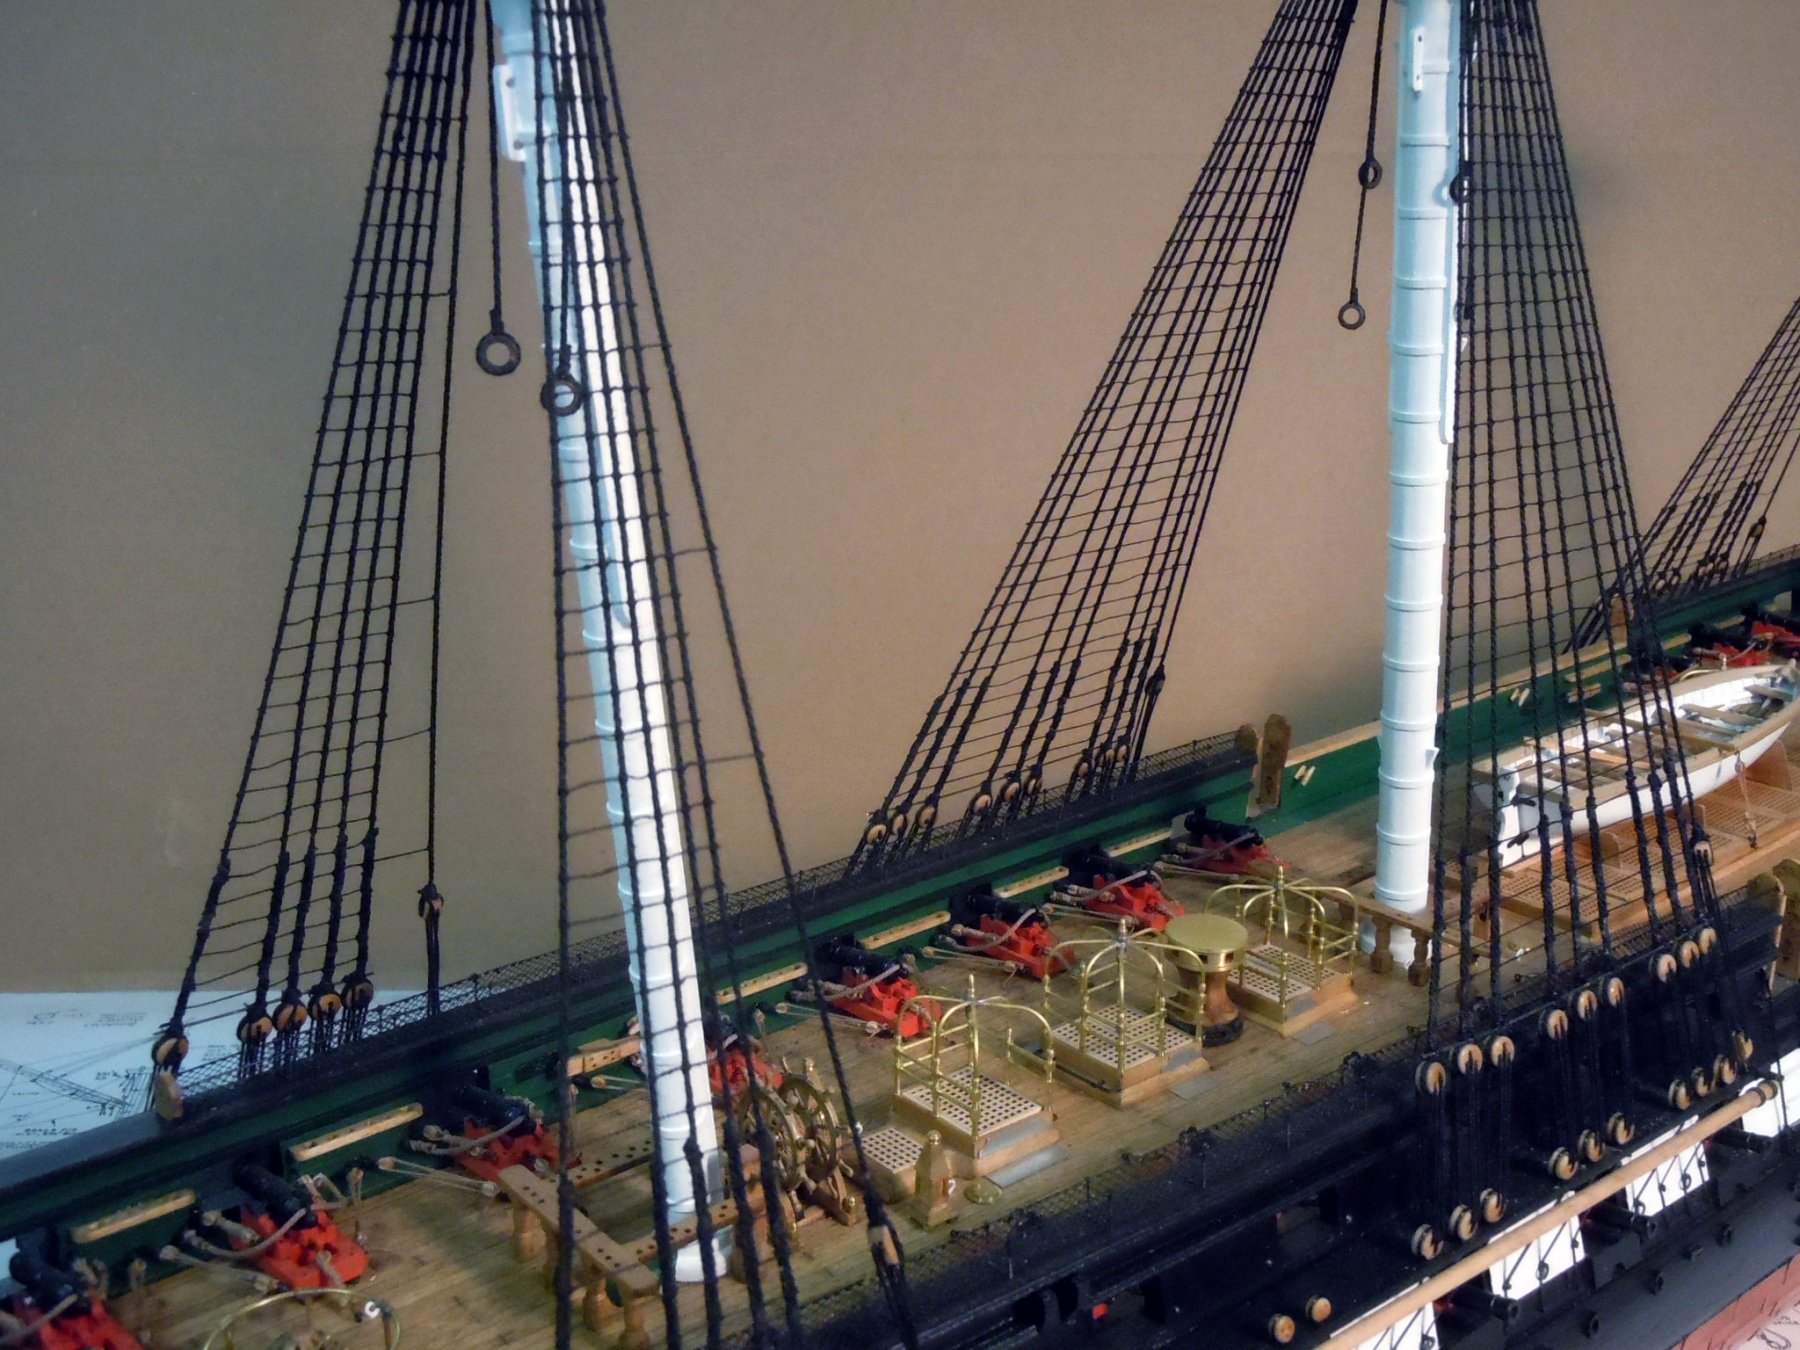
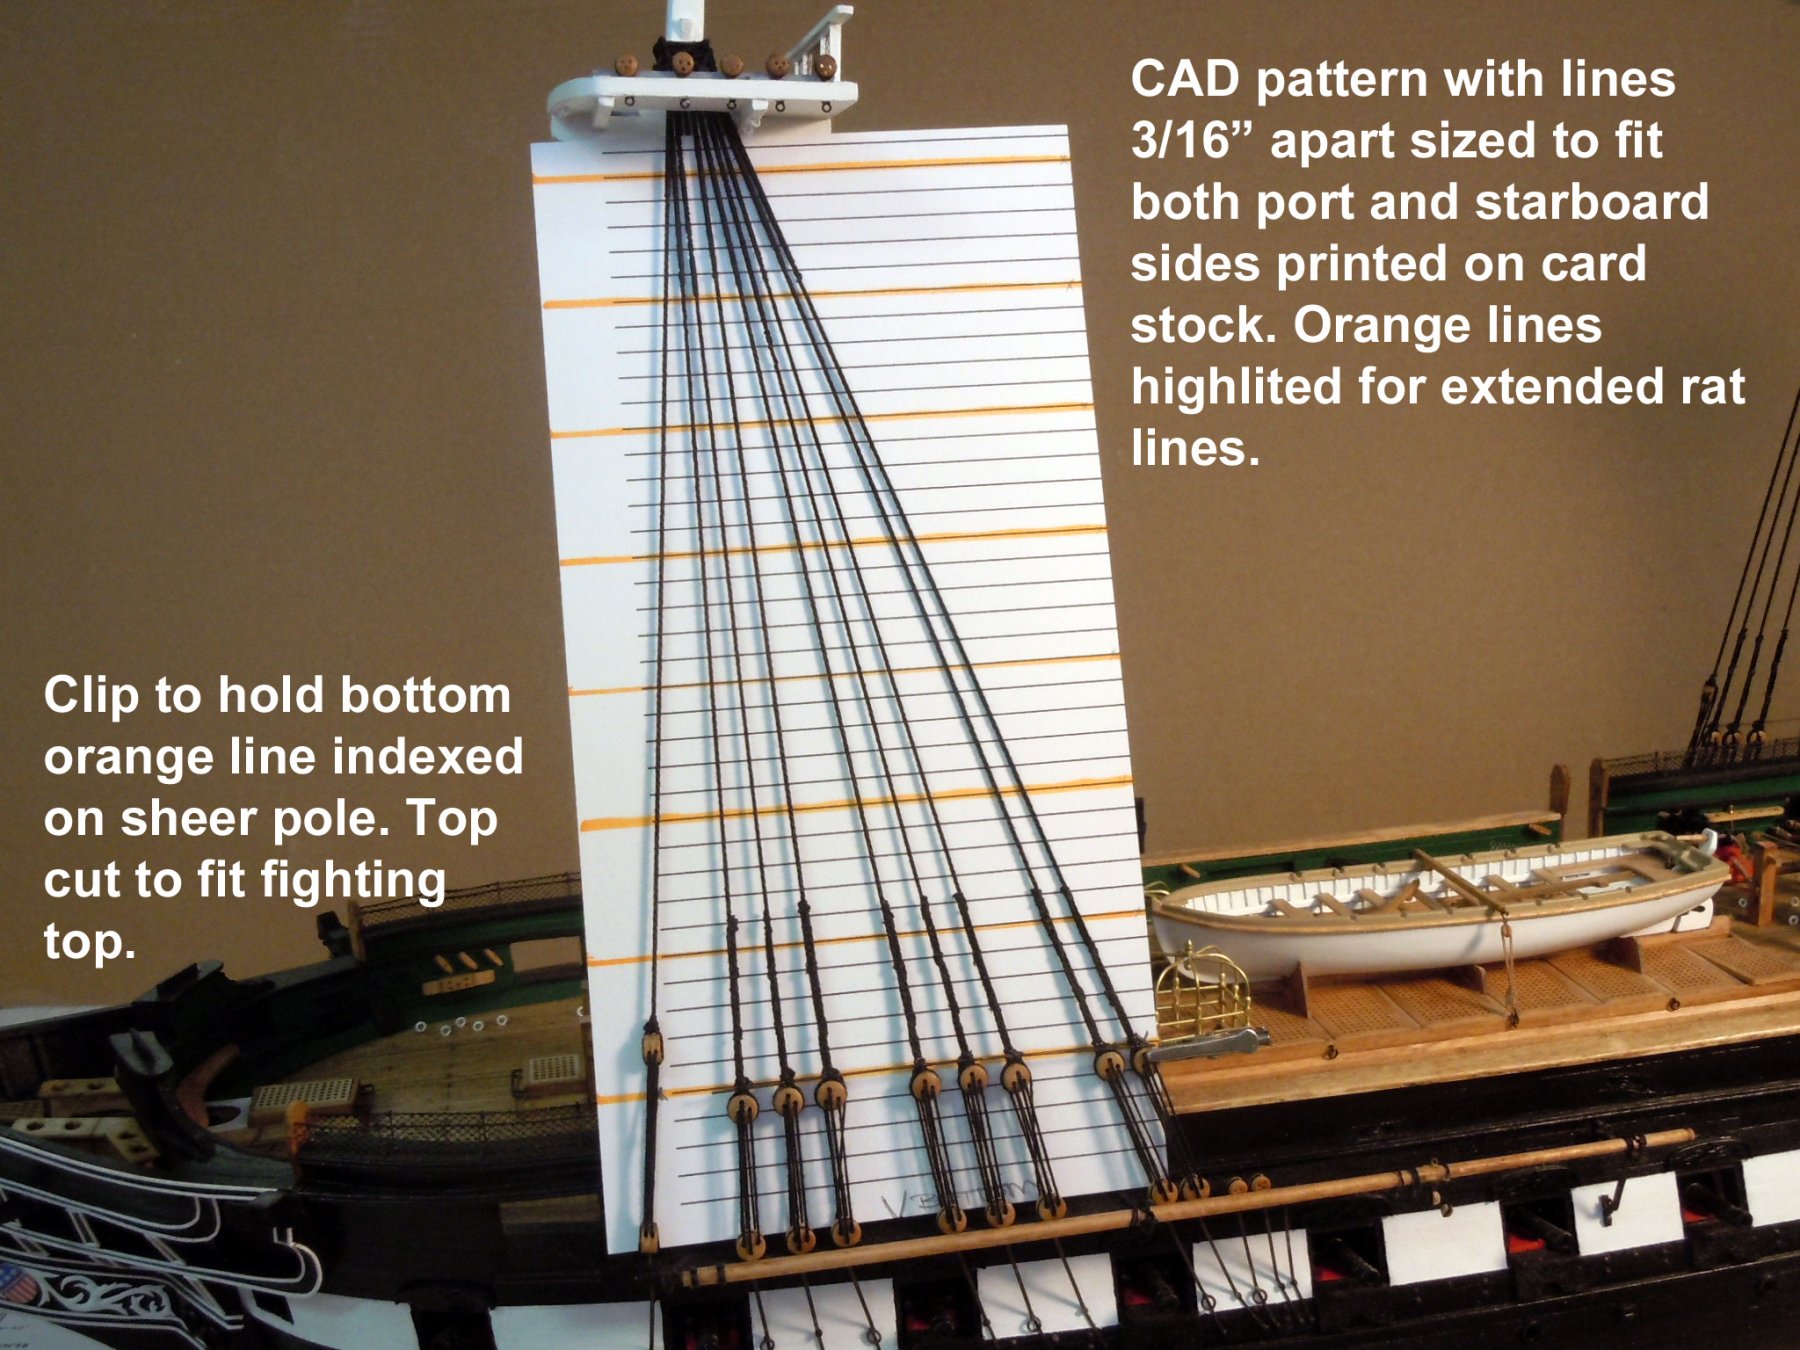
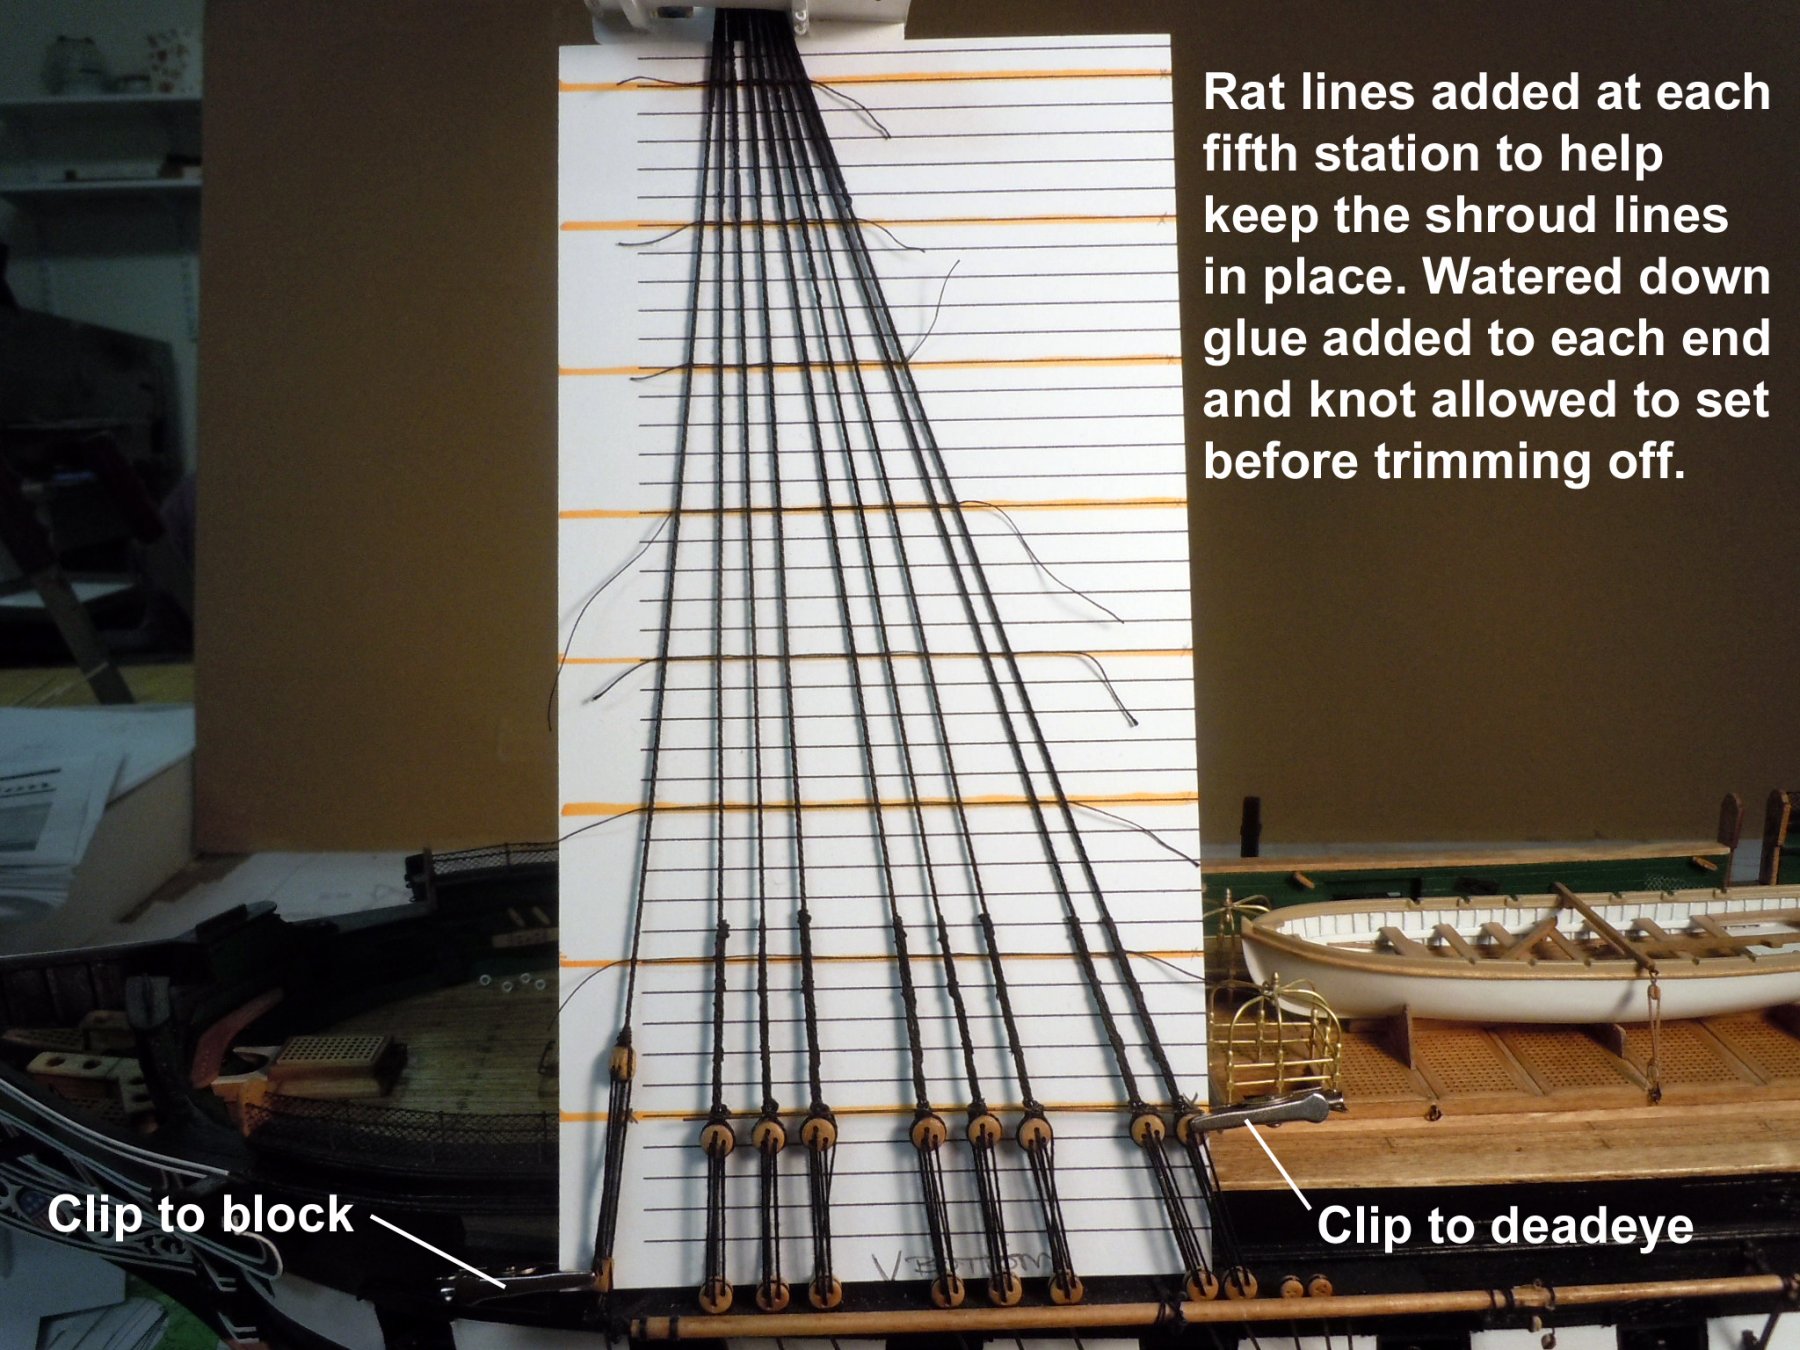
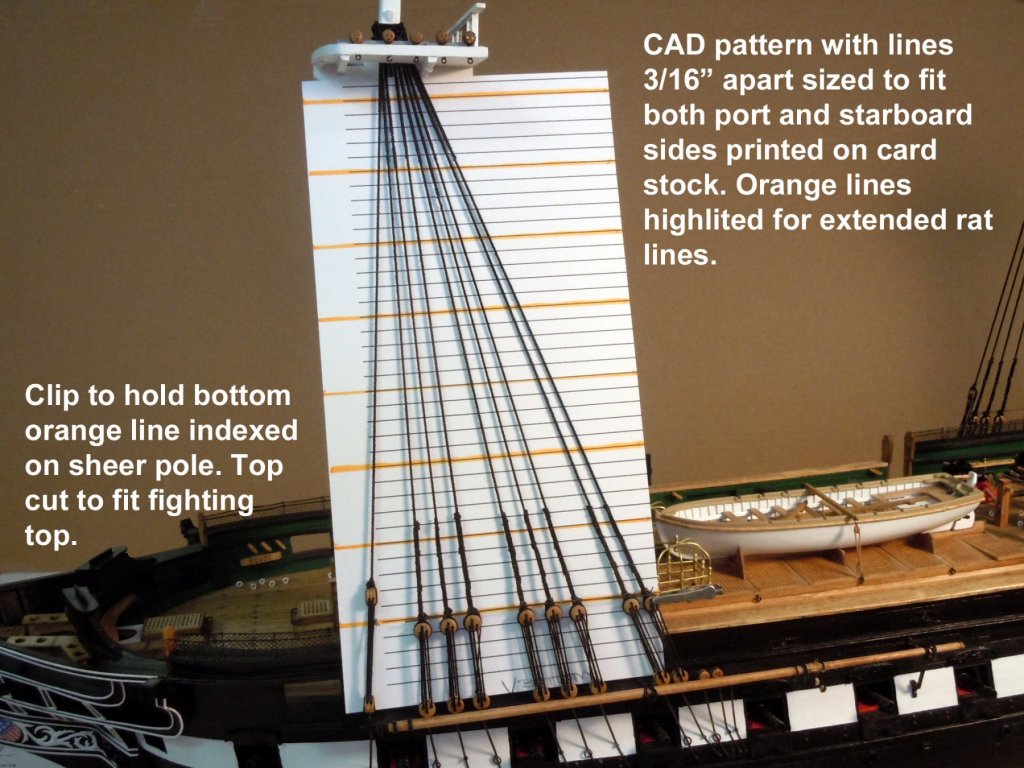
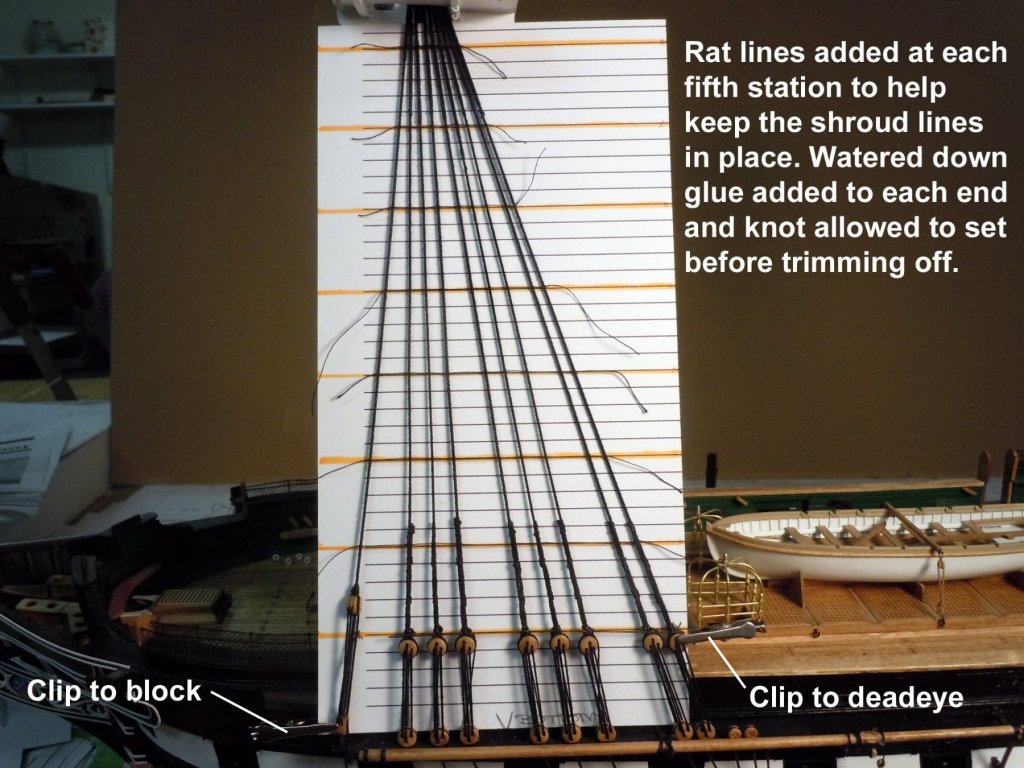
Tom, yes I am loving my lathe setup for serving the ropes. Once you get the feel for doing it it works very well and fast. I was serving 3 inches for the single lines with blocks and 5 inches for the doubles. I have moved onto the ratlines and am using black thread and tying clove hitches at each junction. The foremast lower sections have 295 knots per side. I used my CAD program to draw a guide with 3/16" parallel lines which I printed on card stock cut to size to use on both sides. I aligned the lower guidelines with the sheer poles and clipped to the deadeyes to hold in position and trimmed the top to be tight with the bottom side of the fighting top. I also highlighted in orange every fifth line that was extended per instructions and I tied those first to hold the shrouds in place and then filled in between. I am using a very water downed white glue at each knot once a line is in place and allow to dry before trimming off the ends. Here is a PDF file for others to borrow for their own use on builds. Ratlines.pdf Now onto the main mast.
-
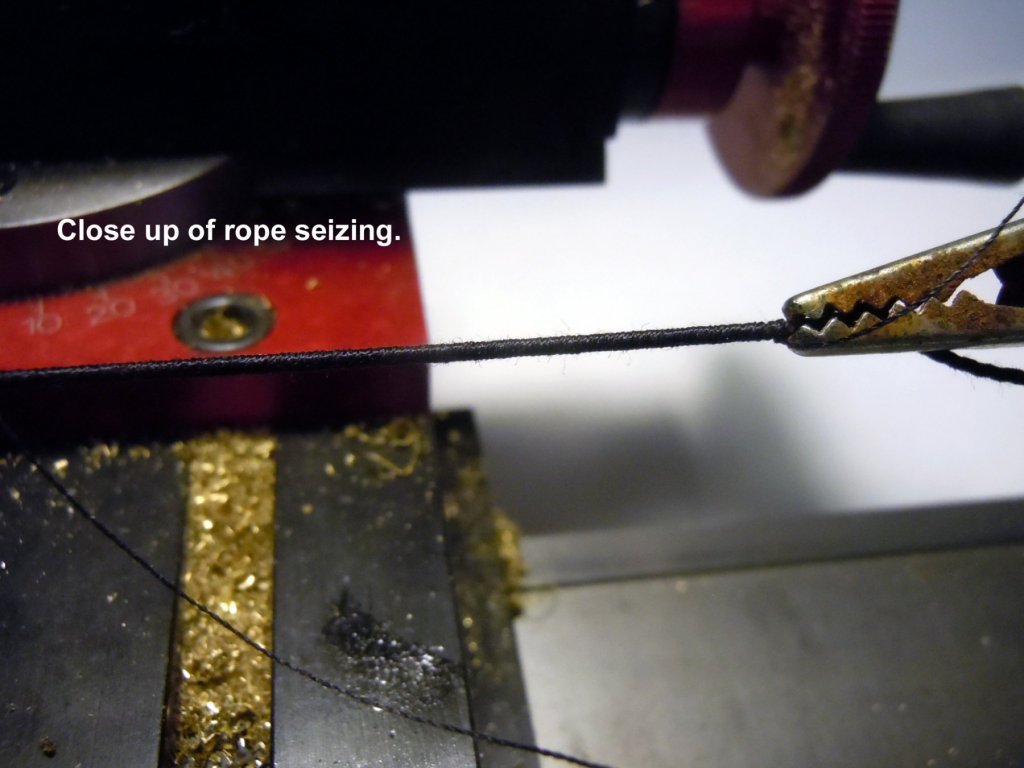
Tom, thanks I will continue to follow your build, it looks like you are ahead of me with the yards. I finished up the shroud lines and have mastered using my Sherline lathe setup for seizing lines. The real trick is speed being slow and slight tension on line being seized and feeding the thread at a slight angle towards the chuck end for the tight wrap. I started adding the deadeyes to the shroud lines tying off at four locations on the back lash. I found with my line that using tweezers at about 1/8" above the final position and bending the line back and tying a loop off with thread then add the deadeye adjust to final location 1/8" and lash off that this would take up the stretch in the line when tying off to final location. I used a ruler to maintain alignment of the deadeyes which I found could easily be slightly adjusted using the stretch in the line. Once one side was complete I added the sheer pole to hold the deadeyes facing forward before I will add the ratlines. I hope this makes sense, but pictures may help as well. Now back to adding sheer poles to the next two masts.


-
Jon, I really meant on the Constitution shroud ratlines. Sorry for any confusion. I have been working back and forth on both builds.
- 162 replies
-
- 4
-
-
- dirty dozen
- fishing
- (and 2 more)
-
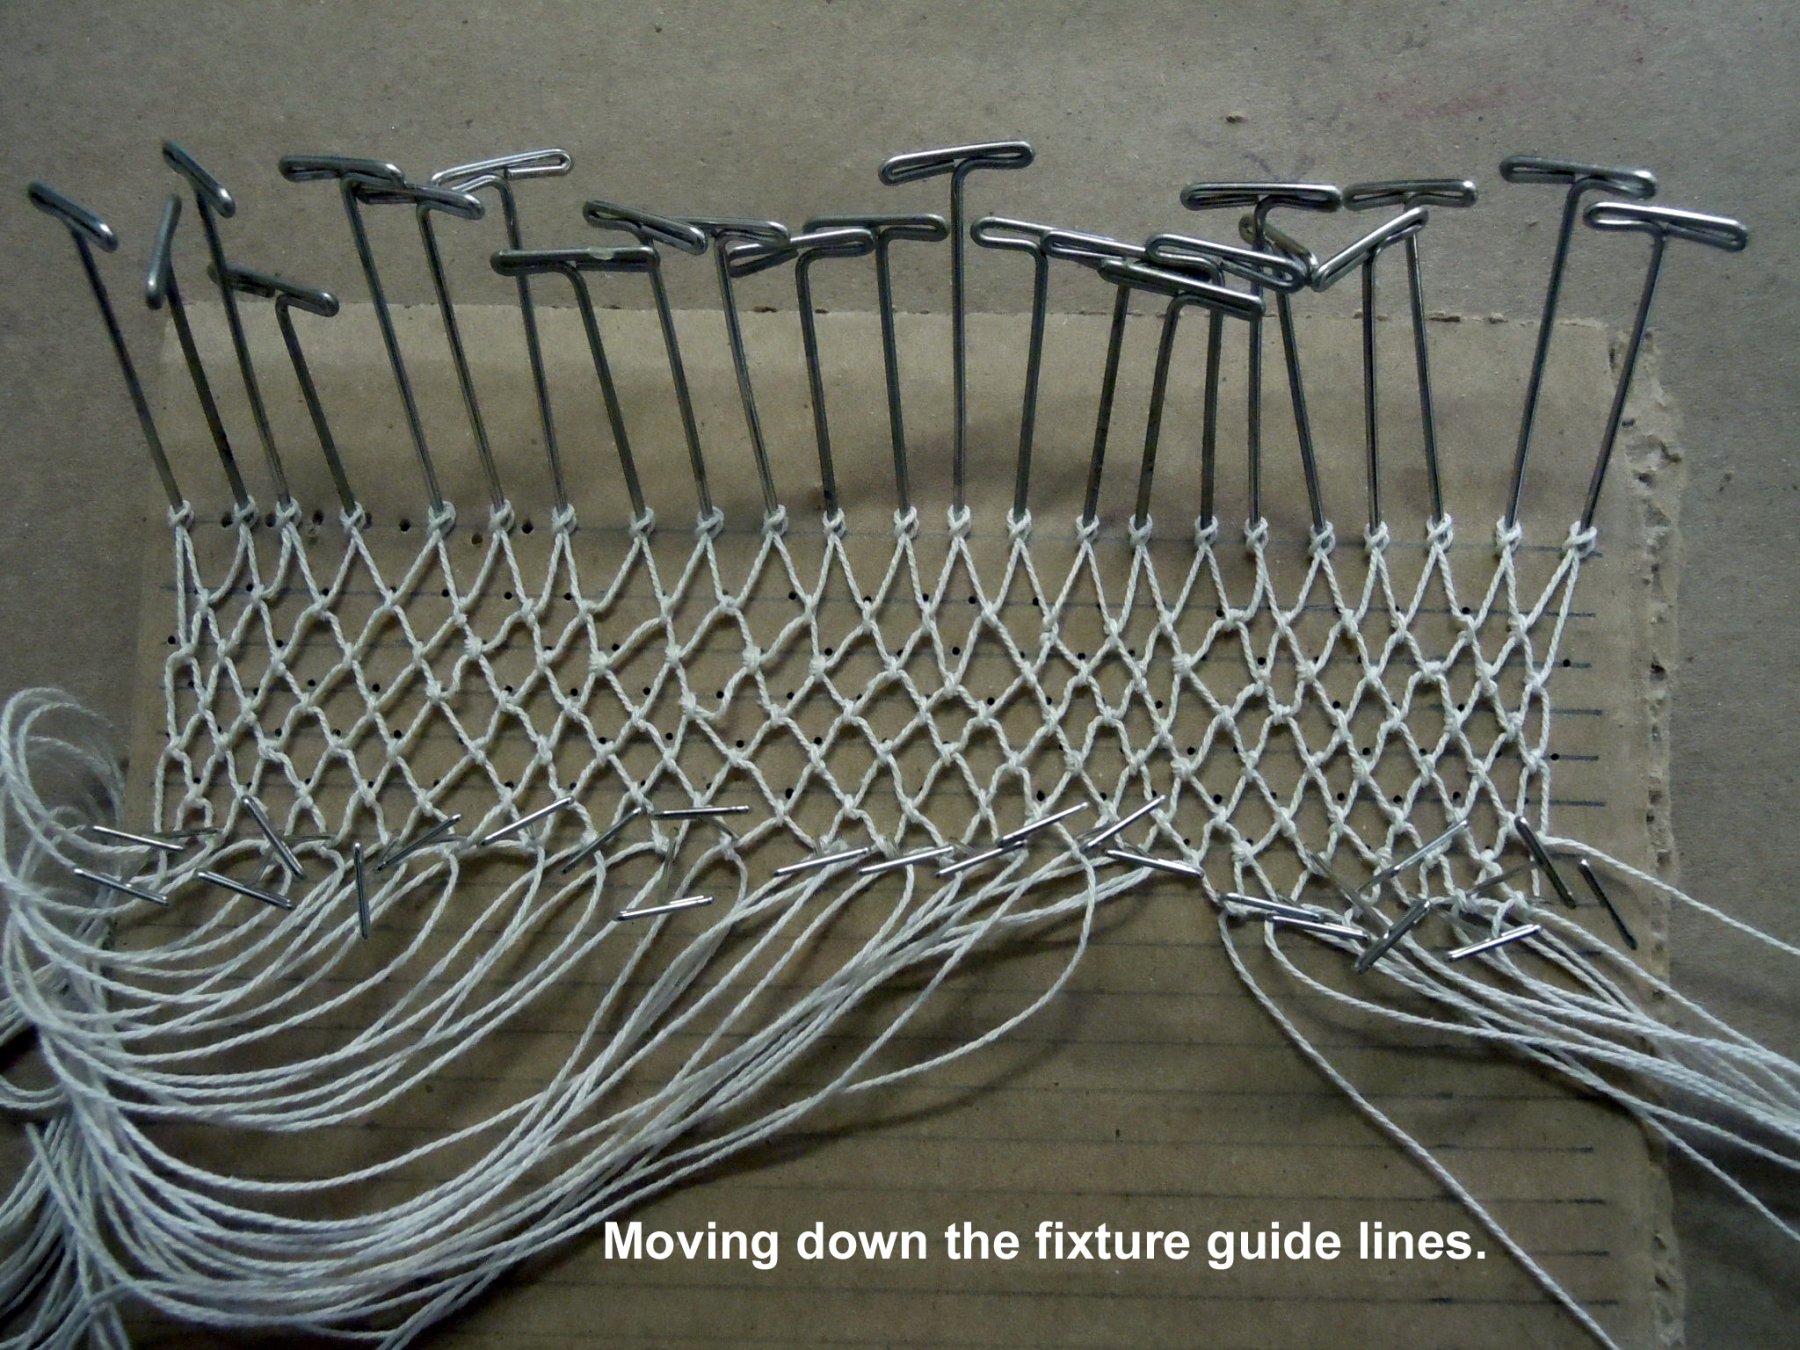
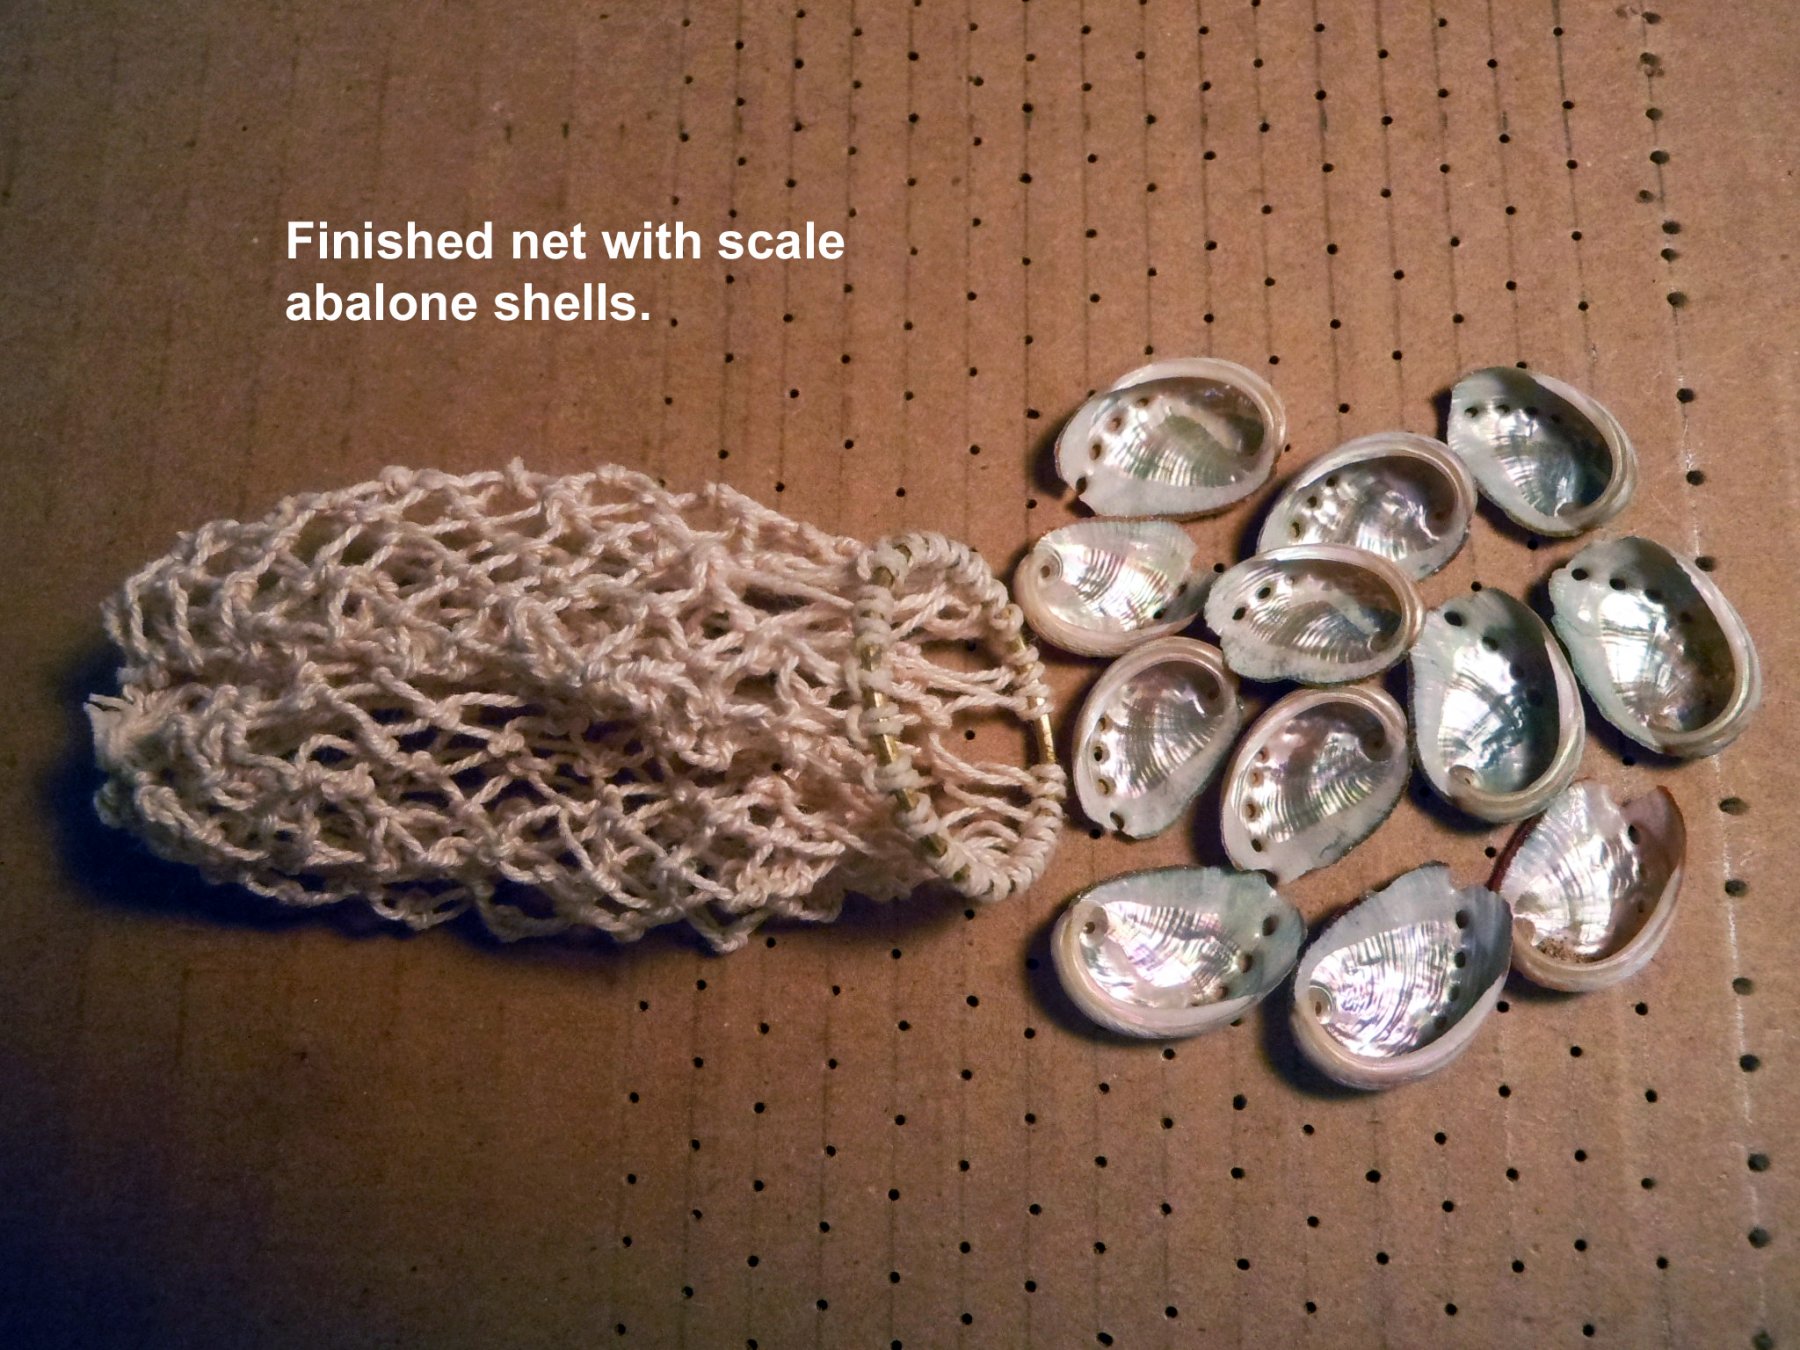
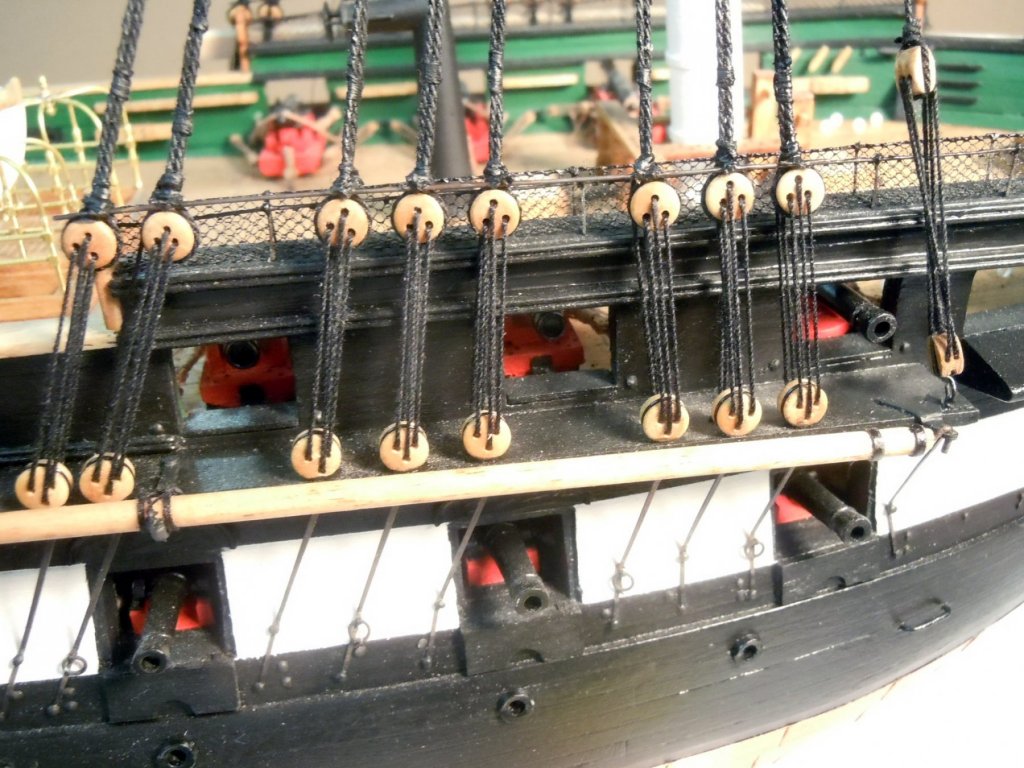
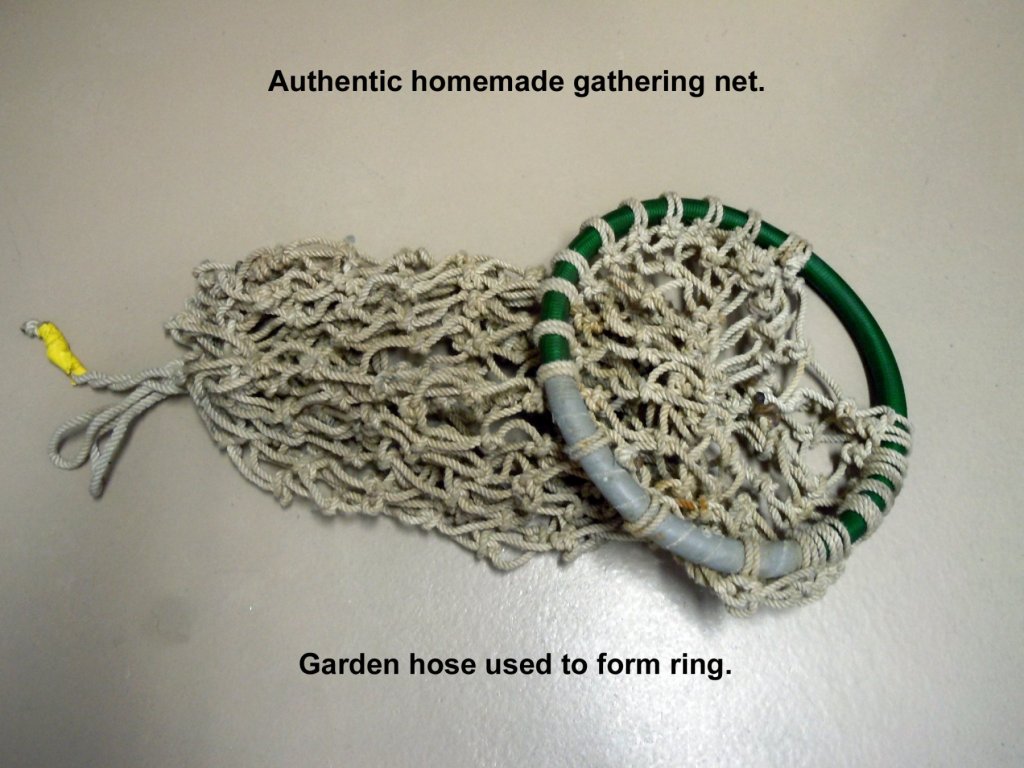
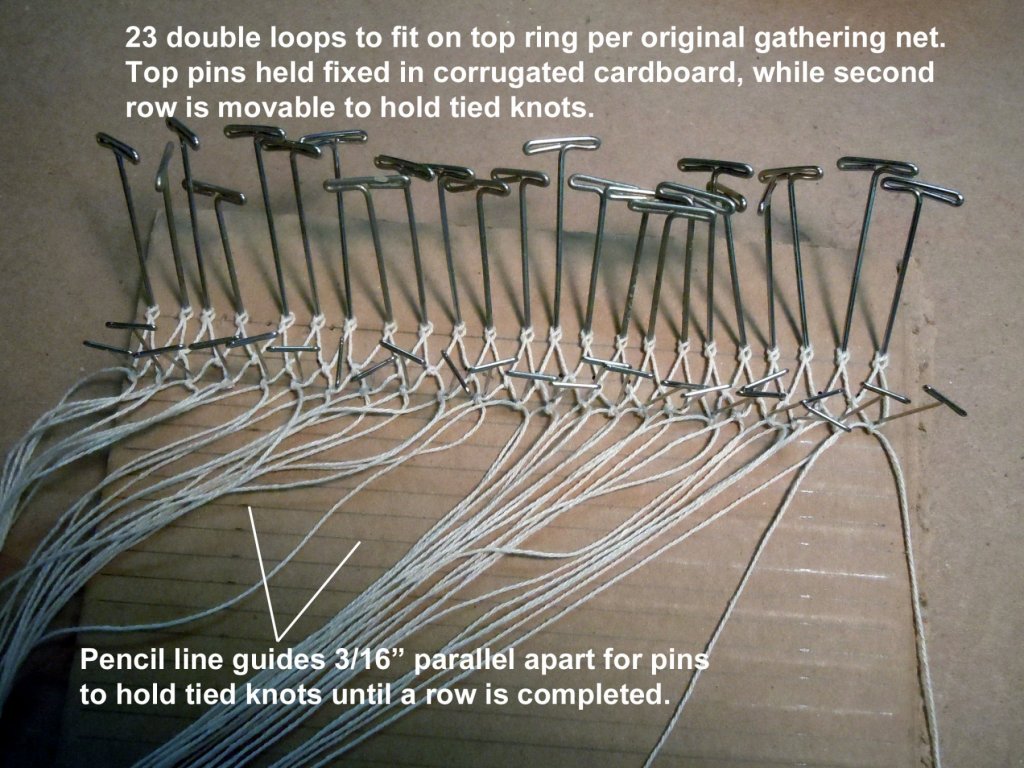
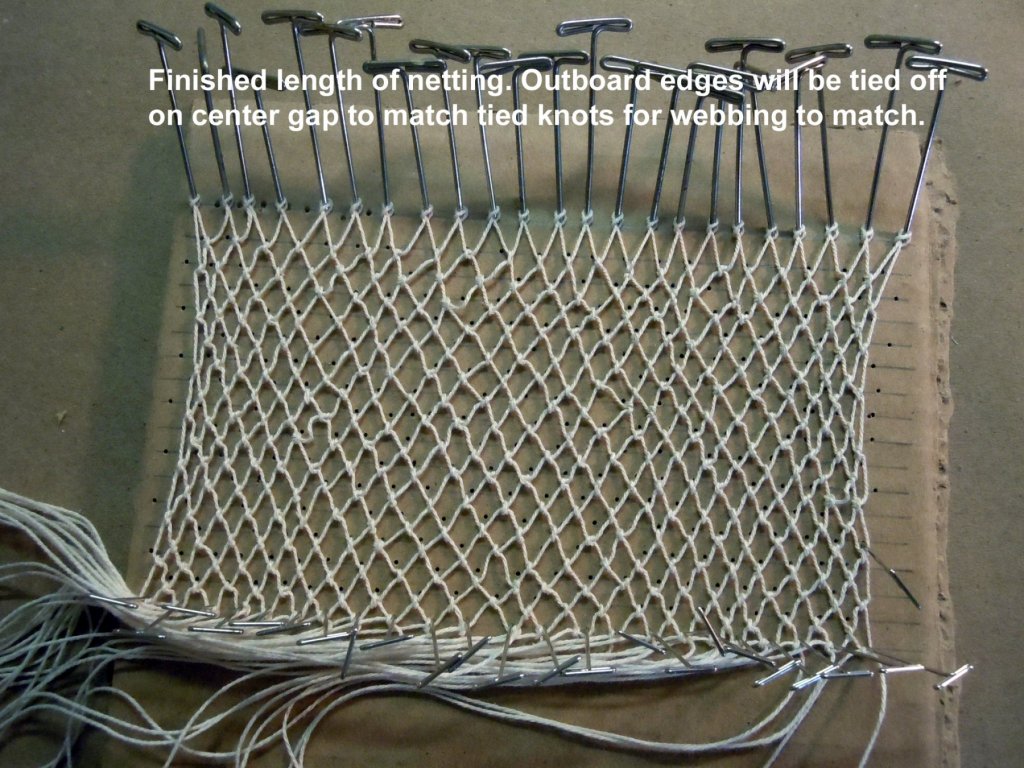
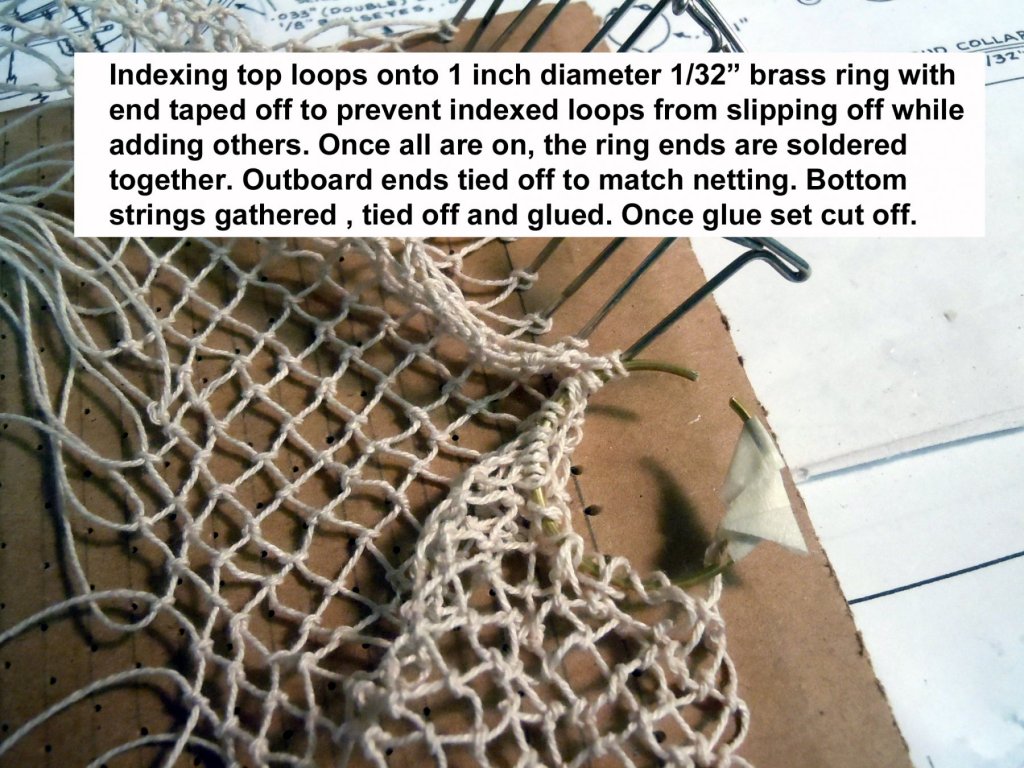
Gary, thanks! I have been busy getting roof quotes to replace the entire roof per insurance company. I have been adding shroud lines and just finished up the lower main mast. In the meantime, the Museum folks came through with an authentic gathering net and 1/2" to 5/8" small abalone shells from the abalone farm north of us. I just could not find a suitable netting to replicate the original net so my wife offered to tie one up using a macrame technique and as far as I am concerned she did a great job of tying it up. I finished it off and it was a fantastic team effort that should please the museum. Here is a sequence showing how we fabricated the net. Now to test some Sculpty clay in the shells to make abalone as caught. Also back to shroud lines. QUESTION: Should the ratlines be Black or Brown I have seen both versions? Options please.


- 162 replies
-
- 12
-
-
- dirty dozen
- fishing
- (and 2 more)
-
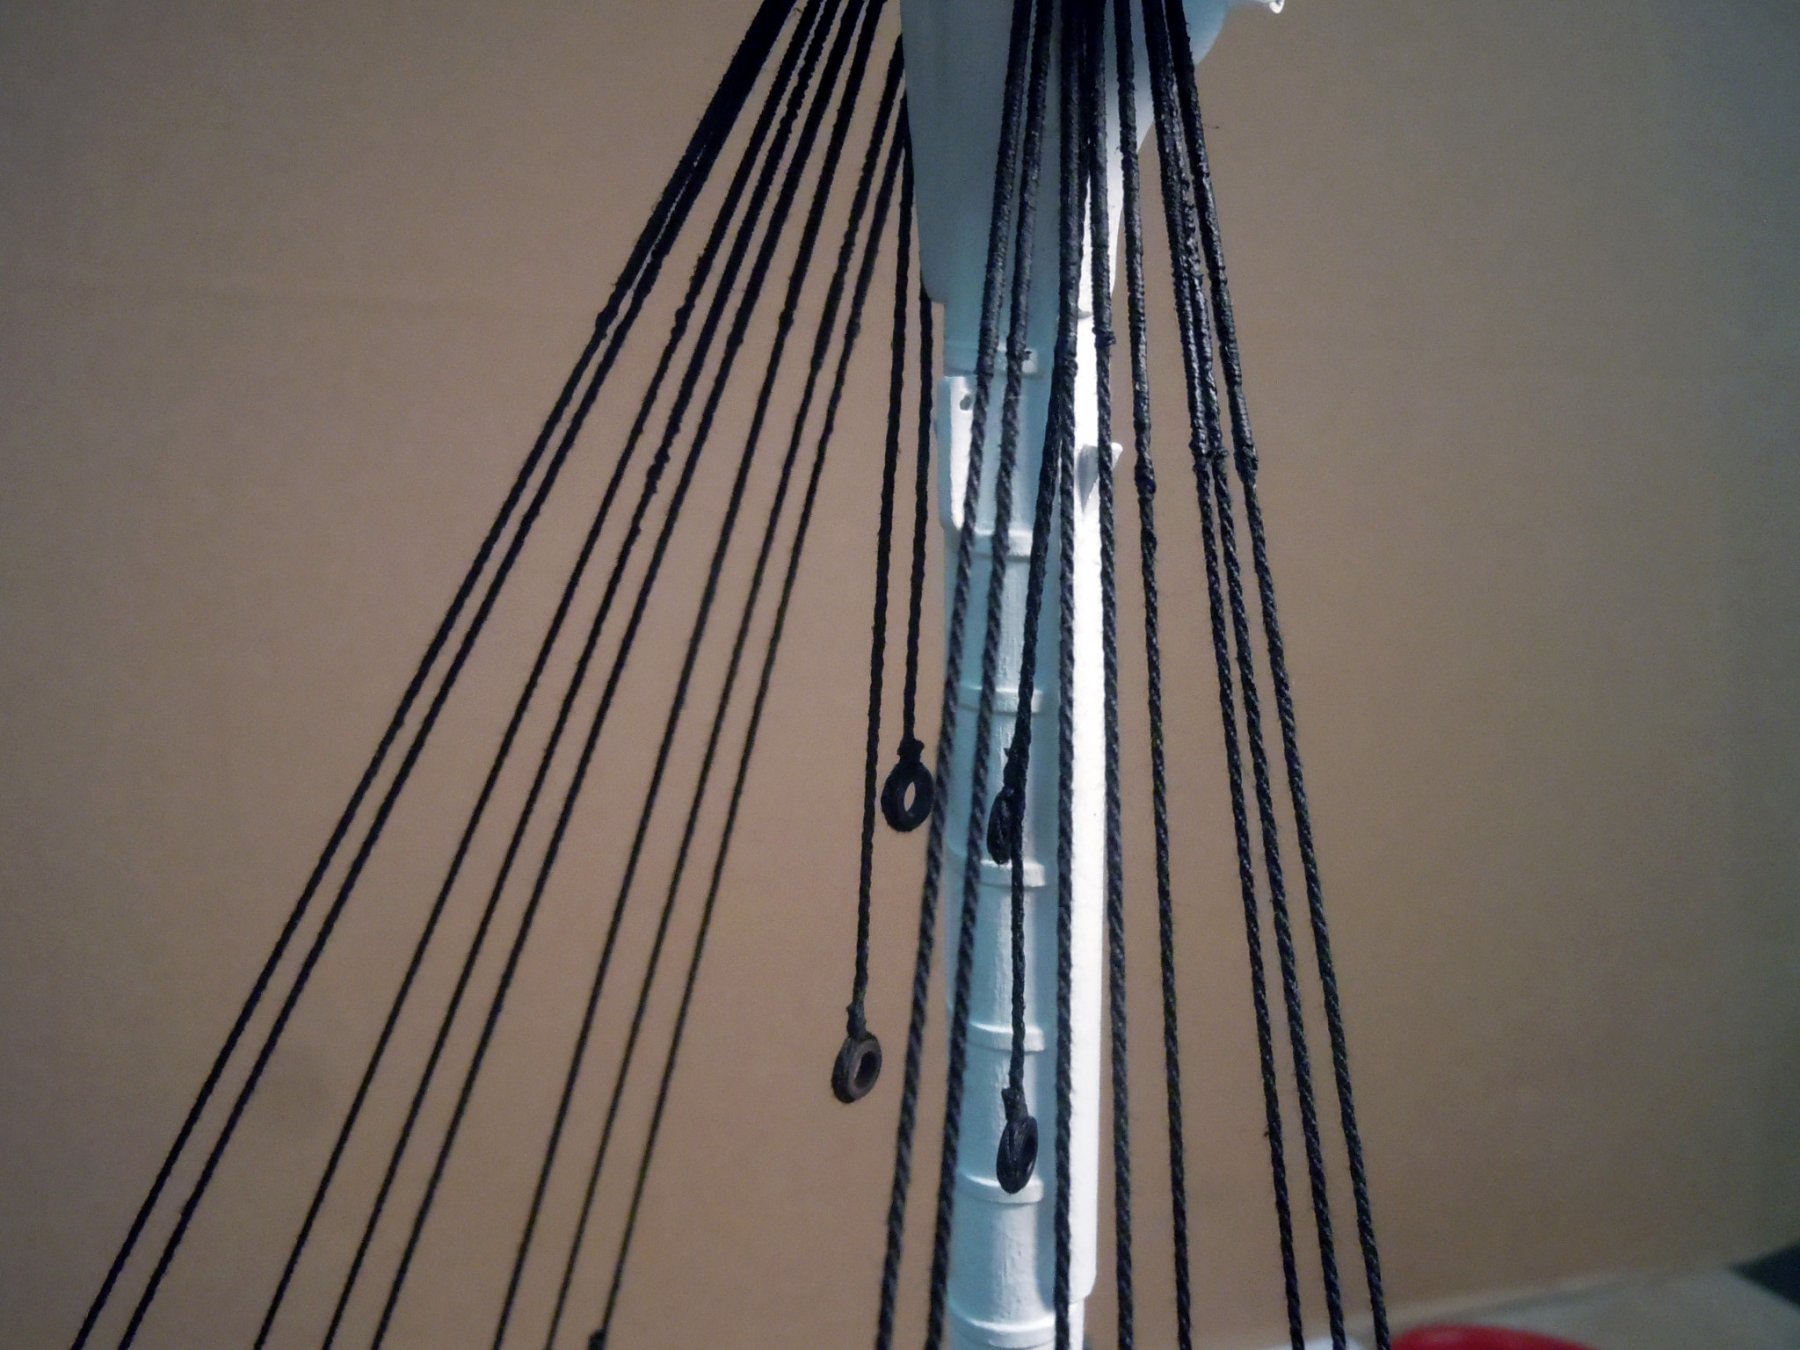
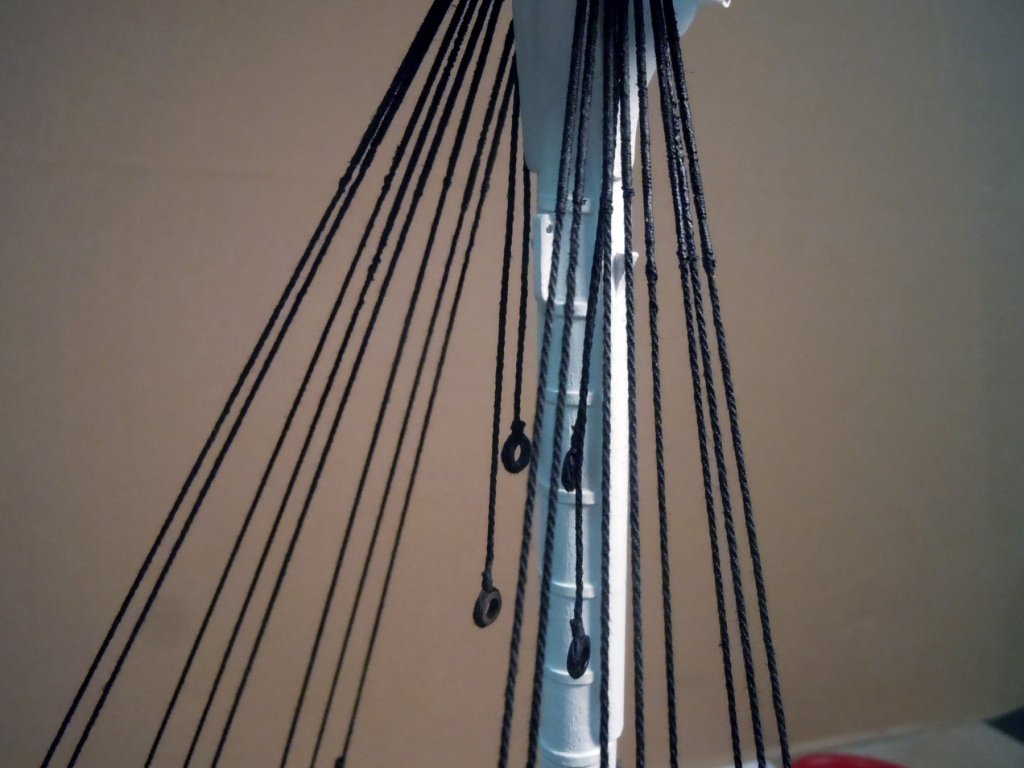
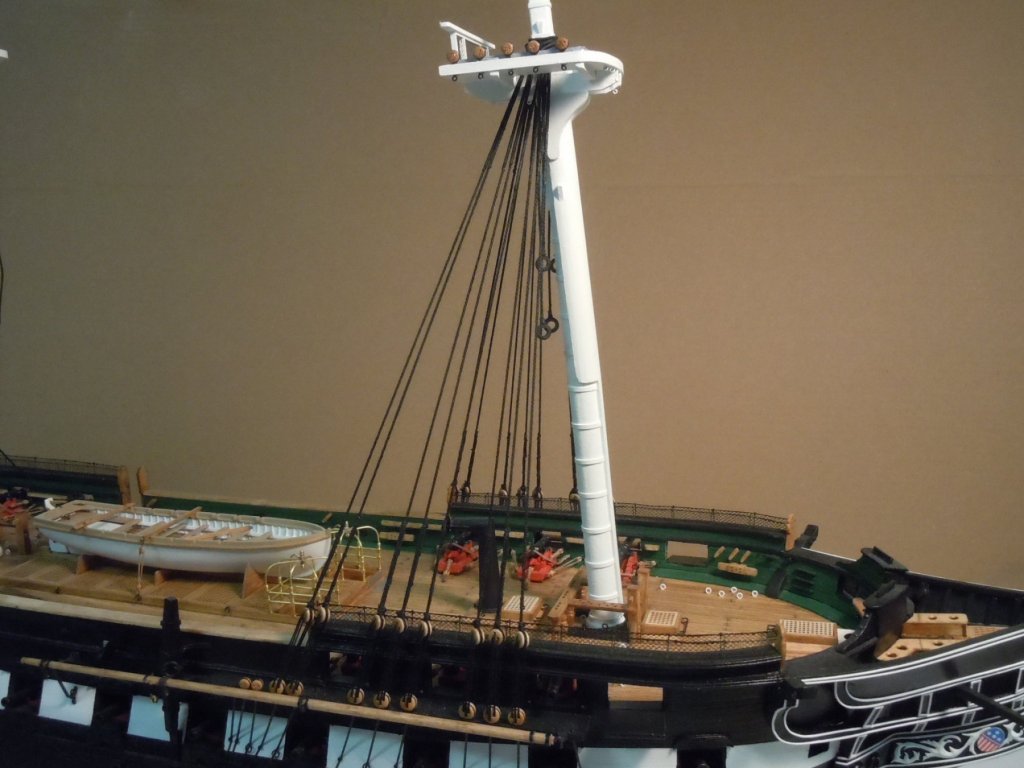
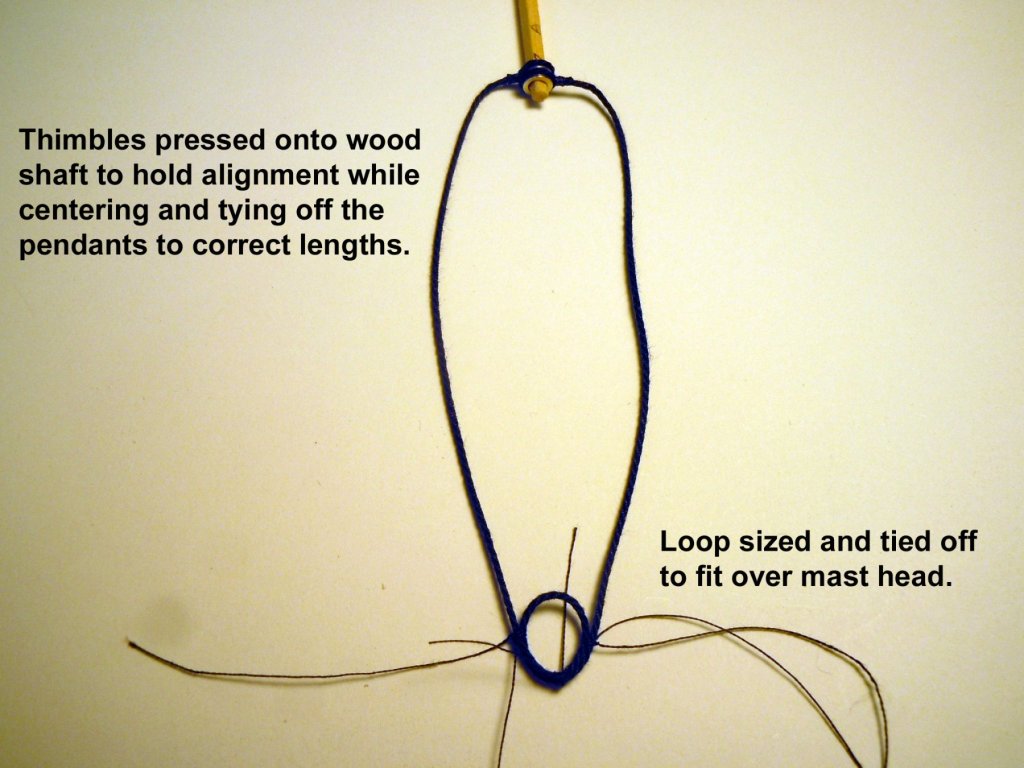
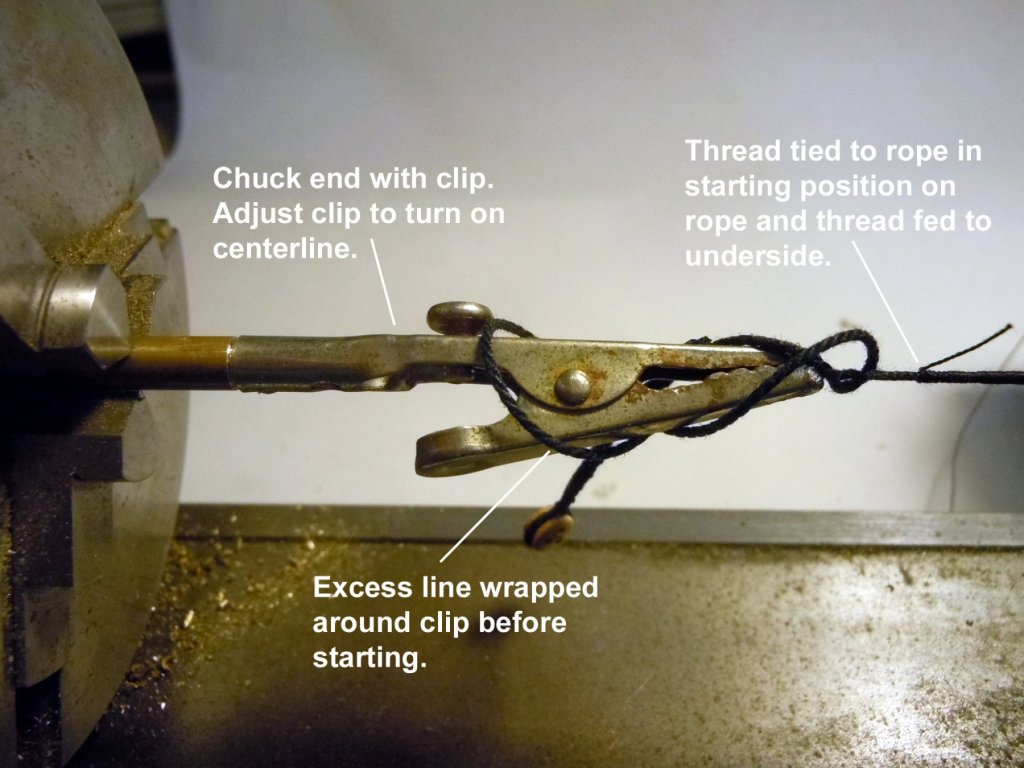
Jon, Yes, much better than by hand, however it does require a learning curve and eye hand coordination. My glue joint broke loose off the live center end so for the second glue joint I added a small piece of paper towel overlapping the center tip and clip end. Will see how long that lasts. Another thought I had was using a fishing lure swivel in a chuck. Here is a picture of the pendants, once attached I found that the rope did not exactly hang straight so I soaked the rope in 50/50 water/white glue mix and added weighted clips on the thimbles and let set overnight and they hang much straighter now. Next I started on the foremast and added the shroud rope lines that I made. I started on the forward starboard side and worked side to side adding a pair at a time. Once all were in place I painted the seizing at the top mast and at the deadeyes with Ultra Flat Black Camouflage paint from a spray can with a brush that when dry appears as being pitched. This is one I learned on building the Niagara. Next to add the single lines with block and tackle and then onto the main mast and I will add the sheer poles as I move along to straighten out the blocks.
-
Jon, looks like you are off to a good start. I am getting back to mine after a hiatus and building the Dirty Dozen. What a difference a scale makes!
-
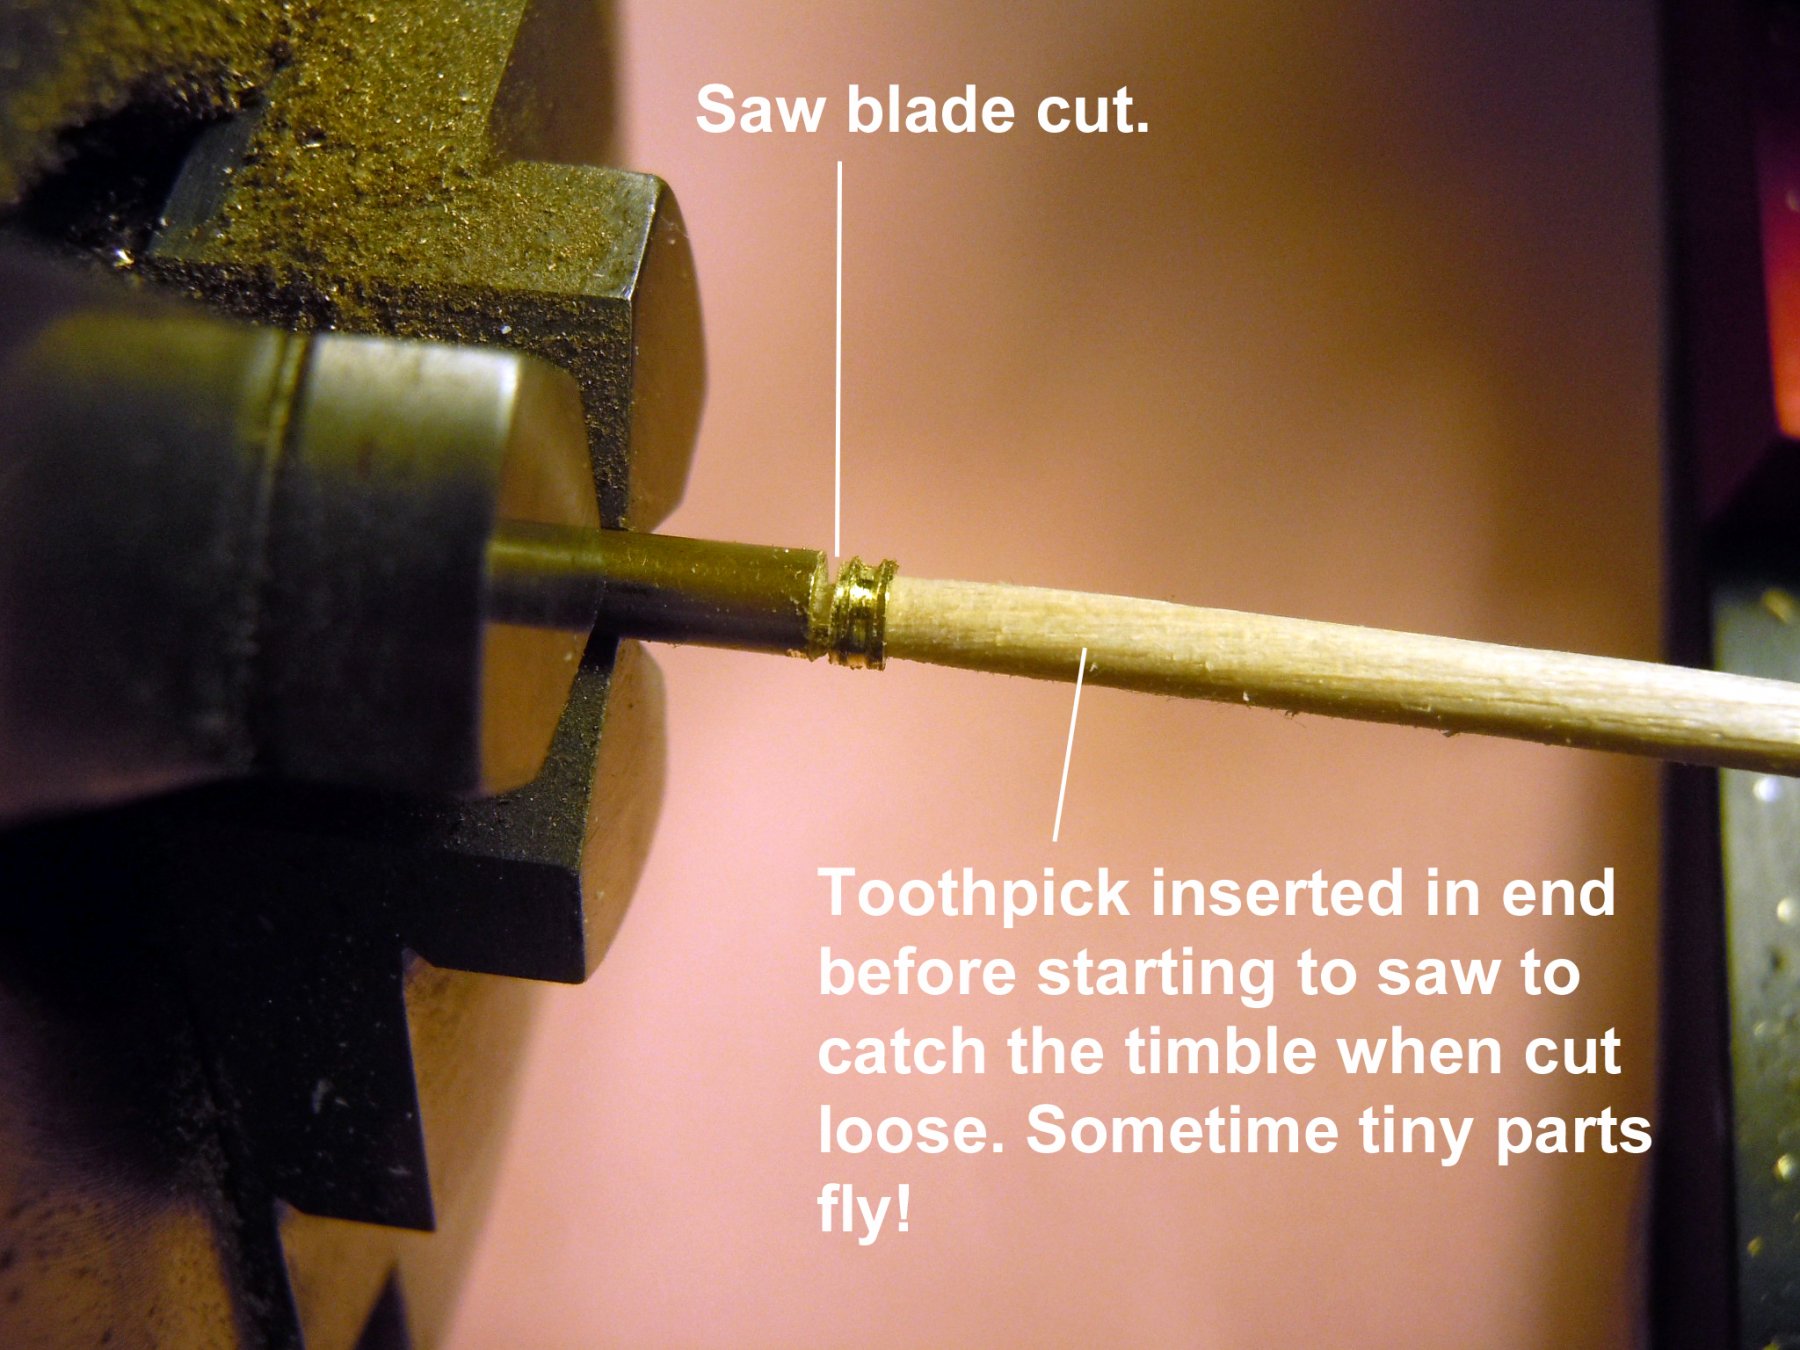
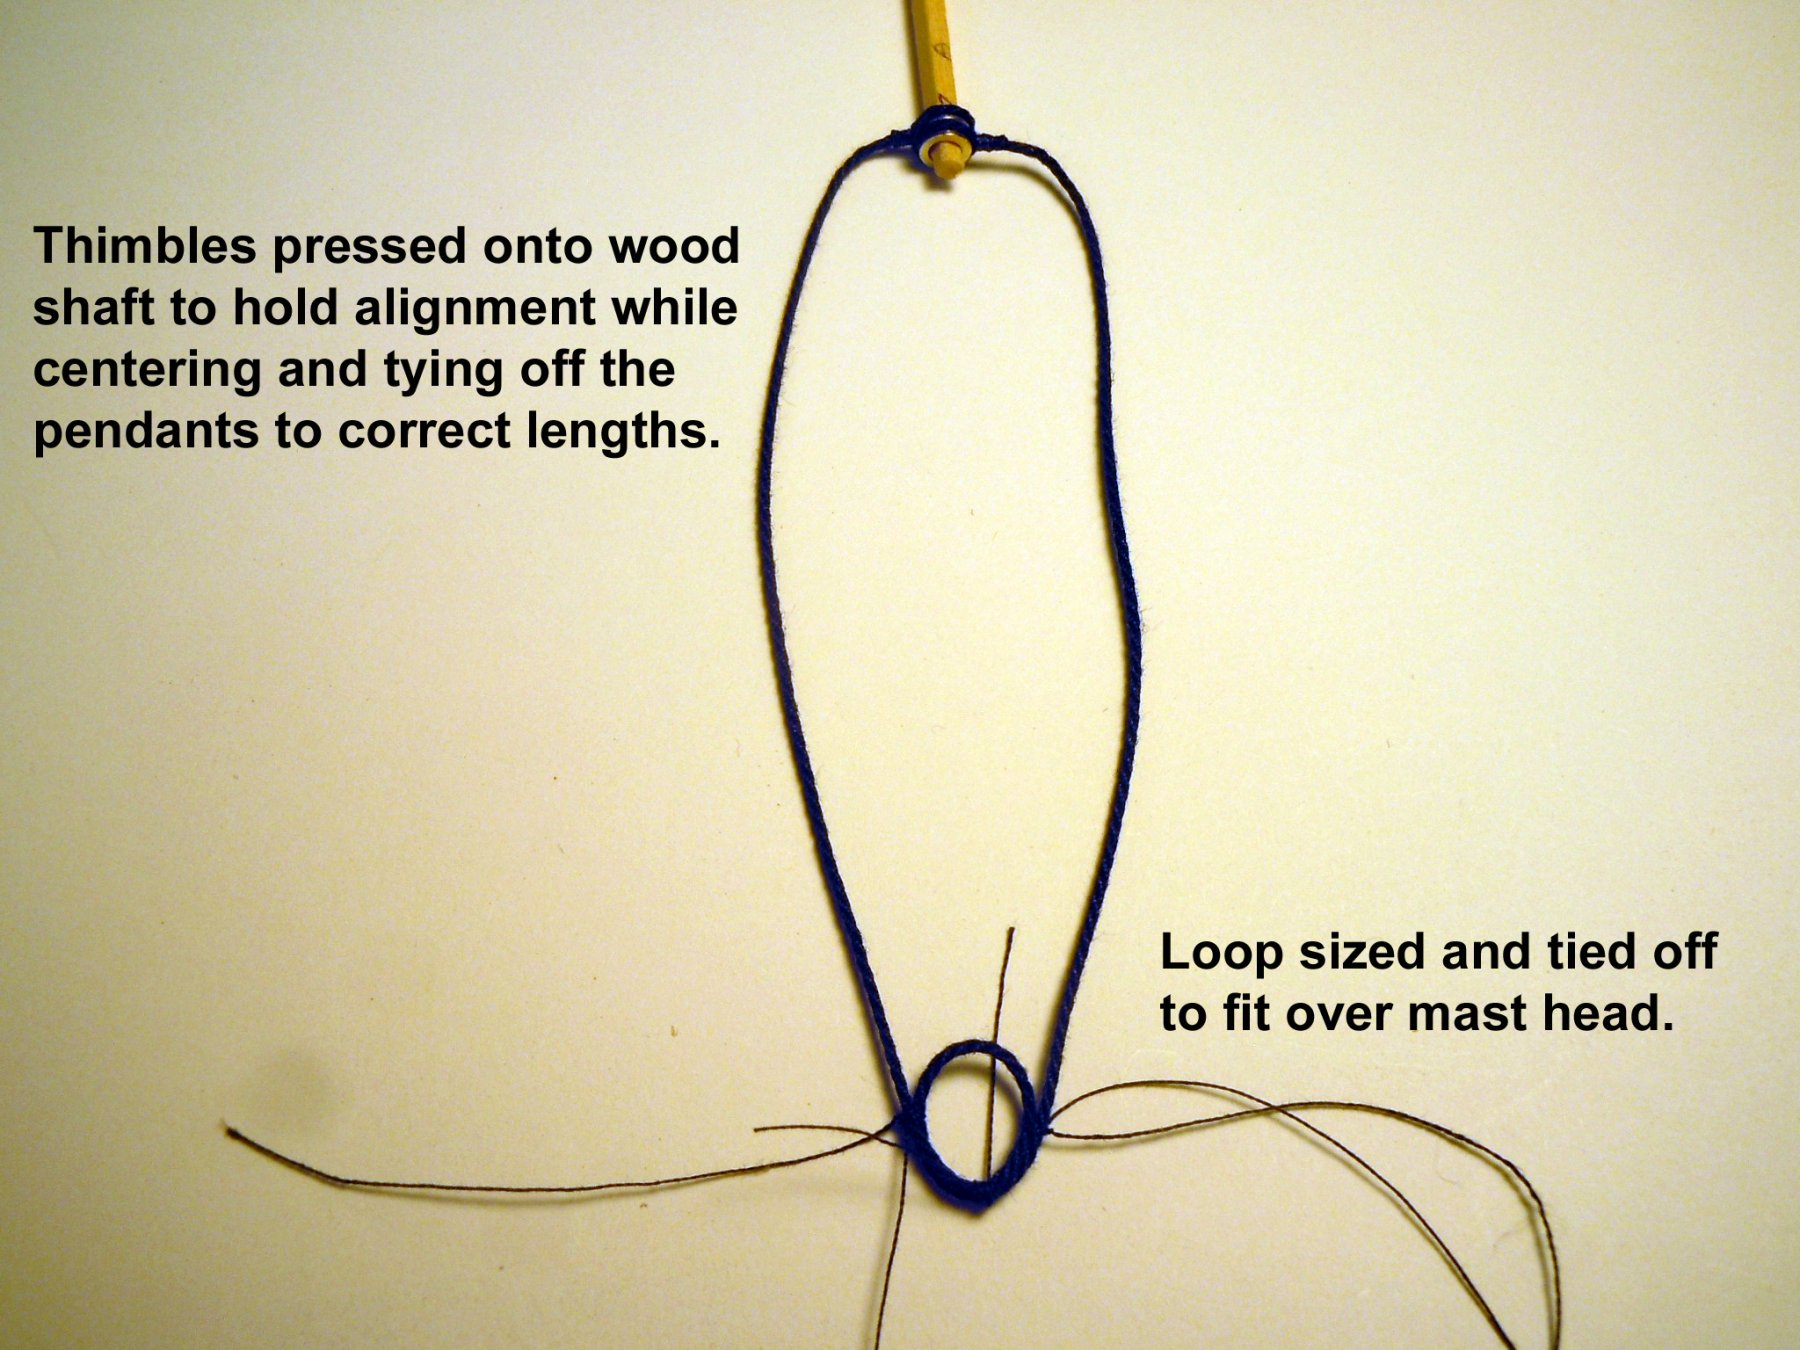
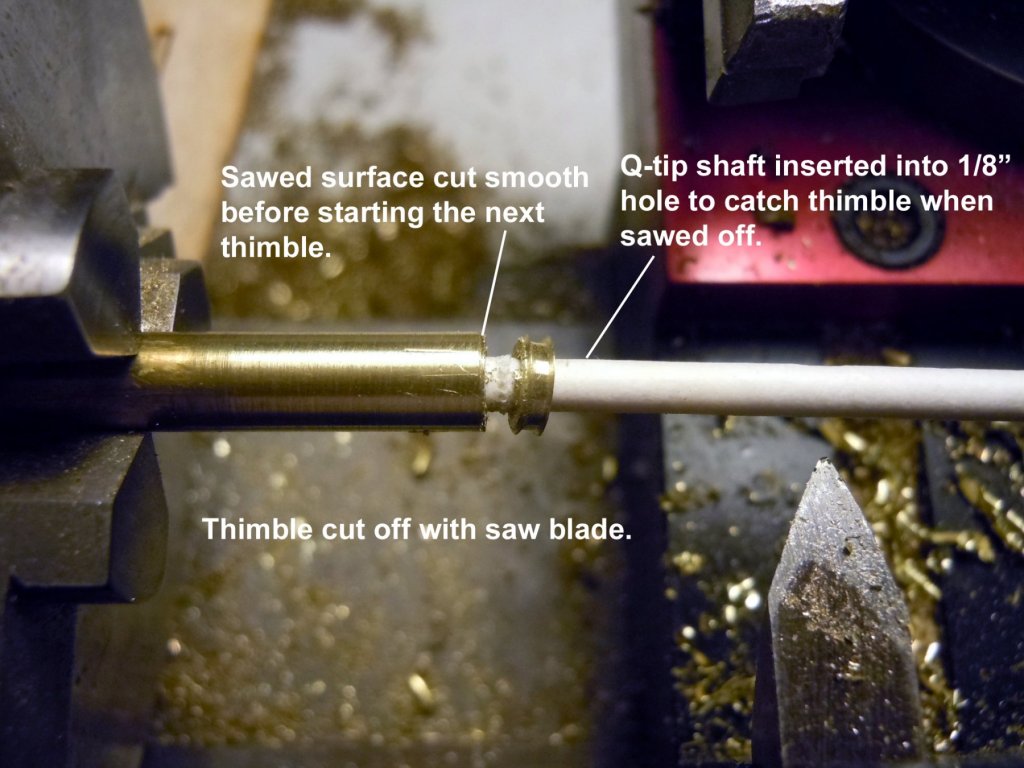
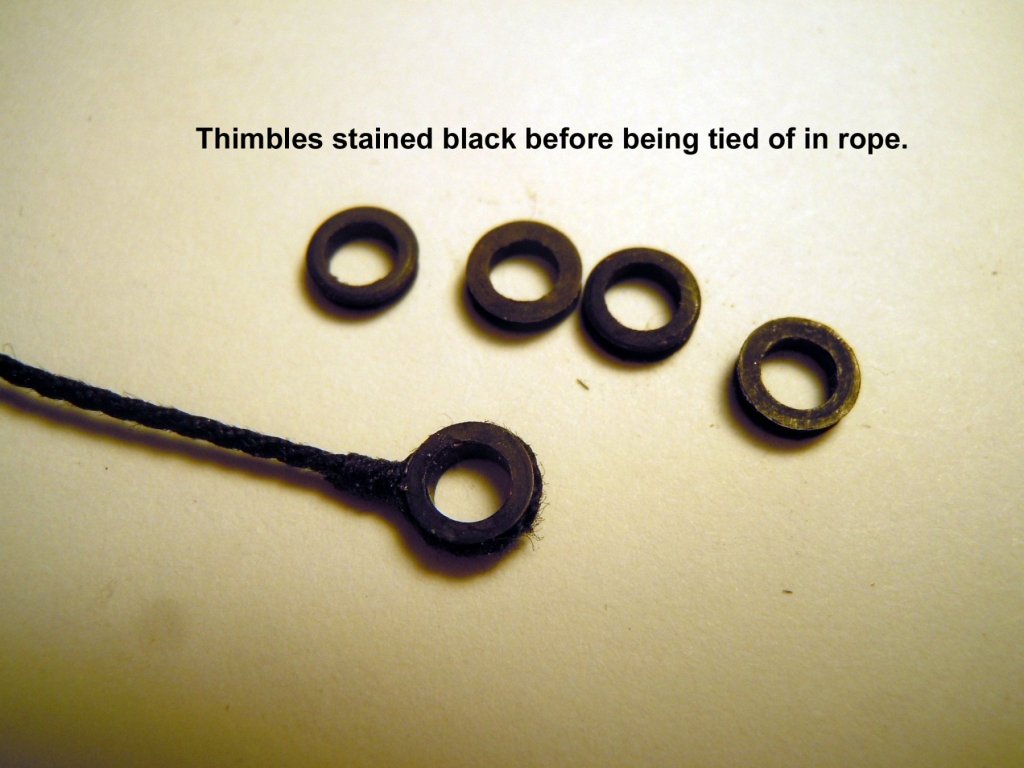
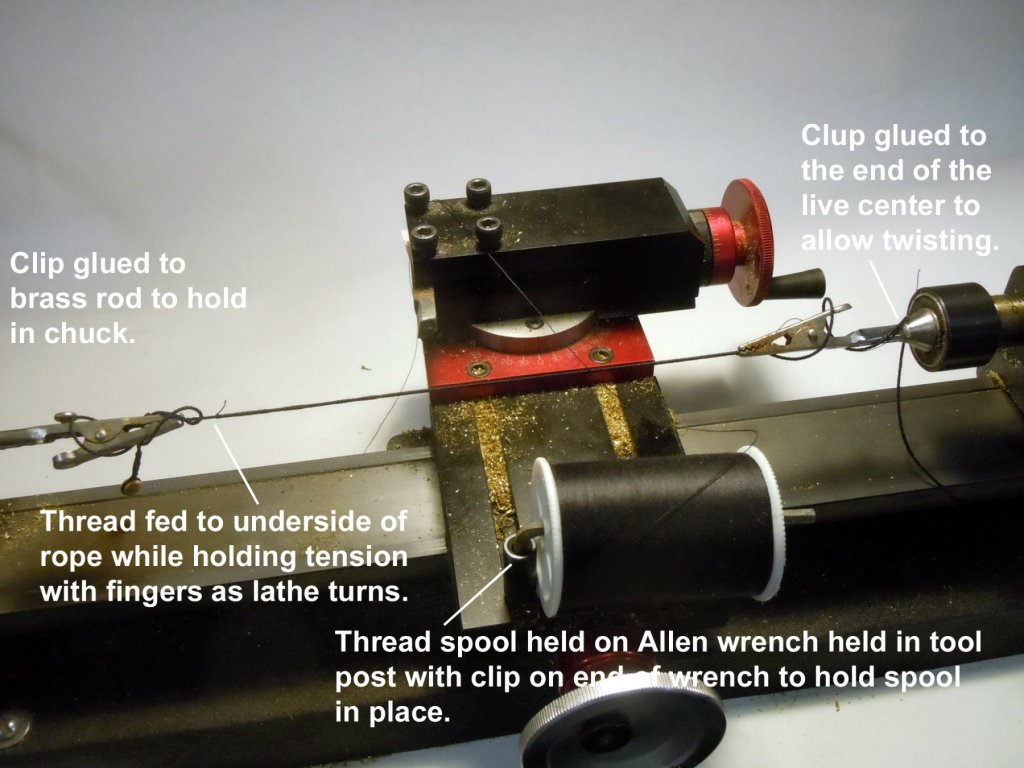
I realized that before I could add the shroud lines that the pendants had to be installed first. So first I had to make thimbles for the ends. I started with 3/16" rod, drilled the end with a 1/8" bit then cut the groove in the thimble for the rope. Once the rope groove was cut I then cut a guideline for the saw blade to cut the thimble off. With this small a part I inserted the shaft of a Q-tip to retain the thimble on when the final cut was made and saving it from flying through the air. After all were cut they were stained with patina and then rope added. The pendants were then added to the masts at their appropriate lengths. Will post a picture later on. Next I made a setup to use my Sherline lathe as a serving machine for the shroud lines. I glued a clip to a brass rod for the chuck and glued another clip to the point of the live center. I used an Allen wrench in a tool post with a small clip to hold the thread spool in place. The thread was then held at a length of 5 inches between the clips and served by holding slight tension on the thread once tied securely to the chuck end of the line turned on the lathe at a very slow speed feeding the thread to the underside of the line being served. It takes a little practice to get the feel but once it is the serving goes quickly. I found that by using the second hand fingers sliding the thread back and forth as you progress it evens out the thread. The lathe speed is almost as slow as you can go. Here are pictures of the set up I am using. Now back to rope work. Slowly but surely.


-
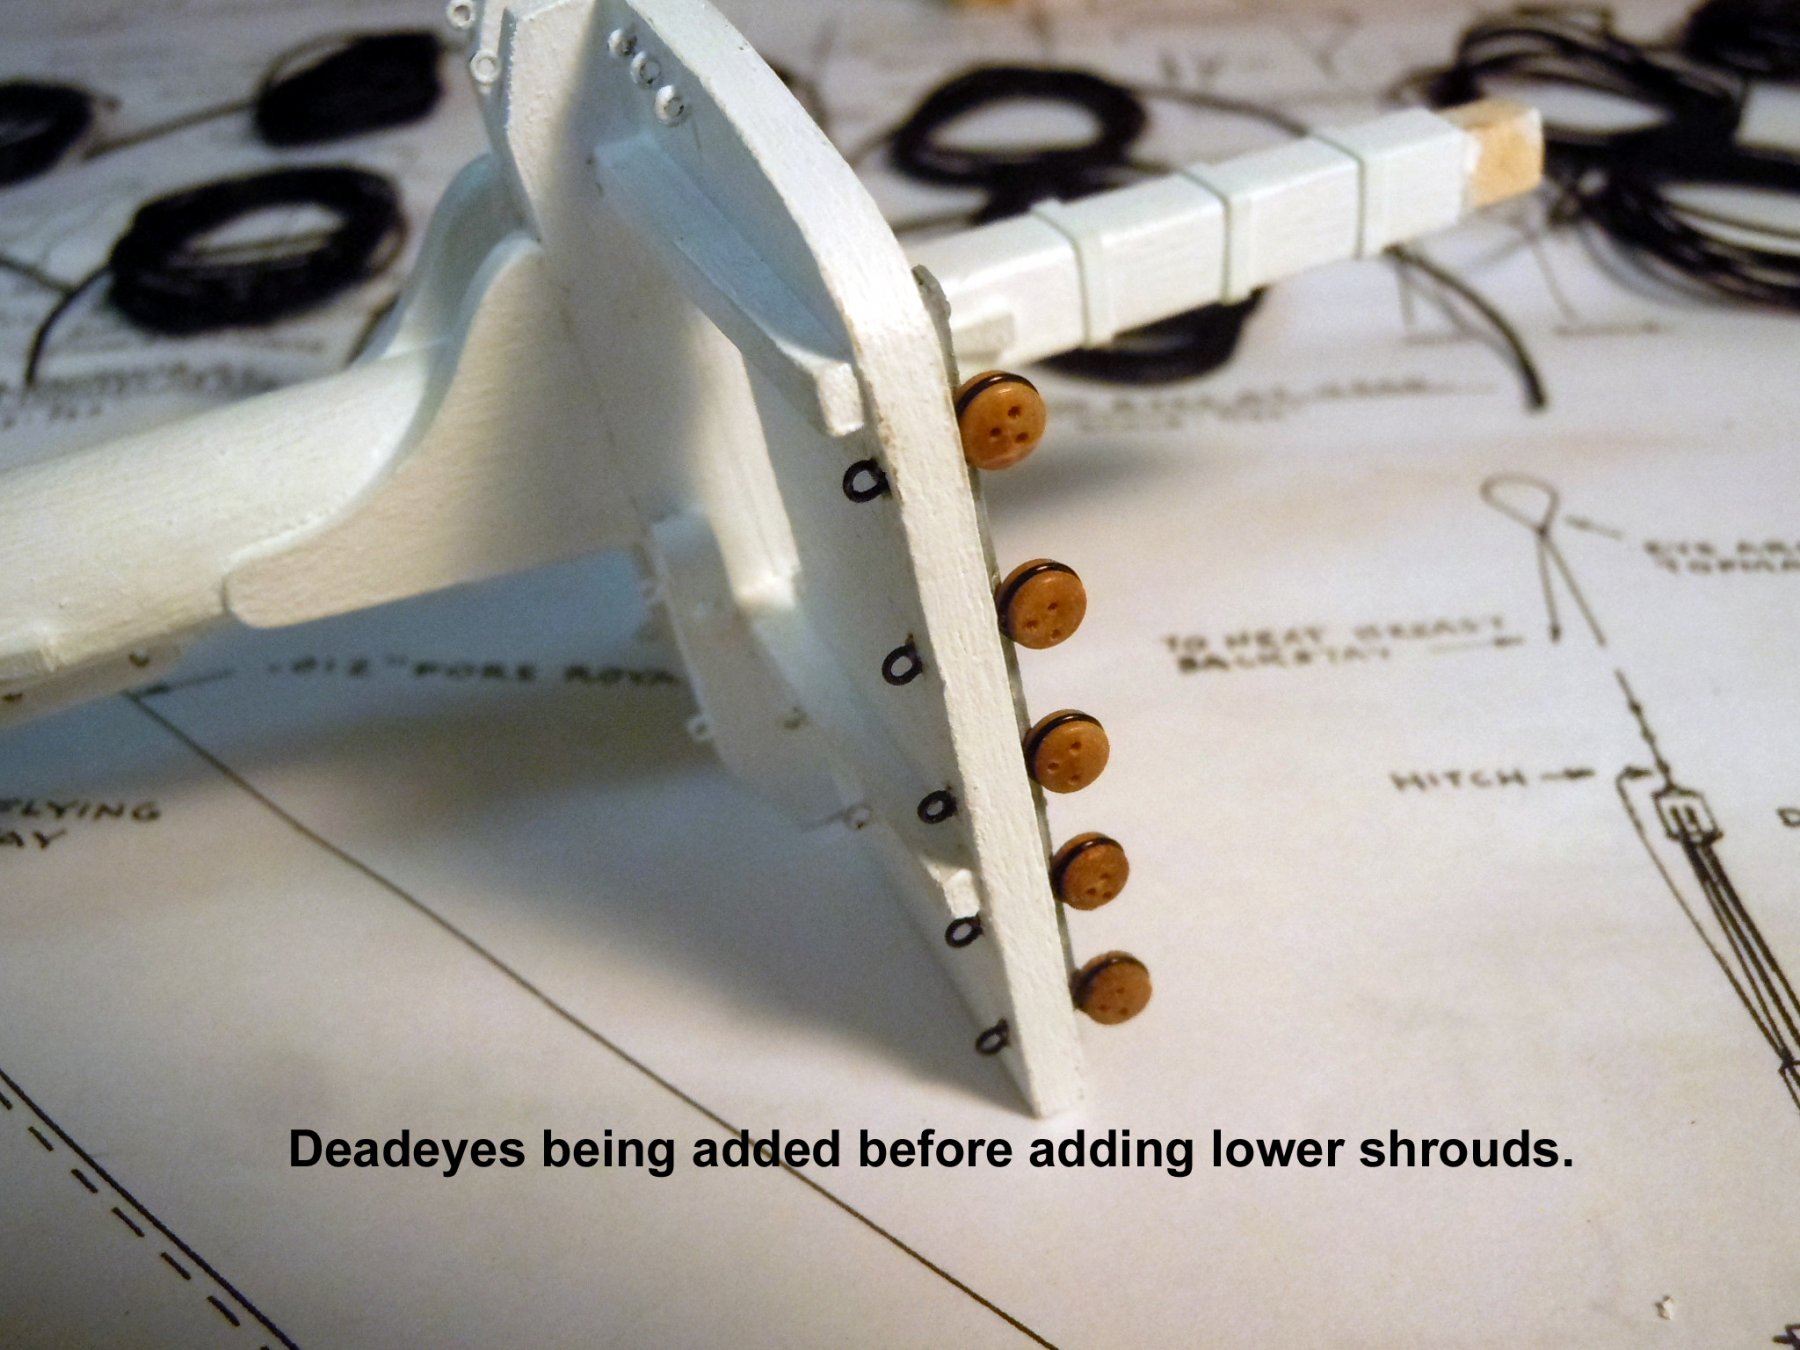
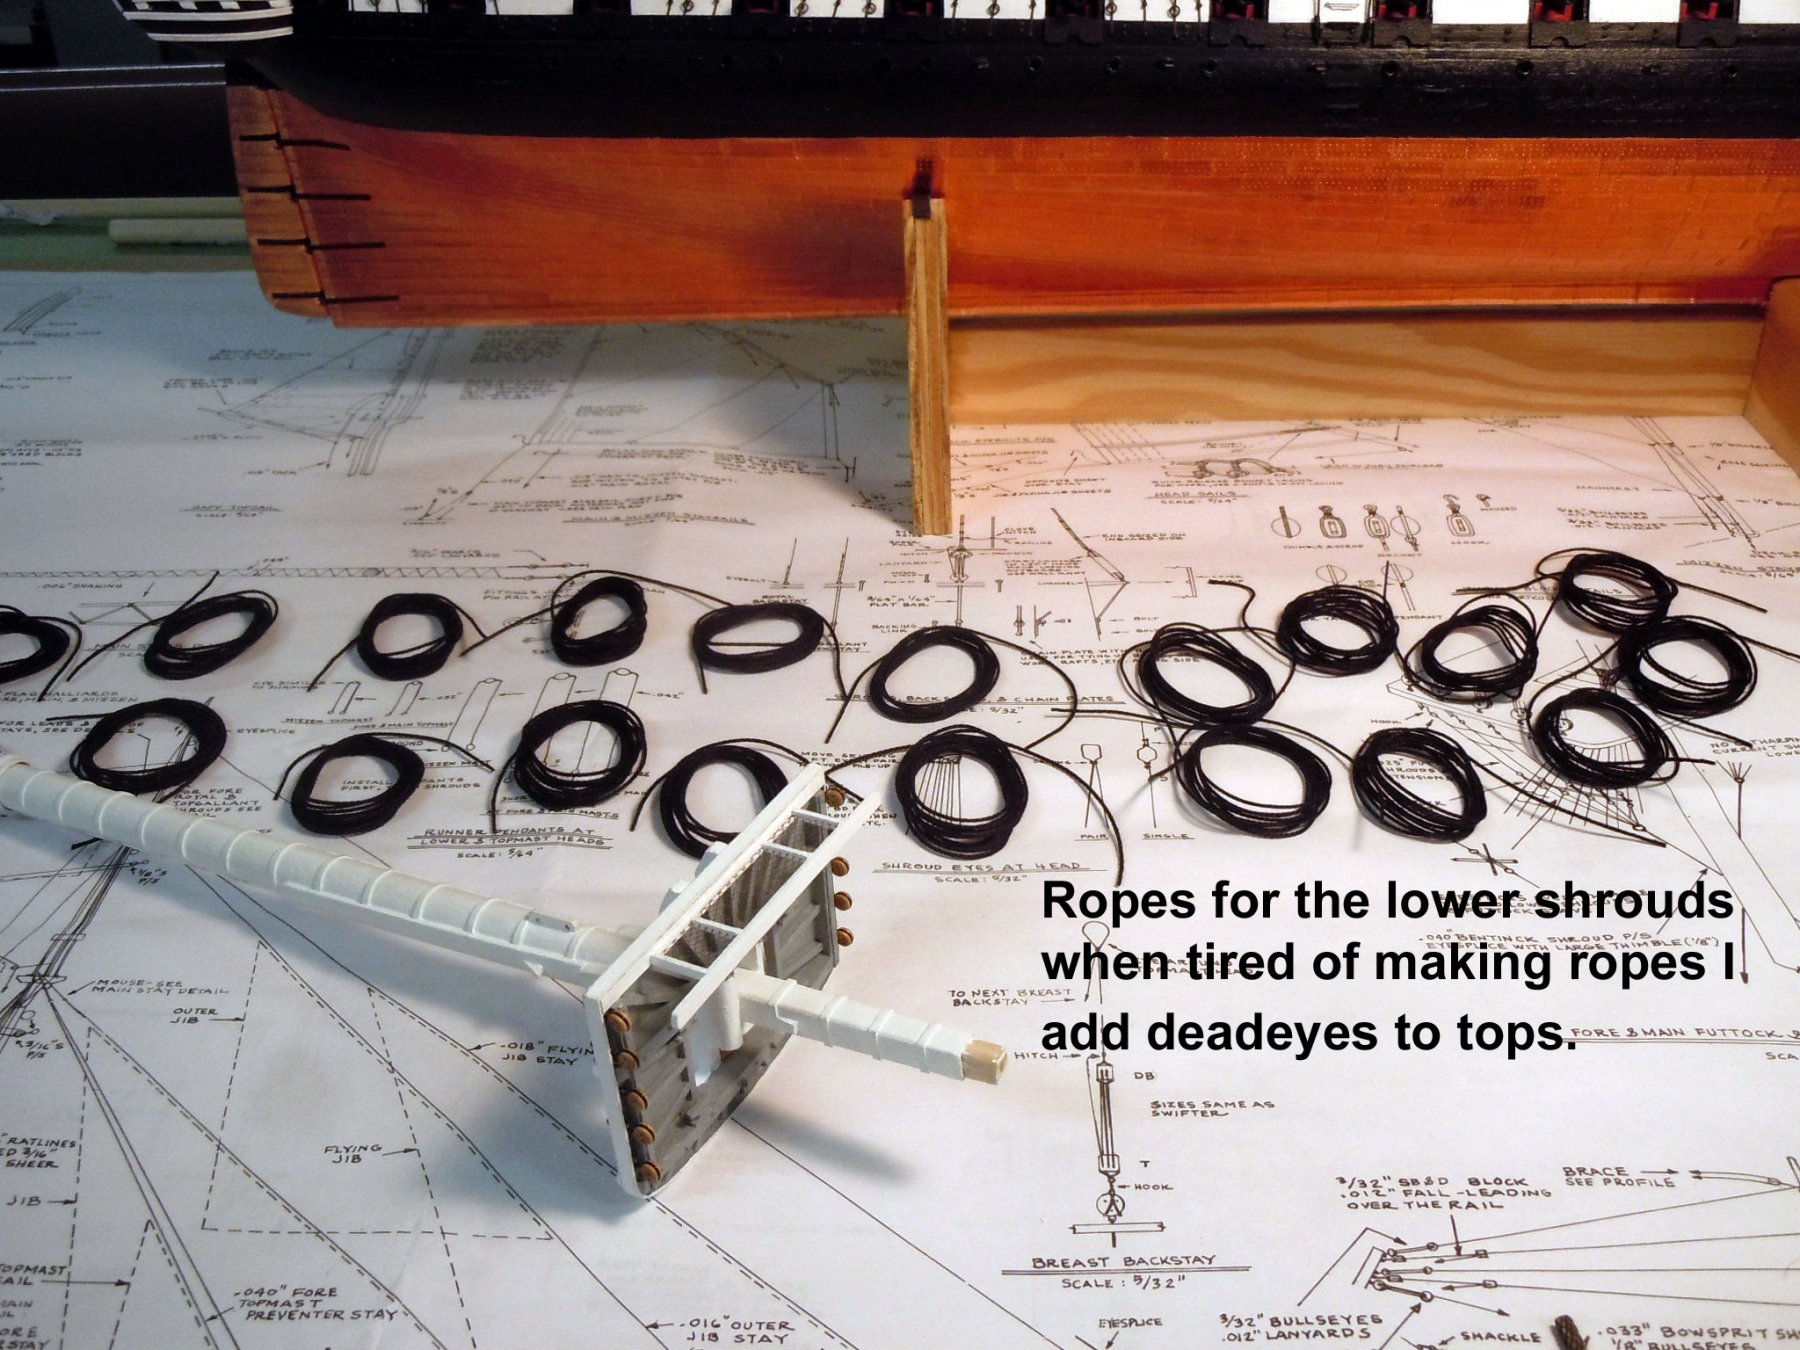
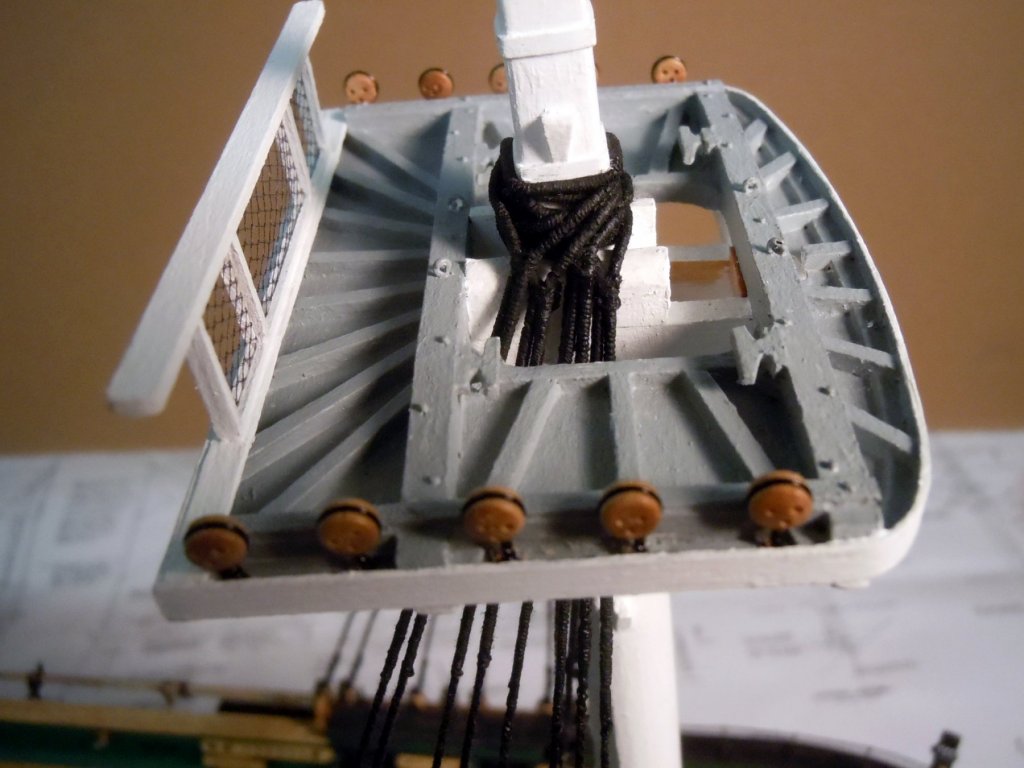
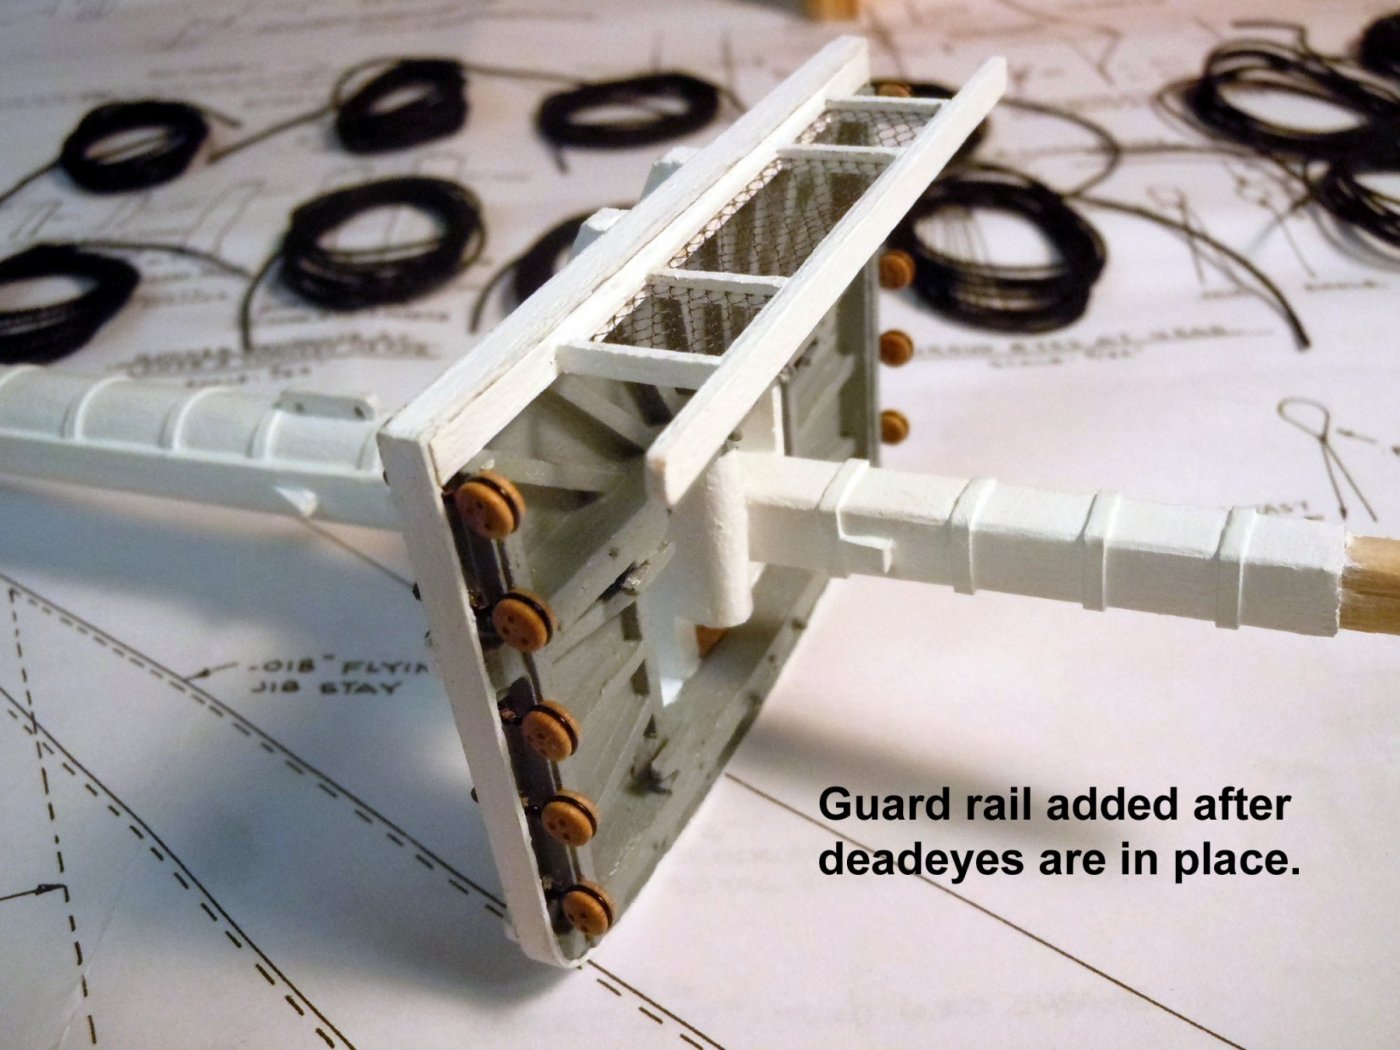
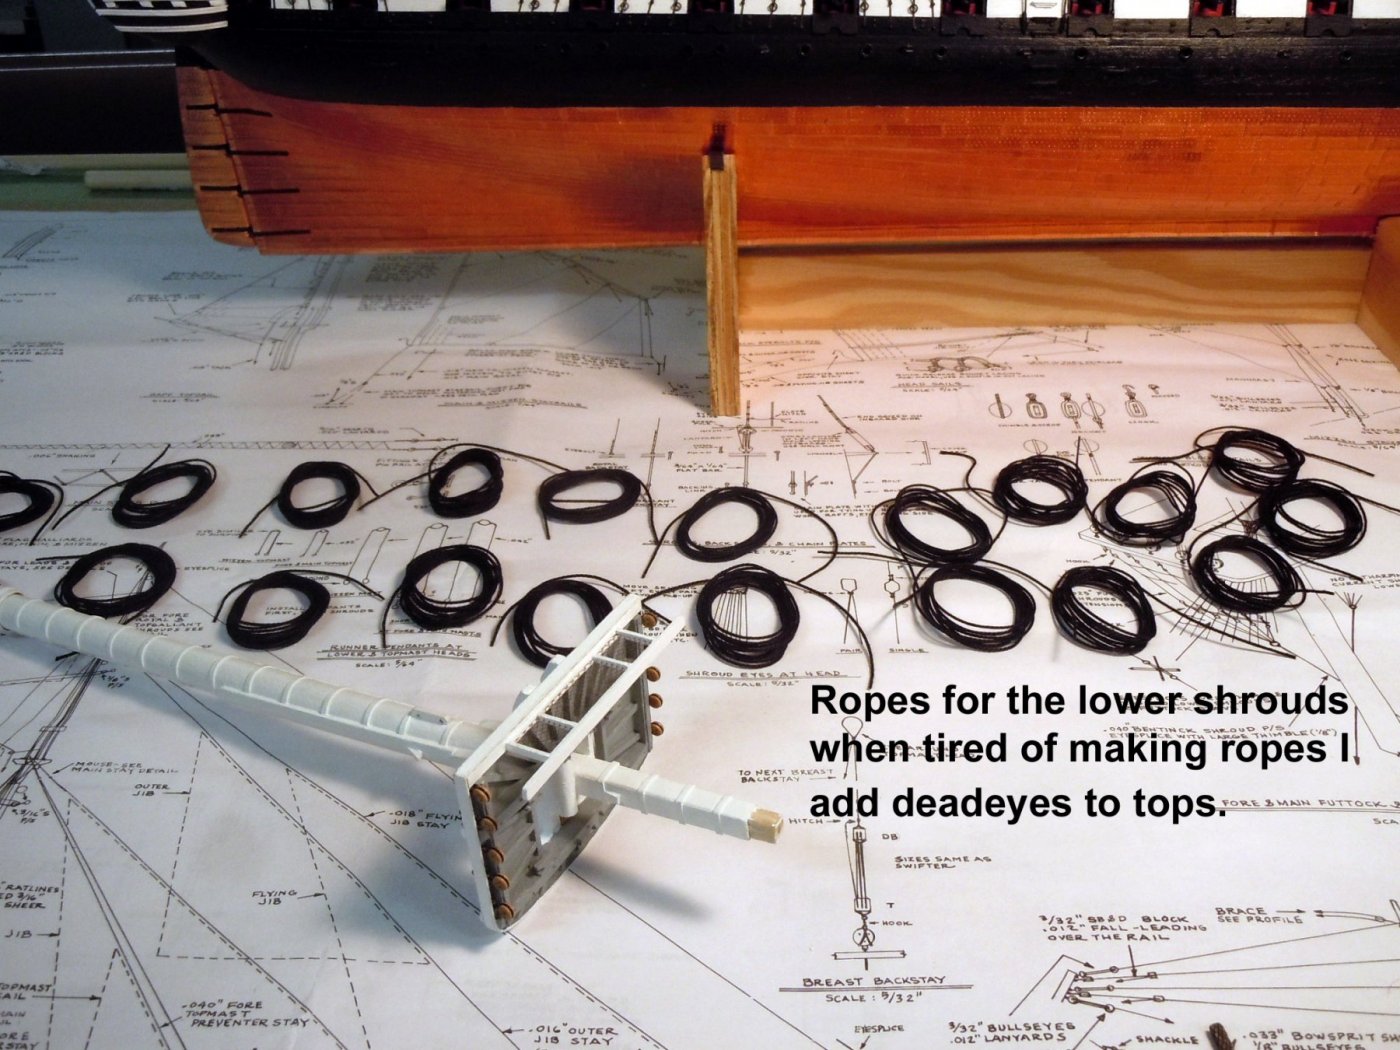
Now that the Dirty Dozen is until control and ready for the museum, the new Chapter for the book is done with CD's burned and will be mailed Monday to the publisher I am back to the Constitution. Since I have limited building space I will follow the process I did on the Niagara and rig up the masts a level at a time. I started by making ropes for the lower shrouds with my Model Expo rope walk somewhat modified. When I get tired of making ropes I add deadeyes to the fighting tops using 26 gauge black anodized copper beading wire. First I wrap the deadeye and twist a 3/8" tail that is inserted into the oval hole to the front and glued in place. Once all deadeyes are in place I use a 1/32" drill bit to clean the hole next to the 3/8" tail as a guide. Once the hole is drilled clean I cut the excess tail flush to the bottom surface. Next I twist a loop using a .040" drill bit stem held in a pin vise and cut a 1/16" tail and then glue the loop into the hole. I then add more CA to each location to assure a tight glue joint for both the deadeye and loop. After all the deadeyes were in place I added the guard rail. Here is the guard in place. Here are the staged ropes for the shrouds. Now back to deadeyes.

-
Bob, I live 5 minutes from where the Alma is on display here in Morro Bay. If I can be any help with photos and such let me know. It is part of the Central Coast Maritime Museum that I just finished up my build of the Dirty Dozen abalone fishing boat at 1/12 scale. Ken
-
Chuck, go to the smooth-on site, click Products; then Modelmaking; then Restoring an antique picture frame. There you can see the process of cold casting a part with 320 resin and gold powder mixed in to make a repair. This is one way to cast parts with metallic finish already in the part. They have various powders including bronze which could make duplicate cannon barrels or other bronze parts. Enjoy! Ken
-
Here is a great site that has great tutorials as well as any product you may need to cast anything. I have used their white casting resins in silicone molds that will duplicate a fingerprint in the mold. Really explore their site. https://www.smooth-on.com/
-
Mark, thanks I checked out Michael's already with no luck. I may try a grocery store for small netting per Brian's suggestion. Bob, just back from my morning walk and all boats are still floating, WindWalker is all buttoned up. The tide was out and only a couple of tourists walking that were speaking French. Once the big rain drops started I did an about face and headed for the car as fast as I could hobble. So far the weather is holding but that can change rather quickly around here with the Pineapple Express hitting us. Thanks for all your comments! Ken
- 162 replies
-
- 4
-
-
- dirty dozen
- fishing
- (and 2 more)
-
Mark and All, the power is back on at 8 pm Sunday life is good again. Roger here are a couple of images of abalone divers. Note the one gathering and putting them in his basket. That is the one item I need to figure out how to weave or make. Second wave of storm to come through late tonight and early tomorrow; here we go again. My daughter saved our bacon, literally she has two refrigerators with freezers and we managed to save everything. Still need to transfer the frozen stuff tomorrow after the second wave goes through.
- 162 replies
-
- 7
-
-
- dirty dozen
- fishing
- (and 2 more)
-
Mark, thanks! Yes it looks like in pictures I have seen some have knives and some do not. Still without power for another day and not looking good for another few days. Thank goodness we have our daughter living close and she has power. Still sleeping at the house just like camping with 58 degrees. The pole is down at the bottom of the hill and roped off but not a PG&E guy in sight.
- 162 replies
-
- 5
-
-
- dirty dozen
- fishing
- (and 2 more)