xken
-
Posts
841 -
Joined
-
Last visited
Content Type
Profiles
Forums
Gallery
Events
Everything posted by xken
-
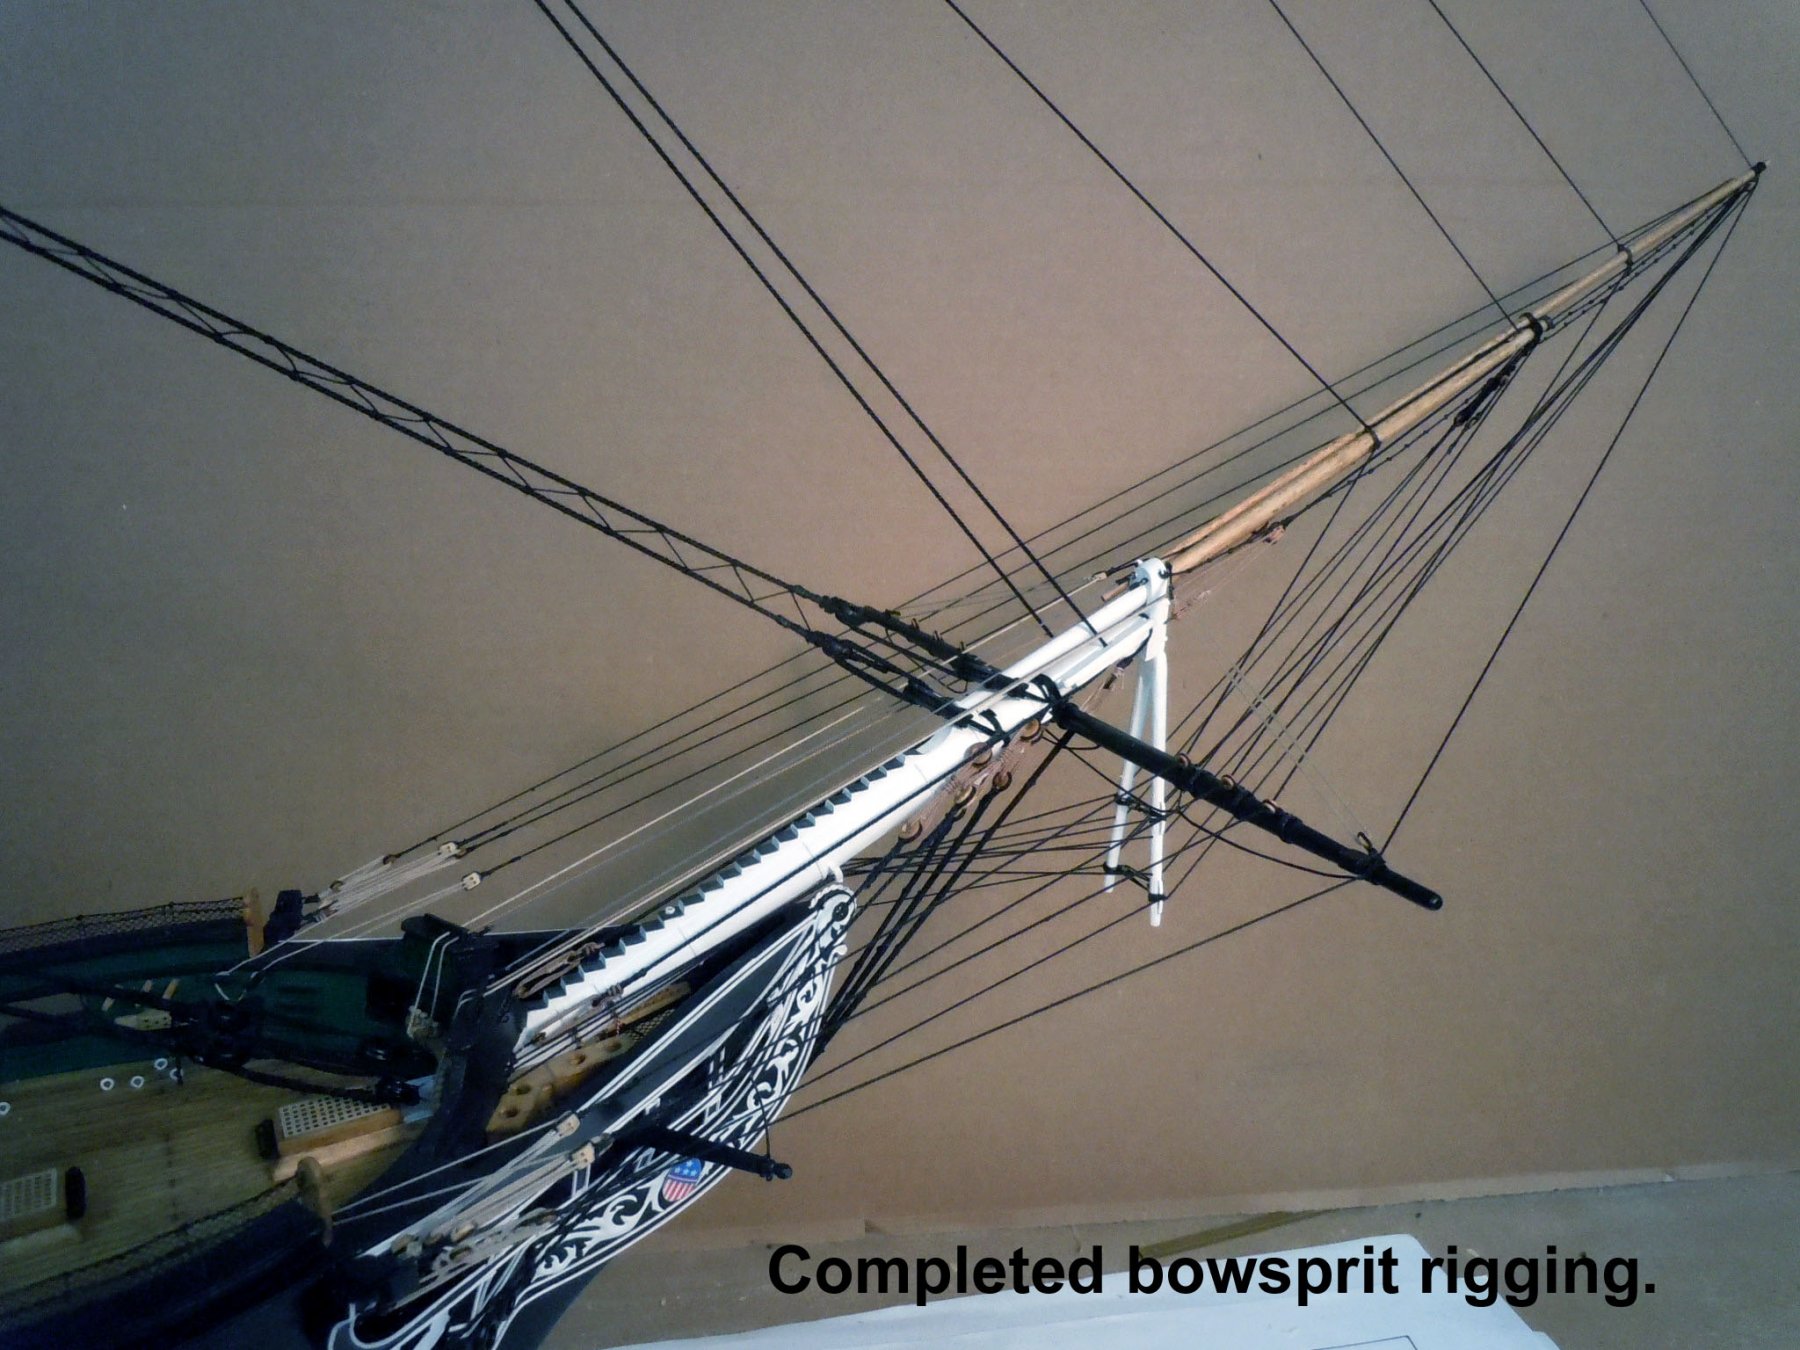
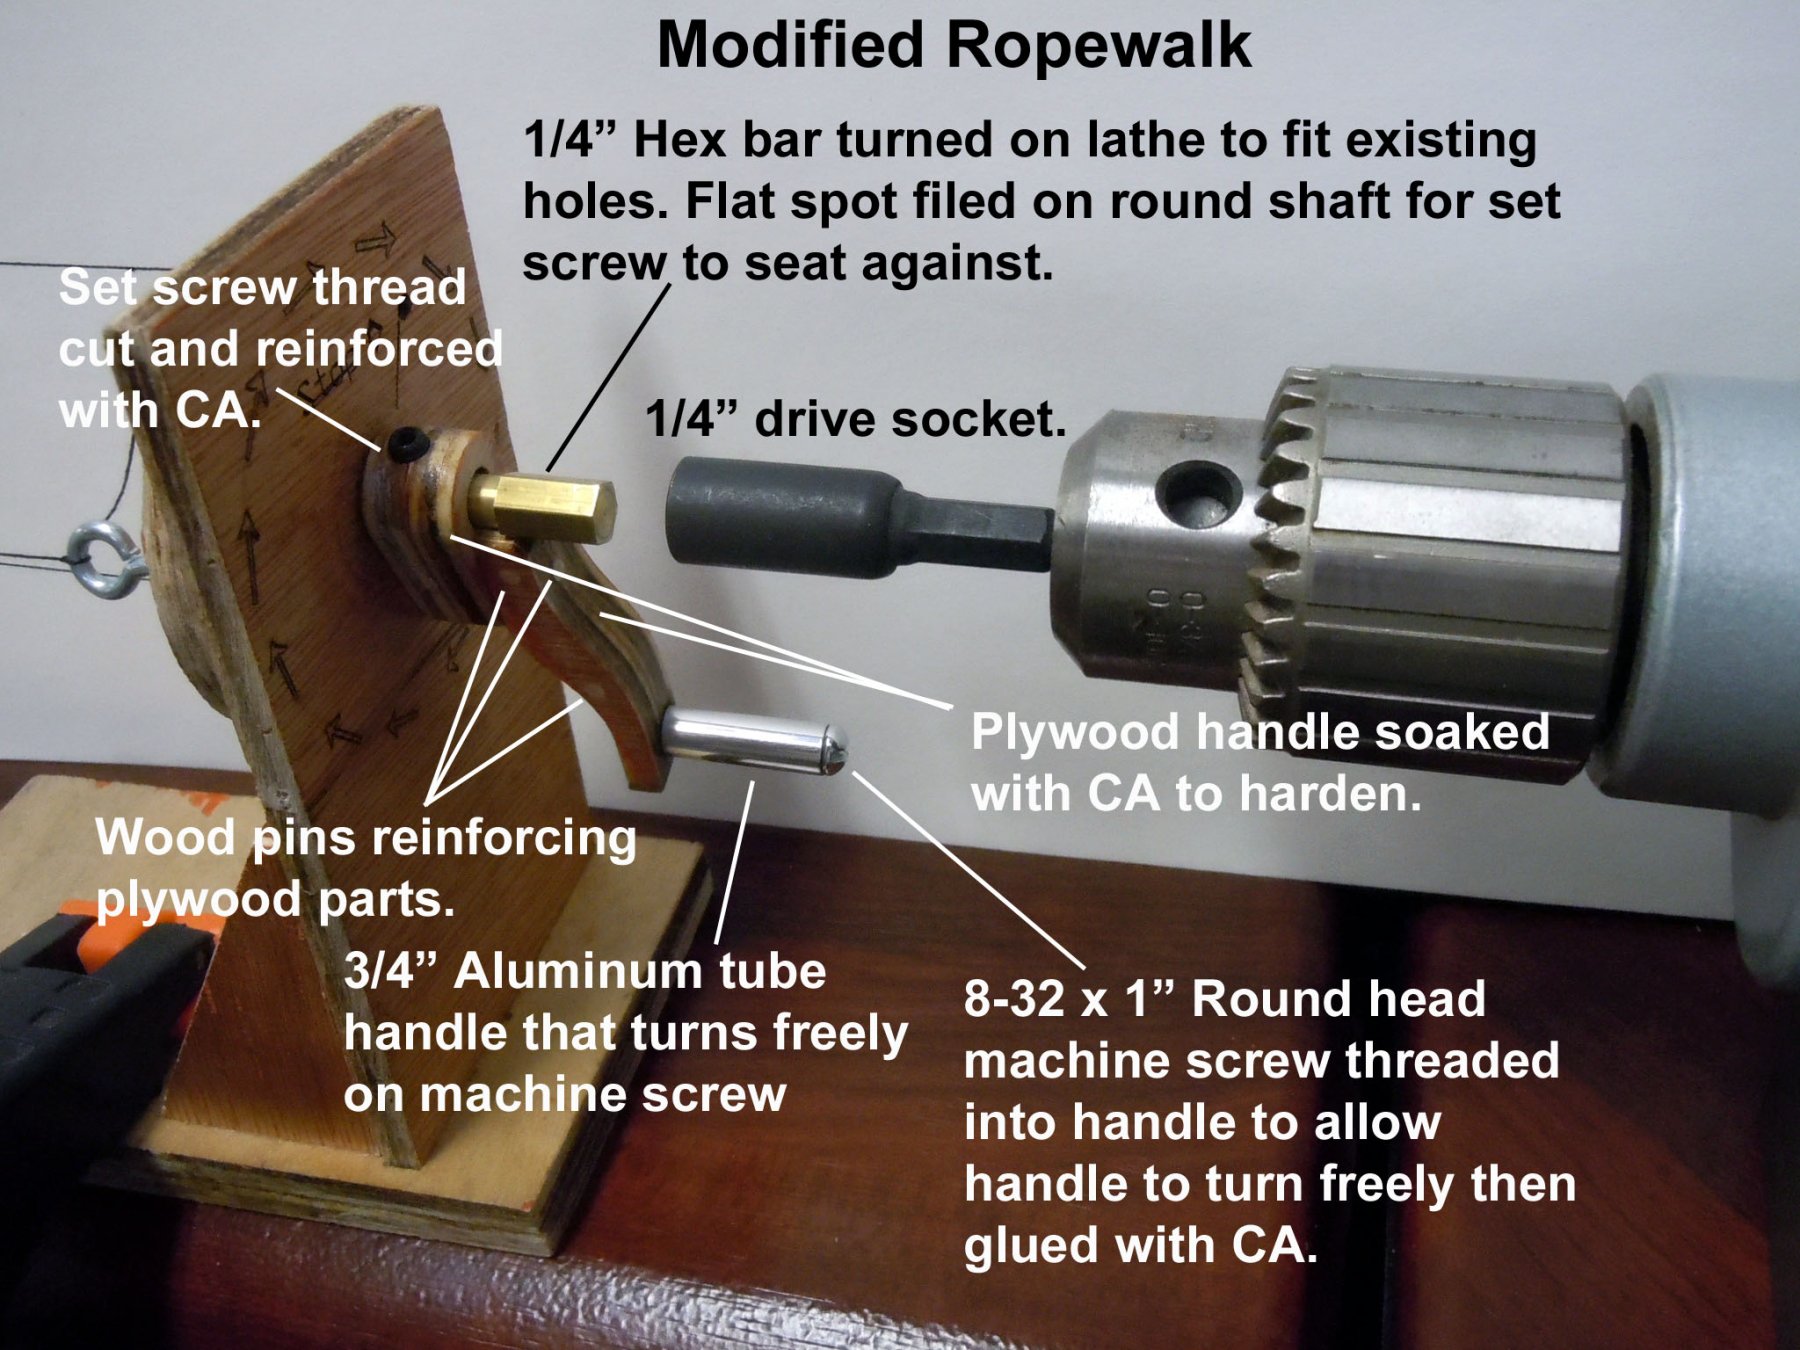
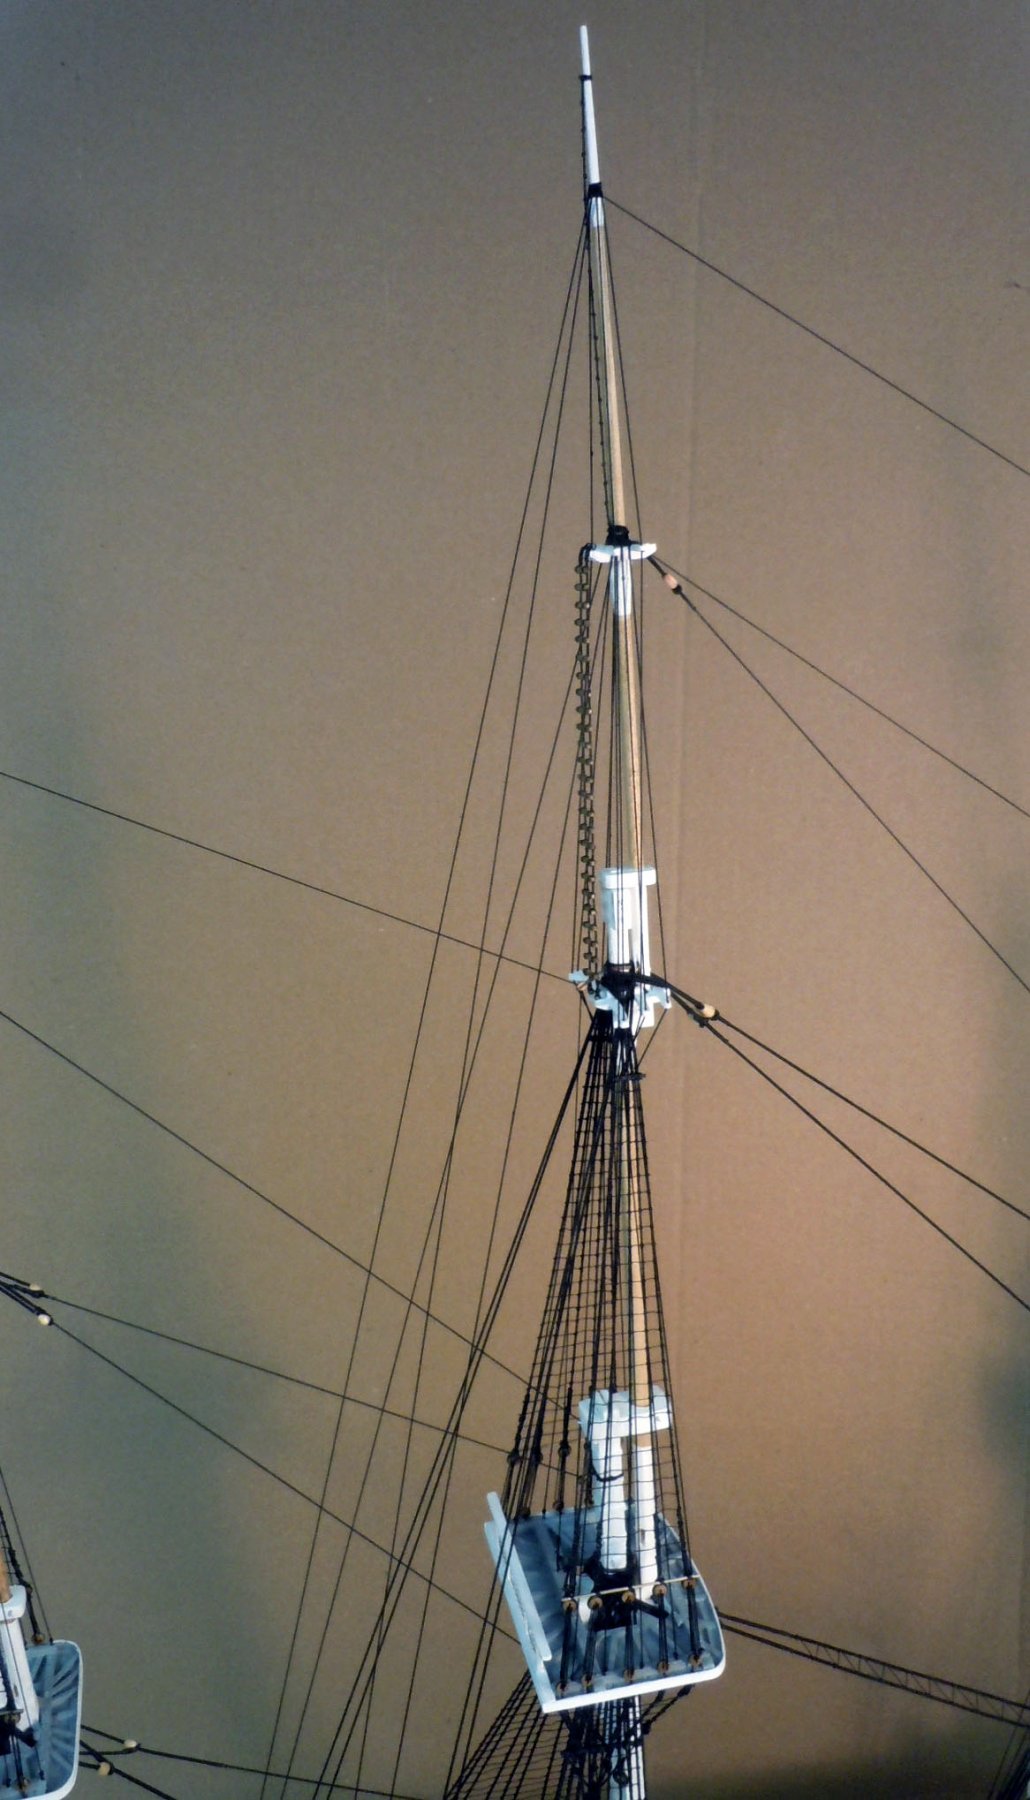
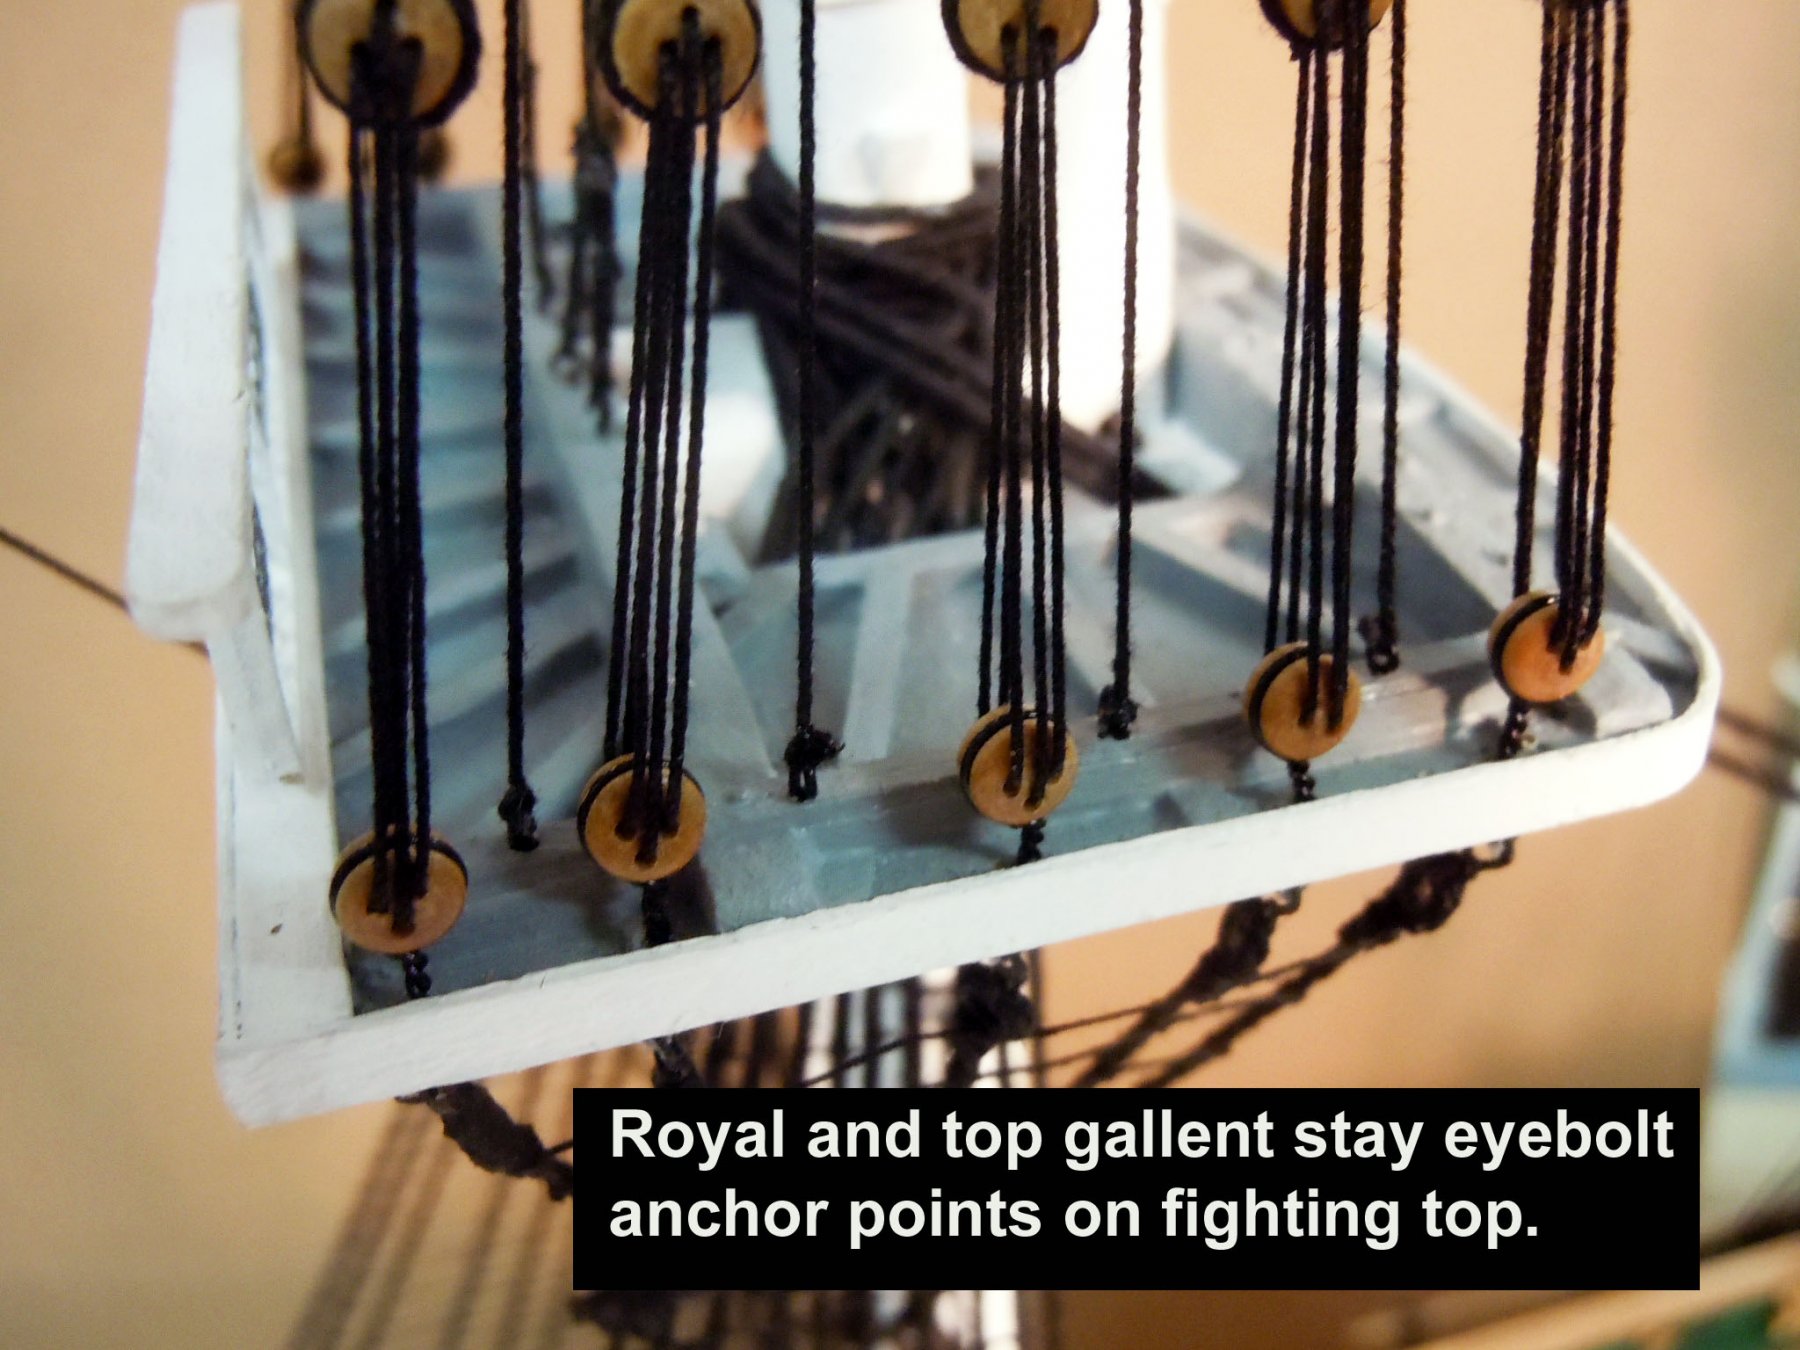
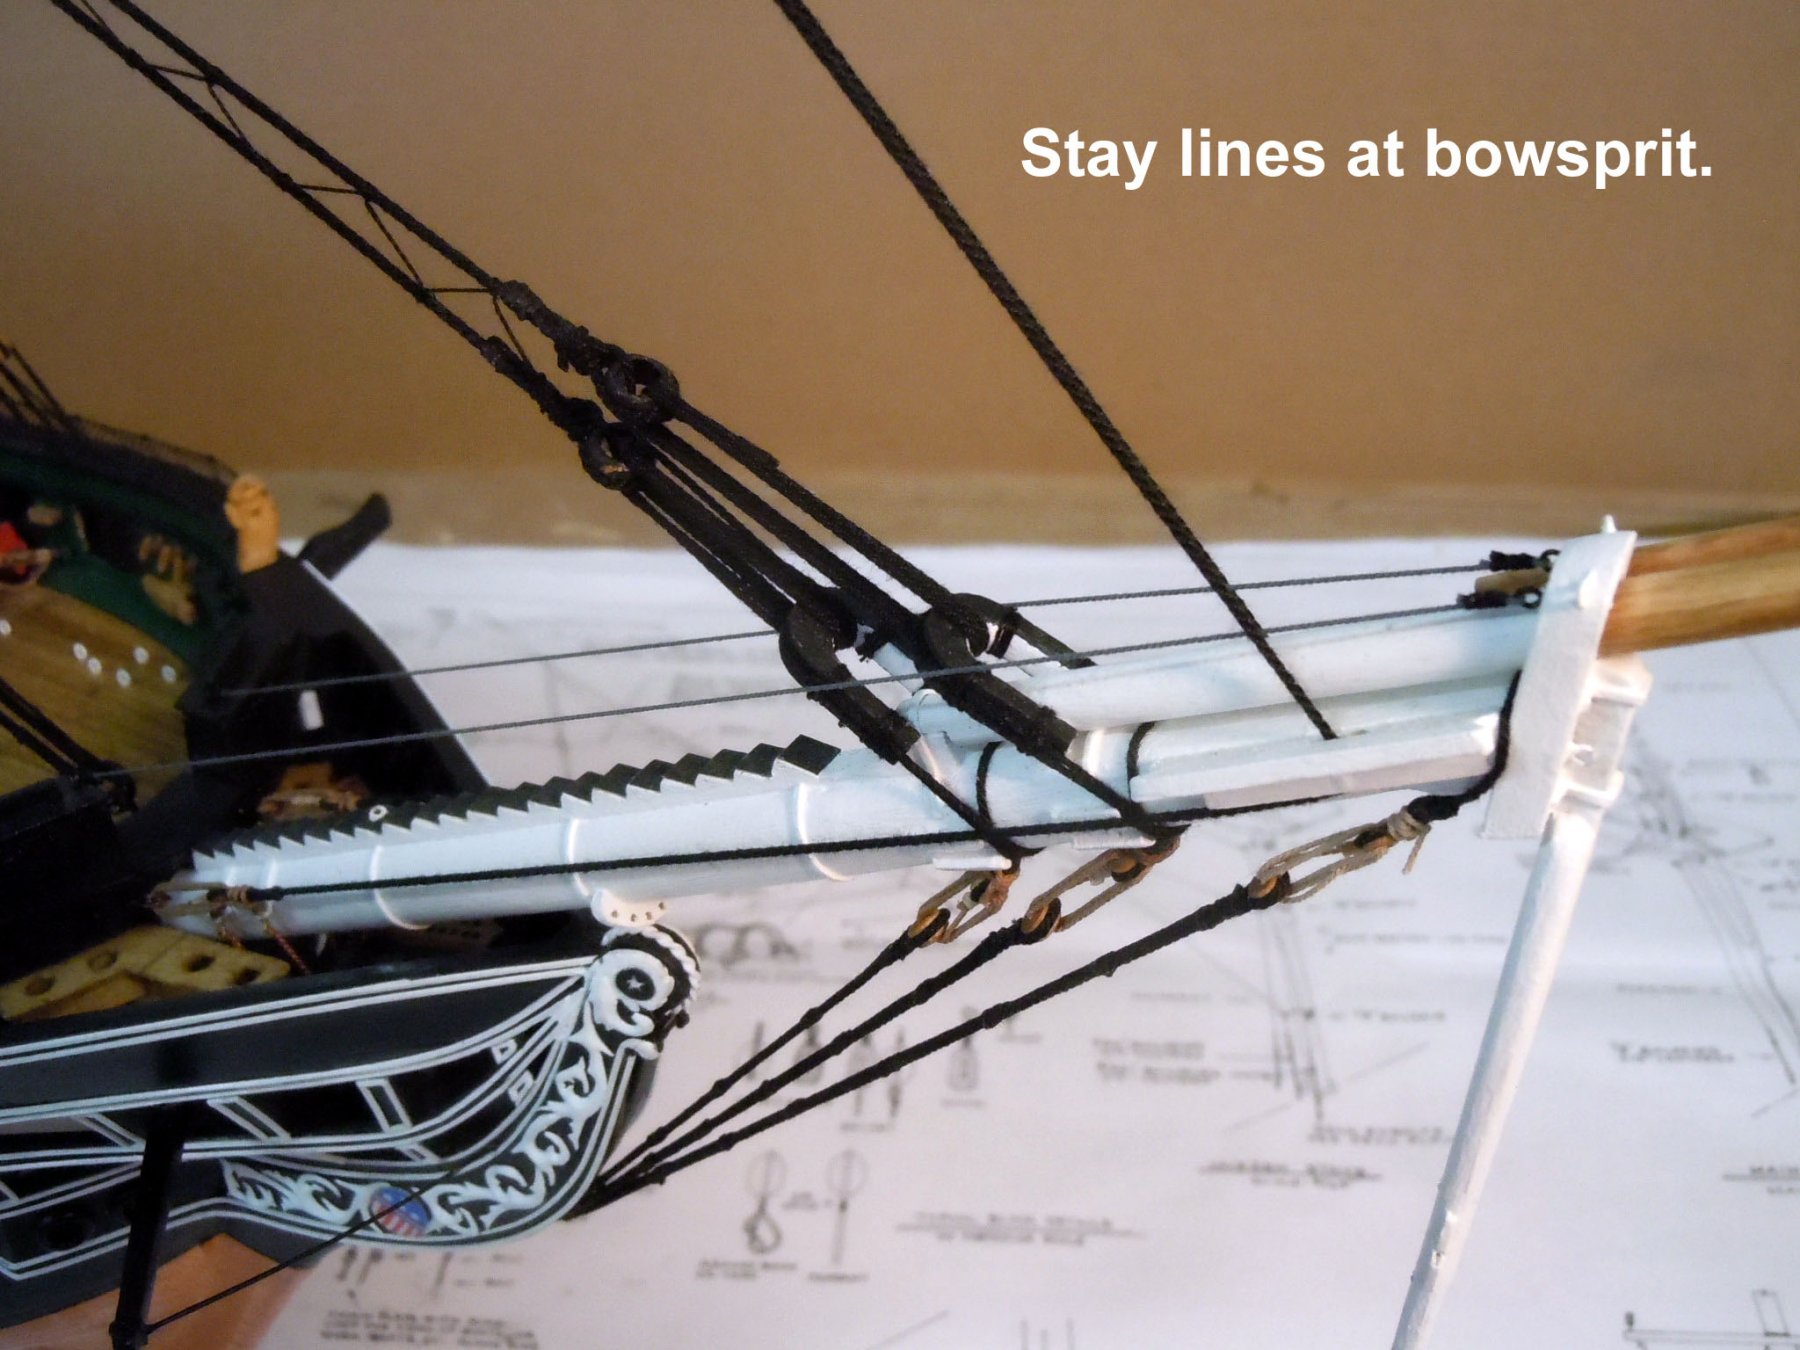
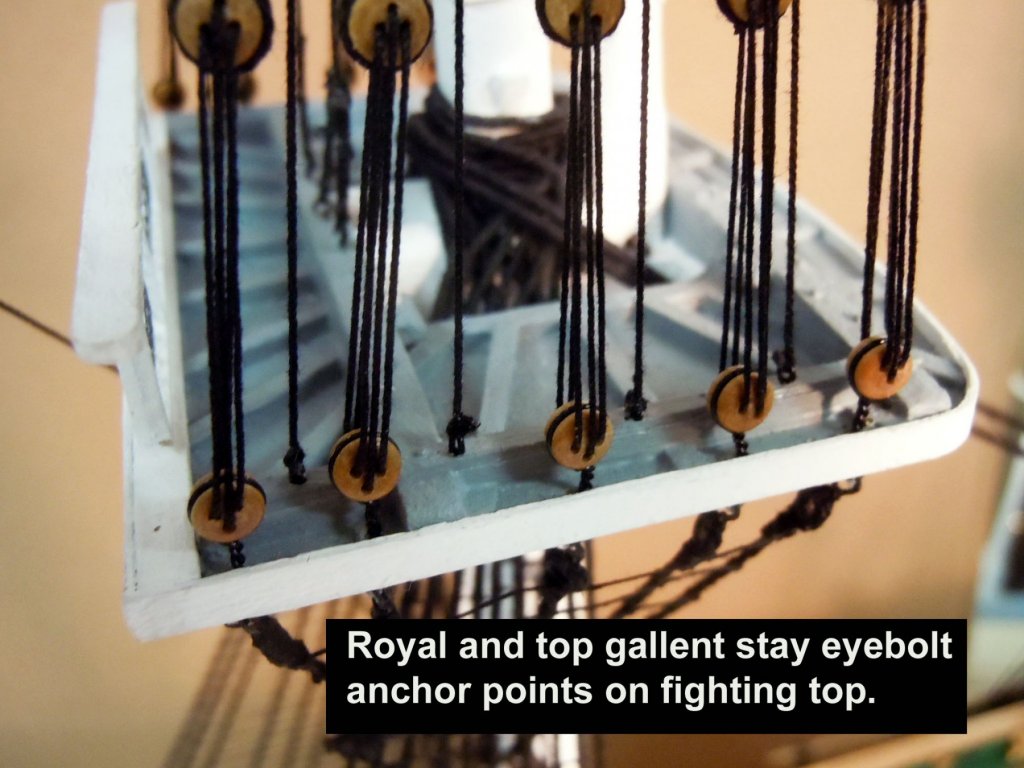
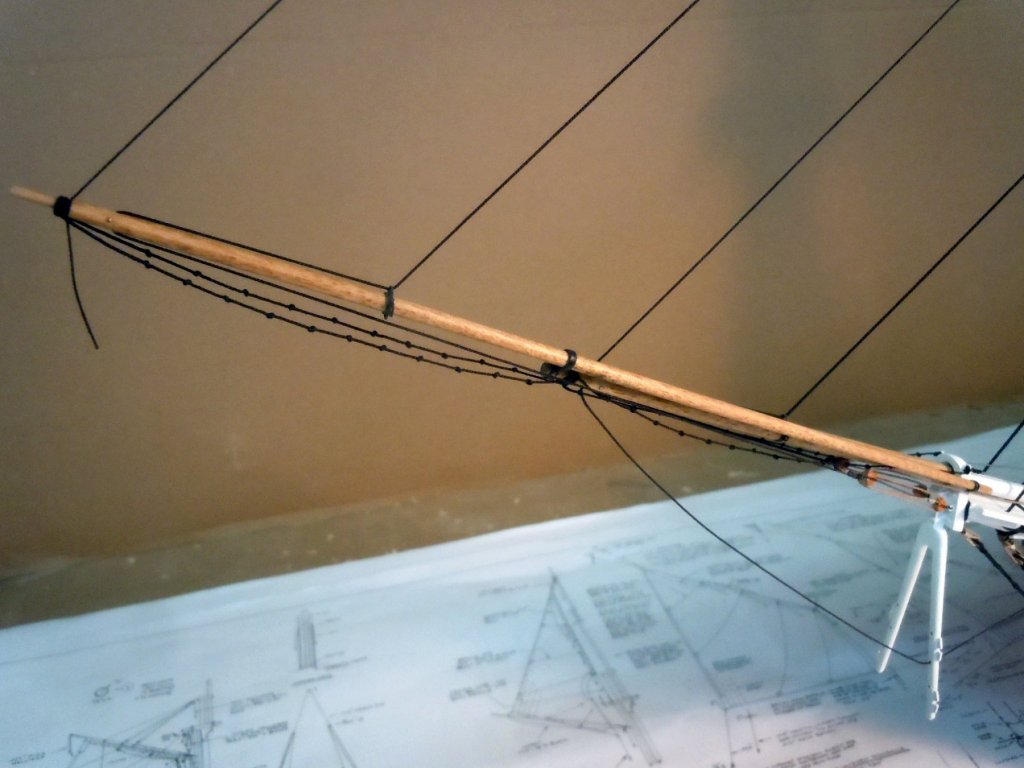
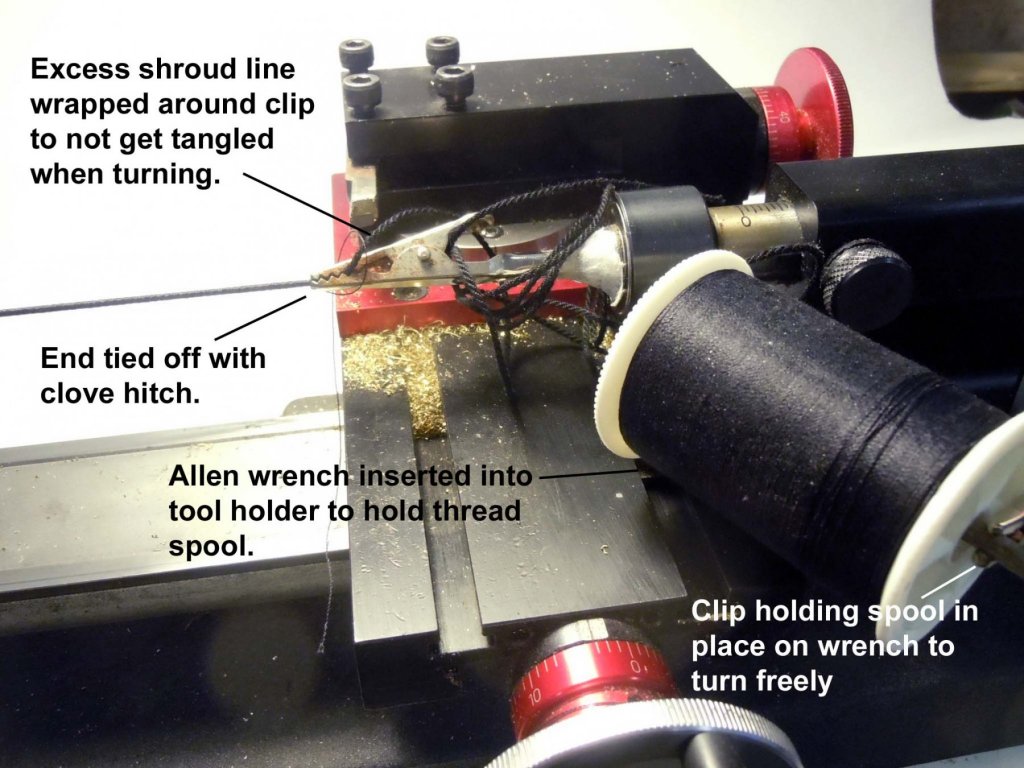
 Dan, Thank you for your kind words and do hope you get back to your Constitution soon. Tom, there may be a solution in the near future for those !*#@! ratlines if all goes well. I finished up the lateral lines on the bowsprit which was a little fun sorting out. Here is a picture of it completed. While waiting for glue to set on lines I painted and located all the small belaying pins in their appropriate locations. For those following I would recommend doing these before stepping the masts. Why I did not recognize this myself is beyond me. One of the things I am doing is to make ropes as needed in the sizes needed as I go since I have space constraints. I modified the MS rope walk to be able to use a hand drill for rope turning and actually enjoy the rope making process now that I have it down pat. Here is a picture of the modifications and set up that works very slick especially with the socket drive. Next I have moved on to the royal and top gallant stay lines; nothing real exciting but just pay attention to not pull the royals out of alignment when tying off at the eyebolts. They flex very easily. The eyebolts were made using the 26 gauge black beading wire. Now to finish up the foremast stays.

-
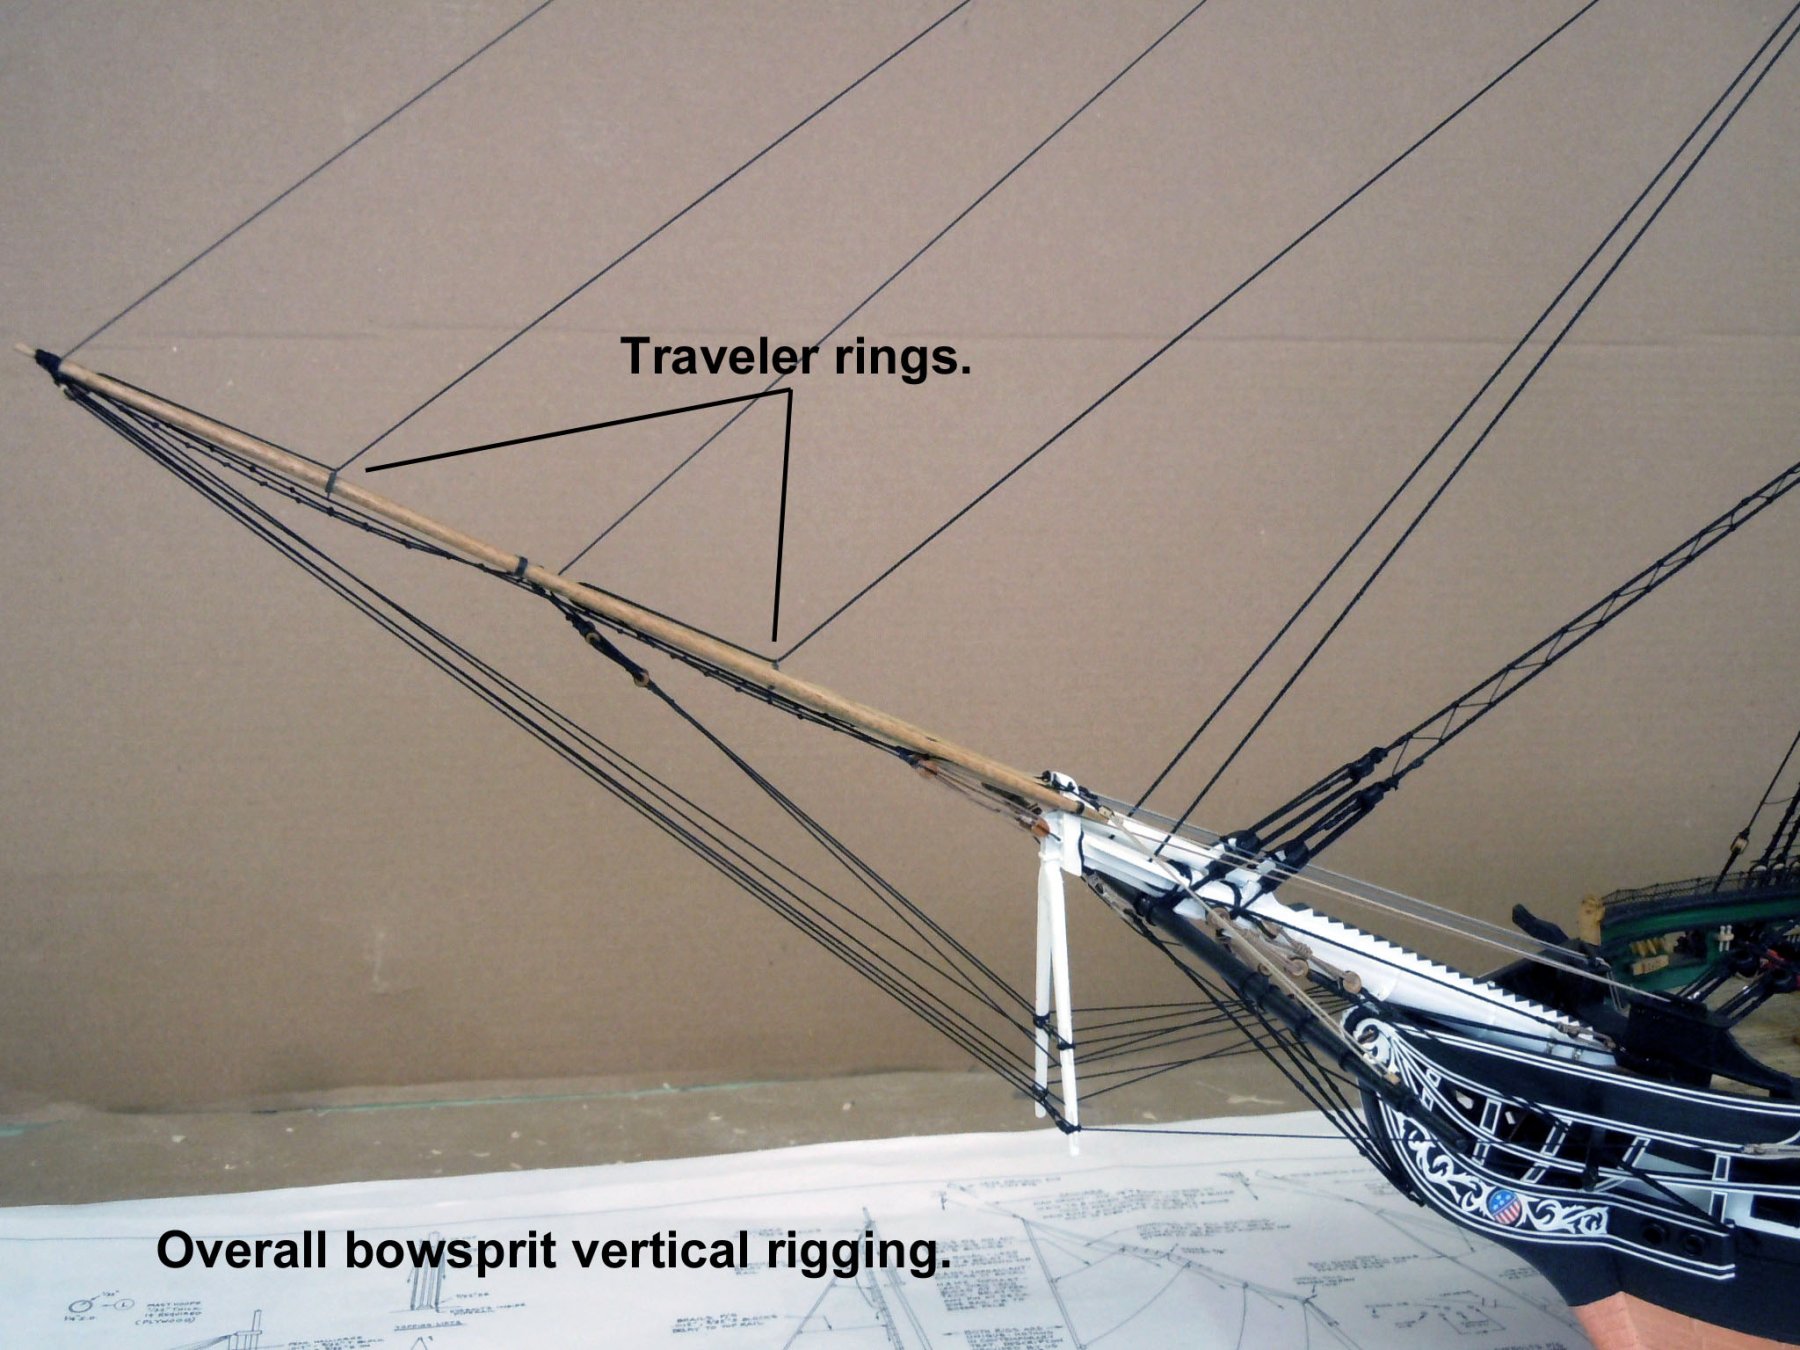
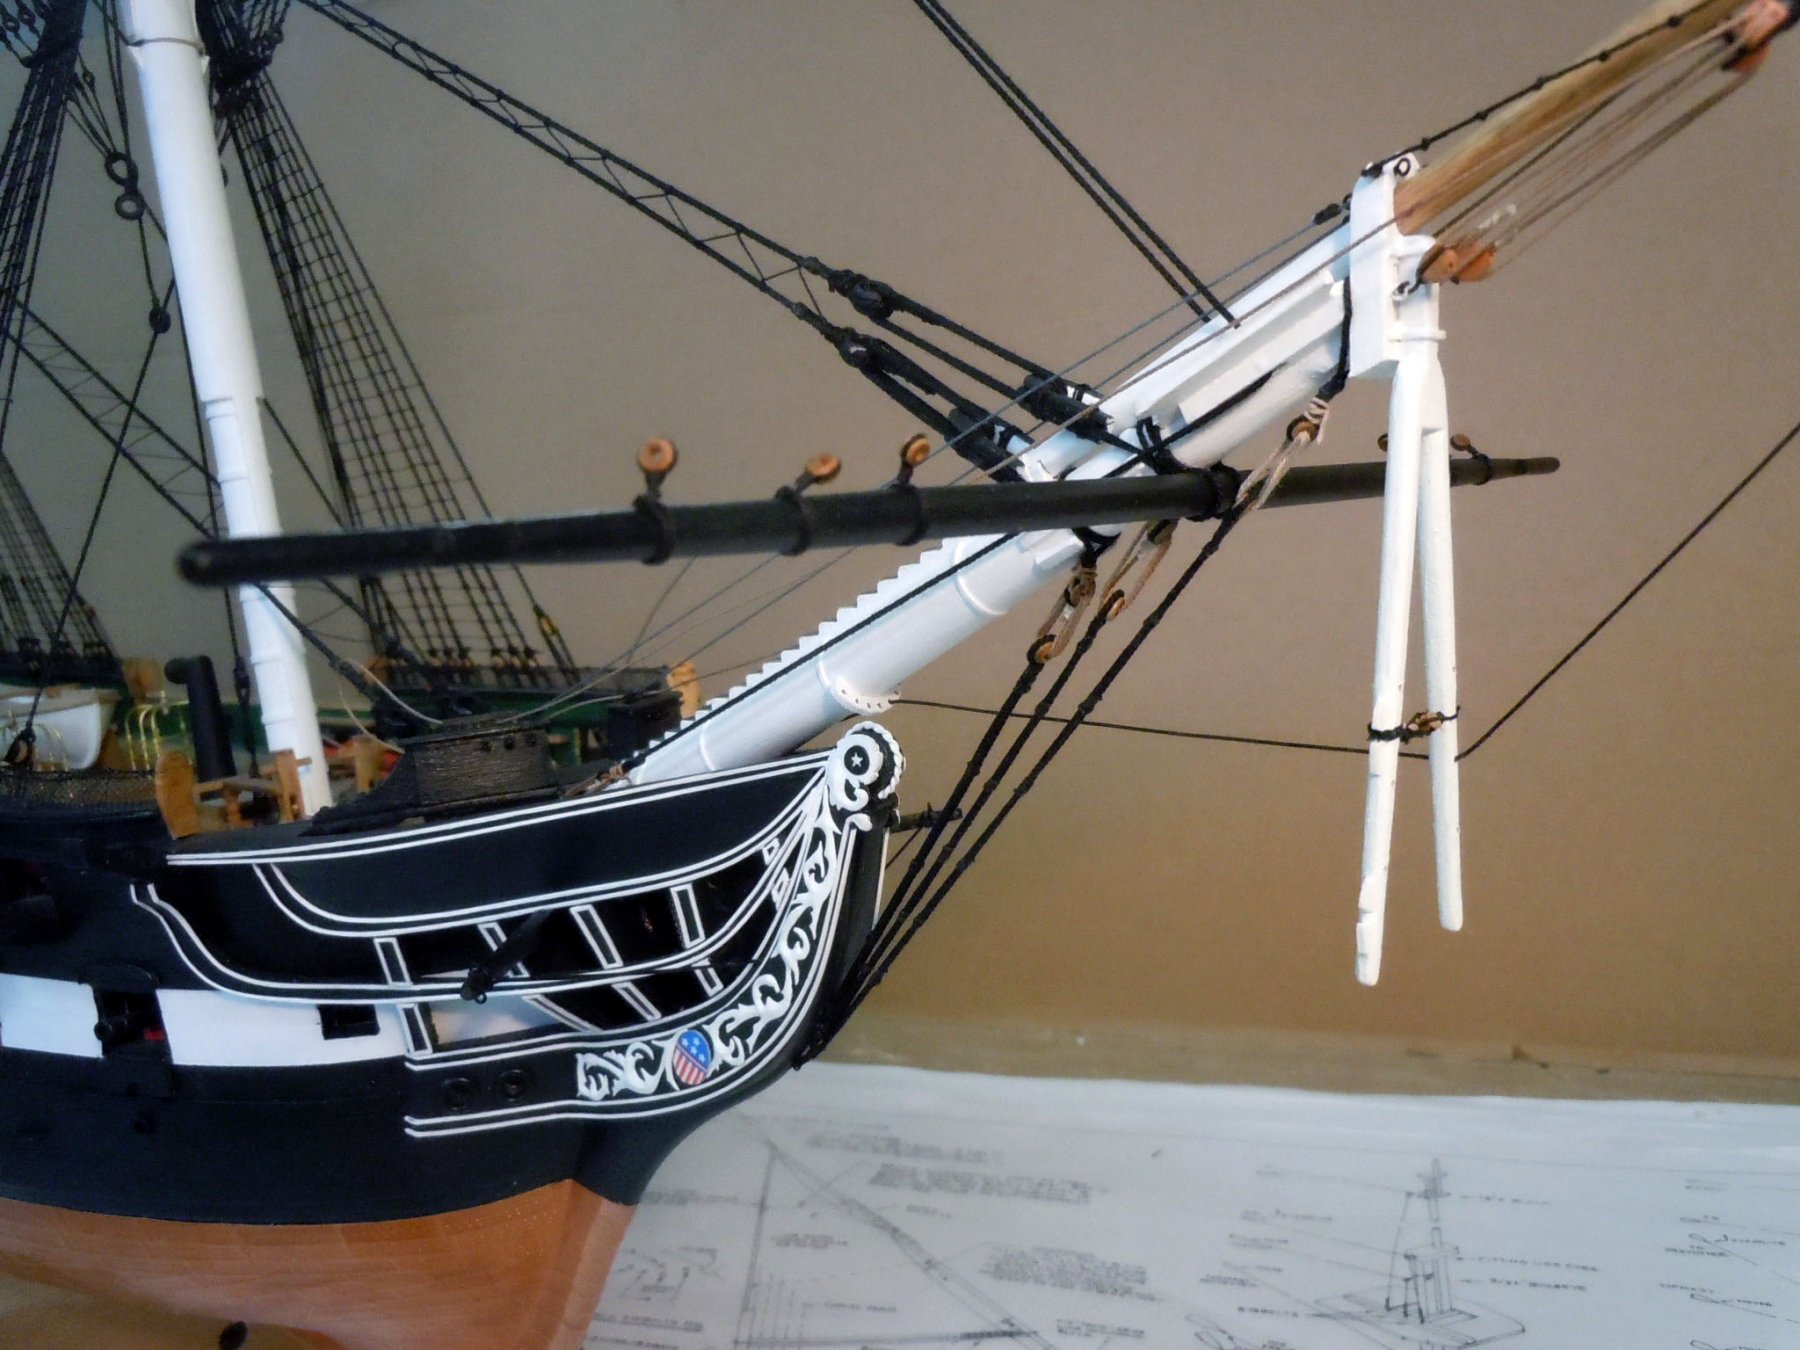
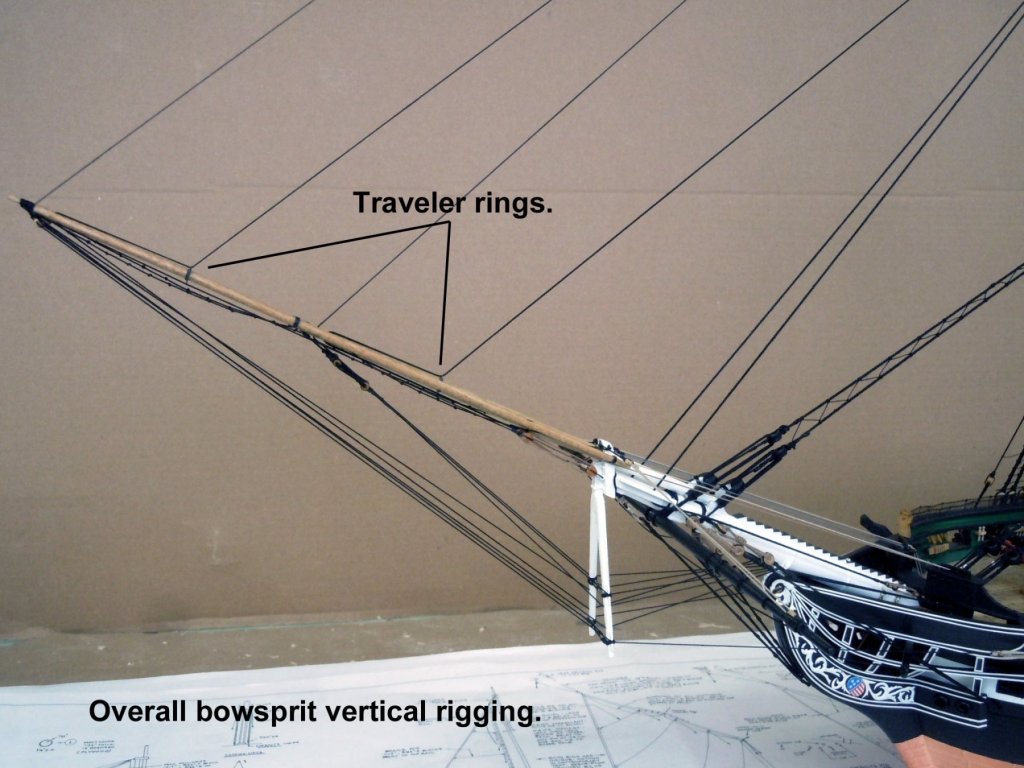
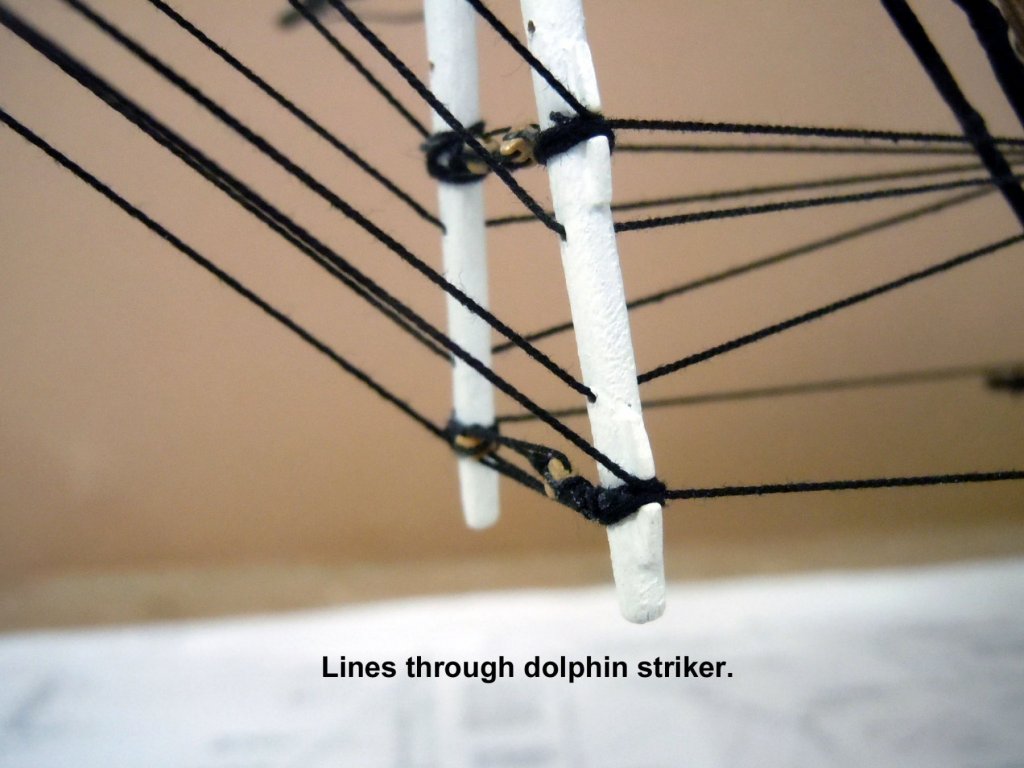
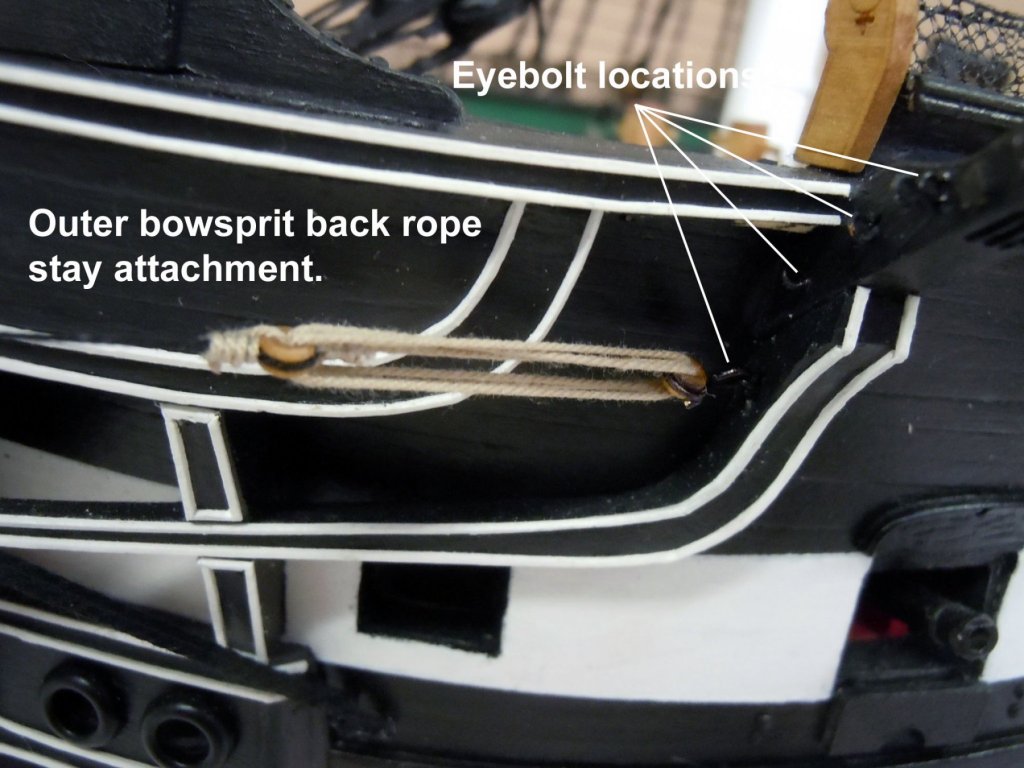
After studying the plans and ship photos I started rigging the bowsprit doing the central lines first before doing the yard lines. Here are some pictures showing some of the rigging details. Now onto the yard lines. I think the bowsprit is the more difficult of the rigging to be done.

-
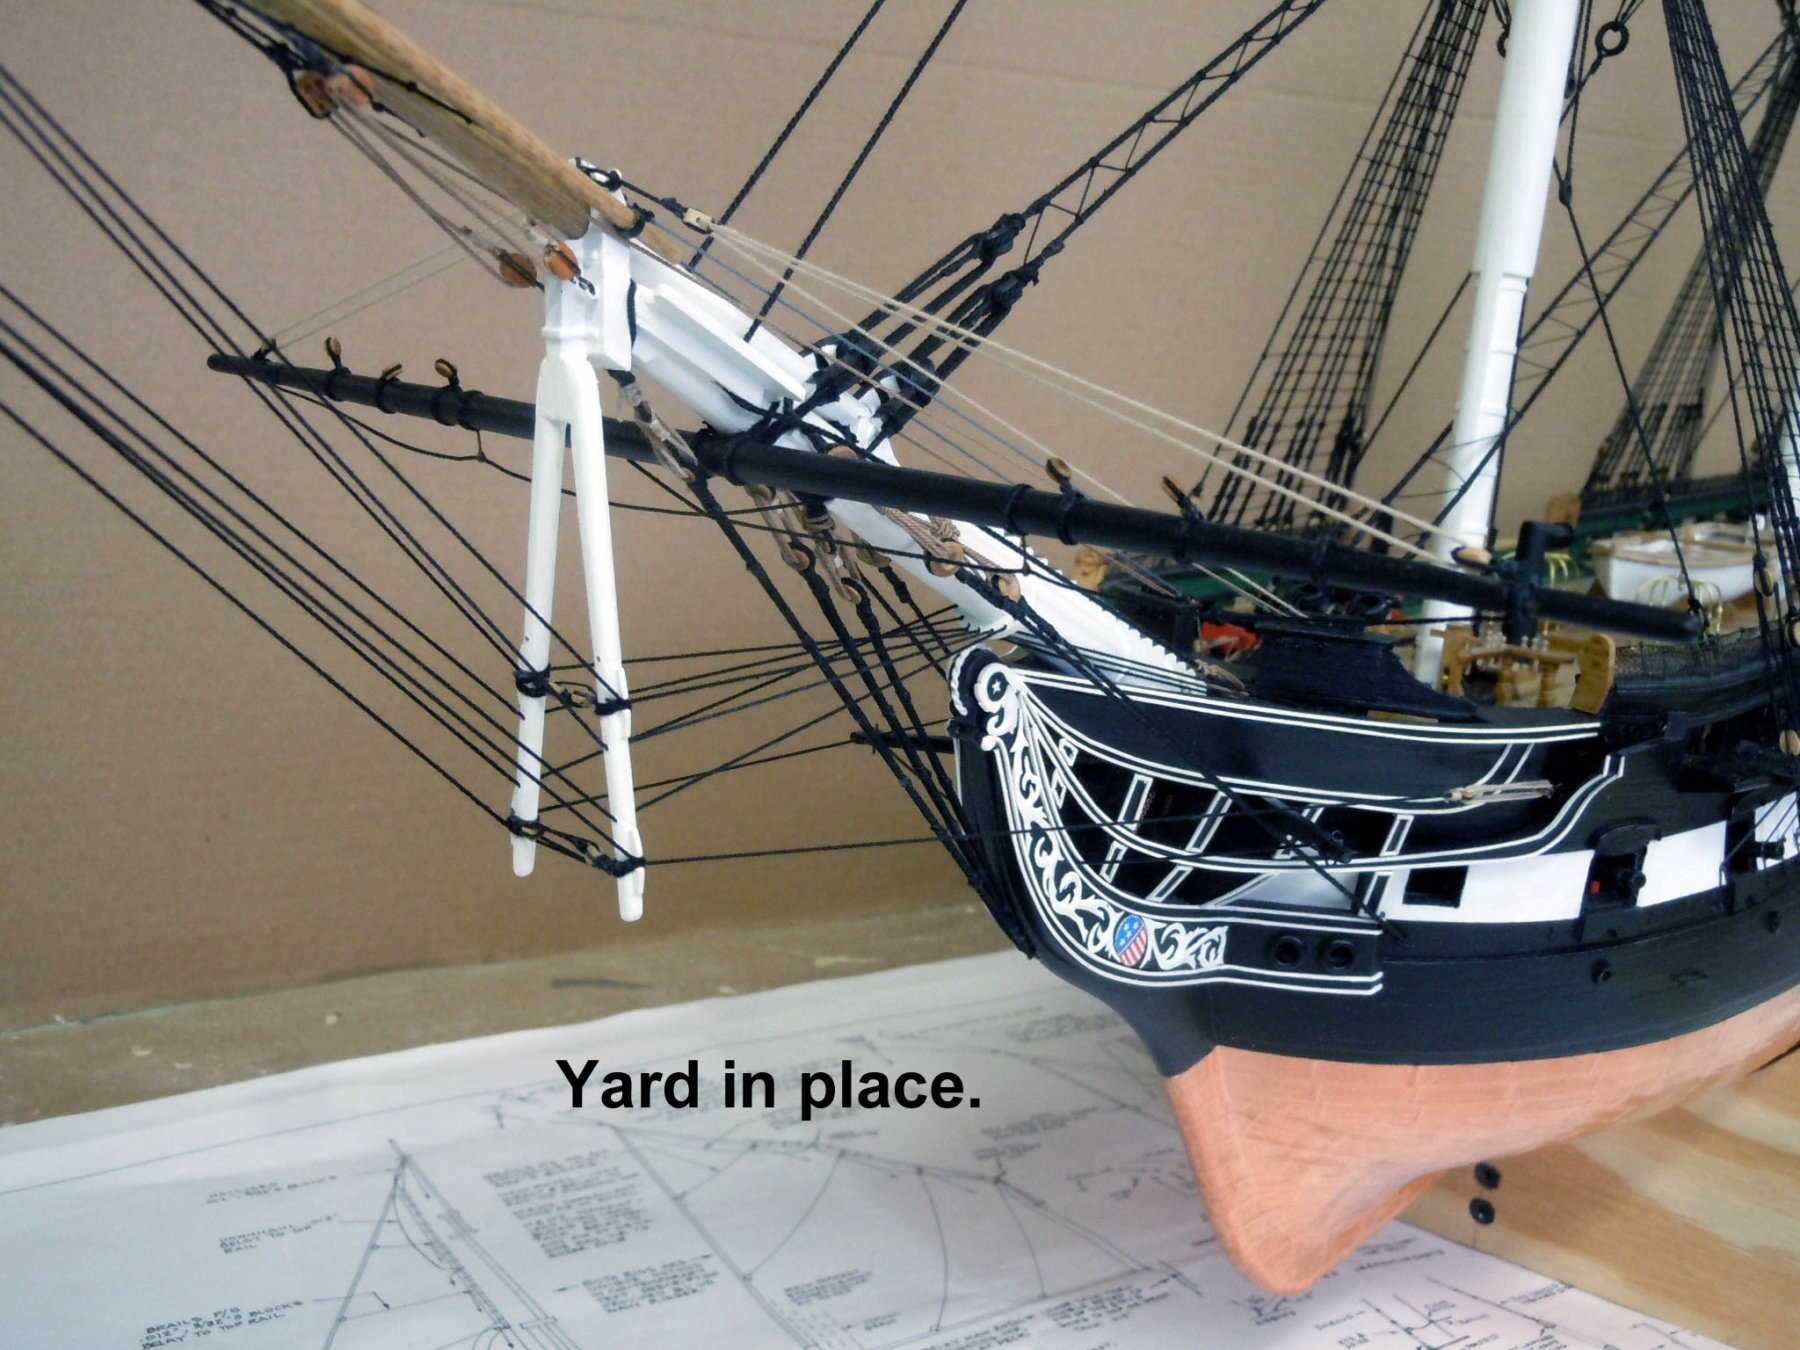
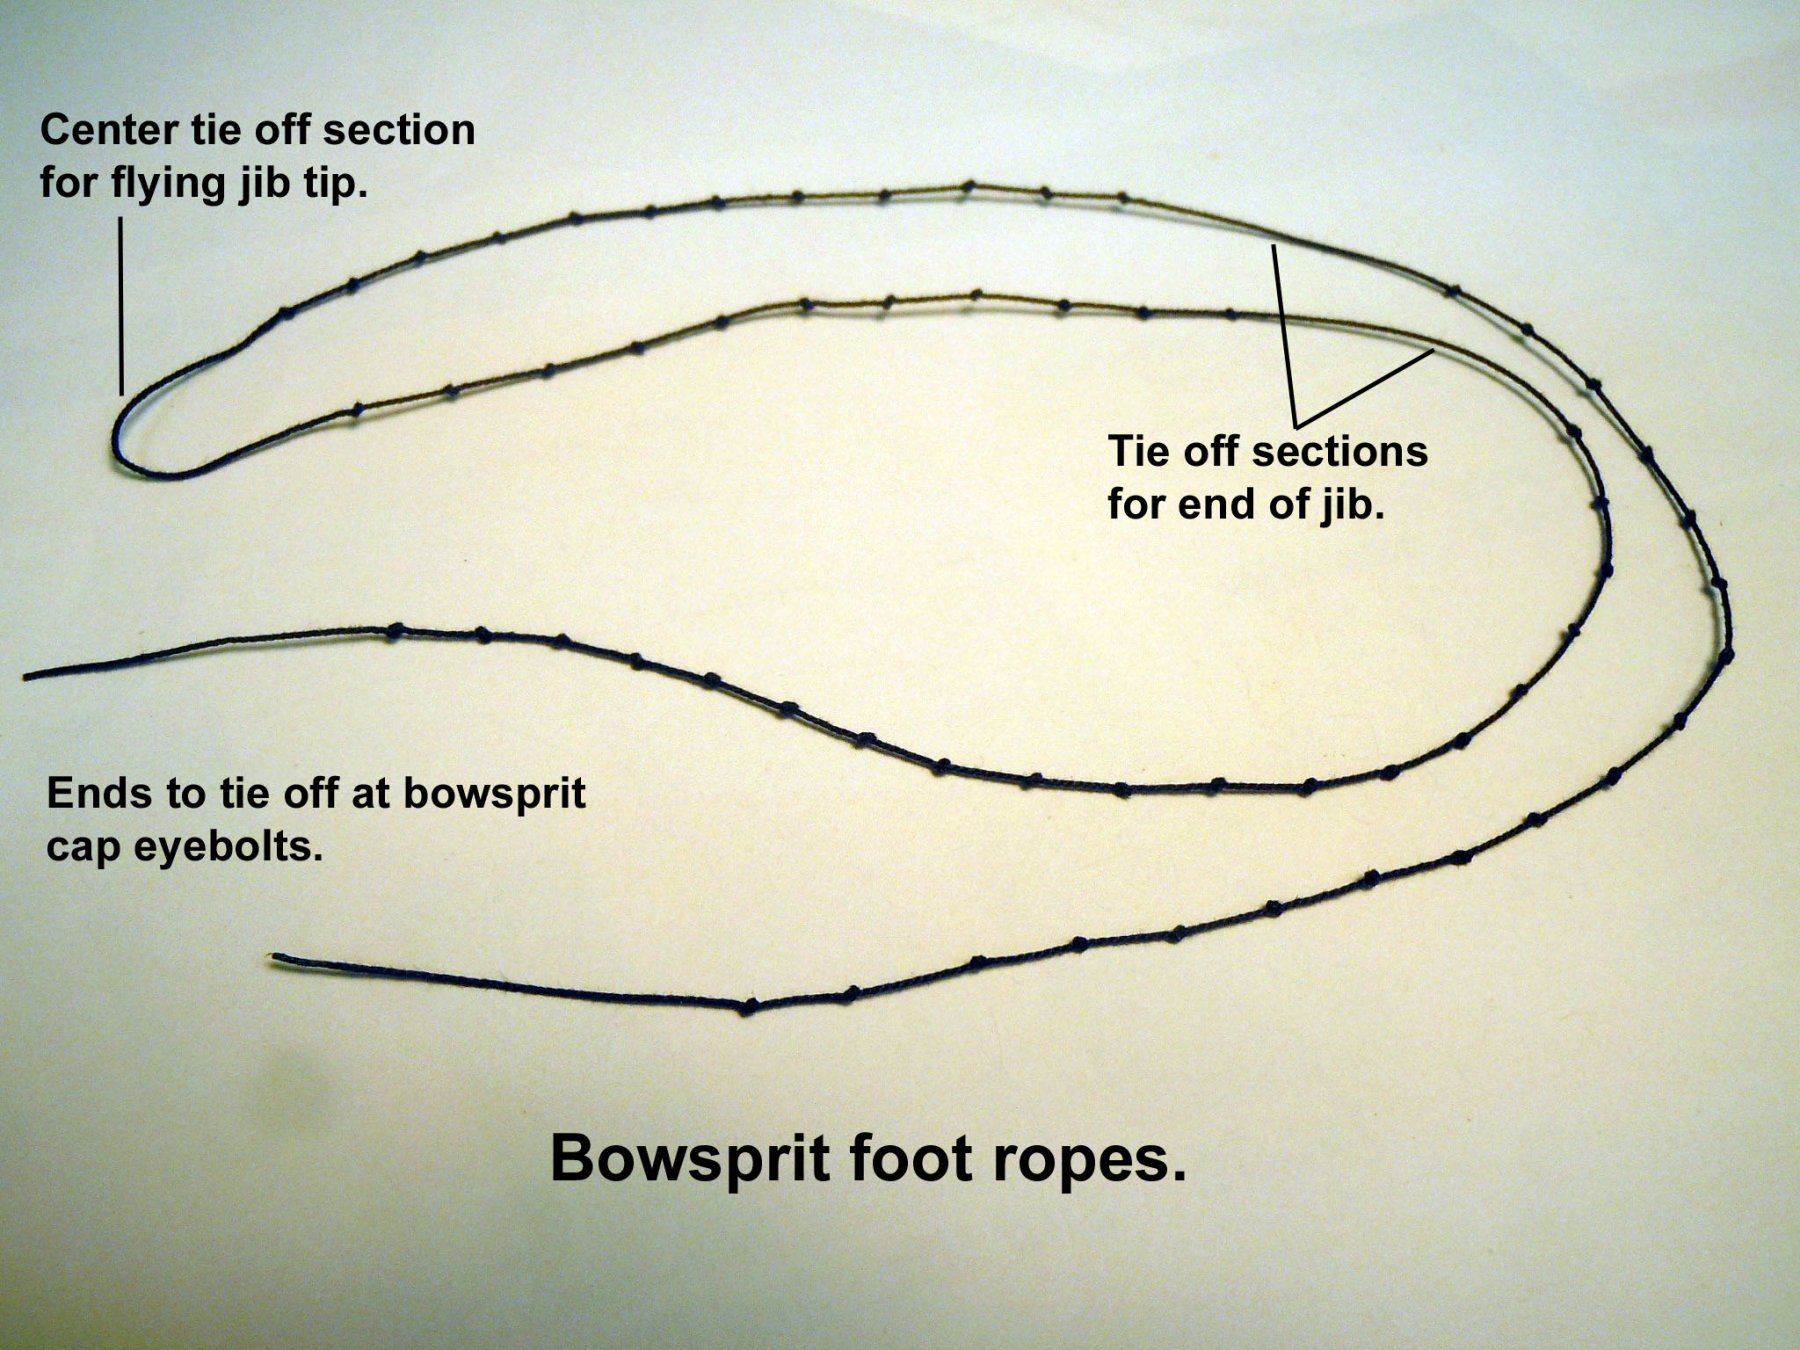
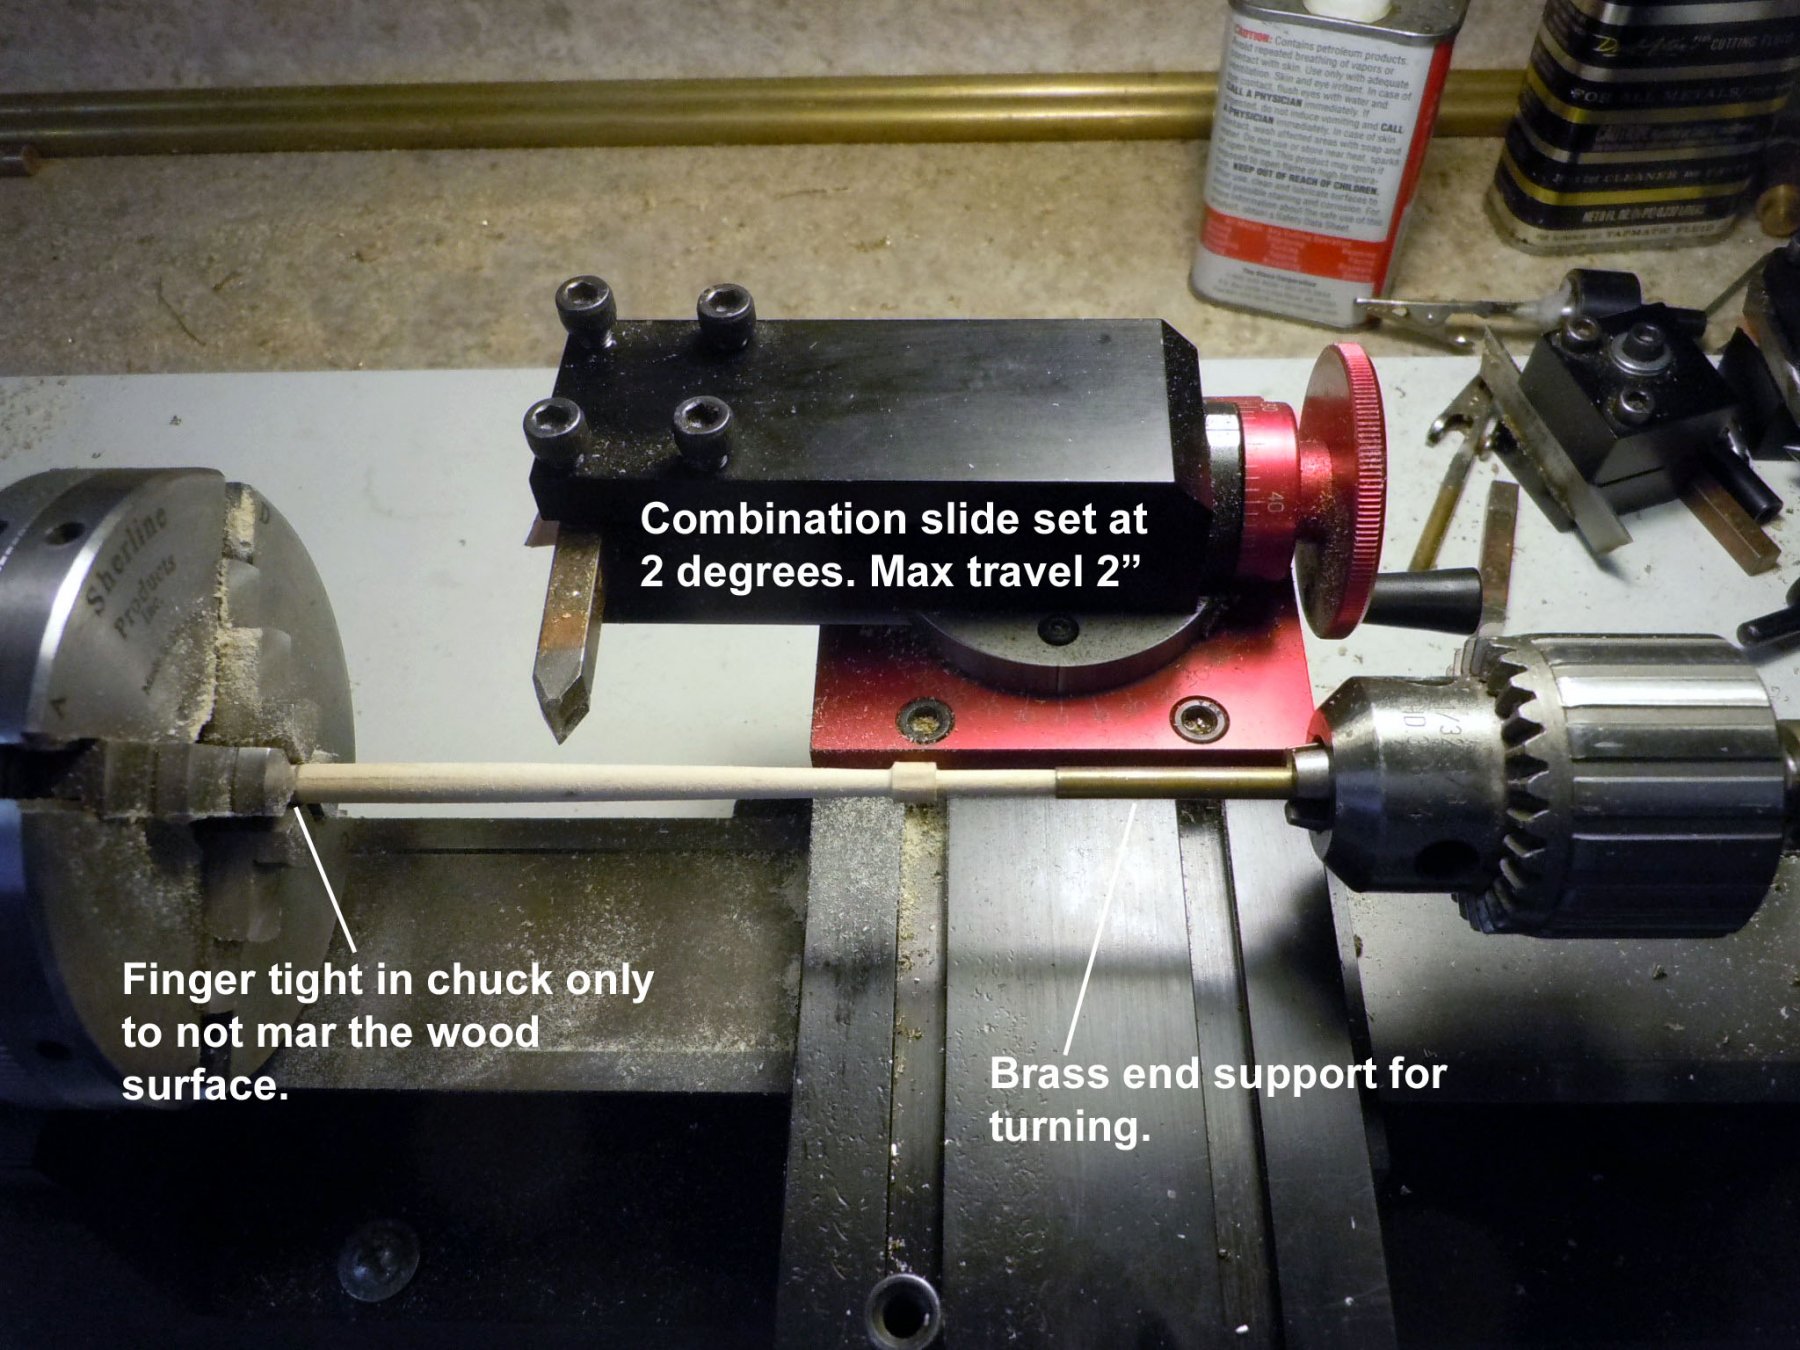
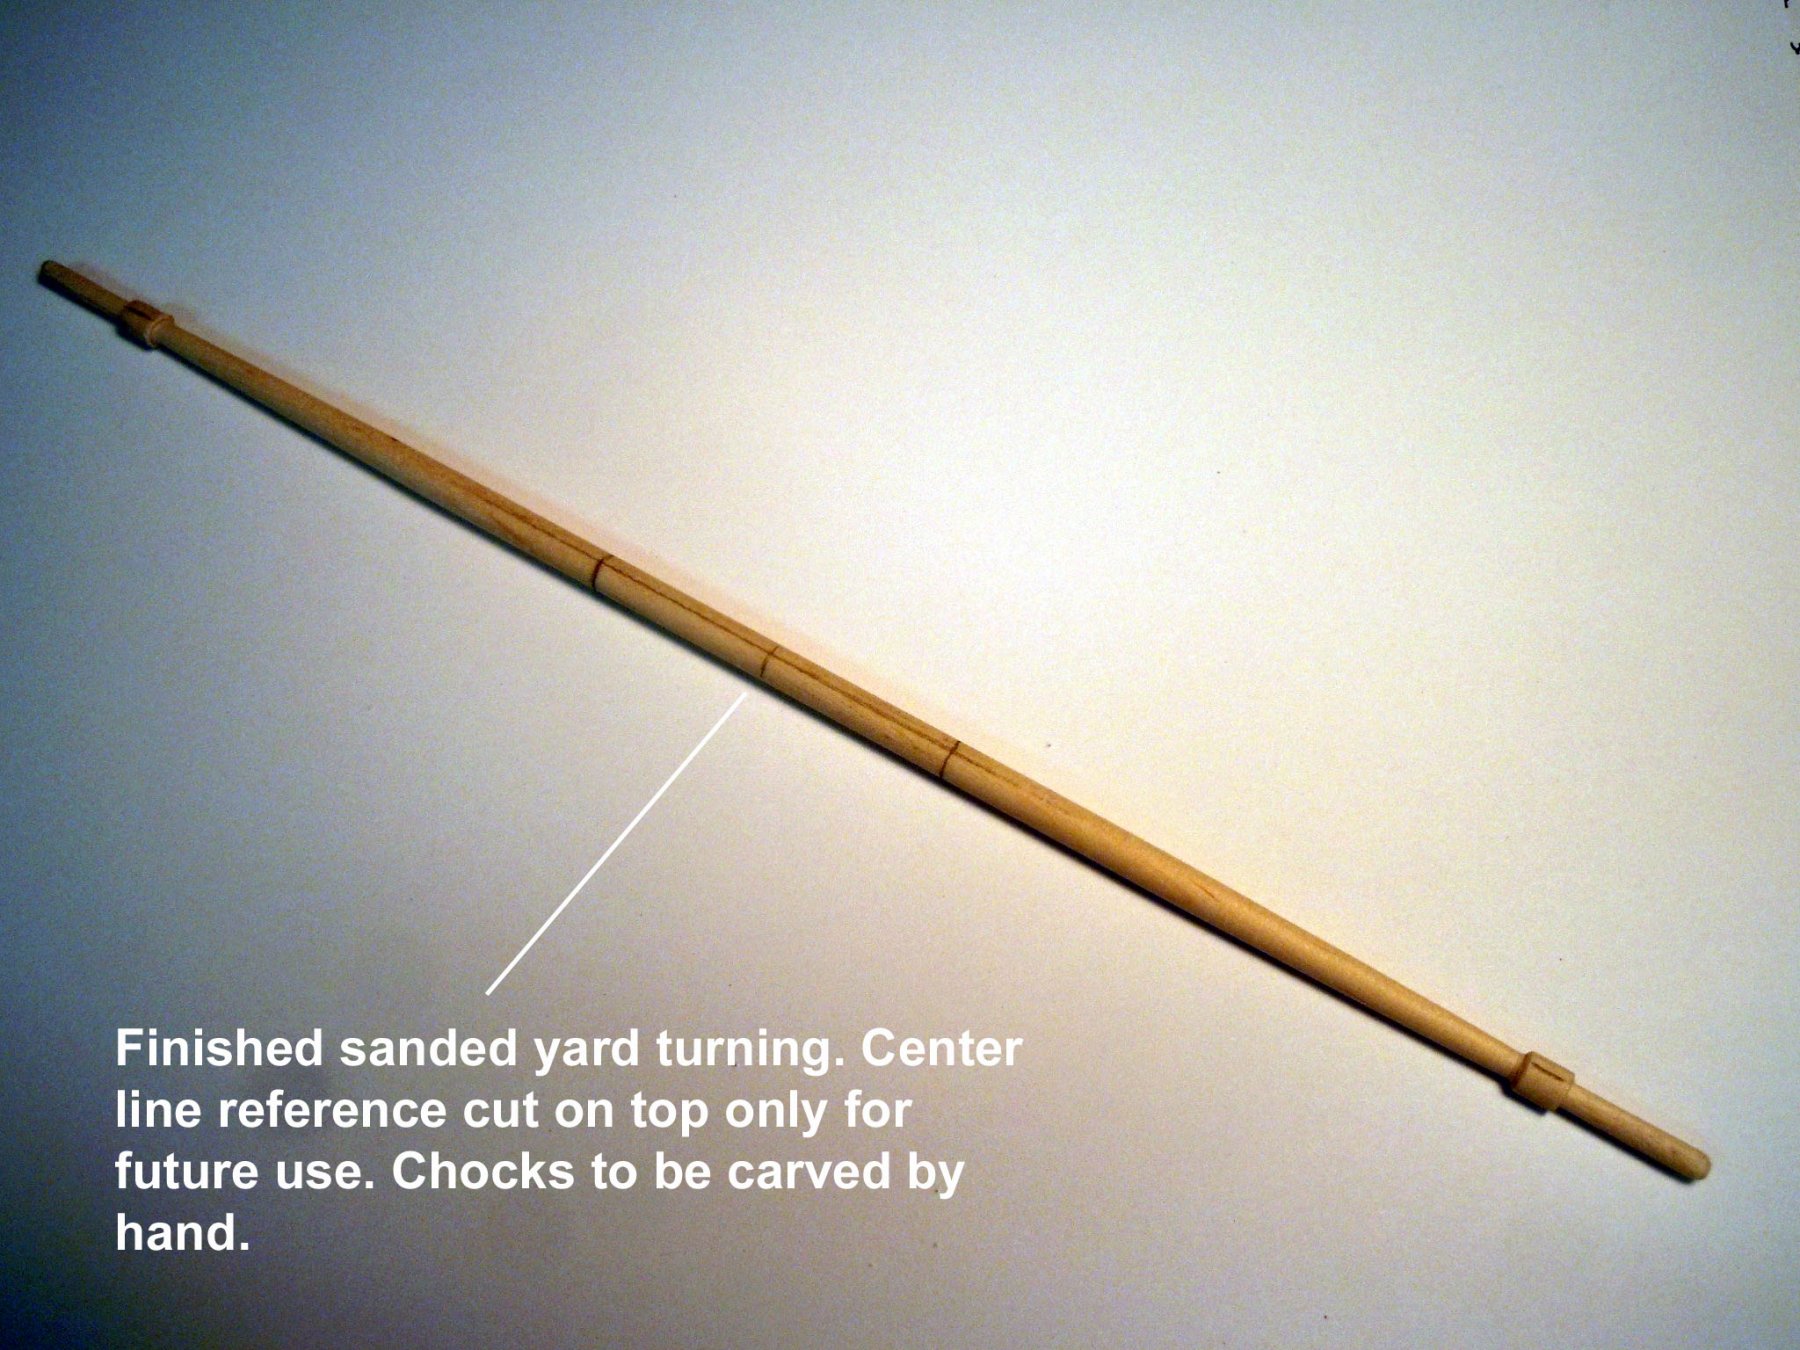
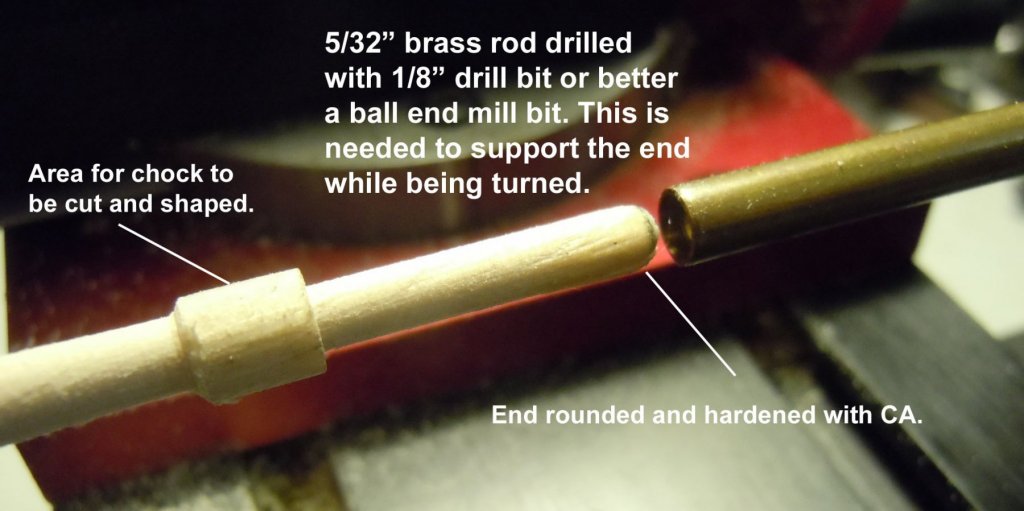
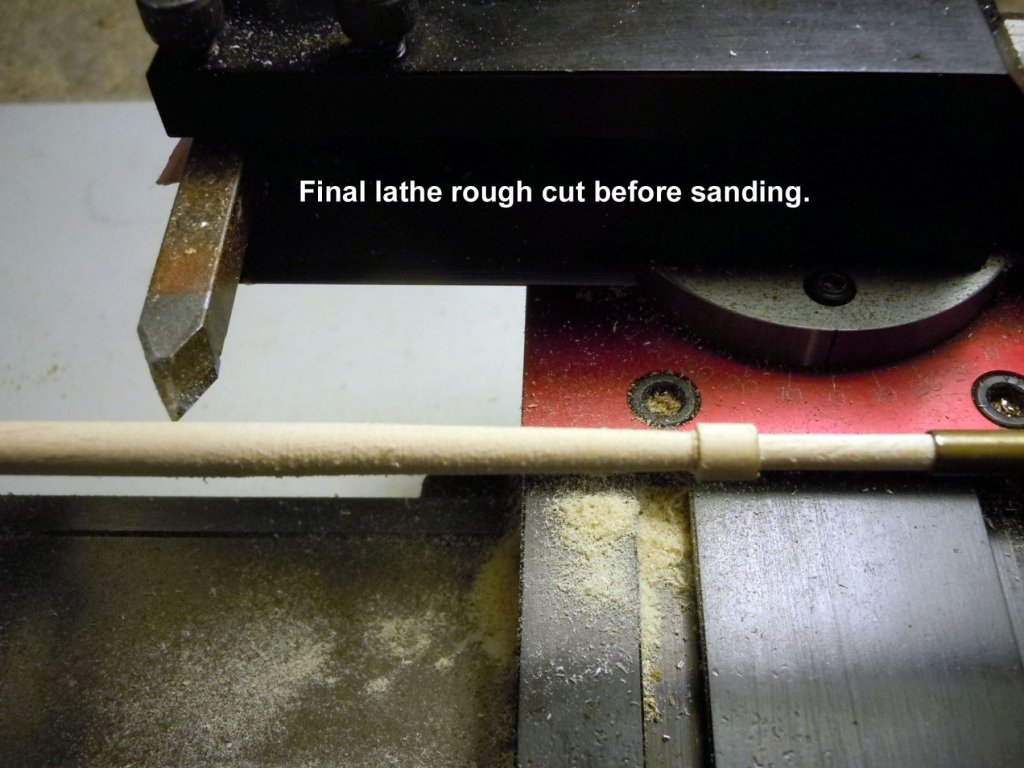
I moved on to the foot ropes and tied off the knots by starting in the center of the rope and spaced them down to the end of the jib allowing the space for a clove hitch and more knots tied down to the eyebolt on the cap. Once one side was completed I duplicated the second side. Tied in place. Now I added the bow sprit yard by turning the tapered ends on the lathe leaving an area for the chocks to be carved once the turning was completed. I used the combination slide which has a 2 inch travel enough to do the ends. I made an end holder out of brass rod to maintain a center when turning. Once turned and the chocks carved it was stained black, them the bulls eye guides were added per the plans. Here is the finished yard tied in place ready for rigging. Now to rig more lines now that the yard is in place.


-
Try using wood stain conditioner; on certain woods it does a good job of evenly raising the grain.
-
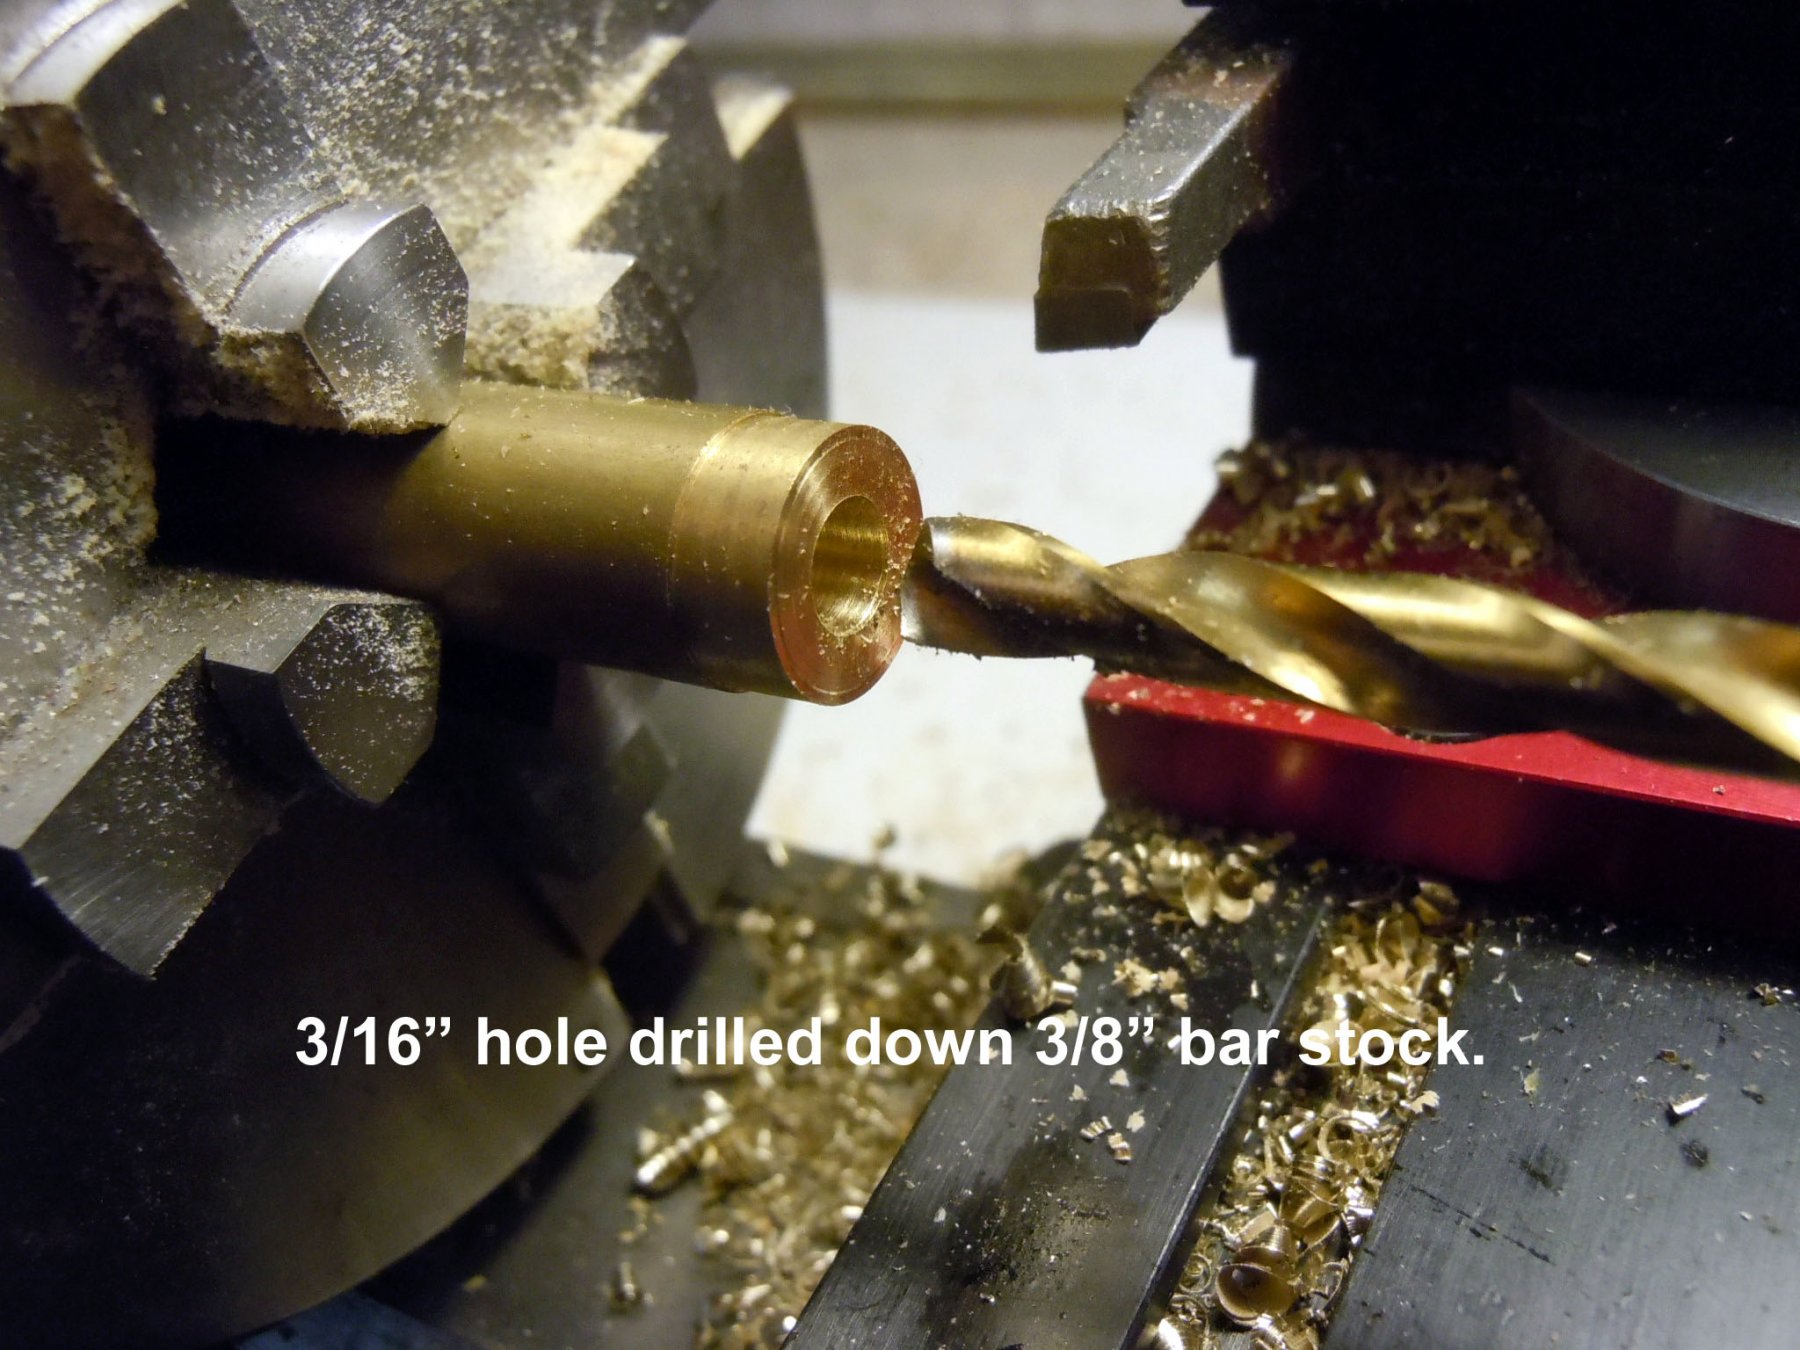
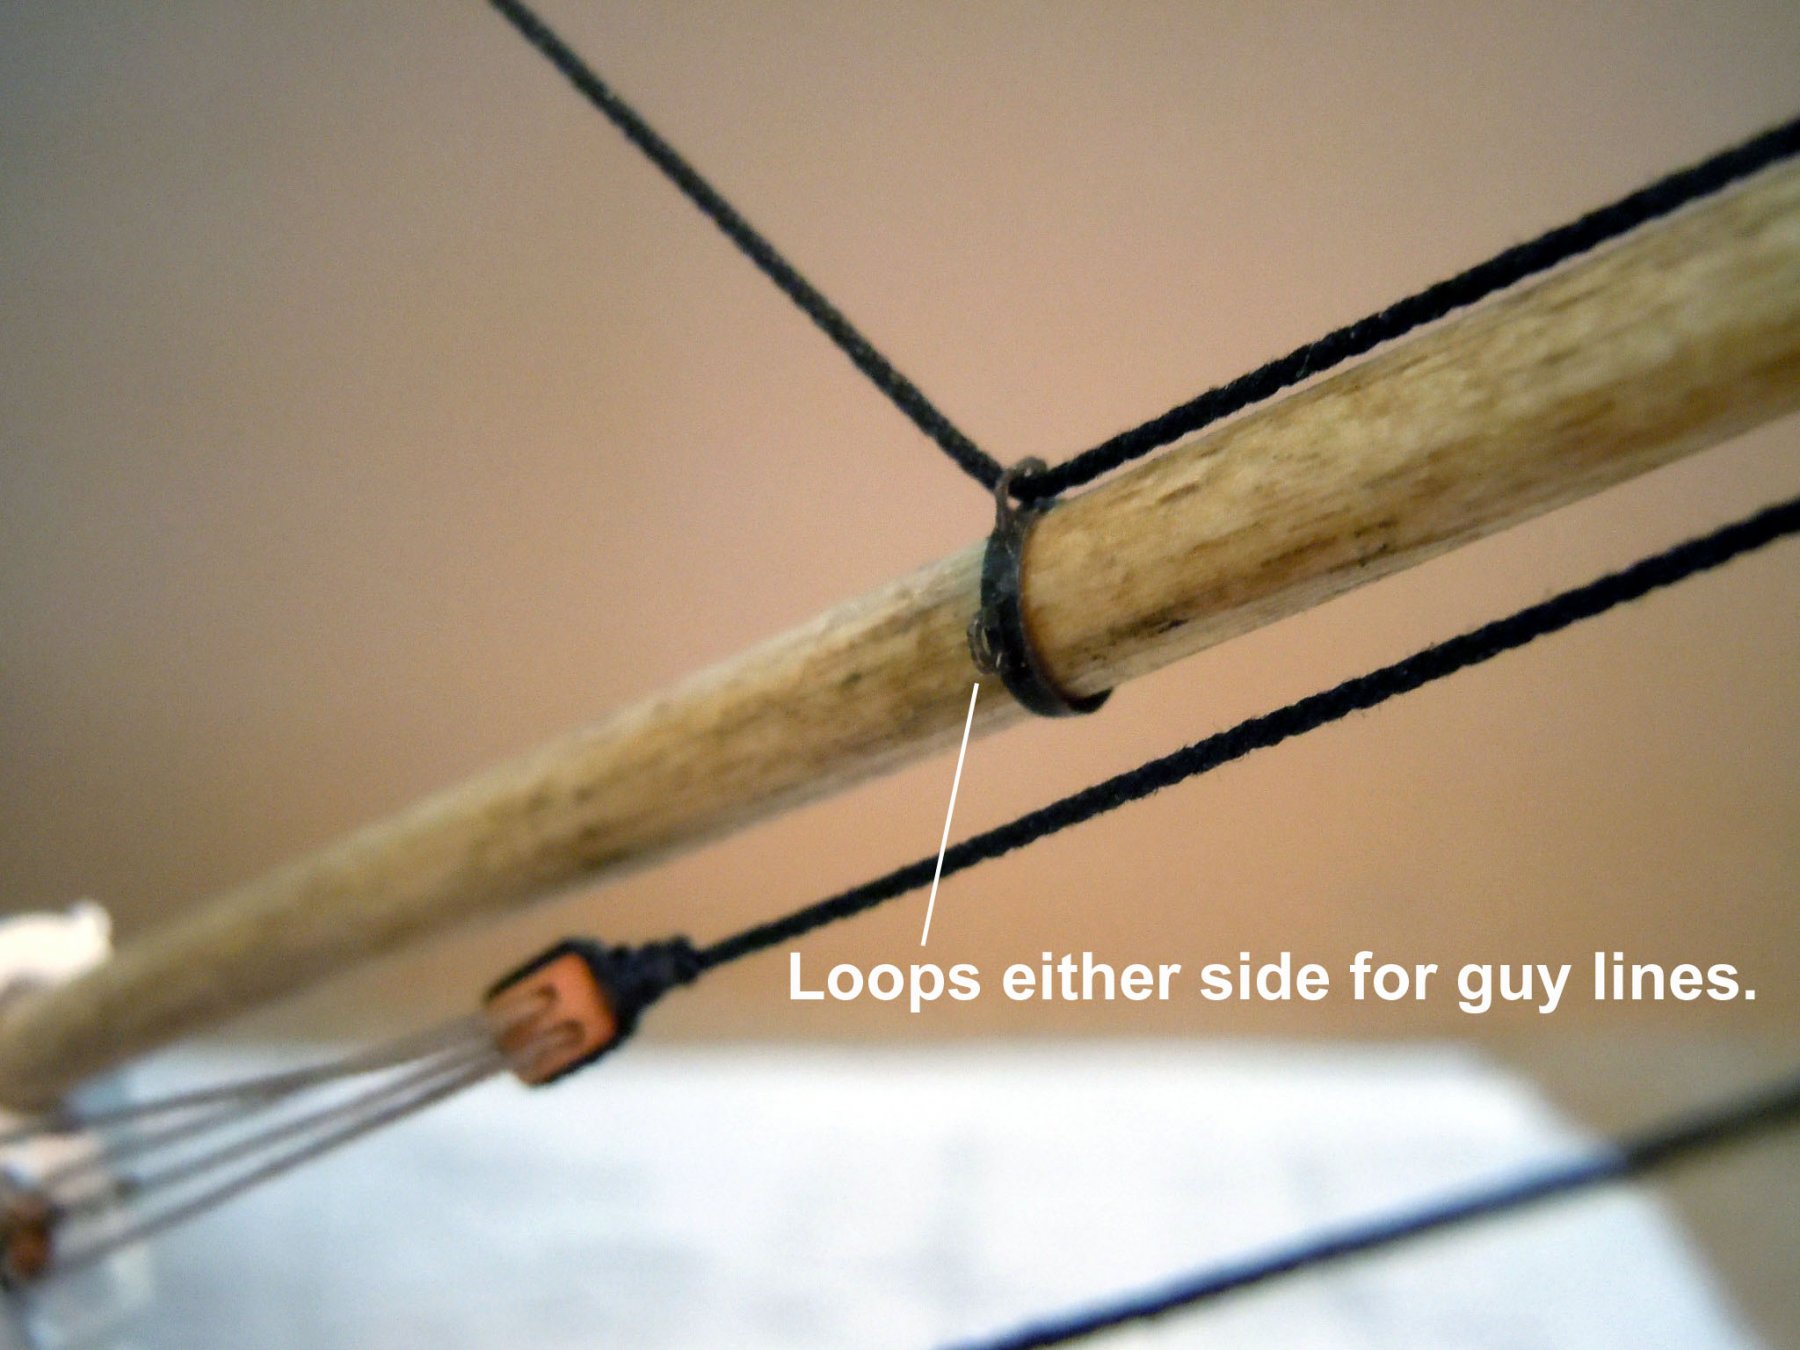
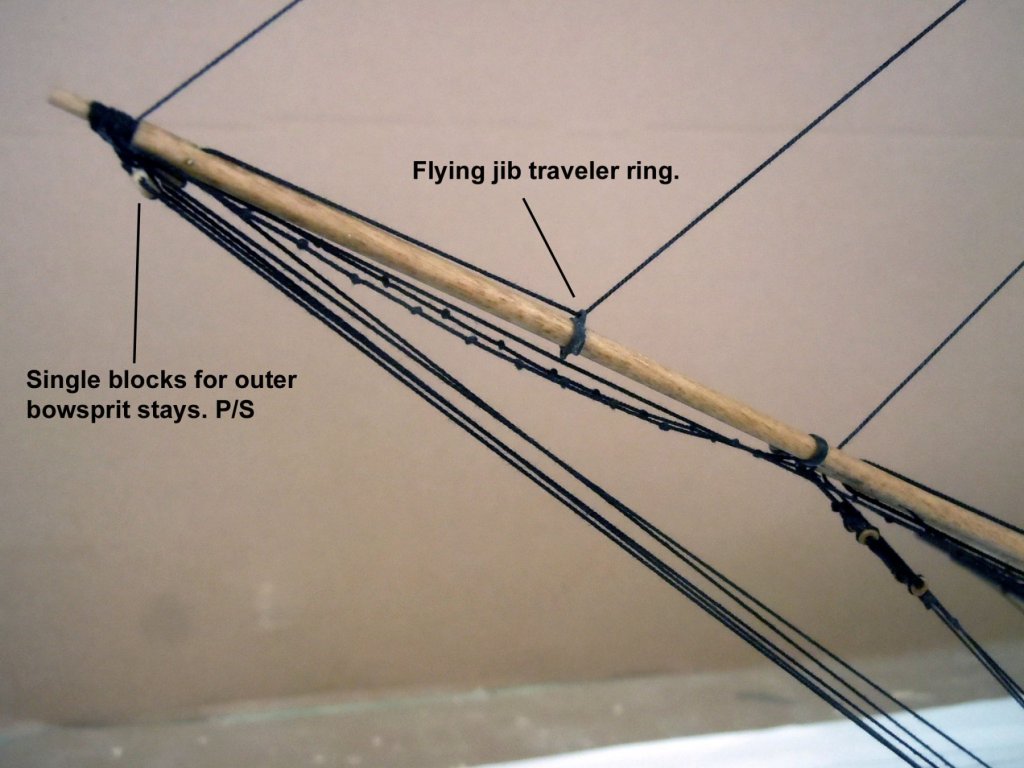
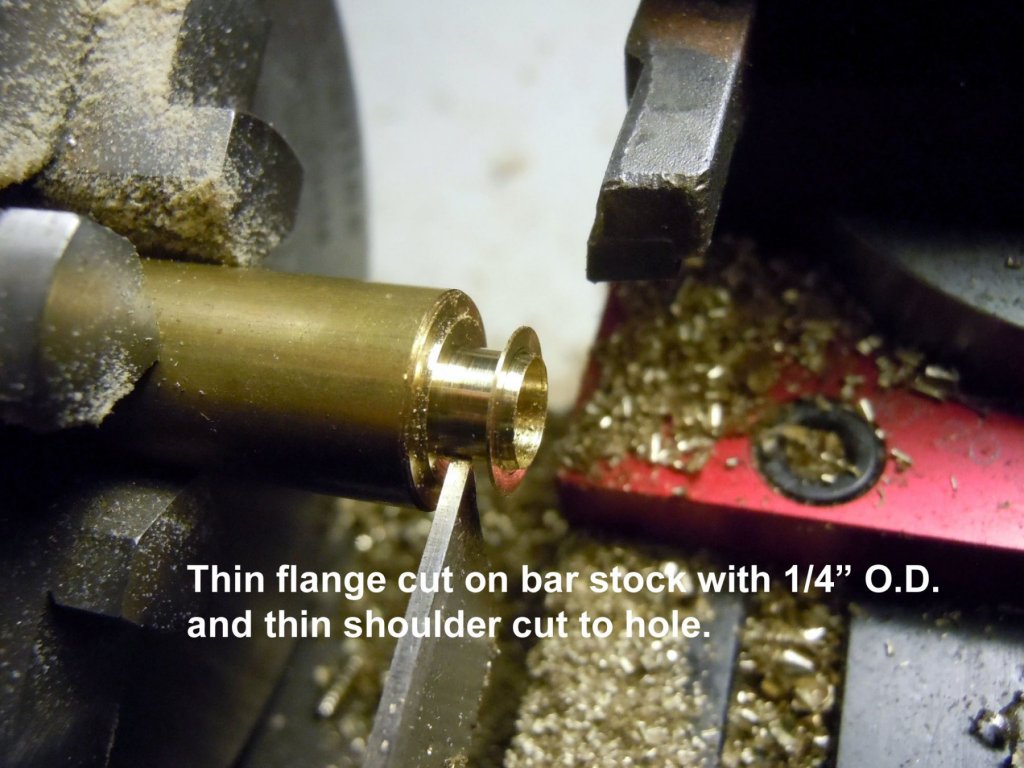
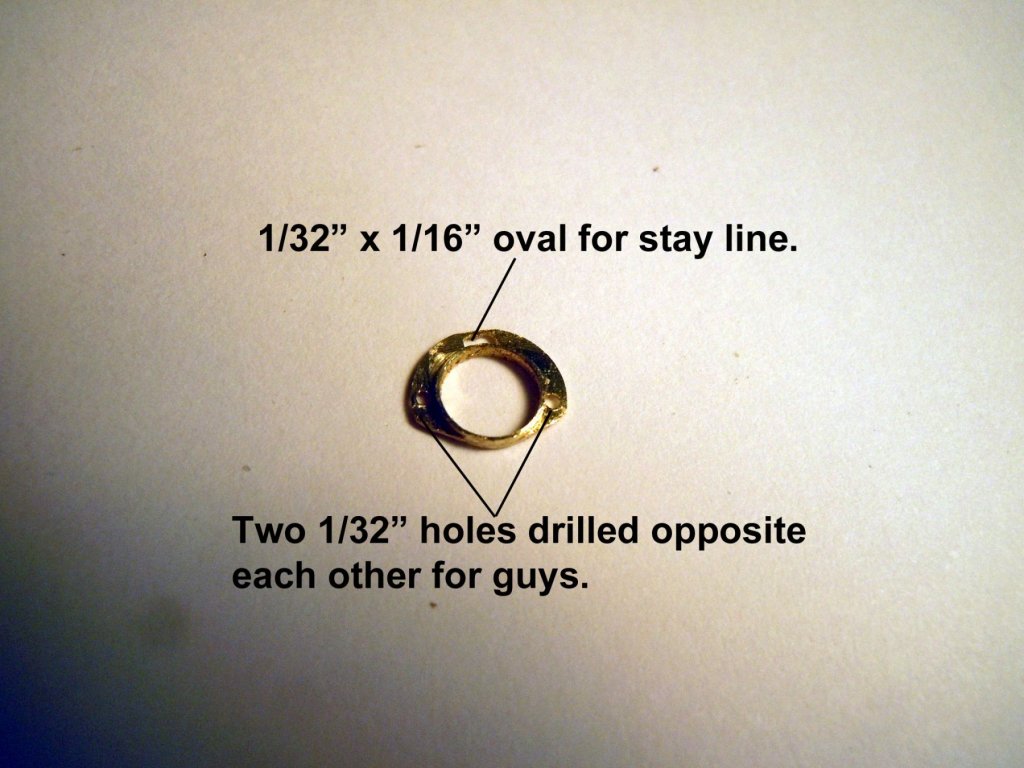
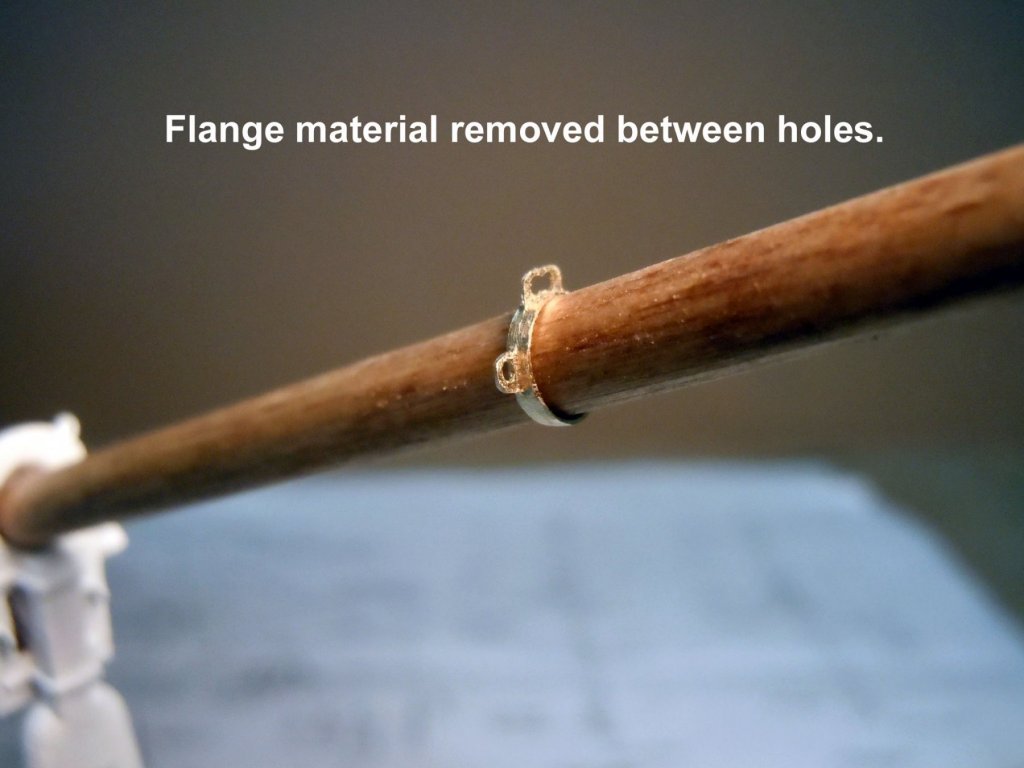
The challenge in making the traveler ring was to get an oval loop on top and two round on the sides for guys as shown on the plans. So I thought the best way was to turn a flange on a ring, drill 1/32" holes and then remove the excess material around the loops. Here is a sequence showing the steps I took using my Sherline lathe. Here the stained ring is rigged in place. Now to make the smaller one using the same steps for the flying jib.


-
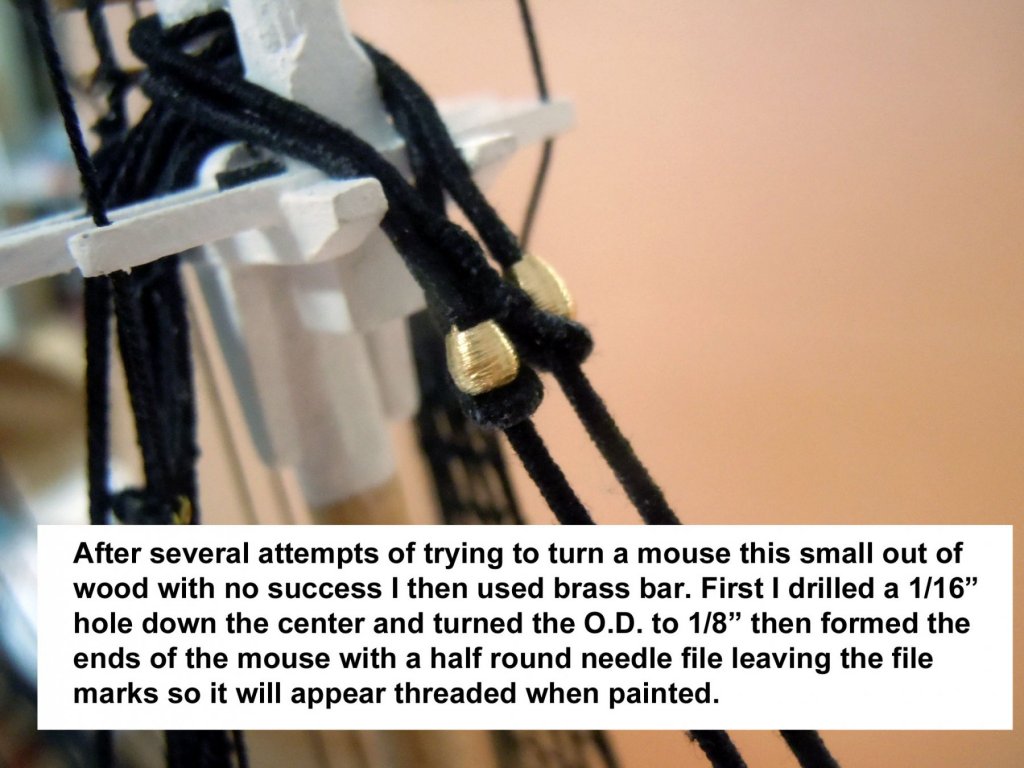
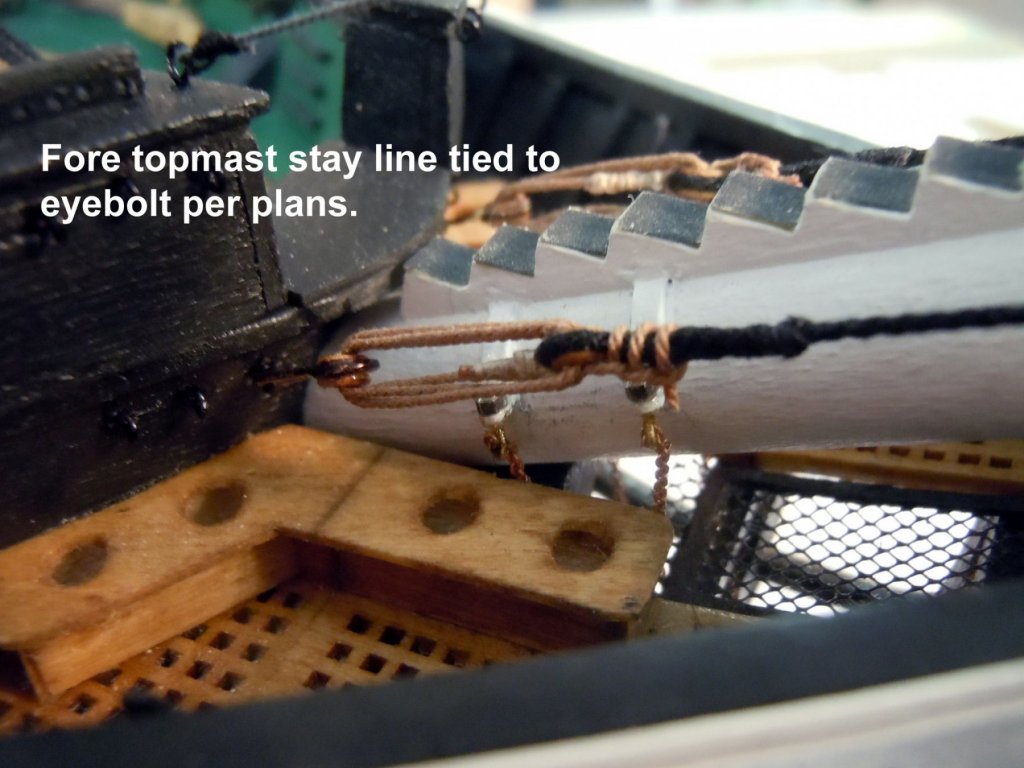
After a couple of attempts to turn small mice out of various woods that I have on hand I gave up and turned them in brass. I actually like them better than the wood for their strength. Next I finished up and rigged the open hearts per photos and bulls eyes. Once the fore mast stays were in place I snaked them this time by tying clove hitches. For those who follow I have found a thread that is great for seizing and serving lines in 40 and 50 weights. There is a limited color offering but it is quilting thread and I also make rope out of it as well. Here is the fore topmast stay line attachment detail. Here is more of a overall view. Next I will move on to the traveler rings to finish out the bowsprit stays.


-
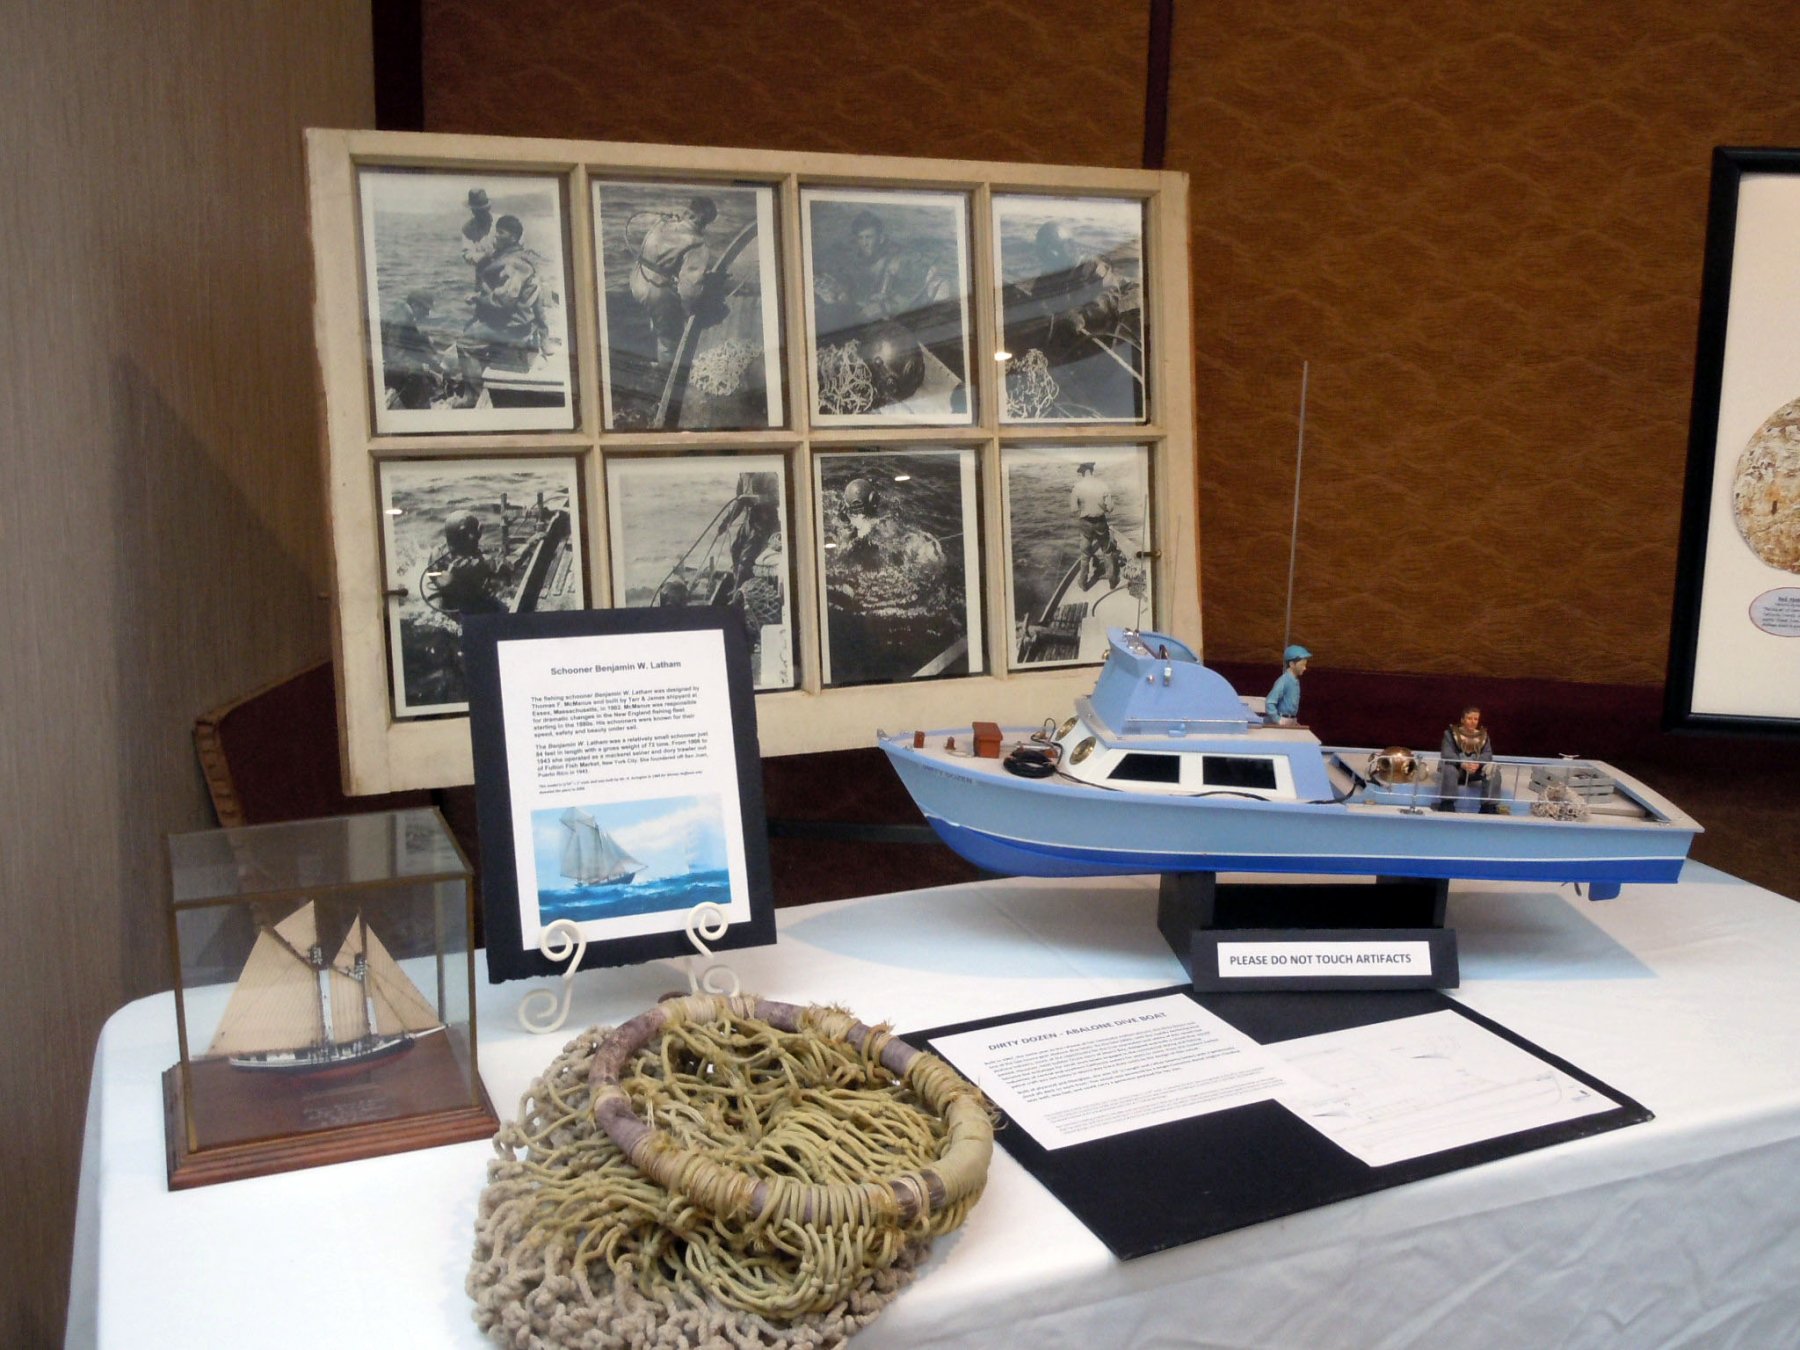
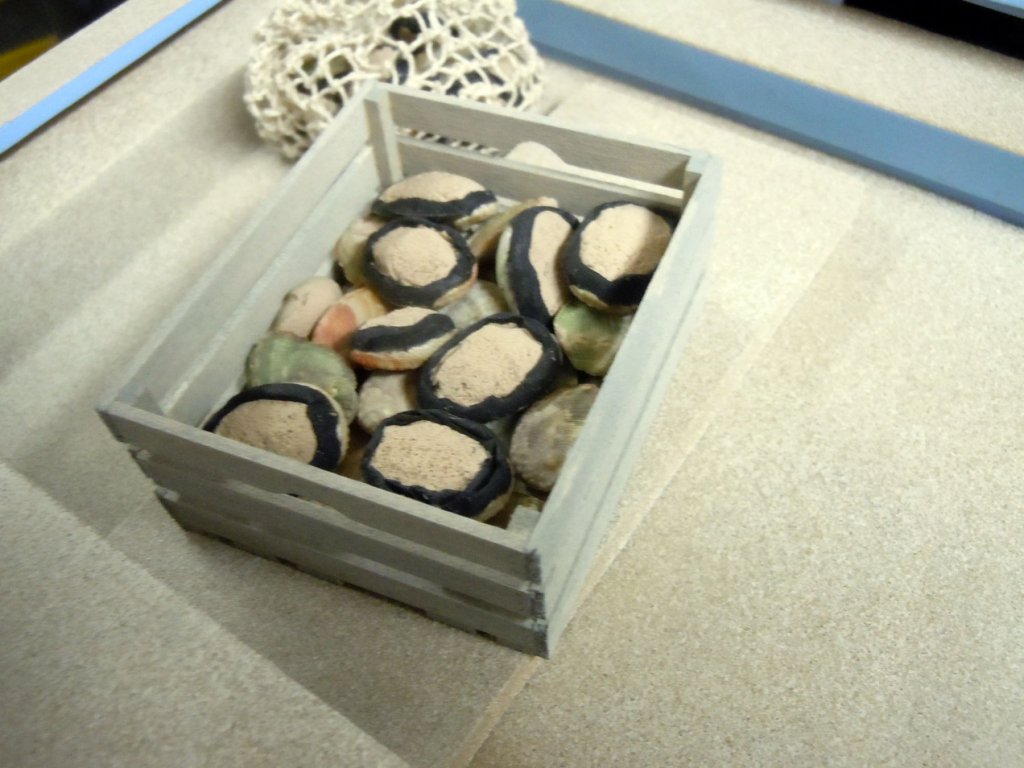
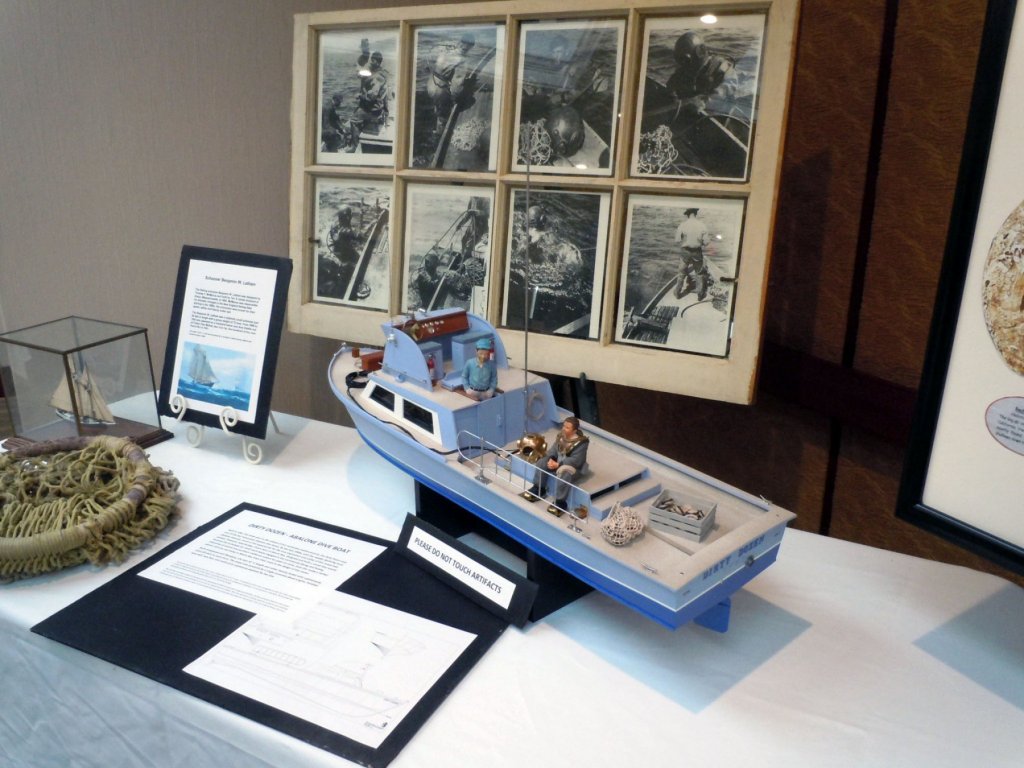
Last night was the first public display of the Dirty Dozen at the Maritime Museum's annual conference. It was very well received by all with lots of compliments. I had also made a crate and net full of scale abalone using real seeding abalone shells that were donated by the local abalone farm. Sculpty was used to fill them and baked in place. Here is the display setup for the meeting, along with local artifacts,including a window pane with diver pictures taped in place. The little schooner is the Benjamin Latham that has been donated to the museum. Now to store it until the museum opens, this fall is the target date assuming the permitting process flows smoothly.

- 162 replies
-
- 9
-

-
- dirty dozen
- fishing
- (and 2 more)
-
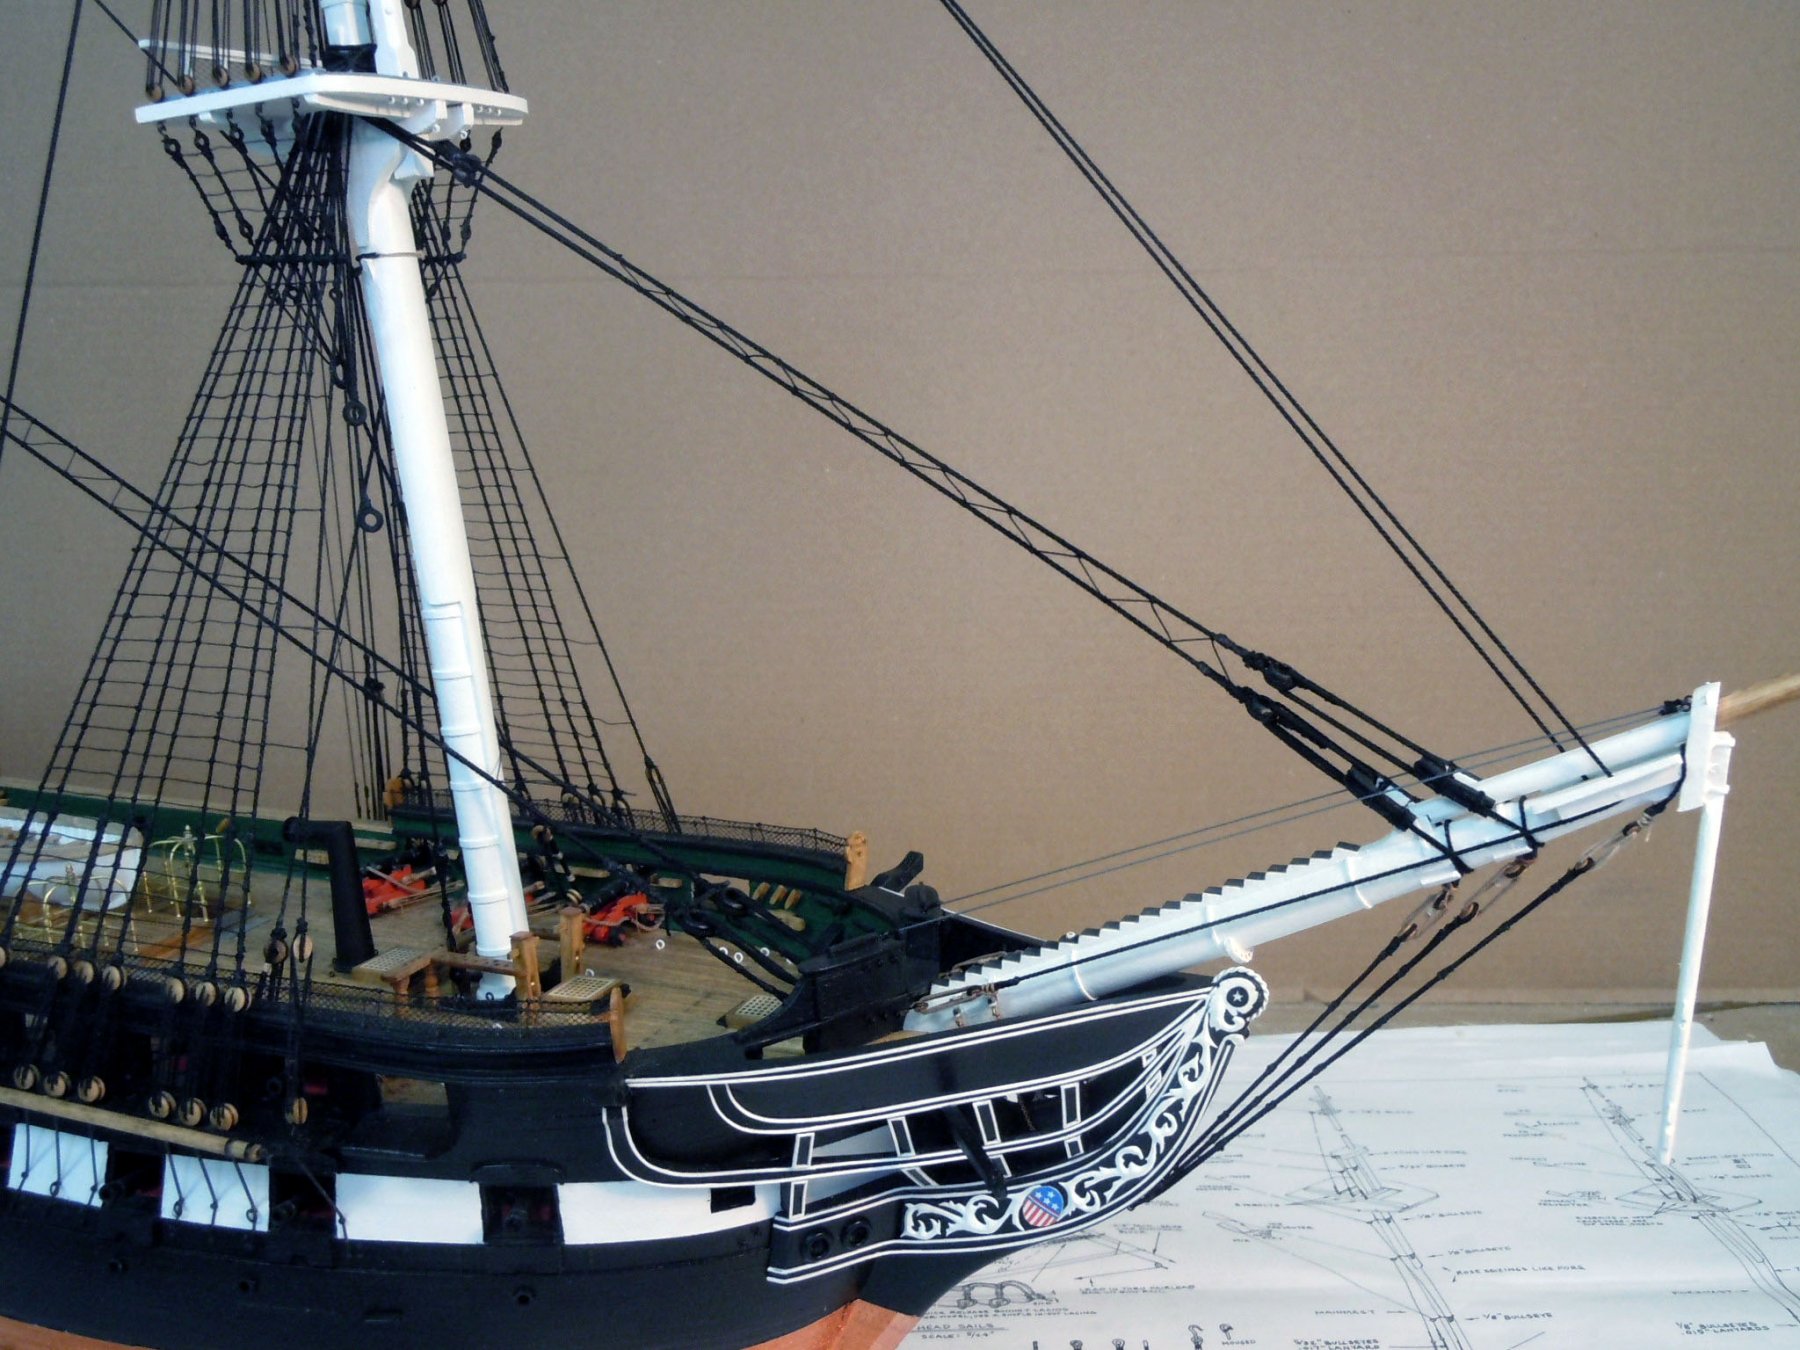
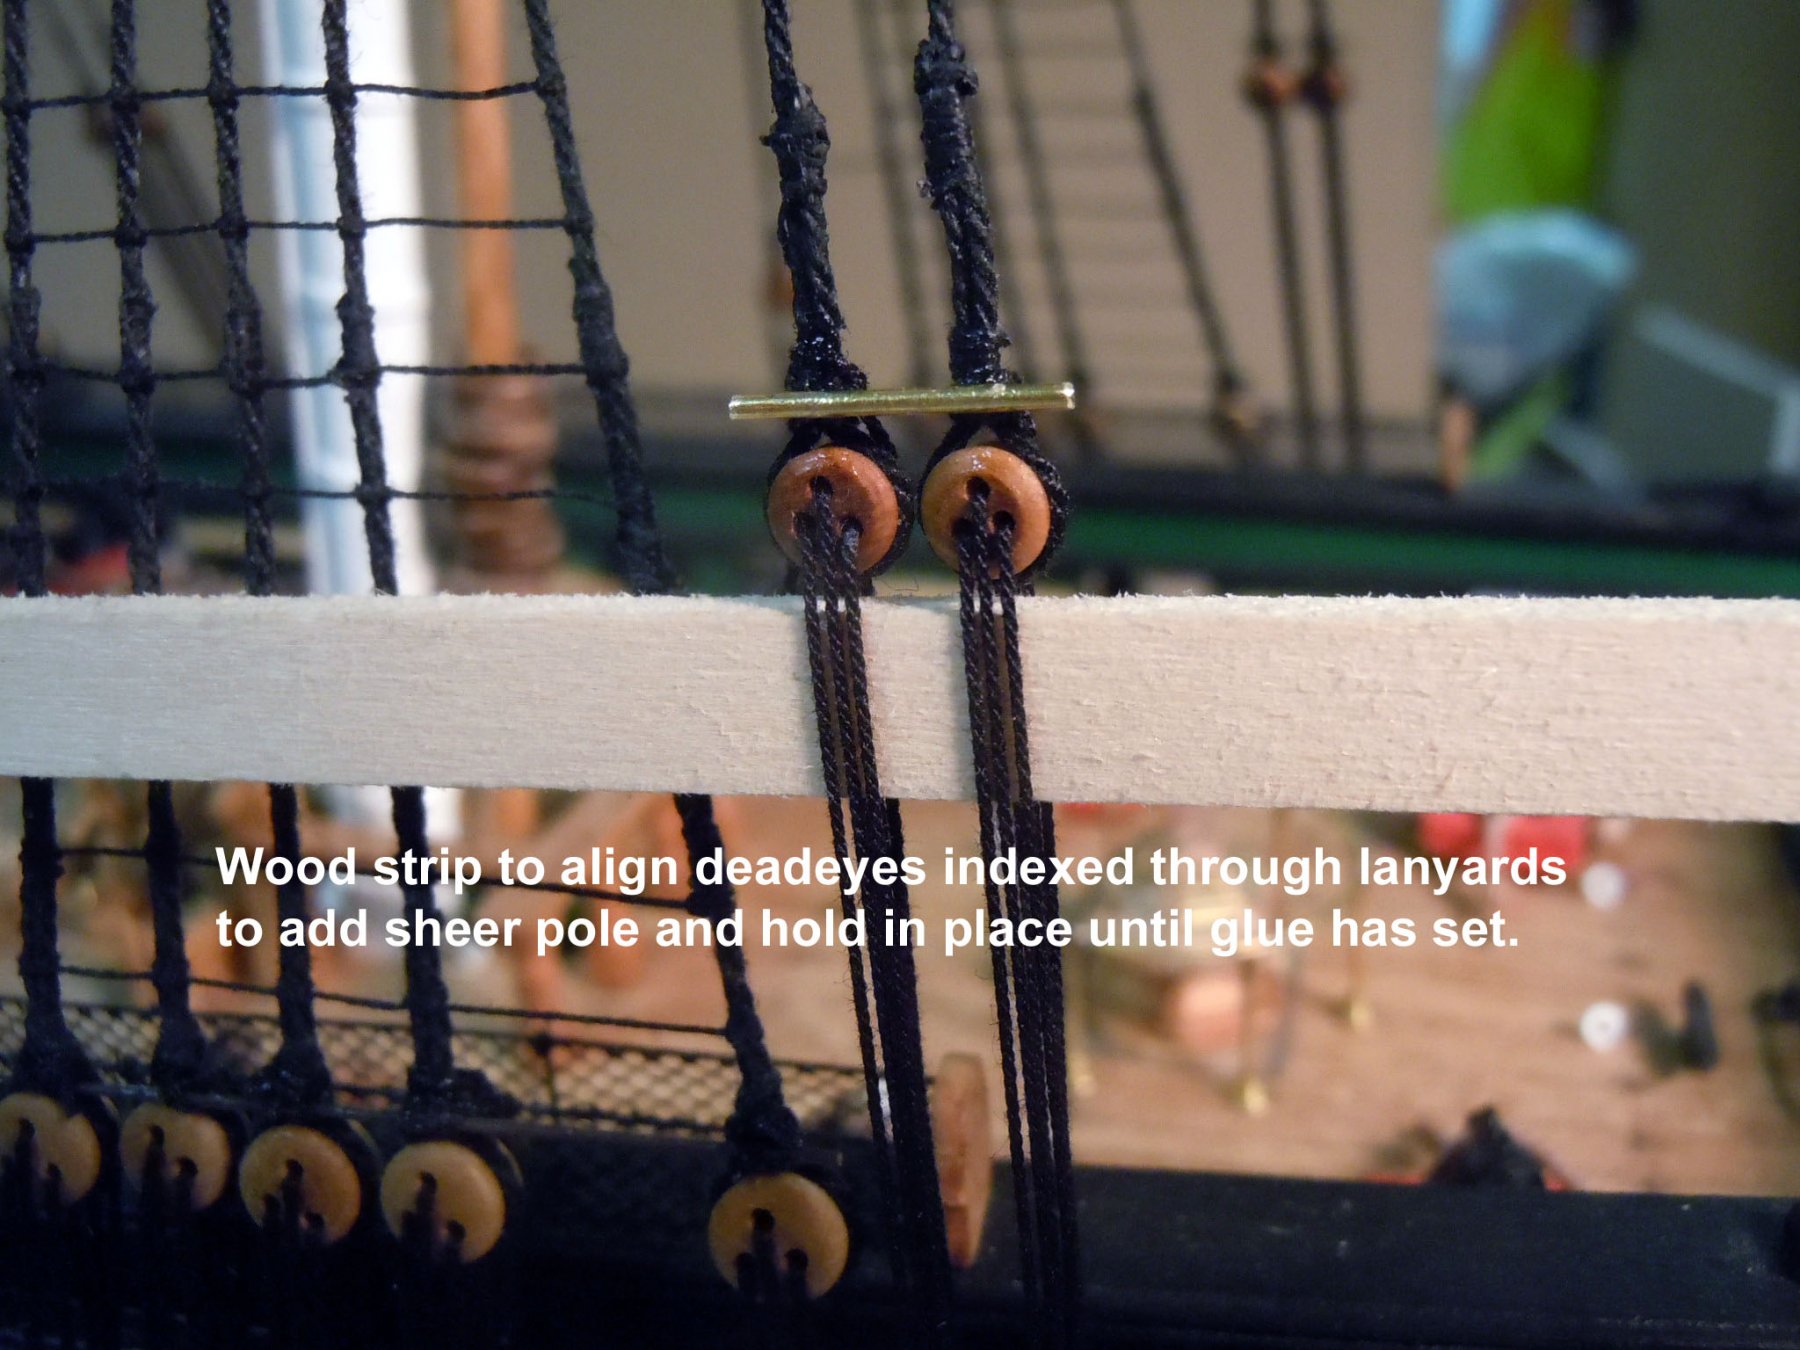
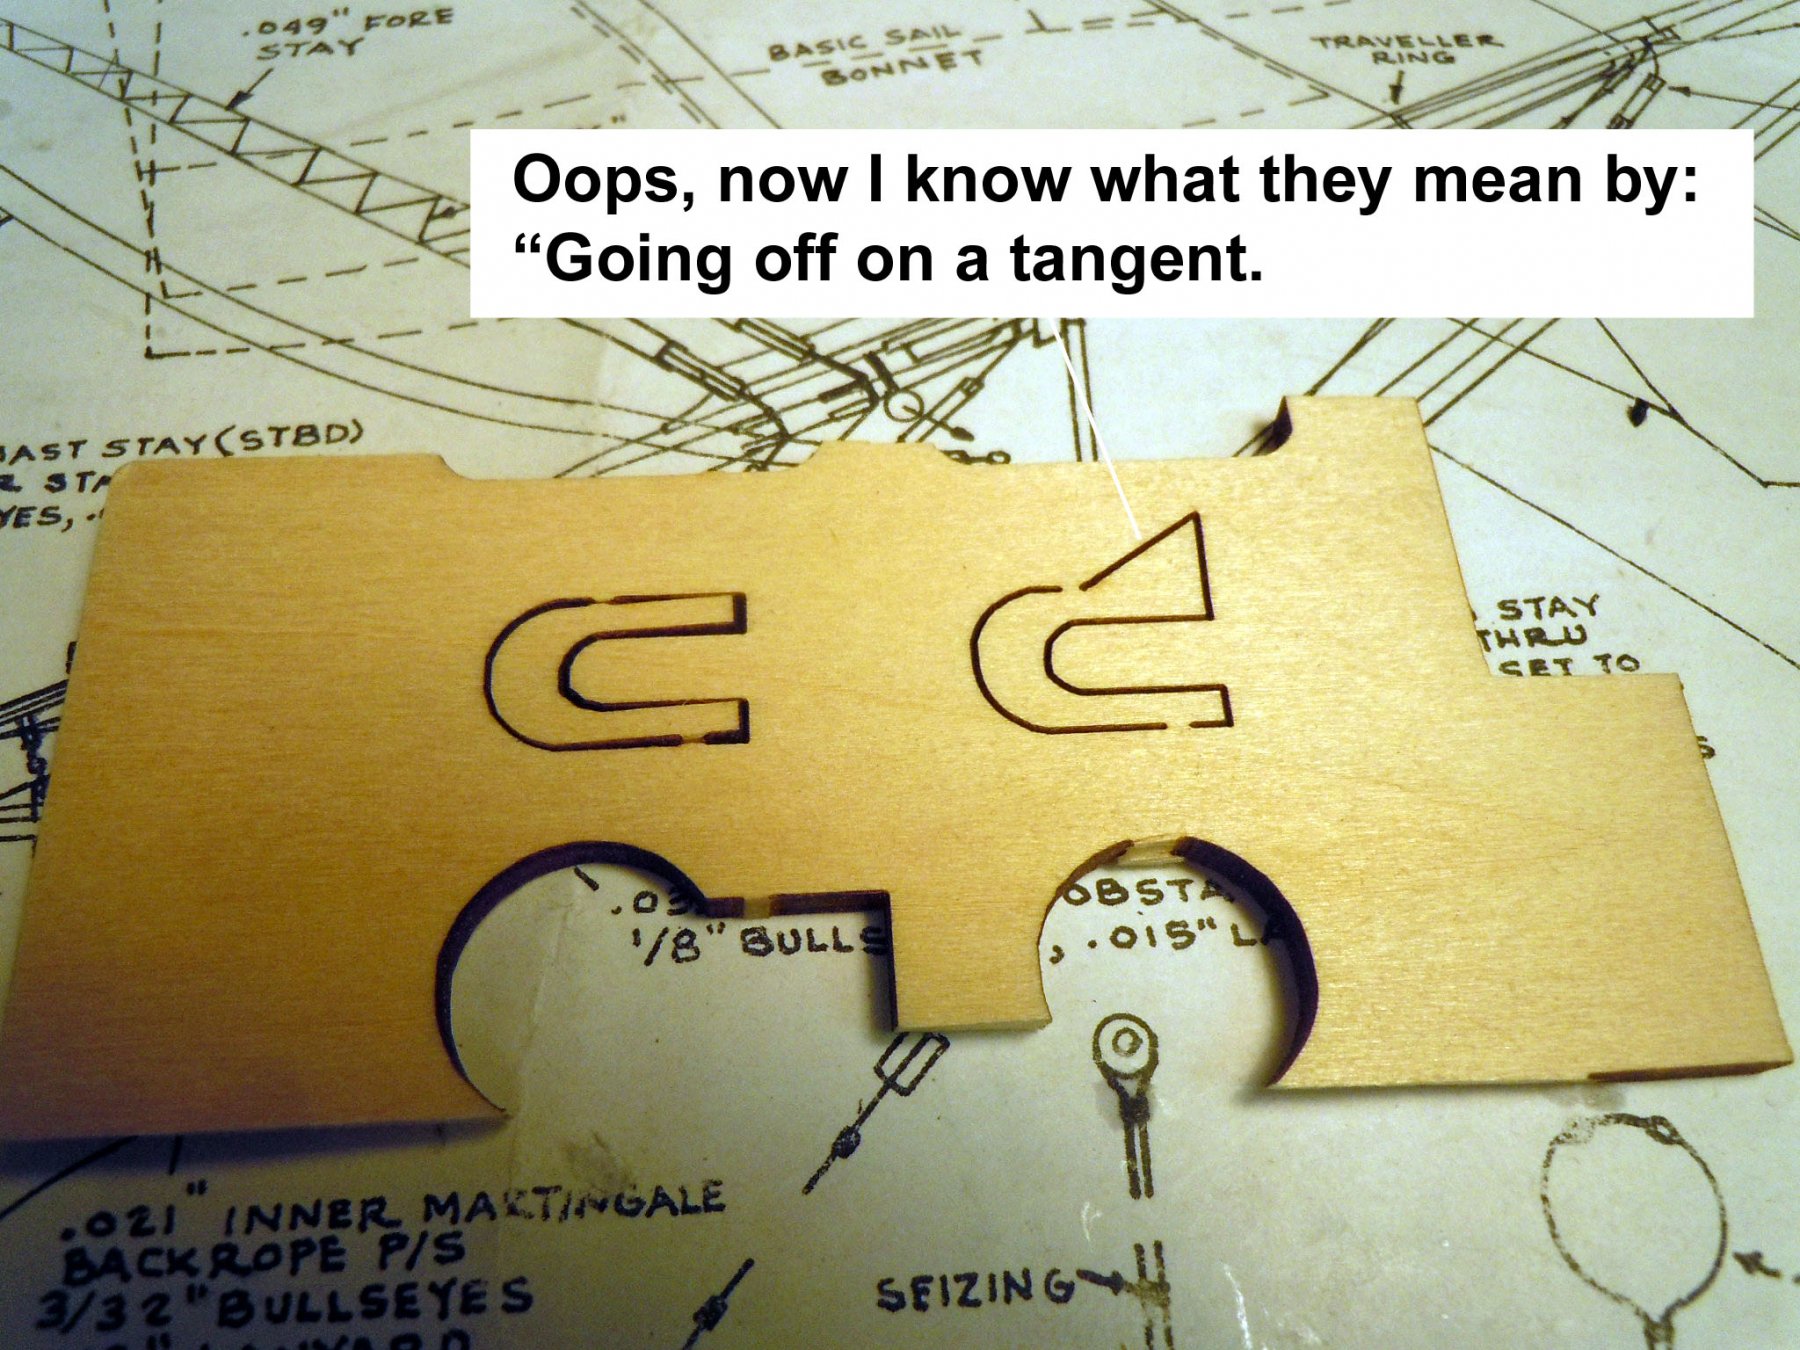
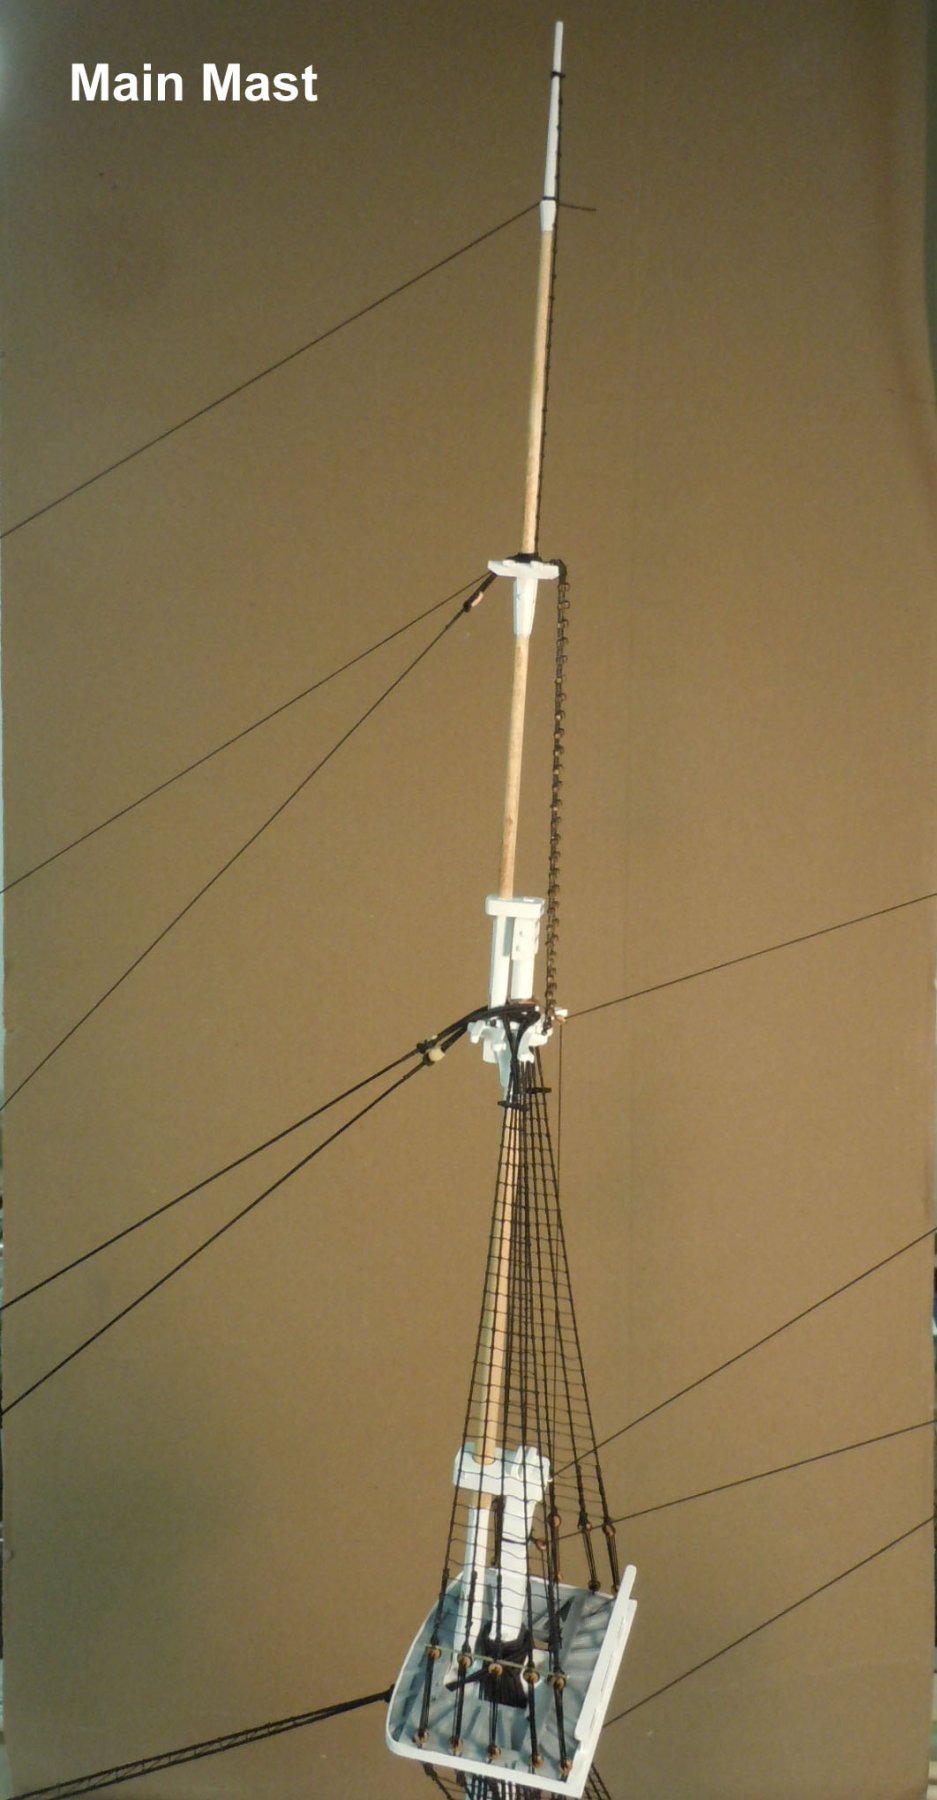
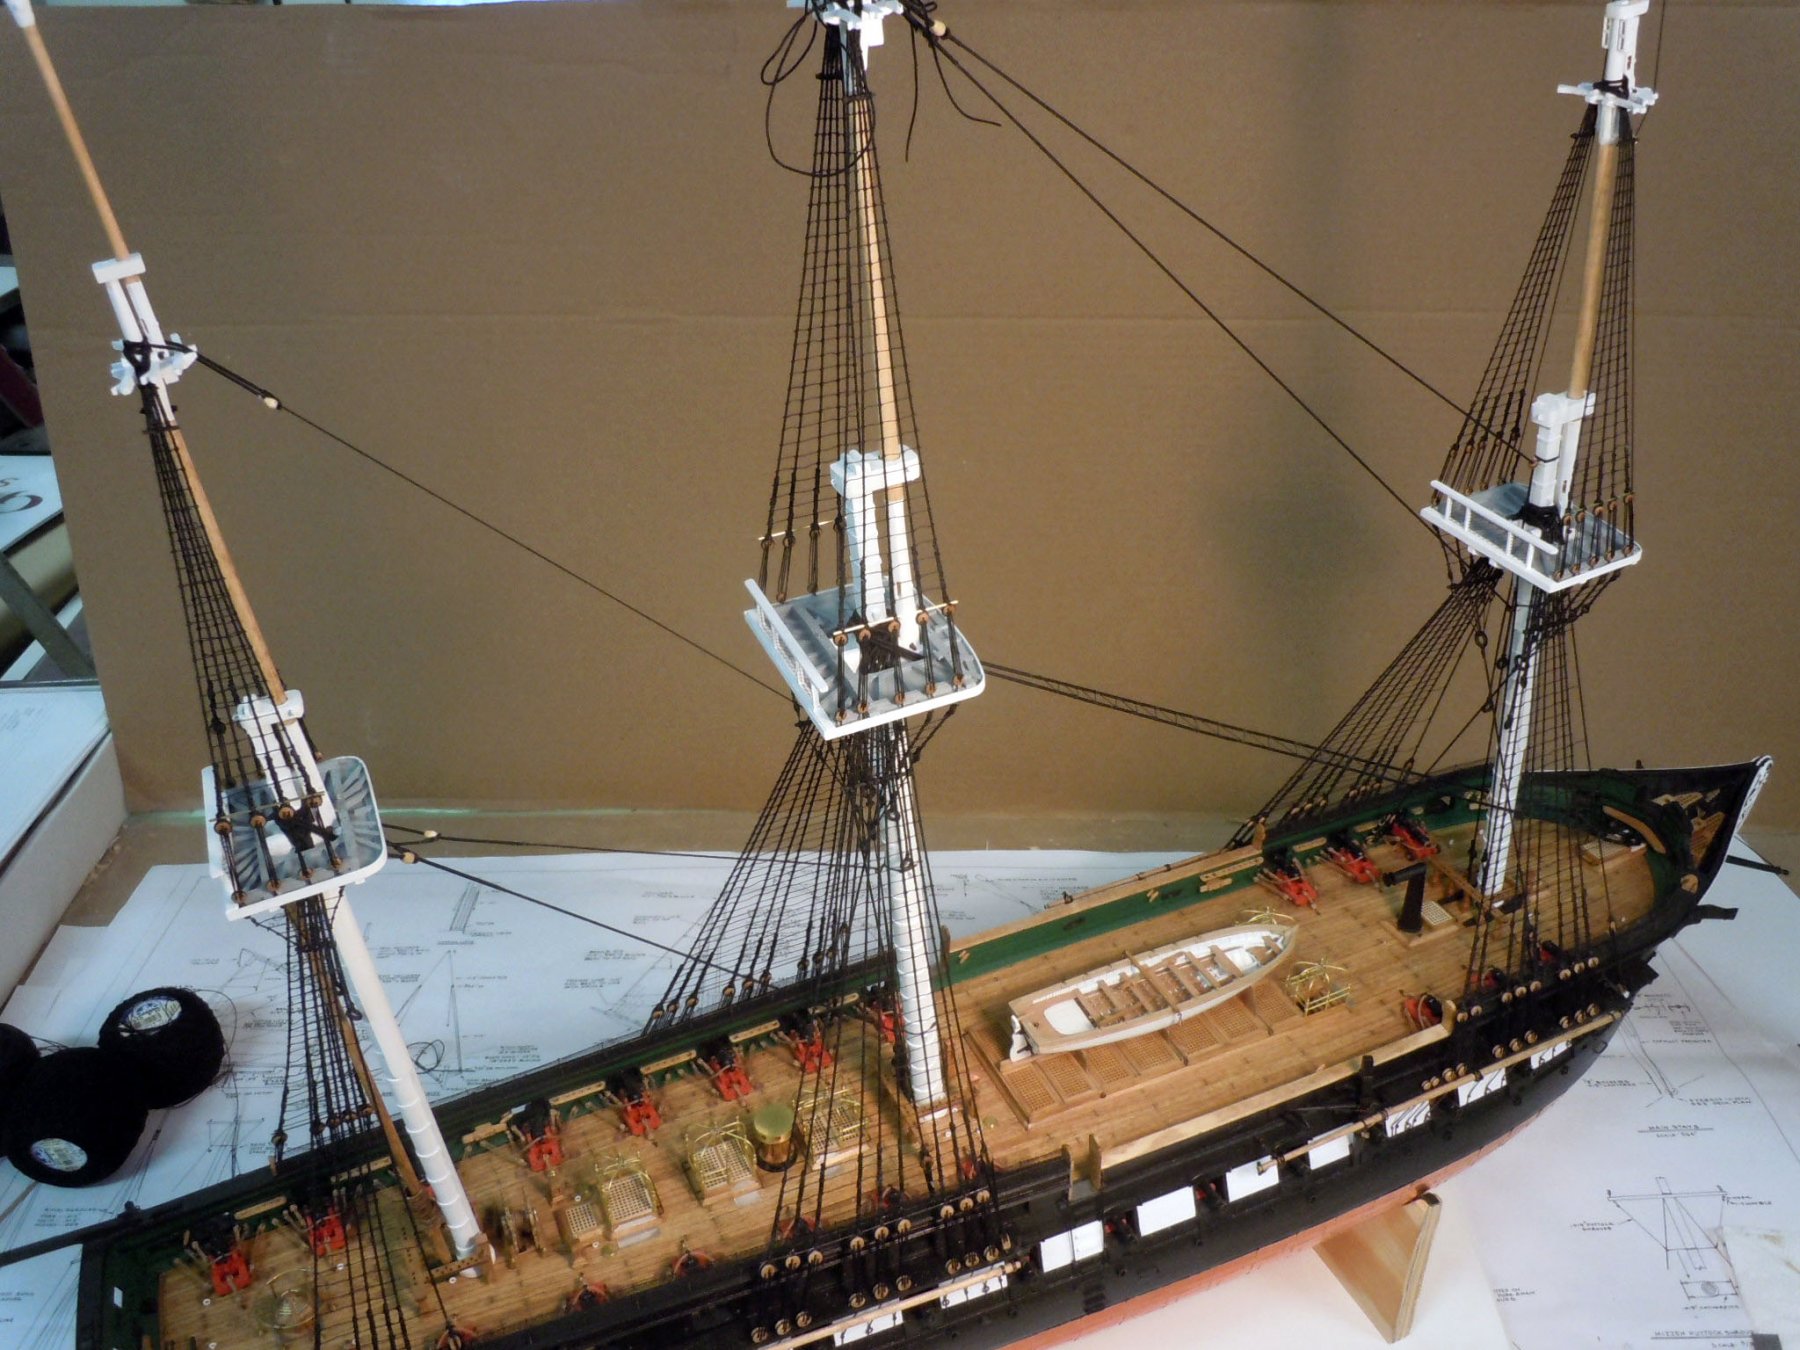
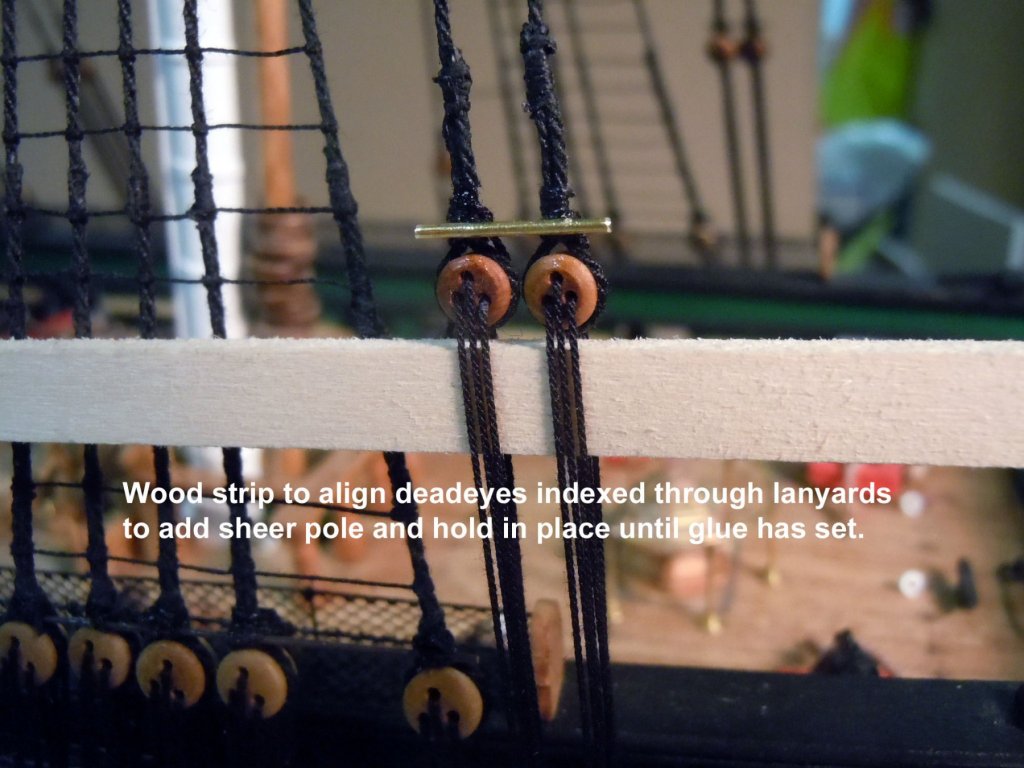
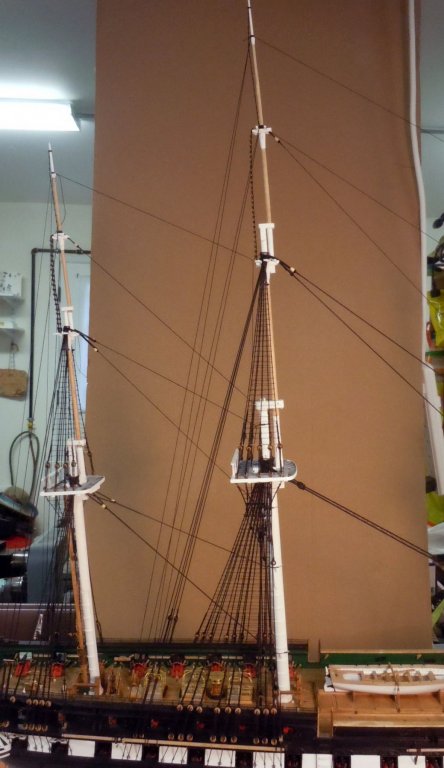
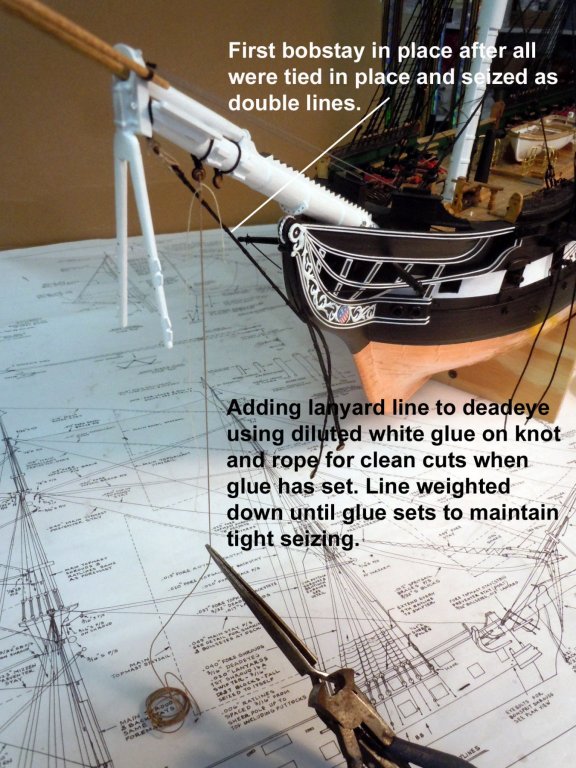
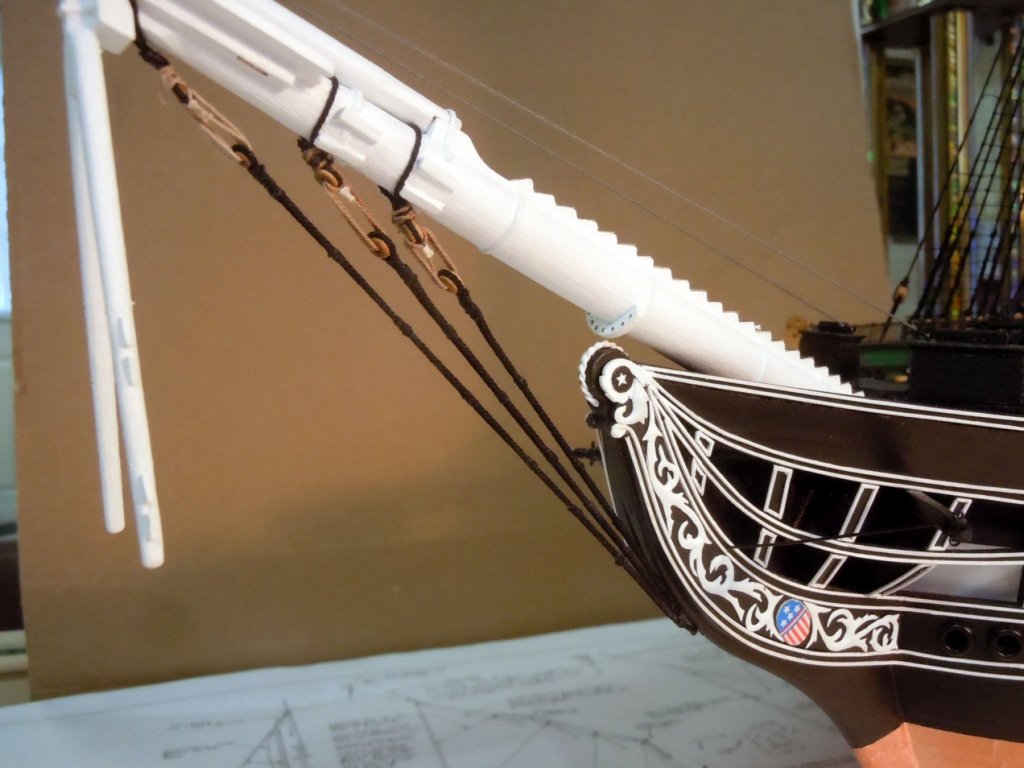
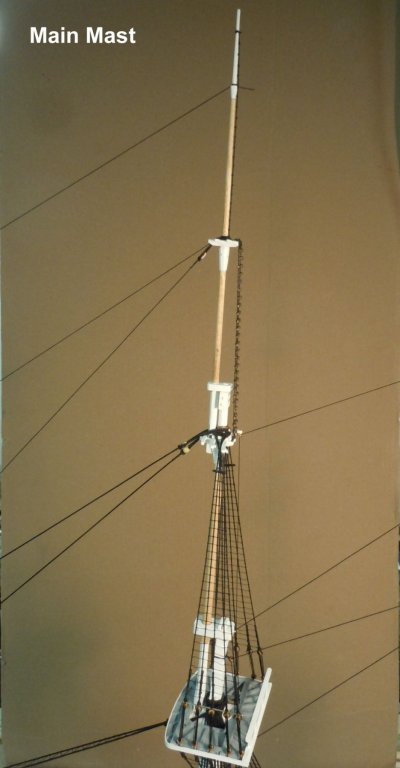
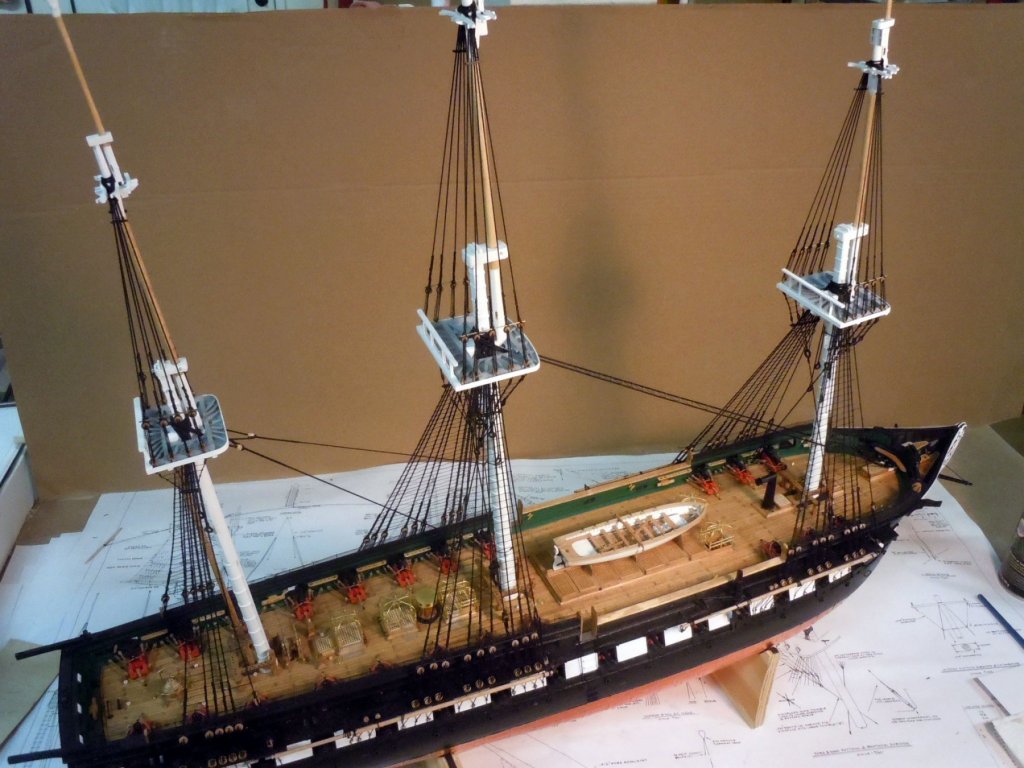
Slow going on the rigging as I am making rope to size as needed due to limited space on work bench. And as Geoff has said the ship has gotten much longer now that the bowsprit has been added. I added all the back stays to all the masts three different sizes as they progressed higher. I again used wood strips to align the deadeyes to add the sheer poles as needed. This worked well on the ratlines. Here is the main mast with the back stays in place. I am going to need a bigger background now as well. Next I moved on to the bowsprit and will make and add lines working from the center out on the bowsprit. Learned this lesson from the Niagara build. First the bob stays were tied off at the bow and seized as double lines which the seizing on the plan view are represented by dots on the line drawing. Dead eyes were added on the ends with the line joint hidden under the top seizing with the deadeye. Another lesson learned in working with the rigging is to used diluted white glue on the seizing and lines to be cut to have clean cuts. Patience is needed to allow the glue to set which is slower than CA but much easier with no color change. Also the center holes of the bull's eyes had to be enlarged for the lanyard ropes to lay properly. Here is an example of how I glued the seizing and lines being weighted down as glue set. Here are the finished bob stays in place. Next I am going to add the fore stay lines with the hearts, keeping in mind of adding lines from the center out for the bowsprit. Found just a little oops when selecting the hearts to work on. Now back to the fore stays,shaping and painting the hearts and making the rope lines to size. My modified and strengthened ME ropewalk is working perfect, as well as, the lathe setup for serving the ropes.

-
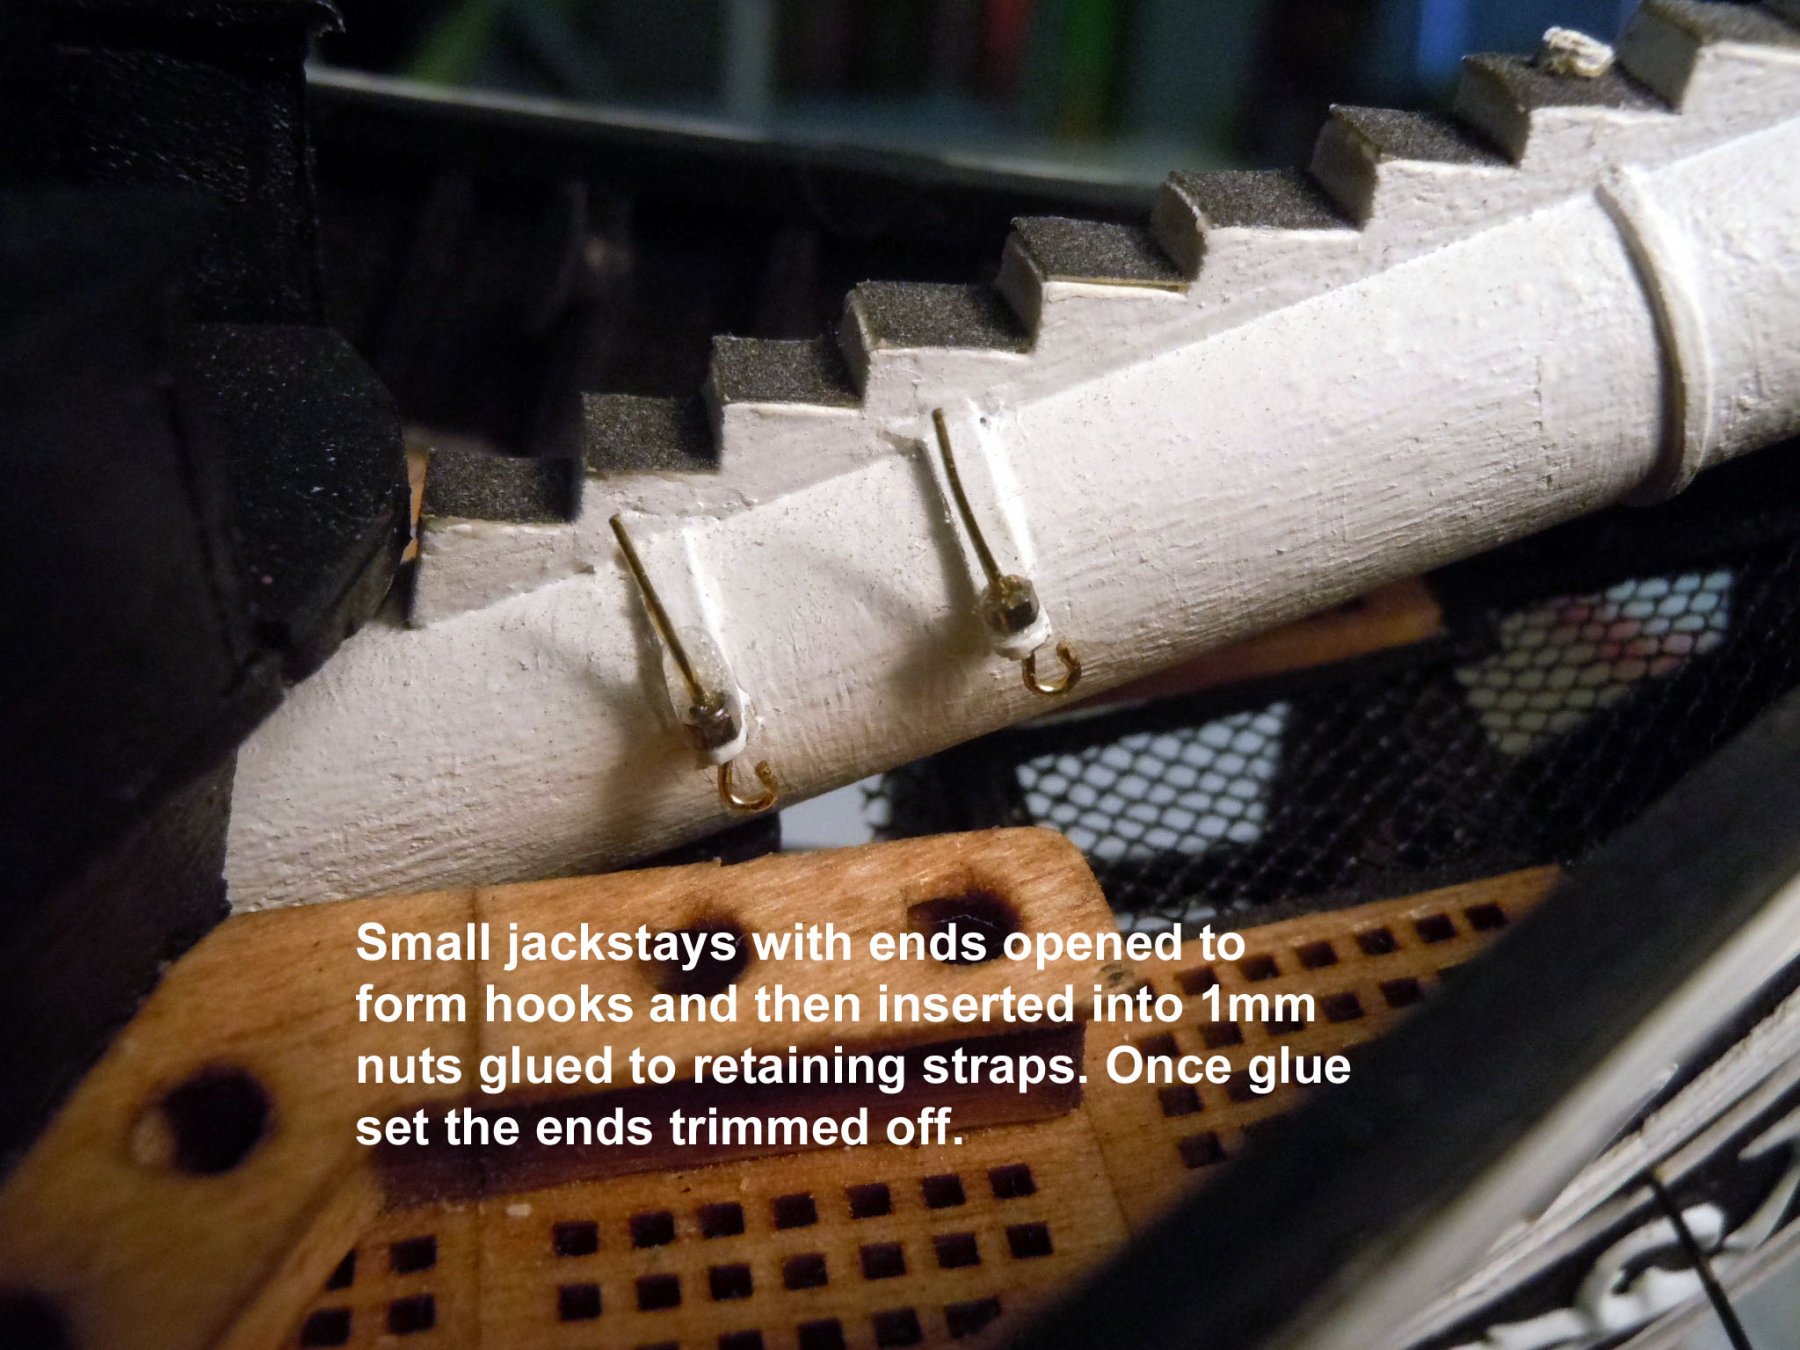
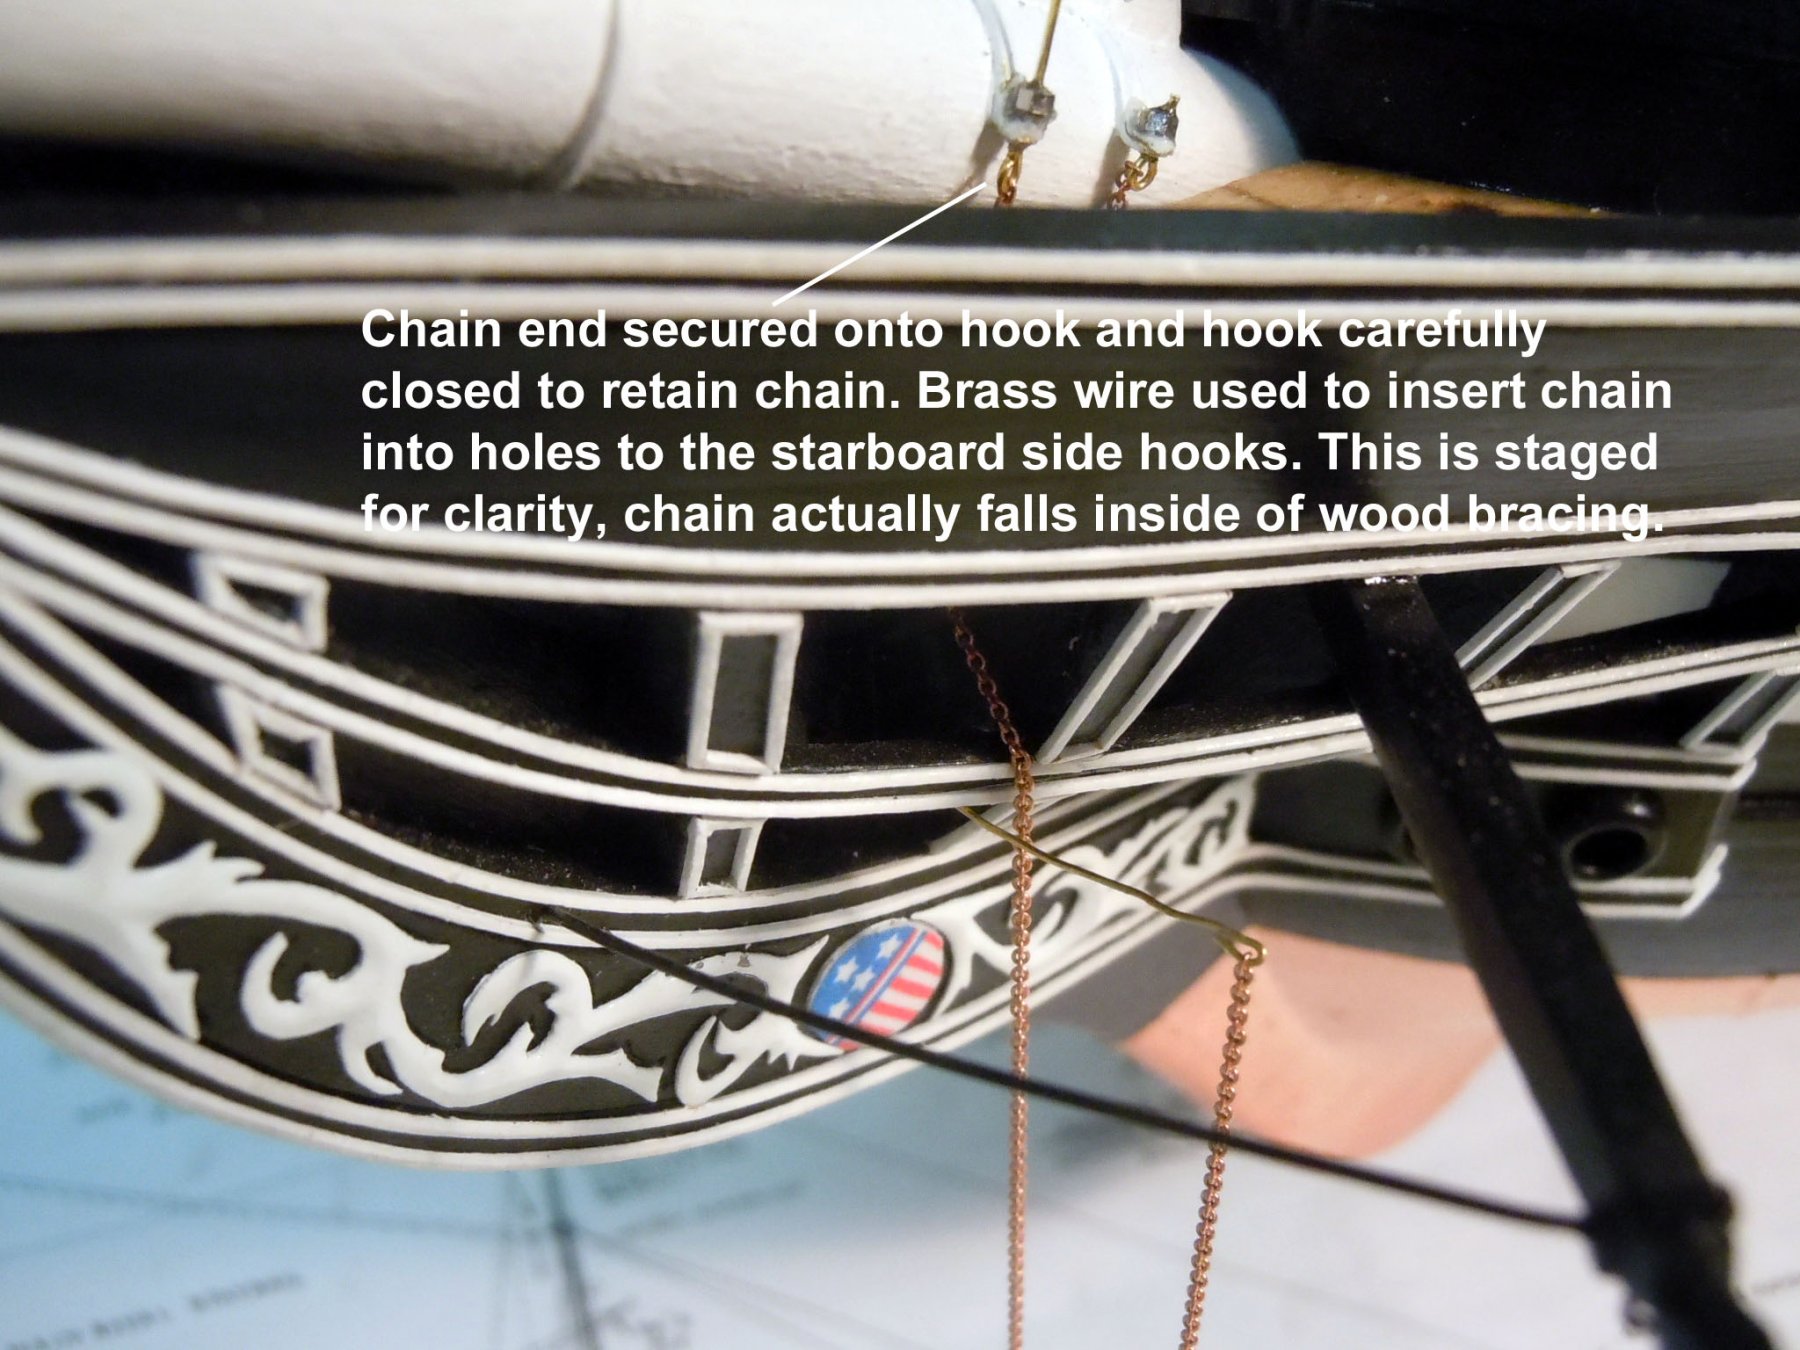
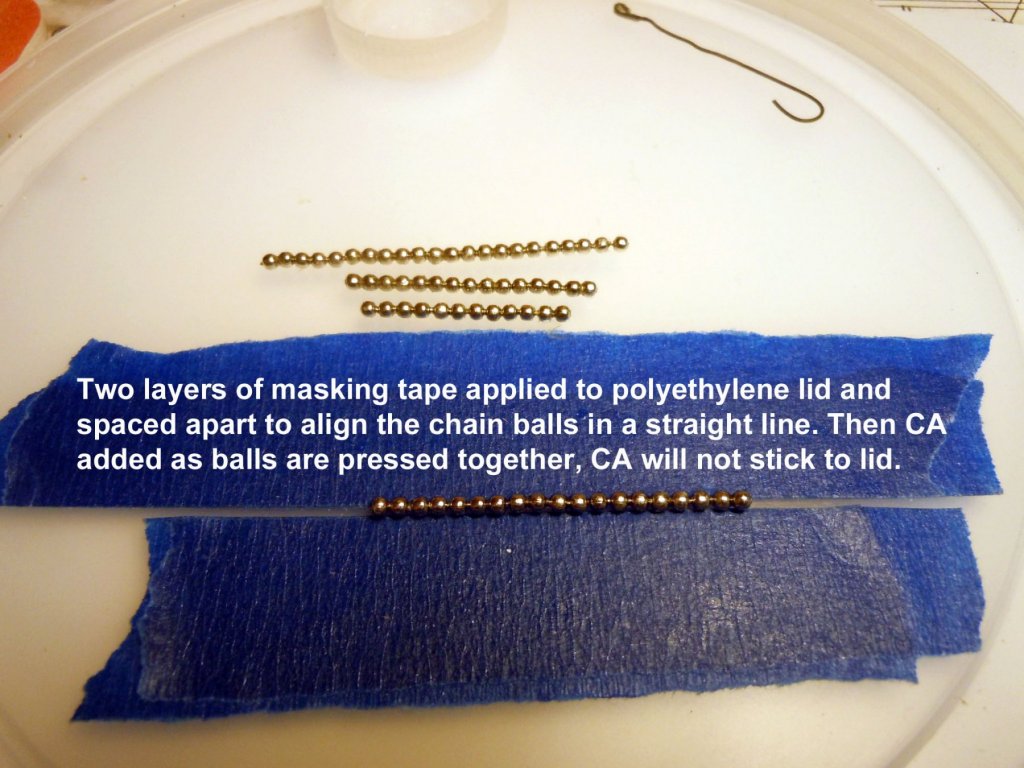
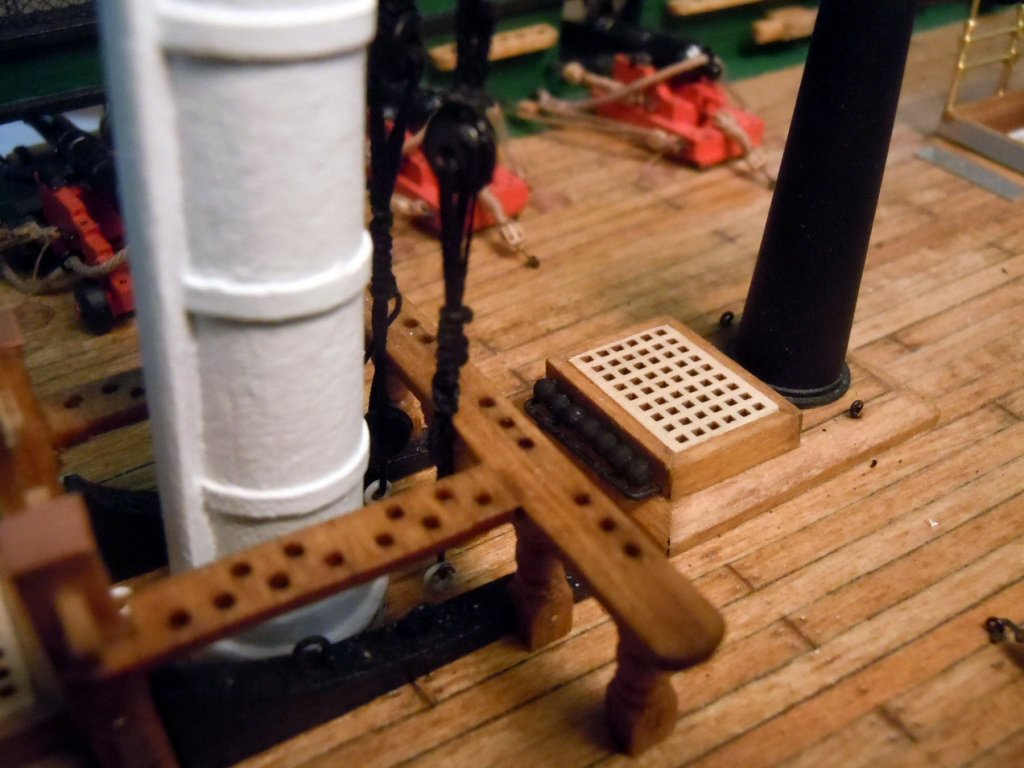
Back from visiting the grand kids and getting back to work on the Constitution. I reached a point where the bowsprit is needed for the rest of the stay lines to be rigged. I glued nuts to the strap indexing them on the holes drilled in the straps. I then opened the ends of small jack stays to form hooks for the chain. Chain was hooked on the port side stays and the hook closed on the chain. The chain was dropped down and I made a feed needle for the chain to fish the chain through the holes and attached them on the starboard side stay, closed the hook and carefully cut the chain. I may stain the chain later once the glue has set. In the meantime I found a size of key chain at Michael's that worked for the cannon balls. The chain was glued in lines and cut to rack lengths needed and glued to the racks. Now onto the back stays and the bowsprit, but first a couple other projects to work on.


-
Glad to see another Marine reporting aboard. I am in the middle of a Constitution build so stop by and visit. I was in Marine helicopters Vietnam tour with HMM-164 and HMM-362 July `67 - Aug `68. Semper Fi to those who fly! This is a great site to enjoy and learn as well. Semper Fi! Ken
-
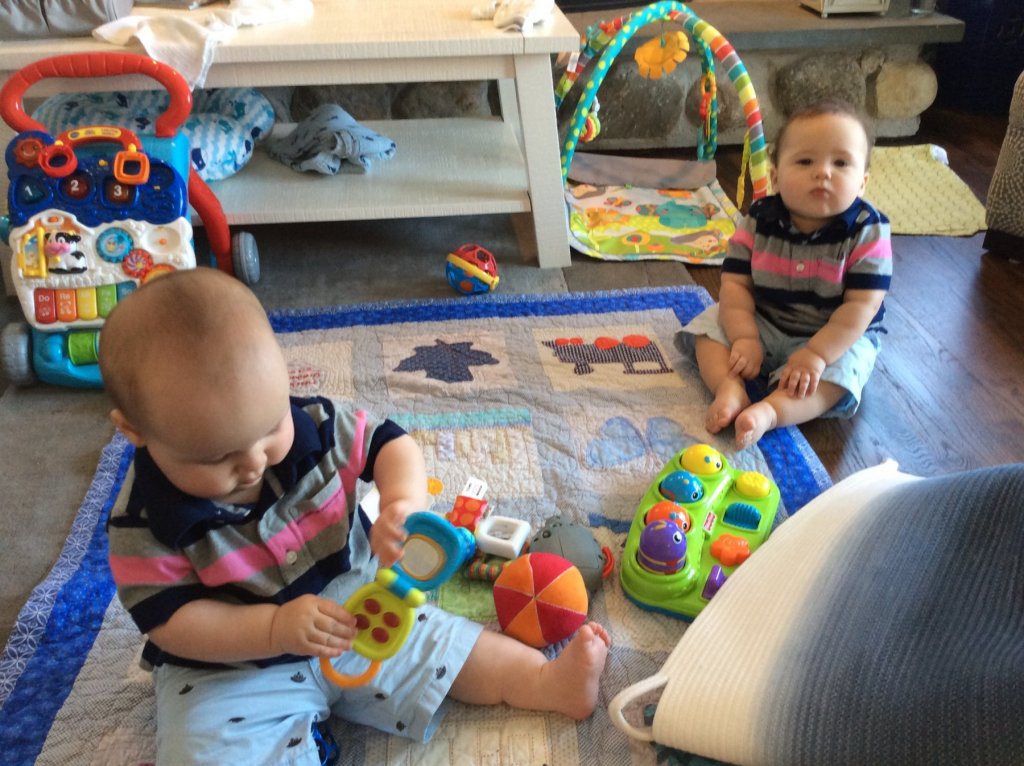
Future ship builders waiting for the Constitution to be completed by grandpa.
-
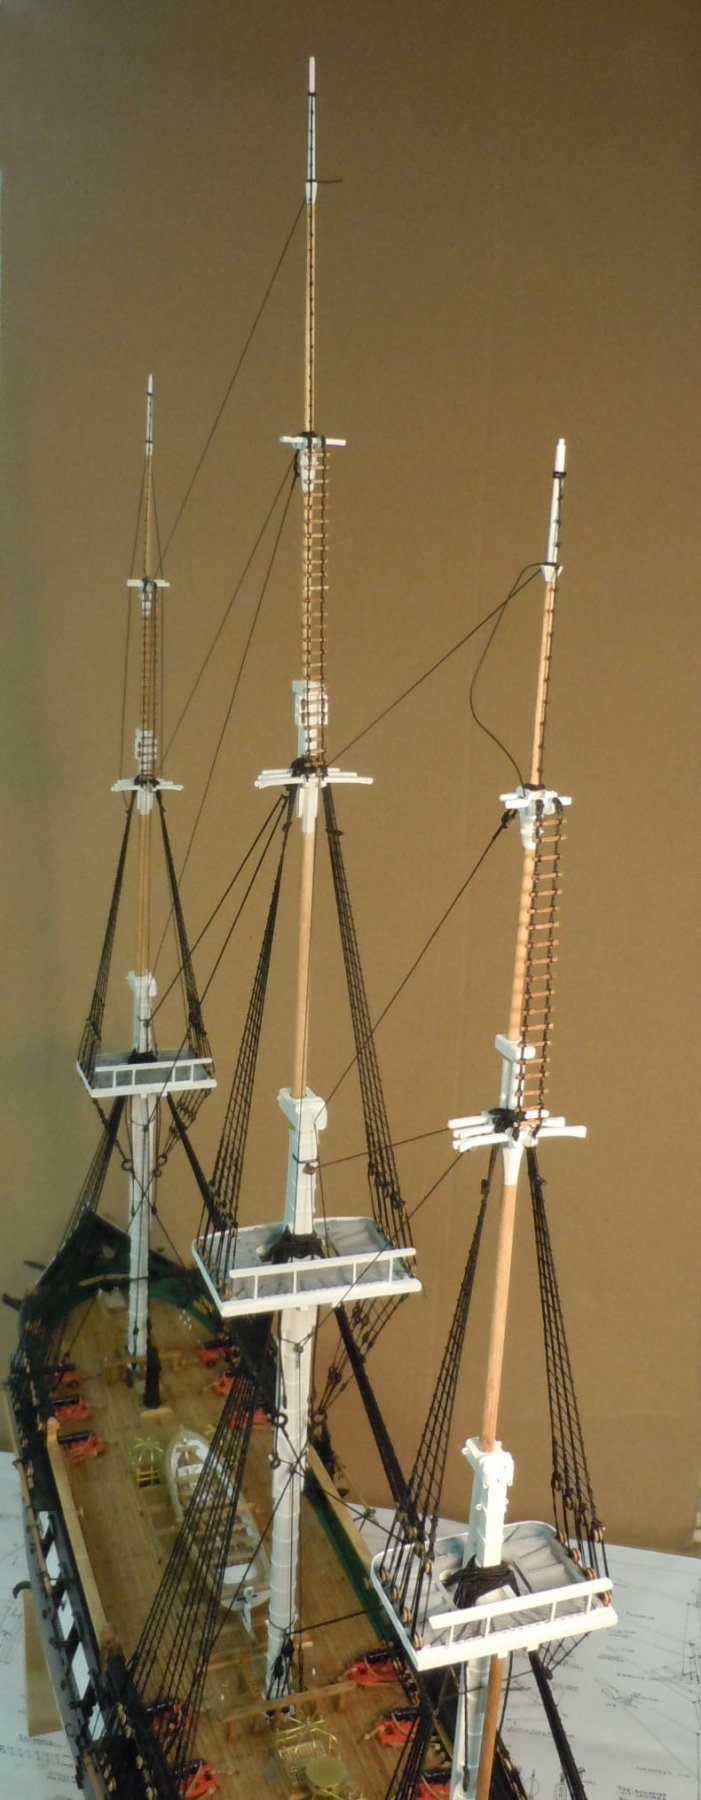
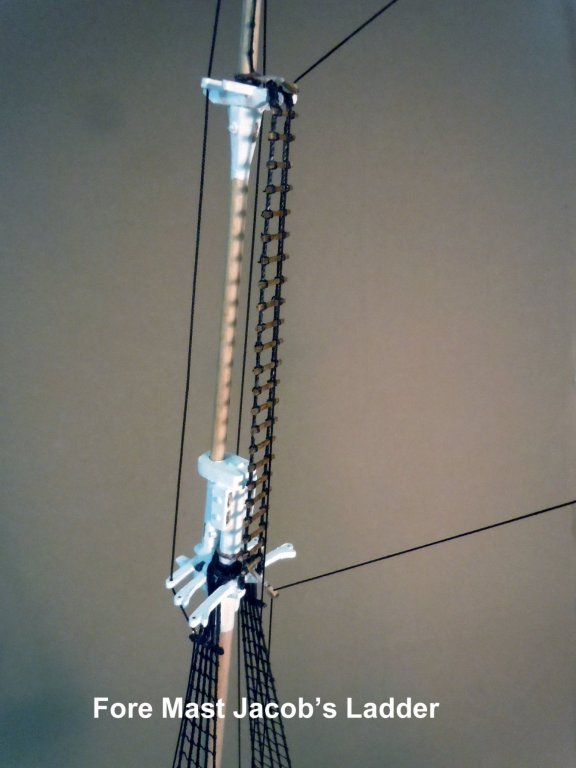
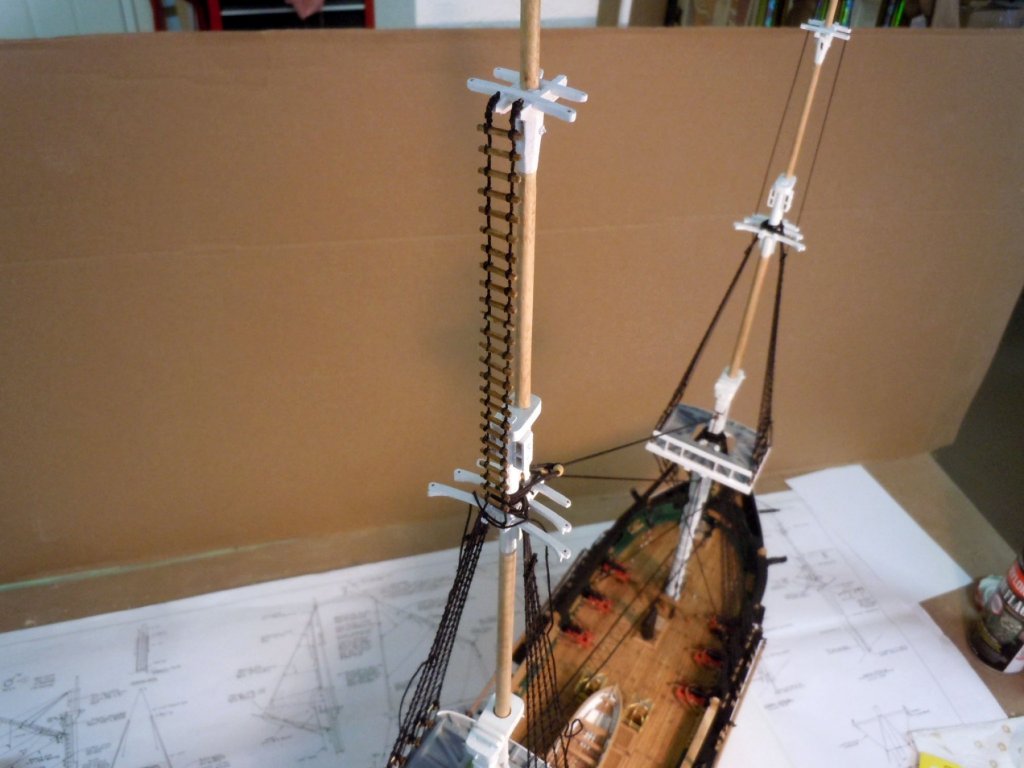
Finished up the Jacob's ladders and man ropes up the shy poles for all masts. I then started the stay lines for the masts. Now I need to make more ropes for the back stay lines this will keep me busy for awhile. I will be off line for a week as the Admiral and I are headed to visit our twin grandsons in NYC. Here is a sequence of the ladders and start of the stay lines. One nice discovery I made is that I can serve the blocks with extension lines using my lather setup. I also decided that I now need a larger background to take overall images....the ship is getting larger. The royal stay lines are only tied for adjustment later if needed once back stays are in place; because of their size they are somewhat flexible. Now back to making ropes and packing.

-
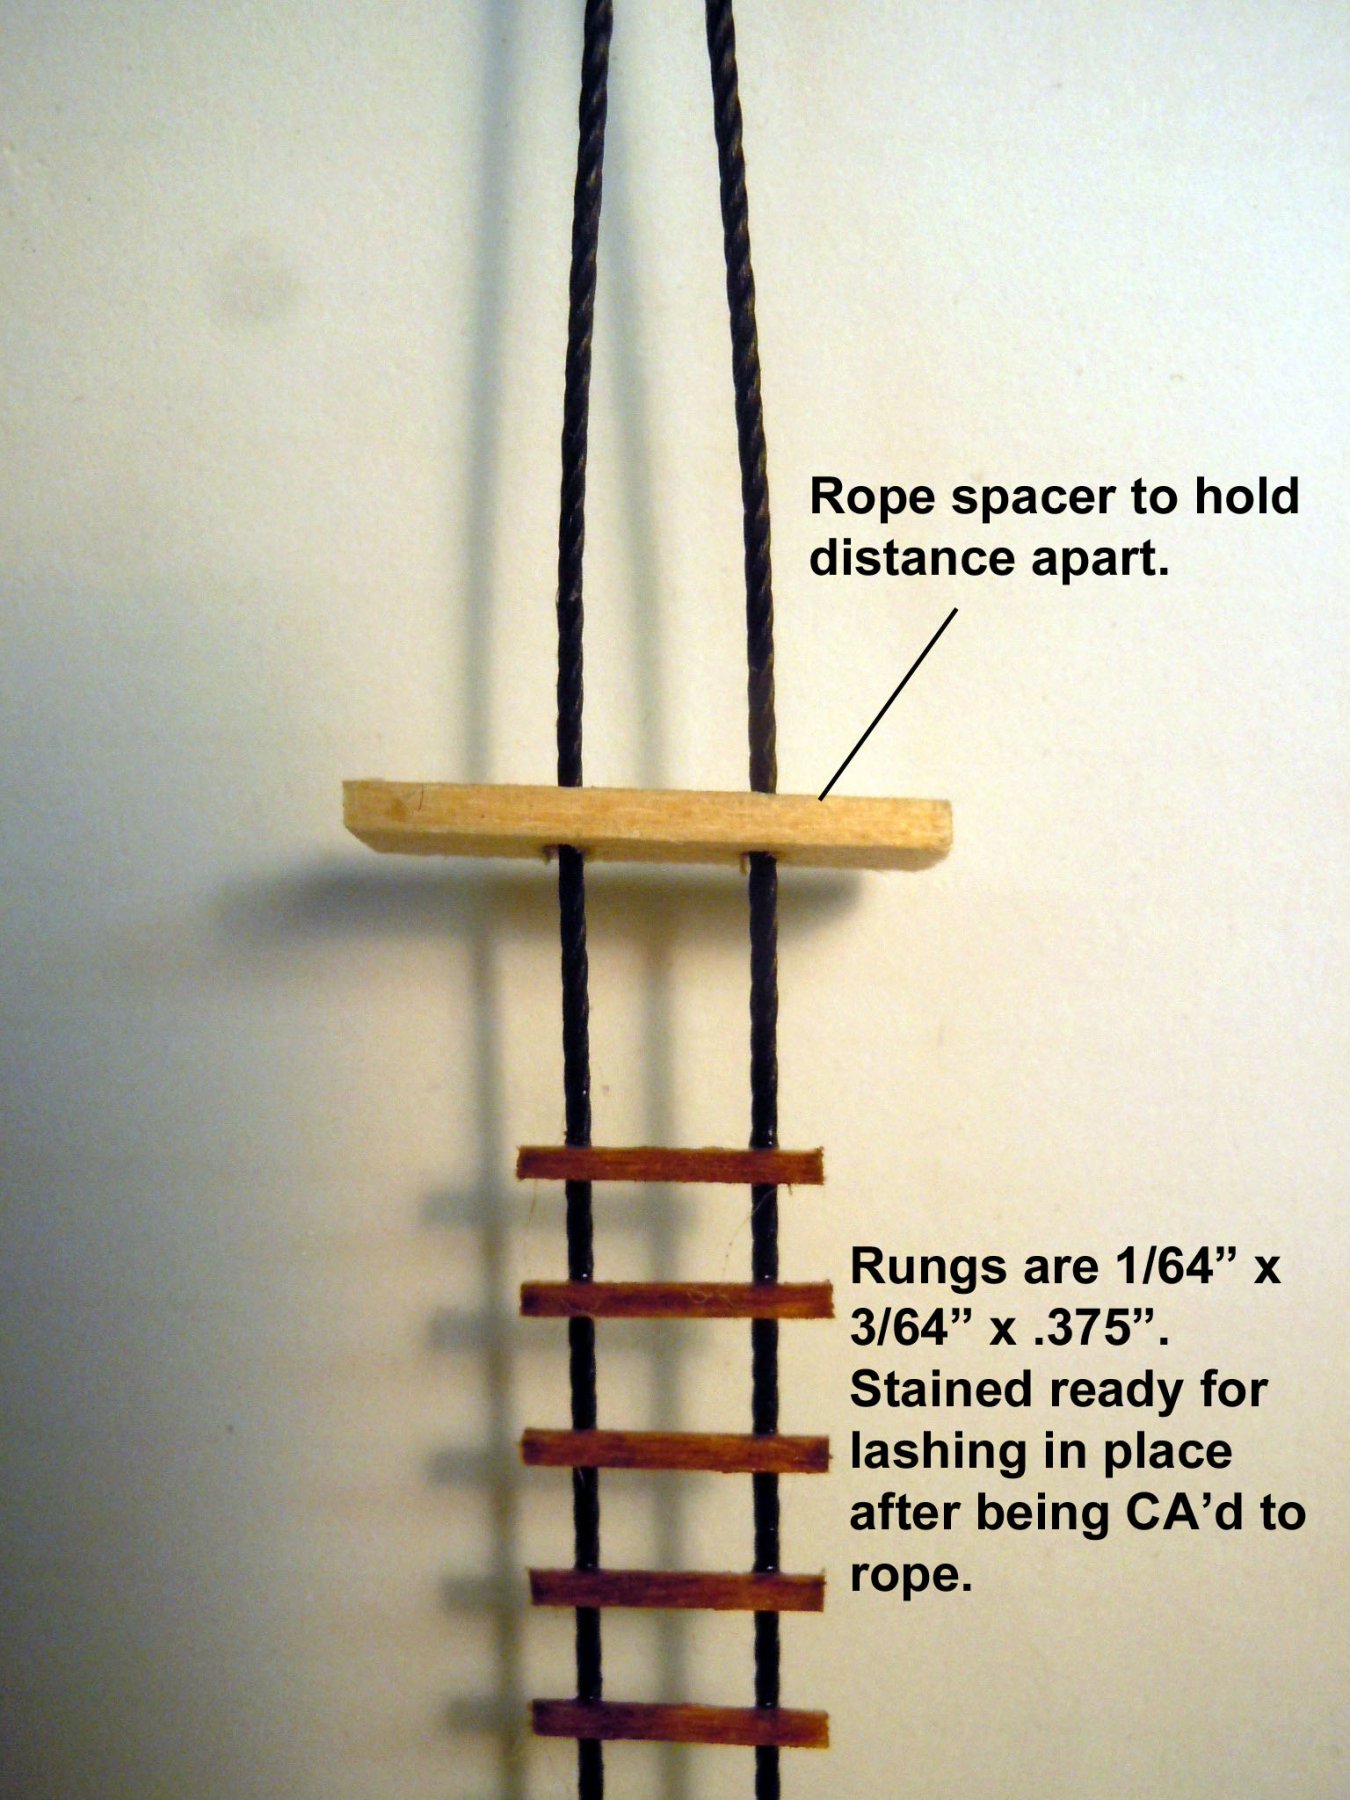
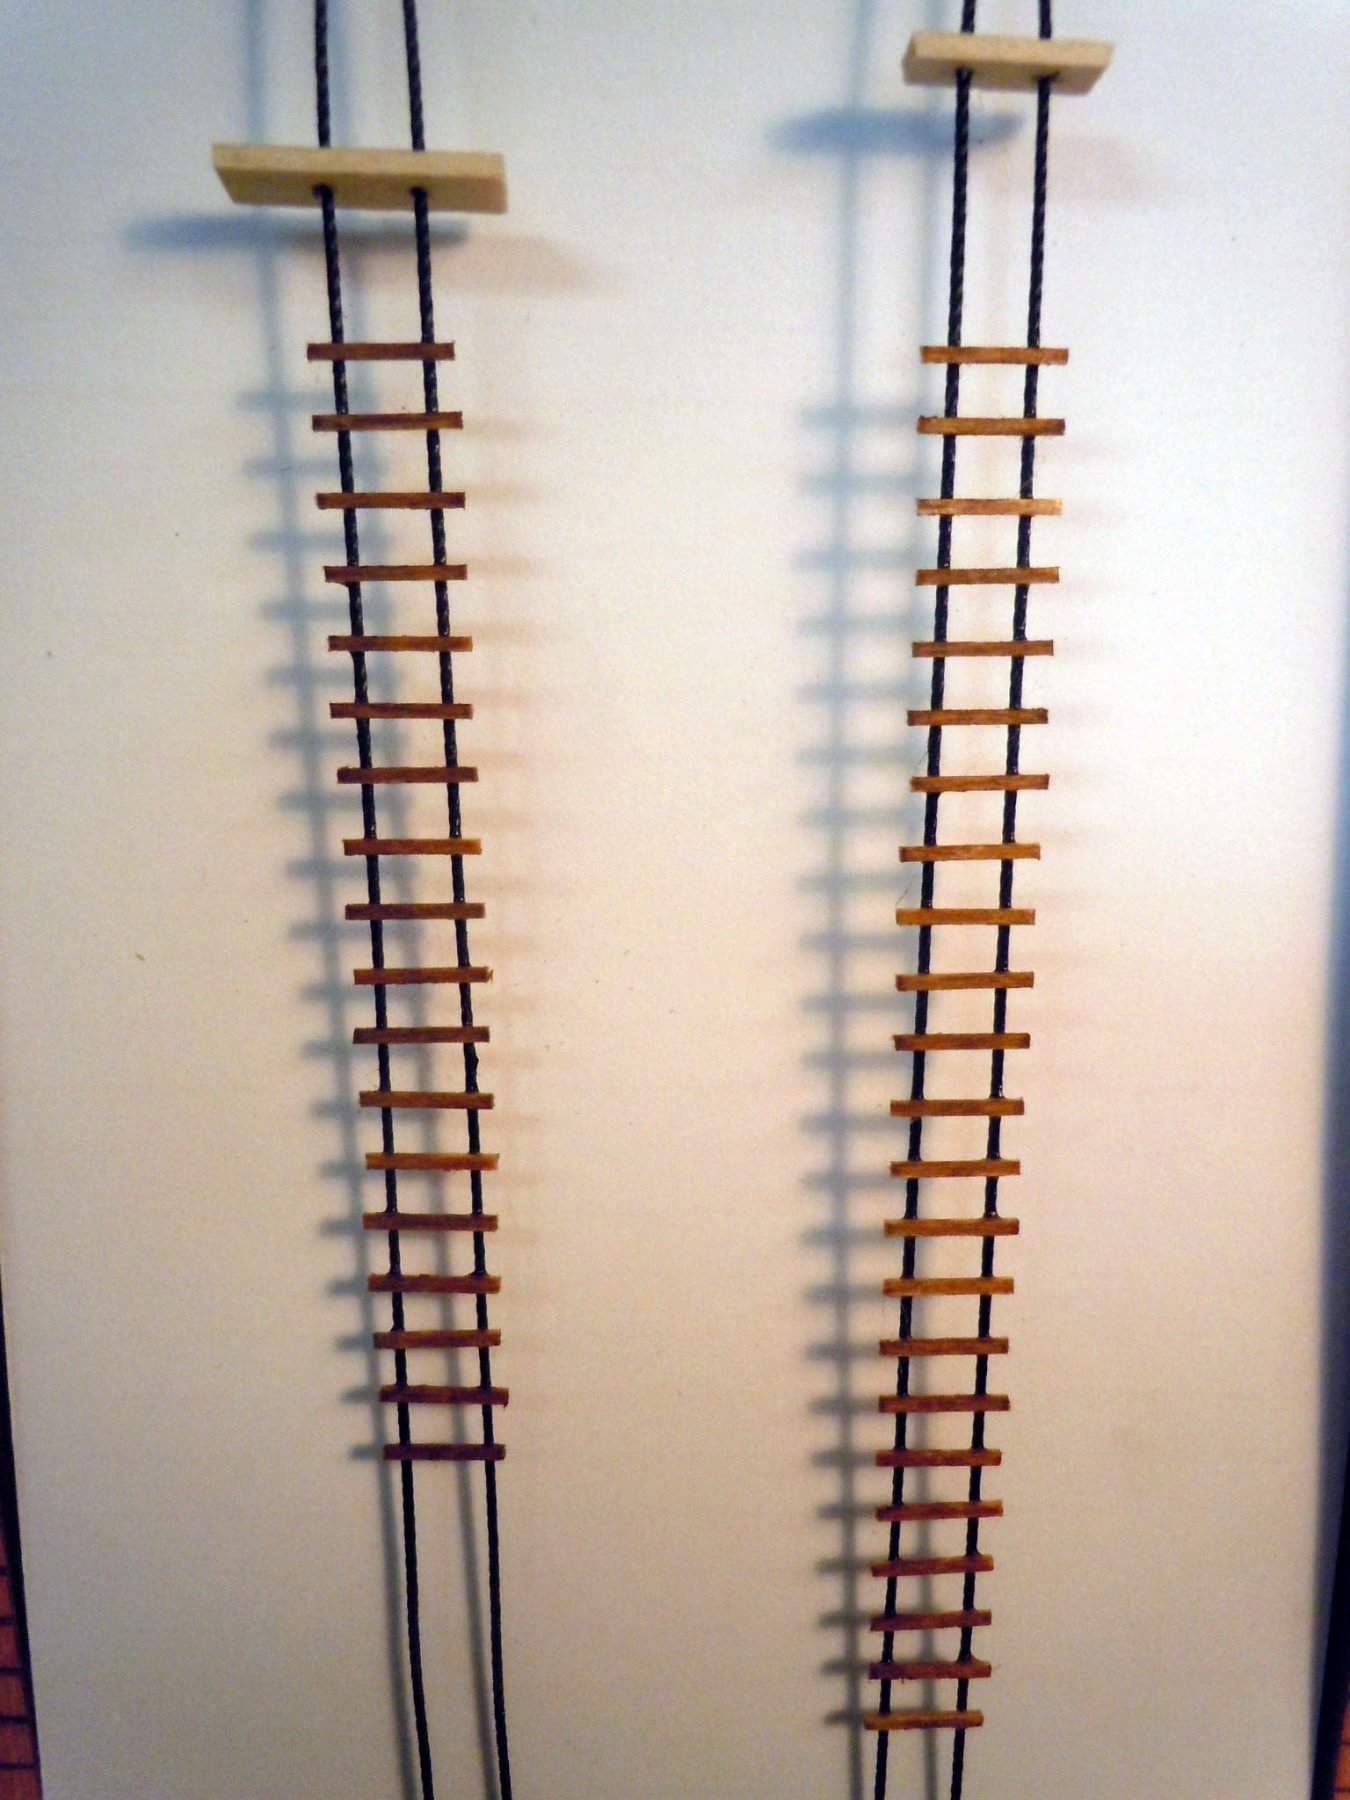
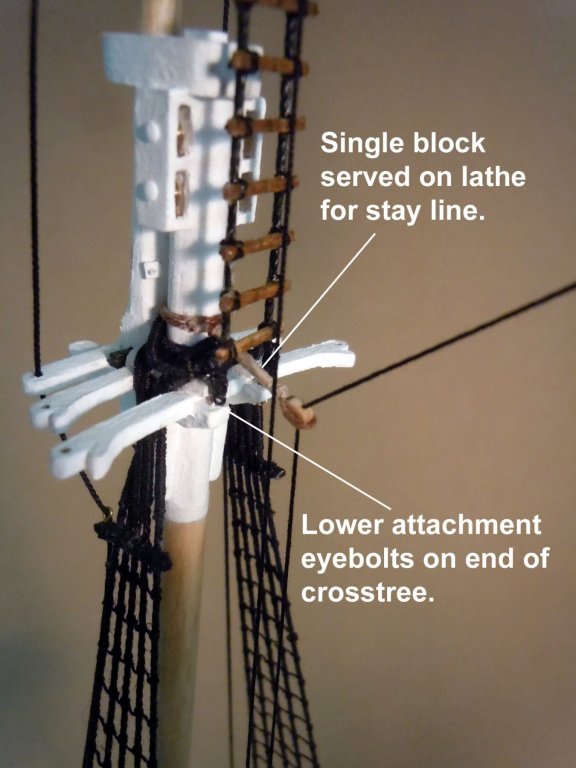
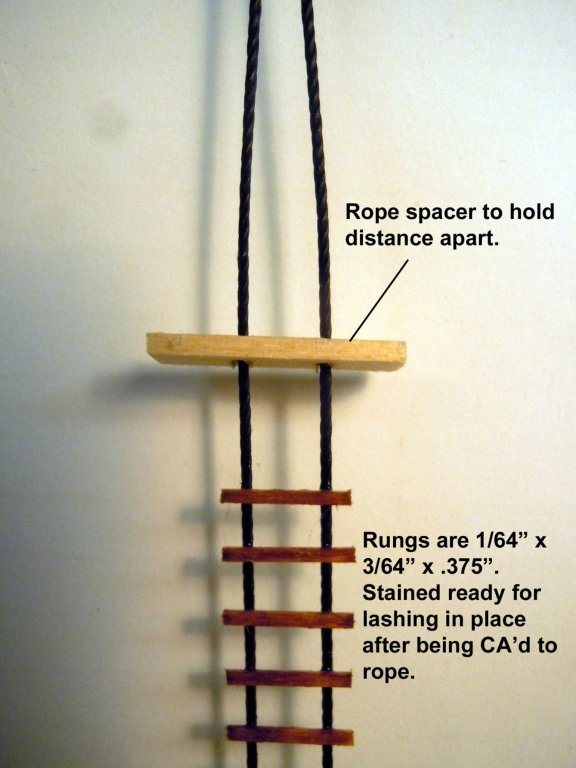
Jon, thanks again it is good to have one's best guess confirmed. No need for the description I have them made already and just now need to lash them to the lower eyebolts. Here you can see I made the mizzen and the foremast at the same time. I found that a wood spacer really helped maintaining the distance until all the rungs were glued in place using thick CA. Once all the rungs were in place they were then stained and lashed to the rope. Slow and tedious but well worth the effort. This shows the ladder ready to be lashed to the lower eyebolts. Now to finish up the ladders and then onto the knotted rope up the sky poles.


-
Jon, thanks for your time and effort in sharing these they are great. What is interesting is that in these pictures the Jacob's ladder is attached one level higher than on the plans which I have been going by. Again, these drawings do not show the lower attachment points. These drawings also show ratlines up between the crosstrees as well; which again are not on the plans. I can only assume that the plans are based on a later configuration. I do like the man rope up the skypole I wondered how they got that high. I think that I will just proceed with a rope attachment tied off at the eyebolts in the lower crosstrees and add the man ropes then move on. Thanks again Jon!
-
Finished up the topmast ratlines and and then started on the ladders. I am assuming that there are ladders on each mast up from the crosstrees. What I am not sure of is how they are attached at the lower cross tree. Are they just attached at the lower eyebolts or if there is a block and tackle to tighten the ladder as it stretches over time? I cannot seem to find a detail that shows the lower end of the ladder. Hopefully someone can share the answer. Now to make a couple of more ladders.

-
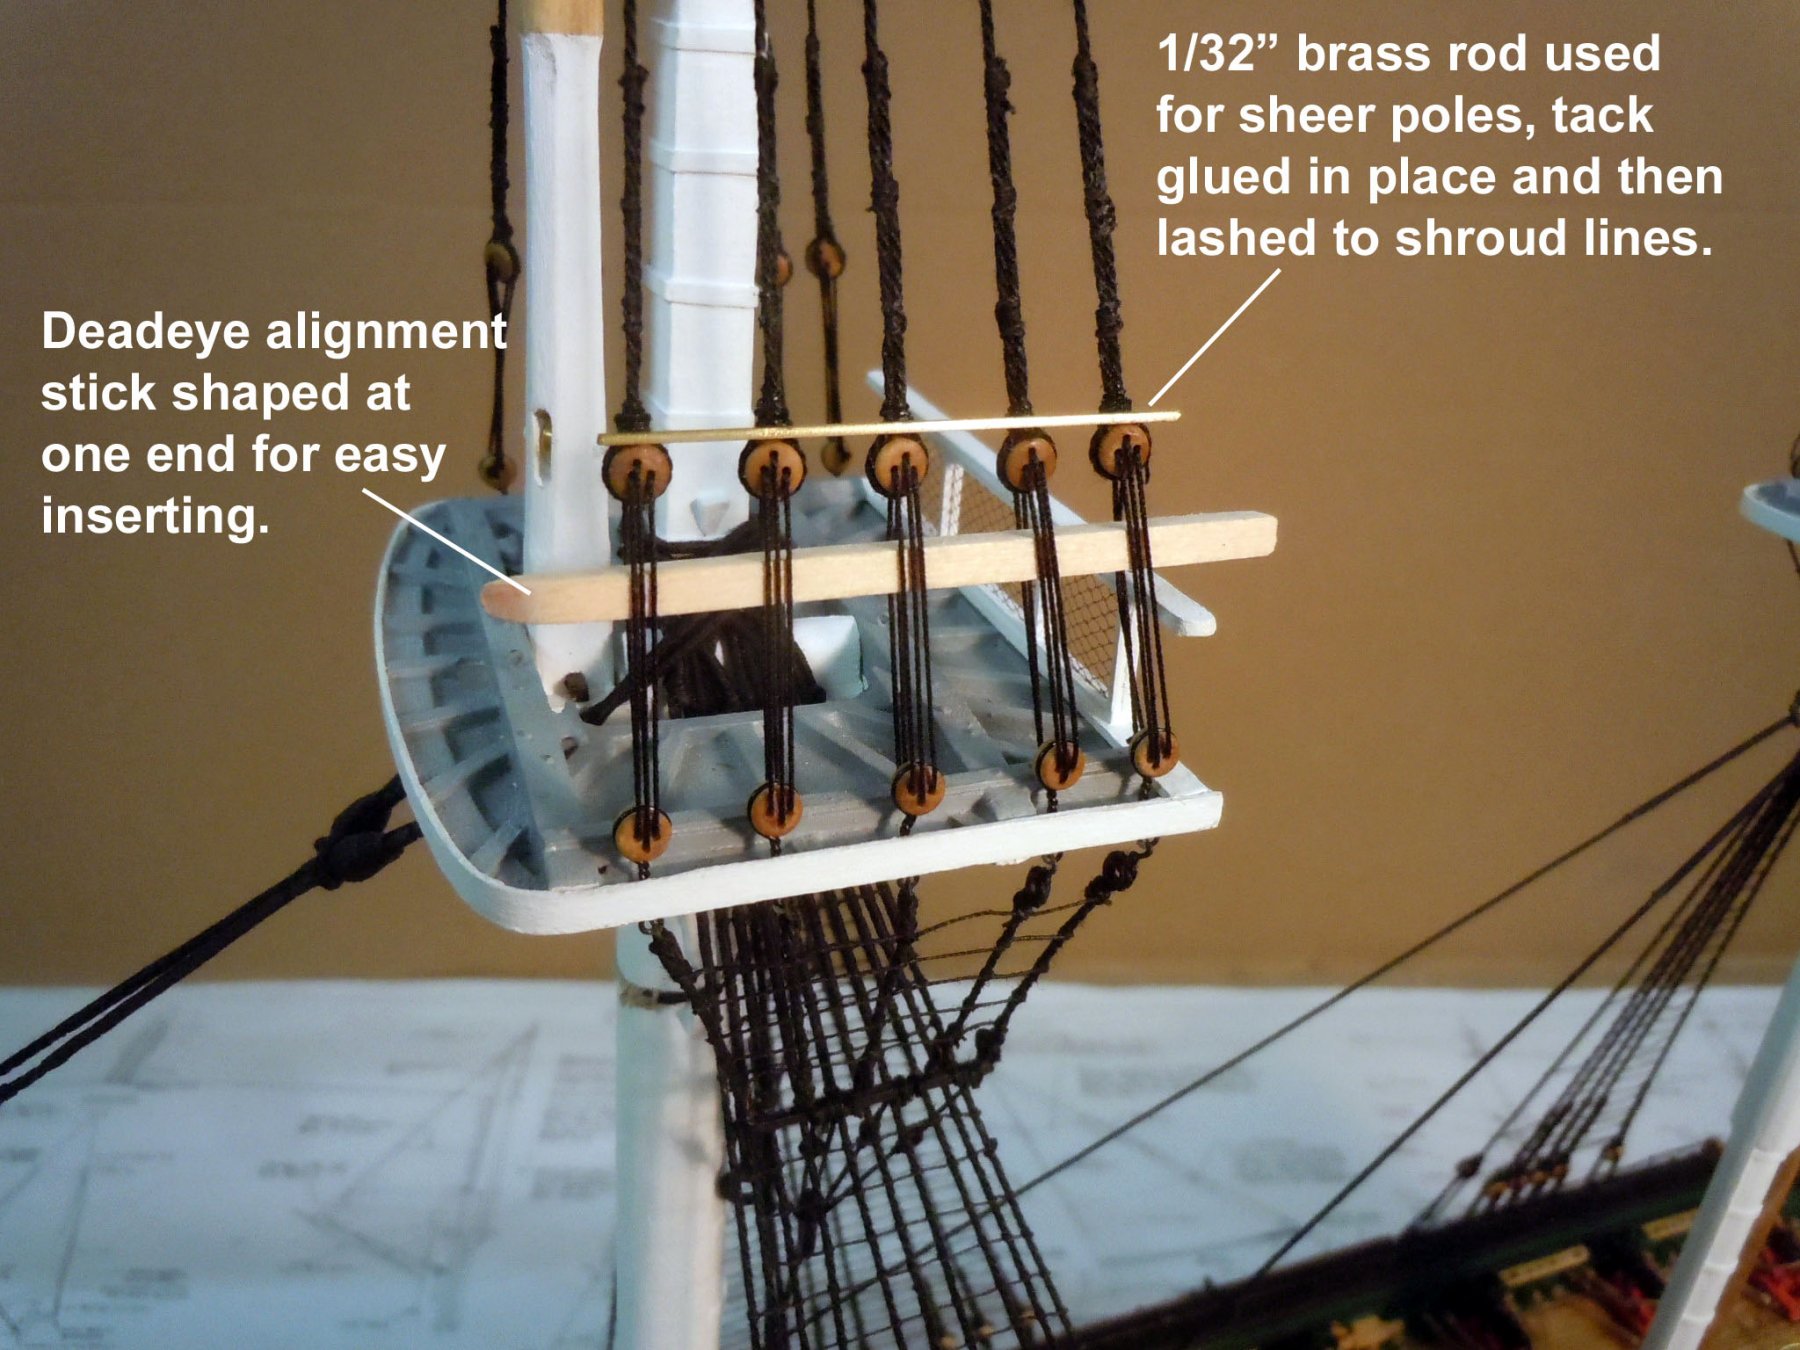
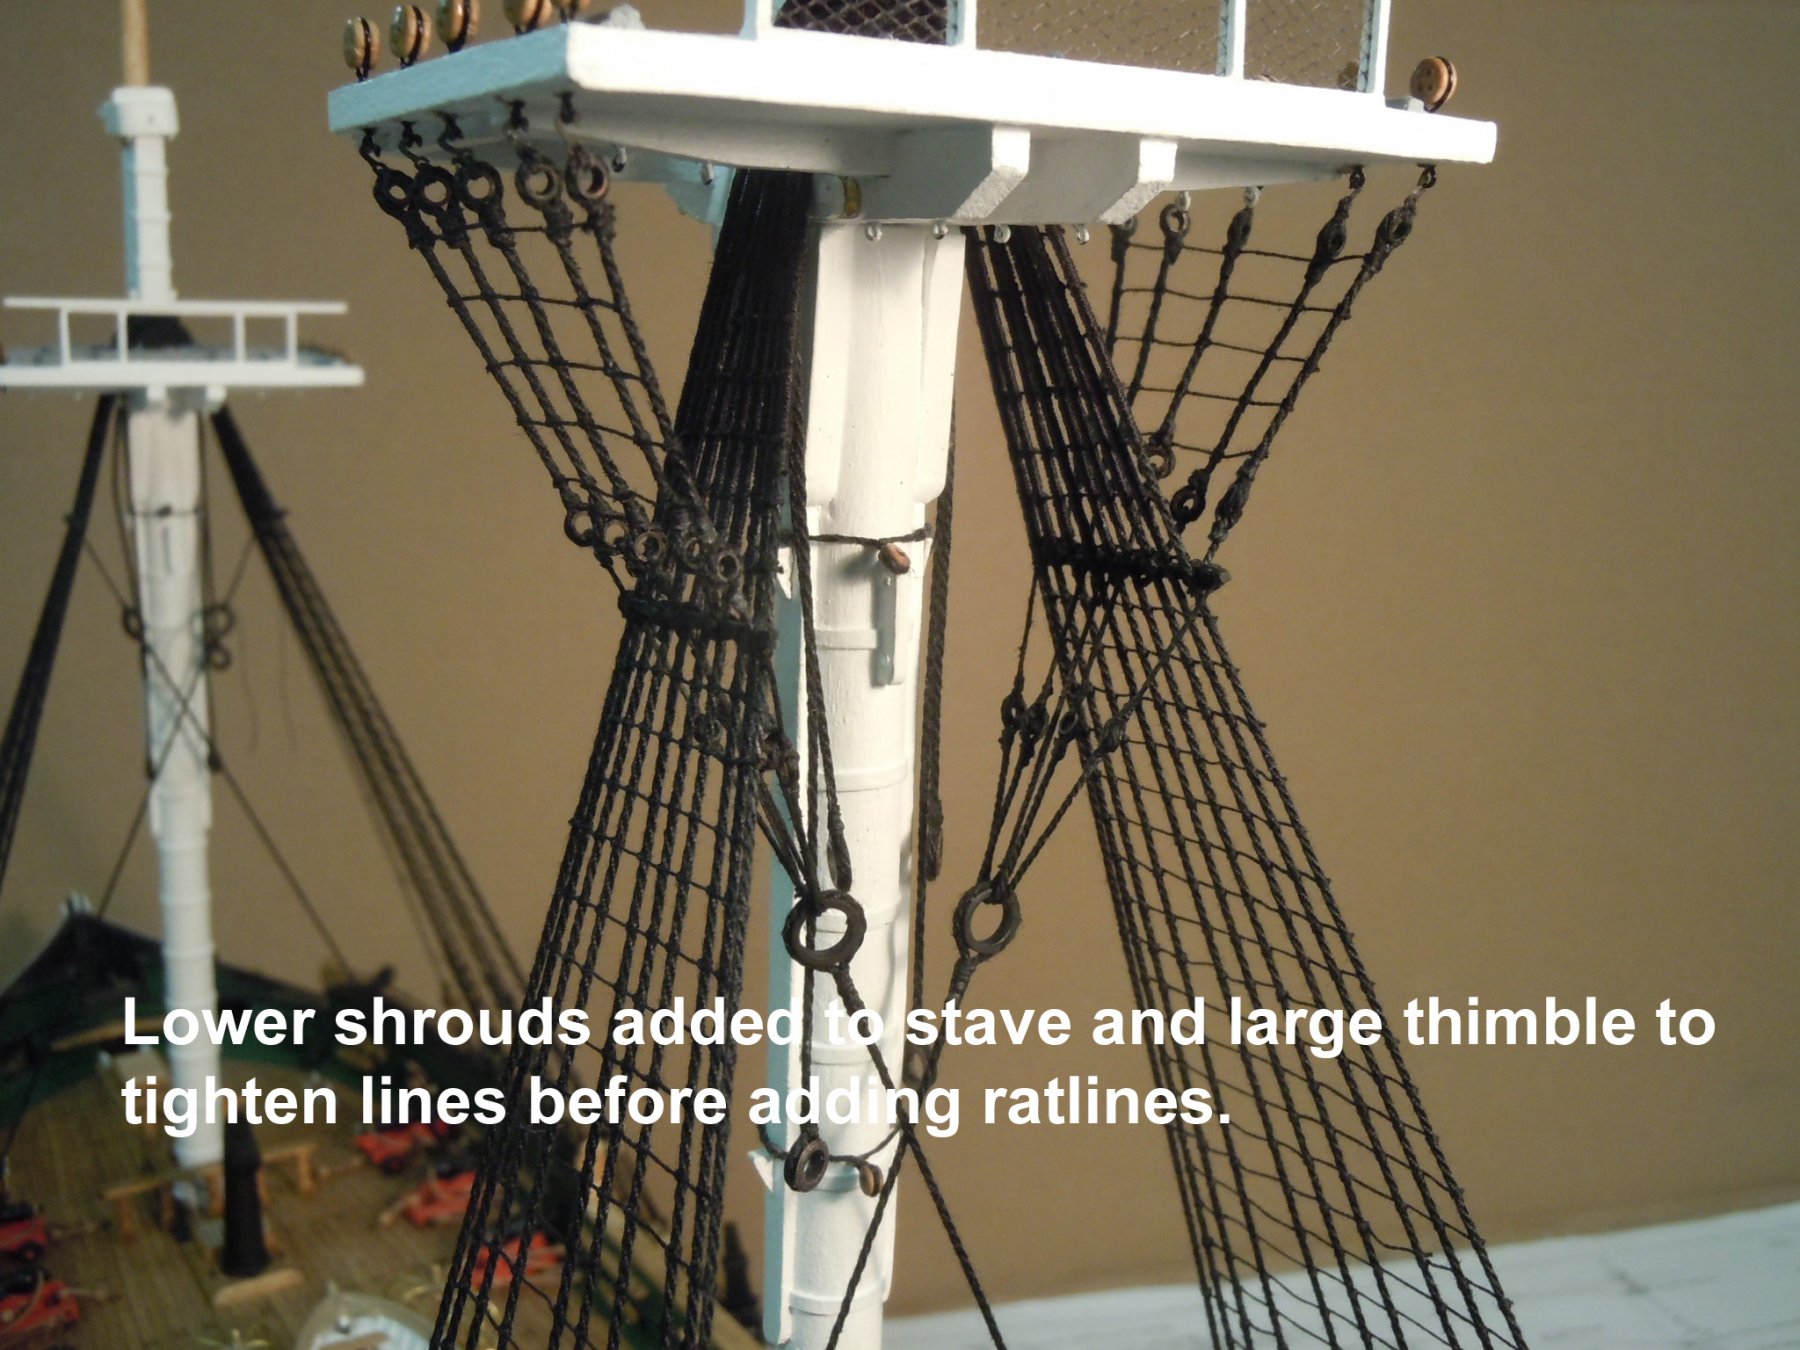
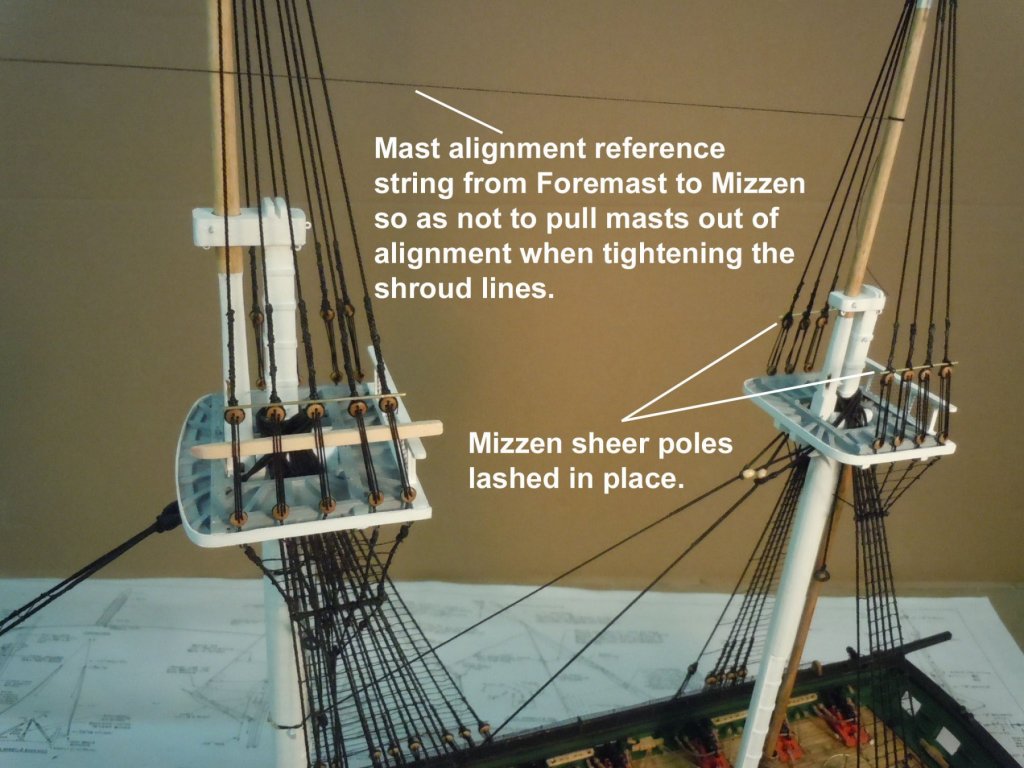
I have moved on to the topmast shroud lines; pretty much the same with the exception of the sheer poles which I used 1/32" rod which does not bend under shroud line tautness when tightening. The staves at the top were added and I used clamping tweezers to hold the lines flat while glue set. I also used a threaded line as a reference point while tightening the shrouds so as not to pull the masts out of alignment. I made sure the mast were tightly fitted at the deck when fitting them to the deck; however the top masts are indexed at the top and are more subject to moving when adding the shroud lines. I am also adding the top mast stay lines while also working on the ratlines. This way I can move back and forth while waiting for glue to set. Shroud lines in place; no staining until the end of the rigging is accomplished for all shrouds and ratlines. Now back to rigging.

-
Fokker Dr.I by Torbogdan - FINISHED - Model Airways
xken replied to Torbogdan's topic in Non-ship/categorised builds
Wulf, here is a link to the show. Put this on your must go to list, plenty to see, swap meet and suppliers to buy from. Plan on taking a fair amount of cash. http://www.wemeshow.com/ Ron, the challenge with stacked disks is cutting them out and then alignment. This was one reason I bought my first lathe. As for casting in resin one would need to do pressure pot casting to drive the resin into the fin detail and then contending with the cleanup of the mold joint lines. Don't ask how I know all this. -
Fokker Dr.I by Torbogdan - FINISHED - Model Airways
xken replied to Torbogdan's topic in Non-ship/categorised builds
Vossiewulf, if you have a milling machine and a rotary table an easier way is to use a slitting saw to cut the fins. Still requires attention to detail but much less nerve wracking. Are you familiar with the model engineering show up in your area? -
Fokker Dr.I by Torbogdan - FINISHED - Model Airways
xken replied to Torbogdan's topic in Non-ship/categorised builds
Ken, Thanks here is the set I used. http://www.tomsmodelworks.com/catalog/product_info.php?cPath=22_32&products_id=30 Will be buying now that they are available again. -
Tom, just FYI when adding stays pre-load the main mast by tying it to the foremast at the tops; then add the lines and when released will add tension to the stay lines.
-
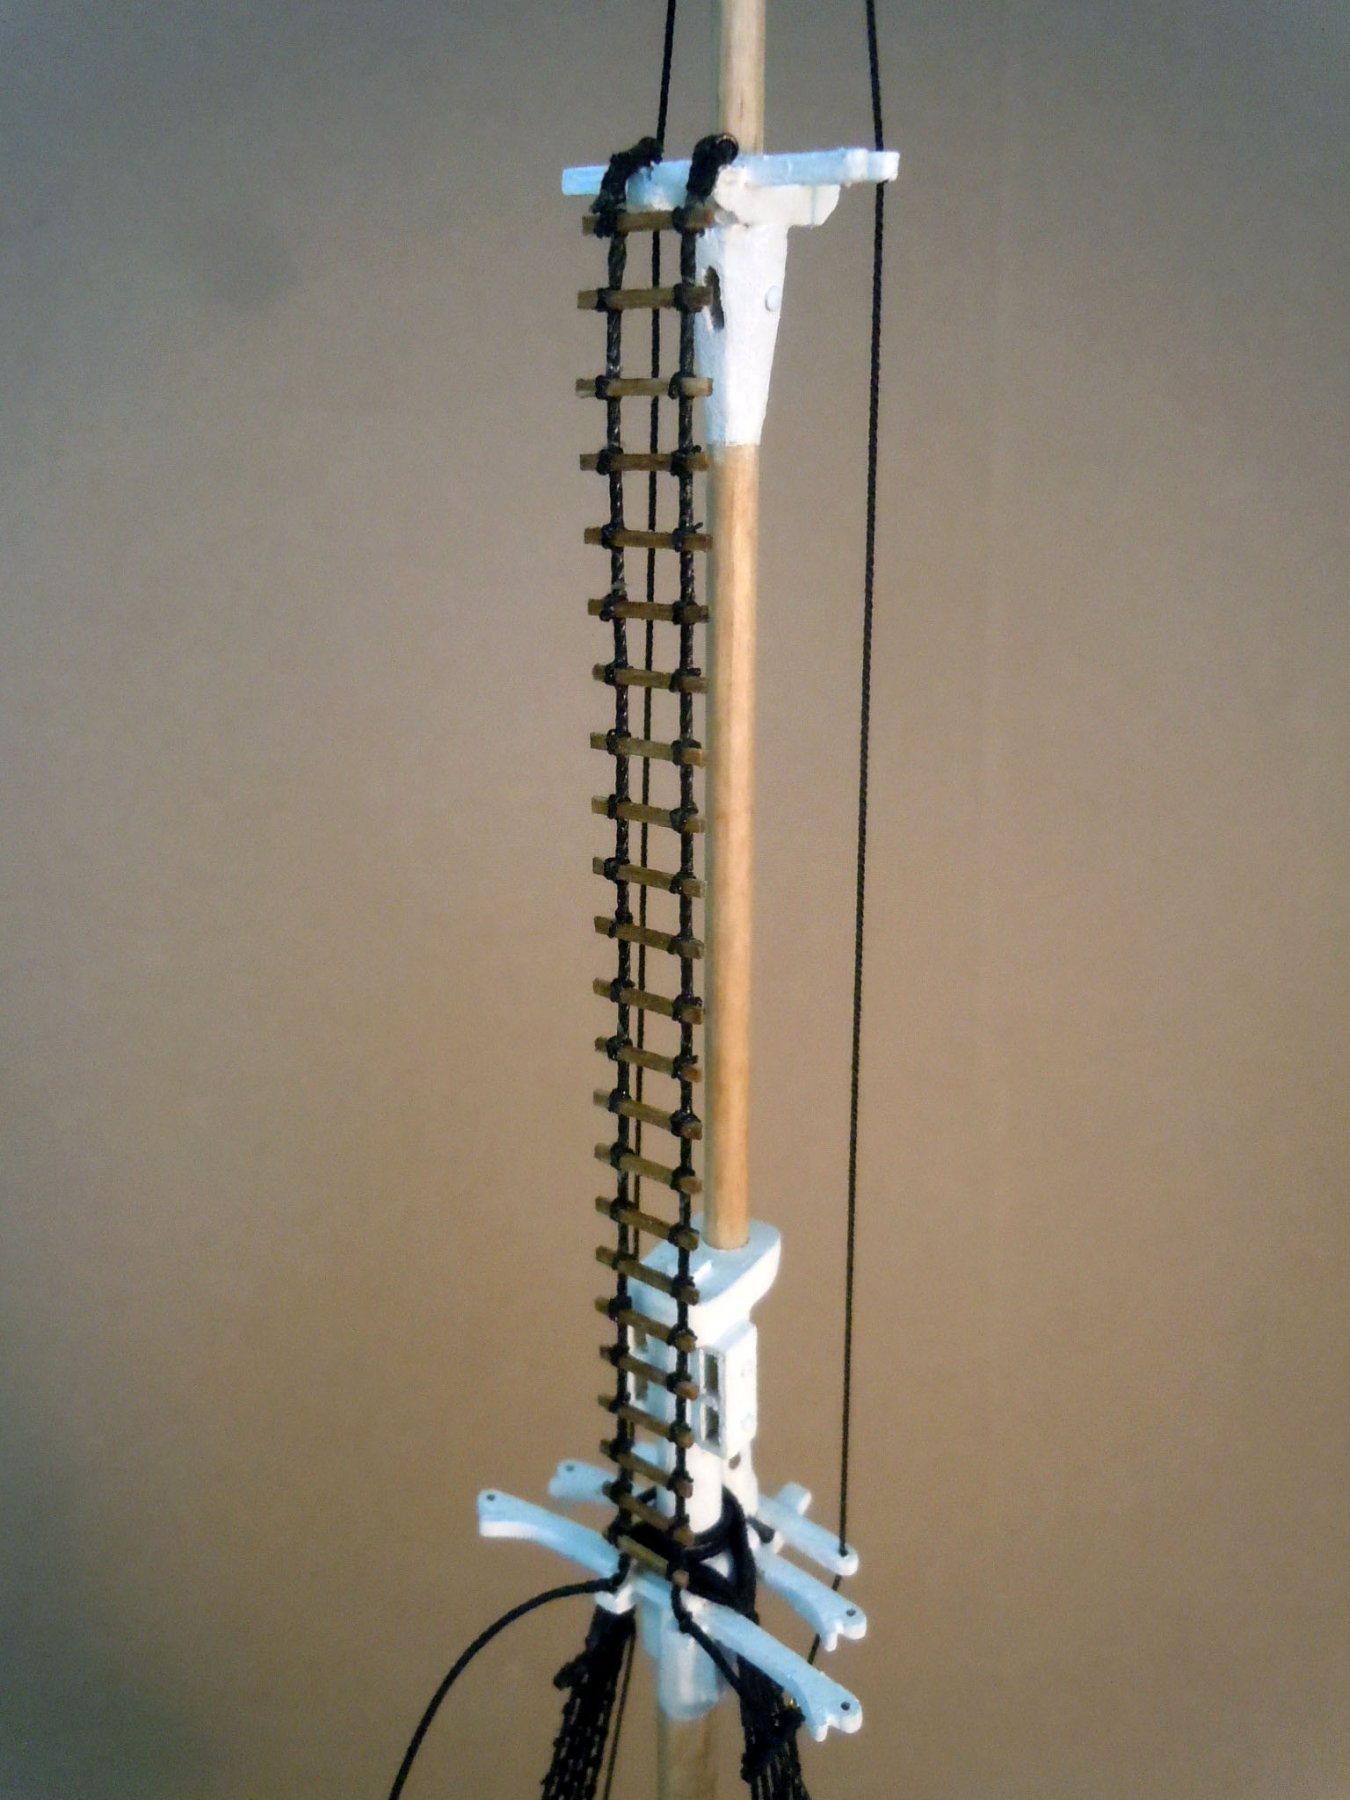
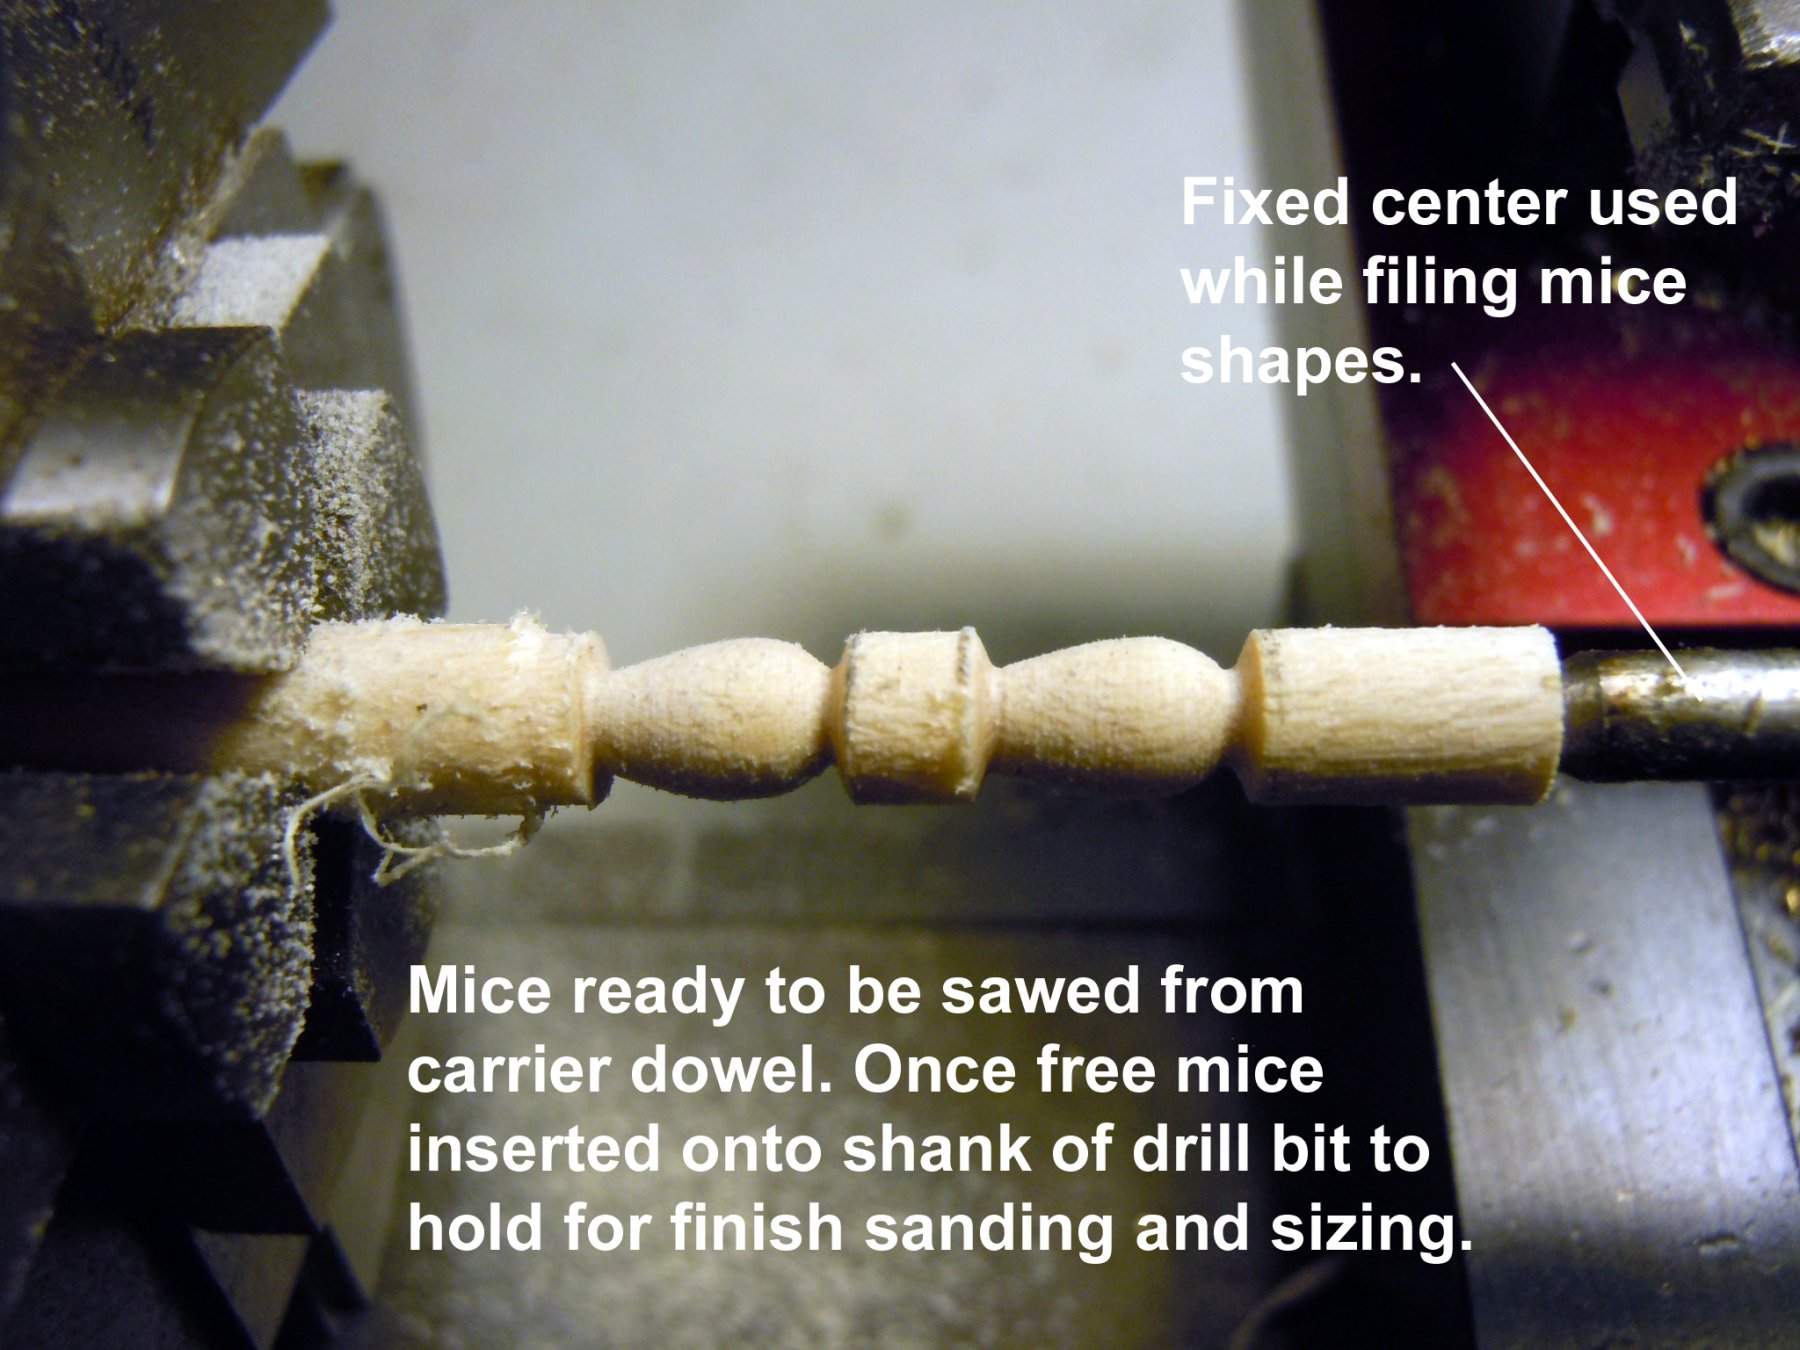
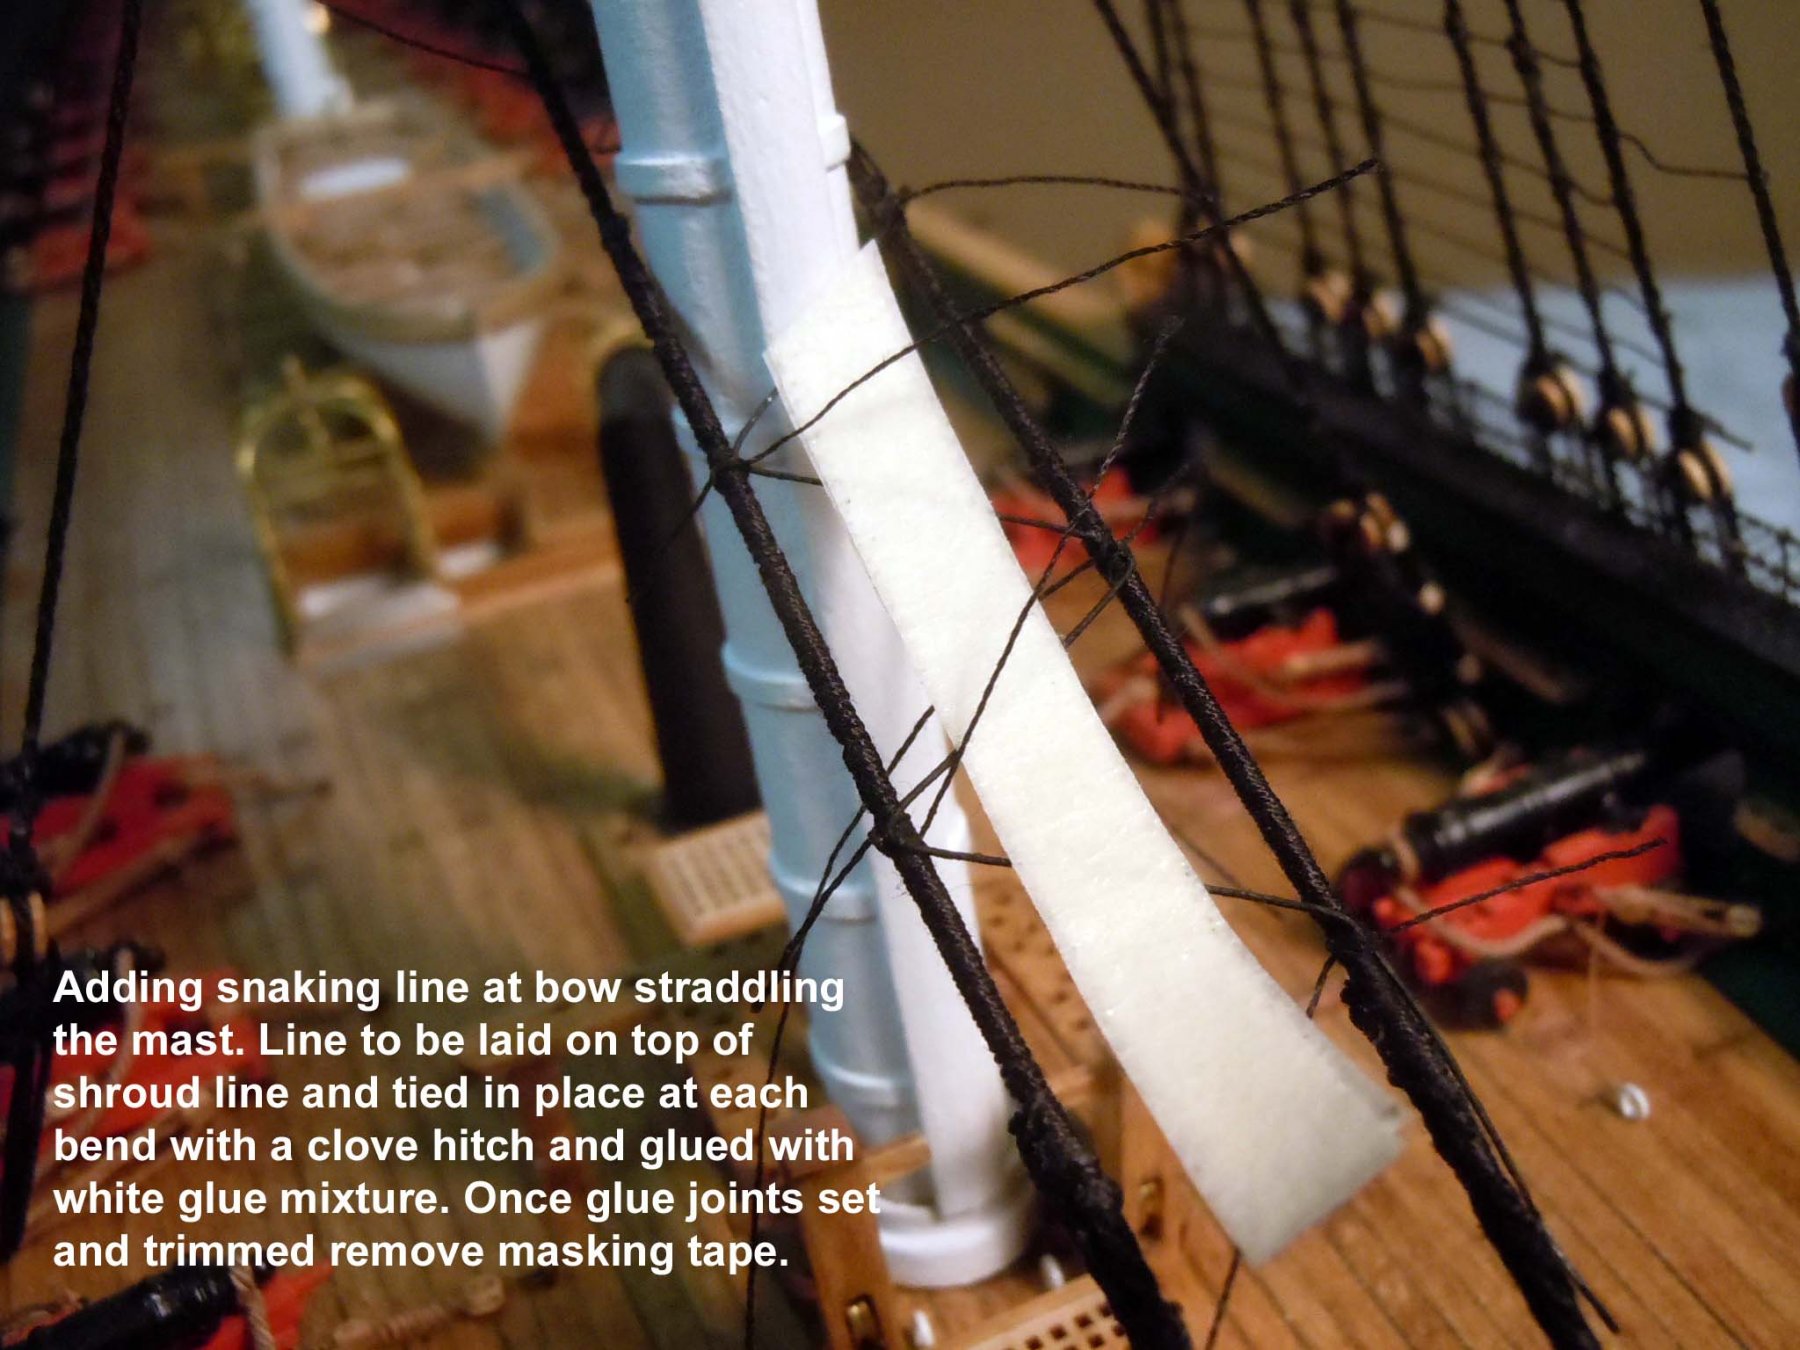
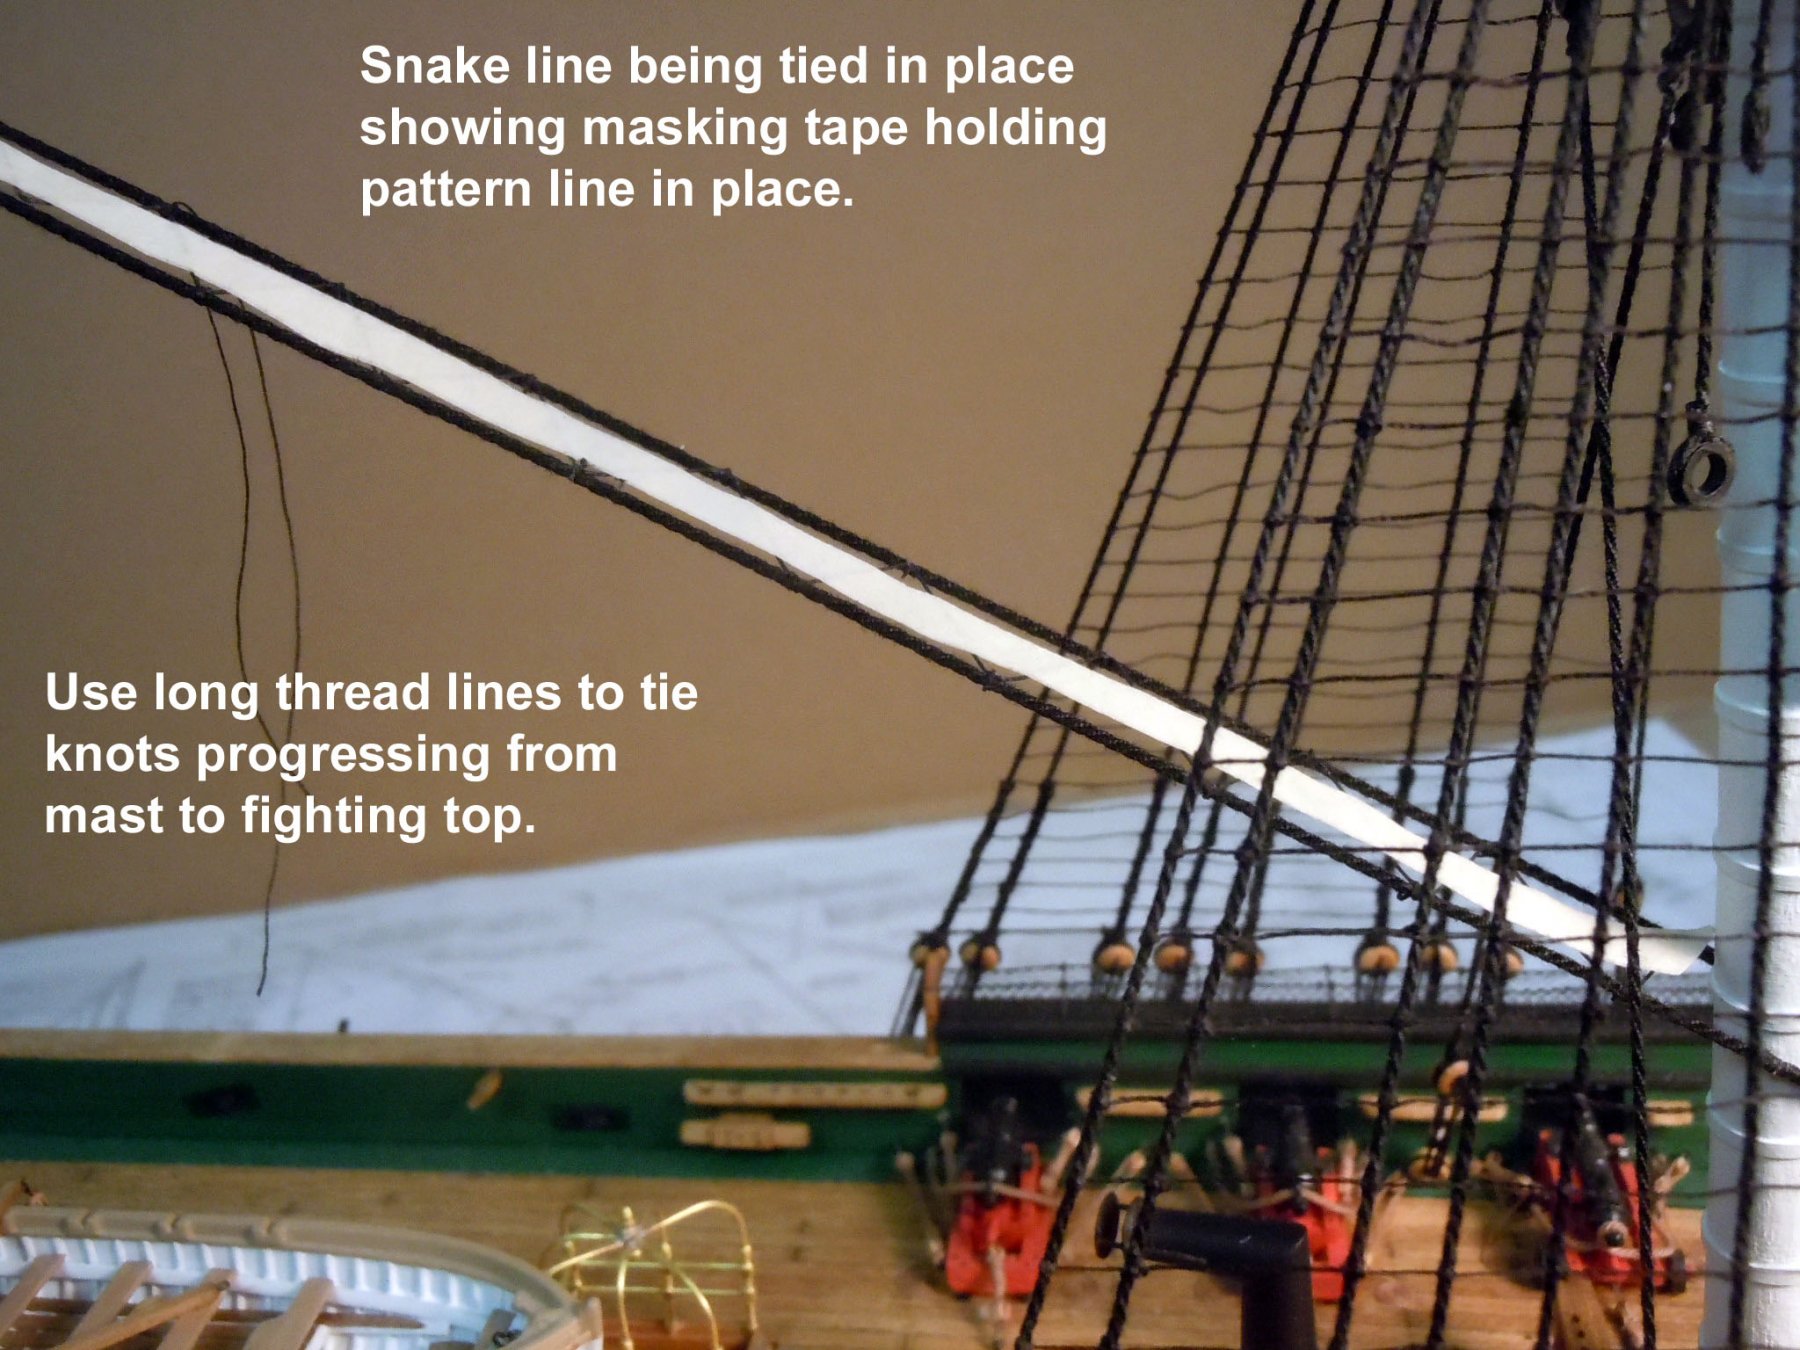
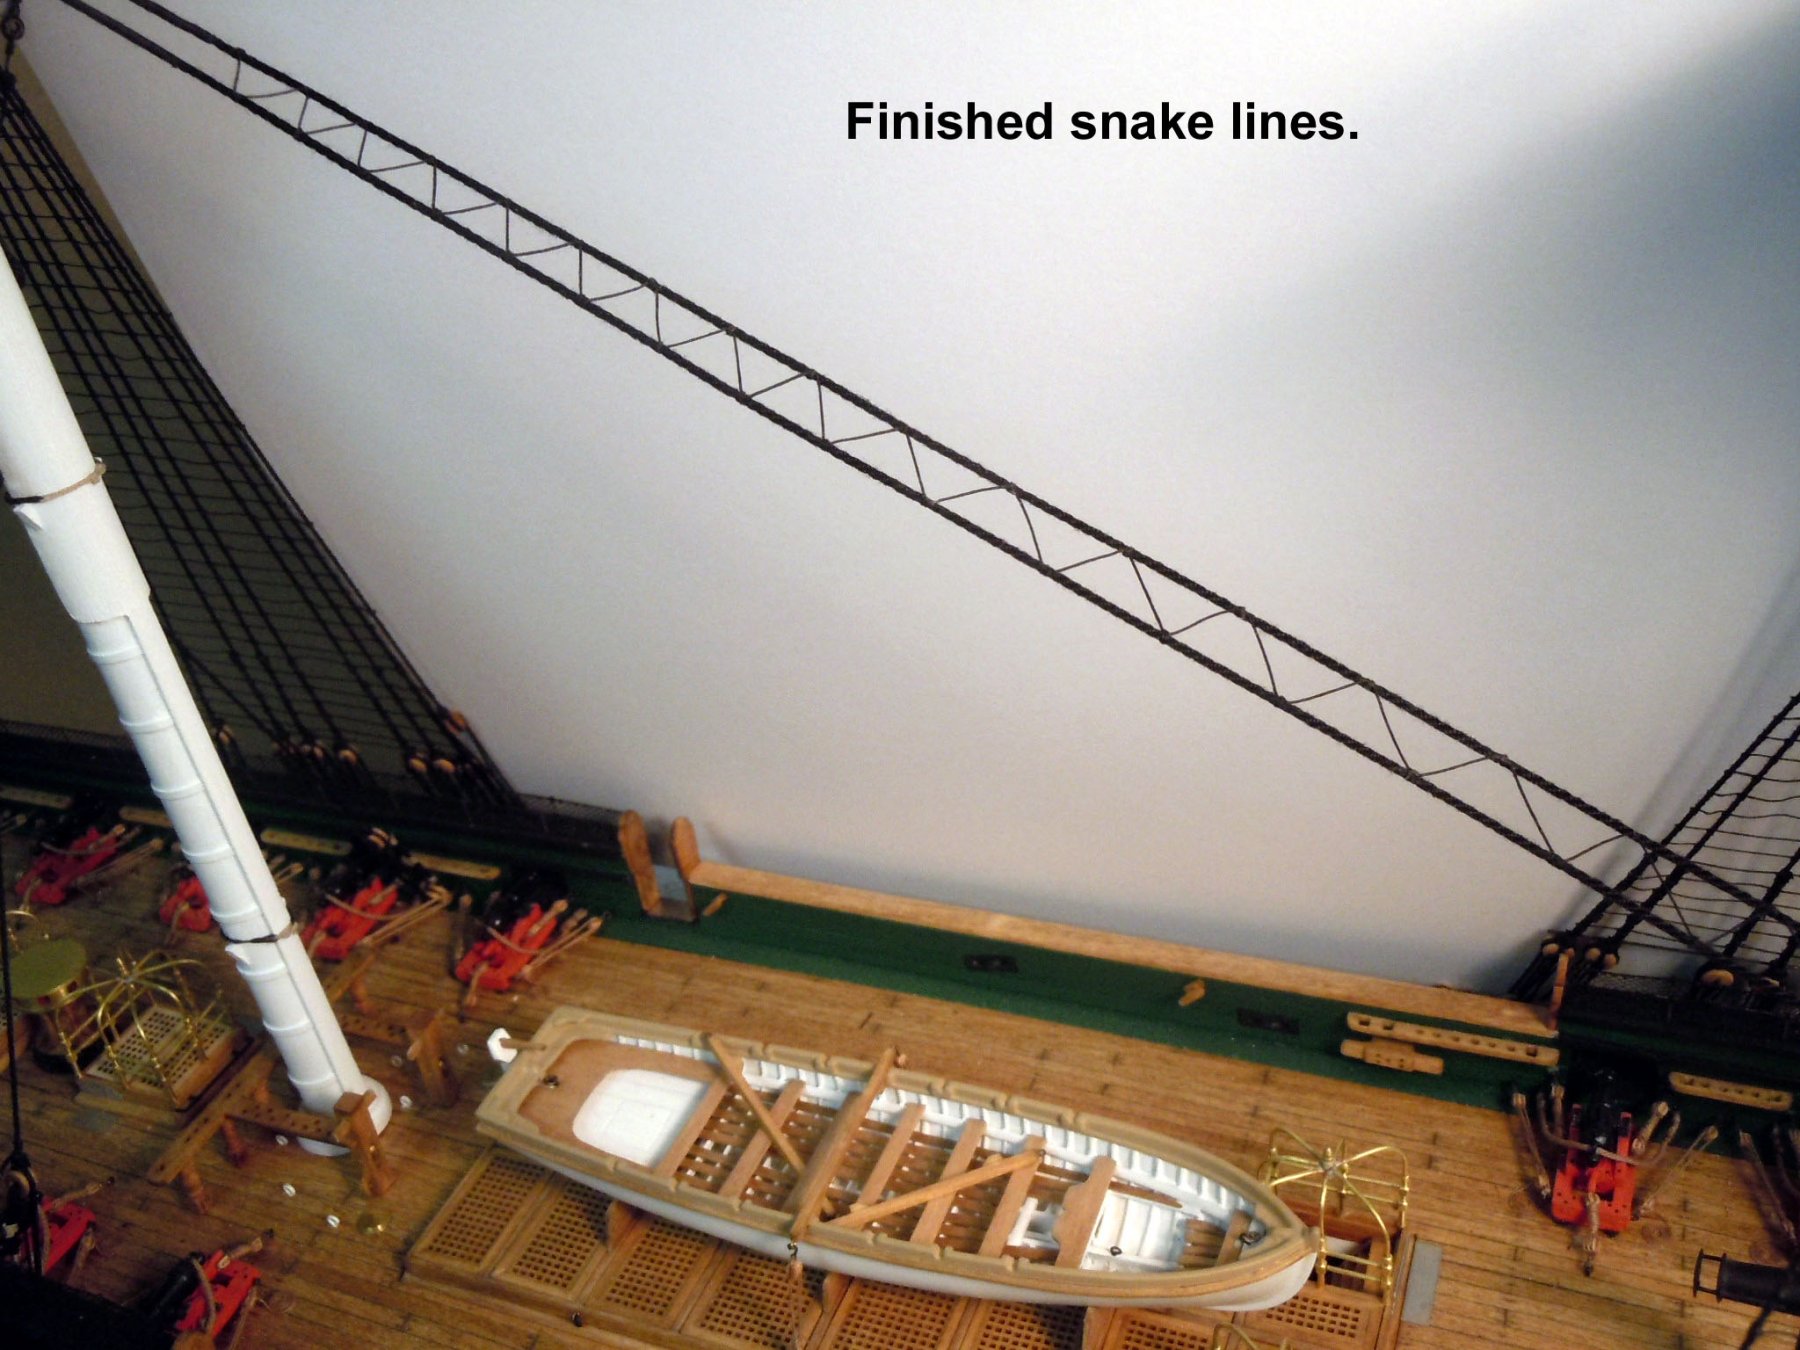
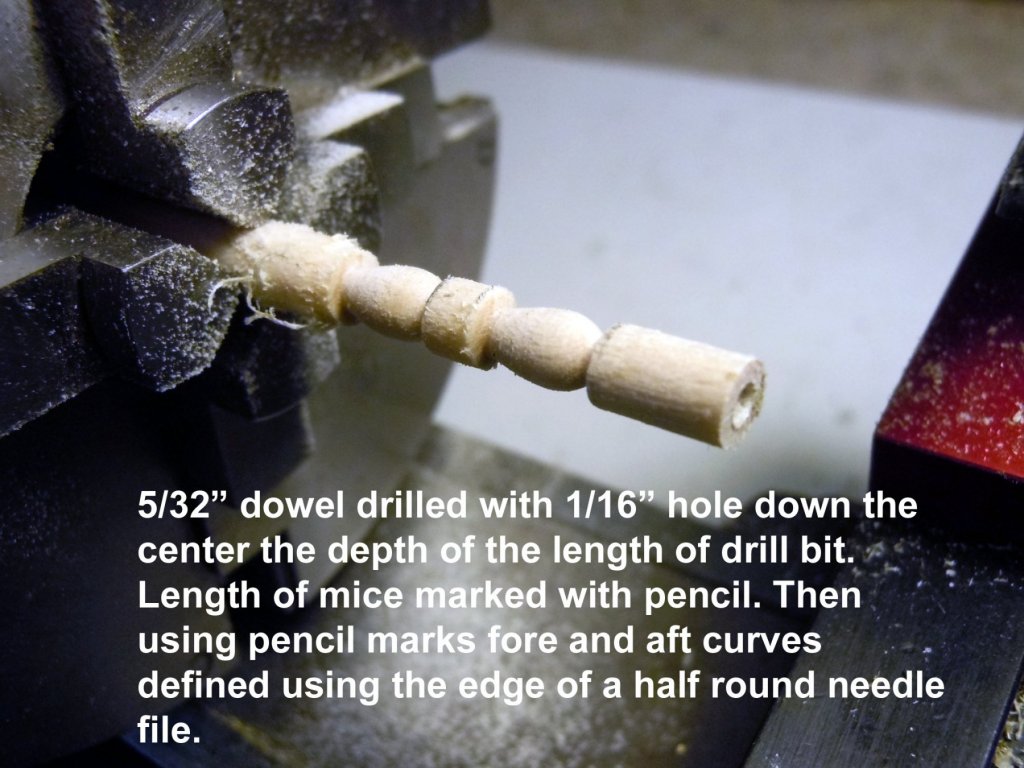
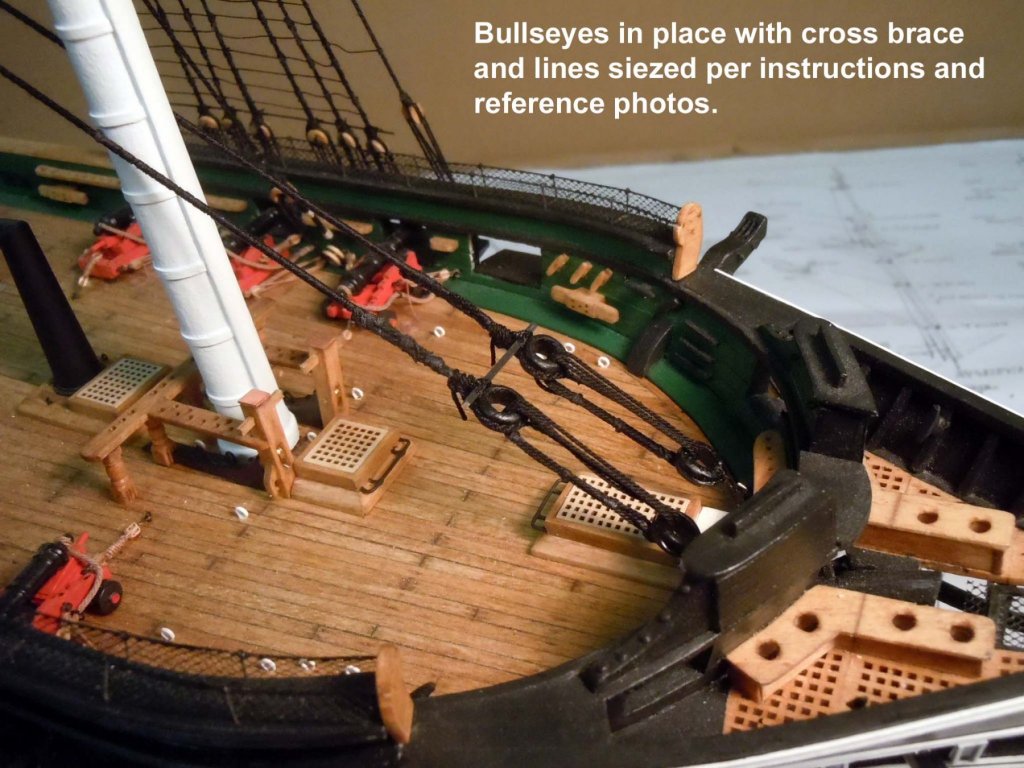
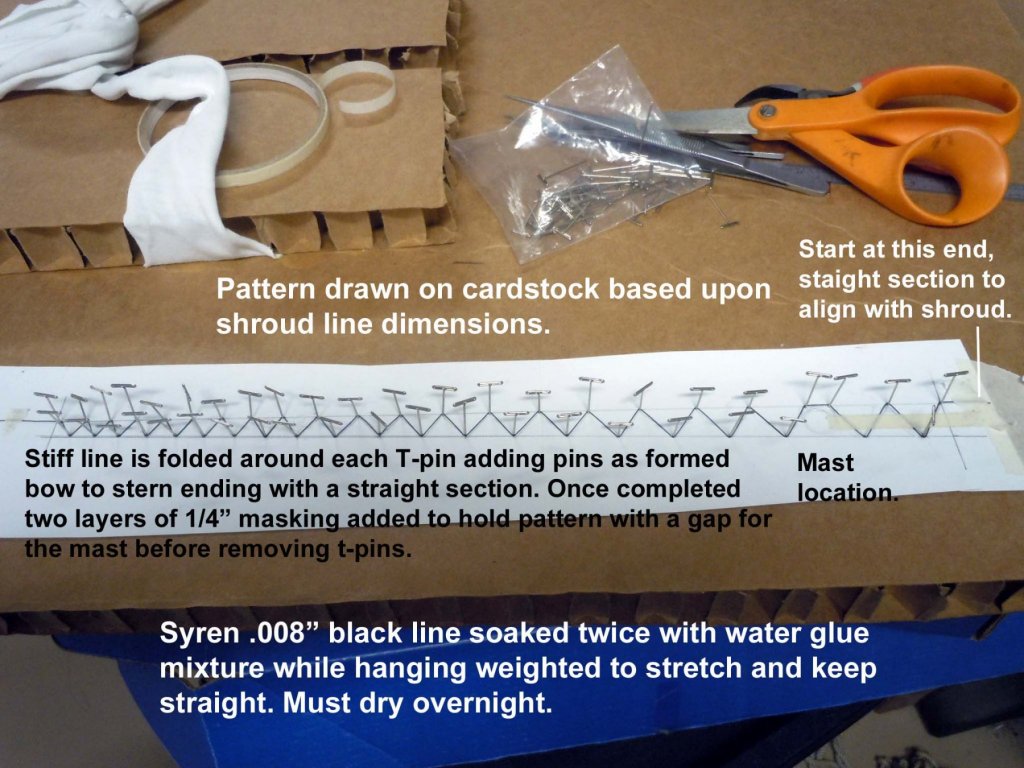
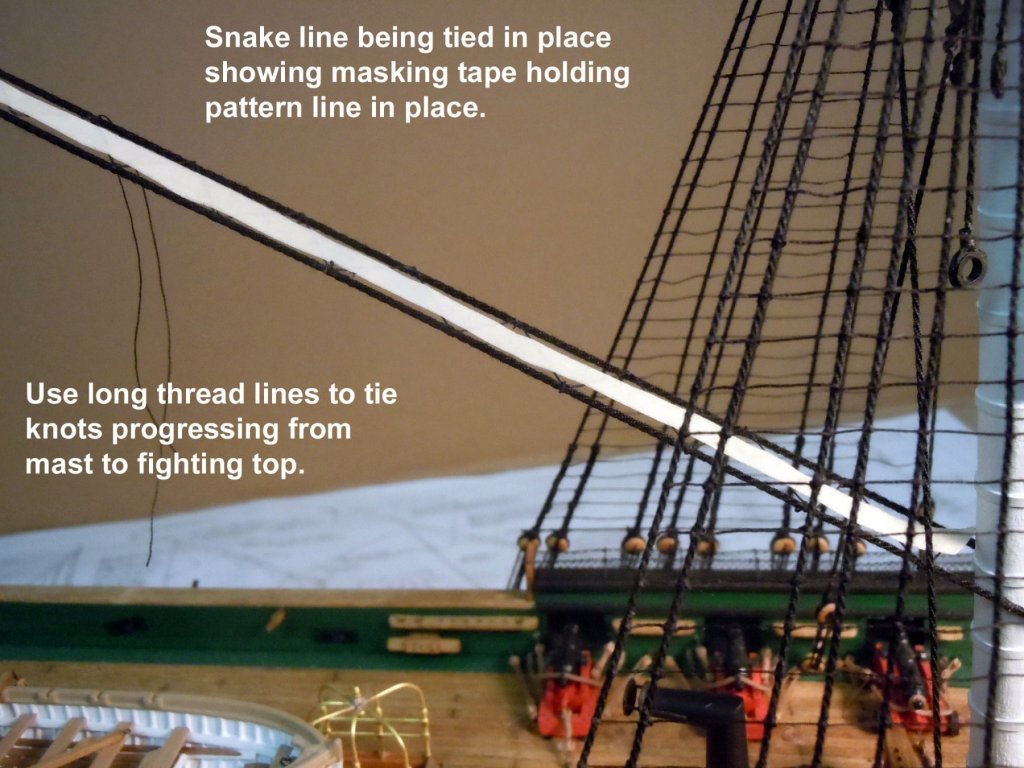
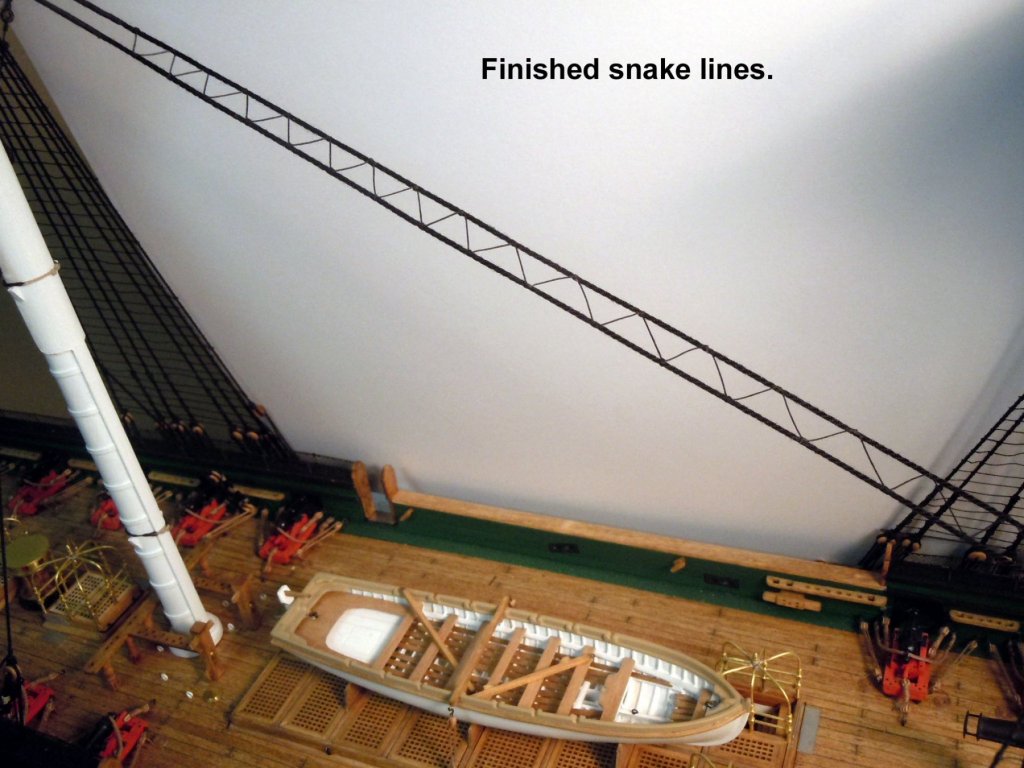
Well I finished up the ratlines and futtocks for all the masts. Also had to take a break and do some fence repair and garden works with the admiral since she wanted to paint the fence. Since she wanted to paint it; who am I to get in her way so the repair work came first. I started with the main mast stay lines by first making the mice to fit the served lines. I have serving lines down pat with my Sherline lathe and served six inch lengths and 2 inch lengths on the shroud lines. After forming the loops and locating the mice I added the bull-eyes to the bow and added the cross brace to keep them aligned. Once the lines were in place I tried tying the snake lines using different weights of threads and the knots at the shrouds just did not look right. So I fell back on my airplane building and took a length of Syren's .008" black line and soaked the line hanging with a weight to stretch and keep straight with a mixture of white glue and water. I soaked the line twice and allowed to dry overnight which resulted in a nice stiff line to work with. The sequence of pictures will explain better than words. Also having tied over 2,000 clove hitches was great preparation for tying the snake line in place. This does require knowing how to tie a clove hitch upside down and backwards given some of the locations around the foremast. With black thread, black snake line on black shrouds will also test one's depth perception. Now to move onto the mizzen stays. My goal is to add as much as I can before adding the bowsprit which is more of a space restriction where I work in turning the model side to side.


-
Fokker Dr.I by Torbogdan - FINISHED - Model Airways
xken replied to Torbogdan's topic in Non-ship/categorised builds
I may be a little late, but here are some steps on how I made the earlier version of the guns. Also not sure if Tom's Modelworks is still in business. I did scratch build my own cooling jackets when I did my Triplane. Just FYI- 250 replies
-
- 11
-
-
Dave, yes I have checked out your build; keep up the great work you are doing! Greg, I use Photoshop Elements to add the text. More cost effective than the full package of Photoshop. Here is a link: http://www.adobe.com/products/photoshop-elements.html?promoid=DW3G16F3&mv=other Still plugging away on the futtock ratlines now and will soon move onto the mast stay lines.
-
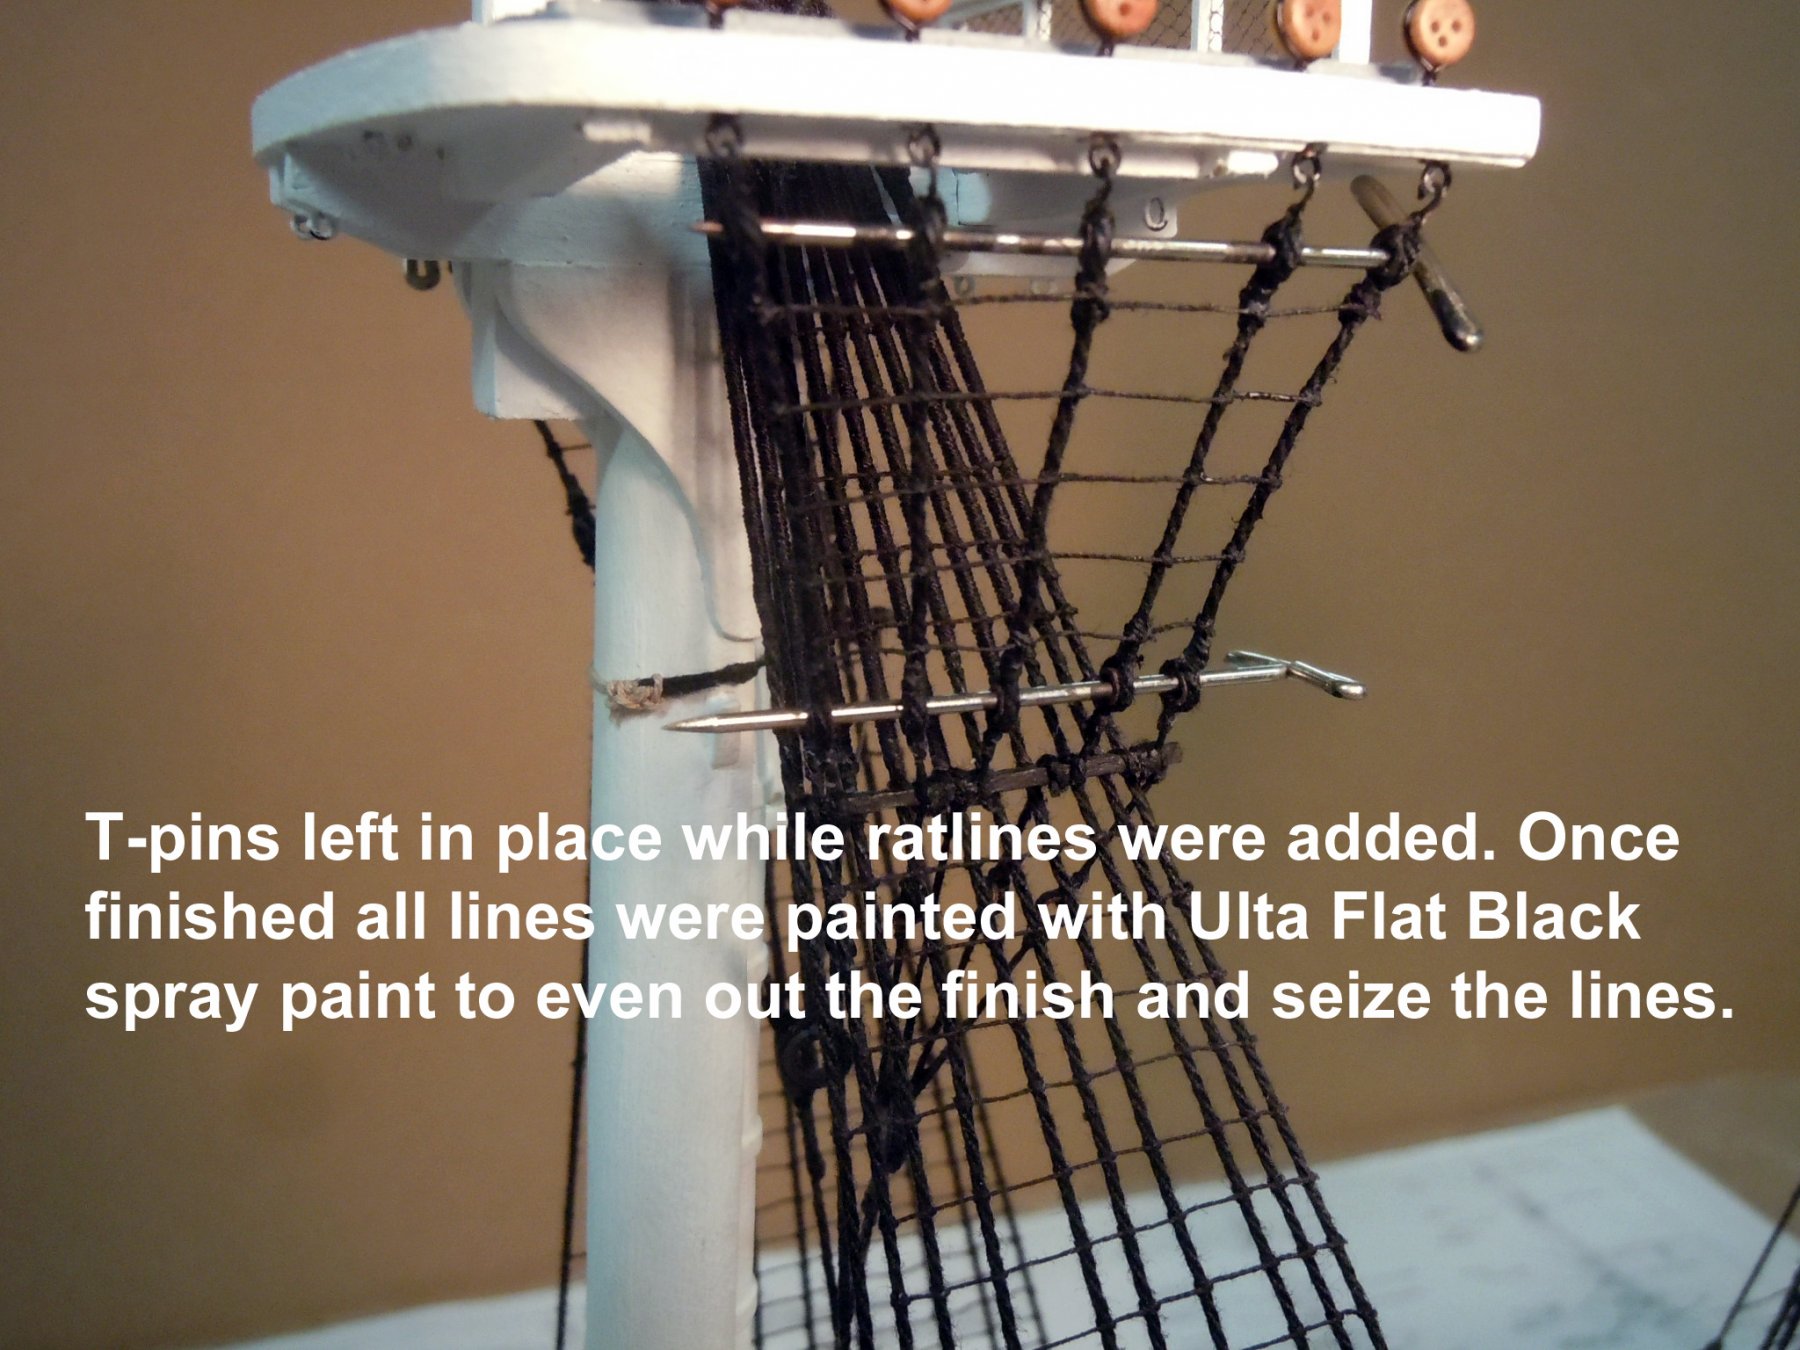
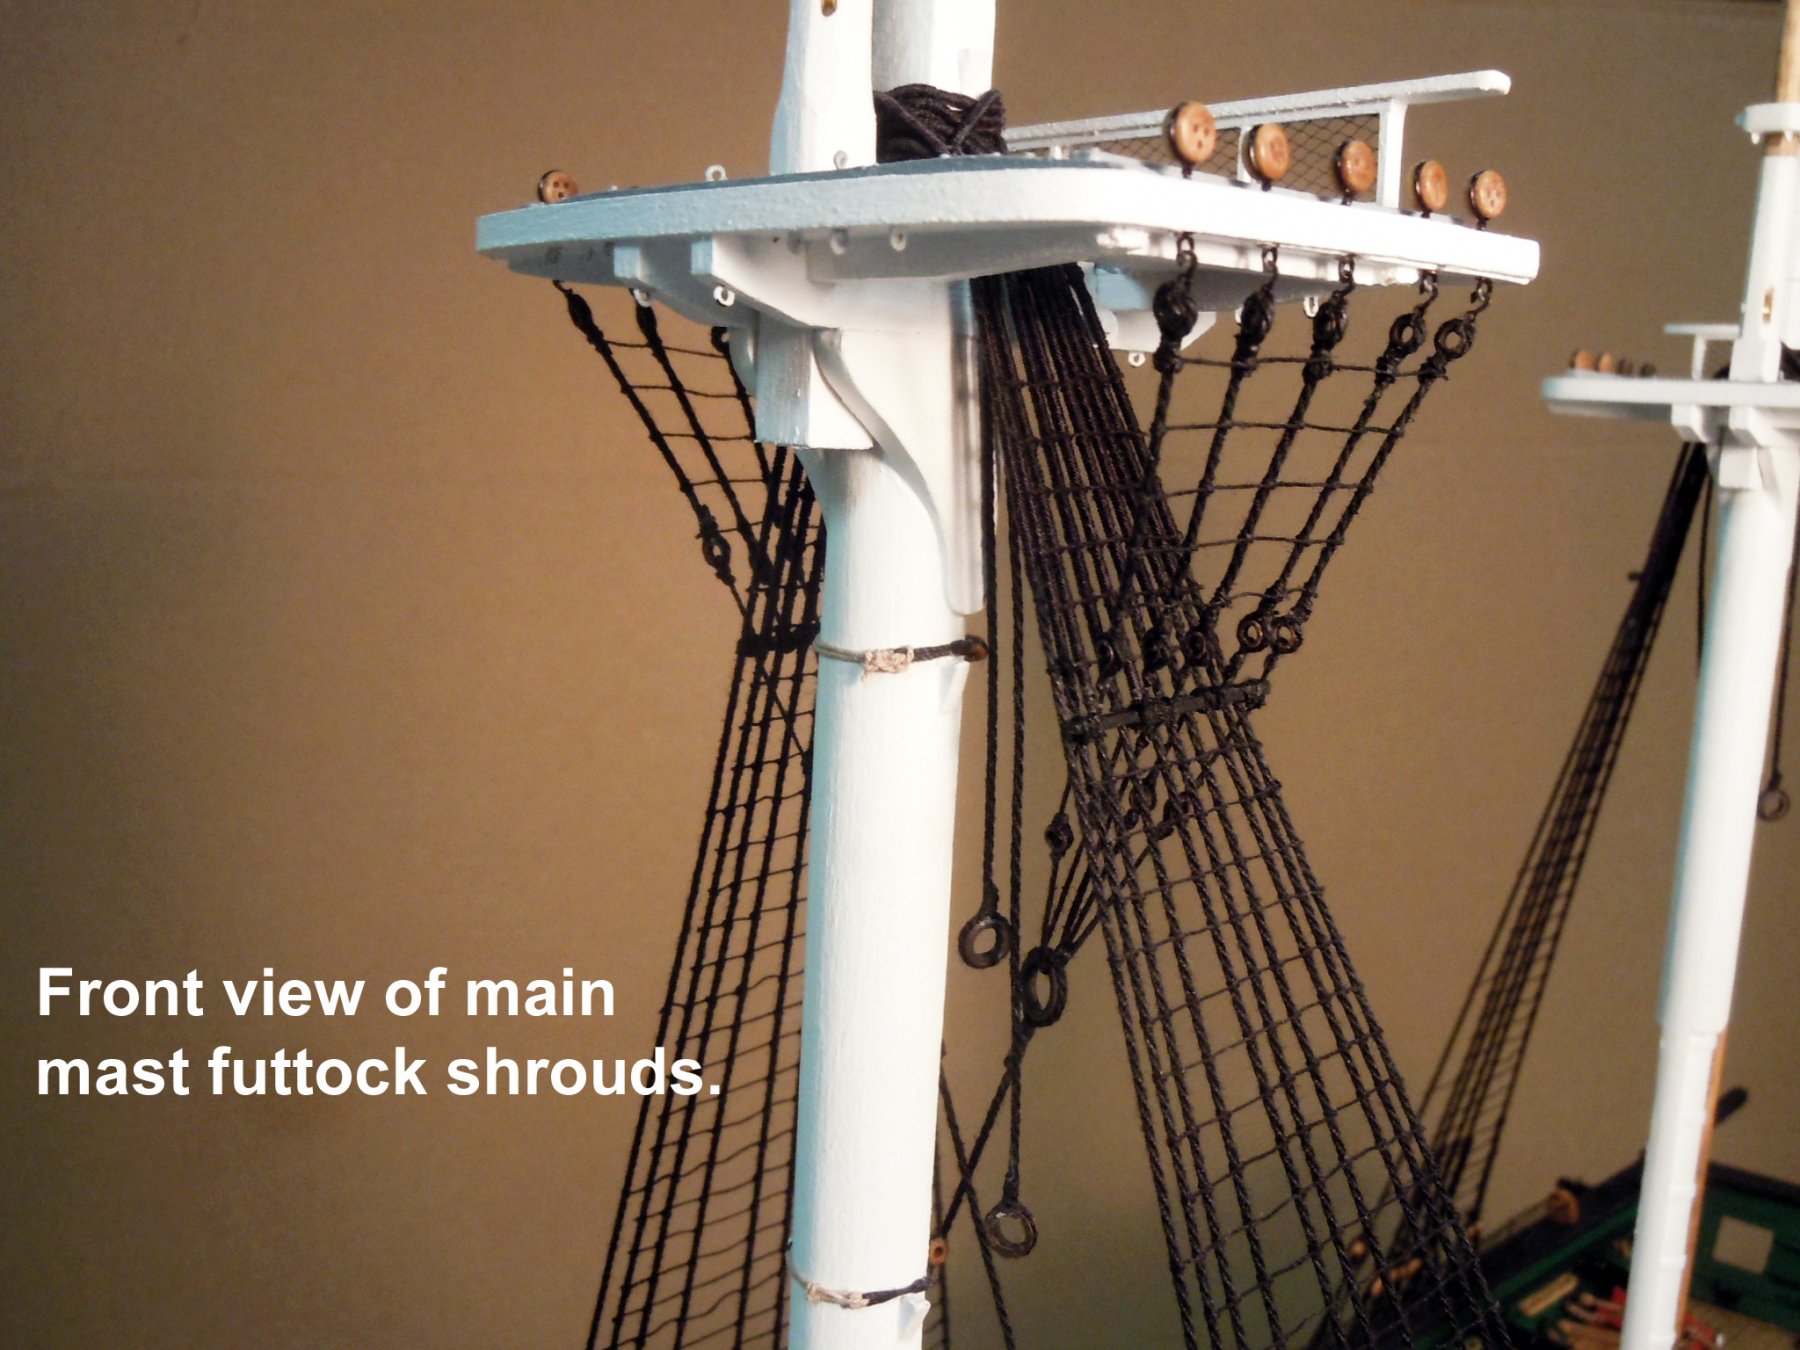
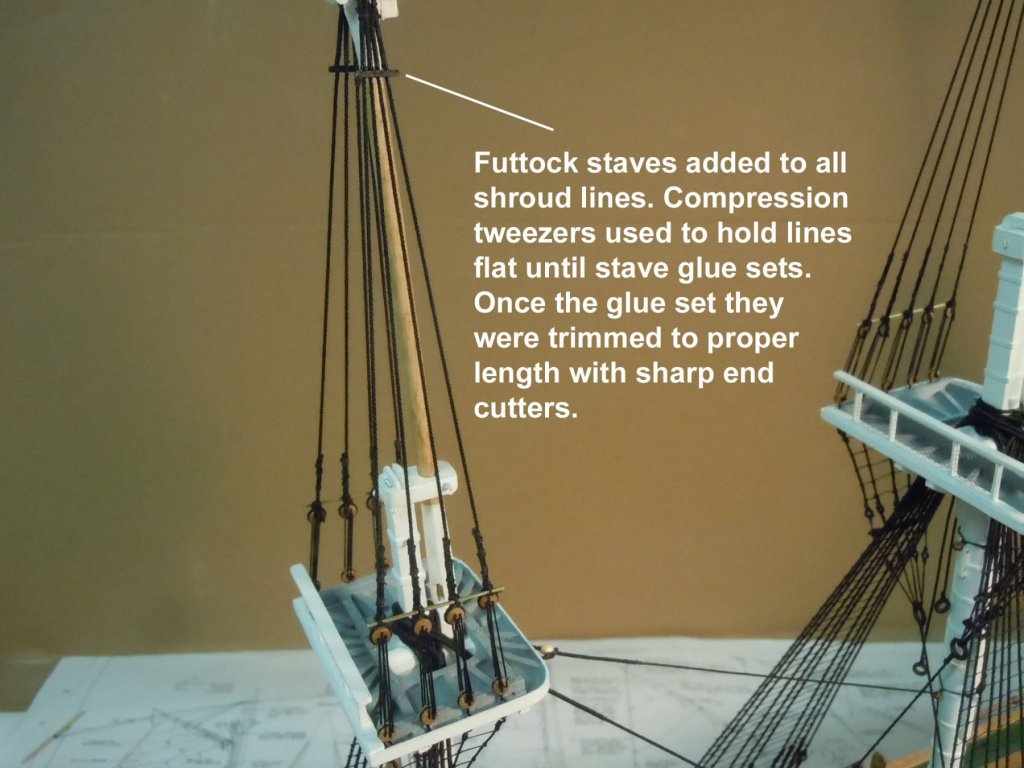
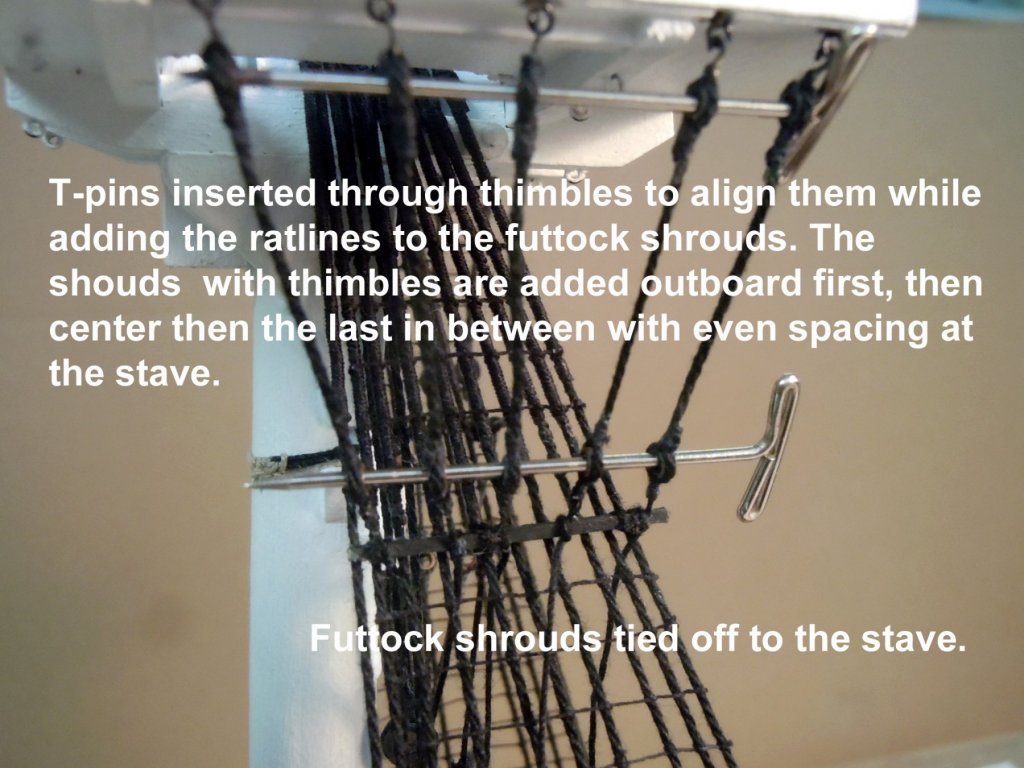
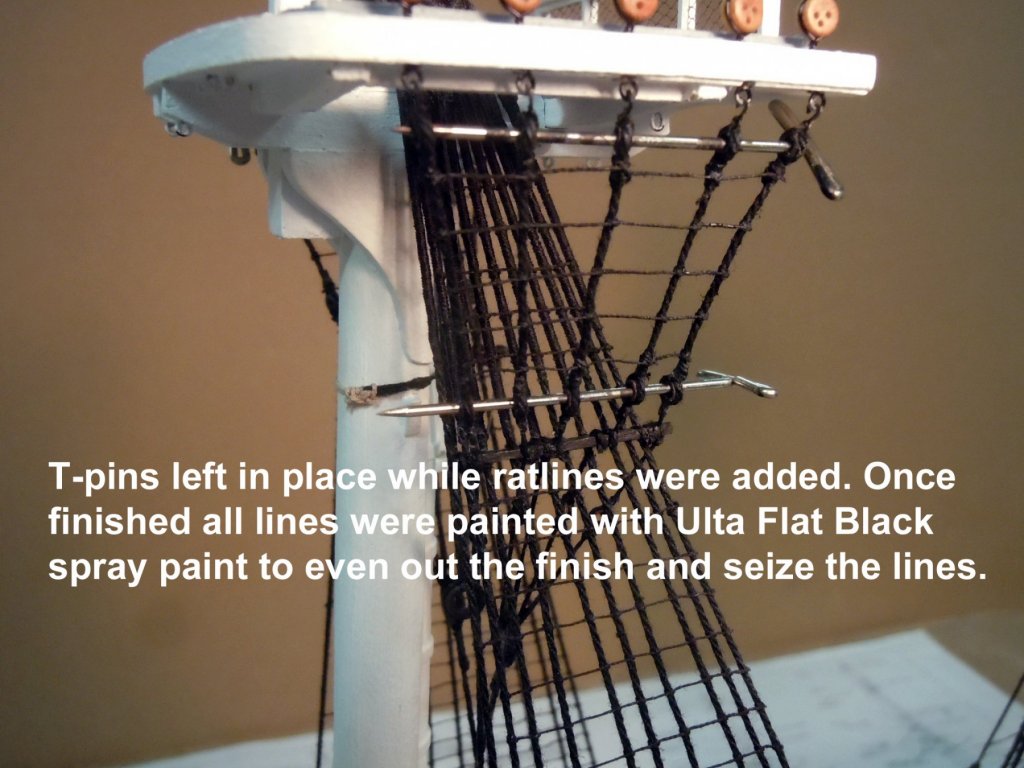
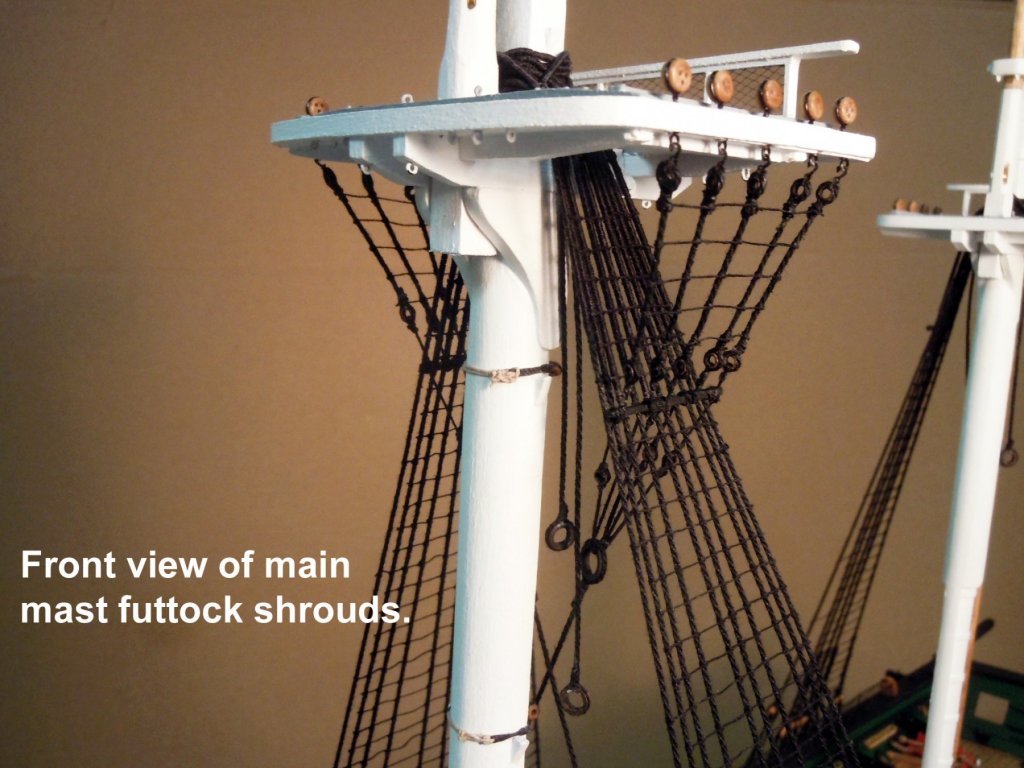
I finished up the bentinck shrouds for the foremast and moved onto the futtock shrouds. After doing the starboard side offhand I realized there had to be an easier way to align the thimbles. I moved to the port side and tied off both ends first; then the center and finally the last two justifying the spacing at the stave. Next I used T-pins through the thimbles top and bottom to align them and then added the ratlines gluing each knot as each line was completed. The T-pins helped to hold the shroud lines in place when tying off and spacing the ratlines. Once all were completed I added CA at the hooks and rings to hold them then holding the stave tight to the shrouds I CA'ed them in place. Once all the excess lines were trimmed after the glue set all were painted with Ultra Flat Black spray paint. This gives them a uniform finish and stiffens the lines a little. Now on to the foremast.

-
John, you have hit upon one of the key factors of chemical staining. Another approach depending upon the size of the parts is to scrub the part using pumice and a toothbrush (I save old ones for this) in a bowl of hot water with a few drops of dishwasher soap until clean. You need to do the scrubbing within a bowl to "catch" the excess pumice which if not caught will plug you sink drain trap. Once the parts are cleaned rinse with warm water and set on a clean cloth to dry. When ready to stain heat the parts under a light bulb and once warmed up then dip the part(s) into the blackening chemical. Heat is a second factor often overlooked in the process that I have had great results with. The product I use is Novacan Black Patina that I purchase at a Stained Glass Supply outlet. Once stained if not pleased try rubbing the part with a clean soft rag and re-stain in the chemical. Sometimes the buffing alone can result in a pleasing finish as well. As you have learned, there are many factors that can influence the results including the alloy used to cast the parts themselves. Next time try heating (warming) the parts and let me know how the heating worked for you.