xken
-
Posts
841 -
Joined
-
Last visited
Content Type
Profiles
Forums
Gallery
Events
Everything posted by xken
-
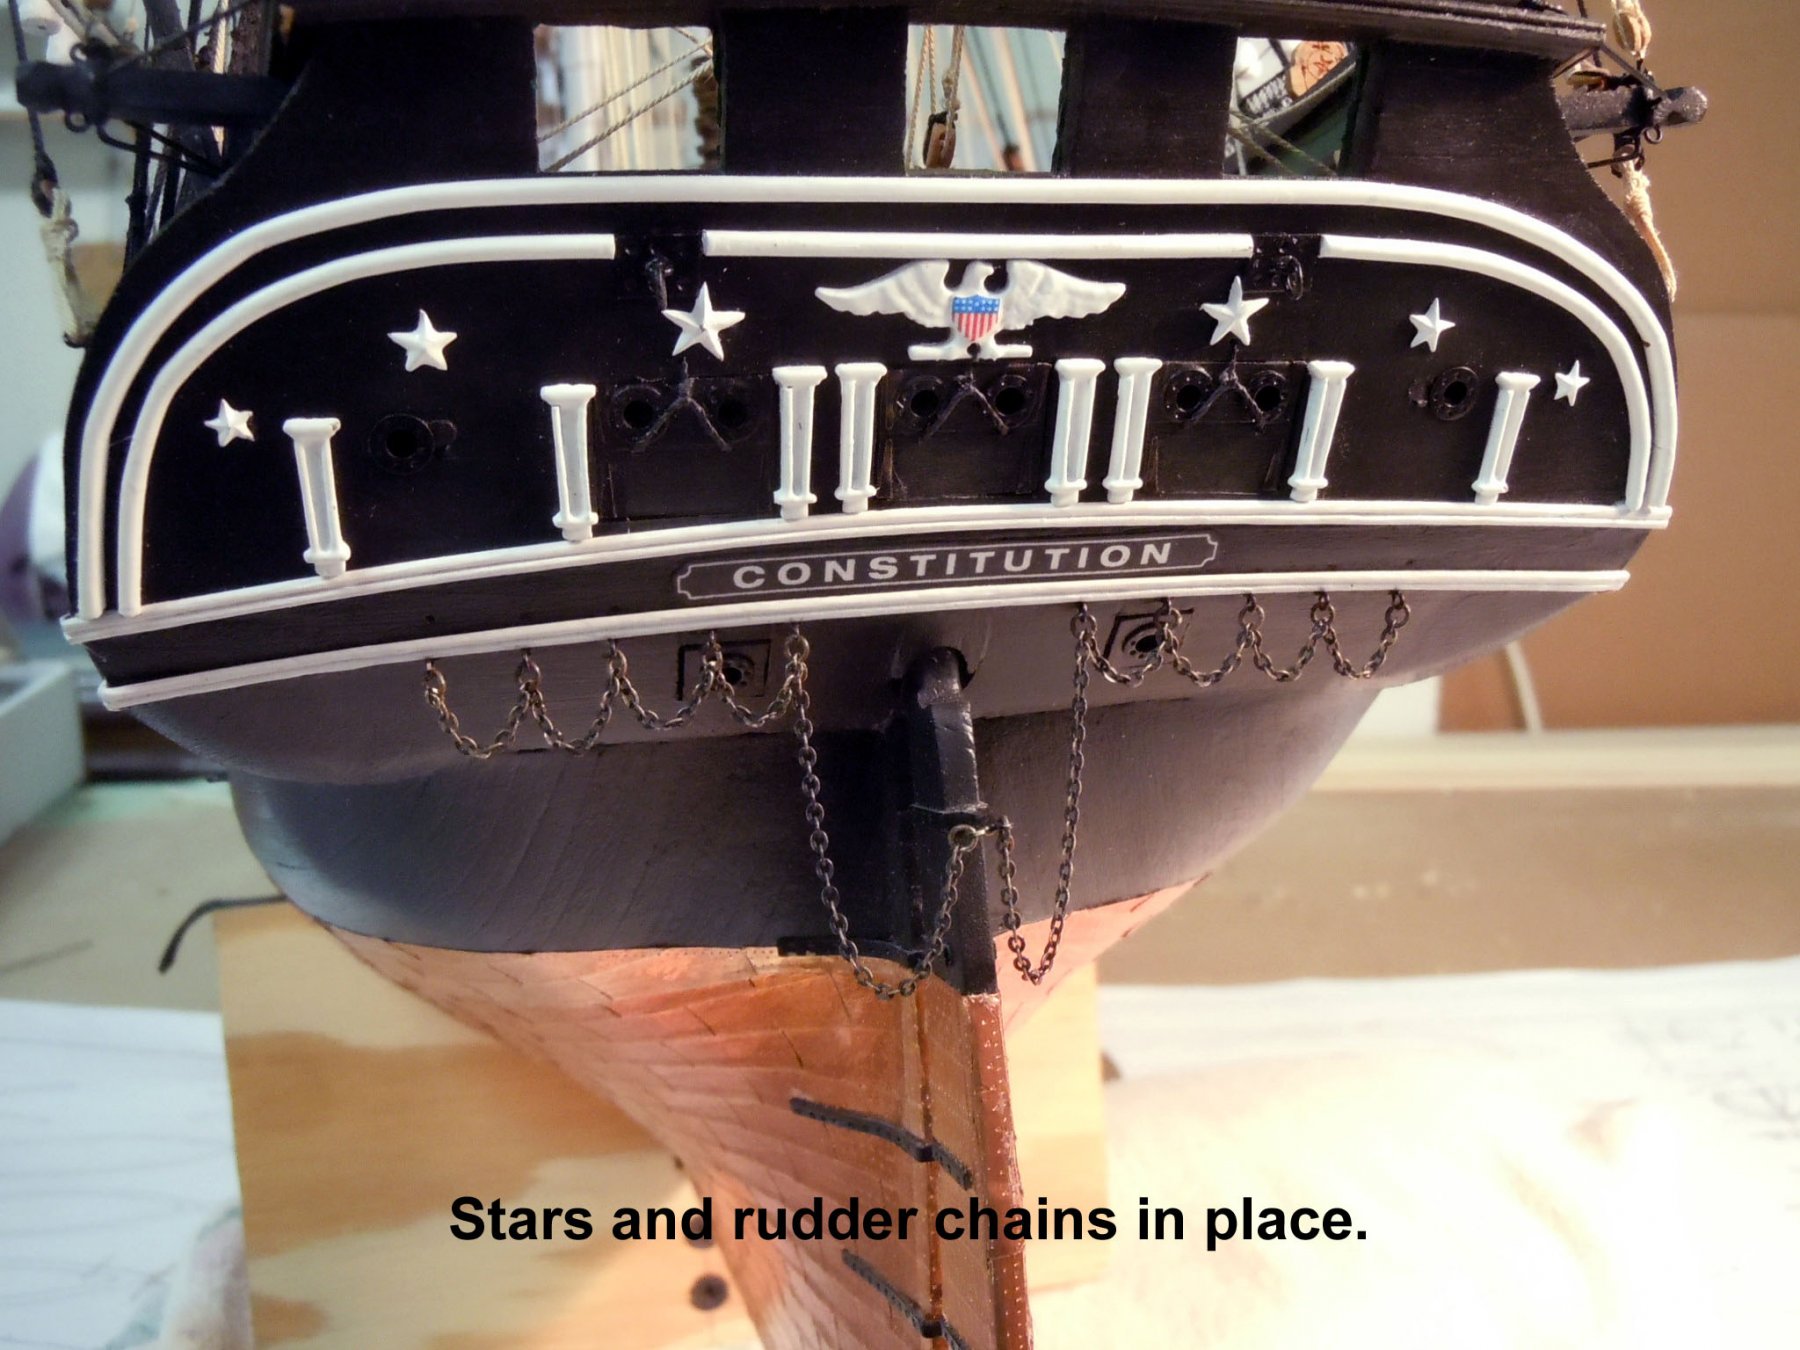
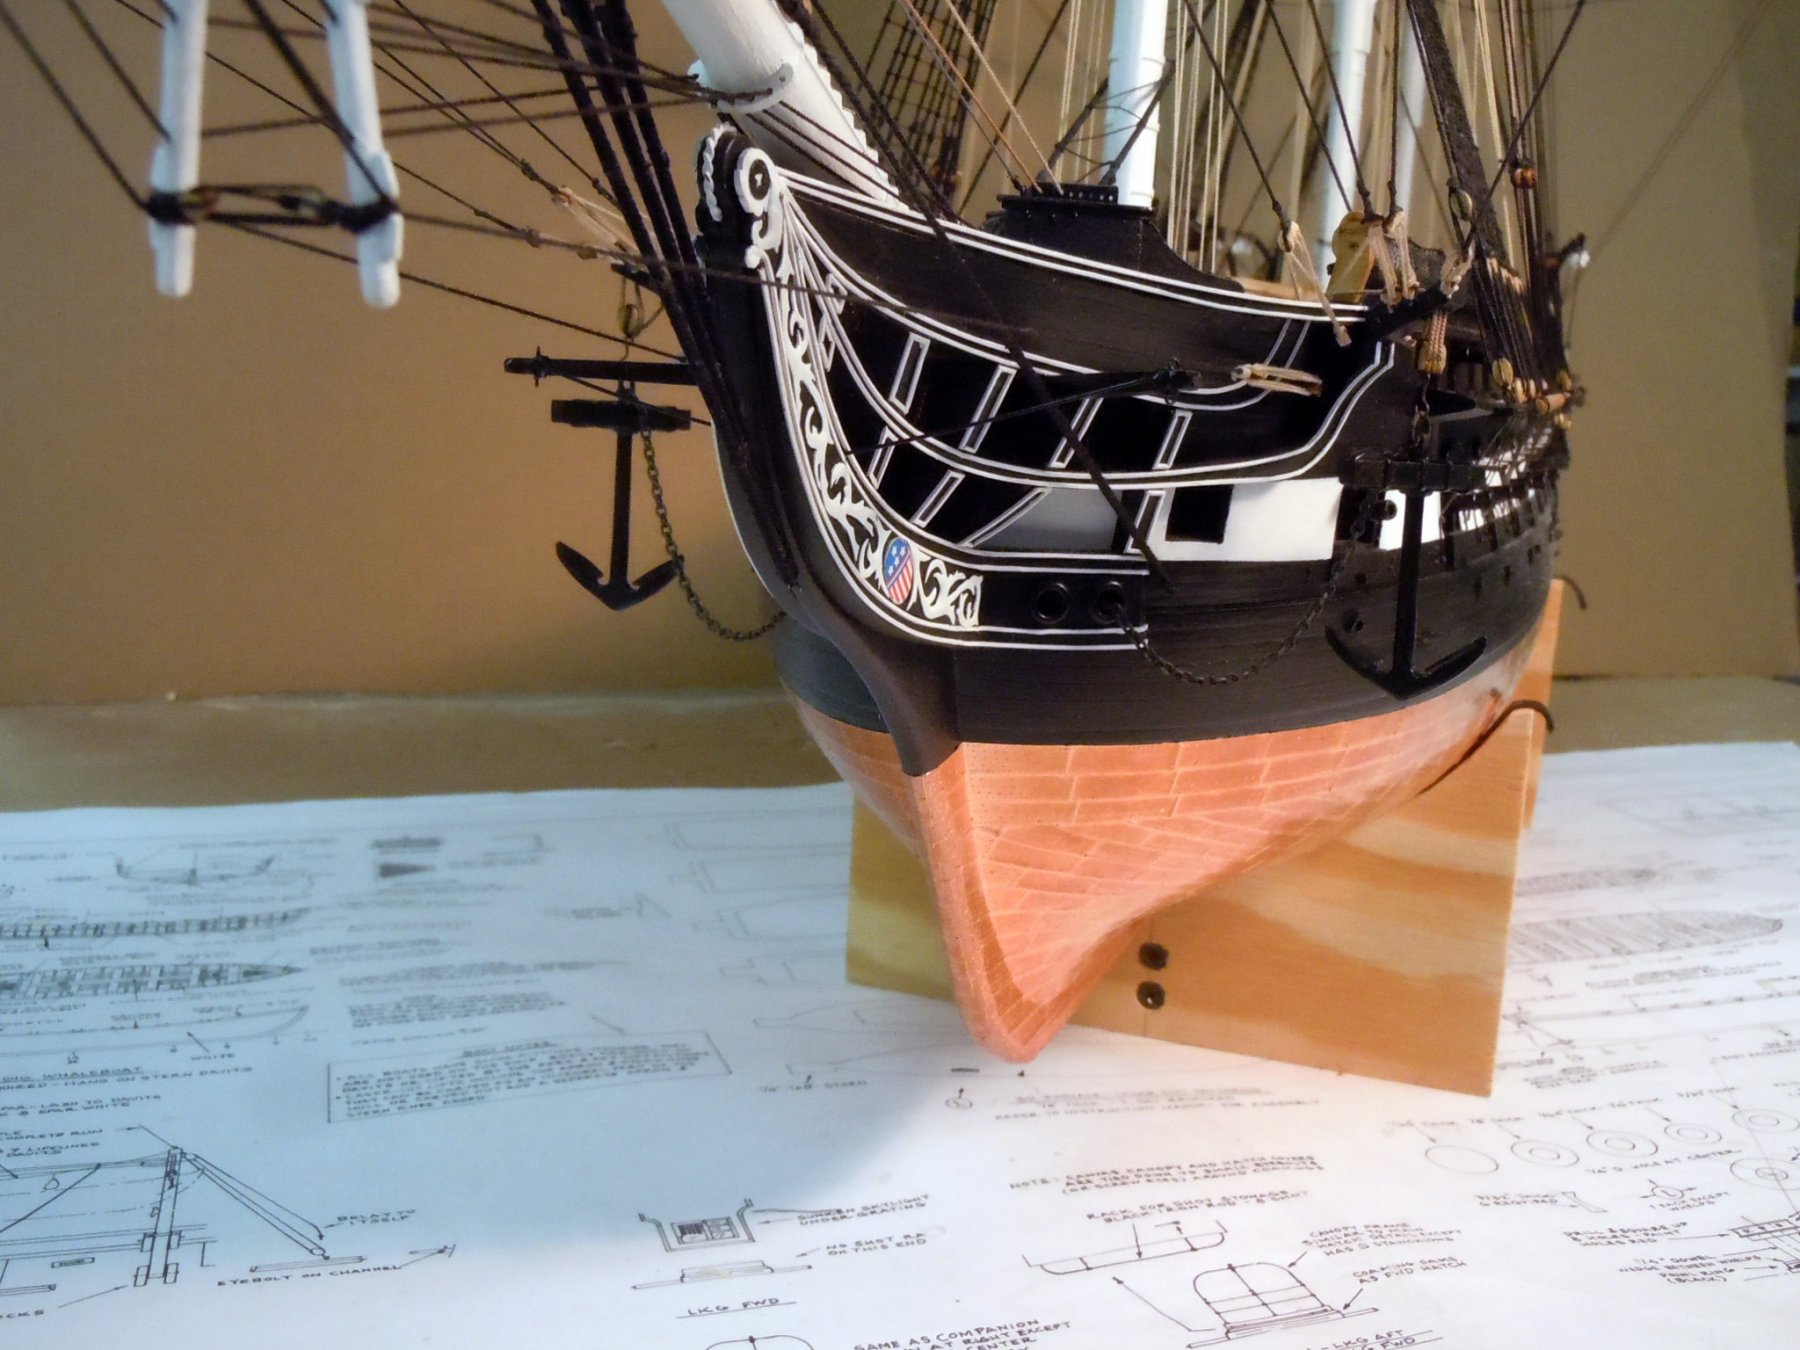
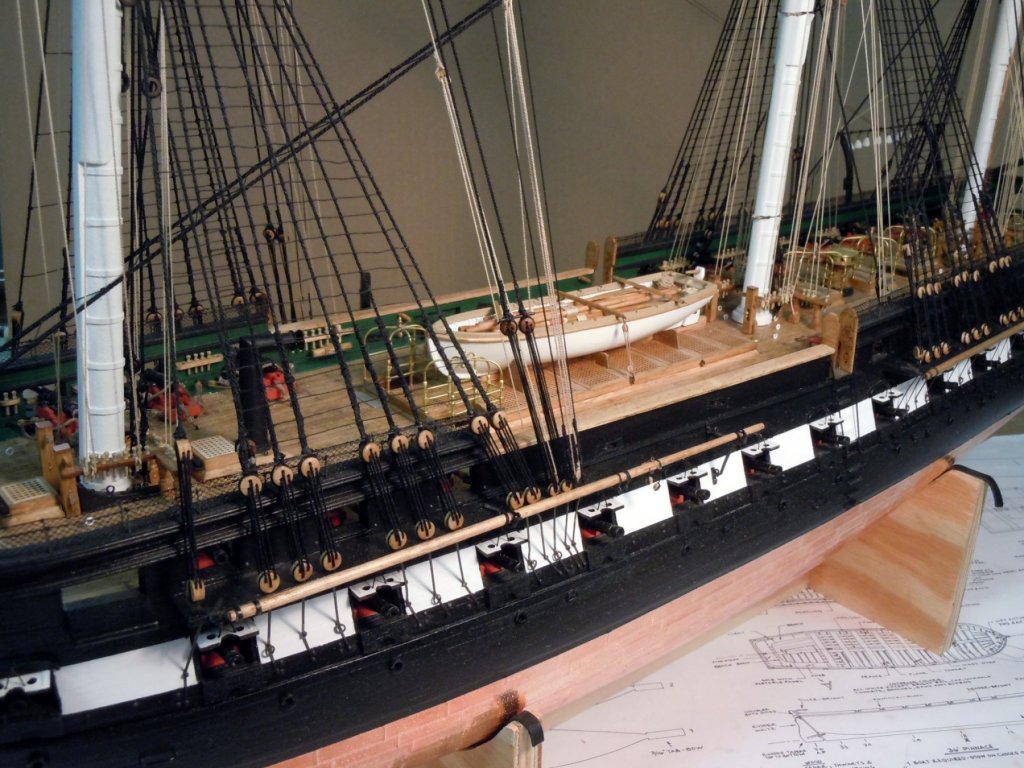
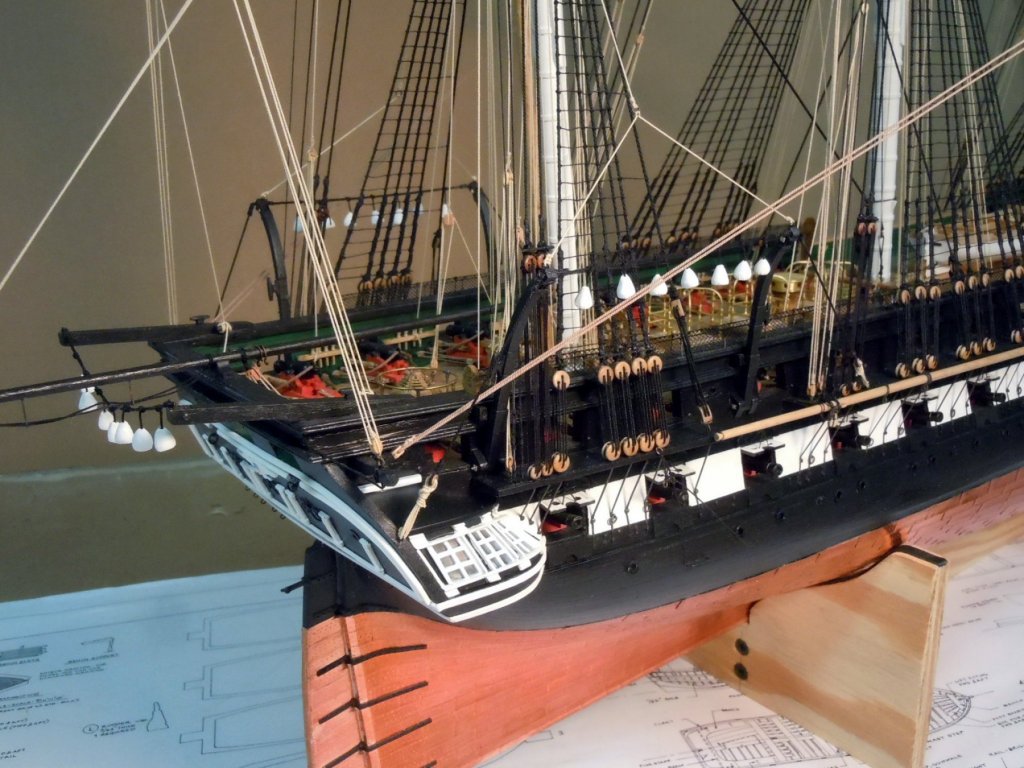
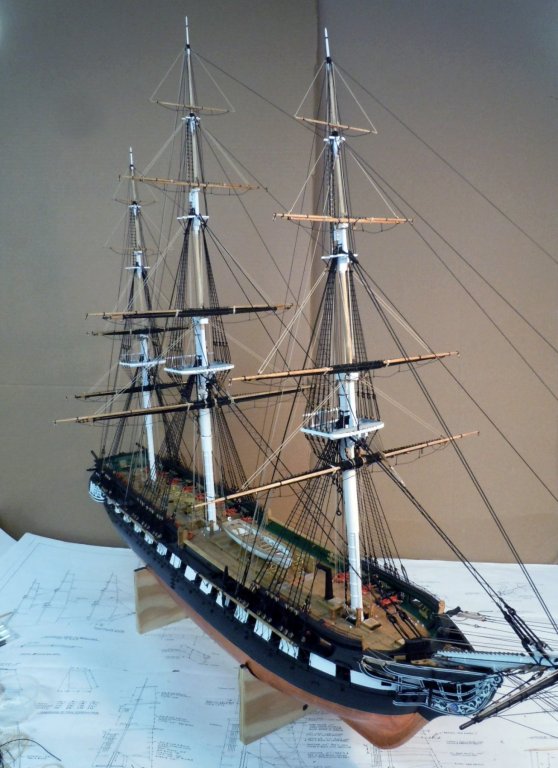
 Just a quick update on the transom with the stars in place and the rudder chains which I thought would be easier to do before adding the small boat. i then seized the boom with the 3mm hooks and then added the flag permanently. Now to rig the studding booms and make ropes for coils for belaying pins.

-
Techsan, No I still have to do those yet, they may be the last items to do. I still have a few more details and rigging issues to do yet. You to can do this level of work, just time and patience and research. Of course the right tools help as well.
-
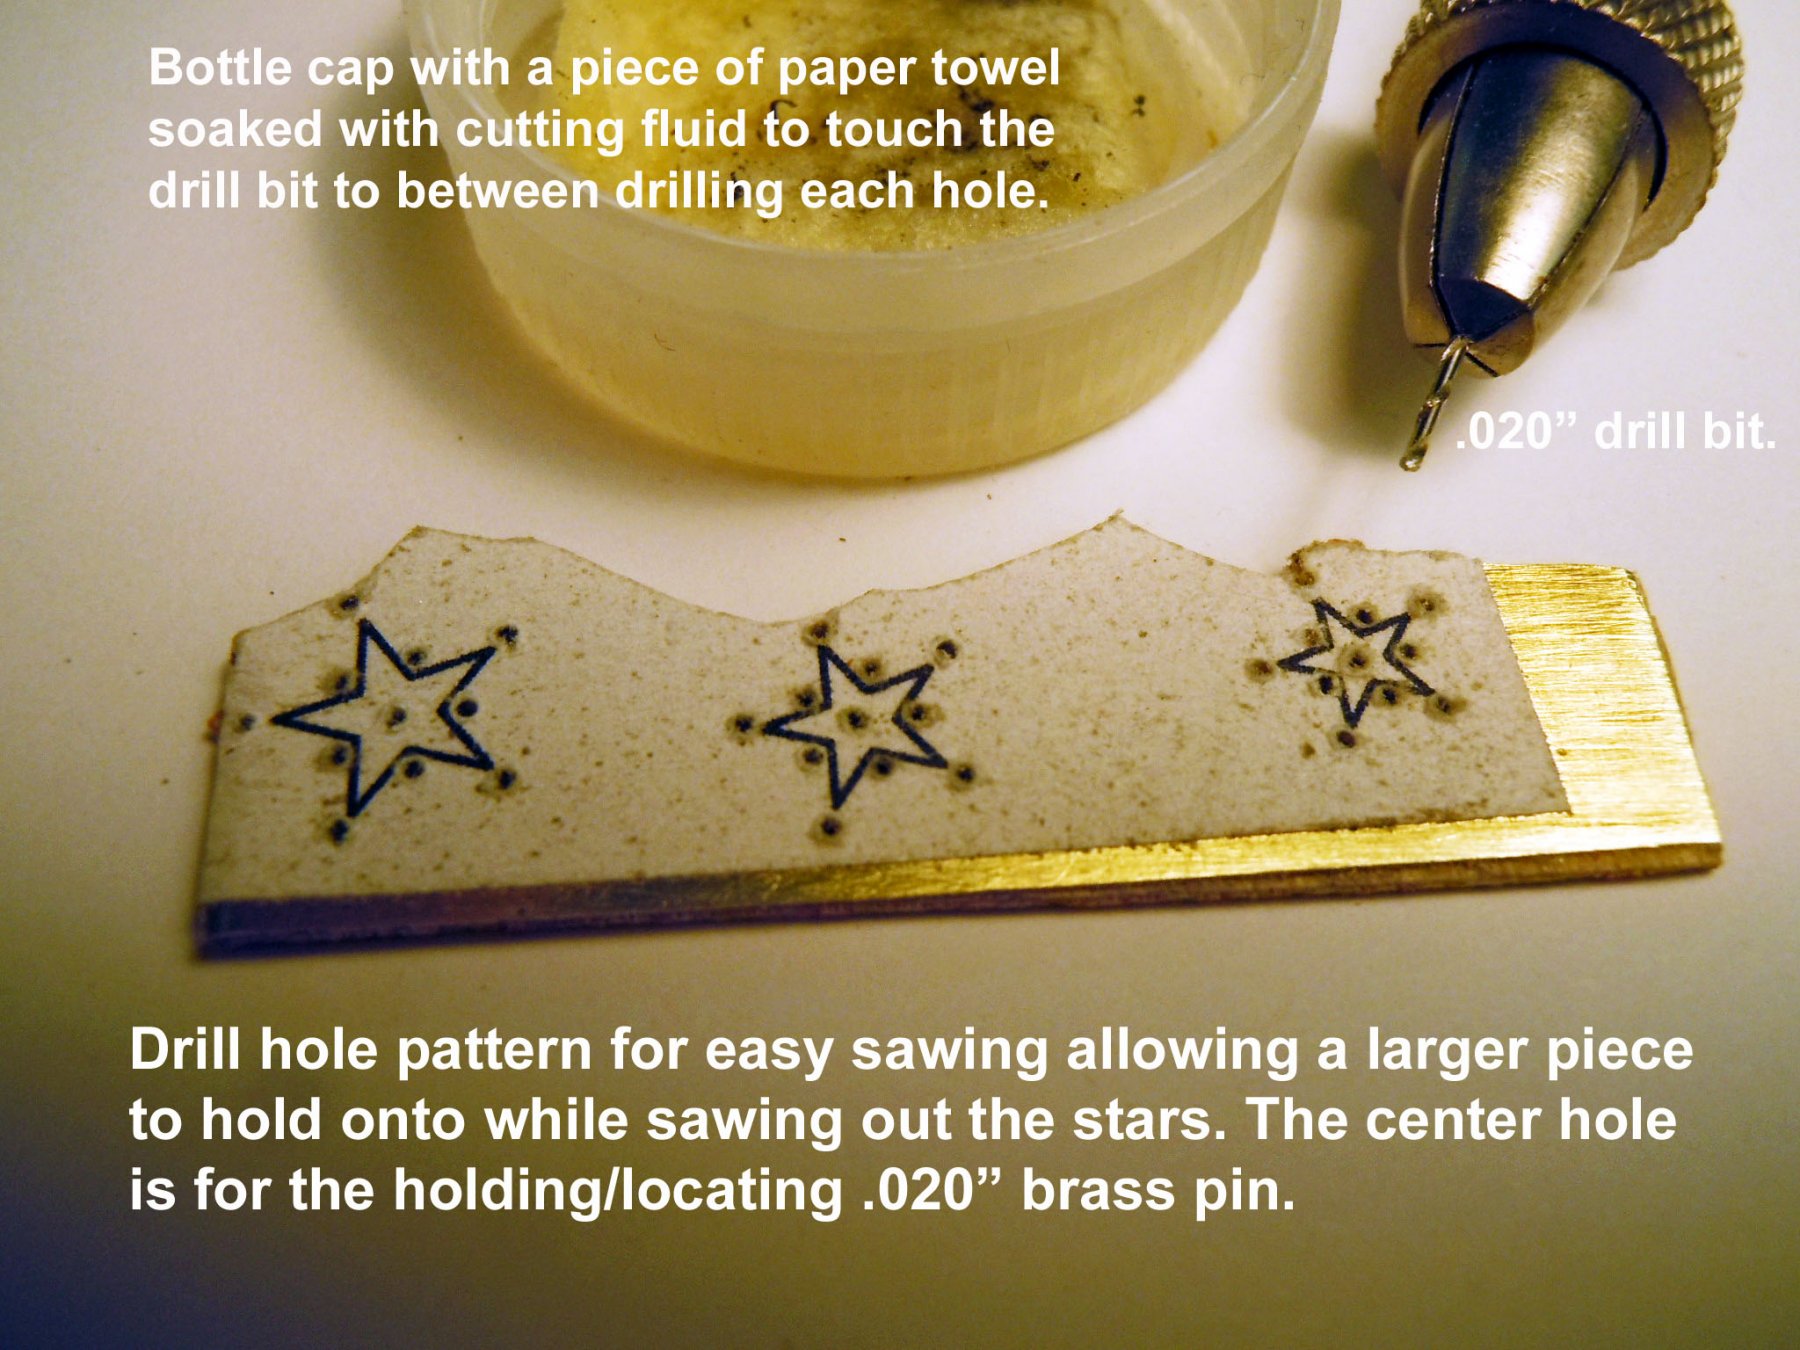
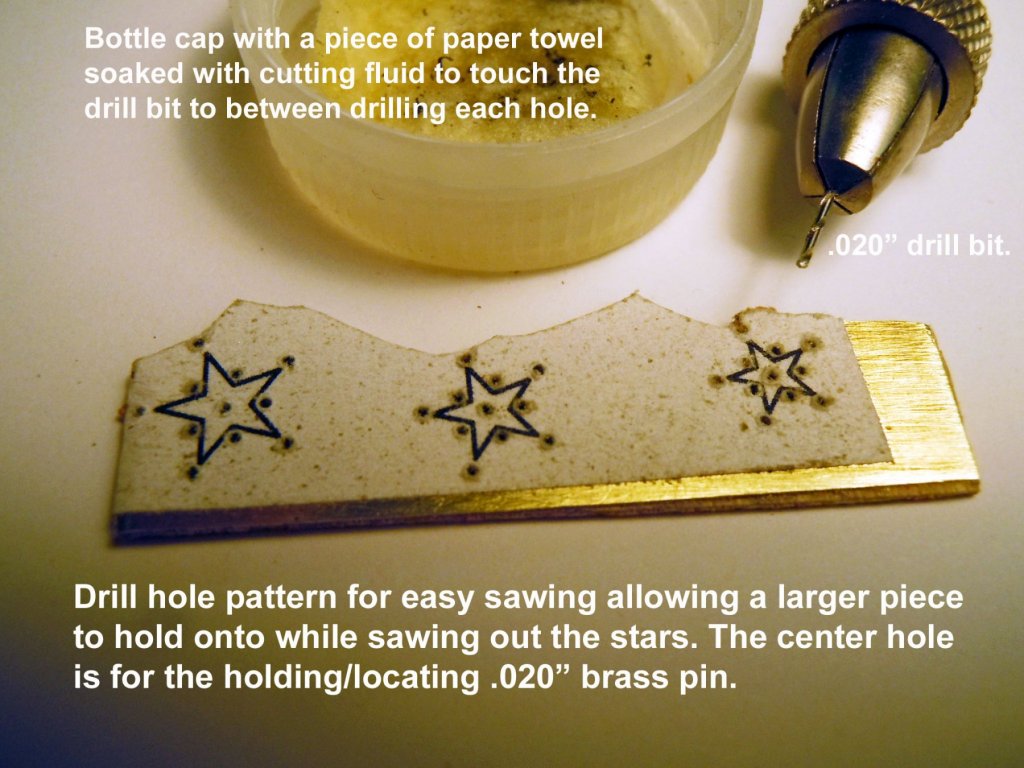
Jon, you will need to locate an industrial tool supplier near you and if they do not have the small drill bits in stock they can usually order them for you. You are correct, most drill bits in hobby outlets are more wood oriented and cheap. As I have said before you get what you pay for. Determine which drill sizes you use all the time because the ordered packs usually come in 10 packs from suppliers. For example I use .010", .020" and .032" based upon the brass rods that I use. The cutting fluid is the same to cut threads, Tapmatic Cutting Fluid 1 good for most metals. A small can will last you a lifetime unless you decide to drink it. Maybe someone else may have an online source for you to use.
-
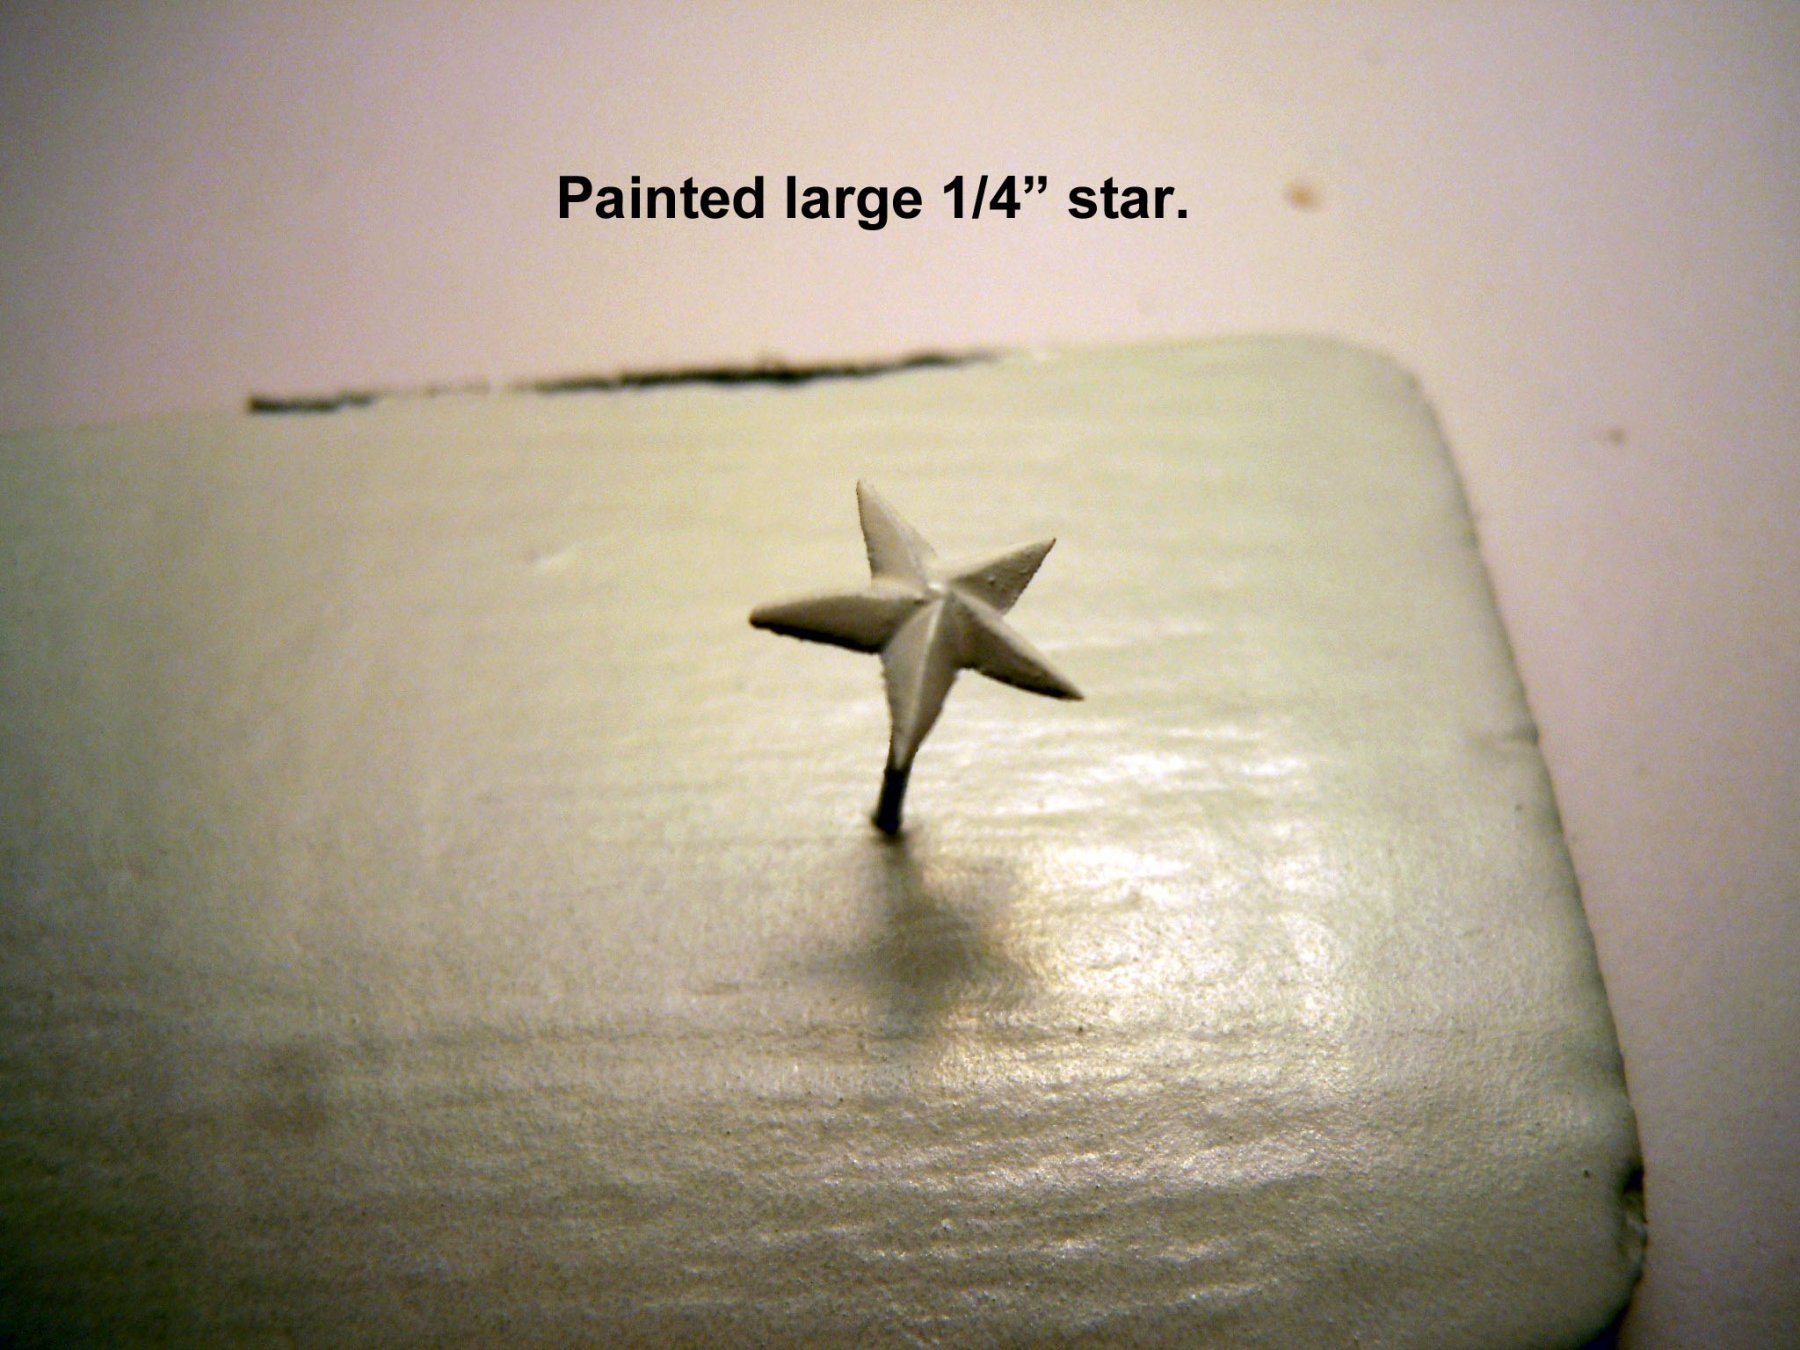
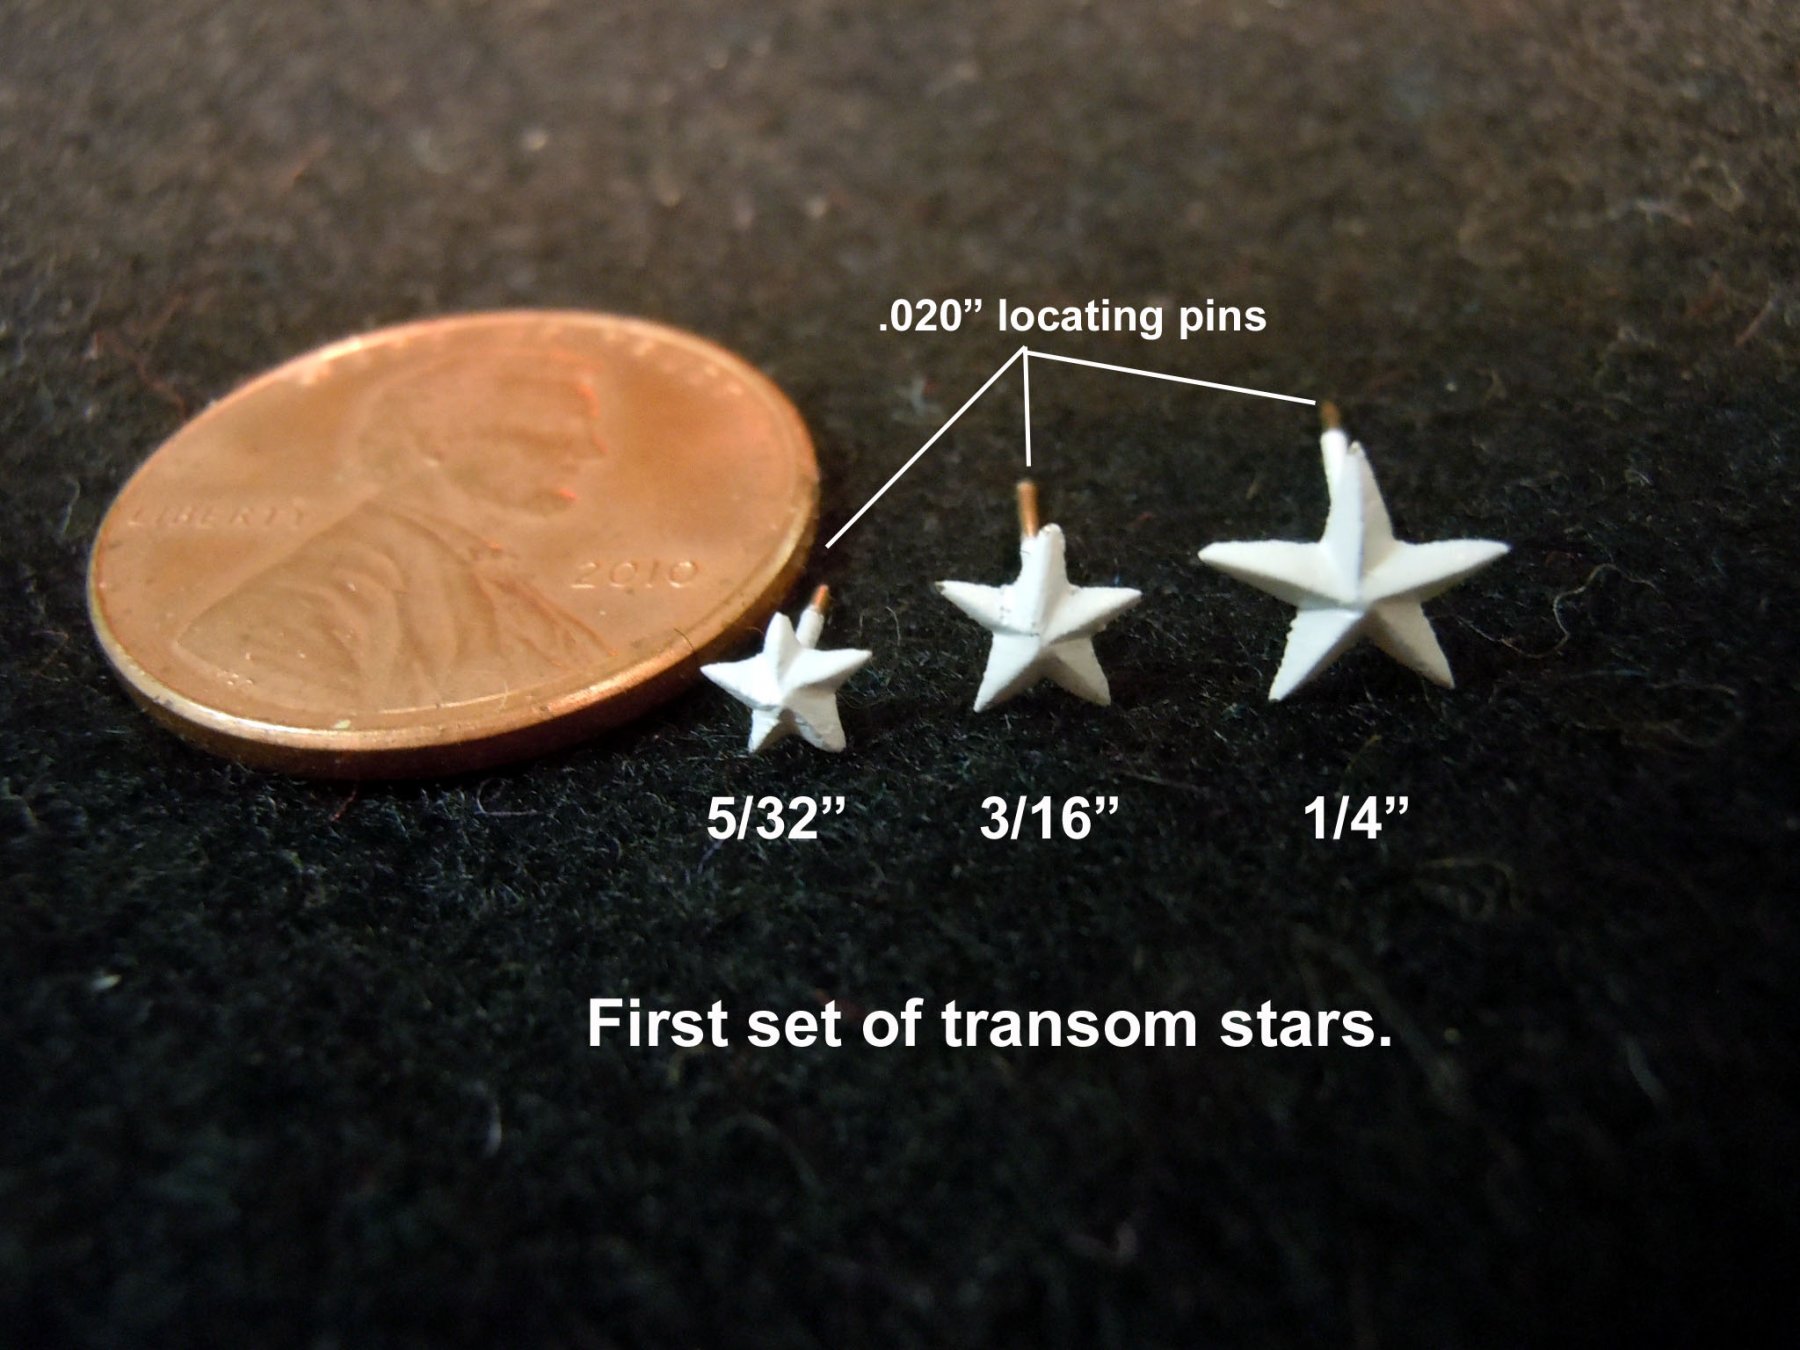
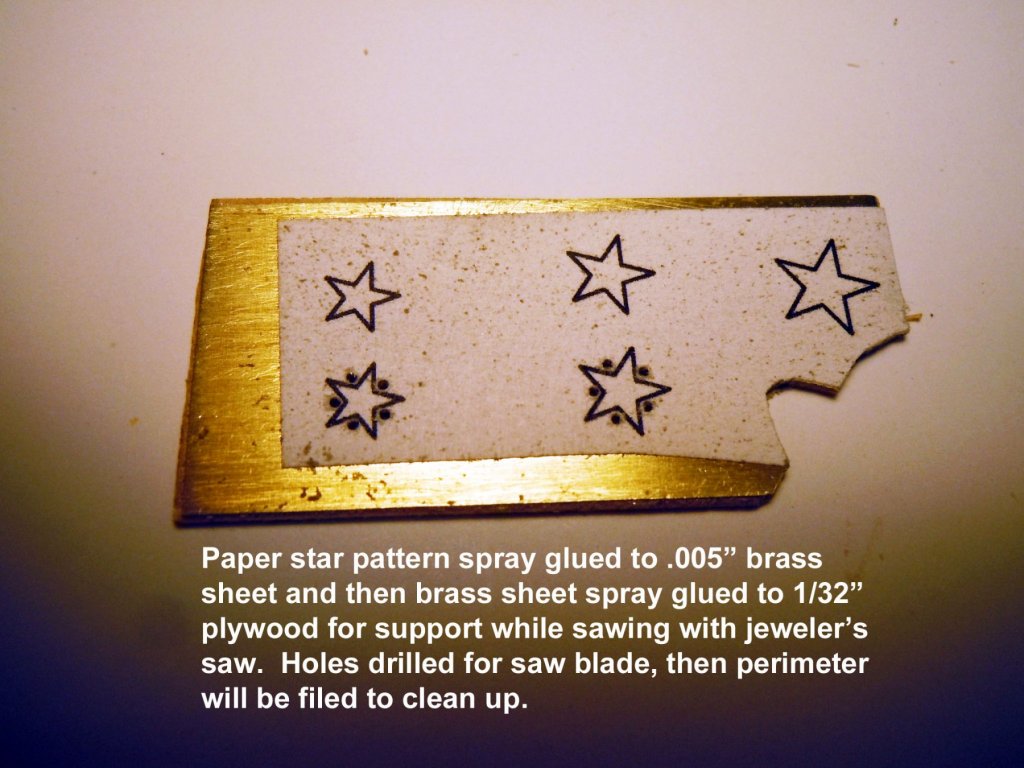
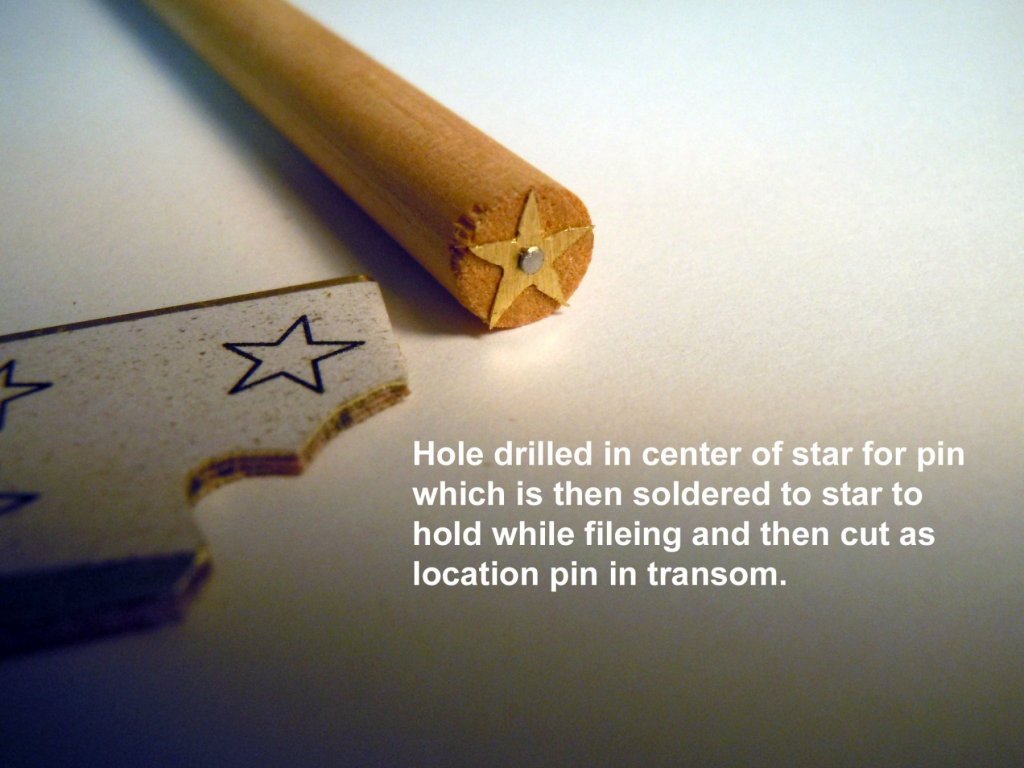
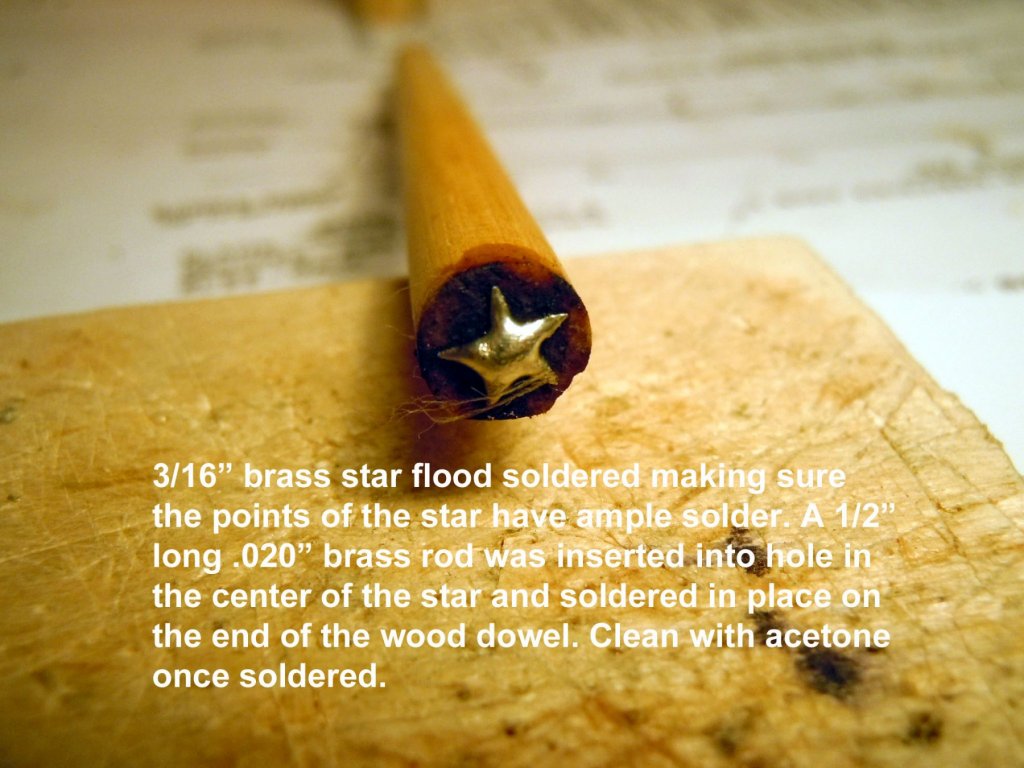
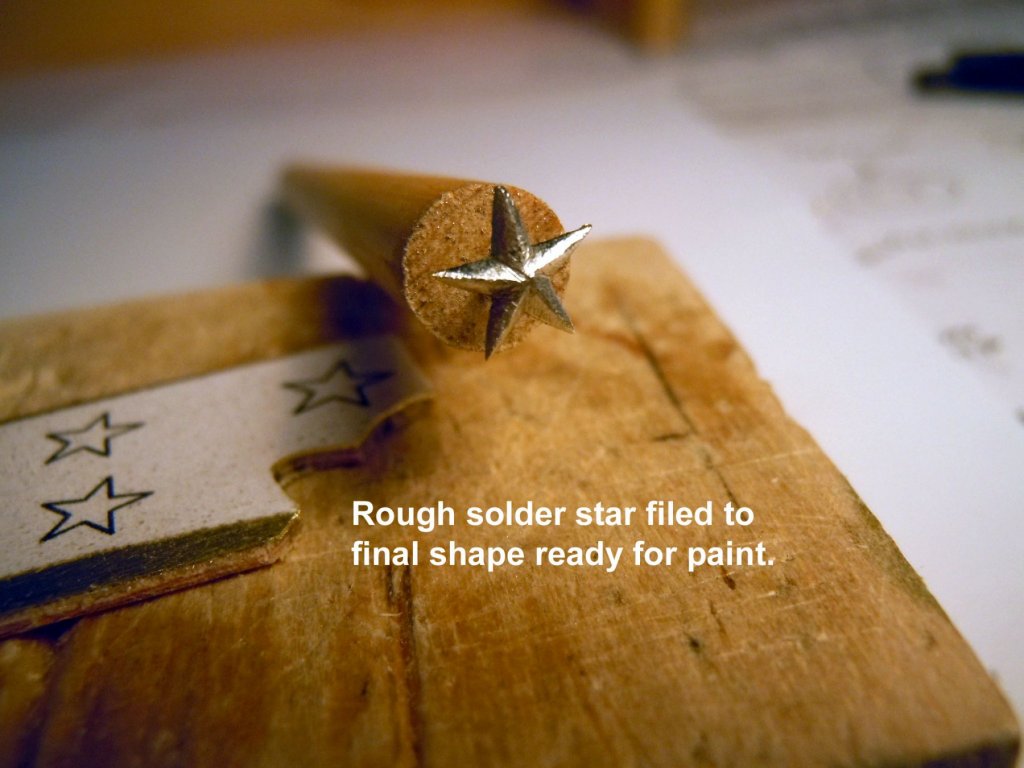
I think I finally broke the code on making the dimensional stars having no success finding the right sizes. First I made a CAD drawing of the three sizes needed; 5/32", 3/16" and 1/4". I spray glued the paper pattern to a .005" brass sheet and then glued both to a 1/32" piece of plywood for support while sawing them out. I started with a pin in the large size but a pin would be too large for the smaller sizes so I then used .020" brass rod for the holding/locating pin in the center of each star. Each star was flood soldered with Staybrite solder after the perimeter was filed clean after sawing. Once painted the paint will be allowed to set before final filing and finishing up. I photograph the stars to see what needs tweaking since the human eye cannot see that fine. Her is a sequence showing the process and the final drilling pattern that will make the second set much easier to saw out. Here are the first set of stars and once all are to this stage and the paint has really set they will be fine tuned under magnification with a small file. New drill hole pattern for the second set that will make it easier sawing. Now onto the second set and finishing up some rigging now that I have hooks.


-
Great customer service Chuck! Ordered my 3mm hooks on Friday and they came in the mail today; coast to coast service by USPS.
-
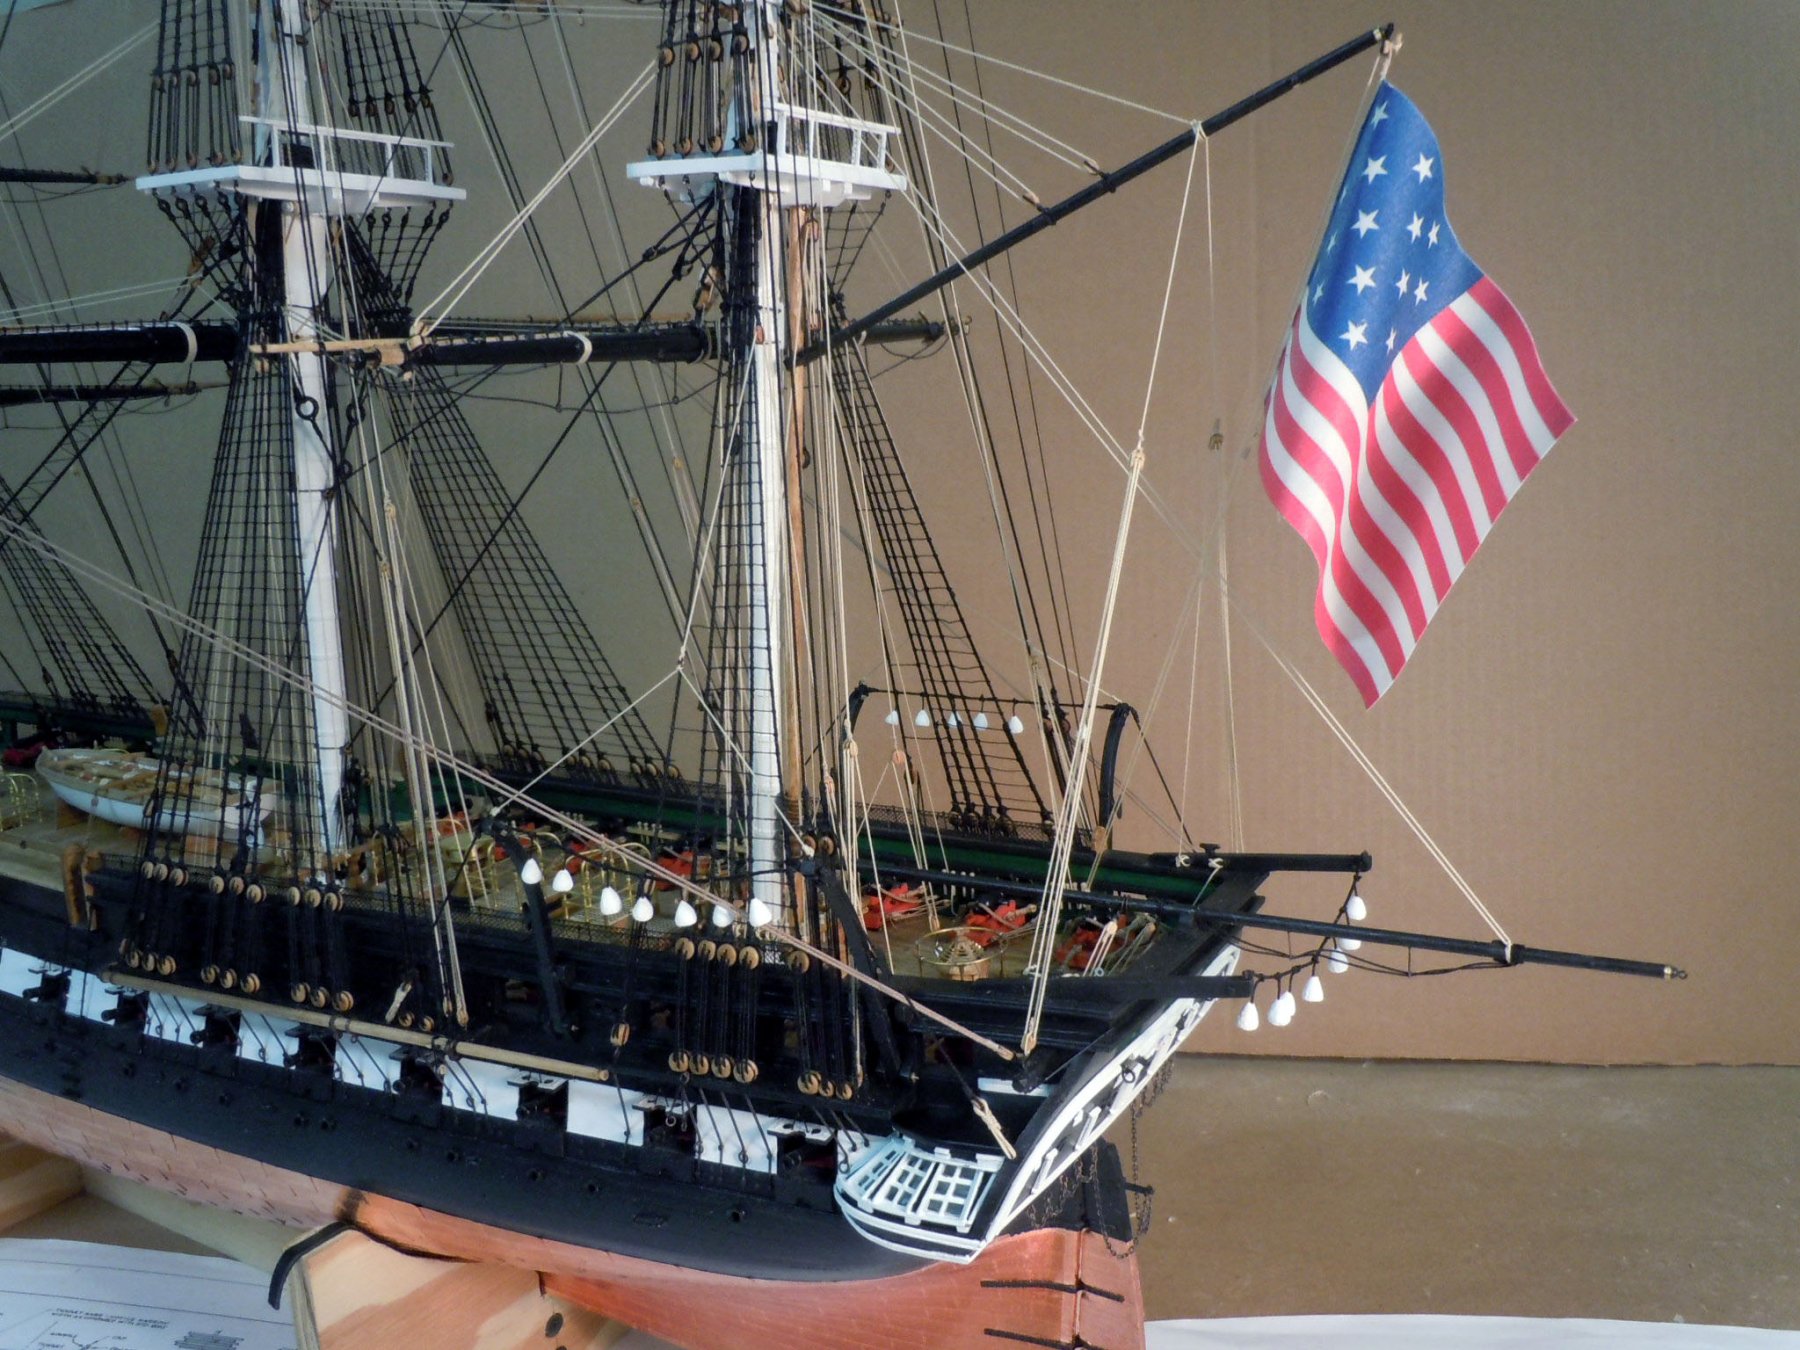
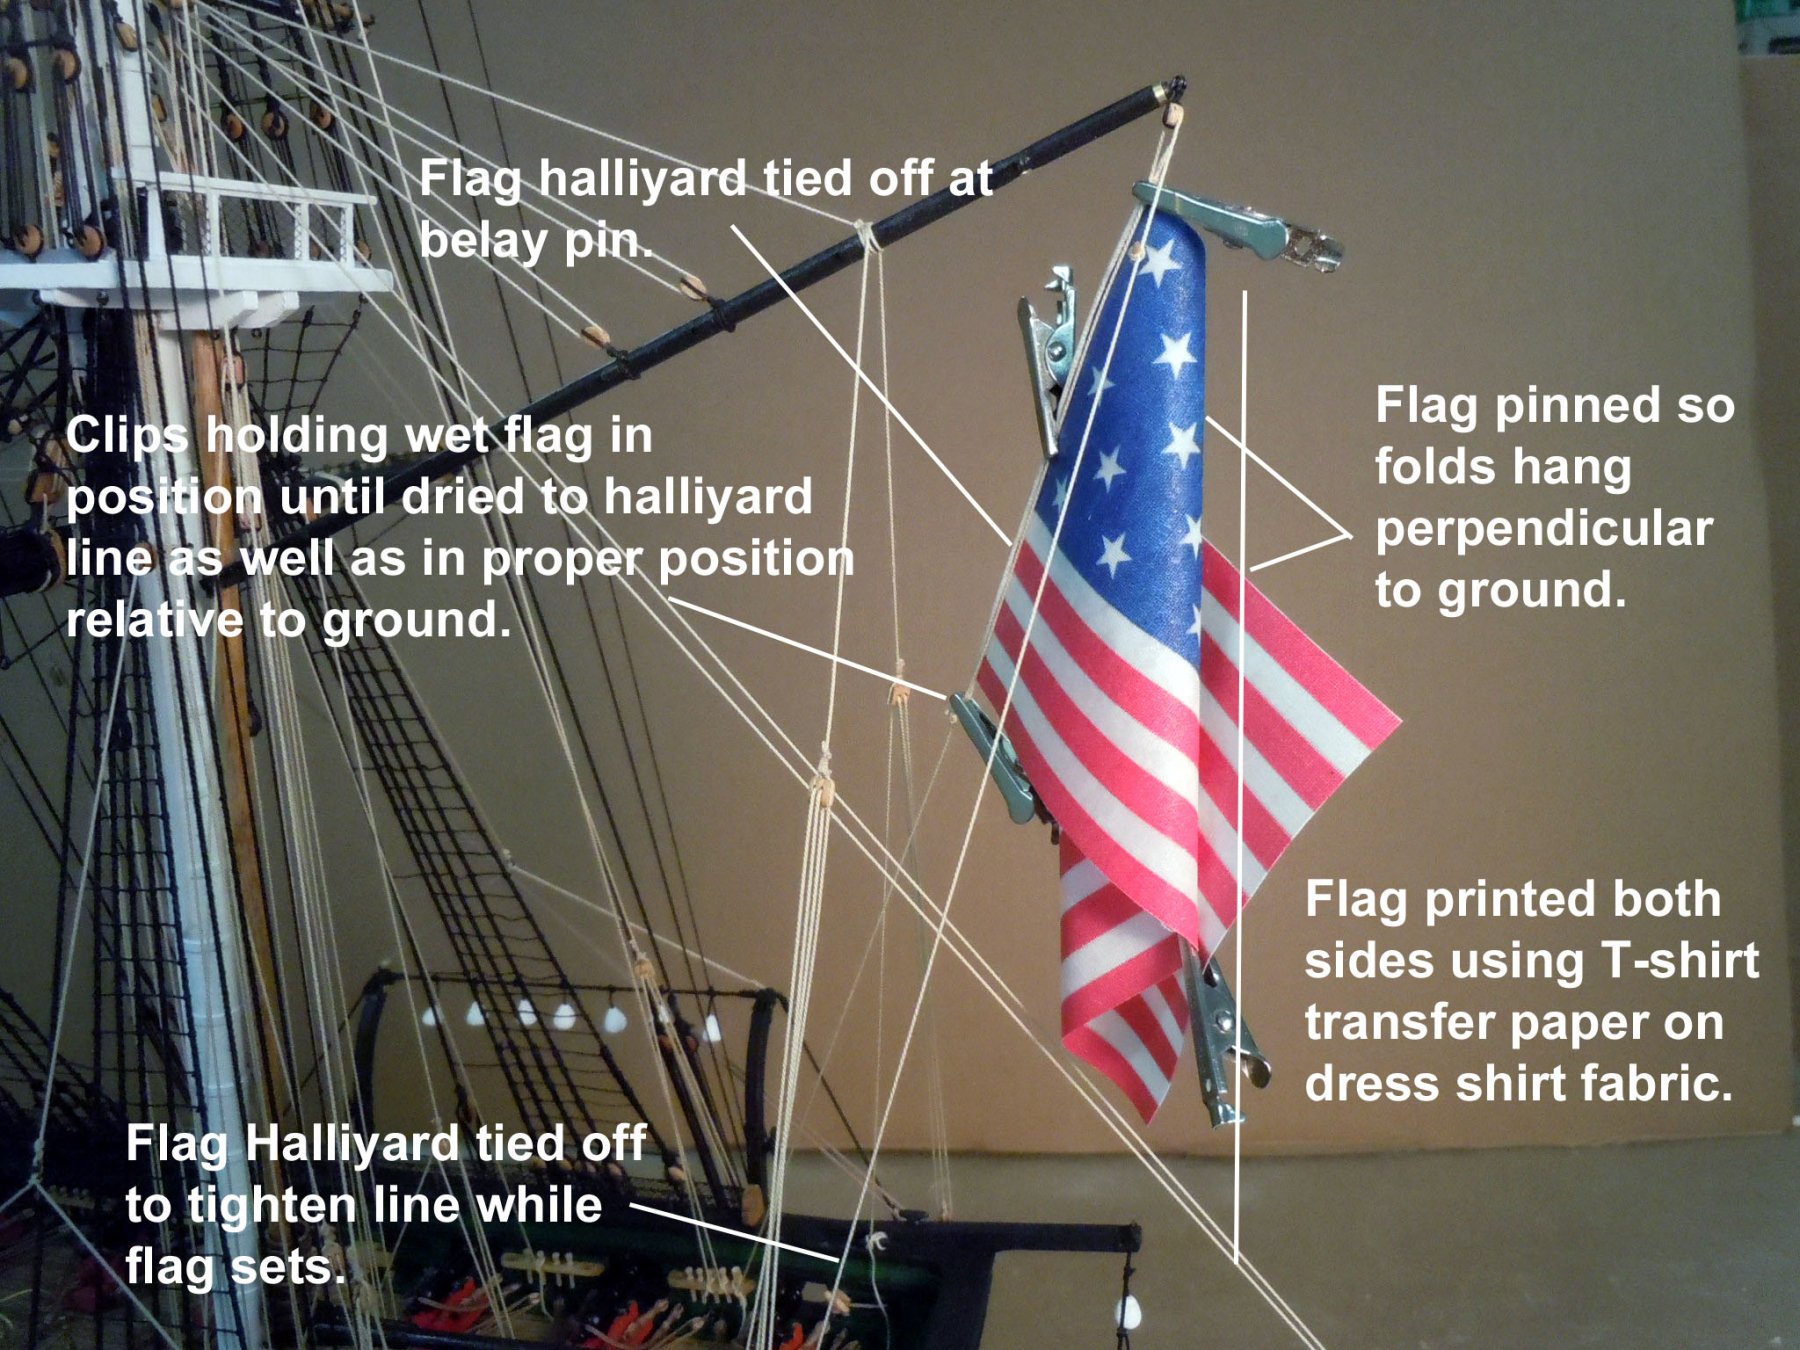
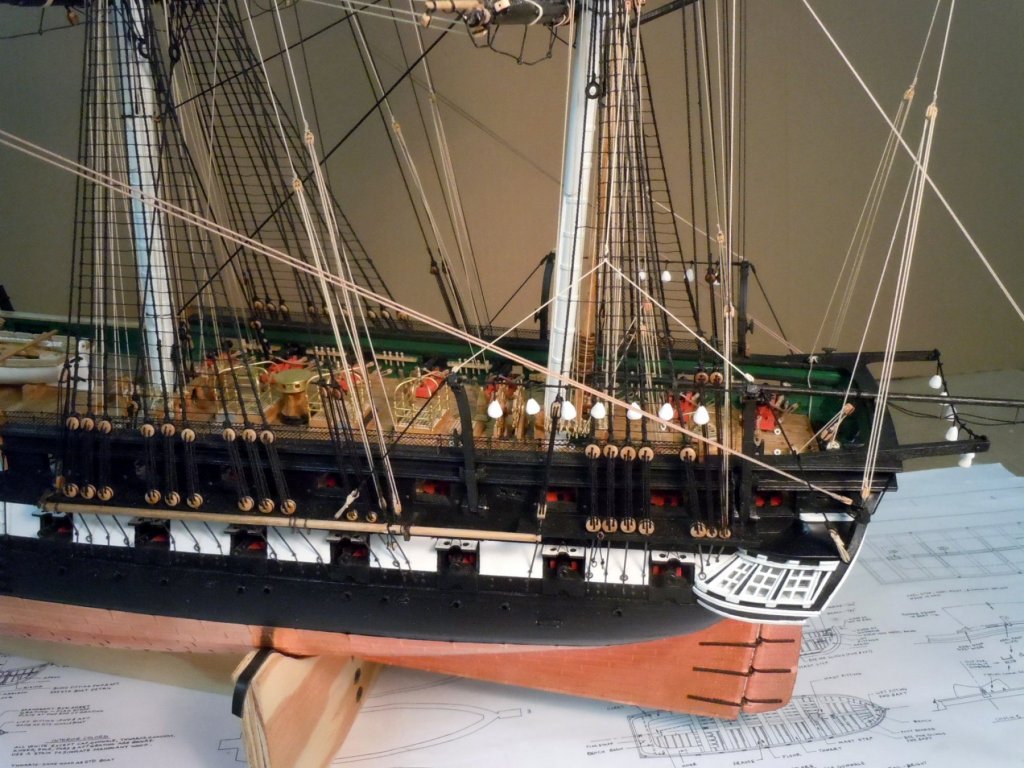
I set the boats aside for now until the 3mm hooks show up so I can finish rigging them to the davits. In the meantime, I am cleaning up details on the hull that were skipped over. I turned the lifeline bags starting with 3/16" dowel that was drill down the center on the lathe with a 1/32" drill bit then the length was scored with the threading bit which allowed an indexing starting point for a half round file to shape the bag one at a time for a total of 21. I then painted them white and after dried tied them off after inserting the hanging rope into the hole in the bag and gluing at the bottom. The challenge here was to get them to hang equally from the spreader rope. Here are a couple of views and trust me do these before the boats are in the davits. Here is a picture of the gunports in place. I then decided to hang the anchors with the challenge of getting then to hang relatively close to each other when looking at the bow directly. I blackened the chain and added a strip of brass to the end of the chain to hold it inside the hull once inserted. For visual interest I decided to let them hang rather than seized on the platforms. Next I moved onto the flag which was printed the same time I did my Niagara as part of my experimenting with T-shirt transfers to make the flags. Here I have rigged the flag halliyard temporarily to establish the hanging angle for the flag folds. First the flag had to be fixed to the rope by wrapping the edge of the flag very carefully around the rope. First scoring the edge using a ruler then laying the rope on the folded edge and wetting the rope with 50/50 glue and then tacking it off and working the fold around the rope. Once half the rope was covered the edge was trimmed and then tucked and glued to finish it off. This does require some patience to get it correct along with a few descriptive adjectives. Here the water wetted flag is clipped in place on the halliyard line and formed in place so that the folds fall perpendicular to the ground for proper hanging. For my eye the proper hanging flag is like the cherry on top. Once dry it will be removed until the hooks arrive since it will be in the way of rigging the boom guys to the deck. Next I will try making the dimensional stars using the solder technique I used for the bow decorations.


-
Bryan, will be checking in now and then on your progress. Remember when setting your bulkheads to mark them and use the laser angle cut in your favor fore and aft of the center of the hull. Also if you plan to finish thr gun deck to trim the bulkheads the material thickness of the deck. This is easier to before they are glued in place. Ken
-
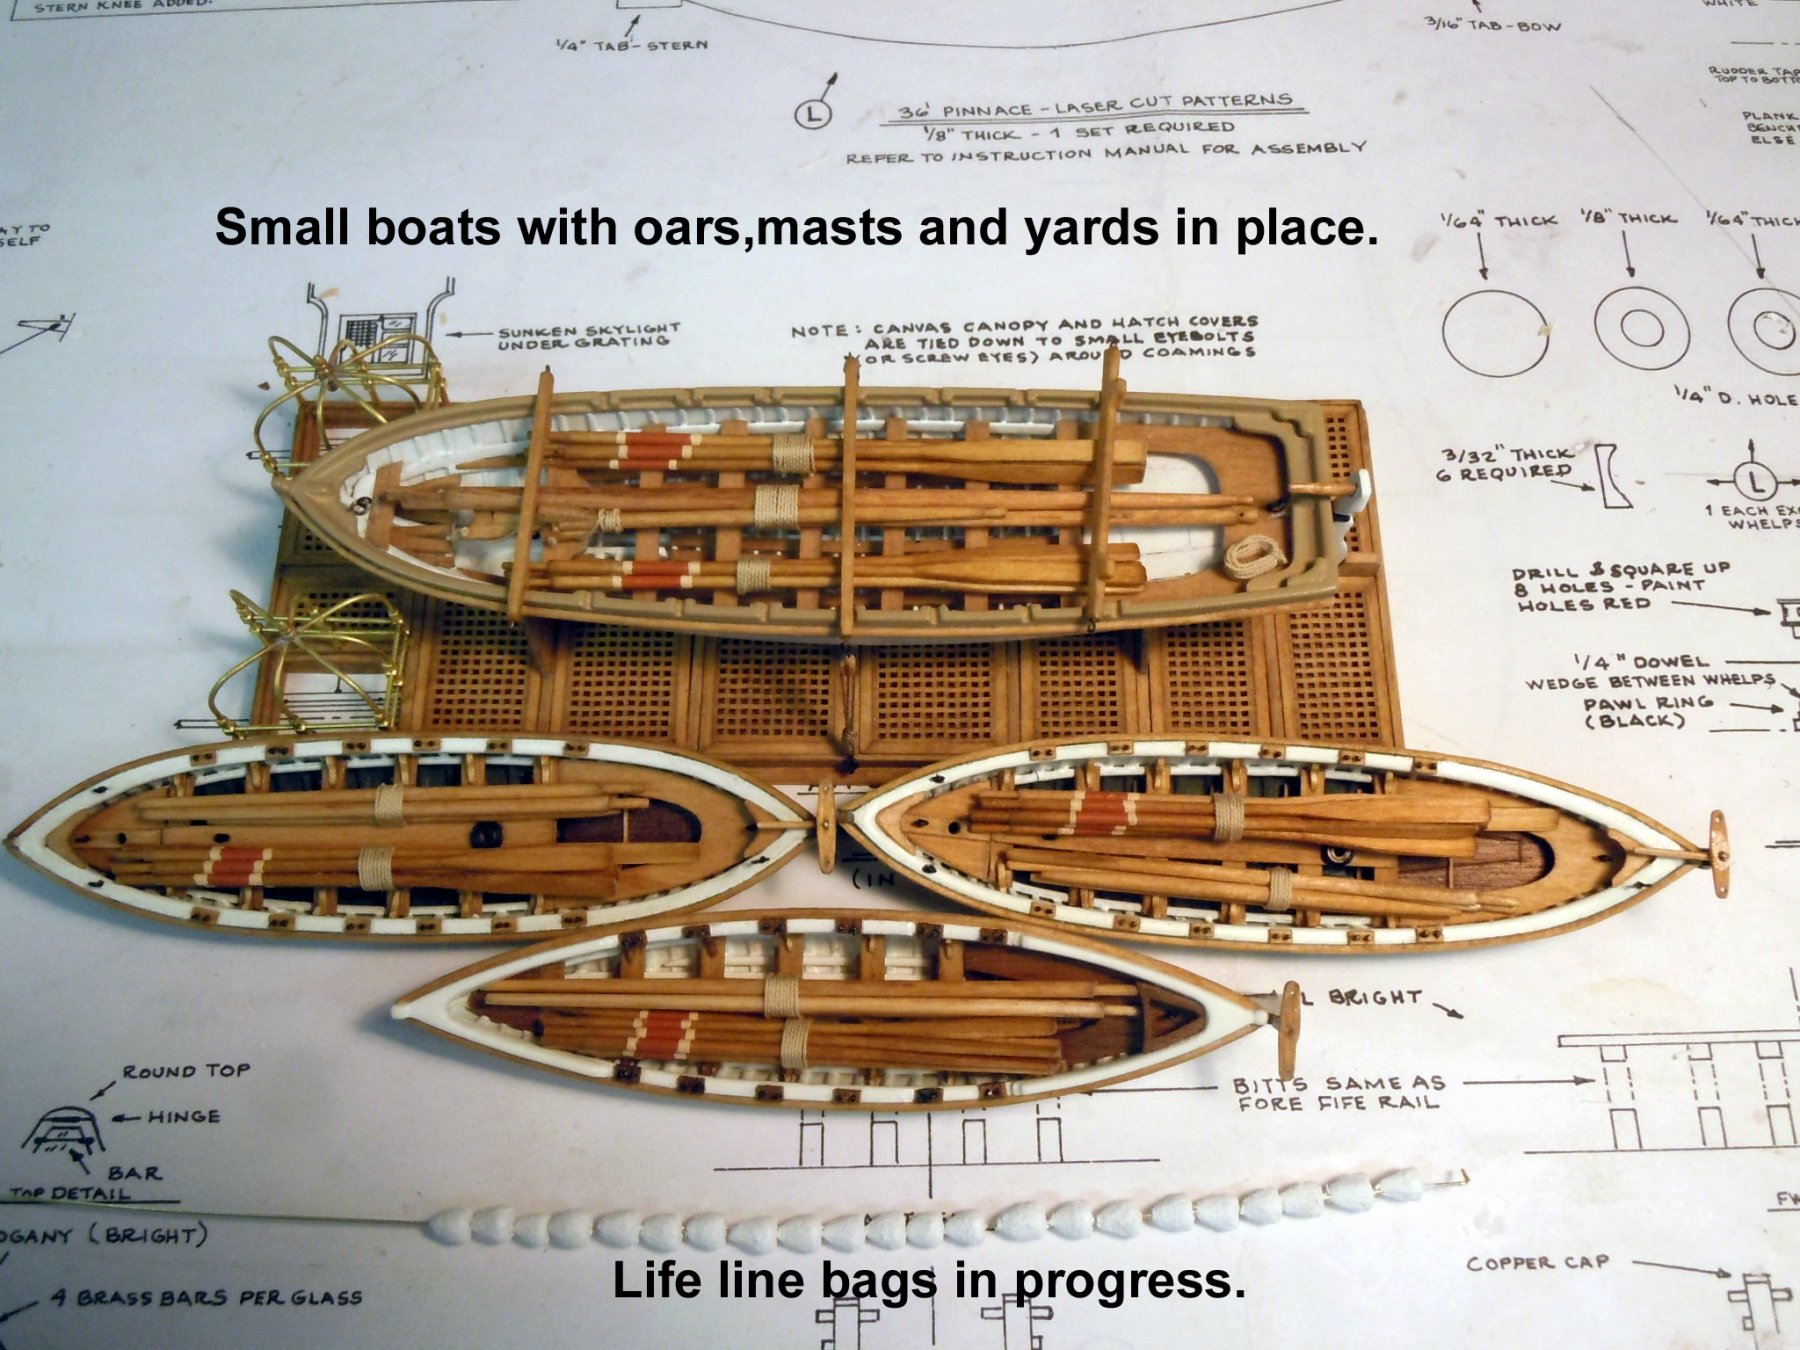
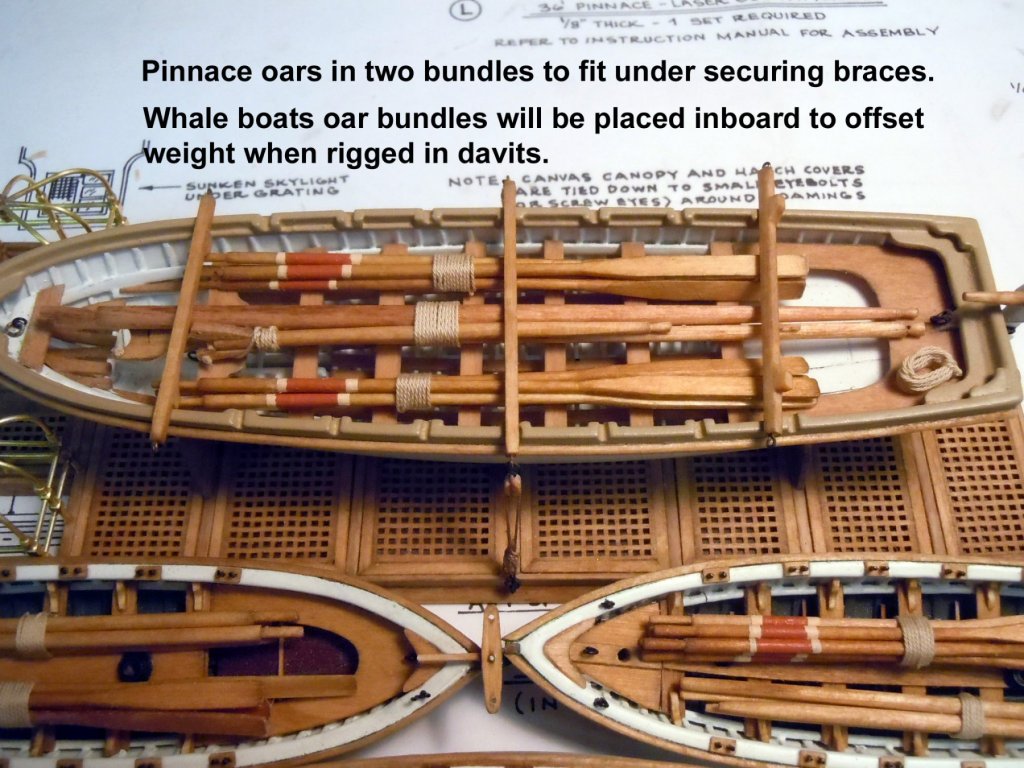
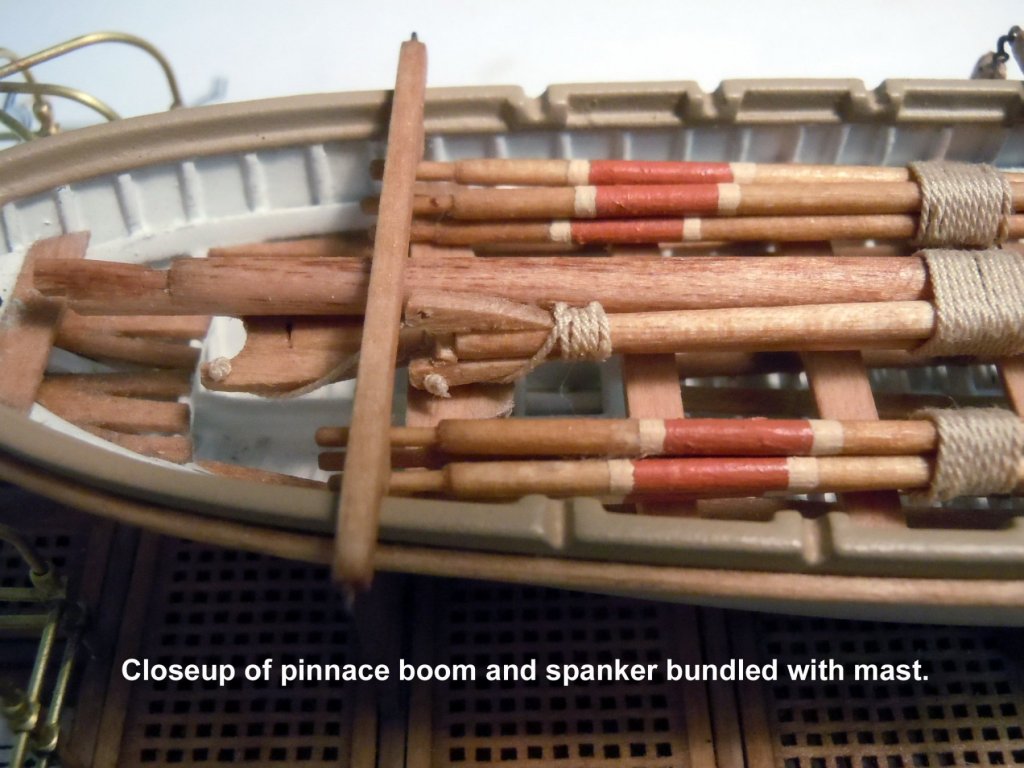
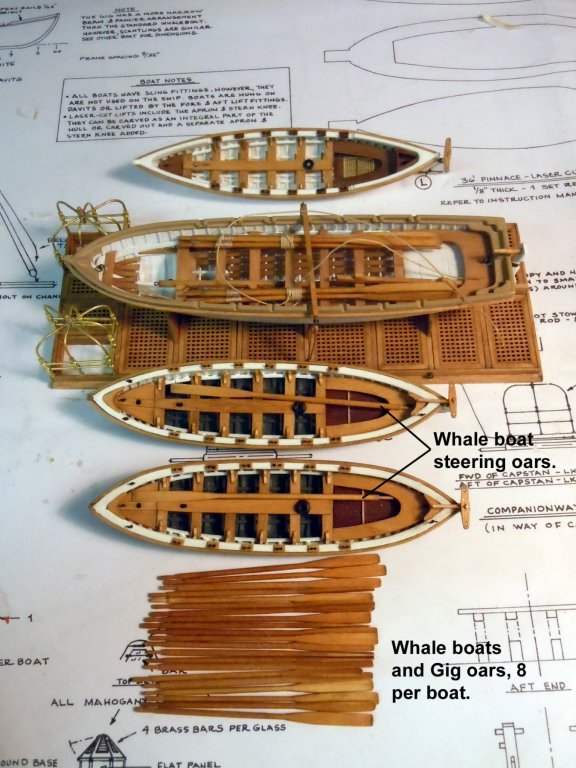
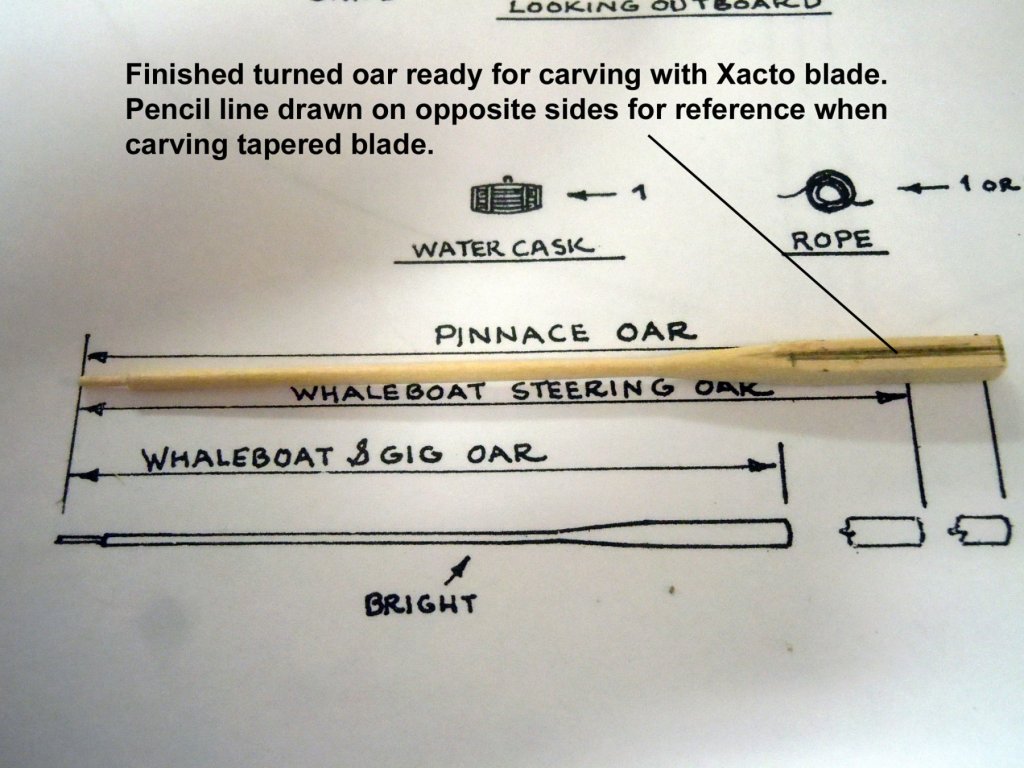
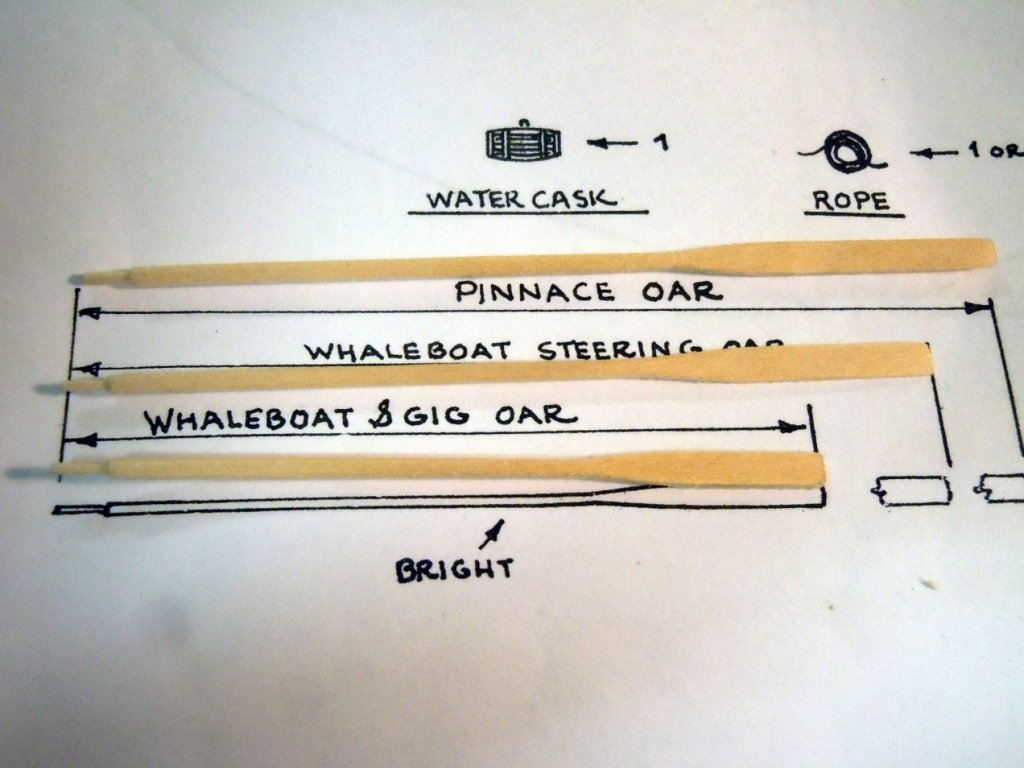
Dave, Michael thank you for your kind words and glad to hear of your support! Yesterday I ordered the 3mm hooks now that they are back in stock from Chuck these are needed to finish rigging the boats to the davits as well as the studding booms. While waiting I finished up the oars, masts, booms and yards for the small boats and painted the oars to depict the leather and Turk's heads on them. I then bundled them and they will just set in place for now. I do however think that I will add the lifeline bags first while the boats are not in the way in their davits. Here are my humble efforts with the small boats, each is almost a model in themselves. Next to finish up the lifeline bags and hopefully the hooks will get here soon.

-
John, I am right behind you in age. There are several ways to get at it; try Googling a scale conversion calculator there are several out there. Here is an old school way: 31.5" x 64 = 2016" / 72 = 28" and 7" x 64 = 448" / 72 = 6.22" if you are proficient with Excel you can create your own calculator. To get a percentage 64 / 72 = .88% example: 31.5"(or any dimension) x .88% = 27.72" (percentage to only two decimal points) I hope this helps and have a great day! Ken
-
Jack very nice knot tying! What diameter was it tied on? I will need 34 at 1/16" diameter.
-
Johnathan, Thanks that is a great photo and if I am seeing it correctly it looks like leather in the oar locks with Turk's head rope limit stops at the ends of the leather. Now to decide how to do them. Thanks again!
-
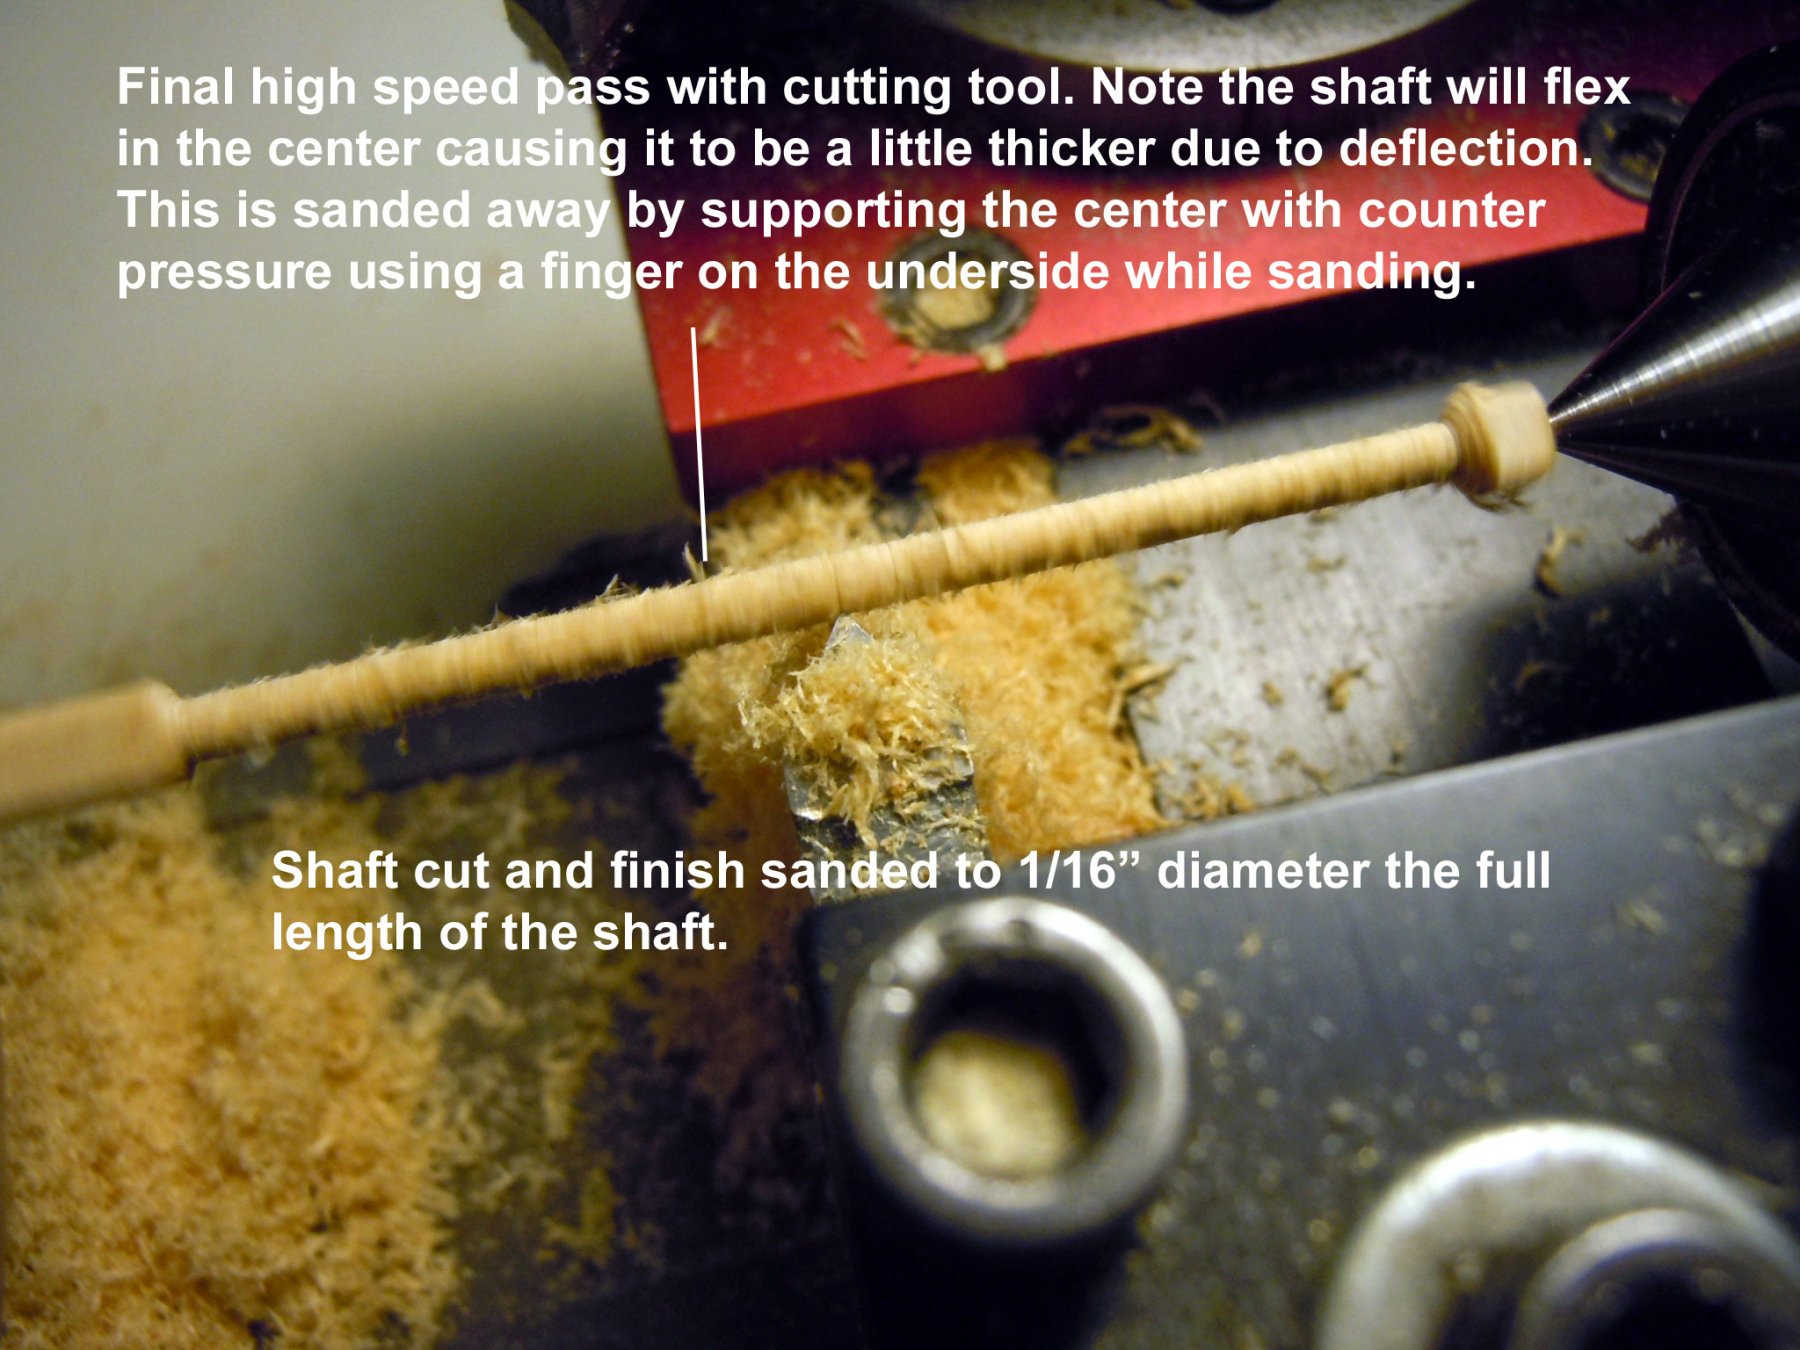
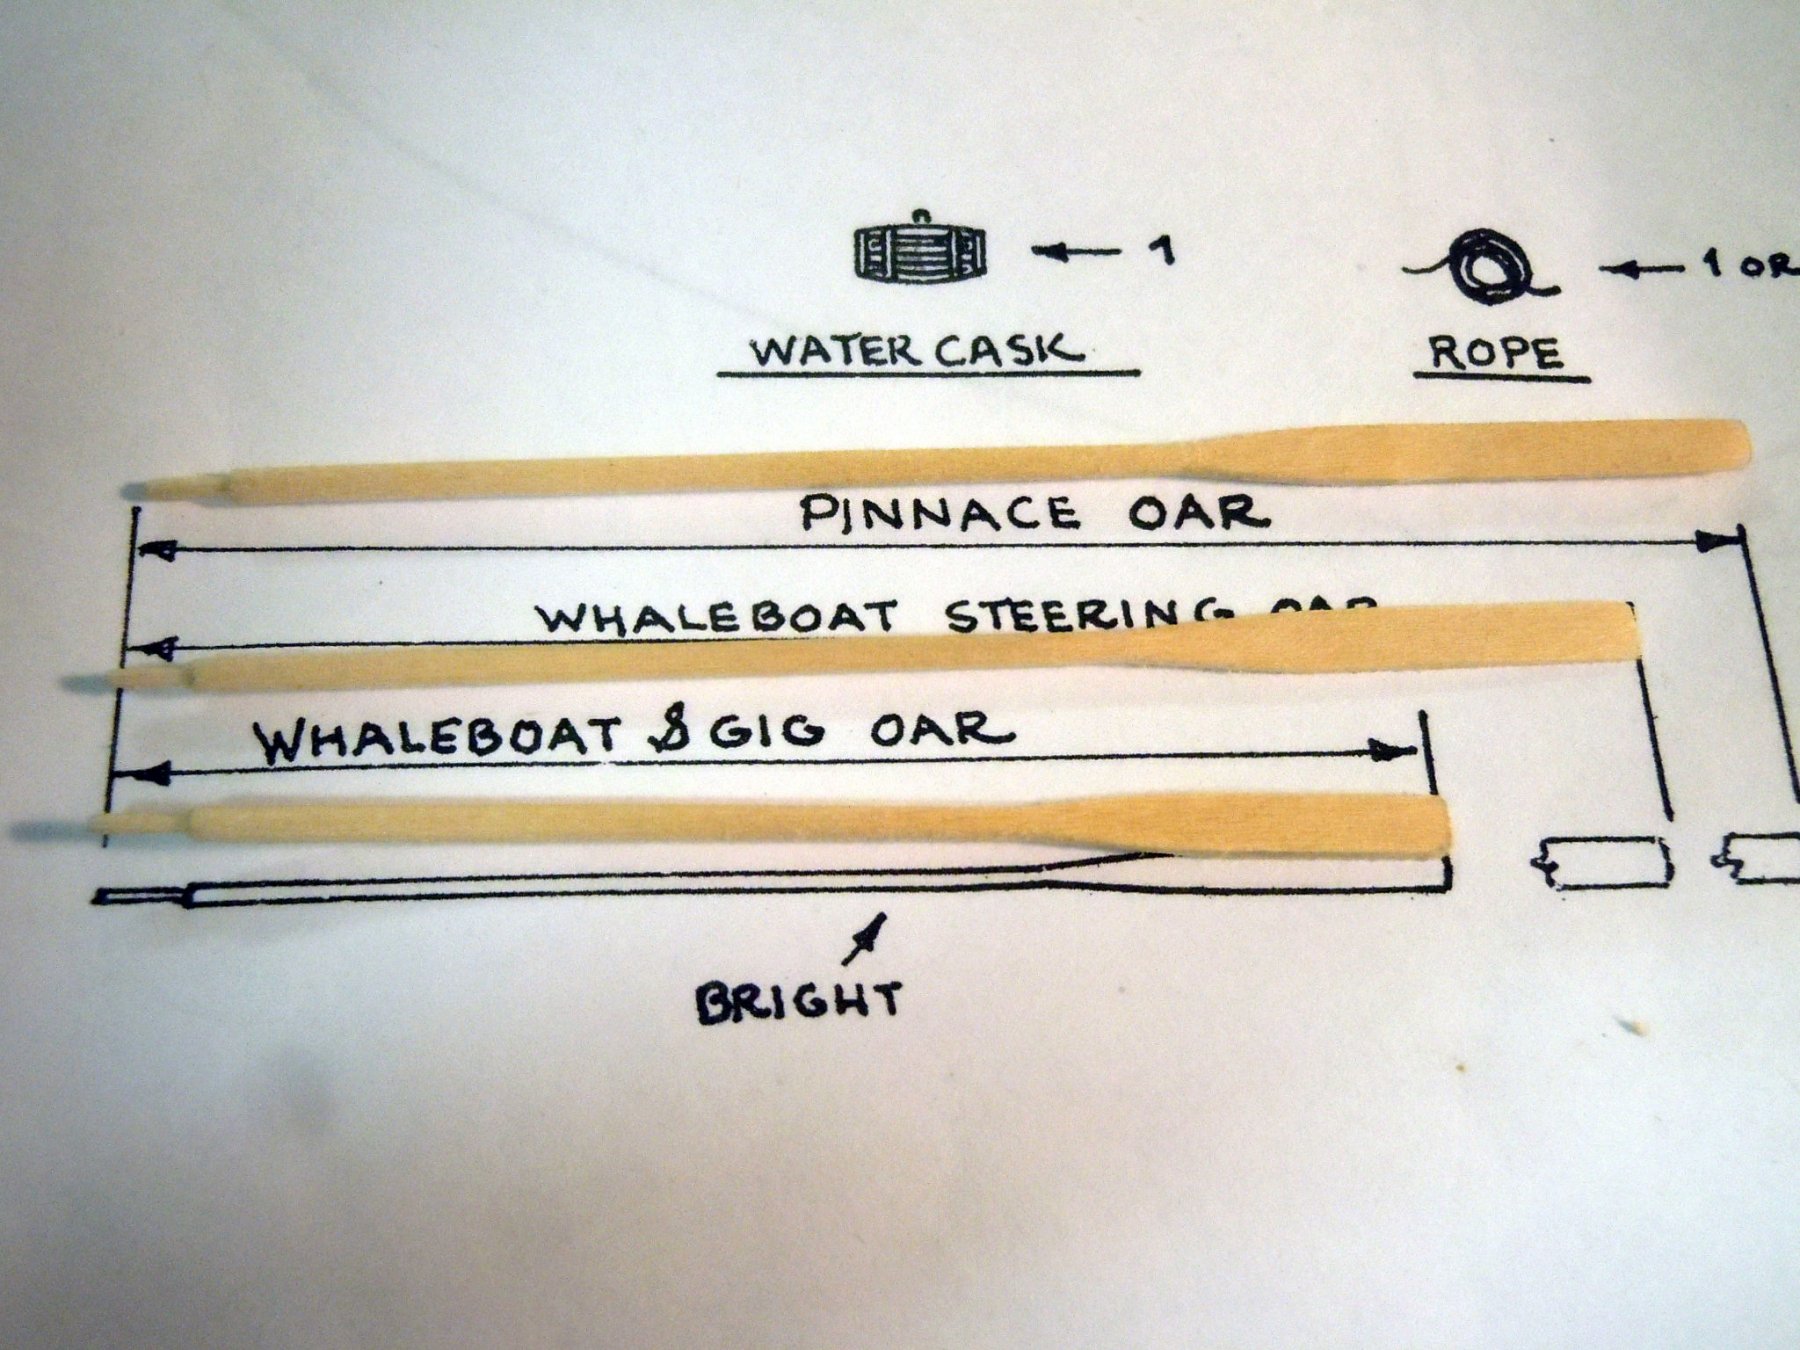
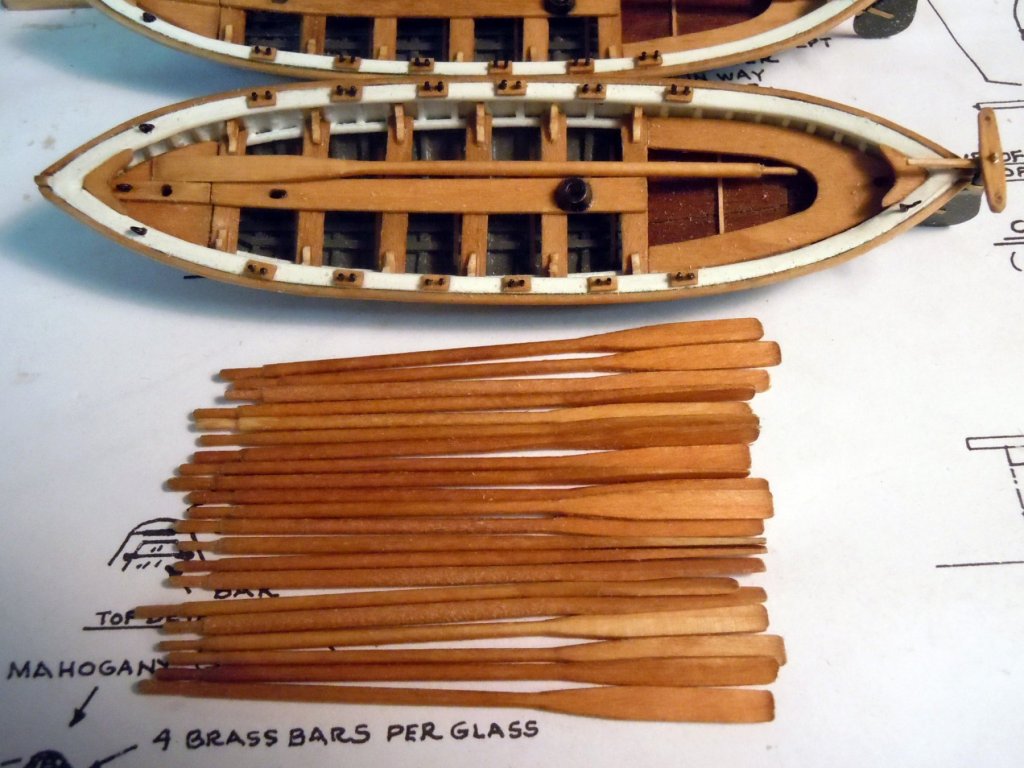
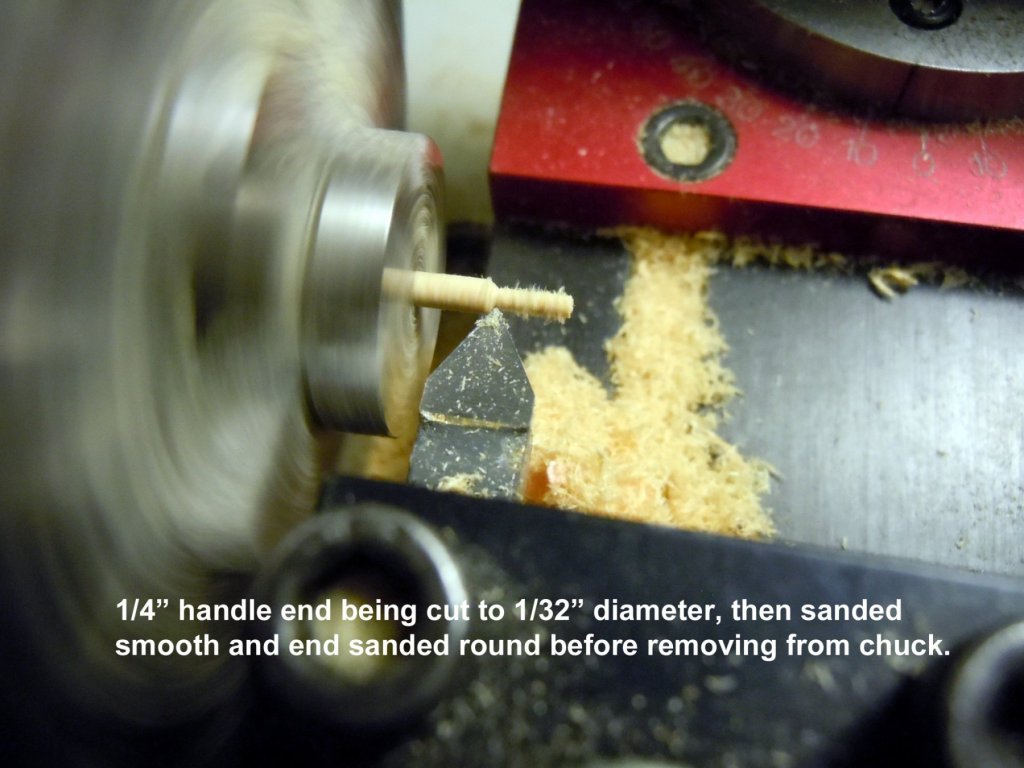
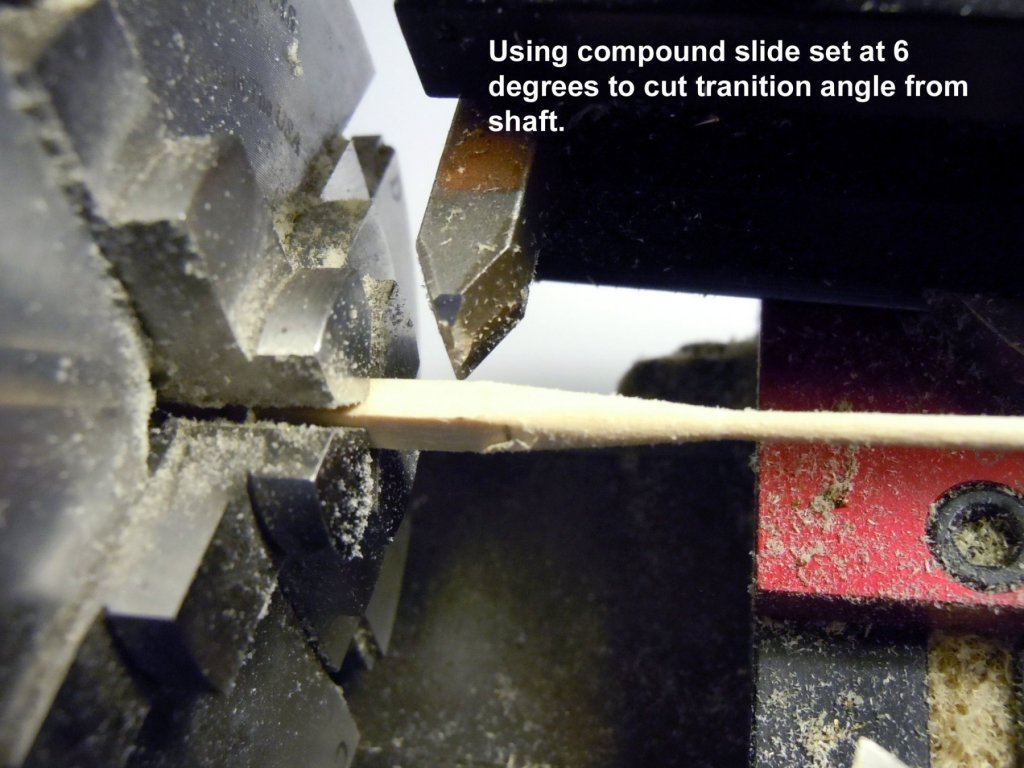
I added all the upper gunports tedious work adding the PE hinge straps painted and holes drilled for the two retrieval lines. I then moved onto the oars for the boats. The real challenge for turning was the kit wood selection of Basswood strips that were dried the same time Noah was building the ark. Basswood tends to shred rather than cut so smaller cuts are needed with more passes with the tool bit but can result in quality oars. Avoid the white(clear) strips, too soft and tend to break when cutting the tiny handle. Here are pictures of the process I used making 8 oars for each boat, plus two steering oars for the whale boats. Can anyone share how the oars were lashed in the boats? or now I was thinking two bundles of 4 as seen in the pinnace on either side with the masts and booms in the center. I think they had to be lashed to keep in place under sail. Any advice would be appreciated. Next I will make the lifeline bags that hang between the davits.


-
Keith, thanks for the answer! Makes a great deal of sense,gravity still exists as it did back then.
-
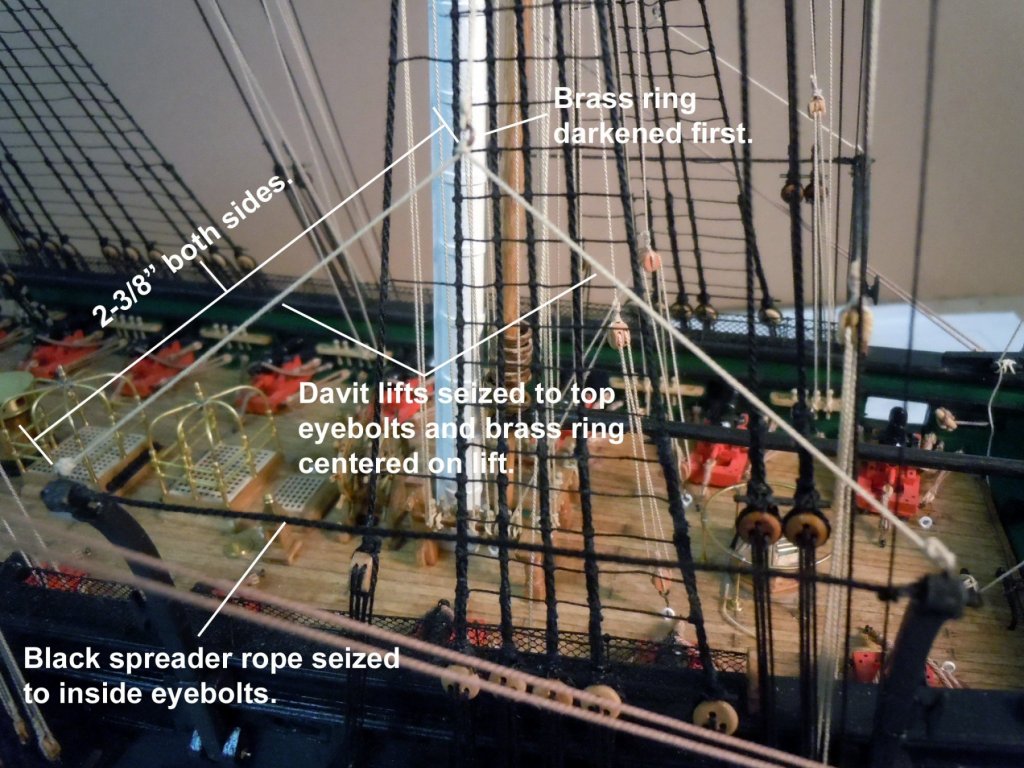
Johnathan, my reference is the Anatomy of the Constitution page 90, image G7/2, in the middle of the page. I am waiting for 3mm hooks to finish the rigging of the side braces(Davit Guys) which have not been added yet. They attach to the outboard eyebolts and are seized as seen in the G7/2 drawing. I imagine that the wood brace was an improvement over the rope per your description and my understanding is that life jackets are in the white bags. Not sure if they had the life jackets back then. Hopefully, someone with more nautical knowledge can share more information on these details.
-
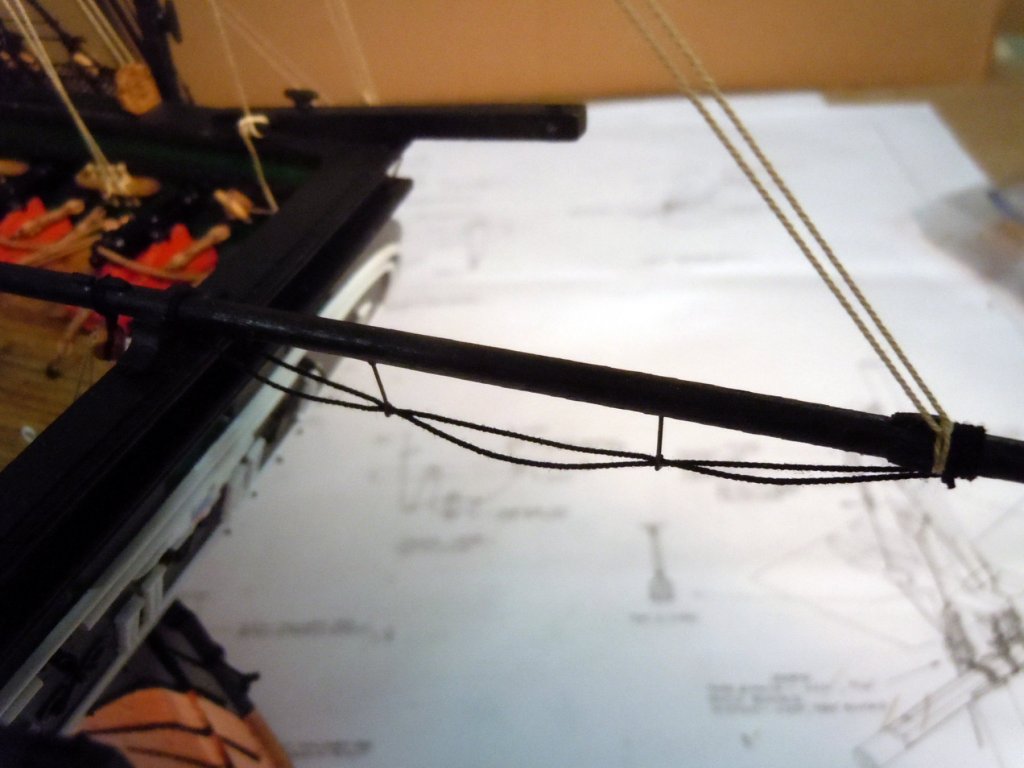
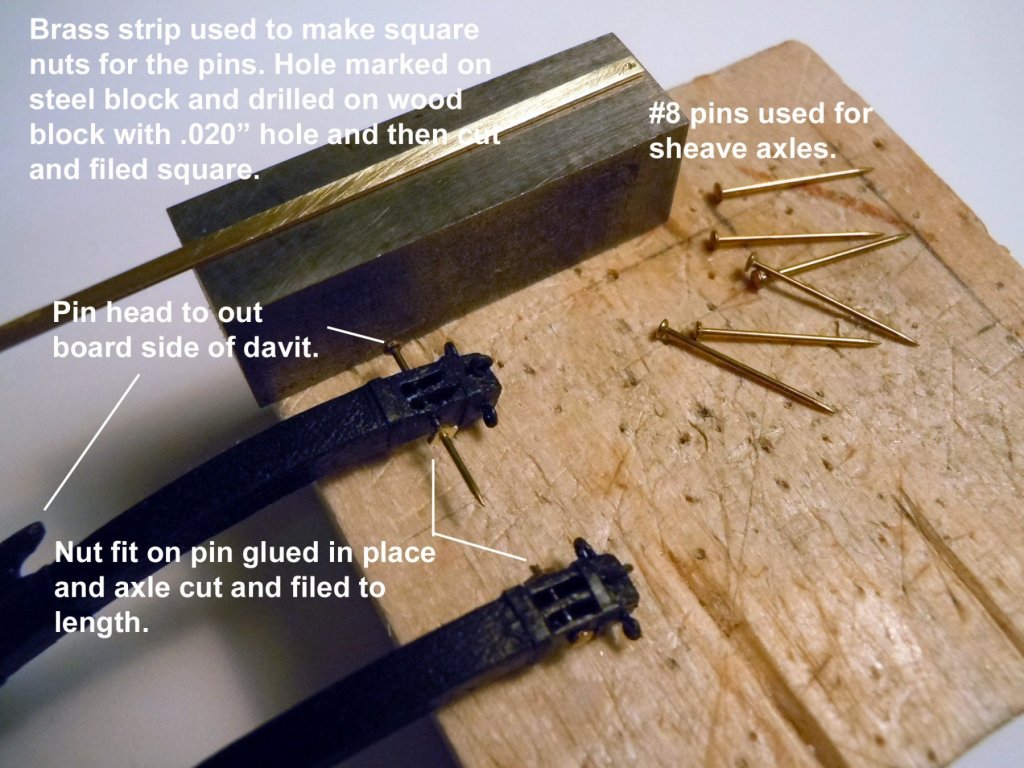
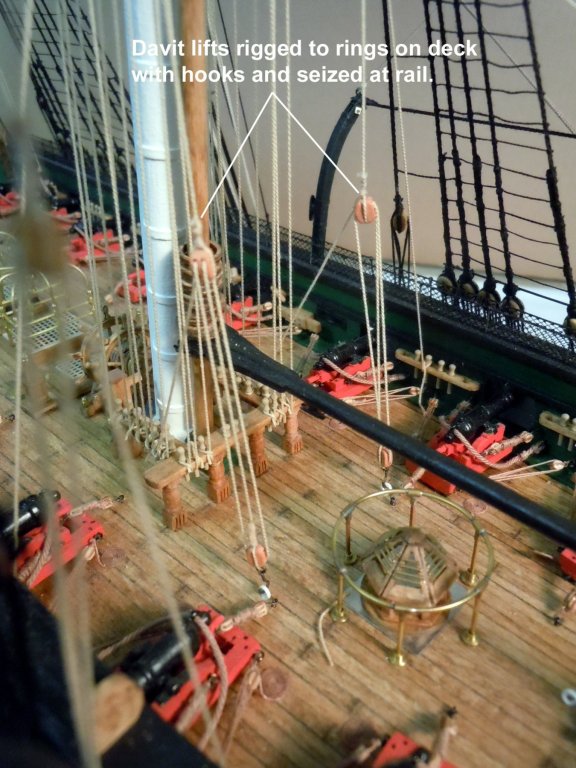
I added the boom foot ropes and then moved on to the davits (still waiting for hooks to get in stock) detailing the sheave axles with square nuts. Here is the boom foot ropes. I used a brass strip to make the nuts due to it's strength this small and drilled a .020" hole to receive the #8 pin shaft. I decided to use rope for the spreader rather than the white wood brace shown in contemporary pictures. Once the davit arms were rigged a single block was seized at the futtock brace with a double block at the of the single lift rope. The line was rigged through a single block with a hook engaged on a hook on the deck and seized at the rail with a belaying pin. Here is an overview of where I am at until I get the 3mm hooks to complete the rigging. Now to sort out my next steps which may be finishing up the gunports and other hull details.

-
Geoff, Not sure if you are going to rig your studding booms on the yards; but if so you will want to add the eyebolts at the inboard ends to receive the 3mm hooks. See my build page 23 if interested.
-
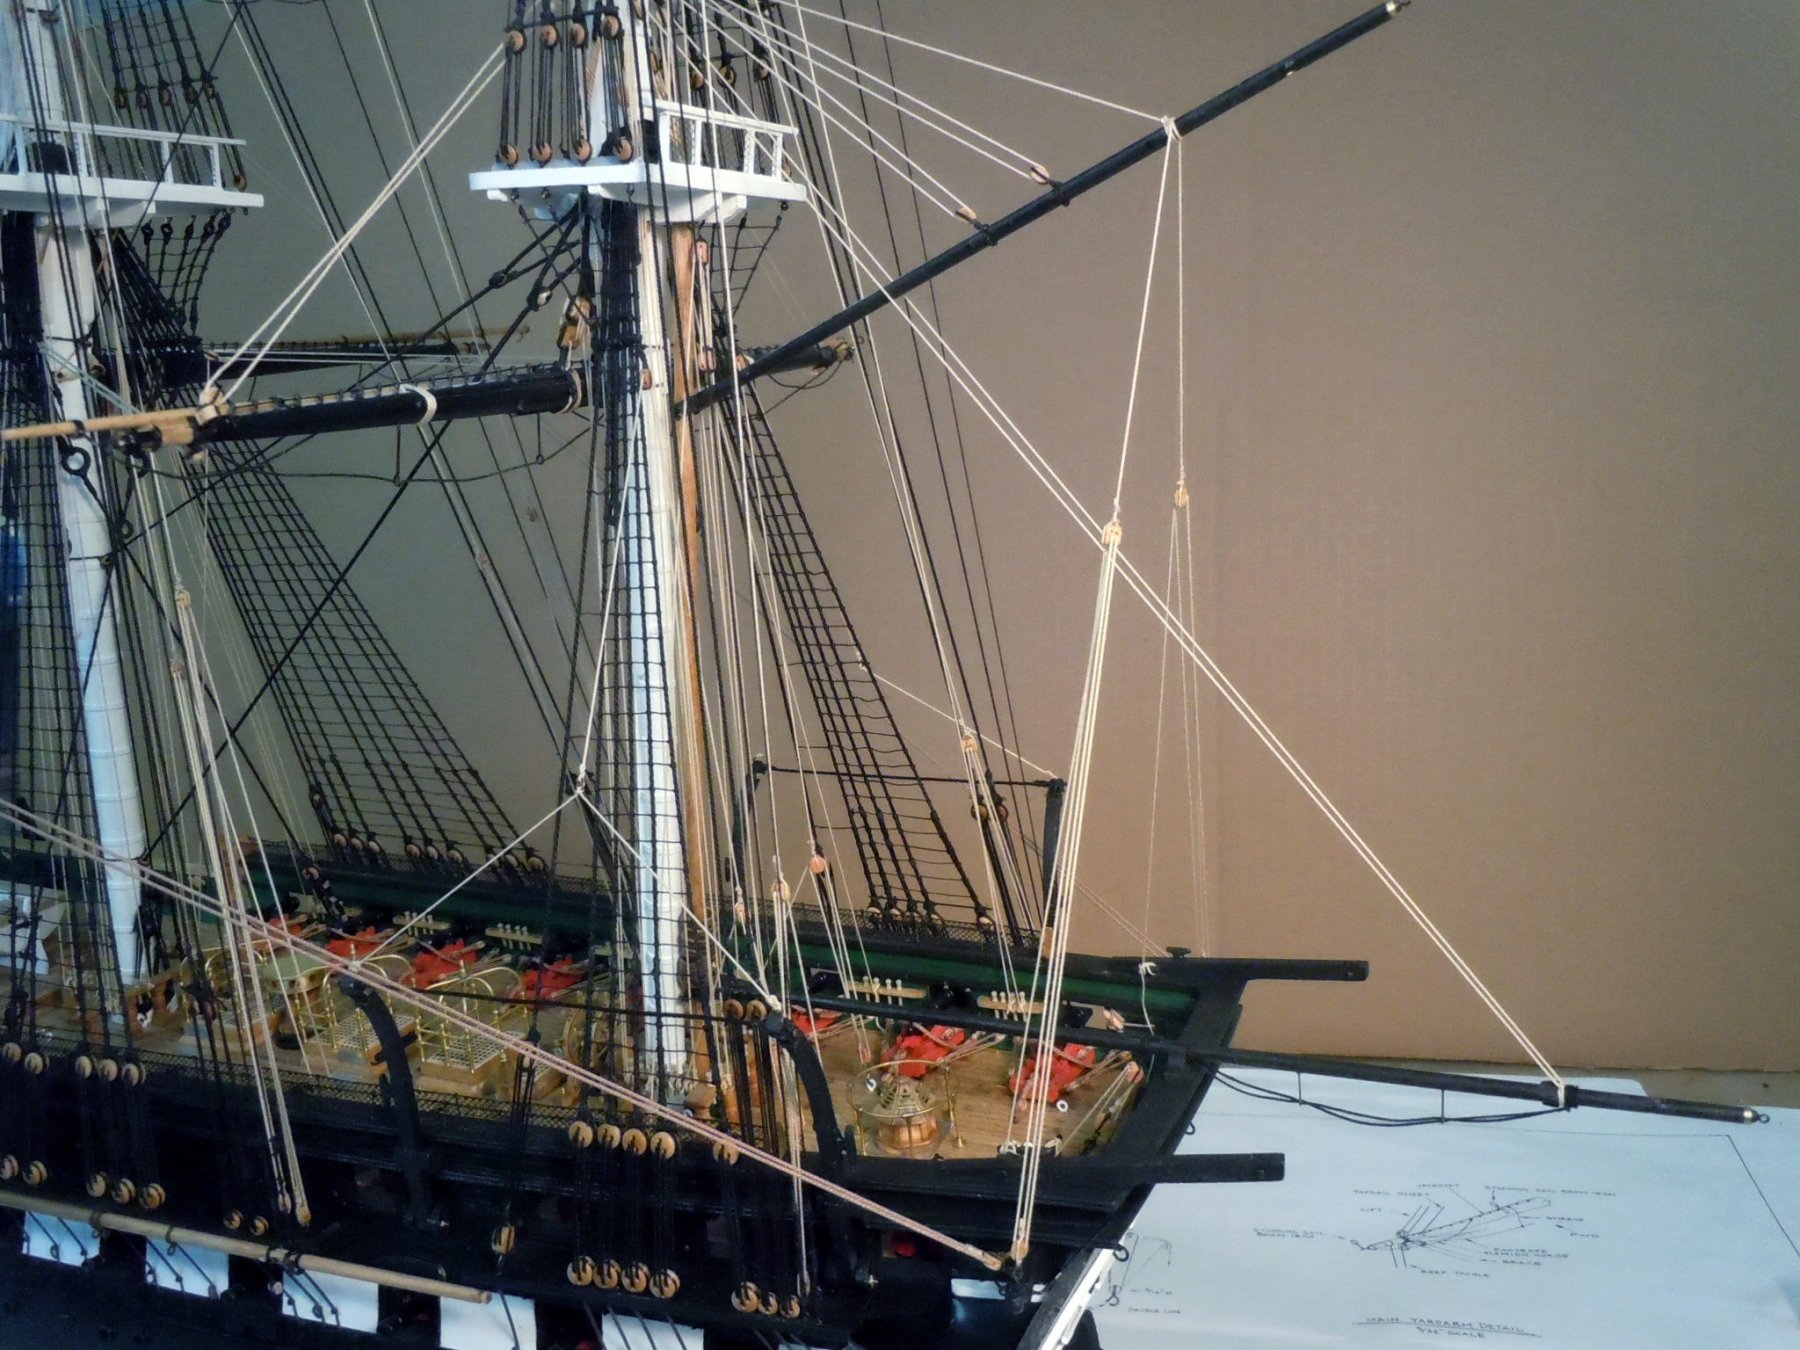
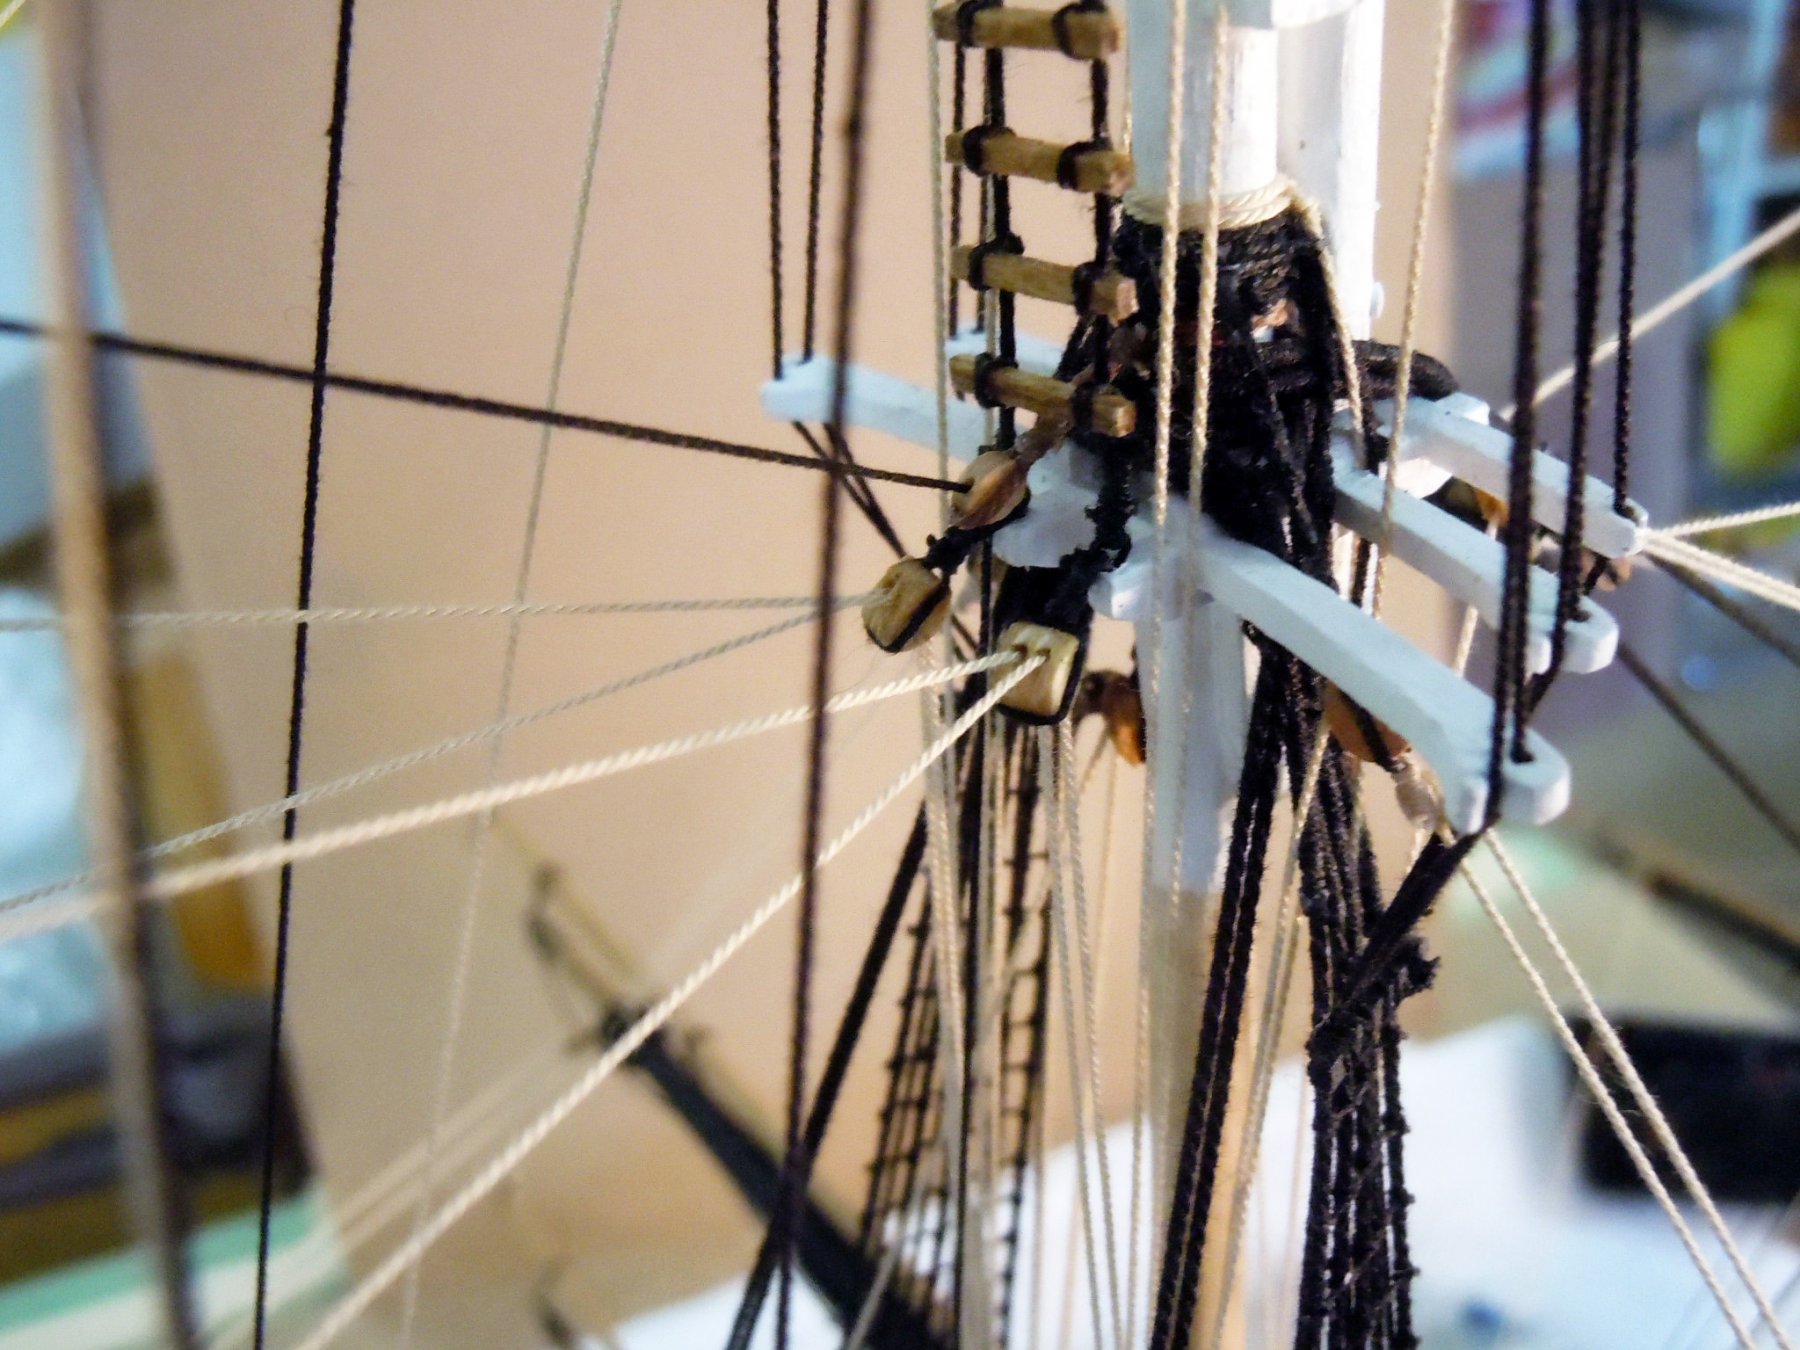
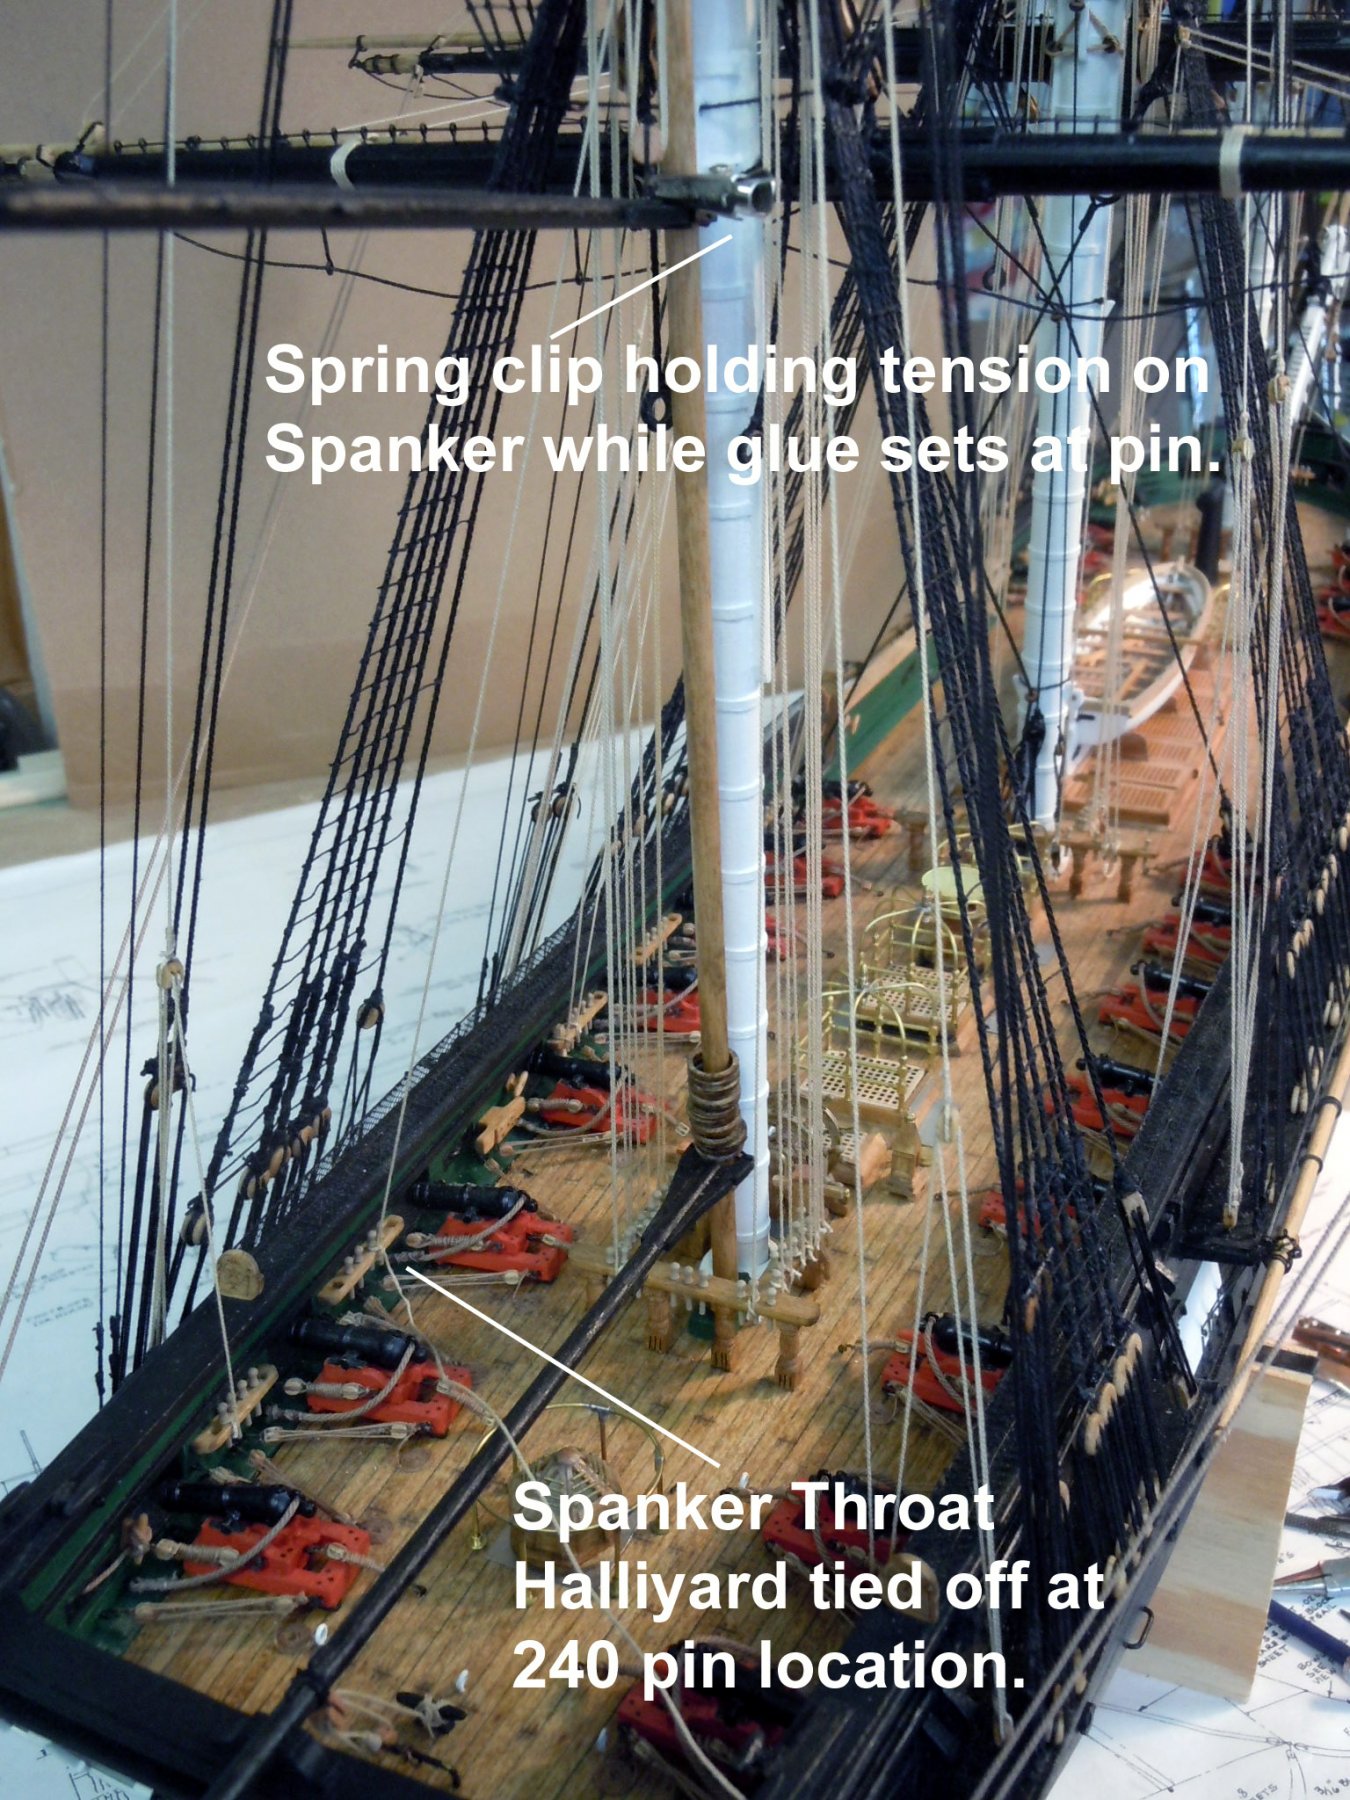
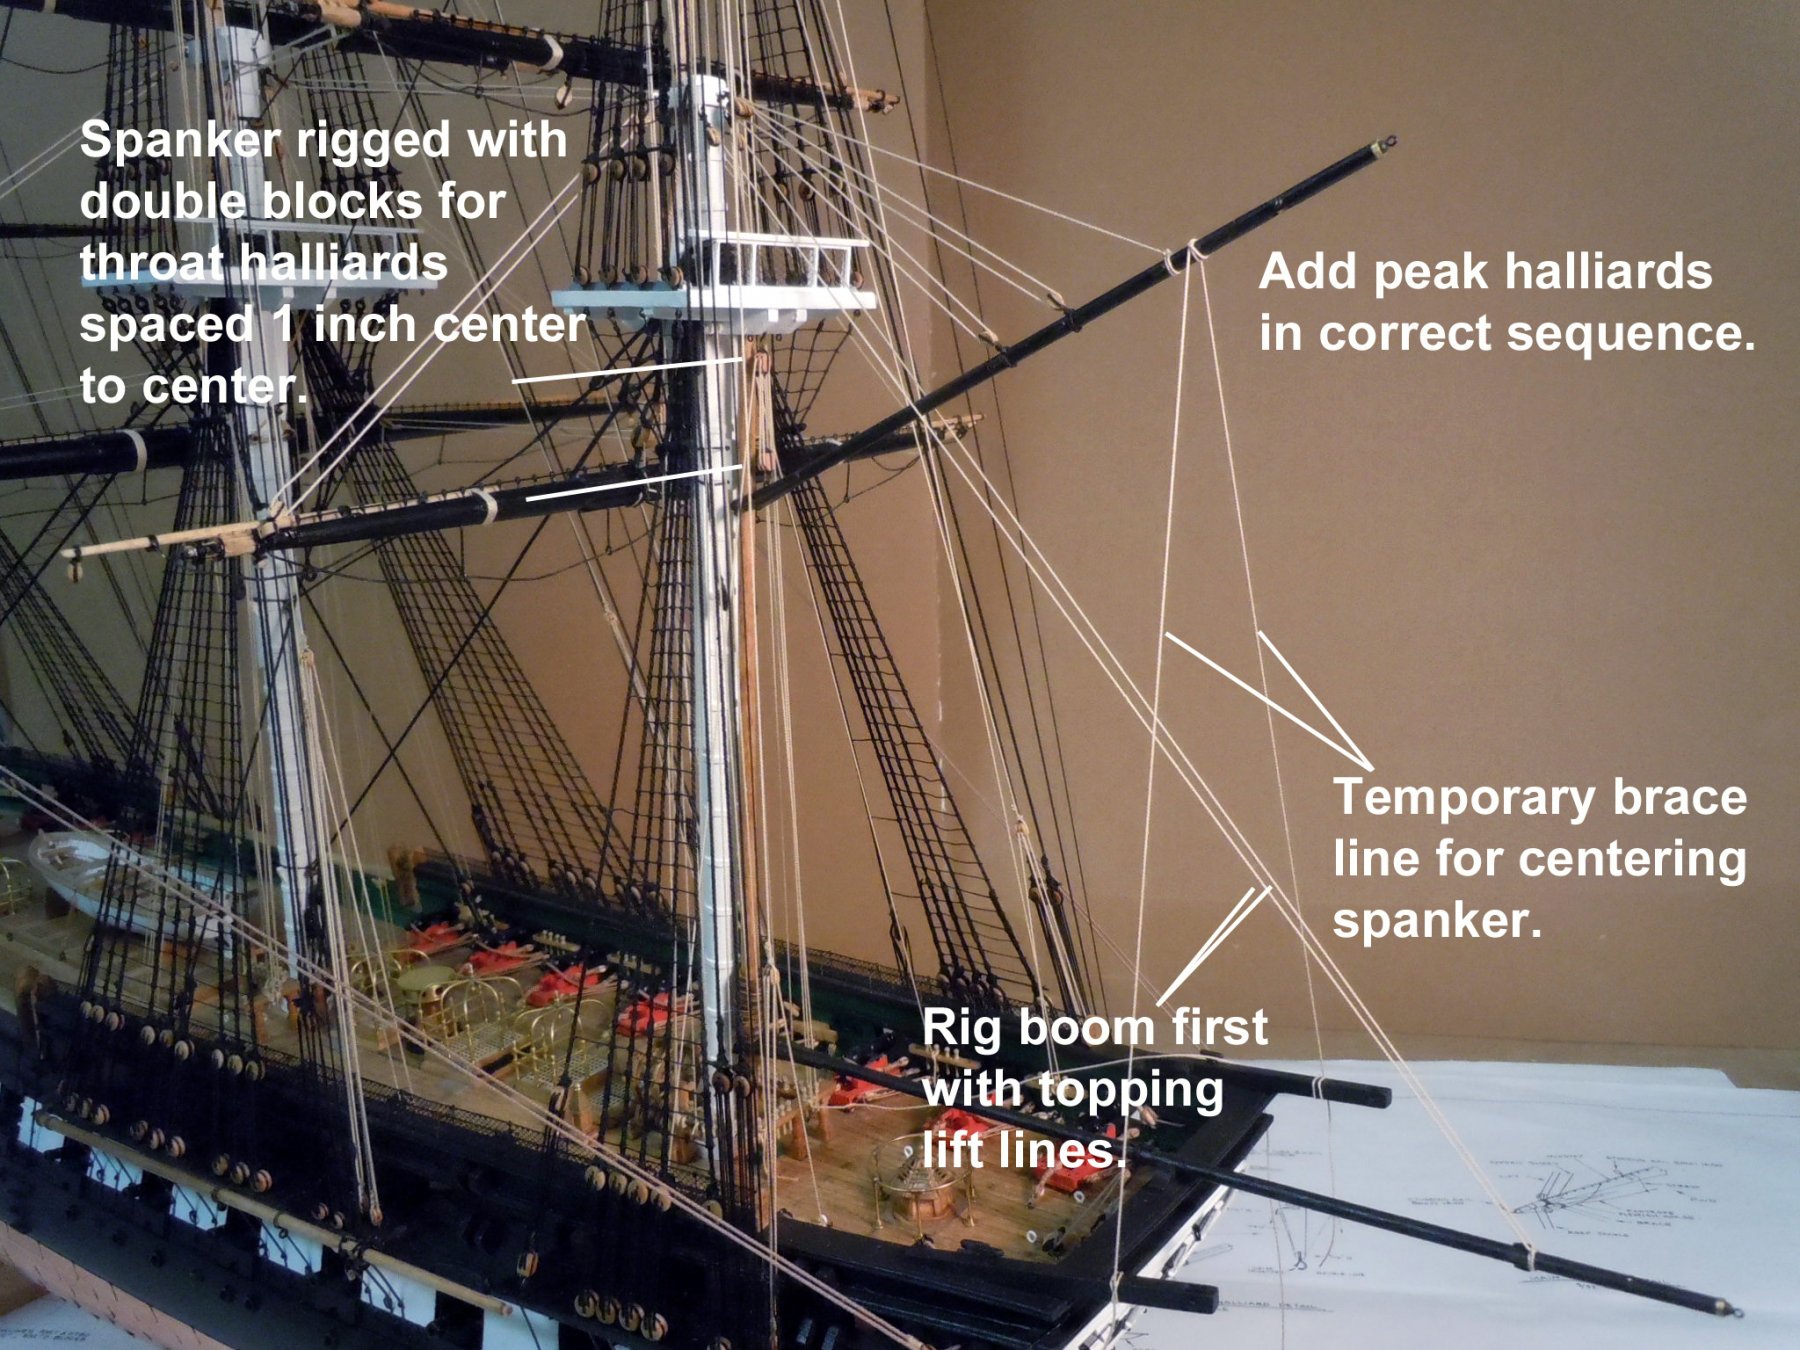
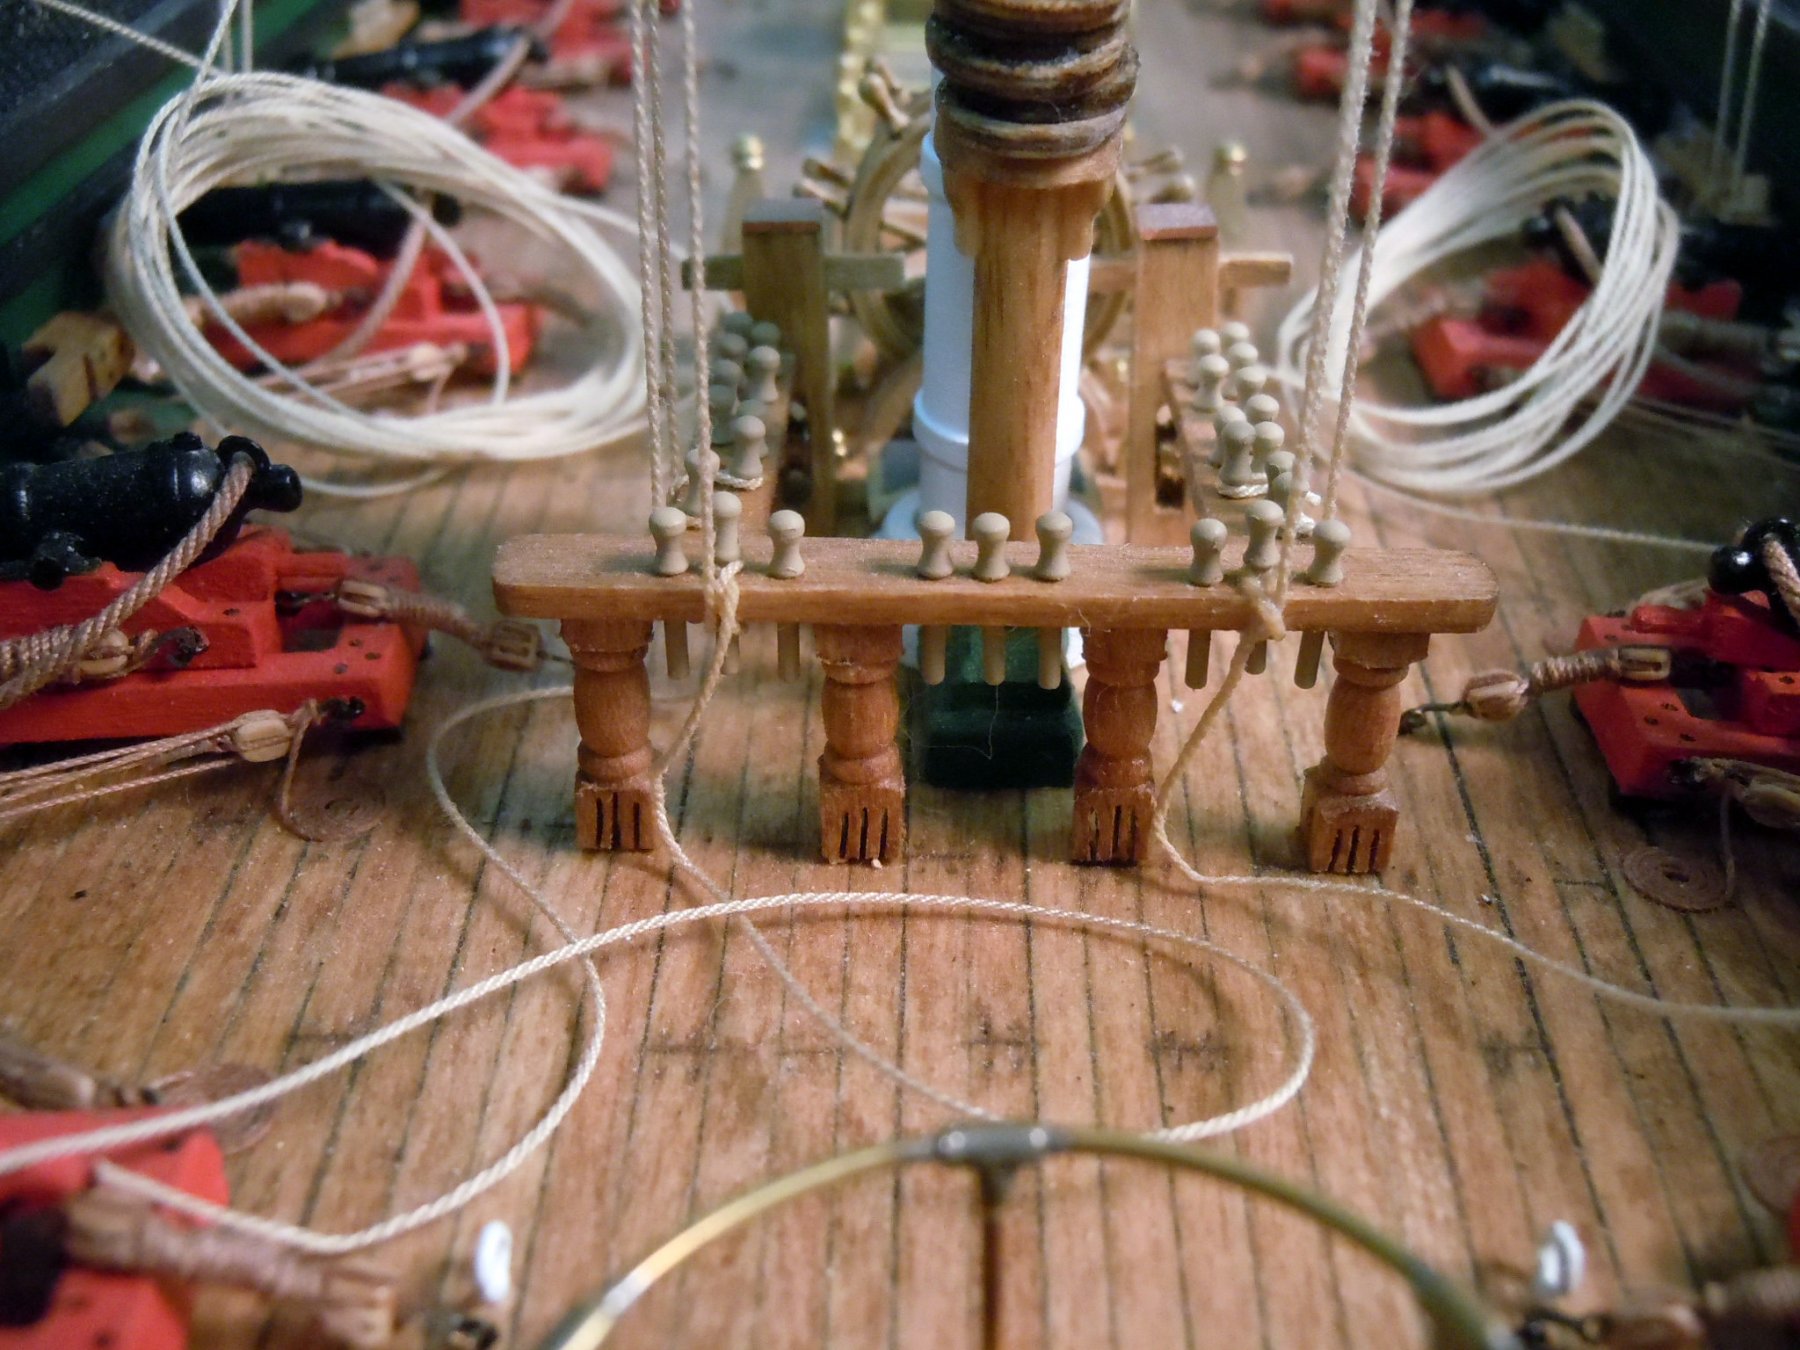
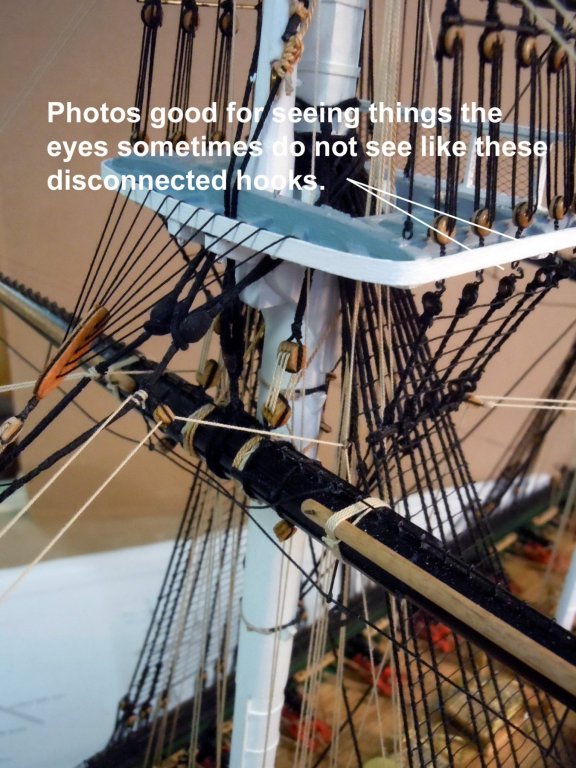
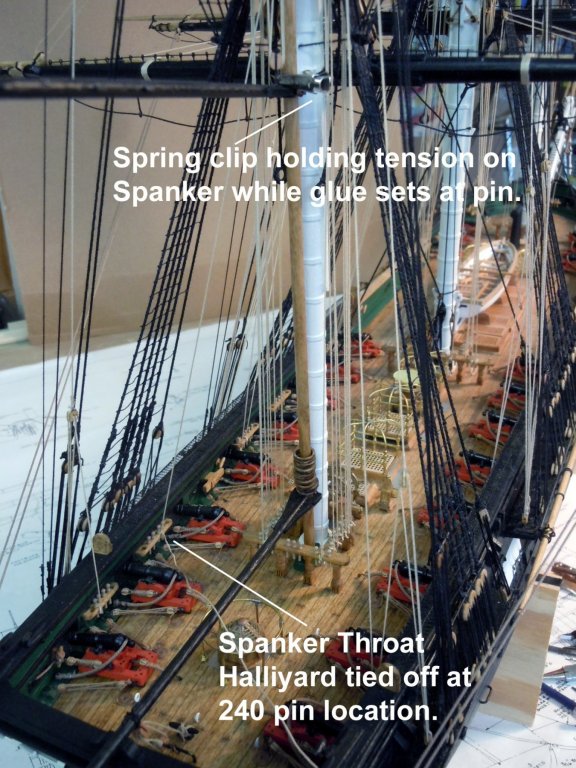
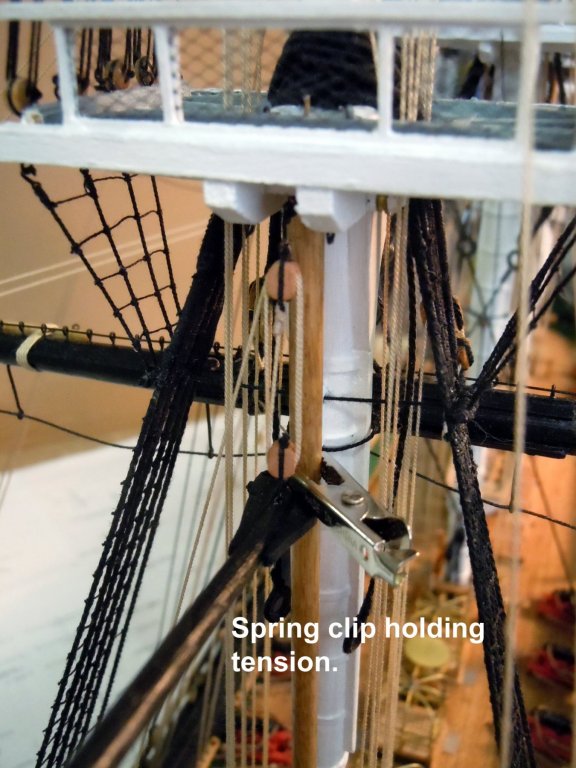
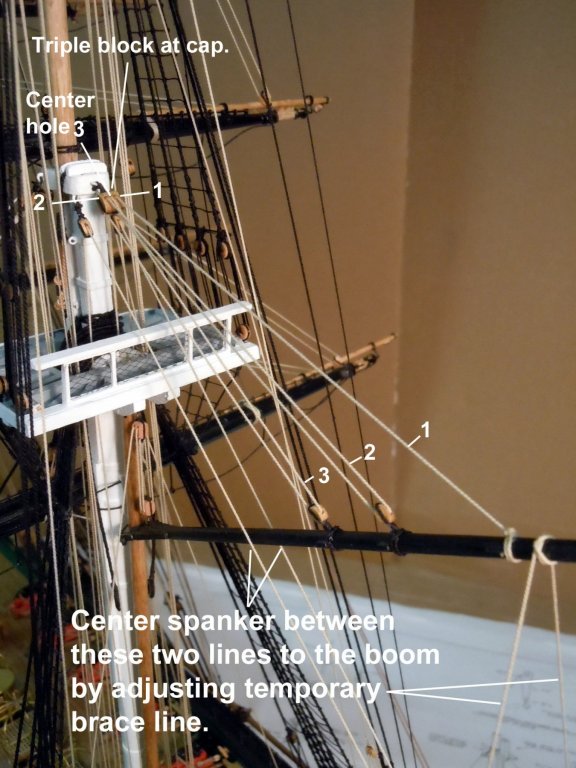
Finished up all the bracing lines and then added the mizzen boom and spanker. Here are some details pictures of the various attachment points for the bracing. Once all are in place there is a real beauty in the symmetry of the geometry of the lines relating to each other. I have to admit I had to do some real detective work to sort all of this out due to the lack of detail in some cases on the plans. Speaking of the plans, a warning for those who follow the plans show two different locations for the "Sheet stop chocks" which impact the location of the spanker boom guys. Not sure which is correct; but I build the Spanker boom first months ago and when rigged to the mizzen realized the two different locations. I am leaving mine to the rear and not tear up the work already completed. This will also impact the rigging of the Vangs as well. Here is an overview with bracing in place. The following show some of the boom and spanker rigging which again required some detective work and common sense. Here I am using a spring clip that I filed the teeth off off so as not to mark up the wood to hold tension on the rigged blocks. These are also handy when seizing blocks to hold the line in place on the block until seized. Also the double blocks are set at 1 inch on center with tension. Here is the use of common sense when rigging the triple block. I first rigged it with the lines feed in sequence across the block and then when tying off and adding tension the block angled severely to one side which I thought looked awkward. So I re-rigged it adding the third line to the center hole which put the tension in the center of the block and leveled it off. Here is a better picture showing the use of the temporary brace line to adjust the centering of the spanker between the topping lift lines. I am now waiting for Chuck to get more 3mm hooks in place before I can finish the boom rigging and the studding sail booms on all the yards. Here are some personal observations I made while rigging lines: I tie my own rope and use 100% cotton for the lines and rope seizing thread. Cotton absorbs the glue mix for a stronger joint. If too much glue is applied to a knot, touch the excess glue with a damp Q-tip and it will wick away the excess glue. When tying knots whether in blocks or belaying pins, wet the lines with clean water and a Q-tip within an 1-1/2" of the knot location. This takes out the spring in the rope for easier manipulation especially at belaying pins. Use 50/50 mix of white glue and water applied to the tied knot and line. Let glue dry and glue will result in a clean cut with no fraying. Also the line will remain flexible with this glue mix. If in doubt apply the glue mix a second time; better safe than sorry and the glue dries clear. If you screw up just soak the 50/50 glued knot with water using a Q-tip and pick the knot apart with a pointed pick. This cannot be done with CA glue. Don't ask how I know this. Only use CA on the end of a line to form a hard needle end for easier indexing in blocks. Once CA has set on the end cut the end at an angle to form a point for indexing. This is the only use for CA when rigging line. All blocks are drilled with a 1/32" drill before being rigged. Kit supplied blocks can be shaped with sanding and grooves filed with a triangular needle file centered on the holes. Complete the same operation on all masts working from bow to stern, top to bottom and from the center out whenever possible. This reduces the risk of breaking things. If using magnification glasses you will have no peripheral vision; be aware of where parts are in space before starting. File the ends and gripping surfaces of tweezers to tie small knots. Test by picking a thread off of working surface. You need to be able to grab a piece of seizing thread. Always double check what you are about to rig to see if you should have done something else first. For example adding a block to an eyebolt that will be needed to be rigged later on. Now to rig the foot lines on the boom and move on until hooks are available which Chuck indicated should be this week.


-
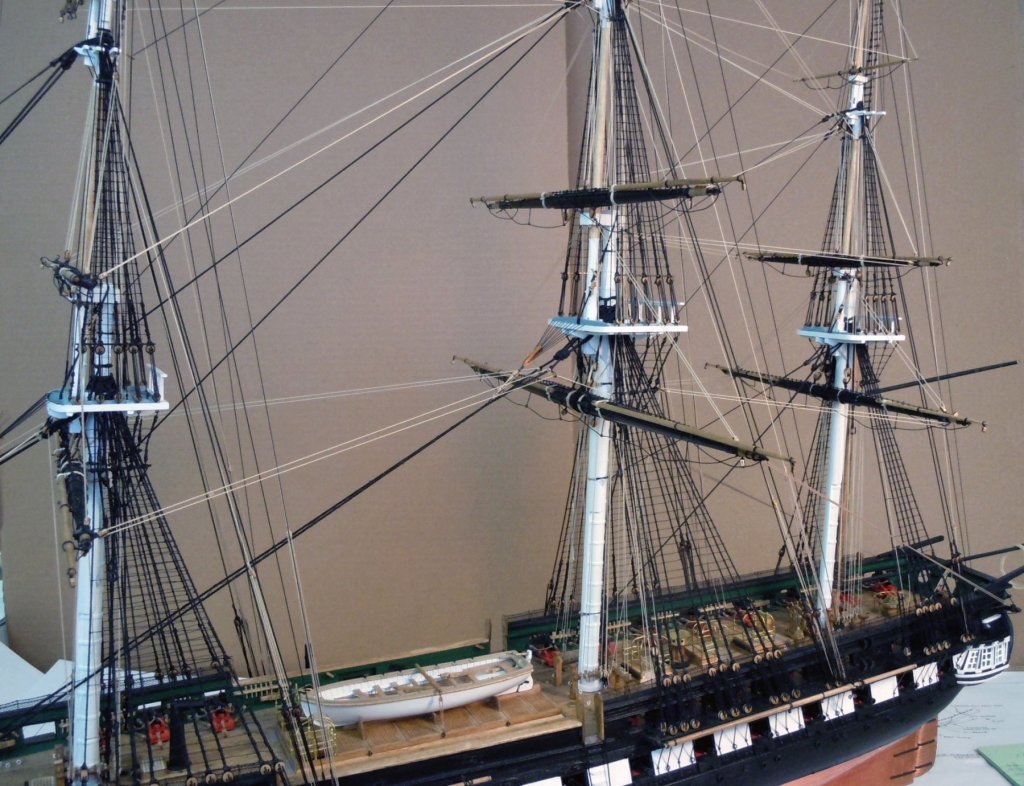
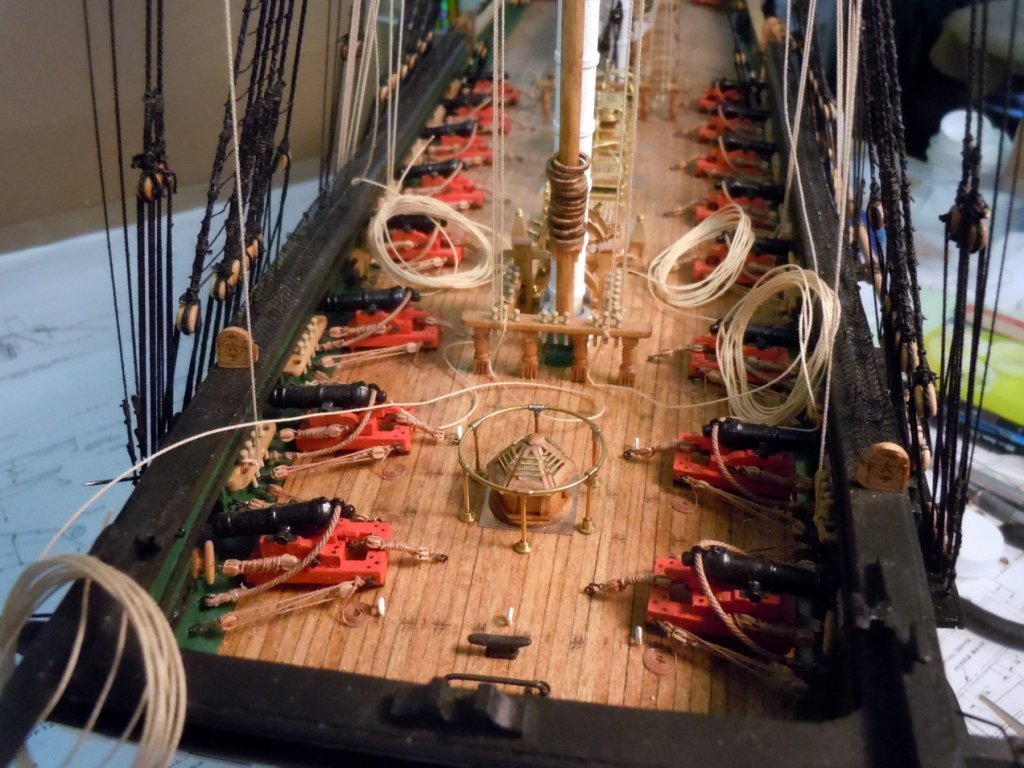
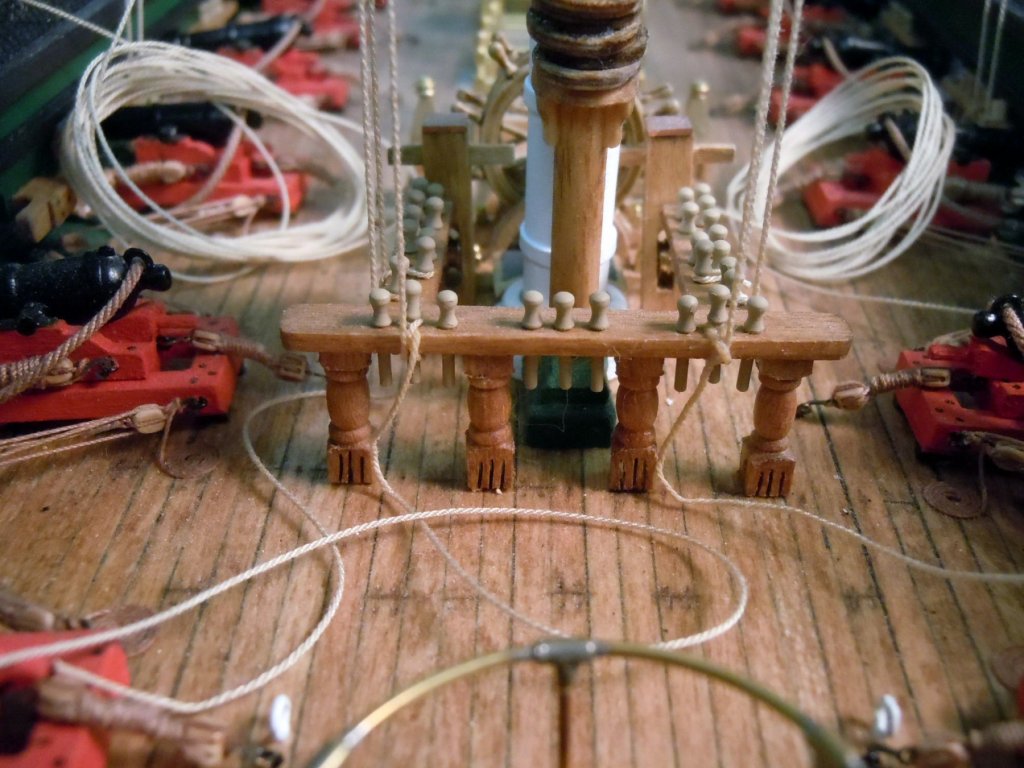
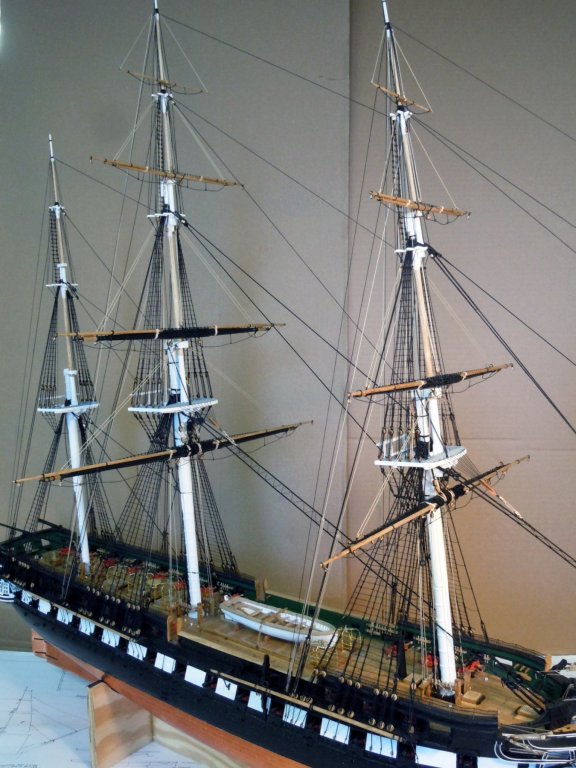
Joshua, here you can see the use of the 50/50 glue mix on these lift lines tied off at the belaying pins. One of the advantages of making your own rope is that you can have coils all over the deck while glue dries. A milestone attained! Masts are in place with all the yards having their lift and halyard lines tied off. Now back to the bowsprit and starting there to add the braces for all the yards and more rope making. Once back to the mizzen I will then add the spanker and boom since I still have to rotate the ship end for end while working on each side.
-
Joshua, no I use a 50/50 mix of white glue and water and I also only use 100% cotton thread for seizing and rigging rope. Cotton absorbs the glue mix and dries clear and stays flexible. Also if you screw up just soak the glued knot with water and untie. CA makes the cotton line too stiff and cannot be unglued without ruining the rope. However, I do use CA to set a needle point on the end of the thread to feed through blocks. Also cut the CA'ed end at an angle for a better point. Here is a link to save that is also very useful for rigging reference. https://io.ua/26628446p
-
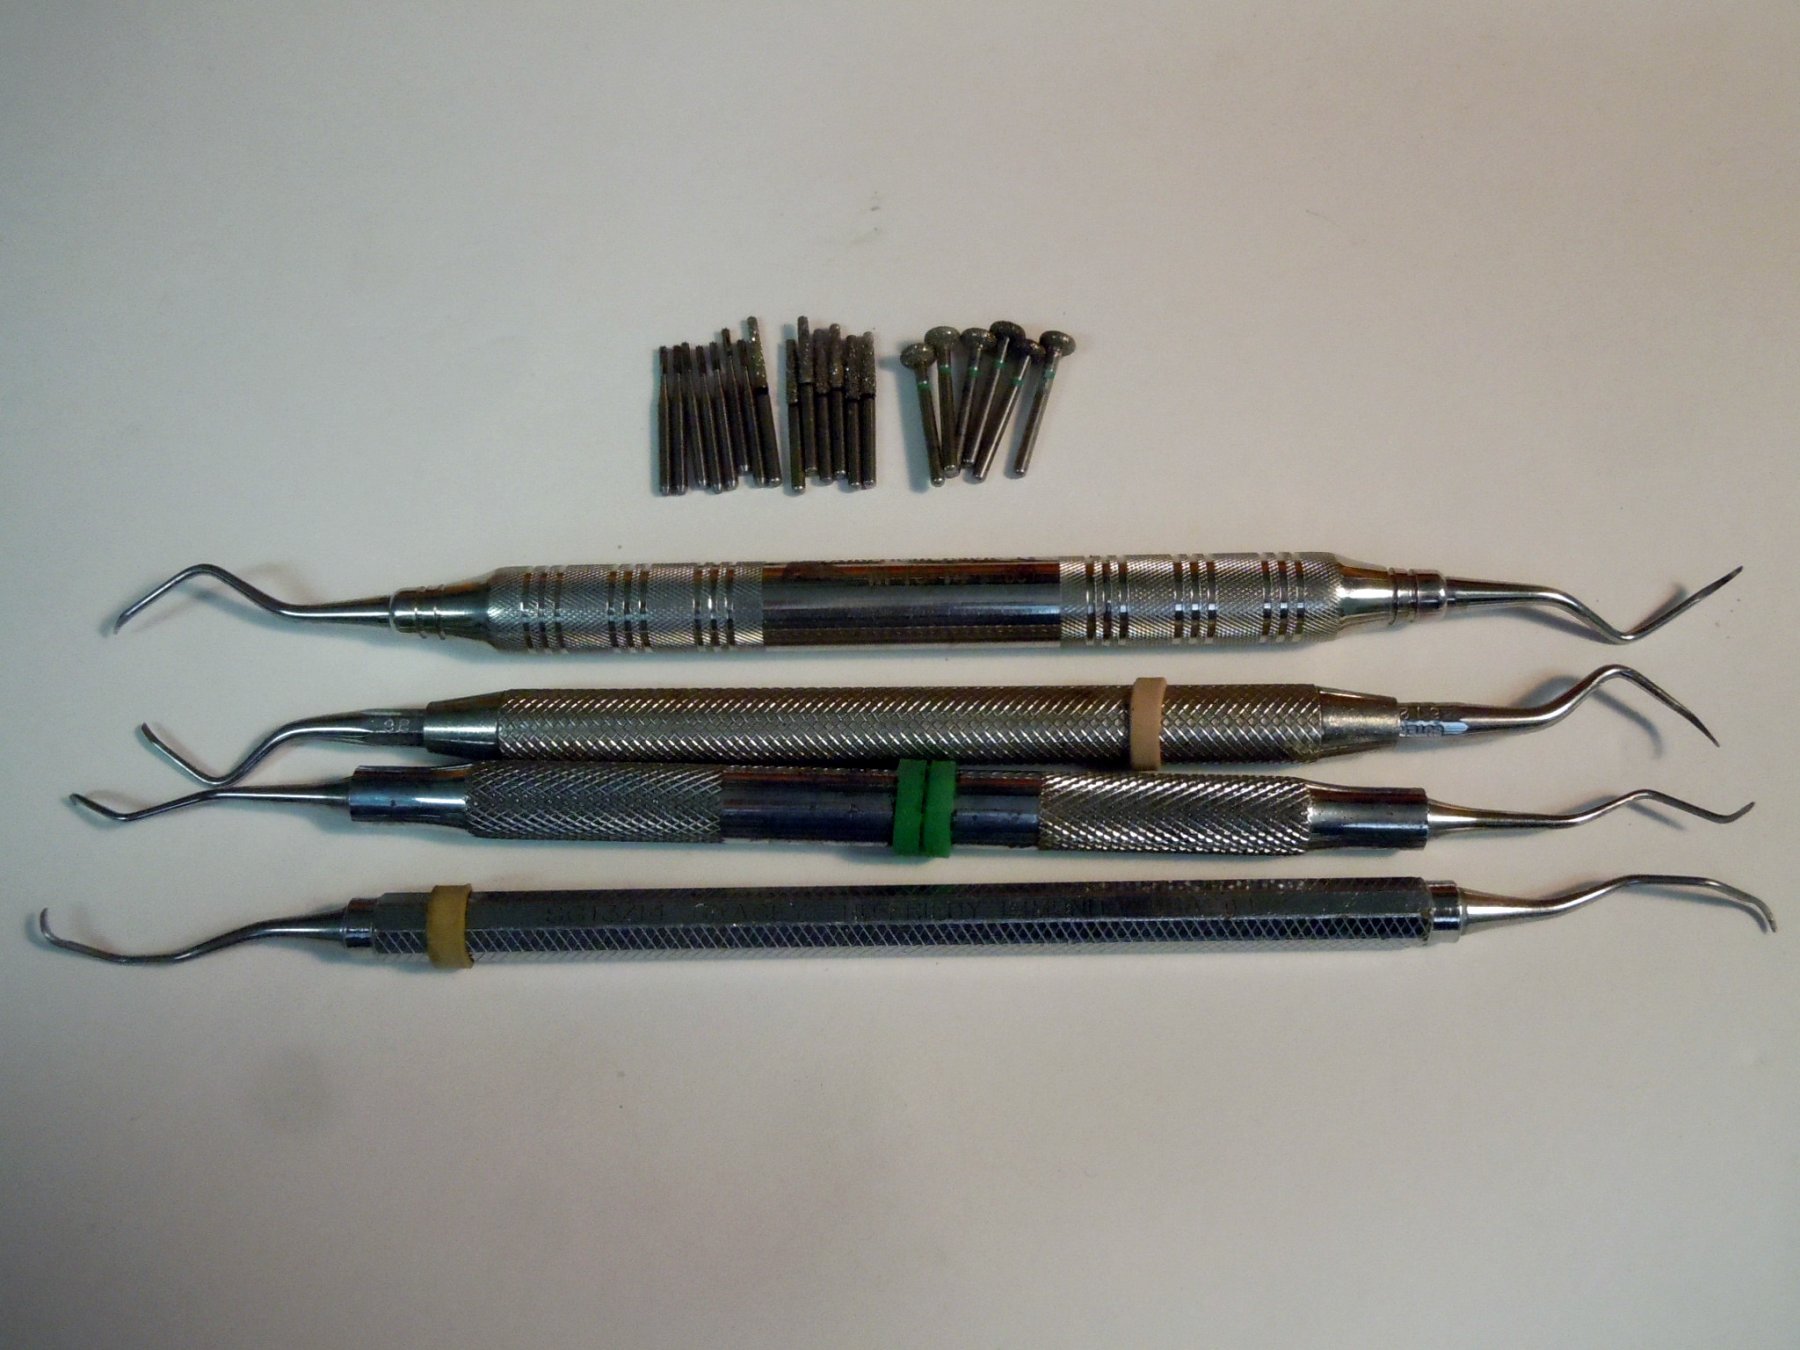
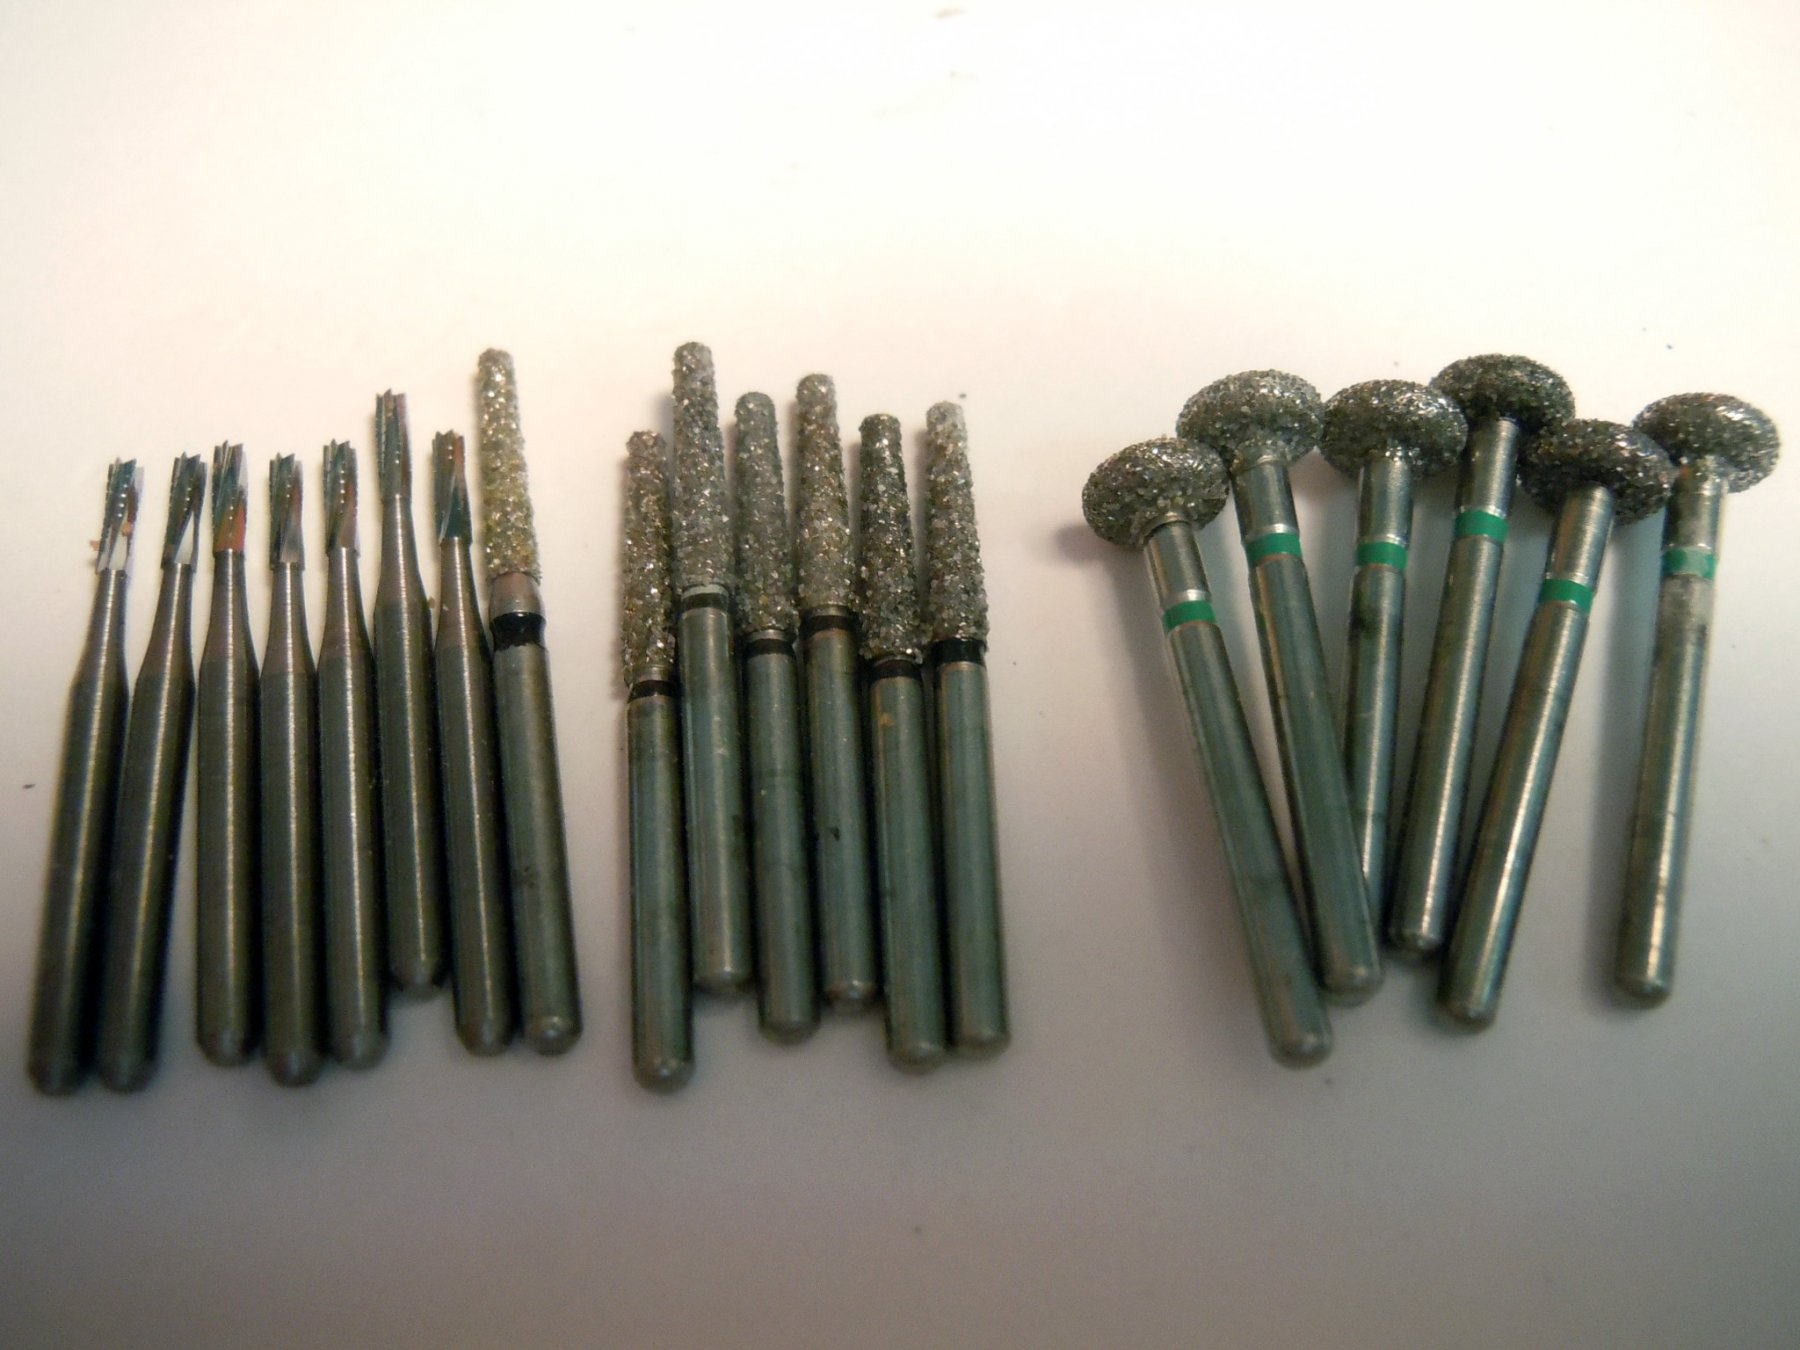
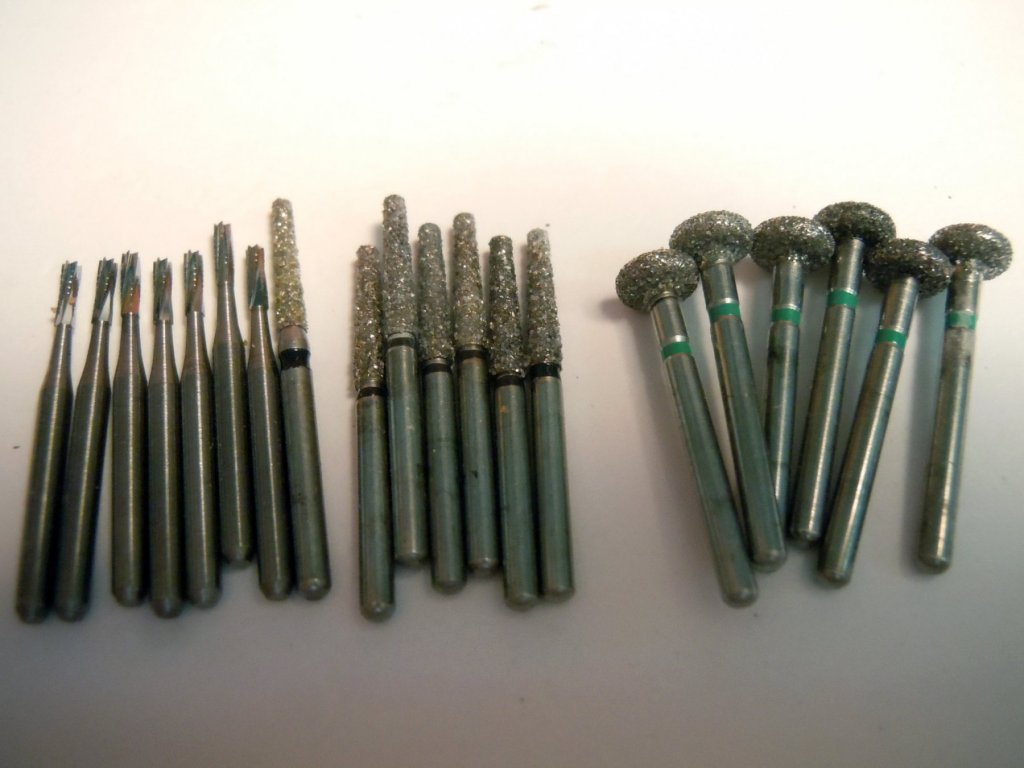
How about this! Today while at the dentist getting my teeth cleaned and my mouth wide open I happened to ask the technician about what they did with there old burrs and picks. She said that they sterilized them and then would just throw them away. She then said they had some they were just getting ready to throw out and would I be interested in them. So when we were finished here is what she gave me. Assorted picks and burrs, she commented that the impregnated burrs could only be used once on a patient by law due to potential material build up. They are sterilized in an autoclave before being disposed of. They are now going to save for me the other styles of burrs and bits and handled picks. All free just for the asking, of course it requires a teeth cleaning first! They fit perfectly in the 1/16" (3mm) Dremel collet and they are sharp as you know what on wood. The picks can also be used to place drops of glue in tricky places. Others may wish to ask their dentists for these as well.

-
Michael, Yes it was fun working with them while it lasted. With the divorce everything had to be liquidated for the settlement which devastated the business. As for the ship builders, I had a chance to meet with the director at the Nuremberg Toy Fair. They are a group of Naval Architects unemployed once the Cold War ended and are located in Riga, Latvia and are trying to reclaim their heritage from the Russian occupation. They started a business underwritten by Gary to build models. The Titanic you reference is the 18 foot long one that took longer to build than the real ship built from original plans with a custom built trailer to transport. Visit the site and check out the details of the model and the update on what they are doing now. Unfortunately, none of the model prototypes I built for them got duplicated.
-
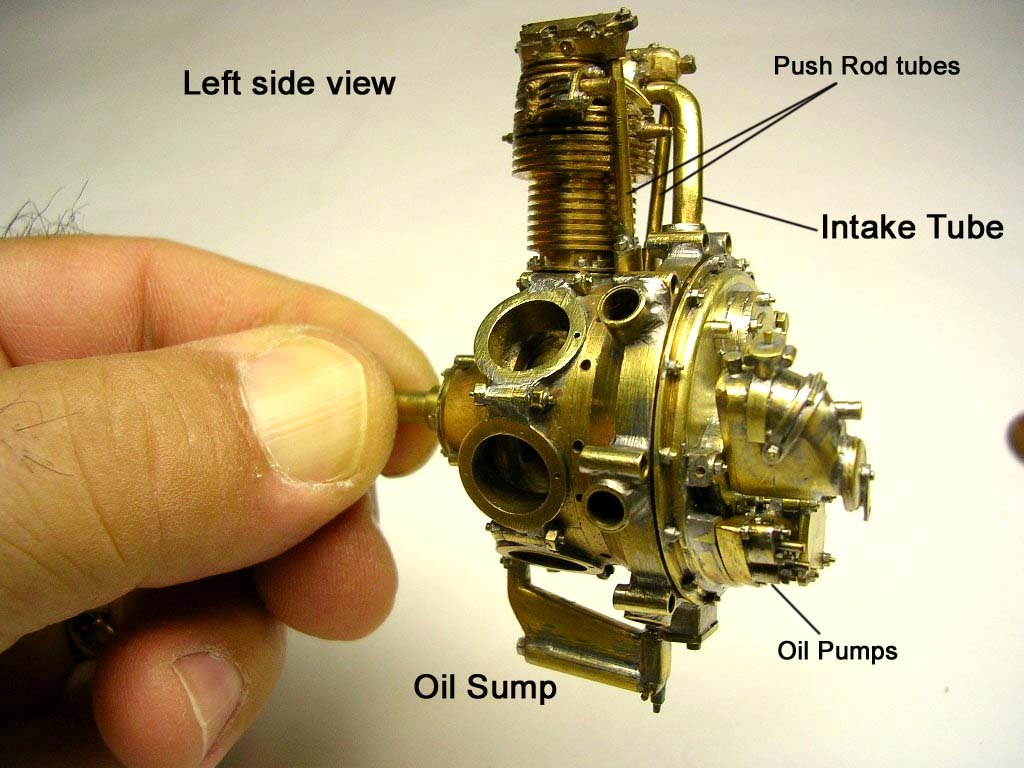
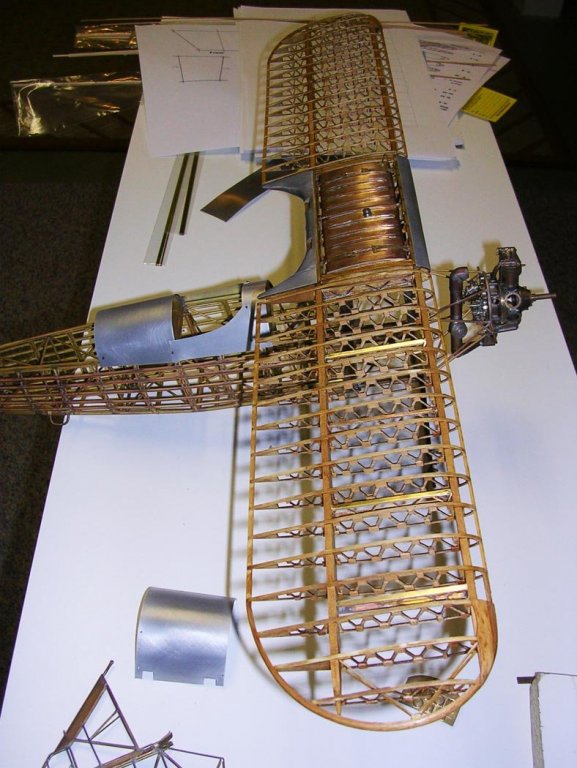
John, Great to hear from you. I just like to share some of what I am learning for those that may be in the same boat as I am being a detective and sorting out what is meant by the plans and assembly instructions which lack enough details for the inexperienced ship builder like myself. Knowledge and experience not shared is a real waste. As for time being retired I make my own schedule unless interrupted by commissions. As for the Stearman it was started as a commission for Fine Art Models, http://www.fineartmodels.com/Welcome.html visit their site if you are not familiar with them. Great cars, ships and planes; they just sold my prototype Sopwith Camel. Anyway it came to a screeching halt and put on hold due to a sticky divorce. Once finished with ship building I plan to finish it it for myself. Here are a couple of pictures of where I ended up. The engine needs parts duplicated and fuselage rigged up once assembled. Keep in mind this was built to come apart for production duplication. Now I just need to decide how I want to finish it up. Maybe like the Sopwith being half covered. Check back now and then and keep up the great work you are doing!
-
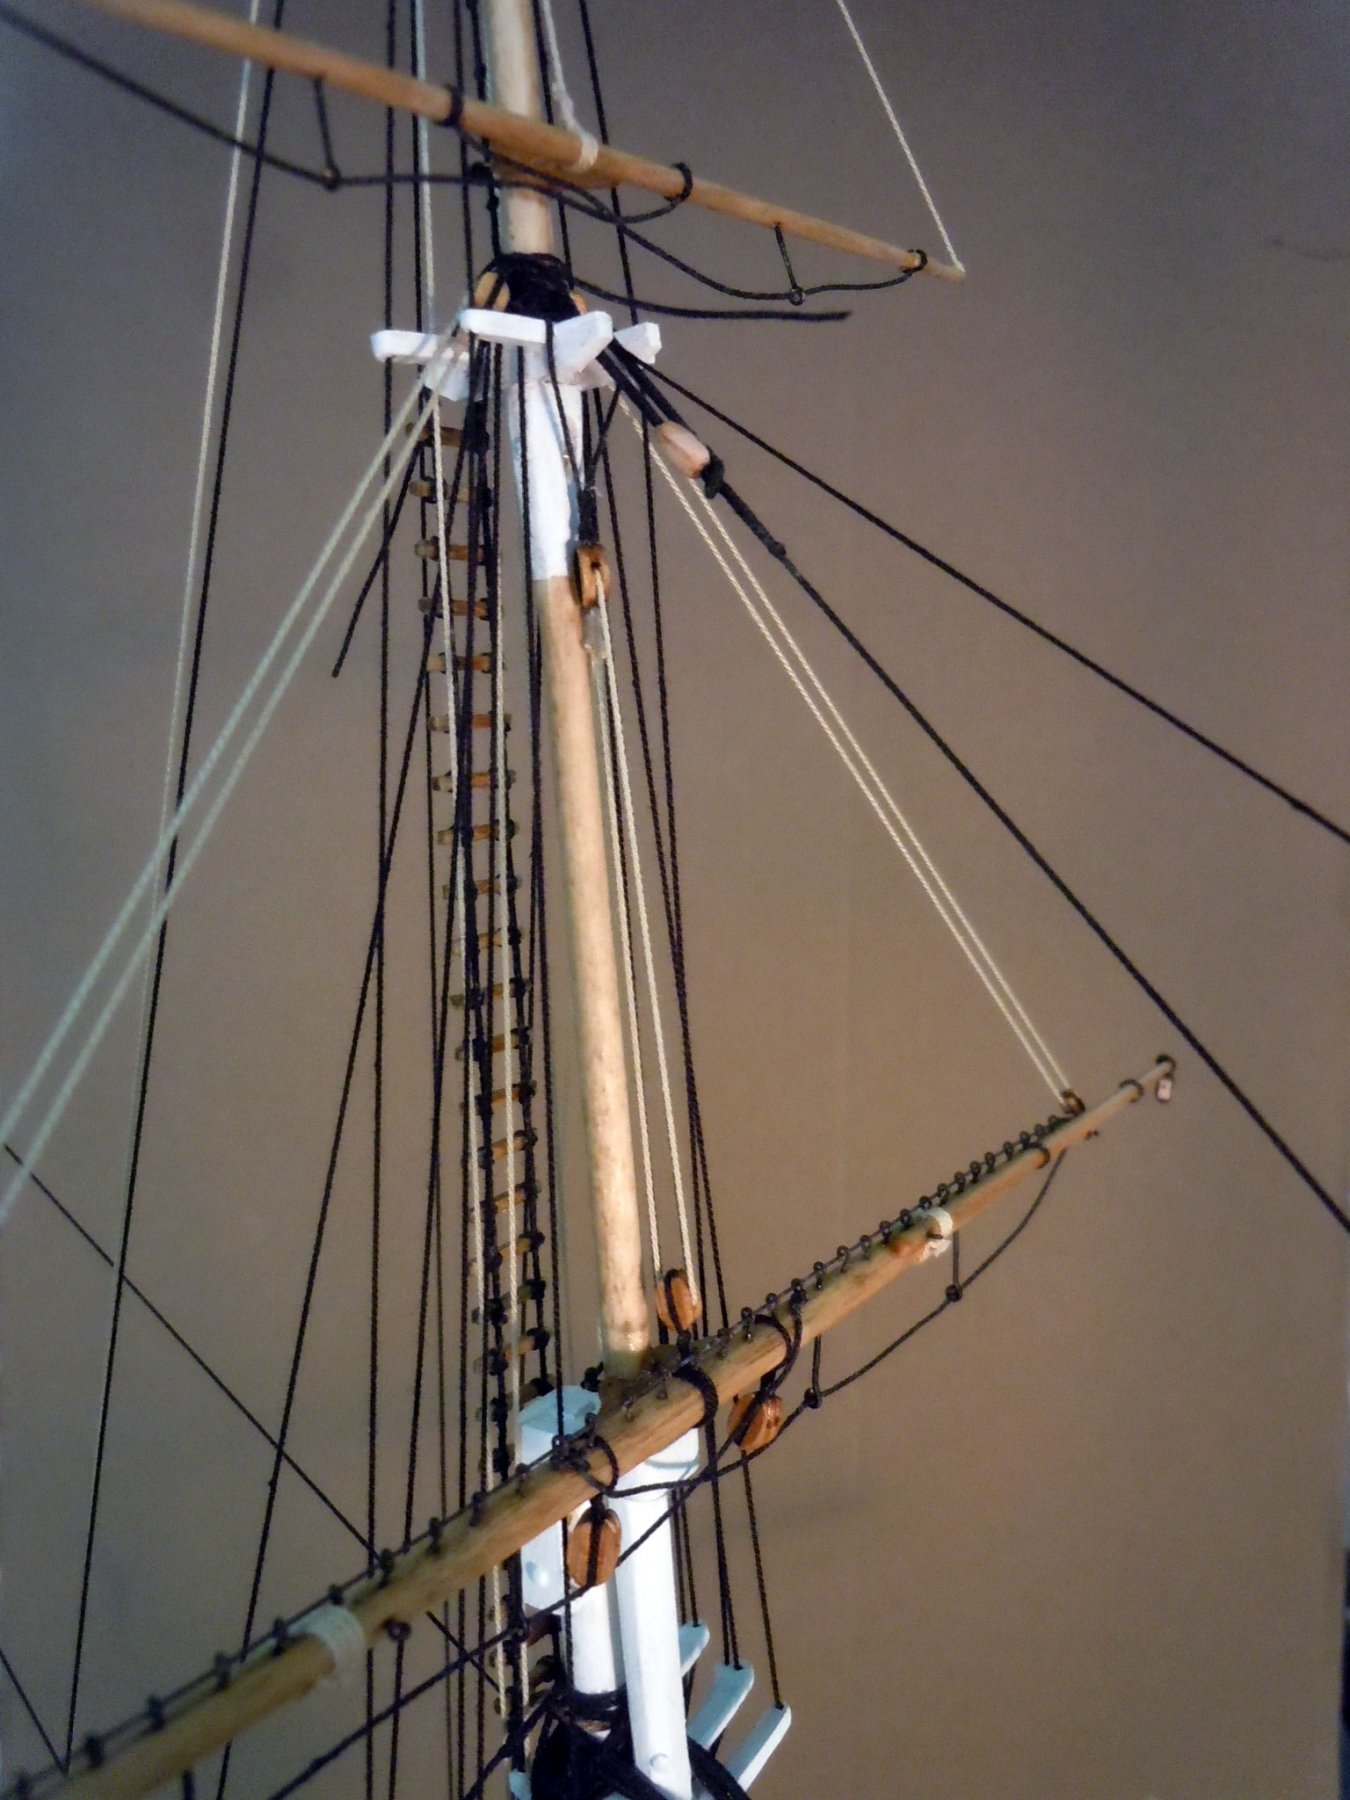
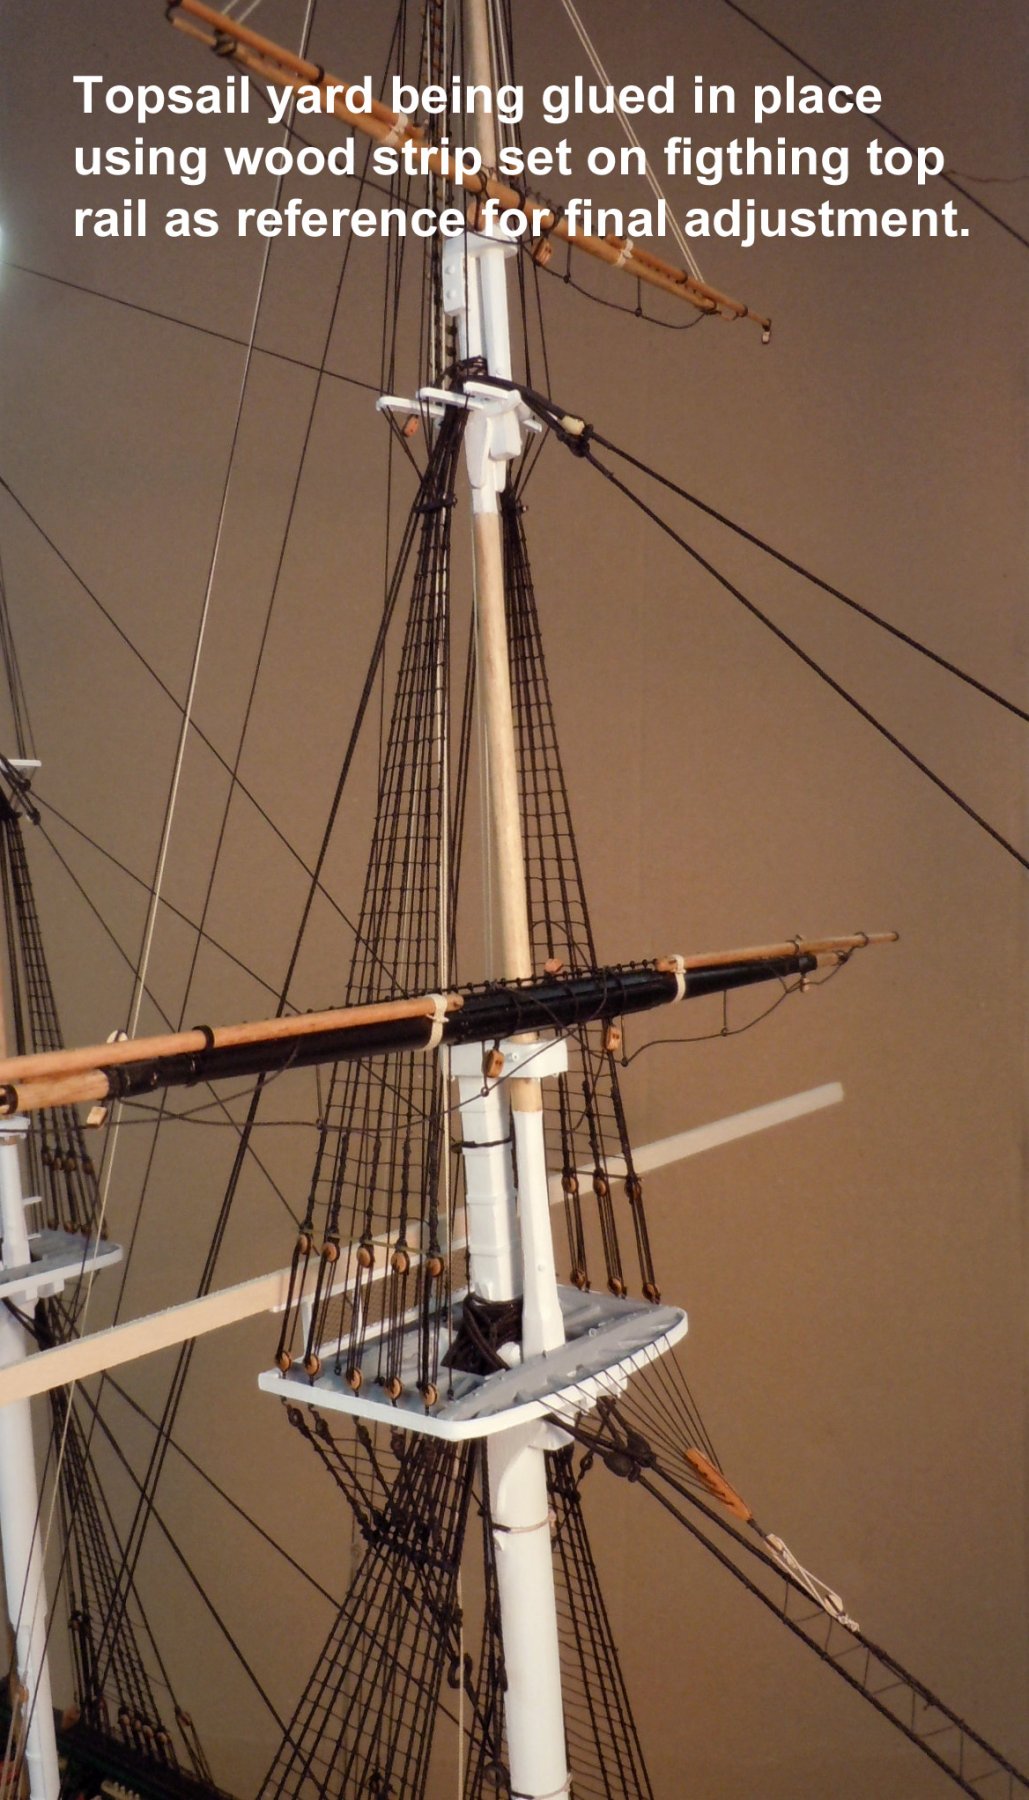
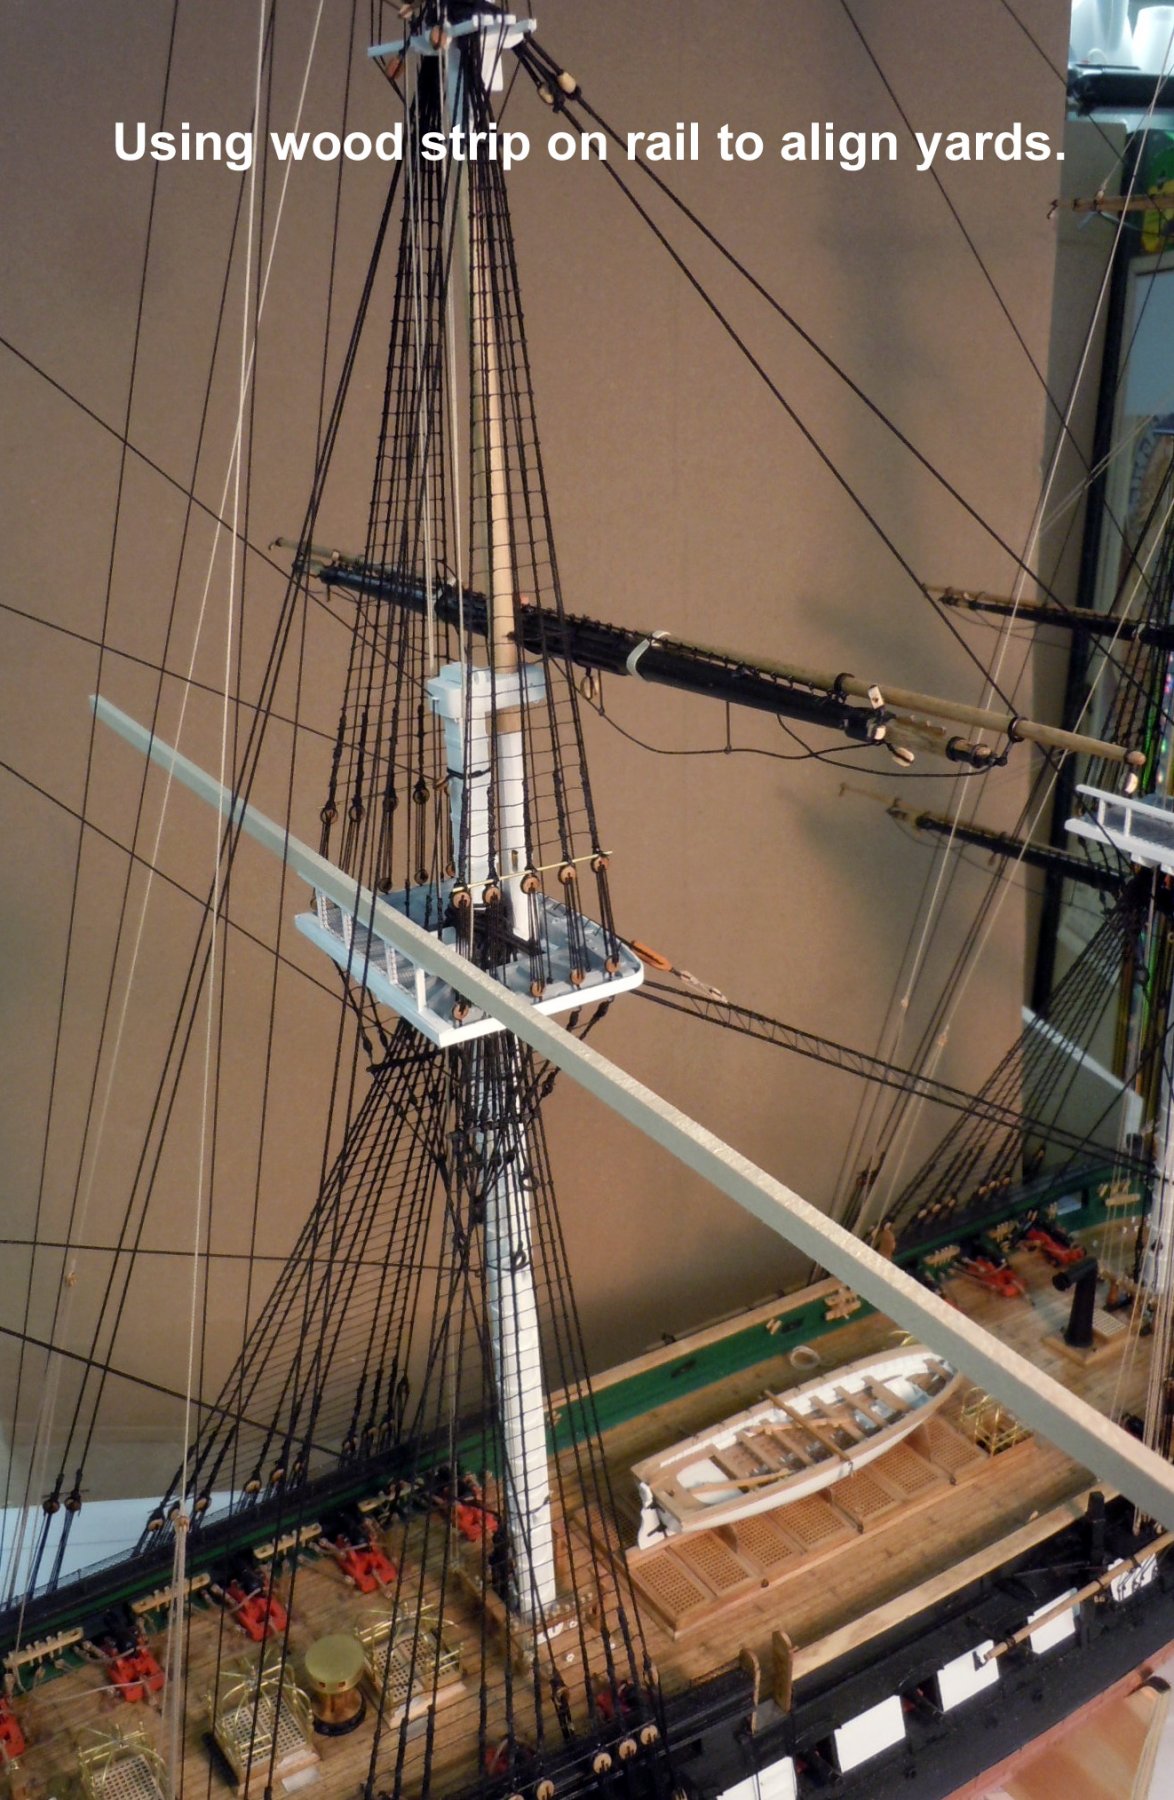
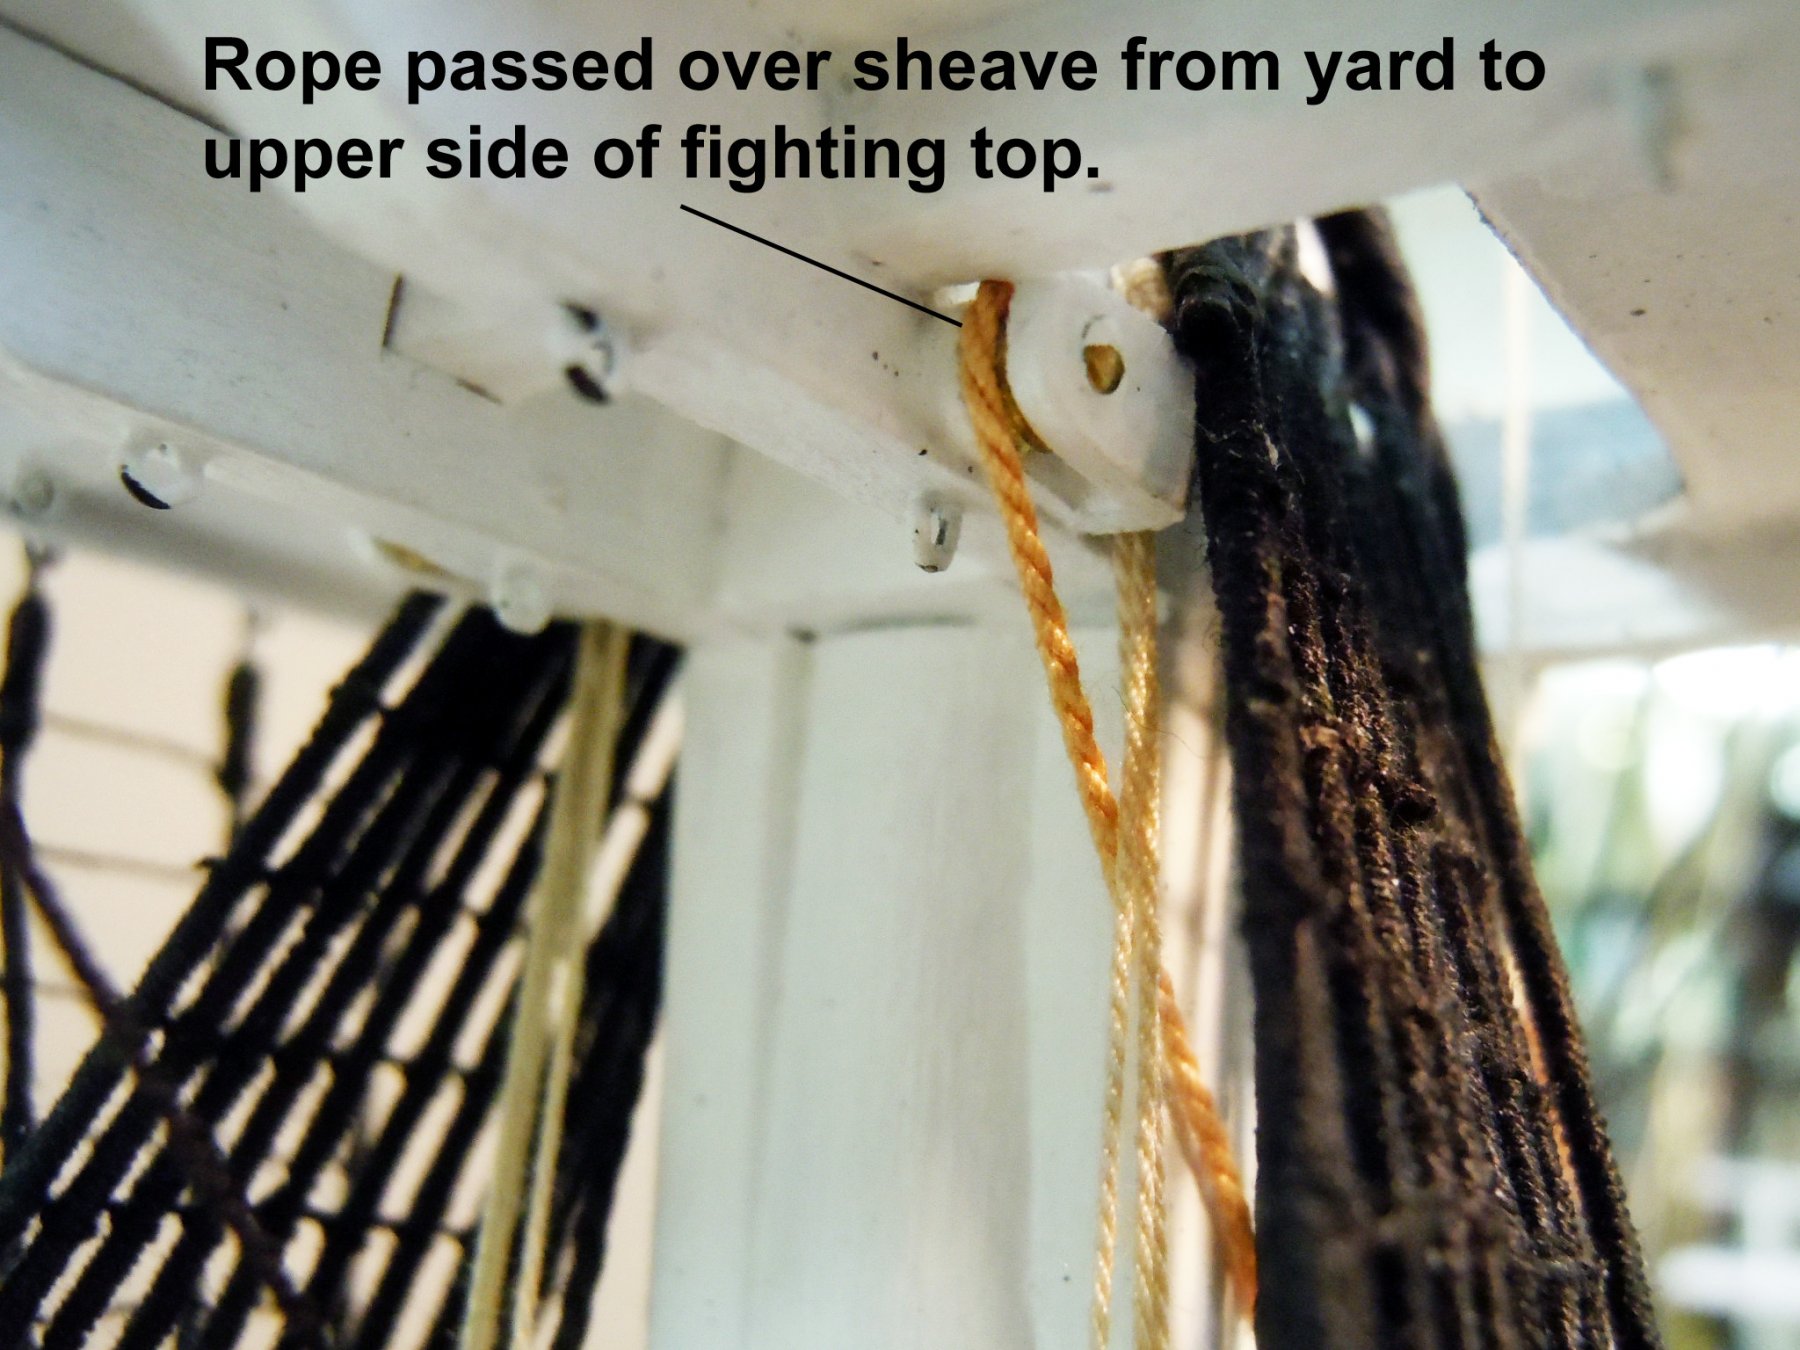
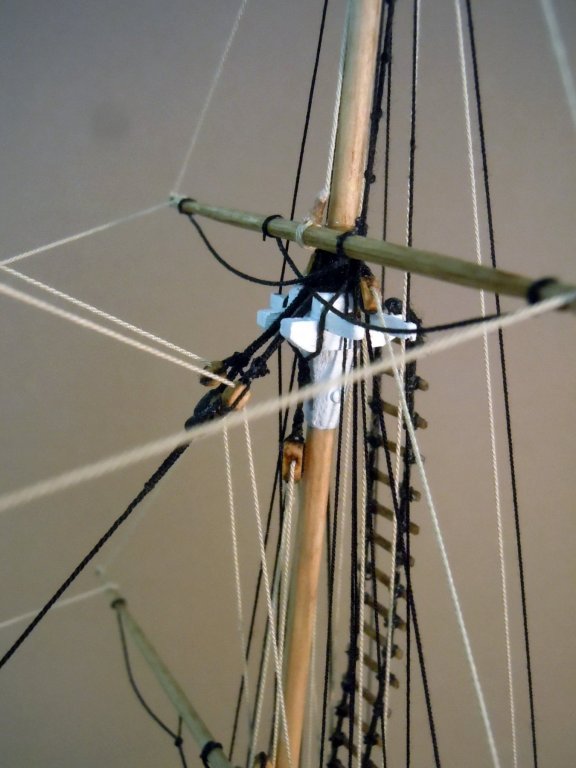
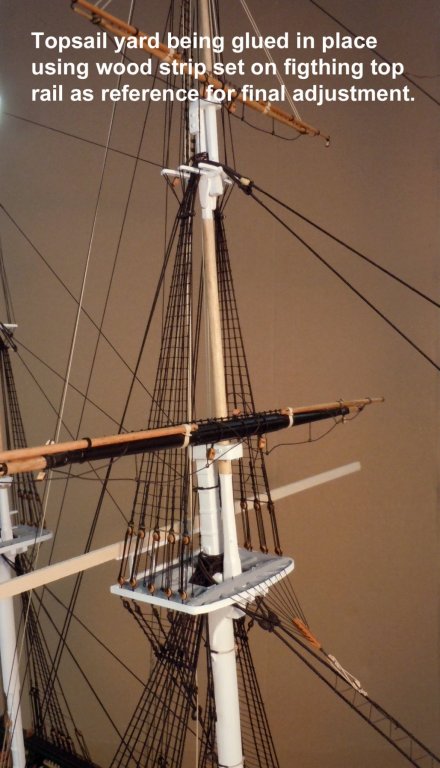
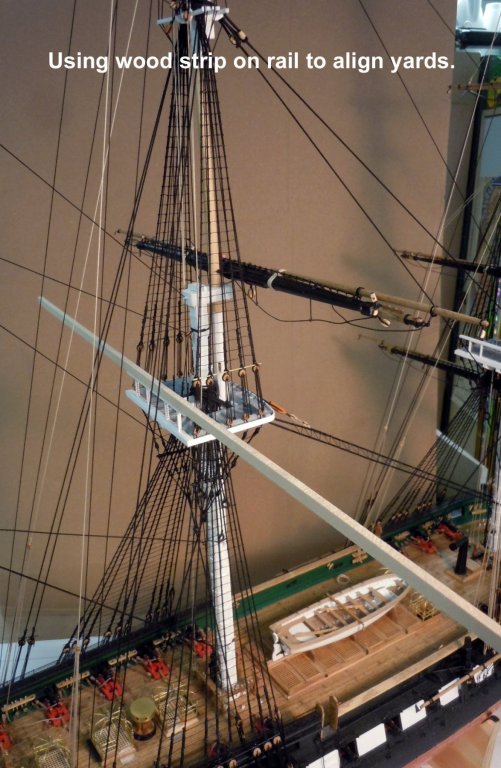
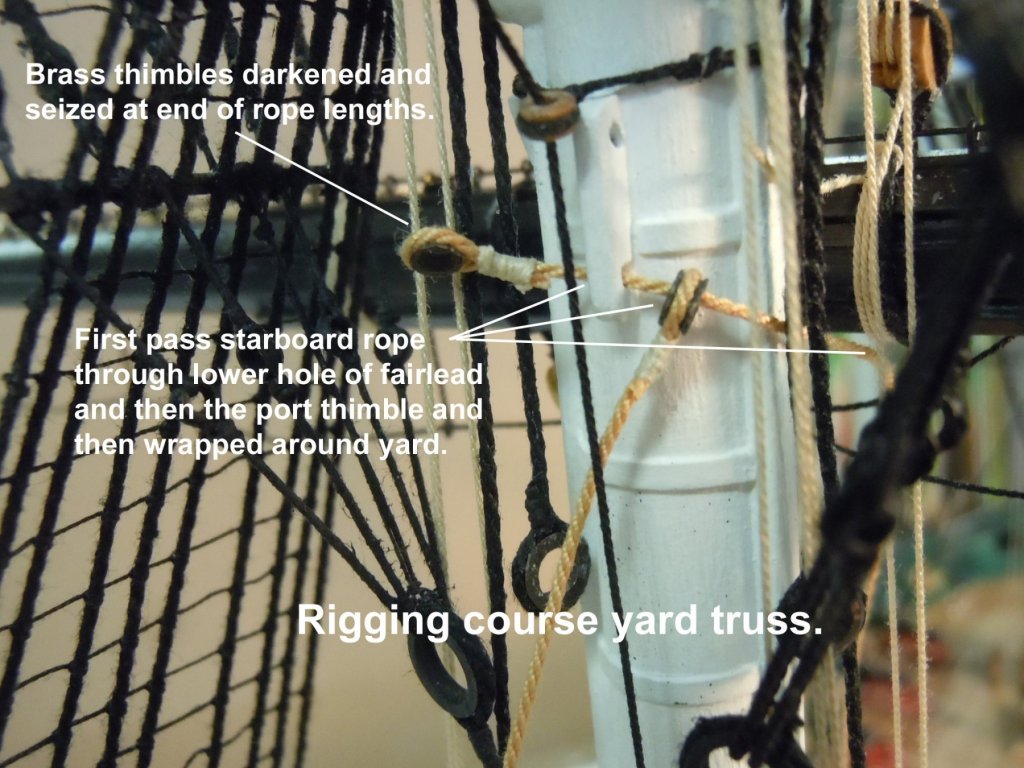
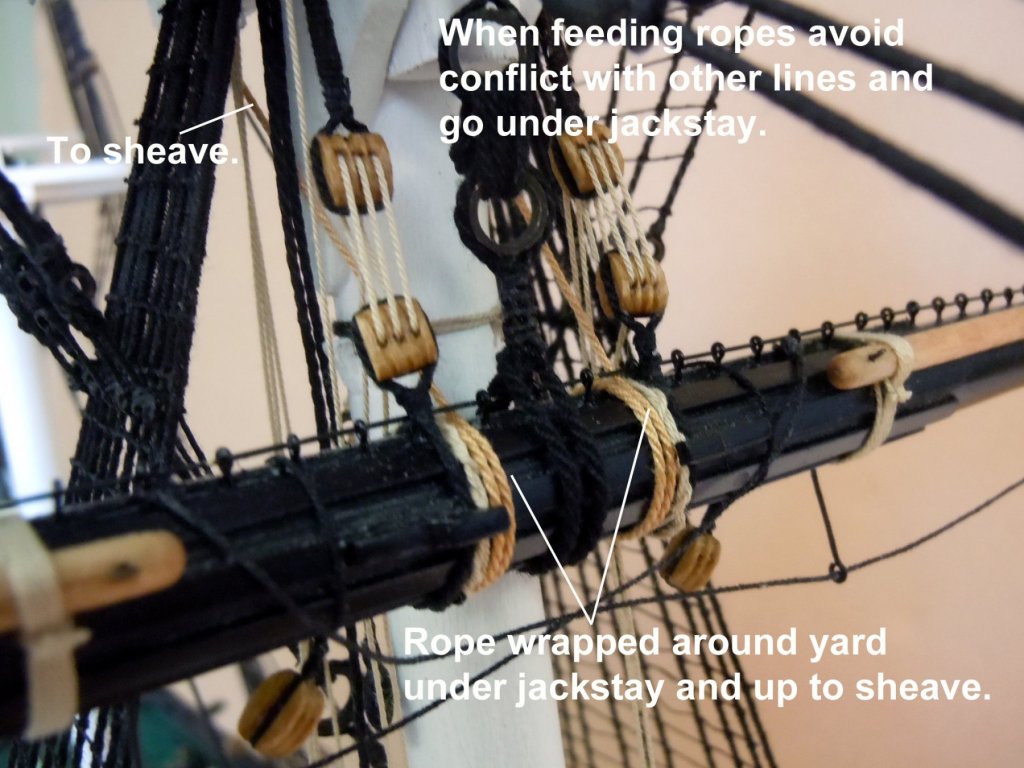
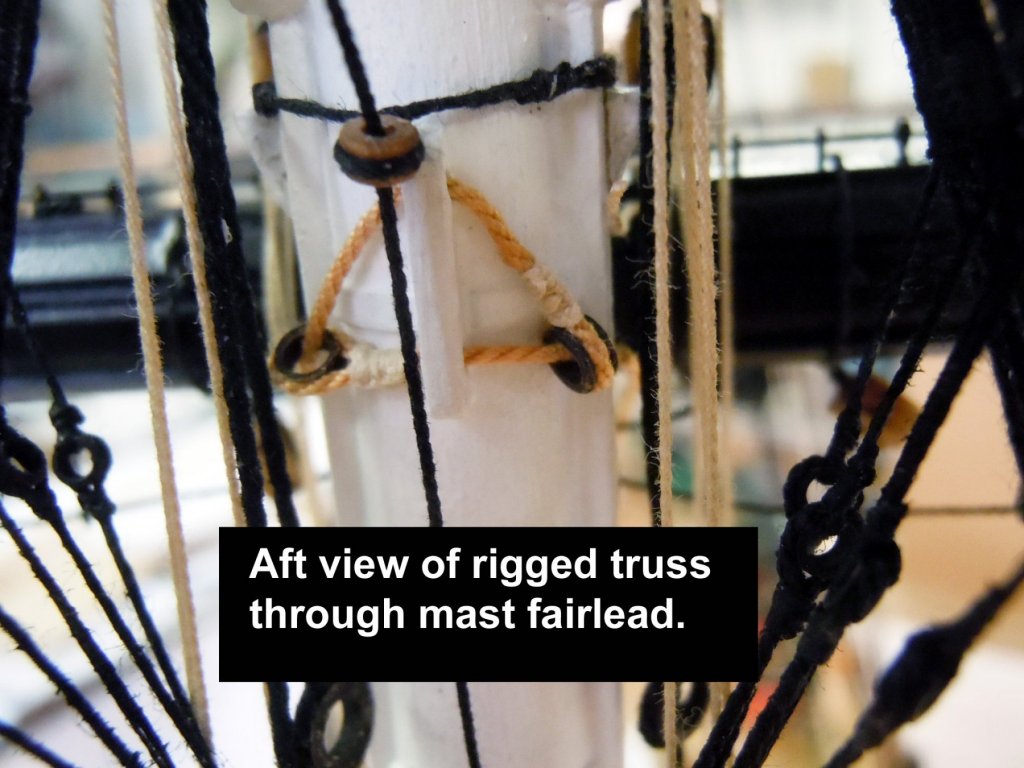
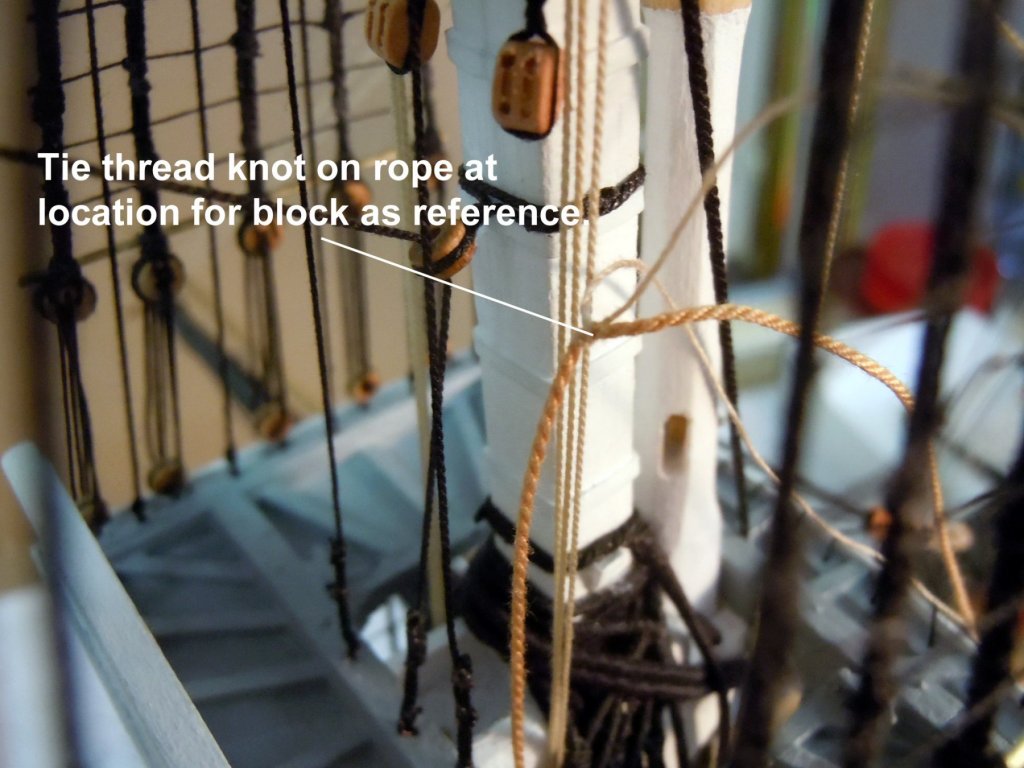
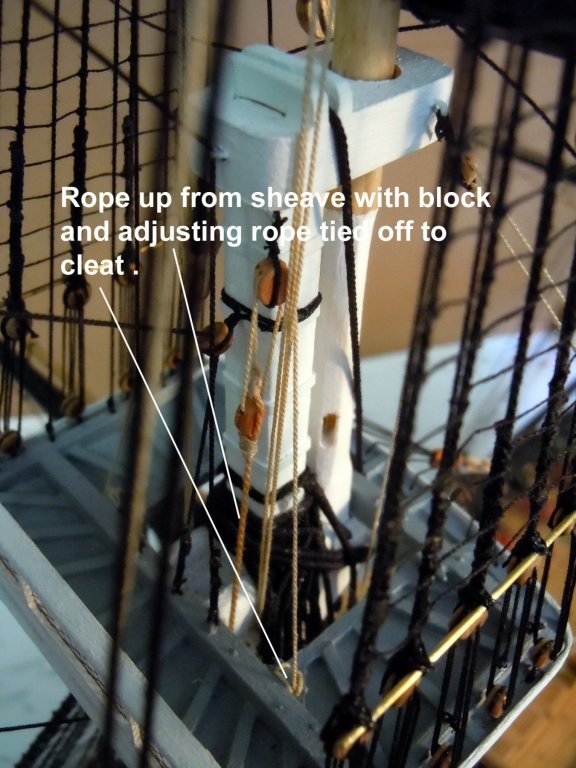
I have just finished up the main mast yards which were pretty much a repeat of the foremast. But After checking around I thought I would better explain the rigging of the trusses in more detail for the benefit of others that may be as confused as I was at first trying to understand the plans and my inexperience as a ship builder. The pictures are self explanatory and the most difficult part was the rigging of the truss block above the fighting top. Here are the royal and top gallant yards in place. Here I am setting the topsail yard. I found that setting a long strip on the fighting top rail flush to the rail's back edge I had a great reference for setting the yard in space both up and down as well as fore and aft while the glue set on the locating pin inserted in the mast. Here is the sequence showing the rigging of the course yard truss based upon what I think the plans were trying to explain. Now on to the mizzen mast yards and then all the yard brace lines before adding the mizzen boom.


-
Welcome aboard my good friend Marvin! Glad you acquired Scale Hardware from Bob and continue his product offering. Members check out Marvin's offering of rivets in "Bulk" quantities.
-
Google uss constitution virtual tour google maps. On the lower right are icons to navigate between decks. Go to gun deck for cabin and furniture details. Follow the arrows to move view direction.
- 742 replies
-
- 5
-

-
- constitution
- frigate
- (and 1 more)