


clarkt
-
Posts
56 -
Joined
-
Last visited
Content Type
Profiles
Forums
Gallery
Events
Everything posted by clarkt
-
Sail feedback request, Mondfeld method
clarkt replied to travis's topic in Masting, rigging and sails
I have used both fabric and silkspan for sails and a flag on four of my models and agree that the silkspan, following David Antscherl's method is by far the best. The fabric sails were sewn by a friend of mine, an expert seamstress. She did a beautiful job but, still, the stitches are way out of scale. Using the Swan Class books addendum I went through the entire process to see how it would go, even though they are furled on the model. It is true there are some tense moments while the paper is wet, but they are surprisingly strong when dry. One other thing: I bought additional paper to make sure I didn't run out and the new product was much weaker and difficult when wet than the first batch. That was Guillows brand. I'll try the Sig brand next time. -
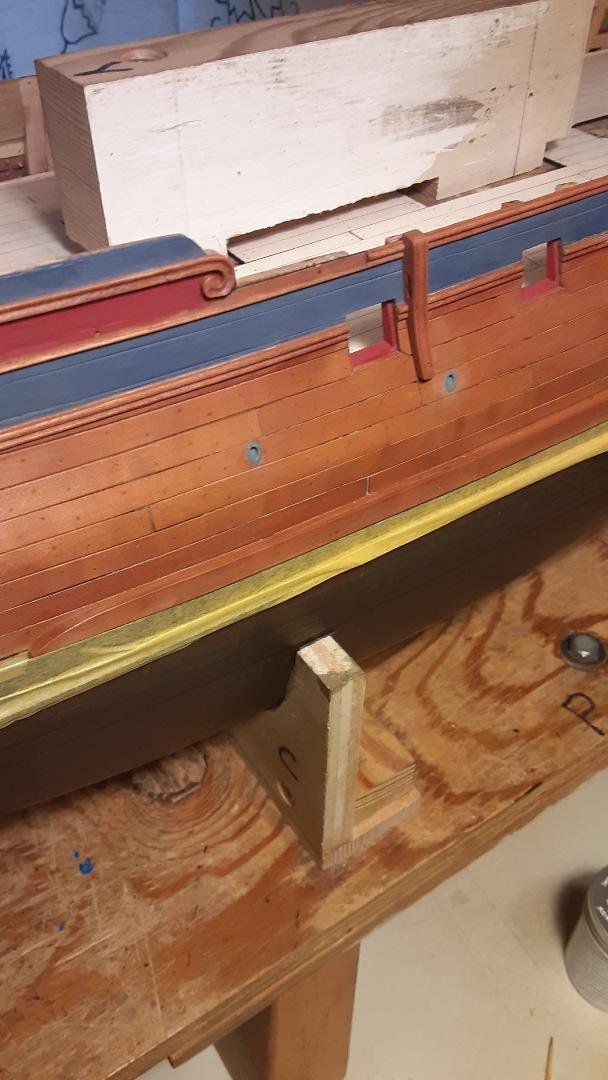
I've also been contemplating the color scheme for my Resolution, 1777 and finding little help from paintings or more modern art. The TFFM Swan class book series says that sheer rail and waist rail moldings , for example, were "bright", ie. unpainted. And, as far as I can tell this applies to head rails and stern galleries/ taffrail as well (with some painted decoration.) But this may mean for Admiralty models and not the actual ships. Someone recently asked on this forum: "Do you want a model of a model or a model of the actual ship?" Were the Admiralty models built to represent the actual ship or were they an idealized representation made to impress the Board? Would they leave so many unprotected wood details on the outer hull exposed to the elements? I'm thinking of painting the headrails and stern features mostly yellow ochre but have no reference to substantiate this choice. That's still a long time off and I could change my plan, agonizing over it all until the brush goes into the paint. As to mixing boxwood and other species, I've also unsuccessfully tried to stain boxwood and instead used wood dye. (mixed with isopropyl alcohol rather than denatured which yields a different color.) In the photo, the moldings and volute are boxwood, the planks and chesstree are Swiss pear. Although every thing was installed, I dyed the moldings first, then matched the color when dyeing the planks.
-
Very interesting, and a lot of information new to me. Makes me wonder about the French replica l'Hermione, which has some very bright yellow painted trim. And the replica Lady Washington has always seemed too "tarted up" to me. Maybe to appeal to a broader audience.
-
I used to use wood from a guava tree. It's pretty much like apple wood; good to work with and no grain.
-
I've had the Serv-o-matic for a few years, now and use it often. I was surprised how easy it was to get good results.
-
The best source for numbered , very small bits I've found is Pan American Tool Corp. (https://www.panamericantool.com/?srsltid=AfmBOoplf2XnA9dfRlNIRURelQxlEWf62EiS9mcYw94EGpbstN0N6A4) But I mostly use the carbide bits from the electronics industry, available from Amazon and others, in the Dremel flexshaft and drill press. It's true they break easily, but they don't cost very much, work better than the ordinary bits and don't wobble when mounted in the drill press That set of pin vises seems pretty expensive. Rio Grande, https://www.riogrande.com/?srsltid=AfmBOopFq7WQdEg-QU2eeaqm3EfZdG7B5DlhxjtTsZD61lKD-Zv2c5Ni has several for a lot less. As for other tools, a broken bit can be ground on an angle and mounted in the pin vise to make a mini chisel, great for forming the sheave on a small block. a broken carbide bit can be used in the same way to make a reamer.
-
I agree with Bill Hudson about Gilmer Wood in Portland. They are aware of modeler's needs, are knowledgeable and easy to work with.
-
Need AL HMS Bounty rigging instructions
clarkt replied to Willem Basson's topic in Wood ship model kits
I used the book "The Armed Transport Bounty" by John McKay from the Anatomy of the Ship series to rig my model of Columbia Rediviva, a similar vessel. It is quite detailed; better than other AOTS books. -
Glad your business is doing well, and hope you will continue to make cotton rope.
-
Laser cutting services?
clarkt replied to Jsk's topic in CAD and 3D Modelling/Drafting Plans with Software
I have also wondered about custom laser cutting, but of sheet brass rather than wood. I'm thinking particularly of preventer links for the chains (on deadeyes) and swivel gun yokes. But if I was making an order I could probably think of other parts. Are such services available? -
Looking for plans or possible models of Magellan's ships.
clarkt replied to J11's topic in Nautical/Naval History
I built a model of Victoria, based largely on the plans for Santa Maria in Xavier Pastor's "Ships of Christopher Columbus" in the Anatomy of the Ship series, but with some significant alterations. According to my research, the stern construction had changed from the "stern tuck" to a transom style. There was a substantial main topsail and a fore topsail. (Elcano's log records that the fore topsail was carried away off the coast of West Africa on the last leg of the circumnavigation.) The ships had cressets, rather than lanterns on the stern. A boat on the Victoria normally had a crew of twelve. These are some of the best items I found while researching the ship, in S. E . Morison"s "The Great Explorers," J. H. Parry's "The Age of Reconnaissance" (Parry has written several good books on the subject,) Joseph Wheatley's "Historic Sail," and many others. I also read the Pigafetta account but it has virtually no information about the ships. Of course, there is a lot of conjecture but you can make a reasonable representation and learn a lot about the ships in the process. -
The tool I use virtually every day is my Mitutoyo digital calipers.
-
You might try using the Sculpy to make a "maquette," to get an idea of how your figure will look and to become familiar with the body proportions. Then make the piece out of boxwood. David Antscherl describes the process very well in The Fully Framed Model, HMN Swan Class Sloops 1767-1780, Vol. II, pp 243 to 255. I think the Sculpy is too gooey to make a finished piece that you will want to display. I also tried to shape a piece of Corian countertop material, thinking that it would be easier with no wood grain issues, but it was too hard and didn't work well. The boxwood is, of course, great to work with. While it is a difficult project, the results can be rewarding. All this at 1:48 scale. Smaller might be unrealistically challenging, although I'm sure it's been done.
-
Phoenician ships were known to be, at least partially, black. They had the great good fortune to have access to natural (petroleum ) tar, still a good sealant, if you have nothing else. I think paint in the early days of sailing was used solely to change color and add decoration. At some point, as quality improved, they realized that it could also seal the wood against the deteroriating effects of the weather and seawater. It would be natural for captains to protect whatever they could, that way, and I imagine that some went pretty far with the technique. The idea of painting anything not moving, I believe, came along with the all steel ships.
-
Santa Maria detailed rigging plans needed
clarkt replied to Richard Moise's topic in Wood ship model kits
The Anatomy of the Ship series book The Ships of Christopher Columbus by Xavier Pastor has a fairly comprehensive rigging plan for Santa Maria, although any plan from this period has got to be speculative. It would probably be worth it to use more than one source. -
I have really enjoyed casting anchors, and some other things from soft metal. Micromark has everything you need.
-
The corded Dremel was one of the first tools I got when I started building models and I still use it almost every day. It is hung from the ceiling along with a flex shaft. I use most of the same bits and heads as Mr. Bordelau shows in his post, especially drill bits, mostly the carbide type, lately. I have thought of replacing it with a Foredom if the Dremel ever wears out. Still going strong after about 25 years. Also, the Dremel handpiece seems to be smaller and handier than any of the ones available from Foredom. A friend gave me a small rechargeable Dremel but it has no power at all.
-
On the use of steel parts in modelmaking
clarkt replied to starlight's topic in Metal Work, Soldering and Metal Fittings
Several years ago, I bought some blackened annealled steel wire and used it to make some hooks, etc. Since then the cut ends have rusted. It was a mistake. If you want an unfinished steel look, inconel safety wire is available which will not corrode at all. -
I made blocks using the method shown in Zu Mondfeld for a few years but it was always pretty haphazard with varying results. However I went all in for the very systematic process developed by William Sproule which he described in the Nautical Research Journal (Vol. 61, No. 3, Fall 2016.) It does require a good mini table saw, and an X-Y table with some sort of drill press, but the blocks can be excellent.
-
The levers are an interesting idea. Never saw that before.
-
What you say makes perfect sense. I had considered the difficulty of moving the backstays but know that the crews were capable of some amazing things. You could drop the gaff and move quickly but probably not quickly enough. I intend now to put backstays on both sides, although I'm still surprised the draftsman left out those details when he was so thorough, otherwise. Thank you for your helpful input.
-
Thanks for that link. It will be helpful. The ship is the same configuration, pretty much.
-
I've found that information and details of fore and aft rigging is considerably harder to locate than for a square rigged ship. My question, at the moment, is this: Could a single backstay have been shifted from one side of the ship to the other as needed to support the mast/topmast in changing conditions? The ship is a single-masted sloop, a rather large example, at 94 tons, of a Hudson river-type sloop. The profile and rig plan shows (from starboard) both topmast and topgallant backstays running, one from the topmast, one from the topgallant mast, to a single double-block. (That, in itself is surprising) That block is part of a tackle hooked to an eyebolt in the top of the planksheer aft of the shrouds. the running end is then belayed on the bulwarks inboard. The mainmast "running" backstay, runs from the lower masthead to a large single block which is part of a tackle that hooks to an eyebolt in the hull placing it just forward of the other backstays. It too belays inboard on the bulwarks. A section drawing at the waist shows the topmast/TG backstays only on the starboard side; the main, running backstay is shown only on the port side, possibly for the sake of clarity(?) In a similar way, a different section drawing shows the crossjack lift only on the starboard side channel, the boom lift only on the port channel. Obviously the crossjack lifts would be on both sides. Another picture indicates that the boom lifts are also on both sides, the very large boom/sail presumably needing both. Can anyone clear this up? Thanks.
-
I am using Syren lines, now, but have also used Admiralty and Wagner commercial modelmakers rope. Also some best Irish linen. They all seem to absorb the dye/stain okay, it's just the color I haven't been able to achieve. I thought the polyester might not work but it does. I used to wear polyester uniforms and they were stained with all kinds of things. Maybe the dark brown dye just overwhelms and the lighter color isn't strong enough?
-
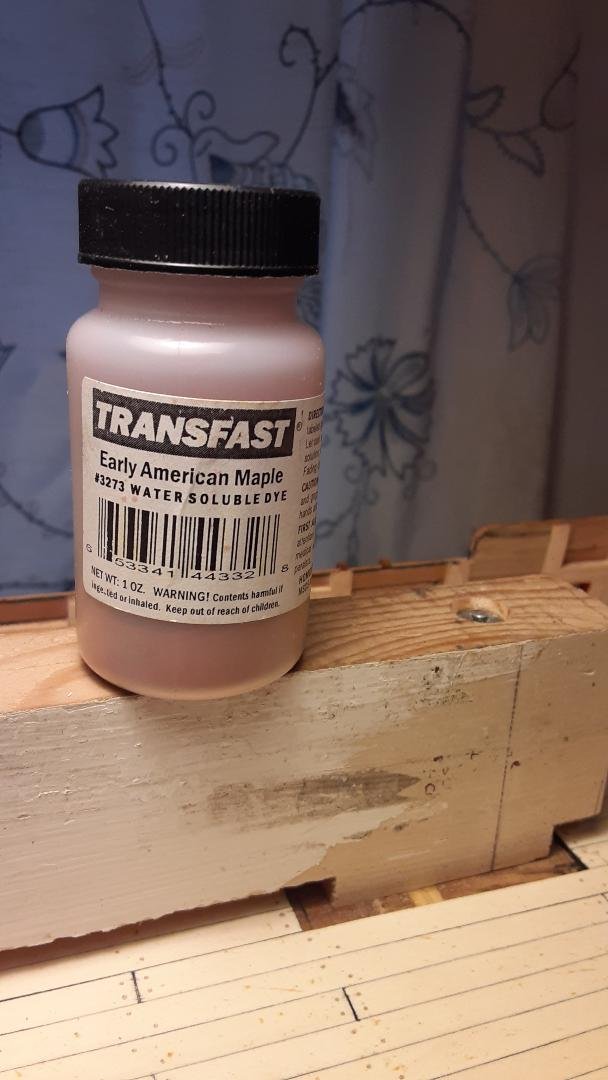
I know this issue has been discussed before, but it is still the biggest problem I have. The standing rigging is easy. It's the running rigging that is elusive. Syren lines are a great product but I have never cared for the grey brown or tan he uses. I have tried fabric dye (a lot of time/effort with poor results,) solvent-based wood stain (also unacceptable results,) and, more recently, powdered wood dye in alcohol. This last attempt seemed at least somewhat better, and is relatively easy, the alcohol drying very quickly. But in just over a year the color has changed, leaving a hue more yellow than when it was dyed. Making my own lines on a rope walk is obviously an option, but it is another level of complication that I would rather avoid. So, has anyone found a reliable way to dye their rope that they can recommend? The wood dye I've been using is Transfast. Dark Mission Brown for standing rigging gives excellent results. The Light Oak, Early American Maple and Grey have not been as successful. Mixing with alcohol or water seems to give the same results. I think this is still a good option, but thought someone may have a color mixture that they like. Maybe there are other products that are better.

