Chuck
-
Posts
9,701 -
Joined
-
Last visited


About Chuck


-
 Ronald-V reacted to a post in a topic:
Syren Ship Model Company News, Updates and Info.....(part 2)
Ronald-V reacted to a post in a topic:
Syren Ship Model Company News, Updates and Info.....(part 2)
-
Ronald-V reacted to a post in a topic:
Syren Ship Model Company News, Updates and Info.....(part 2)
-
 scrubbyj427 reacted to a post in a topic:
Portland Scale Ship Co. news and updates
scrubbyj427 reacted to a post in a topic:
Portland Scale Ship Co. news and updates
-
thibaultron reacted to a post in a topic:
Syren Ship Model Company News, Updates and Info.....(part 2)
-
 thibaultron reacted to a post in a topic:
Syren Ship Model Company News, Updates and Info.....(part 2)
thibaultron reacted to a post in a topic:
Syren Ship Model Company News, Updates and Info.....(part 2)
-
thibaultron reacted to a post in a topic:
Syren Ship Model Company News, Updates and Info.....(part 2)
-
thibaultron reacted to a post in a topic:
Syren Ship Model Company News, Updates and Info.....(part 2)
-
thibaultron reacted to a post in a topic:
Syren Ship Model Company News, Updates and Info.....(part 2)
-
thibaultron reacted to a post in a topic:
Syren Ship Model Company News, Updates and Info.....(part 2)
-
thibaultron reacted to a post in a topic:
Syren Ship Model Company News, Updates and Info.....(part 2)
-
 Just an FYI.... I have a bunch of family coming to stay this long weekend so I am gonna close the shop. I will reopen Monday. I wont even have time to step into the shop to process and mail out orders. I have 8 pre-teen kids coming and another 6 adult Nieces and Nephews. The kids are off from school this Monday so they all decided they wanted to take the kids skiing and tubing. My place is free lodging, LOL and free meals. But seriously, it will be a lot of fun. And no I am not getting on the mountain myself. I would break several bones for sure. Its been a decade or so since I have done that. And about 75 pounds since then. So I apologize for the inconvenience. But the Admiral would also kill me if she saw me sneak into the shop to escape the madness. I will be the guy keeping them from killing each other. They are a lot. Chuck
-
And here is the video for making rope hanks... It is really awkward making these videos. So please excuse how crude they are. I am not very good at it, but I think it tells the story. I am basically in the shop talking to myself, which takes some time getting used to while reaching over my phone to do this close up so you can see the details. I am very new at this as you will see.
-
Chuck reacted to a post in a topic:
Portland Scale Ship Co. news and updates
-
Traffic!!! Your fun is just beginning....
-
Chuck reacted to a post in a topic:
Portland Scale Ship Co. news and updates
-
Happy Wife....Happy ship modeler. 😉
-
Chuck reacted to a post in a topic:
Syren Ship Model Company News, Updates and Info.....(part 2)
-
No not this one yet....Maybe today I will be able to laser cut these. Its just another part I have to make today. Ran out of 1/8" single blocks and I also have three sizes of rope to restock, so its going to be a busy day. My wife also told me to get a hair cut....so we shall see. Chuck
-
I suck at making videos but I did my best. I forget to mention in the video....DONT glue the coil to the plug. You are just adding the glue to the outside edges. And there are notches on both sides of the tool so can make left handed and right handed coils depending on where you need them. For example on both sides of the cannon tackles of gun carriages. The direction of the coils is reversed on each side. Let me know if you have any questions. I literally had the phone in front of me between my arms as I was making the coil so its not as neat as it could be. I had to reach over the phone and try to keep the action in view. Its a lot and I suck at it. But I will try and make more of these for different techniques because I know it just explains things so much better than still photos with descriptions. Chuck
-
Very much so!!!! Its like solving a puzzle.
-
Chuck reacted to a post in a topic:
Syren Ship Model Company News, Updates and Info.....(part 2)
-
No this is a rope coil tool. Different than a rope hank. LOL ONE makes elongated oval coils to hang on belaying pins and cleats This new one makes round coils to be placed flat on deck like those for the gun tackles. Very different shapes and uses. Chuck
-
Chuck reacted to a post in a topic:
Syren Ship Model Company News, Updates and Info.....(part 2)
-
I might but not just yet… That sounds safe and fine but you must know that at some point it will just start making the rounds and be passed from one person to another for “personal use”. LOL I am not saying you would do that…but at some point…it will absolutely happen. I did that with my Cheerful plans a bunch of times…and now they are being sold on the “Best ship Models” site and one Russian site and a Ukrainian site. And they are also around for a free download from many others. So not just yet…but eventually. These tools are so simple I would bet money on it that you will see many others start offering their “version” Soon enough anyway. So when that happens…yes I probably will. LOL Just remember when that happens who actually designed and made the original. LOL
-
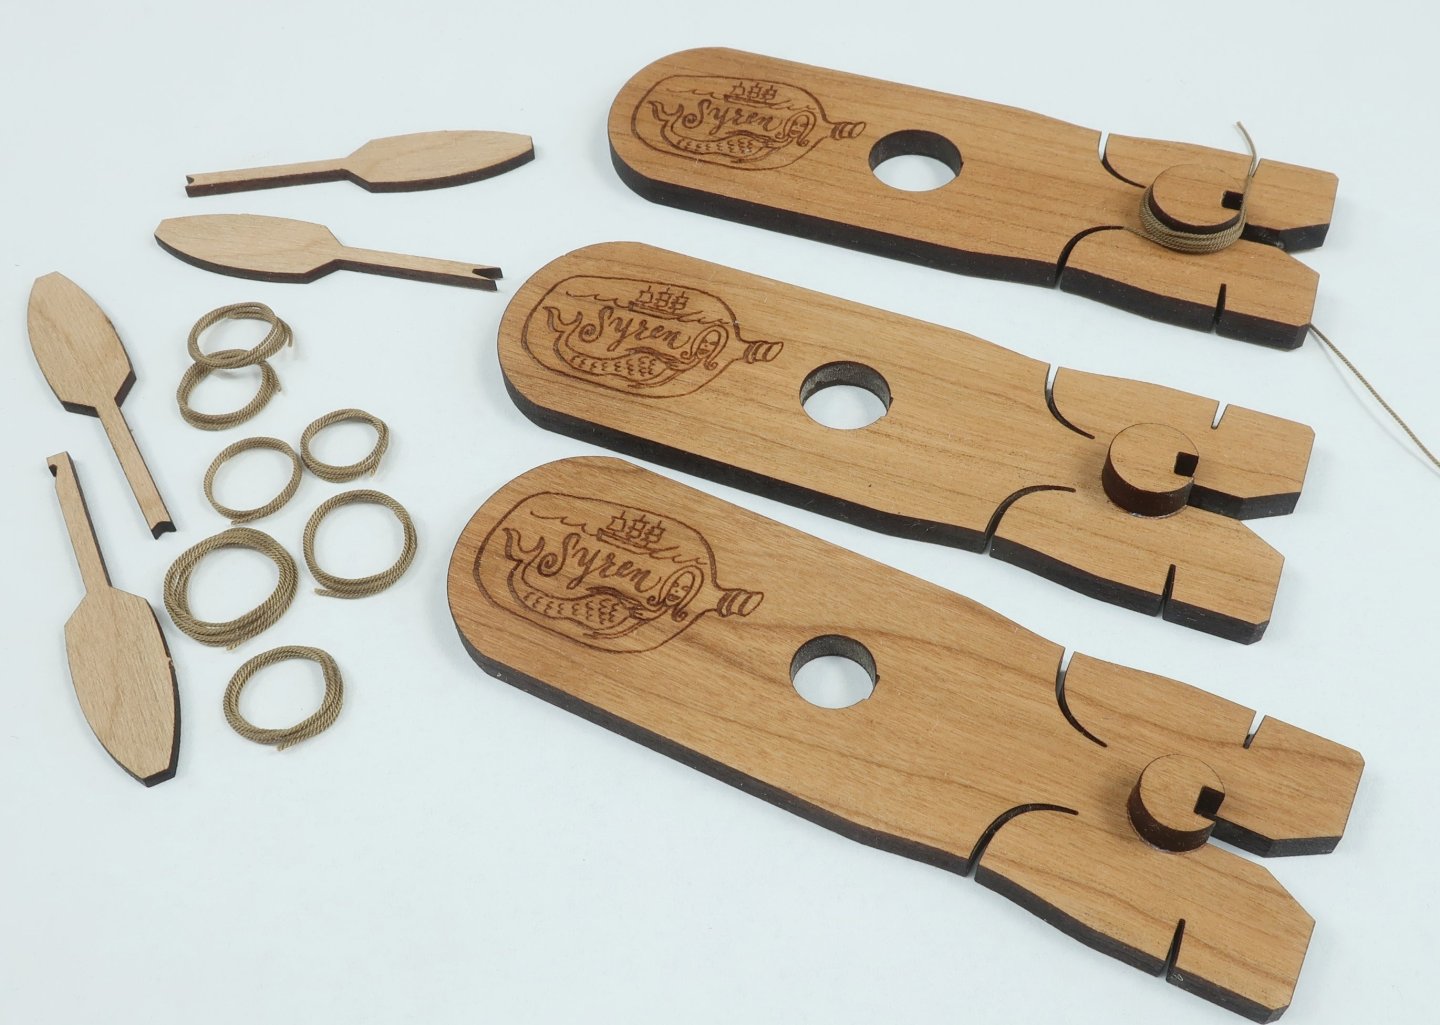
The SYREN ROPE COIL tool. For rope coils needed on deck etc as opposed to hanging on a belaying pin or cleat. The plugs on the tool are round and you can leave a one end to represent the rope's end. Three sizes of coils....Three tools. Its a variation on the design of the Syren rope hank tool. The step by step is a little different but even easier. You can see that I made the prototype from cherry this time. Either works just fine. I will have another step-by-step in a day or so for this tool. But you can guess how its going to be done based on the Rope Hank Tools. While making a bunch of coils I did change it up a little so that the tool would last well....forever, if you are careful with your glue.... Basically after the glue dries preserving the coils shape, it is removed from the tool before you have to use a sharp #11 blade. Then just use your blade to cut off the excess line on your cutting mat. DUH!! So the tool itself wont get damaged at all because there is no need to cut on it. Its funny how once you actually use these tools to make a crap ton of coils and hanks you just figure stuff out. The same can be done with the Rope Hank Tool. It really only takes a few minutes to make a rope coil. Not that I want to over-sell you....but the other thing I realized while making coils was to use two tools of the same size. While the glue dried on the first coil and it was set aside...you can start making another coil on a second tool. Just in case you want to buy two sets of tools. Going back and forth you can really get an assembly line going!!! I made a few below with varying amounts of wrapping and used two of the tool sizes I think in this photo.
-
Remember you can buy the complete kit here!!!! https://portlandscaleshipco.com/product/hms-neptune-1796-capstan-model-kit/ And join the group build completely for Free. Here is a link to the group build....start a build log and enjoy the project. https://modelshipworld.com/forum/175-project-build-logs/ This is a fun and really quick project. Thanks to JJ of Portland Scale Ship Company for making the kits available. Chuck
-
Try contacting Kurt or Mary. They might be able to help you out. They may be able to just give you their paypal address so you can skip the sidebar box all together and send it direct.
-
And just to add..... I agree and will be doing just that. BUT, this is also already available. Plans for the Cheerful are available to buy on my store and the monograph chapters are also there as a FREE download. I just sold a set and it reminded me of our recent discussions. AND...even for larger projects like the Winnie, You can pay just $15 and gain access to all of the plans and monograph chapters along with any templates etc as a download. So at least these two projects are available still for a small fee. Almost free in fact. And should you need to buy any parts that are difficult for you to make like the cannon or carvings....those are actually available too. So you have the best of both worlds. Just check out my website for the Cheerful or join the Winnie group project here. Chuck
-
Chuck reacted to a post in a topic:
Ring Bolts
-
Top right hand corner of the forum. Under the magazine cover.