jmcsys
-
Posts
23 -
Joined
-
Last visited
Content Type
Profiles
Forums
Gallery
Events
Everything posted by jmcsys
-
 Hi Captgino, Thank you for visiting my build. I took the opportunity to visit yours. You have a fine build going and I enjoyed seeing how you have approached similar problems as I have faced even though our pilots are from different manufacturers. I found the links and the video particularly informative as I am at that point in my build. I took some time off for Christmas and I am just now starting back up. Your log and the links are just the thing to help kick start my return. Thank you again, Joe
- 68 replies
-
- 1
-

-
- flyer
- constructo
- (and 2 more)
-
I've just found your build. Very impressive. And you make no apology for taking your time. Really impressive. I see your are getting a ton of advice from folks. Most impressive of all. The commonuity is very generous and supportive and you have tapped into that BIG TIME. Way to go. While certainly good for you, its great for me too. The conversation you are having with them really shows me the thought processes behind the approaches and the choices that get made. Your log is great for this. The pics are great too. They show the work of one who really appreciates craftsmanship. While increasingly rare these days, craftmanship appears to be a hallmark of the model ship builders. You are proving yourself more than up to standard. I will enjoy following your progress. BTW, thank you for the likes. They are voices of encouragement. And as a beginner, I need all I can get. Joe
-
I can't say anymore than what others have already said so I'll repeat: FANTASTIC! I was a bit doubtful when you said you wanted a weathered look. All that opportunity for the beauty of the wood to shine, lost to a dark grungy brown or grey. But on completion, there is no question that you made the right choice. Not only from a standpoint of visual impact but from a thematic one as well. And the disarray of the ropes makes it look so REAL. You walked a fine line between authentic and messy and you won. BTW your choice of display looks perfect. Can't imagine another spot being better. But I eagerly await what you do. Joe
- 274 replies
-
- 4
-
-
- Santa Maria
- Artesania Latina
- (and 2 more)
-
Bob, Thankyou for the Like. Being new to all this, things can get pretty discouraging, and a little encouragement (like the like) can mean more than you might guess. Your like prompted me to find this log. What a fun project you seem to have and what a fine start of it you've made. I look forward to following you progress. Joe
-
Dimitris, Thank you for the like. It is appreciated more than you might imagine. Being new to the hobby each task can be a difficult step. Likes and posts and friendly advice from the members offers me encouragement when it is sorely needed. And the community has been very generous. You are all to be commended. Your like also gave me the opportunity to find this log and see your build. And what a build it is! Truly magnificent. Joe
-
I know this post is WAY late in the log, but I could not help but comment on your dingy from page 1. I dont know how much experience you have with 4 yr olds yet, but I've gone thru 3 of them. My children always acted like they were in their twenties. Now that they actually are (and beyond), they act like children again. In any case, the little things I made for them when they were small (and that they were'nt too impressed with at the time), are now worth more than gold. If yours is anything like, she will in time treasure her dingy too (assuming it survives playtime and the ravages of an admiral trying to clean and make space). Joe Magnificent build BTW.
-
Gotta hand it to the Admiralty. Only the best go that far and best to listen when they speak. Glad the whole discussion / un-furaling thing worked out so well. Your photo is smashing! Joe
- 274 replies
-
- 2
-
-
- Santa Maria
- Artesania Latina
- (and 2 more)
-
Bug, My two cents is from a rank amateur who knows little of the issues you've been discussing with other knowledgiable people. The sails do look great furled and otherwise where the rigging really gives a sense of how the sails are controlled. I guess it goes to show that your attention to detail has been such that the sails look good no matter their state. It would seem that a priudent course of action might be to stand back and look at the ship as a whole. See what you want it to say; and look at what the ship wants to say in return. Is it better served furled or not, or a mix? Seems like a obvious comment (and one others have addressed), but comming from me, obvious is the best I can do. Whatever your choice, you've proven your model will be spectacular. Joe
- 274 replies
-
- 4
-
-
- Santa Maria
- Artesania Latina
- (and 2 more)
-
This build is spectacular! I really admire the extra mile on things like the cabin accessories, hinges, rigging detail, and such. Your appraoches are clever and innovative. Makes me want to go back and take notes on each step. But what impresses most is the way you have built such tiny and complex detail with very basic tools. I'd have thought at a minimum you would need a lathe and perhaps a mill for the things you have fashioned. Simply amazing. Joe
- 274 replies
-
- 3
-
-
- Santa Maria
- Artesania Latina
- (and 2 more)
-
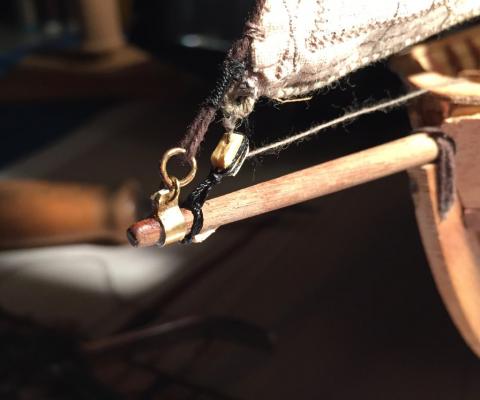
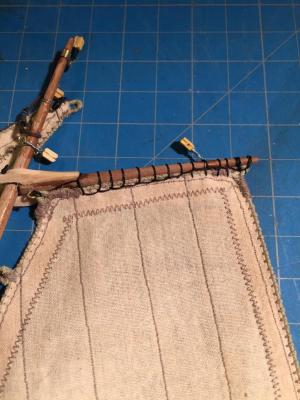
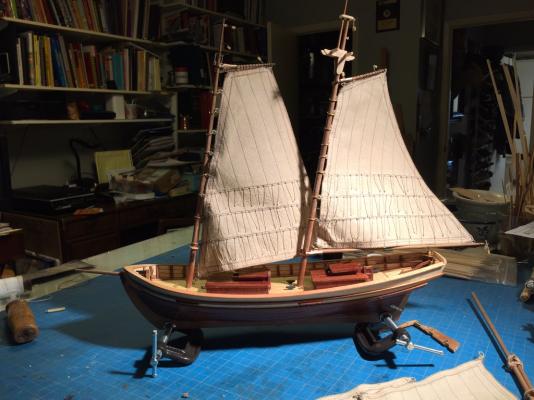
Mounting the Jib: Well I have officially started rigging. I glued the fore mast in place. I'm having second thoughts about that now; at least I did not use much glue. Then strung the fore stay (Oh what are the proper nautucal terms? I really need to pickup the vocabulary!). And attached the jib brail. I even soldered the 2 brass rings; which was interesting given the stay was already looped into its ring. Several of you have commented that the AL sails are too big. Well y'all are right! I hope I can manage the problem, I'd hate to be remaking sails at this point. These few steps burned much of an afternoon and evening. Whew! I hope I get better at this. Here is a shot:
- 21 replies
-
- 5
-
-
- Swift
- Artesania Latina
- (and 1 more)
-
Dave, I left the following message in you Swift's log. I'd like to copy it here to document my log. Hope you don't mind. But before pasting, I have a few more questions: Your deckhouse doors don't have the AL hinges. Did you forego the hinges altogether? Or have you found a better hinge? Where did you get the brass keel mounts that you have on the ship's stand? Did you make them? Now the post: Dave, Thank you for the comments. I had to lookup "nibbling strake." I must say that the strake was great fun to build and still gives me a thrill when I look at the deck. Shame all those rings an bitts and deckhouses clutter the view! I sure wish I'd found your log when I started back up. Your bow answers so many questions and is a joy to behold. You've made the deckhouses actually interesting. Mine are so drab, the lack of scale is very noticeable, and I think they detract from an otherwise pleasant form. Lots of answers in your rigging. Its not too late for me to take advantage here. I see what you mean about replacing the blocks. You choice of woods is spectacular. Where do you find your wood. Too late for my Swift but not for the next build. Joe
- 21 replies
-
- 1
-
-
- Swift
- Artesania Latina
- (and 1 more)
-
Dave, Thank you for the comments. I had to lookup "nibbling strake." I must say that the strake was great fun to build and still gives me a thrill when I look at the deck. Shame all those rings an bitts and deckhouses clutter the view! I sure wish I'd found your log when I started back up. Your bow answers so many questions and is a joy to behold. You've made the deckhouses actually interesting. Mine are so drab, the lack of scale is very noticeable, and I think they detract from an otherwise pleasant form. Lots of answers in your rigging. Its not too late for me to take advantage here. I see what you mean about replacing the blocks. You choice of woods is spectacular. Where do you find your wood. Too late for my Swift but not for the next build. Joe
-
Chris, Thanks for the encouragement. I look forward to looking at your pics. The rudder was my first real departure from the Artesania way. The hinges on the deckhouse doors will probably be done differently too. I just don't know what I will do yet. As it is, I dislike their hinges so much I just can't build them. (Considering the scale, they would be the size of bank vault hinges.) But the Swift is a concept ship so maybe I am maknig too much of it. Every Swift I've seen on the site looks mighty fine hinges and all! In the mean time I am just glueing the doors in place until I can find a better way. Thanks agin, I hope you will continue to follow the build. Joe
-
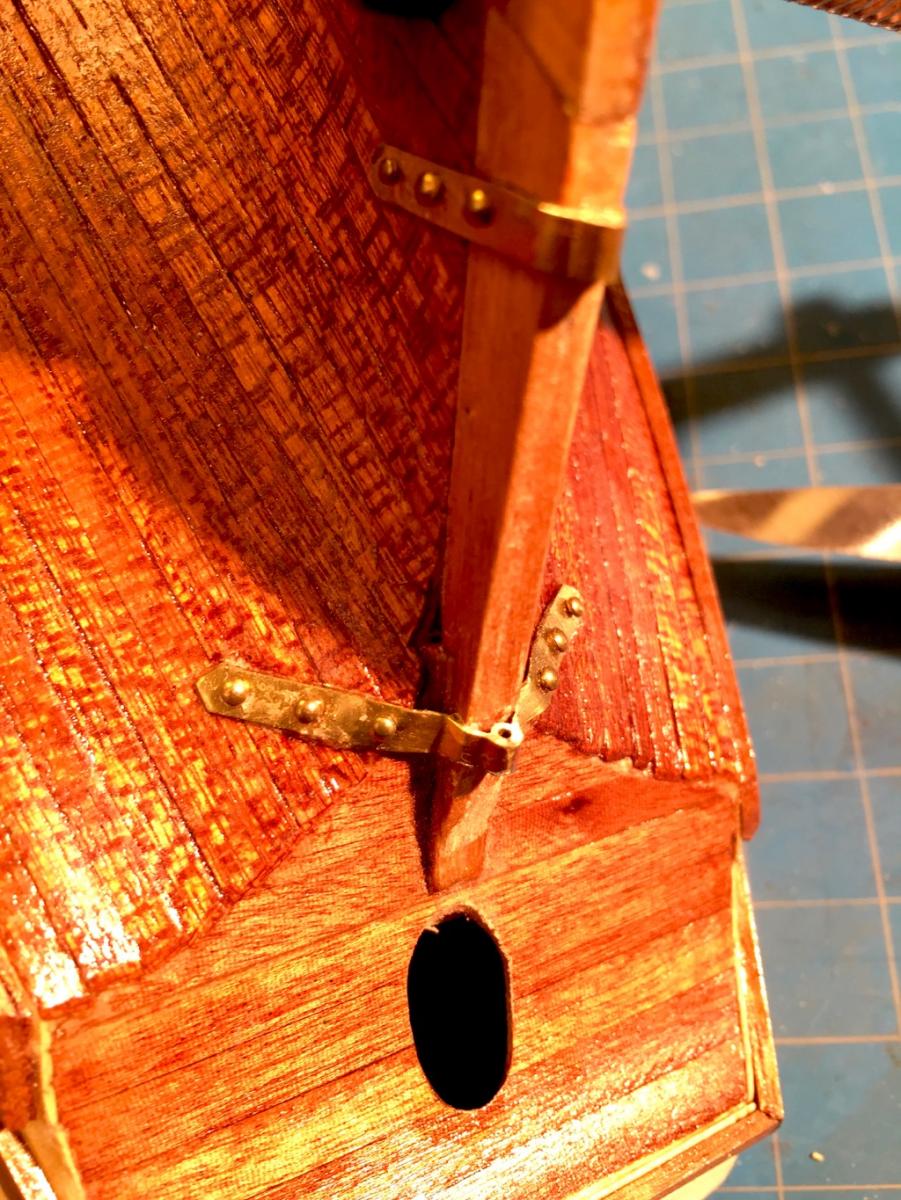
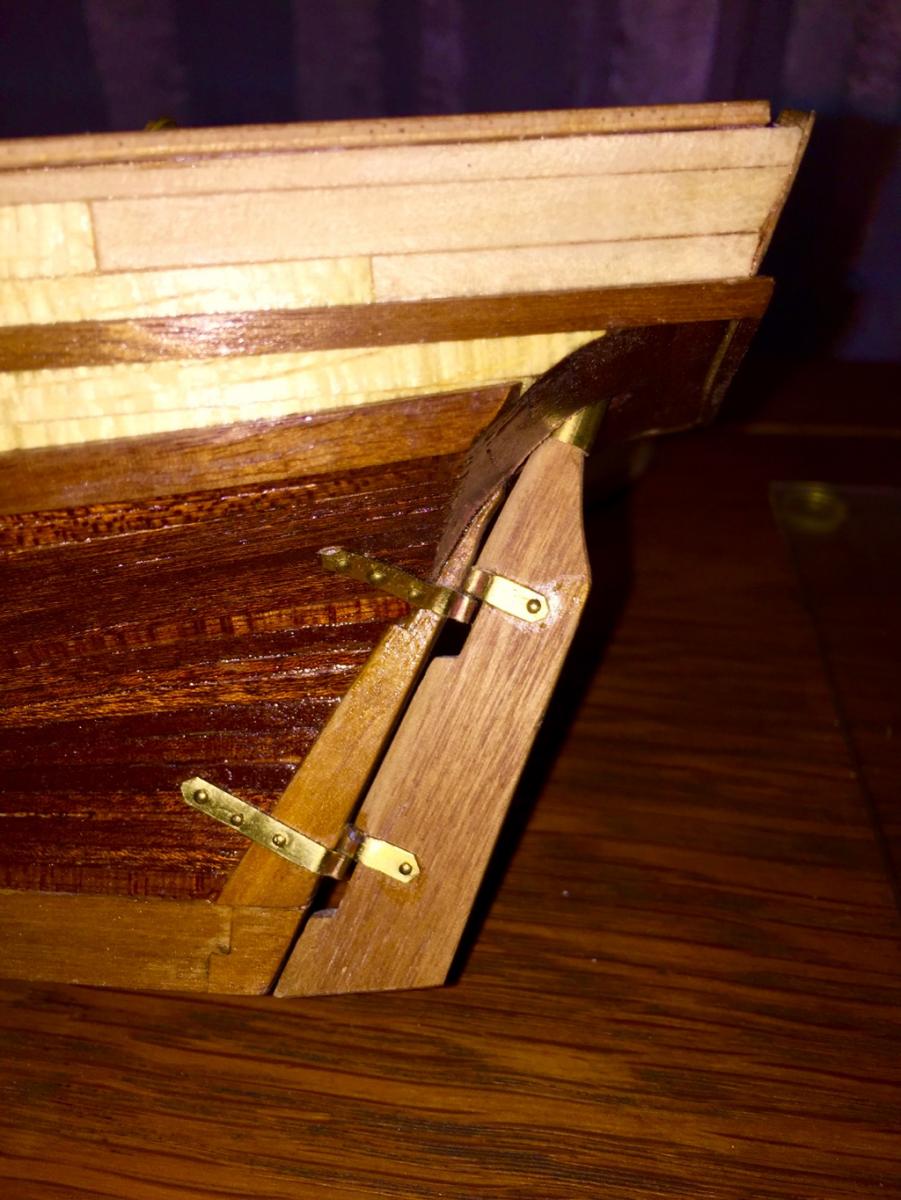
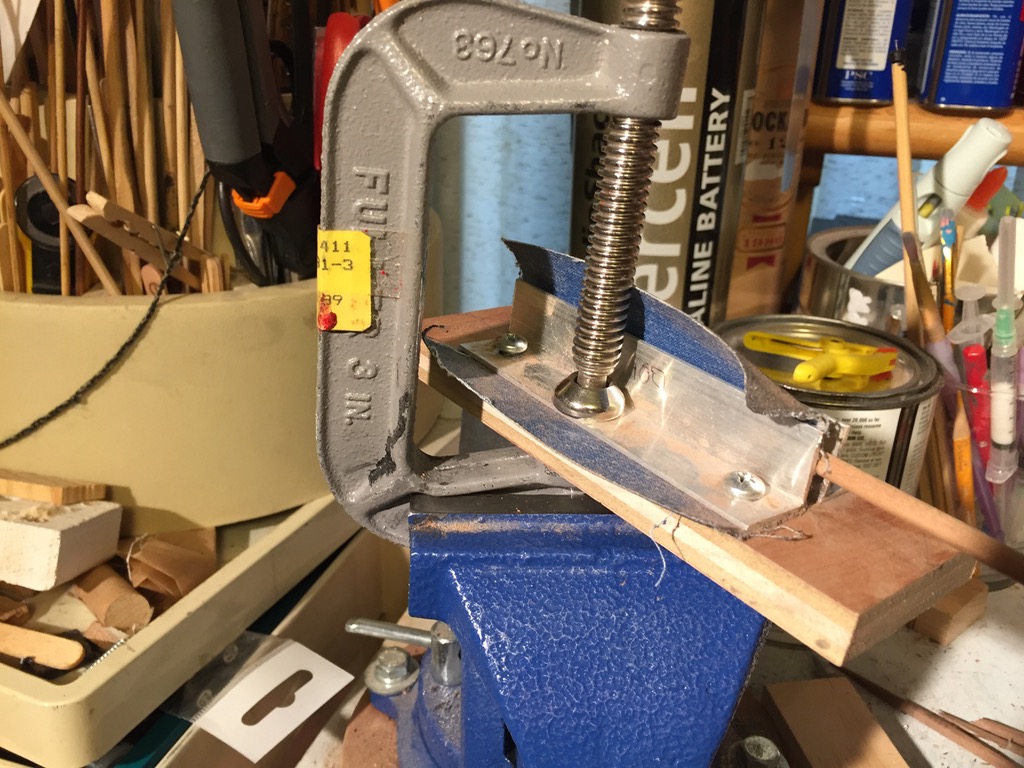
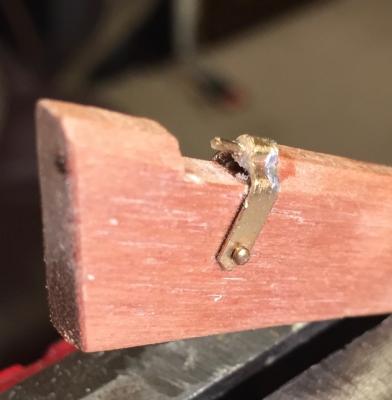
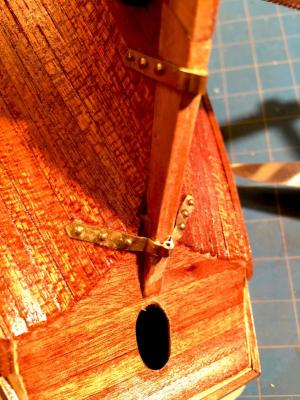
The Rudder This topic is out of sequence and should have followed Deck Furniture. But here goes ... I did not like the AL method for building the rudder hinges. Beside being horribly out of scale, it produces a hinge that seems inherently weak. I thought about it and came up with a design that I like much better. I had some brass tubing that officially measures 0.0625" OD and 0.014" ID. Thats 1/16" outside by slightly under 1/64" internally. Or "thereabouts" as I am able to slide a 1/32" brass wire into the tubing with a perfect fit. Look at the photos and you will see the 1/32" wire is used as the pintle and it fits into braces that are made of the tubing that in turn is soldered within the AL brass strap provided for the purpose. One end of a pintle is soldered into a brace making it the male brace of male/female pair. The mating female brace is left to rotate around the free end of the pintle. I hope the pictures can make this discussion clear. You will also note that I have only used one nail per side on each brace. To my eye there was not enough room to use more nails without making it look crowed and putting a nail dangerously close the rudder's aft edge. In hindsight I should have obtained some blank strap and spaced the nail holes myself for a more balanced look.

- 21 replies
-
- 4
-
-
- Swift
- Artesania Latina
- (and 1 more)
-
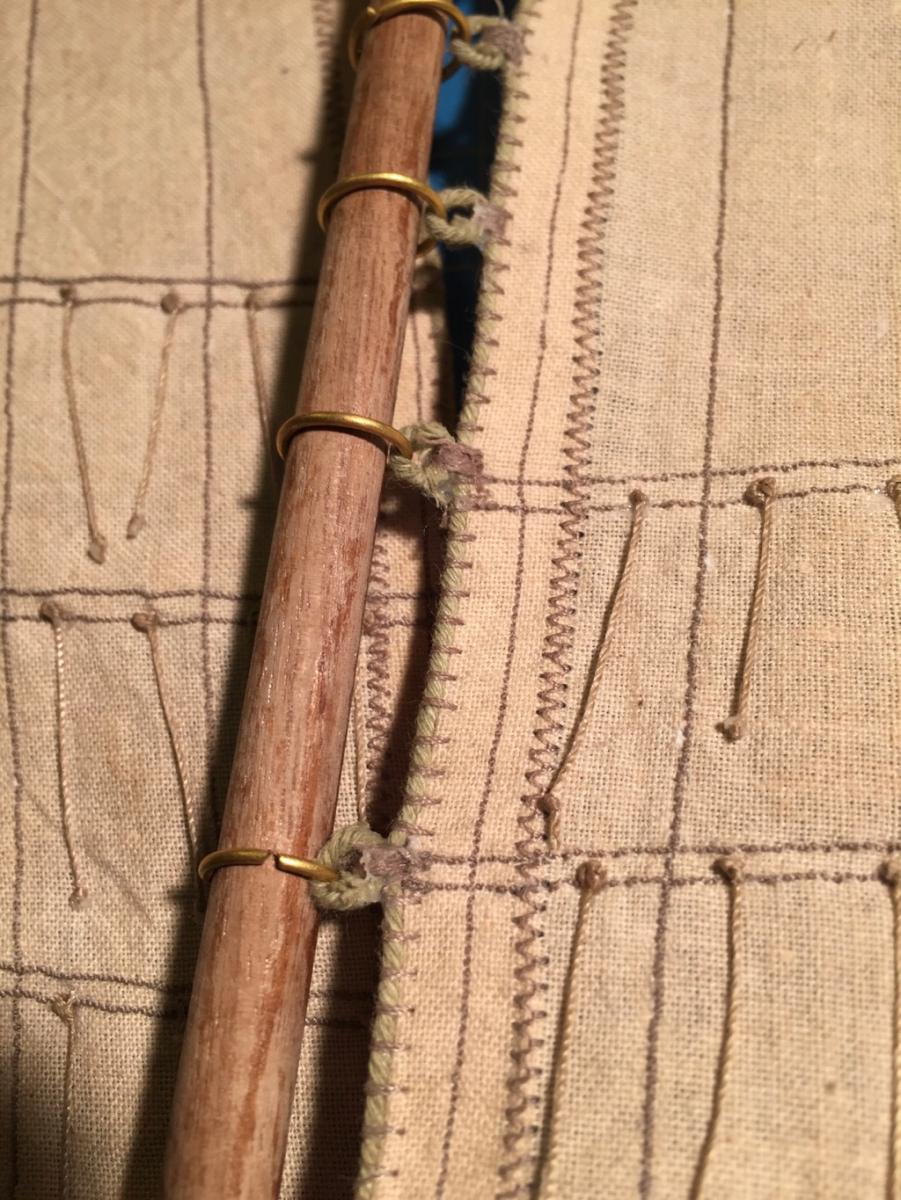
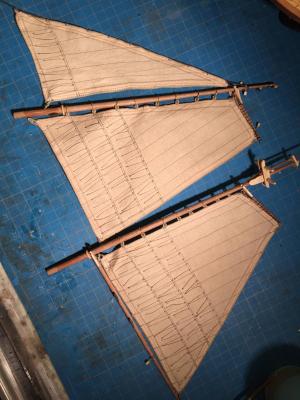
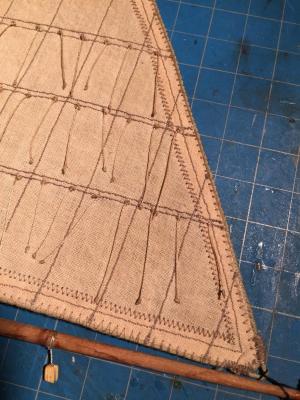
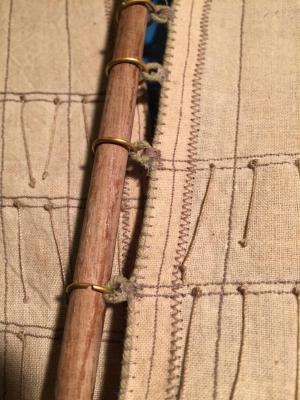
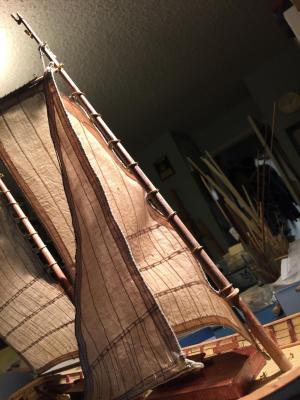
Sails: I thought the sails would be pretty straight forward. Silly me, nothing is straight forward about the Swift. First off the parallel seams that join bolts of frabric together to make a wide expanse of sail is only approximated on the sail plan. If you measure, you find that each bolt has its own unique width. The bolts should be of uniform width from the mill. So first thing I did was to redraw the seam lines. I should have done some research to find out what the bolt widths really are. Instead I averaged the widths from the plans. I did not like the cloth supplied by AL (too open a weave) so I bought my own. It is a simple cotton muslin with a good close weave. I dyed the muslin in hot water and orange pekoe tea bags (4 bags to a quart of almost boiling water). I wanted the hot water to shrink the cloth and set the stain. It came out nicely colored. After drying I starched the muslin to a fairly stiff consistency. This prevented the material from stretching as I subsequently handled it. It also limited the amount of freying at the edges. I scanned the AL sail plans into the computer. The main sail was too large for my scanner so I scanned it in two passes. I used a special "Poster Print" program to print out the sails. The advantage of this program is that I can scale up to a giant poster size and it will break the picture accross as many separate pages as needed to paste together a poster, or it will shrink a pic down by a specified amount. The scaleing is highly accurate. So even though I wanted no magnification or reduction, I was guaranteed to get exactly 100% on the scanned image. (Most image programs print off by a few % either way.) I drew a ruler on the pages prior to scanning and checked it against the printed output for accurate sizing. The print was a knats rear end perfect. I glued the two main sail pages together and got the full sized version perfectly sized. I used a light spray of photo adhesive to glue the sail prints to the muslin. I then cut the the sail out using the glued prints as a pattern. Next I sewed directly on the printed paper and glued muslin with an old vintage Singer sewing machine. The machine sews a darn near perfect seam and can be set for a minuscule stitch length. When finished with the printed pattern, I peeled it away in peices. I was surprised at how well it worked. Next I folded the seam allowances over and made border seams. To keep freying to a minimum, I used a tiny zigzag stitch to tack the raw edges down. I'm not too far a feild here, as the Mondfeld book shows that a zigzag like binding was actually used. I later followed the zigzag seam with a dilute solution of glue to make sure. Since it dries transparently, I used Titebond Translucent Wood Glue. Next I sewed the bolt rope onto the the sails. Believe it or not, the Singer came through again. I set it up for a small stitch length (as opposed to miniscule) and a wide stitch width. This let the needle puncture the sail's edge while going wide to grab the bolt rope (without puncturing the rope). The result is a free rope snugged tight against the sail border. I now made some cringles by wrapping a piece of bolt rope around a small dowel (~3/32 in) and putting a drop of glue where the rope overlaps. When dry I cut the ends and had perfect little rope circles. I again used the Singler's zigzag to attach the circles to the sail's bolt rope. The result were nice little cringles for mounting to the masts. Not to scale, but satisfying even so. Lastly I added the reef cords and mounted the sails on their masts. Whew! A lot of work (thought I'd never finish the reefs) ...
- 21 replies
-
- 4
-
-
- Swift
- Artesania Latina
- (and 1 more)
-
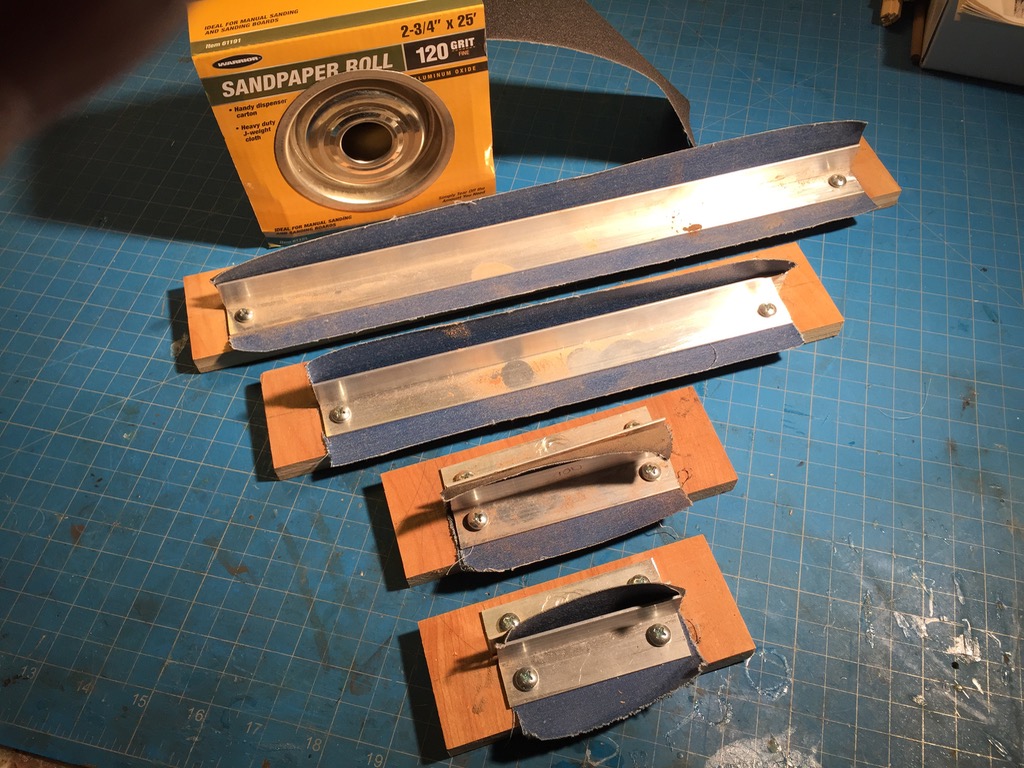
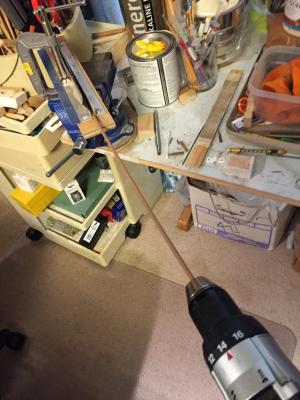
The taper jigs: Next big challenge was tapering the masts. I did a lot of searching and came up with a jig to do tapering. I am sorry to say I cannot remember where I found the jig so I cannot give credit where it is so richly due. Adjust the separation between the angle irons (its actually aluminum) and you get a taper with one end's gap being wider than the other. Mount the sanding belt stock between the jaws and you get a cutting action. Chuck up the dowel in a hand drill, feed it into the larger gap making sure the dowel spins against the grit side and not the back side of the sanding belt, and you are off and cutting a taper. But be careful. The pic of the fore mast shows what happens when its done right. The pic of shards is when it doesn't go so well. I.E., the feed is too aggressive. Moreover, the thicker dowel stock is more forgiving than the thinner stuff. Also be patient! A lot of cutting is going on and it takes time. And don't forget about heat. You can burn those sticks. Also note, I made a separate jig for each mast. I probably could have made one jig do two or more masts by readjusting the gaps for each one.


- 21 replies
-
- 2
-
-
- Swift
- Artesania Latina
- (and 1 more)
-
Hey guys, Thanks for the kind words. This has been a solitary effort. Now its nice to hear from folks and learn a thing two as well. I wish I'd found you sooner. Joe
- 21 replies
-
- 1
-
-
- Swift
- Artesania Latina
- (and 1 more)
-
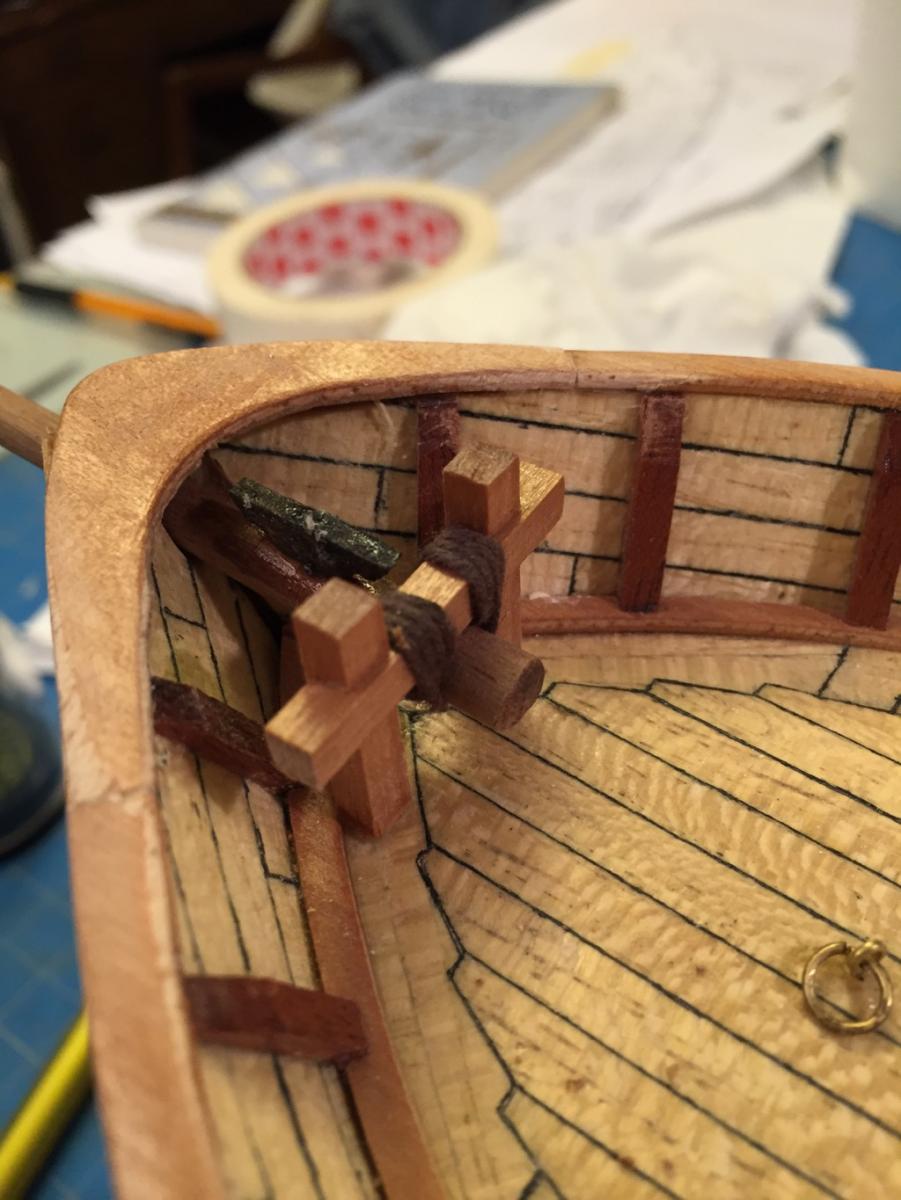
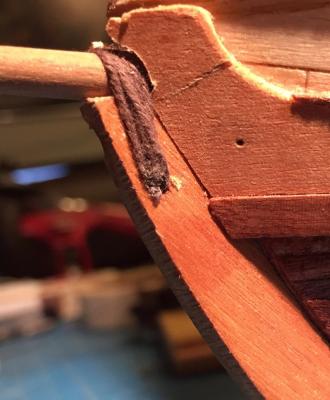
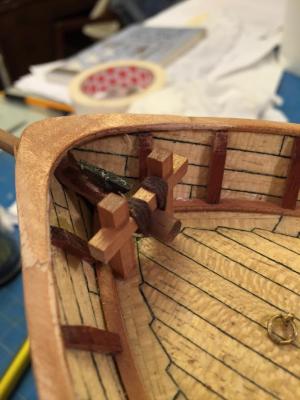
The fore bit caused me a problem (AL calls it the knight's heads). They seem to be the main anchor point for the bowsprit. If so then how does it work? Glue? Hardly sea worthy. All I could find on securing a bowsprit was to gammon it with a lash. Perhaps this is all that is required. But on the Swift, there is no place to lash. I drilled a hole in the stem post and lashed the bowsprit anyway. That is, what little lashing I could actually do. The bowsprit heel seemed a better place to lash and the fore bit was perfect for it so I bound the bowsprit there as well. This is where I really needed some advice! I will still gladly listen to anyone who will comment.
- 21 replies
-
- 4
-
-
- Swift
- Artesania Latina
- (and 1 more)
-
Absolutely beautiful! The hull and deck are works of art. I really appreciate the experimental approach you take to deciding just what techniques you will use.
-
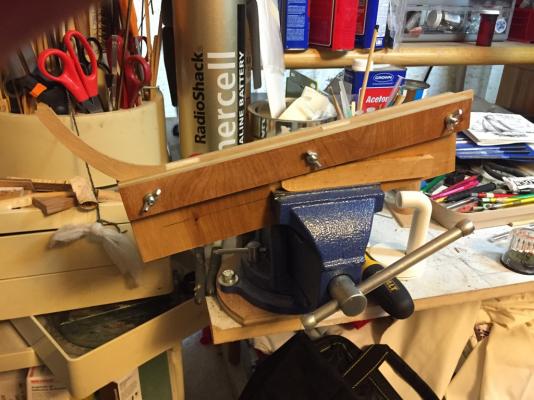
The next hurdle was figuring out how to drill the mast holes into the deck at the required rake angle. I found the angle from the plan to be 9 degrees. How to drill? ... Build a jig of course. I decided the jig would grab the keel as this was the best reference point for all other measures. Then mount the jig in my drill press's x-y vise. But I'd need to cant the jig over the required 9 degrees. I came up with the jig pictured; note the 9 degree stop along the top of the vise's jaw. In the picture, the jig is not in the drill press x-y vise but in a bench vise I used to build the thing. Also the jig is clamping the Keel and Stem Post before they were glued to the hull. This was another job done while waiting for the AL wood shipment. When it came time to actually use the jig, I chucked up a drill bit called a Brad Point. This bit ensured the hole's edges were very cleanly cut. This was a worry to me as 9 degrees off axis can leave a lot of room for tearout. After all the work on the deck planking, I sweat bullets making the 1st hole. By the second I wondered what all the fuss had been about. The jig and bit performed beautifully. Sorry I don't have a pic of the actual drilling. Just imagine the keel and stem glued to the hull, mounted to the jig, and the jig in the x-y vise on the drill press table. Then imagine a wickedly sharp brad point bit tearing into my model. Even now it makes me sweat to just think about. But as I said, it worked beautifully. Joe
- 21 replies
-
- 1
-
-
- Swift
- Artesania Latina
- (and 1 more)
-
Richard, You are my first respondent. Thank you for taking the time to reply. The Swift is a strange beast. Not a real boat but rather it represents a class. Not a scale model per se but a concept piece. She begs to be understood and interpreted. Thats the challenge, the fun, and the frustration. If you are new to ships, there is a lot to learn. Your library budget should be ready. In some ways, she is also badly implemented (some of the parts just dont play nice) so you will be challenged to make them fit. And dont get me started on the instructions! This will prepare you for more challenging builds. At least it helps to tell yourself that. And being a concept, she is really open for modification. Tho' you won't want to stray too far from reality. The forum members will help to keep you grounded. But in the mods you do try you will get to be creative. Thats immensely fun. I hope you enjoy my build log. I know I am looking forward to working it. Joe Campbell
-
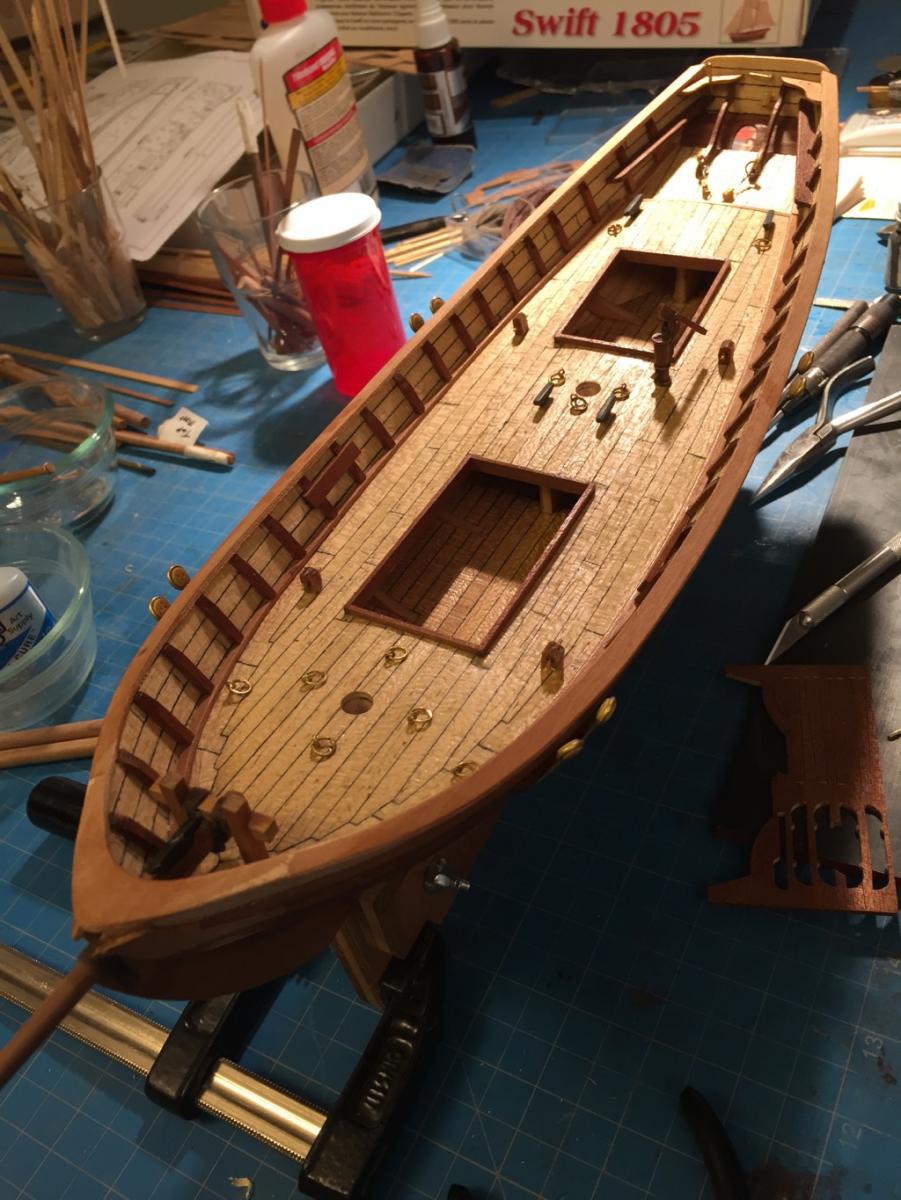
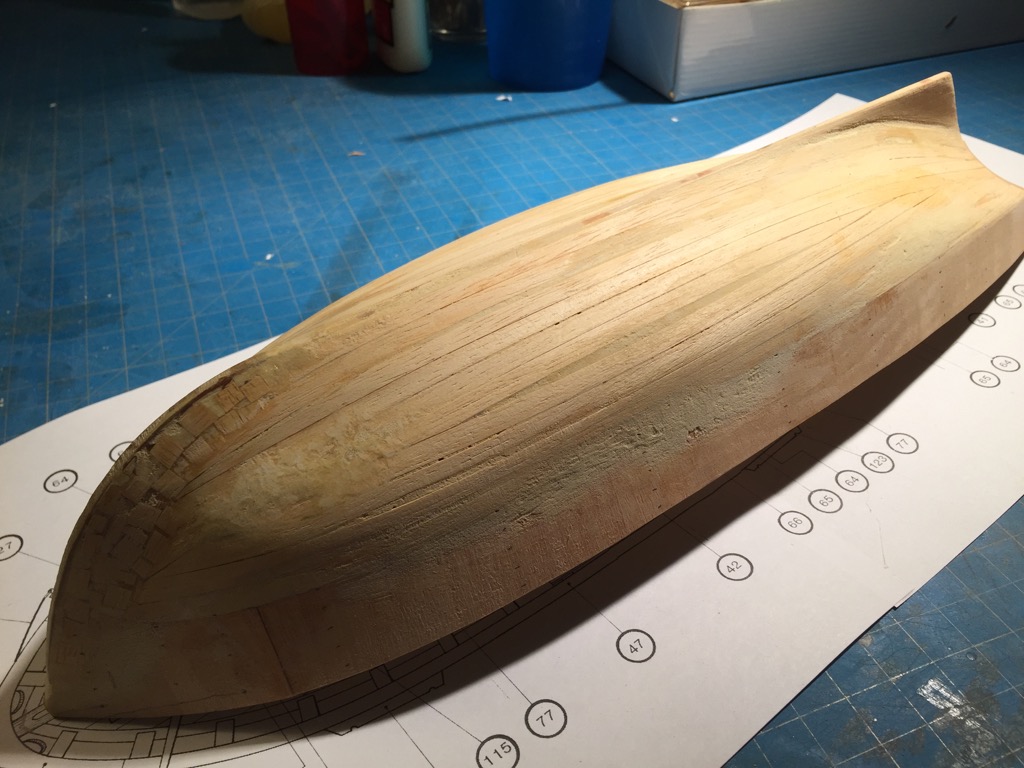
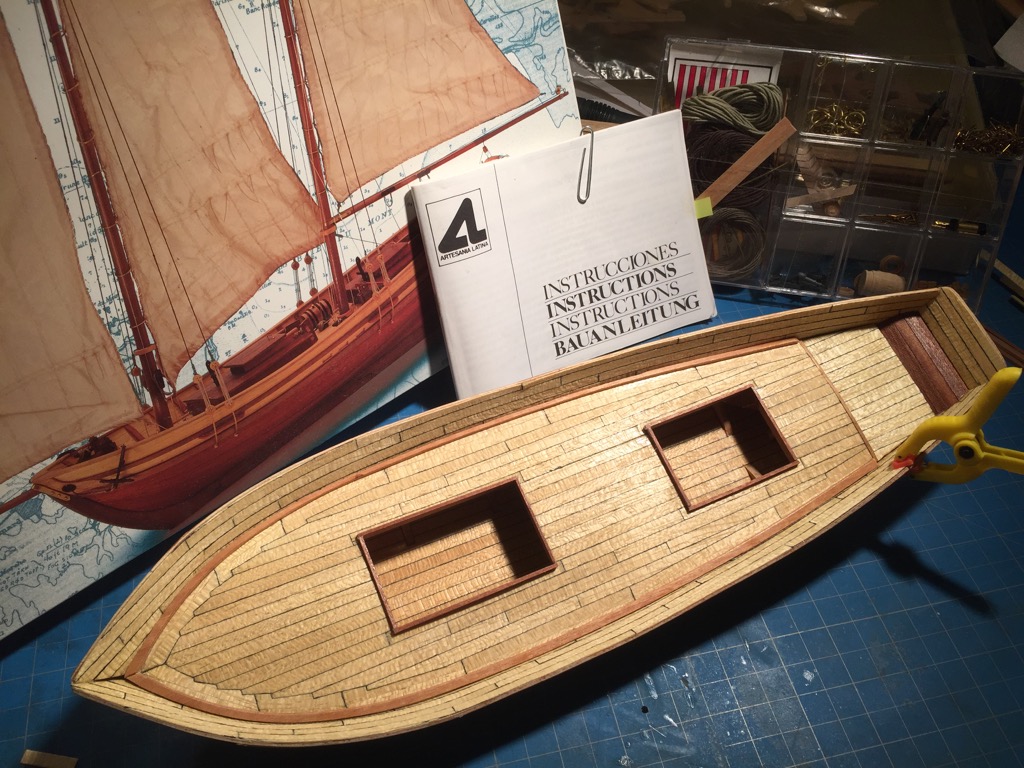
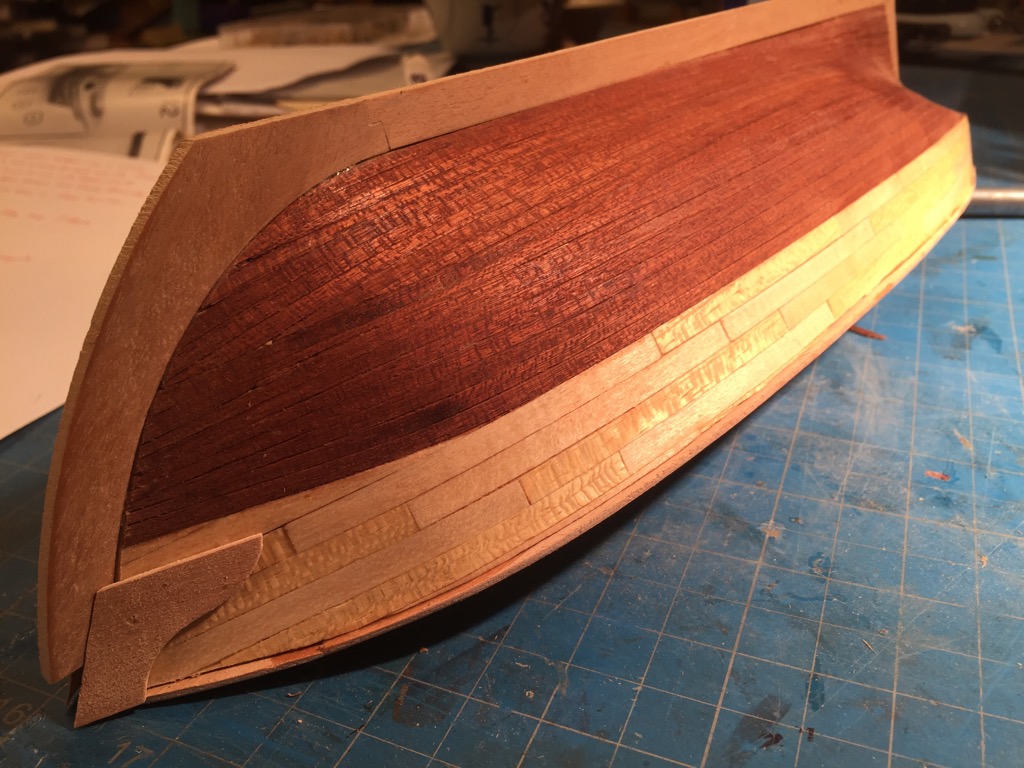
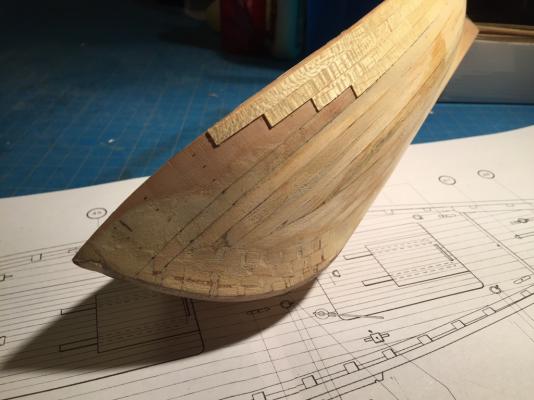
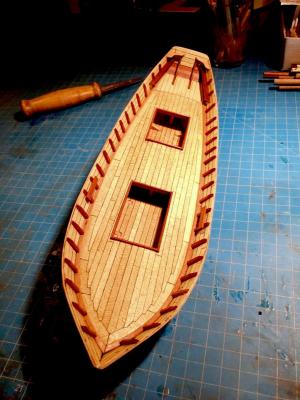
I am new to the forum and to ship building. Well sorta new. I began the Swift in 1999. Life and work conspired and the Swift went into storage after the bulkheads and main deck planking were completed. I recently dusted off the box and started again. I have the rigging left to do. I made a ton of mistakes. So far I have been alone to sort the probems out. But at this point I'm not sure about things. So I Googled them. And that lead me here to your forums and build logs. They are a Godsend of information. I've just mounted the main and fore sails to their respective masts. Next I'd like to mount the Jib on its halyard and stay (correct terminology?). I am studying the plans to understand exactly where each line goes. My plans don't have much detail. For instance I found that the flag and throat halyards have to feed through little holes drilled into the masts. NOWHERE are these holes indicated on my plans. I only found out about them by looking at pics in Gabe K.'s build log. Great log BTW!!! When I worked the hull I got my first big surprise: As I know more than one Swift builder has discovered, the bow profile you get, does not match the required stem post contour. A little wood putty? Not hardly. Way too big a gap to span safely. I used little blocks cut from a spare bass wood plank and glued them into a random mosaic pattern to build out to the needed profile. You can just see the little squares in two of the hull photos. That did the trick. My first big thrill came with planking the deck. I included 2 photos of the planking. I was inspired by "Historic Ship Models" by Wolfram zu Mondfeild and "Ship Modeling from Stem to Stern" by Milton Roth. I don't know if a Virginia Pilot ever had a deck like mine, but the books made it seem plausible, I like it, and at ths point its here to stay. Even so I would appreciate any feedback on the deck and it appropriateness. So if this is an error, I will know better next time. Next surprise was due to a big mistake I made in the bulwark planking. I did not check to see if I had enough plancking to do the bulwarks. As a consequence of using a complex planking pattern on the main deck, I ran short of planks to do the the outer bulwarks. BUMMER. I contacted AL for more. The wood was cheap. The shipping was not. I conserved the few remaining original planks to randomly intersperse with the new ones. The new blanks are much lighter and have a much tighter grain than the 16 yr old originals. Going down it looked horrible but on completon is hardly noticeable. When I had to get the replacment wood from AL, I ordered twice the wood that I needed "just in case." Good thing as the shipment got mangled during transit ruining a third or more of each plank. But the extra wood covered the loss. Note the hull pic with some bulwark planking done, you can see the the hull is waiting for new wood. BTW this has the best veiw of the mosaic used to fill in the bow. Another consequence was spare time while waiting for new wood. So I decicded to build the deck houses. I planked the houses with the narrow sepalia (mahogany like) strips. When the new wood came in I switched back to hull planking, where I finished the upper bulwarks straight way and dived into the 2nd hull planking proper. Here I made a big mistake, for the lower hull I continued to use the narrow sepalia planking that I'd started with on the deckhouses. The wide sepalia planking was the correct stuff to use. Needless to say I ran out of the narrow planks. Too far in to it to back out, I devised a jig that let me cut the wide planks into narrow ones. This allowed me to finish the hull. A comment about mistakes like this: They make you feel really stupid, but sometimes they workout. The narrow planks fit around the hulls compound curves much better than the wide planks ever could have. Plus it just looks better and probably is closer to scale. Checkout the finished hull pic. The Sapalia (mahogany look alike) really shines and is just gorgeous. Lesson: Take your victories where you can. Also note the mix between old and new Mukali (bass wood like) in the upper bulwark. Not too bad given the disaster it could have been.


- 21 replies
-
- 6
-
-
- Swift
- Artesania Latina
- (and 1 more)