tkay11
-
Posts
1,829 -
Joined
-
Last visited
Content Type
Profiles
Forums
Gallery
Events
Everything posted by tkay11
-
 Well, it certainly beats the kit cannon and trucks! Mine won't come out anywhere near as good. I've turned the cannon in ebony but the level of detail and finish are of course nothing like the ones turned in brass, and I haven't done the quoins very neatly. Despite that, though, it's all still very enjoyable. Tony
 -
One thing I forgot to mention is that you might find it easier to leave off the stern post until after you've done the planking. I didn't do that, but regret not having done so. The point is that once you have shaved or filed off the bearding line at the stern, you can then plank and file the planks to the end very precisely. Otherwise once the stern post is in you have to fit the planks to the edge of the stern post. Some also leave the stem post off as well for the same reason until they have done the planking. Of course, you may already have assembled all the pieces, so I'm sorry if this suggestion is redundant! Tony
-
Maybe you could post a close up picture/pictures from different planes? Tony
-
John, you might also want to post a note in the 'New to the Hobby' forum to say you have joined, and that you've started a log with the Chatham. That way you'll get more people who will be careful to pay attention to your log in the early stages to see how much help you need. Otherwise people may not be aware that you are just starting out. Tony
-
These first steps are nice ones as they're fairly easy (just find a method of keeping the bulkheads square with blocks or Lego bricks). Your next choice will be whether to fill in the spaces between the bulkheads. That's really useful for the stem and stern where you're going to be bending the planks round at a sharp angle, but I filled in between all bulkheads with balsa and that proved very useful as a support for the planks and a guide for the fairing. If I did it again I probably wouldn't use balsa, but balsa is very easy to shape. You might also consider how you are going to mount your ship. If you are going to place it on the stand provided by Caldercraft, there's no issue. However if you want to mount it on pedestals then you'll have to insert a couple of nuts into the bulkheads and drill through the keel. That requires very accurate drilling. I set up mounting points in mine, but on reflection it would have been easier to stick with the standard way of mounting. Tony
-
It's great that you're doing a Chatham (and that was a good buy at £50). There were a couple of excellent ones on MSW1 and was the model I was going to start on -- except for the fact that it was out of stock at the time and the Sherbourne was in. As you've been looking at the site for a while you'll know you're in for plenty of help and support from the more experienced. I've never seen anyone here regard any question as stupid, so I'd put that worry aside -- what may seem stupid to you may well show up something that's been missed, and if it is just that you don't know then lots of people who have been through the same learning process will be only too willing to jump in and provide the answers they found to the same question. You'll also find that as you get stuck in you'll be contributing your own skills and ideas to the mix. So, in sum, welcome to the forum, and I (and probably a lot of the other cutter/ yacht builders) am very much looking forward to your log. Tony
-
That's a really great idea, Gregor! I'll have to look into the local universities to see if something similar is available. Certainly beats my attempts at milling. Tony
-
Yes, there's no problem with the 2-pin. I just mentioned it so you would be clear about it. Enjoy the lathe! Tony
-
The price is good for the UK. This may be from one of the German firms that advertise on Amazon uk. From Germany direct it's €114, or about £96 without P&P -- which is normally about £10 to the UK and arrives within two days by courier. Have a look at SAT Berlin http://www.satberlin.de/en/PROXXON-machines/Table-top-tools/PROXXON-MICRO-woodturning-lathe-DB-250-NO-27020. If you check the Amazon site and it is from a German firm, then you'll end up with a European 2-pin plug either way. There's a few of us who've been using the German firms for Proxxon as the costs are so much lower and the service has been excellent to date. I've been using this lathe and like it very much. It's worth getting the 4-jaw chuck if you're going to be making stuff from square stock. Tony
-
micro table saw stop
tkay11 replied to michael mott's topic in Modeling tools and Workshop Equipment
Glad to post. Tim. Who to? Where to? PM to you? Tony -
micro table saw stop
tkay11 replied to michael mott's topic in Modeling tools and Workshop Equipment
There was a long discussion about this on MSW 1.0 which referred to the need for thin strips to be able to move from the blade as they are cut. To do this a feather board is used, or a stop of some kind. There was a great article by Bob Sorenson on this called "TIPS AND TECHNIQUES: MILLING SCALE LUMBER, dated 23 Feb 2011 which you could try to find on the web. I still have the pdf of that article should you want it. If people are interested, I could put it in the downloads section. Others on this forum who are more experienced than I am will probably chip in with more detailed advice. I use this method all the time and it provides great accuracy. Tony -
Yes, it's fairly easy to modify the drill stand. You can see how I did mine at http://modelshipworld.com/index.php?/topic/4539-how-to-modify-proxxon-mb-140-drill-stand-to-act-as-mill/?p=130660. Tony
-
Very pleasing to the eye, Gregor. A lovely addition, well crafted. Thanks yet again for the inspiration! Tony
- 210 replies
-
- 1
-

-
- Sherbourne
- Cutter
- (and 5 more)
-
The link is http://modelshipworld.com/index.php?/topic/5721-gunboat-philadelphia-by-chuck-seiler-scale-148-1776-scratch-from-ms-plans/?p=176932. To insert the link, you can click on the little white number (e.g. #6 in your last post) and there will be a pop-up with the link. Copy that. Then, in your post, highlight the text you'd like to act as a link. Then look for a little icon looking like a chain in the second line of the editing box. Click on that for a pop-up into which you insert your copied link. Your carriages are very nice. For individual sets of carriages your way looks very effective at that scale. As a complete novice, I have spent some time fiddling around with making carriages in a variety of ways, but eventually converted my drill stand to act as a mill stand as well, and have found that method very easy -- especially when you have to make a lot of carriages. I am now on my fourth set for the same model, having been quite unsatisfied with each of the earlier sets (for differing reasons)! Tony
-
I'd strongly recommend buying Proxxon from Germany where their tools are much cheaper and the postage only about £10. Thus SAT Berlin has this scroll-saw brand new for under €300, or about £246. You can see it at http://www.satberlin.de/en/search?xdbbaf=42c4f656601170b92acef002b0c865bc&keywords=ds%20460. TBS Aachen have it for €309. There's a few of us in the UK who've been buying Proxxon from Germany this way, and the experience has been great -- next-day delivery (or within two days), excellent customer service and good communication. There's no customs duty or VAT as they're in the EU. The only slight difficulty is that sometimes they ship with a European plug, but that's a very small problem and costs little to fix. Tony
-
Thanks very much, Michael. I've followed your Bristol Cutter for a long time now in total admiration, so it's very encouraging to hear that you've liked some of the ideas in this build. The idea for the yoke came because I just couldn't think of another way to make the holes on either side exactly in line with one another so that they could have a rod passed through them without sticking. However, I would just like to say that such ideas probably only come after studying the ways builders such as yourself approach problems. There seems to be a definite way of thinking about tools and materials that builders have, and a lot of my enjoyment of this hobby has been picking up this way of thinking and teaching my hands as well as my brain this new language. And the simpler, most basic and easy the solution, the more elegant it seems! Tony
- 269 replies
-
- 2
-
-
- Caldercraft
- First build
- (and 3 more)
-
That's a great explanation, Joe. Thanks very much for the info. I hadn't thought of surface tension. Tony
-
I've seen the recommendations for dusting the mould cavity with powder, but, being totally ignorant, am wondering why the powder would not interfere with the surface of the mould. Is it just absorbed into the liquid as it is poured? And what is the function of the powder? Thanks for any tidbits of illumination! Tony
-
Using chisels for turning brass
tkay11 replied to tkay11's topic in Modeling tools and Workshop Equipment
Thanks, Mark, David and Joe. Mark and David: It's ok, I did understand. I just also thought it useful to reflect, as always, that there are often simpler ways to approach a problem, and that having a lovely toy such as a wood lathe can lead me to lose that search for simple solutions. I have much appreciated this thread of discussion as it really has shown lots of ways to approach the problem. In order to practise working with this kind of detail on the lathe, though, I've already started with the cannon barrels by turning boxwood from an old ruler that I have. You can see the efforts if you want on my log at http://modelshipworld.com/index.php?/topic/335-hmc-sherbourne-by-tkay11-–-caldercraft-–-scale-164-1763-a-novice’s-caldercraft-sherbourne/?p=173630. It's headed 'Wheels/Trucks', but the barrels come at the bottom of the post. I will also be trying with files when the 4mm brass rod arrives. Joe: Your thoughts about balsa and basswood are really ingenious and useful. So now I have heard of perspex, balsa, basswood, ebony, brass and boxwood as substrate for the barrels, and I might well try each one of them just to learn. My next stage is to learn to make molds and replicate. This is all enormous fun. Thanks again, guys! Tony -
Many thanks, Jay, Bugra, B.E., Gregor and Geoff for the lovely comments and the 'likes'. As you all know from your own experience, such appreciation contributes enormously to the motivation -- as well as tickling that eensy bit of pride in achievement. However, more than that, it also serves to remind me of your own contributions to my learning from the builds of you and others in this forum. Tony
-
Using chisels for turning brass
tkay11 replied to tkay11's topic in Modeling tools and Workshop Equipment
Very impressive, Mark! That makes me feel very lazy indeed. Tony -
Thanks, Dirk. You'll just have to keep on being one of my inspirations for me to continue making these efforts. Tony
-
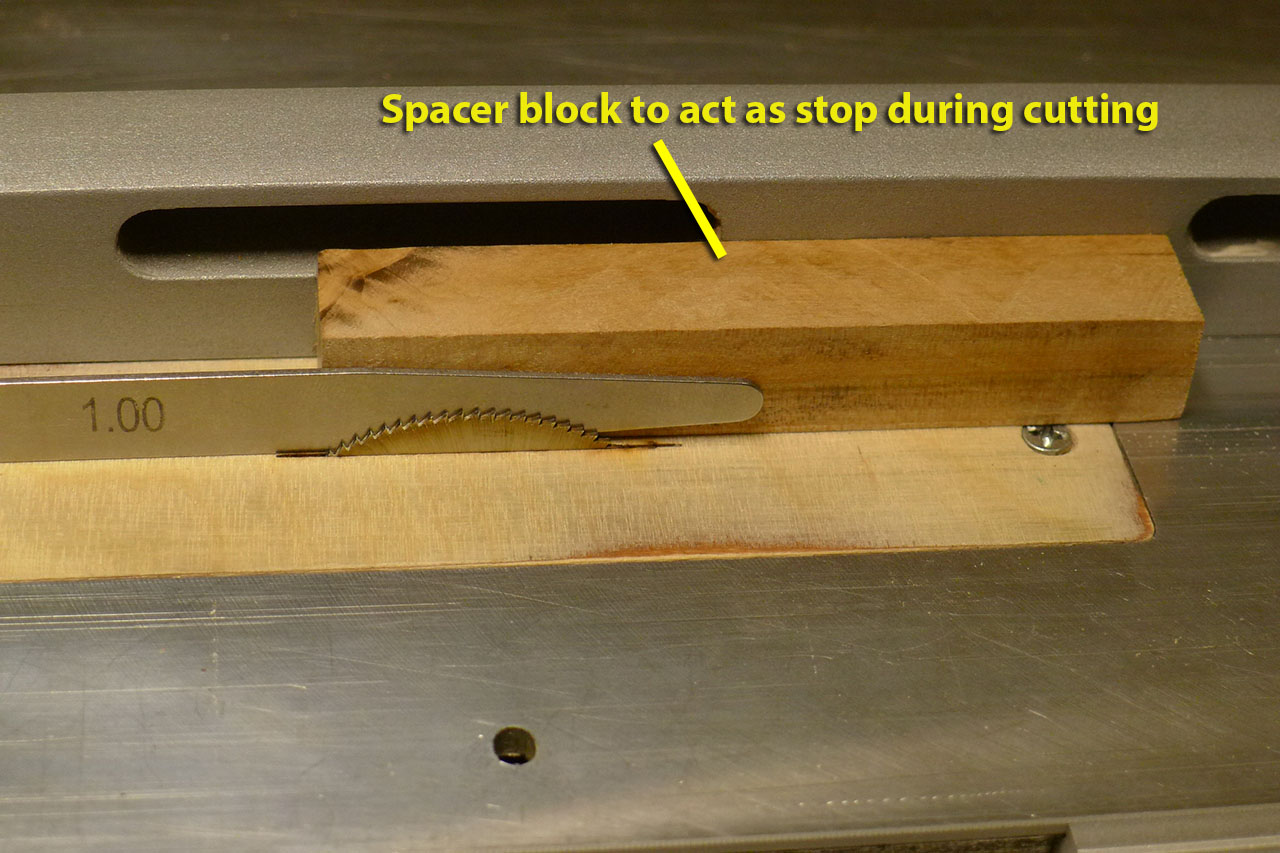
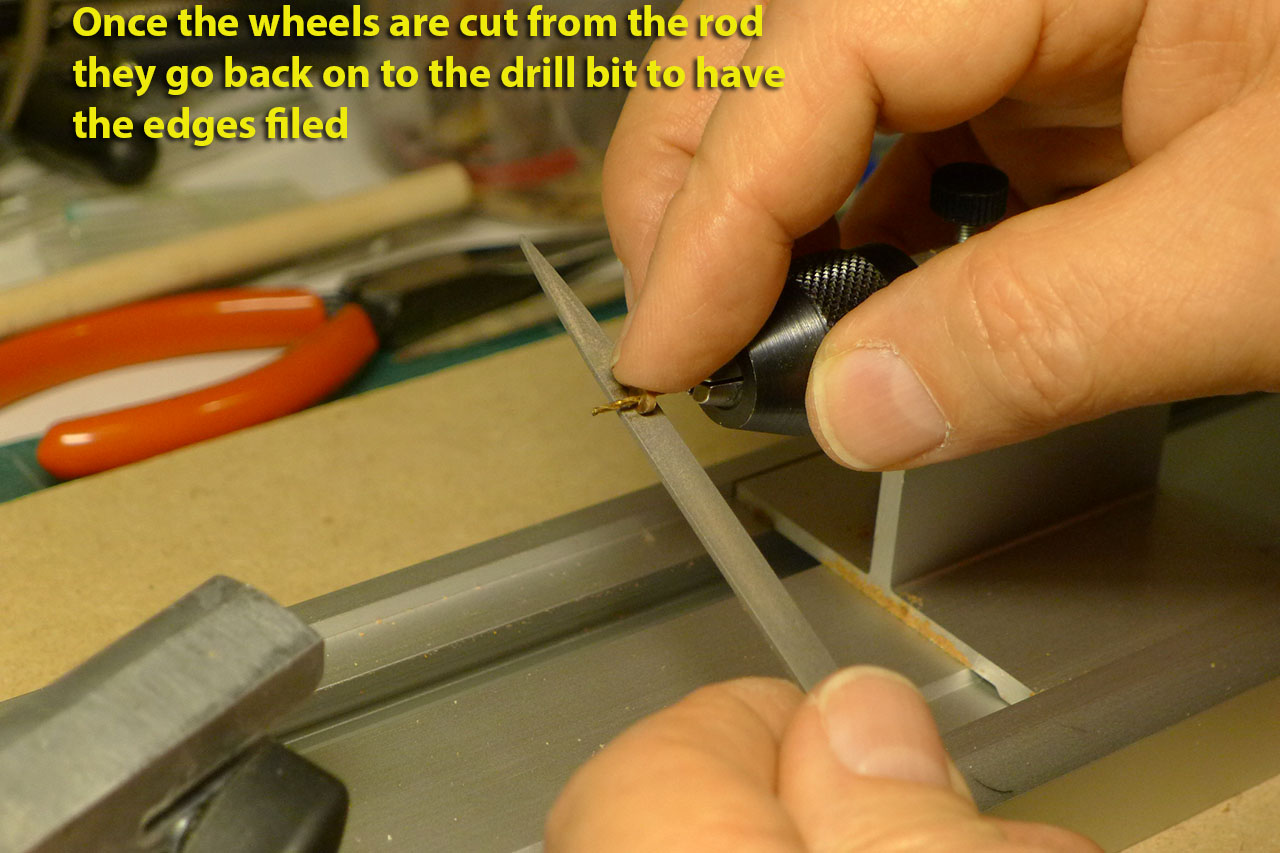
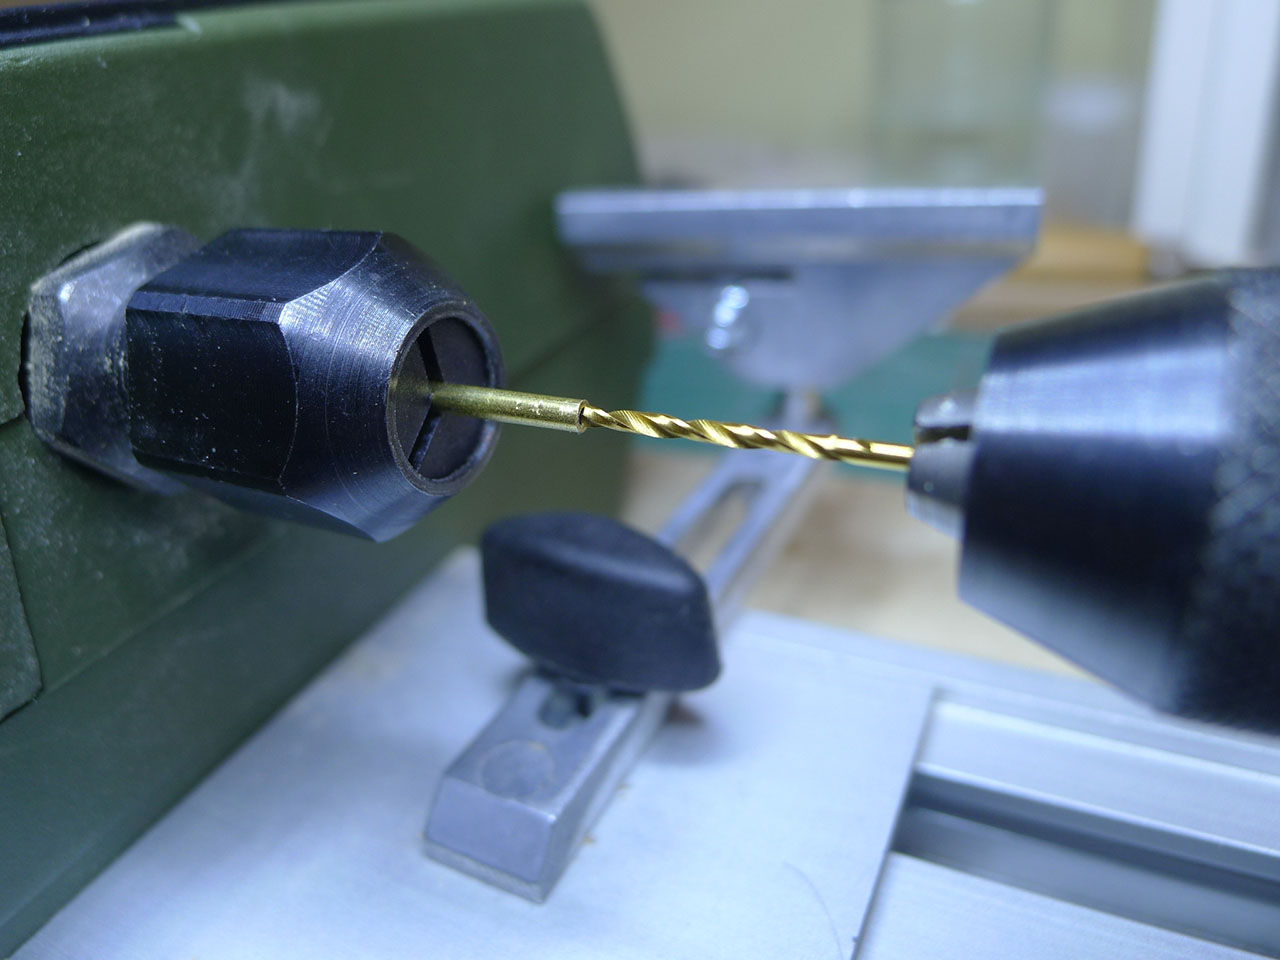
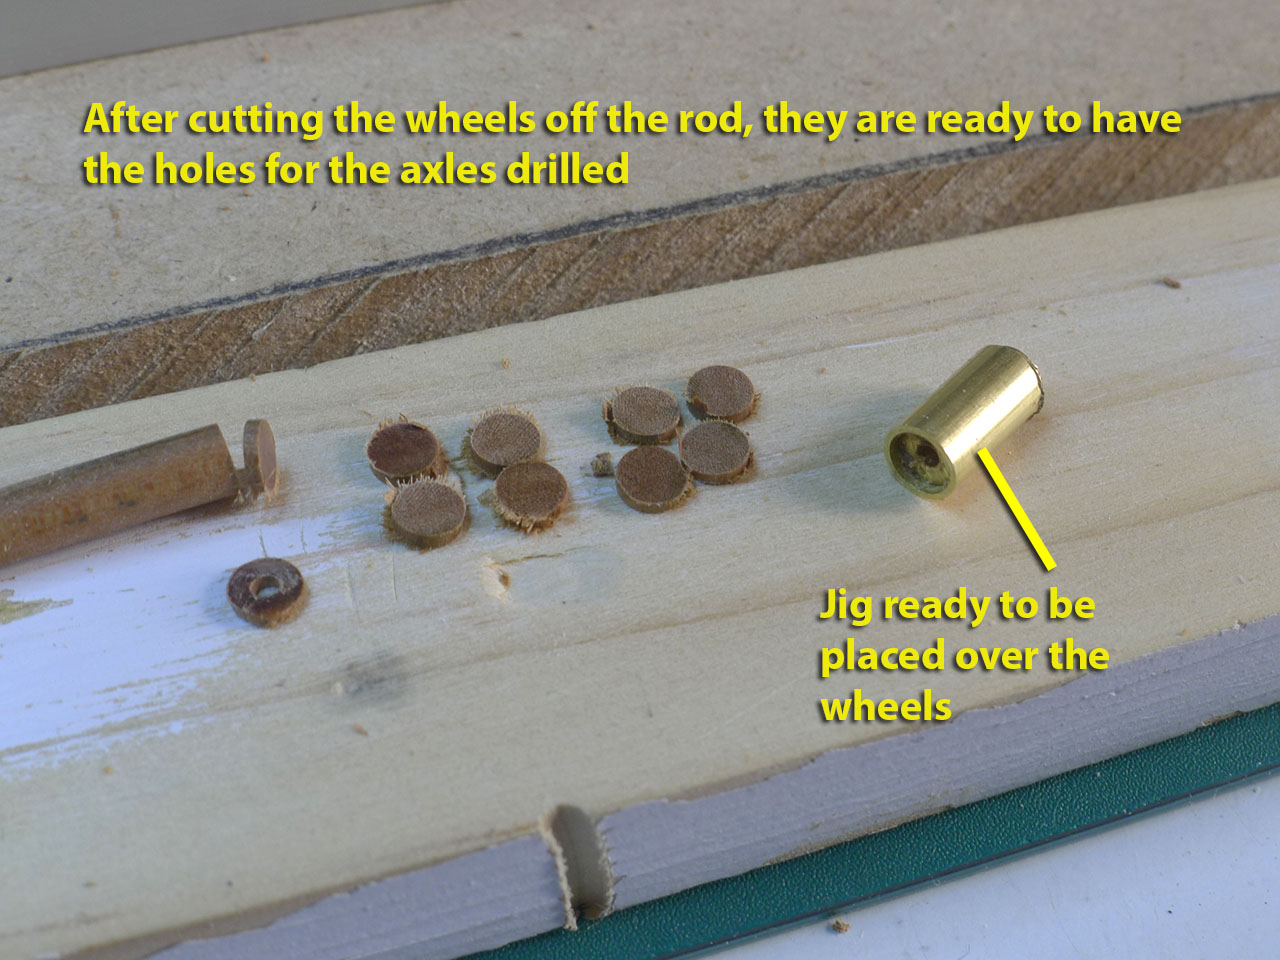
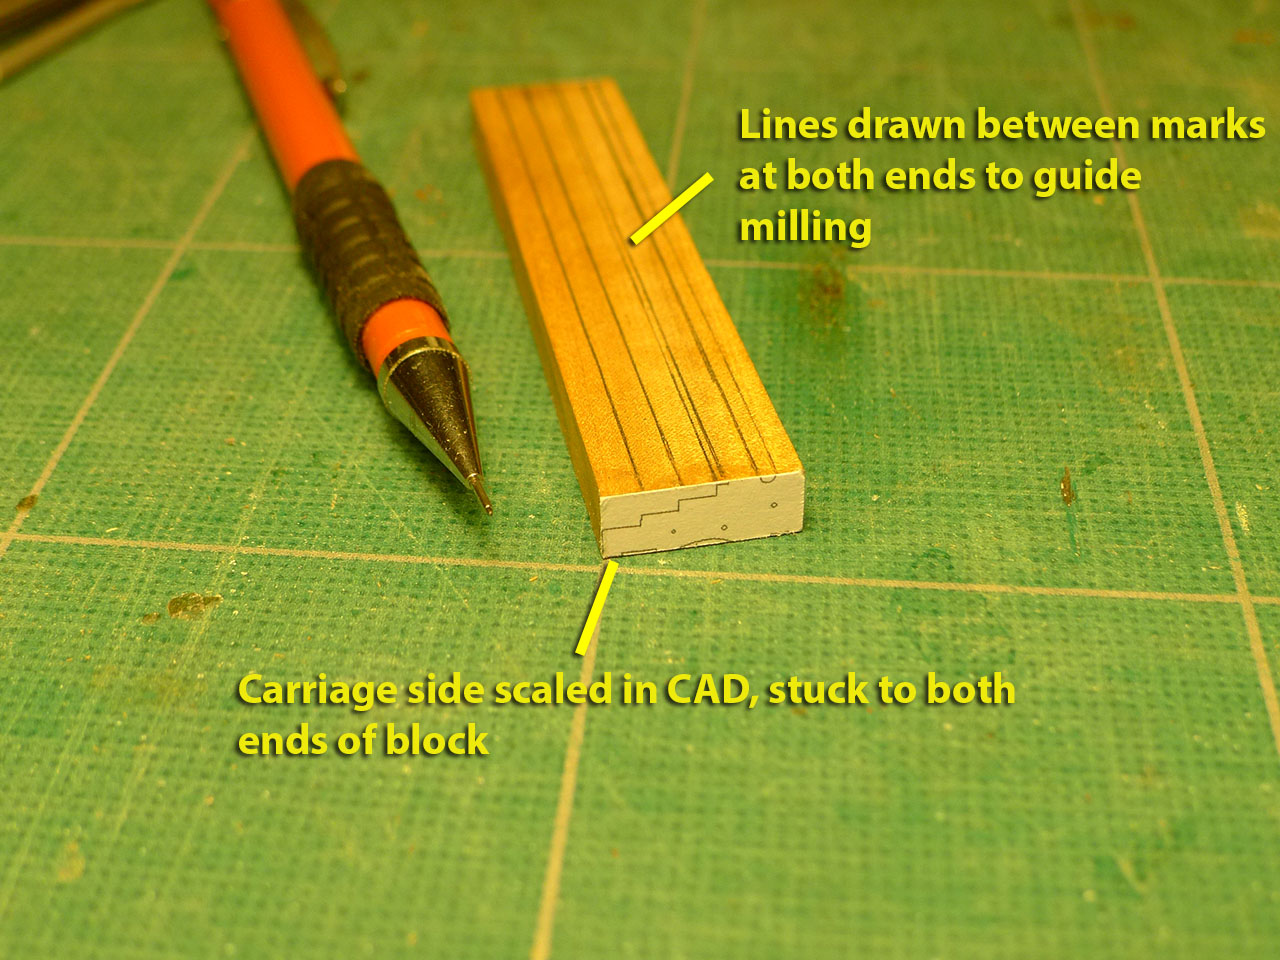
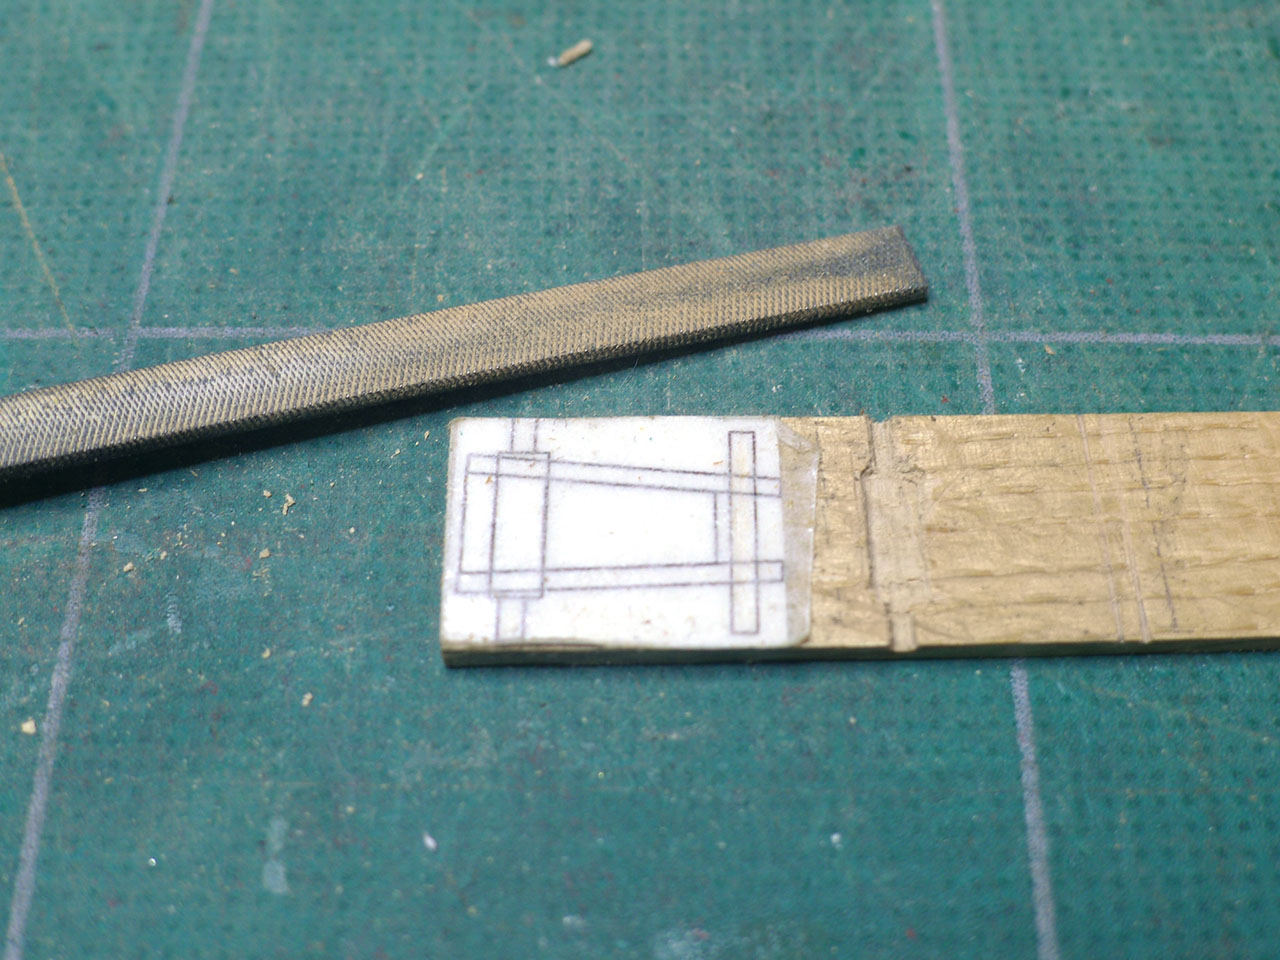
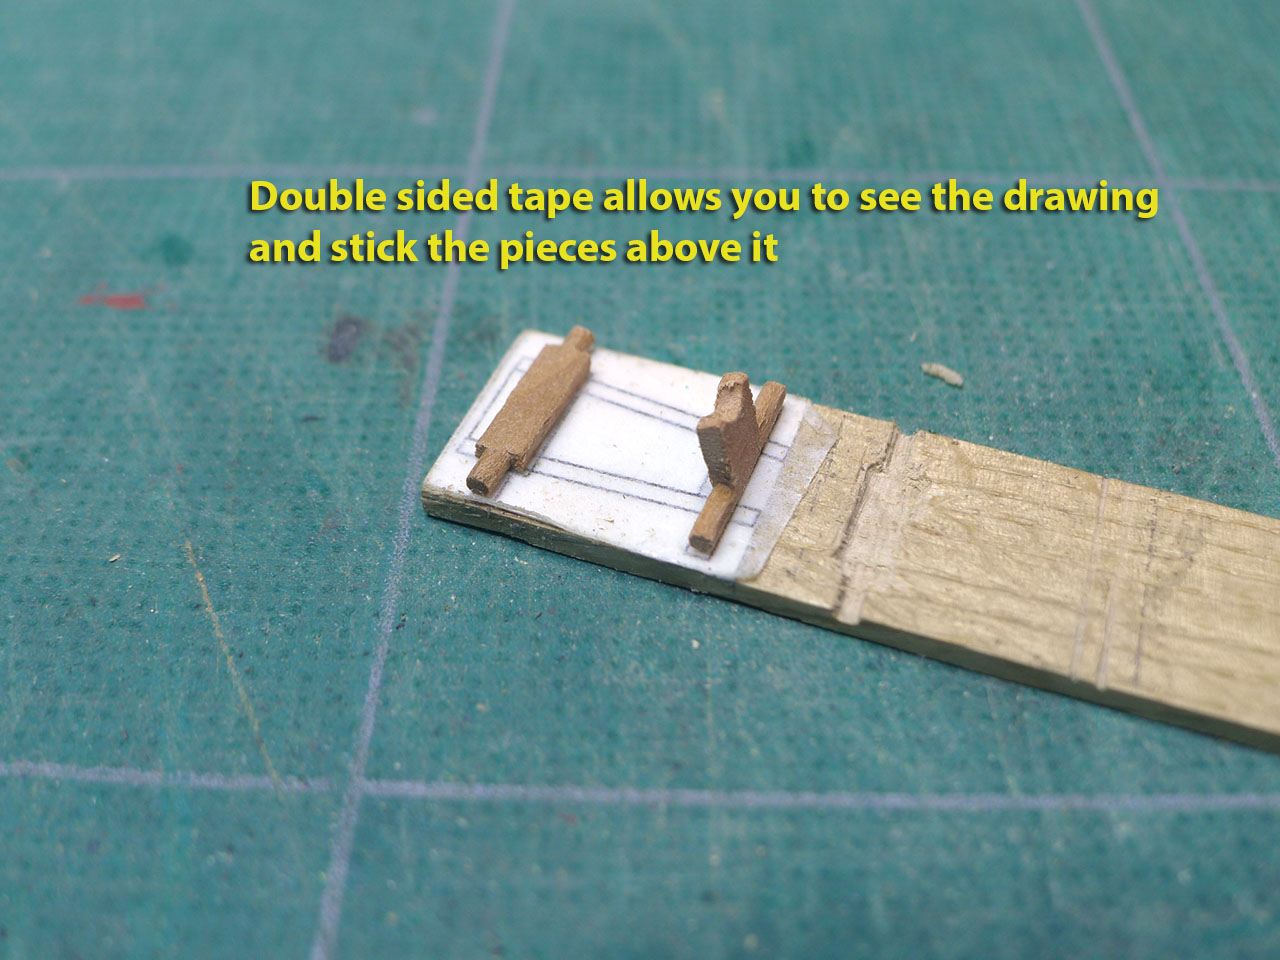
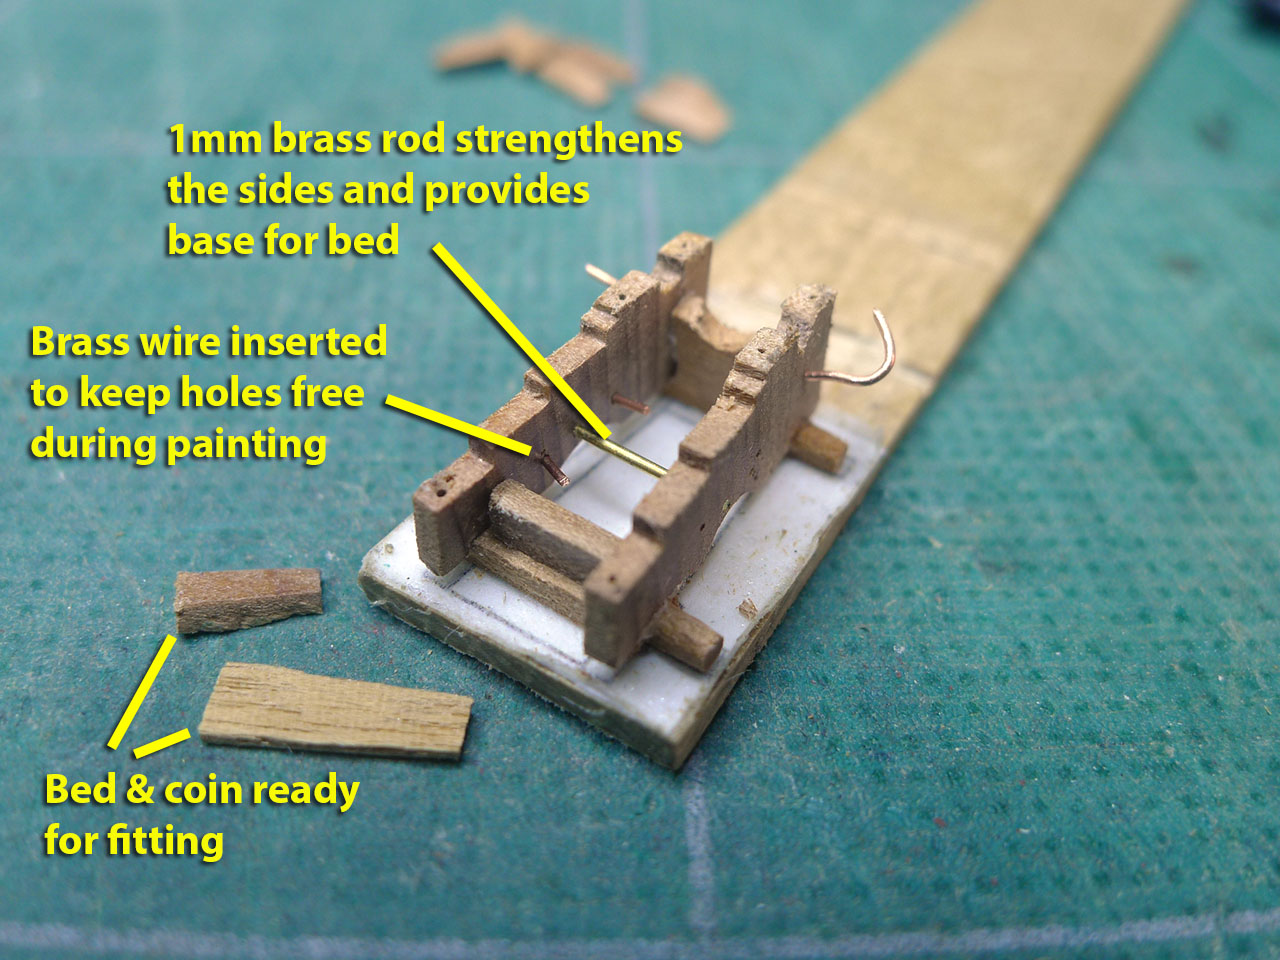
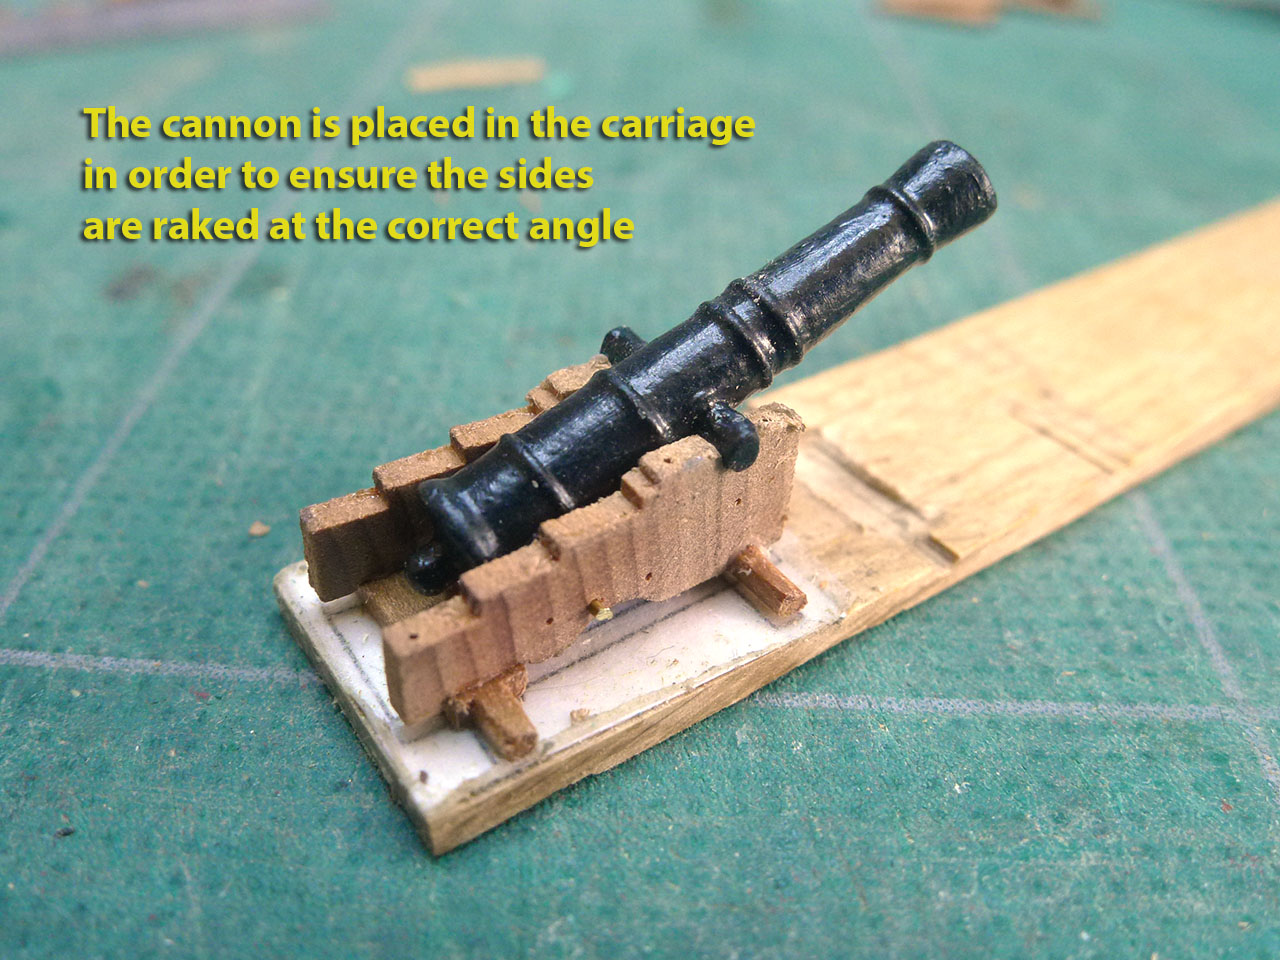
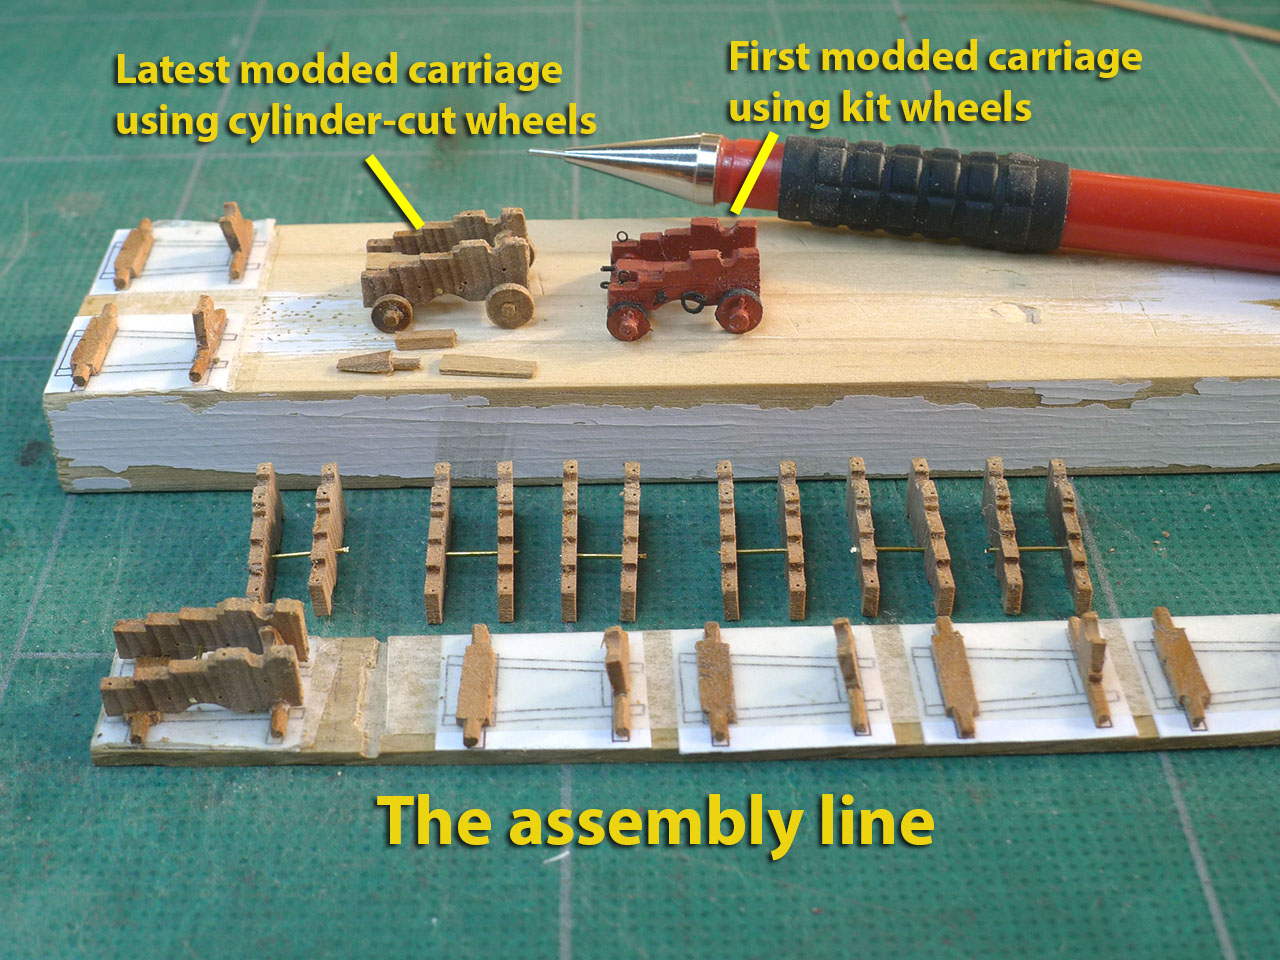
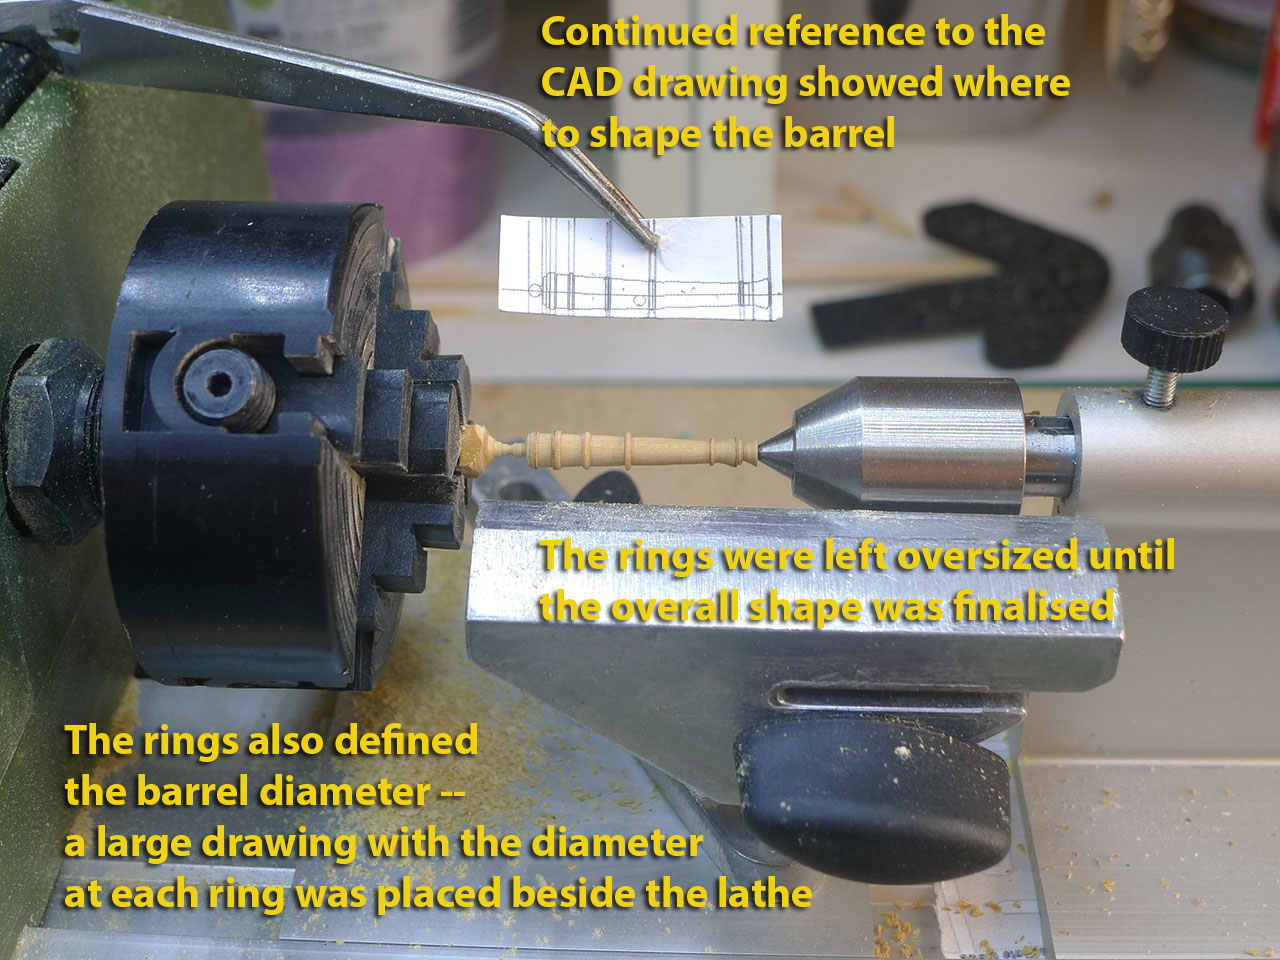
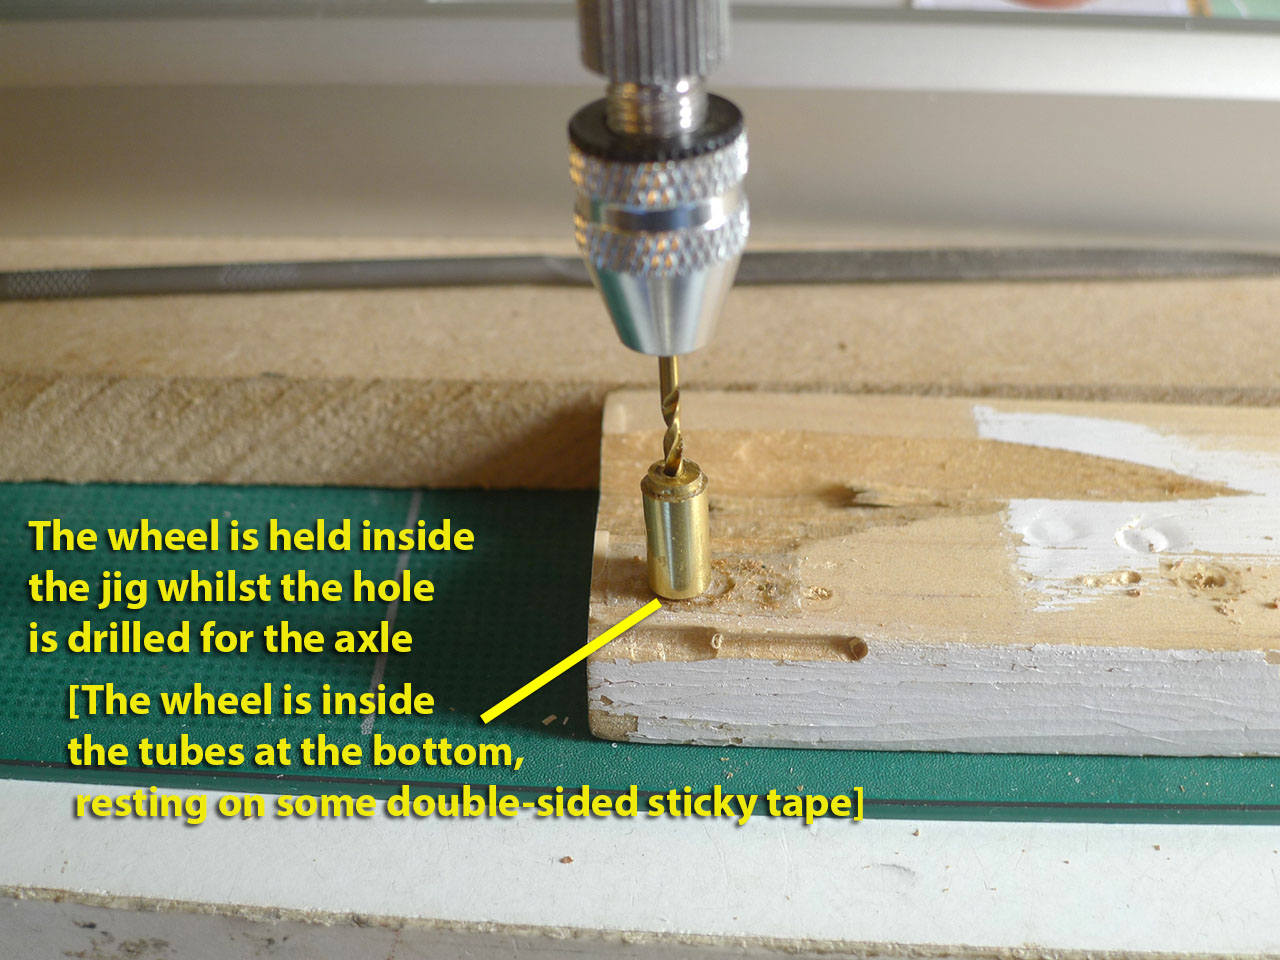
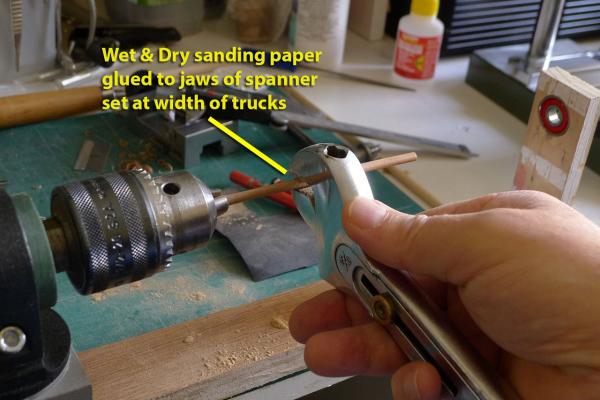
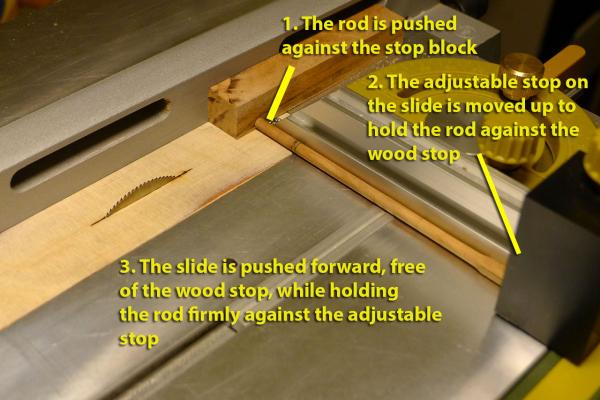
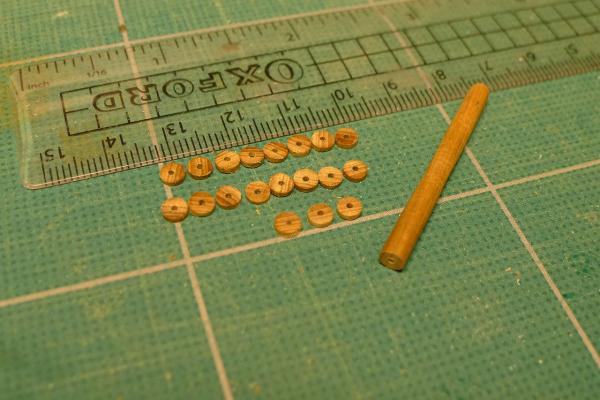
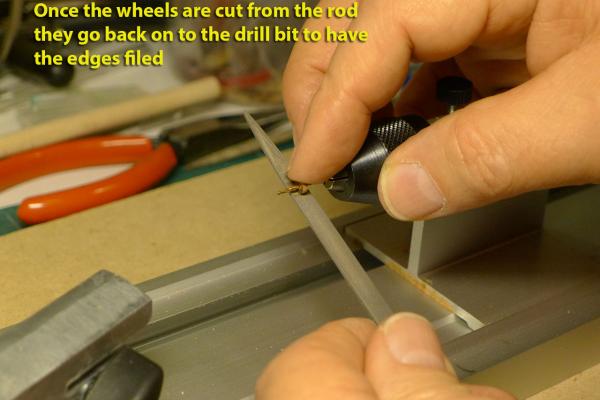
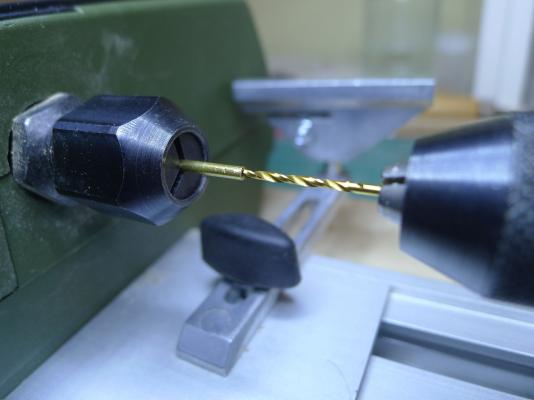
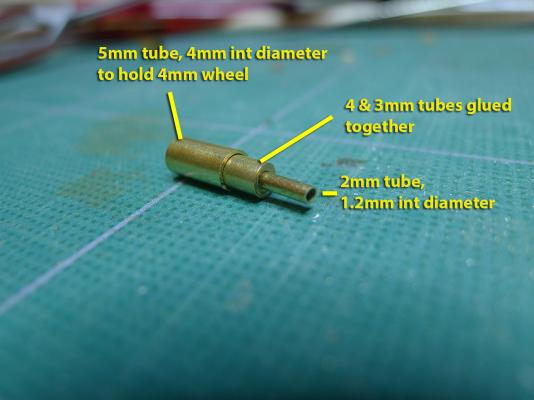
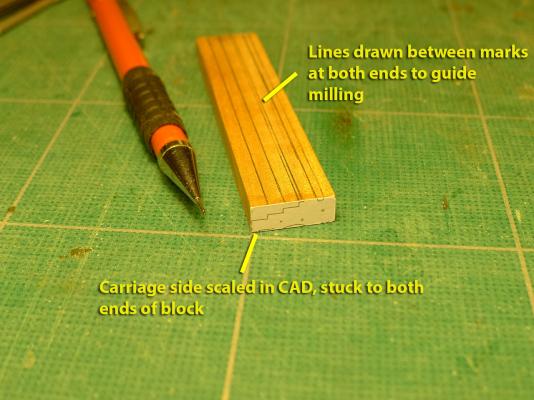
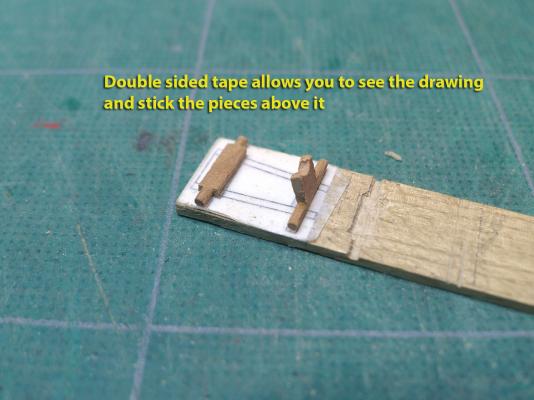
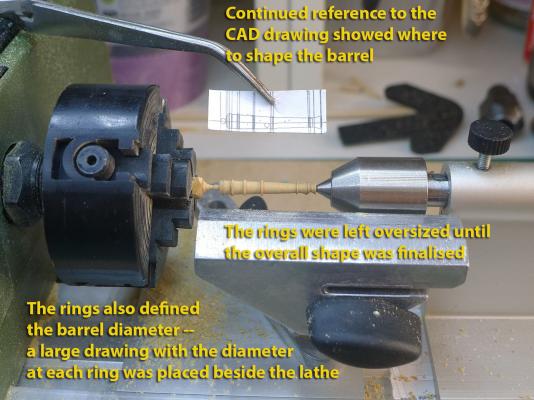
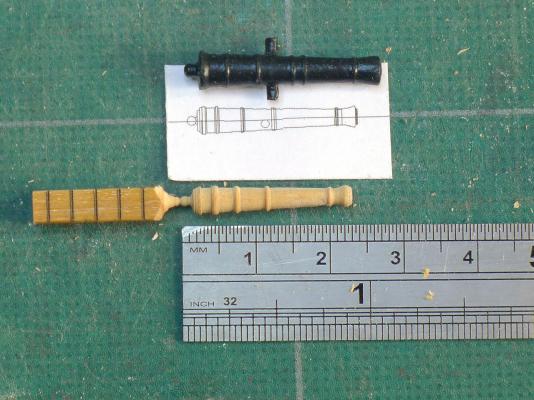
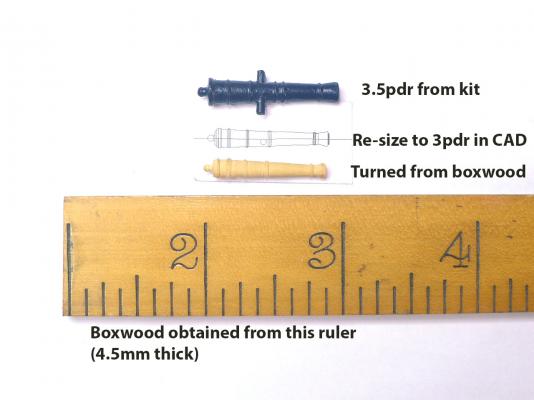
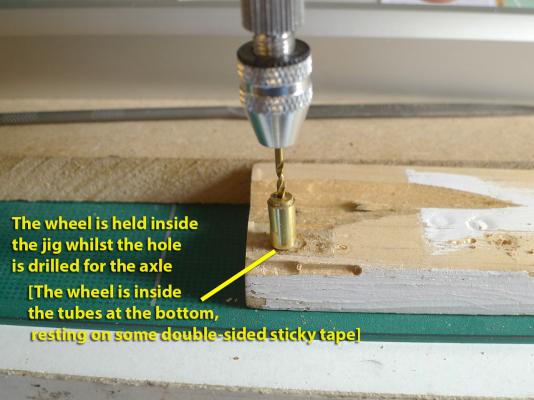
Wheels/Trucks I haven’t been satisfied with the gun carriages I made, so I set about thinking how to do them more accurately. First off was the problem of how to make wheels. Making the rods that were to become the wheels was fairly straightforward. I used a tip from Hubert Sicard’s site ‘Wooden Ship Modeling for Dummies’ at http://www.shipmodeling.ca/, where he suggested using an adjustable spanner with wet&dry paper glued to its faces. That gives a rod of the diameter you want. You can see how this is done in the picture below. I used a stick of pear wood cut from a pen blank (you can buy these cheaply at eBay). But how to drill the holes for the axles? For a long time I couldn’t think how to drill holes in the centre of the wheels to take the axles. However, once I had the wood lathe in place, I thought it would be simple to shape a rod and then drill a hole in the end using a Jacob’s chuck. At first my attempts at centring the hole were not good – until I found that I could put some shims into the tailstock end. You can see the details in my posting at http://modelshipworld.com/index.php?/topic/2765-proxxon-mini-lathe-db-250-opinionsassessmentsrecommendations/?p=154323. With that sorted, I found I could drill the holes quite centrally, but found three further problems: 1. Because of the length of the drill bit, I could only drill a hole to its depth, which was the equivalent of about 5 or 6 wheels. That meant I had to drill the hole each time again after cutting off 5-6 wheels. 2. I also found that despite a good initial centre, the drill had a slight tendency to go off centre the deeper it went. It was slightly reassuring to read in Frolich’s book ‘The Art of Ship Modelling’ that even he had the same problem with his Unimat lathe when making his wheels. 3. My skill with the adjustable spanner probably not being perfect, I could not make perfectly circular rods. I found that there could be up to 0.2mm discrepancy in the diameters. Whilst thinking about these problems, I made a simple jig for my saw to cut the wheels to 1mm thickness, as you can see in the following photos. The spacer block is there to act as a stop. Once the wheels are cut from the rod, they go back on to the drill bit to be filed of any burr. You might think I was satisfied with this result, but because of the three problems listed earlier, I thought I’d have a bash at other ways of achieving perfectly circular trucks with perfectly centred holes for the axles. My solution was to use concentric brass tubing. Starting with the central hole, it was important to have exactly the right diameter. So I took a 2mm diameter rod and, using the wood lathe again, widened its 1mm internal diameter to 1.2mm for the axles. This is to allow for the same drill bit to be pushed into the central tube once the jig has been made. I then added the higher diameter tubes. One thing I noticed was that the tubes had a wall thickness of 0.45mm, thus leaving a 0.1mm gap to the next tube. I reckoned that if I were to put a layer of PVA glue round the tubes that would spread evenly and fill the gap. It seemed to work. Finally the inner tubes were filed smooth at the ends, ready for the outer tube to be slid over to hold the wheel. Clearly this method will only really work for wheel diameters that increase in 0.5mm amounts since the tubing can only provide 0.5mm steps. I had chosen to have wheels at 4 and 4.5mm diameters, so that worked for me. In reality, there was not much difference between the two methods (drilling with the lathe versus drilling through a jig made of concentric brass tubes). The brass tube method allowed for consistency and speed, although its limitation is that of the 0.5mm steps. It also means I am left with a jig that will work for future wheels of the same size. The lathe method works fine too, but takes longer and is more fiddly. The gun carriages Having sorted out the wheels/trucks, the next stage was the carriages. I decided I’d use my modified Proxxon stand, [which you can see at http://modelshipworld.com/index.php?/topic/4539-how-to-modify-proxxon-mb-140-drill-stand-to-act-as-mill/?p=130660, together with the x-y table] to mill a block from which the carriage sides would be cut. This method is the one used by Frolich, along with countless other modellers on this forum and elsewhere. The second iteration of the carriages had been based on CAD drawings I had made of the carriages scaled down to 3 pounder carriages. This proved awkward, because the barrels provided by the kit are in effect 3.5 pounders, but I thought that few would notice their over-size if I placed them in 3 pounder carriages. This time round, for the third iteration, I thought that in order to make everything match up, and because I couldn’t imagine making barrels myself, then the carriages ought to be 3.5 pounder carriages as well. So I rescaled the drawings to make 3.5 pounders. As before, I cut pear wood to size with my table saw and used CAD drawings glued to the wood sheets to cut out the beds, quoins, axles and bolsters. The handles for the quoins were made from rods of pear that were passed through a drawplate. The next stage was to prepare a jig on which to assemble the carriages. I had seen several jigs made of wood, but I was lazy and decided to use double-sided sticky tape. It’s transparent, so can be laid over a print out of the CAD drawing. With this, it was easy to hold the two axles in place in order to put the sides on to them. It should be noted that the transverse bolt was used to link the two sides before placing on the jig. This helped in accurate placement. You’ll also note that I have drilled holes for all the bolts that will be going into the carriages. Before painting, they will have brass wire placed in them to make sure I can find them again after painting! The gun barrels Having done all this, I once again looked at complete guns with carriages and thought that the barrels looked distinctly ropey. But I couldn’t make the barrels myself. Or could I? I decided to give it a bash with the Proxxon wood lathe. I first tried with some of the same pear wood I had used for the carriages. This didn’t turn out too well as the wood just looked too grainy (probably my ineptitude, and I hadn’t thought of using filler), but it gave me the courage to try again. I thought I’d investigate how to make them in brass, and so posted a question on the forum (you can see the discussion at http://modelshipworld.com/index.php?/topic/5975-using-chisels-for-turning-brass/). It turned out that I didn’t really have the right tools to do this, so I thought I’d have a go with boxwood. I still have plenty of the wood from the boxwood ruler I had bought on eBay to make the gratings, and lo and behold the thickness was 4.5mm – just the right size to make 3.9mm barrels with. The barrel rings were left over-sized until the last. This allowed me to use them as markers for the different barrel diameters as they decreased. At the same time I made constant reference to the CAD drawing held by forceps (shown in the picture). This was all quite interesting as, until I had actually made the new barrel at the proper size for a 3pdr, I had thought that the difference in size with that of the kit would not be really noticeable. In fact the difference is size is very noticeable. I can now see that should I make all the cannon at this size, they would fit the gunports perfectly. The barrel hasn’t turned out as beautifully as those made by other modellers, but I now have the courage to improve the skill. Although I had thought making barrels would be incredibly difficult, in fact it just required patience and care, shaving very small amounts off at a time with the turning chisels. The Proxxon turning chisels proved to be wonderful, and I now understand why boxwood is so admired for this kind of thing – it allows for very precise cutting indeed. The big decision now is whether to make a THIRD set of carriages to fit the new barrel, and therefore to make a complete set of barrels. I am still thinking on that one! I have just ordered some ebony at the suggestion made by Nigel in the discussion referred to above about cutting brass and will try turning a cannon in that wood before I make any final decision. Oh, decisions, decisions! But all this experimenting with techniques is definitely going to put me in good stead for future builds. Spending time on getting techniques right at this stage is, in my view, a very good investment for the future. Tony


- 269 replies
-
- 12
-
-
- Caldercraft
- First build
- (and 3 more)
-
Using chisels for turning brass
tkay11 replied to tkay11's topic in Modeling tools and Workshop Equipment
We probably need to start another thread to document such lovely stories. Thanks for the info about grinding, Per. I'm just writing up my log to document my experience with rebuilding the cannon carriages and making the barrels. Tony -
Using chisels for turning brass
tkay11 replied to tkay11's topic in Modeling tools and Workshop Equipment
Thanks, Per. The Clerkenwell story reminds me of some local car mechanics I once knew at Lake Manyara in Tanzania. The road by them was often flooded (if you know the area the river was Mto wa Mbu, or Mosquito River), and cars regularly died as a result of foolish attempts at getting through -- sucking water into the engine. They could dismantle a car and knock a crankshaft back to straight using hammers and iron blocks, checking alignment by eye. I use the Scary Sharp method for my wood chisels, but I have been a bit hesitant after reading about the variety of angles needed for graver bits. I'd probably need to practise quite a lot. At the moment I've been turning some boxwood and have been very impressed with the result (not with my technique or the appearance, more the beauty of the wood and the way a sharp blade can be used so accurately for fine detail with this wood). So once I've learnt the skills with the wood lathe, I'll definitely consider moving to brass, using proper gravers and sharpening by hand. Thanks again for the input. By the way, I didn't understand your commment "there is really very little steel to remove afterwards to get the right shape". Is that a good or a bad thing? What is the implication? Tony