MORE HANDBOOKS ARE ON THEIR WAY! We will let you know when they get here.
×


tkay11
-
Posts
1,824 -
Joined
-
Last visited
Content Type
Profiles
Forums
Gallery
Events
Everything posted by tkay11
-

Gun port lids and sweeps, on small vessels
tkay11 replied to Stockholm tar's topic in Wood ship model kits
Thanks, Druxey. Valuable info. In relation to the side-opening gun port lids, we had a discussion a while back about the feasibility of this. The easily-available plans show one of the ports with lids only, and these were indeed side-opening. The questions were how they would be held to the side and whether they would interfere with the channels. So it's interesting that the more detailed plans do indeed show side-opening lids. By the way, did you build a Sherbourne? Tony -
Gun port lids and sweeps, on small vessels
tkay11 replied to Stockholm tar's topic in Wood ship model kits
Are you thinking of the AOTS book on the Alert, Kester? The Alarm I don't know. Anyway, your points are interesting. Without sweep ports it would be much easire to fit longer shot racks in my build! The following shot is of the model of the cutter 'Trial' of 1790 at the NMM in Greenwich. It shows sweep ports. Tony
-
Very satisfying when it starts taking shape like this. Looks nice and smooth. Tony
- 1,039 replies
-
- 1
-

-
- ballahoo
- caldercraft
- (and 2 more)
-
Thanks, Jurgen! Even cheaper at SAT. I clearly didn't do my homework! Tony
-
They've been great for me. Excellent documentation and communication, excellent packaging, cheapest prices in Europe for Proxxon, fast & secure delivery by DHL, very reasonable postage rates. What more could you ask? But that's me in the UK -- not Germany, where the delivery prices are of course lower and, I note, sometimes included in the price. Interestingly TBS Aachen also sell through Amazon and their prices on Amazon UK are considerably higher than if bought direct through their website. Tony
-
Here is the illustration from the AOTS Cutter Alert: Tony

-
If there's anything I don't understand, it forces me to look it up. I have done this several times with all sorts of jargon that exists on this forum, and each search leads to a new micro-world of understanding. I really appreciate your hands-on experience which makes the whole thing more real. But thanks for asking, Kester. Tony
-
Thanks, Kester. I think I should start putting smileys after light-hearted comments. I was only ribbing you about us poor learners, so don't take it to heart -- I think I understood your focus on Dirk! He's truly a great modeller, as you are, and we love learning from you both. Tony
-
I forgot to say, Kester, that I really appreciate your saying that you keep every scrap of the kit. I do the same. And I too will copy that backstay once I get that far. Great idea! I'm with Gregor on the method of asking questions. In my own work I have often told people that it's the art of finding the right question that will set them on the path to finding answers. For some reason (or lack of reason) there are many who don't have that kind of exploratory mind. One of the nice things about this forum is that there are several like you who have exactly the right kind of exploratory mind that makes this hobby so interesting. Thanks a lot! Tony
-
Thanks, Jan, but please note that I only make suggestions based on my highly limited experience. Others have more knowledge about the Sherbourne and model ship building than I could hope to achieve in a long time. You'll probably see in other posts I make about other builds that sometimes I give an inadequate suggestion, or even (in one case) where I have misunderstood the request entirely due to the fact that I hadn't read the request thoroughly! So never be surprised if you find others providing even better explanations or suggestions! And yes, my package arrived today, but unfortunately they sent some drill bits in error, so I have to send them back and wait for a replacement. Tony
-
There are others who can learn, Kester! Tony
-
In the Sherbourne kit Gregor is right in that the wire is there just to keep the sides upright. It is a kind of bracing bar. However, it is not in the correct position in terms of a real carriage as the photo below from the AOTS book on the Cutter Alert shows. In Chuck's version, it is also performing the function that was originally for the real gun -- there was a transverse rod on which the bed rested and this bed rested on the rear axle tree and held the quoin at the same time. In the Sherbourne kit, as far as I remember, it didn't hold any bed and the quoin just rested on the axle tree -- hence leaving the copper bar just to hold the sides at the right distance apart. Since it is hard to see the details of the bed of the carriage in the assembled carriage with the cannon, not many people would really notice. The problem for me was that the sides of the carriage in the kit just looked elongated and out of proportion. I hope that's right, and that it's correct! Tony

-
This is a really interesting build for me, so if, as you offer in a previous post, you can provide as much detail as possible about each step, I (for one) would be extremely grateful. Thanks Tony
-
I don't know if this helps, but these are the gun dimensions from the Cutter Alert, as in the AOTS book: Tony

- 123 replies
-
- 1
-
-
- lady nelson
- victory models
- (and 1 more)
-
I love seeing people's ideas for jigs. They are always so interesting, and stimulate new ways of thinking. Yours is no exception -- nice idea, Jan! Hubert Sicard also has some nice jigs for cannon at his site 'Wooden Ship Modeling for Dummies'. His hands are some of the shakiest I have seen, yet he manages very well -- so take heart! Tony
-
Thanks for the birthday wishes, you guys! I don't normally leave personal details on fora, but I just wanted to prove I'm as much Neanderthal as the next guy. Yes, self image changes with age. I used to be Tarzan. As for the rigging, Dirk, you've unfortunately let on that you can do it beautifully with your Swift and Krick Alert (for those who haven't seen, have a look at https://plus.google.com/+DirkKarsten/photos?banner=pwa. So you can't call 'chicken' on this one! Tony
- 269 replies
-
- 4
-
-
- Caldercraft
- First build
- (and 3 more)
-
Yes, we are both Neanderthal, except yesterdayI finished with 66 and today started with 67. I'm still working, but gradually trying to phase out -- it's just that people keep asking me to do some more. Looking forward to your jig! They're very satisfying once you get them working. I'm doing mine as a block which I will then mill. I'm still waiting for a particular mill bit, so last night I started trying to work out how to do the wheels. Tony
- 269 replies
-
- 1
-
-
- Caldercraft
- First build
- (and 3 more)
-
Thanks very much, Jan. I think we must both be in the same age group, then. I'm certainly no better than you when it comes to workmanship. You are lucky in that I haven't taken pictures of all the failed attempts at getting things right. After failing with the milling idea, I made two complete captain's companionway windows before I could find the skills to finalise one -- the perspex was particularly difficult to get the hang of as it melts so easily with the heat of cutting, and if CA glue comes into contact it ruins the surface (the trick here was to leave on the plastic covering that comes with the perspex sheet and remove it just before the final cut of the horizontal grooves). So you see it really is just a matter of determination, thinking, learning about the materials and tools, and, of course, practice to see what happens when you try something out. The pictures I made of the final version make the whole process seem more straightforward than it was -- although in reality, once I had the hang of things, it really was straightforward (discounting the unexpected episode with the vacuum cleaner!). As to the cannon, well, I'm just about to try my hand at milling the sides today -- having spent a while yesterday making sure I have the measurements right and practising on a bit of oak floorboard that my neighbours threw out. It's going to be very interesting, and I'm waiting to see how it all turns out myself! Tony
- 269 replies
-
- 2
-
-
- Caldercraft
- First build
- (and 3 more)
-
I certainly found the bow and stern filler blocks useful for the planking in those areas. I don't think I could have done without them. Tony
- 1,039 replies
-
- 1
-
-
- ballahoo
- caldercraft
- (and 2 more)
-
Many thanks, David and Dirk. You can see how much I've been picking up from you and the others who have been so helpful in getting me started. I'm waiting for your rigging to begin on the Sherbourne, Dirk, so I can pick up hints on that as well before I have to start on mine -- so you'd better get cracking! Tony
- 269 replies
-
- 3
-
-
- Caldercraft
- First build
- (and 3 more)
-
Ha! A scroll saw! Now that has to be next on my list -- when I get to scratch building, though, may be in 5 years' time. Tony
-
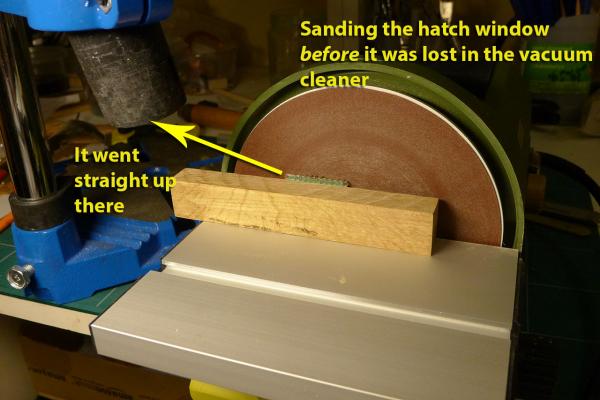
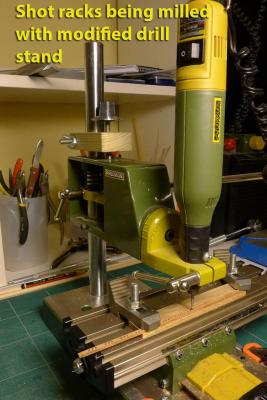
Thanks, Kester. Certainly no need to be envious when your builds are so beautiful. It may well be that your focus on a simple modelling space gives you a similar focus on the perfection of your builds. You're quite right about keeping tools simple. Underhill was a great champion of the card table and basic tools. I too had hoped I would avoid buying the nice new electrical aids (saw, sander, wood lathe) but I succumbed to the temptation as I kept being frustrated by my inability to use simple tools. I am also very aware of the fact that other modellers have been doing this for much longer than I have (or are people who've worked with tools and wood throughout their lives), and so have had time to build up their skills. In my case, now that I am about to be 67, and I haven't had such a lifetime of experience, I reckon the time available to build up those skills is limited -- even though I would like to develop those same skills. So it's all a bit of a balance. Two examples of my failure: (1) keeping the depth of the hollows in the shot racks constant (with my modified drill stand the depths are now constant). I can envisage being able to do it otherwise, but it was so much simpler to use a drill stand. (2) sanding exactly parallel to a surface. I know I could build jigs to achieve flat sanding, but again it was in the end more convenient to buy a sander. All the same, I'm glad you liked the biscuit tin -- even my wife approved! These simple solutions are definitely the ones that are the most enjoyable. The machinery is just luxury -- although it is also fun learning the skills involved in operating it properly. Tony
- 269 replies
-
- 4
-
-
- Caldercraft
- First build
- (and 3 more)
-
It was lovely to start up my computer this morning and find these nice comments and likes -- so thanks Gregor, Eamonn and Jay! As I keep saying, the continued exploration of others' work and the thinking I have to do to guess how to achieve the results are possibly the main factors for me in this hobby. Great fun and continued stimulation to keep the old brain ticking over. Tony
- 269 replies
-
- 1
-
-
- Caldercraft
- First build
- (and 3 more)
-
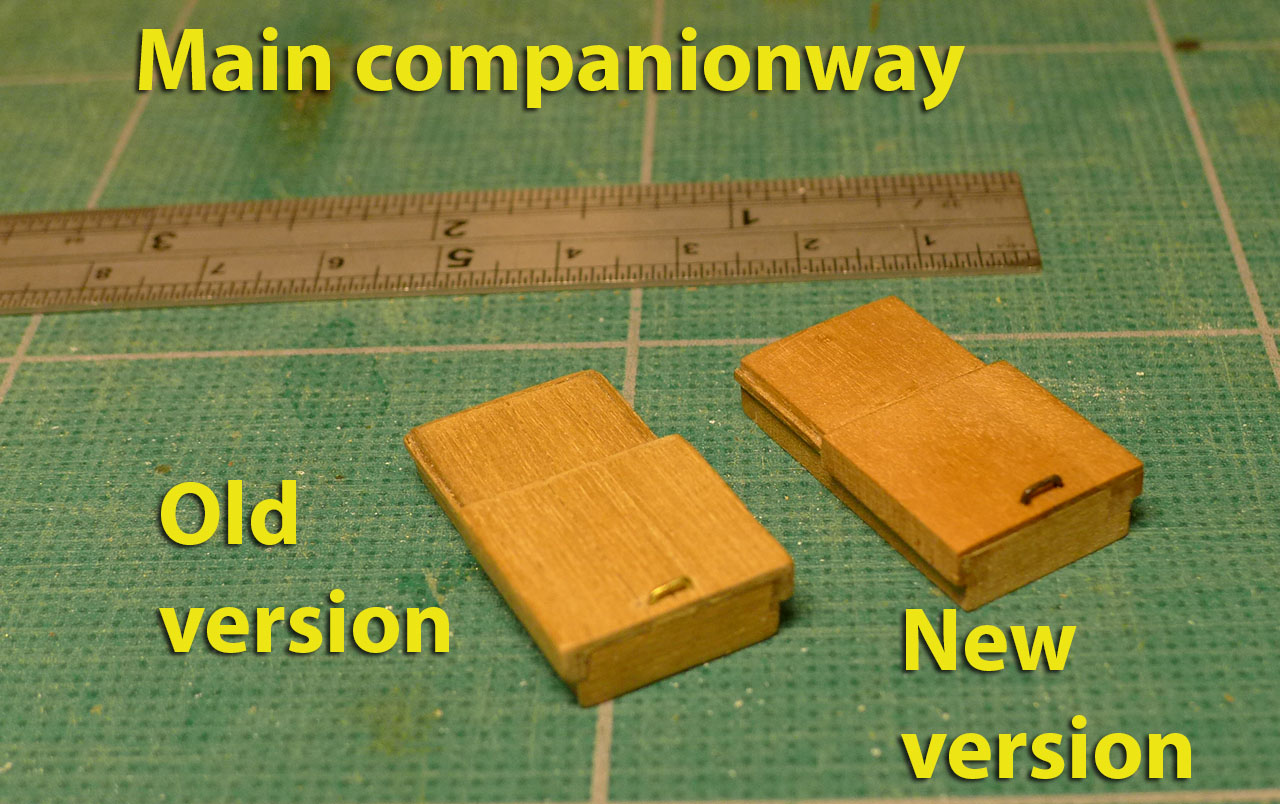
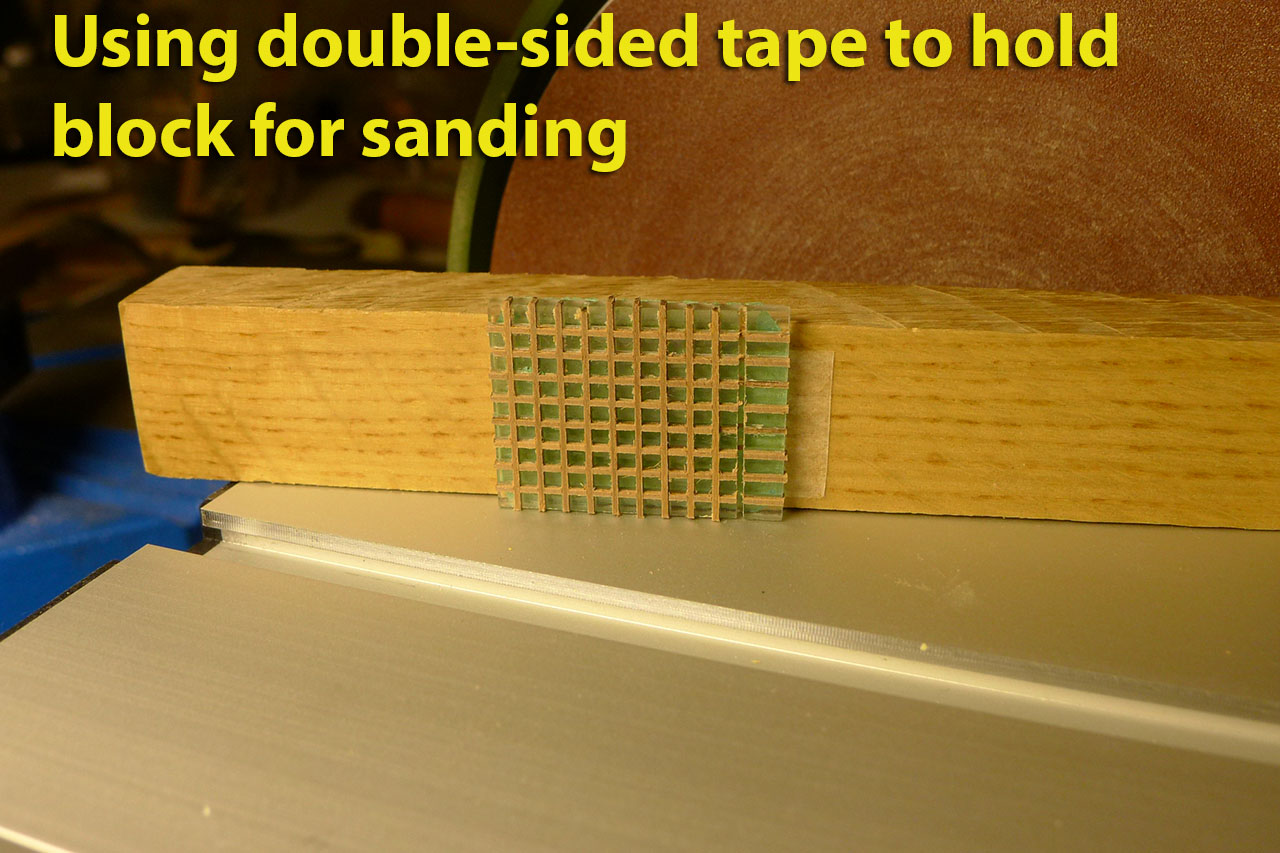
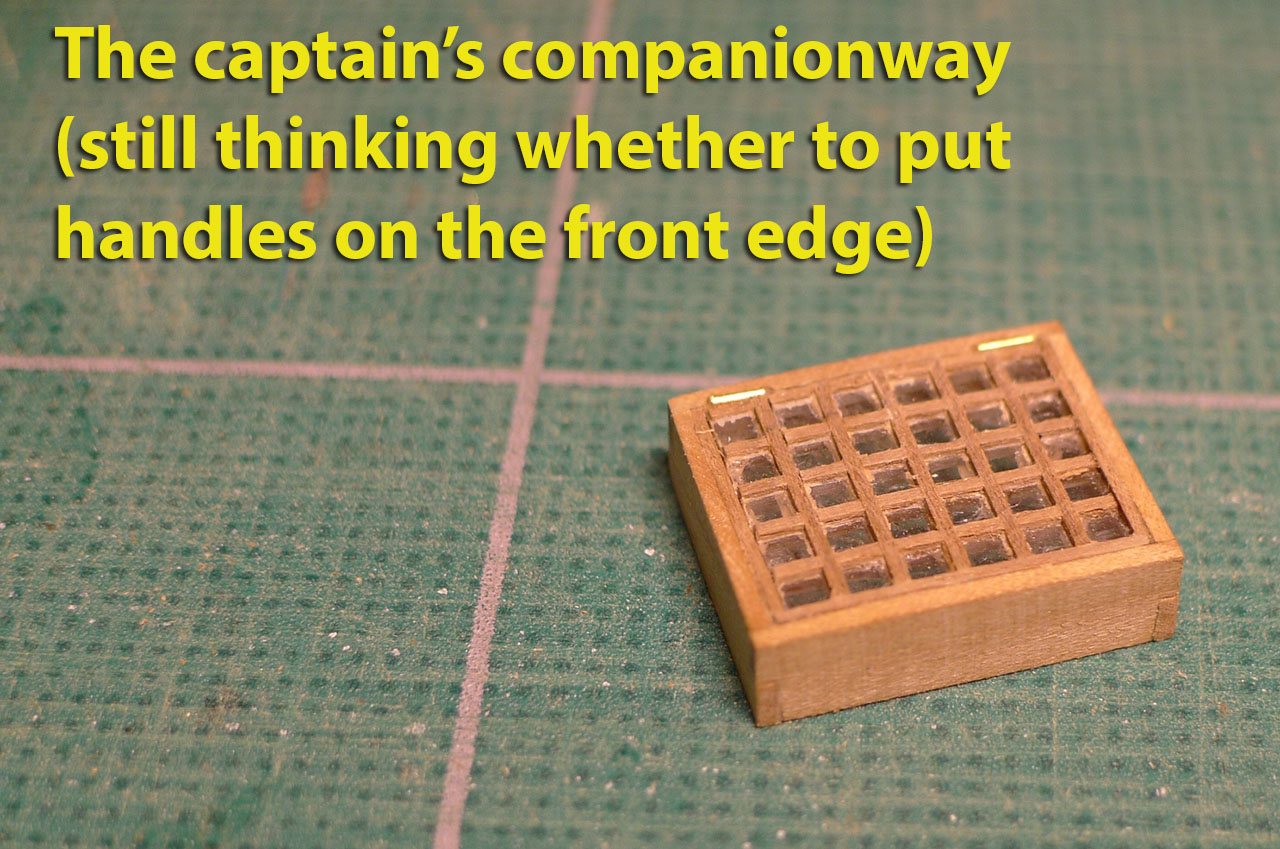
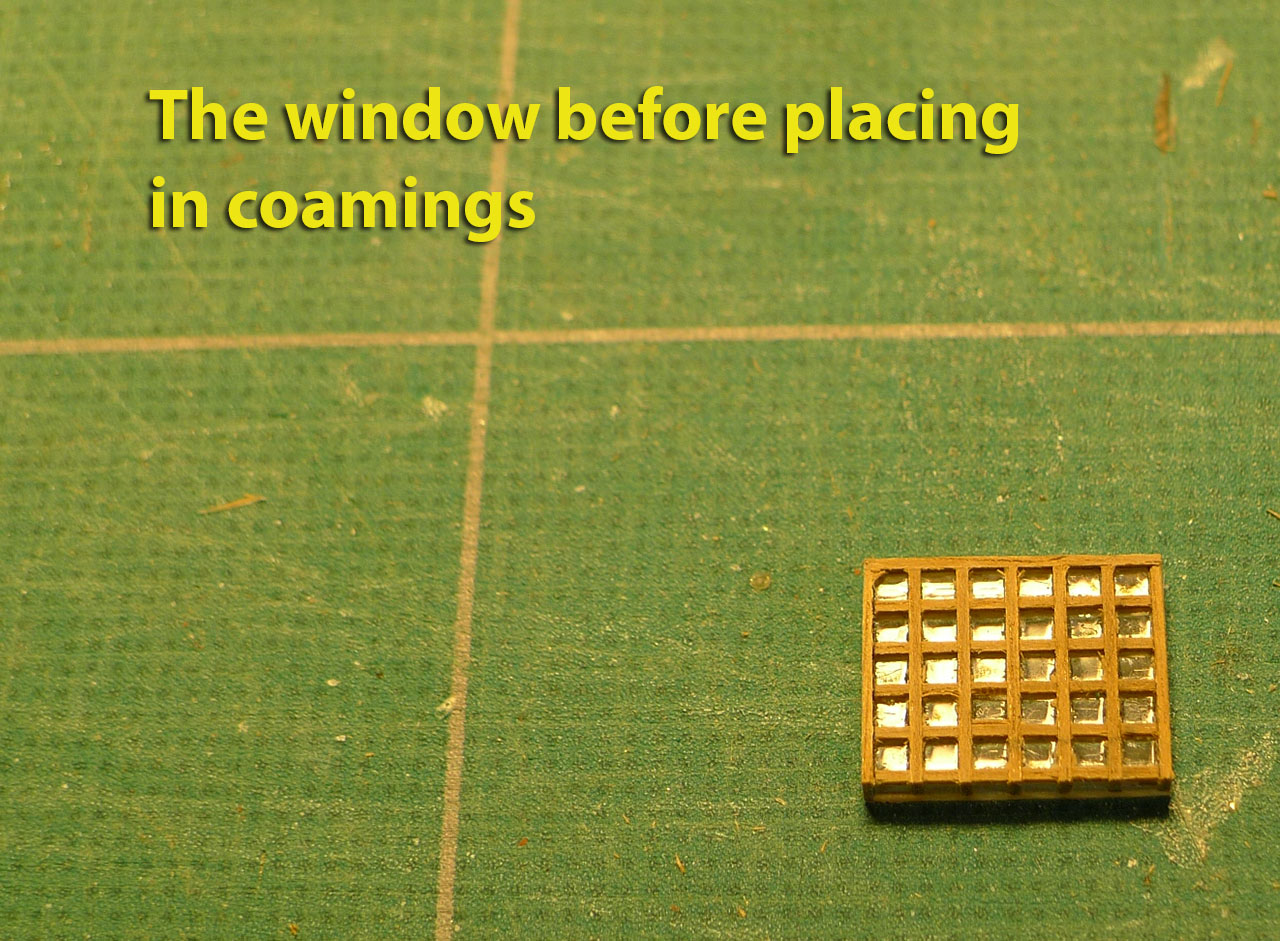
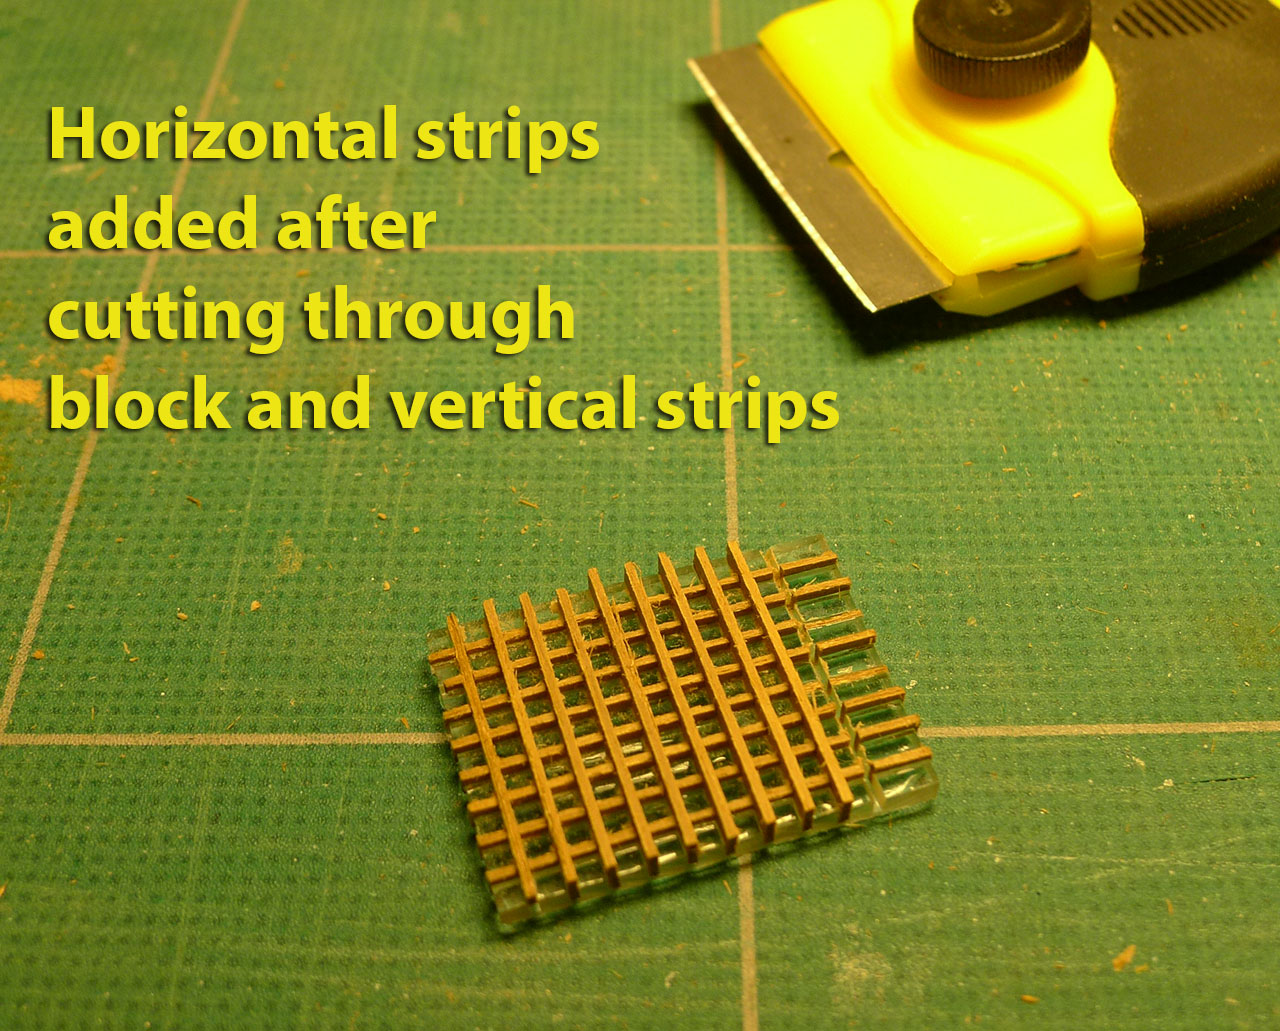
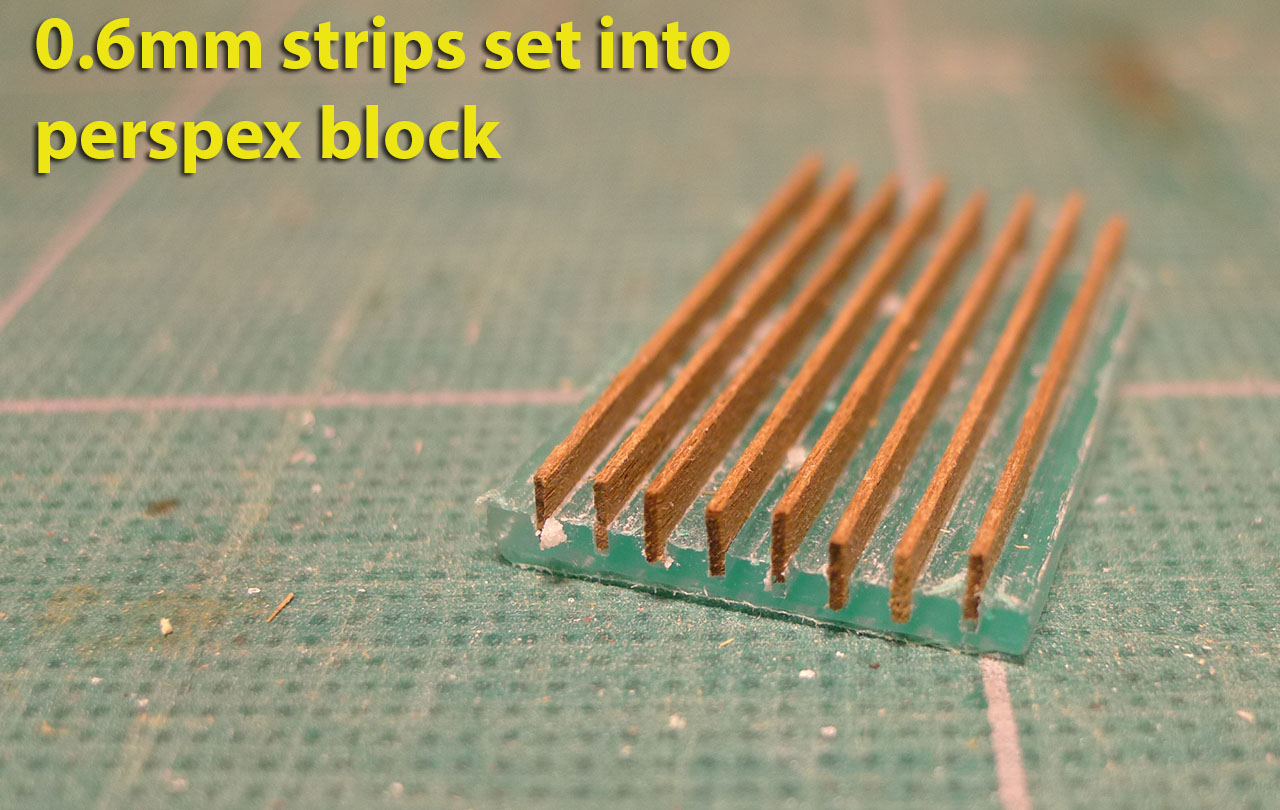
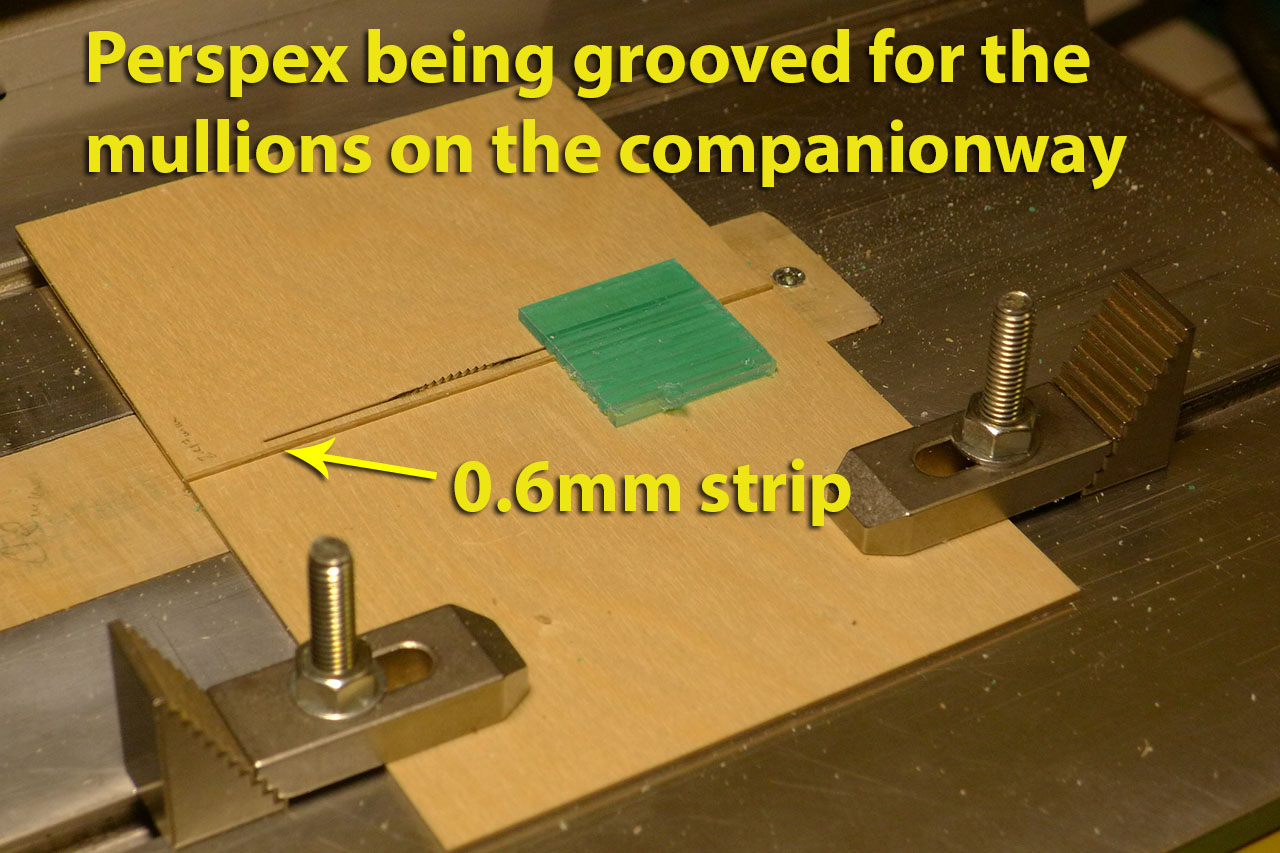
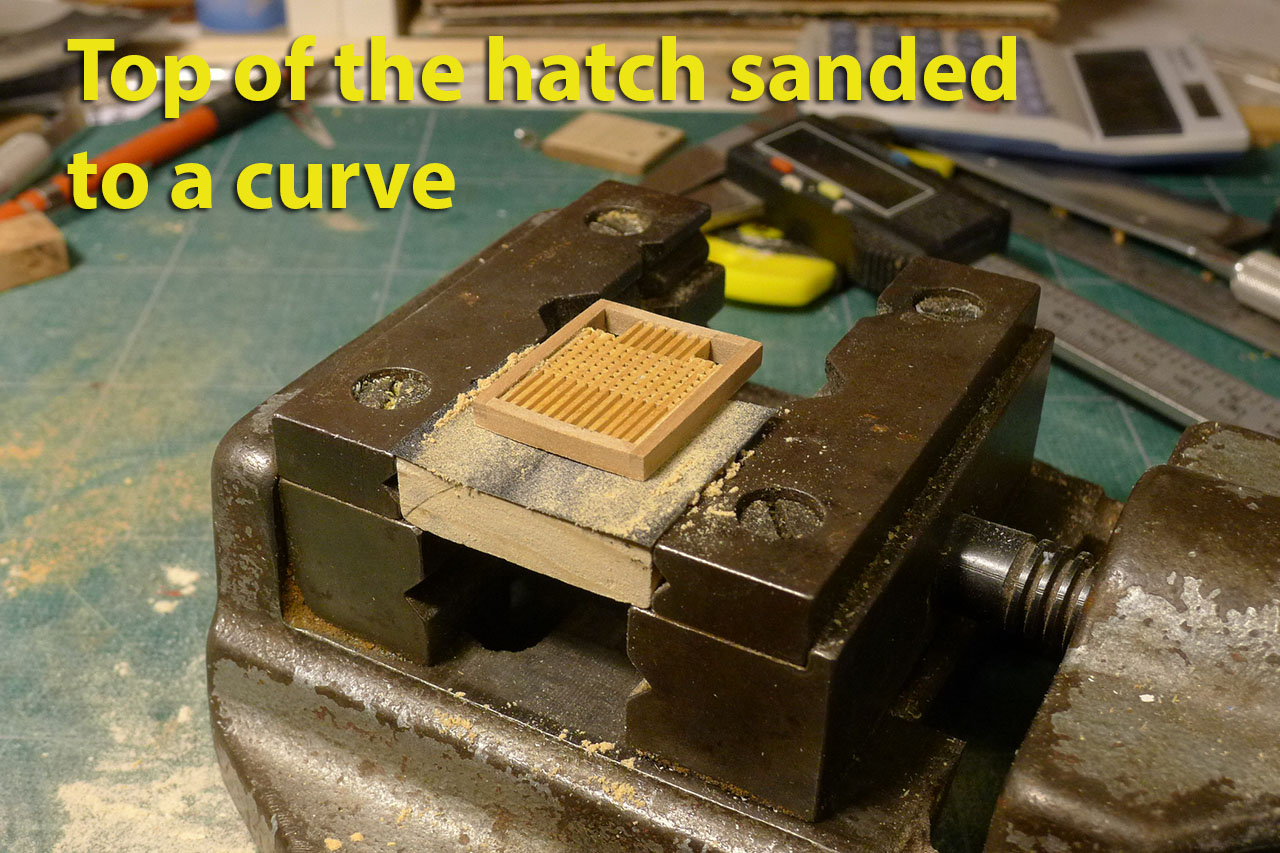
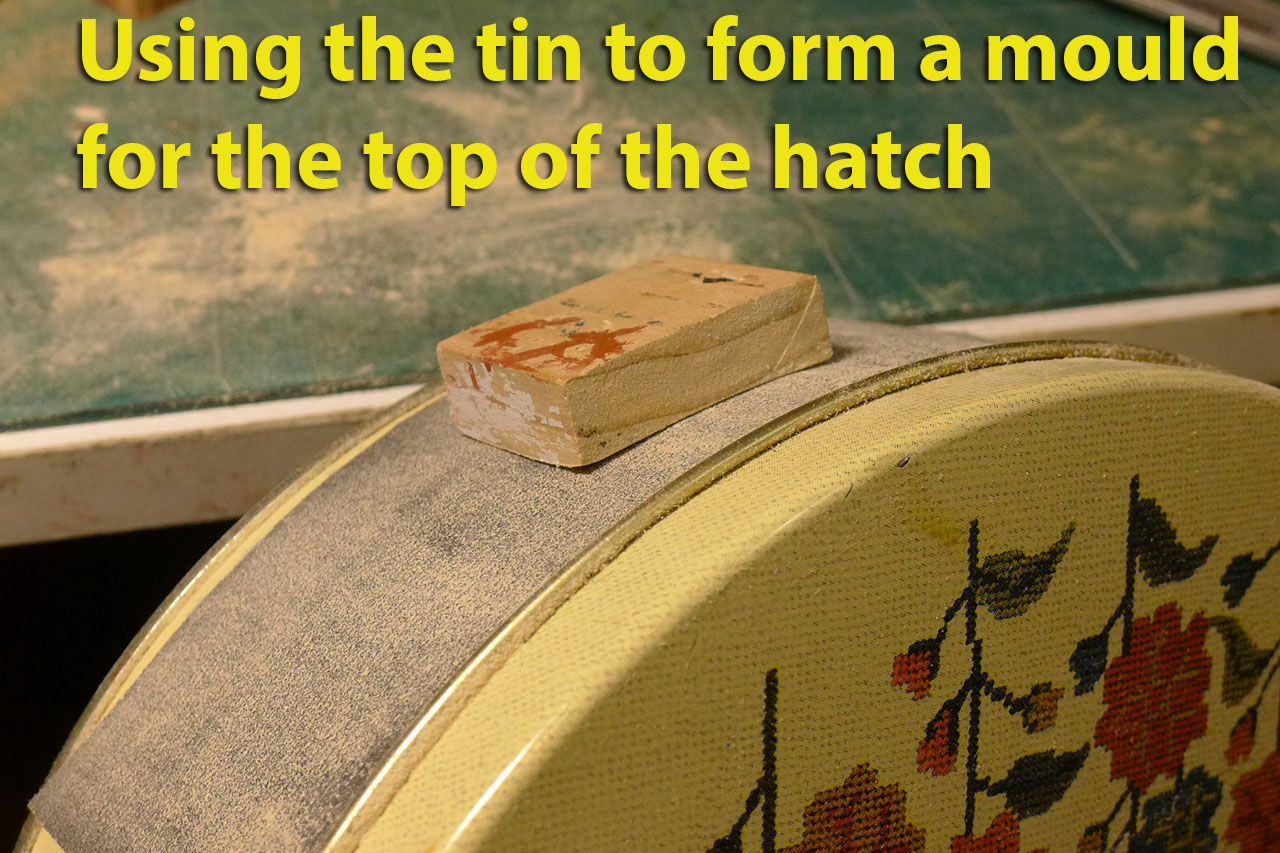
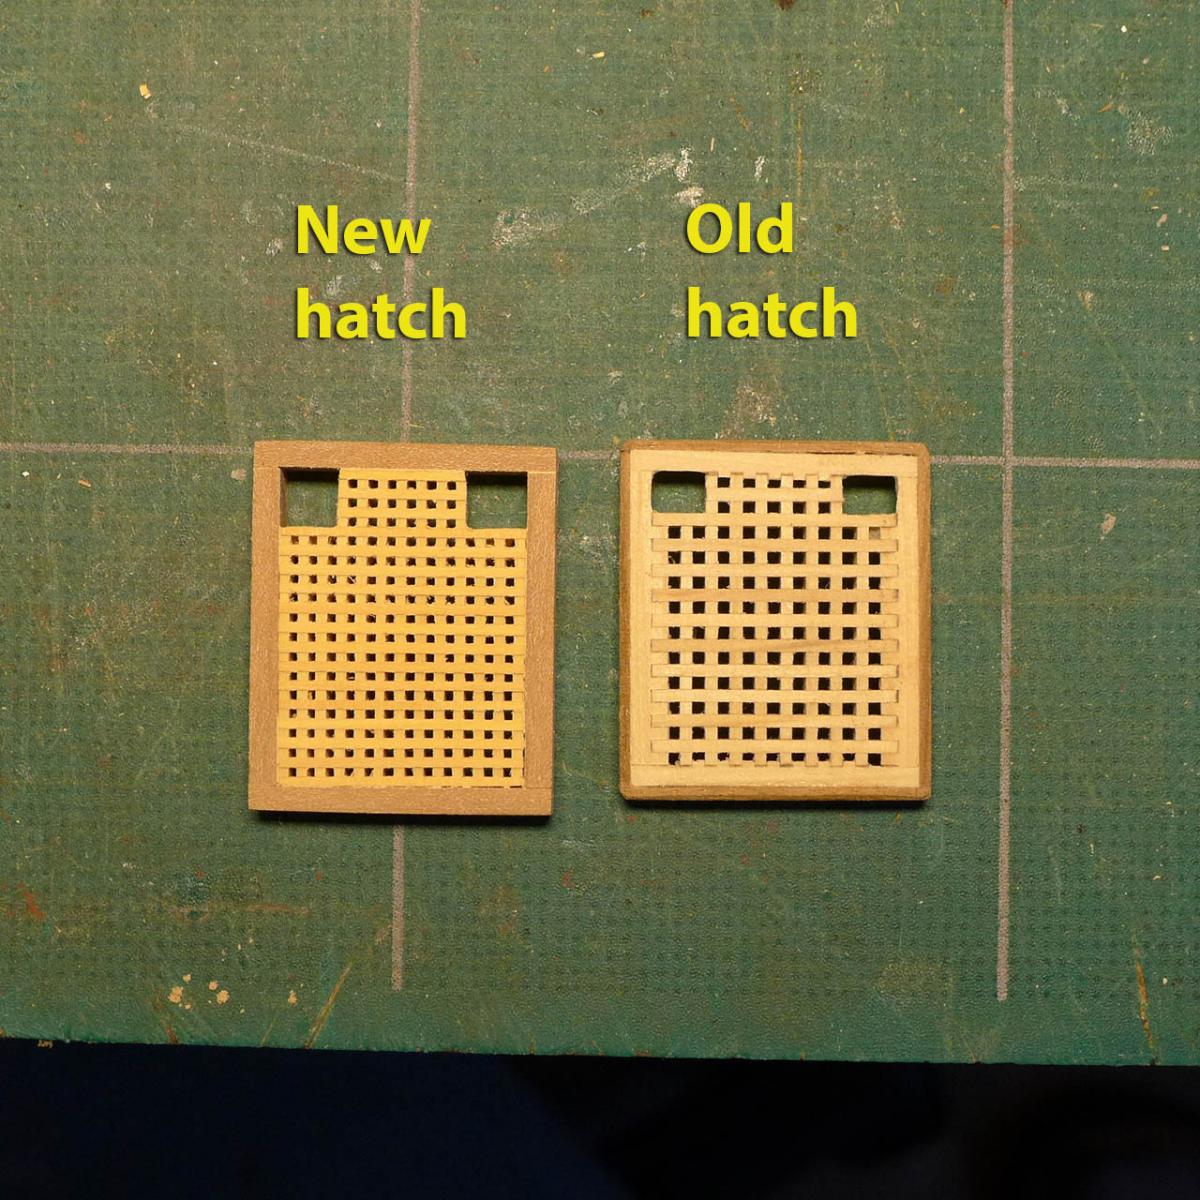
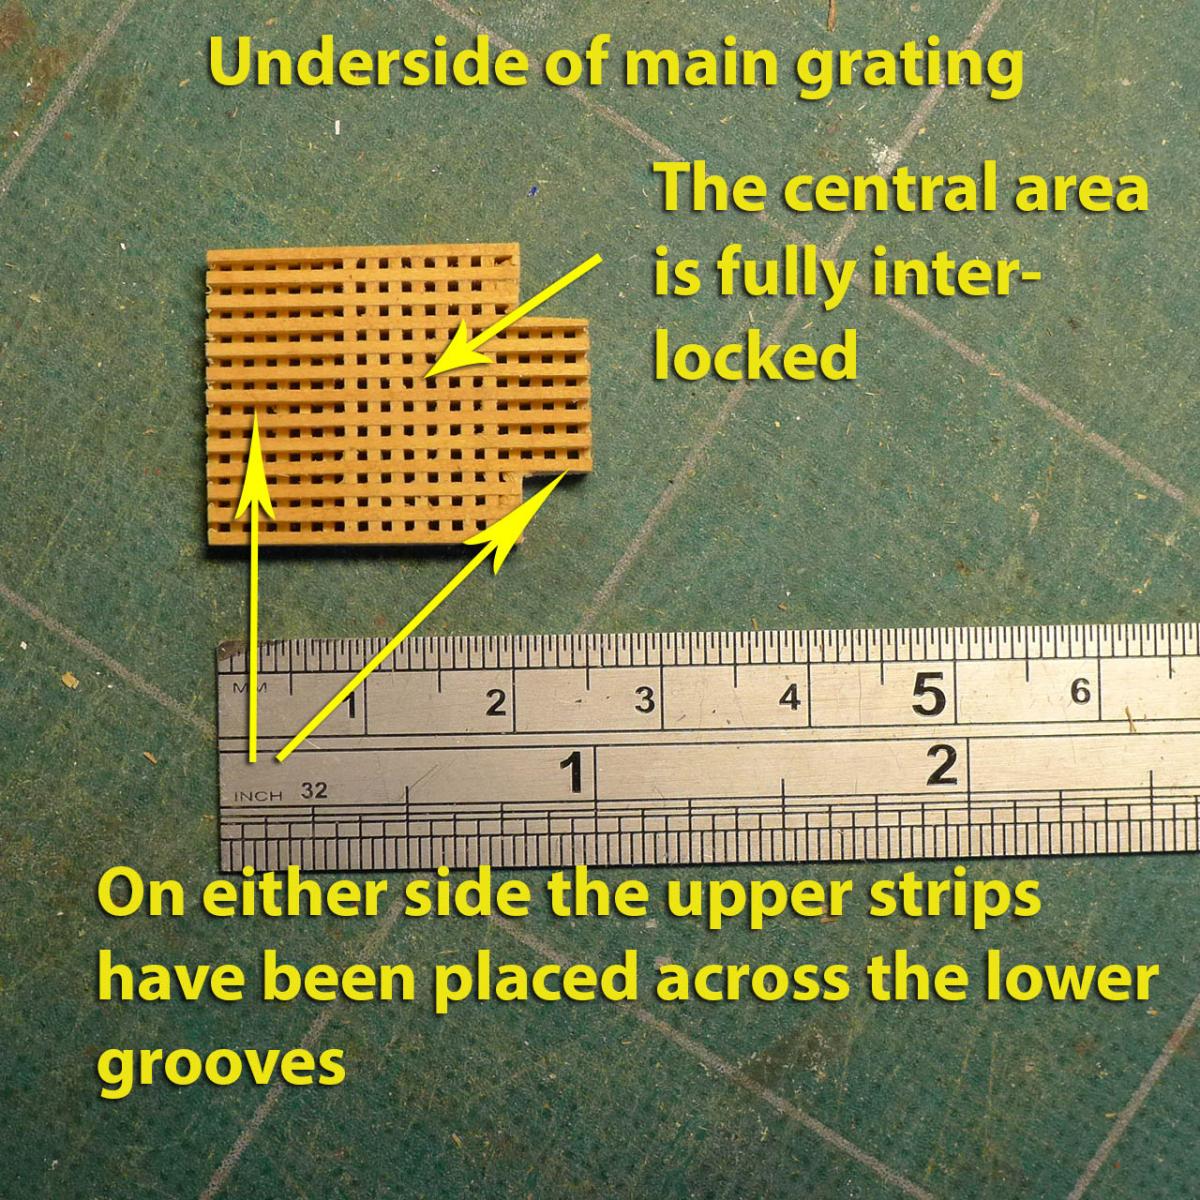
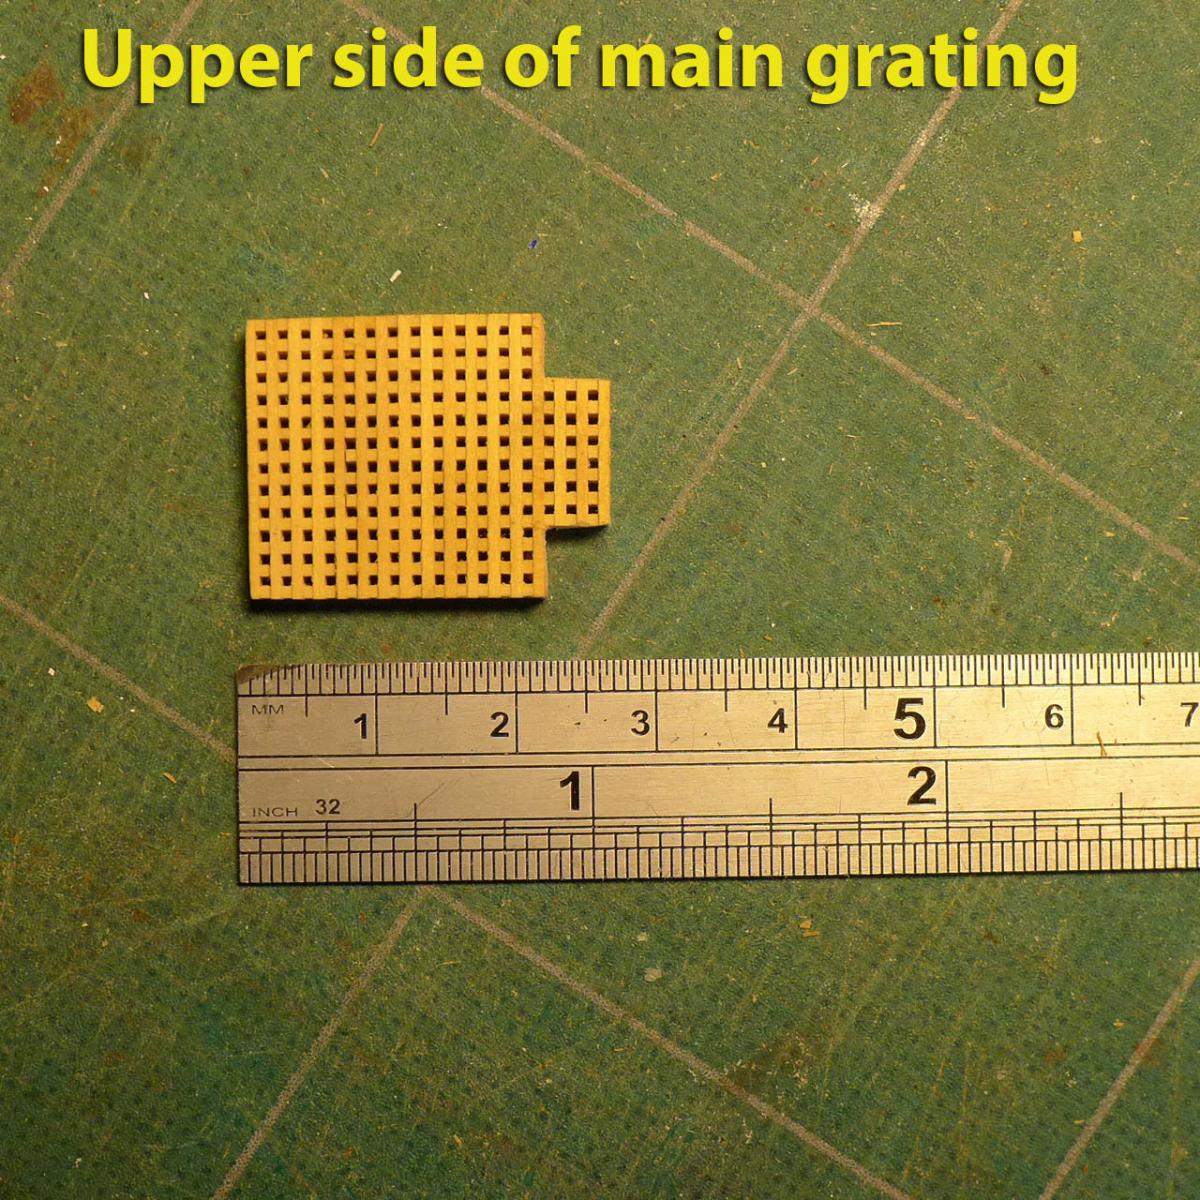
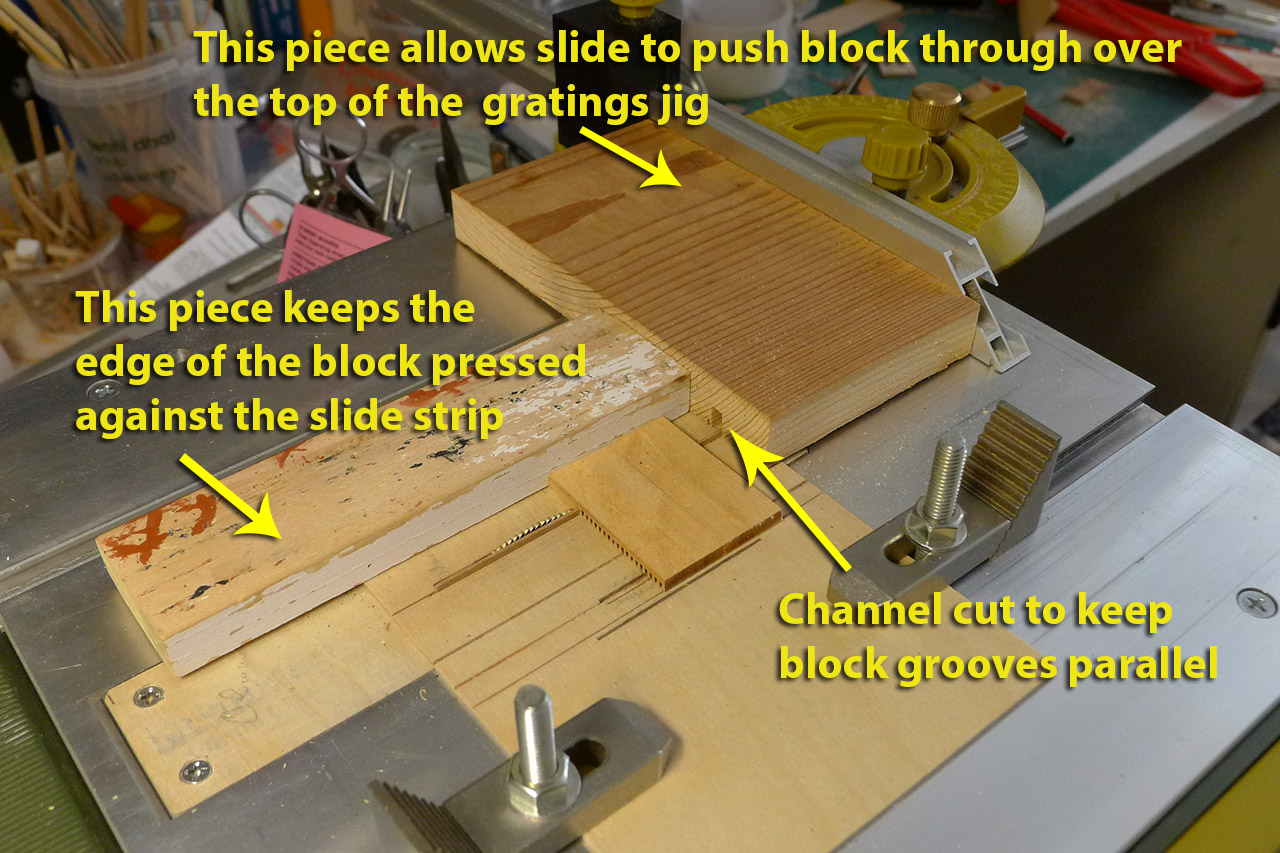
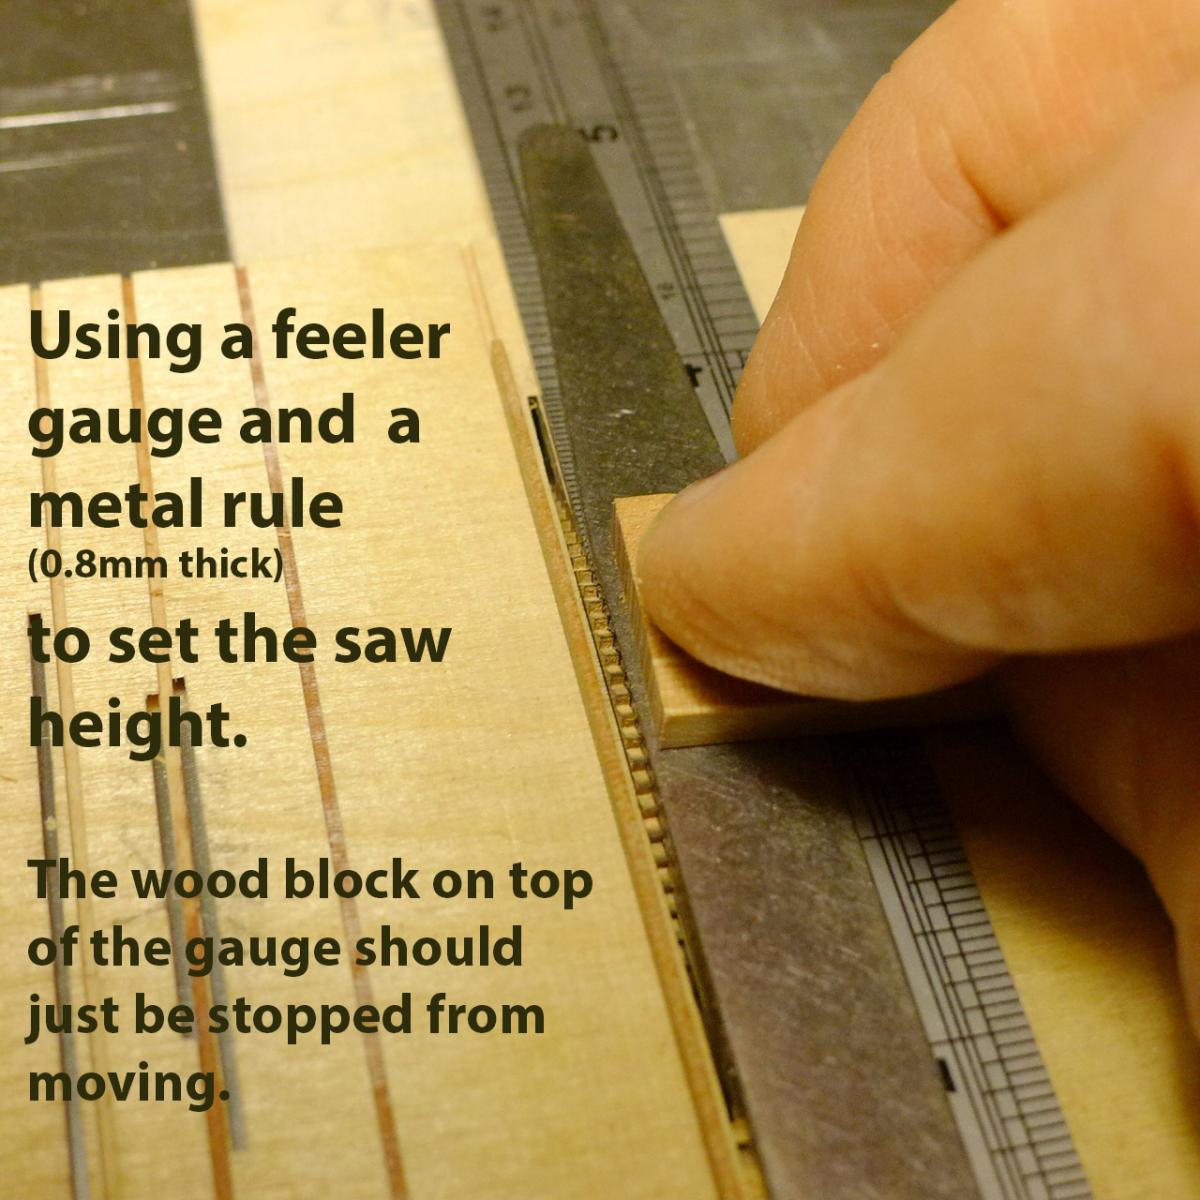
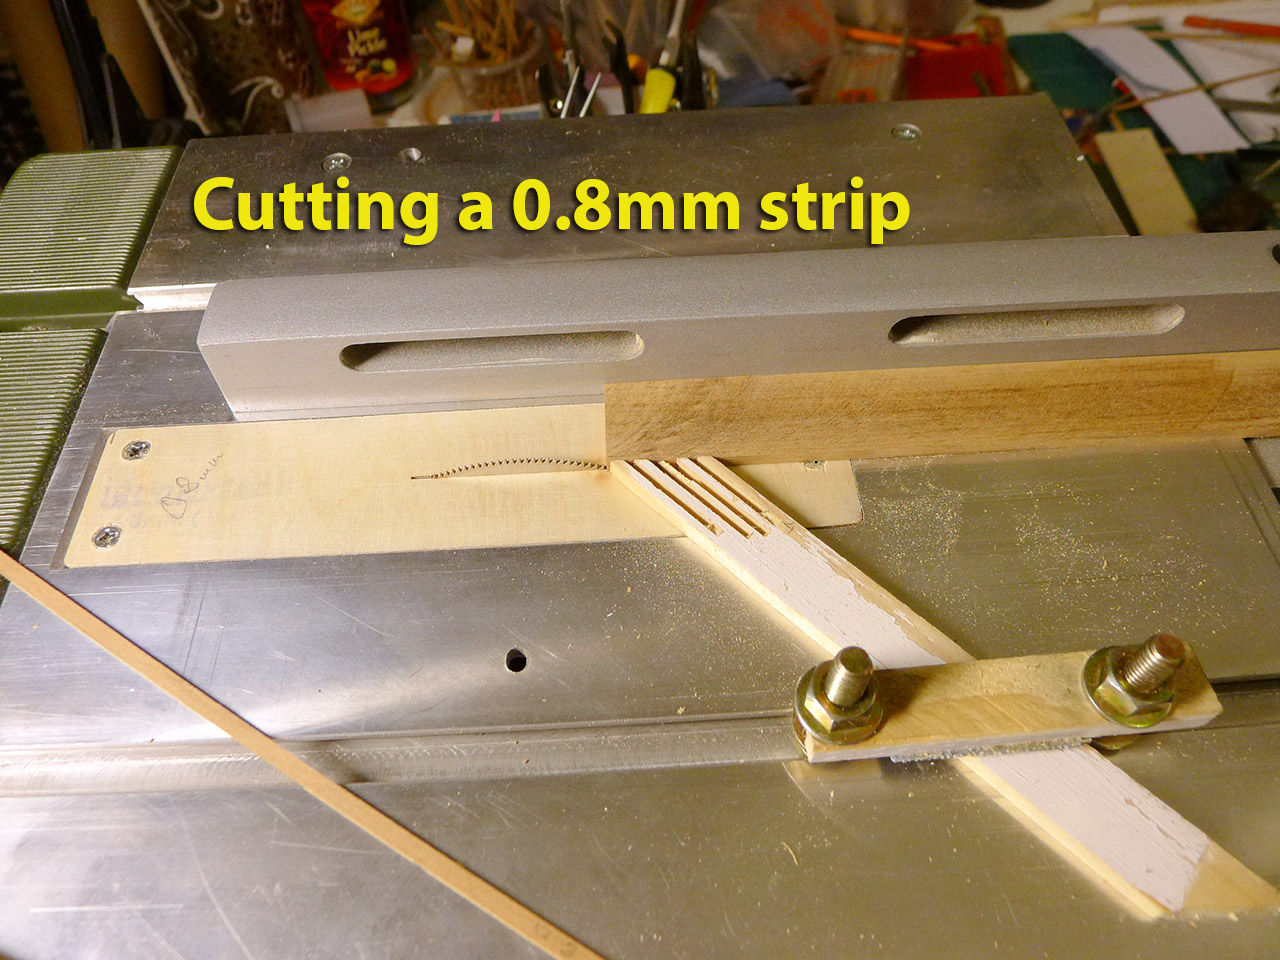
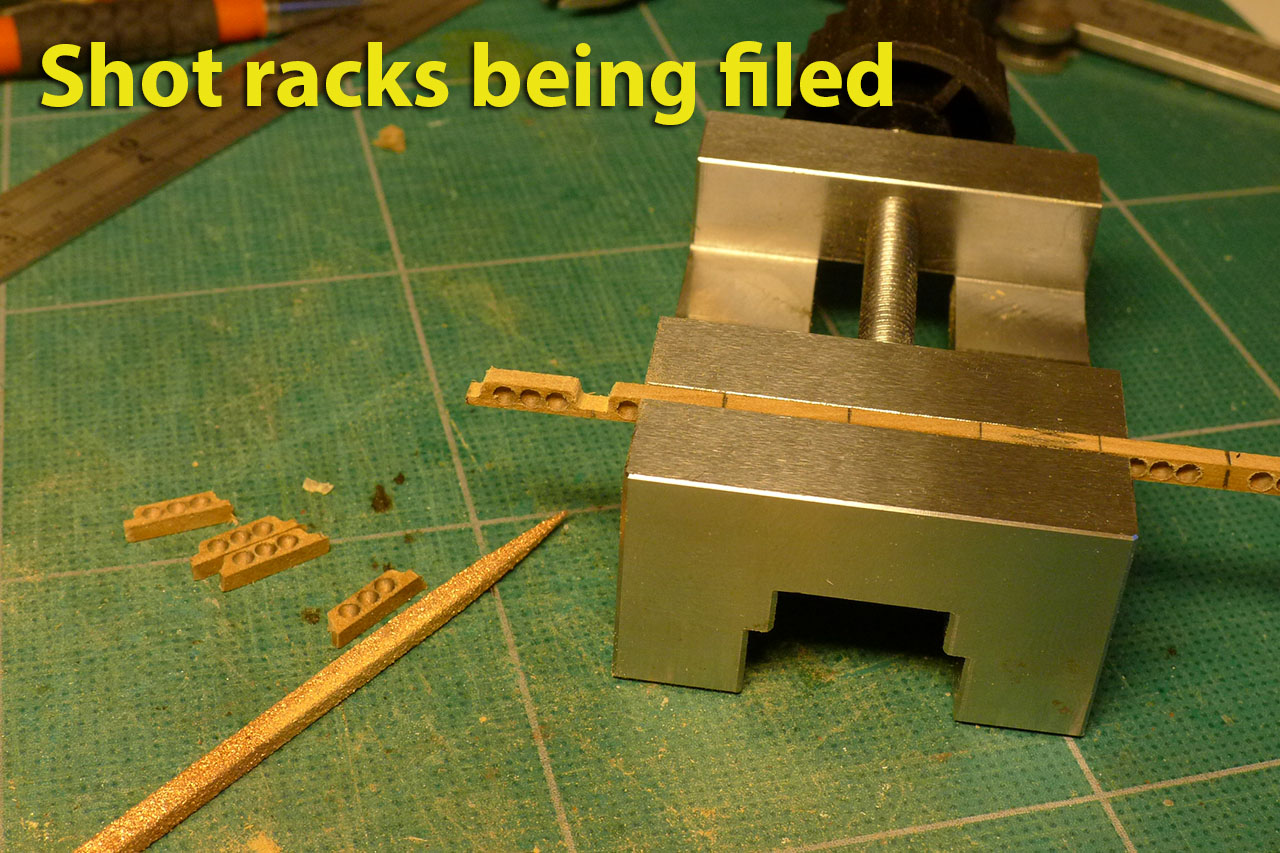
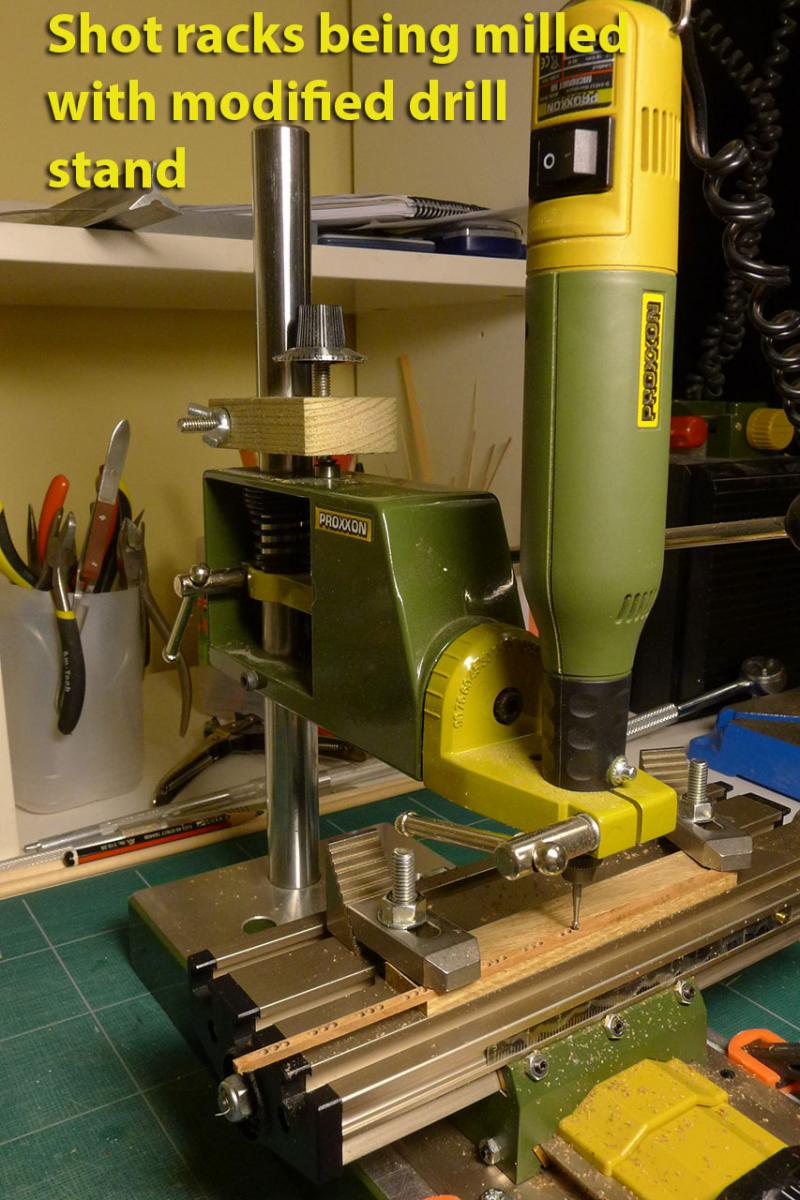
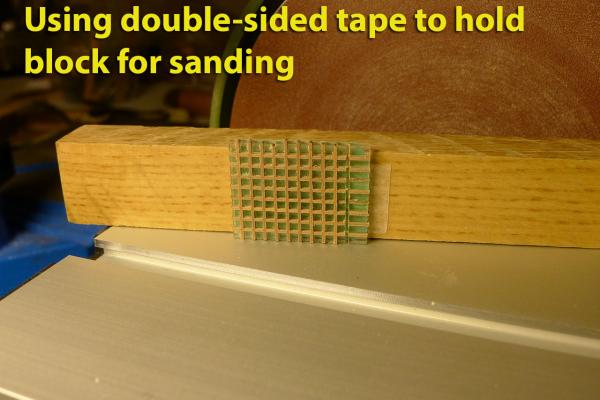
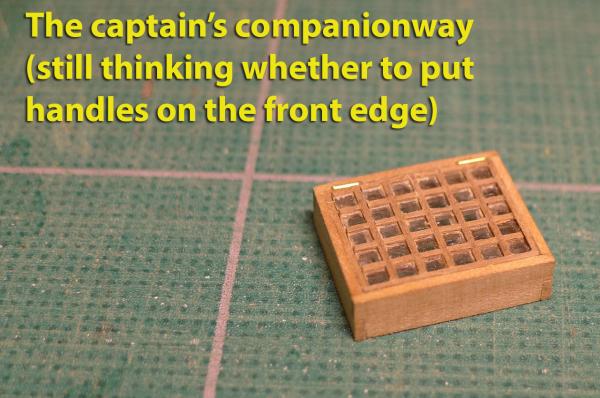
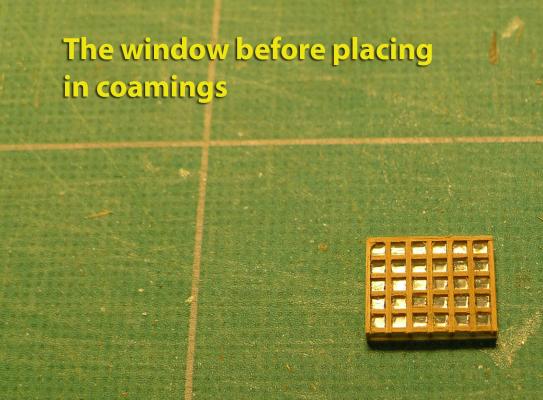
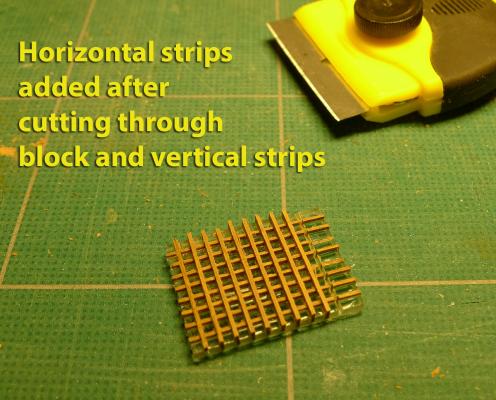
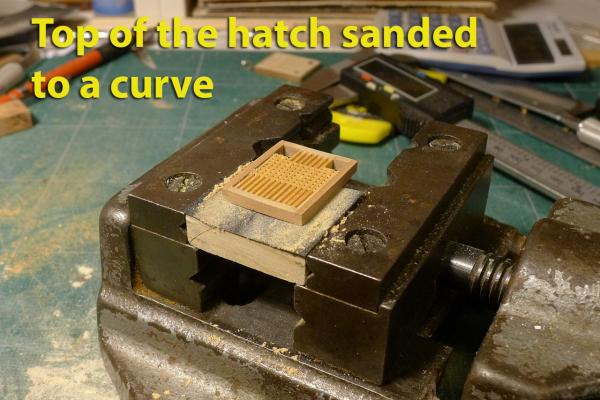
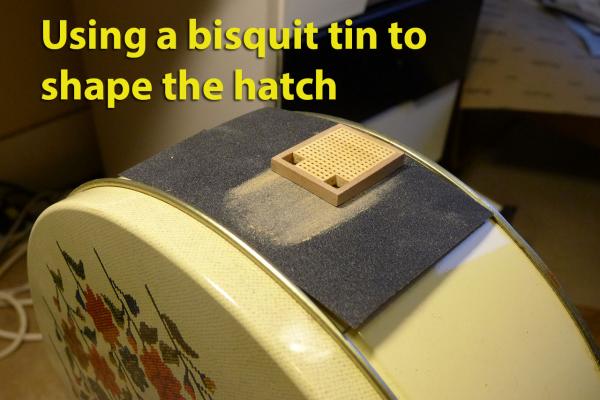
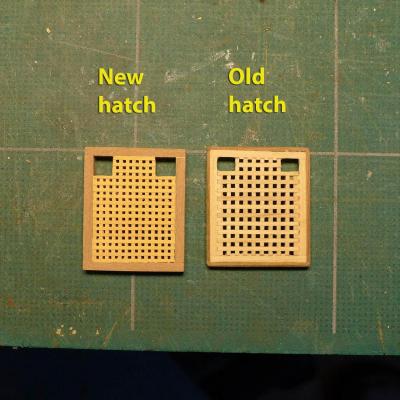
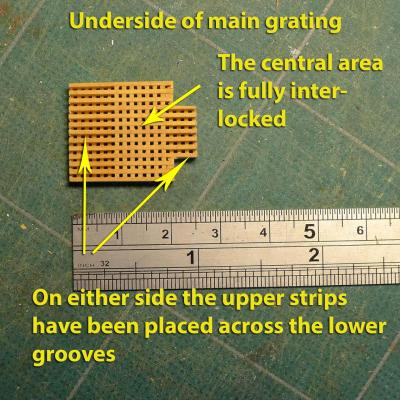
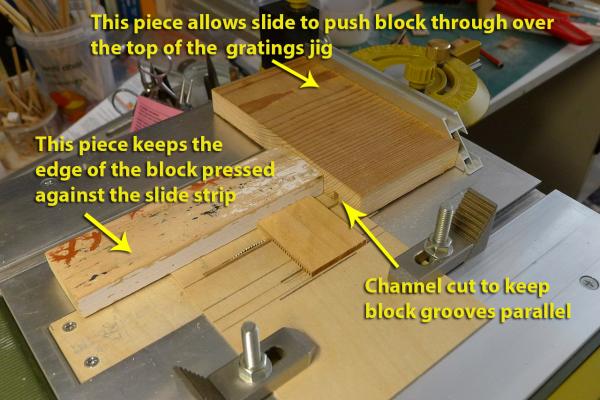
I had started on the channels and deadeyes last month, but was distracted by the continuing discussions about mills. I was sure that there must be some way of modifying my drill stand to act as a mill, and sure enough, after a lot of web searching, I found a railway hobbyist who had done exactly that with his Proxxon drill stand. He was kind enough to share the details and provide a sketch. So with the sketch in hand, I adapted my drill stand as you can see if you look at my positng on the forum about this (see ‘How to modify Proxxon MB 140 drill stand to act as mill’ at http://modelshipworld.com/index.php?/topic/4539-how-to-modify-proxxon-mb-140-drill-stand-to-act-as-mill/?p=130660). This in turn led me to buy an x-y table for the drill stand as well. With all this thinking about better precision, a glance at the deck and looking at all the wonderful work on this forum showed me I could do a lot better with the guns, the shot racks, and the hatches. So why leave learning the skills to do better until later? Answer: do them again, but better if possible. Replacing the shot racks So the first thing to do was to remove all the shot racks. Unfortunately I had used epoxy adhesive to stick them to the walls. Despite much soaking in Isopropanol, they refused to give way, so I had to attack them with chisel blades. They came off, but it was clear I’d have to replace them as small patches of wood were also torn off the walls at the same time. That done, I cut some new strips of wood from some pear pen blanks using my Proxxon FET saw (with which I am at last really comfortable and pleased with the precision it can offer) and loaded them on to a jig that would hold them on the x-y table. That allowed me to mill a nice series of three hollows at a time spaced by 0.5mm, leaving gaps between each three hollows to file out as individual shot racks. I finished them off with a face plate, and painted them. I again used the x-y table to drill holes for the gun bolts that would go into them, and then with some of the salvaged bolts and rings from the previous racks, installed the bolts. The racks were then set aside until I had finished more of the other deck furnishings. Replacing the hatches – (1) the Gratings I had for some time been thinking about learning how to do gratings for myself – I had read a lot about the standard technique of using a circular saw, but had been somewhat mystified as to how to get a groove exactly at the right spacing from the saw blade. Of course, the answer was obvious the moment I decided to put blade to plywood panel. The way to achieve a perfect spacing was simply to start by cutting the slot in the panel by clamping the panel to the table top and having one edge of the panel firmly against the fence. Then, once the slot was cut, the panel was turned over and a spacer of the correct width was inserted between the panel and the fence. I had decided that I’d go for 0.8mm strips for the gratings with a corresponding hole size of 0.8mm in order to achieve a scale size of 2” for the gratings (it’s a 1:64 model). The kit gratings are about 1mm and they just looked a bit too big to my eye. Luckily I have a 0.8mm saw blade with no kerf, and after several attempts using a 0.8mm gauge from an old set of feeler gauges I had, I managed to cut 0.8mm strips that I could use in the slot. One little hint that others might find useful is to set the depth of the cut using feeler gauges until you can just feel the edge of the saw over the edge of the gauge as you raise it through the slot. I had especially enjoyed Dafi’s account of his trials making gratings (at http://modelshipworld.com/index.php?/topic/1449-making-gratings/?p=29923), and I went through similar set-backs. My main problem was making sure the grooves for the gratings were parallel. Given the grooves were 0.8mm, and that I was pushing the block of wood by hand over the blade, minute variations in the pressure I was using resulted in (1) increasing deviation from parallel as I went further into the block, and (2) a very small variation in the spacing between cuts. I found that a deviation of 0.01mm would translate into blocks that would have slightly different spacing, and that this would result in gratings that would only interlock for about 7 or 8 bars. To overcome the problem of variance from parallel cuts, I used a block of wood that covered both sides of the spacing bar as well as the blade. This was then pushed through by the cross-slide/ angle stop. I never quite managed to make grooves that were perfectly spaced for more than a couple of centimetres, but I found that that did not matter – the only grating that was large was the main grating and I found all I had to do was make up the central section as a cross hatch and then simply add ordinary strips of the right depth to the remaining outer grating grooves. Another recent purchase was a Proxxon sander. This I really find valuable. It allowed me to finish off the coamings around the gratings with ease. Curving the gratings I have seen that others bend their gratings using heat. I wasn’t quite sure how I’d do that and then put coamings round them. So I used an old biscuit tin first to shape the underside of the gratings, and then to shape a mirror mould so that I could curve the top of the gratings. Replacing the hatches – (2) Main companionway It has been said that the Alert’s deck plan would not work for the Sherbourne because the Sherbourne is smaller and using the hatches from the Alert would make the deck far too cluttered. That’s probably true, but I liked the look of my old companionway, so I just re-did it using pear wood from the pen blanks I had bought off eBay. It’s a bit better now, but not enormously so. Replacing the hatches – (3) The Captain’s companionway Much more interesting was the aftmost companionway. Others have preferred a tall structure, but I thought I’d stick with the Alert’s glass-covered one – mostly because I wanted to try my hand at using Perspex and embedding mullions in it. I didn’t like the rather tatty look of the one I first made, especially as I had CA glue marks on the plastic sheet I had used for the window panes. At first I tried using my modified drill stand to mill the grooves for the mullions in the Perspex. However, it soon became clear that with my drill at its very high speed the melting Perspex on the mill bit made the process unworkable. Even worse, I snapped my 0.8mm mill bit when trying to remove it from a solidified ball of Perspex. However, it struck me that I could use the skills I had learnt for the gratings. After a bit of experimentation, using a 0.6mm blade and making the necessary 0.6mm strip for the jig, it was relatively easy to slice grooves to a depth of 1mm in a 2mm Perspex block. With another bit of luck, I remembered that some 0.5mm strips of cherry wood that I had previously ordered were in fact 0.6mm thickness – so they made perfect mullions for the grooves in the Perspex. I first cut longitudinal grooves in the Perspex, then fitted the strips of cherry wood into those grooves (using small amounts of CA glue along the bases). These were sanded down to 1mm from the surface of the Perspex. The block was then rotated and the horizontal cuts were made with the saw using the same jig – though this time the depth of the cut was adjusted to allow for the extra depth made by the inserted longitudinal strips of cherry. With this done, the horizontal strips of cherry could then be inserted into the horizontal grooves, and the whole was then sanded down with the sander. The final touch was to mill a couple of slots for the hinges and to insert two 2.5mm lengths of 0.5mm brass wire into the slots. Watch out with the vacuum cleaner! I had rigged up a vacuum cleaner nozzle over the sanding machine as I found that was more successful at removing wood dust than the outlet provided for the sander. Unfortunately, the double sided tape I had been using to fix the companionway cover to a block of wood (to make the sanding more accurate and less dangerous) became worn and, as I was nearing the last bit of sanding on this rather precious piece, the vacuum cleaner simply sucked up the piece! So I spent a dusty 15 minutes taking the bag out of the vacuum cleaner and sifting through the dust until I found my precious tiny piece again. Still to come: Cannon Channels and deadeyes Tony


- 269 replies
-
- 13
-
-

-
- Caldercraft
- First build
- (and 3 more)
-
The keel clamp by Amati is nice but it is a bit expensive and a lot of modellers seem to get by quite well without one. I don't have one and can't say I miss having one. So maybe nice to have but not essential. Others may well disagree. Tony [edit] Advice that others often give on the forum is to start with what you have and then gradually add tools when you feel you really need them. That cuts down the drawers of tools that you may use only once.