
Jsk
-
Posts
267 -
Joined
-
Last visited
Content Type
Profiles
Forums
Gallery
Events
Everything posted by Jsk
-

Fokker D.VI by ccoyle - MPModel - 1/33 - CARD - TERMINATED
Jsk replied to ccoyle's topic in Non-ship/categorised builds
Late to the party as usual... However, my thought was that the mystery parts were a fairing for an instrument. The one in front curves above the deck for aerodynamic purposes, the one to the rear forms the lower curve of a depression into the deck allowing better view of the instrument. I've seen that configuration but I'm not sure on what particular aircraft. Still, it's shaping up to be a nice unique model. Even if it is half guess-and-glue. -
Huh! There are a few locations I haven't thought of for many a year! In 1980/81 I lived in Vallejo and worked for a contractor refurbishing mobile military shelters. I drove a pickup and towed the shelters across the causeway from Mare Island to the shop downtown and back when they were finished. Vallejo was pretty blue-collar at the time. Mare Island was still active though I don't think there was much going on. I was excited to spot the USS Nautilus there--even then I was something of a nautical nerd. IIRC, Nautilus had been decommissioned and was having the reactor removed. I'm sure the town has changed over the past 45 years! I'm sure the Serv-O-Matic will do you proud!
-
Inspiring as always. I know the Card Purists would run me out of town on a rail but I really like the look of the Syren blocks.
-
Yeah... not a pleasant man! I wonder if he's leaning against a gibbet? If not, I think that would be an appropirate mod.
-
'Sailing Alone Around the World' should be required reading for all MSW members. One of my favorite books of all time. I'll be enjoying watching your build.
-
Fokker D.VI by ccoyle - MPModel - 1/33 - CARD - TERMINATED
Jsk replied to ccoyle's topic in Non-ship/categorised builds
Is this really a design issue or a production one? Maybe the manufacturer simply used the wrong thickness of card for the laser cut parts? Still, a better design may have helped identify the problem earlier rather than after constructing the cockpit. A rare plane. I'm not sure I've ever seen another model of a Fokker D.6. Looks like a Dr.I fuselage mated to D.VII wings. -
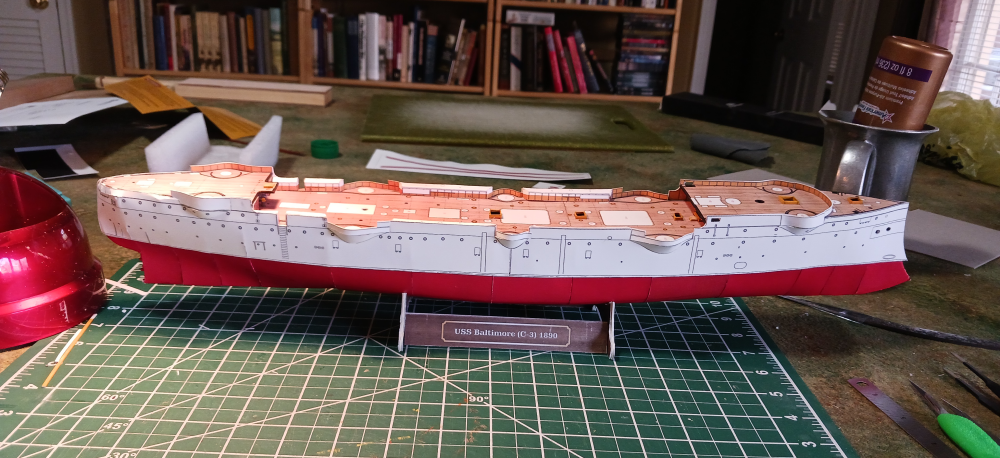
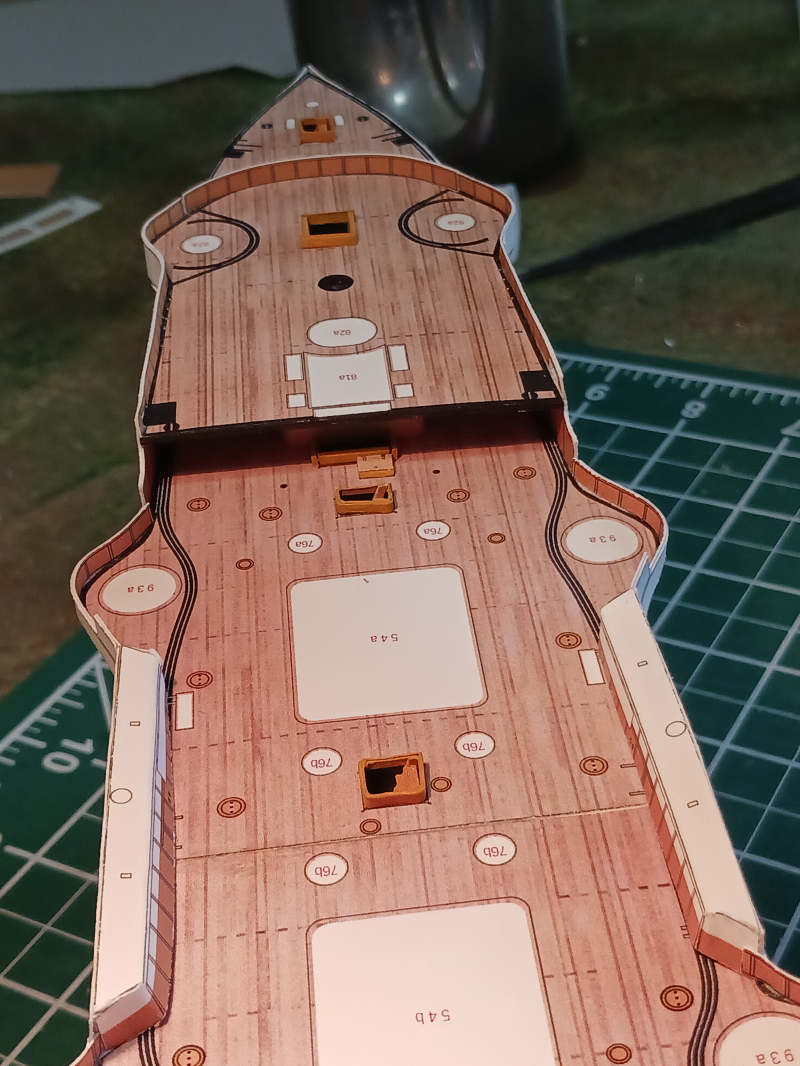
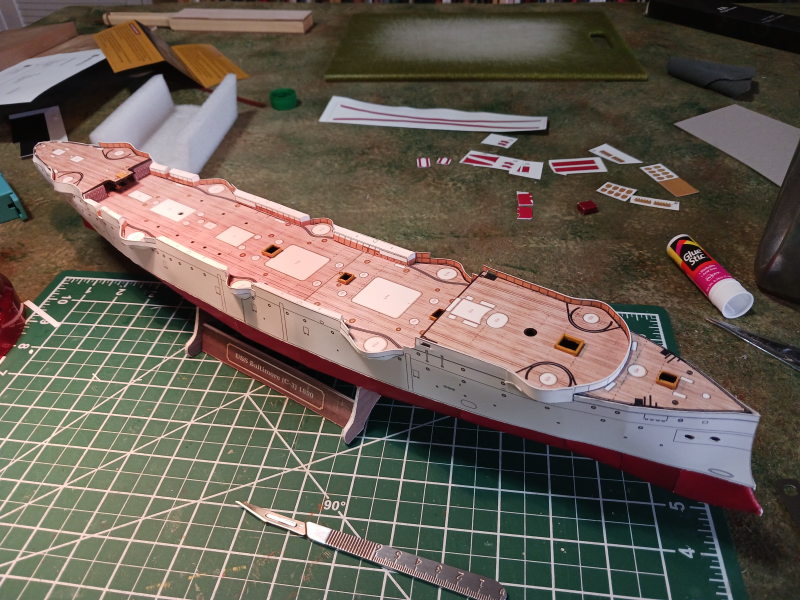
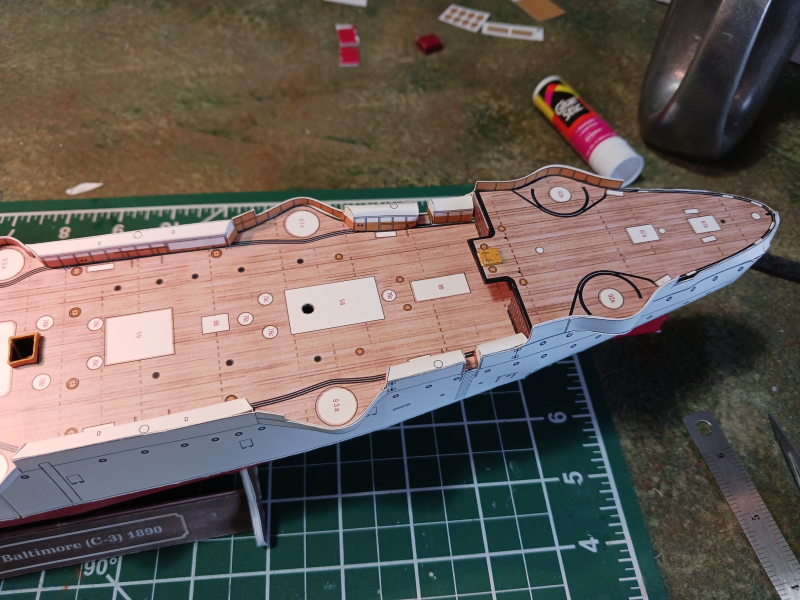
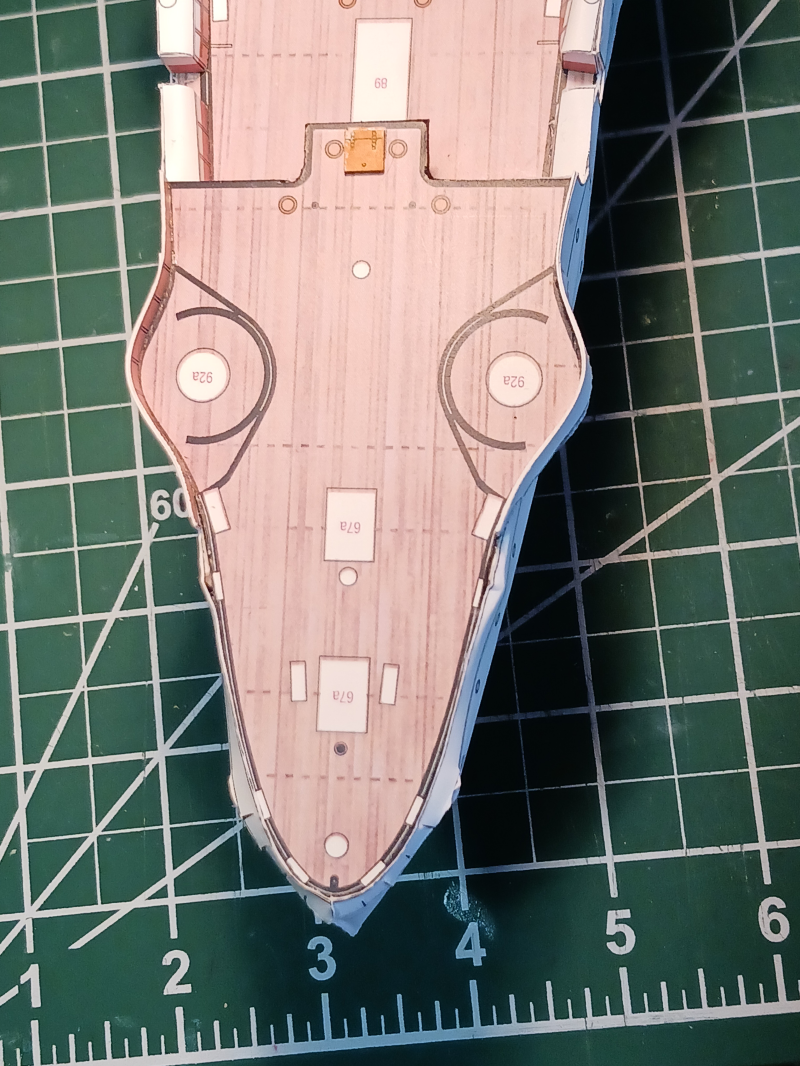
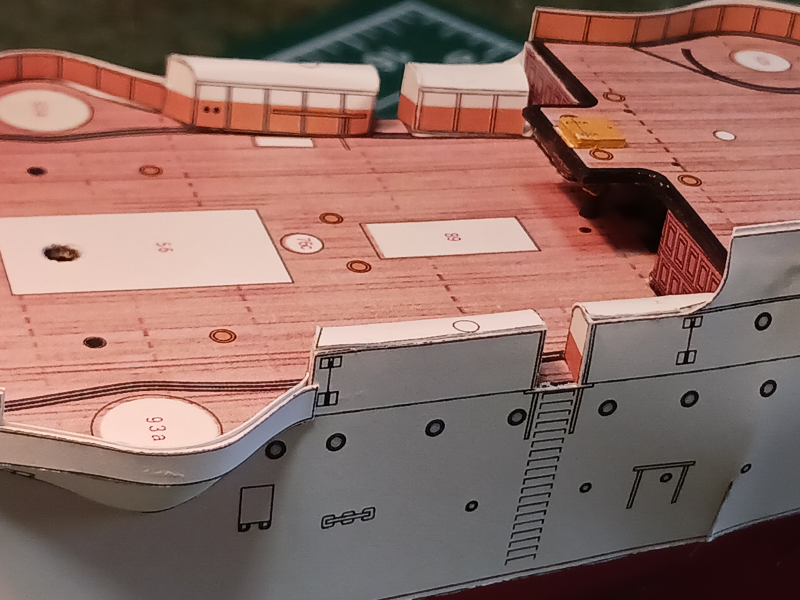
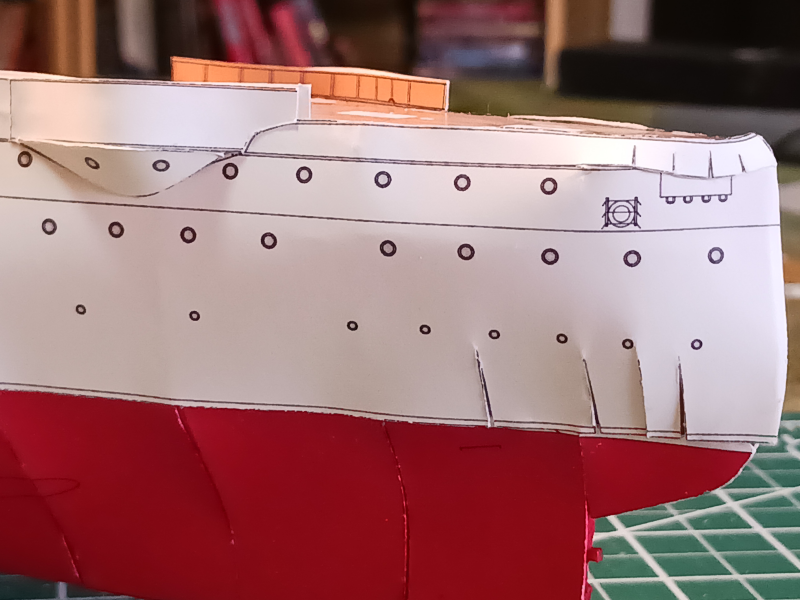
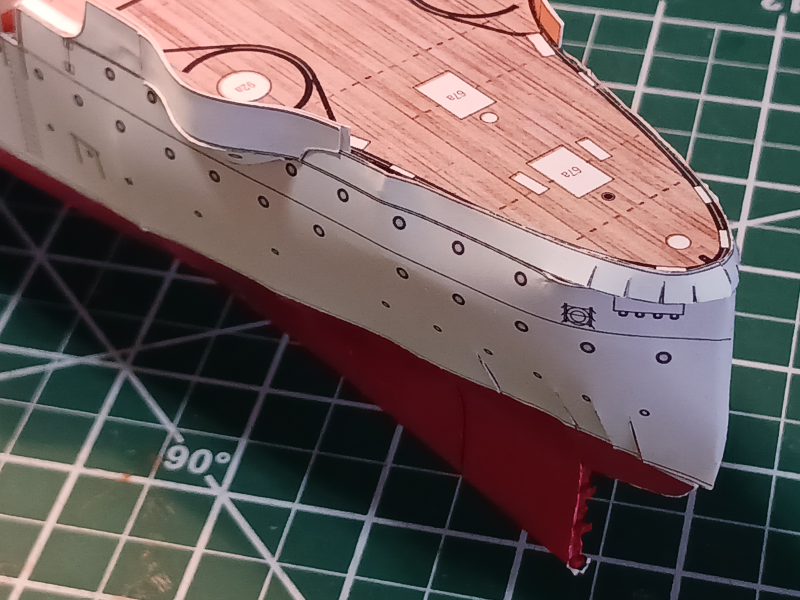
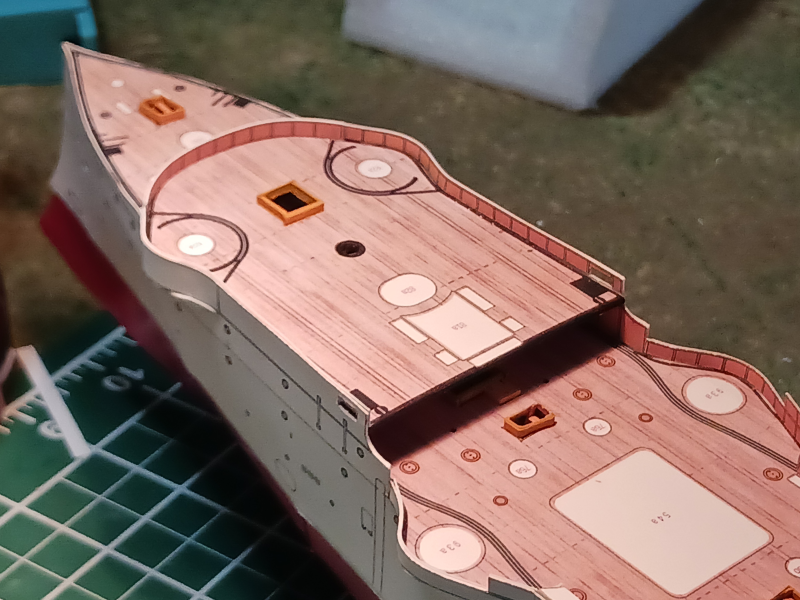
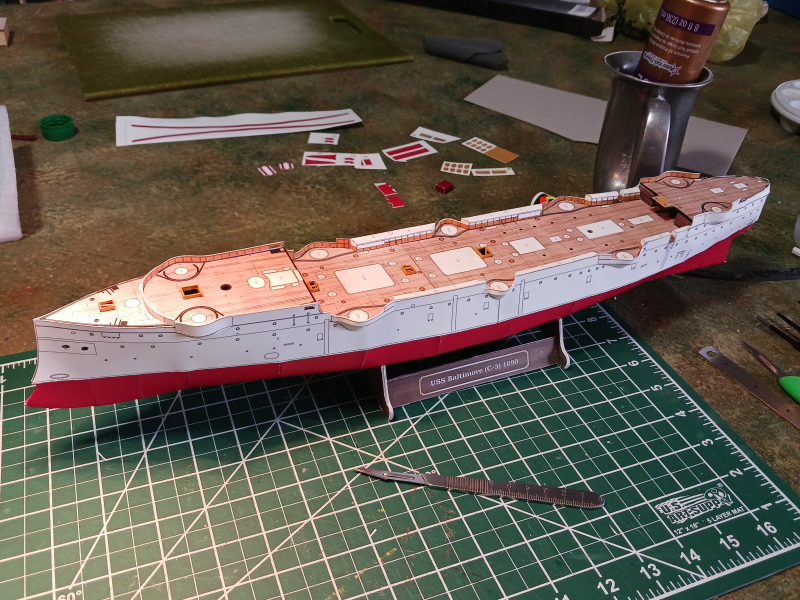
A shout out to MSW's own @JerryTodd ( a 'scholar and a gentleman' as they say) for helping me out with the remaining 3d printed parts. I've had them in hand for a few weeks but real life has reared it's ugly head again and slowed modeling progress. I've been attended twice weekly physical therapy to address some back and knee issues--but that comes to an end next week. (Yay!) Nevertheless, I finally made some significant progress on the Baltimore by skinning the hull and assembling the sides and sponsons. The next step is to install the rudder, propellers, shafts and bilge keels then I'll start on the funnels and deck fittings. Here's the first of the 3D parts installed. If you scroll back a few posts you'll see how the resin wheel is so much better than my bungled card wheel. I have to admit that I almost binned the project because of the stern. It's... well, lumpy. I'm not sure what went wrong. I suspect I don't have the aft decking placed at the proper place but for the life of me I couldn't see where it could go anywhere other than where I put it. Granted, the stern on this ship is a complex shape to form in paper. And my lack of experience... er, learning curve, doesn't help. But after pushing through I decided that it's all about developing skills isn't it? I've got the trash-toss down pat--I don't need to practice that! Maybe some judicial use of white paint will make the stern issues less obvious. This is the kind of shape that would be so much easier to shape in wood than in paper. In addition I see many small details that bug me. Things like the misalignment of the upper and lower hull sides will take some creative solutions but I think I'm over the hump. I just now noticed that maybe I used the wrong sponson fairing pieces? The historic ship had one port hole in the rear sponsons and two in the front. My model has it the other way around. Hmmm... I'd have to check the assembly drawings on that one. No matter. It's going to stay the way it is. One of the biggest challenges I've had is that I don't have any type of jig to hold the model still as I work on it. There is no keel to speak of so I've not been able to clamp the hull to anything. The model has little weight and the hull is quite round in cross section so it likes to roll out from under my hands as I try to attach parts. I'm trying to handle the model as little as possible so I don't dent the paper skin. I saw someone (@GrandpaPhil ?) using Legos to build a jig. I might need to try that. In general, though, I think the model will look better as a whole rather than in detail.


- 36 replies
-
- 6
-

-
- Baltimore
- heinkel models
- (and 2 more)
-
Looking very good. Makes me want to start yet another project. I've not tried a Shipyard model yet but I'm so tempted. But, I don't think I've quite developed the skill set yet. Liquitex and Aleene's... What more does a modeler need? Well... maybe some sort of blade.
-
One of my favorite WWI aircraft. And Rickenbacker is such an interesting character. I read his autobiography and 'Seven Came Through' while I was in high school. He's stuck with me ever since. Years ago when I lived in Columbus, Ohio, where Rickenbacker grew up, there was an effort to conserve his boyhood home. I always found it interesting that at Mott's Military Museum, not far from Columbus, they had built a reproduction of the home rather than move the original structure. I suppose it was cheaper and less bureaucratically restricted to build the repro.
-
What should I avoid when creating *.stl files?
Jsk replied to Jsk's topic in 3D-Printing and Laser-Cutting.
Wanted to pop in again and say thanks for all the useful information. Maybe after we retire and move next year I'll actually take the plunge and get my own resin printer. Until then I'll try and make my *.stl files more print friendly though it sounds like experimentation is the best teacher of this black art. 😉 -
I really like the idea. One of the reasons I like card modeling is because of the limited waste it produces but it does require constantly sharp blades. However, I'm constantly snapping off the fine point of the scalpel as I cut small curves of some card models. Would the harder metal of the better blade really be an advantage in that respect?
-
Hmmm.... The SM B3 handle seems difficult to find in the US.
-
What should I avoid when creating *.stl files?
Jsk replied to Jsk's topic in 3D-Printing and Laser-Cutting.
Wow, a lot of information to absorb here. Thanks so much. It's all good. Most of the parts I get back from the printer still have the supports attached so I can determine the orientation in which they were printed. Does it make sense to orient the model and model the supports in the modeling program? The few slicer programs I've looked at do that for you. I assumed it would be rather slicer/printer specific but perhaps it's just more for convenience sake. I've been rather old-school in my modeling thinking that the fewer triangles in the model the easier and more effecient to print. But it sounds like that's not really the case. -
Thanks, guys. I'll give UMM a bit of support. I've got blades that will fit both handles though I almost always use the #11 blade.
-
I've found that scalpel blades are so much better than hobby blades. But I don't like the standard flat #3 scalpel handle. I like that it doesn't roll away, but I find it rather difficult to hold and determine if I'm holding it the right way. Are there any alternatives? I've got a Fiskars finger grip knife, which I really like. But it doesn't hold a #11 scalpel blades, only #11 hobby blades. Suggestions? TIA
-
Is there any indication as to who designed this model? I'm struck by how similar so many of these card kits are to each other. The instructions all look the same, too. Of course, you never find out what's missing in the instructions until you get to building!
- 185 replies
-
- 4
-
-
- Card
- Pre-Dreadnought
- (and 2 more)
-
Me, too! When I started working on the Seahorse Revenue Cutter a year ago I think I read your entire blog soaking up a lot of ideas on how to approach the build. Very inspiring! I'm really glad you're back to working on the Wolf.
-
Sounds delicious. I'm going to have to try that. Sounds like a Netflix series about pirates. That interior coating of epoxy is an interesting technique. This is a static model, right? Not built for actual use on water?
- 253 replies
-
- 2
-
-
- minesweeper
- Cape
- (and 1 more)
-
What should I avoid when creating *.stl files?
Jsk replied to Jsk's topic in 3D-Printing and Laser-Cutting.
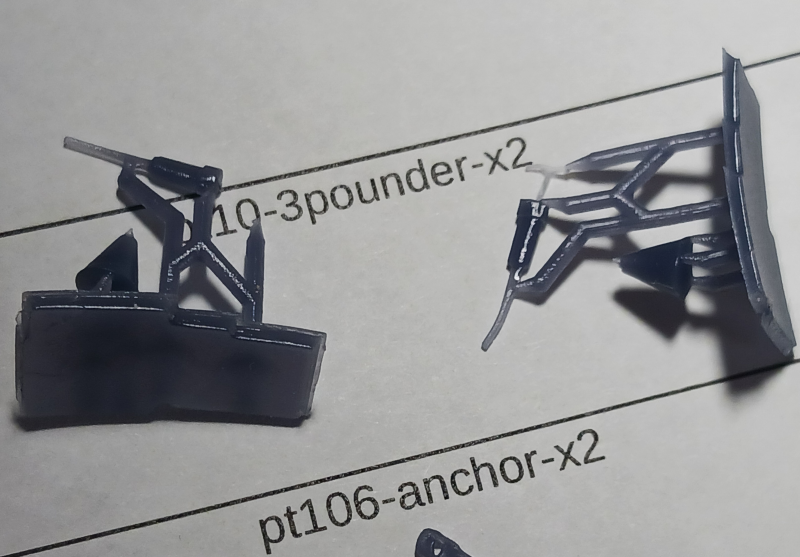
Thanks. Yeah, they're small. The small guns are suppose to be 3 and 4 pounder Hotchkiss (I think). They're no more than 0.5 inch from muzzle to butt. I've tweaked the model with beefier barrels and shoulder stocks and will try again. -
What should I avoid when creating *.stl files?
Jsk replied to Jsk's topic in 3D-Printing and Laser-Cutting.
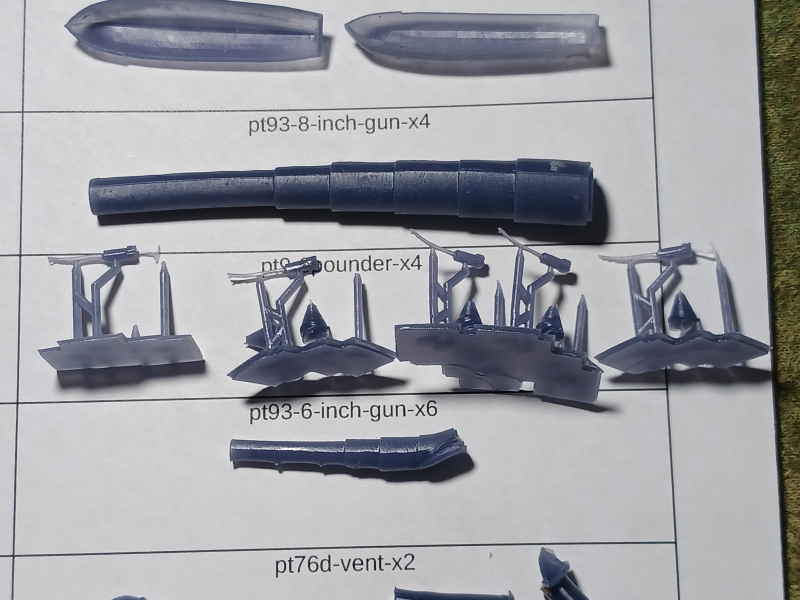
These are for a 1/200th scale model. So the 8" gun (the big one) is 68mm in length. I'm not sure what slicer the guy printing the items is using and I'm assuming his program allows him to add the supports. This particular part came without supports attached but it looks like there were 10 in-line running along the bottom. The 6" gun did have a number of supports attached similarly. Other pieces do seem to be adequately supported. -
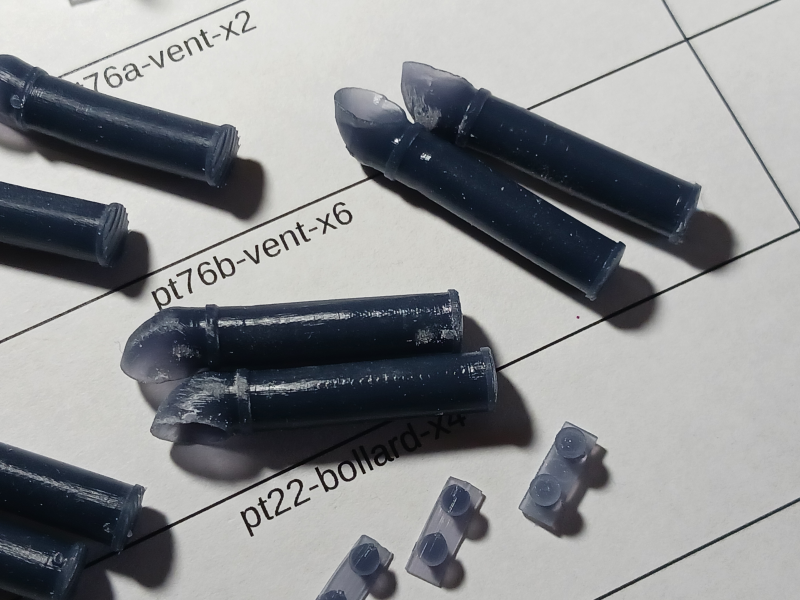
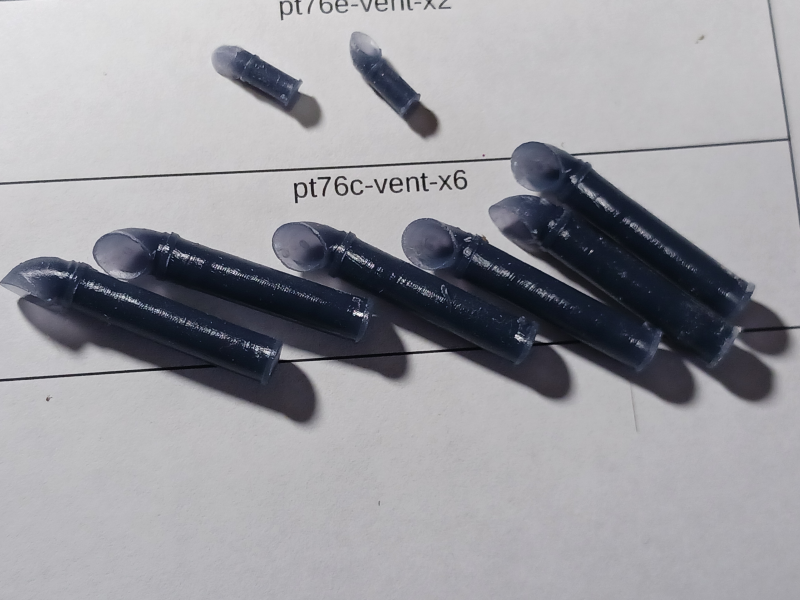
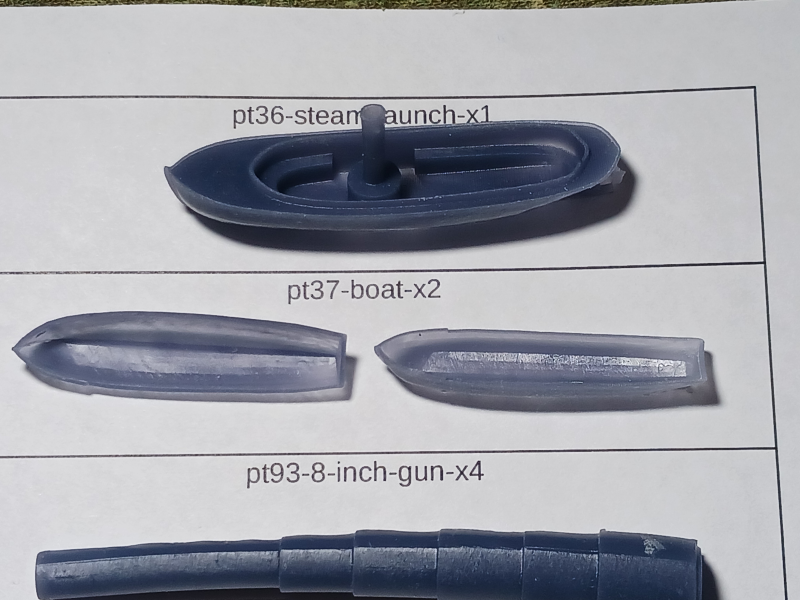
I just received the first batch of 3d printed parts that I designed for my current ship build. Most of the parts printed successfully, but others failed. I do NOT want my own 3d printer. That's a hobby unto itself and I have plenty of hobbies. However, I would like to know how to design *.stl files with a minimal chance of failed prints. Let's face it, since I'm not doing the printing I'm paying for someone else's time and material. I want to avoid wasting their time and my money. My process has been this: I model the parts in Wings3d (my modeling application of choice for many years), which is a subdivision modeler. Wings will export *.stl which I open in the Prusa slicer to see if the slicer catches any errors in the file. Mostly, I think *.stl is a pretty basic file format so the program used to model the part shouldn't matter too much. I don't think there's much in the *.stl that can cause problems when printing but I'm not entirely certain. Occasionally, the slicer will identify an error which I can't find in the origin model so I'll open the *.stl in Blender, and then export it again as *.stl. After that, Prusa typically will not report any errors. I have not added any supports. To me, that seems like something that would be more specific to the slicer program used in the actual printing process. Is that a correct assumption? Also, the guy who printed these for me said that something in the files had 'blown up the printer and he had to clean the tank'. I'm not sure what that means. I've used him to print purchased *.stl files and he's been pretty reliable. A number of the parts I had designed came out very foreshortened as if they had collapsed in length. Is that something that could be caused by the *.stl file? Another question I have is about warping. My understanding is that most warping is due to the curing process where the resin inside the casting cures at a different rate than the outside layers. As a modeler, is there anything I can do to alleviate this? For example, in the picture below, would the 8 inch gun--which is mostly solid--have less of a tendency to warp if it was hollow? if there was a channel running down through the center almost the entire length? The 6-pounder guns under the 8-incher suffer from being too thin in the barrels and shoulder rests. That's just me not knowing the parameters of the printer used and that lesson has been learned. But the 6-inch barrel at the bottom of the picture suffers from something else. I also had a number of ventilators that somehow seem to have shifted during printing. Is there anything in the *.stl that could cause that or is it simply an error in the slicer used to print? Any other advice for a 3d print noobie? TIA!

-
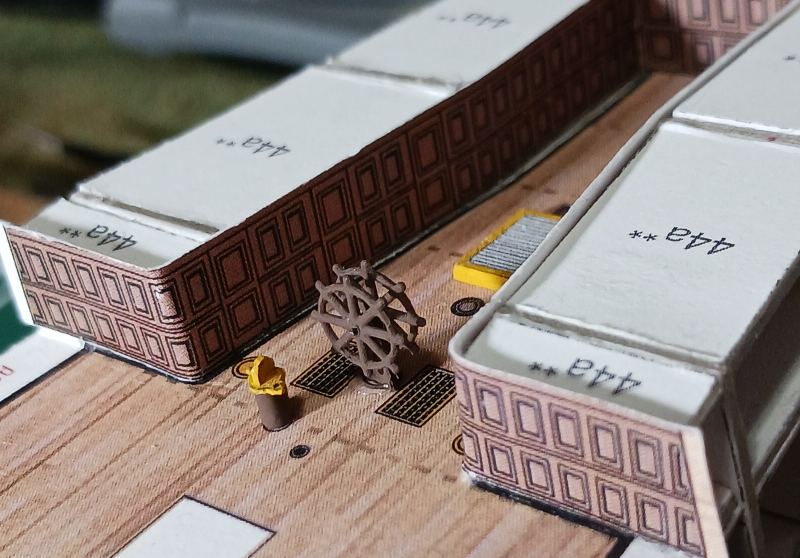
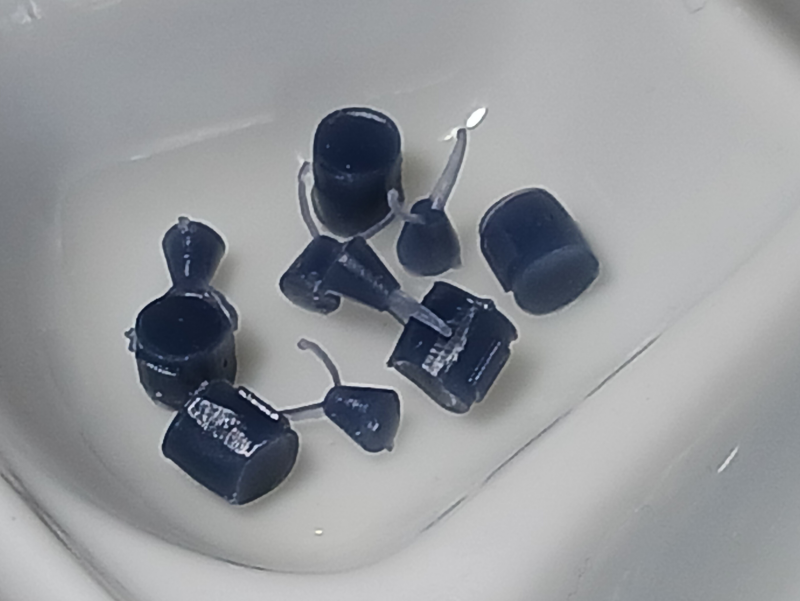
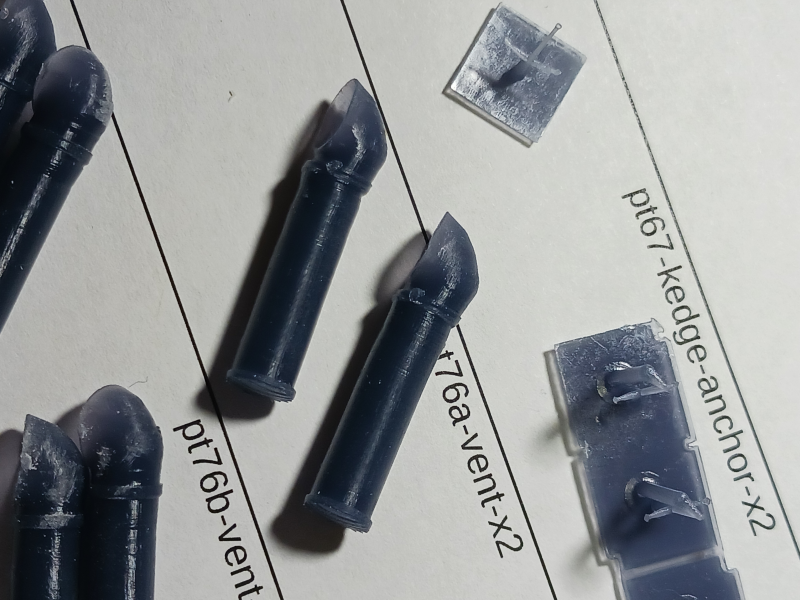
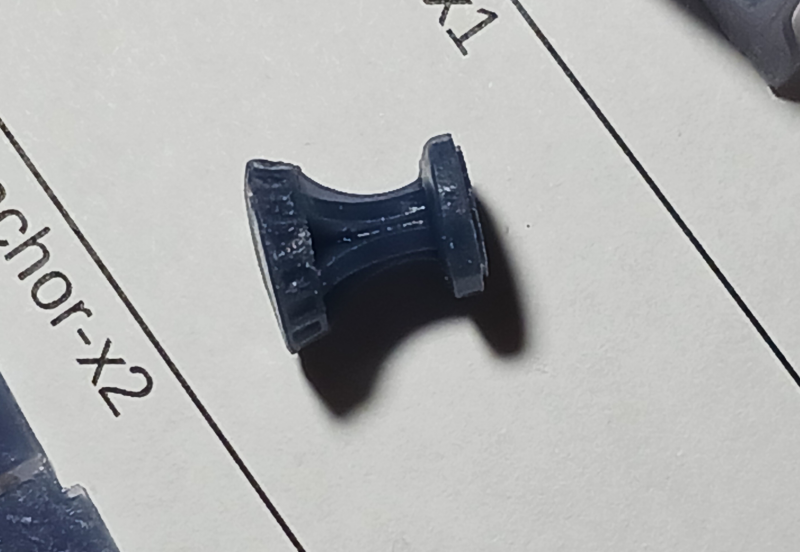
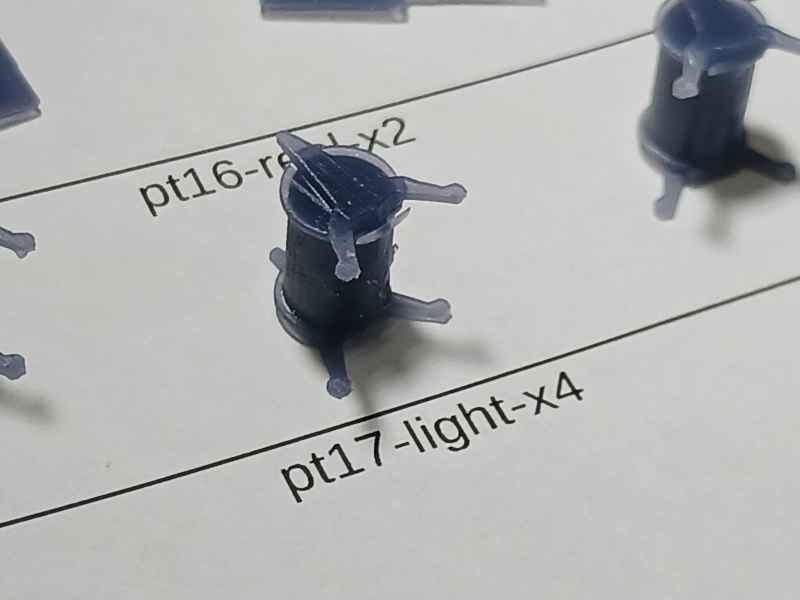
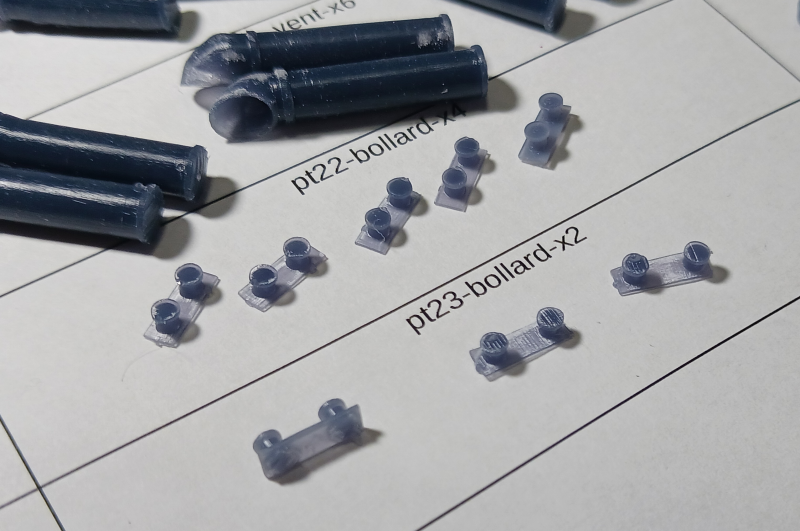
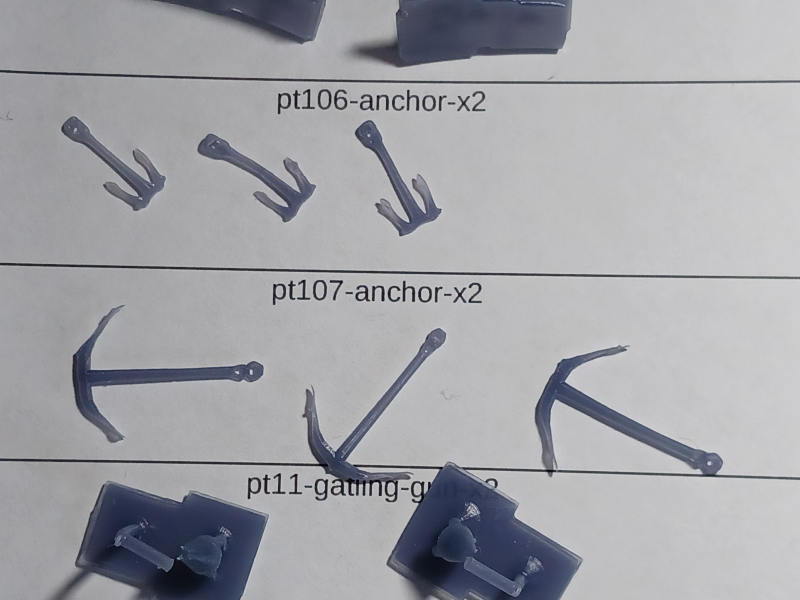
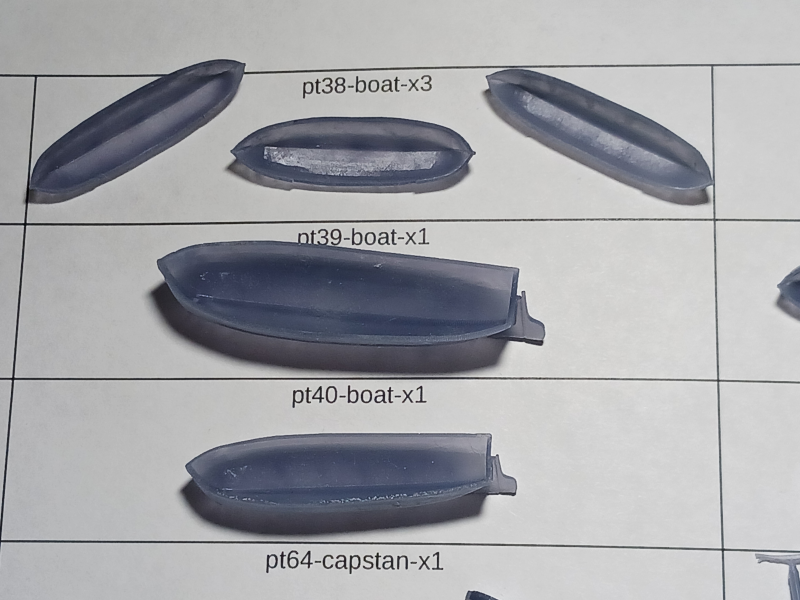
I've been stalling on this build waiting to see how successful the 3d printed parts would be. Well, the resin printed parts arrived yesterday and while not all were successful most of them were. Interestingly enough, the bigger parts, e.g., the primary and secondary guns all failed to print. That's probably a discussion I'll start over on the 3d print area rather than here. Still, I think the barrels are big enough that I'll be able to use the card parts for them. A lot of the small parts, like the bollards--well, there's just no way I'd be able to build them so I'm glad they came out OK in the print process. A few of the parts, like the ship's wheel, were complete failures on my part simply because I made them too thin for the printer to be able to handle. So there's a lesson for me. I'm particular pleased with the capstan, the boats, the search lights, and the anchors. Most of the ventilators came out, all the bollards, and I think most of the small arms will be usable. I really enjoyed the process of modeling these parts and want to continue down this path.

- 36 replies
-
- 6
-
-
- Baltimore
- heinkel models
- (and 2 more)
-
Wow! Just Wow!