


gjdale
-
Posts
4,825 -
Joined
-
Last visited
Content Type
Profiles
Forums
Gallery
Events
Posts posted by gjdale
-
-
-
Thanks Sjors and Mark.
@Mark - sometimes I just need to mull something over for a while before the solution hits me. Mind you, it's usually a BGO (Blinding Glimpse of the Obvious)

Some more progress to day. The laminating of the frames is going well.........so far!

I've used two pieces of 1/64" thick by 1/16"wide boxwood for each frame. I simply soak them for a few minutes in hot water, then dry them off lightly with a paper towel, apply some PVA glue to one piece then join the two together and clamp around the relevant former. It's proving to be a lot easier than I expected so far. Mind you, I suspect it will get a little more difficult once I get further away from the centre of the boat and start trying to bend some pretty sharp curves.

Here's how it looks glued up and clamped around the former:
It only takes about an hour or so to dry sufficiently to be able to remove the laminated frame from the former. Each frame is marked for the centreline and also for the sheer line will on the former. Note in this picture how little "spring back" there is once removed from the former:
It's then a pretty straight forward process to glue the frame to the keel and the building board. The plug simply acts as a bit of backing when installing the frame. Here's a shot showing several frames completed:
It looks to me that there may be a re-do necessary on some frames once all are in place. Sanding these little suckers is not really going to be an option, so getting the right shape is pretty important. Removing and replacing though is pretty easy.
The slow part of this process is actually waiting for the frames to dry on the formers. I can only really do two at a time, but then again, there's no hurry.

-
Hi Mobbsie,
I've scanned the section from Longridge on coppering and placed it in the attached files. Hope this is of some help (and I'm making an assumption that Aggy would have been done the same way - I could be wrong. I think this is the same way (or similar) to the way Kevin has done his.
Interesting caution about the optical illusion of "waterline sag" too.
-
-
Okay Mobbsie,
I'll scan and send the picture in the morning. It's just on midnight here now and I'll disturb the Admiral if I try to do it now! I'll reply to your PM then too - just need to double check with the Admiral.
-
Okay Mobbsie,
That's enough procrastination for now. Best get cracking on that coppering if this build is going to be finished in time for my visit!

On a more serious note, I don't know if Aggy is the same as Victory in this regard, but according to Longridge Vicky had two "belts" of coppering. I can't think how to describe it in words just now, but if you think it might be useful, I can scan the picture from the book and post here for you.
-
-
Thanks very much Augie, B.E., John, Andy and Mobbsie.
@Augie - Yes, the scale is the hardest part of this job. The vibra saw won't be used on the frames themselves. I will be using pre-milled strips that I will laminate together and bend around the formers.
@Mobbsie - my current plan is to scratch build all of the boats, trialling a variety of different techniques as I go. Of course, I may get fed up with them at some point - this is not an easy scale to do boats. Still, it's all a good learning experience.
-
Hi Ryland,
Nice to see you take the plunge with the boxwood upgrade. I intend to do the same before starting on mine (which won't be for quite a while at the rate I've been going lately!)
-
Hi all,
Well at last I can report some progress..........of sorts.
I've decided to pause on the rigging for a little while, while I wait and see if I can work out how to replicate Chuck's block making method. If I can, I'll make my own blocks for the remainder of this build. If not, I'll proceed with the kit-provided blocks.
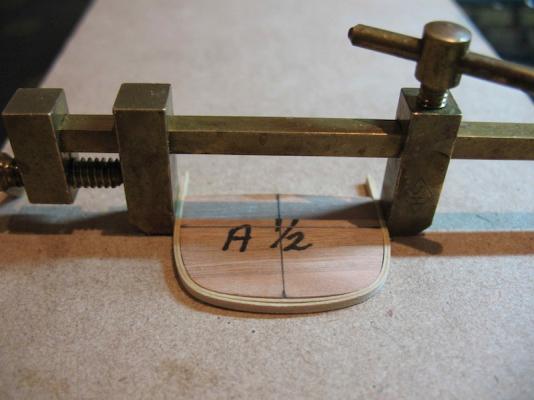
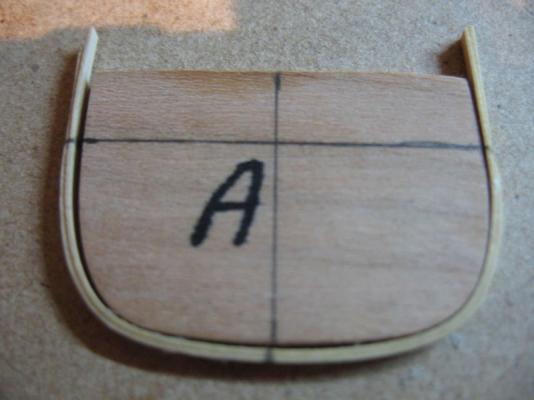
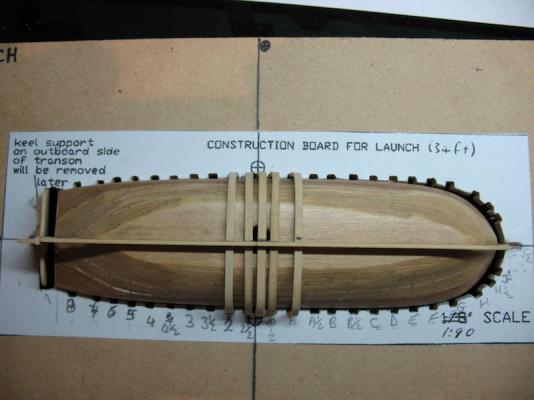
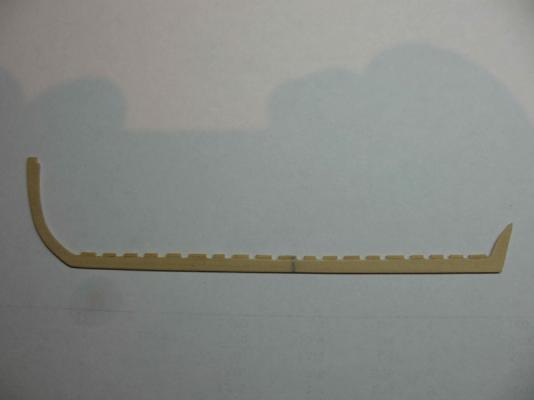
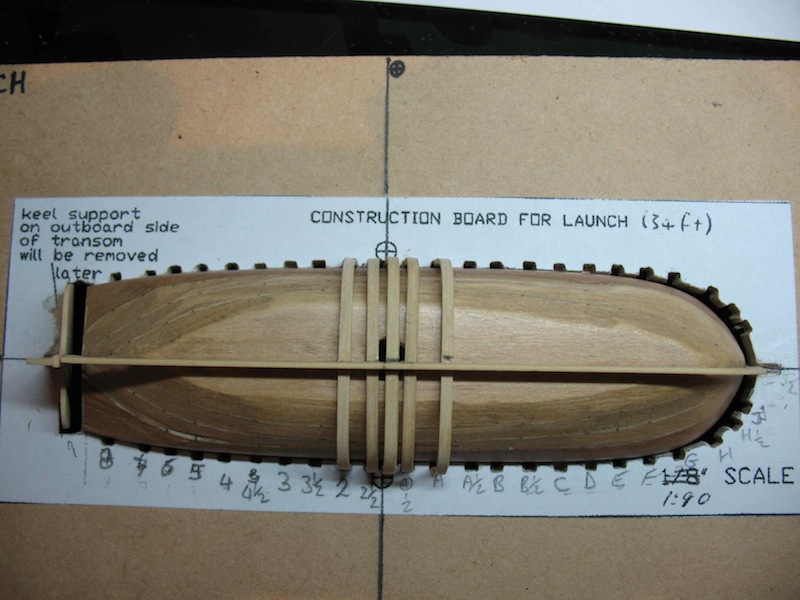
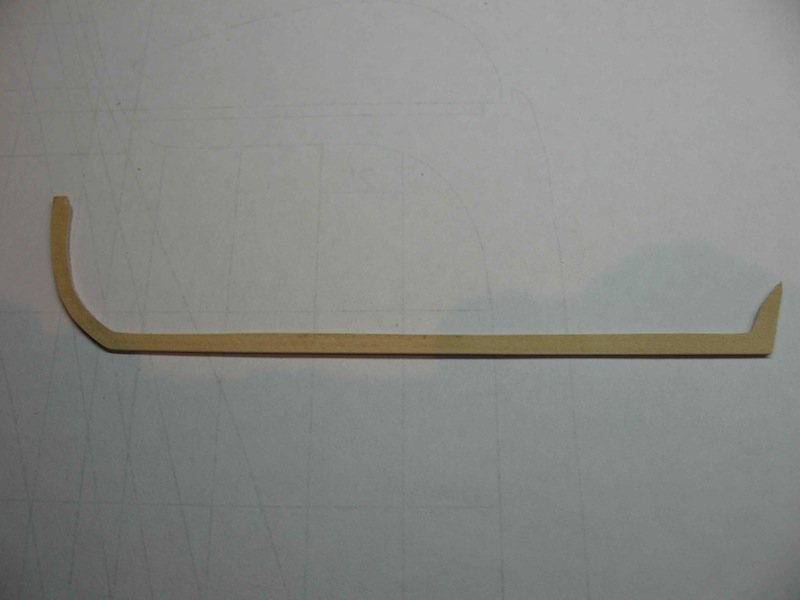
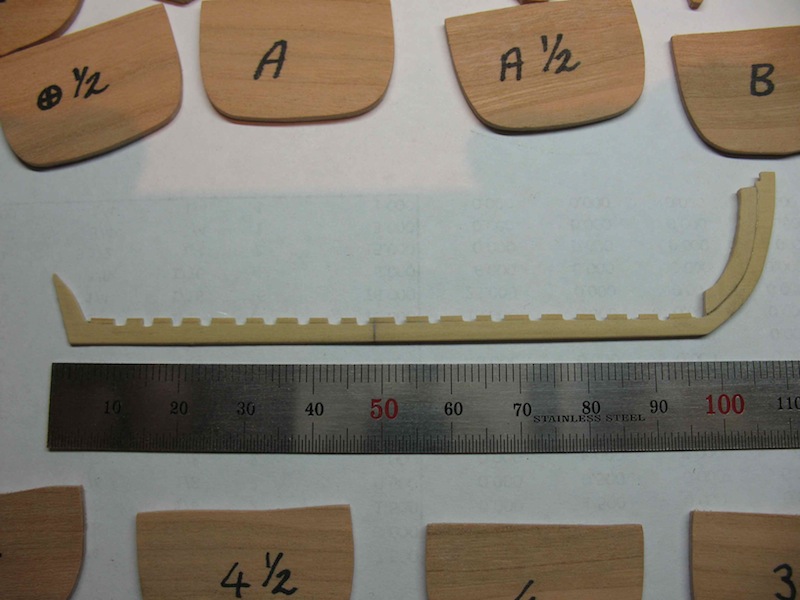
In the meantime, I made a start on scratch building another versions of the 34' Launch (back on page 13). At last post, I'd made the plug and the building board. I'd been having some difficulty making the keel for this boat. Basically, the material is so thin and fragile that I couldn't seem to keep a keel/stem post in tact while cutting it out. I tried making it in separate pieces, but making the joints at this scale seemed nigh on impossible. I scratched my head (pardon the pun) about this for a few weeks until I had a "light bulb" moment a few days ago and implemented it today. I remembered that I had a "vibra" saw in addition to the big scroll saw. The vibra saw is basically a miniature scroll saw. I inherited this from my Dad a while back when he gave up model building, but I'd forgotten it was there (I know, too many toys!). I worked out that I if left a lot of "meat" on the outside of the keel, while I cut the inside section out, it would give it some stability while I fine tuned it. The vibra saw was also a lot more gentle in its cutting, so at last I had some success. Once I had fine tuned the inside shape, I then used an Exacto knife to slice off the outside bottom edge. Here is the basic keel, made from 1/32" thick boxwood:
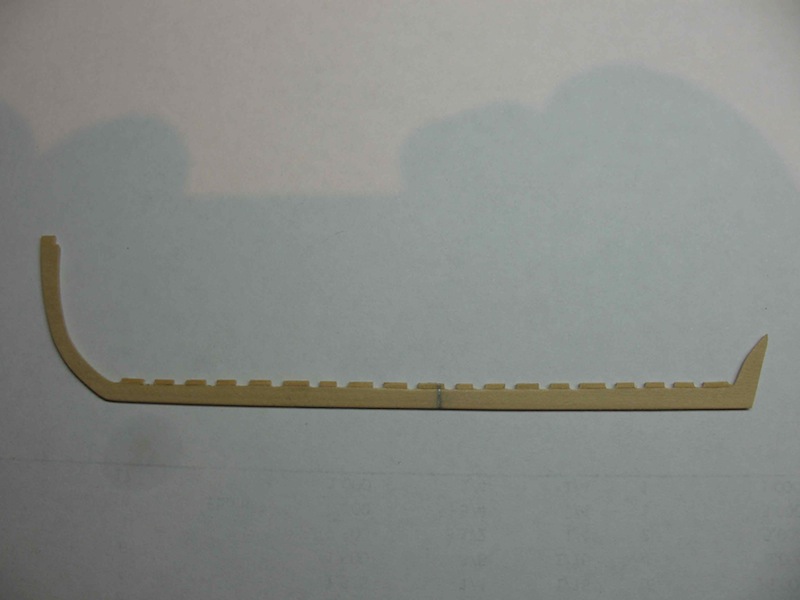
The next step was to add a piece of 1/32" sq deadwood to the keel and mark and notch it for the frames, using the building board notches as a guide.
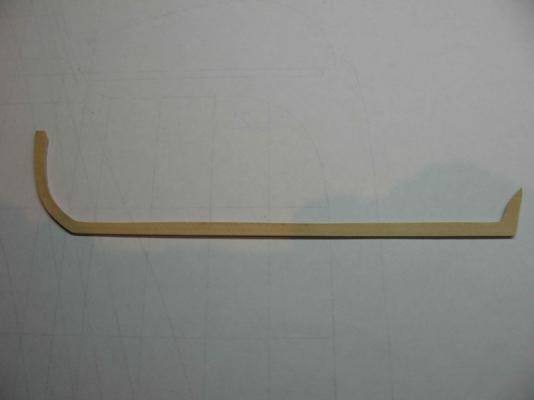
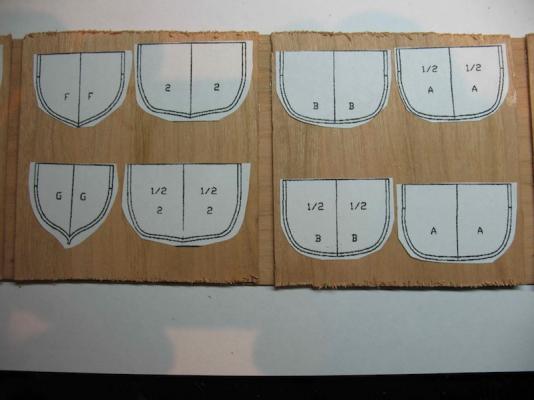
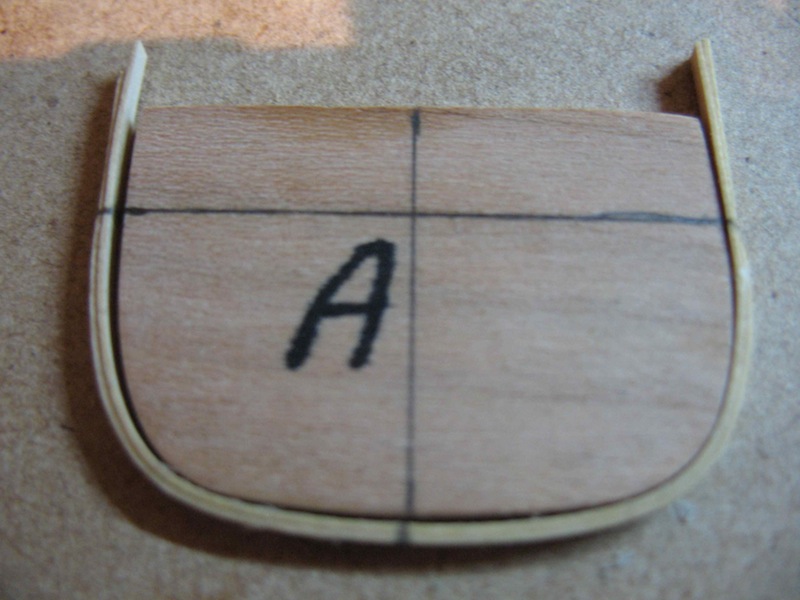
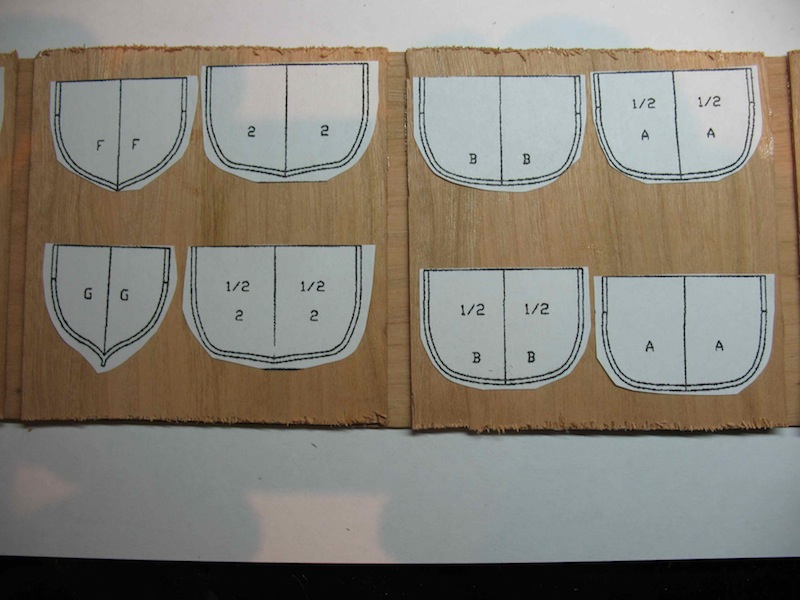
The frames for this little boat will be made from a laminate of two layers of 1/64"thick x 1/16" wide Boxwood. In order to achieve the bends, I will be using some formers from patterns provided within my practicum. To cut the formers, I laminated together two sheets of 1/32" thick cherry in a cross-grained pattern to add strength. Here are a few patterns stuck on ready for cutting out:
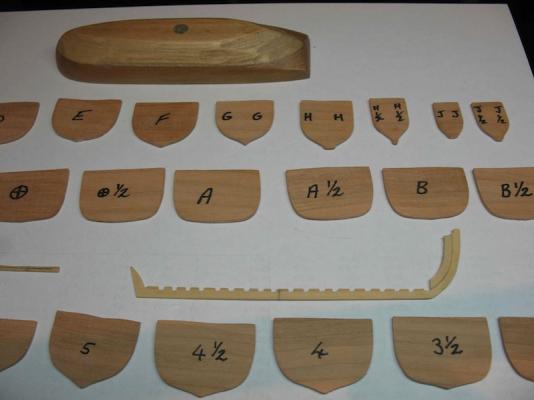
Then it was a simple case of cutting them all out on the vibra saw and sanding to final shape. There are a total of 25 frame formers, including the cant frames, which have been cut in pairs for forming. Here's a few pics of the state of the parts as of close of play today. Note that the keel has had a stem apron added. This is twice the thickness of the keel and the overhang either side will form a small rabbet for attaching planks later on.
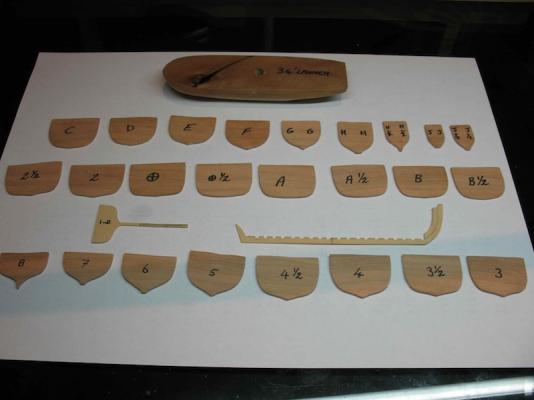

Tomorrow I hope to start forming up the frames and installing the keel into the build board.
-
Robbyn,
Noting your dissatisfaction with the basswood, and that you have only done a couple of planks, one option might be to pause, take off the existing basswood planks and order some boxwood replacements from Jeff at Hobbymill. While I agree that it seems a double whammy after you've paid for the kit, you must remember that ME has built the kit to a price point. At least if you replace the basswood with boxwood you will have a timber that you will enjoy working with and will be satisfied with the result, rather than being frustrated and unhappy. And after all, Chuck's prototype was built with boxwood. This is what I'll be doing before starting this kit anyway.
-
-
Hi John,
I have to agree with Daniel (Dafi) - cannonballs only, not grenades as far as I know.
Your plank bending "machine" seems to be working. Personally, I have only used a steam iron on pre-soaked timber, but your method looks very good. I've seen others use this with great success - you can just vary the diameter of the tin can for different radius bends.
Note also demonborger's comment re the upper deck (poop deck) and placing guns. I think I've already given you the heads-up on this issue.
Looks like you're really getting into it now. Keep up the great work.
-
-
Thanks for dropping by Lawrence and for your very kind words. I've been quietly following your build too, and must say you're doing a fine job yourself.
-
-
Let me join the chorus of congratulations Ed. A beautiful model indeed, and your log has been such an inspiration to so many of us. I look forward to the remainder of the posts in this log, and eagerly await publication of Vol 2. Thanks again for allowing us to share this journey with you.
-
Nice start Daryl. I'll be following this one with interest.
-
Brave decision Robbyn, but the right one. I applaud your courage and determination. As one who has already been down the "major re-work" path, I can assure you it is worth the effort. The hardest part of the process is making the decision to do it, and it seems you've already done that. It all gets easier from here on.
Enjoy your longboat diversion in the meantime.
-
That's odd. I just went back there using the link I provided and the prices are all there. They are included in the description alongside each model/kit - in pounds, euros, and US $. Might be worth having another look.
-
Gulfmedic1,
Try this link for OcCre kits (trams, trains, and buggies):
http://www.cornwallmodelboats.co.uk/acatalog/occre-specialist.html
-
-
-
Hi Daveor,
The Model Expo kits certainly get good reviews from the folks here who have built them, and the Syren is a particularly nice model with excellent instructions by our very own Chuck Passaro (MSW site administrator). There are many fine build logs of this, but I recommend you take a look at Augie's log. I should imagine you could add sails if you really wanted to, and I'm sure Chuck could provide advice.
A similar size ship would be the Brig Badger by Caldercraft/Jotika. This brand is one of the better kit manufacturers going around. Again, several good build logs here for you to review.
Another brand you might look at is Victory Models. This is a subdivision of Amati and is essentially their "premium" range. They do a nice version of HMS Pegasus. Once again, take a look at some of the build logs here to see what's possible with this kit. (Have a look at builds by Blue Ensign and Realworkingsailor).
In the end, you need to choose a model that excites you. Good luck, and be sure to start a build log here once you've made a decision.


San Ildefonso by Sjors - FINISHED - OcCre - 1:70
in - Kit build logs for subjects built from 1751 - 1800
Posted
Nice progress there Sjors - looking good. Don't bother with the cannon ball stowage though, you just know that Anja isn't going to let you have any cannon balls!