HOLIDAY DONATION DRIVE - SUPPORT MSW - DO YOUR PART TO KEEP THIS GREAT FORUM GOING! (Only 20 donations so far - C'mon guys!)
×


fish
-
Posts
184 -
Joined
-
Last visited
Content Type
Profiles
Forums
Gallery
Events
Everything posted by fish
-
So we cleaned up the basement and I setup a separate space for her sewing machine so building will be restarting soon!
-
No I have not given up. I just have found since having a baby I have very little time for the hobbies I love. Also, my wife has taken over my work space with her sewing machine! Second baby is due next march so who knows when I will get back to it!
-
Thanks guys! 31 feels pretty old! I have taken a summer hiatus from building while we are preparing for our baby in October. I usually do a little here and there when I have time. Once the baby's room is ready and the weather is not so nice I will be back at it full swing! Aaron
-
Jim, Do you have a Micheals craft store around? They carry blocks of balsa and strips of basswood. You will also find these at HobbyLobby. How many "bowling pins" are you short? Aaron
-
The SF does make a really nice looking ship, it will look really good in an office or a den.
-
Jim, What parts are missing? I have never heard of anyone contacting them. You may be the first As far as the planking goes, I would get a plank bender (Model Expo has one) and use it with soaking. You can try ammonia versus water. The mahogany planks are very brittle and break easy. If you leave them in too long they will become very brittle, if you don't soak them enough they will break. Planking: I decided to dump the kit supplied mahogany and double plank the hull as opposed to single plank and use cherry instead of the mahogany. Single planking is harder, but double planking cost more and you have to make modifications to the ship to make it work. If you are going to single plank, checkout DesertWolf's build log, his planking is one of the best I have seen. I would also get the planking instructions from this site, read over them and use them as instructions. They aren't the most logical instructions I have seen but they work, if you have trouble with them let me know and I will point you to some others. You will notice in them they talk about a technique called "spilling" which is when you cut a piece of wood with a curved end, you need to have sheets to do that and your kit came with pre-cut planks. I think desertwolf has some instructions in his log to get around that. Have you installed balsa filler blocks in the bow and stern? They will make a huge difference, also you should dry fit planks and taper each bulkhead to maximize the amount of the plank that rests on each bulkhead. If you have questions let me know and I will try to help! -Aaron
-
Jpett, There is nothing I can say that hasn't already been said, I can't believe you made basswood look that good! -Aaron
-
Let me see, let me see, let me see!!!!!
-
Jim, Welcome to the fleet, you are correct...there are a lot of SF 2 builds happening right now. I wondered the same thing as you when I did my decks, it occurred to me afterwards that it would be a lot easier to plank them before they got installed. -Aaron
-
Eric, The railings are a pain! I am still trying to figure out how to tackle them and make it look acceptable, honestly I need a day to just sit and work on it. So which build do you like better the SF or the snake? PS Crosby is playing great but the rest of the team stinks! If they continue to play this way I give them a 50/50 shot at winning the series and probably losing in the next round. They played playoff hockey all year and now they are just sloppy. if they go out in the first round the coach will be gone. -Aaron
-
So I am still working on the railings with no success yet. As most of your SF builders know, the kit supplied timber for the railings is too thick and does not line up properly with each other. I first tried to make my own railing out of the left over cherry I had but it ended up being pretty thick, so I got some thin basswood this weekend and planked them with the cherry veneers. I still run into the problem of the railings lining up properly and I think I will have to manipulate the thickness on certain rails to make it work. Its a major pain because it takes a long time to make each rail since I have to cut, plank and stain. Boy those other kits I have are tempting -Aaron
-
Robbyn, Everything looks great, I haven't been saying much but I have been watching your build and uses your pictures for references. -Aaron
-
Barehook, Great work everything looks really impressive, what did you do to get the coloring of your cannons and anchors? -Aaron
-
RiverRat, The picture of the bow looks fantastic! Well Done. -Aaron
-
Robbyn, I was referring to the small pieces of round wood that are part of the railings which attach to the tops of both bulwarks, the same as what is used on the poopdeck. But, I get what you are saying, whatever I end up doing, I should consider the belaying pins and the rigging that will attach -A
-
Eric, These are the railings I am talking about, I may have to make my own railings from basswood and the cherry veneers Keith mentioned. Keith, I have some cherry sheets I have been using but they are pretty thick, I can go get some thin basswood from a craft store and plank it with the cherry, good idea thanks! -Aaron
-
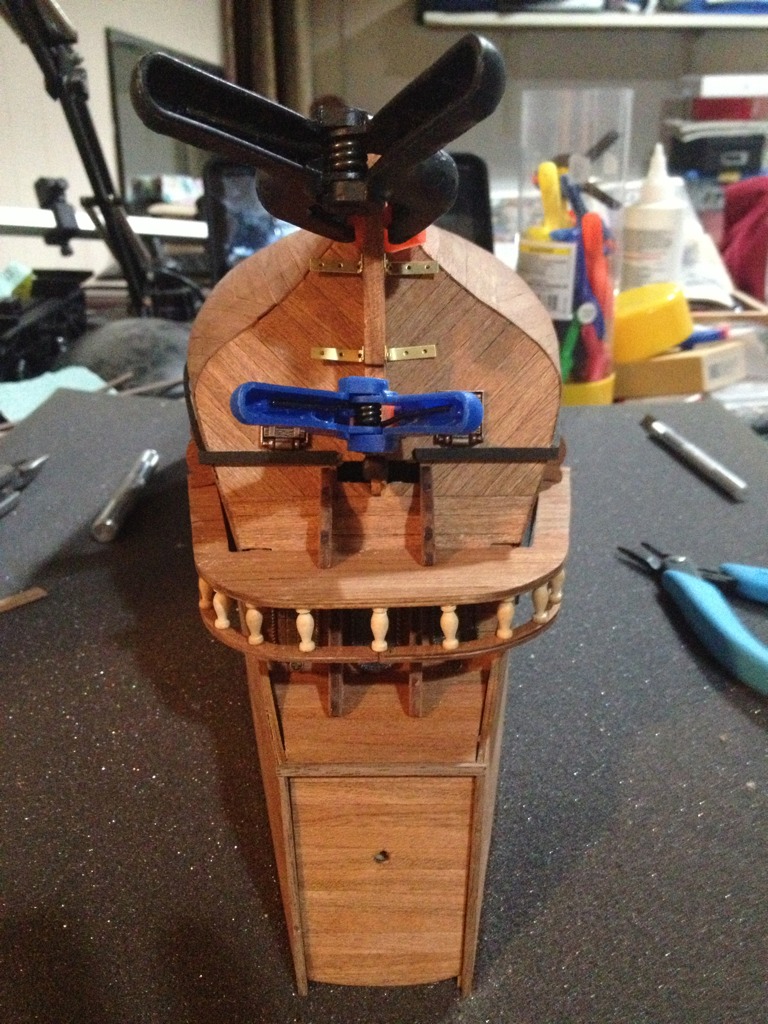
Update, I have worked on and completed most of the details of the stern, I have finished and installed my rudder but I have yet to install the pins to hold it in place. I have a quandary: The limber boards that act as the railings for the ship do not seem to fit correctly, the instructions show the rails overlapping the (bowling pin looking things) on one rail and I dry fitted and they don't appear to be the correct thickness to do that. So I was thinking that I would ditch the kit supplied applewood and use some of the left over cherry I have. It is actually thicker but if I double up the railings in the one spot they should be the correct height to overlap the bowling pins as I will call them until someone corrects me. This may or may not look good, I guess I will have to dry fit them and see. Here are some pics of the stern. -Aaron


-
Lamar, Thanks, this is really interesting. In my experience I have read both sides that it is a fictitious ship and it is a real ship. Seems like this person really did thier homework. -Aaron
-
JP, Aren't you glad you didn't buy the replacement wood kit that we talked about in the beginning? You would probably cry everytime you cut a piece of ebony and it was wrong -Aaron
-
Spellapeaka, I have no experience building any constructo models but I can speak on AL. I am also building the SF 2 and it sounds like you are aware of the issues with the instructions. What I can say is that it is a great kit for bashing. If you look at all of the builds in progress, (Shaz, Me, Lamar, DesertWolf, Msberkman, etc) you will notice that all of us have bashed the kit in one way or another, (double-planked vs single-planked, staining, basing misc, parts, cherry vs. mahogany, etc.) I think the fact that the kit has so many possibilities and it is a fictitious model, it opens the doors for creativity. Honestly the short comings of the instructions are made up double fold by the experience here and the simultaneous builds of the SF2. It has been great for me to have Robbyn, Lamar, and others to get opinions and wisdom from, especially since they are just going through the same obstacles as I am. -Aaron
-
Hi Scott, make sure you start a build log, there are a number of us building this model right now so there is a lot of help available. Aaron
-
Robbyn, I took all of my cheeks and planked them with cherry, I don't understand why they would supply them with the kit if they don't match the rest of the wood? -Aaron
-
He said "fondle", I think you might have a problem Keith
-
Robbyn, Are you going to stain those two little pieces of wood right below the crows nest? -Aaron
-
JP, This is one of the best planking jobs I have witnessed on this site, you have done a great job and given other builders a great resource. -Aaron