HOLIDAY DONATION DRIVE - SUPPORT MSW - DO YOUR PART TO KEEP THIS GREAT FORUM GOING! (Only 51 donations so far out of 49,000 members - C'mon guys!)
×


Modeler12
-
Posts
1,716 -
Joined
-
Last visited
Content Type
Profiles
Forums
Gallery
Events
Everything posted by Modeler12
-
 Boy, you guys take Australia Day serious with all that beer drinking. I see you even take it out to sea.
-
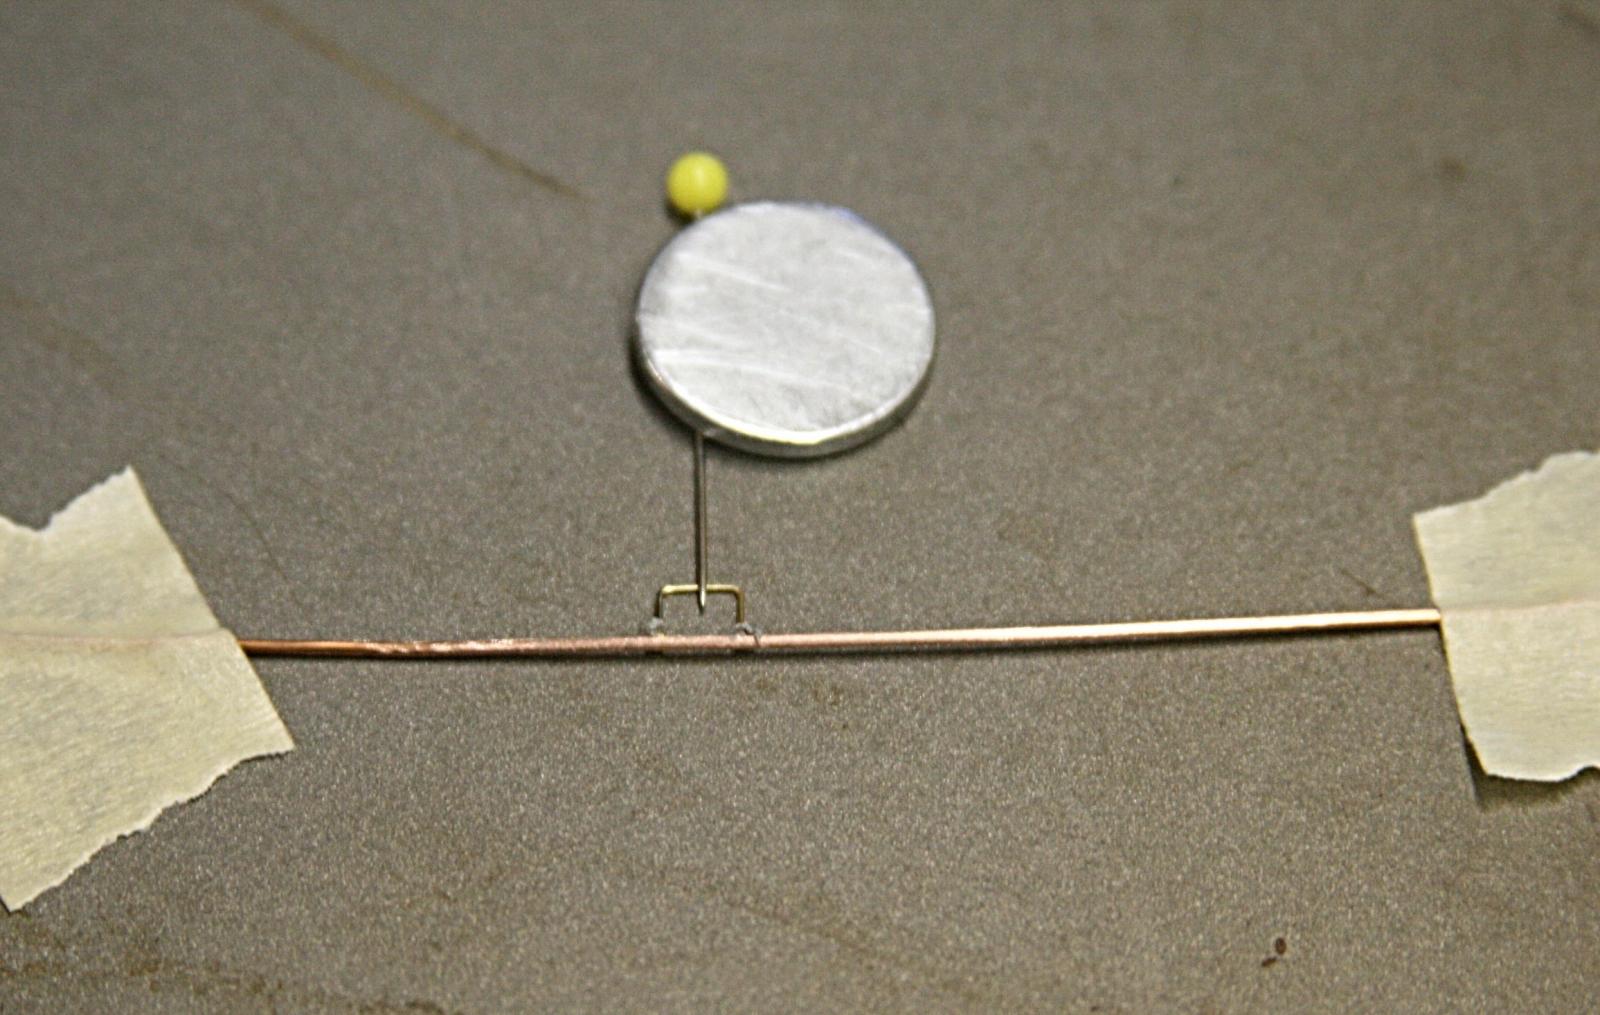
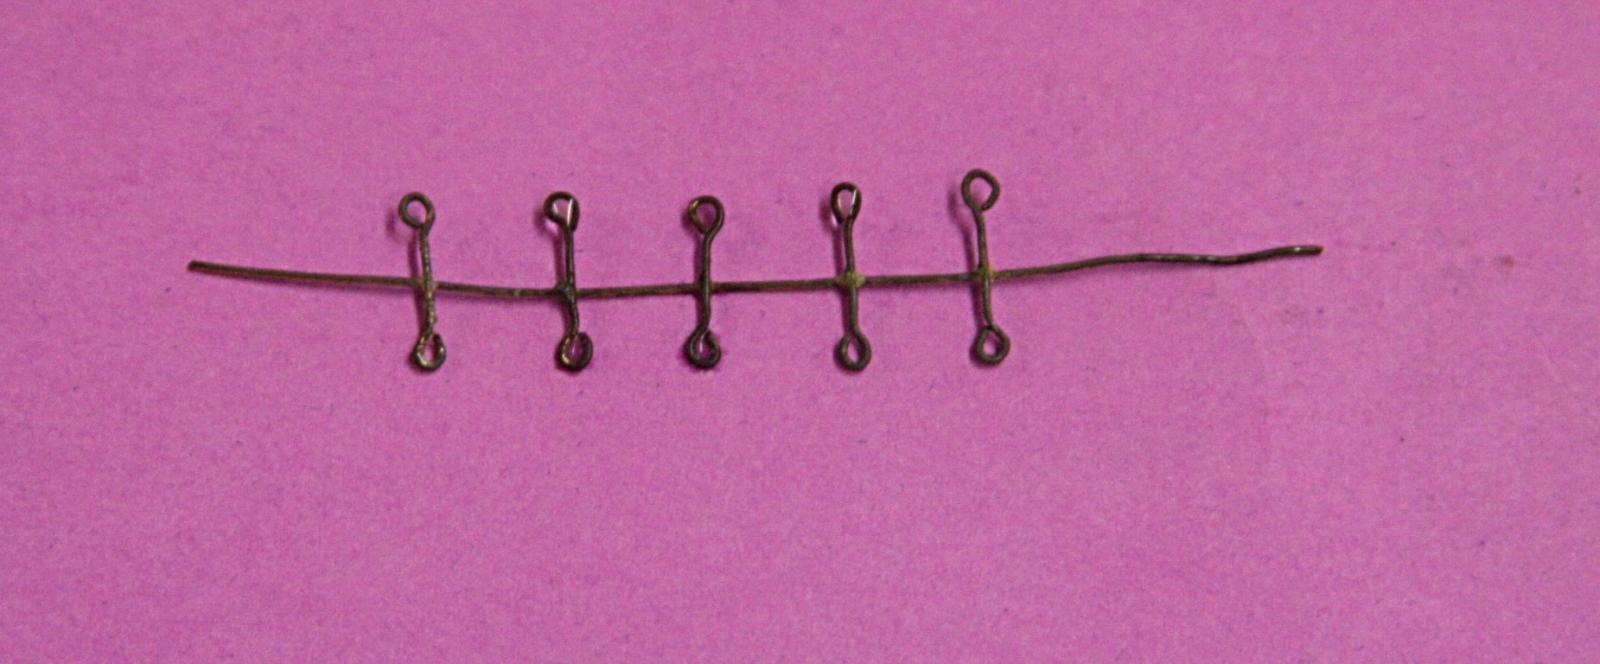
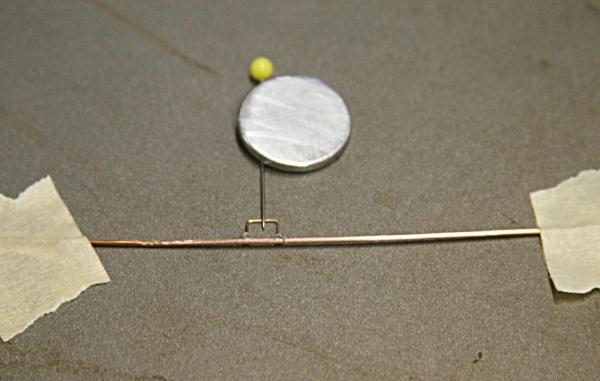
Bob, no need for an old ceramic tile. Just for fun I took a steel pizza pan from the kitchen and used it. In order to hold the little brass piece to the copper 'rod', I used a straight pin and a magnet to hold it in place. It took a bit longer because of the thicker copper and it also used more of the paste flux, but it worked. I show the result along with my second futtock stave to show that my first try worked as well as my second one. It was not an accident. Notice also the extra glob on the brass piece. I have to be careful where I put the flux/paste.
- 732 replies
-
- 4
-

-
- constitution
- model shipways
- (and 1 more)
-
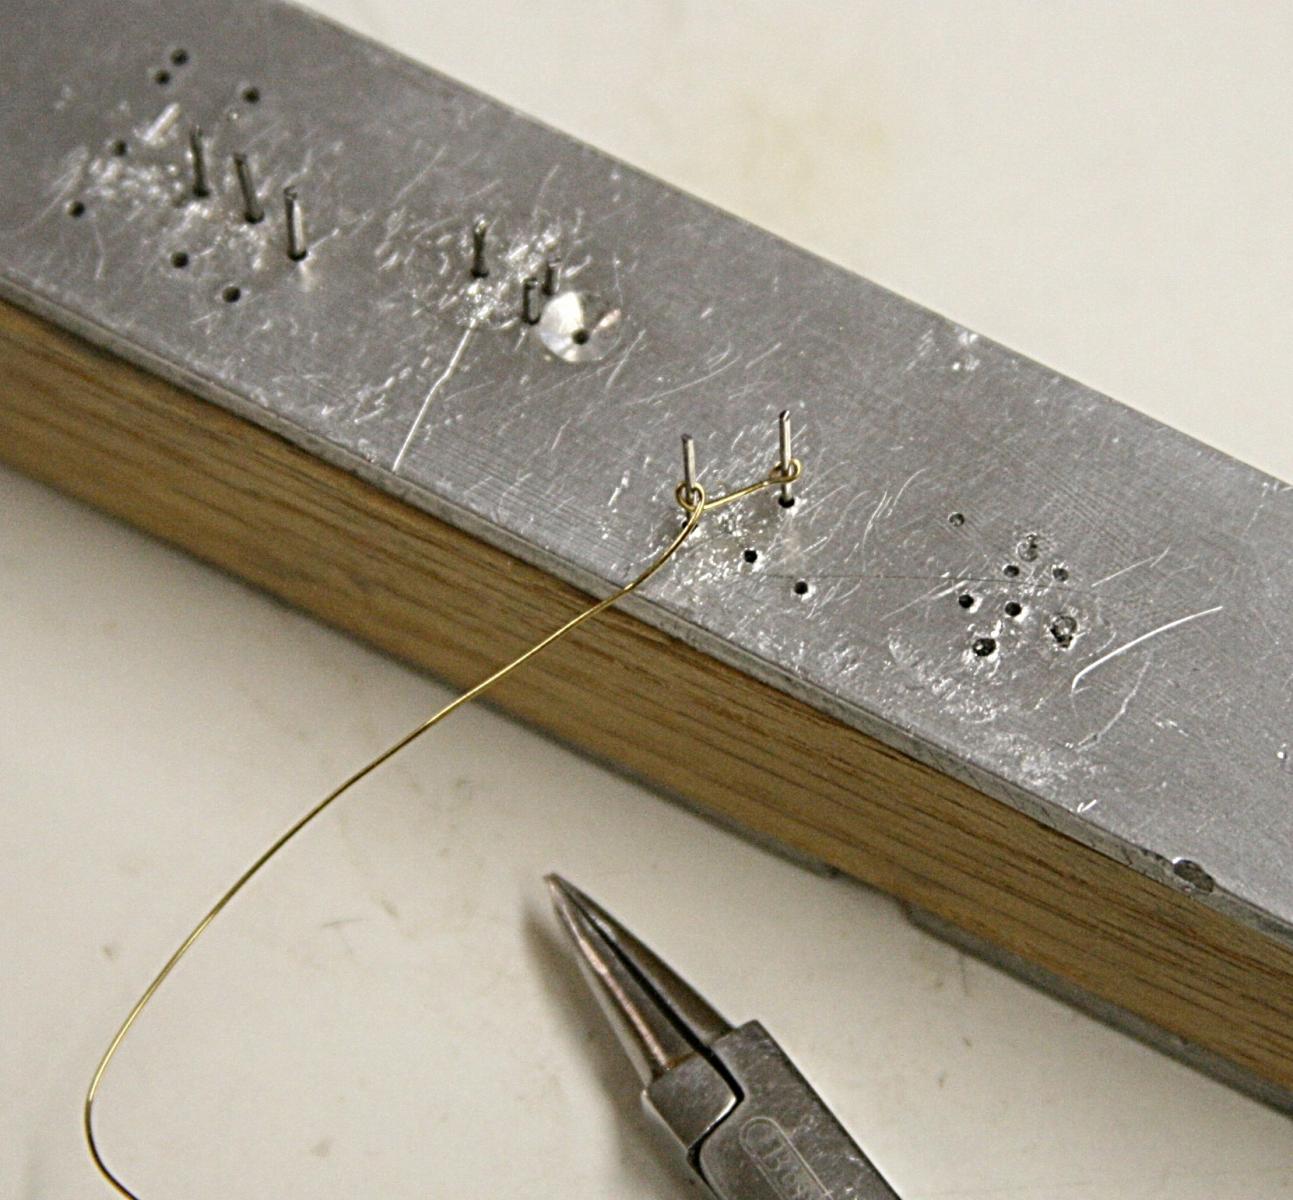
That was my first reaction, Harvey. But when I actually tried it with this thin wire, I was surprised to see only a slight scorching of the tape edge. When I did the parts above, I held the torch such that the flame was towards the top, away from the tape. The pass with the flame took less than a second for each intersection. The picture above makes it look like I held the flame from the top towards the tape. That is not what I really did.
- 732 replies
-
- 1
-
-
- constitution
- model shipways
- (and 1 more)
-
After I posted my question I did find a couple pictures. But I would still like more details if anyone has some.
-
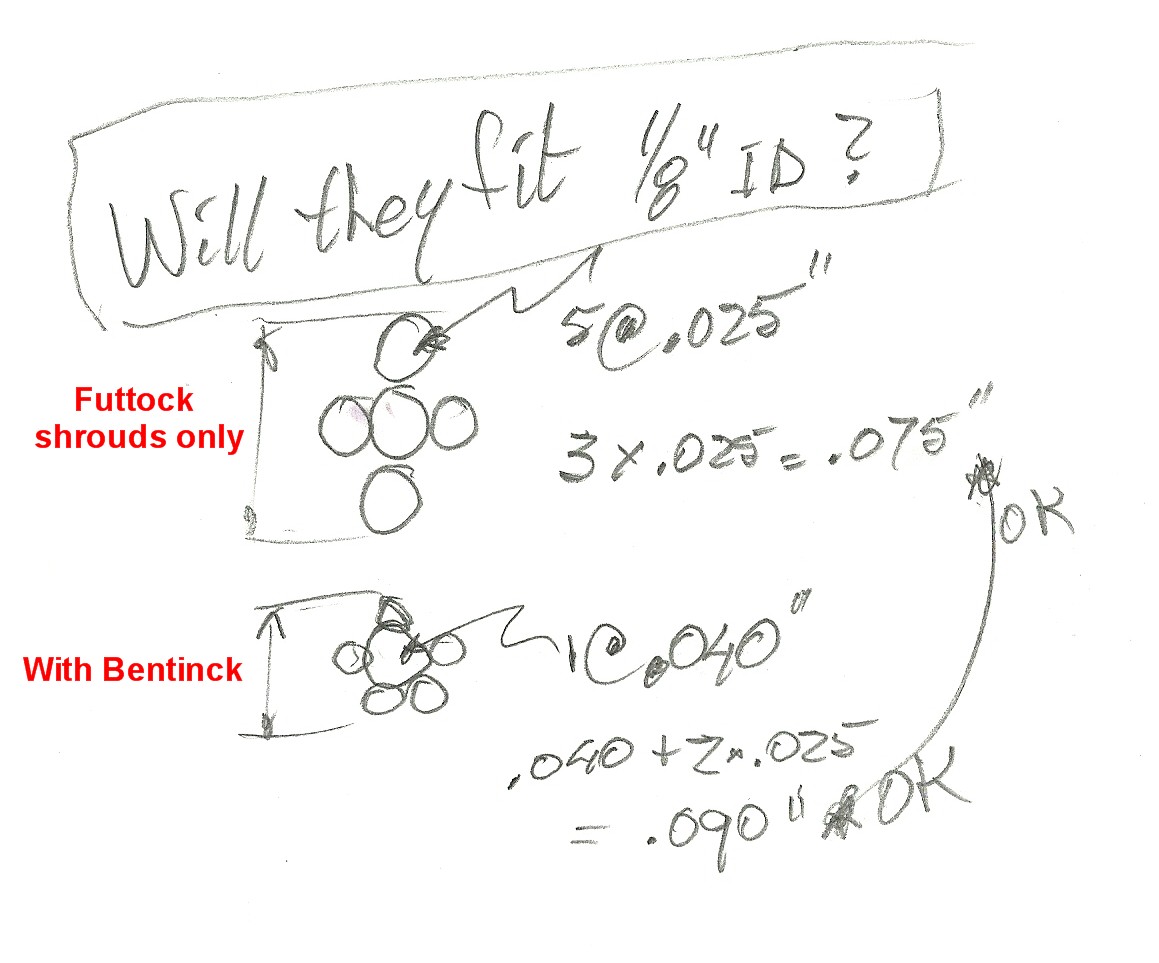
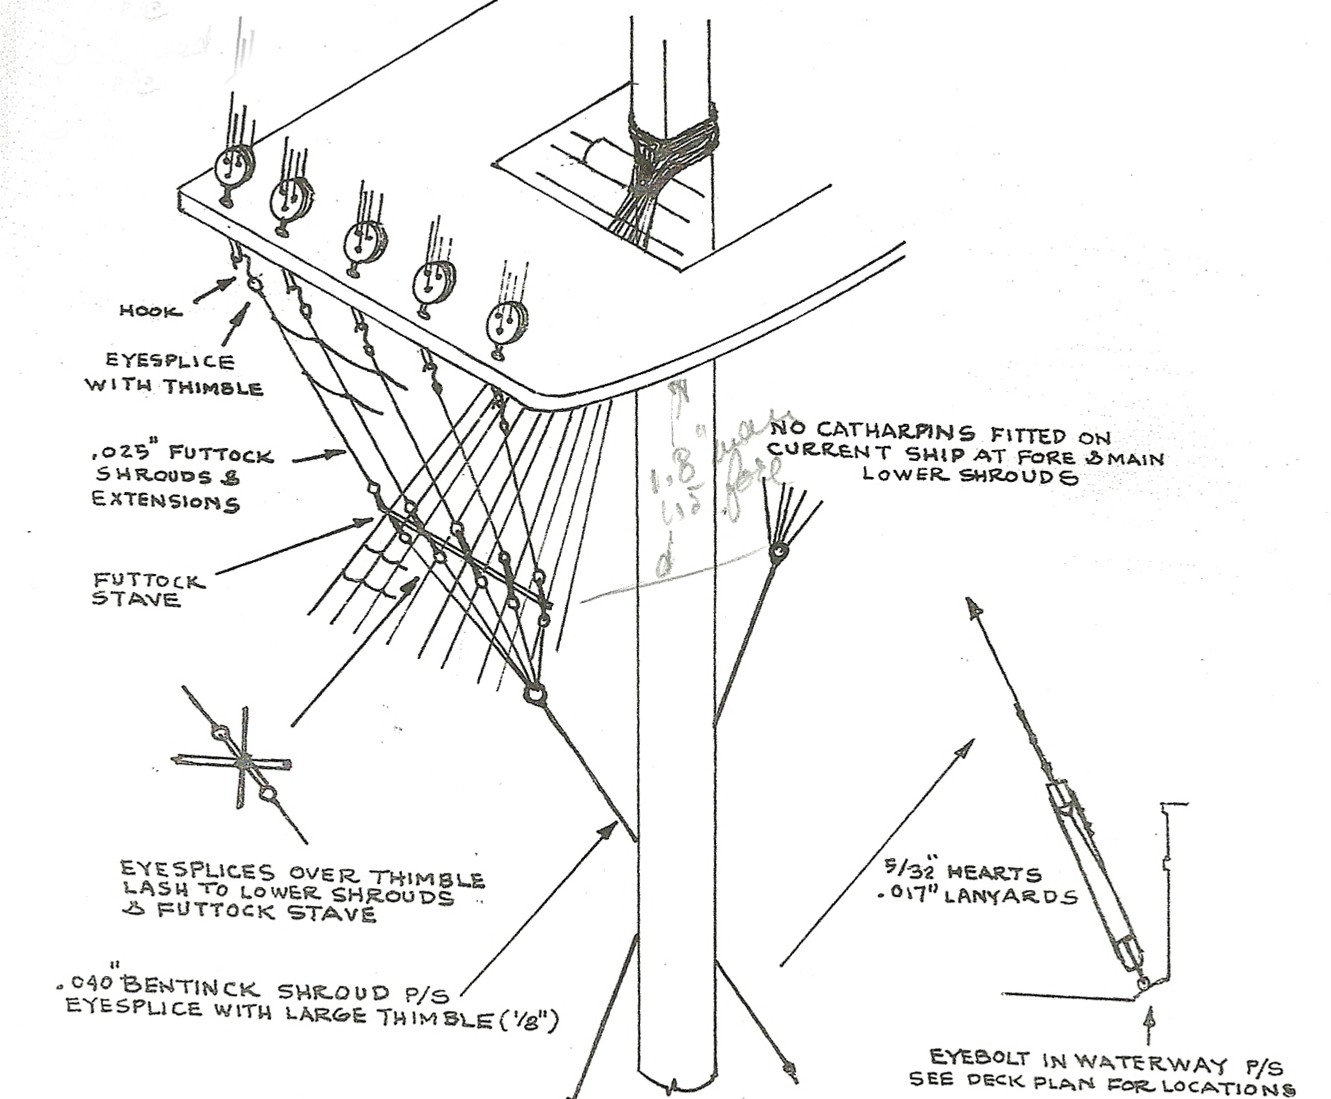
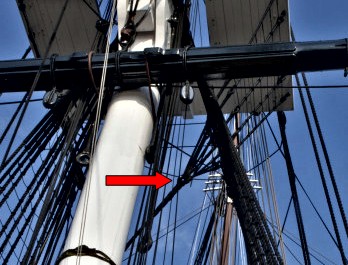
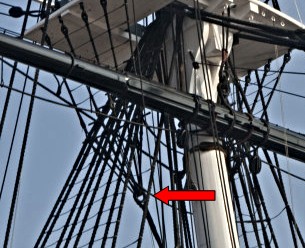
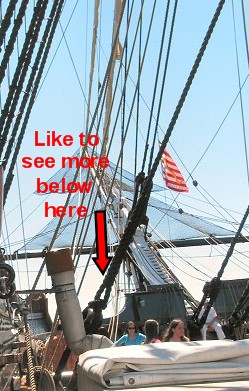
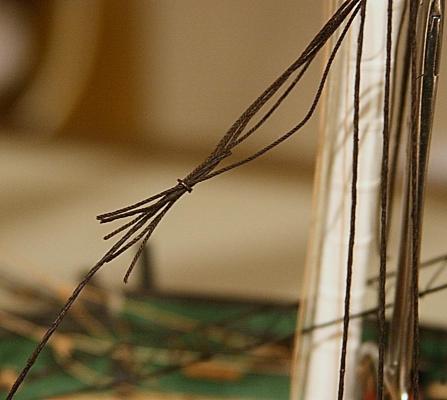
Does anyone have a good picture of how the futtock shrouds on the USS Constitution are attached to the 'Bentinck' shrouds? My plans call for a ring (actually a 1/8" thimble) but that does not seem right. The five futtock shrouds and the Bentinck shroud barely fit through a 1/8 inch hole, let alone a thimble of that outside dimension. I believe the ring is larger but how much? Also I would like to see a picture of how this is rigged to the deck, the waterways, in particular. The closest I can come up with is shown below.
-
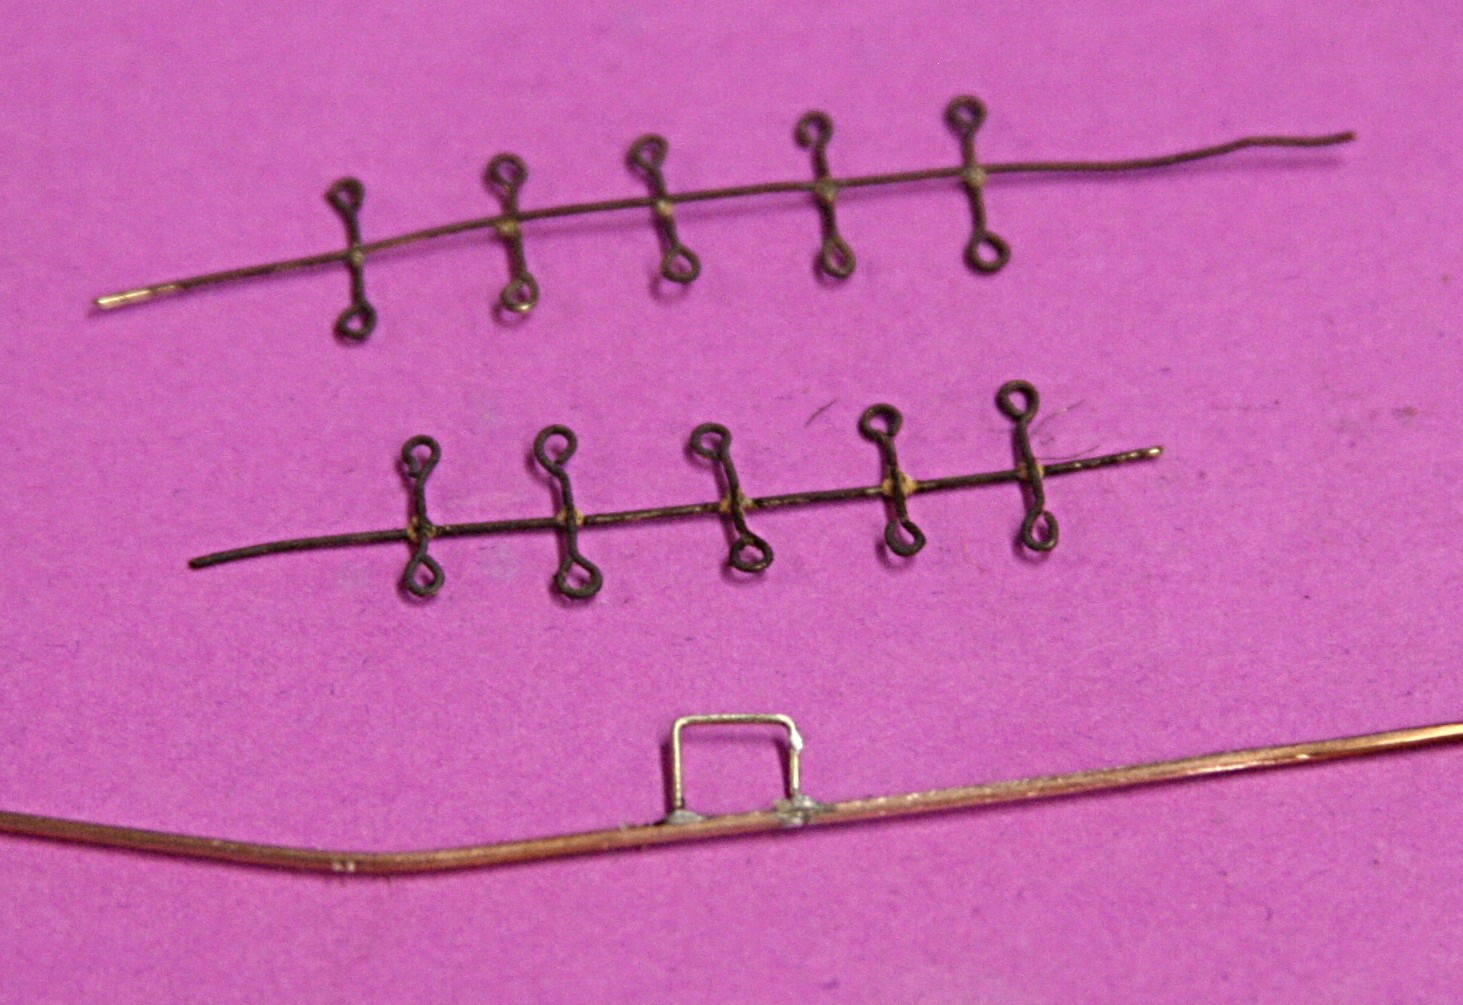
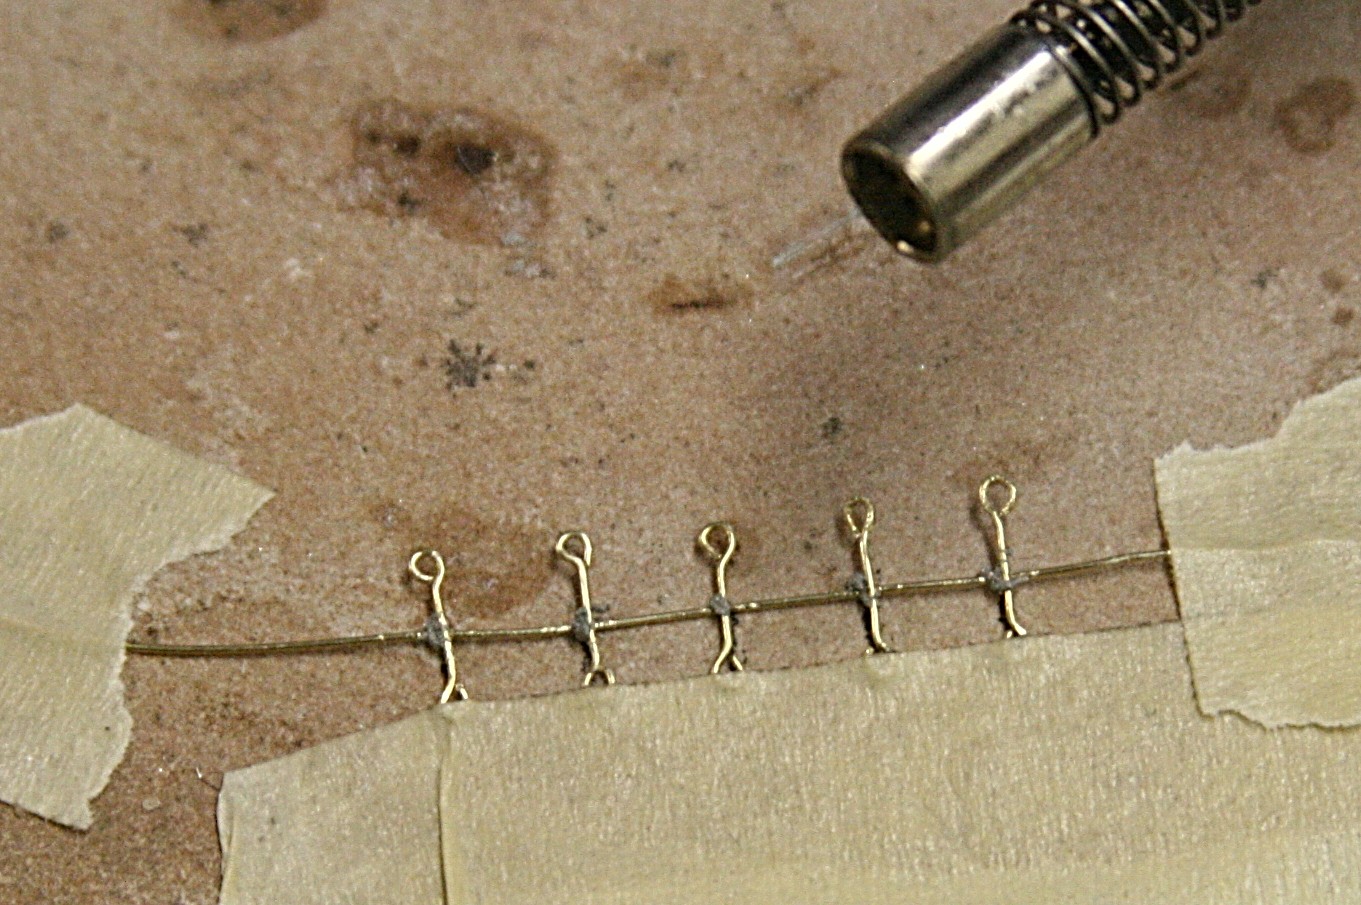
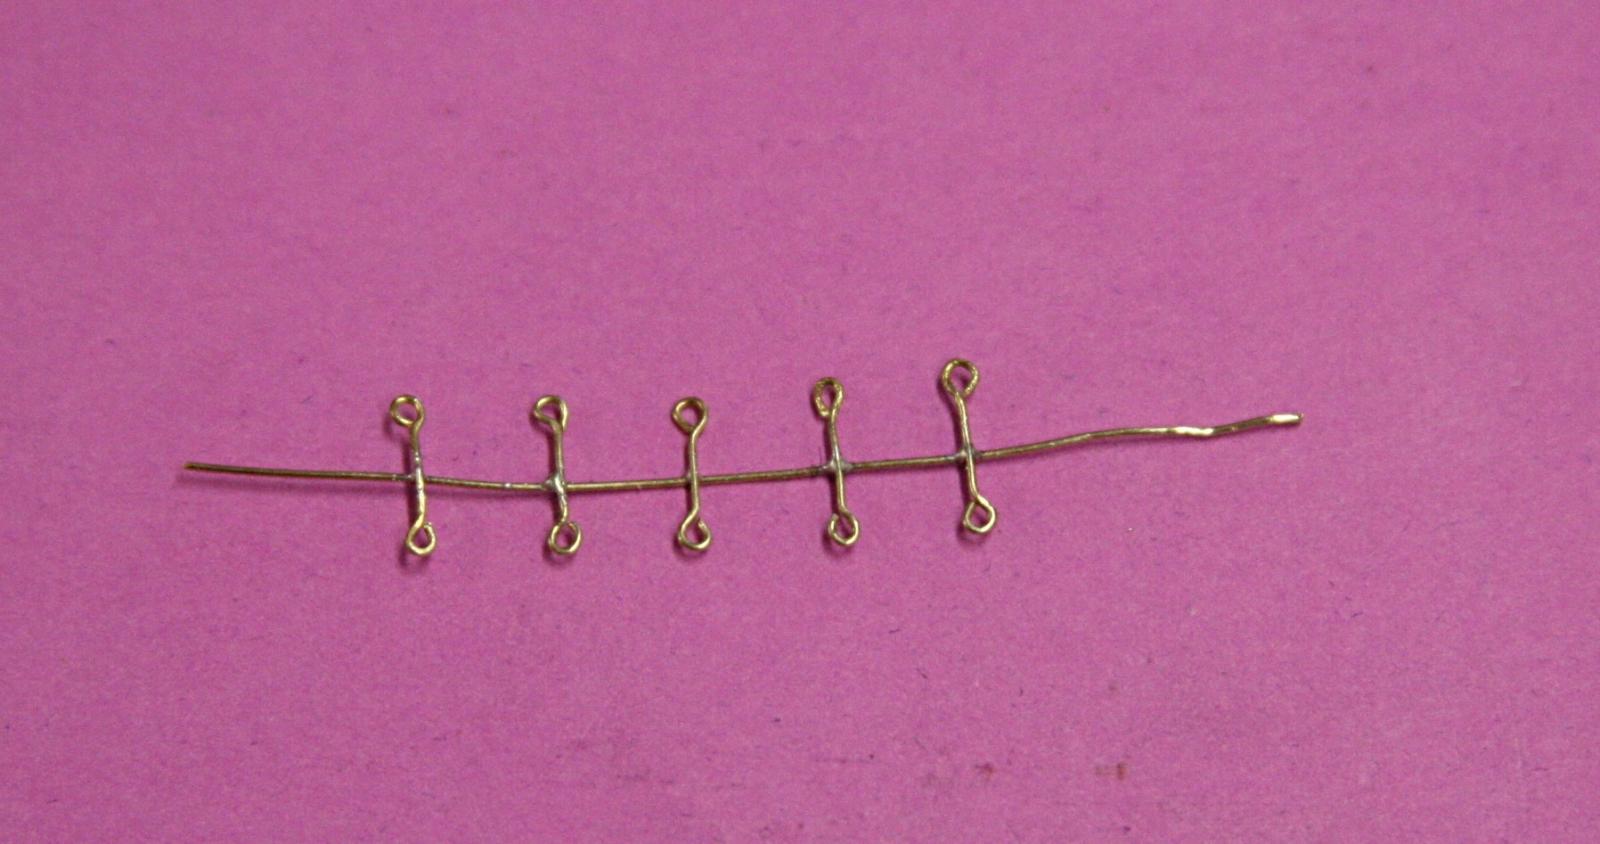
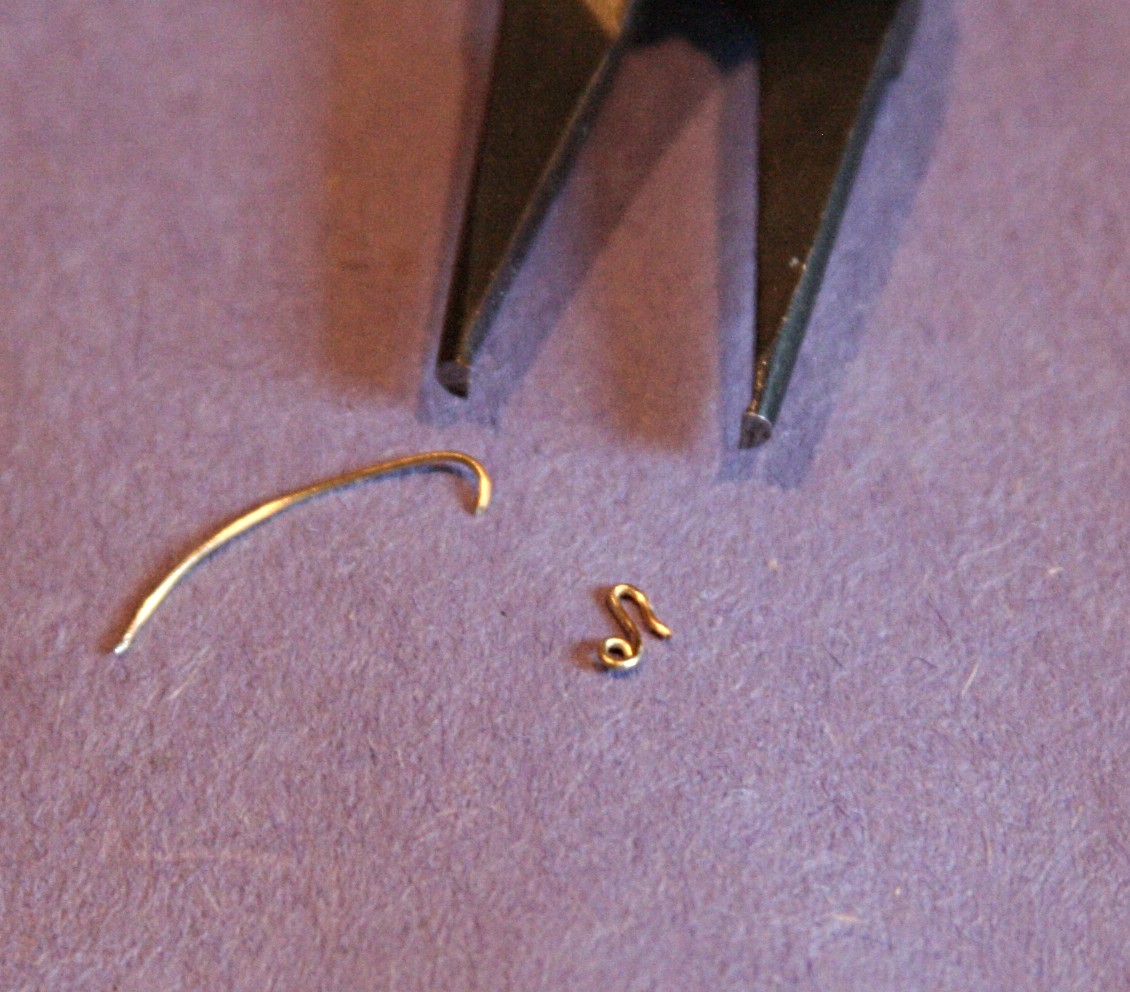
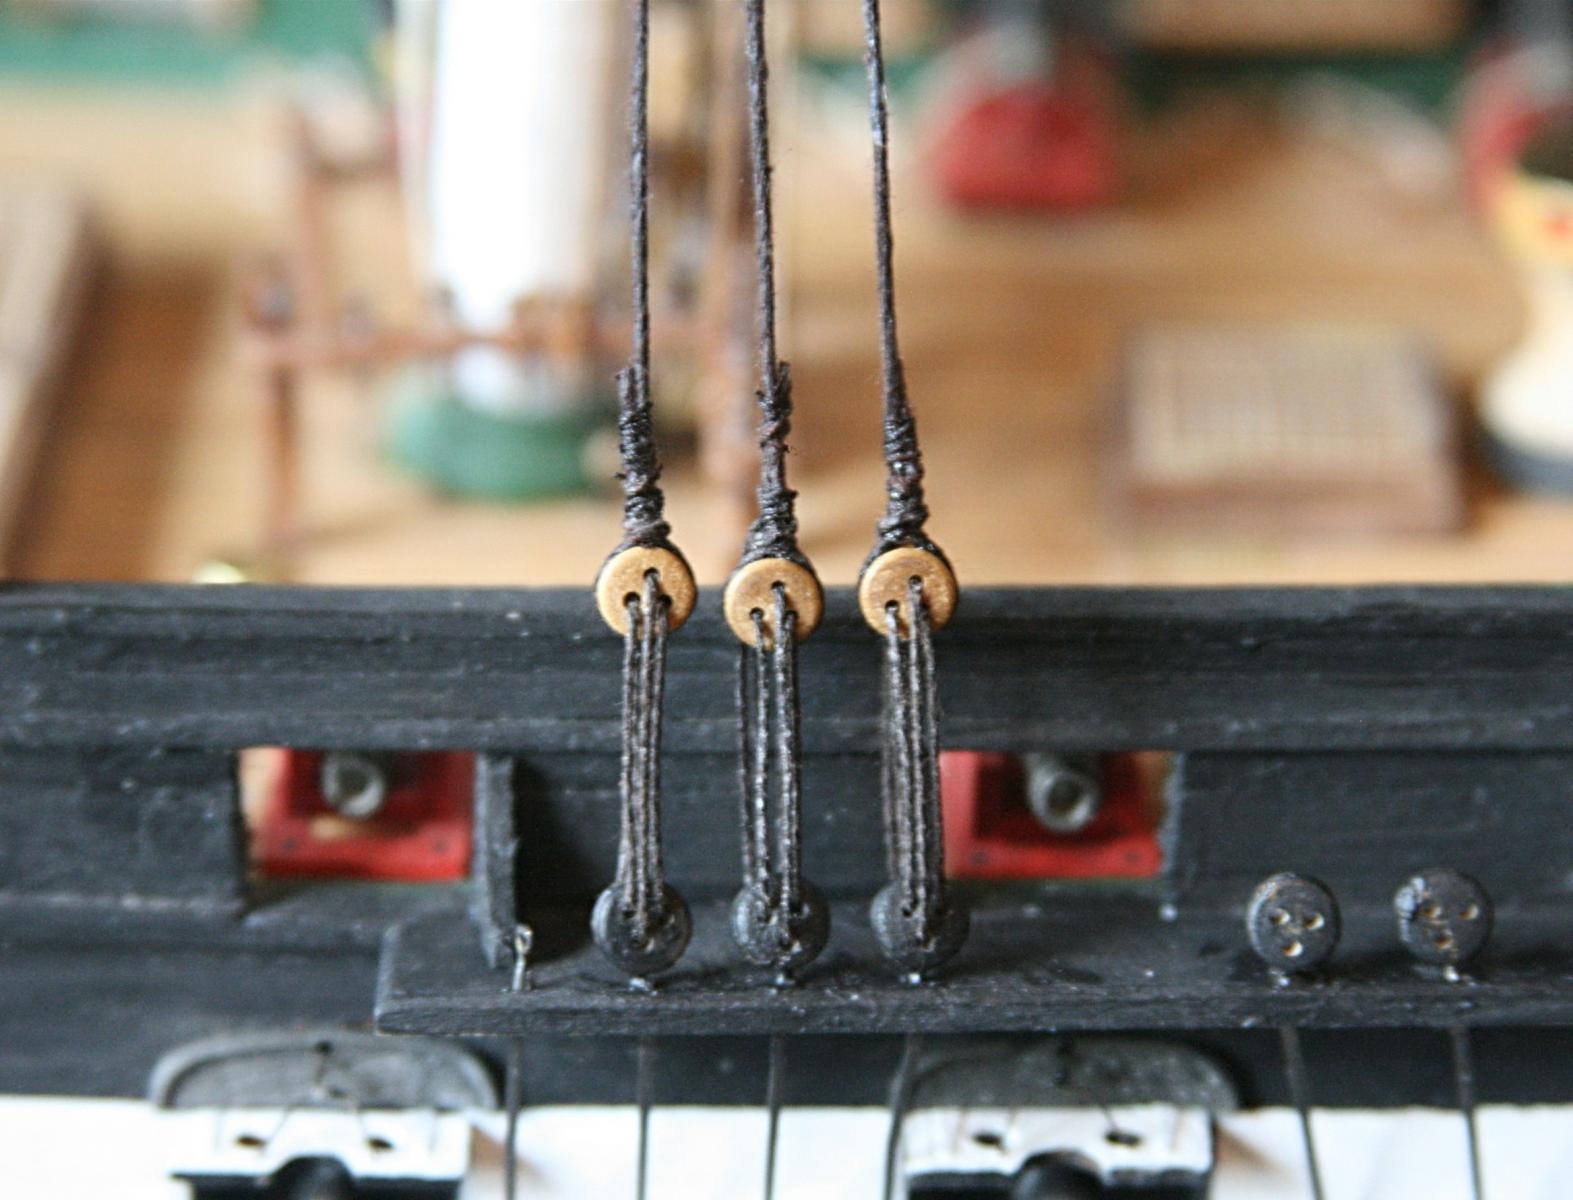
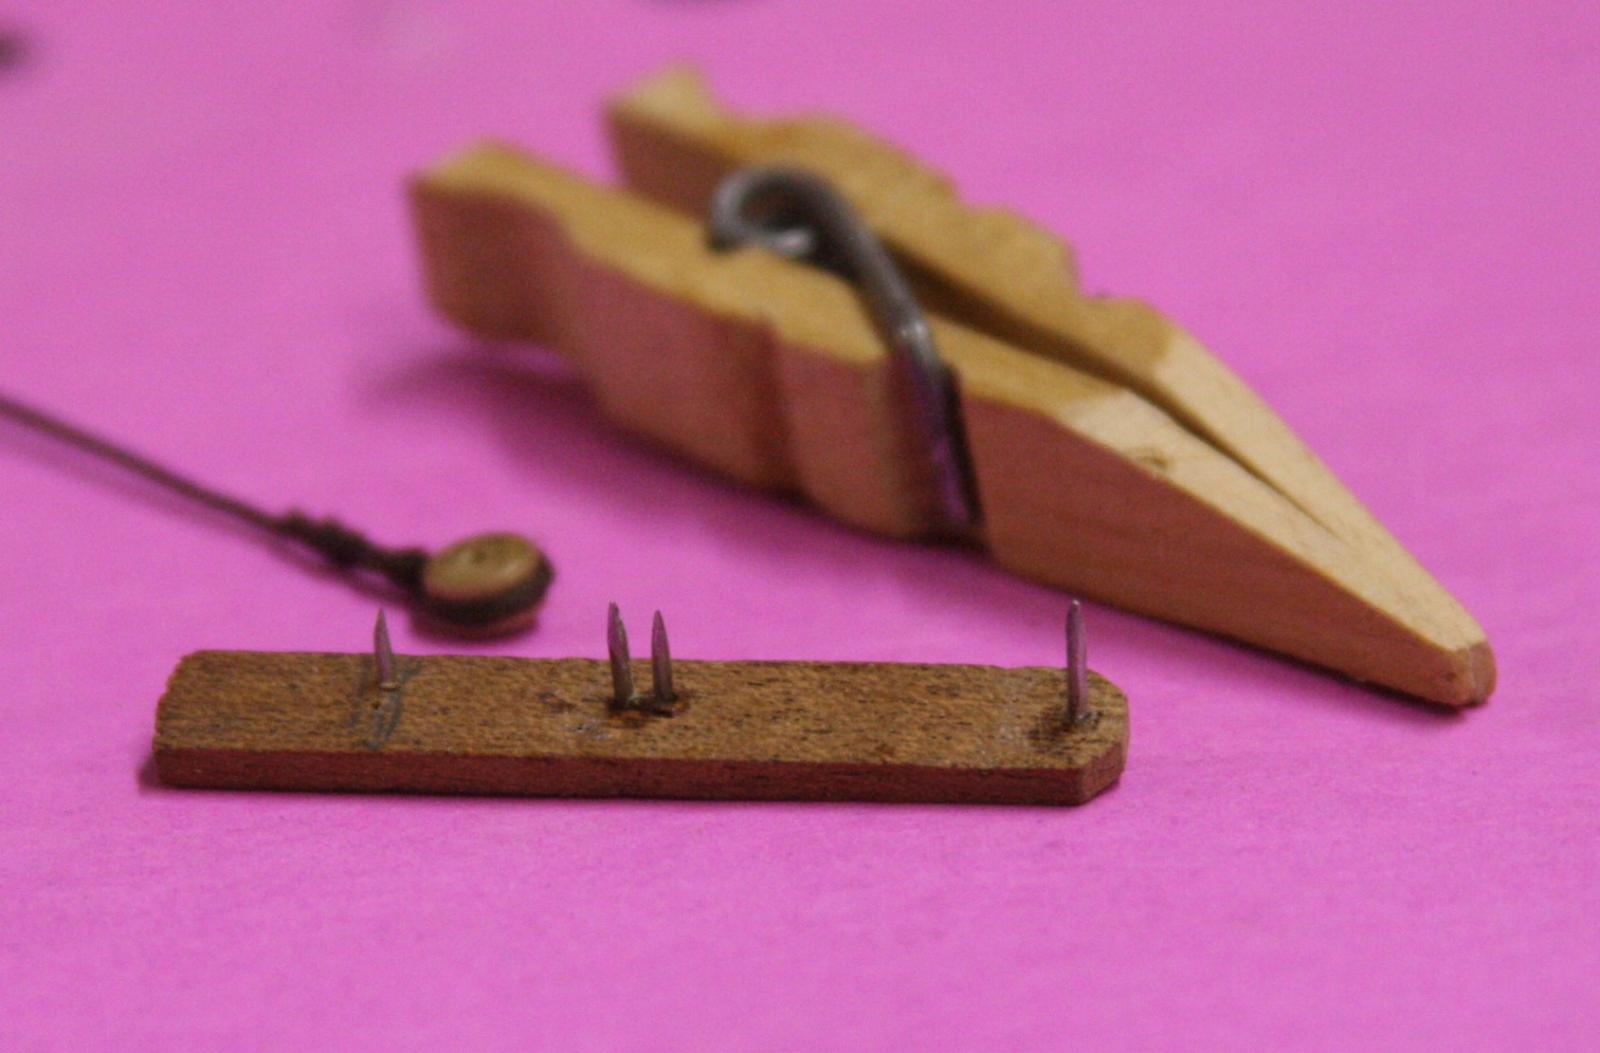
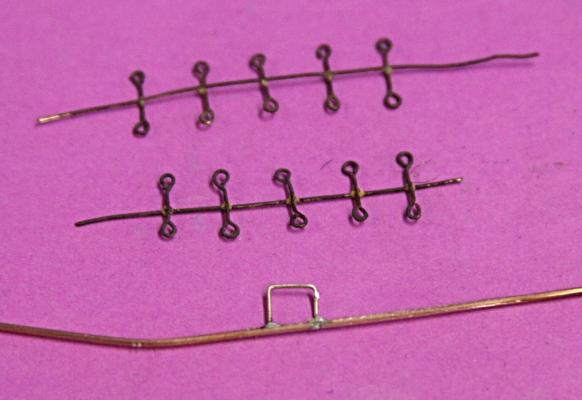
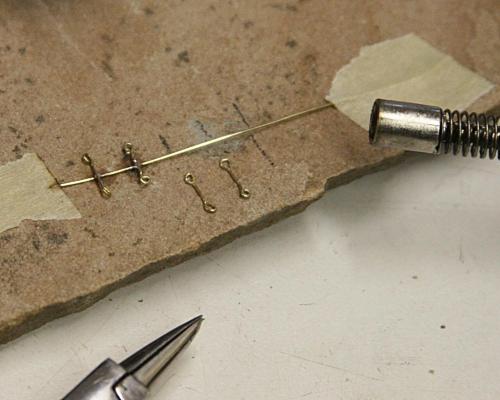
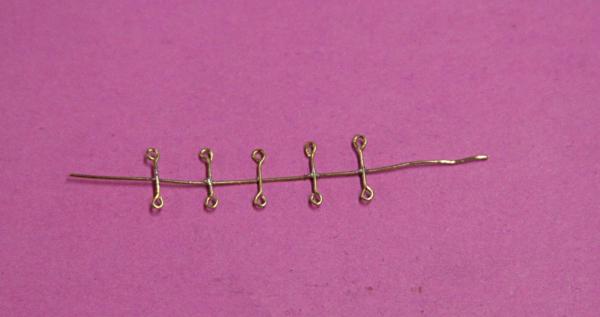
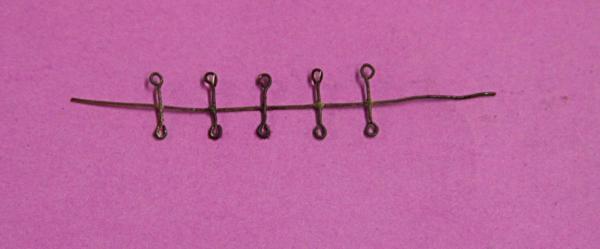
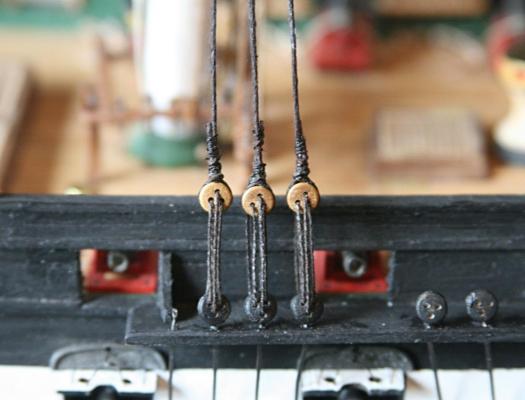
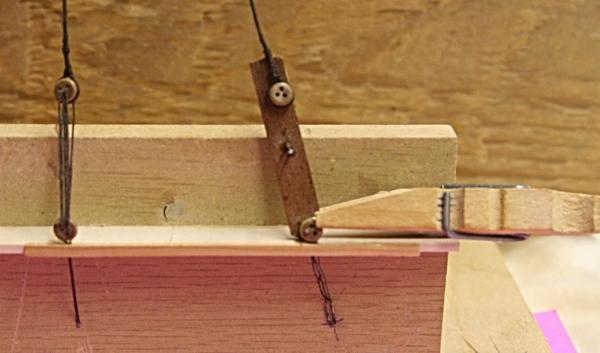
I am not happy with the way the futtock shrouds go around the stave. The drawing shows futtock 'extensions', which I took to mean a metal part with eyes at both ends for the shrouds. I decided to try this approach with some brass wire. Using a fixture I made some time ago for other loops and things, I bent the wire into short sections. I needed five. Then I tried to silver solder these to the futtock stave. It did not work well. As soon as I tried to add another one, the solder came loose on the one before. Back to the drawing board and I found that I should solder all of them at once. Below you can see that I simply taped the pieces to the stone slab, added a tiny amount of solder paste (the grey stuff in the picture), and hit it ever so briefly with the torch. You might think the torch would ignite the tape, but this goes so fast that the edge of the tape was barely scorched. The result seems OK. Before and after blackening. I will use this one for the starboard fore mast and make another for the main mast.


- 732 replies
-
- 6
-
-
- constitution
- model shipways
- (and 1 more)
-
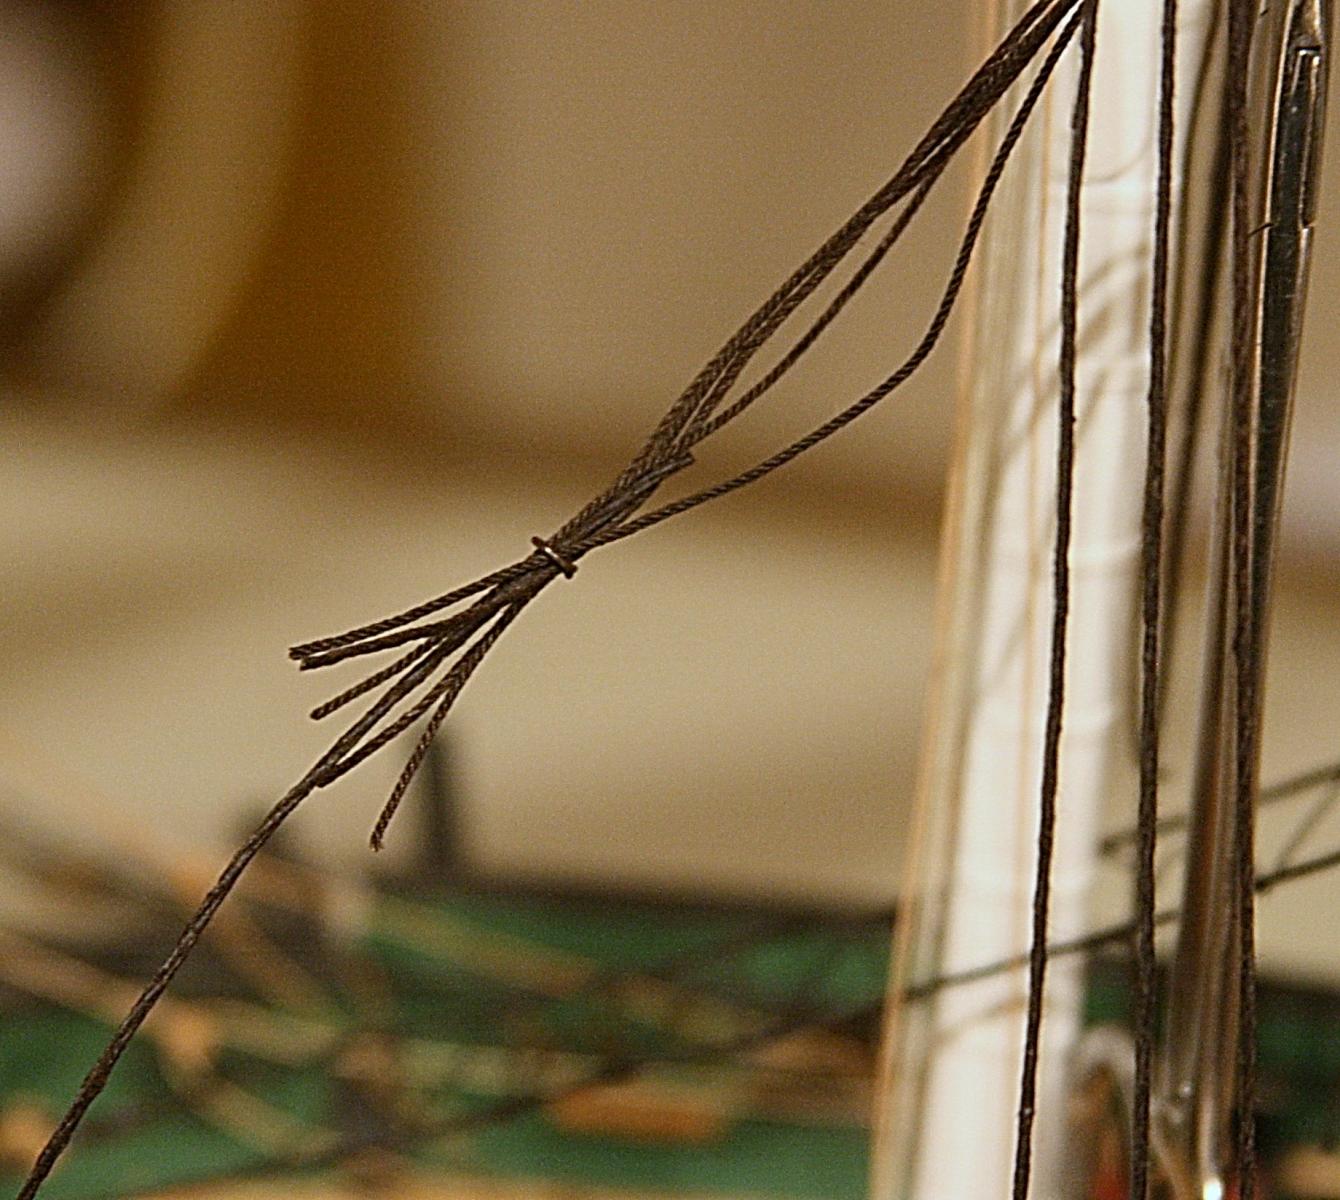
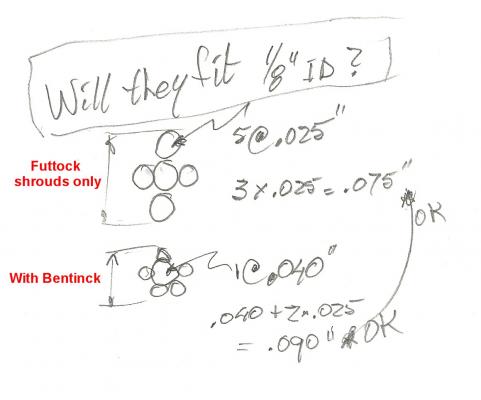
The ends of the five futtock shrouds come together and go through a ring. See diagram above and the picture below. The shrouds are 0.025 inch diameter, and then there is the 'Bentinck shroud', the one that ties all of the above to the waterways. It is 0.040 inch diameter. So, how much of a ring size do I need? I hate to do this, but the idea is shown in my simple calculation below. And sure enough a ring with an inside diameter of 1/8 inch worked fine. I will move the ring up to its proper position and again glue this together before rigging the Bentinck shroud to the waterways. I have to do the same thing from the other side and wonder about interference. Hence I will hold off with details.
- 732 replies
-
- 1
-
-
- constitution
- model shipways
- (and 1 more)
-
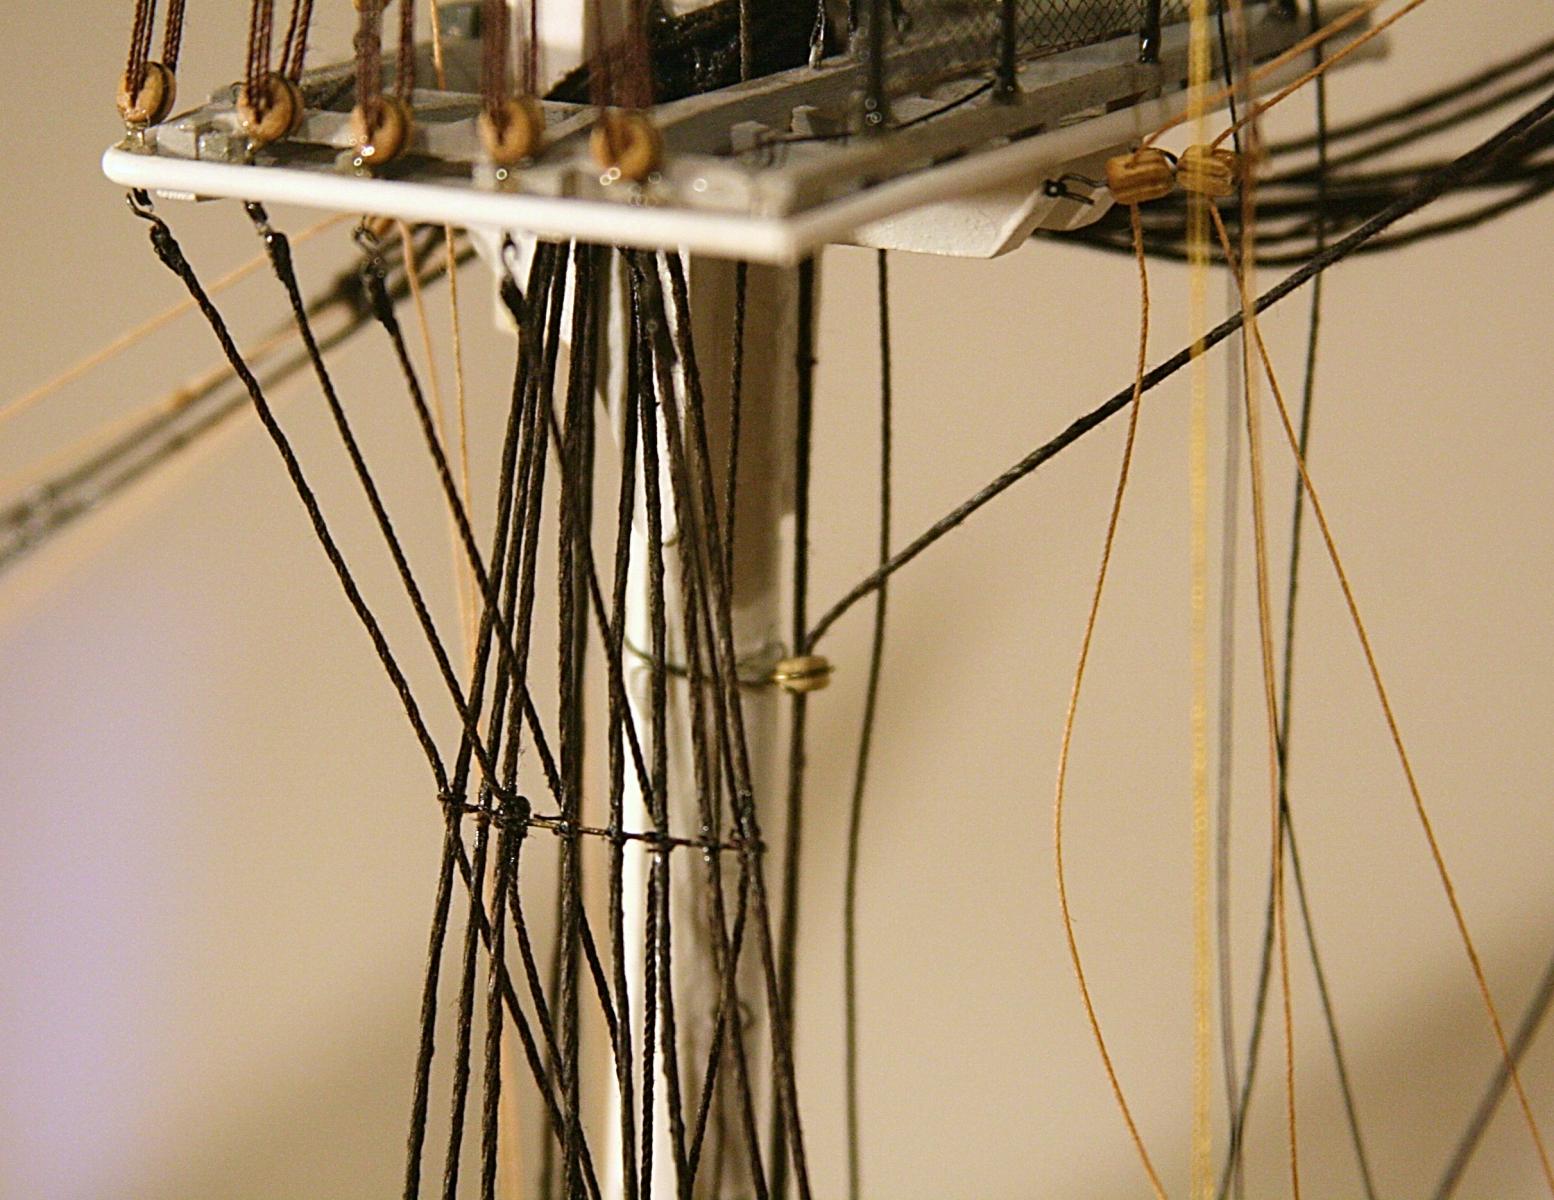
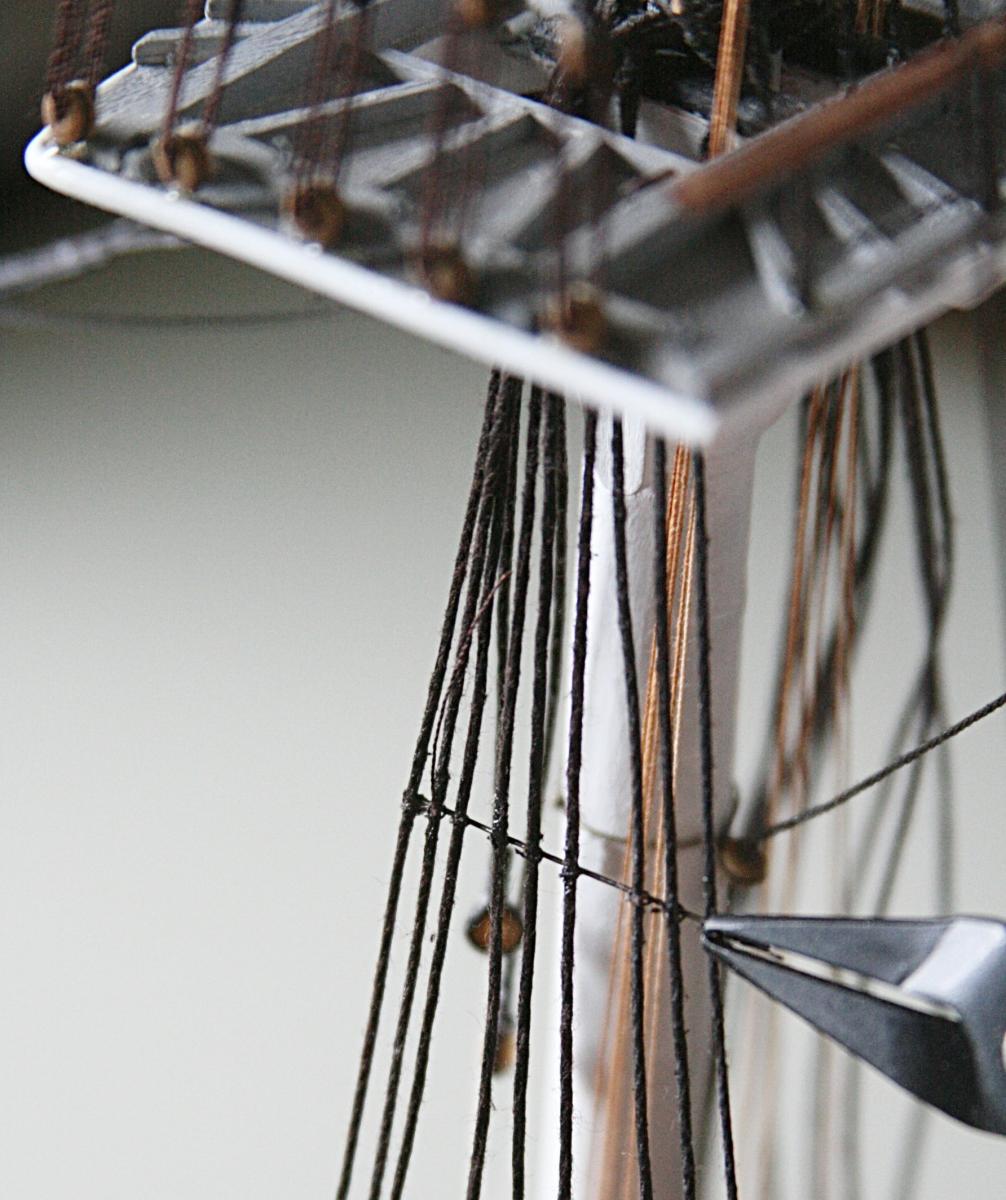
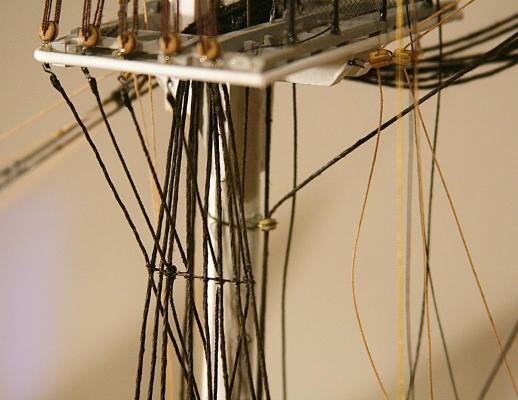
Evening. The futtock shrouds are in place for the port fore mast. Things are getting 'busy'; something I don't like, but Connie seems to have no problem with all those lines. She must be a stage girl, a comedian even. Her shrouds on starboard are still bundled together (like a real dance girl) in the upper right hand corner. Once they come down with futtocks, etc. things will be really jumping in the joint.
- 732 replies
-
- 1
-
-
- constitution
- model shipways
- (and 1 more)
-
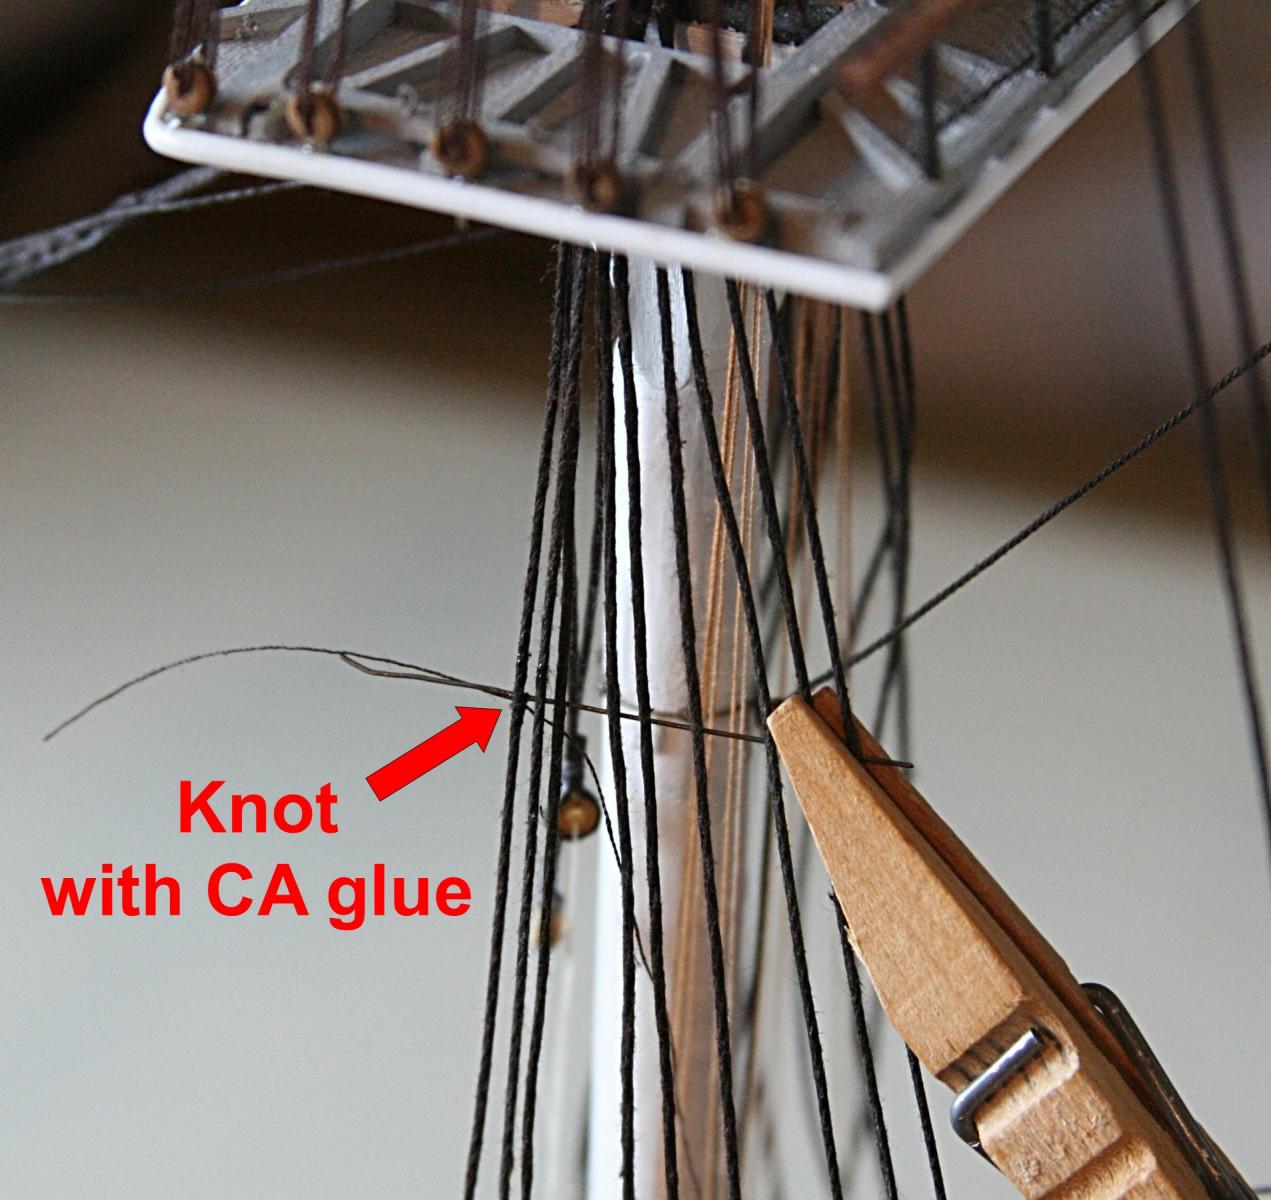
After adding the shrouds on the port side, I attached the batten at the bottom and then did the futtock staves higher up. I used pieces of .013 inch thick brass, blackened. To hold them in place and to allow me to adjust the horizontal spacing of the shrouds, I tied each with some thin sewing thread with some CA glue. After each shroud is tied with the thread, I will use my handy end snippers to trim the stave. The sketch on page 7 of the plans really helps.


- 732 replies
-
- 3
-
-
- constitution
- model shipways
- (and 1 more)
-
Making sails from scratch for niagara
Modeler12 replied to Don Quixote's topic in Masting, rigging and sails
If you only use furled sails you don't need the dimensions. Go to the thread about furled sails and you can see how it can be done. For full sails on the USS Constitution by Model Shipways the plans gave drawings to scale. I am surprised that you did not get them for your build. -
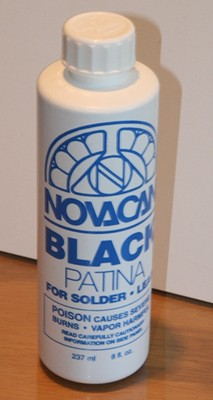
Steve, I am blackening the brass straps to match the real ship in Boston. I also will paint the wooden deadeyes for the same reason. On the port side, thus far, I did not like the alignment of the deadeyes and black paint might hide my mistakes a bit. I found that the patina works fine for me (as long as I clean the metal first) and it is easier than using paint on these small parts. In the beginning I did paint some using an airbrush, but with the primer first and then two coats of paint was taking a lot longer (not to mention cleaning the gun). As far as letting Mother Nature do it? I cannot imagine that the brass would turn black in time. But the bottom of the hull might turn green.
- 732 replies
-
- 2
-
-
- constitution
- model shipways
- (and 1 more)
-
I have done a fair amount of blackening of metals including mild steel, brass, copper and the pewter casting material used to make parts like canon barrels. There are several brands of compound on the market, but what I use was left over from my stain-glass work several years ago. For me it has worked nicely. I show a picture of the stuff below and it is still available through Amazon, for example. If you do a search in the section about 'metal work, etc', you can find several threads on this forum that go into details. Here is one thread http://modelshipworld.com/index.php?/topic/1240-another-type-of-blackening-agent-and-some-experiments/?hl=%2Bblackening+%2Bmetals#entry23331 Thus far I have treated several wire 'strops' around wooden blocks and I have not had any problems (yet) with soaking the wood in the solution and rinse water. I just make sure the wood is dry before doing much else with it.
- 732 replies
-
- 1
-
-
- constitution
- model shipways
- (and 1 more)
-
End snippers, what can we use them for?
Modeler12 replied to Modeler12's topic in Modeling tools and Workshop Equipment
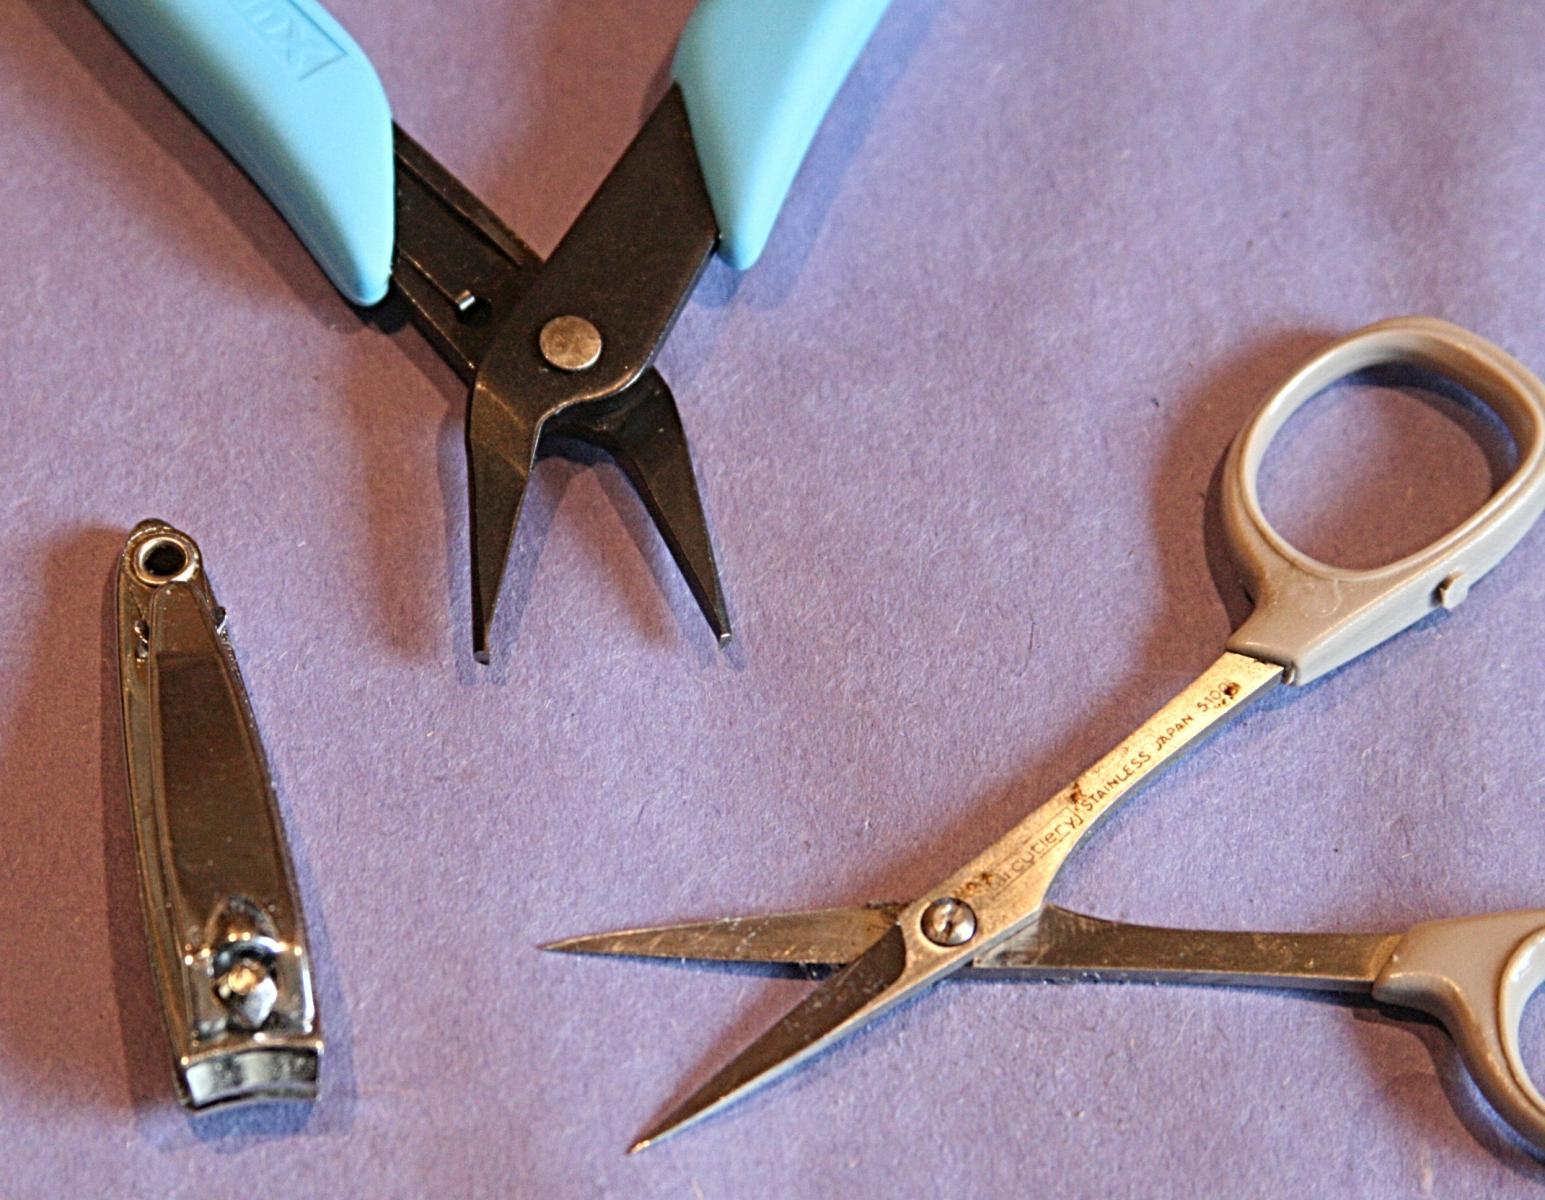
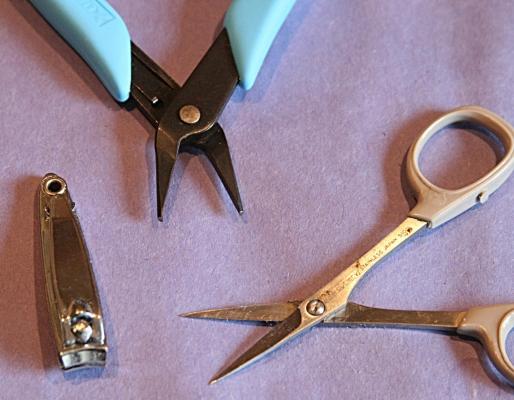
Allow me please, to add one more thought about scissors. We all have several, including those that belong to the admiral. Below are some I have used. You can see the end snippers that I referred to. It has the light blue handle. Then there are large clumsy ones that are nice for cutting fabric but not trimming lines. But the one I still like is the one with the sharp points. I have no idea where it came from. The closest is the one with the blue handle. I got that from the web as a 'nose trimmer'. Do you have some favorites? I know they come in all sorts of sizes and styles.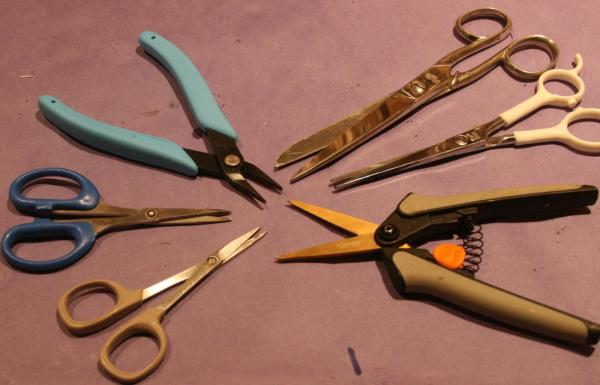
-
End snippers, what can we use them for?
Modeler12 replied to Modeler12's topic in Modeling tools and Workshop Equipment
Yes, Micro Mark. I only mentioned MM. These snippers are not cheap. $25 plus handling, etc. They are also a bit delicate and I don't want to use them on steel, for example. My son-in-law, who works in the electronics industry, wants one for cutting the ends of wires used in experimental circuit boards (one step beyond bread boards). -
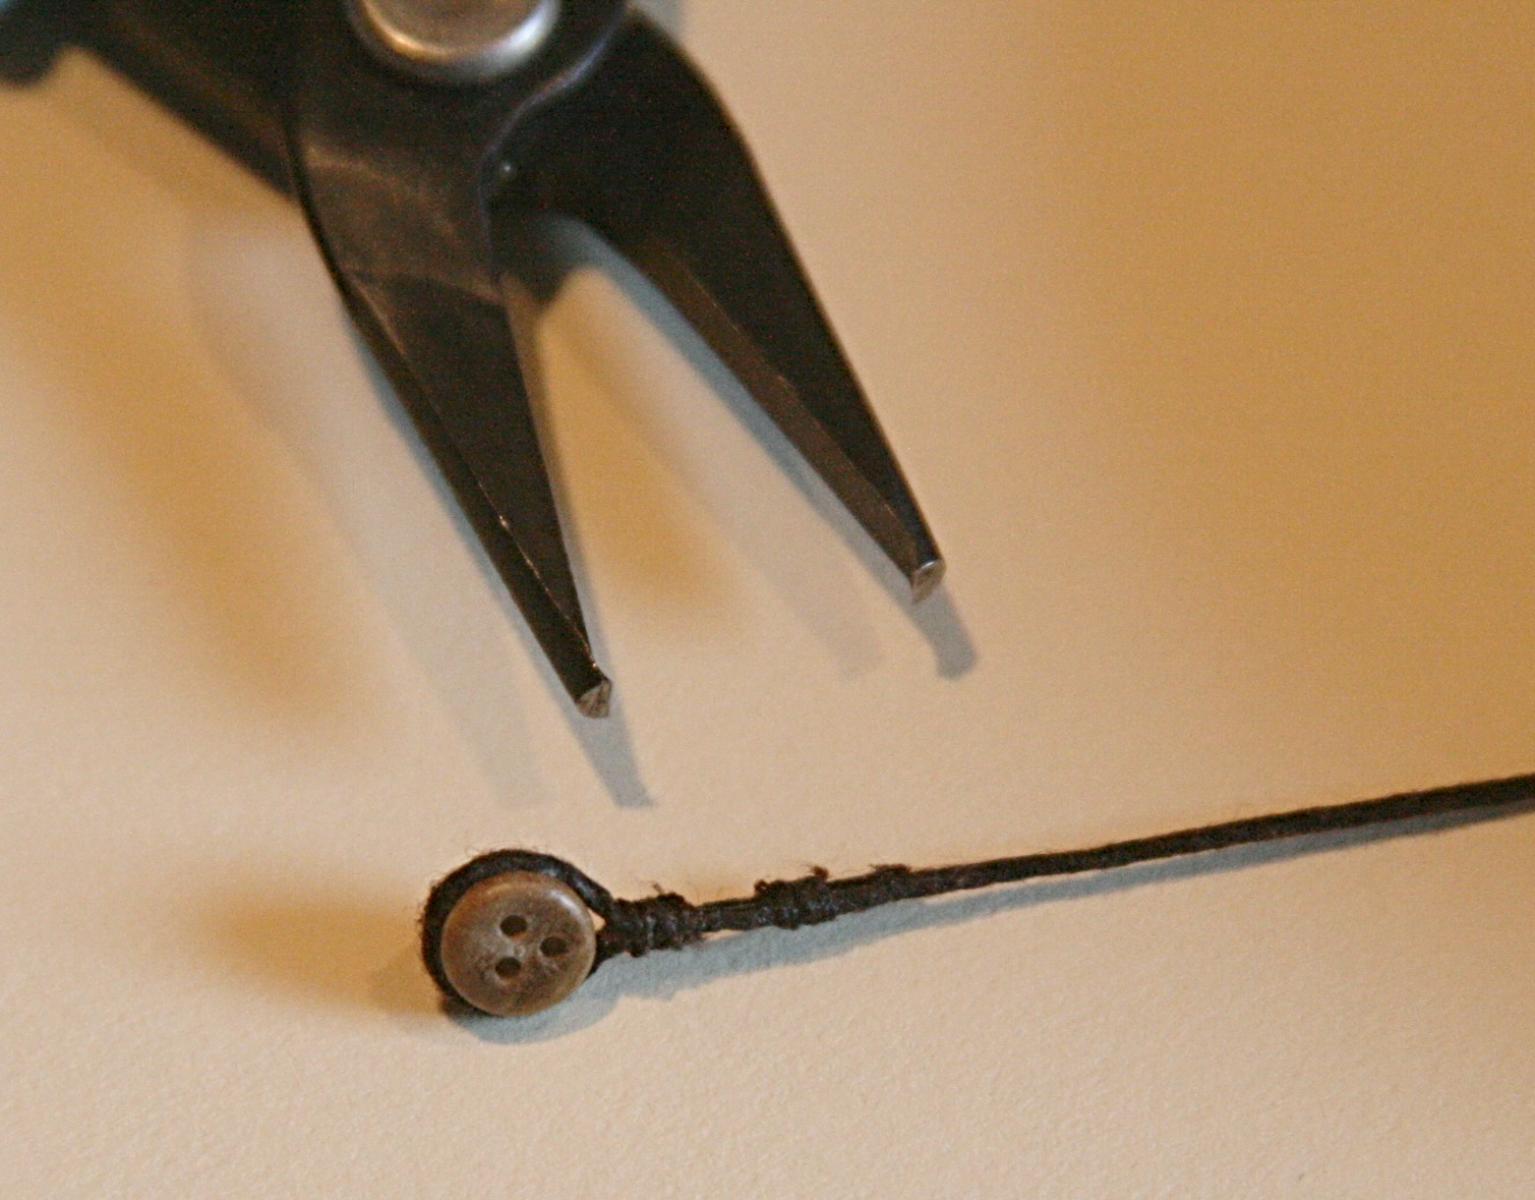
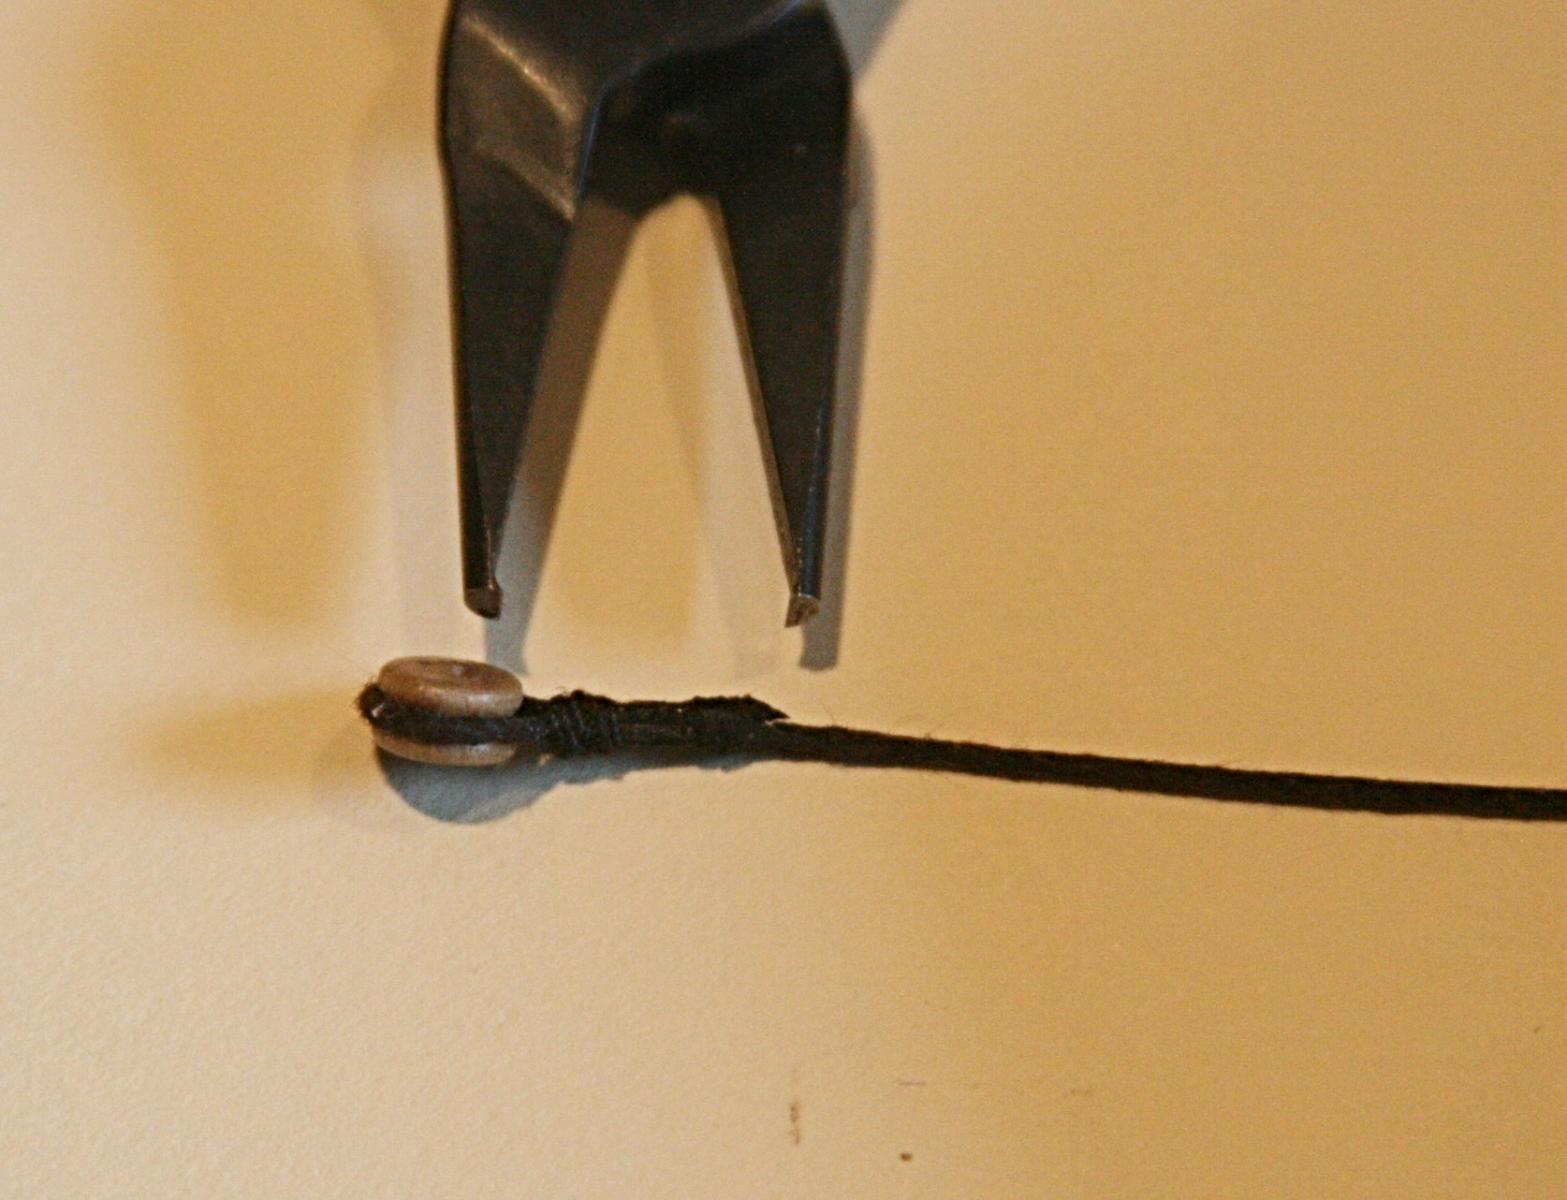
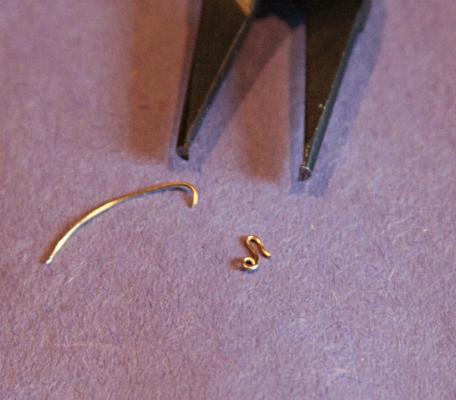
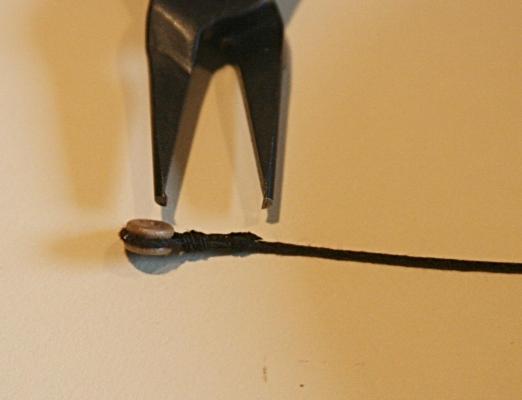
For Christmas my mother-in-law bought me a pair of end snippers from MM. Yes, I did not mean 'slippers'. The cutting edges are not along the sides, like most trimmers, but at the very end. I have used them a bit for making brass parts and also to trim up the loose bits and pieces after seizing lines. I know they will come in handy to trim the ends of rat lines (I use the needle and thread technique). I have done that with a pair of very small scissors, but did not like the clumsy nail trimmer. Below are the before and after trimming pictures. Now I am wondering what else I can do with this tool.

-
After putting that video together I thought I had the shrouds under control. The nine port main shrouds are grouped in threes. Here is the first set. I had used some bees wax on the lanyards and that really shows as a greyish cast. Also when I pulled them through the deadeyes some of it flaked off like dandruff. I put one of them in the microwave for about 45 seconds, pulled the warm thread between my fingers and that helped to smooth things a little. Close-up pictures also show other so-so situations, but from a distance only I will know (and now you, who read this). The real USS Constitution has all of the deadeyes painted black. I am not sure if I want to keep the upper ones as is or also paint them. I should add here that later I 'melted' the bees wax by pulling the lanyards through a hot-damp cloth that I had put in the microwave oven for one minute. It not only did a good job with the wax but it also took care of some of the kinks and coiling. (I learned that from making burritos with large tortillas).
- 732 replies
-
- 4
-
-
- constitution
- model shipways
- (and 1 more)
-
A video about attaching shrouds, deadeyes, etc.
Modeler12 replied to Modeler12's topic in Masting, rigging and sails
Thanks Max, I could have added one more thing and that is the alignment of the deadeyes. For this video I premade the two shrouds and proceeded from there. For an actual model the shroud lines would already be attached to the mast on top and the length would be adjusted at the deadeye at the bottom of the shroud. To do this I have used a simple fixture shown below. The two nails you see in the middle were used for some other shrouds higher up, so ignore them for now. I take the fixture and slip it onto the bottom deadeye and clamp it in place. Then I put the top deadeye onto the nail and wrap the shroud around the groove in the deadeye. A drop of CA glue holds it in place and then I apply the seizings. I hope this all makes sense because I only show the whole thing in place.
-
I am in the process of attaching more shrouds to my Connie and thought it would be good practice to make a mockup to show what I was doing. Here is the result.
-
I have added another video to my collection. It has to do with attaching shrouds, deadeyes and lanyards to a ship model. I did this because I wanted some more practice what is coming up with my model. I also posted this elsewhere.
- 732 replies
-
- 3
-
-
- constitution
- model shipways
- (and 1 more)
-
Could you go through the boom at the tip?
-
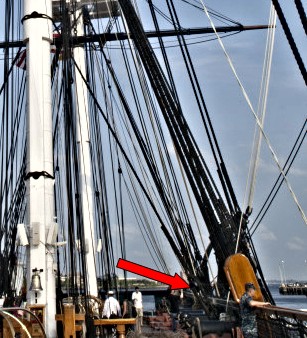
When earlier I said that the picture would change when the main shrouds are installed, I was not quite right. The view did change when I added the two topmast backstays with the deadeyes, but the shrouds will be somewhat more to the right of the cannon. The lines to the left coming down (out off focus) are the starboard main royal halliards. I have also added a small 'coil' for the flag halliard.

- 732 replies
-
- 2
-
-
- constitution
- model shipways
- (and 1 more)
-
I am not sure this will help, but there is a video I made about seizing or whipping. As part of that I show how I strop a line to blocks and then apply the seizing. Of course, there is also the use of wire for stropping. It all depends on the application.
-
Indeed it looks like you are of to a good start. One small suggestion, Tom. You might consider making a copy of the eight plans. FedEx offices should be able to do that for you. I am constantly referring to mine and my originals are getting pretty beaten up. As Steve suggested above, I have made 8.5 x 11 inch copies of certain sections on stiff paper and used them for templates or to keep next to me when working on small details.
- 1,350 replies
-
- 1
-
-
- constitution
- model shipways
- (and 1 more)
-
Thanks Bob. I am glad the videos are of interest to some of you. But, in a way, I have put them together for my own benefit. I find that by doing this slowly in front of this little camera, I concentrate on doing it right and learn in the process. Then when I edit the clips I find more details I need to improve. In the case of this belaying video I also met some nice folks who could show me how they do it on a small but real ship.
- 732 replies
-
- 1
-
-
- constitution
- model shipways
- (and 1 more)